> ## Documentation Index
> Fetch the complete documentation index at: https://docs.m3ter.com/llms.txt
> Use this file to discover all available pages before exploring further.
# Running Bills and Viewing Bill Details
You can open the *Bill management* page and view Bills for your Accounts for the current month. From there, you can:
* Open a Bill for an Account to review the Bill details.
* Reset the billing period to list the Bills for your Accounts for that period.
* If you've set up an integration with for sending Account Bills to a 3rd-party system, you can check the status and then review details of the last completed integration run or view all integrations runs. You can also use an external reference link to open the linked invoice in your external system.
* Filter the Bills listed by status: Locked or Approved/Pending.
* Reorder columns for Bill Management.
* Use display options to:
* Hide zero quantity line items.
* Group line items by Accounting Product or Contract when applicable.
* Run Bills manually for a specific Bill date for your Accounts. You can run Bills:
* Either for all billing frequencies or a specific frequency, such as for weekly or monthly frequency.
* For a specific target currency.
This topic explains how to work in the Bill Management page to view Bill details, reorder the columns for the Bills listed, and run Bills manually:
* [Viewing Bill Details](/guides/billing-and-usage-data/running-viewing-and-managing-bills/running-bills-and-viewing-bill-details#viewing-bill-details)
* [Reviewing Bill Metadata](#reviewing-bill-metadata)
* [Filtering Bills](/guides/billing-and-usage-data/running-viewing-and-managing-bills/running-bills-and-viewing-bill-details#filtering-bills)
* [Managing Columns for Bill Management](/guides/billing-and-usage-data/running-viewing-and-managing-bills/running-bills-and-viewing-bill-details#managing-columns-for-bill-management)
* [Checking Zero Total Bills](#checking-zero-total-bills)
* [Exporting the Bill Management Page](/guides/billing-and-usage-data/running-viewing-and-managing-bills/running-bills-and-viewing-bill-details#exporting-the-bill-management-page)
* [Running Bills Manually](/guides/billing-and-usage-data/running-viewing-and-managing-bills/running-bills-and-viewing-bill-details#running-bills-manually)
**Tip: Viewing and Running Bills for Specific Accounts?** It's sometimes easier to go into an Account and view and run Bills directly from the Bills tab - see [Reviewing and Recalculating Bills for an Account](/guides/end-customer-accounts/reviewing-bills-for-an-account).
**Tip: Encountering Billing Issues?** If you are having issues with Bills - such as a Bill is not generating for an Account or line item and/or total amounts are not what you expect them to be for a Bill, please review the [Troubleshooting Bills](/guides/billing-and-usage-data/running-viewing-and-managing-bills/troubleshooting-bills) in this section, which offers a checklist of common billing issues with guidance on how to follow-up on and resolve issues.
## Viewing Bill Details
* [Opening and Viewing Bills](/guides/billing-and-usage-data/running-viewing-and-managing-bills/running-bills-and-viewing-bill-details#opening-and-viewing-bills)
* [Viewing Bills - Display Options](/guides/billing-and-usage-data/running-viewing-and-managing-bills/running-bills-and-viewing-bill-details#viewing-bills-display-options)
* [Viewing Bills - Notes and Tips](/guides/billing-and-usage-data/running-viewing-and-managing-bills/running-bills-and-viewing-bill-details#viewing-bills-notes-and-tips)
### Opening and Viewing Bills
**To open and view Bill details:**
1. Select **Billing**. The **Bill management** page opens and lists the Bills for your Accounts. The default **Invoice date** settings lists Bills to cover the current month. Details of the current Bills for each Account for this period are given, such as:
* **Reference**
* **External reference**
* **External invoice date**
* **Account name**
* **Account code**
* **Total**
* **Status**
* **Locked**
* **Last calculated date**
* **Integration status**
Optionally:
* **Total debits**
* **Total credits**
**Tips:**
* **Bill Reference number?** We recommend that you set up the **Reference** Bill numbering to suit your accounting and operational requirements, which you can enable at Organization level. This allows you to define a Bill prefix combined with a sequential numbering based on the date Bills are first created. If you do not enable Bill numbering, then a default Bill **Reference** number is used, which concatenates the prefix **Invoice-** with the last four characters of the Bill's **ID**. See [Viewing and Editing Organization Configuration](/guides/organization-and-access-management/viewing-and-editing-organization/viewing-and-editing-organization-configuration).
* **No Bills Listed?** If none of the Accounts in your Organization have Bills for the default current month, then a warning will show to tell you this. You can change the default settings for the **Invoice date** period and the page will automatically refresh.
* **Controlling Bill list Columns?** You can customize the Bills list to either re-order the columns or hide columns - see the following [Managing Columns for Bill Management](/guides/billing-and-usage-data/running-viewing-and-managing-bills/running-bills-and-viewing-bill-details#managing-columns-for-bill-management) section below for details.
2. If you want to view the Bills for a different billing period, use the popup **Invoice date (inclusive)** calendar icons to adjust the period accordingly. The **Bill management** page adjusts to show Bills for the selected period:
* The default period when you open the **Bill management page** is the current month.
* When you open the calendar pop-ups, you can select for pre-defined periods of **This month** or **Last month**.
**Notes:**
* **Invoice dates are inclusive!** Note that when you define a period to view Bills using the **Invoice Date** calendar popups, both the start and end date are interpreted inclusively.
* **Single day Invoice date period?** You can define a single day as the period you want to show Bills for.
3. All Bills are shown by default, regardless of their status. You can filter the list of Bills to show only those with a specific status. See below: [Filtering Bills by Status](/guides/billing-and-usage-data/running-viewing-and-managing-bills/running-bills-and-viewing-bill-details#filtering-bills-by-status).
4. If you want to view the Bills for a specific Account, select the **Account name** text in the listing:
* The **Account details** page for the Account opens showing the **Overview** tab, where you can review the **Latest bills** for the Account. Select the **Bills** tab to review all the Account's Bills.
5. To view the details of a Bill for an Account, select the **Reference** text hotlink. The **Bill details** page opens. This page provides a full breakdown of the charges due on the Account for the billing period for the **Invoice date**.
* A **Bill details** panel gives details of the Bill:
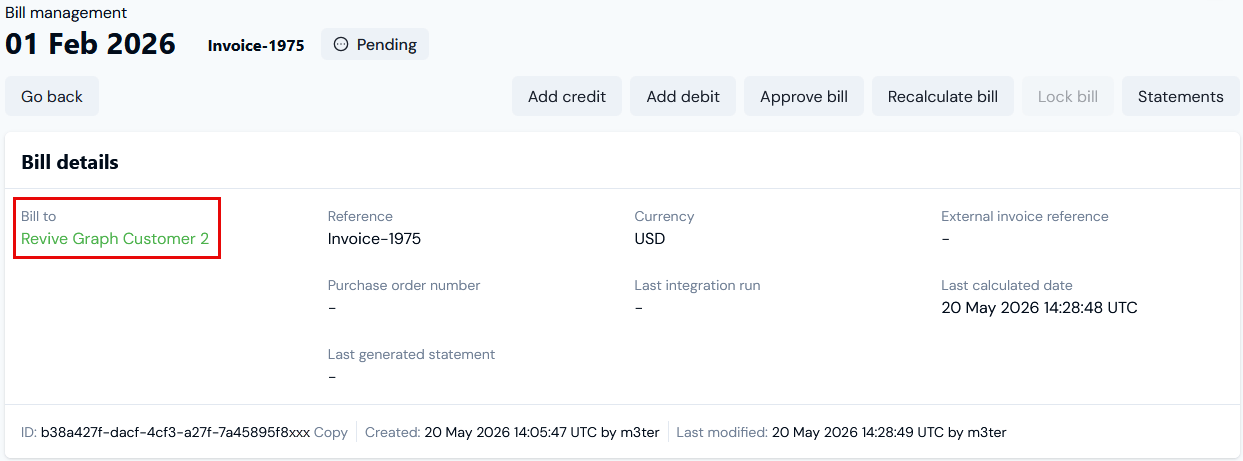 * A text hotlink is provided to open the details page of the Account the Bill is for.
* If you've set up an integration for sending Bills for the Account to a 3rd-party system the date/time and status of the **Last integration run** are shown. Here's an example where an integration exists to Chargebee:
* A text hotlink is provided to open the details page of the Account the Bill is for.
* If you've set up an integration for sending Bills for the Account to a 3rd-party system the date/time and status of the **Last integration run** are shown. Here's an example where an integration exists to Chargebee:
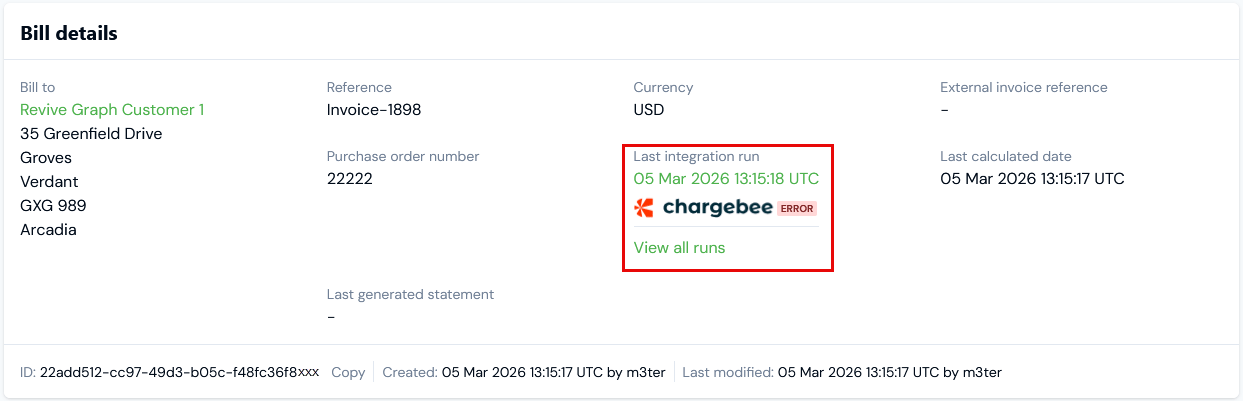 * You can use a text hotlink to open details of the last run or to **View all runs**. Checking integration run details can be very useful when you have implemented an integration with your external invoicing system and you need to troubleshoot if the run fails. For more details, see [Reviewing Integration Run Details](/guides/integrations/setting-up-integrations/reviewing-integration-run-details).
* Note that if the last integration run was successful, then the **External invoice reference** will also show a hotlink text. If you select this hotlink, you'll be taken to the invoice generated in the 3rd-party external system by the integration run.
**Important!** Note that if the Account the Bill was generated for has since been deleted, the Bill will open in **Bill management** but the **Bill details** panel will be incomplete and you'll receive an Account loading error.
6. Scroll down to review the Bill:
* You can use a text hotlink to open details of the last run or to **View all runs**. Checking integration run details can be very useful when you have implemented an integration with your external invoicing system and you need to troubleshoot if the run fails. For more details, see [Reviewing Integration Run Details](/guides/integrations/setting-up-integrations/reviewing-integration-run-details).
* Note that if the last integration run was successful, then the **External invoice reference** will also show a hotlink text. If you select this hotlink, you'll be taken to the invoice generated in the 3rd-party external system by the integration run.
**Important!** Note that if the Account the Bill was generated for has since been deleted, the Bill will open in **Bill management** but the **Bill details** panel will be incomplete and you'll receive an Account loading error.
6. Scroll down to review the Bill:
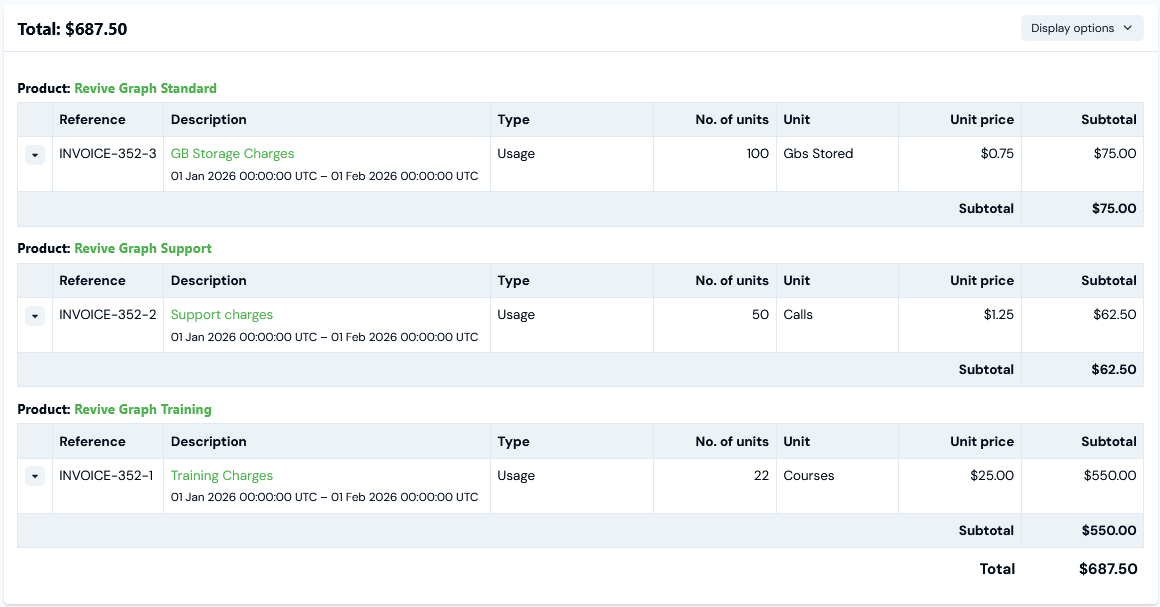
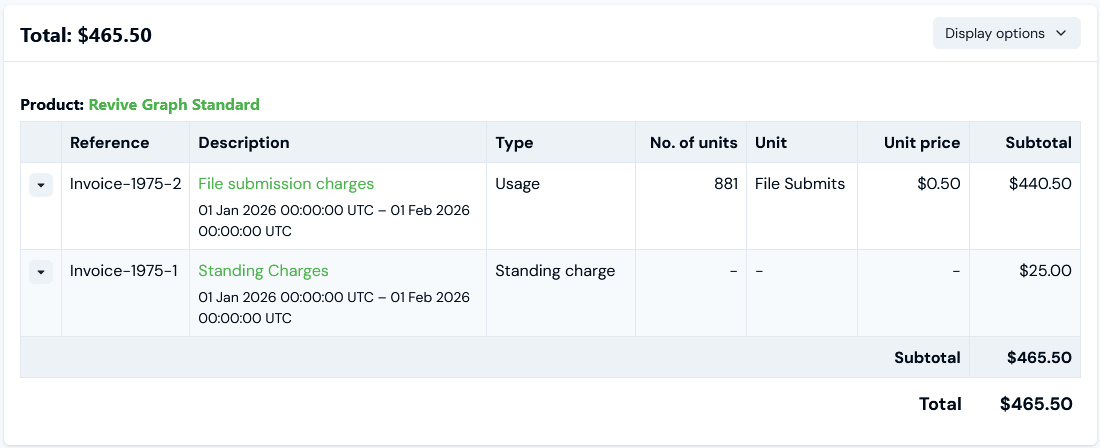 * The Bill **Total** is shown at top-left for quick reference.
* In this example, the Bill line items are grouped for charges due for **Product** consumed.
* For Product charge line items, select the **Description** hotlink text to open the details of the priced Product Plan used to determine the line item charge.
* You can expand a *usage charge line item* to review details:
* The Bill **Total** is shown at top-left for quick reference.
* In this example, the Bill line items are grouped for charges due for **Product** consumed.
* For Product charge line items, select the **Description** hotlink text to open the details of the priced Product Plan used to determine the line item charge.
* You can expand a *usage charge line item* to review details:
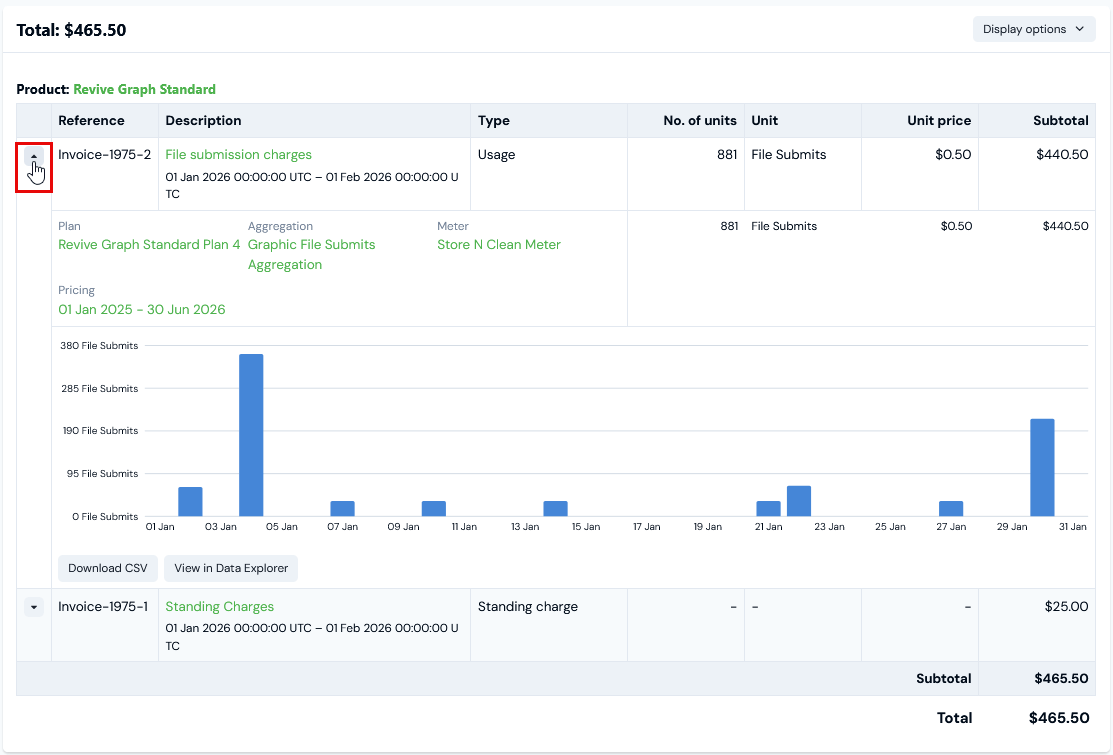 * Read-off:
* The period the **Pricing** has been applied to the Plan.
* The **Plan**, **Aggregation**, **Meter**, and **Pricing** used to set the usage charges raised against the Account. You can then select hotlink texts to open the details pages for each of these.
* If the Pricing is tiered and the usage spans more than one tier, how the total charge for the line item breaks down into the separate charges due for each tiered pricing band.
* A usage chart covering the billing period is also given, which allows you to check when the usage consumption was metered. For that usage, you can then:
* **View in the Data Explorer**
* **Download CSV**
* If there are any draw-down line items for a **Balance** on the Account, select the **Description** text to open the details page for the Balance attached to the billed Account.
### Viewing Bills - Display Options
When you've opened a Bill, there are several **Display options** for controlling how the Bill is displayed:
* If you are viewing a Bill with many zero usage line items, you can use the **Hide zero quantity line items** switch to reduce clutter on the Bill
* If **Accounting products** have been defined for line items:
* Read-off:
* The period the **Pricing** has been applied to the Plan.
* The **Plan**, **Aggregation**, **Meter**, and **Pricing** used to set the usage charges raised against the Account. You can then select hotlink texts to open the details pages for each of these.
* If the Pricing is tiered and the usage spans more than one tier, how the total charge for the line item breaks down into the separate charges due for each tiered pricing band.
* A usage chart covering the billing period is also given, which allows you to check when the usage consumption was metered. For that usage, you can then:
* **View in the Data Explorer**
* **Download CSV**
* If there are any draw-down line items for a **Balance** on the Account, select the **Description** text to open the details page for the Balance attached to the billed Account.
### Viewing Bills - Display Options
When you've opened a Bill, there are several **Display options** for controlling how the Bill is displayed:
* If you are viewing a Bill with many zero usage line items, you can use the **Hide zero quantity line items** switch to reduce clutter on the Bill
* If **Accounting products** have been defined for line items:
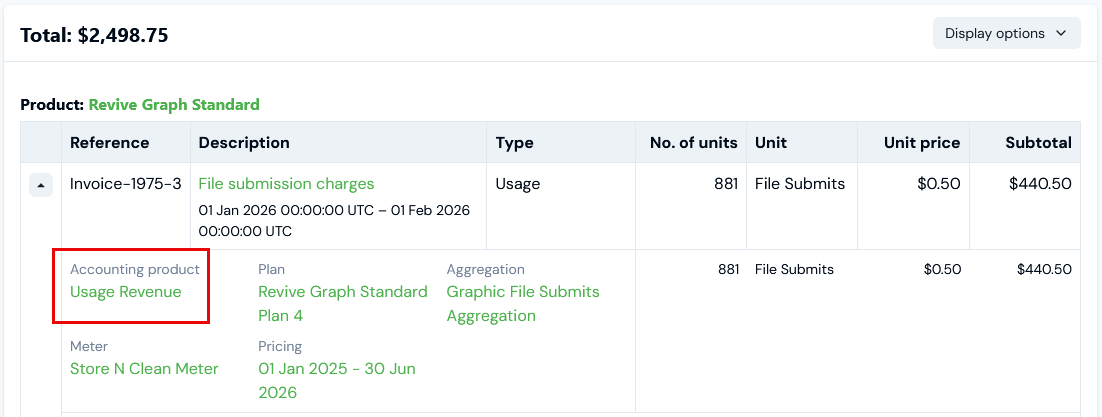
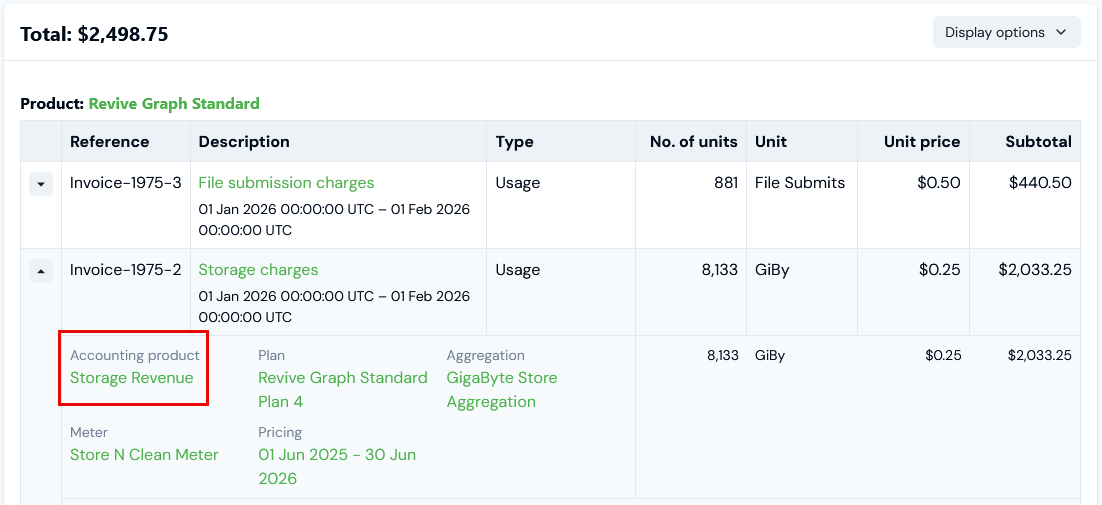
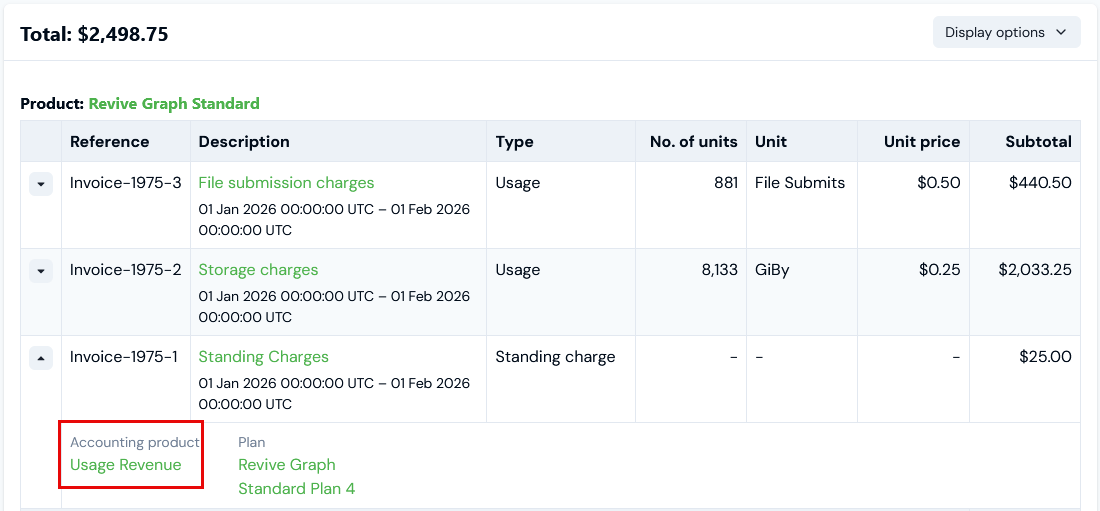 * You can then select **Group by Accounting product**:
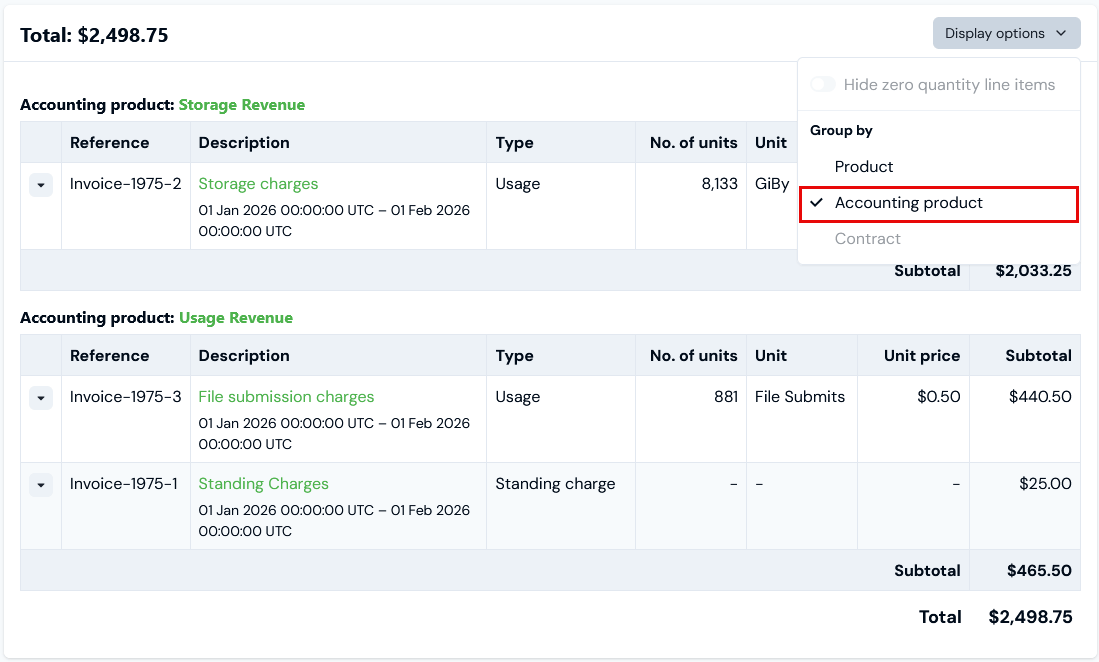 * When a Bill is first opened, the default display arrangement is to group by Product:
 * If an Account has been set up for billing on a Contract basis, you can select to **Group by Contract**:
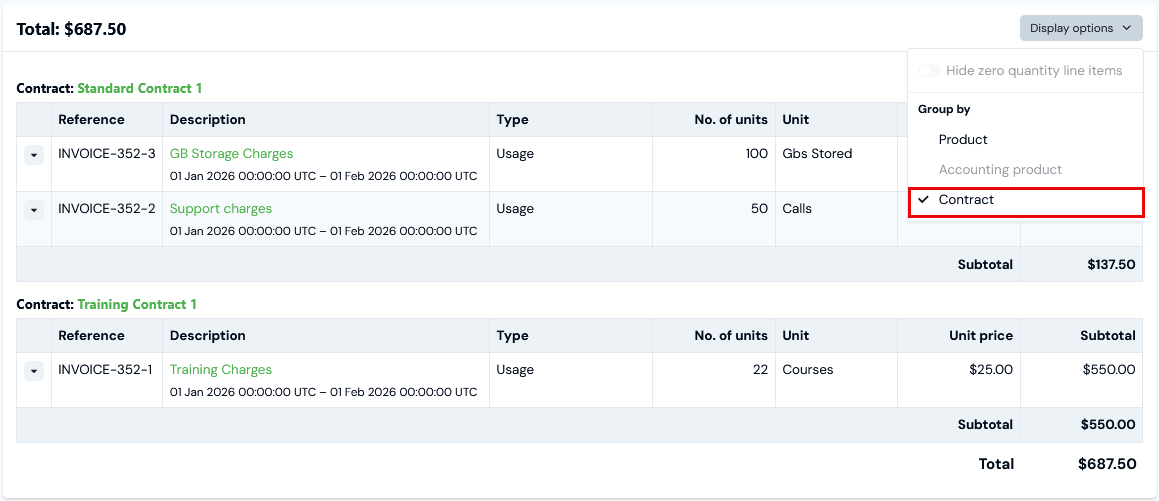 **Display options persisted**. If you've opened a Bill and selected a display option, this will be persisted across reloads, browser tab changes, and separate browser sessions.
### Viewing Bills - Notes and Tips
Here are some notes and tips to bear in mind when viewing Bills:
**Line Item Types**. You can review a list of the different line item types used on Bills in the [Bill Line Item Types](/guides/billing-and-usage-data/running-viewing-and-managing-bills/bill-line-item-types) topic in this section.
**Line Item Descriptions**.
* There are several places where you have the option to define the description texts you want to appear for Bill line items. If you don't define these description texts for line items, then *default descriptions* are used. For details on how these default descriptions are compiled, see the [Bill Line Items - Default Descriptions](/guides/billing-and-usage-data/running-viewing-and-managing-bills/bill-line-items-default-descriptions) topic in this section.
* If you have priced Plans attached to Accounts for billing using Segmented or Custom SQL Aggregations, then you can define custom descriptions for the Bill line items produced by the pricing. See [Custom Descriptions for Segmented Aggregations](https://docs.m3ter.com/guides/usage-data-aggregations/custom-sql-aggregations#example-4-custom-sql-descriptions) and [Custom SQL Descriptions](https://docs.m3ter.com/guides/usage-data-aggregations/custom-sql-aggregations#example-4-custom-sql-descriptions).
**Zero Usage Line Items**. If you are viewing a Bill with many zero usage line items, you can use the **Display options>Hide zero quantity line items** switch to reduce clutter on the Bill.
**Billing Amounts Decimal Places**. The number of decimal places shown for the billing currency amounts depends upon the configured decimal places for the currency in your Organization - see [Creating and Managing Currencies](/guides/organization-and-access-management/viewing-and-editing-organization/creating-and-managing-currencies).
**Mixed Pricing and Billing Currencies and Currency Conversions**:
* If an Account Plan pricing is in a different currency to the configured billing currency, then line items for usage charges due on the Account under that Plan will show the pricing currency for **Unit price** but the **Subtotal** amount for line items will show the converted amount due in the billing currency. See [Billing Currency, Pricing Currency, and Currency Conversions](/guides/plans-and-pricing/working-with-plan-templates-and-plans/understanding-billing-options-for-plan-templates-plans#billing-currency-pricing-currency-and-currency-conversions) for more details.
* If your pricing currency is different to the billing currency, **Currency Conversions** will be shown at the bottom of a Bill. See [Creating and Managing Currencies](/guides/organization-and-access-management/viewing-and-editing-organization/creating-and-managing-currencies).
* For example, here's a Bill where the pricing currency is British Pounds (GBP) and the billing currency is US Dollars (USD):
**Display options persisted**. If you've opened a Bill and selected a display option, this will be persisted across reloads, browser tab changes, and separate browser sessions.
### Viewing Bills - Notes and Tips
Here are some notes and tips to bear in mind when viewing Bills:
**Line Item Types**. You can review a list of the different line item types used on Bills in the [Bill Line Item Types](/guides/billing-and-usage-data/running-viewing-and-managing-bills/bill-line-item-types) topic in this section.
**Line Item Descriptions**.
* There are several places where you have the option to define the description texts you want to appear for Bill line items. If you don't define these description texts for line items, then *default descriptions* are used. For details on how these default descriptions are compiled, see the [Bill Line Items - Default Descriptions](/guides/billing-and-usage-data/running-viewing-and-managing-bills/bill-line-items-default-descriptions) topic in this section.
* If you have priced Plans attached to Accounts for billing using Segmented or Custom SQL Aggregations, then you can define custom descriptions for the Bill line items produced by the pricing. See [Custom Descriptions for Segmented Aggregations](https://docs.m3ter.com/guides/usage-data-aggregations/custom-sql-aggregations#example-4-custom-sql-descriptions) and [Custom SQL Descriptions](https://docs.m3ter.com/guides/usage-data-aggregations/custom-sql-aggregations#example-4-custom-sql-descriptions).
**Zero Usage Line Items**. If you are viewing a Bill with many zero usage line items, you can use the **Display options>Hide zero quantity line items** switch to reduce clutter on the Bill.
**Billing Amounts Decimal Places**. The number of decimal places shown for the billing currency amounts depends upon the configured decimal places for the currency in your Organization - see [Creating and Managing Currencies](/guides/organization-and-access-management/viewing-and-editing-organization/creating-and-managing-currencies).
**Mixed Pricing and Billing Currencies and Currency Conversions**:
* If an Account Plan pricing is in a different currency to the configured billing currency, then line items for usage charges due on the Account under that Plan will show the pricing currency for **Unit price** but the **Subtotal** amount for line items will show the converted amount due in the billing currency. See [Billing Currency, Pricing Currency, and Currency Conversions](/guides/plans-and-pricing/working-with-plan-templates-and-plans/understanding-billing-options-for-plan-templates-plans#billing-currency-pricing-currency-and-currency-conversions) for more details.
* If your pricing currency is different to the billing currency, **Currency Conversions** will be shown at the bottom of a Bill. See [Creating and Managing Currencies](/guides/organization-and-access-management/viewing-and-editing-organization/creating-and-managing-currencies).
* For example, here's a Bill where the pricing currency is British Pounds (GBP) and the billing currency is US Dollars (USD):
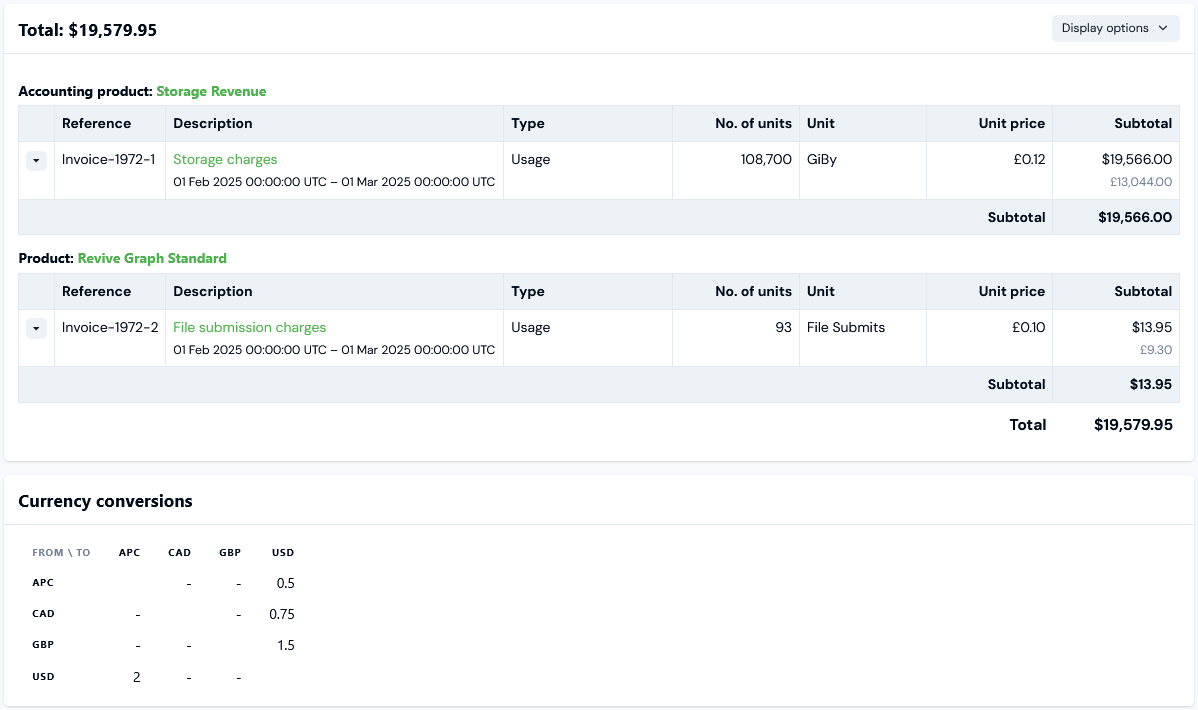 * Note that:
* Under **Subtotal**, the unconverted pricing currency subtotal for line items is also shown in grayed-out text.
* You can check any **Currency conversions** configured for the Organization.
## Reviewing Bill Metadata
You can review **Bill metadata** on the **Bill details** page.
**External mappings**. Any External mappings set up for the Bill are listed:
* Note that:
* Under **Subtotal**, the unconverted pricing currency subtotal for line items is also shown in grayed-out text.
* You can check any **Currency conversions** configured for the Organization.
## Reviewing Bill Metadata
You can review **Bill metadata** on the **Bill details** page.
**External mappings**. Any External mappings set up for the Bill are listed:
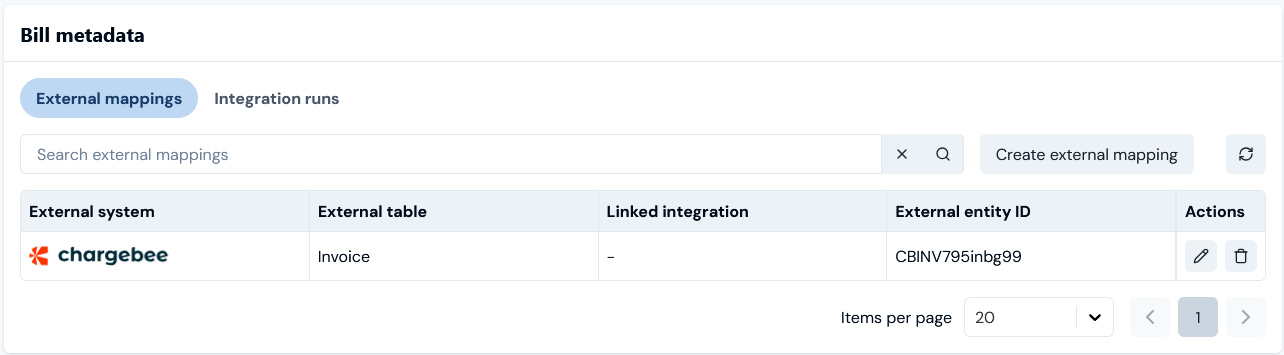 * The **External system** and **External table** mapped to are shown - such as **Chargebee - Invoice** in the above example. The **External entity ID** mapped to is also shown.
* If a listed External mapping is linked to an Integration, under **Linked integration** a hotlink text will be shown which you can use to open the Integration.
* Under **Actions**, you can edit or delete the External mapping.
* If the Bill has multiple External mappings created for it, you can use *Search external mappings* to search by **External table** and **External entity ID** and filter the list.
* You can commence a workflow to **Create external mapping** for the Bill directly - see [Creating and Managing External Mappings for Accounts](https://m3ter.mintlify.app/guides/end-customer-accounts/creating-and-managing-external-mappings-for-accounts) for an example.
**Integration runs**. If you've set up an integration that synchronizes the Bill with an external system, the date/time and status of the **Latest** integration run are shown.
* You can use a text hotlink to open details of this latest run or **View all runs**. See [Reviewing Integration Run Details](/guides/integrations/setting-up-integrations/reviewing-integration-run-details).
## Filtering Bills
When you select a period for the Bills you want to load into the **Bill management** page, you might want to filter the list to help find specific Bills more easily. You can filter the Bills listed by **Status** or show only locked Bills.
**To filter Bills by Status or only show Locked:**
1. Select **Billing>Bill management**. The **Bill management** page opens and the **Invoice date (inclusive)** range is set for the current month and any Bills for that period are listed.
2. If required, update the **Invoice date (inclusive)** range for the period you want to view Bills for. The page adjusts to show Bills for the selected period.
3. You can use the **Status** filter options or the **Only locked** switch:
* The **External system** and **External table** mapped to are shown - such as **Chargebee - Invoice** in the above example. The **External entity ID** mapped to is also shown.
* If a listed External mapping is linked to an Integration, under **Linked integration** a hotlink text will be shown which you can use to open the Integration.
* Under **Actions**, you can edit or delete the External mapping.
* If the Bill has multiple External mappings created for it, you can use *Search external mappings* to search by **External table** and **External entity ID** and filter the list.
* You can commence a workflow to **Create external mapping** for the Bill directly - see [Creating and Managing External Mappings for Accounts](https://m3ter.mintlify.app/guides/end-customer-accounts/creating-and-managing-external-mappings-for-accounts) for an example.
**Integration runs**. If you've set up an integration that synchronizes the Bill with an external system, the date/time and status of the **Latest** integration run are shown.
* You can use a text hotlink to open details of this latest run or **View all runs**. See [Reviewing Integration Run Details](/guides/integrations/setting-up-integrations/reviewing-integration-run-details).
## Filtering Bills
When you select a period for the Bills you want to load into the **Bill management** page, you might want to filter the list to help find specific Bills more easily. You can filter the Bills listed by **Status** or show only locked Bills.
**To filter Bills by Status or only show Locked:**
1. Select **Billing>Bill management**. The **Bill management** page opens and the **Invoice date (inclusive)** range is set for the current month and any Bills for that period are listed.
2. If required, update the **Invoice date (inclusive)** range for the period you want to view Bills for. The page adjusts to show Bills for the selected period.
3. You can use the **Status** filter options or the **Only locked** switch:
 * The default settings when you first open **Bill management** are:
* **Status** filter is **All**.
* **Only locked** is off.
* Select **Pending** for **Status**. The list adjusts to show only **Pending** Bills, none of which can be **Locked**:
* The default settings when you first open **Bill management** are:
* **Status** filter is **All**.
* **Only locked** is off.
* Select **Pending** for **Status**. The list adjusts to show only **Pending** Bills, none of which can be **Locked**:
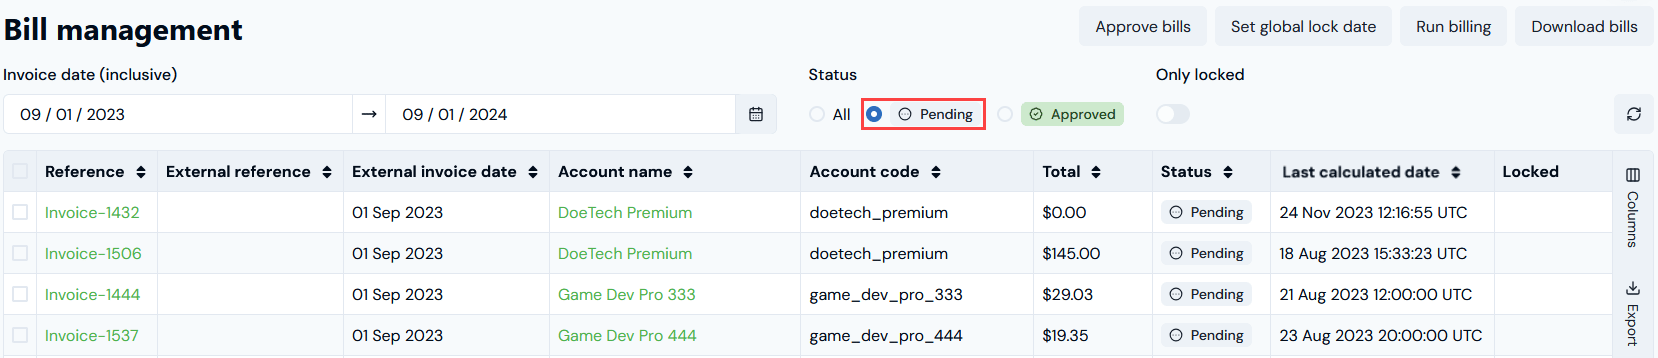 * Select **Approved** for **Status**. The list adjusts to show only **Approved** Bills, some of which might be **Locked**:
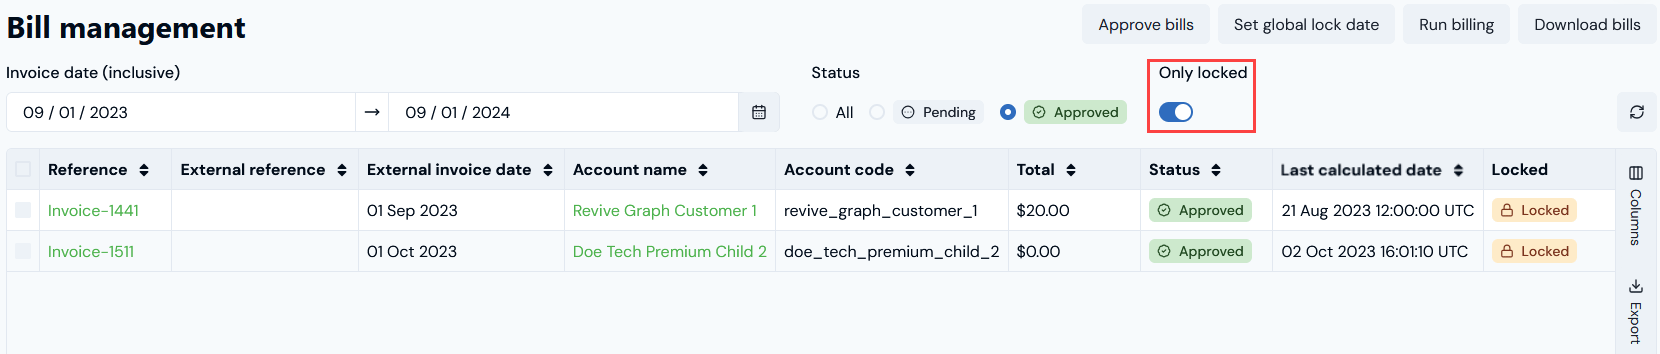
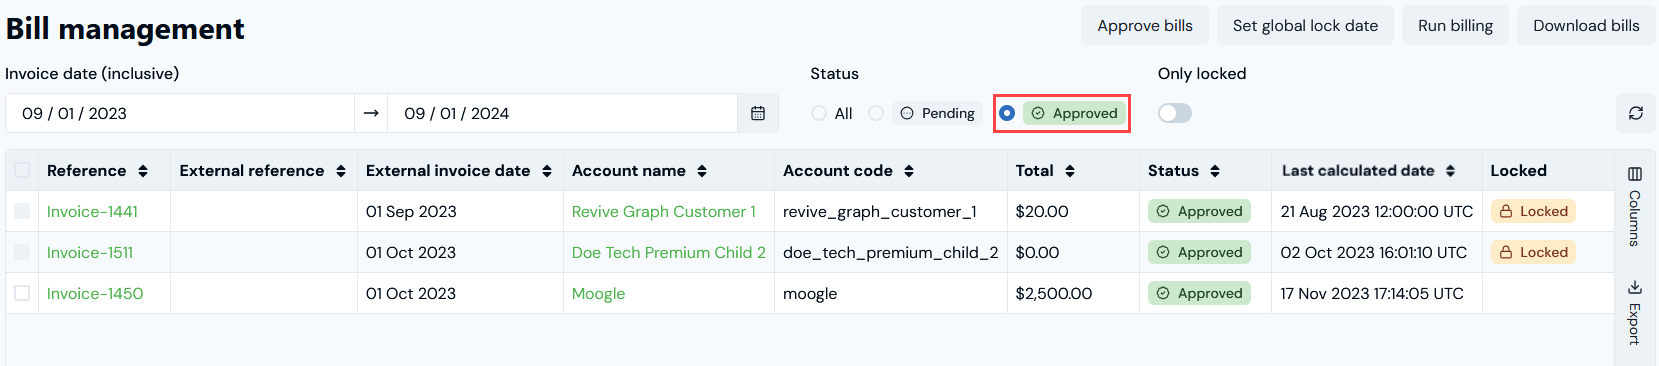 * Select **Approved** or **All** for **Status** and then enable the **Only locked** switch. The list adjusts to show only Bills that are **Approved** and have been **Locked**:
 ## Managing Columns for Bill Management
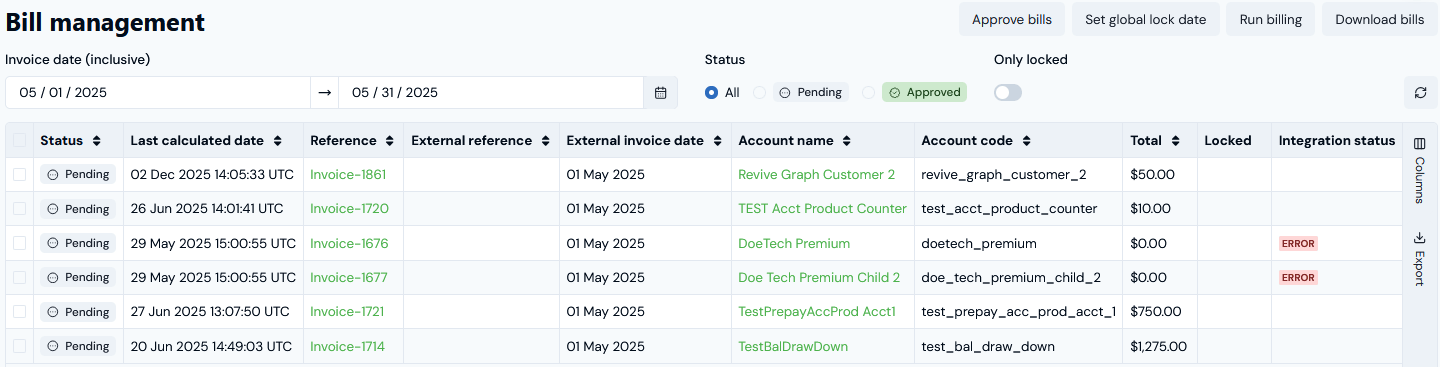
When working with Bills in Bill management, you can quickly reorder columns or switch columns off to suit your current operational purposes. For example, you might want to show **Status** and **Last Calc date** as the first two columns or hide these columns from view:
* [Reordering Bill Management Columns](/guides/billing-and-usage-data/running-viewing-and-managing-bills/running-bills-and-viewing-bill-details#reordering-bill-management-columns)
* [Switching Off Bill Management Columns](/guides/billing-and-usage-data/running-viewing-and-managing-bills/running-bills-and-viewing-bill-details#switching-off-bill-management-columns)
### Reordering Bill Management Columns
**To reorder columns for the Bills list:**
1. Select **Billing>Bill management**. The **Bill management** page opens and the **Invoice date (inclusive)** range is set for the current month and any Bills for that period are listed.
2. If required, update the **Invoice date (inclusive)** range for the period you want to view Bills for. The page adjusts to show Bills for the selected period.
3. If you want to reorder the columns of the Bills list, select the vertical **Columns** button on the right-hand side of the list:
## Managing Columns for Bill Management
When working with Bills in Bill management, you can quickly reorder columns or switch columns off to suit your current operational purposes. For example, you might want to show **Status** and **Last Calc date** as the first two columns or hide these columns from view:
* [Reordering Bill Management Columns](/guides/billing-and-usage-data/running-viewing-and-managing-bills/running-bills-and-viewing-bill-details#reordering-bill-management-columns)
* [Switching Off Bill Management Columns](/guides/billing-and-usage-data/running-viewing-and-managing-bills/running-bills-and-viewing-bill-details#switching-off-bill-management-columns)
### Reordering Bill Management Columns
**To reorder columns for the Bills list:**
1. Select **Billing>Bill management**. The **Bill management** page opens and the **Invoice date (inclusive)** range is set for the current month and any Bills for that period are listed.
2. If required, update the **Invoice date (inclusive)** range for the period you want to view Bills for. The page adjusts to show Bills for the selected period.
3. If you want to reorder the columns of the Bills list, select the vertical **Columns** button on the right-hand side of the list:
 4. On the reorder columns panel that appears, drag-and-drop columns to give the order you want to show on the page:
 * Repeat until you have a top-bottom order of columns that you want to appear in left-right order on the page:
 5. Select **Columns** again. The reorder columns panel closes and the **Bill management** page shows the reordered columns for the Bills list:
 ### Switching Off Bill Management Columns
**To switch off columns for the Bills list:**
1. Select **Billing>Bill management**. The **Bill management** page opens and the **Invoice date (inclusive)** range is set for the current month and any Bills for that period are listed.
2. If required, update the **Invoice date (inclusive)** range for the period you want to view Bills for. The page adjusts to show Bills for the selected period.
3. If you want to switch off columns of the Bills list, select the vertical **Columns** button on the right-hand side of the list:
4. Use the **Columns** panel that appears to switch off any columns you want to hide from the list:
### Switching Off Bill Management Columns
**To switch off columns for the Bills list:**
1. Select **Billing>Bill management**. The **Bill management** page opens and the **Invoice date (inclusive)** range is set for the current month and any Bills for that period are listed.
2. If required, update the **Invoice date (inclusive)** range for the period you want to view Bills for. The page adjusts to show Bills for the selected period.
3. If you want to switch off columns of the Bills list, select the vertical **Columns** button on the right-hand side of the list:
4. Use the **Columns** panel that appears to switch off any columns you want to hide from the list:
 5. Select **Columns** again. The switch columns panel closes and the **Bill management** page shows the Bills list without the hidden columns:
 ## Checking Zero Total Bills
When you select a period for the Bills you want to load into the **Bill management** page, there might be some zero total Bills listed. A Bill can have a zero total because:
* There are no product consumption or other charges due against the Account for the billing period.
* The total of debit line items for product consumption and other charges against the Account are equal to the credit line items, such as Prepayment or Balance draw-downs.
To check Bills listed in Bill management to determine why Bills have a zero total, you can switch on optional columns for *total debits* and *total credits*. This saves you having to open each individual Bill to check.
**To check zero total Bills:**
1. Select **Billing>Bill management**. The **Bill management** page opens and the **Invoice date (inclusive)** range is set for the current month and any Bills for that period are listed:
## Checking Zero Total Bills
When you select a period for the Bills you want to load into the **Bill management** page, there might be some zero total Bills listed. A Bill can have a zero total because:
* There are no product consumption or other charges due against the Account for the billing period.
* The total of debit line items for product consumption and other charges against the Account are equal to the credit line items, such as Prepayment or Balance draw-downs.
To check Bills listed in Bill management to determine why Bills have a zero total, you can switch on optional columns for *total debits* and *total credits*. This saves you having to open each individual Bill to check.
**To check zero total Bills:**
1. Select **Billing>Bill management**. The **Bill management** page opens and the **Invoice date (inclusive)** range is set for the current month and any Bills for that period are listed:
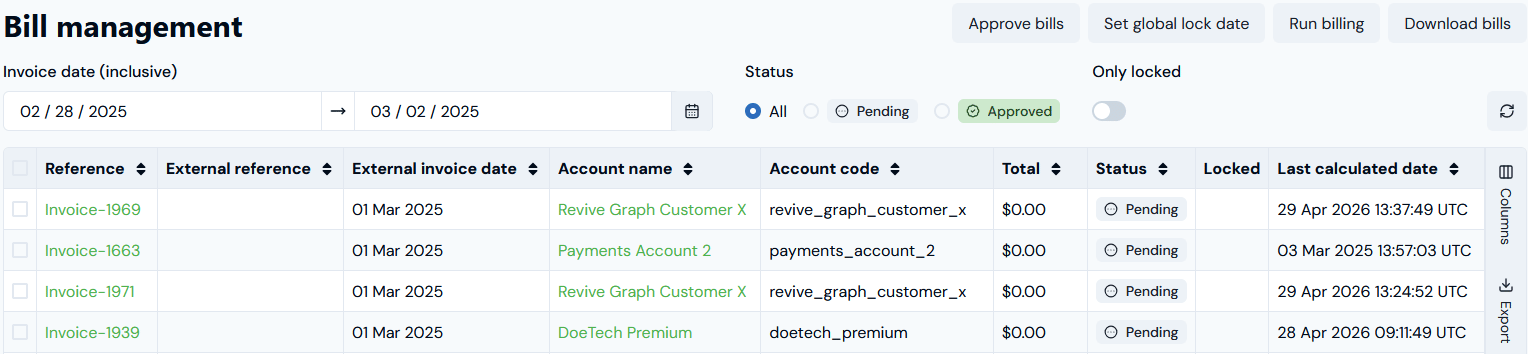 * In this example, the first four Bills listed have a zero **Total**.
2. Select **Columns**, switch on the **Total debits** and **Total credits** columns, and reorder the columns as required - see the [previous section](#managing-columns-for-bill-management) for details on how to do this:
* In this example, the first four Bills listed have a zero **Total**.
2. Select **Columns**, switch on the **Total debits** and **Total credits** columns, and reorder the columns as required - see the [previous section](#managing-columns-for-bill-management) for details on how to do this:
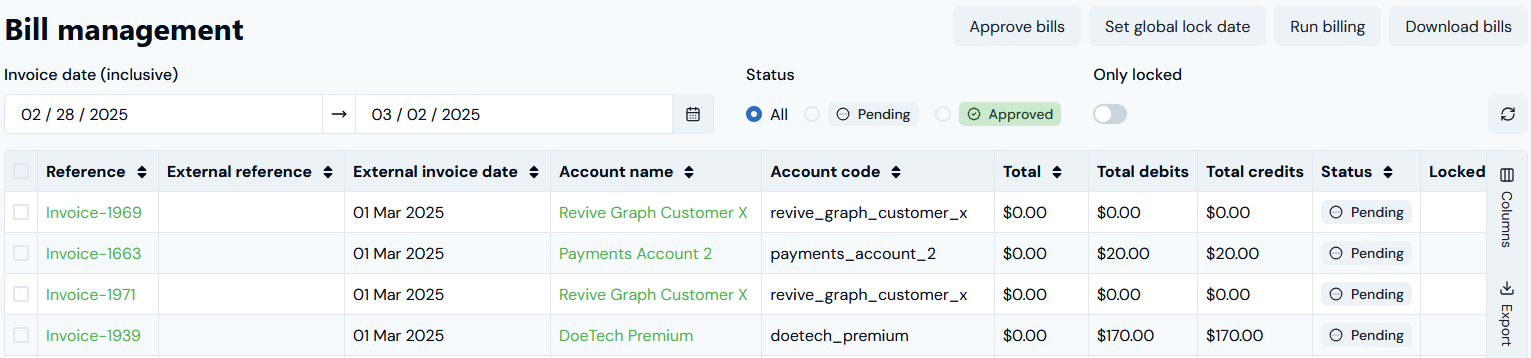 * We can now see that the second and fourth Bill are zero because the Total debits equals the Total credits and the first and third Bill are zero because there are no charges due against the Account for the billing period.
## Exporting the Bill Management Page
You can export the list of Bills displayed on the Bill management page as a `CSV` formatted file at any time.
**To export the Bills list:**
1. Select **Billing>Bill management**. The **Bill management** page opens and the **Invoice date (inclusive)** range is set for the current month and any Bills for that period are listed.
2. If required, update the **Invoice date (inclusive)** range for the period you want to view Bills for. The page adjusts to show Bills for the selected period.
3. If you want to export the list of Bills currently shown on the **Bill management** page, select the vertical **Export** button on the right-hand side:
* We can now see that the second and fourth Bill are zero because the Total debits equals the Total credits and the first and third Bill are zero because there are no charges due against the Account for the billing period.
## Exporting the Bill Management Page
You can export the list of Bills displayed on the Bill management page as a `CSV` formatted file at any time.
**To export the Bills list:**
1. Select **Billing>Bill management**. The **Bill management** page opens and the **Invoice date (inclusive)** range is set for the current month and any Bills for that period are listed.
2. If required, update the **Invoice date (inclusive)** range for the period you want to view Bills for. The page adjusts to show Bills for the selected period.
3. If you want to export the list of Bills currently shown on the **Bill management** page, select the vertical **Export** button on the right-hand side:
 * The current **Bill management** list is downloaded locally in a `CSV` formatted file which you can then load into your preferred application to view. In this example, a downloaded file has been opened and we can see that the column and row ordering of the exported page is preserved:
 ## Running Bills Manually
Some common billing management operations might require you to run bills manually for a specific Bill date. You can do this from **Bill management** by creating a *Bill job*:
* [Preparing to Run Bills Manually - Notes and Tips](/guides/billing-and-usage-data/running-viewing-and-managing-bills/running-bills-and-viewing-bill-details#preparing-to-run-bills-manually-notes-and-tips)
* [Creating and Running Bill Jobs](/guides/billing-and-usage-data/running-viewing-and-managing-bills/running-bills-and-viewing-bill-details#creating-and-running-bill-jobs)
* [Running Bills Jobs - Example](/guides/billing-and-usage-data/running-viewing-and-managing-bills/running-bills-and-viewing-bill-details#running-bill-jobs-example)
### Preparing to Run Bills Manually - Notes and Tips
Please review the following notes and tips before you attempt to set up and run billing manually.
**Notes:**
* **Billing does not run for Child Accounts separately.** Only when you run billing for a Parent Account will billing run for its Child Accounts.
* **Maximum number of concurrent Bill jobs is restricted to 10.** If you already have 10 Bill jobs currently running, and try to create another one, you'll get an HTTP 429 response (Too many requests). When one of the existing bill jobs has completed, you'll be able to submit another job.
**Tips:**
* **Running Bills for Specific Accounts?** It's sometimes easier to open a specific Account and run Bills directly for that Account from the Bills tab - see [Reviewing and Recalculating Bills for an Account](/guides/end-customer-accounts/reviewing-bills-for-an-account).
### Creating and Running Bill Jobs
This section explains how to create a Bill job and run Bills manually.
**To create a Bill job and run billing:**
1. Open **Bill management** and select **Run billing**. The **Create Bill job** page opens:
## Running Bills Manually
Some common billing management operations might require you to run bills manually for a specific Bill date. You can do this from **Bill management** by creating a *Bill job*:
* [Preparing to Run Bills Manually - Notes and Tips](/guides/billing-and-usage-data/running-viewing-and-managing-bills/running-bills-and-viewing-bill-details#preparing-to-run-bills-manually-notes-and-tips)
* [Creating and Running Bill Jobs](/guides/billing-and-usage-data/running-viewing-and-managing-bills/running-bills-and-viewing-bill-details#creating-and-running-bill-jobs)
* [Running Bills Jobs - Example](/guides/billing-and-usage-data/running-viewing-and-managing-bills/running-bills-and-viewing-bill-details#running-bill-jobs-example)
### Preparing to Run Bills Manually - Notes and Tips
Please review the following notes and tips before you attempt to set up and run billing manually.
**Notes:**
* **Billing does not run for Child Accounts separately.** Only when you run billing for a Parent Account will billing run for its Child Accounts.
* **Maximum number of concurrent Bill jobs is restricted to 10.** If you already have 10 Bill jobs currently running, and try to create another one, you'll get an HTTP 429 response (Too many requests). When one of the existing bill jobs has completed, you'll be able to submit another job.
**Tips:**
* **Running Bills for Specific Accounts?** It's sometimes easier to open a specific Account and run Bills directly for that Account from the Bills tab - see [Reviewing and Recalculating Bills for an Account](/guides/end-customer-accounts/reviewing-bills-for-an-account).
### Creating and Running Bill Jobs
This section explains how to create a Bill job and run Bills manually.
**To create a Bill job and run billing:**
1. Open **Bill management** and select **Run billing**. The **Create Bill job** page opens:
 2. First check your current **Organization billing settings**, which can affect how Bills are created for a Bill job:
* **External invoice date**. The **Invoice date** you use is dependent on your Organization-level setting for **External invoice date**. The default for this under **Organization configuration** is **First day of next period**. However, if your accounting policy requires that you recognize usage revenue in the same service period as that in which the usage is recorded, and not in the following service period, then you can set **External invoice date** to **Last day of arrears**. If you are using **Last day of arrears** for the **External invoice date** setting, when entering an **Invoice date** for a Bill job you *must use the last day* of the service period. For example, if you are billing monthly, use the last day of the month period for which you want to generate a Bill manually. If you use the first day of the month service period following, a Bill *will not be generated*.
* **Epochs**. The **Year**, **Month**, **Week**, and **Day epoch** dates configured for your Organization are shown.
* **Consolidate bills**. If you've enabled **Consolidate bills** in your Organization configuration, the **Billing frequency** option will not be available for your Bill job settings.
3. If you want to change any of the current **Organization billing settings** before setting up a Bill job and running Bills manually, select the **View billing settings** hotlink text to open the **Configuration** page where you can **Edit** the **Organization configuration details**. See [Viewing and Editing Organization Configuration](/guides/organization-and-access-management/viewing-and-editing-organization/viewing-and-editing-organization-configuration) for more details.
4. Enter **Bill job settings**:
* **Invoice date**. (*Required*). Your selection for **Invoice date** will depend on the specific settings of your Organization for billing frequency and billing cycle date. For common billing setups, such as for monthly billing frequency and a billing cycle date of the 1st of each month, you can use the 1st of the month following to generate a Bill for the previous month's charges.
* **Bill frequency**. (*Optional*). When you open the **Create Bill job** page, a default of **All** is selected for **Bill frequency**. But if you want to run billing manually for only those Accounts that are on a specific billing frequency, you can use the drop-down list to select the frequency:
* **Daily**
* **Weekly**
* **Monthly**
* **Annually**
* **Ad Hoc** - You can use this setting:
* For Bills generated for one-off Charges on Accounts.
* When a custom billing schedule is used for billing an Account, such as for billing of Prepayment/Commitment fees using a custom billing schedule.
**Warning!** If you've enabled **Consolidate bills** in your Organization configuration, the **Billing frequency** option will not be available. Please see the notes on enabling the **Consolidate bills** option for your Organization in the [Viewing and Editing Organization Configuration](/guides/organization-and-access-management/viewing-and-editing-organization/viewing-and-editing-organization-configuration) topic.
* **Target currency**. (*Optional*). You can select from the drop-down list of currencies you've set up for your Organization:
* If you leave **Target currency** blank, the billing currency used for any bills generated for the Bill job depends on what you've defined as the billing currency at either Account or Organization level.
* If you've defined a currency for an Account and chosen to override the Organization currency for the Account, then the billing currency used when you run Bills manually for the Account will be the Account currency. If you haven't defined an Account currency, then the Organization currency is used for billing the Account.
* If you select a **Target currency**, then any Bills generated for the Bill job will be created using the selected currency as the billing currency.
**Warning!** Remember that you must first configure any required currency conversion rates if the selected **Target currency** is different to the pricing currency configured for use on an Account, otherwise Bills will fail for the Account and you'll receive an **ERROR** alert under **Alerts**. For more details see [Creating and Managing Currencies](/guides/organization-and-access-management/viewing-and-editing-organization/creating-and-managing-currencies).
5. Select **Run billing**:
2. First check your current **Organization billing settings**, which can affect how Bills are created for a Bill job:
* **External invoice date**. The **Invoice date** you use is dependent on your Organization-level setting for **External invoice date**. The default for this under **Organization configuration** is **First day of next period**. However, if your accounting policy requires that you recognize usage revenue in the same service period as that in which the usage is recorded, and not in the following service period, then you can set **External invoice date** to **Last day of arrears**. If you are using **Last day of arrears** for the **External invoice date** setting, when entering an **Invoice date** for a Bill job you *must use the last day* of the service period. For example, if you are billing monthly, use the last day of the month period for which you want to generate a Bill manually. If you use the first day of the month service period following, a Bill *will not be generated*.
* **Epochs**. The **Year**, **Month**, **Week**, and **Day epoch** dates configured for your Organization are shown.
* **Consolidate bills**. If you've enabled **Consolidate bills** in your Organization configuration, the **Billing frequency** option will not be available for your Bill job settings.
3. If you want to change any of the current **Organization billing settings** before setting up a Bill job and running Bills manually, select the **View billing settings** hotlink text to open the **Configuration** page where you can **Edit** the **Organization configuration details**. See [Viewing and Editing Organization Configuration](/guides/organization-and-access-management/viewing-and-editing-organization/viewing-and-editing-organization-configuration) for more details.
4. Enter **Bill job settings**:
* **Invoice date**. (*Required*). Your selection for **Invoice date** will depend on the specific settings of your Organization for billing frequency and billing cycle date. For common billing setups, such as for monthly billing frequency and a billing cycle date of the 1st of each month, you can use the 1st of the month following to generate a Bill for the previous month's charges.
* **Bill frequency**. (*Optional*). When you open the **Create Bill job** page, a default of **All** is selected for **Bill frequency**. But if you want to run billing manually for only those Accounts that are on a specific billing frequency, you can use the drop-down list to select the frequency:
* **Daily**
* **Weekly**
* **Monthly**
* **Annually**
* **Ad Hoc** - You can use this setting:
* For Bills generated for one-off Charges on Accounts.
* When a custom billing schedule is used for billing an Account, such as for billing of Prepayment/Commitment fees using a custom billing schedule.
**Warning!** If you've enabled **Consolidate bills** in your Organization configuration, the **Billing frequency** option will not be available. Please see the notes on enabling the **Consolidate bills** option for your Organization in the [Viewing and Editing Organization Configuration](/guides/organization-and-access-management/viewing-and-editing-organization/viewing-and-editing-organization-configuration) topic.
* **Target currency**. (*Optional*). You can select from the drop-down list of currencies you've set up for your Organization:
* If you leave **Target currency** blank, the billing currency used for any bills generated for the Bill job depends on what you've defined as the billing currency at either Account or Organization level.
* If you've defined a currency for an Account and chosen to override the Organization currency for the Account, then the billing currency used when you run Bills manually for the Account will be the Account currency. If you haven't defined an Account currency, then the Organization currency is used for billing the Account.
* If you select a **Target currency**, then any Bills generated for the Bill job will be created using the selected currency as the billing currency.
**Warning!** Remember that you must first configure any required currency conversion rates if the selected **Target currency** is different to the pricing currency configured for use on an Account, otherwise Bills will fail for the Account and you'll receive an **ERROR** alert under **Alerts**. For more details see [Creating and Managing Currencies](/guides/organization-and-access-management/viewing-and-editing-organization/creating-and-managing-currencies).
5. Select **Run billing**:
 6. The Bill job is queued and you can track the billing run progress by clicking the **Running tasks** icon at top-right to open the **Running tasks** panel:
 When the Bill job has completed, the **Run billing** page opens:
 You can review:
* **Bill job details**. The job **Status** is shown and you can **Copy** the job **ID** directly to your clipboard.
* **Generated bills**. Any Bills created or updated by the Bill job are listed:
* Use the **Reference** hotlink text to open a Bill.
* Use the **Account name** hotlink text to open the Account the Bill was for.
7. If scroll to the bottom of the page, two buttons are provided:
You can review:
* **Bill job details**. The job **Status** is shown and you can **Copy** the job **ID** directly to your clipboard.
* **Generated bills**. Any Bills created or updated by the Bill job are listed:
* Use the **Reference** hotlink text to open a Bill.
* Use the **Account name** hotlink text to open the Account the Bill was for.
7. If scroll to the bottom of the page, two buttons are provided:
 * If you want to set up another Bill job and run billing manually again, select **Re-run billing**. You are taken back to the **Create Bill job** page.
* Otherwise select **Back to Bill Management.**
### Running Bill Jobs - Example
Setting up Bill jobs and running billing manually can be useful for many billing operations scenarios. For example, suppose some historical usage data has come in for an Account that is billed on a monthly billing frequency and you want to run billing for the relevant billing date to check that a Bill is updated correctly to allow for the additional product usage.
**To run Bills manually:**
1. Select **Billing>Bill management**. The **Bill management** page opens.
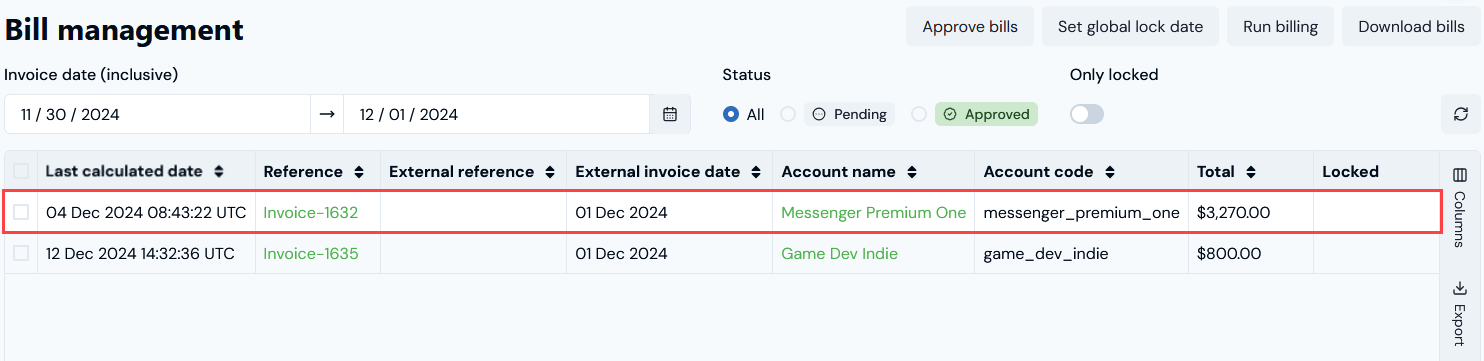
2. First, update the **Invoice date (inclusive)** date range to include the Account Bill you want to check. The page will refresh to show Bills with dates in the date range and you can identify the Account Bill you want to check for additional charges due to new historical usage data:
* If you want to set up another Bill job and run billing manually again, select **Re-run billing**. You are taken back to the **Create Bill job** page.
* Otherwise select **Back to Bill Management.**
### Running Bill Jobs - Example
Setting up Bill jobs and running billing manually can be useful for many billing operations scenarios. For example, suppose some historical usage data has come in for an Account that is billed on a monthly billing frequency and you want to run billing for the relevant billing date to check that a Bill is updated correctly to allow for the additional product usage.
**To run Bills manually:**
1. Select **Billing>Bill management**. The **Bill management** page opens.
2. First, update the **Invoice date (inclusive)** date range to include the Account Bill you want to check. The page will refresh to show Bills with dates in the date range and you can identify the Account Bill you want to check for additional charges due to new historical usage data:
 3. Select **Run billing**.
4. Enter the **Bill job settings** accordingly:
3. Select **Run billing**.
4. Enter the **Bill job settings** accordingly:
 * In this example, we want to check for new historical usage data submitted for the Account in November 2024 and have set the Invoice date at **December 1st 2024** and selected **Monthly** for **Bill frequency.**
4. Select **Run billing**.
5. When the Bill job has completed for the selected date and frequency and the **Run billing** pages opens, scroll to the bottom of the page and select **Back to Bill Management**:
* In this example, we want to check for new historical usage data submitted for the Account in November 2024 and have set the Invoice date at **December 1st 2024** and selected **Monthly** for **Bill frequency.**
4. Select **Run billing**.
5. When the Bill job has completed for the selected date and frequency and the **Run billing** pages opens, scroll to the bottom of the page and select **Back to Bill Management**:
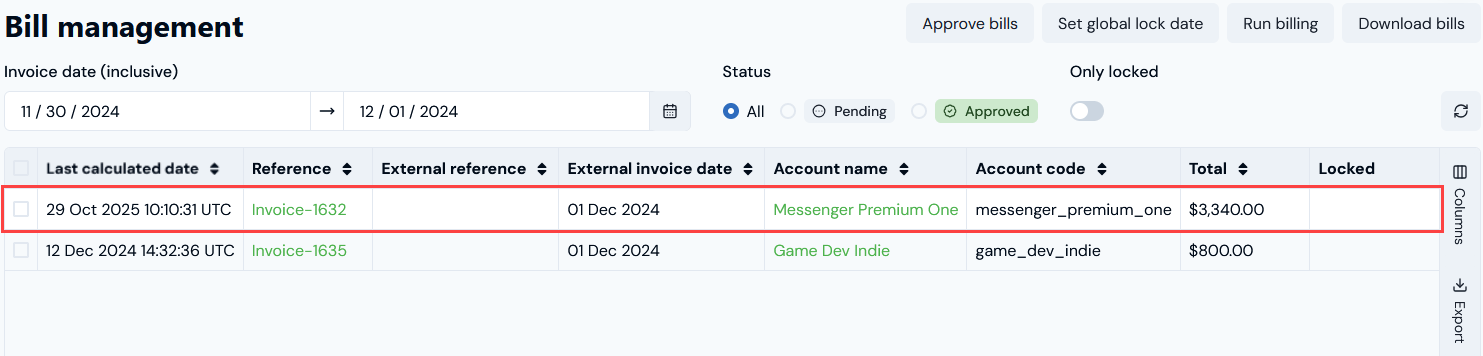 * We can see that for the example Account the Bill **Total** has increased as expected for the charges due for historical usage data submitted in November 2024.