> ## Documentation Index
> Fetch the complete documentation index at: https://docs.m3ter.com/llms.txt
> Use this file to discover all available pages before exploring further.
# Working with Bill Statements
You can create *Statements* to accompany the Bills you send out to your end-customers as backing sheets to their invoices. Bill Statements provide a useful breakdown of the usage responsible for charge line items your end-customers see on their invoices:
* Create *Statement Definitions* to specify the way billed usage will be aggregated and compiled in the Statement. For example, if you are billing customers monthly, you might want to breakdown the usage responsible for the monthly charge on a Bill into weekly portions in Bill Statements.
* At Organization level select a default Statement Definition. See [Viewing and Editing Organization Configuration](/guides/organization-and-access-management/viewing-and-editing-organization/viewing-and-editing-organization-configuration).
* At Account level:
* Select a Statement Definition, which will then override the Organization default.
* Select to auto-generate Statements when Bills are approved or locked.
* When viewing a Bill, generate Statements manually - two options:
* Full Statements. Generated Statements will include for *all usage* collected by the Meters defined for the Statement Definition.
* Partial Statements. Allows you to filter by Meter IDs defined for the Statement Definition. Generated Statements will include only for the *usage collected by selected Meters*.
* When Statements have been generated for a Bill, download them in JSON and CSV format, which you can then transpose and compile into the required delivery format.
* Check if a Bill Statement needs refreshing by comparing the Bill calculation timestamp against the Statement's last modified date, which is available in the response to a get Statement API call
Common Bill Statement use cases:
* One common use case is to provide a breakdown by time period. For example, if you bill and issue invoices on a monthly frequency, then you might want to provide a weekly or daily charge breakdown Statement as a backing sheet to invoices, allowing end-customers to see how their usage was distributed across the billing period.
* Another use case would be to provide a breakdown on the basis of location of usage charged for. For example, a text messaging service imposes a usage charge per billing period for all messages logged that originate from outside of a customer's native country. This usage is measured for the billing charge as a single block of total recorded usage, which results in a single usage charge line item for "other country" usage in customer invoices. But if the Meter collecting that usage is set up to also record a location for message events by country of origin, you can set up a Statement Definition that provides the required breakdown by the Meter's location dimension.
This topic uses the second common use case as a worked example to explain how to create Statement Definitions, set up default Statements, generate full or partial Statements for Bills, and how to download generated Statements in your preferred format.
* [Creating Statement Definitions](#creating-statement-definition)
* [Using Statement Definitions](#using-statement-definitions)
* [Generating Full Statements for Bills and Downloading](#generating-full-statements-for-bills-and-downloading)
* [Generating Partial Statements for Bills and Downloading](#generating-partial-statements-for-bills-and-downloading)
* [Enabling Auto-Generation for Statements](#enabling-auto-generation-for-statements)
* [Checking Statement Last Modified Date](#checking-statement-last-modified-date)
**Bill Statement limit**. A default Bill line item limit of 50,000 is imposed on Bill Statements. This default limit can be increased on request - please ask your m3ter contact for more details or get in touch with [m3ter Support](/guides/getting-started/contacting-m3ter-support).
## Creating Statement Definitions
When you create and configure a Statement Definition, you can define how the usage data collected by a Meter for a billing period, and on which usage charges are based, will be broken down for end-customers who will receive a Statement generated using the Statement Definition.
**To create and configure a Statement Definition:**
1. Select **Billing**. The **Billing** section opens at the **Bill management** page.
2. Select **Statement definitions**:
 The **Statement definitions** page opens and list any existing Statement Definitions.
3. Select **Create statement definition**. The **Create** page opens.
4. Under **Statement definition details**, enter a **Name** for the Statement Definition.
5. Use the drop-down to select an **Aggregation frequency**:
* **Daily**
* **Weekly**
* **Monthly**
* **Quarterly**
* **Yearly**
* **Whole bill period**
6. Use the switch to enable **Include price per unit**. Default is disabled.
7. Use the switch to **Generate slim statements**. Enable this option if you have priced Plans using segmented Aggregations attached to end-customer Accounts and want to exclude segments that don't appear on Bills from Statements. Default is disabled:
The **Statement definitions** page opens and list any existing Statement Definitions.
3. Select **Create statement definition**. The **Create** page opens.
4. Under **Statement definition details**, enter a **Name** for the Statement Definition.
5. Use the drop-down to select an **Aggregation frequency**:
* **Daily**
* **Weekly**
* **Monthly**
* **Quarterly**
* **Yearly**
* **Whole bill period**
6. Use the switch to enable **Include price per unit**. Default is disabled.
7. Use the switch to **Generate slim statements**. Enable this option if you have priced Plans using segmented Aggregations attached to end-customer Accounts and want to exclude segments that don't appear on Bills from Statements. Default is disabled:
 8. Under **Measures**, use the drop-down to select a **Meter** that collects the usage data used as the basis of the usage charges for billing. The **Measure** drop-down selection field is activated for the selected Meter.
9. Use the **Measure** drop-down to select a Meter measure Data Field which is aggregated into unit price rates and used as the basis for usage charges at billing.
10. Use the **Aggregation functions** drop-down list to select the way you want to aggregate the selected Meter Data Field values for Statements. Seven options:
* **Sum**. Adds the values
* **Minimum**. Uses the minimum value.
* **Maximum**. Uses the maximum value.
* **Count**. Counts the number of values
* **Latest**. Uses the most recent value.
* **Mean**. Uses the arithmetic mean of the values.
* **Unique**. Lists each of the unique values.
11. Under **Dimensions**, use the drop-down to select a Meter that collects the usage data as the basis of the usage charges on Bills. The **Dimension** drop-down is activated for the selected Meter.
12. Use the **Dimension** drop-down to select the Meter Dimension you want to use as the basis of the Statement's breakdown of usage.
13. If you want to filter the selected **Dimension** values which will appear on the Statement, under **Filter**, choose the **Selected values** radio button. The **Filter** values field is activated.
14. Enter any values you want to filter the Statement breakdown by - only the **Dimension** values you enter will be used:
8. Under **Measures**, use the drop-down to select a **Meter** that collects the usage data used as the basis of the usage charges for billing. The **Measure** drop-down selection field is activated for the selected Meter.
9. Use the **Measure** drop-down to select a Meter measure Data Field which is aggregated into unit price rates and used as the basis for usage charges at billing.
10. Use the **Aggregation functions** drop-down list to select the way you want to aggregate the selected Meter Data Field values for Statements. Seven options:
* **Sum**. Adds the values
* **Minimum**. Uses the minimum value.
* **Maximum**. Uses the maximum value.
* **Count**. Counts the number of values
* **Latest**. Uses the most recent value.
* **Mean**. Uses the arithmetic mean of the values.
* **Unique**. Lists each of the unique values.
11. Under **Dimensions**, use the drop-down to select a Meter that collects the usage data as the basis of the usage charges on Bills. The **Dimension** drop-down is activated for the selected Meter.
12. Use the **Dimension** drop-down to select the Meter Dimension you want to use as the basis of the Statement's breakdown of usage.
13. If you want to filter the selected **Dimension** values which will appear on the Statement, under **Filter**, choose the **Selected values** radio button. The **Filter** values field is activated.
14. Enter any values you want to filter the Statement breakdown by - only the **Dimension** values you enter will be used:
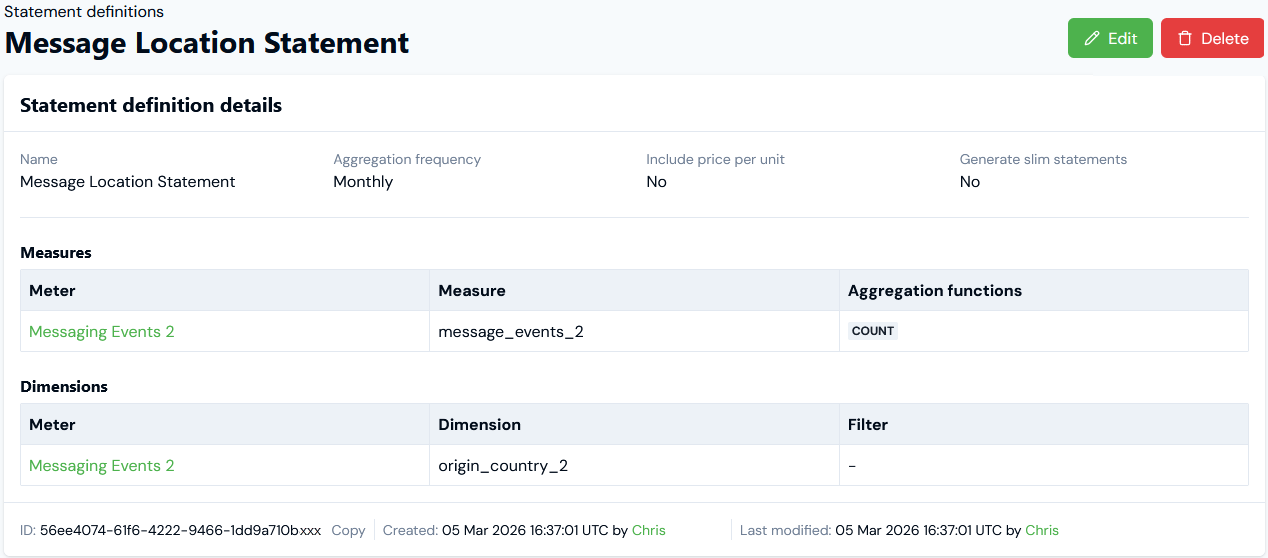
 In this example, the Statement Definition uses:
* A single numeric **Message Events2** measure on a Meter, which collects usage data on the number of messages and on which billing usage charges are based.
* A single non-numeric **Origin Country2** dimension on a Meter and on which a breakdown of charges will be based. No filtering of values is enabled.
15. If you want to use other Meter Measures and Dimensions for your Statement Definition, select **Add** under **Measures** or **Dimensions** and repeat steps 6 to 14.
16. Select **Create statement definition**. The **Statement definition details** page opens:
In this example, the Statement Definition uses:
* A single numeric **Message Events2** measure on a Meter, which collects usage data on the number of messages and on which billing usage charges are based.
* A single non-numeric **Origin Country2** dimension on a Meter and on which a breakdown of charges will be based. No filtering of values is enabled.
15. If you want to use other Meter Measures and Dimensions for your Statement Definition, select **Add** under **Measures** or **Dimensions** and repeat steps 6 to 14.
16. Select **Create statement definition**. The **Statement definition details** page opens:
 ## Using Statement Definitions
When you've set up a Statement Definition, you can select it as the one used to generate Statements for Bills:
* Select it as the default at the Organization level. See [Viewing and Editing Organization Configuration](/guides/organization-and-access-management/viewing-and-editing-organization/viewing-and-editing-organization-configuration).
* Select it to be used for a particular Account as one of the Account settings.
These options act in the following way:
* If you set a default Statement Definition at the Organizational level, this is used when you generate Bill Statements for any Accounts for which *you haven't selected a Statement Definition*.
* If you set a Statement Definition for an individual Account, this will be used when you generate Bill Statements for the Account and *takes precedence* over any Statement Definition you've selected at Organization level.
**To set up default Bill Statements:**
1. Create the Statement Definition you want to set as the default at Organization level or the one you want set as the default for a particular Account level. See the [previous section](/guides/billing-and-usage-data/running-viewing-and-managing-bills/working-with-bill-statements#creating-statement-definitions).
2. To define a default Statement Definition at Organization level, select **Settings**:
## Using Statement Definitions
When you've set up a Statement Definition, you can select it as the one used to generate Statements for Bills:
* Select it as the default at the Organization level. See [Viewing and Editing Organization Configuration](/guides/organization-and-access-management/viewing-and-editing-organization/viewing-and-editing-organization-configuration).
* Select it to be used for a particular Account as one of the Account settings.
These options act in the following way:
* If you set a default Statement Definition at the Organizational level, this is used when you generate Bill Statements for any Accounts for which *you haven't selected a Statement Definition*.
* If you set a Statement Definition for an individual Account, this will be used when you generate Bill Statements for the Account and *takes precedence* over any Statement Definition you've selected at Organization level.
**To set up default Bill Statements:**
1. Create the Statement Definition you want to set as the default at Organization level or the one you want set as the default for a particular Account level. See the [previous section](/guides/billing-and-usage-data/running-viewing-and-managing-bills/working-with-bill-statements#creating-statement-definitions).
2. To define a default Statement Definition at Organization level, select **Settings**:
 The **Organization** page opens with the **Configuration** tab selected.
3. On the **Organization configuration details** panel, select **Edit**. The **Organization configuration** page opens.
4. Scroll down the page and under **Bill statements**, use the **Statement definition** drop-down to select the Statement Definition you want to set as the default.
5. Select **Update Organization configuration**. You are returned to the **Configuration** tab and the selected Statement Definition is shown on the **Organization configuration details** panel as the **Default statement definition**.
* Note that you can select the hotlink name text of the Statement Definition to open the **Statement definition details** page directly.
6. If you want to override the Statement Definition you've set as the default at Organization level for a particular Account, open the **Edit** page for the Account.
7. Scroll down the page and on the **Bill statements** panel, use the **Statement definition** drop-down to select the Statement Definition you want to use for the Account.
8. Select **Update Account**.
## Generating Full Statements for Bills and Downloading
When you open and view a Bill for an Account under Bill management, you can manually generate a *full Bill Statement* and include for usage collected by all Meters when the Statement is generated:
* The Statement generated will use the Statement Definition you've set as the default at Organization level or the Statement Definition you applied to the Account - if you've defined a Statement Definition at Account level, this will take precedence.
* You can choose to generate the Statement in JSON format only or both JSON and CSV format. Note that the line items within a Statement are not necessarily sorted, and you should sort by the appropriate fields as part of subsequent processing.
* When the Statement has been generated for the Bill, you can download the Statement in JSON or CSV format if you also selected CSV format when generating the Statement.
**To generate full Statements for Bills and Download:**
1. Open the Bill you want to generate a full Statement for in **Bill management**:
The **Organization** page opens with the **Configuration** tab selected.
3. On the **Organization configuration details** panel, select **Edit**. The **Organization configuration** page opens.
4. Scroll down the page and under **Bill statements**, use the **Statement definition** drop-down to select the Statement Definition you want to set as the default.
5. Select **Update Organization configuration**. You are returned to the **Configuration** tab and the selected Statement Definition is shown on the **Organization configuration details** panel as the **Default statement definition**.
* Note that you can select the hotlink name text of the Statement Definition to open the **Statement definition details** page directly.
6. If you want to override the Statement Definition you've set as the default at Organization level for a particular Account, open the **Edit** page for the Account.
7. Scroll down the page and on the **Bill statements** panel, use the **Statement definition** drop-down to select the Statement Definition you want to use for the Account.
8. Select **Update Account**.
## Generating Full Statements for Bills and Downloading
When you open and view a Bill for an Account under Bill management, you can manually generate a *full Bill Statement* and include for usage collected by all Meters when the Statement is generated:
* The Statement generated will use the Statement Definition you've set as the default at Organization level or the Statement Definition you applied to the Account - if you've defined a Statement Definition at Account level, this will take precedence.
* You can choose to generate the Statement in JSON format only or both JSON and CSV format. Note that the line items within a Statement are not necessarily sorted, and you should sort by the appropriate fields as part of subsequent processing.
* When the Statement has been generated for the Bill, you can download the Statement in JSON or CSV format if you also selected CSV format when generating the Statement.
**To generate full Statements for Bills and Download:**
1. Open the Bill you want to generate a full Statement for in **Bill management**:
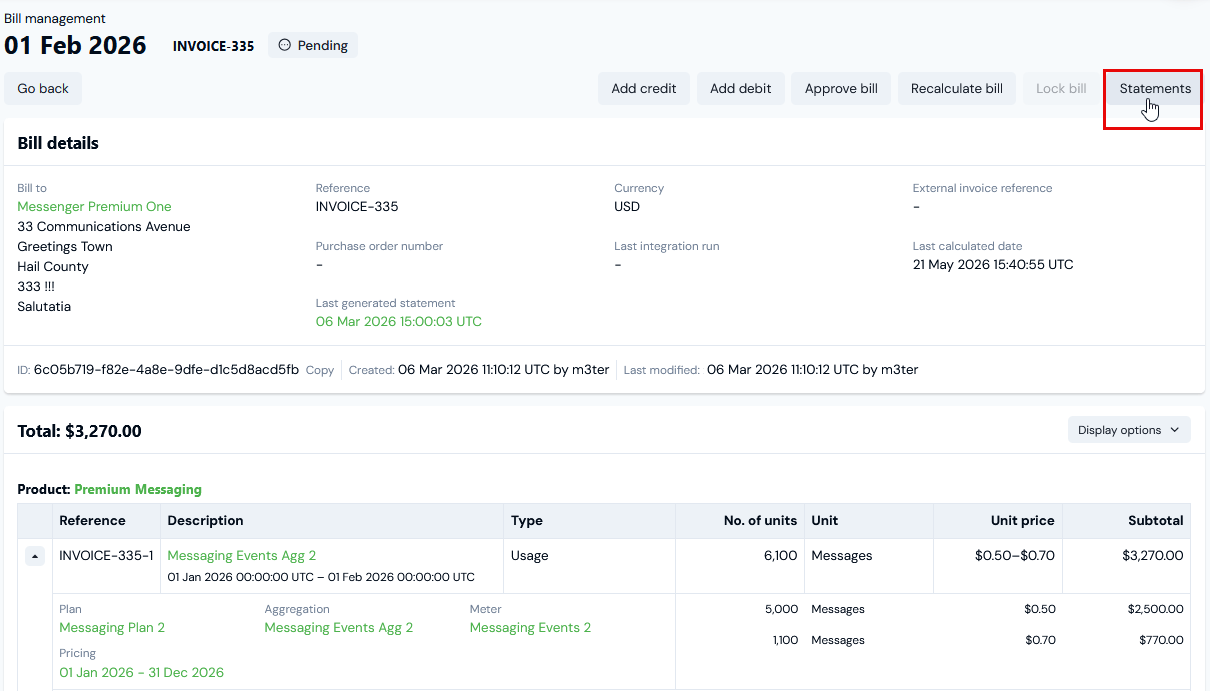 In this example, we've opened a monthly Bill for an Account in an Organization where the default Statement Definition is the **Message Location Statement** we created in the [previous section](/guides/billing-and-usage-data/running-viewing-and-managing-bills/working-with-bill-statements#creating-statement-definitions):
* We can see that month's charge is for a total of 6,100 messages, and this is shown as a single line item.
* The generated Statement should show a breakdown into separate countries of message origin.
2. At top-right, select **Statements**. The **Generate statements** page opens:
In this example, we've opened a monthly Bill for an Account in an Organization where the default Statement Definition is the **Message Location Statement** we created in the [previous section](/guides/billing-and-usage-data/running-viewing-and-managing-bills/working-with-bill-statements#creating-statement-definitions):
* We can see that month's charge is for a total of 6,100 messages, and this is shown as a single line item.
* The generated Statement should show a breakdown into separate countries of message origin.
2. At top-right, select **Statements**. The **Generate statements** page opens:
 3. Under **Statement job settings**, you can review the set up for the Statement that will be generated, including the Statement Definition that will be used.
4. For the current example, we'll leave the **Statement job type** at the default **Full statement** selection.
5. Select for the formats used in Statement generation:
* **Generate JSON statement**. This is selected by default and you cannot de-select.
* **Generate CSV statement**. By default this is de-selected - use the switch to select it if you want the statement to be generated in CSV format also.
**Important: Statement Definition default must be selected!** If you haven't selected a default Statement Definition for Bills at either Organization or Account level, then the **Generate statements** button will not be active and you won't be able to generate Statements. See above: [Using Statement Definitions](/guides/billing-and-usage-data/running-viewing-and-managing-bills/working-with-bill-statements#using-statement-definitions).
6. Select **Generate statement**. This will kick-off the job to generate a full Bill Statement and the **Statement job details** page opens:
3. Under **Statement job settings**, you can review the set up for the Statement that will be generated, including the Statement Definition that will be used.
4. For the current example, we'll leave the **Statement job type** at the default **Full statement** selection.
5. Select for the formats used in Statement generation:
* **Generate JSON statement**. This is selected by default and you cannot de-select.
* **Generate CSV statement**. By default this is de-selected - use the switch to select it if you want the statement to be generated in CSV format also.
**Important: Statement Definition default must be selected!** If you haven't selected a default Statement Definition for Bills at either Organization or Account level, then the **Generate statements** button will not be active and you won't be able to generate Statements. See above: [Using Statement Definitions](/guides/billing-and-usage-data/running-viewing-and-managing-bills/working-with-bill-statements#using-statement-definitions).
6. Select **Generate statement**. This will kick-off the job to generate a full Bill Statement and the **Statement job details** page opens:
 **Notes**:
* Note that the Statement job might take a few minutes and the **Status** will show as **PENDING** while it runs.
* From **Statement job details**, you can select to **Re-generate statement**:
* This takes you back to the **Generate statements** page where you can generate another partial or full Statement.
* Full Statements are persisted on the Bill and remain available for download from the **Generate statements** page. A reminder is given:
**Notes**:
* Note that the Statement job might take a few minutes and the **Status** will show as **PENDING** while it runs.
* From **Statement job details**, you can select to **Re-generate statement**:
* This takes you back to the **Generate statements** page where you can generate another partial or full Statement.
* Full Statements are persisted on the Bill and remain available for download from the **Generate statements** page. A reminder is given:
 7. When the Statement job is **COMPLETE**, select which format you want to download: **Download JSON** (always) or **Download CSV** (if you selected **Generate CSV statement**). The Statement is downloaded and saved locally to your **Downloads** folder.
8. You can now open the Statement in the 3rd-party application of your choice and transpose and compile it as required for issuing to your end-customers as a charge breakdown backing sheet to their invoice.
* For the current example using the **Messaging Location Statement** as Statement Definition for the example Bill, we've generated and downloaded a full Statement in CSV format and loaded it into a spreadsheet:
7. When the Statement job is **COMPLETE**, select which format you want to download: **Download JSON** (always) or **Download CSV** (if you selected **Generate CSV statement**). The Statement is downloaded and saved locally to your **Downloads** folder.
8. You can now open the Statement in the 3rd-party application of your choice and transpose and compile it as required for issuing to your end-customers as a charge breakdown backing sheet to their invoice.
* For the current example using the **Messaging Location Statement** as Statement Definition for the example Bill, we've generated and downloaded a full Statement in CSV format and loaded it into a spreadsheet:
 * We can see that the Bill Statement shows the breakdown on the basis of location of message origin using the Meter dimension field **Origin Country2 (origin\_country\_2)**, and in accordance with the Statement Definition we set up and applied to the billed Account.
## Generating Partial Statements for Bills and Downloading
When you open and view a Bill for an Account under Bill management, you can manually generate a *partial Bill Statement* and include only for the usage collected by selected Meters when the Statement is generated. To show how to generate partial Bill Statements:
* We'll extend the current worked example and update the Statement Definition we used in the [previous section](#generating-full-statements-for-bills-and-downloading) to now use *two each of measure and dimension fields* and belonging to two different Meters.
* Assume end-customer Accounts are Billed for usage collected by both Meters.
First, here's the updated **Message Location Statement**:
* We can see that the Bill Statement shows the breakdown on the basis of location of message origin using the Meter dimension field **Origin Country2 (origin\_country\_2)**, and in accordance with the Statement Definition we set up and applied to the billed Account.
## Generating Partial Statements for Bills and Downloading
When you open and view a Bill for an Account under Bill management, you can manually generate a *partial Bill Statement* and include only for the usage collected by selected Meters when the Statement is generated. To show how to generate partial Bill Statements:
* We'll extend the current worked example and update the Statement Definition we used in the [previous section](#generating-full-statements-for-bills-and-downloading) to now use *two each of measure and dimension fields* and belonging to two different Meters.
* Assume end-customer Accounts are Billed for usage collected by both Meters.
First, here's the updated **Message Location Statement**:
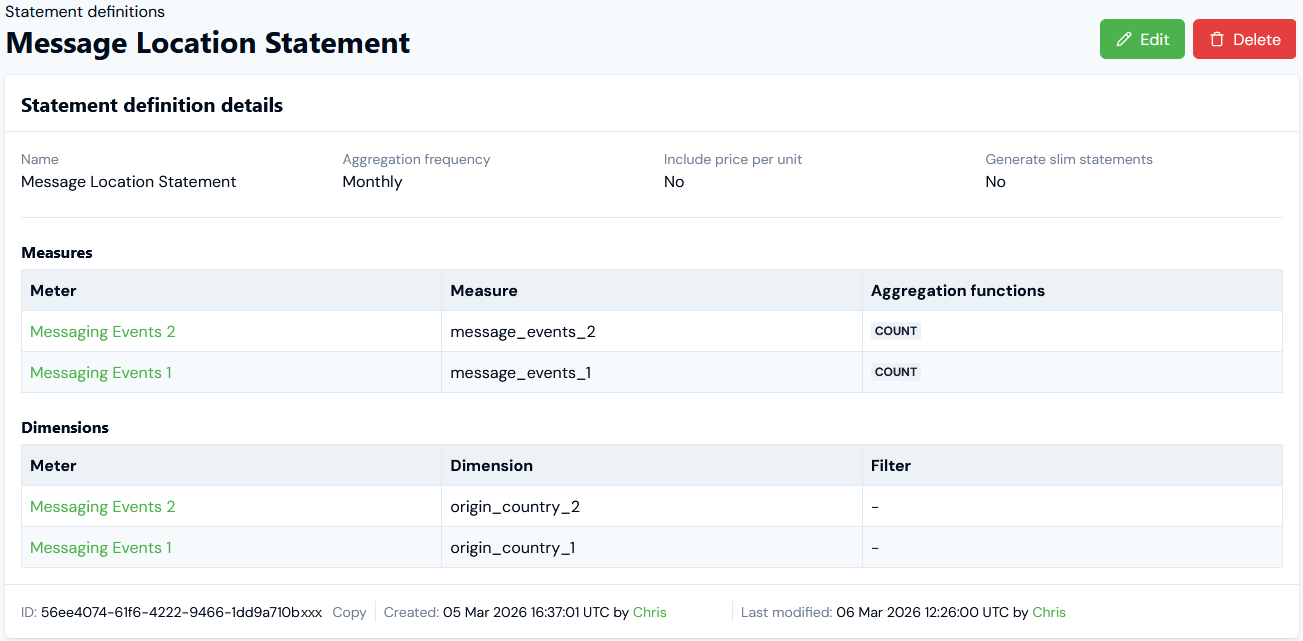 * Note that we've added to include for Statements generated using this Statement Definition to include Measure and Dimension fields on *two different Meters* - **Messaging Events 2** and **Messaging Events 1**.
**To generate partial Statements for Bills and Download:**
1. Open the Bill you want to generate a partial Statement for in **Bill management**:
* Note that we've added to include for Statements generated using this Statement Definition to include Measure and Dimension fields on *two different Meters* - **Messaging Events 2** and **Messaging Events 1**.
**To generate partial Statements for Bills and Download:**
1. Open the Bill you want to generate a partial Statement for in **Bill management**:
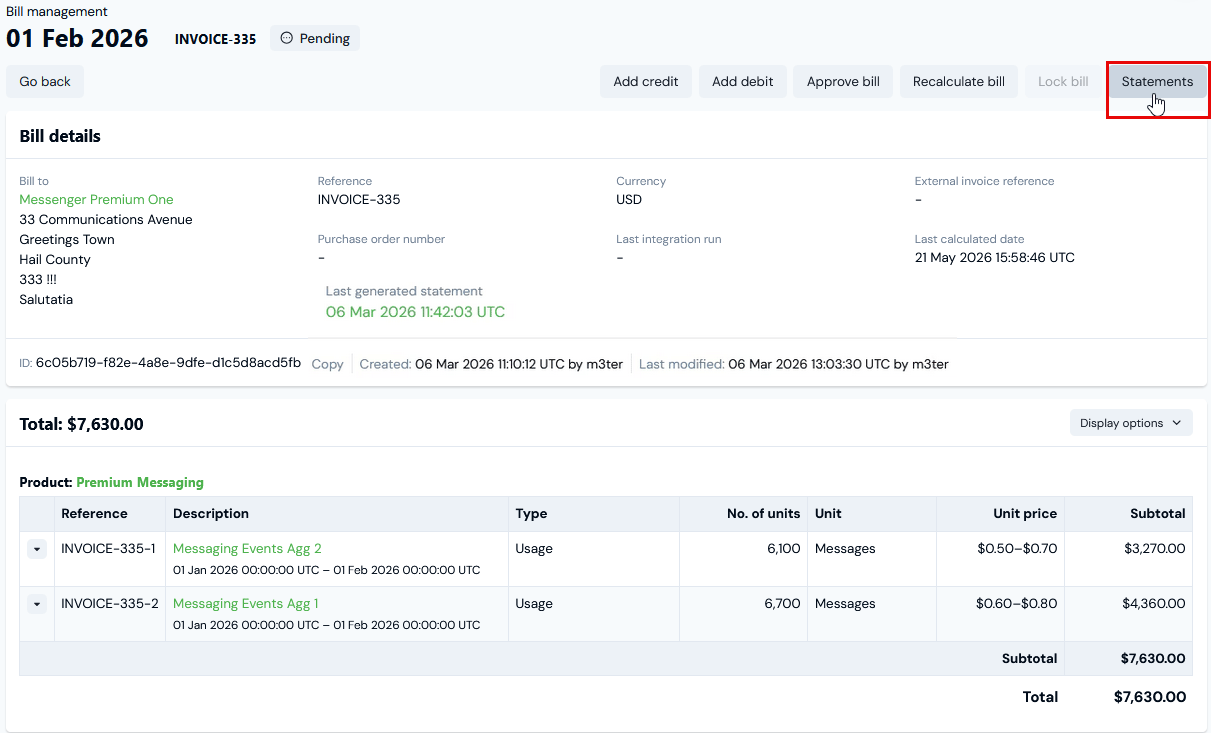 * Note that the Bill has usage charge line items that derive from Aggregation pricing metrics targeting different Meters.
2. Select **Statements**. The **Generate statements** page opens.
3. Under **Statement job type**, select **Partial statement**. The page adjusts to show a **Meters** drop-down selection field.
4. For the current example, select **Messaging Events 1** for **Meters**:
* Note that the Bill has usage charge line items that derive from Aggregation pricing metrics targeting different Meters.
2. Select **Statements**. The **Generate statements** page opens.
3. Under **Statement job type**, select **Partial statement**. The page adjusts to show a **Meters** drop-down selection field.
4. For the current example, select **Messaging Events 1** for **Meters**:
 * Note that you can select up to a maximum of **10 Meters**.
5. Select **Generate partial statement**. This will kick-off the job to generate a partial Bill Statement and the **Statement job details** page opens:
* Note that you can select up to a maximum of **10 Meters**.
5. Select **Generate partial statement**. This will kick-off the job to generate a partial Bill Statement and the **Statement job details** page opens:
 **Notes**:
* The Statement job might take a few minutes and the **Status** will show as **PENDING** while it runs.
* From **Statement job details**, you can select to **Re-generate statement**. This takes you back to the **Generate statements** page where you can generate another partial or full Statement.
**Partial Statements not persisted on Bill!** Note that if you do this and in contrast to when full Statements are generated, any partial Statements you might have already generated are no longer available for download from the **Generate statements** page.
6. When the Statement job is **COMPLETE**, select which format you want to download: **Download JSON** (always) or **Download CSV** (if you selected **Generate CSV statement**). The Statement is downloaded and saved locally to your **Downloads** folder.
7. You can now open the Statement in the 3rd-party application of your choice and transpose and compile it as required for issuing to your end-customers as a charge breakdown backing sheet to their invoice.
* For the current example using the **Messaging Location Statement** as Statement Definition for the example Bill, we've generated and downloaded a partial Statement in CSV format and loaded it into a spreadsheet:
**Notes**:
* The Statement job might take a few minutes and the **Status** will show as **PENDING** while it runs.
* From **Statement job details**, you can select to **Re-generate statement**. This takes you back to the **Generate statements** page where you can generate another partial or full Statement.
**Partial Statements not persisted on Bill!** Note that if you do this and in contrast to when full Statements are generated, any partial Statements you might have already generated are no longer available for download from the **Generate statements** page.
6. When the Statement job is **COMPLETE**, select which format you want to download: **Download JSON** (always) or **Download CSV** (if you selected **Generate CSV statement**). The Statement is downloaded and saved locally to your **Downloads** folder.
7. You can now open the Statement in the 3rd-party application of your choice and transpose and compile it as required for issuing to your end-customers as a charge breakdown backing sheet to their invoice.
* For the current example using the **Messaging Location Statement** as Statement Definition for the example Bill, we've generated and downloaded a partial Statement in CSV format and loaded it into a spreadsheet:
 * We can see that the Bill Statement shows the breakdown on the basis of location of message origin using the Meter dimension field **Origin Country1 (orig\_country\_1)**, and in accordance with the Statement Definition we set up and applied to the billed Account. However, this only includes usage data collected by the single Meter we selected for the partial Bill Statement generation: **Messaging Events 1**.
* Note also that *all* the Measures and Dimensions we included in the Statement Definition - that is in the current example, the **Message Events 2** Measure and **Origin Country 2** Dimension - are included, but since they belong to the *excluded* **Messaging Events 2** Meter these are empty.
## Enabling Auto-Generation for Statements
You can enable auto-generation of Bill Statements for Accounts whenever a Bill is approved or locked:
* At Organization level.
* At individual Account level.
These alternatives work together in the following way:
* If you make a selection for auto-generation of Bill Statements at Organization level but do not select for this at the individual Account level, the Organizational level setting is applied.
* If you make a selection for auto-generation of Bill Statements at the individual Account level, this selection will apply to the individual Account, regardless of the selection for this made at the Organizational level.
**To enable auto-generation of Bill Statements when Bills are approved or locked :**
1. Either:
* At **Settings>Organization**, on the **Configuration** tab select **Edit** on the **Organization configuration details** panel. The **Organization configuration** page opens.
* Open the Account you want to enable auto-generation of Bill Statements for and select **Edit**. The **Edit** page opens.
2. Scroll down the page and on the **Bill statements** panel, use the radio buttons to enable **Auto-generate statements**:
* **None**. Statements will not be auto-generated. (*Default*)
* **JSON**. Statements will be auto-generated in JSON format.
* **JSON and CSV**. Statements will be auto-generated in both JSON and CSV format.
3. Select **Update Organization configuration** or **Update account**.
## Checking Statement Last Modified Date
You can obtain the last modified date for a Bill Statement using API calls. This is useful if you want to check whether or not the Statement needs regenerating by comparing the last modified date/time with the Bill's timestamp.
**To obtain a Statement's last modified date:**
1. First, obtain the `id` of the Bill whose Statement you want to check the last modified date/time for.
2. Use this `id` to make one of the available Retrieve Bill Statement API calls:
* [Retrieve Bill Statement in JSON format](/api/bill/retrieve-bill-statement-in-json-format)
* [Retrieve Bill Statement in CSV format](/api/bill/retrieve-bill-statement-in-csv-format)
3. The response to either call returns a pre-signed URL, which you can use to download the Statement file in either JSON or CSV format with a `GET` call using the URL. For example:
`GET https://m3ter-billing-statements-16yxyxyxyxy-eu-west-2.s3.eu-west-2.amazonaws.com/0a5ec4d1-3300-4e2e-975d-16b3009fbf4e/89b234c3-bbb7-4179...`
The response to this call includes a **Last-Modified** header, where you can read-off the date and time.
* We can see that the Bill Statement shows the breakdown on the basis of location of message origin using the Meter dimension field **Origin Country1 (orig\_country\_1)**, and in accordance with the Statement Definition we set up and applied to the billed Account. However, this only includes usage data collected by the single Meter we selected for the partial Bill Statement generation: **Messaging Events 1**.
* Note also that *all* the Measures and Dimensions we included in the Statement Definition - that is in the current example, the **Message Events 2** Measure and **Origin Country 2** Dimension - are included, but since they belong to the *excluded* **Messaging Events 2** Meter these are empty.
## Enabling Auto-Generation for Statements
You can enable auto-generation of Bill Statements for Accounts whenever a Bill is approved or locked:
* At Organization level.
* At individual Account level.
These alternatives work together in the following way:
* If you make a selection for auto-generation of Bill Statements at Organization level but do not select for this at the individual Account level, the Organizational level setting is applied.
* If you make a selection for auto-generation of Bill Statements at the individual Account level, this selection will apply to the individual Account, regardless of the selection for this made at the Organizational level.
**To enable auto-generation of Bill Statements when Bills are approved or locked :**
1. Either:
* At **Settings>Organization**, on the **Configuration** tab select **Edit** on the **Organization configuration details** panel. The **Organization configuration** page opens.
* Open the Account you want to enable auto-generation of Bill Statements for and select **Edit**. The **Edit** page opens.
2. Scroll down the page and on the **Bill statements** panel, use the radio buttons to enable **Auto-generate statements**:
* **None**. Statements will not be auto-generated. (*Default*)
* **JSON**. Statements will be auto-generated in JSON format.
* **JSON and CSV**. Statements will be auto-generated in both JSON and CSV format.
3. Select **Update Organization configuration** or **Update account**.
## Checking Statement Last Modified Date
You can obtain the last modified date for a Bill Statement using API calls. This is useful if you want to check whether or not the Statement needs regenerating by comparing the last modified date/time with the Bill's timestamp.
**To obtain a Statement's last modified date:**
1. First, obtain the `id` of the Bill whose Statement you want to check the last modified date/time for.
2. Use this `id` to make one of the available Retrieve Bill Statement API calls:
* [Retrieve Bill Statement in JSON format](/api/bill/retrieve-bill-statement-in-json-format)
* [Retrieve Bill Statement in CSV format](/api/bill/retrieve-bill-statement-in-csv-format)
3. The response to either call returns a pre-signed URL, which you can use to download the Statement file in either JSON or CSV format with a `GET` call using the URL. For example:
`GET https://m3ter-billing-statements-16yxyxyxyxy-eu-west-2.s3.eu-west-2.amazonaws.com/0a5ec4d1-3300-4e2e-975d-16b3009fbf4e/89b234c3-bbb7-4179...`
The response to this call includes a **Last-Modified** header, where you can read-off the date and time.