> ## Documentation Index
> Fetch the complete documentation index at: https://docs.m3ter.com/llms.txt
> Use this file to discover all available pages before exploring further.
# Creating and Managing Account Balances
You can create Balances for your end customer Accounts in m3ter directly from the Account details page. When you've added a Balance to an Account, you can open a Balance details page and from there:
* Add Transactions for the Balance for credit or debit amounts.
* Link Balances to Contracts on the Account.
* Review Balance metadata.
This topic explains how to create and manage Balances for your end-customer Accounts:
* [Creating a Balance on an Account](/guides/end-customer-accounts/creating-balances-for-accounts/creating-and-managing-account-balances#creating-a-balance-on-an-account)
* [Adding Balances to or Removing from Contracts](#adding-balances-to-or-removing-from-contracts)
* [Linking Balances to Contracts - Availability for Draw-Down](/guides/end-customer-accounts/creating-balances-for-accounts/creating-and-managing-account-balances#linking-balances-to-contracts-availability-for-draw-down)
* [Reviewing Balance Metadata](/guides/end-customer-accounts/creating-balances-for-accounts/creating-and-managing-account-balances#reviewing-balance-metadata)
* [Balances Draw-Down Order Against Prepayments](/guides/end-customer-accounts/creating-balances-for-accounts/creating-and-managing-account-balances#balances-draw-down-order-against-prepayments)
**Important: Understanding Billing for Balances!** Please review the [Understanding and Managing Billing for Balances](/guides/end-customer-accounts/creating-balances-for-accounts/understanding-billing-for-balances) topic above before creating Balances for your end-customer Accounts.
## Creating a Balance on an Account
**To create a Balance for an Account:**
1. Select **Accounts**. The **Accounts** page opens.
2. Select the **Name** text of the Account for which you want to create a Balance. The **Account** details page opens with the **Overview** tab selected.
3. On the **Account actions** menu, select **Balances>Create balance**:
 Alternatively:
* Select the **Balances** tab and then select **Create balance**.
The **Create** page opens.
**Warning: You must create at least one Currency for your Organization before you can create a Balance!** If you haven't, the **Create** page will not open and you'll see a warning:
* Select the **Manage currencies** hotlink text provided. This takes you directly to the **Create** page to create the Currency you want to use for the Balance. See [Creating and Managing Currencies](/guides/organization-and-access-management/viewing-and-editing-organization/creating-and-managing-currencies).
* When you create the new Currency, you are taken directly back to the Balance **Create** page and the Currency is selected.
4. Enter the required **Balance details**:
* **Name**. (*Required*)
* **Code**. (*Required*)
* **Grant**. Enable this switch if you want to treat the Balance as a Grant, allowing you to credit the Account with an amount of *pre-rated usage* and reduce the amount of usage that is rated and would result in charges against the Account. See [Grants](/guides/end-customer-accounts/creating-balances-for-accounts/balance-grants) for more details.
* **Currency**. Use the drop-down list to select the currency you want to use for the Balance. (*Required*)
* **Start date (inclusive)** and **End date (exclusive)**. Use the calendar pop-ups to set start and end dates/times to define the time period the Balance will be active for the Account. (*Required*)
* **Consumptions accounting product**. For accounting purposes, select to link any *Balance consumed* draw-down Bill line items against the Balance to a particular Product for accounting purposes. (*Optional*)
* If you omit a **Consumptions accounting product**, then then *Balance consumed* Bill line items will not be linked to a Product and will be listed under **Other line items**.
* **Fees accounting product**. For accounting purposes, select to link any *Balance fee* Bill line items to a specific Product for Charges against the Balance. (*Optional*)
* If an **Accounting product** has been selected for a Charge against the Balance, this takes precedence and will be used.
* If an **Accounting product** has not been defined for a Charge and you omit **Fees accounting product** for the Balance, then *Balance fee* Bill line items will not be linked to a Product and will be listed under **Other line items**.
* **Contract.** *(Optional)* If you want to add the Balance to a Contract you've created for the Account, use the drop-down to select it. For more details on Contracts, see [Creating Contracts for Accounts](/guides/end-customer-accounts/creating-contracts-for-accounts).
**Important: Linking Balance to Contract - ensuring Balance is available for draw-down at billing!** Whether you need to link a Balance on an Account to a Contract is dependent on whether or not an Account Plan on the same Account has been linked to a Contract. For details, see the following section on [Linking Balances to Contracts](/guides/end-customer-accounts/creating-balances-for-accounts/creating-and-managing-account-balances#linking-balances-to-contracts).
* **Description**. Enter a description for the Balance. (*Optional*)
5. Enter **Balance draw-down** settings, which are optional:
* **Draw-down products.** Select the Products whose consumption charges can be drawn-down against the Balance amount.
**Note:** If you don't select any products for draw-down, by default the charges for *all products* consumed by the Account will be drawn-down against the Balance amount.
* **Draw-down charge types.** Select the charge types that can be drawn-down against the Balance amount. Six options:
* **Ad-hoc**
* **Counter adjustment debit**
* **Counter running total charge**
* **Minimum spend**
* **Standing charge**
* **Usage**
**Note:** If you don't select any charge types, by default at billing *all charge types* will be able to draw-down against the Balance amount.
* **Draw-down description**. Enter a *custom description* that will appear against Bill line items for draw-down charges against the Balance.
* Note that if you leave this blank, a *default description* will be used: \<*Balance name*>**:** **Balance Consumed**.
**Tip: Draw-Down Order when Multiple Balances on Account?**
* If an Account has multiple Balances, the order in which Balances are drawn-down against is determined by Balance end date - the Balance with the earlier end date is draw-down against first.
* If you have multiple Balances ending on the same date and want to enforce a particular draw-down order, please contact m3ter Support so we can guide you toward the best solution based on your current configuration.
6. Enter **Balance overage and rollover** settings, which are optional:
* **Rollover amount**. If the charges drawn-down against the Balance during the period the Balance is active for the Account don't exhaust the Balance, you can have whatever remains of the Balance rollover. This means charges continue to be drawn-down against the unused amount beyond the active end date set for the Balance.
* If you want to enter a cap on any rollover amount used for a rollover or grace period, enter the amount here.
* You'll need to enter a **Rollover end date** also to enable the rollover/grace period - if you only enter an amount for rollover without entering an end date, you'll receive an error when you try to save the Balance.
* **Rollover end date**. If you want to allow a rollover or grace period where any unused Balance amount continues to be drawn-down against charges due after the defined active end date, then use the pop-up calendar to define an end date for the rollover or grace period.
**Note: Rollover on Balance not required?** If you don't want a rollover on a Balance, simply leave **Rollover amount** and **Rollover end date** blank.
* **Overage surcharge (%)**. Optionally, enter a value for the additional surcharge (in percent) added to bills for overages on the Balance amount:
* Note that you can enter a *negative percentage* if you want to give a discount rate for usage to end customers who exceed their Balance amount.
* **Overage description**. Optionally, enter a *custom description* to be used for Bill line items for Balance amount overage surcharge.
**Tip: Balances overage pricing?** If you are using a tiered pricing structure when pricing Plans, you might want to set up overage pricing bands for **Balance/Prepayment overage pricing**, and instead of using a percentage addition/reduction on the standard pricing for usage. See [Creating Pricing for a Plan](/guides/plans-and-pricing/pricing-plans/pricing-plans#creating-a-pricing-for-a-plan).
**Important! Balance Overage surcharge percentage overrides Balance Overage pricing.** If you have set up overage pricing on a tiered pricing structure when pricing a Plan that will apply to billing for the Account and you have *also set up* overage surcharge percentage when creating the Balance for an Account, any overage usage charges on the Account will be billed at the *overage surcharge percentage rate* and the Balance *overage pricing will be ignored*. See [Creating Pricing for a Plan](/guides/plans-and-pricing/pricing-plans/pricing-plans#creating-a-pricing-for-a-plan).
7. If required, add any **Custom fields** to the Balance:
* Currently, you cannot create Custom Fields for Balances at the Organization-level, and therefore you cannot reference the Custom Fields values you create for an individual Balance in your calculations.
* For more on Custom Fields, see [Adding and Editing Custom Fields](/guides/organization-and-access-management/viewing-and-editing-organization/adding-and-editing-custom-fields). We strongly recommend reviewing [Working with Custom Fields](/guides/creating-and-managing-products/working-with-custom-fields) before you create and use Custom Fields.
8. Select **Create balance**. You are returned to the **Balances** tab, where the new Balance is listed:
Alternatively:
* Select the **Balances** tab and then select **Create balance**.
The **Create** page opens.
**Warning: You must create at least one Currency for your Organization before you can create a Balance!** If you haven't, the **Create** page will not open and you'll see a warning:
* Select the **Manage currencies** hotlink text provided. This takes you directly to the **Create** page to create the Currency you want to use for the Balance. See [Creating and Managing Currencies](/guides/organization-and-access-management/viewing-and-editing-organization/creating-and-managing-currencies).
* When you create the new Currency, you are taken directly back to the Balance **Create** page and the Currency is selected.
4. Enter the required **Balance details**:
* **Name**. (*Required*)
* **Code**. (*Required*)
* **Grant**. Enable this switch if you want to treat the Balance as a Grant, allowing you to credit the Account with an amount of *pre-rated usage* and reduce the amount of usage that is rated and would result in charges against the Account. See [Grants](/guides/end-customer-accounts/creating-balances-for-accounts/balance-grants) for more details.
* **Currency**. Use the drop-down list to select the currency you want to use for the Balance. (*Required*)
* **Start date (inclusive)** and **End date (exclusive)**. Use the calendar pop-ups to set start and end dates/times to define the time period the Balance will be active for the Account. (*Required*)
* **Consumptions accounting product**. For accounting purposes, select to link any *Balance consumed* draw-down Bill line items against the Balance to a particular Product for accounting purposes. (*Optional*)
* If you omit a **Consumptions accounting product**, then then *Balance consumed* Bill line items will not be linked to a Product and will be listed under **Other line items**.
* **Fees accounting product**. For accounting purposes, select to link any *Balance fee* Bill line items to a specific Product for Charges against the Balance. (*Optional*)
* If an **Accounting product** has been selected for a Charge against the Balance, this takes precedence and will be used.
* If an **Accounting product** has not been defined for a Charge and you omit **Fees accounting product** for the Balance, then *Balance fee* Bill line items will not be linked to a Product and will be listed under **Other line items**.
* **Contract.** *(Optional)* If you want to add the Balance to a Contract you've created for the Account, use the drop-down to select it. For more details on Contracts, see [Creating Contracts for Accounts](/guides/end-customer-accounts/creating-contracts-for-accounts).
**Important: Linking Balance to Contract - ensuring Balance is available for draw-down at billing!** Whether you need to link a Balance on an Account to a Contract is dependent on whether or not an Account Plan on the same Account has been linked to a Contract. For details, see the following section on [Linking Balances to Contracts](/guides/end-customer-accounts/creating-balances-for-accounts/creating-and-managing-account-balances#linking-balances-to-contracts).
* **Description**. Enter a description for the Balance. (*Optional*)
5. Enter **Balance draw-down** settings, which are optional:
* **Draw-down products.** Select the Products whose consumption charges can be drawn-down against the Balance amount.
**Note:** If you don't select any products for draw-down, by default the charges for *all products* consumed by the Account will be drawn-down against the Balance amount.
* **Draw-down charge types.** Select the charge types that can be drawn-down against the Balance amount. Six options:
* **Ad-hoc**
* **Counter adjustment debit**
* **Counter running total charge**
* **Minimum spend**
* **Standing charge**
* **Usage**
**Note:** If you don't select any charge types, by default at billing *all charge types* will be able to draw-down against the Balance amount.
* **Draw-down description**. Enter a *custom description* that will appear against Bill line items for draw-down charges against the Balance.
* Note that if you leave this blank, a *default description* will be used: \<*Balance name*>**:** **Balance Consumed**.
**Tip: Draw-Down Order when Multiple Balances on Account?**
* If an Account has multiple Balances, the order in which Balances are drawn-down against is determined by Balance end date - the Balance with the earlier end date is draw-down against first.
* If you have multiple Balances ending on the same date and want to enforce a particular draw-down order, please contact m3ter Support so we can guide you toward the best solution based on your current configuration.
6. Enter **Balance overage and rollover** settings, which are optional:
* **Rollover amount**. If the charges drawn-down against the Balance during the period the Balance is active for the Account don't exhaust the Balance, you can have whatever remains of the Balance rollover. This means charges continue to be drawn-down against the unused amount beyond the active end date set for the Balance.
* If you want to enter a cap on any rollover amount used for a rollover or grace period, enter the amount here.
* You'll need to enter a **Rollover end date** also to enable the rollover/grace period - if you only enter an amount for rollover without entering an end date, you'll receive an error when you try to save the Balance.
* **Rollover end date**. If you want to allow a rollover or grace period where any unused Balance amount continues to be drawn-down against charges due after the defined active end date, then use the pop-up calendar to define an end date for the rollover or grace period.
**Note: Rollover on Balance not required?** If you don't want a rollover on a Balance, simply leave **Rollover amount** and **Rollover end date** blank.
* **Overage surcharge (%)**. Optionally, enter a value for the additional surcharge (in percent) added to bills for overages on the Balance amount:
* Note that you can enter a *negative percentage* if you want to give a discount rate for usage to end customers who exceed their Balance amount.
* **Overage description**. Optionally, enter a *custom description* to be used for Bill line items for Balance amount overage surcharge.
**Tip: Balances overage pricing?** If you are using a tiered pricing structure when pricing Plans, you might want to set up overage pricing bands for **Balance/Prepayment overage pricing**, and instead of using a percentage addition/reduction on the standard pricing for usage. See [Creating Pricing for a Plan](/guides/plans-and-pricing/pricing-plans/pricing-plans#creating-a-pricing-for-a-plan).
**Important! Balance Overage surcharge percentage overrides Balance Overage pricing.** If you have set up overage pricing on a tiered pricing structure when pricing a Plan that will apply to billing for the Account and you have *also set up* overage surcharge percentage when creating the Balance for an Account, any overage usage charges on the Account will be billed at the *overage surcharge percentage rate* and the Balance *overage pricing will be ignored*. See [Creating Pricing for a Plan](/guides/plans-and-pricing/pricing-plans/pricing-plans#creating-a-pricing-for-a-plan).
7. If required, add any **Custom fields** to the Balance:
* Currently, you cannot create Custom Fields for Balances at the Organization-level, and therefore you cannot reference the Custom Fields values you create for an individual Balance in your calculations.
* For more on Custom Fields, see [Adding and Editing Custom Fields](/guides/organization-and-access-management/viewing-and-editing-organization/adding-and-editing-custom-fields). We strongly recommend reviewing [Working with Custom Fields](/guides/creating-and-managing-products/working-with-custom-fields) before you create and use Custom Fields.
8. Select **Create balance**. You are returned to the **Balances** tab, where the new Balance is listed:
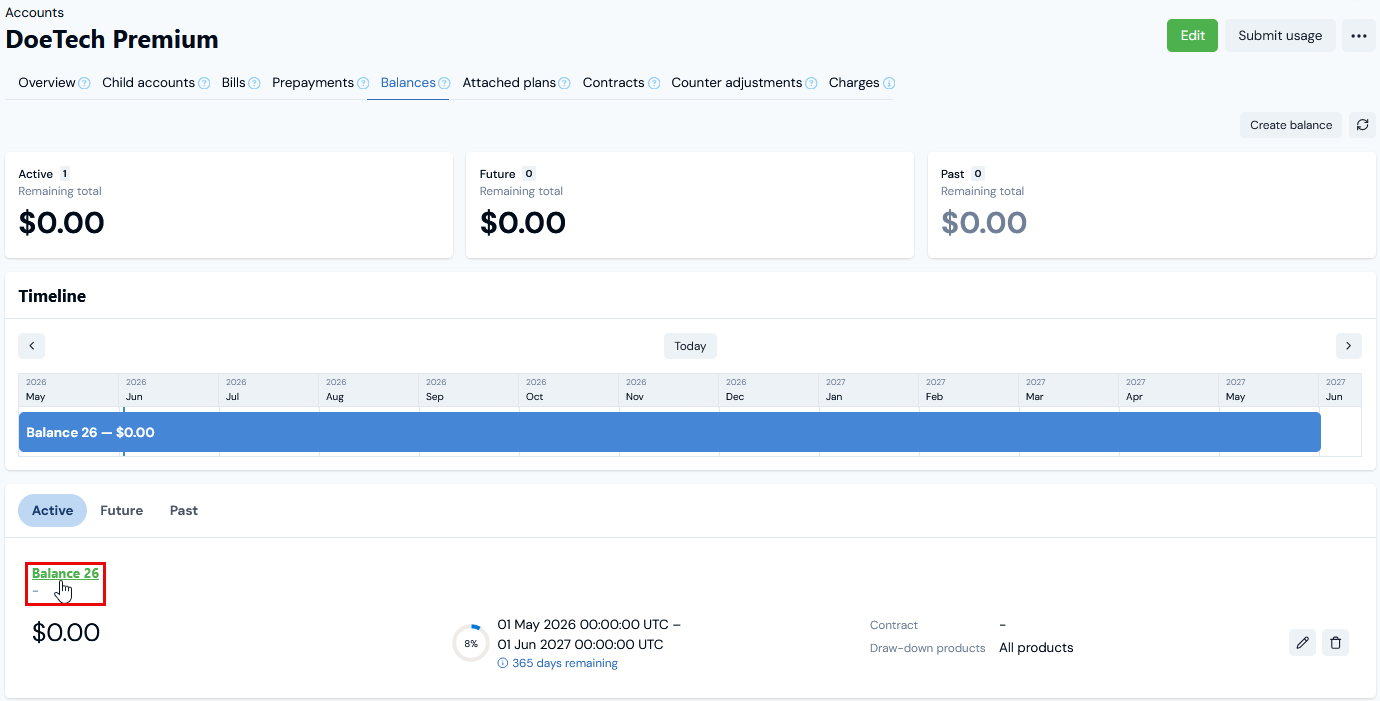 * In this example the new Balance is current and listed under **Active**.
* The Balance **Amount** shows as zero and you'll now have to create Transactions for the Balance to add credit or debit amounts to the Balance. See [Creating and Managing Transactions for Balances](/guides/end-customer-accounts/creating-balances-for-accounts/creating-and-managing-transactions-for-balances).
**Reviewing Account Balances!** When you've set up Balances for an Account, the **Balances** tab offers a very useful summary view with a timeline chart of the active, future, and past Balances Balances on an Account. See [Reviewing Account Balances Summary](/guides/end-customer-accounts/creating-balances-for-accounts/reviewing-account-balances-summary) for more details.
9. If you want to review the details of the Balance, select the **Name** hotlink text. The **Balance details** page opens:
* In this example the new Balance is current and listed under **Active**.
* The Balance **Amount** shows as zero and you'll now have to create Transactions for the Balance to add credit or debit amounts to the Balance. See [Creating and Managing Transactions for Balances](/guides/end-customer-accounts/creating-balances-for-accounts/creating-and-managing-transactions-for-balances).
**Reviewing Account Balances!** When you've set up Balances for an Account, the **Balances** tab offers a very useful summary view with a timeline chart of the active, future, and past Balances Balances on an Account. See [Reviewing Account Balances Summary](/guides/end-customer-accounts/creating-balances-for-accounts/reviewing-account-balances-summary) for more details.
9. If you want to review the details of the Balance, select the **Name** hotlink text. The **Balance details** page opens:
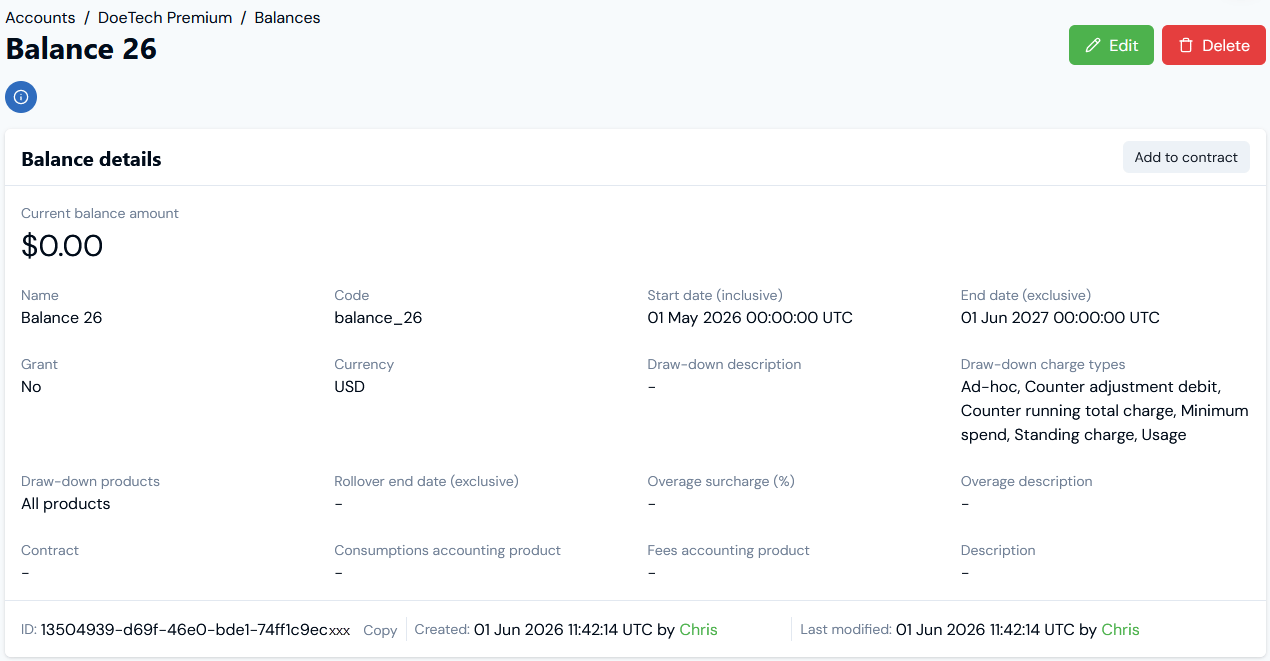 Note that on the **Balance details** card, you can read-off:
* The **Current balance amount**.
* The billing charge types that can draw-down against the Balance.
* The Balance **ID** and **Copy** it directly to your clipboard.
10. Scroll down the page to the **Balance transactions summary** card:
Note that on the **Balance details** card, you can read-off:
* The **Current balance amount**.
* The billing charge types that can draw-down against the Balance.
* The Balance **ID** and **Copy** it directly to your clipboard.
10. Scroll down the page to the **Balance transactions summary** card:
 You can quickly check various amounts for a Balance:
* **Initial credit amount**. The initial credit amount created for the Balance.
* **Total credit amount**. The sum of all credits created for the Balance.
* **Total debit amount**. The sum of all debits created for the Balance.
* **Balance consumed**. The sum of debits made against the Balance. Note that this amount is dynamic over time until either the Balance end date is reached or the available Balance amount reaches zero, after which it will be unchanged.
* **Expired balance amount**. The amount of the Balance remaining at the time the Balance expires and which is not included in any configured Rollover amount. For example, suppose a Balance reaches its end date and \$1000 credit remains unused. If the Balance is configured to rollover \$800, then the **Expired balance amount** is calculated as \$1000 - \$800 = \$200.
* **Rollover amount** and **Rollover remaining amount**.
* **Rollover consumed**. The sum of debits made against the configured rollover amount. Note that this amount is dynamic over time until either the rollover end date is reached or the cap configured for the rollover amount is reached, after which it will be unchanged. If no rollover is configured for a Balance, then this is ignored.
When an Account to which a Balance has been added starts to consume your Products and charges are drawn-down against the Balance, these amount fields are very useful for tracking and managing the Balance.
**Next Step?** When you've created a Balance for an end customer Account, you can then create *Transactions* for the Balance to flexibly manage and maintain the Balance amount. See [Creating and Managing Transactions for Balances](/guides/end-customer-accounts/creating-balances-for-accounts/creating-and-managing-transactions-for-balances).
11. If you want to edit the Balance's details, select the **Edit** button, make your changes, and click **Update Balance**.
12. Return to the **Balances** tab.
13. If you want to remove a Balance, select the **Delete** button for the Balance:
You can quickly check various amounts for a Balance:
* **Initial credit amount**. The initial credit amount created for the Balance.
* **Total credit amount**. The sum of all credits created for the Balance.
* **Total debit amount**. The sum of all debits created for the Balance.
* **Balance consumed**. The sum of debits made against the Balance. Note that this amount is dynamic over time until either the Balance end date is reached or the available Balance amount reaches zero, after which it will be unchanged.
* **Expired balance amount**. The amount of the Balance remaining at the time the Balance expires and which is not included in any configured Rollover amount. For example, suppose a Balance reaches its end date and \$1000 credit remains unused. If the Balance is configured to rollover \$800, then the **Expired balance amount** is calculated as \$1000 - \$800 = \$200.
* **Rollover amount** and **Rollover remaining amount**.
* **Rollover consumed**. The sum of debits made against the configured rollover amount. Note that this amount is dynamic over time until either the rollover end date is reached or the cap configured for the rollover amount is reached, after which it will be unchanged. If no rollover is configured for a Balance, then this is ignored.
When an Account to which a Balance has been added starts to consume your Products and charges are drawn-down against the Balance, these amount fields are very useful for tracking and managing the Balance.
**Next Step?** When you've created a Balance for an end customer Account, you can then create *Transactions* for the Balance to flexibly manage and maintain the Balance amount. See [Creating and Managing Transactions for Balances](/guides/end-customer-accounts/creating-balances-for-accounts/creating-and-managing-transactions-for-balances).
11. If you want to edit the Balance's details, select the **Edit** button, make your changes, and click **Update Balance**.
12. Return to the **Balances** tab.
13. If you want to remove a Balance, select the **Delete** button for the Balance:
 A confirmation popup opens.
14. Select **Yes** to confirm the delete action.
* Note that you can also use the **Delete** button at the top of the **Balance details** page.
## Adding Balances to or Removing from Contracts
From a *Balance details* page, you can quickly add the Balance to or remove it from a Contract on the Account. This saves you having to open and edit the Balance.
**Notes:**
* **Adding or Removing Balances from Contract**. Alternatively, you can open the details page of the Contract you want to add a Balance to or remove a Balance from. See [Adding Balances to a Contract](https://docs.m3ter.com/guides/end-customer-accounts/creating-contracts-for-accounts/creating-and-managing-contracts#adding-balances-to-a-contract). If you do this, then the **Balance details** page will update accordingly.
* **Important: Linking Balance to Contract - ensuring Balance is available for draw-down at billing!** Whether you need to link a Balance on an Account to a Contract is dependent on whether or not an Account Plan on the same Account has been linked to a Contract. For details, see the following section on [Linking Balances to Contracts](/guides/end-customer-accounts/creating-balances-for-accounts/creating-and-managing-account-balances#linking-balances-to-contracts).
**To add a Balance to or remove it from a Contract:**
1. Select **Accounts**. The **Accounts** page opens.
2. Select the **Name** text of the Account for which you want to add a Balance to or remove from a Contract. The **Account** details page opens with the **Overview** tab selected.
3. Select the **Balances** tab.
4. Select the **Name** hotlink text of the Balance. The **Balance details** page opens:
* If the Balance has not been added to a Contract, an **Add to contract** button is available.
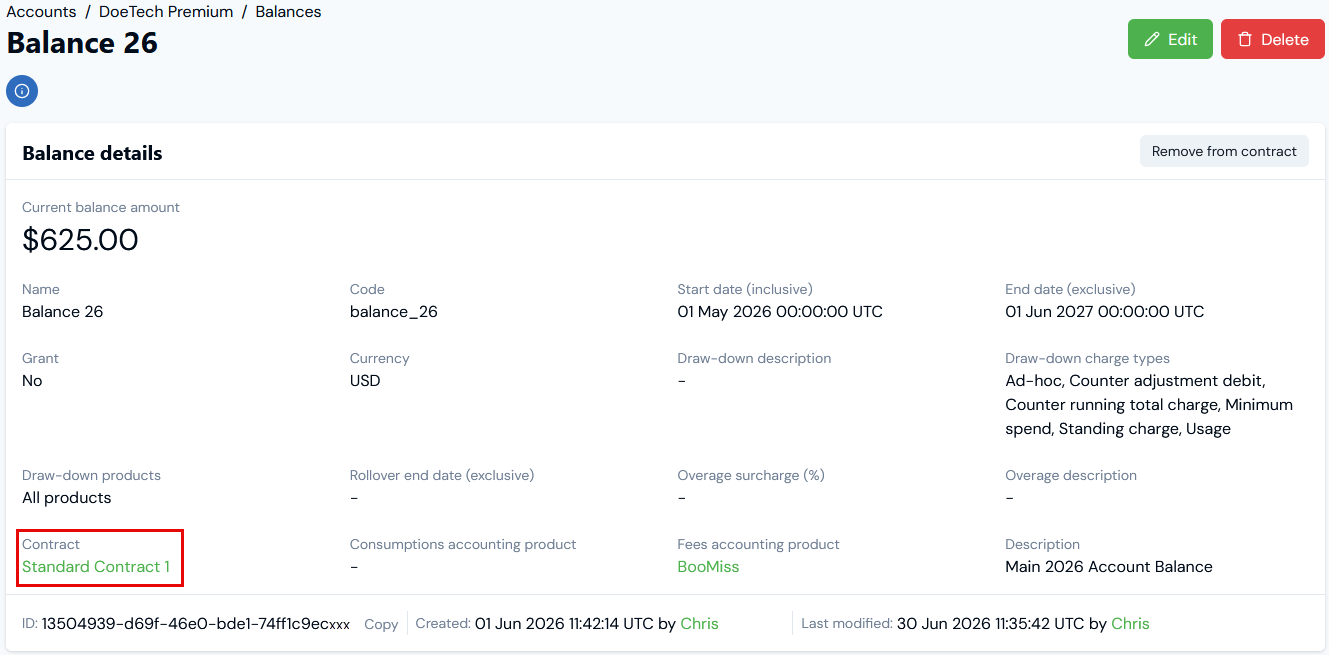
* If the Balance has been added to a Contract, a **Remove from contract** button is available.
5. To add the Balance to a Contract, select **Add to contract**. A **Select contract** modal opens and lists the Contracts created for the Account.
6. Select the Contract you want to add the Balance to and select **Confirm**. The modal closes and the Contract is shown under **Balance details**:
A confirmation popup opens.
14. Select **Yes** to confirm the delete action.
* Note that you can also use the **Delete** button at the top of the **Balance details** page.
## Adding Balances to or Removing from Contracts
From a *Balance details* page, you can quickly add the Balance to or remove it from a Contract on the Account. This saves you having to open and edit the Balance.
**Notes:**
* **Adding or Removing Balances from Contract**. Alternatively, you can open the details page of the Contract you want to add a Balance to or remove a Balance from. See [Adding Balances to a Contract](https://docs.m3ter.com/guides/end-customer-accounts/creating-contracts-for-accounts/creating-and-managing-contracts#adding-balances-to-a-contract). If you do this, then the **Balance details** page will update accordingly.
* **Important: Linking Balance to Contract - ensuring Balance is available for draw-down at billing!** Whether you need to link a Balance on an Account to a Contract is dependent on whether or not an Account Plan on the same Account has been linked to a Contract. For details, see the following section on [Linking Balances to Contracts](/guides/end-customer-accounts/creating-balances-for-accounts/creating-and-managing-account-balances#linking-balances-to-contracts).
**To add a Balance to or remove it from a Contract:**
1. Select **Accounts**. The **Accounts** page opens.
2. Select the **Name** text of the Account for which you want to add a Balance to or remove from a Contract. The **Account** details page opens with the **Overview** tab selected.
3. Select the **Balances** tab.
4. Select the **Name** hotlink text of the Balance. The **Balance details** page opens:
* If the Balance has not been added to a Contract, an **Add to contract** button is available.
* If the Balance has been added to a Contract, a **Remove from contract** button is available.
5. To add the Balance to a Contract, select **Add to contract**. A **Select contract** modal opens and lists the Contracts created for the Account.
6. Select the Contract you want to add the Balance to and select **Confirm**. The modal closes and the Contract is shown under **Balance details**:
 7. To remove a Balance from a Contract, select **Remove from contract**. A confirmation popup appears:
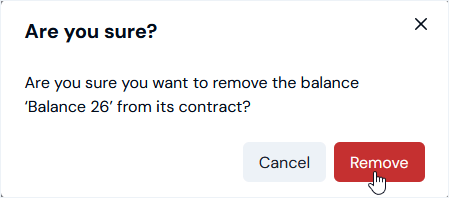 8. Select **Remove** to confirm. The popup closes and the Contract no longer shows under **Balance details**.
## Linking Balances to Contracts - Availability for Draw-Down
Linking a Balance to a Contract on an Account is optional. However, if you have linked an Account Plan to a Contract or set up an ad-hoc Charge for the Account and linked the Charge to a Contract and you want to ensure the Balance is available for draw-down against billed charges on the Account - either usage or ad-hoc charges - you must either link the Balance to the same Contract or ensure the Balance is not linked to a Contract. The following table list the consequences for draw-down availability when linking Account Plans or ad-hoc Account Charges and Balances to Contracts:
| Account Plan or ad-hoc Charge linked to Contract | Balance Linked to Contract | Balance Available for draw-down |
| ------------------------------------------------ | -------------------------- | ------------------------------- |
| NO | NO | YES |
| Contract A | NO | YES |
| NO | Contract A | NO |
| Contract A | Contract A | YES |
| Contract A | Contract B | NO |
**Important: Linking Balances to Contracts on Child Accounts!** If a Contract has been added to a Parent Account, then Balances on any Child Accounts can be linked to that Contract also.
## Reviewing Balance Metadata
On the *Balance details* page, you can review a Balance's metadata:
* Custom Fields or External Mappings created for the Balance.
* Integration runs linked to the Balance.
**To review Balance metadata:**
1. Select **Accounts**. The **Accounts** page opens.
2. Select the **Name** text of the Account for which you want to review Balance metadata. The **Account** page opens.
3. Select the **Balances** tab.
4. On the **Balance** panel, select the **Name** text of the Balance you want to review metadata for. The **Balance details** page opens.
5. Scroll down the page to review **Balance metadata**:
**Custom fields**. Any Custom fields created for the Balance are listed:
8. Select **Remove** to confirm. The popup closes and the Contract no longer shows under **Balance details**.
## Linking Balances to Contracts - Availability for Draw-Down
Linking a Balance to a Contract on an Account is optional. However, if you have linked an Account Plan to a Contract or set up an ad-hoc Charge for the Account and linked the Charge to a Contract and you want to ensure the Balance is available for draw-down against billed charges on the Account - either usage or ad-hoc charges - you must either link the Balance to the same Contract or ensure the Balance is not linked to a Contract. The following table list the consequences for draw-down availability when linking Account Plans or ad-hoc Account Charges and Balances to Contracts:
| Account Plan or ad-hoc Charge linked to Contract | Balance Linked to Contract | Balance Available for draw-down |
| ------------------------------------------------ | -------------------------- | ------------------------------- |
| NO | NO | YES |
| Contract A | NO | YES |
| NO | Contract A | NO |
| Contract A | Contract A | YES |
| Contract A | Contract B | NO |
**Important: Linking Balances to Contracts on Child Accounts!** If a Contract has been added to a Parent Account, then Balances on any Child Accounts can be linked to that Contract also.
## Reviewing Balance Metadata
On the *Balance details* page, you can review a Balance's metadata:
* Custom Fields or External Mappings created for the Balance.
* Integration runs linked to the Balance.
**To review Balance metadata:**
1. Select **Accounts**. The **Accounts** page opens.
2. Select the **Name** text of the Account for which you want to review Balance metadata. The **Account** page opens.
3. Select the **Balances** tab.
4. On the **Balance** panel, select the **Name** text of the Balance you want to review metadata for. The **Balance details** page opens.
5. Scroll down the page to review **Balance metadata**:
**Custom fields**. Any Custom fields created for the Balance are listed:
 * You can **Copy** the *String* or *Number* value of a Custom Field to your clipboard. See [Working with Custom Fields](/guides/creating-and-managing-products/working-with-custom-fields) for more details.
**External mappings**. Any existing mappings created for the Balance are listed:
* You can **Copy** the *String* or *Number* value of a Custom Field to your clipboard. See [Working with Custom Fields](/guides/creating-and-managing-products/working-with-custom-fields) for more details.
**External mappings**. Any existing mappings created for the Balance are listed:
 * The **External system** and **External table** mapped to are shown - such as **NetSuite - Item** in the above example. The **External entity ID** mapped to is also shown.
* If a listed External mapping is linked to an Integration, under **Linked integration** a hotlink text will be shown which you can use to open the Integration.
* Under **Actions**, you can edit or delete the External mapping.
* If the Balance has multiple External mappings created for it, you can use *Search external mappings* to search by **External table** and **External entity ID** and filter the list.
* You can commence a workflow to **Create external mapping** for the Balance directly - see [Creating and Managing External Mappings for Accounts](/guides/end-customer-accounts/creating-and-managing-external-mappings-for-accounts) for an example.
**Integration runs**. If you've set up an integration that synchronizes the Balance data with an external system, the date/time and status of the **Latest** integration run are shown. You can use a text hotlink to open details of this latest run or **View all runs**. See [Reviewing Integration Run Details](/guides/integrations/setting-up-integrations/reviewing-integration-run-details).
## Balances Draw-Down Order Against Prepayments
If you've added Balances and Prepayments as credits on an Account, you can define the order in which these credit amounts are drawn-down for billing the Account. Four options are available for this *credit application order* for Balances against Prepayments:
* **Prepayment then balance**. Draw-down against Prepayment credit before Balance credit. Default.
* **Balance then prepayment**. Draw-down against Balance credit before Prepayment credit.
* **Prepayment only**. Only draw-down against Prepayment credit.
* **Balance only**. Only draw-down against Balance credit.
You can configure this in two places:
* At Organization level as part of your Organization configuration. See [Viewing and Editing Organization Configuration](/guides/organization-and-access-management/viewing-and-editing-organization/viewing-and-editing-organization-configuration).
* At individual Account level when creating or editing the Account to which the Prepayments and Balances have been added under **Bill settings**. See [Creating an Account](/guides/end-customer-accounts/creating-an-account).
* If you configure this at Account level, the Account level setting takes precedence over any setting at Organizational level.
**Important!** If the Account belongs to a Parent/Child Account hierarchy, then the **Credit application order** settings are *not available*, and the draw-down order defaults always to Prepayment then Balance order.
* The **External system** and **External table** mapped to are shown - such as **NetSuite - Item** in the above example. The **External entity ID** mapped to is also shown.
* If a listed External mapping is linked to an Integration, under **Linked integration** a hotlink text will be shown which you can use to open the Integration.
* Under **Actions**, you can edit or delete the External mapping.
* If the Balance has multiple External mappings created for it, you can use *Search external mappings* to search by **External table** and **External entity ID** and filter the list.
* You can commence a workflow to **Create external mapping** for the Balance directly - see [Creating and Managing External Mappings for Accounts](/guides/end-customer-accounts/creating-and-managing-external-mappings-for-accounts) for an example.
**Integration runs**. If you've set up an integration that synchronizes the Balance data with an external system, the date/time and status of the **Latest** integration run are shown. You can use a text hotlink to open details of this latest run or **View all runs**. See [Reviewing Integration Run Details](/guides/integrations/setting-up-integrations/reviewing-integration-run-details).
## Balances Draw-Down Order Against Prepayments
If you've added Balances and Prepayments as credits on an Account, you can define the order in which these credit amounts are drawn-down for billing the Account. Four options are available for this *credit application order* for Balances against Prepayments:
* **Prepayment then balance**. Draw-down against Prepayment credit before Balance credit. Default.
* **Balance then prepayment**. Draw-down against Balance credit before Prepayment credit.
* **Prepayment only**. Only draw-down against Prepayment credit.
* **Balance only**. Only draw-down against Balance credit.
You can configure this in two places:
* At Organization level as part of your Organization configuration. See [Viewing and Editing Organization Configuration](/guides/organization-and-access-management/viewing-and-editing-organization/viewing-and-editing-organization-configuration).
* At individual Account level when creating or editing the Account to which the Prepayments and Balances have been added under **Bill settings**. See [Creating an Account](/guides/end-customer-accounts/creating-an-account).
* If you configure this at Account level, the Account level setting takes precedence over any setting at Organizational level.
**Important!** If the Account belongs to a Parent/Child Account hierarchy, then the **Credit application order** settings are *not available*, and the draw-down order defaults always to Prepayment then Balance order.