> ## Documentation Index
> Fetch the complete documentation index at: https://docs.m3ter.com/llms.txt
> Use this file to discover all available pages before exploring further.
# Setting Up Contract Billing
When you create a Contract for an Account, you can use it to bill the Account on a Contract basis:
* For billing Product *usage* - you must add Account Plans or Account Plan Groups attached to the Account to the Contract.
* For billing one-off *Charges* you've created for the Account - you must add those Charges to the Contract.
The capability to bill your end-customer Accounts on a Contract basis gives you wide flexibility to fulfill invoicing requirements for cases where you offer customers a specific product package agreement to consume several of your core products. You can bill Accounts wholly and exclusively according to the scope of a specific contractual agreement.
This topic explains how to set up Contracts for billing and how to use the available options to ensure any Contract billing you implement meets your specific billing use case:
* [Setting Up Contracts for Billing - Configuration Options](/guides/end-customer-accounts/creating-contracts-for-accounts/setting-up-contract-billing#setting-up-contracts-for-billing-configuration-options)
Some Contract billing worked examples are also provided, which show how you can enable Contract billing and to illustrate the various configuration options m3ter offers for controlling how Contract Bills are generated to meet different invoicing requirements:
* [Example 1 - Multiple Product Contract Billing](/guides/end-customer-accounts/creating-contracts-for-accounts/setting-up-contract-billing#example-1-multiple-product-contract-billing)
* [Example 2 - Mixed Grouping Contract Billing](/guides/end-customer-accounts/creating-contracts-for-accounts/setting-up-contract-billing#example-2-mixed-grouping-contract-billing)
* [Example 3 - Usage Filtering for Contract Billing](/guides/end-customer-accounts/creating-contracts-for-accounts/setting-up-contract-billing#example-3-usage-filtering-for-contract-billing)
**Important: Allowing Overlapping Account Plans!** For some Contract billing use case, you might want to be able to attached overlapping Plans to an Account. For example, if you intend to bill your end-customer Accounts on a Contract basis and your billing use case requires some charges for a Product to be billed under one Contract and other charges for the same Product to be billed under a different Contract, you'll require different and overlapping Account Plans to be attached to an Account for the same Product but linked to different Contracts. To do this, you must enable the **Allow overlapping attached plans** option at Organization level. See [Viewing and Editing Organization Configuration](/guides/organization-and-access-management/viewing-and-editing-organization/viewing-and-editing-organization-configuration).
## Setting Up Contracts for Billing - Configuration Options
When you want to use Contract billing, several options are available to ensure your billing use case is fulfilled:
* [Independent vs. Collective Billing](/guides/end-customer-accounts/creating-contracts-for-accounts/setting-up-contract-billing#independent-vs-collective-billing)
* [Apply Contract Period](/guides/end-customer-accounts/creating-contracts-for-accounts/setting-up-contract-billing#apply-contract-period)
* [Define Usage Filters](/guides/end-customer-accounts/creating-contracts-for-accounts/setting-up-contract-billing#define-usage-filters)
### Independent vs. Collective Billing
You can determine how charges due on the Account and linked to Contracts will be billed:
* **Bill Independently**. A separate Bill will be created for any charge amounts linked to the Contract. This is useful if you have multiple Contracts associated with an Account, but you want separate Bills generated for each of the different Contracts.
* **Bill Collectively**. Charges linked to the Contract can be billed collectively on a shared Bill and together with charges linked to other Contracts and any other charges due.
To control how the Bills for Contracts will be generated you assign them *Bill grouping keys*. There are two types:
* *Exclusive* grouping keys are used for independent Contract billing.
* *Non-exclusive* grouping keys are used for collective Contract billing.
This allows for mixed Contract bill grouping. Suppose you have three Contracts associated with a single Account and you want to bill the charges under one Contract separately and charges due under the other two Contracts collectively. You can assign an exclusive grouping key to one Contract and assign the same non-exclusive key to the other two Contracts.
#### Configuring Independent Billing
When you create or edit a Contract, you can quickly enable it for independent billing.
**To enable a Contract for independent billing:**
1. Open the Account the Contract belongs to and select the **Contracts** tab.
2. Either select **Create contract** or select to **Edit** an existing Contract. The **Create** or **Edit** page opens.
3. On the **Contract billing details** card, enable the **Bill contract independently** switch:
 4. Select **Create contract** or **Update contract**. You are returned to the **Contracts** tab.
5. Select the name hotlink text of the Contract. The **Contract details** page opens:
4. Select **Create contract** or **Update contract**. You are returned to the **Contracts** tab.
5. Select the name hotlink text of the Contract. The **Contract details** page opens:
 * A **Bill grouping key** has been automatically created using the Contract's name, assigned to the Contract, and marked as **EXCLUSIVE**.
* When Bills are generated for the Account the Contract belongs to, any charges due and linked to this Contract will be on a separate Bill.
6. If you later decide that you no longer want to use the Contract for billing, edit it and disable the **Bill contract independently** switch. The **Bill grouping key** is removed:
* A **Bill grouping key** has been automatically created using the Contract's name, assigned to the Contract, and marked as **EXCLUSIVE**.
* When Bills are generated for the Account the Contract belongs to, any charges due and linked to this Contract will be on a separate Bill.
6. If you later decide that you no longer want to use the Contract for billing, edit it and disable the **Bill contract independently** switch. The **Bill grouping key** is removed:
 * Note that the **Bill grouping key** created automatically and assigned to the Contract is *not deleted* and can be re-assigned to the Contract if at a later date you want to re-enable the Contract for independent billing.
#### Configuring Collective Billing
If your Contract billing use case requires that charges due on the Account linked to multiple Contracts are collectively billed, then you can assign a common Bill grouping key to each of the Contracts.
**To enable a Contract for collective billing:**
1. Open the Account the Contract belongs to and select the **Contracts** tab.
2. Either select **Create contract** or select to **Edit** an existing Contract. The **Create** or **Edit** page opens.
3. On the **Contract billing details** card, select **Advanced**. The card adjusts to show a **Bill grouping key** selection/add drop-down:
* Note that the **Bill grouping key** created automatically and assigned to the Contract is *not deleted* and can be re-assigned to the Contract if at a later date you want to re-enable the Contract for independent billing.
#### Configuring Collective Billing
If your Contract billing use case requires that charges due on the Account linked to multiple Contracts are collectively billed, then you can assign a common Bill grouping key to each of the Contracts.
**To enable a Contract for collective billing:**
1. Open the Account the Contract belongs to and select the **Contracts** tab.
2. Either select **Create contract** or select to **Edit** an existing Contract. The **Create** or **Edit** page opens.
3. On the **Contract billing details** card, select **Advanced**. The card adjusts to show a **Bill grouping key** selection/add drop-down:
 * Any existing Bill grouping keys - both exclusive and non-exclusive - are shown in the drop-down selection list.
* For this example, we'll **Add** a new grouping key called **Premium Key**. An information text appears when we add the key:
* Any existing Bill grouping keys - both exclusive and non-exclusive - are shown in the drop-down selection list.
* For this example, we'll **Add** a new grouping key called **Premium Key**. An information text appears when we add the key:
 4. Select **Create contract** or **Update contract**. You are returned to the **Contracts** tab.
5. Select the name hotlink text of the Contract. The **Contract details** page opens:
4. Select **Create contract** or **Update contract**. You are returned to the **Contracts** tab.
5. Select the name hotlink text of the Contract. The **Contract details** page opens:
 * The **Bill grouping key** we added has been created, assigned to the Contract, and is marked as **NON-EXCLUSIVE**.
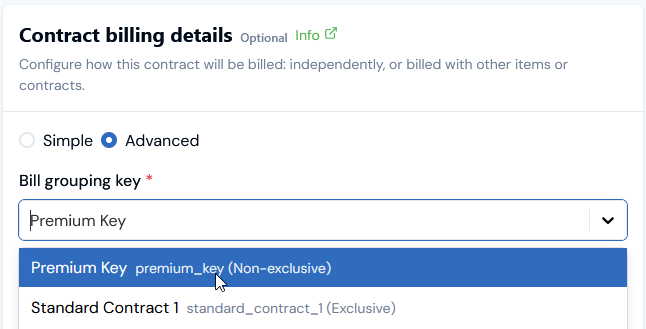
6. If we now open a second Contract on the Account and edit it, we can assign the same non-exclusive **Premium Key** by selecting it from the **Bill grouping key** drop-down list:
* The **Bill grouping key** we added has been created, assigned to the Contract, and is marked as **NON-EXCLUSIVE**.
6. If we now open a second Contract on the Account and edit it, we can assign the same non-exclusive **Premium Key** by selecting it from the **Bill grouping key** drop-down list:
 7. Select **Create contract** or **Update contract**. You are returned to the **Contracts** tab.
8. Select the name hotlink text of the second Contract. The **Contract details** page opens:
7. Select **Create contract** or **Update contract**. You are returned to the **Contracts** tab.
8. Select the name hotlink text of the second Contract. The **Contract details** page opens:
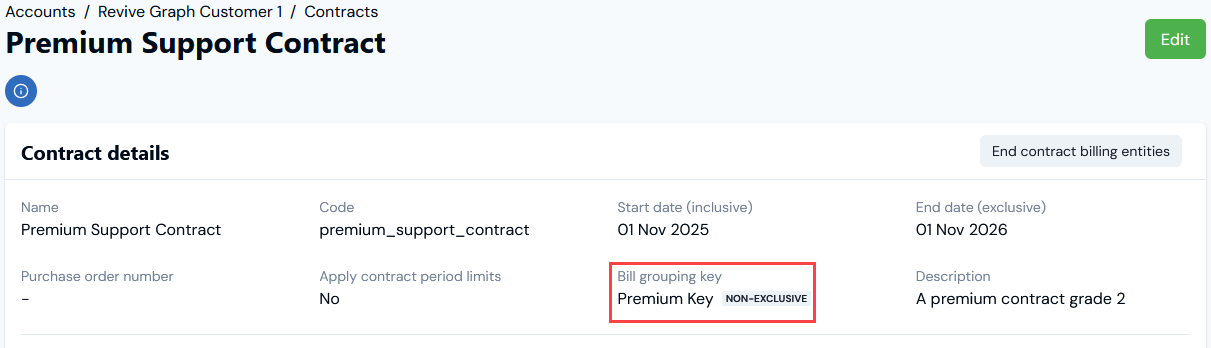 * Any charges due on the Account and linked to either **Premium Contract 1** or **Premium Support Contract** will appear together on single collective Bill.
### Apply Contract Period
When you create or edit a Contract that you've enabled for billing, you can restrict the charges billed to the period you've defined for the Contract using the **Apply contract period limits** switch on the **Contract billing details** card:
* Any charges due on the Account and linked to either **Premium Contract 1** or **Premium Support Contract** will appear together on single collective Bill.
### Apply Contract Period
When you create or edit a Contract that you've enabled for billing, you can restrict the charges billed to the period you've defined for the Contract using the **Apply contract period limits** switch on the **Contract billing details** card:
 * **Enabled**. Contract billing for the Account will be restricted to charge amounts that fall within the defined Contract period.
* **Disabled**. The period for amounts billed under the Contract will be determined by the Account Plan attached to the Account and linked to the Contract.
### Define Usage Filters
As a further option for controlling Contract billing and giving added flexibility, you can define up to three **Usage filters** to either include or exclude charges for usage associated with specific Meter dimensions.
#### Using Contract Code vs. Custom Value
The Create/Edit forms are designed for setting up a default usage filter. The default assumes you've set up a dimension data field on one or more Meters to ensure that only the usage data submissions that use the Contract's code as value for the dimension will be included in billing for the Contract:
* When you **Add** the first **Usage Filter**, the form defaults to show the Contract's code entered as the **Value** and to **Include** usage for billing as the **Usage filter mode**:
* **Enabled**. Contract billing for the Account will be restricted to charge amounts that fall within the defined Contract period.
* **Disabled**. The period for amounts billed under the Contract will be determined by the Account Plan attached to the Account and linked to the Contract.
### Define Usage Filters
As a further option for controlling Contract billing and giving added flexibility, you can define up to three **Usage filters** to either include or exclude charges for usage associated with specific Meter dimensions.
#### Using Contract Code vs. Custom Value
The Create/Edit forms are designed for setting up a default usage filter. The default assumes you've set up a dimension data field on one or more Meters to ensure that only the usage data submissions that use the Contract's code as value for the dimension will be included in billing for the Contract:
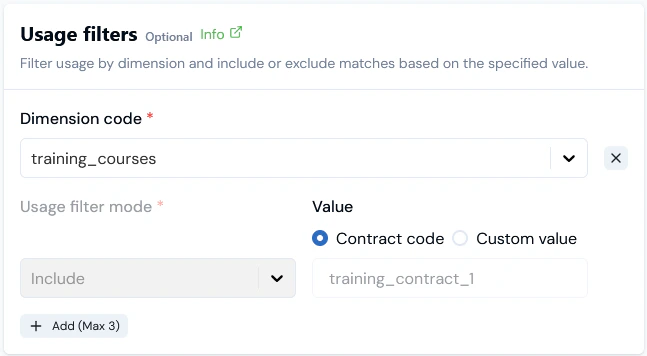
* When you **Add** the first **Usage Filter**, the form defaults to show the Contract's code entered as the **Value** and to **Include** usage for billing as the **Usage filter mode**:
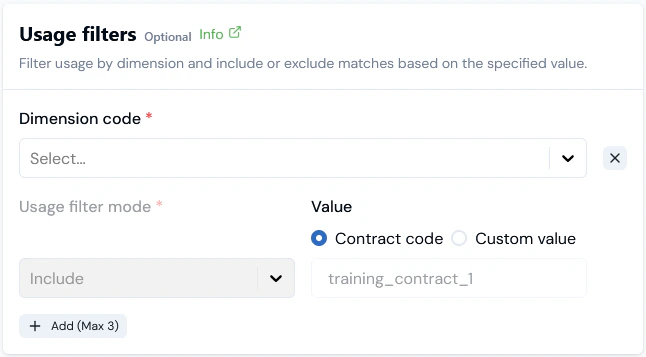 * You can then select the Meter **Dimension code** you want to filter by, for example:
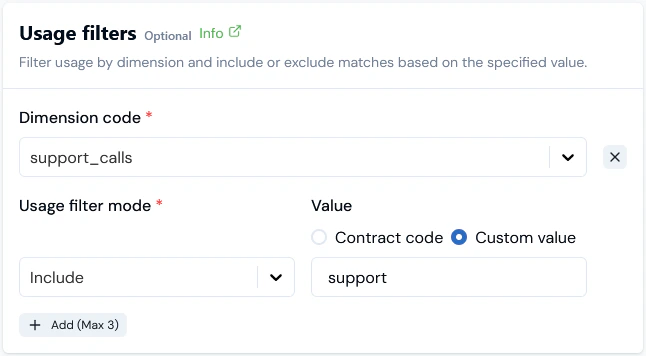
 * Alternatively, if you don't want to filter usage in this way, you can select to use a **Custom value** for a Meter **Dimension code** to filter by - either to **Include** or **Exclude** usage - for example:
 #### Multiple Meters with Same Dimension Fields
If you have multiple Meters with dimension data fields that use the *same code*, then any usage filters you set up for Contract billing will include/exclude usage collected by *all Meters* and which uses the specific **Value** you've entered for the dimension. The **Dimension code** drop-down list identifies instances where there are multiple Meters with dimension fields that use the same code and gives the number of Meters:
#### Multiple Meters with Same Dimension Fields
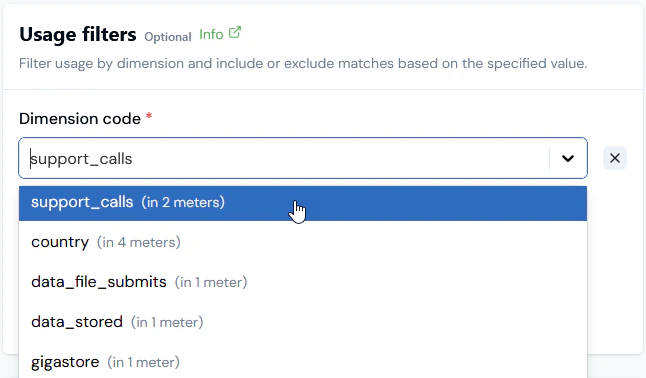
If you have multiple Meters with dimension data fields that use the *same code*, then any usage filters you set up for Contract billing will include/exclude usage collected by *all Meters* and which uses the specific **Value** you've entered for the dimension. The **Dimension code** drop-down list identifies instances where there are multiple Meters with dimension fields that use the same code and gives the number of Meters:
 For a worked example showing how to set up usage filters for Contract billing, see below [Example 3](#example-3-usage-filtering-for-contract-billing).
## Example 1 - Multiple Product Contract Billing
Suppose you offer several core Products and your end-customers typically enter into a contractual agreement to take one or more of these Products. You want to invoice each customer for the specific product package they sign-up for. This example shows how to set things up in m3ter for billing multiple products under a single contract and review generated Bills.
### Setting Up Multiple Product Contract Billing
**To set up multiple product Contract billing:**
1. Select **Accounts**. The **Accounts** page opens.
2. Select the **Name** text of the Account you want to set up multiple product Contract billing for. The Account page opens with the **Overview** tab selected.
3. Select the **Attached plans** tab and attach priced Product Plans to the Account:
For a worked example showing how to set up usage filters for Contract billing, see below [Example 3](#example-3-usage-filtering-for-contract-billing).
## Example 1 - Multiple Product Contract Billing
Suppose you offer several core Products and your end-customers typically enter into a contractual agreement to take one or more of these Products. You want to invoice each customer for the specific product package they sign-up for. This example shows how to set things up in m3ter for billing multiple products under a single contract and review generated Bills.
### Setting Up Multiple Product Contract Billing
**To set up multiple product Contract billing:**
1. Select **Accounts**. The **Accounts** page opens.
2. Select the **Name** text of the Account you want to set up multiple product Contract billing for. The Account page opens with the **Overview** tab selected.
3. Select the **Attached plans** tab and attach priced Product Plans to the Account:
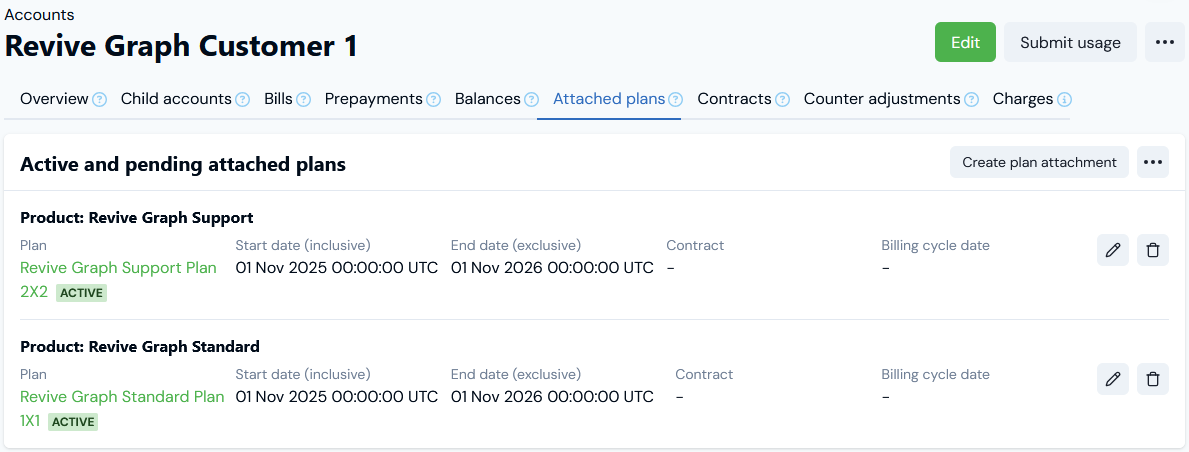 * In this example, we've attached two priced Plans for billing the Account for consumption of two different Products.
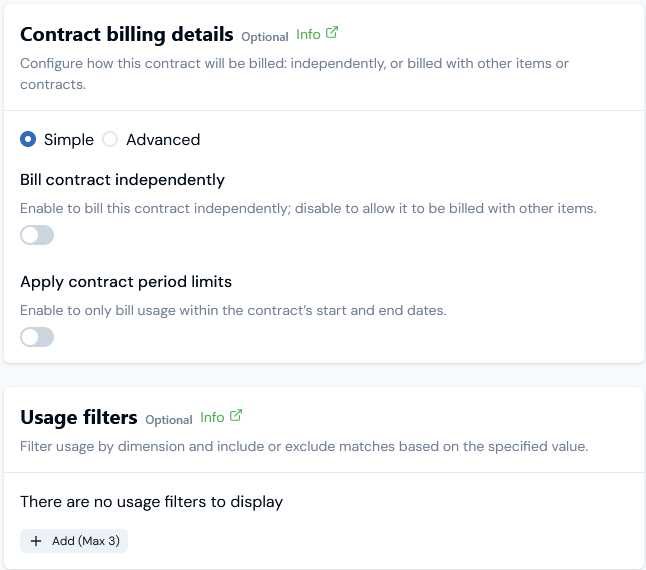
4. Select the **Contracts** tab and create the Contract you want to use to bill the Account for multiple Products. For the current example, under **Contract billing details**:
* Leave the **Bill contract independently** switch disabled. In this example, only one Contract will be associated with the Account and we don't need to use Bill grouping keys.
* **Apply contract period limits**. Leave this switch in the default disabled position.
5. **Usage filters**. Do not attempt to set any usage filters:
* In this example, we've attached two priced Plans for billing the Account for consumption of two different Products.
4. Select the **Contracts** tab and create the Contract you want to use to bill the Account for multiple Products. For the current example, under **Contract billing details**:
* Leave the **Bill contract independently** switch disabled. In this example, only one Contract will be associated with the Account and we don't need to use Bill grouping keys.
* **Apply contract period limits**. Leave this switch in the default disabled position.
5. **Usage filters**. Do not attempt to set any usage filters:
 6. Select **Create contact** and then from the **Contracts** tab select the name hotlink text of the Contract to open the **Contract details** page:
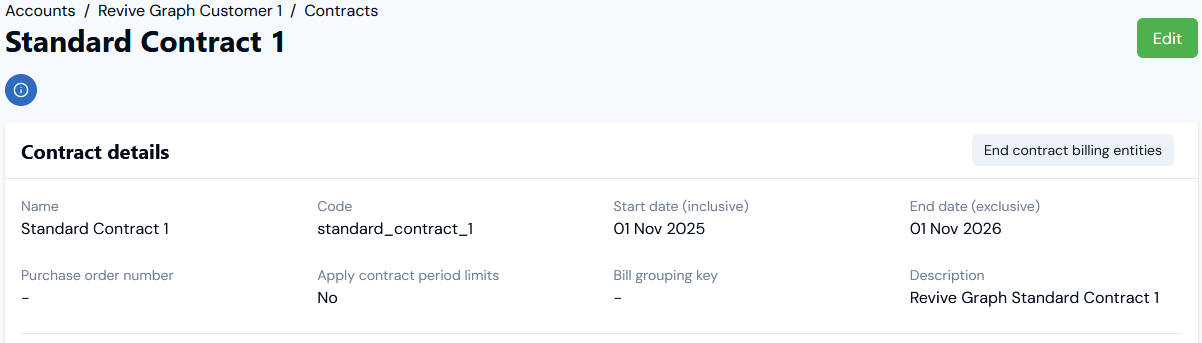 * We can see that no **Bill grouping key** is assigned to the Contract.
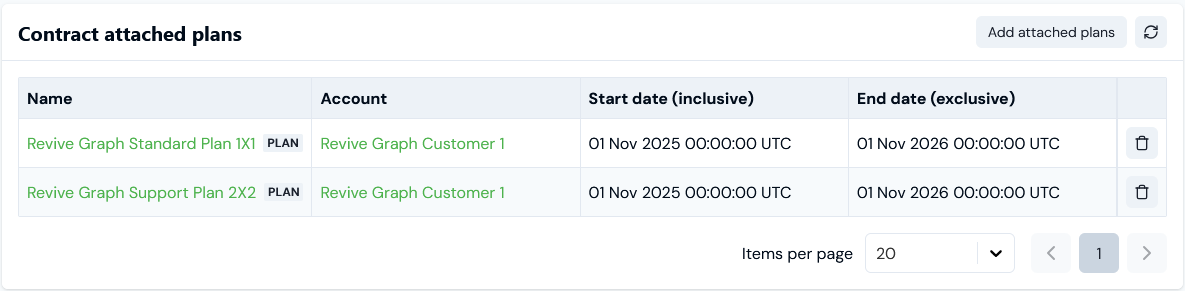
7. Scroll down to the **Contract plans** panel and add the two Product Plans attached to the Account to the Contract:
* We can see that no **Bill grouping key** is assigned to the Contract.
7. Scroll down to the **Contract plans** panel and add the two Product Plans attached to the Account to the Contract:
 8. Return to the **Account>Attached plans** tab:
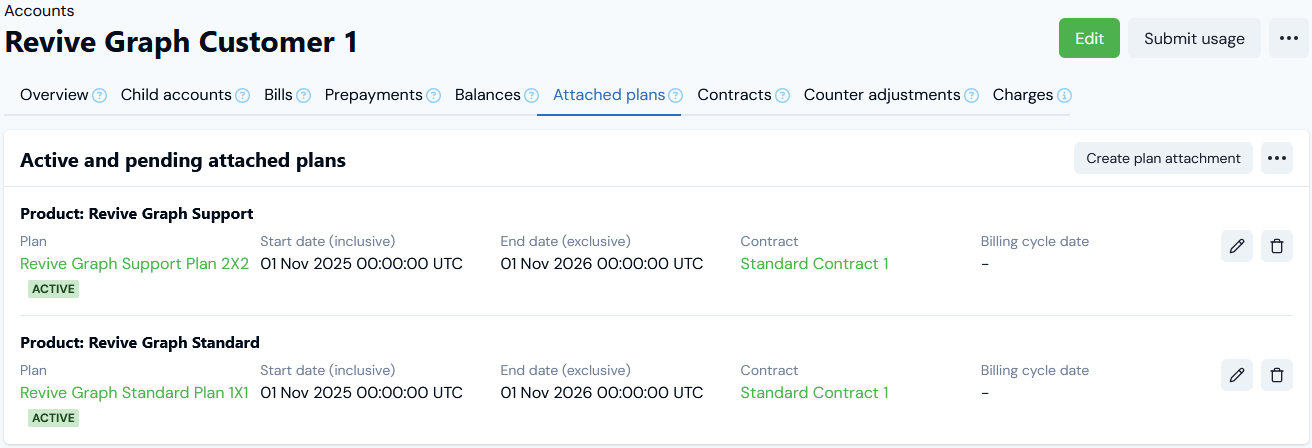 * The Plans attached to the Account for different Products are now linked to the same Contract.
Next, we can submit some test data and generate a Bill for the Account and view Contract billing.
### Running and Viewing Contract Billing for Multiple Products
**To run and view multiple product Contract billing:**
1. Open the **Meter details** page for each of the Meters used to collect usage data for Products the example Account consumes:
* Select the Account - for the current example: **Revive Graph Customer 1**.
* Under **Submit measurements>Submit usage data**, enter some test data for the Meter Data Fields targeted by the Aggregations you've used to price the Product Plans attached to the Account.
2. Open the example Account page and select the **Bills** tab.
3. Select **Run billing** and use the **Run billing** modal to generate a Bill for the Account for the next **Invoice date** covering the period in which you submitted the test data for the Product Meters:
* Because we used the **No grouping key** setting for the Contract, a single Bill is generated and appears on the **Bills** tab.
4. Select the **Reference** hotlink text to open the Bill in **Bill Management**. For example:
* The Plans attached to the Account for different Products are now linked to the same Contract.
Next, we can submit some test data and generate a Bill for the Account and view Contract billing.
### Running and Viewing Contract Billing for Multiple Products
**To run and view multiple product Contract billing:**
1. Open the **Meter details** page for each of the Meters used to collect usage data for Products the example Account consumes:
* Select the Account - for the current example: **Revive Graph Customer 1**.
* Under **Submit measurements>Submit usage data**, enter some test data for the Meter Data Fields targeted by the Aggregations you've used to price the Product Plans attached to the Account.
2. Open the example Account page and select the **Bills** tab.
3. Select **Run billing** and use the **Run billing** modal to generate a Bill for the Account for the next **Invoice date** covering the period in which you submitted the test data for the Product Meters:
* Because we used the **No grouping key** setting for the Contract, a single Bill is generated and appears on the **Bills** tab.
4. Select the **Reference** hotlink text to open the Bill in **Bill Management**. For example:
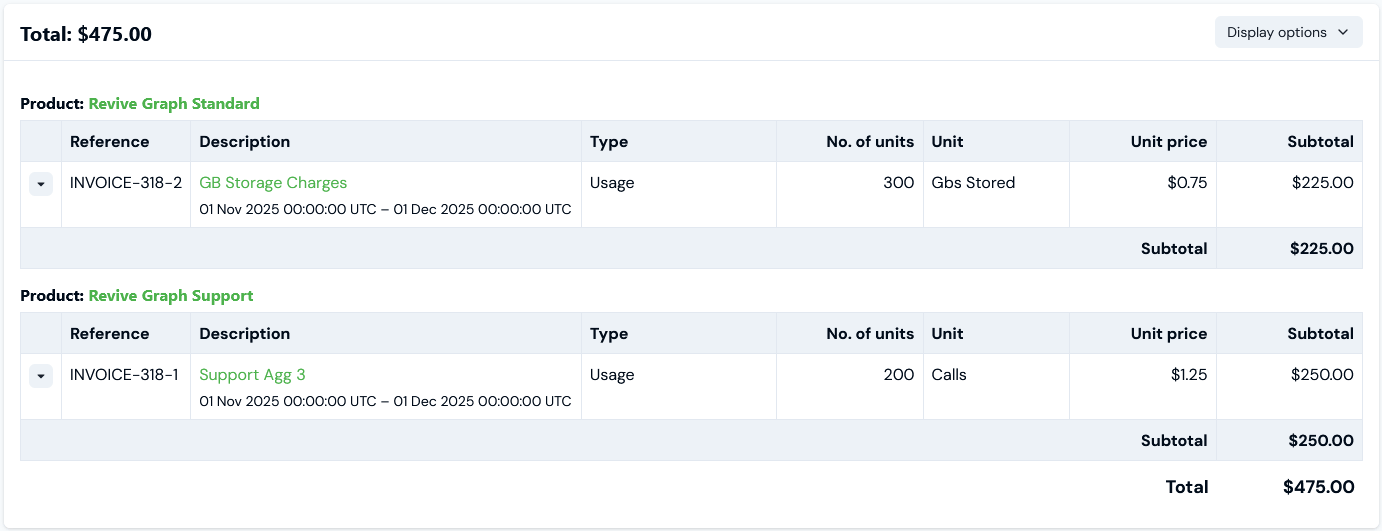 * The Bill opens and by default groups line items by **Product**.
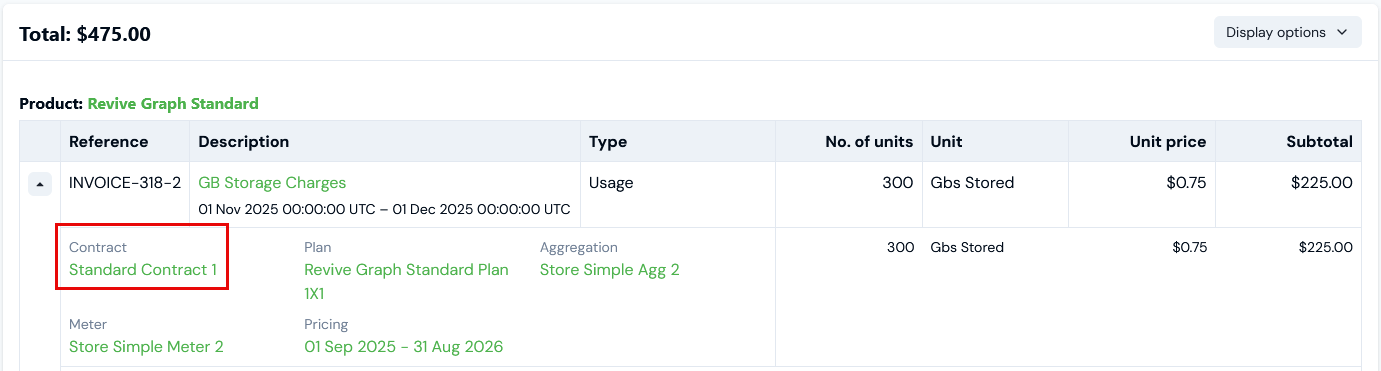
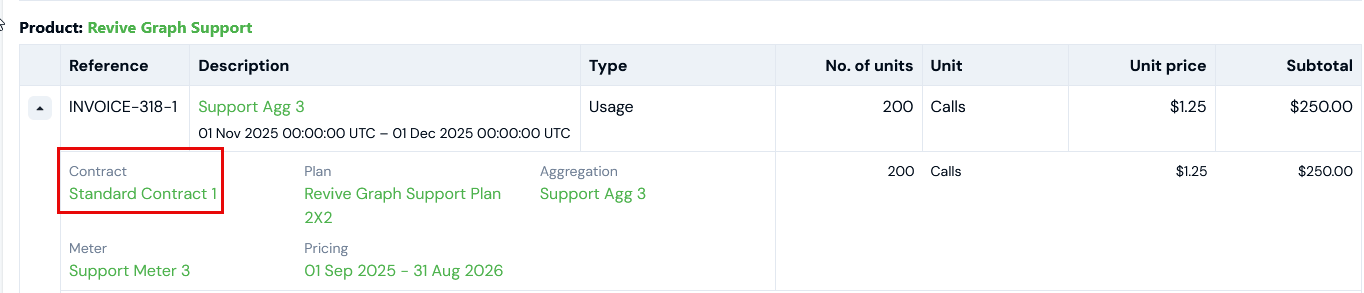
* If we expand each of the line items, we can see that they are both linked to the same Contract:
* The Bill opens and by default groups line items by **Product**.
* If we expand each of the line items, we can see that they are both linked to the same Contract:
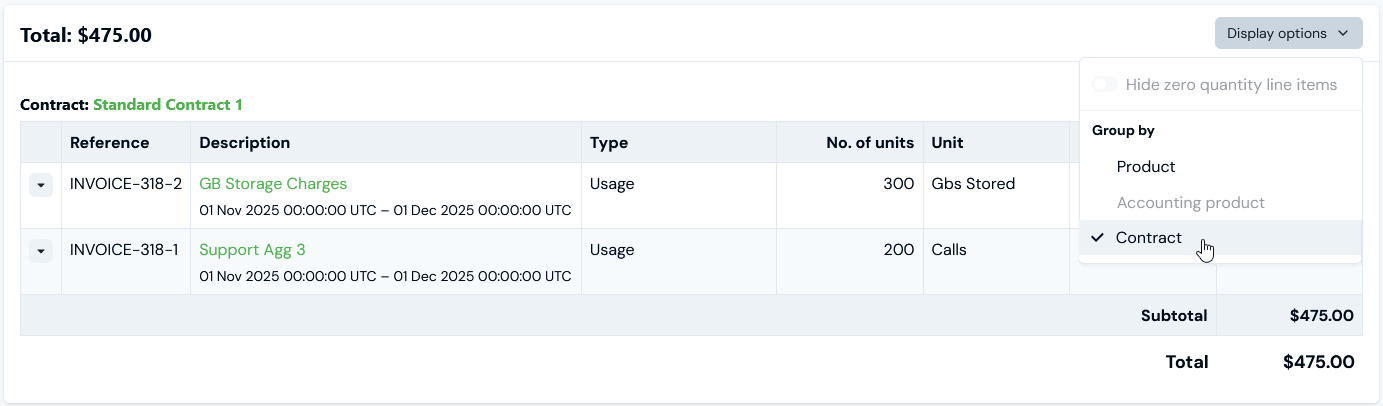
 5. Open the **Display options** menu and enable **Group by contract**. The Bill adjusts to show line items for multiple Products billed under the same **Contract**. For the current example:
 ## Example 2 - Mixed Grouping Contract Billing
This worked example develops the multiple Product Contract billing given in Example 1, and supposes that you want to invoice customers by Contract for multiple Products they have agreed to consume but to create *separate invoices by Contract* for those Products. In this example we'll use the Bill grouping key setting to ensure that:
* Charges for two Products consumed by an Account are grouped together and appear on a single Contract Bill.
* Charges for a third Product consumed by the same Account appear on a separate Contract Bill.
### Setting Up Mixed Grouping Contract Billing
**To set up grouped Contract billing:**
1. Select **Accounts**. The **Accounts** page opens.
2. Select the **Name** text of the Account you want to set up grouped Contract billing for. The Account page opens with the **Overview** tab selected.
3. Select the Contracts tab and ensure two **ACTIVE** Contracts have been created for the Account. For example:
## Example 2 - Mixed Grouping Contract Billing
This worked example develops the multiple Product Contract billing given in Example 1, and supposes that you want to invoice customers by Contract for multiple Products they have agreed to consume but to create *separate invoices by Contract* for those Products. In this example we'll use the Bill grouping key setting to ensure that:
* Charges for two Products consumed by an Account are grouped together and appear on a single Contract Bill.
* Charges for a third Product consumed by the same Account appear on a separate Contract Bill.
### Setting Up Mixed Grouping Contract Billing
**To set up grouped Contract billing:**
1. Select **Accounts**. The **Accounts** page opens.
2. Select the **Name** text of the Account you want to set up grouped Contract billing for. The Account page opens with the **Overview** tab selected.
3. Select the Contracts tab and ensure two **ACTIVE** Contracts have been created for the Account. For example:
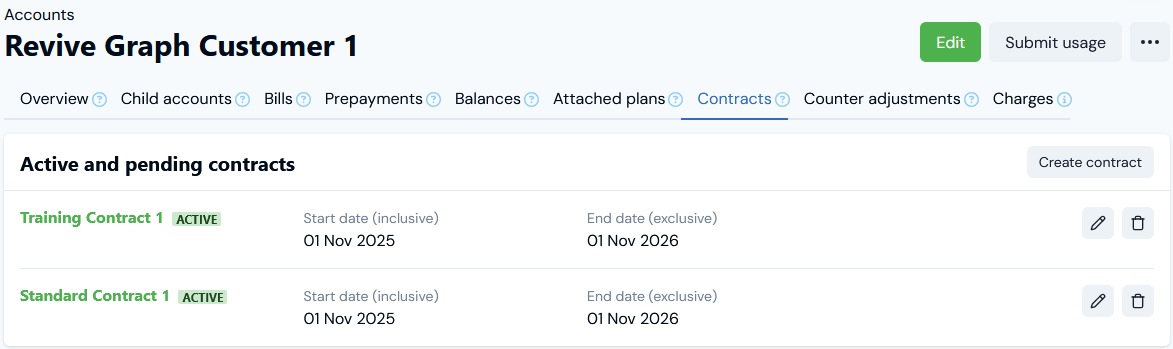 * For this example, we want charges due under **Training Contract 1** to appear on a separate Bill and independently of any billing of charges due under **Standard Contract 1**.
4. Edit the Contract you want to be billed separately and under **Contract billing details**, enable the **Bill contract independently** switch.
5. Select **Update contract** and on the **Contracts** tab select the name hotlink text of the Contract to open the **Contract details** page:
* For this example, we want charges due under **Training Contract 1** to appear on a separate Bill and independently of any billing of charges due under **Standard Contract 1**.
4. Edit the Contract you want to be billed separately and under **Contract billing details**, enable the **Bill contract independently** switch.
5. Select **Update contract** and on the **Contracts** tab select the name hotlink text of the Contract to open the **Contract details** page:
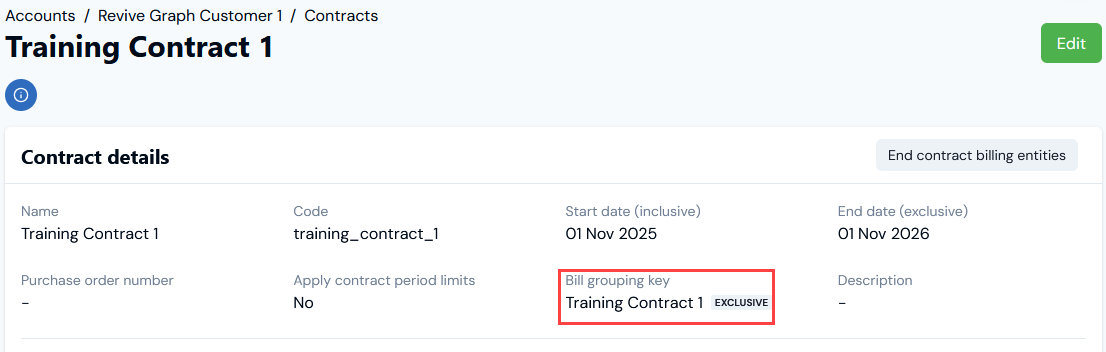 * For the example, we can now see that a **Bill grouping key** using the Contract's name has been created, assigned to **Training Contract 1**, and is marked as **EXCLUSIVE**.
* Note that for **Standard Contract 1** we can leave this without a grouping key for the example because this is the only other Contract associated with the Account.
6. Return to the **Account** page, select the **Attached plans** tab, and attach priced Product Plans to the Account:
* For the example, we can now see that a **Bill grouping key** using the Contract's name has been created, assigned to **Training Contract 1**, and is marked as **EXCLUSIVE**.
* Note that for **Standard Contract 1** we can leave this without a grouping key for the example because this is the only other Contract associated with the Account.
6. Return to the **Account** page, select the **Attached plans** tab, and attach priced Product Plans to the Account:
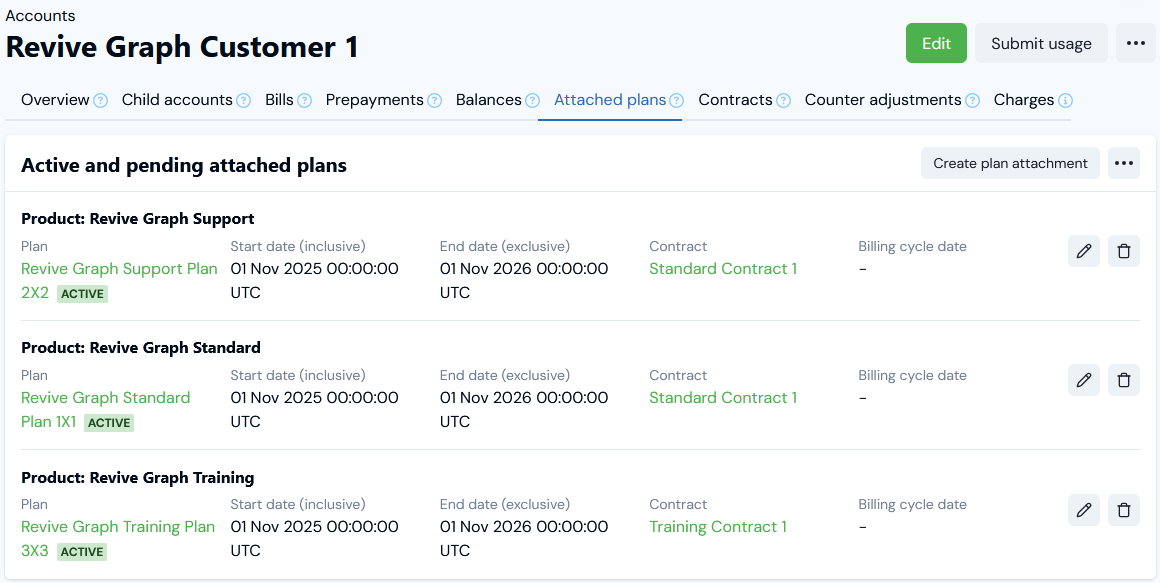 * Note that two of the attached Plans are added to **Standard Contract 1** and one attached Plan is added to **Training Contract 1**.
Next, we can submit some test data and generate Bills for the Account and view the resultant mixed grouping Contract billing.
### Running and Viewing Contract Billing for Mixed Grouping Contract Bills
**To run and view grouped Contract Bills:**
1. Open the **Meter details** page for each of the Meters used to collect usage data for Products the example Account consumes:
* Select the Account - for the current example: **Revive Graph Customer 1**.
* Under **Submit measurements>Submit usage data**, enter some test data for the Meter Data Fields targeted by the Aggregations you've used to price the Product Plans attached to the Account.
2. Open the example Account page and select the **Bills** tab.
3. Select **Run billing** and use the **Run billing** modal to generate Bills for the Account for the next **Invoice date** covering the period in which you submitted the test data for the Product Meters:
* Note that two of the attached Plans are added to **Standard Contract 1** and one attached Plan is added to **Training Contract 1**.
Next, we can submit some test data and generate Bills for the Account and view the resultant mixed grouping Contract billing.
### Running and Viewing Contract Billing for Mixed Grouping Contract Bills
**To run and view grouped Contract Bills:**
1. Open the **Meter details** page for each of the Meters used to collect usage data for Products the example Account consumes:
* Select the Account - for the current example: **Revive Graph Customer 1**.
* Under **Submit measurements>Submit usage data**, enter some test data for the Meter Data Fields targeted by the Aggregations you've used to price the Product Plans attached to the Account.
2. Open the example Account page and select the **Bills** tab.
3. Select **Run billing** and use the **Run billing** modal to generate Bills for the Account for the next **Invoice date** covering the period in which you submitted the test data for the Product Meters:
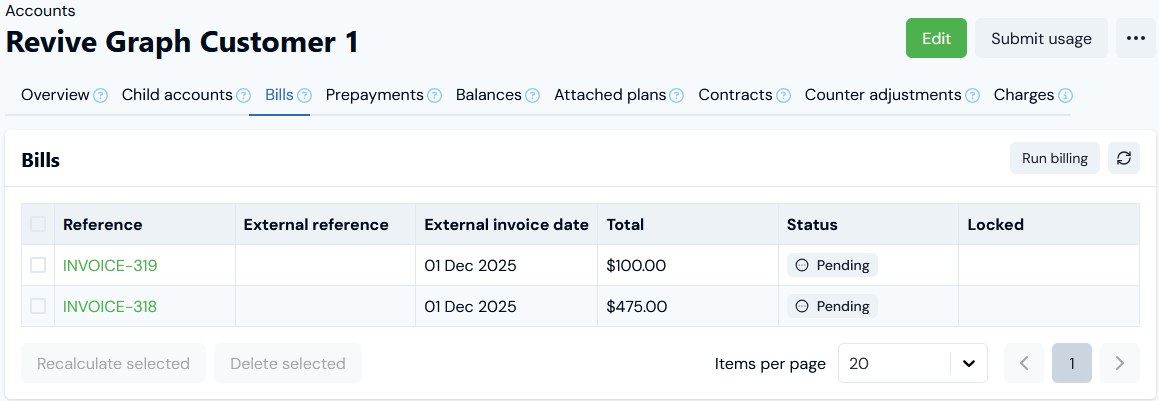 * Because we selected **Bill contract independently** for **Training Contract 1** and assigned an exclusive **Bill grouping key** to it, two separate Bills are generated and appear on the **Bills** tab.
4. Select the **Reference** hotlink text of the **Standard Contract 1** Bill to open it in **Bill Management**:
* Because we selected **Bill contract independently** for **Training Contract 1** and assigned an exclusive **Bill grouping key** to it, two separate Bills are generated and appear on the **Bills** tab.
4. Select the **Reference** hotlink text of the **Standard Contract 1** Bill to open it in **Bill Management**:
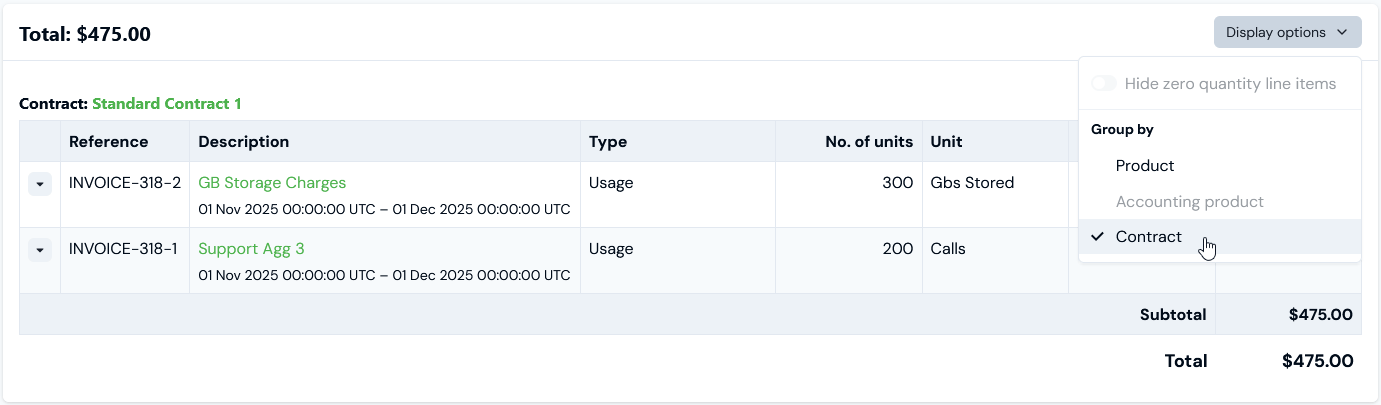
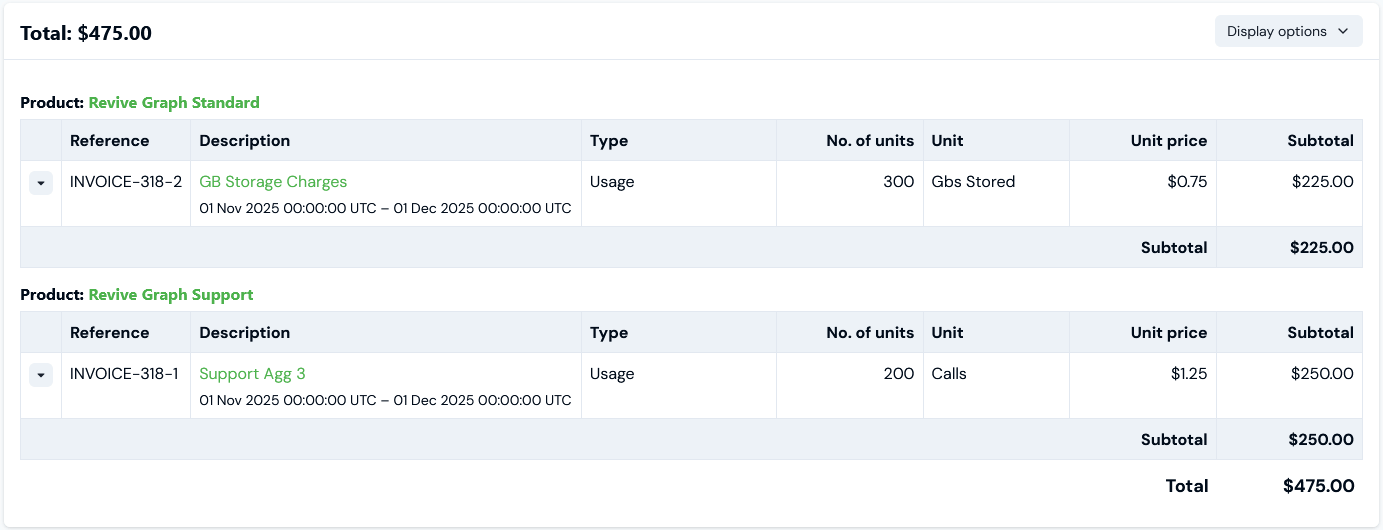 * The **Standard Contract 1** Bill opens with line items grouped by the two Products for the attached Plans added to the Contract and we can then open the **Display options** menu and enable **Group by contract**:
 5. Select the **Reference** hotlink text of the **Training Contract 1** Bill to open it in **Bill Management**:
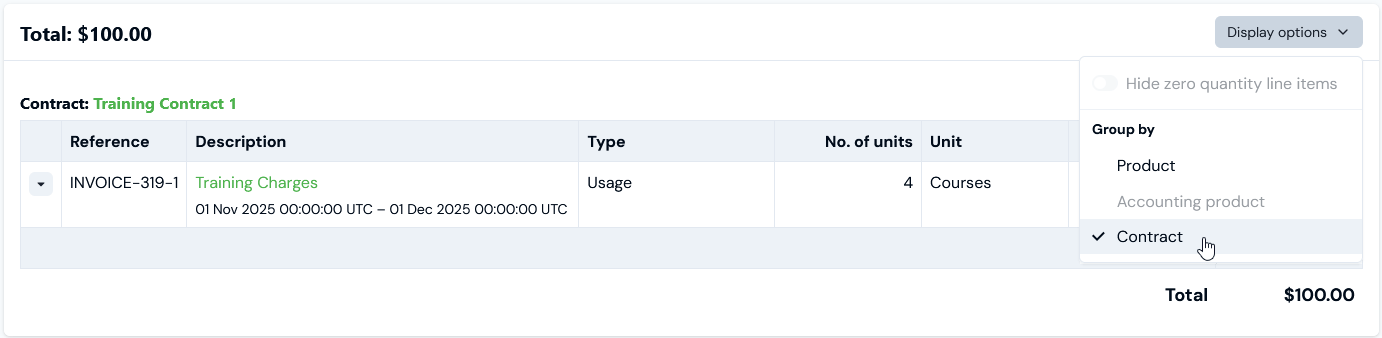
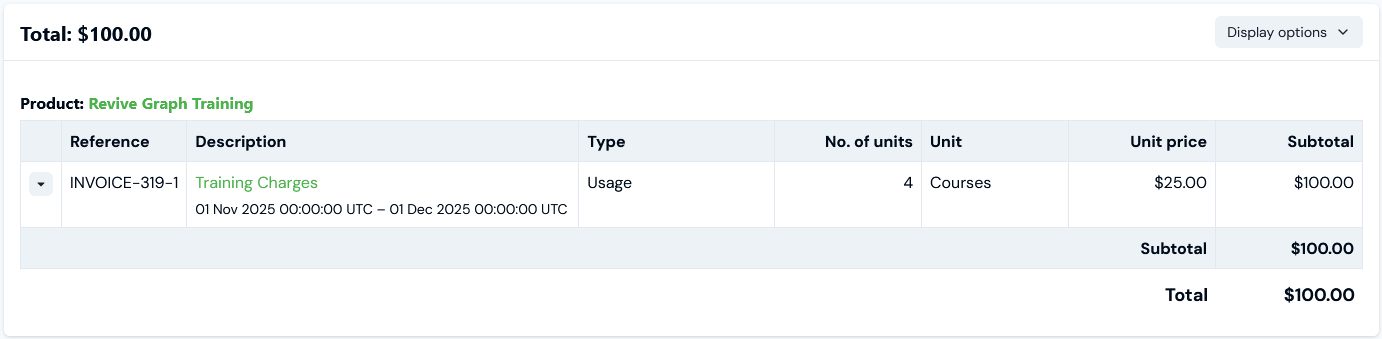 * The **Training Contract 1** Bill opens with line items grouped by the single Product for the attached Plan added to the Contract and we can then open the **Display options** menu and enable **Group by contract**:
 ## Example 3 - Usage Filtering for Contract Billing
This worked example develops the multiple Product Contract billing given in Example 1, and supposes that you want to implement Contract billing for Products but filter the metered usage and charge at billing only for usage where Product Meter dimensions equal specific defined values. You can do this by adding usage filters for the Contract you will use to bill the Account.
### Running and Viewing Contract Billing without Usage Filters
First, we'll review the setup for the example and run billing without Contract usage filters applied to check that all usage is charged for.
**To run and view Contract billing without Usage Filters:**
1. Select **Accounts**. The **Accounts** page opens.
2. Select the **Attached plans** tab:
## Example 3 - Usage Filtering for Contract Billing
This worked example develops the multiple Product Contract billing given in Example 1, and supposes that you want to implement Contract billing for Products but filter the metered usage and charge at billing only for usage where Product Meter dimensions equal specific defined values. You can do this by adding usage filters for the Contract you will use to bill the Account.
### Running and Viewing Contract Billing without Usage Filters
First, we'll review the setup for the example and run billing without Contract usage filters applied to check that all usage is charged for.
**To run and view Contract billing without Usage Filters:**
1. Select **Accounts**. The **Accounts** page opens.
2. Select the **Attached plans** tab:
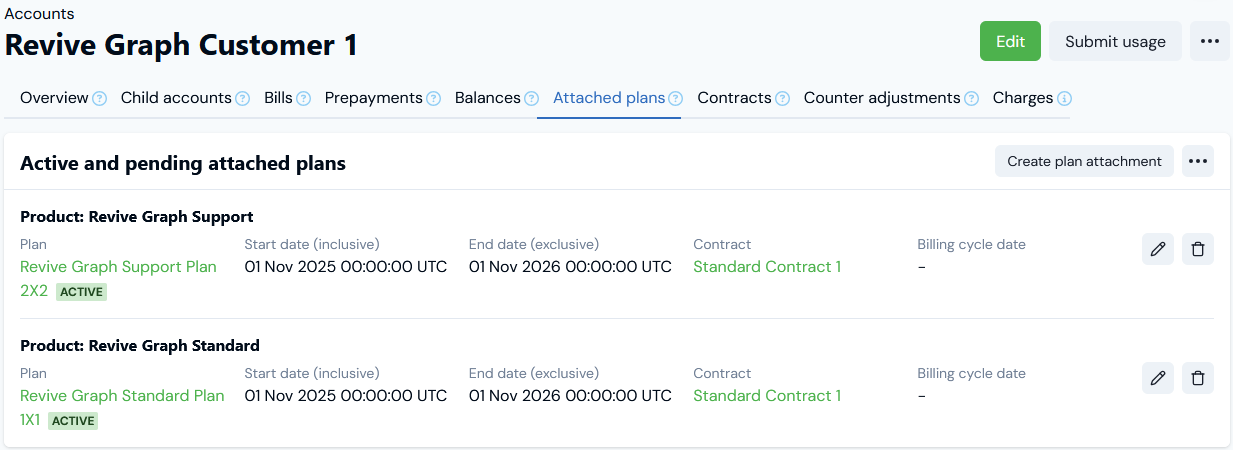 Two Product Plans are attached to the Account and both have been added to **Standard Contract 1:**
* **Revive Graph Standard Plan 1X1** is attached for charging the Account for consuming the **Revive Graph Standard** Product.
* **Revive Graph Support Plan 2X2** is attached for charging the Account for consuming the **Revive Graph Support** Product.
**Revive Graph Standard** Product - Meter and Pricing:
* The Meter that collects usage for this Product has two Data Fields:
* A **MEASURE** field called **GIGABs** to collect the size in GBs of files uploaded for storage.
* A **WHAT** dimension field called **FileFormat** to collect the type of files uploaded - permitted types are **RAW** or **JPEG** format.
* The Aggregation used to price the attached Product Plan targets the **GIGABs** Meter field and applies a **SUM** method to give the billing metric.
* The **Revive Graph Standard Plan 1X1** is priced at the flat rate of **\$0.75** per GB stored.
**Revive Graph Support** Product - Meter and Pricing:
* The Meter that collects usage for this Product has two Data Fields:
* A **MEASURE** field called **Support Calls** to collect the number of support calls by customers.
* A **WHERE** dimension field called **Country** to log which country the support call originates from - customers are located in either the UK or the US.
* The Aggregation used to price the attached Product Plan targets the **Support Calls** Meter field and applies a **SUM** method to give the billing metric.
* The **Revive Graph Support Plan 2X2** is priced at the flat rate of **\$1.25** per call.
3. Submit some test data to the Account using the Meters set up for the example. For the current example:
**Revive Graph Standard** Meter - three usage data measurements submitted for the example Account:
* GIGABs = **300**, FileFormat = **RAW**
* GIGABs = **400**, FileFormat = **JPEG**
* GIGABs = **500**, FileFormat = **RAW**
* Total charge is **1200 x \$0.75 = \$900**
**Revive Graph Support** Meter - three usage data measurements submitted for the example Account:
* Support Calls = **26**, Where = **UK**
* Support Calls = **36**, Where = **US**
* Support Calls = **46**, Where = **UK**
* Total charge is **108 x \$1.25 = \$135**
4. Open the example Account page and select the **Bills** tab.
5. Select **Run billing** and use the **Run billing** modal to generate a Bill for the Account for the next **Invoice date** covering the period in which you submitted the test data for the Product Meters:
6. Select the **Reference** hotlink text to open the Bill in **Bill Management**:
Two Product Plans are attached to the Account and both have been added to **Standard Contract 1:**
* **Revive Graph Standard Plan 1X1** is attached for charging the Account for consuming the **Revive Graph Standard** Product.
* **Revive Graph Support Plan 2X2** is attached for charging the Account for consuming the **Revive Graph Support** Product.
**Revive Graph Standard** Product - Meter and Pricing:
* The Meter that collects usage for this Product has two Data Fields:
* A **MEASURE** field called **GIGABs** to collect the size in GBs of files uploaded for storage.
* A **WHAT** dimension field called **FileFormat** to collect the type of files uploaded - permitted types are **RAW** or **JPEG** format.
* The Aggregation used to price the attached Product Plan targets the **GIGABs** Meter field and applies a **SUM** method to give the billing metric.
* The **Revive Graph Standard Plan 1X1** is priced at the flat rate of **\$0.75** per GB stored.
**Revive Graph Support** Product - Meter and Pricing:
* The Meter that collects usage for this Product has two Data Fields:
* A **MEASURE** field called **Support Calls** to collect the number of support calls by customers.
* A **WHERE** dimension field called **Country** to log which country the support call originates from - customers are located in either the UK or the US.
* The Aggregation used to price the attached Product Plan targets the **Support Calls** Meter field and applies a **SUM** method to give the billing metric.
* The **Revive Graph Support Plan 2X2** is priced at the flat rate of **\$1.25** per call.
3. Submit some test data to the Account using the Meters set up for the example. For the current example:
**Revive Graph Standard** Meter - three usage data measurements submitted for the example Account:
* GIGABs = **300**, FileFormat = **RAW**
* GIGABs = **400**, FileFormat = **JPEG**
* GIGABs = **500**, FileFormat = **RAW**
* Total charge is **1200 x \$0.75 = \$900**
**Revive Graph Support** Meter - three usage data measurements submitted for the example Account:
* Support Calls = **26**, Where = **UK**
* Support Calls = **36**, Where = **US**
* Support Calls = **46**, Where = **UK**
* Total charge is **108 x \$1.25 = \$135**
4. Open the example Account page and select the **Bills** tab.
5. Select **Run billing** and use the **Run billing** modal to generate a Bill for the Account for the next **Invoice date** covering the period in which you submitted the test data for the Product Meters:
6. Select the **Reference** hotlink text to open the Bill in **Bill Management**:
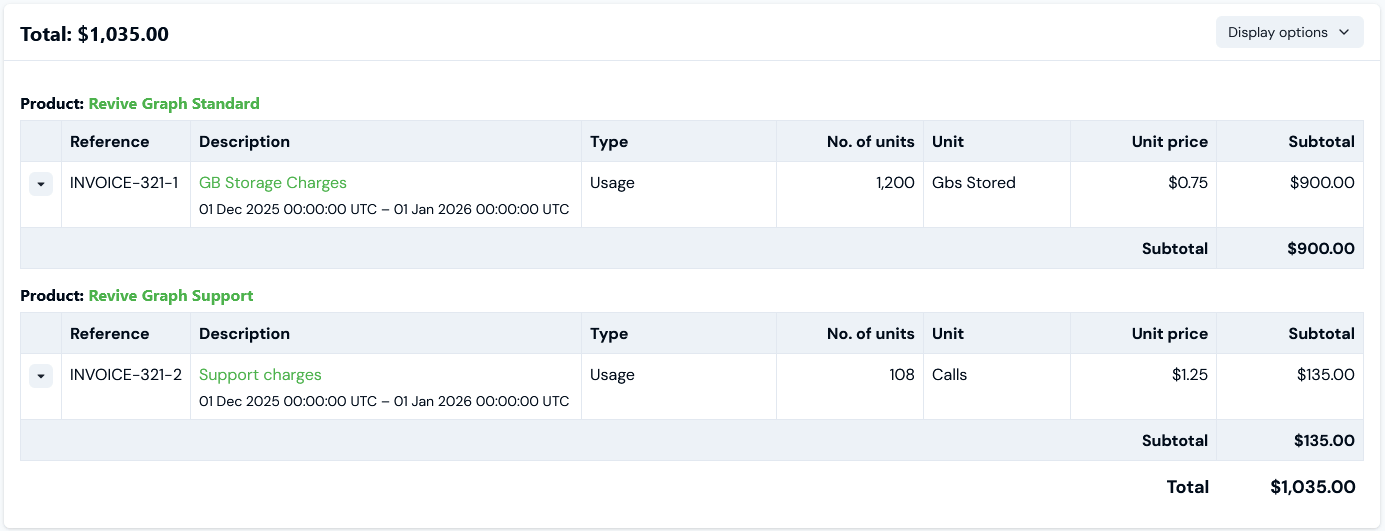 * We can see the Bill has been correctly calculated for the usage submitted for each of the Products and we can then open the **Display options** menu and enable **Group by contract**:
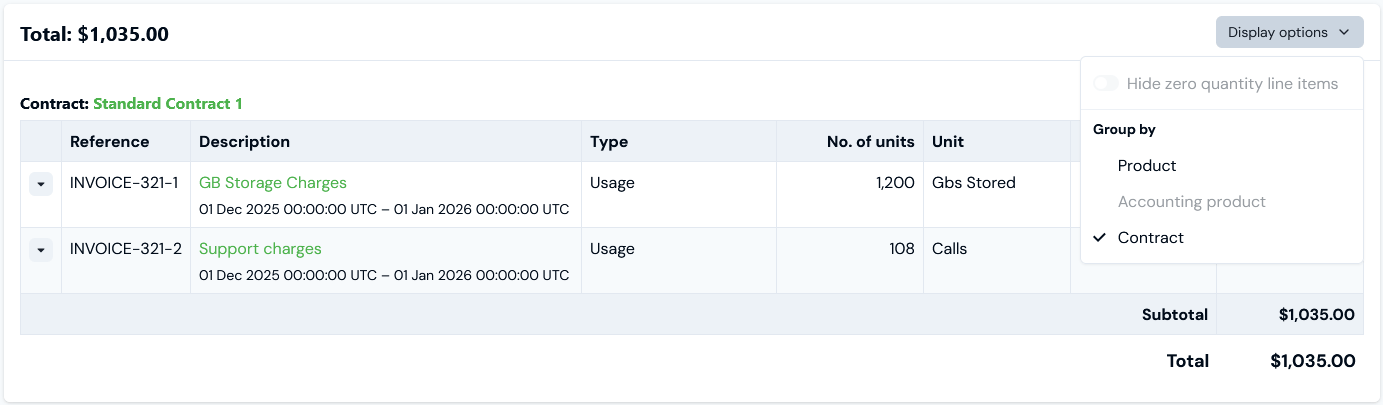 ### Setting Up Contract Billing with Usage Filters
Suppose that for the current example, you want to maintain Contract billing for the two Products but accommodate variation in the contractual agreement made with different customers. For example, some customers will be charged only for storage of RAW files and for support calls made from the UK.
**Defining Usage Filters?** Please first review the [above section](#defining-usage-filters) explaining how to define usage filters.
**To set up Contract billing with Usage Filters:**
1. Select **Accounts**. The **Accounts** page opens.
2. Select the **Contracts** tab and select to edit **Standard Contract 1**.
3. On the **Contract details** panel under **Usage filters**, we'll add two filters to the Contract:
* Select **Add**. The panel adjusts.
* The first filter defaults to using an **Include** filter for **Contract code** as **Value**. For the current example, select **Custom value** as the **Value** instead. The panel adjusts again.
4. Use the **Dimension code** drop-down list to select a Meter dimension you want to use for filtering usage. Then enter the **Value** of the selected Meter Dimension you want to filter by and, for the current example, select **Include** for **Usage filter mode**.
5. Select **Add** again to add a second usage filter for the example:
### Setting Up Contract Billing with Usage Filters
Suppose that for the current example, you want to maintain Contract billing for the two Products but accommodate variation in the contractual agreement made with different customers. For example, some customers will be charged only for storage of RAW files and for support calls made from the UK.
**Defining Usage Filters?** Please first review the [above section](#defining-usage-filters) explaining how to define usage filters.
**To set up Contract billing with Usage Filters:**
1. Select **Accounts**. The **Accounts** page opens.
2. Select the **Contracts** tab and select to edit **Standard Contract 1**.
3. On the **Contract details** panel under **Usage filters**, we'll add two filters to the Contract:
* Select **Add**. The panel adjusts.
* The first filter defaults to using an **Include** filter for **Contract code** as **Value**. For the current example, select **Custom value** as the **Value** instead. The panel adjusts again.
4. Use the **Dimension code** drop-down list to select a Meter dimension you want to use for filtering usage. Then enter the **Value** of the selected Meter Dimension you want to filter by and, for the current example, select **Include** for **Usage filter mode**.
5. Select **Add** again to add a second usage filter for the example:
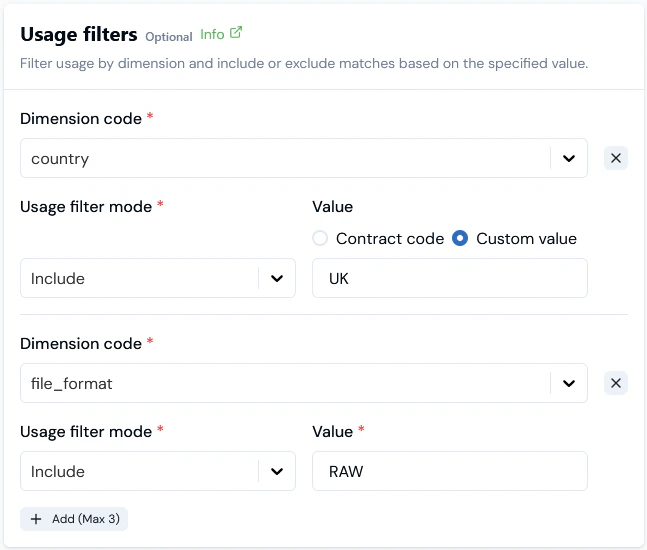 6. Select **Update contract**.
### Running and Viewing Contract Billing with Usage Filters
Now that we've applied usage filters to **Standard** **Contract 1**, we can recalculate the Contract Bill to check that the charges are calculated correctly according to the filtered Product usage:
Revive Graph Standard Meter - two usage data measurements were submitted for the example Account and the Contract usage filtering we've configured should include:
* GIGABs = **300**, FileFormat = **RAW**
* GIGABs = **500**, FileFormat = **RAW**
* Total charge is **800 x \$0.75 = \$600**
Revive Graph Support Meter - two usage data measurements were submitted for the example Account and the Contract usage filtering we've configured should include:
* Support Calls = **26**, Where = **UK**
* Support Calls = **46**, Where = **UK**
* Total charge is **72 x \$1.25 = \$90**
**To run and view Contract billing with Usage Filters:**
1. Open the example **Account** page and select the **Bills** tab.
2. Select the Bill that was generated without usage filters applied to the Contract and select **Recalculate selected**.
3. Select the **Reference** hotlink text to open the Bill in **Bill Management**:
6. Select **Update contract**.
### Running and Viewing Contract Billing with Usage Filters
Now that we've applied usage filters to **Standard** **Contract 1**, we can recalculate the Contract Bill to check that the charges are calculated correctly according to the filtered Product usage:
Revive Graph Standard Meter - two usage data measurements were submitted for the example Account and the Contract usage filtering we've configured should include:
* GIGABs = **300**, FileFormat = **RAW**
* GIGABs = **500**, FileFormat = **RAW**
* Total charge is **800 x \$0.75 = \$600**
Revive Graph Support Meter - two usage data measurements were submitted for the example Account and the Contract usage filtering we've configured should include:
* Support Calls = **26**, Where = **UK**
* Support Calls = **46**, Where = **UK**
* Total charge is **72 x \$1.25 = \$90**
**To run and view Contract billing with Usage Filters:**
1. Open the example **Account** page and select the **Bills** tab.
2. Select the Bill that was generated without usage filters applied to the Contract and select **Recalculate selected**.
3. Select the **Reference** hotlink text to open the Bill in **Bill Management**:
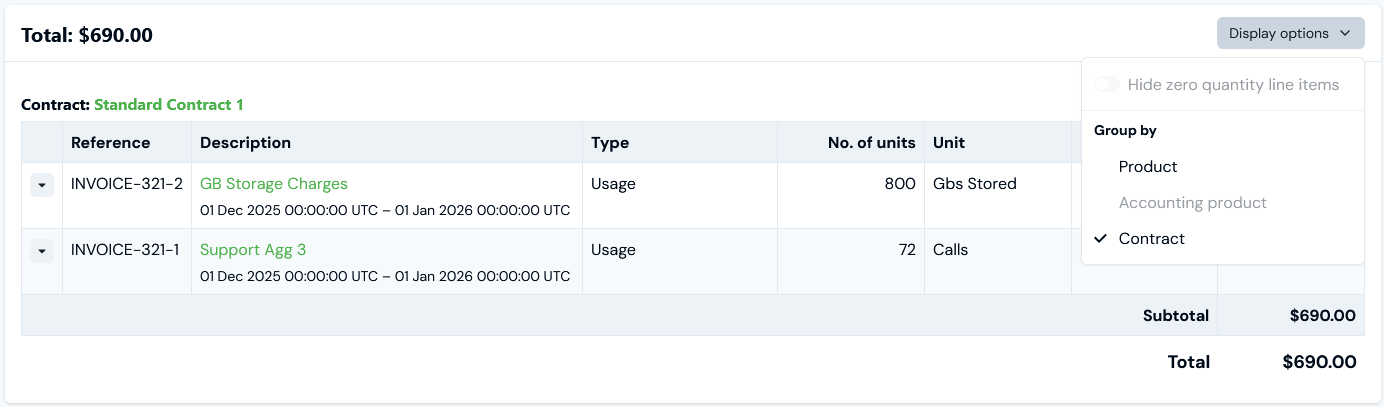
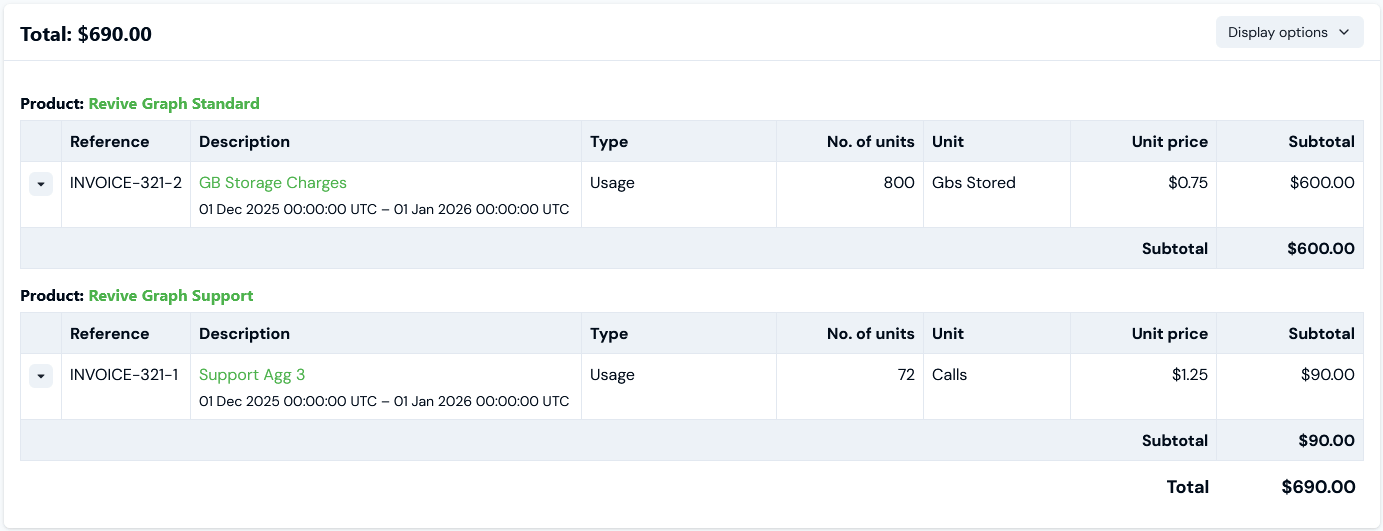 * The Bill has been correctly recalculated for the filtered usage submitted for each of the Products. We can then open the **Display options** menu and enable **Group by contract**: