> ## Documentation Index
> Fetch the complete documentation index at: https://docs.m3ter.com/llms.txt
> Use this file to discover all available pages before exploring further.
# Configuring Azure Marketplace Integrations
The m3ter integration for Azure Marketplace allows you to combine m3ter’s advanced metering and rating capabilities with Marketplace’s unparalleled customer engagement.
You can define and manage integrations for sending your end customer Account Bills generated in m3ter outbound into Azure Marketplace:
* First, [complete prerequisites](/guides/integrations/setting-up-integrations/configuring-azure-marketplace-integrations#completing-azure-prerequisites).
* Second, [create the integration](/guides/integrations/setting-up-integrations/configuring-azure-marketplace-integrations#creating-the-integration).
* Third, [set up authentication](/guides/integrations/setting-up-integrations/configuring-azure-marketplace-integrations#setting-up-authentication-for-the-integration) for the integration to connect with Azure Marketplace using an integration credential.
**Notes:**
* **Azure Marketplace Integration in Beta Release!** Please note that the Azure Marketplace integration is currently in Beta release:
* See [Feature Release Stages](/guides/getting-started/feature-release-stages) for Beta release definition.
* If you intend to implement this integration for your m3ter Organization, please contact m3ter Support or your m3ter contact person to discuss. See section 7. of our [Terms of Service](https://www.m3ter.com/docs/legal/terms-of-service) for Beta Usage.
* **Accounting Products?** Many line item types can be mapped to specific Accounting Products to serve your revenue recognition and accounting purposes. Where this is the case, the integration will use the assigned Accounting Products.
* **Reconciliation Features!** m3ter offers useful reconciliation features to support Azure Marketplace integrations. See [Azure Marketplace Integrations - Reconciliation Features ](/guides/integrations/setting-up-integrations/azure-marketplace-integrations-reconciliation-features)for more details.
* **Reviewing Integration Runs!** When you've set up an integration with Azure Marketplace for your Organization in your production environment, you can review details of the integration runs performed for the integration. See [Reviewing Azure Marketplace Bill Integration Runs](/guides/integrations/setting-up-integrations/azure-marketplace-integrations-reconciliation-features#reviewing-azure-marketplace-bill-integration-runs).
## Completing Azure Prerequisites
This section provides guidance on completing some necessary prerequisites for your m3ter integration to successfully send out Bills to Azure Marketplace:
* [Azure Marketplace Dimension Pricing](/guides/integrations/setting-up-integrations/configuring-azure-marketplace-integrations#azure-marketplace-dimension-pricing)
* [Completing Offer Prerequisites](/guides/integrations/setting-up-integrations/configuring-azure-marketplace-integrations#completing-offer-prerequisites)
* [Completing External Mappings](/guides/integrations/setting-up-integrations/configuring-azure-marketplace-integrations#completing-external-mappings)
### Azure Marketplace Dimension Pricing
As a prerequisite, you must ensure that any target pricing dimensions in your Azure Marketplace listing are configured with a price of \$0.01 per unit. Usage data for these dimensions is then submitted via the m3ter platform. This allows m3ter to fully control pricing logic and to ensure usage metering accuracy. m3ter then proceeds to calculate the quantity to report to Azure Marketplace based on the line items in the bill, and after pricing model logic has already been applied to metered usage. For example, for a line item total of \$0.50 dollars m3ter will report a quantity of 50 to Azure Marketplace.
### Completing Offer Prerequisites
During offer setup, m3ter needs two prerequisites to be in place:
* Tenant ID
* Application (client) ID
You can then complete the technical configuration of the m3ter offer setup:
* Offer Setup
#### Tenant ID
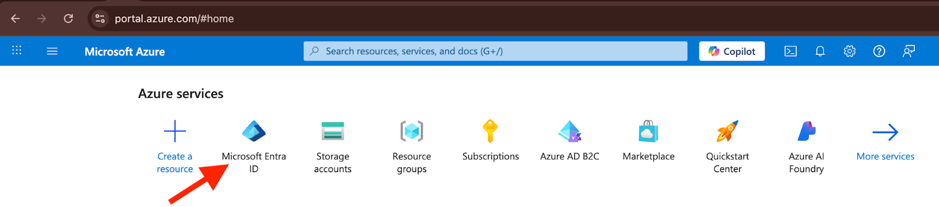
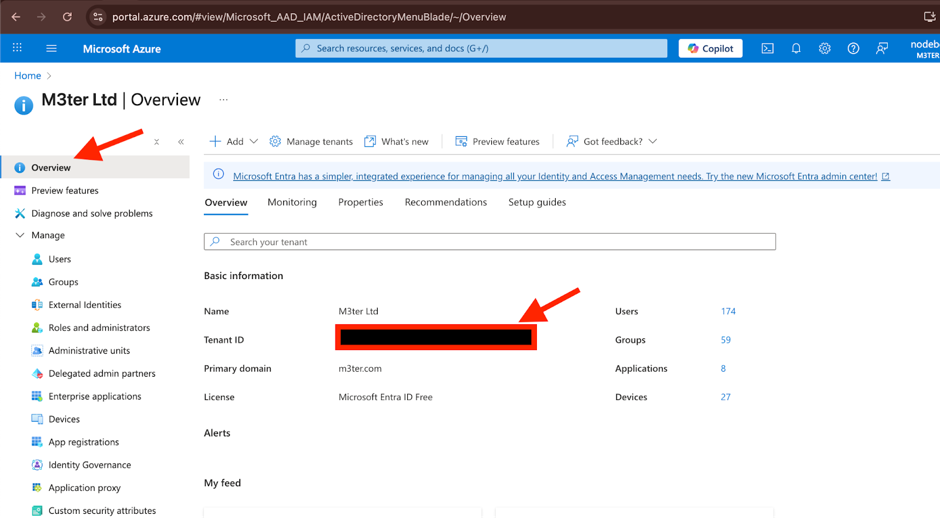
You can create/find details of the **Tenant ID** under **Microsoft Entra ID** in the Azure portal.
* Under **Azure services**, select **Microsoft Entra ID**:
 * Select **M3ter Ltd | Overview**. The **Tenant ID** is listed under **Basic information**:
 #### Application (client) ID
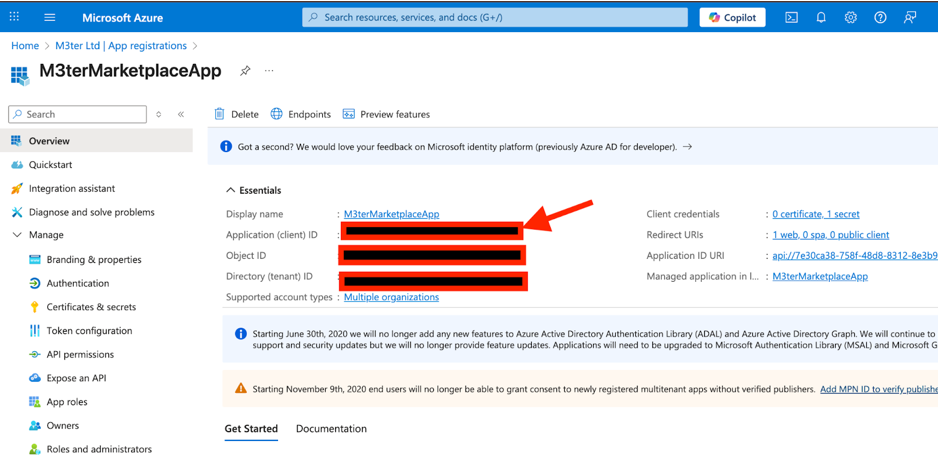
You can create/find the **Application (client) ID** to associate with the offer under Microsoft Entra **App registrations**:
#### Application (client) ID
You can create/find the **Application (client) ID** to associate with the offer under Microsoft Entra **App registrations**:
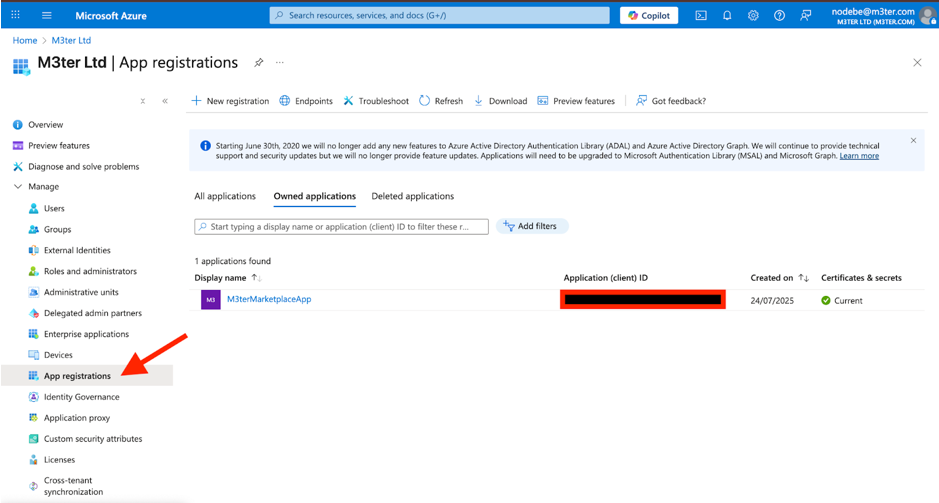 * Alternatively:
 #### Offer Setup
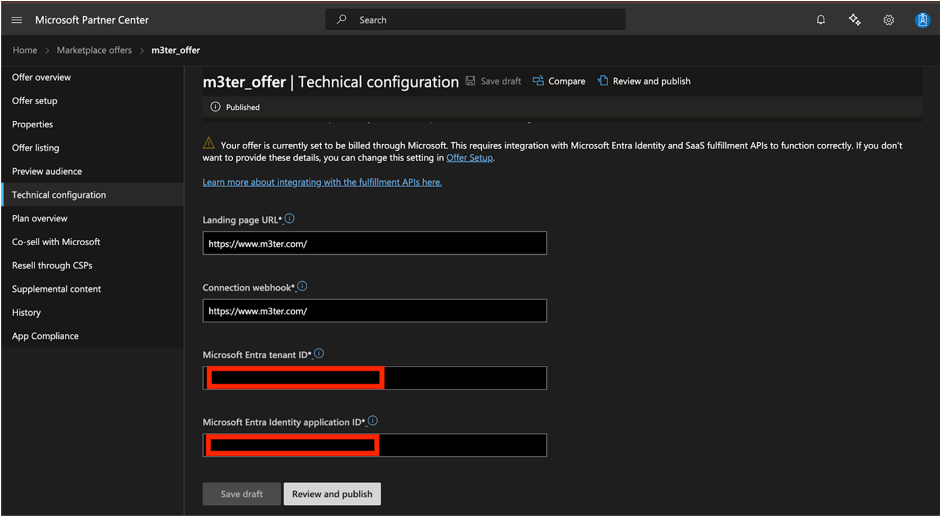
To complete the offer setup:
* Enter the **Tenant ID** for **Microsoft Entra tenant ID**.
* Enter the **Application (client) ID** for **Microsoft Entra Identity application ID**:
#### Offer Setup
To complete the offer setup:
* Enter the **Tenant ID** for **Microsoft Entra tenant ID**.
* Enter the **Application (client) ID** for **Microsoft Entra Identity application ID**:
 ### Completing External Mappings
You must configure some External Mappings in m3ter to support your Azure Marketplace integration:
* [Account Mapping](/guides/integrations/setting-up-integrations/configuring-azure-marketplace-integrations#account-mapping)
* [Usage Line Item Mappings](/guides/integrations/setting-up-integrations/configuring-azure-marketplace-integrations#usage-line-item-mappings)
**Tip: More on External Mappings?** See [Creating and Managing External Mappings](/guides/integrations/setting-up-integrations/creating-and-managing-external-mappings) for more details.
#### Account Mapping
Whenever an end customer subscribes to a Marketplace product, Azure provides a unique **subscriptionId** which m3ter needs to know to submit usage data. An External Mapping therefore needs to be set up for a m3ter Account to the Azure Subscription:
* In your m3ter Organization, select **Integrations>External mappings**:
### Completing External Mappings
You must configure some External Mappings in m3ter to support your Azure Marketplace integration:
* [Account Mapping](/guides/integrations/setting-up-integrations/configuring-azure-marketplace-integrations#account-mapping)
* [Usage Line Item Mappings](/guides/integrations/setting-up-integrations/configuring-azure-marketplace-integrations#usage-line-item-mappings)
**Tip: More on External Mappings?** See [Creating and Managing External Mappings](/guides/integrations/setting-up-integrations/creating-and-managing-external-mappings) for more details.
#### Account Mapping
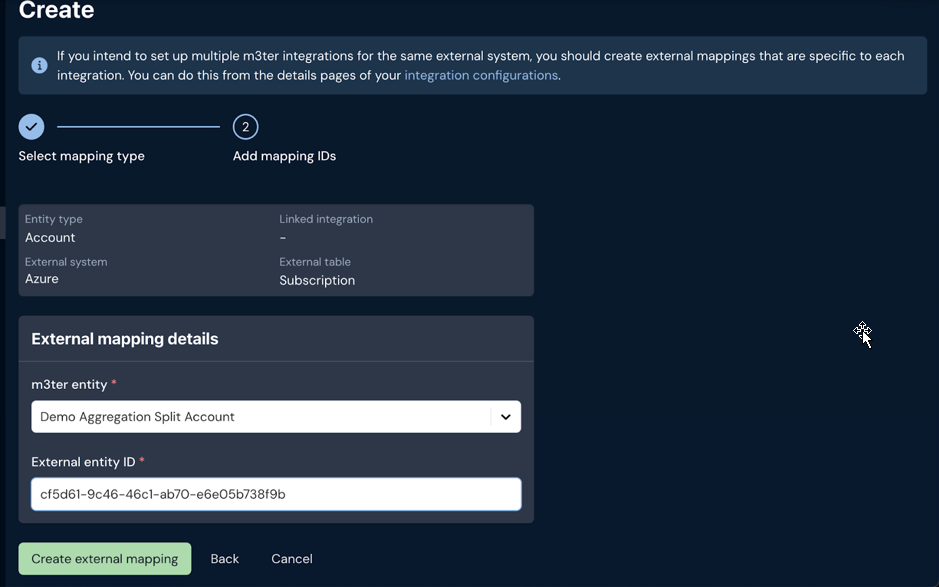
Whenever an end customer subscribes to a Marketplace product, Azure provides a unique **subscriptionId** which m3ter needs to know to submit usage data. An External Mapping therefore needs to be set up for a m3ter Account to the Azure Subscription:
* In your m3ter Organization, select **Integrations>External mappings**:
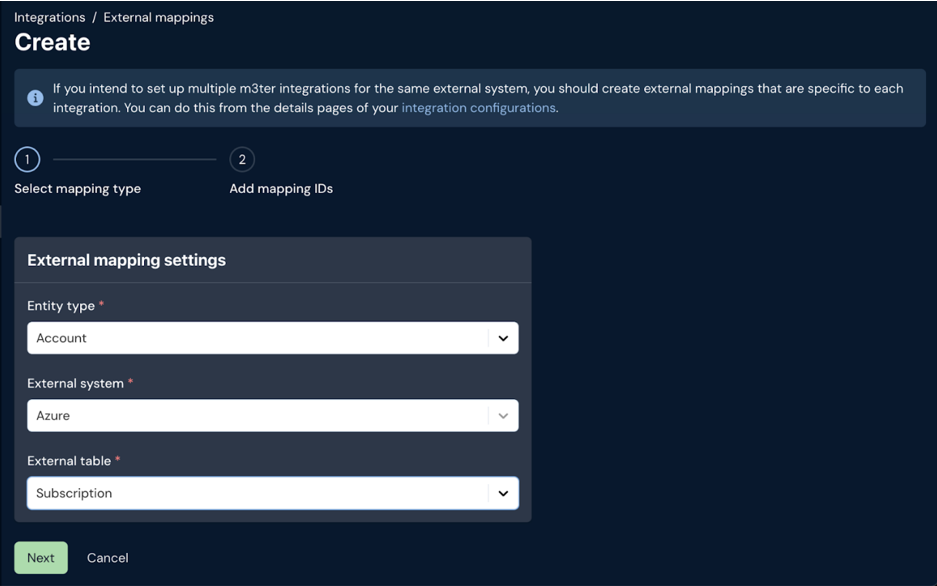
 * Select **Create external mapping**, and then for **Select mapping type** enter the following:
 * Select **Next**. Under **Add mapping IDs**, enter the end customer Account for **m3ter entity** and the Azure Marketplace **subcriptionid** for **External entity ID**:
 #### Usage Line Item Mappings
Depending on how you want to split Bill usage line items for your integration, you might also need to set up some additional External Mappings.
##### **Item per Product**
With this option selected, you'll need to set up External Mappings for each product that's intended to meter to Azure. m3ter will then send the total of all line items for a given product over to its mapped Azure Marketplace dimension:
#### Usage Line Item Mappings
Depending on how you want to split Bill usage line items for your integration, you might also need to set up some additional External Mappings.
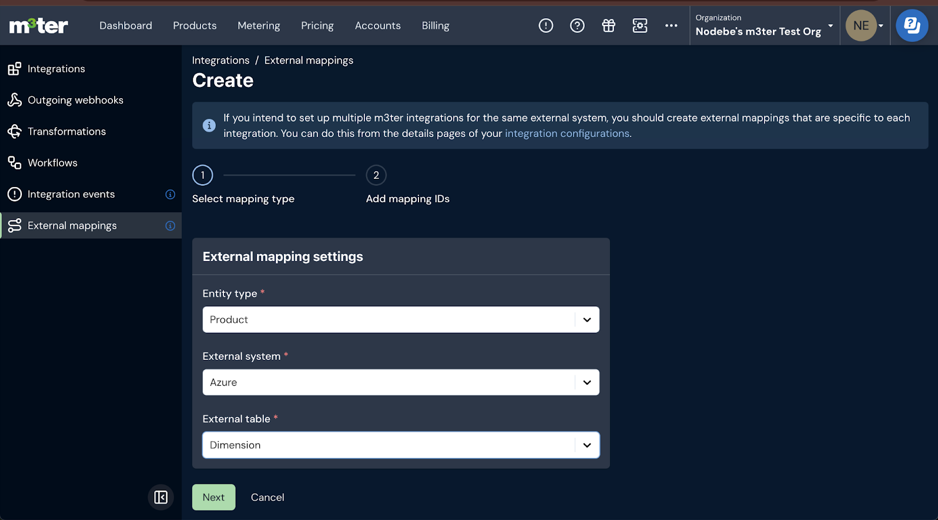
##### **Item per Product**
With this option selected, you'll need to set up External Mappings for each product that's intended to meter to Azure. m3ter will then send the total of all line items for a given product over to its mapped Azure Marketplace dimension:
 ##### **Item per Aggregation**
With this option selected, it’s necessary to set up External Mappings for each Aggregation that's intended to meter to Azure. m3ter will then send the total of all line items for a given Aggregation over to its mapped Azure Marketplace dimension:
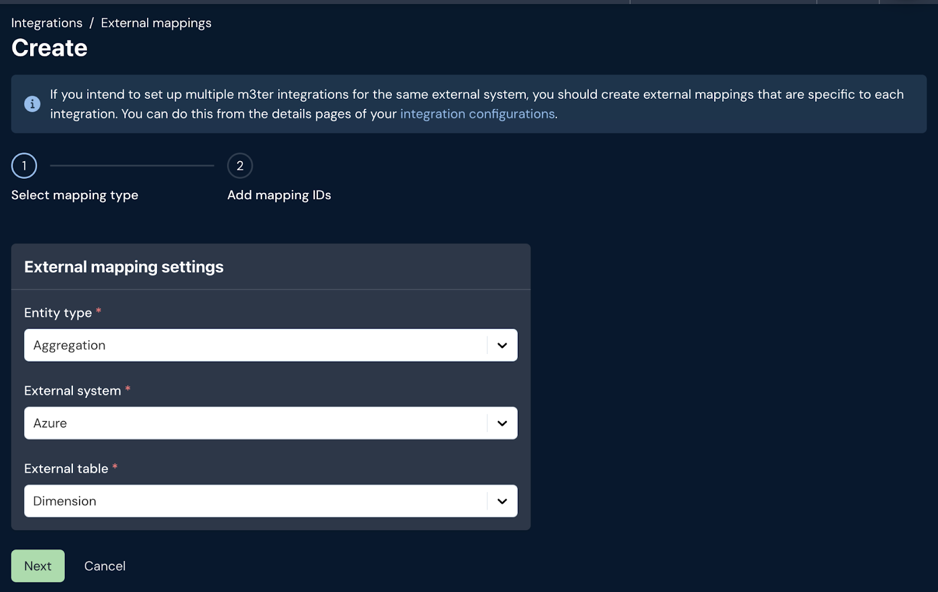
##### **Item per Aggregation**
With this option selected, it’s necessary to set up External Mappings for each Aggregation that's intended to meter to Azure. m3ter will then send the total of all line items for a given Aggregation over to its mapped Azure Marketplace dimension:
 ## Creating the Integration
You can quickly set up an Azure Marketplace integration in the Console.
**To define a m3ter - Azure Marketplace integration:**
1. Select **Integrations**:
## Creating the Integration
You can quickly set up an Azure Marketplace integration in the Console.
**To define a m3ter - Azure Marketplace integration:**
1. Select **Integrations**:
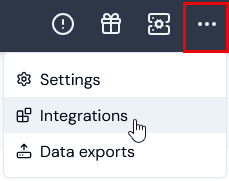 The **Integrations** page opens.
2. Select **Marketplace Integrations**.
3. Select **AZURE**. The **Integrations>AZURE** page opens.
4. On the **Configurations** panel, select **Configure new integration>Configure bill integration**:
The **Integrations** page opens.
2. Select **Marketplace Integrations**.
3. Select **AZURE**. The **Integrations>AZURE** page opens.
4. On the **Configurations** panel, select **Configure new integration>Configure bill integration**:
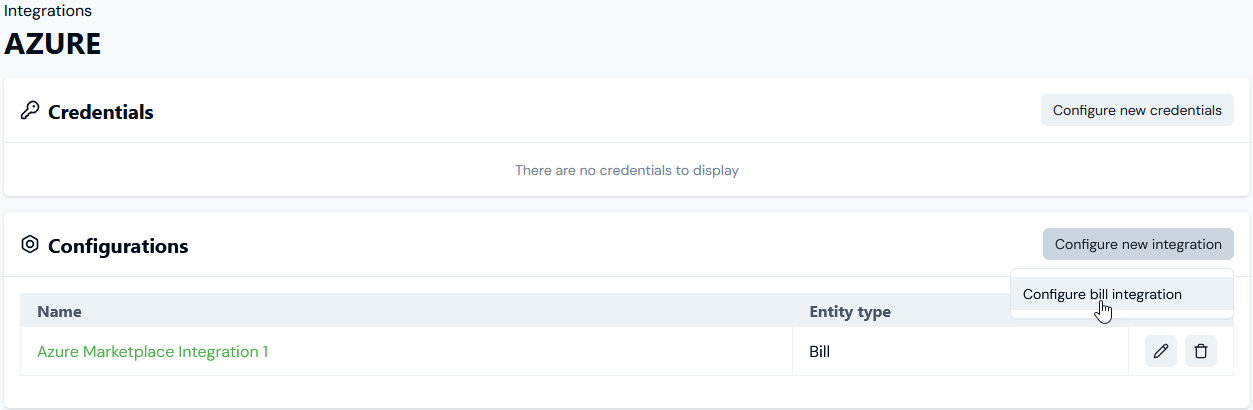 The **Create** page opens and the **Entity type** and **External system** you are creating the integration for are shown at the top of the page.
5. Use the **Global configuration** panel to:
* Enter a **Name** for the integration. This is required and is useful if you intend to create multiple integrations for the same External system/Entity Type and need to clearly differentiate them.
* Select the Accounts you want the integration to apply to:
* **Account ids.** Select the Accounts you want to include - all selected Accounts are treated as *allowed* for the integration.
* **Restricted account ids.** Select the Accounts you want to exclude - all selected Accounts are treated as *disallowed* for the integration.
**Notes:**
* If you want to include *all Accounts* in the integration, leave both **Accounts ids** and **Restricted account ids** empty.
* Any filtering by **Account ids** you define using these settings to control which Accounts the integration runs for will be *in addition* to any filtering you define using the **Account filter** option - see the following step for **Entity configuration** options.
* Select Users for Email notifications if disabled:
* **Integration disabled notification users**. Select Organization Users you want to receive an Email notification if the integration is automatically disabled.
**Notes:**
* An integration is automatically disabled if there have been 20 successive previous error Event responses to earlier attempts to run the integration. See [Reviewing and Resolving Integration Events](/guides/integrations/setting-up-integrations/reviewing-and-resolving-integration-events) for more details.
* If you select Organization Users to receive an Email notification when the integration is automatically disabled, their User id will be listed under **Configuration data** on the **Integration details** page.
6. Use the **Entity configuration** panel to configure the m3ter entity you will be synchronizing with for the integration. In the case of a Bill integration, this entity will be the Bill generated for a customer Account in m3ter:
* **Only send bill on approval.** Enable this if you only want Bills to be sent when they have been approved. If disabled, the Bill will be sent every time it is regenerated. Default is disabled. Note that:
* The frequency of Bills sent will depend on the billing frequency defined for the Account Plan attached to the Account - such as daily/weekly/monthly/annually.
* If an Account has a Prepayment on it and the billing for Prepayment fees is configured to run on a customized schedule, Bills will be sent when scheduled Bills are generated.
* If a Bill is manually recalculated the updated Bill will be sent.
* If you enable this, then the integration will not run for *all Bill Jobs*.
* **Use external mapping account code.** Enable this if you want the integration to look in the External Mappings for the Account identifier code, which means you can use an external Id. If this is disabled, the m3ter Account Id is used. Default is disabled.
* **Excluded line item types.** Optionally filter the Bill line item types you send to the destination system. For example, only send charges or credits and exclude all other line item types.
* For details of line item types, see [Bill Line Item Types](/guides/billing-and-usage-data/running-viewing-and-managing-bills/bill-line-item-types).
* **Account filter**. Optionally, enter an expression that is run on the Account to determine whether or not the integration includes the Account. You can use this setting if you have multiple destinations for sending Bills outbound to Azure Marketplace. For example:
* `"customFields != null AND customFields.country == "UK""`
* In this example, the integration will include an Account *only if* you have created a Custom Field for the Account called *country* and given the field a value of *UK*.
**Notes:**
* **Other Account fields for Account filter expression?** You can reference other fields on the Account object in the **Account filter** expression. For details and another example, see [Managing Multiple Third Party Destinations for Integrations](/guides/integrations/setting-up-integrations/managing-multiple-destinations-for-integrations).
* **Additional filtering?** Any global filtering you define using the settings to include/exclude Accounts for integration runs by **Account ids** will be *in addition* to any filtering you define using the **Account filter** option - see the previous step for **Global Configuration**.
* **Enforce external mappings for config**. Optionally enable this if you want the integration to use only those external mappings specified as being for this configuration.
* Use this setting if you want to set up multiple integrations for the same external system. You can then create separate external mappings for each integration from the details page of each integration, and these external mappings become **Linked external mappings** for the specific integration. See [Creating Linked External Mappings](/guides/integrations/setting-up-integrations/creating-and-managing-external-mappings#creating-linked-external-mappings).
* **Excluded products**. Optionally filter the Bill line items you send to the external system. Any line items associated with the selected Products will be be excluded when the integration runs.
* **Excluded aggregations**. Optionally filter the Bill line items you send to the external system. Any line items associated with the selected Aggregations will be be excluded when the integration runs.
7. Use the **External system configuration** panel to enter the settings specific to the external system. These settings include field mappings as well as other system-specific configurations:
* **Split usage line items**. Select how you want m3ter to create usage invoice items in Azure Marketplace. Three options:
* **Item per bill**.
* **Item per product**.
* **Item per aggregation**.
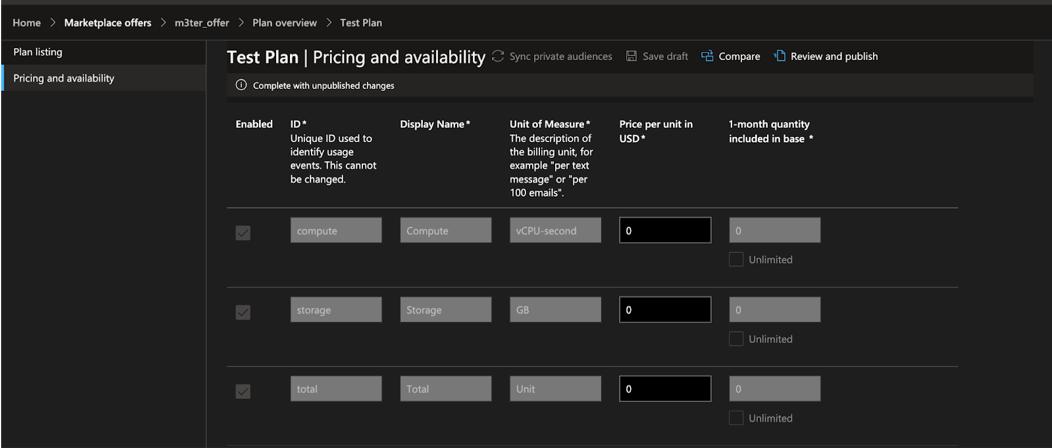
* If you select **Item per bill**, you must enter the Azure dimension you want to use for **Marketplace bill dimension**. m3ter will then send the bill total as one item to the configured dimension. For example, the following **Test Plan** has several dimensions set up under **Pricing and availability**:
The **Create** page opens and the **Entity type** and **External system** you are creating the integration for are shown at the top of the page.
5. Use the **Global configuration** panel to:
* Enter a **Name** for the integration. This is required and is useful if you intend to create multiple integrations for the same External system/Entity Type and need to clearly differentiate them.
* Select the Accounts you want the integration to apply to:
* **Account ids.** Select the Accounts you want to include - all selected Accounts are treated as *allowed* for the integration.
* **Restricted account ids.** Select the Accounts you want to exclude - all selected Accounts are treated as *disallowed* for the integration.
**Notes:**
* If you want to include *all Accounts* in the integration, leave both **Accounts ids** and **Restricted account ids** empty.
* Any filtering by **Account ids** you define using these settings to control which Accounts the integration runs for will be *in addition* to any filtering you define using the **Account filter** option - see the following step for **Entity configuration** options.
* Select Users for Email notifications if disabled:
* **Integration disabled notification users**. Select Organization Users you want to receive an Email notification if the integration is automatically disabled.
**Notes:**
* An integration is automatically disabled if there have been 20 successive previous error Event responses to earlier attempts to run the integration. See [Reviewing and Resolving Integration Events](/guides/integrations/setting-up-integrations/reviewing-and-resolving-integration-events) for more details.
* If you select Organization Users to receive an Email notification when the integration is automatically disabled, their User id will be listed under **Configuration data** on the **Integration details** page.
6. Use the **Entity configuration** panel to configure the m3ter entity you will be synchronizing with for the integration. In the case of a Bill integration, this entity will be the Bill generated for a customer Account in m3ter:
* **Only send bill on approval.** Enable this if you only want Bills to be sent when they have been approved. If disabled, the Bill will be sent every time it is regenerated. Default is disabled. Note that:
* The frequency of Bills sent will depend on the billing frequency defined for the Account Plan attached to the Account - such as daily/weekly/monthly/annually.
* If an Account has a Prepayment on it and the billing for Prepayment fees is configured to run on a customized schedule, Bills will be sent when scheduled Bills are generated.
* If a Bill is manually recalculated the updated Bill will be sent.
* If you enable this, then the integration will not run for *all Bill Jobs*.
* **Use external mapping account code.** Enable this if you want the integration to look in the External Mappings for the Account identifier code, which means you can use an external Id. If this is disabled, the m3ter Account Id is used. Default is disabled.
* **Excluded line item types.** Optionally filter the Bill line item types you send to the destination system. For example, only send charges or credits and exclude all other line item types.
* For details of line item types, see [Bill Line Item Types](/guides/billing-and-usage-data/running-viewing-and-managing-bills/bill-line-item-types).
* **Account filter**. Optionally, enter an expression that is run on the Account to determine whether or not the integration includes the Account. You can use this setting if you have multiple destinations for sending Bills outbound to Azure Marketplace. For example:
* `"customFields != null AND customFields.country == "UK""`
* In this example, the integration will include an Account *only if* you have created a Custom Field for the Account called *country* and given the field a value of *UK*.
**Notes:**
* **Other Account fields for Account filter expression?** You can reference other fields on the Account object in the **Account filter** expression. For details and another example, see [Managing Multiple Third Party Destinations for Integrations](/guides/integrations/setting-up-integrations/managing-multiple-destinations-for-integrations).
* **Additional filtering?** Any global filtering you define using the settings to include/exclude Accounts for integration runs by **Account ids** will be *in addition* to any filtering you define using the **Account filter** option - see the previous step for **Global Configuration**.
* **Enforce external mappings for config**. Optionally enable this if you want the integration to use only those external mappings specified as being for this configuration.
* Use this setting if you want to set up multiple integrations for the same external system. You can then create separate external mappings for each integration from the details page of each integration, and these external mappings become **Linked external mappings** for the specific integration. See [Creating Linked External Mappings](/guides/integrations/setting-up-integrations/creating-and-managing-external-mappings#creating-linked-external-mappings).
* **Excluded products**. Optionally filter the Bill line items you send to the external system. Any line items associated with the selected Products will be be excluded when the integration runs.
* **Excluded aggregations**. Optionally filter the Bill line items you send to the external system. Any line items associated with the selected Aggregations will be be excluded when the integration runs.
7. Use the **External system configuration** panel to enter the settings specific to the external system. These settings include field mappings as well as other system-specific configurations:
* **Split usage line items**. Select how you want m3ter to create usage invoice items in Azure Marketplace. Three options:
* **Item per bill**.
* **Item per product**.
* **Item per aggregation**.
* If you select **Item per bill**, you must enter the Azure dimension you want to use for **Marketplace bill dimension**. m3ter will then send the bill total as one item to the configured dimension. For example, the following **Test Plan** has several dimensions set up under **Pricing and availability**:
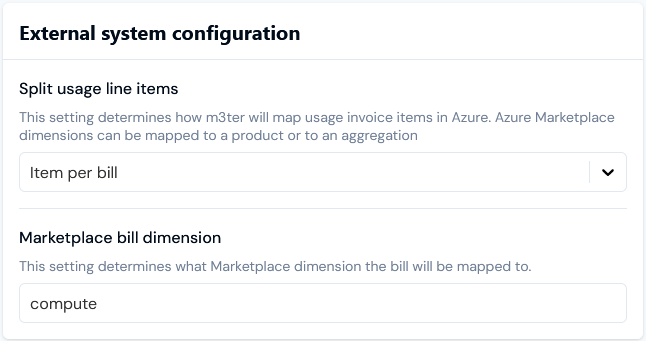
 * We can then use the ID of one of these dimensions - for example **compute**:
 **Important: Split usage line item requirements!**
* **Item Per Bill** selected. In **Marketplace bill dimension** you *must enter* the ID of the Azure Marketplace dimension you want to use for sending Bill data.
* **Item per product** or **Item per aggregation** selected. You *must set up* required External Mappings - see above Usage Line Item Mappings.
* Note that if you've selected **Item per product** or **Item per aggregation**, then **Marketplace bill dimension** is *not required*.
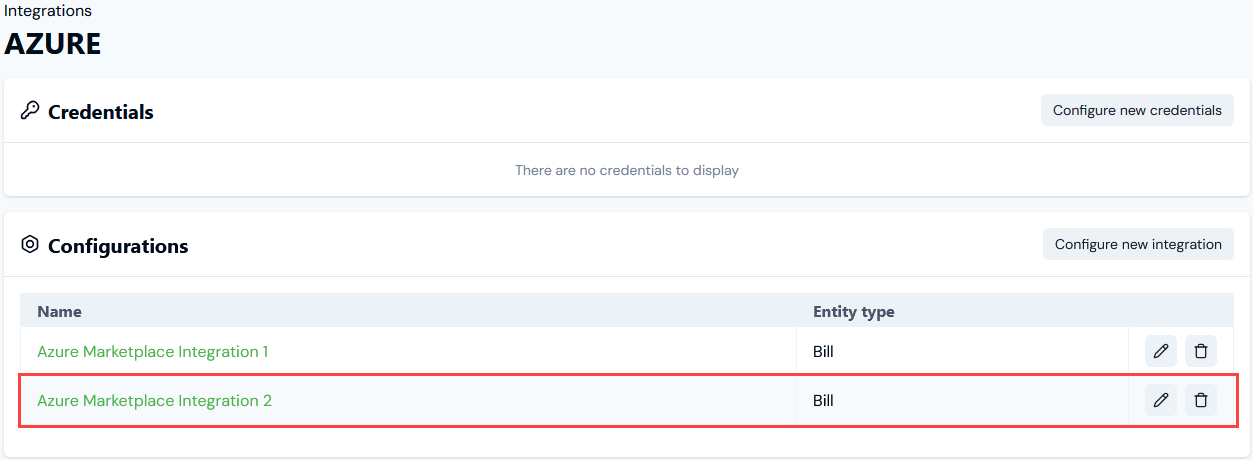
8. Select **Create integration**. You are returned to the **Integrations>AZURE** page, where the integration is listed on the **Configurations** panel:
**Important: Split usage line item requirements!**
* **Item Per Bill** selected. In **Marketplace bill dimension** you *must enter* the ID of the Azure Marketplace dimension you want to use for sending Bill data.
* **Item per product** or **Item per aggregation** selected. You *must set up* required External Mappings - see above Usage Line Item Mappings.
* Note that if you've selected **Item per product** or **Item per aggregation**, then **Marketplace bill dimension** is *not required*.
8. Select **Create integration**. You are returned to the **Integrations>AZURE** page, where the integration is listed on the **Configurations** panel:
 ## Setting Up Authentication for the Integration
When you have created an Azure Marketplace integration, you can select an integration Credential you've created for authentication allowing the integration to connect with Azure Marketplace. See [Creating Azure Marketplace Integration Credentials](/guides/integrations/setting-up-integrations/managing-integration-credentials/creating-azure-marketplace-integration-credentials).
**To set up authentication for your m3ter - Azure Marketplace integration:**
1. Select **Integrations**. The **Integrations** page opens.
2. Select **Marketplace**.
3. Select **Azure**. The **Integrations>AZURE** page opens.
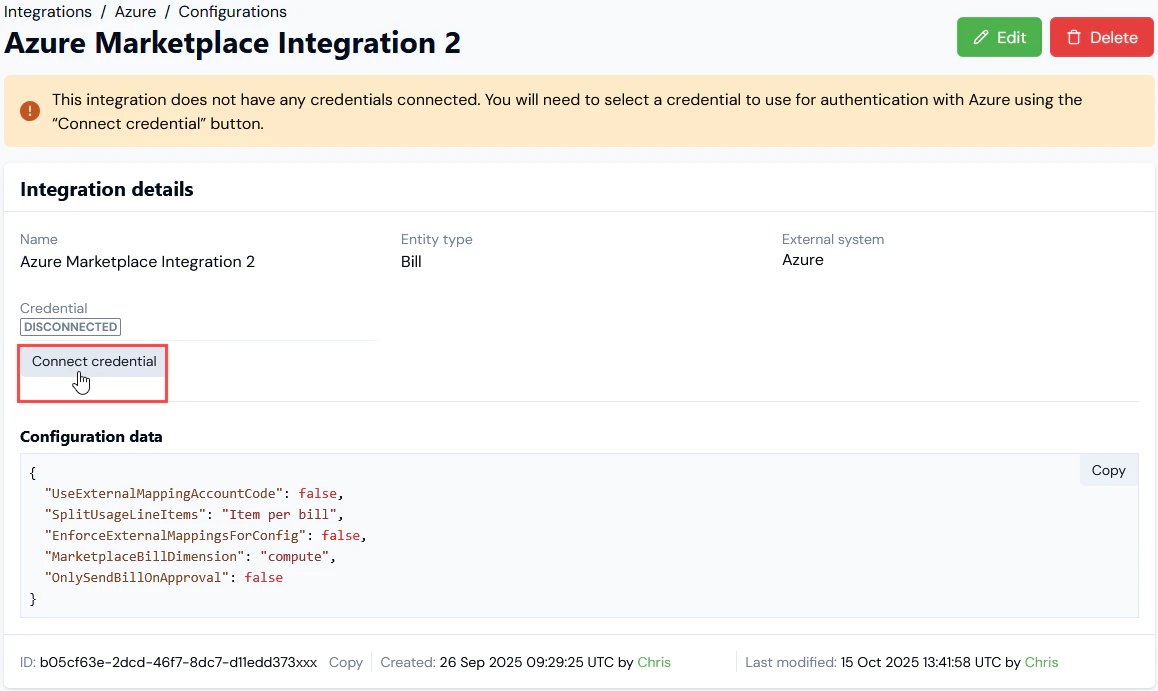
4. On the **Configurations** panel, select the **Name** hotlink text of the **Azure Marketplace** integration you want to set up authentication for. The **Integration details** page opens:
## Setting Up Authentication for the Integration
When you have created an Azure Marketplace integration, you can select an integration Credential you've created for authentication allowing the integration to connect with Azure Marketplace. See [Creating Azure Marketplace Integration Credentials](/guides/integrations/setting-up-integrations/managing-integration-credentials/creating-azure-marketplace-integration-credentials).
**To set up authentication for your m3ter - Azure Marketplace integration:**
1. Select **Integrations**. The **Integrations** page opens.
2. Select **Marketplace**.
3. Select **Azure**. The **Integrations>AZURE** page opens.
4. On the **Configurations** panel, select the **Name** hotlink text of the **Azure Marketplace** integration you want to set up authentication for. The **Integration details** page opens:
 * **Notes:**
* A warning is shown that the integration is not yet connected to Azure Marketplace.
* The **ID** of the integration configuration is shown at the bottom of the **Integration details** card, and you can copy the **ID** directly to your clipboard.
5. Select **Connect credential**. A **Select credential** modal appears.
6. Select a Credential you created earlier and want to use to authenticate the integration with Azure Marketplace. See [Creating Azure Marketplace Integration Credentials](/guides/integrations/setting-up-native-integrations/managing-integration-credentials/creating-azure-marketplace-integration-credentials).
7. Select **Confirm**. The modal closes and on **Integrations details**, the integration now shows as **CONNECTED**:
* The Credential used to connect the integration is shown.
* If at any time you want to disconnect the integration, select **Disconnect credential**.
* If you want to use a different Credential for connecting the integration, select **Change credential**. The **Select credential** modal appears and you can select a different Credential.
**Tip: Integrations API Calls?** When you have set up your integration, you can review and manage the integration using a full set of API Calls. See the [Integrations section](/api/integrations/introduction) of our API Reference Docs.
* **Notes:**
* A warning is shown that the integration is not yet connected to Azure Marketplace.
* The **ID** of the integration configuration is shown at the bottom of the **Integration details** card, and you can copy the **ID** directly to your clipboard.
5. Select **Connect credential**. A **Select credential** modal appears.
6. Select a Credential you created earlier and want to use to authenticate the integration with Azure Marketplace. See [Creating Azure Marketplace Integration Credentials](/guides/integrations/setting-up-native-integrations/managing-integration-credentials/creating-azure-marketplace-integration-credentials).
7. Select **Confirm**. The modal closes and on **Integrations details**, the integration now shows as **CONNECTED**:
* The Credential used to connect the integration is shown.
* If at any time you want to disconnect the integration, select **Disconnect credential**.
* If you want to use a different Credential for connecting the integration, select **Change credential**. The **Select credential** modal appears and you can select a different Credential.
**Tip: Integrations API Calls?** When you have set up your integration, you can review and manage the integration using a full set of API Calls. See the [Integrations section](/api/integrations/introduction) of our API Reference Docs.