> ## Documentation Index
> Fetch the complete documentation index at: https://docs.m3ter.com/llms.txt
> Use this file to discover all available pages before exploring further.
# Creating and Managing Integration Credentials
In the Integrations section of the Console, you can create, view, and manage the *Credentials* for your Organization:
* **Integration Configurations**. Create the Credentials you'll need when setting up authentication with external systems for your Integration Configurations.
* **Multiple Third Party Destinations**. You can create multiple separate Credentials for authentication of your Integrations Configurations with multiple destinations in your 3rd-party system. See [Managing Multiple Third Party Destinations for Integrations](/guides/integrations/setting-up-integrations/managing-multiple-destinations-for-integrations).
* **Notification Webhook Integrations**. When you create an Outgoing webhook and define the M3TER\_SIGNED\_REQUEST Credentials for authentication with the designated webhook endpoint, you can review the Credential on the **Outgoing webhook details** page. You can then link a Notification rule to the Outgoing webhook to complete the configuration of the Notification Webhook Integration. See [Creating and Managing Outgoing Webhooks](/guides/integrations/setting-up-integrations/creating-and-managing-destinations).
* **m3sh Workflows**. If you are using m3sh Workflows, depending on the Workflow type and the functions used in the Workflow, different types of Credentials might be required:
* **Incoming Webhook Credentials**. m3sh Workflows that use an Incoming Webhook trigger require Incoming Webhook Credentials.
* **External System Integration Credentials**. API functions in a m3sh Workflow that call an external system can use the integration Credentials you've set up for that system.
* **m3ter Service User Credentials**. API functions in a m3sh Workflow that call the m3ter system can use the Credentials set up for m3ter Service Users. See [Service Authentication](https://docs.m3ter.com/guides/authenticating-with-the-platform/service-authentication).
This topic explains how to create integration Credentials, Incoming Webhook Credentials, and how to view and manage your Organization's Credentials:
* [Creating Credentials for Integration Configurations](/guides/integrations/setting-up-integrations/managing-integration-credentials#creating-credentials-for-integration-configurations)
* [Creating Incoming Webhook Credentials](#creating-incoming-webhook-credentials)
* [Viewing and Managing Credentials](/guides/integrations/setting-up-integrations/managing-integration-credentials#viewing-and-managing-credentials)
## Creating Credentials for Integration Configurations
For each type of m3ter integrations available, you can create the Credentials you need to authenticate your integrations with specific external 3rd-party systems. In the Console, there are two ways you can create integration Credentials for external systems:
* Open the *Integrations* page for the specific external system and create Credentials from there - see the following topics for details:
* [Creating Stripe Integration Credentials](/guides/integrations/setting-up-integrations/managing-integration-credentials/creating-stripe-integration-credentials)
* [Creating NetSuite Integration Credentials](/guides/integrations/setting-up-integrations/managing-integration-credentials/creating-netsuite-integration-credentials)
* [Creating Paddle Integration Credentials](/guides/integrations/setting-up-integrations/managing-integration-credentials/creating-paddle-integration-credentials)
* [Creating Chargebee Integration Credentials](/guides/integrations/setting-up-integrations/managing-integration-credentials/creating-chargebee-integration-credentials)
* [Creating QuickBooks Integration Credentials](/guides/integrations/setting-up-integrations/managing-integration-credentials/creating-quickbooks-integration-credentials)
* [Creating Xero Integration Credentials](/guides/integrations/setting-up-native-integrations/managing-integration-credentials/creating-xero-integration-credentials)
* [Creating Salesforce Integration Credentials](/guides/integrations/setting-up-integrations/managing-integration-credentials/creating-salesforce-integration-credentials)
* [Creating AWS Marketplace Integration Credentials](/guides/integrations/setting-up-integrations/managing-integration-credentials/creating-aws-marketplace-integration-credentials)
* [Creating Azure Marketplace Integration Credentials](/guides/integrations/setting-up-integrations/managing-integration-credentials/creating-azure-marketplace-integration-credentials)
* Open the *Credentials* page and create integration Credentials for specific externals systems from there, as follows:
**To create integration Credentials:**
1. Select **Integrations**:
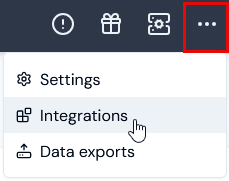 The **Integrations** page opens
2. Select **Credentials**:
The **Integrations** page opens
2. Select **Credentials**:
 The **Credentials** page opens.
3. Select **Create credential**. The **Create** page opens.
4. Under **Credentials details**:
* Enter a **Name**.
* Use the **Destination** drop-down to select the external system. The card adjusts for the selected system to allow you to enter the settings required for authenticating with the system:
The **Credentials** page opens.
3. Select **Create credential**. The **Create** page opens.
4. Under **Credentials details**:
* Enter a **Name**.
* Use the **Destination** drop-down to select the external system. The card adjusts for the selected system to allow you to enter the settings required for authenticating with the system:
 * In this example of creating a Credential for authenticating with **Chargebee**, two settings are required:
* **Api key**. The **Api key** generated in the Chargebee Console.
* **Site**. The details of the Chargebee **Site** to be used as the subdomain when making API Requests
5. Select **Create credential**. You are returned to the **Credentials** page where the new Credential is listed:
* In this example of creating a Credential for authenticating with **Chargebee**, two settings are required:
* **Api key**. The **Api key** generated in the Chargebee Console.
* **Site**. The details of the Chargebee **Site** to be used as the subdomain when making API Requests
5. Select **Create credential**. You are returned to the **Credentials** page where the new Credential is listed:
 * The Credential is now available for connecting your integrations with the external system - in this example **Chargebee**.
## Creating Incoming Webhook Credentials
m3sh Workflows that use an Incoming Webhook trigger require Incoming Webhook Credentials.
**To create Incoming Webhook Credentials:**
1. Select **Integrations**. The **Integrations** page opens.
2. Select **Credentials**:
The **Credentials** page opens.
3. Select **Create credential**. The **Create** page opens.
4. Under **Credentials details**:
* Enter a **Name**.
* Use the **Destination** drop-down to select **m3sh workflow**. The card adjusts:
* The Credential is now available for connecting your integrations with the external system - in this example **Chargebee**.
## Creating Incoming Webhook Credentials
m3sh Workflows that use an Incoming Webhook trigger require Incoming Webhook Credentials.
**To create Incoming Webhook Credentials:**
1. Select **Integrations**. The **Integrations** page opens.
2. Select **Credentials**:
The **Credentials** page opens.
3. Select **Create credential**. The **Create** page opens.
4. Under **Credentials details**:
* Enter a **Name**.
* Use the **Destination** drop-down to select **m3sh workflow**. The card adjusts:
 * Five options are available for the **Type** of Incoming Webhook Credential, and the required settings for each option varies:
* **HTTP basic**. Enter a **Username** and **Password** that matches those configured for the Webhook in the source system. *(Default)*
* **HubSpot client server**. Enter a valid **Client secret** for the HubSpot source.
* **m3ter app signature**. Enter the **Access key id** and **API secret** if the Incoming Webhook requires [M3TER\_SIGNED\_REQUEST](https://docs.m3ter.com/guides/integrations/setting-up-integrations/creating-and-managing-destinations#webhook-authentication-for-m3ter_signed_request) authentication.
* **Sage Intacct client secret**. Enter a valid **Client secret** for the Sage Intacct source.
* **Stripe signed request**. Enter a valid **Signing key** for the Stripe source.
5. Select **Create credential**. You are returned to the **Credentials** page where the new Credential is listed:
* Five options are available for the **Type** of Incoming Webhook Credential, and the required settings for each option varies:
* **HTTP basic**. Enter a **Username** and **Password** that matches those configured for the Webhook in the source system. *(Default)*
* **HubSpot client server**. Enter a valid **Client secret** for the HubSpot source.
* **m3ter app signature**. Enter the **Access key id** and **API secret** if the Incoming Webhook requires [M3TER\_SIGNED\_REQUEST](https://docs.m3ter.com/guides/integrations/setting-up-integrations/creating-and-managing-destinations#webhook-authentication-for-m3ter_signed_request) authentication.
* **Sage Intacct client secret**. Enter a valid **Client secret** for the Sage Intacct source.
* **Stripe signed request**. Enter a valid **Signing key** for the Stripe source.
5. Select **Create credential**. You are returned to the **Credentials** page where the new Credential is listed:
 ## Viewing and Managing Credentials
On the *Credentials* page in the Integrations section of the Console, you can view and manage all of your Organization's Credentials. If you only want to view the integration Credentials created for a specific external system, you can do that from the Integrations page for that system:
* [Viewing and Managing all Credentials](#viewing-and-managing-all-credentials)
* [Viewing and Managing Integration Credentials](#viewing-and-managing-integration-credentials)
### Viewing and Managing All Credentials
**To view all Credentials:**
1. Select **Integrations**. The **Integrations** page opens.
2. Select **Credentials**. The **Credentials** page open and lists all Credential types created for your Organization:
## Viewing and Managing Credentials
On the *Credentials* page in the Integrations section of the Console, you can view and manage all of your Organization's Credentials. If you only want to view the integration Credentials created for a specific external system, you can do that from the Integrations page for that system:
* [Viewing and Managing all Credentials](#viewing-and-managing-all-credentials)
* [Viewing and Managing Integration Credentials](#viewing-and-managing-integration-credentials)
### Viewing and Managing All Credentials
**To view all Credentials:**
1. Select **Integrations**. The **Integrations** page opens.
2. Select **Credentials**. The **Credentials** page open and lists all Credential types created for your Organization:
 * You can read-off the **Name**, **Destination**, **Type**, and **Created date** for each Credential.
* The **ID** of each Credential is shown and you can **Copy** this to your clipboard.
3. If you want to delete a Credential, select **Delete**:
* You can read-off the **Name**, **Destination**, **Type**, and **Created date** for each Credential.
* The **ID** of each Credential is shown and you can **Copy** this to your clipboard.
3. If you want to delete a Credential, select **Delete**:
 A confirmation dialog appears. Select **Yes** to confirm the delete action.
**NOTE: Editing Credentials?** You cannot edit a Credential you’ve created. This is to avoid the need to pass Credential secrets you entered when creating a Credential back up to the Console
### Viewing and Managing Integration Credentials
You can open an external system's Integration page and view Credentials from there.
**To view and manage integration Credentials:**
1. Select **Integrations**. The **Integrations** page opens.
2. Select the external system you want to view Credentials for:
A confirmation dialog appears. Select **Yes** to confirm the delete action.
**NOTE: Editing Credentials?** You cannot edit a Credential you’ve created. This is to avoid the need to pass Credential secrets you entered when creating a Credential back up to the Console
### Viewing and Managing Integration Credentials
You can open an external system's Integration page and view Credentials from there.
**To view and manage integration Credentials:**
1. Select **Integrations**. The **Integrations** page opens.
2. Select the external system you want to view Credentials for:
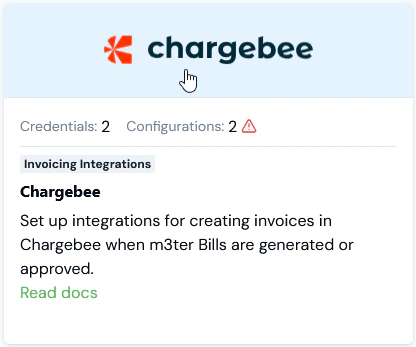 The **Integrations** page for the selected system opens:
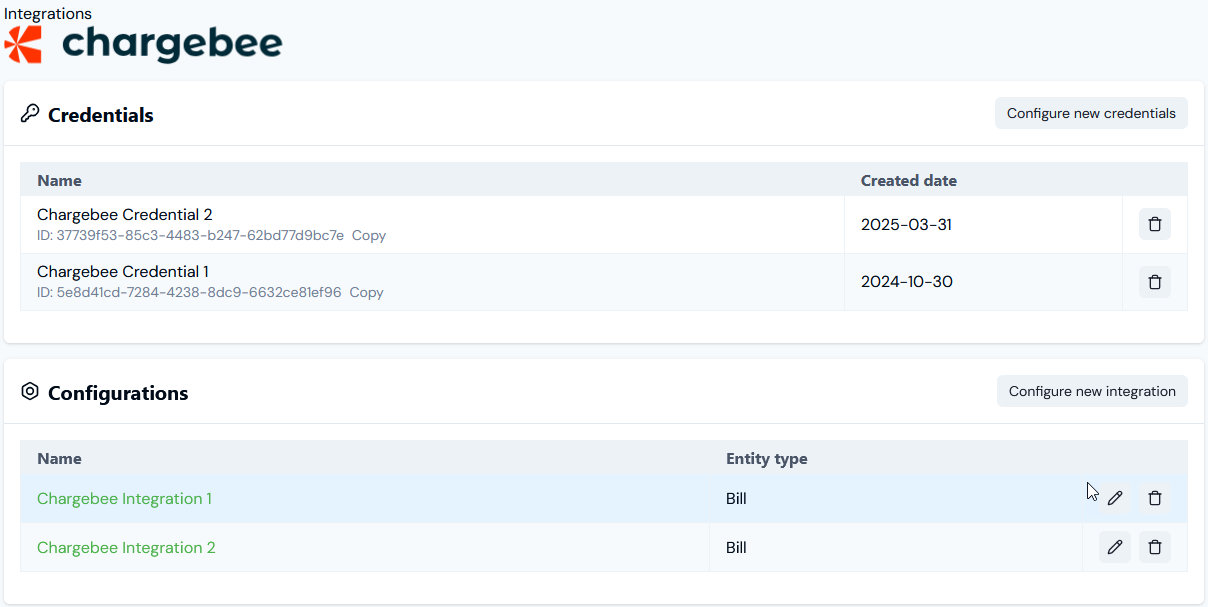 * Any existing Credentials you've set up for the external system are listed on the **Credentials** panel. For each Credential you can.
* Read-off the **Name** and **Created date**.
* Check the **ID** and **Copy** it to your clipboard.
* Note that if you want to create a new Credential, on the **Credentials** panel select **Configure new credentials**. See the relevant topic in this section for creating Credentials for specific external systems - for this example [Creating Chargebee Integration Credentials](/guides/integrations/setting-up-integrations/managing-integration-credentials/creating-chargebee-integration-credentials).
3. If you want to delete a Credential, select **Delete**:
A confirmation dialog appears. Select **Yes** to confirm the delete action.
**Note: Editing Credentials?** You cannot edit a Credential you've set up for an integration. This is to avoid the need to pass Credential secrets you entered when creating a Credential back up to the Console.
* Any existing Credentials you've set up for the external system are listed on the **Credentials** panel. For each Credential you can.
* Read-off the **Name** and **Created date**.
* Check the **ID** and **Copy** it to your clipboard.
* Note that if you want to create a new Credential, on the **Credentials** panel select **Configure new credentials**. See the relevant topic in this section for creating Credentials for specific external systems - for this example [Creating Chargebee Integration Credentials](/guides/integrations/setting-up-integrations/managing-integration-credentials/creating-chargebee-integration-credentials).
3. If you want to delete a Credential, select **Delete**:
A confirmation dialog appears. Select **Yes** to confirm the delete action.
**Note: Editing Credentials?** You cannot edit a Credential you've set up for an integration. This is to avoid the need to pass Credential secrets you entered when creating a Credential back up to the Console.