> ## Documentation Index
> Fetch the complete documentation index at: https://docs.m3ter.com/llms.txt
> Use this file to discover all available pages before exploring further.
# Creating Event Notification Workflows
A main area of operational support that m3sh Workflows are designed to fulfill is enhancing and extending the m3ter platform's capabilities for addressing your operational billing and analytical needs. A common instance is to use m3sh Workflows to automate and streamline the management and updating of key billing entities in response to defined end-customer Account Events, such as when an Account Balance amount changes or an Account Contract expires. For this kind of use case, a Notification rule based on a system Event in m3ter can be configured and used as a Workflow trigger.
This topic introduces an example use case that calls for automated Account billing entity management. How to design, create, and configure a m3sh Workflow that uses a Notification rule as its trigger to implement a solution for this use case is then set out as a worked example:
* [Worked Example](#worked-example)
* [m3sh Workflow Solution - Design and Prerequisites](#m3sh-workflow-solution-design-and-prerequisites)
* [Building a m3sh Workflow](#building-a-m3sh-workflow)
* [Adding and Configuring a Workflow Notification Trigger](#adding-and-configuring-a-workflow-notification-trigger)
* [Testing the Workflow](#testing-the-workflow)
**Review First!** Before attempting to follow this worked example and create and build a m3sh Workflow, please review the earlier topics in this section introducing [Workflow Key Concepts and Options](/guides/m3sh-workflows/m3sh-workflows-key-concepts-and-options) and the [Workflow Builder](/guides/m3sh-workflows/getting-to-know-the-workflow-builder).
## Worked Example
Suppose you offer a sign-up discounted rate for one of your Products to customers. If a customer signs-up for the Product and adds a Balance credit amount to their Account at sign-up, you agree to charge them at a discounted Product pricing rate until the initial credit amount has been depleted by billed usage charges as they consume the Product. When the initial Account credit is depleted, the discounted Product rate will end and the Account will be switched to the standard Product pricing.
A m3sh Workflow that automatically switches a customer Account from an introductory Product pricing rate to the standard Product pricing rate when their sign-up credit has been depleted will clearly save much manual effort for your billing operations team.
## m3sh Workflow Solution - Design and Prerequisites
An Event Notification Workflow design solution can fulfill this type of billing entity management use case. Some preparatory work is required to set up an Account, create a Notification rule to act as the Workflow trigger, and to map out a Workflow design solution covering the functions we'll use for the Workflow steps:
* [Setting Up an Account](#setting-up-an-account)
* [Creating a Workflow Trigger](#creating-a-workflow-trigger)
* [Designing the Workflow](#designing-the-workflow)
* [Workflow Design - Setting Up Function Prerequisites](#workflow-design-setting-up-function-prerequisites)
### Setting Up an Account
For a new customer who signs up for the discounted rate offer, we can create an Account and set up the following configuration details:
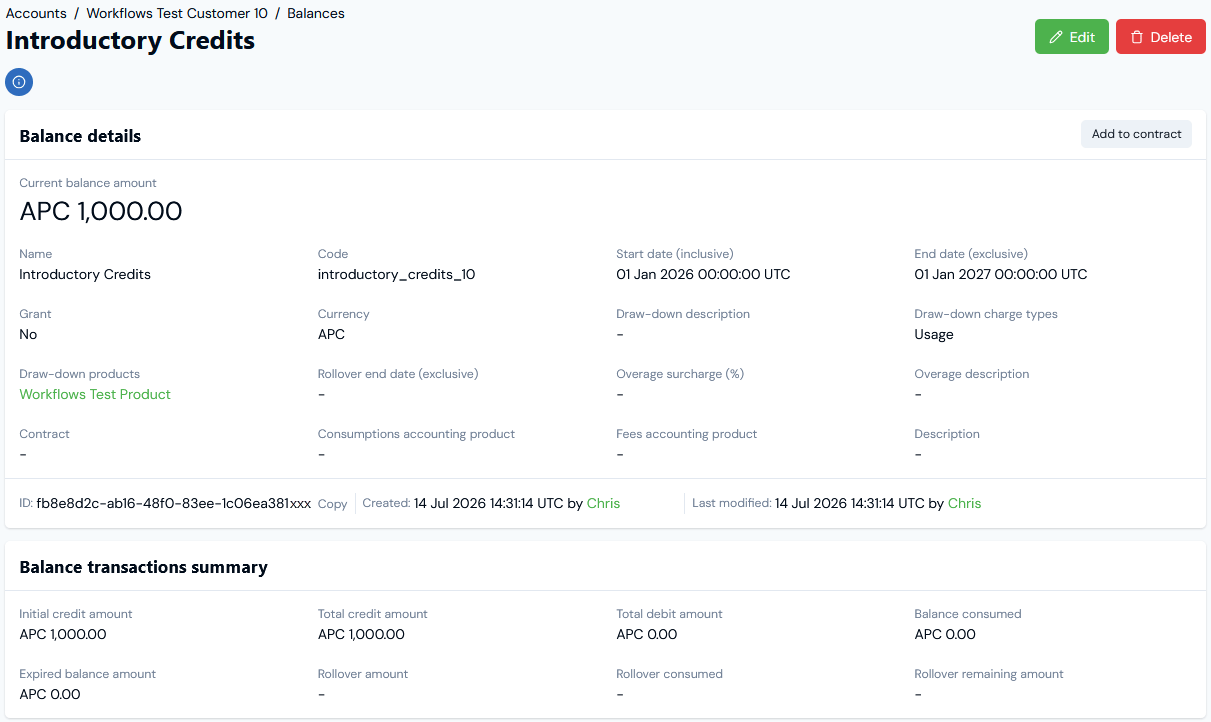
* First, create a Balance on the Account to hold the initial credit amount loaded at sign-up:
* **Balance draw-down**. When creating the Balance, for **Draw-down products**, select the relevant Product in your Organization and for **Draw-down charge types** select **Usage**.
* **Sign-up credit amount**. When you've created the Balance, open the **Balance details** page and under **Balance transactions** add a sign-up credit amount.
* **Custom Field**. Edit the Balance to add a **Custom field**: **Name** = **type**, **Type** = **String**, **Value** = **intro**. When setting up the Notification rule to use as the Workflow trigger, we'll reference this Balance Custom field - see the [following section](#creating-a-workflow-trigger).
* Here's the relevant set up on the **Balance details** page:

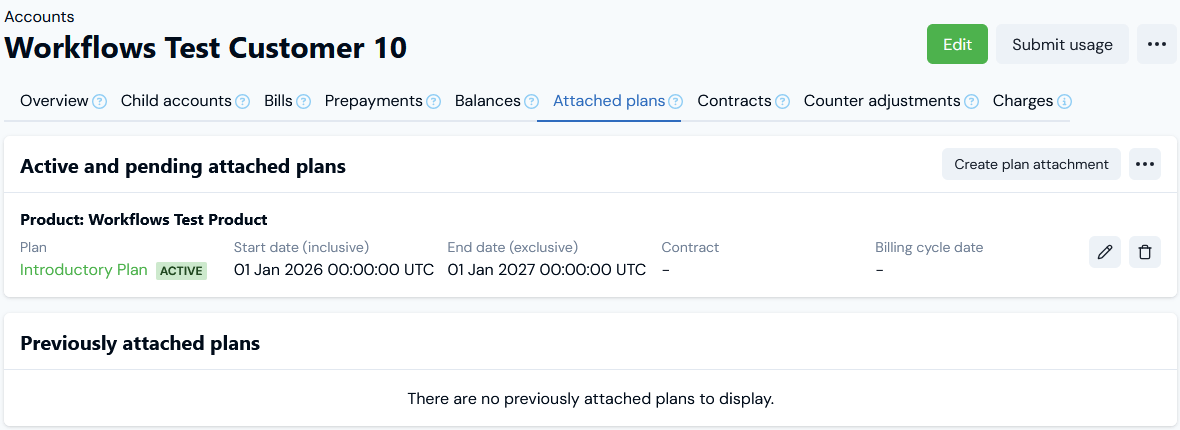
 * Second, create two Plans for the Product, one priced at the introductory discounted rate and one priced at the standard rate. Attach the introductory rate plan to the new Account - for the example, we've created and attached the **Introductory Plan** to our example Account:
 **Tip: More Details?** For more details on creating and managing end-customer Accounts, see the relevant topics in the [End-Customer Accounts](/guides/end-customer-accounts) section.
### Creating a Workflow Trigger
We'll use a Notification Rule as the m3sh Workflow trigger:
* Go to the **Alerts and notifications** section and select **Notification rules**. Create a Notification rule based on the `billing.balanceamount.updated` Event. Here's the details of the **Intro Credit Balance Depleted** rule we've created for the example:
**Tip: More Details?** For more details on creating and managing end-customer Accounts, see the relevant topics in the [End-Customer Accounts](/guides/end-customer-accounts) section.
### Creating a Workflow Trigger
We'll use a Notification Rule as the m3sh Workflow trigger:
* Go to the **Alerts and notifications** section and select **Notification rules**. Create a Notification rule based on the `billing.balanceamount.updated` Event. Here's the details of the **Intro Credit Balance Depleted** rule we've created for the example:
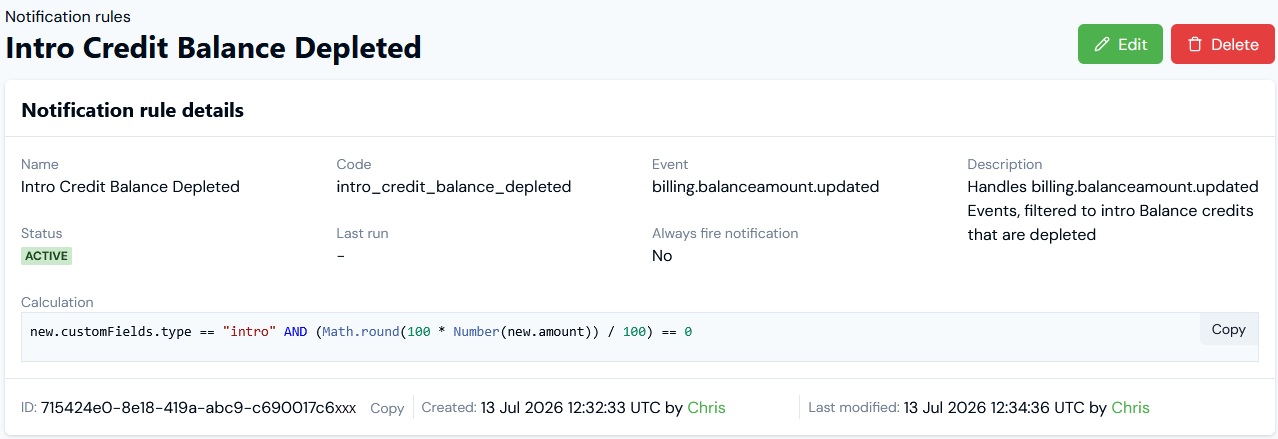 * Note that the rule calculation imposes two conditions and a Notification will only fire when a `balance.billingamount.updated` Event occurs and:
* The Balance is identified as an **intro** type since a **type** Custom field of that value is found in the Balance metadata.
* The `new.amount` field in the Event equals zero.
**Tip: More Details?** For more details on creating and managing Notification rules, see [Creating, Managing, and Reviewing Notifications](/guides/alerts-events-and-notifications/utilizing-events-and-notifications/creating-managing-and-reviewing-notifications) for more details.
### Designing the Workflow
Our Workflow design solution must ensure that when the introductory Balance credit amount on a customer Account is depleted, then the introductory pricing Plan attached to the Account is ended and replaced by a standard pricing Plan which starts at the same time as the introductory Plan ends.
#### Start
By adding the Notification rule we've set up as the Workflow trigger, we know that a Workflow run will only start when an introductory credit Balance has been depleted.
#### Step 1
When the configured Notification fires and the Workflow starts, we'll add a **List AccountPlans** API function as the first step and call it **List Active Account Plans**. We'll then configure this function:
* To lookup the `accountId` for the Account from the `billing.balanceamount.updated` Event payload associated with the Notification that will fire to trigger the Workflow.
* Use this `accountId` as a query parameter together with the `includeall` as query parameter to retrieve the IDs of the active Account Plans attached to the Account.
* The response will include the Account Plan created when we attached the **Introductory Plan** to the Account.
* The function will then load the response into a variable called `accountPlans` as the output state for the Workflow carried into the next step.
#### Step 2
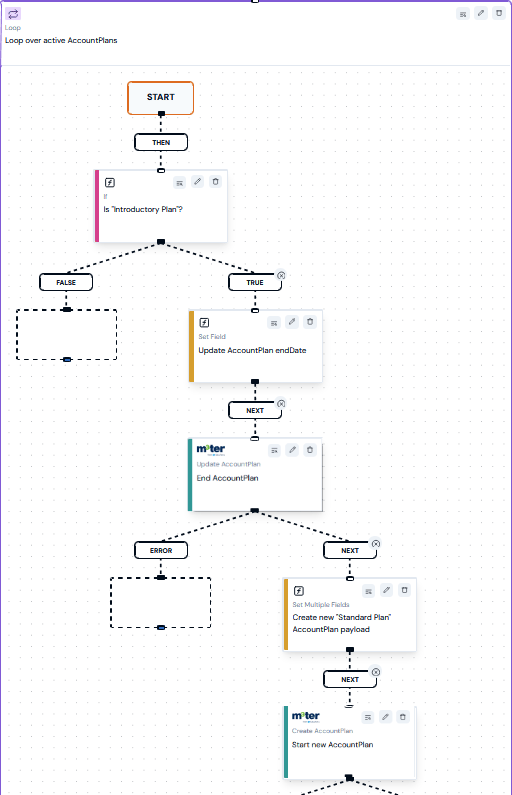
We'll use a **Loop** Logic function as a second step for the Workflow. Loop functions allow you to embed sub-functions to create sub-Workflows. For our example Workflow solution, the Loop will perform the following sub-steps:
**Sub-Step 1**
Use an **If** Logic function to run through the Workflow state in the `accountPlans` variable passed in from from **Step 1**, and:
* If a match for the value for the **Introductory Plan** `planId` associated with an Account Plan *is found* for the **Introductory Plan**, allow the Workflow run to move to the next step.
* If a match for the value for the **Introductory Plan** `planId` associated with an Account Plan *is not found* for the **Introductory Plan**, stop the Workflow run.
**Sub-Step 2**
If the Workflow exits the **If** function and continues, we'll use a **Set Field** Data Management function to update the end date of the Account Plan in the Workflow state using the last modified date from the `billing.balanceamount.updated` Event.
**Sub-Step 3**
Third, use an **Update AccountPlan** API function to end the existing Account Plan using the end date set in the Workflow state by the previous step.
**Sub-Step 4**
Use a **Set Multiple Fields** Data Management function to create a new Standard Plan Account Plan payload. This Workflow state payload will:
* Use the `accountId` that currently exists in the Workflow state.
* Use the ID of the Standard Plan we created for the Product.
* Apply the same start date to the Standard Plan as we used to end the existing Introductory Plan - by again using the last modified date from the `billing.balanceamount.updated` Event.
**Sub-Step 5**
Use a **Create AccountPlan** API function to take the Account Plan data entered as payload into the Workflow state in the previous step and use this to attach the Standard Plan as the Account Plan on the Account starting at the same time as the Introductory Plan was ended at **Sub-Step 3**.
### Workflow Design - Setting Up Function Prerequisites
The Workflow design requires us to use all three types of Workflow function, and for some of these we'll need prerequisites in place to complete a valid functions configuration:
* **Logic functions**. No prerequisites required.
* **Data management functions**. None will require Transformations.
* **API functions**. API functions in a m3sh Workflow that call the m3ter system can use Credentials set up for m3ter Service Users. We'll need to create a m3ter Service User and a Credential for that user in our Organization. See [Service Authentication](https://docs.m3ter.com/guides/authenticating-with-the-platform/service-authentication).
## Building a m3sh Workflow
We'll now open the Workflow Builder and create a Workflow to fulfill the design solution set out in the [previous section](/guides/m3sh-workflows/creating-event-notification-workflows#designing-the-workflow).
**To create and build a m3sh Workflow:**
1. Select **m3sh**:
* Note that the rule calculation imposes two conditions and a Notification will only fire when a `balance.billingamount.updated` Event occurs and:
* The Balance is identified as an **intro** type since a **type** Custom field of that value is found in the Balance metadata.
* The `new.amount` field in the Event equals zero.
**Tip: More Details?** For more details on creating and managing Notification rules, see [Creating, Managing, and Reviewing Notifications](/guides/alerts-events-and-notifications/utilizing-events-and-notifications/creating-managing-and-reviewing-notifications) for more details.
### Designing the Workflow
Our Workflow design solution must ensure that when the introductory Balance credit amount on a customer Account is depleted, then the introductory pricing Plan attached to the Account is ended and replaced by a standard pricing Plan which starts at the same time as the introductory Plan ends.
#### Start
By adding the Notification rule we've set up as the Workflow trigger, we know that a Workflow run will only start when an introductory credit Balance has been depleted.
#### Step 1
When the configured Notification fires and the Workflow starts, we'll add a **List AccountPlans** API function as the first step and call it **List Active Account Plans**. We'll then configure this function:
* To lookup the `accountId` for the Account from the `billing.balanceamount.updated` Event payload associated with the Notification that will fire to trigger the Workflow.
* Use this `accountId` as a query parameter together with the `includeall` as query parameter to retrieve the IDs of the active Account Plans attached to the Account.
* The response will include the Account Plan created when we attached the **Introductory Plan** to the Account.
* The function will then load the response into a variable called `accountPlans` as the output state for the Workflow carried into the next step.
#### Step 2
We'll use a **Loop** Logic function as a second step for the Workflow. Loop functions allow you to embed sub-functions to create sub-Workflows. For our example Workflow solution, the Loop will perform the following sub-steps:
**Sub-Step 1**
Use an **If** Logic function to run through the Workflow state in the `accountPlans` variable passed in from from **Step 1**, and:
* If a match for the value for the **Introductory Plan** `planId` associated with an Account Plan *is found* for the **Introductory Plan**, allow the Workflow run to move to the next step.
* If a match for the value for the **Introductory Plan** `planId` associated with an Account Plan *is not found* for the **Introductory Plan**, stop the Workflow run.
**Sub-Step 2**
If the Workflow exits the **If** function and continues, we'll use a **Set Field** Data Management function to update the end date of the Account Plan in the Workflow state using the last modified date from the `billing.balanceamount.updated` Event.
**Sub-Step 3**
Third, use an **Update AccountPlan** API function to end the existing Account Plan using the end date set in the Workflow state by the previous step.
**Sub-Step 4**
Use a **Set Multiple Fields** Data Management function to create a new Standard Plan Account Plan payload. This Workflow state payload will:
* Use the `accountId` that currently exists in the Workflow state.
* Use the ID of the Standard Plan we created for the Product.
* Apply the same start date to the Standard Plan as we used to end the existing Introductory Plan - by again using the last modified date from the `billing.balanceamount.updated` Event.
**Sub-Step 5**
Use a **Create AccountPlan** API function to take the Account Plan data entered as payload into the Workflow state in the previous step and use this to attach the Standard Plan as the Account Plan on the Account starting at the same time as the Introductory Plan was ended at **Sub-Step 3**.
### Workflow Design - Setting Up Function Prerequisites
The Workflow design requires us to use all three types of Workflow function, and for some of these we'll need prerequisites in place to complete a valid functions configuration:
* **Logic functions**. No prerequisites required.
* **Data management functions**. None will require Transformations.
* **API functions**. API functions in a m3sh Workflow that call the m3ter system can use Credentials set up for m3ter Service Users. We'll need to create a m3ter Service User and a Credential for that user in our Organization. See [Service Authentication](https://docs.m3ter.com/guides/authenticating-with-the-platform/service-authentication).
## Building a m3sh Workflow
We'll now open the Workflow Builder and create a Workflow to fulfill the design solution set out in the [previous section](/guides/m3sh-workflows/creating-event-notification-workflows#designing-the-workflow).
**To create and build a m3sh Workflow:**
1. Select **m3sh**:
 * The **Workflows** page opens.
2. Select **Create workflow**:
* The **Workflows** page opens.
2. Select **Create workflow**:
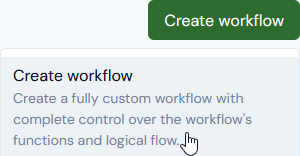 * The **Workflows>Create** page open allowing you to enter required details for the new Workflow:
* **Name**.
* **Code**.
* **Description**.
* The **Workflows>Create** page open allowing you to enter required details for the new Workflow:
* **Name**.
* **Code**.
* **Description**.
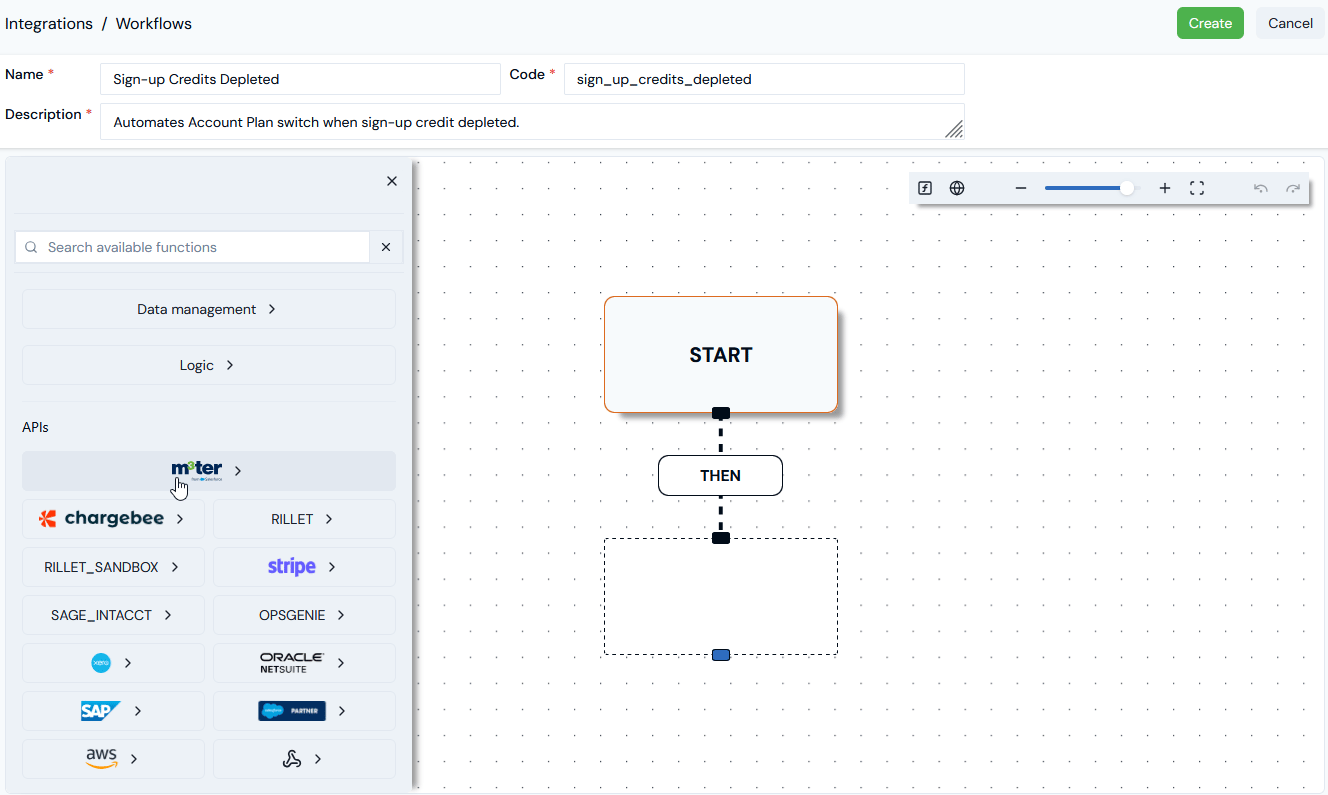 Notes:
* The builder canvas shows a starter Workflow. You can use pan and zoom controls or fit-to-view for the canvas area as you add and configure functions.
* The **Add function** menu panel is shown and you can collapse the panel at any time to open up more canvas area.
* If you try to create the Workflow without having added at least one function, then you'll receive an error.
* You can add a trigger in the Workflow builder later - see the [following section](/guides/m3sh-workflows/creating-event-notification-workflows#adding-workflow-trigger).
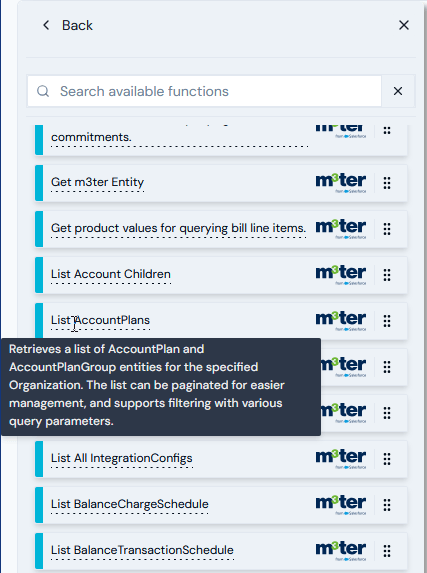
3. On the **Add function** menu, select **m3ter** under **APIs**.
4. Scroll down the **APIs** list and in the **READ** functions locate the **List AccountPlans** function. Note that before adding a function, you can hover your cursor on the function name to open a tool tip explaining what the function is used for:
Notes:
* The builder canvas shows a starter Workflow. You can use pan and zoom controls or fit-to-view for the canvas area as you add and configure functions.
* The **Add function** menu panel is shown and you can collapse the panel at any time to open up more canvas area.
* If you try to create the Workflow without having added at least one function, then you'll receive an error.
* You can add a trigger in the Workflow builder later - see the [following section](/guides/m3sh-workflows/creating-event-notification-workflows#adding-workflow-trigger).
3. On the **Add function** menu, select **m3ter** under **APIs**.
4. Scroll down the **APIs** list and in the **READ** functions locate the **List AccountPlans** function. Note that before adding a function, you can hover your cursor on the function name to open a tool tip explaining what the function is used for:
 5. Drag-and-drop the **List AccountPlans** function onto the Workflow to create the first step:
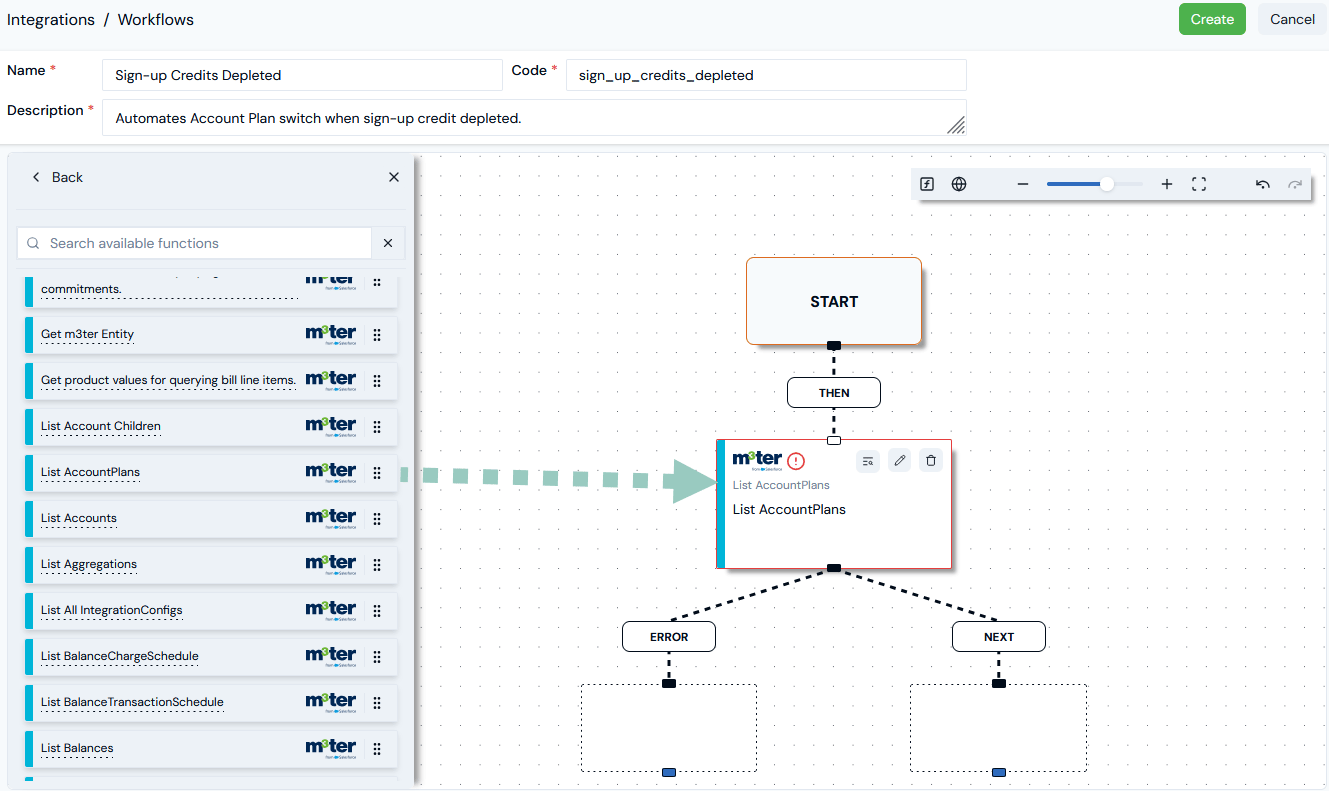 * When first added, the function shows an alert and has a red border since not yet configured.
6. On the **List AccountPlans** function, select the **Edit** icon:
* When first added, the function shows an alert and has a red border since not yet configured.
6. On the **List AccountPlans** function, select the **Edit** icon:
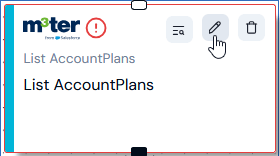 * The function's **Edit** panel appears:
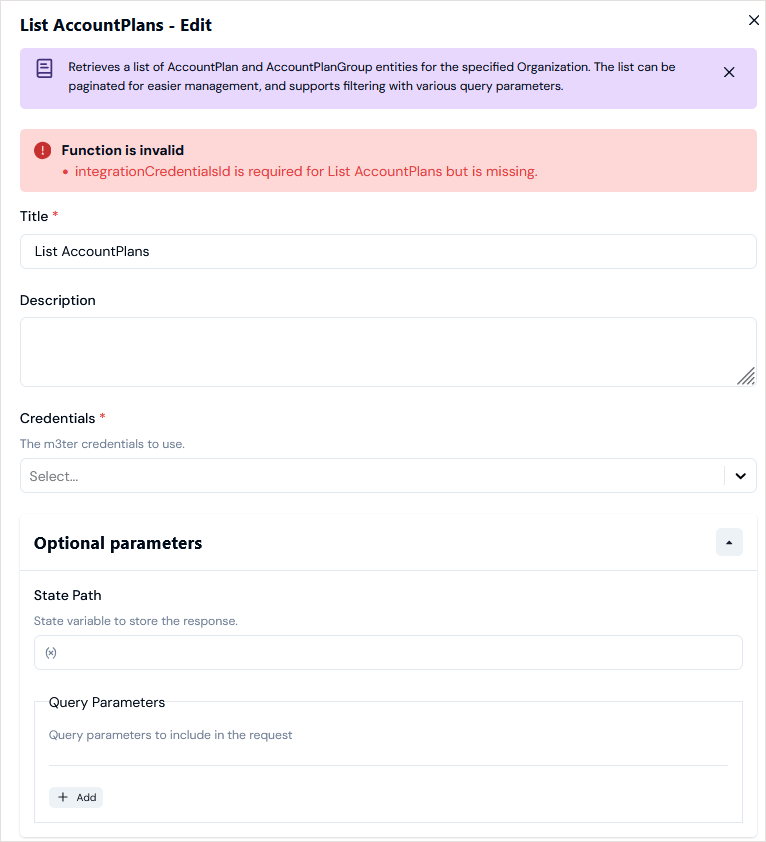 * An information text explains what the function is used for, which you can collapse.
* Since we've just added the function, any validation errors are listed under **Function is invalid**.
7. We can now configure the **List AccountPlans** function in accordance with our design solution for **Step 1** of the Workflow:
* **Title**. We'll change this from the generic default to be specific for the Step: **List Active AccountPlans**.
* **Description**. Optional setting - add a description text.
* **Credentials**. Use the drop-down list to select the m3ter Service User Credential we set up as a prerequisite: **Workflows Service User Credentials**.
* **State path**. Enter `accountPlans` as the state variable which will store the function's output in the Workflow state.
* An information text explains what the function is used for, which you can collapse.
* Since we've just added the function, any validation errors are listed under **Function is invalid**.
7. We can now configure the **List AccountPlans** function in accordance with our design solution for **Step 1** of the Workflow:
* **Title**. We'll change this from the generic default to be specific for the Step: **List Active AccountPlans**.
* **Description**. Optional setting - add a description text.
* **Credentials**. Use the drop-down list to select the m3ter Service User Credential we set up as a prerequisite: **Workflows Service User Credentials**.
* **State path**. Enter `accountPlans` as the state variable which will store the function's output in the Workflow state.
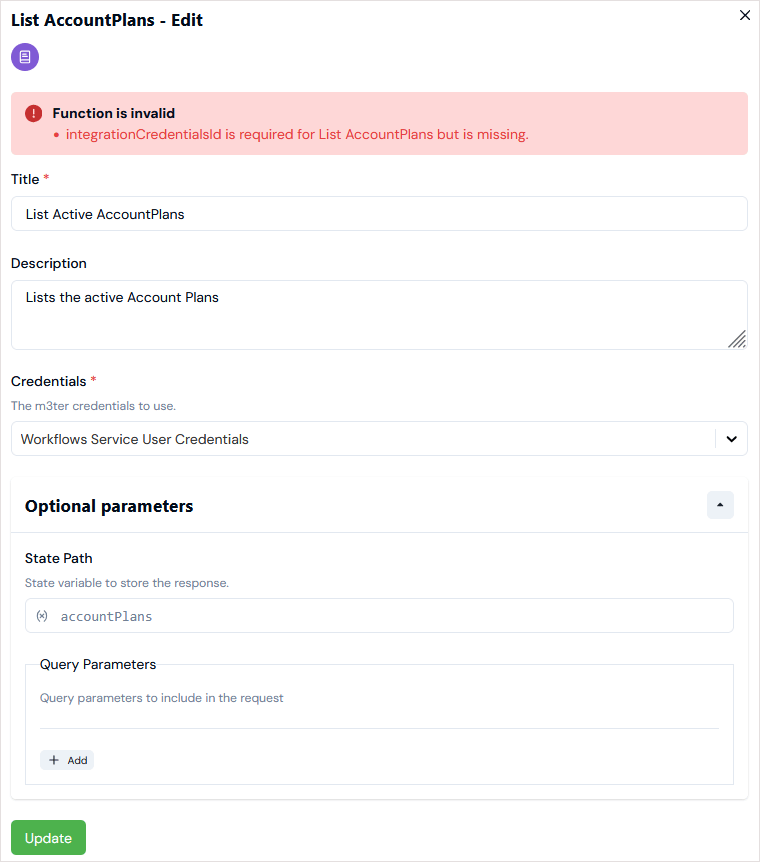 8. We only want to return *active* AccountPlans for the specified Account, so we'll also need to add two **Optional parameters** as **Query parameters**:
* Select **Add**. The panel adjusts allowing you to enter the first parameter:
* **Key**. Select`account`
* **Lookup type**. Select **State path**
* **Value**. Enter `event.new.accountId`
* Select **Add** again. The panel adjusts allowing you to add a second parameter:
* **Key**. Select`includeall`
* **Lookup type**. Select **Calculation**
* **Value**. Enter `false`
**Query parameters?** The `includeAll` boolean query parameter can be used in conjunction with the `account` query parameter to exclude inactive AccountPlans from the response. See [List AccountPlans](https://docs.m3ter.com/api/accountplan/list-accountplans) in the API Reference documentation.
9. Select **Update**. The **Edit** panel closes and you are returned to the Workflow. We now have the **Step 1** function added to our Workflow and configured to meet the design solution.
Notes:
* The function no longer shows an invalid alert flag and if we reopen the **Edit** panel, there are no validation errors.
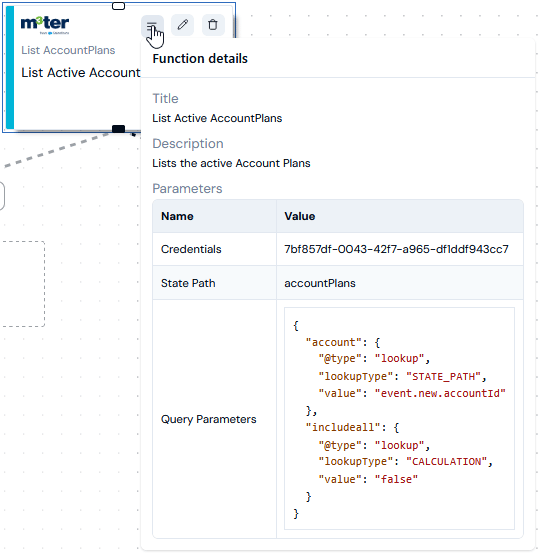
* We can open a **Function details** card to check and review a Workflow function's configuration:
8. We only want to return *active* AccountPlans for the specified Account, so we'll also need to add two **Optional parameters** as **Query parameters**:
* Select **Add**. The panel adjusts allowing you to enter the first parameter:
* **Key**. Select`account`
* **Lookup type**. Select **State path**
* **Value**. Enter `event.new.accountId`
* Select **Add** again. The panel adjusts allowing you to add a second parameter:
* **Key**. Select`includeall`
* **Lookup type**. Select **Calculation**
* **Value**. Enter `false`
**Query parameters?** The `includeAll` boolean query parameter can be used in conjunction with the `account` query parameter to exclude inactive AccountPlans from the response. See [List AccountPlans](https://docs.m3ter.com/api/accountplan/list-accountplans) in the API Reference documentation.
9. Select **Update**. The **Edit** panel closes and you are returned to the Workflow. We now have the **Step 1** function added to our Workflow and configured to meet the design solution.
Notes:
* The function no longer shows an invalid alert flag and if we reopen the **Edit** panel, there are no validation errors.
* We can open a **Function details** card to check and review a Workflow function's configuration:
 **Important:** **Create Workflow!** If you expect a Workflow to require many steps, when you've added at least one function it's good practice to **Create** the Workflow to avoid any possible loss of your work.
10. Select **Create**. A published version of the Workflow is created and the Workflow remains open in **Draft** mode:
* You can continue to build the Workflow and **Save draft** changes as you proceed.
* Select to open the **Published** version at any time.
* When you've added further Workflow steps in **Draft**, you can **Publish draft** to update the **Published** version.
11. After creating the Workflow, remain in **Draft** mode and on the **Add function** menu open the **Logic** functions.
12. Drag-and-drop the **Loop** function onto the Workflow canvas to create the next step:
**Important:** **Create Workflow!** If you expect a Workflow to require many steps, when you've added at least one function it's good practice to **Create** the Workflow to avoid any possible loss of your work.
10. Select **Create**. A published version of the Workflow is created and the Workflow remains open in **Draft** mode:
* You can continue to build the Workflow and **Save draft** changes as you proceed.
* Select to open the **Published** version at any time.
* When you've added further Workflow steps in **Draft**, you can **Publish draft** to update the **Published** version.
11. After creating the Workflow, remain in **Draft** mode and on the **Add function** menu open the **Logic** functions.
12. Drag-and-drop the **Loop** function onto the Workflow canvas to create the next step:
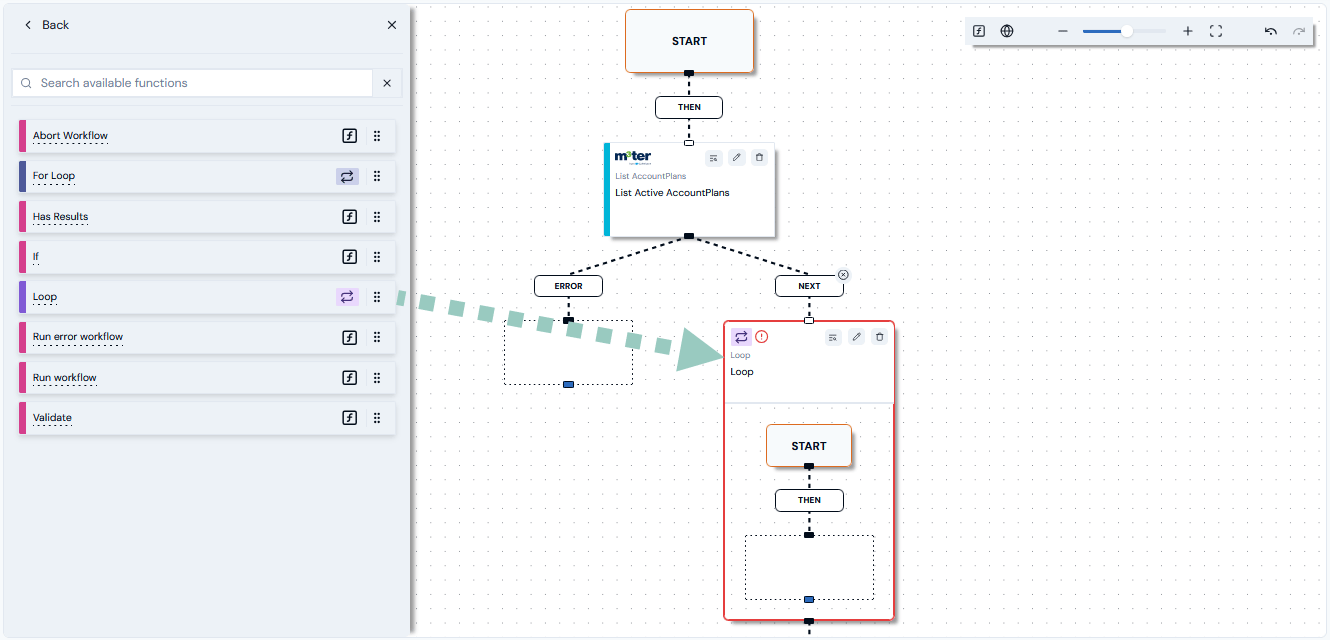 * Note that the function has a alert flag and displays a red border when first added to the Workflow since not yet configured.
13. Open the **Edit** panel for the **Loop** function and enter the required configuration details for our design solution:
* **Title**. We'll change this for a more specific title: **Loop over active AccountPlans**.
* **Source**. Enter `accountPlans`.
* **Counter variable name**. Enter `accountPlanIndex`.
* **Optional Parameters > Element variable**. Enter `accountPlan`.
14. Select **Update**. The **Edit** panel closes and you are returned to the Workflow. We now have the **Step 2** function added to our Workflow and configured to meet the design solution.
* You can open a **Function details** card to check the configuration we've set up for the Loop function.
* The **Loop** function embeds a starter sub-Workflow, which we can now build out in the same way as the main Workflow by dragging-and-dropping functions into the sub-Workflow needed to complete the design solution.
15. First, we'll add an **If** Logic function:
* Note that the function has a alert flag and displays a red border when first added to the Workflow since not yet configured.
13. Open the **Edit** panel for the **Loop** function and enter the required configuration details for our design solution:
* **Title**. We'll change this for a more specific title: **Loop over active AccountPlans**.
* **Source**. Enter `accountPlans`.
* **Counter variable name**. Enter `accountPlanIndex`.
* **Optional Parameters > Element variable**. Enter `accountPlan`.
14. Select **Update**. The **Edit** panel closes and you are returned to the Workflow. We now have the **Step 2** function added to our Workflow and configured to meet the design solution.
* You can open a **Function details** card to check the configuration we've set up for the Loop function.
* The **Loop** function embeds a starter sub-Workflow, which we can now build out in the same way as the main Workflow by dragging-and-dropping functions into the sub-Workflow needed to complete the design solution.
15. First, we'll add an **If** Logic function:
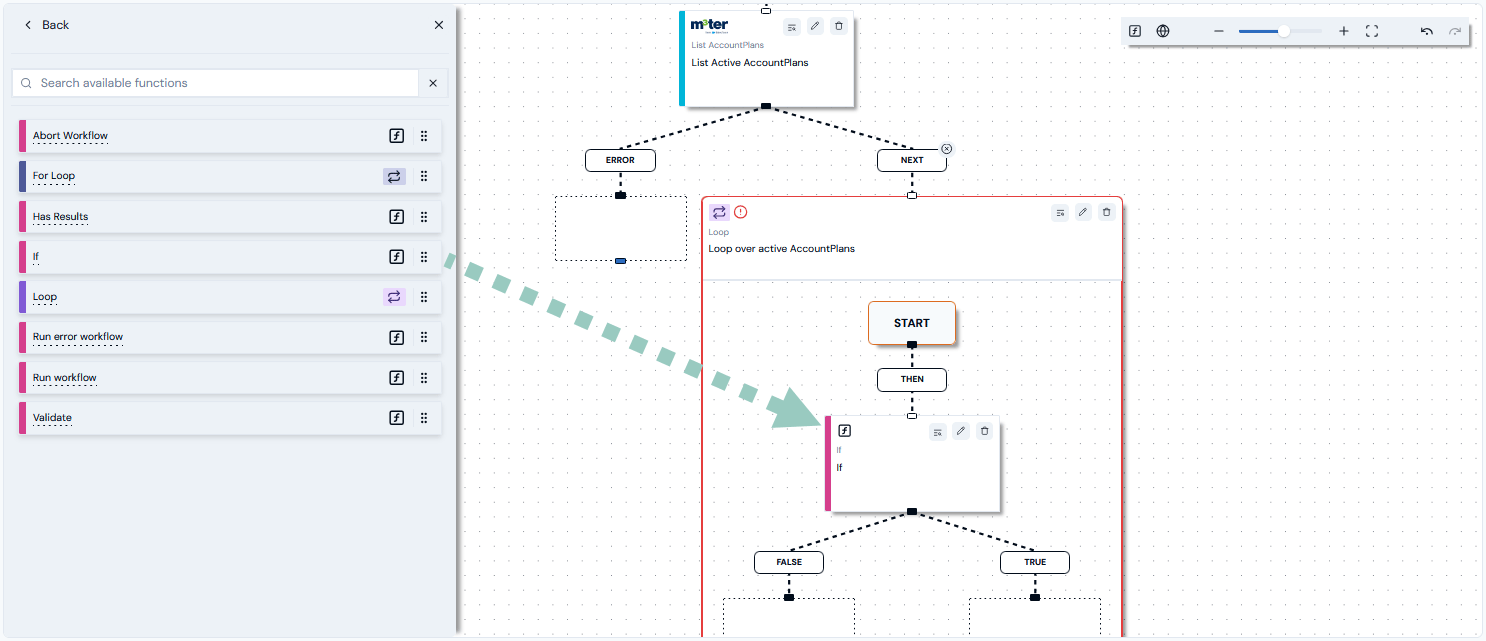 16. Open the **Edit** panel for the **If** function and enter the required configuration details for our design solution:
* **Title**. We'll change this for a title specific to our worked example: **Is "Introductory Plan"?**
* **Calculation**. Enter: `accountPlan.planId == "971da491-afa1-44d5-b977-4d80546ce921"`
**Important!** For the function's **Calculation**, make sure you use the *ID of the* *Introductory Plan* you attached to the Account *NOT the ID of the* *Account Plan* created for the Account when you attached the Introductory Plan to the Account.
17. Select **Update**. We now have **Sub-Step 1** created and configured for the sub-Workflow and in accordance with the design solution:
16. Open the **Edit** panel for the **If** function and enter the required configuration details for our design solution:
* **Title**. We'll change this for a title specific to our worked example: **Is "Introductory Plan"?**
* **Calculation**. Enter: `accountPlan.planId == "971da491-afa1-44d5-b977-4d80546ce921"`
**Important!** For the function's **Calculation**, make sure you use the *ID of the* *Introductory Plan* you attached to the Account *NOT the ID of the* *Account Plan* created for the Account when you attached the Introductory Plan to the Account.
17. Select **Update**. We now have **Sub-Step 1** created and configured for the sub-Workflow and in accordance with the design solution:
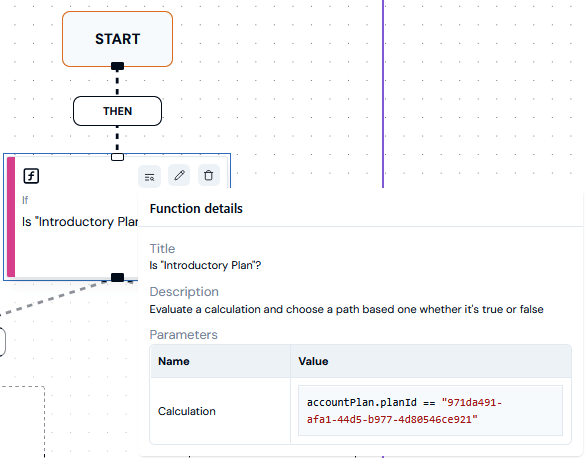 * As required, the function will only evaluate to **TRUE** and the Workflow continue to the next step if a match is found in the Account's active AccountPlans for the attached **Introductory Plan** `planId`.
18. We'll now add the required functions for the remaining four sub-Workflow steps:
* **Sub-Step 2**. Add and configure a **Set Field** Data management function:
* **Title**. We'll change this for a title specific to our worked example: **Update AccountPlan endDate**
* **State Path**. Enter `accountPlan.endDate`
* **Lookup > Lookup type**. Select **State path** and enter **Value**: `event.new.dtLastModified`
* Select **Update** and check the **Function details**:
* As required, the function will only evaluate to **TRUE** and the Workflow continue to the next step if a match is found in the Account's active AccountPlans for the attached **Introductory Plan** `planId`.
18. We'll now add the required functions for the remaining four sub-Workflow steps:
* **Sub-Step 2**. Add and configure a **Set Field** Data management function:
* **Title**. We'll change this for a title specific to our worked example: **Update AccountPlan endDate**
* **State Path**. Enter `accountPlan.endDate`
* **Lookup > Lookup type**. Select **State path** and enter **Value**: `event.new.dtLastModified`
* Select **Update** and check the **Function details**:
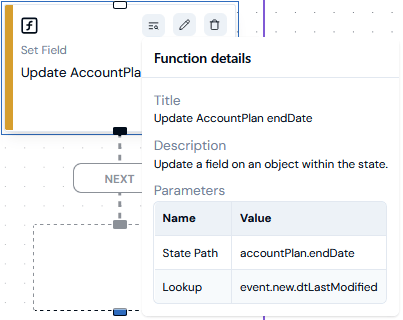 * **Sub-Step 3**. Add and configure an **Update AccountPlan** API **WRITE** function:
* **Title**. We'll change this for a title specific to our worked example: **End AccountPlan**
* **Description**. Optional setting - add a description text.
* **Credentials**. Select the **Workflows Service User Credentials**.
* **id**. Select **Lookup type** **=** **Static path** and enter **accountPlan.id** for **Value**
* **Request Path**. Enter `accountPlan`
* **Optional parameters**. Not required.
* Select **Update** and check the **Function details**:
* **Sub-Step 3**. Add and configure an **Update AccountPlan** API **WRITE** function:
* **Title**. We'll change this for a title specific to our worked example: **End AccountPlan**
* **Description**. Optional setting - add a description text.
* **Credentials**. Select the **Workflows Service User Credentials**.
* **id**. Select **Lookup type** **=** **Static path** and enter **accountPlan.id** for **Value**
* **Request Path**. Enter `accountPlan`
* **Optional parameters**. Not required.
* Select **Update** and check the **Function details**:
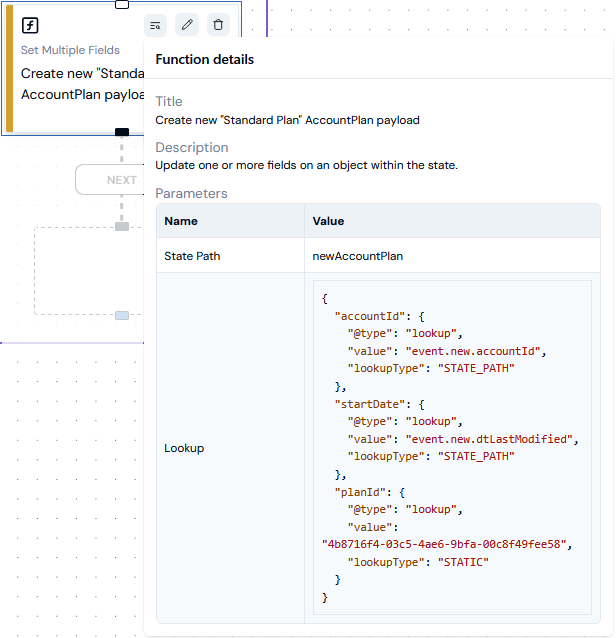
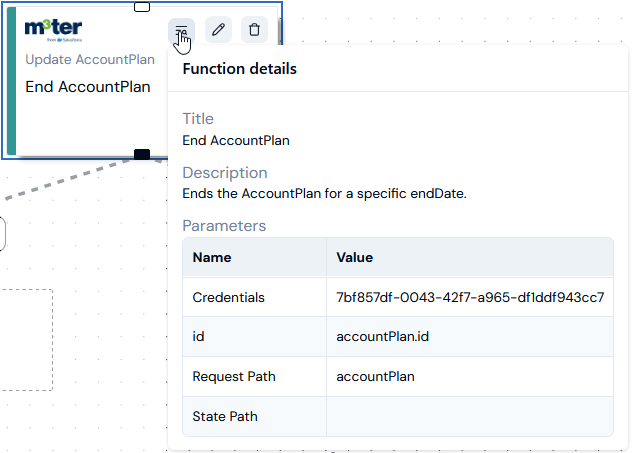 * **Sub-Step 4**. Add and configure a **Set Multiple Fields** Data management function:
* **Title**. We'll change this for a title specific to our worked example: **Create new "Standard Plan" AccountPlan payload**
* **State Path**. Enter `newAccountPlan`
* **Lookups**. Three required:
* **#1**.
* **Key.** Enter `accountId`
* **Lookup type**. Select **State path**
* **Value**. Enter `event.new.accountId`
* **#2**.
* **Key.** Enter `startDate`
* **Lookup type**. Select **State path**
* **Value**. Enter `event.new.dtLastModified`
* **#3**.
* **Key.** Enter `planId`
* **Lookup type**. Select **Static string**
* **Value**. Enter `4b8716f4-03c5-4ae6-9bfa-00c8f49fee58`
* Select **Update** and check the **Function details**:
* **Sub-Step 4**. Add and configure a **Set Multiple Fields** Data management function:
* **Title**. We'll change this for a title specific to our worked example: **Create new "Standard Plan" AccountPlan payload**
* **State Path**. Enter `newAccountPlan`
* **Lookups**. Three required:
* **#1**.
* **Key.** Enter `accountId`
* **Lookup type**. Select **State path**
* **Value**. Enter `event.new.accountId`
* **#2**.
* **Key.** Enter `startDate`
* **Lookup type**. Select **State path**
* **Value**. Enter `event.new.dtLastModified`
* **#3**.
* **Key.** Enter `planId`
* **Lookup type**. Select **Static string**
* **Value**. Enter `4b8716f4-03c5-4ae6-9bfa-00c8f49fee58`
* Select **Update** and check the **Function details**:
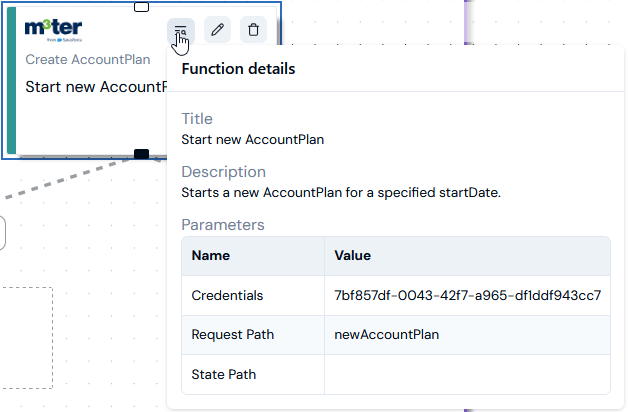
 * **Sub-Step 5**. Add and configure a **Create AccountPlan** API **WRITE** function:
* **Title**. We'll change this for a title specific to our worked example: **Start new AccountPlan**
* **Description**. Optional setting - add a description text.
* **Credentials**. Select the **Workflows Service User Credentials**.
* **m3ter Entity**. Select **AccountPlan**.
* **Request Path**. Enter `newAccountPlan`
* **Optional parameters**. Not required.
* Select **Update** and check the **Function details**:
* **Sub-Step 5**. Add and configure a **Create AccountPlan** API **WRITE** function:
* **Title**. We'll change this for a title specific to our worked example: **Start new AccountPlan**
* **Description**. Optional setting - add a description text.
* **Credentials**. Select the **Workflows Service User Credentials**.
* **m3ter Entity**. Select **AccountPlan**.
* **Request Path**. Enter `newAccountPlan`
* **Optional parameters**. Not required.
* Select **Update** and check the **Function details**:
 * Our sub-workflow for the **Loop** function is now complete with five sub-steps:
 19. Select **Save draft**.
* We now have a Workflow with all required steps required under the design solution for the worked example. To complete the Workflow, we must now add the Notification rule we set up as the Workflow trigger - see the [following section](#adding-and-configuring-a-workflow-notification-trigger).
## Adding and Configuring a Workflow Notification Trigger
To complete the Workflow set up, we can now add the **Intro Credit Balance Depleted** Notification rule we created in the [earlier section](/guides/m3sh-workflows/creating-event-notification-workflows#creating-a-workflow-trigger) as the Workflow trigger.
When you add a Notification trigger to a Workflow, you have the option to select users in your Organization that you want to receive an email notification if the trigger is disabled.
**To add Notification trigger to Workflow:**
1. Select **Integrations**. The **Integrations** page opens.
2. Select **Workflows**.
3. Select the **Name** hotlink text of the Workflow you want to add a trigger to. The **Workflow** opens in **Draft** mode.
4. Select **Workflow triggers**. In the current worked example, no triggers have yet been added for the Workflow:
19. Select **Save draft**.
* We now have a Workflow with all required steps required under the design solution for the worked example. To complete the Workflow, we must now add the Notification rule we set up as the Workflow trigger - see the [following section](#adding-and-configuring-a-workflow-notification-trigger).
## Adding and Configuring a Workflow Notification Trigger
To complete the Workflow set up, we can now add the **Intro Credit Balance Depleted** Notification rule we created in the [earlier section](/guides/m3sh-workflows/creating-event-notification-workflows#creating-a-workflow-trigger) as the Workflow trigger.
When you add a Notification trigger to a Workflow, you have the option to select users in your Organization that you want to receive an email notification if the trigger is disabled.
**To add Notification trigger to Workflow:**
1. Select **Integrations**. The **Integrations** page opens.
2. Select **Workflows**.
3. Select the **Name** hotlink text of the Workflow you want to add a trigger to. The **Workflow** opens in **Draft** mode.
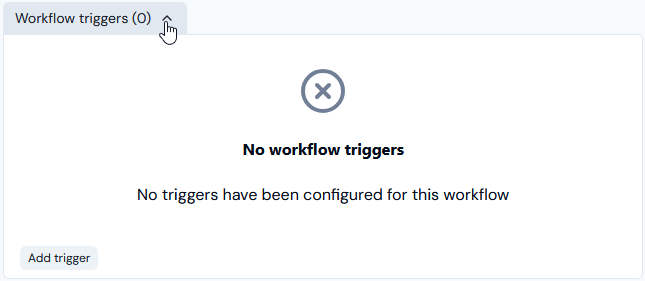
4. Select **Workflow triggers**. In the current worked example, no triggers have yet been added for the Workflow:
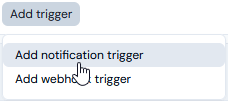
 5. Select **Add trigger>Add notification trigger**:
 * An **Add notification trigger** dialog appears:
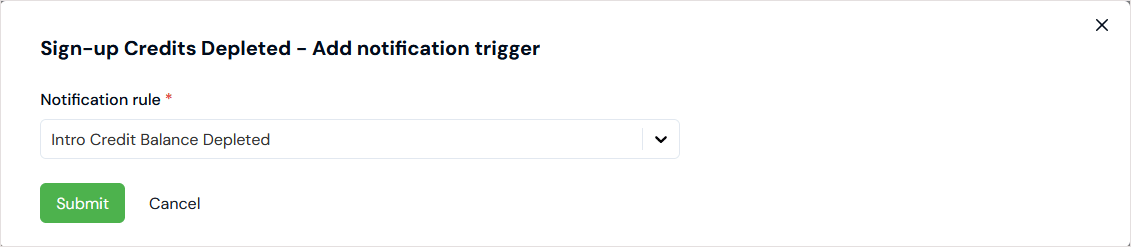 6. Select the Notification rule you want to use as the Workflow trigger and then select **Submit**. The selected notification trigger is listed under **Workflow triggers**:
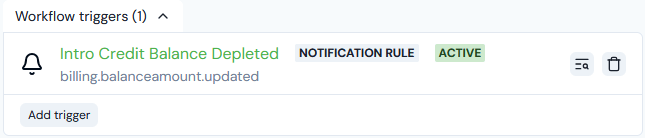 * For the selected **NOTIFICATION RULE**, you can read-off
* The Event the rule is based on.
* Whether the rule is **ACTIVE** or **INACTIVE**.
7. If you want to set up users in your Organization to receive an email notification if the trigger is disabled, select the **Details** icon:
* For the selected **NOTIFICATION RULE**, you can read-off
* The Event the rule is based on.
* Whether the rule is **ACTIVE** or **INACTIVE**.
7. If you want to set up users in your Organization to receive an email notification if the trigger is disabled, select the **Details** icon:
 * A **Workflow trigger** modal appears:
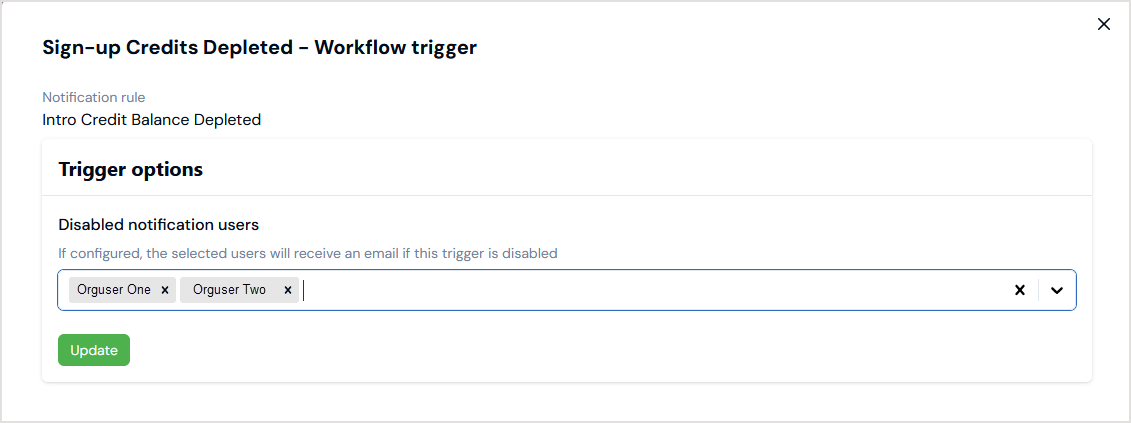 8. Under **Trigger options**, use the **Disabled notification users** drop-down to add the Organization users you want to receive an email notification if the Workflow trigger is disabled.
**Disabled Notification Triggers**: If a Notification rule used as a Workflow trigger is switched to inactive, then the Workflow trigger is disabled. Also, Notification triggers are automatically disabled if the Workflow encounters errors in 20 consecutive runs via a trigger.
9. Select **Update**. A message shows to confirm that the **Trigger options** for notifying Organization users were updated successfully.
10. Select **Publish draft**. The Workflow is now ready to be tested - see the [following section](#testing-the-workflow).
## Testing the Workflow
To test that the Event Notification Workflow we've built will meet the example use case and automate the switching out of AccountPlans on our test Account, we'll cause the Notification rule to fire and trigger the Workflow by adding a debit transaction to the Balance on the Account that reduces the Balance to zero.
**Publish Workflow!** Before testing your Workflow, check that you've published the most recent Draft.
**To test the Workflow:**
1. First, go back to the test Account we set up and open the **Attached plans** tab:
* We can see that the **Introductory Plan** is still attached as the AccountPlan on the Account because the **Introductory Credits** Balance added to the Account remains in credit.
2. Select the **Balances** tab and open the **Balance details** page for the **Introductory Credits** Balance on the Account.
3. On the **Balance transactions** panel, select **Create balance transaction** and add a negative Transaction that reduces the Balance amount to zero:
8. Under **Trigger options**, use the **Disabled notification users** drop-down to add the Organization users you want to receive an email notification if the Workflow trigger is disabled.
**Disabled Notification Triggers**: If a Notification rule used as a Workflow trigger is switched to inactive, then the Workflow trigger is disabled. Also, Notification triggers are automatically disabled if the Workflow encounters errors in 20 consecutive runs via a trigger.
9. Select **Update**. A message shows to confirm that the **Trigger options** for notifying Organization users were updated successfully.
10. Select **Publish draft**. The Workflow is now ready to be tested - see the [following section](#testing-the-workflow).
## Testing the Workflow
To test that the Event Notification Workflow we've built will meet the example use case and automate the switching out of AccountPlans on our test Account, we'll cause the Notification rule to fire and trigger the Workflow by adding a debit transaction to the Balance on the Account that reduces the Balance to zero.
**Publish Workflow!** Before testing your Workflow, check that you've published the most recent Draft.
**To test the Workflow:**
1. First, go back to the test Account we set up and open the **Attached plans** tab:
* We can see that the **Introductory Plan** is still attached as the AccountPlan on the Account because the **Introductory Credits** Balance added to the Account remains in credit.
2. Select the **Balances** tab and open the **Balance details** page for the **Introductory Credits** Balance on the Account.
3. On the **Balance transactions** panel, select **Create balance transaction** and add a negative Transaction that reduces the Balance amount to zero:
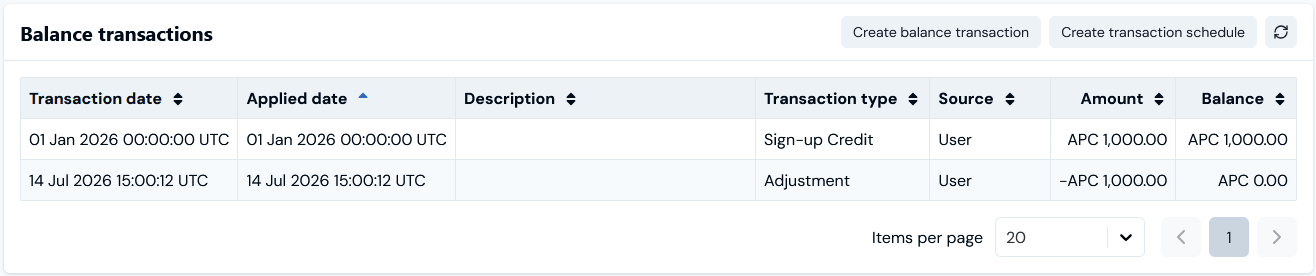 * This should fire the Notification rule and trigger the Workflow to run.
4. Go back to the **Attached plans** tab on the Account:
* This should fire the Notification rule and trigger the Workflow to run.
4. Go back to the **Attached plans** tab on the Account:
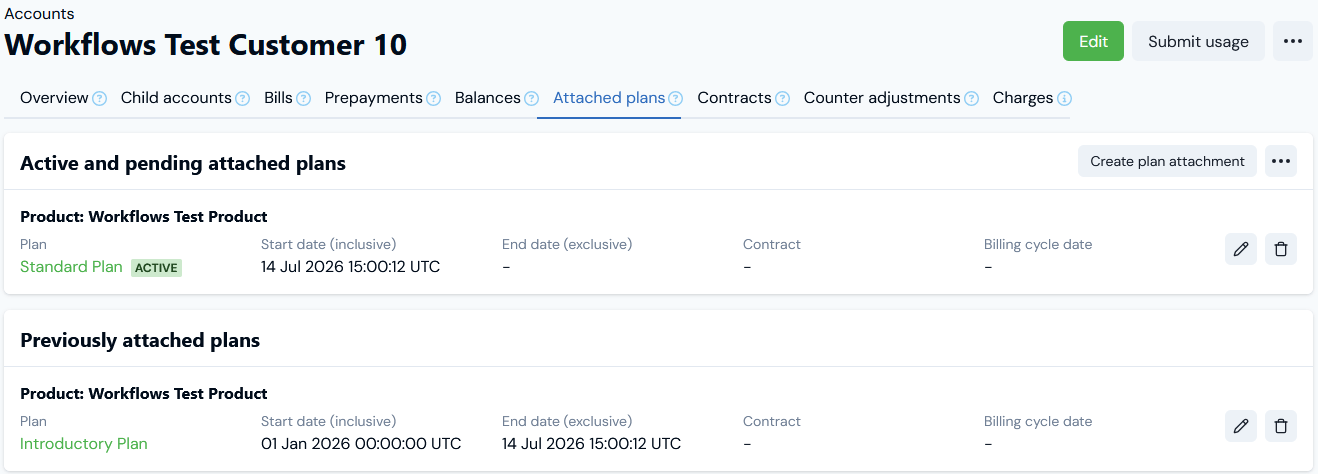 * We can see that under **Active and pending attached plans** the **Standard Plan** is now the **ACTIVE** AccountPlan and the **Introductory Plan** now shows under **Previously attached plans**. As required, the **Introductory Plan** has been end dated at the same time as the **Standard Plan** start date.
5. Lastly, if we return to the **Sign-up Credits Depleted** Workflow, we can confirm under **Latest workflow runs** that a Workflow run started very soon after the Transaction that reduced the Balance to zero was created:
* We can see that under **Active and pending attached plans** the **Standard Plan** is now the **ACTIVE** AccountPlan and the **Introductory Plan** now shows under **Previously attached plans**. As required, the **Introductory Plan** has been end dated at the same time as the **Standard Plan** start date.
5. Lastly, if we return to the **Sign-up Credits Depleted** Workflow, we can confirm under **Latest workflow runs** that a Workflow run started very soon after the Transaction that reduced the Balance to zero was created:
