> ## Documentation Index
> Fetch the complete documentation index at: https://docs.m3ter.com/llms.txt
> Use this file to discover all available pages before exploring further.
# Getting to Know the Workflow Builder
The m3sh Workflow Builder lets you quickly add and configure the functions you'll use to create Workflows. This topic introduces the Workflow Builder environment and explains how work with the usability features and options it incorporates, which are designed to facilitate and streamline Workflow creation and management:
* [Accessing and Exploring Workflow Builder](#accessing-and-exploring-workflow-builder)
* [Adding and Configuring Workflow Functions](#adding-and-configuring-workflow-functions)
* [Arranging Workflow Steps](#arranging-workflow-steps)
* [Publishing Workflows](#publishing-workflows)
* [Managing and Testing Workflows - Builder Options](#managing-and-testing-workflows-builder-options)
## Accessing and Exploring Workflow Builder
You can open the Workflow Builder to begin creating a new m3sh Workflow from the *m3sh* section of the m3ter Console:
1. Select **m3sh**:
 The **Workflows** page opens.
2. Select **Create workflow** - the **Workflow Builder** opens:
The **Workflows** page opens.
2. Select **Create workflow** - the **Workflow Builder** opens:
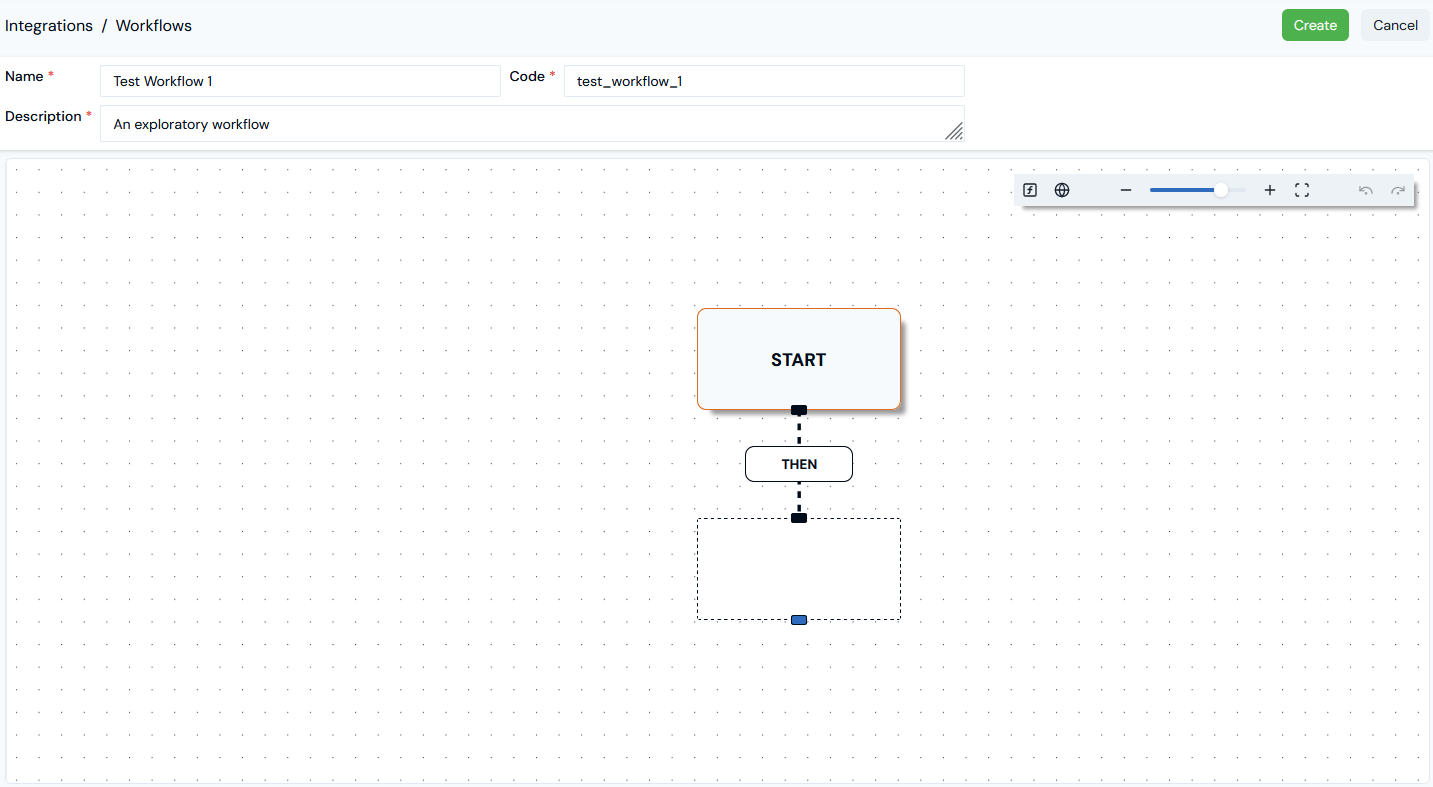
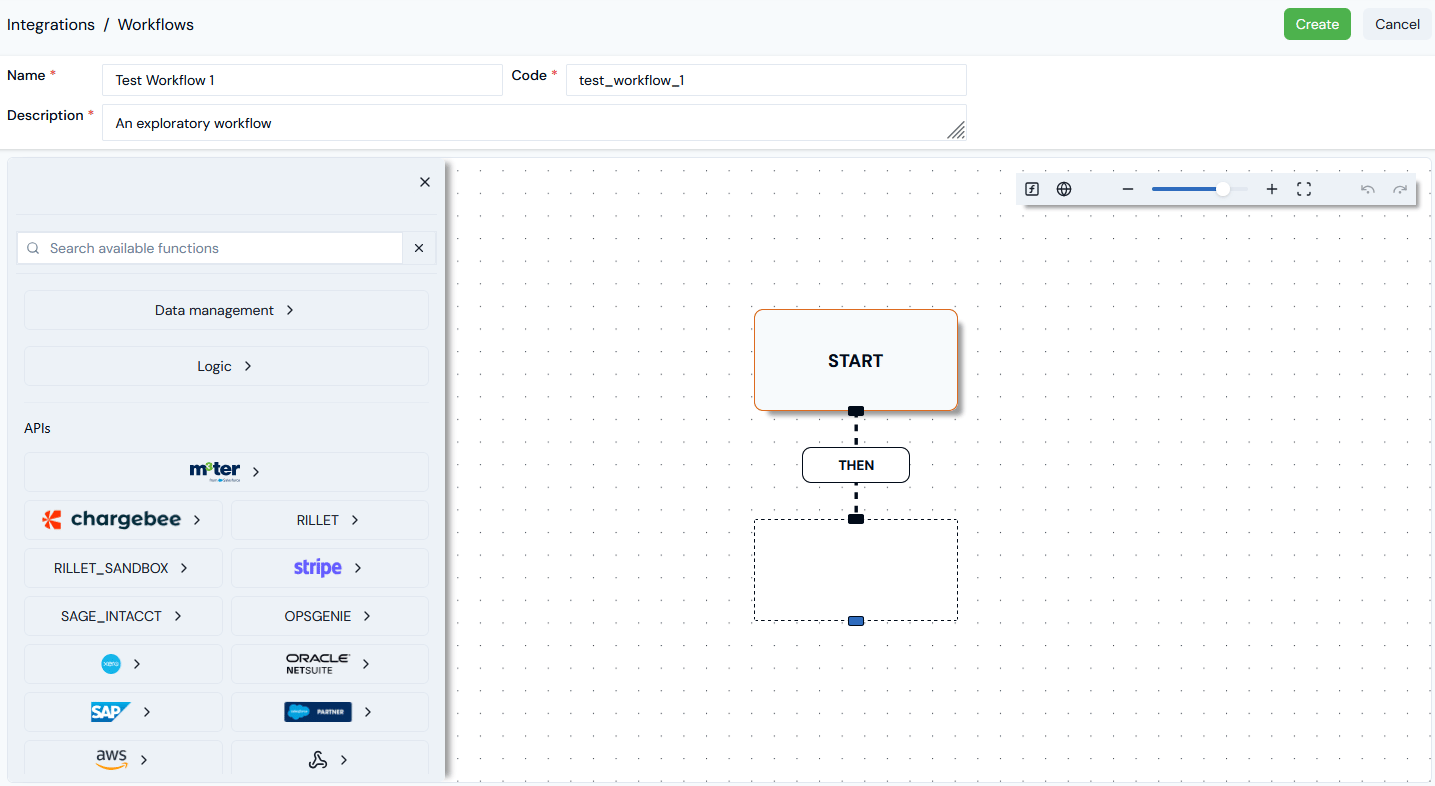 * You can add required details for the new Workflow: **Name**, **Code**, and **Description**.
* The main canvas area:
* Contains a starter Workflow, ready for you to add a function to create the first step.
* Has controls at top-right allowing you to **Zoom In/Out**, **Fit View**, or **Undo/Redo** changes:
* You can add required details for the new Workflow: **Name**, **Code**, and **Description**.
* The main canvas area:
* Contains a starter Workflow, ready for you to add a function to create the first step.
* Has controls at top-right allowing you to **Zoom In/Out**, **Fit View**, or **Undo/Redo** changes:
 * An **Add function** panel is open at the left side. You can:
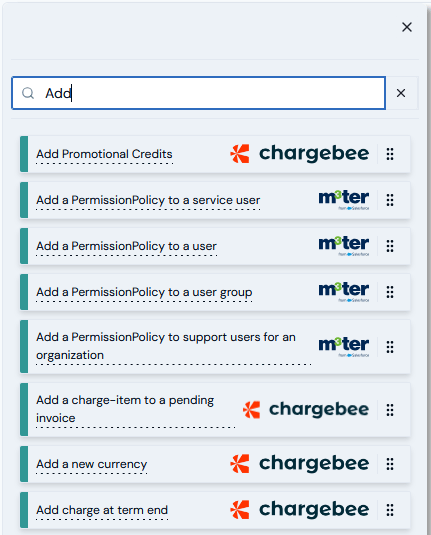
* Search available functions:
* An **Add function** panel is open at the left side. You can:
* Search available functions:
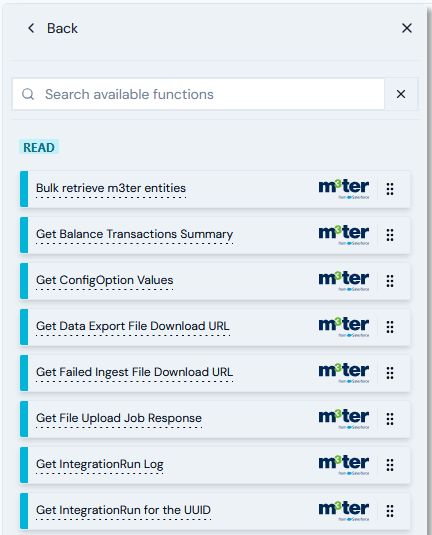
 * Drill into the **Add function** panel to open a sub-menu for one of the function types: **Data management**, **Logic**, or **APIs** (by external system or m3ter). For example **m3ter from Salesforce** **API** functions:
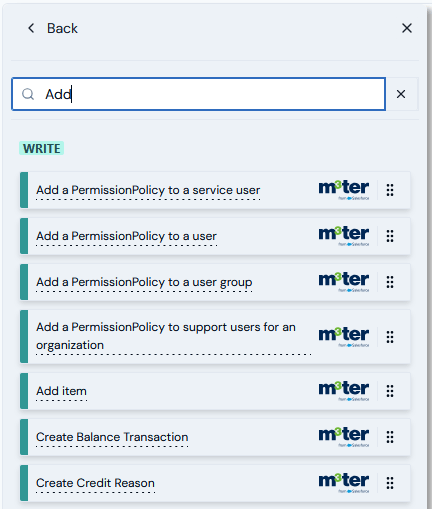
 * If you open an **Add function** sub-menu, the scope of **Search available functions** is limited to the subset of functions. For example a search of the **m3ter from Salesforce API WRITE** functions:
 * Use **Back** to return to the main **Add function** menu.
* You can hide the **Add function** menu to create more space in the Builder main canvas area:
* Use **Back** to return to the main **Add function** menu.
* You can hide the **Add function** menu to create more space in the Builder main canvas area:

 * If you want to set up *Global parameters* to use when adding and configuring functions for your Workflows, you can open a **Global parameters** panel:

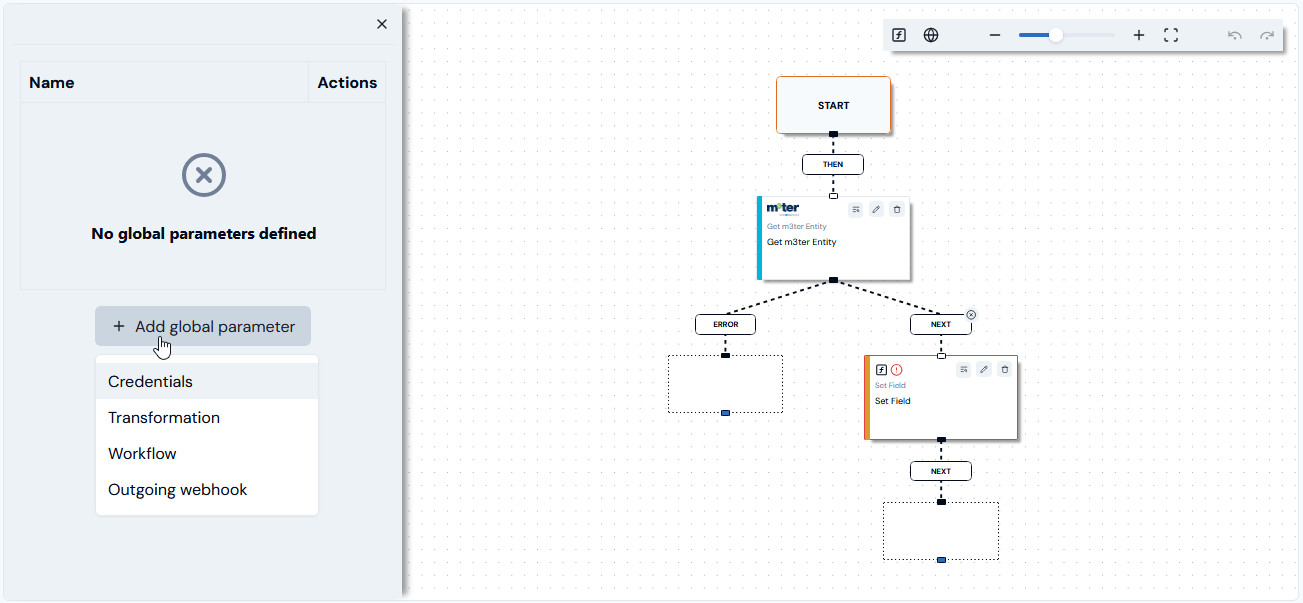 * For more details, see [Working with Global Parameters](/guides/m3sh-workflows/working-with-global-parameters).
## Adding and Configuring Workflow Functions
Before you can create a new Workflow you must add a **Name**, **Code**, and **Description**, and add *at least one* function.
1. To add a function, search for the function or open the appropriate function sub-menu. You can then drag-and-drop the function onto the Workflow to create the first step:
* For more details, see [Working with Global Parameters](/guides/m3sh-workflows/working-with-global-parameters).
## Adding and Configuring Workflow Functions
Before you can create a new Workflow you must add a **Name**, **Code**, and **Description**, and add *at least one* function.
1. To add a function, search for the function or open the appropriate function sub-menu. You can then drag-and-drop the function onto the Workflow to create the first step:
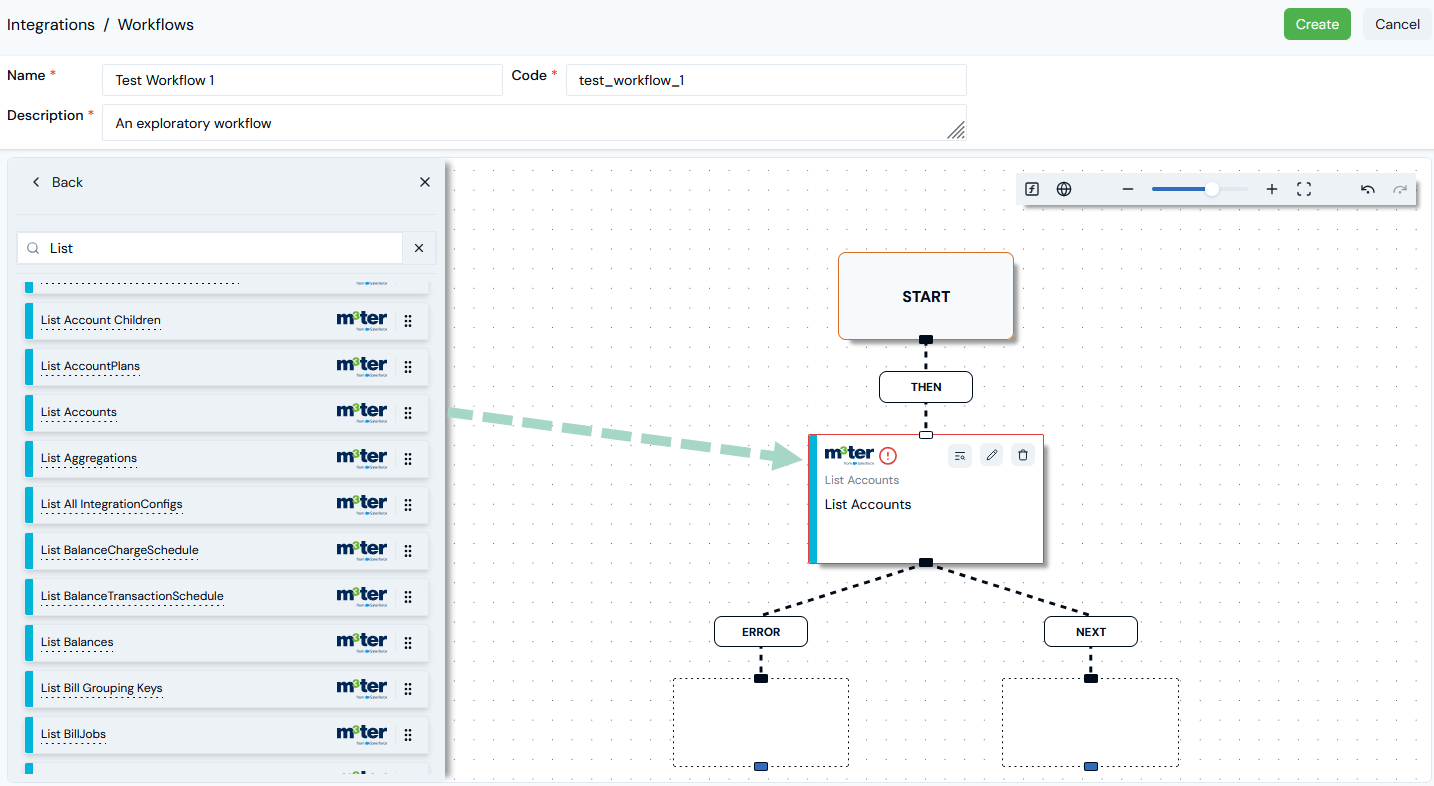 The newly added function shows an alert and red border to indicate that it needs configuring to be viable as a Workflow step. Functions have three icons you can use:
* To show **Function details**:
The newly added function shows an alert and red border to indicate that it needs configuring to be viable as a Workflow step. Functions have three icons you can use:
* To show **Function details**:
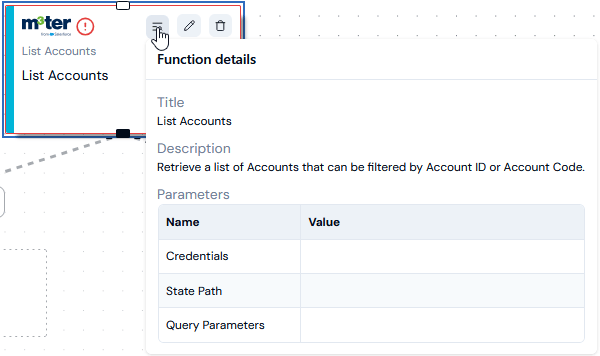 * To **Edit**:
 * To **Delete**:
 2. To configure a function, select the **Edit** icon. An **Edit** panel appears:
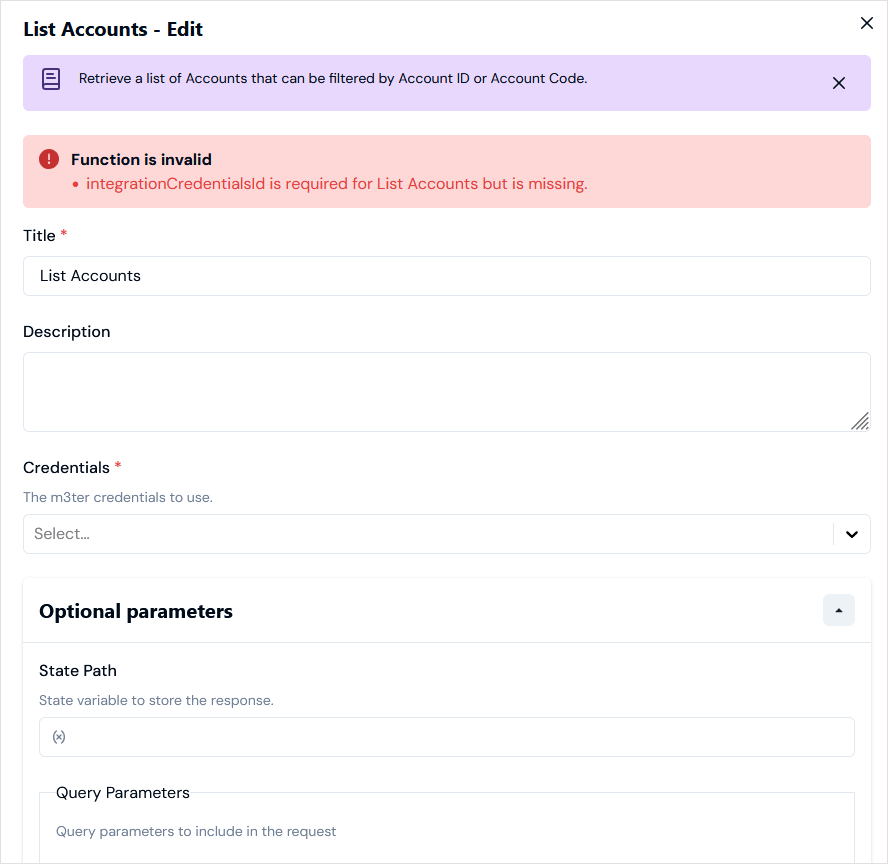 * When you open the **Edit** panel for a function, any required configuration is flagged up at the top of the panel.
* The configuration options for functions vary.
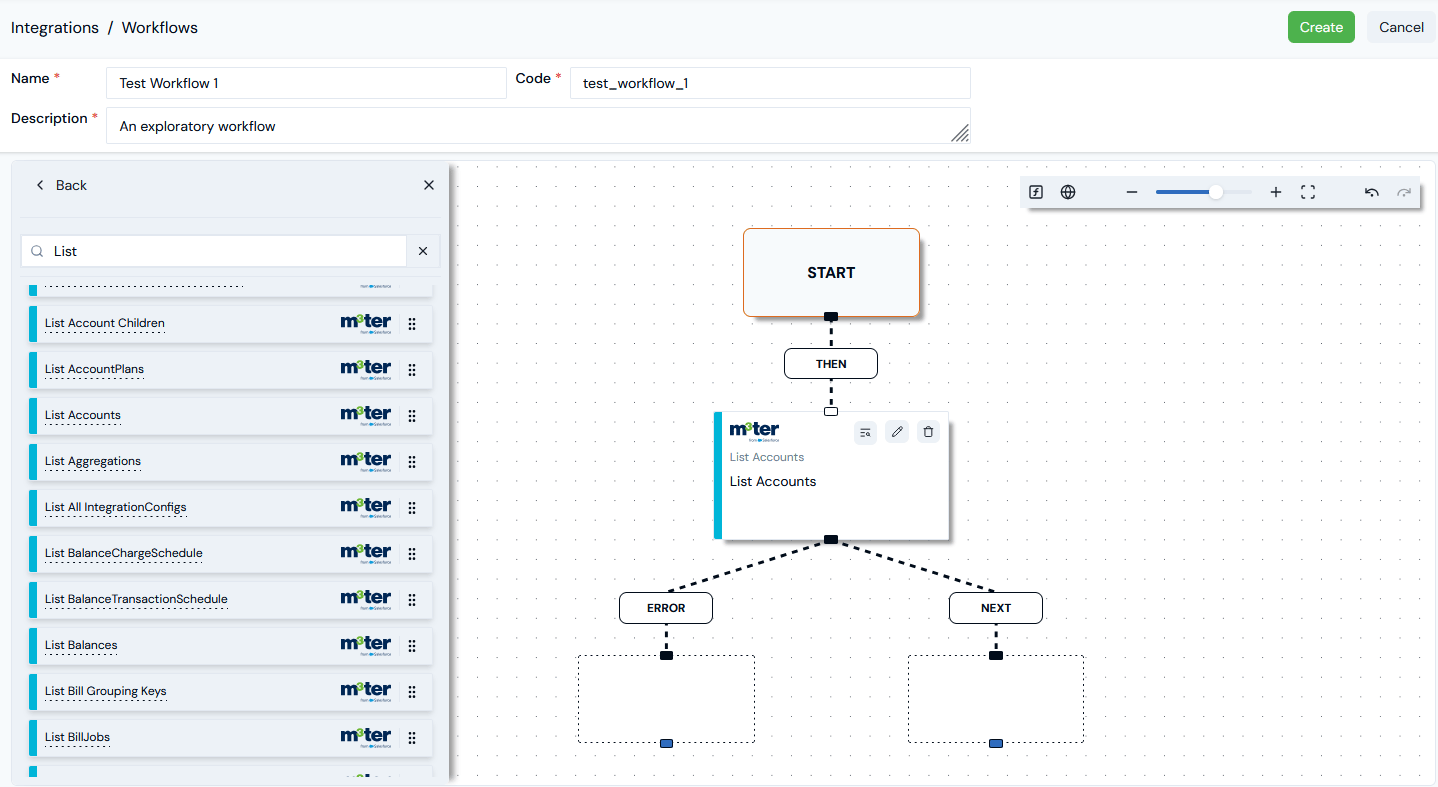
* When you've edited a function for the required configuration, select **Update**. The function then shows as valid in the Workflow canvas and the alert and red border no longer show:
* When you open the **Edit** panel for a function, any required configuration is flagged up at the top of the panel.
* The configuration options for functions vary.
* When you've edited a function for the required configuration, select **Update**. The function then shows as valid in the Workflow canvas and the alert and red border no longer show:
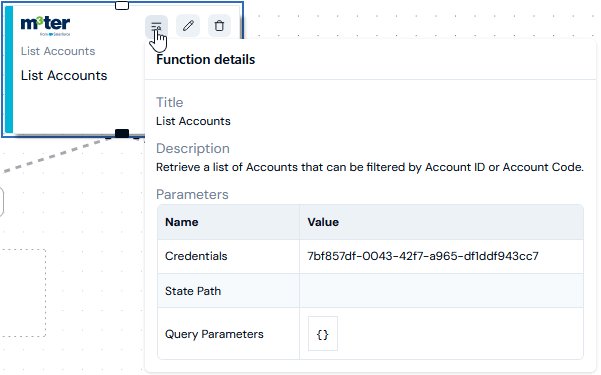
 3. As you configure steps, you can quickly check the **Function details** without having to re-open the **Edit** Panel:
 4. Some functions allow you to include flows, such as the **Loop** Logic function:
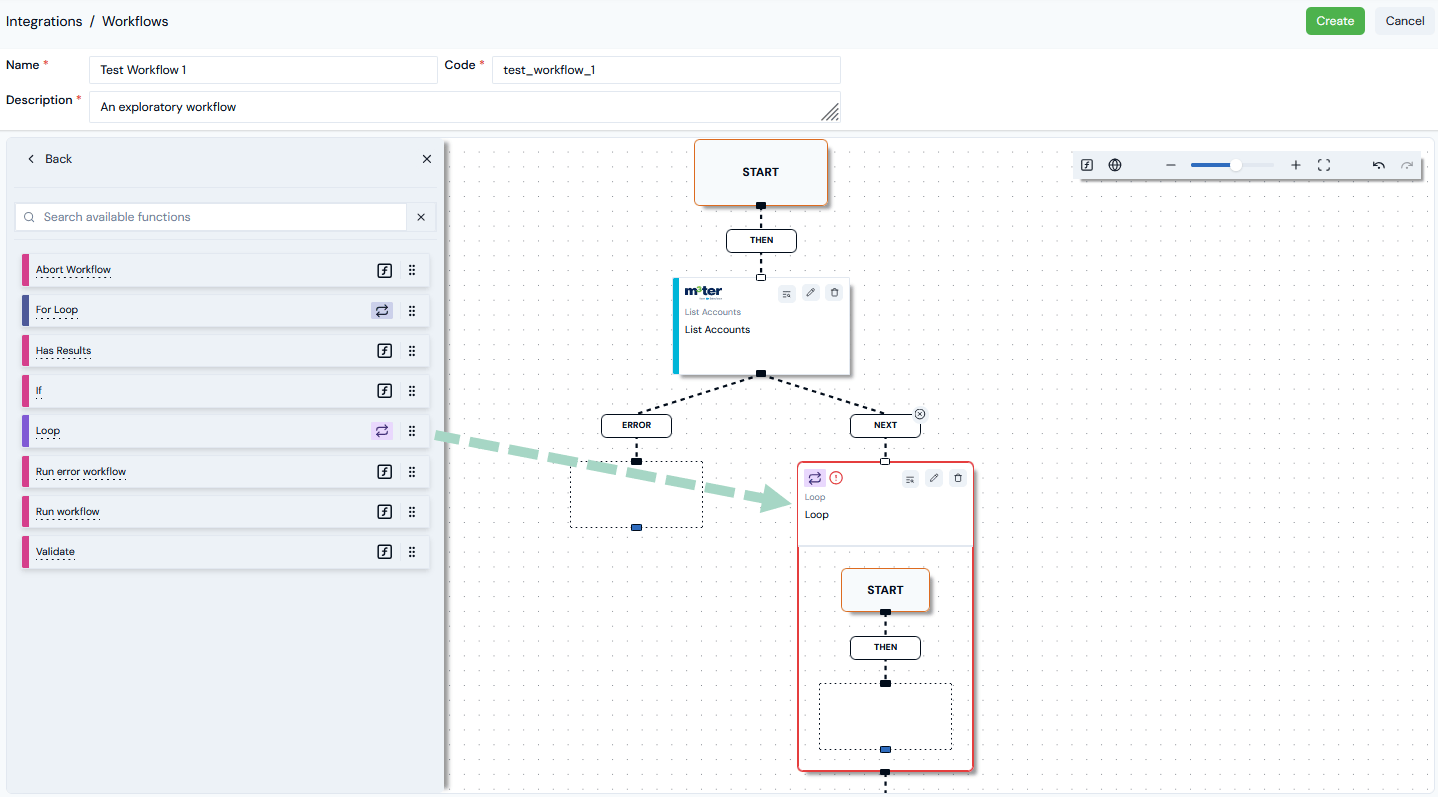 * You can then start to add functions to the **Loop** to create the required flow:
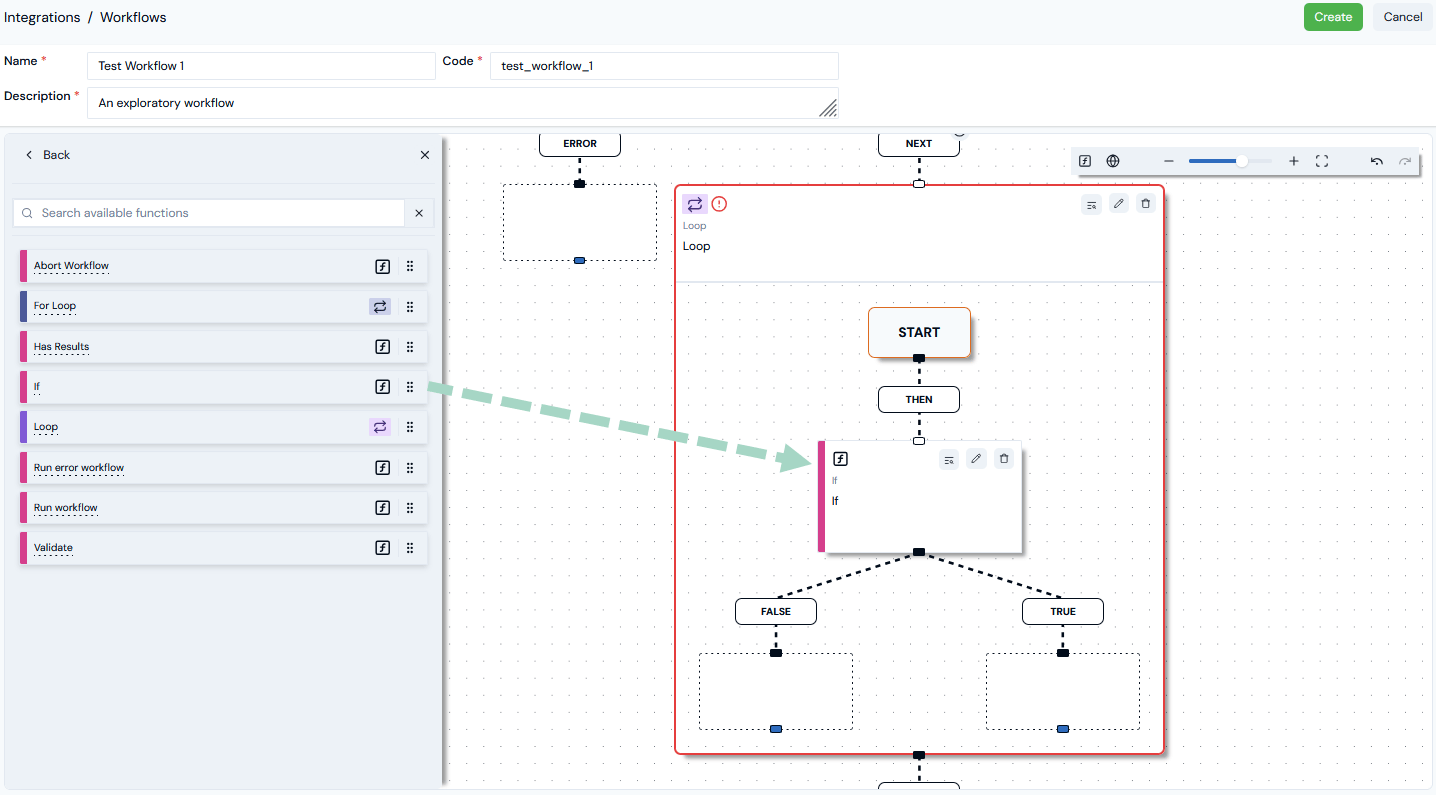 5. Some functions allow you to create an alternative path if the function returns an error. For other functions this is not appropriate:
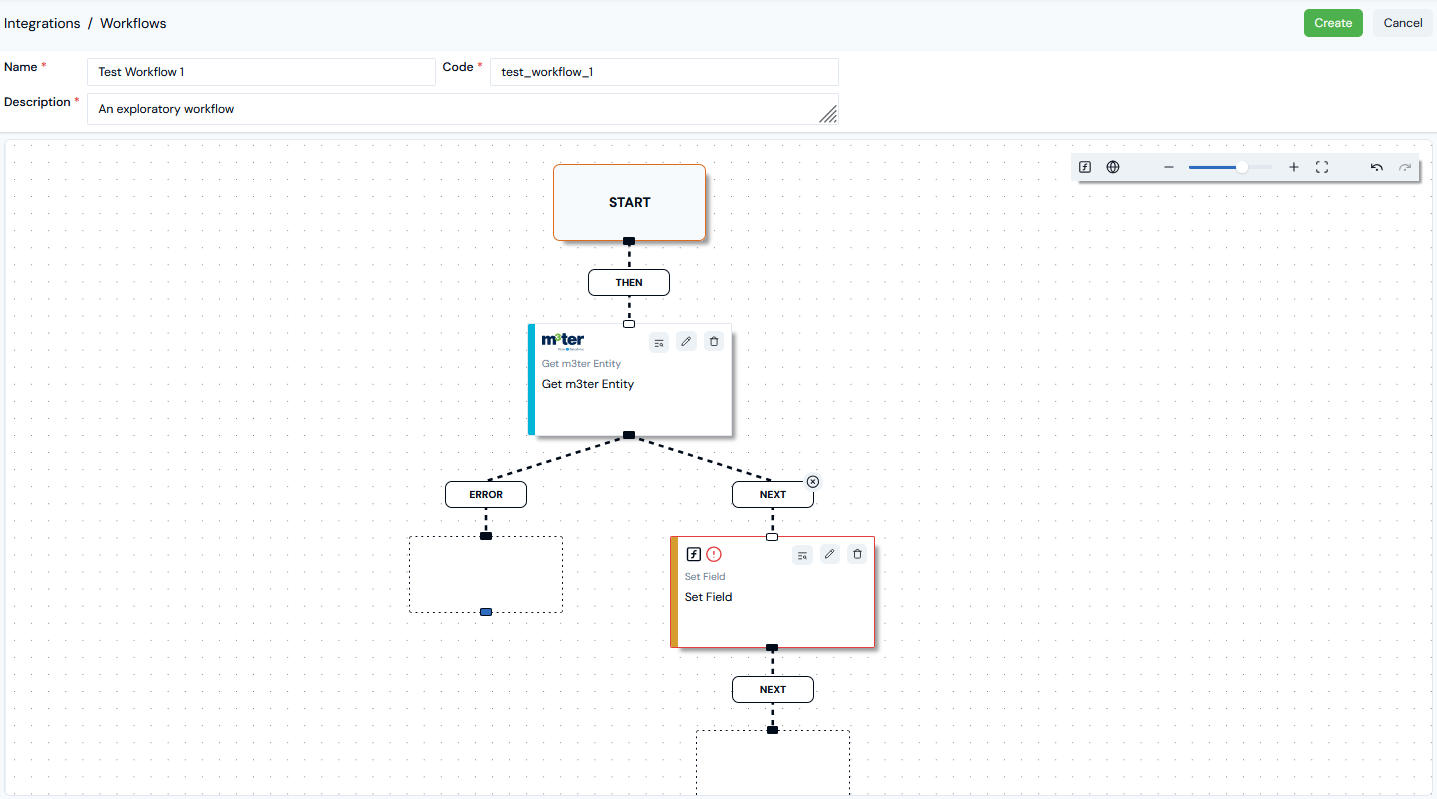 * In this example, the **Get m3ter Entity API** function allows an alternative path to be built for the Workflow if the function returns an error. In contrast, the **Set Field Data management** does not.
**Create Workflow Promptly!** When you've added some functions to a new Draft Workflow, it's good practice to create the Workflow promptly and avoid the risk of losing your work. The Workflow is saved as a **Published** version but the Builder reopens in **Draft** mode allowing you to continue building. See below: [Publishing Workflows](#publishing-workflows).
## Arranging Workflow Steps
As you build a Workflow and add functions, you might need to re-arrange the sequence of steps. Builder features are available for quickly adding to or rearranging the Workflow sequence, avoiding the need to delete and re-add functions to achieve the required Workflow sequence.
1. **Adding intervening steps**. If you've added several steps to a Workflow and then realize you've missed a step, you can drag-and-drop the required missing function directly onto a **THEN**, **NEXT**, **TRUE**, **FALSE**, or **ERROR** node:
* In this example, the **Get m3ter Entity API** function allows an alternative path to be built for the Workflow if the function returns an error. In contrast, the **Set Field Data management** does not.
**Create Workflow Promptly!** When you've added some functions to a new Draft Workflow, it's good practice to create the Workflow promptly and avoid the risk of losing your work. The Workflow is saved as a **Published** version but the Builder reopens in **Draft** mode allowing you to continue building. See below: [Publishing Workflows](#publishing-workflows).
## Arranging Workflow Steps
As you build a Workflow and add functions, you might need to re-arrange the sequence of steps. Builder features are available for quickly adding to or rearranging the Workflow sequence, avoiding the need to delete and re-add functions to achieve the required Workflow sequence.
1. **Adding intervening steps**. If you've added several steps to a Workflow and then realize you've missed a step, you can drag-and-drop the required missing function directly onto a **THEN**, **NEXT**, **TRUE**, **FALSE**, or **ERROR** node:
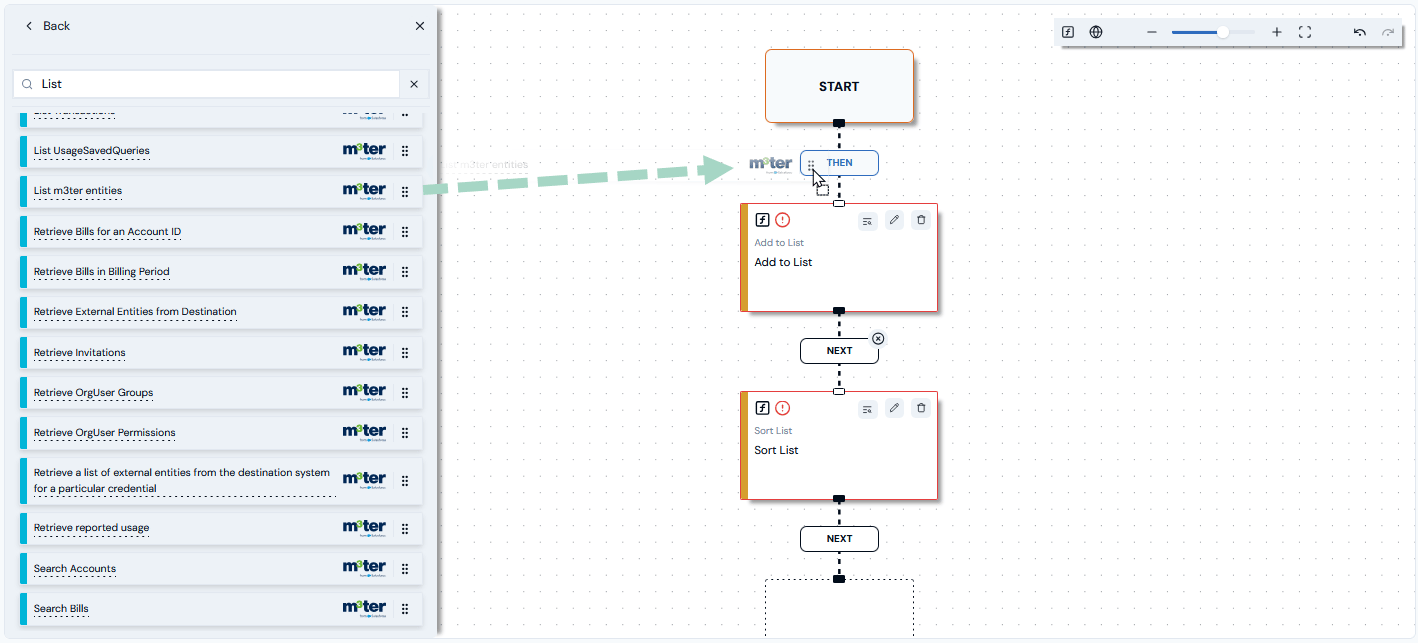 * In this example, a **List m3ter Entities API** function was omitted as the first step required in the Workflow.
* Note that as you drag a function over a node, it will show light blue to indicate the function can be inserted in the Workflow at that point.
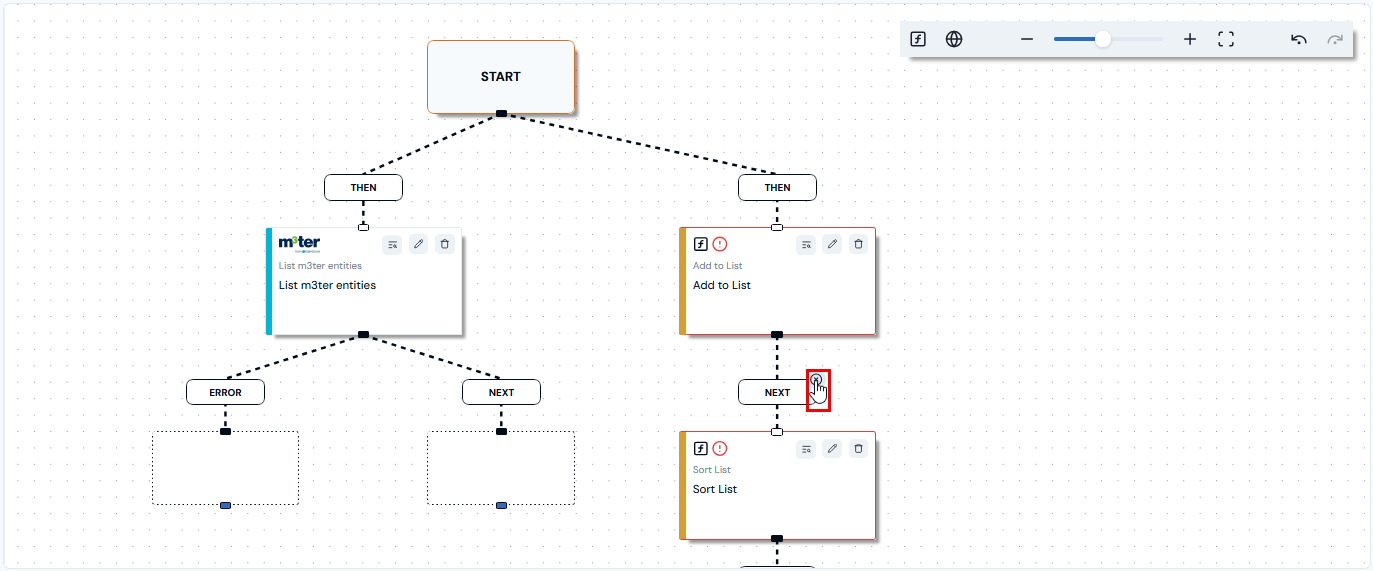
2. **Detaching and re-attaching steps**. If you've reached a point when building your Workflow with several functions added but then realize you need to re-order the sequence, you can select the **X** on the **NEXT**, **TRUE**, **FALSE**, or **ERROR** node that precedes the function to detach it.
* In this example, we want to switch the order of the **Add to List** and **Sort List** functions. First, we'll detach the 2-step branch that starts with the **Add to List** function:
* In this example, a **List m3ter Entities API** function was omitted as the first step required in the Workflow.
* Note that as you drag a function over a node, it will show light blue to indicate the function can be inserted in the Workflow at that point.
2. **Detaching and re-attaching steps**. If you've reached a point when building your Workflow with several functions added but then realize you need to re-order the sequence, you can select the **X** on the **NEXT**, **TRUE**, **FALSE**, or **ERROR** node that precedes the function to detach it.
* In this example, we want to switch the order of the **Add to List** and **Sort List** functions. First, we'll detach the 2-step branch that starts with the **Add to List** function:
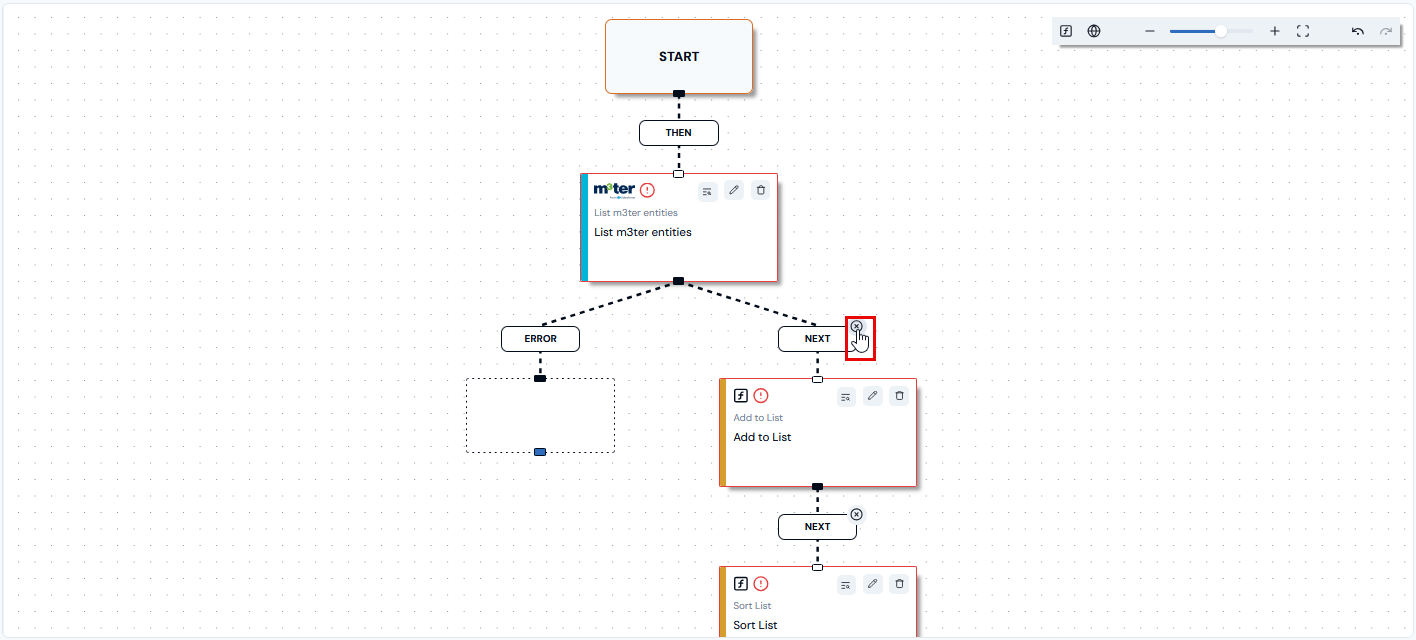 * Second, we'll detach the **Sort List** function:
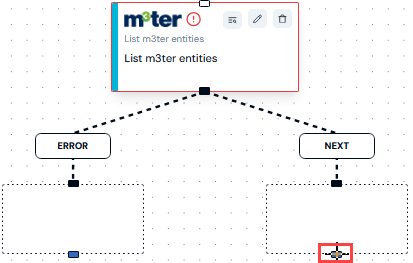
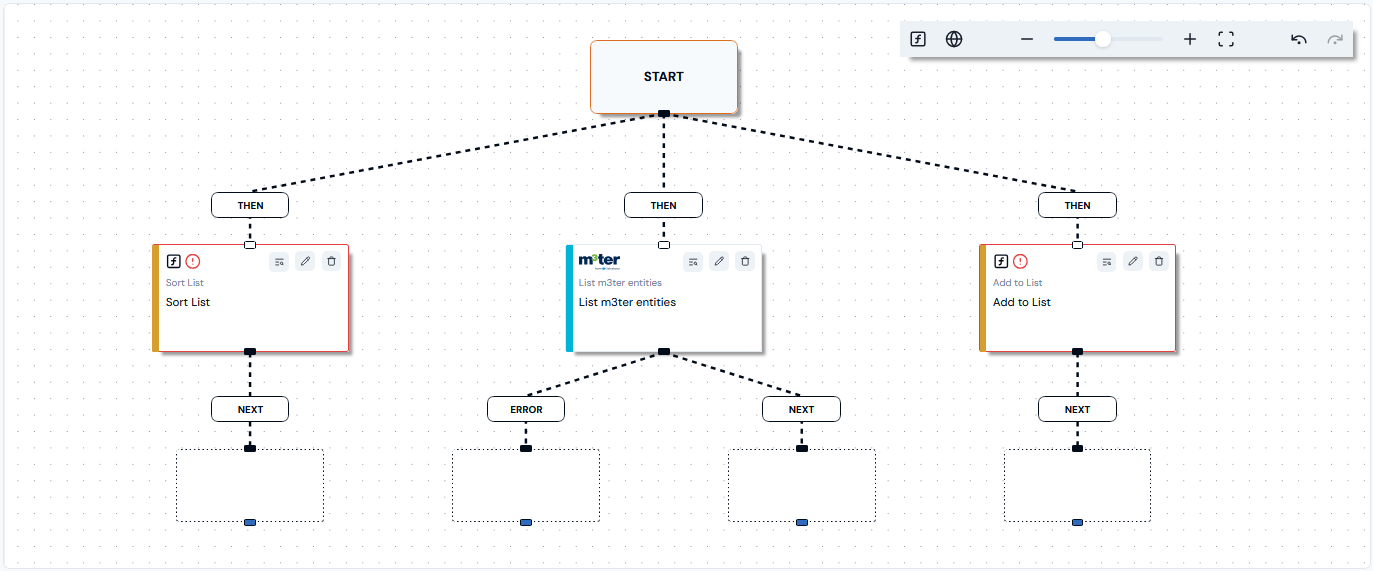 * Now, we can re-attach the **Sort List** function: if we hover our cursor over the blue box on the **NEXT** node, it changes to a cross:
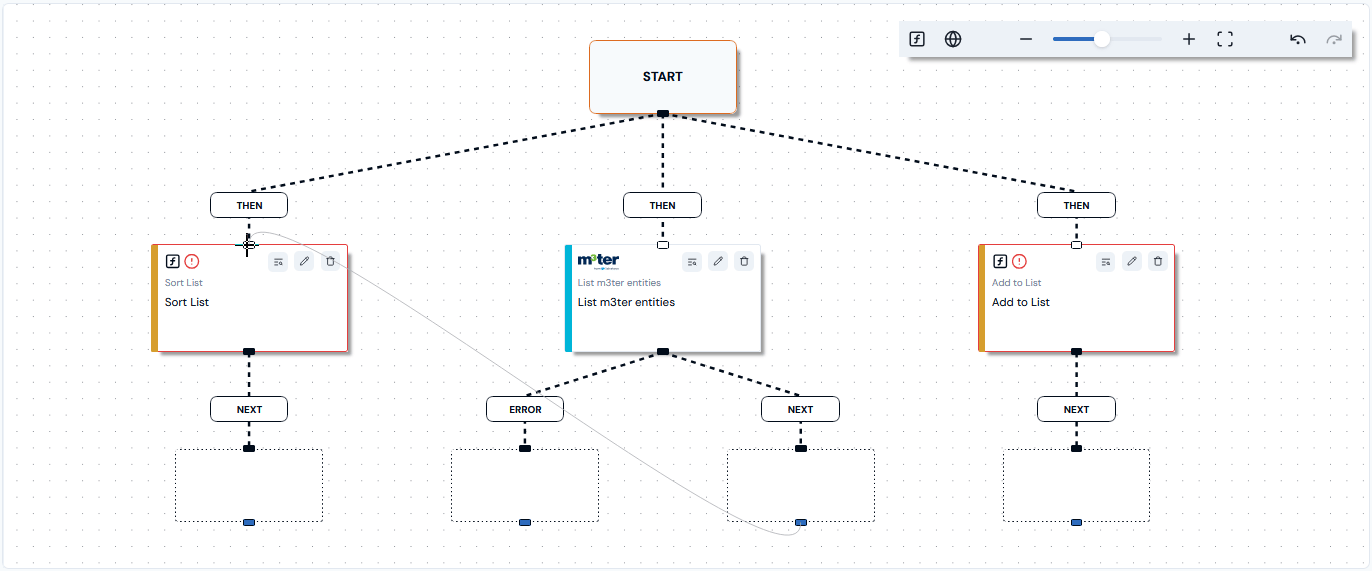
 * We can then click on the blue box and bring up a catch line which we can drag across the canvas to the **Sort List** function and release the catch line on it to re-attach it as that step in the main flow:
 * Lastly, we use the same method to re-attach the **Add to List** function to the Workflow as the next step:
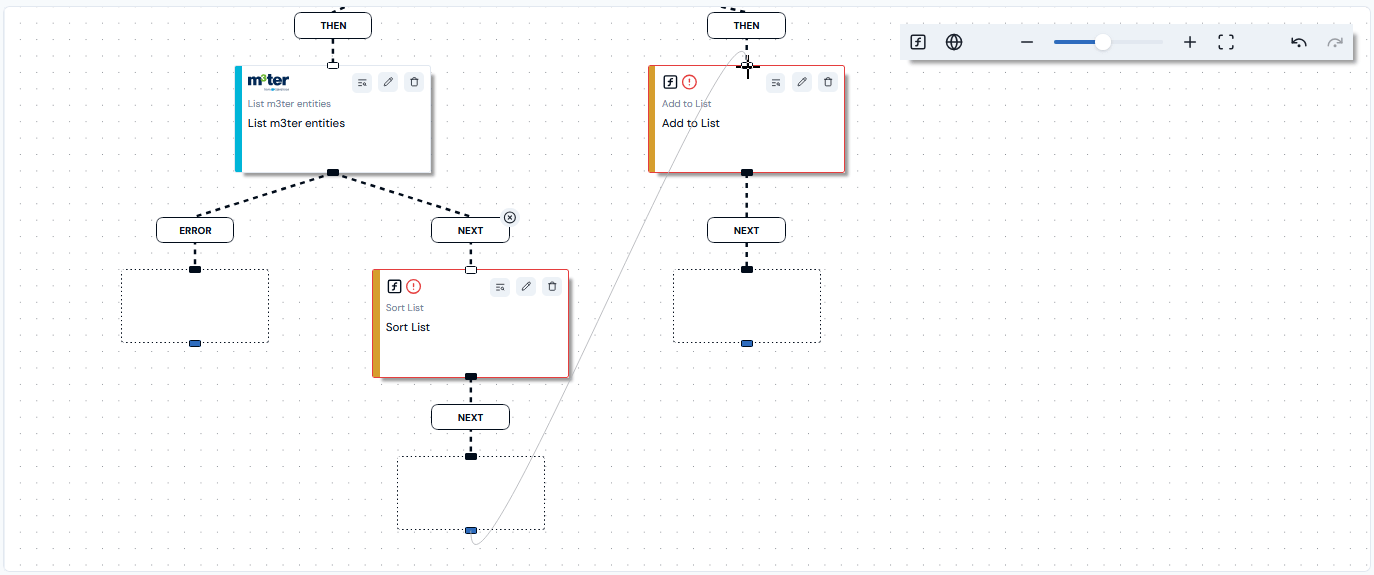
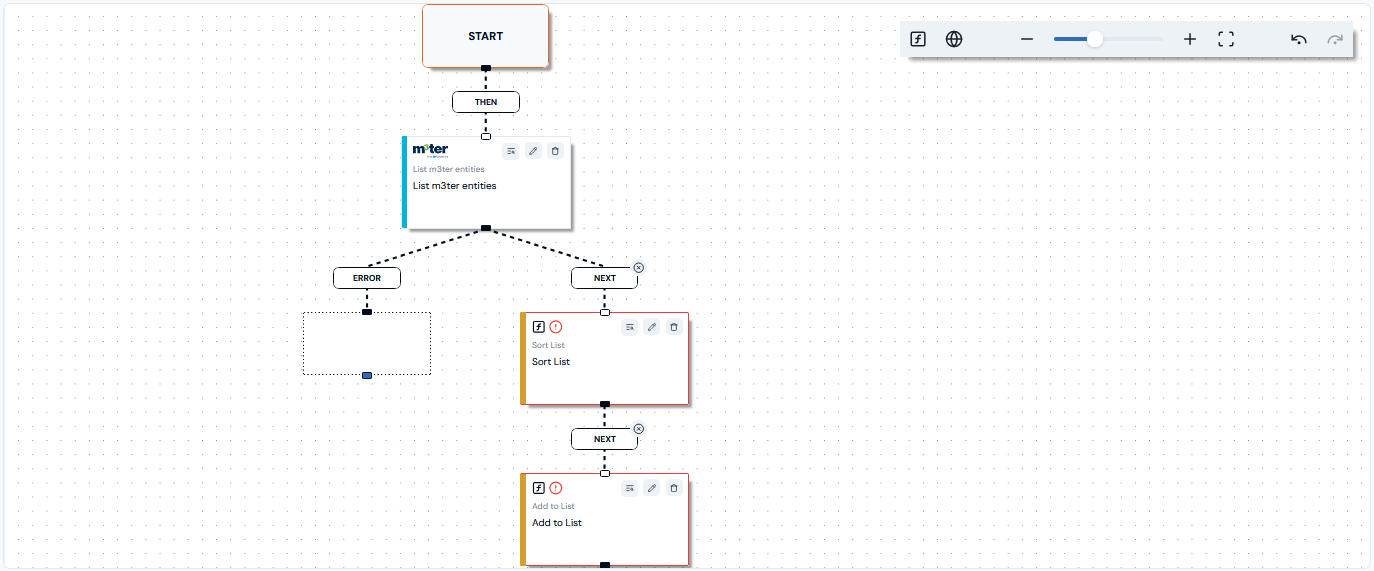 * Note that you cannot detach a function if it is used as the *first step* in a Workflow.
## Publishing Workflows
When you've added some functions to a new draft Workflow, it's good practice to create the Workflow promptly without attempting to build the Workflow out to completion in a single work session and risk losing your work. A *Published* version of the Workflow is then created:
* A saved Draft version cannot be deployed into your production environment - the Published version must be used.
* If you export a Workflow, the Published version is exported. See below [Managing and Testing Workflows - Builder Options](#managing-and-testing-workflows-builder-options).
**To create and publish a Workflow:**
1. With a new Workflow open in **Draft** mode and with at least one function added, select **Create**. The Workflow is saved as a **Published** version and the Workflow Builder reopens in **Draft** mode:
* Note that you cannot detach a function if it is used as the *first step* in a Workflow.
## Publishing Workflows
When you've added some functions to a new draft Workflow, it's good practice to create the Workflow promptly without attempting to build the Workflow out to completion in a single work session and risk losing your work. A *Published* version of the Workflow is then created:
* A saved Draft version cannot be deployed into your production environment - the Published version must be used.
* If you export a Workflow, the Published version is exported. See below [Managing and Testing Workflows - Builder Options](#managing-and-testing-workflows-builder-options).
**To create and publish a Workflow:**
1. With a new Workflow open in **Draft** mode and with at least one function added, select **Create**. The Workflow is saved as a **Published** version and the Workflow Builder reopens in **Draft** mode:
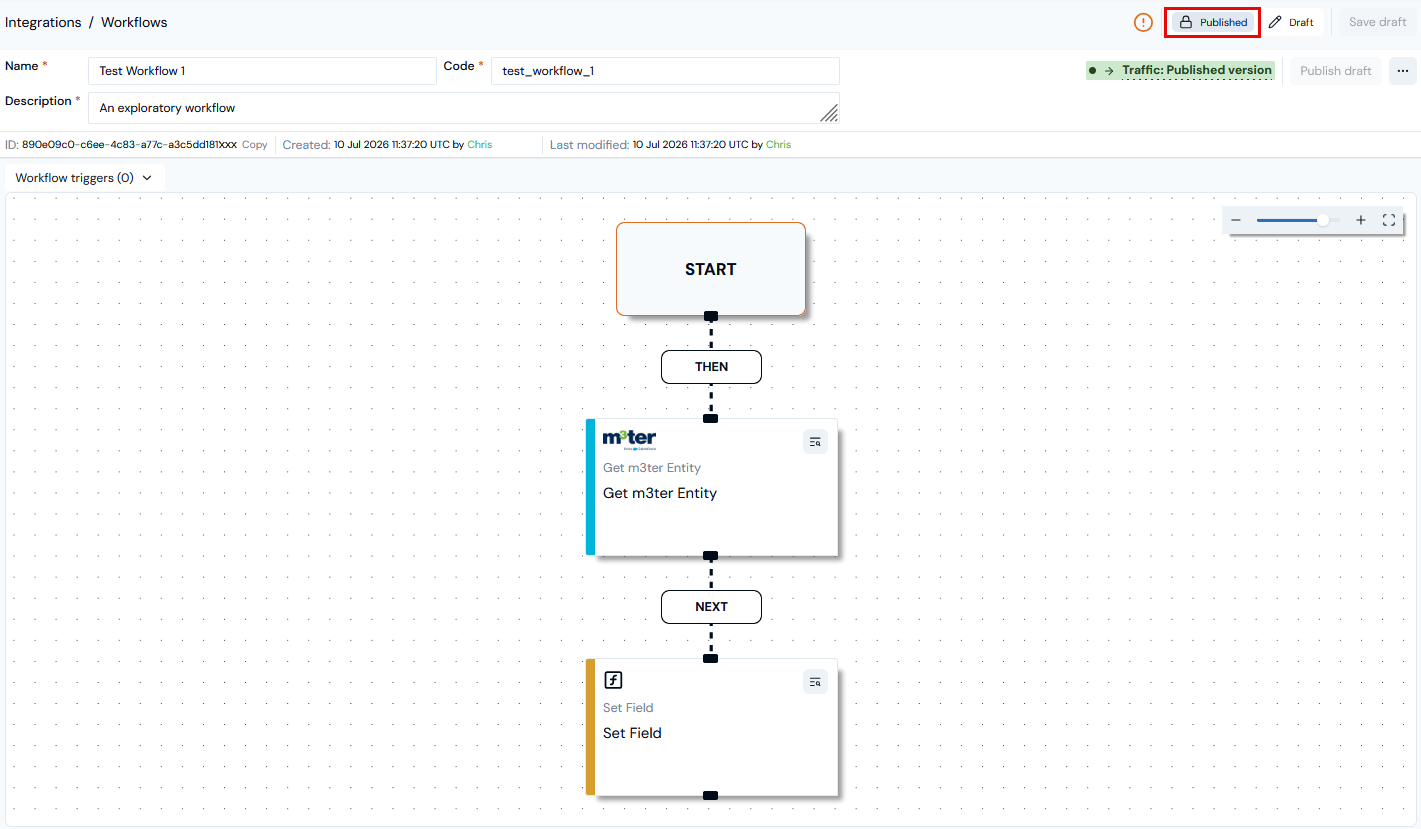
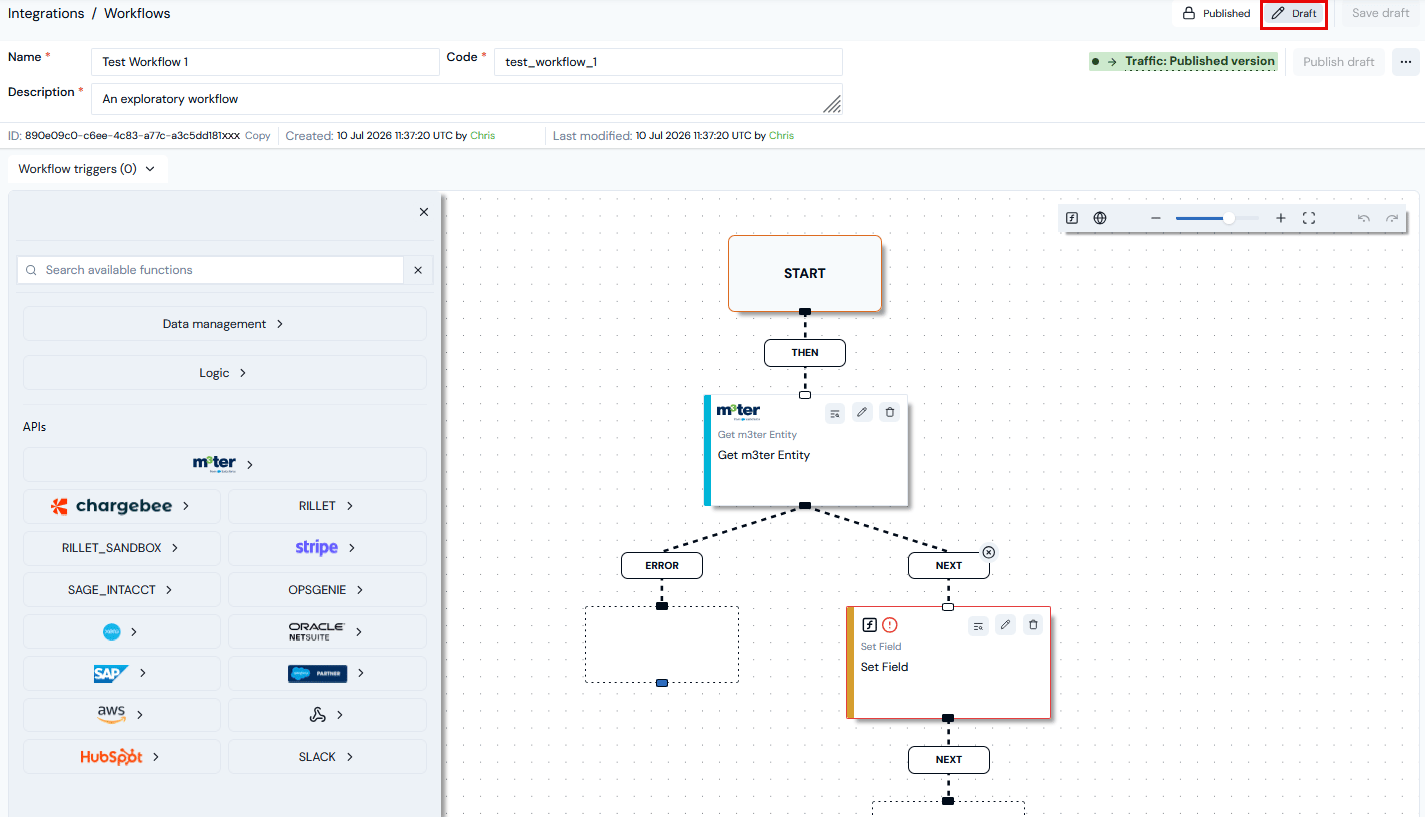 * Note that you can read off the Workflow's details:
* Workflow **ID** which you can **Copy** to your clipboard.
* Audit data for when and who **Created** and **Last modified** the Workflow.
2. You can then continue to add and configure functions to the **Draft** Workflow and **Save draft** updates as you proceed.
3. When you've saved Draft updates and you want replace the **Published** version, select **Publish draft**. A confirmation modal appears:
* Note that you can read off the Workflow's details:
* Workflow **ID** which you can **Copy** to your clipboard.
* Audit data for when and who **Created** and **Last modified** the Workflow.
2. You can then continue to add and configure functions to the **Draft** Workflow and **Save draft** updates as you proceed.
3. When you've saved Draft updates and you want replace the **Published** version, select **Publish draft**. A confirmation modal appears:
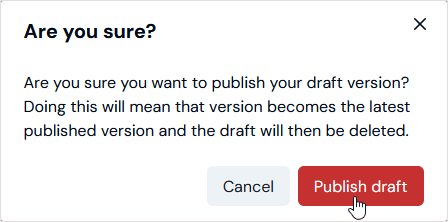 **Note:** When you publish a Workflow Draft version, the Draft is permanently deleted. If you've been using the traffic-forwarding feature to perform test runs of a Workflow using the Draft version before publishing, this means any Draft runs will no longer be available. See [Testing and Troubleshooting Workflows](/guides/m3sh-workflows/testing-and-troubleshooting-workflows) for more details.
4. Select **Publish draft**.
5. At any time, you can select to view the **Published** Workflow:
**Note:** When you publish a Workflow Draft version, the Draft is permanently deleted. If you've been using the traffic-forwarding feature to perform test runs of a Workflow using the Draft version before publishing, this means any Draft runs will no longer be available. See [Testing and Troubleshooting Workflows](/guides/m3sh-workflows/testing-and-troubleshooting-workflows) for more details.
4. Select **Publish draft**.
5. At any time, you can select to view the **Published** Workflow:
 ## Managing and Testing Workflows - Builder Options
When, you've created a Workflow, options for managing and testing your Workflows are available in the Builder environment. Open the drop-down menu at top-right:
## Managing and Testing Workflows - Builder Options
When, you've created a Workflow, options for managing and testing your Workflows are available in the Builder environment. Open the drop-down menu at top-right:
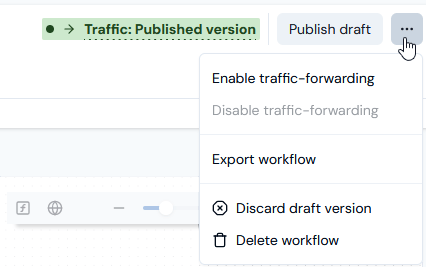 * **Enable/Disable traffic-forwarding**. If you've completed a Workflow and published it to your production environment, you might want to update and improve the Workflow. To facilitate testing your changes on a Draft version and before publishing, you can **Enable traffic-forwarding** to temporarily switch traffic to the Draft version. This means the Draft version will be triggered instead of the Published version. When you are finished testing, you can **Disable traffic-forwarding** to switch traffic back and ensure the Published version is triggered. See [Testing and Troubleshooting Workflows](/guides/m3sh-workflows/testing-and-troubleshooting-workflows) for more details.
* **Export Workflow**. If you've built and published a Workflow and want to use it as the basis for another Workflow - by adapting the current Workflow to serve a similar but different operational use case - you can export the *published Workflow* and import it as a new one. See [Exporting and Importing Workflows](/guides/m3sh-workflows/exporting-and-importing-workflows).
* **Discard draft version**. Only available if you've made changes to a Draft version and saved those changes to draft after you last published a Workflow. Any changes made are discarded and the Draft is reverted to match the Published version.
* **Delete Workflow**. Deletes the current Workflow - the Workflow builder closes and you are taken back to the **Workflows** page.
* **Enable/Disable traffic-forwarding**. If you've completed a Workflow and published it to your production environment, you might want to update and improve the Workflow. To facilitate testing your changes on a Draft version and before publishing, you can **Enable traffic-forwarding** to temporarily switch traffic to the Draft version. This means the Draft version will be triggered instead of the Published version. When you are finished testing, you can **Disable traffic-forwarding** to switch traffic back and ensure the Published version is triggered. See [Testing and Troubleshooting Workflows](/guides/m3sh-workflows/testing-and-troubleshooting-workflows) for more details.
* **Export Workflow**. If you've built and published a Workflow and want to use it as the basis for another Workflow - by adapting the current Workflow to serve a similar but different operational use case - you can export the *published Workflow* and import it as a new one. See [Exporting and Importing Workflows](/guides/m3sh-workflows/exporting-and-importing-workflows).
* **Discard draft version**. Only available if you've made changes to a Draft version and saved those changes to draft after you last published a Workflow. Any changes made are discarded and the Draft is reverted to match the Published version.
* **Delete Workflow**. Deletes the current Workflow - the Workflow builder closes and you are taken back to the **Workflows** page.