> ## Documentation Index
> Fetch the complete documentation index at: https://docs.m3ter.com/llms.txt
> Use this file to discover all available pages before exploring further.
# Creating Custom Metadata Mappings
The Custom Metadata Types installed with the m3ter Connector for Salesforce package are used for syncing your Salesforce records to your m3ter Organization. Mappings are pre-installed which use the Opportunity and other Salesforce standard objects/fields. If you want to sync other Salesforce objects and fields to m3ter, then you can create a new *SyncConfig* Custom Metadata record and new Mapping records to suit your specific Sales process.
This topic explains how to set up new SyncConfigs with custom metadata mappings for syncing objects from your Sales flow in Salesforce into m3ter, such as Quotes or Contracts.
## Custom Metadata Mappings - Prerequisite
In order for any new custom metadata mappings used in a SyncConfig to work, a *m3ter Account* and a *m3ter Contract* need to be mapped as minimal prerequisites. The mappings for these objects are already included in the m3ter Connector managed package at install:
* Salesforce *Account* to m3ter *Account* is an AccountMapping named "New Account Mapping"
* Salesforce *Opportunity* to m3ter *Contract* is a ContractMapping named "New Contract Mapping".
**Important!** The installed mappings should not have their objects changed; these reference Salesforce standard objects. Please create a new mapping instead.
## Creating Custom Metadata Mappings - Contract Example
This section explains how to create Custom Metadata Mappings in your Salesforce Org for syncing objects with m3ter by taking you through the steps to create and set up a *SyncConfig* for a Contract.
**To create and configure a Contract SyncConfig:**
1. At top-right, select the gear icon and on the drop-down menu, select **Setup**. The **SETUP>Home** pages opens.
2. In the **Quick Find** field at top-left, start to type "metadata" - the **SETUP** navigation list is filtered and you'll see **Custom Code>Custom Metadata Types** returned.
3. Select **Custom Metadata Types** in the **SETUP** list. The **Custom Metadata Types** page opens:
 4. Select **SyncConfig**. The **Custom Metadata Type>SyncConfig** details page opens.
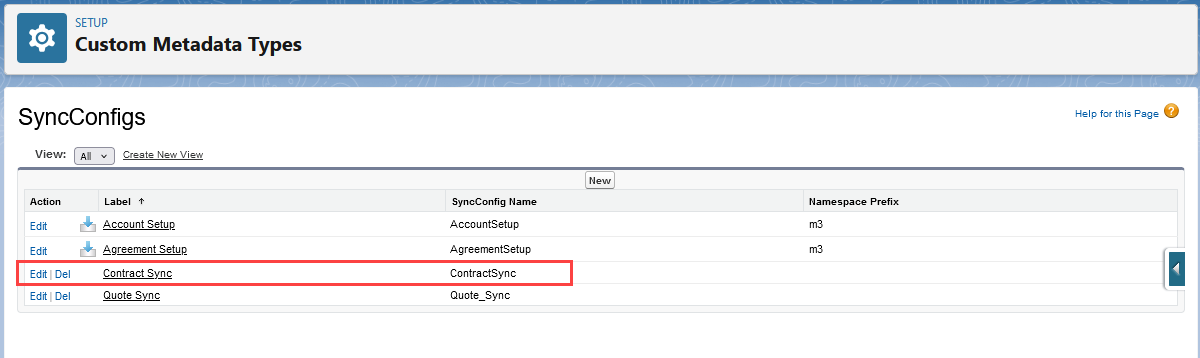
5. Select **Manage SyncConfigs**. The **SyncConfigs** page opens.
6. Select **New**. A **SyncConfig Edit** page opens and you can enter the details of the new SyncConfig. There are three sections to configure:
* **Information**
* **Setup**
* **Mappings**
7. Use the **Information** section to enter:
* **Label**. A descriptive label for the new SyncConfig.
* **SyncConfig Name**. This will be used by the API and managed package. Click the info icon for formatting constraints.
* **Protected Component**. Check the box if you want the SyncConfig data to be treated as protected. Click the info icon for details.
8. Use the **Setup** section to enter:
* **Controlling Object**. Use the drop-down to select which Salesforce object will be the Controlling Object. The Controlling Object is the object you are planning to use to launch the sync. This might be an object that represents your Accounts, or an object that represents the Agreements you make with your customers.
* **Parent Id**. Enter the Id of the object you want use as the parent object. This is the field which points to the identifier of the parent object to this base sync object. In an account hierarchy, this might be the Parent account id field; in an Agreement, this might be the field which points to the account or organization you are selling to.
* **Product Mapping Key**. This is the field used on your line items to say which line item relates to which m3terMapping product. In most cases this will likely be a Product Name or Product Code.
* **Product Mapping Object**. This is the object used in your agreements which includes product information. In most cases, this will be a line item object.
* **Line Item Lookup**. This is how your product can be retrieved via your agreement. In the event your products are on line items as is the usual case, this will be the lookup field which ties them to your main agreement object.
* **Upserts**. For the new SynConifg, you can enable/disable upsert for the **Account** and **Contract** objects in m3ter. The default is for upserts to be enabled.
9. In the **Mappings** section, set up the metadata mappings you want to use for the new SyncConfig:
* You can use the lookup icon to open a **Lookup** modal to search for mappings to select:
4. Select **SyncConfig**. The **Custom Metadata Type>SyncConfig** details page opens.
5. Select **Manage SyncConfigs**. The **SyncConfigs** page opens.
6. Select **New**. A **SyncConfig Edit** page opens and you can enter the details of the new SyncConfig. There are three sections to configure:
* **Information**
* **Setup**
* **Mappings**
7. Use the **Information** section to enter:
* **Label**. A descriptive label for the new SyncConfig.
* **SyncConfig Name**. This will be used by the API and managed package. Click the info icon for formatting constraints.
* **Protected Component**. Check the box if you want the SyncConfig data to be treated as protected. Click the info icon for details.
8. Use the **Setup** section to enter:
* **Controlling Object**. Use the drop-down to select which Salesforce object will be the Controlling Object. The Controlling Object is the object you are planning to use to launch the sync. This might be an object that represents your Accounts, or an object that represents the Agreements you make with your customers.
* **Parent Id**. Enter the Id of the object you want use as the parent object. This is the field which points to the identifier of the parent object to this base sync object. In an account hierarchy, this might be the Parent account id field; in an Agreement, this might be the field which points to the account or organization you are selling to.
* **Product Mapping Key**. This is the field used on your line items to say which line item relates to which m3terMapping product. In most cases this will likely be a Product Name or Product Code.
* **Product Mapping Object**. This is the object used in your agreements which includes product information. In most cases, this will be a line item object.
* **Line Item Lookup**. This is how your product can be retrieved via your agreement. In the event your products are on line items as is the usual case, this will be the lookup field which ties them to your main agreement object.
* **Upserts**. For the new SynConifg, you can enable/disable upsert for the **Account** and **Contract** objects in m3ter. The default is for upserts to be enabled.
9. In the **Mappings** section, set up the metadata mappings you want to use for the new SyncConfig:
* You can use the lookup icon to open a **Lookup** modal to search for mappings to select:
 * For each mapping you set up, you can set the **SyncLevel**.
 10. Select **Save**. You are returned to the **SyncConifgs** page where the new **ContractSync** is listed: