> ## Documentation Index
> Fetch the complete documentation index at: https://docs.m3ter.com/llms.txt
> Use this file to discover all available pages before exploring further.
# Setting Up m3sh Webhook Triggers
The m3sh Webhook Triggers capability in the m3ter Connector for Salesforce managed package offers Salesforce administrators a declarative, no-code solution to send Salesforce record data to m3sh Workflows via webhook endpoints.
This topic explains how to set up and work with the m3sh Webhook Triggers feature:
* [Overview](/guides/m3ter-connector-for-salesforce/setting-up-m3sh-webhook-triggers#overview)
* [Prerequisite Configuration](/guides/m3ter-connector-for-salesforce/setting-up-m3sh-webhook-triggers#prerequisite-configuration)
* [Creating m3sh Webhook Triggers](/guides/m3ter-connector-for-salesforce/setting-up-m3sh-webhook-triggers#creating-m3sh-webhook-triggers)
* [Testing Active m3sh Webhook Triggers](/guides/m3ter-connector-for-salesforce/setting-up-m3sh-webhook-triggers#testing-active-m3sh-webhook-triggers)
* [Implementation Notes](/guides/m3ter-connector-for-salesforce/setting-up-m3sh-webhook-triggers#implementation-notes)
* [Monitoring Execution Logs](/guides/m3ter-connector-for-salesforce/setting-up-m3sh-webhook-triggers#monitoring-execution-logs)
**Important!**
* **Check Version**. The m3sh Triggers feature is only available in version **0.13** and above of the m3ter Connector for Salesforce managed package. See [m3ter Connector for Salesforce - Changelog](/guides/m3ter-connector-for-salesforce/m3ter-connector-for-salesforce-changelog) for details on how to check your current installed version.
## Overview
The m3sh Triggers feature is built on top of the existing custom metadata framework developed for the m3ter Connector. Three distinct integration patterns are supported:
* **Scheduled Polling**. Automated batch jobs that run on a configurable schedule - at 15, 30, or 60 minute intervals.
* **Manual/On-Demand Execution**. Administrator-initiated webhook sent from the UI.
* **Flow/Apex Invocable Actions**. Developer-triggered webhook sent from Salesforce Flows or custom Apex code.
All three patterns leverage the same underlying webhook delivery infrastructure, ensuring consistent behavior, authentication, payload formatting, and execution logging across all integration methods.
## Prerequisite Configuration
There is some prerequisite configuration you'll need to perform in your Salesforce Org before creating and deploying m3sh Webhook Triggers:
* [Enabling m3sh Webhook Triggers](/guides/m3ter-connector-for-salesforce/setting-up-m3sh-webhook-triggers#enabling-m3sh-webhook-triggers)
* [Configuring Remote Site Settings](/guides/m3ter-connector-for-salesforce/setting-up-m3sh-webhook-triggers#configuring-remote-site-settings)
### Enabling m3sh Webhook Triggers
In order to create m3sh Webhook Triggers for your m3ter Connector for Salesforce, you must first enable them in the m3ter Admin App.
**To enable m3sh webhook triggers:**
1. In your Salesforce Org, navigate to **Setup > Custom Settings > m3 Org Settings > Manage > Edit**:
 2. Check the **Enable m3sh Triggers** box and then select **Save**.
### Configuring Remote Site Settings
The m3sh Webhook Triggers feature will make callouts to your m3ter Organization, which means you must configure a remote site setting for m3sh Webhook endpoints.
**To create a** **remote site setting for m3sh Webhook endpoints:**
1. In your Salesforce Org, navigate to **Setup > Security > Remote Site Settings**:
2. Check the **Enable m3sh Triggers** box and then select **Save**.
### Configuring Remote Site Settings
The m3sh Webhook Triggers feature will make callouts to your m3ter Organization, which means you must configure a remote site setting for m3sh Webhook endpoints.
**To create a** **remote site setting for m3sh Webhook endpoints:**
1. In your Salesforce Org, navigate to **Setup > Security > Remote Site Settings**:
 2. Under **Remote Site Settings >** **Remote Site Details** enter these settings for the m3ter Webhook endpoint:
* **Remote Site Name**: m3ter\_Webhook
* **Remote Site URL**: https//\<*m3ter\_Org\_ID*>>.webhook.m3ter.com
* **Active**: TRUE
## Creating m3sh Webhook Triggers
When you've enabled m3sh Webhook Triggers feature for the m3ter Admin App in your Connector for Salesforce, you can create m3sh Webhook Triggers.
**To create a m3sh webhook trigger:**
1. In your Salesforce Org, navigate to the **m3ter Admin** app.
2. Under **Setup**, select the **m3sh Triggers** tab:
2. Under **Remote Site Settings >** **Remote Site Details** enter these settings for the m3ter Webhook endpoint:
* **Remote Site Name**: m3ter\_Webhook
* **Remote Site URL**: https//\<*m3ter\_Org\_ID*>>.webhook.m3ter.com
* **Active**: TRUE
## Creating m3sh Webhook Triggers
When you've enabled m3sh Webhook Triggers feature for the m3ter Admin App in your Connector for Salesforce, you can create m3sh Webhook Triggers.
**To create a m3sh webhook trigger:**
1. In your Salesforce Org, navigate to the **m3ter Admin** app.
2. Under **Setup**, select the **m3sh Triggers** tab:
 3. Select **Create New Trigger**. The tab adjusts and you can enter the details of the new Trigger:
 * Use the **m3ter Workflow** drop-down to select the m3sh Workflow in your m3ter Organization that will be triggered. (*Required*)
* Enter the **Webhook URL**.
* Use the **Salesforce Object** drop-down to select which object's data will be sent to the selected m3sh Workflow. (*Required*)
* Select **Active** to enable the new Trigger.
**Tip: m3sh Webhook Trigger naming?** A composite name is given to a new m3sh Webhook Trigger using the Salesforce object selected followed by a dash followed by the name of the target m3sh Workflow selected - in the above example: **Account - Amazing m3sh Workflow**. You can update the name as required either by going directly to the CMDT record in the backend or after creating the trigger click **Edit**.
4. Select **Create**. The new m3sh Trigger is saved:
* Note that if you want to review or edit an active m3sh Webhook Trigger, you can return to the **m3sh Triggers** tab and use the **Active** drop-down to select the Trigger:
* Use the **m3ter Workflow** drop-down to select the m3sh Workflow in your m3ter Organization that will be triggered. (*Required*)
* Enter the **Webhook URL**.
* Use the **Salesforce Object** drop-down to select which object's data will be sent to the selected m3sh Workflow. (*Required*)
* Select **Active** to enable the new Trigger.
**Tip: m3sh Webhook Trigger naming?** A composite name is given to a new m3sh Webhook Trigger using the Salesforce object selected followed by a dash followed by the name of the target m3sh Workflow selected - in the above example: **Account - Amazing m3sh Workflow**. You can update the name as required either by going directly to the CMDT record in the backend or after creating the trigger click **Edit**.
4. Select **Create**. The new m3sh Trigger is saved:
* Note that if you want to review or edit an active m3sh Webhook Trigger, you can return to the **m3sh Triggers** tab and use the **Active** drop-down to select the Trigger:
 * Select **Edit** if you want to update the configuration of the Trigger.
* Use the **Active** switch if you want to deactivate the Trigger.
## Testing Active m3sh Webhook Triggers
You can run a test of an active m3sh Webhook Trigger.
**To test an active m3sh trigger:**
1. In your Salesforce Org, navigate to the **m3ter Admin** app.
2. Under **Setup**, select the **m3sh Triggers** tab.
3. In the **Active** drop-down list, select the m3sh Webhook Trigger. The Trigger configuration is shown and you can read-off:
* The Salesforce **Object** the Trigger is configured to transfer data for to the m3sh Workflow - in this example **Account**.
* The **Status** of the Trigger - in this example **Never Run**.
* The **Webhook URL** defined for the Trigger.
* Select **Edit** if you want to update the configuration of the Trigger.
* Use the **Active** switch if you want to deactivate the Trigger.
## Testing Active m3sh Webhook Triggers
You can run a test of an active m3sh Webhook Trigger.
**To test an active m3sh trigger:**
1. In your Salesforce Org, navigate to the **m3ter Admin** app.
2. Under **Setup**, select the **m3sh Triggers** tab.
3. In the **Active** drop-down list, select the m3sh Webhook Trigger. The Trigger configuration is shown and you can read-off:
* The Salesforce **Object** the Trigger is configured to transfer data for to the m3sh Workflow - in this example **Account**.
* The **Status** of the Trigger - in this example **Never Run**.
* The **Webhook URL** defined for the Trigger.
 4. Select **Test**. A **Test Webhook** modal opens:
5. On the modal, select the **Account** you want to run the test for, and then select **Run Test**:
4. Select **Test**. A **Test Webhook** modal opens:
5. On the modal, select the **Account** you want to run the test for, and then select **Run Test**:
 * A successful test should return 200 http status code and a response such as the following example:
 **Note!** Please be aware that Test runs will trigger the m3sh Workflow as normal.
## Implementation Notes
This section provides further guidance on successfully implementing the m3sh Webhook Triggers feature for your m3ter Connector for Salesforce managed package:
* [Adding Webhooks as Triggers for m3sh Workflows](/guides/m3ter-connector-for-salesforce/setting-up-m3sh-webhook-triggers#adding-webhooks-as-triggers-for-m3sh-workflows)
* [Implementation Patterns - Options](/guides/m3ter-connector-for-salesforce/setting-up-m3sh-webhook-triggers#implementation-patterns-options)
### Adding Webhooks as Triggers for m3sh Workflows
m3sh Workflows in m3ter can be configured to use different types of Trigger, including webhooks. In addition to the setup required in your Salesforce Org when implementing the m3sh Webhook Triggers feature, you must also ensure a corresponding webhook is configured in the m3ter Console as the Trigger for the target m3sh Workflow.
The correct credentials set up is necessary for the webhook you configure as a Trigger for the m3sh Workflow, and the m3sh Webhook Triggers feature uses the same Integration Credentials setup as used in the Connector for Salesforce managed package to sign requests made to m3ter. Therefore please ensure that when setting up the webhook Trigger for the m3sh Workflow, the integration credentials used match those of the service user used to set up the sync between the m3ter Connector for Salesforce managed package and m3ter, that is, the integration credentials in the managed package.
### Implementation Patterns - Options
Once a m3sh Webhook Trigger has been successfully configured and tested, you are ready to implement it in your process. Three different implementation patterns are available.
* [Use in Salesforce Flows](/guides/m3ter-connector-for-salesforce/setting-up-m3sh-webhook-triggers#salesforce-flows)
* [Use in Apex](/guides/m3ter-connector-for-salesforce/setting-up-m3sh-webhook-triggers#apex)
* [Scheduled Apex Jobs](/guides/m3ter-connector-for-salesforce/setting-up-m3sh-webhook-triggers#scheduled-apex-jobs)
#### Salesforce Flows
The invocable action has two required inputs:
* **Config Developer Name**:
* You can find this by navigating to the underlying CMDT record, that is from **Setup > Custom Metadata >** find\*\* m3sh Trigger Configs\*\* and select **Manage Records**.
* **Record IDs**:
* The Ids for the Salesforce Records to send to the Webhook. These must be of the same type as the configured Salesforce Object.
* The platform will send each record in a separate transaction.
**Note!** Please be aware that Test runs will trigger the m3sh Workflow as normal.
## Implementation Notes
This section provides further guidance on successfully implementing the m3sh Webhook Triggers feature for your m3ter Connector for Salesforce managed package:
* [Adding Webhooks as Triggers for m3sh Workflows](/guides/m3ter-connector-for-salesforce/setting-up-m3sh-webhook-triggers#adding-webhooks-as-triggers-for-m3sh-workflows)
* [Implementation Patterns - Options](/guides/m3ter-connector-for-salesforce/setting-up-m3sh-webhook-triggers#implementation-patterns-options)
### Adding Webhooks as Triggers for m3sh Workflows
m3sh Workflows in m3ter can be configured to use different types of Trigger, including webhooks. In addition to the setup required in your Salesforce Org when implementing the m3sh Webhook Triggers feature, you must also ensure a corresponding webhook is configured in the m3ter Console as the Trigger for the target m3sh Workflow.
The correct credentials set up is necessary for the webhook you configure as a Trigger for the m3sh Workflow, and the m3sh Webhook Triggers feature uses the same Integration Credentials setup as used in the Connector for Salesforce managed package to sign requests made to m3ter. Therefore please ensure that when setting up the webhook Trigger for the m3sh Workflow, the integration credentials used match those of the service user used to set up the sync between the m3ter Connector for Salesforce managed package and m3ter, that is, the integration credentials in the managed package.
### Implementation Patterns - Options
Once a m3sh Webhook Trigger has been successfully configured and tested, you are ready to implement it in your process. Three different implementation patterns are available.
* [Use in Salesforce Flows](/guides/m3ter-connector-for-salesforce/setting-up-m3sh-webhook-triggers#salesforce-flows)
* [Use in Apex](/guides/m3ter-connector-for-salesforce/setting-up-m3sh-webhook-triggers#apex)
* [Scheduled Apex Jobs](/guides/m3ter-connector-for-salesforce/setting-up-m3sh-webhook-triggers#scheduled-apex-jobs)
#### Salesforce Flows
The invocable action has two required inputs:
* **Config Developer Name**:
* You can find this by navigating to the underlying CMDT record, that is from **Setup > Custom Metadata >** find\*\* m3sh Trigger Configs\*\* and select **Manage Records**.
* **Record IDs**:
* The Ids for the Salesforce Records to send to the Webhook. These must be of the same type as the configured Salesforce Object.
* The platform will send each record in a separate transaction.
 **Note:** Because the Invocable Action makes callouts, it needs to be added to an ***Asynchronous Path***.
#### Apex
`Java:`
```java theme={null}
// Trigger delegation pattern
trigger AccountTrigger on Account (after insert, after update) {
AccountTriggerHandler.handleAfterInsertUpdate(Trigger.new, Trigger.oldMap);
}
// Trigger Handler class
public class AccountTriggerHandler {
public static void handleAfterInsertUpdate(List newRecords, Map oldMap) {
if (Trigger.isInsert || (Trigger.isUpdate && needsSync(newRecords, oldMap))) {
Set recordIds = new Map(newRecords).keySet();
sendToWebhookAsync(recordIds, 'Account_Realtime_Sync');
}
}
@future(Callout=true)
public static void sendToWebhookAsync(Set recordIds, String configDeveloperName) {
// Note: In subscriber orgs, use the namespace prefix 'm3' before class names
// Example: m3.M3shSendWebhookService for production installations
m3.M3shSendWebhookService.M3shWebhookRequest request = new m3.M3shSendWebhookService.M3shWebhookRequest();
request.configDeveloperName = configDeveloperName;
request.recordIds = new List(recordIds);
List results =
m3.M3shSendWebhookService.sendToWebhook(new List{ request });
if (!results.isEmpty() && !results[0].success) {
System.debug(LoggingLevel.ERROR, 'Webhook failed: ' + results[0].message);
}
}
private static Boolean needsSync(List newRecords, Map oldMap) {
// Implement your logic here
return true;
}
}
```
* Note that given the service makes callouts, it will need to be wrapped in a `@future(Callout=true) `method.
* See: [https://help.salesforce.com/s/articleView?id=000386018\&type=1](https://help.salesforce.com/s/articleView?id=000386018\&type=1)
#### Scheduled Apex Jobs
For a configured m3sh Webhook Trigger, you can to set up scheduled Apex jobs to periodically send records to the m3sh Webhook:
**Note:** Because the Invocable Action makes callouts, it needs to be added to an ***Asynchronous Path***.
#### Apex
`Java:`
```java theme={null}
// Trigger delegation pattern
trigger AccountTrigger on Account (after insert, after update) {
AccountTriggerHandler.handleAfterInsertUpdate(Trigger.new, Trigger.oldMap);
}
// Trigger Handler class
public class AccountTriggerHandler {
public static void handleAfterInsertUpdate(List newRecords, Map oldMap) {
if (Trigger.isInsert || (Trigger.isUpdate && needsSync(newRecords, oldMap))) {
Set recordIds = new Map(newRecords).keySet();
sendToWebhookAsync(recordIds, 'Account_Realtime_Sync');
}
}
@future(Callout=true)
public static void sendToWebhookAsync(Set recordIds, String configDeveloperName) {
// Note: In subscriber orgs, use the namespace prefix 'm3' before class names
// Example: m3.M3shSendWebhookService for production installations
m3.M3shSendWebhookService.M3shWebhookRequest request = new m3.M3shSendWebhookService.M3shWebhookRequest();
request.configDeveloperName = configDeveloperName;
request.recordIds = new List(recordIds);
List results =
m3.M3shSendWebhookService.sendToWebhook(new List{ request });
if (!results.isEmpty() && !results[0].success) {
System.debug(LoggingLevel.ERROR, 'Webhook failed: ' + results[0].message);
}
}
private static Boolean needsSync(List newRecords, Map oldMap) {
// Implement your logic here
return true;
}
}
```
* Note that given the service makes callouts, it will need to be wrapped in a `@future(Callout=true) `method.
* See: [https://help.salesforce.com/s/articleView?id=000386018\&type=1](https://help.salesforce.com/s/articleView?id=000386018\&type=1)
#### Scheduled Apex Jobs
For a configured m3sh Webhook Trigger, you can to set up scheduled Apex jobs to periodically send records to the m3sh Webhook:
 After selecting a **Run Interval** - available options are every 15 mins, every 30 mins, or every hour - select **Enable Scheduled Runs**:
 With this feature enabled the m3ter Connector for Salesforce managed package will, for every configured m3sh Webhook Trigger:
* Query all the fields for the records from the associated Salesforce Object that have been updated/created since the last run.
* Prepare the request payload.
* Send the records to the Webhook endpoint.
**Tip: Switching off scheduled jobs?** You can easily turn off scheduled jobs using the **Disable Scheduled Runs** button from the Setup UI.
## Monitoring Execution Logs
To aid debugging and monitoring of the callouts made to m3sh Workflows, a new object and tab has been added to the m3ter Connector for Salesforce managed package. This new tab in the m3ter Admin App is called **m3sh Execution Logs**:
With this feature enabled the m3ter Connector for Salesforce managed package will, for every configured m3sh Webhook Trigger:
* Query all the fields for the records from the associated Salesforce Object that have been updated/created since the last run.
* Prepare the request payload.
* Send the records to the Webhook endpoint.
**Tip: Switching off scheduled jobs?** You can easily turn off scheduled jobs using the **Disable Scheduled Runs** button from the Setup UI.
## Monitoring Execution Logs
To aid debugging and monitoring of the callouts made to m3sh Workflows, a new object and tab has been added to the m3ter Connector for Salesforce managed package. This new tab in the m3ter Admin App is called **m3sh Execution Logs**:
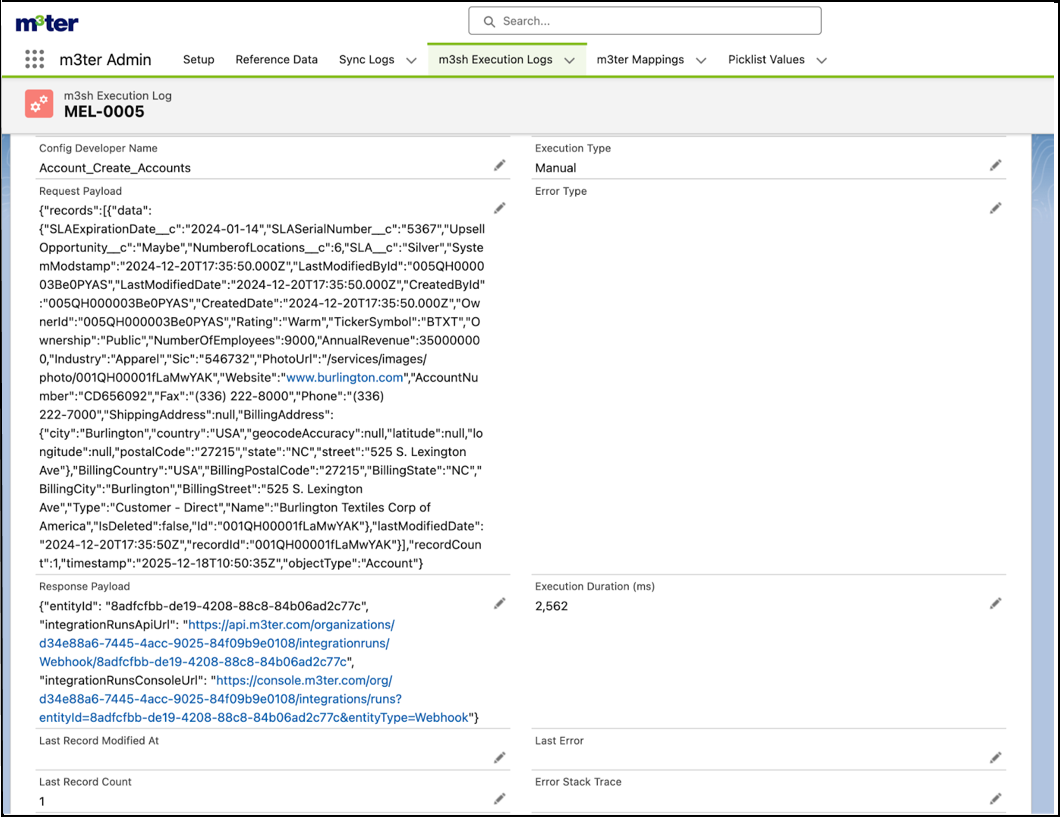
 Each time a callout is made, the request payload, the response, and HTTP Status code is logged, along with other useful information like the Execution Type and name of the CMDT Config.
The possible values for the Execution Type are listed below:
* **Scheduled** - From scheduled batch jobs.
* **Manual** - From admin UI **Run Now** or **Test** buttons.
* **Invocable Action** - From Flow or Apex invocations.
Each time a callout is made, the request payload, the response, and HTTP Status code is logged, along with other useful information like the Execution Type and name of the CMDT Config.
The possible values for the Execution Type are listed below:
* **Scheduled** - From scheduled batch jobs.
* **Manual** - From admin UI **Run Now** or **Test** buttons.
* **Invocable Action** - From Flow or Apex invocations.