> ## Documentation Index
> Fetch the complete documentation index at: https://docs.m3ter.com/llms.txt
> Use this file to discover all available pages before exploring further.
# Managing Users and Assigning Permission Policies
At *Settings>Access* in the Console, you can view Users, deactivate and reactivate them, assign permission policies to modify User access to your Organization, edit User profiles, and resend temporary password to Users:
* [Viewing User Details](/guides/organization-and-access-management/managing-users/managing-users-and-assigning-permission-policies#viewing-user-details)
* [Deactivating and Reactivating Users](/guides/organization-and-access-management/managing-users/managing-users-and-assigning-permission-policies#deactivating-and-reactivating-users)
* [Assigning Permission Policies to Users](/guides/organization-and-access-management/managing-users/managing-users-and-assigning-permission-policies#assigning-permission-policies-to-users)
* [Editing User Profile](/guides/organization-and-access-management/managing-users/managing-users-and-assigning-permission-policies#editing-user-profile)
## Viewing User Details
**To view Users:**
1. Select **Settings**:
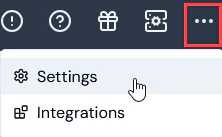 The **Settings** section opens at the **Organization** page.
2. Select **Access settings**. The **Access settings** page opens with the **Users** tab selected. Any existing Users in your Organization are listed. For each User listed you can read-off:
* **Name**
* **Email address**.
* **Status** - whether the User is currently set as **ACTIVE** or **INACTIVE** for your Organization.
* **Access end date** - the date when the User's access to your Organization will end.
3. To review a User's **Permission policies** and **User groups**, select the **Summary** icon:
The **Settings** section opens at the **Organization** page.
2. Select **Access settings**. The **Access settings** page opens with the **Users** tab selected. Any existing Users in your Organization are listed. For each User listed you can read-off:
* **Name**
* **Email address**.
* **Status** - whether the User is currently set as **ACTIVE** or **INACTIVE** for your Organization.
* **Access end date** - the date when the User's access to your Organization will end.
3. To review a User's **Permission policies** and **User groups**, select the **Summary** icon:
 The **User** summary panel is populated for the selected User:
 **Tip: Users Missing?** When you open the **Users** page, you should see all the Users you asked m3ter to set up for your Organization and any who you've invited and have accepted your invitation. If any are missing, please contact m3ter Support.
4. To view a User's details, select their name hotlink text:
**Tip: Users Missing?** When you open the **Users** page, you should see all the Users you asked m3ter to set up for your Organization and any who you've invited and have accepted your invitation. If any are missing, please contact m3ter Support.
4. To view a User's details, select their name hotlink text:
 The **User details** page opens:
 From the **User details** panel, you can manage the User's details:
* **Status**:
* Read-off the User's Status - whether **ACTIVE** or **INACTIVE**.
* Deactivate or Reactivate the User. See below: [Deactivating and Reactivating Users](/guides/organization-and-access-management/managing-users#deactivating-and-reactivating-users).
* **Permission Policies**:
* Remove a Policy from the User.
* Add a Permission Policy to the User. See below: [Adding Permission Policies to Users](/guides/organization-and-access-management/managing-users#adding-permission-policies-to-users).
* **Other details**:
* Read-off the User's unique **ID** and **Copy** it directly to your clipboard.
* Check the User's email address.
* **Audit data**:
* Read-off when the User was **Created** and **Last modified**.
5. Scroll down the page. From the **User groups** panel, you can add the User to User Groups you've set up for your Organization. See: [Creating and Managing User Groups](/guides/organization-and-access-management/managing-users/creating-and-managing-user-groups).
## Deactivating and Reactivating Users
**To deactivate and reactivate Users:**
1. Select **Settings>Access settings**. The **Access settings** page opens with the **Users** tab selected. Any existing Users in your Organization are listed.
2. Select the **Name** text of the User you want to deactivate or reactivate. The **User details** page opens and you can read-off the current **Status** of the User - either **ACTIVE** or **INACTIVE**:
* If **ACTIVE**, a red **Deactivate user** button shows, which you can use to deactivate the User.
* If **INACTIVE**, a green **Activate user** button shows, which you can use to reactivate the User.
3. Use these **Deactivate user/Reactivate user** buttons appropriately to control the status of the User.
**Warning - Deactivating a User does not remove User!** If you deactivate a User, this does not remove them from your Organization - they remain dormant members and can be reactivated. If a deactivated User's details are updated, then other Users in the Organization will be able to view the updated details.
## Assigning Permission Policies to Users
Two types of Permission Policy are available for controlling User access to your Organization:
* **Managed**. System generated Permission Policies. Two *Managed* Permission Policies are currently available to assign to your Users, Service Users, or User Groups:
* **Administrator**. Read and write permissions. Can submit API calls.
* **ReadOnly**. Read permissions only. Cannot submit API calls.
**Note**: You *cannot edit* Managed Permission Policies.
* **Custom**. Permission Policies you create for your own Organization:
* You can use the m3ter Permissions framework to create and configure Custom Permission Policies to impose precise levels of access on individual Users and User Groups.
**Warning: Working with Permission Policies?** Before creating Custom Permission Policies to control Users access to your Organization, we recommend that you review the [Understanding, Creating, and Managing Permission Policies](/guides/organization-and-access-management/creating-and-managing-permissions) topic.
**To add and manage Permission Policies for a User:**
1. Select **Settings>Access settings**. The **Access settings** page opens with the **Users** tab selected. Any existing Users in your Organization are listed.
2. Select the **Name** text of the User whose Permission Policies you want to manage. The **User details** page opens.
3. If you want add a Permission Policy to the User, under **Permission policies**, select **Add permission policies**. A **Select permission policies** dialog opens.
4. Select the Permission Policies you want to add to the User and then select **Confirm**. The dialog closes and you are returned to the **User details** page and the selected Permission Policy shows in the **Permission policies** list for the User.
5. If you want to remove a Permission Policy for a User, select it in the list and select **Remove selected**. A confirmation dialog appears.
6. Select **Yes** to confirm the deletion.
## Editing User Profile
You can edit your User profile at any time to change first and last name.
**To edit User profile:**
1. Select your User profile at top-right of the Console:
From the **User details** panel, you can manage the User's details:
* **Status**:
* Read-off the User's Status - whether **ACTIVE** or **INACTIVE**.
* Deactivate or Reactivate the User. See below: [Deactivating and Reactivating Users](/guides/organization-and-access-management/managing-users#deactivating-and-reactivating-users).
* **Permission Policies**:
* Remove a Policy from the User.
* Add a Permission Policy to the User. See below: [Adding Permission Policies to Users](/guides/organization-and-access-management/managing-users#adding-permission-policies-to-users).
* **Other details**:
* Read-off the User's unique **ID** and **Copy** it directly to your clipboard.
* Check the User's email address.
* **Audit data**:
* Read-off when the User was **Created** and **Last modified**.
5. Scroll down the page. From the **User groups** panel, you can add the User to User Groups you've set up for your Organization. See: [Creating and Managing User Groups](/guides/organization-and-access-management/managing-users/creating-and-managing-user-groups).
## Deactivating and Reactivating Users
**To deactivate and reactivate Users:**
1. Select **Settings>Access settings**. The **Access settings** page opens with the **Users** tab selected. Any existing Users in your Organization are listed.
2. Select the **Name** text of the User you want to deactivate or reactivate. The **User details** page opens and you can read-off the current **Status** of the User - either **ACTIVE** or **INACTIVE**:
* If **ACTIVE**, a red **Deactivate user** button shows, which you can use to deactivate the User.
* If **INACTIVE**, a green **Activate user** button shows, which you can use to reactivate the User.
3. Use these **Deactivate user/Reactivate user** buttons appropriately to control the status of the User.
**Warning - Deactivating a User does not remove User!** If you deactivate a User, this does not remove them from your Organization - they remain dormant members and can be reactivated. If a deactivated User's details are updated, then other Users in the Organization will be able to view the updated details.
## Assigning Permission Policies to Users
Two types of Permission Policy are available for controlling User access to your Organization:
* **Managed**. System generated Permission Policies. Two *Managed* Permission Policies are currently available to assign to your Users, Service Users, or User Groups:
* **Administrator**. Read and write permissions. Can submit API calls.
* **ReadOnly**. Read permissions only. Cannot submit API calls.
**Note**: You *cannot edit* Managed Permission Policies.
* **Custom**. Permission Policies you create for your own Organization:
* You can use the m3ter Permissions framework to create and configure Custom Permission Policies to impose precise levels of access on individual Users and User Groups.
**Warning: Working with Permission Policies?** Before creating Custom Permission Policies to control Users access to your Organization, we recommend that you review the [Understanding, Creating, and Managing Permission Policies](/guides/organization-and-access-management/creating-and-managing-permissions) topic.
**To add and manage Permission Policies for a User:**
1. Select **Settings>Access settings**. The **Access settings** page opens with the **Users** tab selected. Any existing Users in your Organization are listed.
2. Select the **Name** text of the User whose Permission Policies you want to manage. The **User details** page opens.
3. If you want add a Permission Policy to the User, under **Permission policies**, select **Add permission policies**. A **Select permission policies** dialog opens.
4. Select the Permission Policies you want to add to the User and then select **Confirm**. The dialog closes and you are returned to the **User details** page and the selected Permission Policy shows in the **Permission policies** list for the User.
5. If you want to remove a Permission Policy for a User, select it in the list and select **Remove selected**. A confirmation dialog appears.
6. Select **Yes** to confirm the deletion.
## Editing User Profile
You can edit your User profile at any time to change first and last name.
**To edit User profile:**
1. Select your User profile at top-right of the Console:
 A User dialog opens:
 2. Select **Edit profile**. An dialog opens:
 3. Use the **First name** and **Last name** fields to make the required changes to your profile.
4. Select **Update**. The **Edit profile** dialog closes and the updates are saved.
**Notes:**
* When you update your User profile, its background color will change automatically - this is normal behavior.
* If the update fails, you'll receive an error message. For example, if you've selected to **Update** but the **Last name** field is blank.
3. Use the **First name** and **Last name** fields to make the required changes to your profile.
4. Select **Update**. The **Edit profile** dialog closes and the updates are saved.
**Notes:**
* When you update your User profile, its background color will change automatically - this is normal behavior.
* If the update fails, you'll receive an error message. For example, if you've selected to **Update** but the **Last name** field is blank.