> ## Documentation Index
> Fetch the complete documentation index at: https://docs.m3ter.com/llms.txt
> Use this file to discover all available pages before exploring further.
# Creating Plan Templates
This topic explains how to create and manage Plan templates.
**Important!** We *strongly recommend* that you review the options available for configuring Plan templates before you attempt to create them. See [Reviewing Options for Plans and Plan Templates](/guides/plans-and-pricing/working-with-plan-templates-and-plans/reviewing-configuration-options-for-plans-and-plan-templates).
## Creating and Managing Plan Templates
**To create a Plan template:**
1. Select **Pricing>Plan templates**. The **Plan templates** page opens.
2. In the **Product** drop-down, select the Product for which you want to create the new Plan template.
3. Select **Create plan template**. The **Plan templates>Create** page opens.
**Warning: You must create at least one Currency for your Organization before you can create a Plan template!** If you haven't, the **Create** page will not open and you'll see a warning:
* Select the **Manage currencies** hotlink text provided. This takes you directly to the **Create** page to create the Currency you want to use for the Plan Template. See [Creating and Managing Currencies](/guides/organization-and-access-management/viewing-and-editing-organization/creating-and-managing-currencies).
* When you create the new Currency, you are taken directly back to the Plan Template **Create** page and the Currency is selected.
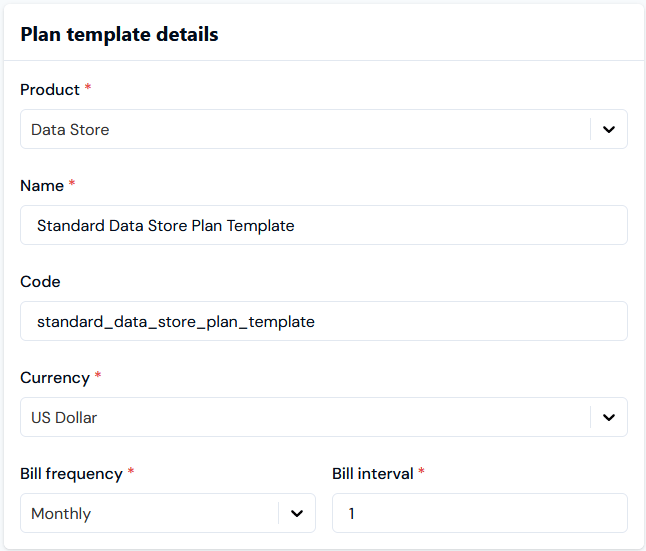
4. Enter the **Plan template details**:
* **Name**. A descriptive name.
* **Code**. Unique identifier for the Plan template. *(Optional)*
* Note that when you've entered a Name for the Plan template, if you click in the **Code** field, a Code is automatically entered based on the Name you've used. You can then edit the auto-generated Code value or remove it as required.
* **Currency**. Use the drop-down list to select the Currency. For example, select **US Dollar**.
* **Bill frequency**. For example, select **Monthly**.
* **Bill Interval**. For example, select **1** for a bill each month:
 5. Enter your **Standing charge** settings:
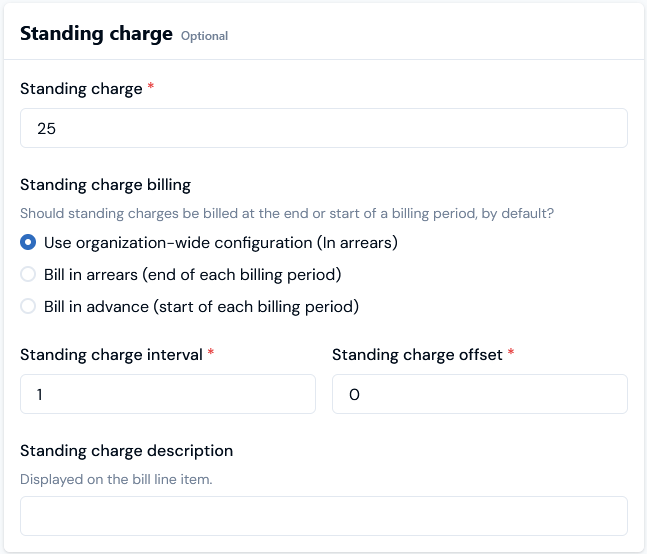
* **Standing charge**. For example, enter **25**.
* **Standing charge billing**. Allows you to control whether any standing charges due are billed in advance or in arrears:
* **Use organization-wide configuration**. Default selection. If enabled, the setting selected at Organization level for Standing charge billing will be used - it will be shown in brackets. If you select either of the other two options, the Organization level setting will be overridden. See [Viewing and Editing Organization Configuration](/guides/organization-and-access-management/viewing-and-editing-organization/viewing-and-editing-organization-configuration).
* **Bill in arrears (end of each billing period)**
* **Bill in advance (start of each billing period)**
* **Standing charge interval**. For example, enter **1** for the **Standing charge** to be applied to each Bill.
* **Standing charge offset**. For example, enter **0** to make the **Standing charge** be applied from the first Bill.
* **Standing charge description**. Enter a custom description, which will appear in the bill line item:
5. Enter your **Standing charge** settings:
* **Standing charge**. For example, enter **25**.
* **Standing charge billing**. Allows you to control whether any standing charges due are billed in advance or in arrears:
* **Use organization-wide configuration**. Default selection. If enabled, the setting selected at Organization level for Standing charge billing will be used - it will be shown in brackets. If you select either of the other two options, the Organization level setting will be overridden. See [Viewing and Editing Organization Configuration](/guides/organization-and-access-management/viewing-and-editing-organization/viewing-and-editing-organization-configuration).
* **Bill in arrears (end of each billing period)**
* **Bill in advance (start of each billing period)**
* **Standing charge interval**. For example, enter **1** for the **Standing charge** to be applied to each Bill.
* **Standing charge offset**. For example, enter **0** to make the **Standing charge** be applied from the first Bill.
* **Standing charge description**. Enter a custom description, which will appear in the bill line item:
 **Tip: Default Standing Charge Description?** If you omit a custom description, then a default Standing Charge description will be shown for Bill line items- see [Bill Line Items - Default Descriptions](/guides/billing-and-usage-data/running-viewing-and-managing-bills/bill-line-items-default-descriptions) for details.
6. Enter your **Minimum Spend** settings:
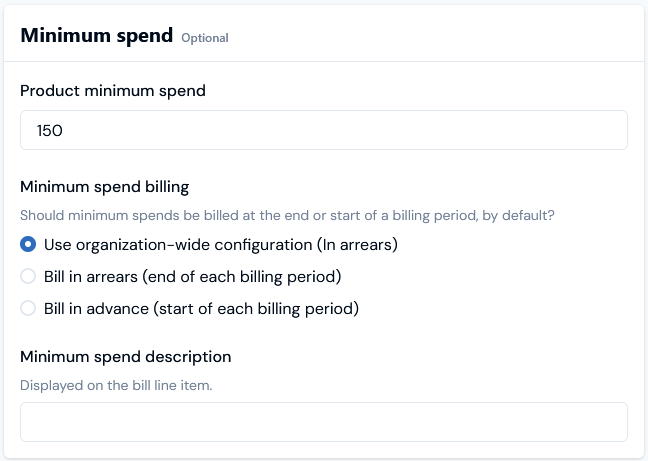
* **Product minimum spend**. For example, enter **150**:
* At billing, this value imposes a minimum for *Product charges* against any Account that has a priced Plan based on the Template attached to it. For example, if the total charges for Product usage is **140**, then an additional line item for a Product Minimum Spend charge of 10 will be added to the Bill to bring the spend up to the minimum.
* The check for Product minimum spend does not include any Standing Charge amounts due.
* When you create a Plan based on the Plan template, you can override the Product minimum spend.
* Note that when you price a Plan, you can also define a Minimum Spend *for that pricing*, which then applies to charges due on an Account at billing under that specific pricing. For example, if you've configured a pricing for a Plan attached to an Account and set a Minimum Spend for that pricing of **140**, but the charges due at billing amount only to **120**, then a Minimum Spend Adjustment line item will be added to the Bill in the amount of **20**. This is independent of any *Product Minimum Spend* defined for the Plan itself - if, as exampled above, that is set at **150**, then a line item for Product Minimum Spend will also appear in the amount of **10** to bring the spend for Product up to the minimum after the minimum for the pricing has been adjusted. See [Understanding Billing Options for Plan Templates/Plans](/guides/plans-and-pricing/working-with-plan-templates-and-plans/understanding-billing-options-for-plan-templates-plans) for more details.
* **Minimum spend billing**. Allows you to control whether minimum spends are applied to Bills in advance or in arrears:
* **Use organization-wide configuration**. Default selection. If enabled, the setting selected at Organization level for Minimum spend billing will be used - it will be shown in brackets. If you select either of the other two options, the Organization level setting will be overridden. See [Viewing and Editing Organization Configuration](/guides/organization-and-access-management/viewing-and-editing-organization/viewing-and-editing-organization-configuration).
* **Bill in arrears (end of each billing period)**
* **Bill in advance (start of each billing period)**
* **Minimum spend description**. Enter a description, which will appear in the bill line item:
**Tip: Default Standing Charge Description?** If you omit a custom description, then a default Standing Charge description will be shown for Bill line items- see [Bill Line Items - Default Descriptions](/guides/billing-and-usage-data/running-viewing-and-managing-bills/bill-line-items-default-descriptions) for details.
6. Enter your **Minimum Spend** settings:
* **Product minimum spend**. For example, enter **150**:
* At billing, this value imposes a minimum for *Product charges* against any Account that has a priced Plan based on the Template attached to it. For example, if the total charges for Product usage is **140**, then an additional line item for a Product Minimum Spend charge of 10 will be added to the Bill to bring the spend up to the minimum.
* The check for Product minimum spend does not include any Standing Charge amounts due.
* When you create a Plan based on the Plan template, you can override the Product minimum spend.
* Note that when you price a Plan, you can also define a Minimum Spend *for that pricing*, which then applies to charges due on an Account at billing under that specific pricing. For example, if you've configured a pricing for a Plan attached to an Account and set a Minimum Spend for that pricing of **140**, but the charges due at billing amount only to **120**, then a Minimum Spend Adjustment line item will be added to the Bill in the amount of **20**. This is independent of any *Product Minimum Spend* defined for the Plan itself - if, as exampled above, that is set at **150**, then a line item for Product Minimum Spend will also appear in the amount of **10** to bring the spend for Product up to the minimum after the minimum for the pricing has been adjusted. See [Understanding Billing Options for Plan Templates/Plans](/guides/plans-and-pricing/working-with-plan-templates-and-plans/understanding-billing-options-for-plan-templates-plans) for more details.
* **Minimum spend billing**. Allows you to control whether minimum spends are applied to Bills in advance or in arrears:
* **Use organization-wide configuration**. Default selection. If enabled, the setting selected at Organization level for Minimum spend billing will be used - it will be shown in brackets. If you select either of the other two options, the Organization level setting will be overridden. See [Viewing and Editing Organization Configuration](/guides/organization-and-access-management/viewing-and-editing-organization/viewing-and-editing-organization-configuration).
* **Bill in arrears (end of each billing period)**
* **Bill in advance (start of each billing period)**
* **Minimum spend description**. Enter a description, which will appear in the bill line item:
 **Tip: Default Minimum Spend Description?** If you omit a custom description, then a default Minimum Spend description will be shown for Bill line items- see [Bill Line Items - Default Descriptions](/guides/billing-and-usage-data/running-viewing-and-managing-bills/bill-line-items-default-descriptions) for details.
7. Add any required **Custom Fields** to the Plan template. For more on Custom Fields, see [Adding and Editing Custom Fields](/guides/organization-and-access-management/viewing-and-editing-organization#adding-and-editing-custom-fields).
8. Select **Create plan template**. The **Plan template details** page opens:
**Tip: Default Minimum Spend Description?** If you omit a custom description, then a default Minimum Spend description will be shown for Bill line items- see [Bill Line Items - Default Descriptions](/guides/billing-and-usage-data/running-viewing-and-managing-bills/bill-line-items-default-descriptions) for details.
7. Add any required **Custom Fields** to the Plan template. For more on Custom Fields, see [Adding and Editing Custom Fields](/guides/organization-and-access-management/viewing-and-editing-organization#adding-and-editing-custom-fields).
8. Select **Create plan template**. The **Plan template details** page opens:
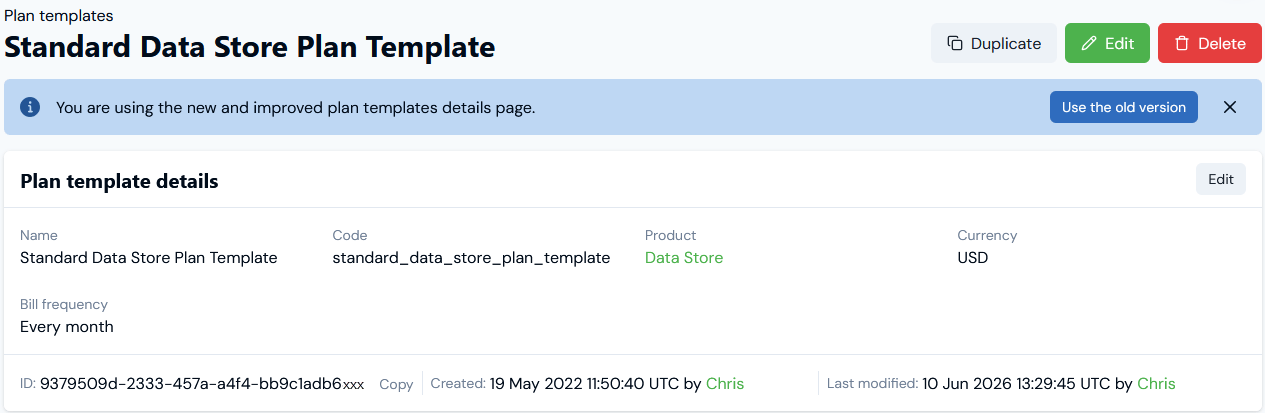 * Note that the **Product** the Plan template belongs to is shown and you can select the text hotlink to open the **Product Details** page.
* For more details on working in **Plan template details** to review pricing and billing setup, manage your Plan templates, review Plan template metadata, or duplicate Plan Templates, see [Working in Plan Template and Plan Details](/guides/plans-and-pricing/working-with-plan-templates-and-plans/working-in-plan-details).
**New Plan template details?** The *new version* of the Plan template details page opens. If you prefer to work in the *old version* of the page, select **Use the old version**.
* Note that the **Product** the Plan template belongs to is shown and you can select the text hotlink to open the **Product Details** page.
* For more details on working in **Plan template details** to review pricing and billing setup, manage your Plan templates, review Plan template metadata, or duplicate Plan Templates, see [Working in Plan Template and Plan Details](/guides/plans-and-pricing/working-with-plan-templates-and-plans/working-in-plan-details).
**New Plan template details?** The *new version* of the Plan template details page opens. If you prefer to work in the *old version* of the page, select **Use the old version**.