> ## Documentation Index
> Fetch the complete documentation index at: https://docs.m3ter.com/llms.txt
> Use this file to discover all available pages before exploring further.
# Working in Plan Template and Plan Details
When you've created a Plan Template or Plan, you can open a details page which is designed to help you to quickly review them for billing setup and pricing and to perform common management and operational tasks:
* [Reviewing Plan Details](#reviewing-plan-details)
* [Reviewing Plan Metadata](#reviewin-plan-metadata)
* [Duplicating Plan and Plan Templates](#duplicating-plans-and-plan-templates)
**Note:** This topic explains how to work in *Plan details* but the guidance given also applies for working in *Plan Template details*.
## Reviewing Plan Details
You can use the Plan details page to review and manage a Plan's setup:
* Review specific and billing details configured for the Plan.
* Check and edit any standing charges, pricing, or minimum spends configured for a Plan.
* Add a usage-based or counter-based pricing to a Plan.
**To review Plan details:**
1. Select **Pricing>Plans**. The **Plans** page opens.
2. In the **Product** drop-down, select the Product the Plan you want to review belongs to. The **Plans** list adjusts.
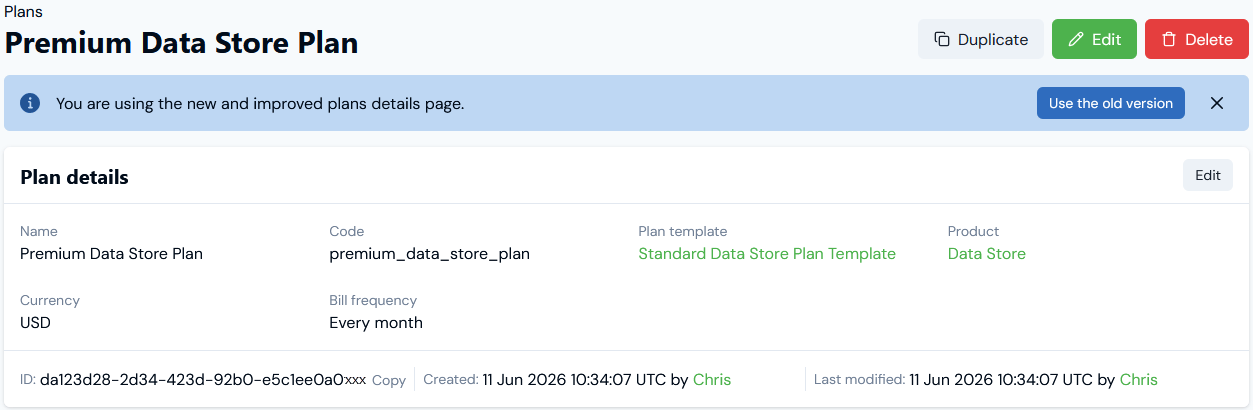
3. Select the **Name** hotlink text of the the Plan you want to review and work with. The **Plan details** page opens:
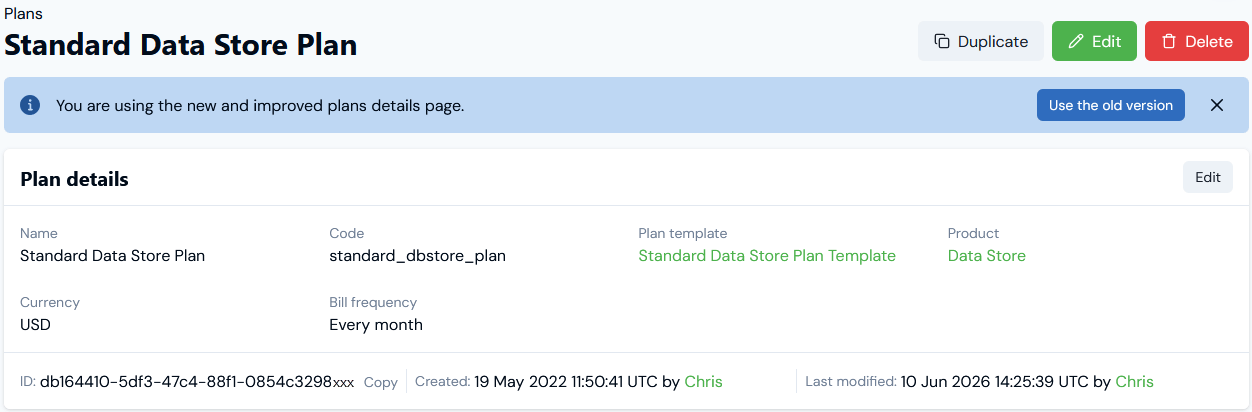 On the **Plan details** panel, you can
* Read-off the Plan's **Name** and **Code**.
* Check the **Currency** and **Bill frequency** configured for the Plan.
* Use hotlink texts to open the **Plan template** the Plan is based on or the **Product** the Plan belongs to.
* Read-off which user **Created** and which **Last modified** the Plan and when.
* Check the Plan's **ID** and **Copy** it to your clipboard.
**Note:** The new version of the Plan details page opens. If you prefer to work in the old version of the page, select **Use the old version**.
4. Scroll down the **Plan details** page to check the **Standing charge** configured for the Plan:
On the **Plan details** panel, you can
* Read-off the Plan's **Name** and **Code**.
* Check the **Currency** and **Bill frequency** configured for the Plan.
* Use hotlink texts to open the **Plan template** the Plan is based on or the **Product** the Plan belongs to.
* Read-off which user **Created** and which **Last modified** the Plan and when.
* Check the Plan's **ID** and **Copy** it to your clipboard.
**Note:** The new version of the Plan details page opens. If you prefer to work in the old version of the page, select **Use the old version**.
4. Scroll down the **Plan details** page to check the **Standing charge** configured for the Plan:
 * In this example, the **Standing charge** billing settings for the Plan are clearly labeled as inherited **FROM PLAN TEMPLATE** and you can read-off:
* Amount.
* Billed in arrears
* Interval for billing is every two Bills.
* No Accounting product is defined.
* You can select **Override** to edit the **Standing charge** if you want to define a specific Standing charge for the Plan:
* In this example, the **Standing charge** billing settings for the Plan are clearly labeled as inherited **FROM PLAN TEMPLATE** and you can read-off:
* Amount.
* Billed in arrears
* Interval for billing is every two Bills.
* No Accounting product is defined.
* You can select **Override** to edit the **Standing charge** if you want to define a specific Standing charge for the Plan:
 * The panel adjusts to clearly label the Standing charge as **FROM PLAN** and the Plan template value is crossed out.
5. Under **Pricing**, you can **Add usage-based pricing** or **Add counter-based pricing**. For example, to add usage-based pricing:
* The panel adjusts to clearly label the Standing charge as **FROM PLAN** and the Plan template value is crossed out.
5. Under **Pricing**, you can **Add usage-based pricing** or **Add counter-based pricing**. For example, to add usage-based pricing:
 * A **Select aggregations** modal appears - for **Aggregation type** select to use either a simple **Aggregation** or a **Compound aggregation** and then select **Next**.
* Select the **Aggregation** you want to use, and then **Confirm**.
* You can then select to **create new pricing**:
* A **Select aggregations** modal appears - for **Aggregation type** select to use either a simple **Aggregation** or a **Compound aggregation** and then select **Next**.
* Select the **Aggregation** you want to use, and then **Confirm**.
* You can then select to **create new pricing**:
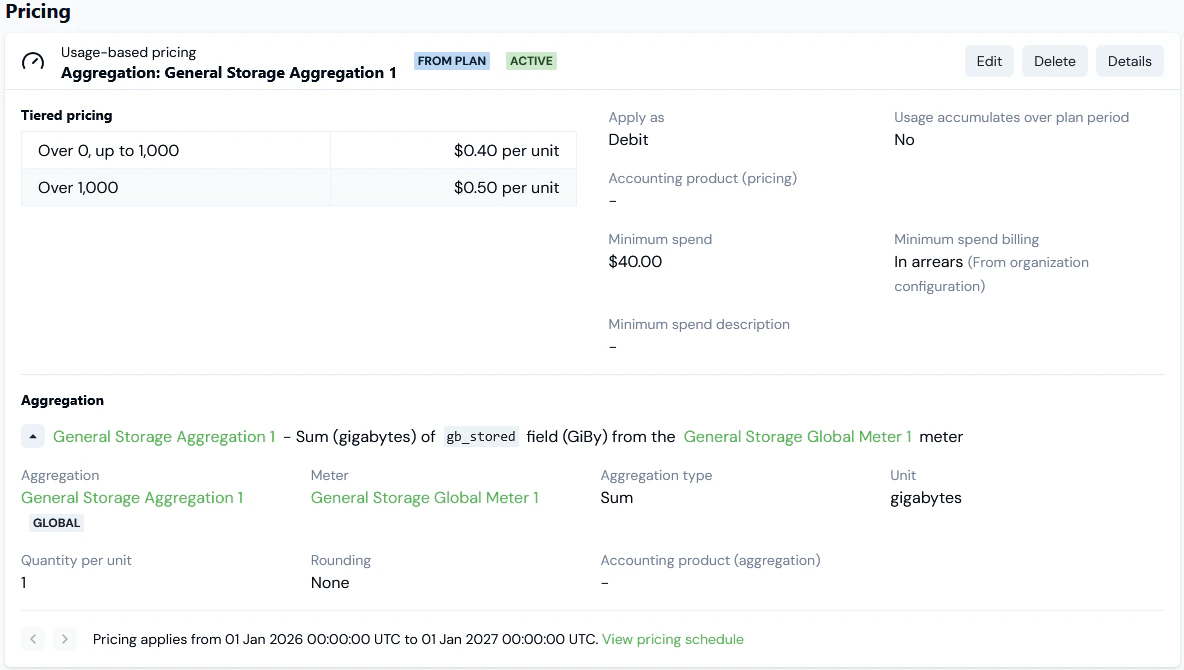
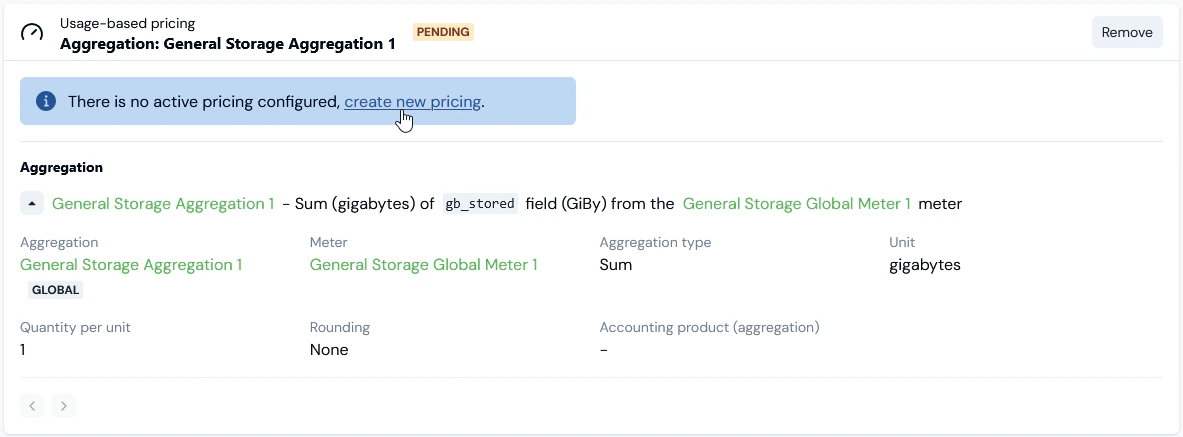 * The **Pricing editor** opens where you can create a pricing for the Plan - see [Pricing Plans and Plan Templates](/guides/plans-and-pricing/pricing-plans/pricing-plans). When you've completed pricing the Plan, you are returned to the **Plan details** page and the **Pricing** is laid out for reviewing and managing:
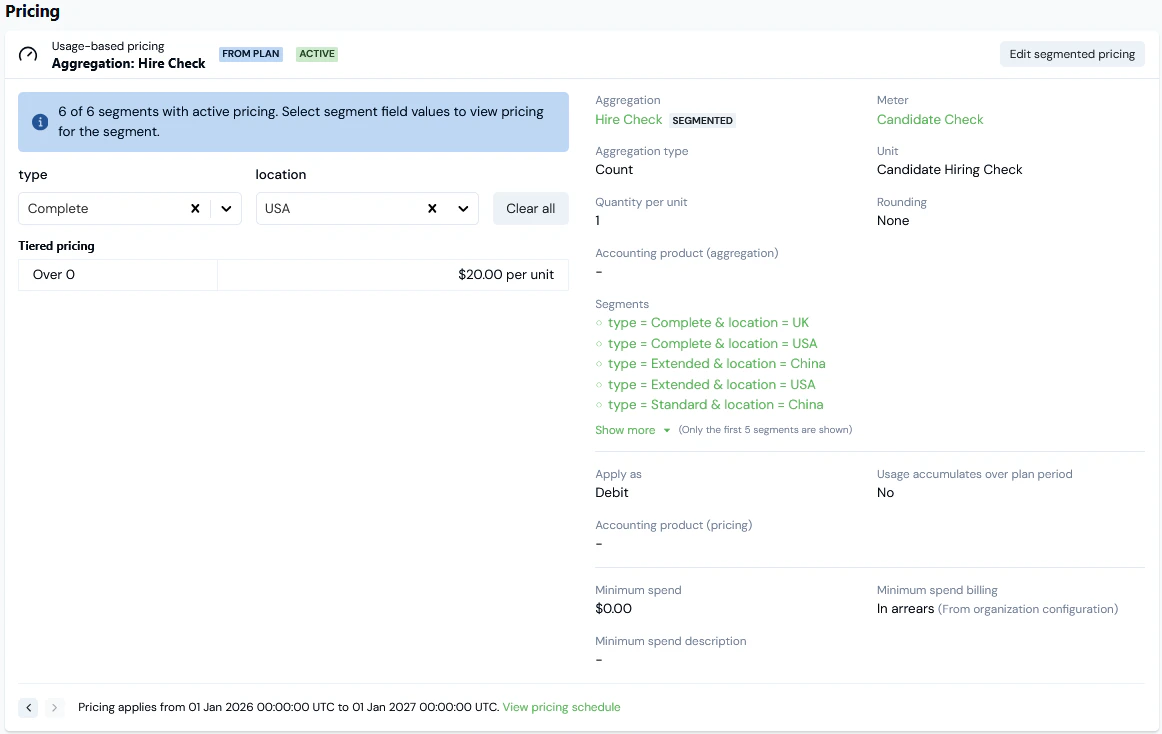
 6. If you've priced a Plan using a segmented Aggregation - see [Pricing Plans Using Segmented Aggregations](/guides/plans-and-pricing/pricing-plans/pricing-plans-using-segmented-aggregations) - you can review each individual segment's pricing - for example:
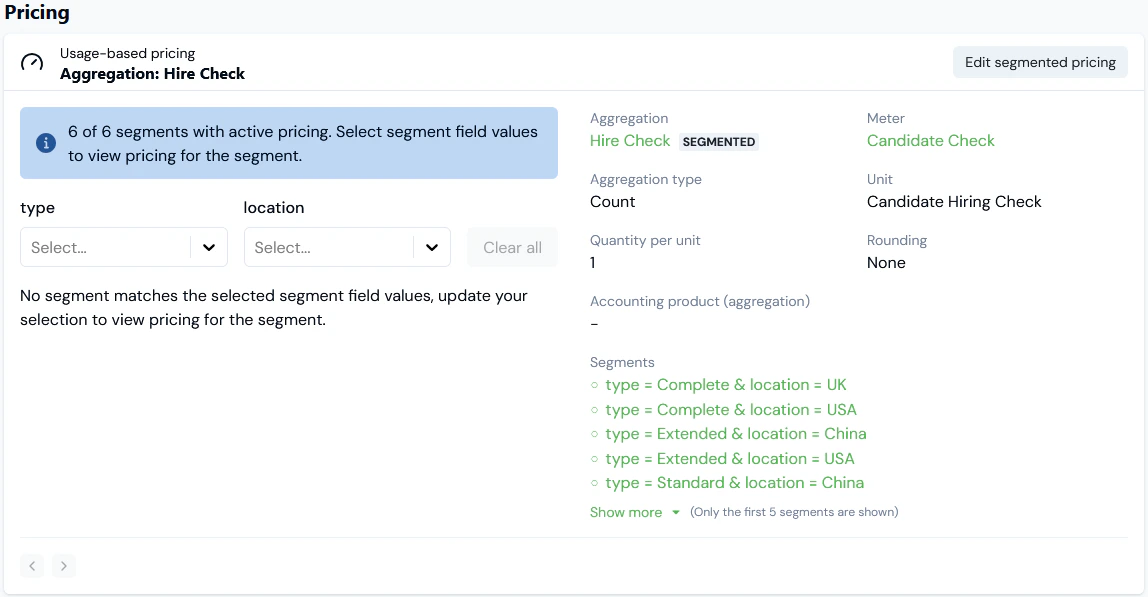 * In this example, where segments are defined by **type** and **location** fields, select the segment whose pricing you want to review:
 7. You can view any historic or future pricing applied to a Plan using the paging arrows at the bottom of the **Pricing** card, for example a **HISTORICAL** pricing:
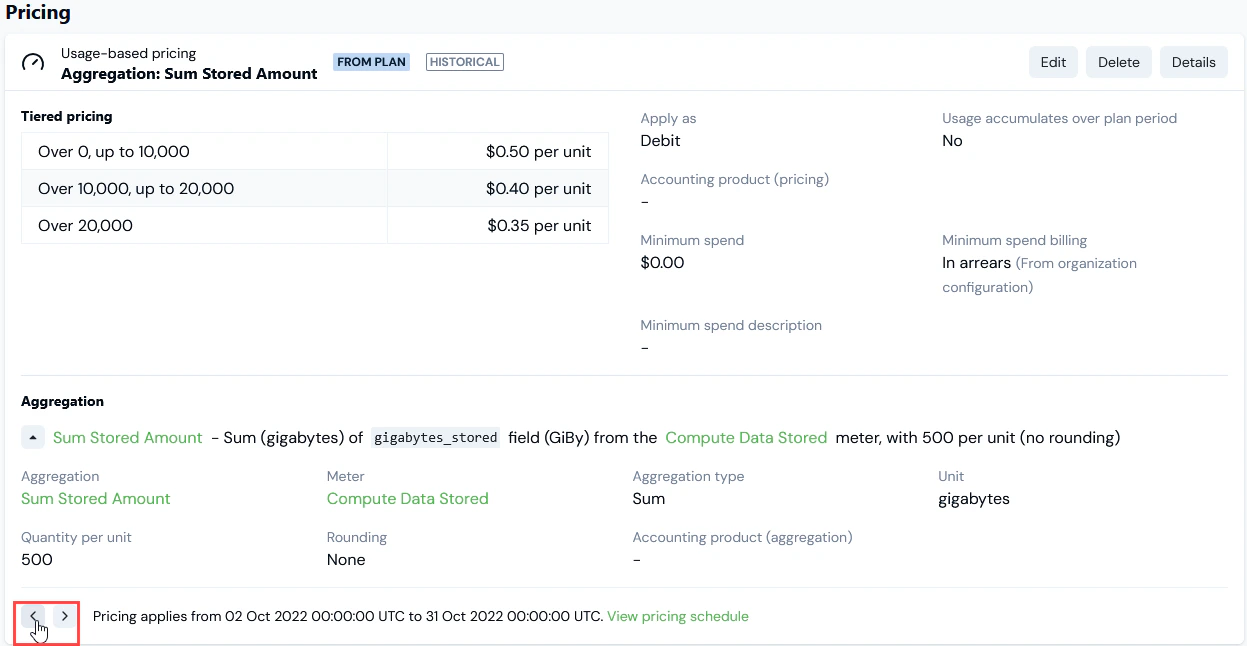 * Lastly, you can select the **View pricing schedule** hotlink to open the **Pricing schedule** for the Plan - see [Viewing Pricing Schedule](https://docs.m3ter.com/guides/plans-and-pricing/pricing-plans/managing-and-editing-priced-plans-or-plan-templates#viewing-pricing-schedule) for more details.
8. Scroll further down a Plan details page and under **Adjustments**, you can check the **Product minimum spend** configured for the Plan:
* Lastly, you can select the **View pricing schedule** hotlink to open the **Pricing schedule** for the Plan - see [Viewing Pricing Schedule](https://docs.m3ter.com/guides/plans-and-pricing/pricing-plans/managing-and-editing-priced-plans-or-plan-templates#viewing-pricing-schedule) for more details.
8. Scroll further down a Plan details page and under **Adjustments**, you can check the **Product minimum spend** configured for the Plan:
 * You can **Edit** the **Product minimum spend** directly from this panel.
9. If you want to edit the Plan's details, select **Edit** at the top of the page, make your changes, and click **Update plan**.
## Reviewing Plan Metadata
On the **Plan details** page, you can also review **Plan metadata**:
**Custom fields**. Any Custom fields created for the Plan entity are listed, and you can **Copy** the *String* or *Number* value of a Custom Field to your clipboard:
* If the fields have been created only at Organizational-level, these values will be shown:
* You can **Edit** the **Product minimum spend** directly from this panel.
9. If you want to edit the Plan's details, select **Edit** at the top of the page, make your changes, and click **Update plan**.
## Reviewing Plan Metadata
On the **Plan details** page, you can also review **Plan metadata**:
**Custom fields**. Any Custom fields created for the Plan entity are listed, and you can **Copy** the *String* or *Number* value of a Custom Field to your clipboard:
* If the fields have been created only at Organizational-level, these values will be shown:
 * If the fields have also been created for an individual Plan, then the values configured for those created at Organizational-level are struck out indicating clearly that the individual Plan's values will be used:
 **External mappings**. Any External mappings set up for the Plan are listed:
 * The **External system** and **External table** mapped to are shown - such as **NetSuite - Item** in the above example. The **External entity ID** mapped to is also shown.
* If a listed External mapping is linked to an Integration, under **Linked integration** a hotlink text will be shown which you can use to open the Integration.
* Under **Actions**, you can edit or delete the External mapping.
* If the Plan has multiple External mappings created for it, you can use *Search external mappings* to search by **External table** and **External entity ID** and filter the list.
* You can commence a workflow to **Create external mapping** for the Plan directly - see [Creating and Managing External Mappings for Accounts](https://docs.m3ter.com/guides/end-customer-accounts/creating-and-managing-external-mappings-for-accounts) for an example.
**Integration runs**. If you’ve set up an integration that synchronizes the Plan with an external system, the date/time and status of the **Latest** integration run are shown. You can use a text hotlink to open details of this latest run or **View all runs**. See [Reviewing Integration Run Details](https://docs.m3ter.com/guides/integrations/setting-up-integrations/reviewing-integration-run-details).
## Duplicating Plans and Plan Templates
You might require a Plan or Plan Template similar to one you've already set up:
* You are planning to offer your customers a new Product line - for example a new premium service as an optional upgrade to your current standard Product service - and you expect the billing set up and pricing structure for this new Product line to be similar to the existing standard service Product offering.
* A customer is coming up for renewal of contract and their existing Product Plan is about to expire. You have agreed a slightly different Product pricing structure for their next service period.
The ability to duplicate an existing Plan and modify the duplicate as required instead of having to start from scratch and create and configure an entirely new Plan saves much time and effort. This topic explains how to duplicate Plans from Plan details pages.
**Notes:**
* **Duplicating Plan Templates?** This section explains how to duplicate an existing Plan from the **Plan details** page. You can duplicate an existing Plan Template from the **Plan Template details** page in the same way.
* **Duplicating from the Pricing Editor!** You can also duplicate Plans and Plan Templates you've priced from the Pricing Editor. See [Duplicating Priced Plans and Plan Templates](https://docs.m3ter.com/guides/plans-and-pricing/pricing-plans/duplicating-priced-plans-or-plan-templates).
**To duplicate a Plan:**
1. Select **Pricing>Plans**. The **Plans** page opens.
2. Search for and then select the **Name** hotlink text of the Plan you want to duplicate. The **Plan details** page opens:
* The **External system** and **External table** mapped to are shown - such as **NetSuite - Item** in the above example. The **External entity ID** mapped to is also shown.
* If a listed External mapping is linked to an Integration, under **Linked integration** a hotlink text will be shown which you can use to open the Integration.
* Under **Actions**, you can edit or delete the External mapping.
* If the Plan has multiple External mappings created for it, you can use *Search external mappings* to search by **External table** and **External entity ID** and filter the list.
* You can commence a workflow to **Create external mapping** for the Plan directly - see [Creating and Managing External Mappings for Accounts](https://docs.m3ter.com/guides/end-customer-accounts/creating-and-managing-external-mappings-for-accounts) for an example.
**Integration runs**. If you’ve set up an integration that synchronizes the Plan with an external system, the date/time and status of the **Latest** integration run are shown. You can use a text hotlink to open details of this latest run or **View all runs**. See [Reviewing Integration Run Details](https://docs.m3ter.com/guides/integrations/setting-up-integrations/reviewing-integration-run-details).
## Duplicating Plans and Plan Templates
You might require a Plan or Plan Template similar to one you've already set up:
* You are planning to offer your customers a new Product line - for example a new premium service as an optional upgrade to your current standard Product service - and you expect the billing set up and pricing structure for this new Product line to be similar to the existing standard service Product offering.
* A customer is coming up for renewal of contract and their existing Product Plan is about to expire. You have agreed a slightly different Product pricing structure for their next service period.
The ability to duplicate an existing Plan and modify the duplicate as required instead of having to start from scratch and create and configure an entirely new Plan saves much time and effort. This topic explains how to duplicate Plans from Plan details pages.
**Notes:**
* **Duplicating Plan Templates?** This section explains how to duplicate an existing Plan from the **Plan details** page. You can duplicate an existing Plan Template from the **Plan Template details** page in the same way.
* **Duplicating from the Pricing Editor!** You can also duplicate Plans and Plan Templates you've priced from the Pricing Editor. See [Duplicating Priced Plans and Plan Templates](https://docs.m3ter.com/guides/plans-and-pricing/pricing-plans/duplicating-priced-plans-or-plan-templates).
**To duplicate a Plan:**
1. Select **Pricing>Plans**. The **Plans** page opens.
2. Search for and then select the **Name** hotlink text of the Plan you want to duplicate. The **Plan details** page opens:
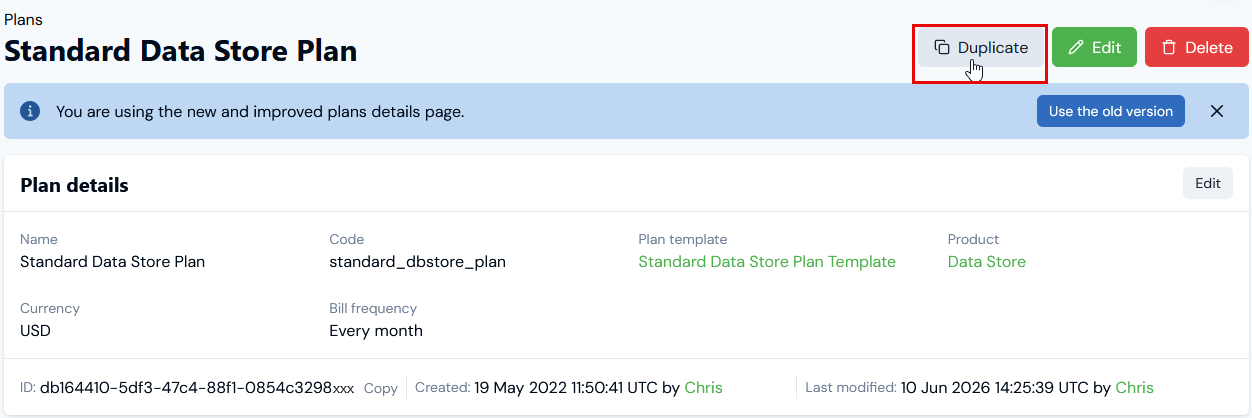 3. Select **Duplicate**. A **Duplicate plan** popup appears:
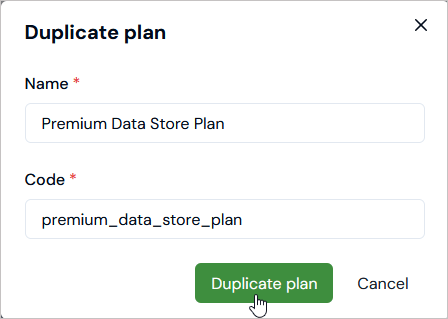 4. Enter the **Name** and **Code** you want for the new duplicate Plan.
**Warning!** **Code must be unique!** You must use a different **Name** and **Code** when you duplicate a Plan - you’ll receive an error if you try to duplicate a Plan using the same **Name** or **Code** as the original Plan. You can edit the new duplicate Plan at a later time and make the **Name** the same as the original Plan, if required. However, the **Code** must remain unique.
5. Select **Duplicate plan**. The popup closes, a message shows to confirm Plan duplication, and the **Plan details** page for the new Plan opens:
4. Enter the **Name** and **Code** you want for the new duplicate Plan.
**Warning!** **Code must be unique!** You must use a different **Name** and **Code** when you duplicate a Plan - you’ll receive an error if you try to duplicate a Plan using the same **Name** or **Code** as the original Plan. You can edit the new duplicate Plan at a later time and make the **Name** the same as the original Plan, if required. However, the **Code** must remain unique.
5. Select **Duplicate plan**. The popup closes, a message shows to confirm Plan duplication, and the **Plan details** page for the new Plan opens:
 The new duplicate Plan:
* Uses the same Plan Template as the original.
* Inherits the pricing structure of the original and you can now edit the duplicate Plan and its pricing as required. See [Managing and Editing Priced Plans and Plan Templates](https://docs.m3ter.com/guides/plans-and-pricing/pricing-plans/managing-and-editing-priced-plans-or-plan-templates).
The new duplicate Plan:
* Uses the same Plan Template as the original.
* Inherits the pricing structure of the original and you can now edit the duplicate Plan and its pricing as required. See [Managing and Editing Priced Plans and Plan Templates](https://docs.m3ter.com/guides/plans-and-pricing/pricing-plans/managing-and-editing-priced-plans-or-plan-templates).