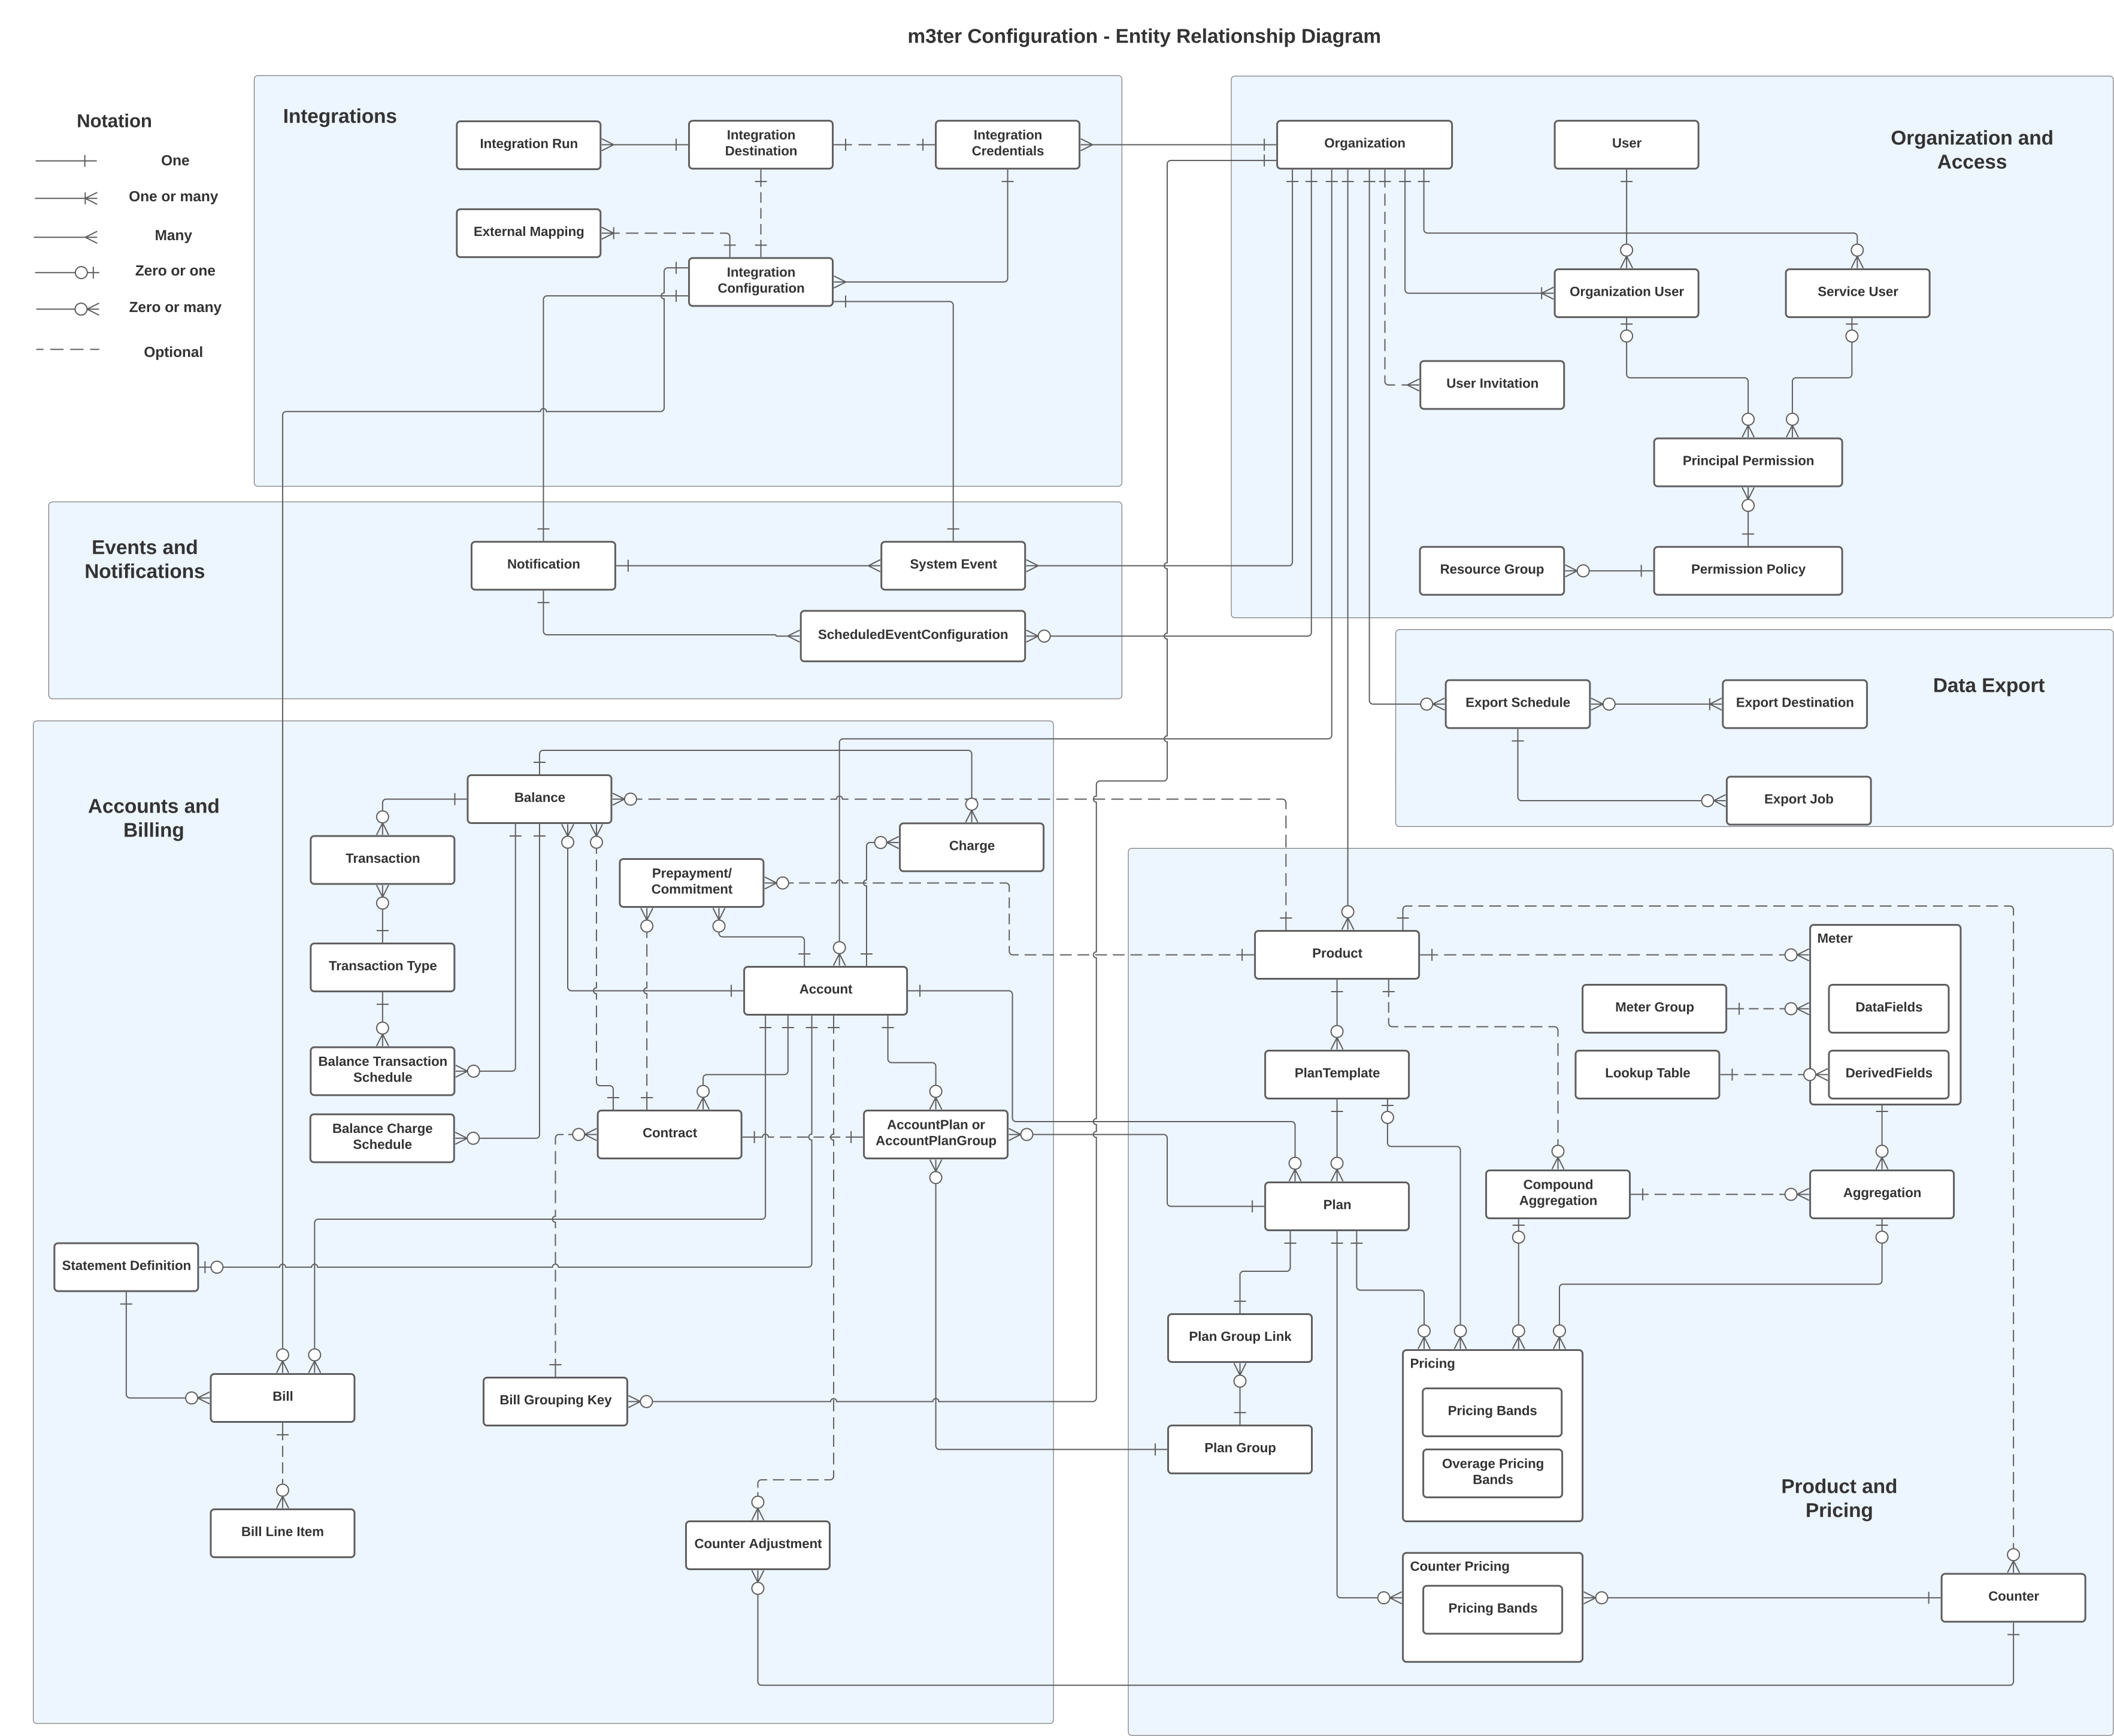
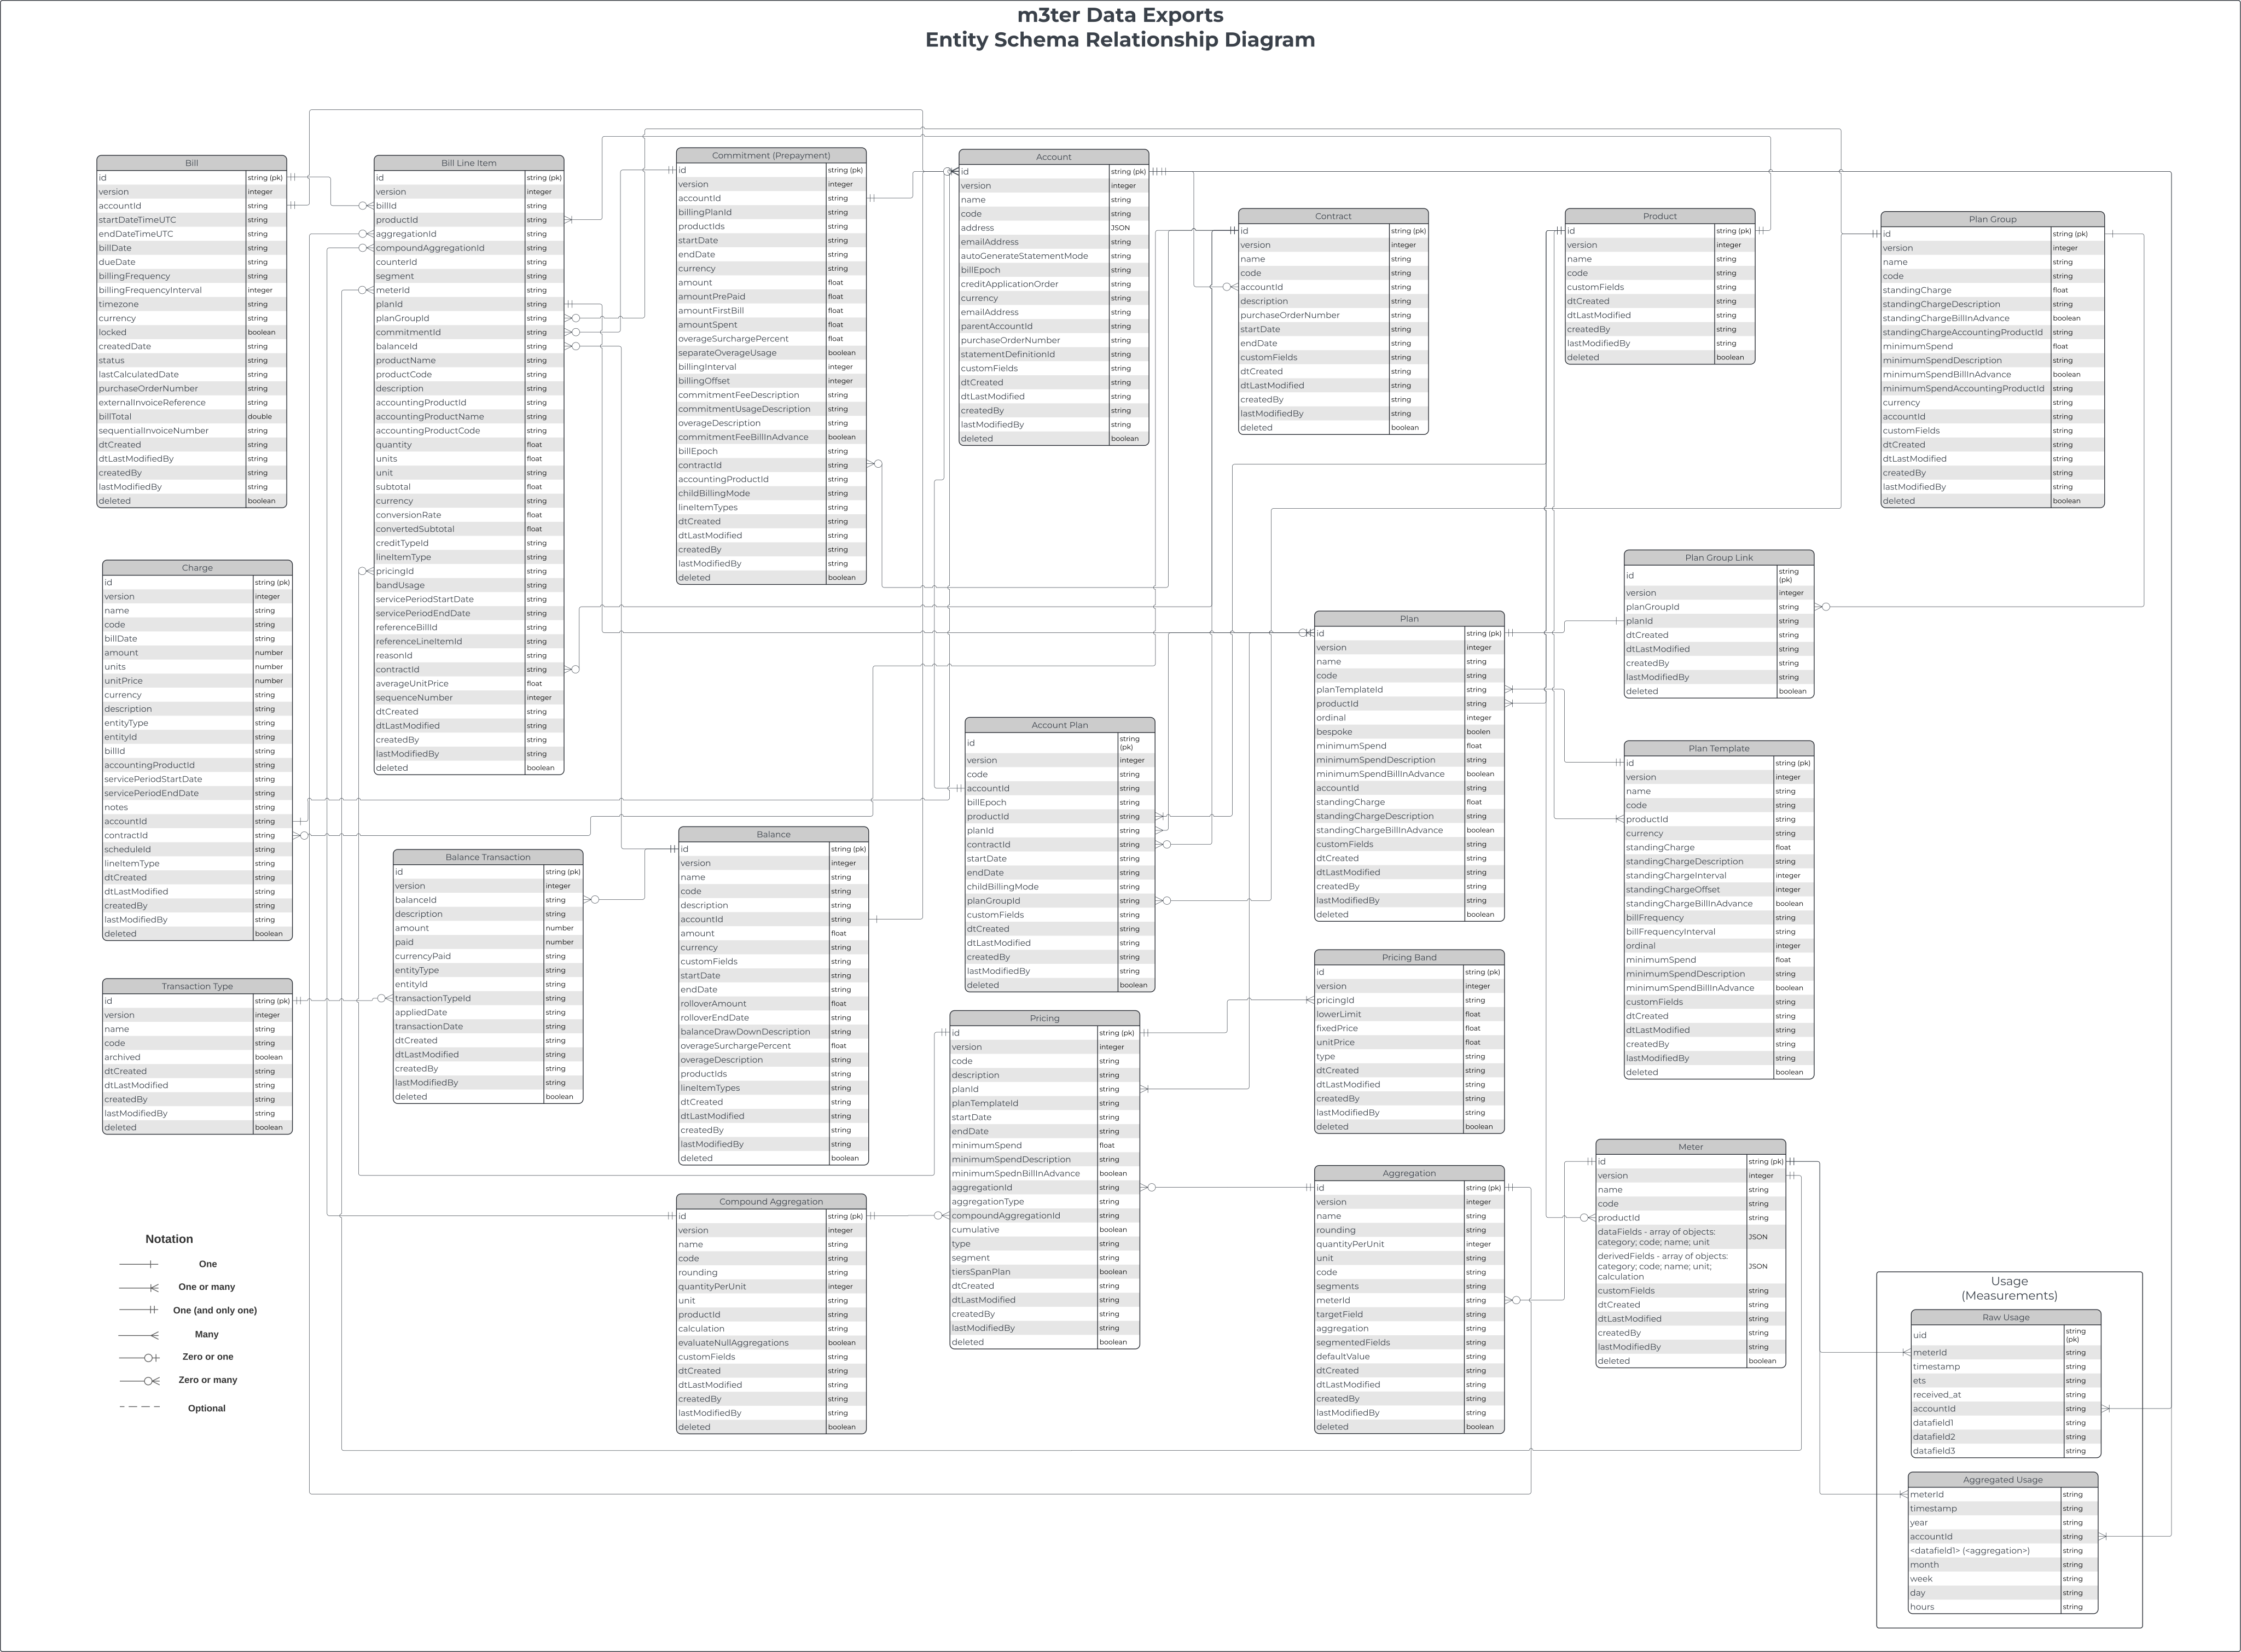
# Create Account
Source: https://docs.m3ter.com/api/account/create-account
https://api.m3ter.com/spec post /organizations/{orgId}/accounts
Create a new Account within the Organization.
# Delete Account
Source: https://docs.m3ter.com/api/account/delete-account
https://api.m3ter.com/spec delete /organizations/{orgId}/accounts/{id}
Delete the Account with the given UUID. This may fail if there are any AccountPlans that reference the Account being deleted.
# End-date Account billing entities
Source: https://docs.m3ter.com/api/account/end-date-account-billing-entities
https://api.m3ter.com/spec put /organizations/{orgId}/accounts/{id}/enddatebillingentities
Apply the specified end-date to billing entities associated with an Account.
**NOTE:**
- When you successfully end-date billing entities, the version number of each entity is incremented.
# Account Endpoints
Source: https://docs.m3ter.com/api/account/introduction
Endpoints for Account related operations such as creation, update, list and delete. An Account represents one of your end-customer accounts.
Accounts do not belong to a Product to allow for cases where an end customer takes more than one of your Products, and the charges for these Products differ.
You typically attach a priced Plan or Plan Template to an Account before you can generate bills for the Account:
* If a customer consumes several of your Products, you can attach a priced Plan or Plan Template to the Account for charging against each Product.
* If an Account is charged solely on the basis of an agreed Prepayment/Commitment amount but not all of the Prepayment is prepaid, you can use a customized billing schedule for outstanding fees without having to attach a Plan to the Account to generate Bills.
You can create Child Accounts for end customers who hold multiple Accounts with you. You can then set up billing for the Parent/Child Account usage to have the end-customer billed once for the Parent Account, instead of having separate bills issued for usage against each of their multiple Accounts.
**IMPORTANT! - use of PII:** The use of any of your end-customers' Personally Identifiable Information (PII) in m3ter is restricted to a few fields on the **Account** entity. Please ensure that only the `name`, `address`, or `emailAddress` fields contain any end-customer PII data on any Accounts you create. See the [Introduction section](/api) above for more details.
# List Account Children
Source: https://docs.m3ter.com/api/account/list-account-children
https://api.m3ter.com/spec get /organizations/{orgId}/accounts/{id}/children
Retrieve a list of Accounts that are children of the specified Account.
# List Accounts
Source: https://docs.m3ter.com/api/account/list-accounts
https://api.m3ter.com/spec get /organizations/{orgId}/accounts
Retrieve a list of Accounts that can be filtered by Account ID or Account Code.
# Retrieve Account
Source: https://docs.m3ter.com/api/account/retrieve-account
https://api.m3ter.com/spec get /organizations/{orgId}/accounts/{id}
Retrieve the Account with the given Account UUID.
# Search Accounts
Source: https://docs.m3ter.com/api/account/search-accounts
https://api.m3ter.com/spec get /organizations/{orgId}/accounts/search
Search for Account entities.
This endpoint executes a search query for Accounts based on the user specified search criteria. The search query is customizable, allowing for complex nested conditions and sorting. The returned list of Accounts can be paginated for easier management.
# Update Account
Source: https://docs.m3ter.com/api/account/update-account
https://api.m3ter.com/spec put /organizations/{orgId}/accounts/{id}
Update the Account with the given Account UUID.
**Note:** If you have created Custom Fields for an Account, when you use this endpoint to update the Account, use the `customFields` parameter to preserve those Custom Fields. If you omit them from the update request, they will be lost.
# Create AccountPlan
Source: https://docs.m3ter.com/api/accountplan/create-accountplan
https://api.m3ter.com/spec post /organizations/{orgId}/accountplans
Create a new AccountPlan or AccountPlanGroup.
This endpoint creates a new AccountPlan or AccountPlanGroup for a specific Account in your Organization. The details of the new AccountPlan or AccountPlanGroup should be supplied in the request body.
**Note:** You cannot use this call to create *both* an AccountPlan and AccountPlanGroup for an Account at the same time. If you want to create both for an Account, you must submit two separate calls.
# Delete AccountPlan
Source: https://docs.m3ter.com/api/accountplan/delete-accountplan
https://api.m3ter.com/spec delete /organizations/{orgId}/accountplans/{id}
Delete the AccountPlan or AccountPlanGroup with the given UUID.
This endpoint deletes an AccountPlan or AccountPlanGroup that has been attached to a specific Account in your Organization.
# Account Plan Endpoints
Source: https://docs.m3ter.com/api/accountplan/introduction
Endpoints for AccountPlan and AccountPlanGroup related operations such as creation, update, list and delete.
## AccountPlans
An Account represents one of your end-customer accounts. To create an AccountPlan, you attach a Product Plan to an Account. The AccountPlan then determines the charges incurred at billing by your end customer for consuming the Product the Plan is for:
* **AccountPlan Active/Inactive**. Set start and end dates to define the period the AccountPlan is active for the Account.
* **AccountPlan per Product**. If an end customer consumes multiple Products, create separate AccountPlans to charge for each Product.
## AccountPlan - Notes and Constraints
* **Multiple AccountPlans:** The default Organization setting imposes the constraint that only one AccountPlan per Product can be active at any one time for an Account.
* **Overlapping Plans:** If your billing use case requires you to attach more than one Plan to an Account for the same Product at the same time, then you must first enable the **Allow overlapping attached plans** setting for your Organization.
* If you create a Plan as a custom Plan for a specific Account, you can only use it to create an AccountPlan for that Account.
## AccountPlanGroups
Plan Groups are used when you want to apply a minimum spend amount at billing across several of your Products each of which are priced separately - when you create the Plan Group, you define an overall minimum spend and then add any priced Plans you want to include in the Group. To create an AccounPlanGroup, you can attach a Plan Group to an Account that consumes the separate Products which are priced using the included Plans. At billing, the minimum spend you've defined for the Plan Group is applied:
* **Active AccountPlanGroup**. Set the start and end dates to define the period for which the Plan Group will be active for the Account.
### Plan Group Notes
* You can only add *one Plan for the same Product* to a Plan Group. See the [Plan Group](/api/plangroup/introduction) in this API Reference for more details on creating Plan Groups.
* You can create a *custom Plan Group* for an Account, which means the Plan Group can only be attached to that Account to create an AccountPlanGroup.
### AcountPlanGroup - Notes and Constraints
* **AccountPlanGroup is type of AccountPlan** When you attach a Plan Group to an Account, this creates an AccountPlanGroup. However, the m3ter data model *does not support a separate AccountPlanGroup entity*, and an AccountPlanGroup is a type of AccountPlan where a `planGroupId` is used instead of a `planId` when it's created. See the [Create AccountPlan](/api/accountplan/create-accountplan) call in this section and [Attaching Plan Groups to an Account](/guides/end-customer-accounts/attaching-plan-groups-to-an-account) in our main User Documentation.
* **Multiple AccountPlan Groups:** You can attach more than one Plan Group to an Account to create multiple AccountPlanGroups, but the rule that *only one attached Plan per Product can be active at any one time for an Account* is preserved:
* Multiple attached Plan Groups on an Account can have overlapping dates only if none of the Plan Groups contain a Plan belonging to the same Product. If you try to attach a Plan Group to an Account with Plan Groups already attached and:
* The new Plan Group contains a Product Plan that also belongs to a Plan Group already attached to the Account.
* The dates for these "matched Plan" Plan Groups being active for the Account would overlap.
* Then you'll receive an error and the attachment will be blocked.
* **Overlapping Plans in Plan Groups:** If your billing use case requires you to attach more than one Plan Group to an Account and containing Plans for the same Product at the same time, then you must first enable the **Allow overlapping attached plans** setting for your Organization.
# List AccountPlans
Source: https://docs.m3ter.com/api/accountplan/list-accountplans
https://api.m3ter.com/spec get /organizations/{orgId}/accountplans
Retrieves a list of AccountPlan and AccountPlanGroup entities for the specified Organization. The list can be paginated for easier management, and supports filtering with various query parameters.
# Replace AccountPlan
Source: https://docs.m3ter.com/api/accountplan/replace-accountplan
https://api.m3ter.com/spec post /organizations/{orgId}/accountplans/{id}/replace
End-dates the specified AccountPlan at the new startDate and creates the new AccountPlan.
# Retrieve AccountPlan
Source: https://docs.m3ter.com/api/accountplan/retrieve-accountplan
https://api.m3ter.com/spec get /organizations/{orgId}/accountplans/{id}
Retrieve the AccountPlan or AccountPlanGroup details corresponding to the given UUID.
# Update AccountPlan
Source: https://docs.m3ter.com/api/accountplan/update-accountplan
https://api.m3ter.com/spec put /organizations/{orgId}/accountplans/{id}
Update the AccountPlan or AccountPlanGroup with the given UUID.
This endpoint updates a new AccountPlan or AccountPlanGroup for a specific Account in your Organization. The updated information should be provided in the request body.
**Notes:**
* You cannot use this call to update *both* an AccountPlan and AccountPlanGroup for an Account at the same time. If you want to update an AccounPlan and an AccountPlanGroup attached to an Account, you must submit two separate calls.
* If you have created Custom Fields for an AccountPlan, when you use this endpoint to update the AccountPlan use the `customFields` parameter to preserve those Custom Fields. If you omit them from the update request, they will be lost.
# Create Aggregation
Source: https://docs.m3ter.com/api/aggregation/create-aggregation
https://api.m3ter.com/spec post /organizations/{orgId}/aggregations
Create a new Aggregation.
# Delete Aggregation
Source: https://docs.m3ter.com/api/aggregation/delete-aggregation
https://api.m3ter.com/spec delete /organizations/{orgId}/aggregations/{id}
Delete the Aggregation with the given UUID.
# Aggregation Endpoints
Source: https://docs.m3ter.com/api/aggregation/introduction
Endpoints for listing, creating, updating, retrieving, or deleting Aggregations.
An Aggregation links to a Meter and targets a Data Field or Derived Field on the Meter. You define the method of aggregation used to convert the usage data collected by the targeted Meter field into a numerical unit of measurement.
You can then use the unit of measurement an Aggregation yields as a metric for pricing Product Plans and apply usage-based pricing to your products and services. You might also want to aggregate raw data measures for other purposes, such as to feed into analytical or business performance tools.
## Notes
* **Contrast with Compound Aggregations**. Standard or simple Aggregations of this type, which apply an aggregation method directly to Meter usage data fields, are contrasted with [Compound Aggregations](/api/compoundaggregation/introduction). A Compound Aggregation typically references one or more simple Aggregations and applies a calculation to them to derive pricing metrics needed to serve more complex usage-based pricing scenarios.
* **Segmented Aggregations**. Segmented Aggregations allow you to segment the usage data collected by a single Meter. This capability is very useful for implementing some pricing and billing use cases. See [Segmented Aggregations](/guides/usage-data-aggregations/segmented-aggregations) in our main documentation for more details.
# List Aggregations
Source: https://docs.m3ter.com/api/aggregation/list-aggregations
https://api.m3ter.com/spec get /organizations/{orgId}/aggregations
Retrieve a list of Aggregations that can be filtered by Product, Aggregation ID, or Code.
# Retrieve Aggregation
Source: https://docs.m3ter.com/api/aggregation/retrieve-aggregation
https://api.m3ter.com/spec get /organizations/{orgId}/aggregations/{id}
Retrieve the Aggregation with the given UUID.
# Update Aggregation
Source: https://docs.m3ter.com/api/aggregation/update-aggregation
https://api.m3ter.com/spec put /organizations/{orgId}/aggregations/{id}
Update the Aggregation with the given UUID.
**Note:** If you have created Custom Fields for an Aggregation, when you use this endpoint to update the Aggregation use the `customFields` parameter to preserve those Custom Fields. If you omit them from the update request, they will be lost.
# Get Token
Source: https://docs.m3ter.com/api/auth/get-token
https://api.m3ter.com/spec post /oauth/token
Get authentication token
# Auth Endpoints
Source: https://docs.m3ter.com/api/auth/introduction
Endpoint for retrieving a JSON Web Token (JWT) bearer token for a Service User using the Client Credentials Grant flow.
A Service User represents the automated process you want to grant access to your Organization - that is, as an API user.
# Authentication and Authorization
Source: https://docs.m3ter.com/api/authentication
Our APIs use an industry-standard authorization protocol known as the OAuth 2.0 specification. OAuth2 supports several grant types, each designed for a specific use case. m3ter uses the following two grant types:
* **Authorization Code**: Used for human login access via the m3ter Console.
* **Client Credentials**: Used for machine-to-machine communication and API access.
Complete the following flow for API access:
Log in to the m3ter Console, go to **Settings**, **Access** then **Service Users** tab, and create a Service User. To enable API calls, grant the user **Administrator** permissions.
In the Console, open the *Overview* page for the Service User by clicking on the name. Generate an **Access Key id** and **Api Secret**. Make sure you copy the **Api Secret** because it is only visible at the time of creation. See [Service Authentication](/guides/authenticating-with-the-platform/service-authentication) for detailed instructions and an example.
We implement the OAuth 2.0 Client Credentials Grant authentication flow for Service User Authentication. Submit a request to the m3ter OAuth Client Credentials authentication flow, using your concatenated **Access Key id** and **Api Secret** to obtain a Bearer Token for your Service User. *See examples below.*
Use the HTTP 'Authorization' header with the bearer token to authorise all subsequent API requests.
The Bearer Token is valid for 18,000 seconds or 5 hours. When the token has expired, you must obtain a new one.
Below are two examples for obtaining a Bearer Token using Basic Auth: the first in cURL and the second as a Python script.
## cURL Example
1. Open your terminal or command prompt.
2. Use the following `cURL` command to obtain a Bearer Token:
```bash theme={null}
curl -X POST https://api.m3ter.com/oauth/token \
-H 'Content-Type: application/x-www-form-urlencoded' \
-u your_access_key_id:your_api_secret \
-d 'grant_type=client_credentials'
```
Replace `your_access_key_id` and `your_api_secret` with your actual **Access Key id** and **Api Secret**.
3. Run the command, and if successful, it will return a JSON response containing the Bearer Token. The response will look like this:
```json theme={null}
{
"access_token": "your_bearer_token",
"token_type": "Bearer",
"expires_in": 18000
}
```
You can then use the Bearer Token *(the value of `"access_token"`)* for subsequent API calls to m3ter.
### Python Example
1. Install the `requests` library if you haven't already:
```bash theme={null}
pip install requests
```
2. Use the following Python script to obtain a Bearer Token:
```python theme={null}
import requests
import base64
# Replace these with your Access Key id and Api Secret
access_key_id = 'your_access_key_id'
api_secret = 'your_api_secret'
# Encode the Access Key id and Api Secret in base64 format
credentials = base64.b64encode(f'{access_key_id}:{api_secret}'.encode('utf-8')).decode('utf-8')
# Set the m3ter token endpoint URL
token_url = 'https://api.m3ter.com/oauth/token'
# Set the headers for the request
headers = {
'Authorization': f'Basic {credentials}',
'Content-Type': 'application/x-www-form-urlencoded'
}
# Set the payload for the request
payload = {
'grant_type': 'client_credentials'
}
# Send the request to obtain the Bearer Token
response = requests.post(token_url, headers=headers, data=payload)
# Check if the request was successful
if response.status_code == 200:
# Extract the Bearer Token from the response
bearer_token = response.json()['access_token']
print(f'Bearer Token: {bearer_token}')
else:
print(f'Error: {response.status_code} - {response.text}')
```
Replace `your_access_key_id` and `your_api_secret` with your actual **Access Key id** and **Api Secret**.
3. Run the script, and if successful, it will print the Bearer Token. You can then use this Bearer Token for subsequent API calls to m3ter.
# Create BalanceChargeSchedule
Source: https://docs.m3ter.com/api/balancechargeschedule/create-balancechargeschedule
https://api.m3ter.com/spec post /organizations/{orgId}/balances/{balanceId}/balancechargeschedules
Create a new BalanceChargeSchedule.
# Delete BalanceChargeSchedule
Source: https://docs.m3ter.com/api/balancechargeschedule/delete-balancechargeschedule
https://api.m3ter.com/spec delete /organizations/{orgId}/balances/{balanceId}/balancechargeschedules/{id}
Delete the BalanceChargeSchedule for the given UUID.
# Balance Charge Schedule Endpoints
Source: https://docs.m3ter.com/api/balancechargeschedule/introduction
Endpoints for creating/updating/deleting BalanceChargeSchedules.
The BalanceChargeSchedule feature is available in Beta release version. See [Feature Release Stages](/guides/getting-started/feature-release-stages) for Beta release definition.
# List BalanceChargeSchedule
Source: https://docs.m3ter.com/api/balancechargeschedule/list-balancechargeschedule
https://api.m3ter.com/spec get /organizations/{orgId}/balances/{balanceId}/balancechargeschedules
Retrieve a list of BalanceChargeSchedule entities
# Preview ScheduledBalanceCharges
Source: https://docs.m3ter.com/api/balancechargeschedule/preview-scheduledbalancecharges
https://api.m3ter.com/spec post /organizations/{orgId}/balances/{balanceId}/balancechargeschedules/preview
Previews the Charges this Schedule would create, without persisting them. You can use this call to obtain a preview of the Charges a Schedule you plan to create for a Balance would generate.
# Retrieve BalanceChargeSchedule
Source: https://docs.m3ter.com/api/balancechargeschedule/retrieve-balancechargeschedule
https://api.m3ter.com/spec get /organizations/{orgId}/balances/{balanceId}/balancechargeschedules/{id}
Retrieve a BalanceChargeSchedule for the given UUID.
# Update BalanceChargeSchedule
Source: https://docs.m3ter.com/api/balancechargeschedule/update-balancechargeschedule
https://api.m3ter.com/spec put /organizations/{orgId}/balances/{balanceId}/balancechargeschedules/{id}
Update a BalanceChargeSchedule for the given UUID.
# Create Balance
Source: https://docs.m3ter.com/api/balances/create-balance
https://api.m3ter.com/spec post /organizations/{orgId}/balances
Create a new Balance for the given end customer Account.
This endpoint allows you to create a new Balance for a specific end customer Account. The Balance details should be provided in the request body.
# Create Balance Transaction
Source: https://docs.m3ter.com/api/balances/create-balance-transaction
https://api.m3ter.com/spec post /organizations/{orgId}/balances/{balanceId}/transactions
Add a Transaction to a Balance. This endpoint allows you to create a new Transaction amount for a Balance. This amount then becomes available at billing for draw-down to cover charges due. The Transaction details should be provided in the request body.
Before you can add a Transaction amount, you must first set up Transaction Types at the Organization Level - see the [Transaction Type](https://docs.m3ter.com/api/transactiontype/introduction) section in this API Reference for more details. You can then use this call to add an instance of a Transaction Type to a Balance.
**Note:** If you have a customer whose payment is in a different currency to the Balance currency, you can use the `paid` and `paidCurrency` request parameters to record the amount paid and alternative currency respectively. For example, you might add a Transaction amount of 200 USD to a Balance on a customer Account where the customer actually paid you 50 units in virtual currency X.
# Delete Balance
Source: https://docs.m3ter.com/api/balances/delete-balance
https://api.m3ter.com/spec delete /organizations/{orgId}/balances/{id}
Delete a specific Balance.
This endpoint allows you to delete a specific Balance with the given UUID.
# Get Balance Transactions Summary
Source: https://docs.m3ter.com/api/balances/get-balance-transactions-summary
https://api.m3ter.com/spec get /organizations/{orgId}/balances/{balanceId}/transactions/summary
Retrieves the Balance Transactions Summary for a given Balance.
The response contains useful recorded and calculated Transaction amounts created for a Balance during the time it is active for the Account, including amounts relevant to any rollover amount configured for a Balance:
* `totalCreditAmount`. The sum of all credits amounts created for the Balance.
* `totalDebitAmount`. The sum of all debit amounts created for the Balance.
* `initialCreditAmount`. The initial credit amount created for the Balance.
* `expiredBalanceAmount`. The amount of the Balance remaining at the time the Balance expires and which is not included in any configured Rollover amount. For example,suppose a Balance reaches its end date and 1000 credit remains unused. If the Balance is configured to rollover 800, then the `expiredBalanceAmount` is calculated as 1000 - 800 = 200.
* `rolloverConsumed`. The sum of debits made against the configured rollover amount. Note that this amount is dynamic relative to when the API call is made until either the rollover end date is reached or the cap configured for the rollover amount is reached, after which it will be unchanged. If no rollover is configured for a Balance, then this is ignored.
* `balanceConsumed`. The sum of debits made against the Balance. Note that this amount is dynamic relative to when the API call is made until either the Balance end date is reached or the available Balance amount reaches zero, after which it will be unchanged.
# Balance Endpoints
Source: https://docs.m3ter.com/api/balances/introduction
Endpoints for creating/retrieving/updating/deleting Balances on Accounts.
When you have created a Balance for an Account, you can create a positive or negative Transaction amounts for the Balance. To do this, you must first define Transaction Types for your Organization, and then use one of these Transaction Types when you add a specific Transaction to a Balance - see the [Create TransactionType](/api/transactiontype/create-transactiontype) call in the Transaction Type section in this API Reference for more details.
Balances are typically used when a customer prepays an amount to add a credit to their Account, which can then be draw-down against charges due for product or service consumption. You can include options to top-up the original Balance.
Examples of how Balances for end customer Accounts can be used:
* Onboarding Balance/Free Trials. Offering an onboarding incentive to new customers as an initial free credit Balance on their Account.
* Balance as initial commitment. Add a Balance amount to a new customer Account. This acts as an initial commitment, which allows them to use the service and gain an accurate insight into their usage level.
* Managing Customer Satisfaction. Use Balance as credits that will be applied to subsequent Bills as compensation for acknowledged service delivery issues.
* Facilitating Balance Adjustments:
* Apply negative amounts to immediately write-off outstanding Balances.
## What is the difference between Balances and Commitments/Prepayments?
To manage credit amounts for your end-customer Accounts, you can use Balances or Commitments/Prepayments. However, these two kinds of credits for Accounts serve different purposes.
Commitments - also referred to as Prepayments - are used for amounts end-customers have agreed to pay for consuming your product or services across a full contract term. A customer might pay the entire or only part of the agreed amount upfront, but ***the commitment or prepayment amount is payable regardless of the actual usage by the customer of your service or product.***
In contrast, a Balance - often referred to as a Top-Up or Prepaid draw-down - is used when a customer wants to add a credit amount to their Account at any time during the service period or when you as service provider want to add a credit to a customer Account. This Balance credit can then be drawn-down against for billing the Account for usage, minimum spend, standing charges, or recurring charges due. Balances therefore serve payment use cases in a more flexible way, for example to be used for a "Free Credit" sign-up scheme you offer to encourage sales or to enhance customer satisfaction by adding credit to an Account to compensate for service delivery issues.
You can use Commitments/Prepayments and Balances together on Account, and define at Organization or individual Account level the order in which any Balance/Commitment credit on an Account is drawn-down - Balance amounts first or Commitment/Prepayment amounts first.
## Grants
Balances can also be enabled as *Grants*. This means you can credit an Account with an amount of pre-rated usage, which can be drawn-down to reduce the amount of usage that is rated and would result in charges against the Account:
* For more details, see [Grants](https://docs.m3ter.com/guides/end-customer-accounts/creating-balances-for-accounts/balance-grants) in our main user documentation.
* Note the Grants feature is currently only available in Preview release version - see [Feature Release Stages](/guides/getting-started/feature-release-stages).
# List Balances
Source: https://docs.m3ter.com/api/balances/list-balances
https://api.m3ter.com/spec get /organizations/{orgId}/balances
Retrieve a list of all Balances for your Organization.
This endpoint returns a list of all Balances associated with your organization. You can filter the Balances by the end customer's Account UUID and end dates, and paginate through them using the `pageSize` and `nextToken` parameters.
**NOTE:** If a Balance has a rollover amount configured and you want to use the `endDateStart` or `endDateEnd` query parameters, the `rolloverEndDate` is used as the end date/time for the Balance.
# List Transactions
Source: https://docs.m3ter.com/api/balances/list-transactions
https://api.m3ter.com/spec get /organizations/{orgId}/balances/{balanceId}/transactions
Retrieve all Transactions for a specific Balance.
This endpoint returns a list of all Transactions associated with a specific Balance. You can paginate through the Transactions by using the `pageSize` and `nextToken` parameters.
# Retrieve Balance
Source: https://docs.m3ter.com/api/balances/retrieve-balance
https://api.m3ter.com/spec get /organizations/{orgId}/balances/{id}
Retrieve a specific Balance.
This endpoint returns the details of the specified Balance.
# Update Balance
Source: https://docs.m3ter.com/api/balances/update-balance
https://api.m3ter.com/spec put /organizations/{orgId}/balances/{id}
Update a specific Balance.
This endpoint allows you to update the details of a specific Balance. The updated Balance details should be provided in the request body.
# Create BalanceTransactionSchedule
Source: https://docs.m3ter.com/api/balancetransactionschedule/create-balancetransactionschedule
https://api.m3ter.com/spec post /organizations/{orgId}/balances/{balanceId}/balancetransactionschedules
Create a new BalanceTransactionSchedule.
# Delete BalanceTransactionSchedule
Source: https://docs.m3ter.com/api/balancetransactionschedule/delete-balancetransactionschedule
https://api.m3ter.com/spec delete /organizations/{orgId}/balances/{balanceId}/balancetransactionschedules/{id}
Delete the BalanceTransactionSchedule for the given UUID.
# Balance Transaction Schedules Endpoints
Source: https://docs.m3ter.com/api/balancetransactionschedule/introduction
Endpoints for creating/updating/deleting BalanceTransactionSchedules.
The BalanceTransactionSchedule feature is available in Beta release version. See [Feature Release Stages](/guides/getting-started/feature-release-stages) for Beta release definition.
# List BalanceTransactionSchedule
Source: https://docs.m3ter.com/api/balancetransactionschedule/list-balancetransactionschedule
https://api.m3ter.com/spec get /organizations/{orgId}/balances/{balanceId}/balancetransactionschedules
Retrieve a list of BalanceTransactionSchedule entities.
# Preview ScheduledBalanceTransactions
Source: https://docs.m3ter.com/api/balancetransactionschedule/preview-scheduledbalancetransactions
https://api.m3ter.com/spec post /organizations/{orgId}/balances/{balanceId}/balancetransactionschedules/preview
Previews the BalanceTransactions this Schedule would create, without persisting them. You can use this call to obtain a preview of the Transactions a Schedule you plan to create for a Balance would generate.
# Retrieve BalanceTransactionSchedule
Source: https://docs.m3ter.com/api/balancetransactionschedule/retrieve-balancetransactionschedule
https://api.m3ter.com/spec get /organizations/{orgId}/balances/{balanceId}/balancetransactionschedules/{id}
Retrieve a BalanceTransactionSchedule for the given UUID.
# Update BalanceTransactionSchedule
Source: https://docs.m3ter.com/api/balancetransactionschedule/update-balancetransactionschedule
https://api.m3ter.com/spec put /organizations/{orgId}/balances/{balanceId}/balancetransactionschedules/{id}
Update a BalanceTransactionSchedule for the given UUID.
# Approve Bills
Source: https://docs.m3ter.com/api/bill/approve-bills
https://api.m3ter.com/spec post /organizations/{orgId}/bills/approve
Approve multiple Bills for the specified Organization based on the given criteria.
This endpoint allows you to change currently *Pending* Bills to *Approved* status for further processing.
Query Parameters:
- Use `accountIds` to approve Bills for specifed Accounts.
Request Body Schema Parameter:
- Use `billIds` to specify a collection of Bills for batch approval.
**Important!** If you use the `billIds` Request Body Schema parameter, any Query parameters you might have also used are ignored when the call is processed.
# Approve Bills in Billing Period
Source: https://docs.m3ter.com/api/bill/approve-bills-in-billing-period
https://api.m3ter.com/spec post /organizations/{orgId}/bills/billingperiod/{lastDateInBillingPeriod}/{billingFrequency}/approve
Approve all Bills within a specified billing period. This endpoint allows you to approve Bills on various frequencies, such as daily, weekly, monthly, or annually. Specify the last day of the period to define the range.
For example, to approve all Bills on monthly billing up to September with due date of 1st of month, use the last day of September, which is September 30th.
# Create Bill Statement in CSV Format
Source: https://docs.m3ter.com/api/bill/create-bill-statement-in-csv-format
https://api.m3ter.com/spec post /organizations/{orgId}/bills/{id}/statement/csv
Generate a specific Bill Statement for the provided Bill UUID in CSV format.
Bill Statements are backing sheets to the invoices sent to your customers. Bill Statements provide a breakdown of the usage responsible for the usage charge line items shown on invoices.
The response to this call returns a pre-signed `downloadUrl`, which you then use with a `GET` call to obtain the Bill statement in CSV format.
# Delete Bill
Source: https://docs.m3ter.com/api/bill/delete-bill
https://api.m3ter.com/spec delete /organizations/{orgId}/bills/{id}
Delete the Bill with the given UUID.
This endpoint deletes the specified Bill with the given unique identifier. Use with caution since deleted Bills cannot be recovered. Suitable for removing incorrect or obsolete Bills, and for Bills that have not been sent to customers. Where end-customer invoices for Bills have been sent to customers, Bills should not be deleted to ensure you have an audit trail of how the invoice was created.
# Download Bills
Source: https://docs.m3ter.com/api/bill/download-bills
https://api.m3ter.com/spec post /organizations/{orgId}/bills/download/csv
Retrieve Bills data in CSV format.
Use this endpoint for retrieving Bills data in CSV format for your Organization for a specified period. The response contains the line items for Bills in the defined time period in a comma-separated string format.
To define a time period you can use exactly one of the `startDate/endDate` or `externalInvoiceDateStart/externalInvoiceDateEnd` request parameter pairings. If you try to mix them when defining a time period - such as `startDate/externalInvoiceDateEnd` - then you'll receive an error.
You can use the `externalSystem` request parameter to control the format of the Bills data given in the comma-separated response:
- **STANDARD** A wider range of data columns is given.
- **XERO** A more limited range of data columns is given and compatible with loading into your 3rd-party Xero system.
**NOTES:**
- **Download Limits**. You can only retrieve Bills data for a period of up to 31 days or up to a maximum of 5000 Bills. If you attempt a call that exceeds either of these two limits, you'll receive an error message
- **Empty Bills**. The CSV formatted response string is compiled by taking each of the line items found in Bills that exist in your Organization for the specified period. The Bill for each line item record is given, along with Bill Total and other billing attributes. However, if you have an *empty Bill* that exists for the specified period - one for which *no line items currently exist* - then no line item records will be shown for this Bill in the CSV formatted response.
- **Downloading a CSV File**. If you want to download a CSV file for Bills data for a specified period, use the [Download Bills URL](https://docs.m3ter.com/api/bill/download-bills-url) endpoint.
# Download Bills URL
Source: https://docs.m3ter.com/api/bill/download-bills-url
https://api.m3ter.com/spec post /organizations/{orgId}/bills/download/csv/url
Generate a URL for downloading a CSV file containing a comprehensive list of Bills data for the specified organization for a specified period. This endpoint facilitates easy exporting of billing data for external analysis and reporting.
The response to this call returns a pre-signed `downloadUrl`, which you then enter into your browser to download the CSV file of the Bill entities.
You can use the `externalSystem` request parameter to control the format of the Bills data in the CSV file:
- **STANDARD** A wider range of Bills data columns is given.
- **XERO** A more limited range of data columns is given and compatible with loading into your 3rd-party Xero system.
**NOTES:**
- **Download Limits**. You can only download Bills for a period of up to 31 days or up to a maximum of 5000 Bills. If you attempt a download that exceeds either of these two limits, you'll receive an error message
- **Empty Bills**. The CSV formatted file is compiled for download by taking each of the line items found in Bills that exist in your Organization for the specified period. The Bill for each line item record is given, along with Bill Total and other billing attributes. However, this means that if you have an *empty Bill* that exists for the specified period - one for which *no line items currently exist* - then no line item records will be shown for this Bill in the CSV file you download.
# Bill Endpoints
Source: https://docs.m3ter.com/api/bill/introduction
Endpoints for billing operations such as creating, updating, listing, downloading, and deleting Bills.
Bills are generated for an Account, and are calculated in accordance with the usage-based or unit-based pricing Plans applied for the Products the Account consumes, together with any charges set up for the Account. These endpoints enable interaction with the billing system, allowing you to obtain billing details and insights into the consumption patterns and charges of your end-customer Accounts.
# List Bills
Source: https://docs.m3ter.com/api/bill/list-bills
https://api.m3ter.com/spec get /organizations/{orgId}/bills
Retrieve a list of Bills.
This endpoint retrieves a list of all Bills for the given Account within the specified Organization. Optional filters can be applied such as by date range, lock status, or other attributes. The list can also be paginated for easier management.
# List Line Items
Source: https://docs.m3ter.com/api/bill/list-line-items
https://api.m3ter.com/spec get /organizations/{orgId}/bills/{billId}/lineitems
Lists all the line items for a specific Bill.
This endpoint retrieves a list of line items for the given Bill within the specified Organization. The list can also be paginated for easier management. The line items returned in the list include individual charges, discounts, or adjustments within a Bill.
# Lock Bill
Source: https://docs.m3ter.com/api/bill/lock-bill
https://api.m3ter.com/spec put /organizations/{orgId}/bills/{id}/lock
Lock the specific Bill identified by the given UUID. Once a Bill is locked, no further changes can be made to it.
**NOTE:** You cannot lock a Bill whose current status is `PENDING`. You will receive an error message if you try to do this. You must first use the [Approve Bills](https://docs.m3ter.com/api/bill/approve-bills) call to approve a Bill before you can lock it.
# Preview Bill
Source: https://docs.m3ter.com/api/bill/preview-bill
https://api.m3ter.com/spec post /organizations/{orgId}/bills/preview
Preview the current Bill for a specific account.
This endpoint is designed to provide a preview of the Bill for exactly one account, allowing you to review charges, frequencies, and other details before finalization. Required parameters include:
* `accountIds` - exactly 1 account must be specified for previewing a Bill.
* `billingFrequency`
* `billFrequencyInterval`
Other request parameters are optional. If `version` is not specified, the latest version of the Bill is previewed.
# Retrieve Bill
Source: https://docs.m3ter.com/api/bill/retrieve-bill
https://api.m3ter.com/spec get /organizations/{orgId}/bills/{id}
Retrieve the Bill with the given UUID.
This endpoint retrieves the Bill with the given unique identifier (UUID) and specific Organization.
# Retrieve Bill Statement in CSV Format
Source: https://docs.m3ter.com/api/bill/retrieve-bill-statement-in-csv-format
https://api.m3ter.com/spec get /organizations/{orgId}/bills/{id}/statement/csv
Retrieve a specific Bill Statement for the given Bill UUID in CSV format.
Bill Statements are backing sheets to the invoices sent to your customers. Bill Statements provide a breakdown of the usage responsible for the usage charge line items shown on invoices.
The response includes a pre-signed `downloadUrl`, which must be used with a separate `GET` call to download the actual Bill Statement. This ensures secure access to the requested information.
# Retrieve Bill Statement in JSON Format
Source: https://docs.m3ter.com/api/bill/retrieve-bill-statement-in-json-format
https://api.m3ter.com/spec get /organizations/{orgId}/bills/{id}/statement/json
Retrieve a Bill Statement in JSON format for a given Bill ID.
Bill Statements are backing sheets to the invoices sent to your customers. Bill Statements provide a breakdown of the usage responsible for the usage charge line items shown on invoices.
The response to this call returns a pre-signed `downloadUrl`, which you use with a `GET` call to obtain the Bill Statement.
# Retrieve Bills for an Account ID
Source: https://docs.m3ter.com/api/bill/retrieve-bills-for-an-account-id
https://api.m3ter.com/spec get /organizations/{orgId}/bills/accountid/{accountId}
Retrieve all Bills for the given Account.
This endpoint retrieves all Bills associated with a specific Account ID in a specified organization. The list can also be paginated for easier management.
This is useful for obtaining an overview of all billing activities for an Account.
# Retrieve Bills in Billing Period
Source: https://docs.m3ter.com/api/bill/retrieve-bills-in-billing-period
https://api.m3ter.com/spec get /organizations/{orgId}/bills/billingperiod/{lastDateInBillingPeriod}/{billingFrequency}
Retrieve all Bills within a specified billing period. This endpoint allows you to retrieve Bills on various frequencies, such as daily, weekly, monthly, or annually. Specify the last day of the period to define the range.
For example, to retrieve all Bills on monthly billing up to September with due date of 1st of month, use the last day of September, which is September 30th.
The list can also be paginated for easier management.
# Retrieve latest Bill
Source: https://docs.m3ter.com/api/bill/retrieve-latest-bill
https://api.m3ter.com/spec get /organizations/{orgId}/bills/latest/{accountId}
Retrieve the latest Bill for the given Account.
This endpoint retrieves the latest Bill for the given Account in the specified Organization. It facilitates tracking of the most recent charges and consumption details.
# Retrieve Line Item
Source: https://docs.m3ter.com/api/bill/retrieve-line-item
https://api.m3ter.com/spec get /organizations/{orgId}/bills/{billId}/lineitems/{id}
Retrieves a specific line item within a Bill.
This endpoint retrieves the line item given by its unique identifier (UUID) from a specific Bill.
# Retrieve Line Item Usage in JSON Format
Source: https://docs.m3ter.com/api/bill/retrieve-line-item-usage-in-json-format
https://api.m3ter.com/spec get /organizations/{orgId}/bills/{billId}/lineitems/{id}/usage/json
Retrieve the line item with the given UUID in JSON format.
This endpoint retrieves detailed usage information for a specific billing line item in JSON format. It is designed to provide granular insights into the consumption pattern for the given line item.
The response includes a pre-signed `downloadUrl`, which must be used with a separate `GET` call to download the Bill line item. This ensures secure access to the requested information.
# Search Bills
Source: https://docs.m3ter.com/api/bill/search-bills
https://api.m3ter.com/spec get /organizations/{orgId}/bills/search
Search for Bill entities.
This endpoint executes a search query for Bills based on the user specified search criteria. The search query is customizable, allowing for complex nested conditions and sorting. The returned list of Bills can be paginated for easier management.
# Update Bill Status
Source: https://docs.m3ter.com/api/bill/update-bill-status
https://api.m3ter.com/spec put /organizations/{orgId}/bills/{id}/status
Updates the status of a specified Bill with the given Bill ID.
This endpoint allows you to transition a Bill's status through various stages, such as from "Pending" to "Approved".
# Bill Config Endpoints
Source: https://docs.m3ter.com/api/billconfig/introduction
Endpoints for updating and retreiving the Bill Configuration for an Organization.
You can use the **Update BillConfig** endpoint to set a global lock date for **all** Bills - any Bill with a service period end date on or before the set date will be locked and cannot be updated.
**Ensure all Bills are Approved!** If you try to set a global lock date when there remains Bills in a *Pending* state whose service period end date is on or before the specified lock date, then you'll receive an error.
# Retrieve BillConfig
Source: https://docs.m3ter.com/api/billconfig/retrieve-billconfig
https://api.m3ter.com/spec get /organizations/{orgId}/billconfig
Retrieve the Organization-wide BillConfig.
# Update BillConfig
Source: https://docs.m3ter.com/api/billconfig/update-billconfig
https://api.m3ter.com/spec put /organizations/{orgId}/billconfig
Update the Organization-wide BillConfig.
You can use this endpoint to set a global lock date for **all** Bills - any Bill with a service period end date on or before the set date will be locked and cannot be updated or recalculated.
# Create BillGroupingKey
Source: https://docs.m3ter.com/api/billgroupingkey/create-billgroupingkey
https://api.m3ter.com/spec post /organizations/{orgId}/picklists/billgroupingkeys
Create a new Bill Grouping Key.
# Delete BillGroupingKey
Source: https://docs.m3ter.com/api/billgroupingkey/delete-billgroupingkey
https://api.m3ter.com/spec delete /organizations/{orgId}/picklists/billgroupingkeys/{id}
Delete a Bill Grouping Key for the given UUID.
# Bill Grouping Key Endpoints
Source: https://docs.m3ter.com/api/billgroupingkey/introduction
Endpoints for Bill Grouping Key operations such as creation, update, list, and delete.
Bill Grouping Keys are stored for your Organization, and you can use them to control billing operations. For example, use Bill Grouping Keys to control how Bills for Contracts linked to an Account are generated:
* Have charges linked to an Account Contract billed exclusively on a separate Bill.
* Have charges linked to multiple Account Contracts billed collectively on a single Bill.
# List Bill Grouping Keys
Source: https://docs.m3ter.com/api/billgroupingkey/list-bill-grouping-keys
https://api.m3ter.com/spec get /organizations/{orgId}/picklists/billgroupingkeys
Retrieve a list of Bill Grouping Keys created for your Organization.
# Retrieve BillGroupingKey
Source: https://docs.m3ter.com/api/billgroupingkey/retrieve-billgroupingkey
https://api.m3ter.com/spec get /organizations/{orgId}/picklists/billgroupingkeys/{id}
Retrieve a Bill Grouping Key for the given UUID.
# Update BillGroupingKey
Source: https://docs.m3ter.com/api/billgroupingkey/update-billgroupingkey
https://api.m3ter.com/spec put /organizations/{orgId}/picklists/billgroupingkeys/{id}
Update a Bill Grouping Key for the given UUID.
# Cancel BillJob
Source: https://docs.m3ter.com/api/billjob/cancel-billjob
https://api.m3ter.com/spec post /organizations/{orgId}/billjobs/{id}/cancel
Cancel an ongoing BillJob for the given Organization and BillJob UUID.
This endpoint allows you to halt the processing of a specific BillJob, which might be necessary if there are changes in billing requirements or other operational considerations.
# Create BillJob
Source: https://docs.m3ter.com/api/billjob/create-billjob
https://api.m3ter.com/spec post /organizations/{orgId}/billjobs
Create a new BillJob to handle asynchronous bill calculations for a specific Organization.
This operation allows you to initiate the processing of bills according to specified parameters. For example, create a BillJob to run only those bills where `billingFrequency` is `MONTHLY`. Note that if you want to run a BillJob for all billing frequencies, simply omit the `billingFrequency` request parameter.
Once created, the BillJob's progress can be monitored:
- In the Running Tasks panel in the m3ter Console - for more details, see [Running Bills Manually](https://www.m3ter.com/docs/guides/billing-and-usage-data/running-viewing-and-managing-bills/running-bills-and-viewing-bill-details#running-bills-manually)
- Queried using the [List BillJobs](https://docs.m3ter.com/api/billjob/list-billjobs) endpoint.
**NOTES:**
- **Consolidated bills**. If you've already run billing with the Consolidate bills option disabled for your Organization but you then enable it, subsequent Bills for specific bill dates will now start afresh and not update earlier non-consolidated Bills for the same bill date. To avoid any billing conflicts, you might want to archive these earlier versions or delete them entirely.
- **Maximum concurrent BillJobs**. If you already have 10 BillJobs currently running, and try to create another one, you'll get an HTTP 429 response (Too many requests). When one of the existing BillJobs has completed, you'll be able to submit another job
# Create Recalculation BillJob
Source: https://docs.m3ter.com/api/billjob/create-recalculation-billjob
https://api.m3ter.com/spec post /organizations/{orgId}/billjobs/recalculate
Create a new BillJob specifically to recalculate existing bills for a given Organization.
This operation is essential when adjustments or corrections are required in previously calculated bills. The recalculated bills when the BillJob is complete can be checked in the m3ter Console Bill Management page or queried by using the [List Bills](https://docs.m3ter.com/api/bill/list-bills) operation.
**NOTE:**
- **Response Schema**. The response schema for this call is dynamic. This means that the response might not contain all of the parameters listed. If set to null,the parameter is hidden to help simplify the output as well as to reduce its size and improve performance.
# Bill Job Endpoints
Source: https://docs.m3ter.com/api/billjob/introduction
Endpoints for creating, retrieving, listing, and cancelling Bill Jobs.
Bill Jobs are critical components in billing management, providing asynchronous mechanisms to calculate and handle bills.
Bill Jobs give you the flexibiity to run Bills manually for Accounts to suit different billing management purposes. For example, some historical usage data has come in for an Account and you want to run a Bill for a specific date on that Account to check that the Bill is showing correctly for the charges due on the new usage data.
# List BillJobs
Source: https://docs.m3ter.com/api/billjob/list-billjobs
https://api.m3ter.com/spec get /organizations/{orgId}/billjobs
Retrieve a list of BillJobs.
This endpoint retrieves a list of BillJobs for the specified Organization. The list can be paginated for easier management, and allows you to query and filter based on various parameters, such as BillJob `status` and whether or not BillJob remains `active`.
# Retrieve BillJob
Source: https://docs.m3ter.com/api/billjob/retrieve-billjob
https://api.m3ter.com/spec get /organizations/{orgId}/billjobs/{id}
Retrieve a Bill Job for the given UUID.
# Create Charge
Source: https://docs.m3ter.com/api/charge/create-charge
https://api.m3ter.com/spec post /organizations/{orgId}/charges
Create a new Charge.
**NOTES:**
* To create an ad-hoc Charge on an Account, use the `accountId` request parameter.
* To create a balance fee Charge for a Balance, use the `entityId` request parameter to specify which Balance on an Account the Charge is for.
* To define the value of the Charge amount that is billed, you can simply specify an `amount` or use a number of `units` together with a `unitPrice` for a calculated value = units x unit price. But you cannot specify *both an amount and units/unit price*.
# Delete Charge
Source: https://docs.m3ter.com/api/charge/delete-charge
https://api.m3ter.com/spec delete /organizations/{orgId}/charges/{id}
Delete the Charge for the given UUID.
# Charge Endpoints
Source: https://docs.m3ter.com/api/charge/introduction
Endpoints for creating/updating/deleting Charges.
Create Charges for your end-customer Accounts to create ad-hoc line items for Account billing. Charges are:
* Created for either debit or credit amounts.
* Linked to a Product for accounting purposes.
* Optionally linked to a Contract.
* Given a specific date for billing. When a bill job has run for the specified Charge bill date, a Charge appears as an Ad-hoc line item on the Bill.
* Assigned a service period.
* Available in any currency defined for your Organization.
See [Creating Charges for Accounts](/guides/end-customer-accounts/creating-charges-for-accounts) in our main user documentation for more details.
Alternatively, you can create a Charge for a Balance on an end-customer Account to create balance fee line items for Account billing. See [Creating Charges for Balances](/guides/end-customer-accounts/creating-balances-for-accounts/creating-charges-for-balances) in our main user documentation for more details.
# List Charges
Source: https://docs.m3ter.com/api/charge/list-charges
https://api.m3ter.com/spec get /organizations/{orgId}/charges
Retrieve a list of Charge entities
# Retrieve Charge
Source: https://docs.m3ter.com/api/charge/retrieve-charge
https://api.m3ter.com/spec get /organizations/{orgId}/charges/{id}
Retrieve a Charge for the given UUID.
# Update Charge
Source: https://docs.m3ter.com/api/charge/update-charge
https://api.m3ter.com/spec put /organizations/{orgId}/charges/{id}
Update a Charge for the given UUID.
**NOTE:** When you update a Charge on an Account, you can provide either a Charge `amount` or Charge `units` together with a `unitPrice`, but *not both*.
# Create Commitment
Source: https://docs.m3ter.com/api/commitments/create-commitment
https://api.m3ter.com/spec post /organizations/{orgId}/commitments
Create a new Commitment.
Creates a new Commitment for an Organization. The request body must include all the necessary details such as the agreed amount, overage surcharge percentage, and the associated account and product details.
**Note:** If some of the agreed Commitment amount remains unpaid at the start of an end-customer contract period, when you create a Commitment for an Account you can set up billing for the outstanding amount in one of two ways:
- Select a Product *Plan to bill with*. Use the `billingPlanId` request parameter to select the Plan used for billing.
- Define a *schedule of billing dates*. Omit a `billingPlanId` and use the `feeDates` request parameter to define a precise schedule of bill dates and amounts.
# Delete Commitment
Source: https://docs.m3ter.com/api/commitments/delete-commitment
https://api.m3ter.com/spec delete /organizations/{orgId}/commitments/{id}
Remove a specific Commitment.
Deletes the Commitment with the given UUID. Use this endpoint when a Commitment is no longer valid or needs to be removed from the system.
# Commitment Endpoints
Source: https://docs.m3ter.com/api/commitments/introduction
Endpoints that manage Commitments (also known as Prepayments) in the context of usage-based pricing and billing.
A Commitment represents an agreement where the end-customer has agreed to pay a fixed minimum amount throughout the contract period. **The commitment amount is payable regardless of the actual usage by the customer of your service or product.**
These endpoints enable the creation, updating, retrieval, and deletion of Commitments. Use them to manage your customer's Commitments and ensure optimal revenue recognition:
* Specify which type of charges can draw-down against a Commitment amount on an Account at billing: usage, minimum spend, standing charges, or recurring charges.
* Define overage surcharge percentages, which are applied when the usage charges exceed the agreed Commitment amount within the contract duration.
## What is the difference between Balances and Commitments/Prepayments?
To manage credit amounts for your end-customer Accounts, you can use Balances or Commitments/Prepayments. However, these two kinds of credits for Accounts serve different purposes.
Commitments/Prepayments are used for amounts end-customers have agreed to pay for consuming your product or services across a full contract term. A customer might pay the entire or only part of the agreed amount upfront, but ***the prepayment amount is payable regardless of the actual usage by the customer of your service or product.***
In contrast, a Balance - often referred to as a Top-Up or Prepaid draw-down - is used when a customer wants to add a credit amount to their Account at any time during the service period or when you as service provider want to add a credit to a customer Account. This Balance credit can then be drawn-down against for billing the Account for usage, minimum spend, standing charges, or recurring charges due. Balances therefore serve payment use cases in a more flexible way, for example to be used for a "Free Credit" sign-up scheme you offer to encourage sales or to enhance customer satisfaction by adding credit to an Account to compensate for service delivery issues.
You can use Prepayments/Commitments and Balances together on Account, and define at Organization or individual Account level the order in which any Balance/Prepayment credit on an Account is drawn-down - Balance amounts first or Prepayment amounts first.
## Billing for Commitments
If not all of an agreed Commitment amount is paid at the start of an end-customer contract period, you can choose one of two options for billing the outstanding fees due on the customer Account:
* Select a Product *Plan to bill with*.
* Define a *schedule of billing dates*.
# List Commitments
Source: https://docs.m3ter.com/api/commitments/list-commitments
https://api.m3ter.com/spec get /organizations/{orgId}/commitments
Retrieve a list of Commitments.
Retrieves a list of all Commitments associated with an Organization. This endpoint supports pagination and includes various query parameters to filter the Commitments based on Account, Product, date, and end dates.
# Retrieve Commitment
Source: https://docs.m3ter.com/api/commitments/retrieve-commitment
https://api.m3ter.com/spec get /organizations/{orgId}/commitments/{id}
Retrieve a specific Commitment.
Retrieve the details of the Commitment with the given UUID. It provides comprehensive information about the Commitment, such as the agreed amount, overage surcharge percentage, and other related details.
# Search Commitments
Source: https://docs.m3ter.com/api/commitments/search-commitments
https://api.m3ter.com/spec get /organizations/{orgId}/commitments/search
Search for commitment entities.
This endpoint executes a search query for Commitments based on the user specified search criteria. The search query is customizable, allowing for complex nested conditions and sorting. The returned list of Commitments can be paginated for easier management.
# Update Commitment
Source: https://docs.m3ter.com/api/commitments/update-commitment
https://api.m3ter.com/spec put /organizations/{orgId}/commitments/{id}
Modify a specific Commitment.
Update the details of the Commitment with the given UUID. Use this endpoint to adjust Commitment parameters such as the fixed amount, overage surcharge percentage, or associated contract details.
# Create Compound Aggregation
Source: https://docs.m3ter.com/api/compoundaggregation/create-compound-aggregation
https://api.m3ter.com/spec post /organizations/{orgId}/compoundaggregations
Create a new Compound Aggregation.
This endpoint allows you to create a new Compound Aggregation for a specific Organization. The request body must include all the necessary details such as the Calculation formula.
# Delete Compound Aggregation
Source: https://docs.m3ter.com/api/compoundaggregation/delete-compound-aggregation
https://api.m3ter.com/spec delete /organizations/{orgId}/compoundaggregations/{id}
Delete a Compound Aggregation with the given UUID.
This endpoint enables deletion of a specific Compound Aggregation associated with a specific Organization. Useful when you need to remove an existing Compound Aggregation that is no longer required, such as when changing pricing or planning models.
# Compound Aggregation Endpoints
Source: https://docs.m3ter.com/api/compoundaggregation/introduction
Endpoints for Compound Aggregation related operations such as creation, update, list and delete.
Use Compound Aggregations to create numerical measures from usage data by applying a calculation to one or more simple Aggregations or Custom Fields. These numerical measures can then be used as pricing metrics to price your Product Plans, enabling you to implement a wide range of usage-based pricing use cases.
## Types of Compound Aggregation
You can create two types of Compound Aggregation:
### Global
* Pricing: Not tied to any specific product and can be used to price Plans belonging to any Product.
* Calculation: can reference all simple Aggregations - both Global simple Aggregations and any product-specific simple Aggregations.
### Product-specific
* Pricing: belong to a specific Product and can only be used to price Plans belonging to the same Product.
* Calculation: can reference any simple Aggregations belonging to the same Product and any Global simple Aggregations.
**Notes and Warnings:**
* **Compound Aggregations based on Segmented Aggregations?** You can use Compound Aggregations that reference Segmented Aggregations to price Plans. However, the segments made available to the Compound Aggregation for pricing a Plan will depend on whether a single or multiple Segmented Aggregations are referenced. See [Pricing with Compound Aggregations Based on Segmented Aggregations](https://docs.m3ter.com/guides/plans-and-pricing/pricing-plans/pricing-plans-using-segmented-aggregations#pricing-with-compound-aggregations-based-on-segmented-aggregations) for details. Any segments made available to a Compound Aggregation will be listed for the `segments` response parameter.
* **Warning!** If a simple Aggregation referenced by a Compound Aggregation has a **Quantity per unit** defined or a **Rounding** defined, these will not be factored into the value used by the calculation. For example, if the simple Aggregation referenced has a base value of 100 and has **Quantity per unit** set at 10, the Compound Aggregation calculation *will use the base value of 100 not 10*.
To better understand and use Compound Aggregations, refer to the example [Compound Aggregation Use Case](https://docs.m3ter.com/guides/usage-data-aggregations/compound-aggregations#example-use-case).
# List Compound Aggregations
Source: https://docs.m3ter.com/api/compoundaggregation/list-compound-aggregations
https://api.m3ter.com/spec get /organizations/{orgId}/compoundaggregations
Retrieve a list of all Compound Aggregations.
This endpoint retrieves a list of Compound Aggregations associated with a specific organization. Compound Aggregations enable you to define numerical measures based on simple Aggregations of usage data. It supports pagination, and includes various query parameters to filter the Compound Aggregations based on Product, Compound Aggregation IDs or short codes.
# Retrieve Compound Aggregation
Source: https://docs.m3ter.com/api/compoundaggregation/retrieve-compound-aggregation
https://api.m3ter.com/spec get /organizations/{orgId}/compoundaggregations/{id}
Retrieve a Compound Aggregation using the given UUID.
This endpoint returns a specific Compound Aggregation associated with an Organization. It provides detailed information about the Compound Aggregation.
# Update Compound Aggregation
Source: https://docs.m3ter.com/api/compoundaggregation/update-compound-aggregation
https://api.m3ter.com/spec put /organizations/{orgId}/compoundaggregations/{id}
Update the Compound Aggregation with the given UUID.
This endpoint allows you to update the details of a specific Compound Aggregation associated with an Organization. Use it to modify details of an existing Compound Aggregation such as the Calculation formula.
**Note:** If you have created Custom Fields for a Compound Aggregation, when you use this endpoint to update the Compound Aggregation use the `customFields` parameter to preserve those Custom Fields. If you omit them from the update request, they will be lost.
# Create Contract
Source: https://docs.m3ter.com/api/contract/create-contract
https://api.m3ter.com/spec post /organizations/{orgId}/contracts
Creates a new Contract for the specified Account. The Contract includes information such as the associated Account along with start and end dates.
If you intend to bill an Account on a Contract basis, you can use the `billGroupingKeyId`, `applyContractPeriodLimits`, and `usageFilters` request parameters to control Contract billing.
# Delete Contract
Source: https://docs.m3ter.com/api/contract/delete-contract
https://api.m3ter.com/spec delete /organizations/{orgId}/contracts/{id}
Deletes the Contract with the specified UUID. Used to remove an existing Contract from an Account.
**Note:** This call will fail if there are any other billing entities associated with the Account and that have been added to the Contract, such as AccountPlans, Balance, or Commitments.
# End-date Contract Account billing entities
Source: https://docs.m3ter.com/api/contract/end-date-contract-account-billing-entities
https://api.m3ter.com/spec put /organizations/{orgId}/contracts/{id}/enddatebillingentities
Apply the specified end-date to billing entities associated with Accounts the Contract has been added to, and apply the end-date to the Contract itself.
**NOTES:**
- If you want to apply the end-date to the Contract *itself* - the Contract `id` you use as the required PATH PARAMETER - you must also specify `CONTRACT` as a `billingEntities` option in the request body schema.
- Only the Contract whose id you specify for the PATH PARAMETER will be end-dated. If there are other Contracts associated with the Account, these will not be end-dated.
- When you successfully end-date billing entities, the version number of each entity is incremented.
# Contract Endpoints
Source: https://docs.m3ter.com/api/contract/introduction
Endpoints for Contract related operations such as creation, update, list and delete.
Contracts are created for Accounts, which are your end-user customers. Contracts can be used for:
* **Accounts Reporting**. To serve your general accounting operations and processes, you can report on total Contract values for an Account.
* **Contract Billing**. Various billing entities associated with an Account can be linked to Contracts on the Account to meet your specific Contract billing use cases.
# List Contracts
Source: https://docs.m3ter.com/api/contract/list-contracts
https://api.m3ter.com/spec get /organizations/{orgId}/contracts
Retrieves a list of Contracts by Organization ID. Supports pagination and includes various query parameters to filter the Contracts returned based on Contract IDs or short codes.
# Retrieve Contract
Source: https://docs.m3ter.com/api/contract/retrieve-contract
https://api.m3ter.com/spec get /organizations/{orgId}/contracts/{id}
Retrieves the Contract with the given UUID. Used to obtain the details of a Contract.
# Update Contract
Source: https://docs.m3ter.com/api/contract/update-contract
https://api.m3ter.com/spec put /organizations/{orgId}/contracts/{id}
Update the Contract with the given UUID.
This endpoint updates the details of the Contract with the specified ID. Used to modify details of an existing Contract such as the start or end dates.
**Note:** If you have created Custom Fields for a Contract, when you use this endpoint to update the Contract use the `customFields` parameter to preserve those Custom Fields. If you omit them from the update request, they will be lost.
# Create Counter
Source: https://docs.m3ter.com/api/counter/create-counter
https://api.m3ter.com/spec post /organizations/{orgId}/counters
Create a new Counter.
# Delete Counter
Source: https://docs.m3ter.com/api/counter/delete-counter
https://api.m3ter.com/spec delete /organizations/{orgId}/counters/{id}
Delete a Counter for the given UUID.
# Counter Endpoints
Source: https://docs.m3ter.com/api/counter/introduction
Endpoints for listing, creating, retrieving, updating, or deleting Counters.
You can create Counters for your m3ter Organization, which can then be used as pricing metrics to apply a unit-based [CounterPricing](/api/counterpricing/introduction) to Product Plans or Plan Templates for recurring subscription charges on Accounts.
Counters can then be used to post [CounterAdjustments](/api/counteradjustments/introduction) on your end-customer Accounts.
Accounts are then billed in accordance with the CounterPricing on Plans attached to the Accounts and for the actual Counter quantities Accounts subscribe to. See [Recurring Charges: Counters](/guides/recurring-charges-counters) in our main user documentation for more details.
# List Counters
Source: https://docs.m3ter.com/api/counter/list-counters
https://api.m3ter.com/spec get /organizations/{orgId}/counters
Retrieve a list of Counter entities that can be filtered by Product, Counter ID, or Codes.
# Retrieve Counter
Source: https://docs.m3ter.com/api/counter/retrieve-counter
https://api.m3ter.com/spec get /organizations/{orgId}/counters/{id}
Retrieve a Counter for the given UUID.
# Update Counter
Source: https://docs.m3ter.com/api/counter/update-counter
https://api.m3ter.com/spec put /organizations/{orgId}/counters/{id}
Update Counter for the given UUID.
# Create CounterAdjustment
Source: https://docs.m3ter.com/api/counteradjustments/create-counteradjustment
https://api.m3ter.com/spec post /organizations/{orgId}/counteradjustments
Create a new CounterAdjustment for an Account using a Counter.
**Notes:**
* Use the new absolute value for the Counter for the selected date - if it was 15 and has increased to 20, enter 20; if it was 15 and has decreased to 10, enter 10. *Do not enter* the plus or minus value relative to the previous Counter value on the Account.
* CounterAdjustments on Accounts are supported down to a *specific day* of granularity - you cannot create more than one CounterAdjustment for any given day using the same Counter and you'll receive an error if you try to do this.
# Delete CounterAdjustment
Source: https://docs.m3ter.com/api/counteradjustments/delete-counteradjustment
https://api.m3ter.com/spec delete /organizations/{orgId}/counteradjustments/{id}
Delete a CounterAdjustment for the given UUID.
# Counter Adjustment Endpoints
Source: https://docs.m3ter.com/api/counteradjustments/introduction
Endpoints for listing, creating, updating, retrieving, or deleting CounterAdjustments.
If you attach a Plan to an Account which is priced using a Counter to apply unit-based pricing, you can then create CounterAdjustments for the Account using that Counter to ensure the Account is billed according to the number of Counter units the Account subscribes to in a given billing period.
See [Understanding and Creating Counter Adjustments for Accounts](/guides/recurring-charges-counters/creating-counter-adjustments-for-accounts) for more information.
# List CounterAdjustments
Source: https://docs.m3ter.com/api/counteradjustments/list-counteradjustments
https://api.m3ter.com/spec get /organizations/{orgId}/counteradjustments
Retrieve a list of CounterAdjustments created for Accounts in your Organization. You can filter the list returned by date, Account ID, or Counter ID.
**CONSTRAINTS:**
* The `counterId` query parameter is always required when calling this endpoint, used either as a single query parameter or in combination with any of the other query parameters.
* If you want to use the `date`, `dateStart`, or `dateEnd` query parameters, you must also use the `accountId` query parameter.
# Retrieve CounterAdjustment
Source: https://docs.m3ter.com/api/counteradjustments/retrieve-counteradjustment
https://api.m3ter.com/spec get /organizations/{orgId}/counteradjustments/{id}
Retrieve a CounterAdjustment for the given UUID.
# Update CounterAdjustment
Source: https://docs.m3ter.com/api/counteradjustments/update-counteradjustment
https://api.m3ter.com/spec put /organizations/{orgId}/counteradjustments/{id}
Update a CounterAdjustment for an Account.
# Create CounterPricing
Source: https://docs.m3ter.com/api/counterpricing/create-counterpricing
https://api.m3ter.com/spec post /organizations/{orgId}/counterpricings
Create a new CounterPricing.
**Note:** Either `planId` or `planTemplateId` request parameters are required for this call to be valid. If you omit both, then you will receive a validation error.
# Delete CounterPricing
Source: https://docs.m3ter.com/api/counterpricing/delete-counterpricing
https://api.m3ter.com/spec delete /organizations/{orgId}/counterpricings/{id}
Delete a CounterPricing for the given UUID.
# Counter Pricing Endpoints
Source: https://docs.m3ter.com/api/counterpricing/introduction
Endpoints for listing, creating, updating, retrieving, or deleting CounterPricing.
Create the CounterPricing for a Plan/PlanTemplate using a Counter, and define a unit-based pricing structure for charging end customer Accounts put on the Plan.
See [Creating Counters and Pricing Plans](/guides/recurring-charges-counters/creating-counters) for more information.
# List CounterPricings
Source: https://docs.m3ter.com/api/counterpricing/list-counterpricings
https://api.m3ter.com/spec get /organizations/{orgId}/counterpricings
Retrieve a list of CounterPricing entities filtered by date, Plan ID, Plan Template ID, or CounterPricing ID.
# Retrieve CounterPricing
Source: https://docs.m3ter.com/api/counterpricing/retrieve-counterpricing
https://api.m3ter.com/spec get /organizations/{orgId}/counterpricings/{id}
Retrieve a CounterPricing for the given UUID.
# Update CounterPricing
Source: https://docs.m3ter.com/api/counterpricing/update-counterpricing
https://api.m3ter.com/spec put /organizations/{orgId}/counterpricings/{id}
Update CounterPricing for the given UUID.
**Note:** Either `planId` or `planTemplateId` request parameters are required for this call to be valid. If you omit both, then you will receive a validation error.
# Create Credit Reason
Source: https://docs.m3ter.com/api/creditreason/create-credit-reason
https://api.m3ter.com/spec post /organizations/{orgId}/picklists/creditreasons
Create a new Credit Reason for your Organization. When you've created a Credit Reason, it becomes available as a credit type for adding Credit line items to Bills. See [Credits](https://www.m3ter.com/docs/api#tag/Credits).
# Delete Credit Reason
Source: https://docs.m3ter.com/api/creditreason/delete-credit-reason
https://api.m3ter.com/spec delete /organizations/{orgId}/picklists/creditreasons/{id}
Delete the Credit Reason with the given UUID.
# Credit Reason Endpoints
Source: https://docs.m3ter.com/api/creditreason/introduction
Endpoints for CreditReason operations such as creation, update, list, and delete.
You can create CreditReasons for your Organization, and then use them when creating a credit line item on a bill, or applying a product credit to a bill. CreditReasons provide contextual information as to why a credit was applied.
# List Credit Reasons
Source: https://docs.m3ter.com/api/creditreason/list-credit-reasons
https://api.m3ter.com/spec get /organizations/{orgId}/picklists/creditreasons
Retrieve a list of the Credit Reason entities created for your Organization. You can filter the list returned for the call by Credit Reason ID, Credit Reason short code, or by Archive status.
# Retrieve Credit Reason
Source: https://docs.m3ter.com/api/creditreason/retrieve-credit-reason
https://api.m3ter.com/spec get /organizations/{orgId}/picklists/creditreasons/{id}
Retrieve the Credit Reason with the given UUID.
# Update Credit Reason
Source: https://docs.m3ter.com/api/creditreason/update-credit-reason
https://api.m3ter.com/spec put /organizations/{orgId}/picklists/creditreasons/{id}
Update the Credit Reason with the given UUID.
# Create Credit Line Item
Source: https://docs.m3ter.com/api/credits/create-credit-line-item
https://api.m3ter.com/spec post /organizations/{orgId}/bills/{billId}/creditlineitems
Create a new Credit line item for the given Bill.
When creating Credit line items for Bills, use the Credit Reasons created for your Organization. See [CreditReason](https://www.m3ter.com/docs/api#tag/CreditReason).
# Delete Credit Line Item
Source: https://docs.m3ter.com/api/credits/delete-credit-line-item
https://api.m3ter.com/spec delete /organizations/{orgId}/bills/{billId}/creditlineitems/{id}
Delete the Credit line item with the given UUID.
# Credit Endpoints
Source: https://docs.m3ter.com/api/credits/introduction
Endpoints for Credit line item related operations such as creation, update, list and delete. These are line items on Bills that are specifically related to Credits.
You use the Credit Reasons created for your Organization when you create Credit line items for Bills. See [CreditReason](/api/creditreason/introduction).
# List Credit Line Items
Source: https://docs.m3ter.com/api/credits/list-credit-line-items
https://api.m3ter.com/spec get /organizations/{orgId}/bills/{billId}/creditlineitems
List the Credit line items for the given Bill.
# Retrieve Credit Line Item
Source: https://docs.m3ter.com/api/credits/retrieve-credit-line-item
https://api.m3ter.com/spec get /organizations/{orgId}/bills/{billId}/creditlineitems/{id}
Retrieve the Credit line item with the given UUID.
# Update Credit Line Item
Source: https://docs.m3ter.com/api/credits/update-credit-line-item
https://api.m3ter.com/spec put /organizations/{orgId}/bills/{billId}/creditlineitems/{id}
Update the Credit line item with the given UUID.
# Create Currency
Source: https://docs.m3ter.com/api/currency/create-currency
https://api.m3ter.com/spec post /organizations/{orgId}/picklists/currency
Creates a new Currency for the specified Organization.
Used to create a Currency that your Organization will start to use.
# Delete Currency
Source: https://docs.m3ter.com/api/currency/delete-currency
https://api.m3ter.com/spec delete /organizations/{orgId}/picklists/currency/{id}
Delete the Currency with the given UUID.
Used to remove an existing Currency from your Organization that is no longer required.
# Currency Endpoints
Source: https://docs.m3ter.com/api/currency/introduction
Endpoints for Currency operations such as creation, update, list, and delete. Currencies are stored for your Organization, and can then be used to specify currencies on various entities such as plan groups and plan templates.
The Currencies you want to use in your Organization must be created first.
The currency you select for your Organization determines the billing currency and overrides any currency settings in your pricing Plans. For example, if the Organization currency is set to USD and a pricing Plan used for an Account is set to GBP, the bill for an Account using that Plan is calculated in GBP, and then each bill line item converted to USD amounts.
Currency conversion rates are setup in the *OrganizationConfig*. For more details, see [Creating and Managing Currencies](/guides/organization-and-access-management/viewing-and-editing-organization/creating-and-managing-currencies) in the m3ter Documentation.
# List Currencies
Source: https://docs.m3ter.com/api/currency/list-currencies
https://api.m3ter.com/spec get /organizations/{orgId}/picklists/currency
Retrieve a list of Currencies.
Retrieves a list of Currencies for the specified Organization. This endpoint supports pagination and includes various query parameters to filter the Currencies based on Currency ID, and short codes.
# Retrieve Currency
Source: https://docs.m3ter.com/api/currency/retrieve-currency
https://api.m3ter.com/spec get /organizations/{orgId}/picklists/currency/{id}
Retrieve the specified Currency with the given UUID. Used to obtain the details of a specified existing Currency in your Organization.
# Update Currency
Source: https://docs.m3ter.com/api/currency/update-currency
https://api.m3ter.com/spec put /organizations/{orgId}/picklists/currency/{id}
Update a Currency with the given UUID.
Used to update the attributes of the specified Currency for the specified Organization.
# Custom Fields Endpoints
Source: https://docs.m3ter.com/api/customfield/introduction
Endpoints for retrieving and updating Custom Fields at the Organization level for all entities that support them.
Custom Fields in m3ter allow you to store custom data in the form of number or string values against m3ter entities in a way that does not directly affect the normal working operation of the m3ter platform. Having this capability to store data in a free-hand fashion can prove very useful in helping you to meet specific usage-based pricing and other operational business use cases.
However, you can exploit the values stored on Custom Fields in a more direct way by referencing them in Derived Field and Compound Aggregation calculations. Given the key role these calculations can play when implementing usage-based pricing schema, any Custom Fields you reference will then affect how the platform behaves. Referencing Custom Field values in your calculations offers a much wider scope of options when it comes to resolving complex usage-based pricing use cases.
Custom Fields can be added to the following entities at Organizational level:
* Organization
* Account
* AccountPlan
* Aggregation
* Compound Aggregation
* Meter
* Product
* Plan
* PlanTemplate
* Contract
These all follow the same pattern - a new *(optional)* field is available on the entity request and response bodies called "customFields" which is a object in this format:
```
"customFields": {
"exampleCustomField1": 7.1,
"exampleCustomField2": "stringValue"
}
```
The value for a Custom Field can be a string or a number.
## Using Custom Field values in calculations
* You can add Custom Fields at two levels - the Organization level and the individual entity level.
* The Organizational level field provides a default value and *must be added* if you want to also add a Custom Field of the same name at the corresponding individual entity level. If you reference the Custom Field in a calculation, the value for the individual entity level field is used. If no field is defined at individual entity level, then the Organization level field value is used.
## Important: Constraints and Exceptions
### Custom Fields at Organization Level
Currently, you cannot create Custom Fields at the Organization-level for the following enitites:
* Plan Group
* Balance
* Balance Transaction Schedule
* Balance Charge Schedule
Therefore you cannot reference the Custom Fields values created at the individual entity level for these entities in your Derived Field or Compound Aggregation calculations.
### Derived Field Calculations
You can *only reference Custom Fields* for the following entities:
* Organization
* Meter
* Account
However, if you are using Meters belonging to *a specific Product*, that is, not *Global Meters*, you can also reference Custom Fields added to a Product in Derived Field calculations.
### Compound Aggregation Calculations - Meter Custom Fields
The value of the *Organization level Meter Custom Field will always be used*, even if you have defined a corresponding field at the individual Meter level.
See [Working with Custom Fields](/guides/creating-and-managing-products/working-with-custom-fields) in the m3ter documentation for more information.
# Retrieve CustomField
Source: https://docs.m3ter.com/api/customfield/retrieve-customfield
https://api.m3ter.com/spec get /organizations/{orgId}/customfields
Retrieve all Custom Fields added at Organizational level for the entities that support them.
# Update CustomFields
Source: https://docs.m3ter.com/api/customfield/update-customfields
https://api.m3ter.com/spec put /organizations/{orgId}/customfields
Update Custom Fields added at Organization level to entities that support them.
# Download aggregated usage data as a CSV.
Source: https://docs.m3ter.com/api/dataexplorer/download-aggregated-usage-data-as-a-csv
https://api.m3ter.com/spec post /organizations/{orgId}/dataexplorer/usagedata/download/csv
Download aggregated usage data as a CSV.
# Download aggregated usage data as JSON.
Source: https://docs.m3ter.com/api/dataexplorer/download-aggregated-usage-data-as-json
https://api.m3ter.com/spec post /organizations/{orgId}/dataexplorer/usagedata/download/json
Download aggregated usage data as JSON.
# Download Bill data as a CSV.
Source: https://docs.m3ter.com/api/dataexplorer/download-bill-data-as-a-csv
https://api.m3ter.com/spec post /organizations/{orgId}/dataexplorer/bills/download/csv
Download Bill data as a CSV.
# Download Bill data as JSON.
Source: https://docs.m3ter.com/api/dataexplorer/download-bill-data-as-json
https://api.m3ter.com/spec post /organizations/{orgId}/dataexplorer/bills/download/json
Download Bill data as JSON.
# Download Commitments data as a CSV.
Source: https://docs.m3ter.com/api/dataexplorer/download-commitments-data-as-a-csv
https://api.m3ter.com/spec post /organizations/{orgId}/dataexplorer/commitments/download/csv
Download Commitments data as a CSV.
# Download Commitments data as JSON.
Source: https://docs.m3ter.com/api/dataexplorer/download-commitments-data-as-json
https://api.m3ter.com/spec post /organizations/{orgId}/dataexplorer/commitments/download/json
Download Commitments data as JSON.
# Download Commitments Obligations data as JSON.
Source: https://docs.m3ter.com/api/dataexplorer/download-commitments-obligations-data-as-json
https://api.m3ter.com/spec post /organizations/{orgId}/dataexplorer/commitments/obligations/download/json
Download Commitments Obligations data as JSON.
# Download Commitments Obligations data in CSV format
Source: https://docs.m3ter.com/api/dataexplorer/download-commitments-obligations-data-in-csv-format
https://api.m3ter.com/spec post /organizations/{orgId}/dataexplorer/commitments/obligations/download/csv
Download Commitments Obligations data in CSV format.
# Get account values for querying bill line items.
Source: https://docs.m3ter.com/api/dataexplorer/get-account-values-for-querying-bill-line-items
https://api.m3ter.com/spec get /organizations/{orgId}/dataexplorer/bills/accounts
Get account values for querying bill line items.
# Get account values for querying commitments.
Source: https://docs.m3ter.com/api/dataexplorer/get-account-values-for-querying-commitments
https://api.m3ter.com/spec get /organizations/{orgId}/dataexplorer/commitments/accounts
Get account values for querying commitments.
# Get product values for querying bill line items.
Source: https://docs.m3ter.com/api/dataexplorer/get-product-values-for-querying-bill-line-items
https://api.m3ter.com/spec get /organizations/{orgId}/dataexplorer/bills/products
Get product values for querying bill line items.
# Data Explorer Endpoints
Source: https://docs.m3ter.com/api/dataexplorer/introduction
Endpoints for querying the Data Explorer and saving query selections.
The Data Explorer is a m3ter analytics tool, enabling you to query the Usage, Billing, and Prepayments data collected for your Organization in m3ter.
**IMPORTANT: Request Rate Limits for Data Explorer!** As part of the Config API, requests made to the Data Explorer are subject to tighter request rate limits:
* **Generally** 1 request per second.
* **Burst** 10 requests per second.
If you exceed either of these rate limits, requests are throttled and an HTTP 429 (Too Many Requests) error response is returned. See the [Rate and Payload Limts section](/api/rate-and-payload-limits) above for more details.
# Query and filter aggregated usage data.
Source: https://docs.m3ter.com/api/dataexplorer/query-and-filter-aggregated-usage-data
https://api.m3ter.com/spec post /organizations/{orgId}/dataexplorer/usagedata
Query and filter aggregated usage data.
# Query and filter for bill line items.
Source: https://docs.m3ter.com/api/dataexplorer/query-and-filter-for-bill-line-items
https://api.m3ter.com/spec post /organizations/{orgId}/dataexplorer/bills
Query and filter for bill line items.
# Query and filter for commitment line items.
Source: https://docs.m3ter.com/api/dataexplorer/query-and-filter-for-commitment-line-items
https://api.m3ter.com/spec post /organizations/{orgId}/dataexplorer/commitments/v2/lineitems
Query and filter for commitment line items.
# Query and filter for commitments.
Source: https://docs.m3ter.com/api/dataexplorer/query-and-filter-for-commitments
https://api.m3ter.com/spec post /organizations/{orgId}/dataexplorer/commitments/v2
Query and filter for commitments.
# Query and filter for obligations.
Source: https://docs.m3ter.com/api/dataexplorer/query-and-filter-for-obligations
https://api.m3ter.com/spec post /organizations/{orgId}/dataexplorer/commitments/obligations
Query and filter for obligations.
# Query and filter for Remaining Commitments.
Source: https://docs.m3ter.com/api/dataexplorer/query-and-filter-for-remaining-commitments
https://api.m3ter.com/spec post /organizations/{orgId}/dataexplorer/commitments/remaining
Query and filter for remaining commitments.
# Retrieve Meters stored in the Data Warehouse over a period of time.
Source: https://docs.m3ter.com/api/dataexplorer/retrieve-meters-stored-in-the-data-warehouse-over-a-period-of-time
https://api.m3ter.com/spec get /organizations/{orgId}/dataexplorer/meters
Retrieve the Meters and their dimension and measure names that are stored in the Data Warehouse over a period of time.
# Retrieve the values of a Meter Dimension.
Source: https://docs.m3ter.com/api/dataexplorer/retrieve-the-values-of-a-meter-dimension
https://api.m3ter.com/spec post /organizations/{orgId}/dataexplorer/meterdimensions
Retrieve the Dimensions of a Meter stored in the Data Warehouse over a period of time.
# Retrieve the values of a single Dimension for one or more Meters.
Source: https://docs.m3ter.com/api/dataexplorer/retrieve-the-values-of-a-single-dimension-for-one-or-more-meters
https://api.m3ter.com/spec post /organizations/{orgId}/dataexplorer/mergedmeterdimensions
Retrieve the values of a single Dimension for one or more Meters stored in the Data Warehouse over a period of time.
# Create UsageSavedQuery
Source: https://docs.m3ter.com/api/dataexplorerv2/create-usagesavedquery
https://api.m3ter.com/spec post /organizations/{orgId}/usage/savedqueries
Create a new UsageSavedQuery.
# Delete UsageSavedQuery
Source: https://docs.m3ter.com/api/dataexplorerv2/delete-usagesavedquery
https://api.m3ter.com/spec delete /organizations/{orgId}/usage/savedqueries/{id}
Delete the UsageSavedQuery for the given UUID.
# Data Explorer V2 Endpoints
Source: https://docs.m3ter.com/api/dataexplorerv2/introduction
Endpoints for querying and filtering Usage data collected for your Organization.
**IMPORTANT: Request Rate Limits for Data Explorer v2!** As part of the Config API, requests made to the Data Explorer v2 are subject to tighter request rate limits:
* **Generally** 2 requests per second.
* **Burst** 20 requests per second.
If you exceed either of these rate limits, requests are throttled and an HTTP 429 (Too Many Requests) error response is returned.
# List UsageSavedQueries
Source: https://docs.m3ter.com/api/dataexplorerv2/list-usagesavedqueries
https://api.m3ter.com/spec get /organizations/{orgId}/usage/savedqueries
Retrieve a list of UsageSavedQuery entities
# Query and filter usage data
Source: https://docs.m3ter.com/api/dataexplorerv2/query-and-filter-usage-data
https://api.m3ter.com/spec post /organizations/{orgId}/usage/query
Query and filter usage data collected for your Organization.
You can use several parameters to filter the range of usage data returned:
* **Time period.** Use `startDate` and `endDate` to define a period. The query references the `timestamp` values of usage data submissions for applying the defined time period, and not the time submissions were `receivedAt` by the platform. Only usage data with a `timestamp` that falls in the defined time period are returned.(Required)
* **Meters.** Specify the Meters you want the query to return data for.
* **Accounts.** Specify the Accounts you want the query to return data for.
* **Dimension Filters.** Specify values for Dimension data fields on included Meters. Only data that match the specified Dimension field values will be returned for the query.
You can apply Aggregations functions to the usage data returned for the query. If you apply Aggregations, you can select to group the data by:
* **Account**
* **Time**
* **Dimension**
# Retrieve UsageSavedQuery
Source: https://docs.m3ter.com/api/dataexplorerv2/retrieve-usagesavedquery
https://api.m3ter.com/spec get /organizations/{orgId}/usage/savedqueries/{id}
Retrieve a UsageSavedQuery for the given UUID.
# Update UsageSavedQuery
Source: https://docs.m3ter.com/api/dataexplorerv2/update-usagesavedquery
https://api.m3ter.com/spec put /organizations/{orgId}/usage/savedqueries/{id}
Update a UsageSavedQuery for the given UUID.
# Create Debit Reason
Source: https://docs.m3ter.com/api/debitreason/create-debit-reason
https://api.m3ter.com/spec post /organizations/{orgId}/picklists/debitreasons
Create a new Debit Reason for your Organization. When you've created a Debit Reason, it becomes available as a debit type for adding Debit line items to Bills. See [Debits](https://www.m3ter.com/docs/api#tag/Debits).
# Delete Debit Reason
Source: https://docs.m3ter.com/api/debitreason/delete-debit-reason
https://api.m3ter.com/spec delete /organizations/{orgId}/picklists/debitreasons/{id}
Delete the Debit Reason with the given UUID.
# Debit Reason Endpoints
Source: https://docs.m3ter.com/api/debitreason/introduction
Endpoints for DebitReason operations such as creation, update, list, and delete.
You can create DebitReasons for your Organization, and then use them when creating a debit line item on a bill, or applying a product debit to a bill. DebitReasons provide contextual information as to why a debit was applied.
# List Debit Reasons
Source: https://docs.m3ter.com/api/debitreason/list-debit-reasons
https://api.m3ter.com/spec get /organizations/{orgId}/picklists/debitreasons
Retrieve a list of the Debit Reason entities created for your Organization. You can filter the list returned for the call by Debit Reason ID, Debit Reason short code, or by Archive status.
# Retrieve Debit Reason
Source: https://docs.m3ter.com/api/debitreason/retrieve-debit-reason
https://api.m3ter.com/spec get /organizations/{orgId}/picklists/debitreasons/{id}
Retrieve the Debit Reason with the given UUID.
# Update Debit Reason
Source: https://docs.m3ter.com/api/debitreason/update-debit-reason
https://api.m3ter.com/spec put /organizations/{orgId}/picklists/debitreasons/{id}
Update the Debit Reason with the given UUID.
# Create Debit Line Item
Source: https://docs.m3ter.com/api/debits/create-debit-line-item
https://api.m3ter.com/spec post /organizations/{orgId}/bills/{billId}/debitlineitems
Create a new Debit line item for the given bill.
When creating Debit line items for Bills, use the Debit Reasons created for your Organization. See [DebitReason](https://www.m3ter.com/docs/api#tag/DebitReason).
# Delete Debit Line Item
Source: https://docs.m3ter.com/api/debits/delete-debit-line-item
https://api.m3ter.com/spec delete /organizations/{orgId}/bills/{billId}/debitlineitems/{id}
Delete the Debit line item with the given UUID.
# Debit Line Item Endpoints
Source: https://docs.m3ter.com/api/debits/introduction
Endpoints for Debit line item related operations such as creation, update, list and delete. These are line items on Bills that are specifically related to Debits.
You use the Debit Reasons created for your Organization when you create Debit line items for Bills. See the [DebitReason](/api/debitreason/introduction) section for calls you can use to create and manage Debit Reasons for your Organization.
# List Debit Line Items
Source: https://docs.m3ter.com/api/debits/list-debit-line-items
https://api.m3ter.com/spec get /organizations/{orgId}/bills/{billId}/debitlineitems
List the Debit line items for the given bill.
# Retrieve Debit Line Item
Source: https://docs.m3ter.com/api/debits/retrieve-debit-line-item
https://api.m3ter.com/spec get /organizations/{orgId}/bills/{billId}/debitlineitems/{id}
Retrieve the Debit line item with the given UUID.
# Update Debit Line Item
Source: https://docs.m3ter.com/api/debits/update-debit-line-item
https://api.m3ter.com/spec put /organizations/{orgId}/bills/{billId}/debitlineitems/{id}
Update the Debit line item with the given UUID.
# Events Endpoints
Source: https://docs.m3ter.com/api/events/introduction
This section provides Endpoints for operations that allow you to retrieve detailed information about individual Events, list all Events or specific Event Types, and explore dynamic fields available for each Event Type.
Events encompass specific instances of state changes within the system, such as the creation of a new Prepayment/Commitment for an Account. Each Event is classified under an Event Type framework, providing context about what kind of change occurred to generate the Event.
## Events for Configuration and Billing Entities
Many Event Types cover common configuration and billing objects, where the Event is generated for a state change of one of these objects - for when the configuration or billing object is **created**, **deleted**, or **updated**.
For example:
* `configuration.commitment.created`
* `configuration.commitment.deleted`
* `configuration.commitment.updated`
* `configuration.account.created`
* `configuration.account.deleted`
* `configuration.account.updated`
* `billing.bill.created`
* `billing.bill.deleted`
* `billing.bill.created`
## Events for Errors or Failures
There are also Event Types for certain kinds of error that can occur:
* For an Integration:
* validation
* authentication
* perform
* missing account mapping
* disabled
* For a Usage Data Ingest Submission:
* validation failure
* For Data Export Jobs:
* data export job failure
## Scheduled Events
In addition to system-generated Events that occur when a configuration entity undergoes a state change at creation, update, or deletion of the entity, you can use API calls to create and configure *Scheduled Event Configurations*. Scheduled Events are custom Event types, which you can set up by referencing Date/Time fields on configuration and billing entities. See the [ScheduledEventConfigurations](/api/scheduledeventconfigurations/introduction) section of this API Reference for more details.
## Notifications for Events
You can create Notification rules based on Events and these rules can reference and apply calculations to the Event's fields. This allows you to set up customized alerts to be sent out via webhooks when the Event occurs and any conditions you've built into the Notification rule's calculation are satisfied.
See the [Notifications](/api/notifications/introduction) section for more details.
## Other Events
When Events occur, they can cause other Events, such as when a Notification is triggered by the Event it is based on. For these Events there are currently two categories:
* Notification
* IntegrationEvent
Also see [Utilizing Events and Notifications](/guides/alerts-events-and-notifications/utilizing-events-and-notifications) and [Object Definitions and API Calls](/guides/alerts-events-and-notifications/utilizing-events-and-notifications/object-definitions-and-api-calls) in the m3ter documentation for more guidance.
# List Event Fields
Source: https://docs.m3ter.com/api/events/list-event-fields
https://api.m3ter.com/spec get /organizations/{orgId}/events/fields
List Event Fields.
Retrieves a list of Fields for a specific Event Type. These Fields are dynamic and forward compatibile, enabling calculation operations on the Event schema.
**Notes:**
- In many of the Response schema for this call, such as when you retrieve the Fields for a `configuration.commitment.created` Event Type, `new` represents the attributes the newly created object has. The Response to a call to retrieve the Fields for a `configuration.commitment.updated` Event Type will contain Field values for both the `old` and `new` objects. The Response to a call to retrieve the Fields for a `configuration.commitment.deleted` Event Type will only contain `old` Fields, for values at point of deletion. Having access to reference both `new` and `old` Field values for an object can be very useful if you want to base a Notification rule on an Event and include a calculation in the rule that, for example, compares `new` values with `old` - for example, trigger a Notification only when a Commitment has been updated and the `new` value for the `amount` is at least $1,000 greater than the `old` value.
- Some Event types will show `customFields` even though the specific billing or configuration object the Event is for does not yet have the custom fields functionality implemented. For these Events, their `customFields` values will not be populated until such time as the custom fields functionality is implemented for them
# List EventResponse
Source: https://docs.m3ter.com/api/events/list-eventresponse
https://api.m3ter.com/spec get /organizations/{orgId}/events
List all Events.
Retrieve a list of all Events, with options to filter the returned list based on various criteria. Each Event represents a unique instance of a state change within the system, classified under a specific kind of Event.
**NOTES:** You can:
* Use `eventName` as a valid Query parameter to filter the list of Events returned. For example:
`.../organizations/{orgId}/events?eventName=configuration.commitment.created`
* Use the [List Notification Events](https://www.m3ter.com/docs/api#tag/Events/operation/ListEventTypes) endpoint in this section. The response lists the valid Query parameters.
# List Notification Events
Source: https://docs.m3ter.com/api/events/list-notification-events
https://api.m3ter.com/spec get /organizations/{orgId}/events/types
Retrieve a list of Notification Event Types.
This endpoint retrieves a list of Event Types that can have Notification rules configured.
# Retrieve EventResponse
Source: https://docs.m3ter.com/api/events/retrieve-eventresponse
https://api.m3ter.com/spec get /organizations/{orgId}/events/{id}
Retrieve a specific Event.
Retrieves detailed information about the specific Event with the given UUID. An Event corresponds to a unique instance of a state change within the system, classified under a specific Event Type.
# Ad Hoc Data Export Endpoints
Source: https://docs.m3ter.com/api/exportadhoc/introduction
Endpoints for triggering one-off, ad-hoc Data Exports.
You can set up and run ad-hoc Exports to export two kinds of data from your m3ter Organization:
* Usage data.
* Operational data for entities.
## Ad-Hoc Export Destinations
When setting up and running an ad-hoc Export:
* You can define one or more Export Destinations - see the [ExportDestination](/api/exportdestination/introduction) section of this API Reference. When the export runs, the data is sent through to the sepecified Destination. However, the export file is also made available for you to download it locally.
* You can set up and run Data Exports without defining a Destination. The data is not exported but the compiled export file is made available for downloading locally.
* For details on downloading an export file, see the [Get Data Export File Download URL](/api/exportdestination/get-data-export-file-download-url) endpoint in this API Reference.
**Preview Version!** The Data Export feature is currently available only in Preview release version. See [Feature Release Stages](/guides/getting-started/feature-release-stages) for Preview release definition. ExportAdHoc endpoints will only be available if Data Export has been enabled for your Organization. For more details see [Data Export(Preview)](/guides/data-exports) in our main User documentation. If you're interested in previewing the Data Export feature, please get in touch with m3ter Support or your m3ter contact.
# Trigger data export.
Source: https://docs.m3ter.com/api/exportadhoc/trigger-data-export
https://api.m3ter.com/spec post /organizations/{orgId}/dataexports/adhoc
Trigger an ad-hoc Data Export. Each ad-hoc Export can be configured for exporting *only one of* either Usage or Operational data:
**Operational Data Exports**.
* **Entity Types**. Use the `operationalDataTypes` parameter to specify the entities whose operational data you want to include in the ad-hoc export.
* **Export Files**. For each of the entity types you select, when the ad-hoc export runs a separate file is compiled containing the operational data for all entities of that type that exist in your Organization
**Usage Data Exports**.
* Select the Meters and Accounts whose usage data you want to include in the ad-hoc export.
* You can use the `dimensionFilters` parameter to filter the usage data returned for export by adding specific values of non-numeric Dimension data fields on included Meters. Only the data collected for the values you've added for the selected Dimension fields will be included in the export.
* You can use the `aggregations` to apply aggregation methods the usage data returned for export. This restricts the range of usage data returned for export to only the data collected by aggregated fields on selected Meters. Nothing is returned for any non-aggregated fields on Meters. The usage data for Meter fields is returned as the values resulting from applying the selected aggregation method. See the [Aggregations for Queries - Options and Consequences](https://www.m3ter.com/docs/guides/data-explorer/usage-data-explorer-v2#aggregations-for-queries---understanding-options-and-consequences) for more details.
* If you've applied `aggregations` to the usage returned for export, you can then use the `groups` parameter to group the data by *Account*, *Dimension*, or *Time*.
**Date Range for Operational Data Exports**. To restrict the operational data included in the ad-hoc export by a date/time range, use the `startDate` date/time request parameter to specify the start of the time period. The export will include all operational data from the specified `startDate` up until the date/time the export job runs.
**Date Range for Usage Data Exports**. To restrict the usage data included in the ad-hoc export by date/time range, use the `startDate` and `endDate` date/time parameters:
* Both `startDate` and `endDate` are required.
* `endDate` must be after `startDate`.
* `endDate` cannot be after tomorrow at midnight UTC. For example if today is May 20th 2025, you can only choose `endDate` to be equal or before 2025-05-21T00:00:00.000Z.
**NOTE:** You can use the ExportJob `id` returned to check the status of the triggered ad-hoc export. See the [ExportJob](https://www.m3ter.com/docs/api#tag/ExportJob) section of this API Reference.
# Create ExportDestination
Source: https://docs.m3ter.com/api/exportdestination/create-exportdestination
https://api.m3ter.com/spec post /organizations/{orgId}/dataexports/destinations
Create a new Export Destination to use for your Data Export Schedules or Ad-Hoc Data Exports.
Currently, two options for setting up Data Export Destinations are available:
* S3 buckets on your AWS account.
* Buckets in your Google Cloud Storage account.
Request and Response schema:
* Use the selector under the `destinationType` parameter to expose the relevant request and response schema for the type of Destination.
Request and Response samples:
* Use the **Example** selector to show the relevant request and response samples for the type of Destination.
# Delete ExportDestination
Source: https://docs.m3ter.com/api/exportdestination/delete-exportdestination
https://api.m3ter.com/spec delete /organizations/{orgId}/dataexports/destinations/{id}
Delete an Export Destination for the given UUID.
**NOTE:** If you attempt to delete an Export Destination that is currently linked to a Data Export Schedule, an error message is returned and you won't be able to delete the Destination.
# Get Data Export File Download URL
Source: https://docs.m3ter.com/api/exportdestination/get-data-export-file-download-url
https://api.m3ter.com/spec get /organizations/{orgId}/dataexports/jobs/{jobId}/getdownloadurl
Returns a presigned download URL for data export file download based on the `jobId` provided.
If you omit `destinationIds` when setting up your [Ad-Hoc data exports](https://www.m3ter.com/docs/api#tag/ExportAdHoc) or [Scheduled data exports](https://www.m3ter.com/docs/api#tag/ExportSchedule), then the data is not copied to a destination but is available for you to download using the returned download URL.
**Constraints:**
* Only valid for Export jobs ran in the past 24 hours.
* The download URL is time-bound and is only valid for 15 minutes.
**NOTE!** This ExportDestination endpoint is available in Beta release version. See [Feature Release Stages](https://www.m3ter.com/docs/guides/getting-started/feature-release-stages) for Beta release definition.
# Export Destination Endpoints
Source: https://docs.m3ter.com/api/exportdestination/introduction
Endpoints for creating, updating, retrieving, or deleting Data Export Destinations.
Before you can configure and run either [Export Schedules](/api/exportschedule/introduction) or [Ad-Hoc Exports](/api/exportadhoc/introduction), you can set up Export Destinations. Currently, two options for setting up Data Export Destinations are available:
* S3 buckets on your AWS account.
* Buckets in your Google Cloud Storage account.
**Exporting without a Destination?** When a Data Export runs, the data is sent through to the specified Destination. However, the export file is also made available for you to download it locally. You can set up and run Data Exports without defining a Destination. The data is not exported but the compiled export file is made available for downloading locally.
**Preview Version!** The Data Export feature is currently available only in Preview release version. See [Feature Release Stages](/guides/getting-started/feature-release-stages) for Preview release definition. ExportDestination endpoints will only be available if Data Export has been enabled for your Organization. For more details see [Data Export(Preview)](/guides/data-exports) in our main User documentation. If you're interested in previewing the Data Export feature, please get in touch with m3ter Support or your m3ter contact.
# List ExportDestinations
Source: https://docs.m3ter.com/api/exportdestination/list-exportdestinations
https://api.m3ter.com/spec get /organizations/{orgId}/dataexports/destinations
Retrieve a list of Export Destination entities. You can filter the list of Destinations returned by UUID.
# Retrieve ExportDestination
Source: https://docs.m3ter.com/api/exportdestination/retrieve-exportdestination
https://api.m3ter.com/spec get /organizations/{orgId}/dataexports/destinations/{id}
Retrieve an Export Destination for the given UUID.
# Update ExportDestination
Source: https://docs.m3ter.com/api/exportdestination/update-exportdestination
https://api.m3ter.com/spec put /organizations/{orgId}/dataexports/destinations/{id}
Update an Export Destination for the given UUID.
Currently, two options for setting up Data Export Destinations are available:
* S3 buckets on your AWS account.
* Buckets in your Google Cloud Storage account.
Request and Response schema:
* Use the selector under the `destinationType` parameter to expose the relevant request and response schema for the type of Destination.
Request and Response samples:
* Use the **Example** selector to show the relevant request and response samples for the type of Destination.
# Data Export Job Endpoints
Source: https://docs.m3ter.com/api/exportjob/introduction
Endpoints for retrieving/querying Data Export jobs.
**Preview Version!** The Data Export feature is currently available only in Preview release version. See [Feature Release Stages](/guides/getting-started/feature-release-stages) for Preview release definition. ExportJob endpoints will only be available if Data Export has been enabled for your Organization. For more details see [Data Export(Preview)](/guides/data-exports) in our main User documentation. If you're interested in previewing the Data Export feature, please get in touch with m3ter Support or your m3ter contact.
# List Jobs
Source: https://docs.m3ter.com/api/exportjob/list-jobs
https://api.m3ter.com/spec get /organizations/{orgId}/dataexports/jobs
Retrieve a list of Export Job entities.
# Retrieve Job
Source: https://docs.m3ter.com/api/exportjob/retrieve-job
https://api.m3ter.com/spec get /organizations/{orgId}/dataexports/jobs/{id}
Retrieve an Export Job for the given UUID.
The response returns:
* The source type for the data exported by the Export Job: one of USAGE or OPERATIONAL.
* The status of the Export Job.
# Create Schedule
Source: https://docs.m3ter.com/api/exportschedule/create-schedule
https://api.m3ter.com/spec post /organizations/{orgId}/dataexports/schedules
Create a new Data Export Schedule. Each Schedule can be configured for exporting *only one* of either Usage or Operational data:
**Operational Data Exports**.
* Use the `operationalDataTypes` parameter to specify the entities whose operational data you want to include in the export each time the Export Schedule runs.
* For each of the entity types you select, each time the Export Schedule runs a separate file is compiled containing the operational data for all entities of that type that exist in your Organization
**Usage Data Exports**.
* Select the Meters and Accounts whose usage data you want to include in the export each time the Export Schedule runs.
* You can use the `dimensionFilters` parameter to filter the usage data returned for export by adding specific values of non-numeric Dimension data fields on included Meters. Only the data collected for the values you've added for the selected Dimension fields will be included in the export.
* You can use the `aggregations` to apply aggregation methods the usage data returned for export. This restricts the range of usage data returned for export to only the data collected by aggregated fields on selected Meters. Nothing is returned for any non-aggregated fields on Meters. The usage data for Meter fields is returned as the values resulting from applying the selected aggregation method. See the [Aggregations for Queries - Options and Consequences](https://www.m3ter.com/docs/guides/data-explorer/usage-data-explorer-v2#aggregations-for-queries---understanding-options-and-consequences) for more details.
* If you've applied `aggregations` to the usage returned for export, you can then use the `groups` parameter to group the data by *Account*, *Dimension*, or *Time*.
Request and Response schema:
* Use the selector under the `sourceType` parameter to expose the relevant request and response schema for the source data type.
Request and Response samples:
* Use the **Example** selector to show the relevant request and response samples for source data type.
# Delete Schedule
Source: https://docs.m3ter.com/api/exportschedule/delete-schedule
https://api.m3ter.com/spec delete /organizations/{orgId}/dataexports/schedules/{id}
Delete the Data Export Schedule for the given UUID. Each Schedule can be configured for exporting *only one* of either Usage or Operational data.
# Data Export Schedule Endpoints
Source: https://docs.m3ter.com/api/exportschedule/introduction
Endpoints for creating, updating, retrieving, or deleting Data Export schedules.
You can set up an Export Schedule to export one of two types of data from your m3ter Organization - either *Usage data* or *Operational data* for entities.
You cannot create a single Export Schedule for exporting *both types of data under a single Schedule*.
## Export Destinations
When creating an Export Schedule:
* You can define one or more Export Destinations - see the [ExportDestination](/api/exportdestination/introduction) section of this API Reference. When the export runs, the data is sent through to the sepecified Destination. However, the export file is also made available for you to download it locally.
* You can set up and run Data Exports without defining a Destination. The data is not exported but the compiled export file is made available for downloading locally.
* For details on downloading an export file, see the [Get Data Export File Download URL](/api/exportdestination/get-data-export-file-download-url) endpoint in this API Reference.
**Preview Version!** The Data Export feature is currently available only in Preview release version. See [Feature Release Stages](/guides/getting-started/feature-release-stages) for Preview release definition. ExportSchedule endpoints will only be available if Data Export has been enabled for your Organization. For more details see [Data Export(Preview)](/guides/data-exports) in our main User documentation. If you're interested in previewing the Data Export feature, please get in touch with m3ter Support or your m3ter contact.
# List Schedules
Source: https://docs.m3ter.com/api/exportschedule/list-schedules
https://api.m3ter.com/spec get /organizations/{orgId}/dataexports/schedules
Retrieve a list of Data Export Schedules created for your Organization. You can filter the response by Schedules `ids`.
The response will contain an array for both the operational and usage Data Export Schedules in your Organization.
# Retrieve Schedule
Source: https://docs.m3ter.com/api/exportschedule/retrieve-schedule
https://api.m3ter.com/spec get /organizations/{orgId}/dataexports/schedules/{id}
Retrieve a Data Export Schedule for the given UUID. Each Schedule can be configured for exporting *only one* of either Usage or Operational data.
# Update Schedule
Source: https://docs.m3ter.com/api/exportschedule/update-schedule
https://api.m3ter.com/spec put /organizations/{orgId}/dataexports/schedules/{id}
Update a Data Export Schedule for the given UUID. Each Schedule can be configured for exporting *only one* of either Usage or Operational data:
**Operational Data Exports**.
* Use the `operationalDataTypes` parameter to specify the entities whose operational data you want to include in the export each time the Export Schedule runs.
* For each of the entity types you select, each time the Export Schedule runs a separate file is compiled containing the operational data for all entities of that type that exist in your Organization
**Usage Data Exports**.
* Select the Meters and Accounts whose usage data you want to include in the export each time the Export Schedule runs.
* You can use the `dimensionFilters` parameter to filter the usage data returned for export by adding specific values of non-numeric Dimension data fields on included Meters. Only the data collected for the values you've added for the selected Dimension fields will be included in the export.
* You can use the `aggregations` to apply aggregation methods the usage data returned for export. This restricts the range of usage data returned for export to only the data collected by aggregated fields on selected Meters. Nothing is returned for any non-aggregated fields on Meters. The usage data for Meter fields is returned as the values resulting from applying the selected aggregation method. See the [Aggregations for Queries - Options and Consequences](https://www.m3ter.com/docs/guides/data-explorer/usage-data-explorer-v2#aggregations-for-queries---understanding-options-and-consequences) for more details.
* If you've applied `aggregations` to the usage returned for export, you can then use the `groups` parameter to group the data by *Account*, *Dimension*, or *Time*.
# Create an External Mapping
Source: https://docs.m3ter.com/api/external-mapping/create-an-external-mapping
https://api.m3ter.com/spec post /organizations/{orgId}/externalmappings
Creates a new External Mapping.
This endpoint enables you to create a new External Mapping for the specified Organization. You need to supply a request body with the details of the new External Mapping.
# Delete an External Mapping
Source: https://docs.m3ter.com/api/external-mapping/delete-an-external-mapping
https://api.m3ter.com/spec delete /organizations/{orgId}/externalmappings/{id}
Delete an External Mapping with the given UUID.
# External Mapping Endpoints
Source: https://docs.m3ter.com/api/external-mapping/introduction
Endpoints for managing External Mapping related operations such as creation, update, list and delete.
When you integrate your 3rd-party systems with the m3ter platform, a mapping between entities in the local system *(m3ter)* and external systems is constructed. This *External Mapping* is crucial in scenarios where data from external systems is consumed or where data from the local system is to be synchronized with external systems.
When you are working to set up your Integrations and want to test or troubleshoot your implementation before going live, you might need to create External Mappings manually and, at a later date, edit or delete them.
# List External Mappings
Source: https://docs.m3ter.com/api/external-mapping/list-external-mappings
https://api.m3ter.com/spec get /organizations/{orgId}/externalmappings
Retrieve a list of all External Mapping entities.
This endpoint retrieves a list of all External Mapping entities for a specific Organization. The list can be paginated for better management, and supports filtering using the external system.
# List External Mappings for a m3ter Entity
Source: https://docs.m3ter.com/api/external-mapping/list-external-mappings-for-a-m3ter-entity
https://api.m3ter.com/spec get /organizations/{orgId}/externalmappings/external/{entity}/{m3terId}
Retrieve a list of External Mapping entities for a specified m3ter entity.
Use this endpoint to retrieve a list of External Mapping entities associated with a specific m3ter entity. The list can be paginated for easier management.
# List External Mappings for External Entity
Source: https://docs.m3ter.com/api/external-mapping/list-external-mappings-for-external-entity
https://api.m3ter.com/spec get /organizations/{orgId}/externalmappings/externalid/{system}/{externalTable}/{externalId}
Retrieve a list of External Mapping entities for a specified external system entity.
Use this endpoint to retrieve a list of External Mapping entities associated with a specific external system entity. The list can be paginated for easier management.
# Retrieve External Entities from Destination
Source: https://docs.m3ter.com/api/external-mapping/retrieve-external-entities-from-destination
https://api.m3ter.com/spec get /organizations/{orgId}/externalmappingconfiguration/values/{destination}/{entityType}
Retrieve a list of external entities from the specified destination system.
This endpoint enables you to retrieve a list of potential values for creating an External Mapping from a specified destination system. The list is only returned if the destination system has been authenticated successfully and it supports such functionality, otherwise, you will receive an empty response.
# Retrieve External Mapping
Source: https://docs.m3ter.com/api/external-mapping/retrieve-external-mapping
https://api.m3ter.com/spec get /organizations/{orgId}/externalmappings/{id}
Retrieve an External Mapping with the given UUID.
This endpoint enables you to retrieve the External Mapping with the specified UUID for a specific Organization.
# Update External Mapping
Source: https://docs.m3ter.com/api/external-mapping/update-external-mapping
https://api.m3ter.com/spec put /organizations/{orgId}/externalmappings/{id}
Updates an External Mapping with the given UUID.
This endpoint enables you to update an existing External Mapping entity, identified by its UUID. You must supply a request body with the new details for the External Mapping.
# Retrieve a list of external entities from the destination system for a particular credential
Source: https://docs.m3ter.com/api/externalmappings/retrieve-a-list-of-external-entities-from-the-destination-system-for-a-particular-credential
https://api.m3ter.com/spec get /organizations/{orgId}/externalmappingconfiguration/values/{destination}/{entityType}/{integrationCredentialsId}
Retrieve a list of possible values to create an external mapping using a particular credential. These options are retrieved from the destination system if the system has been successfully authenticated and provides the mechanism to do so. Otherwise an empty response is returned.
# Retrieve External Mapping Configuration
Source: https://docs.m3ter.com/api/externalmappings/retrieve-external-mapping-configuration
https://api.m3ter.com/spec get /organizations/{orgId}/externalmappingconfiguration
Retrieve the global External Mapping configuration.
This endpoint retrieves the global External Mapping configuration for the specified Organization.
# Create IntegrationConfig
Source: https://docs.m3ter.com/api/integrationconfigs/create-integrationconfig
https://api.m3ter.com/spec post /organizations/{orgId}/integrationconfigs
Set the integration configuration for the entity.
# Delete IntegrationConfig
Source: https://docs.m3ter.com/api/integrationconfigs/delete-integrationconfig
https://api.m3ter.com/spec delete /organizations/{orgId}/integrationconfigs/{id}
Delete the integration configuration for the given UUID.
Use this endpoint to delete the configuration of a specific integration within your organization. It is intended for removing integration settings that are no longer needed.
# Enable IntegrationConfig
Source: https://docs.m3ter.com/api/integrationconfigs/enable-integrationconfig
https://api.m3ter.com/spec post /organizations/{orgId}/integrationconfigs/{id}/enable
Enables a previously disabled integration configuration, allowing it to be operational again.
# Get ConfigOption Values
Source: https://docs.m3ter.com/api/integrationconfigs/get-configoption-values
https://api.m3ter.com/spec get /organizations/{orgId}/integrationconfigs/values/{systemName}/{configOption}
Get possible values for specific configuration setting.
# List All IntegrationConfigs
Source: https://docs.m3ter.com/api/integrationconfigs/list-all-integrationconfigs
https://api.m3ter.com/spec get /organizations/{orgId}/integrationconfigs
List all integration configurations.
This endpoint retrieves a list of all integration configurations for the specified Organization. The list can be paginated for easier management.
# Retrieve Available Auth Config for System and Entity Type
Source: https://docs.m3ter.com/api/integrationconfigs/retrieve-available-auth-config-for-system-and-entity-type
https://api.m3ter.com/spec get /organizations/{orgId}/integrationconfigs/available/{systemName}/auth/{entityType}
Retrieve the valid auth config for provided system and entity type.
# Retrieve Available Configurations
Source: https://docs.m3ter.com/api/integrationconfigs/retrieve-available-configurations
https://api.m3ter.com/spec get /organizations/{orgId}/integrationconfigs/available
This endpoint gets the available configuration options for integrations.
# Retrieve Available Entity Types for System
Source: https://docs.m3ter.com/api/integrationconfigs/retrieve-available-entity-types-for-system
https://api.m3ter.com/spec get /organizations/{orgId}/integrationconfigs/available/{systemName}/entities
Retrieve the valid entity types for provided system.
# Retrieve Available Integration Systems
Source: https://docs.m3ter.com/api/integrationconfigs/retrieve-available-integration-systems
https://api.m3ter.com/spec get /organizations/{orgId}/integrationconfigs/available/systems
Retrieve the valid integration systems. Can be filtered by entityType.
# Retrieve IntegrationConfig
Source: https://docs.m3ter.com/api/integrationconfigs/retrieve-integrationconfig
https://api.m3ter.com/spec get /organizations/{orgId}/integrationconfigs/entity/{entityType}
Retrieve the integration configuration for the entity
# Retrieve IntegrationConfig for UUID
Source: https://docs.m3ter.com/api/integrationconfigs/retrieve-integrationconfig-for-uuid
https://api.m3ter.com/spec get /organizations/{orgId}/integrationconfigs/{id}
Retrieve the integration configuration for the given UUID.
This endpoint retrieves the configuration details of a specific integration within an organization. It is useful for obtaining the settings and parameters of an integration.
# Update IntegrationConfig
Source: https://docs.m3ter.com/api/integrationconfigs/update-integrationconfig
https://api.m3ter.com/spec put /organizations/{orgId}/integrationconfigs/{id}
Update the integration configuration for the given UUID.
This endpoint allows you to update the configuration of a specific integration within your organization. It is used to modify settings or parameters of an existing integration.
# Create IntegrationCredential
Source: https://docs.m3ter.com/api/integrationcredentials/create-integrationcredential
https://api.m3ter.com/spec post /organizations/{orgId}/integrationcredentials
Create an integration credentials
# Delete IntegrationCredentials
Source: https://docs.m3ter.com/api/integrationcredentials/delete-integrationcredentials
https://api.m3ter.com/spec delete /organizations/{orgId}/integrationcredentials/{id}
Delete the integration credentials for the UUID
# List integration credentials
Source: https://docs.m3ter.com/api/integrationcredentials/list-integration-credentials
https://api.m3ter.com/spec get /organizations/{orgId}/integrationcredentials
Retrieve a list of the integration authorization items for the organization
# Retrieve IntegrationCredentials
Source: https://docs.m3ter.com/api/integrationcredentials/retrieve-integrationcredentials
https://api.m3ter.com/spec get /organizations/{orgId}/integrationcredentials/{id}
Retrieve the integration credentials for the UUID
# Update IntegrationCredentials
Source: https://docs.m3ter.com/api/integrationcredentials/update-integrationcredentials
https://api.m3ter.com/spec put /organizations/{orgId}/integrationcredentials/{id}
Updated the integration credentials for the UUID
# Activate Webhook Destination
Source: https://docs.m3ter.com/api/integrationdestinations/activate-webhook-destination
https://api.m3ter.com/spec put /organizations/{orgId}/integrationdestinations/webhooks/{id}/active
Set the `active` status on a webhook integration destination.
Use this endpoint to activate or deactivate a webhook integration destination. It toggles the `active` status of the specific wehbook destination with the given ID.
# Create Webhook Destination
Source: https://docs.m3ter.com/api/integrationdestinations/create-webhook-destination
https://api.m3ter.com/spec post /organizations/{orgId}/integrationdestinations/webhooks
This endpoint creates a new webhook destination. A webhook destination is a URL where webhook payloads will be sent.
# Create Workflow
Source: https://docs.m3ter.com/api/integrationdestinations/create-workflow
https://api.m3ter.com/spec post /organizations/{orgId}/integrationdestinations/workflows
Create a new workflow
# Delete Webhook Destination
Source: https://docs.m3ter.com/api/integrationdestinations/delete-webhook-destination
https://api.m3ter.com/spec delete /organizations/{orgId}/integrationdestinations/webhooks/{id}
This endpoint deletes a specific webhook destination identified by its UUID.
# Delete Workflow
Source: https://docs.m3ter.com/api/integrationdestinations/delete-workflow
https://api.m3ter.com/spec delete /organizations/{orgId}/integrationdestinations/workflows/{id}
Delete an existing workflow
# Discard Workflow Draft
Source: https://docs.m3ter.com/api/integrationdestinations/discard-workflow-draft
https://api.m3ter.com/spec delete /organizations/{orgId}/integrationdestinations/workflows/{id}/draft
Discard the current workflow draft
# Export Workflow Version
Source: https://docs.m3ter.com/api/integrationdestinations/export-workflow-version
https://api.m3ter.com/spec get /organizations/{orgId}/integrationdestinations/workflows/{id}/export
Export the specified version of the workflow for the UUID.
# Get Triggerse
Source: https://docs.m3ter.com/api/integrationdestinations/get-triggerse
https://api.m3ter.com/spec get /organizations/{orgId}/integrationdestinations/workflows/triggers
Retrieve the triggers for workflows
# Get Workflow
Source: https://docs.m3ter.com/api/integrationdestinations/get-workflow
https://api.m3ter.com/spec get /organizations/{orgId}/integrationdestinations/workflows/{id}
Retrieve the workflow for the specified ID
# Get Workflow Access Rights
Source: https://docs.m3ter.com/api/integrationdestinations/get-workflow-access-rights
https://api.m3ter.com/spec get /organizations/{orgId}/integrationdestinations/workflows/accessrights
Retrieve the access rights of the workflow service
# List Destinations
Source: https://docs.m3ter.com/api/integrationdestinations/list-destinations
https://api.m3ter.com/spec get /organizations/{orgId}/integrationdestinations/webhooks
Retrieve a list of all Destinations created in the Organization.
# List Functions
Source: https://docs.m3ter.com/api/integrationdestinations/list-functions
https://api.m3ter.com/spec get /organizations/{orgId}/integrationdestinations/workflows/functions
Retrieve the available workflow functions, optionally filtered by destination type
# List WorkflowIntegrations
Source: https://docs.m3ter.com/api/integrationdestinations/list-workflowintegrations
https://api.m3ter.com/spec get /organizations/{orgId}/integrationdestinations/workflows
Retrieve a list of WorkflowIntegration entities
# Publish Workflow Draft
Source: https://docs.m3ter.com/api/integrationdestinations/publish-workflow-draft
https://api.m3ter.com/spec post /organizations/{orgId}/integrationdestinations/workflows/{id}/publish
Publish the current draft as a new workflow version
# Retrieve Destination
Source: https://docs.m3ter.com/api/integrationdestinations/retrieve-destination
https://api.m3ter.com/spec get /organizations/{orgId}/integrationdestinations/webhooks/{id}
Retrieve the webhook Destination for the UUID.
# Save Workflow Draft
Source: https://docs.m3ter.com/api/integrationdestinations/save-workflow-draft
https://api.m3ter.com/spec put /organizations/{orgId}/integrationdestinations/workflows/{id}/draft
Save a draft of the workflow without publishing it as a new version
# Set Workflow Use Draft
Source: https://docs.m3ter.com/api/integrationdestinations/set-workflow-use-draft
https://api.m3ter.com/spec put /organizations/{orgId}/integrationdestinations/workflows/{id}/useDraft
Toggle whether workflow execution uses the latest draft version or the latest live version
# Update Destination
Source: https://docs.m3ter.com/api/integrationdestinations/update-destination
https://api.m3ter.com/spec put /organizations/{orgId}/integrationdestinations/webhooks/{id}
Update a destination to be used for a webhook.
# Update Workflow
Source: https://docs.m3ter.com/api/integrationdestinations/update-workflow
https://api.m3ter.com/spec put /organizations/{orgId}/integrationdestinations/workflows/{id}
Update an existing workflow
# Validate Workflow
Source: https://docs.m3ter.com/api/integrationdestinations/validate-workflow
https://api.m3ter.com/spec post /organizations/{orgId}/integrationdestinations/workflows/validate
Validate workflow
# Get IntegrationRun for the UUID
Source: https://docs.m3ter.com/api/integrationruns/get-integrationrun-for-the-uuid
https://api.m3ter.com/spec get /organizations/{orgId}/integrationruns/{id}
Retrieve the integration run for the id
# Get IntegrationRun Log
Source: https://docs.m3ter.com/api/integrationruns/get-integrationrun-log
https://api.m3ter.com/spec get /organizations/{orgId}/integrationruns/logs/{id}
Retrieve the integrationrun log for the given UUID.
This endpoint is for retrieving logs of a specific integrationrun. It is useful for debugging and monitoring the performance of integrations within your organization.
# List IntegrationRuns
Source: https://docs.m3ter.com/api/integrationruns/list-integrationruns
https://api.m3ter.com/spec get /organizations/{orgId}/integrationruns/{entityType}/{entityId}
Retrieve a list of the integration runs for the specified entity.
You can filter the list using the `startDate` and `endDate` query parameters to specify date/times to define the time period you want to return integration runs for.
# List IntegrationRuns By DestinationId
Source: https://docs.m3ter.com/api/integrationruns/list-integrationruns-by-destinationid
https://api.m3ter.com/spec get /organizations/{orgId}/integrationruns/destinations/{destinationId}
Retrieve a list of the integration runs for the destination
# Replay an IntegrationRun
Source: https://docs.m3ter.com/api/integrationruns/replay-an-integrationrun
https://api.m3ter.com/spec post /organizations/{orgId}/integrationruns/{id}/replay
Re-submits the original request from a previous integration run
# Retrieve IntegrationRuns
Source: https://docs.m3ter.com/api/integrationruns/retrieve-integrationruns
https://api.m3ter.com/spec get /organizations/{orgId}/integrationruns/{entityType}/latest
Retrieve the latest integration runs for entity and ids
# Retrieve Latest IntegrationRun
Source: https://docs.m3ter.com/api/integrationruns/retrieve-latest-integrationrun
https://api.m3ter.com/spec get /organizations/{orgId}/integrationruns/{entityType}/latest/{id}
Retrieve the latest integration run for the entity.
# Integrations Endpoints
Source: https://docs.m3ter.com/api/integrations/introduction
A suite of endpoints for configuring and managing third party integrations within the m3ter platform. The integration endpoints in this section facilitate various operations such as creating, updating, listing, and deletion of integrations.
m3ter integrations enable seamless data synchronization and mapping with external systems required in core business processes. These processes often include sales, pricing, billing and invoicing, and general finance.
With m3ter integrations, you can establish robust connections with popular business platforms, enhancing your operational capabilities. For example:
* Chargebee
* Salesforce
* Stripe
* Netsuite
* Paddle
* Xero
* QuickBooks
# Create a new transformation
Source: https://docs.m3ter.com/api/integrationtransformations/create-a-new-transformation
https://api.m3ter.com/spec post /organizations/{orgId}/integrationtransformations
Create a new transformation
# Delete IntegrationTransformation for the UUID
Source: https://docs.m3ter.com/api/integrationtransformations/delete-integrationtransformation-for-the-uuid
https://api.m3ter.com/spec delete /organizations/{orgId}/integrationtransformations/{id}
Deletes the integration transformation for the id
# Get IntegrationTransformation for the UUID
Source: https://docs.m3ter.com/api/integrationtransformations/get-integrationtransformation-for-the-uuid
https://api.m3ter.com/spec get /organizations/{orgId}/integrationtransformations/{id}
Retrieve the integration transformation for the id
# Preview a transformation against an existing entity
Source: https://docs.m3ter.com/api/integrationtransformations/preview-a-transformation-against-an-existing-entity
https://api.m3ter.com/spec get /organizations/{orgId}/integrationtransformations/systems
Create a new transformation
# Retrieve IntegrationTransformations
Source: https://docs.m3ter.com/api/integrationtransformations/retrieve-integrationtransformations
https://api.m3ter.com/spec get /organizations/{orgId}/integrationtransformations
Retrieve the integration transformations
# Update the IntegrationTransformation for the UUID
Source: https://docs.m3ter.com/api/integrationtransformations/update-the-integrationtransformation-for-the-uuid
https://api.m3ter.com/spec put /organizations/{orgId}/integrationtransformations/{id}
Update the integration transformation for the id
# API Reference
Source: https://docs.m3ter.com/api/introduction
The m3ter platform supports two HTTP-based REST APIs returning JSON encoded responses:
* The **Ingest API**, which you can use for submitting raw data measurements. *(See the [Submit Measurements](/api/measurements/submit-measurements) endpoint in this API Reference.)*
* The **Config API**, which you can use for configuration and management. *(All other endpoints in this API Reference.)*
# Invitation Endpoints
Source: https://docs.m3ter.com/api/invitations/introduction
Endpoints for creating and retrieving user invitations. Use invitations to invite other people to join your m3ter Organization.
An invitation sends an email inviting someone to join your Organization. When you set up an invitation, you can:
* Assign the required permission policies to control what the invitee can do when they accept the invite and join your Organization.
* Set a date for when the invitation will expire.
* Set a date for when the invited user's access will expire.
When the invitee receives the invitation email:
* If the invitee is already a m3ter user and has a m3ter account, they can click a link and use their credentials to log into your Organization.
* If the invitee is not a m3ter user and does not have a m3ter account, they'll be invited to create a m3ter account before logging into your Organization.
See [Inviting Users to your Organization](/guides/organization-and-access-management/managing-users#inviting-users-to-your-organization) in our user documentation for more details.
# Invite User to Organization
Source: https://docs.m3ter.com/api/invitations/invite-user-to-organization
https://api.m3ter.com/spec post /organizations/{orgId}/invitations
Invite a new user to your Organization.
This sends an email to someone inviting them to join your m3ter Organization.
# Retrieve Invitation
Source: https://docs.m3ter.com/api/invitations/retrieve-invitation
https://api.m3ter.com/spec get /organizations/{orgId}/invitations/{id}
Retrieve the specified invitation with the given UUID.
# Retrieve Invitations
Source: https://docs.m3ter.com/api/invitations/retrieve-invitations
https://api.m3ter.com/spec get /organizations/{orgId}/invitations
Retrieve a list of all invitations in the Organization.
# Line Item Endpoints
Source: https://docs.m3ter.com/api/line-item/introduction
Endpoint for retrieving a list of line items for Bills in an Organization.
# List Line Items
Source: https://docs.m3ter.com/api/line-item/list-line-items
https://api.m3ter.com/spec get /organizations/{orgId}/lineitems
List the billing line items for the given Organization, which can be filtered by the type of line item, Bill ID, or Commitment *(prepayment)* ID.
# Create LookupTable
Source: https://docs.m3ter.com/api/lookuptable/create-lookuptable
https://api.m3ter.com/spec post /organizations/{orgId}/lookuptables
Create a new Lookup Table.
# Delete LookupTable
Source: https://docs.m3ter.com/api/lookuptable/delete-lookuptable
https://api.m3ter.com/spec delete /organizations/{orgId}/lookuptables/{id}
Delete the Lookup Table with the given UUID.
# Get LookupTable
Source: https://docs.m3ter.com/api/lookuptable/get-lookuptable
https://api.m3ter.com/spec get /organizations/{orgId}/lookuptables/{id}
Retrieve a Lookup Table by UUID.
# Lookup Table Endpoints
Source: https://docs.m3ter.com/api/lookuptable/introduction
Endpoints for creating/updating/deleting Lookup Tables.
Lookup Tables enable you to manage dynamic data mappings that your calculations reference. Use them for currency conversion, pricing tiers, discount rates, and similar scenarios where you require values to change operationally but for calculation logic to remain constant.
**Beta Version!** The Lookup Table feature is currently available in Beta release version. See [Feature Release Stages](/guides/getting-started/feature-release-stages) for Beta release definition. Lookup Table endpoints will only be available if Lookup Tables have been enabled for your Organization. For more details see [Lookup Tables (Beta)](/guides/lookup-tables) in our main User documentation.
# List LookupTable
Source: https://docs.m3ter.com/api/lookuptable/list-lookuptable
https://api.m3ter.com/spec get /organizations/{orgId}/lookuptables
Retrieve a list Lookup Tables created for the Organization:
* Returned list can be filtered by Lookup Table `code` query parameter.
* If you want to include any non-default fields for the returned Lookup Tables, use the additional query parameter to specify which you want to include in the response.
# Update LookupTable
Source: https://docs.m3ter.com/api/lookuptable/update-lookuptable
https://api.m3ter.com/spec put /organizations/{orgId}/lookuptables/{id}
Update the Lookup Table with the given UUID.
# Create LookupTableRevision
Source: https://docs.m3ter.com/api/lookuptablerevision/create-lookuptablerevision
https://api.m3ter.com/spec post /organizations/{orgId}/lookuptables/{lookupTableId}/revisions
Create a new Revision for a Lookup Table.
Fields and Keys for Revision schema: Use the `fields` parameter to define a Revision schema containing up to 10 number or string fields. Use the `keys` parameter to specify which are the key fields:
* At least one field must be a non-key field and at least one a key field.
* Up to 5 key fields can be defined.
* Using multiple key fields: ensure that the order in which they are defined matches the order in which you want to use them in any Lookup functions that reference the Revision's Lookup Table, because this is the order in which they will be passed into the function. The order of non-key fields is not constrained in this way.
Revision status: when you first create a Lookup Table Revision it has DRAFT status. Use the [Update LookupTableRevision Status](https://docs.m3ter.com/api/lookuptablerevision/update-lookuptablerevision-status) call to change a Revision's status.
# Delete LookupTableRevision
Source: https://docs.m3ter.com/api/lookuptablerevision/delete-lookuptablerevision
https://api.m3ter.com/spec delete /organizations/{orgId}/lookuptables/{lookupTableId}/revisions/{id}
Delete the Lookup Table Revision for the given UUID.
# Lookup Table Revision Endpoints
Source: https://docs.m3ter.com/api/lookuptablerevision/introduction
Endpoints for creating/updating/deleting Lookup Table Revisions.
Lookup Tables utilize a "Table and Revision" model, which lets you update data cleanly, and extend the schema without modifying existing calculations:
* Create Revisions for a Lookup Table, which you can use to define data schema and lookup keys.
* Populate draft Revisions with data values. You can create and edit multiple draft Revisions, but only one can be published at any given time.
* Publish a Revision to activate it. When you use Lookup functions in your calculations that reference the Lookup Table, the data values defined for the published Revision are used.
* When you want different, updated data values to be used, publish the draft Revision containing the required new values. The currently published Revision is archived automatically.
**Beta Version!** The Lookup Table feature is currently available in Beta release version. See [Feature Release Stages](/guides/getting-started/feature-release-stages) for Beta release definition. Lookup Table Revision endpoints will only be available if Lookup Tables have been enabled for your Organization. For more details see [Lookup Tables (Beta)](/guides/lookup-tables) in our main User documentation.
# List LookupTableRevision
Source: https://docs.m3ter.com/api/lookuptablerevision/list-lookuptablerevision
https://api.m3ter.com/spec get /organizations/{orgId}/lookuptables/{lookupTableId}/revisions
List LookupTableRevision entities
# Retrieve LookupTableRevision
Source: https://docs.m3ter.com/api/lookuptablerevision/retrieve-lookuptablerevision
https://api.m3ter.com/spec get /organizations/{orgId}/lookuptables/{lookupTableId}/revisions/{id}
Retrieve a Lookup Table Revision for the given UUID.
# Update LookupTableRevision
Source: https://docs.m3ter.com/api/lookuptablerevision/update-lookuptablerevision
https://api.m3ter.com/spec put /organizations/{orgId}/lookuptables/{lookupTableId}/revisions/{id}
Update a Lookup Table Revision for the given UUID.
**NOTE:** If you've already added data to a Lookup Table Revision - see the following [Lookup Table Revision Data](https://www.m3ter.com/docs/api#tag/LookupTableRevisionData) section - then you won't be able to change the Revision's field schema and you'll receive an error if you try do this. Create a new Revision instead, or delete the data items first.
# Update LookupTableRevision Status
Source: https://docs.m3ter.com/api/lookuptablerevision/update-lookuptablerevision-status
https://api.m3ter.com/spec put /organizations/{orgId}/lookuptables/{lookupTableId}/revisions/{id}/status
Update the status of a Lookup Table Revision for the given UUID.
# Copy LookupTableRevisionData
Source: https://docs.m3ter.com/api/lookuptablerevisiondata/copy-lookuptablerevisiondata
https://api.m3ter.com/spec post /organizations/{orgId}/lookuptables/{lookupTableId}/revisions/{lookupTableRevisionId}/data/copy
Copy the Lookup Table Revision Data from a source Revision to an optional target Revision:
* If you omit a target `revisionId`, then the source Revision and its Data is duplicated. The new Revision is given the source Revision's name appended with "Copy" but is assigned a new unique id.
* If you specify a target `revisionId` to copy the source Revision and its Data to, you must ensure that the target Revision has a Data schema that matches the source Revision's Data schema otherwise you'll receive an error
# Delete LookupTableRevisionData
Source: https://docs.m3ter.com/api/lookuptablerevisiondata/delete-lookuptablerevisiondata
https://api.m3ter.com/spec delete /organizations/{orgId}/lookuptables/{lookupTableId}/revisions/{lookupTableRevisionId}/data
Delete the Lookup Table Revision Data for the given UUID.
# Delete LookupTableRevisionData entry
Source: https://docs.m3ter.com/api/lookuptablerevisiondata/delete-lookuptablerevisiondata-entry
https://api.m3ter.com/spec delete /organizations/{orgId}/lookuptables/{lookupTableId}/revisions/{lookupTableRevisionId}/data/{lookupKey}
Delete a Lookup Table Revision Data entry by lookup key.
**NOTES:**
* To obtain the lookup key for a Revision's data items, use the [Get LookupTableRevisionData](https://www.m3ter.com/docs/api#tag/LookupTableRevisionData/operation/GetLookupTableRevisionData) endpoint in this section and use the `additional=lookupKey` query parameter.
* If the Revision's Data schema uses multiple key fields, enter these as a comma-separated list for the `lookupKey` path parameter: .../key1,key2,key3 and so on. Importantly, multiple keys must be *entered in the same order* as they are configured in the Revision's Data schema.
# Delete LookupTableRevisionData Job Response
Source: https://docs.m3ter.com/api/lookuptablerevisiondata/delete-lookuptablerevisiondata-job-response
https://api.m3ter.com/spec delete /organizations/{orgId}/lookuptables/{lookupTableId}/revisions/{lookupTableRevisionId}/data/jobs/{id}
Delete the LookupTableRevisionData Job Response for given job id.
**NOTE:** Use the [List LookupTableRevisionData Jobs](https://www.m3ter.com/docs/api#tag/LookupTableRevisionData/operation/ListLookupTableRevisionDataJobs) endpoint to list the Data job Responses for a specific Revision.
# Generate LookupTableRevisionData Upload URL
Source: https://docs.m3ter.com/api/lookuptablerevisiondata/generate-lookuptablerevisiondata-upload-url
https://api.m3ter.com/spec post /organizations/{orgId}/lookuptables/{lookupTableId}/revisions/{lookupTableRevisionId}/data/generateuploadurl
Generate a URL which can be used to upload a data file for creating or updating the Lookup Table Revision's data:
* An upload URL is returned together with an UPLOAD `jobId`.
* You can then upload your data file using a PUT request using the returned upload URL as the endpoint. For the PUT request, map the headers returned and their values and in the request body select the specified CSV or JSONL file containing the Revision Data to upload.
* You can use the returned UPLOAD `jobId` with the [List LookupTableRevisionData Jobs](https://www.m3ter.com/docs/api#tag/LookupTableRevisionData/operation/ListLookupTableRevisionDataJobs) or the [Get LookupTableRevisionData Job Response](https://www.m3ter.com/docs/api#tag/LookupTableRevisionData/operation/GetLookupTableRevisionDataJobResponse) endpoints for any follow-up or troubleshooting.
**Important:**
* The `contentLength` request parameter is required.
* The upload URL is time limited - it is valid for ***one minute***.
# Get LookupTableRevisionArchivedData URL
Source: https://docs.m3ter.com/api/lookuptablerevisiondata/get-lookuptablerevisionarchiveddata-url
https://api.m3ter.com/spec post /organizations/{orgId}/lookuptables/{lookupTableId}/revisions/{lookupTableRevisionId}/data/archived
Get a URL which you can use to download the data for the specified archived Lookup Table Revision:
* The `contentType` request parameter is required.
* The returned URL is presigned - you can copy it into a browser and the data file is downloaded locally.
* The upload URL is time limited - the `expiry` time is given in the response and the URL is valid for ***one hour***.
# Get LookupTableRevisionData
Source: https://docs.m3ter.com/api/lookuptablerevisiondata/get-lookuptablerevisiondata
https://api.m3ter.com/spec get /organizations/{orgId}/lookuptables/{lookupTableId}/revisions/{lookupTableRevisionId}/data
List Lookup Table Revision Data items for the given UUID.
# Get LookupTableRevisionData entry
Source: https://docs.m3ter.com/api/lookuptablerevisiondata/get-lookuptablerevisiondata-entry
https://api.m3ter.com/spec get /organizations/{orgId}/lookuptables/{lookupTableId}/revisions/{lookupTableRevisionId}/data/{lookupKey}
Retrieve a Lookup Table Revision Data item for the given lookup key.
**NOTES:**
* To obtain the lookup key for a Revision's data items, use the [Get LookupTableRevisionData](https://www.m3ter.com/docs/api#tag/LookupTableRevisionData/operation/GetLookupTableRevisionData) endpoint in this section and use the `additional=lookupKey` query parameter.
* If the Revision's Data schema uses multiple key fields, enter these as a comma-separated list for the `lookupKey` path parameter: .../key1,key2,key3 and so on. Importantly, multiple keys must be *entered in the same order* as they are configured in the Revision's Data schema.
# Get LookupTableRevisionData Job Response.
Source: https://docs.m3ter.com/api/lookuptablerevisiondata/get-lookuptablerevisiondata-job-response
https://api.m3ter.com/spec get /organizations/{orgId}/lookuptables/{lookupTableId}/revisions/{lookupTableRevisionId}/data/jobs/{id}
Get the Lookup Table Revision Data job Response for given job id.
**NOTE:** Use the [List LookupTableRevisionData Jobs](https://www.m3ter.com/docs/api#tag/LookupTableRevisionData/operation/ListLookupTableRevisionDataJobs) endpoint to list the Data job Responses for a specific Revision.
# Lookup Table Revision Data Endpoints
Source: https://docs.m3ter.com/api/lookuptablerevisiondata/introduction
Endpoints for creating/updating/deleting Data for specific Lookup Table Revisions.
When you've added fields to create a data schema for a Lookup Table Revision, you can use upsert operations to create or update the data values for those fields:
* Use [Upsert LookupTableRevisionData](/api/lookuptablerevisiondata/upsert-lookuptablerevisiondata) to upsert some or all of a Revision's field data values.
* Use [Upsert LookupTableRevisionData Entry](/api/lookuptablerevisiondata/upsert-lookuptablerevisiondata-entry) to upsert an individual Revision field's data value.
## Notes
* You can only create or update field data values for DRAFT Revisions.
* You cannot change the field data values for PUBLISHED Revisions.
**Beta Version!** The Lookup Table feature is currently available in Beta release version. See [Feature Release Stages](/guides/getting-started/feature-release-stages) for Beta release definition. Lookup Table Revision Data endpoints will only be available if Lookup Tables have been enabled for your Organization. For more details see [Lookup Tables (Beta)](/guides/lookup-tables) in our main User documentation.
# List LookupTableRevisionData Jobs
Source: https://docs.m3ter.com/api/lookuptablerevisiondata/list-lookuptablerevisiondata-jobs
https://api.m3ter.com/spec get /organizations/{orgId}/lookuptables/{lookupTableId}/revisions/{lookupTableRevisionId}/data/jobs
List the Lookup Table Revision Data job Responses for the given Lookup Table Revision.
There are four types of Revision Data jobs:
* **COPY**. Job runs when you use the [Copy LookupTableRevisionData](https://www.m3ter.com/docs/api#tag/LookupTableRevisionData/operation/CopyLookupTableRevisionData) endpoint which returns the `jobId`.
* **UPLOAD**. Job runs when you use the [Generate LookupTableRevisionData Upload URL](https://www.m3ter.com/docs/api#tag/LookupTableRevisionData/operation/GenerateLookupTableDataUploadUrl) endpoint which returns the `jobId`.
* **DOWNLOAD**. Job runs when you use the [](https://www.m3ter.com/docs/api#tag/LookupTableRevisionData/operation/TriggerLookupTableRevisionDataDownloadJob) endpoint which returns the `jobId`.
* **ARCHIVE**. Job runs when you either manually change a DRAFT Revision to PUBLISHED using the [Update LookupTableRevision Status](https://www.m3ter.com/docs/api#tag/LookupTableRevision/operation/UpdateLookupTableRevisionStatus) endpoint or you publish a DRAFT Revision and the existing PUBLISHED Revision is archived.
**NOTE:** This endpoint returns the id of each Data job. You then use:
* The [Get LookupTableRevisionData Job Response](https://www.m3ter.com/docs/api#tag/LookupTableRevisionData/operation/GetLookupTableRevisionDataJobResponse) endpoint to retrieve a specific Data job Response.
* The [Delete LookupTableRevisionData Job Response](https://www.m3ter.com/docs/api#tag/LookupTableRevisionData/operation/DeleteLookupTableRevisionDataJobResponse) to delete a specific Data job Response.
# Trigger Download LookupTableRevisionData URL Job
Source: https://docs.m3ter.com/api/lookuptablerevisiondata/trigger-download-lookuptablerevisiondata-url-job
https://api.m3ter.com/spec post /organizations/{orgId}/lookuptables/{lookupTableId}/revisions/{lookupTableRevisionId}/data/jobs/download
Trigger an URL job to download the Lookup Table Revision Data. The URL download Data `jobId` is returned and you can then use the [List LookupTableRevisionData Jobs](https://www.m3ter.com/docs/api#tag/LookupTableRevisionData/operation/ListLookupTableRevisionDataJobs) endpoint or the [Get LookupTableRevisionData Job Response](https://www.m3ter.com/docs/api#tag/LookupTableRevisionData/operation/GetLookupTableRevisionDataJobResponse) endpoint to retrieve the URL and perform the Revision data Download.
# Upsert LookupTableRevisionData
Source: https://docs.m3ter.com/api/lookuptablerevisiondata/upsert-lookuptablerevisiondata
https://api.m3ter.com/spec put /organizations/{orgId}/lookuptables/{lookupTableId}/revisions/{lookupTableRevisionId}/data
Create/update the Lookup Table Revision Data for the given UUID.
# Upsert LookupTableRevisionData entry
Source: https://docs.m3ter.com/api/lookuptablerevisiondata/upsert-lookuptablerevisiondata-entry
https://api.m3ter.com/spec put /organizations/{orgId}/lookuptables/{lookupTableId}/revisions/{lookupTableRevisionId}/data/{lookupKey}
Create/update a Lookup Table Revision Data item by lookup key.
**NOTES:**
* To obtain the lookup key for a Revision's data items, use the [Get LookupTableRevisionData](https://www.m3ter.com/docs/api#tag/LookupTableRevisionData/operation/GetLookupTableRevisionData) endpoint in this section and use the `additional=lookupKey` query parameter.
* If the Revision's Data schema uses multiple key fields, enter these as a comma-separated list for the `lookupKey` path parameter: .../key1,key2,key3 and so on. Importantly, multiple keys must be *entered in the same order* as they are configured in the Revision's Data schema.
# Marketplace Integrations Endpoints
Source: https://docs.m3ter.com/api/marketplace-integrations/introduction
Endpoints for retrieving reporting data on Marketplace Integration runs
# Retrieve reported usage
Source: https://docs.m3ter.com/api/marketplace-integrations/retrieve-reported-usage
https://api.m3ter.com/spec get /organizations/{orgId}/integrationdestinations/marketplace/usageReport
Retrieve a list of reported usage records that match the provided filters.
When Bill integration runs are performed, all interactions between m3ter and a Marketplace system are persisted as logs. Use this endpoint to retrieve these logs, which you can use to track all amounts sent over to the Marketplace system together with the date and time the Bill data was sent. This provides a report on usage data sent to the Marketplace for each Bill integration run
# Generate Upload URL
Source: https://docs.m3ter.com/api/measurements/generate-upload-url
https://api.m3ter.com/spec post /organizations/{orgId}/fileuploads/measurements/generateUploadUrl
Generate a URL for uploading a file containing measurements to the platform in preparation for the measurements it contains to be ingested:
- An upload URL is returned together with an upload job id:
- You can then upload your data measurements file using a `PUT` request using the returned upload URL as the endpoint.
- You can use the returned upload job id with other calls to the File Upload Service for any follow-up or troubleshooting.
**Important:**
* The `contentLength` request parameter is required.
* The upload URL is time limited - it is valid for ***one*** minute.
Part of the file upload service for submitting measurements data files.
# Get Failed Ingest File Download URL
Source: https://docs.m3ter.com/api/measurements/get-failed-ingest-file-download-url
https://api.m3ter.com/spec get /organizations/{orgId}/measurements/failedIngest/getDownloadUrl
Returns a presigned download URL for failed ingest file download based on the file path provided.
If a usage data ingest measurement you submit to the m3ter platform fails, an `ingest.validation.failure` Event is generated. Use this call to obtain a download URL which you can then use to download a file containing details of what went wrong with the attempted usage data measurement ingest, and allowing you to follow-up and resolve the issue.
To obtain the `file` query parameter:
- Use the [List Events](https://www.m3ter.com/docs/api#tag/Events/operation/ListEventFields) call with the `ingest.validation.failure` for the `eventName` query parameter.
- The response contains a `getDownloadUrl` response parameter and this contains the file path you can use to obtain the failed ingest file download URL.
**Notes:**
- The presigned Url returned to use for failed ingest file download is time-bound and expires after 5 minutes.
- If you make a List Events call for `ingest.validation.failure` Events in your Organization, then you can perform this **GET** call using the full URL returned for any ingest failure Event to obtain a failed ingest file download URL for the Event.
# Get File Upload Job Response
Source: https://docs.m3ter.com/api/measurements/get-file-upload-job-response
https://api.m3ter.com/spec get /organizations/{orgId}/fileuploads/measurements/jobs/{id}
Get the file upload job response using the UUID of the file upload job.
Part of the file upload service for measurements ingest.
# Get Original File Download URL
Source: https://docs.m3ter.com/api/measurements/get-original-file-download-url
https://api.m3ter.com/spec get /organizations/{orgId}/fileuploads/measurements/jobs/{id}/original
Use the original file upload job id to obtain a download URL, which you can then use to retrieve the file you originally uploaded to the file upload service:
- A download URL is returned together with a download job id.
- You can then use a `GET` using the returned download URL as the endpoint to retrieve the file you originally uploaded.
Part of the file upload service for submitting measurements data files.
# Measurement Endpoints
Source: https://docs.m3ter.com/api/measurements/introduction
Endpoints for submitting usage data measurements to the m3ter platform.
* **Directly:** You can use the **Submit Measurements** call to submit raw data measurements directly using the **Ingest API**.
* **Indirectly:** You can use the platform's file upload service calls to prepare for and submit a file for data ingest using the **Config API**.
To use the file upload service:
* First, make a **Generate an upload URL** call to obtain a temporary upload URL and an upload job ID.
* You can then upload your data measurements file using a `PUT` request using the upload URL as the endpoint.
* Any errors are reported via the normal [Alerts](/guides/alerts-events-and-notifications/viewing-and-managing-alerts) service in the Console UI.
* If any issues occur with a file upload, you can use the upload job ID with other file upload service calls we provide to troubleshoot and resolve issues.
You can also perform a File Upload via a Meter's Details page in the m3ter Console using a `CSV` formatted file you've prepared for usage data measurements ingest for the Meter.
See also:
* [Optimizing Measurement Submissions](/guides/m3ter-apis/ingest-api-limits).
* [File Upload Service API](https://docs.m3ter.com/guides/billing-and-usage-data/submitting-usage-data/file-upload-service-api)
* [File Uploads for Usage Data by Meter](https://docs.m3ter.com/guides/billing-and-usage-data/submitting-usage-data/file-uploads-for-usage-data-by-meter)
# List File Upload Jobs
Source: https://docs.m3ter.com/api/measurements/list-file-upload-jobs
https://api.m3ter.com/spec get /organizations/{orgId}/fileuploads/measurements/jobs
Lists the File Upload jobs. Part of the File Upload service for measurements ingest:
* You can use the `dateCreatedStart` and `dateCreatedEnd` optional Query parameters to define a date range to filter the File Uploads jobs returned for this call.
* If `dateCreatedStart` and `dateCreatedEnd` Query parameters are not used, then all File Upload jobs are returned.
# Submit Measurements
Source: https://docs.m3ter.com/api/measurements/submit-measurements
https://api.m3ter.com/spec post /organizations/{orgId}/measurements
Submit a measurement or multiple measurements to the m3ter platform. The maximum size of the payload needs to be less than 512,000 bytes.
**NOTES:**
* **Non-existent Accounts.** The `account` request parameter is required. However, if you want to submit a usage data measurement for an Account which does not yet exist in your Organization, you can use an `account` code for a non-existent Account. A new skeleton Account will be automatically created. The usage data measurement is accepted and ingested as data belonging to the new auto-created Account. At a later date, you can edit the Account and update the Code,??Name, and email address. For more details, see [Submitting Usage Data for Non-Existent Accounts](https://www.m3ter.com/docs/guides/billing-and-usage-data/submitting-usage-data/submitting-usage-data-for-non-existent-accounts) in our main documentation.
* **Usage Data Adjustments.** If you need to make corrections for billing retrospectively against an Account, you can use date/time values in the past for the `ts` (timestamp) request parameter to submit positive or negative usage data amounts to correct and reconcile earlier billing anomalies. For more details, see [Submitting Usage Data Adjustments Using Timestamp](https://www.m3ter.com/docs/guides/billing-and-usage-data/submitting-usage-data/submitting-usage-data-adjustments-using-timestamp) in our main documentation.
* **Ingest Validation Failure Events.** After the intial submission of a usage data measurement to the Ingest API, a data enrichment stage is performed to check for any errors in the usage data measurement, such as a missing field. If an error is identified, this might result in the submission being rejected. In these cases, an *ingest validation failure* Event is generated, which you can review on the [Ingest Events](https://www.m3ter.com/docs/guides/billing-and-usage-data/submitting-usage-data/reviewing-and-resolving-ingest-events) page in the Console. See also the [Events](https://www.m3ter.com/docs/api#tag/Events) section in this API Reference.
**IMPORTANT! - Use of PII:** The use of any of your end-customers' Personally Identifiable Information (PII) in m3ter is restricted to a few fields on the **Account** entity. Please ensure that any measurements you submit do not contain any end-customer PII data. See the [Introduction section](https://www.m3ter.com/docs/api#section/Introduction) above for more details.
# Create Meter
Source: https://docs.m3ter.com/api/meter/create-meter
https://api.m3ter.com/spec post /organizations/{orgId}/meters
Create a new Meter.
When you create a Meter, you can define two types of field for usage data collection and ingest into the platform:
- `dataFields` to collect raw usage data measures - numeric quantitative data values or non-numeric point data values.
- `derivedFields` to derive usage data measures that are the result of applying a calculation to `dataFields`, `customFields`, or system `Timestamp` fields.
You can also:
- Create `customFields` for a Meter, which allows you to attach custom data to the Meter as name/value pairs.
- Create Global Meters, which are not tied to a specific Product and allow you collect to usage data that will form the basis of usage-based pricing across more than one of your Products.
**IMPORTANT! - use of PII:** The use of any of your end-customers' Personally Identifiable Information (PII) in m3ter is restricted to a few fields on the **Account** entity. Please ensure that any fields you configure for Meters, such as Data Fields or Derived Fields, do not contain any end-customer PII data. See the [Introduction section](https://www.m3ter.com/docs/api#section/Introduction) above for more details.
See also:
- [Reviewing Meter Options](https://www.m3ter.com/docs/guides/setting-up-usage-data-meters-and-aggregations/reviewing-meter-options).
# Delete Meter
Source: https://docs.m3ter.com/api/meter/delete-meter
https://api.m3ter.com/spec delete /organizations/{orgId}/meters/{id}
Delete the Meter with the given UUID.
# Meter Endpoints
Source: https://docs.m3ter.com/api/meter/introduction
Endpoints for listing, creating, updating, retrieving, or deleting Meters.
Use Meters to submit usage data for the consumption of your products and services by end customers. This usage data then becomes the basis for setting up usage-based pricing for your products and services.
Examples of usage data collected in Meters:
* Number of logins.
* Duration of session.
* Amount of data downloaded.
To collect usage data and ingest it into the platform, you can define two types of fields for Meters:
* `dataFields` Used to collect raw usage data measures - numeric quantitative data values or non-numeric point data values.
* `derivedFields` Used to derive usage data measures that are the result of applying a calculation to `dataFields`, `customFields`, or system `Timestamp` fields.
You can also:
* Create `customFields` for a Meter, which allows you to attach custom data to the Meter as name/value pairs.
* Create Global Meters, which are not tied to a specific Product and allow you to collect usage data that will form the basis of usage-based pricing across multiple Products.
**Use of PII:** The use of any of your end-customers' Personally Identifiable Information (PII) in m3ter is restricted to a few fields on the **Account** entity. Please ensure that any fields you configure for Meters, such as Data Fields or Derived Fields, do not contain any end-customer PII data. See the [Introduction section](/api) above for more details.
See also:
* [Reviewing Meter Options](/guides/usage-data-meters/reviewing-meter-options).
# List Meters
Source: https://docs.m3ter.com/api/meter/list-meters
https://api.m3ter.com/spec get /organizations/{orgId}/meters
Retrieve a list of Meters that can be filtered by Product, Meter ID, or Meter short code.
# Retrieve Meter
Source: https://docs.m3ter.com/api/meter/retrieve-meter
https://api.m3ter.com/spec get /organizations/{orgId}/meters/{id}
Retrieve the Meter with the given UUID.
# Update Meter
Source: https://docs.m3ter.com/api/meter/update-meter
https://api.m3ter.com/spec put /organizations/{orgId}/meters/{id}
Update the Meter with the given UUID.
**Note:** If you have created Custom Fields for a Meter, when you use this endpoint to update the Meter use the `customFields` parameter to preserve those Custom Fields. If you omit them from the update request, they will be lost.
# Create MeterGroup
Source: https://docs.m3ter.com/api/metergroup/create-metergroup
https://api.m3ter.com/spec post /organizations/{orgId}/metergroups
Create a new MeterGroup.
# Delete MeterGroup
Source: https://docs.m3ter.com/api/metergroup/delete-metergroup
https://api.m3ter.com/spec delete /organizations/{orgId}/metergroups/{id}
Delete a MeterGroup for the given UUID.
# Meter Group Endpoints
Source: https://docs.m3ter.com/api/metergroup/introduction
Endpoints for creating/updating/deleting MeterGroups.
MeterGroups represent a logical grouping of Meters. They are not required for billing, but mainly for Analytics purposes. For example: "show me the total income for all Meters in the 'Events' group".
# List MeterGroups
Source: https://docs.m3ter.com/api/metergroup/list-metergroups
https://api.m3ter.com/spec get /organizations/{orgId}/metergroups
Retrieve a list of MeterGroup entities
# Retrieve MeterGroup
Source: https://docs.m3ter.com/api/metergroup/retrieve-metergroup
https://api.m3ter.com/spec get /organizations/{orgId}/metergroups/{id}
Retrieve a MeterGroup for the given UUID.
# Update MeterGroup
Source: https://docs.m3ter.com/api/metergroup/update-metergroup
https://api.m3ter.com/spec put /organizations/{orgId}/metergroups/{id}
Update MeterGroup for the given UUID.
# Create Notification
Source: https://docs.m3ter.com/api/notifications/create-notification
https://api.m3ter.com/spec post /organizations/{orgId}/notifications/configurations
Create a new Notification for an Event.
This endpoint enables you to create a new Event Notification for the specified Organization. You need to supply a request body with the details of the new Notification.
# Delete Notification
Source: https://docs.m3ter.com/api/notifications/delete-notification
https://api.m3ter.com/spec delete /organizations/{orgId}/notifications/configurations/{id}
Delete the Notification with the given UUID.
This endpoint permanently removes a specified Notification and its configuration. This action cannot be undone.
# Evaluate Calculation
Source: https://docs.m3ter.com/api/notifications/evaluate-calculation
https://api.m3ter.com/spec post /organizations/{orgId}/notifications/evaluate
Evaluates a calculation against a specific Event or an Event type without triggering a Notification. This is useful for validating your calculation logic before adding it to a Notification.
You can use either the `eventId` or `eventName` to test your calculation against:
- `eventId` Tests the calculation for validity against a *specific Event* that has been generated for your Organization.
- `eventName` Tests the calculation for validity against the *Event type*.
Possible outcomes:
- If in either case the calculation is valid, then `"success" : true` is returned.
- If in either case the calculation is invalid, then `"success" : false` is returned, together with an `"error message"` giving the reason why the calculation is invaild for use against the specific Event or Event type.
**Note:** If you use both the `eventId` and the `eventName` as request body parameters in a single call, then the `eventName` takes precedence and the calculation is evaluated for validity against the *Event type*.
# Notification Endpoints
Source: https://docs.m3ter.com/api/notifications/introduction
This section provides endpoints for managing Event Notifications.
You can create Notifications based on system Events generated by the platform. When you base a Notification on a specific Event type, you can include a calculation that references the fields available on that Event type to define precise conditions that must be met for the Notification to be triggered when an Event of that type occurs. In this way, you can set up highly customized Notifications that act as timely alerts to inform you about significant occurrences within your Organization. For instance, if you provide a sign-up bonus to new end-customer Accounts, you can set up a Notification to alert you when an end-customer Account has used up a certain percentage of their bonus credit.
You can also set up Notifications based on Scheduled Event types you've created for your Organization. See the [ScheduledEventConfigurations](/api/scheduledeventconfigurations/introduction) section of this API Reference and [Working with Scheduled Events](/guides/alerts-events-and-notifications/utilizing-events-and-notifications/working-with-scheduled-events) in our user documentation.
For more details on Event types and their fields, see the [Events](/api/events/introduction) section.
For detailed guidance on working with Events and Notifications, refer to the [Utilizing Events and Notifications](/guides/alerts-events-and-notifications/utilizing-events-and-notifications) section of the m3ter user documentation.
# List Notifications
Source: https://docs.m3ter.com/api/notifications/list-notifications
https://api.m3ter.com/spec get /organizations/{orgId}/notifications/configurations
Retrieve a list of Event Notifications for the specified Organization.
This endpoint retrieves a list of all Event Notifications for the Organization identified by its UUID. The list can be paginated for easier management. The list also supports filtering by parameters such as Notification UUID.
# Retrieve Notification
Source: https://docs.m3ter.com/api/notifications/retrieve-notification
https://api.m3ter.com/spec get /organizations/{orgId}/notifications/configurations/{id}
Retrieve the details of a specific Notification using its UUID. Includes the Event the Notification is based on, and any calculation referencing the Event's field and which defines further conditions that must be met to trigger the Notification when the Event occurs.
# Update Notification
Source: https://docs.m3ter.com/api/notifications/update-notification
https://api.m3ter.com/spec put /organizations/{orgId}/notifications/configurations/{id}
Update a Notification with the given UUID.
This endpoint modifies the configuration details of an existing Notification. You can change the Event that triggers the Notification and/or update the conditions for sending the Notification.
# Organization Config Endpoints
Source: https://docs.m3ter.com/api/organizationconfig/introduction
Endpoints for retrieving or updating the Organization Config.
Organization represents your company as a direct customer of m3ter. Use Organization configuration to define *Organization-wide* settings. For example:
* Timezone.
* Currencies and currency conversions.
* Billing operations settings, such as:
* Epoch dates to control first billing dates.
* Whether to bill customer accounts in advance/in arrears for standing charge amounts, minimum spend amounts, and commitment fees.
For other aspects of your Organization setup and configuration, see the following sections in this API Reference:
* [Custom Fields](/api/customfield/introduction)
* [Currencies](/api/currency/introduction)
* [Credit Reasons](/api/creditreason/introduction)
* [Debit Reason](/api/debitreason/introduction)
* [Transaction Types](/api/transactiontype/introduction)
See also:
* [Managing your Organization](https://docs.m3ter.com/guides/organization-and-access-management/viewing-and-editing-organization/viewing-and-editing-organization-configuration).
# Retrieve OrganizationConfig
Source: https://docs.m3ter.com/api/organizationconfig/retrieve-organizationconfig
https://api.m3ter.com/spec get /organizations/{orgId}/organizationconfig
Retrieve the Organization-wide configuration details.
# Update OrganizationConfig
Source: https://docs.m3ter.com/api/organizationconfig/update-organizationconfig
https://api.m3ter.com/spec put /organizations/{orgId}/organizationconfig
Update the Organization-wide configuration details.
# Organization User Endpoints
Source: https://docs.m3ter.com/api/orgusers/introduction
This section contains the endpoints for managing users within an Organization (OrgUser)
These endpoints allow you to retrieve, update, and analyze user data, as well as their associated permissions and user groups.
See the following topics in the m3ter documentation for further information:
* [Understanding, Creating, and Managing Permission Policies](/guides/organization-and-access-management/creating-and-managing-permissions)
* [Managing Access and Users](/guides/organization-and-access-management/managing-users)
# List OrgUsers
Source: https://docs.m3ter.com/api/orgusers/list-orgusers
https://api.m3ter.com/spec get /organizations/{orgId}/users
Retrieve a list of OrgUsers.
Retrieves a list of all users within a specified Organization. Use this endpoint to get an overview of all users and their basic details. The list can be paginated for easier management.
# Resend temporary password for user
Source: https://docs.m3ter.com/api/orgusers/resend-temporary-password-for-user
https://api.m3ter.com/spec put /organizations/{orgId}/users/{id}/password/resend
Resend temporary password for user
# Retrieve OrgUser
Source: https://docs.m3ter.com/api/orgusers/retrieve-orguser
https://api.m3ter.com/spec get /organizations/{orgId}/users/{id}
Retrieve the OrgUser with the given UUID.
Retrieves detailed information for a specific user within an Organization, using their unique identifier (UUID).
# Retrieve OrgUser Groups
Source: https://docs.m3ter.com/api/orgusers/retrieve-orguser-groups
https://api.m3ter.com/spec get /organizations/{orgId}/users/{id}/usergroups
Retrieve a list of User Groups for an OrgUser.
Retrieves a list of all User Groups that a specific user belongs to within an Organization. The list can be paginated for easier management.
**Notes:**
- **User Groups as Resource Groups**. A User Group is a Resource Group - one used to group resources of type `user`. You can use the *Create ResourceGroup* call detailed in the [ResourceGroup](https://www.m3ter.com/docs/api#tag/ResourceGroup) section to create a User Resource Group, and then use the *Add Item* and *Remove Item* calls to manage which Users belong to the User Resource Group.
- **Using the `inherited` parameter for the Retrieve OrgUser Groups call**. Resource Groups can be nested, which means a User Resource Group can contain another User Resource Group as a member. You can use the `inherited` parameter with this *Retrieve OrgUser Groups* call as a *QUERY PARAMETER* to control which User Resource Groups are returned:
* If the user specified belongs to a User Resource Group that is nested as part of another User Resource Group:
* If `inherited = TRUE`, then any Groups the user belongs to AND any parent Groups those Groups belong to as nested Groups are returned.
* If `inherited = FALSE`, then only those User Resource Groups to which the user belongs are returned.
# Retrieve OrgUser Permissions
Source: https://docs.m3ter.com/api/orgusers/retrieve-orguser-permissions
https://api.m3ter.com/spec get /organizations/{orgId}/users/{id}/permissions
Retrieve the permissions for the OrgUser with the given UUID.
Retrieves a list of all permissions associated with a specific user in an Organization using their UUID. The list can be paginated for easier management.
# Update OrgUser
Source: https://docs.m3ter.com/api/orgusers/update-orguser
https://api.m3ter.com/spec put /organizations/{orgId}/users/{id}
Update the OrgUser with the given UUID.
Updates the details for a specific user within an Organization using their unique identifier (UUID). Use this endpoint when you need to modify user information such as their permission policy.
# Pagination
Source: https://docs.m3ter.com/api/pagination
## List Endpoints
API endpoints that have a List resources request support cursor-based pagination - for example, the 'List Accounts' request. These List calls support pagination by taking the two parameters `pageSize` and `nextToken`.
The response of a List API call is a single page list. If the `nextToken` parameter is not supplied, the first page returned contains the newest objects chronologically. Specify a `nextToken` to retrieve the page of older objects that occur immediately after the last object on the previous page.
Use `pageSize` to limit the list results per page, typically this allows up to a maximum of 100 or 200 per page.
## Search Endpoints
API endpoints that have a Search resources request support cursor-based pagination - for example, the 'Search Accounts' request. These Search calls support pagination by taking the two parameters `pageSize` and `fromDocument`.
The response of a Search API call is a single page list. If the `fromDocument` parameter is not supplied, the first page returned contains the newest objects chronologically. Specify a `fromDocument` to retrieve the page of older objects that occur immediately after the last object on the previous page.
Use `pageSize` to limit the list results per page, typically this allows up to a maximum of 100 or 200 per page. Default is 10.
# Add a PermissionPolicy to a service user
Source: https://docs.m3ter.com/api/permissionpolicy/add-a-permissionpolicy-to-a-service-user
https://api.m3ter.com/spec post /organizations/{orgId}/permissionpolicies/{permissionPolicyId}/addtoserviceuser
Add a permission policy to a service user.
# Add a PermissionPolicy to a user
Source: https://docs.m3ter.com/api/permissionpolicy/add-a-permissionpolicy-to-a-user
https://api.m3ter.com/spec post /organizations/{orgId}/permissionpolicies/{permissionPolicyId}/addtouser
Add a permission policy to a user.
# Add a PermissionPolicy to a user group
Source: https://docs.m3ter.com/api/permissionpolicy/add-a-permissionpolicy-to-a-user-group
https://api.m3ter.com/spec post /organizations/{orgId}/permissionpolicies/{permissionPolicyId}/addtousergroup
Add a permission Policy to a user group
# Add a PermissionPolicy to support users for an organization
Source: https://docs.m3ter.com/api/permissionpolicy/add-a-permissionpolicy-to-support-users-for-an-organization
https://api.m3ter.com/spec post /organizations/{orgId}/permissionpolicies/{permissionPolicyId}/addtosupportusers
Add a permission policy to support users for an organization.
# Create Permission Policy
Source: https://docs.m3ter.com/api/permissionpolicy/create-permission-policy
https://api.m3ter.com/spec post /organizations/{orgId}/permissionpolicies
Create a new Permission Policy
**NOTE:** When you set up a policy statement for this call using the `permissionPolicy` request parameter to specify the `effect`, `action`, and `resource`, you must use all lower case and the format as shown in this example for a Permission Policy statement that grants full CRUD access to all meters:
```
"permissionPolicy" : [
{
"effect" : "allow",
"action" : [
"config:create",
"config:delete",
"config:retrieve",
"config:update"
]
"resource" : [
"config:meter/*"
]
}
]
```
For more details and further examples, see [Understanding, Creating, and Managing Permission Policies](https://www.m3ter.com/docs/guides/organization-and-access-management/creating-and-managing-permissions#permission-policy-statements---available-actions-and-resources) in our main Documentation.
# Delete Permission Policy
Source: https://docs.m3ter.com/api/permissionpolicy/delete-permission-policy
https://api.m3ter.com/spec delete /organizations/{orgId}/permissionpolicies/{id}
Delete the PermissionPolicy for the UUID
# Permission Policy Endpoints
Source: https://docs.m3ter.com/api/permissionpolicy/introduction
Endpoints for Permission Policy related operations such as creation, update, add and retrieve.
Permission Policies can restrict or grant access to specific resources for both Users *(people)* and Service Users *(automated processes with direct API access)*. This enables you to control precisely what a User can do in your m3ter Organization.
For more details, see [Understanding, Creating, and Managing Permission Policies](/guides/organization-and-access-management/creating-and-managing-permissions#permission-policy-statements-available-actions-and-resources) in our main Documentation.
# List PermissionPolicies
Source: https://docs.m3ter.com/api/permissionpolicy/list-permissionpolicies
https://api.m3ter.com/spec get /organizations/{orgId}/permissionpolicies
Retrieve a list of PermissionPolicy entities
# Remove a PermissionPolicy from a service user
Source: https://docs.m3ter.com/api/permissionpolicy/remove-a-permissionpolicy-from-a-service-user
https://api.m3ter.com/spec post /organizations/{orgId}/permissionpolicies/{permissionPolicyId}/removefromserviceuser
Remove a permission policy from a service user.
# Remove a PermissionPolicy from a user
Source: https://docs.m3ter.com/api/permissionpolicy/remove-a-permissionpolicy-from-a-user
https://api.m3ter.com/spec post /organizations/{orgId}/permissionpolicies/{permissionPolicyId}/removefromuser
Remove a permission policy from a user.
# Remove a PermissionPolicy from a user group
Source: https://docs.m3ter.com/api/permissionpolicy/remove-a-permissionpolicy-from-a-user-group
https://api.m3ter.com/spec post /organizations/{orgId}/permissionpolicies/{permissionPolicyId}/removefromusergroup
Remove a permission policy from a user group.
# Remove a PermissionPolicy from support users for an organization
Source: https://docs.m3ter.com/api/permissionpolicy/remove-a-permissionpolicy-from-support-users-for-an-organization
https://api.m3ter.com/spec post /organizations/{orgId}/permissionpolicies/{permissionPolicyId}/removefromsupportusers
Remove a permission policy from support users for an organization.
# Retrieve Permission Policy
Source: https://docs.m3ter.com/api/permissionpolicy/retrieve-permission-policy
https://api.m3ter.com/spec get /organizations/{orgId}/permissionpolicies/{id}
Retrieve the permission policy for the UUID
# Update Permission Policy
Source: https://docs.m3ter.com/api/permissionpolicy/update-permission-policy
https://api.m3ter.com/spec put /organizations/{orgId}/permissionpolicies/{id}
Update a Permission Policy for the UUID
**NOTE:** When you set up a policy statement for this call to specify the `effect`, `action`, and `resource`, you must use all lower case and the format as shown in this example - a Permission Policy statement that grants full CRUD access to all meters:
```
"permissionPolicy" : [
{
"effect" : "allow",
"action" : [
"config:create",
"config:delete",
"config:retrieve",
"config:update"
]
"resource" : [
"config:meter/*"
]
}
]
```
For more details and further examples, see [Understanding, Creating, and Managing Permission Policies](https://www.m3ter.com/docs/guides/organization-and-access-management/creating-and-managing-permissions#permission-policy-statements---available-actions-and-resources) in our main Documentation.
# Create Plan
Source: https://docs.m3ter.com/api/plan/create-plan
https://api.m3ter.com/spec post /organizations/{orgId}/plans
Create a new Plan.
# Delete Plan
Source: https://docs.m3ter.com/api/plan/delete-plan
https://api.m3ter.com/spec delete /organizations/{orgId}/plans/{id}
Delete the Plan with the given UUID.
# Plan Endpoints
Source: https://docs.m3ter.com/api/plan/introduction
Endpoints for listing, creating, updating, retrieving, or deleting Plans.
A Plan is based on a PlanTemplate and represents a specific pricing plan for one of your products or services. Each Plan inherits general billing attributes or pricing structure from its parent Plan Template. Some attributes can be overriden for the specific Plan.
When you've created the Plan Templates and Plans you need for your Products, you can configure the exact pricing structures for Plans to charge customers that consume one or more of your Products.
You can then attach the appropriately priced Plans to customer Accounts to create [Account Plans](/api/accountplan/introduction) and enable charges to be calculated correctly for billing against those Accounts.
See also:
* [Reviewing Options for Plans and Plan Templates](/guides/plans-and-pricing/working-with-plan-templates-and-plans/reviewing-configuration-options-for-plans-and-plan-templates).
# List Plans
Source: https://docs.m3ter.com/api/plan/list-plans
https://api.m3ter.com/spec get /organizations/{orgId}/plans
Retrieve a list of Plans that can be filtered by Product, Account, or Plan ID.
# Retrieve Plan
Source: https://docs.m3ter.com/api/plan/retrieve-plan
https://api.m3ter.com/spec get /organizations/{orgId}/plans/{id}
Retrieve the Plan with the given UUID.
# Update Plan
Source: https://docs.m3ter.com/api/plan/update-plan
https://api.m3ter.com/spec put /organizations/{orgId}/plans/{id}
Update the Plan with the given UUID.
**Note:** If you have created Custom Fields for a Plan, when you use this endpoint to update the Plan use the `customFields` parameter to preserve those Custom Fields. If you omit them from the update request, they will be lost.
# Create PlanGroup
Source: https://docs.m3ter.com/api/plangroup/create-plangroup
https://api.m3ter.com/spec post /organizations/{orgId}/plangroups
Create a new PlanGroup.
This endpoint creates a new PlanGroup within the specified organization.
# Delete PlanGroup
Source: https://docs.m3ter.com/api/plangroup/delete-plangroup
https://api.m3ter.com/spec delete /organizations/{orgId}/plangroups/{id}
Delete a PlanGroup with the given UUID.
This endpoint deletes the PlanGroup identified by the given UUID within a specific organization. This operation is irreversible and removes the PlanGroup along with any associated settings.
# Plan Group Endpoints
Source: https://docs.m3ter.com/api/plangroup/introduction
Endpoints for PlanGroup related operations such as creation, update, retrieve, list and delete.
PlanGroups are constructs that group multiple plans together. This enables a unified approach to efficiently handle various uses cases across different plans. For example applying a minimum spend amount at billing, across several of your products or features that are each priced separately.
# List PlanGroups
Source: https://docs.m3ter.com/api/plangroup/list-plangroups
https://api.m3ter.com/spec get /organizations/{orgId}/plangroups
Retrieve a list of PlanGroups.
Retrieves a list of PlanGroups within the specified organization. You can optionally filter by Account IDs or PlanGroup IDs, and also paginate the results for easier management.
# Retrieve PlanGroup
Source: https://docs.m3ter.com/api/plangroup/retrieve-plangroup
https://api.m3ter.com/spec get /organizations/{orgId}/plangroups/{id}
Retrieve a specific PlanGroup with the given UUID.
This endpoint retrieves detailed information about a specific PlanGroup identified by the given UUID within a specific organization.
# Update PlanGroup
Source: https://docs.m3ter.com/api/plangroup/update-plangroup
https://api.m3ter.com/spec put /organizations/{orgId}/plangroups/{id}
Update the PlanGroup with the given UUID.
This endpoint updates the details of a specific PlanGroup identified by the given UUID within a specific organization. This allows modifications to existing PlanGroup attributes.
**Note:** If you have created Custom Fields for a PlanGroup, when you use this endpoint to update the PlanGroup use the `customFields` parameter to preserve those Custom Fields. If you omit them from the update request, they will be lost.
# Create PlanGroupLink
Source: https://docs.m3ter.com/api/plangrouplink/create-plangrouplink
https://api.m3ter.com/spec post /organizations/{orgId}/plangrouplinks
Create a new PlanGroupLink.
# Delete PlanGroupLink
Source: https://docs.m3ter.com/api/plangrouplink/delete-plangrouplink
https://api.m3ter.com/spec delete /organizations/{orgId}/plangrouplinks/{id}
Delete a PlanGroupLink for the given UUID.
# Plan Group Link Endpoints
Source: https://docs.m3ter.com/api/plangrouplink/introduction
Endpoints for PlanGroupLink related operations such as creation, update, list and delete.
PlanGroupLinks are the intersection table between a PlanGroup and its associated Plans. A PlanGroupLink is only created when at least 1 Plan is linked to a PlanGroup.
# List PlanGroupLinks
Source: https://docs.m3ter.com/api/plangrouplink/list-plangrouplinks
https://api.m3ter.com/spec get /organizations/{orgId}/plangrouplinks
Retrieve a list of PlanGroupLink entities
# Retrieve PlanGroupLink
Source: https://docs.m3ter.com/api/plangrouplink/retrieve-plangrouplink
https://api.m3ter.com/spec get /organizations/{orgId}/plangrouplinks/{id}
Retrieve a PlanGroupLink for the given UUID.
# Update PlanGroupLink
Source: https://docs.m3ter.com/api/plangrouplink/update-plangrouplink
https://api.m3ter.com/spec put /organizations/{orgId}/plangrouplinks/{id}
Update PlanGroupLink for the given UUID.
# Create PlanTemplate
Source: https://docs.m3ter.com/api/plantemplate/create-plantemplate
https://api.m3ter.com/spec post /organizations/{orgId}/plantemplates
Create a new PlanTemplate.
This endpoint creates a new PlanTemplate within a specific Organization, identified by its unique UUID. The request body should contain the necessary information for the new PlanTemplate.
# Delete PlanTemplate
Source: https://docs.m3ter.com/api/plantemplate/delete-plantemplate
https://api.m3ter.com/spec delete /organizations/{orgId}/plantemplates/{id}
Delete a specific PlanTemplate.
This endpoint enables you to delete a specific PlanTemplate within a specific Organization, both identified by their unique identifiers (UUIDs).
# Plan Template Endpoints
Source: https://docs.m3ter.com/api/plantemplate/introduction
Endpoints for listing, creating, updating, retrieving, or deleting PlanTemplates.
Use PlanTemplates to define default values for Plans. These default values control the billing operations you want applied to your products. PlanTemplates avoid repetition in configuration work - many Plans will share settings for billing operations and differ only in the details of their pricing structures.
A PlanTemplate is linked to a Product, and each Plan is a child of a PlanTemplate.
# List PlanTemplates
Source: https://docs.m3ter.com/api/plantemplate/list-plantemplates
https://api.m3ter.com/spec get /organizations/{orgId}/plantemplates
Retrieve a list of PlanTemplates.
This endpoint enables you to retrieve a paginated list of PlanTemplates belonging to a specific Organization, identified by its UUID. You can filter the list by PlanTemplate IDs or Product IDs for more focused retrieval.
# Retrieve PlanTemplate
Source: https://docs.m3ter.com/api/plantemplate/retrieve-plantemplate
https://api.m3ter.com/spec get /organizations/{orgId}/plantemplates/{id}
Retrieve a specific PlanTemplate.
This endpoint allows you to retrieve a specific PlanTemplate within a specific Organization, both identified by their unique identifiers (UUIDs).
# Update PlanTemplate
Source: https://docs.m3ter.com/api/plantemplate/update-plantemplate
https://api.m3ter.com/spec put /organizations/{orgId}/plantemplates/{id}
Update a specific PlanTemplate.
This endpoint enables you to update a specific PlanTemplate within a specific Organization, both identified by their unique identifiers (UUIDs). The request body should contain the updated information for the PlanTemplate.
**Note:** If you have created Custom Fields for a Plan Template, when you use this endpoint to update the Plan Template use the `customFields` parameter to preserve those Custom Fields. If you omit them from the update request, they will be lost.
# Postman
Source: https://docs.m3ter.com/api/postman
If you are using Postman, you can:
* Download the [m3ter Open API spec JSON file](https://api.m3ter.com/spec) and then import this file as the **m3ter API Collection** into your Workspace. See [Importing the m3ter Open API](https://www.m3ter.com/docs/guides/m3ter-apis/getting-started-with-api-calls#importing-the-m3ter-open-api) in our main user Documentation for details.
* Copy this link: [m3ter-Template API Collection](/downloads/m3ter-postman-collection.json) and use it to import the **m3ter-Template API Collection** into your Workspace. See [Importing the m3ter Template API Collection](https://www.m3ter.com/docs/guides/m3ter-apis/getting-started-with-api-calls#importing-the-m3ter-template-api-collection) in our main user Documentation for details.
# Create Pricing
Source: https://docs.m3ter.com/api/pricing/create-pricing
https://api.m3ter.com/spec post /organizations/{orgId}/pricings
Create a new Pricing.
**Notes:**
* **Pricing Plan or Plan Template?** Exactly one of `planId` or `planTemplateId` request parameters are required for this call to be valid. If you omit both, then you will receive a validation error.
* **Using Aggregation or Compound Aggregation for Pricing?** Exactly one of `aggregationId` or `compoundAggregationId` request parameters are required for this call to be valid. If you omit both, then you will receive a validation error.
* **Using Negative Values for Pricing?** If you use the `type` request parameter with the `DEBIT` option, *you cannot use negative values* for `fixedPrice` or `unitPrice` in `pricingBands` or `overagePricingBands`, and you'll receive a validation error. If you omit a `type` request parameter a `DEBIT` pricing is created by default and the same constraint on the use of negative values applies.
# Delete Pricing
Source: https://docs.m3ter.com/api/pricing/delete-pricing
https://api.m3ter.com/spec delete /organizations/{orgId}/pricings/{id}
Delete the Pricing with the given UUID.
# Pricing Endpoints
Source: https://docs.m3ter.com/api/pricing/introduction
Endpoints for listing, creating, updating, retrieving, or deleting Pricing.
Create the Pricing for a Plan/PlanTemplate with usage data Aggregations, and define a usage-based pricing structure for charging end customer Accounts put on the Plan.
See [Reviewing Pricing Options for Plans and Plan Templates](/guides/plans-and-pricing/pricing-plans/reviewing-pricing-options-and-pricing-plans) for more information.
# List Pricings
Source: https://docs.m3ter.com/api/pricing/list-pricings
https://api.m3ter.com/spec get /organizations/{orgId}/pricings
Retrieve a list of Pricings filtered by date/time, Plan ID, PlanTemplate ID, or Pricing ID.
# Retrieve Pricing
Source: https://docs.m3ter.com/api/pricing/retrieve-pricing
https://api.m3ter.com/spec get /organizations/{orgId}/pricings/{id}
Retrieve the Pricing with the given UUID.
# Update Pricing
Source: https://docs.m3ter.com/api/pricing/update-pricing
https://api.m3ter.com/spec put /organizations/{orgId}/pricings/{id}
Update Pricing for the given UUID.
**Notes:**
* **Pricing Plan or Plan Template?** Exactly one of `planId` or `planTemplateId` request parameters are required for this call to be valid. If you omit both, then you will receive a validation error.
* **Using Aggregation or Compound Aggregation for Pricing?** Exactly one of `aggregationId` or `compoundAggregationId` request parameters are required for this call to be valid. If you omit both, then you will receive a validation error.
* **Using Negative Values for Pricing?** If you use the `type` request parameter with the `DEBIT` option, *you cannot use negative values* for `fixedPrice` or `unitPrice` in `pricingBands` or `overagePricingBands`, and you'll receive a validation error. If you omit a `type` request parameter a `DEBIT` pricing is created by default and the same constraint on the use of negative values applies.
# Create Product
Source: https://docs.m3ter.com/api/product/create-product
https://api.m3ter.com/spec post /organizations/{orgId}/products
Create a new Product.
This endpoint creates a new Product within the specified Organization. The details of the Product are provided in the request body.
# Delete Product
Source: https://docs.m3ter.com/api/product/delete-product
https://api.m3ter.com/spec delete /organizations/{orgId}/products/{id}
Delete a Product with the given UUID.
This endpoint deletes a specific Product within a specified Organization, using the Product UUID.
# Product Endpoints
Source: https://docs.m3ter.com/api/product/introduction
Endpoints for listing, creating, updating, retrieving, or deleting Products.
A Product represents the products and services you offer to your end customers. Products act as a container for the Meters, Aggregations, Pricing, and Plans required to implement usage-based and other pricing models for your Organization.
# List Products
Source: https://docs.m3ter.com/api/product/list-products
https://api.m3ter.com/spec get /organizations/{orgId}/products
Retrieve a list of Products.
This endpoint retrieves a list of all the Products within a specified Organization. The list can be paginated, and supports filtering by specific Product IDs.
# Retrieve Product
Source: https://docs.m3ter.com/api/product/retrieve-product
https://api.m3ter.com/spec get /organizations/{orgId}/products/{id}
Retrieve a Product with the given UUID.
This endpoint retrieves the details of a specific Product within a specified Organization, using the Product UUID.
# Update Product
Source: https://docs.m3ter.com/api/product/update-product
https://api.m3ter.com/spec put /organizations/{orgId}/products/{id}
Update a Product with the given UUID.
This endpoint updates the details of a specific Product within a specified Organization, using the Product UUID. The updated details are provided in the request body.
**Note:** If you have created Custom Fields for a Product, when you use this endpoint to update the Product use the `customFields` parameter to preserve those Custom Fields. If you omit them from the update request, they will be lost.
# Rate and Payload Limits
Source: https://docs.m3ter.com/api/rate-and-payload-limits
## Config API Request Rate Limits
See [Config API Limits](/guides/m3ter-apis/config-api-limits).
## Data Explorer API Request Rate Limits
See [Data Explorer Request Rate Limits](/guides/m3ter-apis/config-api-limits#date-explorer-request-rate-limits).
## Ingest API Request Rate and Payload Limits
See [Ingest API Limits](https://www.m3ter.com/docs/guides/m3ter-apis/ingest-api-limits) for more information.
# Add item
Source: https://docs.m3ter.com/api/resourcegroup/add-item
https://api.m3ter.com/spec post /organizations/{orgId}/resourcegroups/{type}/{resourceGroupId}/addresource
Add an item to a ResourceGroup.
# Create ResourceGroup
Source: https://docs.m3ter.com/api/resourcegroup/create-resourcegroup
https://api.m3ter.com/spec post /organizations/{orgId}/resourcegroups/{type}
Create a ResourceGroup for the UUID
# Delete ResourceGroup
Source: https://docs.m3ter.com/api/resourcegroup/delete-resourcegroup
https://api.m3ter.com/spec delete /organizations/{orgId}/resourcegroups/{type}/{id}
Delete a ResourceGroup for the UUID
# Resource Group Endpoints
Source: https://docs.m3ter.com/api/resourcegroup/introduction
Endpoints for ResourceGroup related operations such as creation, update, list and delete.
ResourceGroups are used in the context of Permission Policies, which controls what a User who has been given access to your Organization can and cannot do. For example, you might want to create a Permissions Policy that denies Users the ability to retrieve Meters.
Resources are defined as m3ter Resource Identifiers *(MRIs)* in the format:
```text theme={null}
service:resource-type/item-type/id
```
Where:
* `service` is a distinct part of the overall m3ter system, and which forms a natural functional grouping, such as "config" or "billing".
* `resource-type` is the resource type item accessed - for example: "Plan", "Meter", "Bill"
* `item-type` is one of:
* `item` - to specify an individual item.
* `group` - to specify a resource group.
* `id` is the resource group id or the resource item id
Resources can be assigned to one or more ResourceGroups. For example, a Plan can be assigned to Plan ResourceGroups, a Meter can be assigned to Meter ResourceGroups, and so on. This is useful for cases where you want to create Permission Policies which allow or deny access to a specific subset of resources. For example, grant a user access to only some of the Plans in your Organization.
This concept of grouping resources applies to every resource in m3ter, including ResourceGroups themselves. This allows you to nest ResourceGroups to support hierarchies of groups.
See [Understanding, Creating, and Managing Permission Policies](/guides/organization-and-access-management/creating-and-managing-permissions) in the m3ter documentation for more information.
**User Resource Groups** You can create a User Resource Group to group resources of type = `user`. You can then retrieve a list of the User Resource Groups a user belongs to. For more details, see the [Retrieve OrgUser Groups](/api/orgusers/retrieve-orguser-groups) call in the OrgUsers section.
# List ResourceGroup items
Source: https://docs.m3ter.com/api/resourcegroup/list-resourcegroup-items
https://api.m3ter.com/spec post /organizations/{orgId}/resourcegroups/{type}/{resourceGroupId}/contents
Retrieve a list of items for a ResourceGroup
# List ResourceGroup permission policies
Source: https://docs.m3ter.com/api/resourcegroup/list-resourcegroup-permission-policies
https://api.m3ter.com/spec get /organizations/{orgId}/resourcegroups/{type}/{resourceGroupId}/permissions
Retrieve a list of permission policies for a ResourceGroup
# List ResourceGroups
Source: https://docs.m3ter.com/api/resourcegroup/list-resourcegroups
https://api.m3ter.com/spec get /organizations/{orgId}/resourcegroups/{type}
Retrieve a list of ResourceGroup entities
# Remove item
Source: https://docs.m3ter.com/api/resourcegroup/remove-item
https://api.m3ter.com/spec post /organizations/{orgId}/resourcegroups/{type}/{resourceGroupId}/removeresource
Remove an item from a ResourceGroup.
# Retrieve ResourceGroup
Source: https://docs.m3ter.com/api/resourcegroup/retrieve-resourcegroup
https://api.m3ter.com/spec get /organizations/{orgId}/resourcegroups/{type}/{id}
Retrieve the ResourceGroup for the UUID
# Update ResourceGroup
Source: https://docs.m3ter.com/api/resourcegroup/update-resourcegroup
https://api.m3ter.com/spec put /organizations/{orgId}/resourcegroups/{type}/{id}
Update the ResourceGroup for the UUID
# Create ScheduledEventConfiguration
Source: https://docs.m3ter.com/api/scheduledeventconfigurations/create-scheduledeventconfiguration
https://api.m3ter.com/spec post /organizations/{orgId}/scheduledevents/configurations
Create a new ScheduledEventConfiguration.
# Delete ScheduledEventConfiguration
Source: https://docs.m3ter.com/api/scheduledeventconfigurations/delete-scheduledeventconfiguration
https://api.m3ter.com/spec delete /organizations/{orgId}/scheduledevents/configurations/{id}
Delete the ScheduledEventConfiguration for the given UUID.
# Scheduled Event Configuration Endpoints
Source: https://docs.m3ter.com/api/scheduledeventconfigurations/introduction
Endpoints for retrieving and managing scheduled Events' configurations.
Scheduled Event Configurations define custom Event types that reference Date/Time fields belonging to configuration and billing entities. They therefore provide you with an extra degree of flexibility over and above system-generated Events for setting up Notifications based on Events.
For more details, see the [Working with Scheduled Events](/guides/alerts-events-and-notifications/utilizing-events-and-notifications/working-with-scheduled-events) in our Documenation.
# List ScheduledEventConfigurations
Source: https://docs.m3ter.com/api/scheduledeventconfigurations/list-scheduledeventconfigurations
https://api.m3ter.com/spec get /organizations/{orgId}/scheduledevents/configurations
Retrieve a list of ScheduledEventConfiguration entities
# Retrieve ScheduledEventConfiguration
Source: https://docs.m3ter.com/api/scheduledeventconfigurations/retrieve-scheduledeventconfiguration
https://api.m3ter.com/spec get /organizations/{orgId}/scheduledevents/configurations/{id}
Retrieve a ScheduledEventConfiguration for the given UUID.
# Update ScheduledEventConfiguration
Source: https://docs.m3ter.com/api/scheduledeventconfigurations/update-scheduledeventconfiguration
https://api.m3ter.com/spec put /organizations/{orgId}/scheduledevents/configurations/{id}
Update a ScheduledEventConfiguration for the given UUID.
# Create ServiceUser
Source: https://docs.m3ter.com/api/serviceuser/create-serviceuser
https://api.m3ter.com/spec post /organizations/{orgId}/serviceusers
Create a new service user.
# Delete ServiceUser
Source: https://docs.m3ter.com/api/serviceuser/delete-serviceuser
https://api.m3ter.com/spec delete /organizations/{orgId}/serviceusers/{id}
Delete the service user for the UUID.
# Service User Endpoints
Source: https://docs.m3ter.com/api/serviceuser/introduction
Endpoints for creating/updating/deleting service users and credentials.
# List ServiceUsers
Source: https://docs.m3ter.com/api/serviceuser/list-serviceusers
https://api.m3ter.com/spec get /organizations/{orgId}/serviceusers
Retrieve a list of service users.
# Retrieve ServiceUser
Source: https://docs.m3ter.com/api/serviceuser/retrieve-serviceuser
https://api.m3ter.com/spec get /organizations/{orgId}/serviceusers/{id}
Retrieve the service user for the UUID.
# Retrieve ServiceUser Permissions
Source: https://docs.m3ter.com/api/serviceuser/retrieve-serviceuser-permissions
https://api.m3ter.com/spec get /organizations/{orgId}/serviceusers/{id}/permissions
Retrieve permission policies attached to a service user.
# Update ServiceUser
Source: https://docs.m3ter.com/api/serviceuser/update-serviceuser
https://api.m3ter.com/spec put /organizations/{orgId}/serviceusers/{id}
Update the service user for the UUID.
# Activate ServiceUser Credentials
Source: https://docs.m3ter.com/api/serviceusercredentials/activate-serviceuser-credentials
https://api.m3ter.com/spec put /organizations/{orgId}/serviceusers/{id}/credentials/{apiKey}/activate
Activate a credentials key pair for a service user.
# Create ServiceUser Credentials
Source: https://docs.m3ter.com/api/serviceusercredentials/create-serviceuser-credentials
https://api.m3ter.com/spec post /organizations/{orgId}/serviceusers/{id}/credentials
Create a new credentials key pair for a service user.
# Deactivate ServiceUser Credentials
Source: https://docs.m3ter.com/api/serviceusercredentials/deactivate-serviceuser-credentials
https://api.m3ter.com/spec put /organizations/{orgId}/serviceusers/{id}/credentials/{apiKey}/inactivate
Deactivate a credentials key pair for a service user.
# Delete ServiceUser Credentials
Source: https://docs.m3ter.com/api/serviceusercredentials/delete-serviceuser-credentials
https://api.m3ter.com/spec delete /organizations/{orgId}/serviceusers/{id}/credentials/{apiKey}
Delete a deactivated credentials key pair for a service user.
# List ServiceUser Credentials
Source: https://docs.m3ter.com/api/serviceusercredentials/list-serviceuser-credentials
https://api.m3ter.com/spec get /organizations/{orgId}/serviceusers/{id}/credentials
Retrieve the credentials key pairs for a service user.
# Retrieve ServiceUser Credentials
Source: https://docs.m3ter.com/api/serviceusercredentials/retrieve-serviceuser-credentials
https://api.m3ter.com/spec get /organizations/{orgId}/serviceusers/{id}/credentials/{apiKey}
Retrieve a credentials key pair for a service user.
# Create StatementDefinition
Source: https://docs.m3ter.com/api/statementdefinition/create-statementdefinition
https://api.m3ter.com/spec post /organizations/{orgId}/statementdefinitions
Create a new StatementDefinition.
This endpoint creates a new StatementDefinition within the specified Organization. The details of the StatementDefinition are provided in the request body.
# Delete StatementDefinition
Source: https://docs.m3ter.com/api/statementdefinition/delete-statementdefinition
https://api.m3ter.com/spec delete /organizations/{orgId}/statementdefinitions/{id}
Delete a StatementDefinition with the given UUID.
This endpoint deletes a specific StatementDefinition within a specified Organization, using the StatementDefinition UUID.
# Statement Definition Endpoints
Source: https://docs.m3ter.com/api/statementdefinition/introduction
Endpoints for listing, creating, updating, retrieving, or deleting Statement Definitions.
Bill statements are informative backing sheets to invoices. They provide a breakdown of the usage charges that appear on the bill, helping your end customers better understand those charges, and gain a clearer picture of their usage over the billing period.
Statement Definitions specify the way billed usage will be aggregated and compiled in the Statement. For example, if you are billing customers monthly, you might want to breakdown the usage responsible for the monthly charge on a Bill into weekly portions in Bill statements.
# List StatementDefinitions
Source: https://docs.m3ter.com/api/statementdefinition/list-statementdefinitions
https://api.m3ter.com/spec get /organizations/{orgId}/statementdefinitions
Retrieve a list of StatementDefinitions.
This endpoint retrieves a list of all the StatementDefinitions within a specified Organization. The list can be paginated for easier management.
# Retrieve StatementDefinition
Source: https://docs.m3ter.com/api/statementdefinition/retrieve-statementdefinition
https://api.m3ter.com/spec get /organizations/{orgId}/statementdefinitions/{id}
Retrieve a StatementDefinition with the given UUID.
Retrieves the details of a specific StatementDefinition for the specified Organization, using its unique identifier (UUID). This endpoint is useful when you want to retrieve the complete details of a single StatementDefinition.
# Update StatementDefinition
Source: https://docs.m3ter.com/api/statementdefinition/update-statementdefinition
https://api.m3ter.com/spec put /organizations/{orgId}/statementdefinitions/{id}
Update StatementDefinition for the given UUID.
Update the details of a specific StatementDefinition for the specified Organization, using its unique identifier (UUID). The updated details for the StatementDefinition should be sent in the request body.
# Cancel StatementJob
Source: https://docs.m3ter.com/api/statementjob/cancel-statementjob
https://api.m3ter.com/spec post /organizations/{orgId}/statementjobs/{id}/cancel
Cancel the StatementJob with the given UUID.
Use this endpoint to halt the execution of a specific StatementJob identified by its UUID. This operation may be useful if you need to stop a StatementJob due to unforeseen issues or changes.
# Create Batch StatementJobs
Source: https://docs.m3ter.com/api/statementjob/create-batch-statementjobs
https://api.m3ter.com/spec post /organizations/{orgId}/statementjobs/batch
Create a batch of StatementJobs for multiple bills.
Initiate the creation of multiple StatementJobs asynchronously for the list of bills with the given UUIDs:
* The default format for generating Bill Statements is in JSON format and according to the Bill Statement Definition you've specified at either Organization level or Account level.
* If you also want to generate the Statements in CSV format, use the `includeCsvFormat` request body parameter.
* The response body provides a time-bound pre-signed URL, which you can use to download the JSON format Statement.
* When you have generated a Statement for a Bill, you can also obtain a time-bound pre-signed download URL using either the [Retrieve Bill Statement in JSON Format](https://www.m3ter.com/docs/api#tag/Bill/operation/GetBillJsonStatement) and [Retrieve Bill Statement in CSV Format](https://www.m3ter.com/docs/api#tag/Bill/operation/GetBillCsvStatement) calls found in the [Bill](https://www.m3ter.com/docs/api#tag/Bill) section of this API Reference.
**Notes:**
* If the response to the Create StatementJob call shows the `statementJobStatus` as `PENDING` or `RUNNING`, you will not receive the pre-signed URL in the response. Wait a few minutes to allow the StatementJob to complete and then use the [Get StatmentJob](https://www.m3ter.com/docs/api#tag/StatementJob/operation/GetStatementJob) call in this section to obtain the pre-signed download URL for the generated Bill Statement.
* When you have submitted a StatementJob and a Bill Statement has been generated, you can also download the Statement directly from a Bill Details page in the Console. See [Working with Bill Statements](https://www.m3ter.com/docs/guides/billing-and-usage-data/running-viewing-and-managing-bills/working-with-bill-statements) in our user Documentation.
# Create StatementJob
Source: https://docs.m3ter.com/api/statementjob/create-statementjob
https://api.m3ter.com/spec post /organizations/{orgId}/statementjobs
This endpoint creates a StatementJob for a single bill within an Organization using the Bill UUID.
The Bill Statement is generated asynchronously:
* The default format for generating the Statement is in JSON format and according to the Bill Statement Definition you've specified at either Organization level or Account level.
* If you also want to generate the Statement in CSV format, use the `includeCsvFormat` request body parameter.
* The response body provides a time-bound pre-signed URL, which you can use to download the JSON format Statement.
* When you have generated a Statement for a Bill, you can also obtain a time-bound pre-signed download URL using either the [Retrieve Bill Statement in JSON Format](https://docs.m3ter.com/api/bill/retrieve-bill-statement-in-json-format) and [Retrieve Bill Statement in CSV Format](https://docs.m3ter.com/api/bill/retrieve-bill-statement-in-csv-format) calls found in the [Bill](https://docs.m3ter.com/api/bill/introduction) section of this API Reference.
**Notes:**
* If the response to the Create StatementJob call shows the `statementJobStatus` as `PENDING` or `RUNNING`, you will not receive the pre-signed URL in the response. Wait a few minutes to allow the StatementJob to complete and then use the [Get StatmentJob](https://www.m3ter.com/docs/api#tag/StatementJob/operation/GetStatementJob) call in this section to obtain the pre-signed download URL for the generated Bill Statement.
* When you have submitted a StatementJob and a Bill Statement has been generated, you can also download the Statement directly from a Bill Details page in the Console. See [Working with Bill Statements](https://www.m3ter.com/docs/guides/billing-and-usage-data/running-viewing-and-managing-bills/working-with-bill-statements) in our user Documentation.
# Get StatementJob
Source: https://docs.m3ter.com/api/statementjob/get-statementjob
https://api.m3ter.com/spec get /organizations/{orgId}/statementjobs/{id}
Retrieves the details of a specific StatementJob using its UUID.
Use this call to obtain the time-bound pre-signed download URL for the generated Bill Statement if the initial [Create StatementJob](https://www.m3ter.com/docs/api#tag/StatementJob/operation/CreateStatementJob) returned a response showing the `statementJobStatus` not yet complete and as `PENDING` or `RUNNING`.
**Note:** When you have submitted a StatementJob and a Bill Statement has been generated, you can also download the Statement directly from a Bill Details page in the Console. See [Working with Bill Statements](https://www.m3ter.com/docs/guides/billing-and-usage-data/running-viewing-and-managing-bills/working-with-bill-statements) in our user Documentation.
# Statement Job Endpoints
Source: https://docs.m3ter.com/api/statementjob/introduction
Endpoints for creating, retrieving, listing, and cancelling statement jobs.
StatementJobs are tasks to asynchronously calculate and generate a bill statement.
Bill statements are informative backing sheets to invoices. They provide a breakdown of the usage charges that appear on the bill, helping your end customers better understand those charges, and gain a clearer picture of their usage over the billing period.
# List Statement Jobs
Source: https://docs.m3ter.com/api/statementjob/list-statement-jobs
https://api.m3ter.com/spec get /organizations/{orgId}/statementjobs
Retrieve a list of StatementJobs.
Retrieves a list of all StatementJobs for a specific Organization. You can filter the results based on:
* StatementJob status.
* Whether StatementJob is neither completed nor cancelled but remains active.
* The ID of the Bill the StatementJob is associated with.
You can also paginate the results for easier management.
**WARNING!**
* You can use only one of the valid Query parameters: `active`, `status`, or `billId` in any call. If you use more than one of these Query parameters in the same call, then a 400 Bad Request is returned with an error message.
# Submitting Personally Identifiable Information (PII)
Source: https://docs.m3ter.com/api/submitting-pii
**IMPORTANT!** Under the [Data Processing Agreement](https://www.m3ter.com/docs/legal/dpa), the only fields permissible for use in submitting any of your end-customer PII data in m3ter are the `name`, `address`, and `emailAddress` fields on the **Account** entity - see the details for [Create Account](/api/account/create-account). See also section 4.2 of the [Terms of Service](https://www.m3ter.com/docs/legal/terms-of-service).
# Support Endpoints
Source: https://docs.m3ter.com/api/support/introduction
Endpoints for requesting support and managing m3ter Support users.
For troubleshooting purposes, you can grant m3ter Support access to your Organization. m3ter Support only has access for a limited time that you specify.
# Request Support
Source: https://docs.m3ter.com/api/support/request-support
https://api.m3ter.com/spec put /organizations/{orgId}/support
Use this call to make a request and grant m3ter Support access to your Organization for a specified timeframe and with specific permissions assigned to Support users. You might want to grant Support access when you've submitted a request for help in resolving an issue you've encountered in your Organization
# Retrieve Support Details
Source: https://docs.m3ter.com/api/support/retrieve-support-details
https://api.m3ter.com/spec get /organizations/{orgId}/support
Get support user details on the specific permissions applied and the date and time support access ends.
# Retrieve Support Permissions
Source: https://docs.m3ter.com/api/support/retrieve-support-permissions
https://api.m3ter.com/spec get /organizations/{orgId}/support-permissions
Get permission policies assigned to support users when they access your Organization.
# Create TransactionType
Source: https://docs.m3ter.com/api/transactiontype/create-transactiontype
https://api.m3ter.com/spec post /organizations/{orgId}/picklists/transactiontypes
Create a new TransactionType for the specified Organization. Details of the new TransactionType should be included in the request body.
# Delete TransactionType
Source: https://docs.m3ter.com/api/transactiontype/delete-transactiontype
https://api.m3ter.com/spec delete /organizations/{orgId}/picklists/transactiontypes/{id}
Deletes the TransactionType with the given UUID from the specified Organization.
# Transaction Type Endpoints
Source: https://docs.m3ter.com/api/transactiontype/introduction
Endpoints for TransactionType operations such as creation, update, list, retrieve, and delete.
You can create TransactionTypes for your Organization, which can then be used when creating and updating Balances. Example TransactionTypes: "Balance Amount" or "Add Funds".
For details on creating a Transaction amount for a Balance using a TransactionType you've created for your Organization, see the [Create Balance Transaction](/api/balances/create-balance-transaction) call in the [Balances](/api/balances/introduction) section of this API Reference.
# List TransactionTypes
Source: https://docs.m3ter.com/api/transactiontype/list-transactiontypes
https://api.m3ter.com/spec get /organizations/{orgId}/picklists/transactiontypes
Retrieves a list of TransactionType entities for the specified Organization. The list can be paginated for easier management, and supports filtering by various parameters.
# Retrieve TransactionType
Source: https://docs.m3ter.com/api/transactiontype/retrieve-transactiontype
https://api.m3ter.com/spec get /organizations/{orgId}/picklists/transactiontypes/{id}
Retrieves the TransactionType with the given UUID from the specified Organization.
# Update TransactionType
Source: https://docs.m3ter.com/api/transactiontype/update-transactiontype
https://api.m3ter.com/spec put /organizations/{orgId}/picklists/transactiontypes/{id}
Updates the TransactionType with the specified UUID for the specified Organization. Update details for the TransactionType should be included in the request body.
# User Endpoints
Source: https://docs.m3ter.com/api/user/introduction
Endpoints for creating/updating Users
# Retrieve current user information
Source: https://docs.m3ter.com/api/user/retrieve-current-user-information
https://api.m3ter.com/spec get /organizations/{orgId}/users/me
Retrieve information about the current user
# Changelog
Source: https://docs.m3ter.com/changelog
Stay updated with m3ter's changelog. Track new features, improvements & bug fixes in each version release for better user experience.
This Changelog lists the new features, functionality, and updates added in each month for 2026 and 2025.
**More on New Features?** Please see the [**Product News**](https://www.m3ter.com/blog/category/product-updates) blog for more detailed information on the value you can get from the new features in each release.
### New Features
* **m3sh Workflows Usage Ingest**
* A m3sh Workflow managed template is now available which allows you to create a Workflow that exploits the AWS Simple Notification Service (SNS) and is triggered when a file is uploaded to the designated Amazon S3 bucket.
* Further managed Workflow templates for common automation use cases will continue to be rolled out over time.
* See [Utilizing Workflow Managed Templates](https://docs.m3ter.com/guides/m3sh-workflows/utilizing-workflow-managed-templates) for more information.
### Console Improvements
* **Statement Definitions**
* When creating Statement definitions, the Meter selection drop-down list is now searchable.
* **m3sh promoted to Console navigation top-level**
* As announced in the July 2026 Changelog, the Console's main navigation has been redesigned with m3sh now at top-level, bringing together all related automation features offered in the platform, such as m3sh Workflows, Integrations, and Notifications.
* **Account Balances**
* The Account Balances page has been improved for usability to accommodate Accounts with many Balances. The Timeline and List panels now adjust for scrolling when five or more Balances are added to an Account.
### Changes and Bug Fixes
* **Geo-blocking added to** [api.m3ter.com](http://api.m3ter.com)
* As announced in the July 2026 Changelog, work to strengthen the security of the m3ter platform has continued and we have now applied a geo-blocking policy to the WAF ruleset protecting the [api.m3ter.com](http://api.m3ter.com) endpoint. Traffic originating from high-risk regions (currently defined as Cuba, Iran, North Korea, Syria, and Ukraine) is blocked.
We are actively monitoring the change and do not expect any impact on legitimate traffic.
* **Retirement of SDKs and Terraform Provider**
* As announced in the July Changelog, the SDKs and Terraform provider were retired on Monday August 17th. These will no longer be updated and the GitHub repositories have been made private. Current version packages will remain on package repositories such as PyPi and Maven Central for the time being, but won't receive further updates and will be removed later.
* The principles that lead us to develop these tools remain important to us, and we'll share more on future plans in due course. In the meantime, all capabilities in the m3ter service remain accessible via our REST API.
* If you have any questions, please reach out to your m3ter contact.
* **Data Explorer v2 fixes**
* As announced in the July Changelog, two fixes were deployed in August:
* Query responses are now filtered on meter id to prevent issues where meters having the same data field codes could result in the response returning data for all meters.
* The LATEST aggregation method for queries now aligns with billing LATEST aggregation method: measurements are ordered by `ts` first, `receivedAt` second.
### New Releases
* The m3ter Connector for Salesforce managed package is now generally available. See [m3ter Connector for Salesforce](/guides/m3ter-connector-for-salesforce).
### Console Improvements
* **Authentication**
* When you open the Console log in page, the log in method you last used (email/password or SSO) is now remembered and the page presents accordingly.
* **Mixed currency billing**
* For Bills where the pricing currency is different to the billing currency, the Subtotal column on Bills now shows the pricing currency amount as well as the billed amount. This is particularly useful when reviewing Bills where custom currencies such as credits are used as the pricing currency.
### Changes and Bug Fixes
* **Geo-blocking added to [ingest.m3ter.com](http://ingest.m3ter.com)**
* As part of our ongoing work to strengthen the security of the m3ter platform, we have applied a geo-blocking policy to the WAF ruleset protecting the [ingest.m3ter.com](http://ingest.m3ter.com) endpoint. Traffic originating from high-risk regions (currently defined as Cuba, Iran, North Korea, Syria, and Ukraine) is blocked.
We are actively monitoring the change and do not expect any impact on legitimate traffic. The same policy will be rolled out to the [api.m3ter.com](http://api.m3ter.com) endpoint in late August.
* An issue preventing creation of a Plan Template pricing in the Pricing Editor has been resolved.
* Endpoints for creating and managing Service Users and Service User Credentials which had previously remained hidden are now published in the API Reference.
* For Balances with a Rollover amount defined, the Balance transactions summary card now correctly tracks the Rollover remaining amount as it is consumed.
### Upcoming Changes
* **Retirement of SDKs and Terraform Provider**
* Last year we launched SDKs for four popular languages, along with a Terraform provider. Due to low uptake, and complexities introduced by the acquisition of the vendor whose product was used to generate them, maintaining the SDKs is not practical, and we are retiring them.
* From Monday August 17th the SDKs and Terraform provider will no longer be updated, and the GitHub repositories will be made private. Current version packages will remain on package repositories such as PyPi and Maven Central for the time being, but won't receive further updates and will be removed later.
* The principles that lead us to develop these tools remain important to us, and we'll share more on future plans in due course. In the meantime, all capabilities in the m3ter service remain accessible via our REST API.
* If you have any questions, please reach out to your m3ter contact.
* **Data Explorer v2**
* An issue with Data Explorer v2 query responses has been resolved where meters having the same data field codes could result in the response returning data for all meters. To avoid this, the fix ensures query responses are now filtered on meter id.
* Additionally, the LATEST aggregation method was incorrectly implemented for queries and ordered the ingest data measurements based on when we received them. The LATEST aggregation method for queries now aligns with billing LATEST aggregation method: measurements are ordered by `ts` first, `receivedAt` second.
* Both fixes will be release during the first week of August.
* **Coming soon - m3sh promoted to Console navigation top-level**
* Following last month's announcement that m3sh Workflows are soon to be made available in write access preview release version, the Console main navigation is being redesigned making m3sh a top-level section containing Workflows together with other related automation features such as Notifications.
### New Features
* **Understanding zero-total Bills at a glance**
* In Bill management, you can now add *total debits* and *total credits* columns.
* This lets you quickly see whether a zero total Bill means there was no product consumption, or whether debits and credits simply cancelled each other out, so you can move on with confidence instead of investigating each Bill manually.
* **New Improved Balance Drawdown algorithm**
* A new and enhanced Unified Drawdowns model is now available in preview release.
* Designed to maximize credit use and when enabled, the billing engine considers *all* eligible Balances on an Account together as a group rather than one at a time.
* A max-flow algorithm with iterative optimizations is then applied to achieve the best coverage for drawdown against the Account’s available grouped Balance credit.
* See [Unified Balance Drawdown](https://docs.m3ter.com/guides/end-customer-accounts/creating-balances-for-accounts/understanding-billing-for-balances#new-unified-balance-drawdown) for more details.
* **Inline Usage Insights on Account Overview**
* On Account Overview, users can now open a Usage chart which tracks usage against the Account for a selected Aggregation giving a quick inline summary of usage.
* Quickly read off specific usage data point values.
* Links directly to the full Usage Data Explorer interface for further exploration to review details of the usage data ingested for the selected time period.
### Console Improvements
* **Meter Activity Chart**
* On Meter details pages, the Activity panel now includes a *Measurement counts* chart showing a running count of submissions made for the Meter over the previous 24 hours.
* Users can hover their cursor over the chart’s hourly data points to read off actual measurement counts.
* **Duplicating Plans/Plan Templates**
* From details pages, Plans and Plan Templates can now be quickly duplicated.
* **Grants**
* When setting up a Grant, users can now open a list of Aggregation units and check which unit they need to select as the Grant currency.
* **Segmented Aggregations**
* The workflow for adding segments has been improved and is now more intuitive with an updated help text offering guidance for when wildcard segments are required.
* **Console Help Center.**
* An upgraded Help Center is now available in the Console:
* Search User and API Reference documentation.
* Submit questions to the AI Assistant.
* Open the login page for our web ticketing Support portal.
* Check the operational status of the m3ter platform’s Config and Ingest API services.
* Open a Product Portal page and review the roadmap for planned features and capabilities.
### Changes and Bug Fixes
* The `allowNegativeBalances` request parameter on the Update OrganizationConfig endpoint is now deprecated.
### Upcoming Changes
* **Coming soon m3sh Workflows**:
* Write access to a preview release version of m3sh Workflows will soon be made available on request and subject to agreed commercial terms.
* By extending the m3ter platform's core functionality for data integration supporting interoperability across external systems, this powerful feature allows you to build automated routines serving a wide variety of operational uses cases.
### Console Improvements
* **Account Balances Summary**.
* A new Balance Summary page provides a breakdown and timeline chart of the Balances on an Account, and allows remaining totals for active, future, and past Balances to be quickly read off. See [Reviewing Account Balances Summary](https://docs.m3ter.com/guides/end-customer-accounts/creating-balances-for-accounts/reviewing-account-balances-summary).
* **Documentation Search and AI Assistant**.
* The Console Help section now includes links to search the m3ter Documentation directly or open an AI Assistant and enter questions for help and resources on current workflows and tasks or to obtain coding examples.
* **Bill Details**.
* The Bill details has undergone significant redesign to improve Bill layout, line item presentation, and overall usability.
* Individual line items can be expanded for a detailed review with links to associated billing entities provided.
* When expanded, usage line items show a chart tracking usage submission over the billing period.
### Changes and Bug Fixes
* As announced in the April 2026 Changelog, Bill Jobs will now be updated less frequently, and at most once a second. For large Bill Jobs, this reduces the number of events generated and safeguards against excessive processing where notifications are enabled for the Bill Job Updated event.
* As announced in the April 2026 Changelog, when creating or updating a Balance Transaction Schedule a Transaction Description is no longer a required field.
* As announced in the March 2026 Changelog, the ability to set a negative value on debit pricing is now disallowed.
### Upcoming Changes
* **Coming soon**: The Bills listing page in Bill management will soon be updated to show additional fields for debit and credit totals. This will allow users to quickly assess whether zero total Bills are due to zero consumption over the billing period or because a Bill's debit and credit totals equate to zero.
### Console Improvements
* **Viewing Bills**.
* Bill viewing preferences, such as preferred display options for line item grouping, are now persisted across reloads, browser tab changes, and separate browser sessions.
* **Plan Details**.
* When reviewing Plan details, if you are creating a usage-based or unit-based pricing for a Plan a new modal selection for Aggregations or Counters is now available and provides a more intuitive workflow.
* **Search List Pages**.
* Search results for list pages are now persisted when moving between pages. For example, if you search the Aggregations list page, go to the Compound Aggregations list page then come back, you'll see the same search results listed on the Aggregations page. Search results are stored per tab / session so survive reloads but not opening new tabs.
### Changes and Bug Fixes
* As announced in the March 2026 Changelog, the `billTotal` value has been added to `billing.bill.updated` Events.
* As announced in the October 2025 Changelog, as of 1st March 2026: [Usage Data Explorer v1](https://docs.m3ter.com/guides/data-explorer/performing-usage-queries-and-reviewing-results) entered maintenance mode and will no longer receive new features or enhancements, but will continue to receive security updates:
* If you signed up with m3ter after 21st April 2026, you will not have access to the legacy Data Explorer v1 service.
* As a reminder: on 1st March 2027 Usage Data Explorer v1 endpoints will be removed.
* As announced in the February 2026 Changelog for Statement Definitions, only the measures and dimensions within the filtered Meters defined for the Statement Definition are now included.
* As announced in the February 2026 Changelog, a code will be required when creating or editing a Plan Group, Contract, or Plan Template. Any entities without a code defined at that time will have a default value set matching the entity's ID field.
### Upcoming Changes
* In May a preview version of a new Unified Balance Drawdown mode will be made available on customer request. This new mode is designed to maximize credit use for Accounts with multiple Balances - where proportional distribution of credit is necessary, the system will use best-efforts to proportionally distribute credit between line items.
* In May we’ll be introducing a change whereby a Transaction Description will no longer be a mandatory field when creating or updating a Balance Transaction Schedule.
* A new Balance Summary view is due for release in May showing a detailed breakdown and timeline chart for Balances on an Account, and allows totals for active, future, and past Balances to be quickly read-off.
* In May we'll be introducing a change whereby Bill Jobs will be updated less frequently, and at most once a second. For large Bill Jobs, this will reduce the number of events generated and safeguard against excessive processing where notifications are enabled for the Bill Job Updated event.
### New Features
* **Filtered Bill Statements.**
* When generating Bill Statements, users can now generate statements for a subset of the bill data by filtering the Statement by Meter ID(s).
* See [Working with Bill Statements](https://docs.m3ter.com/guides/billing-and-usage-data/running-viewing-and-managing-bills/working-with-bill-statements).
* **Filtering Account Charges**.
* When viewing an Account's Charges, you can now filter the list to show only Ad-hoc or Balance Charges.
* **Scheduled Billing Offset**.
* Customers using daily scheduled billing can now set a scheduled billing offset to allow late-arriving usage to be included in the daily bill. The offset can be specified in hours after midnight (UTC).
### Console Improvements
* **Product details**.
* When viewing the entities belong to a Product, you can now create a new entity for the Product directly from Product details.
* **Lookup Table Revisions**.
* Published Lookup Table Revisions can now be archived in the Console. Previously this was an API-only operation.
### Changes and Bug Fixes
* The maximum length for measurement UIDs has been increased from 50 to 128 characters.
* Bill line items for Balance overages now have the consumptions account product assigned to them when configured for the Balance.
* As announced in the February Changelog, prorating of standing charge and minimum spend amounts for billing will be done to millisecond precision instead of whole days.
### Upcoming Changes
* In April we’ll be adding the billTotal value to `billing.bill.updated` Events. This enhancement has required us to change how the billTotal value is calculated, and we’re also activating that change in April. You should not notice any difference when this rolls out, but if you do notice any issues with the billTotal value reach out to your m3ter contact and let them know.
* In November 2027 we'll be removing the ability to set a negative value on debit pricing, because the equivalent and more correct behavior is now available by using positive values on credit pricing. If customers want to retain the capability beyond that date, they should reach out to their m3ter contact.
### New Features
* **Grants**
* Grants are now available for adding to end-customer Accounts. This means the Account is credited with an amount of pre-rated usage, which can be drawn-down to reduce the amount of usage that is rated and would result in charges against the Account. See [Grants](https://docs.m3ter.com/guides/end-customer-accounts/creating-balances-for-accounts/balance-grants#grants).
* The Grants feature is now available in Preview to all customers.
* **Replace Attached Plan.**
* You can now replace an existing attached Plan on an Account with a single API call or a single operation in the Console. When you do this, the start date you define for the replacement attached Plan is used to automatically end date the existing attached Plan.
* **Documentation**. Our User and API Reference documentation has been migrated to a new platform:
* Improved look and feel and navigation structure.
* Improved search capability.
* API Reference has intuitive built in *Try it* feature for quickly testing endpoints.
* AI agent integration allows users to ask a question in natural language and quickly obtain an answer without having to manually search through the documentation.
### Console Improvements
* **Plan/Plan Template Details**. This key area of the Console has been significantly redesigned to enhance overall usability:
* Provides an at-a-glance review of the active Pricing configured for a Plan.
* All aspects of Pricing details are laid out to facilitate reviewing and checking.
* Bill line item descriptions are used as Pricing headings, closely matching what's seen in Bills for Accounts that use a Plan.
* The Pricing Schedule shows active vs. historical and future pricing, allowing users to smoothly navigate Plan Pricing across different periods in a complete sequence.
* **Currency Rounding Mode**.
* When creating and configuring Currencies for your Organization, you can select the rounding mode you want to apply to currency amounts.
* This was an [API feature](https://docs.m3ter.com/api/currency/create-currency#body-rounding-mode) previously, and has now been made available through the Console.
* **Prepayments Consumption Chart**. A new improved version of this helpful chart is now available:
* Facilitates tracking and managing a Prepayment's consumption over its service period.
* Immediate visibility of overages is now built-in, removing the need to open and analyze Account Bills for this information and reducing the risk of billing surprises for end-customers.
* Smoother overall Prepayment management workflow.
### Changes and Bug Fixes
* As announced in the October 2025 Changelog, where the billing mode is set to bill the Parent Account and Account Plans are attached only to Child Accounts, any *credit charge amounts* are now recognized for Parent Account billing.
### Upcoming Changes
* In March, a change will be made whereby prorating of standing charge and minimum spend amounts for billing will be done to millisecond precision instead of whole days.
* In April, we'll be introducing a change for Statement Definitions whereby only the measures and dimensions within the filtered Meters defined for the Statement Definition will be included.
* In April, a code will be required when creating or editing a Plan Group, Contract, or Plan Template. Any entities without a code defined at that time will have a default value set matching the entity's ID field.
### New Features
* **m3sh**
* m3sh is the framework that underpins and drives m3ter's interoperability and automation capabilities, encompassing Events and Notifications, Integrations, Workflows, and Apps, such as the Salesforce Managed Package and soon the NetSuite SuiteApp.
* As part of m3sh, m3sh Workflows allow customers to view and edit built-in and custom automation flows, and this month we're releasing it in read-only mode; read-write mode allowing customers to define their own custom Workflows will be coming soon! Read more about m3sh [here](https://www.m3ter.com/docs/guides/m3sh-automation).
* **Custom SQL Aggregations**
* You can now reference Counter values using the syntax: `counters ['counterCode']`
* This is particularly useful for billing use cases where you need to calculate things like Reserved Instances (RIs) with Overages.
* The system will automatically split Custom SQL aggregations across the billing period when the Counter value changes, so the returned Counter will always represent the value as it was at the timestamp of the measurements being queried.
* In addition, the `COALESCE` function is now supported for Custom SQL Aggregations, which is useful if you need to evaluate multiple values when some values might be null.
* **Bill Statements**
* When creating Statement Jobs, you can now filter by `meterIds` to reduce the size of the Statement generated and exclude unwanted line items.
* **Charges**. Charges on Accounts and Balances are now Generally Available.
### New Features
* **Custom SQL Aggregations**
* Powerful new feature that offers you more flexibility than traditional simple Aggregations such as SUM, MAX, and COUNT when defining your billing metrics.
* As an additional option in the existing Aggregation layer, Custom SQL Aggregations can be used in combination with Segmentation and any existing pricing model.
* The [Custom SQL Aggregations](/guides/usage-data-aggregations/custom-sql-aggregations) feature is is now available in Preview to all customers - reach out to your m3ter contact to have it enabled in your Organizations.
* **Lookup Tables**
* Lookup Tables enable you to manage dynamic data mappings that your calculations reference.
* Use them for currency conversion, pricing tiers, discount rates, and similar scenarios where you require values to change operationally but for calculation logic to remain constant.
* Designed for very high throughput and millisecond latency, and can be used at any rate supported by the services that query them. For example, multiple lookups can be made for each usage data measurement being ingested and enriched by the platform, thousands of times a second.
* [Lookup Tables](/guides/lookup-tables) are now available in Beta to customers on request - reach out to your m3ter contact to have it enabled in your Organizations.
* **Overlapping Account Plans**
* A switch is now available under Organization Configuration settings to allow multiple plans for the same Product to be active on an Account at the same time.
* For some billing use cases, you'll need to enable this option. For example, if you intend to bill end-customer Accounts on a Contract basis and your billing use case requires some charges for a Product to be billed under one Contract and other charges for the same Product to be billed under a different Contract.
### Console Improvements
* **Charges**
* When creating or editing Account or Balance Charges, you can now enter a number of Units and Unit Price, resulting in a calculated Charge amount.
* **Bill management**
* An **Integration status** column has been added to the Bills list in Bill management. Users can quickly check the status of the latest integration run for individual Bills without having to open a Bill's details page.
* **Integrations - External Mappings**
* When creating External Mappings, all drop-down fields on the **External mapping settings** form are now searchable - users can input text into a field to filter for and quickly find the required selection.
### New Features
* **Contract Billing**
* Enables billing customers under specific contractual agreements for bundled product consumption, supporting flexible product packaging aligned with enterprise contracts.
* Provides control over bill grouping using exclusive/non-exclusive keys, allowing separate invoicing per contract or consolidated billing across multiple contracts as needed.
* Supports billing to include only for usage matching specific Meter dimension values (for example: contract id, service type, geographic location), enabling precise charge calculation per contract terms without modifying underlying product configurations.
* [Contract Billing](/guides/end-customer-accounts/creating-contracts-for-accounts/setting-up-contract-billing) is now available in Preview to all customers - reach out to your m3ter contact to have it enabled in your Organizations.
* **Stripe Native Integrations**
* Stripe Integrations will now use Accounting Products where these have been assigned to Bill Line items.
* If you configure an Integration to create Stripe invoices, you can now specify the id and version of the Invoice Rendering template you want the integration to use.
### Console Improvements
* **Contracts**
* In the Accounts section, a new *Contracts* page is available listing the Contracts created for your Organization. You can search for a Contract or for those belonging to a specific Account, and then review a Contract's period together with a read-off scale showing Contract percentage completion.
* On Contract details pages you can now add Balances on an Account to a Contract.
* **Bill management**
* The workflow for creating and running Bill jobs has been upgraded to help and support users perform this key operation. When you open Run billing, the core Organization billing settings - such as epoch dates for billing periods and External invoice date for revenue recognition - are shown for checking. At Bill job completion, a new *Run billing* page opens giving you the Bill job details and listing any Bills created or updated by the job.
* **Billed Charges**
* Bill line items for Ad-hoc Charges and Balance Fee Charges now show Units and Unit price values.
### Changes and Bug Fixes
* As notified in the September Changelog, the Count Notifications endpoint has now been removed.
* Following the September Changelog notifying deprecation of the ‘Retrieve Line Item Usage in JSON Format’ endpoint and the associated `jsonUsageGenerated` line item response parameter, we now can confirm that generation of line-item JSON usage statements has been disabled. The deprecated retrieval endpoint/fields will be removed in December
* **Fix**: An issue where submitting the currency conversions form didn't redirect or indicate it had updated has now been resolved.
* **Fix**: When users try to redeem an invitation to an Organization and the invitation has already been redeemed, we now redirect them to an error screen.
* **Fix**: When creating or editing Prepayments or Balances on Accounts in the Console, users can now select Ad-Hoc charges on Accounts to be made available for draw-down against them.
### Upcoming Changes
* **Debit/Credit Bill Line Items**
* In December, we'll be adding validation to ensure a service period is defined when you add Debit or Credit line items to Bills.
* **New API infrastructure**
* As stated in the October Changelog, we've been preparing to migrate the m3ter APIs to new infrastructure. This migration will take place in December 2025.
### New Features
* **Usage Data Explorer** The new [Usage Data Explorer ](/guides/data-explorer/usage-data-explorer-v2)(v2) is now Generally Available. The old Usage Data Explorer will continue to be available until March 2027 (see "Upcoming Changes" below).
* **Bill Statements.** Line Items now include the relevant `contractId` for any corresponding source Bill line items that are linked to a Contract.
* **Data Exports**. Data Export jobs now emit a `dataexport.job.success` Event after completing successfully.
* **Meter Derived Fields**. Derived Field calculations can now reference the account code directly as `m3ter.account.code`.
### Console Improvements
* **Product details**. You can now quickly review and manage the entities created for a Product on the Product details page. Separate tabs are provided for each entity type and you can open the details page for a specific Product entity directly, as well as edit or delete entities.
* **Bill management**. Usability enhancements:
* Your invoice date range selection on Bill Management is now saved in the query string so reloading or going back retains your selection.
* Filtering Bills is now more intuitive with radio button options to filter quickly for Approved or Pending status or by switching to show only Locked Bills.
* **Account pages**:
* If an Account Plan has had a Billing cycle date defined or has been added to a Contract on the Account, then the Attached Plans tab now clearly shows this.
* Account details are now only shown on an Account's Overview tab leaving more room when working in other tabs.
* **Entity metadata**. The metadata cards on details pages now list the latest integration runs for relevant entity types and users can use a link to view all runs.
* **Create and Edit Forms**. When users have made editing changes to Create or Edit forms and then attempt to navigate away, a helpful dialog now appears to remind them that there are unsaved changes and asking them to confirm they want to leave the form without saving.
### Changes and Bug Fixes
* **Fix**: An issue where the Balance details page attempted to load too many Bills has been resolved.
* **Fix**: Some character sets were not rendered correctly on Console screens. This issue has now been resolved.
### Upcoming Changes
* **Usage Data Explorer (v1).** With the release of the new [Usage Data Explorer](/guides/data-explorer/usage-data-explorer-v2), we're starting the process of retiring the legacy version. Your m3ter contact will reach out with more details and assistance on migrating. The following key dates should be noted:
* 1st March 2026: [Usage Data Explorer v1](/guides/data-explorer/performing-usage-queries-and-reviewing-results) will enter maintenance mode. After this date, it won't receive new features or enhancements, but will continue to receive security updates. New customers onboarded after this date will only have access to the new version.
* 1st March 2027: Usage Data Explorer v1 endpoints will be removed.
* **New API infrastructure.** We’re preparing to migrate the m3ter APIs to new infrastructure. This change will be transparent to RFC-compliant clients, but the new infrastructure is less tolerant of non-RFC compliant requests. We’re reaching out to customers we can know will be affected, and will confirm a timeline for the change in due course, but in the meantime customers should check they are adhering to the following:
* All requests with a body need to include the appropriate Content-Type header, typically content-type: `application/json`.
* Requests using HTTP methods that do not expect a body, such as `GET`, `HEAD`, and `OPTIONS`, must not contain one.
* **HTTP status codes for oversized payload.** In December, we'll be making a change to give a different and more informative 413 error code when the payload in a PUT request to our APIs is too large.
* **Bill Statements.** In December, we'll be making a change to what Statement line items are generated for Bills in some specific configurations. After the change, a Statement line item will be produced for each Meter referenced by a Compound Aggregation, rather than a single Statement line item per Compound Aggregation. This will ensure any usage filters applied for the Statement don't risk usage being omitted at Statement generation. You will only be affected by this change if:
* The pricing uses a Compound Aggregation, and the Compound Aggregation references multiple Meters.
* The Statement Definition uses a field as a dimension that exists in some, but not all, of the Meters used.
* **Bill Statements**. In December, we'll be changing the way Statements are generated for Bills resulting from segmented pricing. If a segment pricing is updated, any Statements generated after the update will not include the pricing bands for the earlier legacy segment pricing.
* **Credit Charge Amounts with Parent/Child Accounts.** Where the billing mode is set to bill the Parent Account, and Account Plans are attached only to Child Accounts, in December a change will be made to allow *credit charge amounts* to be recognized for Parent Account billing. Previously in these scenarios only debit charge amounts were recognized for Parent Account billing.
* We reported last month that the [Retrieve Line Item Usage in JSON Format](/api/bill/retrieve-line-item-usage-in-json-format) endpoint had been deprecated and will be removed in November 2025. The associated `jsonUsageGenerated` response parameter for the [List Line Items](/api/line-item/list-line-items) endpoint has been deprecated and will also be removed.
### Product Updates
#### Azure Marketplace Integration
A new *Azure Marketplace* native integration is now available in Beta release version, which you can use to send your end customer Account Bills generated in m3ter into Azure Marketplace. Included with this release is a reconciliation feature designed to support your Azure Marketplace integrations:
* **Billing usage data reporting**. Performed for each integration run and allows you to track all amounts sent over to Azure Marketplace for each Bill, together with the date and time the Bill data was sent. This is particularly useful for Bill recalculation scenarios where several updates might have taken place during the billing period.
#### Data Exports
* **Scheduling**. When setting up a Schedule, you can now use a simple or advanced mode for defining when exports will run:
* **Simple Scheduling**. Define a frequency in days, hours, or minutes. For daily and hourly scheduling an offset is now also available. For daily jobs, you can offset in hours from midnight. For hourly jobs, you can offset in minutes from the start of the hour.
* **Advanced Scheduling**. Define when exports run using the *cron* format.
* **Operational Data Exports**. Charges are now available in operational Data Exports.
* See [Data Exports](/guides/data-exports).
#### Usability Improvements
* **Calculation Editors**. Several usability enhancements:
* **Referencing Custom Fields in Derived Field editor**. Includes autocomplete/tooltips for defined Custom Fields. As you start to enter a field in the editor:
* A list of any matching defined fields shows with prefix allowing you to read-off whether field is defined at Organization or individual entity level.
* Context-sensitive filtering is applied - if a Meter is Product linked, then only Product Custom Fields are shown.
* **All Calculation Contexts:**
* Context-sensitive tooltips for functions showing syntax and examples.
* Support for `IF..THEN..ELSE` syntax, so you can use that instead of ternary expressions for more readable calculations.
* Clickable link to open calculation engine reference documentation.
* **Organization Selector**. Organization type is now more clearly and readily indicated for users both when changing Organization and when working in the Console:
* Production Organizations are labeled in red.
* Sandbox Organizations are labeled in teal.
* **Page Not Found**. User experience has been significantly improved for when a Page Not Found error occurs. The m3ter branding and page header is now always shown together with a more helpful message and link to the Dashboard. If you're logged in, you also get your user actions and the main navigation to help you quickly get back on track.
### Coming soon
* In December 2025, we’ll be introducing validation that the `ets` timestamp optionally present in usage data measurements must be equal to or after the `ts` timestamp. Measurements that fail this validation will be rejected using the standard method for the method of ingest being used.
* Bill Statement line items will soon have the relevant `contractId` added to them for any corresponding source Bill line items that are linked to a Contract.
* The previously deprecated `configData` request parameter for the [Create Account](/api/account/create-account) endpoint will be removed in November 2025.
* The [Retrieve Line Item Usage in JSON Format](/api/bill/retrieve-line-item-usage-in-json-format) endpoint has been deprecated and will be removed in November 2025.
* The Count Notifications endpoint has been deprecated and will be removed in November 2025.
### Product Updates
* **Meters**. Product-linked Meters can now be made into Global Meters.
* **Calculation Functions**. A new `IN()` function is available which takes multiple arguments. Can be used with the ternary operator to return `TRUE` if any of the arguments are satisfied, otherwise return `FALSE`:
* For example, `IN("completed", "succeeded") ? "true" : "false`
* **Permission Policies**. New `export:config` resources and an `export:download` action are now available for creating a custom Permission Policy granting Users full working access to create, manage, and run data exports.
* **Balances**. Custom Fields can now be added to Balances at the individual entity level.
* **Data Exports**. Accounting Product fields for Bill line items are now included in Data Exports.
* **m3ter SDKs and Terraform Provider**. New versions of the m3ter SDKs and Terraform provider have been released with various fixes and enhancements. See [Developer Tools](/guides/developer-tools) for details.
* **AWS Marketplace Integration**. The m3ter platform integration is now listed on [AWS Marketplace](https://aws.amazon.com/marketplace/pp/prodview-xdjbyfvlsd36s). You can review our [blog posting](https://www.m3ter.com/blog/extending-complex-pricing-to-aws-marketplace-with-m3ter) for more details.
### API Updates
* **User**:
* A new [Retrieve current user information](/api/user/retrieve-current-user-information) endpoint was added to the API and SDKs. This allows you to identify and check the current session's user.
### Console Updates
**Usability Improvements**:
* **Integrations**. On the main *Integrations* page, the badges for external systems now show the number of Credentials and Configurations set up for a system. If either a Credential is disconnected or a Configuration is disabled, then a warning will show.
* **Plan Templates**. You can now price a Plan Template directly from the Plan Template details page.
### Resolved Issues
* Fix: Previously a Balance could be created for an Account without specifying a Name or Code. This is no longer possible and any Balances created without Name or Code will now be required to add a Code when updated.
* Fix: If a Create or Edit form was opened in a new browser tab, the Cancel button was inactive. This has now been resolved.
### Product Updates
* **Events and Notifications**. New system Events are generated for Balance amounts - when a Balance amount is created, updated, or deleted. Notifications based on these Balance amount Events can be set up to meet common use cases, such as an alert when a Balance amount reaches zero, is consumed down a preset threshold, or is consumed down to a defined percentage of the initial amount.
* **Accounting Products for Bill line items**:
* **Reviewing Bills**. If you've defined Accounting products for line item types to meet your revenue recognition and accounting purposes, when reviewing and managing Bills in Bill management you can now group line items by Accounting product.
* **Integrations**. If you've set up a billing integration with your external accounts receivable and invoicing system, the integration will now use the Accounting product ids assigned to line items.
* **Terraform Provider**. The m3ter Terraform provider joins our SDKs in developer tools and is available for early access use, allowing you to manage m3ter resources using the popular infrastructure as code tool from Hashicorp. See [Developer Tools](/guides/developer-tools) for details.
* **Integrations**. When configuring billing integrations with your external systems, you can now filter the line items included in the integration using line item Product IDs or Aggregation IDs.
### API Updates
* **Marketplace Integrations**:
* A new [Retrieve reported usage](/api/marketplace-integrations/retrieve-reported-usage) endpoint is available, which allows you to return a list of reported usage records for integration runs with external marketplace systems. Query parameters are available to filter what is returned in this usage report by `billStartDate`, `billId`, `externalSystem`, or `accountId`.
### Console Updates
**Usability Improvements**:
* **Account Plan and Plan Group attachment**:
* **Plan details**. When reviewing an Account's Plan attachment details, a new hotlink text allows you to open the Plan attached to the Account directly.
* **Attached Plan pricing**. The pricing for an attached Plan is now shown in the same panel as the attached Plan's details, make it quite clear the pricing is associated with the Plan. Similarly for when a specific Plan in an attached Plan Group is selected - the associated pricing is shown with the Plan details.
* **Plan Group attachment**. When a Plan Group containing many Plans is attached to an Account, the attachment page loading is much faster.
* **Accounts section**. The Accounts section of the Console now provides a faster loading experience and when opening the details pages for entities attached to an Account a full breadcrumb trail is given.
### Resolved Issues
* Fix: Previously, the Console usage data ingest form could be submitted when invalid JSON was shown, and the last valid JSON entered was submitted without any indication to users. This issue is now resolved.
* Fix: The usage chart for latest bills on the Account Overview tab now correctly includes for any billed usage with a service period of one day or less.
* Fix: An issue that allowed invalid Custom Fields to be attached to a Contract has now been resolved.
* Fix: The *Hide zero quantity line items* display option available when viewing Bills containing zero line items is now working correctly to hide any and only the zero quantity items.
* Fix: An issue has now been resolved that prevented an Aggregation being used to price a Plan in a Plan Group if the Aggregation had been used to price another Plan in the same Plan Group.
### Product Updates
* **Account Balances linked to Contracts**. Account Balances can now be optionally linked to a Contract on the Account. If you've linked an Account Plan to a Contract, link a Balance to the same Contract to ensure the Balance is available for draw-down. See [Linking Balances to Contracts](/guides/end-customer-accounts/creating-balances-for-accounts/creating-and-managing-account-balances#linking-balances-to-contracts) for more details.
* **Integrations** A new *AWS Marketplace* native integration is now available in Beta release version, which you can use to send your end customer Account Bills generated in m3ter into AWS Marketplace. Included with this release are two reconciliation features specifically designed to support AWS Marketplace integrations:
* **Billing usage data reporting**. Performed for each integration run and allows you to track all amounts sent over to AWS Marketplace for each Bill, together with the date and time the Bill data was sent. This is particularly useful for Bill recalculation scenarios where several updates might have taken place during the billing period.
* **AWS CloudTrail reconciliation**. Provides visibility between the data *received by* AWS Marketplace and the log data *sent by* m3ter when integrations run. This data comparison is then used to maintain data parity between systems by identifying differences and automatically making adjustments to reported metering data, and removes the need to carry out manual troubleshooting and reconciliation for clean billing operations.
* See [Configuring AWS Marketplace Integrations](/guides/integrations/setting-up-integrations/configuring-aws-integrations) for more details.
* **Custom Fields**:
* **Balances**. You can now add Custom Fields to Balances at the individual entity level. See [Creating a Balance on an Account](/guides/end-customer-accounts/creating-balances-for-accounts/creating-and-managing-account-balances#creating-a-balance-on-an-account) for more details.
* **Balance Schedules**. When setting up Transaction or Charge Schedules for Balances, you can now add Custom Fields to them. See [Creating Transaction Schedules for Balances ](/guides/end-customer-accounts/creating-balances-for-accounts/setting-transaction-schedules-for-balances#creating-transaction-schedules-for-balances)and [Creating Balances Charge Schedules](/guides/end-customer-accounts/creating-balances-for-accounts/setting-charge-schedules-for-balances#creating-balance-charge-schedules) for more details.
* **Data Exports**. Transaction Types are now available for operational Data Exports.
* **Calculation Functions**:
* **Date Time Functions**. The new `DateTime.secondsOverlap` function allows you to calculate the total number of seconds of overlap between a given overall time range and a time period. This function is useful in cases where discount rates are offered for service consumption during "off-peak" hours - for example any consumption on any given day that is outside the peak rate hours of 06:00:00 until 22:00:00. See [Date Time Functions](/guides/m3ter-calculation-engine#date-time-functions) for more details.
* **Math Functions**. For the `Math.ceil()`, `Math.floor()`, and `Math.round()` functions, a second optional parameter is now available to control the scale of the result. See [Functions](/guides/m3ter-calculation-engine#functions) for more details.
### Console Updates
**Usability Improvements**:
* **Code Editor**. Several usability enhancements: consistent highlighting; auto-adjustment in size to full width in read and edit mode and to accommodate multi-line calculations; clickable suggestions to expand for fuller descriptions.
* **Ad-hoc Operational Data Exports**. Help texts for the *Time period* options have been updated to make clear that the export will include operational data from a defined start date/time up until when the export runs, and not a defined end date/time.
* **Entity Metadata for Custom Fields**. When reviewing the Metadata panel for an entity, any Custom Fields configured at Organization level for that entity type are shown together with their values, which can be copied. If a corresponding Custom Field has been created for the individual entity, then the value defined at Organization level is struck through to clearly indicate that the individual entity level value will be used.
* **Balance Transactions**. The Balance Transaction table on the Balance details page can now be sorted ASC/DESC by column.
* **Meter Details**. Data fields for Meters are now clearly grouped on the Meter details page: Measure data fields, Dimension data fields, and Derived fields.
**Usage Submissions**:
* **End Timestamp**. When submitting usage data measurements into the Ingest API from either the Meter details or Account details pages in the Console, you can now enter an optional *End timestamp* date/time for the submitted measurement.
* **Submission Activity**. The *Activity* panel on the Meter details page which tracks usage data submissions for the previous hour has been optimized for faster response times and refresh rate as you submit measurements.
**Balance Details**. The Balance details page now contains three additional summary fields tracking key amounts in a Balance's lifecycle: *Balance consumed*, *Rollover consumed*, and *Expired Balance amount*.
### API Updates
* **Integrations - Retrieve Available endpoints updates**:
* [Retrieve Available Configurations](/api/integrationconfigs/retrieve-available-configurations). This endpoint now supports two optional query parameters for `systemName` and `entityType`. When these are used, the response contains a new `selectedConfigurations` section.
* [Retrieve Available Integration Systems](/api/integrationconfigs/retrieve-available-integration-systems). New endpoint and supports an optional `entityType` query parameter.
* [Retrieve Available Entity Types for System](/api/integrationconfigs/retrieve-available-entity-types-for-system). New endpoint and returns the available `entityTypes` for the given system.
* [Retrieve Available Auth Config for System and Entity Type](/api/integrationconfigs/retrieve-available-auth-config-for-system-and-entity-type). New endpoint and returns the auth configuration for the given `system` and `entityType`.
### Resolved Issues
* Fix: The *Timestamp* column in the Result rows table of Usage Data Explorer (v2) now correctly displays a UTC date/time.
* Fix: An issue where the Balance Transactions ledger was not correctly tracking Transactions has been resolved.
* Fix: When editing a Google Cloud Platform Destination for Data Exports, an issue where the incorrect edit form showed is now resolved.
* Fix: Some searchable drop-down selection lists showed incorrect filtering on text entry. This has now been resolved.
* Fix: The Custom Fields section on the Bill details Metadata panel has now been removed since not applicable.
* Fix: When editing External mappings an issue where the linked integration was not showing on the Edit form has been resolved.
### Product Updates
* **Billing Operations - Line Item Usage Insights**. When reviewing a Bill's details, you can now drill into usage line items and quickly gather key information about the usage directly and without having to move to other areas of the Console to obtain a fuller picture the billed usage:
* The Meter and pricing components - Aggregation, Plan, and Pricing - are identified with hotlinks to open their details pages.
* A bar chart displays the distribution of usage across the relevant bill period and spikes in usage can be readily identified.
* A download button is provided to obtain a CSV formatted file of the line item's usage.
* If any further investigation is required, open the Usage Data Explorer directly with a query to return the line item's usage preloaded and performed.
* **Date Time Functions**. New date time functions have been added to the m3ter Calculation Engine and are now available for use in Derived Field, Compound Aggregation, and Notification Rule calculations. Please see [Date Time Functions](/guides/m3ter-calculation-engine#date-time-functions) for details.
* **Data Exports**:
* Usage Data Exports now use Data Explorer v2 queries to return usage data for export. You can open Data Explorer v2, build a query, and check the usage data returned. If satisfied, you can then quickly load the query into the Data Export page and complete setting up a usage data Export Schedule or Ad-Hoc Export.
* The frequency for Export schedules can now be set at minute intervals as well as at hourly or daily intervals, with a highest frequency limit of every 15 minutes.
* Setting the time period for Ad-Hoc Operational Exports has been simplified and requires users to specify only a start date/time. The Export will include only the operational data created or modified from the specified start date/time up until when the Export runs.
* **Account Contracts**. Custom Fields can now be created for Contracts at the Organizational level as well as individual Contract level. This means Contract Custom Field values are available for calculations.
### Console Updates
**Usability Improvements**:
* **Notification/Webhook Links**. The links between Notification Rules and Outgoing Webhooks which support Notification Webhook integrations can now be much more easily managed through a new link details modal. This intuitive screen can be quickly accessed from either the Notification Rule or Outgoing Webhook details page, allowing the active/inactive status of the Notification Webhook integration to be checked and managed or Organization users to be added for receiving email notices when the integration has been auto-disabled. See [Linking Notifications to Outgoing Webhooks](/guides/integrations/setting-up-integrations/creating-and-managing-destinations#linking-notifications-to-outgoing-webhooks) for details.
* **Meter Derived Field Calculations - Editor**. When creating and editing Derived Field calculations, the Derived Field ordering can be quickly changed to facilitate referencing Derived Fields earlier in the list, and the calculation editor now provides completion suggestions and syntax highlighting.
* **Currencies**. A new separate **Currency settings** page is now available, making creation and management of currencies and currency conversion rates in your Organization easier and more accessible. See [Creating and Managing Currencies](/guides/organization-and-access-management/viewing-and-editing-organization/creating-and-managing-currencies) for details.
* **Balances**:
* The Balance summary listing page for an Account now has a Currency column.
* The Transaction ledger for a Balance now shows "Billed" not "Paid" against Transaction amounts to avoid any suggestion that m3ter provides a collections or payments function for end-customer Account Balances.
* When creating or editing a Transaction for a Balance in the Console, users can now define the Transaction date and Applied date.
* **Data Exports**. Console pages and forms for configuring and managing Data Exports now all consistently use UTC for date/times, with clear labeling to avoid any user uncertainty.
* **Integrations**:
* The Credential being used to connect an integration with an external system is now clearly shown on the **Integration details** panel.
* The **Integration runs** page listing can now be filtered by run status and sorted by run start time.
### API Updates
* The Get Balance Transaction Summary endpoint in the Config API now provides three extra response parameters giving amounts for `expiredBalanceAmount`, `rolloverConsumed`, and `balanceConsumed`.
### Resolved Issues
* Fix: Issues where several configuration forms were missing *Accounting product* settings have now been resolved.
* Fix: When creating Charges for Accounts, it was possible to set an end date for a Charge that was before the start date. Extra validation is now in place to prevent this.
* Fix: An issue has been resolved where Events associated with Custom Fields and segmented Aggregations were being stored in an inconsistent way making the data inaccessible when transferred into Notification payloads. For example:
```text theme={null}
…
"segments": "[{country=PT}, {country=ES}, {country=UK}, {country=EE}, {country=IE}, {}]",
…
```
* The content for the affected Events is now structured in an accessible format and consistent with the standard API response formatting:
```text theme={null}
…
"segments" : [
{ "country" : "PT" },
{ "country" : "ES" },
…
],
…
```
* If you suspect this issue has affected you, please get in touch with your m3ter contact or contact [m3ter Support](https://m3ter.myfreshworks.com/login/auth/1662629775049?client_id=451980218021503405\&redirect_uri=https%3A%2F%2Fm3ter.freshdesk.com%2Ffreshid%2Fcustomer_authorize_callback%3Fhd%3Dm3ter.freshdesk.com).
### Product Updates
* **Charges on Accounts**. You can now create *Charges* for your end-customer Accounts to serve use cases that require ad-hoc or one-off line items for Account billing. Charges are:
* Created for either debit or credit amounts and are available in any currency defined for your Organization.
* Assigned a service period and given a specific date for billing the Account. When a bill job has run for the specified bill date, the Charge appears as an *Ad-hoc* line item on the Bill.
* Linked to a Product for accounting purposes and can be optionally linked to a Contract.
* See [Creating Charges for Accounts](/guides/end-customer-accounts/creating-charges-for-accounts) for more details.
* **Integrations**. A new *NetSuite Notification* native integration is now available in Preview release version, which offers wide flexibility for controlling *when* the integration runs and for controlling *what* range of m3ter entity data is sent through to your NetSuite system. The integration:
* Exploits m3ter's Notification framework driven by system Events, which means you can specify one or more Notifications that will trigger the integration. The integration runs when the relevant system Event occurs and triggers the Notification rule.
* Links to a Transformation you've set up in m3ter. By defining a one-way data mapping from one specific data type to another, Transformations allow you to customize the conversion of data as it flows into or out of the m3ter system via integrations.
* See Configuring NetSuite Notification Integrations for details.
* **m3ter SDKs**. SDKs are now available in Alpha for Python, Golang, and TypeScript/Javascript. See [m3ter SDKs](/guides/developer-tools) for details.
* **Data Exports**:
* **Destinations**. You can now export your m3ter usage and operational data to Google Cloud Storage bucket destinations.
* **Usage Data Export**. The capabilities of the new Usage Data Explorer (v2) for querying usage data are now fully available to the Data Export service, offering you significantly more power and flexibility to control precisely the range of exported usage data.
### Console Updates
**Usability Improvements**:
* **Advanced Account Browsing**. The Accounts page now offers a range of new features:
* Sorting added, with intuitive default sort order when the page is first opened.
* Additional columns can be added to the listing and the ordering of columns changed to suit user requirements.
* Advanced search and filtering, with shareable URLs when search filters applied.
* General usability enhancements:
* Anchored pagination controls avoiding the need to scroll to use.
* Improved empty/no results state.
* Loading spinner not present when returning from an Account details page.
* **Select modal listings**. Modal selection views have been recast to improve usability, including:
* Anchoring the pagination controls at the bottom.
* The number of selections made is dynamically tracked.
* **Delete confirmations**. When deleting entities, the confirmation dialog now states explicitly the entity selected for deletion.
* **Integration Details**. The integration details page has been updated to make adding and managing Credentials for an integration easier with added Credentials clearly listed.
### Product Updates
**Usage Data Explorer V2**. A new version of Usage Data Explorer is now available in Preview release, which you can use to query the metered usage data collected for your Organization in m3ter. The Console user experience is highly intuitive and facilitates setting up a query that returns the precise usage data set needed to serve your current analytical purposes. Features include:
* **Dimensions filtering**. Filter the usage data returned by specific Dimension data field values.
* **Aggregate data**. Apply Aggregation functions to the usage data returned for the query.
* **Grouped by**. For queries that apply Aggregations, select to group the data returned for the query by:
* **Account**
* **Time**
* **Dimension**
* **Reviewing query results**. Review the data returned for your query in a Results row table.
* **Query saving and re-loading**. Quickly save a query and re-use it.
* **Downloading query results**. From the results table, promptly download the returned data set in a CSV or JSONL formatted file.
**Data Exports Service**:
* **Downloads to Local Device**. Now available through the Console. If you omit a Destination for either an Export schedule or an ad-hoc Export, when the Export job runs and has succeeded a file download button is provided on the Export jobs page.
### Console Updates
**Usability Improvements**:
* **Calculation Editor**. The display and editing experience for creating calculations in the Console has been greatly enhanced. This includes full syntax highlighting support for the m3ter calculation language and other editing features:
* **Auto-indentation**
* **Auto closing of brackets / quotes**
* **Undo / redo**
* **Find & replace**
* **Re-size text editor**
* **Integrations and Notifications**. The Console area covering these key functions have undergone significant consolidation and rework to give a better overall user experience in terms of core workflows for creating and configuring, and for ease of management:
* **Integrations**. The main page shows a grid layout for the external systems available for integration and can be filtered for either Accounts Receivable or CRM systems. Each external system now has its own page for configuring and managing Native Integrations with the system, and incorporates a Credentials section.
* **Notifications**. Similarly, once a Notification Webhook Integration has been set up, management is done from a single page for the Notification rule details, including linking to Outgoing Webhooks and reviewing Events for the Notification.
* **Segmented Aggregations**. When setting up a segmented Aggregation, the Segments panel now extends the full width of the page to accommodate longer text entries for segment values.
* **Accounting Product IDs**. These are now clearly shown on the details pages in the Console for relevant billing-related entities and for linking to Bill line items: Prepayment/Commitments for fees and usage; Plans for minimum spends and standing charges; Pricings for usage and minimum spends; Counter Pricings for recurring charges; Balances for consumption draw-downs.
**Balance Transactions**. When creating Transactions for Balances in the Console, users can now define a Transaction date and an Applied date, and these are now clearly shown on the Balance Transactions ledger. There is no restriction on back-dating Transactions, which is useful for certain use cases such as when contract renewal negotiations for an end-customer Account are protracted.
### Resolved Issues
* Fix: The to-date options for date range setting for operational data exports now set the range to end at the minute a selection is made, and instead of setting the date range to end at the start of the following day.
* Fix: An issue where dimension fields on Usage Explorer V1 did not reset correctly has been resolved.
* Fix: If `productId` was missing for line items, then duplicate line items could appear on Bills. This has now been resolved.
* Fix: When a Prepayment/Commitment on an Account is configured to be billed on a schedule, an issue where the service period end date appeared on Bills as the day prior has been resolved.
### Product Updates
**Accounting Products for Billing Elements**. The range and granularity of billing elements in m3ter that can be assigned an accounting product has been extended to include:
* **Prepayments/Commitments**:
* **Fees**
* **Usage draw-downs**
* **Pricings and Counter Pricings**. Allows pricing metric accounting (Aggregation and Counter-level).
* **Plans**:
* **Standing Charges**
* **Minimum Spends**
* **Balances:**
* **Fees**
* **Consumption draw-downs**
By allowing assignment of accounting products at these various levels, m3ter ensures that each bill line item can be correctly categorized for accounting purposes
**Data Exports Service**:
* **Ad-hoc Operational Exports**. Some additional options are now available when running these data exports:
* Define a date/time range to include only the data created or modified within that time period.
* Include Balance Transactions data in the export.
* **Downloads to Local Device**. Available through the API - if a Destination is omitted, a Data Export file download URL can be obtained for the export job and then used to download the file to your local device.
**Recurring Charges**. You can now enter a value of 0 for a Counter Adjustment on an Account, which is useful if an end-customer wants to terminate a contract mid-billing period.
**Integrations**:
* **External Mappings**. When setting up External Mappings for integrations, *custom External Table* *names* can now be used for the mapping. This is especially useful when integrating with systems that support custom objects, such as Salesforce.
* **Bill Integration Runs**. From the Bill details card you can now open and review *all integration runs* for a Bill. This serves several common use cases: where a single Bill is subject to multiple integration runs, Bills are synced to multiple external Accounts Receivable (AR) systems, or Bills are synced to multiple instances of the same external AR system.
* **Balances**. The Balance details card in the Console now provides a comprehensive set of fields that allow users to closely review and track key Balance amounts, including any rollover amount originally defined for the Balance and the remaining rollover amount.
### Console Updates
**Usability Improvements**:
* **Table Style**. A new style has been implemented for tables across Console pages, which provides bolded text header rows and sharper contrast for content rows when viewing.
* **Search Accounts**. Users can now use the Account ID to search the Accounts list page.
### Resolved Issues
* Fix: When attaching Plans to an Account, the start date and end date selectors on the Create Plan attachment page now allow users to select a time as well as a date.
* Fix: If the Organization timezone was set at other than UTC, an issue is now resolved which allowed the start and end dates of a Prepayment/Commitment or Contract to be set incorrectly.
* Fix: If the Meters list has been filtered by Product, the Product selection is now retained for starting the create Meter workflow, and relieves the user from having to re-select the Product to start the workflow.
* Fix: When a Single Sign-On (SSO) failure occurs, users are now shown an error message for the failure in the Console.
* Fix: If a unit is not defined for a Bill line item type, then the unit is now shown as having no value where previously a zero value was shown, which could be misleading.
### Product Updates
* **Data Export Service**. A *Data Export service* is now available in m3ter in Preview release version. You can use this new service to export usage data and operational data from your m3ter Organization directly into your AWS S3 buckets. Configure data export schedules to run at hourly or daily intervals or run ad-hoc data exports:
* **Usage Data**. Specify a precise range of usage data measurements ingested for your Organization that you want to export - by Meter, Account, and time period. You can select to aggregate the specified usage data for exporting, if required.
* **Operational Data**. Export the configuration and operational data for a range entities from your production environment - such as Bills, Prepayments/Commitments, Accounts, and Balances.
* See [Data Exports (Preview)](/guides/data-exports) for more details.
* **Salesforce Native Integrations**. When setting up Salesforce native integrations for either billing or entity data, you can now select a *Namespace* to specify where in your Salesforce Org you want to sync data to. See [External System Configuration](/guides/integrations/setting-up-integrations/configuring-sf-entity-data-integrations#external-system-configuration) for more details.
### Console Updates
* **Outgoing Webhooks for Notifications**. When configuring integrations for Notifications based on system or scheduled events, the webhooks you create for where a Notification's payload will be delivered are now called *Outgoing Webhooks*. This makes the configuration workflow for implementing Notifications in m3ter simpler and more intuitive. See [Creating and Managing Outgoing Webhooks](/guides/integrations/setting-up-integrations/creating-and-managing-destinations) for more details.
* **Usability Improvements**:
* **Segmented Aggregations**. When users select the target Meter fields they want to segment aggregated usage by, a default row is now added automatically allowing them to promptly add required segments.
* **Date/Time Selection Fields**. For start and end dates that include a time component, Date/Time selectors in the Console now offer time selections to 15 minutes of granularity, and the selected Date/Time is clearly displayed in the form fields.
### Resolved Issues
* Fix: When deploying Counter pricing for recurring charges against end-customer Accounts, Counter values can now be set at zero to accommodate cases where an end-customer terminates their contract in the middle of the billing cycle.
* Fix: An issue has been resolved for an error showing when attempting to enter decimal place amounts for setting up Prepayment billing on a schedule.
* Fix: Rows on UI forms when one has a Help text associated now align correctly.
# Changelog 2022
Source: https://docs.m3ter.com/changelog/changelog-2022
New features, functionality and updates for 2022.
**More on New Features?** Please see the [**Product News**](https://www.m3ter.com/blog/category/product-updates) blog for more detailed information on the value you can get from the new features in each release.
### Console Updates
* New Prepayment/Commitment details page accessed directly from Account>Prepayments tab. Includes Prepayment Fee details and Fee billing dates.
* Added links to Plan, Plan Template, Meter, and Aggregation from the Pricing Edit form.
* Added Custom Fields for Aggregations and Compound Aggregations.
* Account Custom Fields sorted by key now displayed on Account Overview>Details card.
* New switch in the Organization Configuration form to suppress generating bills when they are empty.
* Added Code field in the Balances tab.
* Added Currency Code to Account Details card.
* Implemented inline Learning Center panel with direct links to documentation and context-sensitive Help call outs.
* Added gift-box button for direct access to latest What's New blog.
* New String manipulation functions available for calculations.
### Resolved Issues
* Fix: Billing spinners showing after job is complete.
* Fix: Timezone related issues with bill dates when running billing, approving all bills or setting the lock date.
* Fix: Long balances layout issue.
* Fix: Destinations list data in External Mappings.
* Fix: Restored account name to Account Details page.
* Fix: Prevent long account names breaking layout.
* Fix: Exclude archived currencies from the currency drop-down.
### Product Updates
* New Events and Notifications feature available in the API. Define and implement notifications that are triggered by system events in your m3ter Organization.
* Automatically send outbound Bills from m3ter to Paddle with updated native Paddle integration.
#### Billing
* **Bill Management enhancements**
* Can now run bill jobs within an Account.
* New Bill Job modal enabling billing of one or all bill frequencies based on bill date.
* Can now view all bills within a period - m3ter will show you all the Bills from the 1st of the month to the current day.
* Added ability to delete one or more pending bills.
* Can now view running bill jobs in the Console.
* **Bills**
* New field **invoiceRef** added to Bills.
* **Accounts**
* Added account currency setting, which enables setting a different billing currency against an account. Optional field.
* Allows Bill Jobs to be run from UI and use the account currency setting.
* If left blank, the organization billing currency is used.
* **Organization**
* *External Invoice date* can now be set in the Console and via API *(new field externalInvoiceDate)*. Use case is when recognizing usage revenue in the same period that it is consumed, rather than in the following month.
* *Days before bill due* setting now available to enter the number of days after bill generation date that you want to show on bills as the due date.
#### Miscellaneous
* New Currency pick list for use when defining the currency for an Organization, Account, Plan Template, Plan Group, Balance, or Prepayment/Commitment. Required currencies must first be defined at Organization level, which helps prevent billing errors due to mixed and undefined currencies being used.
* Allows both standard world currencies to be used or user-defined custom currencies, such as "\[Company Name] credits".
* Bill Jobs now use the account currency as a default. If not set at the account level, the default Organization currency is used by the Bill Job.
* Twelve new bill period variables now available for use in compound aggregation calculations giving tight control over the number of hours, days, or dates in a billing period.
```
ts.hoursInPlanArrearsPeriod
ts.datesInPlanArrearsPeriod
ts.daysInPlanArrearsPeriod
ts.hoursInPlanAdvancePeriod
ts.datesInPlanAdvancePeriod
ts.daysInPlanAdvancePeriod
ts.hoursInBillArrearsPeriod
ts.datesInBillArrearsPeriod
ts.daysInBillArrearsPeriod
ts.hoursInBillAdvancePeriod
ts.datesInBillAdvancePeriod
ts.daysInBillAdvancePeriod
```
### Console Updates
* Show option to select currencies on any screen that require a currency.
* Added approve all bills modal - new pop-up that enables you to set the bill approval date for the selected bills.
* New remove / unlink to child accounts list - easy access to remove child accounts from a billing hierarchy.
* Bill line item rows now always show service periods.
* Can now test notification rule calculations.
### Resolved Issues
* Fix: Consuming Balances for Bills fails at first attempt.
* Fix: Incorrect units on parent breakdown line items.
* Fix: Commitments / Prepayments error when trying to save prepayment after switching between billing options.
* Fix: Bill item service period not reflecting account plan effective dates in some cases.
### Product Updates
* New Balances functionality that enables crediting accounts with positive or negative amounts.
* New "native" integrations for NetSuite and Stripe, which allow the set up and configuration for controlling outbound Bills flow for these integrations to be performed directly in the Console.
* New user defined custom billing schedule option for Prepayments/Commitments.
* New math functions supported for use in Derived Field and Compound Aggregation calculations:
* `Math.floor()`
* `Math.ceil()`
* `Math.round()`
* `Math.pow()`
* `Math.abs()`
* Data Explorer: new "Overage Usage" and "Credit Memo" as line item types.
* Ability to set up tiered overage pricing on Plans for when a Prepayment/Commitment has been consumed.
* If Scheduled Billing is enabled for Organization, allow a 24 hour grace period beyond active Plan end date to include charges due for late-arriving usage data in Bills.
* Added navigation links to access m3ter Support web ticketing system.
* New Ad Hoc Bill line item type for ad hoc charges, such as for charges on Prepayments/Commitments that have a manual (custom) bill schedule.
### Console Updates
* Alerts modal size is reduced.
* Improved UX for adding a default segment.
* Pricing:
* Added overage pricing bands to the Pricing form.
* Added time controls for start and end date entries to the Pricing form.
* Duplicate pricing is now possible when overriding from a Pricing template.
* Pricing wizard now allows negative pricing.
* For clarity and to remove doubt, the text "inclusive" (start date) and "exclusive" (end date) has been added to the configuration form Date field labels.
* The Remove User button in User Settings now removes the Organization user.
* The Scheduled Bill Interval options now include 15 minute and 30 minute interval options in addition to hourly interval options.
* Added a Contract field to Prepayments and Account Plans.
* New Balances tab on Account details page.
* The Code field in the Plan creation form now has a user editable default Code value auto-generated.
### Resolved Issues
* Fix: Bill webhook not firing on approved bills.
* Fix: Commitment form fee dates validation.
* Fix: Prepayment bug when switching from old Prepayments to scheduled billing.
* Fix: Resolved potential XSS problem in `returnPath `query parameter.
### Product Updates
* Initial Pay-As-You-Go (PAYG) release:
* Top-up balances for an account as many times as required.
* Ability to draw down account balances via billing or manual adjustments.
* Time-bound balances with the option of a grace period.
* Improved billing hierarchies for parent/child account billing:
* Bill a child account with pricing at the parent level.
* Rollup child billing to the parent on a single bill item.
* Create a Bill item per child account with price averaging.
* Negative pricing and the ability to generate negative Bills:
* Enables you to refund your customers for unused services.
* Can now add Bill line item descriptions for Standing charges and Minimum spends.
* Auto-approve Bills. Can now schedule automated Bill approval from 15 minutes to 10 days after Bill generation.
### Console Updates
* Pricing band range now visible on Bill items.
* When creating a new entity and you enter a Name, a Code is auto-generated based on the Name.
* Number field formatting now shows a thousands separator.
* A last updated date was add to the to Alerts list modal.
* Improved Data Explorer Query Builder form for easier filter selection.
* Pricing Schedule can now be opened directly from pricing grid.
* Historic/future pricing can now be shown in the pricing grid.
* Better Pricing Schedule layout to suit smaller screens.
* Ability to add start/end dates to all pricing.
* Added Account Plan details to custom Plan details page, with a links to edit Plan. Same for Account Plan Group/custom Plan Group.
* Accounts page 'Plans' tab renamed to 'Attached plans' to make clear the separation between Plan and Account Plan.
* Added **Duplicate** button to Prepayments/Commitments list.
* Added scheduled Bill interval setting to Org Config page for regular updating of Bills.
* Added link from Bill details to Account.
* Replaced Bill Period with Bill Date in several places.
* Added search to popup entity selectors *(for example, when picking an Aggregation from pricing grid).*
* When adding child accounts to a parent, a searchable Select Accounts modal is now shown.
* Data Explorer usage data Query Builder now shows both Account name and code in selection list.
### Resolved Issues
* Fix: Update Org config form validation *(issue with using 0 as the bill schedule).*
* Fix: Prepayments Data Explorer calculation bug.
* Fix: Include global Aggregations in missing data check.
* Fix: Re-open date pickers on the selected month.
* Fix: Stop date pickers causing double scrollbars.
* Fix: Correctly show active/inactive for plan template pricing on pricing schedule.
* Fix: Pricing edit when using negative values for fixedPrice/unitPrice.
* Fix: Account tabs not fitting on smaller screen widths.
* Fix: Speed up Data Explorer by loading data batches in parallel.
* Fix: Lists create button enabling/disabling *(for example, when creating Compound Aggregations and you only have global Aggregations).*
# Changelog 2023
Source: https://docs.m3ter.com/changelog/changelog-2023
New features, functionality and updates for 2023.
**More on New Features?** Please see the [**Product News**](https://www.m3ter.com/blog/category/product-updates) blog for more detailed information on the value you can get from the new features in each release.
### Product Updates
* The Xero native integration is now available as a beta release version. See [Configuring Xero Integrations](/guides/integrations/setting-up-integrations/configuring-xero-integrations) for more details.
### Console Updates
* When you price a Custom Plan for an Account, the Plan is now clearly labelled as Custom in the Pricing Grid.
* The Plan Template create/edit forms in the Console now shows an optional Code field.
### Resolved Issues
* Fix: A bottom border misalignment issue that could occur in some browsers for the Bill table page in the Console has now been resolved.
* Fix: On some browsers, a validation error was shown when attempting to enter a decimal value in the Console usage data measurement submission form. This is now resolved.
* Fix: The Recent Accounts panel on the Console Dashboard page now correctly loads only the five most recently visited Accounts.
* Fix: On create and edit forms in the Console, pressing the Enter key after entering a search term in a searchable select drop-down field resulted in the form being submitted prematurely. This no longer occurs.
* Fix: Resolved issues for search API calls: Search Accounts, Search Bills, or Search Commitments:
* If `sortOrder` is specified in a `searchQuery`, the sort now works correctly.
* The way in which the tilde "\~" comparator works when used in a `searchQuery` string is now explained in the API Reference topic for these calls.
### Product Updates
* The *Ingest Failure Events* feature is now generally available for all customers. This allows you to review and troubleshoot validation failure Events generated when usage data measurements you submit to the platform fail to ingest properly. For more details, see [Reviewing and Resolving Ingest Events](/guides/billing-and-usage-data/submitting-usage-data/reviewing-and-resolving-ingest-events).
* External Mappings for 3rd-party integrations can now be created in bulk for a given mapping type. See [Creating Bulk External Mappings](/guides/integrations/setting-up-integrations/creating-and-managing-external-mappings#creating-bulk-external-mappings) for more details.
### Console Updates
* When reviewing Bills in the Bill Management page, you can now filter the Bills listed:
* By *Status* to show only the **Approved/Pending** or **Locked**.
* By *Bill frequency* to show only the **Daily**, **Weekly**, **Monthly**, or **Annually**.
* See [Filtering Bills](/guides/billing-and-usage-data/running-viewing-and-managing-bills/running-bills-and-viewing-bill-details#filtering-bills) for more details.
* A breakdown of Overage Usage line item is now shown on Bills.
* Usability improvements:
* Drop-down selection lists for entities across the Console now show entity *Codes* as well as *Names*.
* Reordering columns for the Bill Management listing and the Data Explorer loaded query Data Tables is now made easier with drag-and-drop functionality.
* On the Alerts and Users pages, a non-intuitive row click selection is replaced with either an Alert Details button or single User name selection.
### Resolved Issues
* Fix: The Compound Aggregation create form now shows a default value of None for the Rounding attribute.
* Fix: The Bill Details page Approve button now properly shows as disabled when the Bill has been Approved.
* Fix: The Global Lock Date modal now correctly locks all Approved Bills whose service period end date falls on or before the specified date.
* Fix: The `billId` query parameter now shows for the [List Statement Job](/api/statementjob/list-statement-jobs) API call in the API Reference.
### Product Updates
* Organization Admin users can now promptly resend a temporary password to users who failed to log into the platform before their original temporary password expired.
* In the Console, you can now select a Meter set up to collect usage data and perform a File Upload using a `CSV` formatted file you've prepared for usage data measurements ingest into the platform. Prior to ingest, the uploaded file is parsed and loaded into a table for review and validation, with any errors in formatting requirements, required code, or required Meter data fields values clearly shown to ensure data measurements ingest failure is avoided.
### Console Updates
* A User's profile can now be quickly edited for name changes.
* Entity IDs are now shown on entity Details cards. IDs can be copied directly to a user's clipboard, providing quick access to entity IDs for those working with API calls to the platform.
* When reviewing and investigating Integration Error and Ingest Failure Events, Events are now clearly labelled as either actioned or not actioned, and users can now toggle to show or hide actioned Events.
* Warnings are now clearly shown to alert users to the risk of duplicate billing when switching between consolidated billing and non-consolidated billing across their end-customers Accounts, and after billing has already been run in one of these modes.
### API Updates
* New API endpoints are available for [Search Accounts](/api/account/search-accounts), [Search Bills](/api/bill/search-bills), and [Search Commitments](/api/commitments/search-commitments) calls. The `searchQuery` parameter for each call allows you to build a complex query using a variety of fields available on the queried entity.
* API endpoints are now available for setting up [Scheduled Event Configurations](/api/scheduledeventconfigurations/introduction). These API calls allow you to create, configure, and manage Scheduled Events as custom Events for your Organization that reference Date/Time fields belonging to configuration and billing entities. Scheduled Events therefore provide you with an extra degree of flexibility over and above system-generated Events when setting up Notifications based on Events.
### Resolved Issues
* Fix: The Timestamp field on the Console Submit Usage form is no longer updated automatically for successive usage data ingest measurement submissions.
* Fix: Access to the Account Actions menu from Account pages has been updated to avoid styling overlap issues and to conform to the Console menu access paradigm.
* Fix: The Organization selection screen at Console login now scrolls elegantly without losing the search field for users belonging to many Organizations when they scroll their list.
* Fix: The end date for Contracts associated with an Account can now be set at the Account level as well as at the Contract level.
### Console Updates
* When logging in to the Console, users with access to more than one Organization now see a **Select Organization** screen. This helps users to quickly open the Organization they want to work in and avoids having to first open a default Organization. The last accessed Organization is clearly shown for selection and a search is available.
### API Updates
* The [Approve Bills](/api/bill/approve-bills) API call now offers a `billIds` request parameter, which can be used to perform batch approval of Bills.
### Resolved Issues
* Fix: The presentation of the time taken for Integration run tasks has been simplified.
### Product Updates
* End-dating of the Billing entities associated with an Account - Contracts, Account Plans, Pricings, or Prepayments - can now be done directly from an Account page in the Console. This capability proves very useful for cases where you need to create new agreements with end-customers - such as for renewals or mid-service term amendments - and for service cancellations.
### Console Updates
* The **Dashboard** page has been re-modeled to now show a **Recent Accounts** listing, allowing you to quickly return to those Accounts you have worked on recently.
* Days before Bills are due after the initial Bill generation date can now be defined at the individual Account level and to override the setting defined at Organizational level. This allows Bill due dates to be set differently across different end-customer Accounts.
* Where an integration with an external system has been set up for sending Bills outbound, the **Bill Details** cards now include a status for the **Last Completed Integration Run Date**.
* Inviting users to join your Organization and managing your invitations can now be done more easily using a separate tab on the **Access** page.
* The **Meter Details** card now lists the Data Fields and Derived Fields set up for a Meter.
* When setting up External Mappings, if the possible values for the **External entity ID** field can be fetched for the **External system** and **m3ter entity** selections, then you can use a drop-down list to select the value for this field from the list of possible values returned.
* The layout for Bills has been restyled to improve readability and help differentiate main running totals from individual line item breakdown amounts when reviewing Bills.
### API Updates
* A [Search Account](/api/account/search-accounts) API call is now available, which you can use to build a query to return a selection of Accounts using a wide variety of search criteria. We expect the Accounts search functionality to be available in the Console soon.
### Resolved Issues
* Fix: The option to select a Parent Account when editing an Account that is itself a Parent Account is now disabled on the edit Account form.
* Fix: The edit linked Plans button is now appropriately disabled on the Plan Group Attachment Details page when the Plan Group is empty.
* Fix: long-text entity Name and Code fields are now accommodated elegantly within UI details cards and forms.
* Fix: Error handling has been improved for Notification Rule calculation testing.
* Fix: Breadcrumb links have been removed where no destination page exists.
* Fix: Notification Rule can now be saved without testing calculation.
* Fix: When duplicating Plans or Plan Templates, the Name and Code field are no longer pre-populated with the existing Plan's or Plan Template's Name and Code values.
### Console Updates
* Bill details page improved for ease of use and Bill review. When a Bill is opened the Bill entity details are now shown on a separate card from the breakdown of charges that make up the Bill total.
* General usability improvements:
* Details cards now clearly indicate Custom Plans/Plan Groups and identify the Accounts they are Custom Plans/Plan Groups for.
* Create/Edit/Add buttons labeled specifically for the entities being created or edited or added.
* The selection click area for radio button and checkbox options now tightly restricted to area of text label footprint to prevent unintended selections by stray clicks.
* The Pricing Schedule page now shows audit data for the Product Plan and Aggregation used to price it.
* A specific expiry date can now be set when inviting other Users to join your Organization and to override the default expiry date of 30 days from when the invite was sent out.
* The Pricing Editor now shows a pricing readiness guide when opened for a Product where not all of the required configuration for starting to price Product Plans has been completed. As the required pricing readiness configuration work is carried out, the guide show a percentage progression to completion.
### API Updates
* API calls are now available which allow you to end-date the Billing entities - Contracts, Account Plans, or Prepayments - associated with an end-customer Account or with an Account a Contract has been attached to.
### Resolved Issues
* Fix: Bill breakdown - usage per price band unit price didn't align with line item subtotals.
* Fix: Add missing account external mappings table translations.
* Fix: Data Explorer dimensions for usage data queries now loaded sequentially to ensure smooth loading.
### Product Updates
* Audit data is now automatically generated for all main m3ter entity details pages. This logs which users created and which last modified the entity and when.
* Billing:
* The order or selection for billing draw-down against Prepayment or Billing credit amounts on Accounts can now be defined. Options are: *Prepayments first*, *Balances first*, *Prepayment only*, or *Balances only*. This gives much greater flexibility for meeting specific use cases for handling the consumption of credits on end-customer Accounts.
* You no longer need to attach a Product Plan or Plan Group to an Account in order to add a Prepayment to the Account and set up billing for fees on outstanding Prepayment amount.
* Check if a Bill Statement needs refreshing by comparing the Bill calculation timestamp against the Statement last modified date, which is available in the response to a get Statement API call.
* Integrations:
* Five new system Events are now generated for integration errors and are available for Notifications. When any of these Events occur, they are surfaced on a Console page with an explanatory message. Operational support for managing these integrations error Events is provided with a button linking you out directly to start the appropriate follow up workflow to troubleshoot and resolve. When resolved, error Events can be marked as actioned and removed from the Events page.
* New options added for setting up a Chargebee Integration:
* Multi-decimal values. If multi-decimal support is enabled in your Chargebee site, you can now set precise decimal places for sending price and unit values out from m3ter to match your Chargebee settings and achieve greater precision when integrating data.
* Synchronize credits. For an outbound billing flow, negative bill line items can now be synchronized with credits in Chargebee
### Console Updates
* Permission Policy Statements can now be quickly compiled using an advanced editor to choose *Effect*, *Actions*, and *Resources*.
* The Pricing Editor grid labeling has been improved making clear where a Plan has been priced directly instead of inheriting it's pricing from a Plan Template .
* General usability improvements:
* Details pages standardized across main configuration entities and now show audit data and custom fields.
* Radio button sets used where few available options for ease of option selection.
* Simple on/off toggle for bill in advance/in arrears selections to avoid possible confusion.
* The submit test usage data measurements modal is improved to regenerate submit measurement UIDs for successive submissions. A submissions log is also now built as you make submissions, which is helpful when querying for ingested data at a later time.
* Billing:
* Purchase Order Number now shows on Bill details.
* Bill line items now ordered by Aggregation or Compound Aggregation.
* An AI-powered Help Assistant is now available directly in the Console through the Help Center. The Assistant is fully-trained on our entire documentation knowledge base and can quickly provide answers to your questions as you work on the platform, giving direct links into relevant documentation topics.
### Resolved Issues
* Fix: Prepayment fee billing setting on Organization Configuration card.
* Fix: Advanced usage data submission UID reset.
### Product Updates
* You can now invite new Users to your Organization:
* Assign Permission Policies to control their access level when they accept the invite.
* Deactivate and reactivate invited User's access.
* Set an expiry date for accepting the invite.
* When creating a Notification Rule, you can configure the Notification to always be triggered when an Event occurs, and without any further conditions for sending the Notification being defined.
* System Events available for Integration errors. Review and troubleshoot to resolve errors from the *Integrations > Events* page in the Console.
* Events on Statement Jobs - receive notifications when a statement job changes status so you can take action. For example:
* Send statements to customers
* Refresh your customer billing dashboard
* Integration run details can be reviewed in the Console for Bill and Notification integrations.
### Console Updates
* Billing:
* Add enable checkbox for bill numbering.
* Update approve Bills modal to allow approval by date range.
* Add Bill export button.
* Listing Bills from Bill Management can now be filtered by date range and Locked or Approved/Pending status.
* Extended line item details shown on Bills.
* Target Currency selection available on Run Billing modal.
* Billing data query results in Data Explorer show line item descriptions.
* Pre-defined "Current Month" and "Last Month" ranges added to date range picker for Bills listing.
* Codes for Meter Data Fields and Derived Fields auto-generated from entered name string.
* Product details page added.
* Native Integration 3rd-party authentication set up separated from main integration configuration workflow.
* Plan creation workflow now requires existing Plan Template selection.
* Bulk delete available on External Mappings page.
* Account Actions menu added to Account details page.
* Accounting Product selection required when creating a Prepayment/Commitment.
* Line Item charge types for draw-down against a Prepayment/Commitment can now be selected.
* Details pages for main configuration entities show audit data on User activity for "Created by" and "Last modified by".
### Resolved Issues
* Fix: Filtering of plans on custom plan group page.
* Fix: Order pricing grid columns and rows by name.
* Fix: Incorrect Bill prefix and sequence number on account overview.
* Fix: Bill line item reference numbers displaying undefined.
* Fix: Remove hard-coded page size from Bills lists.
* Fix: Allow adding custom plan to custom plan group.
* Fix: Duplicating prepayments that use a Bill schedule.
* Fix: Missing translations for External Mappings.
* Fix: Date picker pop-up positioning bug.
* Fix: Save issue when creating Pricing using wizard.
* Fix: Date selection for Epoch dates.
* Fix: Prepayment Consumption chart only shows trending data up to the Prepayment's end date.
### Product Updates
* Chargebee and Quickbooks now available as native integrations.
* Billing:
* Bill Statements can now be defined and generated as backing sheets for end customer Bills. Once generated, you can then download Statements in either JSON or CSV format to transpose and compile them into the required format.
* Download Bills in CSV format.
* Approve Bills for selected date range.
* Using the List Bills API call, you can now filter Bills returned by Locked status or Start/End dates.
* Switch available on Bill details to hide zero quantity line items and reduce Bill clutter.
* Set Global lock date for Bills.
* Bill currency conversion summary added to Bill details.
* Notification Rules can now be created and configured in the Console for system Events. You can then link Notification Rules to integration Destination webhooks to complete alerting and notification set up and have your Notifications sent through to your external systems.
* You can now use an option to show Prepayment fee overage usage charges as separate line items on Bills.
### Console Updates
* Prepayment/Commitment details page now contains a consumption chart showing minimum expected consumption, actual consumption, and consumption trend for the service period.
* Balance Create form now has options to select the products consumed and charge types that can drawn-down against the Balance amount.
* Overage Percentage setting now available for Balances.
* Bill line item groupings now show clear labels for Product/Prepayment charges.
* Bill details page now shows total at top of page.
* Custom Bill reference prefix and numbering sequence start can now be set at Organization level.
* Service User creation now supported with wizard.
### Resolved Issues
* Fix: Handle error when cancelling bill jobs.
* Fix: Fix default for last day month changes.
* Fix: Prevent usage explorer error if we can't load dimensions.
* Fix: Disable close on overlay click for run billing modal.
* Fix: Increase Bill list page size to 50.
### Product Updates
* Added Balance amount events. Users can now trigger notifications when a Balance amount is updated and reaches a certain threshold.
* New overage pricing and overage surcharge settings for Balances. When a Balance is fully consumed, merchants can configure 3 different actions:
* Specify a rollover amount and expiry date. This is the existing behavior.
* Specify an overage percentage, either positive or negative, which will increase or decrease the standard billed rate at which any further usage is charged against an Account once any Balance on the Account is fully consumed. This can be used to incentivize end customers to top up their Balance, or to move onto a different billing arrangement with you.
* Specify overage pricing. When creating pricing using a tiered pricing structure for Plans, overage pricing can also be defined. Overage pricing cuts in when the Balance is fully consumed. This is another way to increase or decrease the standard billed rate charged against an Account once a Balance on the Account has been consumed.
* Service Period dates.
* Balance consumption shown on m3ter Bills now includes the service period that the Balance covered.
* Bill Statements.
* Bill Statements can be used as informative backing sheets to invoices. They provide a breakdown of the usage charges that appear on the Bill, and help your end customers understand better those charges and gain a better picture of their usage over the billing period.
* Bill Statements can be defined for Meter usage data measures that form the basis of pricing rates used to calculate billing charges together with other Meter usage data dimensions. These other usage data dimensions are used as the basis for a breakdown of the billed usage to produce backing sheets for invoices. Usage data can be de-aggregated and grouped for use on the end customer Statement. It is downloadable in *.csv* or JSON format for rendering via 3rd party tools.
The Bill Statements features is available on request.
* Access
* **m3ter Support.** Console users can now submit a request to grant m3ter Support access to their m3ter Organization for troubleshooting purposes, and when they have submitted a Support ticket.
* **Permission Policies.**
* In the Console, Administrator users can create custom Permission Policies to assign to other users and service users, and then apply these Policies to control precisely users' access to Organization resources. Permission Policies can be defined to assist with the separation of duties for users within the Console, in addition to restricting access to specific areas. For example, an ingest only user will not have access to any other m3ter functions.
* User groups are now available in the m3ter Console. Permission Policies can be applied to User Groups. Users can then be added to a User Group and any Permission Policies applied to the Group are applied to the member Users. User Groups:
* Allow logical grouping of resources for different roles within your Organization. For example, a Billing Operations User Group can have a Permission Policy applied to the Group to restrict access to only those resources needed to perform their routine billing tasks - such as Bills, Accounts, and so on. All Billing Operations team members can then be assigned to the Group.
* Help solve common issues when trying to apply very fine-grained permissions.
### Console Updates
* Added capability to create and manage Permission Policies.
* Line item currency now used for Bill unit prices.
* New search field in External Mappings list.
* Added maximum decimal places column to currencies list.
* Improved labels for Product and Bill hotlinks in External Mappings list.
* Added Bill in Advance / Arrears to Plan and Plan Template details.
* Obligations panel in the Data Explorer > Prepayments tab.
### Resolved Issues
* Fix: Date range picker bug.
* Fix: Handles single zero-priced band on Pricing edit.
* Fix: Pick list currencies now use the number of decimal places specified.
* Fix: Page titles now always show and update correctly.
* Fix: Global lock date setting now works as expected.
### Product Updates
* Draw downs across Account hierarchies enabled for Prepayments fee billing. New *drawdown mode* enables control of whether to draw down Prepayments against the child or parent account.
* Add debit memos to bills that can be used to correct undercharges for example.
* New Consolidate Bills option in the Organization Configuration. Bills are currently created by bill date and billing frequency. When enabled, charges that are billed on a given bill date are automatically added to the bill regardless of charge billing frequency. All charges due on the date are put into one bill instead of separate bills for each of the different billing frequencies.
### Console Updates
* "Commitment Details" now known as "Prepayment Details".
* Timezone field is now a pick-list. As well as UTC and GMT-relative tz database formats being listed, a complete set of tz database regional timezones is also available for selection.
* Custom field editor columns now have labels.
* Bills list filter now uses date range picker.
* Organization Settings now uses a Debit Reason pick-list.
* Added full currency symbols to distinguish for example, between Canadian and US Dollars.
* "Aggregated Usage" has been added as an external mappings m3ter entity type.
* Added pagination to Users list.
* Settings > Access page now has a Support Access tab. Enables granting m3ter Support temporary access to your Organization for investigation and troubleshooting.
* Added Product label to Account Plans list.
### Resolved Issues
* Fix: Bill list date resetting.
* Fix: Error in Pricing Grid Pricing Navigator.
# Changelog 2024
Source: https://docs.m3ter.com/changelog/changelog-2024
New features, functionality and updates for 2024.
**More on New Features?** Please see the [**Product News**](https://www.m3ter.com/blog/category/product-updates) blog for more detailed information on the value you can get from the new features in each release.
### Product Updates
* **Integration-specific External Mappings**. If you want to create multiple separate integrations for an external system, you can create external mappings for each separate integration and these external mappings are then *linked to* the specific integration they were created for. See [Creating Linked External Mappings](/guides/integrations/setting-up-integrations/creating-and-managing-external-mappings#creating-linked-external-mappings).
* **m3ter Connector for Salesforce**. Version **0.5** of the Connector is now available - see the [m3ter Connector Changelog](/guides/m3ter-connector-for-salesforce/m3ter-connector-for-salesforce-changelog) page for details of the enhancements in this version.
### Console Updates
* **Adding Account Plans to Contracts**. Child Account Plans or Account Plan Groups can now be added to the Parent Account Contract. See [Adding Child Account Plans to Parent Account Contract](/guides/end-customer-accounts/creating-contracts-for-accounts#adding-child-account-plans-or-account-plan-groups-to-parent-account-contract).
* **Salesforce Native Integrations - support for Custom Fields**. When setting up a Salesforce native integration configuration for an entity data sync for Accounts or Contracts in your m3ter Organization, you can now select to sync custom fields for these two entity types with fields in your Salesforce Org.
* **Usability Improvements**:
* **Plan Group Attachment**. The Plan Group Attachment page allows users to view details of an Account Plan created when a Plan Group is attached to an Account. For user convenience, the page also allows users to go through the Plans in an attached Plan Group and inspect the details and pricing of those Plans. Previously, Plan selection was rendered outside of any cards on the page, which didn’t help users understand they were looking at details and pricing of the individual Plans in the Plan Group and as distinct from the Account Plan itself. The page has been restyled to make it more intuitive for users and consistent with other areas of the Console.
* **Updating Prepayment/Commitment Fee Schedule**. If a Prepayment fee schedule is updated after Bills have been generated according to the original schedule, recalculating Bills will not update them for the new schedule. A warning is now shown on the Billing Configuration form to alerts users and to remind them to delete and rerun billing to update for the new schedule.
### Resolved Issues
* Fix: If an invalid CSV file is selected for usage data measurements ingest, an informative error message is now properly displayed to users on the Meter ingest form in the Console.
* Fix: An issue where the loading of Bill lists for an Account might timeout has been resolved.
* Fix: In the Console Organization switcher list, an issue has been resolved where an Organization with both normal user access and Support user access would appear twice in the select list.
### Product Updates
* **Data Export in Preview Release.** Data Exports allow you to export data from m3ter into your own systems, giving you the flexibility to create your own reports, user dashboards, and more. Exports can be scheduled as frequently as every hour, and run on-demand as required. If you're interested in previewing the Data Export feature, please get in touch with m3ter Support or your m3ter contact. See [Data Exports (Preview)](/guides/data-exports) for more details.
* **Salesforce Integration**. The Salesforce native integration in m3ter now supports sending **Balances** data outbound into your Salesforce Org. This data can then be used for reporting purposes or to support your other business intelligence tools.
### Console Updates
* **Integration Credentials**. When creating and managing your Integration Credentials, you can use a new *Grid* layout page, which has external system logos embedded in the page allowing you to quickly identify which system a Credential can be used with when configuring your m3ter Integrations.
* **Usability Improvements**:
* **Integrations**. Pages that display the external system destinations for integrations, such as the Integration Details and External Mappings pages, now show external system logos for prompt identification of the external system the integration is for.
* **Searching Plans and Plan Templates**. The Product selector field on Plan and Plan Templates pages is now searchable.
* **Plan/Plan Group Attachment**. Plan and Plan Group attachment pages for Accounts have been reorganized and the metadata card relabeled to clearly associate it with the Plan/Plan Group attachment.
* **List Pages**. For list pages, options to show only 5 or 10 items per page are now available. These new options can be used where single page items might be large, such as the Bills list page, and to prevent any delays due to slow loading of multiple items of 20 (the default) and above per page.
* **Statements for Bills**. Users attempting to generate Bill Statements when a Statement Definition does not yet exist at either Organization or Account level are now shown information alerts advising them that they first need to create at least one Statement Definition and assign it at either Organization or Account level.
* **Pricing details for non-custom Plans**. Pricing details can now be viewed for non-custom Plans when reviewing Plan attachments on Accounts.
* **Custom Fields**. When creating Custom Fields for entities, full validation with appropriate warnings given is now implemented to ensure the required Name and Value are entered to allow successful creation.
* **Viewing Meter details**. Meter details no longer incorrectly shows a Create aggregation button for Meter Data Field types that don't support aggregation.
### Resolved Issues
* Fix: The information alert text that appears on the Select counters modal when adding Counters to the Pricing Editor now reads correctly.
* Fix: A slow loading issue has been resolved when opening an Account Plan Group for an Account where the Plan Group contains a large number of Plans.
* Fix: An issue has been resolved for priced Plan Templates that have a Code field configured which meant a Plan based on the template could not override the template pricing.
* Fix: Page scroll now properly resets when users move to a different page in the Console.
* Fix: An unhelpful validation error has been removed that was shown if users entered an email address containing a space when attempting to log into the Console.
* Fix: When a Plan Group was attached to an Account and Standing Charge and Minimum Spend amounts were configured for the Plan Group, at billing these amounts were correctly factored into the Bill total but not shown as individual line items. This issue has now been resolved and separate line items are correctly shown and labeled.
### Product Updates
* **End-dating Billing Entities includes Counter Pricings**. When applying an end date to billing entities on an Account directly from the Account or via a Contract you've created for the Account, you can now select *Counter Pricings* to be included in the end-dating.
* **Draw-Down types for Prepayments and Balances**. The billing charge types that can be selected for draw-down against Prepayments and Balances on an Account now includes charges due to unit-based pricing for *Counter running total charges* and *Counter adjustment debit*s.
### Console Updates
* **Integrations**. The Integrations section now shows a *Grid* layout page, which greatly enhances user experience when reviewing and managing integrations with external systems. External system logos are embedded in the page, allowing you to quickly identify which systems are integrated with your m3ter Organization. In addition, the workflows when creating, editing, or deleting integrations become more direct and accessible. Links out to relevant Docs topics for guidance on setting up integrations with external systems are provided.
* **Entity Metadata**. Details pages for main configuration entities now carry an *Entity Metadata* card showing any Custom Fields and External Mappings created for the entity. This makes finding and reviewing the Custom Fields and External Mappings associated with an m3ter entity straightforward. For added convenience, Custom Field values or the IDs of external entities mapped to a m3ter entity can be copied directly.
* **Usability Improvements**.
* **Counter Adjustments**. If you open an *Account >Counter adjustments* tab but no Counters have yet been created for your Organization, a warning is shown with a link provided to go directly to the \*Create Counter \*page.
* **Organization Sections**. Organization configuration and management sections - such as *Settings* and *Integration*s - are now grouped and made accessible from a drop-down menu on the Console top bar.
* **Pricing Editor**. If pricing prerequisite configuration is not complete, a help text shows in the *Pricing Editor* to remind users of the configuration required before Plans can be priced, with links out to relevant create pages.
* **Integration Credentials**. The workflow to create Integration Credentials is improved and a Credential's ID is displayed and can be copied directly from the *Credentials* list page.
### Resolved Issues
* Fix: When logging into the Console with dark mode enabled, the toggle password icon was difficult to see. This issue has now been resolved.
* Fix: Icons flagging errors with entity audit data on Details panels now correctly show as red not green.
* Fix: An issue where an actioned call for Integration Events was incorrectly returning an error has been resolved.
* Fix: A minor UI issue where drop-down list could be hidden behind other screen content has been resolved.
### Product Updates
* **Integrations.**
* **Salesforce Integration.** You can now use the m3ter Salesforce Native Integration to send raw data outbound into your Salesforce Org for Accounts, Contracts, and Prepayments/Commitments in your m3ter Organization. You can then use this raw data for other purposes in your Salesforce Org, such as for building reports or reconciliation.
* **Reviewing Integration Runs**. The Integration Runs workflow has been redesigned for ease of use, with an intuitive **Run Log** panel now shown and listing tasks performed during the run. The success or failure for each task performed under the integration run is clearly flagged and you can quickly drill into tasks to examine the requests and responses for the task when troubleshooting errors.
### Console Updates
* **New Console!** When you log into m3ter and select an Organization you'll be taken to the new Console offering an improved layout, navigation, and more intuitive look and feel:
* Improved top-level navigation gets you to main sections quickly with collapsible side bars for working on specific configuration and operational tasks.
* Data Explorers for querying Usage, Billing, and Prepayments data in your Organization are now conveniently located within their relevant areas.
* Improved Organization switcher with search facility.
* For a limited overlap period, you'll be able to switch back to the old Console as you familiarize yourself with the new Console. You can continue to submit feedback and we'd very much welcome your views on the new layout and navigation.
* **Bill Management Invoice Date Range**. The **Invoice date** range picker for displaying Bills in **Bill Management** now allows a single day to be set as the date range.
* **User Groups**. The **User Group Details** page now contains a **Users** panel listing the users assigned to the User Group. You can then select a user's name to open the **Details** page for that user directly.
### Resolved Issues
* Fix: Plan pricing grid action buttons now wrap neatly to fit on small screens.
* Fix: An issue where the Organization switcher duplicated Organizations listed has been resolved.
* Fix: When you try to select an Organization which you don't have access to, the Organization switcher now correctly shows allowing you to select a different Organization.
* Fix: The Terms and Conditions acceptance check modal popup now presents correctly to users at first time login.
* Fix: Standing Charge and Minimum Spend descriptions are now persisted in Plan edit forms.
* Fix: If a download task fails to complete, an error is shows to inform the user.
* Fix: The Integration Credential create form no longer shows webhook as an option.
* Fix: An issue with the selection of searchable entities in the Console not having the selected value reloaded has been resolved.
* Fix: The Accounts page in the Console now uses a list call returning a boolean when checking for the presence of child Accounts, which avoids multiple requests when an Organization contains many Accounts.
* Fix: The Recent Account list in the Console Accounts section side bar is now restricted to a maximum of 5 items.
* Fix: An issue where the Recent Accounts listing in the Dashboard could remain empty is now resolved.
### Product Updates
* **Recurring Charges with Counters**. The new Recurring Charges feature in m3ter allows you to create Counters and quickly implement unit-based pricing for your Product Plans to define recurring subscription charge rates on end-customer Accounts. Common pricing use cases the feature fulfills are seat-based or user license pricing. For these sorts of cases, unit quantities can fluctuate from one billing period to the next and you'll want to offer end-customers a flexible pricing model. Importantly, hybrid-pricing for Products is enabled and you can apply both usage-based and unit-based pricing for a single Product. For more details see [Recurring Charges: Counters](/guides/recurring-charges-counters).
* **Trust Center**. The m3ter [Trust Center](https://trust.m3ter.com/overview) is now available where you can review details of the data protection and security measures we maintain for the platform.
* **Integrations**.
* **Salesforce Integration**. The native integration for Salesforce now supports *Account*, *Contract*, or *Prepayments/Commitments* when creating an integration.
* **Manage Multiple Integrations**. If you need to set up multiple integrations with the same 3rd-party system, you can now easily manage which m3ter objects and fields are mapped into which of the different integrations you've set up for that system. When creating External Mappings for integrations, you can define the *Parent Integration* the mapping is to be used for. For each integration, you can then enable a setting to enforce only those external mappings specifying the integration as the parent are the mappings used for the integration. See [Creating and Managing External Mappings](/guides/integrations/setting-up-integrations/creating-and-managing-external-mappings).
### Console Updates
* **Product for Plans**. For ease of reference, the Product to which a Plan or Plan Template belongs is now shown on the **Plan/Plan Templates Details** page, and you can open the **Product Details** page directly from there.
* **Billed Recurring Charges Chart**. In the **Account Overview** tab, if the Account has been charged for recurring subscription charges, you can select a Counter used to apply unit-based pricing to the Account Plan and open a *Billed Recurring Charges* chart.
* **Default Values Shown**. When configuring an object that can inherit a default setting from another object - for example whether a Plan will use the setting set at Plan Template level for minimum spend amounts to be billed in advance/in arrears or override it - the actual default values are now clearly shown on the create/edit forms.
### Resolved Issues
* Fix: If more than 100 Bills are selected for a recalculate Bill Job in the Console Bill Management page, then the Bill Job will fail. A clear error now shows for users if this occurs.
* Fix: When updating a User profile, any errors are now properly displayed to users.
* Fix: If you select to open a Bill in the Bill Management page for an Account that no longer exists, then an error is now clearly shown informing you of this.
### Product Updates
* **Integration Configurations**. You can now give specific names to your Integration Configurations, which is useful if you require multiple Integrations for the same destination and need to clearly differentiate them.
* **Coming Soon - Recurring Charges!** The capability to charge for your products using subscription or recurring charge pricing will soon be available out-of-the-box in the m3ter platform. This new unit-based pricing feature will allow you to charge customers in flexible way - based on the numbers of product units, seats, or user licenses subscribed to within a given billing period. This new feature will support and facilitate applying hybrid pricing models for your products in m3ter - where recurring charge pricing is combined with usage-based pricing for a product.
### Console Updates
* **Working with Meters**.
* **Listed by Product**. The Meters page has been updated to list Meters by Product or as Global. This makes finding Meters easier and removes the need to select a Product first. The create Meter workflow is then streamlined since Product is pre-selected.
* **Ingest API Code Samples**. Code Samples for making usage data measurement submissions for a Meter are now provided on the Submit Measurements panel of Meter Details pages - JSON, cURL, JavaScript, Python, and Java. These samples can be conveniently copied directly to your clipboard.
* **Activity Panel**. Meter Details pages now provide an Activity Panel, which allows you to quickly check that usage data measurement submissions for a Meter have been successfully ingested into the platform. Up to a maximum of the five most recent submissions made in the last hour are listed. See [Submitting and Checking Test Usage Data](/guides/billing-and-usage-data/submitting-usage-data/submitting-test-usage-data) for more details.
* **Usability Issues**.
* When users are submitting usage data measurements from an Account page, a warning text now advises that any changes made in Advanced view are persisted for Simple view on the Submit usage data form. This helps to avoid usage data submissions being made for incorrect Meters or Accounts.
* Forms that allow users selection for Billing in advance/in arrears options now use a radio button set, since the options are mutually exclusive.
* **Coming Soon!** A new Console with updated layout and navigation is coming soon. For now, you can check out a preview of the new Console from your Dashboard page. You can submit feedback when previewing and we'd welcome your views from trying out the new layout and navigation.
### API Updates
* **File Upload Service API**. If you have prepared a usage data measurements file in JSON format ready for upload using the File Upload Service, you can now perform the upload directly in the Console. The **File Upload API** tab on the Submit Measurements panel on Meter Details pages allows you to either drag-and-drop the file or select it for upload. See the [File Upload Service API](/guides/billing-and-usage-data/submitting-usage-data/file-upload-service-api) topic for more details.
* **Listing File Upload Jobs**. The [List File Upload Jobs](/api#tag/Measurements/operation/ListJobs) call now offers `dateCreatedStart` and `dateCreatedEnd` optional query parameters, which allows you to define a date range and filter the File Upload Jobs returned.
### Resolved Issues
* Fix: When linking a Credential to an Integration, the select dialog now lists the timestamp for the date the Credential was created.
* Fix: The Create Aggregation form in the Console now properly clears out both the Meter and Target field drop-downs if the Product selection is changed.
* Fix: An error where the Console attempted to load an Account where no id was available is now resolved by running a check for id first.
* Fix: An error preventing users from viewing Integration Destination details is now resolved.
* Fix: The submit usage workflow for an Account now works correctly when a Meter has been selected - previously the workflow might hang after Meter selection.
* Fix: A UI issue where Account Details with long strings failed to wrap text is now resolved.
* Fix: A problem with the Users tab on the Organization Access page in the Console where the Users panel was hidden when the browser window was narrowed is now resolved. A similar problem when viewing an Account Prepayment Details page has also been addressed.
### Product Updates
* **Salesforce Native Integration**. You can now create and manage native integrations for sending your end customer Account Bills generated in m3ter outbound into your Salesforce system.
* **Notifications for Disabled Integration**. You can set up Emails notifications to be sent to Organization users when an Integration has been auto-disabled. See the [Setting Up and Managing Native and Notification Integrations](/guides/integrations/setting-up-integrations) section for more details.
### Console Updates
* **Usability Enhancements**:
* **Pricing Editor**. When users are setting up to price Product Plans in the Pricing Editor, the workflow is improved to avoid the creation of duplicated pricing - items which have already been selected for pricing are now removed from selection lists:
* Plans and Plan Templates.
* Aggregations and Compound Aggregations.
* **Billing for Accounts and Prepayments**. The **First bill date** setting for Account and Prepayment/Commitment billing forms has been changed to **Billing cycle date** to clarify the purpose of this setting for users, with an advisory text shown on forms giving an example of how the setting can be used.
* **Bill Management**. When users define a period to view Bills using the **Invoice Date** calendar popups, both the start and end date are interpreted inclusively and this is now clearly labeled.
* **Meter Details**. Users can now commence a workflow directly from a **Meter Details** page to create an Aggregation that targets one of the Meter's Data Fields or Derived Fields.
* **Integration Credentials**. The Credentials page now contains a **Created Date** column to help users distinguish Credentials they've created for the same integration destination.
* **User/Password Authentication**. Advisory texts have been added to the m3ter sign-in modal to enhance the user login experience and reminding users:
* The Email address used for sign-in is case sensitive.
* Temporary passwords cannot be reset and a new one must be requested.
### Resolved Issues
* Fix: An issue that allowed duplicate pricing grid rows to appear in the Pricing Editor is now resolved.
* Fix: Credit or Debit line items on Approved or Locked Bills can no longer be edited or deleted.
* Fix: Labels have been made consistent across Plan Details and Plan Template Details pages.
* Fix: Settings on Pricing forms are now grouped to match the styling used on other configuration forms.
* Fix: An issue where a pricing would not show in the Pricing Editor when a minimum spend was not configured has been resolved.
* Fix: Duplication of a Plan Template from the Pricing Editor is now working correctly.
### Product Updates
* **Connector for Salesforce**. The m3ter Connector for Salesforce is now available as an initial release version. If you are interested in installing the Connector into your Salesforce environment to sync your Salesforce data with the m3ter platform, please get in touch with m3ter Support or your m3ter contact. See [m3ter Connector for Salesforce](/guides/m3ter-connector-for-salesforce) for more details.
* **Event Notifications**. When a Notification is triggered for an Event, the Notification payload sent out to a webhook now contains details of the Event. See [Event Notification Payload](/guides/alerts-events-and-notifications/utilizing-events-and-notifications/creating-managing-and-reviewing-notifications#example-notification-payload).
### Console Updates
* **Usability Enhancements**:
* When users attempt to sign in with the platform, the alternative authentication methods —using either Email/Password credentials or Single Sign-On (SSO)—are now clearly signposted.
* Configuring a **Bill auto-approval** setting for an Organization has been improved. The default period is now set at 24 hours, and a clear warning text explains a possible conflict if scheduled billing is also enabled.
* When selecting an Aggregation/Compound Aggregation for pricing a Product Plan, a clear warning informs users that the selection list is pre-filtered to show only those Aggregations/Compound Aggregations belonging to the same Product as the Plan together with any Global Aggregations/Compound Aggregations created for the Organization.
* Users confronting empty pick-lists when attempting to add Currencies/Transactions/Credits/Debits are now shown a warning that no relevant items are available, with advice to check for archived items and, alternatively, use a link taking them directly to the relevant page to commence a create item workflow.
* Time Period options for Data Explorer query setup have been adjusted for usability and clarity with options now fully documented - for example, at [Building and Performing a Usage Data Query](/guides/data-explorer/performing-usage-queries-and-reviewing-results#building-and-performing-a-usage-data-query).
* When reviewing a Pricing configuration, the Pricing Details card now clearly distinguishes between the *Pricing type* and *Pricing applied as* setting.
* Updated button labels used when attaching Product and Custom Plans to Accounts to create Account Plans now make it clear what this workflow achieves, and help to avoid confusion with the separate workflow for creating Product or Custom Plans in the first place.
* When creating or editing an Account Prepayment, an improved Prepayment Draw-Down card assists users in selecting the Products and charge types made available for draw-down against the Prepayment.
### Resolved Issues
* Fix: The pricing for a Global Plan added to Custom Plan Group can no longer be edited in the Associated Pricing panel for the Custom Plan Group.
* Fix: Aggregations added to the Associated Pricing panel for Plan or Plan Template Details pages now persist.
* Fix: The Submit Usage form now correctly auto-updates the UID field for the usage data measurement submission when users switch to and from Simple/Advanced view before making the submission.
* Fix: Creation of Custom Currencies now imposes the constraint that a three-character Code must be used.
### Product Updates
* A **Service Status** page is now available, which can be accessed directly from the Console main navigation. On this page you can check the current operational status of the platform's Config API and Ingest API services, together with a percentage measure of status over the last 90 days. To review a breakdown of service performance status over the 90 days, you can expand a service. For more details, see [Checking Service Status](/guides/getting-started/working-in-the-m3ter-console#checking-service-status).
* **Integration Credentials** can now be created and managed separately from Integration Configurations. You can then use these Credentials to set up authentication of m3ter integrations with your 3rd-party systems. For more details, see [Creating and Managing Integration Credentials](/guides/integrations/setting-up-integrations/managing-integration-credentials).
### Console Updates
* Configuring pricing for a Product Plan has been made easier in Pricing Editor and Plan Details - separate buttons for adding Plans and Aggregations are now clearly shown instead of users having to open a menu to select these options.
* The m3ter authentication flow for both Username/Password and Single Sign-On (SSO) authentication is now handled directly in the Console, leading to a smoother experience when accessing the platform.
* When checking Integration Run details, the presentation and styling of the payload has been improved to be more accessible and readable.
* When selecting Aggregations to price Product Plans, a useful warning is now shown informing users that the Aggregations available are restricted to those belonging to the same Product as the Plan and any Global Aggregations.
### Resolved Issues
* Fix: Keyboard accessibility issues on Create forms in the Console have now been addressed.
* Fix: An issue where Bill line items might be duplicated by being associated with both a Product ID and a Plan Group ID has now been fixed.
### Product Updates
* **Native Integrations**. If you want to send outbound bills for Accounts to multiple destinations in your 3rd-party Accounts Receivable system, you can now use an *Account Filter* setting on a native integration to do this. You can enter an expression for Account Filter that references available Account fields or references custom fields you have added to Accounts. The integration will then run for an Account \*only if \*the expression is satisfied. See [Managing Multiple Third Party Destinations for Integrations](/guides/integrations/setting-up-integrations/managing-multiple-destinations-for-integrations) for more details.
* **Integration Credentials**. Any authentication credentials you've set up for connecting native integrations to 3rd-party systems or for notification integration webhook destinations are now listed in a new Credentials page, where you can view and manage them. See [Managing Integration Credentials](/guides/integrations/setting-up-integrations/managing-integration-credentials) for more details.
### Console Updates
* **Product-specific vs. Global Entities**. Usability and workflow changes now help reinforce the distinction between Product-specific and Global Meters and Aggregations:
* When a Product is selected for Meters, Aggregations, and Compound Aggregation pages, any Global entities are included in the list but are clearly labeled - previously users had to to first de-select a Product to see Global entities listed. If Product is de-selected, only Global entities are listed.
* Creating Aggregations:
* If you select a Product for the Aggregations list, the Meter pick list on the Create form only shows Meters belonging to the Product as targets.
* If you de-select Product for the Aggregations list, the Meter pick list on the Create form only shows Global Meters as targets.
* If you de-select Product once inside the Create form, the Meter pick list adjusts to only show Global Meters as targets.
* See [Creating Product Aggregations](/guides/usage-data-aggregations/creating-aggregations), [Creating Global Aggregations](/guides/usage-data-aggregations/creating-global-aggregations), and [Compound Aggregations](/guides/usage-data-aggregations/compound-aggregations) for more details.
* **Revisiting Recent Pages**. You can now use a **Recents** button to open a panel listing links to recently visited pages, such as Accounts, and allowing you to quickly re-open these pages.
* **Empty Pick Lists**. Users attempting a workflow where prerequisites do not yet exist previously confronted empty pick lists, such as trying to add a Transaction to a Balance but no Transaction Types yet exist in their Organization. A clear warning is now given with a hotlink which takes users directly to the relevant Create page for the missing entity. When they click to create the missing entity, they are taken back to their original workflow to continue.
### Resolved Issues
* Fix: The UI validation for a Notification Rule now only runs when the *Always fire notification* switch is not selected.
* Fix: When selected, the *Re-enable* button on the Integration Details card for a disabled Integration Configuration now correctly re-enables it.
* Fix: An error shown in the Console when trying to connect to a Paddle integration has been resolved.
### Product Updates
* m3ter Single Sign-On (SSO) is now available and supports SAML based Identity Providers (IdPs). m3ter SSO allows users with federated identities that exist in different IdPs to sign into m3ter without having to manually provision new users/identities in m3ter’s user pool. See [m3ter Single Sign-On](/guides/authenticating-with-the-platform/m3ter-single-sign-on) for details.
* We recommend setting up your end-customer Accounts prior to submitting usage data measurements for them, but we appreciate this may not always be possible. To avoid rejecting usage data measurements in instances where the measurement is submitted but an Account does not yet exist in your Organization, the m3ter system will now *auto-create an Account* for you. See [Submitting Usage Data for Non-Existent Accounts](/guides/billing-and-usage-data/submitting-usage-data/submitting-usage-data-for-non-existent-accounts) for details.
### Console Updates
* When creating a custom Plan and attaching it to create an Account Plan on an Account, you can now immediately define the Account hierarchy billing mode to be applied for Parent/Child Account contexts. This is also now available when creating and attaching custom Plan Groups to Accounts.
* For Parent/Child Account contexts, Child Accounts Bills cannot be calculated separately from the Parent Account billing. In the Console, relevant Account and billing management pages now make this restriction clear by disabling *Run Billing* and *Recalculate Bills* for Child Accounts and also showing a warning why these actions are blocked for Child Accounts.
* On entity create and edit configuration forms, fields are now presented under functional groupings with mandatory and optional field groupings labeled accordingly. When building a configuration to meet their specific functional requirements, this allows users to quickly focus on the fields relevant to required features and ignore those features not needed for their specific requirements.
### Resolved Issues
* Fix: The Pricing Editor now correctly shows a newly created Plan pricing when saved.
* Fix: When creating entities used to populate picklists, such as currencies or transaction types, the *Code* field can now be properly edited when first creating the entity.
### Console Updates
* When reviewing an Account in the Overview tab, the latest ten Bills for the Account are listed together with two informative charts covering the billing period:
* **Revenue Tracking**. Review and track Account revenue.
* **Billed Usage**. Select an aggregated usage pricing metric and review the billed usage against the Account.
* See [Working in Account Overview](/guides/end-customer-accounts/working-in-account-overview) for more details.
* The Invitation Details page now lists the Permission Policies assigned to the invited user.
### Resolved Issues
Fix: Prevent enter key submitting forms unexpectedly when using drop-downs.
Fix: Percentage pricing rounding error.
Fix: External mapping combo box error.
Fix: Error when no Permission Policies defined for a user Invitation.
# Exploring m3ter - Getting to Know the Platform
Source: https://docs.m3ter.com/exploring-m3ter-getting-to-know-the-platform
Use our docs to get to know m3ter: simplify usage-based pricing, automate billing, sync with finance & boost innovation. Shorten cycles, prevent revenue loss.
m3ter helps B2B software scale-ups manage complex usage-based pricing and billing, ingesting usage data at scale, automating bill calculation, and sending the results to downstream finance and invoicing systems - you can shorten billing cycles, eliminate revenue loss, and unblock product innovation.
### How does it work?
* m3ter plugs directly into your existing quote-to-cash stack including your CRM, CPQ, finance systems, payment providers and your product. Data flows will be automated and the data used for bill calculations always synchronized and up to date.
* m3ter ingests, aggregates, prices, and bills your product usage data right within a single environment, saving your finance team hours of challenging and tedious manual work.
* m3ter distributes bill line items and customer spend data across your organization, enabling Sales to have informed customer conversations, Finance to analyze reports on profit margins, and Product teams to quickly develop and iterate new features.
Use this section to evaluate the m3ter platform and quickly gain an understanding of the features and capabilities the platform offers for implementing usage-based pricing solutions for your products and services:
* [Key Concepts](/exploring-m3ter-getting-to-know-the-platform/key-concepts)
* [Entity relationship Diagram](/exploring-m3ter-getting-to-know-the-platform/entity-relationship-diagram)
* [Getting Usage Data into m3ter](/exploring-m3ter-getting-to-know-the-platform/getting-usage-data-into-m3ter-quick-reference-starter)
* [Integrations for m3ter](/exploring-m3ter-getting-to-know-the-platform/integrations)
* [Sending your Data into m3ter](/exploring-m3ter-getting-to-know-the-platform/sending-data-to-m3ter-quick-reference-starter)
# Entity Relationship Diagram
Source: https://docs.m3ter.com/exploring-m3ter-getting-to-know-the-platform/entity-relationship-diagram
The following diagram shows the main configuration entities of the m3ter platform and their relationships:
* Click the diagram to open it in a separate tab and use the browser zoom to view.
* See below for section summaries and links to relevant documentation.
![Entity Relationship Diagram]() ## Organization and Access
An *Organization* represents your company as a direct customer of m3ter. An Organization offers many settings that are applied generally and ensure key areas such as billing fulfill your specific requirements.
m3ter supports two types of user that can authenticate and be *granted access* to your Organization:
* **Users**. Represent the *people* you’ll grant access to your Organization.
* **Service Users**. Intended to represent *automated processes* that you want to grant direct API access to your Organization. You'll typically want to set up Service Users for integrations of your 3rd-party systems with the m3ter platform.
Using **Permission Policies**, you can then control what individual Users and Service Users are authorized to do when they have gained access to your Organization.
**More Details?** See the [Organization and Access Management](/guides/organization-and-access-management) section in our User Guides.
## Product and Pricing
*Products* in m3ter to represent the products and services you offer to your end customers. Once you have created a Product, to enable pricing for it you can then:
* Create **Meters** to collect Product usage data.
* Create and configure **Aggregations** that target Meter data fields and define usage-based pricing metrics as units of aggregated usage.
* Create **Counters** to apply unit-based pricing for recurring subscription charges.
* Set up Product **Plans** and apply **Pricing** to those Plans using your pricing metrics.
**More Details?** See the following sections in our User Guides:
* [Creating Products](/guides/creating-and-managing-products)
* [Usage Date: Meters](/guides/usage-data-meters)
* [Pricing Metrics: Aggregations](/guides/usage-data-aggregations)
* [Creating Counters and Pricing Plans](/guides/recurring-charges-counters/creating-counters)
* [Plans and Pricing](/guides/plans-and-pricing)
## Accounts and Billing
An *Account* is used to define one of your end-customers. You can attach a priced Product Plan to an Account and create an **Account Plan**, which is used at *billing* to determine the charges due for any:
* Product usage consumed by the Account in the billing period.
* Counter units subscribed to by the Account for the billing period.
**Bills** are generated according to the configured billing frequency and can be quickly integrated with your external account receivable systems.
**Bill Statements** can be generated for an Account to provide a customized breakdown of the Bill by metered dimensions. These act as helpful backing sheets to invoices sent to your end-customers and are based on a **Statement Definition** you have set up either for your Organization as a whole or for particular Accounts.
**More Details?**
* See the following sections in our User Guides:
* [End-Customer Accounts](/guides/end-customer-accounts)
* [Running, Viewing, and Managing Bills](/guides/billing-and-usage-data/running-viewing-and-managing-bills)
* [Working with Bill Statements](/guides/billing-and-usage-data/running-viewing-and-managing-bills/working-with-bill-statements)
## Integrations
Use m3ter Integrations to quickly map and synchronize data held in any 3rd-party systems you use for core business operations, such as sales, pricing, billing and invoicing, and general finance:
* Map and synchronize data held in leading Finance, CRM, and CPQ systems.
* Self-serve Integrations and set them up directly in the m3ter Console for outbound billing flows into your preferred invoicing system.
**More Details?** See the following sections in our User Guides:
* [Integrations](/guides/integrations)
* [Setting Up and Managing Integrations](/guides/integrations/setting-up-integrations)
## Events and Notifications
m3ter's *Events and Notifications* feature allows you to define and implement **Notifications** that are triggered by specific **Events** in your m3ter production environment:
* Set up a **Notification Rule** that references a **System Event** or a **Scheduled Event**.
* Include a calculation for the Notification Rule that references the Event's fields to define the precise conditions for triggering the Notification.
* Configure a webhook as **Destination** for the Notification payload to be delivered to.
**More Details?** See the [Utilizing Events and Notifications](/guides/alerts-events-and-notifications/utilizing-events-and-notifications) section in our User Guides.
## Data Export
The m3ter *Data Export* service allows you to export usage data and operational data from your m3ter Organization directly into your AWS S3 or Google Cloud Storage buckets.
**More Details?** See the [Data Export (Preview)](/guides/data-exports) section in our User Guides.
# Getting Usage Data into m3ter
Source: https://docs.m3ter.com/exploring-m3ter-getting-to-know-the-platform/getting-usage-data-into-m3ter-quick-reference-starter
Designed as a data-first solution from the outset, the m3ter platform helps you ingest usage data flexibly and easily, and with the minimum of ongoing effort. This topic provides a quick reference starter explaining some of the options available for getting your usage data into the platform.
## Usage Data
We’ve built our platform to handle high volumes of usage events, and we encourage customers to send rich, granular usage data because this allows us to provide you with more flexibility and value from the data after ingestion.
*Measurements* are the individual units of usage data in m3ter, and their schema and data types are defined by Meters. You can find out more about Meters and the structure of Measurements in the [Reviewing Meter Options](/guides/usage-data-meters/reviewing-meter-options) topic. However, to demonstrate using a simple example - suppose you run a SaaS platform that provides messaging services via API, then you might define a Meter that collects usage data for the number of requests, the region in which they occurred, and the category of action performed:
```json theme={null}
{
"uid": "705b30d2-4a79-43f3-9aae-a6ebe3894a2b",
"meter": "api_requests",
"account": "your_customer_ref_123456789",
"ts": "2023-01-02T03:04:05.000Z",
"measure": {
"requests": 21
},
“what”: {
“action”: “sendMessage”
},
“where”: {
“region”: “eu-west-1”
}
}
```
There are two endpoints for ingesting usage data - *Ingest REST API* and *File Upload*. We also offer multiple client-side options to help you deliver your usage data reliably, quickly, and cost-effectively
## Ingest API
Our *Ingest REST API* is the primary mechanism for ingesting your usage data into the platform. It’s easy to use, and is designed with scale in mind. See the [API Calls for Data Ingest](/guides/billing-and-usage-data/submitting-usage-data/api-calls-for-data-ingest) topic and the [Submit Measurements](/api/measurements/submit-measurements) section in our API Reference documentation.
Some request rate and payload size limits are imposed on data submissions to the Ingest API. For details on these limits and guidance on optimizing your data submissions, see [Ingest Limits and Optimizing Submissions](/guides/m3ter-apis/ingest-api-limits).
## File Upload
If your existing systems and data flow are better suited to uploading a file containing usage data, perhaps at the end of a batch operation, we offer a *File Upload* service. The process is simple - make a call to the API to generate a temporary upload URL, then upload your file and we’ll do the rest. Any errors are reported to you via the normal Events and Notifications service. See our [File Upload Service API](/guides/billing-and-usage-data/submitting-usage-data/file-upload-service-api) topic for more information.
## Usage Data Ingest Process
The usage data ingest process has two stages:
* **Pre-enrichment**. This stage is kept as simple as possible to avert the possibility of data loss:
* It is synchronous and is the level at which any API response to a usage data measurement submission refers.
* Data validation checks are not performed at this stage and a usage data submission might not be immediately rejected.
* **Enrichment**. This stage is where data validation checks are made:
* It is asynchronous.
* A usage data submission that was accepted for the pre-enrichment stage might be rejected at this stage because it fails a validation check that is performed during data enrichment.
**Note: Ingest Processing time?** The ingest process can up to a few minutes to complete. Consequently, features that work on usage data, such as Billing and Data Explorer, will not reflect ingested usage data until the process has completed.
## Third-Party Integrations and Managed Ingest
Many customers have usage data already being passed between systems via streams and queues. We can often help these customers get up and running quickly without additional steps and infrastructure by ‘hooking into’ existing data streams, transforming them into m3ter measurement format and sending them to our API. This ingest capability is currently available for Amazon SNS, Amazon SQS, and Apache Kafka, with support for Customer Data Platforms (CDPs) such as Segment, and Reverse ETL platforms planned.
Additionally, we offer *Managed Ingest* solutions that typically involve m3ter pulling usage data from a set endpoint or location (like an S3 bucket) on the customer’s behalf.
## SDKs
m3ter SDKs reduce the development effort associated with integrating your applications with m3ter, and help ensure efficient behavior with the API.
SDKs are available in different languages to support convenient access to our REST APIs and maintain feature parity with our APIs - please see [Developer Tools](/guides/developer-tools) for more details.
## Error Handling
m3ter gives you complete visibility of exceptions that occur during ingest. There are two feedback processes, depending on the exception:
* Those that can be detected at the point of submission - for example, authorization failures, malformed payloads, and missing mandatory fields like the measurement timestamp. These are indicated clearly and immediately in the API response.
* Errors that occur in the ingest and enrichment stage - for example, validation against your Meter configurations and failures in Derived Field calculations. These are reported asynchronously via the Events service. Ingest Error events contain the error detail, the original measurement submitted, and additional information to assist with troubleshooting. You can then set up Notifications to be triggered when these error Events occur for manual or automated follow-up.
See the [Reviewing and Resolving Ingest Events](/guides/billing-and-usage-data/submitting-usage-data/reviewing-and-resolving-ingest-events) topic for further information.
## Idempotency and Deduplication
No system is immune from failures, especially when transferring data across the Internet, and there are many reasons measurements might get lost or duplicated on their way into the m3ter platform. To handle this, a key feature of the m3ter ingest service is that sending a measurement is an idempotent operation within a 35 day window - each measurement is stored for 35 days based on their `receivedAt` timestamp. This means that if a measurement with the same UID arrives multiple times in that time-frame, we'll only ingest it once.
If you’re not sure whether a network connectivity issue or application crash affected measurements being sent, you can simply resend them with their original UIDs and we’ll de-duplicate and only store the missing ones.
## General Recommendations
There are some general recommendations worth noting for usage data ingest:
* **More not Less**. Send us **more** data rather than less. Also, where possible enrich the usage data you send us, for example by sending data more frequently, or by adding more data dimensions and metadata. The richer the data you send us, the more powerful you’ll find m3ter since we’ll be able to provide better analytics on your ingested data.
* **Queue Usage Events**. If your usage events are short-lived or not retained after being submitted, we recommend putting them on a queue, such as Amazon SQS, Azure Storage Queues, or RabbitMQ, within your environment first. Then, read from that queue when submitting to the m3ter Ingest API. This adds a layer of protection against data loss due to network or software issues.
## FAQs
**Can you fetch my usage data instead of me submitting it?**
**Yes**. Please get in touch with your m3ter contact to discuss your preferred solution.
**Is it possible to delete or modify usage data?**
**Not directly**. Measurements are immutable once ingested, but it’s possible to make adjustments to correct aggregated data by submitting corrective measurements (either positive or negative). See the [Submitting Test Usage Data](/guides/billing-and-usage-data/submitting-usage-data/submitting-test-usage-data) and [Dates in m3ter](/guides/getting-started/working-with-dates-in-m3ter-easy-reference) topics for more information.
**Can I export my data?**
**Yes**. You can view, filter, aggregate, and export usage data via our Data Explorer, either by using API calls or through the UI.
In the future, we'll be introducing additional features to allow you to export larger volumes of data. For now if you require bulk export, you can submit a request to m3ter Support to assist you
**What happens if I need to add fields to my Meter or remove fields after I've already sent data?**
If you send measurements containing data fields that are not yet configured in your Meter, we still store the data. When you create a Data Field with the same code field, it will become linked and available for rating. Removing a Data Field from a Meter does not delete the existing measurements, but it becomes unavailable for other m3ter features.
**What happens if I attempt to send usage data for a Meter that doesn't exist?**
You might plan to set up a new product and have already done some testing in your sandbox or UAT m3ter environments. If you attempt to then perform some testing for the new product in your production environment and submit test data for a Meter that doesn't yet exist, this usage data will be rejected. This will not cause any issues or break anything in your production environment but the usage will have to be resubmitted once the Meter has been created and set up.
**Can I send you any Personal Data in usage?**
**No**. Don’t put any Personal Data (sometimes referred to as PI or PII) in the usage data. Instead, use anonymous unique identifiers that map to Personal Data in your CRM or other systems. A limited amount of Personal Data *can* be used in the Account object. Please see section 4.2 “Customer responsibility for Customer Data and Authorised User Accounts” in our [Terms of Service](https://www.m3ter.com/docs/legal/terms-of-service) and section 4 “Data Retention” of m3ter’s [Data Protection Agreement](https://www.m3ter.com/docs/legal/dpa) for more details.
## Data Ingest Overview - Diagram
This diagram gives an overview of how usage data fits into the wider m3ter platform:
## Organization and Access
An *Organization* represents your company as a direct customer of m3ter. An Organization offers many settings that are applied generally and ensure key areas such as billing fulfill your specific requirements.
m3ter supports two types of user that can authenticate and be *granted access* to your Organization:
* **Users**. Represent the *people* you’ll grant access to your Organization.
* **Service Users**. Intended to represent *automated processes* that you want to grant direct API access to your Organization. You'll typically want to set up Service Users for integrations of your 3rd-party systems with the m3ter platform.
Using **Permission Policies**, you can then control what individual Users and Service Users are authorized to do when they have gained access to your Organization.
**More Details?** See the [Organization and Access Management](/guides/organization-and-access-management) section in our User Guides.
## Product and Pricing
*Products* in m3ter to represent the products and services you offer to your end customers. Once you have created a Product, to enable pricing for it you can then:
* Create **Meters** to collect Product usage data.
* Create and configure **Aggregations** that target Meter data fields and define usage-based pricing metrics as units of aggregated usage.
* Create **Counters** to apply unit-based pricing for recurring subscription charges.
* Set up Product **Plans** and apply **Pricing** to those Plans using your pricing metrics.
**More Details?** See the following sections in our User Guides:
* [Creating Products](/guides/creating-and-managing-products)
* [Usage Date: Meters](/guides/usage-data-meters)
* [Pricing Metrics: Aggregations](/guides/usage-data-aggregations)
* [Creating Counters and Pricing Plans](/guides/recurring-charges-counters/creating-counters)
* [Plans and Pricing](/guides/plans-and-pricing)
## Accounts and Billing
An *Account* is used to define one of your end-customers. You can attach a priced Product Plan to an Account and create an **Account Plan**, which is used at *billing* to determine the charges due for any:
* Product usage consumed by the Account in the billing period.
* Counter units subscribed to by the Account for the billing period.
**Bills** are generated according to the configured billing frequency and can be quickly integrated with your external account receivable systems.
**Bill Statements** can be generated for an Account to provide a customized breakdown of the Bill by metered dimensions. These act as helpful backing sheets to invoices sent to your end-customers and are based on a **Statement Definition** you have set up either for your Organization as a whole or for particular Accounts.
**More Details?**
* See the following sections in our User Guides:
* [End-Customer Accounts](/guides/end-customer-accounts)
* [Running, Viewing, and Managing Bills](/guides/billing-and-usage-data/running-viewing-and-managing-bills)
* [Working with Bill Statements](/guides/billing-and-usage-data/running-viewing-and-managing-bills/working-with-bill-statements)
## Integrations
Use m3ter Integrations to quickly map and synchronize data held in any 3rd-party systems you use for core business operations, such as sales, pricing, billing and invoicing, and general finance:
* Map and synchronize data held in leading Finance, CRM, and CPQ systems.
* Self-serve Integrations and set them up directly in the m3ter Console for outbound billing flows into your preferred invoicing system.
**More Details?** See the following sections in our User Guides:
* [Integrations](/guides/integrations)
* [Setting Up and Managing Integrations](/guides/integrations/setting-up-integrations)
## Events and Notifications
m3ter's *Events and Notifications* feature allows you to define and implement **Notifications** that are triggered by specific **Events** in your m3ter production environment:
* Set up a **Notification Rule** that references a **System Event** or a **Scheduled Event**.
* Include a calculation for the Notification Rule that references the Event's fields to define the precise conditions for triggering the Notification.
* Configure a webhook as **Destination** for the Notification payload to be delivered to.
**More Details?** See the [Utilizing Events and Notifications](/guides/alerts-events-and-notifications/utilizing-events-and-notifications) section in our User Guides.
## Data Export
The m3ter *Data Export* service allows you to export usage data and operational data from your m3ter Organization directly into your AWS S3 or Google Cloud Storage buckets.
**More Details?** See the [Data Export (Preview)](/guides/data-exports) section in our User Guides.
# Getting Usage Data into m3ter
Source: https://docs.m3ter.com/exploring-m3ter-getting-to-know-the-platform/getting-usage-data-into-m3ter-quick-reference-starter
Designed as a data-first solution from the outset, the m3ter platform helps you ingest usage data flexibly and easily, and with the minimum of ongoing effort. This topic provides a quick reference starter explaining some of the options available for getting your usage data into the platform.
## Usage Data
We’ve built our platform to handle high volumes of usage events, and we encourage customers to send rich, granular usage data because this allows us to provide you with more flexibility and value from the data after ingestion.
*Measurements* are the individual units of usage data in m3ter, and their schema and data types are defined by Meters. You can find out more about Meters and the structure of Measurements in the [Reviewing Meter Options](/guides/usage-data-meters/reviewing-meter-options) topic. However, to demonstrate using a simple example - suppose you run a SaaS platform that provides messaging services via API, then you might define a Meter that collects usage data for the number of requests, the region in which they occurred, and the category of action performed:
```json theme={null}
{
"uid": "705b30d2-4a79-43f3-9aae-a6ebe3894a2b",
"meter": "api_requests",
"account": "your_customer_ref_123456789",
"ts": "2023-01-02T03:04:05.000Z",
"measure": {
"requests": 21
},
“what”: {
“action”: “sendMessage”
},
“where”: {
“region”: “eu-west-1”
}
}
```
There are two endpoints for ingesting usage data - *Ingest REST API* and *File Upload*. We also offer multiple client-side options to help you deliver your usage data reliably, quickly, and cost-effectively
## Ingest API
Our *Ingest REST API* is the primary mechanism for ingesting your usage data into the platform. It’s easy to use, and is designed with scale in mind. See the [API Calls for Data Ingest](/guides/billing-and-usage-data/submitting-usage-data/api-calls-for-data-ingest) topic and the [Submit Measurements](/api/measurements/submit-measurements) section in our API Reference documentation.
Some request rate and payload size limits are imposed on data submissions to the Ingest API. For details on these limits and guidance on optimizing your data submissions, see [Ingest Limits and Optimizing Submissions](/guides/m3ter-apis/ingest-api-limits).
## File Upload
If your existing systems and data flow are better suited to uploading a file containing usage data, perhaps at the end of a batch operation, we offer a *File Upload* service. The process is simple - make a call to the API to generate a temporary upload URL, then upload your file and we’ll do the rest. Any errors are reported to you via the normal Events and Notifications service. See our [File Upload Service API](/guides/billing-and-usage-data/submitting-usage-data/file-upload-service-api) topic for more information.
## Usage Data Ingest Process
The usage data ingest process has two stages:
* **Pre-enrichment**. This stage is kept as simple as possible to avert the possibility of data loss:
* It is synchronous and is the level at which any API response to a usage data measurement submission refers.
* Data validation checks are not performed at this stage and a usage data submission might not be immediately rejected.
* **Enrichment**. This stage is where data validation checks are made:
* It is asynchronous.
* A usage data submission that was accepted for the pre-enrichment stage might be rejected at this stage because it fails a validation check that is performed during data enrichment.
**Note: Ingest Processing time?** The ingest process can up to a few minutes to complete. Consequently, features that work on usage data, such as Billing and Data Explorer, will not reflect ingested usage data until the process has completed.
## Third-Party Integrations and Managed Ingest
Many customers have usage data already being passed between systems via streams and queues. We can often help these customers get up and running quickly without additional steps and infrastructure by ‘hooking into’ existing data streams, transforming them into m3ter measurement format and sending them to our API. This ingest capability is currently available for Amazon SNS, Amazon SQS, and Apache Kafka, with support for Customer Data Platforms (CDPs) such as Segment, and Reverse ETL platforms planned.
Additionally, we offer *Managed Ingest* solutions that typically involve m3ter pulling usage data from a set endpoint or location (like an S3 bucket) on the customer’s behalf.
## SDKs
m3ter SDKs reduce the development effort associated with integrating your applications with m3ter, and help ensure efficient behavior with the API.
SDKs are available in different languages to support convenient access to our REST APIs and maintain feature parity with our APIs - please see [Developer Tools](/guides/developer-tools) for more details.
## Error Handling
m3ter gives you complete visibility of exceptions that occur during ingest. There are two feedback processes, depending on the exception:
* Those that can be detected at the point of submission - for example, authorization failures, malformed payloads, and missing mandatory fields like the measurement timestamp. These are indicated clearly and immediately in the API response.
* Errors that occur in the ingest and enrichment stage - for example, validation against your Meter configurations and failures in Derived Field calculations. These are reported asynchronously via the Events service. Ingest Error events contain the error detail, the original measurement submitted, and additional information to assist with troubleshooting. You can then set up Notifications to be triggered when these error Events occur for manual or automated follow-up.
See the [Reviewing and Resolving Ingest Events](/guides/billing-and-usage-data/submitting-usage-data/reviewing-and-resolving-ingest-events) topic for further information.
## Idempotency and Deduplication
No system is immune from failures, especially when transferring data across the Internet, and there are many reasons measurements might get lost or duplicated on their way into the m3ter platform. To handle this, a key feature of the m3ter ingest service is that sending a measurement is an idempotent operation within a 35 day window - each measurement is stored for 35 days based on their `receivedAt` timestamp. This means that if a measurement with the same UID arrives multiple times in that time-frame, we'll only ingest it once.
If you’re not sure whether a network connectivity issue or application crash affected measurements being sent, you can simply resend them with their original UIDs and we’ll de-duplicate and only store the missing ones.
## General Recommendations
There are some general recommendations worth noting for usage data ingest:
* **More not Less**. Send us **more** data rather than less. Also, where possible enrich the usage data you send us, for example by sending data more frequently, or by adding more data dimensions and metadata. The richer the data you send us, the more powerful you’ll find m3ter since we’ll be able to provide better analytics on your ingested data.
* **Queue Usage Events**. If your usage events are short-lived or not retained after being submitted, we recommend putting them on a queue, such as Amazon SQS, Azure Storage Queues, or RabbitMQ, within your environment first. Then, read from that queue when submitting to the m3ter Ingest API. This adds a layer of protection against data loss due to network or software issues.
## FAQs
**Can you fetch my usage data instead of me submitting it?**
**Yes**. Please get in touch with your m3ter contact to discuss your preferred solution.
**Is it possible to delete or modify usage data?**
**Not directly**. Measurements are immutable once ingested, but it’s possible to make adjustments to correct aggregated data by submitting corrective measurements (either positive or negative). See the [Submitting Test Usage Data](/guides/billing-and-usage-data/submitting-usage-data/submitting-test-usage-data) and [Dates in m3ter](/guides/getting-started/working-with-dates-in-m3ter-easy-reference) topics for more information.
**Can I export my data?**
**Yes**. You can view, filter, aggregate, and export usage data via our Data Explorer, either by using API calls or through the UI.
In the future, we'll be introducing additional features to allow you to export larger volumes of data. For now if you require bulk export, you can submit a request to m3ter Support to assist you
**What happens if I need to add fields to my Meter or remove fields after I've already sent data?**
If you send measurements containing data fields that are not yet configured in your Meter, we still store the data. When you create a Data Field with the same code field, it will become linked and available for rating. Removing a Data Field from a Meter does not delete the existing measurements, but it becomes unavailable for other m3ter features.
**What happens if I attempt to send usage data for a Meter that doesn't exist?**
You might plan to set up a new product and have already done some testing in your sandbox or UAT m3ter environments. If you attempt to then perform some testing for the new product in your production environment and submit test data for a Meter that doesn't yet exist, this usage data will be rejected. This will not cause any issues or break anything in your production environment but the usage will have to be resubmitted once the Meter has been created and set up.
**Can I send you any Personal Data in usage?**
**No**. Don’t put any Personal Data (sometimes referred to as PI or PII) in the usage data. Instead, use anonymous unique identifiers that map to Personal Data in your CRM or other systems. A limited amount of Personal Data *can* be used in the Account object. Please see section 4.2 “Customer responsibility for Customer Data and Authorised User Accounts” in our [Terms of Service](https://www.m3ter.com/docs/legal/terms-of-service) and section 4 “Data Retention” of m3ter’s [Data Protection Agreement](https://www.m3ter.com/docs/legal/dpa) for more details.
## Data Ingest Overview - Diagram
This diagram gives an overview of how usage data fits into the wider m3ter platform:
![]() # Integrations for m3ter
Source: https://docs.m3ter.com/exploring-m3ter-getting-to-know-the-platform/integrations
The m3ter platform is designed to facilitate and support robust and seamless *Integrations* with your 3rd-party systems. m3ter Integrations allow you to quickly map and synchronize data in m3ter with data held in other systems you rely on for core business operations, such as sales, pricing, billing and invoicing, and general finance.
We also support usage data ingest directly from 3rd-party customer data platforms.
You can then promptly start to leverage this data synchronization between m3ter and your other systems to implement a wide range of use cases to serve your operational requirements.
# Integrations for m3ter
Source: https://docs.m3ter.com/exploring-m3ter-getting-to-know-the-platform/integrations
The m3ter platform is designed to facilitate and support robust and seamless *Integrations* with your 3rd-party systems. m3ter Integrations allow you to quickly map and synchronize data in m3ter with data held in other systems you rely on for core business operations, such as sales, pricing, billing and invoicing, and general finance.
We also support usage data ingest directly from 3rd-party customer data platforms.
You can then promptly start to leverage this data synchronization between m3ter and your other systems to implement a wide range of use cases to serve your operational requirements.
![]() **More Details?** For more details, see the [Integrations](/guides/integrations) section.
# Key Concepts
Source: https://docs.m3ter.com/exploring-m3ter-getting-to-know-the-platform/key-concepts
This topic sets out and explains the key concepts of the m3ter platform. Links for more details on these key concepts are provided.
**Tip: Other Terms?** For definitions of other terms you'll find when working with the m3ter service, see the [Glossary of Terms](/glossary-of-terms).
## Organization
An *Organization* represents either:
* Your company as a direct customer of m3ter.
* Your company as an indirect customer of m3ter via one of our partners who integrate with m3ter.
**More Details?:** See [Managing Organization and Users](/guides/organization-and-access-management)
## Products
A *Product* in m3ter represents a product or service that you offer to your end customers. Each **Product** can act as a container the following items:
* [Plan Templates and Plans](/exploring-m3ter-getting-to-know-the-platform/key-concepts#plan-templates-and-plans)
* [Meters](/exploring-m3ter-getting-to-know-the-platform/key-concepts#meters)
* [Aggregations](/exploring-m3ter-getting-to-know-the-platform/key-concepts#aggregations)
* [Pricing](/exploring-m3ter-getting-to-know-the-platform/key-concepts#pricing)
**More Details?** For more details, see the [Integrations](/guides/integrations) section.
# Key Concepts
Source: https://docs.m3ter.com/exploring-m3ter-getting-to-know-the-platform/key-concepts
This topic sets out and explains the key concepts of the m3ter platform. Links for more details on these key concepts are provided.
**Tip: Other Terms?** For definitions of other terms you'll find when working with the m3ter service, see the [Glossary of Terms](/glossary-of-terms).
## Organization
An *Organization* represents either:
* Your company as a direct customer of m3ter.
* Your company as an indirect customer of m3ter via one of our partners who integrate with m3ter.
**More Details?:** See [Managing Organization and Users](/guides/organization-and-access-management)
## Products
A *Product* in m3ter represents a product or service that you offer to your end customers. Each **Product** can act as a container the following items:
* [Plan Templates and Plans](/exploring-m3ter-getting-to-know-the-platform/key-concepts#plan-templates-and-plans)
* [Meters](/exploring-m3ter-getting-to-know-the-platform/key-concepts#meters)
* [Aggregations](/exploring-m3ter-getting-to-know-the-platform/key-concepts#aggregations)
* [Pricing](/exploring-m3ter-getting-to-know-the-platform/key-concepts#pricing)
![]() Plans and Plan Templates always belong to a specific Product. You can create Meters and Aggregations which belong to a specific Product, as shown above.
**More Details?** See [Create and Manage Products](/guides/creating-and-managing-products).
## Plan Templates and Plans
You can use *PlanTemplates* to define default values for the pricing **Plans** you want to apply to your **Products**. This allows you to avoid unnecessary repetition when setting up your pricing **Plans**, while retaining some flexibility to adjust individual pricing Plans to suit individual customer accounts.
Each *Plan* is a child of a **PlanTemplate** and represents a specific pricing plan for one of your products or services. A **Plan** inherits key attributes for billing purposes from a **PlanTemplate**, such as the pricing structure, billing currency, billing frequency, billing interval, and any standing charge to apply to each bill. In a particular **Plan**, only some of these inherited attributes, such as pricing structure and standing charge, can be overridden to meet individual account billing needs.
You can create **Plan Groups** for cases where you want to apply a minimum spend amount at billing across several of your products or features that are each priced separately. When you create the Plan Group, you can define an overall minimum spend and then add the priced Plans you want to include in the Group.
**More Details?** See [Creating and Working with Plan Templates and Plans](/guides/plans-and-pricing/working-with-plan-templates-and-plans) and [Working with Plan Groups](/guides/plans-and-pricing/working-with-plan-templates-and-plans/working-with-plan-groups).
**Tip: Custom Plans for Accounts!** You can also create *Custom Plans* for an Account, which means the Plan can only be attached to that specific Account for charging for the Products the Account consumes. For more details, see [Creating Custom Plans for Accounts](/guides/end-customer-accounts/creating-custom-account-plans).
## Meters
A *Meter* is used to collect usage data. You can set up **Data Fields** for a **Meter** to collect usage data measurements for your products or services. If required, you can use these raw data fields to set up more complex usage data collectors as **Derived Fields**, whose values are the result of calculations made on **Data Fields**.
**Tip: Global Meters?** Note that you can also create Global Meters and Aggregations, which are not tied to a specific Product.
**More Details?** See [Reviewing Meter Options](/guides/usage-data-meters/reviewing-meter-options).
## Aggregations
When you have configured a **Meter** for usage data collection, you can create an *Aggregation* using the **Data Fields** or **Derived Fields** on the **Meter**. This allows you to define how the data collected by **Data Fields** will be aggregated to create a metric to suit the pricing model you want to apply to one of your products or services. For example:
* You might want a **Data Field’s** data to be *summed* to yield a pricing metric.
* Or for another **Data Field’s** data, you might want the *maximum value* reached to be used as a pricing metric.
As key aspects for usage-based pricing, there are further ways you can use Aggregations to achieve the precise units of usage you require for pricing your products:
* You can use your Aggregations to create *Compound Aggregations*. These allow you to derive numerical measures from usage data by applying a calculation to one or more simple Aggregations. This capability greatly extends the range of unit measure you can set up for the pricing you want to apply to usage.
* If the Meter your Aggregation targets contains the appropriate Data Fields, you can also configure *Segmented Aggregations*, which allow you to segment the usage data collected by a single Meter and go on to apply separate pricing to the resultant segmented values. This capability can prove extremely useful for implementing some pricing and billing use cases.
**More Details?** See [Reviewing Aggregation Options](/guides/usage-data-aggregations/reviewing-aggregation-options), [Compound Aggregations](/guides/usage-data-aggregations/compound-aggregations), and [Segmented Aggregations](/guides/usage-data-aggregations/segmented-aggregations).
## Counters
Many providers of SaaS products and services want to charge their end-customers for product consumption using a subscription or recurring charge pricing model, one where end-customers are charged based on the numbers of product units, seats, or user licenses subscribed to within a given billing period.
Counters in m3ter enable you to quickly implement a wide-range of unit-based pricing models for your products:
* Set up recurring subscription charges for your products with a quantity or number of units as the pricing metric.
* Offer your end-customers a flexible subscription model to help them optimize their subscription costs and easily manage their billing as their level of product consumption changes.
* Implement hybrid pricing models for products or services that you want to charge your end-customer for in a mixed way - partly on this kind of subscription basis and partly based on metered product usage.
## Pricing
### Usage-Based Pricing
For *usage-based pricing*, you can link an **Aggregation** to a **Plan** or a **PlanTemplate** to produce usage-based pricing plans. You can then complete the pricing configuration by selecting the type of pricing structure you want for your pricing plans, such as tiered pricing, pricing by volume, or stairstep pricing.
**More Details?** See [Pricing and Managing Plan Templates and Plans](/guides/plans-and-pricing/pricing-plans)
### Unit-Based Pricing
For *unit-based pricing*, you can quickly price Product **Plans** in the **Pricing Editor** using **Counters**.
**More Details?** See [Creating Counters and Pricing Plans](/guides/recurring-charges-counters/creating-counters).
### Hybrid Pricing
If you want to apply a hybrid pricing model for a product or service, you can set up a combined pricing for a Product Plan to charge end-customers who consume the product or service using:
* An **Aggregation** as the pricing metric for usage-based charges you want to apply.
* A **Counter** as the pricing metric for any recurring subscription charges you want to apply.
At billing, all charge amounts due on the Account are combined in a single Bill.
**More Details?** To review a worked example of hybrid pricing, see [Recurring Charges Billing: Hybrid Pricing](/guides/recurring-charges-counters/recurring-charges-example-2-hybrid-pricing).
## Accounts
An *Account* represents your end customer - a person or company that pays your **Organization** for one of your products or services.
For setting up your end customer Accounts, you can:
* Attach a **Plan** to an **Account**, which determines the pricing that will be applied to that **Account** for billing purposes. When you attach a **Plan** to an **Account**, you can select for the start and end dates to define the period the pricing **Plan** is active and will be applied to the **Account** for billing purposes.
* Apply a **Prepayment/Commitment** to an Account for cases where your customer has agreed to pay a fixed amount over the duration of their contract with you to consume one or more of your products or services. The amount is understood as payable regardless of the actual usage they become liable to pay for during the contract period. You can include a surcharge rate to be applied for any overage on the Prepayment/Commitment amount that occurs during the contract period.
* Create **Contracts** for end-customer Accounts. If you expect to have end customers who consume several different service or product packages you offer, for accounting purposes you can then report on the total Contract values for these end customer Accounts.
* Create **Child Accounts** for a main or **Parent Account**. You might want to do this if your Organization has customers with multiple Accounts and instead of issuing multiple bills to these customers, you want to provide them with single Bill for a Parent Account that covers data usage across their multiple Child Accounts.
* Define **Custom Plans** for an Account. A Custom Plan can only be attached to that specific Account.
In your production environment, operationally you can:
* Open an Account **Overview** summarizing the Account setup and showing latest Bills for the Account with charts tracking billed usage and any recurring charges.
* Review and manage a detailed listing of Account **Bills**.
**More Details?** See [End-Customer Accounts](/guides/end-customer-accounts)
## Account Plan
When you attach a priced Plan to an Account, this defines a link between them to create an *Account Plan*. Attaching priced Plans to an Account determines the charges incurred by customers who are put on the Plan when they consume one of your Products.
**More Details?** See [Attaching Plans to Accounts](/guides/end-customer-accounts/attaching-plans-to-an-account)
## Account Plan Group
When you attach a Plan Group to an end customer Account, this defines a link between them to create an *Account Plan Group*. The Account Plan Group for an Account determines the charges incurred by the Account.
**More Details?** See [Attaching Plan Groups to an Account](/guides/end-customer-accounts/attaching-plan-groups-to-an-account)
## Billing
A *Bill* is generated for an **Account** based on the usage-based pricing **Plan** that has been attached to the **Account**.
**More Details?** See [Running, Viewing, and Managing Bills](/guides/billing-and-usage-data/running-viewing-and-managing-bills).
# Sending your Data to m3ter
Source: https://docs.m3ter.com/exploring-m3ter-getting-to-know-the-platform/sending-data-to-m3ter-quick-reference-starter
A common question we get asked by our customers is: "What data are we required to send to m3ter?". To some extent the data we need from you will depend on the details of the usage-based pricing solution you implement on the m3ter platform. However, there's a limited core set of business and operational data we typically require from you and which is independent of the end-customer usage data you'll be sending for your rating and billing purposes.
This topic summarizes the core business and operational data we'll require from you and explains the types of more specific end-customer data we'll need relevant to your particular usage-based pricing solution:
* [User's Data](/exploring-m3ter-getting-to-know-the-platform/sending-data-to-m3ter-quick-reference-starter#users-data)
* [End-Customer's Data](/exploring-m3ter-getting-to-know-the-platform/sending-data-to-m3ter-quick-reference-starter#end-customers-data)
* [Usage Data](/exploring-m3ter-getting-to-know-the-platform/sending-data-to-m3ter-quick-reference-starter#usage-data)
You may also have questions regarding how a Subject Access Request (SAR) regarding Personal Data made under the General Data Protection Regulation (GDPR) would be handled by m3ter:
* [GDPR and m3ter](/exploring-m3ter-getting-to-know-the-platform/sending-data-to-m3ter-quick-reference-starter#gdpr-and-m3ter)
## User's Data
We'll require some details of the people in your organization who become m3ter Users:
* Their name and e-mail address so we can identify them as Users.
* What we do with this data - how we process and store it - is covered in our [Privacy Notice](https://www.m3ter.com/docs/legal/privacy-notice).
## End-Customer's Data
Setting up your m3ter Organization will require you to enter data about your end-customers. This will comprise:
* Any end-customer data required to create and configure key m3ter entities, such as your end-customer Accounts and service Contracts on Accounts.
* In general terms, the details of their charge rates for billing them when pricing up their Product Plans.
We need this minimum amount of data to be able to identify your end-customers in m3ter and understand their contracts with yourselves, and therefore to ensure we are able to generate sound and complete end-customer bills.
In many cases, this data will be sent through to m3ter via an integration with one of your 3rd-party systems.
### Personal Data
* Any *Personal Data* you send is confined to certain fields on the *Account* configuration object. Under the [Data Processing Agreement](https://www.m3ter.com/docs/legal/dpa), the only fields you are allowed to use for any of your end-customer Personal Data in m3ter are the `name`, `address`, and `emailAddress` fields on an Account - see the [Create Account](/api/account/create-account) request schema as documented in our API Reference. See also section 4.2 of the [Terms of Service](https://www.m3ter.com/docs/legal/terms-of-service).
* We appreciate that many of your end-customers will be businesses, and in those cases these fields on the Account object won’t contain Personal Data anyway. These fields act as labels to identify your end-customers and it is your choice what data you use to populate these fields - either personal or non-personal.
## Usage Data
The *usage data* we require will be wholly dependent on the usage-based pricing schema you want to apply to charge and bill your end-customers for consuming your products and services. Given the wide scope m3ter offers, in terms of the pricing complexity you can set up for charging your customers, this usage data can vary enormously. Here are some examples to illustrate how the usage data you'll need to send us to implement your usage-based pricing and billing solution can vary:
* Suppose you run a SaaS company that provides a cloud storage and cleanup service for corrupted graphics files. You want to charge your end-customers for this service on the basis of a count of the number of corrupted files submitted for cleanup together with the total storage measured at the end of any given billing period. The usage data you'll need to send us will therefore include metadata on each end-customer's number of files submitted and the cumulative storage volume of the files.
* Suppose you provide a cloud service which allows your end-customers to develop and host software applications. You intend to charge customers for this application build-and-host cloud service by total number of applications built and hosted on your service and by count on the number of requests made to their applications. The usage data you'll need to send us will therefore include metadata on the number of applications each end-customer has built together with application request counts.
* Suppose you offer a service to manage and process orders and deliveries for online retailers. Your basic pricing model uses a tiered structure on number of orders/deliveries you handle per billing period for an end-customer. You also want to include a fixed charges for product add-ons you offer, such as express delivery, which your customers can select for on an order-by-order basis. The usage data you'll need to send us will therefore include metadata on the number of orders each end-customer sends through for processing together with a count of the number of product add-ons they request.
### Personal Data - Inclusion in Usage Data
We are conscious that Personal Data should only be processed for specific purposes, therefore as stated in our [Terms of Service](https://www.m3ter.com/docs/legal/terms-of-service), you are *not permitted* to send any Personal Data in Usage Data.
## GDPR and m3ter
With respect to the General Data Protection Regulation (GDPR) and in the case of individuals making a Subject Access Request (SAR) regarding Personal Data sent to m3ter or collected by m3ter:
* **User's Data**. If a person in your organization who has become a m3ter user makes a SAR, we as the Data Controller would respond to that request.
* **End-Customer's Data**. m3ter is the Data Processor of any data relating to your end-customers, and you are the Data Controller. Therefore, we would direct any SAR issued by a person whose Personal Data has been processed in this way by m3ter to you for your action.
# FAQs: Configuration and Setup - Best Practices
Source: https://docs.m3ter.com/faqs/faqs-configuration-and-setup-best-practices
Answers to questions on configuration setup in m3ter. Learn when to use one Meter or two and how to structure Products for accurate accounting and billing.
## Question: When to use one Meter and when to use two?
One Meter is sufficient when the source data does not change.
Aggregations *(including compound aggregations)*, segmentation and pricing can then be leveraged to create different data summaries and price points. As a general rule, you should use a single Meter with multiple Data Fields when the data being collected is of a similar or related type. For example:
* Suppose you want to charge your end customers on the basis of the number of logins they make and where they are logging into your service from. You could create a single Meter and define two non-numeric Data Fields: a *Who* Data Field to collect the required data for login counts on specific users; a *Where* Data Field for collecting the location of logins.
* However, you might also want to charge your customers on the basis of the volume of data they upload to store on your service during a given billing period. You should then create a second and separate Meter with a numeric *Measure* Data Field to sum each customer's quantity of data stored.
***
## Question: Should you have one Product or two?
Typically you would create a Product per accounting code in your accounts receivables (AR) system. This way, when integrating with the AR, m3ter knows which Product to assign to the invoice line so that revenue for the product/service can be easily identifiable and recognized.
To ensure Bill line items are assigned to the correct Product lines, you can select an *Accounting Product* when configuring many of the billing-related entities used to set up pricing and charges in your m3ter Organization.
**More Details?** See [Bill Line Items - Mapping to Accounting Products](/guides/billing-and-usage-data/running-viewing-and-managing-bills/bill-line-items-mapping-accounting-products).
# FAQs: Configuration, Rating and Billing
Source: https://docs.m3ter.com/faqs/faqs-configuration-rating-and-billing
Gain insights on Commitments/Prepayments, billing methods, and more. Optimize pricing and manage accounts effectively.
## Question: What are Commitments/Prepayments?
A *Commitment/Prepayment* is when an end customer agrees to pay you a fixed amount over the duration of their contract with you. The agreed Commitment/Prepayment amount is typically paid in advance and used to consume one or more of your products or services.
The Commitment/Prepayment amount is payable regardless of the actual usage by the end customer of your service or product. You can define overage rates should the original agreed amount be exhausted before the customer's contract ends. For an example, see [m3ter prepayment example](/guides/end-customer-accounts/creating-prepayments-for-accounts#example-prepayment).
***
## Question: How does a Prepayment/Commitment differ from a minimum spend?
A *minimum spend* ensures that you receive revenue from your customers in each billing period of at least the minimum spend amount. It is assessed on a bill-by-bill basis.
An end customer's consumption of your product or service is based on usage at an agreed pricing. Should the customer consumption amount be less than the minimum spend, they will be billed at the minimum amount. If the total value of the usage consumed exceeds the minimum spend amount, then the customer is charged for the usage amount. That is, they are charged the minimum spend plus the usage excess over the minimum.
A Commitment/Prepayment is assessed across multiple bills for the entire contract period. It represents your customer's prepayment for services or contractual spend agreements and typically falls under a contractual purchase clause requiring your customer to purchase a minimum quantity of your service at an aggregate agreed price over the contract term.
***
## Question: Does m3ter support both in advance and in arrears billing?
Yes, m3ter supports both billing in advance and in arrears with the following conditions:
* For usage charges, only billing in arrears is supported. Billed in arrears is also known as "invoice in arrears", "paid in arrears", or "arrears billing". This is when the billing and payment occur *after* a service is completed, rather than in advance.
* Other charges such as standing charges, prepayments/commitments, and minimum spend can be billed in advance or in arrears. Billing in advance means sending bills to customers *before* the service is completed.
Plans and Plan Templates always belong to a specific Product. You can create Meters and Aggregations which belong to a specific Product, as shown above.
**More Details?** See [Create and Manage Products](/guides/creating-and-managing-products).
## Plan Templates and Plans
You can use *PlanTemplates* to define default values for the pricing **Plans** you want to apply to your **Products**. This allows you to avoid unnecessary repetition when setting up your pricing **Plans**, while retaining some flexibility to adjust individual pricing Plans to suit individual customer accounts.
Each *Plan* is a child of a **PlanTemplate** and represents a specific pricing plan for one of your products or services. A **Plan** inherits key attributes for billing purposes from a **PlanTemplate**, such as the pricing structure, billing currency, billing frequency, billing interval, and any standing charge to apply to each bill. In a particular **Plan**, only some of these inherited attributes, such as pricing structure and standing charge, can be overridden to meet individual account billing needs.
You can create **Plan Groups** for cases where you want to apply a minimum spend amount at billing across several of your products or features that are each priced separately. When you create the Plan Group, you can define an overall minimum spend and then add the priced Plans you want to include in the Group.
**More Details?** See [Creating and Working with Plan Templates and Plans](/guides/plans-and-pricing/working-with-plan-templates-and-plans) and [Working with Plan Groups](/guides/plans-and-pricing/working-with-plan-templates-and-plans/working-with-plan-groups).
**Tip: Custom Plans for Accounts!** You can also create *Custom Plans* for an Account, which means the Plan can only be attached to that specific Account for charging for the Products the Account consumes. For more details, see [Creating Custom Plans for Accounts](/guides/end-customer-accounts/creating-custom-account-plans).
## Meters
A *Meter* is used to collect usage data. You can set up **Data Fields** for a **Meter** to collect usage data measurements for your products or services. If required, you can use these raw data fields to set up more complex usage data collectors as **Derived Fields**, whose values are the result of calculations made on **Data Fields**.
**Tip: Global Meters?** Note that you can also create Global Meters and Aggregations, which are not tied to a specific Product.
**More Details?** See [Reviewing Meter Options](/guides/usage-data-meters/reviewing-meter-options).
## Aggregations
When you have configured a **Meter** for usage data collection, you can create an *Aggregation* using the **Data Fields** or **Derived Fields** on the **Meter**. This allows you to define how the data collected by **Data Fields** will be aggregated to create a metric to suit the pricing model you want to apply to one of your products or services. For example:
* You might want a **Data Field’s** data to be *summed* to yield a pricing metric.
* Or for another **Data Field’s** data, you might want the *maximum value* reached to be used as a pricing metric.
As key aspects for usage-based pricing, there are further ways you can use Aggregations to achieve the precise units of usage you require for pricing your products:
* You can use your Aggregations to create *Compound Aggregations*. These allow you to derive numerical measures from usage data by applying a calculation to one or more simple Aggregations. This capability greatly extends the range of unit measure you can set up for the pricing you want to apply to usage.
* If the Meter your Aggregation targets contains the appropriate Data Fields, you can also configure *Segmented Aggregations*, which allow you to segment the usage data collected by a single Meter and go on to apply separate pricing to the resultant segmented values. This capability can prove extremely useful for implementing some pricing and billing use cases.
**More Details?** See [Reviewing Aggregation Options](/guides/usage-data-aggregations/reviewing-aggregation-options), [Compound Aggregations](/guides/usage-data-aggregations/compound-aggregations), and [Segmented Aggregations](/guides/usage-data-aggregations/segmented-aggregations).
## Counters
Many providers of SaaS products and services want to charge their end-customers for product consumption using a subscription or recurring charge pricing model, one where end-customers are charged based on the numbers of product units, seats, or user licenses subscribed to within a given billing period.
Counters in m3ter enable you to quickly implement a wide-range of unit-based pricing models for your products:
* Set up recurring subscription charges for your products with a quantity or number of units as the pricing metric.
* Offer your end-customers a flexible subscription model to help them optimize their subscription costs and easily manage their billing as their level of product consumption changes.
* Implement hybrid pricing models for products or services that you want to charge your end-customer for in a mixed way - partly on this kind of subscription basis and partly based on metered product usage.
## Pricing
### Usage-Based Pricing
For *usage-based pricing*, you can link an **Aggregation** to a **Plan** or a **PlanTemplate** to produce usage-based pricing plans. You can then complete the pricing configuration by selecting the type of pricing structure you want for your pricing plans, such as tiered pricing, pricing by volume, or stairstep pricing.
**More Details?** See [Pricing and Managing Plan Templates and Plans](/guides/plans-and-pricing/pricing-plans)
### Unit-Based Pricing
For *unit-based pricing*, you can quickly price Product **Plans** in the **Pricing Editor** using **Counters**.
**More Details?** See [Creating Counters and Pricing Plans](/guides/recurring-charges-counters/creating-counters).
### Hybrid Pricing
If you want to apply a hybrid pricing model for a product or service, you can set up a combined pricing for a Product Plan to charge end-customers who consume the product or service using:
* An **Aggregation** as the pricing metric for usage-based charges you want to apply.
* A **Counter** as the pricing metric for any recurring subscription charges you want to apply.
At billing, all charge amounts due on the Account are combined in a single Bill.
**More Details?** To review a worked example of hybrid pricing, see [Recurring Charges Billing: Hybrid Pricing](/guides/recurring-charges-counters/recurring-charges-example-2-hybrid-pricing).
## Accounts
An *Account* represents your end customer - a person or company that pays your **Organization** for one of your products or services.
For setting up your end customer Accounts, you can:
* Attach a **Plan** to an **Account**, which determines the pricing that will be applied to that **Account** for billing purposes. When you attach a **Plan** to an **Account**, you can select for the start and end dates to define the period the pricing **Plan** is active and will be applied to the **Account** for billing purposes.
* Apply a **Prepayment/Commitment** to an Account for cases where your customer has agreed to pay a fixed amount over the duration of their contract with you to consume one or more of your products or services. The amount is understood as payable regardless of the actual usage they become liable to pay for during the contract period. You can include a surcharge rate to be applied for any overage on the Prepayment/Commitment amount that occurs during the contract period.
* Create **Contracts** for end-customer Accounts. If you expect to have end customers who consume several different service or product packages you offer, for accounting purposes you can then report on the total Contract values for these end customer Accounts.
* Create **Child Accounts** for a main or **Parent Account**. You might want to do this if your Organization has customers with multiple Accounts and instead of issuing multiple bills to these customers, you want to provide them with single Bill for a Parent Account that covers data usage across their multiple Child Accounts.
* Define **Custom Plans** for an Account. A Custom Plan can only be attached to that specific Account.
In your production environment, operationally you can:
* Open an Account **Overview** summarizing the Account setup and showing latest Bills for the Account with charts tracking billed usage and any recurring charges.
* Review and manage a detailed listing of Account **Bills**.
**More Details?** See [End-Customer Accounts](/guides/end-customer-accounts)
## Account Plan
When you attach a priced Plan to an Account, this defines a link between them to create an *Account Plan*. Attaching priced Plans to an Account determines the charges incurred by customers who are put on the Plan when they consume one of your Products.
**More Details?** See [Attaching Plans to Accounts](/guides/end-customer-accounts/attaching-plans-to-an-account)
## Account Plan Group
When you attach a Plan Group to an end customer Account, this defines a link between them to create an *Account Plan Group*. The Account Plan Group for an Account determines the charges incurred by the Account.
**More Details?** See [Attaching Plan Groups to an Account](/guides/end-customer-accounts/attaching-plan-groups-to-an-account)
## Billing
A *Bill* is generated for an **Account** based on the usage-based pricing **Plan** that has been attached to the **Account**.
**More Details?** See [Running, Viewing, and Managing Bills](/guides/billing-and-usage-data/running-viewing-and-managing-bills).
# Sending your Data to m3ter
Source: https://docs.m3ter.com/exploring-m3ter-getting-to-know-the-platform/sending-data-to-m3ter-quick-reference-starter
A common question we get asked by our customers is: "What data are we required to send to m3ter?". To some extent the data we need from you will depend on the details of the usage-based pricing solution you implement on the m3ter platform. However, there's a limited core set of business and operational data we typically require from you and which is independent of the end-customer usage data you'll be sending for your rating and billing purposes.
This topic summarizes the core business and operational data we'll require from you and explains the types of more specific end-customer data we'll need relevant to your particular usage-based pricing solution:
* [User's Data](/exploring-m3ter-getting-to-know-the-platform/sending-data-to-m3ter-quick-reference-starter#users-data)
* [End-Customer's Data](/exploring-m3ter-getting-to-know-the-platform/sending-data-to-m3ter-quick-reference-starter#end-customers-data)
* [Usage Data](/exploring-m3ter-getting-to-know-the-platform/sending-data-to-m3ter-quick-reference-starter#usage-data)
You may also have questions regarding how a Subject Access Request (SAR) regarding Personal Data made under the General Data Protection Regulation (GDPR) would be handled by m3ter:
* [GDPR and m3ter](/exploring-m3ter-getting-to-know-the-platform/sending-data-to-m3ter-quick-reference-starter#gdpr-and-m3ter)
## User's Data
We'll require some details of the people in your organization who become m3ter Users:
* Their name and e-mail address so we can identify them as Users.
* What we do with this data - how we process and store it - is covered in our [Privacy Notice](https://www.m3ter.com/docs/legal/privacy-notice).
## End-Customer's Data
Setting up your m3ter Organization will require you to enter data about your end-customers. This will comprise:
* Any end-customer data required to create and configure key m3ter entities, such as your end-customer Accounts and service Contracts on Accounts.
* In general terms, the details of their charge rates for billing them when pricing up their Product Plans.
We need this minimum amount of data to be able to identify your end-customers in m3ter and understand their contracts with yourselves, and therefore to ensure we are able to generate sound and complete end-customer bills.
In many cases, this data will be sent through to m3ter via an integration with one of your 3rd-party systems.
### Personal Data
* Any *Personal Data* you send is confined to certain fields on the *Account* configuration object. Under the [Data Processing Agreement](https://www.m3ter.com/docs/legal/dpa), the only fields you are allowed to use for any of your end-customer Personal Data in m3ter are the `name`, `address`, and `emailAddress` fields on an Account - see the [Create Account](/api/account/create-account) request schema as documented in our API Reference. See also section 4.2 of the [Terms of Service](https://www.m3ter.com/docs/legal/terms-of-service).
* We appreciate that many of your end-customers will be businesses, and in those cases these fields on the Account object won’t contain Personal Data anyway. These fields act as labels to identify your end-customers and it is your choice what data you use to populate these fields - either personal or non-personal.
## Usage Data
The *usage data* we require will be wholly dependent on the usage-based pricing schema you want to apply to charge and bill your end-customers for consuming your products and services. Given the wide scope m3ter offers, in terms of the pricing complexity you can set up for charging your customers, this usage data can vary enormously. Here are some examples to illustrate how the usage data you'll need to send us to implement your usage-based pricing and billing solution can vary:
* Suppose you run a SaaS company that provides a cloud storage and cleanup service for corrupted graphics files. You want to charge your end-customers for this service on the basis of a count of the number of corrupted files submitted for cleanup together with the total storage measured at the end of any given billing period. The usage data you'll need to send us will therefore include metadata on each end-customer's number of files submitted and the cumulative storage volume of the files.
* Suppose you provide a cloud service which allows your end-customers to develop and host software applications. You intend to charge customers for this application build-and-host cloud service by total number of applications built and hosted on your service and by count on the number of requests made to their applications. The usage data you'll need to send us will therefore include metadata on the number of applications each end-customer has built together with application request counts.
* Suppose you offer a service to manage and process orders and deliveries for online retailers. Your basic pricing model uses a tiered structure on number of orders/deliveries you handle per billing period for an end-customer. You also want to include a fixed charges for product add-ons you offer, such as express delivery, which your customers can select for on an order-by-order basis. The usage data you'll need to send us will therefore include metadata on the number of orders each end-customer sends through for processing together with a count of the number of product add-ons they request.
### Personal Data - Inclusion in Usage Data
We are conscious that Personal Data should only be processed for specific purposes, therefore as stated in our [Terms of Service](https://www.m3ter.com/docs/legal/terms-of-service), you are *not permitted* to send any Personal Data in Usage Data.
## GDPR and m3ter
With respect to the General Data Protection Regulation (GDPR) and in the case of individuals making a Subject Access Request (SAR) regarding Personal Data sent to m3ter or collected by m3ter:
* **User's Data**. If a person in your organization who has become a m3ter user makes a SAR, we as the Data Controller would respond to that request.
* **End-Customer's Data**. m3ter is the Data Processor of any data relating to your end-customers, and you are the Data Controller. Therefore, we would direct any SAR issued by a person whose Personal Data has been processed in this way by m3ter to you for your action.
# FAQs: Configuration and Setup - Best Practices
Source: https://docs.m3ter.com/faqs/faqs-configuration-and-setup-best-practices
Answers to questions on configuration setup in m3ter. Learn when to use one Meter or two and how to structure Products for accurate accounting and billing.
## Question: When to use one Meter and when to use two?
One Meter is sufficient when the source data does not change.
Aggregations *(including compound aggregations)*, segmentation and pricing can then be leveraged to create different data summaries and price points. As a general rule, you should use a single Meter with multiple Data Fields when the data being collected is of a similar or related type. For example:
* Suppose you want to charge your end customers on the basis of the number of logins they make and where they are logging into your service from. You could create a single Meter and define two non-numeric Data Fields: a *Who* Data Field to collect the required data for login counts on specific users; a *Where* Data Field for collecting the location of logins.
* However, you might also want to charge your customers on the basis of the volume of data they upload to store on your service during a given billing period. You should then create a second and separate Meter with a numeric *Measure* Data Field to sum each customer's quantity of data stored.
***
## Question: Should you have one Product or two?
Typically you would create a Product per accounting code in your accounts receivables (AR) system. This way, when integrating with the AR, m3ter knows which Product to assign to the invoice line so that revenue for the product/service can be easily identifiable and recognized.
To ensure Bill line items are assigned to the correct Product lines, you can select an *Accounting Product* when configuring many of the billing-related entities used to set up pricing and charges in your m3ter Organization.
**More Details?** See [Bill Line Items - Mapping to Accounting Products](/guides/billing-and-usage-data/running-viewing-and-managing-bills/bill-line-items-mapping-accounting-products).
# FAQs: Configuration, Rating and Billing
Source: https://docs.m3ter.com/faqs/faqs-configuration-rating-and-billing
Gain insights on Commitments/Prepayments, billing methods, and more. Optimize pricing and manage accounts effectively.
## Question: What are Commitments/Prepayments?
A *Commitment/Prepayment* is when an end customer agrees to pay you a fixed amount over the duration of their contract with you. The agreed Commitment/Prepayment amount is typically paid in advance and used to consume one or more of your products or services.
The Commitment/Prepayment amount is payable regardless of the actual usage by the end customer of your service or product. You can define overage rates should the original agreed amount be exhausted before the customer's contract ends. For an example, see [m3ter prepayment example](/guides/end-customer-accounts/creating-prepayments-for-accounts#example-prepayment).
***
## Question: How does a Prepayment/Commitment differ from a minimum spend?
A *minimum spend* ensures that you receive revenue from your customers in each billing period of at least the minimum spend amount. It is assessed on a bill-by-bill basis.
An end customer's consumption of your product or service is based on usage at an agreed pricing. Should the customer consumption amount be less than the minimum spend, they will be billed at the minimum amount. If the total value of the usage consumed exceeds the minimum spend amount, then the customer is charged for the usage amount. That is, they are charged the minimum spend plus the usage excess over the minimum.
A Commitment/Prepayment is assessed across multiple bills for the entire contract period. It represents your customer's prepayment for services or contractual spend agreements and typically falls under a contractual purchase clause requiring your customer to purchase a minimum quantity of your service at an aggregate agreed price over the contract term.
***
## Question: Does m3ter support both in advance and in arrears billing?
Yes, m3ter supports both billing in advance and in arrears with the following conditions:
* For usage charges, only billing in arrears is supported. Billed in arrears is also known as "invoice in arrears", "paid in arrears", or "arrears billing". This is when the billing and payment occur *after* a service is completed, rather than in advance.
* Other charges such as standing charges, prepayments/commitments, and minimum spend can be billed in advance or in arrears. Billing in advance means sending bills to customers *before* the service is completed.
![]() **Example of billing in advance**
Standing charges, minimum spends, and prepayments/commitments can all be set to bill in advance. Suppose
* The quarterly prepayment amount is \$10,000.
* The prepayment runs from 01-Jul-2022 through 30-Sep-2022.
* Billing frequency is monthly.
If the prepayment first bill date is 01-Jul-2022 and prepayment is set to "bill in advance", the upfront fee will appear on the June invoice, which is typically run in the first week of July.
***
## Question: Can I migrate to m3ter with customers already within a Prepayment period?
Yes, m3ter supports migration even with end customers in mid-flight, when they have usage already logged against their prepayment. This means the end customers have remaining balances that m3ter does not know anything about.
Currently, m3ter supports two approaches to this use case, depending upon the exact setup of the prepayment schemes and other circumstances.
1. Insert usage into m3ter reflecting the usage that has already occurred prior to migration over to m3ter.
2. Tweak the Prepayment amounts in m3ter, ignoring the usage so that the remaining balance is represented as expected.
***
## Question: What are Balances and how can they be used?
Balances, also known as Top-Ups or Prepaid draw-down, can be used for cases where a customer prepays an amount for use as credit against a service. Any service consumption draws-down against the Balance for charging and billing purposes.
Balances can also be used as a "Free Credit" scheme. This encourages sales because customers can use the free credits for consumption against your product or service for a trial period. The free credits can be added on customer signup, or at other stages during the active customer service period.
Balances can also enhance customer satisfaction. Credit can be added to a Balance when there have been issues delivering your service, or some other form of customer dissatisfaction has occurred. The additional Balance credit can then be used for future service consumption, instead of you having to take the trouble to credit and adjust an invoice that covered the period during which the agreed issue occurred.
***
## Question: Can I use Prepayments/Commitments and Balances together?
Yes. You can use Prepayments and Balances together on the same end customer Account, with options to define the draw-down order - Balance first or Prepayment first.
# FAQs: General Questions
Source: https://docs.m3ter.com/faqs/faqs-general-questions
Get expert answers about Usage-Based Pricing (UBP), m3ter's role, suitability for your business, and why not to build your own billing system.
## Question: What does usage-based pricing (UBP) mean?
[Usage-Based Pricing](https://www.m3ter.com/guides/usage-based-pricing) (UBP) is a pricing model where customers are charged based on their consumption of services or products, rather than a flat rate. This approach can complement or substitute the traditional recurring subscription models commonly seen in SaaS businesses. Typically, vendors offer a base subscription package and incorporate additional usage elements, like overages or usage-based add-ons, to provide more flexibility and alignment with customer usage patterns.
However, billing operations and management for UBP are often done manually, introducing risk of errors with consequent revenue leakage. Manual billing process also place heavy and tedious operational demands each billing cycle for teams across Billing Operations & Finance, Product, and Sales. This is where m3ter can help.
***
## Question: What is m3ter and how does it help with usage-based pricing?
m3ter helps B2B software scale-ups implement and manage complex usage-based pricing models by automating bill calculation and sending the results to downstream systems so you can shorten billing cycle operations, eliminate revenue loss and unblock product innovation. m3ter not only supports UBP but also accommodates complex pricing structures, such as hybrid pricing, which blends subscription fees with usage-based charges.
m3ter plugs directly into your existing quote-to-cash stack including your CRM, CPQ, finance systems, payment providers and your product. Data flows will be automated and the data used for bill calculations always synchronized and up to date.
m3ter seamlessly aggregates, prices, and bills your product usage data within a single environment, saving your finance team hours of challenging and tedious manual work.
You can then distribute bill line items and customer spend data across your organization, enabling Sales to have informed customer conversations, Finance to analyze reports on profit margins, and Product teams to quickly develop and iterate new features.
***
## Question: Is UBP right for my business?
UBP isn't suitable for every SaaS company, but when it's a good match, it can reduce adoption friction, enable effortless upselling, and help manage gross margins. Customers appreciate it too, because it aligns the costs they incur with the value they receive from your product. Discover if UBP is the right choice for your business [here](https://www.m3ter.com/blog/is-usage-based-pricing-right-for-my-saas-business).
Various pricing models might suit your business depending on your product and business model. Explore the full spectrum of pricing options [here](https://www.m3ter.com/guides/saas-pricing-spectrum).
***
## Question: Why should I use m3ter instead of building my own system?
m3ter, a flexible usage-based billing platform, offers distinct advantages over building your own system, ensuring your business is equipped with a robust, scalable solution:
1. **Cost-Effective Solution**: Developing and maintaining an in-house system is costly, with an average initial build cost of \$500K and an annual maintenance fee of \$300K. These figures, sourced from a survey of over 150 top SaaS companies, underscore the cost benefits of choosing m3ter.
2. **Reduced Risk and Complexity**: m3ter's proven track record mitigates the execution risks and complexities associated with in-house development. m3ter's seamless integrations with essential quote-to-cash tools like Stripe, NetSuite, Paddle, and Chargebee, combined with the flexibility of the open-API framework for custom integrations, streamlines your billing processes.
3. **Expert Support and Scalability:** m3ter provides unparalleled customer support and a platform that scales with your business growth, handling increasing volumes and complexities without the constant need for internal development.
4. **Compliance and Security:** m3ter adheres to strict industry compliance standards and prioritizes data security, so you have peace of mind and no internal burden of maintaining these critical aspects.
5. **Continuous Innovation:** With m3ter, you benefit from continuous updates to the product, so your business stays at the forefront without any additional development from your team.
6. **Rapid Time to Market:** Implementing m3ter is much faster than the lengthy process of building, testing, and launching an in-house solution. Plus, you might build something that meets your pricing and billing needs today, without being able to fully anticipate what those needs will be in the future.
7. **Proven Success:** Dive into [our customer success stories](https://www.m3ter.com/customers) to see how SaaS businesses like yours have successfully leveraged m3ter to transform their billing.
Discover the strategic benefits of choosing m3ter for your billing needs and learn why our customers prefer our solution over building their own.
Hear from [one of our customers](https://www.m3ter.com/blog/it-s-dangerous-to-go-alone-take-this) why they decided to buy rather than build.
***
## Question: How soon can I start using your platform?
With m3ter, you can implement simple configurations in just hours. Easily integrate with your quote-to-cash systems, automate processes, and tailor m3ter to your business's evolving complexities.
[Reach out to us here](https://www.m3ter.com/contact) for an initial discussion about your needs and how we can assist. Our expert team is ready to guide you through a demo, assist with sandbox setup, and support you throughout your evaluation journey.
# FAQs: Metering
Source: https://docs.m3ter.com/faqs/faqs-metering
Review answers to key questions concerning usage data ingest into m3ter, such as how to handle data ingest issues and what happens when Account codes are changed.
## Question 1: How can I get my usage data into m3ter?
We’ve built our platform to handle high volumes of usage events, and we encourage customers to send us rich, granular usage data, because this allows us to provide you with more flexibility and value from your data once it has been ingested.
There are two generally available methods of sending usage data to m3ter - **API** and **File Upload**.
### API
Our ingest API is the primary mechanism for ingesting usage data. It’s built with scale and flexibility in mind, allowing up to **1,000** measurements in each API request.
### File Upload
If your existing systems and data flow better suit uploading a file containing usage data, perhaps at the end of a batch operation, we offer a file upload service. Make an API call to generate a temporary upload URL, then upload your file; we’ll do the rest, and any errors are reported to you via the normal Alerts service.
**Other Options?** Other options are currently in beta, such as the m3ter Ingest Agent - see [Question 6](/faqs/faqs-metering#question-6-can-you-fetch-my-usage-data-instead-of-me-submitting-it) below. Please ask your m3ter contact for more details in usage data ingest options with m3ter.
**More Details?**
* See the [Getting Usage Data into m3ter](/exploring-m3ter-getting-to-know-the-platform/getting-usage-data-into-m3ter-quick-reference-starter) topic for a broad overview quick reference covering usage data ingest.
* See the [Submitting Usage Data](/guides/billing-and-usage-data/submitting-usage-data) section for more detailed topics with instructions and examples.
***
## Question 2: What should I do if data was not ingested due to network issues?
There are many reasons measurements might get lost or duplicated on their way to the m3ter platform, so a key quality of the m3ter ingest service is that sending a measurement is an idempotent operation within a 35-day window. This means that if a measurement with the same UID arrives multiple times in that timeframe, we will only ingest it once.
If you're unsure whether a network connectivity issue or application crash affected measurements being sent, resend them with their original UID. We’ll de-duplicate, only store the missing ones, and will generate an event so you can confirm.
When dealing with short-lived usage events, we recommend putting the events on a queue such as Amazon SQS or Azure Storage Queues within your environment, then read from that queue when sending it to the m3ter API. This adds a layer of protection against data loss because of network or software issues.
***
## Question 3: What if I need to change an Account code?
Although changing Account codes is possible to allow for corrections, be aware that because usage is submitted using the Account code you need to properly coordinate sending usage to the current Account code when changing it. We therefore recommend not renaming Account codes once usage has been sent.
## Question 4: Can I reuse an old Account code for a different Account?
Yes, but we recommend that you *don't do this*. Account codes should generally be a unique, immutable identifier for the Account, for example a customer ID in your system.
**More Details?** See [Managing Accounts - Best Practices](/guides/end-customer-accounts/managing-accounts-best-practices) for more on the implications of deleting and recreating Accounts using the same Code.
***
## Question 5: Should I send PII in the usage data?
No. Do not send personally identifiable information (PII) in the usage data. Use an anonymous unique identifier that you can map to individual information in your CRM.
**More Details?** See [Sending your Data to m3ter](/exploring-m3ter-getting-to-know-the-platform/sending-data-to-m3ter-quick-reference-starter).
***
## Question 6: Can you fetch my usage data instead of me submitting it?
Yes. Our Ingest Agent can poll external systems and submit it to the m3ter API. Various sources and formats are supported out of the box, but we can also help develop custom collectors should one be required.
**More Details?** See the [Getting Usage Data into m3ter](/exploring-m3ter-getting-to-know-the-platform/getting-usage-data-into-m3ter-quick-reference-starter) topic for more on working with our Ingest Agent.
***
## Question 7: Is it possible to delete or modify usage data?
Measurements are immutable once ingested, but it’s possible to make adjustments to correct aggregated data by submitting corrective measurements *(either positive or negative)*.
**More Details?** See [Using Timestamp to Submit Usage Data Adjustments](/guides/billing-and-usage-data/submitting-usage-data/submitting-usage-data-adjustments-using-timestamp) and [Dates for Usage Data](/guides/getting-started/working-with-dates-in-m3ter-easy-reference#dates-for-usage-data) for more information.
***
## Question 8: Can I export my data?
Yes, you can view, filter, aggregate, and export usage data via our Data Explorer (v2) in the m3ter Console, or via the API. In the future, we shall introduce additional features enabling you to export larger volumes of data.
**More Details?** See [Data Explorer (v2)](/guides/data-explorer/usage-data-explorer-v2).
***
## Question 9: What happens if I need to add fields to my Meter or remove them after I've already sent data?
If you send measurements containing data that you have not configured in your Meter yet, we will still store the data. When you create a Data Field with the same code field, it will become available.
Removing a Data Field from a Meter does not delete the existing measurements, but it becomes unavailable for other m3ter features.
## Question 10: What happens if I attempt to send usage data for a Meter that doesn't exist?
You might plan to set up a new product and have already done some testing in your sandbox or UAT m3ter environments. If you attempt to then perform some testing for the new product in your production environment and submit test data for a Meter that doesn't yet exist, this usage data will be rejected. This will not cause any issues or break anything in your production environment but the usage will have to be resubmitted once the Meter has been created and set up.
# FAQs: Parent and Child Accounts
Source: https://docs.m3ter.com/faqs/faqs-parent-and-child-accounts
If you are implementing Parent/Child Accounts in your Organization, key questions concerning billing when Child Accounts are deleted or removed.
## Question: When a Child account is deleted and Bills recalculated, do the Child items still show on the Bill?
As soon as a Child is disassociated from the Parent, the Child no longer contributes to the Bill.
However, Parent-Child relationships do not carry start and end date information. The disassociation of the Child from the Parent will apply to all Bills. Therefore, you need to recalculate all the Bills for the Parent before the Child usage or line items are removed.
***
## Question: A Child is removed from one Parent and added to a new Parent. When Bills are recalculated, does the Child show for both Parents?
No, it will only show up for the *new* Parent. However, you will need to recalculate all the Bills for the *previous* Parent to have the Child usage or line items removed.
***
## Question: A Child is removed from the Parent and now exists without a Parent. What happens to previously calculated Bills for the Parent?
Since the Child is disassociated from the Parent, all future Bills no longer have any contributions from the former Child. However, all previous Bills must be recalculated before the Child's usage or line items are removed.
# Glossary of Terms
Source: https://docs.m3ter.com/glossary-of-terms
## Account
An *Account* is used to define one of your end-customers, and contains the end-customer name and contact details.
> **See:** [Creating and Managing Accounts](/guides/end-customer-accounts)
## Account Plan
When you attach a priced Plan to an Account, this creates a link between them to create an *Account Plan*. Attaching priced Plans to an Account determines the charges incurred by customers who are put on the Plan when they consume one of your Products.
> **See:** [Attaching Plans to Accounts](/guides/end-customer-accounts/attaching-plans-to-an-account)
## Account Plan Group
When you attach a Plan Group to an end customer Account, this creates a link between them to create an *Account Plan Group*. Attaching a Plan Group to an Account implicitly attaches all of the Plans included in the Group to the Account, and the Account is charged in accordance with those Plans.
> **See:** [Attaching Plan Groups to an Account](/guides/end-customer-accounts/attaching-plan-groups-to-an-account)
## Aggregation
An *Aggregation* specifies how to transform into a single number all of the individual measurements submitted to a Meter data field as usage data. For example, you may choose to simply SUM the values of a data field in the submitted usage data. These single number measurements can then be used as pricing metrics for your products and services and for calculating bills against the customer Accounts that consume those products and services.
> **See:** [Reviewing Aggregation Options](/guides/usage-data-aggregations/reviewing-aggregation-options)
## Balance
You create *Balances* for end customer Accounts, which act as credit or debit amounts for your customers. A customer can then draw down against any Balance credit amount for charges incurred throughout the period the Balance has been defined as active for the Account. You can include options to top-up the original Balance.
> **See:** [Creating Balances for Accounts](/guides/end-customer-accounts/creating-balances-for-accounts)
## Bill
A *Bill* is generated for an Account based on the usage-based pricing Plan that has been attached to the Account.
> **See:** [Running, Viewing, and Managing Bills](/guides/billing-and-usage-data/running-viewing-and-managing-bills)
## Charge
A *Charge* can be created for an end-customer Account and serves those use cases requiring ad-hoc or one-off line items for Account billing.
> **See:** [Creating Charges for Accounts](/guides/end-customer-accounts/creating-charges-for-accounts)
A *Charge* can be created for a Balance on an end-customer Account to create single, one-off line items for Balance billing.
> **See:** [Creating Charges for Balances](/guides/end-customer-accounts/creating-balances-for-accounts/creating-charges-for-balances)
## Charge Schedule
You can set up a *Charge Schedule* for a Balance on an Account. This allows you to generate Charges for billing a Balance at regular daily, weekly, monthly, or yearly intervals over a specified time period.
> **See:** [Setting Up Charge Schedules for Balances](/guides/end-customer-accounts/creating-balances-for-accounts/setting-charge-schedules-for-balances)
## Child Account
A *Child Account* is an Account that has a Parent Account defined. You can create Child Accounts for cases where your Organization has customers with multiple Accounts and instead of issuing multiple bills to these customers, you want to provide them with single Bill for the Parent account.
> **See:** [Working with Parent/Child Accounts](/guides/end-customer-accounts/creating-and-working-with-child-accounts)
## Compound Aggregation
A *Compound Aggregation* allows you to define an aggregation that is based on other (simple) Aggregations using a mathematical expression. For example, you may choose to multiply the result of two Aggregations together, or choose the maximum value of them, and so on. You can also reference *default* Custom Fields - those defined at Organizational level - in your Compound Aggregation calculation.
> **See:** [Compound Aggregations](/guides/usage-data-aggregations/compound-aggregations)
## Contract
Create a *Contract* for an Account if you expect to have end customers who consume several different service or product packages you offer. You can then:
* Report for your accounting purpose the total Contract values for these end-customer Accounts.
* Bill end-customer Accounts on a Contract basis and fulfill invoicing requirements for cases where you offer customers a specific product package agreement to consume several of your core products
> **See:** [Working with Contracts for Accounts](/guides/end-customer-accounts/creating-contracts-for-accounts)
## Counter
*Counters* in m3ter enable you to quickly implement a wide-range of unit-based pricing models for recurring subscription charges on your products. These types of pricing models require a quantity or number of units as the pricing metric and enable you to charge end-customers based on the numbers of product units, seats, or user licenses they subscribe to within a given billing period.
> **See:** [Creating Counters and Pricing Plans](/guides/recurring-charges-counters/creating-counters)
## Counter Adjustment
Create *Counter Adjustments* for end-customer Accounts using Counters to ensure the Account is billed according to the number of Counter units the Account subscribes to in a given billing period.
> **See:** [Understanding and Creating Counter Adjustments for Accounts](/guides/recurring-charges-counters/creating-counter-adjustments-for-accounts)
## Counter Pricing
Create a *Counter Pricing* for a Product Plan or Plan Template using a Counter, and define a unit-based pricing structure for charging end-customer Accounts put on the Plan for consuming the Product.
> **See:** [Creating Counters and Pricing Plans](/guides/recurring-charges-counters/creating-counters)
## Credits
*Credit Reasons* are defined for an Organization. For Bill adjustments, Credit Reasons are then used to add Credits for an existing bill line item or apply a product Credit manually to a Bill.
> **See:** [Creating Credit Reasons](/guides/organization-and-access-management/viewing-and-editing-organization#creating-credit-reasons) and [Adding Credit Line Items to Bills](/guides/billing-and-usage-data/running-viewing-and-managing-bills/adding-credit-line-items-to-bills)
## Custom Fields
*Custom Fields* allow you to attach custom data to some m3ter entities. You can add Custom Fields to define default custom string or number values at the level of your Organization for Products, Plan Templates, Plans, Accounts, Account Plans, or Meters. You can also add Custom Fields to define custom string and number values at the level of the individual Product, Plan Template, Plan, Account, Account Plan, or Meter. The custom values you define at the individual-entity level override the values you’ve defined at the Organizational level.
> **See:** [Adding and Editing Custom Fields](/guides/organization-and-access-management/viewing-and-editing-organization#adding-and-editing-custom-fields)
## Data Explorers
A *Data Explorer* allows you to query the data collected for your Organization in the m3ter platform for *Usage*, *Billing*, or *Prepayments/Commitments* data. You can review the data returned for submitted queries in various formats, including Data Tables or Pivot Tables.
> **See:** [Data Explorers](/guides/data-explorer)
## Data Field
A *Data Field* is configured for a Meter and defines a raw usage data collection field.
> **See:** [Reviewing Meter Options](/guides/usage-data-meters/reviewing-meter-options)
## Debits
*Debit Reasons* are defined for an Organization. For Bill adjustments, Debit Reasons are then used to add Debits for an existing bill line item or apply a product Debit manually to a Bill.
> **See:** [Creating Debit Reasons](/guides/organization-and-access-management/viewing-and-editing-organization#creating-debit-reasons) and [Adding Debit Line Items to Bills](/guides/billing-and-usage-data/running-viewing-and-managing-bills/adding-debit-line-items-to-bills)
## Derived Field
A *Derived Field* is configured for a Meter and uses a calculation on other fields to determine a usage data field. The calculation for a Derived Field can reference Meter Data Fields, Custom Fields, and system Timestamp fields.
> **See:** [Reviewing Meter Options](/guides/usage-data-meters/reviewing-meter-options)
## Events
You can use *Events* generated in m3ter as the basis for setting up and sending [Notifications](/glossary-of-terms#notifications) into your external systems when those Events occur and the specific conditions you've defined for triggering a Notification are satisfied.
> **See:** [Utilizing Events and Notifications](/guides/alerts-events-and-notifications/utilizing-events-and-notifications)
## External Mapping
An *External Mapping* is a mapping reference. It is a configuration object that allows you to store unique ids for matched objects (such as your end Customer id matched to an Account id in m3ter) across two or more systems. An External Mapping can then be used as a reference lookup for which objects are matched across systems.
> **See:** [Reviewing External Mappings](/guides/organization-and-access-management/viewing-and-editing-organization#reviewing-external-mappings)
## Global Meter
A *Global Meter* does not belong to a specific Product. This allows you to set up usage-based pricing across different Products on the basis of the usage data a single Global Meter collects.
> **See:** [Reviewing Meter Options](/guides/usage-data-meters/reviewing-meter-options)
## Grants
A *Grant* is an allowance of pre-rated usage data allocated to an end-customer Account, which can be drawn-down to reduce the amount of usage that is rated and would result in charges against the Account.
> See: [Grants](https://m3ter.mintlify.app/guides/end-customer-accounts/creating-balances-for-accounts/balance-grants)
## Integrations
*Integrations* exploit m3ter's open-API framework allowing you to quickly map and synchronize data held in any 3rd-party systems you use for core business operations.
> **See:** [Integrations](/guides/integrations)
## Lookup Tables
Lookup Tables enable you to manage dynamic data mappings that your calculations reference. Use them for currency conversion, pricing tiers, discount rates, and similar scenarios where you require values to change operationally but for calculation logic to remain constant.
> **See:** [Lookup Tables](/guides/lookup-tables)
## Meter
A *Meter* defines the data fields that your system will submit to the m3ter platform as usage data. You can create Product-specific Meters or Global Meters. Global Meters are not tied to a specific Product.
> **See:** [Reviewing Meter Options](/guides/usage-data-meters/reviewing-meter-options)
## m3sh
The m3sh platform underpins and drives m3ter's interoperability and automation capabilities, encompassing Events and Notifications, Integrations, Workflows, and Apps.
> **See:** [m3sh](/guides/m3sh-automation)
## Notifications
You can set up *Notifications* to be triggered and sent into external systems on the basis of m3ter-generated [Events](/glossary-of-terms#events). This includes the capability to create rule sets to define the precise conditions under which a Notification will be triggered and sent out when a specific Event occurs.
> **See:** [Utilizing Events and Notifications](/guides/alerts-events-and-notifications/utilizing-events-and-notifications)
## Organization
An *Organization* represents your company as a direct customer of the m3ter platform.
> **See:** [Managing your Organization](/guides/organization-and-access-management/viewing-and-editing-organization)
## Permission Policy
A *Permission Policy* allows you to control what users in your Organization who have authenticated with the platform are allowed to do.
> **See:** [Managing your Users](/guides/organization-and-access-management/managing-users)
## Plan
A *Plan* represents a pricing plan for one of your products or services. A Plan is always derived from a Plan Template and inherits settings from the Plan Template only some of which can be overridden.
> **See:** [Reviewing Options for Plans and Plan Templates](/guides/plans-and-pricing/working-with-plan-templates-and-plans/reviewing-configuration-options-for-plans-and-plan-templates)
## Plan Group
A Plan Group allows you to include Plans for different Products in the Group and define a minimum spend for the Group. This means you can apply a cross-product minimum spend straightforwardly, which is a very useful capability for certain billing use-case.
> **See:** [Working with Plan Groups](/guides/plans-and-pricing/working-with-plan-templates-and-plans/working-with-plan-groups)
## Plan Template
A *Plan Template* allows you to configure default settings for your pricing Plans. These settings control billing operations and the pricing structure you want to apply to your products. Plan Templates avoid repetition in configuration work - many Plans will share settings for billing operations and differ only in the details of their pricing structures.
> **See:** [Reviewing Options for Plans and Plan Templates](/guides/plans-and-pricing/working-with-plan-templates-and-plans/reviewing-configuration-options-for-plans-and-plan-templates)
## Prepayment
A *Prepayment/Commitment* allows you to assign an amount to a customer Account that the customer has agreed to pay over the duration of their contract with you to consume one or more of your products or services. The Prepayment amount is understood as payable regardless of the actual usage the customer becomes liable to pay for during the contract period. A Prepayment contrasts with a simple agreed minimum spend amount defined for an Account, since this will be assessed on a bill-by-bill basis whereas a Prepayment spans across multiple bills and is for the entire contract period. When setting up a Prepayment on an Account, you can include a surcharge rate to be applied for any overage on the Prepayment amount that occurs during the contract period.
> **See:** [Creating Prepayments for Accounts](/guides/end-customer-accounts/creating-prepayments-for-accounts)
## Pricing
*Pricing* allows you to configure the cost of usage data under a specific Plan you apply to an Account, and is used to calculate bills.
> **See:** [Pricing and Managing Plans and Plan Templates](/guides/plans-and-pricing/pricing-plans)
## Product
A *Product* represents a product or service that your Organization offers to your end customers. A Meter, Aggregation, Plan Template, Plan, or Pricing typically all belong to a Product. *Global* Meters and Aggregations can be created, which do not belong to a specific Product.
> **See:** [Creating, Managing, and Reviewing Products](/guides/creating-and-managing-products)
## Segmented Aggregations
*Segmented Aggregations* allow you to segment the usage data collected by a single Meter and price your Product Plans by these segment values. This capability is very useful for implementing some pricing and billing use cases.
> **See:** [Segmented Aggregations](/guides/usage-data-aggregations/segmented-aggregations)
## Service User
A *Service User* represents automated processes that you want to grant direct API access to your Organization. Service Users are used for integrating 3rd-party systems with the m3ter platform.
> **See:** [Creating and Configuring Service Users](/guides/organization-and-access-management/managing-users#creating-and-configuring-service-users)
## Statements
*Statements* are used to accompany the Bills sent out to end customers as backing sheets to invoices. Bill Statements can provide a useful and welcome breakdown of the usage responsible for the usage charge line items your customers see on their invoices.
> **See:** [Working with Bill Statements](/guides/billing-and-usage-data/running-viewing-and-managing-bills/working-with-bill-statements)
## Transaction Types and Transactions
*Transaction Types* are defined for an Organization. Transaction Types are then used to create specific *Transaction amounts* for Balances on end-customer Accounts. In this way, Transaction are used to flexibly manage Balance amounts on end-customer Accounts, with a Transaction ledger being maintained for individual Balances.
> **See:** [Creating Transaction Types](/guides/organization-and-access-management/viewing-and-editing-organization#creating-transaction-types) and [Creating Transactions for Balances](/guides/end-customer-accounts/creating-balances-for-accounts#creating-transactions-for-a-balance)
## Transaction Schedule
You can set up a *Transaction Schedule* for a Balance on an Account. This allows you to generate Transactions of a specific type for a Balance at regular daily, weekly, monthly, or yearly intervals over a specified time period.
> **See:** [Setting Up Transaction Schedules for Balances](/guides/end-customer-accounts/creating-balances-for-accounts/setting-transaction-schedules-for-balances)
## User
A *User* represents a person you allow to authenticate with and have access to your Organization in the m3ter platform.
> **See:** [Viewing and Editing Users](/guides/organization-and-access-management/managing-users#viewing-and-editing-users)
# Utilizing Events and Notifications
Source: https://docs.m3ter.com/guides/alerts-events-and-notifications/utilizing-events-and-notifications
You can use m3ter's *Events and Notifications* feature to define and implement alerts or notifications that are triggered by specific events in your m3ter production environment. For example, you might offer a sign-up bonus credit to your new customers. You then want to receive a notification when an end customer account has consumed 90% of their initial credit amount.
This section explains m3ter's *Events and Notifications* framework, sets out the main object definitions within that framework, explains how to create and configure *Notification Rules* in the m3ter Console, and provides some worked examples for you to follow:
* [Key Concepts and Relationships](/guides/alerts-events-and-notifications/utilizing-events-and-notifications/key-concepts-and-relationships)
* [Object Definitions and API Calls](/guides/alerts-events-and-notifications/utilizing-events-and-notifications/object-definitions-and-api-calls)
* [Creating, Managing, and Reviewing Notifications](/guides/alerts-events-and-notifications/utilizing-events-and-notifications/creating-managing-and-reviewing-notifications)
* [Example - Notification Setup for Commitment Updated Event](/guides/alerts-events-and-notifications/utilizing-events-and-notifications/example-1-commitment-updated-event)
In addition to system-generated Events that occur when a configuration entity undergoes a state change at creation, update, or deletion of the entity, you can use API calls to create and configure *Scheduled Event Configurations*. Scheduled Events are custom Event types, which you can set up by referencing Date/Time fields on configuration and billing entities:
* [Working with Scheduled Events](/guides/alerts-events-and-notifications/utilizing-events-and-notifications/working-with-scheduled-events)
# Creating, Managing, and Reviewing Notifications
Source: https://docs.m3ter.com/guides/alerts-events-and-notifications/utilizing-events-and-notifications/creating-managing-and-reviewing-notifications
In the Console, you can set up *Notification rules*, which allow you to define a rule set that controls when a Notification is triggered with reference to an Event:
* **Event**. Specify the system Event that the Notification will be sent for - for example, a Prepayment/Commitment created Event.
* **Calculation**. Include a calculation that references the Event's fields. The calculation is evaluated as either true or false, and this allows you to define precisely the conditions that must be satisfied for the Notification to be triggered and sent when the specified Event occurs. For example, a Notification that will be sent only when a Prepayment created Event occurs and the Prepayment amount is equal to or greater than \$5,000.
* **Always fire notification**. If you want a Notification to be triggered simply by the Event occurring and with no further conditions having to be met, you can use a switch to implement this use case. No calculation is then required for the Notification rule.
* **Active/Inactive**. Switch the Notification on and off for the referenced Event.
When you've created Notification rules for Events, you can link them to Outgoing webhooks and complete your setup to create *Notification Webhook Integrations*.
Once this setup is complete, a Notification will be sent to an Outgoing webhook if:
* You have enabled the Notification rule linked to the Outgoing webhook to be active.
* The system Event occurs that the Notification rule is based on.
* Any calculation you've built into the Notification rule is evaluated as true at the time the Event occurs.
After setting up your Notification rules and enabled them as active in your production environment, any Events that cause Notifications to be triggered in accordance with those rules are logged and recorded. You can then review and inspect these Notification Events as part of your routine operations.
This topic explains how to create a Notification rule and link it to an Outgoing webhook. How to view and manage your Notification rules is also explained:
* [Creating Notification Rules](/guides/alerts-events-and-notifications/utilizing-events-and-notifications/creating-managing-and-reviewing-notifications#creating-notification-rules)
* [Linking Notification Rules to Outgoing Webhooks](/guides/alerts-events-and-notifications/utilizing-events-and-notifications/creating-managing-and-reviewing-notifications#linking-notification-rules-to-outgoing-webhooks)
* [Managing Notification Rules](/guides/alerts-events-and-notifications/utilizing-events-and-notifications/creating-managing-and-reviewing-notifications#managing-notification-rules)
How to review the Events that have triggered Notifications according to your Notification rules is explained:
* [Reviewing Events for Notifications](/guides/alerts-events-and-notifications/utilizing-events-and-notifications/creating-managing-and-reviewing-notifications#reviewing-events-for-notifications)
Lastly, an example of a Notification payload is given:
* [Example Notification Payload](/guides/alerts-events-and-notifications/utilizing-events-and-notifications/creating-managing-and-reviewing-notifications#example-notification-payload)
**IMPORTANT: Notes and Tips:**
* **Events are Time-Bound!** Events in m3ter are time-bound and are deleted 28 days after creation. This includes all system Events, Notification Events, Integration error Events, Ingestion validation failure Events, Data Export job failure Events, and Scheduled Events.
* **Working with Notifications?** Before attempting to create and configure Notification rules, we *strongly recommend* that you first review the [Key Concepts and Relationships](/guides/alerts-events-and-notifications/utilizing-events-and-notifications/key-concepts-and-relationships) and [Object Definitions and API Calls](/guides/alerts-events-and-notifications/utilizing-events-and-notifications/object-definitions-and-api-calls) topics in this section, which explain in detail the Events and Notifications framework and provide guidance on object definitions and API calls.
* **Scheduled Events?** As well as setting up Notifications for system-generated Events, you can also set up Notifications on the basis of any *Scheduled Events* you've created for your Organization. See [Working with Scheduled Events](/guides/alerts-events-and-notifications/utilizing-events-and-notifications/working-with-scheduled-events) for more details.
## Creating Notification Rules
**To create a Notification Rule:**
1. In the Console, select **m3sh**:
**Example of billing in advance**
Standing charges, minimum spends, and prepayments/commitments can all be set to bill in advance. Suppose
* The quarterly prepayment amount is \$10,000.
* The prepayment runs from 01-Jul-2022 through 30-Sep-2022.
* Billing frequency is monthly.
If the prepayment first bill date is 01-Jul-2022 and prepayment is set to "bill in advance", the upfront fee will appear on the June invoice, which is typically run in the first week of July.
***
## Question: Can I migrate to m3ter with customers already within a Prepayment period?
Yes, m3ter supports migration even with end customers in mid-flight, when they have usage already logged against their prepayment. This means the end customers have remaining balances that m3ter does not know anything about.
Currently, m3ter supports two approaches to this use case, depending upon the exact setup of the prepayment schemes and other circumstances.
1. Insert usage into m3ter reflecting the usage that has already occurred prior to migration over to m3ter.
2. Tweak the Prepayment amounts in m3ter, ignoring the usage so that the remaining balance is represented as expected.
***
## Question: What are Balances and how can they be used?
Balances, also known as Top-Ups or Prepaid draw-down, can be used for cases where a customer prepays an amount for use as credit against a service. Any service consumption draws-down against the Balance for charging and billing purposes.
Balances can also be used as a "Free Credit" scheme. This encourages sales because customers can use the free credits for consumption against your product or service for a trial period. The free credits can be added on customer signup, or at other stages during the active customer service period.
Balances can also enhance customer satisfaction. Credit can be added to a Balance when there have been issues delivering your service, or some other form of customer dissatisfaction has occurred. The additional Balance credit can then be used for future service consumption, instead of you having to take the trouble to credit and adjust an invoice that covered the period during which the agreed issue occurred.
***
## Question: Can I use Prepayments/Commitments and Balances together?
Yes. You can use Prepayments and Balances together on the same end customer Account, with options to define the draw-down order - Balance first or Prepayment first.
# FAQs: General Questions
Source: https://docs.m3ter.com/faqs/faqs-general-questions
Get expert answers about Usage-Based Pricing (UBP), m3ter's role, suitability for your business, and why not to build your own billing system.
## Question: What does usage-based pricing (UBP) mean?
[Usage-Based Pricing](https://www.m3ter.com/guides/usage-based-pricing) (UBP) is a pricing model where customers are charged based on their consumption of services or products, rather than a flat rate. This approach can complement or substitute the traditional recurring subscription models commonly seen in SaaS businesses. Typically, vendors offer a base subscription package and incorporate additional usage elements, like overages or usage-based add-ons, to provide more flexibility and alignment with customer usage patterns.
However, billing operations and management for UBP are often done manually, introducing risk of errors with consequent revenue leakage. Manual billing process also place heavy and tedious operational demands each billing cycle for teams across Billing Operations & Finance, Product, and Sales. This is where m3ter can help.
***
## Question: What is m3ter and how does it help with usage-based pricing?
m3ter helps B2B software scale-ups implement and manage complex usage-based pricing models by automating bill calculation and sending the results to downstream systems so you can shorten billing cycle operations, eliminate revenue loss and unblock product innovation. m3ter not only supports UBP but also accommodates complex pricing structures, such as hybrid pricing, which blends subscription fees with usage-based charges.
m3ter plugs directly into your existing quote-to-cash stack including your CRM, CPQ, finance systems, payment providers and your product. Data flows will be automated and the data used for bill calculations always synchronized and up to date.
m3ter seamlessly aggregates, prices, and bills your product usage data within a single environment, saving your finance team hours of challenging and tedious manual work.
You can then distribute bill line items and customer spend data across your organization, enabling Sales to have informed customer conversations, Finance to analyze reports on profit margins, and Product teams to quickly develop and iterate new features.
***
## Question: Is UBP right for my business?
UBP isn't suitable for every SaaS company, but when it's a good match, it can reduce adoption friction, enable effortless upselling, and help manage gross margins. Customers appreciate it too, because it aligns the costs they incur with the value they receive from your product. Discover if UBP is the right choice for your business [here](https://www.m3ter.com/blog/is-usage-based-pricing-right-for-my-saas-business).
Various pricing models might suit your business depending on your product and business model. Explore the full spectrum of pricing options [here](https://www.m3ter.com/guides/saas-pricing-spectrum).
***
## Question: Why should I use m3ter instead of building my own system?
m3ter, a flexible usage-based billing platform, offers distinct advantages over building your own system, ensuring your business is equipped with a robust, scalable solution:
1. **Cost-Effective Solution**: Developing and maintaining an in-house system is costly, with an average initial build cost of \$500K and an annual maintenance fee of \$300K. These figures, sourced from a survey of over 150 top SaaS companies, underscore the cost benefits of choosing m3ter.
2. **Reduced Risk and Complexity**: m3ter's proven track record mitigates the execution risks and complexities associated with in-house development. m3ter's seamless integrations with essential quote-to-cash tools like Stripe, NetSuite, Paddle, and Chargebee, combined with the flexibility of the open-API framework for custom integrations, streamlines your billing processes.
3. **Expert Support and Scalability:** m3ter provides unparalleled customer support and a platform that scales with your business growth, handling increasing volumes and complexities without the constant need for internal development.
4. **Compliance and Security:** m3ter adheres to strict industry compliance standards and prioritizes data security, so you have peace of mind and no internal burden of maintaining these critical aspects.
5. **Continuous Innovation:** With m3ter, you benefit from continuous updates to the product, so your business stays at the forefront without any additional development from your team.
6. **Rapid Time to Market:** Implementing m3ter is much faster than the lengthy process of building, testing, and launching an in-house solution. Plus, you might build something that meets your pricing and billing needs today, without being able to fully anticipate what those needs will be in the future.
7. **Proven Success:** Dive into [our customer success stories](https://www.m3ter.com/customers) to see how SaaS businesses like yours have successfully leveraged m3ter to transform their billing.
Discover the strategic benefits of choosing m3ter for your billing needs and learn why our customers prefer our solution over building their own.
Hear from [one of our customers](https://www.m3ter.com/blog/it-s-dangerous-to-go-alone-take-this) why they decided to buy rather than build.
***
## Question: How soon can I start using your platform?
With m3ter, you can implement simple configurations in just hours. Easily integrate with your quote-to-cash systems, automate processes, and tailor m3ter to your business's evolving complexities.
[Reach out to us here](https://www.m3ter.com/contact) for an initial discussion about your needs and how we can assist. Our expert team is ready to guide you through a demo, assist with sandbox setup, and support you throughout your evaluation journey.
# FAQs: Metering
Source: https://docs.m3ter.com/faqs/faqs-metering
Review answers to key questions concerning usage data ingest into m3ter, such as how to handle data ingest issues and what happens when Account codes are changed.
## Question 1: How can I get my usage data into m3ter?
We’ve built our platform to handle high volumes of usage events, and we encourage customers to send us rich, granular usage data, because this allows us to provide you with more flexibility and value from your data once it has been ingested.
There are two generally available methods of sending usage data to m3ter - **API** and **File Upload**.
### API
Our ingest API is the primary mechanism for ingesting usage data. It’s built with scale and flexibility in mind, allowing up to **1,000** measurements in each API request.
### File Upload
If your existing systems and data flow better suit uploading a file containing usage data, perhaps at the end of a batch operation, we offer a file upload service. Make an API call to generate a temporary upload URL, then upload your file; we’ll do the rest, and any errors are reported to you via the normal Alerts service.
**Other Options?** Other options are currently in beta, such as the m3ter Ingest Agent - see [Question 6](/faqs/faqs-metering#question-6-can-you-fetch-my-usage-data-instead-of-me-submitting-it) below. Please ask your m3ter contact for more details in usage data ingest options with m3ter.
**More Details?**
* See the [Getting Usage Data into m3ter](/exploring-m3ter-getting-to-know-the-platform/getting-usage-data-into-m3ter-quick-reference-starter) topic for a broad overview quick reference covering usage data ingest.
* See the [Submitting Usage Data](/guides/billing-and-usage-data/submitting-usage-data) section for more detailed topics with instructions and examples.
***
## Question 2: What should I do if data was not ingested due to network issues?
There are many reasons measurements might get lost or duplicated on their way to the m3ter platform, so a key quality of the m3ter ingest service is that sending a measurement is an idempotent operation within a 35-day window. This means that if a measurement with the same UID arrives multiple times in that timeframe, we will only ingest it once.
If you're unsure whether a network connectivity issue or application crash affected measurements being sent, resend them with their original UID. We’ll de-duplicate, only store the missing ones, and will generate an event so you can confirm.
When dealing with short-lived usage events, we recommend putting the events on a queue such as Amazon SQS or Azure Storage Queues within your environment, then read from that queue when sending it to the m3ter API. This adds a layer of protection against data loss because of network or software issues.
***
## Question 3: What if I need to change an Account code?
Although changing Account codes is possible to allow for corrections, be aware that because usage is submitted using the Account code you need to properly coordinate sending usage to the current Account code when changing it. We therefore recommend not renaming Account codes once usage has been sent.
## Question 4: Can I reuse an old Account code for a different Account?
Yes, but we recommend that you *don't do this*. Account codes should generally be a unique, immutable identifier for the Account, for example a customer ID in your system.
**More Details?** See [Managing Accounts - Best Practices](/guides/end-customer-accounts/managing-accounts-best-practices) for more on the implications of deleting and recreating Accounts using the same Code.
***
## Question 5: Should I send PII in the usage data?
No. Do not send personally identifiable information (PII) in the usage data. Use an anonymous unique identifier that you can map to individual information in your CRM.
**More Details?** See [Sending your Data to m3ter](/exploring-m3ter-getting-to-know-the-platform/sending-data-to-m3ter-quick-reference-starter).
***
## Question 6: Can you fetch my usage data instead of me submitting it?
Yes. Our Ingest Agent can poll external systems and submit it to the m3ter API. Various sources and formats are supported out of the box, but we can also help develop custom collectors should one be required.
**More Details?** See the [Getting Usage Data into m3ter](/exploring-m3ter-getting-to-know-the-platform/getting-usage-data-into-m3ter-quick-reference-starter) topic for more on working with our Ingest Agent.
***
## Question 7: Is it possible to delete or modify usage data?
Measurements are immutable once ingested, but it’s possible to make adjustments to correct aggregated data by submitting corrective measurements *(either positive or negative)*.
**More Details?** See [Using Timestamp to Submit Usage Data Adjustments](/guides/billing-and-usage-data/submitting-usage-data/submitting-usage-data-adjustments-using-timestamp) and [Dates for Usage Data](/guides/getting-started/working-with-dates-in-m3ter-easy-reference#dates-for-usage-data) for more information.
***
## Question 8: Can I export my data?
Yes, you can view, filter, aggregate, and export usage data via our Data Explorer (v2) in the m3ter Console, or via the API. In the future, we shall introduce additional features enabling you to export larger volumes of data.
**More Details?** See [Data Explorer (v2)](/guides/data-explorer/usage-data-explorer-v2).
***
## Question 9: What happens if I need to add fields to my Meter or remove them after I've already sent data?
If you send measurements containing data that you have not configured in your Meter yet, we will still store the data. When you create a Data Field with the same code field, it will become available.
Removing a Data Field from a Meter does not delete the existing measurements, but it becomes unavailable for other m3ter features.
## Question 10: What happens if I attempt to send usage data for a Meter that doesn't exist?
You might plan to set up a new product and have already done some testing in your sandbox or UAT m3ter environments. If you attempt to then perform some testing for the new product in your production environment and submit test data for a Meter that doesn't yet exist, this usage data will be rejected. This will not cause any issues or break anything in your production environment but the usage will have to be resubmitted once the Meter has been created and set up.
# FAQs: Parent and Child Accounts
Source: https://docs.m3ter.com/faqs/faqs-parent-and-child-accounts
If you are implementing Parent/Child Accounts in your Organization, key questions concerning billing when Child Accounts are deleted or removed.
## Question: When a Child account is deleted and Bills recalculated, do the Child items still show on the Bill?
As soon as a Child is disassociated from the Parent, the Child no longer contributes to the Bill.
However, Parent-Child relationships do not carry start and end date information. The disassociation of the Child from the Parent will apply to all Bills. Therefore, you need to recalculate all the Bills for the Parent before the Child usage or line items are removed.
***
## Question: A Child is removed from one Parent and added to a new Parent. When Bills are recalculated, does the Child show for both Parents?
No, it will only show up for the *new* Parent. However, you will need to recalculate all the Bills for the *previous* Parent to have the Child usage or line items removed.
***
## Question: A Child is removed from the Parent and now exists without a Parent. What happens to previously calculated Bills for the Parent?
Since the Child is disassociated from the Parent, all future Bills no longer have any contributions from the former Child. However, all previous Bills must be recalculated before the Child's usage or line items are removed.
# Glossary of Terms
Source: https://docs.m3ter.com/glossary-of-terms
## Account
An *Account* is used to define one of your end-customers, and contains the end-customer name and contact details.
> **See:** [Creating and Managing Accounts](/guides/end-customer-accounts)
## Account Plan
When you attach a priced Plan to an Account, this creates a link between them to create an *Account Plan*. Attaching priced Plans to an Account determines the charges incurred by customers who are put on the Plan when they consume one of your Products.
> **See:** [Attaching Plans to Accounts](/guides/end-customer-accounts/attaching-plans-to-an-account)
## Account Plan Group
When you attach a Plan Group to an end customer Account, this creates a link between them to create an *Account Plan Group*. Attaching a Plan Group to an Account implicitly attaches all of the Plans included in the Group to the Account, and the Account is charged in accordance with those Plans.
> **See:** [Attaching Plan Groups to an Account](/guides/end-customer-accounts/attaching-plan-groups-to-an-account)
## Aggregation
An *Aggregation* specifies how to transform into a single number all of the individual measurements submitted to a Meter data field as usage data. For example, you may choose to simply SUM the values of a data field in the submitted usage data. These single number measurements can then be used as pricing metrics for your products and services and for calculating bills against the customer Accounts that consume those products and services.
> **See:** [Reviewing Aggregation Options](/guides/usage-data-aggregations/reviewing-aggregation-options)
## Balance
You create *Balances* for end customer Accounts, which act as credit or debit amounts for your customers. A customer can then draw down against any Balance credit amount for charges incurred throughout the period the Balance has been defined as active for the Account. You can include options to top-up the original Balance.
> **See:** [Creating Balances for Accounts](/guides/end-customer-accounts/creating-balances-for-accounts)
## Bill
A *Bill* is generated for an Account based on the usage-based pricing Plan that has been attached to the Account.
> **See:** [Running, Viewing, and Managing Bills](/guides/billing-and-usage-data/running-viewing-and-managing-bills)
## Charge
A *Charge* can be created for an end-customer Account and serves those use cases requiring ad-hoc or one-off line items for Account billing.
> **See:** [Creating Charges for Accounts](/guides/end-customer-accounts/creating-charges-for-accounts)
A *Charge* can be created for a Balance on an end-customer Account to create single, one-off line items for Balance billing.
> **See:** [Creating Charges for Balances](/guides/end-customer-accounts/creating-balances-for-accounts/creating-charges-for-balances)
## Charge Schedule
You can set up a *Charge Schedule* for a Balance on an Account. This allows you to generate Charges for billing a Balance at regular daily, weekly, monthly, or yearly intervals over a specified time period.
> **See:** [Setting Up Charge Schedules for Balances](/guides/end-customer-accounts/creating-balances-for-accounts/setting-charge-schedules-for-balances)
## Child Account
A *Child Account* is an Account that has a Parent Account defined. You can create Child Accounts for cases where your Organization has customers with multiple Accounts and instead of issuing multiple bills to these customers, you want to provide them with single Bill for the Parent account.
> **See:** [Working with Parent/Child Accounts](/guides/end-customer-accounts/creating-and-working-with-child-accounts)
## Compound Aggregation
A *Compound Aggregation* allows you to define an aggregation that is based on other (simple) Aggregations using a mathematical expression. For example, you may choose to multiply the result of two Aggregations together, or choose the maximum value of them, and so on. You can also reference *default* Custom Fields - those defined at Organizational level - in your Compound Aggregation calculation.
> **See:** [Compound Aggregations](/guides/usage-data-aggregations/compound-aggregations)
## Contract
Create a *Contract* for an Account if you expect to have end customers who consume several different service or product packages you offer. You can then:
* Report for your accounting purpose the total Contract values for these end-customer Accounts.
* Bill end-customer Accounts on a Contract basis and fulfill invoicing requirements for cases where you offer customers a specific product package agreement to consume several of your core products
> **See:** [Working with Contracts for Accounts](/guides/end-customer-accounts/creating-contracts-for-accounts)
## Counter
*Counters* in m3ter enable you to quickly implement a wide-range of unit-based pricing models for recurring subscription charges on your products. These types of pricing models require a quantity or number of units as the pricing metric and enable you to charge end-customers based on the numbers of product units, seats, or user licenses they subscribe to within a given billing period.
> **See:** [Creating Counters and Pricing Plans](/guides/recurring-charges-counters/creating-counters)
## Counter Adjustment
Create *Counter Adjustments* for end-customer Accounts using Counters to ensure the Account is billed according to the number of Counter units the Account subscribes to in a given billing period.
> **See:** [Understanding and Creating Counter Adjustments for Accounts](/guides/recurring-charges-counters/creating-counter-adjustments-for-accounts)
## Counter Pricing
Create a *Counter Pricing* for a Product Plan or Plan Template using a Counter, and define a unit-based pricing structure for charging end-customer Accounts put on the Plan for consuming the Product.
> **See:** [Creating Counters and Pricing Plans](/guides/recurring-charges-counters/creating-counters)
## Credits
*Credit Reasons* are defined for an Organization. For Bill adjustments, Credit Reasons are then used to add Credits for an existing bill line item or apply a product Credit manually to a Bill.
> **See:** [Creating Credit Reasons](/guides/organization-and-access-management/viewing-and-editing-organization#creating-credit-reasons) and [Adding Credit Line Items to Bills](/guides/billing-and-usage-data/running-viewing-and-managing-bills/adding-credit-line-items-to-bills)
## Custom Fields
*Custom Fields* allow you to attach custom data to some m3ter entities. You can add Custom Fields to define default custom string or number values at the level of your Organization for Products, Plan Templates, Plans, Accounts, Account Plans, or Meters. You can also add Custom Fields to define custom string and number values at the level of the individual Product, Plan Template, Plan, Account, Account Plan, or Meter. The custom values you define at the individual-entity level override the values you’ve defined at the Organizational level.
> **See:** [Adding and Editing Custom Fields](/guides/organization-and-access-management/viewing-and-editing-organization#adding-and-editing-custom-fields)
## Data Explorers
A *Data Explorer* allows you to query the data collected for your Organization in the m3ter platform for *Usage*, *Billing*, or *Prepayments/Commitments* data. You can review the data returned for submitted queries in various formats, including Data Tables or Pivot Tables.
> **See:** [Data Explorers](/guides/data-explorer)
## Data Field
A *Data Field* is configured for a Meter and defines a raw usage data collection field.
> **See:** [Reviewing Meter Options](/guides/usage-data-meters/reviewing-meter-options)
## Debits
*Debit Reasons* are defined for an Organization. For Bill adjustments, Debit Reasons are then used to add Debits for an existing bill line item or apply a product Debit manually to a Bill.
> **See:** [Creating Debit Reasons](/guides/organization-and-access-management/viewing-and-editing-organization#creating-debit-reasons) and [Adding Debit Line Items to Bills](/guides/billing-and-usage-data/running-viewing-and-managing-bills/adding-debit-line-items-to-bills)
## Derived Field
A *Derived Field* is configured for a Meter and uses a calculation on other fields to determine a usage data field. The calculation for a Derived Field can reference Meter Data Fields, Custom Fields, and system Timestamp fields.
> **See:** [Reviewing Meter Options](/guides/usage-data-meters/reviewing-meter-options)
## Events
You can use *Events* generated in m3ter as the basis for setting up and sending [Notifications](/glossary-of-terms#notifications) into your external systems when those Events occur and the specific conditions you've defined for triggering a Notification are satisfied.
> **See:** [Utilizing Events and Notifications](/guides/alerts-events-and-notifications/utilizing-events-and-notifications)
## External Mapping
An *External Mapping* is a mapping reference. It is a configuration object that allows you to store unique ids for matched objects (such as your end Customer id matched to an Account id in m3ter) across two or more systems. An External Mapping can then be used as a reference lookup for which objects are matched across systems.
> **See:** [Reviewing External Mappings](/guides/organization-and-access-management/viewing-and-editing-organization#reviewing-external-mappings)
## Global Meter
A *Global Meter* does not belong to a specific Product. This allows you to set up usage-based pricing across different Products on the basis of the usage data a single Global Meter collects.
> **See:** [Reviewing Meter Options](/guides/usage-data-meters/reviewing-meter-options)
## Grants
A *Grant* is an allowance of pre-rated usage data allocated to an end-customer Account, which can be drawn-down to reduce the amount of usage that is rated and would result in charges against the Account.
> See: [Grants](https://m3ter.mintlify.app/guides/end-customer-accounts/creating-balances-for-accounts/balance-grants)
## Integrations
*Integrations* exploit m3ter's open-API framework allowing you to quickly map and synchronize data held in any 3rd-party systems you use for core business operations.
> **See:** [Integrations](/guides/integrations)
## Lookup Tables
Lookup Tables enable you to manage dynamic data mappings that your calculations reference. Use them for currency conversion, pricing tiers, discount rates, and similar scenarios where you require values to change operationally but for calculation logic to remain constant.
> **See:** [Lookup Tables](/guides/lookup-tables)
## Meter
A *Meter* defines the data fields that your system will submit to the m3ter platform as usage data. You can create Product-specific Meters or Global Meters. Global Meters are not tied to a specific Product.
> **See:** [Reviewing Meter Options](/guides/usage-data-meters/reviewing-meter-options)
## m3sh
The m3sh platform underpins and drives m3ter's interoperability and automation capabilities, encompassing Events and Notifications, Integrations, Workflows, and Apps.
> **See:** [m3sh](/guides/m3sh-automation)
## Notifications
You can set up *Notifications* to be triggered and sent into external systems on the basis of m3ter-generated [Events](/glossary-of-terms#events). This includes the capability to create rule sets to define the precise conditions under which a Notification will be triggered and sent out when a specific Event occurs.
> **See:** [Utilizing Events and Notifications](/guides/alerts-events-and-notifications/utilizing-events-and-notifications)
## Organization
An *Organization* represents your company as a direct customer of the m3ter platform.
> **See:** [Managing your Organization](/guides/organization-and-access-management/viewing-and-editing-organization)
## Permission Policy
A *Permission Policy* allows you to control what users in your Organization who have authenticated with the platform are allowed to do.
> **See:** [Managing your Users](/guides/organization-and-access-management/managing-users)
## Plan
A *Plan* represents a pricing plan for one of your products or services. A Plan is always derived from a Plan Template and inherits settings from the Plan Template only some of which can be overridden.
> **See:** [Reviewing Options for Plans and Plan Templates](/guides/plans-and-pricing/working-with-plan-templates-and-plans/reviewing-configuration-options-for-plans-and-plan-templates)
## Plan Group
A Plan Group allows you to include Plans for different Products in the Group and define a minimum spend for the Group. This means you can apply a cross-product minimum spend straightforwardly, which is a very useful capability for certain billing use-case.
> **See:** [Working with Plan Groups](/guides/plans-and-pricing/working-with-plan-templates-and-plans/working-with-plan-groups)
## Plan Template
A *Plan Template* allows you to configure default settings for your pricing Plans. These settings control billing operations and the pricing structure you want to apply to your products. Plan Templates avoid repetition in configuration work - many Plans will share settings for billing operations and differ only in the details of their pricing structures.
> **See:** [Reviewing Options for Plans and Plan Templates](/guides/plans-and-pricing/working-with-plan-templates-and-plans/reviewing-configuration-options-for-plans-and-plan-templates)
## Prepayment
A *Prepayment/Commitment* allows you to assign an amount to a customer Account that the customer has agreed to pay over the duration of their contract with you to consume one or more of your products or services. The Prepayment amount is understood as payable regardless of the actual usage the customer becomes liable to pay for during the contract period. A Prepayment contrasts with a simple agreed minimum spend amount defined for an Account, since this will be assessed on a bill-by-bill basis whereas a Prepayment spans across multiple bills and is for the entire contract period. When setting up a Prepayment on an Account, you can include a surcharge rate to be applied for any overage on the Prepayment amount that occurs during the contract period.
> **See:** [Creating Prepayments for Accounts](/guides/end-customer-accounts/creating-prepayments-for-accounts)
## Pricing
*Pricing* allows you to configure the cost of usage data under a specific Plan you apply to an Account, and is used to calculate bills.
> **See:** [Pricing and Managing Plans and Plan Templates](/guides/plans-and-pricing/pricing-plans)
## Product
A *Product* represents a product or service that your Organization offers to your end customers. A Meter, Aggregation, Plan Template, Plan, or Pricing typically all belong to a Product. *Global* Meters and Aggregations can be created, which do not belong to a specific Product.
> **See:** [Creating, Managing, and Reviewing Products](/guides/creating-and-managing-products)
## Segmented Aggregations
*Segmented Aggregations* allow you to segment the usage data collected by a single Meter and price your Product Plans by these segment values. This capability is very useful for implementing some pricing and billing use cases.
> **See:** [Segmented Aggregations](/guides/usage-data-aggregations/segmented-aggregations)
## Service User
A *Service User* represents automated processes that you want to grant direct API access to your Organization. Service Users are used for integrating 3rd-party systems with the m3ter platform.
> **See:** [Creating and Configuring Service Users](/guides/organization-and-access-management/managing-users#creating-and-configuring-service-users)
## Statements
*Statements* are used to accompany the Bills sent out to end customers as backing sheets to invoices. Bill Statements can provide a useful and welcome breakdown of the usage responsible for the usage charge line items your customers see on their invoices.
> **See:** [Working with Bill Statements](/guides/billing-and-usage-data/running-viewing-and-managing-bills/working-with-bill-statements)
## Transaction Types and Transactions
*Transaction Types* are defined for an Organization. Transaction Types are then used to create specific *Transaction amounts* for Balances on end-customer Accounts. In this way, Transaction are used to flexibly manage Balance amounts on end-customer Accounts, with a Transaction ledger being maintained for individual Balances.
> **See:** [Creating Transaction Types](/guides/organization-and-access-management/viewing-and-editing-organization#creating-transaction-types) and [Creating Transactions for Balances](/guides/end-customer-accounts/creating-balances-for-accounts#creating-transactions-for-a-balance)
## Transaction Schedule
You can set up a *Transaction Schedule* for a Balance on an Account. This allows you to generate Transactions of a specific type for a Balance at regular daily, weekly, monthly, or yearly intervals over a specified time period.
> **See:** [Setting Up Transaction Schedules for Balances](/guides/end-customer-accounts/creating-balances-for-accounts/setting-transaction-schedules-for-balances)
## User
A *User* represents a person you allow to authenticate with and have access to your Organization in the m3ter platform.
> **See:** [Viewing and Editing Users](/guides/organization-and-access-management/managing-users#viewing-and-editing-users)
# Utilizing Events and Notifications
Source: https://docs.m3ter.com/guides/alerts-events-and-notifications/utilizing-events-and-notifications
You can use m3ter's *Events and Notifications* feature to define and implement alerts or notifications that are triggered by specific events in your m3ter production environment. For example, you might offer a sign-up bonus credit to your new customers. You then want to receive a notification when an end customer account has consumed 90% of their initial credit amount.
This section explains m3ter's *Events and Notifications* framework, sets out the main object definitions within that framework, explains how to create and configure *Notification Rules* in the m3ter Console, and provides some worked examples for you to follow:
* [Key Concepts and Relationships](/guides/alerts-events-and-notifications/utilizing-events-and-notifications/key-concepts-and-relationships)
* [Object Definitions and API Calls](/guides/alerts-events-and-notifications/utilizing-events-and-notifications/object-definitions-and-api-calls)
* [Creating, Managing, and Reviewing Notifications](/guides/alerts-events-and-notifications/utilizing-events-and-notifications/creating-managing-and-reviewing-notifications)
* [Example - Notification Setup for Commitment Updated Event](/guides/alerts-events-and-notifications/utilizing-events-and-notifications/example-1-commitment-updated-event)
In addition to system-generated Events that occur when a configuration entity undergoes a state change at creation, update, or deletion of the entity, you can use API calls to create and configure *Scheduled Event Configurations*. Scheduled Events are custom Event types, which you can set up by referencing Date/Time fields on configuration and billing entities:
* [Working with Scheduled Events](/guides/alerts-events-and-notifications/utilizing-events-and-notifications/working-with-scheduled-events)
# Creating, Managing, and Reviewing Notifications
Source: https://docs.m3ter.com/guides/alerts-events-and-notifications/utilizing-events-and-notifications/creating-managing-and-reviewing-notifications
In the Console, you can set up *Notification rules*, which allow you to define a rule set that controls when a Notification is triggered with reference to an Event:
* **Event**. Specify the system Event that the Notification will be sent for - for example, a Prepayment/Commitment created Event.
* **Calculation**. Include a calculation that references the Event's fields. The calculation is evaluated as either true or false, and this allows you to define precisely the conditions that must be satisfied for the Notification to be triggered and sent when the specified Event occurs. For example, a Notification that will be sent only when a Prepayment created Event occurs and the Prepayment amount is equal to or greater than \$5,000.
* **Always fire notification**. If you want a Notification to be triggered simply by the Event occurring and with no further conditions having to be met, you can use a switch to implement this use case. No calculation is then required for the Notification rule.
* **Active/Inactive**. Switch the Notification on and off for the referenced Event.
When you've created Notification rules for Events, you can link them to Outgoing webhooks and complete your setup to create *Notification Webhook Integrations*.
Once this setup is complete, a Notification will be sent to an Outgoing webhook if:
* You have enabled the Notification rule linked to the Outgoing webhook to be active.
* The system Event occurs that the Notification rule is based on.
* Any calculation you've built into the Notification rule is evaluated as true at the time the Event occurs.
After setting up your Notification rules and enabled them as active in your production environment, any Events that cause Notifications to be triggered in accordance with those rules are logged and recorded. You can then review and inspect these Notification Events as part of your routine operations.
This topic explains how to create a Notification rule and link it to an Outgoing webhook. How to view and manage your Notification rules is also explained:
* [Creating Notification Rules](/guides/alerts-events-and-notifications/utilizing-events-and-notifications/creating-managing-and-reviewing-notifications#creating-notification-rules)
* [Linking Notification Rules to Outgoing Webhooks](/guides/alerts-events-and-notifications/utilizing-events-and-notifications/creating-managing-and-reviewing-notifications#linking-notification-rules-to-outgoing-webhooks)
* [Managing Notification Rules](/guides/alerts-events-and-notifications/utilizing-events-and-notifications/creating-managing-and-reviewing-notifications#managing-notification-rules)
How to review the Events that have triggered Notifications according to your Notification rules is explained:
* [Reviewing Events for Notifications](/guides/alerts-events-and-notifications/utilizing-events-and-notifications/creating-managing-and-reviewing-notifications#reviewing-events-for-notifications)
Lastly, an example of a Notification payload is given:
* [Example Notification Payload](/guides/alerts-events-and-notifications/utilizing-events-and-notifications/creating-managing-and-reviewing-notifications#example-notification-payload)
**IMPORTANT: Notes and Tips:**
* **Events are Time-Bound!** Events in m3ter are time-bound and are deleted 28 days after creation. This includes all system Events, Notification Events, Integration error Events, Ingestion validation failure Events, Data Export job failure Events, and Scheduled Events.
* **Working with Notifications?** Before attempting to create and configure Notification rules, we *strongly recommend* that you first review the [Key Concepts and Relationships](/guides/alerts-events-and-notifications/utilizing-events-and-notifications/key-concepts-and-relationships) and [Object Definitions and API Calls](/guides/alerts-events-and-notifications/utilizing-events-and-notifications/object-definitions-and-api-calls) topics in this section, which explain in detail the Events and Notifications framework and provide guidance on object definitions and API calls.
* **Scheduled Events?** As well as setting up Notifications for system-generated Events, you can also set up Notifications on the basis of any *Scheduled Events* you've created for your Organization. See [Working with Scheduled Events](/guides/alerts-events-and-notifications/utilizing-events-and-notifications/working-with-scheduled-events) for more details.
## Creating Notification Rules
**To create a Notification Rule:**
1. In the Console, select **m3sh**:
 2. In the **m3sh** section, select **Notification rules**:
![]() The **Notification rules** page opens and lists existing Notification rules. You can search the list:
The **Notification rules** page opens and lists existing Notification rules. You can search the list:
![Notifications63]() 3. Select **Create notification rule**. The **Create** page opens.
4. On the **Notification rule details** panel, enter:
* **Name** and **Code**. (*Required*)
* A **Description** for the Notification rule. (*Required*)
**Tip:** When you enter a **Name** and click in the **Code** field, a default code is entered based on the name you've entered, which you can then edit as required.
5. Enter **Notification rule settings**:
* Use the **Event** drop-down list to select the Event you want to create the Notification rule for. Note that this field is searchable - simply start to type in the name of the Event and the list will be filtered automatically as you type:
3. Select **Create notification rule**. The **Create** page opens.
4. On the **Notification rule details** panel, enter:
* **Name** and **Code**. (*Required*)
* A **Description** for the Notification rule. (*Required*)
**Tip:** When you enter a **Name** and click in the **Code** field, a default code is entered based on the name you've entered, which you can then edit as required.
5. Enter **Notification rule settings**:
* Use the **Event** drop-down list to select the Event you want to create the Notification rule for. Note that this field is searchable - simply start to type in the name of the Event and the list will be filtered automatically as you type:
![]() **Tip: Scheduled Events?** If you've created any custom Scheduled Events for your Organization, these will also be available for selection in the **Event** drop-down list.
* Use the **Active** switch to enable the Notification rule for the selected Event. Default is disabled.
* If you want a Notification to be triggered simply by the selected Event occurring and with no further conditions having to be met, enable the **Always fire notification** switch. Default is disabled.
* No calculation is then required for the Notification rule configuration.
* However, if you do enter a calculation, then the **Test calculation** button on the **Rule calculation** panel will be disabled and when you save the Notification rule, any calculation you've entered will be ignored.
* In the **Calculation** edit box, enter the calculation that defines the condition you want to apply for the Notification rule to be triggered when the selected Event occurs:
* Note that you must ensure you reference fields that are valid for the Event. For details on how to obtain the fields available for different Event types, see [Event Fields](/guides/alerts-events-and-notifications/utilizing-events-and-notifications/object-definitions-and-api-calls#event-fields).
* For more details on creating calculations for Notification rules, see [Creating Calculations](/guides/alerts-events-and-notifications/utilizing-events-and-notifications/key-concepts-and-relationships#creating-calculations).
**Tip: Add Calculation later?** You can omit a calculation when you first create a Notification rule and edit the rule later to add the required calculation.
6. When you've entered a calculation, in the **Rule calculation** panel, select **Test calculation**. The calculation is evaluated for correctness with respect to:
* The fields you've referenced are valid ones for the selected Event type.
* The syntax, functions, and operators you've used are valid for the m3ter calculation engine - see [Creating Calculations](/guides/alerts-events-and-notifications/utilizing-events-and-notifications/key-concepts-and-relationships#creating-calculations).
7. Check the result of the calculation evaluation:
* If the calculation is valid, **Calculation passed** will show **True**.
* If the calculation is invalid, **Calculation passed** will show **False:**
**Tip: Scheduled Events?** If you've created any custom Scheduled Events for your Organization, these will also be available for selection in the **Event** drop-down list.
* Use the **Active** switch to enable the Notification rule for the selected Event. Default is disabled.
* If you want a Notification to be triggered simply by the selected Event occurring and with no further conditions having to be met, enable the **Always fire notification** switch. Default is disabled.
* No calculation is then required for the Notification rule configuration.
* However, if you do enter a calculation, then the **Test calculation** button on the **Rule calculation** panel will be disabled and when you save the Notification rule, any calculation you've entered will be ignored.
* In the **Calculation** edit box, enter the calculation that defines the condition you want to apply for the Notification rule to be triggered when the selected Event occurs:
* Note that you must ensure you reference fields that are valid for the Event. For details on how to obtain the fields available for different Event types, see [Event Fields](/guides/alerts-events-and-notifications/utilizing-events-and-notifications/object-definitions-and-api-calls#event-fields).
* For more details on creating calculations for Notification rules, see [Creating Calculations](/guides/alerts-events-and-notifications/utilizing-events-and-notifications/key-concepts-and-relationships#creating-calculations).
**Tip: Add Calculation later?** You can omit a calculation when you first create a Notification rule and edit the rule later to add the required calculation.
6. When you've entered a calculation, in the **Rule calculation** panel, select **Test calculation**. The calculation is evaluated for correctness with respect to:
* The fields you've referenced are valid ones for the selected Event type.
* The syntax, functions, and operators you've used are valid for the m3ter calculation engine - see [Creating Calculations](/guides/alerts-events-and-notifications/utilizing-events-and-notifications/key-concepts-and-relationships#creating-calculations).
7. Check the result of the calculation evaluation:
* If the calculation is valid, **Calculation passed** will show **True**.
* If the calculation is invalid, **Calculation passed** will show **False:**
 In this example:
* The Notification rule is set to be **Active**.
* Because we want to apply conditions for the rule, we leave the **Always fire notification** switch in the default *off position*.
* A calculation is used that references the `new.amount` field for a `configuration.commitment.created` Event.
* The calculation has been tested and evaluated as **Calculation passed** = **True**.
**Tip: Can't create or update a Notification rule?** If you enter an invalid calculation and the **Test calculation** returns **False** for **Calculation passed**, then you'll receive an error and you won't be able to save the Notification rule.
8. Select **Create notification rule**. The **Notification rule details** page opens:
In this example:
* The Notification rule is set to be **Active**.
* Because we want to apply conditions for the rule, we leave the **Always fire notification** switch in the default *off position*.
* A calculation is used that references the `new.amount` field for a `configuration.commitment.created` Event.
* The calculation has been tested and evaluated as **Calculation passed** = **True**.
**Tip: Can't create or update a Notification rule?** If you enter an invalid calculation and the **Test calculation** returns **False** for **Calculation passed**, then you'll receive an error and you won't be able to save the Notification rule.
8. Select **Create notification rule**. The **Notification rule details** page opens:
![Notifications64]() You can now link the Notification Rule to an Outgoing webhook to complete the setup - see the [next section](/guides/alerts-events-and-notifications/utilizing-events-and-notifications/creating-managing-and-reviewing-notifications#linking-notification-rules-to-outgoing-webhooks-to-create-notification-integration-configurations) for details.
## Linking Notification Rules to Outgoing Webhooks
To complete your setup for a Notification, you can link a Notification rule to an Outgoing webhook - see [Creating and Managing Outgoing Webhooks](/guides/integrations/setting-up-integrations/creating-and-managing-destinations) for more details:
* When you link a Notification rule to an Outgoing webhook, this creates a Notification Webhook Integration.
* If an Event of the type on which the Notification rule is based occurs and any conditions you've defined using a calculation in the rule are satisfied, then the Notification is triggered and sent to the Outgoing webhook you've linked it to.
This section explains how to link Notifications to Webhooks and how to review and manage those links:
* [Linking Notifications to Webhooks](/guides/alerts-events-and-notifications/utilizing-events-and-notifications/creating-managing-and-reviewing-notifications#linking-notifications-to-webhooks)
* [Reviewing and Managing Notification/Webhook Links](/guides/alerts-events-and-notifications/utilizing-events-and-notifications/creating-managing-and-reviewing-notifications#reviewing-and-managing-notificationwebhook-links)
### Linking Notifications to Webhooks
**To link a Notification Rule to an Outgoing webhook:**
1. In the Console, select **m3sh>Notifications**. The **Notification rules** page opens and lists any existing Notification rules.
2. Select the **Name** hotlink text of the Notification rule you want to link to an Outgoing webhook. The **Notification rule details** page opens.
3. Scroll down the page and on the **Linked webhooks** panel, select **Link webhooks**. A **Select outgoing webhooks** dialog appears, and lists the Outgoing webhooks created for your Organization.
4. Select the Outgoing webhooks you want to link the Notification rule to, and then select **Confirm**. The dialog closes and the selected Outgoing webhooks are listed:
You can now link the Notification Rule to an Outgoing webhook to complete the setup - see the [next section](/guides/alerts-events-and-notifications/utilizing-events-and-notifications/creating-managing-and-reviewing-notifications#linking-notification-rules-to-outgoing-webhooks-to-create-notification-integration-configurations) for details.
## Linking Notification Rules to Outgoing Webhooks
To complete your setup for a Notification, you can link a Notification rule to an Outgoing webhook - see [Creating and Managing Outgoing Webhooks](/guides/integrations/setting-up-integrations/creating-and-managing-destinations) for more details:
* When you link a Notification rule to an Outgoing webhook, this creates a Notification Webhook Integration.
* If an Event of the type on which the Notification rule is based occurs and any conditions you've defined using a calculation in the rule are satisfied, then the Notification is triggered and sent to the Outgoing webhook you've linked it to.
This section explains how to link Notifications to Webhooks and how to review and manage those links:
* [Linking Notifications to Webhooks](/guides/alerts-events-and-notifications/utilizing-events-and-notifications/creating-managing-and-reviewing-notifications#linking-notifications-to-webhooks)
* [Reviewing and Managing Notification/Webhook Links](/guides/alerts-events-and-notifications/utilizing-events-and-notifications/creating-managing-and-reviewing-notifications#reviewing-and-managing-notificationwebhook-links)
### Linking Notifications to Webhooks
**To link a Notification Rule to an Outgoing webhook:**
1. In the Console, select **m3sh>Notifications**. The **Notification rules** page opens and lists any existing Notification rules.
2. Select the **Name** hotlink text of the Notification rule you want to link to an Outgoing webhook. The **Notification rule details** page opens.
3. Scroll down the page and on the **Linked webhooks** panel, select **Link webhooks**. A **Select outgoing webhooks** dialog appears, and lists the Outgoing webhooks created for your Organization.
4. Select the Outgoing webhooks you want to link the Notification rule to, and then select **Confirm**. The dialog closes and the selected Outgoing webhooks are listed:
![]() In this example:
* A single Outgoing webhook has been linked to a Notification rule.
* You can read off the URL for the the webhook.
* If you haven't yet created the Outgoing webhook you want to link the Notification rule to, you can select **Create outgoing webhook**. This takes you directly to the **Create** page - see [Creating and Managing Outgoing Webhooks](/guides/integrations/setting-up-integrations/creating-and-managing-destinations).
5. If you want to review the Outgoing webhook details, select the **Name** hotlink text. The **Outgoing webhook details** page opens:
In this example:
* A single Outgoing webhook has been linked to a Notification rule.
* You can read off the URL for the the webhook.
* If you haven't yet created the Outgoing webhook you want to link the Notification rule to, you can select **Create outgoing webhook**. This takes you directly to the **Create** page - see [Creating and Managing Outgoing Webhooks](/guides/integrations/setting-up-integrations/creating-and-managing-destinations).
5. If you want to review the Outgoing webhook details, select the **Name** hotlink text. The **Outgoing webhook details** page opens:
![Notifications65]() 6. You can open the **m3sh>Outgoing webhooks** page and review other webhooks:
6. You can open the **m3sh>Outgoing webhooks** page and review other webhooks:
![Notifications66]() **Tip: Reviewing and Managing Notification Webhook Integrations?** See [Creating and Managing Integrations](/guides/integrations/setting-up-integrations/creating-and-managing-integration-configurations).
**Tip: Review Integration Run Details for a Notification?** For detail on how to do this, see [Reviewing Notification Integration Runs](/guides/integrations/setting-up-integrations/reviewing-integration-run-details#reviewing-notification-integration-runs).
### Reviewing and Managing Notification/Webhook Links
When you've linked a Notification to a webhook, you can review and manage the link:
* If the link is flagged as inactive, check the status.
* Set up Organization users to receive email notifications if the Notification Webhook integration created by the link has been auto-disabled.
**To review and manage Notification/Webhook Links:**
1. Open the **Notification rules** page and select the **Name** hotlink text of the Notification rule you want to review and manage a Notification/Webhook link for. The **Notification rule details** page opens.
2. Scroll down the page to the **Linked webhooks** panel.
3. Select the **Details** icon for the link you want to review and manage:
**Tip: Reviewing and Managing Notification Webhook Integrations?** See [Creating and Managing Integrations](/guides/integrations/setting-up-integrations/creating-and-managing-integration-configurations).
**Tip: Review Integration Run Details for a Notification?** For detail on how to do this, see [Reviewing Notification Integration Runs](/guides/integrations/setting-up-integrations/reviewing-integration-run-details#reviewing-notification-integration-runs).
### Reviewing and Managing Notification/Webhook Links
When you've linked a Notification to a webhook, you can review and manage the link:
* If the link is flagged as inactive, check the status.
* Set up Organization users to receive email notifications if the Notification Webhook integration created by the link has been auto-disabled.
**To review and manage Notification/Webhook Links:**
1. Open the **Notification rules** page and select the **Name** hotlink text of the Notification rule you want to review and manage a Notification/Webhook link for. The **Notification rule details** page opens.
2. Scroll down the page to the **Linked webhooks** panel.
3. Select the **Details** icon for the link you want to review and manage:
![]() The **Notification rule / outgoing webhook link** modal appears:
The **Notification rule / outgoing webhook link** modal appears:
![Notifications60]() * In this example, the modal for an **INACTIVE** Notification/Webhook link has been opened and an information banner gives the reason why - because the Notification rule configuration is set as globally inactive.
* If you want to change the status, select **Update**. The **Edit** page of the Notification opens.
* Under **Notification rule settings**, enable the **Active** switch and select **Update notification rule**. You are returned to the **Notification rules** page where the Notification now shows as **ACTIVE**.
4. If you want to set up an Organization user to receive an email notification when the Notification Webhook integration created by the link is auto-disabled, use the **Disabled notification users** drop-down to select the user:
* In this example, the modal for an **INACTIVE** Notification/Webhook link has been opened and an information banner gives the reason why - because the Notification rule configuration is set as globally inactive.
* If you want to change the status, select **Update**. The **Edit** page of the Notification opens.
* Under **Notification rule settings**, enable the **Active** switch and select **Update notification rule**. You are returned to the **Notification rules** page where the Notification now shows as **ACTIVE**.
4. If you want to set up an Organization user to receive an email notification when the Notification Webhook integration created by the link is auto-disabled, use the **Disabled notification users** drop-down to select the user:
![Notifications69a]() **Tip: When is a Notification Webhook Integration Auto-Disabled?** See [Integration Run Error Handling and Alerts](/guides/integrations/setting-up-integrations/creating-and-managing-integration-configurations#integration-run-error-handling-and-alerts) for details.
5. Select **Update**. A message appears advising that the link options were updated successfully.
## Managing Notification Rules
**To manage Notification Rules:**
1. In the Console, select **m3sh>Notifications**. The **Notification rules** page opens.
2. If you want to make any editing changes to a Notification, select **Edit**:
**Tip: When is a Notification Webhook Integration Auto-Disabled?** See [Integration Run Error Handling and Alerts](/guides/integrations/setting-up-integrations/creating-and-managing-integration-configurations#integration-run-error-handling-and-alerts) for details.
5. Select **Update**. A message appears advising that the link options were updated successfully.
## Managing Notification Rules
**To manage Notification Rules:**
1. In the Console, select **m3sh>Notifications**. The **Notification rules** page opens.
2. If you want to make any editing changes to a Notification, select **Edit**:
![]() 4. Make your changes, and select **Update**.
5. If you want to view details of the Notification, select the **Name** hotlink text. The **Notification rules details** page opens.
6. If you want to delete a Notification rule, select **Delete**:
4. Make your changes, and select **Update**.
5. If you want to view details of the Notification, select the **Name** hotlink text. The **Notification rules details** page opens.
6. If you want to delete a Notification rule, select **Delete**:
![]() A confirmation dialog appears.
7. Select **Yes** to confirm the deletion.
## Reviewing Events for Notifications
When you have created and configured Notifications rules for system Events and enabled them as active in your production environment, you can review any triggered Notifications and the Events that triggered them.
**To review Events for Notifications:**
1. In the Console, select **m3sh>Notifications**. The **Notification rules** page opens.
2. Select the **Name** hotlink text of the Notification that you want to check for triggering Events:
A confirmation dialog appears.
7. Select **Yes** to confirm the deletion.
## Reviewing Events for Notifications
When you have created and configured Notifications rules for system Events and enabled them as active in your production environment, you can review any triggered Notifications and the Events that triggered them.
**To review Events for Notifications:**
1. In the Console, select **m3sh>Notifications**. The **Notification rules** page opens.
2. Select the **Name** hotlink text of the Notification that you want to check for triggering Events:
![Notifications67]() The **Notification rule details** page opens.
4. Scroll down the page and the **Latest events** panel lists recent Events which triggered the Notification giving the **Date** for each triggering **Event** for the Notification rule:
The **Notification rule details** page opens.
4. Scroll down the page and the **Latest events** panel lists recent Events which triggered the Notification giving the **Date** for each triggering **Event** for the Notification rule:
![Notifications68]() ## Example Notification Payload
The following is an example of the payload sent on a webhook when a Notification is triggered. The example is for a Notification triggered by a `billing.bill.created` Event:
```json theme={null}
{
"orgId": "30de0543-b025-4e4f-87cb-76edfcb6a37f",
"entityId": "ee2b80ed-a064-42cb-8bc8-4ecee84b10f3",
"requestType": "NOTIFICATION",
"name": "Webhook Create",
"description": "Webhook bill create",
"sourceEntityId": "384973f7-c83a-45d2-a509-26bf8c7a7d3b",
"event": {
"new.lastModifiedBy": "m3ter_server",
"new.orgId": "30de0543-b025-4e4f-87cb-76edfcb6a37f",
"new.dtCreated": "2024-05-17T14:28:14.511170Z",
"new.billJobId": "4eec6950-2c32-43cd-ac1c-b1d29dc5c985",
"new.endDateTimeUTC": "2024-05-01T00:00:00Z",
"new.startDate": "2024-04-01",
"new.dtLastCalculated": "2024-05-17T14:28:13.911668Z",
"new.id": "384973f7-c83a-45d2-a509-26bf8c7a7d3b",
"new.currency": "USD",
"new.startDateTimeUTC": "2024-04-01T00:00:00Z",
"new.billingFrequency": "MONTHLY",
"new.accountCode": "customer_ing",
"new.billDate": "2024-05-01",
"new.createdBy": "m3ter_server",
"new.accountId": "a5ef843e-a0ce-4e56-8ede-9345591aae86",
"new.status": "PENDING",
"new.billFrequencyInterval": 1,
"new.endDate": "2024-05-01",
"new.version": 1,
"new.locked": false,
"new.statementUpdateOnly": false,
"new.timezone": "UTC",
"new.dueDate": "2024-05-15",
"new.dtLastModified": "2024-05-17T14:28:14.511170Z"
},
"accountId": "a5ef843e-a0ce-4e56-8ede-9345591aae86",
"originalEventId": "90dc31eb-3ee4-4e7d-a7c8-18312505ed5e",
"eventName": "billing.bill.created",
"notificationEventId": "2dd1741c-6d9e-4439-b55d-91876ebd6a55",
"notificationCode": "webhook_create",
"entityType": "Notification"
}
```
**NOTE:** `entityId`, `sourceEntityId`, and `event`:
* `entityId` is the ID of the Notification Configuration that was used to send a Notification to a webhook.
* `sourceEntityId` is the ID of the entity that the Notification is about. For example, for a `configuration.account.updated` Event, `sourceEntityId` would be the ID of the Account.
* `event` contains the details of the Event that triggered the Notification.
# Example - Notification Setup for Commitment Updated Event
Source: https://docs.m3ter.com/guides/alerts-events-and-notifications/utilizing-events-and-notifications/example-1-commitment-updated-event
This topic provides a worked example of how to use API calls to set up a Notification Rule for triggering a Notification only if the specific conditions defined in the Notification Rule are satisfied:
* Any Commitment updated Event where the Commitment amount drops below 10% of the original amount.
When an Event of this type occurs in the system and which satisfies this condition, a Notification will be sent to the configured Destination.
You can follow the set up in three steps:
* [Step 1: Create a Notification Rule](/guides/alerts-events-and-notifications/utilizing-events-and-notifications/example-1-commitment-updated-event#step-1-create-a-notification-rule)
* [Step 2: Create Integration Destination](/guides/alerts-events-and-notifications/utilizing-events-and-notifications/example-1-commitment-updated-event#step-2-create-integration-destination)
* [Step 3: Create Integration Configuration for Notification](/guides/alerts-events-and-notifications/utilizing-events-and-notifications/example-1-commitment-updated-event#step-3-create-integration-configuration-for-notification)
**Tip: Setting Up Notifications for Events in Console?** You can also set up Notification Rules that reference a specific system Event and then link these Rules to webhook integration Destinations you've created to complete the Notification configuration. See the [Linking Notification Rules to Destinations](/guides/alerts-events-and-notifications/utilizing-events-and-notifications/creating-managing-and-reviewing-notifications#linking-notification-rules-to-destinations-to-create-notification-integration-configurations) section in the [Creating, Managing, and Reviewing Notifications](/guides/alerts-events-and-notifications/utilizing-events-and-notifications/creating-managing-and-reviewing-notifications) topic.
## Step 1: Create a Notification Rule
`POST at https://api.m3ter.com/organizations/{orgId}/notifications/configurations/`
In this example, we’ve set up a rule for triggering a Notification based on a `configuration.commitment.updated` Event, which includes a calculation referencing Event Fields to define the precise conditions for triggering the Notification. The calculation means the Notification will be triggered when the amount spent from the commitment drops below 10% of the total amount.
```json theme={null}
{
"name": "Commitment has under 10% remaining",
"description": "Commitment amount fell below 10%",
"eventName": "configuration.commitment.updated",
"calculation": "(new.amountSpent >= ((new.amount*90)/100))
AND ((old.amountSpent <= ((old.amount*90)/100)) OR (old.amountSpent == null))",
"code" : "under_10_percent_",
"active": true
}
```
**Note:** The response schema for this call returns a unique “id” for the notification rule we’ve set up
## Step 2: Create Integration Destination
`POST at: https://api.m3ter.com/organizations/{orgId}/integrationdestinations/webhooks`
```json theme={null}
{
"url":"https://xbmnbkwece.execute-api.eu-west-2.amazonaws.com/dev/send_email"
"version": 1,
"credentials": {
"version": 1,
"type": "M3TER_SIGNED_REQUEST",
"apiKey": "apiKey",
"secret": "some secret"
}
}
```
With this call, credentials are done in the same call as the Destination. In the response schema, the unique “id” for Integration Destination is returned.
## Step 3: Create Integration Configuration for Notification
`POST at: https://api.m3ter.com/organizations/{orgId}/integrationconfigs`
```json theme={null}
{
"entityType": "Notification",
"entityId": "id of the notification rule",
"destination": "Webhook",
"destinationId": "id of the destination",
"configData": {},
"credentials": {
"type" : "M3TER_SIGNED_REQUEST"
}
}
```
For this call:
* We use the `“id”` of the Notification Rule returned for the `POST` call we sent in [Step 1](/guides/alerts-events-and-notifications/utilizing-events-and-notifications/example-1-commitment-updated-event#step-1-create-a-notification-configuration) as the value for the `“entityId”`.
* We use the Integration Destination `“id”` returned for the `POST` call at [Step 2](/guides/alerts-events-and-notifications/utilizing-events-and-notifications/example-1-commitment-updated-event#step-2-create-integration-destination) as the value for the `“destinationId”`.
# Key Concepts and Relationships
Source: https://docs.m3ter.com/guides/alerts-events-and-notifications/utilizing-events-and-notifications/key-concepts-and-relationships
This topic sets out the Events and Notifications framework and introduces the main configuration concepts, objects, and their roles:
* [Relationship Diagram](/guides/alerts-events-and-notifications/utilizing-events-and-notifications/key-concepts-and-relationships#relationship-diagram)
* [Events and Event Types - Key Points](/guides/alerts-events-and-notifications/utilizing-events-and-notifications/key-concepts-and-relationships#events-and-event-types-key-points)
* [Types of Events](/guides/alerts-events-and-notifications/utilizing-events-and-notifications/key-concepts-and-relationships#types-of-events)
* [Notification Rule](/guides/alerts-events-and-notifications/utilizing-events-and-notifications/key-concepts-and-relationships#notification-rule)
* [Notification Webhook Integration - Outgoing Webhooks and Credentials](/guides/alerts-events-and-notifications/utilizing-events-and-notifications/key-concepts-and-relationships#notification-webhook-integration-outgoing-webhooks-and-credentials)
* [Creating Calculations](/guides/alerts-events-and-notifications/utilizing-events-and-notifications/key-concepts-and-relationships#creating-calculations)
* [Events Permissions](/guides/alerts-events-and-notifications/utilizing-events-and-notifications/key-concepts-and-relationships#events-permissions)
## Relationship Diagram
The following diagram shows the key concepts and their relationships in the Events and Notifications framework:
## Example Notification Payload
The following is an example of the payload sent on a webhook when a Notification is triggered. The example is for a Notification triggered by a `billing.bill.created` Event:
```json theme={null}
{
"orgId": "30de0543-b025-4e4f-87cb-76edfcb6a37f",
"entityId": "ee2b80ed-a064-42cb-8bc8-4ecee84b10f3",
"requestType": "NOTIFICATION",
"name": "Webhook Create",
"description": "Webhook bill create",
"sourceEntityId": "384973f7-c83a-45d2-a509-26bf8c7a7d3b",
"event": {
"new.lastModifiedBy": "m3ter_server",
"new.orgId": "30de0543-b025-4e4f-87cb-76edfcb6a37f",
"new.dtCreated": "2024-05-17T14:28:14.511170Z",
"new.billJobId": "4eec6950-2c32-43cd-ac1c-b1d29dc5c985",
"new.endDateTimeUTC": "2024-05-01T00:00:00Z",
"new.startDate": "2024-04-01",
"new.dtLastCalculated": "2024-05-17T14:28:13.911668Z",
"new.id": "384973f7-c83a-45d2-a509-26bf8c7a7d3b",
"new.currency": "USD",
"new.startDateTimeUTC": "2024-04-01T00:00:00Z",
"new.billingFrequency": "MONTHLY",
"new.accountCode": "customer_ing",
"new.billDate": "2024-05-01",
"new.createdBy": "m3ter_server",
"new.accountId": "a5ef843e-a0ce-4e56-8ede-9345591aae86",
"new.status": "PENDING",
"new.billFrequencyInterval": 1,
"new.endDate": "2024-05-01",
"new.version": 1,
"new.locked": false,
"new.statementUpdateOnly": false,
"new.timezone": "UTC",
"new.dueDate": "2024-05-15",
"new.dtLastModified": "2024-05-17T14:28:14.511170Z"
},
"accountId": "a5ef843e-a0ce-4e56-8ede-9345591aae86",
"originalEventId": "90dc31eb-3ee4-4e7d-a7c8-18312505ed5e",
"eventName": "billing.bill.created",
"notificationEventId": "2dd1741c-6d9e-4439-b55d-91876ebd6a55",
"notificationCode": "webhook_create",
"entityType": "Notification"
}
```
**NOTE:** `entityId`, `sourceEntityId`, and `event`:
* `entityId` is the ID of the Notification Configuration that was used to send a Notification to a webhook.
* `sourceEntityId` is the ID of the entity that the Notification is about. For example, for a `configuration.account.updated` Event, `sourceEntityId` would be the ID of the Account.
* `event` contains the details of the Event that triggered the Notification.
# Example - Notification Setup for Commitment Updated Event
Source: https://docs.m3ter.com/guides/alerts-events-and-notifications/utilizing-events-and-notifications/example-1-commitment-updated-event
This topic provides a worked example of how to use API calls to set up a Notification Rule for triggering a Notification only if the specific conditions defined in the Notification Rule are satisfied:
* Any Commitment updated Event where the Commitment amount drops below 10% of the original amount.
When an Event of this type occurs in the system and which satisfies this condition, a Notification will be sent to the configured Destination.
You can follow the set up in three steps:
* [Step 1: Create a Notification Rule](/guides/alerts-events-and-notifications/utilizing-events-and-notifications/example-1-commitment-updated-event#step-1-create-a-notification-rule)
* [Step 2: Create Integration Destination](/guides/alerts-events-and-notifications/utilizing-events-and-notifications/example-1-commitment-updated-event#step-2-create-integration-destination)
* [Step 3: Create Integration Configuration for Notification](/guides/alerts-events-and-notifications/utilizing-events-and-notifications/example-1-commitment-updated-event#step-3-create-integration-configuration-for-notification)
**Tip: Setting Up Notifications for Events in Console?** You can also set up Notification Rules that reference a specific system Event and then link these Rules to webhook integration Destinations you've created to complete the Notification configuration. See the [Linking Notification Rules to Destinations](/guides/alerts-events-and-notifications/utilizing-events-and-notifications/creating-managing-and-reviewing-notifications#linking-notification-rules-to-destinations-to-create-notification-integration-configurations) section in the [Creating, Managing, and Reviewing Notifications](/guides/alerts-events-and-notifications/utilizing-events-and-notifications/creating-managing-and-reviewing-notifications) topic.
## Step 1: Create a Notification Rule
`POST at https://api.m3ter.com/organizations/{orgId}/notifications/configurations/`
In this example, we’ve set up a rule for triggering a Notification based on a `configuration.commitment.updated` Event, which includes a calculation referencing Event Fields to define the precise conditions for triggering the Notification. The calculation means the Notification will be triggered when the amount spent from the commitment drops below 10% of the total amount.
```json theme={null}
{
"name": "Commitment has under 10% remaining",
"description": "Commitment amount fell below 10%",
"eventName": "configuration.commitment.updated",
"calculation": "(new.amountSpent >= ((new.amount*90)/100))
AND ((old.amountSpent <= ((old.amount*90)/100)) OR (old.amountSpent == null))",
"code" : "under_10_percent_",
"active": true
}
```
**Note:** The response schema for this call returns a unique “id” for the notification rule we’ve set up
## Step 2: Create Integration Destination
`POST at: https://api.m3ter.com/organizations/{orgId}/integrationdestinations/webhooks`
```json theme={null}
{
"url":"https://xbmnbkwece.execute-api.eu-west-2.amazonaws.com/dev/send_email"
"version": 1,
"credentials": {
"version": 1,
"type": "M3TER_SIGNED_REQUEST",
"apiKey": "apiKey",
"secret": "some secret"
}
}
```
With this call, credentials are done in the same call as the Destination. In the response schema, the unique “id” for Integration Destination is returned.
## Step 3: Create Integration Configuration for Notification
`POST at: https://api.m3ter.com/organizations/{orgId}/integrationconfigs`
```json theme={null}
{
"entityType": "Notification",
"entityId": "id of the notification rule",
"destination": "Webhook",
"destinationId": "id of the destination",
"configData": {},
"credentials": {
"type" : "M3TER_SIGNED_REQUEST"
}
}
```
For this call:
* We use the `“id”` of the Notification Rule returned for the `POST` call we sent in [Step 1](/guides/alerts-events-and-notifications/utilizing-events-and-notifications/example-1-commitment-updated-event#step-1-create-a-notification-configuration) as the value for the `“entityId”`.
* We use the Integration Destination `“id”` returned for the `POST` call at [Step 2](/guides/alerts-events-and-notifications/utilizing-events-and-notifications/example-1-commitment-updated-event#step-2-create-integration-destination) as the value for the `“destinationId”`.
# Key Concepts and Relationships
Source: https://docs.m3ter.com/guides/alerts-events-and-notifications/utilizing-events-and-notifications/key-concepts-and-relationships
This topic sets out the Events and Notifications framework and introduces the main configuration concepts, objects, and their roles:
* [Relationship Diagram](/guides/alerts-events-and-notifications/utilizing-events-and-notifications/key-concepts-and-relationships#relationship-diagram)
* [Events and Event Types - Key Points](/guides/alerts-events-and-notifications/utilizing-events-and-notifications/key-concepts-and-relationships#events-and-event-types-key-points)
* [Types of Events](/guides/alerts-events-and-notifications/utilizing-events-and-notifications/key-concepts-and-relationships#types-of-events)
* [Notification Rule](/guides/alerts-events-and-notifications/utilizing-events-and-notifications/key-concepts-and-relationships#notification-rule)
* [Notification Webhook Integration - Outgoing Webhooks and Credentials](/guides/alerts-events-and-notifications/utilizing-events-and-notifications/key-concepts-and-relationships#notification-webhook-integration-outgoing-webhooks-and-credentials)
* [Creating Calculations](/guides/alerts-events-and-notifications/utilizing-events-and-notifications/key-concepts-and-relationships#creating-calculations)
* [Events Permissions](/guides/alerts-events-and-notifications/utilizing-events-and-notifications/key-concepts-and-relationships#events-permissions)
## Relationship Diagram
The following diagram shows the key concepts and their relationships in the Events and Notifications framework:
![]() You can exploit this framework to quickly set up Notifications based on system Events. The following sections explain the role of the essential configuration components and how they are designed to work together.
## Events and Event Types - Key Points
Here are some key points to note regarding *Events* and *Event Types*:
* **Events are tokens of Event Types**. Any Notifications you set up act on actual **Events**.
* **Events are system generated**. For example, when a new Prepayment/Commitment is created for an Account.
* **Events Types are available for main configuration and billing entities**. For each entity three Event Types are available - when the entity is created, updated, or deleted.
* **Each Event Type offers a number of fields**. By referencing these Event fields, you can exploit a wide-ranging flexibility when you define the conditions on which a Notification will be triggered by an Event.
* **Real-time processing**. Events are evaluated in real-time.
* **Evolving schemas**. The Events system doesn’t statically hold schemas, they are dynamically updated assuming forward compatibility is kept.
* **Events are time-bound**. Events in m3ter are time-bound and are deleted 28 days after creation. This includes all system Events, Notification Events, Integration error Events, Ingestion validation failure Events, Data Export job failure Events, and Scheduled Events.
## Types of Events
Events fall into several broad categories:
* [Configuration Entity Events](/guides/alerts-events-and-notifications/utilizing-events-and-notifications/key-concepts-and-relationships#configuration-entity-events)
* [Billing Entity Events](/guides/alerts-events-and-notifications/utilizing-events-and-notifications/key-concepts-and-relationships#billing-entity-events)
* [Integration Events](#integration-events)
* [Integration Error Events](/guides/alerts-events-and-notifications/utilizing-events-and-notifications/key-concepts-and-relationships#integration-error-events)
* [Ingest Failure Events](/guides/alerts-events-and-notifications/utilizing-events-and-notifications/key-concepts-and-relationships#ingest-failure-events)
* [Data Export Job Events](/guides/alerts-events-and-notifications/utilizing-events-and-notifications/key-concepts-and-relationships#data-export-job-events)
* [Scheduled Events](/guides/alerts-events-and-notifications/utilizing-events-and-notifications/key-concepts-and-relationships#scheduled-events)
### Configuration Entity Events
**Event Types** are available for each of the following m3ter *configuration* entities. Three events are associated with each entity - whenever an entity is *created*, *deleted*, or *updated*:
* Account
* Account Plan
* Aggregation
* Alert
* Commitment
* Compound Aggregation
* Contract
* Counter
* Counter Pricing
* Credit Reason
* Custom Field
* Lookup Table
* Lookup Table Revision
* Lookup Table Revision Data Job
* Meter
* Meter Group
* Organization
* Organization Configuration
* Plan
* Plan Group
* Plan Group Link
* Plan Template
* Pricing
* Pricing Band
* Product
* Transaction Type
### Billing Entity Events
**Event Types** are available for each of the following m3ter *billing* entities. Three events are associated with each entity - whenever a billing entity is *created*, *deleted*, or *updated*:
* Balance
* Balance Amount
* Bill
* Bill Config
* Bill Job
* Charge
* Counter Adjustment
* Scheduled Balance Charge
* Scheduled Balance Transaction
* Statement Job
### Integration Events
**Event Types** are available for the *External Mapping* entity - whenever one is created, updated, or deleted.
### Integration Error Events
**Event Types** are available for certain kinds of *error* that can occur for an integration:
* authentication
* disabled
* missing account mapping
* perform
* validation
**Tip: Reviewing Integration Error Events?** When any of these types of integration error Events are generated, they are listed on the **Integrations>Integration Events** page. For more details, see [Reviewing and Resolving Integration Events](/guides/integrations/setting-up-integrations/reviewing-and-resolving-integration-events).
### Ingest Failure Events
A usage data ingest *failure* **Event Type** is available for when a usage measurement you submit to the m3ter platform fails to ingest properly:
* ingest validation
**Tip: Reviewing Ingest Failure Events?** When this type of ingest failure Event is generated, it is listed on the **Usage>Ingest Events** page. For more details, see [Reviewing and Resolving Ingest Events](/guides/billing-and-usage-data/submitting-usage-data/reviewing-and-resolving-ingest-events).
### Data Export Job Events
Data export job *success* and *failure* **Event Types** are available for when a data export job succeeds or fails to complete:
* data export job
**Tip: Reviewing Data Export Job Events?** When either one of these types of data export job Event is generated, it is listed on the **Export jobs** page. For more details, see [Reviewing Export Jobs](/guides/data-exports/reviewing-export-jobs).
### Scheduled Events
Scheduled Events are custom Events that reference Date/Time fields belonging to configuration and billing entities. They are specific to an Organization. See [Working with Scheduled Events](/guides/alerts-events-and-notifications/utilizing-events-and-notifications/working-with-scheduled-events) for more details.
## Notification Rule
A *Notification Rule* allows you to control when a Notification is triggered with reference to an Event. You can:
* Include a *calculation* that references Event fields. This allows you to precisely define the conditions on which the Notification is triggered with respect to the Event. For example, send a Notification when a new Commitment is created for an Account and the commitment amount is equal to or greater than \$5000. See the following [Creating Calculations](/guides/alerts-events-and-notifications/utilizing-events-and-notifications/key-concepts-and-relationships#creating-calculations) section for more details.
* Select to *always fire the Notification*, and omit any calculation. This means the Notification will be triggered simply by the referenced Event occurring and with no further conditions having to be met.
When you have created a Notification Rule, you can link it to an Outgoing Webhook to complete the Notification setup and create a *Notification Webhook Integration* - see the [following section](/guides/alerts-events-and-notifications/utilizing-events-and-notifications/key-concepts-and-relationships#integration-destination-and-credentials).
## Notification Webhook Integration - Outgoing Webhooks and Credentials
To complete a Notification setup, you must link a Notification Rule to an Outgoing Webhook as the endpoint for the Notification and to create a *Notification Webhook Integration*:
* Currently, only the `M3TER_SIGNED_REQUEST` credentials format can be used as the authentication method used for connecting to a webhook.
* If credentials are not required, then dummy values can be used.
**Tip: More Details on Outgoing Webhooks?** See [Creating and Managing Outgoing Webhooks](/guides/integrations/setting-up-integrations/creating-and-managing-destinations).
## Creating Calculations
The *calculations* you use in your Notification Rules can reference Event fields. This powerful capability sits at the heart of the Events and Notifications feature, giving you wide-ranging flexibility to define the precise conditions for sending Notifications:
* A Notification calculation is a formula that will be evaluated to a **boolean**.
* If the calculation evaluates to **true**, a Notification instance for the Event is created and is sent to the configured Outgoing Webhook.
* You can reference numeric, string, and boolean Event fields in a calculation.
* The fields you can use in a calculation are those returned in the response to the **List Events** API call:
* `GET https://api.m3ter.com/organizations/{orgId}/events/fields`
* See the [Event Fields](/guides/alerts-events-and-notifications/utilizing-events-and-notifications/object-definitions-and-api-calls#event-fields) section of the [Object Definitions and API Calls](/guides/alerts-events-and-notifications/utilizing-events-and-notifications/object-definitions-and-api-calls) topic for more details.
* For details of the supported operators, variables, functions, and type casts for creating Notification calculations, see [m3ter Calculation Engine](/guides/m3ter-calculation-engine).
### Example Calculations
* Only trigger the Notification for a single Account:
* `new.accountId == "df41d216-XXXX-470f-YYYY-79b16059a96f"`
* Trigger a Notification when the Amount Spent field (on a commitment) has exceeded 90%:
* `(new.amountSpent >= ((new.amount*100)/90)) AND ((old.amountSpent <= ((old.amount*100)/90)) OR (old.amountSpent == null))`
* Note that this has a check against the “old” value to ensure there is only 1 notification when crossing the 90% threshold.
## Events Permissions
You can use the m3ter Permissions framework to create Permission Policies to allow users in your Organization to create, retrieve, update, or delete Events. Permissions for Events work in the normal way:
* If a user has a deny Event Permission Policy assigned to them, they will not be able to see Events.
* If a user has a deny Permission Policy for another entity assigned to them, for example deny Product, they will not be able to see Events associated with Products.
See [Understanding, Creating, and Managing Permission Policies](/guides/organization-and-access-management/creating-and-managing-permissions) for more details.
# Object Definitions and API Calls
Source: https://docs.m3ter.com/guides/alerts-events-and-notifications/utilizing-events-and-notifications/object-definitions-and-api-calls
This topic sets out in detail the objects that feature in the Events and Notifications framework. The relevant API calls you can use with each object are noted together with examples of object JSON schemas:
* [Event Types](/guides/alerts-events-and-notifications/utilizing-events-and-notifications/object-definitions-and-api-calls#event-types)
* [Event Fields](/guides/alerts-events-and-notifications/utilizing-events-and-notifications/object-definitions-and-api-calls#event-fields)
* [Events](/guides/alerts-events-and-notifications/utilizing-events-and-notifications/object-definitions-and-api-calls#events)
* [Notification Rule](/guides/alerts-events-and-notifications/utilizing-events-and-notifications/object-definitions-and-api-calls#notification-rule)
* [Outgoing Webhooks and Credentials](/guides/alerts-events-and-notifications/utilizing-events-and-notifications/object-definitions-and-api-calls#outgoing-webhooks-and-credentials)
* [Integration Configuration for Notification](/guides/alerts-events-and-notifications/utilizing-events-and-notifications/object-definitions-and-api-calls#integration-configuration-for-notification)
**Tip: API Calls?** Please see the [Events](/api/events/introduction), [Notifications](/api/notifications/introduction), and [Integrations](/api/integrations/introduction) sections of our API Reference Docs for relevant API calls.
## Event Types
*Events Types* cover:
* Many of the common configuration and billing objects:
* For each object there are three Event Types - for when the configuration or billing object is **created**, **updated**, or **deleted**.
* The integration **External Mapping** entity - whenever one is **created**, **updated**, or **deleted**.
* Some integration errors. These are surfaced in the Console on the **Integrations>Events** page. See [Reviewing and Resolving Integration Events](/guides/integrations/setting-up-integrations/reviewing-and-resolving-integration-events).
* Some ingest validation failures. These are surfaced in the Console on the **Usage>Ingest Events** page. See [Reviewing and Resolving Ingest Events](/guides/billing-and-usage-data/submitting-usage-data/reviewing-and-resolving-ingest-events).
* Data export job failures. You can return these using the [List EventResponse](/api/events/list-eventresponse) API endpoint. See [Following-Up on Failed Export Jobs](/guides/data-exports/reviewing-export-jobs#following-up-on-failed-export-jobs) for more details.
* Scheduled Events you can set up for your specific Organization. See [Working with Scheduled Events](/guides/alerts-events-and-notifications/utilizing-events-and-notifications/working-with-scheduled-events).
### API Call
To obtain a list of the Event Types currently available for configuring Notifications, you can use the [List Notification Events](/api/events/list-notification-events) API call:
`GET https://api.m3ter.com/organizations/{orgId}/events/types`
The return lists the available Event Types:
```json theme={null}
{
"events": [
"billing.balance.created",
"billing.balance.deleted",
"billing.balance.updated",
"billing.balanceamount.created",
"billing.balanceamount.deleted",
"billing.balanceamount.updated",
"billing.bill.created",
"billing.bill.deleted",
"billing.bill.updated",
"billing.billconfig.created",
"billing.billconfig.deleted",
"billing.billconfig.updated",
"billing.billjob.created",
"billing.billjob.deleted",
"billing.billjob.updated",
"billing.charge.created",
"billing.charge.deleted",
"billing.charge.updated",
"billing.counteradjustment.created",
"billing.counteradjustment.deleted",
"billing.counteradjustment.updated",
"billing.scheduledbalancecharge.created",
"billing.scheduledbalancecharge.deleted",
"billing.scheduledbalancecharge.updated",
"billing.scheduledbalancetransaction.created",
"billing.scheduledbalancetransaction.deleted",
"billing.scheduledbalancetransaction.updated",
"billing.statementjob.created",
"billing.statementjob.deleted",
"billing.statementjob.updated",
"configuration.account.created",
"configuration.account.deleted",
"configuration.account.updated",
"configuration.accountplan.created",
"configuration.accountplan.deleted",
"configuration.accountplan.updated",
"configuration.aggregation.created",
"configuration.aggregation.deleted",
"configuration.aggregation.updated",
"configuration.alert.created",
"configuration.alert.deleted",
"configuration.alert.updated",
"configuration.commitment.created",
"configuration.commitment.deleted",
"configuration.commitment.updated",
"configuration.compoundaggregation.created",
"configuration.compoundaggregation.deleted",
"configuration.compoundaggregation.updated",
"configuration.contract.created",
"configuration.contract.deleted",
"configuration.contract.updated",
"configuration.counter.created",
"configuration.counter.deleted",
"configuration.counter.updated",
"configuration.counterpricing.created",
"configuration.counterpricing.deleted",
"configuration.counterpricing.updated",
"configuration.creditreason.created",
"configuration.creditreason.deleted",
"configuration.creditreason.updated",
"configuration.customfield.created",
"configuration.customfield.deleted",
"configuration.customfield.updated",
"configuration.lookuptable.created",
"configuration.lookuptable.deleted",
"configuration.lookuptable.updated",
"configuration.lookuptablerevision.created",
"configuration.lookuptablerevision.deleted",
"configuration.lookuptablerevision.updated",
"configuration.lookuptablerevisiondatajob.created",
"configuration.lookuptablerevisiondatajob.deleted",
"configuration.lookuptablerevisiondatajob.updated",
"configuration.meter.created",
"configuration.meter.deleted",
"configuration.meter.updated",
"configuration.metergroup.created",
"configuration.metergroup.deleted",
"configuration.metergroup.updated",
"configuration.organization.created",
"configuration.organization.deleted",
"configuration.organization.updated",
"configuration.organizationconfig.created",
"configuration.organizationconfig.deleted",
"configuration.organizationconfig.updated",
"configuration.plan.created",
"configuration.plan.deleted",
"configuration.plan.updated",
"configuration.plangroup.created",
"configuration.plangroup.deleted",
"configuration.plangroup.updated",
"configuration.plangrouplink.created",
"configuration.plangrouplink.deleted",
"configuration.plangrouplink.updated",
"configuration.plantemplate.created",
"configuration.plantemplate.deleted",
"configuration.plantemplate.updated",
"configuration.pricing.created",
"configuration.pricing.deleted",
"configuration.pricing.updated",
"configuration.pricingband.created",
"configuration.pricingband.deleted",
"configuration.pricingband.updated",
"configuration.product.created",
"configuration.product.deleted",
"configuration.product.updated",
"configuration.transactiontype.created",
"configuration.transactiontype.deleted",
"configuration.transactiontype.updated",
"dataexport.job.failure",
"dataexport.job.success",
"ingest.validation.failure",
"integration.authentication.error",
"integration.disabled.error",
"integration.externalmapping.created",
"integration.externalmapping.deleted",
"integration.externalmapping.updated",
"integration.missingaccountmapping.error",
"integration.perform.error",
"integration.validation.error"
]
}
```
* Note that if you've set up any Scheduled Events for your Organization, these will be included in the response to this call. The format for this type of Event is:
* **scheduled**.*\*.*\*
* For example: `"scheduled.bill.endDateEvent"`
* See [Working with Scheduled Events](/guides/alerts-events-and-notifications/utilizing-events-and-notifications/working-with-scheduled-events) for more details.
## Event Fields
*Fields* are available for each Event Type to make any calculations on the schema dynamic and forward compatible.
### API Call
To obtain a list of the fields for an Event Type, you can use the [List Event Fields](https://docs.m3ter.com/api/events/list-event-fields) call:
`GET https://api.m3ter.com/organizations/{orgId}/events/fields`
#### Query Parameters
`eventName (String)` - the name of the Event Type to filter by.
Here we've queried to get the field for the `configuration.commitment.created` Event Type - `new` represents the attributes the new object has:
```json theme={null}
{
"events": {
"configuration.commitment.created": {
"new.accountCode": "string",
"new.accountId": "string",
"new.accountingProductId": "string",
"new.amount": "double",
"new.amountFirstBill": "double",
"new.amountPrePaid": "double",
"new.amountSpent": "double",
"new.billEpoch": "string",
"new.billingInterval": "int",
"new.billingOffset": "int",
"new.billingPlanId": "string",
"new.commitmentFeeBillInAdvance": "boolean",
"new.commitmentFeeDescription": "string",
"new.commitmentUsageDescription": "string",
"new.contractId": "string",
"new.currency": "string",
"new.customFields": "map",
"new.endDate": "string",
"new.feeDates": "array",
"new.id": "string",
"new.overageDescription": "string",
"new.overageSurchargePercent": "double",
"new.productIds": "array",
"new.startDate": "string"
}
}
}
```
Here we’ve queried to get the fields for the `configuration.commitment.updated` Event Type, where `new` is the updated object and `old` is the previous state of the object:
```json theme={null}
{
"events": {
"configuration.commitment.updated": {
"new.accountCode": "string",
"new.accountId": "string",
"new.accountingProductId": "string",
"new.amount": "double",
"new.amountFirstBill": "double",
"new.amountPrePaid": "double",
"new.amountSpent": "double",
"new.billEpoch": "string",
"new.billingInterval": "int",
"new.billingOffset": "int",
"new.billingPlanId": "string",
"new.commitmentFeeBillInAdvance": "boolean",
"new.commitmentFeeDescription": "string",
"new.commitmentUsageDescription": "string",
"new.contractId": "string",
"new.currency": "string",
"new.customFields": "map",
"new.endDate": "string",
"new.feeDates": "array",
"new.id": "string",
"new.overageDescription": "string",
"new.overageSurchargePercent": "double",
"new.productIds": "array",
"new.startDate": "string",
"old.accountCode": "string",
"old.accountId": "string",
"old.accountingProductId": "string",
"old.amount": "double",
"old.amountFirstBill": "double",
"old.amountPrePaid": "double",
"old.amountSpent": "double",
"old.billEpoch": "string",
"old.billingInterval": "int",
"old.billingOffset": "int",
"old.billingPlanId": "string",
"old.commitmentFeeBillInAdvance": "boolean",
"old.commitmentFeeDescription": "string",
"old.commitmentUsageDescription": "string",
"old.contractId": "string",
"old.currency": "string",
"old.customFields": "map",
"old.endDate": "string",
"old.feeDates": "array",
"old.id": "string",
"old.overageDescription": "string",
"old.overageSurchargePercent": "double",
"old.productIds": "array",
"old.startDate": "string"
}
}
}
```
Note that in contrast to a new Event, an updated Event contains fields for both `new` and `old` values, where the `old` field values are those from the previous version and `new` are the updated version values.
Correspondingly, if you query for `configuration.commitment.deleted` Event, the response will show only `old` field values, which are the values at point of deletion.
**Warning:** `customFields`**show!** Some Event types will show `customFields` even though the specific billing or configuration object the Event is for doesn't yet have the custom fields functionality implemented. For these Events, their `customFields` values will not be populated until such time as the custom fields functionality is implemented for them.
## Events
*Events* are instances of available Event Types. They describe a state change in the system.
### API Call
You can use the [List Event Response](/api/events/list-eventresponse) call to obtain a list of all Events and apply a filter or `GET` by id.
#### Query Parameters
* `eventName (String)` - the name of the Event to filter by.
* `notificationId (String)` - the notification id to filter by.
* `accountId (String)` - the account Id that generated the Event to filter by.
* `eventType (String)` - the name of the Event to filter by.
* `notificationCode (String)` - the code of the notification to filter by.
* `resourceId (String)` - the id of the resource that triggered the Event to filter by.
* `ids(String)` - List of ids to filter by. **NOTE:** cannot be used with other filters.
* `nextToken (String)` - next page token.
* `pageSize (int)` - page size.
For example, if we query by `eventName`:
`GET https://api.m3ter.com/organizations/{orgId}/events?eventName=configuration.commitment.created`
In this example, we see that there is a single `configuration.commitment.created` Event for the Organization:
```json theme={null}
{
"data": [
{
"id": "9cb46d85-7cb6-4637-80a1-d4ec38e4ab30",
"eventName": "configuration.commitment.created",
"eventTime": "2022-10-28T13:54:49.557Z",
"m3terEvent": {
"eventData": {
"newDto": {
"commitmentFeeDescription": "",
"endDate": "2024-12-31",
"billingInterval": 1,
"orgId": "396d788d-5174-XXXX-9d69-YYYY4671fc33",
"overageSurchargePercent": 5.0,
"overageDescription": "",
"currency": "USD",
"id": "480d317e-2030-416b-b64b-c07577c418b4",
"amountSpent": 0.0,
"accountCode": "doetech_premium",
"amount": 15000.0,
"billingOffset": 0,
"lastModifiedBy": "USER_810e3a43-XXXX-4dab-YYYY-470977405b58",
"billingPlanId": "0409e75a-8a87-43de-aa58-fc6ec823ce37",
"version": 1,
"accountId": "1cf2a754-476c-498c-b05a-7d41abfc404d",
"dtCreated": "2022-10-28T13:54:48.081781Z",
"amountPrePaid": 0.0,
"productIds": [
"bec371ef-dbad-4e73-a56a-dadecff2287c"
],
"createdBy": "USER_810e3a43-XXXX-4dab-YYYY-470977405b58",
"contractId": "68595d6d-261f-496b-bf88-51fc7d2b5ccc",
"commitmentUsageDescription": "",
"startDate": "2023-01-01",
"dtLastModified": "2022-10-28T13:54:48.081781Z"
}
},
"eventTime": "2022-10-28T13:54:48.087Z",
"eventName": "configuration.commitment.created"
}
}
],
"nextToken": "MTY2MDMxNTYyNjQ1NCNERUxJTSNhNTIxMDQ0Zi0zMzA0LTQ0ZjEtYTBkYy05YzQyMjIzZGFhMWE="
}
```
## Notification Rule
Enables you to set up the rules for when a Notification gets triggered on the basis of an Event.
### API Calls
You can use the API calls documented in the [Notifications](/api/notifications/introduction) section of our API Reference Docs - supports `POST`, `PUT`, `DELETE`, `GET `by id, or `GET` list verbs.
Here's an example schema:
```json theme={null}
{
"id": "uuid",
"version": 1,
"name": "Commitment has under 10% remaining",
"description": "Commitment amount fell below 10%",
"eventName": "configuration.commitment.updated",
"calculation": "(new.amountSpent >= ((new.amount*100)/90)) AND
((old.amountSpent <= ((old.amount*100)/90)) OR (old.amountSpent == null))",
"code" : "under_10_percent",
"active": true
}
```
Some points to note for the Notification Rule schema:
* `calculation` - is the key part, determining whether or not an Event will trigger a Notification. Please see the [Creating Calculations](/guides/alerts-events-and-notifications/utilizing-events-and-notifications/key-concepts-and-relationships#creating-calculations) section for more details on working with calculations for Notifications.
* `active` - allows you to temporarily disable a Notification.
* `eventName` - the calculation will be applied only on these specific events. To apply the same calculation over multiple events, multiple notification rules need to be created.
**Tip: Creating Notification Rules in the Console?** For details on how to create and configure Notification Rules in the Console and go on to link Rules to integration Destinations to create Notification Integration Configurations, see the following topic in this section: [Creating, Managing, and Reviewing Notifications](/guides/alerts-events-and-notifications/utilizing-events-and-notifications/creating-managing-and-reviewing-notifications).
## Outgoing Webhooks and Credentials
You can specify the endpoint for a Notification using an Outgoing Webhook.
You can also specify credentials to be used with the Outgoing Webhook. Currently, only the `M3TER_SIGNED_REQUEST` credential format is supported:
* `apiKey` - secret that will always be passed in “X-m3ter-apikey” header when the webhook is called.
* `Secret` - secret that never leaves m3ter servers. Used as key to compute a SHA256 hash over: url + "|" + queryString + "|" + apiKey + "|" + timestamp + "|" + body.
* The timestamp will be passed in the request at “X-m3ter-timestamp”.
### API Calls
You can use the webhooks Destination calls documented in the [Integrations](/api/integrations/introduction) section of our API Reference Docs - supports all `POST`, `PUT`, `DELETE`, `GET `by id or `GET `list verbs. For example [Create Webhook Destination](/api/integrationdestinations/create-webhook-destination):
`POST https://api.m3ter.com/organizations/{orgId}/integrationdestinations/webhooks`
Here's an example of the Destination schema:
```json theme={null}
{
"version": null,
"url":"https://someurl.io",
"credentials": {
"version": null,
"type": "M3TER_SIGNED_REQUEST",
"apiKey": "apiKey",
"secret": "a secret" // Only visible in first call
}
}
```
**Important!** As a security safeguard, you won’t be able to retrieve the secret once you’ve saved the credential.
**Tip: Creating and Managing Outgoing Webhooks in the Console?** For details on how to create and configure Outgoing Webhooks in the Console and how to link them to Notifications and create Notification Integration configurations, see [Creating and Managing Outgoing Webhooks](/guides/integrations/setting-up-integrations/creating-and-managing-destinations).
## Integration Configuration for Notification
When you connect a Notification Rule of entityType (=’Notification’) to an Outgoing Webhook as destination, you set up a *Notification Webhook* *Integration*.
### API Calls
You can use the IntegrationConfig calls documented in the [Integrations](/api/integrations/introduction) section of our API Reference Docs - supports all `POST`, `PUT`, `DELETE`, `GET `by id or `GET `list verbs.
Here's an example:
```json theme={null}
{
"entityType":"Notification",
"entityId":"be2b3082-f660-42b0-8895-33fdebcce73c",
"destination":"Webhook",
"destinationId":"ff1767ca-5871-49dd-82c1-48fc78610d72"
}
```
We use the ID from the notification created in the Notification Rule step, and the ID of the Integration Destination created.
# Working with Scheduled Events
Source: https://docs.m3ter.com/guides/alerts-events-and-notifications/utilizing-events-and-notifications/working-with-scheduled-events
You can use API calls to create, configure, and manage *Scheduled Event Configurations*. Scheduled Event Configurations define custom Event types that reference Date/Time fields belonging to configuration and billing entities. They therefore provide you with an extra degree of flexibility over and above system-generated Events for setting up Notifications based on Events:
* When you've created a Scheduled Event Configuration, it becomes available as an Event type to set up Notifications for in the same way as you can for system-generated Event types.
* You use an `offset` parameter when you create a Scheduled Event Configuration, which allows you to specify in days after a Date/Time field when Events of that type will occur.
* For example, you might want to set up a Scheduled Event Configuration that references the `endDate` field for Bill entities and then specify an `offset` of ten days. This means an Event of that type will occur ten days after a Bill end date. Using this custom Scheduled Event as a basis, you can then set up a Notification that triggers on the Event occurring, and which can then alert your Billing Operations team to check that the Bill has been settled.
This topic provides a worked example showing how to use an API call to create and configure a Scheduled Event Configuration and explains how to go on to set up a Notification based on the new custom Scheduled Event:
* [Creating a Scheduled Event Configuration](/guides/alerts-events-and-notifications/utilizing-events-and-notifications/working-with-scheduled-events#creating-a-scheduled-event-configuration)
* [Creating Notifications for Scheduled Events](/guides/alerts-events-and-notifications/utilizing-events-and-notifications/working-with-scheduled-events#creating-notifications-for-scheduled-events)
**Tip: API Reference for Scheduled Events API calls?** Details of all API calls used in this topic can be found in the [Scheduled Event Configurations](/api/scheduledeventconfigurations/introduction) section of our API Reference documentation.
## Creating a Scheduled Event Configuration
This section uses the [Create ScheduledEventConfiguration](/api/scheduledeventconfigurations/create-scheduledeventconfiguration) API call to create an example custom Scheduled Event Configuration:
* We'll reference the `endDate` field for Bill entities to create the Event Configuration.
* We'll use the `offset` request body parameter to set an offset of 5 days.
* Our custom Scheduled Event will therefore occur 5 days after the end date of Bills in our Organization.
**Note:** For this example, we use Postman to submit API Calls and the request body JSON is given for you to copy out directly to your clipboard.
**To create a Scheduled Event Configuration:**
1. First, use a `POST` call to obtain a Bearer Token for the Service User you want to use to create a Scheduled Event Configuration. See [Service Authentication](/guides/authenticating-with-the-platform/service-authentication).
2. Make a `POST` [Create ScheduledEventConfiguration](/api/scheduledeventconfigurations/create-scheduledeventconfiguration) call:
You can exploit this framework to quickly set up Notifications based on system Events. The following sections explain the role of the essential configuration components and how they are designed to work together.
## Events and Event Types - Key Points
Here are some key points to note regarding *Events* and *Event Types*:
* **Events are tokens of Event Types**. Any Notifications you set up act on actual **Events**.
* **Events are system generated**. For example, when a new Prepayment/Commitment is created for an Account.
* **Events Types are available for main configuration and billing entities**. For each entity three Event Types are available - when the entity is created, updated, or deleted.
* **Each Event Type offers a number of fields**. By referencing these Event fields, you can exploit a wide-ranging flexibility when you define the conditions on which a Notification will be triggered by an Event.
* **Real-time processing**. Events are evaluated in real-time.
* **Evolving schemas**. The Events system doesn’t statically hold schemas, they are dynamically updated assuming forward compatibility is kept.
* **Events are time-bound**. Events in m3ter are time-bound and are deleted 28 days after creation. This includes all system Events, Notification Events, Integration error Events, Ingestion validation failure Events, Data Export job failure Events, and Scheduled Events.
## Types of Events
Events fall into several broad categories:
* [Configuration Entity Events](/guides/alerts-events-and-notifications/utilizing-events-and-notifications/key-concepts-and-relationships#configuration-entity-events)
* [Billing Entity Events](/guides/alerts-events-and-notifications/utilizing-events-and-notifications/key-concepts-and-relationships#billing-entity-events)
* [Integration Events](#integration-events)
* [Integration Error Events](/guides/alerts-events-and-notifications/utilizing-events-and-notifications/key-concepts-and-relationships#integration-error-events)
* [Ingest Failure Events](/guides/alerts-events-and-notifications/utilizing-events-and-notifications/key-concepts-and-relationships#ingest-failure-events)
* [Data Export Job Events](/guides/alerts-events-and-notifications/utilizing-events-and-notifications/key-concepts-and-relationships#data-export-job-events)
* [Scheduled Events](/guides/alerts-events-and-notifications/utilizing-events-and-notifications/key-concepts-and-relationships#scheduled-events)
### Configuration Entity Events
**Event Types** are available for each of the following m3ter *configuration* entities. Three events are associated with each entity - whenever an entity is *created*, *deleted*, or *updated*:
* Account
* Account Plan
* Aggregation
* Alert
* Commitment
* Compound Aggregation
* Contract
* Counter
* Counter Pricing
* Credit Reason
* Custom Field
* Lookup Table
* Lookup Table Revision
* Lookup Table Revision Data Job
* Meter
* Meter Group
* Organization
* Organization Configuration
* Plan
* Plan Group
* Plan Group Link
* Plan Template
* Pricing
* Pricing Band
* Product
* Transaction Type
### Billing Entity Events
**Event Types** are available for each of the following m3ter *billing* entities. Three events are associated with each entity - whenever a billing entity is *created*, *deleted*, or *updated*:
* Balance
* Balance Amount
* Bill
* Bill Config
* Bill Job
* Charge
* Counter Adjustment
* Scheduled Balance Charge
* Scheduled Balance Transaction
* Statement Job
### Integration Events
**Event Types** are available for the *External Mapping* entity - whenever one is created, updated, or deleted.
### Integration Error Events
**Event Types** are available for certain kinds of *error* that can occur for an integration:
* authentication
* disabled
* missing account mapping
* perform
* validation
**Tip: Reviewing Integration Error Events?** When any of these types of integration error Events are generated, they are listed on the **Integrations>Integration Events** page. For more details, see [Reviewing and Resolving Integration Events](/guides/integrations/setting-up-integrations/reviewing-and-resolving-integration-events).
### Ingest Failure Events
A usage data ingest *failure* **Event Type** is available for when a usage measurement you submit to the m3ter platform fails to ingest properly:
* ingest validation
**Tip: Reviewing Ingest Failure Events?** When this type of ingest failure Event is generated, it is listed on the **Usage>Ingest Events** page. For more details, see [Reviewing and Resolving Ingest Events](/guides/billing-and-usage-data/submitting-usage-data/reviewing-and-resolving-ingest-events).
### Data Export Job Events
Data export job *success* and *failure* **Event Types** are available for when a data export job succeeds or fails to complete:
* data export job
**Tip: Reviewing Data Export Job Events?** When either one of these types of data export job Event is generated, it is listed on the **Export jobs** page. For more details, see [Reviewing Export Jobs](/guides/data-exports/reviewing-export-jobs).
### Scheduled Events
Scheduled Events are custom Events that reference Date/Time fields belonging to configuration and billing entities. They are specific to an Organization. See [Working with Scheduled Events](/guides/alerts-events-and-notifications/utilizing-events-and-notifications/working-with-scheduled-events) for more details.
## Notification Rule
A *Notification Rule* allows you to control when a Notification is triggered with reference to an Event. You can:
* Include a *calculation* that references Event fields. This allows you to precisely define the conditions on which the Notification is triggered with respect to the Event. For example, send a Notification when a new Commitment is created for an Account and the commitment amount is equal to or greater than \$5000. See the following [Creating Calculations](/guides/alerts-events-and-notifications/utilizing-events-and-notifications/key-concepts-and-relationships#creating-calculations) section for more details.
* Select to *always fire the Notification*, and omit any calculation. This means the Notification will be triggered simply by the referenced Event occurring and with no further conditions having to be met.
When you have created a Notification Rule, you can link it to an Outgoing Webhook to complete the Notification setup and create a *Notification Webhook Integration* - see the [following section](/guides/alerts-events-and-notifications/utilizing-events-and-notifications/key-concepts-and-relationships#integration-destination-and-credentials).
## Notification Webhook Integration - Outgoing Webhooks and Credentials
To complete a Notification setup, you must link a Notification Rule to an Outgoing Webhook as the endpoint for the Notification and to create a *Notification Webhook Integration*:
* Currently, only the `M3TER_SIGNED_REQUEST` credentials format can be used as the authentication method used for connecting to a webhook.
* If credentials are not required, then dummy values can be used.
**Tip: More Details on Outgoing Webhooks?** See [Creating and Managing Outgoing Webhooks](/guides/integrations/setting-up-integrations/creating-and-managing-destinations).
## Creating Calculations
The *calculations* you use in your Notification Rules can reference Event fields. This powerful capability sits at the heart of the Events and Notifications feature, giving you wide-ranging flexibility to define the precise conditions for sending Notifications:
* A Notification calculation is a formula that will be evaluated to a **boolean**.
* If the calculation evaluates to **true**, a Notification instance for the Event is created and is sent to the configured Outgoing Webhook.
* You can reference numeric, string, and boolean Event fields in a calculation.
* The fields you can use in a calculation are those returned in the response to the **List Events** API call:
* `GET https://api.m3ter.com/organizations/{orgId}/events/fields`
* See the [Event Fields](/guides/alerts-events-and-notifications/utilizing-events-and-notifications/object-definitions-and-api-calls#event-fields) section of the [Object Definitions and API Calls](/guides/alerts-events-and-notifications/utilizing-events-and-notifications/object-definitions-and-api-calls) topic for more details.
* For details of the supported operators, variables, functions, and type casts for creating Notification calculations, see [m3ter Calculation Engine](/guides/m3ter-calculation-engine).
### Example Calculations
* Only trigger the Notification for a single Account:
* `new.accountId == "df41d216-XXXX-470f-YYYY-79b16059a96f"`
* Trigger a Notification when the Amount Spent field (on a commitment) has exceeded 90%:
* `(new.amountSpent >= ((new.amount*100)/90)) AND ((old.amountSpent <= ((old.amount*100)/90)) OR (old.amountSpent == null))`
* Note that this has a check against the “old” value to ensure there is only 1 notification when crossing the 90% threshold.
## Events Permissions
You can use the m3ter Permissions framework to create Permission Policies to allow users in your Organization to create, retrieve, update, or delete Events. Permissions for Events work in the normal way:
* If a user has a deny Event Permission Policy assigned to them, they will not be able to see Events.
* If a user has a deny Permission Policy for another entity assigned to them, for example deny Product, they will not be able to see Events associated with Products.
See [Understanding, Creating, and Managing Permission Policies](/guides/organization-and-access-management/creating-and-managing-permissions) for more details.
# Object Definitions and API Calls
Source: https://docs.m3ter.com/guides/alerts-events-and-notifications/utilizing-events-and-notifications/object-definitions-and-api-calls
This topic sets out in detail the objects that feature in the Events and Notifications framework. The relevant API calls you can use with each object are noted together with examples of object JSON schemas:
* [Event Types](/guides/alerts-events-and-notifications/utilizing-events-and-notifications/object-definitions-and-api-calls#event-types)
* [Event Fields](/guides/alerts-events-and-notifications/utilizing-events-and-notifications/object-definitions-and-api-calls#event-fields)
* [Events](/guides/alerts-events-and-notifications/utilizing-events-and-notifications/object-definitions-and-api-calls#events)
* [Notification Rule](/guides/alerts-events-and-notifications/utilizing-events-and-notifications/object-definitions-and-api-calls#notification-rule)
* [Outgoing Webhooks and Credentials](/guides/alerts-events-and-notifications/utilizing-events-and-notifications/object-definitions-and-api-calls#outgoing-webhooks-and-credentials)
* [Integration Configuration for Notification](/guides/alerts-events-and-notifications/utilizing-events-and-notifications/object-definitions-and-api-calls#integration-configuration-for-notification)
**Tip: API Calls?** Please see the [Events](/api/events/introduction), [Notifications](/api/notifications/introduction), and [Integrations](/api/integrations/introduction) sections of our API Reference Docs for relevant API calls.
## Event Types
*Events Types* cover:
* Many of the common configuration and billing objects:
* For each object there are three Event Types - for when the configuration or billing object is **created**, **updated**, or **deleted**.
* The integration **External Mapping** entity - whenever one is **created**, **updated**, or **deleted**.
* Some integration errors. These are surfaced in the Console on the **Integrations>Events** page. See [Reviewing and Resolving Integration Events](/guides/integrations/setting-up-integrations/reviewing-and-resolving-integration-events).
* Some ingest validation failures. These are surfaced in the Console on the **Usage>Ingest Events** page. See [Reviewing and Resolving Ingest Events](/guides/billing-and-usage-data/submitting-usage-data/reviewing-and-resolving-ingest-events).
* Data export job failures. You can return these using the [List EventResponse](/api/events/list-eventresponse) API endpoint. See [Following-Up on Failed Export Jobs](/guides/data-exports/reviewing-export-jobs#following-up-on-failed-export-jobs) for more details.
* Scheduled Events you can set up for your specific Organization. See [Working with Scheduled Events](/guides/alerts-events-and-notifications/utilizing-events-and-notifications/working-with-scheduled-events).
### API Call
To obtain a list of the Event Types currently available for configuring Notifications, you can use the [List Notification Events](/api/events/list-notification-events) API call:
`GET https://api.m3ter.com/organizations/{orgId}/events/types`
The return lists the available Event Types:
```json theme={null}
{
"events": [
"billing.balance.created",
"billing.balance.deleted",
"billing.balance.updated",
"billing.balanceamount.created",
"billing.balanceamount.deleted",
"billing.balanceamount.updated",
"billing.bill.created",
"billing.bill.deleted",
"billing.bill.updated",
"billing.billconfig.created",
"billing.billconfig.deleted",
"billing.billconfig.updated",
"billing.billjob.created",
"billing.billjob.deleted",
"billing.billjob.updated",
"billing.charge.created",
"billing.charge.deleted",
"billing.charge.updated",
"billing.counteradjustment.created",
"billing.counteradjustment.deleted",
"billing.counteradjustment.updated",
"billing.scheduledbalancecharge.created",
"billing.scheduledbalancecharge.deleted",
"billing.scheduledbalancecharge.updated",
"billing.scheduledbalancetransaction.created",
"billing.scheduledbalancetransaction.deleted",
"billing.scheduledbalancetransaction.updated",
"billing.statementjob.created",
"billing.statementjob.deleted",
"billing.statementjob.updated",
"configuration.account.created",
"configuration.account.deleted",
"configuration.account.updated",
"configuration.accountplan.created",
"configuration.accountplan.deleted",
"configuration.accountplan.updated",
"configuration.aggregation.created",
"configuration.aggregation.deleted",
"configuration.aggregation.updated",
"configuration.alert.created",
"configuration.alert.deleted",
"configuration.alert.updated",
"configuration.commitment.created",
"configuration.commitment.deleted",
"configuration.commitment.updated",
"configuration.compoundaggregation.created",
"configuration.compoundaggregation.deleted",
"configuration.compoundaggregation.updated",
"configuration.contract.created",
"configuration.contract.deleted",
"configuration.contract.updated",
"configuration.counter.created",
"configuration.counter.deleted",
"configuration.counter.updated",
"configuration.counterpricing.created",
"configuration.counterpricing.deleted",
"configuration.counterpricing.updated",
"configuration.creditreason.created",
"configuration.creditreason.deleted",
"configuration.creditreason.updated",
"configuration.customfield.created",
"configuration.customfield.deleted",
"configuration.customfield.updated",
"configuration.lookuptable.created",
"configuration.lookuptable.deleted",
"configuration.lookuptable.updated",
"configuration.lookuptablerevision.created",
"configuration.lookuptablerevision.deleted",
"configuration.lookuptablerevision.updated",
"configuration.lookuptablerevisiondatajob.created",
"configuration.lookuptablerevisiondatajob.deleted",
"configuration.lookuptablerevisiondatajob.updated",
"configuration.meter.created",
"configuration.meter.deleted",
"configuration.meter.updated",
"configuration.metergroup.created",
"configuration.metergroup.deleted",
"configuration.metergroup.updated",
"configuration.organization.created",
"configuration.organization.deleted",
"configuration.organization.updated",
"configuration.organizationconfig.created",
"configuration.organizationconfig.deleted",
"configuration.organizationconfig.updated",
"configuration.plan.created",
"configuration.plan.deleted",
"configuration.plan.updated",
"configuration.plangroup.created",
"configuration.plangroup.deleted",
"configuration.plangroup.updated",
"configuration.plangrouplink.created",
"configuration.plangrouplink.deleted",
"configuration.plangrouplink.updated",
"configuration.plantemplate.created",
"configuration.plantemplate.deleted",
"configuration.plantemplate.updated",
"configuration.pricing.created",
"configuration.pricing.deleted",
"configuration.pricing.updated",
"configuration.pricingband.created",
"configuration.pricingband.deleted",
"configuration.pricingband.updated",
"configuration.product.created",
"configuration.product.deleted",
"configuration.product.updated",
"configuration.transactiontype.created",
"configuration.transactiontype.deleted",
"configuration.transactiontype.updated",
"dataexport.job.failure",
"dataexport.job.success",
"ingest.validation.failure",
"integration.authentication.error",
"integration.disabled.error",
"integration.externalmapping.created",
"integration.externalmapping.deleted",
"integration.externalmapping.updated",
"integration.missingaccountmapping.error",
"integration.perform.error",
"integration.validation.error"
]
}
```
* Note that if you've set up any Scheduled Events for your Organization, these will be included in the response to this call. The format for this type of Event is:
* **scheduled**.*\*.*\*
* For example: `"scheduled.bill.endDateEvent"`
* See [Working with Scheduled Events](/guides/alerts-events-and-notifications/utilizing-events-and-notifications/working-with-scheduled-events) for more details.
## Event Fields
*Fields* are available for each Event Type to make any calculations on the schema dynamic and forward compatible.
### API Call
To obtain a list of the fields for an Event Type, you can use the [List Event Fields](https://docs.m3ter.com/api/events/list-event-fields) call:
`GET https://api.m3ter.com/organizations/{orgId}/events/fields`
#### Query Parameters
`eventName (String)` - the name of the Event Type to filter by.
Here we've queried to get the field for the `configuration.commitment.created` Event Type - `new` represents the attributes the new object has:
```json theme={null}
{
"events": {
"configuration.commitment.created": {
"new.accountCode": "string",
"new.accountId": "string",
"new.accountingProductId": "string",
"new.amount": "double",
"new.amountFirstBill": "double",
"new.amountPrePaid": "double",
"new.amountSpent": "double",
"new.billEpoch": "string",
"new.billingInterval": "int",
"new.billingOffset": "int",
"new.billingPlanId": "string",
"new.commitmentFeeBillInAdvance": "boolean",
"new.commitmentFeeDescription": "string",
"new.commitmentUsageDescription": "string",
"new.contractId": "string",
"new.currency": "string",
"new.customFields": "map",
"new.endDate": "string",
"new.feeDates": "array",
"new.id": "string",
"new.overageDescription": "string",
"new.overageSurchargePercent": "double",
"new.productIds": "array",
"new.startDate": "string"
}
}
}
```
Here we’ve queried to get the fields for the `configuration.commitment.updated` Event Type, where `new` is the updated object and `old` is the previous state of the object:
```json theme={null}
{
"events": {
"configuration.commitment.updated": {
"new.accountCode": "string",
"new.accountId": "string",
"new.accountingProductId": "string",
"new.amount": "double",
"new.amountFirstBill": "double",
"new.amountPrePaid": "double",
"new.amountSpent": "double",
"new.billEpoch": "string",
"new.billingInterval": "int",
"new.billingOffset": "int",
"new.billingPlanId": "string",
"new.commitmentFeeBillInAdvance": "boolean",
"new.commitmentFeeDescription": "string",
"new.commitmentUsageDescription": "string",
"new.contractId": "string",
"new.currency": "string",
"new.customFields": "map",
"new.endDate": "string",
"new.feeDates": "array",
"new.id": "string",
"new.overageDescription": "string",
"new.overageSurchargePercent": "double",
"new.productIds": "array",
"new.startDate": "string",
"old.accountCode": "string",
"old.accountId": "string",
"old.accountingProductId": "string",
"old.amount": "double",
"old.amountFirstBill": "double",
"old.amountPrePaid": "double",
"old.amountSpent": "double",
"old.billEpoch": "string",
"old.billingInterval": "int",
"old.billingOffset": "int",
"old.billingPlanId": "string",
"old.commitmentFeeBillInAdvance": "boolean",
"old.commitmentFeeDescription": "string",
"old.commitmentUsageDescription": "string",
"old.contractId": "string",
"old.currency": "string",
"old.customFields": "map",
"old.endDate": "string",
"old.feeDates": "array",
"old.id": "string",
"old.overageDescription": "string",
"old.overageSurchargePercent": "double",
"old.productIds": "array",
"old.startDate": "string"
}
}
}
```
Note that in contrast to a new Event, an updated Event contains fields for both `new` and `old` values, where the `old` field values are those from the previous version and `new` are the updated version values.
Correspondingly, if you query for `configuration.commitment.deleted` Event, the response will show only `old` field values, which are the values at point of deletion.
**Warning:** `customFields`**show!** Some Event types will show `customFields` even though the specific billing or configuration object the Event is for doesn't yet have the custom fields functionality implemented. For these Events, their `customFields` values will not be populated until such time as the custom fields functionality is implemented for them.
## Events
*Events* are instances of available Event Types. They describe a state change in the system.
### API Call
You can use the [List Event Response](/api/events/list-eventresponse) call to obtain a list of all Events and apply a filter or `GET` by id.
#### Query Parameters
* `eventName (String)` - the name of the Event to filter by.
* `notificationId (String)` - the notification id to filter by.
* `accountId (String)` - the account Id that generated the Event to filter by.
* `eventType (String)` - the name of the Event to filter by.
* `notificationCode (String)` - the code of the notification to filter by.
* `resourceId (String)` - the id of the resource that triggered the Event to filter by.
* `ids(String)` - List of ids to filter by. **NOTE:** cannot be used with other filters.
* `nextToken (String)` - next page token.
* `pageSize (int)` - page size.
For example, if we query by `eventName`:
`GET https://api.m3ter.com/organizations/{orgId}/events?eventName=configuration.commitment.created`
In this example, we see that there is a single `configuration.commitment.created` Event for the Organization:
```json theme={null}
{
"data": [
{
"id": "9cb46d85-7cb6-4637-80a1-d4ec38e4ab30",
"eventName": "configuration.commitment.created",
"eventTime": "2022-10-28T13:54:49.557Z",
"m3terEvent": {
"eventData": {
"newDto": {
"commitmentFeeDescription": "",
"endDate": "2024-12-31",
"billingInterval": 1,
"orgId": "396d788d-5174-XXXX-9d69-YYYY4671fc33",
"overageSurchargePercent": 5.0,
"overageDescription": "",
"currency": "USD",
"id": "480d317e-2030-416b-b64b-c07577c418b4",
"amountSpent": 0.0,
"accountCode": "doetech_premium",
"amount": 15000.0,
"billingOffset": 0,
"lastModifiedBy": "USER_810e3a43-XXXX-4dab-YYYY-470977405b58",
"billingPlanId": "0409e75a-8a87-43de-aa58-fc6ec823ce37",
"version": 1,
"accountId": "1cf2a754-476c-498c-b05a-7d41abfc404d",
"dtCreated": "2022-10-28T13:54:48.081781Z",
"amountPrePaid": 0.0,
"productIds": [
"bec371ef-dbad-4e73-a56a-dadecff2287c"
],
"createdBy": "USER_810e3a43-XXXX-4dab-YYYY-470977405b58",
"contractId": "68595d6d-261f-496b-bf88-51fc7d2b5ccc",
"commitmentUsageDescription": "",
"startDate": "2023-01-01",
"dtLastModified": "2022-10-28T13:54:48.081781Z"
}
},
"eventTime": "2022-10-28T13:54:48.087Z",
"eventName": "configuration.commitment.created"
}
}
],
"nextToken": "MTY2MDMxNTYyNjQ1NCNERUxJTSNhNTIxMDQ0Zi0zMzA0LTQ0ZjEtYTBkYy05YzQyMjIzZGFhMWE="
}
```
## Notification Rule
Enables you to set up the rules for when a Notification gets triggered on the basis of an Event.
### API Calls
You can use the API calls documented in the [Notifications](/api/notifications/introduction) section of our API Reference Docs - supports `POST`, `PUT`, `DELETE`, `GET `by id, or `GET` list verbs.
Here's an example schema:
```json theme={null}
{
"id": "uuid",
"version": 1,
"name": "Commitment has under 10% remaining",
"description": "Commitment amount fell below 10%",
"eventName": "configuration.commitment.updated",
"calculation": "(new.amountSpent >= ((new.amount*100)/90)) AND
((old.amountSpent <= ((old.amount*100)/90)) OR (old.amountSpent == null))",
"code" : "under_10_percent",
"active": true
}
```
Some points to note for the Notification Rule schema:
* `calculation` - is the key part, determining whether or not an Event will trigger a Notification. Please see the [Creating Calculations](/guides/alerts-events-and-notifications/utilizing-events-and-notifications/key-concepts-and-relationships#creating-calculations) section for more details on working with calculations for Notifications.
* `active` - allows you to temporarily disable a Notification.
* `eventName` - the calculation will be applied only on these specific events. To apply the same calculation over multiple events, multiple notification rules need to be created.
**Tip: Creating Notification Rules in the Console?** For details on how to create and configure Notification Rules in the Console and go on to link Rules to integration Destinations to create Notification Integration Configurations, see the following topic in this section: [Creating, Managing, and Reviewing Notifications](/guides/alerts-events-and-notifications/utilizing-events-and-notifications/creating-managing-and-reviewing-notifications).
## Outgoing Webhooks and Credentials
You can specify the endpoint for a Notification using an Outgoing Webhook.
You can also specify credentials to be used with the Outgoing Webhook. Currently, only the `M3TER_SIGNED_REQUEST` credential format is supported:
* `apiKey` - secret that will always be passed in “X-m3ter-apikey” header when the webhook is called.
* `Secret` - secret that never leaves m3ter servers. Used as key to compute a SHA256 hash over: url + "|" + queryString + "|" + apiKey + "|" + timestamp + "|" + body.
* The timestamp will be passed in the request at “X-m3ter-timestamp”.
### API Calls
You can use the webhooks Destination calls documented in the [Integrations](/api/integrations/introduction) section of our API Reference Docs - supports all `POST`, `PUT`, `DELETE`, `GET `by id or `GET `list verbs. For example [Create Webhook Destination](/api/integrationdestinations/create-webhook-destination):
`POST https://api.m3ter.com/organizations/{orgId}/integrationdestinations/webhooks`
Here's an example of the Destination schema:
```json theme={null}
{
"version": null,
"url":"https://someurl.io",
"credentials": {
"version": null,
"type": "M3TER_SIGNED_REQUEST",
"apiKey": "apiKey",
"secret": "a secret" // Only visible in first call
}
}
```
**Important!** As a security safeguard, you won’t be able to retrieve the secret once you’ve saved the credential.
**Tip: Creating and Managing Outgoing Webhooks in the Console?** For details on how to create and configure Outgoing Webhooks in the Console and how to link them to Notifications and create Notification Integration configurations, see [Creating and Managing Outgoing Webhooks](/guides/integrations/setting-up-integrations/creating-and-managing-destinations).
## Integration Configuration for Notification
When you connect a Notification Rule of entityType (=’Notification’) to an Outgoing Webhook as destination, you set up a *Notification Webhook* *Integration*.
### API Calls
You can use the IntegrationConfig calls documented in the [Integrations](/api/integrations/introduction) section of our API Reference Docs - supports all `POST`, `PUT`, `DELETE`, `GET `by id or `GET `list verbs.
Here's an example:
```json theme={null}
{
"entityType":"Notification",
"entityId":"be2b3082-f660-42b0-8895-33fdebcce73c",
"destination":"Webhook",
"destinationId":"ff1767ca-5871-49dd-82c1-48fc78610d72"
}
```
We use the ID from the notification created in the Notification Rule step, and the ID of the Integration Destination created.
# Working with Scheduled Events
Source: https://docs.m3ter.com/guides/alerts-events-and-notifications/utilizing-events-and-notifications/working-with-scheduled-events
You can use API calls to create, configure, and manage *Scheduled Event Configurations*. Scheduled Event Configurations define custom Event types that reference Date/Time fields belonging to configuration and billing entities. They therefore provide you with an extra degree of flexibility over and above system-generated Events for setting up Notifications based on Events:
* When you've created a Scheduled Event Configuration, it becomes available as an Event type to set up Notifications for in the same way as you can for system-generated Event types.
* You use an `offset` parameter when you create a Scheduled Event Configuration, which allows you to specify in days after a Date/Time field when Events of that type will occur.
* For example, you might want to set up a Scheduled Event Configuration that references the `endDate` field for Bill entities and then specify an `offset` of ten days. This means an Event of that type will occur ten days after a Bill end date. Using this custom Scheduled Event as a basis, you can then set up a Notification that triggers on the Event occurring, and which can then alert your Billing Operations team to check that the Bill has been settled.
This topic provides a worked example showing how to use an API call to create and configure a Scheduled Event Configuration and explains how to go on to set up a Notification based on the new custom Scheduled Event:
* [Creating a Scheduled Event Configuration](/guides/alerts-events-and-notifications/utilizing-events-and-notifications/working-with-scheduled-events#creating-a-scheduled-event-configuration)
* [Creating Notifications for Scheduled Events](/guides/alerts-events-and-notifications/utilizing-events-and-notifications/working-with-scheduled-events#creating-notifications-for-scheduled-events)
**Tip: API Reference for Scheduled Events API calls?** Details of all API calls used in this topic can be found in the [Scheduled Event Configurations](/api/scheduledeventconfigurations/introduction) section of our API Reference documentation.
## Creating a Scheduled Event Configuration
This section uses the [Create ScheduledEventConfiguration](/api/scheduledeventconfigurations/create-scheduledeventconfiguration) API call to create an example custom Scheduled Event Configuration:
* We'll reference the `endDate` field for Bill entities to create the Event Configuration.
* We'll use the `offset` request body parameter to set an offset of 5 days.
* Our custom Scheduled Event will therefore occur 5 days after the end date of Bills in our Organization.
**Note:** For this example, we use Postman to submit API Calls and the request body JSON is given for you to copy out directly to your clipboard.
**To create a Scheduled Event Configuration:**
1. First, use a `POST` call to obtain a Bearer Token for the Service User you want to use to create a Scheduled Event Configuration. See [Service Authentication](/guides/authenticating-with-the-platform/service-authentication).
2. Make a `POST` [Create ScheduledEventConfiguration](/api/scheduledeventconfigurations/create-scheduledeventconfiguration) call:
![]() Here is the request body JSON:
```json theme={null}
{
"name": "scheduled.bill.enddate",
"entity": "Bill",
"field": "endDate",
"offset": 5
}
```
* Note that for the `name` request parameter, you must use the following format:
* **scheduled**.*\*.*\*
If the custom Scheduled Event has been created successfully, you'll receive a 200 response similar to this:
Here is the request body JSON:
```json theme={null}
{
"name": "scheduled.bill.enddate",
"entity": "Bill",
"field": "endDate",
"offset": 5
}
```
* Note that for the `name` request parameter, you must use the following format:
* **scheduled**.*\*.*\*
If the custom Scheduled Event has been created successfully, you'll receive a 200 response similar to this:
![]() You've now created a Scheduled Event Configuration for the current Organization, which you can use as the basis for setting up a Notification.
**Tip: Check for Scheduled Event Configurations?** If you want to check for the Scheduled Event Configurations that have been created for your Organization, you can use the [List ScheduledEventConfigurations](/api/scheduledeventconfigurations/list-scheduledeventconfigurations) API call.
## Creating Notifications for Scheduled Events
If you've created a Scheduled Event Configuration for your Organization, you can now create a Notification based on it in the same way that you can create Notifications based on a system-generated Event. For full details on how to create a Notification Rule based on an Event, please see the [Creating, Managing, and Reviewing Notifications](/guides/alerts-events-and-notifications/utilizing-events-and-notifications/creating-managing-and-reviewing-notifications) topic.
If you go to **Notifications>Create notification rule** in the Console, on the **Create** page under **Notification rule settings** your new custom Scheduled Event will show for selection in the **Event** drop-down for the same name as you used to create it. For the example shown in the [previous section](/guides/alerts-events-and-notifications/utilizing-events-and-notifications/working-with-scheduled-events#creating-notifications-for-scheduled-events) of this topic, this Event name is **scheduled.bill.enddate**, and you can start to enter this name to filter the drop-down Event list:
You've now created a Scheduled Event Configuration for the current Organization, which you can use as the basis for setting up a Notification.
**Tip: Check for Scheduled Event Configurations?** If you want to check for the Scheduled Event Configurations that have been created for your Organization, you can use the [List ScheduledEventConfigurations](/api/scheduledeventconfigurations/list-scheduledeventconfigurations) API call.
## Creating Notifications for Scheduled Events
If you've created a Scheduled Event Configuration for your Organization, you can now create a Notification based on it in the same way that you can create Notifications based on a system-generated Event. For full details on how to create a Notification Rule based on an Event, please see the [Creating, Managing, and Reviewing Notifications](/guides/alerts-events-and-notifications/utilizing-events-and-notifications/creating-managing-and-reviewing-notifications) topic.
If you go to **Notifications>Create notification rule** in the Console, on the **Create** page under **Notification rule settings** your new custom Scheduled Event will show for selection in the **Event** drop-down for the same name as you used to create it. For the example shown in the [previous section](/guides/alerts-events-and-notifications/utilizing-events-and-notifications/working-with-scheduled-events#creating-notifications-for-scheduled-events) of this topic, this Event name is **scheduled.bill.enddate**, and you can start to enter this name to filter the drop-down Event list:
 # System Alerts
Source: https://docs.m3ter.com/guides/alerts-events-and-notifications/viewing-and-managing-alerts
System Alerts are automatically generated for your Organization in m3ter, both to inform you about key events and to notify you of any issues or errors that have occurred:
* **INFO**. Information about key events.
* **WARN**. Warnings about events.
* **ERROR**. Errors for events with information about cause of error where possible.
You can access and view **System alerts** page in two ways:
* Open the page directly from the Console main navigation.
* An Alerts summary is shown on your Dashboard and from there you can open the main page.
This topic explains how to view and open Alerts, follow up on them, and manage their status.
* [Viewing, Opening, and Following Up System Alerts](/guides/alerts-events-and-notifications/viewing-and-managing-alerts#viewing-opening-and-following-up-system-alerts)
* [Managing System Alerts](/guides/alerts-events-and-notifications/viewing-and-managing-alerts#managing-system-alerts)
**Note: System Alerts also generate Events.** For some Alerts corresponding Events are generated. For example, an **API\_INGEST** Alert might be generated for a missing Meter field but a corresponding **ingest.validation.failure** Event for a *MissingField* will also be listed on the **Ingest Events** page. You can use this ingest failure Event as an alternative way to follow-up on and troubleshoot the issue. See [Reviewing and Resolving Ingest Events](/guides/billing-and-usage-data/submitting-usage-data/reviewing-and-resolving-ingest-events).
## Viewing, Opening, and Following Up System Alerts
You can quickly view a full listing of your Organization's Alerts, open an Alert, and view details to follow up.
**To view, open, and follow up Alerts:**
1. To access and review Alerts:
* Open your [Dashboard](https://docs.m3ter.com/guides/getting-started/working-in-the-m3ter-console#working-in-the-dashboard). The **Your alerts** panel lists the number and types of Alerts triggered for your Organization:
# System Alerts
Source: https://docs.m3ter.com/guides/alerts-events-and-notifications/viewing-and-managing-alerts
System Alerts are automatically generated for your Organization in m3ter, both to inform you about key events and to notify you of any issues or errors that have occurred:
* **INFO**. Information about key events.
* **WARN**. Warnings about events.
* **ERROR**. Errors for events with information about cause of error where possible.
You can access and view **System alerts** page in two ways:
* Open the page directly from the Console main navigation.
* An Alerts summary is shown on your Dashboard and from there you can open the main page.
This topic explains how to view and open Alerts, follow up on them, and manage their status.
* [Viewing, Opening, and Following Up System Alerts](/guides/alerts-events-and-notifications/viewing-and-managing-alerts#viewing-opening-and-following-up-system-alerts)
* [Managing System Alerts](/guides/alerts-events-and-notifications/viewing-and-managing-alerts#managing-system-alerts)
**Note: System Alerts also generate Events.** For some Alerts corresponding Events are generated. For example, an **API\_INGEST** Alert might be generated for a missing Meter field but a corresponding **ingest.validation.failure** Event for a *MissingField* will also be listed on the **Ingest Events** page. You can use this ingest failure Event as an alternative way to follow-up on and troubleshoot the issue. See [Reviewing and Resolving Ingest Events](/guides/billing-and-usage-data/submitting-usage-data/reviewing-and-resolving-ingest-events).
## Viewing, Opening, and Following Up System Alerts
You can quickly view a full listing of your Organization's Alerts, open an Alert, and view details to follow up.
**To view, open, and follow up Alerts:**
1. To access and review Alerts:
* Open your [Dashboard](https://docs.m3ter.com/guides/getting-started/working-in-the-m3ter-console#working-in-the-dashboard). The **Your alerts** panel lists the number and types of Alerts triggered for your Organization:
 * Select **View all**.
* Alternatively, select **System alerts** in the Console main navigation:
* Select **View all**.
* Alternatively, select **System alerts** in the Console main navigation:
 The **System alerts** page opens:
![Alerts15]() 2. You can read off information about an Alert:
* **Status**. Shows if the Alert is **NEW** or **IN PROGRESS**.
* **Dates**. When the Alert was created and last updated.
* **Severity**. Whether the Alert is **INFO**, **WARN**, or **ERROR** severity level.
* **Type**. The type of event which is the source of the Alert.
* **Description**. A short description of the Alert.
3. To open an Alert for more details, select the **Details** button at the right side of the row:
2. You can read off information about an Alert:
* **Status**. Shows if the Alert is **NEW** or **IN PROGRESS**.
* **Dates**. When the Alert was created and last updated.
* **Severity**. Whether the Alert is **INFO**, **WARN**, or **ERROR** severity level.
* **Type**. The type of event which is the source of the Alert.
* **Description**. A short description of the Alert.
3. To open an Alert for more details, select the **Details** button at the right side of the row:
 An **Alert Details** dialog opens:
![]() In this example, we've opened an **ERROR** Alert for **BILLING** where a Bill has failed to create. Under **Details**, the Account for which a Bill failed and the cause of failure are given - in this case a required currency conversion rate between pricing currency for the Account and the configured billing currency was not found. Where possible, Alerts will provide **Details** that help you to follow up and investigate the Alert to resolve and close it.
**Tip: Following up on failed Bill Alerts?** For more details on following up and resolving failed Bill Alerts, see [Troubleshooting Bills](/guides/billing-and-usage-data/running-viewing-and-managing-bills/troubleshooting-bills).
4. Select **Close** to return to the main **Alerts** page.
## Managing System Alerts
When you open to view an Alert and follow up on it, you can manage your workflow as you investigate and resolve it.
**To view, open, and follow up Alerts:**
1. Open the new Alert you want to view and follow up - see the [previous section](/guides/alerts-events-and-notifications/viewing-and-managing-alerts#viewing-opening-and-following-up-alerts). On the **Alert Details** dialog you can review the **Details** given about the cause of the Alert and decide whether or not you want to follow up the Alert to resolve it.
2. If you are following up to troubleshoot an Alert, take note of the information given about the cause of the Alert and then use the **Status** drop-down to change the Alert's status from **New** to **In progress** and select **Update Status**:
In this example, we've opened an **ERROR** Alert for **BILLING** where a Bill has failed to create. Under **Details**, the Account for which a Bill failed and the cause of failure are given - in this case a required currency conversion rate between pricing currency for the Account and the configured billing currency was not found. Where possible, Alerts will provide **Details** that help you to follow up and investigate the Alert to resolve and close it.
**Tip: Following up on failed Bill Alerts?** For more details on following up and resolving failed Bill Alerts, see [Troubleshooting Bills](/guides/billing-and-usage-data/running-viewing-and-managing-bills/troubleshooting-bills).
4. Select **Close** to return to the main **Alerts** page.
## Managing System Alerts
When you open to view an Alert and follow up on it, you can manage your workflow as you investigate and resolve it.
**To view, open, and follow up Alerts:**
1. Open the new Alert you want to view and follow up - see the [previous section](/guides/alerts-events-and-notifications/viewing-and-managing-alerts#viewing-opening-and-following-up-alerts). On the **Alert Details** dialog you can review the **Details** given about the cause of the Alert and decide whether or not you want to follow up the Alert to resolve it.
2. If you are following up to troubleshoot an Alert, take note of the information given about the cause of the Alert and then use the **Status** drop-down to change the Alert's status from **New** to **In progress** and select **Update Status**:
 3. Select **Close**. The **Alert Details** dialog closes and on the **Alerts** page the Alert now shows a **STATUS** of **IN PROGRESS**.
4. When you have completed your follow up on the Alert and resolved it, on the **Alerts** page, you can select **Delete**:
3. Select **Close**. The **Alert Details** dialog closes and on the **Alerts** page the Alert now shows a **STATUS** of **IN PROGRESS**.
4. When you have completed your follow up on the Alert and resolved it, on the **Alerts** page, you can select **Delete**:
![]() A confirmation dialog appears.
5. Select **Yes** to confirm Alert deletion.
# Authentication
Source: https://docs.m3ter.com/guides/authenticating-with-the-platform
Discover m3ter's authentication options: Username/Password for Console access, m3ter SSO, and Bearer Token for API calls.
The m3ter platform supports several authentication methods:
* Username/Password authentication. This method is used for log in to the m3ter Console.
**Important Note: Login Email is Case Sensitive!**
* Please note that your login email address is case-sensitive. This means that `example.user@acme.com` and `Example.User@acme.com` are treated as two different logins, even though they appear similar.
* *Always double-check* the capitalization of your email address when logging in.
* Service authentication using a Bearer Token for API calls. This method is used for programmatic access via API calls.
* m3ter Single Sign-On. This method allows users with federated identities in different Identity Providers (IdPs) to sign into m3ter.
These authentication methods allow different types of user to access to the m3ter platform:
* **Users** represent the *people* you want to grant access to your Organization in m3ter. Authentication by **Users** can be performed:
* With Username/Password login credentials to authenticate and gain access to the Console.
* **Service Users** represent the *automated processes* you want to grant access to your Organization. **Service Users** will use service authentication to gain access to the m3ter platform.
**Tip: More on User Types?** For more details on the types of user supported in m3ter, see [Managing your Users](/guides/organization-and-access-management/managing-users).
To support these two authentication methods for different types of user, we maintain two authorization flows:
* An *Authorization Code* flow, which controls access for Users.
* A *Client Credentials* flow, which controls API access for Service Users.
**Tip: More Details on Auth Flows?** For more details see the [API Reference Docs Authentication](/api/authentication) page.
This section explains how to authenticate with the m3ter platform:
* [User/Password Authentication](/guides/authenticating-with-the-platform/user-password-authentication)
* [m3ter Single Sign-On](/guides/authenticating-with-the-platform/m3ter-single-sign-on)
* [Service Authentication](/guides/authenticating-with-the-platform/service-authentication)
# m3ter Single Sign-On
Source: https://docs.m3ter.com/guides/authenticating-with-the-platform/m3ter-single-sign-on
m3ter Single Sign-On (SSO) allows users with federated identities that exist in different Identity Providers (IdPs) to sign into m3ter without having to manually provision new users/identities in m3ter's user pool.
m3ter SSO supports SAML based Identity Providers (IdPs). The SAML 2.0 standard offers an XML-based protocol for the exchange of user security information, such as authentication and authorization details, between an identity provider and service provider. In this way, SAML enables the implementation of web-based SSO across security domains.
To implement SSO, two main steps are required:
* Set up your external SAML based Identity Provider application.
* Request m3ter Support to create an Identity Provider in m3ter for you.
When SSO has been implemented for your chosen SAML-based IdP, you might have to check how your users will be provisioned.
This topic explains how SSO is implemented in m3ter for your chosen IdP and how to authenticate and log into the m3ter Console when your corporate federated identity has been set up:
* [Setting Up an External Identity Provider](/guides/authenticating-with-the-platform/m3ter-single-sign-on#setting-up-an-external-identity-provider)
* [Setting Up an Identity Provider in m3ter](/guides/authenticating-with-the-platform/m3ter-single-sign-on#setting-up-an-identity-provider-in-m3ter)
* [User Provisioning for SSO](/guides/authenticating-with-the-platform/m3ter-single-sign-on#user-provisioning-for-sso)
* [Using SSO to Sign Into the m3ter Console](/guides/authenticating-with-the-platform/m3ter-single-sign-on#using-sso-to-sign-into-the-m3ter-console)
## Setting Up an External Identity Provider
Here are the settings you'll need when setting up your external IdP.
### SSO URL/Endpoint
This is the Single Sign-On URL/Endpoint where the m3ter application receives the SAML assertion:
> `https://m3ter.auth.us-east-1.amazoncognito.com/saml2/idpresponse`
### Audience URI
This is the Entity ID of the m3ter application:
> `urn:amazon:cognito:sp:us-east-1_9OJBvIFUw`
### Attributes Mappings
The following table gives the mappings between the identity attributes used in the external provider and the ones used by m3ter that must be also configured:
| External IdP Attribute | m3ter Attribute |
| - | - |
| \<> | name\* |
| \<> | email\* |
| \<> | firstName |
| \<> | lastName |
| \<> | groups |
**Notes:**
* \* means mapping is mandatory.
* For `groups` mapping values, use comma-separated format. For example: `m3ter-staging-admin, m3ter-prod-read-only`
## Setting Up an Identity Provider in m3ter
An Identity Provider can be created in m3ter for a single m3ter Organization or for all of the m3ter Organizations you use:
* **Note:** This second step will be done for you by m3ter Support.
* **Required IdP Details:** In order for us to create an Identity Provider for you, please provide the following details:
* `name` - Unique name of IdP.
* `metadataUrl` - URL for downloading the SAML metadata.
* Note: For setting up Google SSO, we'll need the xml file.
* `identifiers` - Globally unique values of IdP domains. Used to redirect users to corresponding external IdP login page.
* `groupMappings` - Used to map groups in the external IdP to regular User Groups in m3ter. Ensures that SSO users belonging to groups in the IdP will be added to corresponding User Groups in m3ter, and inherit the Permission Policies assigned to those m3ter User Groups.
## User Provisioning for SSO
Depending on how and when your IdP setup for m3ter SSO was implemented and other factors, such as the possibility of pre-existing m3ter users, you might have to check to ensure your users are properly provisioned for SSO inclusion and have the correct permissions assigned to them. Here are some explanatory notes and recommendations to help with this:
* **Pre-existing Users**. If the user with the given email *already exists as a m3ter user*, then the federated identity will be attached to the existing user’s profile and the identity will have access to the same Organizations with the same permissions as before and will be allowed to login with both the m3ter credentials or using the external identity provider.
* **New Users - Provisioning**. If the user with the given email *does not already exists as a m3ter user*, then the provisioning process will create a m3ter User and an OrgUser having no actual permissions for the configured Organization(s).
* **New Users - Permissions**. As per the previous bullet point, the `OrgUser` now exists in the proper Organizations but can’t do anything because they lack permissions. There are two ways in which you can attach the required Permission Policies to them:
* **Directly**. Attach the relevant Permission Policies to the `OrgUser`. See [Managing Users and Assigning Permission Policies](/guides/organization-and-access-management/managing-users/managing-users-and-assigning-permission-policies) for more details.
* **Via** `groupMappings`. Ask m3ter Support to set up `groupMappings` at the IdP level so the `OrgUser` is automatically added to the corresponding m3ter User Groups at each login, hence inheriting the Permission Policies attached to the User Groups they then belong to in the Organization.
## Using SSO to Sign Into the m3ter Console
When your corporate federated identity has been set up for SSO, you can use it to authenticate and sign into the m3ter Console.
**Coming Soon: IdP-Initiated Logins!** IdP-initiated logins are not currently supported but will be added in the future. If you're interested in this feature, please get in touch with m3ter Support or your m3ter contact.
**To authenticate with the platform:**
1. Open your browser and enter the URL for the m3ter environment. The m3ter **Sign in to your account** appears. The default presentation is for User/Password authentication:
A confirmation dialog appears.
5. Select **Yes** to confirm Alert deletion.
# Authentication
Source: https://docs.m3ter.com/guides/authenticating-with-the-platform
Discover m3ter's authentication options: Username/Password for Console access, m3ter SSO, and Bearer Token for API calls.
The m3ter platform supports several authentication methods:
* Username/Password authentication. This method is used for log in to the m3ter Console.
**Important Note: Login Email is Case Sensitive!**
* Please note that your login email address is case-sensitive. This means that `example.user@acme.com` and `Example.User@acme.com` are treated as two different logins, even though they appear similar.
* *Always double-check* the capitalization of your email address when logging in.
* Service authentication using a Bearer Token for API calls. This method is used for programmatic access via API calls.
* m3ter Single Sign-On. This method allows users with federated identities in different Identity Providers (IdPs) to sign into m3ter.
These authentication methods allow different types of user to access to the m3ter platform:
* **Users** represent the *people* you want to grant access to your Organization in m3ter. Authentication by **Users** can be performed:
* With Username/Password login credentials to authenticate and gain access to the Console.
* **Service Users** represent the *automated processes* you want to grant access to your Organization. **Service Users** will use service authentication to gain access to the m3ter platform.
**Tip: More on User Types?** For more details on the types of user supported in m3ter, see [Managing your Users](/guides/organization-and-access-management/managing-users).
To support these two authentication methods for different types of user, we maintain two authorization flows:
* An *Authorization Code* flow, which controls access for Users.
* A *Client Credentials* flow, which controls API access for Service Users.
**Tip: More Details on Auth Flows?** For more details see the [API Reference Docs Authentication](/api/authentication) page.
This section explains how to authenticate with the m3ter platform:
* [User/Password Authentication](/guides/authenticating-with-the-platform/user-password-authentication)
* [m3ter Single Sign-On](/guides/authenticating-with-the-platform/m3ter-single-sign-on)
* [Service Authentication](/guides/authenticating-with-the-platform/service-authentication)
# m3ter Single Sign-On
Source: https://docs.m3ter.com/guides/authenticating-with-the-platform/m3ter-single-sign-on
m3ter Single Sign-On (SSO) allows users with federated identities that exist in different Identity Providers (IdPs) to sign into m3ter without having to manually provision new users/identities in m3ter's user pool.
m3ter SSO supports SAML based Identity Providers (IdPs). The SAML 2.0 standard offers an XML-based protocol for the exchange of user security information, such as authentication and authorization details, between an identity provider and service provider. In this way, SAML enables the implementation of web-based SSO across security domains.
To implement SSO, two main steps are required:
* Set up your external SAML based Identity Provider application.
* Request m3ter Support to create an Identity Provider in m3ter for you.
When SSO has been implemented for your chosen SAML-based IdP, you might have to check how your users will be provisioned.
This topic explains how SSO is implemented in m3ter for your chosen IdP and how to authenticate and log into the m3ter Console when your corporate federated identity has been set up:
* [Setting Up an External Identity Provider](/guides/authenticating-with-the-platform/m3ter-single-sign-on#setting-up-an-external-identity-provider)
* [Setting Up an Identity Provider in m3ter](/guides/authenticating-with-the-platform/m3ter-single-sign-on#setting-up-an-identity-provider-in-m3ter)
* [User Provisioning for SSO](/guides/authenticating-with-the-platform/m3ter-single-sign-on#user-provisioning-for-sso)
* [Using SSO to Sign Into the m3ter Console](/guides/authenticating-with-the-platform/m3ter-single-sign-on#using-sso-to-sign-into-the-m3ter-console)
## Setting Up an External Identity Provider
Here are the settings you'll need when setting up your external IdP.
### SSO URL/Endpoint
This is the Single Sign-On URL/Endpoint where the m3ter application receives the SAML assertion:
> `https://m3ter.auth.us-east-1.amazoncognito.com/saml2/idpresponse`
### Audience URI
This is the Entity ID of the m3ter application:
> `urn:amazon:cognito:sp:us-east-1_9OJBvIFUw`
### Attributes Mappings
The following table gives the mappings between the identity attributes used in the external provider and the ones used by m3ter that must be also configured:
| External IdP Attribute | m3ter Attribute |
| - | - |
| \<> | name\* |
| \<> | email\* |
| \<> | firstName |
| \<> | lastName |
| \<> | groups |
**Notes:**
* \* means mapping is mandatory.
* For `groups` mapping values, use comma-separated format. For example: `m3ter-staging-admin, m3ter-prod-read-only`
## Setting Up an Identity Provider in m3ter
An Identity Provider can be created in m3ter for a single m3ter Organization or for all of the m3ter Organizations you use:
* **Note:** This second step will be done for you by m3ter Support.
* **Required IdP Details:** In order for us to create an Identity Provider for you, please provide the following details:
* `name` - Unique name of IdP.
* `metadataUrl` - URL for downloading the SAML metadata.
* Note: For setting up Google SSO, we'll need the xml file.
* `identifiers` - Globally unique values of IdP domains. Used to redirect users to corresponding external IdP login page.
* `groupMappings` - Used to map groups in the external IdP to regular User Groups in m3ter. Ensures that SSO users belonging to groups in the IdP will be added to corresponding User Groups in m3ter, and inherit the Permission Policies assigned to those m3ter User Groups.
## User Provisioning for SSO
Depending on how and when your IdP setup for m3ter SSO was implemented and other factors, such as the possibility of pre-existing m3ter users, you might have to check to ensure your users are properly provisioned for SSO inclusion and have the correct permissions assigned to them. Here are some explanatory notes and recommendations to help with this:
* **Pre-existing Users**. If the user with the given email *already exists as a m3ter user*, then the federated identity will be attached to the existing user’s profile and the identity will have access to the same Organizations with the same permissions as before and will be allowed to login with both the m3ter credentials or using the external identity provider.
* **New Users - Provisioning**. If the user with the given email *does not already exists as a m3ter user*, then the provisioning process will create a m3ter User and an OrgUser having no actual permissions for the configured Organization(s).
* **New Users - Permissions**. As per the previous bullet point, the `OrgUser` now exists in the proper Organizations but can’t do anything because they lack permissions. There are two ways in which you can attach the required Permission Policies to them:
* **Directly**. Attach the relevant Permission Policies to the `OrgUser`. See [Managing Users and Assigning Permission Policies](/guides/organization-and-access-management/managing-users/managing-users-and-assigning-permission-policies) for more details.
* **Via** `groupMappings`. Ask m3ter Support to set up `groupMappings` at the IdP level so the `OrgUser` is automatically added to the corresponding m3ter User Groups at each login, hence inheriting the Permission Policies attached to the User Groups they then belong to in the Organization.
## Using SSO to Sign Into the m3ter Console
When your corporate federated identity has been set up for SSO, you can use it to authenticate and sign into the m3ter Console.
**Coming Soon: IdP-Initiated Logins!** IdP-initiated logins are not currently supported but will be added in the future. If you're interested in this feature, please get in touch with m3ter Support or your m3ter contact.
**To authenticate with the platform:**
1. Open your browser and enter the URL for the m3ter environment. The m3ter **Sign in to your account** appears. The default presentation is for User/Password authentication:
 2. Instead, select **Single Sign-On (SSO)**. The sign in adjusts for SSO and **Sign in with Single Sign-On (SSO) using your Corporate ID** shows:
 3. Enter your federated SSO corporate **Email Address** to authenticate and gain access to the Console:
* If your account has been set up for access to a single Organization, you are taken directly to the m3ter Console **Dashboard** for the Organization.
* If your account had been set up for access to more than one Organization, a **Select Organization** page opens. Select the Organization you want to access. The meter Console **Dashboard** for the selected Organization opens.
**Important!** When you log in to the m3ter platform for the first time, please review our **Terms of Service** straightaway to ensure you accept them. To review these terms, click the **Documentation** link at the bottom of the Console's main navigation, and then select **Legal**.
# Service Authentication
Source: https://docs.m3ter.com/guides/authenticating-with-the-platform/service-authentication
When sending usage data to m3ter or accessing the API directly, you should always use *Service Authentication*. To control access to m3ter by Service Users, we implement the OAuth 2.0 Client Credentials Grant authentication flow. In accordance with this grant type, to use Service Authentication you must first obtain a Bearer Token to use for access when making API calls to the m3ter platform. You can use Basic Authentication to obtain a Bearer Token. For Basic Authentication, you will first need an api key and api secret.
**OAuth 2.0 Client Credentials Grant?** If you are not already familiar with this type of client credentials authorization flow, we *strongly recommend* you consult the [OAuth 2.0 Clients Credentials documentation](https://datatracker.ietf.org/doc/html/rfc6749#section-4.4) first.
This topic explains how to generate access keys and obtain Bearer Tokens for your Service Users.
**Tip: Creating and Managing Service Users?** For more details, see [Creating and Configuring Service Users](/guides/organization-and-access-management/managing-users/creating-and-configuring-service-users).
## Generating an API Key and Secret for a Service User
You can generate an **Access Key id** and **Api Secret** for a Service User from within the m3ter Console:
* When you first create a Service User, you can choose to generate access keys - see [Creating a Service User](/guides/organization-and-access-management/managing-users/creating-and-configuring-service-users#creating-service-users).
* Alternatively, you can open the details page for a Service User and generate access keys. You will likely want to rotate access keys at regular intervals as good security practice by making existing keys inactive and generating new ones.
**To generate access keys for Service Users:**
1. On the **Settings>Access>Service Users** tab, select the **NAME** text of the **Service User**. The details page for the Service User opens. Any access keys generated for the Service User are listed in the **Access Keys** panel.
2. Select **Generate Access Key**. A **Generate Access Key** popup appears, which shows:
* **Organization ID**
* **Access Key ID**
* **API Secret**
You can copy each of these string values directly to your clipboard.
**Important!** When you generate an access key for a Service User, you need to keep a record of the **Api Secret** before you close the popup, because this will only be shown once.
3. On the **Generate Access Key** popup, select **Close**. You are returned to the details page where the access key is listed as **ACTIVE** on the **Access Keys** panel.
You can now use the **Access Key id** and **Api Secret** to authenticate the Service User to m3ter using the Basic Authentication method and obtain a Bearer Token for making subsequent API calls.
4. If you want to generate additional access keys, you can repeat steps 2 to 3. If you generate additional keys, you should take care to mark the old ones as **Inactive** - those for which you cannot remember or find the **Api Secret** or those no longer required due to rotation.
**Tip: Rotating Access Keys?** Note that you can only create up to two Access Keys at a time - if you want to maintain continual rotation of your Service User Access Keys, after creating two you must first inactivate and remove one to create a new one.
## Obtaining a Bearer Token Using Basic Auth
When you have generated access keys for a Service User as explained in the [previous section](/guides/authenticating-with-the-platform/service-authentication#generating-an-api-key-and-secret-for-a-service-user), you can use them with Basic Authentication to obtain a Bearer Token. This section gives some examples of how to obtain a Bearer Token using Basic Auth:
* [Example Using Postman](/guides/authenticating-with-the-platform/service-authentication#example-using-postman)
* [Example Using cmd Line](/guides/authenticating-with-the-platform/service-authentication#example-using-cmd-line)
* [Example Using Python Script](/guides/authenticating-with-the-platform/service-authentication#example-using-python-script)
**Tip: API Reference Docs?** When obtaining a Bearer Token for a Service User, please see the [Auth section](/api/auth/get-token) of our API Reference Docs.
### Example Using Postman
This example uses Postman to obtain a Service User Bearer Token using Basic Authentication.
**To obtain a Bearer Token using access keys in Postman:**
1. In your Postman workspace, select to make a **POST** call and enter this URL as the endpoint:
> `https://api.m3ter.com/oauth/token`
2. On the **Authorization** tab, for **Type** select **Basic Auth** and copy and paste your Service User **Access Key id** for **Username** and **Api Secret** for **Password**:
3. Enter your federated SSO corporate **Email Address** to authenticate and gain access to the Console:
* If your account has been set up for access to a single Organization, you are taken directly to the m3ter Console **Dashboard** for the Organization.
* If your account had been set up for access to more than one Organization, a **Select Organization** page opens. Select the Organization you want to access. The meter Console **Dashboard** for the selected Organization opens.
**Important!** When you log in to the m3ter platform for the first time, please review our **Terms of Service** straightaway to ensure you accept them. To review these terms, click the **Documentation** link at the bottom of the Console's main navigation, and then select **Legal**.
# Service Authentication
Source: https://docs.m3ter.com/guides/authenticating-with-the-platform/service-authentication
When sending usage data to m3ter or accessing the API directly, you should always use *Service Authentication*. To control access to m3ter by Service Users, we implement the OAuth 2.0 Client Credentials Grant authentication flow. In accordance with this grant type, to use Service Authentication you must first obtain a Bearer Token to use for access when making API calls to the m3ter platform. You can use Basic Authentication to obtain a Bearer Token. For Basic Authentication, you will first need an api key and api secret.
**OAuth 2.0 Client Credentials Grant?** If you are not already familiar with this type of client credentials authorization flow, we *strongly recommend* you consult the [OAuth 2.0 Clients Credentials documentation](https://datatracker.ietf.org/doc/html/rfc6749#section-4.4) first.
This topic explains how to generate access keys and obtain Bearer Tokens for your Service Users.
**Tip: Creating and Managing Service Users?** For more details, see [Creating and Configuring Service Users](/guides/organization-and-access-management/managing-users/creating-and-configuring-service-users).
## Generating an API Key and Secret for a Service User
You can generate an **Access Key id** and **Api Secret** for a Service User from within the m3ter Console:
* When you first create a Service User, you can choose to generate access keys - see [Creating a Service User](/guides/organization-and-access-management/managing-users/creating-and-configuring-service-users#creating-service-users).
* Alternatively, you can open the details page for a Service User and generate access keys. You will likely want to rotate access keys at regular intervals as good security practice by making existing keys inactive and generating new ones.
**To generate access keys for Service Users:**
1. On the **Settings>Access>Service Users** tab, select the **NAME** text of the **Service User**. The details page for the Service User opens. Any access keys generated for the Service User are listed in the **Access Keys** panel.
2. Select **Generate Access Key**. A **Generate Access Key** popup appears, which shows:
* **Organization ID**
* **Access Key ID**
* **API Secret**
You can copy each of these string values directly to your clipboard.
**Important!** When you generate an access key for a Service User, you need to keep a record of the **Api Secret** before you close the popup, because this will only be shown once.
3. On the **Generate Access Key** popup, select **Close**. You are returned to the details page where the access key is listed as **ACTIVE** on the **Access Keys** panel.
You can now use the **Access Key id** and **Api Secret** to authenticate the Service User to m3ter using the Basic Authentication method and obtain a Bearer Token for making subsequent API calls.
4. If you want to generate additional access keys, you can repeat steps 2 to 3. If you generate additional keys, you should take care to mark the old ones as **Inactive** - those for which you cannot remember or find the **Api Secret** or those no longer required due to rotation.
**Tip: Rotating Access Keys?** Note that you can only create up to two Access Keys at a time - if you want to maintain continual rotation of your Service User Access Keys, after creating two you must first inactivate and remove one to create a new one.
## Obtaining a Bearer Token Using Basic Auth
When you have generated access keys for a Service User as explained in the [previous section](/guides/authenticating-with-the-platform/service-authentication#generating-an-api-key-and-secret-for-a-service-user), you can use them with Basic Authentication to obtain a Bearer Token. This section gives some examples of how to obtain a Bearer Token using Basic Auth:
* [Example Using Postman](/guides/authenticating-with-the-platform/service-authentication#example-using-postman)
* [Example Using cmd Line](/guides/authenticating-with-the-platform/service-authentication#example-using-cmd-line)
* [Example Using Python Script](/guides/authenticating-with-the-platform/service-authentication#example-using-python-script)
**Tip: API Reference Docs?** When obtaining a Bearer Token for a Service User, please see the [Auth section](/api/auth/get-token) of our API Reference Docs.
### Example Using Postman
This example uses Postman to obtain a Service User Bearer Token using Basic Authentication.
**To obtain a Bearer Token using access keys in Postman:**
1. In your Postman workspace, select to make a **POST** call and enter this URL as the endpoint:
> `https://api.m3ter.com/oauth/token`
2. On the **Authorization** tab, for **Type** select **Basic Auth** and copy and paste your Service User **Access Key id** for **Username** and **Api Secret** for **Password**:
![Authorization m3ter example]() 3. Select the **Body** tab and enter this JSON:
3. Select the **Body** tab and enter this JSON:
![post in m3ter authorisation code]() 4. Click **Send**. Your Bearer Token is generated and loaded into the **Body** tab of the **Response** panel in Postman as the `"access_token"` value:
4. Click **Send**. Your Bearer Token is generated and loaded into the **Body** tab of the **Response** panel in Postman as the `"access_token"` value:
![Bearer Token m3ter]() **Warning:** The Bearer Token is valid for 18000 seconds or 5 hours, after which time has elapsed, you will have to obtain a new one.
You can now use your Bearer Token when making API calls to m3ter.
**Important!** You must assign **Administrator** Permissions to a Service User to allow the user to make API calls to the Service. See [Adding Permissions to Service Users](/guides/organization-and-access-management/managing-users/creating-and-configuring-service-users#adding-permission-policies-to-service-users).
### Example Using cmd Line
This example uses the cmd line to obtain a Service User Bearer Token using Basic Authentication.
**To obtain a Bearer Token using access keys from the cmd line:**
1. Encode the **Access key id** and **Api Secret** as base64 and use the value as in Step 2:
2. Encode the **Access key id** and **Api Secret** as base64 and use the value as `{{basicAuth}}` in Step 2:
> `base64(${Access key id}:{Api Secret})`
2. Submit the following:
```bash theme={null}
curl --location --request POST 'https://api.m3ter.com/oauth/token' \
--header 'Authorization: Basic {{basicAuth}}' \
--header 'Content-Type: application/json' \
--data-raw '{
"grant_type": "client_credentials"
}'
```
The response is:
```json theme={null}
{
"token_type": "Bearer",
"access_token": "xx",
"expires_in": 18000
}
```
You can now use the returned `access_token` value as a Bearer Token in API calls to m3ter.
3. Alternatively, you can skip the base64 encoding at Step 1, and simply use:
```bash theme={null}
curl --location --request POST 'https://api.m3ter.com/oauth/token' \
-u {Access key id}:{Api Secret} \
--header 'Content-Type: application/json' \
--data-raw '{
"grant_type": "client_credentials"
}'
```
In other words, use the `-u` option and specify the **Access key id** and **Api Secre**t separated by colon.
### Example using Python Script
For an example of how to obtain a Bearer Token using a Python script, please see the [Authentication and Authorization](/api/authentication) section in the introduction to our API Reference documentation.
# User/Password Authentication
Source: https://docs.m3ter.com/guides/authenticating-with-the-platform/user-password-authentication
When you have registered for an account with the m3ter platform, you will receive login credentials with a temporary password from m3ter Support, together with a URL for the m3ter environment. You can use these login credentials to log in to the m3ter Console.
**Important: Login Email is case-sensitive!**
* The login email you enter when attempting to sign into the platform is treated case-sensitively. For example, if your email is `example.user@acme.com` and you enter `Example.User@acme.com` you will not be able to login.
* Please exercise care in this respect when typing your email address.
**To authenticate with the platform:**
1. Open your browser and enter the URL for the m3ter environment. The m3ter **Sign in to your account** appears:
**Warning:** The Bearer Token is valid for 18000 seconds or 5 hours, after which time has elapsed, you will have to obtain a new one.
You can now use your Bearer Token when making API calls to m3ter.
**Important!** You must assign **Administrator** Permissions to a Service User to allow the user to make API calls to the Service. See [Adding Permissions to Service Users](/guides/organization-and-access-management/managing-users/creating-and-configuring-service-users#adding-permission-policies-to-service-users).
### Example Using cmd Line
This example uses the cmd line to obtain a Service User Bearer Token using Basic Authentication.
**To obtain a Bearer Token using access keys from the cmd line:**
1. Encode the **Access key id** and **Api Secret** as base64 and use the value as in Step 2:
2. Encode the **Access key id** and **Api Secret** as base64 and use the value as `{{basicAuth}}` in Step 2:
> `base64(${Access key id}:{Api Secret})`
2. Submit the following:
```bash theme={null}
curl --location --request POST 'https://api.m3ter.com/oauth/token' \
--header 'Authorization: Basic {{basicAuth}}' \
--header 'Content-Type: application/json' \
--data-raw '{
"grant_type": "client_credentials"
}'
```
The response is:
```json theme={null}
{
"token_type": "Bearer",
"access_token": "xx",
"expires_in": 18000
}
```
You can now use the returned `access_token` value as a Bearer Token in API calls to m3ter.
3. Alternatively, you can skip the base64 encoding at Step 1, and simply use:
```bash theme={null}
curl --location --request POST 'https://api.m3ter.com/oauth/token' \
-u {Access key id}:{Api Secret} \
--header 'Content-Type: application/json' \
--data-raw '{
"grant_type": "client_credentials"
}'
```
In other words, use the `-u` option and specify the **Access key id** and **Api Secre**t separated by colon.
### Example using Python Script
For an example of how to obtain a Bearer Token using a Python script, please see the [Authentication and Authorization](/api/authentication) section in the introduction to our API Reference documentation.
# User/Password Authentication
Source: https://docs.m3ter.com/guides/authenticating-with-the-platform/user-password-authentication
When you have registered for an account with the m3ter platform, you will receive login credentials with a temporary password from m3ter Support, together with a URL for the m3ter environment. You can use these login credentials to log in to the m3ter Console.
**Important: Login Email is case-sensitive!**
* The login email you enter when attempting to sign into the platform is treated case-sensitively. For example, if your email is `example.user@acme.com` and you enter `Example.User@acme.com` you will not be able to login.
* Please exercise care in this respect when typing your email address.
**To authenticate with the platform:**
1. Open your browser and enter the URL for the m3ter environment. The m3ter **Sign in to your account** appears:
 2. Enter your m3ter **Email Address** and **Password** login credentials:
* If your account has been set up for access to a single Organization, you are taken directly to the m3ter Console **Dashboard** for the Organization.
* If your account had been set up for access to more than one Organization, a **Select Organization** page opens. Select the Organization you want to access. The meter Console **Dashboard** for the selected Organization opens.
**Tip: Using Single Sign-On (SSO)?** If your Organization has been set up to allow you to use SSO with a federated identity, you can use your corporate ID to authenticate with and sign in instead. On the m3ter **Sign in to your account** select **Single Sign-On (SSO)** instead. See [m3ter Single Sign-On](/guides/authenticating-with-the-platform/m3ter-single-sign-on).
**Important!**
**First Log in:**
* **Didn't Attempt Log In Within 30 Days?** When you receive your temporary password for Console log in, you have 30 days to make your first log in. If you go beyond this grace period, your temporary password will expire and you'll not be able to log in, so please contact your Organization Administrator who will be able to issue you with a new temporary password.
* **Forgot Password not applicable.** If you try the **Forgot you password?** option on your first attempt at sign in and before you've used your temporary password, it will not work.
* **Change Temporary Password.** After your first log in, you'll be asked to change your temporary password.
* **Check Terms of Service.** When you log into the m3ter platform for the first time, please review our **Terms of Service** straight away to ensure you accept them. To review these terms, click the **Documentation** link at the bottom of the Console's main navigation, and then select **Legal**.
**Subsequent Log ins**:
* After performing your first log in and then logging out, for any subsequent logins when you open the Console log in page the log in method (email/password or SSO) you last used is remembered and the page presents accordingly.
# Billing and Usage Data
Source: https://docs.m3ter.com/guides/billing-and-usage-data
The first part of this section guides you through submitting usage data:
* [Submitting Usage Data](/guides/billing-and-usage-data/submitting-usage-data)
* [API Calls for Data Ingest](/guides/billing-and-usage-data/submitting-usage-data/api-calls-for-data-ingest)
* [File Upload Service API](/guides/billing-and-usage-data/submitting-usage-data/file-upload-service-api)
* [Submitting and Checking Test Usage Data](/guides/billing-and-usage-data/submitting-usage-data/submitting-test-usage-data)
* [File Uploads for Usage Data by Meter](/guides/billing-and-usage-data/submitting-usage-data/submitting-usage-data-adjustments-using-timestamp)
* [Submitting Usage Data Adjustments Using Timestamp](/guides/billing-and-usage-data/submitting-usage-data/submitting-usage-data-adjustments-using-timestamp)
* [Submitting Usage Data for Non-Existent Accounts](/guides/billing-and-usage-data/submitting-usage-data/submitting-usage-data-for-non-existent-accounts)
* [Reviewing and Resolving Ingest Events](/guides/billing-and-usage-data/submitting-usage-data/reviewing-and-resolving-ingest-events)
The second part of this section provides detailed guidance on viewing and managing Bills:
* [Running, Viewing, and Managing Bills](/guides/billing-and-usage-data/running-viewing-and-managing-bills)
* [Running Bills and Viewing Bill Details](/guides/billing-and-usage-data/running-viewing-and-managing-bills/running-bills-and-viewing-bill-details)
* [Working with Bills in Bill Management](/guides/billing-and-usage-data/running-viewing-and-managing-bills/managing-bills)
* [Approving and Locking Bills - Managing Bill Lifecycle](/guides/billing-and-usage-data/running-viewing-and-managing-bills/approving-and-locking-bills-managing-bill-lifecycle)
* [Adding Credit Line Items to Bills](/guides/billing-and-usage-data/running-viewing-and-managing-bills/adding-credit-line-items-to-bills)
* [Adding Debit Line Items to Bills](/guides/billing-and-usage-data/running-viewing-and-managing-bills/adding-debit-line-items-to-bills)
* [Viewing Bill History](/guides/billing-and-usage-data/running-viewing-and-managing-bills/viewing-bill-history)
* [Scheduling Billing](/guides/billing-and-usage-data/running-viewing-and-managing-bills/scheduling-billing)
* [Working with Bill Statements](/guides/billing-and-usage-data/running-viewing-and-managing-bills/working-with-bill-statements)
* [Bill Line Item Types](/guides/billing-and-usage-data/running-viewing-and-managing-bills/bill-line-item-types)
* [Bill Line Items - Default Descriptions](/guides/billing-and-usage-data/running-viewing-and-managing-bills/bill-line-items-default-descriptions)
* [Troubleshooting Bills](/guides/billing-and-usage-data/running-viewing-and-managing-bills/troubleshooting-bills)
# Running, Viewing, and Managing Bills
Source: https://docs.m3ter.com/guides/billing-and-usage-data/running-viewing-and-managing-bills
The *Billing* area of the m3ter Console is designed to let you run, view, and manage Bills for your Accounts. You can:
* View Bills for your Accounts.
* Select a billing period, and view Bills for that period.
You can also access and manage for specific Accounts Bills directly from the Bills tab for the Account:
* View the Bills for an Account.
* Open a Bill in Bill Management and view Bill details with a breakdown of charges.
You can also perform common tasks for billing management workflows:
* View and approve a Bill.
* Lock an approved Bill or set a global lock date for all Bills.
* Re-calculate a Bill.
* Re-run billing.
* Add Credit or Debit line items to a Bill.
* Review the Bill History for a selected Account.
* Download Bills.
* Run billing manually by date and billing frequency using a *Run billing* modal.
You might want Bills to be updated on a regular basis. If so, you can set up scheduling for Bill creation at set intervals as part of your Organization configuration.
This section explains how to run and manage Bills for your Accounts:
* [Running Bills and Viewing Bill Details](/guides/billing-and-usage-data/running-viewing-and-managing-bills/running-bills-and-viewing-bill-details)
* [Managing Bills](/guides/billing-and-usage-data/running-viewing-and-managing-bills/managing-bills)
* [Approving and Locking Bills](/guides/billing-and-usage-data/running-viewing-and-managing-bills/approving-and-locking-bills-managing-bill-lifecycle)
* [Adding Credit Line Items to Bills](/guides/billing-and-usage-data/running-viewing-and-managing-bills/adding-credit-line-items-to-bills)
* [Adding Debit Line Items to Bills](/guides/billing-and-usage-data/running-viewing-and-managing-bills/adding-debit-line-items-to-bills)
* [Viewing Bill History](/guides/billing-and-usage-data/running-viewing-and-managing-bills/viewing-bill-history)
* [Scheduling Billing](/guides/billing-and-usage-data/running-viewing-and-managing-bills/scheduling-billing)
* [Working with Bill Statements](/guides/billing-and-usage-data/running-viewing-and-managing-bills/working-with-bill-statements)
* [Bill Line Item Types](/guides/billing-and-usage-data/running-viewing-and-managing-bills/bill-line-item-types)
* [Bill Line Items - Default Descriptions](/guides/billing-and-usage-data/running-viewing-and-managing-bills/bill-line-items-default-descriptions)
* [Bill Line Items - Mapping to Accounting Products](/guides/billing-and-usage-data/running-viewing-and-managing-bills/bill-line-items-mapping-accounting-products)
* [Troubleshooting Bills](/guides/billing-and-usage-data/running-viewing-and-managing-bills/troubleshooting-bills)
**Tip: Encountering Billing Issues?** If you are having issues with Bills - such as a Bill is not generating for an Account or line item and/or total amounts are not what you expect them to be for a Bill, please review the [Troubleshooting Bills](/guides/billing-and-usage-data/running-viewing-and-managing-bills/troubleshooting-bills) in this section, which offers a checklist of common billing issues with guidance on how to follow-up on and resolve issues.
**Tip: Reviewing Billing Data?** You can query for Billing data and review the returned data using the [Usage Data Explorer (v2)](/guides/data-explorer/usage-data-explorer-v2).
**Tip: End-dating billing entities associated with an Account?** You can end-date the billing entities associated with an end-customer Account - Account Plans, Prepayments, Pricings, and Contracts - from an Account page. This is useful in cases where you need to create new agreements with end-customers - such as for renewals or mid-service term amendments - and for service cancellations. For more details, see [End Dating Account Billing Entities](/guides/end-customer-accounts/end-dating-account-billing-entities).
# Adding Credit Line Items to Bills
Source: https://docs.m3ter.com/guides/billing-and-usage-data/running-viewing-and-managing-bills/adding-credit-line-items-to-bills
From *Bill management*, you can open Bills and add credits for Bill line items using the Credit reasons you've created for your Organization:
* [Add a credit for a line item on an existing bill](/guides/billing-and-usage-data/running-viewing-and-managing-bills/adding-credit-line-items-to-bills#adding-a-credit-for-an-existing-bill-line-item).
* [Add a credit line item manually](/guides/billing-and-usage-data/running-viewing-and-managing-bills/adding-credit-line-items-to-bills#adding-a-credit-manually).
**Tip: Adding Credit Reasons?** For details on how to add Credit reasons to your Organization, see [Creating Credit Reasons](/guides/organization-and-access-management/viewing-and-editing-organization/creating-credit-reasons).
## Adding a Credit for an Existing Bill Line Item
**To add credit line items to Bills for an existing Bill line item:**
1. Select **Billing**. The **Bill management** page opens and the Bills that have been generated for your Accounts are listed. The Bills listed are those for the default settings of monthly frequency and current month period end.
2. If the Bills you want to work with are for a different frequency and period, use the **Invoice date (inclusive)** calendar pop-ups accordingly. See [Running Bills and Viewing Bill Details](/guides/billing-and-usage-data/running-viewing-and-managing-bills/running-bills-and-viewing-bill-details).
**Tip: Invoice dates are inclusive!** Note that when you define a period to view Bills using the **Invoice date** calendar popups, both the start and end date are interpreted inclusively.
3. To select a specific **Bill** you want to add a credit line item for, select the **Reference** hotlink text. The **Bill details** page opens.
* Note that this page provides a full breakdown of the charges made to the Account for the billing period up to the **Last calculated date**. You can expand line items to see further details.
4. Select **Add credit**. The **Create** page opens and the **Credit a line item from a bill** option is selected by default.
5. Leave this default option selected and under **Credit line item details** use the **Bill** drop-down to select the bill date. The **Line item** drop-down is enabled.
6. Use the **Line item** drop-down to select the line item from the Bill for which you want to apply a credit.
* Note that the **Amount** field is automatically populated for the selected line item's amount.
7. Select a **Credit reason** for the credit line item.
**Warning: You must create at least one Credit reason for your Organization before you can add a credit line item to a Bill!** If you haven't, the **Credit reason** drop-down will not be available and you'll see a warning:
* Select the **create a new credit reason** hotlink text provided. This takes you directly to the **Create** page to create the Credit reason you want to use to add a credit line item to the Bill. See [Creating Credit Reasons](/guides/organization-and-access-management/viewing-and-editing-organization/creating-credit-reasons).
* When you create the new Credit reason, you are taken directly back to the **Create** page and the Credit reason is selected.
8. Enter a **Description**.
9. Adjust the **Amount** as required.
10. If you want to define a specific service period to apply to the credit line item, under **Service period settings** use the pop-up calendars to enter a **Service period start date (inclusive)** and **Service period end date (exclusive)**.
**Notes!**
* If you leave the service period start and end date fields blank, the service period applied to the credit line item will be the same as the current billing period.
* If you intend to set up an integration for sending Bills to an external 3rd-party system, the service period start and end dates for credit line items may be *required* when integrating with some external systems. Please check your external system requirements to avoid any issues that might occur with an integration if these dates are left blank.
11. Select **Create Credit line item**. You are returned to the **Bill** **details** page, where the credit line item is shown and the bill is re-calculated to factor in the credit line item amount:
2. Enter your m3ter **Email Address** and **Password** login credentials:
* If your account has been set up for access to a single Organization, you are taken directly to the m3ter Console **Dashboard** for the Organization.
* If your account had been set up for access to more than one Organization, a **Select Organization** page opens. Select the Organization you want to access. The meter Console **Dashboard** for the selected Organization opens.
**Tip: Using Single Sign-On (SSO)?** If your Organization has been set up to allow you to use SSO with a federated identity, you can use your corporate ID to authenticate with and sign in instead. On the m3ter **Sign in to your account** select **Single Sign-On (SSO)** instead. See [m3ter Single Sign-On](/guides/authenticating-with-the-platform/m3ter-single-sign-on).
**Important!**
**First Log in:**
* **Didn't Attempt Log In Within 30 Days?** When you receive your temporary password for Console log in, you have 30 days to make your first log in. If you go beyond this grace period, your temporary password will expire and you'll not be able to log in, so please contact your Organization Administrator who will be able to issue you with a new temporary password.
* **Forgot Password not applicable.** If you try the **Forgot you password?** option on your first attempt at sign in and before you've used your temporary password, it will not work.
* **Change Temporary Password.** After your first log in, you'll be asked to change your temporary password.
* **Check Terms of Service.** When you log into the m3ter platform for the first time, please review our **Terms of Service** straight away to ensure you accept them. To review these terms, click the **Documentation** link at the bottom of the Console's main navigation, and then select **Legal**.
**Subsequent Log ins**:
* After performing your first log in and then logging out, for any subsequent logins when you open the Console log in page the log in method (email/password or SSO) you last used is remembered and the page presents accordingly.
# Billing and Usage Data
Source: https://docs.m3ter.com/guides/billing-and-usage-data
The first part of this section guides you through submitting usage data:
* [Submitting Usage Data](/guides/billing-and-usage-data/submitting-usage-data)
* [API Calls for Data Ingest](/guides/billing-and-usage-data/submitting-usage-data/api-calls-for-data-ingest)
* [File Upload Service API](/guides/billing-and-usage-data/submitting-usage-data/file-upload-service-api)
* [Submitting and Checking Test Usage Data](/guides/billing-and-usage-data/submitting-usage-data/submitting-test-usage-data)
* [File Uploads for Usage Data by Meter](/guides/billing-and-usage-data/submitting-usage-data/submitting-usage-data-adjustments-using-timestamp)
* [Submitting Usage Data Adjustments Using Timestamp](/guides/billing-and-usage-data/submitting-usage-data/submitting-usage-data-adjustments-using-timestamp)
* [Submitting Usage Data for Non-Existent Accounts](/guides/billing-and-usage-data/submitting-usage-data/submitting-usage-data-for-non-existent-accounts)
* [Reviewing and Resolving Ingest Events](/guides/billing-and-usage-data/submitting-usage-data/reviewing-and-resolving-ingest-events)
The second part of this section provides detailed guidance on viewing and managing Bills:
* [Running, Viewing, and Managing Bills](/guides/billing-and-usage-data/running-viewing-and-managing-bills)
* [Running Bills and Viewing Bill Details](/guides/billing-and-usage-data/running-viewing-and-managing-bills/running-bills-and-viewing-bill-details)
* [Working with Bills in Bill Management](/guides/billing-and-usage-data/running-viewing-and-managing-bills/managing-bills)
* [Approving and Locking Bills - Managing Bill Lifecycle](/guides/billing-and-usage-data/running-viewing-and-managing-bills/approving-and-locking-bills-managing-bill-lifecycle)
* [Adding Credit Line Items to Bills](/guides/billing-and-usage-data/running-viewing-and-managing-bills/adding-credit-line-items-to-bills)
* [Adding Debit Line Items to Bills](/guides/billing-and-usage-data/running-viewing-and-managing-bills/adding-debit-line-items-to-bills)
* [Viewing Bill History](/guides/billing-and-usage-data/running-viewing-and-managing-bills/viewing-bill-history)
* [Scheduling Billing](/guides/billing-and-usage-data/running-viewing-and-managing-bills/scheduling-billing)
* [Working with Bill Statements](/guides/billing-and-usage-data/running-viewing-and-managing-bills/working-with-bill-statements)
* [Bill Line Item Types](/guides/billing-and-usage-data/running-viewing-and-managing-bills/bill-line-item-types)
* [Bill Line Items - Default Descriptions](/guides/billing-and-usage-data/running-viewing-and-managing-bills/bill-line-items-default-descriptions)
* [Troubleshooting Bills](/guides/billing-and-usage-data/running-viewing-and-managing-bills/troubleshooting-bills)
# Running, Viewing, and Managing Bills
Source: https://docs.m3ter.com/guides/billing-and-usage-data/running-viewing-and-managing-bills
The *Billing* area of the m3ter Console is designed to let you run, view, and manage Bills for your Accounts. You can:
* View Bills for your Accounts.
* Select a billing period, and view Bills for that period.
You can also access and manage for specific Accounts Bills directly from the Bills tab for the Account:
* View the Bills for an Account.
* Open a Bill in Bill Management and view Bill details with a breakdown of charges.
You can also perform common tasks for billing management workflows:
* View and approve a Bill.
* Lock an approved Bill or set a global lock date for all Bills.
* Re-calculate a Bill.
* Re-run billing.
* Add Credit or Debit line items to a Bill.
* Review the Bill History for a selected Account.
* Download Bills.
* Run billing manually by date and billing frequency using a *Run billing* modal.
You might want Bills to be updated on a regular basis. If so, you can set up scheduling for Bill creation at set intervals as part of your Organization configuration.
This section explains how to run and manage Bills for your Accounts:
* [Running Bills and Viewing Bill Details](/guides/billing-and-usage-data/running-viewing-and-managing-bills/running-bills-and-viewing-bill-details)
* [Managing Bills](/guides/billing-and-usage-data/running-viewing-and-managing-bills/managing-bills)
* [Approving and Locking Bills](/guides/billing-and-usage-data/running-viewing-and-managing-bills/approving-and-locking-bills-managing-bill-lifecycle)
* [Adding Credit Line Items to Bills](/guides/billing-and-usage-data/running-viewing-and-managing-bills/adding-credit-line-items-to-bills)
* [Adding Debit Line Items to Bills](/guides/billing-and-usage-data/running-viewing-and-managing-bills/adding-debit-line-items-to-bills)
* [Viewing Bill History](/guides/billing-and-usage-data/running-viewing-and-managing-bills/viewing-bill-history)
* [Scheduling Billing](/guides/billing-and-usage-data/running-viewing-and-managing-bills/scheduling-billing)
* [Working with Bill Statements](/guides/billing-and-usage-data/running-viewing-and-managing-bills/working-with-bill-statements)
* [Bill Line Item Types](/guides/billing-and-usage-data/running-viewing-and-managing-bills/bill-line-item-types)
* [Bill Line Items - Default Descriptions](/guides/billing-and-usage-data/running-viewing-and-managing-bills/bill-line-items-default-descriptions)
* [Bill Line Items - Mapping to Accounting Products](/guides/billing-and-usage-data/running-viewing-and-managing-bills/bill-line-items-mapping-accounting-products)
* [Troubleshooting Bills](/guides/billing-and-usage-data/running-viewing-and-managing-bills/troubleshooting-bills)
**Tip: Encountering Billing Issues?** If you are having issues with Bills - such as a Bill is not generating for an Account or line item and/or total amounts are not what you expect them to be for a Bill, please review the [Troubleshooting Bills](/guides/billing-and-usage-data/running-viewing-and-managing-bills/troubleshooting-bills) in this section, which offers a checklist of common billing issues with guidance on how to follow-up on and resolve issues.
**Tip: Reviewing Billing Data?** You can query for Billing data and review the returned data using the [Usage Data Explorer (v2)](/guides/data-explorer/usage-data-explorer-v2).
**Tip: End-dating billing entities associated with an Account?** You can end-date the billing entities associated with an end-customer Account - Account Plans, Prepayments, Pricings, and Contracts - from an Account page. This is useful in cases where you need to create new agreements with end-customers - such as for renewals or mid-service term amendments - and for service cancellations. For more details, see [End Dating Account Billing Entities](/guides/end-customer-accounts/end-dating-account-billing-entities).
# Adding Credit Line Items to Bills
Source: https://docs.m3ter.com/guides/billing-and-usage-data/running-viewing-and-managing-bills/adding-credit-line-items-to-bills
From *Bill management*, you can open Bills and add credits for Bill line items using the Credit reasons you've created for your Organization:
* [Add a credit for a line item on an existing bill](/guides/billing-and-usage-data/running-viewing-and-managing-bills/adding-credit-line-items-to-bills#adding-a-credit-for-an-existing-bill-line-item).
* [Add a credit line item manually](/guides/billing-and-usage-data/running-viewing-and-managing-bills/adding-credit-line-items-to-bills#adding-a-credit-manually).
**Tip: Adding Credit Reasons?** For details on how to add Credit reasons to your Organization, see [Creating Credit Reasons](/guides/organization-and-access-management/viewing-and-editing-organization/creating-credit-reasons).
## Adding a Credit for an Existing Bill Line Item
**To add credit line items to Bills for an existing Bill line item:**
1. Select **Billing**. The **Bill management** page opens and the Bills that have been generated for your Accounts are listed. The Bills listed are those for the default settings of monthly frequency and current month period end.
2. If the Bills you want to work with are for a different frequency and period, use the **Invoice date (inclusive)** calendar pop-ups accordingly. See [Running Bills and Viewing Bill Details](/guides/billing-and-usage-data/running-viewing-and-managing-bills/running-bills-and-viewing-bill-details).
**Tip: Invoice dates are inclusive!** Note that when you define a period to view Bills using the **Invoice date** calendar popups, both the start and end date are interpreted inclusively.
3. To select a specific **Bill** you want to add a credit line item for, select the **Reference** hotlink text. The **Bill details** page opens.
* Note that this page provides a full breakdown of the charges made to the Account for the billing period up to the **Last calculated date**. You can expand line items to see further details.
4. Select **Add credit**. The **Create** page opens and the **Credit a line item from a bill** option is selected by default.
5. Leave this default option selected and under **Credit line item details** use the **Bill** drop-down to select the bill date. The **Line item** drop-down is enabled.
6. Use the **Line item** drop-down to select the line item from the Bill for which you want to apply a credit.
* Note that the **Amount** field is automatically populated for the selected line item's amount.
7. Select a **Credit reason** for the credit line item.
**Warning: You must create at least one Credit reason for your Organization before you can add a credit line item to a Bill!** If you haven't, the **Credit reason** drop-down will not be available and you'll see a warning:
* Select the **create a new credit reason** hotlink text provided. This takes you directly to the **Create** page to create the Credit reason you want to use to add a credit line item to the Bill. See [Creating Credit Reasons](/guides/organization-and-access-management/viewing-and-editing-organization/creating-credit-reasons).
* When you create the new Credit reason, you are taken directly back to the **Create** page and the Credit reason is selected.
8. Enter a **Description**.
9. Adjust the **Amount** as required.
10. If you want to define a specific service period to apply to the credit line item, under **Service period settings** use the pop-up calendars to enter a **Service period start date (inclusive)** and **Service period end date (exclusive)**.
**Notes!**
* If you leave the service period start and end date fields blank, the service period applied to the credit line item will be the same as the current billing period.
* If you intend to set up an integration for sending Bills to an external 3rd-party system, the service period start and end dates for credit line items may be *required* when integrating with some external systems. Please check your external system requirements to avoid any issues that might occur with an integration if these dates are left blank.
11. Select **Create Credit line item**. You are returned to the **Bill** **details** page, where the credit line item is shown and the bill is re-calculated to factor in the credit line item amount:
![Credit Reasons22]() * In this example, a credit line item has been added to a Bill in the full amount for one of the line items - **File submission charges**.
12. You can expand the credit line item to view details and **Edit** or **Delete** the credit line item.
**Warning: Approving and Locking Bills!**
* If you Approve the Bill:
* You can **Edit** the credit line item but the Bill will be reverted to Pending.
* You cannot **Delete** the credit line item.
* If you Approve and then Lock the Bill:
* You cannot **Edit** or **Delete** the credit line item.
## Adding a Credit Manually
**To add a manual credit line items to Bills:**
1. Select **Billing>Bill management**. The **Bill management** page opens and the Bills that have been generated for your Accounts are listed. The Bills listed are those for the default settings of monthly frequency and current month period end.
2. If the Bills you want to work with are for a different frequency and period, use the **Invoice date** calendar pop-ups accordingly. See [Running Bills and Viewing Bill Details](/guides/billing-and-usage-data/running-viewing-and-managing-bills/running-bills-and-viewing-bill-details).
3. To select a specific **Bill** you want to add a credit line item for, select the **Reference** hotlink text. The **Bill details** page opens.
* Note that this page provides a full breakdown of the charges made to the Account for the billing period up to the **Last calculated date**. You can expand line items to see further details.
4. Select **Add credit**. The **Create** page opens and the **Credit a line item from a bill** option is selected by default.
5. Select **Apply manual credit**. The **Create** page adjusts for creating a manual credit line item to the Bill.
6. Under **Credit line item details**, select a **Product** reference for the manual credit line item.
* Note that this is required for accounting purposes and associates the credit line item with a specific Product.
7. Enter a **Credit reason**, **Description**, and the **Amount** for the manual credit line item.
**Warning: You must create at least one Credit reason for your Organization before you can add a manual credit to a Bill!** If you haven't, the **Credit reason** drop-down will not be available and you'll see a warning:
* Select the **create a new credit reason** hotlink text provided. This takes you directly to the **Create** page to create the Credit reason you want to use to add a manual credit to the Bill. See [Creating Credit Reasons](/guides/organization-and-access-management/viewing-and-editing-organization/creating-credit-reasons).
* When you create the new Credit reason, you are taken directly back to the **Create** page and the Credit reason is selected.
8. Enter a **Service period start date (inclusive)** and **Service period end date (exclusive)**.
**Service Period Required!** When adding a *manual credit line item*, these dates are required. If you leave them blank, you'll receive an error when you try to create the credit line item
9. Select **Create Credit line item**. You are returned to the **Bill** **details** page, where the manual credit line item is shown and the bill is re-calculated to factor in the manual credit line item amount:
* In this example, a credit line item has been added to a Bill in the full amount for one of the line items - **File submission charges**.
12. You can expand the credit line item to view details and **Edit** or **Delete** the credit line item.
**Warning: Approving and Locking Bills!**
* If you Approve the Bill:
* You can **Edit** the credit line item but the Bill will be reverted to Pending.
* You cannot **Delete** the credit line item.
* If you Approve and then Lock the Bill:
* You cannot **Edit** or **Delete** the credit line item.
## Adding a Credit Manually
**To add a manual credit line items to Bills:**
1. Select **Billing>Bill management**. The **Bill management** page opens and the Bills that have been generated for your Accounts are listed. The Bills listed are those for the default settings of monthly frequency and current month period end.
2. If the Bills you want to work with are for a different frequency and period, use the **Invoice date** calendar pop-ups accordingly. See [Running Bills and Viewing Bill Details](/guides/billing-and-usage-data/running-viewing-and-managing-bills/running-bills-and-viewing-bill-details).
3. To select a specific **Bill** you want to add a credit line item for, select the **Reference** hotlink text. The **Bill details** page opens.
* Note that this page provides a full breakdown of the charges made to the Account for the billing period up to the **Last calculated date**. You can expand line items to see further details.
4. Select **Add credit**. The **Create** page opens and the **Credit a line item from a bill** option is selected by default.
5. Select **Apply manual credit**. The **Create** page adjusts for creating a manual credit line item to the Bill.
6. Under **Credit line item details**, select a **Product** reference for the manual credit line item.
* Note that this is required for accounting purposes and associates the credit line item with a specific Product.
7. Enter a **Credit reason**, **Description**, and the **Amount** for the manual credit line item.
**Warning: You must create at least one Credit reason for your Organization before you can add a manual credit to a Bill!** If you haven't, the **Credit reason** drop-down will not be available and you'll see a warning:
* Select the **create a new credit reason** hotlink text provided. This takes you directly to the **Create** page to create the Credit reason you want to use to add a manual credit to the Bill. See [Creating Credit Reasons](/guides/organization-and-access-management/viewing-and-editing-organization/creating-credit-reasons).
* When you create the new Credit reason, you are taken directly back to the **Create** page and the Credit reason is selected.
8. Enter a **Service period start date (inclusive)** and **Service period end date (exclusive)**.
**Service Period Required!** When adding a *manual credit line item*, these dates are required. If you leave them blank, you'll receive an error when you try to create the credit line item
9. Select **Create Credit line item**. You are returned to the **Bill** **details** page, where the manual credit line item is shown and the bill is re-calculated to factor in the manual credit line item amount:
![Credit Reasons23]() * In this example, a **General rebate** manual credit line item has been added to a Bill in the amount of \$20.
10. You can expand the manual credit line item to view details and **Edit** or **Delete** the credit line item.
**Warning: Approving and Locking Bills!**
* If you Approve the Bill:
* You can **Edit** the manual credit line item but the Bill will be reverted to Pending.
* You cannot **Delete** the manual credit line item.
* If you Approve and then Lock the Bill:
* You cannot **Edit** or **Delete** the manual credit line item.
11. Also, you can add a manual credit line item to a bill for credit against *another Product* consumed by the Account:
* In this example, a **General rebate** manual credit line item has been added to a Bill in the amount of \$20.
10. You can expand the manual credit line item to view details and **Edit** or **Delete** the credit line item.
**Warning: Approving and Locking Bills!**
* If you Approve the Bill:
* You can **Edit** the manual credit line item but the Bill will be reverted to Pending.
* You cannot **Delete** the manual credit line item.
* If you Approve and then Lock the Bill:
* You cannot **Edit** or **Delete** the manual credit line item.
11. Also, you can add a manual credit line item to a bill for credit against *another Product* consumed by the Account:
![Credit Reasons24]() * In this example, a **New product sign-up bonus** manual credit line item has been added to the Bill in the amount of \$50. Note that this new line item is clearly listed on the recalculated Bill as a credit against the Account for a different Product.
# Adding Debit Line Items to Bills
Source: https://docs.m3ter.com/guides/billing-and-usage-data/running-viewing-and-managing-bills/adding-debit-line-items-to-bills
From *Bill management*, you can open Bills and add debits for Bill line items using the Debit reasons you've created for your Organization:
* [Add a debit for a line item on an existing bill](/guides/billing-and-usage-data/running-viewing-and-managing-bills/adding-debit-line-items-to-bills#adding-a-debit-for-an-existing-bill-line-item).
* [Add a debit line item manually](/guides/billing-and-usage-data/running-viewing-and-managing-bills/adding-debit-line-items-to-bills#adding-a-debit-manually).
**Tip: Adding Debit Reasons?** For details on how to add Debit Reasons to your Organization, see [Creating Debit Reasons](/guides/organization-and-access-management/viewing-and-editing-organization/creating-debit-reasons).
## Adding a Debit for an Existing Bill Line Item
**To add debit line items to Bills for an existing line item:**
1. Select **Billing**. The **Bill management** page opens and the Bills that have been generated for your Accounts are listed. The Bills listed are those for the default settings of monthly frequency and current month period end.
2. If the Bills you want to work with are for a different frequency and period, use the **Invoice date (inclusive)** calendar pop-ups accordingly. See [Running Bills and Viewing Bill Details](/guides/billing-and-usage-data/running-viewing-and-managing-bills/running-bills-and-viewing-bill-details).
**Tip: Invoice dates are inclusive!** Note that when you define a period to view Bills using the **Invoice date** calendar popups, both the start and end date are interpreted inclusively.
3. To select a specific **Bill** you want to add a debit line item for, select the **Reference** hotlink text. The **Bill details** page opens.
* Note that this page provides a full breakdown of the charges made to the Account for the billing period up to the **Last calculated date**. You can expand line items to see further details.
4. Select **Add debit**. The **Create** page opens and the **Debit a line item from a bill** option is selected by default.
5. Leave this default option selected and under **Debit line item details** use the **Bill** drop-down to select the bill date.
6. Use the **Line item** drop-down to select the line item from the Bill for which you want to apply a debit.
* Note that the **Amount** field is automatically populated for the selected line item's amount.
7. Select a **Debit reason** for the debit line item.
**Warning: You must create at least one Debit reason for your Organization before you can add a debit line item to a Bill!** If you haven't, the **Debit reason** drop-down will not be available and you'll see a warning:
* Select the **create a new debit reason** hotlink text provided. This takes you directly to the **Create** page to create the Debit reason you want to use to add a debit line item to the Bill. See [Creating Debit Reasons](/guides/organization-and-access-management/viewing-and-editing-organization/creating-debit-reasons).
* When you create the new Debit reason, you are taken directly back to the **Create** page and the Debit reason is selected.
8. Enter a **Description**.
9. Adjust the **Amount** as required.
10. If you want to define a specific service period to apply to the debit line item, under **Service period settings** use the pop-up calendars to enter a **Service period start date (inclusive)** and **Service period end date (exclusive)**.
**Notes!**
* If you leave these start and end date fields blank, the service period applied to the debit line item will be the same as the current billing period.
* If you intend to set up an integration for sending Bills to an external 3rd-party system, the service period start and end dates for debit line items may be *required* when integrating with some external systems. Please check your external system requirements to avoid any issues that might occur with an integration if these dates are left blank.
11. Select **Create Debit line item**. You are returned to the **Bill details** page, where the debit item is shown and the bill is re-calculated to factor in the debit item amount:
* In this example, a **New product sign-up bonus** manual credit line item has been added to the Bill in the amount of \$50. Note that this new line item is clearly listed on the recalculated Bill as a credit against the Account for a different Product.
# Adding Debit Line Items to Bills
Source: https://docs.m3ter.com/guides/billing-and-usage-data/running-viewing-and-managing-bills/adding-debit-line-items-to-bills
From *Bill management*, you can open Bills and add debits for Bill line items using the Debit reasons you've created for your Organization:
* [Add a debit for a line item on an existing bill](/guides/billing-and-usage-data/running-viewing-and-managing-bills/adding-debit-line-items-to-bills#adding-a-debit-for-an-existing-bill-line-item).
* [Add a debit line item manually](/guides/billing-and-usage-data/running-viewing-and-managing-bills/adding-debit-line-items-to-bills#adding-a-debit-manually).
**Tip: Adding Debit Reasons?** For details on how to add Debit Reasons to your Organization, see [Creating Debit Reasons](/guides/organization-and-access-management/viewing-and-editing-organization/creating-debit-reasons).
## Adding a Debit for an Existing Bill Line Item
**To add debit line items to Bills for an existing line item:**
1. Select **Billing**. The **Bill management** page opens and the Bills that have been generated for your Accounts are listed. The Bills listed are those for the default settings of monthly frequency and current month period end.
2. If the Bills you want to work with are for a different frequency and period, use the **Invoice date (inclusive)** calendar pop-ups accordingly. See [Running Bills and Viewing Bill Details](/guides/billing-and-usage-data/running-viewing-and-managing-bills/running-bills-and-viewing-bill-details).
**Tip: Invoice dates are inclusive!** Note that when you define a period to view Bills using the **Invoice date** calendar popups, both the start and end date are interpreted inclusively.
3. To select a specific **Bill** you want to add a debit line item for, select the **Reference** hotlink text. The **Bill details** page opens.
* Note that this page provides a full breakdown of the charges made to the Account for the billing period up to the **Last calculated date**. You can expand line items to see further details.
4. Select **Add debit**. The **Create** page opens and the **Debit a line item from a bill** option is selected by default.
5. Leave this default option selected and under **Debit line item details** use the **Bill** drop-down to select the bill date.
6. Use the **Line item** drop-down to select the line item from the Bill for which you want to apply a debit.
* Note that the **Amount** field is automatically populated for the selected line item's amount.
7. Select a **Debit reason** for the debit line item.
**Warning: You must create at least one Debit reason for your Organization before you can add a debit line item to a Bill!** If you haven't, the **Debit reason** drop-down will not be available and you'll see a warning:
* Select the **create a new debit reason** hotlink text provided. This takes you directly to the **Create** page to create the Debit reason you want to use to add a debit line item to the Bill. See [Creating Debit Reasons](/guides/organization-and-access-management/viewing-and-editing-organization/creating-debit-reasons).
* When you create the new Debit reason, you are taken directly back to the **Create** page and the Debit reason is selected.
8. Enter a **Description**.
9. Adjust the **Amount** as required.
10. If you want to define a specific service period to apply to the debit line item, under **Service period settings** use the pop-up calendars to enter a **Service period start date (inclusive)** and **Service period end date (exclusive)**.
**Notes!**
* If you leave these start and end date fields blank, the service period applied to the debit line item will be the same as the current billing period.
* If you intend to set up an integration for sending Bills to an external 3rd-party system, the service period start and end dates for debit line items may be *required* when integrating with some external systems. Please check your external system requirements to avoid any issues that might occur with an integration if these dates are left blank.
11. Select **Create Debit line item**. You are returned to the **Bill details** page, where the debit item is shown and the bill is re-calculated to factor in the debit item amount:
![Debit Reasons3]() * In this example, a debit item has been added to a Bill in the amount of \$50 for one of the line items - **Stored charges**.
12. You can expand the debit line item to view details and **Edit** or **Delete** it.
**Warning: Approving and Locking Bills!**
* If you Approve the Bill:
* You can **Edit** the debit line item but the Bill will be reverted to Pending.
* You cannot **Delete** the debit line item.
* If you Approve and then Lock the Bill:
* You cannot **Edit** or **Delete** the debit line item.
## Adding a Debit Manually
**To add debit line items manually:**
1. Select **Billing**. The **Bill management** page opens and the Bills that have been generated for your Accounts are listed. The Bills listed are those for the default settings of monthly frequency and current month period end.
2. If the Bills you want to work with are for a different frequency and period, use the **Invoice date (inclusive)** calendar pop-ups accordingly. See [Running Bills and Viewing Bill Details](/guides/billing-and-usage-data/running-viewing-and-managing-bills/running-bills-and-viewing-bill-details).
3. To select a specific **Bill** you want to add a debit line item for, select the **Reference** hotlink text. The **Bill details** page opens.
* Note that this page provides a full breakdown of the charges made to the Account for the billing period up to the **Last calculated date**. You can expand line items to see further details.
4. Select **Add debit**. The **Create** page opens and the **Debit a line item from a bill** option is selected by default.
5. Select **Apply manual debit**. The **Create** page adjusts for creating a manual debit line item for the Bill.
6. Under **Debit line item details**, select a **Product** reference for the manual debit line item.
* Note that this is required for accounting purposes and associates the debit line item with a specific Product.
7. Enter a **Debit reason**, **Description**, and **Amount** for the manual debit line item.
**Warning: You must create at least one Debit reason for your Organization before you can add a manual debit to a Bill!** If you haven't, the **Debit reason** drop-down will not be available and you'll see a warning:
* Select the **create a new debit reason** hotlink text provided. This takes you directly to the **Create** page to create the Debit reason you want to use to add a manual debit to the Bill. See [Creating Debit Reasons](/guides/organization-and-access-management/viewing-and-editing-organization/creating-debit-reasons).
* When you create the new Debit reason, you are taken directly back to the **Create** page and the Debit reason is selected.
8. Enter a **Service period start date (inclusive)** and **Service period end date (exclusive)**.
**Service Period Required!** When adding a *manual debit line item*, these dates are required. If you leave them blank, you'll receive an error when you try to create the debit line item
9. Select **Create Debit line item**. You are returned to the **Bill details** page, where the manual debit line item is shown and the bill is re-calculated to factor in the debit line item amount:
* In this example, a debit item has been added to a Bill in the amount of \$50 for one of the line items - **Stored charges**.
12. You can expand the debit line item to view details and **Edit** or **Delete** it.
**Warning: Approving and Locking Bills!**
* If you Approve the Bill:
* You can **Edit** the debit line item but the Bill will be reverted to Pending.
* You cannot **Delete** the debit line item.
* If you Approve and then Lock the Bill:
* You cannot **Edit** or **Delete** the debit line item.
## Adding a Debit Manually
**To add debit line items manually:**
1. Select **Billing**. The **Bill management** page opens and the Bills that have been generated for your Accounts are listed. The Bills listed are those for the default settings of monthly frequency and current month period end.
2. If the Bills you want to work with are for a different frequency and period, use the **Invoice date (inclusive)** calendar pop-ups accordingly. See [Running Bills and Viewing Bill Details](/guides/billing-and-usage-data/running-viewing-and-managing-bills/running-bills-and-viewing-bill-details).
3. To select a specific **Bill** you want to add a debit line item for, select the **Reference** hotlink text. The **Bill details** page opens.
* Note that this page provides a full breakdown of the charges made to the Account for the billing period up to the **Last calculated date**. You can expand line items to see further details.
4. Select **Add debit**. The **Create** page opens and the **Debit a line item from a bill** option is selected by default.
5. Select **Apply manual debit**. The **Create** page adjusts for creating a manual debit line item for the Bill.
6. Under **Debit line item details**, select a **Product** reference for the manual debit line item.
* Note that this is required for accounting purposes and associates the debit line item with a specific Product.
7. Enter a **Debit reason**, **Description**, and **Amount** for the manual debit line item.
**Warning: You must create at least one Debit reason for your Organization before you can add a manual debit to a Bill!** If you haven't, the **Debit reason** drop-down will not be available and you'll see a warning:
* Select the **create a new debit reason** hotlink text provided. This takes you directly to the **Create** page to create the Debit reason you want to use to add a manual debit to the Bill. See [Creating Debit Reasons](/guides/organization-and-access-management/viewing-and-editing-organization/creating-debit-reasons).
* When you create the new Debit reason, you are taken directly back to the **Create** page and the Debit reason is selected.
8. Enter a **Service period start date (inclusive)** and **Service period end date (exclusive)**.
**Service Period Required!** When adding a *manual debit line item*, these dates are required. If you leave them blank, you'll receive an error when you try to create the debit line item
9. Select **Create Debit line item**. You are returned to the **Bill details** page, where the manual debit line item is shown and the bill is re-calculated to factor in the debit line item amount:
![Debit Reasons4]() * In this example, an **Overdue Bill payment penalty** manual debit line item has been added to a Bill in the amount of \$25.
10. You can expand the manual debit line item to view details and **Edit** or **Delete** the manual debit line item.
**Warning: Approving and Locking Bills!**
* If you Approve the Bill:
* You can **Edit** the manual debit line item but the Bill will be reverted to Pending.
* You cannot **Delete** the manual debit line item.
* If you Approve and then Lock the Bill:
* You cannot **Edit** or **Delete** the manual debit line item.
11. Also, you can add a manual debit line item to a bill for consumption of *another Product* by the Account:
* In this example, an **Overdue Bill payment penalty** manual debit line item has been added to a Bill in the amount of \$25.
10. You can expand the manual debit line item to view details and **Edit** or **Delete** the manual debit line item.
**Warning: Approving and Locking Bills!**
* If you Approve the Bill:
* You can **Edit** the manual debit line item but the Bill will be reverted to Pending.
* You cannot **Delete** the manual debit line item.
* If you Approve and then Lock the Bill:
* You cannot **Edit** or **Delete** the manual debit line item.
11. Also, you can add a manual debit line item to a bill for consumption of *another Product* by the Account:
![Debit Reasons5]() * In this example, an **Additional storage** manual debit line item has been added to the Bill in the amount of \$125. Note that this new debit line item is clearly listed on the recalculated Bill as a charge due against the Account for a different Product.
# Approving and Locking Bills - Managing Bill Lifecycle
Source: https://docs.m3ter.com/guides/billing-and-usage-data/running-viewing-and-managing-bills/approving-and-locking-bills-managing-bill-lifecycle
Account Bills can be taken through a lifecycle, from when they are first generated in a Pending status, being approved, and finally being locked at which point they can no longer be recalculated or updated.
Bills can be in either Pending or Approved status:
* **Pending Status**:
* When Bills are first generated they have a Pending status.
* You can move a Bill into Approved from Pending status.
* You cannot lock a Pending status Bill.
* Pending status allows you to review and check an Account Bill before moving it to Approved. When you are satisfied a Pending status Bill on an Account is correct and complete, you can move it to Approved status meaning it is ready for sending out to invoicing systems.
* **Approved Status**:
* You can lock an Approved status Bill.
* If you recalculate an Approved status Bill, such as running a Bill job that includes an Approved Bill or recalculating an Approved Bill directly in Bill management, the Bill is automatically moved back to Pending status.
**Note: Approving Bills with Integrations set up for 3rd-party systems.** m3ter integrations for sending Bills to 3rd-party invoicing systems are typically configured to send Bills out when they are changed from Pending to Approved status, and this change of status can also be used as the trigger for billing flows implemented for custom integrations.
Only Approved status Bills can be locked. A locked Bill cannot be changed - it can no longer be:
* Selected in Bill management.
* Unlocked.
* Updated.
* Recalculated, and is therefore excluded from any billing runs.
You can also define a *Global* lock date in the Console under Bill management:
* All Bills dated before or on the global lock date are effectively locked and cannot be updated or recalculated.
* However, globally locked Bills can be unlocked - if you change the Global lock date and move the date backwards in time, any Bills previously locked globally but which are dated after the new global locking date will be unlocked.
This topic explains how to work in Bill management to move Bills through their lifecycle:
* [Approving Bills](/guides/billing-and-usage-data/running-viewing-and-managing-bills/approving-and-locking-bills-managing-bill-lifecycle#approving-bills)
* [Auto-Approving Bills](/guides/billing-and-usage-data/running-viewing-and-managing-bills/approving-and-locking-bills-managing-bill-lifecycle#auto-approving-bills)
* [Locking Bills](/guides/billing-and-usage-data/running-viewing-and-managing-bills/approving-and-locking-bills-managing-bill-lifecycle#locking-bills)
* [Setting Global Lock Date](/guides/billing-and-usage-data/running-viewing-and-managing-bills/approving-and-locking-bills-managing-bill-lifecycle#setting-global-lock-date)
**Tip: API calls for managing Bill lifecycle?**
* **Changing Bill Status**. You can use the [Update Bill Status](/api/bill/update-bill-status) API call to change the status of a Bill.
* **Locking Bills**. You can use the [Lock Bill](/api/bill/lock-bill) API call to lock Bills.
## Approving Bills
When Bills are first generated, they have **Pending** status. For Pending Bills, you can:
* Select Bills directly in Bill management and then approve the selected Bills.
* Approve a set of Bills by a specified invoice date period.
**To approve Bills:**
1. Select **Billing**. The **Bill management** page opens and lists Bills for the default **Invoice date** setting of the current month.
2. If you want to approve Bills for a different period, use the **Invoice date** calendar pop-ups to adjust the period accordingly. See [Running Bills and Viewing Bill Details](/guides/billing-and-usage-data/running-viewing-and-managing-bills/running-bills-and-viewing-bill-details).
* If you want to review the details of a Bill before approving it, select the **Reference** hotlink text to open the Bill.
3. Use the checkboxes to select the Bill or Bills you want to approve.
* Note that if you've selected a Bill which is already at **Approved** status. the **Approve selected** button is automatically disabled.
4. Select **Approve selected**. The selected Bills are moved to **Approved** status and the **Lock selected** button is now enabled for these Bills.
5. If you want to approve a set of Bills by date range, select **Approve bills**. The **Approve bills** modal appears:
* In this example, an **Additional storage** manual debit line item has been added to the Bill in the amount of \$125. Note that this new debit line item is clearly listed on the recalculated Bill as a charge due against the Account for a different Product.
# Approving and Locking Bills - Managing Bill Lifecycle
Source: https://docs.m3ter.com/guides/billing-and-usage-data/running-viewing-and-managing-bills/approving-and-locking-bills-managing-bill-lifecycle
Account Bills can be taken through a lifecycle, from when they are first generated in a Pending status, being approved, and finally being locked at which point they can no longer be recalculated or updated.
Bills can be in either Pending or Approved status:
* **Pending Status**:
* When Bills are first generated they have a Pending status.
* You can move a Bill into Approved from Pending status.
* You cannot lock a Pending status Bill.
* Pending status allows you to review and check an Account Bill before moving it to Approved. When you are satisfied a Pending status Bill on an Account is correct and complete, you can move it to Approved status meaning it is ready for sending out to invoicing systems.
* **Approved Status**:
* You can lock an Approved status Bill.
* If you recalculate an Approved status Bill, such as running a Bill job that includes an Approved Bill or recalculating an Approved Bill directly in Bill management, the Bill is automatically moved back to Pending status.
**Note: Approving Bills with Integrations set up for 3rd-party systems.** m3ter integrations for sending Bills to 3rd-party invoicing systems are typically configured to send Bills out when they are changed from Pending to Approved status, and this change of status can also be used as the trigger for billing flows implemented for custom integrations.
Only Approved status Bills can be locked. A locked Bill cannot be changed - it can no longer be:
* Selected in Bill management.
* Unlocked.
* Updated.
* Recalculated, and is therefore excluded from any billing runs.
You can also define a *Global* lock date in the Console under Bill management:
* All Bills dated before or on the global lock date are effectively locked and cannot be updated or recalculated.
* However, globally locked Bills can be unlocked - if you change the Global lock date and move the date backwards in time, any Bills previously locked globally but which are dated after the new global locking date will be unlocked.
This topic explains how to work in Bill management to move Bills through their lifecycle:
* [Approving Bills](/guides/billing-and-usage-data/running-viewing-and-managing-bills/approving-and-locking-bills-managing-bill-lifecycle#approving-bills)
* [Auto-Approving Bills](/guides/billing-and-usage-data/running-viewing-and-managing-bills/approving-and-locking-bills-managing-bill-lifecycle#auto-approving-bills)
* [Locking Bills](/guides/billing-and-usage-data/running-viewing-and-managing-bills/approving-and-locking-bills-managing-bill-lifecycle#locking-bills)
* [Setting Global Lock Date](/guides/billing-and-usage-data/running-viewing-and-managing-bills/approving-and-locking-bills-managing-bill-lifecycle#setting-global-lock-date)
**Tip: API calls for managing Bill lifecycle?**
* **Changing Bill Status**. You can use the [Update Bill Status](/api/bill/update-bill-status) API call to change the status of a Bill.
* **Locking Bills**. You can use the [Lock Bill](/api/bill/lock-bill) API call to lock Bills.
## Approving Bills
When Bills are first generated, they have **Pending** status. For Pending Bills, you can:
* Select Bills directly in Bill management and then approve the selected Bills.
* Approve a set of Bills by a specified invoice date period.
**To approve Bills:**
1. Select **Billing**. The **Bill management** page opens and lists Bills for the default **Invoice date** setting of the current month.
2. If you want to approve Bills for a different period, use the **Invoice date** calendar pop-ups to adjust the period accordingly. See [Running Bills and Viewing Bill Details](/guides/billing-and-usage-data/running-viewing-and-managing-bills/running-bills-and-viewing-bill-details).
* If you want to review the details of a Bill before approving it, select the **Reference** hotlink text to open the Bill.
3. Use the checkboxes to select the Bill or Bills you want to approve.
* Note that if you've selected a Bill which is already at **Approved** status. the **Approve selected** button is automatically disabled.
4. Select **Approve selected**. The selected Bills are moved to **Approved** status and the **Lock selected** button is now enabled for these Bills.
5. If you want to approve a set of Bills by date range, select **Approve bills**. The **Approve bills** modal appears:
![]() 6. Use the **Calendar** pop-ups to select the **Invoice start date** and **Invoice end date** to define the date range for Bill approval.
* **Note to clarify**: start and end dates for Bill approval date range:
* The **Invoice start date** is *inclusive*. This means, for example, if you've set the **Invoice start date** for Bill approval date range as April 1st, any Bill with an **Invoice date** of April 1st or later will be approved.
* The **Invoice end date** you select for the date range is *exclusive*. This means, for example, if you've set the **Invoice end date** for Bill approval date range as April 30th, any Bill with an **Invoice date** of April 29th or earlier will be approved. However, a Bill dated April 30th *will not be approved*.
7. Select **Approve bills**. The modal closes and all **Pending** status Bills dated within the defined date range are moved to **Approved** status.
## Auto-Approving Bills
You can enable *auto-approval* for Bills, which allows you to specify a time period (*in minutes, hours, or days)* following the Bill date after which Bills will be automatically approved:
* For example, suppose you are using a monthly billing frequency for an end customer Account and Bills are created at 12 midnight on the the last day of each month. You then enable **Auto-approve bills** and set it to 2 hours. Each month's Bill is approved automatically at 2 a.m. on the first day of the month following.
**Warnings!**
* **Possible Conflict between Auto-Approval of Bills and Scheduled Bill Interval!** If a Bill is recalculated because of late-arriving data after being auto-approved, and the bill auto-approval interval is less than 24 hours, then the Bill will revert to a Pending, unapproved state:
* We recommend setting the auto-approval interval to 24 hours or longer when using scheduled bill updates.
* Please see [Understanding the Scheduled Billing Process](/guides/billing-and-usage-data/running-viewing-and-managing-bills/scheduling-billing#understanding-the-scheduled-billing-process) for more details.
* **Auto-Approval tied to Bill date!** If you generate a Bill early and *before* the scheduled Bill date, it will *not be auto-approved* from the date/time you do this, but only at the specified time after the Bill date.
**To set up auto-approval for Bills:**
1. Select **Settings**:
6. Use the **Calendar** pop-ups to select the **Invoice start date** and **Invoice end date** to define the date range for Bill approval.
* **Note to clarify**: start and end dates for Bill approval date range:
* The **Invoice start date** is *inclusive*. This means, for example, if you've set the **Invoice start date** for Bill approval date range as April 1st, any Bill with an **Invoice date** of April 1st or later will be approved.
* The **Invoice end date** you select for the date range is *exclusive*. This means, for example, if you've set the **Invoice end date** for Bill approval date range as April 30th, any Bill with an **Invoice date** of April 29th or earlier will be approved. However, a Bill dated April 30th *will not be approved*.
7. Select **Approve bills**. The modal closes and all **Pending** status Bills dated within the defined date range are moved to **Approved** status.
## Auto-Approving Bills
You can enable *auto-approval* for Bills, which allows you to specify a time period (*in minutes, hours, or days)* following the Bill date after which Bills will be automatically approved:
* For example, suppose you are using a monthly billing frequency for an end customer Account and Bills are created at 12 midnight on the the last day of each month. You then enable **Auto-approve bills** and set it to 2 hours. Each month's Bill is approved automatically at 2 a.m. on the first day of the month following.
**Warnings!**
* **Possible Conflict between Auto-Approval of Bills and Scheduled Bill Interval!** If a Bill is recalculated because of late-arriving data after being auto-approved, and the bill auto-approval interval is less than 24 hours, then the Bill will revert to a Pending, unapproved state:
* We recommend setting the auto-approval interval to 24 hours or longer when using scheduled bill updates.
* Please see [Understanding the Scheduled Billing Process](/guides/billing-and-usage-data/running-viewing-and-managing-bills/scheduling-billing#understanding-the-scheduled-billing-process) for more details.
* **Auto-Approval tied to Bill date!** If you generate a Bill early and *before* the scheduled Bill date, it will *not be auto-approved* from the date/time you do this, but only at the specified time after the Bill date.
**To set up auto-approval for Bills:**
1. Select **Settings**:
![]() The **Organization** page opens with the **Configuration** tab selected.
2. On the **Organization configuration details** panel, select **Edit**. The **Organization configuration** page opens.
3. Under **Bill auto-approval** use the **Auto-approve bills** switch to enable auto-approval. Two time period settings fields are activated for **Bill auto-approval grace period**.
4. Use these two fields to define the time-period following the Bill date you want Bills to be auto-approved:
* Use the drop-down field to select **Minutes**, **Hours** , or **Days**.
* Use the numeric field to enter the *number* of minutes, hours, or days.
5. Select **Update Organization configuration**.
## Locking Bills
You can only lock Bills that have an **Approved** status. When you've locked a Bill it can no longer be changed and is excluded from any billing runs.
**To lock Bills:**
1. Select **Billing**. The **Bill management** page opens and lists Bills for the default **Invoice date** setting of the current month.
2. If you want to lock Bills for a different period, use the **Invoice date** calendar pop-ups to adjust the period accordingly. See [Running Bills and Viewing Bill Details](/guides/billing-and-usage-data/running-viewing-and-managing-bills/running-bills-and-viewing-bill-details).
3. Use the checkboxes to select the **Approved** **Status** Bill or Bills you want to lock.
* Note that if you've selected a Bill which is in **Pending** status, the **Lock selected** button is automatically disabled.
4. Select **Lock selected**:
* The **Status** on Console screens will show the selected Bills as **Approved**.
* Since the Bill `locked` property value has been changed to `true`, the **Locked** column will also show the Bill as **Locked**:
The **Organization** page opens with the **Configuration** tab selected.
2. On the **Organization configuration details** panel, select **Edit**. The **Organization configuration** page opens.
3. Under **Bill auto-approval** use the **Auto-approve bills** switch to enable auto-approval. Two time period settings fields are activated for **Bill auto-approval grace period**.
4. Use these two fields to define the time-period following the Bill date you want Bills to be auto-approved:
* Use the drop-down field to select **Minutes**, **Hours** , or **Days**.
* Use the numeric field to enter the *number* of minutes, hours, or days.
5. Select **Update Organization configuration**.
## Locking Bills
You can only lock Bills that have an **Approved** status. When you've locked a Bill it can no longer be changed and is excluded from any billing runs.
**To lock Bills:**
1. Select **Billing**. The **Bill management** page opens and lists Bills for the default **Invoice date** setting of the current month.
2. If you want to lock Bills for a different period, use the **Invoice date** calendar pop-ups to adjust the period accordingly. See [Running Bills and Viewing Bill Details](/guides/billing-and-usage-data/running-viewing-and-managing-bills/running-bills-and-viewing-bill-details).
3. Use the checkboxes to select the **Approved** **Status** Bill or Bills you want to lock.
* Note that if you've selected a Bill which is in **Pending** status, the **Lock selected** button is automatically disabled.
4. Select **Lock selected**:
* The **Status** on Console screens will show the selected Bills as **Approved**.
* Since the Bill `locked` property value has been changed to `true`, the **Locked** column will also show the Bill as **Locked**:
![View Bills53]() Note that locked Bills can no longer be:
* Selected in the list.
* Unlocked.
* Updated.
* Recalculated.
**Important!**
* **Re-running Billing**. If you re-run billing, locked Bills are excluded.
* **Deleting Locked Bills**. You can delete a locked Bill using the [Delete Bill](/api/bill/delete-bill) API call. We strongly recommend that you only do this after due consideration since deleted Bills cannot be recovered. This call is made available for removing incorrect or obsolete Bills, and for Bills that have not been sent to customers. Where end-customer invoices for Bills have been sent to customers, Bills should not be deleted to ensure you have an audit trail of how the invoice was created.
## Setting Global Lock Date
You can also set a *Global lock date*, after which all Bills dated before or on the date set will be effectively locked and you won't be able to update or recalculate them. The global locking capability allows you to impose a cut-off date where all Bills dated on or before the date are frozen - they can no longer be updated and are excluded from billing. However, if you subsequently change the Global lock date for your Bills and move it back in time, any Bills whose date is now *after* the new global lock date will be unlocked.
**To set a Global lock date:**
1. Select **Billing**. The **Bill management** page opens and lists Bills for the default **Invoice date** setting of the current month.
2. Select **Set global lock date**. A **Set global lock date** modal appears:
Note that locked Bills can no longer be:
* Selected in the list.
* Unlocked.
* Updated.
* Recalculated.
**Important!**
* **Re-running Billing**. If you re-run billing, locked Bills are excluded.
* **Deleting Locked Bills**. You can delete a locked Bill using the [Delete Bill](/api/bill/delete-bill) API call. We strongly recommend that you only do this after due consideration since deleted Bills cannot be recovered. This call is made available for removing incorrect or obsolete Bills, and for Bills that have not been sent to customers. Where end-customer invoices for Bills have been sent to customers, Bills should not be deleted to ensure you have an audit trail of how the invoice was created.
## Setting Global Lock Date
You can also set a *Global lock date*, after which all Bills dated before or on the date set will be effectively locked and you won't be able to update or recalculate them. The global locking capability allows you to impose a cut-off date where all Bills dated on or before the date are frozen - they can no longer be updated and are excluded from billing. However, if you subsequently change the Global lock date for your Bills and move it back in time, any Bills whose date is now *after* the new global lock date will be unlocked.
**To set a Global lock date:**
1. Select **Billing**. The **Bill management** page opens and lists Bills for the default **Invoice date** setting of the current month.
2. Select **Set global lock date**. A **Set global lock date** modal appears:
![]() * Note that the default date used in the Modal when it's first opened is dependent on the end date set in **Bill management** for the **Invoice date** range - in this example, the end date was set at **04/30/2023** and the default global lock date is set as the following day.
3. Use the calendar popup to select the global locking date for which you want all Bills to be locked and then select **Save**. The modal closes and the **Status** on Console screens will show affected Bills as **Locked**, since a global lock has been has now been set on those Bills in Bill configuration. However, the `locked` property on these Bills will remain as `false`, since globally locked Bills can be unlocked in Bill configuration if the global lock date is changed.
# Bill Line Item Types
Source: https://docs.m3ter.com/guides/billing-and-usage-data/running-viewing-and-managing-bills/bill-line-item-types
This topic lists Bill line item types in m3ter and explains what each type means and what each type is used for. The term used in the API response schema is given together with the term used to denote the same type when Bills are viewed in the Console.
| API Line Item Type | Console Line Item Type | Used to Show |
| - | - | - |
| AD\_HOC | Ad-hoc | Ad-hoc Charge amounts for Accounts. |
| BALANCE\_CONSUMED | Balance consumed | Balance draw down amount. |
| BALANCE\_FEE | Balance fee | Charge amounts for Balances. |
| COMMITMENT\_CONSUMED | Prepayment consumed | Prepayment/Commitment draw down amount. |
| COMMITMENT\_FEE | Prepayment fee | When m3ter bills the prepayment/commitment, this is the charge, either upfront, recurring, or according to a custom schedule. |
| COUNTER\_ADJUSTMENT\_CREDIT | Counter adjustment credit | Recurring charges amount based on counter adjustment quantity on Account (credit). |
| COUNTER\_ADJUSTMENT\_DEBIT | Counter adjustment debit | Recurring charges amount based on counter adjustment quantity on Account (debit). |
| COUNTER\_RUNNING\_TOTAL\_CHARGE | Counter running total charge | Recurring charges amount based on running total counter quantity on Account (debit). |
| CREDIT\_DEDUCTION | | No longer used. |
| CREDIT\_MEMO | Credit | Referenced or ad hoc credit memo item. |
| DEBIT\_MEMO | Debit | Referenced or ad hoc debit memo item. |
| MANUAL\_ADJUSTMENT | | No longer used. |
| MINIMUM\_SPEND | Minimum spend | Recurring minimum charge (debit). |
| MINIMUM\_SPEND\_REFUND | Minimum spend adjustment | Used for cases where minimum spend is charged in advance. If advance minimum spend charge is \$1000 per billing period and actual usage consumed charge due in a billing period amounts to \$800, then \$200 is refunded under this line item type. |
| OVERAGE\_SURCHARGE | Overage surcharge | For Prepayments/Commitments when using overage surcharge percentage. |
| OVERAGE\_USAGE | Overage usage | For Prepayments/Commitments where “overage pricing” has been configured on the plan. |
| STANDING\_CHARGE | Standing charge | A fixed amount charge that is billed on a recurring basis. |
| USAGE | Usage | Metered consumption amount based on usage (debit). |
| USAGE\_CREDIT | Usage Credit | Metered consumption amount based on usage (credit). |
# Bill Line Items - Default Descriptions
Source: https://docs.m3ter.com/guides/billing-and-usage-data/running-viewing-and-managing-bills/bill-line-items-default-descriptions
1When setting up priced Product Plans and Prepayment or Balance amounts to apply usage-based or unit-based charges against your end-customer Accounts for consuming Products, there are several places where you have the option to define custom descriptions for Bill line items:
* **Plan Templates/Plans**: Standing Charge and Minimum Spend descriptions.
* **Plan Groups** - Standing Charge and Minimum Spend descriptions.
* **Pricing** - Usage and Minimum Spend descriptions.
* **Counter Pricing** - Recurring subscription charge descriptions.
* **Prepayments** - Fee, Usage, and Overage descriptions.
* **Balances** - Draw-down description, one-off Charge description.
* **Accounts** - Charge description.
This topic explains how Bill line item default descriptions are compiled *if you omit custom descriptions for Bill line items.*
## Standing Charge
* **Plan Template or Plan**:
* Default DESCRIPTION: **Standing Charge**
* **Plan Group**:
* Default DESCRIPTION: **Standing Charge**
## Minimum Spend
* **Plan Template**:
* Default DESCRIPTION: *\* **Minimum Spend Adjustment**
* **Plan**:
* Default DESCRIPTION: *\* **Minimum Spend Adjustment**
* **Plan Group**:
* Default DESCRIPTION: *\* **Minimum Spend Adjustment**
* **Pricing:**
* Default DESCRIPTION: *\* **Minimum Spend Adjustment**
## Usage
The default descriptions for *usage line items* are derived from the name of the Aggregation that defines the usage metric used to price the Product Plan.
* **Simple Aggregation**:
* Default DESCRIPTION: *\*
* **Compound Aggregation**:
* Default DESCRIPTION: *\*
* **Segmented Aggregation**:
* Default DESCRIPTION: *\ + (\, \, ...)*
* **Custom SQL Aggregation**:
* Default DESCRIPTION: \<*Custom SQL Aggregation name> + (\,\< group key/value 2>,* *...)*
## Recurring Charges
The default descriptions for unit-based recurring *subscription line items* are derived from the different *types of counter charges* due on Accounts whose Account Plan is priced using a counter:
* Charge type: Counter running total charge:
* Default DESCRIPTION: **Counter Running Total Charge**
* Charge type: Counter adjustment debit:
* Default DESCRIPTION: **Counter Adjustment Debit**
* Charge type: Counter adjustment credit:
* Default DESCRIPTION: **Counter Adjustment Credit**
## Prepayments
* **Fee**. Two cases:
* Product selected:
* Default DESCRIPTION: **Prepayment Fee (***\***)**
* No Product selected:
* Default DESCRIPTION: **Prepayment Fee (account-wide)**
* **Usage**. Two cases:
* Product selected:
* Default DESCRIPTION: **Prepayment Consumed (***\***)**
* No Product selected:
* Default DESCRIPTION: **Prepayment Consumed (account-wide)**
* **Overage**. Two cases:
* Product selected:
* Default DESCRIPTION: **Overage Surcharge (***\***)**
* No Product selected:
* Default DESCRIPTION: **Overage Surcharge (account-wide)**
## Accounts
* **Charge**:
* Default DESCRIPTION: **Ad hoc charge**
## Balances
* **Draw-down**:
* Default DESCRIPTION: \<*Balance name*>**:** **Balance Consumed**.
* **One-off Charge**:
* Default DESCRIPTION: **Balance fee charge**
## Parent/Child Account Bills - Line Item Descriptions
Default descriptions for line items that appear on Bills where there is a Parent/Child Accounts set up follow the same rules for compiling the DESCRIPTION text, except the *name of the Child Account* is also appended to the default description text string.
**Warning - Case where Child Account code also shown in description!** If you have the Account Plan attached to the Parent Account and set the **Account hierarchy billing mode** to **Bill parent account - bill line item per account**, then the Bill for the Parent Account will append both the Child Account **name** and **code** to the description text for any Child Account usage charge line items.
# Bill Line Items - Mapping to Accounting Products
Source: https://docs.m3ter.com/guides/billing-and-usage-data/running-viewing-and-managing-bills/bill-line-items-mapping-accounting-products
To ensure Bill line items are assigned to the correct Product lines, you can select an *Accounting Product* when configuring many of the billing-related entities used to set up pricing and charges in your m3ter Organization. The Accounting Product feature gives you the capability to map line items to specific Products in a fine-grained way, and therefore allows your finance team to:
* Map revenue sources more accurately to track profitability and financial performance.
* Automate revenue recognition and deferrals based on contract, plan, and pricing structures.
* Reduce manual finance workload by ensuring accounting products set in m3ter flow through to accounts receivables when invoices are generated.
This topic explains by line item type how different billing-related entities assign this mapping to an Accounting Product. Since in many cases the mapping of Accounting Product to a line item type can be defined for several billing-related entities, the order of precedence for which Accounting Product mapping is used is also explained:
* [Usage Line Items](/guides/billing-and-usage-data/running-viewing-and-managing-bills/bill-line-items-mapping-accounting-products#usage-line-items)
* [Recurring Charges Line Items](#recurring-charges-line-items)
* [Prepayment/Commitment Line Items](/guides/billing-and-usage-data/running-viewing-and-managing-bills/bill-line-items-mapping-accounting-products#prepaymentcommitment-line-items)
* [Minimum Spend Line Items](/guides/billing-and-usage-data/running-viewing-and-managing-bills/bill-line-items-mapping-accounting-products#minimum-spend-line-items)
* [Standing Charge Line Items](/guides/billing-and-usage-data/running-viewing-and-managing-bills/bill-line-items-mapping-accounting-products#standing-charge-line-items)
* [Balance Line Items](/guides/billing-and-usage-data/running-viewing-and-managing-bills/bill-line-items-mapping-accounting-products#balance-line-items)
* [Ad-Hoc Line Items](/guides/billing-and-usage-data/running-viewing-and-managing-bills/bill-line-items-mapping-accounting-products#ad-hoc-line-items)
**Tip: Grouping Bill Line Items by Accounting Products!** When a Bill has been generated for an Account and line items are mapped to Accounting Products, in Bill Management you can use a display option to group line items by Accounting Product. See [Viewing Bill Details](/guides/billing-and-usage-data/running-viewing-and-managing-bills/running-bills-and-viewing-bill-details#viewing-bill-details).
## Usage Line Items
The mapping to Accounting Product for *Usage* or *Usage credit* line items is determined by:
* **Pricing**. The Pricing **Accounting product** takes precedence.
* **Aggregation**. If not defined for the Pricing, the **Accounting product** for the Aggregation used to price a Plan is used.
* **Plan**. If not defined for either the Pricing or the Aggregation, the **Product** the Plan belongs to is used.
## Recurring Charges Line Items
The mapping to Accounting Product for *Counter adjustment credit*, *Counter adjustment debit*, or *Counter running total charge* line items is determined by:
* **Counter Pricing**. The **Accounting product** defined for the Counter pricing takes precedence.
* **Counter**. If not defined for the Counter pricing, then the **Product** the Counter belongs to is used.
## Prepayment/Commitment Line Items
### Prepayment Consumed
The mapping to Accounting Product for *Prepayment consumed* line items is determined by:
* The **Draw-downs accounting product** defined for the Prepayment takes precedence.
* If the **Draw-downs accounting product** is not defined, then the **Accounting product** defined for the Prepayment is used.
### Prepayment Fee
The mapping to Accounting Product for *Prepayment fee* line items is determined by:
* The **Fees accounting product** defined for the Prepayment takes precedence.
* If the **Fees accounting product** is not defined, then the **Accounting product** defined for the Prepayment is used.
## Minimum Spend Line Items
### Plan
The mapping to Accounting Product for *Minimum spend* and *Minimum spend adjustment* line items is determined by:
* The **Minimum spend accounting product** defined for the Plan takes precedence.
* If the **Minimum spend accounting product** is not defined for the Plan, then the **Product** the Plan belongs to is used.
### Plan Group
The mapping to Accounting Product for *Minimum spend* and *Minimum spend adjustment* line items is determined by the **Minimum spend accounting product** defined for the Plan Group.
## Standing Charge Line Items
### Plan
The mapping to Accounting Product for *Standing charge* line items is determined by:
* The **Standing charge accounting product** defined for the Plan takes precedence.
* If the **Standing charge accounting product** is not defined for the Plan, then the **Product** the Plan belongs to is used.
### Plan Group
The mapping to Accounting Product for *Standing charge* line items is determined by the **Standing charge accounting product** defined for the Plan Group.
## Balance Line Items
### Balance Consumed
The mapping to Accounting Product for *Balance consumed* line items is determined by the **Consumptions accounting product** defined for the Balance:
* If you omit a **Consumptions accounting product**, then then *Balance consumed* Bill line items will not be linked to a Product and will be listed under **Balance**.
### Balance Fee
The mapping to Accounting Product for *Balance fee* line items is determined by:
* The **Accounting product** defined for the Balance Charge takes precedence.
* If the **Accounting product** is not defined for the Balance Charge, then the **Fees accounting product** defined for the Balance is used.
* If an **Accounting product** has not been defined for a Charge and you omit **Fees accounting product** for the Balance, then *Balance fee* Bill line items will not be linked to a Product and will be listed under **Balance**.
## Ad-Hoc Line Items
The mapping to Accounting Product for *Ad-hoc* line items is determined by the **Accounting product** defined for the Account Charge.
# Working with Bills in Bill Management
Source: https://docs.m3ter.com/guides/billing-and-usage-data/running-viewing-and-managing-bills/managing-bills
You can use the *Bill Management* page to review your Account Bills and perform common administrative tasks for managing them.
This topic explains how to work in Bill Management:
* [Recalculating Bills](/guides/billing-and-usage-data/running-viewing-and-managing-bills/managing-bills#recalculating-bills)
* [Downloading Bills](/guides/billing-and-usage-data/running-viewing-and-managing-bills/managing-bills#downloading-bills)
* [Deleting Bills](/guides/billing-and-usage-data/running-viewing-and-managing-bills/managing-bills#deleting-bills)
**Tips:**
* **Run Bills and view Bill details?** See the previous topic: [Running Bills and Viewing Bill Details](/guides/billing-and-usage-data/running-viewing-and-managing-bills/running-bills-and-viewing-bill-details).
* **Approving and Locking Bills?** For details on how to approve and lock Bills, see the following topic: [Approving and Locking Bills - Managing Bill Lifecycle](/guides/billing-and-usage-data/running-viewing-and-managing-bills/approving-and-locking-bills-managing-bill-lifecycle).
* **Encountering Billing Issues?** If you are having issues with Bills - such as a Bill is not generating for an Account or line item and/or total amounts are not what you expect them to be for a Bill, please review the [Troubleshooting Bills](/guides/billing-and-usage-data/running-viewing-and-managing-bills/troubleshooting-bills) in this section, which offers a checklist of common billing issues with guidance on how to follow-up on and resolve issues.
## Recalculating Bills
You can recalculate Bills for end-customer Accounts at any time. For example, you might want to do this if you’ve updated the pricing Plan for the Account and want to check that the Bill is correct when calculated using the revised pricing.
**To recalculate Bills:**
1. Select **Billing**. The **Bill management** page opens and lists Bills for the default **Invoice date** setting of the current month.
2. If you want to recalculate Bills for a different period, use the **Invoice date** calendar pop-ups to adjust the period accordingly. See [Running Bills and Viewing Bill Details](/guides/billing-and-usage-data/running-viewing-and-managing-bills/running-bills-and-viewing-bill-details).
**Tip: Invoice dates are inclusive!** Note that when you define a period to view Bills using the **Invoice date** calendar popups, both the start and end date are interpreted inclusively.
3. Use the checkboxes to select the Bill or Bills you want to recalculate.
4. Select **Recalculate selected**. The selected Bills are recalculated.
**Important!**
* **Child Account Bills are not recalculated separately**. If you've selected Child Account Bills, these are not guaranteed to be recalculated. A Child Account Bill is only recalculated when its Parent Account Bill is recalculated.
* **Maximum for a Recalculate Bill Job is 100**. If you select more that 100 Bills to recalculate, the Bill Job will fail and you'll receive an error.
## Downloading Bills
You can download the Bills listed in the Bill management page for a selected **Invoice Date** period as a `.csv` formatted file.
**To download Bills:**
1. Select **Billing**. The **Bill management** page opens and lists Bills for the default **Invoice Date** setting of the current month.
2. If you want to download Bills for a different period, use the **Invoice Date** calendar pop-ups to adjust the period accordingly. See [Running Bills and Viewing Bill Details](/guides/billing-and-usage-data/running-viewing-and-managing-bills/running-bills-and-viewing-bill-details).
**Tip: Invoice Dates are inclusive!** Note that when you define a period to view Bills using the **Invoice Date** calendar popups, both the start and end date are interpreted inclusively.
3. Select **Download Bills**. The Bills in the selected date range are exported in a `.csv` formatted file and saved to your **Downloads** folder.
**Warning!**
* **Download Limits**. You can only download Bills for a period of up to 31 days or up to a maximum of 5000 Bills. If you attempt a download that exceeds either of these two limits, you'll receive an error message.
* **Empty Bills**. The `.csv` formatted file is compiled for download by taking each of the line items found in Bills that exist in your Organization for the specified period. The Bill for each line item record is given, along with Bill Total and other billing attributes. However, this means that if you have an *empty Bill* that exists for the specified period - one for which *no line items currently exist* - then no line item records will be shown for this Bill in the `.csv` file you download.
## Deleting Bills
You can delete Bills listed in Bill management.
**To delete Bills:**
1. Select **Billing**. The **Bill management** page opens and lists Bills for the default **Invoice date** setting of the current month.
2. If you want to delete Bills for a different period, use the **Invoice date** calendar pop-ups to adjust the period accordingly. See [Running Bills and Viewing Bill Details](/guides/billing-and-usage-data/running-viewing-and-managing-bills/running-bills-and-viewing-bill-details).
**Tip: Invoice dates are inclusive!** Note that when you define a period to view Bills using the **Invoice date** calendar popups, both the start and end date are interpreted inclusively.
3. Select the checkboxes of the Bills you want to delete.
4. Select **Delete selected**. A pop-up appears asking you to confirm the delete.
5. Select **Yes** to confirm and the selected Bills are deleted.
# Running Bills and Viewing Bill Details
Source: https://docs.m3ter.com/guides/billing-and-usage-data/running-viewing-and-managing-bills/running-bills-and-viewing-bill-details
You can open the *Bill management* page and view Bills for your Accounts for the current month. From there, you can:
* Open a Bill for an Account to review the Bill details.
* Reset the billing period to list the Bills for your Accounts for that period.
* If you've set up an integration with for sending Account Bills to a 3rd-party system, you can check the status and then review details of the last completed integration run or view all integrations runs. You can also use an external reference link to open the linked invoice in your external system.
* Filter the Bills listed by status: Locked or Approved/Pending.
* Reorder columns for Bill Management.
* Use display options to:
* Hide zero quantity line items.
* Group line items by Accounting Product or Contract when applicable.
* Run Bills manually for a specific Bill date for your Accounts. You can run Bills:
* Either for all billing frequencies or a specific frequency, such as for weekly or monthly frequency.
* For a specific target currency.
This topic explains how to work in the Bill Management page to view Bill details, reorder the columns for the Bills listed, and run Bills manually:
* [Viewing Bill Details](/guides/billing-and-usage-data/running-viewing-and-managing-bills/running-bills-and-viewing-bill-details#viewing-bill-details)
* [Reviewing Bill Metadata](#reviewing-bill-metadata)
* [Filtering Bills](/guides/billing-and-usage-data/running-viewing-and-managing-bills/running-bills-and-viewing-bill-details#filtering-bills)
* [Managing Columns for Bill Management](/guides/billing-and-usage-data/running-viewing-and-managing-bills/running-bills-and-viewing-bill-details#managing-columns-for-bill-management)
* [Checking Zero Total Bills](#checking-zero-total-bills)
* [Exporting the Bill Management Page](/guides/billing-and-usage-data/running-viewing-and-managing-bills/running-bills-and-viewing-bill-details#exporting-the-bill-management-page)
* [Running Bills Manually](/guides/billing-and-usage-data/running-viewing-and-managing-bills/running-bills-and-viewing-bill-details#running-bills-manually)
**Tip: Viewing and Running Bills for Specific Accounts?** It's sometimes easier to go into an Account and view and run Bills directly from the Bills tab - see [Reviewing and Recalculating Bills for an Account](/guides/end-customer-accounts/reviewing-bills-for-an-account).
**Tip: Encountering Billing Issues?** If you are having issues with Bills - such as a Bill is not generating for an Account or line item and/or total amounts are not what you expect them to be for a Bill, please review the [Troubleshooting Bills](/guides/billing-and-usage-data/running-viewing-and-managing-bills/troubleshooting-bills) in this section, which offers a checklist of common billing issues with guidance on how to follow-up on and resolve issues.
## Viewing Bill Details
* [Opening and Viewing Bills](/guides/billing-and-usage-data/running-viewing-and-managing-bills/running-bills-and-viewing-bill-details#opening-and-viewing-bills)
* [Viewing Bills - Display Options](/guides/billing-and-usage-data/running-viewing-and-managing-bills/running-bills-and-viewing-bill-details#viewing-bills-display-options)
* [Viewing Bills - Notes and Tips](/guides/billing-and-usage-data/running-viewing-and-managing-bills/running-bills-and-viewing-bill-details#viewing-bills-notes-and-tips)
### Opening and Viewing Bills
**To open and view Bill details:**
1. Select **Billing**. The **Bill management** page opens and lists the Bills for your Accounts. The default **Invoice date** settings lists Bills to cover the current month. Details of the current Bills for each Account for this period are given, such as:
* **Reference**
* **External reference**
* **External invoice date**
* **Account name**
* **Account code**
* **Total**
* **Status**
* **Locked**
* **Last calculated date**
* **Integration status**
Optionally:
* **Total debits**
* **Total credits**
**Tips:**
* **Bill Reference number?** We recommend that you set up the **Reference** Bill numbering to suit your accounting and operational requirements, which you can enable at Organization level. This allows you to define a Bill prefix combined with a sequential numbering based on the date Bills are first created. If you do not enable Bill numbering, then a default Bill **Reference** number is used, which concatenates the prefix **Invoice-** with the last four characters of the Bill's **ID**. See [Viewing and Editing Organization Configuration](/guides/organization-and-access-management/viewing-and-editing-organization/viewing-and-editing-organization-configuration).
* **No Bills Listed?** If none of the Accounts in your Organization have Bills for the default current month, then a warning will show to tell you this. You can change the default settings for the **Invoice date** period and the page will automatically refresh.
* **Controlling Bill list Columns?** You can customize the Bills list to either re-order the columns or hide columns - see the following [Managing Columns for Bill Management](/guides/billing-and-usage-data/running-viewing-and-managing-bills/running-bills-and-viewing-bill-details#managing-columns-for-bill-management) section below for details.
2. If you want to view the Bills for a different billing period, use the popup **Invoice date (inclusive)** calendar icons to adjust the period accordingly. The **Bill management** page adjusts to show Bills for the selected period:
* The default period when you open the **Bill management page** is the current month.
* When you open the calendar pop-ups, you can select for pre-defined periods of **This month** or **Last month**.
**Notes:**
* **Invoice dates are inclusive!** Note that when you define a period to view Bills using the **Invoice Date** calendar popups, both the start and end date are interpreted inclusively.
* **Single day Invoice date period?** You can define a single day as the period you want to show Bills for.
3. All Bills are shown by default, regardless of their status. You can filter the list of Bills to show only those with a specific status. See below: [Filtering Bills by Status](/guides/billing-and-usage-data/running-viewing-and-managing-bills/running-bills-and-viewing-bill-details#filtering-bills-by-status).
4. If you want to view the Bills for a specific Account, select the **Account name** text in the listing:
* The **Account details** page for the Account opens showing the **Overview** tab, where you can review the **Latest bills** for the Account. Select the **Bills** tab to review all the Account's Bills.
5. To view the details of a Bill for an Account, select the **Reference** text hotlink. The **Bill details** page opens. This page provides a full breakdown of the charges due on the Account for the billing period for the **Invoice date**.
* A **Bill details** panel gives details of the Bill:
* Note that the default date used in the Modal when it's first opened is dependent on the end date set in **Bill management** for the **Invoice date** range - in this example, the end date was set at **04/30/2023** and the default global lock date is set as the following day.
3. Use the calendar popup to select the global locking date for which you want all Bills to be locked and then select **Save**. The modal closes and the **Status** on Console screens will show affected Bills as **Locked**, since a global lock has been has now been set on those Bills in Bill configuration. However, the `locked` property on these Bills will remain as `false`, since globally locked Bills can be unlocked in Bill configuration if the global lock date is changed.
# Bill Line Item Types
Source: https://docs.m3ter.com/guides/billing-and-usage-data/running-viewing-and-managing-bills/bill-line-item-types
This topic lists Bill line item types in m3ter and explains what each type means and what each type is used for. The term used in the API response schema is given together with the term used to denote the same type when Bills are viewed in the Console.
| API Line Item Type | Console Line Item Type | Used to Show |
| - | - | - |
| AD\_HOC | Ad-hoc | Ad-hoc Charge amounts for Accounts. |
| BALANCE\_CONSUMED | Balance consumed | Balance draw down amount. |
| BALANCE\_FEE | Balance fee | Charge amounts for Balances. |
| COMMITMENT\_CONSUMED | Prepayment consumed | Prepayment/Commitment draw down amount. |
| COMMITMENT\_FEE | Prepayment fee | When m3ter bills the prepayment/commitment, this is the charge, either upfront, recurring, or according to a custom schedule. |
| COUNTER\_ADJUSTMENT\_CREDIT | Counter adjustment credit | Recurring charges amount based on counter adjustment quantity on Account (credit). |
| COUNTER\_ADJUSTMENT\_DEBIT | Counter adjustment debit | Recurring charges amount based on counter adjustment quantity on Account (debit). |
| COUNTER\_RUNNING\_TOTAL\_CHARGE | Counter running total charge | Recurring charges amount based on running total counter quantity on Account (debit). |
| CREDIT\_DEDUCTION | | No longer used. |
| CREDIT\_MEMO | Credit | Referenced or ad hoc credit memo item. |
| DEBIT\_MEMO | Debit | Referenced or ad hoc debit memo item. |
| MANUAL\_ADJUSTMENT | | No longer used. |
| MINIMUM\_SPEND | Minimum spend | Recurring minimum charge (debit). |
| MINIMUM\_SPEND\_REFUND | Minimum spend adjustment | Used for cases where minimum spend is charged in advance. If advance minimum spend charge is \$1000 per billing period and actual usage consumed charge due in a billing period amounts to \$800, then \$200 is refunded under this line item type. |
| OVERAGE\_SURCHARGE | Overage surcharge | For Prepayments/Commitments when using overage surcharge percentage. |
| OVERAGE\_USAGE | Overage usage | For Prepayments/Commitments where “overage pricing” has been configured on the plan. |
| STANDING\_CHARGE | Standing charge | A fixed amount charge that is billed on a recurring basis. |
| USAGE | Usage | Metered consumption amount based on usage (debit). |
| USAGE\_CREDIT | Usage Credit | Metered consumption amount based on usage (credit). |
# Bill Line Items - Default Descriptions
Source: https://docs.m3ter.com/guides/billing-and-usage-data/running-viewing-and-managing-bills/bill-line-items-default-descriptions
1When setting up priced Product Plans and Prepayment or Balance amounts to apply usage-based or unit-based charges against your end-customer Accounts for consuming Products, there are several places where you have the option to define custom descriptions for Bill line items:
* **Plan Templates/Plans**: Standing Charge and Minimum Spend descriptions.
* **Plan Groups** - Standing Charge and Minimum Spend descriptions.
* **Pricing** - Usage and Minimum Spend descriptions.
* **Counter Pricing** - Recurring subscription charge descriptions.
* **Prepayments** - Fee, Usage, and Overage descriptions.
* **Balances** - Draw-down description, one-off Charge description.
* **Accounts** - Charge description.
This topic explains how Bill line item default descriptions are compiled *if you omit custom descriptions for Bill line items.*
## Standing Charge
* **Plan Template or Plan**:
* Default DESCRIPTION: **Standing Charge**
* **Plan Group**:
* Default DESCRIPTION: **Standing Charge**
## Minimum Spend
* **Plan Template**:
* Default DESCRIPTION: *\* **Minimum Spend Adjustment**
* **Plan**:
* Default DESCRIPTION: *\* **Minimum Spend Adjustment**
* **Plan Group**:
* Default DESCRIPTION: *\* **Minimum Spend Adjustment**
* **Pricing:**
* Default DESCRIPTION: *\* **Minimum Spend Adjustment**
## Usage
The default descriptions for *usage line items* are derived from the name of the Aggregation that defines the usage metric used to price the Product Plan.
* **Simple Aggregation**:
* Default DESCRIPTION: *\*
* **Compound Aggregation**:
* Default DESCRIPTION: *\*
* **Segmented Aggregation**:
* Default DESCRIPTION: *\ + (\, \, ...)*
* **Custom SQL Aggregation**:
* Default DESCRIPTION: \<*Custom SQL Aggregation name> + (\,\< group key/value 2>,* *...)*
## Recurring Charges
The default descriptions for unit-based recurring *subscription line items* are derived from the different *types of counter charges* due on Accounts whose Account Plan is priced using a counter:
* Charge type: Counter running total charge:
* Default DESCRIPTION: **Counter Running Total Charge**
* Charge type: Counter adjustment debit:
* Default DESCRIPTION: **Counter Adjustment Debit**
* Charge type: Counter adjustment credit:
* Default DESCRIPTION: **Counter Adjustment Credit**
## Prepayments
* **Fee**. Two cases:
* Product selected:
* Default DESCRIPTION: **Prepayment Fee (***\***)**
* No Product selected:
* Default DESCRIPTION: **Prepayment Fee (account-wide)**
* **Usage**. Two cases:
* Product selected:
* Default DESCRIPTION: **Prepayment Consumed (***\***)**
* No Product selected:
* Default DESCRIPTION: **Prepayment Consumed (account-wide)**
* **Overage**. Two cases:
* Product selected:
* Default DESCRIPTION: **Overage Surcharge (***\***)**
* No Product selected:
* Default DESCRIPTION: **Overage Surcharge (account-wide)**
## Accounts
* **Charge**:
* Default DESCRIPTION: **Ad hoc charge**
## Balances
* **Draw-down**:
* Default DESCRIPTION: \<*Balance name*>**:** **Balance Consumed**.
* **One-off Charge**:
* Default DESCRIPTION: **Balance fee charge**
## Parent/Child Account Bills - Line Item Descriptions
Default descriptions for line items that appear on Bills where there is a Parent/Child Accounts set up follow the same rules for compiling the DESCRIPTION text, except the *name of the Child Account* is also appended to the default description text string.
**Warning - Case where Child Account code also shown in description!** If you have the Account Plan attached to the Parent Account and set the **Account hierarchy billing mode** to **Bill parent account - bill line item per account**, then the Bill for the Parent Account will append both the Child Account **name** and **code** to the description text for any Child Account usage charge line items.
# Bill Line Items - Mapping to Accounting Products
Source: https://docs.m3ter.com/guides/billing-and-usage-data/running-viewing-and-managing-bills/bill-line-items-mapping-accounting-products
To ensure Bill line items are assigned to the correct Product lines, you can select an *Accounting Product* when configuring many of the billing-related entities used to set up pricing and charges in your m3ter Organization. The Accounting Product feature gives you the capability to map line items to specific Products in a fine-grained way, and therefore allows your finance team to:
* Map revenue sources more accurately to track profitability and financial performance.
* Automate revenue recognition and deferrals based on contract, plan, and pricing structures.
* Reduce manual finance workload by ensuring accounting products set in m3ter flow through to accounts receivables when invoices are generated.
This topic explains by line item type how different billing-related entities assign this mapping to an Accounting Product. Since in many cases the mapping of Accounting Product to a line item type can be defined for several billing-related entities, the order of precedence for which Accounting Product mapping is used is also explained:
* [Usage Line Items](/guides/billing-and-usage-data/running-viewing-and-managing-bills/bill-line-items-mapping-accounting-products#usage-line-items)
* [Recurring Charges Line Items](#recurring-charges-line-items)
* [Prepayment/Commitment Line Items](/guides/billing-and-usage-data/running-viewing-and-managing-bills/bill-line-items-mapping-accounting-products#prepaymentcommitment-line-items)
* [Minimum Spend Line Items](/guides/billing-and-usage-data/running-viewing-and-managing-bills/bill-line-items-mapping-accounting-products#minimum-spend-line-items)
* [Standing Charge Line Items](/guides/billing-and-usage-data/running-viewing-and-managing-bills/bill-line-items-mapping-accounting-products#standing-charge-line-items)
* [Balance Line Items](/guides/billing-and-usage-data/running-viewing-and-managing-bills/bill-line-items-mapping-accounting-products#balance-line-items)
* [Ad-Hoc Line Items](/guides/billing-and-usage-data/running-viewing-and-managing-bills/bill-line-items-mapping-accounting-products#ad-hoc-line-items)
**Tip: Grouping Bill Line Items by Accounting Products!** When a Bill has been generated for an Account and line items are mapped to Accounting Products, in Bill Management you can use a display option to group line items by Accounting Product. See [Viewing Bill Details](/guides/billing-and-usage-data/running-viewing-and-managing-bills/running-bills-and-viewing-bill-details#viewing-bill-details).
## Usage Line Items
The mapping to Accounting Product for *Usage* or *Usage credit* line items is determined by:
* **Pricing**. The Pricing **Accounting product** takes precedence.
* **Aggregation**. If not defined for the Pricing, the **Accounting product** for the Aggregation used to price a Plan is used.
* **Plan**. If not defined for either the Pricing or the Aggregation, the **Product** the Plan belongs to is used.
## Recurring Charges Line Items
The mapping to Accounting Product for *Counter adjustment credit*, *Counter adjustment debit*, or *Counter running total charge* line items is determined by:
* **Counter Pricing**. The **Accounting product** defined for the Counter pricing takes precedence.
* **Counter**. If not defined for the Counter pricing, then the **Product** the Counter belongs to is used.
## Prepayment/Commitment Line Items
### Prepayment Consumed
The mapping to Accounting Product for *Prepayment consumed* line items is determined by:
* The **Draw-downs accounting product** defined for the Prepayment takes precedence.
* If the **Draw-downs accounting product** is not defined, then the **Accounting product** defined for the Prepayment is used.
### Prepayment Fee
The mapping to Accounting Product for *Prepayment fee* line items is determined by:
* The **Fees accounting product** defined for the Prepayment takes precedence.
* If the **Fees accounting product** is not defined, then the **Accounting product** defined for the Prepayment is used.
## Minimum Spend Line Items
### Plan
The mapping to Accounting Product for *Minimum spend* and *Minimum spend adjustment* line items is determined by:
* The **Minimum spend accounting product** defined for the Plan takes precedence.
* If the **Minimum spend accounting product** is not defined for the Plan, then the **Product** the Plan belongs to is used.
### Plan Group
The mapping to Accounting Product for *Minimum spend* and *Minimum spend adjustment* line items is determined by the **Minimum spend accounting product** defined for the Plan Group.
## Standing Charge Line Items
### Plan
The mapping to Accounting Product for *Standing charge* line items is determined by:
* The **Standing charge accounting product** defined for the Plan takes precedence.
* If the **Standing charge accounting product** is not defined for the Plan, then the **Product** the Plan belongs to is used.
### Plan Group
The mapping to Accounting Product for *Standing charge* line items is determined by the **Standing charge accounting product** defined for the Plan Group.
## Balance Line Items
### Balance Consumed
The mapping to Accounting Product for *Balance consumed* line items is determined by the **Consumptions accounting product** defined for the Balance:
* If you omit a **Consumptions accounting product**, then then *Balance consumed* Bill line items will not be linked to a Product and will be listed under **Balance**.
### Balance Fee
The mapping to Accounting Product for *Balance fee* line items is determined by:
* The **Accounting product** defined for the Balance Charge takes precedence.
* If the **Accounting product** is not defined for the Balance Charge, then the **Fees accounting product** defined for the Balance is used.
* If an **Accounting product** has not been defined for a Charge and you omit **Fees accounting product** for the Balance, then *Balance fee* Bill line items will not be linked to a Product and will be listed under **Balance**.
## Ad-Hoc Line Items
The mapping to Accounting Product for *Ad-hoc* line items is determined by the **Accounting product** defined for the Account Charge.
# Working with Bills in Bill Management
Source: https://docs.m3ter.com/guides/billing-and-usage-data/running-viewing-and-managing-bills/managing-bills
You can use the *Bill Management* page to review your Account Bills and perform common administrative tasks for managing them.
This topic explains how to work in Bill Management:
* [Recalculating Bills](/guides/billing-and-usage-data/running-viewing-and-managing-bills/managing-bills#recalculating-bills)
* [Downloading Bills](/guides/billing-and-usage-data/running-viewing-and-managing-bills/managing-bills#downloading-bills)
* [Deleting Bills](/guides/billing-and-usage-data/running-viewing-and-managing-bills/managing-bills#deleting-bills)
**Tips:**
* **Run Bills and view Bill details?** See the previous topic: [Running Bills and Viewing Bill Details](/guides/billing-and-usage-data/running-viewing-and-managing-bills/running-bills-and-viewing-bill-details).
* **Approving and Locking Bills?** For details on how to approve and lock Bills, see the following topic: [Approving and Locking Bills - Managing Bill Lifecycle](/guides/billing-and-usage-data/running-viewing-and-managing-bills/approving-and-locking-bills-managing-bill-lifecycle).
* **Encountering Billing Issues?** If you are having issues with Bills - such as a Bill is not generating for an Account or line item and/or total amounts are not what you expect them to be for a Bill, please review the [Troubleshooting Bills](/guides/billing-and-usage-data/running-viewing-and-managing-bills/troubleshooting-bills) in this section, which offers a checklist of common billing issues with guidance on how to follow-up on and resolve issues.
## Recalculating Bills
You can recalculate Bills for end-customer Accounts at any time. For example, you might want to do this if you’ve updated the pricing Plan for the Account and want to check that the Bill is correct when calculated using the revised pricing.
**To recalculate Bills:**
1. Select **Billing**. The **Bill management** page opens and lists Bills for the default **Invoice date** setting of the current month.
2. If you want to recalculate Bills for a different period, use the **Invoice date** calendar pop-ups to adjust the period accordingly. See [Running Bills and Viewing Bill Details](/guides/billing-and-usage-data/running-viewing-and-managing-bills/running-bills-and-viewing-bill-details).
**Tip: Invoice dates are inclusive!** Note that when you define a period to view Bills using the **Invoice date** calendar popups, both the start and end date are interpreted inclusively.
3. Use the checkboxes to select the Bill or Bills you want to recalculate.
4. Select **Recalculate selected**. The selected Bills are recalculated.
**Important!**
* **Child Account Bills are not recalculated separately**. If you've selected Child Account Bills, these are not guaranteed to be recalculated. A Child Account Bill is only recalculated when its Parent Account Bill is recalculated.
* **Maximum for a Recalculate Bill Job is 100**. If you select more that 100 Bills to recalculate, the Bill Job will fail and you'll receive an error.
## Downloading Bills
You can download the Bills listed in the Bill management page for a selected **Invoice Date** period as a `.csv` formatted file.
**To download Bills:**
1. Select **Billing**. The **Bill management** page opens and lists Bills for the default **Invoice Date** setting of the current month.
2. If you want to download Bills for a different period, use the **Invoice Date** calendar pop-ups to adjust the period accordingly. See [Running Bills and Viewing Bill Details](/guides/billing-and-usage-data/running-viewing-and-managing-bills/running-bills-and-viewing-bill-details).
**Tip: Invoice Dates are inclusive!** Note that when you define a period to view Bills using the **Invoice Date** calendar popups, both the start and end date are interpreted inclusively.
3. Select **Download Bills**. The Bills in the selected date range are exported in a `.csv` formatted file and saved to your **Downloads** folder.
**Warning!**
* **Download Limits**. You can only download Bills for a period of up to 31 days or up to a maximum of 5000 Bills. If you attempt a download that exceeds either of these two limits, you'll receive an error message.
* **Empty Bills**. The `.csv` formatted file is compiled for download by taking each of the line items found in Bills that exist in your Organization for the specified period. The Bill for each line item record is given, along with Bill Total and other billing attributes. However, this means that if you have an *empty Bill* that exists for the specified period - one for which *no line items currently exist* - then no line item records will be shown for this Bill in the `.csv` file you download.
## Deleting Bills
You can delete Bills listed in Bill management.
**To delete Bills:**
1. Select **Billing**. The **Bill management** page opens and lists Bills for the default **Invoice date** setting of the current month.
2. If you want to delete Bills for a different period, use the **Invoice date** calendar pop-ups to adjust the period accordingly. See [Running Bills and Viewing Bill Details](/guides/billing-and-usage-data/running-viewing-and-managing-bills/running-bills-and-viewing-bill-details).
**Tip: Invoice dates are inclusive!** Note that when you define a period to view Bills using the **Invoice date** calendar popups, both the start and end date are interpreted inclusively.
3. Select the checkboxes of the Bills you want to delete.
4. Select **Delete selected**. A pop-up appears asking you to confirm the delete.
5. Select **Yes** to confirm and the selected Bills are deleted.
# Running Bills and Viewing Bill Details
Source: https://docs.m3ter.com/guides/billing-and-usage-data/running-viewing-and-managing-bills/running-bills-and-viewing-bill-details
You can open the *Bill management* page and view Bills for your Accounts for the current month. From there, you can:
* Open a Bill for an Account to review the Bill details.
* Reset the billing period to list the Bills for your Accounts for that period.
* If you've set up an integration with for sending Account Bills to a 3rd-party system, you can check the status and then review details of the last completed integration run or view all integrations runs. You can also use an external reference link to open the linked invoice in your external system.
* Filter the Bills listed by status: Locked or Approved/Pending.
* Reorder columns for Bill Management.
* Use display options to:
* Hide zero quantity line items.
* Group line items by Accounting Product or Contract when applicable.
* Run Bills manually for a specific Bill date for your Accounts. You can run Bills:
* Either for all billing frequencies or a specific frequency, such as for weekly or monthly frequency.
* For a specific target currency.
This topic explains how to work in the Bill Management page to view Bill details, reorder the columns for the Bills listed, and run Bills manually:
* [Viewing Bill Details](/guides/billing-and-usage-data/running-viewing-and-managing-bills/running-bills-and-viewing-bill-details#viewing-bill-details)
* [Reviewing Bill Metadata](#reviewing-bill-metadata)
* [Filtering Bills](/guides/billing-and-usage-data/running-viewing-and-managing-bills/running-bills-and-viewing-bill-details#filtering-bills)
* [Managing Columns for Bill Management](/guides/billing-and-usage-data/running-viewing-and-managing-bills/running-bills-and-viewing-bill-details#managing-columns-for-bill-management)
* [Checking Zero Total Bills](#checking-zero-total-bills)
* [Exporting the Bill Management Page](/guides/billing-and-usage-data/running-viewing-and-managing-bills/running-bills-and-viewing-bill-details#exporting-the-bill-management-page)
* [Running Bills Manually](/guides/billing-and-usage-data/running-viewing-and-managing-bills/running-bills-and-viewing-bill-details#running-bills-manually)
**Tip: Viewing and Running Bills for Specific Accounts?** It's sometimes easier to go into an Account and view and run Bills directly from the Bills tab - see [Reviewing and Recalculating Bills for an Account](/guides/end-customer-accounts/reviewing-bills-for-an-account).
**Tip: Encountering Billing Issues?** If you are having issues with Bills - such as a Bill is not generating for an Account or line item and/or total amounts are not what you expect them to be for a Bill, please review the [Troubleshooting Bills](/guides/billing-and-usage-data/running-viewing-and-managing-bills/troubleshooting-bills) in this section, which offers a checklist of common billing issues with guidance on how to follow-up on and resolve issues.
## Viewing Bill Details
* [Opening and Viewing Bills](/guides/billing-and-usage-data/running-viewing-and-managing-bills/running-bills-and-viewing-bill-details#opening-and-viewing-bills)
* [Viewing Bills - Display Options](/guides/billing-and-usage-data/running-viewing-and-managing-bills/running-bills-and-viewing-bill-details#viewing-bills-display-options)
* [Viewing Bills - Notes and Tips](/guides/billing-and-usage-data/running-viewing-and-managing-bills/running-bills-and-viewing-bill-details#viewing-bills-notes-and-tips)
### Opening and Viewing Bills
**To open and view Bill details:**
1. Select **Billing**. The **Bill management** page opens and lists the Bills for your Accounts. The default **Invoice date** settings lists Bills to cover the current month. Details of the current Bills for each Account for this period are given, such as:
* **Reference**
* **External reference**
* **External invoice date**
* **Account name**
* **Account code**
* **Total**
* **Status**
* **Locked**
* **Last calculated date**
* **Integration status**
Optionally:
* **Total debits**
* **Total credits**
**Tips:**
* **Bill Reference number?** We recommend that you set up the **Reference** Bill numbering to suit your accounting and operational requirements, which you can enable at Organization level. This allows you to define a Bill prefix combined with a sequential numbering based on the date Bills are first created. If you do not enable Bill numbering, then a default Bill **Reference** number is used, which concatenates the prefix **Invoice-** with the last four characters of the Bill's **ID**. See [Viewing and Editing Organization Configuration](/guides/organization-and-access-management/viewing-and-editing-organization/viewing-and-editing-organization-configuration).
* **No Bills Listed?** If none of the Accounts in your Organization have Bills for the default current month, then a warning will show to tell you this. You can change the default settings for the **Invoice date** period and the page will automatically refresh.
* **Controlling Bill list Columns?** You can customize the Bills list to either re-order the columns or hide columns - see the following [Managing Columns for Bill Management](/guides/billing-and-usage-data/running-viewing-and-managing-bills/running-bills-and-viewing-bill-details#managing-columns-for-bill-management) section below for details.
2. If you want to view the Bills for a different billing period, use the popup **Invoice date (inclusive)** calendar icons to adjust the period accordingly. The **Bill management** page adjusts to show Bills for the selected period:
* The default period when you open the **Bill management page** is the current month.
* When you open the calendar pop-ups, you can select for pre-defined periods of **This month** or **Last month**.
**Notes:**
* **Invoice dates are inclusive!** Note that when you define a period to view Bills using the **Invoice Date** calendar popups, both the start and end date are interpreted inclusively.
* **Single day Invoice date period?** You can define a single day as the period you want to show Bills for.
3. All Bills are shown by default, regardless of their status. You can filter the list of Bills to show only those with a specific status. See below: [Filtering Bills by Status](/guides/billing-and-usage-data/running-viewing-and-managing-bills/running-bills-and-viewing-bill-details#filtering-bills-by-status).
4. If you want to view the Bills for a specific Account, select the **Account name** text in the listing:
* The **Account details** page for the Account opens showing the **Overview** tab, where you can review the **Latest bills** for the Account. Select the **Bills** tab to review all the Account's Bills.
5. To view the details of a Bill for an Account, select the **Reference** text hotlink. The **Bill details** page opens. This page provides a full breakdown of the charges due on the Account for the billing period for the **Invoice date**.
* A **Bill details** panel gives details of the Bill:
![View Bills39]() * A text hotlink is provided to open the details page of the Account the Bill is for.
* If you've set up an integration for sending Bills for the Account to a 3rd-party system the date/time and status of the **Last integration run** are shown. Here's an example where an integration exists to Chargebee:
* A text hotlink is provided to open the details page of the Account the Bill is for.
* If you've set up an integration for sending Bills for the Account to a 3rd-party system the date/time and status of the **Last integration run** are shown. Here's an example where an integration exists to Chargebee:
![View Bills38]() * You can use a text hotlink to open details of the last run or to **View all runs**. Checking integration run details can be very useful when you have implemented an integration with your external invoicing system and you need to troubleshoot if the run fails. For more details, see [Reviewing Integration Run Details](/guides/integrations/setting-up-integrations/reviewing-integration-run-details).
* Note that if the last integration run was successful, then the **External invoice reference** will also show a hotlink text. If you select this hotlink, you'll be taken to the invoice generated in the 3rd-party external system by the integration run.
**Important!** Note that if the Account the Bill was generated for has since been deleted, the Bill will open in **Bill management** but the **Bill details** panel will be incomplete and you'll receive an Account loading error.
6. Scroll down to review the Bill:
* You can use a text hotlink to open details of the last run or to **View all runs**. Checking integration run details can be very useful when you have implemented an integration with your external invoicing system and you need to troubleshoot if the run fails. For more details, see [Reviewing Integration Run Details](/guides/integrations/setting-up-integrations/reviewing-integration-run-details).
* Note that if the last integration run was successful, then the **External invoice reference** will also show a hotlink text. If you select this hotlink, you'll be taken to the invoice generated in the 3rd-party external system by the integration run.
**Important!** Note that if the Account the Bill was generated for has since been deleted, the Bill will open in **Bill management** but the **Bill details** panel will be incomplete and you'll receive an Account loading error.
6. Scroll down to review the Bill:
![View Bills42]() * The Bill **Total** is shown at top-left for quick reference.
* In this example, the Bill line items are grouped for charges due for **Product** consumed.
* For Product charge line items, select the **Description** hotlink text to open the details of the priced Product Plan used to determine the line item charge.
* You can expand a *usage charge line item* to review details:
* The Bill **Total** is shown at top-left for quick reference.
* In this example, the Bill line items are grouped for charges due for **Product** consumed.
* For Product charge line items, select the **Description** hotlink text to open the details of the priced Product Plan used to determine the line item charge.
* You can expand a *usage charge line item* to review details:
![View Bills43]() * Read-off:
* The period the **Pricing** has been applied to the Plan.
* The **Plan**, **Aggregation**, **Meter**, and **Pricing** used to set the usage charges raised against the Account. You can then select hotlink texts to open the details pages for each of these.
* If the Pricing is tiered and the usage spans more than one tier, how the total charge for the line item breaks down into the separate charges due for each tiered pricing band.
* A usage chart covering the billing period is also given, which allows you to check when the usage consumption was metered. For that usage, you can then:
* **View in the Data Explorer**
* **Download CSV**
* If there are any draw-down line items for a **Balance** on the Account, select the **Description** text to open the details page for the Balance attached to the billed Account.
### Viewing Bills - Display Options
When you've opened a Bill, there are several **Display options** for controlling how the Bill is displayed:
* If you are viewing a Bill with many zero usage line items, you can use the **Hide zero quantity line items** switch to reduce clutter on the Bill
* If **Accounting products** have been defined for line items:
* Read-off:
* The period the **Pricing** has been applied to the Plan.
* The **Plan**, **Aggregation**, **Meter**, and **Pricing** used to set the usage charges raised against the Account. You can then select hotlink texts to open the details pages for each of these.
* If the Pricing is tiered and the usage spans more than one tier, how the total charge for the line item breaks down into the separate charges due for each tiered pricing band.
* A usage chart covering the billing period is also given, which allows you to check when the usage consumption was metered. For that usage, you can then:
* **View in the Data Explorer**
* **Download CSV**
* If there are any draw-down line items for a **Balance** on the Account, select the **Description** text to open the details page for the Balance attached to the billed Account.
### Viewing Bills - Display Options
When you've opened a Bill, there are several **Display options** for controlling how the Bill is displayed:
* If you are viewing a Bill with many zero usage line items, you can use the **Hide zero quantity line items** switch to reduce clutter on the Bill
* If **Accounting products** have been defined for line items:
![View Bills44]()
![View Bills45]()
![View Bills46]() * You can then select **Group by Accounting product**:
* You can then select **Group by Accounting product**:
![View Bills47]() * When a Bill is first opened, the default display arrangement is to group by Product:
* When a Bill is first opened, the default display arrangement is to group by Product:
![View Bills48]() * If an Account has been set up for billing on a Contract basis, you can select to **Group by Contract**:
* If an Account has been set up for billing on a Contract basis, you can select to **Group by Contract**:
![View Bills49]() **Display options persisted**. If you've opened a Bill and selected a display option, this will be persisted across reloads, browser tab changes, and separate browser sessions.
### Viewing Bills - Notes and Tips
Here are some notes and tips to bear in mind when viewing Bills:
**Line Item Types**. You can review a list of the different line item types used on Bills in the [Bill Line Item Types](/guides/billing-and-usage-data/running-viewing-and-managing-bills/bill-line-item-types) topic in this section.
**Line Item Descriptions**.
* There are several places where you have the option to define the description texts you want to appear for Bill line items. If you don't define these description texts for line items, then *default descriptions* are used. For details on how these default descriptions are compiled, see the [Bill Line Items - Default Descriptions](/guides/billing-and-usage-data/running-viewing-and-managing-bills/bill-line-items-default-descriptions) topic in this section.
* If you have priced Plans attached to Accounts for billing using Segmented or Custom SQL Aggregations, then you can define custom descriptions for the Bill line items produced by the pricing. See [Custom Descriptions for Segmented Aggregations](https://docs.m3ter.com/guides/usage-data-aggregations/custom-sql-aggregations#example-4-custom-sql-descriptions) and [Custom SQL Descriptions](https://docs.m3ter.com/guides/usage-data-aggregations/custom-sql-aggregations#example-4-custom-sql-descriptions).
**Zero Usage Line Items**. If you are viewing a Bill with many zero usage line items, you can use the **Display options>Hide zero quantity line items** switch to reduce clutter on the Bill.
**Billing Amounts Decimal Places**. The number of decimal places shown for the billing currency amounts depends upon the configured decimal places for the currency in your Organization - see [Creating and Managing Currencies](/guides/organization-and-access-management/viewing-and-editing-organization/creating-and-managing-currencies).
**Mixed Pricing and Billing Currencies and Currency Conversions**:
* If an Account Plan pricing is in a different currency to the configured billing currency, then line items for usage charges due on the Account under that Plan will show the pricing currency for **Unit price** but the **Subtotal** amount for line items will show the converted amount due in the billing currency. See [Billing Currency, Pricing Currency, and Currency Conversions](/guides/plans-and-pricing/working-with-plan-templates-and-plans/understanding-billing-options-for-plan-templates-plans#billing-currency-pricing-currency-and-currency-conversions) for more details.
* If your pricing currency is different to the billing currency, **Currency Conversions** will be shown at the bottom of a Bill. See [Creating and Managing Currencies](/guides/organization-and-access-management/viewing-and-editing-organization/creating-and-managing-currencies).
* For example, here's a Bill where the pricing currency is British Pounds (GBP) and the billing currency is US Dollars (USD):
**Display options persisted**. If you've opened a Bill and selected a display option, this will be persisted across reloads, browser tab changes, and separate browser sessions.
### Viewing Bills - Notes and Tips
Here are some notes and tips to bear in mind when viewing Bills:
**Line Item Types**. You can review a list of the different line item types used on Bills in the [Bill Line Item Types](/guides/billing-and-usage-data/running-viewing-and-managing-bills/bill-line-item-types) topic in this section.
**Line Item Descriptions**.
* There are several places where you have the option to define the description texts you want to appear for Bill line items. If you don't define these description texts for line items, then *default descriptions* are used. For details on how these default descriptions are compiled, see the [Bill Line Items - Default Descriptions](/guides/billing-and-usage-data/running-viewing-and-managing-bills/bill-line-items-default-descriptions) topic in this section.
* If you have priced Plans attached to Accounts for billing using Segmented or Custom SQL Aggregations, then you can define custom descriptions for the Bill line items produced by the pricing. See [Custom Descriptions for Segmented Aggregations](https://docs.m3ter.com/guides/usage-data-aggregations/custom-sql-aggregations#example-4-custom-sql-descriptions) and [Custom SQL Descriptions](https://docs.m3ter.com/guides/usage-data-aggregations/custom-sql-aggregations#example-4-custom-sql-descriptions).
**Zero Usage Line Items**. If you are viewing a Bill with many zero usage line items, you can use the **Display options>Hide zero quantity line items** switch to reduce clutter on the Bill.
**Billing Amounts Decimal Places**. The number of decimal places shown for the billing currency amounts depends upon the configured decimal places for the currency in your Organization - see [Creating and Managing Currencies](/guides/organization-and-access-management/viewing-and-editing-organization/creating-and-managing-currencies).
**Mixed Pricing and Billing Currencies and Currency Conversions**:
* If an Account Plan pricing is in a different currency to the configured billing currency, then line items for usage charges due on the Account under that Plan will show the pricing currency for **Unit price** but the **Subtotal** amount for line items will show the converted amount due in the billing currency. See [Billing Currency, Pricing Currency, and Currency Conversions](/guides/plans-and-pricing/working-with-plan-templates-and-plans/understanding-billing-options-for-plan-templates-plans#billing-currency-pricing-currency-and-currency-conversions) for more details.
* If your pricing currency is different to the billing currency, **Currency Conversions** will be shown at the bottom of a Bill. See [Creating and Managing Currencies](/guides/organization-and-access-management/viewing-and-editing-organization/creating-and-managing-currencies).
* For example, here's a Bill where the pricing currency is British Pounds (GBP) and the billing currency is US Dollars (USD):
![View Bills57]() * Note that:
* Under **Subtotal**, the unconverted pricing currency subtotal for line items is also shown in grayed-out text.
* You can check any **Currency conversions** configured for the Organization.
## Reviewing Bill Metadata
You can review **Bill metadata** on the **Bill details** page.
**External mappings**. Any External mappings set up for the Bill are listed:
* Note that:
* Under **Subtotal**, the unconverted pricing currency subtotal for line items is also shown in grayed-out text.
* You can check any **Currency conversions** configured for the Organization.
## Reviewing Bill Metadata
You can review **Bill metadata** on the **Bill details** page.
**External mappings**. Any External mappings set up for the Bill are listed:
![View Bills36]() * The **External system** and **External table** mapped to are shown - such as **Chargebee - Invoice** in the above example. The **External entity ID** mapped to is also shown.
* If a listed External mapping is linked to an Integration, under **Linked integration** a hotlink text will be shown which you can use to open the Integration.
* Under **Actions**, you can edit or delete the External mapping.
* If the Bill has multiple External mappings created for it, you can use *Search external mappings* to search by **External table** and **External entity ID** and filter the list.
* You can commence a workflow to **Create external mapping** for the Bill directly - see [Creating and Managing External Mappings for Accounts](https://m3ter.mintlify.app/guides/end-customer-accounts/creating-and-managing-external-mappings-for-accounts) for an example.
**Integration runs**. If you've set up an integration that synchronizes the Bill with an external system, the date/time and status of the **Latest** integration run are shown.
* You can use a text hotlink to open details of this latest run or **View all runs**. See [Reviewing Integration Run Details](/guides/integrations/setting-up-integrations/reviewing-integration-run-details).
## Filtering Bills
When you select a period for the Bills you want to load into the **Bill management** page, you might want to filter the list to help find specific Bills more easily. You can filter the Bills listed by **Status** or show only locked Bills.
**To filter Bills by Status or only show Locked:**
1. Select **Billing>Bill management**. The **Bill management** page opens and the **Invoice date (inclusive)** range is set for the current month and any Bills for that period are listed.
2. If required, update the **Invoice date (inclusive)** range for the period you want to view Bills for. The page adjusts to show Bills for the selected period.
3. You can use the **Status** filter options or the **Only locked** switch:
* The **External system** and **External table** mapped to are shown - such as **Chargebee - Invoice** in the above example. The **External entity ID** mapped to is also shown.
* If a listed External mapping is linked to an Integration, under **Linked integration** a hotlink text will be shown which you can use to open the Integration.
* Under **Actions**, you can edit or delete the External mapping.
* If the Bill has multiple External mappings created for it, you can use *Search external mappings* to search by **External table** and **External entity ID** and filter the list.
* You can commence a workflow to **Create external mapping** for the Bill directly - see [Creating and Managing External Mappings for Accounts](https://m3ter.mintlify.app/guides/end-customer-accounts/creating-and-managing-external-mappings-for-accounts) for an example.
**Integration runs**. If you've set up an integration that synchronizes the Bill with an external system, the date/time and status of the **Latest** integration run are shown.
* You can use a text hotlink to open details of this latest run or **View all runs**. See [Reviewing Integration Run Details](/guides/integrations/setting-up-integrations/reviewing-integration-run-details).
## Filtering Bills
When you select a period for the Bills you want to load into the **Bill management** page, you might want to filter the list to help find specific Bills more easily. You can filter the Bills listed by **Status** or show only locked Bills.
**To filter Bills by Status or only show Locked:**
1. Select **Billing>Bill management**. The **Bill management** page opens and the **Invoice date (inclusive)** range is set for the current month and any Bills for that period are listed.
2. If required, update the **Invoice date (inclusive)** range for the period you want to view Bills for. The page adjusts to show Bills for the selected period.
3. You can use the **Status** filter options or the **Only locked** switch:
![]() * The default settings when you first open **Bill management** are:
* **Status** filter is **All**.
* **Only locked** is off.
* Select **Pending** for **Status**. The list adjusts to show only **Pending** Bills, none of which can be **Locked**:
* The default settings when you first open **Bill management** are:
* **Status** filter is **All**.
* **Only locked** is off.
* Select **Pending** for **Status**. The list adjusts to show only **Pending** Bills, none of which can be **Locked**:
![View Bills50]() * Select **Approved** for **Status**. The list adjusts to show only **Approved** Bills, some of which might be **Locked**:
* Select **Approved** for **Status**. The list adjusts to show only **Approved** Bills, some of which might be **Locked**:
![View Bills51]() * Select **Approved** or **All** for **Status** and then enable the **Only locked** switch. The list adjusts to show only Bills that are **Approved** and have been **Locked**:
* Select **Approved** or **All** for **Status** and then enable the **Only locked** switch. The list adjusts to show only Bills that are **Approved** and have been **Locked**:
![View Bills52]() ## Managing Columns for Bill Management
When working with Bills in Bill management, you can quickly reorder columns or switch columns off to suit your current operational purposes. For example, you might want to show **Status** and **Last Calc date** as the first two columns or hide these columns from view:
* [Reordering Bill Management Columns](/guides/billing-and-usage-data/running-viewing-and-managing-bills/running-bills-and-viewing-bill-details#reordering-bill-management-columns)
* [Switching Off Bill Management Columns](/guides/billing-and-usage-data/running-viewing-and-managing-bills/running-bills-and-viewing-bill-details#switching-off-bill-management-columns)
### Reordering Bill Management Columns
**To reorder columns for the Bills list:**
1. Select **Billing>Bill management**. The **Bill management** page opens and the **Invoice date (inclusive)** range is set for the current month and any Bills for that period are listed.
2. If required, update the **Invoice date (inclusive)** range for the period you want to view Bills for. The page adjusts to show Bills for the selected period.
3. If you want to reorder the columns of the Bills list, select the vertical **Columns** button on the right-hand side of the list:
## Managing Columns for Bill Management
When working with Bills in Bill management, you can quickly reorder columns or switch columns off to suit your current operational purposes. For example, you might want to show **Status** and **Last Calc date** as the first two columns or hide these columns from view:
* [Reordering Bill Management Columns](/guides/billing-and-usage-data/running-viewing-and-managing-bills/running-bills-and-viewing-bill-details#reordering-bill-management-columns)
* [Switching Off Bill Management Columns](/guides/billing-and-usage-data/running-viewing-and-managing-bills/running-bills-and-viewing-bill-details#switching-off-bill-management-columns)
### Reordering Bill Management Columns
**To reorder columns for the Bills list:**
1. Select **Billing>Bill management**. The **Bill management** page opens and the **Invoice date (inclusive)** range is set for the current month and any Bills for that period are listed.
2. If required, update the **Invoice date (inclusive)** range for the period you want to view Bills for. The page adjusts to show Bills for the selected period.
3. If you want to reorder the columns of the Bills list, select the vertical **Columns** button on the right-hand side of the list:
![]() 4. On the reorder columns panel that appears, drag-and-drop columns to give the order you want to show on the page:
4. On the reorder columns panel that appears, drag-and-drop columns to give the order you want to show on the page:
![]() * Repeat until you have a top-bottom order of columns that you want to appear in left-right order on the page:
* Repeat until you have a top-bottom order of columns that you want to appear in left-right order on the page:
![]() 5. Select **Columns** again. The reorder columns panel closes and the **Bill management** page shows the reordered columns for the Bills list:
5. Select **Columns** again. The reorder columns panel closes and the **Bill management** page shows the reordered columns for the Bills list:
![Reorder Cols18]() ### Switching Off Bill Management Columns
**To switch off columns for the Bills list:**
1. Select **Billing>Bill management**. The **Bill management** page opens and the **Invoice date (inclusive)** range is set for the current month and any Bills for that period are listed.
2. If required, update the **Invoice date (inclusive)** range for the period you want to view Bills for. The page adjusts to show Bills for the selected period.
3. If you want to switch off columns of the Bills list, select the vertical **Columns** button on the right-hand side of the list:
### Switching Off Bill Management Columns
**To switch off columns for the Bills list:**
1. Select **Billing>Bill management**. The **Bill management** page opens and the **Invoice date (inclusive)** range is set for the current month and any Bills for that period are listed.
2. If required, update the **Invoice date (inclusive)** range for the period you want to view Bills for. The page adjusts to show Bills for the selected period.
3. If you want to switch off columns of the Bills list, select the vertical **Columns** button on the right-hand side of the list:
![]() 4. Use the **Columns** panel that appears to switch off any columns you want to hide from the list:
4. Use the **Columns** panel that appears to switch off any columns you want to hide from the list:
![]() 5. Select **Columns** again. The switch columns panel closes and the **Bill management** page shows the Bills list without the hidden columns:
5. Select **Columns** again. The switch columns panel closes and the **Bill management** page shows the Bills list without the hidden columns:
![]() ## Checking Zero Total Bills
When you select a period for the Bills you want to load into the **Bill management** page, there might be some zero total Bills listed. A Bill can have a zero total because:
* There are no product consumption or other charges due against the Account for the billing period.
* The total of debit line items for product consumption and other charges against the Account are equal to the credit line items, such as Prepayment or Balance draw-downs.
To check Bills listed in Bill management to determine why Bills have a zero total, you can switch on optional columns for *total debits* and *total credits*. This saves you having to open each individual Bill to check.
**To check zero total Bills:**
1. Select **Billing>Bill management**. The **Bill management** page opens and the **Invoice date (inclusive)** range is set for the current month and any Bills for that period are listed:
## Checking Zero Total Bills
When you select a period for the Bills you want to load into the **Bill management** page, there might be some zero total Bills listed. A Bill can have a zero total because:
* There are no product consumption or other charges due against the Account for the billing period.
* The total of debit line items for product consumption and other charges against the Account are equal to the credit line items, such as Prepayment or Balance draw-downs.
To check Bills listed in Bill management to determine why Bills have a zero total, you can switch on optional columns for *total debits* and *total credits*. This saves you having to open each individual Bill to check.
**To check zero total Bills:**
1. Select **Billing>Bill management**. The **Bill management** page opens and the **Invoice date (inclusive)** range is set for the current month and any Bills for that period are listed:
![View Bills55]() * In this example, the first four Bills listed have a zero **Total**.
2. Select **Columns**, switch on the **Total debits** and **Total credits** columns, and reorder the columns as required - see the [previous section](#managing-columns-for-bill-management) for details on how to do this:
* In this example, the first four Bills listed have a zero **Total**.
2. Select **Columns**, switch on the **Total debits** and **Total credits** columns, and reorder the columns as required - see the [previous section](#managing-columns-for-bill-management) for details on how to do this:
![View Bills56]() * We can now see that the second and fourth Bill are zero because the Total debits equals the Total credits and the first and third Bill are zero because there are no charges due against the Account for the billing period.
## Exporting the Bill Management Page
You can export the list of Bills displayed on the Bill management page as a `CSV` formatted file at any time.
**To export the Bills list:**
1. Select **Billing>Bill management**. The **Bill management** page opens and the **Invoice date (inclusive)** range is set for the current month and any Bills for that period are listed.
2. If required, update the **Invoice date (inclusive)** range for the period you want to view Bills for. The page adjusts to show Bills for the selected period.
3. If you want to export the list of Bills currently shown on the **Bill management** page, select the vertical **Export** button on the right-hand side:
* We can now see that the second and fourth Bill are zero because the Total debits equals the Total credits and the first and third Bill are zero because there are no charges due against the Account for the billing period.
## Exporting the Bill Management Page
You can export the list of Bills displayed on the Bill management page as a `CSV` formatted file at any time.
**To export the Bills list:**
1. Select **Billing>Bill management**. The **Bill management** page opens and the **Invoice date (inclusive)** range is set for the current month and any Bills for that period are listed.
2. If required, update the **Invoice date (inclusive)** range for the period you want to view Bills for. The page adjusts to show Bills for the selected period.
3. If you want to export the list of Bills currently shown on the **Bill management** page, select the vertical **Export** button on the right-hand side:
![]() * The current **Bill management** list is downloaded locally in a `CSV` formatted file which you can then load into your preferred application to view. In this example, a downloaded file has been opened and we can see that the column and row ordering of the exported page is preserved:
* The current **Bill management** list is downloaded locally in a `CSV` formatted file which you can then load into your preferred application to view. In this example, a downloaded file has been opened and we can see that the column and row ordering of the exported page is preserved:
![]() ## Running Bills Manually
Some common billing management operations might require you to run bills manually for a specific Bill date. You can do this from **Bill management** by creating a *Bill job*:
* [Preparing to Run Bills Manually - Notes and Tips](/guides/billing-and-usage-data/running-viewing-and-managing-bills/running-bills-and-viewing-bill-details#preparing-to-run-bills-manually-notes-and-tips)
* [Creating and Running Bill Jobs](/guides/billing-and-usage-data/running-viewing-and-managing-bills/running-bills-and-viewing-bill-details#creating-and-running-bill-jobs)
* [Running Bills Jobs - Example](/guides/billing-and-usage-data/running-viewing-and-managing-bills/running-bills-and-viewing-bill-details#running-bill-jobs-example)
### Preparing to Run Bills Manually - Notes and Tips
Please review the following notes and tips before you attempt to set up and run billing manually.
**Notes:**
* **Billing does not run for Child Accounts separately.** Only when you run billing for a Parent Account will billing run for its Child Accounts.
* **Maximum number of concurrent Bill jobs is restricted to 10.** If you already have 10 Bill jobs currently running, and try to create another one, you'll get an HTTP 429 response (Too many requests). When one of the existing bill jobs has completed, you'll be able to submit another job.
**Tips:**
* **Running Bills for Specific Accounts?** It's sometimes easier to open a specific Account and run Bills directly for that Account from the Bills tab - see [Reviewing and Recalculating Bills for an Account](/guides/end-customer-accounts/reviewing-bills-for-an-account).
### Creating and Running Bill Jobs
This section explains how to create a Bill job and run Bills manually.
**To create a Bill job and run billing:**
1. Open **Bill management** and select **Run billing**. The **Create Bill job** page opens:
## Running Bills Manually
Some common billing management operations might require you to run bills manually for a specific Bill date. You can do this from **Bill management** by creating a *Bill job*:
* [Preparing to Run Bills Manually - Notes and Tips](/guides/billing-and-usage-data/running-viewing-and-managing-bills/running-bills-and-viewing-bill-details#preparing-to-run-bills-manually-notes-and-tips)
* [Creating and Running Bill Jobs](/guides/billing-and-usage-data/running-viewing-and-managing-bills/running-bills-and-viewing-bill-details#creating-and-running-bill-jobs)
* [Running Bills Jobs - Example](/guides/billing-and-usage-data/running-viewing-and-managing-bills/running-bills-and-viewing-bill-details#running-bill-jobs-example)
### Preparing to Run Bills Manually - Notes and Tips
Please review the following notes and tips before you attempt to set up and run billing manually.
**Notes:**
* **Billing does not run for Child Accounts separately.** Only when you run billing for a Parent Account will billing run for its Child Accounts.
* **Maximum number of concurrent Bill jobs is restricted to 10.** If you already have 10 Bill jobs currently running, and try to create another one, you'll get an HTTP 429 response (Too many requests). When one of the existing bill jobs has completed, you'll be able to submit another job.
**Tips:**
* **Running Bills for Specific Accounts?** It's sometimes easier to open a specific Account and run Bills directly for that Account from the Bills tab - see [Reviewing and Recalculating Bills for an Account](/guides/end-customer-accounts/reviewing-bills-for-an-account).
### Creating and Running Bill Jobs
This section explains how to create a Bill job and run Bills manually.
**To create a Bill job and run billing:**
1. Open **Bill management** and select **Run billing**. The **Create Bill job** page opens:
![]() 2. First check your current **Organization billing settings**, which can affect how Bills are created for a Bill job:
* **External invoice date**. The **Invoice date** you use is dependent on your Organization-level setting for **External invoice date**. The default for this under **Organization configuration** is **First day of next period**. However, if your accounting policy requires that you recognize usage revenue in the same service period as that in which the usage is recorded, and not in the following service period, then you can set **External invoice date** to **Last day of arrears**. If you are using **Last day of arrears** for the **External invoice date** setting, when entering an **Invoice date** for a Bill job you *must use the last day* of the service period. For example, if you are billing monthly, use the last day of the month period for which you want to generate a Bill manually. If you use the first day of the month service period following, a Bill *will not be generated*.
* **Epochs**. The **Year**, **Month**, **Week**, and **Day epoch** dates configured for your Organization are shown.
* **Consolidate bills**. If you've enabled **Consolidate bills** in your Organization configuration, the **Billing frequency** option will not be available for your Bill job settings.
3. If you want to change any of the current **Organization billing settings** before setting up a Bill job and running Bills manually, select the **View billing settings** hotlink text to open the **Configuration** page where you can **Edit** the **Organization configuration details**. See [Viewing and Editing Organization Configuration](/guides/organization-and-access-management/viewing-and-editing-organization/viewing-and-editing-organization-configuration) for more details.
4. Enter **Bill job settings**:
* **Invoice date**. (*Required*). Your selection for **Invoice date** will depend on the specific settings of your Organization for billing frequency and billing cycle date. For common billing setups, such as for monthly billing frequency and a billing cycle date of the 1st of each month, you can use the 1st of the month following to generate a Bill for the previous month's charges.
* **Bill frequency**. (*Optional*). When you open the **Create Bill job** page, a default of **All** is selected for **Bill frequency**. But if you want to run billing manually for only those Accounts that are on a specific billing frequency, you can use the drop-down list to select the frequency:
* **Daily**
* **Weekly**
* **Monthly**
* **Annually**
* **Ad Hoc** - You can use this setting:
* For Bills generated for one-off Charges on Accounts.
* When a custom billing schedule is used for billing an Account, such as for billing of Prepayment/Commitment fees using a custom billing schedule.
**Warning!** If you've enabled **Consolidate bills** in your Organization configuration, the **Billing frequency** option will not be available. Please see the notes on enabling the **Consolidate bills** option for your Organization in the [Viewing and Editing Organization Configuration](/guides/organization-and-access-management/viewing-and-editing-organization/viewing-and-editing-organization-configuration) topic.
* **Target currency**. (*Optional*). You can select from the drop-down list of currencies you've set up for your Organization:
* If you leave **Target currency** blank, the billing currency used for any bills generated for the Bill job depends on what you've defined as the billing currency at either Account or Organization level.
* If you've defined a currency for an Account and chosen to override the Organization currency for the Account, then the billing currency used when you run Bills manually for the Account will be the Account currency. If you haven't defined an Account currency, then the Organization currency is used for billing the Account.
* If you select a **Target currency**, then any Bills generated for the Bill job will be created using the selected currency as the billing currency.
**Warning!** Remember that you must first configure any required currency conversion rates if the selected **Target currency** is different to the pricing currency configured for use on an Account, otherwise Bills will fail for the Account and you'll receive an **ERROR** alert under **Alerts**. For more details see [Creating and Managing Currencies](/guides/organization-and-access-management/viewing-and-editing-organization/creating-and-managing-currencies).
5. Select **Run billing**:
2. First check your current **Organization billing settings**, which can affect how Bills are created for a Bill job:
* **External invoice date**. The **Invoice date** you use is dependent on your Organization-level setting for **External invoice date**. The default for this under **Organization configuration** is **First day of next period**. However, if your accounting policy requires that you recognize usage revenue in the same service period as that in which the usage is recorded, and not in the following service period, then you can set **External invoice date** to **Last day of arrears**. If you are using **Last day of arrears** for the **External invoice date** setting, when entering an **Invoice date** for a Bill job you *must use the last day* of the service period. For example, if you are billing monthly, use the last day of the month period for which you want to generate a Bill manually. If you use the first day of the month service period following, a Bill *will not be generated*.
* **Epochs**. The **Year**, **Month**, **Week**, and **Day epoch** dates configured for your Organization are shown.
* **Consolidate bills**. If you've enabled **Consolidate bills** in your Organization configuration, the **Billing frequency** option will not be available for your Bill job settings.
3. If you want to change any of the current **Organization billing settings** before setting up a Bill job and running Bills manually, select the **View billing settings** hotlink text to open the **Configuration** page where you can **Edit** the **Organization configuration details**. See [Viewing and Editing Organization Configuration](/guides/organization-and-access-management/viewing-and-editing-organization/viewing-and-editing-organization-configuration) for more details.
4. Enter **Bill job settings**:
* **Invoice date**. (*Required*). Your selection for **Invoice date** will depend on the specific settings of your Organization for billing frequency and billing cycle date. For common billing setups, such as for monthly billing frequency and a billing cycle date of the 1st of each month, you can use the 1st of the month following to generate a Bill for the previous month's charges.
* **Bill frequency**. (*Optional*). When you open the **Create Bill job** page, a default of **All** is selected for **Bill frequency**. But if you want to run billing manually for only those Accounts that are on a specific billing frequency, you can use the drop-down list to select the frequency:
* **Daily**
* **Weekly**
* **Monthly**
* **Annually**
* **Ad Hoc** - You can use this setting:
* For Bills generated for one-off Charges on Accounts.
* When a custom billing schedule is used for billing an Account, such as for billing of Prepayment/Commitment fees using a custom billing schedule.
**Warning!** If you've enabled **Consolidate bills** in your Organization configuration, the **Billing frequency** option will not be available. Please see the notes on enabling the **Consolidate bills** option for your Organization in the [Viewing and Editing Organization Configuration](/guides/organization-and-access-management/viewing-and-editing-organization/viewing-and-editing-organization-configuration) topic.
* **Target currency**. (*Optional*). You can select from the drop-down list of currencies you've set up for your Organization:
* If you leave **Target currency** blank, the billing currency used for any bills generated for the Bill job depends on what you've defined as the billing currency at either Account or Organization level.
* If you've defined a currency for an Account and chosen to override the Organization currency for the Account, then the billing currency used when you run Bills manually for the Account will be the Account currency. If you haven't defined an Account currency, then the Organization currency is used for billing the Account.
* If you select a **Target currency**, then any Bills generated for the Bill job will be created using the selected currency as the billing currency.
**Warning!** Remember that you must first configure any required currency conversion rates if the selected **Target currency** is different to the pricing currency configured for use on an Account, otherwise Bills will fail for the Account and you'll receive an **ERROR** alert under **Alerts**. For more details see [Creating and Managing Currencies](/guides/organization-and-access-management/viewing-and-editing-organization/creating-and-managing-currencies).
5. Select **Run billing**:
![]() 6. The Bill job is queued and you can track the billing run progress by clicking the **Running tasks** icon at top-right to open the **Running tasks** panel:
6. The Bill job is queued and you can track the billing run progress by clicking the **Running tasks** icon at top-right to open the **Running tasks** panel:
![]() When the Bill job has completed, the **Run billing** page opens:
When the Bill job has completed, the **Run billing** page opens:
![]() You can review:
* **Bill job details**. The job **Status** is shown and you can **Copy** the job **ID** directly to your clipboard.
* **Generated bills**. Any Bills created or updated by the Bill job are listed:
* Use the **Reference** hotlink text to open a Bill.
* Use the **Account name** hotlink text to open the Account the Bill was for.
7. If scroll to the bottom of the page, two buttons are provided:
You can review:
* **Bill job details**. The job **Status** is shown and you can **Copy** the job **ID** directly to your clipboard.
* **Generated bills**. Any Bills created or updated by the Bill job are listed:
* Use the **Reference** hotlink text to open a Bill.
* Use the **Account name** hotlink text to open the Account the Bill was for.
7. If scroll to the bottom of the page, two buttons are provided:
![]() * If you want to set up another Bill job and run billing manually again, select **Re-run billing**. You are taken back to the **Create Bill job** page.
* Otherwise select **Back to Bill Management.**
### Running Bill Jobs - Example
Setting up Bill jobs and running billing manually can be useful for many billing operations scenarios. For example, suppose some historical usage data has come in for an Account that is billed on a monthly billing frequency and you want to run billing for the relevant billing date to check that a Bill is updated correctly to allow for the additional product usage.
**To run Bills manually:**
1. Select **Billing>Bill management**. The **Bill management** page opens.
2. First, update the **Invoice date (inclusive)** date range to include the Account Bill you want to check. The page will refresh to show Bills with dates in the date range and you can identify the Account Bill you want to check for additional charges due to new historical usage data:
* If you want to set up another Bill job and run billing manually again, select **Re-run billing**. You are taken back to the **Create Bill job** page.
* Otherwise select **Back to Bill Management.**
### Running Bill Jobs - Example
Setting up Bill jobs and running billing manually can be useful for many billing operations scenarios. For example, suppose some historical usage data has come in for an Account that is billed on a monthly billing frequency and you want to run billing for the relevant billing date to check that a Bill is updated correctly to allow for the additional product usage.
**To run Bills manually:**
1. Select **Billing>Bill management**. The **Bill management** page opens.
2. First, update the **Invoice date (inclusive)** date range to include the Account Bill you want to check. The page will refresh to show Bills with dates in the date range and you can identify the Account Bill you want to check for additional charges due to new historical usage data:
![Run Billing32]() 3. Select **Run billing**.
4. Enter the **Bill job settings** accordingly:
3. Select **Run billing**.
4. Enter the **Bill job settings** accordingly:
![]() * In this example, we want to check for new historical usage data submitted for the Account in November 2024 and have set the Invoice date at **December 1st 2024** and selected **Monthly** for **Bill frequency.**
4. Select **Run billing**.
5. When the Bill job has completed for the selected date and frequency and the **Run billing** pages opens, scroll to the bottom of the page and select **Back to Bill Management**:
* In this example, we want to check for new historical usage data submitted for the Account in November 2024 and have set the Invoice date at **December 1st 2024** and selected **Monthly** for **Bill frequency.**
4. Select **Run billing**.
5. When the Bill job has completed for the selected date and frequency and the **Run billing** pages opens, scroll to the bottom of the page and select **Back to Bill Management**:
![Run Billing33]() * We can see that for the example Account the Bill **Total** has increased as expected for the charges due for historical usage data submitted in November 2024.
# Scheduling Billing
Source: https://docs.m3ter.com/guides/billing-and-usage-data/running-viewing-and-managing-bills/scheduling-billing
If you want Bills for your Accounts to be updated on a regular basis, you can:
* Define this as part of your Organization configuration in the Console.
* Use the *Update OrganizationConfig* API call.
## Understanding the Scheduled Billing Process
If you implement scheduled billing for your Organization to have Bills for end customer Accounts updated at regular intervals, it's important to be clear about how the process works:
* **What is included at Bill update?** The Bill for each Account is calculated at the time the scheduled update is due. The calculation will only include charges from *active* Account Plans on the Account at the time of the update. If an Account Plan becomes inactive before the scheduled update, only charges accumulated under that Account Plan up to its deactivation date will be included in the Bill.
* **What about late-arriving data?** We accommodate usage data received up to 24 hours after the scheduled Bill update. Late-arriving data refers to usage data with a timestamp before the scheduled update, but which is ingested into the m3ter platform after the Bill has been updated. If any late-arriving data is recorded for an Account within this 24-hour window, the Bill will be recalculated to include the associated charges.
* **Important qualification**: The 24 hour inclusion period following scheduled Bill update for late-arriving data is not always timed from the scheduled Bill update time. For cases where an Account Plan used to charge an Account ends before the scheduled time of Bill update, the 24 hour inclusion period for late-arriving data is timed from the time the Account Plan ends. For example,
* If, on a monthly billing frequency, an Account has a single Account Plan which is active for all of October, we'll continue to recalculate the Bill to catch any late-arriving data through to end of November 1st.
* If, however, the single Account Plan ceases to be active for the Account at midnight on the 14th October, we'll continue to recalculate the Bill to catch any late-arriving data only up to midnight on the 15th October.
**Warnings!**
* **Possible Conflict between Auto-Approval of Bills and Scheduled Bill Interval!** If a Bill is recalculated because of late-arriving data after being auto-approved, and the bill auto-approval interval is less than 24 hours, then the Bill will revert to a pending, unapproved state.
* We recommend setting the auto-approval interval to 24 hours or longer when using scheduled bill updates.
* **Deleting and recreating Account using same Code in late-arriving window**. If you delete an Account and recreate it using the same Code within the 24 hour late-arriving window, then usage data with an earlier timestamp will not be caught. For this and other reasons we strongly recommend *not reusing Account Codes* - see [Managing Accounts - Best Practices](/guides/end-customer-accounts/managing-accounts-best-practices) for more details.
## Scheduling Billing from Console
**To schedule Billing in the Console:**
1. Select **Settings**:
* We can see that for the example Account the Bill **Total** has increased as expected for the charges due for historical usage data submitted in November 2024.
# Scheduling Billing
Source: https://docs.m3ter.com/guides/billing-and-usage-data/running-viewing-and-managing-bills/scheduling-billing
If you want Bills for your Accounts to be updated on a regular basis, you can:
* Define this as part of your Organization configuration in the Console.
* Use the *Update OrganizationConfig* API call.
## Understanding the Scheduled Billing Process
If you implement scheduled billing for your Organization to have Bills for end customer Accounts updated at regular intervals, it's important to be clear about how the process works:
* **What is included at Bill update?** The Bill for each Account is calculated at the time the scheduled update is due. The calculation will only include charges from *active* Account Plans on the Account at the time of the update. If an Account Plan becomes inactive before the scheduled update, only charges accumulated under that Account Plan up to its deactivation date will be included in the Bill.
* **What about late-arriving data?** We accommodate usage data received up to 24 hours after the scheduled Bill update. Late-arriving data refers to usage data with a timestamp before the scheduled update, but which is ingested into the m3ter platform after the Bill has been updated. If any late-arriving data is recorded for an Account within this 24-hour window, the Bill will be recalculated to include the associated charges.
* **Important qualification**: The 24 hour inclusion period following scheduled Bill update for late-arriving data is not always timed from the scheduled Bill update time. For cases where an Account Plan used to charge an Account ends before the scheduled time of Bill update, the 24 hour inclusion period for late-arriving data is timed from the time the Account Plan ends. For example,
* If, on a monthly billing frequency, an Account has a single Account Plan which is active for all of October, we'll continue to recalculate the Bill to catch any late-arriving data through to end of November 1st.
* If, however, the single Account Plan ceases to be active for the Account at midnight on the 14th October, we'll continue to recalculate the Bill to catch any late-arriving data only up to midnight on the 15th October.
**Warnings!**
* **Possible Conflict between Auto-Approval of Bills and Scheduled Bill Interval!** If a Bill is recalculated because of late-arriving data after being auto-approved, and the bill auto-approval interval is less than 24 hours, then the Bill will revert to a pending, unapproved state.
* We recommend setting the auto-approval interval to 24 hours or longer when using scheduled bill updates.
* **Deleting and recreating Account using same Code in late-arriving window**. If you delete an Account and recreate it using the same Code within the 24 hour late-arriving window, then usage data with an earlier timestamp will not be caught. For this and other reasons we strongly recommend *not reusing Account Codes* - see [Managing Accounts - Best Practices](/guides/end-customer-accounts/managing-accounts-best-practices) for more details.
## Scheduling Billing from Console
**To schedule Billing in the Console:**
1. Select **Settings**:
![]() The **Settings** section opens at the **Organization** page with the **Configuration** tab selected.
2. On the **Organization configuration details** panel, select **Edit** The **Organization configuration** page opens.
3. Use the **Scheduled bill interval** drop-down to select the required interval in minutes or hours - ten options: **15 minutes, 30 minutes,** **1 hour**, **2 hours**, **3 hours**, **4 hours**, **6 hours**, **8 hours**, **12 hours**, or **24 hours**:
* If, and only if, you select **24 hours** to implement daily Bill updates, then optionally you can also select a **Scheduled bill offset** and specify the hour in the day - **1** to **23** - when the scheduled daily Bill update will run.
* The default is **Disabled**, which means no Billing is scheduled.
4. Select **Update Organization configuration**. You are returned to the **Configuration** tab where the **Scheduled bill interval** now shows on the **Organization configuration details** panel.
## Scheduling Billing Using API Call
**To schedule Billing using API call:**
1. Review the API Documentation at [https://m3ter.com/docs](https://m3ter.com/docs).
2. Open the **OrganizationConfig** section. You can use the [Update OrganizationConfig](/api/organizationconfig/update-organizationconfig) API call to define a schedule interval for updating Bills:
> **PUT** `/organizations/{orgid}/organizationconfig`
3. Enter the required parameters for this call and use the optional `scheduledBillInterval` request schema parameter to set the required interval:
* **For portions of an hour (minutes).** Two options: **0.25** (15 minutes) and **0.5** (30 minutes).
* **For full hours.** Enter **1** for every hour, **2** for every two hours, and so on. Eight options: **1**, **2**, **3**, **4**, **6**, **8**, **12**, or **24**.
* If, and only if, you use **24** to implement daily Bill updates, then you can also use the optional `scheduledBillOffset` request schema parameter to specify the hour in the day - **1** to **23** - when the scheduled daily Bill update will run.
* **Default.** The default is **0**, which disables scheduling.
4. Submit the API call.
# Troubleshooting Bills
Source: https://docs.m3ter.com/guides/billing-and-usage-data/running-viewing-and-managing-bills/troubleshooting-bills
If you're experiencing issues when generating bills for an end customer Account, it's well worth running through the following troubleshooting checklist of common billing problems with suggested remedies/checks.
* [Failed Bill Checklist](/guides/billing-and-usage-data/running-viewing-and-managing-bills/troubleshooting-bills#failed-bill-checklist)
* [Billing Dates Issues](/guides/billing-and-usage-data/running-viewing-and-managing-bills/troubleshooting-bills#billing-dates-issues)
* [Recalculating Bills after Billing Configuration Changes](/guides/billing-and-usage-data/running-viewing-and-managing-bills/troubleshooting-bills#recalculating-bills-after-billing-configuration-changes)
* [Prorated Charges](/guides/billing-and-usage-data/running-viewing-and-managing-bills/troubleshooting-bills#prorated-charges)
* [Using Preview Bill API Call with Debug Enabled](/guides/billing-and-usage-data/running-viewing-and-managing-bills/troubleshooting-bills#using-preview-bill-api-call-with-debug-enabled)
* [Querying and Checking Usage Data in Data Explorer](#querying-and-checking-usage-data-in-data-explorer)
## Failed Bill Checklist
Bills for an Account in your Organization might be failing to create for several reasons. You can use the *System Alerts* page in the Console as a starting point to check and remedy any issues which are causing Bills to fail. On your Organization **Dashboard**, *Your alerts* are listed and you can click **View all** to open the System Alerts page:
* When a Bill is created successfully, an **INFO** Alert is generated. You can click the Alert to bring up an Alert dialog, which identifies the Account and the Bill total is shown. You can then use this information to keep track of Bills and also to check if the calculated Bill amount is what you'd expected it to be.
* When a Bill fails to create, an **ERROR** Alert is generated. You can click on the Alert and in many cases the reason for the failure is explained in the Alert dialog.
Here are some of the main reasons Bills fail to create and how to remedy the cause of failure:
* [Currency Conversion Rate Missing](/guides/billing-and-usage-data/running-viewing-and-managing-bills/troubleshooting-bills#currency-conversion-rate-missing)
* [Compound Aggregation Calculation Invalid](/guides/billing-and-usage-data/running-viewing-and-managing-bills/troubleshooting-bills#compound-aggregation-calculation-invalid)
* [No Price Plan Attached to Account](/guides/billing-and-usage-data/running-viewing-and-managing-bills/troubleshooting-bills#no-price-plan-attached-to-account)
* [Usage Data Issues](/guides/billing-and-usage-data/running-viewing-and-managing-bills/troubleshooting-bills#usage-data-issues)
* [Parent/Child Accounts - Billing Hierarchy Issues](/guides/billing-and-usage-data/running-viewing-and-managing-bills/troubleshooting-bills#parentchild-accounts-billing-hierarchy-issues)
* [Accounts with Prepayments/Commitments](/guides/billing-and-usage-data/running-viewing-and-managing-bills/troubleshooting-bills#accounts-with-prepaymentscommitments)
* [Unexpected Error](/guides/billing-and-usage-data/running-viewing-and-managing-bills/troubleshooting-bills#unexpected-error)
### Currency Conversion Rate Missing
If the *billing currency* set for your Organization or at Account level doesn't match the *pricing currency* set in the Plan Template/Plan you've attached to an Account for billing and you haven't defined a rate for converting the Plan pricing currency into the billing currency, then Bills will fail for the Account. To remedy:
* Check the currency set for the Organization or at Account Level - see [Creating and Managing Currencies](/guides/organization-and-access-management/viewing-and-editing-organization/creating-and-managing-currencies).
* Check the pricing currency set for the Plan Template/Plan - see [Editing Plan Templates and Plans](/guides/plans-and-pricing/working-with-plan-templates-and-plans/editing-plan-templates-and-plans).
* Edit your Organization configuration. First select **Settings**:
The **Settings** section opens at the **Organization** page with the **Configuration** tab selected.
2. On the **Organization configuration details** panel, select **Edit** The **Organization configuration** page opens.
3. Use the **Scheduled bill interval** drop-down to select the required interval in minutes or hours - ten options: **15 minutes, 30 minutes,** **1 hour**, **2 hours**, **3 hours**, **4 hours**, **6 hours**, **8 hours**, **12 hours**, or **24 hours**:
* If, and only if, you select **24 hours** to implement daily Bill updates, then optionally you can also select a **Scheduled bill offset** and specify the hour in the day - **1** to **23** - when the scheduled daily Bill update will run.
* The default is **Disabled**, which means no Billing is scheduled.
4. Select **Update Organization configuration**. You are returned to the **Configuration** tab where the **Scheduled bill interval** now shows on the **Organization configuration details** panel.
## Scheduling Billing Using API Call
**To schedule Billing using API call:**
1. Review the API Documentation at [https://m3ter.com/docs](https://m3ter.com/docs).
2. Open the **OrganizationConfig** section. You can use the [Update OrganizationConfig](/api/organizationconfig/update-organizationconfig) API call to define a schedule interval for updating Bills:
> **PUT** `/organizations/{orgid}/organizationconfig`
3. Enter the required parameters for this call and use the optional `scheduledBillInterval` request schema parameter to set the required interval:
* **For portions of an hour (minutes).** Two options: **0.25** (15 minutes) and **0.5** (30 minutes).
* **For full hours.** Enter **1** for every hour, **2** for every two hours, and so on. Eight options: **1**, **2**, **3**, **4**, **6**, **8**, **12**, or **24**.
* If, and only if, you use **24** to implement daily Bill updates, then you can also use the optional `scheduledBillOffset` request schema parameter to specify the hour in the day - **1** to **23** - when the scheduled daily Bill update will run.
* **Default.** The default is **0**, which disables scheduling.
4. Submit the API call.
# Troubleshooting Bills
Source: https://docs.m3ter.com/guides/billing-and-usage-data/running-viewing-and-managing-bills/troubleshooting-bills
If you're experiencing issues when generating bills for an end customer Account, it's well worth running through the following troubleshooting checklist of common billing problems with suggested remedies/checks.
* [Failed Bill Checklist](/guides/billing-and-usage-data/running-viewing-and-managing-bills/troubleshooting-bills#failed-bill-checklist)
* [Billing Dates Issues](/guides/billing-and-usage-data/running-viewing-and-managing-bills/troubleshooting-bills#billing-dates-issues)
* [Recalculating Bills after Billing Configuration Changes](/guides/billing-and-usage-data/running-viewing-and-managing-bills/troubleshooting-bills#recalculating-bills-after-billing-configuration-changes)
* [Prorated Charges](/guides/billing-and-usage-data/running-viewing-and-managing-bills/troubleshooting-bills#prorated-charges)
* [Using Preview Bill API Call with Debug Enabled](/guides/billing-and-usage-data/running-viewing-and-managing-bills/troubleshooting-bills#using-preview-bill-api-call-with-debug-enabled)
* [Querying and Checking Usage Data in Data Explorer](#querying-and-checking-usage-data-in-data-explorer)
## Failed Bill Checklist
Bills for an Account in your Organization might be failing to create for several reasons. You can use the *System Alerts* page in the Console as a starting point to check and remedy any issues which are causing Bills to fail. On your Organization **Dashboard**, *Your alerts* are listed and you can click **View all** to open the System Alerts page:
* When a Bill is created successfully, an **INFO** Alert is generated. You can click the Alert to bring up an Alert dialog, which identifies the Account and the Bill total is shown. You can then use this information to keep track of Bills and also to check if the calculated Bill amount is what you'd expected it to be.
* When a Bill fails to create, an **ERROR** Alert is generated. You can click on the Alert and in many cases the reason for the failure is explained in the Alert dialog.
Here are some of the main reasons Bills fail to create and how to remedy the cause of failure:
* [Currency Conversion Rate Missing](/guides/billing-and-usage-data/running-viewing-and-managing-bills/troubleshooting-bills#currency-conversion-rate-missing)
* [Compound Aggregation Calculation Invalid](/guides/billing-and-usage-data/running-viewing-and-managing-bills/troubleshooting-bills#compound-aggregation-calculation-invalid)
* [No Price Plan Attached to Account](/guides/billing-and-usage-data/running-viewing-and-managing-bills/troubleshooting-bills#no-price-plan-attached-to-account)
* [Usage Data Issues](/guides/billing-and-usage-data/running-viewing-and-managing-bills/troubleshooting-bills#usage-data-issues)
* [Parent/Child Accounts - Billing Hierarchy Issues](/guides/billing-and-usage-data/running-viewing-and-managing-bills/troubleshooting-bills#parentchild-accounts-billing-hierarchy-issues)
* [Accounts with Prepayments/Commitments](/guides/billing-and-usage-data/running-viewing-and-managing-bills/troubleshooting-bills#accounts-with-prepaymentscommitments)
* [Unexpected Error](/guides/billing-and-usage-data/running-viewing-and-managing-bills/troubleshooting-bills#unexpected-error)
### Currency Conversion Rate Missing
If the *billing currency* set for your Organization or at Account level doesn't match the *pricing currency* set in the Plan Template/Plan you've attached to an Account for billing and you haven't defined a rate for converting the Plan pricing currency into the billing currency, then Bills will fail for the Account. To remedy:
* Check the currency set for the Organization or at Account Level - see [Creating and Managing Currencies](/guides/organization-and-access-management/viewing-and-editing-organization/creating-and-managing-currencies).
* Check the pricing currency set for the Plan Template/Plan - see [Editing Plan Templates and Plans](/guides/plans-and-pricing/working-with-plan-templates-and-plans/editing-plan-templates-and-plans).
* Edit your Organization configuration. First select **Settings**:
![]() * The **Organization** page opens with the **Configuration** tab selected:
* Select **Currency settings**:
* The **Organization** page opens with the **Configuration** tab selected:
* Select **Currency settings**:
 * The **Currency settings** page opens.
* On the **Currency conversions** panel, select **Edit**.
* Add the required **Currency conversion** and then select **Update currency conversions**.
* Re-run billing for the Account.
**Tip:** The mismatch between the *billing currency* and *pricing currency* setting might not be explicit. For example, if you have entered "USD" for billing currency for Organization but entered "usd" - that is, in lower case - for Plan Template/Plan pricing currency, this will cause Bills to fail and a "Currency conversion missing" **ERROR** Alert will be generated. The remedy in this example is to update the Plan pricing currency setting to use upper case: "USD".
### Compound Aggregation Calculation Invalid
If you've used a Compound Aggregation - an Aggregation that uses a calculation - and the calculation is invalid and cannot be resolved by the m3ter calculation engine, then Bills will fail for any Account on a Plan that is priced using the Compound Aggregation. A simple example would be if your calculation attempts to multiply or divide two non-numeric values. An **ERROR** Alert will be generated that identifies the invalid Compound Aggregation and explains why the calculation it uses is invalid. To remedy:
* Open the Compound Aggregation and update the calculation as required in light of the explanation given on the Alert.
* Re-run Billing for the Account.
### No Priced Plan Attached to Account
A priced Plan has not been attached to an Account. This means that no pricing metrics are available for any usage data submitted for the Account so no Bill is generated.
To resolve this problem:
1. [Create a Priced Plan](/guides/plans-and-pricing/pricing-plans/pricing-plans) if you have not already created one.
2. [Attach the Plan to the Account](/guides/end-customer-accounts/attaching-plans-to-an-account) to create an Account Plan.
3. Re-run Bill generation.
### Usage Data Issues
Usage data may not have been uploaded correctly due to a variety of reasons. You can use the [Usage Data Explorer (v2)](/guides/data-explorer/usage-data-explorer-v2) to check if usage data and measures have been submitted against the Account. Key points to check:
* Does the Account number on the usage data match the Account number you are billing?
* Is the usage data within the service period being billed?
### Parent/Child Accounts - Billing Hierarchy Issues
For Parent/Child Accounts, billing hierarchy issues can cause problems. If Bills are failing to generate:
* Check at which level the Account Plan to be used for billing has been attached?
* Is the Account Plan attached to the Parent/Child, or both?
* Is the Account to which the Account Plan is attached part of the billing hierarchy?
For more details on Parent/Child Accounts billing hierarchy mode settings, see [Billing Hierarchy Modes for Parent/Child Accounts](/guides/end-customer-accounts/creating-and-working-with-child-accounts/billing-for-parent-child-accounts).
### Accounts with Prepayments/Commitments
If the Account has a Prepayment added, then it's worth noting:
* When using the **Bill with plan** option for billing Prepayment fees, ensure:
* The Account Plan has the same **Billing cycle date** as the Prepayment/Commitment.
* If configured, the Account Plan has the same Contract associated with it as the Prepayment. If Contracts do not match, then at billing the Prepayment amount will not be drawn-down against.
* If you have set up billing for Prepayment fees to **Bill on a schedule** and you have made changes to the schedule, check Bills that were generated according to the original schedule. See [Prepayment Billing on a Schedule](/guides/end-customer-accounts/creating-prepayments-for-accounts#prepayment-billing-on-a-schedule) for more details.
### Unexpected Error
If you receive a "Failed to create bill" **ERROR** on your **System Alerts** page, when you open the Alert an "Unexpected error" might be given as the reason for failure. This is for failures where the system cannot identify and report on a specific reason for the failure. In such cases, we recommend:
* Select the the Alert. The Alert dialog will identify the Account for which a Bill has failed to generate and the date the error occurred is given.
* [Contact m3ter Support](/guides/getting-started/contacting-m3ter-support) for help in investigating the error and have these details given in the Alert dialog ready to hand.
## Billing Dates Issues
There are several areas where billing dates can get out of alignment and cause issues for Bill generation:
* [Plan Pricing and Account Plan Dates not Synchronized](/guides/billing-and-usage-data/running-viewing-and-managing-bills/troubleshooting-bills#plan-pricing-dates-and-account-plan-dates-not-synchronized)
* [First and Subsequent Bill Dates not Aligned](/guides/billing-and-usage-data/running-viewing-and-managing-bills/troubleshooting-bills#first-bill-date-not-aligned)
* [Prepayment Dates Alignment with Required Billing Period](/guides/billing-and-usage-data/running-viewing-and-managing-bills/troubleshooting-bills#prepayment-dates-alignment-with-required-billing-period)
### Plan Pricing Dates and Account Plan Dates not Synchronized
When Account Bills are generated in m3ter, two key sets of dates affect what is calculated with respect to the usage charged for in the Bill:
* **Plan Pricing**. The period you've configured for the pricing on a Plan to be *applied to that Plan* - you set a start date and optional end date when you price a Plan.
* **Account Plan**. The period you've configured for a priced Plan to be *active for an Account* - when you attach the Plan to an Account to create an Account Plan, you set a start date and optional end date.
The start and end dates that define these two periods do not have to coincide, but if they do not, you might see a generated bill with unexpected amounts showing:
* **Example**. Suppose you've set up a pricing to be applied to a Plan to start on September 1st 2022 for the rest of the calendar year. You've then attached the priced Plan to become active for an Account on August 1st, also through to the end of the year. If, after some usage data has been submitted for the Account during the month of August, you open **Bill management** in the Console and **Re-run billing**, the Bill generated for the Account *will not show* charges for this submitted usage data. Because the pricing start date is set at September 1st, the Bill will only show any standing charges configured for the Plan.
* **Fix**. What's the fix for this sort of misalignment of dates for billing? Assuming monthly billing frequency, if you want to produce a Bill for the month of August that includes charges for usage data, you must go back into the **Pricing editor** and create a *second pricing* for the Plan with a start/end date of August 1st/ September 1st (remembering end dates are exclusive so to cover the August period through to midnight on August 31st). If you return to **Bill management** and **Re-run billing**, the bill for the same Account will now show charges for the August usage data according to the new pricing you've configured for the Plan, since the Plan is already active for the Account.
If you suspect this might be your billing issue, you can follow a course through the Console to quickly chase it down and confirm Account Plan/Plan Pricing dates alignment:
1. Open the page for the Account with billing issues and select the **Attached Plans** tab. The **Active and pending plans** panel lists Account Plans with **ACTIVE** and **PENDING** tags. Note the start/end dates of an **ACTIVE** Account Plan.
2. Select the hotlink text for the Account Plan. The **Plan attachment** page opens:
* Under Plan attachment details, you can read off the **Start** and **End** dates defining the *period the Account Plan will be active for the Account*.
3. Scroll down the page:
* Under **Plan details** you can read-off details of the Plan attached to the Account to create the Account Plan.
* Any **Pricing** configured for the attached Plan will be shown with the **Start** and **End** dates defining the *period a Pricing applies to the Plan*.
4. Check the start/end dates for the pricing on the Plan to confirm date alignment between *period pricing applies to Plan* and *period Account Plan is active for the Account*.
5. If you want to investigate further, select the **View pricing schedule** hotlink text for a **Pricing**:
* The **Pricing schedule** page for the priced Plan opens and gives you comprehensive details of the Plan with the **Aggregation** used to price it and date ranges for a list of (active or pending) **Pricings** you've configured for the Plan.
### First and Subsequent Bill Dates not Aligned
You can set up *first and subsequent* Bill creation dates at the Organization level when you configure your *Epoch settings* at **Settings>Organization>Edit Organization**. However, you can also define *first and subsequent* Bill creation dates at two further points in your overall configuration:
* **At Account Level**. You can optionally set a **Billing cycle date** for a specific Account and this will override the Epoch settings at Organizational level.
* **At Account Plan Level**. You can optionally set a **Billing cycle date** for a specific Account Plan that will be used to determine charges on an Account and this will override the **Billing cycle date** you might have set up at Account level.
With these configuration dependencies in mind, if you're seeing some unexpected billing behavior, it's well worth performing a quick check to confirm the *first and subsequent* Bill creation date that applies for the Account - at Organization, Account, or Account Plan level - is correct. For more details with explanatory examples, see [First and Subsequent Bill Dates](/guides/getting-started/working-with-dates-in-m3ter-easy-reference#first-and-subsequent-bill-creation-dates).
### Prepayment Dates Alignment with Required Billing Period
If you add a Prepayment to an end-customer Account and not all of the Prepayment is paid upfront, to set up billing on the Account for the remaining Prepayment fees due you can select either to *Bill with Plan* or *Bill on a Schedule* - see [Creating Prepayments for Accounts](/guides/end-customer-accounts/creating-prepayments-for-accounts) for more details.
If you choose to set up billing for any outstanding Prepayment fees due on an Account using the *Bill with plan* option, please take care to ensure the required alignment of start/end dates for the Prepayment service period with the required overall billing period:
* For example, suppose you select a Plan for Prepayment billing that is set up for quarterly billing. This is what your Prepayment billing use case requires:
* A \$10,000 Prepayment has been agreed with your customer with nothing to be paid upfront. The Prepayment amount is to be paid in four equal amounts at quarterly intervals across the first year.
* You want to Bill in advance and the first bill date to be July 1st 2025.
* The first Bill amount to be set at \$2,500, and the remaining \$7,500 is to be billed at quarterly intervals in three equal amounts of \$2,500.
* However, if the end date configured for the Prepayment service period doesn't extend for the full year from the first bill date - say the Prepayment end date is set at June 15th 2026:
* The **Currency settings** page opens.
* On the **Currency conversions** panel, select **Edit**.
* Add the required **Currency conversion** and then select **Update currency conversions**.
* Re-run billing for the Account.
**Tip:** The mismatch between the *billing currency* and *pricing currency* setting might not be explicit. For example, if you have entered "USD" for billing currency for Organization but entered "usd" - that is, in lower case - for Plan Template/Plan pricing currency, this will cause Bills to fail and a "Currency conversion missing" **ERROR** Alert will be generated. The remedy in this example is to update the Plan pricing currency setting to use upper case: "USD".
### Compound Aggregation Calculation Invalid
If you've used a Compound Aggregation - an Aggregation that uses a calculation - and the calculation is invalid and cannot be resolved by the m3ter calculation engine, then Bills will fail for any Account on a Plan that is priced using the Compound Aggregation. A simple example would be if your calculation attempts to multiply or divide two non-numeric values. An **ERROR** Alert will be generated that identifies the invalid Compound Aggregation and explains why the calculation it uses is invalid. To remedy:
* Open the Compound Aggregation and update the calculation as required in light of the explanation given on the Alert.
* Re-run Billing for the Account.
### No Priced Plan Attached to Account
A priced Plan has not been attached to an Account. This means that no pricing metrics are available for any usage data submitted for the Account so no Bill is generated.
To resolve this problem:
1. [Create a Priced Plan](/guides/plans-and-pricing/pricing-plans/pricing-plans) if you have not already created one.
2. [Attach the Plan to the Account](/guides/end-customer-accounts/attaching-plans-to-an-account) to create an Account Plan.
3. Re-run Bill generation.
### Usage Data Issues
Usage data may not have been uploaded correctly due to a variety of reasons. You can use the [Usage Data Explorer (v2)](/guides/data-explorer/usage-data-explorer-v2) to check if usage data and measures have been submitted against the Account. Key points to check:
* Does the Account number on the usage data match the Account number you are billing?
* Is the usage data within the service period being billed?
### Parent/Child Accounts - Billing Hierarchy Issues
For Parent/Child Accounts, billing hierarchy issues can cause problems. If Bills are failing to generate:
* Check at which level the Account Plan to be used for billing has been attached?
* Is the Account Plan attached to the Parent/Child, or both?
* Is the Account to which the Account Plan is attached part of the billing hierarchy?
For more details on Parent/Child Accounts billing hierarchy mode settings, see [Billing Hierarchy Modes for Parent/Child Accounts](/guides/end-customer-accounts/creating-and-working-with-child-accounts/billing-for-parent-child-accounts).
### Accounts with Prepayments/Commitments
If the Account has a Prepayment added, then it's worth noting:
* When using the **Bill with plan** option for billing Prepayment fees, ensure:
* The Account Plan has the same **Billing cycle date** as the Prepayment/Commitment.
* If configured, the Account Plan has the same Contract associated with it as the Prepayment. If Contracts do not match, then at billing the Prepayment amount will not be drawn-down against.
* If you have set up billing for Prepayment fees to **Bill on a schedule** and you have made changes to the schedule, check Bills that were generated according to the original schedule. See [Prepayment Billing on a Schedule](/guides/end-customer-accounts/creating-prepayments-for-accounts#prepayment-billing-on-a-schedule) for more details.
### Unexpected Error
If you receive a "Failed to create bill" **ERROR** on your **System Alerts** page, when you open the Alert an "Unexpected error" might be given as the reason for failure. This is for failures where the system cannot identify and report on a specific reason for the failure. In such cases, we recommend:
* Select the the Alert. The Alert dialog will identify the Account for which a Bill has failed to generate and the date the error occurred is given.
* [Contact m3ter Support](/guides/getting-started/contacting-m3ter-support) for help in investigating the error and have these details given in the Alert dialog ready to hand.
## Billing Dates Issues
There are several areas where billing dates can get out of alignment and cause issues for Bill generation:
* [Plan Pricing and Account Plan Dates not Synchronized](/guides/billing-and-usage-data/running-viewing-and-managing-bills/troubleshooting-bills#plan-pricing-dates-and-account-plan-dates-not-synchronized)
* [First and Subsequent Bill Dates not Aligned](/guides/billing-and-usage-data/running-viewing-and-managing-bills/troubleshooting-bills#first-bill-date-not-aligned)
* [Prepayment Dates Alignment with Required Billing Period](/guides/billing-and-usage-data/running-viewing-and-managing-bills/troubleshooting-bills#prepayment-dates-alignment-with-required-billing-period)
### Plan Pricing Dates and Account Plan Dates not Synchronized
When Account Bills are generated in m3ter, two key sets of dates affect what is calculated with respect to the usage charged for in the Bill:
* **Plan Pricing**. The period you've configured for the pricing on a Plan to be *applied to that Plan* - you set a start date and optional end date when you price a Plan.
* **Account Plan**. The period you've configured for a priced Plan to be *active for an Account* - when you attach the Plan to an Account to create an Account Plan, you set a start date and optional end date.
The start and end dates that define these two periods do not have to coincide, but if they do not, you might see a generated bill with unexpected amounts showing:
* **Example**. Suppose you've set up a pricing to be applied to a Plan to start on September 1st 2022 for the rest of the calendar year. You've then attached the priced Plan to become active for an Account on August 1st, also through to the end of the year. If, after some usage data has been submitted for the Account during the month of August, you open **Bill management** in the Console and **Re-run billing**, the Bill generated for the Account *will not show* charges for this submitted usage data. Because the pricing start date is set at September 1st, the Bill will only show any standing charges configured for the Plan.
* **Fix**. What's the fix for this sort of misalignment of dates for billing? Assuming monthly billing frequency, if you want to produce a Bill for the month of August that includes charges for usage data, you must go back into the **Pricing editor** and create a *second pricing* for the Plan with a start/end date of August 1st/ September 1st (remembering end dates are exclusive so to cover the August period through to midnight on August 31st). If you return to **Bill management** and **Re-run billing**, the bill for the same Account will now show charges for the August usage data according to the new pricing you've configured for the Plan, since the Plan is already active for the Account.
If you suspect this might be your billing issue, you can follow a course through the Console to quickly chase it down and confirm Account Plan/Plan Pricing dates alignment:
1. Open the page for the Account with billing issues and select the **Attached Plans** tab. The **Active and pending plans** panel lists Account Plans with **ACTIVE** and **PENDING** tags. Note the start/end dates of an **ACTIVE** Account Plan.
2. Select the hotlink text for the Account Plan. The **Plan attachment** page opens:
* Under Plan attachment details, you can read off the **Start** and **End** dates defining the *period the Account Plan will be active for the Account*.
3. Scroll down the page:
* Under **Plan details** you can read-off details of the Plan attached to the Account to create the Account Plan.
* Any **Pricing** configured for the attached Plan will be shown with the **Start** and **End** dates defining the *period a Pricing applies to the Plan*.
4. Check the start/end dates for the pricing on the Plan to confirm date alignment between *period pricing applies to Plan* and *period Account Plan is active for the Account*.
5. If you want to investigate further, select the **View pricing schedule** hotlink text for a **Pricing**:
* The **Pricing schedule** page for the priced Plan opens and gives you comprehensive details of the Plan with the **Aggregation** used to price it and date ranges for a list of (active or pending) **Pricings** you've configured for the Plan.
### First and Subsequent Bill Dates not Aligned
You can set up *first and subsequent* Bill creation dates at the Organization level when you configure your *Epoch settings* at **Settings>Organization>Edit Organization**. However, you can also define *first and subsequent* Bill creation dates at two further points in your overall configuration:
* **At Account Level**. You can optionally set a **Billing cycle date** for a specific Account and this will override the Epoch settings at Organizational level.
* **At Account Plan Level**. You can optionally set a **Billing cycle date** for a specific Account Plan that will be used to determine charges on an Account and this will override the **Billing cycle date** you might have set up at Account level.
With these configuration dependencies in mind, if you're seeing some unexpected billing behavior, it's well worth performing a quick check to confirm the *first and subsequent* Bill creation date that applies for the Account - at Organization, Account, or Account Plan level - is correct. For more details with explanatory examples, see [First and Subsequent Bill Dates](/guides/getting-started/working-with-dates-in-m3ter-easy-reference#first-and-subsequent-bill-creation-dates).
### Prepayment Dates Alignment with Required Billing Period
If you add a Prepayment to an end-customer Account and not all of the Prepayment is paid upfront, to set up billing on the Account for the remaining Prepayment fees due you can select either to *Bill with Plan* or *Bill on a Schedule* - see [Creating Prepayments for Accounts](/guides/end-customer-accounts/creating-prepayments-for-accounts) for more details.
If you choose to set up billing for any outstanding Prepayment fees due on an Account using the *Bill with plan* option, please take care to ensure the required alignment of start/end dates for the Prepayment service period with the required overall billing period:
* For example, suppose you select a Plan for Prepayment billing that is set up for quarterly billing. This is what your Prepayment billing use case requires:
* A \$10,000 Prepayment has been agreed with your customer with nothing to be paid upfront. The Prepayment amount is to be paid in four equal amounts at quarterly intervals across the first year.
* You want to Bill in advance and the first bill date to be July 1st 2025.
* The first Bill amount to be set at \$2,500, and the remaining \$7,500 is to be billed at quarterly intervals in three equal amounts of \$2,500.
* However, if the end date configured for the Prepayment service period doesn't extend for the full year from the first bill date - say the Prepayment end date is set at June 15th 2026:
![]() * In this case, the Bills will not be calculated at the correct \$2,500 for each of the remaining three quarters:
* In this case, the Bills will not be calculated at the correct \$2,500 for each of the remaining three quarters:
![]() * We can see that because the Prepayment service period does not extend for the full extent of the final quarter, the remaining \$7,500 due has been split between the 2nd and 3rd quarterly Bills.
* If we adjust the Prepayment service period to make the end date July 1st 2026:
* We can see that because the Prepayment service period does not extend for the full extent of the final quarter, the remaining \$7,500 due has been split between the 2nd and 3rd quarterly Bills.
* If we adjust the Prepayment service period to make the end date July 1st 2026:
![]() * And we then recalculate the 2nd, 3rd, and 4th quarter Bills, we see the correct Bill totals of \$2,500:
* And we then recalculate the 2nd, 3rd, and 4th quarter Bills, we see the correct Bill totals of \$2,500:
![]() ## Recalculating Bills after Billing Configuration Changes
Suppose you've set up a specific billing configuration for an end-customer Account and Bills have already been generated according to this configuration. If you then make changes to the billing configuration, when you recalculate the previously generated Bills, the changes might not be reflected the recalculated Bills:
* [Removing or Changing an Account Plan](/guides/billing-and-usage-data/running-viewing-and-managing-bills/troubleshooting-bills#removing-or-changing-an-account-plan)
* [Updating a Prepayment/Commitment Fee Billing Schedule](/guides/billing-and-usage-data/running-viewing-and-managing-bills/troubleshooting-bills#updating-a-prepaymentcommitment-fee-billing-schedule)
### Removing or Changing an Account Plan
After setting up billing configuration for an end-customer Account by attaching one or more Account Plans to the Account, you might need to change the billing configuration for the Account for cases such as:
* An end-customer begins their service period with you having signed-up to consume several of your products or services. After some billing dates have passed, the customer decides they want to drop one of the products. Several Account Plans are attached to the Account - one for each of the products consumed. You therefore remove the Account Plan from their Account covering charges for the dropped product. In this type of case, any charges due under the previously attached Account Plan - such as standing charges even if no product usage charges had accrued - *will not be removed* when you simply recalculate the existing Bills. You must first *manually delete these Bills* and then *re-run billing* to ensure the billing configuration changes are correctly shown on the Account's Bills.
* In a similar way, if Bills have been created for an Account, you want adjust the pricing for the product. To do this, you swap out the Account Plan for a product your end-customer consumes by removing the original Account Plan attached to the Account and replacing it with a new one. To ensure Bills created for the original billing configuration are updated, you must first *manually delete* those existing Bills and then *re-run billing*.
### Updating a Prepayment/Commitment Fee Billing Schedule
Suppose you've set up a schedule for Prepayment billing for an Account and a Bill has already been generated for one of the Prepayment fee dates on that schedule, a Bill that might also includes usage charges for priced Plans attached to the Account. If you then change the dates for the Prepayment schedule, when you recalculate the existing Bill the Prepayment fee due under the original schedule will still be included. You must *first delete the old Bill* generated for the original Prepayment fee schedule and then *re-run billing*. The new Bill will then be generated in accordance with the updated Prepayment schedule.
**Important: Scheduled Billing!** If you are using [Scheduled Billing](/guides/billing-and-usage-data/running-viewing-and-managing-bills/scheduling-billing), please ensure you check for this after updating a Prepayment fee schedule.
## Prorated Charges
There are cases where line item charges shown on Bills are prorated. If you see a charge amount on a Bill which you were not expecting or which you find puzzling, this mechanism might be the cause. It's worth checking for this when you find what at first appears to be an odd billing charge.
### Bill Doesn't Cover Entire Billing Period
If a Bill doesn't cover the entire billing period, then prorating is applied:
* **Billing Charges Start Mid Billing Period**. For example, if you've set things up to bill an Account on a monthly frequency on the 1st of each month, *BUT* you've set the start and end dates for the Account Plan to fall *somewhere within calendar month billing periods* - the first and last Bills will apply prorating accordingly:
* Similarly, if the Account Plan is active for the Account from the first day of the first month and last day of the last month of the overall service period, *BUT* when you priced the Product Plan you set the start and end dates for the period the pricing *applies to the Plan* somewhere within the first and last calendar month of the overall service period.
* Similarly, for other billing frequencies - weekly or yearly.
* **First and subsequent Bill dates not set to 1st day of Billing Period**. For example, prorating is applied if you've set things up to bill an Account on a monthly frequency and the Account Plan is set to start to be active for the Account on the 1st of a month and end on the last day of a month, *BUT* you've set the *first and subsequent Bill date* somewhere in the middle of the first and successive months. The first Bill will apply prorating to cover the appropriate *leading portion* of the first billing period, and the last Bill will apply prorating to cover the appropriate *trailing portion* of the last billing period of the overall service period.
* Similarly, for other billing frequencies - weekly or yearly.
**Note: Prorating Precision**. The following examples illustrate cases of prorating applied for whole days, such as when an Account Plan attached to an Account only covers a number of whole days within a monthly billing period. However, prorating of standing charge and minimum spend amounts for billing is done to millisecond precision to accommodate cases where start or end date/times fall within a single day, such as when one Account Plan ends at 10:00 and another Account Plan starts at 14:00 on the same day.
Here are some examples to illustrate:
* [Billing Charges Start Mid-Billing Period](/guides/billing-and-usage-data/running-viewing-and-managing-bills/troubleshooting-bills#billing-charges-start-mid-billing-period)
* [First Bill Date Not Set to 1st of Month](/guides/billing-and-usage-data/running-viewing-and-managing-bills/troubleshooting-bills#first-bill-date-not-set-to-1st-of-month)
#### Billing Charges Start Mid-Billing Period
Suppose we've set up an Account to be billed using a priced Product Plan we've attached to the Account where the Plan is set up for:
* Monthly billing frequency billed on the 1st of each month.
* A Standing Charge of \$20.
* A Minimum Spend amount of \$40.
However, when we attached the Plan to create an Account Plan, we select a start date for the Account Plan to become active for the Account that falls somewhere within the first monthly billing period. This means on the first Bill, the Standing Charge and Minimum Spend amounts will be prorated for the number of days of the first month's billing period the Account Plan was active for the Account:
## Recalculating Bills after Billing Configuration Changes
Suppose you've set up a specific billing configuration for an end-customer Account and Bills have already been generated according to this configuration. If you then make changes to the billing configuration, when you recalculate the previously generated Bills, the changes might not be reflected the recalculated Bills:
* [Removing or Changing an Account Plan](/guides/billing-and-usage-data/running-viewing-and-managing-bills/troubleshooting-bills#removing-or-changing-an-account-plan)
* [Updating a Prepayment/Commitment Fee Billing Schedule](/guides/billing-and-usage-data/running-viewing-and-managing-bills/troubleshooting-bills#updating-a-prepaymentcommitment-fee-billing-schedule)
### Removing or Changing an Account Plan
After setting up billing configuration for an end-customer Account by attaching one or more Account Plans to the Account, you might need to change the billing configuration for the Account for cases such as:
* An end-customer begins their service period with you having signed-up to consume several of your products or services. After some billing dates have passed, the customer decides they want to drop one of the products. Several Account Plans are attached to the Account - one for each of the products consumed. You therefore remove the Account Plan from their Account covering charges for the dropped product. In this type of case, any charges due under the previously attached Account Plan - such as standing charges even if no product usage charges had accrued - *will not be removed* when you simply recalculate the existing Bills. You must first *manually delete these Bills* and then *re-run billing* to ensure the billing configuration changes are correctly shown on the Account's Bills.
* In a similar way, if Bills have been created for an Account, you want adjust the pricing for the product. To do this, you swap out the Account Plan for a product your end-customer consumes by removing the original Account Plan attached to the Account and replacing it with a new one. To ensure Bills created for the original billing configuration are updated, you must first *manually delete* those existing Bills and then *re-run billing*.
### Updating a Prepayment/Commitment Fee Billing Schedule
Suppose you've set up a schedule for Prepayment billing for an Account and a Bill has already been generated for one of the Prepayment fee dates on that schedule, a Bill that might also includes usage charges for priced Plans attached to the Account. If you then change the dates for the Prepayment schedule, when you recalculate the existing Bill the Prepayment fee due under the original schedule will still be included. You must *first delete the old Bill* generated for the original Prepayment fee schedule and then *re-run billing*. The new Bill will then be generated in accordance with the updated Prepayment schedule.
**Important: Scheduled Billing!** If you are using [Scheduled Billing](/guides/billing-and-usage-data/running-viewing-and-managing-bills/scheduling-billing), please ensure you check for this after updating a Prepayment fee schedule.
## Prorated Charges
There are cases where line item charges shown on Bills are prorated. If you see a charge amount on a Bill which you were not expecting or which you find puzzling, this mechanism might be the cause. It's worth checking for this when you find what at first appears to be an odd billing charge.
### Bill Doesn't Cover Entire Billing Period
If a Bill doesn't cover the entire billing period, then prorating is applied:
* **Billing Charges Start Mid Billing Period**. For example, if you've set things up to bill an Account on a monthly frequency on the 1st of each month, *BUT* you've set the start and end dates for the Account Plan to fall *somewhere within calendar month billing periods* - the first and last Bills will apply prorating accordingly:
* Similarly, if the Account Plan is active for the Account from the first day of the first month and last day of the last month of the overall service period, *BUT* when you priced the Product Plan you set the start and end dates for the period the pricing *applies to the Plan* somewhere within the first and last calendar month of the overall service period.
* Similarly, for other billing frequencies - weekly or yearly.
* **First and subsequent Bill dates not set to 1st day of Billing Period**. For example, prorating is applied if you've set things up to bill an Account on a monthly frequency and the Account Plan is set to start to be active for the Account on the 1st of a month and end on the last day of a month, *BUT* you've set the *first and subsequent Bill date* somewhere in the middle of the first and successive months. The first Bill will apply prorating to cover the appropriate *leading portion* of the first billing period, and the last Bill will apply prorating to cover the appropriate *trailing portion* of the last billing period of the overall service period.
* Similarly, for other billing frequencies - weekly or yearly.
**Note: Prorating Precision**. The following examples illustrate cases of prorating applied for whole days, such as when an Account Plan attached to an Account only covers a number of whole days within a monthly billing period. However, prorating of standing charge and minimum spend amounts for billing is done to millisecond precision to accommodate cases where start or end date/times fall within a single day, such as when one Account Plan ends at 10:00 and another Account Plan starts at 14:00 on the same day.
Here are some examples to illustrate:
* [Billing Charges Start Mid-Billing Period](/guides/billing-and-usage-data/running-viewing-and-managing-bills/troubleshooting-bills#billing-charges-start-mid-billing-period)
* [First Bill Date Not Set to 1st of Month](/guides/billing-and-usage-data/running-viewing-and-managing-bills/troubleshooting-bills#first-bill-date-not-set-to-1st-of-month)
#### Billing Charges Start Mid-Billing Period
Suppose we've set up an Account to be billed using a priced Product Plan we've attached to the Account where the Plan is set up for:
* Monthly billing frequency billed on the 1st of each month.
* A Standing Charge of \$20.
* A Minimum Spend amount of \$40.
However, when we attached the Plan to create an Account Plan, we select a start date for the Account Plan to become active for the Account that falls somewhere within the first monthly billing period. This means on the first Bill, the Standing Charge and Minimum Spend amounts will be prorated for the number of days of the first month's billing period the Account Plan was active for the Account:
![T Shoot Bills113]() In this example, we've attached the Plan to create an Account Plan that becomes active on May 25th 2025 for the Account. Suppose that as yet no usage charges have accrued since we attached the Plan and we now run a Bill for June 1st 2025:
In this example, we've attached the Plan to create an Account Plan that becomes active on May 25th 2025 for the Account. Suppose that as yet no usage charges have accrued since we attached the Plan and we now run a Bill for June 1st 2025:
![T Shoot Bills14]() We can see that prorating is applied for the non-usage charges to bill only 7-day's worth each of the 31-day month of May for the \$20 Standing Charge and \$40 Minimum Spend.
A similar prorating occurs if we set the *end date* for when the Account Plan ceases to be active for the Account on a date that falls somewhere within the final billing period:
* To adapt this example, suppose we'd set the end date for the Account Plan at May 25th 2026. The final Bill for June 1st 2026, would then prorate the \$20 Standing Charge and \$40 Minimum spend amounts accordingly. Remembering that end dates are exclusive, the final Bill shows 24-day's worth of the 31-day month of May for these charges:
We can see that prorating is applied for the non-usage charges to bill only 7-day's worth each of the 31-day month of May for the \$20 Standing Charge and \$40 Minimum Spend.
A similar prorating occurs if we set the *end date* for when the Account Plan ceases to be active for the Account on a date that falls somewhere within the final billing period:
* To adapt this example, suppose we'd set the end date for the Account Plan at May 25th 2026. The final Bill for June 1st 2026, would then prorate the \$20 Standing Charge and \$40 Minimum spend amounts accordingly. Remembering that end dates are exclusive, the final Bill shows 24-day's worth of the 31-day month of May for these charges:
![T Shoot Bills15]() #### First and Subsequent Bill Date Not Set to 1st of Month
If you set the [first and subsequent Bill creation date](/guides/authenticating-with-the-platform/service-authentication#generating-an-api-key-and-secret-for-a-service-user) for an Account to fall somewhere mid-month, then the billing period for calculating any prorated charges will span that date on successive months. For example with a monthly billing frequency, if you set first and subsequent Bill date at May 15th, then the first billing period is April 15th to May 15th, and it's important to note that the number of days in that period will vary depending on the successive months the period spans.
Suppose we've set up an Account to be billed using a priced Product Plan we've attached to the Account where the Plan is set up for:
* Monthly billing frequency.
* A Standing Charge of \$20.
* A Minimum Spend amount of \$40.
* The Account Plan is active for billing the Account from the first day of the first month until the last day of the last month - for our example, an overall period of May 1st 2025 until May 31st 2026:
#### First and Subsequent Bill Date Not Set to 1st of Month
If you set the [first and subsequent Bill creation date](/guides/authenticating-with-the-platform/service-authentication#generating-an-api-key-and-secret-for-a-service-user) for an Account to fall somewhere mid-month, then the billing period for calculating any prorated charges will span that date on successive months. For example with a monthly billing frequency, if you set first and subsequent Bill date at May 15th, then the first billing period is April 15th to May 15th, and it's important to note that the number of days in that period will vary depending on the successive months the period spans.
Suppose we've set up an Account to be billed using a priced Product Plan we've attached to the Account where the Plan is set up for:
* Monthly billing frequency.
* A Standing Charge of \$20.
* A Minimum Spend amount of \$40.
* The Account Plan is active for billing the Account from the first day of the first month until the last day of the last month - for our example, an overall period of May 1st 2025 until May 31st 2026:
![T Shoot Bills19]() However, we've set the **Billing cycle date** for the Account at May 15th 2025:
However, we've set the **Billing cycle date** for the Account at May 15th 2025:
 Suppose as yet no usage charges have accrued on the Account and we run billing for the first bill date:
![T Shoot Bills16]() Since we've set the **Billing cycle date** as May 15th, the billing period is determined as the 30-day period April 15th 2025 to May 15th 2025. We can see that prorating is applied for the non-usage charges to bill only 14-day's worth each of this 30-day period for the \$20 Standing Charge and \$40 Minimum Spend.
A similar prorating occurs for the final Bill for this example, when we again assume no usage charges have accrued and we run billing for June 15th 2026 - only 17-day's worth each of the 31-day billing period from May 15th 2026 to June 14th 2026 for the \$20 Standing Charge and \$40 Minimum Spend:
Since we've set the **Billing cycle date** as May 15th, the billing period is determined as the 30-day period April 15th 2025 to May 15th 2025. We can see that prorating is applied for the non-usage charges to bill only 14-day's worth each of this 30-day period for the \$20 Standing Charge and \$40 Minimum Spend.
A similar prorating occurs for the final Bill for this example, when we again assume no usage charges have accrued and we run billing for June 15th 2026 - only 17-day's worth each of the 31-day billing period from May 15th 2026 to June 14th 2026 for the \$20 Standing Charge and \$40 Minimum Spend:
![T Shoot Bills18]() ## Using Preview Bill API Call with Debug Enabled
When you generate a bill and the result isn't what you expect, you can use the *Preview Bill* API call with *Debug* enabled to review information in the response which might help you to figure out what's going wrong. Here's an example to follow using Postman.
**To make a Preview Bill call with debug enabled in Postman:**
1. Make the usual preparation for Service User authentication with the platform by generating an **Access Key id** and **Api Secret** in the Console - see [Generating an API Key and Secret for a Service User](/guides/authenticating-with-the-platform/service-authentication#generating-an-api-key-and-secret-for-a-service-user).
2. In your Postman workspace, obtain a Bearer Token for the Service User using the Access Key id and Api Secret - see [Obtaining a Bearer Token Using Basic Auth](/api/account/list-accounts).
3. If you are unsure of the Account id of the Account for which bill generation has failed, then use your Bearer Token to submit a **GET** *List Accounts* call for your Organization:
> `https://api.m3ter.com/organizations/396d788d-5174-XyXy-RsRs-a12f3456fc78/accounts`
The response will list all of the Accounts in your Organization and you can read-off the Account id you need. See the API Reference for the [List Accounts](/api/account/list-accounts) call for more details.
4. Now, submit a **POST** *Preview Bill* call for the relevant Account using your Bearer Token and with debug enabled:
> `https://api.m3ter.com/organizations/396d788d-5174-4e8b-9d69-a41f4671fc33/bills/preview?debug=true`
In the **Body** tab, enter the relevant bill data, for example:
```json theme={null}
{
"lastDateInBillingPeriod": "2022-06-30",
"accountIds": ["18611463-aa04-46bf-9233-bfdab1fcf082"],
"billingFrequency": "MONTHLY",
"billFrequencyInterval": 1
}
```
See the API Reference for the [Preview Bill](/api/bill/preview-bill) call for more details.
5. In the `debugLog` section of the response schema, you can read-off debug `INFO`. For example:
```json theme={null}
"debugLog": [
"INFO Retrieving billing configuration for account:18611463-aa04-46bf-9233-bfdab1fcf082",
"INFO Getting required bills to generate",
"INFO Will generate bill for date:2022-07-01 interval:1 frequency:MONTHLY",
"INFO Generating bill for account:18611463-aa04-46bf-9233-bfdab1fcf082 date:2022-07-01 interval:1 frequency:MONTHLY",
"INFO Adding standing charge of 25.0 for Plan ee03ac6f-77d1-4ae7-81cd-4e62673b2b0f",
"INFO Retrieving aggregated usage between 2022-06-01T00:00:00Z to 2022-07-01T00:00:00Z for meter code:my_meter1 aggregation:SUM field:gb_store segments: for account codes:[doetech_premium2]",
"INFO No aggregated usage found",
"INFO Processing usage for Plan ee03ac6f-77d1-4ae7-81cd-4e62673b2b0f",
"INFO No product dynamic credits to apply",
"INFO Adding arrears minimum spend adjustment of 1.5E+2 for Plan ee03ac6f-77d1-4ae7-81cd-4e62673b2b0f",
"INFO No global dynamic credits to apply",
"INFO No commitments to consume",
"INFO No commitments to charge fee"
]
```
In this example, at line **8**, we can see that `"No aggregated usage found"` for the target field on the Meter for the billing time period, all as detailed on line **7**. This might the reason the Bill amount is not what was expected, which can now be followed-up.
## Querying and Checking Usage Data in Data Explorer
The Usage Data Explorer (v2) is a great tool that let's you query for usage data held for your Organization in m3ter. We strongly urge you to exploit the Usage Data Explorer (v2) when investigating and chasing down any knottier billing issues you are encountering. You can quickly build a usage data query and review the returned usage data measurements ingested into the platform. For details see [Usage Data Explorer (v2)](/guides/data-explorer/usage-data-explorer-v2).
# Viewing Bill History
Source: https://docs.m3ter.com/guides/billing-and-usage-data/running-viewing-and-managing-bills/viewing-bill-history
Under Billing, you can review the *Bill history* for a selected Account. You can inspect the standing charges and pricing charges under the pricing Plans attached to the Account. You can also open a pricing Plan used for a Bill and review the pricing structure of the Plan more closely.
This topic explains how to work in the Billing section to open and view an Account's Bill history.
**To view Bill history for an Account:**
1. Select **Billing**. The **Bill management** page opens.
2. Select **Bill history**:
## Using Preview Bill API Call with Debug Enabled
When you generate a bill and the result isn't what you expect, you can use the *Preview Bill* API call with *Debug* enabled to review information in the response which might help you to figure out what's going wrong. Here's an example to follow using Postman.
**To make a Preview Bill call with debug enabled in Postman:**
1. Make the usual preparation for Service User authentication with the platform by generating an **Access Key id** and **Api Secret** in the Console - see [Generating an API Key and Secret for a Service User](/guides/authenticating-with-the-platform/service-authentication#generating-an-api-key-and-secret-for-a-service-user).
2. In your Postman workspace, obtain a Bearer Token for the Service User using the Access Key id and Api Secret - see [Obtaining a Bearer Token Using Basic Auth](/api/account/list-accounts).
3. If you are unsure of the Account id of the Account for which bill generation has failed, then use your Bearer Token to submit a **GET** *List Accounts* call for your Organization:
> `https://api.m3ter.com/organizations/396d788d-5174-XyXy-RsRs-a12f3456fc78/accounts`
The response will list all of the Accounts in your Organization and you can read-off the Account id you need. See the API Reference for the [List Accounts](/api/account/list-accounts) call for more details.
4. Now, submit a **POST** *Preview Bill* call for the relevant Account using your Bearer Token and with debug enabled:
> `https://api.m3ter.com/organizations/396d788d-5174-4e8b-9d69-a41f4671fc33/bills/preview?debug=true`
In the **Body** tab, enter the relevant bill data, for example:
```json theme={null}
{
"lastDateInBillingPeriod": "2022-06-30",
"accountIds": ["18611463-aa04-46bf-9233-bfdab1fcf082"],
"billingFrequency": "MONTHLY",
"billFrequencyInterval": 1
}
```
See the API Reference for the [Preview Bill](/api/bill/preview-bill) call for more details.
5. In the `debugLog` section of the response schema, you can read-off debug `INFO`. For example:
```json theme={null}
"debugLog": [
"INFO Retrieving billing configuration for account:18611463-aa04-46bf-9233-bfdab1fcf082",
"INFO Getting required bills to generate",
"INFO Will generate bill for date:2022-07-01 interval:1 frequency:MONTHLY",
"INFO Generating bill for account:18611463-aa04-46bf-9233-bfdab1fcf082 date:2022-07-01 interval:1 frequency:MONTHLY",
"INFO Adding standing charge of 25.0 for Plan ee03ac6f-77d1-4ae7-81cd-4e62673b2b0f",
"INFO Retrieving aggregated usage between 2022-06-01T00:00:00Z to 2022-07-01T00:00:00Z for meter code:my_meter1 aggregation:SUM field:gb_store segments: for account codes:[doetech_premium2]",
"INFO No aggregated usage found",
"INFO Processing usage for Plan ee03ac6f-77d1-4ae7-81cd-4e62673b2b0f",
"INFO No product dynamic credits to apply",
"INFO Adding arrears minimum spend adjustment of 1.5E+2 for Plan ee03ac6f-77d1-4ae7-81cd-4e62673b2b0f",
"INFO No global dynamic credits to apply",
"INFO No commitments to consume",
"INFO No commitments to charge fee"
]
```
In this example, at line **8**, we can see that `"No aggregated usage found"` for the target field on the Meter for the billing time period, all as detailed on line **7**. This might the reason the Bill amount is not what was expected, which can now be followed-up.
## Querying and Checking Usage Data in Data Explorer
The Usage Data Explorer (v2) is a great tool that let's you query for usage data held for your Organization in m3ter. We strongly urge you to exploit the Usage Data Explorer (v2) when investigating and chasing down any knottier billing issues you are encountering. You can quickly build a usage data query and review the returned usage data measurements ingested into the platform. For details see [Usage Data Explorer (v2)](/guides/data-explorer/usage-data-explorer-v2).
# Viewing Bill History
Source: https://docs.m3ter.com/guides/billing-and-usage-data/running-viewing-and-managing-bills/viewing-bill-history
Under Billing, you can review the *Bill history* for a selected Account. You can inspect the standing charges and pricing charges under the pricing Plans attached to the Account. You can also open a pricing Plan used for a Bill and review the pricing structure of the Plan more closely.
This topic explains how to work in the Billing section to open and view an Account's Bill history.
**To view Bill history for an Account:**
1. Select **Billing**. The **Bill management** page opens.
2. Select **Bill history**:
![]() The **Bill history** page opens.
3. Use the drop-down to select the **Account** for which you want to view Bill history. The Bills generated for the Account are listed with the most recent shown first:
The **Bill history** page opens.
3. Use the drop-down to select the **Account** for which you want to view Bill history. The Bills generated for the Account are listed with the most recent shown first:
![]() The charges amounts used to calculate the Bill totals are listed by Product.
4. If you want to review the usage quantity under a listed charge, select to expand the charge and reveal the **Quantity**:
The charges amounts used to calculate the Bill totals are listed by Product.
4. If you want to review the usage quantity under a listed charge, select to expand the charge and reveal the **Quantity**:
![]() 5. If you want to review a **Pricing plan** used for a Bill, select the name text of the Plan. You are taken to the **Plan details** page, where you can review any **Pricing** configured for the Plan.
# Working with Bill Statements
Source: https://docs.m3ter.com/guides/billing-and-usage-data/running-viewing-and-managing-bills/working-with-bill-statements
You can create *Statements* to accompany the Bills you send out to your end-customers as backing sheets to their invoices. Bill Statements provide a useful breakdown of the usage responsible for charge line items your end-customers see on their invoices:
* Create *Statement Definitions* to specify the way billed usage will be aggregated and compiled in the Statement. For example, if you are billing customers monthly, you might want to breakdown the usage responsible for the monthly charge on a Bill into weekly portions in Bill Statements.
* At Organization level select a default Statement Definition. See [Viewing and Editing Organization Configuration](/guides/organization-and-access-management/viewing-and-editing-organization/viewing-and-editing-organization-configuration).
* At Account level:
* Select a Statement Definition, which will then override the Organization default.
* Select to auto-generate Statements when Bills are approved or locked.
* When viewing a Bill, generate Statements manually - two options:
* Full Statements. Generated Statements will include for *all usage* collected by the Meters defined for the Statement Definition.
* Partial Statements. Allows you to filter by Meter IDs defined for the Statement Definition. Generated Statements will include only for the *usage collected by selected Meters*.
* When Statements have been generated for a Bill, download them in JSON and CSV format, which you can then transpose and compile into the required delivery format.
* Check if a Bill Statement needs refreshing by comparing the Bill calculation timestamp against the Statement's last modified date, which is available in the response to a get Statement API call
Common Bill Statement use cases:
* One common use case is to provide a breakdown by time period. For example, if you bill and issue invoices on a monthly frequency, then you might want to provide a weekly or daily charge breakdown Statement as a backing sheet to invoices, allowing end-customers to see how their usage was distributed across the billing period.
* Another use case would be to provide a breakdown on the basis of location of usage charged for. For example, a text messaging service imposes a usage charge per billing period for all messages logged that originate from outside of a customer's native country. This usage is measured for the billing charge as a single block of total recorded usage, which results in a single usage charge line item for "other country" usage in customer invoices. But if the Meter collecting that usage is set up to also record a location for message events by country of origin, you can set up a Statement Definition that provides the required breakdown by the Meter's location dimension.
This topic uses the second common use case as a worked example to explain how to create Statement Definitions, set up default Statements, generate full or partial Statements for Bills, and how to download generated Statements in your preferred format.
* [Creating Statement Definitions](#creating-statement-definition)
* [Using Statement Definitions](#using-statement-definitions)
* [Generating Full Statements for Bills and Downloading](#generating-full-statements-for-bills-and-downloading)
* [Generating Partial Statements for Bills and Downloading](#generating-partial-statements-for-bills-and-downloading)
* [Enabling Auto-Generation for Statements](#enabling-auto-generation-for-statements)
* [Checking Statement Last Modified Date](#checking-statement-last-modified-date)
**Bill Statement limit**. A default Bill line item limit of 50,000 is imposed on Bill Statements. This default limit can be increased on request - please ask your m3ter contact for more details or get in touch with [m3ter Support](/guides/getting-started/contacting-m3ter-support).
## Creating Statement Definitions
When you create and configure a Statement Definition, you can define how the usage data collected by a Meter for a billing period, and on which usage charges are based, will be broken down for end-customers who will receive a Statement generated using the Statement Definition.
**To create and configure a Statement Definition:**
1. Select **Billing**. The **Billing** section opens at the **Bill management** page.
2. Select **Statement definitions**:
5. If you want to review a **Pricing plan** used for a Bill, select the name text of the Plan. You are taken to the **Plan details** page, where you can review any **Pricing** configured for the Plan.
# Working with Bill Statements
Source: https://docs.m3ter.com/guides/billing-and-usage-data/running-viewing-and-managing-bills/working-with-bill-statements
You can create *Statements* to accompany the Bills you send out to your end-customers as backing sheets to their invoices. Bill Statements provide a useful breakdown of the usage responsible for charge line items your end-customers see on their invoices:
* Create *Statement Definitions* to specify the way billed usage will be aggregated and compiled in the Statement. For example, if you are billing customers monthly, you might want to breakdown the usage responsible for the monthly charge on a Bill into weekly portions in Bill Statements.
* At Organization level select a default Statement Definition. See [Viewing and Editing Organization Configuration](/guides/organization-and-access-management/viewing-and-editing-organization/viewing-and-editing-organization-configuration).
* At Account level:
* Select a Statement Definition, which will then override the Organization default.
* Select to auto-generate Statements when Bills are approved or locked.
* When viewing a Bill, generate Statements manually - two options:
* Full Statements. Generated Statements will include for *all usage* collected by the Meters defined for the Statement Definition.
* Partial Statements. Allows you to filter by Meter IDs defined for the Statement Definition. Generated Statements will include only for the *usage collected by selected Meters*.
* When Statements have been generated for a Bill, download them in JSON and CSV format, which you can then transpose and compile into the required delivery format.
* Check if a Bill Statement needs refreshing by comparing the Bill calculation timestamp against the Statement's last modified date, which is available in the response to a get Statement API call
Common Bill Statement use cases:
* One common use case is to provide a breakdown by time period. For example, if you bill and issue invoices on a monthly frequency, then you might want to provide a weekly or daily charge breakdown Statement as a backing sheet to invoices, allowing end-customers to see how their usage was distributed across the billing period.
* Another use case would be to provide a breakdown on the basis of location of usage charged for. For example, a text messaging service imposes a usage charge per billing period for all messages logged that originate from outside of a customer's native country. This usage is measured for the billing charge as a single block of total recorded usage, which results in a single usage charge line item for "other country" usage in customer invoices. But if the Meter collecting that usage is set up to also record a location for message events by country of origin, you can set up a Statement Definition that provides the required breakdown by the Meter's location dimension.
This topic uses the second common use case as a worked example to explain how to create Statement Definitions, set up default Statements, generate full or partial Statements for Bills, and how to download generated Statements in your preferred format.
* [Creating Statement Definitions](#creating-statement-definition)
* [Using Statement Definitions](#using-statement-definitions)
* [Generating Full Statements for Bills and Downloading](#generating-full-statements-for-bills-and-downloading)
* [Generating Partial Statements for Bills and Downloading](#generating-partial-statements-for-bills-and-downloading)
* [Enabling Auto-Generation for Statements](#enabling-auto-generation-for-statements)
* [Checking Statement Last Modified Date](#checking-statement-last-modified-date)
**Bill Statement limit**. A default Bill line item limit of 50,000 is imposed on Bill Statements. This default limit can be increased on request - please ask your m3ter contact for more details or get in touch with [m3ter Support](/guides/getting-started/contacting-m3ter-support).
## Creating Statement Definitions
When you create and configure a Statement Definition, you can define how the usage data collected by a Meter for a billing period, and on which usage charges are based, will be broken down for end-customers who will receive a Statement generated using the Statement Definition.
**To create and configure a Statement Definition:**
1. Select **Billing**. The **Billing** section opens at the **Bill management** page.
2. Select **Statement definitions**:
![]() The **Statement definitions** page opens and list any existing Statement Definitions.
3. Select **Create statement definition**. The **Create** page opens.
4. Under **Statement definition details**, enter a **Name** for the Statement Definition.
5. Use the drop-down to select an **Aggregation frequency**:
* **Daily**
* **Weekly**
* **Monthly**
* **Quarterly**
* **Yearly**
* **Whole bill period**
6. Use the switch to enable **Include price per unit**. Default is disabled.
7. Use the switch to **Generate slim statements**. Enable this option if you have priced Plans using segmented Aggregations attached to end-customer Accounts and want to exclude segments that don't appear on Bills from Statements. Default is disabled:
The **Statement definitions** page opens and list any existing Statement Definitions.
3. Select **Create statement definition**. The **Create** page opens.
4. Under **Statement definition details**, enter a **Name** for the Statement Definition.
5. Use the drop-down to select an **Aggregation frequency**:
* **Daily**
* **Weekly**
* **Monthly**
* **Quarterly**
* **Yearly**
* **Whole bill period**
6. Use the switch to enable **Include price per unit**. Default is disabled.
7. Use the switch to **Generate slim statements**. Enable this option if you have priced Plans using segmented Aggregations attached to end-customer Accounts and want to exclude segments that don't appear on Bills from Statements. Default is disabled:
 **Generate slim statements not shown?** If this option is not shown when creating a Statement definition and you want to use this feature, please advise your m3ter contact or get in touch with [m3ter Support](/guides/getting-started/contacting-m3ter-support) to have it enabled for your Organization.
8. Under **Measures**, use the drop-down to select a **Meter** that collects the usage data used as the basis of the usage charges for billing. The **Measure** drop-down selection field is activated for the selected Meter.
9. Use the **Measure** drop-down to select a Meter measure Data Field which is aggregated into unit price rates and used as the basis for usage charges at billing.
10. Use the **Aggregation functions** drop-down list to select the way you want to aggregate the selected Meter Data Field values for Statements. Seven options:
* **Sum**. Adds the values
* **Minimum**. Uses the minimum value.
* **Maximum**. Uses the maximum value.
* **Count**. Counts the number of values
* **Latest**. Uses the most recent value.
* **Mean**. Uses the arithmetic mean of the values.
* **Unique**. List each of the unique values.
**Custom SQL?** The **Custom SQL** Aggregation function is not available when setting up **Measures** for a Statement definition.
11. Under **Dimensions**, use the drop-down to select a Meter that collects the usage data as the basis of the usage charges on Bills. The **Dimension** drop-down is activated for the selected Meter.
12. Use the **Dimension** drop-down to select the Meter Dimension you want to use as the basis of the Statement's breakdown of usage.
13. If you want to filter the selected **Dimension** values which will appear on the Statement, under **Filter**, choose the **Selected values** radio button. The **Filter** values field is activated.
14. Enter any values you want to filter the Statement breakdown by - only the **Dimension** values you enter will be used:
**Generate slim statements not shown?** If this option is not shown when creating a Statement definition and you want to use this feature, please advise your m3ter contact or get in touch with [m3ter Support](/guides/getting-started/contacting-m3ter-support) to have it enabled for your Organization.
8. Under **Measures**, use the drop-down to select a **Meter** that collects the usage data used as the basis of the usage charges for billing. The **Measure** drop-down selection field is activated for the selected Meter.
9. Use the **Measure** drop-down to select a Meter measure Data Field which is aggregated into unit price rates and used as the basis for usage charges at billing.
10. Use the **Aggregation functions** drop-down list to select the way you want to aggregate the selected Meter Data Field values for Statements. Seven options:
* **Sum**. Adds the values
* **Minimum**. Uses the minimum value.
* **Maximum**. Uses the maximum value.
* **Count**. Counts the number of values
* **Latest**. Uses the most recent value.
* **Mean**. Uses the arithmetic mean of the values.
* **Unique**. List each of the unique values.
**Custom SQL?** The **Custom SQL** Aggregation function is not available when setting up **Measures** for a Statement definition.
11. Under **Dimensions**, use the drop-down to select a Meter that collects the usage data as the basis of the usage charges on Bills. The **Dimension** drop-down is activated for the selected Meter.
12. Use the **Dimension** drop-down to select the Meter Dimension you want to use as the basis of the Statement's breakdown of usage.
13. If you want to filter the selected **Dimension** values which will appear on the Statement, under **Filter**, choose the **Selected values** radio button. The **Filter** values field is activated.
14. Enter any values you want to filter the Statement breakdown by - only the **Dimension** values you enter will be used:
 In this example, the Statement Definition uses:
* A single numeric **Message Events2** measure on a Meter, which collects usage data on the number of messages and on which billing usage charges are based.
* A single non-numeric **Origin Country2** dimension on a Meter and on which a breakdown of charges will be based. No filtering of values is enabled.
15. If you want to use other Meter Measures and Dimensions for your Statement Definition, select **Add** under **Measures** or **Dimensions** and repeat steps 6 to 14.
16. Select **Create statement definition**. The **Statement definition details** page opens:
In this example, the Statement Definition uses:
* A single numeric **Message Events2** measure on a Meter, which collects usage data on the number of messages and on which billing usage charges are based.
* A single non-numeric **Origin Country2** dimension on a Meter and on which a breakdown of charges will be based. No filtering of values is enabled.
15. If you want to use other Meter Measures and Dimensions for your Statement Definition, select **Add** under **Measures** or **Dimensions** and repeat steps 6 to 14.
16. Select **Create statement definition**. The **Statement definition details** page opens:
![Statementdef33]() ## Using Statement Definitions
When you've set up a Statement Definition, you can select it as the one used to generate Statements for Bills:
* Select it as the default at the Organization level. See [Viewing and Editing Organization Configuration](/guides/organization-and-access-management/viewing-and-editing-organization/viewing-and-editing-organization-configuration).
* Select it to be used for a particular Account as one of the Account settings.
These options act in the following way:
* If you set a default Statement Definition at the Organizational level, this is used when you generate Bill Statements for any Accounts for which *you haven't selected a Statement Definition*.
* If you set a Statement Definition for an individual Account, this will be used when you generate Bill Statements for the Account and *takes precedence* over any Statement Definition you've selected at Organization level.
**To set up default Bill Statements:**
1. Create the Statement Definition you want to set as the default at Organization level or the one you want set as the default for a particular Account level. See the [previous section](/guides/billing-and-usage-data/running-viewing-and-managing-bills/working-with-bill-statements#creating-statement-definitions).
2. To define a default Statement Definition at Organization level, select **Settings**:
## Using Statement Definitions
When you've set up a Statement Definition, you can select it as the one used to generate Statements for Bills:
* Select it as the default at the Organization level. See [Viewing and Editing Organization Configuration](/guides/organization-and-access-management/viewing-and-editing-organization/viewing-and-editing-organization-configuration).
* Select it to be used for a particular Account as one of the Account settings.
These options act in the following way:
* If you set a default Statement Definition at the Organizational level, this is used when you generate Bill Statements for any Accounts for which *you haven't selected a Statement Definition*.
* If you set a Statement Definition for an individual Account, this will be used when you generate Bill Statements for the Account and *takes precedence* over any Statement Definition you've selected at Organization level.
**To set up default Bill Statements:**
1. Create the Statement Definition you want to set as the default at Organization level or the one you want set as the default for a particular Account level. See the [previous section](/guides/billing-and-usage-data/running-viewing-and-managing-bills/working-with-bill-statements#creating-statement-definitions).
2. To define a default Statement Definition at Organization level, select **Settings**:
![]() The **Organization** page opens with the **Configuration** tab selected.
3. On the **Organization configuration details** panel, select **Edit**. The **Organization configuration** page opens.
4. Scroll down the page and under **Bill statements**, use the **Statement definition** drop-down to select the Statement Definition you want to set as the default.
5. Select **Update Organization configuration**. You are returned to the **Configuration** tab and the selected Statement Definition is shown on the **Organization configuration details** panel as the **Default statement definition**.
* Note that you can select the hotlink name text of the Statement Definition to open the **Statement definition details** page directly.
6. If you want to override the Statement Definition you've set as the default at Organization level for a particular Account, open the **Edit** page for the Account.
7. Scroll down the page and on the **Bill statements** panel, use the **Statement definition** drop-down to select the Statement Definition you want to use for the Account.
8. Select **Update Account**.
## Generating Full Statements for Bills and Downloading
When you open and view a Bill for an Account under Bill management, you can manually generate a *full Bill Statement* and include for usage collected by all Meters when the Statement is generated:
* The Statement generated will use the Statement Definition you've set as the default at Organization level or the Statement Definition you applied to the Account - if you've defined a Statement Definition at Account level, this will take precedence.
* You can choose to generate the Statement in JSON format only or both JSON and CSV format. Note that the line items within a Statement are not necessarily sorted, and you should sort by the appropriate fields as part of subsequent processing.
* When the Statement has been generated for the Bill, you can download the Statement in JSON or CSV format if you also selected CSV format when generating the Statement.
**To generate full Statements for Bills and Download:**
1. Open the Bill you want to generate a full Statement for in **Bill management**:
The **Organization** page opens with the **Configuration** tab selected.
3. On the **Organization configuration details** panel, select **Edit**. The **Organization configuration** page opens.
4. Scroll down the page and under **Bill statements**, use the **Statement definition** drop-down to select the Statement Definition you want to set as the default.
5. Select **Update Organization configuration**. You are returned to the **Configuration** tab and the selected Statement Definition is shown on the **Organization configuration details** panel as the **Default statement definition**.
* Note that you can select the hotlink name text of the Statement Definition to open the **Statement definition details** page directly.
6. If you want to override the Statement Definition you've set as the default at Organization level for a particular Account, open the **Edit** page for the Account.
7. Scroll down the page and on the **Bill statements** panel, use the **Statement definition** drop-down to select the Statement Definition you want to use for the Account.
8. Select **Update Account**.
## Generating Full Statements for Bills and Downloading
When you open and view a Bill for an Account under Bill management, you can manually generate a *full Bill Statement* and include for usage collected by all Meters when the Statement is generated:
* The Statement generated will use the Statement Definition you've set as the default at Organization level or the Statement Definition you applied to the Account - if you've defined a Statement Definition at Account level, this will take precedence.
* You can choose to generate the Statement in JSON format only or both JSON and CSV format. Note that the line items within a Statement are not necessarily sorted, and you should sort by the appropriate fields as part of subsequent processing.
* When the Statement has been generated for the Bill, you can download the Statement in JSON or CSV format if you also selected CSV format when generating the Statement.
**To generate full Statements for Bills and Download:**
1. Open the Bill you want to generate a full Statement for in **Bill management**:
![Statement Def37]() In this example, we've opened a monthly Bill for an Account in an Organization where the default Statement Definition is the **Message Location Statement** we created in the [previous section](/guides/billing-and-usage-data/running-viewing-and-managing-bills/working-with-bill-statements#creating-statement-definitions):
* We can see that month's charge is for a total of 6,100 messages, and this is shown as a single line item.
* The generated Statement should show a breakdown into separate countries of message origin.
2. At top-right, select **Statements**. The **Generate statements** page opens:
In this example, we've opened a monthly Bill for an Account in an Organization where the default Statement Definition is the **Message Location Statement** we created in the [previous section](/guides/billing-and-usage-data/running-viewing-and-managing-bills/working-with-bill-statements#creating-statement-definitions):
* We can see that month's charge is for a total of 6,100 messages, and this is shown as a single line item.
* The generated Statement should show a breakdown into separate countries of message origin.
2. At top-right, select **Statements**. The **Generate statements** page opens:
![Statementdef24]() 3. Under **Statement job settings**, you can review the set up for the Statement that will be generated, including the Statement Definition that will be used.
4. For the current example, we'll leave the **Statement job type** at the default **Full statement** selection.
5. Select for the formats used in Statement generation:
* **Generate JSON statement**. This is selected by default and you cannot de-select.
* **Generate CSV statement**. By default this is de-selected - use the switch to select it if you want the statement to be generated in CSV format also.
**Important: Statement Definition default must be selected!** If you haven't selected a default Statement Definition for Bills at either Organization or Account level, then the **Generate statements** button will not be active and you won't be able to generate Statements. See above: [Using Statement Definitions](/guides/billing-and-usage-data/running-viewing-and-managing-bills/working-with-bill-statements#using-statement-definitions).
6. Select **Generate statement**. This will kick-off the job to generate a full Bill Statement and the **Statement job details** page opens:
3. Under **Statement job settings**, you can review the set up for the Statement that will be generated, including the Statement Definition that will be used.
4. For the current example, we'll leave the **Statement job type** at the default **Full statement** selection.
5. Select for the formats used in Statement generation:
* **Generate JSON statement**. This is selected by default and you cannot de-select.
* **Generate CSV statement**. By default this is de-selected - use the switch to select it if you want the statement to be generated in CSV format also.
**Important: Statement Definition default must be selected!** If you haven't selected a default Statement Definition for Bills at either Organization or Account level, then the **Generate statements** button will not be active and you won't be able to generate Statements. See above: [Using Statement Definitions](/guides/billing-and-usage-data/running-viewing-and-managing-bills/working-with-bill-statements#using-statement-definitions).
6. Select **Generate statement**. This will kick-off the job to generate a full Bill Statement and the **Statement job details** page opens:
![Statementdef25]() **Notes**:
* Note that the Statement job might take a few minutes and the **Status** will show as **PENDING** while it runs.
* From **Statement job details**, you can select to **Re-generate statement**:
* This takes you back to the **Generate statements** page where you can generate another partial or full Statement.
* Full Statements are persisted on the Bill and remain available for download from the **Generate statements** page. A reminder is given:
**Notes**:
* Note that the Statement job might take a few minutes and the **Status** will show as **PENDING** while it runs.
* From **Statement job details**, you can select to **Re-generate statement**:
* This takes you back to the **Generate statements** page where you can generate another partial or full Statement.
* Full Statements are persisted on the Bill and remain available for download from the **Generate statements** page. A reminder is given:
![Statementdef32]() 7. When the Statement job is **COMPLETE**, select which format you want to download: **Download JSON** (always) or **Download CSV** (if you selected **Generate CSV statement**). The Statement is downloaded and saved locally to your **Downloads** folder.
8. You can now open the Statement in the 3rd-party application of your choice and transpose and compile it as required for issuing to your end-customers as a charge breakdown backing sheet to their invoice.
* For the current example using the **Messaging Location Statement** as Statement Definition for the example Bill, we've generated and downloaded a full Statement in CSV format and loaded it into a spreadsheet:
7. When the Statement job is **COMPLETE**, select which format you want to download: **Download JSON** (always) or **Download CSV** (if you selected **Generate CSV statement**). The Statement is downloaded and saved locally to your **Downloads** folder.
8. You can now open the Statement in the 3rd-party application of your choice and transpose and compile it as required for issuing to your end-customers as a charge breakdown backing sheet to their invoice.
* For the current example using the **Messaging Location Statement** as Statement Definition for the example Bill, we've generated and downloaded a full Statement in CSV format and loaded it into a spreadsheet:
![Statementdef26]() * We can see that the Bill Statement shows the breakdown on the basis of location of message origin using the Meter dimension field **Origin Country2 (origin\_country\_2)**, and in accordance with the Statement Definition we set up and applied to the billed Account.
## Generating Partial Statements for Bills and Downloading
When you open and view a Bill for an Account under Bill management, you can manually generate a *partial Bill Statement* and include only for the usage collected by selected Meters when the Statement is generated. To show how to generate partial Bill Statements:
* We'll extend the current worked example and update the Statement Definition we used in the [previous section](#generating-full-statements-for-bills-and-downloading) to now use *two each of measure and dimension fields* and belonging to two different Meters.
* Assume end-customer Accounts are Billed for usage collected by both Meters.
First, here's the updated **Message Location Statement**:
* We can see that the Bill Statement shows the breakdown on the basis of location of message origin using the Meter dimension field **Origin Country2 (origin\_country\_2)**, and in accordance with the Statement Definition we set up and applied to the billed Account.
## Generating Partial Statements for Bills and Downloading
When you open and view a Bill for an Account under Bill management, you can manually generate a *partial Bill Statement* and include only for the usage collected by selected Meters when the Statement is generated. To show how to generate partial Bill Statements:
* We'll extend the current worked example and update the Statement Definition we used in the [previous section](#generating-full-statements-for-bills-and-downloading) to now use *two each of measure and dimension fields* and belonging to two different Meters.
* Assume end-customer Accounts are Billed for usage collected by both Meters.
First, here's the updated **Message Location Statement**:
![Statementdef35]() * Note that we've added to include for Statements generated using this Statement Definition to include Measure and Dimension fields on *two different Meters* - **Messaging Events 2** and **Messaging Events 1**.
**To generate partial Statements for Bills and Download:**
1. Open the Bill you want to generate a partial Statement for in **Bill management**:
* Note that we've added to include for Statements generated using this Statement Definition to include Measure and Dimension fields on *two different Meters* - **Messaging Events 2** and **Messaging Events 1**.
**To generate partial Statements for Bills and Download:**
1. Open the Bill you want to generate a partial Statement for in **Bill management**:
![Statement Def38]() * Note that the Bill has usage charge line items that derive from Aggregation pricing metrics targeting different Meters.
2. Select **Statements**. The **Generate statements** page opens.
3. Under **Statement job type**, select **Partial statement**. The page adjusts to show a **Meters** drop-down selection field.
4. For the current example, select **Messaging Events 1** for **Meters**:
* Note that the Bill has usage charge line items that derive from Aggregation pricing metrics targeting different Meters.
2. Select **Statements**. The **Generate statements** page opens.
3. Under **Statement job type**, select **Partial statement**. The page adjusts to show a **Meters** drop-down selection field.
4. For the current example, select **Messaging Events 1** for **Meters**:
![Statementdef29]() * Note that you can select up to a maximum of **10 Meters**.
5. Select **Generate partial statement**. This will kick-off the job to generate a partial Bill Statement and the **Statement job details** page opens:
* Note that you can select up to a maximum of **10 Meters**.
5. Select **Generate partial statement**. This will kick-off the job to generate a partial Bill Statement and the **Statement job details** page opens:
![Statementdef30]() **Notes**:
* The Statement job might take a few minutes and the **Status** will show as **PENDING** while it runs.
* From **Statement job details**, you can select to **Re-generate statement**. This takes you back to the **Generate statements** page where you can generate another partial or full Statement.
**Partial Statements not persisted on Bill!** Note that if you do this and in contrast to when full Statements are generated, any partial Statements you might have already generated are no longer available for download from the **Generate statements** page.
6. When the Statement job is **COMPLETE**, select which format you want to download: **Download JSON** (always) or **Download CSV** (if you selected **Generate CSV statement**). The Statement is downloaded and saved locally to your **Downloads** folder.
7. You can now open the Statement in the 3rd-party application of your choice and transpose and compile it as required for issuing to your end-customers as a charge breakdown backing sheet to their invoice.
* For the current example using the **Messaging Location Statement** as Statement Definition for the example Bill, we've generated and downloaded a partial Statement in CSV format and loaded it into a spreadsheet:
**Notes**:
* The Statement job might take a few minutes and the **Status** will show as **PENDING** while it runs.
* From **Statement job details**, you can select to **Re-generate statement**. This takes you back to the **Generate statements** page where you can generate another partial or full Statement.
**Partial Statements not persisted on Bill!** Note that if you do this and in contrast to when full Statements are generated, any partial Statements you might have already generated are no longer available for download from the **Generate statements** page.
6. When the Statement job is **COMPLETE**, select which format you want to download: **Download JSON** (always) or **Download CSV** (if you selected **Generate CSV statement**). The Statement is downloaded and saved locally to your **Downloads** folder.
7. You can now open the Statement in the 3rd-party application of your choice and transpose and compile it as required for issuing to your end-customers as a charge breakdown backing sheet to their invoice.
* For the current example using the **Messaging Location Statement** as Statement Definition for the example Bill, we've generated and downloaded a partial Statement in CSV format and loaded it into a spreadsheet:
![Statementdef31]() * We can see that the Bill Statement shows the breakdown on the basis of location of message origin using the Meter dimension field **Origin Country1 (orig\_country\_1)**, and in accordance with the Statement Definition we set up and applied to the billed Account. However, this only includes usage data collected by the single Meter we selected for the partial Bill Statement generation: **Messaging Events 1**.
* Note also that *all* the Measures and Dimensions we included in the Statement Definition - that is in the current example, the **Message Events 2** Measure and **Origin Country 2** Dimension - are included, but since they belong to the *excluded* **Messaging Events 2** Meter these are empty.
## Enabling Auto-Generation for Statements
You can enable auto-generation of Bill Statements for Accounts whenever a Bill is approved or locked:
* At Organization level.
* At individual Account level.
These alternatives work together in the following way:
* If you make a selection for auto-generation of Bill Statements at Organization level but do not select for this at the individual Account level, the Organizational level setting is applied.
* If you make a selection for auto-generation of Bill Statements at the individual Account level, this selection will apply to the individual Account, regardless of the selection for this made at the Organizational level.
**To enable auto-generation of Bill Statements when Bills are approved or locked :**
1. Either:
* At **Settings>Organization**, on the **Configuration** tab select **Edit** on the **Organization configuration details** panel. The **Organization configuration** page opens.
* Open the Account you want to enable auto-generation of Bill Statements for and select **Edit**. The **Edit** page opens.
2. Scroll down the page and on the **Bill statements** panel, use the radio buttons to enable **Auto-generate statements**:
* **None**. Statements will not be auto-generated. (*Default*)
* **JSON**. Statements will be auto-generated in JSON format.
* **JSON and CSV**. Statements will be auto-generated in both JSON and CSV format.
3. Select **Update Organization configuration** or **Update account**.
## Checking Statement Last Modified Date
You can obtain the last modified date for a Bill Statement using API calls. This is useful if you want to check whether or not the Statement needs regenerating by comparing the last modified date/time with the Bill's timestamp.
**To obtain a Statement's last modified date:**
1. First, obtain the `id` of the Bill whose Statement you want to check the last modified date/time for.
2. Use this `id` to make one of the available Retrieve Bill Statement API calls:
* [Retrieve Bill Statement in JSON format](/api/bill/retrieve-bill-statement-in-json-format)
* [Retrieve Bill Statement in CSV format](/api/bill/retrieve-bill-statement-in-csv-format)
3. The response to either call returns a pre-signed URL, which you can use to download the Statement file in either JSON or CSV format with a `GET` call using the URL. For example:
`GET https://m3ter-billing-statements-16yxyxyxyxy-eu-west-2.s3.eu-west-2.amazonaws.com/0a5ec4d1-3300-4e2e-975d-16b3009fbf4e/89b234c3-bbb7-4179...`
The response to this call includes a **Last-Modified** header, where you can read-off the date and time.
# Submitting Usage Data
Source: https://docs.m3ter.com/guides/billing-and-usage-data/submitting-usage-data
Usage data sits at the heart of any robust and reliable usage-based pricing implementation. As an explicitly data-first solution, m3ter offers several ways for you to quickly and easily get your usage data into the platform:
* [API Calls for Data Ingest](/guides/billing-and-usage-data/submitting-usage-data/api-calls-for-data-ingest)
* [File Upload Service API](/guides/billing-and-usage-data/submitting-usage-data/file-upload-service-api)
* [Submitting and Checking Test Usage Data](/guides/billing-and-usage-data/submitting-usage-data/submitting-test-usage-data)
* [File Uploads for Usage Data by Meter](/guides/billing-and-usage-data/submitting-usage-data/file-uploads-for-usage-data-by-meter)
## Usage Data Adjustments
There might be occasions where you need to make corrections for billing retrospectively against an Account. You can use the timestamp field for a usage data submission and submit positive or negative usage data amounts to correct and reconcile earlier billing anomalies:
* [Submitting Usage Data Adjustments Using Timestamp](/guides/billing-and-usage-data/submitting-usage-data/submitting-usage-data-adjustments-using-timestamp)
## Usage Data for Non-Existent Accounts
If you need to get product usage data into the platform before you've set up all of your end-customer Accounts, you can use an Account code to submit a usage data measurement even if the Account doesn't yet exist. A skeleton Account is created automatically using the code, and the usage data measurement is then linked to the skeleton Account.
* [Submitting Usage Data for Non-Existent Accounts](/guides/billing-and-usage-data/submitting-usage-data/submitting-usage-data-for-non-existent-accounts)
## Usage Data Ingest Failure Events
Usage data ingest can fail for several reasons. When an attempt to ingest usage data measurements into the platform encounters an error, an ingest validation failure Event is generated. You can review and follow-up on ingest failure Events and resolve any issues:
* [Reviewing and Resolving Ingest Events](/guides/billing-and-usage-data/submitting-usage-data/reviewing-and-resolving-ingest-events)
**Tip: Reviewing Submitted Usage Data?** You can query for and review submitted usage data using the [Usage Data Explorer (v2)](/guides/data-explorer/usage-data-explorer-v2).
# API Calls for Data Ingest
Source: https://docs.m3ter.com/guides/billing-and-usage-data/submitting-usage-data/api-calls-for-data-ingest
m3ter is an API-first platform. When you've created your Meters and their data-collection fields, you can use the *Submit Measurements* API call to m3ter's *Ingest API* to submit usage data into those fields:
> **POST** `/organizations/{orgid}/measurements`
For more details on the Submit Measurements API call to the Ingest API, see:
* The [Submit measurements](/api/measurements/submit-measurements) API Reference Docs page.
* The [Getting Started with API Calls](/guides/m3ter-apis/getting-started-with-api-calls) topic, which provides an example of a the call with code snippets for different languages you can copy.
**Important! Request Rate and Payload Limits**. The Ingest API is designed to handle high request rates and offers high payload-per-request size. However, we impose limits on request rate and request payload size. See [m3ter APIs](/guides/m3ter-apis)
# File Upload Service API
Source: https://docs.m3ter.com/guides/billing-and-usage-data/submitting-usage-data/file-upload-service-api
You can use the m3ter *File Upload Service API* to upload a usage data measurements data files to the platform in preparation for measurements ingest:
* You can upload measurements files in `JSON` format and you must specify the file content type when you request an upload URL.
* An upload job ID is returned with the upload URL and you can use this upload job ID for other file upload service calls to follow up and troubleshoot any issues that arise with a file upload.
* Uploaded files are processed sequentially at a rate of 2,000 measurements per second. Multiple files can be uploaded concurrently or while other files are being processed. Higher processing rates are available if required.
**Maximum File Size!** You can upload JSON files up to 1GB in size using the File Upload service.
This topic explains how to use the file upload service API to upload a usage data measurements file, and explains which API calls you can use to troubleshoot any issues you encounter:
* [Uploading a Measurements Data File](/guides/billing-and-usage-data/submitting-usage-data/file-upload-service-api#uploading-a-measurements-data-file)
* [Troubleshooting Measurement File Uploads](/guides/billing-and-usage-data/submitting-usage-data/file-upload-service-api#troubleshooting-measurement-file-uploads)
If you have prepared a JSON file for upload using the File Upload Service API, then you can open a Meter Details page in the Console and also upload the file from there:
* [Uploading a Measurements Data File in the Console](/guides/billing-and-usage-data/submitting-usage-data/file-upload-service-api#uploading-a-measurements-data-file-in-the-console)
## Uploading a Measurements Data File
This is a two-stage process:
1. First, obtain an upload URL from the m3ter platform by making a ***POST*** request to this endpoint:
`https://api.m3ter.com/organizations/{orgId}/fileuploads/measurements/generateUploadUrl`
The request body for this call should have the following structure:
```json theme={null}
{
"fileName": "measurements_2022_02_14.json",
"contentType": "text/json",
"contentLength": 209
}
```
The `fileName` and `contentLength` parameter values you use will be specific to the file you intend to upload. In the response, the call will return:
* An upload URL, which is time limited - it is valid for *one minute*.
* An upload job ID.
**Note: Authentication with Platform**. To make the *POST generateUploadUrl* API call, you'll have to use a Bearer Token you've obtained for authentication with the platform. For more details, see [Service Authentication](/guides/authenticating-with-the-platform/service-authentication).
**More Details?** See the API Reference documentation for the [Generate an upload URL ](/api/measurements/generate-upload-url)API call.
2. Second, when you have received the response to your request for an upload URL, you can upload the data in your file using a ***PUT*** request to the returned upload URL. The binary data from the file should form the request body and the file should contain an array of measurements data. For example:
```json theme={null}
[
{
"uid": "xxxxxxxx-62f7-45ea-a916-xxxxxxxxxxxx",
"meter": "api_request",
"account": "acme_corp",
"ts": "2022-02-14T11:30:51.897Z",
"measure": {
"quantity": 1.0
}
},
.
.
.
]
```
## Troubleshooting Measurement File Uploads
If any issues occur with your measurements data file upload, file upload service API calls are available to help you follow up and troubleshoot:
* [Downloading Previously Uploaded Measurements File](/guides/billing-and-usage-data/submitting-usage-data/file-upload-service-api#downloading-previously-uploaded-measurements-file)
* [Obtaining File Upload Job Details](/guides/billing-and-usage-data/submitting-usage-data/file-upload-service-api#obtaining-file-upload-job-details)
**More Details?** For more details on how to make the API calls referred to in this section, see the [Measurements](/api/measurements/introduction) section of our API Reference documentation.
### Downloading Previously Uploaded Measurements File
You can retrieve a measurements file that you've previously uploaded to the file upload service:
* [Get Original File Download URL](/api/measurements/get-original-file-download-url)
Follow a two-step process:
* Use this call with the file upload job id to obtain a download URL. A download URL is returned together with a download job id.
* You can then use a ***GET*** using the returned download URL as the endpoint to retrieve the previously uploaded file.
### Obtaining File Upload Job Details
You can use two calls to obtain details of file upload jobs:
* [List File Upload Jobs](/api/measurements/list-file-upload-jobs) - use this call to return a list of the file upload jobs. You can use two optional query parameters with this call - `dateCreatedStart` and `dateCreatedEnd` - to define a date range and filter the list of file upload jobs returned.
* [Get File Upload Job Response](/api/measurements/get-file-upload-job-response) - use this call to get the file upload job response using the file upload job id. This returns useful information about the specific upload job, including it's status - "notUploaded", "running", "failed", or "succeeded".
## Uploading a Measurements Data File in the Console
If you have prepared a usage data measurements file in JSON format ready for upload using the File Upload Service, you can perform the upload directly in the Console.
**Warning: Using correct JSON format!** Please review the [section above](/guides/billing-and-usage-data/submitting-usage-data/file-upload-service-api#uploading-a-measurements-data-file) *before you attempt* to upload a usage data measurements file through the Console - an example is given of the array format required in your JSON file. If you attempt to upload a file using the incorrect JSON format, then you'll receive an error and the upload will fail.
**To upload a JSON measurements data file in the Console:**
1. Select **Metering**. The **Meters** page opens.
2. Select the name hotlink text of the Meter. The **Meter Details** page opens.
3. Scroll down the page to the **Submit Measurements** panel.
4. Select the **File Upload API** tab:
* We can see that the Bill Statement shows the breakdown on the basis of location of message origin using the Meter dimension field **Origin Country1 (orig\_country\_1)**, and in accordance with the Statement Definition we set up and applied to the billed Account. However, this only includes usage data collected by the single Meter we selected for the partial Bill Statement generation: **Messaging Events 1**.
* Note also that *all* the Measures and Dimensions we included in the Statement Definition - that is in the current example, the **Message Events 2** Measure and **Origin Country 2** Dimension - are included, but since they belong to the *excluded* **Messaging Events 2** Meter these are empty.
## Enabling Auto-Generation for Statements
You can enable auto-generation of Bill Statements for Accounts whenever a Bill is approved or locked:
* At Organization level.
* At individual Account level.
These alternatives work together in the following way:
* If you make a selection for auto-generation of Bill Statements at Organization level but do not select for this at the individual Account level, the Organizational level setting is applied.
* If you make a selection for auto-generation of Bill Statements at the individual Account level, this selection will apply to the individual Account, regardless of the selection for this made at the Organizational level.
**To enable auto-generation of Bill Statements when Bills are approved or locked :**
1. Either:
* At **Settings>Organization**, on the **Configuration** tab select **Edit** on the **Organization configuration details** panel. The **Organization configuration** page opens.
* Open the Account you want to enable auto-generation of Bill Statements for and select **Edit**. The **Edit** page opens.
2. Scroll down the page and on the **Bill statements** panel, use the radio buttons to enable **Auto-generate statements**:
* **None**. Statements will not be auto-generated. (*Default*)
* **JSON**. Statements will be auto-generated in JSON format.
* **JSON and CSV**. Statements will be auto-generated in both JSON and CSV format.
3. Select **Update Organization configuration** or **Update account**.
## Checking Statement Last Modified Date
You can obtain the last modified date for a Bill Statement using API calls. This is useful if you want to check whether or not the Statement needs regenerating by comparing the last modified date/time with the Bill's timestamp.
**To obtain a Statement's last modified date:**
1. First, obtain the `id` of the Bill whose Statement you want to check the last modified date/time for.
2. Use this `id` to make one of the available Retrieve Bill Statement API calls:
* [Retrieve Bill Statement in JSON format](/api/bill/retrieve-bill-statement-in-json-format)
* [Retrieve Bill Statement in CSV format](/api/bill/retrieve-bill-statement-in-csv-format)
3. The response to either call returns a pre-signed URL, which you can use to download the Statement file in either JSON or CSV format with a `GET` call using the URL. For example:
`GET https://m3ter-billing-statements-16yxyxyxyxy-eu-west-2.s3.eu-west-2.amazonaws.com/0a5ec4d1-3300-4e2e-975d-16b3009fbf4e/89b234c3-bbb7-4179...`
The response to this call includes a **Last-Modified** header, where you can read-off the date and time.
# Submitting Usage Data
Source: https://docs.m3ter.com/guides/billing-and-usage-data/submitting-usage-data
Usage data sits at the heart of any robust and reliable usage-based pricing implementation. As an explicitly data-first solution, m3ter offers several ways for you to quickly and easily get your usage data into the platform:
* [API Calls for Data Ingest](/guides/billing-and-usage-data/submitting-usage-data/api-calls-for-data-ingest)
* [File Upload Service API](/guides/billing-and-usage-data/submitting-usage-data/file-upload-service-api)
* [Submitting and Checking Test Usage Data](/guides/billing-and-usage-data/submitting-usage-data/submitting-test-usage-data)
* [File Uploads for Usage Data by Meter](/guides/billing-and-usage-data/submitting-usage-data/file-uploads-for-usage-data-by-meter)
## Usage Data Adjustments
There might be occasions where you need to make corrections for billing retrospectively against an Account. You can use the timestamp field for a usage data submission and submit positive or negative usage data amounts to correct and reconcile earlier billing anomalies:
* [Submitting Usage Data Adjustments Using Timestamp](/guides/billing-and-usage-data/submitting-usage-data/submitting-usage-data-adjustments-using-timestamp)
## Usage Data for Non-Existent Accounts
If you need to get product usage data into the platform before you've set up all of your end-customer Accounts, you can use an Account code to submit a usage data measurement even if the Account doesn't yet exist. A skeleton Account is created automatically using the code, and the usage data measurement is then linked to the skeleton Account.
* [Submitting Usage Data for Non-Existent Accounts](/guides/billing-and-usage-data/submitting-usage-data/submitting-usage-data-for-non-existent-accounts)
## Usage Data Ingest Failure Events
Usage data ingest can fail for several reasons. When an attempt to ingest usage data measurements into the platform encounters an error, an ingest validation failure Event is generated. You can review and follow-up on ingest failure Events and resolve any issues:
* [Reviewing and Resolving Ingest Events](/guides/billing-and-usage-data/submitting-usage-data/reviewing-and-resolving-ingest-events)
**Tip: Reviewing Submitted Usage Data?** You can query for and review submitted usage data using the [Usage Data Explorer (v2)](/guides/data-explorer/usage-data-explorer-v2).
# API Calls for Data Ingest
Source: https://docs.m3ter.com/guides/billing-and-usage-data/submitting-usage-data/api-calls-for-data-ingest
m3ter is an API-first platform. When you've created your Meters and their data-collection fields, you can use the *Submit Measurements* API call to m3ter's *Ingest API* to submit usage data into those fields:
> **POST** `/organizations/{orgid}/measurements`
For more details on the Submit Measurements API call to the Ingest API, see:
* The [Submit measurements](/api/measurements/submit-measurements) API Reference Docs page.
* The [Getting Started with API Calls](/guides/m3ter-apis/getting-started-with-api-calls) topic, which provides an example of a the call with code snippets for different languages you can copy.
**Important! Request Rate and Payload Limits**. The Ingest API is designed to handle high request rates and offers high payload-per-request size. However, we impose limits on request rate and request payload size. See [m3ter APIs](/guides/m3ter-apis)
# File Upload Service API
Source: https://docs.m3ter.com/guides/billing-and-usage-data/submitting-usage-data/file-upload-service-api
You can use the m3ter *File Upload Service API* to upload a usage data measurements data files to the platform in preparation for measurements ingest:
* You can upload measurements files in `JSON` format and you must specify the file content type when you request an upload URL.
* An upload job ID is returned with the upload URL and you can use this upload job ID for other file upload service calls to follow up and troubleshoot any issues that arise with a file upload.
* Uploaded files are processed sequentially at a rate of 2,000 measurements per second. Multiple files can be uploaded concurrently or while other files are being processed. Higher processing rates are available if required.
**Maximum File Size!** You can upload JSON files up to 1GB in size using the File Upload service.
This topic explains how to use the file upload service API to upload a usage data measurements file, and explains which API calls you can use to troubleshoot any issues you encounter:
* [Uploading a Measurements Data File](/guides/billing-and-usage-data/submitting-usage-data/file-upload-service-api#uploading-a-measurements-data-file)
* [Troubleshooting Measurement File Uploads](/guides/billing-and-usage-data/submitting-usage-data/file-upload-service-api#troubleshooting-measurement-file-uploads)
If you have prepared a JSON file for upload using the File Upload Service API, then you can open a Meter Details page in the Console and also upload the file from there:
* [Uploading a Measurements Data File in the Console](/guides/billing-and-usage-data/submitting-usage-data/file-upload-service-api#uploading-a-measurements-data-file-in-the-console)
## Uploading a Measurements Data File
This is a two-stage process:
1. First, obtain an upload URL from the m3ter platform by making a ***POST*** request to this endpoint:
`https://api.m3ter.com/organizations/{orgId}/fileuploads/measurements/generateUploadUrl`
The request body for this call should have the following structure:
```json theme={null}
{
"fileName": "measurements_2022_02_14.json",
"contentType": "text/json",
"contentLength": 209
}
```
The `fileName` and `contentLength` parameter values you use will be specific to the file you intend to upload. In the response, the call will return:
* An upload URL, which is time limited - it is valid for *one minute*.
* An upload job ID.
**Note: Authentication with Platform**. To make the *POST generateUploadUrl* API call, you'll have to use a Bearer Token you've obtained for authentication with the platform. For more details, see [Service Authentication](/guides/authenticating-with-the-platform/service-authentication).
**More Details?** See the API Reference documentation for the [Generate an upload URL ](/api/measurements/generate-upload-url)API call.
2. Second, when you have received the response to your request for an upload URL, you can upload the data in your file using a ***PUT*** request to the returned upload URL. The binary data from the file should form the request body and the file should contain an array of measurements data. For example:
```json theme={null}
[
{
"uid": "xxxxxxxx-62f7-45ea-a916-xxxxxxxxxxxx",
"meter": "api_request",
"account": "acme_corp",
"ts": "2022-02-14T11:30:51.897Z",
"measure": {
"quantity": 1.0
}
},
.
.
.
]
```
## Troubleshooting Measurement File Uploads
If any issues occur with your measurements data file upload, file upload service API calls are available to help you follow up and troubleshoot:
* [Downloading Previously Uploaded Measurements File](/guides/billing-and-usage-data/submitting-usage-data/file-upload-service-api#downloading-previously-uploaded-measurements-file)
* [Obtaining File Upload Job Details](/guides/billing-and-usage-data/submitting-usage-data/file-upload-service-api#obtaining-file-upload-job-details)
**More Details?** For more details on how to make the API calls referred to in this section, see the [Measurements](/api/measurements/introduction) section of our API Reference documentation.
### Downloading Previously Uploaded Measurements File
You can retrieve a measurements file that you've previously uploaded to the file upload service:
* [Get Original File Download URL](/api/measurements/get-original-file-download-url)
Follow a two-step process:
* Use this call with the file upload job id to obtain a download URL. A download URL is returned together with a download job id.
* You can then use a ***GET*** using the returned download URL as the endpoint to retrieve the previously uploaded file.
### Obtaining File Upload Job Details
You can use two calls to obtain details of file upload jobs:
* [List File Upload Jobs](/api/measurements/list-file-upload-jobs) - use this call to return a list of the file upload jobs. You can use two optional query parameters with this call - `dateCreatedStart` and `dateCreatedEnd` - to define a date range and filter the list of file upload jobs returned.
* [Get File Upload Job Response](/api/measurements/get-file-upload-job-response) - use this call to get the file upload job response using the file upload job id. This returns useful information about the specific upload job, including it's status - "notUploaded", "running", "failed", or "succeeded".
## Uploading a Measurements Data File in the Console
If you have prepared a usage data measurements file in JSON format ready for upload using the File Upload Service, you can perform the upload directly in the Console.
**Warning: Using correct JSON format!** Please review the [section above](/guides/billing-and-usage-data/submitting-usage-data/file-upload-service-api#uploading-a-measurements-data-file) *before you attempt* to upload a usage data measurements file through the Console - an example is given of the array format required in your JSON file. If you attempt to upload a file using the incorrect JSON format, then you'll receive an error and the upload will fail.
**To upload a JSON measurements data file in the Console:**
1. Select **Metering**. The **Meters** page opens.
2. Select the name hotlink text of the Meter. The **Meter Details** page opens.
3. Scroll down the page to the **Submit Measurements** panel.
4. Select the **File Upload API** tab:
![]() 5. You can perform the measurements data file upload in one of two ways:
* Drag-and-drop the file into the panel.
* Use **Select Files** to open a **File Upload** selection window, locate and select the file where you have it saved, and select **Open**.
**PLEASE NOTE!**
* **Incorrectly formatted file?** If the file is incorrectly formatted for the upload, you'll receive a FAILED error and the upload will not complete. You can check and follow-up on the error under [System Alerts](/guides/alerts-events-and-notifications/viewing-and-managing-alerts).
* **Measurements for different Meters?** The usage data measurements contained in the upload file *ARE NOT* restricted to the specific Meter whose **Meter Details** page you've opened to perform the upload from the **Submit Measurements** panel - you can submit a file containing measurements for any Meters in your Organization.
# File Uploads for Usage Data by Meter
Source: https://docs.m3ter.com/guides/billing-and-usage-data/submitting-usage-data/file-uploads-for-usage-data-by-meter
In the Console, you can select a Meter you've set up to collect your usage data and upload a `CSV` formatted file for usage data measurements ingest. Some constraints are imposed on the size and formatting of the measurements file:
* **Size**. The file can contain up to a maximum of 1000 rows.
* **Formatting**. You must compile the file in a way that makes it compatible for file upload.
This topic explains how to prepare your usage data measurements CSV file and how to upload it:
* [Preparing Upload File - Example](/guides/billing-and-usage-data/submitting-usage-data/file-uploads-for-usage-data-by-meter#preparing-upload-file-example)
* [Uploading a File](/guides/billing-and-usage-data/submitting-usage-data/file-uploads-for-usage-data-by-meter#uploading-a-file)
**Tip: Upload a JSON formatted usage data measurements file?** You can use the File Upload Service API to upload a measurements file in JSON format. On a **Meter Details** page in the Console on the **Submit Measurements** panel using the **File Upload API** tab, you can also do this directly. For more details, see the [File Upload Service API](/guides/billing-and-usage-data/submitting-usage-data/file-upload-service-api) topic in this section.
## Preparing Upload File - Example
For a successful and smooth CSV file upload for a Meter's usage data, you must ensure the file is correctly formatted and structured. To help you ensure these constraints are complied with, you can download a template for the CSV file for a Meter:
5. You can perform the measurements data file upload in one of two ways:
* Drag-and-drop the file into the panel.
* Use **Select Files** to open a **File Upload** selection window, locate and select the file where you have it saved, and select **Open**.
**PLEASE NOTE!**
* **Incorrectly formatted file?** If the file is incorrectly formatted for the upload, you'll receive a FAILED error and the upload will not complete. You can check and follow-up on the error under [System Alerts](/guides/alerts-events-and-notifications/viewing-and-managing-alerts).
* **Measurements for different Meters?** The usage data measurements contained in the upload file *ARE NOT* restricted to the specific Meter whose **Meter Details** page you've opened to perform the upload from the **Submit Measurements** panel - you can submit a file containing measurements for any Meters in your Organization.
# File Uploads for Usage Data by Meter
Source: https://docs.m3ter.com/guides/billing-and-usage-data/submitting-usage-data/file-uploads-for-usage-data-by-meter
In the Console, you can select a Meter you've set up to collect your usage data and upload a `CSV` formatted file for usage data measurements ingest. Some constraints are imposed on the size and formatting of the measurements file:
* **Size**. The file can contain up to a maximum of 1000 rows.
* **Formatting**. You must compile the file in a way that makes it compatible for file upload.
This topic explains how to prepare your usage data measurements CSV file and how to upload it:
* [Preparing Upload File - Example](/guides/billing-and-usage-data/submitting-usage-data/file-uploads-for-usage-data-by-meter#preparing-upload-file-example)
* [Uploading a File](/guides/billing-and-usage-data/submitting-usage-data/file-uploads-for-usage-data-by-meter#uploading-a-file)
**Tip: Upload a JSON formatted usage data measurements file?** You can use the File Upload Service API to upload a measurements file in JSON format. On a **Meter Details** page in the Console on the **Submit Measurements** panel using the **File Upload API** tab, you can also do this directly. For more details, see the [File Upload Service API](/guides/billing-and-usage-data/submitting-usage-data/file-upload-service-api) topic in this section.
## Preparing Upload File - Example
For a successful and smooth CSV file upload for a Meter's usage data, you must ensure the file is correctly formatted and structured. To help you ensure these constraints are complied with, you can download a template for the CSV file for a Meter:
![File Upload Meter26]() Suppose the Meter you want to upload a usage data measurements file for is set up with three Data Fields - two fields of Category **Measure** and one dimension field of Category **Who**. You plan to upload a file that contains ten measurements for this Meter. When you compile the file, you must ensure it conforms to the file upload requirements. Here's an example:
Suppose the Meter you want to upload a usage data measurements file for is set up with three Data Fields - two fields of Category **Measure** and one dimension field of Category **Who**. You plan to upload a file that contains ten measurements for this Meter. When you compile the file, you must ensure it conforms to the file upload requirements. Here's an example:
![]() Note in particular:
* **Column headers**:
* Use all lower case for these.
* For Meter Data Fields column headers, use the format *\.\*. For example, for the current Meter use: **measure.num\_apps**.
* **Measurement rows**:
* Use valid codes for **account** and **meter**.
* Ensure a column is included for each Meter Data Field and a value is given for each.
* Use a unique **uid** for each measurement.
* The **ts** value used must conform to **ISO-8601** format.
When you upload a `CSV` usage data measurements file, a validation check is made to ensure these formatting rules have been complied with. If errors are identified, the ingest will be blocked.
You can begin to compile a CSV file for upload by first downloading a template for a specific Meter.
**To download a template for a Meter's CSV file:**
1. Select **Metering**. The **Meters** page opens.
2. In the **Product** drop-down, select the Product for the Meter you want to upload a measurements file.
3. Select the hotlink text of the Meter for which you want to perform a usage data measurements upload using a CSV file. The **Meter Details** page opens.
4. On the **Meter Details** card, select **Download CSV template**. A CSV file is downloaded to your Downloads folder. This is pre-formatted to agree with the specific Meter's Data Field configuration:
Note in particular:
* **Column headers**:
* Use all lower case for these.
* For Meter Data Fields column headers, use the format *\.\*. For example, for the current Meter use: **measure.num\_apps**.
* **Measurement rows**:
* Use valid codes for **account** and **meter**.
* Ensure a column is included for each Meter Data Field and a value is given for each.
* Use a unique **uid** for each measurement.
* The **ts** value used must conform to **ISO-8601** format.
When you upload a `CSV` usage data measurements file, a validation check is made to ensure these formatting rules have been complied with. If errors are identified, the ingest will be blocked.
You can begin to compile a CSV file for upload by first downloading a template for a specific Meter.
**To download a template for a Meter's CSV file:**
1. Select **Metering**. The **Meters** page opens.
2. In the **Product** drop-down, select the Product for the Meter you want to upload a measurements file.
3. Select the hotlink text of the Meter for which you want to perform a usage data measurements upload using a CSV file. The **Meter Details** page opens.
4. On the **Meter Details** card, select **Download CSV template**. A CSV file is downloaded to your Downloads folder. This is pre-formatted to agree with the specific Meter's Data Field configuration:
![]() For the current example Meter, we can see that the template complies with the required formatting and structure, and we can safely begin to enter measurements into the file in preparation for usage data ingest.
## Uploading a File
**Warning! Check File:** Before you attempt to upload a `CSV` formatted usage data measurements file through the Meter Details page in the Console, please review the file to ensure it conforms with the upload formatting rules as explained in the [previous section](/guides/billing-and-usage-data/submitting-usage-data/file-uploads-for-usage-data-by-meter#preparing-upload-file-example).
**To upload usage data measurements file through the Console:**
1. Select **Metering**. The **Meters** page opens.
2. You first need to locate the Meter you want to upload a usage data measurements file for:
* You can select or search for the Product to which the Meter belongs. Use the **Product**s drop-down at top-right, select the Product the Meter belongs to. The **Meters** page adjusts and shows:
* The selected Product and any existing Meters created for it.
* Any Global Meters.
* Alternatively, in the **Search** box at top-left, start to type in the name of the Meter. The Meter pages adjusts as you type and shows:
* The Meters whose name matches the entered text string and listed under the Product they belong to.
* Any Global Meters whose name matches the entered text string.
3. Select the **Name** hotlink text of the Meter. The **Meter Details** page opens.
4. Scroll down the page to the **Submit measurements** panel.
5. Select the **Upload CSV** tab:
For the current example Meter, we can see that the template complies with the required formatting and structure, and we can safely begin to enter measurements into the file in preparation for usage data ingest.
## Uploading a File
**Warning! Check File:** Before you attempt to upload a `CSV` formatted usage data measurements file through the Meter Details page in the Console, please review the file to ensure it conforms with the upload formatting rules as explained in the [previous section](/guides/billing-and-usage-data/submitting-usage-data/file-uploads-for-usage-data-by-meter#preparing-upload-file-example).
**To upload usage data measurements file through the Console:**
1. Select **Metering**. The **Meters** page opens.
2. You first need to locate the Meter you want to upload a usage data measurements file for:
* You can select or search for the Product to which the Meter belongs. Use the **Product**s drop-down at top-right, select the Product the Meter belongs to. The **Meters** page adjusts and shows:
* The selected Product and any existing Meters created for it.
* Any Global Meters.
* Alternatively, in the **Search** box at top-left, start to type in the name of the Meter. The Meter pages adjusts as you type and shows:
* The Meters whose name matches the entered text string and listed under the Product they belong to.
* Any Global Meters whose name matches the entered text string.
3. Select the **Name** hotlink text of the Meter. The **Meter Details** page opens.
4. Scroll down the page to the **Submit measurements** panel.
5. Select the **Upload CSV** tab:
![File Upload Meter27]() 6. Select **Browse** and use the search window to find and select the file you want to upload. The `CSV` file is parsed and loaded into the **Upload usage data** as a measurements table for you to review:
6. Select **Browse** and use the search window to find and select the file you want to upload. The `CSV` file is parsed and loaded into the **Upload usage data** as a measurements table for you to review:
![]() **Important: Invalid CSV file!** If you select a CSV file with an invalid format, then you'll receive and error when parsing of the file is attempted.
7. If on review you are satisfied with the measurements that are loaded, select **Submit usage**. The measurements contained in the file are ingested and under the **Log** section of the tab:
* You'll see a `{"result" : "accepted"}` message.
* The timestamp for the ingest is given.
* The JSON for the measurements ingest is reproduced and you can scroll the **Log** window.
**Important: Invalid CSV file!** If you select a CSV file with an invalid format, then you'll receive and error when parsing of the file is attempted.
7. If on review you are satisfied with the measurements that are loaded, select **Submit usage**. The measurements contained in the file are ingested and under the **Log** section of the tab:
* You'll see a `{"result" : "accepted"}` message.
* The timestamp for the ingest is given.
* The JSON for the measurements ingest is reproduced and you can scroll the **Log** window.
![]() Note that if you attempt to submit a usage data measurements file that when loaded into the **Upload CSV** tab contains rows that do not conform to the formatting requirements, use invalid codes, or are missing required values, the ingest will fail. Error messages are shown to help you make good the file and successfully re-submit:
Note that if you attempt to submit a usage data measurements file that when loaded into the **Upload CSV** tab contains rows that do not conform to the formatting requirements, use invalid codes, or are missing required values, the ingest will fail. Error messages are shown to help you make good the file and successfully re-submit:
![]() **Tip: Check usage data ingest?** If you want to check the usage data measurements ingest, you can open [Data Explorer (v2)](/guides/data-explorer/usage-data-explorer-v2) and submit a Usage Data query.
# Reviewing and Resolving Ingest Events
Source: https://docs.m3ter.com/guides/billing-and-usage-data/submitting-usage-data/reviewing-and-resolving-ingest-events
If a usage data measurement you submit to the platform fails to ingest properly, then an ingest validation failure system Event is generated for the ingest error that has occurred:
* **ingest.validation.failure**
In the *Metering* section of the Console on the *Ingest events* page, you can review this errors handling and follow-up on ingest failure Events to troubleshoot and resolve them. When you have followed-up on an ingest validation failure Event and resolved it, you can select *Mark as actioned* and remove it from the Ingest events list:
* [Reviewing Ingest Events](/guides/billing-and-usage-data/submitting-usage-data/reviewing-and-resolving-ingest-events#reviewing-ingest-events)
* [Marking Ingest Events as Actioned](/guides/billing-and-usage-data/submitting-usage-data/reviewing-and-resolving-ingest-events#marking-ingest-events-as-actioned)
**Note: Submit Measurements API call does NOT throw an Error.** If you use the **Submit Measurements** call to the Ingest API and the call is invalid due to one of the ingest validation failure errors, please be aware that the submission *is not immediately rejected*:
* The API response will be: `"result" : "accepted"`.
* This is by design - the API response refers to the pre-enrichment stage of the usage data ingest process. This synchronous stage is kept as simple as possible to avert the possibility of data loss as the first priority. The asynchronous enrichment stage can then carry out checks and reject any invalid usage data measurements.
**Note: Ingest Failure Events also show as System Alerts.** For some **ingest.validation.failure** Events - for example the *MissingField* ingest failure Event - you'll also see a corresponding System Alert created for your Organization on the **System alerts** page. You can use the Alert as an alternative way to inspect details of the failure to follow-up and troubleshoot the issue. See [Viewing and Managing System Alerts](/guides/alerts-events-and-notifications/viewing-and-managing-alerts) for more details.
## Reviewing Ingest Events
**To review and resolve ingest failure Events:**
1. In the Console, select **Metering>Ingest events**.
**Tip: Check usage data ingest?** If you want to check the usage data measurements ingest, you can open [Data Explorer (v2)](/guides/data-explorer/usage-data-explorer-v2) and submit a Usage Data query.
# Reviewing and Resolving Ingest Events
Source: https://docs.m3ter.com/guides/billing-and-usage-data/submitting-usage-data/reviewing-and-resolving-ingest-events
If a usage data measurement you submit to the platform fails to ingest properly, then an ingest validation failure system Event is generated for the ingest error that has occurred:
* **ingest.validation.failure**
In the *Metering* section of the Console on the *Ingest events* page, you can review this errors handling and follow-up on ingest failure Events to troubleshoot and resolve them. When you have followed-up on an ingest validation failure Event and resolved it, you can select *Mark as actioned* and remove it from the Ingest events list:
* [Reviewing Ingest Events](/guides/billing-and-usage-data/submitting-usage-data/reviewing-and-resolving-ingest-events#reviewing-ingest-events)
* [Marking Ingest Events as Actioned](/guides/billing-and-usage-data/submitting-usage-data/reviewing-and-resolving-ingest-events#marking-ingest-events-as-actioned)
**Note: Submit Measurements API call does NOT throw an Error.** If you use the **Submit Measurements** call to the Ingest API and the call is invalid due to one of the ingest validation failure errors, please be aware that the submission *is not immediately rejected*:
* The API response will be: `"result" : "accepted"`.
* This is by design - the API response refers to the pre-enrichment stage of the usage data ingest process. This synchronous stage is kept as simple as possible to avert the possibility of data loss as the first priority. The asynchronous enrichment stage can then carry out checks and reject any invalid usage data measurements.
**Note: Ingest Failure Events also show as System Alerts.** For some **ingest.validation.failure** Events - for example the *MissingField* ingest failure Event - you'll also see a corresponding System Alert created for your Organization on the **System alerts** page. You can use the Alert as an alternative way to inspect details of the failure to follow-up and troubleshoot the issue. See [Viewing and Managing System Alerts](/guides/alerts-events-and-notifications/viewing-and-managing-alerts) for more details.
## Reviewing Ingest Events
**To review and resolve ingest failure Events:**
1. In the Console, select **Metering>Ingest events**.
 The **Ingest events** page opens and lists any ingest failure Events generated for data submission measurement errors that have occurred in your Organization, and which have not yet been actioned:
![Ingest Events17]() You can read-off the details of the Event:
* **Name**. The name of the Event.
* **Date**. The date and time of the Event.
* **Type**. The error that occurred and caused the ingest failure.
Several different error Types can be shown:
* **UndefinedMeter**. The Meter Code used does not reference an existing Meter:
* Consequence: The submitted usage data measurement IS NOT ingested.
* **MissingField**. A field required to successfully ingest the measurement is missing. For example, this could be a Data Field defined for the Meter:
* Consequence: The submitted usage data measurement IS NOT ingested.
* **DuplicateUid**. A non-unique, duplicate UID was used for the measurement submission:
* Consequence: The submitted usage data measurement IS NOT ingested.
* **DuplicateField**. The measurement contained data fields with the same code in different categories.
* Consequence: The submitted usage data measurement IS NOT ingested.
* **CalculationError**. A Meter Derived Field calculation derivative on the measurements details failed to evaluate.
* Consequence: The submitted usage data measurement IS ingested without the value for the failed Derived Field.
* **InvalidAccountCode**. The Account code supplied in the measurement was invalid, and does not exactly match an existing Account code. A new Account could not be automatically created because an Account with a code string closely matching the submitted code string already exists but capitalization does not exactly match - such as for **Account1** and **account1**.
* Consequence: The submitted usage data measurement IS NOT ingested.
2. If you want to follow-up and investigate the ingest failure, you can select the **Download log** button for the Event. A error log text file in JSON format is downloaded.
3. Open the downloaded log file. The file contains details of the error that caused the ingest failure, along with the original measurement to help identify and resolve the issue. For example:
You can read-off the details of the Event:
* **Name**. The name of the Event.
* **Date**. The date and time of the Event.
* **Type**. The error that occurred and caused the ingest failure.
Several different error Types can be shown:
* **UndefinedMeter**. The Meter Code used does not reference an existing Meter:
* Consequence: The submitted usage data measurement IS NOT ingested.
* **MissingField**. A field required to successfully ingest the measurement is missing. For example, this could be a Data Field defined for the Meter:
* Consequence: The submitted usage data measurement IS NOT ingested.
* **DuplicateUid**. A non-unique, duplicate UID was used for the measurement submission:
* Consequence: The submitted usage data measurement IS NOT ingested.
* **DuplicateField**. The measurement contained data fields with the same code in different categories.
* Consequence: The submitted usage data measurement IS NOT ingested.
* **CalculationError**. A Meter Derived Field calculation derivative on the measurements details failed to evaluate.
* Consequence: The submitted usage data measurement IS ingested without the value for the failed Derived Field.
* **InvalidAccountCode**. The Account code supplied in the measurement was invalid, and does not exactly match an existing Account code. A new Account could not be automatically created because an Account with a code string closely matching the submitted code string already exists but capitalization does not exactly match - such as for **Account1** and **account1**.
* Consequence: The submitted usage data measurement IS NOT ingested.
2. If you want to follow-up and investigate the ingest failure, you can select the **Download log** button for the Event. A error log text file in JSON format is downloaded.
3. Open the downloaded log file. The file contains details of the error that caused the ingest failure, along with the original measurement to help identify and resolve the issue. For example:
![]() * In this example, the downloaded log file shows an ingest failure caused by an **UndefinedMeter**. We can see that the Meter Code used is identified as not belonging to an existing Meter in the current Organization.
**Note:** **Delay in Ingest Failure Events Showing**? There can be a delay of one to two minutes before an ingest failure shows on the **Ingest Events** page.
**Tip: Batch Submissions?** If you submit a set of usage data measurements as a batch submission, then all good measurements *are ingested* but any that provoke a, an **UndefinedMeter**, **MissingField** or **DuplicateUid** error *are blocked and do not get ingested*.
## Marking Ingest Events as Actioned
When you have followed-up and resolved an Ingest Event, you can mark it as actioned to remove it from the list.
**To mark an Ingest Event as actioned and remove it from the list:**
1. Select the checkbox of the Event you want to mark as actioned.
2. Select the **Mark as actioned** button. A confirmation popup appears:
* In this example, the downloaded log file shows an ingest failure caused by an **UndefinedMeter**. We can see that the Meter Code used is identified as not belonging to an existing Meter in the current Organization.
**Note:** **Delay in Ingest Failure Events Showing**? There can be a delay of one to two minutes before an ingest failure shows on the **Ingest Events** page.
**Tip: Batch Submissions?** If you submit a set of usage data measurements as a batch submission, then all good measurements *are ingested* but any that provoke a, an **UndefinedMeter**, **MissingField** or **DuplicateUid** error *are blocked and do not get ingested*.
## Marking Ingest Events as Actioned
When you have followed-up and resolved an Ingest Event, you can mark it as actioned to remove it from the list.
**To mark an Ingest Event as actioned and remove it from the list:**
1. Select the checkbox of the Event you want to mark as actioned.
2. Select the **Mark as actioned** button. A confirmation popup appears:
![Ingest Events18]() 3. Select **Yes** to confirm. The page refreshes and the checked Event is removed from the Events list.
**Tip: Mark multiple Events as actioned?** You can check-off multiple Events to mark them all as actioned at the same time.
4. If you want to check again on Events that you've already actioned, enable the **Include actioned events?** switch. The page refreshes and any actioned Events are added back into the Events list, and are clearly marked as **ACTIONED**:
3. Select **Yes** to confirm. The page refreshes and the checked Event is removed from the Events list.
**Tip: Mark multiple Events as actioned?** You can check-off multiple Events to mark them all as actioned at the same time.
4. If you want to check again on Events that you've already actioned, enable the **Include actioned events?** switch. The page refreshes and any actioned Events are added back into the Events list, and are clearly marked as **ACTIONED**:
![Ingest Events19]() # Submitting and Checking Test Usage Data
Source: https://docs.m3ter.com/guides/billing-and-usage-data/submitting-usage-data/submitting-test-usage-data
When you have set up pricing for your Product Plans, attached these to end customer Accounts, and created any Prepayments/Commitments or Balances for Accounts that need them, you can generate some test Bills for these Accounts in your non-production (Sandbox) environment. To do this, you'll need to first feed some sample usage data measurements into the m3ter platform before you generate test Bills for Accounts.
You can exploit a very useful feature built into the Console, which allows you to submit test usage data into m3ter directly from *Meter details* pages:
* For a specific Account.
* For the Meter data collection fields which are the basis for charging the Account.
To do this, you need to have the following to hand:
* The *Name* or *Code* of the Account for which you want to submit some test usage data measurements and then go on to check the Account billing.
* The *Meters* whose Data Fields are the Target Fields for the Aggregations which you used to configure the Pricing for the Plan you’ve attached to the Account.
As you make test usage data measurement submissions from a Meter details page, you can also check and track those submissions for ingest into the platform on an *Activity* panel on the Meter details page.
You can then generate a sample Bill for the Account and verify that your usage-based pricing set up is charging correctly before you deploy to your production environment.
This topic explains how to submit test usage data for a specific Meter Details page for an existing Account and how to check and track those submissions for ingest:
* [Submitting Test Usage Data](/guides/billing-and-usage-data/submitting-usage-data/submitting-test-usage-data#submitting-test-usage-data)
* [Checking Test Usage Data Submissions](/guides/billing-and-usage-data/submitting-usage-data/submitting-test-usage-data#checking-test-usage-data-submissions)
* [Deleting Usage Data Measurements from Non-Production Organizations](#deleting-usage-data-measurements-from-non-production-organizations)
**Tip: Submit Test Usage Data from an Account page?** Alternatively, you can follow similar steps to those explained here to submit usage data for a specific Account directly from the Account page. However, note that you'll not be able to check and track the submissions from there. See [Submitting Usage Data for an Account](/guides/end-customer-accounts/submitting-usage-data-for-an-account).
## Submitting Test Usage Data
You can submit test usage data measurements for ingest into the platform directly from Meter details pages.
**To submit test usage data:**
1. Select **Metering**. The **Meters** page opens and lists Meters by Product for **All Products** together with any **Global** Meters.
2. You first need to locate the Meter whose Data Fields were Target Fields for the Aggregation used for pricing the Plan you've attached to the Account:
* You can select or search for the Product to which the Meter belongs. Use the **Product**s drop-down at top-right, select the Product the Meter belongs to. The **Meters** page adjusts and shows:
* The selected Product and any existing Meters created for it.
* Any Global Meters.
* Alternatively, in the **Search** box at top-left, start to type in the name of the Meter. The Meter pages adjusts as you type and shows:
* The Meters whose name matches the entered text string and listed under the Product they belong to.
* Any Global Meters whose name matches the entered text string.
3. Select the name hotlink text of the Meter you want to submit test data for. The **Meter details** page opens.
4. Scroll down the page to the **Submit measurements** panel. There are four tabs:
* **Ingest API.** Default selection offering advice on how to use the [Submit Measurements API](/api/measurements/submit-measurements) call to the m3ter Ingest API, together with code snippets in different languages that you can copy directly to your clipboard. For more details, see [Getting Started with API Calls](/guides/m3ter-apis/getting-started-with-api-calls).
* **File upload API**. If you have prepared a usage data measurements file in JSON format ready for upload using the File Upload Service, you can perform the upload directly in the Console. See [File Upload Service API](/guides/billing-and-usage-data/submitting-usage-data/file-upload-service-api) for more details.
* **Upload CSV**. Allows you to upload a `CSV` formatted file for usage data measurements ingest. For more details, see [File Uploads for Usage Data by Meter](/guides/billing-and-usage-data/submitting-usage-data/file-uploads-for-usage-data-by-meter).
* **Submit usage data**. Allows you to submit usage data measurements for the Meter's Data Fields for specified Accounts.
5. Select the **Submit usage data** tab.
6. On the **Submit usage data** tab you can submit usage data for the Meter:
* Using the default **Simple** UI format:
* A measurement **UID** is entered automatically.
* A **Timestamp** date/time is entered for the current date and time. You can adjust this as required, and you might want to enter a date/time value that is in the past for your submission - see the [section below](/guides/billing-and-usage-data/submitting-usage-data/submitting-test-usage-data#adjusting-timestamp-for-submitting-usage-data) for more details. (*Required*)
* **End timestamp**. Can be used in those cases where a usage event needs to have an explicit start and end rather than being instantaneous. (*Optional*)
* The *Code* string for the **Meter** is entered - this is the required parameter for a Submit Measurements API call to the Ingest API.
* You can select the **Account** for which you want to submit usage data for charging the Account. (*Required*)
* Enter a **Value** for each of the Meter Data fields as required for the usage data submission. In this example, the selected Meter has a single **MEASURE** numeric Data Field:
# Submitting and Checking Test Usage Data
Source: https://docs.m3ter.com/guides/billing-and-usage-data/submitting-usage-data/submitting-test-usage-data
When you have set up pricing for your Product Plans, attached these to end customer Accounts, and created any Prepayments/Commitments or Balances for Accounts that need them, you can generate some test Bills for these Accounts in your non-production (Sandbox) environment. To do this, you'll need to first feed some sample usage data measurements into the m3ter platform before you generate test Bills for Accounts.
You can exploit a very useful feature built into the Console, which allows you to submit test usage data into m3ter directly from *Meter details* pages:
* For a specific Account.
* For the Meter data collection fields which are the basis for charging the Account.
To do this, you need to have the following to hand:
* The *Name* or *Code* of the Account for which you want to submit some test usage data measurements and then go on to check the Account billing.
* The *Meters* whose Data Fields are the Target Fields for the Aggregations which you used to configure the Pricing for the Plan you’ve attached to the Account.
As you make test usage data measurement submissions from a Meter details page, you can also check and track those submissions for ingest into the platform on an *Activity* panel on the Meter details page.
You can then generate a sample Bill for the Account and verify that your usage-based pricing set up is charging correctly before you deploy to your production environment.
This topic explains how to submit test usage data for a specific Meter Details page for an existing Account and how to check and track those submissions for ingest:
* [Submitting Test Usage Data](/guides/billing-and-usage-data/submitting-usage-data/submitting-test-usage-data#submitting-test-usage-data)
* [Checking Test Usage Data Submissions](/guides/billing-and-usage-data/submitting-usage-data/submitting-test-usage-data#checking-test-usage-data-submissions)
* [Deleting Usage Data Measurements from Non-Production Organizations](#deleting-usage-data-measurements-from-non-production-organizations)
**Tip: Submit Test Usage Data from an Account page?** Alternatively, you can follow similar steps to those explained here to submit usage data for a specific Account directly from the Account page. However, note that you'll not be able to check and track the submissions from there. See [Submitting Usage Data for an Account](/guides/end-customer-accounts/submitting-usage-data-for-an-account).
## Submitting Test Usage Data
You can submit test usage data measurements for ingest into the platform directly from Meter details pages.
**To submit test usage data:**
1. Select **Metering**. The **Meters** page opens and lists Meters by Product for **All Products** together with any **Global** Meters.
2. You first need to locate the Meter whose Data Fields were Target Fields for the Aggregation used for pricing the Plan you've attached to the Account:
* You can select or search for the Product to which the Meter belongs. Use the **Product**s drop-down at top-right, select the Product the Meter belongs to. The **Meters** page adjusts and shows:
* The selected Product and any existing Meters created for it.
* Any Global Meters.
* Alternatively, in the **Search** box at top-left, start to type in the name of the Meter. The Meter pages adjusts as you type and shows:
* The Meters whose name matches the entered text string and listed under the Product they belong to.
* Any Global Meters whose name matches the entered text string.
3. Select the name hotlink text of the Meter you want to submit test data for. The **Meter details** page opens.
4. Scroll down the page to the **Submit measurements** panel. There are four tabs:
* **Ingest API.** Default selection offering advice on how to use the [Submit Measurements API](/api/measurements/submit-measurements) call to the m3ter Ingest API, together with code snippets in different languages that you can copy directly to your clipboard. For more details, see [Getting Started with API Calls](/guides/m3ter-apis/getting-started-with-api-calls).
* **File upload API**. If you have prepared a usage data measurements file in JSON format ready for upload using the File Upload Service, you can perform the upload directly in the Console. See [File Upload Service API](/guides/billing-and-usage-data/submitting-usage-data/file-upload-service-api) for more details.
* **Upload CSV**. Allows you to upload a `CSV` formatted file for usage data measurements ingest. For more details, see [File Uploads for Usage Data by Meter](/guides/billing-and-usage-data/submitting-usage-data/file-uploads-for-usage-data-by-meter).
* **Submit usage data**. Allows you to submit usage data measurements for the Meter's Data Fields for specified Accounts.
5. Select the **Submit usage data** tab.
6. On the **Submit usage data** tab you can submit usage data for the Meter:
* Using the default **Simple** UI format:
* A measurement **UID** is entered automatically.
* A **Timestamp** date/time is entered for the current date and time. You can adjust this as required, and you might want to enter a date/time value that is in the past for your submission - see the [section below](/guides/billing-and-usage-data/submitting-usage-data/submitting-test-usage-data#adjusting-timestamp-for-submitting-usage-data) for more details. (*Required*)
* **End timestamp**. Can be used in those cases where a usage event needs to have an explicit start and end rather than being instantaneous. (*Optional*)
* The *Code* string for the **Meter** is entered - this is the required parameter for a Submit Measurements API call to the Ingest API.
* You can select the **Account** for which you want to submit usage data for charging the Account. (*Required*)
* Enter a **Value** for each of the Meter Data fields as required for the usage data submission. In this example, the selected Meter has a single **MEASURE** numeric Data Field:
![]() * Alternatively, you can switch to **Advanced**, where you can edit the raw JSON for the usage data submission:
* Alternatively, you can switch to **Advanced**, where you can edit the raw JSON for the usage data submission:
![]() **Important!**
* The [Submit Measurements](/api/measurements/submit-measurements) call to the Ingest API requires the Account *Code* string for the `"account"` request parameter. On the **Simple** format you'll select by the Account *Name*, but when you switch to the **Advanced** format, you'll see that it's the Account *Code* that is being used.
* Any change you make to the **Ingest request body** JSON in **Advanced** format before submitting - such as changing the `“account”` parameter value - will persist and be reflected in the **Simple** format.
* For JSON well-formedness, do not have a trailing comma after the last Data Field parameter entry. If you do, then your **Submit usage** call will be rejected as invalid.
7. Select **Submit usage**. If the submission succeeds:
* You'll see a `{ "result" : "accepted"}` message under **Log**.
* A **Log** item is shown for the measurement submission which reproduces the JSON.
**Important!**
* The [Submit Measurements](/api/measurements/submit-measurements) call to the Ingest API requires the Account *Code* string for the `"account"` request parameter. On the **Simple** format you'll select by the Account *Name*, but when you switch to the **Advanced** format, you'll see that it's the Account *Code* that is being used.
* Any change you make to the **Ingest request body** JSON in **Advanced** format before submitting - such as changing the `“account”` parameter value - will persist and be reflected in the **Simple** format.
* For JSON well-formedness, do not have a trailing comma after the last Data Field parameter entry. If you do, then your **Submit usage** call will be rejected as invalid.
7. Select **Submit usage**. If the submission succeeds:
* You'll see a `{ "result" : "accepted"}` message under **Log**.
* A **Log** item is shown for the measurement submission which reproduces the JSON.
![]() * Note that:
* The usage data measurement **UID** - `"uid"` - has been automatically refreshed with a new unique value to allow a second submission for the same Meter and Account.
* The timestamp - `"ts"` - is not refreshed and you can edit this as required for further submissions.
**Warning! Repeated Test Submissions using the same UID:** If you submit using the same measurement `"uid"`, the Ingest API will accept the measurement, and then during enrichment the system will deduplicate the measurements and notify you of the duplicate.
8. If you want to send a second set of usage data for the same Meter but for a different Account, edit the Account Code, and a second set of measures for the Meter Data Fields.
9. Select **Submit usage** again to submit a second set of usage data.
**Tip: Account consumes several Products?** If the Account for which you want to test Billing consumes more that one of your Products, you can repeat these steps for each of the Meters used as the basis for pricing each of the Product Plans attached to the Account.
## Checking Test Usage Data Submissions
When you submit test usage data for ingest into the platform from a Meter details page, you can quickly check and track usage data measurement submissions using the *Activity* panel on the page, which will show:
* A *Recent measurements* list for the Meter for submissions made in the last hour and which were successfully ingested into the platform:
* Up to a maximum of the ten most recent submissions made in the last hour are listed.
* A *Measurement counts* chart showing a running count of submissions made for the Meter over the previous 24 hours:
* You can hover your cursor over the chart's hourly data points to read off actual measurement counts.
**Important!** The **Activity** panel will on only show data measurement submissions whose **Timestamp** (`ts`) value falls in the last hour. If you have made submissions with a **Timestamp** of earlier in the past than sometime in the last hour, these will not be loaded into the **Activity** panel.
**To check test usage data submissions:**
1. Select **Metering**. The **Meters** page opens and lists Meters by Product for **All Products** together with any **Global** Meters.
2. Follow the steps given in the [previous section](/guides/billing-and-usage-data/submitting-usage-data/submitting-test-usage-data#submitting-test-usage-data) to open a **Meter details** page and submit some usage data measurements.
3. When you have done this and received a `{ "result" : "accepted"}` message under **Log** for your submissions, scroll down the page to the **Activity** panel.
4. Wait a few minutes and select **Refresh**:
* Note that:
* The usage data measurement **UID** - `"uid"` - has been automatically refreshed with a new unique value to allow a second submission for the same Meter and Account.
* The timestamp - `"ts"` - is not refreshed and you can edit this as required for further submissions.
**Warning! Repeated Test Submissions using the same UID:** If you submit using the same measurement `"uid"`, the Ingest API will accept the measurement, and then during enrichment the system will deduplicate the measurements and notify you of the duplicate.
8. If you want to send a second set of usage data for the same Meter but for a different Account, edit the Account Code, and a second set of measures for the Meter Data Fields.
9. Select **Submit usage** again to submit a second set of usage data.
**Tip: Account consumes several Products?** If the Account for which you want to test Billing consumes more that one of your Products, you can repeat these steps for each of the Meters used as the basis for pricing each of the Product Plans attached to the Account.
## Checking Test Usage Data Submissions
When you submit test usage data for ingest into the platform from a Meter details page, you can quickly check and track usage data measurement submissions using the *Activity* panel on the page, which will show:
* A *Recent measurements* list for the Meter for submissions made in the last hour and which were successfully ingested into the platform:
* Up to a maximum of the ten most recent submissions made in the last hour are listed.
* A *Measurement counts* chart showing a running count of submissions made for the Meter over the previous 24 hours:
* You can hover your cursor over the chart's hourly data points to read off actual measurement counts.
**Important!** The **Activity** panel will on only show data measurement submissions whose **Timestamp** (`ts`) value falls in the last hour. If you have made submissions with a **Timestamp** of earlier in the past than sometime in the last hour, these will not be loaded into the **Activity** panel.
**To check test usage data submissions:**
1. Select **Metering**. The **Meters** page opens and lists Meters by Product for **All Products** together with any **Global** Meters.
2. Follow the steps given in the [previous section](/guides/billing-and-usage-data/submitting-usage-data/submitting-test-usage-data#submitting-test-usage-data) to open a **Meter details** page and submit some usage data measurements.
3. When you have done this and received a `{ "result" : "accepted"}` message under **Log** for your submissions, scroll down the page to the **Activity** panel.
4. Wait a few minutes and select **Refresh**:
![]() If your usage data submissions have been successfully ingested into the platform they will be listed on the **Activity** panel. For example:
If your usage data submissions have been successfully ingested into the platform they will be listed on the **Activity** panel. For example:
![Submit Usage73]() **Warning: Usage data measurements logged as successful might not appear!** Ingest into the m3ter platform is a two-stage process and if a submission is not ingested because it fails one of the ingest validation checks, please be aware that the submission *is not immediately rejected*:
* The logged response to the submission can be: `"result" : "accepted"`. This is by design - the API response refers to the pre-enrichment stage of the usage data ingest process. This synchronous stage is kept as simple as possible to avert the possibility of data loss as the first priority.
* The asynchronous enrichment stage can then carry out checks and reject any invalid usage data measurements.
5. If a usage data submission you've made in the last hour does not appear on the **Activity** panel and you suspect the submission has failed one of the validation checks performed during the asynchronous enrichment stage, you can select the check **Ingest Events** hotlink text at the bottom of the panel. This takes you directly to the **Ingest Events** page, where any ingest failures are listed and you can review and troubleshoot these errors - see [Reviewing and Resolving Ingest Events](/guides/billing-and-usage-data/submitting-usage-data/reviewing-and-resolving-ingest-events).
6. Also, if you want to review a wider range of usage data measurements you've submitted to the platform, you can select **View in Data Explorer** on the **Activity** panel to open the **Usage Data Explorer**, where a query using the selected Meter and for a time period of **Today** is preloaded and performed.
**Tip: Checking usage data ingest in the Usage Data Explorer :**
* Submitted usage data can be queried for and then viewed in the Usage Data Explorer. See [Usage Data Explorer (v2)](/guides/end-customer-accounts/managing-accounts-best-practices) for details.
* However, please note that in the *special case* where, after submitting some usage data for an Account, you have:
* Deleted the Account and recreated it using the same Code.
* Submitted further usage data for the recreated Account.
* Then, usage data queries using the Usage Data Explorer will not be synchronized fully with the usage data linked to the Account for Billing purposes.
* This is because the usage data linked to the now deleted Account is no longer available for Billing against the new recreated Account, but remains available for Usage Data Explorer queries using the same Account Code.
* As a matter of best practice when managing your customer Accounts, we *strongly recommend* against deleting and recreating Accounts using the *same Code*. Please see [Managing Accounts - Best Practices](/guides/end-customer-accounts/managing-accounts-best-practices) for more on the implications of doing this.
## Deleting Usage Data Measurements from Non-Production Organizations
If you are working in a non-production (Sandbox) Organization and, having submitted some usage data measurements for testing, you can submit a request to [m3ter Support](/guides/getting-started/contacting-m3ter-support) to have them deleted. Please include the following details in your request:
* **Organization name**. The non-production Organization you want to delete the measurements from.
* **Time Period**. The start date and end date (UTC) of the time window for deletion.
* **Account ID**. Optional - to filter the scope of deletion to the Account.
* **Meter ID**. Optional - to filter the scope of deletion to the Meter.
**Check First!** Before submitting, we'd recommend using [Usage Data Explorer (v2)](/guides/data-explorer/usage-data-explorer-v2) in your non-production Organization to query the same time window, Account, and Meter you plan to delete against, so you can verify what will be removed. Deletions cannot be undone.
# Submitting Usage Data Adjustments Using Timestamp
Source: https://docs.m3ter.com/guides/billing-and-usage-data/submitting-usage-data/submitting-usage-data-adjustments-using-timestamp
When you are setting things up to **Submit usage data**, the **Timestamp** field is automatically populated with the current date/time. You can edit this field and enter your own past date/time value for the usage data submission:
* The data item is ingested immediately into m3ter.
* The date/time value you enter determines billing for the submitted usage.
* The date/time value you enter for the submission is used for the usage data item in the Data Explorer - when you query for usage data, the date/time value you've entered for the submission is shown for Meter Data Fields and is the value that can be filtered on. If the Meter also has Derived Fields whose value is calculated with reference to the Meter Data Fields, the custom date/time value you enter for the submission is applied to any such Derived Fields also.
Adjusting the **Timestamp** to use date/time values in the past for submitted usage data is useful if you need to make corrections for billing retrospectively against an Account - you can submit positive or negative usage data amounts to correct and reconcile earlier billing anomalies.
**Important!** **Please Note:**
* **Future Date/Times**. If you edit the **Timestamp** value, you must enter a date/time that *is in the past*. If you try to submit usage date for a future date/time, the submission will be rejected and you'll receive an error message.
* **Deleting and recreating Account with same Code**. You cannot send usage data adjustment measurements for an Account when the Account Code has been reused for a different Account. We strongly recommend not reusing Account Codes - for more details, see [Managing Accounts - Best Practices](/guides/end-customer-accounts/managing-accounts-best-practices).
# Submitting Usage Data for Non-Existent Accounts
Source: https://docs.m3ter.com/guides/billing-and-usage-data/submitting-usage-data/submitting-usage-data-for-non-existent-accounts
Although we recommend setting up Accounts prior to submitting usage data measurements for them, we appreciate this may not always be possible. To avoid rejecting usage data measurements in instances where the measurement is submitted but an Account does not yet exist, the m3ter system will *auto-create an Account* for you. You can test this functionality:
* You'll still need details of the Meter and the Data Fields you want to submit usage data measurements for.
* You can enter a Code for an Account, even if no Account with that Code exists in your Organization.
In these cases, when you submit a usage data measurement to the m3ter Ingest API a new skeleton Account is auto-created:
* **Code**. The Account Code used for the data measurement submission is assigned to the auto-created Account.
* **Name**. The name assigned to the auto-created Account is the result of concatenating the Code used with "-autocreated":
* For example, if you enter **TempAcct** as the Account **Code**, the **Name** assigned to the auto-created Account will be: **TempAcct-autocreated**.
* **E-mail address**. An e-mail address is assigned to the Account using a random hash prefix to create a temporary address.
* For example: [**-autocreated@example.com**](mailto:-autocreated@example.com)
The usage data measurement is accepted and ingested as data belonging to the new auto-created Account. At a later date, you can then open the details of the new Account and edit the **Code**, **Name**, and **e-mail address**.
**To submit usage data for a non-existent Account:**
1. Select **Metering**. The **Meters** page opens.
2. In the **Product** drop-down, select the Product the Meter is linked to. The Meters configured for the selected Product are listed.
* Note that if you want to submit test data for a *Global Meter* instead, don't select a Product and only the Global Meters in your Organization are listed.
3. In the list, locate the Meter whose Data Fields you want to submit test usage data for the non-existent Account.
4. Select the hotlink text of this Meter. The **Meter details** page opens. On the **Submit usage data** panel you can submit usage data measurements for the Meter and for a non-existent Account.
* Note that the default data submission format is **Simple**. In this format, you can go ahead and enter any Meter Data Fields **Values**. However, you cannot use this default **Simple** format to enter the **Code** you want use for the non-existent Account and you must switch to the **Advanced** and use a JSON editor format.
5. Switch to select the **Advanced** JSON editor format:
* A measurement **UID** is entered automatically.
* A **Timestamp** date/time is entered for the current date and time. If required, you can adjust this and enter a date/time value that is in the past for your submission - see the [Submitting Usage Data Adjustments Using Timestamp](/guides/billing-and-usage-data/submitting-usage-data/submitting-usage-data-adjustments-using-timestamp) topic for more details.
* Enter a **Value** for each of the Meter Data Fields as required for the usage data submission. In the example shown below, the selected Meter has a single **MEASURE** numeric Data Field. As noted above, you can also enter the Data Field values first using the **Simple** format.
* Enter a *Code* string for the non-existent **Account** for which you want to submit usage data for charging the Account.
6. Select **Submit usage**. If the submission succeeds:
* You'll see a `{ "result" : "accepted"}` message under **Log**.
* A **Log** item is shown for the measurement submission which reproduces the JSON:
**Warning: Usage data measurements logged as successful might not appear!** Ingest into the m3ter platform is a two-stage process and if a submission is not ingested because it fails one of the ingest validation checks, please be aware that the submission *is not immediately rejected*:
* The logged response to the submission can be: `"result" : "accepted"`. This is by design - the API response refers to the pre-enrichment stage of the usage data ingest process. This synchronous stage is kept as simple as possible to avert the possibility of data loss as the first priority.
* The asynchronous enrichment stage can then carry out checks and reject any invalid usage data measurements.
5. If a usage data submission you've made in the last hour does not appear on the **Activity** panel and you suspect the submission has failed one of the validation checks performed during the asynchronous enrichment stage, you can select the check **Ingest Events** hotlink text at the bottom of the panel. This takes you directly to the **Ingest Events** page, where any ingest failures are listed and you can review and troubleshoot these errors - see [Reviewing and Resolving Ingest Events](/guides/billing-and-usage-data/submitting-usage-data/reviewing-and-resolving-ingest-events).
6. Also, if you want to review a wider range of usage data measurements you've submitted to the platform, you can select **View in Data Explorer** on the **Activity** panel to open the **Usage Data Explorer**, where a query using the selected Meter and for a time period of **Today** is preloaded and performed.
**Tip: Checking usage data ingest in the Usage Data Explorer :**
* Submitted usage data can be queried for and then viewed in the Usage Data Explorer. See [Usage Data Explorer (v2)](/guides/end-customer-accounts/managing-accounts-best-practices) for details.
* However, please note that in the *special case* where, after submitting some usage data for an Account, you have:
* Deleted the Account and recreated it using the same Code.
* Submitted further usage data for the recreated Account.
* Then, usage data queries using the Usage Data Explorer will not be synchronized fully with the usage data linked to the Account for Billing purposes.
* This is because the usage data linked to the now deleted Account is no longer available for Billing against the new recreated Account, but remains available for Usage Data Explorer queries using the same Account Code.
* As a matter of best practice when managing your customer Accounts, we *strongly recommend* against deleting and recreating Accounts using the *same Code*. Please see [Managing Accounts - Best Practices](/guides/end-customer-accounts/managing-accounts-best-practices) for more on the implications of doing this.
## Deleting Usage Data Measurements from Non-Production Organizations
If you are working in a non-production (Sandbox) Organization and, having submitted some usage data measurements for testing, you can submit a request to [m3ter Support](/guides/getting-started/contacting-m3ter-support) to have them deleted. Please include the following details in your request:
* **Organization name**. The non-production Organization you want to delete the measurements from.
* **Time Period**. The start date and end date (UTC) of the time window for deletion.
* **Account ID**. Optional - to filter the scope of deletion to the Account.
* **Meter ID**. Optional - to filter the scope of deletion to the Meter.
**Check First!** Before submitting, we'd recommend using [Usage Data Explorer (v2)](/guides/data-explorer/usage-data-explorer-v2) in your non-production Organization to query the same time window, Account, and Meter you plan to delete against, so you can verify what will be removed. Deletions cannot be undone.
# Submitting Usage Data Adjustments Using Timestamp
Source: https://docs.m3ter.com/guides/billing-and-usage-data/submitting-usage-data/submitting-usage-data-adjustments-using-timestamp
When you are setting things up to **Submit usage data**, the **Timestamp** field is automatically populated with the current date/time. You can edit this field and enter your own past date/time value for the usage data submission:
* The data item is ingested immediately into m3ter.
* The date/time value you enter determines billing for the submitted usage.
* The date/time value you enter for the submission is used for the usage data item in the Data Explorer - when you query for usage data, the date/time value you've entered for the submission is shown for Meter Data Fields and is the value that can be filtered on. If the Meter also has Derived Fields whose value is calculated with reference to the Meter Data Fields, the custom date/time value you enter for the submission is applied to any such Derived Fields also.
Adjusting the **Timestamp** to use date/time values in the past for submitted usage data is useful if you need to make corrections for billing retrospectively against an Account - you can submit positive or negative usage data amounts to correct and reconcile earlier billing anomalies.
**Important!** **Please Note:**
* **Future Date/Times**. If you edit the **Timestamp** value, you must enter a date/time that *is in the past*. If you try to submit usage date for a future date/time, the submission will be rejected and you'll receive an error message.
* **Deleting and recreating Account with same Code**. You cannot send usage data adjustment measurements for an Account when the Account Code has been reused for a different Account. We strongly recommend not reusing Account Codes - for more details, see [Managing Accounts - Best Practices](/guides/end-customer-accounts/managing-accounts-best-practices).
# Submitting Usage Data for Non-Existent Accounts
Source: https://docs.m3ter.com/guides/billing-and-usage-data/submitting-usage-data/submitting-usage-data-for-non-existent-accounts
Although we recommend setting up Accounts prior to submitting usage data measurements for them, we appreciate this may not always be possible. To avoid rejecting usage data measurements in instances where the measurement is submitted but an Account does not yet exist, the m3ter system will *auto-create an Account* for you. You can test this functionality:
* You'll still need details of the Meter and the Data Fields you want to submit usage data measurements for.
* You can enter a Code for an Account, even if no Account with that Code exists in your Organization.
In these cases, when you submit a usage data measurement to the m3ter Ingest API a new skeleton Account is auto-created:
* **Code**. The Account Code used for the data measurement submission is assigned to the auto-created Account.
* **Name**. The name assigned to the auto-created Account is the result of concatenating the Code used with "-autocreated":
* For example, if you enter **TempAcct** as the Account **Code**, the **Name** assigned to the auto-created Account will be: **TempAcct-autocreated**.
* **E-mail address**. An e-mail address is assigned to the Account using a random hash prefix to create a temporary address.
* For example: [**-autocreated@example.com**](mailto:-autocreated@example.com)
The usage data measurement is accepted and ingested as data belonging to the new auto-created Account. At a later date, you can then open the details of the new Account and edit the **Code**, **Name**, and **e-mail address**.
**To submit usage data for a non-existent Account:**
1. Select **Metering**. The **Meters** page opens.
2. In the **Product** drop-down, select the Product the Meter is linked to. The Meters configured for the selected Product are listed.
* Note that if you want to submit test data for a *Global Meter* instead, don't select a Product and only the Global Meters in your Organization are listed.
3. In the list, locate the Meter whose Data Fields you want to submit test usage data for the non-existent Account.
4. Select the hotlink text of this Meter. The **Meter details** page opens. On the **Submit usage data** panel you can submit usage data measurements for the Meter and for a non-existent Account.
* Note that the default data submission format is **Simple**. In this format, you can go ahead and enter any Meter Data Fields **Values**. However, you cannot use this default **Simple** format to enter the **Code** you want use for the non-existent Account and you must switch to the **Advanced** and use a JSON editor format.
5. Switch to select the **Advanced** JSON editor format:
* A measurement **UID** is entered automatically.
* A **Timestamp** date/time is entered for the current date and time. If required, you can adjust this and enter a date/time value that is in the past for your submission - see the [Submitting Usage Data Adjustments Using Timestamp](/guides/billing-and-usage-data/submitting-usage-data/submitting-usage-data-adjustments-using-timestamp) topic for more details.
* Enter a **Value** for each of the Meter Data Fields as required for the usage data submission. In the example shown below, the selected Meter has a single **MEASURE** numeric Data Field. As noted above, you can also enter the Data Field values first using the **Simple** format.
* Enter a *Code* string for the non-existent **Account** for which you want to submit usage data for charging the Account.
6. Select **Submit usage**. If the submission succeeds:
* You'll see a `{ "result" : "accepted"}` message under **Log**.
* A **Log** item is shown for the measurement submission which reproduces the JSON:
![]() * Note that:
* The usage data measurement **UID** - `"uid"` - has been automatically refreshed with a new unique value to allow a second submission for the same Meter and Account.
* The timestamp - `"ts"` - is not refreshed and you can edit this as required for further submissions.
**Warning! Repeated Test Submissions using the same UID:** If you submit using the same measurement `"uid"`, the Ingest API will accept the measurement, and then during enrichment the system will deduplicate the measurements and notify you of the duplicate.
7. If you want to check that a new Account for the submitted usage data has been auto-created, select **Accounts**. A new Account should be listed for your Organization and named according to the Account auto-creation process - in the current example **TestAcct-autocreated**:
* Note that:
* The usage data measurement **UID** - `"uid"` - has been automatically refreshed with a new unique value to allow a second submission for the same Meter and Account.
* The timestamp - `"ts"` - is not refreshed and you can edit this as required for further submissions.
**Warning! Repeated Test Submissions using the same UID:** If you submit using the same measurement `"uid"`, the Ingest API will accept the measurement, and then during enrichment the system will deduplicate the measurements and notify you of the duplicate.
7. If you want to check that a new Account for the submitted usage data has been auto-created, select **Accounts**. A new Account should be listed for your Organization and named according to the Account auto-creation process - in the current example **TestAcct-autocreated**:
![Submit Usage71]() You can now edit the details of the auto-created Account as required.
**Tip: Using Submit Measurement Ingest API Call?** You can also use the [Submit Measurements API](/api/measurements/submit-measurements) call to to the Ingest API to make a usage data measurement submission for a non-existent Account.
# Creating, Managing, and Reviewing Products
Source: https://docs.m3ter.com/guides/creating-and-managing-products
You can create *Products* in m3ter to represent the products and services you offer to your end customers. You can then create and configure the required Product entities in you m3ter Organization to bill end-customers for Product consumption:
* To enable usage-based pricing for a Product:
* Create Meters and Aggregations to collect Product usage data and define pricing metrics for Product consumption.
* Set up Product Plans and apply usage-based pricing to Plans using the metrics you've defined, and then attach priced Plans to Accounts that consume the Product.
* To enable unit-based subscription charge pricing for a Product:
* Create Counters to represent the Product units you want to charge by - such as seats or licenses - and use these Counters to apply unit-based pricing to Product Plans.
* Attach the priced Plans to Accounts that consume the Product and then Create Counter adjustments against Accounts for the number of units the Account has subscribed to.
This topic explains how to create Products for your Organization, review Product entities, create Product entities, and how to check a Product's metadata:
* [Creating Products](/guides/creating-and-managing-products#creating-products)
* [Reviewing Product Entities](/guides/creating-and-managing-products#reviewing-product-entities)
* [Creating Product Entities](#creating-product-entities)
* [Reviewing Product Metadata](/guides/creating-and-managing-products#reviewing-product-metadata)
* [Custom Fields](/guides/creating-and-managing-products#custom-fields)
## Creating Products
**To create a Product:**
1. In the Console, select **Products**. The **Products** page opens and lists any existing Products in your Organization.
2. Select **Create product**. The **Create** page opens:
3. On the **Create** page enter the details of your new Product:
* **Name**. Enter a descriptive name.
* **Code**. Unique identifier for the Product.
* Note that when you enter a name and click in the **Code** field, a default code is entered based on the name you've entered, which you can then edit as required.
**Tip: Required Attributes?** Both attributes are required and are marked with a red asterisk.
4. Select **Create product**:
You can now edit the details of the auto-created Account as required.
**Tip: Using Submit Measurement Ingest API Call?** You can also use the [Submit Measurements API](/api/measurements/submit-measurements) call to to the Ingest API to make a usage data measurement submission for a non-existent Account.
# Creating, Managing, and Reviewing Products
Source: https://docs.m3ter.com/guides/creating-and-managing-products
You can create *Products* in m3ter to represent the products and services you offer to your end customers. You can then create and configure the required Product entities in you m3ter Organization to bill end-customers for Product consumption:
* To enable usage-based pricing for a Product:
* Create Meters and Aggregations to collect Product usage data and define pricing metrics for Product consumption.
* Set up Product Plans and apply usage-based pricing to Plans using the metrics you've defined, and then attach priced Plans to Accounts that consume the Product.
* To enable unit-based subscription charge pricing for a Product:
* Create Counters to represent the Product units you want to charge by - such as seats or licenses - and use these Counters to apply unit-based pricing to Product Plans.
* Attach the priced Plans to Accounts that consume the Product and then Create Counter adjustments against Accounts for the number of units the Account has subscribed to.
This topic explains how to create Products for your Organization, review Product entities, create Product entities, and how to check a Product's metadata:
* [Creating Products](/guides/creating-and-managing-products#creating-products)
* [Reviewing Product Entities](/guides/creating-and-managing-products#reviewing-product-entities)
* [Creating Product Entities](#creating-product-entities)
* [Reviewing Product Metadata](/guides/creating-and-managing-products#reviewing-product-metadata)
* [Custom Fields](/guides/creating-and-managing-products#custom-fields)
## Creating Products
**To create a Product:**
1. In the Console, select **Products**. The **Products** page opens and lists any existing Products in your Organization.
2. Select **Create product**. The **Create** page opens:
3. On the **Create** page enter the details of your new Product:
* **Name**. Enter a descriptive name.
* **Code**. Unique identifier for the Product.
* Note that when you enter a name and click in the **Code** field, a default code is entered based on the name you've entered, which you can then edit as required.
**Tip: Required Attributes?** Both attributes are required and are marked with a red asterisk.
4. Select **Create product**:
![]() The **Product details** page opens:
The **Product details** page opens:
![]() 5. If you want to edit a Product's details, select the **Edit** button, make your changes, and click **Update**.
6. If you want to remove a Product, select **Delete**:
5. If you want to edit a Product's details, select the **Edit** button, make your changes, and click **Update**.
6. If you want to remove a Product, select **Delete**:
![]() * Alternatively, return to the **Products** page and select the **Delete** button for the Product:
* Alternatively, return to the **Products** page and select the **Delete** button for the Product:
![]() A confirmation popup opens.
7. Select **Yes** to confirm the delete action.
**Important: Product has child entities!** If you attempt to delete a Product and child entities exists that belong to the Product - such as Plan Templates or Meters - then you will not be able to and an error message will show.
## Reviewing Product Entities
On the **Product details** page, you can review and check various types of entities created for a Product and which belong to it.
**To review Product entities:**
1. In the Console, select **Products**. The **Products** page opens.
2. Search for the Product you want to review and select the **Name** hotlink text to open the Product. The **Product details** page opens.
3. Scroll down the page and entities belonging to a Product are listed under tabs:
* **Meters**
* **Aggregations**
* **Compound Aggregations**
* **Counters**
* **Plan Templates**
* **Plans**
When you first open the **Product details** page, the **Meters** tab is selected by default.
4. Select a tab to review the entities of that type that belong to the Product:
A confirmation popup opens.
7. Select **Yes** to confirm the delete action.
**Important: Product has child entities!** If you attempt to delete a Product and child entities exists that belong to the Product - such as Plan Templates or Meters - then you will not be able to and an error message will show.
## Reviewing Product Entities
On the **Product details** page, you can review and check various types of entities created for a Product and which belong to it.
**To review Product entities:**
1. In the Console, select **Products**. The **Products** page opens.
2. Search for the Product you want to review and select the **Name** hotlink text to open the Product. The **Product details** page opens.
3. Scroll down the page and entities belonging to a Product are listed under tabs:
* **Meters**
* **Aggregations**
* **Compound Aggregations**
* **Counters**
* **Plan Templates**
* **Plans**
When you first open the **Product details** page, the **Meters** tab is selected by default.
4. Select a tab to review the entities of that type that belong to the Product:
![Products17]() * In this example, two **Plans** belonging to the Product are listed.
* Note that if you select the **Meters**, **Aggregations**, **Compound aggregations**, or **Counters** tab, then **GLOBAL** versions of these entities created for your Organization are also listed because these can be applied to any Product, such as using a global Counter to price a Product Plan:
* In this example, two **Plans** belonging to the Product are listed.
* Note that if you select the **Meters**, **Aggregations**, **Compound aggregations**, or **Counters** tab, then **GLOBAL** versions of these entities created for your Organization are also listed because these can be applied to any Product, such as using a global Counter to price a Product Plan:
![Products18]() **Tip: Tab selection persists!** If you select a Product entity tab and navigate away from the **Product details** page, when you return the tab selection is preserved for your current login session.
5. You can manage entities belonging to a Product:
* Select the **Name** hotlink text to open the details page for an entity.
* Edit an entity:
**Tip: Tab selection persists!** If you select a Product entity tab and navigate away from the **Product details** page, when you return the tab selection is preserved for your current login session.
5. You can manage entities belonging to a Product:
* Select the **Name** hotlink text to open the details page for an entity.
* Edit an entity:
![]() * Delete an entity:
* Delete an entity:
![]() ## Creating Product Entities
You can create entities for a Product directly from the **Product details** page.
This section shows how to create a *Product Plan* as an example. To create other entity types for a Product, you can follow similar steps.
**To create Product entities:**
1. In the Console, select **Products**. The **Products** page opens.
2. Search for the Product you want to create an entity for and select the **Name** hotlink text to open the Product. The **Product details** page opens.
3. Scroll down the page and select the tab for the entity type you want to create for the Product - for the current example **Plans**:
## Creating Product Entities
You can create entities for a Product directly from the **Product details** page.
This section shows how to create a *Product Plan* as an example. To create other entity types for a Product, you can follow similar steps.
**To create Product entities:**
1. In the Console, select **Products**. The **Products** page opens.
2. Search for the Product you want to create an entity for and select the **Name** hotlink text to open the Product. The **Product details** page opens.
3. Scroll down the page and select the tab for the entity type you want to create for the Product - for the current example **Plans**:
![Products15]() 4. Select **Create plan**. The **Create** page opens with the **Product** pre-selected.
5. Select or enter the other required Plan details:
* **Plan Template**
* **Name**
* **Code**
6. Configure the other Plan attributes as required:
* **Standing charge**
* **Minimum spend**
* **Custom fields**
7. Select **Create plan**. You are returned to the **Product details** page and the new Product entity is shown on the **Plans** tab:
4. Select **Create plan**. The **Create** page opens with the **Product** pre-selected.
5. Select or enter the other required Plan details:
* **Plan Template**
* **Name**
* **Code**
6. Configure the other Plan attributes as required:
* **Standing charge**
* **Minimum spend**
* **Custom fields**
7. Select **Create plan**. You are returned to the **Product details** page and the new Product entity is shown on the **Plans** tab:
![Products16]() ## Reviewing Product Metadata
If you scroll down the **Product details** page, you can review **Product metadata**:
**Custom fields**. Any Custom fields created for the Product entity are listed:
## Reviewing Product Metadata
If you scroll down the **Product details** page, you can review **Product metadata**:
**Custom fields**. Any Custom fields created for the Product entity are listed:
![Products21]() * You can **Copy** the *String* or *Number* value of a Custom Field to your clipboard. See below [Custom Fields](/guides/creating-and-managing-products#custom-fields).
**External mappings**. Any existing mappings created for the Product are listed:
* You can **Copy** the *String* or *Number* value of a Custom Field to your clipboard. See below [Custom Fields](/guides/creating-and-managing-products#custom-fields).
**External mappings**. Any existing mappings created for the Product are listed:
![Products22]() * The **External system** and **External table** mapped to are shown - such as **Stripe - Product** in the above example. The **External entity ID** mapped to is also shown.
* If a listed External mapping is linked to an Integration, under **Linked integration** a hotlink text will be shown which you can use to open the Integration.
* Under **Actions**, you can edit or delete the External mapping.
* If the Product has multiple External mappings created for it, you can use *Search external mappings* to search by **External table** and **External entity ID** and filter the list.
* You can commence a workflow to **Create external mapping** for the Product directly - see [Creating and Managing External Mappings for Accounts](/guides/end-customer-accounts/creating-and-managing-external-mappings-for-accounts) for an example.
**Integration runs**. If you've set up an integration that synchronizes the Product with an external system, the date/time and status of the **Latest** integration run are shown. You can use a text hotlink to open details of this latest run or **View all runs**. See [Reviewing Integration Run Details](/guides/integrations/setting-up-integrations/reviewing-integration-run-details).
## Custom Fields
You can define **Custom Fields** when creating a Product or edit the Product at a later date to do this. Any Custom Fields you create for an individual Product override those you've created for Products at the Organizational level. We strongly recommend reviewing [Working with Custom Fields](/guides/creating-and-managing-products/working-with-custom-fields) before you create Custom Fields.
# Working with Custom Fields
Source: https://docs.m3ter.com/guides/creating-and-managing-products/working-with-custom-fields
*Custom Fields* in m3ter allow you to store custom data in the form of number or string values against m3ter entities in a way that does not directly affect the normal working operation of the m3ter platform. Having this capability to store data in a free-hand fashion can prove very useful in helping you to meet the specific usage-based pricing and other operational business use cases you want to implement.
You can create Custom Fields for the following m3ter entities:
* **Organization**
* **Product**
* **Meter**
* **Plan**
* **Plan Template**
* **Account**
* **Account Plan**
* **Aggregation**
* **Compound Aggregation**
* **Contract**
* **Balance**
* **Balance Transaction Schedules**
* **Balance Charge Schedules**
* **Plan Group**
However, you can exploit the values you store using Custom Fields in another, more directed, way by referencing them in your Derived Field and Compound Aggregation calculations. When you use Custom Fields for this purpose, and given the key role Derived Fields or Compound Aggregation can play in implementing usage-based pricing schema, they will then affect how the platform behaves. Referencing Custom Field values in your calculations gives you a much wider scope of options when it comes to resolving complex usage-based pricing use cases.
If you plan to use Custom Fields in calculations, there are some key points to note:
* You can create Custom Fields you want to reference in your calculations at *two levels* - at the Organizational-level and at the level of individual entities - for the following:
* **Product**
* **Plan Template**
* **Plan**
* **Meter**
* **Account**
* **Account Plan**
* **Aggregation**
* **Compound Aggregation**
* **Contract**
* For example, if you want reference a Custom Field for Account, say `cfAccount1`, in your calculations:
* You *must first create* an Account Custom Field called `cfAccount1` at the Organizational-level to act as a default value for the field. This is designed to ensure that a default value is always available and, for cases where the individual entity - in this case an Account - does not have a Custom Field defined, the calculation will not fail. You cannot simply create a Custom Field at the entity-level.
* If you *do not create* a Custom Field called `cfAccount1` for an individual Account (say for Account 1), then when you reference `cfAccount1` in a calculation, the value of the *Organization-level field* will be used for the calculation.
* If you *do create* a Custom Field called `cfAccount1` for an individual Account (say Account 1), then when you reference `cfAccount1` in a calculation, the value of the *entity-level field* will be used in the calculation.
* The general rule when referencing Custom Fields in calculations is: the entity-level field value is used if defined, otherwise the Organization-level value is used.
**Limits and Constraints:**
* **Maximum number.** The maximum number of Custom Fields you can create for each entity type at Organization-level is **25**.
* **Duplicate Naming**. More that one Custom Field with the same name is not allowed. If you try to add two or more Custom Fields with the same name for an entity type, when you save your changes *only the last one you added is saved*.
**Important!**
* **Exceptions to Rule**. There are exceptions to the general rule, so please review the following sections in this topic for [Referencing Custom Fields in Derived Field Calculations](/guides/creating-and-managing-products/working-with-custom-fields#referencing-custom-fields-in-derived-field-calculations) and [Referencing Custom Fields in Compound Aggregation Calculations](/guides/creating-and-managing-products/working-with-custom-fields#referencing-custom-fields-in-compound-aggregation-calculations) before you attempt to use them.
* **What about Custom Fields for Aggregations and Compound Aggregations?** You can define Custom Fields for **Aggregations** and **Compound Aggregations** at both the Organizational level and the individual entity level. However, these Custom Fields are *NOT supported* for referencing in Derived Field or Compound Aggregation calculations.
* **What about the entities you cannot create Custom Fields for at the Organization-level?** If you cannot create Custom Fields for an entity at Organization-level and only at individual entity-level, you cannot reference the field values for those you create at the entity-level in your calculations. Currently, these are:
* **Balances**
* **Balance Transaction Schedules**
* **Balance Charge Schedules**
* **Plan Groups**
## Creating Custom Fields
### At Organizational-Level
You can create Custom Fields at the Organization-level in the Console when setting up your Organization in m3ter: see [Adding and Editing Custom Fields](/guides/organization-and-access-management/viewing-and-editing-organization/adding-and-editing-custom-fields) in the [Managing your Organization](/guides/organization-and-access-management/viewing-and-editing-organization) section.
You can also use the [Update CustomFields](/api/customfield/update-customfields) API call to do this.
### At Individual Entity-Level
When you create or edit an individual entity that accepts Custom Fields in the Console, you'll be able to add them. For example, when Creating Products.
You can also use an API call to do this. For example, the [Create Product](/api/product/create-product) API call.
## Reviewing Custom Fields
On the details pages for the main entities in your m3ter Organization, you can quickly review any Custom Fields created for the entity on the metadata panel. Any Custom Fields created for the entity are listed, and you can **Copy** the *String* or *Number* value of a Custom Field to your clipboard.
* If the fields have been created only at Organizational-level, then these values will be shown:
* The **External system** and **External table** mapped to are shown - such as **Stripe - Product** in the above example. The **External entity ID** mapped to is also shown.
* If a listed External mapping is linked to an Integration, under **Linked integration** a hotlink text will be shown which you can use to open the Integration.
* Under **Actions**, you can edit or delete the External mapping.
* If the Product has multiple External mappings created for it, you can use *Search external mappings* to search by **External table** and **External entity ID** and filter the list.
* You can commence a workflow to **Create external mapping** for the Product directly - see [Creating and Managing External Mappings for Accounts](/guides/end-customer-accounts/creating-and-managing-external-mappings-for-accounts) for an example.
**Integration runs**. If you've set up an integration that synchronizes the Product with an external system, the date/time and status of the **Latest** integration run are shown. You can use a text hotlink to open details of this latest run or **View all runs**. See [Reviewing Integration Run Details](/guides/integrations/setting-up-integrations/reviewing-integration-run-details).
## Custom Fields
You can define **Custom Fields** when creating a Product or edit the Product at a later date to do this. Any Custom Fields you create for an individual Product override those you've created for Products at the Organizational level. We strongly recommend reviewing [Working with Custom Fields](/guides/creating-and-managing-products/working-with-custom-fields) before you create Custom Fields.
# Working with Custom Fields
Source: https://docs.m3ter.com/guides/creating-and-managing-products/working-with-custom-fields
*Custom Fields* in m3ter allow you to store custom data in the form of number or string values against m3ter entities in a way that does not directly affect the normal working operation of the m3ter platform. Having this capability to store data in a free-hand fashion can prove very useful in helping you to meet the specific usage-based pricing and other operational business use cases you want to implement.
You can create Custom Fields for the following m3ter entities:
* **Organization**
* **Product**
* **Meter**
* **Plan**
* **Plan Template**
* **Account**
* **Account Plan**
* **Aggregation**
* **Compound Aggregation**
* **Contract**
* **Balance**
* **Balance Transaction Schedules**
* **Balance Charge Schedules**
* **Plan Group**
However, you can exploit the values you store using Custom Fields in another, more directed, way by referencing them in your Derived Field and Compound Aggregation calculations. When you use Custom Fields for this purpose, and given the key role Derived Fields or Compound Aggregation can play in implementing usage-based pricing schema, they will then affect how the platform behaves. Referencing Custom Field values in your calculations gives you a much wider scope of options when it comes to resolving complex usage-based pricing use cases.
If you plan to use Custom Fields in calculations, there are some key points to note:
* You can create Custom Fields you want to reference in your calculations at *two levels* - at the Organizational-level and at the level of individual entities - for the following:
* **Product**
* **Plan Template**
* **Plan**
* **Meter**
* **Account**
* **Account Plan**
* **Aggregation**
* **Compound Aggregation**
* **Contract**
* For example, if you want reference a Custom Field for Account, say `cfAccount1`, in your calculations:
* You *must first create* an Account Custom Field called `cfAccount1` at the Organizational-level to act as a default value for the field. This is designed to ensure that a default value is always available and, for cases where the individual entity - in this case an Account - does not have a Custom Field defined, the calculation will not fail. You cannot simply create a Custom Field at the entity-level.
* If you *do not create* a Custom Field called `cfAccount1` for an individual Account (say for Account 1), then when you reference `cfAccount1` in a calculation, the value of the *Organization-level field* will be used for the calculation.
* If you *do create* a Custom Field called `cfAccount1` for an individual Account (say Account 1), then when you reference `cfAccount1` in a calculation, the value of the *entity-level field* will be used in the calculation.
* The general rule when referencing Custom Fields in calculations is: the entity-level field value is used if defined, otherwise the Organization-level value is used.
**Limits and Constraints:**
* **Maximum number.** The maximum number of Custom Fields you can create for each entity type at Organization-level is **25**.
* **Duplicate Naming**. More that one Custom Field with the same name is not allowed. If you try to add two or more Custom Fields with the same name for an entity type, when you save your changes *only the last one you added is saved*.
**Important!**
* **Exceptions to Rule**. There are exceptions to the general rule, so please review the following sections in this topic for [Referencing Custom Fields in Derived Field Calculations](/guides/creating-and-managing-products/working-with-custom-fields#referencing-custom-fields-in-derived-field-calculations) and [Referencing Custom Fields in Compound Aggregation Calculations](/guides/creating-and-managing-products/working-with-custom-fields#referencing-custom-fields-in-compound-aggregation-calculations) before you attempt to use them.
* **What about Custom Fields for Aggregations and Compound Aggregations?** You can define Custom Fields for **Aggregations** and **Compound Aggregations** at both the Organizational level and the individual entity level. However, these Custom Fields are *NOT supported* for referencing in Derived Field or Compound Aggregation calculations.
* **What about the entities you cannot create Custom Fields for at the Organization-level?** If you cannot create Custom Fields for an entity at Organization-level and only at individual entity-level, you cannot reference the field values for those you create at the entity-level in your calculations. Currently, these are:
* **Balances**
* **Balance Transaction Schedules**
* **Balance Charge Schedules**
* **Plan Groups**
## Creating Custom Fields
### At Organizational-Level
You can create Custom Fields at the Organization-level in the Console when setting up your Organization in m3ter: see [Adding and Editing Custom Fields](/guides/organization-and-access-management/viewing-and-editing-organization/adding-and-editing-custom-fields) in the [Managing your Organization](/guides/organization-and-access-management/viewing-and-editing-organization) section.
You can also use the [Update CustomFields](/api/customfield/update-customfields) API call to do this.
### At Individual Entity-Level
When you create or edit an individual entity that accepts Custom Fields in the Console, you'll be able to add them. For example, when Creating Products.
You can also use an API call to do this. For example, the [Create Product](/api/product/create-product) API call.
## Reviewing Custom Fields
On the details pages for the main entities in your m3ter Organization, you can quickly review any Custom Fields created for the entity on the metadata panel. Any Custom Fields created for the entity are listed, and you can **Copy** the *String* or *Number* value of a Custom Field to your clipboard.
* If the fields have been created only at Organizational-level, then these values will be shown:
![]() * If the fields have also been created for an individual entity, then the values configured for those created at Organizational-level are struck out indicating clearly that the Account level values will be used:
* If the fields have also been created for an individual entity, then the values configured for those created at Organizational-level are struck out indicating clearly that the Account level values will be used:
![]() ## Referencing Custom Fields in Derived Field Calculations
### Range of Entities
In Derived Field calculations, the Custom Fields you can reference is restricted to the following entities:
* **Organization**
* **Meter**
* **Account**
If you are using Meters belonging to a specific Product, that is, *not Global Meters*, you can also reference Custom Fields added to a:
* **Product**
The following table summarizes the Custom Fields on which entities you can reference in Derived Field calculations:
| Entity | Using Global Meters | Using Product Meters |
| - | - | - |
| Organization | YES | YES |
| Meter | YES | YES |
| Product | NO | YES |
| Account | YES | YES |
| Account Plan | NO | NO |
| Plan | NO | NO |
| Plan Template | NO | NO |
### Format
When referencing Custom Fields in your Derived Field calculations, you can use the following format:
* `organization.`
* `meter.`
* `account.`
* `product.`
For example:
* `meter.cfMeter1`
* `account.cfAccount1`
### Precedence
In Derived Field calculations the general rule of precedence applies: the entity-level value is used if defined, otherwise the Organization-level value is used.
**Important! Aggregation and Compound Aggregation Custom Fields**. You can define Custom Fields for **Aggregations** and **Compound Aggregations**. However, these Custom Fields are *NOT supported* for referencing in Derived Field calculations.
**Tip: More Details?** For more details on referencing Custom Fields in your Derived Field calculations, see [Calculation Syntax and Supported Functions/Operators](/guides/usage-data-aggregations/compound-aggregation-calculations).
## Referencing Custom Fields in Compound Aggregation Calculations
### Range of Entities
* **Organization**
* **Meter**
* **Product**
* **Account**
* **Account Plan**
* **Plan**
* **Plan Template**
### Format
When referencing Custom Fields in your Compound Aggregation calculations, you can use the following format:
* `organization.`
* `meter.`
* `product.`
* `account.`
* `accountPlan.`
* `plan.`
* `planTemplate.`
For example:
* `plan.cfPlan1`
* `account.cfAccount1`
### Precedence
In Compound Aggregation calculations the general rule or precedence applies: the entity-level value is used if defined, otherwise the Organization-level value is used.
**Important! Exceptions:**
* **Meter Custom Fields**. If you reference a Meter Custom Field in a Compound Aggregation calculation, the default value set at Organization-level is ***always used***. This is because a Compound Aggregation might reference multiple individual Meters or no individual Meters, which means the specific Meter whose Custom Field value should be used cannot be identified, and therefore the default value is used.
* **Aggregation and Compound Aggregation Custom Fields**. You can define Custom Fields for **Aggregations** and **Compound Aggregations**. However, these Custom Fields are *NOT supported* for referencing in Compound Aggregation calculations.
**Tip: More Details?** For more details on referencing Custom Fields in your Compound Aggregation calculations, see [Calculation Syntax and Supported Functions/Operators](/guides/usage-data-aggregations/compound-aggregation-calculations).
# Data Explorers
Source: https://docs.m3ter.com/guides/data-explorer
The m3ter *Data Explorers* are analytics tools you can use to query the Usage, Billing, and Prepayments data collected for your Organization in m3ter:
* You can review and analyze the data returned for your queries in various formats, including Data Tables and Pivot Tables.
* If you expect to want to run a query you've built repeatedly, you can save and re-use the query.
* When you have built a query for your Usage, Billing, or Prepayments data in m3ter, you can export the data returned for the query as a `.csv` file.
This section explains how to work with the data explorers to build and submit queries against your data, and how to review returned data:
* [Usage Data Explorer](/guides/data-explorer/performing-usage-queries-and-reviewing-results)
* [Usage Data Explorer (v2)](/guides/data-explorer/usage-data-explorer-v2)
* [Billing Data Explorer](/guides/data-explorer/performing-billing-queries-and-reviewing-results)
* [Prepayments Data Explorer](/guides/data-explorer/performing-commitments-queries-and-reviewing-results)
* [Data Explorers: Saving, Updating, and Re-Using Queries](/guides/data-explorer/saving-queries)
* [Data Explorers: Exporting Query Results](/guides/data-explorer/exporting-usage-query-results)
# Data Explorers: Exporting Query Results
Source: https://docs.m3ter.com/guides/data-explorer/exporting-usage-query-results
When you have built a query for your Usage, Billing, or Prepayments data in m3ter using a Data Explorer, you can export the data returned for the query as a `.csv` file. This topic explains how to export your query results data from the Data Explorers.
**Notes:**
* **Usage Data Explorer - example export**. The following procedure explains how to export *Usage* data query results in the original version Usage Data Explorer. You can follow similar steps to export your *Billing* or *Prepayments* query results.
* **Usage Data Explorer (v2)**. If you're working in Data Explorer (v2), you can export query results data directly from the Result rows table. See [Usage Data Explorer (v2)](/guides/data-explorer/usage-data-explorer-v2) for details.
**To export query results:**
1. Select **Metering>Usage Data Explorer**.
2. In the **Usage query builder**, configure a query, perform the query, and review the returned data in the **Data Table** tab.
3. On the **Data table** tab, select **Export**. The returned data set is compiled in *.csv* formatted file, downloaded, and saved locally.
**Warning: Number of Rows for Export!** If you download query results in a `.csv` formatted file, the number of rows is limited to **20001**.
**Tip: Exporting Prepayments Query Data?** If you're exporting Prepayments query data, the **Export** button is on the **Prepayments - Table** tab.
# Billing Data Explorer
Source: https://docs.m3ter.com/guides/data-explorer/performing-billing-queries-and-reviewing-results
You can use the *Billing Data Explorer* to configure and perform queries against your Organization's Billing data. You can quickly set up and submit a query that returns the billing data set needed to serve your current analytical purposes. You can then review the data in either a flat Data Table or a Pivot Table format.
This topic explains how to work successfully in the Billing data explorer to configure and perform queries against your Billing data and review the returned data.
**Important! Required Permissions for performing Billing queries in Data Explorer**. If you create a Custom Permission Policy to assign to your Organization Users and want Users to be able to perform Billing queries and view the results, ensure the Permission Policy allows:
* Create and Retrieve action for the `config:analyticsJob` Resource.
* Retrieve action for the `config:bill` Resource.
For more details on working with Permission Policies, see [Understanding, Creating and Managing Permission Policies](/guides/organization-and-access-management/creating-and-managing-permissions).
## Building and Performing a Billing Data Query
**To submit queries for Billing data and review returned data:**
1. Select **Billing>Billing Data Explorer**:
## Referencing Custom Fields in Derived Field Calculations
### Range of Entities
In Derived Field calculations, the Custom Fields you can reference is restricted to the following entities:
* **Organization**
* **Meter**
* **Account**
If you are using Meters belonging to a specific Product, that is, *not Global Meters*, you can also reference Custom Fields added to a:
* **Product**
The following table summarizes the Custom Fields on which entities you can reference in Derived Field calculations:
| Entity | Using Global Meters | Using Product Meters |
| - | - | - |
| Organization | YES | YES |
| Meter | YES | YES |
| Product | NO | YES |
| Account | YES | YES |
| Account Plan | NO | NO |
| Plan | NO | NO |
| Plan Template | NO | NO |
### Format
When referencing Custom Fields in your Derived Field calculations, you can use the following format:
* `organization.`
* `meter.`
* `account.`
* `product.`
For example:
* `meter.cfMeter1`
* `account.cfAccount1`
### Precedence
In Derived Field calculations the general rule of precedence applies: the entity-level value is used if defined, otherwise the Organization-level value is used.
**Important! Aggregation and Compound Aggregation Custom Fields**. You can define Custom Fields for **Aggregations** and **Compound Aggregations**. However, these Custom Fields are *NOT supported* for referencing in Derived Field calculations.
**Tip: More Details?** For more details on referencing Custom Fields in your Derived Field calculations, see [Calculation Syntax and Supported Functions/Operators](/guides/usage-data-aggregations/compound-aggregation-calculations).
## Referencing Custom Fields in Compound Aggregation Calculations
### Range of Entities
* **Organization**
* **Meter**
* **Product**
* **Account**
* **Account Plan**
* **Plan**
* **Plan Template**
### Format
When referencing Custom Fields in your Compound Aggregation calculations, you can use the following format:
* `organization.`
* `meter.`
* `product.`
* `account.`
* `accountPlan.`
* `plan.`
* `planTemplate.`
For example:
* `plan.cfPlan1`
* `account.cfAccount1`
### Precedence
In Compound Aggregation calculations the general rule or precedence applies: the entity-level value is used if defined, otherwise the Organization-level value is used.
**Important! Exceptions:**
* **Meter Custom Fields**. If you reference a Meter Custom Field in a Compound Aggregation calculation, the default value set at Organization-level is ***always used***. This is because a Compound Aggregation might reference multiple individual Meters or no individual Meters, which means the specific Meter whose Custom Field value should be used cannot be identified, and therefore the default value is used.
* **Aggregation and Compound Aggregation Custom Fields**. You can define Custom Fields for **Aggregations** and **Compound Aggregations**. However, these Custom Fields are *NOT supported* for referencing in Compound Aggregation calculations.
**Tip: More Details?** For more details on referencing Custom Fields in your Compound Aggregation calculations, see [Calculation Syntax and Supported Functions/Operators](/guides/usage-data-aggregations/compound-aggregation-calculations).
# Data Explorers
Source: https://docs.m3ter.com/guides/data-explorer
The m3ter *Data Explorers* are analytics tools you can use to query the Usage, Billing, and Prepayments data collected for your Organization in m3ter:
* You can review and analyze the data returned for your queries in various formats, including Data Tables and Pivot Tables.
* If you expect to want to run a query you've built repeatedly, you can save and re-use the query.
* When you have built a query for your Usage, Billing, or Prepayments data in m3ter, you can export the data returned for the query as a `.csv` file.
This section explains how to work with the data explorers to build and submit queries against your data, and how to review returned data:
* [Usage Data Explorer](/guides/data-explorer/performing-usage-queries-and-reviewing-results)
* [Usage Data Explorer (v2)](/guides/data-explorer/usage-data-explorer-v2)
* [Billing Data Explorer](/guides/data-explorer/performing-billing-queries-and-reviewing-results)
* [Prepayments Data Explorer](/guides/data-explorer/performing-commitments-queries-and-reviewing-results)
* [Data Explorers: Saving, Updating, and Re-Using Queries](/guides/data-explorer/saving-queries)
* [Data Explorers: Exporting Query Results](/guides/data-explorer/exporting-usage-query-results)
# Data Explorers: Exporting Query Results
Source: https://docs.m3ter.com/guides/data-explorer/exporting-usage-query-results
When you have built a query for your Usage, Billing, or Prepayments data in m3ter using a Data Explorer, you can export the data returned for the query as a `.csv` file. This topic explains how to export your query results data from the Data Explorers.
**Notes:**
* **Usage Data Explorer - example export**. The following procedure explains how to export *Usage* data query results in the original version Usage Data Explorer. You can follow similar steps to export your *Billing* or *Prepayments* query results.
* **Usage Data Explorer (v2)**. If you're working in Data Explorer (v2), you can export query results data directly from the Result rows table. See [Usage Data Explorer (v2)](/guides/data-explorer/usage-data-explorer-v2) for details.
**To export query results:**
1. Select **Metering>Usage Data Explorer**.
2. In the **Usage query builder**, configure a query, perform the query, and review the returned data in the **Data Table** tab.
3. On the **Data table** tab, select **Export**. The returned data set is compiled in *.csv* formatted file, downloaded, and saved locally.
**Warning: Number of Rows for Export!** If you download query results in a `.csv` formatted file, the number of rows is limited to **20001**.
**Tip: Exporting Prepayments Query Data?** If you're exporting Prepayments query data, the **Export** button is on the **Prepayments - Table** tab.
# Billing Data Explorer
Source: https://docs.m3ter.com/guides/data-explorer/performing-billing-queries-and-reviewing-results
You can use the *Billing Data Explorer* to configure and perform queries against your Organization's Billing data. You can quickly set up and submit a query that returns the billing data set needed to serve your current analytical purposes. You can then review the data in either a flat Data Table or a Pivot Table format.
This topic explains how to work successfully in the Billing data explorer to configure and perform queries against your Billing data and review the returned data.
**Important! Required Permissions for performing Billing queries in Data Explorer**. If you create a Custom Permission Policy to assign to your Organization Users and want Users to be able to perform Billing queries and view the results, ensure the Permission Policy allows:
* Create and Retrieve action for the `config:analyticsJob` Resource.
* Retrieve action for the `config:bill` Resource.
For more details on working with Permission Policies, see [Understanding, Creating and Managing Permission Policies](/guides/organization-and-access-management/creating-and-managing-permissions).
## Building and Performing a Billing Data Query
**To submit queries for Billing data and review returned data:**
1. Select **Billing>Billing Data Explorer**:
![]() The **Billing Data Explorer** page opens and you can use the **Billing query builder** to build a query for your Organization's billing data.
2. In the **Select period** section, define a period to retrieve billing data for:
* **Time period**. Use the drop-down list to select a period for which you want to retrieve billing data. **Today** is the default. If you want to select a specific period, you can use **Custom**.
* **Today**. All of today - that is, the 24 hour period from midnight to midnight. This saves you from having to reset the query time period to catch other new billing data that become available later that same day.
* **Yesterday**. All of yesterday - that is, the 24 hour period from midnight to midnight yesterday.
* **Week to date/Month to date**. Period covering the current week/month to date. For example, selecting **Month to date** on April 8th, 2024 means your query returns data for the time period starting April 1st, 2024 and including the entire current day - April 8th - and ending at midnight. This saves you from having to reset the query time period to catch other new billing data that become available later that same day.
* **Last 7/30/90/120 days**. Period covering the selected number of whole days leading up to today. For example, selecting **Last 30 days** on April 8th, 2024 means your query returns data for the time period commencing 30 days prior - March 9th, 2024 - and ending midnight on April 7th, 2024.
* **Previous week/month/quarter**. Period covering the entire previous week/month/quarter. For example, selecting **Previous month** on April 8th, 2024 means your query returns data for the whole of March 2024.
* **Custom**. Define the time period for which you want your query to return data.
* **Start (inclusive)** and **End (exclusive)**. If you have selected **Custom** for the query **Time period**, these date/time fields will be enabled. You can use calendar popups to select the start and end dates/times for the period you want to query.
* Start dates are explicitly labeled as *inclusive* and End dates as *exclusive*. For example, if you want data returned for the entire month of June 2023, you must set the **Start** at June 1st 2023 and the **End** at July 1st 2023. If you set the **End** at June 30th 2023, the Custom Time period for your query will end at midnight on June 29th 2023.
**Warning and Notes:**
* **Warning!** Billing Data Explorer will filter on the basis of Bill *start dates*. For example, if you want your query to return the line items for a November 1st Bill for an Account that is set up for monthly billing on the 1st of each month, you must ensure the **Time period** you select includes October 1st, since that is the start date of the billing period for the the November 1st Bill on the Account.
* **Note: Timezone for Query Start and End Dates/Time?** The **Start date** and **End date** fields will show the timezone you've set for your Organization. See [Managing your Organization](/guides/organization-and-access-management/viewing-and-editing-organization).
3. In the **Apply filters** section, enter the details of any filters you want to apply to the billing data returned for your query:
* **Line item types**. Filter on line item types:
* **All Line item types**. Data will be returned for all Bill line item types.
* **Selected values**. Use the drop-down to select the Bill line item types for which you want to return Billing data.
* **Accounts**. Filter on Accounts:
* **All Accounts**. Data will be returned for all Accounts for which Bills have been created.
* **Selected values**. Use the drop-down to select the Account Code of those Accounts for which you want to return Billing data.
* **Products**. Filter on Products:
* **All Products**. Data will be returned for all Products for which a Bill has been created.
* **Selected values**. Use the drop-down to select the Products for which you want to return Billing data.
The **Billing Data Explorer** page opens and you can use the **Billing query builder** to build a query for your Organization's billing data.
2. In the **Select period** section, define a period to retrieve billing data for:
* **Time period**. Use the drop-down list to select a period for which you want to retrieve billing data. **Today** is the default. If you want to select a specific period, you can use **Custom**.
* **Today**. All of today - that is, the 24 hour period from midnight to midnight. This saves you from having to reset the query time period to catch other new billing data that become available later that same day.
* **Yesterday**. All of yesterday - that is, the 24 hour period from midnight to midnight yesterday.
* **Week to date/Month to date**. Period covering the current week/month to date. For example, selecting **Month to date** on April 8th, 2024 means your query returns data for the time period starting April 1st, 2024 and including the entire current day - April 8th - and ending at midnight. This saves you from having to reset the query time period to catch other new billing data that become available later that same day.
* **Last 7/30/90/120 days**. Period covering the selected number of whole days leading up to today. For example, selecting **Last 30 days** on April 8th, 2024 means your query returns data for the time period commencing 30 days prior - March 9th, 2024 - and ending midnight on April 7th, 2024.
* **Previous week/month/quarter**. Period covering the entire previous week/month/quarter. For example, selecting **Previous month** on April 8th, 2024 means your query returns data for the whole of March 2024.
* **Custom**. Define the time period for which you want your query to return data.
* **Start (inclusive)** and **End (exclusive)**. If you have selected **Custom** for the query **Time period**, these date/time fields will be enabled. You can use calendar popups to select the start and end dates/times for the period you want to query.
* Start dates are explicitly labeled as *inclusive* and End dates as *exclusive*. For example, if you want data returned for the entire month of June 2023, you must set the **Start** at June 1st 2023 and the **End** at July 1st 2023. If you set the **End** at June 30th 2023, the Custom Time period for your query will end at midnight on June 29th 2023.
**Warning and Notes:**
* **Warning!** Billing Data Explorer will filter on the basis of Bill *start dates*. For example, if you want your query to return the line items for a November 1st Bill for an Account that is set up for monthly billing on the 1st of each month, you must ensure the **Time period** you select includes October 1st, since that is the start date of the billing period for the the November 1st Bill on the Account.
* **Note: Timezone for Query Start and End Dates/Time?** The **Start date** and **End date** fields will show the timezone you've set for your Organization. See [Managing your Organization](/guides/organization-and-access-management/viewing-and-editing-organization).
3. In the **Apply filters** section, enter the details of any filters you want to apply to the billing data returned for your query:
* **Line item types**. Filter on line item types:
* **All Line item types**. Data will be returned for all Bill line item types.
* **Selected values**. Use the drop-down to select the Bill line item types for which you want to return Billing data.
* **Accounts**. Filter on Accounts:
* **All Accounts**. Data will be returned for all Accounts for which Bills have been created.
* **Selected values**. Use the drop-down to select the Account Code of those Accounts for which you want to return Billing data.
* **Products**. Filter on Products:
* **All Products**. Data will be returned for all Products for which a Bill has been created.
* **Selected values**. Use the drop-down to select the Products for which you want to return Billing data.
![]() In this example we have:
* Defined a **Custom** time period. The Organization Timezone is set to **UTC**.
* Selected a single Account and a single Product to return Billing data for.
* Selected for two line item types in the returned Billing data.
4. Select **Perform query**. The query executes and the resultant data is loaded into the data tables.
**Important: Limits imposed on response payload size and number of rows!**
* **Response too Large:** If the response payload for your query is **>10MB**, this exceeds the limit and you'll receive an error message to inform you. You can either use the available filters to further limit the query result set and re-run your query or use the **Export** button to download the current results in a `.csv` formatted file - see [Exporting Query Results](/guides/data-explorer/exporting-usage-query-results).
* **Number of Rows Returned for Query:** If the number of rows returned by your query exceeds **5001** but the payload size limit is not exceeded, then only the first **5001** are loaded. You will not receive an error and if you suspect your query return contained more rows, we recommend you use the **Export** button to download the results in a `.csv` formatted file and check.
* **Number of Rows for Export:** If you download the query results in a `.csv` formatted file, the number of rows is limited to **20001**.
## Reviewing Billing Data Query Results in a Data Table
You can review the Billing data returned for your query in a **Data table**:
In this example we have:
* Defined a **Custom** time period. The Organization Timezone is set to **UTC**.
* Selected a single Account and a single Product to return Billing data for.
* Selected for two line item types in the returned Billing data.
4. Select **Perform query**. The query executes and the resultant data is loaded into the data tables.
**Important: Limits imposed on response payload size and number of rows!**
* **Response too Large:** If the response payload for your query is **>10MB**, this exceeds the limit and you'll receive an error message to inform you. You can either use the available filters to further limit the query result set and re-run your query or use the **Export** button to download the current results in a `.csv` formatted file - see [Exporting Query Results](/guides/data-explorer/exporting-usage-query-results).
* **Number of Rows Returned for Query:** If the number of rows returned by your query exceeds **5001** but the payload size limit is not exceeded, then only the first **5001** are loaded. You will not receive an error and if you suspect your query return contained more rows, we recommend you use the **Export** button to download the results in a `.csv` formatted file and check.
* **Number of Rows for Export:** If you download the query results in a `.csv` formatted file, the number of rows is limited to **20001**.
## Reviewing Billing Data Query Results in a Data Table
You can review the Billing data returned for your query in a **Data table**:
![]() You can make adjustments to the **Data table** to:
* Show/Hide data element columns.
* Reorder the columns.
**To Show/Hide columns:**
1. Select the column icon at top-right of the table:
You can make adjustments to the **Data table** to:
* Show/Hide data element columns.
* Reorder the columns.
**To Show/Hide columns:**
1. Select the column icon at top-right of the table:
![]() A panel appears showing the columns available for the table and you can use switches to select your Show/Hide preferences:
A panel appears showing the columns available for the table and you can use switches to select your Show/Hide preferences:
![]() 2. Select **Update** - the panel closes and the **Data table** refreshes for your Show/Hide selections.
**To reorder columns:**
1. Select the column icon at top-right. A panel appears listing the available table columns.
2. Drag-and-drop these into a top-bottom ordering to correspond to the left-right ordering you want for the **Data table**:
2. Select **Update** - the panel closes and the **Data table** refreshes for your Show/Hide selections.
**To reorder columns:**
1. Select the column icon at top-right. A panel appears listing the available table columns.
2. Drag-and-drop these into a top-bottom ordering to correspond to the left-right ordering you want for the **Data table**:
![]() 2. Select **Update**. The panel closes and the **Data table** refreshes for the selected column order:
2. Select **Update**. The panel closes and the **Data table** refreshes for the selected column order:
![]() ## Reviewing Billing Data Query Results in a Pivot Table
You can review the Billing data returned for your query in a **Pivot table**:
## Reviewing Billing Data Query Results in a Pivot Table
You can review the Billing data returned for your query in a **Pivot table**:
![]() **Tip: Saving Billing Queries?** You can save, update already saved, and re-use saved Billing queries. You can also load pre-configured *Standard Queries* directly into the Query Builder. See [Saving, Updating, and Re-Using Queries](/guides/data-explorer/saving-queries).
# Prepayments Data Explorer
Source: https://docs.m3ter.com/guides/data-explorer/performing-commitments-queries-and-reviewing-results
You can use the *Prepayments Data Explorer* to configure and perform queries against the Prepayments/Commitments data for your Organization in m3ter. You can quickly set up and submit a query that returns the Prepayments data set needed for your current analytical purposes. You can then review the data in either a Summaries or a Data Table format.
When a query succeeds for Prepayments data, you can also review:
* Remaining obligations due on Prepayment as month-on-month amounts for the remainder of the Prepayment service period.
* Draw-down amounts made against the Prepayment at billing.
This topic explains how to work successfully in the Prepayments data explorer to configure and perform queries against your Prepayments data and review returned data.
**Important! Required Permissions for performing Prepayment queries in Data Explorer**. If you create a Custom Permission Policy to assign to your Organization Users and want Users to be able to perform Prepayment queries in Data Explorer and view the results, ensure the Permission Policy allows:
* Create and Retrieve action for the `config:analyticsJob` Resource.
* Retrieve action for the `config:commitment` Resource.
For more details on working with Permission Policies, see [Understanding, Creating and Managing Permission Policies](/guides/organization-and-access-management/creating-and-managing-permissions).
**Tip: Prepayments on Accounts?** For more details on Prepayments and creating them for an Account, see [Creating Prepayments for Accounts](/guides/end-customer-accounts/creating-prepayments-for-accounts).
## Building and Performing a Prepayments Data Query
**To submit queries for Prepayments data and review returned data:**
1. Select **Accounts>Prepayments Data Explorer**:
**Tip: Saving Billing Queries?** You can save, update already saved, and re-use saved Billing queries. You can also load pre-configured *Standard Queries* directly into the Query Builder. See [Saving, Updating, and Re-Using Queries](/guides/data-explorer/saving-queries).
# Prepayments Data Explorer
Source: https://docs.m3ter.com/guides/data-explorer/performing-commitments-queries-and-reviewing-results
You can use the *Prepayments Data Explorer* to configure and perform queries against the Prepayments/Commitments data for your Organization in m3ter. You can quickly set up and submit a query that returns the Prepayments data set needed for your current analytical purposes. You can then review the data in either a Summaries or a Data Table format.
When a query succeeds for Prepayments data, you can also review:
* Remaining obligations due on Prepayment as month-on-month amounts for the remainder of the Prepayment service period.
* Draw-down amounts made against the Prepayment at billing.
This topic explains how to work successfully in the Prepayments data explorer to configure and perform queries against your Prepayments data and review returned data.
**Important! Required Permissions for performing Prepayment queries in Data Explorer**. If you create a Custom Permission Policy to assign to your Organization Users and want Users to be able to perform Prepayment queries in Data Explorer and view the results, ensure the Permission Policy allows:
* Create and Retrieve action for the `config:analyticsJob` Resource.
* Retrieve action for the `config:commitment` Resource.
For more details on working with Permission Policies, see [Understanding, Creating and Managing Permission Policies](/guides/organization-and-access-management/creating-and-managing-permissions).
**Tip: Prepayments on Accounts?** For more details on Prepayments and creating them for an Account, see [Creating Prepayments for Accounts](/guides/end-customer-accounts/creating-prepayments-for-accounts).
## Building and Performing a Prepayments Data Query
**To submit queries for Prepayments data and review returned data:**
1. Select **Accounts>Prepayments Data Explorer**:
![]() The **Prepayments Data Explorer** page opens and you can use the **Prepayments query builder** to build the specific query you want to perform against Prepayments data collected for your Organization.
2. In the **Select period** section, define a period for returning Prepayments data:
* **Time period**. Use the drop-down list to select a period. If a Prepayment has a start date that falls in the period, then its data will be returned for the query.
* **Today**. All of today - that is, the 24 hour period from midnight to midnight. This saves you from having to reset the query time period to catch other new Prepayment data that become available later that same day. (*Default*)
* **Yesterday**. All of yesterday - that is, the 24 hour period from midnight to midnight yesterday.
* **Week to date/Month to date**. Period covering the current week/month to date. For example, selecting **Month to date** on April 8th, 2024 means your query returns data for the time period starting April 1st, 2024 and including the entire current day - April 8th - and ending at midnight. This saves you from having to reset the query time period to catch other new Prepayment data that become available later that same day.
* **Last 7/30/90/120 days**. Period covering the selected number of whole days leading up to today. For example, selecting **Last 30 days** on April 8th, 2024 means your query returns data for the time period commencing 30 days prior - March 9th, 2024 - and ending midnight on April 7th, 2024.
* **Previous week/month/quarter**. Period covering the entire previous week/month/quarter. For example, selecting **Previous month** on April 8th, 2024 means your query returns data for the whole of March 2024.
* **Custom**. Define the time period for which you want your query to return data.
* If you want to define a specific period, you can use **Custom**:
* **Start (inclusive)** and **End (exclusive)**. If you select **Custom** for the query **Time period**, these date/time fields will be enabled. You can use calendar popups to define the start and end dates/times for a custom period.
* Start dates are explicitly labeled as *inclusive* and End dates as *exclusive*. For example, if you want data returned for the entire month of June 2023, you must set the **Start date** at June 1st 2023 and the **End date** at July 1st 2023. If you set the **End date** at June 30th 2023, the Custom Time period for your query will end at midnight on June 29th 2023.
3. In the **Apply an account filter** section, select the **Accounts** you want to the query to return Prepayments data for:
* **All Accounts**. Data will be returned for all Accounts for which Prepayments have been created.
* **Selected Accounts**. Use the drop-down to select the Accounts you want to return Prepayments data for.
The **Prepayments Data Explorer** page opens and you can use the **Prepayments query builder** to build the specific query you want to perform against Prepayments data collected for your Organization.
2. In the **Select period** section, define a period for returning Prepayments data:
* **Time period**. Use the drop-down list to select a period. If a Prepayment has a start date that falls in the period, then its data will be returned for the query.
* **Today**. All of today - that is, the 24 hour period from midnight to midnight. This saves you from having to reset the query time period to catch other new Prepayment data that become available later that same day. (*Default*)
* **Yesterday**. All of yesterday - that is, the 24 hour period from midnight to midnight yesterday.
* **Week to date/Month to date**. Period covering the current week/month to date. For example, selecting **Month to date** on April 8th, 2024 means your query returns data for the time period starting April 1st, 2024 and including the entire current day - April 8th - and ending at midnight. This saves you from having to reset the query time period to catch other new Prepayment data that become available later that same day.
* **Last 7/30/90/120 days**. Period covering the selected number of whole days leading up to today. For example, selecting **Last 30 days** on April 8th, 2024 means your query returns data for the time period commencing 30 days prior - March 9th, 2024 - and ending midnight on April 7th, 2024.
* **Previous week/month/quarter**. Period covering the entire previous week/month/quarter. For example, selecting **Previous month** on April 8th, 2024 means your query returns data for the whole of March 2024.
* **Custom**. Define the time period for which you want your query to return data.
* If you want to define a specific period, you can use **Custom**:
* **Start (inclusive)** and **End (exclusive)**. If you select **Custom** for the query **Time period**, these date/time fields will be enabled. You can use calendar popups to define the start and end dates/times for a custom period.
* Start dates are explicitly labeled as *inclusive* and End dates as *exclusive*. For example, if you want data returned for the entire month of June 2023, you must set the **Start date** at June 1st 2023 and the **End date** at July 1st 2023. If you set the **End date** at June 30th 2023, the Custom Time period for your query will end at midnight on June 29th 2023.
3. In the **Apply an account filter** section, select the **Accounts** you want to the query to return Prepayments data for:
* **All Accounts**. Data will be returned for all Accounts for which Prepayments have been created.
* **Selected Accounts**. Use the drop-down to select the Accounts you want to return Prepayments data for.
![]() In this example we have:
* Selected a single Account to return Prepayments data for.
* Selected a **Custom** time period. The Organization Timezone is set to **UTC**.
4. Select **Perform query**. The query executes and the resultant data is loaded into the **Summaries** panel and **Data Table**.
**Note: Prepayment Start Date must fall in selected period!** The query will only return data for Prepayments on the selected Accounts for Prepayments whose *start date falls in the selected time period*.
**Important: Limits imposed on response payload size and number of rows!**
* **Response too Large:** If the response payload for your query is **>10MB**, this exceeds the limit and you'll receive an error message to inform you. You can either use the available filters to further limit the query result set and re-run your query or use the **Export** button to download the current results in a `.csv` formatted file - see [Exporting Query Results](/guides/data-explorer/exporting-usage-query-results).
* **Number of Rows Returned for Query:** If the number of rows returned by your query exceeds **5001** but the payload size limit is not exceeded, then only the first **5001** are loaded. You will not receive an error and if you suspect your query return contained more rows, we recommend you use the **Export** button to download the results in a `.csv` formatted file and check.
* **Number of Rows for Export:** If you download the query results in a `.csv` formatted file, the number of rows is limited to **20001**.
## Reviewing Prepayments Data Query Results in a Summaries Table
You can review the Prepayments data returned for your query in a **Summaries** table:
In this example we have:
* Selected a single Account to return Prepayments data for.
* Selected a **Custom** time period. The Organization Timezone is set to **UTC**.
4. Select **Perform query**. The query executes and the resultant data is loaded into the **Summaries** panel and **Data Table**.
**Note: Prepayment Start Date must fall in selected period!** The query will only return data for Prepayments on the selected Accounts for Prepayments whose *start date falls in the selected time period*.
**Important: Limits imposed on response payload size and number of rows!**
* **Response too Large:** If the response payload for your query is **>10MB**, this exceeds the limit and you'll receive an error message to inform you. You can either use the available filters to further limit the query result set and re-run your query or use the **Export** button to download the current results in a `.csv` formatted file - see [Exporting Query Results](/guides/data-explorer/exporting-usage-query-results).
* **Number of Rows Returned for Query:** If the number of rows returned by your query exceeds **5001** but the payload size limit is not exceeded, then only the first **5001** are loaded. You will not receive an error and if you suspect your query return contained more rows, we recommend you use the **Export** button to download the results in a `.csv` formatted file and check.
* **Number of Rows for Export:** If you download the query results in a `.csv` formatted file, the number of rows is limited to **20001**.
## Reviewing Prepayments Data Query Results in a Summaries Table
You can review the Prepayments data returned for your query in a **Summaries** table:
![]() **Tip: Multiple Prepayments Data?** If your query has returned data for multiple Prepayments - either for a single Account or across multiple Accounts - you can use the **Prepayment** drop-down to select which one you want to review.
## Reviewing Prepayment Data Query Results in a Data Table
You can review the Prepayments data returned for your query in a data **Table**:
* In **Prepayments - Table**:
**Tip: Multiple Prepayments Data?** If your query has returned data for multiple Prepayments - either for a single Account or across multiple Accounts - you can use the **Prepayment** drop-down to select which one you want to review.
## Reviewing Prepayment Data Query Results in a Data Table
You can review the Prepayments data returned for your query in a data **Table**:
* In **Prepayments - Table**:
![]() **Tip: End Date shown in Results Data differs from end date set for query?** The **End date** shown for the returned data, both in the **Prepayments - Summaries** panel and in the **Prepayments - Table**, might not be the same as the **End date** you've set for a query. This is because a Prepayment spans an entire contract period, and is not simply a minimum spend amount to be charged on a bill-by-bill basis. The **End date** shows as the *end date of the Prepayment contract period*, which in this example is January 1st 2025.
You can reorder the columns for the **Prepayments - Table**.
**To reorder columns:**
1. Select the column icon at top-right:
**Tip: End Date shown in Results Data differs from end date set for query?** The **End date** shown for the returned data, both in the **Prepayments - Summaries** panel and in the **Prepayments - Table**, might not be the same as the **End date** you've set for a query. This is because a Prepayment spans an entire contract period, and is not simply a minimum spend amount to be charged on a bill-by-bill basis. The **End date** shows as the *end date of the Prepayment contract period*, which in this example is January 1st 2025.
You can reorder the columns for the **Prepayments - Table**.
**To reorder columns:**
1. Select the column icon at top-right:
![]() A panel appears listing the available table columns.
2. Drag-and-drop these into a top-bottom ordering to correspond to the left-right ordering you want for the **Prepayments - Table**:
A panel appears listing the available table columns.
2. Drag-and-drop these into a top-bottom ordering to correspond to the left-right ordering you want for the **Prepayments - Table**:
![]() 3. Select **Update**. The panel closes and the **Prepayments - Table** refreshes for the selected column order:
3. Select **Update**. The panel closes and the **Prepayments - Table** refreshes for the selected column order:
![]() **Tip: Exporting Prepayments Data?** You can use the **Export** button to create a `.csv` file of your returned Prepayments data. See [Exporting Query Results](/guides/data-explorer/exporting-usage-query-results) for more details.
## Reviewing Remaining Obligations for Prepayments
You can use the **Obligations** panel to review the remaining obligations due under the Prepayment service period:
**Tip: Exporting Prepayments Data?** You can use the **Export** button to create a `.csv` file of your returned Prepayments data. See [Exporting Query Results](/guides/data-explorer/exporting-usage-query-results) for more details.
## Reviewing Remaining Obligations for Prepayments
You can use the **Obligations** panel to review the remaining obligations due under the Prepayment service period:
![]() * Note that you can reorder the columns in the **Obligations** table in the same way as you can in the **Prepayments - Table**. See the [previous section](/guides/data-explorer/performing-commitments-queries-and-reviewing-results#reviewing-prepayment-data-query-results-in-a-data-table) for details.
**Tip: Export Prepayment Obligations?** You can select **Export** on the **Obligations** panel to export the remaining obligations as a `.csv` format file, which is downloaded to the Downloads folder on your local machine.
## Reviewing Prepayments Billing Information
You can scroll down in the **Prepayments** tab to review a **Billing** panel. This gives details of amounts drawn-down against Prepayments at billing:
* Note that you can reorder the columns in the **Obligations** table in the same way as you can in the **Prepayments - Table**. See the [previous section](/guides/data-explorer/performing-commitments-queries-and-reviewing-results#reviewing-prepayment-data-query-results-in-a-data-table) for details.
**Tip: Export Prepayment Obligations?** You can select **Export** on the **Obligations** panel to export the remaining obligations as a `.csv` format file, which is downloaded to the Downloads folder on your local machine.
## Reviewing Prepayments Billing Information
You can scroll down in the **Prepayments** tab to review a **Billing** panel. This gives details of amounts drawn-down against Prepayments at billing:
![]() * Note that you can reorder the columns in the **Billing** table in the same way as you can in the **Prepayments - Table**. See the [section above](/guides/data-explorer/performing-commitments-queries-and-reviewing-results#reviewing-prepayment-data-query-results-in-a-data-table) for details.
**Tip: Export Prepayment billing details?** You can select **Export** on the **Billing** panel to export the billing details as a `.csv` format file, which is downloaded locally.
**Tip: Saving Prepayments Queries?** You can save, update already saved, and re-use saved Prepayments queries. You can also load pre-configured *Standard Queries* directly into the Query Builder. See [Saving, Updating, and Re-Using Queries](/guides/data-explorer/saving-queries).
# Usage Data Explorer
Source: https://docs.m3ter.com/guides/data-explorer/performing-usage-queries-and-reviewing-results
You can use the *Usage Data Explorer* to configure and perform queries against the metered usage data collected for your Organization in m3ter. You can quickly set up and submit a query that returns the metered data set needed to serve your current analytical purposes:
* To build a usage data query, you can select a time period. Any Meters will be available for selection that have *numeric* Data Fields configured - **MEASURE**, **INCOME**, or **COST** types - and have had data submitted during the time period for those numeric fields.
* Select an Aggregation function to apply to the numeric data that is returned by your query.
* You can also filter the data returned by your query:
* By Account - select only those end-customer Accounts you want data returned for.
* Using other Meter dimensions, which are any *string* Data Field types also configured for the selected Meters - **WHO**, **WHAT**, **WHERE**, or **OTHER** types. For example, you might want your query to only return numeric data for usage data measurements submitted for specific **WHO** field values.
* Note that **METADATA** string fields are *not made available* for filtering the data returned.
You can then review the data in either a flat Data Table or a Pivot Table format.
This topic explains how to work with the Usage Data Explorer to configure and perform queries against your usage data and review the returned data.
**Notes and Warnings:**
* **Usage Data Explorer - two versions**:
* **Legacy Data Explorer**. If you signed up with m3ter after the 1st May 2026, you will not have access to the legacy Data Explorer service, and this version has now passed into maintenance mode with only security fixes being applied henceforth. This topic explains how to open and work with the Legacy Data Explorer.
* **Usage Data Explorer (v2)**. This is the current version and opens when you select **Metering>Usage Data Explorer** in the Console. See [Usage Data Explorer (v2)](https://docs.m3ter.com/guides/data-explorer/usage-data-explorer-v2) for details on how to work with the current version.
* **Required Permissions for performing Usage data queries**. If you create a Custom Permission Policy for your Organization Users to be able to perform Usage queries and view the results, ensure the Permission Policy allows:
* Create and Retrieve action for the `config:analyticsJob` Resource.
* Retrieve action for the `analytics:usage` Resource.
* For more details on working with Permission Policies, see [Understanding, Creating and Managing Permission Policies](/guides/organization-and-access-management/creating-and-managing-permissions).
* **Important! Data retrieval from Parent/Child Accounts**. When you query for usage data for a Parent Account or any of its Child Accounts, the usage data is treated as entirely separate. The data returned for a Parent Account will contain *none of the data* collected for any of its Child Accounts. If you want data from a Child Account, you must include the Account in the query you submit.
## Building and Performing a Usage Data Query
**To submit queries for metered usage data and review returned data:**
1. Select **Metering>Usage Data Explorer**:
* Note that you can reorder the columns in the **Billing** table in the same way as you can in the **Prepayments - Table**. See the [section above](/guides/data-explorer/performing-commitments-queries-and-reviewing-results#reviewing-prepayment-data-query-results-in-a-data-table) for details.
**Tip: Export Prepayment billing details?** You can select **Export** on the **Billing** panel to export the billing details as a `.csv` format file, which is downloaded locally.
**Tip: Saving Prepayments Queries?** You can save, update already saved, and re-use saved Prepayments queries. You can also load pre-configured *Standard Queries* directly into the Query Builder. See [Saving, Updating, and Re-Using Queries](/guides/data-explorer/saving-queries).
# Usage Data Explorer
Source: https://docs.m3ter.com/guides/data-explorer/performing-usage-queries-and-reviewing-results
You can use the *Usage Data Explorer* to configure and perform queries against the metered usage data collected for your Organization in m3ter. You can quickly set up and submit a query that returns the metered data set needed to serve your current analytical purposes:
* To build a usage data query, you can select a time period. Any Meters will be available for selection that have *numeric* Data Fields configured - **MEASURE**, **INCOME**, or **COST** types - and have had data submitted during the time period for those numeric fields.
* Select an Aggregation function to apply to the numeric data that is returned by your query.
* You can also filter the data returned by your query:
* By Account - select only those end-customer Accounts you want data returned for.
* Using other Meter dimensions, which are any *string* Data Field types also configured for the selected Meters - **WHO**, **WHAT**, **WHERE**, or **OTHER** types. For example, you might want your query to only return numeric data for usage data measurements submitted for specific **WHO** field values.
* Note that **METADATA** string fields are *not made available* for filtering the data returned.
You can then review the data in either a flat Data Table or a Pivot Table format.
This topic explains how to work with the Usage Data Explorer to configure and perform queries against your usage data and review the returned data.
**Notes and Warnings:**
* **Usage Data Explorer - two versions**:
* **Legacy Data Explorer**. If you signed up with m3ter after the 1st May 2026, you will not have access to the legacy Data Explorer service, and this version has now passed into maintenance mode with only security fixes being applied henceforth. This topic explains how to open and work with the Legacy Data Explorer.
* **Usage Data Explorer (v2)**. This is the current version and opens when you select **Metering>Usage Data Explorer** in the Console. See [Usage Data Explorer (v2)](https://docs.m3ter.com/guides/data-explorer/usage-data-explorer-v2) for details on how to work with the current version.
* **Required Permissions for performing Usage data queries**. If you create a Custom Permission Policy for your Organization Users to be able to perform Usage queries and view the results, ensure the Permission Policy allows:
* Create and Retrieve action for the `config:analyticsJob` Resource.
* Retrieve action for the `analytics:usage` Resource.
* For more details on working with Permission Policies, see [Understanding, Creating and Managing Permission Policies](/guides/organization-and-access-management/creating-and-managing-permissions).
* **Important! Data retrieval from Parent/Child Accounts**. When you query for usage data for a Parent Account or any of its Child Accounts, the usage data is treated as entirely separate. The data returned for a Parent Account will contain *none of the data* collected for any of its Child Accounts. If you want data from a Child Account, you must include the Account in the query you submit.
## Building and Performing a Usage Data Query
**To submit queries for metered usage data and review returned data:**
1. Select **Metering>Usage Data Explorer**:
![]() **Usage Data Explorer (v2)** opens.
2. To use the original version of the Usage Data Explorer, select the information icon at the top-left. An information banner opens:
**Usage Data Explorer (v2)** opens.
2. To use the original version of the Usage Data Explorer, select the information icon at the top-left. An information banner opens:
![]() 3. Select **Use the old version**. The original version of the **Usage Data Explorer** opens and you can use the **Usage query builder** to build a query for metered usage data collected for your Organization.
* Note that if you can switch back to Usage Data Explorer (v2) - select the information icon time and select **Try it out!** on the information banner.
4. In the **Select period** section, define a period to retrieve usage data for:
* **Time period**. Use the drop-down list to select a period for which you want to retrieve usage data. **Today** is the default. If you want to select a specific period, you can use **Custom**:
* **Today**. All of today - that is, the 24 hour period from midnight to midnight. This saves you from having to reset the query time period to catch other new pieces of data submitted later that same day.
* **Yesterday**. All of yesterday - that is, the 24 hour period from midnight to midnight yesterday.
* **Week to date/Month to date**. Period covering the current week/month to date. For example:
* Selecting **Month to date** on April 14th, 2024 means your query returns data for the time period starting April 1st, 2024 and including the *entire current day* - April 14th - and ending at midnight.
* Weeks run Monday to Monday, so selecting **Week to date** on a Thursday means your query returns data for time period starting Monday of that week and including the *entire Thursday*.
* In both cases, this saves you from having to reset the query time period to catch other new pieces of data submitted later that same day.
* **Last 7/30/90/120 days**. Period covering the selected number of whole days leading up to today. For example, selecting **Last 30 days** on April 8th, 2024 means your query returns data for the time period commencing 30 days prior - March 9th, 2024 - and ending midnight on April 7th, 2024.
* **Previous week/month/quarter**. Period covering the entire previous week/month/quarter. For example, selecting **Previous month** on April 8th, 2024 means your query returns data for the whole of March 2024.
* **Custom**. Define the time period for which you want your query to return data.
* **Start (inclusive)** and **End (exclusive)**. If you have selected **Custom** for the query **Time period**, these date/time fields will be enabled. You can use calendar popups to select the start and end dates/times for the period you want to query.
* Start dates are explicitly labeled as *inclusive* and End dates as *exclusive*. For example, if you want data returned for the entire month of June 2023, you must set the **Start** at June 1st 2023 and the **End** at July 1st 2023. If you set the **End** at June 30th 2023, the Custom Time period for your query will end at midnight on June 29th 2023.
* Note that when you select **Custom** for **Time period** and select the **Start** and **End** dates/times, the list of Meters available to filter your query by is restricted to those Meters for which data was submitted in that time period - see below Step 3.
**Tip: Timezone for Query Start and End Dates/Time?** The **Start** and **End** fields will show the timezone you've set for your Organization. See [Managing your Organization](/guides/organization-and-access-management/viewing-and-editing-organization).
5. In the **Filter by meters and measures** section, select the **Meters** and **Measures** you want to filter your query by.
* **Meters**. Select the Meters for which you want to return collected data. The default is **All Meters**.
* Note that when you select a Meter, the **Filter by meter dimensions** section adjusts to show only those fields on the selected Meter as dimensions to filter by - see below Step 5.
* **Measures**. Select the *numeric* Data Fields on the selected Meter or Meters whose data you want to return. These will be any **MEASURE**, **INCOME**, or **COST** Data Fields configured for the Meters.
3. Select **Use the old version**. The original version of the **Usage Data Explorer** opens and you can use the **Usage query builder** to build a query for metered usage data collected for your Organization.
* Note that if you can switch back to Usage Data Explorer (v2) - select the information icon time and select **Try it out!** on the information banner.
4. In the **Select period** section, define a period to retrieve usage data for:
* **Time period**. Use the drop-down list to select a period for which you want to retrieve usage data. **Today** is the default. If you want to select a specific period, you can use **Custom**:
* **Today**. All of today - that is, the 24 hour period from midnight to midnight. This saves you from having to reset the query time period to catch other new pieces of data submitted later that same day.
* **Yesterday**. All of yesterday - that is, the 24 hour period from midnight to midnight yesterday.
* **Week to date/Month to date**. Period covering the current week/month to date. For example:
* Selecting **Month to date** on April 14th, 2024 means your query returns data for the time period starting April 1st, 2024 and including the *entire current day* - April 14th - and ending at midnight.
* Weeks run Monday to Monday, so selecting **Week to date** on a Thursday means your query returns data for time period starting Monday of that week and including the *entire Thursday*.
* In both cases, this saves you from having to reset the query time period to catch other new pieces of data submitted later that same day.
* **Last 7/30/90/120 days**. Period covering the selected number of whole days leading up to today. For example, selecting **Last 30 days** on April 8th, 2024 means your query returns data for the time period commencing 30 days prior - March 9th, 2024 - and ending midnight on April 7th, 2024.
* **Previous week/month/quarter**. Period covering the entire previous week/month/quarter. For example, selecting **Previous month** on April 8th, 2024 means your query returns data for the whole of March 2024.
* **Custom**. Define the time period for which you want your query to return data.
* **Start (inclusive)** and **End (exclusive)**. If you have selected **Custom** for the query **Time period**, these date/time fields will be enabled. You can use calendar popups to select the start and end dates/times for the period you want to query.
* Start dates are explicitly labeled as *inclusive* and End dates as *exclusive*. For example, if you want data returned for the entire month of June 2023, you must set the **Start** at June 1st 2023 and the **End** at July 1st 2023. If you set the **End** at June 30th 2023, the Custom Time period for your query will end at midnight on June 29th 2023.
* Note that when you select **Custom** for **Time period** and select the **Start** and **End** dates/times, the list of Meters available to filter your query by is restricted to those Meters for which data was submitted in that time period - see below Step 3.
**Tip: Timezone for Query Start and End Dates/Time?** The **Start** and **End** fields will show the timezone you've set for your Organization. See [Managing your Organization](/guides/organization-and-access-management/viewing-and-editing-organization).
5. In the **Filter by meters and measures** section, select the **Meters** and **Measures** you want to filter your query by.
* **Meters**. Select the Meters for which you want to return collected data. The default is **All Meters**.
* Note that when you select a Meter, the **Filter by meter dimensions** section adjusts to show only those fields on the selected Meter as dimensions to filter by - see below Step 5.
* **Measures**. Select the *numeric* Data Fields on the selected Meter or Meters whose data you want to return. These will be any **MEASURE**, **INCOME**, or **COST** Data Fields configured for the Meters.
![]() **Warning!** Note that the **Meters** list will show *only those Meters* whose *numeric* Data Fields have had data submitted/collected in the time period you've selected for your usage data query.
6. Use the **Apply aggregations** section to select:
* **Aggregation frequency**. Select the frequency for the Aggregation data returned for the query. Note that if you select an **Aggregation function**, you must select a frequency other than **None**.
* **Aggregation function**. If you want to aggregate the numeric Measures you've selected for your query, select how you want to aggregate the data returned. Default is **No Aggregation**. Seven options:
* **Count**. Returns a count of the number of measure values.
* **Latest**. Returns the latest measure value.
* **Max**. Returns the maximum measure value.
* **Mean**. Returns the arithmetic mean of the returned measure values.
* **Min**. Returns the minimum measure value.
* **Sum**. Returns the addition of the measure values.
* **Unique**. Special case:
* If you select this as the **Aggregation function**, it does not apply an aggregation method to the measure values but means your query will return a list of the Meters that have received usage data for the selected time period.
* Note that if you also select to filter by a Meter dimension - see step 6 below - then this returns a list of Meters and the dimensions used.
7. In the **Filter by meter dimensions** section, use the **Account** filter to select the Accounts for which you want to return usage data submitted for the selected Meters:
* **Any Account.** Usage data measurements for all Accounts will be returned. An **Account Code** column will be shown in the Data and Pivot Tables.
* **Select Accounts.** Usage data measurements for the selected Accounts will be returned. An **Account Code** column will be shown in the Data and Pivot Tables.
* **No filter**. Default setting. If you leave the **Account** filter blank, all usage data measurements for the Meter will be returned, regardless of whether an Account code was submitted with the measurement. No **Account Code** column will show in the Data and Pivot Tables.
8. In the **Filter by meter dimensions** section, use any *string* Data Fields on the selected Meters to filter your query by:
* The *string* Data Fields available for filtering will depend on the Meters you've select for usage data querying.
**Tip: Which Meter string Data Fields are included for filtering?** Note that as you start to set up your query and select a **Time period**, a check is made to determine the Meters which have had numeric data submitted during that period. The **Filter by meter dimensions section** then automatically adjusts to include any string Data Fields configured for those Meters. This is because the default selection for Meters is **All Meters**. However, if you then select only some of those Meters to query for submitted usage data, the **Filter by meter dimensions** section might auto-adjust again to remove any string Data Fields that do not belong specifically to the Meters you've selected.
**Warning!** Note that the **Meters** list will show *only those Meters* whose *numeric* Data Fields have had data submitted/collected in the time period you've selected for your usage data query.
6. Use the **Apply aggregations** section to select:
* **Aggregation frequency**. Select the frequency for the Aggregation data returned for the query. Note that if you select an **Aggregation function**, you must select a frequency other than **None**.
* **Aggregation function**. If you want to aggregate the numeric Measures you've selected for your query, select how you want to aggregate the data returned. Default is **No Aggregation**. Seven options:
* **Count**. Returns a count of the number of measure values.
* **Latest**. Returns the latest measure value.
* **Max**. Returns the maximum measure value.
* **Mean**. Returns the arithmetic mean of the returned measure values.
* **Min**. Returns the minimum measure value.
* **Sum**. Returns the addition of the measure values.
* **Unique**. Special case:
* If you select this as the **Aggregation function**, it does not apply an aggregation method to the measure values but means your query will return a list of the Meters that have received usage data for the selected time period.
* Note that if you also select to filter by a Meter dimension - see step 6 below - then this returns a list of Meters and the dimensions used.
7. In the **Filter by meter dimensions** section, use the **Account** filter to select the Accounts for which you want to return usage data submitted for the selected Meters:
* **Any Account.** Usage data measurements for all Accounts will be returned. An **Account Code** column will be shown in the Data and Pivot Tables.
* **Select Accounts.** Usage data measurements for the selected Accounts will be returned. An **Account Code** column will be shown in the Data and Pivot Tables.
* **No filter**. Default setting. If you leave the **Account** filter blank, all usage data measurements for the Meter will be returned, regardless of whether an Account code was submitted with the measurement. No **Account Code** column will show in the Data and Pivot Tables.
8. In the **Filter by meter dimensions** section, use any *string* Data Fields on the selected Meters to filter your query by:
* The *string* Data Fields available for filtering will depend on the Meters you've select for usage data querying.
**Tip: Which Meter string Data Fields are included for filtering?** Note that as you start to set up your query and select a **Time period**, a check is made to determine the Meters which have had numeric data submitted during that period. The **Filter by meter dimensions section** then automatically adjusts to include any string Data Fields configured for those Meters. This is because the default selection for Meters is **All Meters**. However, if you then select only some of those Meters to query for submitted usage data, the **Filter by meter dimensions** section might auto-adjust again to remove any string Data Fields that do not belong specifically to the Meters you've selected.
![]() In this example we have:
* Set a **Custom** time period of one month. The Organization Timezone is set to UTC.
* Selected to filter our query by two Meter numeric Measures: **file\_submits** for number of files submitted and **gb\_store** for gigabytes stored.
* Chosen *not to aggregate* any of the numeric measures returned for the query.
* Filtered for any relevant Account codes to be shown as a column in the returned data.
* Selected to filter our query by the **Customer\_name** Meter string field to return data for all values for that field.
9. Select **Perform Query**. The query executes and the resultant data is loaded into the data tables for you to review.
**Important: Limits imposed on response payload size and number of rows!**
* **Response too Large:** If the response payload for your query is **>10MB**, this exceeds the limit and you'll receive an error message to inform you. You can either use the available filters to further limit the query result set and re-run your query or use the **Export** button to download the current results in a `.csv` formatted file - see [Exporting Query Results](/guides/data-explorer/exporting-usage-query-results).
* **Number of Rows Returned for Query:** If the number of rows returned by your query exceeds **5001** but the payload size limit is not exceeded, then only the first **5001** are loaded. You will not receive an error and if you suspect your query return contained more rows, we recommend you use the **Export** button to download the results in a `.csv` formatted file and check.
* **Number of Rows for Export:** If you download the query results in a `.csv` formatted file, the number of rows is limited to **20001**.
## Reviewing Usage Data Query Results in a Data Table
You can review the usage data returned for your query in a **Data table**:
In this example we have:
* Set a **Custom** time period of one month. The Organization Timezone is set to UTC.
* Selected to filter our query by two Meter numeric Measures: **file\_submits** for number of files submitted and **gb\_store** for gigabytes stored.
* Chosen *not to aggregate* any of the numeric measures returned for the query.
* Filtered for any relevant Account codes to be shown as a column in the returned data.
* Selected to filter our query by the **Customer\_name** Meter string field to return data for all values for that field.
9. Select **Perform Query**. The query executes and the resultant data is loaded into the data tables for you to review.
**Important: Limits imposed on response payload size and number of rows!**
* **Response too Large:** If the response payload for your query is **>10MB**, this exceeds the limit and you'll receive an error message to inform you. You can either use the available filters to further limit the query result set and re-run your query or use the **Export** button to download the current results in a `.csv` formatted file - see [Exporting Query Results](/guides/data-explorer/exporting-usage-query-results).
* **Number of Rows Returned for Query:** If the number of rows returned by your query exceeds **5001** but the payload size limit is not exceeded, then only the first **5001** are loaded. You will not receive an error and if you suspect your query return contained more rows, we recommend you use the **Export** button to download the results in a `.csv` formatted file and check.
* **Number of Rows for Export:** If you download the query results in a `.csv` formatted file, the number of rows is limited to **20001**.
## Reviewing Usage Data Query Results in a Data Table
You can review the usage data returned for your query in a **Data table**:
![]() You can make adjustments to the **Data Table** to:
* Show/Hide data element columns.
* Reorder the columns.
**To Show/Hide columns:**
1. Select the columns icon at top-right:
You can make adjustments to the **Data Table** to:
* Show/Hide data element columns.
* Reorder the columns.
**To Show/Hide columns:**
1. Select the columns icon at top-right:
![]() A panel appears showing the columns available for the table and you can use switches to select your Show/Hide preferences:
A panel appears showing the columns available for the table and you can use switches to select your Show/Hide preferences:
![]() 2. Select **Update** - the panel closes and the **Data Table** refreshes for your Show/Hide selections.
* Note that if you've run a query that *doesn't aggregate the usage data* it returns, you'll be able to Show/Hide a **UID** column:
2. Select **Update** - the panel closes and the **Data Table** refreshes for your Show/Hide selections.
* Note that if you've run a query that *doesn't aggregate the usage data* it returns, you'll be able to Show/Hide a **UID** column:
![]() * This shows the **UID** used for the original usage data measurements when submitted:
* This shows the **UID** used for the original usage data measurements when submitted:
![]() **To reorder columns:**
1. Select the columns icon at top-right. A panel appears listing the available table columns.
2. Drag-and-drop these into a top-bottom ordering to correspond to the left-right ordering you want for the **Data Table**:
**To reorder columns:**
1. Select the columns icon at top-right. A panel appears listing the available table columns.
2. Drag-and-drop these into a top-bottom ordering to correspond to the left-right ordering you want for the **Data Table**:
![]() 2. Select **Update**. The panel closes and the **Data Table** refreshes for the selected column order:
2. Select **Update**. The panel closes and the **Data Table** refreshes for the selected column order:
![]() **Tip: Collapse Query Builder**. If your query returns a large results set, to make it easier to review the data loaded into the tables, you can collapse the Query Builder by selecting the arrow at top-right next to the **Saved Queries** button.
## Reviewing Usage Data Query Results in a Pivot Table
You can review the usage data returned for your query in a **Pivot table**:
**Tip: Collapse Query Builder**. If your query returns a large results set, to make it easier to review the data loaded into the tables, you can collapse the Query Builder by selecting the arrow at top-right next to the **Saved Queries** button.
## Reviewing Usage Data Query Results in a Pivot Table
You can review the usage data returned for your query in a **Pivot table**:
![]() * To review returned data using the Pivot Table, you can drag-and-drop data elements to show the preferred arrangement. For example:
* To review returned data using the Pivot Table, you can drag-and-drop data elements to show the preferred arrangement. For example:
![]() **Important: Returning Aggregated Data for Pivot Table Review and Analysis!** In the example given, we chose not to apply any Aggregations to the data returned for the query. If you want to work with raw usage data returned for the selected Meter Measures, you must de-select any **Aggregation functions** and select **None** for **Aggregation frequency** before you perform the query. In the Pivot table, you can then apply your own aggregations, without risking a distorted view of your usage data by aggregating already-aggregated data.
**Tips:**
* **Saving Usage Queries?** You can save, update, and re-use Usage queries. You can also load pre-configured *Standard Queries* directly into the Usage query builder. See [Saving, Updating, and Re-Using Queries](/guides/data-explorer/saving-queries).
* **Exporting Usage Query Results?** You can export the results of a Usage query. See [Exporting Query Results](/guides/data-explorer/exporting-usage-query-results).
# Data Explorers: Saving, Updating, and Re-Using Queries
Source: https://docs.m3ter.com/guides/data-explorer/saving-queries
If you have set up a query in either the *Usage Data Explorer*, *Billing Data Explorer*, or *Prepayments Data Explorer* and expect to use the query again, you can:
* Save the query for re-use.
* Update a saved query with the details of the current query.
* Re-load a saved query into a query builder.
This topic explains how to save, update, and re-use queries in the context of the original version Usage Data Explorer. You can follow a similar procedure when working in the Prepayment Data Explorer or the Billing Data Explorer.
**Notes and Warnings:**
* **Standard Queries.** For some query builders, pre-configured *Standard Queries* are available, such as the **Month-on-month report** Billing Query. You can use the Standard Queries button in the same way as the Saved Queries button to load these pre-configured Queries.
* **Usage Date Explorer (v2)**. When working in Usage Data Explorer (v2), you can save and re-use queries, but you *cannot update saved queries*.
## Saving Queries
**To save a query:**
1. Select **Metering>Usage Data Explorer**.
2. Use the **Usage query builder** to configure a query, perform the query, and review the returned data.
3. If you expect to want to perform the same query at a later date, select **Save Query**. A popup appears and the default action selected is to **Save a new query**:
**Important: Returning Aggregated Data for Pivot Table Review and Analysis!** In the example given, we chose not to apply any Aggregations to the data returned for the query. If you want to work with raw usage data returned for the selected Meter Measures, you must de-select any **Aggregation functions** and select **None** for **Aggregation frequency** before you perform the query. In the Pivot table, you can then apply your own aggregations, without risking a distorted view of your usage data by aggregating already-aggregated data.
**Tips:**
* **Saving Usage Queries?** You can save, update, and re-use Usage queries. You can also load pre-configured *Standard Queries* directly into the Usage query builder. See [Saving, Updating, and Re-Using Queries](/guides/data-explorer/saving-queries).
* **Exporting Usage Query Results?** You can export the results of a Usage query. See [Exporting Query Results](/guides/data-explorer/exporting-usage-query-results).
# Data Explorers: Saving, Updating, and Re-Using Queries
Source: https://docs.m3ter.com/guides/data-explorer/saving-queries
If you have set up a query in either the *Usage Data Explorer*, *Billing Data Explorer*, or *Prepayments Data Explorer* and expect to use the query again, you can:
* Save the query for re-use.
* Update a saved query with the details of the current query.
* Re-load a saved query into a query builder.
This topic explains how to save, update, and re-use queries in the context of the original version Usage Data Explorer. You can follow a similar procedure when working in the Prepayment Data Explorer or the Billing Data Explorer.
**Notes and Warnings:**
* **Standard Queries.** For some query builders, pre-configured *Standard Queries* are available, such as the **Month-on-month report** Billing Query. You can use the Standard Queries button in the same way as the Saved Queries button to load these pre-configured Queries.
* **Usage Date Explorer (v2)**. When working in Usage Data Explorer (v2), you can save and re-use queries, but you *cannot update saved queries*.
## Saving Queries
**To save a query:**
1. Select **Metering>Usage Data Explorer**.
2. Use the **Usage query builder** to configure a query, perform the query, and review the returned data.
3. If you expect to want to perform the same query at a later date, select **Save Query**. A popup appears and the default action selected is to **Save a new query**:
 4. Enter a **Query name** and select **Save query**. The popup closes and your query is saved.
## Updating Saved Queries
**To update a saved query:**
1. Select **Metering>Usage Data Explorer**.
2. Use the **Usage query builder** to configure a query, perform the query, and review the returned data.
3. If you expect to want to perform the query at a later date, and want to update a query you've previously saved with the details of the current query, select **Save query**. A popup appears and the default action selected on the popup is to **Save a new query**.
4. Select **Update an existing query**. The popup adjusts:
4. Enter a **Query name** and select **Save query**. The popup closes and your query is saved.
## Updating Saved Queries
**To update a saved query:**
1. Select **Metering>Usage Data Explorer**.
2. Use the **Usage query builder** to configure a query, perform the query, and review the returned data.
3. If you expect to want to perform the query at a later date, and want to update a query you've previously saved with the details of the current query, select **Save query**. A popup appears and the default action selected on the popup is to **Save a new query**.
4. Select **Update an existing query**. The popup adjusts:
 5. Select a previously **Saved query** to update. The **Query name** field adjusts to show the selected saved query to be updated and to be saved under the same **Query name**.
* If you want use the same name when updating, select **Update Query**. The popup closes and the updated query is saved under the same name.
* If you want to update the saved query under a different name, enter a new **Query name** and select **Update Query**. The popup closes and the updated query is saved under the new name.
## Re-Loading Saved Queries
**To re-load a saved query into Query Builder:**
1. Select **Metering>Usage Data Explorer**.
2. In the **Usage query builder**, select **Saved queries**. A popup appears and lists saved Usage queries.
3. Select **Load query** for the query you want to load into **Usage query builder**. The query is loaded and the query is automatically performed to return data for review.
# Usage Data Explorer (v2)
Source: https://docs.m3ter.com/guides/data-explorer/usage-data-explorer-v2
You can use the *Usage Data Explorer* *(v2)* to configure and perform queries against the metered usage data collected for your Organization in m3ter. It allows you to quickly set up and submit a query that returns the usage data set needed to serve your current analytical purposes:
* **Time Period**. Define a time period for your data query:
* You can select from a set of predefined time period options or define a custom time period.
* The query returns the usage data collected for your Organization for the selected period:
* Note that the query references the *timestamp values* of usage data submissions for applying the defined time period, and *not the time submissions were received* by the platform. Only usage data with a timestamp that falls in the defined time period are returned.
* **Meters**. Select the Meters you want the query to return data for.
* **Accounts**. Select the Accounts you want the query to return data for.
* **Dimension Filters**. Filter the usage data returned by adding specific values of non-numeric Dimension data fields on included Meters. Only the data collected for the values you've added for the selected Dimension fields will be returned for the query.
* **Aggregations**. Apply Aggregation functions to the usage data returned for the query.
* **Grouped by**. For queries that apply Aggregations, you can select to group the data returned for the query by:
* **Account**
* **Time**
* **Dimension**
When you have performed a query, the data is loaded into the Usage Data Explorer (v2) and you can:
* Review the data in a results table and check that it serves your current purposes.
* Download the data in either `CSV` or `JSONL` format.
* Use the query to create a usage Data Export Schedule or to run an Ad-Hoc Data Export.
If you intend to use the Usage Data Explorer (v2) [API endpoints](/api/dataexplorerv2/introduction), for convenience you can view and copy the query JSON.
This topic explains how to work with the Usage Data Explorer (v2) to configure and perform queries against your usage data and review the returned data.
* [Building and Performing Simple Queries](/guides/data-explorer/usage-data-explorer-v2#building-and-performing-simple-queries)
* [Using Dimension Filters for Queries](/guides/data-explorer/usage-data-explorer-v2#using-dimension-filters-for-queries)
* [Applying Aggregations for Queries](/guides/data-explorer/usage-data-explorer-v2#applying-aggregations-for-queries)
* [Managing Result Rows Table Columns](/guides/data-explorer/usage-data-explorer-v2#managing-result-rows-table-columns)
* [Viewing and Copying Queries](/guides/data-explorer/usage-data-explorer-v2#viewing-and-copying-queries)
* [Saving and Re-Using Queries](/guides/data-explorer/usage-data-explorer-v2#saving-and-re-using-queries)
* [Downloading Query Results](/guides/data-explorer/usage-data-explorer-v2#downloading-query-results)
* [Using Queries for Data Export](/guides/data-explorer/usage-data-explorer-v2#using-queries-for-data-export)
**Note: Usage Data Explorers - two versions:**
* **Data Explorer (v2)**. This is the current version and opens when you select **Metering>Usage Data Explorer** in the Console. This topic explains how to open and work with Usage Data Explorer (v2).
* **Legacy Data Explorer**. If you signed up with m3ter after the 1st May 2026, you will not have access to the legacy Data Explorer service, and this version has now passed into maintenance mode with only security fixes being applied henceforth. See [Usage Data Explorer](https://docs.m3ter.com/guides/data-explorer/performing-usage-queries-and-reviewing-results).
## Building and Performing Simple Queries
This section works through an example showing how to build and perform a simple usage data query - a simple query in that it doesn't use any Dimension filters and doesn't apply any Aggregations to the returned data.
**To build and perform a simple query:**
1. Select **Metering>Usage Data Explorer**:
5. Select a previously **Saved query** to update. The **Query name** field adjusts to show the selected saved query to be updated and to be saved under the same **Query name**.
* If you want use the same name when updating, select **Update Query**. The popup closes and the updated query is saved under the same name.
* If you want to update the saved query under a different name, enter a new **Query name** and select **Update Query**. The popup closes and the updated query is saved under the new name.
## Re-Loading Saved Queries
**To re-load a saved query into Query Builder:**
1. Select **Metering>Usage Data Explorer**.
2. In the **Usage query builder**, select **Saved queries**. A popup appears and lists saved Usage queries.
3. Select **Load query** for the query you want to load into **Usage query builder**. The query is loaded and the query is automatically performed to return data for review.
# Usage Data Explorer (v2)
Source: https://docs.m3ter.com/guides/data-explorer/usage-data-explorer-v2
You can use the *Usage Data Explorer* *(v2)* to configure and perform queries against the metered usage data collected for your Organization in m3ter. It allows you to quickly set up and submit a query that returns the usage data set needed to serve your current analytical purposes:
* **Time Period**. Define a time period for your data query:
* You can select from a set of predefined time period options or define a custom time period.
* The query returns the usage data collected for your Organization for the selected period:
* Note that the query references the *timestamp values* of usage data submissions for applying the defined time period, and *not the time submissions were received* by the platform. Only usage data with a timestamp that falls in the defined time period are returned.
* **Meters**. Select the Meters you want the query to return data for.
* **Accounts**. Select the Accounts you want the query to return data for.
* **Dimension Filters**. Filter the usage data returned by adding specific values of non-numeric Dimension data fields on included Meters. Only the data collected for the values you've added for the selected Dimension fields will be returned for the query.
* **Aggregations**. Apply Aggregation functions to the usage data returned for the query.
* **Grouped by**. For queries that apply Aggregations, you can select to group the data returned for the query by:
* **Account**
* **Time**
* **Dimension**
When you have performed a query, the data is loaded into the Usage Data Explorer (v2) and you can:
* Review the data in a results table and check that it serves your current purposes.
* Download the data in either `CSV` or `JSONL` format.
* Use the query to create a usage Data Export Schedule or to run an Ad-Hoc Data Export.
If you intend to use the Usage Data Explorer (v2) [API endpoints](/api/dataexplorerv2/introduction), for convenience you can view and copy the query JSON.
This topic explains how to work with the Usage Data Explorer (v2) to configure and perform queries against your usage data and review the returned data.
* [Building and Performing Simple Queries](/guides/data-explorer/usage-data-explorer-v2#building-and-performing-simple-queries)
* [Using Dimension Filters for Queries](/guides/data-explorer/usage-data-explorer-v2#using-dimension-filters-for-queries)
* [Applying Aggregations for Queries](/guides/data-explorer/usage-data-explorer-v2#applying-aggregations-for-queries)
* [Managing Result Rows Table Columns](/guides/data-explorer/usage-data-explorer-v2#managing-result-rows-table-columns)
* [Viewing and Copying Queries](/guides/data-explorer/usage-data-explorer-v2#viewing-and-copying-queries)
* [Saving and Re-Using Queries](/guides/data-explorer/usage-data-explorer-v2#saving-and-re-using-queries)
* [Downloading Query Results](/guides/data-explorer/usage-data-explorer-v2#downloading-query-results)
* [Using Queries for Data Export](/guides/data-explorer/usage-data-explorer-v2#using-queries-for-data-export)
**Note: Usage Data Explorers - two versions:**
* **Data Explorer (v2)**. This is the current version and opens when you select **Metering>Usage Data Explorer** in the Console. This topic explains how to open and work with Usage Data Explorer (v2).
* **Legacy Data Explorer**. If you signed up with m3ter after the 1st May 2026, you will not have access to the legacy Data Explorer service, and this version has now passed into maintenance mode with only security fixes being applied henceforth. See [Usage Data Explorer](https://docs.m3ter.com/guides/data-explorer/performing-usage-queries-and-reviewing-results).
## Building and Performing Simple Queries
This section works through an example showing how to build and perform a simple usage data query - a simple query in that it doesn't use any Dimension filters and doesn't apply any Aggregations to the returned data.
**To build and perform a simple query:**
1. Select **Metering>Usage Data Explorer**:
 Usage Data Explorer (v2) opens.
2. Select the **Time period** you want to return usage data for:
* Default is **Today**.
* Other predefined options:
* **Yesterday**.
* **Week**, **Month**, or **Year** to date.
* **Previous week**, **month**, **quarter**, or **year**.
* **Last 12 hours, Last 7**, **30**, **35**, **90**, or **120 days**, or **Last year**.
* If you select a predefined **Time period**, then the start and end date/times are clearly shown in brackets. For example, **Last 120 days**:
Usage Data Explorer (v2) opens.
2. Select the **Time period** you want to return usage data for:
* Default is **Today**.
* Other predefined options:
* **Yesterday**.
* **Week**, **Month**, or **Year** to date.
* **Previous week**, **month**, **quarter**, or **year**.
* **Last 12 hours, Last 7**, **30**, **35**, **90**, or **120 days**, or **Last year**.
* If you select a predefined **Time period**, then the start and end date/times are clearly shown in brackets. For example, **Last 120 days**:
 3. For the current example, select **Custom**. The **Time period** panel adjusts to allow you to enter start and end date/times to define the time period for the query:
 * Note that for a **Custom** period start date/time is *inclusive* and end date/time is *exclusive*. For the current example, we want to include all usage data collected for the entire month of January 2025. We've therefore set the exclusive end date/time as midnight on February 1st 2025. This means the query will return data collected up to the end of day January 31st 2025.
4. Use the plus icon on the **Meters** panel to open a dialog showing a list of Meters in your Organization.
5. On the dialog, check the Meters you want to include data from in your query and select **Add**. The selected Meters are then shown on the **Meters** panel.
* For the current example, we've used the **Search** field on the dialog to filter the list, checked a single Meter, and then added it:
* Note that for a **Custom** period start date/time is *inclusive* and end date/time is *exclusive*. For the current example, we want to include all usage data collected for the entire month of January 2025. We've therefore set the exclusive end date/time as midnight on February 1st 2025. This means the query will return data collected up to the end of day January 31st 2025.
4. Use the plus icon on the **Meters** panel to open a dialog showing a list of Meters in your Organization.
5. On the dialog, check the Meters you want to include data from in your query and select **Add**. The selected Meters are then shown on the **Meters** panel.
* For the current example, we've used the **Search** field on the dialog to filter the list, checked a single Meter, and then added it:
![]() Note that:
* Alternatively, you can enter the **ID** of a Meter and **Add** it for a query.
* Default is for **All Meters**.
6. Use the plus icon on the **Accounts** panel to open a dialog showing a list of Accounts in your Organization.
7. On the dialog, check the Accounts you want to include data for in your query and select **Add**. The selected Accounts are then shown on the **Accounts** panel.
* For the current example, we've used the **Search** field on the dialog to filter the list, checked a single Account, and then added it:
Note that:
* Alternatively, you can enter the **ID** of a Meter and **Add** it for a query.
* Default is for **All Meters**.
6. Use the plus icon on the **Accounts** panel to open a dialog showing a list of Accounts in your Organization.
7. On the dialog, check the Accounts you want to include data for in your query and select **Add**. The selected Accounts are then shown on the **Accounts** panel.
* For the current example, we've used the **Search** field on the dialog to filter the list, checked a single Account, and then added it:
![]() Note that:
* Alternatively, you can enter the **ID** of an Account and **Add** it for a query.
* Default is for **All Accounts**.
8. For the current example, we'll not use any **Dimension filters** for the query and we'll omit applying any **Aggregations** for the query results:
Note that:
* Alternatively, you can enter the **ID** of an Account and **Add** it for a query.
* Default is for **All Accounts**.
8. For the current example, we'll not use any **Dimension filters** for the query and we'll omit applying any **Aggregations** for the query results:
![]() 9. Select **Perform query**. The usage data collected for the defined **Time period** by the selected **Meters** and **Accounts** is loaded into a **Result rows** table:
9. Select **Perform query**. The usage data collected for the defined **Time period** by the selected **Meters** and **Accounts** is loaded into a **Result rows** table:
![]() In this example, we can see:
* Nine usage data submissions have been returned for the selected time period of the entire month of January 2025.
* The selected Meter has four Data Fields configured:
* **File Submits**. A numeric Measure field of type **MEASURE**.
* **GBStore**. A numeric Measure field of type **MEASURE**.
* **Customer Name**. A non-numeric Dimensions field of type **WHO**.
* **Status**. A non-numeric Dimension field of type **METADATA**.
Because no **Dimension filters** were defined and no **Aggregations** were applied, the query has returned all usage data submissions made using the single Meter for the single Account.
In the [next section](/guides/data-explorer/usage-data-explorer-v2#using-dimension-filters-for-queries), we'll use Dimension filters to refine this example query to control the usage data returned.
**Notes and Warnings:**
* **Meter Derived Fields?** If selected Meters contain Derived Fields, then these will also be returned by your query.
* **Result rows limit!** The **Result rows** panel is limited to loading up to **2000** rows. If your query returns more than this limit, the results will not load and you'll be advised to update your query to return fewer rows.
## Using Dimension Filters for Queries
To control the range of usage data a query returns, you can set up Dimension filters for any non-numeric Dimension Data Fields configured for the Meters selected for the query. This section explains how to use Dimension filters and extends the example of a simple query given in the [previous section](/guides/data-explorer/usage-data-explorer-v2#building-and-performing-simple-queries):
* The example used a simple query to return usage data collected by a single Meter and single Account.
* We saw that the example Meter was configured with two numeric or Measure Data Fields and two non-numeric or Dimension Data Fields.
We'll now use the **Customer Name** Dimension field to filter the range of data that's returned by the query.
**To use dimension filters for queries:**
1. Build and perform the simple query example given in the [previous section](/guides/data-explorer/usage-data-explorer-v2#building-and-performing-simple-queries).
2. Before you perform the query, under **Dimension filters** select **Add dimension filter**. A menu appears and lists any Dimension fields for Meters selected for the query:
In this example, we can see:
* Nine usage data submissions have been returned for the selected time period of the entire month of January 2025.
* The selected Meter has four Data Fields configured:
* **File Submits**. A numeric Measure field of type **MEASURE**.
* **GBStore**. A numeric Measure field of type **MEASURE**.
* **Customer Name**. A non-numeric Dimensions field of type **WHO**.
* **Status**. A non-numeric Dimension field of type **METADATA**.
Because no **Dimension filters** were defined and no **Aggregations** were applied, the query has returned all usage data submissions made using the single Meter for the single Account.
In the [next section](/guides/data-explorer/usage-data-explorer-v2#using-dimension-filters-for-queries), we'll use Dimension filters to refine this example query to control the usage data returned.
**Notes and Warnings:**
* **Meter Derived Fields?** If selected Meters contain Derived Fields, then these will also be returned by your query.
* **Result rows limit!** The **Result rows** panel is limited to loading up to **2000** rows. If your query returns more than this limit, the results will not load and you'll be advised to update your query to return fewer rows.
## Using Dimension Filters for Queries
To control the range of usage data a query returns, you can set up Dimension filters for any non-numeric Dimension Data Fields configured for the Meters selected for the query. This section explains how to use Dimension filters and extends the example of a simple query given in the [previous section](/guides/data-explorer/usage-data-explorer-v2#building-and-performing-simple-queries):
* The example used a simple query to return usage data collected by a single Meter and single Account.
* We saw that the example Meter was configured with two numeric or Measure Data Fields and two non-numeric or Dimension Data Fields.
We'll now use the **Customer Name** Dimension field to filter the range of data that's returned by the query.
**To use dimension filters for queries:**
1. Build and perform the simple query example given in the [previous section](/guides/data-explorer/usage-data-explorer-v2#building-and-performing-simple-queries).
2. Before you perform the query, under **Dimension filters** select **Add dimension filter**. A menu appears and lists any Dimension fields for Meters selected for the query:
![]() * In the current example, a single Meter has two Dimension fields configured.
3. Select the Meter Dimension field you want to use to filter the data returned for the query. For the current example, we'll select **RevGraph Meter 1 > Customer Name**. A dialog replaces the menu, which lists values used for this field when usage submissions were made for the Meter within the selected **Time period**.
4. Check the values used for the selected Meter Dimension field you want to use to filter the data returned for the query and then select **Add filter**:
* In the current example, a single Meter has two Dimension fields configured.
3. Select the Meter Dimension field you want to use to filter the data returned for the query. For the current example, we'll select **RevGraph Meter 1 > Customer Name**. A dialog replaces the menu, which lists values used for this field when usage submissions were made for the Meter within the selected **Time period**.
4. Check the values used for the selected Meter Dimension field you want to use to filter the data returned for the query and then select **Add filter**:
![]() The dialog closes and the select Dimension field values are added under **Dimension filters**:
The dialog closes and the select Dimension field values are added under **Dimension filters**:
![]() 5. Select **Perform query**. The filtered query executes and returns the data into the **Result rows** panel:
5. Select **Perform query**. The filtered query executes and returns the data into the **Result rows** panel:
![]() * For the current example, we can see that the data returned for the filtered query now includes only those usage submissions made for **Customer Pay1** values for the **Customer Name** Dimension field on the Meter.
## Applying Aggregations for Queries
When building a query in the Usage Data Explorer (v2), you can choose to apply Aggregations to the usage data collected by any Data Fields on the Meters selected for the query.
This section explains the options you have when using Aggregations for queries and the consequences of using Aggregations. It then explains how to create and perform aggregated queries with some typical examples:
* [Aggregations for Queries - Understanding Options and Consequences](/guides/data-explorer/usage-data-explorer-v2#aggregations-for-queries---understanding-options-and-consequences)
* [Applying Aggregations to Queries and Grouping Results](/guides/data-explorer/usage-data-explorer-v2#applying-aggregations-to-queries-and-grouping-results)
### Aggregations for Queries - Understanding Options and Consequences
Before you attempt to use Aggregations for your queries in the Usage Data Explorer (v2), it's important to understand the options you have and the consequences that aggregating the data returned by the query will have.
There are two types of Meter Data Fields:
* **Measures**. Numeric fields of category **MEASURE**, **INCOME**, or **COST**.
* **Dimensions**. Non-numeric fields of category **WHO**, **WHAT**, **WHERE**, **METADATA**, or **OTHER**.
When building queries in Usage Data Explorer (v2), the available Aggregation methods for the various Meter Data Field categories are as follows:
| Aggregation Method | What it does | Can be applied to Meter field categories |
| - | - | - |
| Sum | Adds the values. | MEASURE, INCOME, or COST |
| Minimum | Uses the minimum value. | MEASURE, INCOME, or COST |
| Maximum | Used the maximum value. | MEASURE, INCOME, or COST |
| Count | Counts the number of values. | MEASURE, INCOME, COST, WHO, WHAT, WHERE, METADATA, or OTHER |
| Latest | Uses the most recent value. Based on the timestamp (ts) value of usage data submissions. | MEASURE, INCOME, or COST |
| Mean | Uses the arithmetic mean of the values. | MEASURE, INCOME, or COST |
| Unique | Uses unique values and returns a count of the number of unique values. | WHO, WHAT, WHERE, METADATA, or OTHER |
If you apply Aggregations for a query:
* This restricts the range of usage data returned by the query to only the data collected by the aggregated fields on Meters. Nothing is returned for any non-aggregated fields on Meters.
* The usage data for Meter fields is returned as the values resulting from applying the selected aggregation method.
* You can then select to group the results of the aggregated data returned by:
* **Account**
* **Time**
* **Dimension**
### Applying Aggregations to Queries and Grouping Results
This section provides some examples of aggregated queries with grouped results:
* **Example 1**. [Results grouped by Dimension](/guides/data-explorer/usage-data-explorer-v2#aggregated-queries-with-grouped-results-example-1)
* **Example 2**. [Results grouped by Time](/guides/data-explorer/usage-data-explorer-v2#aggregated-queries-with-grouped-results-example-2)
* **Example 3**. [Results grouped by Account](/guides/data-explorer/usage-data-explorer-v2#aggregated-queries-with-grouped-results-example-3)
#### Aggregated Queries with Grouped Results - Example 1
This example extends the simple unfiltered query example from the earlier section to show how to apply aggregations to usage data returned for the query. It then goes on to show how to group the query results by a Dimension.
**To apply aggregations for queries and group the results:**
1. Build and perform the simple unfiltered query example given in the [earlier section](/guides/data-explorer/usage-data-explorer-v2#building-and-performing-simple-queries).
2. Under **Aggregations**, select **Add aggregation**. A menu listing available aggregation methods appears:
* For the current example, we can see that the data returned for the filtered query now includes only those usage submissions made for **Customer Pay1** values for the **Customer Name** Dimension field on the Meter.
## Applying Aggregations for Queries
When building a query in the Usage Data Explorer (v2), you can choose to apply Aggregations to the usage data collected by any Data Fields on the Meters selected for the query.
This section explains the options you have when using Aggregations for queries and the consequences of using Aggregations. It then explains how to create and perform aggregated queries with some typical examples:
* [Aggregations for Queries - Understanding Options and Consequences](/guides/data-explorer/usage-data-explorer-v2#aggregations-for-queries---understanding-options-and-consequences)
* [Applying Aggregations to Queries and Grouping Results](/guides/data-explorer/usage-data-explorer-v2#applying-aggregations-to-queries-and-grouping-results)
### Aggregations for Queries - Understanding Options and Consequences
Before you attempt to use Aggregations for your queries in the Usage Data Explorer (v2), it's important to understand the options you have and the consequences that aggregating the data returned by the query will have.
There are two types of Meter Data Fields:
* **Measures**. Numeric fields of category **MEASURE**, **INCOME**, or **COST**.
* **Dimensions**. Non-numeric fields of category **WHO**, **WHAT**, **WHERE**, **METADATA**, or **OTHER**.
When building queries in Usage Data Explorer (v2), the available Aggregation methods for the various Meter Data Field categories are as follows:
| Aggregation Method | What it does | Can be applied to Meter field categories |
| - | - | - |
| Sum | Adds the values. | MEASURE, INCOME, or COST |
| Minimum | Uses the minimum value. | MEASURE, INCOME, or COST |
| Maximum | Used the maximum value. | MEASURE, INCOME, or COST |
| Count | Counts the number of values. | MEASURE, INCOME, COST, WHO, WHAT, WHERE, METADATA, or OTHER |
| Latest | Uses the most recent value. Based on the timestamp (ts) value of usage data submissions. | MEASURE, INCOME, or COST |
| Mean | Uses the arithmetic mean of the values. | MEASURE, INCOME, or COST |
| Unique | Uses unique values and returns a count of the number of unique values. | WHO, WHAT, WHERE, METADATA, or OTHER |
If you apply Aggregations for a query:
* This restricts the range of usage data returned by the query to only the data collected by the aggregated fields on Meters. Nothing is returned for any non-aggregated fields on Meters.
* The usage data for Meter fields is returned as the values resulting from applying the selected aggregation method.
* You can then select to group the results of the aggregated data returned by:
* **Account**
* **Time**
* **Dimension**
### Applying Aggregations to Queries and Grouping Results
This section provides some examples of aggregated queries with grouped results:
* **Example 1**. [Results grouped by Dimension](/guides/data-explorer/usage-data-explorer-v2#aggregated-queries-with-grouped-results-example-1)
* **Example 2**. [Results grouped by Time](/guides/data-explorer/usage-data-explorer-v2#aggregated-queries-with-grouped-results-example-2)
* **Example 3**. [Results grouped by Account](/guides/data-explorer/usage-data-explorer-v2#aggregated-queries-with-grouped-results-example-3)
#### Aggregated Queries with Grouped Results - Example 1
This example extends the simple unfiltered query example from the earlier section to show how to apply aggregations to usage data returned for the query. It then goes on to show how to group the query results by a Dimension.
**To apply aggregations for queries and group the results:**
1. Build and perform the simple unfiltered query example given in the [earlier section](/guides/data-explorer/usage-data-explorer-v2#building-and-performing-simple-queries).
2. Under **Aggregations**, select **Add aggregation**. A menu listing available aggregation methods appears:
![]() 3. For the current example, select **Sum**. A dialog replaces the menu and shows the fields on the Meters selected for the query which can have this aggregation method applied:
3. For the current example, select **Sum**. A dialog replaces the menu and shows the fields on the Meters selected for the query which can have this aggregation method applied:
![]() In the current example, the two Meter fields of category **MEASURE** - **File Submits** and **GBStore** are listed.
4. Select to **Sum** the **RevGraph Meter 1 > GB Store** numeric data field. The dialog closes and the aggregation is added.
5. Repeat steps 2 to 4 to apply a **Sum** aggregation to the **File Submits** Meter field:
In the current example, the two Meter fields of category **MEASURE** - **File Submits** and **GBStore** are listed.
4. Select to **Sum** the **RevGraph Meter 1 > GB Store** numeric data field. The dialog closes and the aggregation is added.
5. Repeat steps 2 to 4 to apply a **Sum** aggregation to the **File Submits** Meter field:
![]() 6. Select **Perform Query**. The query with aggregations applied executes and returns the data into the **Result rows** panel:
6. Select **Perform Query**. The query with aggregations applied executes and returns the data into the **Result rows** panel:
![]() Suppose now we want to see how many different customers were responsible for these totals of file submissions and Gigabytes stored.
7. Repeat steps 2 to 4 to apply a **Unique** aggregation to the **Customer Name** Meter field:
Suppose now we want to see how many different customers were responsible for these totals of file submissions and Gigabytes stored.
7. Repeat steps 2 to 4 to apply a **Unique** aggregation to the **Customer Name** Meter field:
![]() 8. Select **Perform Query**. The query executes and returns the data into the **Result rows** panel:
8. Select **Perform Query**. The query executes and returns the data into the **Result rows** panel:
![]() We can see that only two distinct customers were responsible for the totals of usage data.
Suppose now that we want to check how the totals were distributed between the two customers. We can use the **grouped by** option to do this.
9. First, remove the **Unique** aggregation of the **Customer Name** Dimension field from the query.
10. Under **Aggregations**, select the **grouped by** plus icon. A menu appears:
We can see that only two distinct customers were responsible for the totals of usage data.
Suppose now that we want to check how the totals were distributed between the two customers. We can use the **grouped by** option to do this.
9. First, remove the **Unique** aggregation of the **Customer Name** Dimension field from the query.
10. Under **Aggregations**, select the **grouped by** plus icon. A menu appears:
![]() 11. Select **Dimension**. The menu is replaced with a **Dimension** dialog:
11. Select **Dimension**. The menu is replaced with a **Dimension** dialog:
![]() 12. Select the **Dimension** you want to group the aggregated usage by. For the current example, **RevGraph Meter 1 > Customer Name**.
13. Select **Perform Query**. The query executes and returns the data into the **Result rows** panel:
12. Select the **Dimension** you want to group the aggregated usage by. For the current example, **RevGraph Meter 1 > Customer Name**.
13. Select **Perform Query**. The query executes and returns the data into the **Result rows** panel:
![]() #### Aggregated Queries with Grouped Results - Example 2
This example uses a query that aggregates measures data by a SUM method over a month and then groups the results by day.
**To apply aggregations for queries and group the results:**
1. Build and perform an unfiltered query with **Sum** aggregations applied to MEASURE Data Fields on selected Meters:
#### Aggregated Queries with Grouped Results - Example 2
This example uses a query that aggregates measures data by a SUM method over a month and then groups the results by day.
**To apply aggregations for queries and group the results:**
1. Build and perform an unfiltered query with **Sum** aggregations applied to MEASURE Data Fields on selected Meters:
![]() * The query returns the data for the month of February 2025 collected for a single Meter and Account, and aggregates for a Sum of the data for each of the MEASURE fields on the Meter.
* The data is returned into the **Result rows** table as a single row.
Suppose we want to review the sum of usage data over the month by day. We can do this using the **grouped by** option by **Time**.
2. Under **Aggregations**, select the **grouped by** plus icon. A menu appears:
* The query returns the data for the month of February 2025 collected for a single Meter and Account, and aggregates for a Sum of the data for each of the MEASURE fields on the Meter.
* The data is returned into the **Result rows** table as a single row.
Suppose we want to review the sum of usage data over the month by day. We can do this using the **grouped by** option by **Time**.
2. Under **Aggregations**, select the **grouped by** plus icon. A menu appears:
![]() 3. Select **Time**. The menu is replaced with a **Time** dialog:
3. Select **Time**. The menu is replaced with a **Time** dialog:
![]() 4. Select **Daily**.
5. Select **Perform Query**. The query executes and returns the data into the **Result rows** panel:
4. Select **Daily**.
5. Select **Perform Query**. The query executes and returns the data into the **Result rows** panel:
![]() #### Aggregated Queries with Grouped Results - Example 3
This example uses a query that aggregates measures data by a SUM method over a month and then groups the results by Account.
**To apply aggregations for queries and group the results:**
1. Build and perform an unfiltered query with Sum aggregations applied to MEASURE Data Fields on selected Meters:
#### Aggregated Queries with Grouped Results - Example 3
This example uses a query that aggregates measures data by a SUM method over a month and then groups the results by Account.
**To apply aggregations for queries and group the results:**
1. Build and perform an unfiltered query with Sum aggregations applied to MEASURE Data Fields on selected Meters:
![]() * The query returns the data for the month of January 2025 collected for a single Meter and all Accounts, and aggregates for a Sum of the data for each of the MEASURE fields on the Meter.
* The data is returned into the **Result rows** table as a single row.
Suppose we want to review the sum of usage data over the month by Account. We can do this using the **grouped by** option by **Account**.
2. Under **Aggregations**, select the **grouped by** plus icon. A menu appears:
* The query returns the data for the month of January 2025 collected for a single Meter and all Accounts, and aggregates for a Sum of the data for each of the MEASURE fields on the Meter.
* The data is returned into the **Result rows** table as a single row.
Suppose we want to review the sum of usage data over the month by Account. We can do this using the **grouped by** option by **Account**.
2. Under **Aggregations**, select the **grouped by** plus icon. A menu appears:
![]() 3. Select **Account**.
4. Select **Perform Query**. The query executes and returns the data into the **Result rows** panel:
3. Select **Account**.
4. Select **Perform Query**. The query executes and returns the data into the **Result rows** panel:
![]() ## Managing Result Rows Table Columns
When you perform a query the usage data returned for the query is loaded into the **Result rows** table. You can then open a *Columns* dialog to show or hide some table columns.
**To manage Result rows table columns:**
1. Build and perform the query that returns the usage data results required for your analytical purposes. For example:
## Managing Result Rows Table Columns
When you perform a query the usage data returned for the query is loaded into the **Result rows** table. You can then open a *Columns* dialog to show or hide some table columns.
**To manage Result rows table columns:**
1. Build and perform the query that returns the usage data results required for your analytical purposes. For example:
![]() 2. At the right-side of the **Result rows** table, select **Columns**. A menu appears:
2. At the right-side of the **Result rows** table, select **Columns**. A menu appears:
![]() * The columns in the **Result rows** table will depend upon the query you've performed and some columns will be shown by default - such as the **Timestamp**, **Meter**, and **Account** columns in this example - and you will not be able to hide some - such as the Meter field data columns in this example:
* The columns in the **Result rows** table will depend upon the query you've performed and some columns will be shown by default - such as the **Timestamp**, **Meter**, and **Account** columns in this example - and you will not be able to hide some - such as the Meter field data columns in this example:
![]() 3. You can hide and show columns to suit current requirements. For the current example, you might want to hide the **Timestamp** column and show the usage data measurement **UID** instead:
3. You can hide and show columns to suit current requirements. For the current example, you might want to hide the **Timestamp** column and show the usage data measurement **UID** instead:
![]() * The **Result rows** table adjusts accordingly:
* The **Result rows** table adjusts accordingly:
![]() 4. When you've finished showing or hiding columns for the **Result rows** table, select **Columns** again to close the menu.
## Viewing and Copying Queries
As you are building a query, you might want to review the query's JSON structure. This can be helpful if you intend to use the Usage Data Explorer (v2) [API query endpoint](/api/dataexplorerv2/query-and-filter-usage-data). For convenience, you can quickly view a query's JSON and copy it from the explorer page in the Console.
**To view and copy queries:**
1. Build and perform the query that returns the usage data results required for your analytical purposes.
2. In the Usage Data Explorer (v2), select **View query**:
4. When you've finished showing or hiding columns for the **Result rows** table, select **Columns** again to close the menu.
## Viewing and Copying Queries
As you are building a query, you might want to review the query's JSON structure. This can be helpful if you intend to use the Usage Data Explorer (v2) [API query endpoint](/api/dataexplorerv2/query-and-filter-usage-data). For convenience, you can quickly view a query's JSON and copy it from the explorer page in the Console.
**To view and copy queries:**
1. Build and perform the query that returns the usage data results required for your analytical purposes.
2. In the Usage Data Explorer (v2), select **View query**:
 A modal appears containing the query JSON as currently configured:
 3. You can **Copy** the query JSON to your clipboard, if required.
**Tip: API for Usage Data Explorer (v2)?** See the [DataExplorerV2](/api/dataexplorerv2/introduction) section of our API Reference for details.
## Saving and Re-Using Queries
You can save queries and re-use them.
**To save and re-use queries:**
1. In the **Query** panel, build and perform the query that returns the usage data results required for your analytical purposes.
2. Select **Save query**:
3. You can **Copy** the query JSON to your clipboard, if required.
**Tip: API for Usage Data Explorer (v2)?** See the [DataExplorerV2](/api/dataexplorerv2/introduction) section of our API Reference for details.
## Saving and Re-Using Queries
You can save queries and re-use them.
**To save and re-use queries:**
1. In the **Query** panel, build and perform the query that returns the usage data results required for your analytical purposes.
2. Select **Save query**:
![]() A **Save query** dialog appears.
3. Enter a **Query name** and select **Save query**:
A **Save query** dialog appears.
3. Enter a **Query name** and select **Save query**:
 The **Save query** dialog closes and a **Query successfully saved** message appears.
4. If you want to re-use a saved query, on the **Query** panel select **Saved queries**:
The **Save query** dialog closes and a **Query successfully saved** message appears.
4. If you want to re-use a saved query, on the **Query** panel select **Saved queries**:
![]() A **Saved queries** dialog appears.
5. For the saved query you want to re-use, select **Load query**:
A **Saved queries** dialog appears.
5. For the saved query you want to re-use, select **Load query**:
 The dialog closes and the selected saved query is loaded onto the **Query** panel.
* Note that you can *delete saved queries* on the **Saved queries** dialog.
6. Make adjustments to the loaded query, if required, and select **Perform query**. The query executes and returns the data into the **Result rows** panel.
## Downloading Query Results
When you have built a usage data query in Usage Data Explorer (v2), you can export the results returned for the query as a `CSV` or `JSONL` formatted file.
**To download query results:**
1. Build and perform the query that returns the usage data results required for your analytical purposes and which you want to download for use elsewhere.
2. On the **Result rows** panel, select **Download CSV** or **Download JSONL**. The returned data set that was loaded into the **Result rows** panel from the query is compiled in a *.csv* or *.jsonl* formatted file, downloaded, and saved locally.
## Using Queries for Data Export
When you've set up and performed a query in Usage Data Explorer (v2), you can quickly use the query for creating usage Data Export Schedules or to run an Ad-Hoc Data Export.
**To use queries for Data Exports:**
1. Build and perform the query that returns the usage data results you want to export using the Data Export service.
2. If you want to use the query to create a Usage Data Export Schedule, select **Create export schedule**:
The dialog closes and the selected saved query is loaded onto the **Query** panel.
* Note that you can *delete saved queries* on the **Saved queries** dialog.
6. Make adjustments to the loaded query, if required, and select **Perform query**. The query executes and returns the data into the **Result rows** panel.
## Downloading Query Results
When you have built a usage data query in Usage Data Explorer (v2), you can export the results returned for the query as a `CSV` or `JSONL` formatted file.
**To download query results:**
1. Build and perform the query that returns the usage data results required for your analytical purposes and which you want to download for use elsewhere.
2. On the **Result rows** panel, select **Download CSV** or **Download JSONL**. The returned data set that was loaded into the **Result rows** panel from the query is compiled in a *.csv* or *.jsonl* formatted file, downloaded, and saved locally.
## Using Queries for Data Export
When you've set up and performed a query in Usage Data Explorer (v2), you can quickly use the query for creating usage Data Export Schedules or to run an Ad-Hoc Data Export.
**To use queries for Data Exports:**
1. Build and perform the query that returns the usage data results you want to export using the Data Export service.
2. If you want to use the query to create a Usage Data Export Schedule, select **Create export schedule**:
 The **Export schedules>Create** page opens with the query loaded for the **Export schedule details**. You can now proceed to configure the Data Export Schedule. See [Creating Usage Data Export Schedules](/guides/data-exports/creating-export-schedules) for more details.
**Note: Using Custom Time Period?** If you've set up a usage data query in Data Explorer that uses a **Custom** time period, when you load the query for configuring an Export Schedule, this *static time period* is not available for Export Schedules and the default of **Today** is used instead.
3. If you want to use the query to run and Ad-Hoc Usage Data Export, select **Run ad-hoc export**:
The **Export schedules>Create** page opens with the query loaded for the **Export schedule details**. You can now proceed to configure the Data Export Schedule. See [Creating Usage Data Export Schedules](/guides/data-exports/creating-export-schedules) for more details.
**Note: Using Custom Time Period?** If you've set up a usage data query in Data Explorer that uses a **Custom** time period, when you load the query for configuring an Export Schedule, this *static time period* is not available for Export Schedules and the default of **Today** is used instead.
3. If you want to use the query to run and Ad-Hoc Usage Data Export, select **Run ad-hoc export**:
 The **Run ad-hoc export** page opens with the query loaded for the **Ad-hoc export details**. You can now proceed to configure the Ad-Hoc Usage Data Export. See [Running Ad-Hoc Usage Data Exports](/guides/data-exports/running-ad-hoc-data-exports) for more details.
# Data Exports (Preview)
Source: https://docs.m3ter.com/guides/data-exports
**Note: Data Exports in Preview Release.** Please note that the Data Exports feature is currently a Preview feature. See [Feature Release Stages](/guides/getting-started/feature-release-stages) for Preview feature guidance.
The m3ter *Data Export* service allows you to export usage data and operational data from your m3ter Organization directly into your AWS S3 or Google Cloud Storage buckets:
* Firstly, you can create *Export Destinations* and enable the Data Export service to export data to your AWS S3 or Google Cloud Storage buckets.
* Secondly, use the Export Destinations you've set up to configure Export Schedules for usage or operational data exports at specified intervals of minutes, hours, or days.
* Alternatively, select an Export Destination to run a one-off, ad-hoc, data export, delivered either to an existing Export Destination, or local device.
When setting up Export Schedules or running ad-hoc exports, you can define precisely the data you want included in the exported data set:
* **Usage Data**. Define the usage data measurements ingested for your Organization by Meter and Account that you want to export.
* **Operational Data**. Export the configuration and operational data for a range entities from your production environment, such as Bills and Bill Line Items, Prepayments/Commitments, Accounts, and Balances.
* **Export Format**. Two file formats are available for data exports: `.CSV` or `JSONL`.
Export jobs are created for both export schedules and ad-hoc exports you've created, and you can open a page to review export jobs at any time to check their status.
If you want to download the content of a data export file locally, you can simply omit a destination when setting up either an Export schedule or an ad-hoc Export. When the Export job runs and has succeeded, a download button is provided on the Export jobs page.
In this way, the Data Export service is designed to facilitate business use cases where you want to export a clearly defined usage or operational data set extracted from your m3ter Organization, and which you can then use to drive other business applications such as dashboards or other business intelligence and reporting tools.
This section explains how to work with, create, and manage Data Exports for your m3ter Organization:
* [Creating and Managing Export Destinations](/guides/data-exports/creating-data-export-destinations)
* [Creating Usage Data Export Schedules](/guides/data-exports/creating-export-schedules)
* [Creating Operational Data Export Schedules](/guides/data-exports/creating-operational-data-export-schedules)
* [Reviewing and Managing Export Schedules](/guides/data-exports/reviewing-and-managing-export-schedules)
* [Running Ad-Hoc Usage Data Exports](/guides/data-exports/running-ad-hoc-data-exports)
* [Running Ad-Hoc Operational Data Exports](/guides/data-exports/running-ad-hoc-operational-data-exports)
* [Downloading Data Export Files Locally](/guides/data-exports/downloading-data-export-files-locally)
* [Reviewing Export Jobs](/guides/data-exports/reviewing-export-jobs)
* [Data Export - Entity Schema and Relationship Diagram](/guides/data-exports/data-export-object-relationship-diagram)
**Important: Permissions for Data Export!** For users to be able to create, manage, and run Data Exports for either usage or operational data in your Organization, they will need the following permissions assigned to them:
* **Create and Manage Exports**. **Create** and **Update** configuration actions for `config:exportDestination`, `config:exportSchedules`, and `config:exportStatus` resources.
* **Run Exports**. **Download** export action for `exports:data` resource.
* Do not grant permission to manage data exports to users who shouldn't have access to all data in m3ter. See [Understanding, Creating, and Managing Permission Policies](/guides/organization-and-access-management/creating-and-managing-permissions).
# Creating and Managing Export Destinations
Source: https://docs.m3ter.com/guides/data-exports/creating-data-export-destinations
You can create data *Export Destinations* using:
* S3 buckets on your AWS account.
* Buckets in your Google Cloud Storage account.
You'll need to create Export Destinations before you can create data Export Schedules or run ad-hoc data Exports using the Data Export service:
* [Preparing to Create Export Destinations](/guides/data-exports/creating-data-export-destinations#preparing-to-create-export-destinations)
* [Creating AWS S3 Bucket Export Destinations](/guides/data-exports/creating-data-export-destinations#creating-aws-s3-bucket-export-destinations)
* [Creating Google Cloud Storage Bucket Export Destinations](/guides/data-exports/creating-data-export-destinations#creating-google-cloud-storage-bucket-export-destinations)
* [Reviewing and Managing Export Destinations](/guides/data-exports/creating-data-export-destinations#reviewing-and-managing-export-destinations)
## Preparing to Create Export Destinations
### AWS S3 Bucket
For a data upload into your S3 bucket to succeed, the m3ter Data Export service has to assume an IAM role with `PutObject` permission for the bucket. For this reason, you'll need to go into your AWS account and set up an IAM role for this access level. You then must enter the IAM role ARN when you create the Export Destination.
**Tip: Copy Permission and Trust Policies from m3ter Console!** To assist you in setting up the required IAM role, the **Create export destination** page in the Console shows sample **Permission** and **Trust** policies, which you can copy, complete for your specific bucket details, and then use to create the required IAM role. See the [following section](/guides/data-exports/creating-data-export-destinations#creating-aws-s3-bucket-export-destinations).
### Google Cloud Storage Bucket
For a data upload into your Google Cloud Storage (GCS) bucket to succeed, the m3ter Data Export service has to authenticate with your Google Cloud Platform Project using Workload Identity Federation. You can grant the `storage.objectCreator` role to the data exports principal directly or using service account impersonation.
**Tip: Copy gcloud commands from m3ter Console!** To assist you in setting up the required authentication with your Google Cloud Platform project, we've created sample gcloud commands for you to create a workload identity pool, identity provider and policy binding. You can copy these commands to use with your specific project details. See the [following section](/guides/data-exports/creating-data-export-destinations#creating-google-cloud-storage-bucket-export-destinations).
## Creating AWS S3 Bucket Export Destinations
You can create Export Destinations for your AWS S3 buckets in the m3ter Console.
**To create an AWS S3 Export Destination:**
1. Select **Data exports**:
The **Run ad-hoc export** page opens with the query loaded for the **Ad-hoc export details**. You can now proceed to configure the Ad-Hoc Usage Data Export. See [Running Ad-Hoc Usage Data Exports](/guides/data-exports/running-ad-hoc-data-exports) for more details.
# Data Exports (Preview)
Source: https://docs.m3ter.com/guides/data-exports
**Note: Data Exports in Preview Release.** Please note that the Data Exports feature is currently a Preview feature. See [Feature Release Stages](/guides/getting-started/feature-release-stages) for Preview feature guidance.
The m3ter *Data Export* service allows you to export usage data and operational data from your m3ter Organization directly into your AWS S3 or Google Cloud Storage buckets:
* Firstly, you can create *Export Destinations* and enable the Data Export service to export data to your AWS S3 or Google Cloud Storage buckets.
* Secondly, use the Export Destinations you've set up to configure Export Schedules for usage or operational data exports at specified intervals of minutes, hours, or days.
* Alternatively, select an Export Destination to run a one-off, ad-hoc, data export, delivered either to an existing Export Destination, or local device.
When setting up Export Schedules or running ad-hoc exports, you can define precisely the data you want included in the exported data set:
* **Usage Data**. Define the usage data measurements ingested for your Organization by Meter and Account that you want to export.
* **Operational Data**. Export the configuration and operational data for a range entities from your production environment, such as Bills and Bill Line Items, Prepayments/Commitments, Accounts, and Balances.
* **Export Format**. Two file formats are available for data exports: `.CSV` or `JSONL`.
Export jobs are created for both export schedules and ad-hoc exports you've created, and you can open a page to review export jobs at any time to check their status.
If you want to download the content of a data export file locally, you can simply omit a destination when setting up either an Export schedule or an ad-hoc Export. When the Export job runs and has succeeded, a download button is provided on the Export jobs page.
In this way, the Data Export service is designed to facilitate business use cases where you want to export a clearly defined usage or operational data set extracted from your m3ter Organization, and which you can then use to drive other business applications such as dashboards or other business intelligence and reporting tools.
This section explains how to work with, create, and manage Data Exports for your m3ter Organization:
* [Creating and Managing Export Destinations](/guides/data-exports/creating-data-export-destinations)
* [Creating Usage Data Export Schedules](/guides/data-exports/creating-export-schedules)
* [Creating Operational Data Export Schedules](/guides/data-exports/creating-operational-data-export-schedules)
* [Reviewing and Managing Export Schedules](/guides/data-exports/reviewing-and-managing-export-schedules)
* [Running Ad-Hoc Usage Data Exports](/guides/data-exports/running-ad-hoc-data-exports)
* [Running Ad-Hoc Operational Data Exports](/guides/data-exports/running-ad-hoc-operational-data-exports)
* [Downloading Data Export Files Locally](/guides/data-exports/downloading-data-export-files-locally)
* [Reviewing Export Jobs](/guides/data-exports/reviewing-export-jobs)
* [Data Export - Entity Schema and Relationship Diagram](/guides/data-exports/data-export-object-relationship-diagram)
**Important: Permissions for Data Export!** For users to be able to create, manage, and run Data Exports for either usage or operational data in your Organization, they will need the following permissions assigned to them:
* **Create and Manage Exports**. **Create** and **Update** configuration actions for `config:exportDestination`, `config:exportSchedules`, and `config:exportStatus` resources.
* **Run Exports**. **Download** export action for `exports:data` resource.
* Do not grant permission to manage data exports to users who shouldn't have access to all data in m3ter. See [Understanding, Creating, and Managing Permission Policies](/guides/organization-and-access-management/creating-and-managing-permissions).
# Creating and Managing Export Destinations
Source: https://docs.m3ter.com/guides/data-exports/creating-data-export-destinations
You can create data *Export Destinations* using:
* S3 buckets on your AWS account.
* Buckets in your Google Cloud Storage account.
You'll need to create Export Destinations before you can create data Export Schedules or run ad-hoc data Exports using the Data Export service:
* [Preparing to Create Export Destinations](/guides/data-exports/creating-data-export-destinations#preparing-to-create-export-destinations)
* [Creating AWS S3 Bucket Export Destinations](/guides/data-exports/creating-data-export-destinations#creating-aws-s3-bucket-export-destinations)
* [Creating Google Cloud Storage Bucket Export Destinations](/guides/data-exports/creating-data-export-destinations#creating-google-cloud-storage-bucket-export-destinations)
* [Reviewing and Managing Export Destinations](/guides/data-exports/creating-data-export-destinations#reviewing-and-managing-export-destinations)
## Preparing to Create Export Destinations
### AWS S3 Bucket
For a data upload into your S3 bucket to succeed, the m3ter Data Export service has to assume an IAM role with `PutObject` permission for the bucket. For this reason, you'll need to go into your AWS account and set up an IAM role for this access level. You then must enter the IAM role ARN when you create the Export Destination.
**Tip: Copy Permission and Trust Policies from m3ter Console!** To assist you in setting up the required IAM role, the **Create export destination** page in the Console shows sample **Permission** and **Trust** policies, which you can copy, complete for your specific bucket details, and then use to create the required IAM role. See the [following section](/guides/data-exports/creating-data-export-destinations#creating-aws-s3-bucket-export-destinations).
### Google Cloud Storage Bucket
For a data upload into your Google Cloud Storage (GCS) bucket to succeed, the m3ter Data Export service has to authenticate with your Google Cloud Platform Project using Workload Identity Federation. You can grant the `storage.objectCreator` role to the data exports principal directly or using service account impersonation.
**Tip: Copy gcloud commands from m3ter Console!** To assist you in setting up the required authentication with your Google Cloud Platform project, we've created sample gcloud commands for you to create a workload identity pool, identity provider and policy binding. You can copy these commands to use with your specific project details. See the [following section](/guides/data-exports/creating-data-export-destinations#creating-google-cloud-storage-bucket-export-destinations).
## Creating AWS S3 Bucket Export Destinations
You can create Export Destinations for your AWS S3 buckets in the m3ter Console.
**To create an AWS S3 Export Destination:**
1. Select **Data exports**:
![]() The **Data export** page opens and lists any existing **Export destinations**:
The **Data export** page opens and lists any existing **Export destinations**:
![]() 2. On the **Export destinations** panel, select **Create export destination**. The **Create** page opens with **AWS S3** selected by default as **Export destination type**.
3. Select **Next**. The page adjusts for **Export destination details**.
4. Enter the details of the new Export destination:
* **Name**. Descriptive name for the destination.
* **Code**. Unique identifier for the destination.
* Note that when you've entered a Name and clicked in the **Code** field, a Code is automatically entered based on the Name. You can then edit the auto-generated Code as required.
* **Bucket name**. Name of the S3 bucket for the destination.
* **Prefix**. Location in bucket for the export. Leave this blank if you want to use the root of the bucket.
* **IAM role ARN**. You must use the correct format:
* The **IAM role ARN** must begin with "`arn:aws:iam`".
* The general format required is: "`arn:aws:iam:::role/`". For example: **arn:aws:iam::922609978421:role/IAMRole636**.
* If the **IAM role ARN** you enter doesn't comply with this format, then you won't be able to save the Export Destination and an error message will show.
* **Partition data by**. Required. Specify how you want the file path to be structured in your bucket destination - by **Time first** (Default) or **Type first**.
* Type is dependent on whether the data export is for usage or operational data:
* **Usage**. Type is `measurements`.
* **Operational**. Type is one of the entities for which operational data exports are available, such as `account`, `commitment`, `meter`, and so on.
* Here's an example for usage data export:
* **Time first**:
* `{bucketName}/{prefix}/orgId={orgId}/date=2025-01-27/hour=10/type=measurements/b9a317a6-860a-40f9-9bf4-e65c44c72c94_measurements.csv.gz`
* **Type first**:
* `{bucketName}/{prefix}/orgId={orgId}/type=measurements/date=2025-01-27/hour=10/b9a317a6-860a-40f9-9bf4-e65c44c72c94_measurements.csv.gz`
2. On the **Export destinations** panel, select **Create export destination**. The **Create** page opens with **AWS S3** selected by default as **Export destination type**.
3. Select **Next**. The page adjusts for **Export destination details**.
4. Enter the details of the new Export destination:
* **Name**. Descriptive name for the destination.
* **Code**. Unique identifier for the destination.
* Note that when you've entered a Name and clicked in the **Code** field, a Code is automatically entered based on the Name. You can then edit the auto-generated Code as required.
* **Bucket name**. Name of the S3 bucket for the destination.
* **Prefix**. Location in bucket for the export. Leave this blank if you want to use the root of the bucket.
* **IAM role ARN**. You must use the correct format:
* The **IAM role ARN** must begin with "`arn:aws:iam`".
* The general format required is: "`arn:aws:iam:::role/`". For example: **arn:aws:iam::922609978421:role/IAMRole636**.
* If the **IAM role ARN** you enter doesn't comply with this format, then you won't be able to save the Export Destination and an error message will show.
* **Partition data by**. Required. Specify how you want the file path to be structured in your bucket destination - by **Time first** (Default) or **Type first**.
* Type is dependent on whether the data export is for usage or operational data:
* **Usage**. Type is `measurements`.
* **Operational**. Type is one of the entities for which operational data exports are available, such as `account`, `commitment`, `meter`, and so on.
* Here's an example for usage data export:
* **Time first**:
* `{bucketName}/{prefix}/orgId={orgId}/date=2025-01-27/hour=10/type=measurements/b9a317a6-860a-40f9-9bf4-e65c44c72c94_measurements.csv.gz`
* **Type first**:
* `{bucketName}/{prefix}/orgId={orgId}/type=measurements/date=2025-01-27/hour=10/b9a317a6-860a-40f9-9bf4-e65c44c72c94_measurements.csv.gz`
![]() **Notes:**
* Sample **Permission** and **Trust** polices are provided on the **Create** form and you can **Copy** these directly to your clipboard.
* For the **Trust** policy, your m3ter *Organization ID* is used as the `ExternalId`. *Please ensure this is not changed*. This is what the Data Export service will use when assuming the role and if you change it, the export will not work and security will be compromised.
5. Select **Create export destination**. The new Export destination is saved and is listed under **Export destinations** on the **Data export** page. You can read-off the **Code**, **Bucket name**, and **Prefix** settings, and also **Export destination type**.
**Note:** The service validates that it can assume the defined role prior to saving.
## Creating Google Cloud Storage Bucket Export Destinations
You can create Export Destinations for your Google Cloud Storage (GCS) buckets in the m3ter Console.
**To create an Google Cloud Storage Export Destination:**
1. Select **Data exports**:
**Notes:**
* Sample **Permission** and **Trust** polices are provided on the **Create** form and you can **Copy** these directly to your clipboard.
* For the **Trust** policy, your m3ter *Organization ID* is used as the `ExternalId`. *Please ensure this is not changed*. This is what the Data Export service will use when assuming the role and if you change it, the export will not work and security will be compromised.
5. Select **Create export destination**. The new Export destination is saved and is listed under **Export destinations** on the **Data export** page. You can read-off the **Code**, **Bucket name**, and **Prefix** settings, and also **Export destination type**.
**Note:** The service validates that it can assume the defined role prior to saving.
## Creating Google Cloud Storage Bucket Export Destinations
You can create Export Destinations for your Google Cloud Storage (GCS) buckets in the m3ter Console.
**To create an Google Cloud Storage Export Destination:**
1. Select **Data exports**:
![]() The **Data export** page opens and lists any existing **Export destinations**.
2. On the **Export destinations** panel, select **Create export destination**. The **Create** page opens with **AWS S3** selected by default as **Export destination type**.
3. Select **Google Cloud Storage**.
4. Select **Next**. The page adjusts for **Export destination details**.
5. Enter the details of the new Export destination:
* **Name**. Descriptive name for the destination.
* **Code**. Unique identifier for the destination.
* Note that when you've entered a Name and clicked in the **Code** field, a Code is automatically entered based on the Name. You can then edit the auto-generated Code as required.
* **Bucket name**. Name of the GCS bucket for the destination.
* **Prefix**. Location in bucket for the export. Leave this blank if you want to use the root of the bucket.
* **Workload identity pool ID**. (*Required*)
* **Identity Provider ID**. (*Required*)
* **GCP Project Number**. (*Required*)
* **Service account email**. (*Optional*) If you want m3ter to authenticate using service account impersonation, the email of the service account.
* **Partition data by**. Required. Specify how you want the file path to be structured in your bucket destination - by **Time first** (Default) or **Type first**.
* Type is dependent on whether the data export is for usage or operational data:
* **Usage**. Type is `measurements`.
* **Operational**. Type is one of the entities for which operational data exports are available, such as `account`, `commitment`, `meter`, and so on.
* Here's an example for usage data export:
* **Time first**:
* `{bucketName}/{prefix}/orgId={orgId}/date=2025-01-27/hour=10/type=measurements/b9a317a6-860a-40f9-9bf4-e65c44c72c94_measurements.csv.gz`
* **Type first**:
* `{bucketName}/{prefix}/orgId={orgId}/type=measurements/date=2025-01-27/hour=10/b9a317a6-860a-40f9-9bf4-e65c44c72c94_measurements.csv.gz`
The **Data export** page opens and lists any existing **Export destinations**.
2. On the **Export destinations** panel, select **Create export destination**. The **Create** page opens with **AWS S3** selected by default as **Export destination type**.
3. Select **Google Cloud Storage**.
4. Select **Next**. The page adjusts for **Export destination details**.
5. Enter the details of the new Export destination:
* **Name**. Descriptive name for the destination.
* **Code**. Unique identifier for the destination.
* Note that when you've entered a Name and clicked in the **Code** field, a Code is automatically entered based on the Name. You can then edit the auto-generated Code as required.
* **Bucket name**. Name of the GCS bucket for the destination.
* **Prefix**. Location in bucket for the export. Leave this blank if you want to use the root of the bucket.
* **Workload identity pool ID**. (*Required*)
* **Identity Provider ID**. (*Required*)
* **GCP Project Number**. (*Required*)
* **Service account email**. (*Optional*) If you want m3ter to authenticate using service account impersonation, the email of the service account.
* **Partition data by**. Required. Specify how you want the file path to be structured in your bucket destination - by **Time first** (Default) or **Type first**.
* Type is dependent on whether the data export is for usage or operational data:
* **Usage**. Type is `measurements`.
* **Operational**. Type is one of the entities for which operational data exports are available, such as `account`, `commitment`, `meter`, and so on.
* Here's an example for usage data export:
* **Time first**:
* `{bucketName}/{prefix}/orgId={orgId}/date=2025-01-27/hour=10/type=measurements/b9a317a6-860a-40f9-9bf4-e65c44c72c94_measurements.csv.gz`
* **Type first**:
* `{bucketName}/{prefix}/orgId={orgId}/type=measurements/date=2025-01-27/hour=10/b9a317a6-860a-40f9-9bf4-e65c44c72c94_measurements.csv.gz`
![]() **Note: Sample gcloud commands**. You can copy sample gcloud commands to create a workload identity pool, identity provider and policy binding. You can grant the 'storage.objectCreator' role to the data exports principal directly or using service account impersonation. For further help in performing this setup, please consult your Google Cloud Platform documentation, such as this [Workload Identity Federation](https://cloud.google.com/iam/docs/workload-identity-federation) page.
6. Select **Create export destination**. The new Export destination is saved and is listed under **Export destinations** on the **Data export** page. You can read-off the **Code**, **Bucket name**, and **Prefix** settings, and also **Export destination type**.
**Note:** The service validates that it can assume the defined role prior to saving.
## Reviewing and Managing Export Destinations
From the Data export page you can manage your export Destinations to review or edit a Destination's details and delete a Destination if you no longer want to export data to it.
**To view details, edit, or delete an Export Destination:**
1. Select **Data exports**. The **Data export** page opens and lists any existing **Export destinations**.
2. If you want to review details of a Destination, on the **Export destinations** panel, select the name hotlink text.
The **Export destination details** page opens:
**Note: Sample gcloud commands**. You can copy sample gcloud commands to create a workload identity pool, identity provider and policy binding. You can grant the 'storage.objectCreator' role to the data exports principal directly or using service account impersonation. For further help in performing this setup, please consult your Google Cloud Platform documentation, such as this [Workload Identity Federation](https://cloud.google.com/iam/docs/workload-identity-federation) page.
6. Select **Create export destination**. The new Export destination is saved and is listed under **Export destinations** on the **Data export** page. You can read-off the **Code**, **Bucket name**, and **Prefix** settings, and also **Export destination type**.
**Note:** The service validates that it can assume the defined role prior to saving.
## Reviewing and Managing Export Destinations
From the Data export page you can manage your export Destinations to review or edit a Destination's details and delete a Destination if you no longer want to export data to it.
**To view details, edit, or delete an Export Destination:**
1. Select **Data exports**. The **Data export** page opens and lists any existing **Export destinations**.
2. If you want to review details of a Destination, on the **Export destinations** panel, select the name hotlink text.
The **Export destination details** page opens:
![Data Export90]() You can review details and copy directly to your clipboard the:
* Destination **ID**.
* In the example of an AWS S3 bucket Destination, the **IAM role ARN**.
3. If you want edit a Destination, on the **Data export** page under **Export destinations** select the **Edit** icon:
You can review details and copy directly to your clipboard the:
* Destination **ID**.
* In the example of an AWS S3 bucket Destination, the **IAM role ARN**.
3. If you want edit a Destination, on the **Data export** page under **Export destinations** select the **Edit** icon:
![]() * Alternatively, if you've opened the **Export destination details** page, you can **Edit** the Destination directly from there.
The **Edit** page opens and you can update the **Export destination details**.
4. When you have completed your editing changes, select **Update export destination**.
5. If you want to delete a Destination, select the **Delete** icon:
* Alternatively, if you've opened the **Export destination details** page, you can **Edit** the Destination directly from there.
The **Edit** page opens and you can update the **Export destination details**.
4. When you have completed your editing changes, select **Update export destination**.
5. If you want to delete a Destination, select the **Delete** icon:
![]() A confirmation dialog appears.
6. Select **Yes** to confirm the delete action.
**Tip**: Alternatively, you can use the **Edit** and **Delete** buttons at top right of the **Export destination details** page.
**Warning: Destination currently in use!** If the Export Destination is currently being used for an Export Schedule, you won't be able to delete it and an error message will show.
# Creating Usage Data Export Schedules
Source: https://docs.m3ter.com/guides/data-exports/creating-export-schedules
When you have created some Export Destinations using S3 buckets in your AWS account or using buckets in your Google Cloud Storage account, you can set up Export Schedules to perform *usage data exports* to those destinations from your m3ter Organization. You can specify an hourly or daily frequency for these exports to run.
This topic explains how to work with and create Export Schedules for exporting usage data from your Organization at regular intervals:
* [Working with Usage Data Export Schedules](/guides/data-exports/creating-export-schedules#working-with-usage-data-export-schedules)
* [Creating Usage Data Export Schedules](/guides/data-exports/creating-export-schedules#creating-usage-data-export-schedules)
**Note and Tips:**
* **Start in Usage Data Explorer?** You might want to first review the usage data returned for a query you plan to use for your Export Schedule. If so, you can start in the Usage Data Explorer and build and perform the query. If the data the query returns is the data you want to export, you can then select **Create export schedule**. See [Using Queries for Data Export](/guides/data-explorer/usage-data-explorer-v2#using-queries-for-data-export) for more details.
* **Export jobs for Export schedules?** When you have created a data Export schedule, an export job is created for each time the data export is due to run under the schedule. You can review and check the status of data export jobs on the **Export jobs** page - see [Reviewing Export Jobs](/guides/data-exports/reviewing-export-jobs).
* **Usage data (legacy format) Export Schedules?** If you were an early customer of Data Exports you might also still have access to the legacy usage format for data Export Schedules. See [Creating Legacy Usage Data Export Schedules](/guides/data-exports/creating-export-schedules/creating-legacy-usage-export-schedules). However, the legacy usage format is *NOT available* for new customers.
## Working with Usage Data Export Schedules
This section explains how the Data Export service will compile and run usage data exports according to the various options available to you when setting up your usage data Export Schedules:
* [Data Export Service - Timezone Used](/guides/data-exports/creating-export-schedules#data-export-service-timezone-used)
* [When Export Schedules are Run](/guides/data-exports/creating-export-schedules#when-export-schedules-are-run)
* [Export File Format and Composition](/guides/data-exports/creating-export-schedules#export-file-format-and-composition)
* [Maximum Results and Output File Sizes](/guides/data-exports/creating-export-schedules#maximum-results-and-output-file-sizes)
**Important!** Please review this section before setting up any usage data Export schedules to understand the various options you can use to ensure the exports contain the correct usage data to serve your specific needs.
### Data Export Service - Timezone Used
The Data Export service uses UTC and this is not affected by the **Timezone** you've set for your Organization.
### When Export Schedules are Run
When you've completed the configuration for an Export Schedule and select to create it:
* An Export job is scheduled to run the data export immediately with the Data Export service.
* Export jobs for the next and subsequent in the series of exports are then scheduled to run with the Data Export Service according to the frequency you've configured for the Schedule - at a specified number of minutes, hours, or days intervals. You can also define an offset: for hourly scheduling an offset in minutes from start of hour; for daily scheduling an offset in hours from midnight.
* For example, if you select to create an Export schedule at 10:00 a.m. on June 1st, 2024 UTC and the Export schedule is configured for a frequency of every 2 days, an Export job is scheduled to run with the Data Export Service immediately. An Export job for the next data export will then be scheduled to run at 10:00 a.m. on June 3rd 2024 UTC, and so on.
* Exported files are retained in m3ter for 24 hours after the Export job completes, after which they are removed.
### Export File Format and Composition
The range of usage data and the way it is compiled will depend on several options which allow you to control closely what the export file will contain.
#### File Format
The available data exports file formats are `.CSV` or `JSONL`.
#### Time Period
You can define a Time period when creating a usage data Export schedule to control the range of data you want the data export to contain each time it runs according to the schedule. Options:
* **Today**. Data collected for the current day up until the time the export is scheduled to run. For example, if the Export schedule is configured to run with a frequency of every 3 hours and is created initially at 10:00 a.m. UTC, the first export scheduled to run will contain the usage data collected up until 10 a.m. UTC of the current day, the second export will be scheduled to run at 1 p.m. UTC that day and will contain all the usage data collected up until 1 p.m. for that day, and so on. (*Default setting*)
* **Yesterday**. Data collected for the day before the export runs under the schedule - that is, the 24 hour period from midnight to midnight of the day before.
* **Week, Month, Year to date**. Data collected for the period covering the current week, month, or year period. For example, for **Week to date** setting weeks run Monday to Monday - if the Export is scheduled to run at 10 a.m. UTC on October 16th 2024, which is a Wednesday, it will contain all usage data collected starting Monday October 14th 2024 through to the Wednesday at 10 a.m. UTC of the current week.
* **Previous week, month, quarter, year**. Data collected for the previous full week, month, quarter, or year period. For example, weeks run Monday to Monday - if the export is scheduled to run on June 12th 2024, which is a Wednesday, the export will contain data for the period running from Monday, June 3rd to midnight on Sunday, June 9th 2024.
* **Last 12 hours**. Data collected for the twelve hour period up to the start of the hour in which the export is scheduled to run.
* **Last 7 days, 30 days, 35 days, 90 days, 120 days, year**. Data collected for the selected period prior to the date the export is scheduled to run. For example, if **Last 30 days** and the export is scheduled to run for any time on June 15th 2024, it will contain usage data collected for the previous 30 days - starting May 16th 2024 through to midnight on June 14th 2024.
#### Meters and Accounts
You can select Meters and Accounts in your Organization for the export. The usage data export file will then contain only the usage data collected for those Meters and Accounts:
* If you *do not select to aggregate* the usage data, then the export will contain the raw usage data measurements ingested by the selected Meters and selected Accounts. The usage data measurement values included in the export for *non-aggregated* usage data exports are:
* For all Data Fields types - both String and Numeric - and any Derived Fields on the selected Meters.
* The values will be the post-enrichment ingest process values. See [Usage Data Ingest Process](/exploring-m3ter-getting-to-know-the-platform/getting-usage-data-into-m3ter-quick-reference-starter#usage-data-ingest-process) for more details.
* Default option is for all Meters and all Accounts.
#### Dimension Filters
You can filter the usage data returned for export by adding specific values of non-numeric Dimension data fields on included Meters. Only the data collected for the values you've added for the selected Dimension fields will be included in the export.
#### Aggregations
You can apply Aggregation functions to the usage data returned for export.
#### Group By
If you've applied Aggregation functions to the usage data for export, you can then select to group the data returned for export by:
* **Account**
* **Time**
* **Dimension**
**Important: Applying Aggregations and Grouping for Usage Data Exports!** If you intend to apply Aggregations to usage data returned for export and apply grouping to the aggregated data, *please ensure you review* the [Applying Aggregations for Queries](/guides/data-explorer/usage-data-explorer-v2#applying-aggregations-for-queries) section first. The functionality used by the Data Export service when you set up a usage data export and aggregate the data is the same as used by the Usage Data Explorer (v2) for querying usage data.
### Maximum Results and Output File Sizes
Data Exports can contain up to 500,000,000 records, and the file size limit is determined by the file size limit imposed by your destination.
## Creating Usage Data Export Schedules
You can quickly set up Export schedules for data exports containing usage data collected for your Organization. Usage data exports contain the usage data measurements ingested into m3ter for the selected Meters and Accounts covering the specified time period.
**To create a Usage Data Export Schedule:**
1. Select **Data exports**:
A confirmation dialog appears.
6. Select **Yes** to confirm the delete action.
**Tip**: Alternatively, you can use the **Edit** and **Delete** buttons at top right of the **Export destination details** page.
**Warning: Destination currently in use!** If the Export Destination is currently being used for an Export Schedule, you won't be able to delete it and an error message will show.
# Creating Usage Data Export Schedules
Source: https://docs.m3ter.com/guides/data-exports/creating-export-schedules
When you have created some Export Destinations using S3 buckets in your AWS account or using buckets in your Google Cloud Storage account, you can set up Export Schedules to perform *usage data exports* to those destinations from your m3ter Organization. You can specify an hourly or daily frequency for these exports to run.
This topic explains how to work with and create Export Schedules for exporting usage data from your Organization at regular intervals:
* [Working with Usage Data Export Schedules](/guides/data-exports/creating-export-schedules#working-with-usage-data-export-schedules)
* [Creating Usage Data Export Schedules](/guides/data-exports/creating-export-schedules#creating-usage-data-export-schedules)
**Note and Tips:**
* **Start in Usage Data Explorer?** You might want to first review the usage data returned for a query you plan to use for your Export Schedule. If so, you can start in the Usage Data Explorer and build and perform the query. If the data the query returns is the data you want to export, you can then select **Create export schedule**. See [Using Queries for Data Export](/guides/data-explorer/usage-data-explorer-v2#using-queries-for-data-export) for more details.
* **Export jobs for Export schedules?** When you have created a data Export schedule, an export job is created for each time the data export is due to run under the schedule. You can review and check the status of data export jobs on the **Export jobs** page - see [Reviewing Export Jobs](/guides/data-exports/reviewing-export-jobs).
* **Usage data (legacy format) Export Schedules?** If you were an early customer of Data Exports you might also still have access to the legacy usage format for data Export Schedules. See [Creating Legacy Usage Data Export Schedules](/guides/data-exports/creating-export-schedules/creating-legacy-usage-export-schedules). However, the legacy usage format is *NOT available* for new customers.
## Working with Usage Data Export Schedules
This section explains how the Data Export service will compile and run usage data exports according to the various options available to you when setting up your usage data Export Schedules:
* [Data Export Service - Timezone Used](/guides/data-exports/creating-export-schedules#data-export-service-timezone-used)
* [When Export Schedules are Run](/guides/data-exports/creating-export-schedules#when-export-schedules-are-run)
* [Export File Format and Composition](/guides/data-exports/creating-export-schedules#export-file-format-and-composition)
* [Maximum Results and Output File Sizes](/guides/data-exports/creating-export-schedules#maximum-results-and-output-file-sizes)
**Important!** Please review this section before setting up any usage data Export schedules to understand the various options you can use to ensure the exports contain the correct usage data to serve your specific needs.
### Data Export Service - Timezone Used
The Data Export service uses UTC and this is not affected by the **Timezone** you've set for your Organization.
### When Export Schedules are Run
When you've completed the configuration for an Export Schedule and select to create it:
* An Export job is scheduled to run the data export immediately with the Data Export service.
* Export jobs for the next and subsequent in the series of exports are then scheduled to run with the Data Export Service according to the frequency you've configured for the Schedule - at a specified number of minutes, hours, or days intervals. You can also define an offset: for hourly scheduling an offset in minutes from start of hour; for daily scheduling an offset in hours from midnight.
* For example, if you select to create an Export schedule at 10:00 a.m. on June 1st, 2024 UTC and the Export schedule is configured for a frequency of every 2 days, an Export job is scheduled to run with the Data Export Service immediately. An Export job for the next data export will then be scheduled to run at 10:00 a.m. on June 3rd 2024 UTC, and so on.
* Exported files are retained in m3ter for 24 hours after the Export job completes, after which they are removed.
### Export File Format and Composition
The range of usage data and the way it is compiled will depend on several options which allow you to control closely what the export file will contain.
#### File Format
The available data exports file formats are `.CSV` or `JSONL`.
#### Time Period
You can define a Time period when creating a usage data Export schedule to control the range of data you want the data export to contain each time it runs according to the schedule. Options:
* **Today**. Data collected for the current day up until the time the export is scheduled to run. For example, if the Export schedule is configured to run with a frequency of every 3 hours and is created initially at 10:00 a.m. UTC, the first export scheduled to run will contain the usage data collected up until 10 a.m. UTC of the current day, the second export will be scheduled to run at 1 p.m. UTC that day and will contain all the usage data collected up until 1 p.m. for that day, and so on. (*Default setting*)
* **Yesterday**. Data collected for the day before the export runs under the schedule - that is, the 24 hour period from midnight to midnight of the day before.
* **Week, Month, Year to date**. Data collected for the period covering the current week, month, or year period. For example, for **Week to date** setting weeks run Monday to Monday - if the Export is scheduled to run at 10 a.m. UTC on October 16th 2024, which is a Wednesday, it will contain all usage data collected starting Monday October 14th 2024 through to the Wednesday at 10 a.m. UTC of the current week.
* **Previous week, month, quarter, year**. Data collected for the previous full week, month, quarter, or year period. For example, weeks run Monday to Monday - if the export is scheduled to run on June 12th 2024, which is a Wednesday, the export will contain data for the period running from Monday, June 3rd to midnight on Sunday, June 9th 2024.
* **Last 12 hours**. Data collected for the twelve hour period up to the start of the hour in which the export is scheduled to run.
* **Last 7 days, 30 days, 35 days, 90 days, 120 days, year**. Data collected for the selected period prior to the date the export is scheduled to run. For example, if **Last 30 days** and the export is scheduled to run for any time on June 15th 2024, it will contain usage data collected for the previous 30 days - starting May 16th 2024 through to midnight on June 14th 2024.
#### Meters and Accounts
You can select Meters and Accounts in your Organization for the export. The usage data export file will then contain only the usage data collected for those Meters and Accounts:
* If you *do not select to aggregate* the usage data, then the export will contain the raw usage data measurements ingested by the selected Meters and selected Accounts. The usage data measurement values included in the export for *non-aggregated* usage data exports are:
* For all Data Fields types - both String and Numeric - and any Derived Fields on the selected Meters.
* The values will be the post-enrichment ingest process values. See [Usage Data Ingest Process](/exploring-m3ter-getting-to-know-the-platform/getting-usage-data-into-m3ter-quick-reference-starter#usage-data-ingest-process) for more details.
* Default option is for all Meters and all Accounts.
#### Dimension Filters
You can filter the usage data returned for export by adding specific values of non-numeric Dimension data fields on included Meters. Only the data collected for the values you've added for the selected Dimension fields will be included in the export.
#### Aggregations
You can apply Aggregation functions to the usage data returned for export.
#### Group By
If you've applied Aggregation functions to the usage data for export, you can then select to group the data returned for export by:
* **Account**
* **Time**
* **Dimension**
**Important: Applying Aggregations and Grouping for Usage Data Exports!** If you intend to apply Aggregations to usage data returned for export and apply grouping to the aggregated data, *please ensure you review* the [Applying Aggregations for Queries](/guides/data-explorer/usage-data-explorer-v2#applying-aggregations-for-queries) section first. The functionality used by the Data Export service when you set up a usage data export and aggregate the data is the same as used by the Usage Data Explorer (v2) for querying usage data.
### Maximum Results and Output File Sizes
Data Exports can contain up to 500,000,000 records, and the file size limit is determined by the file size limit imposed by your destination.
## Creating Usage Data Export Schedules
You can quickly set up Export schedules for data exports containing usage data collected for your Organization. Usage data exports contain the usage data measurements ingested into m3ter for the selected Meters and Accounts covering the specified time period.
**To create a Usage Data Export Schedule:**
1. Select **Data exports**:
![]() The **Data exports** page opens and lists any existing **Export schedules**:
The **Data exports** page opens and lists any existing **Export schedules**:
![]() 2. Select **Create export schedule**. The **Create** page opens.
3. Enter the **Export schedule details**:
* **Name**. Descriptive name for the schedule.
* **Code**. Unique identifier for the schedule.
* Note that when you've entered a Name and clicked in the **Code** field, a Code is automatically entered based on the Name. You can then edit the auto-generated Code as required.
* **Destinations**. Use the drop-down to select the Export destinations to be used each time the data export runs for the schedule. Notes:
* Select a destination.
* If *No options* shows in the drop-down, you must first create at least one destination before you can set up an Export Schedule - see [Creating and Managing Export Destinations](/guides/data-exports/creating-data-export-destinations).
* Alternatively, if you simply want to download the data export file locally, *do not select* a Destination. See [Downloading Data Export Files Locally](/guides/data-exports/downloading-data-export-files-locally) for more details.
* **Export file format**. Select the format you require for the usage data export files:
* **CSV**. (*Default*).
* **JSONL**.
4. Set up the **Export schedule**:
2. Select **Create export schedule**. The **Create** page opens.
3. Enter the **Export schedule details**:
* **Name**. Descriptive name for the schedule.
* **Code**. Unique identifier for the schedule.
* Note that when you've entered a Name and clicked in the **Code** field, a Code is automatically entered based on the Name. You can then edit the auto-generated Code as required.
* **Destinations**. Use the drop-down to select the Export destinations to be used each time the data export runs for the schedule. Notes:
* Select a destination.
* If *No options* shows in the drop-down, you must first create at least one destination before you can set up an Export Schedule - see [Creating and Managing Export Destinations](/guides/data-exports/creating-data-export-destinations).
* Alternatively, if you simply want to download the data export file locally, *do not select* a Destination. See [Downloading Data Export Files Locally](/guides/data-exports/downloading-data-export-files-locally) for more details.
* **Export file format**. Select the format you require for the usage data export files:
* **CSV**. (*Default*).
* **JSONL**.
4. Set up the **Export schedule**:
![]() * You can use the default **Simple** scheduling mode to do this:
* **Frequency**. Define the frequency for the schedule in **Hours**, **Days**, or **Minutes**.
* **Offset**. If you use an hourly or daily frequency, then you can define an offset for when the export will run relative to the hour or day:
* For hourly scheduling, an offset in minutes from start of hour.
* For daily scheduling an offset in hours from midnight.
* Alternatively, select the **Advanced** scheduling mode and define a cron expression for when you want the export to run:
* You can use the default **Simple** scheduling mode to do this:
* **Frequency**. Define the frequency for the schedule in **Hours**, **Days**, or **Minutes**.
* **Offset**. If you use an hourly or daily frequency, then you can define an offset for when the export will run relative to the hour or day:
* For hourly scheduling, an offset in minutes from start of hour.
* For daily scheduling an offset in hours from midnight.
* Alternatively, select the **Advanced** scheduling mode and define a cron expression for when you want the export to run:
![]() The data export will be scheduled to run immediately when you create it and then at the defined frequency.
**Warning! Limits are imposed:**
* Lowest frequency is every 3 days.
* Highest frequency is every 15 minutes.
* Errors will show if you try to set a frequency outside of these limits.
5. Enter the **Export data**:
* **Source type**. For a usage data Export schedule, leave this as the default selection for **Usage data**.
* **Time period**. Define a time period you want the data export to cover each time it runs according to the schedule. This setting controls what usage data collected for the specified Meters/Accounts the export will contain. See above: [Time Period](/guides/data-exports/creating-export-schedules#time-period) for details on each of the options. **Today** is the Default.
The data export will be scheduled to run immediately when you create it and then at the defined frequency.
**Warning! Limits are imposed:**
* Lowest frequency is every 3 days.
* Highest frequency is every 15 minutes.
* Errors will show if you try to set a frequency outside of these limits.
5. Enter the **Export data**:
* **Source type**. For a usage data Export schedule, leave this as the default selection for **Usage data**.
* **Time period**. Define a time period you want the data export to cover each time it runs according to the schedule. This setting controls what usage data collected for the specified Meters/Accounts the export will contain. See above: [Time Period](/guides/data-exports/creating-export-schedules#time-period) for details on each of the options. **Today** is the Default.
![]() * **Meters**. Add Meters for the data export:
* Select the plus icon. A popup will show listing all Meters in your Organization and you can search the list.
* Check the Meters whose usage data you want to include in the export and select **Add**.
* For the current example, we've used the **Search** field on the dialog to filter the list.
* Alternatively, you can enter the **ID** of a Meter and then **Add** it.
* The export will contain the usage data collected by the Meters you add for the specified **Time period**. (*Default is* ***All meters***)
* **Meters**. Add Meters for the data export:
* Select the plus icon. A popup will show listing all Meters in your Organization and you can search the list.
* Check the Meters whose usage data you want to include in the export and select **Add**.
* For the current example, we've used the **Search** field on the dialog to filter the list.
* Alternatively, you can enter the **ID** of a Meter and then **Add** it.
* The export will contain the usage data collected by the Meters you add for the specified **Time period**. (*Default is* ***All meters***)
![]() * **Accounts**. Add Accounts for the data export:
* Select the plus icon. A popup will show listing all Accounts in your Organization and you can search the list.
* Check the Accounts whose usage data you want to include in the export and select **Add**.
* For the current example, we've used the **Search** field on the dialog to filter the list.
* Alternatively, you can enter the **ID** of an Account and then **Add** it.
* The export will contain the usage data collected by the Meters and Accounts you've added for the specified **Time period**. (*Default is* ***All Accounts***)
* **Accounts**. Add Accounts for the data export:
* Select the plus icon. A popup will show listing all Accounts in your Organization and you can search the list.
* Check the Accounts whose usage data you want to include in the export and select **Add**.
* For the current example, we've used the **Search** field on the dialog to filter the list.
* Alternatively, you can enter the **ID** of an Account and then **Add** it.
* The export will contain the usage data collected by the Meters and Accounts you've added for the specified **Time period**. (*Default is* ***All Accounts***)
![]() 6. If you want to use **Dimensions filters** for the usage data included in the export, select **Add dimension filter**. A menu appears and lists any Dimension fields for Meters selected for the export:
6. If you want to use **Dimensions filters** for the usage data included in the export, select **Add dimension filter**. A menu appears and lists any Dimension fields for Meters selected for the export:
![]() * In the current example, a single Meter has two Dimension fields configured.
7. Select the Meter Dimension field you want to use to filter the data returned for the export. For the current example, we'll select **RevGraph Meter 1 > Customer Name**. A dialog replaces the menu, which lists values used for this field when usage submissions were made for the Meter within the selected **Time period**.
8. Check the values used for the selected Meter Dimension field you want to use to filter the data returned for the export and then select **Add filter**:
* In the current example, a single Meter has two Dimension fields configured.
7. Select the Meter Dimension field you want to use to filter the data returned for the export. For the current example, we'll select **RevGraph Meter 1 > Customer Name**. A dialog replaces the menu, which lists values used for this field when usage submissions were made for the Meter within the selected **Time period**.
8. Check the values used for the selected Meter Dimension field you want to use to filter the data returned for the export and then select **Add filter**:
![]() The dialog closes and the select Dimension field values are added under **Dimension filters**:
The dialog closes and the select Dimension field values are added under **Dimension filters**:
![]() 9. If you want to apply Aggregations to the usage data returned for export, under **Aggregations**, select **Add aggregation**. A menu listing available aggregation methods appears:
9. If you want to apply Aggregations to the usage data returned for export, under **Aggregations**, select **Add aggregation**. A menu listing available aggregation methods appears:
![]() 10. Select the Aggregation method you want to apply. For example, select **Sum**. A dialog replaces the menu and shows the fields on the Meters selected for the export which can have this aggregation method applied:
10. Select the Aggregation method you want to apply. For example, select **Sum**. A dialog replaces the menu and shows the fields on the Meters selected for the export which can have this aggregation method applied:
![]() 11. Select the Meter data field you want to apply the Aggregation method to. The selection is added under **Aggregations**.
12. Repeat steps to apply any other Aggregations for the usage data export:
11. Select the Meter data field you want to apply the Aggregation method to. The selection is added under **Aggregations**.
12. Repeat steps to apply any other Aggregations for the usage data export:
![]() For the current example, we've applied a **Sum** Aggregation to both of the numeric data fields on the selected Meter.
13. If you've applied Aggregations to the returned usage data for export and you want to group the data, under **Aggregations**, select the **grouped by** plus icon. A menu appears:
For the current example, we've applied a **Sum** Aggregation to both of the numeric data fields on the selected Meter.
13. If you've applied Aggregations to the returned usage data for export and you want to group the data, under **Aggregations**, select the **grouped by** plus icon. A menu appears:
![]() In the current example, we select to group by a Meter Dimension. The menu is replaced by a dialog showing the available Dimensions on the Meter:
In the current example, we select to group by a Meter Dimension. The menu is replaced by a dialog showing the available Dimensions on the Meter:
![]() 14. Select the Dimension you want to group the data by. The dialog closes and your **grouped by** selection is added under **Aggregations**.
15. When you have entered all details, select **Create export schedule**. The **Export schedule details** page opens:
14. Select the Dimension you want to group the data by. The dialog closes and your **grouped by** selection is added under **Aggregations**.
15. When you have entered all details, select **Create export schedule**. The **Export schedule details** page opens:
![Data Export91]() * In this example, we've selected a single Meter and Account for which filtered and aggregated usage data grouped by a dimension will be included in the data exports ran every three days for the Export Schedule.
16. Return to the **Data exports** page where the new schedule is listed on the **Export schedules** panel:
* In this example, we've selected a single Meter and Account for which filtered and aggregated usage data grouped by a dimension will be included in the data exports ran every three days for the Export Schedule.
16. Return to the **Data exports** page where the new schedule is listed on the **Export schedules** panel:
![]() # Creating Legacy Usage Data Export Schedules
Source: https://docs.m3ter.com/guides/data-exports/creating-export-schedules/creating-legacy-usage-export-schedules
When you have created some Export Destinations using S3 buckets in your AWS account or using buckets in your Google Cloud Storage account, you can set up Export Schedules to perform *usage data exports* into those destinations from your m3ter Organization. You can specify an hourly or daily frequency for these exports to run.
This topic explains how to work with and create Export Schedules for exporting usage data from your Organization at regular intervals:
* [Working with Usage Data Export Schedules](/guides/data-exports/creating-export-schedules#working-with-usage-data-export-schedules)
* [Creating Legacy Usage Data Export Schedules](/guides/data-exports/creating-export-schedules/creating-legacy-usage-export-schedules#creating-legacy-usage-data-export-schedules)
**Notes:**
* **Usage data (legacy format) Export Schedules?** If you were an early customer of Data Exports you might also still have access to the legacy usage format for data Export Schedules. However, the legacy usage format is *NOT available* for new customers - please see [Creating Usage Data Export Schedules](/guides/data-exports/creating-export-schedules).
* **Export jobs for Export schedules**. When you have created a data Export schedule, an export job is created for each time the data export is due to run under the schedule. You can review and check the status of data export jobs on the **Export jobs** page - see [Reviewing Export Jobs](/guides/data-exports/reviewing-export-jobs).
## Working with Usage Data Export Schedules
This section explains how the Data Export service will compile and run usage data exports according to the various options available to you when setting up your usage data Export Schedules:
* [Data Export Service - Timezone Used](/guides/data-exports/creating-export-schedules#data-export-service-timezone-used)
* [When Export Schedules are Run](/guides/data-exports/creating-export-schedules#when-export-schedules-are-run)
* [Export File Format and Composition](/guides/data-exports/creating-export-schedules#export-file-format-and-composition)
* [Export File Size Limit](/guides/data-exports/creating-export-schedules#export-file-size-limit)
**Important!** Please review this section before setting up any usage data Export schedules to understand the various options you can use to ensure the exports contain the correct usage data to serve your specific needs.
### Data Export Service - Timezone Used
The Data Export service uses UTC and this is not affected by the **Timezone** you've set for your Organization.
### When Export Schedules are Run
When you've completed the configuration for an Export Schedule and select to create it:
* An Export job is scheduled to run the data export immediately with the Data Export service.
* Export jobs for the next and subsequent in the series of exports are then scheduled to run with the Data Export Service according to the hourly or daily frequency you've configured for the Schedule.
* For example, if you select to create an Export schedule at 10:00 a.m. on June 1st, 2024 UTC and the Export schedule is configured for a frequency of every 5 days, an Export job is scheduled to run with the Data Export Service immediately. An Export job for the next data export will then be scheduled to run at 10:00 a.m. on June 6th 2024 UTC, and so on.
* Exported files are retained in m3ter for 24 hours after the job completes, after which they are removed.
### Export File Format and Composition
The range of usage data and the way it is compiled will depend on several options which allow you to control closely what the export file will contain.
#### File Format
The available data exports file formats are `.CSV` or `JSONL`.
#### Time Period
You can define a Time period when creating a usage data Export schedule to control the range of data you want the data export to contain each time it runs according to the schedule. Options:
* **Today**. Data collected for the current day up until the time the export is scheduled to run. For example, if the Export schedule is configured to run with a frequency of every 3 hours and is created initially at 10:00 a.m. UTC, the first export scheduled to run will contain the usage data collected up until 10 a.m. UTC of the current day, the second export will be scheduled to run at 1 p.m. UTC that day and will contain all the usage data collected up until 1 p.m. for that day, and so on. (*Default setting*)
* **Yesterday**. Data collected for the day before the export runs under the schedule - that is, the 24 hour period from midnight to midnight of the day before.
* **Week, Month, Year to date**. Data collected for the period covering the current week, month, or year period. For example, for **Week to date** setting weeks run Monday to Monday - if the Export is scheduled to run at 10 a.m. UTC on October 16th 2024, which is a Wednesday, it will contain all usage data collected starting Monday October 14th 2024 through to the Wednesday at 10 a.m. UTC of the current week.
* **Previous week, month, quarter, year**. Data collected for the previous full week, month, quarter, or year period. For example, weeks run Monday to Monday - if the export is scheduled to run on June 12th 2024, which is a Wednesday, the export will contain data for the period running from Monday, June 3rd to midnight on Sunday, June 9th 2024.
* **Last 12 hours**. Data collected for the twelve hour period up to the start of the hour in which the export is scheduled to run.
* **Last 7 days, 30 days, 35 days, 90 days, 120 days, year**. Data collected for the selected period prior to the date the export is scheduled to run. For example, if **Last 30 days** and the export is scheduled to run for any time on June 15th 2024, it will contain usage data collected for the previous 30 days - starting May 16th 2024 through to midnight on June 14th 2024.
#### Meters and Accounts
You can select Meters and Accounts in your Organization for the export. The usage data export file will then contain only the usage data collected for those Meters and Accounts:
* If you *do not select to aggregate* the usage data, then the export will contain the raw usage data measurements ingested by the selected Meters and selected Accounts. The usage data measurement values included in the export for *non-aggregated* usage data exports are:
* For all Data Fields types - both String and Numeric - and any Derived Fields on the selected Meters.
* The values will be the post-enrichment ingest process values. See [Usage Data Ingest Process](/exploring-m3ter-getting-to-know-the-platform/getting-usage-data-into-m3ter-quick-reference-starter#usage-data-ingest-process) for more details.
* Default option is for all Meters and all Accounts.
#### Aggregated Usage
You can select to *aggregate the usage data measurement values* collected for the selected Meters and Accounts:
* **Aggregation Frequency**. Select a time period for aggregation - **Hourly**, **Daily**, **Weekly**, or **Monthly**:
* The default setting is **Original**, which means the usage data is *not aggregated* for export. See the [previous section](/guides/data-exports/creating-export-schedules#meters-and-accounts) for what is included when the usage data export is for non-aggregated usage.
* **Aggregation**. Select a function for aggregating raw usage data measurement values over the selected aggregation frequency time period:
* **Sum**. Adds the values.
* **Minimum**. Uses the minimum value.
* **Maximum**. Uses the maximum value.
* **Count**. Counts the number of values.
* **Latest**. Uses the most recent value, based on the timestamp - `ts` - values of ingested usage data measurements.
* **Mean**. Uses the arithmetic mean of the values.
If you select to aggregate usage data measurements for data export, the usage data values contained in the data export will only include:
* The usages data measurements collected for any *numeric* Data Fields on selected Meters for Accounts - Data Fields of type MEASURE, INCOME, or COST - and aggregated in accordance with the aggregation frequency and function you've selected.
* For example:
* Suppose you select a single Meter for the data export that has two Data Fields:
* A Data Field of type MEASURE, a Numeric field which is used to collect usage data for file submissions by size of file in megabytes.
* A Data Field of type WHAT, a String field which is used to collect usage data on the file format.
* You then implement aggregation for a daily sum of usage data values for the export.
* The aggregated usage data export will only contain the values for the daily sums of file submission size from the MEASURE Data Field.
### Export File Size Limit
We perform gzip compression for usage data files for export. The file size limit for usage data exports is constrained by the limit imposed by your S3 bucket destination, which we understand to be 5TB maximum size after gzip compression.
## Creating Legacy Usage Data Export Schedules
You can quickly set up Export schedules for data exports containing usage data collected for your Organization. Usage data exports contain the usage data measurements ingested into m3ter for the selected Meters and Accounts covering the specified time period.
**To create a Legacy Usage Data Export Schedule:**
1. Select **Data exports**:
# Creating Legacy Usage Data Export Schedules
Source: https://docs.m3ter.com/guides/data-exports/creating-export-schedules/creating-legacy-usage-export-schedules
When you have created some Export Destinations using S3 buckets in your AWS account or using buckets in your Google Cloud Storage account, you can set up Export Schedules to perform *usage data exports* into those destinations from your m3ter Organization. You can specify an hourly or daily frequency for these exports to run.
This topic explains how to work with and create Export Schedules for exporting usage data from your Organization at regular intervals:
* [Working with Usage Data Export Schedules](/guides/data-exports/creating-export-schedules#working-with-usage-data-export-schedules)
* [Creating Legacy Usage Data Export Schedules](/guides/data-exports/creating-export-schedules/creating-legacy-usage-export-schedules#creating-legacy-usage-data-export-schedules)
**Notes:**
* **Usage data (legacy format) Export Schedules?** If you were an early customer of Data Exports you might also still have access to the legacy usage format for data Export Schedules. However, the legacy usage format is *NOT available* for new customers - please see [Creating Usage Data Export Schedules](/guides/data-exports/creating-export-schedules).
* **Export jobs for Export schedules**. When you have created a data Export schedule, an export job is created for each time the data export is due to run under the schedule. You can review and check the status of data export jobs on the **Export jobs** page - see [Reviewing Export Jobs](/guides/data-exports/reviewing-export-jobs).
## Working with Usage Data Export Schedules
This section explains how the Data Export service will compile and run usage data exports according to the various options available to you when setting up your usage data Export Schedules:
* [Data Export Service - Timezone Used](/guides/data-exports/creating-export-schedules#data-export-service-timezone-used)
* [When Export Schedules are Run](/guides/data-exports/creating-export-schedules#when-export-schedules-are-run)
* [Export File Format and Composition](/guides/data-exports/creating-export-schedules#export-file-format-and-composition)
* [Export File Size Limit](/guides/data-exports/creating-export-schedules#export-file-size-limit)
**Important!** Please review this section before setting up any usage data Export schedules to understand the various options you can use to ensure the exports contain the correct usage data to serve your specific needs.
### Data Export Service - Timezone Used
The Data Export service uses UTC and this is not affected by the **Timezone** you've set for your Organization.
### When Export Schedules are Run
When you've completed the configuration for an Export Schedule and select to create it:
* An Export job is scheduled to run the data export immediately with the Data Export service.
* Export jobs for the next and subsequent in the series of exports are then scheduled to run with the Data Export Service according to the hourly or daily frequency you've configured for the Schedule.
* For example, if you select to create an Export schedule at 10:00 a.m. on June 1st, 2024 UTC and the Export schedule is configured for a frequency of every 5 days, an Export job is scheduled to run with the Data Export Service immediately. An Export job for the next data export will then be scheduled to run at 10:00 a.m. on June 6th 2024 UTC, and so on.
* Exported files are retained in m3ter for 24 hours after the job completes, after which they are removed.
### Export File Format and Composition
The range of usage data and the way it is compiled will depend on several options which allow you to control closely what the export file will contain.
#### File Format
The available data exports file formats are `.CSV` or `JSONL`.
#### Time Period
You can define a Time period when creating a usage data Export schedule to control the range of data you want the data export to contain each time it runs according to the schedule. Options:
* **Today**. Data collected for the current day up until the time the export is scheduled to run. For example, if the Export schedule is configured to run with a frequency of every 3 hours and is created initially at 10:00 a.m. UTC, the first export scheduled to run will contain the usage data collected up until 10 a.m. UTC of the current day, the second export will be scheduled to run at 1 p.m. UTC that day and will contain all the usage data collected up until 1 p.m. for that day, and so on. (*Default setting*)
* **Yesterday**. Data collected for the day before the export runs under the schedule - that is, the 24 hour period from midnight to midnight of the day before.
* **Week, Month, Year to date**. Data collected for the period covering the current week, month, or year period. For example, for **Week to date** setting weeks run Monday to Monday - if the Export is scheduled to run at 10 a.m. UTC on October 16th 2024, which is a Wednesday, it will contain all usage data collected starting Monday October 14th 2024 through to the Wednesday at 10 a.m. UTC of the current week.
* **Previous week, month, quarter, year**. Data collected for the previous full week, month, quarter, or year period. For example, weeks run Monday to Monday - if the export is scheduled to run on June 12th 2024, which is a Wednesday, the export will contain data for the period running from Monday, June 3rd to midnight on Sunday, June 9th 2024.
* **Last 12 hours**. Data collected for the twelve hour period up to the start of the hour in which the export is scheduled to run.
* **Last 7 days, 30 days, 35 days, 90 days, 120 days, year**. Data collected for the selected period prior to the date the export is scheduled to run. For example, if **Last 30 days** and the export is scheduled to run for any time on June 15th 2024, it will contain usage data collected for the previous 30 days - starting May 16th 2024 through to midnight on June 14th 2024.
#### Meters and Accounts
You can select Meters and Accounts in your Organization for the export. The usage data export file will then contain only the usage data collected for those Meters and Accounts:
* If you *do not select to aggregate* the usage data, then the export will contain the raw usage data measurements ingested by the selected Meters and selected Accounts. The usage data measurement values included in the export for *non-aggregated* usage data exports are:
* For all Data Fields types - both String and Numeric - and any Derived Fields on the selected Meters.
* The values will be the post-enrichment ingest process values. See [Usage Data Ingest Process](/exploring-m3ter-getting-to-know-the-platform/getting-usage-data-into-m3ter-quick-reference-starter#usage-data-ingest-process) for more details.
* Default option is for all Meters and all Accounts.
#### Aggregated Usage
You can select to *aggregate the usage data measurement values* collected for the selected Meters and Accounts:
* **Aggregation Frequency**. Select a time period for aggregation - **Hourly**, **Daily**, **Weekly**, or **Monthly**:
* The default setting is **Original**, which means the usage data is *not aggregated* for export. See the [previous section](/guides/data-exports/creating-export-schedules#meters-and-accounts) for what is included when the usage data export is for non-aggregated usage.
* **Aggregation**. Select a function for aggregating raw usage data measurement values over the selected aggregation frequency time period:
* **Sum**. Adds the values.
* **Minimum**. Uses the minimum value.
* **Maximum**. Uses the maximum value.
* **Count**. Counts the number of values.
* **Latest**. Uses the most recent value, based on the timestamp - `ts` - values of ingested usage data measurements.
* **Mean**. Uses the arithmetic mean of the values.
If you select to aggregate usage data measurements for data export, the usage data values contained in the data export will only include:
* The usages data measurements collected for any *numeric* Data Fields on selected Meters for Accounts - Data Fields of type MEASURE, INCOME, or COST - and aggregated in accordance with the aggregation frequency and function you've selected.
* For example:
* Suppose you select a single Meter for the data export that has two Data Fields:
* A Data Field of type MEASURE, a Numeric field which is used to collect usage data for file submissions by size of file in megabytes.
* A Data Field of type WHAT, a String field which is used to collect usage data on the file format.
* You then implement aggregation for a daily sum of usage data values for the export.
* The aggregated usage data export will only contain the values for the daily sums of file submission size from the MEASURE Data Field.
### Export File Size Limit
We perform gzip compression for usage data files for export. The file size limit for usage data exports is constrained by the limit imposed by your S3 bucket destination, which we understand to be 5TB maximum size after gzip compression.
## Creating Legacy Usage Data Export Schedules
You can quickly set up Export schedules for data exports containing usage data collected for your Organization. Usage data exports contain the usage data measurements ingested into m3ter for the selected Meters and Accounts covering the specified time period.
**To create a Legacy Usage Data Export Schedule:**
1. Select **Data exports**:
![]() The **Data exports** page opens and lists any existing **Export schedules**.
2. Select **Create export schedule**. The **Create** page opens.
3. Enter the **Export schedule details**:
* **Name**. Descriptive name for the schedule.
* **Code**. Unique identifier for the schedule.
* Note that when you've entered a Name and clicked in the **Code** field, a Code is automatically entered based on the Name. You can then edit the auto-generated Code as required.
* **Destinations**. Use the drop-down to select the Export destinations to be used each time the data export runs for the schedule. Notes:
* Select at least one destination.
* If *No options* shows in the drop-down, you must first create at least one destination before you can set up an Export Schedule - see [Creating and Managing Export Destinations](/guides/data-exports/creating-data-export-destinations).
* Alternatively, if you simply want to download the data export file locally, *do not select* a Destination. See [Downloading Data Export Files Locally](/guides/data-exports/downloading-data-export-files-locally) for more details.
* **Export file format**. Select the format you require for the usage data export files:
* **CSV**. (*Default*).
* **JSONL**.
* **Frequency**. Define the frequency for the schedule in **Hours** or **Days**. Highest frequency is for exports to run every hour.
* Note that the data export will be scheduled to run immediately when you create it and then at the defined frequency. See above [Working with Usage Data Export Schedules](/guides/data-exports/creating-export-schedules#working-with-usage-data-export-schedules) for details.
* **Source type**. Select **Usage data (legacy format)**. The **Export schedule details** panel adjusts.
* **Time period**. Define a time period you want the data export to cover each time it runs according to the schedule. This setting controls what usage data collected for the specified Meters/Accounts the export will contain. See above: [Time Period](/guides/data-exports/creating-export-schedules#time-period) for details on each of the eight options. **Today** is the Default.
The **Data exports** page opens and lists any existing **Export schedules**.
2. Select **Create export schedule**. The **Create** page opens.
3. Enter the **Export schedule details**:
* **Name**. Descriptive name for the schedule.
* **Code**. Unique identifier for the schedule.
* Note that when you've entered a Name and clicked in the **Code** field, a Code is automatically entered based on the Name. You can then edit the auto-generated Code as required.
* **Destinations**. Use the drop-down to select the Export destinations to be used each time the data export runs for the schedule. Notes:
* Select at least one destination.
* If *No options* shows in the drop-down, you must first create at least one destination before you can set up an Export Schedule - see [Creating and Managing Export Destinations](/guides/data-exports/creating-data-export-destinations).
* Alternatively, if you simply want to download the data export file locally, *do not select* a Destination. See [Downloading Data Export Files Locally](/guides/data-exports/downloading-data-export-files-locally) for more details.
* **Export file format**. Select the format you require for the usage data export files:
* **CSV**. (*Default*).
* **JSONL**.
* **Frequency**. Define the frequency for the schedule in **Hours** or **Days**. Highest frequency is for exports to run every hour.
* Note that the data export will be scheduled to run immediately when you create it and then at the defined frequency. See above [Working with Usage Data Export Schedules](/guides/data-exports/creating-export-schedules#working-with-usage-data-export-schedules) for details.
* **Source type**. Select **Usage data (legacy format)**. The **Export schedule details** panel adjusts.
* **Time period**. Define a time period you want the data export to cover each time it runs according to the schedule. This setting controls what usage data collected for the specified Meters/Accounts the export will contain. See above: [Time Period](/guides/data-exports/creating-export-schedules#time-period) for details on each of the eight options. **Today** is the Default.
![]() * **Aggregation frequency** and **Aggregation**. If you want to aggregate ingested values for your usage data export, then use these options in combination:
* **Aggregation frequency**. Select the frequency for aggregation - five options:
* **Original**. No aggregation performed. (*Default*)
* **Hourly**.
* **Daily**.
* **Weekly**.
* **Monthly**.
* **Aggregation**. Select the type of Aggregation you want to apply to the data values for the selected frequency - six options:
* **Sum**. Adds the values.
* **Minimum**. Uses the minimum value.
* **Maximum**. Uses the maximum value.
* **Count**. Counts the number of values.
* **Latest**. Uses the most recent value, based on the timestamp - `ts` - values of ingested usage data measurements.
* **Mean**. Uses the arithmetic mean of the values.
**Aggregation for Usage Data exports - notes:**
* **Aggregation type is required!** If you select an **Aggregation frequency** other than the default of **Original** (which means the data will *not be aggregated*), then you must select an **Aggregation** type. If you don't select a type, then you won't be able to create the Export schedule and an error will show.
* **Aggregation vs. non-aggregated usage data for export?** If you choose to aggregate usage data for an export schedule, this will affect what data is included in the export. For details, please see the [Working with Usage Data Export Schedules](/guides/data-exports/creating-export-schedules#working-with-usage-data-export-schedules) section above.
* **Meters**. Add Meters for the data export:
* Select the plus icon. A popup will show listing all Meters in your Organization and you can search the list.
* Check the Meters whose usage data you want to include in the export and select **Add**.
* The export will contain the usage data collected by the Meters you add for the specified **Time period**. (*Default is* ***All meters***)
* **Aggregation frequency** and **Aggregation**. If you want to aggregate ingested values for your usage data export, then use these options in combination:
* **Aggregation frequency**. Select the frequency for aggregation - five options:
* **Original**. No aggregation performed. (*Default*)
* **Hourly**.
* **Daily**.
* **Weekly**.
* **Monthly**.
* **Aggregation**. Select the type of Aggregation you want to apply to the data values for the selected frequency - six options:
* **Sum**. Adds the values.
* **Minimum**. Uses the minimum value.
* **Maximum**. Uses the maximum value.
* **Count**. Counts the number of values.
* **Latest**. Uses the most recent value, based on the timestamp - `ts` - values of ingested usage data measurements.
* **Mean**. Uses the arithmetic mean of the values.
**Aggregation for Usage Data exports - notes:**
* **Aggregation type is required!** If you select an **Aggregation frequency** other than the default of **Original** (which means the data will *not be aggregated*), then you must select an **Aggregation** type. If you don't select a type, then you won't be able to create the Export schedule and an error will show.
* **Aggregation vs. non-aggregated usage data for export?** If you choose to aggregate usage data for an export schedule, this will affect what data is included in the export. For details, please see the [Working with Usage Data Export Schedules](/guides/data-exports/creating-export-schedules#working-with-usage-data-export-schedules) section above.
* **Meters**. Add Meters for the data export:
* Select the plus icon. A popup will show listing all Meters in your Organization and you can search the list.
* Check the Meters whose usage data you want to include in the export and select **Add**.
* The export will contain the usage data collected by the Meters you add for the specified **Time period**. (*Default is* ***All meters***)
![]() * **Accounts**. Add Accounts for the data export:
* Select the plus icon. A popup will show listing all Accounts in your Organization and you can search the list.
* Check the Accounts whose usage data you want to include in the export and select **Add**.
* The export will contain the usage data collected by the Meters you've added and for the Accounts you add for the specified **Time period**. (*Default is* ***All Accounts***)
* **Accounts**. Add Accounts for the data export:
* Select the plus icon. A popup will show listing all Accounts in your Organization and you can search the list.
* Check the Accounts whose usage data you want to include in the export and select **Add**.
* The export will contain the usage data collected by the Meters you've added and for the Accounts you add for the specified **Time period**. (*Default is* ***All Accounts***)
![]() 4. When you have entered all details, select **Create export schedule**:
4. When you have entered all details, select **Create export schedule**:
![]() The Schedule is saved and the **Export schedule details** page opens:
The Schedule is saved and the **Export schedule details** page opens:
![Data Export93]() * In this example, we've selected two Meters and two Accounts for which non-aggregated usage data will be included in the data exports ran every day for the Export Schedule.
5. Return to the **Data exports** page where the new schedule is listed on the **Export schedules** panel:
* In this example, we've selected two Meters and two Accounts for which non-aggregated usage data will be included in the data exports ran every day for the Export Schedule.
5. Return to the **Data exports** page where the new schedule is listed on the **Export schedules** panel:
![]() # Creating Operational Data Export Schedules
Source: https://docs.m3ter.com/guides/data-exports/creating-operational-data-export-schedules
When you have created some Export Destinations using S3 buckets in your AWS account or using buckets in your Google Cloud Storage account, you can set up Export Schedules to perform *operational data exports* into those destinations from your m3ter Organization.
This topic explains how to work with and create Export Schedules for exporting operational data from your Organization at regular intervals:
* [Working with Operational Data Export Schedules](/guides/data-exports/creating-operational-data-export-schedules#working-with-operational-data-export-schedules)
* [Creating Operational Data Export Schedules](/guides/data-exports/creating-operational-data-export-schedules#creating-operational-data-export-schedules)
**Note: Export jobs for Export schedules**. When you have created a data Export schedule, an export job is created for each time the data export is due to run under the schedule. You can review and check the status of data export jobs on the Exports job page - see [Reviewing Export Jobs](/guides/data-exports/reviewing-export-jobs).
## Working with Operational Data Export Schedules
This section explains how the Data Export service will compile and run operational data exports according to the various options available to you when setting up your operational data Export Schedules:
* [Data Export Service - Timezone Used](/guides/data-exports/creating-operational-data-export-schedules#data-export-service-timezone-used)
* [When Export Schedules are Run](/guides/data-exports/creating-operational-data-export-schedules#when-export-schedules-are-run)
* [Export File Format and Composition](/guides/data-exports/creating-operational-data-export-schedules#export-file-format-and-composition)
* [Export Size Limit](/guides/data-exports/creating-operational-data-export-schedules#export-size-limit)
### Data Export Service - Timezone Used
The Data Export service uses UTC and this is not affected by the **Timezone** you've set for your Organization.
### When Export Schedules are Run
When you've completed the configuration for an operational data Export Schedule and select to create it:
* An Export job is scheduled to run the data export immediately with the Data Export service.
* Export jobs for the next and subsequent in the series of exports are then scheduled to run with the Data Export Service according to the minutes, hours, or days frequency you've configured for the Schedule.
* For example, if you select to create an Export schedule at 10:00 a.m. on June 1st, 2024 UTC and the Export Schedule is configured for a frequency of every 2 days, then:
* An Export job is scheduled to run with the Data Export Service immediately.
* An Export job for the next data export will then be scheduled to run at 10:00 a.m. on June 3rd 2024 UTC; and so on.
* Exported files are retained in m3ter for 24 hours after the Export job completes, after which they are removed.
### Export File Format and Composition
The range of data included in an operational data export depends on the operational entities you select when you set up the Export Schedule:
* [Operational Entities](/guides/data-exports/creating-operational-data-export-schedules#operational-entities)
* [File Format, Composition, and Entity Schema](/guides/data-exports/creating-operational-data-export-schedules#file-format-composition-and-entity-schema)
#### Operational Entities
You can select to export the operational data in your m3ter Organization for the following entities:
* **Accounts**
* **Account Plans**
* **Aggregations**
* **Balances**
* **Balance Transactions**
* **Bills**
* **Bill line items**
* **Charges**
* **Prepayments/Commitments**
* **Compound Aggregations**
* **Contracts**
* **Meters**
* **Plans**
* **Plan Groups**
* **Plan Group Links**
* **Plan Templates**
* **Pricing**
* **Pricing Bands**
* **Products**
* **Transaction Types**
A file is compiled for each of the entity types you select.
#### File Format, Composition, and Entity Schema
##### **File Format**
The available data export file formats are `.CSV` or `JSONL`.
##### **File Composition - Entity Fields**
Generally, the fields returned with entities by Data Exports are the same as are returned by the API when retrieving an entity, plus some additional fields only relevant for exports.
##### **File Composition - Initial and Subsequent Scheduled Exports**
The data included in an Export Job performed for an operational data Export Schedule will depend on where it sits in the sequence of exports:
* **Initial Export**. The operational data for all selected entities are included.
* **Subsequent Exports**. Only the operational data for any selected entities that have been created or modified since the previous export are included. Note:
* If *nothing has changed* from one export run to the next in the Schedule - in the period since the previous export was run none of the selected entities have been created or modified - then an *empty file* is exported.
* If one of the selected entities *has been deleted* in the period since the previous export was run, then the data for that entity are included in the next run and the `deleted` field for the entity is set to `true`. Data for a deleted entity data are only included in the export ran *immediately following* the period in which the entity was deleted and are not included in any further exports ran for the Schedule.
* If you *edit the frequency* mid-Schedule after some exports have already been run for the original frequency - for example from hourly to daily - then only the data for selected entities that have been created or modified in the period since the last hourly export run to the first daily export ran are included. Importantly, the first export ran for the adjusted frequency *does not include* the data for *all selected entities*, and as if a new Schedule has been set up.
##### **Data Export Entity Schema**
You can review the details of export schema for each entity available for operational data export - see [Data Export - Entity Schema and Relationship Diagram](/guides/data-exports/data-export-object-relationship-diagram).
### Export Size Limit
Typically Operational Data exported files are relatively small, but if they do exceed 6GB the exported data is split across multiple files.
## Creating Operational Data Export Schedules
You can quickly set up scheduled exports of operational data such as Accounts, Bills, and Balances. Scheduled exports are incremental and designed to be easily integrated into downstream data tools.
**To create an Operational Data Export Schedule:**
1. Select **Data exports**:
# Creating Operational Data Export Schedules
Source: https://docs.m3ter.com/guides/data-exports/creating-operational-data-export-schedules
When you have created some Export Destinations using S3 buckets in your AWS account or using buckets in your Google Cloud Storage account, you can set up Export Schedules to perform *operational data exports* into those destinations from your m3ter Organization.
This topic explains how to work with and create Export Schedules for exporting operational data from your Organization at regular intervals:
* [Working with Operational Data Export Schedules](/guides/data-exports/creating-operational-data-export-schedules#working-with-operational-data-export-schedules)
* [Creating Operational Data Export Schedules](/guides/data-exports/creating-operational-data-export-schedules#creating-operational-data-export-schedules)
**Note: Export jobs for Export schedules**. When you have created a data Export schedule, an export job is created for each time the data export is due to run under the schedule. You can review and check the status of data export jobs on the Exports job page - see [Reviewing Export Jobs](/guides/data-exports/reviewing-export-jobs).
## Working with Operational Data Export Schedules
This section explains how the Data Export service will compile and run operational data exports according to the various options available to you when setting up your operational data Export Schedules:
* [Data Export Service - Timezone Used](/guides/data-exports/creating-operational-data-export-schedules#data-export-service-timezone-used)
* [When Export Schedules are Run](/guides/data-exports/creating-operational-data-export-schedules#when-export-schedules-are-run)
* [Export File Format and Composition](/guides/data-exports/creating-operational-data-export-schedules#export-file-format-and-composition)
* [Export Size Limit](/guides/data-exports/creating-operational-data-export-schedules#export-size-limit)
### Data Export Service - Timezone Used
The Data Export service uses UTC and this is not affected by the **Timezone** you've set for your Organization.
### When Export Schedules are Run
When you've completed the configuration for an operational data Export Schedule and select to create it:
* An Export job is scheduled to run the data export immediately with the Data Export service.
* Export jobs for the next and subsequent in the series of exports are then scheduled to run with the Data Export Service according to the minutes, hours, or days frequency you've configured for the Schedule.
* For example, if you select to create an Export schedule at 10:00 a.m. on June 1st, 2024 UTC and the Export Schedule is configured for a frequency of every 2 days, then:
* An Export job is scheduled to run with the Data Export Service immediately.
* An Export job for the next data export will then be scheduled to run at 10:00 a.m. on June 3rd 2024 UTC; and so on.
* Exported files are retained in m3ter for 24 hours after the Export job completes, after which they are removed.
### Export File Format and Composition
The range of data included in an operational data export depends on the operational entities you select when you set up the Export Schedule:
* [Operational Entities](/guides/data-exports/creating-operational-data-export-schedules#operational-entities)
* [File Format, Composition, and Entity Schema](/guides/data-exports/creating-operational-data-export-schedules#file-format-composition-and-entity-schema)
#### Operational Entities
You can select to export the operational data in your m3ter Organization for the following entities:
* **Accounts**
* **Account Plans**
* **Aggregations**
* **Balances**
* **Balance Transactions**
* **Bills**
* **Bill line items**
* **Charges**
* **Prepayments/Commitments**
* **Compound Aggregations**
* **Contracts**
* **Meters**
* **Plans**
* **Plan Groups**
* **Plan Group Links**
* **Plan Templates**
* **Pricing**
* **Pricing Bands**
* **Products**
* **Transaction Types**
A file is compiled for each of the entity types you select.
#### File Format, Composition, and Entity Schema
##### **File Format**
The available data export file formats are `.CSV` or `JSONL`.
##### **File Composition - Entity Fields**
Generally, the fields returned with entities by Data Exports are the same as are returned by the API when retrieving an entity, plus some additional fields only relevant for exports.
##### **File Composition - Initial and Subsequent Scheduled Exports**
The data included in an Export Job performed for an operational data Export Schedule will depend on where it sits in the sequence of exports:
* **Initial Export**. The operational data for all selected entities are included.
* **Subsequent Exports**. Only the operational data for any selected entities that have been created or modified since the previous export are included. Note:
* If *nothing has changed* from one export run to the next in the Schedule - in the period since the previous export was run none of the selected entities have been created or modified - then an *empty file* is exported.
* If one of the selected entities *has been deleted* in the period since the previous export was run, then the data for that entity are included in the next run and the `deleted` field for the entity is set to `true`. Data for a deleted entity data are only included in the export ran *immediately following* the period in which the entity was deleted and are not included in any further exports ran for the Schedule.
* If you *edit the frequency* mid-Schedule after some exports have already been run for the original frequency - for example from hourly to daily - then only the data for selected entities that have been created or modified in the period since the last hourly export run to the first daily export ran are included. Importantly, the first export ran for the adjusted frequency *does not include* the data for *all selected entities*, and as if a new Schedule has been set up.
##### **Data Export Entity Schema**
You can review the details of export schema for each entity available for operational data export - see [Data Export - Entity Schema and Relationship Diagram](/guides/data-exports/data-export-object-relationship-diagram).
### Export Size Limit
Typically Operational Data exported files are relatively small, but if they do exceed 6GB the exported data is split across multiple files.
## Creating Operational Data Export Schedules
You can quickly set up scheduled exports of operational data such as Accounts, Bills, and Balances. Scheduled exports are incremental and designed to be easily integrated into downstream data tools.
**To create an Operational Data Export Schedule:**
1. Select **Data exports**:
![]() The **Data exports** page opens and lists any existing **Export** schedules.
2. Select **Create export schedule**. The **Create** page opens.
3. Enter the **Export schedule details**:
* **Name**. Descriptive name for the schedule.
* **Destinations**. Use the drop-down to select the Export destinations to be used each time the data export runs for the schedule:
* Select the Export Destination(s) you want the export to be delivered to.
* If *No options* shows in the drop-down, you must first create at least one Destination before you can set up an Export Schedule - see [Creating and Managing Export Destinations](/guides/data-exports/creating-data-export-destinations).
* Alternatively, if you simply want to download the data export file locally, *do not select* a Destination. See [Downloading Data Export Files Locally](/guides/data-exports/downloading-data-export-files-locally) for more details.
* **Export file format.** Select the format you require for the usage data export files:
* **CSV**. (*Default*).
* **JSONL**.
4. Set up the **Export schedule**:
The **Data exports** page opens and lists any existing **Export** schedules.
2. Select **Create export schedule**. The **Create** page opens.
3. Enter the **Export schedule details**:
* **Name**. Descriptive name for the schedule.
* **Destinations**. Use the drop-down to select the Export destinations to be used each time the data export runs for the schedule:
* Select the Export Destination(s) you want the export to be delivered to.
* If *No options* shows in the drop-down, you must first create at least one Destination before you can set up an Export Schedule - see [Creating and Managing Export Destinations](/guides/data-exports/creating-data-export-destinations).
* Alternatively, if you simply want to download the data export file locally, *do not select* a Destination. See [Downloading Data Export Files Locally](/guides/data-exports/downloading-data-export-files-locally) for more details.
* **Export file format.** Select the format you require for the usage data export files:
* **CSV**. (*Default*).
* **JSONL**.
4. Set up the **Export schedule**:
![]() * You can use the default **Simple** scheduling mode to do this:
* **Frequency**. Define the frequency for the schedule in **Hours**, **Days**, or **Minutes**.
* **Offset**. If you use an hourly or daily frequency, then you can define an offset for when the export will run relative to the hour or day:
* For hourly scheduling, an offset in minutes from start of hour.
* For daily scheduling an offset in hours from midnight.
* Alternatively, select the **Advanced** scheduling mode and define a cron expression for when you want the export to run:
* You can use the default **Simple** scheduling mode to do this:
* **Frequency**. Define the frequency for the schedule in **Hours**, **Days**, or **Minutes**.
* **Offset**. If you use an hourly or daily frequency, then you can define an offset for when the export will run relative to the hour or day:
* For hourly scheduling, an offset in minutes from start of hour.
* For daily scheduling an offset in hours from midnight.
* Alternatively, select the **Advanced** scheduling mode and define a cron expression for when you want the export to run:
![]() The data export will be scheduled to run immediately when you create it and then at the defined frequency.
**Warning! Limits are imposed:**
* Lowest frequency is every 3 days.
* Highest frequency is every 15 minutes.
* Errors will show if you try to set a frequency outside of these limits.
**Note: Editing the Frequency mid-Schedule?** You can edit an operational Export Schedule's **Frequency** after some exports have already been run for the original **Frequency** - for example from an hourly to a daily. However, this *does not mean the Schedule will reset* and the first export ran for the adjusted **Frequency** will include the data for *all selected entities*. See above under [Export File Format and Composition](/guides/data-exports/creating-operational-data-export-schedules#export-file-format-and-composition).
5. Enter the **Export data**:
* **Source type**. Select the **Operational data** option. The page adjusts to allow you to select the operational entities whose data you want the export to contain.
* Under **Operational data entities**, select the plus icon and use the pop-up to select the entities whose data you want to include in the export:
The data export will be scheduled to run immediately when you create it and then at the defined frequency.
**Warning! Limits are imposed:**
* Lowest frequency is every 3 days.
* Highest frequency is every 15 minutes.
* Errors will show if you try to set a frequency outside of these limits.
**Note: Editing the Frequency mid-Schedule?** You can edit an operational Export Schedule's **Frequency** after some exports have already been run for the original **Frequency** - for example from an hourly to a daily. However, this *does not mean the Schedule will reset* and the first export ran for the adjusted **Frequency** will include the data for *all selected entities*. See above under [Export File Format and Composition](/guides/data-exports/creating-operational-data-export-schedules#export-file-format-and-composition).
5. Enter the **Export data**:
* **Source type**. Select the **Operational data** option. The page adjusts to allow you to select the operational entities whose data you want the export to contain.
* Under **Operational data entities**, select the plus icon and use the pop-up to select the entities whose data you want to include in the export:
![]() * Select **Add**. the selected entities are added to **Export data**:
* Select **Add**. the selected entities are added to **Export data**:
![]() * In this example, we've selected to include the operational data for **Accounts**, **Account Plans**, and **Prepayments/Commitments** in data exports ran every three days.
6. When you have entered all details, select **Create export schedule**. The **Export schedule details** page opens:
* In this example, we've selected to include the operational data for **Accounts**, **Account Plans**, and **Prepayments/Commitments** in data exports ran every three days.
6. When you have entered all details, select **Create export schedule**. The **Export schedule details** page opens:
![Data Export94]() 7. Return to the **Data exports** page where the new schedule is listed on the **Export schedules** panel:
7. Return to the **Data exports** page where the new schedule is listed on the **Export schedules** panel:
![]() # Data Export - Entity Schema and Relationship Diagram
Source: https://docs.m3ter.com/guides/data-exports/data-export-object-relationship-diagram
The following diagram shows the Data Export entity schema and their relationships:
* Click the diagram to open it in a separate tab and you can use the browser zoom to view.
# Data Export - Entity Schema and Relationship Diagram
Source: https://docs.m3ter.com/guides/data-exports/data-export-object-relationship-diagram
The following diagram shows the Data Export entity schema and their relationships:
* Click the diagram to open it in a separate tab and you can use the browser zoom to view.
![Data Export - Entity Schema and Relationship Diagram]() # Downloading Data Export Files Locally
Source: https://docs.m3ter.com/guides/data-exports/downloading-data-export-files-locally
When a Data Export job has run, you can download the content of a data export file locally. Even if you omit a destination when setting up either an Export schedule or an ad-hoc Export, when the Export job runs and has succeeded a file download button is provided on the Export jobs page.
This topic explains how to download a data export file locally using an example of creating an ad-hoc operational Data Export.
**Notes:**
* **Download Window** The export file is available for 24 hours after the Export job has completed.
* **Using API for Downloading Export File Locally?** You can use the [Get Data Export File Download URL](/api/exportdestination/get-data-export-file-download-url) endpoint to obtain a pre-signed URL that is valid for 15 minutes for downloading a data export file by Export job id.
**To create an ad-hoc Operational Data export for local download:**
1. Select **Data exports**:
# Downloading Data Export Files Locally
Source: https://docs.m3ter.com/guides/data-exports/downloading-data-export-files-locally
When a Data Export job has run, you can download the content of a data export file locally. Even if you omit a destination when setting up either an Export schedule or an ad-hoc Export, when the Export job runs and has succeeded a file download button is provided on the Export jobs page.
This topic explains how to download a data export file locally using an example of creating an ad-hoc operational Data Export.
**Notes:**
* **Download Window** The export file is available for 24 hours after the Export job has completed.
* **Using API for Downloading Export File Locally?** You can use the [Get Data Export File Download URL](/api/exportdestination/get-data-export-file-download-url) endpoint to obtain a pre-signed URL that is valid for 15 minutes for downloading a data export file by Export job id.
**To create an ad-hoc Operational Data export for local download:**
1. Select **Data exports**:
![]() The **Data exports** page opens.
2. On the **Export schedules** panel, select **Run ad-hoc export**. The **Run ad-hoc export** page opens.
3. Follow the steps to configure an ad-hoc data export given in the above [Running Ad-Hoc Operational Data Exports](/guides/data-exports/running-ad-hoc-operational-data-exports) topic, but note that you can omit selection of a **Destination** for the export:
The **Data exports** page opens.
2. On the **Export schedules** panel, select **Run ad-hoc export**. The **Run ad-hoc export** page opens.
3. Follow the steps to configure an ad-hoc data export given in the above [Running Ad-Hoc Operational Data Exports](/guides/data-exports/running-ad-hoc-operational-data-exports) topic, but note that you can omit selection of a **Destination** for the export:
![Data Export95]() In this example, we've:
* Selected `.CSV` as the export file format.
* Selected to export the operational data for any **Accounts** created or modified in the **Last 30 days**.
4. Select **Run ad-hoc export**. You are returned to the main **Data export** page and a message will appear stating that the Export job has been successfully queued.
5. Open the **Exports job** page:
In this example, we've:
* Selected `.CSV` as the export file format.
* Selected to export the operational data for any **Accounts** created or modified in the **Last 30 days**.
4. Select **Run ad-hoc export**. You are returned to the main **Data export** page and a message will appear stating that the Export job has been successfully queued.
5. Open the **Exports job** page:
![]() 6. When the Export job has run and succeeded, you can use a **Download** button for the export file:
6. When the Export job has run and succeeded, you can use a **Download** button for the export file:
![Data Export96]() The data export file downloads locally.
**Note: Download Button Inactive for Export Job?** The download button for data export file local download is *only available* on the **Export jobs** page for those Export schedules and ad-hoc Exports which ran *in the past 24 hours*.
# Reviewing and Managing Export Schedules
Source: https://docs.m3ter.com/guides/data-exports/reviewing-and-managing-export-schedules
From the Data export page you can manage your Export Schedules to review or edit a schedule's details and delete a schedule if you no longer want to use it to export data.
**To view details, edit, or delete an Export schedule:**
1. Select **Data exports**:
The data export file downloads locally.
**Note: Download Button Inactive for Export Job?** The download button for data export file local download is *only available* on the **Export jobs** page for those Export schedules and ad-hoc Exports which ran *in the past 24 hours*.
# Reviewing and Managing Export Schedules
Source: https://docs.m3ter.com/guides/data-exports/reviewing-and-managing-export-schedules
From the Data export page you can manage your Export Schedules to review or edit a schedule's details and delete a schedule if you no longer want to use it to export data.
**To view details, edit, or delete an Export schedule:**
1. Select **Data exports**:
![]() The **Data exports** page opens and lists any existing **Export schedules**.
2. If you want to review details of an **Operational data** Export schedule, on the **Export schedules** panel select the **Name** hotlink text:
The **Data exports** page opens and lists any existing **Export schedules**.
2. If you want to review details of an **Operational data** Export schedule, on the **Export schedules** panel select the **Name** hotlink text:
![]() The **Export schedule details** page opens:
The **Export schedule details** page opens:
![Data Export94]() * For an **Operational data** Export schedule, you can review the details and:
* Check the **Export file format**.
* Copy the schedule **ID** directly to your clipboard.
* Select the hotlink text of any **Destinations** configured for the schedule and review the Destination details.
* Under **Query**, read-off the entities whose operational data the export will contain.
3. If you want to review details of an **Usage data** Export schedule, on the **Export schedules** panel select the **Name** hotlink text. The **Export schedule details** page opens:
* For an **Operational data** Export schedule, you can review the details and:
* Check the **Export file format**.
* Copy the schedule **ID** directly to your clipboard.
* Select the hotlink text of any **Destinations** configured for the schedule and review the Destination details.
* Under **Query**, read-off the entities whose operational data the export will contain.
3. If you want to review details of an **Usage data** Export schedule, on the **Export schedules** panel select the **Name** hotlink text. The **Export schedule details** page opens:
![Data Export91]() * For a **Usage data** Export schedule, you can review the details and:
* Check the **Export file format**.
* Copy the schedule **ID** directly to your clipboard.
* Select the hotlink text of any **Destinations** configured for the schedule and review the Destination details.
* Under **Query**:
* Read-off the **Accounts** and **Meters** the export will contain usage data for.
* Check any **Dimension filters** that will be applied to the usage data.
* Check any **Aggregations** that will be applied to the usage data.
* If Aggregations are applied, check how the aggregated usage data is **Grouped by**.
* If you want to check what usage data will be exported for the **Query** you've built, select **View in Data Explorer**. The **Usage Data Explorer** opens where the **Query** is loaded and performed. You can review what usage data is returned in the **Results row** table.
4. If you want edit an Export schedule, on the **Data export** page select the **Edit** icon:
* For a **Usage data** Export schedule, you can review the details and:
* Check the **Export file format**.
* Copy the schedule **ID** directly to your clipboard.
* Select the hotlink text of any **Destinations** configured for the schedule and review the Destination details.
* Under **Query**:
* Read-off the **Accounts** and **Meters** the export will contain usage data for.
* Check any **Dimension filters** that will be applied to the usage data.
* Check any **Aggregations** that will be applied to the usage data.
* If Aggregations are applied, check how the aggregated usage data is **Grouped by**.
* If you want to check what usage data will be exported for the **Query** you've built, select **View in Data Explorer**. The **Usage Data Explorer** opens where the **Query** is loaded and performed. You can review what usage data is returned in the **Results row** table.
4. If you want edit an Export schedule, on the **Data export** page select the **Edit** icon:
![]() * Alternatively, if you've opened the **Export schedule details** page, you can **Edit** the schedule directly from there.
The **Edit** page opens and you can update the **Export schedule details**.
5. When you've completed your editing changes, select **Update Export schedule**.
6. If you want to delete a schedule, select the **Delete** icon:
* Alternatively, if you've opened the **Export schedule details** page, you can **Edit** the schedule directly from there.
The **Edit** page opens and you can update the **Export schedule details**.
5. When you've completed your editing changes, select **Update Export schedule**.
6. If you want to delete a schedule, select the **Delete** icon:
![]() A confirmation dialog appears.
7. Select **Yes** to confirm the delete action.
**Tip**: Alternatively, you can use the **Edit** or **Delete** buttons at top right of the **Export schedule details** page.
# Reviewing Export Jobs
Source: https://docs.m3ter.com/guides/data-exports/reviewing-export-jobs
*Export jobs* are created each time a usage or operational data export is due to run under an Export schedule or when you run an ad-hoc data export. You can review and check the status of Export jobs at any time, which are listed on the Export jobs page:
* Read-off job status:
* Pending
* Running
* Succeeded
* Failed
* Filter the list by job status.
* Filter the list by specifying a date range by job start date.
* Download data export files locally.
This topic explains how to review Export jobs for your data exports, check their status, download data export files locally, and follow-up on failed jobs:
* [Reviewing Export Jobs and Checking Status](/guides/data-exports/reviewing-export-jobs#reviewing-export-jobs-and-checking-status)
* [Downloading Data Export Files](/guides/data-exports/reviewing-export-jobs#downloading-data-export-files)
* [Following-Up on Failed Export Jobs](/guides/data-exports/reviewing-export-jobs#following-up-on-failed-export-jobs)
## Reviewing Export Jobs and Checking Status
**To review Export jobs and check their status:**
1. Select **Data exports**:
A confirmation dialog appears.
7. Select **Yes** to confirm the delete action.
**Tip**: Alternatively, you can use the **Edit** or **Delete** buttons at top right of the **Export schedule details** page.
# Reviewing Export Jobs
Source: https://docs.m3ter.com/guides/data-exports/reviewing-export-jobs
*Export jobs* are created each time a usage or operational data export is due to run under an Export schedule or when you run an ad-hoc data export. You can review and check the status of Export jobs at any time, which are listed on the Export jobs page:
* Read-off job status:
* Pending
* Running
* Succeeded
* Failed
* Filter the list by job status.
* Filter the list by specifying a date range by job start date.
* Download data export files locally.
This topic explains how to review Export jobs for your data exports, check their status, download data export files locally, and follow-up on failed jobs:
* [Reviewing Export Jobs and Checking Status](/guides/data-exports/reviewing-export-jobs#reviewing-export-jobs-and-checking-status)
* [Downloading Data Export Files](/guides/data-exports/reviewing-export-jobs#downloading-data-export-files)
* [Following-Up on Failed Export Jobs](/guides/data-exports/reviewing-export-jobs#following-up-on-failed-export-jobs)
## Reviewing Export Jobs and Checking Status
**To review Export jobs and check their status:**
1. Select **Data exports**:
![]() The **Data exports** page opens.
2. In the sidebar, select **Export jobs**:
The **Data exports** page opens.
2. In the sidebar, select **Export jobs**:
![]() The **Export jobs** page opens and lists all the jobs created for your Export schedules and ad-hoc data exports:
The **Export jobs** page opens and lists all the jobs created for your Export schedules and ad-hoc data exports:
![Data Export97]() * For each Export job listed, you can read-off:
* The **Start date** and time the export was scheduled to run.
* The Export job **ID**, which you can **Copy** directly to your clipboard.
* The **Source type** for the Export job.
* Under **Schedule**, whether the job was created for an Export schedule or for an ad-hoc export.
* The job **Status**.
* You can open the **Details** page for an Export schedule using the **Schedule** hotlink text.
**Notes:**
**Schedule not showing?** If you delete an Export Schedule after an Export job has been run for the schedule, then **(Schedule not found)** will show under **Schedule**.
* **Follow-up on Failed Export jobs?** You can make an API call to retrieve details of failed Export jobs - see the [section below](/guides/data-exports/reviewing-export-jobs#following-up-on-failed-export-jobs) for how to do this.
3. Export jobs with any **Status** are listed by default when the page opens. If you want to filter the list, use the **Status** drop-down:
* For each Export job listed, you can read-off:
* The **Start date** and time the export was scheduled to run.
* The Export job **ID**, which you can **Copy** directly to your clipboard.
* The **Source type** for the Export job.
* Under **Schedule**, whether the job was created for an Export schedule or for an ad-hoc export.
* The job **Status**.
* You can open the **Details** page for an Export schedule using the **Schedule** hotlink text.
**Notes:**
**Schedule not showing?** If you delete an Export Schedule after an Export job has been run for the schedule, then **(Schedule not found)** will show under **Schedule**.
* **Follow-up on Failed Export jobs?** You can make an API call to retrieve details of failed Export jobs - see the [section below](/guides/data-exports/reviewing-export-jobs#following-up-on-failed-export-jobs) for how to do this.
3. Export jobs with any **Status** are listed by default when the page opens. If you want to filter the list, use the **Status** drop-down:
![]() The page adjusts to show only those Export jobs with the selected **Status**.
3. Export jobs for any **Start date** are listed by default when the page opens, and ordered by timestamp with most recent job first. Use the **Start date** popup calendars to define a date range to filter the list to show only those Export jobs with a start date within the date range.
## Downloading Data Export Files
On the **Export jobs** page, an *active download button* will be available for downloading the export file locally for an Export job that has succeeded for an Export schedule or ad-hoc Export *within the past 24 hours*.
To download the data export file locally, simply select the active download button:
The page adjusts to show only those Export jobs with the selected **Status**.
3. Export jobs for any **Start date** are listed by default when the page opens, and ordered by timestamp with most recent job first. Use the **Start date** popup calendars to define a date range to filter the list to show only those Export jobs with a start date within the date range.
## Downloading Data Export Files
On the **Export jobs** page, an *active download button* will be available for downloading the export file locally for an Export job that has succeeded for an Export schedule or ad-hoc Export *within the past 24 hours*.
To download the data export file locally, simply select the active download button:
![Data Export96]() **Tip: More Details?** See [Downloading Data Export Files Locally](/guides/data-exports/downloading-data-export-files-locally).
## Following-Up on Failed Export Jobs
You can use the [List EventResponse](/api/events/list-eventresponse) API call to query for any events of type `dataexport.job.failure`.
For example:
`GET https://api.m3ter.com/organizations/{orgId}/events?eventName=dataexport.job.failure`
The response gives details of the Export job failure event:
```json theme={null}
{
"data": [
{
"id": "3bffe288-f04e-4a6f-8d0b-39c616faxyxy",
"eventName": "dataexport.job.failure",
"eventTime": "2024-10-28T10:02:23.892Z",
"m3terEvent": {
"eventData": {
"jobId": "dc83dec1-94af-4611-b532-fd778b83xy99",
"code": "NoSuchBucket",
"sourceType": "USAGE",
"startedAt": "2024-10-28T10:02:23.614Z",
"eventType": "DataExportJobFailure",
"orgId": "eb4d6f1e-0795-484e-a0b8-3640ca22xyxy",
"scheduleId": "ed1f2303-87b3-4b43-bc27-0b6d70axyx0xa"
},
"eventTime": "2024-10-28T10:02:23.892Z",
"eventName": "dataexport.job.failure"
}
},
...
]
```
# Running Ad-Hoc Usage Data Exports
Source: https://docs.m3ter.com/guides/data-exports/running-ad-hoc-data-exports
You can quickly set up and run a one-off, ad-hoc data export containing usage data collected for your Organization. Usage data exports contain the usage data measurements ingested into m3ter for the selected Meters and Accounts covering the specified time period, and you can select to aggregate the data for an export.
**Important: Reviewing Usage Data Export Options!** Before attempting to run and ad-hoc usage data export, *please ensure you review* the options available for controlling the usage data the export will contain - see [Working with Usage Data Export Schedules](/guides/data-exports/creating-export-schedules#working-with-usage-data-export-schedules).
**Notes and Tips:**
* **Start in Usage Data Explorer?** You might want to first review the usage data returned for a query you plan to use for your Ad-Hoc Export. If so, you can start in the Usage Data Explorer and build and perform the query. If the data the query returns is the data you want to export, you can then select **Run ad-hoc export**. See [Using Queries for Data Export](/guides/data-explorer/usage-data-explorer-v2#using-queries-for-data-export) for more details.
* **Legacy Usage data (legacy format) Ad-Hoc Exports?** If you were an early customer of Data Exports you might also still have access to the legacy usage format for Ad-Hoc data Exports. See [Running Ad-Hoc Legacy Usage Data Exports](/guides/data-exports/running-ad-hoc-data-exports/running-ad-hoc-legacy-data-exports). However, the legacy usage format is *NOT available* for new customers.
## Setting Up and Running Ad-Hoc Usage Data Export
**To set up and run an ad-hoc Usage Data Export:**
1. Select **Data exports**:
**Tip: More Details?** See [Downloading Data Export Files Locally](/guides/data-exports/downloading-data-export-files-locally).
## Following-Up on Failed Export Jobs
You can use the [List EventResponse](/api/events/list-eventresponse) API call to query for any events of type `dataexport.job.failure`.
For example:
`GET https://api.m3ter.com/organizations/{orgId}/events?eventName=dataexport.job.failure`
The response gives details of the Export job failure event:
```json theme={null}
{
"data": [
{
"id": "3bffe288-f04e-4a6f-8d0b-39c616faxyxy",
"eventName": "dataexport.job.failure",
"eventTime": "2024-10-28T10:02:23.892Z",
"m3terEvent": {
"eventData": {
"jobId": "dc83dec1-94af-4611-b532-fd778b83xy99",
"code": "NoSuchBucket",
"sourceType": "USAGE",
"startedAt": "2024-10-28T10:02:23.614Z",
"eventType": "DataExportJobFailure",
"orgId": "eb4d6f1e-0795-484e-a0b8-3640ca22xyxy",
"scheduleId": "ed1f2303-87b3-4b43-bc27-0b6d70axyx0xa"
},
"eventTime": "2024-10-28T10:02:23.892Z",
"eventName": "dataexport.job.failure"
}
},
...
]
```
# Running Ad-Hoc Usage Data Exports
Source: https://docs.m3ter.com/guides/data-exports/running-ad-hoc-data-exports
You can quickly set up and run a one-off, ad-hoc data export containing usage data collected for your Organization. Usage data exports contain the usage data measurements ingested into m3ter for the selected Meters and Accounts covering the specified time period, and you can select to aggregate the data for an export.
**Important: Reviewing Usage Data Export Options!** Before attempting to run and ad-hoc usage data export, *please ensure you review* the options available for controlling the usage data the export will contain - see [Working with Usage Data Export Schedules](/guides/data-exports/creating-export-schedules#working-with-usage-data-export-schedules).
**Notes and Tips:**
* **Start in Usage Data Explorer?** You might want to first review the usage data returned for a query you plan to use for your Ad-Hoc Export. If so, you can start in the Usage Data Explorer and build and perform the query. If the data the query returns is the data you want to export, you can then select **Run ad-hoc export**. See [Using Queries for Data Export](/guides/data-explorer/usage-data-explorer-v2#using-queries-for-data-export) for more details.
* **Legacy Usage data (legacy format) Ad-Hoc Exports?** If you were an early customer of Data Exports you might also still have access to the legacy usage format for Ad-Hoc data Exports. See [Running Ad-Hoc Legacy Usage Data Exports](/guides/data-exports/running-ad-hoc-data-exports/running-ad-hoc-legacy-data-exports). However, the legacy usage format is *NOT available* for new customers.
## Setting Up and Running Ad-Hoc Usage Data Export
**To set up and run an ad-hoc Usage Data Export:**
1. Select **Data exports**:
![]() The **Data exports** page opens.
2. On the **Export schedules** panel, select **Run ad-hoc export**:
The **Data exports** page opens.
2. On the **Export schedules** panel, select **Run ad-hoc export**:
![]() The **Run ad-hoc export** page opens with **Usage data** selected by default as the **Source type**.
3. Enter the **Ad-hoc export details**:
* **Destinations**. Use the drop-down to select the Export destinations to be used for the ad-hoc data export:
* Select a destination.
* If *No options* shows in the drop-down, you must first create at least one destination before you can set up an ad-hoc data export - see [Creating and Managing Export Destinations](/guides/data-exports/creating-data-export-destinations).
* Alternatively, if you simply want to download the data export file locally, *do not select* a Destination. See [Downloading Data Export Files Locally](/guides/data-exports/downloading-data-export-files-locally) for more details.
* **Export file format**. Select the format you require for the usage data export files:
* **CSV** (*Default*)
* **JSONL**
4. Under **Ad-hoc export data**:
* **Source type**. For a usage data ad-hoc export, leave this as the default selection for **Usage data**.
* **Time period**. Define a time period you want the ad-hoc data export to cover. This setting controls the range of usage data the export will contain:
* **Custom**. Enter start and end date/times to define the time period.
* **Today**. Data collected for the current day up until the time the export is run. (*Default setting*)
* **Yesterday**. Data collected for the day before the export runs - that is, the 24 hour period from midnight to midnight of the day before.
* **Week, Month, Year to date**. Data collected for the period covering the current week, month, or year period. For example, for **Week to date** setting weeks run Monday to Monday - if the export is run at 10 a.m. UTC on October 16th 2024, which is a Wednesday, it will contain all usage data collected starting Monday October 14th 2024 through to the Wednesday at 10 a.m. UTC of the current week.
* **Previous week, month, quarter, year**. Data collected for the previous full week, month, quarter, or year period. For example, weeks run Monday to Monday - if the export is run on June 12th 2024, which is a Wednesday, the export will contain data for the period running from Monday, June 3rd to midnight on Sunday, June 9th 2024.
* **Last 12 hours**. Data collected for the twelve hour period up to the start of the hour in which the export is run.
* **Last 7 days, 30 days, 35 days, 90 days, 120 days, year**. Data collected for the selected period prior to the date the export is run. For example, if **Last 30 days** and the export is run for any time on June 15th 2024, it will contain usage data collected for the previous 30 days - starting May 16th 2024 through to midnight on June 14th 2024.
The **Run ad-hoc export** page opens with **Usage data** selected by default as the **Source type**.
3. Enter the **Ad-hoc export details**:
* **Destinations**. Use the drop-down to select the Export destinations to be used for the ad-hoc data export:
* Select a destination.
* If *No options* shows in the drop-down, you must first create at least one destination before you can set up an ad-hoc data export - see [Creating and Managing Export Destinations](/guides/data-exports/creating-data-export-destinations).
* Alternatively, if you simply want to download the data export file locally, *do not select* a Destination. See [Downloading Data Export Files Locally](/guides/data-exports/downloading-data-export-files-locally) for more details.
* **Export file format**. Select the format you require for the usage data export files:
* **CSV** (*Default*)
* **JSONL**
4. Under **Ad-hoc export data**:
* **Source type**. For a usage data ad-hoc export, leave this as the default selection for **Usage data**.
* **Time period**. Define a time period you want the ad-hoc data export to cover. This setting controls the range of usage data the export will contain:
* **Custom**. Enter start and end date/times to define the time period.
* **Today**. Data collected for the current day up until the time the export is run. (*Default setting*)
* **Yesterday**. Data collected for the day before the export runs - that is, the 24 hour period from midnight to midnight of the day before.
* **Week, Month, Year to date**. Data collected for the period covering the current week, month, or year period. For example, for **Week to date** setting weeks run Monday to Monday - if the export is run at 10 a.m. UTC on October 16th 2024, which is a Wednesday, it will contain all usage data collected starting Monday October 14th 2024 through to the Wednesday at 10 a.m. UTC of the current week.
* **Previous week, month, quarter, year**. Data collected for the previous full week, month, quarter, or year period. For example, weeks run Monday to Monday - if the export is run on June 12th 2024, which is a Wednesday, the export will contain data for the period running from Monday, June 3rd to midnight on Sunday, June 9th 2024.
* **Last 12 hours**. Data collected for the twelve hour period up to the start of the hour in which the export is run.
* **Last 7 days, 30 days, 35 days, 90 days, 120 days, year**. Data collected for the selected period prior to the date the export is run. For example, if **Last 30 days** and the export is run for any time on June 15th 2024, it will contain usage data collected for the previous 30 days - starting May 16th 2024 through to midnight on June 14th 2024.
![]() * **Meters**. Add Meters for the data export:
* Select the plus icon. A popup will show listing all Meters in your Organization and you can search the list.
* Check the Meters whose usage data you want to include in the export and select **Add**.
* The export will contain the usage data collected by the Meters you add for the specified **Time period**. (*Default is* ***All meters***)
* Note that you can search the Meters list by name or enter an ID.
* **Meters**. Add Meters for the data export:
* Select the plus icon. A popup will show listing all Meters in your Organization and you can search the list.
* Check the Meters whose usage data you want to include in the export and select **Add**.
* The export will contain the usage data collected by the Meters you add for the specified **Time period**. (*Default is* ***All meters***)
* Note that you can search the Meters list by name or enter an ID.
![]() * **Accounts**. Add Accounts for the data export:
* Select the plus icon. A popup will show listing all Accounts in your Organization and you can search the list.
* Check the Accounts whose usage data you want to include in the export and select **Add**.
* The export will contain the usage data collected by the Meters you've added and for the Accounts you add for the specified **Time period**. (*Default is* ***All Accounts***)
* Note that you can search the Accounts list be name or enter an ID.
* **Accounts**. Add Accounts for the data export:
* Select the plus icon. A popup will show listing all Accounts in your Organization and you can search the list.
* Check the Accounts whose usage data you want to include in the export and select **Add**.
* The export will contain the usage data collected by the Meters you've added and for the Accounts you add for the specified **Time period**. (*Default is* ***All Accounts***)
* Note that you can search the Accounts list be name or enter an ID.
![]() 5. If you want to use **Dimensions filters** for the usage data included in the export, select **Add dimension filter**. A menu appears and lists any Dimension fields for Meters selected for the export:
5. If you want to use **Dimensions filters** for the usage data included in the export, select **Add dimension filter**. A menu appears and lists any Dimension fields for Meters selected for the export:
![]() * In the current example, a single Meter has one Dimension field configured.
6. Select the Meter Dimension field you want to use to filter the data returned for the export. For the current example, we'll select **Data Fields Meter 1 > Data File Type**. A dialog replaces the menu, which lists values used for this field when usage submissions were made for the Meter within the selected **Time period**.
7. Check the values used for the selected Meter Dimension field you want to use to filter the data returned for the export and then select **Add filter**:
* In the current example, a single Meter has one Dimension field configured.
6. Select the Meter Dimension field you want to use to filter the data returned for the export. For the current example, we'll select **Data Fields Meter 1 > Data File Type**. A dialog replaces the menu, which lists values used for this field when usage submissions were made for the Meter within the selected **Time period**.
7. Check the values used for the selected Meter Dimension field you want to use to filter the data returned for the export and then select **Add filter**:
![]() The dialog closes and the select Dimension field values are added under **Dimension filters**:
The dialog closes and the select Dimension field values are added under **Dimension filters**:
![]() 8. If you want to apply Aggregations to the usage data returned for export, under **Aggregations**, select **Add aggregation**. A menu listing available aggregation methods appears:
8. If you want to apply Aggregations to the usage data returned for export, under **Aggregations**, select **Add aggregation**. A menu listing available aggregation methods appears:
![]() 9. Select the Aggregation method you want to apply. For example, select **Sum**. A dialog replaces the menu and shows the fields on the Meters selected for the export which can have this aggregation method applied:
9. Select the Aggregation method you want to apply. For example, select **Sum**. A dialog replaces the menu and shows the fields on the Meters selected for the export which can have this aggregation method applied:
![]() 10. Select the Meter data field you want to apply the Aggregation method to. The selection is added under **Aggregations**.
* For the current example, we've applied a **Sum** Aggregation to the numeric data field on the selected Meter.
11. If you've applied Aggregations to the returned usage data for export and you want to group the data, under **Aggregations**, select the **grouped by** plus icon. A menu appears:
10. Select the Meter data field you want to apply the Aggregation method to. The selection is added under **Aggregations**.
* For the current example, we've applied a **Sum** Aggregation to the numeric data field on the selected Meter.
11. If you've applied Aggregations to the returned usage data for export and you want to group the data, under **Aggregations**, select the **grouped by** plus icon. A menu appears:
![]() * In the current example, we select to group by a **Time**. The menu is replaced by a dialog showing the available options:
* In the current example, we select to group by a **Time**. The menu is replaced by a dialog showing the available options:
![]() 12. Select the time period you want to group the data by. The dialog closes and your **grouped by** selection is added under **Aggregations**.
13. When you have entered all details for the ad-hoc data export, select **Run ad-hoc export**:
12. Select the time period you want to group the data by. The dialog closes and your **grouped by** selection is added under **Aggregations**.
13. When you have entered all details for the ad-hoc data export, select **Run ad-hoc export**:
![]() * In this example, we've selected a single Meter and two Accounts for which filtered and aggregated usage data grouped daily will be included in the ad-hoc usage data export.
An Export job is scheduled for the ad-hoc usage data export you can check if the job succeeded on the **Export jobs** page - see [Reviewing Export Jobs](/guides/data-exports/reviewing-export-jobs).
# Running Ad-Hoc Legacy Usage Data Exports
Source: https://docs.m3ter.com/guides/data-exports/running-ad-hoc-data-exports/running-ad-hoc-legacy-data-exports
You can quickly set up and run a one-off, ad-hoc data export containing usage data collected for your Organization. Usage data exports contain the usage data measurements ingested into m3ter for the selected Meters and Accounts covering the specified time period, and you can select to aggregate the data for an export.
**Notes:**
* **Note: Legacy Usage data (legacy format) Ad-Hoc Exports?** If you were an early customer of Data Exports you might also still have access to the legacy usage format for Ad-Hoc data Exports. However, the legacy usage format is *NOT available* for new customers. See [Running Ad-Hoc Usage Data Exports](/guides/data-exports/running-ad-hoc-data-exports).
* **Reviewing Usage Data Export Options!** Before attempting to run and ad-hoc usage data export, please review the options available for controlling the usage data the export will contain - see [Working with Usage Data Export Schedules](/guides/data-exports/creating-export-schedules#working-with-usage-data-export-schedules).
**To set up and run an ad-hoc Legacy Usage Data Export:**
1. Select **Data exports**:
* In this example, we've selected a single Meter and two Accounts for which filtered and aggregated usage data grouped daily will be included in the ad-hoc usage data export.
An Export job is scheduled for the ad-hoc usage data export you can check if the job succeeded on the **Export jobs** page - see [Reviewing Export Jobs](/guides/data-exports/reviewing-export-jobs).
# Running Ad-Hoc Legacy Usage Data Exports
Source: https://docs.m3ter.com/guides/data-exports/running-ad-hoc-data-exports/running-ad-hoc-legacy-data-exports
You can quickly set up and run a one-off, ad-hoc data export containing usage data collected for your Organization. Usage data exports contain the usage data measurements ingested into m3ter for the selected Meters and Accounts covering the specified time period, and you can select to aggregate the data for an export.
**Notes:**
* **Note: Legacy Usage data (legacy format) Ad-Hoc Exports?** If you were an early customer of Data Exports you might also still have access to the legacy usage format for Ad-Hoc data Exports. However, the legacy usage format is *NOT available* for new customers. See [Running Ad-Hoc Usage Data Exports](/guides/data-exports/running-ad-hoc-data-exports).
* **Reviewing Usage Data Export Options!** Before attempting to run and ad-hoc usage data export, please review the options available for controlling the usage data the export will contain - see [Working with Usage Data Export Schedules](/guides/data-exports/creating-export-schedules#working-with-usage-data-export-schedules).
**To set up and run an ad-hoc Legacy Usage Data Export:**
1. Select **Data exports**:
![]() The **Data exports** page opens.
2. On the **Export schedules** panel, select **Run ad-hoc export**:
The **Data exports** page opens.
2. On the **Export schedules** panel, select **Run ad-hoc export**:
![]() The **Run ad-hoc export** page opens.
3. Enter the **Ad-hoc export details**:
* **Destinations**. Use the drop-down to select the Export destinations to be used for the ad-hoc data export. Notes:
* Select a destination.
* If *No options* shows in the drop-down, you must first create at least one destination before you can set up an ad-hoc data export - see [Creating and Managing Export Destinations](/guides/data-exports/creating-data-export-destinations).
* Alternatively, if you simply want to download the data export file locally, *do not select* a Destination. See [Downloading Data Export Files Locally](/guides/data-exports/downloading-data-export-files-locally) for more details.
* **Export file format**. Select the format you require for the usage data export files:
* **CSV**. (*Default*).
* **JSON**.
4. Under **Ad-hoc export data**:
* **Source type**. For a usage data ad-hoc export, select **Usage data (legacy format)**. The **Ad-hoc export details** panel adjusts.
* **Time period**. Define a time period you want the ad-hoc data export to cover. This setting controls the range of usage data the export will contain:
* **Custom**. Enter start and end date/times to define the time period.
* **Today**. Data collected for the current day up until the time the export is run. (*Default setting*)
* **Yesterday**. Data collected for the day before the export runs - that is, the 24 hour period from midnight to midnight of the day before.
* **Week, Month, Year to date**. Data collected for the period covering the current week, month, or year period. For example, for **Week to date** setting weeks run Monday to Monday - if the export is run at 10 a.m. UTC on October 16th 2024, which is a Wednesday, it will contain all usage data collected starting Monday October 14th 2024 through to the Wednesday at 10 a.m. UTC of the current week.
* **Previous week, month, quarter, year**. Data collected for the previous full week, month, quarter, or year period. For example, weeks run Monday to Monday - if the export is run on June 12th 2024, which is a Wednesday, the export will contain data for the period running from Monday, June 3rd to midnight on Sunday, June 9th 2024.
* **Last 12 hours**. Data collected for the twelve hour period up to the start of the hour in which the export is run.
* **Last 7 days, 30 days, 35 days, 90 days, 120 days, year**. Data collected for the selected period prior to the date the export is run. For example, if **Last 30 days** and the export is run for any time on June 15th 2024, it will contain usage data collected for the previous 30 days - starting May 16th 2024 through to midnight on June 14th 2024.
The **Run ad-hoc export** page opens.
3. Enter the **Ad-hoc export details**:
* **Destinations**. Use the drop-down to select the Export destinations to be used for the ad-hoc data export. Notes:
* Select a destination.
* If *No options* shows in the drop-down, you must first create at least one destination before you can set up an ad-hoc data export - see [Creating and Managing Export Destinations](/guides/data-exports/creating-data-export-destinations).
* Alternatively, if you simply want to download the data export file locally, *do not select* a Destination. See [Downloading Data Export Files Locally](/guides/data-exports/downloading-data-export-files-locally) for more details.
* **Export file format**. Select the format you require for the usage data export files:
* **CSV**. (*Default*).
* **JSON**.
4. Under **Ad-hoc export data**:
* **Source type**. For a usage data ad-hoc export, select **Usage data (legacy format)**. The **Ad-hoc export details** panel adjusts.
* **Time period**. Define a time period you want the ad-hoc data export to cover. This setting controls the range of usage data the export will contain:
* **Custom**. Enter start and end date/times to define the time period.
* **Today**. Data collected for the current day up until the time the export is run. (*Default setting*)
* **Yesterday**. Data collected for the day before the export runs - that is, the 24 hour period from midnight to midnight of the day before.
* **Week, Month, Year to date**. Data collected for the period covering the current week, month, or year period. For example, for **Week to date** setting weeks run Monday to Monday - if the export is run at 10 a.m. UTC on October 16th 2024, which is a Wednesday, it will contain all usage data collected starting Monday October 14th 2024 through to the Wednesday at 10 a.m. UTC of the current week.
* **Previous week, month, quarter, year**. Data collected for the previous full week, month, quarter, or year period. For example, weeks run Monday to Monday - if the export is run on June 12th 2024, which is a Wednesday, the export will contain data for the period running from Monday, June 3rd to midnight on Sunday, June 9th 2024.
* **Last 12 hours**. Data collected for the twelve hour period up to the start of the hour in which the export is run.
* **Last 7 days, 30 days, 35 days, 90 days, 120 days, year**. Data collected for the selected period prior to the date the export is run. For example, if **Last 30 days** and the export is run for any time on June 15th 2024, it will contain usage data collected for the previous 30 days - starting May 16th 2024 through to midnight on June 14th 2024.
![]() * **Aggregation frequency** and **Aggregation**. If you want to aggregate ingested values for your usage data export, then use these options in combination:
* **Aggregation frequency**. Select the frequency for aggregation - five options:
* **Original**. No aggregation performed. (*Default*)
* **Hourly**.
* **Daily**.
* **Weekly**.
* **Monthly**.
* **Aggregation**. Select the type of Aggregation you want to apply to the data values for the selected frequency - six options:
* **Sum**. Adds the values.
* **Minimum**. Uses the minimum value.
* **Maximum**. Uses the maximum value.
* **Count**. Counts the number of values.
* **Latest**. Uses the most recent value, based on the timestamp - `ts` - values of ingested usage data measurements.
* **Mean**. Uses the arithmetic mean of the values.
**Aggregation for Usage Data exports - notes:**
* **Aggregation type is required!** If you select an **Aggregation frequency** other than the default of **Original** (which means the data will *not be aggregated*), then you must select an **Aggregation** type. If you don't select a type, then you won't be able to create the ad-hoc export and an error will show.
* **Aggregation vs. non-aggregated usage data for export?** If you choose to aggregate usage data for an ad-hoc export, this will affect what data is included in the export, and this is the same for both scheduled and ad-hoc exports. For details, please see the [Working with Usage Data Export Schedules](/guides/data-exports/creating-export-schedules#working-with-usage-data-export-schedules) section.
* **Meters**. Add Meters for the data export:
* Select the plus icon. A popup will show listing all Meters in your Organization and you can search the list.
* Check the Meters whose usage data you want to include in the export and select **Add**.
* The export will contain the usage data collected by the Meters you add for the specified **Time period**. (*Default is* ***All meters***)
* Note that you can search the Meters list by name or enter an ID.
* **Aggregation frequency** and **Aggregation**. If you want to aggregate ingested values for your usage data export, then use these options in combination:
* **Aggregation frequency**. Select the frequency for aggregation - five options:
* **Original**. No aggregation performed. (*Default*)
* **Hourly**.
* **Daily**.
* **Weekly**.
* **Monthly**.
* **Aggregation**. Select the type of Aggregation you want to apply to the data values for the selected frequency - six options:
* **Sum**. Adds the values.
* **Minimum**. Uses the minimum value.
* **Maximum**. Uses the maximum value.
* **Count**. Counts the number of values.
* **Latest**. Uses the most recent value, based on the timestamp - `ts` - values of ingested usage data measurements.
* **Mean**. Uses the arithmetic mean of the values.
**Aggregation for Usage Data exports - notes:**
* **Aggregation type is required!** If you select an **Aggregation frequency** other than the default of **Original** (which means the data will *not be aggregated*), then you must select an **Aggregation** type. If you don't select a type, then you won't be able to create the ad-hoc export and an error will show.
* **Aggregation vs. non-aggregated usage data for export?** If you choose to aggregate usage data for an ad-hoc export, this will affect what data is included in the export, and this is the same for both scheduled and ad-hoc exports. For details, please see the [Working with Usage Data Export Schedules](/guides/data-exports/creating-export-schedules#working-with-usage-data-export-schedules) section.
* **Meters**. Add Meters for the data export:
* Select the plus icon. A popup will show listing all Meters in your Organization and you can search the list.
* Check the Meters whose usage data you want to include in the export and select **Add**.
* The export will contain the usage data collected by the Meters you add for the specified **Time period**. (*Default is* ***All meters***)
* Note that you can search the Meters list by name or enter an ID.
![]() * **Accounts**. Add Accounts for the data export:
* Select the plus icon. A popup will show listing all Accounts in your Organization and you can search the list.
* Check the Accounts whose usage data you want to include in the export and select **Add**.
* The export will contain the usage data collected by the Meters you've added and for the Accounts you add for the specified **Time period**. (*Default is* ***All Accounts***)
* Note that you can search the Accounts list be name or enter an ID.
* **Accounts**. Add Accounts for the data export:
* Select the plus icon. A popup will show listing all Accounts in your Organization and you can search the list.
* Check the Accounts whose usage data you want to include in the export and select **Add**.
* The export will contain the usage data collected by the Meters you've added and for the Accounts you add for the specified **Time period**. (*Default is* ***All Accounts***)
* Note that you can search the Accounts list be name or enter an ID.
![]() 5. When you have entered all details for the ad-hoc data export, select **Run ad-hoc export**:
5. When you have entered all details for the ad-hoc data export, select **Run ad-hoc export**:
![]() * In this example, we've selected a single Meter and two Accounts for which non-aggregated usage data will be included in the ad-hoc usage data export.
An Export job is scheduled for the ad-hoc usage data export you can check if the job succeeded on the **Export jobs** page - see [Reviewing Export Jobs](/guides/data-exports/reviewing-export-jobs).
# Running Ad-Hoc Operational Data Exports
Source: https://docs.m3ter.com/guides/data-exports/running-ad-hoc-operational-data-exports
You can quickly set up and run a one-off, ad-hoc data export containing operational data of selected entities in your Organization - such as Bills, Prepayments/Commitments, Accounts, and Balances. The data export will contain the operational data for the selected entities at the time the export runs.
**Important!**
* **Reviewing Operational Data Export Options**. Before attempting to run and ad-hoc operational data export, please review the options available for controlling the data the export will contain - see [Working with Operational Data Export Schedules](/guides/data-exports/creating-operational-data-export-schedules#working-with-operational-data-export-schedules).
* **Data Export Entity Schema!** You can review the details of export schema for each entity available for operational data export - see [Data Export - Entity Schema and Relationship Diagram](/guides/data-exports/data-export-object-relationship-diagram).
## Creating and Running an Ad-Hoc Operational Data Export
**To create and run an ad-hoc Operational Data export:**
1. Select **Data exports**:
* In this example, we've selected a single Meter and two Accounts for which non-aggregated usage data will be included in the ad-hoc usage data export.
An Export job is scheduled for the ad-hoc usage data export you can check if the job succeeded on the **Export jobs** page - see [Reviewing Export Jobs](/guides/data-exports/reviewing-export-jobs).
# Running Ad-Hoc Operational Data Exports
Source: https://docs.m3ter.com/guides/data-exports/running-ad-hoc-operational-data-exports
You can quickly set up and run a one-off, ad-hoc data export containing operational data of selected entities in your Organization - such as Bills, Prepayments/Commitments, Accounts, and Balances. The data export will contain the operational data for the selected entities at the time the export runs.
**Important!**
* **Reviewing Operational Data Export Options**. Before attempting to run and ad-hoc operational data export, please review the options available for controlling the data the export will contain - see [Working with Operational Data Export Schedules](/guides/data-exports/creating-operational-data-export-schedules#working-with-operational-data-export-schedules).
* **Data Export Entity Schema!** You can review the details of export schema for each entity available for operational data export - see [Data Export - Entity Schema and Relationship Diagram](/guides/data-exports/data-export-object-relationship-diagram).
## Creating and Running an Ad-Hoc Operational Data Export
**To create and run an ad-hoc Operational Data export:**
1. Select **Data exports**:
![]() The **Data exports** page opens.
2. On the **Export schedules** panel, select **Run ad-hoc export**. The **Run ad-hoc export** page opens.
3. Enter the **Ad-hoc export details**:
* **Destinations**. Use the drop-down to select the Export destinations to be used for the ad-hoc data export:
* Select a destination.
* If *No options* shows in the drop-down, you must first create at least one destination before you can set up an ad-hoc data export - see [Creating and Managing Export Destinations](/guides/data-exports/creating-data-export-destinations).
* Alternatively, if you simply want to download the data export file locally, *do not select* a Destination. See [Downloading Data Export Files Locally](/guides/data-exports/downloading-data-export-files-locally) for more details.
* **Export file format**. Select the format you require for the data export files:
* **CSV**. (*Default*).
* **JSONL**.
4. Under **Ad-hoc export data**:
* **Source type**. Select the **Operational data** option. The page adjusts to allow you to select a **Time period** for the export and the **Operational data entities** you want the export to contain.
5. **Time period**. Define a time period using an *inclusive start date/time* to define the period you want the ad-hoc data export to cover and control the range of operational data that the export will contain. Only data created or modified from the specified start date/time until *now* - where this means *the date/time the Export runs* - will be included. As well as allowing you to set a custom start, several preset options are available:
* **Custom**. Use the calendar selector to specify a start date/time.
* **Today**. Data for the current day up until now.
* **Week**, **Month**, or **Year to date**. Data for the period covering the current week, month, or year up until now.
* **Last 12 hours**. Data collected for the twelve hour period prior to when you make the selection up to now.
* **Last 7**, **30**, **35**, **90**, or **120 days**. Data for the selected number of days prior to when you make the selection up until now.
* **Last year**. Data for the full year prior to when you make the selection up until now.
* **All Time**. Unrestricted and the export contains all the operational data available for selected entities up until now. (*Default setting*)
When you select the **Time period**, the inclusive start date is shown in brackets. For example, if **Today** is selected on June 9th 2025:
The **Data exports** page opens.
2. On the **Export schedules** panel, select **Run ad-hoc export**. The **Run ad-hoc export** page opens.
3. Enter the **Ad-hoc export details**:
* **Destinations**. Use the drop-down to select the Export destinations to be used for the ad-hoc data export:
* Select a destination.
* If *No options* shows in the drop-down, you must first create at least one destination before you can set up an ad-hoc data export - see [Creating and Managing Export Destinations](/guides/data-exports/creating-data-export-destinations).
* Alternatively, if you simply want to download the data export file locally, *do not select* a Destination. See [Downloading Data Export Files Locally](/guides/data-exports/downloading-data-export-files-locally) for more details.
* **Export file format**. Select the format you require for the data export files:
* **CSV**. (*Default*).
* **JSONL**.
4. Under **Ad-hoc export data**:
* **Source type**. Select the **Operational data** option. The page adjusts to allow you to select a **Time period** for the export and the **Operational data entities** you want the export to contain.
5. **Time period**. Define a time period using an *inclusive start date/time* to define the period you want the ad-hoc data export to cover and control the range of operational data that the export will contain. Only data created or modified from the specified start date/time until *now* - where this means *the date/time the Export runs* - will be included. As well as allowing you to set a custom start, several preset options are available:
* **Custom**. Use the calendar selector to specify a start date/time.
* **Today**. Data for the current day up until now.
* **Week**, **Month**, or **Year to date**. Data for the period covering the current week, month, or year up until now.
* **Last 12 hours**. Data collected for the twelve hour period prior to when you make the selection up to now.
* **Last 7**, **30**, **35**, **90**, or **120 days**. Data for the selected number of days prior to when you make the selection up until now.
* **Last year**. Data for the full year prior to when you make the selection up until now.
* **All Time**. Unrestricted and the export contains all the operational data available for selected entities up until now. (*Default setting*)
When you select the **Time period**, the inclusive start date is shown in brackets. For example, if **Today** is selected on June 9th 2025:
![]() 6. Under **Operational data entities**, select the plus icon and use the pop-up to select the entities whose data you want to include in the ad-hoc export:
* **Accounts**
* **Account Plans**
* **Aggregations**
* **Balances**
* **Balance Transactions**
* **Bills**
* **Bill line items**
* **Charges**
* **Prepayments/Commitments**
* **Compound Aggregations**
* **Contracts**
* **Meters**
* **Plans**
* **Plan Groups**
* **Plan Group Links**
* **Plan Templates**
* **Pricing**
* **Pricing Bands**
* **Products**
* **Transaction Types**
6. Under **Operational data entities**, select the plus icon and use the pop-up to select the entities whose data you want to include in the ad-hoc export:
* **Accounts**
* **Account Plans**
* **Aggregations**
* **Balances**
* **Balance Transactions**
* **Bills**
* **Bill line items**
* **Charges**
* **Prepayments/Commitments**
* **Compound Aggregations**
* **Contracts**
* **Meters**
* **Plans**
* **Plan Groups**
* **Plan Group Links**
* **Plan Templates**
* **Pricing**
* **Pricing Bands**
* **Products**
* **Transaction Types**
![]() **Tip: Exporting data for all entities?** If you want to export the operational data for all entities, use **Select all**.
7. Select **Add**. The selected entities are added to the **Ad-hoc export details**.
8. When you have entered all details for the ad-hoc data export, select **Run ad-hoc export**:
**Tip: Exporting data for all entities?** If you want to export the operational data for all entities, use **Select all**.
7. Select **Add**. The selected entities are added to the **Ad-hoc export details**.
8. When you have entered all details for the ad-hoc data export, select **Run ad-hoc export**:
![]() * In this example for an ad-hoc export to run on May 15th 2025, we've selected to include the operational data for any **Accounts** and **Bills** created or modified in the previous week to be included.
An Export job is scheduled for the ad-hoc operational data export and you can check if the job succeeded on the **Export jobs** page - see [Reviewing Export Jobs](/guides/data-exports/reviewing-export-jobs).
# Developer Tools
Source: https://docs.m3ter.com/guides/developer-tools
Some developer tools are available to help you work with the m3ter platform:
* [SDKs](/guides/developer-tools#sdks)
* [Terraform Provider](#terraform-provider)
## SDKs
m3ter SDKs reduce the development effort associated with integrating your applications with m3ter, and help ensure efficient behavior with the API.
SDKs are available in the following languages to provide convenient access to our REST APIs and maintain feature parity with our APIs:
* [Python](https://pypi.org/project/m3ter/)
* [NodeJS](https://www.npmjs.com/package/m3ter-sdk)
* [Java](https://central.sonatype.com/artifact/com.m3ter/sdk-java/overview)
* [GoLang](https://github.com/m3ter-com/m3ter-sdk-go)
Please follow the links for install and resources for each SDK.
**Note: SDKs available for early access!** Please note that the m3ter SDKs are currently available for early access, and as such some features may be incomplete or change without warning. We welcome you to try them out and give feedback, but do not recommend their use for critical functionality.
**Note: SDKs for Other Languages?** If you'd prefer an SDK for another language, please get in touch with [m3ter Support](https://m3ter.myfreshworks.com/login/auth/1662629775049?client_id=451980218021503405\&redirect_uri=https%3A%2F%2Fm3ter.freshdesk.com%2Ffreshid%2Fcustomer_authorize_callback%3Fhd%3Dm3ter.freshdesk.com) or your m3ter contact.
## Terraform Provider
The m3ter Terraform provider allows you to manage m3ter resources using the popular [Infrastructure as Code tool from Hashicorp](https://developer.hashicorp.com/terraform):
* **Organization configuration management**. Easily deploy a m3ter configuration across multiple Organizations - you can apply a configuration to a Sandbox Organization, test it, and then apply exactly the same configuration to the Production Organization.
* **Reuse common configuration patterns**. Terraform modules give you the ability to package up and parameterize a set of resources.
* **Integrating m3ter configuration with configuration for other services**. For example, the configuration for a Lambda function in AWS could now be alongside the configuration for the m3ter webhook that invokes it.
You can find the provider [here](https://registry.terraform.io/providers/m3ter-com/m3ter/latest/docs).
**Note: Terraform Provider available for early access!** Please note that the m3ter Terraform provider is currently available for early access, and as such some features may be incomplete or change without warning. We welcome you to try it out and give feedback, but do not recommend its use for critical functionality.
# End-Customer Accounts
Source: https://docs.m3ter.com/guides/end-customer-accounts
You can create *Account*s in the m3ter Console for end customers who consume your Products:
* Accounts *do not belong to a Product* to allow for cases where an end customer takes more than one of your Products, and the charges for these Products differ.
* You will typically attach a priced *Plan* or *Plan Template* to an Account before you generate bills for the Account. If an end customer consumes several of your Products, you can attach a priced Plan or Plan Template to the Account for charging against each Product.
* An exception is a case where an Account is charged solely on the basis of an agreed Prepayment/Commitment amount but not all of the Prepayment is prepaid - you can use a customized billing schedule for outstanding fees without having to attach a Plan to the Account to generate Bills
* When you have generated Bills against an Account, you can review the most recent ten Bills on the *Account Overview* tab. Charts are provided that track revenue and billed usage for these latest Bills.
* For some of your end customer Accounts, you might want to apply a *Prepayment/Commitment* for those end customers who have agreed to pay a set amount over a fixed contract term for one of your Products.
* You can create *Child Accounts* for end customers who hold multiple Accounts with you. You can then set up billing for the Parent/Child Account usage to have the end-customer billed once for the Parent Account, instead of having separate bills issued for usage against each of their multiple Accounts.
Before you begin to work in the Accounts area, we *strongly recommend* you review some best practice notes we've put together for managing your end-customer Accounts. These notes are intended to help you avoid any unintended and unwanted issues with your Organization's Accounts, such as loss of usage data associated with an Account:
* [Managing Accounts - Best Practices](/guides/end-customer-accounts/managing-accounts-best-practices)
This remaining topics in this section explain how to create and work with your Organization's Accounts:
* [Creating and Managing Accounts](/guides/end-customer-accounts/creating-an-account)
* [Attaching Plans to an Account](/guides/end-customer-accounts/attaching-plans-to-an-account)
* [Creating Custom Plans for Accounts](/guides/end-customer-accounts/creating-custom-account-plans)
* [Attaching Plan Groups to an Account](/guides/end-customer-accounts/attaching-plan-groups-to-an-account)
* [Creating Custom Plan Groups for Accounts](/guides/end-customer-accounts/creating-custom-plan-groups-for-accounts)
* [Creating Prepayments for Accounts](/guides/end-customer-accounts/creating-prepayments-for-accounts)
* [Working with Contracts for Accounts](/guides/end-customer-accounts/creating-contracts-for-accounts)
* [Working with Balances for Accounts](/guides/end-customer-accounts/creating-balances-for-accounts)
* [Creating Charges for Accounts](/guides/end-customer-accounts/creating-charges-for-accounts)
* [Creating Counter Adjustments for Accounts](/guides/end-customer-accounts/creating-counter-adjustments-for-accounts)
* [Submitting Usage Data for an Account](/guides/end-customer-accounts/submitting-usage-data-for-an-account)
* [Working in Account Overview](/guides/end-customer-accounts/working-in-account-overview)
* [Reviewing and Recalculating Bills for an Account](/guides/end-customer-accounts/reviewing-bills-for-an-account)
* [Working with Parent/Child Accounts](/guides/end-customer-accounts/creating-and-working-with-child-accounts)
* [End-Dating Account Billing Entities](/guides/end-customer-accounts/end-dating-account-billing-entities)
* [Creating and Managing External Mappings for Accounts](/guides/end-customer-accounts/creating-and-managing-external-mappings-for-accounts)
**Important!** **Personally Identifiable Information (PII)**. Under the [Data Processing Agreement](https://www.m3ter.com/docs/legal/dpa), the only fields you are allowed to use for any of your end customer PII data in m3ter are the `name`, `address`, and `emailAddress` fields on the **Account** entity - see the [Create Account](/api/account/create-account) request schema as documented in our API Reference. See also section 4.2 of the [Terms of Service](https://www.m3ter.com/docs/legal/terms-of-service).
# Attaching Plan Groups to an Account
Source: https://docs.m3ter.com/guides/end-customer-accounts/attaching-plan-groups-to-an-account
When you attach a Plan Group to an end customer Account, this creates a link between them to create an *Account Plan Group*. Attaching a Plan Group to an Account implicitly attaches all of the Plans included in the Group to the Account, and the Account is charged in accordance with those Plans.
* **Active Account Plan Group**. You can set the start and end dates to define the period the Account Plan Group will be active for the Account.
* **Account Plan Group Minimum Spend**. You can set a minimum spend amount for the Plan Group, which then acts as a cross-product minimum spend at billing for the Account. See [Plan Group vs Plan Minimum Spends](/guides/plans-and-pricing/working-with-plan-templates-and-plans/working-with-plan-groups#plan-group-minimum-spend-vs-plans-minimum-spends) for more details.
* **Attaching Multiple Plan Groups**.
* **Default Organization setting**. You can attach more than one Plan Group to an Account to create multiple Account Plan Groups. However, the default Organization setting safeguards the rule that *only one attached Plan per Product can be active at any one time* *for an Account*. Multiple attached Plan Groups on an Account can have overlapping dates only if none of the Plan Groups contain a Plan belonging to the same Product. If you try to attach a Plan Group to an Account which contains a Plan belonging to the same Product as a Plan belonging to another Plan Group attached to the Account and the Plan Group attachment dates would overlap, then you'll receive an error and the attachment will be blocked.
* **Overlapping Plans in Plan Groups**. If your billing use case requires you to attach more than one Plan Group to an Account and containing Plans for the same Product at the same time, then you must first enable the **Allow overlapping attached plans** setting for your Organization. See [Viewing and Editing Organization Configuration](/guides/organization-and-access-management/viewing-and-editing-organization/viewing-and-editing-organization-configuration) for more details.
* **Reviewing Plan Group Attachment:**
* When you've attached a Plan Group to an Account, you can open a Plan Group Attachment page and review:
* The details of the Account Plan Group created when you attached the Plan Group to the Account.
* The Account Plan Group metadata for any Custom Fields, External Mappings, or Integration runs.
* Details of the Plan Group itself.
* **Add Plans to Plan Group and review Plan pricing:**
* From the Plan Group Attachment page, you can also add Plans directly to the Plan Group. This saves you having to open the Plan Group separately and add Plans to it from there.
* You can then select a Plan that belongs to the attached Plan Group and review:
* The Plan's Details.
* The Plan's Associated Pricing directly on the page, which saves you having to open the Pricing Editor.
* Note that you cannot add *custom Plans* - that is, Account-specific Plans - to a global Plan Group.
* **Replacing Plan Group Attachment**. You can quickly replace an existing attached Plan Group on an Account. When you do this, the start date you define for the replacement Plan Group is used to automatically end date the existing attached Plan Group.
* **Custom Plan Group**. You can create a custom Plan Group for an Account, which means the Plan Group can only be attached to that Account. See [Creating Custom Plan Groups for Accounts](/guides/end-customer-accounts/creating-custom-plan-groups-for-accounts).
**Important: Account Plan Group is type of Account Plan!** When you attach a Plan Group to an Account, this creates an *Account Plan Group*. However, the m3ter data model *does not support a separate Account Plan Group entity*, and an Account Plan Group is a type of Account Plan where a *Plan Group id* is used instead of a Plan id when it's created. See the [Create Account Plan API](/api/accountplan/create-accountplan) call.
This topic explains how to attach a Plan Group to an Account and how to review and manage the Plan Group attachment:
* [Attaching a Plan Group to Create an Account Plan Group](/guides/end-customer-accounts/attaching-plan-groups-to-an-account#attaching-a-plan-group-to-create-an-account-plan-group)
* [Reviewing Plan Group Attachment](/guides/end-customer-accounts/attaching-plan-groups-to-an-account#reviewing-plan-group-attachment)
* [Adding Plans to Plan Group and Reviewing Plan Pricing](/guides/end-customer-accounts/attaching-plan-groups-to-an-account#adding-plans-to-plan-group-and-reviewing-plan-pricing)
* [Adding Attached Plan Groups to or Removing from Contracts](#adding-attached-plan-groups-to-or-removing-from-contracts)
* [Replacing a Plan Group Attachment](#replacing-a-plan-group-attachment)
If you want to delete an Account Plan Group from an Account, you can do this from the **Attached Plans** tab:
* [Deleting an Account Plan Group](/guides/end-customer-accounts/attaching-plan-groups-to-an-account#deleting-an-account-plan-group)
**Tip: More Details on Plan Groups?** See [Working with Plan Groups](/guides/plans-and-pricing/working-with-plan-templates-and-plans/working-with-plan-groups).
## Attaching a Plan Group to Create an Account Plan Group
**To attach a Plan Group to an Account:**
1. Select **Accounts**. The **Accounts** page opens.
2. Select the **Name** text of the **Account** to which you want to attach a Plan Group. The **Account** page opens with the **Overview** tab selected.
3. On the **Account actions** menu, select **Plans>Create plan attachment**:
* In this example for an ad-hoc export to run on May 15th 2025, we've selected to include the operational data for any **Accounts** and **Bills** created or modified in the previous week to be included.
An Export job is scheduled for the ad-hoc operational data export and you can check if the job succeeded on the **Export jobs** page - see [Reviewing Export Jobs](/guides/data-exports/reviewing-export-jobs).
# Developer Tools
Source: https://docs.m3ter.com/guides/developer-tools
Some developer tools are available to help you work with the m3ter platform:
* [SDKs](/guides/developer-tools#sdks)
* [Terraform Provider](#terraform-provider)
## SDKs
m3ter SDKs reduce the development effort associated with integrating your applications with m3ter, and help ensure efficient behavior with the API.
SDKs are available in the following languages to provide convenient access to our REST APIs and maintain feature parity with our APIs:
* [Python](https://pypi.org/project/m3ter/)
* [NodeJS](https://www.npmjs.com/package/m3ter-sdk)
* [Java](https://central.sonatype.com/artifact/com.m3ter/sdk-java/overview)
* [GoLang](https://github.com/m3ter-com/m3ter-sdk-go)
Please follow the links for install and resources for each SDK.
**Note: SDKs available for early access!** Please note that the m3ter SDKs are currently available for early access, and as such some features may be incomplete or change without warning. We welcome you to try them out and give feedback, but do not recommend their use for critical functionality.
**Note: SDKs for Other Languages?** If you'd prefer an SDK for another language, please get in touch with [m3ter Support](https://m3ter.myfreshworks.com/login/auth/1662629775049?client_id=451980218021503405\&redirect_uri=https%3A%2F%2Fm3ter.freshdesk.com%2Ffreshid%2Fcustomer_authorize_callback%3Fhd%3Dm3ter.freshdesk.com) or your m3ter contact.
## Terraform Provider
The m3ter Terraform provider allows you to manage m3ter resources using the popular [Infrastructure as Code tool from Hashicorp](https://developer.hashicorp.com/terraform):
* **Organization configuration management**. Easily deploy a m3ter configuration across multiple Organizations - you can apply a configuration to a Sandbox Organization, test it, and then apply exactly the same configuration to the Production Organization.
* **Reuse common configuration patterns**. Terraform modules give you the ability to package up and parameterize a set of resources.
* **Integrating m3ter configuration with configuration for other services**. For example, the configuration for a Lambda function in AWS could now be alongside the configuration for the m3ter webhook that invokes it.
You can find the provider [here](https://registry.terraform.io/providers/m3ter-com/m3ter/latest/docs).
**Note: Terraform Provider available for early access!** Please note that the m3ter Terraform provider is currently available for early access, and as such some features may be incomplete or change without warning. We welcome you to try it out and give feedback, but do not recommend its use for critical functionality.
# End-Customer Accounts
Source: https://docs.m3ter.com/guides/end-customer-accounts
You can create *Account*s in the m3ter Console for end customers who consume your Products:
* Accounts *do not belong to a Product* to allow for cases where an end customer takes more than one of your Products, and the charges for these Products differ.
* You will typically attach a priced *Plan* or *Plan Template* to an Account before you generate bills for the Account. If an end customer consumes several of your Products, you can attach a priced Plan or Plan Template to the Account for charging against each Product.
* An exception is a case where an Account is charged solely on the basis of an agreed Prepayment/Commitment amount but not all of the Prepayment is prepaid - you can use a customized billing schedule for outstanding fees without having to attach a Plan to the Account to generate Bills
* When you have generated Bills against an Account, you can review the most recent ten Bills on the *Account Overview* tab. Charts are provided that track revenue and billed usage for these latest Bills.
* For some of your end customer Accounts, you might want to apply a *Prepayment/Commitment* for those end customers who have agreed to pay a set amount over a fixed contract term for one of your Products.
* You can create *Child Accounts* for end customers who hold multiple Accounts with you. You can then set up billing for the Parent/Child Account usage to have the end-customer billed once for the Parent Account, instead of having separate bills issued for usage against each of their multiple Accounts.
Before you begin to work in the Accounts area, we *strongly recommend* you review some best practice notes we've put together for managing your end-customer Accounts. These notes are intended to help you avoid any unintended and unwanted issues with your Organization's Accounts, such as loss of usage data associated with an Account:
* [Managing Accounts - Best Practices](/guides/end-customer-accounts/managing-accounts-best-practices)
This remaining topics in this section explain how to create and work with your Organization's Accounts:
* [Creating and Managing Accounts](/guides/end-customer-accounts/creating-an-account)
* [Attaching Plans to an Account](/guides/end-customer-accounts/attaching-plans-to-an-account)
* [Creating Custom Plans for Accounts](/guides/end-customer-accounts/creating-custom-account-plans)
* [Attaching Plan Groups to an Account](/guides/end-customer-accounts/attaching-plan-groups-to-an-account)
* [Creating Custom Plan Groups for Accounts](/guides/end-customer-accounts/creating-custom-plan-groups-for-accounts)
* [Creating Prepayments for Accounts](/guides/end-customer-accounts/creating-prepayments-for-accounts)
* [Working with Contracts for Accounts](/guides/end-customer-accounts/creating-contracts-for-accounts)
* [Working with Balances for Accounts](/guides/end-customer-accounts/creating-balances-for-accounts)
* [Creating Charges for Accounts](/guides/end-customer-accounts/creating-charges-for-accounts)
* [Creating Counter Adjustments for Accounts](/guides/end-customer-accounts/creating-counter-adjustments-for-accounts)
* [Submitting Usage Data for an Account](/guides/end-customer-accounts/submitting-usage-data-for-an-account)
* [Working in Account Overview](/guides/end-customer-accounts/working-in-account-overview)
* [Reviewing and Recalculating Bills for an Account](/guides/end-customer-accounts/reviewing-bills-for-an-account)
* [Working with Parent/Child Accounts](/guides/end-customer-accounts/creating-and-working-with-child-accounts)
* [End-Dating Account Billing Entities](/guides/end-customer-accounts/end-dating-account-billing-entities)
* [Creating and Managing External Mappings for Accounts](/guides/end-customer-accounts/creating-and-managing-external-mappings-for-accounts)
**Important!** **Personally Identifiable Information (PII)**. Under the [Data Processing Agreement](https://www.m3ter.com/docs/legal/dpa), the only fields you are allowed to use for any of your end customer PII data in m3ter are the `name`, `address`, and `emailAddress` fields on the **Account** entity - see the [Create Account](/api/account/create-account) request schema as documented in our API Reference. See also section 4.2 of the [Terms of Service](https://www.m3ter.com/docs/legal/terms-of-service).
# Attaching Plan Groups to an Account
Source: https://docs.m3ter.com/guides/end-customer-accounts/attaching-plan-groups-to-an-account
When you attach a Plan Group to an end customer Account, this creates a link between them to create an *Account Plan Group*. Attaching a Plan Group to an Account implicitly attaches all of the Plans included in the Group to the Account, and the Account is charged in accordance with those Plans.
* **Active Account Plan Group**. You can set the start and end dates to define the period the Account Plan Group will be active for the Account.
* **Account Plan Group Minimum Spend**. You can set a minimum spend amount for the Plan Group, which then acts as a cross-product minimum spend at billing for the Account. See [Plan Group vs Plan Minimum Spends](/guides/plans-and-pricing/working-with-plan-templates-and-plans/working-with-plan-groups#plan-group-minimum-spend-vs-plans-minimum-spends) for more details.
* **Attaching Multiple Plan Groups**.
* **Default Organization setting**. You can attach more than one Plan Group to an Account to create multiple Account Plan Groups. However, the default Organization setting safeguards the rule that *only one attached Plan per Product can be active at any one time* *for an Account*. Multiple attached Plan Groups on an Account can have overlapping dates only if none of the Plan Groups contain a Plan belonging to the same Product. If you try to attach a Plan Group to an Account which contains a Plan belonging to the same Product as a Plan belonging to another Plan Group attached to the Account and the Plan Group attachment dates would overlap, then you'll receive an error and the attachment will be blocked.
* **Overlapping Plans in Plan Groups**. If your billing use case requires you to attach more than one Plan Group to an Account and containing Plans for the same Product at the same time, then you must first enable the **Allow overlapping attached plans** setting for your Organization. See [Viewing and Editing Organization Configuration](/guides/organization-and-access-management/viewing-and-editing-organization/viewing-and-editing-organization-configuration) for more details.
* **Reviewing Plan Group Attachment:**
* When you've attached a Plan Group to an Account, you can open a Plan Group Attachment page and review:
* The details of the Account Plan Group created when you attached the Plan Group to the Account.
* The Account Plan Group metadata for any Custom Fields, External Mappings, or Integration runs.
* Details of the Plan Group itself.
* **Add Plans to Plan Group and review Plan pricing:**
* From the Plan Group Attachment page, you can also add Plans directly to the Plan Group. This saves you having to open the Plan Group separately and add Plans to it from there.
* You can then select a Plan that belongs to the attached Plan Group and review:
* The Plan's Details.
* The Plan's Associated Pricing directly on the page, which saves you having to open the Pricing Editor.
* Note that you cannot add *custom Plans* - that is, Account-specific Plans - to a global Plan Group.
* **Replacing Plan Group Attachment**. You can quickly replace an existing attached Plan Group on an Account. When you do this, the start date you define for the replacement Plan Group is used to automatically end date the existing attached Plan Group.
* **Custom Plan Group**. You can create a custom Plan Group for an Account, which means the Plan Group can only be attached to that Account. See [Creating Custom Plan Groups for Accounts](/guides/end-customer-accounts/creating-custom-plan-groups-for-accounts).
**Important: Account Plan Group is type of Account Plan!** When you attach a Plan Group to an Account, this creates an *Account Plan Group*. However, the m3ter data model *does not support a separate Account Plan Group entity*, and an Account Plan Group is a type of Account Plan where a *Plan Group id* is used instead of a Plan id when it's created. See the [Create Account Plan API](/api/accountplan/create-accountplan) call.
This topic explains how to attach a Plan Group to an Account and how to review and manage the Plan Group attachment:
* [Attaching a Plan Group to Create an Account Plan Group](/guides/end-customer-accounts/attaching-plan-groups-to-an-account#attaching-a-plan-group-to-create-an-account-plan-group)
* [Reviewing Plan Group Attachment](/guides/end-customer-accounts/attaching-plan-groups-to-an-account#reviewing-plan-group-attachment)
* [Adding Plans to Plan Group and Reviewing Plan Pricing](/guides/end-customer-accounts/attaching-plan-groups-to-an-account#adding-plans-to-plan-group-and-reviewing-plan-pricing)
* [Adding Attached Plan Groups to or Removing from Contracts](#adding-attached-plan-groups-to-or-removing-from-contracts)
* [Replacing a Plan Group Attachment](#replacing-a-plan-group-attachment)
If you want to delete an Account Plan Group from an Account, you can do this from the **Attached Plans** tab:
* [Deleting an Account Plan Group](/guides/end-customer-accounts/attaching-plan-groups-to-an-account#deleting-an-account-plan-group)
**Tip: More Details on Plan Groups?** See [Working with Plan Groups](/guides/plans-and-pricing/working-with-plan-templates-and-plans/working-with-plan-groups).
## Attaching a Plan Group to Create an Account Plan Group
**To attach a Plan Group to an Account:**
1. Select **Accounts**. The **Accounts** page opens.
2. Select the **Name** text of the **Account** to which you want to attach a Plan Group. The **Account** page opens with the **Overview** tab selected.
3. On the **Account actions** menu, select **Plans>Create plan attachment**:
![]() Alternatively:
* Select the **Attached plans** tab.
* On the **Active and pending attached plans** panel, select **Create plan attachment**.
The **Create** page opens.
4. Select the **Plan group** radio button. The page adjusts.
5. On the **Plan group attachment details** card:
* Select the **Plan group** you want to attach to the Account.
* Select the **Start date** and **End date** to define the period you want the Plan Group to apply to the Account for billing purposes:
* **Start date** is required.
* If you omit an **End date**, the Account Plan Group will be applied to the Account perpetually or until such time as you delete the Account Plan Group.
* End dates are *exclusive*. For example, if you set the **End date** of June 1st 2022, then the Account Plan Group ceases to be active for the Account at midnight on May 31st 2022, and any billing is calculated up to that point in time, NOT up to midnight on June 1st. If you want to include end customer Account usage occurring on June 1st for billing, you must set the **End date** to June 2nd.
6. On the **Plan group attachment settings** card, configure other optional settings:
* If you want to set the date the first and subsequent Bills are due for the Account using the Plan Group, use the **Billing cycle date** option. For example, if the Plan Group is configured for monthly billing frequency and you set a **Billing cycle date** of January 14th, then a Bill will be created for the Account on January 14th and then every month from that date - on February 14th, March 14th, and so on. If you leave this blank then the start of billing defaults to the billing cycle date configured for the Account.
* If you want to add the Account Plan Group to a Contract you've created for the Account, use the **Contract** drop-down to select it. For more details on Contracts, see [Creating Contracts for Accounts](/guides/end-customer-accounts/creating-contracts-for-accounts).
* If the Account is either a Parent or a Child Account, you can select for **Account hierarchy billing mode**, which determines how billing will be handled and shown on bills for charges due for the Parent Account and charges due for Child Accounts:
* **Bill parent account - bill line item per account**. Default setting.
* **Bill parent account - single bill line item for all accounts**.
* **Bill child account**.
**Notes:**
* The billing mode options are only operative if the Account is a Parent or Child Account. For a full explanation of what each means when attaching Plans to create Account Plans for Parent or Child Accounts, see [Billing Hierarchy Modes for Parent/Child Accounts](/guides/end-customer-accounts/creating-and-working-with-child-accounts/billing-for-parent-child-accounts).
* If you price a Plan using a Counter for unit-based pricing, then Parent/Account billing is not available for the charges or credits due under the pricing.
7. Add any required **Custom fields** to the Account Plan Group. For more on Custom Fields, see [Working with Custom Fields](/guides/creating-and-managing-products/working-with-custom-fields).
8. Select **Create Plan group attachment**. You are returned to the **Account** page **Attached plans** tab and the Plan Group is listed in the **Active and pending attached plans** panel under **Plan groups**. Attaching a Plan Group to an Account creates an *Account Plan Group*. The Account Plan Group will show as **ACTIVE** or **INACTIVE** or **PENDING** and the **Start** and **End** dates are also shown:
Alternatively:
* Select the **Attached plans** tab.
* On the **Active and pending attached plans** panel, select **Create plan attachment**.
The **Create** page opens.
4. Select the **Plan group** radio button. The page adjusts.
5. On the **Plan group attachment details** card:
* Select the **Plan group** you want to attach to the Account.
* Select the **Start date** and **End date** to define the period you want the Plan Group to apply to the Account for billing purposes:
* **Start date** is required.
* If you omit an **End date**, the Account Plan Group will be applied to the Account perpetually or until such time as you delete the Account Plan Group.
* End dates are *exclusive*. For example, if you set the **End date** of June 1st 2022, then the Account Plan Group ceases to be active for the Account at midnight on May 31st 2022, and any billing is calculated up to that point in time, NOT up to midnight on June 1st. If you want to include end customer Account usage occurring on June 1st for billing, you must set the **End date** to June 2nd.
6. On the **Plan group attachment settings** card, configure other optional settings:
* If you want to set the date the first and subsequent Bills are due for the Account using the Plan Group, use the **Billing cycle date** option. For example, if the Plan Group is configured for monthly billing frequency and you set a **Billing cycle date** of January 14th, then a Bill will be created for the Account on January 14th and then every month from that date - on February 14th, March 14th, and so on. If you leave this blank then the start of billing defaults to the billing cycle date configured for the Account.
* If you want to add the Account Plan Group to a Contract you've created for the Account, use the **Contract** drop-down to select it. For more details on Contracts, see [Creating Contracts for Accounts](/guides/end-customer-accounts/creating-contracts-for-accounts).
* If the Account is either a Parent or a Child Account, you can select for **Account hierarchy billing mode**, which determines how billing will be handled and shown on bills for charges due for the Parent Account and charges due for Child Accounts:
* **Bill parent account - bill line item per account**. Default setting.
* **Bill parent account - single bill line item for all accounts**.
* **Bill child account**.
**Notes:**
* The billing mode options are only operative if the Account is a Parent or Child Account. For a full explanation of what each means when attaching Plans to create Account Plans for Parent or Child Accounts, see [Billing Hierarchy Modes for Parent/Child Accounts](/guides/end-customer-accounts/creating-and-working-with-child-accounts/billing-for-parent-child-accounts).
* If you price a Plan using a Counter for unit-based pricing, then Parent/Account billing is not available for the charges or credits due under the pricing.
7. Add any required **Custom fields** to the Account Plan Group. For more on Custom Fields, see [Working with Custom Fields](/guides/creating-and-managing-products/working-with-custom-fields).
8. Select **Create Plan group attachment**. You are returned to the **Account** page **Attached plans** tab and the Plan Group is listed in the **Active and pending attached plans** panel under **Plan groups**. Attaching a Plan Group to an Account creates an *Account Plan Group*. The Account Plan Group will show as **ACTIVE** or **INACTIVE** or **PENDING** and the **Start** and **End** dates are also shown:
![]() You now have an Account Plan Group on the Account, and Bills will be calculated for the Account in accordance with the priced Plans that belong to the Plan Group.
## Reviewing Plan Group Attachment
When you've attached a Plan Group to an Account, you can open the Plan Group Attachment page and review details of the attachment.
**To review Plan Group Attachment:**
1. On the **Account Details** page, select the **Attached plans** tab.
2. On the **Active and pending attached plans panel**, select the **NAME** hotlink text of the attached Plan Group you want to review. The **Plan group attachment** page opens:
You now have an Account Plan Group on the Account, and Bills will be calculated for the Account in accordance with the priced Plans that belong to the Plan Group.
## Reviewing Plan Group Attachment
When you've attached a Plan Group to an Account, you can open the Plan Group Attachment page and review details of the attachment.
**To review Plan Group Attachment:**
1. On the **Account Details** page, select the **Attached plans** tab.
2. On the **Active and pending attached plans panel**, select the **NAME** hotlink text of the attached Plan Group you want to review. The **Plan group attachment** page opens:
![Attachplangroup45]() 3. For the *Account Plan Group* created when you attached the Plan to the Account, you can review the **Plan group attachment details**:
* Check the dates for the period the Account Plan Group will be active for the Account.
* Read-off the Account Plan Group **ID** with the option to **Copy** this directly to your clipboard.
* Select **Edit** if you need to make any changes to the Account Plan Group, such as update the start and end dates.
4. You can also review the **Plan group attachment metadata**:
**Custom Fields**. Any fields created for the Account Plan Group entity are listed:
3. For the *Account Plan Group* created when you attached the Plan to the Account, you can review the **Plan group attachment details**:
* Check the dates for the period the Account Plan Group will be active for the Account.
* Read-off the Account Plan Group **ID** with the option to **Copy** this directly to your clipboard.
* Select **Edit** if you need to make any changes to the Account Plan Group, such as update the start and end dates.
4. You can also review the **Plan group attachment metadata**:
**Custom Fields**. Any fields created for the Account Plan Group entity are listed:
![Attach Plan Group48]() * Note that because an Account Plan Group is a type of Account Plan, any Custom Fields created at Organizational level for Account Plans will be listed and you can **Copy** the number or string value of a field directly to your clipboard.
**External mappings**. Any mappings created for the Account Plan Group are listed:
* Note that because an Account Plan Group is a type of Account Plan, any Custom Fields created at Organizational level for Account Plans will be listed and you can **Copy** the number or string value of a field directly to your clipboard.
**External mappings**. Any mappings created for the Account Plan Group are listed:
![Attach Plan Group49]() * The **External system** and **External table** mapped to are shown - such as **Chargebee - Item** in the above example. The **External entity ID** mapped to is also shown.
* If a listed External mapping is linked to an Integration, under **Linked integration** a hotlink text will be shown which you can use to open the Integration.
* Under **Actions**, you can edit or delete the External mapping.
* If the Account Plan Group has multiple External mappings created for it, you can use *Search external mappings* to search by **External table** and **External entity ID** and filter the list.
* You can commence a workflow to **Create external mapping** for the Account Plan Group directly - see [Creating and Managing External Mappings for Accounts](/guides/end-customer-accounts/creating-and-managing-external-mappings-for-accounts) for an example.
**Integration runs**. If you've set up an integration that synchronizes the Account Plan Group data with an external system, the date/time and status of the **Latest** integration run are shown. You can use a text hotlink to open details of this latest run or **View all runs**. See [Reviewing Integration Run Details](/guides/integrations/setting-up-integrations/reviewing-integration-run-details).
5. If you scroll down the page, on the **Plan group details** panel you can check the details of the Plan Group you attached to the Account to create an Account Plan Group:
* The **External system** and **External table** mapped to are shown - such as **Chargebee - Item** in the above example. The **External entity ID** mapped to is also shown.
* If a listed External mapping is linked to an Integration, under **Linked integration** a hotlink text will be shown which you can use to open the Integration.
* Under **Actions**, you can edit or delete the External mapping.
* If the Account Plan Group has multiple External mappings created for it, you can use *Search external mappings* to search by **External table** and **External entity ID** and filter the list.
* You can commence a workflow to **Create external mapping** for the Account Plan Group directly - see [Creating and Managing External Mappings for Accounts](/guides/end-customer-accounts/creating-and-managing-external-mappings-for-accounts) for an example.
**Integration runs**. If you've set up an integration that synchronizes the Account Plan Group data with an external system, the date/time and status of the **Latest** integration run are shown. You can use a text hotlink to open details of this latest run or **View all runs**. See [Reviewing Integration Run Details](/guides/integrations/setting-up-integrations/reviewing-integration-run-details).
5. If you scroll down the page, on the **Plan group details** panel you can check the details of the Plan Group you attached to the Account to create an Account Plan Group:
![]() You can review the details of the Plan Group itself and:
* Read-off the **ID** for the Plan Group and **Copy** it directly to your clipboard.
* If you want to view a Plan belonging to the Plan Group or add a Plan to it and review the details and pricing configured for the Plan, you can do this directly. See the following section [Adding Plans to Plan Group and Reviewing Plan Pricing](/guides/end-customer-accounts/attaching-plan-groups-to-an-account#adding-plans-to-plan-group-and-reviewing-plan-pricing) for details.
* Use hotlink texts to open:
* The **Plan group details** page directly.
* The **Product details** page for the **Standing charge accounting product** or the **Minimum spend accounting product**.
## Adding Plans to Plan Group and Reviewing Plan Pricing
When you have attached a Plan Group to an Account, there are two ways you can add Plans to the Plan Group:
* Go to **Pricing>Plan groups** and open the Plan Group you want to add a Plan to. On the **Included plans** panel, select **Add plans**. For more details, see the [Adding Plans to Plan Groups](/guides/plans-and-pricing/working-with-plan-templates-and-plans/working-with-plan-groups#adding-plans-to-plan-groups) section in the [Working with Plan Groups](/guides/plans-and-pricing/working-with-plan-templates-and-plans/working-with-plan-groups) topic.
* When you've attached a Plan Group to an Account, open the **Plan group attachment** page from the **Account>Attached plans** tab and add Plans to the Plan Group directly from there.
This section explains how to add Plans to a Plan Group directly from the **Plan group attachment** page.
**To add Plans to Plan Group and review Plan pricing:**
1. Open the Account and on the **Account** page, select the **Attached plans** tab.
2. On the **Active and pending attached plans panel**, select the **NAME** hotlink text of the attached Plan Group you want to review Plans for. The **Plan group attachment** page opens.
3. Scroll down the **Plan group attachment** page and on the **Plan group details** panel, select **Add plans**. A **Select plans** dialog appears and lists all the Plans created for Products in your Organization and any custom Plans created for the Account you've created the Plan Group for.
* Note that if no Plans have yet been added to the Plan Group, then a blue help text advising you is shown to warn you.
4. Select the Plans you want to add to the Plan Group and select **Confirm**. The **Select plans** dialog closes and:
* The Plans are added to the **Select a plan** drop-down list on the **Plan details** panel, which is now enabled.
* The blue help text advising you the Plan Group doesn't currently contain any Plans is no longer shown.
* The **Edit linked plans** button on the **Plan group details** panel is enabled.
**Warning: Constraints on Adding Plans to Plan Groups!**
* **Only one Plan per Product:** If you try to add more than one Plan for the same Product to the Plan Group, you'll receive an error message.
* **Custom Plans can't be added to a Global Plan Group:** If you try to add a custom Plan (a Plan that has been created exclusively for a specific Account) to a Global Plan Group (a Plan Group that can be attached to multiple Accounts) you'll receive an error message.
5. To review a Plan and its pricing that you've added to the Plan Group, select it from the **Select a plan** drop-down list on the **Plan details** panel:
You can review the details of the Plan Group itself and:
* Read-off the **ID** for the Plan Group and **Copy** it directly to your clipboard.
* If you want to view a Plan belonging to the Plan Group or add a Plan to it and review the details and pricing configured for the Plan, you can do this directly. See the following section [Adding Plans to Plan Group and Reviewing Plan Pricing](/guides/end-customer-accounts/attaching-plan-groups-to-an-account#adding-plans-to-plan-group-and-reviewing-plan-pricing) for details.
* Use hotlink texts to open:
* The **Plan group details** page directly.
* The **Product details** page for the **Standing charge accounting product** or the **Minimum spend accounting product**.
## Adding Plans to Plan Group and Reviewing Plan Pricing
When you have attached a Plan Group to an Account, there are two ways you can add Plans to the Plan Group:
* Go to **Pricing>Plan groups** and open the Plan Group you want to add a Plan to. On the **Included plans** panel, select **Add plans**. For more details, see the [Adding Plans to Plan Groups](/guides/plans-and-pricing/working-with-plan-templates-and-plans/working-with-plan-groups#adding-plans-to-plan-groups) section in the [Working with Plan Groups](/guides/plans-and-pricing/working-with-plan-templates-and-plans/working-with-plan-groups) topic.
* When you've attached a Plan Group to an Account, open the **Plan group attachment** page from the **Account>Attached plans** tab and add Plans to the Plan Group directly from there.
This section explains how to add Plans to a Plan Group directly from the **Plan group attachment** page.
**To add Plans to Plan Group and review Plan pricing:**
1. Open the Account and on the **Account** page, select the **Attached plans** tab.
2. On the **Active and pending attached plans panel**, select the **NAME** hotlink text of the attached Plan Group you want to review Plans for. The **Plan group attachment** page opens.
3. Scroll down the **Plan group attachment** page and on the **Plan group details** panel, select **Add plans**. A **Select plans** dialog appears and lists all the Plans created for Products in your Organization and any custom Plans created for the Account you've created the Plan Group for.
* Note that if no Plans have yet been added to the Plan Group, then a blue help text advising you is shown to warn you.
4. Select the Plans you want to add to the Plan Group and select **Confirm**. The **Select plans** dialog closes and:
* The Plans are added to the **Select a plan** drop-down list on the **Plan details** panel, which is now enabled.
* The blue help text advising you the Plan Group doesn't currently contain any Plans is no longer shown.
* The **Edit linked plans** button on the **Plan group details** panel is enabled.
**Warning: Constraints on Adding Plans to Plan Groups!**
* **Only one Plan per Product:** If you try to add more than one Plan for the same Product to the Plan Group, you'll receive an error message.
* **Custom Plans can't be added to a Global Plan Group:** If you try to add a custom Plan (a Plan that has been created exclusively for a specific Account) to a Global Plan Group (a Plan Group that can be attached to multiple Accounts) you'll receive an error message.
5. To review a Plan and its pricing that you've added to the Plan Group, select it from the **Select a plan** drop-down list on the **Plan details** panel:
![]() On the **Plan details** panel, you can:
* Check the details of the Plan.
* Use hotlink texts to open the Plan details page directly and the associated details page for the **Plan template** or **Product**.
* Under **Associated pricing**:
* If the Plan has been priced, this will be shown and you can review the pricing.
* Select **Details** if you want to review full details of the pricing applied to the Plan.
* Note that you cannot create or edit a pricing for the Plan, since it is not a custom Plan for the Account and might be attached to multiple Accounts. You must go the **Pricing Editor** or open the **Plan details** page to do this.
At the bottom of **Plan details**, you can:
* Read-off the Plan **ID** and **Copy** it to your clipboard.
* Check the audit data for the Plan for who **Created** and **Last modified** the Plan and when.
**Tip: Removing Plans from Plan Group?** To remove Plans from a Plan Group from the **Plan group attachment** page, on the **Plan group details** panel select **Edit linked plans**. The **Plan group details** page opens and the **Included plans** panel lists the Plans added to the Plan Group. From there you can remove Plans from the Plan Group - see [Removing Plans from Plan Group](/guides/plans-and-pricing/working-with-plan-templates-and-plans/working-with-plan-groups#removing-plans-from-plan-groups).
## Adding Attached Plan Groups to or Removing from Contracts
From *Plan group attachment details*, you can quickly add the attached Plan Group to a Contract or remove it from a Contract on the Account. This saves you having to open and edit the Plan Group attachment.
**Updating a Contract to add or remove an attached Plan Group.** Alternatively, you can open the details page of a Contract and add an attached Plan Group to it or remove an attached Plan Group from it. See [Adding Account Plans or Account Plan Groups to Contracts](https://docs.m3ter.com/guides/end-customer-accounts/creating-contracts-for-accounts/creating-and-managing-contracts#adding-account-plans-or-account-plan-groups-to-contracts). If you do this, then the **Plan group attachment details** will update accordingly.
**To add an attached Plan Group to or remove it from a Contract:**
1. Select **Accounts**. The **Accounts** page opens.
2. Select the **Name** text of the Account for which you want to add an attached Plan Group to or remove from a Contract. The **Account** details page opens with the **Overview** tab selected.
3. Select the **Attached Plans** tab.
4. On the **Active and pending attached plans** panel, select the name hotlink text of the attached Plan Group you want to add to or remove from a Contract. The **Plan group attachment** page opens and on the **Plan group attachment details** panel:
* If the attached Plan Group has not been added to a Contract, an **Add to contract** button is available.
* If the attached Plan Group has been added to a Contract, a **Remove from contract** button is available.
5. To add the attached Plan Group to a Contract, select **Add to contract**. A **Select contract** modal opens and lists the Contracts created for the Account.
6. Select the Contract you want to add the attached Plan Group to and select **Confirm**. The modal closes and the Contract is shown under **Plan group attachment details**:
On the **Plan details** panel, you can:
* Check the details of the Plan.
* Use hotlink texts to open the Plan details page directly and the associated details page for the **Plan template** or **Product**.
* Under **Associated pricing**:
* If the Plan has been priced, this will be shown and you can review the pricing.
* Select **Details** if you want to review full details of the pricing applied to the Plan.
* Note that you cannot create or edit a pricing for the Plan, since it is not a custom Plan for the Account and might be attached to multiple Accounts. You must go the **Pricing Editor** or open the **Plan details** page to do this.
At the bottom of **Plan details**, you can:
* Read-off the Plan **ID** and **Copy** it to your clipboard.
* Check the audit data for the Plan for who **Created** and **Last modified** the Plan and when.
**Tip: Removing Plans from Plan Group?** To remove Plans from a Plan Group from the **Plan group attachment** page, on the **Plan group details** panel select **Edit linked plans**. The **Plan group details** page opens and the **Included plans** panel lists the Plans added to the Plan Group. From there you can remove Plans from the Plan Group - see [Removing Plans from Plan Group](/guides/plans-and-pricing/working-with-plan-templates-and-plans/working-with-plan-groups#removing-plans-from-plan-groups).
## Adding Attached Plan Groups to or Removing from Contracts
From *Plan group attachment details*, you can quickly add the attached Plan Group to a Contract or remove it from a Contract on the Account. This saves you having to open and edit the Plan Group attachment.
**Updating a Contract to add or remove an attached Plan Group.** Alternatively, you can open the details page of a Contract and add an attached Plan Group to it or remove an attached Plan Group from it. See [Adding Account Plans or Account Plan Groups to Contracts](https://docs.m3ter.com/guides/end-customer-accounts/creating-contracts-for-accounts/creating-and-managing-contracts#adding-account-plans-or-account-plan-groups-to-contracts). If you do this, then the **Plan group attachment details** will update accordingly.
**To add an attached Plan Group to or remove it from a Contract:**
1. Select **Accounts**. The **Accounts** page opens.
2. Select the **Name** text of the Account for which you want to add an attached Plan Group to or remove from a Contract. The **Account** details page opens with the **Overview** tab selected.
3. Select the **Attached Plans** tab.
4. On the **Active and pending attached plans** panel, select the name hotlink text of the attached Plan Group you want to add to or remove from a Contract. The **Plan group attachment** page opens and on the **Plan group attachment details** panel:
* If the attached Plan Group has not been added to a Contract, an **Add to contract** button is available.
* If the attached Plan Group has been added to a Contract, a **Remove from contract** button is available.
5. To add the attached Plan Group to a Contract, select **Add to contract**. A **Select contract** modal opens and lists the Contracts created for the Account.
6. Select the Contract you want to add the attached Plan Group to and select **Confirm**. The modal closes and the Contract is shown under **Plan group attachment details**:
![Attach Plan Group50]() 7. To remove an attached Plan Group from a Contract, select **Remove from contract**. A confirmation popup appears:
7. To remove an attached Plan Group from a Contract, select **Remove from contract**. A confirmation popup appears:
 8. Select **Remove** to confirm. The popup closes and the Contract no longer shows under **Plan group attachment details**.
## Replacing a Plan Group Attachment
From the *Plan group attachment* page you can quickly replace an existing attached Plan Group. When you do this, the start date you define for the replacement attached Plan Group is used to automatically end date the existing attached Plan Group.
**To replace a Plan Group attachment:**
1. On the **Account** page, select the **Attached plans** tab.
2. On the **Active and pending attached plans** panel, select the name hotlink text of the attached Plan Group you want to replace:
8. Select **Remove** to confirm. The popup closes and the Contract no longer shows under **Plan group attachment details**.
## Replacing a Plan Group Attachment
From the *Plan group attachment* page you can quickly replace an existing attached Plan Group. When you do this, the start date you define for the replacement attached Plan Group is used to automatically end date the existing attached Plan Group.
**To replace a Plan Group attachment:**
1. On the **Account** page, select the **Attached plans** tab.
2. On the **Active and pending attached plans** panel, select the name hotlink text of the attached Plan Group you want to replace:
![Attach Plan Group40]() The **Plan group attachment** page opens:
The **Plan group attachment** page opens:
![Attachplangroup47 2]() 3. Select **Replace plan group attachment**. The **Replace plan group attachment** page opens:
* **Plan group attachment details**:
* The existing attached **Plan group** will be pre-selected and you can edit this as required for the replacement.
* Enter a required **Start date** and optionally an **End date**.
* **Plan group attachment settings**. The settings of the existing attached Plan Group are shown and you can edit these as required for the replacement:
* **Billing cycle date**.
* **Contract**.
* **Account billing hierarchy mode**.
* **Custom fields**. Any Custom Fields created for the existing attached Plan Group are shown and you can add, edit, or remove as required for the replacement.
**Important: Replacement start date must be before or equal to the existing end date!** If you enter a **Start date** for the replacement Plan Group attachment that is after the existing Plan Group attachment **End date**, you'll receive an error when you try to replace the existing Plan Group attachment.
4. Select **Replace plan group attachment**. You are returned to the **Plan group attachment** page for the replacement attached Plan Group:
3. Select **Replace plan group attachment**. The **Replace plan group attachment** page opens:
* **Plan group attachment details**:
* The existing attached **Plan group** will be pre-selected and you can edit this as required for the replacement.
* Enter a required **Start date** and optionally an **End date**.
* **Plan group attachment settings**. The settings of the existing attached Plan Group are shown and you can edit these as required for the replacement:
* **Billing cycle date**.
* **Contract**.
* **Account billing hierarchy mode**.
* **Custom fields**. Any Custom Fields created for the existing attached Plan Group are shown and you can add, edit, or remove as required for the replacement.
**Important: Replacement start date must be before or equal to the existing end date!** If you enter a **Start date** for the replacement Plan Group attachment that is after the existing Plan Group attachment **End date**, you'll receive an error when you try to replace the existing Plan Group attachment.
4. Select **Replace plan group attachment**. You are returned to the **Plan group attachment** page for the replacement attached Plan Group:
![Attach Plan Group42]() 5. Return to the **Attached plans** tab for the Account:
5. Return to the **Attached plans** tab for the Account:
![Attach Plan Group43]() * We can see that the **Start date** entered for the replacement attached Plan Group has been used to update the **End date** for the originally attached Plan Group, which is now listed under **Previously attached plans**.
## Deleting an Account Plan Group
**To delete an Account Plan Group:**
1. On the **Active and pending attached plans** panel, select **Delete**:
* We can see that the **Start date** entered for the replacement attached Plan Group has been used to update the **End date** for the originally attached Plan Group, which is now listed under **Previously attached plans**.
## Deleting an Account Plan Group
**To delete an Account Plan Group:**
1. On the **Active and pending attached plans** panel, select **Delete**:
![]() A confirmation popup appears.
2. Select **Yes** to confirm the Account Plan Group deletion.
3. Alternatively, on the **Active and pending attached plans** panel, select the **Name** hotlink text of the Account Plan Group you want to delete. The **Plan group attachment** page opens.
4. Select **Delete**:
A confirmation popup appears.
2. Select **Yes** to confirm the Account Plan Group deletion.
3. Alternatively, on the **Active and pending attached plans** panel, select the **Name** hotlink text of the Account Plan Group you want to delete. The **Plan group attachment** page opens.
4. Select **Delete**:
 A confirmation popup appears.
5. Select **Yes** to confirm the Account Plan Group deletion. You are taken back to the **Attached plans** tab.
**Important!** Deleting the *Account Plan Group* does not mean the *Plan Group* is deleted - the Account Plan Group is created only when you attach a Plan Group to an Account and remains distinct from the Plan Group you attached. If you want to delete a Plan Group, you must go to **Pricing>Plan Groups**, and then delete it from there.
5. To add the attached Plan Group to a Contract, select **Add to contract**. A **Select contract** modal opens and lists the Contracts created for the Account.
6. Select the Contract you want to add the attached Plan Group to and select **Confirm**. The modal closes and the Contract is shown under **Plan group attachment details**:
A confirmation popup appears.
5. Select **Yes** to confirm the Account Plan Group deletion. You are taken back to the **Attached plans** tab.
**Important!** Deleting the *Account Plan Group* does not mean the *Plan Group* is deleted - the Account Plan Group is created only when you attach a Plan Group to an Account and remains distinct from the Plan Group you attached. If you want to delete a Plan Group, you must go to **Pricing>Plan Groups**, and then delete it from there.
5. To add the attached Plan Group to a Contract, select **Add to contract**. A **Select contract** modal opens and lists the Contracts created for the Account.
6. Select the Contract you want to add the attached Plan Group to and select **Confirm**. The modal closes and the Contract is shown under **Plan group attachment details**:
![Attach Plan Group50]() 5. Etc.
# Attaching Plans to an Account
Source: https://docs.m3ter.com/guides/end-customer-accounts/attaching-plans-to-an-account
When you attach a Plan to an Account, this creates a link between them to create an *Account Plan*. Attaching priced Plans to an Account determines the charges incurred by end customers who consume your Products:
* **Active Account Plan**. You can set the start and end dates to define the period for which the Account Plan will be *active* for the Account.
* **Plan per Product**. If the end customer Account consumes more than one of your Products, you can attach a Plan to the Account for each of the Products.
* **Attaching Multiple Plans**:
* **Default Organization setting**. The default Organization setting for attaching multiple Plans to the same account allows you to attach more than one Plan to an Account, but imposes the restriction that *only one attached Plan per Product can be active at any one time*. For example, you can attach a Product Plan to an Account to create an Account Plan that will active for the first six months, and attach another Plan for the same Product to create a second Account Plan that becomes active for the following twelve months. If you try to attach a Product Plan to an Account with start and end dates that overlap with an existing Account Plan for the same Product that is already active, you'll receive a notification with an option to end the currently active Account Plan on the start date you've set for the new Account Plan.
* **Overlapping Plans**. If your billing use case requires you to attach more than one Plan to an Account for the same Product at the same time, then you must first enable the **Allow overlapping attached plans** setting for your Organization. See [Viewing and Editing Organization Configuration](/guides/organization-and-access-management/viewing-and-editing-organization/viewing-and-editing-organization-configuration) for more details.
* **Reviewing Plan Attachment**. When you've attached a Plan to an Account, you can open a Plan Attachment page and:
* Review and edit the details of the Account Plan created when you attached the Plan to the Account.
* Review the Account Plan metadata for any Custom Fields, External Mappings, or Integration runs.
* Review details of the Plan itself and any associated pricing.
* **Replacing Plan Attachment**. You can quickly replace an existing attached Plan on an Account. When you do this, the start date you define for the replacement Plan is used to automatically end date the existing attached Plan.
* **Custom Plans and Custom Plan Groups**. You can create a custom Plan or a custom Plan Group for an Account, which means the Plan or Plan Group can only be attached to that Account. See [Creating Custom Plans for Accounts](/guides/end-customer-accounts/creating-custom-account-plans) and [Creating Custom Plan Groups for Accounts](/guides/end-customer-accounts/creating-custom-plan-groups-for-accounts).
This topic explains how to attach a Plan to an Account, review the Plan attachment, add an attached Plan to or remove it from a Contract, and replace an attached Plan:
* [Attaching a Plan to Create an Account Plan](/guides/end-customer-accounts/attaching-plans-to-an-account#attaching-a-plan-to-create-an-account-plan)
* [Reviewing Plan Attachment](/guides/end-customer-accounts/attaching-plans-to-an-account#reviewing-plan-attachment)
* [Adding Attached Plans to or Removing from Contracts](#adding-attached-plans-to-or-removing-from-contracts)
* [Replacing a Plan Attachment](#replacing-a-plan-attachment)
If you want to delete an Account Plan from the Account, you can do this from the **Attached Plans** tab:
* [Deleting an Account Plan](/guides/end-customer-accounts/attaching-plans-to-an-account#deleting-an-account-plan)
**Tip: Attach Plan before Pricing?** You can attach a Plan to an Account *before* you have configured Pricing for the Plan, and price the Plan at some later date.
## Attaching a Plan to Create an Account Plan
You can attach a Plan to an Account to create an *Account Plan*. An Account Plan determines the charges incurred by end-customers who consume the Product the Plan is for.
**To attach a Plan to an Account and create an Account Plan:**
1. Select **Accounts**. The **Accounts** page opens.
2. Select the **Name** text of the **Account** to which you want to attach a Plan. The **Account** page opens with the **Overview** tab selected.
3. On the **Account actions** menu, select **Plans>Create plan attachment**:
5. Etc.
# Attaching Plans to an Account
Source: https://docs.m3ter.com/guides/end-customer-accounts/attaching-plans-to-an-account
When you attach a Plan to an Account, this creates a link between them to create an *Account Plan*. Attaching priced Plans to an Account determines the charges incurred by end customers who consume your Products:
* **Active Account Plan**. You can set the start and end dates to define the period for which the Account Plan will be *active* for the Account.
* **Plan per Product**. If the end customer Account consumes more than one of your Products, you can attach a Plan to the Account for each of the Products.
* **Attaching Multiple Plans**:
* **Default Organization setting**. The default Organization setting for attaching multiple Plans to the same account allows you to attach more than one Plan to an Account, but imposes the restriction that *only one attached Plan per Product can be active at any one time*. For example, you can attach a Product Plan to an Account to create an Account Plan that will active for the first six months, and attach another Plan for the same Product to create a second Account Plan that becomes active for the following twelve months. If you try to attach a Product Plan to an Account with start and end dates that overlap with an existing Account Plan for the same Product that is already active, you'll receive a notification with an option to end the currently active Account Plan on the start date you've set for the new Account Plan.
* **Overlapping Plans**. If your billing use case requires you to attach more than one Plan to an Account for the same Product at the same time, then you must first enable the **Allow overlapping attached plans** setting for your Organization. See [Viewing and Editing Organization Configuration](/guides/organization-and-access-management/viewing-and-editing-organization/viewing-and-editing-organization-configuration) for more details.
* **Reviewing Plan Attachment**. When you've attached a Plan to an Account, you can open a Plan Attachment page and:
* Review and edit the details of the Account Plan created when you attached the Plan to the Account.
* Review the Account Plan metadata for any Custom Fields, External Mappings, or Integration runs.
* Review details of the Plan itself and any associated pricing.
* **Replacing Plan Attachment**. You can quickly replace an existing attached Plan on an Account. When you do this, the start date you define for the replacement Plan is used to automatically end date the existing attached Plan.
* **Custom Plans and Custom Plan Groups**. You can create a custom Plan or a custom Plan Group for an Account, which means the Plan or Plan Group can only be attached to that Account. See [Creating Custom Plans for Accounts](/guides/end-customer-accounts/creating-custom-account-plans) and [Creating Custom Plan Groups for Accounts](/guides/end-customer-accounts/creating-custom-plan-groups-for-accounts).
This topic explains how to attach a Plan to an Account, review the Plan attachment, add an attached Plan to or remove it from a Contract, and replace an attached Plan:
* [Attaching a Plan to Create an Account Plan](/guides/end-customer-accounts/attaching-plans-to-an-account#attaching-a-plan-to-create-an-account-plan)
* [Reviewing Plan Attachment](/guides/end-customer-accounts/attaching-plans-to-an-account#reviewing-plan-attachment)
* [Adding Attached Plans to or Removing from Contracts](#adding-attached-plans-to-or-removing-from-contracts)
* [Replacing a Plan Attachment](#replacing-a-plan-attachment)
If you want to delete an Account Plan from the Account, you can do this from the **Attached Plans** tab:
* [Deleting an Account Plan](/guides/end-customer-accounts/attaching-plans-to-an-account#deleting-an-account-plan)
**Tip: Attach Plan before Pricing?** You can attach a Plan to an Account *before* you have configured Pricing for the Plan, and price the Plan at some later date.
## Attaching a Plan to Create an Account Plan
You can attach a Plan to an Account to create an *Account Plan*. An Account Plan determines the charges incurred by end-customers who consume the Product the Plan is for.
**To attach a Plan to an Account and create an Account Plan:**
1. Select **Accounts**. The **Accounts** page opens.
2. Select the **Name** text of the **Account** to which you want to attach a Plan. The **Account** page opens with the **Overview** tab selected.
3. On the **Account actions** menu, select **Plans>Create plan attachment**:
![]() Alternatively:
* Select the **Attached plans** tab.
* On the **Active and pending attached plans** panel, select **Create plan attachment**.
The **Create** page opens:
Alternatively:
* Select the **Attached plans** tab.
* On the **Active and pending attached plans** panel, select **Create plan attachment**.
The **Create** page opens:
 * **Plan** is selected by default for **Plan attachment type**.
4. Select **Next**. The **Create** page adjusts.
5. On the **Plan attachment details** card, enter the required details of the Plan you want to attach to the **Account**:
* **Plan** is selected by default for **Plan attachment type**.
4. Select **Next**. The **Create** page adjusts.
5. On the **Plan attachment details** card, enter the required details of the Plan you want to attach to the **Account**:
 * First, select a **Product** from the drop-down list. The **Plan** drop-down list is populated with the Plans belonging to the selected Product:
* Note that the **Plan** drop-down list will include any custom Plans you've created for the Account.
* Second, select the Plan you want to attach to the Account from the drop-down list.
* Now, select the **Start date** (*Required*) and **End date** (*Optional*) to define the period you want the Plan to apply to the Account for billing purposes:
* If you omit an **End date**, the Account Plan will be applied to the Account perpetually or until such time as you delete the Account Plan.
* End dates are *exclusive*. For example, if you set the **End date** of June 1st 2022, then the Account Plan ceases to be active for the Account at midnight on May 31st 2022, and any billing is calculated up to that point in time, NOT up to midnight on June 1st. If you want to include end customer Account usage occurring on June 1st for billing, you must set the **End date** to June 2nd.
**Warning: Overlapping Attached Plans!**
* **Default setting**. The default Organization setting imposes the contraint that an Account can only have one active Account Plan *per Product* - if you enter a **Start** **date** which would mean the new Account Plan overlaps with an Account Plan that is already active for the Account, then a warning will show and you'll be given the option to end the existing Account Plan on the **Start date** of the new Account Plan.
* **Allow overlapping attached plans**. If your billing use case requires you to attach more than one Plan to an Account for the same Product at the same time, then you must first enable the **Allow overlapping attached plans** Organization setting.
6. For other optional settings, use the **Plan attachment settings** card:
* First, select a **Product** from the drop-down list. The **Plan** drop-down list is populated with the Plans belonging to the selected Product:
* Note that the **Plan** drop-down list will include any custom Plans you've created for the Account.
* Second, select the Plan you want to attach to the Account from the drop-down list.
* Now, select the **Start date** (*Required*) and **End date** (*Optional*) to define the period you want the Plan to apply to the Account for billing purposes:
* If you omit an **End date**, the Account Plan will be applied to the Account perpetually or until such time as you delete the Account Plan.
* End dates are *exclusive*. For example, if you set the **End date** of June 1st 2022, then the Account Plan ceases to be active for the Account at midnight on May 31st 2022, and any billing is calculated up to that point in time, NOT up to midnight on June 1st. If you want to include end customer Account usage occurring on June 1st for billing, you must set the **End date** to June 2nd.
**Warning: Overlapping Attached Plans!**
* **Default setting**. The default Organization setting imposes the contraint that an Account can only have one active Account Plan *per Product* - if you enter a **Start** **date** which would mean the new Account Plan overlaps with an Account Plan that is already active for the Account, then a warning will show and you'll be given the option to end the existing Account Plan on the **Start date** of the new Account Plan.
* **Allow overlapping attached plans**. If your billing use case requires you to attach more than one Plan to an Account for the same Product at the same time, then you must first enable the **Allow overlapping attached plans** Organization setting.
6. For other optional settings, use the **Plan attachment settings** card:
 * **Billing cycle date**. Optional setting, which sets the date when the first Bill is created and acts as a reference for when in the applied billing frequency period subsequent Bills are created for the Account:
* For example, suppose you attach a Plan to the Account that is configured for monthly billing frequency and you've defined the period the Plan will apply to the Account to be from January 1st, 2022 until January 1st, 2023. You then set a **Billing cycle date** of February 15th, 2022. The first Bill will be created for the Account on February 15th, and subsequent Bills created on the 15th of the months following for the remainder of the billing period - March 15th, April 15th, and so on.
* If you leave this blank, then the **Billing cycle date** set for the Account will be used instead - see [Creating, Editing, and Deleting Accounts](/guides/end-customer-accounts/creating-an-account).
* If you want to add the Account Plan to a Contract you've created for the Account, use the **Contract** drop down to select it. For more details on Contracts, see [Creating Contracts for Accounts](/guides/end-customer-accounts/creating-contracts-for-accounts).
* If the Account is either a Parent or a Child Account, you can select for **Account hierarchy billing mode**, which determines how billing will be handled and shown on bills for charges due for the Parent Account and charges due for Child Accounts:
* **Bill parent account - bill line item per account**. Default setting.
* **Bill parent account - single bill line item for all accounts**.
* **Bill child account**.
**Important!**
* **Only Operative for Parent/Child Accounts**. The **Account hierarchy billing mode** options are only operative if the Account is a Parent or Child Account. For a full explanation of what each means when attaching Plans to create Account Plans for Parent or Child Accounts, see [Billing Hierarchy Modes for Parent/Child Accounts](/guides/end-customer-accounts/creating-and-working-with-child-accounts/billing-for-parent-child-accounts).
* **Parent/Child billing for Recurring Charges not supported**. If you price a Plan using a Counter to apply unit-based pricing for recurring subscription charges and attach the Plan to Parent or Child Accounts, Parent/Child billing is not supported for the recurring charges.
7. Add any required **Custom Fields** to the Account Plan. For more on Custom Fields, see [Working with Custom Fields](/guides/creating-and-managing-products/working-with-custom-fields).
8. Select **Create Plan attachment**. You are returned to the Account page with the **Attached plans** tab selected. The Plan is listed under **Active and pending attached plans**:
* **Billing cycle date**. Optional setting, which sets the date when the first Bill is created and acts as a reference for when in the applied billing frequency period subsequent Bills are created for the Account:
* For example, suppose you attach a Plan to the Account that is configured for monthly billing frequency and you've defined the period the Plan will apply to the Account to be from January 1st, 2022 until January 1st, 2023. You then set a **Billing cycle date** of February 15th, 2022. The first Bill will be created for the Account on February 15th, and subsequent Bills created on the 15th of the months following for the remainder of the billing period - March 15th, April 15th, and so on.
* If you leave this blank, then the **Billing cycle date** set for the Account will be used instead - see [Creating, Editing, and Deleting Accounts](/guides/end-customer-accounts/creating-an-account).
* If you want to add the Account Plan to a Contract you've created for the Account, use the **Contract** drop down to select it. For more details on Contracts, see [Creating Contracts for Accounts](/guides/end-customer-accounts/creating-contracts-for-accounts).
* If the Account is either a Parent or a Child Account, you can select for **Account hierarchy billing mode**, which determines how billing will be handled and shown on bills for charges due for the Parent Account and charges due for Child Accounts:
* **Bill parent account - bill line item per account**. Default setting.
* **Bill parent account - single bill line item for all accounts**.
* **Bill child account**.
**Important!**
* **Only Operative for Parent/Child Accounts**. The **Account hierarchy billing mode** options are only operative if the Account is a Parent or Child Account. For a full explanation of what each means when attaching Plans to create Account Plans for Parent or Child Accounts, see [Billing Hierarchy Modes for Parent/Child Accounts](/guides/end-customer-accounts/creating-and-working-with-child-accounts/billing-for-parent-child-accounts).
* **Parent/Child billing for Recurring Charges not supported**. If you price a Plan using a Counter to apply unit-based pricing for recurring subscription charges and attach the Plan to Parent or Child Accounts, Parent/Child billing is not supported for the recurring charges.
7. Add any required **Custom Fields** to the Account Plan. For more on Custom Fields, see [Working with Custom Fields](/guides/creating-and-managing-products/working-with-custom-fields).
8. Select **Create Plan attachment**. You are returned to the Account page with the **Attached plans** tab selected. The Plan is listed under **Active and pending attached plans**:
![Attachplans48]() * Note that if the **End date** selected when attaching the Plan is in the past, then the Plan is listed under **Previously attached plans**.
* Attaching a Plan to an Account creates an *Account Plan*. The Account Plan will show as **ACTIVE** or **INACTIVE** or **PENDING**, and the **Start** and **End** dates are also shown:
**Tip: Account Consumes Multiple Products?** In this example, the Account Plan is attached to a Product called **Premium Data Storage**. If the Account consumes more than one of your Products and you've attached Plans to create Account Plans for each Product, these will be grouped accordingly under respective Products.
9. If you want to edit the Account Plan, select the **Edit** icon:
* Note that if the **End date** selected when attaching the Plan is in the past, then the Plan is listed under **Previously attached plans**.
* Attaching a Plan to an Account creates an *Account Plan*. The Account Plan will show as **ACTIVE** or **INACTIVE** or **PENDING**, and the **Start** and **End** dates are also shown:
**Tip: Account Consumes Multiple Products?** In this example, the Account Plan is attached to a Product called **Premium Data Storage**. If the Account consumes more than one of your Products and you've attached Plans to create Account Plans for each Product, these will be grouped accordingly under respective Products.
9. If you want to edit the Account Plan, select the **Edit** icon:
![]() 10. Make your changes on the **Edit** page, and select **Update Plan attachment**. For example, you might want to add the Account Plan to a Contract you've created for the Account. The **Contract** is then shown against the Account Plan in the **Active and pending attached plans** panel:
10. Make your changes on the **Edit** page, and select **Update Plan attachment**. For example, you might want to add the Account Plan to a Contract you've created for the Account. The **Contract** is then shown against the Account Plan in the **Active and pending attached plans** panel:
![Attachplans49]() 11. If the end-customer Account consumes another of your Products, you can repeat steps 3 to 8 to attach a second Plan to the Account for the overall billing setup for the Account - Bills will be calculated for the Account in accordance with the Account Plans attached for each of your Products the Account consumes:
11. If the end-customer Account consumes another of your Products, you can repeat steps 3 to 8 to attach a second Plan to the Account for the overall billing setup for the Account - Bills will be calculated for the Account in accordance with the Account Plans attached for each of your Products the Account consumes:
![Attachplans50]() **Tip: Adding Custom Fields when attaching a Plan?** You can define Custom Fields when attaching a Plan to an Account to create an Account Plan. Note that:
* These Custom Fields will be *specific to the Account Plan* - they are separate from any Custom Fields you might have already added either to the Account itself or to the Plan that was used to create the Account Plan.
* Secondly, any Custom Fields you create for an individual Account Plan *override* those you've created for Account Plans at the Organizational level. See [Adding and Editing Custom Fields](/guides/organization-and-access-management/viewing-and-editing-organization/adding-and-editing-custom-fields).
## Reviewing Plan Attachment
When you've attached a Plan to an Account, you can open a *Plan attachment* page and review details of the attachment.
**To review a Plan attachment:**
1. On the **Account** page, select the **Attached plans** tab.
2. On the **Active and pending attached plans** panel, select the name hotlink text of the attached Plan you want to review. The **Plan attachment** page opens:
**Tip: Adding Custom Fields when attaching a Plan?** You can define Custom Fields when attaching a Plan to an Account to create an Account Plan. Note that:
* These Custom Fields will be *specific to the Account Plan* - they are separate from any Custom Fields you might have already added either to the Account itself or to the Plan that was used to create the Account Plan.
* Secondly, any Custom Fields you create for an individual Account Plan *override* those you've created for Account Plans at the Organizational level. See [Adding and Editing Custom Fields](/guides/organization-and-access-management/viewing-and-editing-organization/adding-and-editing-custom-fields).
## Reviewing Plan Attachment
When you've attached a Plan to an Account, you can open a *Plan attachment* page and review details of the attachment.
**To review a Plan attachment:**
1. On the **Account** page, select the **Attached plans** tab.
2. On the **Active and pending attached plans** panel, select the name hotlink text of the attached Plan you want to review. The **Plan attachment** page opens:
![Attachplans66]() * For the *Account Plan* created when you attached the Plan to the Account, under **Plan attachment details** you can:
* Check the dates for the period the Account Plan will be active for the Account.
* Read-off the Account Plan **ID** with the option to **Copy** this directly to your clipboard.
* If a Contract is linked to the Account Plan, this will be shown and you can use a hotlink text to open the Contract details page.
**New Plan attachment page?** The new version of the **Plan attachment** page opens. If you prefer to work in the old version of the page, select **Use the old version**.
3. If you scroll down the page, you can review the **Plan attachment metadata**:
**Custom Fields**. Any fields created for the Account Plan entity are listed:
* If any Custom Fields have been created at the Organizational level, these are shown and you can **Copy** the number or string value to your clipboard:
* For the *Account Plan* created when you attached the Plan to the Account, under **Plan attachment details** you can:
* Check the dates for the period the Account Plan will be active for the Account.
* Read-off the Account Plan **ID** with the option to **Copy** this directly to your clipboard.
* If a Contract is linked to the Account Plan, this will be shown and you can use a hotlink text to open the Contract details page.
**New Plan attachment page?** The new version of the **Plan attachment** page opens. If you prefer to work in the old version of the page, select **Use the old version**.
3. If you scroll down the page, you can review the **Plan attachment metadata**:
**Custom Fields**. Any fields created for the Account Plan entity are listed:
* If any Custom Fields have been created at the Organizational level, these are shown and you can **Copy** the number or string value to your clipboard:
![Attach Plans63]() * If the fields have also been created for an individual Account Plan, then the values configured for those created at Organizational-level are struck out indicating clearly that the individual Account Plan’s values will be used:
* If the fields have also been created for an individual Account Plan, then the values configured for those created at Organizational-level are struck out indicating clearly that the individual Account Plan’s values will be used:
![Attach Plans64]() **External mappings**. Any mappings created for the Account Plan are listed:
**External mappings**. Any mappings created for the Account Plan are listed:
![Attach Plans65]() * The **External system** and **External table** mapped to are shown - such as **Netsuite - Item** in the above example. The **External entity ID** mapped to is also shown.
* If a listed External mapping is linked to an Integration, under **Linked integration** a hotlink text will be shown which you can use to open the Integration.
* Under **Actions**, you can edit or delete the External mapping.
* If the Account Plan has multiple External mappings created for it, you can use *Search external mappings* to search by **External table** and **External entity ID** and filter the list.
* You can commence a workflow to **Create external mapping** for the Account Plan directly - see [Creating and Managing External Mappings for Accounts](/guides/end-customer-accounts/creating-and-managing-external-mappings-for-accounts) for an example.
**Integration runs**. If you go on to set up an integration that synchronizes the Account Plan data with an external system, the date/time and status of the **Latest** integration run will be shown. You can use a text hotlink to open details of this latest run or **View all runs**. See [Reviewing Integration Run Details](/guides/integrations/setting-up-integrations/reviewing-integration-run-details).
4. Scroll further down the page to review the details of the Plan that was attached to the Account to create the Account Plan:
* The **External system** and **External table** mapped to are shown - such as **Netsuite - Item** in the above example. The **External entity ID** mapped to is also shown.
* If a listed External mapping is linked to an Integration, under **Linked integration** a hotlink text will be shown which you can use to open the Integration.
* Under **Actions**, you can edit or delete the External mapping.
* If the Account Plan has multiple External mappings created for it, you can use *Search external mappings* to search by **External table** and **External entity ID** and filter the list.
* You can commence a workflow to **Create external mapping** for the Account Plan directly - see [Creating and Managing External Mappings for Accounts](/guides/end-customer-accounts/creating-and-managing-external-mappings-for-accounts) for an example.
**Integration runs**. If you go on to set up an integration that synchronizes the Account Plan data with an external system, the date/time and status of the **Latest** integration run will be shown. You can use a text hotlink to open details of this latest run or **View all runs**. See [Reviewing Integration Run Details](/guides/integrations/setting-up-integrations/reviewing-integration-run-details).
4. Scroll further down the page to review the details of the Plan that was attached to the Account to create the Account Plan:
![Attachplans54]() * On the **Plan details** panel, you can:
* Check the details of the Plan.
* Use hotlink text links to open the **Plan details** page and details pages for associated entities - **Plan template** and **Product**.
5. Further details of the Plan attached to the Account are shown:
* **Standing charge**:
* On the **Plan details** panel, you can:
* Check the details of the Plan.
* Use hotlink text links to open the **Plan details** page and details pages for associated entities - **Plan template** and **Product**.
5. Further details of the Plan attached to the Account are shown:
* **Standing charge**:
![Attachplans55]() * **Pricing**:
* **Pricing**:
![Attach Plans69]() * **Adjustments**:
* **Adjustments**:
![Attachplans57]() * **Plan metadata**:
* **Custom fields**
* **External mappings**
* **Integration runs**
**Plan metadata!** The *Plan's metadata* shown at the bottom of the page should not be confused with the *Account Plan's metadata*, which is also shown immediately below the **Plan attachment details** card.
## Adding Attached Plans to or Removing from Contracts
From *Plan attachment details*, you can quickly add the attached Plan to a Contract or remove it from a Contract on the Account. This saves you having to open and edit the Plan attachment.
**Updating a Contract to add or remove an attached Plan.** Alternatively, you can open the details page of a Contract and add an attached Plan to it or remove an attached Plan from it. See [Adding Account Plans or Account Plan Groups to Contracts](https://docs.m3ter.com/guides/end-customer-accounts/creating-contracts-for-accounts/creating-and-managing-contracts#adding-account-plans-or-account-plan-groups-to-contracts). If you do this, then the **Plan attachment details** will update accordingly.
**To add an attached Plan to or remove it from a Contract:**
1. Select **Accounts**. The **Accounts** page opens.
2. Select the **Name** text of the Account for which you want to add an attached Plan to or remove from a Contract. The **Account** details page opens with the **Overview** tab selected.
3. Select the **Attached Plans** tab.
4. On the **Active and pending attached plans** panel, select the name hotlink text of the attached Plan you want to add to or remove from a Contract. The **Plan attachment** page opens and on the Plan attachment details panel:
* If the attached Plan has not been added to a Contract, an **Add to contract** button is available.
* If the attached Plan has been added to a Contract, a **Remove from contract** button is available.
5. To add the attached Plan to a Contract, select **Add to contract**. A **Select contract** modal opens and lists the Contracts created for the Account.
6. Select the Contract you want to add the attached Plan to and select **Confirm**. The modal closes and the Contract is shown under **Plan attachment details**:
* **Plan metadata**:
* **Custom fields**
* **External mappings**
* **Integration runs**
**Plan metadata!** The *Plan's metadata* shown at the bottom of the page should not be confused with the *Account Plan's metadata*, which is also shown immediately below the **Plan attachment details** card.
## Adding Attached Plans to or Removing from Contracts
From *Plan attachment details*, you can quickly add the attached Plan to a Contract or remove it from a Contract on the Account. This saves you having to open and edit the Plan attachment.
**Updating a Contract to add or remove an attached Plan.** Alternatively, you can open the details page of a Contract and add an attached Plan to it or remove an attached Plan from it. See [Adding Account Plans or Account Plan Groups to Contracts](https://docs.m3ter.com/guides/end-customer-accounts/creating-contracts-for-accounts/creating-and-managing-contracts#adding-account-plans-or-account-plan-groups-to-contracts). If you do this, then the **Plan attachment details** will update accordingly.
**To add an attached Plan to or remove it from a Contract:**
1. Select **Accounts**. The **Accounts** page opens.
2. Select the **Name** text of the Account for which you want to add an attached Plan to or remove from a Contract. The **Account** details page opens with the **Overview** tab selected.
3. Select the **Attached Plans** tab.
4. On the **Active and pending attached plans** panel, select the name hotlink text of the attached Plan you want to add to or remove from a Contract. The **Plan attachment** page opens and on the Plan attachment details panel:
* If the attached Plan has not been added to a Contract, an **Add to contract** button is available.
* If the attached Plan has been added to a Contract, a **Remove from contract** button is available.
5. To add the attached Plan to a Contract, select **Add to contract**. A **Select contract** modal opens and lists the Contracts created for the Account.
6. Select the Contract you want to add the attached Plan to and select **Confirm**. The modal closes and the Contract is shown under **Plan attachment details**:
![Attachplans67]() 7. To remove an attached Plan from a Contract, select **Remove from contract**. A confirmation popup appears:
7. To remove an attached Plan from a Contract, select **Remove from contract**. A confirmation popup appears:
 8. Select **Remove** to confirm. The popup closes and the Contract no longer shows under **Plan attachment details**.
## Replacing a Plan Attachment
From the *Plan attachment* page you can quickly replace an existing attached Plan. When you do this, the start date you define for the replacement attached Plan is used to automatically end date the existing attached Plan.
**To replace a Plan attachment:**
1. On the **Account** page, select the **Attached plans** tab.
2. On the **Active and pending attached plans** panel, select the name hotlink text of the attached Plan you want to replace:
8. Select **Remove** to confirm. The popup closes and the Contract no longer shows under **Plan attachment details**.
## Replacing a Plan Attachment
From the *Plan attachment* page you can quickly replace an existing attached Plan. When you do this, the start date you define for the replacement attached Plan is used to automatically end date the existing attached Plan.
**To replace a Plan attachment:**
1. On the **Account** page, select the **Attached plans** tab.
2. On the **Active and pending attached plans** panel, select the name hotlink text of the attached Plan you want to replace:
![Attachplans58]() The **Plan attachment** page opens:
The **Plan attachment** page opens:
![Attachplans59]() 3. Select **Replace plan attachment**. The **Replace plan attachment** page opens:
* **Plan attachment details**:
* The **Product** and **Plan** of the existing attached Plan will be pre-selected and you can edit these as required for the replacement.
* Enter a required **Start date** and optionally an **End date**.
* **Plan attachment settings**. The settings of the existing attached Plan are shown and you can edit these as required for the replacement:
* **Billing cycle date**.
* **Contract**.
* **Account billing hierarchy mode**.
* **Custom fields**. Any Custom Fields created for the existing attached Plan are shown and you can add, edit, or remove as required for the replacement.
**Important: Replacement start date must be before or equal to the existing end date!** If you enter a **Start date** for the replacement Plan attachment that is after the existing Plan attachment **End date**, you'll receive an error when you try to replace the existing Plan attachment.
4. Select **Replace plan attachment**. You are returned to the **Plan attachment** page for the replacement attached Plan:
3. Select **Replace plan attachment**. The **Replace plan attachment** page opens:
* **Plan attachment details**:
* The **Product** and **Plan** of the existing attached Plan will be pre-selected and you can edit these as required for the replacement.
* Enter a required **Start date** and optionally an **End date**.
* **Plan attachment settings**. The settings of the existing attached Plan are shown and you can edit these as required for the replacement:
* **Billing cycle date**.
* **Contract**.
* **Account billing hierarchy mode**.
* **Custom fields**. Any Custom Fields created for the existing attached Plan are shown and you can add, edit, or remove as required for the replacement.
**Important: Replacement start date must be before or equal to the existing end date!** If you enter a **Start date** for the replacement Plan attachment that is after the existing Plan attachment **End date**, you'll receive an error when you try to replace the existing Plan attachment.
4. Select **Replace plan attachment**. You are returned to the **Plan attachment** page for the replacement attached Plan:
![Attachplans60]() 5. Return to the **Attached plans** tab for the Account:
5. Return to the **Attached plans** tab for the Account:
![Attachplans61]() * We can see that the **Start date** entered for the replacement attached Plan has been used to update the **End date** for the originally attached Plan, which is now listed under **Previously attached plans**.
## Deleting an Account Plan
**To delete an Account Plan:**
1. On the **Active and pending attached plans** panel, select **Delete**:
* We can see that the **Start date** entered for the replacement attached Plan has been used to update the **End date** for the originally attached Plan, which is now listed under **Previously attached plans**.
## Deleting an Account Plan
**To delete an Account Plan:**
1. On the **Active and pending attached plans** panel, select **Delete**:
![]() A confirmation popup appears.
2. Select **Yes** to confirm the Account Plan deletion.
3. Alternatively, on the **Active and pending attached plans** panel, select the **Name** hotlink text of the Account Plan you want to delete. The **Plan attachment** page opens.
4. Select **Delete**:
A confirmation popup appears.
2. Select **Yes** to confirm the Account Plan deletion.
3. Alternatively, on the **Active and pending attached plans** panel, select the **Name** hotlink text of the Account Plan you want to delete. The **Plan attachment** page opens.
4. Select **Delete**:
 A confirmation popup appears.
5. Select **Yes** to confirm the Account Plan deletion. You are taken back to the **Attached plans** tab.
**Important!**
* **Deleting the Plan**. Deleting the *Account Plan* does not mean the *Plan* is deleted - the Account Plan is created only when you attach a Plan to an Account and remains distinct from the Plan you attached. If you want to delete a Plan, you must go to **Pricing>Plans**, select the **Product** you created the Plan for, and then delete it from there. See [Editing and Deleting Plan Templates and Plans](/guides/plans-and-pricing/working-with-plan-templates-and-plans/editing-plan-templates-and-plans).
* **Removing or Changing Account Plans on Accounts**. If you remove or swap out Account Plans on and Account after Bills have been created on the basis of the Account Plans on the Account, simply recalculating those existing Bills will not reflect the change of Account Plans. You must first manually delete the previously created Bills and then re-run billing. See [Recalculating Bills after Billing Configuration Changes](/guides/billing-and-usage-data/running-viewing-and-managing-bills/troubleshooting-bills#recalculating-bills-after-billing-configuration-changes) in the [Troubleshooting Bills](/guides/billing-and-usage-data/running-viewing-and-managing-bills/troubleshooting-bills) topic.
# Creating and Managing Accounts
Source: https://docs.m3ter.com/guides/end-customer-accounts/creating-an-account
Your end customer **Accounts** will typically be created in m3ter as a result of an integration with one of your 3rd-party systems. However, you might need to create an Account manually during the set up phase of your Organization and for testing before you switch to a production environment. This topic explains how to create, manage, and delete Accounts in the Console:
* [Creating Accounts](/guides/end-customer-accounts/creating-an-account#creating-accounts)
* [Editing and Deleting Accounts](/guides/end-customer-accounts/creating-an-account#editing-and-deleting-accounts)
* [Managing the Accounts Page](/guides/end-customer-accounts/creating-an-account#managing-the-accounts-page)
**Tip: Accounts Created for Integrations?** In typical production settings, your end customer Accounts will be created in m3ter as a result of an Integration with one of your 3rd-party systems. For more details, see [m3ter Integrations](/guides/integrations/m3ter-integrations).
## Creating Accounts
You can quickly create an Account manually in the Console. Accounts do not belong to Products to allow for cases where an end-customer consumes more that one of your products or services.
**To create an Account:**
1. Select **Accounts**. The **Accounts** page opens.
2. Select **Create account**. The **Accounts>Create** page opens.
3. Enter the **Account details**:
* **Name**. The customer’s name. Required field.
* **Code**. Unique identifier for the **Account**. You will need this **Code** as a unique id for API calls, such as a call to make usage data submissions for the **Account**. It will also be used to identify the **Account** in any 3rd-party systems you integrate with m3ter. Required field.
* **Email Address**. Required field.
* **Parent account**. Optional - if you want the Account to be the Child of another Account, then select the Parent Account. For more details see [Working with Parent/Child Accounts](/guides/end-customer-accounts/creating-and-working-with-child-accounts).
**Warnings:**
* **Only single tier Parent/Child Accounts are allowed!** An Account cannot be made a Child of another Child Account or made a Child of itself. If you select an Account that means the Account would become a *grandchild Account*, then you will receive an error when you try to save.
* **Accounts selection list restricted to twenty!** If you have a large number (more than twenty) Accounts in your Organization, then the Account you want to select as the Parent might not show in the drop-down list. To find the Account you want, start to type the Account name and the list will be filtered to match the entered text string.
4. Enter the optional **Address** details for the Account:
* **Address line 1**.
* **Address line 2**.
* **City / town**.
* **Region / province**.
* **Postcode / ZIP**.
* **Country**.
**Warning: Personally Identifiable Information (PII)!** Under the Data Processing Agreement, the only fields you are allowed to use for any of your end-customer's PII are **Name**, **Address**, and **Email Address**. See the [Personally Identifiable Information (PII)](/guides/end-customer-accounts/managing-accounts-best-practices#personally-identifiable-information-pii) section for more details.
5. Enter any **Bill settings** for the Account:
* **Currency**. Use the drop-down list to select the currency you want to use as the billing currency for the Account. Note that:
* If you select a currency for the Account, this will override the billing currency you've defined at Organizational level.
* If you leave this blank, the billing currency defined at Organizational level will be used for billing on the Account. See [Creating and Managing Currencies](/guides/organization-and-access-management/viewing-and-editing-organization/creating-and-managing-currencies).
* Note that if you attach a Plan to the Account that uses a different *pricing currency* to the selected *billing currency*, then you must add the relevant currency conversion rate at Organization level to ensure the billing process can convert line items calculated using the pricing currency into the selected billing currency. If you don't add these currency conversion rates, then bills will fail for the Account. See [Adding Currency Conversion Rates](/guides/organization-and-access-management/viewing-and-editing-organization/creating-and-managing-currencies#adding-currency-conversion-rates).
* **Billing cycle date**. Optional setting, which sets the date when the first Bill is created and acts as a reference for when in the applied billing frequency period subsequent bills for the Account are created:
* For example, suppose you attach a Plan to the Account that is configured for monthly billing frequency and you've defined the period the Plan will apply to the Account to be from January 1st, 2022 until January 1st, 2023. You then set a **Billing cycle date** of February 15th, 2022. The first Bill will be created for the Account on February 15th, and subsequent Bills created on the 15th of the months following for the remainder of the billing period - March 15th, April 15th, and so on.
* If you leave this blank, then Epoch dates from your Organization's configuration will be used as the **Billing cycle date** for the Account instead - see [Viewing and Editing Organization Configuration](/guides/organization-and-access-management/viewing-and-editing-organization/viewing-and-editing-organization-configuration).
* Note that you can override the **Billing cycle date** set for the Account when you attach a Plan to the Account to create an Account Plan - see [Attaching Plans to an Account](/guides/end-customer-accounts/attaching-plans-to-an-account).
* **Credit application order**. Optional setting. Select to define the order in which any Prepayment or Balance credit amounts on the Account are to be drawn-down for billing:
* **Use organization-wide configuration**. Default selection. If enabled, the setting selected at Organization level for credit draw-down order will be used - it will be shown in brackets. If you select any of the other four options, the Organization level setting will be overridden. See [Viewing and Editing Organization Configuration](/guides/organization-and-access-management/viewing-and-editing-organization/viewing-and-editing-organization-configuration).
* **Prepayment then balance**. Draw-down against Prepayment credit before Balance credit.
* **Balance then prepayment**. Draw-down against Balance credit before Prepayment credit.
* **Prepayment only**. Only draw-down against Prepayment credit.
* **Balance only**. Only draw-down against Balance credit.
**Important!** If the Account belongs to a Parent/Child Account hierarchy, then the **Credit application order** settings are *not available*, and the draw-down order defaults always to Prepayment then Balance order.
* **Days before bill due.** Optional setting. Enter the number of days after the Bill generation date that you want to show on Bills as the due date. This is useful for cases where you want Bills for different end-customer Accounts to show different due dates:
* You can also define this at Organizational level - see [Viewing and Editing Organization Configuration](/guides/organization-and-access-management/viewing-and-editing-organization/viewing-and-editing-organization-configuration). The setting at individual Account level takes precedence over any setting at Organizational level.
* **Purchase order number**. Optional attribute. Allows you to assign an order number to an end-customer Account. The purchase order number will then come through into invoicing. For example, your financial systems might require this as a reference for clearing payments.
**Warning: Changing Account Purchase Order Number!** If you have generated Bills for an Account that has a Purchase Order number assigned to it and then changed the number, when you recalculate Bills the old number will persist on **Bill Details** and not be updated. This is expected behavior. If you need a Bill to show the new Purchase Order number, you must delete the Bill and regenerate it.
6. Enter any **Bill statements** settings for the Account. These are optional allowing you to define how you want Bill Statements to be generated for the Account. Any settings at Account level will override Organization level settings for Bill Statements:
* **Statement definition**. Optional setting. Select a Statement definition on which Statements generated for the Account will be based.
* **Auto-generate statements**. Optional setting. Select for the formats in which Statements for the Account will be generated when Bills for the Account are approved or locked - four options:
* **Use organization-wide configuration**. Default selection. If enabled, the setting selected at Organizational-level for auto-generation of statements will be used - it will be shown in brackets. If you select any of the other three options, the Organization level setting will be overridden. See [Viewing and Editing Organization Configuration](/guides/organization-and-access-management/viewing-and-editing-organization/viewing-and-editing-organization-configuration).
* **None**. Statements are not auto-generated.
* **JSON**. Statements are generated only in JSON format.
* **JSON and CSV**. Statements are generated in both JSON and CSV formats.
**Tip: Bill Statements?** For more on setting up and generating Bill Statements for end customer Accounts, see [Working with Bill Statements](/guides/billing-and-usage-data/running-viewing-and-managing-bills/working-with-bill-statements).
7. Create any **Custom fields** for the Account:
* You can define **Custom Fields** when creating an Account or edit it at a later date to do this. Any Custom Fields you create for an Account override Custom Fields you've created for Accounts at Organizational level. We strongly recommend reviewing [Working with Custom Fields](/guides/creating-and-managing-products/working-with-custom-fields) before you create Custom Fields.
8. Select **Create account**. The **Account Details** page opens with the **Overview** tab selected.
A confirmation popup appears.
5. Select **Yes** to confirm the Account Plan deletion. You are taken back to the **Attached plans** tab.
**Important!**
* **Deleting the Plan**. Deleting the *Account Plan* does not mean the *Plan* is deleted - the Account Plan is created only when you attach a Plan to an Account and remains distinct from the Plan you attached. If you want to delete a Plan, you must go to **Pricing>Plans**, select the **Product** you created the Plan for, and then delete it from there. See [Editing and Deleting Plan Templates and Plans](/guides/plans-and-pricing/working-with-plan-templates-and-plans/editing-plan-templates-and-plans).
* **Removing or Changing Account Plans on Accounts**. If you remove or swap out Account Plans on and Account after Bills have been created on the basis of the Account Plans on the Account, simply recalculating those existing Bills will not reflect the change of Account Plans. You must first manually delete the previously created Bills and then re-run billing. See [Recalculating Bills after Billing Configuration Changes](/guides/billing-and-usage-data/running-viewing-and-managing-bills/troubleshooting-bills#recalculating-bills-after-billing-configuration-changes) in the [Troubleshooting Bills](/guides/billing-and-usage-data/running-viewing-and-managing-bills/troubleshooting-bills) topic.
# Creating and Managing Accounts
Source: https://docs.m3ter.com/guides/end-customer-accounts/creating-an-account
Your end customer **Accounts** will typically be created in m3ter as a result of an integration with one of your 3rd-party systems. However, you might need to create an Account manually during the set up phase of your Organization and for testing before you switch to a production environment. This topic explains how to create, manage, and delete Accounts in the Console:
* [Creating Accounts](/guides/end-customer-accounts/creating-an-account#creating-accounts)
* [Editing and Deleting Accounts](/guides/end-customer-accounts/creating-an-account#editing-and-deleting-accounts)
* [Managing the Accounts Page](/guides/end-customer-accounts/creating-an-account#managing-the-accounts-page)
**Tip: Accounts Created for Integrations?** In typical production settings, your end customer Accounts will be created in m3ter as a result of an Integration with one of your 3rd-party systems. For more details, see [m3ter Integrations](/guides/integrations/m3ter-integrations).
## Creating Accounts
You can quickly create an Account manually in the Console. Accounts do not belong to Products to allow for cases where an end-customer consumes more that one of your products or services.
**To create an Account:**
1. Select **Accounts**. The **Accounts** page opens.
2. Select **Create account**. The **Accounts>Create** page opens.
3. Enter the **Account details**:
* **Name**. The customer’s name. Required field.
* **Code**. Unique identifier for the **Account**. You will need this **Code** as a unique id for API calls, such as a call to make usage data submissions for the **Account**. It will also be used to identify the **Account** in any 3rd-party systems you integrate with m3ter. Required field.
* **Email Address**. Required field.
* **Parent account**. Optional - if you want the Account to be the Child of another Account, then select the Parent Account. For more details see [Working with Parent/Child Accounts](/guides/end-customer-accounts/creating-and-working-with-child-accounts).
**Warnings:**
* **Only single tier Parent/Child Accounts are allowed!** An Account cannot be made a Child of another Child Account or made a Child of itself. If you select an Account that means the Account would become a *grandchild Account*, then you will receive an error when you try to save.
* **Accounts selection list restricted to twenty!** If you have a large number (more than twenty) Accounts in your Organization, then the Account you want to select as the Parent might not show in the drop-down list. To find the Account you want, start to type the Account name and the list will be filtered to match the entered text string.
4. Enter the optional **Address** details for the Account:
* **Address line 1**.
* **Address line 2**.
* **City / town**.
* **Region / province**.
* **Postcode / ZIP**.
* **Country**.
**Warning: Personally Identifiable Information (PII)!** Under the Data Processing Agreement, the only fields you are allowed to use for any of your end-customer's PII are **Name**, **Address**, and **Email Address**. See the [Personally Identifiable Information (PII)](/guides/end-customer-accounts/managing-accounts-best-practices#personally-identifiable-information-pii) section for more details.
5. Enter any **Bill settings** for the Account:
* **Currency**. Use the drop-down list to select the currency you want to use as the billing currency for the Account. Note that:
* If you select a currency for the Account, this will override the billing currency you've defined at Organizational level.
* If you leave this blank, the billing currency defined at Organizational level will be used for billing on the Account. See [Creating and Managing Currencies](/guides/organization-and-access-management/viewing-and-editing-organization/creating-and-managing-currencies).
* Note that if you attach a Plan to the Account that uses a different *pricing currency* to the selected *billing currency*, then you must add the relevant currency conversion rate at Organization level to ensure the billing process can convert line items calculated using the pricing currency into the selected billing currency. If you don't add these currency conversion rates, then bills will fail for the Account. See [Adding Currency Conversion Rates](/guides/organization-and-access-management/viewing-and-editing-organization/creating-and-managing-currencies#adding-currency-conversion-rates).
* **Billing cycle date**. Optional setting, which sets the date when the first Bill is created and acts as a reference for when in the applied billing frequency period subsequent bills for the Account are created:
* For example, suppose you attach a Plan to the Account that is configured for monthly billing frequency and you've defined the period the Plan will apply to the Account to be from January 1st, 2022 until January 1st, 2023. You then set a **Billing cycle date** of February 15th, 2022. The first Bill will be created for the Account on February 15th, and subsequent Bills created on the 15th of the months following for the remainder of the billing period - March 15th, April 15th, and so on.
* If you leave this blank, then Epoch dates from your Organization's configuration will be used as the **Billing cycle date** for the Account instead - see [Viewing and Editing Organization Configuration](/guides/organization-and-access-management/viewing-and-editing-organization/viewing-and-editing-organization-configuration).
* Note that you can override the **Billing cycle date** set for the Account when you attach a Plan to the Account to create an Account Plan - see [Attaching Plans to an Account](/guides/end-customer-accounts/attaching-plans-to-an-account).
* **Credit application order**. Optional setting. Select to define the order in which any Prepayment or Balance credit amounts on the Account are to be drawn-down for billing:
* **Use organization-wide configuration**. Default selection. If enabled, the setting selected at Organization level for credit draw-down order will be used - it will be shown in brackets. If you select any of the other four options, the Organization level setting will be overridden. See [Viewing and Editing Organization Configuration](/guides/organization-and-access-management/viewing-and-editing-organization/viewing-and-editing-organization-configuration).
* **Prepayment then balance**. Draw-down against Prepayment credit before Balance credit.
* **Balance then prepayment**. Draw-down against Balance credit before Prepayment credit.
* **Prepayment only**. Only draw-down against Prepayment credit.
* **Balance only**. Only draw-down against Balance credit.
**Important!** If the Account belongs to a Parent/Child Account hierarchy, then the **Credit application order** settings are *not available*, and the draw-down order defaults always to Prepayment then Balance order.
* **Days before bill due.** Optional setting. Enter the number of days after the Bill generation date that you want to show on Bills as the due date. This is useful for cases where you want Bills for different end-customer Accounts to show different due dates:
* You can also define this at Organizational level - see [Viewing and Editing Organization Configuration](/guides/organization-and-access-management/viewing-and-editing-organization/viewing-and-editing-organization-configuration). The setting at individual Account level takes precedence over any setting at Organizational level.
* **Purchase order number**. Optional attribute. Allows you to assign an order number to an end-customer Account. The purchase order number will then come through into invoicing. For example, your financial systems might require this as a reference for clearing payments.
**Warning: Changing Account Purchase Order Number!** If you have generated Bills for an Account that has a Purchase Order number assigned to it and then changed the number, when you recalculate Bills the old number will persist on **Bill Details** and not be updated. This is expected behavior. If you need a Bill to show the new Purchase Order number, you must delete the Bill and regenerate it.
6. Enter any **Bill statements** settings for the Account. These are optional allowing you to define how you want Bill Statements to be generated for the Account. Any settings at Account level will override Organization level settings for Bill Statements:
* **Statement definition**. Optional setting. Select a Statement definition on which Statements generated for the Account will be based.
* **Auto-generate statements**. Optional setting. Select for the formats in which Statements for the Account will be generated when Bills for the Account are approved or locked - four options:
* **Use organization-wide configuration**. Default selection. If enabled, the setting selected at Organizational-level for auto-generation of statements will be used - it will be shown in brackets. If you select any of the other three options, the Organization level setting will be overridden. See [Viewing and Editing Organization Configuration](/guides/organization-and-access-management/viewing-and-editing-organization/viewing-and-editing-organization-configuration).
* **None**. Statements are not auto-generated.
* **JSON**. Statements are generated only in JSON format.
* **JSON and CSV**. Statements are generated in both JSON and CSV formats.
**Tip: Bill Statements?** For more on setting up and generating Bill Statements for end customer Accounts, see [Working with Bill Statements](/guides/billing-and-usage-data/running-viewing-and-managing-bills/working-with-bill-statements).
7. Create any **Custom fields** for the Account:
* You can define **Custom Fields** when creating an Account or edit it at a later date to do this. Any Custom Fields you create for an Account override Custom Fields you've created for Accounts at Organizational level. We strongly recommend reviewing [Working with Custom Fields](/guides/creating-and-managing-products/working-with-custom-fields) before you create Custom Fields.
8. Select **Create account**. The **Account Details** page opens with the **Overview** tab selected.
![]() Note that:
* The unique `id` generated for the new Account is listed under **Account Details** and you can copy this directly to your clipboard.
* Any usage data ingested for the Account will be linked strictly to the Account `id`.
* You can scroll down the page to review the **Account metadata**. See [Reviewing Account Metadata](/guides/end-customer-accounts/working-in-account-overview#reviewing-account-metadata) for more details.
**Tip: Working in Account Overview?** For more details and guidance on the Account **Overview** tab, see [Working in Account Overview](/guides/end-customer-accounts/working-in-account-overview).
## Editing and Deleting Accounts
You can edit or delete Accounts in the Console.
**Warning: Deleting Accounts for which you've already submitted usage data!** If you delete an Account for which you've already submitted usage data, that usage data is *permanently dissociated* from the Account. Even if you recreate a new Account *with the same Code* as the Account you deleted earlier, the usage data ingested for the deleted Account is no longer available for billing against the newly created Account using the same Code. This means you'll have to re-submit the usage data for the recreated Account if you want to use the data for billing the Account. See [Editing and Deleting Accounts - Implications for Usage Data](/guides/end-customer-accounts/managing-accounts-best-practices#editing-and-deleting-accounts-implications-for-usage-data) for more details.
**To edit or delete an Account:**
1. Select **Accounts**. The **Accounts** listing page opens.
2. Search for the Account you want to edit or delete.
3. If you want to edit the Account, select the **NAME** hotlink text. The **Account** page opens with the **Overview** tab selected.
4. On the **Account details** panel select **Edit**. The **Edit** page opens.
5. Make your editing changes, and click **Update account**. You are returned to the **Account** page.
6. If you want to delete the Account, stay on the **Accounts** listing page and select the **Delete** button for the Account:
Note that:
* The unique `id` generated for the new Account is listed under **Account Details** and you can copy this directly to your clipboard.
* Any usage data ingested for the Account will be linked strictly to the Account `id`.
* You can scroll down the page to review the **Account metadata**. See [Reviewing Account Metadata](/guides/end-customer-accounts/working-in-account-overview#reviewing-account-metadata) for more details.
**Tip: Working in Account Overview?** For more details and guidance on the Account **Overview** tab, see [Working in Account Overview](/guides/end-customer-accounts/working-in-account-overview).
## Editing and Deleting Accounts
You can edit or delete Accounts in the Console.
**Warning: Deleting Accounts for which you've already submitted usage data!** If you delete an Account for which you've already submitted usage data, that usage data is *permanently dissociated* from the Account. Even if you recreate a new Account *with the same Code* as the Account you deleted earlier, the usage data ingested for the deleted Account is no longer available for billing against the newly created Account using the same Code. This means you'll have to re-submit the usage data for the recreated Account if you want to use the data for billing the Account. See [Editing and Deleting Accounts - Implications for Usage Data](/guides/end-customer-accounts/managing-accounts-best-practices#editing-and-deleting-accounts-implications-for-usage-data) for more details.
**To edit or delete an Account:**
1. Select **Accounts**. The **Accounts** listing page opens.
2. Search for the Account you want to edit or delete.
3. If you want to edit the Account, select the **NAME** hotlink text. The **Account** page opens with the **Overview** tab selected.
4. On the **Account details** panel select **Edit**. The **Edit** page opens.
5. Make your editing changes, and click **Update account**. You are returned to the **Account** page.
6. If you want to delete the Account, stay on the **Accounts** listing page and select the **Delete** button for the Account:
![]() A confirmation popup opens:
A confirmation popup opens:
![]() 7. Select **Yes** to confirm the delete action.
## Managing the Accounts Page
When working with Accounts, you can quickly reorder columns or switch columns on or off to suit your current operational purposes. For example, you might want to show the **Created by** and **Last modified** dates as the first two columns or show additional columns for **Currency** and **Parent account**:
* [Reordering Accounts Page Columns](/guides/end-customer-accounts/creating-an-account#reordering-accounts-page-columns)
* [Switching Accounts Page Columns On and Off](/guides/end-customer-accounts/creating-an-account#switching-accounts-page-columns-on-and-off)
### Reordering Accounts Page Columns
**To reorder columns for the Accounts page:**
1. Select **Accounts**. The **Accounts** page opens with columns in the default order.
2. Select the vertical **Columns** button on the right-hand side of the list:
7. Select **Yes** to confirm the delete action.
## Managing the Accounts Page
When working with Accounts, you can quickly reorder columns or switch columns on or off to suit your current operational purposes. For example, you might want to show the **Created by** and **Last modified** dates as the first two columns or show additional columns for **Currency** and **Parent account**:
* [Reordering Accounts Page Columns](/guides/end-customer-accounts/creating-an-account#reordering-accounts-page-columns)
* [Switching Accounts Page Columns On and Off](/guides/end-customer-accounts/creating-an-account#switching-accounts-page-columns-on-and-off)
### Reordering Accounts Page Columns
**To reorder columns for the Accounts page:**
1. Select **Accounts**. The **Accounts** page opens with columns in the default order.
2. Select the vertical **Columns** button on the right-hand side of the list:
![]() 3. On the reorder columns panel that appears, drag-and-drop columns to give the order you want to show on the page:
3. On the reorder columns panel that appears, drag-and-drop columns to give the order you want to show on the page:
![]() * Repeat until you have a top-bottom order of columns that you want to appear in left-right order on the page.
5. Select **Columns** again. The reorder columns panel closes and the **Accounts** page shows the reordered columns:
* Repeat until you have a top-bottom order of columns that you want to appear in left-right order on the page.
5. Select **Columns** again. The reorder columns panel closes and the **Accounts** page shows the reordered columns:
![]() ### Switching Accounts Page Columns On and Off
**To reorder columns for the Accounts page:**
1. Select **Accounts**. The **Accounts** page opens with columns in the default order.
2. Select the vertical **Columns** button on the right-hand side of the list:
### Switching Accounts Page Columns On and Off
**To reorder columns for the Accounts page:**
1. Select **Accounts**. The **Accounts** page opens with columns in the default order.
2. Select the vertical **Columns** button on the right-hand side of the list:
![]() 3. Use the **Columns** panel that appears to switch on or off any columns you want to show or hide from the list:
3. Use the **Columns** panel that appears to switch on or off any columns you want to show or hide from the list:
![]() * In this example, we've switched on two additional columns for **Currency** and **Parent account** that are hidden in the default arrangement of the page.
* Note that the **Name** and **Actions** columns are fixed and you cannot switch them off to hide them.
4. Select **Columns** again. The **Columns** panel closes and the **Accounts** page shows the columns you have switched on:
* In this example, we've switched on two additional columns for **Currency** and **Parent account** that are hidden in the default arrangement of the page.
* Note that the **Name** and **Actions** columns are fixed and you cannot switch them off to hide them.
4. Select **Columns** again. The **Columns** panel closes and the **Accounts** page shows the columns you have switched on:
![]() # Creating and Managing External Mappings for Accounts
Source: https://docs.m3ter.com/guides/end-customer-accounts/creating-and-managing-external-mappings-for-accounts
When you integrate your 3rd-party external systems with the m3ter platform, external system entities and fields are mapped to m3ter entities and fields. *External Mappings* are created and act as mapping reference lookups for which entities and fields have been mapped across two or more systems.
As you set up and configure integrations, you might want to review, create, and manage the External Mappings created for a specific Account:
* You can review the mappings created for an Account on the **Overview** tab of the Account's page, where they are listed under the **Account metadata** panel.
* You can also create new External Mappings for the Account from panel.
**Tip: External Mappings for your Integrations?** You can create and manage all External Mappings for your Integrations from the main **Integrations>External Mappings** page, including those that reference your m3ter Accounts - see [Creating and Managing External Mappings](/guides/integrations/setting-up-integrations/creating-and-managing-external-mappings).
**To create and manage External mappings for an Account:**
1. Select **Accounts**. The **Accounts** page opens
2. Select the **Name** text of the Account you want to review or create External mappings for. The **Account** page opens with the **Overview** tab selected.
3. Scroll down the page to **Account metadata**.
4. Select **External mappings**:
# Creating and Managing External Mappings for Accounts
Source: https://docs.m3ter.com/guides/end-customer-accounts/creating-and-managing-external-mappings-for-accounts
When you integrate your 3rd-party external systems with the m3ter platform, external system entities and fields are mapped to m3ter entities and fields. *External Mappings* are created and act as mapping reference lookups for which entities and fields have been mapped across two or more systems.
As you set up and configure integrations, you might want to review, create, and manage the External Mappings created for a specific Account:
* You can review the mappings created for an Account on the **Overview** tab of the Account's page, where they are listed under the **Account metadata** panel.
* You can also create new External Mappings for the Account from panel.
**Tip: External Mappings for your Integrations?** You can create and manage all External Mappings for your Integrations from the main **Integrations>External Mappings** page, including those that reference your m3ter Accounts - see [Creating and Managing External Mappings](/guides/integrations/setting-up-integrations/creating-and-managing-external-mappings).
**To create and manage External mappings for an Account:**
1. Select **Accounts**. The **Accounts** page opens
2. Select the **Name** text of the Account you want to review or create External mappings for. The **Account** page opens with the **Overview** tab selected.
3. Scroll down the page to **Account metadata**.
4. Select **External mappings**:
![Ext Mapping70]() * The **External system** and **External table** mapped to are shown - such as **Xero - Contact** in the above example. The **External entity ID** mapped to is also shown.
* If a listed External mapping is linked to an Integration, under **Linked integration** a hotlink text will be shown which you can use to open the Integration.
* Under **Actions**, you can edit or delete the External mapping.
* If the Account has multiple External mappings created for it, you can use *Search external mappings* to search by **External table** and **External entity ID** and filter the list.
5. Select **Create** **external mapping**.
* Alternatively, on the **Account actions** menu, select **External mappings>Create external mapping**:
* The **External system** and **External table** mapped to are shown - such as **Xero - Contact** in the above example. The **External entity ID** mapped to is also shown.
* If a listed External mapping is linked to an Integration, under **Linked integration** a hotlink text will be shown which you can use to open the Integration.
* Under **Actions**, you can edit or delete the External mapping.
* If the Account has multiple External mappings created for it, you can use *Search external mappings* to search by **External table** and **External entity ID** and filter the list.
5. Select **Create** **external mapping**.
* Alternatively, on the **Account actions** menu, select **External mappings>Create external mapping**:
![]() The **Create** page opens at **Stage 1 - Select mapping type** and the **Entity type** is preselected for **Account**.
6. Using the **External system** drop-down list, select the external system referenced for the mapping type.
**Tip: Other External systems showing?** Note that you can configure mappings for any of the integrations with external systems set up for your m3ter Organization. This includes any custom integrations as well as native integrations
7. Using the **External table** drop-down list, select the table in the selected 3rd-party system that you want to use for the mapping type:
The **Create** page opens at **Stage 1 - Select mapping type** and the **Entity type** is preselected for **Account**.
6. Using the **External system** drop-down list, select the external system referenced for the mapping type.
**Tip: Other External systems showing?** Note that you can configure mappings for any of the integrations with external systems set up for your m3ter Organization. This includes any custom integrations as well as native integrations
7. Using the **External table** drop-down list, select the table in the selected 3rd-party system that you want to use for the mapping type:
![]() * In this example, we've chosen to create an **Account \<> Customer** mapping for **m3ter \<> Chargebee**.
8. When you've completed the mapping type set up, select **Next**. You're taken to **Stage 2 - Add mapping IDs:**
* The **m3ter entity type**, **External system**, and **External table** you configured for **Stage 1** are shown.
9. On **External mappings details**:
* The **m3ter entity** drop-down is preselected for the **Name** of the Account you started the workflow from.
* **Linked integration**. Note that because you started the create external mapping workflow from the Account metadata panel, the external mapping will *not be linked* to a specific integration with the selected external system. See [Creating Linked External Mappings](/guides/integrations/setting-up-integrations/creating-and-managing-external-mappings#creating-linked-external-mappings) for more details.
10. In the **External entity ID** field, enter the ID of the external system entity you want to map to.
**Tip: Possibles values might show!** Note that if the possible values for the **External entity ID** field can be fetched for the **External system**, then you can use a drop-down list to select the value for this field from the list of possible values returned.
* In this example, we've chosen to create an **Account \<> Customer** mapping for **m3ter \<> Chargebee**.
8. When you've completed the mapping type set up, select **Next**. You're taken to **Stage 2 - Add mapping IDs:**
* The **m3ter entity type**, **External system**, and **External table** you configured for **Stage 1** are shown.
9. On **External mappings details**:
* The **m3ter entity** drop-down is preselected for the **Name** of the Account you started the workflow from.
* **Linked integration**. Note that because you started the create external mapping workflow from the Account metadata panel, the external mapping will *not be linked* to a specific integration with the selected external system. See [Creating Linked External Mappings](/guides/integrations/setting-up-integrations/creating-and-managing-external-mappings#creating-linked-external-mappings) for more details.
10. In the **External entity ID** field, enter the ID of the external system entity you want to map to.
**Tip: Possibles values might show!** Note that if the possible values for the **External entity ID** field can be fetched for the **External system**, then you can use a drop-down list to select the value for this field from the list of possible values returned.
![]() 11. Select **Create external mapping**. You are returned to the **Account details** page where the new mapping is listed for **Account metadata** under **External mappings**:
11. Select **Create external mapping**. You are returned to the **Account details** page where the new mapping is listed for **Account metadata** under **External mappings**:
![Ext Mapping71]() # Working with Parent/Child Accounts
Source: https://docs.m3ter.com/guides/end-customer-accounts/creating-and-working-with-child-accounts
You can create *Child Accounts* for a main or *Parent Account* in m3ter. You might want to do this if your Organization has end customers with multiple Accounts and instead of issuing multiple Bills to the end customer, you want to provide them with a Bill for a single Parent Account that pools usage data across multiple Child Accounts.
How Bills are calculated and compiled for Parent/Child Accounts depends upon:
* The *Account Plan location* - whether it is on the Parent or Child Accounts.
* The *billing mode settings* you use when you attach a priced Plan to Parent/Child Accounts to create Account Plans for the Accounts.
For more details on the configuration options available for controlling billing for Parent/Child Accounts, see [Billing Hierarchy Modes for Parent/Child Accounts](/guides/end-customer-accounts/creating-and-working-with-child-accounts/billing-for-parent-child-accounts).
This topic explains how to create a Child Account and how to review and work with Child Accounts and their Parent Accounts in the Console:
* [Creating Child Accounts](/guides/end-customer-accounts/creating-and-working-with-child-accounts#creating-child-accounts)
* [Reviewing Parent/Child Accounts](/guides/end-customer-accounts/creating-and-working-with-child-accounts#reviewing-parentchild-accounts)
* [Recalculating and Running Billing for Parent/Child Accounts](/guides/end-customer-accounts/creating-and-working-with-child-accounts#recalculating-and-running-billing-for-parentchild-accounts)
**Important!**
* **Parent/Child billing for Recurring Charges not supported**. If you price a Plan using a Counter to apply unit-based pricing for recurring subscription charges and attach the Plan to Parent or Child Accounts, Parent/Child billing is not supported for the recurring charges.
* **Limit on Child Accounts.** A Parent Account can have a maximum of 999 Child Accounts.
* **Grandparent Account Creation is Blocked.** To prevent circular reference, if you try to create a Parent for an Account that has a Child Account, the request will be blocked.
## Creating Child Accounts
You can define an Account as a Child Account either when you first create it or by updating an existing Account. See [Creating and Managing Accounts](/guides/end-customer-accounts/creating-an-account).
## Reviewing Parent/Child Accounts
When you have created a Parent Account for one or more Child Accounts, you can go to the *Account Overview* page of the Parent Account and review its Child Accounts.
**Tip: Is an Account a Child or a Parent?** If you want to check whether or not an Account is linked to another Account as Child or Parent, then open the Account - only Parent Accounts or Accounts that have *not been designated* as **Child Accounts** will have a **Child Accounts** tab.
**To review Child Accounts:**
1. Select **Accounts**. The **Accounts** page opens.
2. Select the **Name** text of the Parent Account. The **Account** page opens with the **Overview** tab selected.
3. Select the **Child accounts** tab. The **Child accounts** panel lists any Accounts that are defined as children:
# Working with Parent/Child Accounts
Source: https://docs.m3ter.com/guides/end-customer-accounts/creating-and-working-with-child-accounts
You can create *Child Accounts* for a main or *Parent Account* in m3ter. You might want to do this if your Organization has end customers with multiple Accounts and instead of issuing multiple Bills to the end customer, you want to provide them with a Bill for a single Parent Account that pools usage data across multiple Child Accounts.
How Bills are calculated and compiled for Parent/Child Accounts depends upon:
* The *Account Plan location* - whether it is on the Parent or Child Accounts.
* The *billing mode settings* you use when you attach a priced Plan to Parent/Child Accounts to create Account Plans for the Accounts.
For more details on the configuration options available for controlling billing for Parent/Child Accounts, see [Billing Hierarchy Modes for Parent/Child Accounts](/guides/end-customer-accounts/creating-and-working-with-child-accounts/billing-for-parent-child-accounts).
This topic explains how to create a Child Account and how to review and work with Child Accounts and their Parent Accounts in the Console:
* [Creating Child Accounts](/guides/end-customer-accounts/creating-and-working-with-child-accounts#creating-child-accounts)
* [Reviewing Parent/Child Accounts](/guides/end-customer-accounts/creating-and-working-with-child-accounts#reviewing-parentchild-accounts)
* [Recalculating and Running Billing for Parent/Child Accounts](/guides/end-customer-accounts/creating-and-working-with-child-accounts#recalculating-and-running-billing-for-parentchild-accounts)
**Important!**
* **Parent/Child billing for Recurring Charges not supported**. If you price a Plan using a Counter to apply unit-based pricing for recurring subscription charges and attach the Plan to Parent or Child Accounts, Parent/Child billing is not supported for the recurring charges.
* **Limit on Child Accounts.** A Parent Account can have a maximum of 999 Child Accounts.
* **Grandparent Account Creation is Blocked.** To prevent circular reference, if you try to create a Parent for an Account that has a Child Account, the request will be blocked.
## Creating Child Accounts
You can define an Account as a Child Account either when you first create it or by updating an existing Account. See [Creating and Managing Accounts](/guides/end-customer-accounts/creating-an-account).
## Reviewing Parent/Child Accounts
When you have created a Parent Account for one or more Child Accounts, you can go to the *Account Overview* page of the Parent Account and review its Child Accounts.
**Tip: Is an Account a Child or a Parent?** If you want to check whether or not an Account is linked to another Account as Child or Parent, then open the Account - only Parent Accounts or Accounts that have *not been designated* as **Child Accounts** will have a **Child Accounts** tab.
**To review Child Accounts:**
1. Select **Accounts**. The **Accounts** page opens.
2. Select the **Name** text of the Parent Account. The **Account** page opens with the **Overview** tab selected.
3. Select the **Child accounts** tab. The **Child accounts** panel lists any Accounts that are defined as children:
![]() 4. If you want to review the details of a Child Account, select its **Name** text. The Account page for the selected Child Account opens with the **Overview** tab selected and you can review any **Bills**, **Prepayments**, **Plans**, or **Contracts** for the Child Account:
4. If you want to review the details of a Child Account, select its **Name** text. The Account page for the selected Child Account opens with the **Overview** tab selected and you can review any **Bills**, **Prepayments**, **Plans**, or **Contracts** for the Child Account:
![]() **Tip: Child Accounts don't have Child Accounts tab?** Since a Child Account cannot also be a Parent Account, the Child Account page doesn't carry a **Child Accounts** tab.
5. If you want to return to the Parent Account, on the **Account details** panel, select the hotlink text under **Parent account**. You are returned to the Parent **Account** page.
6. If you want to remove the Child Account from the Parent Account, select **Remove child account**. You'll receive a confirmation message that the Child has been removed.
7. If you want to review the details of any of the Parent Account's other Child Accounts, repeat steps 4 and 5.
## Recalculating and Running Billing for Parent/Child Accounts
**Warning: Billing does not run for Child Accounts separately!**
* **Recalculating Parent/Child Account Bills:** Only when you recalculate a Parent Account will its Child Accounts be recalculated. See [Reviewing and Recalculating Bills for an Account](/guides/end-customer-accounts/reviewing-bills-for-an-account).
* **Running billing for Parent/Child Accounts:** Only when you run billing for a Parent Account will billing run for its Child Accounts. See [Running Bills Manually](/guides/billing-and-usage-data/running-viewing-and-managing-bills/running-bills-and-viewing-bill-details#running-bills-manually).
# Billing Hierarchy Modes for Parent/Child Accounts
Source: https://docs.m3ter.com/guides/end-customer-accounts/creating-and-working-with-child-accounts/billing-for-parent-child-accounts
When you attach Plans to either a Parent or Child Account, you can use the **Account hierarchy billing mode** setting to chose for different *billing hierarchy* modes - for more details, see [Attaching Plans to Accounts](/guides/end-customer-accounts/attaching-plans-to-an-account). The billing hierarchy mode you select then determines how billing will be handled and shown on bills as between charges due for the Parent Account and charges due for Child Accounts. This topic explains the different billing hierarchy modes you can set up for Parent/Child Accounts.
The way in which Bills are calculated and compiled for Parent and Child Accounts depends upon two conditions:
* **Account Plan Location**. Whether you've attached a priced Plan to create an Account Plan for the Parent Account or for the Child Account:
* If the Parent Account has an Account Plan and the Child Account does not, then any Child usage will be rated at the Parent level. Note that if Child usage is bundled up into a single block in this way, it means the Child Accounts might be able to take advantage of lower rates under a tiered pricing structure that, if rated independently, they would not have reached. See the [Rating Usage as a Block](/guides/end-customer-accounts/creating-and-working-with-child-accounts/billing-for-parent-child-accounts#rating-usage-as-a-block) section below.
* If a Child Account has an Account Plan, then its usage is rated independently.
* **Billing Mode**. When you attach a priced Plan to either a Parent or a Child Account to create an Account Plan, billing mode settings allow you to control how Bills at either Parent or Child level are compiled from line items calculated for either Parent or Child usage. See the [Billing Modes](/guides/end-customer-accounts/creating-and-working-with-child-accounts/billing-for-parent-child-accounts#billing-modes) sections below for full details.
The combination of Account Plan location and Billing Mode settings gives you wide flexibility on how usage as between Parent and Child Accounts is charged and compiled into Bills. Some [Example Billing Scenarios](/guides/end-customer-accounts/creating-and-working-with-child-accounts/billing-for-parent-child-accounts#example-billing-scenarios) are provided below to help you set up Parent/Child Account billing to correctly meet your specific billing use cases.
**Important!**
* **Parent/Child billing for Recurring Charges not supported**. If you price a Plan using a Counter to apply unit-based pricing for recurring subscription charges and attach the Plan to Parent or Child Accounts, Parent/Child billing is not supported for the recurring charges.
**Tip: Billing for Prepayments drawdown when Parent/Child Accounts involved?** If you create a Prepayment for an Account that is a Parent or Child of another Account, you can select the same options to control how the billing of drawdown against the Prepayment amount is handled as between Parent and Child Accounts. See [Creating Prepayments for Accounts](/guides/end-customer-accounts/creating-prepayments-for-accounts).
## Billing Modes
Billing mode settings are available when you attach a Plan to a Parent/Child Account to create an Account Plan.
### Billing Modes for Parent Accounts
In the Console, when you attach a priced Plan to a *Parent Account* to create an Account Plan, you can use the **Account hierarchy billing mode** setting to control how bills for usage charges under the Account Plan are processed:
* **Bill parent account - bill line item per account**. This creates a "Parent Bill Breakdown" billing format. Usage data is rated at the Parent level, and multiple line items are added to the Parent - one per Child - with an "average" unit price applied. Default setting.
* **Bill parent account - single bill line item for all accounts**. This creates a "Parent Bill Summary" billing format. Usage data is rated at the Parent level - usage for children is treated as a single block of usage - and a single line item is added to the Parent bill representing the total of all the Child usage for the Plan.
* **Bill child account**. Usage data is rated at the Parent level, but the line items appear on the Child bills instead of on the Parent.
### Billing Modes for Child Accounts
In the Console, when you attach a priced Plan to a *Child Account* to create an Account Plan, you can use the **Account hierarchy billing mode** setting to control how bills for usage charges under the Account Plan are processed:
* **Bill parent account - bill line item per account**. Usage data is rated at the Child level, and multiple line items are added to the Parent - one per Child - with an "average" unit price applied. Default setting.
* **Bill parent account - single bill line item for all accounts**. Usage data is rated at the Child level - that is, each Child is rated for its own usage individually - and a single line item is added to the Parent bill representing the total of all the Child usage for the Plan:
* **Note:** We only "summarize" line items for the **same plan**, so if different children each have their own custom Plans, it won't get summarized because we can't tell which line items should be merged with each other.
* **Bill child account**. Usage data is rated at the Child level, but the line items appear on the Child bills rather than on the Parent.
**Important! Child and Parent Accounts have same Account Plans!** If you attach the same priced Plan to *both Parent and Child*, then *double-billing* occurs - once rated against the Parent Account Plan and then again against the Child Account Plans. We strongly recommend caution if you intend to set up pricing for Parent and Child Accounts in this way.
### Setting Billing Mode using API Call
You can use the `childBillingMode` request parameter in the [Create AccountPlan](/api/accountplan/create-accountplan) call to set the billing mode for your Parent Child Account:
* `PARENT_SUMMARY`
* `PARENT_BREAKDOWN`
* `CHILD`
## Example Billing Scenarios
This section describes six Parent/Child billing scenarios to help you decide which best suits your billing use case.
**Scenario 1: Parent bill has single line item representing usage for all children, rated as a single block**
* **Account Plan Location**:
* Parent Account has Account Plan.
* Child Accounts do not have Account Plans.
* **Billing Mode**. When you create the Account Plan for the Parent Account, select **Bill parent account - single bill line item for all accounts**. This means:
* Bills will be created for the Parent Account.
* Usage data is rated at the Parent level.
* All Child usage treated as a single block of usage.
* A single line item is added to the Parent bill representing the total of all the Child usage for the Plan.
**Scenario 2: Parent bill has single line item representing usage for all children, rated independently**
* **Account Plan Location**:
* Parent Account does not have Account Plan.
* Child Accounts have same priced Plan attached for Account Plans.
* **Billing Mode**. When you create Account Plans for Child Accounts, select **Bill parent account - single bill line item for all accounts**. This means:
* Bills will be created for the Parent Account.
* Usage data is rated at the Child level.
* Each Child is rated for its own usage individually.
* A single line item is added to the Parent bill representing the total of all the Child usage for the Plan.
**Scenario 3: Parent bill has line item per child, rated as a single block**
* **Account Plan Location**:
* Parent Account has Account Plan.
* Child Accounts do not have Account Plans.
* **Billing Mode**. When you create the Account Plan for the Parent Account, select **Bill parent account - bill line item per account**. This means:
* Bills will be created for the Parent Account.
* Usage data is rated at the Parent level.
* Multiple line items are added to the parent - one per child - with an "average" unit price applied.
**Scenario 4: Parent bill has line item per child, rated independently**
* **Account Plan Location**:
* Parent Account does not have Account Plan.
* Child Accounts have Account Plans.
* **Billing Mode**. When you create Account Plans for Child Accounts, select **Bill parent account - bill line item per account**. This means:
* Bills will be created for the Parent Account.
* Usage data is rated at the Child level.
* Each Child is rated for its own usage individually.
* Multiple line items are added to the bill - one per child - with an "average" unit price applied.
**Scenario 5: Child bills each have a line item representing their own usage, rated as a single block**
* **Account Plan Location**:
* Parent Account has Account Plan.
* Child Accounts do not have Account Plans.
* **Billing Mode**. When you create the Account Plan for the Parent Account, select **Bill child account**. This means:
* Bills will be created for Child Accounts.
* Usage data is rated at the Parent level and line items appear on the Child bills rather than on the Parent.
**Scenario 6: Child bills each have a line item representing their own usage, rated independently**
* **Account Plan Location**:
* Parent Account does not have an Account Plan.
* Child Accounts have Account Plans.
* **Billing Mode**. When you create Account Plans for Child Accounts, select **Bill child account**. This means:
* Bills will be created for the Child Account.
* Usage data is rated at the Child level and line items appear on the Child bills rather than on the Parent.
**Important! Child and Parent Accounts have same Account Plans!** If you attach the same priced Plan to *both Parent and Child*, then *double-billing* occurs - once rated against the Parent Account Plan and then again against the Child Account Plans. We strongly recommend caution if you intend to set up pricing for Parent and Child Accounts in this way.
## Rating Usage as a Block
This section explains how usage rating as a block for Child Accounts will be calculated and compiled into bill line items.
Some common use cases for Parent/Child Account billing where usage is rated as a block across all Child Accounts at the Parent level - such as Scenario 3 above - allow Child accounts to take advantage of discounted usage rates in higher tiers. These are those cases where they would not have qualified for the discounted usage rates, had they been rated independently. Here's a simple example to illustrate how this works.
Suppose you have an end customer Parent Account with two Child Accounts - **A** and **B**:
* The Account Plan you use to charge has the following two-tiered pricing structure:
* **Tier 1**: \$1.00 per unit for usage up to the first 1000 units.
* **Tier 2**: \$0.90 per unit for any usage above 1000 units.
* For the current billing period:
* **A** consumes 900 units.
* **B** consumes 500 units.
* If we attach the Account Plan to each of the Child Accounts and charge them independently:
* **A** pays \$900 and **B** pays \$500 for a total of **\$1400**.
* If we attach the Account Plan to the Parent Account and charge them as a single block of usage:
* Total usage is 1400 units, and this is all rated as a block amount against the Account Plan - 1000 units @ \$1.00 and 400 units @ \$0.90. Total cost is therefore **\$1360** across both Child Accounts.
* For billing when charging as a single block, the total payable is then split across the Child Accounts and proportionately to their respective usage:
* **A** would be charged 1360\*(900/1400) = **\$874.29** (less than the \$900 when rated independently)
* **B** would be charged 1360\*(500/1400) = **\$485.71** (less than the \$500 when rated independently)
# Working with Balances for Accounts
Source: https://docs.m3ter.com/guides/end-customer-accounts/creating-balances-for-accounts
You can create *Balances* for your end-customer Accounts. Customers can then draw-down against their Balance amount for any charges due for consuming your products and services throughout the period the Balance is active for their Account. You can include options to top-up the original Balance.
Using Balances for end customer Accounts delivers other benefits, for example:
* **Onboarding Balance/Free Trials.** You can offer an onboarding incentive to new customers by way of an initial free credit Balance on their Account to be used within a set time frame but which carries no further commitment. This can encourage customers to start using your service by drawing down against the Balance, and increases the likelihood they will sign-up as a fully onboarded customer.
* **Balance as initial commitment.** Add a Balance amount to a new customer Account to act as an initial commitment, which allows them to start using the service and gain an accurate insight into their usage level. You can then have a well-informed discussion with them about the most suitable usage-based pricing contract to suit their projected usage level.
* **Managing Customer Satisfaction**. Use Balances as credits that will be applied to subsequent Bills as compensation for acknowledged service delivery issues, rather than using credit notes.
* **Facilitating Balance Adjustments**:
* Apply negative amounts to immediately write-off outstanding Balances.
* When setting up to migrate data into the m3ter service create a Balance total, which you can then adjust to accurately reflect the Balance at the precise cut-over date.
This section explains how to create, work with, and manage Balances for your end-customer Accounts.
You can create Balances for an end-customer Account in the Console from the Account details page:
* [Understanding and Managing Billing for Balances](/guides/end-customer-accounts/creating-balances-for-accounts/understanding-billing-for-balances)
* [Creating and Managing Account Balances](/guides/end-customer-accounts/creating-balances-for-accounts/creating-and-managing-account-balances)
You can then add Transaction amounts to Balances to manage the amount available for drawing-down against charges due on the Account when Bills are calculated. Add single Transactions manually or set up a *Transaction Schedule* for Balances:
* [Creating and Managing Transactions for Balances](/guides/end-customer-accounts/creating-balances-for-accounts/creating-and-managing-transactions-for-balances)
* [Setting Up Transaction Schedules for Balances](/guides/end-customer-accounts/creating-balances-for-accounts/setting-transaction-schedules-for-balances)
You can create *Charges* for Balances to create single, one-off line items for Balance billing. Alternatively, you can set up a *Charge Schedule* for a Balance:
* [Creating Charges for Balances](/guides/end-customer-accounts/creating-balances-for-accounts/creating-charges-for-balances)
* [Setting Up Charge Schedules for Balances](/guides/end-customer-accounts/creating-balances-for-accounts/setting-charge-schedules-for-balances)
You can run billing for either one-off Charges or scheduled Charges and view Bill details:
* [Running and Viewing Bills for Balance Charges](/guides/end-customer-accounts/creating-balances-for-accounts/runnning-viewing-bill-for-balance-charges)
When you have set up Balances for an Account, the Balances tab offers a very useful summary view with a timeline chart of the currently active, any future, and any past Balances on the Account:
* [Reviewing Account Balances Summary](/guides/end-customer-accounts/creating-balances-for-accounts/reviewing-account-balances-summary)
**Important: Review First!** Before setting up Balances for your end-customer Accounts, we *strongly recommend* that you first review the [Understanding and Managing Billing for Balances](/guides/end-customer-accounts/creating-balances-for-accounts/understanding-billing-for-balances) topic.
**Grants available in Preview Release.** You can enable a Balance as a *Grant*. This means the Account is credited with an amount of *pre-rated usage*, which can be drawn-down to reduce the amount of usage that is rated and would result in charges against the Account. See the [Grants](/guides/end-customer-accounts/creating-balances-for-accounts/balance-grants) topic below in this section for more details.
**Notes and Tips:**
* **Note: Terminology?** *Balances*, *Credits*, and *Prepaid Drawdown*, are all terms used to describe the addition of funds to an end-customer Account in m3ter.
* **Tip: API Calls for Balances?** We maintain a full set of API calls to create and manage Balances for your end-customer Accounts - see the [Balances](/api/balances/introduction) section in our API Ref Docs.
* **Tip: Balances and Prepayments/Commitments?** You can use both Balances and Prepayments to help manage credit for end-customer Accounts, but they serve different purposes:
* Use Prepayments for credit end-customers have agreed to pay for consuming your product or services across a full contract term.
* In contrast, Balances - often referred to as a *Top-Up* or *Prepaid draw-down* - serve credit payment use cases in a more flexible way. Use Balances when a customers want to add credit to their Accounts or when you as service provider want to add credit to Accounts - such as "Free Credit" sign-up schemes to encourage sales or credit rebates to safeguard customer satisfaction when there have been issues delivering your service.
* You can use Prepayments and Balances together on an Account, and control the order in which the credit is draw-down - Balance credit draw-down before or after Prepayment credit draw-down. See Balances Draw-Down Order Against Prepayments for more details.
# Grants
Source: https://docs.m3ter.com/guides/end-customer-accounts/creating-balances-for-accounts/balance-grants
You can enable a Balance on an Account as a *Grant*. This means the Account is credited with an amount of *pre-rated usage*, which can be drawn-down to reduce the amount of usage that is rated and would result in charges against the Account.
This topic provides a worked example to explain how to enable an Account Balance as a Grant allowance for pre-rated usage. Some example test data is then submitted against the Account and Bills are ran to show how pre-rated usage is draw-down against the Grant before rating is applied and charges billed against the Account:
* [Worked Example for Grants](#worked-example-for-grants)
* [Setting Up Rating and Pricing](#setting-up-rating-and-pricing)
* [Setting Up a Balance as a Grant](#setting-up-a-balance-as-a-grant)
* [Submitting Usage Data and Running Bills](#submitting-usage-data-and-running-bills)
**Note: Grants in Preview Release!** Please note that the Grants feature is currently available only in Preview release version. See [Feature Release Stages](/guides/getting-started/feature-release-stages) for Preview release definition.
## Worked Example for Grants
Suppose you offer a product for cloud storage and charge on the basis of gigabytes stored by your end-customers and which you bill on a monthly basis in US dollars (USD). However, you want to offer new customers a free pre-rated usage allowance at sign-up for your product - say 1000 gigabytes. Only when the customer's usage has exceeded this initial free usage allowance will they start to be charged at the normal pricing rates per gigabyte stored on your platform.
In m3ter, you can enable a Balance as a Grant to implement a solution for this kind of use case.
## Setting Up Rating and Pricing
The rating and pricing setup for an Account must be completed in a way that allows a Balance Grant to implement a free pre-rated usage allowance on an Account. The key part of the overall configuration is:
* Create a custom currency for your Organization and define this as the unit of aggregated usage used to price a Product Plan attached to the Account.
* When a Balance is enabled as a Grant for the Account with the Plan attached, use the *same custom currency* for the Grant as you've defined as the unit of aggregated usage.
Here's the setup for pricing and rating we'll use for the worked example:
* **Create Product**. We've created the **Standard Storage Free Allowance Product**.
* **Create Product Plan Template and Plan**. We've created a Plan Template and used it for a Product Plan called **Standard Storage Allowance Plan 1**. Ensure the Plan Template is set up for monthly billing and uses **USD** as the billing currency.
* **Create Product Meter and Aggregation**. We've created the **Standard Storage Allowance Aggregation 1** that targets the **Standard Storage Allowance Meter 1**, and we'll use this Aggregation to price the Product Plan to **SUM** the metered usage and defined a **Unit** of **GIB**:
**Tip: Child Accounts don't have Child Accounts tab?** Since a Child Account cannot also be a Parent Account, the Child Account page doesn't carry a **Child Accounts** tab.
5. If you want to return to the Parent Account, on the **Account details** panel, select the hotlink text under **Parent account**. You are returned to the Parent **Account** page.
6. If you want to remove the Child Account from the Parent Account, select **Remove child account**. You'll receive a confirmation message that the Child has been removed.
7. If you want to review the details of any of the Parent Account's other Child Accounts, repeat steps 4 and 5.
## Recalculating and Running Billing for Parent/Child Accounts
**Warning: Billing does not run for Child Accounts separately!**
* **Recalculating Parent/Child Account Bills:** Only when you recalculate a Parent Account will its Child Accounts be recalculated. See [Reviewing and Recalculating Bills for an Account](/guides/end-customer-accounts/reviewing-bills-for-an-account).
* **Running billing for Parent/Child Accounts:** Only when you run billing for a Parent Account will billing run for its Child Accounts. See [Running Bills Manually](/guides/billing-and-usage-data/running-viewing-and-managing-bills/running-bills-and-viewing-bill-details#running-bills-manually).
# Billing Hierarchy Modes for Parent/Child Accounts
Source: https://docs.m3ter.com/guides/end-customer-accounts/creating-and-working-with-child-accounts/billing-for-parent-child-accounts
When you attach Plans to either a Parent or Child Account, you can use the **Account hierarchy billing mode** setting to chose for different *billing hierarchy* modes - for more details, see [Attaching Plans to Accounts](/guides/end-customer-accounts/attaching-plans-to-an-account). The billing hierarchy mode you select then determines how billing will be handled and shown on bills as between charges due for the Parent Account and charges due for Child Accounts. This topic explains the different billing hierarchy modes you can set up for Parent/Child Accounts.
The way in which Bills are calculated and compiled for Parent and Child Accounts depends upon two conditions:
* **Account Plan Location**. Whether you've attached a priced Plan to create an Account Plan for the Parent Account or for the Child Account:
* If the Parent Account has an Account Plan and the Child Account does not, then any Child usage will be rated at the Parent level. Note that if Child usage is bundled up into a single block in this way, it means the Child Accounts might be able to take advantage of lower rates under a tiered pricing structure that, if rated independently, they would not have reached. See the [Rating Usage as a Block](/guides/end-customer-accounts/creating-and-working-with-child-accounts/billing-for-parent-child-accounts#rating-usage-as-a-block) section below.
* If a Child Account has an Account Plan, then its usage is rated independently.
* **Billing Mode**. When you attach a priced Plan to either a Parent or a Child Account to create an Account Plan, billing mode settings allow you to control how Bills at either Parent or Child level are compiled from line items calculated for either Parent or Child usage. See the [Billing Modes](/guides/end-customer-accounts/creating-and-working-with-child-accounts/billing-for-parent-child-accounts#billing-modes) sections below for full details.
The combination of Account Plan location and Billing Mode settings gives you wide flexibility on how usage as between Parent and Child Accounts is charged and compiled into Bills. Some [Example Billing Scenarios](/guides/end-customer-accounts/creating-and-working-with-child-accounts/billing-for-parent-child-accounts#example-billing-scenarios) are provided below to help you set up Parent/Child Account billing to correctly meet your specific billing use cases.
**Important!**
* **Parent/Child billing for Recurring Charges not supported**. If you price a Plan using a Counter to apply unit-based pricing for recurring subscription charges and attach the Plan to Parent or Child Accounts, Parent/Child billing is not supported for the recurring charges.
**Tip: Billing for Prepayments drawdown when Parent/Child Accounts involved?** If you create a Prepayment for an Account that is a Parent or Child of another Account, you can select the same options to control how the billing of drawdown against the Prepayment amount is handled as between Parent and Child Accounts. See [Creating Prepayments for Accounts](/guides/end-customer-accounts/creating-prepayments-for-accounts).
## Billing Modes
Billing mode settings are available when you attach a Plan to a Parent/Child Account to create an Account Plan.
### Billing Modes for Parent Accounts
In the Console, when you attach a priced Plan to a *Parent Account* to create an Account Plan, you can use the **Account hierarchy billing mode** setting to control how bills for usage charges under the Account Plan are processed:
* **Bill parent account - bill line item per account**. This creates a "Parent Bill Breakdown" billing format. Usage data is rated at the Parent level, and multiple line items are added to the Parent - one per Child - with an "average" unit price applied. Default setting.
* **Bill parent account - single bill line item for all accounts**. This creates a "Parent Bill Summary" billing format. Usage data is rated at the Parent level - usage for children is treated as a single block of usage - and a single line item is added to the Parent bill representing the total of all the Child usage for the Plan.
* **Bill child account**. Usage data is rated at the Parent level, but the line items appear on the Child bills instead of on the Parent.
### Billing Modes for Child Accounts
In the Console, when you attach a priced Plan to a *Child Account* to create an Account Plan, you can use the **Account hierarchy billing mode** setting to control how bills for usage charges under the Account Plan are processed:
* **Bill parent account - bill line item per account**. Usage data is rated at the Child level, and multiple line items are added to the Parent - one per Child - with an "average" unit price applied. Default setting.
* **Bill parent account - single bill line item for all accounts**. Usage data is rated at the Child level - that is, each Child is rated for its own usage individually - and a single line item is added to the Parent bill representing the total of all the Child usage for the Plan:
* **Note:** We only "summarize" line items for the **same plan**, so if different children each have their own custom Plans, it won't get summarized because we can't tell which line items should be merged with each other.
* **Bill child account**. Usage data is rated at the Child level, but the line items appear on the Child bills rather than on the Parent.
**Important! Child and Parent Accounts have same Account Plans!** If you attach the same priced Plan to *both Parent and Child*, then *double-billing* occurs - once rated against the Parent Account Plan and then again against the Child Account Plans. We strongly recommend caution if you intend to set up pricing for Parent and Child Accounts in this way.
### Setting Billing Mode using API Call
You can use the `childBillingMode` request parameter in the [Create AccountPlan](/api/accountplan/create-accountplan) call to set the billing mode for your Parent Child Account:
* `PARENT_SUMMARY`
* `PARENT_BREAKDOWN`
* `CHILD`
## Example Billing Scenarios
This section describes six Parent/Child billing scenarios to help you decide which best suits your billing use case.
**Scenario 1: Parent bill has single line item representing usage for all children, rated as a single block**
* **Account Plan Location**:
* Parent Account has Account Plan.
* Child Accounts do not have Account Plans.
* **Billing Mode**. When you create the Account Plan for the Parent Account, select **Bill parent account - single bill line item for all accounts**. This means:
* Bills will be created for the Parent Account.
* Usage data is rated at the Parent level.
* All Child usage treated as a single block of usage.
* A single line item is added to the Parent bill representing the total of all the Child usage for the Plan.
**Scenario 2: Parent bill has single line item representing usage for all children, rated independently**
* **Account Plan Location**:
* Parent Account does not have Account Plan.
* Child Accounts have same priced Plan attached for Account Plans.
* **Billing Mode**. When you create Account Plans for Child Accounts, select **Bill parent account - single bill line item for all accounts**. This means:
* Bills will be created for the Parent Account.
* Usage data is rated at the Child level.
* Each Child is rated for its own usage individually.
* A single line item is added to the Parent bill representing the total of all the Child usage for the Plan.
**Scenario 3: Parent bill has line item per child, rated as a single block**
* **Account Plan Location**:
* Parent Account has Account Plan.
* Child Accounts do not have Account Plans.
* **Billing Mode**. When you create the Account Plan for the Parent Account, select **Bill parent account - bill line item per account**. This means:
* Bills will be created for the Parent Account.
* Usage data is rated at the Parent level.
* Multiple line items are added to the parent - one per child - with an "average" unit price applied.
**Scenario 4: Parent bill has line item per child, rated independently**
* **Account Plan Location**:
* Parent Account does not have Account Plan.
* Child Accounts have Account Plans.
* **Billing Mode**. When you create Account Plans for Child Accounts, select **Bill parent account - bill line item per account**. This means:
* Bills will be created for the Parent Account.
* Usage data is rated at the Child level.
* Each Child is rated for its own usage individually.
* Multiple line items are added to the bill - one per child - with an "average" unit price applied.
**Scenario 5: Child bills each have a line item representing their own usage, rated as a single block**
* **Account Plan Location**:
* Parent Account has Account Plan.
* Child Accounts do not have Account Plans.
* **Billing Mode**. When you create the Account Plan for the Parent Account, select **Bill child account**. This means:
* Bills will be created for Child Accounts.
* Usage data is rated at the Parent level and line items appear on the Child bills rather than on the Parent.
**Scenario 6: Child bills each have a line item representing their own usage, rated independently**
* **Account Plan Location**:
* Parent Account does not have an Account Plan.
* Child Accounts have Account Plans.
* **Billing Mode**. When you create Account Plans for Child Accounts, select **Bill child account**. This means:
* Bills will be created for the Child Account.
* Usage data is rated at the Child level and line items appear on the Child bills rather than on the Parent.
**Important! Child and Parent Accounts have same Account Plans!** If you attach the same priced Plan to *both Parent and Child*, then *double-billing* occurs - once rated against the Parent Account Plan and then again against the Child Account Plans. We strongly recommend caution if you intend to set up pricing for Parent and Child Accounts in this way.
## Rating Usage as a Block
This section explains how usage rating as a block for Child Accounts will be calculated and compiled into bill line items.
Some common use cases for Parent/Child Account billing where usage is rated as a block across all Child Accounts at the Parent level - such as Scenario 3 above - allow Child accounts to take advantage of discounted usage rates in higher tiers. These are those cases where they would not have qualified for the discounted usage rates, had they been rated independently. Here's a simple example to illustrate how this works.
Suppose you have an end customer Parent Account with two Child Accounts - **A** and **B**:
* The Account Plan you use to charge has the following two-tiered pricing structure:
* **Tier 1**: \$1.00 per unit for usage up to the first 1000 units.
* **Tier 2**: \$0.90 per unit for any usage above 1000 units.
* For the current billing period:
* **A** consumes 900 units.
* **B** consumes 500 units.
* If we attach the Account Plan to each of the Child Accounts and charge them independently:
* **A** pays \$900 and **B** pays \$500 for a total of **\$1400**.
* If we attach the Account Plan to the Parent Account and charge them as a single block of usage:
* Total usage is 1400 units, and this is all rated as a block amount against the Account Plan - 1000 units @ \$1.00 and 400 units @ \$0.90. Total cost is therefore **\$1360** across both Child Accounts.
* For billing when charging as a single block, the total payable is then split across the Child Accounts and proportionately to their respective usage:
* **A** would be charged 1360\*(900/1400) = **\$874.29** (less than the \$900 when rated independently)
* **B** would be charged 1360\*(500/1400) = **\$485.71** (less than the \$500 when rated independently)
# Working with Balances for Accounts
Source: https://docs.m3ter.com/guides/end-customer-accounts/creating-balances-for-accounts
You can create *Balances* for your end-customer Accounts. Customers can then draw-down against their Balance amount for any charges due for consuming your products and services throughout the period the Balance is active for their Account. You can include options to top-up the original Balance.
Using Balances for end customer Accounts delivers other benefits, for example:
* **Onboarding Balance/Free Trials.** You can offer an onboarding incentive to new customers by way of an initial free credit Balance on their Account to be used within a set time frame but which carries no further commitment. This can encourage customers to start using your service by drawing down against the Balance, and increases the likelihood they will sign-up as a fully onboarded customer.
* **Balance as initial commitment.** Add a Balance amount to a new customer Account to act as an initial commitment, which allows them to start using the service and gain an accurate insight into their usage level. You can then have a well-informed discussion with them about the most suitable usage-based pricing contract to suit their projected usage level.
* **Managing Customer Satisfaction**. Use Balances as credits that will be applied to subsequent Bills as compensation for acknowledged service delivery issues, rather than using credit notes.
* **Facilitating Balance Adjustments**:
* Apply negative amounts to immediately write-off outstanding Balances.
* When setting up to migrate data into the m3ter service create a Balance total, which you can then adjust to accurately reflect the Balance at the precise cut-over date.
This section explains how to create, work with, and manage Balances for your end-customer Accounts.
You can create Balances for an end-customer Account in the Console from the Account details page:
* [Understanding and Managing Billing for Balances](/guides/end-customer-accounts/creating-balances-for-accounts/understanding-billing-for-balances)
* [Creating and Managing Account Balances](/guides/end-customer-accounts/creating-balances-for-accounts/creating-and-managing-account-balances)
You can then add Transaction amounts to Balances to manage the amount available for drawing-down against charges due on the Account when Bills are calculated. Add single Transactions manually or set up a *Transaction Schedule* for Balances:
* [Creating and Managing Transactions for Balances](/guides/end-customer-accounts/creating-balances-for-accounts/creating-and-managing-transactions-for-balances)
* [Setting Up Transaction Schedules for Balances](/guides/end-customer-accounts/creating-balances-for-accounts/setting-transaction-schedules-for-balances)
You can create *Charges* for Balances to create single, one-off line items for Balance billing. Alternatively, you can set up a *Charge Schedule* for a Balance:
* [Creating Charges for Balances](/guides/end-customer-accounts/creating-balances-for-accounts/creating-charges-for-balances)
* [Setting Up Charge Schedules for Balances](/guides/end-customer-accounts/creating-balances-for-accounts/setting-charge-schedules-for-balances)
You can run billing for either one-off Charges or scheduled Charges and view Bill details:
* [Running and Viewing Bills for Balance Charges](/guides/end-customer-accounts/creating-balances-for-accounts/runnning-viewing-bill-for-balance-charges)
When you have set up Balances for an Account, the Balances tab offers a very useful summary view with a timeline chart of the currently active, any future, and any past Balances on the Account:
* [Reviewing Account Balances Summary](/guides/end-customer-accounts/creating-balances-for-accounts/reviewing-account-balances-summary)
**Important: Review First!** Before setting up Balances for your end-customer Accounts, we *strongly recommend* that you first review the [Understanding and Managing Billing for Balances](/guides/end-customer-accounts/creating-balances-for-accounts/understanding-billing-for-balances) topic.
**Grants available in Preview Release.** You can enable a Balance as a *Grant*. This means the Account is credited with an amount of *pre-rated usage*, which can be drawn-down to reduce the amount of usage that is rated and would result in charges against the Account. See the [Grants](/guides/end-customer-accounts/creating-balances-for-accounts/balance-grants) topic below in this section for more details.
**Notes and Tips:**
* **Note: Terminology?** *Balances*, *Credits*, and *Prepaid Drawdown*, are all terms used to describe the addition of funds to an end-customer Account in m3ter.
* **Tip: API Calls for Balances?** We maintain a full set of API calls to create and manage Balances for your end-customer Accounts - see the [Balances](/api/balances/introduction) section in our API Ref Docs.
* **Tip: Balances and Prepayments/Commitments?** You can use both Balances and Prepayments to help manage credit for end-customer Accounts, but they serve different purposes:
* Use Prepayments for credit end-customers have agreed to pay for consuming your product or services across a full contract term.
* In contrast, Balances - often referred to as a *Top-Up* or *Prepaid draw-down* - serve credit payment use cases in a more flexible way. Use Balances when a customers want to add credit to their Accounts or when you as service provider want to add credit to Accounts - such as "Free Credit" sign-up schemes to encourage sales or credit rebates to safeguard customer satisfaction when there have been issues delivering your service.
* You can use Prepayments and Balances together on an Account, and control the order in which the credit is draw-down - Balance credit draw-down before or after Prepayment credit draw-down. See Balances Draw-Down Order Against Prepayments for more details.
# Grants
Source: https://docs.m3ter.com/guides/end-customer-accounts/creating-balances-for-accounts/balance-grants
You can enable a Balance on an Account as a *Grant*. This means the Account is credited with an amount of *pre-rated usage*, which can be drawn-down to reduce the amount of usage that is rated and would result in charges against the Account.
This topic provides a worked example to explain how to enable an Account Balance as a Grant allowance for pre-rated usage. Some example test data is then submitted against the Account and Bills are ran to show how pre-rated usage is draw-down against the Grant before rating is applied and charges billed against the Account:
* [Worked Example for Grants](#worked-example-for-grants)
* [Setting Up Rating and Pricing](#setting-up-rating-and-pricing)
* [Setting Up a Balance as a Grant](#setting-up-a-balance-as-a-grant)
* [Submitting Usage Data and Running Bills](#submitting-usage-data-and-running-bills)
**Note: Grants in Preview Release!** Please note that the Grants feature is currently available only in Preview release version. See [Feature Release Stages](/guides/getting-started/feature-release-stages) for Preview release definition.
## Worked Example for Grants
Suppose you offer a product for cloud storage and charge on the basis of gigabytes stored by your end-customers and which you bill on a monthly basis in US dollars (USD). However, you want to offer new customers a free pre-rated usage allowance at sign-up for your product - say 1000 gigabytes. Only when the customer's usage has exceeded this initial free usage allowance will they start to be charged at the normal pricing rates per gigabyte stored on your platform.
In m3ter, you can enable a Balance as a Grant to implement a solution for this kind of use case.
## Setting Up Rating and Pricing
The rating and pricing setup for an Account must be completed in a way that allows a Balance Grant to implement a free pre-rated usage allowance on an Account. The key part of the overall configuration is:
* Create a custom currency for your Organization and define this as the unit of aggregated usage used to price a Product Plan attached to the Account.
* When a Balance is enabled as a Grant for the Account with the Plan attached, use the *same custom currency* for the Grant as you've defined as the unit of aggregated usage.
Here's the setup for pricing and rating we'll use for the worked example:
* **Create Product**. We've created the **Standard Storage Free Allowance Product**.
* **Create Product Plan Template and Plan**. We've created a Plan Template and used it for a Product Plan called **Standard Storage Allowance Plan 1**. Ensure the Plan Template is set up for monthly billing and uses **USD** as the billing currency.
* **Create Product Meter and Aggregation**. We've created the **Standard Storage Allowance Aggregation 1** that targets the **Standard Storage Allowance Meter 1**, and we'll use this Aggregation to price the Product Plan to **SUM** the metered usage and defined a **Unit** of **GIB**:
![Balance Grant11]() **Aggregation Unit**. When we set up a Grant, we'll select a currency that matches the Aggregation's **Unit**.
* **Price Product Plan**. In the **Pricing Editor**, we've created a tiered pricing for **Standard Storage Allowance Plan 1** using **Standard Storage Allowance Aggregation 1**:
**Aggregation Unit**. When we set up a Grant, we'll select a currency that matches the Aggregation's **Unit**.
* **Price Product Plan**. In the **Pricing Editor**, we've created a tiered pricing for **Standard Storage Allowance Plan 1** using **Standard Storage Allowance Aggregation 1**:
 * **Attach Plan to Account**. We've attached the priced **Standard Storage Allowance Plan 1** to the **Standard Storage Allowance Customer 1** Account:
![Balance Grant4]() * **Custom Currency**. In **Settings>Currency settings**, we've created a Custom Currency for our Organization called **GIB** to match the **Unit** we defined for the **Standard Storage Allowance Aggregation 1**:
* **Custom Currency**. In **Settings>Currency settings**, we've created a Custom Currency for our Organization called **GIB** to match the **Unit** we defined for the **Standard Storage Allowance Aggregation 1**:
![Balance Grant1c]() ## Setting Up a Balance as a Grant
With the required rating and pricing setup completed, we can now set up a Balance as a Grant on the Account for the worked example.
**To enable a Balance as a Grant:**
1. Open the example Account: **Standard Storage Allowance Customer 1** and select the **Balances** tab.
2. Select **Create balance**. The **Create** form opens.
3. Under **Balance details** enter:
* **Name** and **Code**.
* Use the **Grant** switch to enable the Balance as a Grant.
* Select the **GIB** for **Currency**.
* This ensures the Grant **Currency** and Aggregation **Unit** match.
* Note that when you enable the **Grant** switch, the **Create** form adjusts and an information text shows to remind you that the Grant currency must match the unit of the Aggregation used to price the Plan attached to the Account. You can select to **View aggregation units** to open an **Aggregation units** modal to help you check for and select the correct **Currency** for the Grant:
## Setting Up a Balance as a Grant
With the required rating and pricing setup completed, we can now set up a Balance as a Grant on the Account for the worked example.
**To enable a Balance as a Grant:**
1. Open the example Account: **Standard Storage Allowance Customer 1** and select the **Balances** tab.
2. Select **Create balance**. The **Create** form opens.
3. Under **Balance details** enter:
* **Name** and **Code**.
* Use the **Grant** switch to enable the Balance as a Grant.
* Select the **GIB** for **Currency**.
* This ensures the Grant **Currency** and Aggregation **Unit** match.
* Note that when you enable the **Grant** switch, the **Create** form adjusts and an information text shows to remind you that the Grant currency must match the unit of the Aggregation used to price the Plan attached to the Account. You can select to **View aggregation units** to open an **Aggregation units** modal to help you check for and select the correct **Currency** for the Grant:
 * Enter a **Start date** and **End date**.
* The remaining options can be omitted for the current worked example.
4. Select **Create balance**. The Balance is listed on the **Account balances** tab.
5. Select the **Name** hotlink text to open the **Balance details** page.
6. Scroll down the **Balance details** page and on the **Balance transactions** card, select **Create balance transaction**.
7. On the **Create** page under **Balance transaction details** enter details:
* **Transaction type**
* **Amount** - for the worked example, enter 1,000 GIB
* **Transaction date**
* **Applied date**
**More details?** See [Creating and Managing Transactions for Balances](/guides/end-customer-accounts/creating-balances-for-accounts/creating-and-managing-transactions-for-balances).
8. Select **Create balance transaction**:
* Enter a **Start date** and **End date**.
* The remaining options can be omitted for the current worked example.
4. Select **Create balance**. The Balance is listed on the **Account balances** tab.
5. Select the **Name** hotlink text to open the **Balance details** page.
6. Scroll down the **Balance details** page and on the **Balance transactions** card, select **Create balance transaction**.
7. On the **Create** page under **Balance transaction details** enter details:
* **Transaction type**
* **Amount** - for the worked example, enter 1,000 GIB
* **Transaction date**
* **Applied date**
**More details?** See [Creating and Managing Transactions for Balances](/guides/end-customer-accounts/creating-balances-for-accounts/creating-and-managing-transactions-for-balances).
8. Select **Create balance transaction**:
![Balance Grant12]() * We now have a Grant set up that can be used by the Account as a pre-rated usage allowance of 1,000 GIB.
## Submitting Usage Data and Running Bills
In this section, we'll submit some test usage data for the example Account and then run billing to check that the Grant we've set up for the Account is being correctly drawn-down against.
**To submit test usage data and run billing:**
1. Open the example Account: **Standard Storage Allowance Customer 1**.
2. Select **Submit usage**.
3. On the modal that appears, select the Meter set up for the example: **Standard Storage Allowance Meter 1**, and select **Next**.
4. On the **Submit usage data**, since billing frequency is monthly we'll submit a single **500** amount for January 2026 using the **Std Storage** measure Data Field that the **Standard Storage Allowance Aggregation 1** targets and will **SUM** as a **GIB** amount:
* We now have a Grant set up that can be used by the Account as a pre-rated usage allowance of 1,000 GIB.
## Submitting Usage Data and Running Bills
In this section, we'll submit some test usage data for the example Account and then run billing to check that the Grant we've set up for the Account is being correctly drawn-down against.
**To submit test usage data and run billing:**
1. Open the example Account: **Standard Storage Allowance Customer 1**.
2. Select **Submit usage**.
3. On the modal that appears, select the Meter set up for the example: **Standard Storage Allowance Meter 1**, and select **Next**.
4. On the **Submit usage data**, since billing frequency is monthly we'll submit a single **500** amount for January 2026 using the **Std Storage** measure Data Field that the **Standard Storage Allowance Aggregation 1** targets and will **SUM** as a **GIB** amount:
![Balance Grant6]() 5. Select **Submit usage**.
6. Open the **Bills** tab for the Account and select **Run billing**.
7. On the **Run billing** modal, for the **Invoice date** select the next monthly billing date - February 1st 2026 for current example - **Monthly** as the **Bill frequency**, and select **Run billing**.
8. When the Bill is generated, open it from the Account's **Bills** tab:
5. Select **Submit usage**.
6. Open the **Bills** tab for the Account and select **Run billing**.
7. On the **Run billing** modal, for the **Invoice date** select the next monthly billing date - February 1st 2026 for current example - **Monthly** as the **Bill frequency**, and select **Run billing**.
8. When the Bill is generated, open it from the Account's **Bills** tab:
![Balance Grant14]() * As expected, we can see that the Bill is zero and the Grant pre-rated usage allowance has a **Balance consumed** line item covering the 500 GIB usage amount for the single test submission.
9. If we return to the **Balance details** page, we can see that the draw-down against the Grant's pre-rated usage allowance on the Balance when the Bill was generated is entered on the **Balance transactions** ledger:
* As expected, we can see that the Bill is zero and the Grant pre-rated usage allowance has a **Balance consumed** line item covering the 500 GIB usage amount for the single test submission.
9. If we return to the **Balance details** page, we can see that the draw-down against the Grant's pre-rated usage allowance on the Balance when the Bill was generated is entered on the **Balance transactions** ledger:
![Balance Grant8]() 10. To check that rating cuts in correctly for the Account if the Grant pre-rated usage allowance is exceeded, we can now make a second test usage submission of **700** for January and re-calculate the February 1st Bill:
10. To check that rating cuts in correctly for the Account if the Grant pre-rated usage allowance is exceeded, we can now make a second test usage submission of **700** for January and re-calculate the February 1st Bill:
![Balance Grant15]() * The second test usage data submission takes the total aggregated usage amount to 200 GIB above the Grant's 1,000 GIB pre-rated usage allowance, and we can see that the Account has been correctly charged for the 200 GIB at the \$3.00 per GIB rate we configured for the priced Plan attached to the Account.
# Creating and Managing Account Balances
Source: https://docs.m3ter.com/guides/end-customer-accounts/creating-balances-for-accounts/creating-and-managing-account-balances
You can create Balances for your end customer Accounts in m3ter directly from the Account details page. When you've added a Balance to an Account, you can open a Balance details page and from there:
* Add Transactions for the Balance for credit or debit amounts.
* Link Balances to Contracts on the Account.
* Review Balance metadata.
This topic explains how to create and manage Balances for your end-customer Accounts:
* [Creating a Balance on an Account](/guides/end-customer-accounts/creating-balances-for-accounts/creating-and-managing-account-balances#creating-a-balance-on-an-account)
* [Adding Balances to or Removing from Contracts](#adding-balances-to-or-removing-from-contracts)
* [Linking Balances to Contracts - Availability for Draw-Down](/guides/end-customer-accounts/creating-balances-for-accounts/creating-and-managing-account-balances#linking-balances-to-contracts-availability-for-draw-down)
* [Reviewing Balance Metadata](/guides/end-customer-accounts/creating-balances-for-accounts/creating-and-managing-account-balances#reviewing-balance-metadata)
* [Balances Draw-Down Order Against Prepayments](/guides/end-customer-accounts/creating-balances-for-accounts/creating-and-managing-account-balances#balances-draw-down-order-against-prepayments)
**Important: Understanding Billing for Balances!** Please review the [Understanding and Managing Billing for Balances](/guides/end-customer-accounts/creating-balances-for-accounts/understanding-billing-for-balances) topic above before creating Balances for your end-customer Accounts.
## Creating a Balance on an Account
**To create a Balance for an Account:**
1. Select **Accounts**. The **Accounts** page opens.
2. Select the **Name** text of the Account for which you want to create a Balance. The **Account** details page opens with the **Overview** tab selected.
3. On the **Account actions** menu, select **Balances>Create balance**:
* The second test usage data submission takes the total aggregated usage amount to 200 GIB above the Grant's 1,000 GIB pre-rated usage allowance, and we can see that the Account has been correctly charged for the 200 GIB at the \$3.00 per GIB rate we configured for the priced Plan attached to the Account.
# Creating and Managing Account Balances
Source: https://docs.m3ter.com/guides/end-customer-accounts/creating-balances-for-accounts/creating-and-managing-account-balances
You can create Balances for your end customer Accounts in m3ter directly from the Account details page. When you've added a Balance to an Account, you can open a Balance details page and from there:
* Add Transactions for the Balance for credit or debit amounts.
* Link Balances to Contracts on the Account.
* Review Balance metadata.
This topic explains how to create and manage Balances for your end-customer Accounts:
* [Creating a Balance on an Account](/guides/end-customer-accounts/creating-balances-for-accounts/creating-and-managing-account-balances#creating-a-balance-on-an-account)
* [Adding Balances to or Removing from Contracts](#adding-balances-to-or-removing-from-contracts)
* [Linking Balances to Contracts - Availability for Draw-Down](/guides/end-customer-accounts/creating-balances-for-accounts/creating-and-managing-account-balances#linking-balances-to-contracts-availability-for-draw-down)
* [Reviewing Balance Metadata](/guides/end-customer-accounts/creating-balances-for-accounts/creating-and-managing-account-balances#reviewing-balance-metadata)
* [Balances Draw-Down Order Against Prepayments](/guides/end-customer-accounts/creating-balances-for-accounts/creating-and-managing-account-balances#balances-draw-down-order-against-prepayments)
**Important: Understanding Billing for Balances!** Please review the [Understanding and Managing Billing for Balances](/guides/end-customer-accounts/creating-balances-for-accounts/understanding-billing-for-balances) topic above before creating Balances for your end-customer Accounts.
## Creating a Balance on an Account
**To create a Balance for an Account:**
1. Select **Accounts**. The **Accounts** page opens.
2. Select the **Name** text of the Account for which you want to create a Balance. The **Account** details page opens with the **Overview** tab selected.
3. On the **Account actions** menu, select **Balances>Create balance**:
![]() Alternatively:
* Select the **Balances** tab and then select **Create balance**.
The **Create** page opens.
**Warning: You must create at least one Currency for your Organization before you can create a Balance!** If you haven't, the **Create** page will not open and you'll see a warning:
* Select the **Manage currencies** hotlink text provided. This takes you directly to the **Create** page to create the Currency you want to use for the Balance. See [Creating and Managing Currencies](/guides/organization-and-access-management/viewing-and-editing-organization/creating-and-managing-currencies).
* When you create the new Currency, you are taken directly back to the Balance **Create** page and the Currency is selected.
4. Enter the required **Balance details**:
* **Name**. (*Required*)
* **Code**. (*Required*)
* **Grant**. Enable this switch if you want to treat the Balance as a Grant, allowing you to credit the Account with an amount of *pre-rated usage* and reduce the amount of usage that is rated and would result in charges against the Account. See [Grants](/guides/end-customer-accounts/creating-balances-for-accounts/balance-grants) for more details.
* **Currency**. Use the drop-down list to select the currency you want to use for the Balance. (*Required*)
* **Start date (inclusive)** and **End date (exclusive)**. Use the calendar pop-ups to set start and end dates/times to define the time period the Balance will be active for the Account. (*Required*)
* **Consumptions accounting product**. For accounting purposes, select to link any *Balance consumed* draw-down Bill line items against the Balance to a particular Product for accounting purposes. (*Optional*)
* If you omit a **Consumptions accounting product**, then then *Balance consumed* Bill line items will not be linked to a Product and will be listed under **Other line items**.
* **Fees accounting product**. For accounting purposes, select to link any *Balance fee* Bill line items to a specific Product for Charges against the Balance. (*Optional*)
* If an **Accounting product** has been selected for a Charge against the Balance, this takes precedence and will be used.
* If an **Accounting product** has not been defined for a Charge and you omit **Fees accounting product** for the Balance, then *Balance fee* Bill line items will not be linked to a Product and will be listed under **Other line items**.
* **Contract.** *(Optional)* If you want to add the Balance to a Contract you've created for the Account, use the drop-down to select it. For more details on Contracts, see [Creating Contracts for Accounts](/guides/end-customer-accounts/creating-contracts-for-accounts).
**Important: Linking Balance to Contract - ensuring Balance is available for draw-down at billing!** Whether you need to link a Balance on an Account to a Contract is dependent on whether or not an Account Plan on the same Account has been linked to a Contract. For details, see the following section on [Linking Balances to Contracts](/guides/end-customer-accounts/creating-balances-for-accounts/creating-and-managing-account-balances#linking-balances-to-contracts).
* **Description**. Enter a description for the Balance. (*Optional*)
5. Enter **Balance draw-down** settings, which are optional:
* **Draw-down products.** Select the Products whose consumption charges can be drawn-down against the Balance amount.
**Note:** If you don't select any products for draw-down, by default the charges for *all products* consumed by the Account will be drawn-down against the Balance amount.
* **Draw-down charge types.** Select the charge types that can be drawn-down against the Balance amount. Six options:
* **Ad-hoc**
* **Counter adjustment debit**
* **Counter running total charge**
* **Minimum spend**
* **Standing charge**
* **Usage**
**Note:** If you don't select any charge types, by default at billing *all charge types* will be able to draw-down against the Balance amount.
* **Draw-down description**. Enter a *custom description* that will appear against Bill line items for draw-down charges against the Balance.
* Note that if you leave this blank, a *default description* will be used: \<*Balance name*>**:** **Balance Consumed**.
**Tip: Draw-Down Order when Multiple Balances on Account?**
* If an Account has multiple Balances, the order in which Balances are drawn-down against is determined by Balance end date - the Balance with the earlier end date is draw-down against first.
* If you have multiple Balances ending on the same date and want to enforce a particular draw-down order, please contact m3ter Support so we can guide you toward the best solution based on your current configuration.
6. Enter **Balance overage and rollover** settings, which are optional:
* **Rollover amount**. If the charges drawn-down against the Balance during the period the Balance is active for the Account don't exhaust the Balance, you can have whatever remains of the Balance rollover. This means charges continue to be drawn-down against the unused amount beyond the active end date set for the Balance.
* If you want to enter a cap on any rollover amount used for a rollover or grace period, enter the amount here.
* You'll need to enter a **Rollover end date** also to enable the rollover/grace period - if you only enter an amount for rollover without entering an end date, you'll receive an error when you try to save the Balance.
* **Rollover end date**. If you want to allow a rollover or grace period where any unused Balance amount continues to be drawn-down against charges due after the defined active end date, then use the pop-up calendar to define an end date for the rollover or grace period.
**Note: Rollover on Balance not required?** If you don't want a rollover on a Balance, simply leave **Rollover amount** and **Rollover end date** blank.
* **Overage surcharge (%)**. Optionally, enter a value for the additional surcharge (in percent) added to bills for overages on the Balance amount:
* Note that you can enter a *negative percentage* if you want to give a discount rate for usage to end customers who exceed their Balance amount.
* **Overage description**. Optionally, enter a *custom description* to be used for Bill line items for Balance amount overage surcharge.
**Tip: Balances overage pricing?** If you are using a tiered pricing structure when pricing Plans, you might want to set up overage pricing bands for **Balance/Prepayment overage pricing**, and instead of using a percentage addition/reduction on the standard pricing for usage. See [Creating Pricing for a Plan](/guides/plans-and-pricing/pricing-plans/pricing-plans#creating-a-pricing-for-a-plan).
**Important! Balance Overage surcharge percentage overrides Balance Overage pricing.** If you have set up overage pricing on a tiered pricing structure when pricing a Plan that will apply to billing for the Account and you have *also set up* overage surcharge percentage when creating the Balance for an Account, any overage usage charges on the Account will be billed at the *overage surcharge percentage rate* and the Balance *overage pricing will be ignored*. See [Creating Pricing for a Plan](/guides/plans-and-pricing/pricing-plans/pricing-plans#creating-a-pricing-for-a-plan).
7. If required, add any **Custom fields** to the Balance:
* Currently, you cannot create Custom Fields for Balances at the Organization-level, and therefore you cannot reference the Custom Fields values you create for an individual Balance in your calculations.
* For more on Custom Fields, see [Adding and Editing Custom Fields](/guides/organization-and-access-management/viewing-and-editing-organization/adding-and-editing-custom-fields). We strongly recommend reviewing [Working with Custom Fields](/guides/creating-and-managing-products/working-with-custom-fields) before you create and use Custom Fields.
8. Select **Create balance**. You are returned to the **Balances** tab, where the new Balance is listed:
Alternatively:
* Select the **Balances** tab and then select **Create balance**.
The **Create** page opens.
**Warning: You must create at least one Currency for your Organization before you can create a Balance!** If you haven't, the **Create** page will not open and you'll see a warning:
* Select the **Manage currencies** hotlink text provided. This takes you directly to the **Create** page to create the Currency you want to use for the Balance. See [Creating and Managing Currencies](/guides/organization-and-access-management/viewing-and-editing-organization/creating-and-managing-currencies).
* When you create the new Currency, you are taken directly back to the Balance **Create** page and the Currency is selected.
4. Enter the required **Balance details**:
* **Name**. (*Required*)
* **Code**. (*Required*)
* **Grant**. Enable this switch if you want to treat the Balance as a Grant, allowing you to credit the Account with an amount of *pre-rated usage* and reduce the amount of usage that is rated and would result in charges against the Account. See [Grants](/guides/end-customer-accounts/creating-balances-for-accounts/balance-grants) for more details.
* **Currency**. Use the drop-down list to select the currency you want to use for the Balance. (*Required*)
* **Start date (inclusive)** and **End date (exclusive)**. Use the calendar pop-ups to set start and end dates/times to define the time period the Balance will be active for the Account. (*Required*)
* **Consumptions accounting product**. For accounting purposes, select to link any *Balance consumed* draw-down Bill line items against the Balance to a particular Product for accounting purposes. (*Optional*)
* If you omit a **Consumptions accounting product**, then then *Balance consumed* Bill line items will not be linked to a Product and will be listed under **Other line items**.
* **Fees accounting product**. For accounting purposes, select to link any *Balance fee* Bill line items to a specific Product for Charges against the Balance. (*Optional*)
* If an **Accounting product** has been selected for a Charge against the Balance, this takes precedence and will be used.
* If an **Accounting product** has not been defined for a Charge and you omit **Fees accounting product** for the Balance, then *Balance fee* Bill line items will not be linked to a Product and will be listed under **Other line items**.
* **Contract.** *(Optional)* If you want to add the Balance to a Contract you've created for the Account, use the drop-down to select it. For more details on Contracts, see [Creating Contracts for Accounts](/guides/end-customer-accounts/creating-contracts-for-accounts).
**Important: Linking Balance to Contract - ensuring Balance is available for draw-down at billing!** Whether you need to link a Balance on an Account to a Contract is dependent on whether or not an Account Plan on the same Account has been linked to a Contract. For details, see the following section on [Linking Balances to Contracts](/guides/end-customer-accounts/creating-balances-for-accounts/creating-and-managing-account-balances#linking-balances-to-contracts).
* **Description**. Enter a description for the Balance. (*Optional*)
5. Enter **Balance draw-down** settings, which are optional:
* **Draw-down products.** Select the Products whose consumption charges can be drawn-down against the Balance amount.
**Note:** If you don't select any products for draw-down, by default the charges for *all products* consumed by the Account will be drawn-down against the Balance amount.
* **Draw-down charge types.** Select the charge types that can be drawn-down against the Balance amount. Six options:
* **Ad-hoc**
* **Counter adjustment debit**
* **Counter running total charge**
* **Minimum spend**
* **Standing charge**
* **Usage**
**Note:** If you don't select any charge types, by default at billing *all charge types* will be able to draw-down against the Balance amount.
* **Draw-down description**. Enter a *custom description* that will appear against Bill line items for draw-down charges against the Balance.
* Note that if you leave this blank, a *default description* will be used: \<*Balance name*>**:** **Balance Consumed**.
**Tip: Draw-Down Order when Multiple Balances on Account?**
* If an Account has multiple Balances, the order in which Balances are drawn-down against is determined by Balance end date - the Balance with the earlier end date is draw-down against first.
* If you have multiple Balances ending on the same date and want to enforce a particular draw-down order, please contact m3ter Support so we can guide you toward the best solution based on your current configuration.
6. Enter **Balance overage and rollover** settings, which are optional:
* **Rollover amount**. If the charges drawn-down against the Balance during the period the Balance is active for the Account don't exhaust the Balance, you can have whatever remains of the Balance rollover. This means charges continue to be drawn-down against the unused amount beyond the active end date set for the Balance.
* If you want to enter a cap on any rollover amount used for a rollover or grace period, enter the amount here.
* You'll need to enter a **Rollover end date** also to enable the rollover/grace period - if you only enter an amount for rollover without entering an end date, you'll receive an error when you try to save the Balance.
* **Rollover end date**. If you want to allow a rollover or grace period where any unused Balance amount continues to be drawn-down against charges due after the defined active end date, then use the pop-up calendar to define an end date for the rollover or grace period.
**Note: Rollover on Balance not required?** If you don't want a rollover on a Balance, simply leave **Rollover amount** and **Rollover end date** blank.
* **Overage surcharge (%)**. Optionally, enter a value for the additional surcharge (in percent) added to bills for overages on the Balance amount:
* Note that you can enter a *negative percentage* if you want to give a discount rate for usage to end customers who exceed their Balance amount.
* **Overage description**. Optionally, enter a *custom description* to be used for Bill line items for Balance amount overage surcharge.
**Tip: Balances overage pricing?** If you are using a tiered pricing structure when pricing Plans, you might want to set up overage pricing bands for **Balance/Prepayment overage pricing**, and instead of using a percentage addition/reduction on the standard pricing for usage. See [Creating Pricing for a Plan](/guides/plans-and-pricing/pricing-plans/pricing-plans#creating-a-pricing-for-a-plan).
**Important! Balance Overage surcharge percentage overrides Balance Overage pricing.** If you have set up overage pricing on a tiered pricing structure when pricing a Plan that will apply to billing for the Account and you have *also set up* overage surcharge percentage when creating the Balance for an Account, any overage usage charges on the Account will be billed at the *overage surcharge percentage rate* and the Balance *overage pricing will be ignored*. See [Creating Pricing for a Plan](/guides/plans-and-pricing/pricing-plans/pricing-plans#creating-a-pricing-for-a-plan).
7. If required, add any **Custom fields** to the Balance:
* Currently, you cannot create Custom Fields for Balances at the Organization-level, and therefore you cannot reference the Custom Fields values you create for an individual Balance in your calculations.
* For more on Custom Fields, see [Adding and Editing Custom Fields](/guides/organization-and-access-management/viewing-and-editing-organization/adding-and-editing-custom-fields). We strongly recommend reviewing [Working with Custom Fields](/guides/creating-and-managing-products/working-with-custom-fields) before you create and use Custom Fields.
8. Select **Create balance**. You are returned to the **Balances** tab, where the new Balance is listed:
![Create Balance44]() * In this example the new Balance is current and listed under **Active**.
* The Balance **Amount** shows as zero and you'll now have to create Transactions for the Balance to add credit or debit amounts to the Balance. See [Creating and Managing Transactions for Balances](/guides/end-customer-accounts/creating-balances-for-accounts/creating-and-managing-transactions-for-balances).
**Reviewing Account Balances!** When you've set up Balances for an Account, the **Balances** tab offers a very useful summary view with a timeline chart of the active, future, and past Balances Balances on an Account. See [Reviewing Account Balances Summary](/guides/end-customer-accounts/creating-balances-for-accounts/reviewing-account-balances-summary) for more details.
9. If you want to review the details of the Balance, select the **Name** hotlink text. The **Balance details** page opens:
* In this example the new Balance is current and listed under **Active**.
* The Balance **Amount** shows as zero and you'll now have to create Transactions for the Balance to add credit or debit amounts to the Balance. See [Creating and Managing Transactions for Balances](/guides/end-customer-accounts/creating-balances-for-accounts/creating-and-managing-transactions-for-balances).
**Reviewing Account Balances!** When you've set up Balances for an Account, the **Balances** tab offers a very useful summary view with a timeline chart of the active, future, and past Balances Balances on an Account. See [Reviewing Account Balances Summary](/guides/end-customer-accounts/creating-balances-for-accounts/reviewing-account-balances-summary) for more details.
9. If you want to review the details of the Balance, select the **Name** hotlink text. The **Balance details** page opens:
![Create Balance45]() Note that on the **Balance details** card, you can read-off:
* The **Current balance amount**.
* The billing charge types that can draw-down against the Balance.
* The Balance **ID** and **Copy** it directly to your clipboard.
10. Scroll down the page to the **Balance transactions summary** card:
Note that on the **Balance details** card, you can read-off:
* The **Current balance amount**.
* The billing charge types that can draw-down against the Balance.
* The Balance **ID** and **Copy** it directly to your clipboard.
10. Scroll down the page to the **Balance transactions summary** card:
![Create Balance46]() You can quickly check various amounts for a Balance:
* **Initial credit amount**. The initial credit amount created for the Balance.
* **Total credit amount**. The sum of all credits created for the Balance.
* **Total debit amount**. The sum of all debits created for the Balance.
* **Balance consumed**. The sum of debits made against the Balance. Note that this amount is dynamic over time until either the Balance end date is reached or the available Balance amount reaches zero, after which it will be unchanged.
* **Expired balance amount**. The amount of the Balance remaining at the time the Balance expires and which is not included in any configured Rollover amount. For example, suppose a Balance reaches its end date and \$1000 credit remains unused. If the Balance is configured to rollover \$800, then the **Expired balance amount** is calculated as \$1000 - \$800 = \$200.
* **Rollover amount** and **Rollover remaining amount**.
* **Rollover consumed**. The sum of debits made against the configured rollover amount. Note that this amount is dynamic over time until either the rollover end date is reached or the cap configured for the rollover amount is reached, after which it will be unchanged. If no rollover is configured for a Balance, then this is ignored.
When an Account to which a Balance has been added starts to consume your Products and charges are drawn-down against the Balance, these amount fields are very useful for tracking and managing the Balance.
**Next Step?** When you've created a Balance for an end customer Account, you can then create *Transactions* for the Balance to flexibly manage and maintain the Balance amount. See [Creating and Managing Transactions for Balances](/guides/end-customer-accounts/creating-balances-for-accounts/creating-and-managing-transactions-for-balances).
11. If you want to edit the Balance's details, select the **Edit** button, make your changes, and click **Update Balance**.
12. Return to the **Balances** tab.
13. If you want to remove a Balance, select the **Delete** button for the Balance:
You can quickly check various amounts for a Balance:
* **Initial credit amount**. The initial credit amount created for the Balance.
* **Total credit amount**. The sum of all credits created for the Balance.
* **Total debit amount**. The sum of all debits created for the Balance.
* **Balance consumed**. The sum of debits made against the Balance. Note that this amount is dynamic over time until either the Balance end date is reached or the available Balance amount reaches zero, after which it will be unchanged.
* **Expired balance amount**. The amount of the Balance remaining at the time the Balance expires and which is not included in any configured Rollover amount. For example, suppose a Balance reaches its end date and \$1000 credit remains unused. If the Balance is configured to rollover \$800, then the **Expired balance amount** is calculated as \$1000 - \$800 = \$200.
* **Rollover amount** and **Rollover remaining amount**.
* **Rollover consumed**. The sum of debits made against the configured rollover amount. Note that this amount is dynamic over time until either the rollover end date is reached or the cap configured for the rollover amount is reached, after which it will be unchanged. If no rollover is configured for a Balance, then this is ignored.
When an Account to which a Balance has been added starts to consume your Products and charges are drawn-down against the Balance, these amount fields are very useful for tracking and managing the Balance.
**Next Step?** When you've created a Balance for an end customer Account, you can then create *Transactions* for the Balance to flexibly manage and maintain the Balance amount. See [Creating and Managing Transactions for Balances](/guides/end-customer-accounts/creating-balances-for-accounts/creating-and-managing-transactions-for-balances).
11. If you want to edit the Balance's details, select the **Edit** button, make your changes, and click **Update Balance**.
12. Return to the **Balances** tab.
13. If you want to remove a Balance, select the **Delete** button for the Balance:
![]() A confirmation popup opens.
14. Select **Yes** to confirm the delete action.
* Note that you can also use the **Delete** button at the top of the **Balance details** page.
## Adding Balances to or Removing from Contracts
From a *Balance details* page, you can quickly add the Balance to or remove it from a Contract on the Account. This saves you having to open and edit the Balance.
**Notes:**
* **Adding or Removing Balances from Contract**. Alternatively, you can open the details page of the Contract you want to add a Balance to or remove a Balance from. See [Adding Balances to a Contract](https://docs.m3ter.com/guides/end-customer-accounts/creating-contracts-for-accounts/creating-and-managing-contracts#adding-balances-to-a-contract). If you do this, then the **Balance details** page will update accordingly.
* **Important: Linking Balance to Contract - ensuring Balance is available for draw-down at billing!** Whether you need to link a Balance on an Account to a Contract is dependent on whether or not an Account Plan on the same Account has been linked to a Contract. For details, see the following section on [Linking Balances to Contracts](/guides/end-customer-accounts/creating-balances-for-accounts/creating-and-managing-account-balances#linking-balances-to-contracts).
**To add a Balance to or remove it from a Contract:**
1. Select **Accounts**. The **Accounts** page opens.
2. Select the **Name** text of the Account for which you want to add a Balance to or remove from a Contract. The **Account** details page opens with the **Overview** tab selected.
3. Select the **Balances** tab.
4. Select the **Name** hotlink text of the Balance. The **Balance details** page opens:
* If the Balance has not been added to a Contract, an **Add to contract** button is available.
* If the Balance has been added to a Contract, a **Remove from contract** button is available.
5. To add the Balance to a Contract, select **Add to contract**. A **Select contract** modal opens and lists the Contracts created for the Account.
6. Select the Contract you want to add the Balance to and select **Confirm**. The modal closes and the Contract is shown under **Balance details**:
A confirmation popup opens.
14. Select **Yes** to confirm the delete action.
* Note that you can also use the **Delete** button at the top of the **Balance details** page.
## Adding Balances to or Removing from Contracts
From a *Balance details* page, you can quickly add the Balance to or remove it from a Contract on the Account. This saves you having to open and edit the Balance.
**Notes:**
* **Adding or Removing Balances from Contract**. Alternatively, you can open the details page of the Contract you want to add a Balance to or remove a Balance from. See [Adding Balances to a Contract](https://docs.m3ter.com/guides/end-customer-accounts/creating-contracts-for-accounts/creating-and-managing-contracts#adding-balances-to-a-contract). If you do this, then the **Balance details** page will update accordingly.
* **Important: Linking Balance to Contract - ensuring Balance is available for draw-down at billing!** Whether you need to link a Balance on an Account to a Contract is dependent on whether or not an Account Plan on the same Account has been linked to a Contract. For details, see the following section on [Linking Balances to Contracts](/guides/end-customer-accounts/creating-balances-for-accounts/creating-and-managing-account-balances#linking-balances-to-contracts).
**To add a Balance to or remove it from a Contract:**
1. Select **Accounts**. The **Accounts** page opens.
2. Select the **Name** text of the Account for which you want to add a Balance to or remove from a Contract. The **Account** details page opens with the **Overview** tab selected.
3. Select the **Balances** tab.
4. Select the **Name** hotlink text of the Balance. The **Balance details** page opens:
* If the Balance has not been added to a Contract, an **Add to contract** button is available.
* If the Balance has been added to a Contract, a **Remove from contract** button is available.
5. To add the Balance to a Contract, select **Add to contract**. A **Select contract** modal opens and lists the Contracts created for the Account.
6. Select the Contract you want to add the Balance to and select **Confirm**. The modal closes and the Contract is shown under **Balance details**:
![Create Balance55]() 7. To remove a Balance from a Contract, select **Remove from contract**. A confirmation popup appears:
7. To remove a Balance from a Contract, select **Remove from contract**. A confirmation popup appears:
 8. Select **Remove** to confirm. The popup closes and the Contract no longer shows under **Balance details**.
## Linking Balances to Contracts - Availability for Draw-Down
Linking a Balance to a Contract on an Account is optional. However, if you have linked an Account Plan to a Contract or set up an ad-hoc Charge for the Account and linked the Charge to a Contract and you want to ensure the Balance is available for draw-down against billed charges on the Account - either usage or ad-hoc charges - you must either link the Balance to the same Contract or ensure the Balance is not linked to a Contract. The following table list the consequences for draw-down availability when linking Account Plans or ad-hoc Account Charges and Balances to Contracts:
| Account Plan or ad-hoc Charge linked to Contract | Balance Linked to Contract | Balance Available for draw-down |
| - | - | - |
| NO | NO | YES |
| Contract A | NO | YES |
| NO | Contract A | NO |
| Contract A | Contract A | YES |
| Contract A | Contract B | NO |
**Important: Linking Balances to Contracts on Child Accounts!** If a Contract has been added to a Parent Account, then Balances on any Child Accounts can be linked to that Contract also.
## Reviewing Balance Metadata
On the *Balance details* page, you can review a Balance's metadata:
* Custom Fields or External Mappings created for the Balance.
* Integration runs linked to the Balance.
**To review Balance metadata:**
1. Select **Accounts**. The **Accounts** page opens.
2. Select the **Name** text of the Account for which you want to review Balance metadata. The **Account** page opens.
3. Select the **Balances** tab.
4. On the **Balance** panel, select the **Name** text of the Balance you want to review metadata for. The **Balance details** page opens.
5. Scroll down the page to review **Balance metadata**:
**Custom fields**. Any Custom fields created for the Balance are listed:
8. Select **Remove** to confirm. The popup closes and the Contract no longer shows under **Balance details**.
## Linking Balances to Contracts - Availability for Draw-Down
Linking a Balance to a Contract on an Account is optional. However, if you have linked an Account Plan to a Contract or set up an ad-hoc Charge for the Account and linked the Charge to a Contract and you want to ensure the Balance is available for draw-down against billed charges on the Account - either usage or ad-hoc charges - you must either link the Balance to the same Contract or ensure the Balance is not linked to a Contract. The following table list the consequences for draw-down availability when linking Account Plans or ad-hoc Account Charges and Balances to Contracts:
| Account Plan or ad-hoc Charge linked to Contract | Balance Linked to Contract | Balance Available for draw-down |
| - | - | - |
| NO | NO | YES |
| Contract A | NO | YES |
| NO | Contract A | NO |
| Contract A | Contract A | YES |
| Contract A | Contract B | NO |
**Important: Linking Balances to Contracts on Child Accounts!** If a Contract has been added to a Parent Account, then Balances on any Child Accounts can be linked to that Contract also.
## Reviewing Balance Metadata
On the *Balance details* page, you can review a Balance's metadata:
* Custom Fields or External Mappings created for the Balance.
* Integration runs linked to the Balance.
**To review Balance metadata:**
1. Select **Accounts**. The **Accounts** page opens.
2. Select the **Name** text of the Account for which you want to review Balance metadata. The **Account** page opens.
3. Select the **Balances** tab.
4. On the **Balance** panel, select the **Name** text of the Balance you want to review metadata for. The **Balance details** page opens.
5. Scroll down the page to review **Balance metadata**:
**Custom fields**. Any Custom fields created for the Balance are listed:
![Create Balance41]() * You can **Copy** the *String* or *Number* value of a Custom Field to your clipboard. See [Working with Custom Fields](/guides/creating-and-managing-products/working-with-custom-fields) for more details.
**External mappings**. Any existing mappings created for the Balance are listed:
* You can **Copy** the *String* or *Number* value of a Custom Field to your clipboard. See [Working with Custom Fields](/guides/creating-and-managing-products/working-with-custom-fields) for more details.
**External mappings**. Any existing mappings created for the Balance are listed:
![Create Balance42]() * The **External system** and **External table** mapped to are shown - such as **NetSuite - Item** in the above example. The **External entity ID** mapped to is also shown.
* If a listed External mapping is linked to an Integration, under **Linked integration** a hotlink text will be shown which you can use to open the Integration.
* Under **Actions**, you can edit or delete the External mapping.
* If the Balance has multiple External mappings created for it, you can use *Search external mappings* to search by **External table** and **External entity ID** and filter the list.
* You can commence a workflow to **Create external mapping** for the Balance directly - see [Creating and Managing External Mappings for Accounts](/guides/end-customer-accounts/creating-and-managing-external-mappings-for-accounts) for an example.
**Integration runs**. If you've set up an integration that synchronizes the Balance data with an external system, the date/time and status of the **Latest** integration run are shown. You can use a text hotlink to open details of this latest run or **View all runs**. See [Reviewing Integration Run Details](/guides/integrations/setting-up-integrations/reviewing-integration-run-details).
## Balances Draw-Down Order Against Prepayments
If you've added Balances and Prepayments as credits on an Account, you can define the order in which these credit amounts are drawn-down for billing the Account. Four options are available for this *credit application order* for Balances against Prepayments:
* **Prepayment then balance**. Draw-down against Prepayment credit before Balance credit. Default.
* **Balance then prepayment**. Draw-down against Balance credit before Prepayment credit.
* **Prepayment only**. Only draw-down against Prepayment credit.
* **Balance only**. Only draw-down against Balance credit.
You can configure this in two places:
* At Organization level as part of your Organization configuration. See [Viewing and Editing Organization Configuration](/guides/organization-and-access-management/viewing-and-editing-organization/viewing-and-editing-organization-configuration).
* At individual Account level when creating or editing the Account to which the Prepayments and Balances have been added under **Bill settings**. See [Creating an Account](/guides/end-customer-accounts/creating-an-account).
* If you configure this at Account level, the Account level setting takes precedence over any setting at Organizational level.
**Important!** If the Account belongs to a Parent/Child Account hierarchy, then the **Credit application order** settings are *not available*, and the draw-down order defaults always to Prepayment then Balance order.
# Creating and Managing Transactions for Balances
Source: https://docs.m3ter.com/guides/end-customer-accounts/creating-balances-for-accounts/creating-and-managing-transactions-for-balances
When you've created a Balance for an end customer Account, you can then create *Transactions* for the Balance to flexibly manage and maintain the Balance amount. The Balance amount will determine how much credit your customer has available to be drawn-down against any usage or other charges due for the period the Balance is active for the Account - and possibly for longer if you choose to allow rollovers on the Balance amount.
When Transactions have been added to an Account Balance, the **Balance transactions** panel on the **Balance details** page in the Console acts as a *ledger* for tracking credit and debit Transactions made against the Balance.
This topic explains how to create Transactions for Balances and how to work with the Balance transactions ledger:
* [Creating Transactions for Balances](/guides/end-customer-accounts/creating-balances-for-accounts/creating-and-managing-transactions-for-balances#creating-transactions-for-balances)
* [Working with the Balance Transactions Ledger](/guides/end-customer-accounts/creating-balances-for-accounts/creating-and-managing-transactions-for-balances#working-with-the-balance-transactions-ledger)
**Important: Understanding Billing for Balances!** Please review the [Understanding and Managing Billing for Balances](/guides/end-customer-accounts/creating-balances-for-accounts/understanding-billing-for-balances) topic above before creating Transactions for Balances on your end-customer Accounts.
**Note: Transaction Schedules!** As well as creating single Transactions for a Balance, you can set up a *Transaction Schedule* for a Balance on an Account. This allows you to add multiple Transactions of a specific type and amount to a Balance at regular daily, weekly, monthly, or yearly intervals over a specified time period. See [Setting Up Transaction Schedules for Balances](/guides/end-customer-accounts/creating-balances-for-accounts/setting-transaction-schedules-for-balances) for more details.
## Creating Transactions for Balances
**Important!** Before you can create a *Transaction* for a Balance on an Account, you must first set up *Transaction Types* for your Organization - see [Creating Transaction Types](/guides/organization-and-access-management/viewing-and-editing-organization/creating-transaction-types).
**To create a Transaction for a Balance:**
1. Select **Accounts**. The **Accounts** page opens.
2. Select the **Name** text of the Account for which you want to add a Transaction to a Balance. The **Account** details page opens with the **Overview** tab selected.
3. Select the **Balances** tab.
4. Select the **Name** text of the Balance you want to create a Transaction for. The **Balance details** page opens. The **Balance transactions** panel lists any Transactions that have been created for the Balance.
5. On the **Balance transactions** panel, select **Create balance transaction**. The **Create** page opens.
6. Enter the **Balance transaction details**:
* **Transaction type**. Use the drop-down to select the Transaction Type. *(Required)*
* **Amount**. The amount of the Transaction. *(Required)*
* **Transaction date**. The date the Transaction will be logged for the Balance. (*Optional*).
* If omitted, then current date is used.
* **Applied date**. The date the Transaction will be applied to the Balance. (*Optional*)
* If omitted, then current date is used.
* **Description**. A description for the Transaction. (*Optional*)
**Warning: You must create at least one Transaction Type for your Organization before you can create a Balance Transaction!** If you haven't, the **Transaction type** drop-down will not be available and you'll see a warning:
* Select the **create a new Transaction Type** hotlink text provided. This takes you directly to the **Create** page to create the Transaction Type you want to use for the Balance Transaction. See [Creating Transaction Types](/guides/organization-and-access-management/viewing-and-editing-organization/creating-transaction-types).
* When you create the new Transaction Type, you are taken directly back to the **Create** Balance Transaction page and the Transaction Type is selected.
7. If the amount billed to the end customer will differ from the Transaction amount or the currency of payment differs from the currency defined for the Balance, you can optionally use the **Balance transactions settings** panel to enter:
* **Currency**. The currency in which payment was made.
* **Amount**. The payment amount.
This allows you to record the fact that an end customer has been credited for a Balance amount using another currency/amount. Examples - you might have agreed with one of your end customers:
* To credit a Balance on their Account in the amount of \$200 USD and the end customer will then be billed for a payment in virtual currency credits of X amount.
* To credit a Balance on their Account in the amount of \$200 USD and the end customer will then be billed for a payment of £100 GBP for that credit.
* To credit a Balance on their Account in the amount of \$200 USD and the end customer will then be billed for a discounted payment of \$195 USD for that credit.
8. Select **Create balance transaction**. You are returned to the **Balance details** page where the new Transaction has been added to the Balance.
9. If you want to add further Transactions of different types to a Balance, repeat steps **5** to **8**:
* The **External system** and **External table** mapped to are shown - such as **NetSuite - Item** in the above example. The **External entity ID** mapped to is also shown.
* If a listed External mapping is linked to an Integration, under **Linked integration** a hotlink text will be shown which you can use to open the Integration.
* Under **Actions**, you can edit or delete the External mapping.
* If the Balance has multiple External mappings created for it, you can use *Search external mappings* to search by **External table** and **External entity ID** and filter the list.
* You can commence a workflow to **Create external mapping** for the Balance directly - see [Creating and Managing External Mappings for Accounts](/guides/end-customer-accounts/creating-and-managing-external-mappings-for-accounts) for an example.
**Integration runs**. If you've set up an integration that synchronizes the Balance data with an external system, the date/time and status of the **Latest** integration run are shown. You can use a text hotlink to open details of this latest run or **View all runs**. See [Reviewing Integration Run Details](/guides/integrations/setting-up-integrations/reviewing-integration-run-details).
## Balances Draw-Down Order Against Prepayments
If you've added Balances and Prepayments as credits on an Account, you can define the order in which these credit amounts are drawn-down for billing the Account. Four options are available for this *credit application order* for Balances against Prepayments:
* **Prepayment then balance**. Draw-down against Prepayment credit before Balance credit. Default.
* **Balance then prepayment**. Draw-down against Balance credit before Prepayment credit.
* **Prepayment only**. Only draw-down against Prepayment credit.
* **Balance only**. Only draw-down against Balance credit.
You can configure this in two places:
* At Organization level as part of your Organization configuration. See [Viewing and Editing Organization Configuration](/guides/organization-and-access-management/viewing-and-editing-organization/viewing-and-editing-organization-configuration).
* At individual Account level when creating or editing the Account to which the Prepayments and Balances have been added under **Bill settings**. See [Creating an Account](/guides/end-customer-accounts/creating-an-account).
* If you configure this at Account level, the Account level setting takes precedence over any setting at Organizational level.
**Important!** If the Account belongs to a Parent/Child Account hierarchy, then the **Credit application order** settings are *not available*, and the draw-down order defaults always to Prepayment then Balance order.
# Creating and Managing Transactions for Balances
Source: https://docs.m3ter.com/guides/end-customer-accounts/creating-balances-for-accounts/creating-and-managing-transactions-for-balances
When you've created a Balance for an end customer Account, you can then create *Transactions* for the Balance to flexibly manage and maintain the Balance amount. The Balance amount will determine how much credit your customer has available to be drawn-down against any usage or other charges due for the period the Balance is active for the Account - and possibly for longer if you choose to allow rollovers on the Balance amount.
When Transactions have been added to an Account Balance, the **Balance transactions** panel on the **Balance details** page in the Console acts as a *ledger* for tracking credit and debit Transactions made against the Balance.
This topic explains how to create Transactions for Balances and how to work with the Balance transactions ledger:
* [Creating Transactions for Balances](/guides/end-customer-accounts/creating-balances-for-accounts/creating-and-managing-transactions-for-balances#creating-transactions-for-balances)
* [Working with the Balance Transactions Ledger](/guides/end-customer-accounts/creating-balances-for-accounts/creating-and-managing-transactions-for-balances#working-with-the-balance-transactions-ledger)
**Important: Understanding Billing for Balances!** Please review the [Understanding and Managing Billing for Balances](/guides/end-customer-accounts/creating-balances-for-accounts/understanding-billing-for-balances) topic above before creating Transactions for Balances on your end-customer Accounts.
**Note: Transaction Schedules!** As well as creating single Transactions for a Balance, you can set up a *Transaction Schedule* for a Balance on an Account. This allows you to add multiple Transactions of a specific type and amount to a Balance at regular daily, weekly, monthly, or yearly intervals over a specified time period. See [Setting Up Transaction Schedules for Balances](/guides/end-customer-accounts/creating-balances-for-accounts/setting-transaction-schedules-for-balances) for more details.
## Creating Transactions for Balances
**Important!** Before you can create a *Transaction* for a Balance on an Account, you must first set up *Transaction Types* for your Organization - see [Creating Transaction Types](/guides/organization-and-access-management/viewing-and-editing-organization/creating-transaction-types).
**To create a Transaction for a Balance:**
1. Select **Accounts**. The **Accounts** page opens.
2. Select the **Name** text of the Account for which you want to add a Transaction to a Balance. The **Account** details page opens with the **Overview** tab selected.
3. Select the **Balances** tab.
4. Select the **Name** text of the Balance you want to create a Transaction for. The **Balance details** page opens. The **Balance transactions** panel lists any Transactions that have been created for the Balance.
5. On the **Balance transactions** panel, select **Create balance transaction**. The **Create** page opens.
6. Enter the **Balance transaction details**:
* **Transaction type**. Use the drop-down to select the Transaction Type. *(Required)*
* **Amount**. The amount of the Transaction. *(Required)*
* **Transaction date**. The date the Transaction will be logged for the Balance. (*Optional*).
* If omitted, then current date is used.
* **Applied date**. The date the Transaction will be applied to the Balance. (*Optional*)
* If omitted, then current date is used.
* **Description**. A description for the Transaction. (*Optional*)
**Warning: You must create at least one Transaction Type for your Organization before you can create a Balance Transaction!** If you haven't, the **Transaction type** drop-down will not be available and you'll see a warning:
* Select the **create a new Transaction Type** hotlink text provided. This takes you directly to the **Create** page to create the Transaction Type you want to use for the Balance Transaction. See [Creating Transaction Types](/guides/organization-and-access-management/viewing-and-editing-organization/creating-transaction-types).
* When you create the new Transaction Type, you are taken directly back to the **Create** Balance Transaction page and the Transaction Type is selected.
7. If the amount billed to the end customer will differ from the Transaction amount or the currency of payment differs from the currency defined for the Balance, you can optionally use the **Balance transactions settings** panel to enter:
* **Currency**. The currency in which payment was made.
* **Amount**. The payment amount.
This allows you to record the fact that an end customer has been credited for a Balance amount using another currency/amount. Examples - you might have agreed with one of your end customers:
* To credit a Balance on their Account in the amount of \$200 USD and the end customer will then be billed for a payment in virtual currency credits of X amount.
* To credit a Balance on their Account in the amount of \$200 USD and the end customer will then be billed for a payment of £100 GBP for that credit.
* To credit a Balance on their Account in the amount of \$200 USD and the end customer will then be billed for a discounted payment of \$195 USD for that credit.
8. Select **Create balance transaction**. You are returned to the **Balance details** page where the new Transaction has been added to the Balance.
9. If you want to add further Transactions of different types to a Balance, repeat steps **5** to **8**:
![Create Balance47]() The **Transactions** panel provides a ledger for the Balance. In this example:
* We've manually added three credit Transactions of different amounts to a Balance. Note that the Transaction for \$100 USD credit amount will be billed to the end customer in the amount of £55 GBP.
* There is a fourth debit Transaction, which shows an amount billed against the Account was drawn-down against the Balance.
* **Source**. Note that in each case the **Source** column in the Transactions ledger identifies who or what was responsible for the Transaction being added - such as a **User** or **Bill**.
* Note that if a Transaction is generated by a Transaction Schedule you've set up for a Balance, then the **Source** will be identified as: ***\*** (Scheduler). See [Setting Up Transaction Schedules for Balances](/guides/end-customer-accounts/creating-balances-for-accounts/setting-transaction-schedules-for-balances).
For further details on working with the Transactions panel ledger, see the [following section](/guides/end-customer-accounts/creating-balances-for-accounts/creating-and-managing-transactions-for-balances#working-with-the-balance-transactions-ledger).
## Working with the Balance Transactions Ledger
The **Balance transactions** panel on the **Balance details** page provides a *ledger* for tracking credit and debit Transactions for the Balance, including billed amounts drawn-down against the Balance:
The **Transactions** panel provides a ledger for the Balance. In this example:
* We've manually added three credit Transactions of different amounts to a Balance. Note that the Transaction for \$100 USD credit amount will be billed to the end customer in the amount of £55 GBP.
* There is a fourth debit Transaction, which shows an amount billed against the Account was drawn-down against the Balance.
* **Source**. Note that in each case the **Source** column in the Transactions ledger identifies who or what was responsible for the Transaction being added - such as a **User** or **Bill**.
* Note that if a Transaction is generated by a Transaction Schedule you've set up for a Balance, then the **Source** will be identified as: ***\*** (Scheduler). See [Setting Up Transaction Schedules for Balances](/guides/end-customer-accounts/creating-balances-for-accounts/setting-transaction-schedules-for-balances).
For further details on working with the Transactions panel ledger, see the [following section](/guides/end-customer-accounts/creating-balances-for-accounts/creating-and-managing-transactions-for-balances#working-with-the-balance-transactions-ledger).
## Working with the Balance Transactions Ledger
The **Balance transactions** panel on the **Balance details** page provides a *ledger* for tracking credit and debit Transactions for the Balance, including billed amounts drawn-down against the Balance:
![Create Balance48]() You can read-off details of each Transaction:
* **Transaction date**. The date the Transaction was logged for the Balance.
* **Applied date**. The date of application of the Transaction amount against the Balance.
* Note that in the case of a manual Transaction - such as when an Organization User adds a top-up credit amount to an Account Balance, the **Transaction date** and the **Applied date** will often coincide. However, in cases such as billed amount debit draw-down against the Balance, these dates often differ. In the above example, the **Applied date** for the billing draw-down item is the date of the Bill responsible for the draw-down against the Balance.
* **Description**. The *description entered* for the specific Transaction of that type.
* **Transaction type**.
* **Source**. The source of the Transaction:
* If a manually credited/debited Transaction, this is shown as Organization **User**.
* If a billing Transaction, this is shown as **Bill** with a hotlink text link allowing you to open the Bill responsible.
* If a Transaction is generated by a Transaction Schedule you've set up for a Balance, then the **Source** will be identified as: ***\*** (Scheduler). See [Setting Up Transaction Schedules for Balances](/guides/end-customer-accounts/creating-balances-for-accounts/setting-transaction-schedules-for-balances).
* **Amount**. The Transaction credit/debit amount,
* **Balance**. Shows the running total for the Balance as credit or debit Transactions are registered against the Balance amount.
# Creating Charges for Balances
Source: https://docs.m3ter.com/guides/end-customer-accounts/creating-balances-for-accounts/creating-charges-for-balances
You can create *Charges* for Balances to create single, one-off line items for Balance billing. Charges for Balances are:
* Created for either debit or credit amounts.
* Linked to a Product for accounting purposes.
* Optionally linked to a Contract.
* Given a specific date for billing.
* When a bill job has run for the specified Charge bill date, a Charge appears as a *Balance fee* line item on the Bill.
* Assigned a service period.
* Available in any currency defined for your Organization.
When you set up a Charge for a Balance, a *separate Bill* is created for the specified Charge billing date for the Account the Balance belongs to. If other billing charge types are due on the Account on that date, the Balance charge can be consolidated with those other charge types in a single Bill, and you'll have to set up consolidated billing if you don't want separate Balance Charge billing. See [Running and Viewing Bills for Balance Charges](/guides/end-customer-accounts/creating-balances-for-accounts/runnning-viewing-bill-for-balance-charges) for details.
This topic explains how to create and manage Charges for Balances:
* [Creating Balance Charges](/guides/end-customer-accounts/creating-balances-for-accounts/creating-charges-for-balances#creating-balance-charges)
* [Viewing Balance Charge Details](/guides/end-customer-accounts/creating-balances-for-accounts/creating-charges-for-balances#viewing-balance-charge-details)
* [Editing and Deleting Balance Charges](/guides/end-customer-accounts/creating-balances-for-accounts/creating-charges-for-balances#editing-and-deleting-balance-charges)
**Notes:**
* **Charge Schedules!** You can set up a *Charge Schedule* for a Balance on an Account. This allows you to generate multiple Charges against a Balance at regular daily, weekly, monthly, or yearly intervals over a specified time period. See [Setting Up Charge Schedules for Balances](/guides/end-customer-accounts/creating-balances-for-accounts/setting-charge-schedules-for-balances) for more details.
* **Running and Viewing Bills for Balance Charges?** You can run billing for an Account that has a Balance with a Charge on it and check the billed amount and date. See [Running and Viewing Bills for Balance Charges](/guides/end-customer-accounts/creating-balances-for-accounts/runnning-viewing-bill-for-balance-charges) for more details.
## Creating Balance Charges
You can create a one-off Charge for a Balance from the Balance details page.
**To create a Balance Charge:**
1. Select **Accounts**. The **Accounts** page opens.
2. In the Accounts listing, search for and select the **Name** text of the Account with the Balance you want to create a Charge for. The **Account** details page opens with the **Overview** tab selected.
3. Select the **Balances** tab.
4. Select the **Name** hotlink text of the Balance you want to create a Charge for. The **Balance details** page opens.
5. Scroll down to the **Balance charges** panel and select **Create balance charge**. The **Create** page opens.
6. Complete **Balance charge details**:
* **Name**. *(Required)*
* **Code**. *(Required)*
* **Currency**. Use the drop-down list to select the currency you want to use for the Charge. *(Required)*
* **Amount**. Enter the Charge amount. *(Required if Units/Unit price not provided)*
* **Units** and **Unit price**. Enter if you haven't entered an **Amount**. At billing, the Charge amount will be calculated as the number of **Units** multiplied by the **Unit price**. *(Required if Amount not provided)*
**Warning!** You cannot *provide both* an **Amount** and **Units/Unit price**.
* **Service period start date (inclusive)** and **Service period end date (exclusive)**. Use the calendar pop-ups to define a service period for the Charge. *(Required)*
* **Bill date**. Enter the date the Charge will be billed against the Balance. *(Optional)*
* You can omit a specific date for billing the Charge in cases where you want to create the Charge against the Balance but the exact date it will be billed is not yet determined.
You can read-off details of each Transaction:
* **Transaction date**. The date the Transaction was logged for the Balance.
* **Applied date**. The date of application of the Transaction amount against the Balance.
* Note that in the case of a manual Transaction - such as when an Organization User adds a top-up credit amount to an Account Balance, the **Transaction date** and the **Applied date** will often coincide. However, in cases such as billed amount debit draw-down against the Balance, these dates often differ. In the above example, the **Applied date** for the billing draw-down item is the date of the Bill responsible for the draw-down against the Balance.
* **Description**. The *description entered* for the specific Transaction of that type.
* **Transaction type**.
* **Source**. The source of the Transaction:
* If a manually credited/debited Transaction, this is shown as Organization **User**.
* If a billing Transaction, this is shown as **Bill** with a hotlink text link allowing you to open the Bill responsible.
* If a Transaction is generated by a Transaction Schedule you've set up for a Balance, then the **Source** will be identified as: ***\*** (Scheduler). See [Setting Up Transaction Schedules for Balances](/guides/end-customer-accounts/creating-balances-for-accounts/setting-transaction-schedules-for-balances).
* **Amount**. The Transaction credit/debit amount,
* **Balance**. Shows the running total for the Balance as credit or debit Transactions are registered against the Balance amount.
# Creating Charges for Balances
Source: https://docs.m3ter.com/guides/end-customer-accounts/creating-balances-for-accounts/creating-charges-for-balances
You can create *Charges* for Balances to create single, one-off line items for Balance billing. Charges for Balances are:
* Created for either debit or credit amounts.
* Linked to a Product for accounting purposes.
* Optionally linked to a Contract.
* Given a specific date for billing.
* When a bill job has run for the specified Charge bill date, a Charge appears as a *Balance fee* line item on the Bill.
* Assigned a service period.
* Available in any currency defined for your Organization.
When you set up a Charge for a Balance, a *separate Bill* is created for the specified Charge billing date for the Account the Balance belongs to. If other billing charge types are due on the Account on that date, the Balance charge can be consolidated with those other charge types in a single Bill, and you'll have to set up consolidated billing if you don't want separate Balance Charge billing. See [Running and Viewing Bills for Balance Charges](/guides/end-customer-accounts/creating-balances-for-accounts/runnning-viewing-bill-for-balance-charges) for details.
This topic explains how to create and manage Charges for Balances:
* [Creating Balance Charges](/guides/end-customer-accounts/creating-balances-for-accounts/creating-charges-for-balances#creating-balance-charges)
* [Viewing Balance Charge Details](/guides/end-customer-accounts/creating-balances-for-accounts/creating-charges-for-balances#viewing-balance-charge-details)
* [Editing and Deleting Balance Charges](/guides/end-customer-accounts/creating-balances-for-accounts/creating-charges-for-balances#editing-and-deleting-balance-charges)
**Notes:**
* **Charge Schedules!** You can set up a *Charge Schedule* for a Balance on an Account. This allows you to generate multiple Charges against a Balance at regular daily, weekly, monthly, or yearly intervals over a specified time period. See [Setting Up Charge Schedules for Balances](/guides/end-customer-accounts/creating-balances-for-accounts/setting-charge-schedules-for-balances) for more details.
* **Running and Viewing Bills for Balance Charges?** You can run billing for an Account that has a Balance with a Charge on it and check the billed amount and date. See [Running and Viewing Bills for Balance Charges](/guides/end-customer-accounts/creating-balances-for-accounts/runnning-viewing-bill-for-balance-charges) for more details.
## Creating Balance Charges
You can create a one-off Charge for a Balance from the Balance details page.
**To create a Balance Charge:**
1. Select **Accounts**. The **Accounts** page opens.
2. In the Accounts listing, search for and select the **Name** text of the Account with the Balance you want to create a Charge for. The **Account** details page opens with the **Overview** tab selected.
3. Select the **Balances** tab.
4. Select the **Name** hotlink text of the Balance you want to create a Charge for. The **Balance details** page opens.
5. Scroll down to the **Balance charges** panel and select **Create balance charge**. The **Create** page opens.
6. Complete **Balance charge details**:
* **Name**. *(Required)*
* **Code**. *(Required)*
* **Currency**. Use the drop-down list to select the currency you want to use for the Charge. *(Required)*
* **Amount**. Enter the Charge amount. *(Required if Units/Unit price not provided)*
* **Units** and **Unit price**. Enter if you haven't entered an **Amount**. At billing, the Charge amount will be calculated as the number of **Units** multiplied by the **Unit price**. *(Required if Amount not provided)*
**Warning!** You cannot *provide both* an **Amount** and **Units/Unit price**.
* **Service period start date (inclusive)** and **Service period end date (exclusive)**. Use the calendar pop-ups to define a service period for the Charge. *(Required)*
* **Bill date**. Enter the date the Charge will be billed against the Balance. *(Optional)*
* You can omit a specific date for billing the Charge in cases where you want to create the Charge against the Balance but the exact date it will be billed is not yet determined.
![]() 7. Enter optional **Balance charge settings**:
* **Accounting product**. For accounting purposes, select a Product to link the Charge *Balance fee* line item on the Bill to. *(Optional)*
* Note that if you omit an **Accounting product** for a Balance Charge, the **Fees accounting product** defined for the Balance is used.
* **Contract**. Use this if you want to add the Balance Charge to a Contract on the Account. For more details on Contracts, see [Creating Contracts for Accounts](/guides/end-customer-accounts/creating-contracts-for-accounts). *(Optional)*
* **Description**. Enter a *custom description* that will appear for the bill line item for the Charge. (*Optional*)
* Note that if you leave this blank, a *default description* will be used: **Balance fee charge**.
* **Notes**. Use this to enter any notes for the Balance Charge. These will not appear on any Bills, but can be referred to for audit purposes. *(Optional)*
7. Enter optional **Balance charge settings**:
* **Accounting product**. For accounting purposes, select a Product to link the Charge *Balance fee* line item on the Bill to. *(Optional)*
* Note that if you omit an **Accounting product** for a Balance Charge, the **Fees accounting product** defined for the Balance is used.
* **Contract**. Use this if you want to add the Balance Charge to a Contract on the Account. For more details on Contracts, see [Creating Contracts for Accounts](/guides/end-customer-accounts/creating-contracts-for-accounts). *(Optional)*
* **Description**. Enter a *custom description* that will appear for the bill line item for the Charge. (*Optional*)
* Note that if you leave this blank, a *default description* will be used: **Balance fee charge**.
* **Notes**. Use this to enter any notes for the Balance Charge. These will not appear on any Bills, but can be referred to for audit purposes. *(Optional)*
![]() In this example a **Charge** will be created against the Balance for a connection service fee of \$75:
* A service period of one day - April 15th - is defined to allow for connection testing for a new service setup.
* The **Charge** will be billed the same day - April 15th.
8. Select **Create balance charge**. You are returned to the **Balance details** page and the Charge is listed on the **Balance charges** panel:
In this example a **Charge** will be created against the Balance for a connection service fee of \$75:
* A service period of one day - April 15th - is defined to allow for connection testing for a new service setup.
* The **Charge** will be billed the same day - April 15th.
8. Select **Create balance charge**. You are returned to the **Balance details** page and the Charge is listed on the **Balance charges** panel:
![]() Note that:
* You can read-off the **Source** of a Balance Charge:
* **User** - when an Organization User has created the Charge and as shown in the above example.
* When the Charge results from a Charge Schedule, then the **Source** will be identified as: ***\*** (Scheduler), such as Charges listed in the following example:
Note that:
* You can read-off the **Source** of a Balance Charge:
* **User** - when an Organization User has created the Charge and as shown in the above example.
* When the Charge results from a Charge Schedule, then the **Source** will be identified as: ***\*** (Scheduler), such as Charges listed in the following example:
![]() * When the Bill for a Balance Charge has been generated, this will be shown in the **Bill** column and you can open the Bill directly:
* When the Bill for a Balance Charge has been generated, this will be shown in the **Bill** column and you can open the Bill directly:
![]() ## Viewing Balance Charge Details
When you've created Charges for an Account Balance, you can open to review Balance Charge details in two ways:
* From the Account's **Balances** tab.
* From the Account's **Charges** tab.
**To view Balance Charge details:**
1. Select **Accounts**. The **Accounts** page opens.
2. Select the **Name** text hotlink of the Account that the Balance belongs to. The **Account details** page opens.
3. Select the **Balances** tab.
4. Select the **Name** text hotlink of the Balance. The **Balance details** page opens.
5. Scroll down the **Balance details** page and on the **Balance charges** panel, select the **Name** text hotlink of the Charge you want to review. The **Balance charge details** page opens:
## Viewing Balance Charge Details
When you've created Charges for an Account Balance, you can open to review Balance Charge details in two ways:
* From the Account's **Balances** tab.
* From the Account's **Charges** tab.
**To view Balance Charge details:**
1. Select **Accounts**. The **Accounts** page opens.
2. Select the **Name** text hotlink of the Account that the Balance belongs to. The **Account details** page opens.
3. Select the **Balances** tab.
4. Select the **Name** text hotlink of the Balance. The **Balance details** page opens.
5. Scroll down the **Balance details** page and on the **Balance charges** panel, select the **Name** text hotlink of the Charge you want to review. The **Balance charge details** page opens:
![Balance Charge11]() You can review and check the details for the Balance Charge:
* Read-off the **Service period** and **Bill date**.
* If a Bill for the Charge has been generated, use a text hotlink to open the **Bill**.
* Use a text hotlink to open the **Balance** the Charge is for.
* Use a text hotlink to open the **Accounting product** for the Charge.
* Copy the **ID** of the Charge directly to your clipboard.
6. Alternatively, on the **Account details** page, select the **Charges** tab. Both ad-hoc Charges created for the Account and Charges created for Account Balances are listed.
7. Select **Balance charges** to filter the **Charges** list:
You can review and check the details for the Balance Charge:
* Read-off the **Service period** and **Bill date**.
* If a Bill for the Charge has been generated, use a text hotlink to open the **Bill**.
* Use a text hotlink to open the **Balance** the Charge is for.
* Use a text hotlink to open the **Accounting product** for the Charge.
* Copy the **ID** of the Charge directly to your clipboard.
6. Alternatively, on the **Account details** page, select the **Charges** tab. Both ad-hoc Charges created for the Account and Charges created for Account Balances are listed.
7. Select **Balance charges** to filter the **Charges** list:
![Balance Charge10b]() 8. Select the **Name** hotlink text to open the **Balance charge details** page.
## Editing and Deleting Balance Charges
**To edit or delete a Balance Charge:**
1. Select **Accounts**. The **Accounts** page opens.
2. Select the **Name** text hotlink of the Account that the Balance belongs to. The **Account details** page opens.
3. Select the **Balances** tab.
4. Select the **Name** text hotlink of the Balance. The **Balance details** page opens.
5. If you want to edit a Balance Charge, on the **Balance charges** panel select the edit icon:
8. Select the **Name** hotlink text to open the **Balance charge details** page.
## Editing and Deleting Balance Charges
**To edit or delete a Balance Charge:**
1. Select **Accounts**. The **Accounts** page opens.
2. Select the **Name** text hotlink of the Account that the Balance belongs to. The **Account details** page opens.
3. Select the **Balances** tab.
4. Select the **Name** text hotlink of the Balance. The **Balance details** page opens.
5. If you want to edit a Balance Charge, on the **Balance charges** panel select the edit icon:
![]() The **Edit** page opens.
6. Make the required editing changes and select **Update balance charge**. Your updates are saved and you are returned to the **Balance charges** tab.
7. If you want to delete a Balance Charge, select the **Delete** icon:
The **Edit** page opens.
6. Make the required editing changes and select **Update balance charge**. Your updates are saved and you are returned to the **Balance charges** tab.
7. If you want to delete a Balance Charge, select the **Delete** icon:
![]() A confirmation popup appears
8. Select **Yes** to confirm and complete the deletion.
**Note: Deleting Billed Charges?** If a Bill for a Balance Charge has already been generated, you won't be able to delete the Charge and an error message will show. You must first delete any Bills generated for a Balance Charge before attempting to delete it.
# Reviewing Account Balances Summary
Source: https://docs.m3ter.com/guides/end-customer-accounts/creating-balances-for-accounts/reviewing-account-balances-summary
An Account's *Balances* tab offers a helpful summary of the Balances created for the Account over time where you can quickly review key details for each Balance and their timelines.
**To review Account Balances Summary:**
1. Select **Accounts**. The **Accounts** page opens.
2. Select the **Name** text hotlink of the Account you want to review the Balances summary for. The **Account details** page opens.
3. Select the **Balances** tab:
A confirmation popup appears
8. Select **Yes** to confirm and complete the deletion.
**Note: Deleting Billed Charges?** If a Bill for a Balance Charge has already been generated, you won't be able to delete the Charge and an error message will show. You must first delete any Bills generated for a Balance Charge before attempting to delete it.
# Reviewing Account Balances Summary
Source: https://docs.m3ter.com/guides/end-customer-accounts/creating-balances-for-accounts/reviewing-account-balances-summary
An Account's *Balances* tab offers a helpful summary of the Balances created for the Account over time where you can quickly review key details for each Balance and their timelines.
**To review Account Balances Summary:**
1. Select **Accounts**. The **Accounts** page opens.
2. Select the **Name** text hotlink of the Account you want to review the Balances summary for. The **Account details** page opens.
3. Select the **Balances** tab:
![Create Balance50]() On review for this example:
* The Account has two currently **Active** Balances, two **Past** Balances, and one **Future** Balance.
* The **Remaining total** is given for the currently **Active**, **Future**, and **Past** Balances.
4. On the **Timeline** chart, you can use the paging arrows to move backwards or forwards in time to review **Past** Balances:
On review for this example:
* The Account has two currently **Active** Balances, two **Past** Balances, and one **Future** Balance.
* The **Remaining total** is given for the currently **Active**, **Future**, and **Past** Balances.
4. On the **Timeline** chart, you can use the paging arrows to move backwards or forwards in time to review **Past** Balances:
![Create Balance51]() or **Future** Balances:
or **Future** Balances:
![Create Balance52]() * Note that you can also scroll the **Timeline** chart for Balances on an Account.
5. If you want to review further details of a Balance select it in the **Timeline** chart to open the **Balance details** page:
* Note that you can also scroll the **Timeline** chart for Balances on an Account.
5. If you want to review further details of a Balance select it in the **Timeline** chart to open the **Balance details** page:
![Create Balance53]() 6. Also provided is a detailed view of the **Active**, **Future**, and **Past** Balances for an Account. In the current example, the **Active**:
6. Also provided is a detailed view of the **Active**, **Future**, and **Past** Balances for an Account. In the current example, the **Active**:
![Create Balance54]() You can quickly check:
* The period configured for a Balance:
* For **Active** Balances, the percentage of the period to date, and the number of days remaining.
* For **Future** Balances, that the period sits at zero percentage and the number of days before the period starts.
* For **Past** Balances, that the period is has reached 100% and the number of days elapsed since the period ended.
* Any **Contract** the Balance has been linked to.
* The **Draw-down products** configured for the Balance.
7. If you want to review further details of a Balance, select the name hotlink text to open the **Balance details** page.
# Running and Viewing Bills for Balance Charges
Source: https://docs.m3ter.com/guides/end-customer-accounts/creating-balances-for-accounts/runnning-viewing-bill-for-balance-charges
You can run billing for an Account that has a Balance with a Charge on it and check the billed amount and date. How Bills are generated for Accounts with Balance Charges depends on whether or not you have selected to consolidate Bills for your Organization:
* **Separate Bills for Charges**. If you *haven't selected to consolidate Bills* for your Organization, you can run billing for an Account for the Balance Charge bill date and generate a *separate Bill* for the Charge.
* Note that in this case, even if the Balance Charge bill date coincides with a regular billing date set up for the Account - such as the first of a month for an Account on a monthly billing frequency with billing dates of the first day of month - the Balance Charge *will not appear* on the regular monthly Bill covering other charge types due against the Account, such as usage charges, and a separate Bill is generated.
* **Consolidated Bills for Charges**. If you *have selected to consolidate Bills* for your Organization and the Balance Charge bill date coincides with a regular bill date set up for the Account, then the Balance Charge *will appear* on the regular monthly Bill covering other charge types due against the Account, such as usage charges.
* Note that in this case, if the Balance Charge bill date doesn't coincide with one of the Account's regular billing dates, you can generate a separate bill for the Balance Charge by running billing for the specific Charge bill date.
This topic gives some examples to show how to generate Bills for Account with Balance Charges:
* [Viewing Separate Bills for Balance Charges](/guides/end-customer-accounts/creating-balances-for-accounts/runnning-viewing-bill-for-balance-charges#viewing-separate-bills-for-balance-charges)
* [Viewing Consolidated Bills for Balance Charges](/guides/end-customer-accounts/creating-balances-for-accounts/runnning-viewing-bill-for-balance-charges#viewing-consolidated-bills-for-balance-charges)
## Viewing Separate Bills for Balance Charges
**To view separate Bills for Balance Charges:**
1. Select **Accounts**. The **Accounts** page opens.
2. Select the **Name** text hotlink of the Account with the Balance Charge you want to view the Bill for. The **Account details** page opens.
3. Select the **Bills** tab.
4. On the **Bills** panel, select **Run billing**. The **Run billing** modal opens.
5. On the **Run billing** modal:
* For **Invoice date**, select the **Bill date** defined for the Balance Charge.
* For **Bill frequency**, select **Ad hoc**.
* For **Target currency**, select the **Currency** configured for the Balance charge:
6. Select **Run billing**. The Bill for the Balance Charge is generated and is listed on the **Bills** panel:
You can quickly check:
* The period configured for a Balance:
* For **Active** Balances, the percentage of the period to date, and the number of days remaining.
* For **Future** Balances, that the period sits at zero percentage and the number of days before the period starts.
* For **Past** Balances, that the period is has reached 100% and the number of days elapsed since the period ended.
* Any **Contract** the Balance has been linked to.
* The **Draw-down products** configured for the Balance.
7. If you want to review further details of a Balance, select the name hotlink text to open the **Balance details** page.
# Running and Viewing Bills for Balance Charges
Source: https://docs.m3ter.com/guides/end-customer-accounts/creating-balances-for-accounts/runnning-viewing-bill-for-balance-charges
You can run billing for an Account that has a Balance with a Charge on it and check the billed amount and date. How Bills are generated for Accounts with Balance Charges depends on whether or not you have selected to consolidate Bills for your Organization:
* **Separate Bills for Charges**. If you *haven't selected to consolidate Bills* for your Organization, you can run billing for an Account for the Balance Charge bill date and generate a *separate Bill* for the Charge.
* Note that in this case, even if the Balance Charge bill date coincides with a regular billing date set up for the Account - such as the first of a month for an Account on a monthly billing frequency with billing dates of the first day of month - the Balance Charge *will not appear* on the regular monthly Bill covering other charge types due against the Account, such as usage charges, and a separate Bill is generated.
* **Consolidated Bills for Charges**. If you *have selected to consolidate Bills* for your Organization and the Balance Charge bill date coincides with a regular bill date set up for the Account, then the Balance Charge *will appear* on the regular monthly Bill covering other charge types due against the Account, such as usage charges.
* Note that in this case, if the Balance Charge bill date doesn't coincide with one of the Account's regular billing dates, you can generate a separate bill for the Balance Charge by running billing for the specific Charge bill date.
This topic gives some examples to show how to generate Bills for Account with Balance Charges:
* [Viewing Separate Bills for Balance Charges](/guides/end-customer-accounts/creating-balances-for-accounts/runnning-viewing-bill-for-balance-charges#viewing-separate-bills-for-balance-charges)
* [Viewing Consolidated Bills for Balance Charges](/guides/end-customer-accounts/creating-balances-for-accounts/runnning-viewing-bill-for-balance-charges#viewing-consolidated-bills-for-balance-charges)
## Viewing Separate Bills for Balance Charges
**To view separate Bills for Balance Charges:**
1. Select **Accounts**. The **Accounts** page opens.
2. Select the **Name** text hotlink of the Account with the Balance Charge you want to view the Bill for. The **Account details** page opens.
3. Select the **Bills** tab.
4. On the **Bills** panel, select **Run billing**. The **Run billing** modal opens.
5. On the **Run billing** modal:
* For **Invoice date**, select the **Bill date** defined for the Balance Charge.
* For **Bill frequency**, select **Ad hoc**.
* For **Target currency**, select the **Currency** configured for the Balance charge:
6. Select **Run billing**. The Bill for the Balance Charge is generated and is listed on the **Bills** panel:
![]() 7. Select the **Reference** text hotlink for the Bill. The Bill opens in **Bill management**:
7. Select the **Reference** text hotlink for the Bill. The Bill opens in **Bill management**:
![Balance Charge12]() In this example, we've run billing for the Balance Charge example created in the [Creating Charges for Balances](/guides/end-customer-accounts/creating-balances-for-accounts/creating-charges-for-balances#creating-balance-charges) topic, which was in the amount of \$75 and had a Bill date of April 15th 2025. When the Bill is opened:
* The Charge line item **TYPE** is shown as **Balance fee**.
* Although we configured an Amount for the Charge, this is shown for the Bill line item as **NO. OF** **UNITS** = **1** and as a **UNIT PRICE** = **Amount**.
* If you expand the Charge line item, a **Balance** text hotlink opens the **Balance details** page.
* You can use either of two text hotlinks to open the **Balance charge details** page:
* A **DESCRIPTION** hotlink text for the Charge line item.
* If you expand the Charge line item, a **Balance charge** hotlink text.
* The **Product** shown for the **Balance fee** line item is the **Accounting product** selected for the Balance Charge: **Revive Graph Standard**. If required, you can use the Display options menu to group line items by Accounting Product:
In this example, we've run billing for the Balance Charge example created in the [Creating Charges for Balances](/guides/end-customer-accounts/creating-balances-for-accounts/creating-charges-for-balances#creating-balance-charges) topic, which was in the amount of \$75 and had a Bill date of April 15th 2025. When the Bill is opened:
* The Charge line item **TYPE** is shown as **Balance fee**.
* Although we configured an Amount for the Charge, this is shown for the Bill line item as **NO. OF** **UNITS** = **1** and as a **UNIT PRICE** = **Amount**.
* If you expand the Charge line item, a **Balance** text hotlink opens the **Balance details** page.
* You can use either of two text hotlinks to open the **Balance charge details** page:
* A **DESCRIPTION** hotlink text for the Charge line item.
* If you expand the Charge line item, a **Balance charge** hotlink text.
* The **Product** shown for the **Balance fee** line item is the **Accounting product** selected for the Balance Charge: **Revive Graph Standard**. If required, you can use the Display options menu to group line items by Accounting Product:
![]() 8. If the Balance Charge has been generated for a Charge Schedule you've set up for the Balance, you can follow the same steps and use the **Run billing** modal using the **billing date** for the scheduled Charge:
8. If the Balance Charge has been generated for a Charge Schedule you've set up for the Balance, you can follow the same steps and use the **Run billing** modal using the **billing date** for the scheduled Charge:
![Balance Charge13]() In this example, we've run billing for a \$50 Balance Charge generated under a Charge Schedule and dated May 1st 2025:
* The line item **TYPE** is shown as **Balance fee**.
* Text hotlinks allows you to open:
* The **Balance details** page.
* The **Balance charge details** page.
* The **Accounting Product** page.
**Note: Charges for Accounts?** You can also create Charges for Accounts. If you've done this and the Account Charge bill date is the same as the Balance Charge bill date and you run billing on the Account for the joint bill date for Ad hoc frequency, then the *Ad-hoc* line item for the Account Charge will also appear on the Bill. See [Viewing Bills for Account Charges](/guides/end-customer-accounts/creating-charges-for-accounts#viewing-bills-for-account-charges).
## Viewing Consolidated Bills for Balance Charges
In the following example, we have an Account set up for monthly billing frequency in arrears and the billing cycle date for the first and subsequent billing as March 1st 2025. The Account has a Balance on it and a Charge of \$150 has been created for the Balance with a Bill date of April 1st 2025, which coincides with the second monthly bill for the Account.
**Important: Switch on Consolidated Bills for Organization!** If you want to show Balance Charges line items on the same Bills as other line item types - such as usage charges set up to be billed at monthly frequencies - you must switch on the **Consolidate bills** setting on in your Organization configuration. This will ensure different billing frequencies are consolidated into the same Bill. See [Viewing and Editing Organization Configuration](/guides/organization-and-access-management/viewing-and-editing-organization/viewing-and-editing-organization-configuration) for more details.
**To view consolidated Bills for Balance Charges:**
1. Select **Accounts**. The **Accounts** page opens.
2. Select the **Name** text hotlink of the Account the Balance with the Charge belongs to. The **Account details** page opens.
3. Select the **Bills** tab.
4. On the **Bills** panel, select **Run billing**. The **Run billing** modal opens.
5. On the **Run billing** modal:
* For **Invoice date**, select the regular billing date which the Balance Charge bill date coincides with - for the current example, April 1st 2025.
* For **Target currency**, select the **Currency** configured for the ad-hoc charge.
* Note that because **Consolidating bills** is enabled, charges for all billing frequencies will be shown on the generated Bill and there is no option to select a **Bill frequency** on the **Run billing** modal.
6. Select **Run billing**. The Bill for the selected date is generated and listed on the **Bills** panel:
In this example, we've run billing for a \$50 Balance Charge generated under a Charge Schedule and dated May 1st 2025:
* The line item **TYPE** is shown as **Balance fee**.
* Text hotlinks allows you to open:
* The **Balance details** page.
* The **Balance charge details** page.
* The **Accounting Product** page.
**Note: Charges for Accounts?** You can also create Charges for Accounts. If you've done this and the Account Charge bill date is the same as the Balance Charge bill date and you run billing on the Account for the joint bill date for Ad hoc frequency, then the *Ad-hoc* line item for the Account Charge will also appear on the Bill. See [Viewing Bills for Account Charges](/guides/end-customer-accounts/creating-charges-for-accounts#viewing-bills-for-account-charges).
## Viewing Consolidated Bills for Balance Charges
In the following example, we have an Account set up for monthly billing frequency in arrears and the billing cycle date for the first and subsequent billing as March 1st 2025. The Account has a Balance on it and a Charge of \$150 has been created for the Balance with a Bill date of April 1st 2025, which coincides with the second monthly bill for the Account.
**Important: Switch on Consolidated Bills for Organization!** If you want to show Balance Charges line items on the same Bills as other line item types - such as usage charges set up to be billed at monthly frequencies - you must switch on the **Consolidate bills** setting on in your Organization configuration. This will ensure different billing frequencies are consolidated into the same Bill. See [Viewing and Editing Organization Configuration](/guides/organization-and-access-management/viewing-and-editing-organization/viewing-and-editing-organization-configuration) for more details.
**To view consolidated Bills for Balance Charges:**
1. Select **Accounts**. The **Accounts** page opens.
2. Select the **Name** text hotlink of the Account the Balance with the Charge belongs to. The **Account details** page opens.
3. Select the **Bills** tab.
4. On the **Bills** panel, select **Run billing**. The **Run billing** modal opens.
5. On the **Run billing** modal:
* For **Invoice date**, select the regular billing date which the Balance Charge bill date coincides with - for the current example, April 1st 2025.
* For **Target currency**, select the **Currency** configured for the ad-hoc charge.
* Note that because **Consolidating bills** is enabled, charges for all billing frequencies will be shown on the generated Bill and there is no option to select a **Bill frequency** on the **Run billing** modal.
6. Select **Run billing**. The Bill for the selected date is generated and listed on the **Bills** panel:
![]() 7. Select the **Reference** text hotlink for the Bill. The Bill opens in **Bill management**:
7. Select the **Reference** text hotlink for the Bill. The Bill opens in **Bill management**:
![Balance Charge14]() In this example of a consolidated Bill:
* The Balance fee line item for the Balance Charge is shown under the Balance the Charge was created for.
* Line items for **Usage** charges that have accrued during March and a monthly **Standing charge** are also shown under the **Revive Graph Standard** Product.
# Setting Up Charge Schedules for Balances
Source: https://docs.m3ter.com/guides/end-customer-accounts/creating-balances-for-accounts/setting-charge-schedules-for-balances
You can set up a *Charge Schedule* for a Balance on an Account. This allows you to generate Charges for billing a Balance at regular daily, weekly, monthly, or yearly intervals over a specified time period.
This topic explains how to set up and manage Charge Schedules for your Account Balances:
* [Creating Balance Charge Schedules](/guides/end-customer-accounts/creating-balances-for-accounts/setting-charge-schedules-for-balances#creating-balance-charge-schedules)
* [Reviewing Balance Charge Schedules](/guides/end-customer-accounts/creating-balances-for-accounts/setting-charge-schedules-for-balances#reviewing-balance-charge-schedules)
* [Viewing and Managing Scheduled Charges for Balances](/guides/end-customer-accounts/creating-balances-for-accounts/setting-charge-schedules-for-balances#viewing-and-managing-scheduled-charges-for-balances)
**Note: Balance Charge Schedules in Beta Release!** Please note that the Balance Charge Schedules feature is currently available only in Beta release version. See [Feature Release Stages](/guides/getting-started/feature-release-stages) for Beta release definition.
**Notes:**
* **One-Off Charges!** You can create one-off Charges for a Balance on an Account. See [Creating Charges for Balances](/guides/end-customer-accounts/creating-balances-for-accounts/creating-charges-for-balances) for more details on creating one-off Charges and on using Balance Charges.
* **Running and Viewing Bills for Balance Charges?** You can run billing for an Account that has a Balance with a Charge on it and check the billed amount and date. See [Running and Viewing Bills for Balance Charges](/guides/end-customer-accounts/creating-balances-for-accounts/runnning-viewing-bill-for-balance-charges) for more details.
## Creating Balance Charge Schedules
**To create a Charge Schedule for a Balance:**
1. Select **Accounts**. The **Accounts** page opens.
2. Select the **Name** text of the Account with the Balance you want to set up a Charge Schedule for. The **Account** details page opens with the **Overview** tab selected.
3. Select the **Balances** tab.
4. Select the **Name** text of the Balance. The **Balance details** page opens.
5. On the **Balance charges** panel, select **Create charge schedule**.
* Alternatively, scroll down the page and on the **Active and pending balance schedules** panel select **Create charge schedule**.
The **Create** page opens.
6. Enter the **Balance charge schedule details**:
* **Name**. *(Required)*
* **Code**. *(Required)*
* **Currency**. Use the drop-down list to select the currency you want to use for the Charge Schedule. *(Required)*
* **Amount**. Enter the amount for Charges generated for the Schedule. *(Required if Units/Unit price not provided)*
* **Units** and **Unit price**. **Units** and **Unit price**. Enter if you haven't entered an **Amount**. At billing, the Charge amount will be calculated as the number of **Units** multiplied by the **Unit price**. *(Required if Amount not provided)*
* Note that you cannot *provide both* an **Amount** and **Units/Unit price**.
* **Service period start date (inclusive)** and **Service period end date (exclusive)**. Use the calendar pop-ups to define a service period for the Charge Schedule. *(Required)*
In this example of a consolidated Bill:
* The Balance fee line item for the Balance Charge is shown under the Balance the Charge was created for.
* Line items for **Usage** charges that have accrued during March and a monthly **Standing charge** are also shown under the **Revive Graph Standard** Product.
# Setting Up Charge Schedules for Balances
Source: https://docs.m3ter.com/guides/end-customer-accounts/creating-balances-for-accounts/setting-charge-schedules-for-balances
You can set up a *Charge Schedule* for a Balance on an Account. This allows you to generate Charges for billing a Balance at regular daily, weekly, monthly, or yearly intervals over a specified time period.
This topic explains how to set up and manage Charge Schedules for your Account Balances:
* [Creating Balance Charge Schedules](/guides/end-customer-accounts/creating-balances-for-accounts/setting-charge-schedules-for-balances#creating-balance-charge-schedules)
* [Reviewing Balance Charge Schedules](/guides/end-customer-accounts/creating-balances-for-accounts/setting-charge-schedules-for-balances#reviewing-balance-charge-schedules)
* [Viewing and Managing Scheduled Charges for Balances](/guides/end-customer-accounts/creating-balances-for-accounts/setting-charge-schedules-for-balances#viewing-and-managing-scheduled-charges-for-balances)
**Note: Balance Charge Schedules in Beta Release!** Please note that the Balance Charge Schedules feature is currently available only in Beta release version. See [Feature Release Stages](/guides/getting-started/feature-release-stages) for Beta release definition.
**Notes:**
* **One-Off Charges!** You can create one-off Charges for a Balance on an Account. See [Creating Charges for Balances](/guides/end-customer-accounts/creating-balances-for-accounts/creating-charges-for-balances) for more details on creating one-off Charges and on using Balance Charges.
* **Running and Viewing Bills for Balance Charges?** You can run billing for an Account that has a Balance with a Charge on it and check the billed amount and date. See [Running and Viewing Bills for Balance Charges](/guides/end-customer-accounts/creating-balances-for-accounts/runnning-viewing-bill-for-balance-charges) for more details.
## Creating Balance Charge Schedules
**To create a Charge Schedule for a Balance:**
1. Select **Accounts**. The **Accounts** page opens.
2. Select the **Name** text of the Account with the Balance you want to set up a Charge Schedule for. The **Account** details page opens with the **Overview** tab selected.
3. Select the **Balances** tab.
4. Select the **Name** text of the Balance. The **Balance details** page opens.
5. On the **Balance charges** panel, select **Create charge schedule**.
* Alternatively, scroll down the page and on the **Active and pending balance schedules** panel select **Create charge schedule**.
The **Create** page opens.
6. Enter the **Balance charge schedule details**:
* **Name**. *(Required)*
* **Code**. *(Required)*
* **Currency**. Use the drop-down list to select the currency you want to use for the Charge Schedule. *(Required)*
* **Amount**. Enter the amount for Charges generated for the Schedule. *(Required if Units/Unit price not provided)*
* **Units** and **Unit price**. **Units** and **Unit price**. Enter if you haven't entered an **Amount**. At billing, the Charge amount will be calculated as the number of **Units** multiplied by the **Unit price**. *(Required if Amount not provided)*
* Note that you cannot *provide both* an **Amount** and **Units/Unit price**.
* **Service period start date (inclusive)** and **Service period end date (exclusive)**. Use the calendar pop-ups to define a service period for the Charge Schedule. *(Required)*
![]() 7. Enter billing options:
* **Bill frequency**. Specify the daily, weekly, monthly, or yearly intervals for when Bills for Charges against the Balance under the Schedule are generated for the Account. Default setting is every month. *(Required)*
* **Billing cycle date**. Optional setting, which sets the date when the first Bill is created for Balance Charges under the Schedule, and also acts as a reference for when in the Schedule period subsequent bills are created:
* For example, suppose the Charge Schedule is configured for monthly billing frequency and a time period of a calendar year of February 1st to February 1st. You then set a **Billing cycle date** of February 15th. The first Bill will be created for the Balance Charge under the Schedule Account on February 15th, and subsequent Bills created on the 15th of the months following for the remainder of the period - March 15th, April 15th, and so on.
* If you leave this blank, then Epoch dates from your Organization's configuration will be used as the **Billing cycle date** instead.
* **Charge billing**. Select to have Charges billed in arrears or in advance. *(Required)*
* **Bill in arrears (end of each billing period)** Default setting.
* **Bill in advance (start of each billing period)**
* **Charge description**. Enter a description used for Bill line items for Charges billed against the Balance under the Schedule. (*Required*)
7. Enter billing options:
* **Bill frequency**. Specify the daily, weekly, monthly, or yearly intervals for when Bills for Charges against the Balance under the Schedule are generated for the Account. Default setting is every month. *(Required)*
* **Billing cycle date**. Optional setting, which sets the date when the first Bill is created for Balance Charges under the Schedule, and also acts as a reference for when in the Schedule period subsequent bills are created:
* For example, suppose the Charge Schedule is configured for monthly billing frequency and a time period of a calendar year of February 1st to February 1st. You then set a **Billing cycle date** of February 15th. The first Bill will be created for the Balance Charge under the Schedule Account on February 15th, and subsequent Bills created on the 15th of the months following for the remainder of the period - March 15th, April 15th, and so on.
* If you leave this blank, then Epoch dates from your Organization's configuration will be used as the **Billing cycle date** instead.
* **Charge billing**. Select to have Charges billed in arrears or in advance. *(Required)*
* **Bill in arrears (end of each billing period)** Default setting.
* **Bill in advance (start of each billing period)**
* **Charge description**. Enter a description used for Bill line items for Charges billed against the Balance under the Schedule. (*Required*)
![]() In this example, a Charge Schedule for a Balance is set up for generating Charges of \$100 against the Balance for billing at monthly intervals in arrears throughout the defined time period for the schedule:
* The first Charge will be generated for the Balance on April 1st 2025, and then on the 1st of every month following throughout the defined Charge Schedule time period.
8. If you want to check the Charges that will be created for the Balance under the Charge Schedule configuration, expand the **Balance charge schedule preview**.
9. If required, add any **Custom fields** to the Charge Schedule:
* Currently, you cannot create Custom Fields for Charge Schedules at the Organization-level, and therefore you cannot reference the Custom Fields values you create for an individual Charge Schedule in your calculations.
* For more on Custom Fields, see [Adding and Editing Custom Fields](/guides/organization-and-access-management/viewing-and-editing-organization/adding-and-editing-custom-fields). We strongly recommend reviewing [Working with Custom Fields](/guides/creating-and-managing-products/working-with-custom-fields) before you create and use Custom Fields.
10. Select **Create balance charge schedule**. You are returned to the **Balance details** page where the new Charge Schedule is listed on the **Active and pending balance schedules** panel under **Active and pending balance charge schedules**:
In this example, a Charge Schedule for a Balance is set up for generating Charges of \$100 against the Balance for billing at monthly intervals in arrears throughout the defined time period for the schedule:
* The first Charge will be generated for the Balance on April 1st 2025, and then on the 1st of every month following throughout the defined Charge Schedule time period.
8. If you want to check the Charges that will be created for the Balance under the Charge Schedule configuration, expand the **Balance charge schedule preview**.
9. If required, add any **Custom fields** to the Charge Schedule:
* Currently, you cannot create Custom Fields for Charge Schedules at the Organization-level, and therefore you cannot reference the Custom Fields values you create for an individual Charge Schedule in your calculations.
* For more on Custom Fields, see [Adding and Editing Custom Fields](/guides/organization-and-access-management/viewing-and-editing-organization/adding-and-editing-custom-fields). We strongly recommend reviewing [Working with Custom Fields](/guides/creating-and-managing-products/working-with-custom-fields) before you create and use Custom Fields.
10. Select **Create balance charge schedule**. You are returned to the **Balance details** page where the new Charge Schedule is listed on the **Active and pending balance schedules** panel under **Active and pending balance charge schedules**:
![]() 11. If you want to edit the Charge Schedule, select the **Edit** button:
11. If you want to edit the Charge Schedule, select the **Edit** button:
![]() 12. Make your changes, and click **Update balance charge schedule** and return to the **Active and pending balance schedules** panel.
13. If you want to remove a Charge Schedule, select the **Delete** button:
12. Make your changes, and click **Update balance charge schedule** and return to the **Active and pending balance schedules** panel.
13. If you want to remove a Charge Schedule, select the **Delete** button:
![]() A confirmation popup opens.
14. Select **Delete** to confirm.
## Reviewing Balance Charge Schedules
You can review the Charge Schedules you've set up for a Balance.
**To review Charge Schedules for a Balance:**
1. Select **Accounts**. The **Accounts** page opens.
2. Select the **Name** text of the Account with the Balance you want to review Charge Schedules for. The **Account** details page opens with the **Overview** tab selected.
3. Select the **Balances** tab.
4. Select the **Name** text of the Balance. The **Balance details** page opens.
5. Scroll down the page and on the **Active and pending balance schedules** panel any Charge Schedules set up for the Balance will be listed under **Active and pending balance charge schedules**.
6. Select the **Name** hotlink text of the Charge Schedule you want to review. The **Balance charge schedule details** page opens:
A confirmation popup opens.
14. Select **Delete** to confirm.
## Reviewing Balance Charge Schedules
You can review the Charge Schedules you've set up for a Balance.
**To review Charge Schedules for a Balance:**
1. Select **Accounts**. The **Accounts** page opens.
2. Select the **Name** text of the Account with the Balance you want to review Charge Schedules for. The **Account** details page opens with the **Overview** tab selected.
3. Select the **Balances** tab.
4. Select the **Name** text of the Balance. The **Balance details** page opens.
5. Scroll down the page and on the **Active and pending balance schedules** panel any Charge Schedules set up for the Balance will be listed under **Active and pending balance charge schedules**.
6. Select the **Name** hotlink text of the Charge Schedule you want to review. The **Balance charge schedule details** page opens:
![Balance Charge Schedule13]() On the **Balance charge schedule details** card, you can:
* Read-off the Charge Schedule **ID**, and copy it directly to your clipboard.
* Check at-a-glance the **Next/Previous charge generation dates** under the schedule.
7. Use the **Scheduled balance charges** card to review a list of the Charges already generated for the Balance to date:
On the **Balance charge schedule details** card, you can:
* Read-off the Charge Schedule **ID**, and copy it directly to your clipboard.
* Check at-a-glance the **Next/Previous charge generation dates** under the schedule.
7. Use the **Scheduled balance charges** card to review a list of the Charges already generated for the Balance to date:
![]() * Note that the Charge for the current billing service period - in this example for the January 1st Bill - is generated in advance to allow for scheduling billing.
8. Scroll down the page and expand the **Balance charge schedule preview** card. Note that you can scroll and page the list to review the entire series:
* Note that the Charge for the current billing service period - in this example for the January 1st Bill - is generated in advance to allow for scheduling billing.
8. Scroll down the page and expand the **Balance charge schedule preview** card. Note that you can scroll and page the list to review the entire series:
![]() **Note: Viewing Recently Created Balance Charge Schedule Details!** The Scheduler service runs every hour, approximately a few minutes after the hour. If you have only very recently - within the past hour - created a Balance Charge Schedule with a start date in the past:
* The **Scheduled balance charge** card *might remain empty*. When the Scheduler service next runs, the **Scheduled balance charge** card will refresh automatically and show any Charges generated for past dates under the Schedule.
* The **Balance schedule charge preview** card *might show* *all Charges*, including past ones. When the Scheduler service next runs, the **Balance schedule charge preview** card will refresh automatically and show only future Charges due under the Schedule.
9. Scroll further down the page and you can review **Balance charge schedule metadata**:
* **Custom Fields**. Any Custom Fields created for the Charge Schedule are listed:
**Note: Viewing Recently Created Balance Charge Schedule Details!** The Scheduler service runs every hour, approximately a few minutes after the hour. If you have only very recently - within the past hour - created a Balance Charge Schedule with a start date in the past:
* The **Scheduled balance charge** card *might remain empty*. When the Scheduler service next runs, the **Scheduled balance charge** card will refresh automatically and show any Charges generated for past dates under the Schedule.
* The **Balance schedule charge preview** card *might show* *all Charges*, including past ones. When the Scheduler service next runs, the **Balance schedule charge preview** card will refresh automatically and show only future Charges due under the Schedule.
9. Scroll further down the page and you can review **Balance charge schedule metadata**:
* **Custom Fields**. Any Custom Fields created for the Charge Schedule are listed:
![Balance Charge Schedule14]() * You can **Copy** the *String* or *Number* value of a field to your clipboard. See [Working with Custom Fields](/guides/creating-and-managing-products/working-with-custom-fields) for more details.
10. Return to the **Balance details** page. If a Balance has multiple Charge Schedules set up, from the **Active and pending transaction schedules** panel you can select to **View all**:
* You can **Copy** the *String* or *Number* value of a field to your clipboard. See [Working with Custom Fields](/guides/creating-and-managing-products/working-with-custom-fields) for more details.
10. Return to the **Balance details** page. If a Balance has multiple Charge Schedules set up, from the **Active and pending transaction schedules** panel you can select to **View all**:
![]() The **Balance charge schedules** page opens:
The **Balance charge schedules** page opens:
![]() From this page, you can review all Charge Schedules set up for a Balance and:
* Create a new Charge Schedule for the Balance.
* Select the **Name** hotlink text to open an existing Charge Schedule and review its details.
## Viewing and Managing Scheduled Charges for Balances
When you have set up a Charge Schedule for a Balance and Charges have been generated for the Schedule, you can review specific Charge details and manage these Charges:
* [Reviewing Scheduled Charge Details](/guides/end-customer-accounts/creating-balances-for-accounts/setting-charge-schedules-for-balances#reviewing-scheduled-charge-details)
* [Editing and Deleting Scheduled Charges](/guides/end-customer-accounts/creating-balances-for-accounts/setting-charge-schedules-for-balances#editing-and-deleting-scheduled-charges)
### Reviewing Scheduled Charge Details
**To review Scheduled Charge details:**
1. Select **Accounts**. The **Accounts** page opens.
2. Select the **Name** text of the Account with the Balance you want to review Scheduled Charges for. The **Account** details page opens with the **Overview** tab selected.
3. Select the **Balances** tab.
4. Select the **Name** text of the Balance. The **Balance details** page opens.
5. Scroll down the page and on the **Balance charges** card, any Charges created for the Balance - either one-off Charges or Scheduled Charges are listed:
From this page, you can review all Charge Schedules set up for a Balance and:
* Create a new Charge Schedule for the Balance.
* Select the **Name** hotlink text to open an existing Charge Schedule and review its details.
## Viewing and Managing Scheduled Charges for Balances
When you have set up a Charge Schedule for a Balance and Charges have been generated for the Schedule, you can review specific Charge details and manage these Charges:
* [Reviewing Scheduled Charge Details](/guides/end-customer-accounts/creating-balances-for-accounts/setting-charge-schedules-for-balances#reviewing-scheduled-charge-details)
* [Editing and Deleting Scheduled Charges](/guides/end-customer-accounts/creating-balances-for-accounts/setting-charge-schedules-for-balances#editing-and-deleting-scheduled-charges)
### Reviewing Scheduled Charge Details
**To review Scheduled Charge details:**
1. Select **Accounts**. The **Accounts** page opens.
2. Select the **Name** text of the Account with the Balance you want to review Scheduled Charges for. The **Account** details page opens with the **Overview** tab selected.
3. Select the **Balances** tab.
4. Select the **Name** text of the Balance. The **Balance details** page opens.
5. Scroll down the page and on the **Balance charges** card, any Charges created for the Balance - either one-off Charges or Scheduled Charges are listed:
![]() In this example of a Balance we set up a Charge Schedule for in the [previous section](/guides/end-customer-accounts/creating-balances-for-accounts/setting-charge-schedules-for-balances#creating-charge-schedules-for-balances), we can see:
* There is a single one-off Charge.
* To date, four scheduled Charges have been generated. Note that:
* The **Name** for a scheduled Charge is the name of the Charge Schedule with the date of the Charge appended.
* The **Source** for each Charge is clearly identified as **(Scheduler)** with a hotlink text for the Charge Schedule also provided.
6. Select the **Name** hotlink text of the scheduled Charge you want to review details for.
* Alternatively, on the **Balance details** page scroll down to the **Active and pending balance schedules** card and under **Active and pending balance charge schedules**, select the **Name** hotlink text of the Charge Schedule you want to reviewing Charges for. The **Charge schedule details** page opens.
* On the **Scheduled balance charges** card select the scheduled Charge **Name** hotlink text:
In this example of a Balance we set up a Charge Schedule for in the [previous section](/guides/end-customer-accounts/creating-balances-for-accounts/setting-charge-schedules-for-balances#creating-charge-schedules-for-balances), we can see:
* There is a single one-off Charge.
* To date, four scheduled Charges have been generated. Note that:
* The **Name** for a scheduled Charge is the name of the Charge Schedule with the date of the Charge appended.
* The **Source** for each Charge is clearly identified as **(Scheduler)** with a hotlink text for the Charge Schedule also provided.
6. Select the **Name** hotlink text of the scheduled Charge you want to review details for.
* Alternatively, on the **Balance details** page scroll down to the **Active and pending balance schedules** card and under **Active and pending balance charge schedules**, select the **Name** hotlink text of the Charge Schedule you want to reviewing Charges for. The **Charge schedule details** page opens.
* On the **Scheduled balance charges** card select the scheduled Charge **Name** hotlink text:
![]() The **Balance charge details** page opens:
The **Balance charge details** page opens:
![Balance Charge Schedule15]() You can review and check the details scheduled Charge generated for the Balance:
* Read-off the **Service period** and **Bill date**.
* If a Bill for the scheduled Charge has been generated, use a text hotlink to open the **Bill**.
* Use a text hotlink to open the **Balance** the scheduled Charge is for.
* Use a text hotlink to open the **Balance charge schedule** for the Charge.
* Copy the **ID** of the scheduled Charge directly to your clipboard.
### Editing and Deleting Scheduled Charges
**To edit or delete a Scheduled Charge for a Balance:**
1. Select **Accounts**. The **Accounts** page opens.
2. Select the **Name** text hotlink of the Account that the Balance belongs to. The **Account details** page opens.
3. Select the **Balances** tab.
4. Select the **Name** text hotlink of the Balance. The **Balance details** page opens.
5. If you want to edit a scheduled Charge, on the **Balance charges** panel select the edit icon:
You can review and check the details scheduled Charge generated for the Balance:
* Read-off the **Service period** and **Bill date**.
* If a Bill for the scheduled Charge has been generated, use a text hotlink to open the **Bill**.
* Use a text hotlink to open the **Balance** the scheduled Charge is for.
* Use a text hotlink to open the **Balance charge schedule** for the Charge.
* Copy the **ID** of the scheduled Charge directly to your clipboard.
### Editing and Deleting Scheduled Charges
**To edit or delete a Scheduled Charge for a Balance:**
1. Select **Accounts**. The **Accounts** page opens.
2. Select the **Name** text hotlink of the Account that the Balance belongs to. The **Account details** page opens.
3. Select the **Balances** tab.
4. Select the **Name** text hotlink of the Balance. The **Balance details** page opens.
5. If you want to edit a scheduled Charge, on the **Balance charges** panel select the edit icon:
![]() The **Edit** page opens.
6. Make the required editing changes and select **Update balance charge**. Your updates are saved and you are returned to the **Balance charges** tab.
7. If you want to delete a scheduled Charge, select the **Delete** icon:
The **Edit** page opens.
6. Make the required editing changes and select **Update balance charge**. Your updates are saved and you are returned to the **Balance charges** tab.
7. If you want to delete a scheduled Charge, select the **Delete** icon:
![]() A confirmation popup appears
8. Select **Delete** to confirm.
# Setting Up Transaction Schedules for Balances
Source: https://docs.m3ter.com/guides/end-customer-accounts/creating-balances-for-accounts/setting-transaction-schedules-for-balances
You can set up a *Transaction Schedule* for a Balance on an Account. This allows you to generate Transactions of a specific type for a Balance at regular daily, weekly, monthly, or yearly intervals over a specified time period.
This topic explains how to set up and manage Transaction Schedules for your Account Balances:
* [Creating Transaction Schedules for Balances](/guides/end-customer-accounts/creating-balances-for-accounts/setting-transaction-schedules-for-balances#creating-transaction-schedules-for-balances)
* [Reviewing Transaction Schedules for a Balance](/guides/end-customer-accounts/creating-balances-for-accounts/setting-transaction-schedules-for-balances#reviewing-transaction-schedules-for-a-balance)
**Note: Balance Transaction Schedules in Beta Release!** Please note that the Balance Transaction Schedules feature is currently available only in Beta release version. See [Feature Release Stages](/guides/getting-started/feature-release-stages) for Beta release definition.
## Creating Transaction Schedules for Balances
**To create a Transaction Schedule for a Balance:**
1. Select **Accounts**. The **Accounts** page opens.
2. Select the **Name** text of the Account with the Balance you want to set up a Transaction Schedule for. The **Account** details page opens with the **Overview** tab selected.
3. Select the **Balances** tab.
4. Select the **Name** text of the Balance. The **Balance details** page opens.
5. On the **Balance transactions** panel, select **Create transaction schedule**.
* Alternatively, scroll down the page and on the **Active and pending balance schedules** panel select **Create transaction schedule**.
The **Create** page opens.
6. Enter the **Balance transaction schedule details**:
* **Name**. *(Required)*
* **Code**. *(Required)*
* **Transaction type**. Use the drop-down to select the Transaction Type. *(Required)*
* **Amount**. The amount of each Transaction created for the Balance under the schedule. *(Required)*
* **Start date (inclusive)** and **End date (exclusive)**. Use the calendar pop-ups to set start and end dates/times to define a time period for the Transaction Schedule. *(Required)*
* **Frequency**. Specify the daily, weekly, monthly, or yearly intervals for when Transactions are generated for the Balance throughout the defined time period. Default setting is every month. *(Required)*
In this example, a Transaction Schedule is set up for monthly Transactions of \$100 to be created for the Balance throughout the defined time period for the schedule:
A confirmation popup appears
8. Select **Delete** to confirm.
# Setting Up Transaction Schedules for Balances
Source: https://docs.m3ter.com/guides/end-customer-accounts/creating-balances-for-accounts/setting-transaction-schedules-for-balances
You can set up a *Transaction Schedule* for a Balance on an Account. This allows you to generate Transactions of a specific type for a Balance at regular daily, weekly, monthly, or yearly intervals over a specified time period.
This topic explains how to set up and manage Transaction Schedules for your Account Balances:
* [Creating Transaction Schedules for Balances](/guides/end-customer-accounts/creating-balances-for-accounts/setting-transaction-schedules-for-balances#creating-transaction-schedules-for-balances)
* [Reviewing Transaction Schedules for a Balance](/guides/end-customer-accounts/creating-balances-for-accounts/setting-transaction-schedules-for-balances#reviewing-transaction-schedules-for-a-balance)
**Note: Balance Transaction Schedules in Beta Release!** Please note that the Balance Transaction Schedules feature is currently available only in Beta release version. See [Feature Release Stages](/guides/getting-started/feature-release-stages) for Beta release definition.
## Creating Transaction Schedules for Balances
**To create a Transaction Schedule for a Balance:**
1. Select **Accounts**. The **Accounts** page opens.
2. Select the **Name** text of the Account with the Balance you want to set up a Transaction Schedule for. The **Account** details page opens with the **Overview** tab selected.
3. Select the **Balances** tab.
4. Select the **Name** text of the Balance. The **Balance details** page opens.
5. On the **Balance transactions** panel, select **Create transaction schedule**.
* Alternatively, scroll down the page and on the **Active and pending balance schedules** panel select **Create transaction schedule**.
The **Create** page opens.
6. Enter the **Balance transaction schedule details**:
* **Name**. *(Required)*
* **Code**. *(Required)*
* **Transaction type**. Use the drop-down to select the Transaction Type. *(Required)*
* **Amount**. The amount of each Transaction created for the Balance under the schedule. *(Required)*
* **Start date (inclusive)** and **End date (exclusive)**. Use the calendar pop-ups to set start and end dates/times to define a time period for the Transaction Schedule. *(Required)*
* **Frequency**. Specify the daily, weekly, monthly, or yearly intervals for when Transactions are generated for the Balance throughout the defined time period. Default setting is every month. *(Required)*
In this example, a Transaction Schedule is set up for monthly Transactions of \$100 to be created for the Balance throughout the defined time period for the schedule:
 * The first Transaction will be created March 1st 2026, and then one on the 1st of each month following with a final Transaction created on March 1st 2027, a total of 13. Note that since the end date defined for the Schedule of April 1st 2027 is *exclusive*, a Transaction *will not be created* on that date.
**Warning: You must create at least one Transaction Type for your Organization before you can create a Balance Transaction Schedule!** If you haven't, the **Transaction type** drop-down will not be available and you'll see a warning:
* Select the **create a new Transaction Type** hotlink text provided. This takes you directly to the **Create** page to create the Transaction Type you want to use for the Balance Transaction Schedule. See [Creating Transaction Types](/guides/organization-and-access-management/viewing-and-editing-organization/creating-transaction-types).
* When you create the new Transaction Type, you are taken directly back to the **Create** page and the Transaction Type is selected.
7. If the amount to be paid differs from the Transaction or the currency of payment differs from the currency defined for the Balance you can optionally use the **Balance transactions settings** panel to enter:
* **Currency**. The currency in which payment was made.
* **Amount**. The payment amount.
This allows you to record the fact that an end customer has been credited for a Balance amount using another currency/amount. For example, you might credit an end customer in the amount of 200 USD for a payment they've made in virtual currency credits of X amount.
8. If you want to check the transactions that will be created for the Balance under the Transaction Schedule configuration, expand the **Balance transaction schedule preview** card.
9. If required, add any **Custom fields** to the Transaction Schedule:
* Currently, you cannot create Custom Fields for Transaction Schedules at the Organization-level, and therefore you cannot reference the Custom Fields values you create for an individual Transaction Schedule in your calculations.
* For more on Custom Fields, see [Adding and Editing Custom Fields](/guides/organization-and-access-management/viewing-and-editing-organization/adding-and-editing-custom-fields). We strongly recommend reviewing [Working with Custom Fields](/guides/creating-and-managing-products/working-with-custom-fields) before you create and use Custom Fields.
10. Select **Create balance transaction schedule**. You are returned to the **Balance details** page where the new Transaction Schedule is listed on the **Active and pending balance schedules** panel under **Active and pending balance transaction schedules**:
* The first Transaction will be created March 1st 2026, and then one on the 1st of each month following with a final Transaction created on March 1st 2027, a total of 13. Note that since the end date defined for the Schedule of April 1st 2027 is *exclusive*, a Transaction *will not be created* on that date.
**Warning: You must create at least one Transaction Type for your Organization before you can create a Balance Transaction Schedule!** If you haven't, the **Transaction type** drop-down will not be available and you'll see a warning:
* Select the **create a new Transaction Type** hotlink text provided. This takes you directly to the **Create** page to create the Transaction Type you want to use for the Balance Transaction Schedule. See [Creating Transaction Types](/guides/organization-and-access-management/viewing-and-editing-organization/creating-transaction-types).
* When you create the new Transaction Type, you are taken directly back to the **Create** page and the Transaction Type is selected.
7. If the amount to be paid differs from the Transaction or the currency of payment differs from the currency defined for the Balance you can optionally use the **Balance transactions settings** panel to enter:
* **Currency**. The currency in which payment was made.
* **Amount**. The payment amount.
This allows you to record the fact that an end customer has been credited for a Balance amount using another currency/amount. For example, you might credit an end customer in the amount of 200 USD for a payment they've made in virtual currency credits of X amount.
8. If you want to check the transactions that will be created for the Balance under the Transaction Schedule configuration, expand the **Balance transaction schedule preview** card.
9. If required, add any **Custom fields** to the Transaction Schedule:
* Currently, you cannot create Custom Fields for Transaction Schedules at the Organization-level, and therefore you cannot reference the Custom Fields values you create for an individual Transaction Schedule in your calculations.
* For more on Custom Fields, see [Adding and Editing Custom Fields](/guides/organization-and-access-management/viewing-and-editing-organization/adding-and-editing-custom-fields). We strongly recommend reviewing [Working with Custom Fields](/guides/creating-and-managing-products/working-with-custom-fields) before you create and use Custom Fields.
10. Select **Create balance transaction schedule**. You are returned to the **Balance details** page where the new Transaction Schedule is listed on the **Active and pending balance schedules** panel under **Active and pending balance transaction schedules**:
![Balance Schedule17]() 11. If you want to edit the Transaction Schedule, select the **Edit** button:
11. If you want to edit the Transaction Schedule, select the **Edit** button:
![]() 12. Make your changes, and click **Update balance transaction schedule** and return to the **Active and pending balance schedules** panel.
13. If you want to remove a Transaction Schedule, select the **Delete** button:
12. Make your changes, and click **Update balance transaction schedule** and return to the **Active and pending balance schedules** panel.
13. If you want to remove a Transaction Schedule, select the **Delete** button:
![]() A confirmation popup opens.
14. Select **Yes** to confirm the delete action.
## Reviewing Transaction Schedules for a Balance
You can review the Transaction Schedules you've set up for a Balance.
**To review Transaction Schedules for a Balance:**
1. Select **Accounts**. The **Accounts** page opens.
2. Select the **Name** text of the Account with the Balance you want to review Transaction Schedules for. The **Account** details page opens with the **Overview** tab selected.
3. Select the **Balances** tab.
4. Select the **Name** text of the Balance. The **Balance details** page opens.
5. Scroll down the page and on the **Active and pending balance schedules** panel any Transaction Schedules set up for the Balance will be listed under **Active and pending balance transaction schedules**:
A confirmation popup opens.
14. Select **Yes** to confirm the delete action.
## Reviewing Transaction Schedules for a Balance
You can review the Transaction Schedules you've set up for a Balance.
**To review Transaction Schedules for a Balance:**
1. Select **Accounts**. The **Accounts** page opens.
2. Select the **Name** text of the Account with the Balance you want to review Transaction Schedules for. The **Account** details page opens with the **Overview** tab selected.
3. Select the **Balances** tab.
4. Select the **Name** text of the Balance. The **Balance details** page opens.
5. Scroll down the page and on the **Active and pending balance schedules** panel any Transaction Schedules set up for the Balance will be listed under **Active and pending balance transaction schedules**:
![Balance Schedule18]() 6. Select the **Name** hotlink text of the Transaction Schedule you want to review. The **Balance transaction schedule details** page opens:
6. Select the **Name** hotlink text of the Transaction Schedule you want to review. The **Balance transaction schedule details** page opens:
![Balance Schedule19]() Note that on the **Balance transaction schedule details** card, you can:
* Read off the Transaction Schedule **ID**, and copy it directly to your clipboard.
* Check at-a-glance the **Next/Previous transaction generation dates** under the schedule.
7. Use the **Scheduled balance transactions** card to review a list the Transactions already generated for the Balance to date.
8. Scroll down the page and expand the **Balance transaction schedule preview** card. Note that you can scroll and page the list to review the entire series:
Note that on the **Balance transaction schedule details** card, you can:
* Read off the Transaction Schedule **ID**, and copy it directly to your clipboard.
* Check at-a-glance the **Next/Previous transaction generation dates** under the schedule.
7. Use the **Scheduled balance transactions** card to review a list the Transactions already generated for the Balance to date.
8. Scroll down the page and expand the **Balance transaction schedule preview** card. Note that you can scroll and page the list to review the entire series:
![Balance Schedule23]() **Note: Viewing Recently Created Balance Transaction Schedule Details!** The Scheduler service runs every hour, approximately a few minutes after the hour. If you have only very recently - within the past hour - created a Balance Transaction Schedule with a start date in the past:
* The **Scheduled balance transaction** card *might remain empty*. When the Scheduler service next runs, the **Scheduled balance transaction** card will refresh automatically and show any Transactions generated for past dates under the Schedule.
* The **Balance schedule transaction preview** card *might show* *all Transactions*, including past ones. When the Scheduler service next runs, the **Balance schedule transaction preview** card will refresh automatically and show only future Transactions due under the Schedule.
9. Scroll further down the page and you can review **Balance transaction schedule metadata**.
* **Custom fields**. Any Custom Fields created for the Transaction Schedule are listed:
**Note: Viewing Recently Created Balance Transaction Schedule Details!** The Scheduler service runs every hour, approximately a few minutes after the hour. If you have only very recently - within the past hour - created a Balance Transaction Schedule with a start date in the past:
* The **Scheduled balance transaction** card *might remain empty*. When the Scheduler service next runs, the **Scheduled balance transaction** card will refresh automatically and show any Transactions generated for past dates under the Schedule.
* The **Balance schedule transaction preview** card *might show* *all Transactions*, including past ones. When the Scheduler service next runs, the **Balance schedule transaction preview** card will refresh automatically and show only future Transactions due under the Schedule.
9. Scroll further down the page and you can review **Balance transaction schedule metadata**.
* **Custom fields**. Any Custom Fields created for the Transaction Schedule are listed:
![Balance Schedule12]() * You can **Copy** the *String* or *Number* value of a field to your clipboard. See [Working with Custom Fields](/guides/creating-and-managing-products/working-with-custom-fields) for more details.
10. Return to the **Balance details** page. If a Balance has multiple Transaction Schedules set up, on the **Active and pending transaction schedules** panel you can select to **View all**:
* You can **Copy** the *String* or *Number* value of a field to your clipboard. See [Working with Custom Fields](/guides/creating-and-managing-products/working-with-custom-fields) for more details.
10. Return to the **Balance details** page. If a Balance has multiple Transaction Schedules set up, on the **Active and pending transaction schedules** panel you can select to **View all**:
![Balance Schedule21]() The **Balance transaction schedules** page opens:
The **Balance transaction schedules** page opens:
![Balance Schedule22]() From this page, you can review all Transaction Schedules set up for a Balance and:
* Create a new Transaction Schedule for the Balance.
* Select the **Name** hotlink text to open an existing Transaction Schedule and review its details.
# Understanding and Managing Billing for Balances
Source: https://docs.m3ter.com/guides/end-customer-accounts/creating-balances-for-accounts/understanding-billing-for-balances
Before setting up Balances for your end-customer Accounts, we *strongly recommend* that you review this topic, which explains in details how charges are drawn-down against Balance amounts for billing purposes:
* [Understanding Charges Draw-Down against Balances for Billing](/guides/end-customer-accounts/creating-balances-for-accounts/understanding-billing-for-balances#understanding-charges-draw-down-against-balances-for-billing)
Secondly, if you intend to use both Prepayments and Balances on your end-customer Accounts, *please review* this section on how to control the draw-down order against them for billing:
* [Balances Draw-Down Order Against Prepayments](/guides/end-customer-accounts/creating-balances-for-accounts/understanding-billing-for-balances#balances-draw-down-order-against-prepayments)
## Understanding Charges Draw-Down Against Balances for Billing
When you create Balances for an end customer Account, it's important to know how the Balance amounts are handled for billing purposes:
* [Draw-Down Charge Types](/guides/end-customer-accounts/creating-balances-for-accounts/understanding-billing-for-balances#draw-down-charge-types)
* [Balance Active Period](/guides/end-customer-accounts/creating-balances-for-accounts/understanding-billing-for-balances#balance-active-period)
* [Balance Consumption](/guides/end-customer-accounts/creating-balances-for-accounts/understanding-billing-for-balances#balance-consumption)
* [Balance Transactions Ledger](/guides/end-customer-accounts/creating-balances-for-accounts/understanding-billing-for-balances#balance-transactions-ledger)
* [Multiple Balances on Account](/guides/end-customer-accounts/creating-balances-for-accounts/understanding-billing-for-balances#multiple-balances-on-account)
* [New Unified Balance Drawdown](#new-unified-balance-drawdown)
* [Balances in Parent/Child Account Hierarchy](#balances-in-parent-child-account-hierarchy)
* [Period for Charges Draw-Down](/guides/end-customer-accounts/creating-balances-for-accounts/understanding-billing-for-balances#period-for-charges-draw-down)
### Draw-Down Charge Types
A Balance amount on an Account can be applied to Bills that contain any of the following charge types and made available for draw-down:
* **Usage**
* **Standing Charge**
* **Minimum Spend**
* **Recurring Charges**:
* **Counter running total charge**
* **Counter adjustment debit**
**Notes:**
* **Controlling the charge types for draw-down?** When you create or edit a Balance, you can select the charge types you want to be made available for draw-down against the Balance. If you select none, then by default all are made available for draw-down against the Balance.
* **Balance and Prepayments on an Account?** If you have both Balances and Prepayments added to an end-customer Account, then you can specify the order in which charges are drawn-down against them. See the [following section](/guides/end-customer-accounts/creating-balances-for-accounts/understanding-billing-for-balances#balances-draw-down-order-against-prepayments) for details.
### Balance Active Period
For billing purposes, usage, standing charges, minimum spend, or recurring charges on an Account with a Balance can only be drawn-down against the Balance amount for the period the Balance is *active for the Account*.
* Importantly, note that if you create a Balance on an Account and the Balance is active for only *part of the normal billing period* set up for the Account, then only the charges for usage, standing charge, minimum spend or recurring charges that are due for *the period the Balance is active* will be drawn down against the Balance, not charges due for the entire normal billing period for the Account
* You can also optionally define a rollover or grace period, with a restricted rollover amount specified, to allow any unused Balance amounts to continue to be drawn-down against for billing purposes beyond the defined active period for the Balance. See the [following section](#period-for-charges-draw-down) for details.
### Balance Consumption
When applied to a Bills, the Balance amount will be drawn down until it is fully consumed:
* **First and subsequent Bills**. If the Balance amount is greater than the first Bill amount and the Balance remains active for some or all of the following billing periods, the remaining Balance amount will be applied to subsequent bills.
* **Draw-down applied to Bill line items is proportional to usage**. If an Account Bill contains several line items each of which is eligible to draw-down against a Balance on the Account, then the Balance amount is allocated proportionally against each line item:
* For example, if the Account Balance amount is \$20 and the Bill contains three line items in the amount of \$30, \$35, and \$35 for a total Bill of \$100, the entire Balance amount of \$20 is not simply used for draw-down against the first line item. The \$20 is distributed proportionally for draw-down across all three line items: the first line item gets 30% of \$20, the second gets 35% of \$20, and the third gets 35% of \$20.
* This method of draw-down in also applied if the Account has multiple Balances available for draw-down at billing. However, the rule that the Balance that expires first will be applied first - see below [Multiple Balances on Account](/guides/end-customer-accounts/creating-balances-for-accounts/understanding-billing-for-balances#multiple-balances-on-account).
* **Linking Balances to Contracts**. Linking a Balance to a Contract on an Account is optional. However, if you have linked an Account Plan to a Contract or set up an ad-hoc Charge for the Account and linked the Charge to a Contract and you want to ensure the Balance is available for draw-down against billed charges on the Account - either usage or ad-hoc charges - you must either link the Balance to the same Contract or ensure the Balance is not linked to a Contract. See [Linking Balances to Contracts](/guides/end-customer-accounts/creating-balances-for-accounts/creating-and-managing-account-balances#linking-balances-to-contracts) for more details.
### Balance Transactions Ledger
Each Transaction that makes up the Balance, for example, an addition of credit, consumption of credit against a Bill, or adjustment of credit, are all recorded against a *ledger*, so that a complete record of all Transaction movements is known.
The **Balance transactions** panel on a **Balance details** page acts as a ledger. For example, if a Bill draws-down against a Balance for charges due on the Account during the Balance active period, then this will automatically show as a Bill Transaction with a link out to view the Bill. See [Working with the Balance Transactions Ledger](/guides/end-customer-accounts/creating-balances-for-accounts/creating-and-managing-transactions-for-balances#working-with-the-balance-transactions-ledger) for more details.
### Multiple Balances on Account
You can set up multiple Balances for a single Account. If you do this, there are some key points to note:
* **Draw-down order**. If you have created more than one Balance for an Account, the order in which Balances are drawn-down against is determined by Balance end date - the Balance with the earlier end date is draw-down against first.
* Importantly, please note that if you've set up multiple Balances on an Account and a Balance has a *Rollover end date* defined, then *this date will be used instead of the Balance end date* for the purpose of determining the draw-down order.
* For cases where Balances have exactly the same end date (and this includes cases where for one Balance it is the *Balance end date* and for another it is the *rollover end date*), they are drawn-down against in the order they happen to come back from data storage, which is deterministic in the sense that it won't change if the Balances are not changed. However, the order is not predictable, in that you can't tell by looking at the Balances which one would be draw-down against first.
* If you have multiple Balances ending on the same date and want to enforce a particular draw-down order, please contact m3ter Support so we can guide you toward the best solution based on your current configuration.
* If your pricing use case requires multiple overlapping Balances on Accounts, please contact m3ter Support so we can guide you toward the best solution to meet your requirements.
* **Overage surcharge percentage must be configured for last Balance drawn-down**. As stated above, if you have multiple Balances on an end-customer Account, the draw-down order is determined by the end date on the different Balances - the Balance with earliest expiry date is drawn-down against first. However, if an overage surcharge is *not configured* for the last Balance that will be drawn-down against for overages, then *no overage surcharge* that might be configured on Balances drawn-down previously will be applied.
**Important: Frequently Recalculating Bills for Accounts with Multiple Balances!** If you have end-customer Accounts with multiple Balances ending on the same date and your accounting operations require Bills for those Accounts to be frequently recalculated during the service period of the Balances, then, as stated above, the draw-down order can change between successive Bills.
### New Unified Balance Drawdown
A new and enhanced Balance drawdown model called "Unified Drawdowns" is now available. It's currently opt-in via an Organization Setting, and over time will become the default. This unified draw-down model is designed to maximize credit use, but also opens up the opportunity to implement many other optimizations and capabilities. If enabled, the billing engine considers *all* eligible Balances on an Account together as a group rather than one at a time. A max-flow algorithm with iterative optimizations is then applied to achieve the best coverage for draw-down against the Account's available grouped Balance credit.
There are some key points to note when enabling this unified Balance draw-down mode:
* Where proportional distribution of credit is necessary, the system will use best-efforts to proportionally distribute Balance credit draw-down across line items.
* This is a necessary side-effect of maximizing coverage and one of the main reasons small amounts of credit could be left unused. The system still uses best-effort to distribute line items draw-down across multiple Balances proportionally, but will sacrifice it in favor of coverage if necessary.
* When drawing-down against Balances within Parent/Child Account hierarchies, the system no longer prioritizes Parent Account credit use.
* As far as possible, the system distributes proportionally between all consumers of the credit - that is, the system doesn’t prioritize either Parent or Child usage.
Other enhancements this model unlocks are:
* Surcharge items are added per line item that is in overage (similar to overage pricing).
* Previously the system would group surcharge by Commitment and add a single overage line item.
* Overage pricing, when defined, is used even when there is no Balance or Commitment.
* This a change in logic that’s been requested and outstanding for some time - overage pricing should be used whenever the usage isn’t being covered by a Balance, regardless of whether one exists or if it existed and was exhausted during that billing cycle.
* Child Accounts will now draw-down from both Child and Parent Balances and Commitments.
**Important:**
* **Preview Release**. Please note the Unified Balance Drawdown feature is currently in Preview release. See [Feature Release Stages](/guides/getting-started/feature-release-stages) for Preview feature guidance.
* **Test in non-production first!** If you intend to enable Unified Balance Drawdown, we *strongly recommend* that you test Balance draw-down behavior thoroughly in a non-production (Sandbox) Organization before switching to your production Organization, and especially if you're using a complex balance/credit model.
* **Prepayments and Balances on an Account?** If you have set up both Balances and Prepayments credit on the same Account and enabled Unified Drawdowns, your preferred [**Credit application order**](#balance-draw-down-order-against-prepayments) option can be applied to control the order in which the available Account credit is drawn-down against at billing - the credit for any Balances configured for the Account is considered as a group and the credit for any Prepayments is also considered as a separate group with the aim of maximizing overall draw-down coverage. If you are intending to set up both Balances and Prepayments credit on a single Account, for Account management and operational simplicity we would recommend using only Balances. Please get in touch with your m3ter contact or reach out to m3ter Support to discuss.
### Balances in Parent/Child Account Hierarchy
If you intend to create Balances on Accounts that belong to a Parent/Child Account hierarchy, then the availability of Balance amounts for draw-down against charges at billing will depend on a combination of factors:
* Whether the Balance is on the Parent or the Child Account.
* Which billing mode you have selected when attaching Plans to Parent or Child Accounts.
It's important to consider this when setting up your Parent/Child Accounts for billing and you expect to also create Balances for either Parent or Child Accounts. For example, suppose:
* The Parent Account:
* Has a Balance with available credit amount.
* Does not have an attached Plan.
* The Child Account:
* Does not have a Balance.
* Does have an attached Plan where the **Account billing hierarchy mode** is set to the default option: **Bill parent account - bill line item per account**.
With this set up, if in a given billing period usage data is ingested for the Child Account's product consumption, then the Balance amount on the Parent Account is made available to draw-down against Child Account charges on the Parent bill:
From this page, you can review all Transaction Schedules set up for a Balance and:
* Create a new Transaction Schedule for the Balance.
* Select the **Name** hotlink text to open an existing Transaction Schedule and review its details.
# Understanding and Managing Billing for Balances
Source: https://docs.m3ter.com/guides/end-customer-accounts/creating-balances-for-accounts/understanding-billing-for-balances
Before setting up Balances for your end-customer Accounts, we *strongly recommend* that you review this topic, which explains in details how charges are drawn-down against Balance amounts for billing purposes:
* [Understanding Charges Draw-Down against Balances for Billing](/guides/end-customer-accounts/creating-balances-for-accounts/understanding-billing-for-balances#understanding-charges-draw-down-against-balances-for-billing)
Secondly, if you intend to use both Prepayments and Balances on your end-customer Accounts, *please review* this section on how to control the draw-down order against them for billing:
* [Balances Draw-Down Order Against Prepayments](/guides/end-customer-accounts/creating-balances-for-accounts/understanding-billing-for-balances#balances-draw-down-order-against-prepayments)
## Understanding Charges Draw-Down Against Balances for Billing
When you create Balances for an end customer Account, it's important to know how the Balance amounts are handled for billing purposes:
* [Draw-Down Charge Types](/guides/end-customer-accounts/creating-balances-for-accounts/understanding-billing-for-balances#draw-down-charge-types)
* [Balance Active Period](/guides/end-customer-accounts/creating-balances-for-accounts/understanding-billing-for-balances#balance-active-period)
* [Balance Consumption](/guides/end-customer-accounts/creating-balances-for-accounts/understanding-billing-for-balances#balance-consumption)
* [Balance Transactions Ledger](/guides/end-customer-accounts/creating-balances-for-accounts/understanding-billing-for-balances#balance-transactions-ledger)
* [Multiple Balances on Account](/guides/end-customer-accounts/creating-balances-for-accounts/understanding-billing-for-balances#multiple-balances-on-account)
* [New Unified Balance Drawdown](#new-unified-balance-drawdown)
* [Balances in Parent/Child Account Hierarchy](#balances-in-parent-child-account-hierarchy)
* [Period for Charges Draw-Down](/guides/end-customer-accounts/creating-balances-for-accounts/understanding-billing-for-balances#period-for-charges-draw-down)
### Draw-Down Charge Types
A Balance amount on an Account can be applied to Bills that contain any of the following charge types and made available for draw-down:
* **Usage**
* **Standing Charge**
* **Minimum Spend**
* **Recurring Charges**:
* **Counter running total charge**
* **Counter adjustment debit**
**Notes:**
* **Controlling the charge types for draw-down?** When you create or edit a Balance, you can select the charge types you want to be made available for draw-down against the Balance. If you select none, then by default all are made available for draw-down against the Balance.
* **Balance and Prepayments on an Account?** If you have both Balances and Prepayments added to an end-customer Account, then you can specify the order in which charges are drawn-down against them. See the [following section](/guides/end-customer-accounts/creating-balances-for-accounts/understanding-billing-for-balances#balances-draw-down-order-against-prepayments) for details.
### Balance Active Period
For billing purposes, usage, standing charges, minimum spend, or recurring charges on an Account with a Balance can only be drawn-down against the Balance amount for the period the Balance is *active for the Account*.
* Importantly, note that if you create a Balance on an Account and the Balance is active for only *part of the normal billing period* set up for the Account, then only the charges for usage, standing charge, minimum spend or recurring charges that are due for *the period the Balance is active* will be drawn down against the Balance, not charges due for the entire normal billing period for the Account
* You can also optionally define a rollover or grace period, with a restricted rollover amount specified, to allow any unused Balance amounts to continue to be drawn-down against for billing purposes beyond the defined active period for the Balance. See the [following section](#period-for-charges-draw-down) for details.
### Balance Consumption
When applied to a Bills, the Balance amount will be drawn down until it is fully consumed:
* **First and subsequent Bills**. If the Balance amount is greater than the first Bill amount and the Balance remains active for some or all of the following billing periods, the remaining Balance amount will be applied to subsequent bills.
* **Draw-down applied to Bill line items is proportional to usage**. If an Account Bill contains several line items each of which is eligible to draw-down against a Balance on the Account, then the Balance amount is allocated proportionally against each line item:
* For example, if the Account Balance amount is \$20 and the Bill contains three line items in the amount of \$30, \$35, and \$35 for a total Bill of \$100, the entire Balance amount of \$20 is not simply used for draw-down against the first line item. The \$20 is distributed proportionally for draw-down across all three line items: the first line item gets 30% of \$20, the second gets 35% of \$20, and the third gets 35% of \$20.
* This method of draw-down in also applied if the Account has multiple Balances available for draw-down at billing. However, the rule that the Balance that expires first will be applied first - see below [Multiple Balances on Account](/guides/end-customer-accounts/creating-balances-for-accounts/understanding-billing-for-balances#multiple-balances-on-account).
* **Linking Balances to Contracts**. Linking a Balance to a Contract on an Account is optional. However, if you have linked an Account Plan to a Contract or set up an ad-hoc Charge for the Account and linked the Charge to a Contract and you want to ensure the Balance is available for draw-down against billed charges on the Account - either usage or ad-hoc charges - you must either link the Balance to the same Contract or ensure the Balance is not linked to a Contract. See [Linking Balances to Contracts](/guides/end-customer-accounts/creating-balances-for-accounts/creating-and-managing-account-balances#linking-balances-to-contracts) for more details.
### Balance Transactions Ledger
Each Transaction that makes up the Balance, for example, an addition of credit, consumption of credit against a Bill, or adjustment of credit, are all recorded against a *ledger*, so that a complete record of all Transaction movements is known.
The **Balance transactions** panel on a **Balance details** page acts as a ledger. For example, if a Bill draws-down against a Balance for charges due on the Account during the Balance active period, then this will automatically show as a Bill Transaction with a link out to view the Bill. See [Working with the Balance Transactions Ledger](/guides/end-customer-accounts/creating-balances-for-accounts/creating-and-managing-transactions-for-balances#working-with-the-balance-transactions-ledger) for more details.
### Multiple Balances on Account
You can set up multiple Balances for a single Account. If you do this, there are some key points to note:
* **Draw-down order**. If you have created more than one Balance for an Account, the order in which Balances are drawn-down against is determined by Balance end date - the Balance with the earlier end date is draw-down against first.
* Importantly, please note that if you've set up multiple Balances on an Account and a Balance has a *Rollover end date* defined, then *this date will be used instead of the Balance end date* for the purpose of determining the draw-down order.
* For cases where Balances have exactly the same end date (and this includes cases where for one Balance it is the *Balance end date* and for another it is the *rollover end date*), they are drawn-down against in the order they happen to come back from data storage, which is deterministic in the sense that it won't change if the Balances are not changed. However, the order is not predictable, in that you can't tell by looking at the Balances which one would be draw-down against first.
* If you have multiple Balances ending on the same date and want to enforce a particular draw-down order, please contact m3ter Support so we can guide you toward the best solution based on your current configuration.
* If your pricing use case requires multiple overlapping Balances on Accounts, please contact m3ter Support so we can guide you toward the best solution to meet your requirements.
* **Overage surcharge percentage must be configured for last Balance drawn-down**. As stated above, if you have multiple Balances on an end-customer Account, the draw-down order is determined by the end date on the different Balances - the Balance with earliest expiry date is drawn-down against first. However, if an overage surcharge is *not configured* for the last Balance that will be drawn-down against for overages, then *no overage surcharge* that might be configured on Balances drawn-down previously will be applied.
**Important: Frequently Recalculating Bills for Accounts with Multiple Balances!** If you have end-customer Accounts with multiple Balances ending on the same date and your accounting operations require Bills for those Accounts to be frequently recalculated during the service period of the Balances, then, as stated above, the draw-down order can change between successive Bills.
### New Unified Balance Drawdown
A new and enhanced Balance drawdown model called "Unified Drawdowns" is now available. It's currently opt-in via an Organization Setting, and over time will become the default. This unified draw-down model is designed to maximize credit use, but also opens up the opportunity to implement many other optimizations and capabilities. If enabled, the billing engine considers *all* eligible Balances on an Account together as a group rather than one at a time. A max-flow algorithm with iterative optimizations is then applied to achieve the best coverage for draw-down against the Account's available grouped Balance credit.
There are some key points to note when enabling this unified Balance draw-down mode:
* Where proportional distribution of credit is necessary, the system will use best-efforts to proportionally distribute Balance credit draw-down across line items.
* This is a necessary side-effect of maximizing coverage and one of the main reasons small amounts of credit could be left unused. The system still uses best-effort to distribute line items draw-down across multiple Balances proportionally, but will sacrifice it in favor of coverage if necessary.
* When drawing-down against Balances within Parent/Child Account hierarchies, the system no longer prioritizes Parent Account credit use.
* As far as possible, the system distributes proportionally between all consumers of the credit - that is, the system doesn’t prioritize either Parent or Child usage.
Other enhancements this model unlocks are:
* Surcharge items are added per line item that is in overage (similar to overage pricing).
* Previously the system would group surcharge by Commitment and add a single overage line item.
* Overage pricing, when defined, is used even when there is no Balance or Commitment.
* This a change in logic that’s been requested and outstanding for some time - overage pricing should be used whenever the usage isn’t being covered by a Balance, regardless of whether one exists or if it existed and was exhausted during that billing cycle.
* Child Accounts will now draw-down from both Child and Parent Balances and Commitments.
**Important:**
* **Preview Release**. Please note the Unified Balance Drawdown feature is currently in Preview release. See [Feature Release Stages](/guides/getting-started/feature-release-stages) for Preview feature guidance.
* **Test in non-production first!** If you intend to enable Unified Balance Drawdown, we *strongly recommend* that you test Balance draw-down behavior thoroughly in a non-production (Sandbox) Organization before switching to your production Organization, and especially if you're using a complex balance/credit model.
* **Prepayments and Balances on an Account?** If you have set up both Balances and Prepayments credit on the same Account and enabled Unified Drawdowns, your preferred [**Credit application order**](#balance-draw-down-order-against-prepayments) option can be applied to control the order in which the available Account credit is drawn-down against at billing - the credit for any Balances configured for the Account is considered as a group and the credit for any Prepayments is also considered as a separate group with the aim of maximizing overall draw-down coverage. If you are intending to set up both Balances and Prepayments credit on a single Account, for Account management and operational simplicity we would recommend using only Balances. Please get in touch with your m3ter contact or reach out to m3ter Support to discuss.
### Balances in Parent/Child Account Hierarchy
If you intend to create Balances on Accounts that belong to a Parent/Child Account hierarchy, then the availability of Balance amounts for draw-down against charges at billing will depend on a combination of factors:
* Whether the Balance is on the Parent or the Child Account.
* Which billing mode you have selected when attaching Plans to Parent or Child Accounts.
It's important to consider this when setting up your Parent/Child Accounts for billing and you expect to also create Balances for either Parent or Child Accounts. For example, suppose:
* The Parent Account:
* Has a Balance with available credit amount.
* Does not have an attached Plan.
* The Child Account:
* Does not have a Balance.
* Does have an attached Plan where the **Account billing hierarchy mode** is set to the default option: **Bill parent account - bill line item per account**.
With this set up, if in a given billing period usage data is ingested for the Child Account's product consumption, then the Balance amount on the Parent Account is made available to draw-down against Child Account charges on the Parent bill:
![Balances16]() However, if the **Account billing hierarchy mode** on the attached Plan of the Child Account is updated and set to: **Bill child account**, then the Parent Account Balance will not be made available to draw-down against the Child Account charges at billing for the separate Child Account Bill that is now generated:
However, if the **Account billing hierarchy mode** on the attached Plan of the Child Account is updated and set to: **Bill child account**, then the Parent Account Balance will not be made available to draw-down against the Child Account charges at billing for the separate Child Account Bill that is now generated:
![Balances18]() For another example scenario that changes the original set up to locate the Balance on the Child Account instead of on the Parent Account:
* The Parent Account:
* Does not have a Balance.
* Does not have an attached Plan.
* The Child Account:
* Has a Balance with available credit amount.
* Does have an attached Plan where the **Account billing hierarchy mode** is set to the default option: **Bill parent account - bill line item per account**.
With this alternative set up, if in a given billing period usage data is ingested for the Child Account's product consumption, then the Balance amount on the Child Account is *not made available to draw-down against* Child Account charges on the Parent bill:
For another example scenario that changes the original set up to locate the Balance on the Child Account instead of on the Parent Account:
* The Parent Account:
* Does not have a Balance.
* Does not have an attached Plan.
* The Child Account:
* Has a Balance with available credit amount.
* Does have an attached Plan where the **Account billing hierarchy mode** is set to the default option: **Bill parent account - bill line item per account**.
With this alternative set up, if in a given billing period usage data is ingested for the Child Account's product consumption, then the Balance amount on the Child Account is *not made available to draw-down against* Child Account charges on the Parent bill:
![Balances18 1]() However, if the **Account billing hierarchy mode** on the attached Plan of the Child Account is updated and set to: **Bill child account**, then the Child Account Balance will be made available to draw-down against the Child Account charges at billing for the separate Child Account Bill that is now generated:
However, if the **Account billing hierarchy mode** on the attached Plan of the Child Account is updated and set to: **Bill child account**, then the Child Account Balance will be made available to draw-down against the Child Account charges at billing for the separate Child Account Bill that is now generated:
![Balances20]() **Test Parent/Child Account billing setup!** If you intend to use Parent/Child Account hierarchies and want to use Balances on either Parent or Child Accounts, then we *strongly recommend* that you test the overall billing setup in your sandbox/pre-production environment before implementing in production. See also: [Billing Hierarchy Modes for Parent/Child Accounts](/guides/end-customer-accounts/creating-and-working-with-child-accounts/billing-for-parent-child-accounts).
### Period for Charges Draw-Down
The following diagrams illustrate how the effective period for charges draw-down against Balance amounts on an Account are determined for billing purposes:
* **Active Balance Period by Date.** No rollover or grace periods for consuming the Balance amount defined:
**Test Parent/Child Account billing setup!** If you intend to use Parent/Child Account hierarchies and want to use Balances on either Parent or Child Accounts, then we *strongly recommend* that you test the overall billing setup in your sandbox/pre-production environment before implementing in production. See also: [Billing Hierarchy Modes for Parent/Child Accounts](/guides/end-customer-accounts/creating-and-working-with-child-accounts/billing-for-parent-child-accounts).
### Period for Charges Draw-Down
The following diagrams illustrate how the effective period for charges draw-down against Balance amounts on an Account are determined for billing purposes:
* **Active Balance Period by Date.** No rollover or grace periods for consuming the Balance amount defined:
![]() * **Active Balance Period by Date with Grace Periods**. Rollover periods defined for consuming the Balance amount:
* **Active Balance Period by Date with Grace Periods**. Rollover periods defined for consuming the Balance amount:
![]() * **Active Balance Period by Date/Time**. No rollover or grace periods defined for consuming the Balance amount:
* **Active Balance Period by Date/Time**. No rollover or grace periods defined for consuming the Balance amount:
![]() > Note that the end date/time is exclusive to the second, meaning that in this example the Balance amount can be used for draw-down against charges due up to and including 11:59:59 on 30th June.
## Balances Draw-Down Order Against Prepayments
If you have added Balances and Prepayments as credits on an Account, you can define the order in which these credit amounts are drawn-down for billing the Account. Four options are available for this *credit application order* for Balances against Prepayments:
* **Prepayment then balance**. Draw-down against Prepayment credit before Balance credit. Default.
* **Balance then prepayment**. Draw-down against Balance credit before Prepayment credit.
* **Prepayment only**. Only draw-down against Prepayment credit.
* **Balance only**. Only draw-down against Balance credit.
You can configure this in two places:
* At Organization level as part of your Organization configuration. See [Viewing and Editing Organization Configuration](/guides/organization-and-access-management/viewing-and-editing-organization/viewing-and-editing-organization-configuration).
* At individual Account level when creating or editing the Account to which the Prepayments and Balances have been added under **Bill settings**. See [Creating an Account](/guides/end-customer-accounts/creating-an-account).
* If you configure this at Account level, the Account level setting takes precedence over any setting at Organizational level.
**Important!** If the Account belongs to a Parent/Child Account hierarchy, then the **Credit application order** settings are *not available*, and the draw-down order defaults always to Prepayment then Balance order.
# Creating Charges for Accounts
Source: https://docs.m3ter.com/guides/end-customer-accounts/creating-charges-for-accounts
You can create *Charges* for your end-customer Accounts to serve use cases that require ad-hoc or one-off line items for Account billing. Charges are:
* Created for either debit or credit amounts.
* Linked to a Product for accounting purposes.
* Optionally linked to a Contract.
* Given a specific date for billing.
* When a bill job has run for the specified Charge bill date, a Charge appears as an *Ad-hoc* line item on a Bill.
* Assigned a service period.
* Available in any currency defined for your Organization.
When you set up a Charge for an Account, a new Bill is created for the specified billing date or, if other billing charge types are due on the Account on that date, can be consolidated with those other charge types in a single Bill.
This topic sets out some common use cases where Charges can be used, explains how to create and manage Charges for your end-customer Accounts, and gives some examples of how to view Bills for Account Charges:
* [Charges: Common Use Cases](/guides/end-customer-accounts/creating-charges-for-accounts#charges-common-use-cases)
* [Creating and Managing Charges](/guides/end-customer-accounts/creating-charges-for-accounts#creating-and-managing-charges)
* [Viewing Bills for Account Charges](/guides/end-customer-accounts/creating-charges-for-accounts#viewing-bills-for-account-charges)
## Charges: Common Use Cases
The following use cases illustrate where Charges can enhance your revenue operations, providing your business with greater control over billing workflows without modifying core pricing plans:
* [One-Time Fees and Ad hoc Adjustments](/guides/end-customer-accounts/creating-charges-for-accounts#one-time-fees-and-ad-hoc-adjustments)
* [Discounts, Refunds, and Service Credits](/guides/end-customer-accounts/creating-charges-for-accounts#discounts-refunds-and-service-credits)
* [Contract-Specific Custom Charges](/guides/end-customer-accounts/creating-charges-for-accounts#contract-specific-custom-charges)
### One-Time Fees and Ad hoc Adjustments
#### Scenario
A business wants to add *manual, one-time fees* to customer invoices outside of standard usage-based billing.
#### How Charges solve this Scenario
Users can create *Adhoc Charges* that appear as one-time line items on bills. Examples include:
* *Setup fees* for new accounts.
* *Manual service fees* (for example, consulting charges).
* *Penalty fees* for late payments.
#### Example
A SaaS company charges a one-time custom onboarding fee of \$500 when a new customer signs up. Instead of modifying the contract, they create an *Adhoc Charge* linked to the *Onboarding Service product* and assign it to the customer’s next bill.
### Discounts, Refunds, and Service Credits
#### Scenario
A business wants to issue *discounts, refunds, or credits* directly to customer bills without altering contracts or subscription plans.
#### How Charges solve this Scenario
* *Negative Charges (credits)* can be applied to offset fees.
* *Discounts* can be linked to *specific products or contracts* for accounting accuracy.
* *Service credits* can be *applied to future bills* using a scheduled charge.
#### Example
A telecom provider issues a *\$50 refund* to a customer due to a *service outage*. Instead of modifying the plan, they create a *credit charge* for -\$50 and link it to the next billing cycle.
### Contract-Specific Custom Charges
#### Scenario
Businesses need to *apply charges tied to specific contracts* rather than general billing rules.
#### How Charges solve this Scenario
* Charges *can be linked to contracts* for tracking and auditing.
* Ensures alignment with *contractual obligations, service levels, or penalties*.
#### Example
A managed services provider includes a clause in a contract for *custom engineering support fees* at an hourly rate. When support is provided, an *Adhoc Charge is created under the contract’s ID* and added to the next bill.
## Creating and Managing Account Charges
You can create ad-hoc Charges for your end-customer Accounts in m3ter directly from the Account details page. When you've created Charges for an Account, from the Charges tab you can review Charge details and edit or delete a Charge:
* [Creating a Charge for an Account](/guides/end-customer-accounts/creating-charges-for-accounts#creating-a-charge-for-an-account)
* [Viewing Charge Details](/guides/end-customer-accounts/creating-charges-for-accounts#viewing-charge-details)
* [Editing and Deleting Charges](/guides/end-customer-accounts/creating-charges-for-accounts#editing-and-deleting-charges)
* [Filtering the Charges List](#filtering-the-charges-list)
**Note: Balance Charges.** You can also create Charges for Account Balances, and these will also be listed on the **Account>Charges** tab. See [Creating Charges for Balances](/guides/end-customer-accounts/creating-balances-for-accounts/creating-charges-for-balances) for more details.
### Creating a Charge for an Account
**To create a Charge for an Account:**
1. Select **Accounts**. The **Accounts** page opens.
2. In the Accounts listing, search for and select the **Name** text of the Account you want to create a Charge for. The **Account** details page opens with the **Overview** tab selected.
3. On the **Account actions** menu:
> Note that the end date/time is exclusive to the second, meaning that in this example the Balance amount can be used for draw-down against charges due up to and including 11:59:59 on 30th June.
## Balances Draw-Down Order Against Prepayments
If you have added Balances and Prepayments as credits on an Account, you can define the order in which these credit amounts are drawn-down for billing the Account. Four options are available for this *credit application order* for Balances against Prepayments:
* **Prepayment then balance**. Draw-down against Prepayment credit before Balance credit. Default.
* **Balance then prepayment**. Draw-down against Balance credit before Prepayment credit.
* **Prepayment only**. Only draw-down against Prepayment credit.
* **Balance only**. Only draw-down against Balance credit.
You can configure this in two places:
* At Organization level as part of your Organization configuration. See [Viewing and Editing Organization Configuration](/guides/organization-and-access-management/viewing-and-editing-organization/viewing-and-editing-organization-configuration).
* At individual Account level when creating or editing the Account to which the Prepayments and Balances have been added under **Bill settings**. See [Creating an Account](/guides/end-customer-accounts/creating-an-account).
* If you configure this at Account level, the Account level setting takes precedence over any setting at Organizational level.
**Important!** If the Account belongs to a Parent/Child Account hierarchy, then the **Credit application order** settings are *not available*, and the draw-down order defaults always to Prepayment then Balance order.
# Creating Charges for Accounts
Source: https://docs.m3ter.com/guides/end-customer-accounts/creating-charges-for-accounts
You can create *Charges* for your end-customer Accounts to serve use cases that require ad-hoc or one-off line items for Account billing. Charges are:
* Created for either debit or credit amounts.
* Linked to a Product for accounting purposes.
* Optionally linked to a Contract.
* Given a specific date for billing.
* When a bill job has run for the specified Charge bill date, a Charge appears as an *Ad-hoc* line item on a Bill.
* Assigned a service period.
* Available in any currency defined for your Organization.
When you set up a Charge for an Account, a new Bill is created for the specified billing date or, if other billing charge types are due on the Account on that date, can be consolidated with those other charge types in a single Bill.
This topic sets out some common use cases where Charges can be used, explains how to create and manage Charges for your end-customer Accounts, and gives some examples of how to view Bills for Account Charges:
* [Charges: Common Use Cases](/guides/end-customer-accounts/creating-charges-for-accounts#charges-common-use-cases)
* [Creating and Managing Charges](/guides/end-customer-accounts/creating-charges-for-accounts#creating-and-managing-charges)
* [Viewing Bills for Account Charges](/guides/end-customer-accounts/creating-charges-for-accounts#viewing-bills-for-account-charges)
## Charges: Common Use Cases
The following use cases illustrate where Charges can enhance your revenue operations, providing your business with greater control over billing workflows without modifying core pricing plans:
* [One-Time Fees and Ad hoc Adjustments](/guides/end-customer-accounts/creating-charges-for-accounts#one-time-fees-and-ad-hoc-adjustments)
* [Discounts, Refunds, and Service Credits](/guides/end-customer-accounts/creating-charges-for-accounts#discounts-refunds-and-service-credits)
* [Contract-Specific Custom Charges](/guides/end-customer-accounts/creating-charges-for-accounts#contract-specific-custom-charges)
### One-Time Fees and Ad hoc Adjustments
#### Scenario
A business wants to add *manual, one-time fees* to customer invoices outside of standard usage-based billing.
#### How Charges solve this Scenario
Users can create *Adhoc Charges* that appear as one-time line items on bills. Examples include:
* *Setup fees* for new accounts.
* *Manual service fees* (for example, consulting charges).
* *Penalty fees* for late payments.
#### Example
A SaaS company charges a one-time custom onboarding fee of \$500 when a new customer signs up. Instead of modifying the contract, they create an *Adhoc Charge* linked to the *Onboarding Service product* and assign it to the customer’s next bill.
### Discounts, Refunds, and Service Credits
#### Scenario
A business wants to issue *discounts, refunds, or credits* directly to customer bills without altering contracts or subscription plans.
#### How Charges solve this Scenario
* *Negative Charges (credits)* can be applied to offset fees.
* *Discounts* can be linked to *specific products or contracts* for accounting accuracy.
* *Service credits* can be *applied to future bills* using a scheduled charge.
#### Example
A telecom provider issues a *\$50 refund* to a customer due to a *service outage*. Instead of modifying the plan, they create a *credit charge* for -\$50 and link it to the next billing cycle.
### Contract-Specific Custom Charges
#### Scenario
Businesses need to *apply charges tied to specific contracts* rather than general billing rules.
#### How Charges solve this Scenario
* Charges *can be linked to contracts* for tracking and auditing.
* Ensures alignment with *contractual obligations, service levels, or penalties*.
#### Example
A managed services provider includes a clause in a contract for *custom engineering support fees* at an hourly rate. When support is provided, an *Adhoc Charge is created under the contract’s ID* and added to the next bill.
## Creating and Managing Account Charges
You can create ad-hoc Charges for your end-customer Accounts in m3ter directly from the Account details page. When you've created Charges for an Account, from the Charges tab you can review Charge details and edit or delete a Charge:
* [Creating a Charge for an Account](/guides/end-customer-accounts/creating-charges-for-accounts#creating-a-charge-for-an-account)
* [Viewing Charge Details](/guides/end-customer-accounts/creating-charges-for-accounts#viewing-charge-details)
* [Editing and Deleting Charges](/guides/end-customer-accounts/creating-charges-for-accounts#editing-and-deleting-charges)
* [Filtering the Charges List](#filtering-the-charges-list)
**Note: Balance Charges.** You can also create Charges for Account Balances, and these will also be listed on the **Account>Charges** tab. See [Creating Charges for Balances](/guides/end-customer-accounts/creating-balances-for-accounts/creating-charges-for-balances) for more details.
### Creating a Charge for an Account
**To create a Charge for an Account:**
1. Select **Accounts**. The **Accounts** page opens.
2. In the Accounts listing, search for and select the **Name** text of the Account you want to create a Charge for. The **Account** details page opens with the **Overview** tab selected.
3. On the **Account actions** menu:
![]() Select **Charges>Create charge**:
Select **Charges>Create charge**:
![]() Alternatively:
* Select the **Charges** tab.
* On the **Charges** panel, select **Create charge**.
The **Create** page opens.
4. Complete the **Charge details**:
* **Name**. Enter a name for the Charge. (*Required*)
* **Code**. Enter a code for the Charge. (*Required*)
* **Currency**. Use the drop-down list to select the currency you want to use for the Charge. (*Required*)
* **Amount**. Enter the Charge amount to be billed. (*Required* *if Units/Unit price not provided*)
* **Units** and **Unit price**. Enter if you haven't entered an **Amount**. At billing, the Charge amount will be calculated as the number of **Units** multiplied by the **Unit price**. (*Required if Amount not provided*)
* Note that you cannot *provide both* an **Amount** and **Units/Unit price**.
* **Service period start date (inclusive)** and **Service period end date (exclusive)**. Use the calendar pop-ups to define a service period for the charge. (*Required*)
* **Bill date**. Enter the date the Charge will be billed against the Account. (*Optional*)
* You can omit a specific date for billing the Charge in cases where you want to create the Charge against the account but the exact date it will be billed is not yet determined.
Alternatively:
* Select the **Charges** tab.
* On the **Charges** panel, select **Create charge**.
The **Create** page opens.
4. Complete the **Charge details**:
* **Name**. Enter a name for the Charge. (*Required*)
* **Code**. Enter a code for the Charge. (*Required*)
* **Currency**. Use the drop-down list to select the currency you want to use for the Charge. (*Required*)
* **Amount**. Enter the Charge amount to be billed. (*Required* *if Units/Unit price not provided*)
* **Units** and **Unit price**. Enter if you haven't entered an **Amount**. At billing, the Charge amount will be calculated as the number of **Units** multiplied by the **Unit price**. (*Required if Amount not provided*)
* Note that you cannot *provide both* an **Amount** and **Units/Unit price**.
* **Service period start date (inclusive)** and **Service period end date (exclusive)**. Use the calendar pop-ups to define a service period for the charge. (*Required*)
* **Bill date**. Enter the date the Charge will be billed against the Account. (*Optional*)
* You can omit a specific date for billing the Charge in cases where you want to create the Charge against the account but the exact date it will be billed is not yet determined.
![]() 5. Enter optional **Charge settings**:
* **Accounting product**. For accounting purposes, select a Product to link the Charge Bill line item to. *(Optional)*
* **Description**. Enter a *custom description* that will appear for the bill line item for the Charge. (*Optional*)
* Note that if you leave this blank, a *default description* will be used: **Ad hoc charge**.
* **Contract**. If you want to add the Charge to a Contract you've created for the Account, use the drop-down to select it. For more details on Contracts, see [Creating Contracts for Accounts](/guides/end-customer-accounts/creating-contracts-for-accounts). (*Optional*)
* **Description**. Enter a *custom description* that will appear for the bill line item for the Charge. (*Optional*)
* Note that if you leave this blank, a *default description* will be used: **Ad hoc charge**.
* **Notes**. Use this to enter any notes for the Charge. These will not appear on any Bills, but can be referred to for audit purposes. (*Optional*)
5. Enter optional **Charge settings**:
* **Accounting product**. For accounting purposes, select a Product to link the Charge Bill line item to. *(Optional)*
* **Description**. Enter a *custom description* that will appear for the bill line item for the Charge. (*Optional*)
* Note that if you leave this blank, a *default description* will be used: **Ad hoc charge**.
* **Contract**. If you want to add the Charge to a Contract you've created for the Account, use the drop-down to select it. For more details on Contracts, see [Creating Contracts for Accounts](/guides/end-customer-accounts/creating-contracts-for-accounts). (*Optional*)
* **Description**. Enter a *custom description* that will appear for the bill line item for the Charge. (*Optional*)
* Note that if you leave this blank, a *default description* will be used: **Ad hoc charge**.
* **Notes**. Use this to enter any notes for the Charge. These will not appear on any Bills, but can be referred to for audit purposes. (*Optional*)
![]() In this example a **Charge** will be created for a one-off onboarding fee of \$500 against a new customer:
* A service period of two days - March 14th and 15th - is defined to allow for setting up and testing the new service setup.
* The **Charge** will be billed the day after the two-day service period - March 16th.
6. Select **Create charge**. You are returned to the **Charges** tab where the new Charge is listed:
In this example a **Charge** will be created for a one-off onboarding fee of \$500 against a new customer:
* A service period of two days - March 14th and 15th - is defined to allow for setting up and testing the new service setup.
* The **Charge** will be billed the day after the two-day service period - March 16th.
6. Select **Create charge**. You are returned to the **Charges** tab where the new Charge is listed:
![Charges18]() ### Viewing Charge Details
**To view Charge details:**
1. Select **Accounts**. The **Accounts** page opens.
2. Select the **Name** text hotlink of the Account with the Charge you want to review. The **Account details** page opens.
3. Select the **Charges** tab.
4. On the **Charges** panel, select the **Name** text hotlink of the Charge you want to review. The **Charge details** page opens:
### Viewing Charge Details
**To view Charge details:**
1. Select **Accounts**. The **Accounts** page opens.
2. Select the **Name** text hotlink of the Account with the Charge you want to review. The **Account details** page opens.
3. Select the **Charges** tab.
4. On the **Charges** panel, select the **Name** text hotlink of the Charge you want to review. The **Charge details** page opens:
![Charges22]() You can check the details for the Charge:
* Read-off the **Service period** and **Bill date** for the Charge.
* Use a text hotlink to open the **Bill** for the Charge.
* Use a text hotlink to open the **Accounting product** for the Charge.
* Copy the **ID** of the Charge directly to your clipboard.
### Editing and Deleting Charges
**To edit or delete a Charge on an Account:**
1. Select **Accounts**. The **Accounts** page opens.
2. Select the **Name** text hotlink of the Account with the Charge you want to review. The **Account details** page opens.
3. Select the **Charges** tab.
4. If you want to edit a Charge, on the **Charges** panel select the edit icon for the Charge:
You can check the details for the Charge:
* Read-off the **Service period** and **Bill date** for the Charge.
* Use a text hotlink to open the **Bill** for the Charge.
* Use a text hotlink to open the **Accounting product** for the Charge.
* Copy the **ID** of the Charge directly to your clipboard.
### Editing and Deleting Charges
**To edit or delete a Charge on an Account:**
1. Select **Accounts**. The **Accounts** page opens.
2. Select the **Name** text hotlink of the Account with the Charge you want to review. The **Account details** page opens.
3. Select the **Charges** tab.
4. If you want to edit a Charge, on the **Charges** panel select the edit icon for the Charge:
![]() The **Edit** page opens.
4. Make the required editing changes and select **Update charge**. Your updates are saved and you are returned to the **Charges** tab.
5. If you want to delete a Charge, select the **Delete** icon:
The **Edit** page opens.
4. Make the required editing changes and select **Update charge**. Your updates are saved and you are returned to the **Charges** tab.
5. If you want to delete a Charge, select the **Delete** icon:
![]() A confirmation popup appears
6. Select **Yes** to confirm and complete the deletion.
**Note: Deleting Billed Charges?** If a Bill for a Charge has already been generated, you won't be able to delete the Charge and an error message will show. You must first delete any Bills generated for a Charge before attempting to delete it.
### Filtering the Charges List
An Account's Charges tab lists both ad-hoc and Balance Charges. You can filter the Charges list to meet your current requirements.
**To filter the Charges list on an Account:**
1. Select **Accounts**. The **Accounts** page opens.
2. Select the **Name** text hotlink of the Account with the Charges you want to filter for review. The **Account details** page opens.
3. Select the **Charges** tab. By default **All charges**, both ad-hoc and Balance Charges, are listed.
4. You can filter the list to show only **Ad-hoc charges** created for the Account:
A confirmation popup appears
6. Select **Yes** to confirm and complete the deletion.
**Note: Deleting Billed Charges?** If a Bill for a Charge has already been generated, you won't be able to delete the Charge and an error message will show. You must first delete any Bills generated for a Charge before attempting to delete it.
### Filtering the Charges List
An Account's Charges tab lists both ad-hoc and Balance Charges. You can filter the Charges list to meet your current requirements.
**To filter the Charges list on an Account:**
1. Select **Accounts**. The **Accounts** page opens.
2. Select the **Name** text hotlink of the Account with the Charges you want to filter for review. The **Account details** page opens.
3. Select the **Charges** tab. By default **All charges**, both ad-hoc and Balance Charges, are listed.
4. You can filter the list to show only **Ad-hoc charges** created for the Account:
![Charges19]() * The list is filtered:
* The list is filtered:
![Charges20]() 5. Alternatively, you can filter the list to show only **Balance charges**:
5. Alternatively, you can filter the list to show only **Balance charges**:
![Charges21]() ## Viewing Bills for Account Charges
You can run billing for an Account with an ad-hoc Charge on it and check the billed amount and date. How Bills are generated for Accounts with ad-hoc Charges created for them depends on whether or not you have selected to consolidate Bills for your Organization:
* **Separate Bills for Charges**. If you *haven't selected to consolidate Bills* for your Organization, you can run billing for an Account for the ad-hoc Charge bill date and generate a *separate Bill* for the Charge.
* Note that in this case, even if the Charge bill date coincides with a regular billing date set up for the Account - such as the first of a month for an Account on a monthly billing frequency with billing dates of the first day of month - the Charge *will not appear* on the regular monthly Bill covering other charge types due against the Account, such as usage charges, and a separate Bill is generated.
* **Consolidated Bills for Charges**. If you *have selected to consolidate Bills* for your Organization and the ad-hoc Charge bill date coincides with a regular bill date set up for the Account, then the Charge *will appear* on the regular monthly Bill covering other charge types due against the Account, such as usage charges.
* Note that in this case, if the Charge bill date doesn't coincide with one of the Account's regular billing dates, you can generate a separate bill for the Charge by running billing for the specific Charge bill date.
This section gives examples to show how to generate Bills for Account with ad-hoc Charges:
* [Viewing Separate Bills for Ad-Hoc Charges](/guides/end-customer-accounts/creating-charges-for-accounts#viewing-separate-bills-for-ad-hoc-charges)
* [Viewing Consolidated Bills for Ad-Hoc Charges](/guides/end-customer-accounts/creating-charges-for-accounts#viewing-consolidated-bills-for-ad-hoc-charges)
### Viewing Separate Bills for Ad- Hoc Charges
**To view separate Bills for ad-hoc Charges:**
1. Select **Accounts**. The **Accounts** page opens.
2. Select the **Name** text hotlink of the Account with the ad-hoc Charge for which you want to view Bill. The **Account details** page opens.
3. Select the **Bills** tab.
4. On the **Bills** panel, select **Run billing**. The **Run billing** modal opens.
5. On the **Run billing** modal:
* For **Invoice date**, select the **Bill date** defined for the ad-hoc Charge.
* For **Bill frequency**, select **Ad hoc**.
* For **Target currency**, select the **Currency** configured for the ad-hoc charge:
## Viewing Bills for Account Charges
You can run billing for an Account with an ad-hoc Charge on it and check the billed amount and date. How Bills are generated for Accounts with ad-hoc Charges created for them depends on whether or not you have selected to consolidate Bills for your Organization:
* **Separate Bills for Charges**. If you *haven't selected to consolidate Bills* for your Organization, you can run billing for an Account for the ad-hoc Charge bill date and generate a *separate Bill* for the Charge.
* Note that in this case, even if the Charge bill date coincides with a regular billing date set up for the Account - such as the first of a month for an Account on a monthly billing frequency with billing dates of the first day of month - the Charge *will not appear* on the regular monthly Bill covering other charge types due against the Account, such as usage charges, and a separate Bill is generated.
* **Consolidated Bills for Charges**. If you *have selected to consolidate Bills* for your Organization and the ad-hoc Charge bill date coincides with a regular bill date set up for the Account, then the Charge *will appear* on the regular monthly Bill covering other charge types due against the Account, such as usage charges.
* Note that in this case, if the Charge bill date doesn't coincide with one of the Account's regular billing dates, you can generate a separate bill for the Charge by running billing for the specific Charge bill date.
This section gives examples to show how to generate Bills for Account with ad-hoc Charges:
* [Viewing Separate Bills for Ad-Hoc Charges](/guides/end-customer-accounts/creating-charges-for-accounts#viewing-separate-bills-for-ad-hoc-charges)
* [Viewing Consolidated Bills for Ad-Hoc Charges](/guides/end-customer-accounts/creating-charges-for-accounts#viewing-consolidated-bills-for-ad-hoc-charges)
### Viewing Separate Bills for Ad- Hoc Charges
**To view separate Bills for ad-hoc Charges:**
1. Select **Accounts**. The **Accounts** page opens.
2. Select the **Name** text hotlink of the Account with the ad-hoc Charge for which you want to view Bill. The **Account details** page opens.
3. Select the **Bills** tab.
4. On the **Bills** panel, select **Run billing**. The **Run billing** modal opens.
5. On the **Run billing** modal:
* For **Invoice date**, select the **Bill date** defined for the ad-hoc Charge.
* For **Bill frequency**, select **Ad hoc**.
* For **Target currency**, select the **Currency** configured for the ad-hoc charge:
![]() 6. Select **Run billing**. The Bill for the ad-hoc Charge is generated and is listed on the **Bills** tab:
6. Select **Run billing**. The Bill for the ad-hoc Charge is generated and is listed on the **Bills** tab:
![Charges23]() 7. Select the **Reference** text hotlink for the Bill. The Bill opens in **Bill management**.
8. Under **Display options**, select to **Group by accounting product**:
7. Select the **Reference** text hotlink for the Bill. The Bill opens in **Bill management**.
8. Under **Display options**, select to **Group by accounting product**:
 The Bill adjusts:
![Charges26]() In this example, we've run billing for the ad-hoc Charge example created for an Account in the [previous section](/guides/end-customer-accounts/creating-charges-for-accounts#creating-a-charge-on-an-account) in the amount of \$500, which had a Bill date of March 16th 2025. When the Bill is opened:
* The line item **Type** is shown as **Ad-hoc**.
* Because we set up the Charge as an **Amount**, the line item shows **No. of units** = **1** and a **Unit price** in the **Amount** specified.
* A text hotlink allows you to open the **Charge details** page directly from the Bill.
Suppose now that other ad-hoc Charges had been created for the same Account with the same Bill date. For example, the new customer was eligible for a discount against the normal onboarding fee for taking early sign-on. A negative ad-hoc Charge could be created for the Account and for the same Accounting product to cover this kind of case:
In this example, we've run billing for the ad-hoc Charge example created for an Account in the [previous section](/guides/end-customer-accounts/creating-charges-for-accounts#creating-a-charge-on-an-account) in the amount of \$500, which had a Bill date of March 16th 2025. When the Bill is opened:
* The line item **Type** is shown as **Ad-hoc**.
* Because we set up the Charge as an **Amount**, the line item shows **No. of units** = **1** and a **Unit price** in the **Amount** specified.
* A text hotlink allows you to open the **Charge details** page directly from the Bill.
Suppose now that other ad-hoc Charges had been created for the same Account with the same Bill date. For example, the new customer was eligible for a discount against the normal onboarding fee for taking early sign-on. A negative ad-hoc Charge could be created for the Account and for the same Accounting product to cover this kind of case:
![Charges27]() If we now go back to the **Bills** tab and re-run billing for **Ad-hoc** Charges on the same Account for March 16th **Invoice date** and open the recalculated Bill, then the new ad-hoc negative discount Charge is shown:
If we now go back to the **Bills** tab and re-run billing for **Ad-hoc** Charges on the same Account for March 16th **Invoice date** and open the recalculated Bill, then the new ad-hoc negative discount Charge is shown:
![Charges28]() **Note: Charges for Balances?** You can also create Charges for Balances on an Account. If you've done this and the Balance Charge bill date is the same as the Account Charge bill date and you run billing on the Account for the joint bill date for Ad-hoc frequency, then the *Balance fee* line item for the Balance Charge will also appear on the Bill. See [Running and Viewing Bills for Balance Charges](/guides/end-customer-accounts/creating-balances-for-accounts/runnning-viewing-bill-for-balance-charges).
### Viewing Consolidated Bills for Ad-Hoc Charges
In the following example, we have an Account set up for monthly billing frequency and the billing cycle date for the first and subsequent billing as March 1st 2025. The Account was onboarded mid-February 2025 and an ad-hoc onboarding charge was created with a Bill date of March 1st 2025:
**Note: Charges for Balances?** You can also create Charges for Balances on an Account. If you've done this and the Balance Charge bill date is the same as the Account Charge bill date and you run billing on the Account for the joint bill date for Ad-hoc frequency, then the *Balance fee* line item for the Balance Charge will also appear on the Bill. See [Running and Viewing Bills for Balance Charges](/guides/end-customer-accounts/creating-balances-for-accounts/runnning-viewing-bill-for-balance-charges).
### Viewing Consolidated Bills for Ad-Hoc Charges
In the following example, we have an Account set up for monthly billing frequency and the billing cycle date for the first and subsequent billing as March 1st 2025. The Account was onboarded mid-February 2025 and an ad-hoc onboarding charge was created with a Bill date of March 1st 2025:
![Charges11d]() **Important: Switch on Consolidated Bills for Organization!** If you want to show ad-hoc Charges line items on the same Bills as other line item types - such as usage charges set up to be billed at monthly frequencies - you must switch on the **Consolidate bills** setting on in your Organization configuration. This will ensure different billing frequencies are consolidated into the same Bill. See [Viewing and Editing Organization Configuration](/guides/organization-and-access-management/viewing-and-editing-organization/viewing-and-editing-organization-configuration) for more details.
**To view consolidated Bills for ad-hoc Charges:**
1. Select **Accounts**. The **Accounts** page opens.
2. Select the **Name** text hotlink of the Account with the ad-hoc Charge for which you want to view a consolidated Bill. The **Account details** page opens.
3. Select the **Bills** tab.
4. On the **Bills** panel, select **Run billing**. The **Run billing** modal opens.
5. On the **Run billing** modal:
* For **Invoice date**, select the regular billing date which the ad-hoc Charge bill date coincides with - for the current example, March 1st 2025.
* For **Target currency**, select the **Currency** configured for the ad-hoc charge:
**Important: Switch on Consolidated Bills for Organization!** If you want to show ad-hoc Charges line items on the same Bills as other line item types - such as usage charges set up to be billed at monthly frequencies - you must switch on the **Consolidate bills** setting on in your Organization configuration. This will ensure different billing frequencies are consolidated into the same Bill. See [Viewing and Editing Organization Configuration](/guides/organization-and-access-management/viewing-and-editing-organization/viewing-and-editing-organization-configuration) for more details.
**To view consolidated Bills for ad-hoc Charges:**
1. Select **Accounts**. The **Accounts** page opens.
2. Select the **Name** text hotlink of the Account with the ad-hoc Charge for which you want to view a consolidated Bill. The **Account details** page opens.
3. Select the **Bills** tab.
4. On the **Bills** panel, select **Run billing**. The **Run billing** modal opens.
5. On the **Run billing** modal:
* For **Invoice date**, select the regular billing date which the ad-hoc Charge bill date coincides with - for the current example, March 1st 2025.
* For **Target currency**, select the **Currency** configured for the ad-hoc charge:
![]() * Note that because **Consolidating bills** is enabled, charges for all billing frequencies will be shown on the generated Bill and there is no option to select a **Bill frequency** on the **Run billing** modal.
6. Select **Run billing**. The Bill for the selected date is generated and listed on the **Bills** panel:
* Note that because **Consolidating bills** is enabled, charges for all billing frequencies will be shown on the generated Bill and there is no option to select a **Bill frequency** on the **Run billing** modal.
6. Select **Run billing**. The Bill for the selected date is generated and listed on the **Bills** panel:
![]() 7. Select the **Reference** text hotlink for the Bill. The Bill opens in **Bill Management**:
7. Select the **Reference** text hotlink for the Bill. The Bill opens in **Bill Management**:
![Charges29]() In this example of a consolidated Bill:
* The ad-hoc Charge line item is shown under the **Onboarding Service Product**.
* Usage charges that have accrued since the new end-customer Account was onboarded mid-month are shown under the **Premium Data Store** product.
# Working with Contracts for Accounts
Source: https://docs.m3ter.com/guides/end-customer-accounts/creating-contracts-for-accounts
If you expect to have end-customers who will consume several different services or product packages you offer, you can create *Contracts* for these end-customer Accounts. Depending on your accounting operations and invoicing requirements, when you create a Contract for an Account you can choose to use it for Account reporting purposes or for billing the Account on a Contract basis:
* **Accounts Reporting**. If your invoicing requirements do not include billing end-customers on a Contract basis, you can create a Contract on an Account without enabling the Account for Contract billing. To serve your general accounting operations and processes, you can then report on total Contract values for the Account and the Contract has no effect on billing for the Account.
* **Contract Billing**. If your invoicing requirements include billing on a Contract basis, you can set up a Contract for billing when you create it for an end-customer Account. Various billing entities associated with an Account can then be linked to the Contract to meet your specific Contract billing use cases.
This section explains how to create and manage Contracts for your end-customer Accounts and how to set up Contract billing for Accounts:
* [Creating and Managing Contracts](/guides/end-customer-accounts/creating-contracts-for-accounts/creating-and-managing-contracts)
* [Setting Up Contract Billing](/guides/end-customer-accounts/creating-contracts-for-accounts/setting-up-contract-billing)
A *Contracts* page is available which lists the Contracts created for your Organization by Account and where you can quickly review their completion status:
* [Reviewing Organization Contracts](/guides/end-customer-accounts/creating-contracts-for-accounts/reviewing-organization-contracts)
**Contract Billing in Preview Release!** Please note that the Contract Billing feature is currently available in Preview release version:
* See [Feature Release Stages](/guides/getting-started/feature-release-stages) for Preview release definition and guidance.
* If you're interested in previewing Contract Billing, please get in touch with m3ter Support or your m3ter contact.
# Creating and Managing Contracts
Source: https://docs.m3ter.com/guides/end-customer-accounts/creating-contracts-for-accounts/creating-and-managing-contracts
If you expect to have end-customers who will consume several different services or product packages you offer, you can create *Contracts* for these Accounts to meet either your general Accounts reporting requirements or to meet invoicing requirements for billing these Accounts on a Contract basis.
When you create a Contract for an end customer Account, you can:
* Set the start and end dates and define the Contract period:
* For Accounts reporting, can be used for auto-renewal of the customer's Contract - for example on an annual renewal basis.
* For Contract billing, can be used to limit any charges to the Contract period and exclude charges on the Account dated outside of the period.
* To enable Contract billing, you can link Account Plans attached to the Account to the Contract or Contracts you want to use to bill the Account.
* If the Account is a Parent Account, you can add Account Plans or Account Plan Groups on Child Accounts to Parent Account Contracts.
* Add other entities associated with the Account to the Contract:
* Prepayment/Commitments.
* Balances and Balance Charges.
* Charges
* Review Contract metadata for any Custom Fields or External Mappings created for the Contract.
* End date billing entities associated with the Account you've created the Contract for or end date the Contract itself. For more details, see [End Dating Account Billing Entities](/guides/end-customer-accounts/end-dating-account-billing-entities).
This topic explains how to create and manage Contracts for your end-customer Accounts:
* [Creating Contracts](/guides/end-customer-accounts/creating-contracts-for-accounts#creating-contracts)
* [Adding Account Plans or Account Plan Groups to Contracts](/guides/end-customer-accounts/creating-contracts-for-accounts#adding-account-plans-or-account-plan-groups-to-contracts)
* [Adding Child Account Plans or Account Plan Groups to Parent Account Contract](/guides/end-customer-accounts/creating-contracts-for-accounts#adding-child-account-plans-or-account-plan-groups-to-parent-account-contract)
* [Adding Prepayments to a Contract](/guides/end-customer-accounts/creating-contracts-for-accounts#adding-prepayments-to-a-contract)
* [Adding Balances to a Contract](/guides/end-customer-accounts/creating-contracts-for-accounts/creating-and-managing-contracts#adding-balances-to-a-contract)
* [Editing and Deleting Contracts](/guides/end-customer-accounts/creating-contracts-for-accounts/creating-and-managing-contracts#editing-and-deleting-contracts)
* [Reviewing Contract Metadata](/guides/end-customer-accounts/creating-contracts-for-accounts#reviewing-contract-metadata)
**Note: Adding Billing Entities to Contracts!** Currently you cannot add some billing entities associated with an Account to a Contract directly from the *Contract details* page. You must add these entities to a Contract when you create or edit them:
* **Charges**. See [Creating Charges for Accounts](/guides/end-customer-accounts/creating-charges-for-accounts).
* **Balance Charges**. See [Creating Charges for Balances](/guides/end-customer-accounts/creating-balances-for-accounts/creating-charges-for-balances).
## Creating Contracts
You can create Contracts for an end customer Account from the **Accounts** page.
**Note: Contract billing?** This section explains how to create a Contract for an Account and assumes you don't want enable the Contract for billing. If you want to bill Accounts on a Contract basis, please see the [Setting Up Contract Billing - Examples](/guides/end-customer-accounts/creating-contracts-for-accounts/setting-up-contract-billing) topic for details of how to do this with worked examples.
**To create a Contract for an Account:**
1. Select **Accounts**. The **Accounts** page opens.
2. Select the **Name** text of the Account for which you want to create a Contract. The **Account** page opens.
3. On the **Account actions** menu, select **Contracts>Create contract**:
In this example of a consolidated Bill:
* The ad-hoc Charge line item is shown under the **Onboarding Service Product**.
* Usage charges that have accrued since the new end-customer Account was onboarded mid-month are shown under the **Premium Data Store** product.
# Working with Contracts for Accounts
Source: https://docs.m3ter.com/guides/end-customer-accounts/creating-contracts-for-accounts
If you expect to have end-customers who will consume several different services or product packages you offer, you can create *Contracts* for these end-customer Accounts. Depending on your accounting operations and invoicing requirements, when you create a Contract for an Account you can choose to use it for Account reporting purposes or for billing the Account on a Contract basis:
* **Accounts Reporting**. If your invoicing requirements do not include billing end-customers on a Contract basis, you can create a Contract on an Account without enabling the Account for Contract billing. To serve your general accounting operations and processes, you can then report on total Contract values for the Account and the Contract has no effect on billing for the Account.
* **Contract Billing**. If your invoicing requirements include billing on a Contract basis, you can set up a Contract for billing when you create it for an end-customer Account. Various billing entities associated with an Account can then be linked to the Contract to meet your specific Contract billing use cases.
This section explains how to create and manage Contracts for your end-customer Accounts and how to set up Contract billing for Accounts:
* [Creating and Managing Contracts](/guides/end-customer-accounts/creating-contracts-for-accounts/creating-and-managing-contracts)
* [Setting Up Contract Billing](/guides/end-customer-accounts/creating-contracts-for-accounts/setting-up-contract-billing)
A *Contracts* page is available which lists the Contracts created for your Organization by Account and where you can quickly review their completion status:
* [Reviewing Organization Contracts](/guides/end-customer-accounts/creating-contracts-for-accounts/reviewing-organization-contracts)
**Contract Billing in Preview Release!** Please note that the Contract Billing feature is currently available in Preview release version:
* See [Feature Release Stages](/guides/getting-started/feature-release-stages) for Preview release definition and guidance.
* If you're interested in previewing Contract Billing, please get in touch with m3ter Support or your m3ter contact.
# Creating and Managing Contracts
Source: https://docs.m3ter.com/guides/end-customer-accounts/creating-contracts-for-accounts/creating-and-managing-contracts
If you expect to have end-customers who will consume several different services or product packages you offer, you can create *Contracts* for these Accounts to meet either your general Accounts reporting requirements or to meet invoicing requirements for billing these Accounts on a Contract basis.
When you create a Contract for an end customer Account, you can:
* Set the start and end dates and define the Contract period:
* For Accounts reporting, can be used for auto-renewal of the customer's Contract - for example on an annual renewal basis.
* For Contract billing, can be used to limit any charges to the Contract period and exclude charges on the Account dated outside of the period.
* To enable Contract billing, you can link Account Plans attached to the Account to the Contract or Contracts you want to use to bill the Account.
* If the Account is a Parent Account, you can add Account Plans or Account Plan Groups on Child Accounts to Parent Account Contracts.
* Add other entities associated with the Account to the Contract:
* Prepayment/Commitments.
* Balances and Balance Charges.
* Charges
* Review Contract metadata for any Custom Fields or External Mappings created for the Contract.
* End date billing entities associated with the Account you've created the Contract for or end date the Contract itself. For more details, see [End Dating Account Billing Entities](/guides/end-customer-accounts/end-dating-account-billing-entities).
This topic explains how to create and manage Contracts for your end-customer Accounts:
* [Creating Contracts](/guides/end-customer-accounts/creating-contracts-for-accounts#creating-contracts)
* [Adding Account Plans or Account Plan Groups to Contracts](/guides/end-customer-accounts/creating-contracts-for-accounts#adding-account-plans-or-account-plan-groups-to-contracts)
* [Adding Child Account Plans or Account Plan Groups to Parent Account Contract](/guides/end-customer-accounts/creating-contracts-for-accounts#adding-child-account-plans-or-account-plan-groups-to-parent-account-contract)
* [Adding Prepayments to a Contract](/guides/end-customer-accounts/creating-contracts-for-accounts#adding-prepayments-to-a-contract)
* [Adding Balances to a Contract](/guides/end-customer-accounts/creating-contracts-for-accounts/creating-and-managing-contracts#adding-balances-to-a-contract)
* [Editing and Deleting Contracts](/guides/end-customer-accounts/creating-contracts-for-accounts/creating-and-managing-contracts#editing-and-deleting-contracts)
* [Reviewing Contract Metadata](/guides/end-customer-accounts/creating-contracts-for-accounts#reviewing-contract-metadata)
**Note: Adding Billing Entities to Contracts!** Currently you cannot add some billing entities associated with an Account to a Contract directly from the *Contract details* page. You must add these entities to a Contract when you create or edit them:
* **Charges**. See [Creating Charges for Accounts](/guides/end-customer-accounts/creating-charges-for-accounts).
* **Balance Charges**. See [Creating Charges for Balances](/guides/end-customer-accounts/creating-balances-for-accounts/creating-charges-for-balances).
## Creating Contracts
You can create Contracts for an end customer Account from the **Accounts** page.
**Note: Contract billing?** This section explains how to create a Contract for an Account and assumes you don't want enable the Contract for billing. If you want to bill Accounts on a Contract basis, please see the [Setting Up Contract Billing - Examples](/guides/end-customer-accounts/creating-contracts-for-accounts/setting-up-contract-billing) topic for details of how to do this with worked examples.
**To create a Contract for an Account:**
1. Select **Accounts**. The **Accounts** page opens.
2. Select the **Name** text of the Account for which you want to create a Contract. The **Account** page opens.
3. On the **Account actions** menu, select **Contracts>Create contract**:
![]() Alternatively:
* Select the **Contracts** tab.
* On the **Active and pending contracts** panel, select **Create contract**.
The **Create** page opens.
4. Enter the **Contract details**:
Alternatively:
* Select the **Contracts** tab.
* On the **Active and pending contracts** panel, select **Create contract**.
The **Create** page opens.
4. Enter the **Contract details**:
 * **Name.** Descriptive name for the Contract. (*Required*)
* **Code.** Unique identifier for the Contract. (*Required*)
* **Start date (inclusive)** and **End date (exclusive)**. Use the popup calendars to select the start and end dates for the Contract. (*Required*)
* Note that the **End date** is *exclusive* - if you want the contract to end at midnight on June 30th 2023, set the **End date** to July 1st 2023.
* **Description.** (*Optional*)
* **Purchase order number.** (*Optional*) Allows you to assign an order number to the Contract. For example, your financial systems might require this as a reference for clearing payments.
**Note: Contract Purchase Order Number and Account Purchase Order Number?** These are entirely separate Purchase Order Numbers and are in no sense connected in the m3ter system.
5. Enter **Contract billing details**. The **Create** page opens with default settings of Contract billing not enabled:
* **Name.** Descriptive name for the Contract. (*Required*)
* **Code.** Unique identifier for the Contract. (*Required*)
* **Start date (inclusive)** and **End date (exclusive)**. Use the popup calendars to select the start and end dates for the Contract. (*Required*)
* Note that the **End date** is *exclusive* - if you want the contract to end at midnight on June 30th 2023, set the **End date** to July 1st 2023.
* **Description.** (*Optional*)
* **Purchase order number.** (*Optional*) Allows you to assign an order number to the Contract. For example, your financial systems might require this as a reference for clearing payments.
**Note: Contract Purchase Order Number and Account Purchase Order Number?** These are entirely separate Purchase Order Numbers and are in no sense connected in the m3ter system.
5. Enter **Contract billing details**. The **Create** page opens with default settings of Contract billing not enabled:
![]() * These settings are optional and allow you to control Contract billing. If you want to implement billing based on a Contract, please see the following [Setting Up Contract Billing](/guides/end-customer-accounts/creating-contracts-for-accounts/setting-up-contract-billing) topic.
6. If you are implementing Contract billing, you can add any required **Usage filters**. Define up to three filters to control the usage billed against the Account for the Contract:
* See the following [Setting Up Contract Billing](/guides/end-customer-accounts/creating-contracts-for-accounts/setting-up-contract-billing) topic for details on how to add and configure **Usage filters**.
7. If required, add any **Custom fields** to the Contract:
* For more on Custom Fields, see [Adding and Editing Custom Fields](/guides/organization-and-access-management/viewing-and-editing-organization/adding-and-editing-custom-fields). We strongly recommend reviewing [Working with Custom Fields](/guides/creating-and-managing-products/working-with-custom-fields) before you create and use Custom Fields.
8. Select **Create contract**. You are returned to the **Contracts** tab, where the new Contract is listed on the **Active and pending contracts** panel:
* These settings are optional and allow you to control Contract billing. If you want to implement billing based on a Contract, please see the following [Setting Up Contract Billing](/guides/end-customer-accounts/creating-contracts-for-accounts/setting-up-contract-billing) topic.
6. If you are implementing Contract billing, you can add any required **Usage filters**. Define up to three filters to control the usage billed against the Account for the Contract:
* See the following [Setting Up Contract Billing](/guides/end-customer-accounts/creating-contracts-for-accounts/setting-up-contract-billing) topic for details on how to add and configure **Usage filters**.
7. If required, add any **Custom fields** to the Contract:
* For more on Custom Fields, see [Adding and Editing Custom Fields](/guides/organization-and-access-management/viewing-and-editing-organization/adding-and-editing-custom-fields). We strongly recommend reviewing [Working with Custom Fields](/guides/creating-and-managing-products/working-with-custom-fields) before you create and use Custom Fields.
8. Select **Create contract**. You are returned to the **Contracts** tab, where the new Contract is listed on the **Active and pending contracts** panel:
![]() ## Adding Account Plans or Account Plan Groups to Contracts
You can add Account Plans or Account Plan Groups that you've attached to an end-customer Account to a Contract.
**To add attached Plans/Plan Groups to a Contract:**
1. Select **Accounts**. The **Accounts** page opens.
2. Select the **Name** text of the Account for which you want to add attached Plans for a Contract. The **Account** page opens.
3. Select the **Contracts** tab.
4. On the **Active and pending contracts** panel, select the **Name** text of the Contract to which you want to add attached Plans. The **Contract details** page opens:
## Adding Account Plans or Account Plan Groups to Contracts
You can add Account Plans or Account Plan Groups that you've attached to an end-customer Account to a Contract.
**To add attached Plans/Plan Groups to a Contract:**
1. Select **Accounts**. The **Accounts** page opens.
2. Select the **Name** text of the Account for which you want to add attached Plans for a Contract. The **Account** page opens.
3. Select the **Contracts** tab.
4. On the **Active and pending contracts** panel, select the **Name** text of the Contract to which you want to add attached Plans. The **Contract details** page opens:
![Attach Contract106]() 5. Scroll down the page to the **Contract attached plans** panel and select **Add attached plans**. A **Select account plans** dialog appears and lists the Account Plans/Account Plan Groups attached to the Account.
**Notes and Tips:**
* **Account Plans or Account Plans Groups Already Show?** If you've already added an Account Plan or Account Plan Group to the Contract when you attached Plans/Plan Groups to the Account, these will show in the **Contract attached plans** panel. See [Attaching Plans to an Account](/guides/end-customer-accounts/attaching-plans-to-an-account) and [Attaching Plan Groups to an Account](/guides/end-customer-accounts/attaching-plan-groups-to-an-account).
* **Adding Account Plans or Account Plan Groups from Child Accounts?** If the Contract belongs to a parent Account, when you open the **Select account plans** dialog, you'll be able to select any Child accounts and then select Account Plans or Account Plan Groups attached to the Child Account to add them to the Contract on the Parent Account.
6. Use the check boxes to select the attached Account Plans/Account Plan Groups you want to add to the Contract, and select **Confirm**.
7. The dialog closes and you are returned to the **Contract details** page and the selected Account Plans/Account Plan Groups are listed in the **Contracts attached plans** panel:
5. Scroll down the page to the **Contract attached plans** panel and select **Add attached plans**. A **Select account plans** dialog appears and lists the Account Plans/Account Plan Groups attached to the Account.
**Notes and Tips:**
* **Account Plans or Account Plans Groups Already Show?** If you've already added an Account Plan or Account Plan Group to the Contract when you attached Plans/Plan Groups to the Account, these will show in the **Contract attached plans** panel. See [Attaching Plans to an Account](/guides/end-customer-accounts/attaching-plans-to-an-account) and [Attaching Plan Groups to an Account](/guides/end-customer-accounts/attaching-plan-groups-to-an-account).
* **Adding Account Plans or Account Plan Groups from Child Accounts?** If the Contract belongs to a parent Account, when you open the **Select account plans** dialog, you'll be able to select any Child accounts and then select Account Plans or Account Plan Groups attached to the Child Account to add them to the Contract on the Parent Account.
6. Use the check boxes to select the attached Account Plans/Account Plan Groups you want to add to the Contract, and select **Confirm**.
7. The dialog closes and you are returned to the **Contract details** page and the selected Account Plans/Account Plan Groups are listed in the **Contracts attached plans** panel:
![]() 8. If you now select the attached Plan **Name** hotlink text, the **Plan attachment details** page opens and the **Contract** is shown:
8. If you now select the attached Plan **Name** hotlink text, the **Plan attachment details** page opens and the **Contract** is shown:
![]() 9. If you return to the Account page, on the **Attached plans** tab the Contract an attached Plan has been added to is also shown on the **Active and pending attached plans** panel:
9. If you return to the Account page, on the **Attached plans** tab the Contract an attached Plan has been added to is also shown on the **Active and pending attached plans** panel:
![]() ## Adding Child Account Plans or Account Plan Groups to Parent Account Contract
If you want to add Account Plans or Account Plan Groups attached to a Child Account to a Contract on the Parent Account, you can do this from the Child Account's *Plan attachment* page or *Plan group attachment* page.
**Tip:** The following procedure explains how to add a Child **Account Plan** to a Parent Account Contract. To add a Child **Account Plan Group** to a Parent Account Contract, you can follow similar steps.
**To add Child Account Plans/Plan Groups to a Parent Account Contract:**
1. Select **Accounts**. The **Accounts** page opens.
2. Search for and open the Child Account.
3. Select the **Attached plans** tab.
4. On the **Active and pending attached plans** panel, select the name text of the attached Account Plan that you want to add to the Parent Account Contract. The **Plan attachment** page opens
5. Under **Plan attachment details**, select **Add to parent contract**:
## Adding Child Account Plans or Account Plan Groups to Parent Account Contract
If you want to add Account Plans or Account Plan Groups attached to a Child Account to a Contract on the Parent Account, you can do this from the Child Account's *Plan attachment* page or *Plan group attachment* page.
**Tip:** The following procedure explains how to add a Child **Account Plan** to a Parent Account Contract. To add a Child **Account Plan Group** to a Parent Account Contract, you can follow similar steps.
**To add Child Account Plans/Plan Groups to a Parent Account Contract:**
1. Select **Accounts**. The **Accounts** page opens.
2. Search for and open the Child Account.
3. Select the **Attached plans** tab.
4. On the **Active and pending attached plans** panel, select the name text of the attached Account Plan that you want to add to the Parent Account Contract. The **Plan attachment** page opens
5. Under **Plan attachment details**, select **Add to parent contract**:
![]() A **Select one contract** dialog opens and lists the Contracts on the Parent Account.
6. Select the Contract on the Parent Account that you want to attach the Child Account Plan to and select **Confirm**. A message appears confirming that the Child Account Plan has been successfully attached to the Parent Account Contract and the selected Contract is now shown for the Account Plan:
A **Select one contract** dialog opens and lists the Contracts on the Parent Account.
6. Select the Contract on the Parent Account that you want to attach the Child Account Plan to and select **Confirm**. A message appears confirming that the Child Account Plan has been successfully attached to the Parent Account Contract and the selected Contract is now shown for the Account Plan:
![]() 7. If you open the **Contract details** page for the Parent Contract, the **Contract Plans** panel will now show the Child Account Account Plan:
7. If you open the **Contract details** page for the Parent Contract, the **Contract Plans** panel will now show the Child Account Account Plan:
![]() ## Adding Prepayments to a Contract
You can add a Prepayment/Commitment amount you've created for an Account to a Contract.
**To add a Prepayment to a Contract:**
1. Select **Accounts**. The **Accounts** page opens.
2. Select the **Name** text of the Account for which you want to add a Prepayment amount to a Contract. The **Account** page opens.
3. Select the **Contracts** tab.
4. On the **Active and pending contracts** panel, select the **Name** text of the Contract to which you want to add the Prepayment amount. The **Contract details** page opens.
5. On the **Contract prepayments** panel, select **Add prepayments**. A **Select prepayments** dialog appears and lists the Prepayment amounts created for the Account.
**Notes and Tips:**
* **Prepayment Already Shows?** If you've already added a Prepayment to the Contract, this will show in the **Contract prepayments** panel. See [Creating Prepayments for Accounts](/guides/end-customer-accounts/creating-prepayments-for-accounts).
* **Adding Prepayments from Child Accounts?** If the Contract belongs to a parent Account, when you open the **Select prepayments** dialog, you'll be able to select any Child accounts and then select Prepayments attached to the Child Account to add them to the Contract on the Parent Account.
6. Use the check boxes to select the Prepayment amount you want to add to the Contract, and select **Confirm**.
7. The dialog closes and you are returned to the **Contract details** page and the selected Prepayment amount is listed in the **Contracts prepayments** panel:
## Adding Prepayments to a Contract
You can add a Prepayment/Commitment amount you've created for an Account to a Contract.
**To add a Prepayment to a Contract:**
1. Select **Accounts**. The **Accounts** page opens.
2. Select the **Name** text of the Account for which you want to add a Prepayment amount to a Contract. The **Account** page opens.
3. Select the **Contracts** tab.
4. On the **Active and pending contracts** panel, select the **Name** text of the Contract to which you want to add the Prepayment amount. The **Contract details** page opens.
5. On the **Contract prepayments** panel, select **Add prepayments**. A **Select prepayments** dialog appears and lists the Prepayment amounts created for the Account.
**Notes and Tips:**
* **Prepayment Already Shows?** If you've already added a Prepayment to the Contract, this will show in the **Contract prepayments** panel. See [Creating Prepayments for Accounts](/guides/end-customer-accounts/creating-prepayments-for-accounts).
* **Adding Prepayments from Child Accounts?** If the Contract belongs to a parent Account, when you open the **Select prepayments** dialog, you'll be able to select any Child accounts and then select Prepayments attached to the Child Account to add them to the Contract on the Parent Account.
6. Use the check boxes to select the Prepayment amount you want to add to the Contract, and select **Confirm**.
7. The dialog closes and you are returned to the **Contract details** page and the selected Prepayment amount is listed in the **Contracts prepayments** panel:
![]() **Important: Prepayment Contract and Account Plan Contract must match!** If you associate a Prepayment with a Contract you must ensure the Account Plan attached to the Account has the same Contract associated with it. If the Account Plan Contract and Prepayment Contract do not match, then at billing the Prepayment amount will not be drawn-down against. See [Linking Prepayments to Contracts - Availability for Draw-Down](/guides/end-customer-accounts/creating-prepayments-for-accounts#linking-prepayments-to-contracts-availability-for-draw-down).
## Adding Balances to a Contract
You can add a Balance you've created for an Account to a Contract.
**To add a Balance to a Contract:**
1. Select **Accounts**. The **Accounts** page opens.
2. Select the **Name** text of the Account for which you want to add a Balance to a Contract. The **Account** page opens.
3. Select the **Contracts** tab.
4. On the **Active and pending contracts** panel, select the **Name** text of the Contract to which you want to add the Balance. The **Contract details** page opens.
5. On the **Contract balances** panel, select **Add balances**. A **Select balances** dialog appears and lists the Balances created for the Account.
**Notes and Tips:**
* **Balance Already Shows?** If you've already added a Balance to the Contract, this will show in the **Contract balances** panel. See [Creating and Managing Account Balances](/guides/end-customer-accounts/creating-balances-for-accounts/creating-and-managing-account-balances).
* **Adding Balances from Child Accounts?** If the Contract belongs to a parent Account, when you open the **Select balances** dialog, you'll be able to select any Child accounts and then select Balances attached to the Child Account to add them to the Contract on the Parent Account.
6. Use the check boxes to select the Balance you want to add to the Contract, and select **Confirm**.
7. The dialog closes and you are returned to the **Contract details** page and the selected Balance is listed in the **Contracts balances** panel:
**Important: Prepayment Contract and Account Plan Contract must match!** If you associate a Prepayment with a Contract you must ensure the Account Plan attached to the Account has the same Contract associated with it. If the Account Plan Contract and Prepayment Contract do not match, then at billing the Prepayment amount will not be drawn-down against. See [Linking Prepayments to Contracts - Availability for Draw-Down](/guides/end-customer-accounts/creating-prepayments-for-accounts#linking-prepayments-to-contracts-availability-for-draw-down).
## Adding Balances to a Contract
You can add a Balance you've created for an Account to a Contract.
**To add a Balance to a Contract:**
1. Select **Accounts**. The **Accounts** page opens.
2. Select the **Name** text of the Account for which you want to add a Balance to a Contract. The **Account** page opens.
3. Select the **Contracts** tab.
4. On the **Active and pending contracts** panel, select the **Name** text of the Contract to which you want to add the Balance. The **Contract details** page opens.
5. On the **Contract balances** panel, select **Add balances**. A **Select balances** dialog appears and lists the Balances created for the Account.
**Notes and Tips:**
* **Balance Already Shows?** If you've already added a Balance to the Contract, this will show in the **Contract balances** panel. See [Creating and Managing Account Balances](/guides/end-customer-accounts/creating-balances-for-accounts/creating-and-managing-account-balances).
* **Adding Balances from Child Accounts?** If the Contract belongs to a parent Account, when you open the **Select balances** dialog, you'll be able to select any Child accounts and then select Balances attached to the Child Account to add them to the Contract on the Parent Account.
6. Use the check boxes to select the Balance you want to add to the Contract, and select **Confirm**.
7. The dialog closes and you are returned to the **Contract details** page and the selected Balance is listed in the **Contracts balances** panel:
![]() **Important: Balance Contract and Account Plan Contract must match!** If you associate a Balance with a Contract you must ensure the Account Plan attached to the Account has the same Contract associated with it. If the Account Plan Contract and Balance Contract do not match, then at billing the Balance amount will not be drawn-down against. See [Linking Balances to Contracts - Availability for Draw-Down](/guides/end-customer-accounts/creating-balances-for-accounts/creating-and-managing-account-balances#linking-balances-to-contracts-availability-for-draw-down).
## Editing and Deleting Contracts
You can manage an existing Contract to edit or delete it from an Account from the **Contracts** tab.
**To edit or delete Account Contracts:**
1. Select **Accounts**. The **Accounts** page opens.
2. Select the **Name** text of the Account for which you want to edit or delete. The **Account** page opens.
3. Select the **Contracts** tab.
4. If you want to edit a Contract, on the **Active and pending contracts** panel select the **Edit** icon:
**Important: Balance Contract and Account Plan Contract must match!** If you associate a Balance with a Contract you must ensure the Account Plan attached to the Account has the same Contract associated with it. If the Account Plan Contract and Balance Contract do not match, then at billing the Balance amount will not be drawn-down against. See [Linking Balances to Contracts - Availability for Draw-Down](/guides/end-customer-accounts/creating-balances-for-accounts/creating-and-managing-account-balances#linking-balances-to-contracts-availability-for-draw-down).
## Editing and Deleting Contracts
You can manage an existing Contract to edit or delete it from an Account from the **Contracts** tab.
**To edit or delete Account Contracts:**
1. Select **Accounts**. The **Accounts** page opens.
2. Select the **Name** text of the Account for which you want to edit or delete. The **Account** page opens.
3. Select the **Contracts** tab.
4. If you want to edit a Contract, on the **Active and pending contracts** panel select the **Edit** icon:
![]() The **Edit** page opens.
5. Make any required editing changes and select **Update contract**.
6. If you want to delete a Contract, select the **Delete** icon:
The **Edit** page opens.
5. Make any required editing changes and select **Update contract**.
6. If you want to delete a Contract, select the **Delete** icon:
![]() A confirmation dialog appears.
7. Select **Delete** to confirm.
* Note that if you attempt to delete a Contract that is linked to another entity associated with the Account, such as an Account Plan or Prepayment, you will not be able to and an error will show.
**Tip: Managing Contracts from the Contracts page**. You can edit or delete a Contract directly from the Contracts page. See [Reviewing Organization Contracts](/guides/end-customer-accounts/creating-contracts-for-accounts/reviewing-organization-contracts).
## Reviewing Contract Metadata
On the *Contract details* page, you can review **Contract metadata**:
* Custom Fields or External Mappings created for the Contract.
* Integration runs linked to the Contract.
**To review Contract metadata:**
1. Select **Accounts**. The **Accounts** page opens.
2. Select the **Name** text of the Account for which you want to review Contract metadata. The **Account** page opens.
3. Select the **Contracts** tab.
4. On the **Active and pending contracts** panel, select the **Name** text of the Contract you want to review metadata for. The **Contract details** page opens.
5. Scroll down the page to review the Contract's metadata:
**Custom fields**. Any Custom fields created for the Contract are listed:
A confirmation dialog appears.
7. Select **Delete** to confirm.
* Note that if you attempt to delete a Contract that is linked to another entity associated with the Account, such as an Account Plan or Prepayment, you will not be able to and an error will show.
**Tip: Managing Contracts from the Contracts page**. You can edit or delete a Contract directly from the Contracts page. See [Reviewing Organization Contracts](/guides/end-customer-accounts/creating-contracts-for-accounts/reviewing-organization-contracts).
## Reviewing Contract Metadata
On the *Contract details* page, you can review **Contract metadata**:
* Custom Fields or External Mappings created for the Contract.
* Integration runs linked to the Contract.
**To review Contract metadata:**
1. Select **Accounts**. The **Accounts** page opens.
2. Select the **Name** text of the Account for which you want to review Contract metadata. The **Account** page opens.
3. Select the **Contracts** tab.
4. On the **Active and pending contracts** panel, select the **Name** text of the Contract you want to review metadata for. The **Contract details** page opens.
5. Scroll down the page to review the Contract's metadata:
**Custom fields**. Any Custom fields created for the Contract are listed:
![Attach Contract107]() * You can **Copy** the *String* or *Number* value of a Custom Field to your clipboard. See [Working with Custom Fields](/guides/creating-and-managing-products/working-with-custom-fields) for more details.
**External mappings**. Any existing mappings created for the Contract are listed:
* You can **Copy** the *String* or *Number* value of a Custom Field to your clipboard. See [Working with Custom Fields](/guides/creating-and-managing-products/working-with-custom-fields) for more details.
**External mappings**. Any existing mappings created for the Contract are listed:
![Attach Contract108]() * The **External system** and **External table** mapped to are shown - such as **NetSuite - Item** in the above example. The **External entity ID** mapped to is also shown.
* If a listed External mapping is linked to an Integration, under **Linked integration** a hotlink text will be shown which you can use to open the Integration.
* Under **Actions**, you can edit or delete the External mapping.
* If the Contract has multiple External mappings created for it, you can use *Search external mappings* to search by **External table** and **External entity ID** and filter the list.
* You can commence a workflow to **Create external mapping** for the Contract directly - see [Creating and Managing External Mappings for Accounts](/guides/end-customer-accounts/creating-and-managing-external-mappings-for-accounts) for an example.
**Integration runs**. If you've set up an integration that synchronizes the Contract data with an external system, the date/time and status of the **Latest** integration run are shown. You can use a text hotlink to open details of this latest run or **View all runs**. See [Reviewing Integration Run Details](/guides/integrations/setting-up-integrations/reviewing-integration-run-details).
# Reviewing Organization Contracts
Source: https://docs.m3ter.com/guides/end-customer-accounts/creating-contracts-for-accounts/reviewing-organization-contracts
A *Contracts* page is available which lists the Contracts you have created for your Organization where you can review and manage them. You can search for individual Contracts or for those belonging to a specific Account, check a Contract's period, and quickly read-off a Contract's percentage completion.
This topic explains how to access the Contract's page for your Organization and review your Account Contracts.
**To access the Contracts page and review Account Contracts:**
1. In the Console top navigation, select **Accounts**:
* The **External system** and **External table** mapped to are shown - such as **NetSuite - Item** in the above example. The **External entity ID** mapped to is also shown.
* If a listed External mapping is linked to an Integration, under **Linked integration** a hotlink text will be shown which you can use to open the Integration.
* Under **Actions**, you can edit or delete the External mapping.
* If the Contract has multiple External mappings created for it, you can use *Search external mappings* to search by **External table** and **External entity ID** and filter the list.
* You can commence a workflow to **Create external mapping** for the Contract directly - see [Creating and Managing External Mappings for Accounts](/guides/end-customer-accounts/creating-and-managing-external-mappings-for-accounts) for an example.
**Integration runs**. If you've set up an integration that synchronizes the Contract data with an external system, the date/time and status of the **Latest** integration run are shown. You can use a text hotlink to open details of this latest run or **View all runs**. See [Reviewing Integration Run Details](/guides/integrations/setting-up-integrations/reviewing-integration-run-details).
# Reviewing Organization Contracts
Source: https://docs.m3ter.com/guides/end-customer-accounts/creating-contracts-for-accounts/reviewing-organization-contracts
A *Contracts* page is available which lists the Contracts you have created for your Organization where you can review and manage them. You can search for individual Contracts or for those belonging to a specific Account, check a Contract's period, and quickly read-off a Contract's percentage completion.
This topic explains how to access the Contract's page for your Organization and review your Account Contracts.
**To access the Contracts page and review Account Contracts:**
1. In the Console top navigation, select **Accounts**:
![]() The **Accounts** page opens.
2. Select **Contracts**:
The **Accounts** page opens.
2. Select **Contracts**:
![]() 3. The **Contracts** page opens:
3. The **Contracts** page opens:
![Attach Contract118]() From here, you can:
* Use the **Name** hotlink text to open a Contract's details page.
* Use the **Account** hotlink text to open the page of the Account the Contract belongs to.
* Check the **Start date(inclusive)** and **End date(exclusive)** configured for a Contract.
* Under **Completion %** read-off the timeline percentage completion to date of the Contract's period:
* If the Contract is still active, the number of days remaining to completion is given.
* If the Contract has ended, the number of days since it ended is given.
4. Use **Search contracts** to search for individual Contracts:
From here, you can:
* Use the **Name** hotlink text to open a Contract's details page.
* Use the **Account** hotlink text to open the page of the Account the Contract belongs to.
* Check the **Start date(inclusive)** and **End date(exclusive)** configured for a Contract.
* Under **Completion %** read-off the timeline percentage completion to date of the Contract's period:
* If the Contract is still active, the number of days remaining to completion is given.
* If the Contract has ended, the number of days since it ended is given.
4. Use **Search contracts** to search for individual Contracts:
![Attach Contract119]() 5. Use the **Select account** drop-down list to filter the list by Account:
5. Use the **Select account** drop-down list to filter the list by Account:
![]() 6. If you want to manage a Contract directly, under **Actions** you can **Edit** or **Delete** a Contract. See [Creating and Managing Contracts](/guides/end-customer-accounts/creating-contracts-for-accounts/creating-and-managing-contracts).
# Setting Up Contract Billing
Source: https://docs.m3ter.com/guides/end-customer-accounts/creating-contracts-for-accounts/setting-up-contract-billing
When you create a Contract for an Account, you can use it to bill the Account on a Contract basis:
* For billing Product *usage* - you must add Account Plans or Account Plan Groups attached to the Account to the Contract.
* For billing one-off *Charges* you've created for the Account - you must add those Charges to the Contract.
The capability to bill your end-customer Accounts on a Contract basis gives you wide flexibility to fulfill invoicing requirements for cases where you offer customers a specific product package agreement to consume several of your core products. You can bill Accounts wholly and exclusively according to the scope of a specific contractual agreement.
This topic explains how to set up Contracts for billing and how to use the available options to ensure any Contract billing you implement meets your specific billing use case:
* [Setting Up Contracts for Billing - Configuration Options](/guides/end-customer-accounts/creating-contracts-for-accounts/setting-up-contract-billing#setting-up-contracts-for-billing-configuration-options)
Some Contract billing worked examples are also provided, which show how you can enable Contract billing and to illustrate the various configuration options m3ter offers for controlling how Contract Bills are generated to meet different invoicing requirements:
* [Example 1 - Multiple Product Contract Billing](/guides/end-customer-accounts/creating-contracts-for-accounts/setting-up-contract-billing#example-1-multiple-product-contract-billing)
* [Example 2 - Mixed Grouping Contract Billing](/guides/end-customer-accounts/creating-contracts-for-accounts/setting-up-contract-billing#example-2-mixed-grouping-contract-billing)
* [Example 3 - Usage Filtering for Contract Billing](/guides/end-customer-accounts/creating-contracts-for-accounts/setting-up-contract-billing#example-3-usage-filtering-for-contract-billing)
**Important: Allowing Overlapping Account Plans!** For some Contract billing use case, you might want to be able to attached overlapping Plans to an Account. For example, if you intend to bill your end-customer Accounts on a Contract basis and your billing use case requires some charges for a Product to be billed under one Contract and other charges for the same Product to be billed under a different Contract, you'll require different and overlapping Account Plans to be attached to an Account for the same Product but linked to different Contracts. To do this, you must enable the **Allow overlapping attached plans** option at Organization level. See [Viewing and Editing Organization Configuration](/guides/organization-and-access-management/viewing-and-editing-organization/viewing-and-editing-organization-configuration).
## Setting Up Contracts for Billing - Configuration Options
When you want to use Contract billing, several options are available to ensure your billing use case is fulfilled:
* [Independent vs. Collective Billing](/guides/end-customer-accounts/creating-contracts-for-accounts/setting-up-contract-billing#independent-vs-collective-billing)
* [Apply Contract Period](/guides/end-customer-accounts/creating-contracts-for-accounts/setting-up-contract-billing#apply-contract-period)
* [Define Usage Filters](/guides/end-customer-accounts/creating-contracts-for-accounts/setting-up-contract-billing#define-usage-filters)
### Independent vs. Collective Billing
You can determine how charges due on the Account and linked to Contracts will be billed:
* **Bill Independently**. A separate Bill will be created for any charge amounts linked to the Contract. This is useful if you have multiple Contracts associated with an Account, but you want separate Bills generated for each of the different Contracts.
* **Bill Collectively**. Charges linked to the Contract can be billed collectively on a shared Bill and together with charges linked to other Contracts and any other charges due.
To control how the Bills for Contracts will be generated you assign them *Bill grouping keys*. There are two types:
* *Exclusive* grouping keys are used for independent Contract billing.
* *Non-exclusive* grouping keys are used for collective Contract billing.
This allows for mixed Contract bill grouping. Suppose you have three Contracts associated with a single Account and you want to bill the charges under one Contract separately and charges due under the other two Contracts collectively. You can assign an exclusive grouping key to one Contract and assign the same non-exclusive key to the other two Contracts.
#### Configuring Independent Billing
When you create or edit a Contract, you can quickly enable it for independent billing.
**To enable a Contract for independent billing:**
1. Open the Account the Contract belongs to and select the **Contracts** tab.
2. Either select **Create contract** or select to **Edit** an existing Contract. The **Create** or **Edit** page opens.
3. On the **Contract billing details** card, enable the **Bill contract independently** switch:
6. If you want to manage a Contract directly, under **Actions** you can **Edit** or **Delete** a Contract. See [Creating and Managing Contracts](/guides/end-customer-accounts/creating-contracts-for-accounts/creating-and-managing-contracts).
# Setting Up Contract Billing
Source: https://docs.m3ter.com/guides/end-customer-accounts/creating-contracts-for-accounts/setting-up-contract-billing
When you create a Contract for an Account, you can use it to bill the Account on a Contract basis:
* For billing Product *usage* - you must add Account Plans or Account Plan Groups attached to the Account to the Contract.
* For billing one-off *Charges* you've created for the Account - you must add those Charges to the Contract.
The capability to bill your end-customer Accounts on a Contract basis gives you wide flexibility to fulfill invoicing requirements for cases where you offer customers a specific product package agreement to consume several of your core products. You can bill Accounts wholly and exclusively according to the scope of a specific contractual agreement.
This topic explains how to set up Contracts for billing and how to use the available options to ensure any Contract billing you implement meets your specific billing use case:
* [Setting Up Contracts for Billing - Configuration Options](/guides/end-customer-accounts/creating-contracts-for-accounts/setting-up-contract-billing#setting-up-contracts-for-billing-configuration-options)
Some Contract billing worked examples are also provided, which show how you can enable Contract billing and to illustrate the various configuration options m3ter offers for controlling how Contract Bills are generated to meet different invoicing requirements:
* [Example 1 - Multiple Product Contract Billing](/guides/end-customer-accounts/creating-contracts-for-accounts/setting-up-contract-billing#example-1-multiple-product-contract-billing)
* [Example 2 - Mixed Grouping Contract Billing](/guides/end-customer-accounts/creating-contracts-for-accounts/setting-up-contract-billing#example-2-mixed-grouping-contract-billing)
* [Example 3 - Usage Filtering for Contract Billing](/guides/end-customer-accounts/creating-contracts-for-accounts/setting-up-contract-billing#example-3-usage-filtering-for-contract-billing)
**Important: Allowing Overlapping Account Plans!** For some Contract billing use case, you might want to be able to attached overlapping Plans to an Account. For example, if you intend to bill your end-customer Accounts on a Contract basis and your billing use case requires some charges for a Product to be billed under one Contract and other charges for the same Product to be billed under a different Contract, you'll require different and overlapping Account Plans to be attached to an Account for the same Product but linked to different Contracts. To do this, you must enable the **Allow overlapping attached plans** option at Organization level. See [Viewing and Editing Organization Configuration](/guides/organization-and-access-management/viewing-and-editing-organization/viewing-and-editing-organization-configuration).
## Setting Up Contracts for Billing - Configuration Options
When you want to use Contract billing, several options are available to ensure your billing use case is fulfilled:
* [Independent vs. Collective Billing](/guides/end-customer-accounts/creating-contracts-for-accounts/setting-up-contract-billing#independent-vs-collective-billing)
* [Apply Contract Period](/guides/end-customer-accounts/creating-contracts-for-accounts/setting-up-contract-billing#apply-contract-period)
* [Define Usage Filters](/guides/end-customer-accounts/creating-contracts-for-accounts/setting-up-contract-billing#define-usage-filters)
### Independent vs. Collective Billing
You can determine how charges due on the Account and linked to Contracts will be billed:
* **Bill Independently**. A separate Bill will be created for any charge amounts linked to the Contract. This is useful if you have multiple Contracts associated with an Account, but you want separate Bills generated for each of the different Contracts.
* **Bill Collectively**. Charges linked to the Contract can be billed collectively on a shared Bill and together with charges linked to other Contracts and any other charges due.
To control how the Bills for Contracts will be generated you assign them *Bill grouping keys*. There are two types:
* *Exclusive* grouping keys are used for independent Contract billing.
* *Non-exclusive* grouping keys are used for collective Contract billing.
This allows for mixed Contract bill grouping. Suppose you have three Contracts associated with a single Account and you want to bill the charges under one Contract separately and charges due under the other two Contracts collectively. You can assign an exclusive grouping key to one Contract and assign the same non-exclusive key to the other two Contracts.
#### Configuring Independent Billing
When you create or edit a Contract, you can quickly enable it for independent billing.
**To enable a Contract for independent billing:**
1. Open the Account the Contract belongs to and select the **Contracts** tab.
2. Either select **Create contract** or select to **Edit** an existing Contract. The **Create** or **Edit** page opens.
3. On the **Contract billing details** card, enable the **Bill contract independently** switch:
 4. Select **Create contract** or **Update contract**. You are returned to the **Contracts** tab.
5. Select the name hotlink text of the Contract. The **Contract details** page opens:
4. Select **Create contract** or **Update contract**. You are returned to the **Contracts** tab.
5. Select the name hotlink text of the Contract. The **Contract details** page opens:
![Attach Contract109]() * A **Bill grouping key** has been automatically created using the Contract's name, assigned to the Contract, and marked as **EXCLUSIVE**.
* When Bills are generated for the Account the Contract belongs to, any charges due and linked to this Contract will be on a separate Bill.
6. If you later decide that you no longer want to use the Contract for billing, edit it and disable the **Bill contract independently** switch. The **Bill grouping key** is removed:
* A **Bill grouping key** has been automatically created using the Contract's name, assigned to the Contract, and marked as **EXCLUSIVE**.
* When Bills are generated for the Account the Contract belongs to, any charges due and linked to this Contract will be on a separate Bill.
6. If you later decide that you no longer want to use the Contract for billing, edit it and disable the **Bill contract independently** switch. The **Bill grouping key** is removed:
![Attach Contract110]() * Note that the **Bill grouping key** created automatically and assigned to the Contract is *not deleted* and can be re-assigned to the Contract if at a later date you want to re-enable the Contract for independent billing.
#### Configuring Collective Billing
If your Contract billing use case requires that charges due on the Account linked to multiple Contracts are collectively billed, then you can assign a common Bill grouping key to each of the Contracts.
**To enable a Contract for collective billing:**
1. Open the Account the Contract belongs to and select the **Contracts** tab.
2. Either select **Create contract** or select to **Edit** an existing Contract. The **Create** or **Edit** page opens.
3. On the **Contract billing details** card, select **Advanced**. The card adjusts to show a **Bill grouping key** selection/add drop-down:
* Note that the **Bill grouping key** created automatically and assigned to the Contract is *not deleted* and can be re-assigned to the Contract if at a later date you want to re-enable the Contract for independent billing.
#### Configuring Collective Billing
If your Contract billing use case requires that charges due on the Account linked to multiple Contracts are collectively billed, then you can assign a common Bill grouping key to each of the Contracts.
**To enable a Contract for collective billing:**
1. Open the Account the Contract belongs to and select the **Contracts** tab.
2. Either select **Create contract** or select to **Edit** an existing Contract. The **Create** or **Edit** page opens.
3. On the **Contract billing details** card, select **Advanced**. The card adjusts to show a **Bill grouping key** selection/add drop-down:
 * Any existing Bill grouping keys - both exclusive and non-exclusive - are shown in the drop-down selection list.
* For this example, we'll **Add** a new grouping key called **Premium Key**. An information text appears when we add the key:
* Any existing Bill grouping keys - both exclusive and non-exclusive - are shown in the drop-down selection list.
* For this example, we'll **Add** a new grouping key called **Premium Key**. An information text appears when we add the key:
 4. Select **Create contract** or **Update contract**. You are returned to the **Contracts** tab.
5. Select the name hotlink text of the Contract. The **Contract details** page opens:
4. Select **Create contract** or **Update contract**. You are returned to the **Contracts** tab.
5. Select the name hotlink text of the Contract. The **Contract details** page opens:
![Attach Contract113]() * The **Bill grouping key** we added has been created, assigned to the Contract, and is marked as **NON-EXCLUSIVE**.
6. If we now open a second Contract on the Account and edit it, we can assign the same non-exclusive **Premium Key** by selecting it from the **Bill grouping key** drop-down list:
* The **Bill grouping key** we added has been created, assigned to the Contract, and is marked as **NON-EXCLUSIVE**.
6. If we now open a second Contract on the Account and edit it, we can assign the same non-exclusive **Premium Key** by selecting it from the **Bill grouping key** drop-down list:
![]() 7. Select **Create contract** or **Update contract**. You are returned to the **Contracts** tab.
8. Select the name hotlink text of the second Contract. The **Contract details** page opens:
7. Select **Create contract** or **Update contract**. You are returned to the **Contracts** tab.
8. Select the name hotlink text of the second Contract. The **Contract details** page opens:
![]() * Any charges due on the Account and linked to either **Premium Contract 1** or **Premium Support Contract** will appear together on single collective Bill.
### Apply Contract Period
When you create or edit a Contract that you've enabled for billing, you can restrict the charges billed to the period you've defined for the Contract using the **Apply contract period limits** switch on the **Contract billing details** card:
* Any charges due on the Account and linked to either **Premium Contract 1** or **Premium Support Contract** will appear together on single collective Bill.
### Apply Contract Period
When you create or edit a Contract that you've enabled for billing, you can restrict the charges billed to the period you've defined for the Contract using the **Apply contract period limits** switch on the **Contract billing details** card:
 * **Enabled**. Contract billing for the Account will be restricted to charge amounts that fall within the defined Contract period.
* **Disabled**. The period for amounts billed under the Contract will be determined by the Account Plan attached to the Account and linked to the Contract.
### Define Usage Filters
As a further option for controlling Contract billing and giving added flexibility, you can define up to three **Usage filters** to either include or exclude charges for usage associated with specific Meter dimensions.
#### Using Contract Code vs. Custom Value
The Create/Edit forms are designed for setting up a default usage filter. The default assumes you've set up a dimension data field on one or more Meters to ensure that only the usage data submissions that use the Contract's code as value for the dimension will be included in billing for the Contract:
* When you **Add** the first **Usage Filter**, the form defaults to show the Contract's code entered as the **Value** and to **Include** usage for billing as the **Usage filter mode**:
* **Enabled**. Contract billing for the Account will be restricted to charge amounts that fall within the defined Contract period.
* **Disabled**. The period for amounts billed under the Contract will be determined by the Account Plan attached to the Account and linked to the Contract.
### Define Usage Filters
As a further option for controlling Contract billing and giving added flexibility, you can define up to three **Usage filters** to either include or exclude charges for usage associated with specific Meter dimensions.
#### Using Contract Code vs. Custom Value
The Create/Edit forms are designed for setting up a default usage filter. The default assumes you've set up a dimension data field on one or more Meters to ensure that only the usage data submissions that use the Contract's code as value for the dimension will be included in billing for the Contract:
* When you **Add** the first **Usage Filter**, the form defaults to show the Contract's code entered as the **Value** and to **Include** usage for billing as the **Usage filter mode**:
 * You can then select the Meter **Dimension code** you want to filter by, for example:
 * Alternatively, if you don't want to filter usage in this way, you can select to use a **Custom value** for a Meter **Dimension code** to filter by - either to **Include** or **Exclude** usage - for example:
 #### Multiple Meters with Same Dimension Fields
If you have multiple Meters with dimension data fields that use the *same code*, then any usage filters you set up for Contract billing will include/exclude usage collected by *all Meters* and which uses the specific **Value** you've entered for the dimension. The **Dimension code** drop-down list identifies instances where there are multiple Meters with dimension fields that use the same code and gives the number of Meters:
#### Multiple Meters with Same Dimension Fields
If you have multiple Meters with dimension data fields that use the *same code*, then any usage filters you set up for Contract billing will include/exclude usage collected by *all Meters* and which uses the specific **Value** you've entered for the dimension. The **Dimension code** drop-down list identifies instances where there are multiple Meters with dimension fields that use the same code and gives the number of Meters:
 For a worked example showing how to set up usage filters for Contract billing, see below [Example 3](#example-3-usage-filtering-for-contract-billing).
## Example 1 - Multiple Product Contract Billing
Suppose you offer several core Products and your end-customers typically enter into a contractual agreement to take one or more of these Products. You want to invoice each customer for the specific product package they sign-up for. This example shows how to set things up in m3ter for billing multiple products under a single contract and review generated Bills.
### Setting Up Multiple Product Contract Billing
**To set up multiple product Contract billing:**
1. Select **Accounts**. The **Accounts** page opens.
2. Select the **Name** text of the Account you want to set up multiple product Contract billing for. The Account page opens with the **Overview** tab selected.
3. Select the **Attached plans** tab and attach priced Product Plans to the Account:
For a worked example showing how to set up usage filters for Contract billing, see below [Example 3](#example-3-usage-filtering-for-contract-billing).
## Example 1 - Multiple Product Contract Billing
Suppose you offer several core Products and your end-customers typically enter into a contractual agreement to take one or more of these Products. You want to invoice each customer for the specific product package they sign-up for. This example shows how to set things up in m3ter for billing multiple products under a single contract and review generated Bills.
### Setting Up Multiple Product Contract Billing
**To set up multiple product Contract billing:**
1. Select **Accounts**. The **Accounts** page opens.
2. Select the **Name** text of the Account you want to set up multiple product Contract billing for. The Account page opens with the **Overview** tab selected.
3. Select the **Attached plans** tab and attach priced Product Plans to the Account:
![]() * In this example, we've attached two priced Plans for billing the Account for consumption of two different Products.
4. Select the **Contracts** tab and create the Contract you want to use to bill the Account for multiple Products. For the current example, under **Contract billing details**:
* Leave the **Bill contract independently** switch disabled. In this example, only one Contract will be associated with the Account and we don't need to use Bill grouping keys.
* **Apply contract period limits**. Leave this switch in the default disabled position.
5. **Usage filters**. Do not attempt to set any usage filters:
* In this example, we've attached two priced Plans for billing the Account for consumption of two different Products.
4. Select the **Contracts** tab and create the Contract you want to use to bill the Account for multiple Products. For the current example, under **Contract billing details**:
* Leave the **Bill contract independently** switch disabled. In this example, only one Contract will be associated with the Account and we don't need to use Bill grouping keys.
* **Apply contract period limits**. Leave this switch in the default disabled position.
5. **Usage filters**. Do not attempt to set any usage filters:
![]() 6. Select **Create contact** and then from the **Contracts** tab select the name hotlink text of the Contract to open the **Contract details** page:
6. Select **Create contact** and then from the **Contracts** tab select the name hotlink text of the Contract to open the **Contract details** page:
![]() * We can see that no **Bill grouping key** is assigned to the Contract.
7. Scroll down to the **Contract plans** panel and add the two Product Plans attached to the Account to the Contract:
* We can see that no **Bill grouping key** is assigned to the Contract.
7. Scroll down to the **Contract plans** panel and add the two Product Plans attached to the Account to the Contract:
![]() 8. Return to the **Account>Attached plans** tab:
8. Return to the **Account>Attached plans** tab:
![]() * The Plans attached to the Account for different Products are now linked to the same Contract.
Next, we can submit some test data and generate a Bill for the Account and view Contract billing.
### Running and Viewing Contract Billing for Multiple Products
**To run and view multiple product Contract billing:**
1. Open the **Meter details** page for each of the Meters used to collect usage data for Products the example Account consumes:
* Select the Account - for the current example: **Revive Graph Customer 1**.
* Under **Submit measurements>Submit usage data**, enter some test data for the Meter Data Fields targeted by the Aggregations you've used to price the Product Plans attached to the Account.
2. Open the example Account page and select the **Bills** tab.
3. Select **Run billing** and use the **Run billing** modal to generate a Bill for the Account for the next **Invoice date** covering the period in which you submitted the test data for the Product Meters:
* Because we used the **No grouping key** setting for the Contract, a single Bill is generated and appears on the **Bills** tab.
4. Select the **Reference** hotlink text to open the Bill in **Bill Management**. For example:
* The Plans attached to the Account for different Products are now linked to the same Contract.
Next, we can submit some test data and generate a Bill for the Account and view Contract billing.
### Running and Viewing Contract Billing for Multiple Products
**To run and view multiple product Contract billing:**
1. Open the **Meter details** page for each of the Meters used to collect usage data for Products the example Account consumes:
* Select the Account - for the current example: **Revive Graph Customer 1**.
* Under **Submit measurements>Submit usage data**, enter some test data for the Meter Data Fields targeted by the Aggregations you've used to price the Product Plans attached to the Account.
2. Open the example Account page and select the **Bills** tab.
3. Select **Run billing** and use the **Run billing** modal to generate a Bill for the Account for the next **Invoice date** covering the period in which you submitted the test data for the Product Meters:
* Because we used the **No grouping key** setting for the Contract, a single Bill is generated and appears on the **Bills** tab.
4. Select the **Reference** hotlink text to open the Bill in **Bill Management**. For example:
![Attach Contract120]() * The Bill opens and by default groups line items by **Product**.
* If we expand each of the line items, we can see that they are both linked to the same Contract:
* The Bill opens and by default groups line items by **Product**.
* If we expand each of the line items, we can see that they are both linked to the same Contract:
![Attach Contract121]()
![Attach Contract122]() 5. Open the **Display options** menu and enable **Group by contract**. The Bill adjusts to show line items for multiple Products billed under the same **Contract**. For the current example:
5. Open the **Display options** menu and enable **Group by contract**. The Bill adjusts to show line items for multiple Products billed under the same **Contract**. For the current example:
![Attach Contract123]() ## Example 2 - Mixed Grouping Contract Billing
This worked example develops the multiple Product Contract billing given in Example 1, and supposes that you want to invoice customers by Contract for multiple Products they have agreed to consume but to create *separate invoices by Contract* for those Products. In this example we'll use the Bill grouping key setting to ensure that:
* Charges for two Products consumed by an Account are grouped together and appear on a single Contract Bill.
* Charges for a third Product consumed by the same Account appear on a separate Contract Bill.
### Setting Up Mixed Grouping Contract Billing
**To set up grouped Contract billing:**
1. Select **Accounts**. The **Accounts** page opens.
2. Select the **Name** text of the Account you want to set up grouped Contract billing for. The Account page opens with the **Overview** tab selected.
3. Select the Contracts tab and ensure two **ACTIVE** Contracts have been created for the Account. For example:
## Example 2 - Mixed Grouping Contract Billing
This worked example develops the multiple Product Contract billing given in Example 1, and supposes that you want to invoice customers by Contract for multiple Products they have agreed to consume but to create *separate invoices by Contract* for those Products. In this example we'll use the Bill grouping key setting to ensure that:
* Charges for two Products consumed by an Account are grouped together and appear on a single Contract Bill.
* Charges for a third Product consumed by the same Account appear on a separate Contract Bill.
### Setting Up Mixed Grouping Contract Billing
**To set up grouped Contract billing:**
1. Select **Accounts**. The **Accounts** page opens.
2. Select the **Name** text of the Account you want to set up grouped Contract billing for. The Account page opens with the **Overview** tab selected.
3. Select the Contracts tab and ensure two **ACTIVE** Contracts have been created for the Account. For example:
![]() * For this example, we want charges due under **Training Contract 1** to appear on a separate Bill and independently of any billing of charges due under **Standard Contract 1**.
4. Edit the Contract you want to be billed separately and under **Contract billing details**, enable the **Bill contract independently** switch.
5. Select **Update contract** and on the **Contracts** tab select the name hotlink text of the Contract to open the **Contract details** page:
* For this example, we want charges due under **Training Contract 1** to appear on a separate Bill and independently of any billing of charges due under **Standard Contract 1**.
4. Edit the Contract you want to be billed separately and under **Contract billing details**, enable the **Bill contract independently** switch.
5. Select **Update contract** and on the **Contracts** tab select the name hotlink text of the Contract to open the **Contract details** page:
![]() * For the example, we can now see that a **Bill grouping key** using the Contract's name has been created, assigned to **Training Contract 1**, and is marked as **EXCLUSIVE**.
* Note that for **Standard Contract 1** we can leave this without a grouping key for the example because this is the only other Contract associated with the Account.
6. Return to the **Account** page, select the **Attached plans** tab, and attach priced Product Plans to the Account:
* For the example, we can now see that a **Bill grouping key** using the Contract's name has been created, assigned to **Training Contract 1**, and is marked as **EXCLUSIVE**.
* Note that for **Standard Contract 1** we can leave this without a grouping key for the example because this is the only other Contract associated with the Account.
6. Return to the **Account** page, select the **Attached plans** tab, and attach priced Product Plans to the Account:
![]() * Note that two of the attached Plans are added to **Standard Contract 1** and one attached Plan is added to **Training Contract 1**.
Next, we can submit some test data and generate Bills for the Account and view the resultant mixed grouping Contract billing.
### Running and Viewing Contract Billing for Mixed Grouping Contract Bills
**To run and view grouped Contract Bills:**
1. Open the **Meter details** page for each of the Meters used to collect usage data for Products the example Account consumes:
* Select the Account - for the current example: **Revive Graph Customer 1**.
* Under **Submit measurements>Submit usage data**, enter some test data for the Meter Data Fields targeted by the Aggregations you've used to price the Product Plans attached to the Account.
2. Open the example Account page and select the **Bills** tab.
3. Select **Run billing** and use the **Run billing** modal to generate Bills for the Account for the next **Invoice date** covering the period in which you submitted the test data for the Product Meters:
* Note that two of the attached Plans are added to **Standard Contract 1** and one attached Plan is added to **Training Contract 1**.
Next, we can submit some test data and generate Bills for the Account and view the resultant mixed grouping Contract billing.
### Running and Viewing Contract Billing for Mixed Grouping Contract Bills
**To run and view grouped Contract Bills:**
1. Open the **Meter details** page for each of the Meters used to collect usage data for Products the example Account consumes:
* Select the Account - for the current example: **Revive Graph Customer 1**.
* Under **Submit measurements>Submit usage data**, enter some test data for the Meter Data Fields targeted by the Aggregations you've used to price the Product Plans attached to the Account.
2. Open the example Account page and select the **Bills** tab.
3. Select **Run billing** and use the **Run billing** modal to generate Bills for the Account for the next **Invoice date** covering the period in which you submitted the test data for the Product Meters:
![]() * Because we selected **Bill contract independently** for **Training Contract 1** and assigned an exclusive **Bill grouping key** to it, two separate Bills are generated and appear on the **Bills** tab.
4. Select the **Reference** hotlink text of the **Standard Contract 1** Bill to open it in **Bill Management**:
* Because we selected **Bill contract independently** for **Training Contract 1** and assigned an exclusive **Bill grouping key** to it, two separate Bills are generated and appear on the **Bills** tab.
4. Select the **Reference** hotlink text of the **Standard Contract 1** Bill to open it in **Bill Management**:
![Attach Contract124]() * The **Standard Contract 1** Bill opens with line items grouped by the two Products for the attached Plans added to the Contract and we can then open the **Display options** menu and enable **Group by contract**:
* The **Standard Contract 1** Bill opens with line items grouped by the two Products for the attached Plans added to the Contract and we can then open the **Display options** menu and enable **Group by contract**:
![Attach Contract125]() 5. Select the **Reference** hotlink text of the **Training Contract 1** Bill to open it in **Bill Management**:
5. Select the **Reference** hotlink text of the **Training Contract 1** Bill to open it in **Bill Management**:
![Attach Contract126]() * The **Training Contract 1** Bill opens with line items grouped by the single Product for the attached Plan added to the Contract and we can then open the **Display options** menu and enable **Group by contract**:
* The **Training Contract 1** Bill opens with line items grouped by the single Product for the attached Plan added to the Contract and we can then open the **Display options** menu and enable **Group by contract**:
![Attach Contract127]() ## Example 3 - Usage Filtering for Contract Billing
This worked example develops the multiple Product Contract billing given in Example 1, and supposes that you want to implement Contract billing for Products but filter the metered usage and charge at billing only for usage where Product Meter dimensions equal specific defined values. You can do this by adding usage filters for the Contract you will use to bill the Account.
### Running and Viewing Contract Billing without Usage Filters
First, we'll review the setup for the example and run billing without Contract usage filters applied to check that all usage is charged for.
**To run and view Contract billing without Usage Filters:**
1. Select **Accounts**. The **Accounts** page opens.
2. Select the **Attached plans** tab:
## Example 3 - Usage Filtering for Contract Billing
This worked example develops the multiple Product Contract billing given in Example 1, and supposes that you want to implement Contract billing for Products but filter the metered usage and charge at billing only for usage where Product Meter dimensions equal specific defined values. You can do this by adding usage filters for the Contract you will use to bill the Account.
### Running and Viewing Contract Billing without Usage Filters
First, we'll review the setup for the example and run billing without Contract usage filters applied to check that all usage is charged for.
**To run and view Contract billing without Usage Filters:**
1. Select **Accounts**. The **Accounts** page opens.
2. Select the **Attached plans** tab:
![]() Two Product Plans are attached to the Account and both have been added to **Standard Contract 1:**
* **Revive Graph Standard Plan 1X1** is attached for charging the Account for consuming the **Revive Graph Standard** Product.
* **Revive Graph Support Plan 2X2** is attached for charging the Account for consuming the **Revive Graph Support** Product.
**Revive Graph Standard** Product - Meter and Pricing:
* The Meter that collects usage for this Product has two Data Fields:
* A **MEASURE** field called **GIGABs** to collect the size in GBs of files uploaded for storage.
* A **WHAT** dimension field called **FileFormat** to collect the type of files uploaded - permitted types are **RAW** or **JPEG** format.
* The Aggregation used to price the attached Product Plan targets the **GIGABs** Meter field and applies a **SUM** method to give the billing metric.
* The **Revive Graph Standard Plan 1X1** is priced at the flat rate of **\$0.75** per GB stored.
**Revive Graph Support** Product - Meter and Pricing:
* The Meter that collects usage for this Product has two Data Fields:
* A **MEASURE** field called **Support Calls** to collect the number of support calls by customers.
* A **WHERE** dimension field called **Country** to log which country the support call originates from - customers are located in either the UK or the US.
* The Aggregation used to price the attached Product Plan targets the **Support Calls** Meter field and applies a **SUM** method to give the billing metric.
* The **Revive Graph Support Plan 2X2** is priced at the flat rate of **\$1.25** per call.
3. Submit some test data to the Account using the Meters set up for the example. For the current example:
**Revive Graph Standard** Meter - three usage data measurements submitted for the example Account:
* GIGABs = **300**, FileFormat = **RAW**
* GIGABs = **400**, FileFormat = **JPEG**
* GIGABs = **500**, FileFormat = **RAW**
* Total charge is **1200 x \$0.75 = \$900**
**Revive Graph Support** Meter - three usage data measurements submitted for the example Account:
* Support Calls = **26**, Where = **UK**
* Support Calls = **36**, Where = **US**
* Support Calls = **46**, Where = **UK**
* Total charge is **108 x \$1.25 = \$135**
4. Open the example Account page and select the **Bills** tab.
5. Select **Run billing** and use the **Run billing** modal to generate a Bill for the Account for the next **Invoice date** covering the period in which you submitted the test data for the Product Meters:
6. Select the **Reference** hotlink text to open the Bill in **Bill Management**:
Two Product Plans are attached to the Account and both have been added to **Standard Contract 1:**
* **Revive Graph Standard Plan 1X1** is attached for charging the Account for consuming the **Revive Graph Standard** Product.
* **Revive Graph Support Plan 2X2** is attached for charging the Account for consuming the **Revive Graph Support** Product.
**Revive Graph Standard** Product - Meter and Pricing:
* The Meter that collects usage for this Product has two Data Fields:
* A **MEASURE** field called **GIGABs** to collect the size in GBs of files uploaded for storage.
* A **WHAT** dimension field called **FileFormat** to collect the type of files uploaded - permitted types are **RAW** or **JPEG** format.
* The Aggregation used to price the attached Product Plan targets the **GIGABs** Meter field and applies a **SUM** method to give the billing metric.
* The **Revive Graph Standard Plan 1X1** is priced at the flat rate of **\$0.75** per GB stored.
**Revive Graph Support** Product - Meter and Pricing:
* The Meter that collects usage for this Product has two Data Fields:
* A **MEASURE** field called **Support Calls** to collect the number of support calls by customers.
* A **WHERE** dimension field called **Country** to log which country the support call originates from - customers are located in either the UK or the US.
* The Aggregation used to price the attached Product Plan targets the **Support Calls** Meter field and applies a **SUM** method to give the billing metric.
* The **Revive Graph Support Plan 2X2** is priced at the flat rate of **\$1.25** per call.
3. Submit some test data to the Account using the Meters set up for the example. For the current example:
**Revive Graph Standard** Meter - three usage data measurements submitted for the example Account:
* GIGABs = **300**, FileFormat = **RAW**
* GIGABs = **400**, FileFormat = **JPEG**
* GIGABs = **500**, FileFormat = **RAW**
* Total charge is **1200 x \$0.75 = \$900**
**Revive Graph Support** Meter - three usage data measurements submitted for the example Account:
* Support Calls = **26**, Where = **UK**
* Support Calls = **36**, Where = **US**
* Support Calls = **46**, Where = **UK**
* Total charge is **108 x \$1.25 = \$135**
4. Open the example Account page and select the **Bills** tab.
5. Select **Run billing** and use the **Run billing** modal to generate a Bill for the Account for the next **Invoice date** covering the period in which you submitted the test data for the Product Meters:
6. Select the **Reference** hotlink text to open the Bill in **Bill Management**:
![Attach Contract130]() * We can see the Bill has been correctly calculated for the usage submitted for each of the Products and we can then open the **Display options** menu and enable **Group by contract**:
* We can see the Bill has been correctly calculated for the usage submitted for each of the Products and we can then open the **Display options** menu and enable **Group by contract**:
![Attach Contract131]() ### Setting Up Contract Billing with Usage Filters
Suppose that for the current example, you want to maintain Contract billing for the two Products but accommodate variation in the contractual agreement made with different customers. For example, some customers will be charged only for storage of RAW files and for support calls made from the UK.
**Defining Usage Filters?** Please first review the [above section](#defining-usage-filters) explaining how to define usage filters.
**To set up Contract billing with Usage Filters:**
1. Select **Accounts**. The **Accounts** page opens.
2. Select the **Contracts** tab and select to edit **Standard Contract 1**.
3. On the **Contract details** panel under **Usage filters**, we'll add two filters to the Contract:
* Select **Add**. The panel adjusts.
* The first filter defaults to using an **Include** filter for **Contract code** as **Value**. For the current example, select **Custom value** as the **Value** instead. The panel adjusts again.
4. Use the **Dimension code** drop-down list to select a Meter dimension you want to use for filtering usage. Then enter the **Value** of the selected Meter Dimension you want to filter by and, for the current example, select **Include** for **Usage filter mode**.
5. Select **Add** again to add a second usage filter for the example:
### Setting Up Contract Billing with Usage Filters
Suppose that for the current example, you want to maintain Contract billing for the two Products but accommodate variation in the contractual agreement made with different customers. For example, some customers will be charged only for storage of RAW files and for support calls made from the UK.
**Defining Usage Filters?** Please first review the [above section](#defining-usage-filters) explaining how to define usage filters.
**To set up Contract billing with Usage Filters:**
1. Select **Accounts**. The **Accounts** page opens.
2. Select the **Contracts** tab and select to edit **Standard Contract 1**.
3. On the **Contract details** panel under **Usage filters**, we'll add two filters to the Contract:
* Select **Add**. The panel adjusts.
* The first filter defaults to using an **Include** filter for **Contract code** as **Value**. For the current example, select **Custom value** as the **Value** instead. The panel adjusts again.
4. Use the **Dimension code** drop-down list to select a Meter dimension you want to use for filtering usage. Then enter the **Value** of the selected Meter Dimension you want to filter by and, for the current example, select **Include** for **Usage filter mode**.
5. Select **Add** again to add a second usage filter for the example:
 6. Select **Update contract**.
### Running and Viewing Contract Billing with Usage Filters
Now that we've applied usage filters to **Standard** **Contract 1**, we can recalculate the Contract Bill to check that the charges are calculated correctly according to the filtered Product usage:
Revive Graph Standard Meter - two usage data measurements were submitted for the example Account and the Contract usage filtering we've configured should include:
* GIGABs = **300**, FileFormat = **RAW**
* GIGABs = **500**, FileFormat = **RAW**
* Total charge is **800 x \$0.75 = \$600**
Revive Graph Support Meter - two usage data measurements were submitted for the example Account and the Contract usage filtering we've configured should include:
* Support Calls = **26**, Where = **UK**
* Support Calls = **46**, Where = **UK**
* Total charge is **72 x \$1.25 = \$90**
**To run and view Contract billing with Usage Filters:**
1. Open the example **Account** page and select the **Bills** tab.
2. Select the Bill that was generated without usage filters applied to the Contract and select **Recalculate selected**.
3. Select the **Reference** hotlink text to open the Bill in **Bill Management**:
6. Select **Update contract**.
### Running and Viewing Contract Billing with Usage Filters
Now that we've applied usage filters to **Standard** **Contract 1**, we can recalculate the Contract Bill to check that the charges are calculated correctly according to the filtered Product usage:
Revive Graph Standard Meter - two usage data measurements were submitted for the example Account and the Contract usage filtering we've configured should include:
* GIGABs = **300**, FileFormat = **RAW**
* GIGABs = **500**, FileFormat = **RAW**
* Total charge is **800 x \$0.75 = \$600**
Revive Graph Support Meter - two usage data measurements were submitted for the example Account and the Contract usage filtering we've configured should include:
* Support Calls = **26**, Where = **UK**
* Support Calls = **46**, Where = **UK**
* Total charge is **72 x \$1.25 = \$90**
**To run and view Contract billing with Usage Filters:**
1. Open the example **Account** page and select the **Bills** tab.
2. Select the Bill that was generated without usage filters applied to the Contract and select **Recalculate selected**.
3. Select the **Reference** hotlink text to open the Bill in **Bill Management**:
![Attach Contract128]() * The Bill has been correctly recalculated for the filtered usage submitted for each of the Products. We can then open the **Display options** menu and enable **Group by contract**:
* The Bill has been correctly recalculated for the filtered usage submitted for each of the Products. We can then open the **Display options** menu and enable **Group by contract**:
![Attach Contract129]() # Creating Counter Adjustments for Accounts
Source: https://docs.m3ter.com/guides/end-customer-accounts/creating-counter-adjustments-for-accounts
If you've attached a Product Plan to an end-customer Account and the Plan is priced using a *Counter* for unit-based recurring subscription charges, you can then use the *Counter Adjustments* tab on the Account page to create adjustments for the number of Counter units the Account subscribes to. The Counter Adjustments on an Account for a given billing period will then determine the recurring charges calculated for that period's Bill.
For full details on how to work in the Counter Adjustments tab to create and manage Counter Adjustments for your end-customer Accounts, please see the [Understanding and Creating Counter Adjustments for Accounts](/guides/recurring-charges-counters/creating-counter-adjustments-for-accounts) topic in the [Recurring Charges](/guides/recurring-charges-counters) section.
**Important!** Before you attempt to price your Product Plans for unit-based pricing, attach those Plans to Accounts, and then create Counter Adjustments for Accounts, we *strongly recommend* that you review all of the topics in the [Recurring Charges](/guides/recurring-charges-counters) section, which explains how to work with Counters for pricing Plans and manage Counter Adjustments on Accounts for recurring charges billing.
# Creating Custom Plans for Accounts
Source: https://docs.m3ter.com/guides/end-customer-accounts/creating-custom-account-plans
You can create custom Plans for an Account:
* Custom Plans can only be attached to that specific Account.
* When you create custom Plans, they are attached to the Account to create an Account Plan based on the start and end dates you have entered.
* You can add Aggregations or Counters and price the custom Plan straight away in the Plan details page.
* Lastly, you might then want to edit the details of the Account Plan you've created for the Account using the custom Plan, such as first bill date or adding it to a Contract that's linked to the Account.
**Attaching Plans to Accounts!** We strongly recommend you review the [Attaching Plans to an Account](/guides/end-customer-accounts/attaching-plans-to-an-account) topic for more details before you proceed to create custom Plans for an Account.
Creating a custom Plan for an Account and performing the required configuration work to prepare the attached Plan for charging the Account involves four stages:
* Stage 1: [Creating Custom Plan](/guides/end-customer-accounts/creating-custom-account-plans#creating-custom-plan)
* Stage 2: [Attaching Custom Plan to Create Account Plan](/guides/end-customer-accounts/creating-custom-account-plans#attaching-custom-plan-to-create-account-plan)
* Stage 3: [Pricing the Custom Plan](/guides/end-customer-accounts/creating-custom-account-plans#pricing-custom-plans)
* Stage 4: [Editing Account Plan Details](/guides/end-customer-accounts/creating-custom-account-plans#editing-account-plan-details)
You can delete an Account Plan from an Account on the **Attached Plans** tab:
* [Deleting an Account Plan](/guides/end-customer-accounts/creating-custom-account-plans#deleting-an-account-plan)
## Creating Custom Plan
**To create a custom Plan for an Account:**
1. Select **Accounts**. The **Accounts** page opens.
2. Select the **Name** text of the **Account**. The **Account** page opens with the **Overview** tab selected.
3. On the **Account actions** menu, select **Plans>Create custom plan**:
# Creating Counter Adjustments for Accounts
Source: https://docs.m3ter.com/guides/end-customer-accounts/creating-counter-adjustments-for-accounts
If you've attached a Product Plan to an end-customer Account and the Plan is priced using a *Counter* for unit-based recurring subscription charges, you can then use the *Counter Adjustments* tab on the Account page to create adjustments for the number of Counter units the Account subscribes to. The Counter Adjustments on an Account for a given billing period will then determine the recurring charges calculated for that period's Bill.
For full details on how to work in the Counter Adjustments tab to create and manage Counter Adjustments for your end-customer Accounts, please see the [Understanding and Creating Counter Adjustments for Accounts](/guides/recurring-charges-counters/creating-counter-adjustments-for-accounts) topic in the [Recurring Charges](/guides/recurring-charges-counters) section.
**Important!** Before you attempt to price your Product Plans for unit-based pricing, attach those Plans to Accounts, and then create Counter Adjustments for Accounts, we *strongly recommend* that you review all of the topics in the [Recurring Charges](/guides/recurring-charges-counters) section, which explains how to work with Counters for pricing Plans and manage Counter Adjustments on Accounts for recurring charges billing.
# Creating Custom Plans for Accounts
Source: https://docs.m3ter.com/guides/end-customer-accounts/creating-custom-account-plans
You can create custom Plans for an Account:
* Custom Plans can only be attached to that specific Account.
* When you create custom Plans, they are attached to the Account to create an Account Plan based on the start and end dates you have entered.
* You can add Aggregations or Counters and price the custom Plan straight away in the Plan details page.
* Lastly, you might then want to edit the details of the Account Plan you've created for the Account using the custom Plan, such as first bill date or adding it to a Contract that's linked to the Account.
**Attaching Plans to Accounts!** We strongly recommend you review the [Attaching Plans to an Account](/guides/end-customer-accounts/attaching-plans-to-an-account) topic for more details before you proceed to create custom Plans for an Account.
Creating a custom Plan for an Account and performing the required configuration work to prepare the attached Plan for charging the Account involves four stages:
* Stage 1: [Creating Custom Plan](/guides/end-customer-accounts/creating-custom-account-plans#creating-custom-plan)
* Stage 2: [Attaching Custom Plan to Create Account Plan](/guides/end-customer-accounts/creating-custom-account-plans#attaching-custom-plan-to-create-account-plan)
* Stage 3: [Pricing the Custom Plan](/guides/end-customer-accounts/creating-custom-account-plans#pricing-custom-plans)
* Stage 4: [Editing Account Plan Details](/guides/end-customer-accounts/creating-custom-account-plans#editing-account-plan-details)
You can delete an Account Plan from an Account on the **Attached Plans** tab:
* [Deleting an Account Plan](/guides/end-customer-accounts/creating-custom-account-plans#deleting-an-account-plan)
## Creating Custom Plan
**To create a custom Plan for an Account:**
1. Select **Accounts**. The **Accounts** page opens.
2. Select the **Name** text of the **Account**. The **Account** page opens with the **Overview** tab selected.
3. On the **Account actions** menu, select **Plans>Create custom plan**:
![]() Alternatively:
* Select the **Attached plans** tab.
* On the **Active and pending attached plans** panel, select the actions **Menu** button.
* On the menu, select **Create custom plan**.
The **Create** page opens for **Stage 1: Create plan**.
4. On the **Plan details** card, use the **Product** drop-down list to select the Product for the custom Plan you're creating for the Account:
* If the Product you select doesn't have any Plan Templates created for it, then you must first create one before you can create a Plan for the Product. You'll see a warning with a hotlink **create plan template** text, which you can use to go directly to the **Plan Templates>Create** page. When you've created a Plan Template for the Product, you'll be brought straight back to the **Create** custom plan page to proceed.
* If the selected Product has Plan Templates created for it, you can proceed and create a custom Plan based on one of the templates.
5. Use the **Plan Template** drop-down list to select the template you want to use for the custom Plan.
6. Enter the details of the custom Account Plan:
* **Name**. Descriptive name for the custom Plan. When you create a custom Plan for an Account, a default name is loaded, which prefixes the Account name. You can edit this name text as required.
* **Code**. Unique identifier for the custom Plan. When you create a custom Plan for an Account, a default code string is loaded. You can edit this code string as required.
7. Use the **Standing charge** card to enter settings for the custom Plan:
* **Standing charge**. You can override the value inherited from the **Plan Template**. For example, enter **20**. The **Value from template** value is struck through.
* **Standing charge billing**. If you want to override the **Use configuration from plan template** setting for billing either in arrears or in advance - shown in brackets - then select the setting you want for the custom Plan.
* **Standing charge accounting product**. For accounting purposes, select a Product that will be linked to any *Standing charge* line items on Bills. (*Optional*)
* Note that if you leave this blank, then the Product the Plan belongs will be used.
* **Standing charge description**. You can enter a description for any Standing charge amounts billed. This will override any description entered for the Plan template and will appear against this type of bill line item.
Alternatively:
* Select the **Attached plans** tab.
* On the **Active and pending attached plans** panel, select the actions **Menu** button.
* On the menu, select **Create custom plan**.
The **Create** page opens for **Stage 1: Create plan**.
4. On the **Plan details** card, use the **Product** drop-down list to select the Product for the custom Plan you're creating for the Account:
* If the Product you select doesn't have any Plan Templates created for it, then you must first create one before you can create a Plan for the Product. You'll see a warning with a hotlink **create plan template** text, which you can use to go directly to the **Plan Templates>Create** page. When you've created a Plan Template for the Product, you'll be brought straight back to the **Create** custom plan page to proceed.
* If the selected Product has Plan Templates created for it, you can proceed and create a custom Plan based on one of the templates.
5. Use the **Plan Template** drop-down list to select the template you want to use for the custom Plan.
6. Enter the details of the custom Account Plan:
* **Name**. Descriptive name for the custom Plan. When you create a custom Plan for an Account, a default name is loaded, which prefixes the Account name. You can edit this name text as required.
* **Code**. Unique identifier for the custom Plan. When you create a custom Plan for an Account, a default code string is loaded. You can edit this code string as required.
7. Use the **Standing charge** card to enter settings for the custom Plan:
* **Standing charge**. You can override the value inherited from the **Plan Template**. For example, enter **20**. The **Value from template** value is struck through.
* **Standing charge billing**. If you want to override the **Use configuration from plan template** setting for billing either in arrears or in advance - shown in brackets - then select the setting you want for the custom Plan.
* **Standing charge accounting product**. For accounting purposes, select a Product that will be linked to any *Standing charge* line items on Bills. (*Optional*)
* Note that if you leave this blank, then the Product the Plan belongs will be used.
* **Standing charge description**. You can enter a description for any Standing charge amounts billed. This will override any description entered for the Plan template and will appear against this type of bill line item.
![]() 8. Use the **Minimum spend** card to enter settings for the custom Plan:
* **Product minimum spend**. You can override the value inherited from the **Plan Template**. For example, enter **125**.
* **Minimum spend billing**. If you want to override the **Use configuration from plan template** setting for billing either in arrears or in advance for minimum spend amount - shown in brackets - select the setting you want for the custom Plan.
* **Minimum spend accounting product**. For accounting purposes, select a Product that will be linked to any *Minimum spend* or *Minimum spend adjustment* line items on Bills. (*Optional*)
* Note that if you leave this blank, then the Product the Plan belongs to will be used.
* **Minimum spend description**. You can enter a description for any Minimum spend amounts charged at billing. This will override any description entered for the Plan template and will appear against this type of bill line item.
8. Use the **Minimum spend** card to enter settings for the custom Plan:
* **Product minimum spend**. You can override the value inherited from the **Plan Template**. For example, enter **125**.
* **Minimum spend billing**. If you want to override the **Use configuration from plan template** setting for billing either in arrears or in advance for minimum spend amount - shown in brackets - select the setting you want for the custom Plan.
* **Minimum spend accounting product**. For accounting purposes, select a Product that will be linked to any *Minimum spend* or *Minimum spend adjustment* line items on Bills. (*Optional*)
* Note that if you leave this blank, then the Product the Plan belongs to will be used.
* **Minimum spend description**. You can enter a description for any Minimum spend amounts charged at billing. This will override any description entered for the Plan template and will appear against this type of bill line item.
![]() 9. Select **Next**. The page adjusts to show that **Stage 1: Create plan** is completed and you can now move to [**Stage 2: Attach plan**](/guides/end-customer-accounts/creating-custom-account-plans#attaching-custom-plan-to-create-account-plan-and-price-plan) to the Account to create an Account Plan.
## Attaching Custom Plan to Create Account Plan
When you have completed **Stage 1: Create plan**, the **Create** page adjusts to allow you to complete for **Stage 2: Attach plan**.
**To attach a Custom plan to an Account:**
1. On the **Plan attachment settings** card, enter **Start date** and **End date** to define the period you want the custom Plan to be active for the Account for charging for Product usage:
* A **Start date** is required.
* If you omit an **End date**, the Account Plan will be applied to the Account perpetually or until such time as you delete the Account Plan.
* Note that **End dates** are treated *exclusively*. For example, if you set the **End date** of June 1st 2022, then the Account Plan ceases to be active for the Account at midnight on May 31st 2022, and any billing is calculated up to that point in time, NOT up to midnight on June 1st. If you want to include end customer Account usage occurring on June 1st for billing, you must set the **End date** to June 2nd.
9. Select **Next**. The page adjusts to show that **Stage 1: Create plan** is completed and you can now move to [**Stage 2: Attach plan**](/guides/end-customer-accounts/creating-custom-account-plans#attaching-custom-plan-to-create-account-plan-and-price-plan) to the Account to create an Account Plan.
## Attaching Custom Plan to Create Account Plan
When you have completed **Stage 1: Create plan**, the **Create** page adjusts to allow you to complete for **Stage 2: Attach plan**.
**To attach a Custom plan to an Account:**
1. On the **Plan attachment settings** card, enter **Start date** and **End date** to define the period you want the custom Plan to be active for the Account for charging for Product usage:
* A **Start date** is required.
* If you omit an **End date**, the Account Plan will be applied to the Account perpetually or until such time as you delete the Account Plan.
* Note that **End dates** are treated *exclusively*. For example, if you set the **End date** of June 1st 2022, then the Account Plan ceases to be active for the Account at midnight on May 31st 2022, and any billing is calculated up to that point in time, NOT up to midnight on June 1st. If you want to include end customer Account usage occurring on June 1st for billing, you must set the **End date** to June 2nd.
![]() **Warning: Overlapping Attached Plans!**
* **Default setting**. The default Organization setting imposes the contraint that an Account can only have one active Account Plan *per Product* - if you enter a **Start** **date** which would mean the new Account Plan overlaps with an Account Plan that is already active for the Account, then a warning will show and you'll be given the option to end the existing Account Plan on the **Start date** of the new Account Plan.
* **Allow overlapping attached plans**. If your billing use case requires you to attach more than one Plan to an Account for the same Product at the same time, then you must first enable the **Allow overlapping attached plans** Organization setting.
2. If you want to set the date the first and subsequent Bills are due for the selected Account using the Account Plan, use the **Billing cycle date** option. For example, if the Plan is configured for monthly billing frequency and you set **Billing cycle date** as February 14th, then m3ter will create a first bill for the Account on that date and every month from that date - March 14th, April 14th, and so on. If left blank, then start of billing defaults to the billing cycle date configured for the Account. *(Optional)*
3. If you want to add the Account Plan to a Contract you've created for the Account, use the **Contract** drop down to select it.*(Optional)*
**Notes:**
* Once you've attached a Plan to an Account, you can quickly add it to a Contract from **Plan attachment details**.
* For more details on Contracts, see [Creating Contracts for Accounts](/guides/end-customer-accounts/creating-and-managing-external-mappings-for-accounts).
4. If the Account is either a Parent or a Child Account, you can select for **Account hierarchy billing mode**, which determines how billing will be handled and shown on bills for charges due for the Parent Account and charges due for Child Accounts:
* **Bill parent account - bill line item per account**. Default setting.
* **Bill parent account - single bill line item for all accounts**.
* **Bill child account**.
**Notes:**
* The billing mode options are only operative if the Account is a Parent or Child Account. For a full explanation of what each means when attaching Plans to create Account Plans for Parent or Child Accounts, see [Billing Hierarchy Modes for Parent/Child Accounts](/guides/end-customer-accounts/creating-and-working-with-child-accounts/billing-for-parent-child-accounts).
* If you Price the Custom Plan using a Counter for unit-based pricing, then Parent/Account billing is *not available for the charges or credits due under the pricing*.
5. Select **Create plan and attach** to complete **Stage 2**:
* The custom Plan is created for the Account - it's created as an *Account specific Plan*, which means you can only attach it to this Account.
* The custom Plan is attached to the Account and an Account Plan is created.
* The **Plan attachment** details page opens:
**Warning: Overlapping Attached Plans!**
* **Default setting**. The default Organization setting imposes the contraint that an Account can only have one active Account Plan *per Product* - if you enter a **Start** **date** which would mean the new Account Plan overlaps with an Account Plan that is already active for the Account, then a warning will show and you'll be given the option to end the existing Account Plan on the **Start date** of the new Account Plan.
* **Allow overlapping attached plans**. If your billing use case requires you to attach more than one Plan to an Account for the same Product at the same time, then you must first enable the **Allow overlapping attached plans** Organization setting.
2. If you want to set the date the first and subsequent Bills are due for the selected Account using the Account Plan, use the **Billing cycle date** option. For example, if the Plan is configured for monthly billing frequency and you set **Billing cycle date** as February 14th, then m3ter will create a first bill for the Account on that date and every month from that date - March 14th, April 14th, and so on. If left blank, then start of billing defaults to the billing cycle date configured for the Account. *(Optional)*
3. If you want to add the Account Plan to a Contract you've created for the Account, use the **Contract** drop down to select it.*(Optional)*
**Notes:**
* Once you've attached a Plan to an Account, you can quickly add it to a Contract from **Plan attachment details**.
* For more details on Contracts, see [Creating Contracts for Accounts](/guides/end-customer-accounts/creating-and-managing-external-mappings-for-accounts).
4. If the Account is either a Parent or a Child Account, you can select for **Account hierarchy billing mode**, which determines how billing will be handled and shown on bills for charges due for the Parent Account and charges due for Child Accounts:
* **Bill parent account - bill line item per account**. Default setting.
* **Bill parent account - single bill line item for all accounts**.
* **Bill child account**.
**Notes:**
* The billing mode options are only operative if the Account is a Parent or Child Account. For a full explanation of what each means when attaching Plans to create Account Plans for Parent or Child Accounts, see [Billing Hierarchy Modes for Parent/Child Accounts](/guides/end-customer-accounts/creating-and-working-with-child-accounts/billing-for-parent-child-accounts).
* If you Price the Custom Plan using a Counter for unit-based pricing, then Parent/Account billing is *not available for the charges or credits due under the pricing*.
5. Select **Create plan and attach** to complete **Stage 2**:
* The custom Plan is created for the Account - it's created as an *Account specific Plan*, which means you can only attach it to this Account.
* The custom Plan is attached to the Account and an Account Plan is created.
* The **Plan attachment** details page opens:
![Createcustomplan70]() For the *Account Plan* created when you attached the custom Plan to the Account, under **Plan attachment details** you can:
* Check the dates for the period the Account Plan will be active for the Account.
* Read-off the Account Plan **ID** with the option to **Copy** this directly to your clipboard.
* Manage linking of the Account Plan to a Contract:
* If not previously added to a Contract, select **Add to contract**.
* If previously added to a Contract, select **Remove from contract**.
* Select **Edit** if you need to make any changes to the Account Plan, such as update the start and end dates.
6. If you scroll down the page, you can review **Plan attachment metadata** metadata:
**Custom Fields**. Any fields created for the Account Plan entity are listed.
* If any Custom Fields have been created at the Organizational level, these are shown and you can **Copy** the number or string value to your clipboard:
For the *Account Plan* created when you attached the custom Plan to the Account, under **Plan attachment details** you can:
* Check the dates for the period the Account Plan will be active for the Account.
* Read-off the Account Plan **ID** with the option to **Copy** this directly to your clipboard.
* Manage linking of the Account Plan to a Contract:
* If not previously added to a Contract, select **Add to contract**.
* If previously added to a Contract, select **Remove from contract**.
* Select **Edit** if you need to make any changes to the Account Plan, such as update the start and end dates.
6. If you scroll down the page, you can review **Plan attachment metadata** metadata:
**Custom Fields**. Any fields created for the Account Plan entity are listed.
* If any Custom Fields have been created at the Organizational level, these are shown and you can **Copy** the number or string value to your clipboard:
![Attach Plans63]() **External mappings**. You can commence a workflow to **Create external mapping** for the Account Plan directly - see [Creating and Managing External Mappings for Accounts](https://docs.m3ter.com/guides/end-customer-accounts/creating-and-managing-external-mappings-for-accounts) for an example of how to do this:
**External mappings**. You can commence a workflow to **Create external mapping** for the Account Plan directly - see [Creating and Managing External Mappings for Accounts](https://docs.m3ter.com/guides/end-customer-accounts/creating-and-managing-external-mappings-for-accounts) for an example of how to do this:
![Attach Plans65]() * The **External system** and **External table** mapped to are shown - such as **Netsuite - Item** in the above example. The **External entity ID** mapped to is also shown.
* If a listed External mapping is linked to an Integration, under **Linked integration** a hotlink text will be shown which you can use to open the Integration.
* Under **Actions**, you can edit or delete the External mapping.
* If the Account Plan has multiple External mappings created for it, you can use *Search external mappings* to search by **External table** and **External entity ID** and filter the list.
**Integration runs**. If you go on to set up an integration that synchronizes the Account Plan data with an external system, the date/time and status of the **Latest** integration run will be shown. You can use a text hotlink to open details of this latest run or **View all runs**. See [Reviewing Integration Run Details](/guides/integrations/setting-up-integrations/reviewing-integration-run-details).
7. If you scroll further down the page, you can review details of the custom Plan that was attached to the Account to create the Account Plan. This saves you having to navigate away or open the Plan details page in a separate tab:
* **Plan details**:
* Check the details of the Plan.
* Use hotlink text links to open the **Plan details** page and details pages for associated entities - **Plan template** and **Product**.
* Read-off the Plan **ID** and **Copy** it to your clipboard.
* Check the audit data for the Plan for who **Created** and **Last modified** the Plan and when.
* The **External system** and **External table** mapped to are shown - such as **Netsuite - Item** in the above example. The **External entity ID** mapped to is also shown.
* If a listed External mapping is linked to an Integration, under **Linked integration** a hotlink text will be shown which you can use to open the Integration.
* Under **Actions**, you can edit or delete the External mapping.
* If the Account Plan has multiple External mappings created for it, you can use *Search external mappings* to search by **External table** and **External entity ID** and filter the list.
**Integration runs**. If you go on to set up an integration that synchronizes the Account Plan data with an external system, the date/time and status of the **Latest** integration run will be shown. You can use a text hotlink to open details of this latest run or **View all runs**. See [Reviewing Integration Run Details](/guides/integrations/setting-up-integrations/reviewing-integration-run-details).
7. If you scroll further down the page, you can review details of the custom Plan that was attached to the Account to create the Account Plan. This saves you having to navigate away or open the Plan details page in a separate tab:
* **Plan details**:
* Check the details of the Plan.
* Use hotlink text links to open the **Plan details** page and details pages for associated entities - **Plan template** and **Product**.
* Read-off the Plan **ID** and **Copy** it to your clipboard.
* Check the audit data for the Plan for who **Created** and **Last modified** the Plan and when.
![Createcustom Plan71]() * Plan **Standing charge**:
* Plan **Standing charge**:
![Createcustomplan72]() * Plan **Pricing**:
* For the new Custom Plan **Add usage-based pricing** or **Add counter-based pricing** directly. For example, select an **Aggregation** and add usage-based pricing for the Plan - see the [following section](#pricin-custom-plans):
* Plan **Pricing**:
* For the new Custom Plan **Add usage-based pricing** or **Add counter-based pricing** directly. For example, select an **Aggregation** and add usage-based pricing for the Plan - see the [following section](#pricin-custom-plans):
![Create Custom Plan83]() * Plan **Adjustments**:
* Plan **Adjustments**:
![Createcustomplan74]() * **Plan metadata**:
* **Custom fields**
* **External mappings**
* **Integration runs**
**Plan metadata!** The *Plan's metadata* shown at the bottom of the page should not be confused with the *Account Plan's metadata*, which is also shown immediately below the **Plan attachment details** card.
8. If you return to the **Accounts** page and select the **Attached plans** tab, you'll see that an Account Plan has been created for the Account using the new custom Plan to charge for the Product, and which is listed on the **Active and pending attached plans** panel:
* **Plan metadata**:
* **Custom fields**
* **External mappings**
* **Integration runs**
**Plan metadata!** The *Plan's metadata* shown at the bottom of the page should not be confused with the *Account Plan's metadata*, which is also shown immediately below the **Plan attachment details** card.
8. If you return to the **Accounts** page and select the **Attached plans** tab, you'll see that an Account Plan has been created for the Account using the new custom Plan to charge for the Product, and which is listed on the **Active and pending attached plans** panel:
![Createcustomplan75]() ## Pricing Custom Plans
When you have completed **Stage 2: Attach plan**, you can complete **Stage 3: Price plan** - price custom Plans you've created for an Account from the **Plan attachment** page under **Pricing**.
This section explains how to add *usage-based pricing* to an Account's custom plan from the **Plan attachment** page:
* You can follow similar steps to add usage-based pricing from the **Plan details** page of the custom Plan.
* Alternatively, you can add *counter-based pricing* from either the **Plan attachment** page or the custom **Plan details** page
**Warning: Custom Plans cannot be priced directly in the Pricing Editor!** If you open the **Pricing Editor** and select the Product the custom Plan belongs to and then select to **Add plans**, only non-custom Plans created for the Product will be available for selection. You must price custom Plans from the **Plan Attachment** page or from the **Plan details** page.
**To price a Custom plan for an Account:**
1. From the Account's **Attached plans** tab on the **Active and pending attached plans** panel, select the Account Plan name text hotlink. The **Plan attachment** page opens.
2. Under **Pricing** on the Plan details panel, select add usage-based pricing:
## Pricing Custom Plans
When you have completed **Stage 2: Attach plan**, you can complete **Stage 3: Price plan** - price custom Plans you've created for an Account from the **Plan attachment** page under **Pricing**.
This section explains how to add *usage-based pricing* to an Account's custom plan from the **Plan attachment** page:
* You can follow similar steps to add usage-based pricing from the **Plan details** page of the custom Plan.
* Alternatively, you can add *counter-based pricing* from either the **Plan attachment** page or the custom **Plan details** page
**Warning: Custom Plans cannot be priced directly in the Pricing Editor!** If you open the **Pricing Editor** and select the Product the custom Plan belongs to and then select to **Add plans**, only non-custom Plans created for the Product will be available for selection. You must price custom Plans from the **Plan Attachment** page or from the **Plan details** page.
**To price a Custom plan for an Account:**
1. From the Account's **Attached plans** tab on the **Active and pending attached plans** panel, select the Account Plan name text hotlink. The **Plan attachment** page opens.
2. Under **Pricing** on the Plan details panel, select add usage-based pricing:
![Createcustomplan76]() * A **Select aggregations** modal opens with **Aggregation** pre-selected as the **Aggregation type**:
* Select **Compound aggregation** if you want to use this **Aggregation type** for the Plan pricing.
3. Select **Next**. The modal adjusts.
4. Select the Aggregation you want to use to price the Plan and select **Confirm**. The modal closes and the Aggregation is loaded into the **Pricing** panel:
* A **Select aggregations** modal opens with **Aggregation** pre-selected as the **Aggregation type**:
* Select **Compound aggregation** if you want to use this **Aggregation type** for the Plan pricing.
3. Select **Next**. The modal adjusts.
4. Select the Aggregation you want to use to price the Plan and select **Confirm**. The modal closes and the Aggregation is loaded into the **Pricing** panel:
![Create Custom Plan84]() 6. Select **create new pricing**. The **Pricing>Create** page opens and you can create a pricing in the usual way - as if you had reached this page from the Pricing Editor when pricing a non-custom Plan.
**Tip: More details on pricing Plans?**
* If you're pricing the Plan using Aggregations, see the [Creating a Pricing for a Plan](/guides/plans-and-pricing/pricing-plans/pricing-plans#creating-a-pricing-for-a-plan).
* If you're pricing the Plan using Counters, see [Creating Counters and Pricing Plans](/guides/recurring-charges-counters/creating-counters).
7. When you've completed the pricing configuration you want to apply to the custom Plan, select **Create pricing**. The **Pricing>Create** page closes and you are returned to the **Plan attachment** page where the custom Plan's new usage-based pricing now shows under **Pricing**:
6. Select **create new pricing**. The **Pricing>Create** page opens and you can create a pricing in the usual way - as if you had reached this page from the Pricing Editor when pricing a non-custom Plan.
**Tip: More details on pricing Plans?**
* If you're pricing the Plan using Aggregations, see the [Creating a Pricing for a Plan](/guides/plans-and-pricing/pricing-plans/pricing-plans#creating-a-pricing-for-a-plan).
* If you're pricing the Plan using Counters, see [Creating Counters and Pricing Plans](/guides/recurring-charges-counters/creating-counters).
7. When you've completed the pricing configuration you want to apply to the custom Plan, select **Create pricing**. The **Pricing>Create** page closes and you are returned to the **Plan attachment** page where the custom Plan's new usage-based pricing now shows under **Pricing**:
![Create Custom Plan86]() * In this example, we've set up the custom Plan for tiered pricing with two pricing bands.
## Editing Account Plan Details
When you have completed **Stage 3: Price plan**, you can complete **Stage 4: Edit plan details**.
**To edit Account plan details:**
1. From the Account's **Attached plans** tab on the **Active and pending attached plans** panel, select the Account Plan name text hotlink to open the **Plan attachment** page.
2. Select **Edit**. The **Edit** page opens and you can edit the Account Plan and define settings.
3. Edit **Start date** and **End date**, as required.
4. If you want to set the date the first Bill is due for the selected Account using the Account Plan, you can use the **Billing cycle date** option. Subsequent billing will be determined from the first date you define. For example, if the Plan is configured for monthly billing frequency and you set **Billing cycle date** as February 14th 2022, then m3ter will create a first bill for the Account on that date and every month from that date. If left blank, then start of billing defaults to the billing cycle date configured for the Account. *(Optional)*
5. If you want to add the Account Plan to a Contract you've created for the Account, use the **Contract** drop down to select it. For more details on Contracts, see [Creating Contracts for Accounts](/guides/end-customer-accounts/creating-contracts-for-accounts). *(Optional)*
6. If the Account is either a Parent or a Child Account, you can select for **Account hierarchy billing mode**, which determines how billing will be handled and shown on bills for charges due for the Parent Account and charges due for Child Accounts:
* **Bill parent account - bill line item per account**. Default setting.
* **Bill parent account - single bill line item for all accounts**.
* **Bill child account**.
**Notes:**
* The billing mode options are only operative if the Account is a Parent or Child Account. For a full explanation of what each means when attaching Plans to create Account Plans for Parent or Child Accounts, see [Billing Hierarchy Modes for Parent/Child Accounts](/guides/end-customer-accounts/creating-and-working-with-child-accounts/billing-for-parent-child-accounts).
* If you Price a Custom Plan using a Counter for unit-based pricing, then Parent/Account billing is not available for the charges or credits due under the pricing.
7. Add any required **Custom fields** to the Account Plan. For more on Custom Fields, see [Adding and Editing Custom Fields](/guides/organization-and-access-management/viewing-and-editing-organization/adding-and-editing-custom-fields).
8. Select **Update plan attachment** to complete the final stage of your custom Plan set up for the Account.
You now have a fully configured Account Plan on the Account - Bills will be calculated for the Account in accordance with the Account Plans on the Account for each of your Products the Account consumes.
**Tip: Adding Custom Fields when attaching a Plan?** You can define Custom Fields for the Account Plan created when you attached a custom Plan to an Account. Note that:
* These Custom Fields will be *specific to the Account Plan* - they are separate from any Custom Fields you might have already added either to the Account itself or to the custom Plan that you're attaching and that was used to create the Account Plan.
* Secondly, any Custom Fields you create for an individual Account Plan *override* those you've created for Account Plans at the Organizational level. See [Working with Custom Fields](/guides/creating-and-managing-products/working-with-custom-fields).
## Deleting an Account Plan
**To delete an Account Plan:**
1. On the **Active and pending attached plans** panel, select **Delete**:
* In this example, we've set up the custom Plan for tiered pricing with two pricing bands.
## Editing Account Plan Details
When you have completed **Stage 3: Price plan**, you can complete **Stage 4: Edit plan details**.
**To edit Account plan details:**
1. From the Account's **Attached plans** tab on the **Active and pending attached plans** panel, select the Account Plan name text hotlink to open the **Plan attachment** page.
2. Select **Edit**. The **Edit** page opens and you can edit the Account Plan and define settings.
3. Edit **Start date** and **End date**, as required.
4. If you want to set the date the first Bill is due for the selected Account using the Account Plan, you can use the **Billing cycle date** option. Subsequent billing will be determined from the first date you define. For example, if the Plan is configured for monthly billing frequency and you set **Billing cycle date** as February 14th 2022, then m3ter will create a first bill for the Account on that date and every month from that date. If left blank, then start of billing defaults to the billing cycle date configured for the Account. *(Optional)*
5. If you want to add the Account Plan to a Contract you've created for the Account, use the **Contract** drop down to select it. For more details on Contracts, see [Creating Contracts for Accounts](/guides/end-customer-accounts/creating-contracts-for-accounts). *(Optional)*
6. If the Account is either a Parent or a Child Account, you can select for **Account hierarchy billing mode**, which determines how billing will be handled and shown on bills for charges due for the Parent Account and charges due for Child Accounts:
* **Bill parent account - bill line item per account**. Default setting.
* **Bill parent account - single bill line item for all accounts**.
* **Bill child account**.
**Notes:**
* The billing mode options are only operative if the Account is a Parent or Child Account. For a full explanation of what each means when attaching Plans to create Account Plans for Parent or Child Accounts, see [Billing Hierarchy Modes for Parent/Child Accounts](/guides/end-customer-accounts/creating-and-working-with-child-accounts/billing-for-parent-child-accounts).
* If you Price a Custom Plan using a Counter for unit-based pricing, then Parent/Account billing is not available for the charges or credits due under the pricing.
7. Add any required **Custom fields** to the Account Plan. For more on Custom Fields, see [Adding and Editing Custom Fields](/guides/organization-and-access-management/viewing-and-editing-organization/adding-and-editing-custom-fields).
8. Select **Update plan attachment** to complete the final stage of your custom Plan set up for the Account.
You now have a fully configured Account Plan on the Account - Bills will be calculated for the Account in accordance with the Account Plans on the Account for each of your Products the Account consumes.
**Tip: Adding Custom Fields when attaching a Plan?** You can define Custom Fields for the Account Plan created when you attached a custom Plan to an Account. Note that:
* These Custom Fields will be *specific to the Account Plan* - they are separate from any Custom Fields you might have already added either to the Account itself or to the custom Plan that you're attaching and that was used to create the Account Plan.
* Secondly, any Custom Fields you create for an individual Account Plan *override* those you've created for Account Plans at the Organizational level. See [Working with Custom Fields](/guides/creating-and-managing-products/working-with-custom-fields).
## Deleting an Account Plan
**To delete an Account Plan:**
1. On the **Active and pending attached plans** panel, select **Delete**:
![]() A confirmation popup appears.
2. Select **Yes** to confirm the Account Plan deletion.
3. Alternatively, on the **Active and pending attached plans** panel, select the **Name** hotlink text of the Account Plan you want to delete. The **Plan attachment** page opens.
4. Select **Delete**:
A confirmation popup appears.
2. Select **Yes** to confirm the Account Plan deletion.
3. Alternatively, on the **Active and pending attached plans** panel, select the **Name** hotlink text of the Account Plan you want to delete. The **Plan attachment** page opens.
4. Select **Delete**:
 A confirmation popup appears.
5. Select **Yes** to confirm the Account Plan deletion. You are taken back to the **Attached plans** tab.
**Important!** Deleting the *Account Plan* does not mean the *Plan* is deleted - the Account Plan is created only when you attach a Plan to an Account. The Account Plan and Plan are therefore separate entities. If you want to delete a Plan, you must go to **Pricing>Plans**, select the **Product** you created the Plan for, and then delete it from there.
# Creating Custom Plan Groups for Accounts
Source: https://docs.m3ter.com/guides/end-customer-accounts/creating-custom-plan-groups-for-accounts
You can create custom Plan Groups for an Account:
* Custom Plan Groups can only be attached to that specific Account.
* When you create custom Plan Groups, they are attached automatically to the Account to create an *Account Plan Group* based on the start and end dates you have entered.
* You can then edit the details of the Account Plan Group you've created for the Account, such as first bill date or adding the Account Plan Group to a Contract that's linked to the Account.
* When you create the custom Plan Group, you can add Plans to the Plan Group and review and edit the pricing of these Plans straightaway.
**Important!**
* **Creating Custom Plan Groups for Accounts.** We strongly recommend you review the [Attaching Plan Groups to an Account](/guides/end-customer-accounts/attaching-plan-groups-to-an-account) and [Working with Plan Groups](/guides/plans-and-pricing/working-with-plan-templates-and-plans/working-with-plan-groups) topics before you proceed to create custom Plan Groups for an Account.
* **Account Plan Group is type of Account Plan.** When you attach a Plan Group to an Account, an Account Plan Group is created. However, the m3ter data model *does not support a separate Account Plan Group entity*, and an Account Plan Group is a type of Account Plan where a *Plan Group id* is used instead of a Plan id when it's created. See the [Create Account Plan API](/api/accountplan/create-accountplan) call.
Creating a custom Plan Group for an Account and performing the required configuration work to prepare the attached Plan Group for charging the Account involves four stages:
* Stage 1: [Creating Custom Plan Group](/guides/end-customer-accounts/creating-custom-plan-groups-for-accounts#creating-custom-plan-group)
* Stage 2: [Attaching Custom Plan Group to Create Account Plan Group](/guides/end-customer-accounts/creating-custom-plan-groups-for-accounts#attaching-custom-plan-group-to-create-account-plan-group)
* Stage 3: [Adding Plans to Group and Reviewing and Pricing Plans](/guides/end-customer-accounts/creating-custom-plan-groups-for-accounts#adding-plans-to-group-and-reviewing-and-pricing-plans)
* Stage 4: [Editing Account Plan Group Details](/guides/end-customer-accounts/creating-custom-plan-groups-for-accounts#editing-account-plan-group-details)
You can delete an Account Plan Group from an Account on the **Attached Plans** tab:
* [Deleting an Account Plan Group](/guides/end-customer-accounts/creating-custom-plan-groups-for-accounts#deleting-an-account-plan-group)
## Creating Custom Plan Group
**To create a custom Plan Group for an Account:**
1. Select **Accounts**. The **Accounts** page opens.
2. Select the **Name** text of the **Account**. The Account page opens with the **Overview** tab selected.
3. On the **Account actions** menu, select **Plans>Create custom plan group**:
A confirmation popup appears.
5. Select **Yes** to confirm the Account Plan deletion. You are taken back to the **Attached plans** tab.
**Important!** Deleting the *Account Plan* does not mean the *Plan* is deleted - the Account Plan is created only when you attach a Plan to an Account. The Account Plan and Plan are therefore separate entities. If you want to delete a Plan, you must go to **Pricing>Plans**, select the **Product** you created the Plan for, and then delete it from there.
# Creating Custom Plan Groups for Accounts
Source: https://docs.m3ter.com/guides/end-customer-accounts/creating-custom-plan-groups-for-accounts
You can create custom Plan Groups for an Account:
* Custom Plan Groups can only be attached to that specific Account.
* When you create custom Plan Groups, they are attached automatically to the Account to create an *Account Plan Group* based on the start and end dates you have entered.
* You can then edit the details of the Account Plan Group you've created for the Account, such as first bill date or adding the Account Plan Group to a Contract that's linked to the Account.
* When you create the custom Plan Group, you can add Plans to the Plan Group and review and edit the pricing of these Plans straightaway.
**Important!**
* **Creating Custom Plan Groups for Accounts.** We strongly recommend you review the [Attaching Plan Groups to an Account](/guides/end-customer-accounts/attaching-plan-groups-to-an-account) and [Working with Plan Groups](/guides/plans-and-pricing/working-with-plan-templates-and-plans/working-with-plan-groups) topics before you proceed to create custom Plan Groups for an Account.
* **Account Plan Group is type of Account Plan.** When you attach a Plan Group to an Account, an Account Plan Group is created. However, the m3ter data model *does not support a separate Account Plan Group entity*, and an Account Plan Group is a type of Account Plan where a *Plan Group id* is used instead of a Plan id when it's created. See the [Create Account Plan API](/api/accountplan/create-accountplan) call.
Creating a custom Plan Group for an Account and performing the required configuration work to prepare the attached Plan Group for charging the Account involves four stages:
* Stage 1: [Creating Custom Plan Group](/guides/end-customer-accounts/creating-custom-plan-groups-for-accounts#creating-custom-plan-group)
* Stage 2: [Attaching Custom Plan Group to Create Account Plan Group](/guides/end-customer-accounts/creating-custom-plan-groups-for-accounts#attaching-custom-plan-group-to-create-account-plan-group)
* Stage 3: [Adding Plans to Group and Reviewing and Pricing Plans](/guides/end-customer-accounts/creating-custom-plan-groups-for-accounts#adding-plans-to-group-and-reviewing-and-pricing-plans)
* Stage 4: [Editing Account Plan Group Details](/guides/end-customer-accounts/creating-custom-plan-groups-for-accounts#editing-account-plan-group-details)
You can delete an Account Plan Group from an Account on the **Attached Plans** tab:
* [Deleting an Account Plan Group](/guides/end-customer-accounts/creating-custom-plan-groups-for-accounts#deleting-an-account-plan-group)
## Creating Custom Plan Group
**To create a custom Plan Group for an Account:**
1. Select **Accounts**. The **Accounts** page opens.
2. Select the **Name** text of the **Account**. The Account page opens with the **Overview** tab selected.
3. On the **Account actions** menu, select **Plans>Create custom plan group**:
![]() Alternatively:
* Select the **Attached plans** tab.
* On the **Active and pending attached plans** panel, select the actions **Menu** button.
* On the menu, select **Create custom plan group**.
The **Create** page opens.
4. Enter the required **Plan group details**:
* **Name**. Descriptive name for the Account Plan Group. When you create a custom Account Plan Group, a default name is loaded for which prefixes the Account name. You can edit this name text as required.
* **Code**. Unique identifier for Account Plan Group. When you create a custom Account Plan Group, a default code string is loaded. You can edit this string as required.
* **Currency**. Select the currency for the Plan Group:
Alternatively:
* Select the **Attached plans** tab.
* On the **Active and pending attached plans** panel, select the actions **Menu** button.
* On the menu, select **Create custom plan group**.
The **Create** page opens.
4. Enter the required **Plan group details**:
* **Name**. Descriptive name for the Account Plan Group. When you create a custom Account Plan Group, a default name is loaded for which prefixes the Account name. You can edit this name text as required.
* **Code**. Unique identifier for Account Plan Group. When you create a custom Account Plan Group, a default code string is loaded. You can edit this string as required.
* **Currency**. Select the currency for the Plan Group:
![]() **Warning: You must create at least one Currency for your Organization before you can create a Custom Plan Group!** If you haven't, the **Currency** drop-down list will not be available and you'll see a warning:
* Select the **create a new currency** hotlink text provided. This takes you directly to the **Create** page to create the Currency you want to use for the Plan Group. See [Creating and Managing Currencies](/guides/organization-and-access-management/viewing-and-editing-organization/creating-and-managing-currencies).
* When you create the new Currency, you are taken directly back to the Custom Plan Group **Create** page and the Currency is selected.
5. Enter **Standing charge** settings for the custom Plan Group, which are optional:
* **Standing charge**. Optional field to set standing charge to be applied for Plan Group.
* **Standing charge billing**. If you want to override the default **Use organization-wide configuration** setting for billing either in arrears or in advance for standing charges, and which is shown in brackets, select the setting you want for the Plan Group.
* **Standing charge accounting product**. If your accounting operations require it, you can use this to link the standing charge on the Account to a particular Product. *(Optional)*
* **Standing charge description**. You can enter a description for any Standing charge amounts, which will appear in the bill line item *(Optional)*:
**Warning: You must create at least one Currency for your Organization before you can create a Custom Plan Group!** If you haven't, the **Currency** drop-down list will not be available and you'll see a warning:
* Select the **create a new currency** hotlink text provided. This takes you directly to the **Create** page to create the Currency you want to use for the Plan Group. See [Creating and Managing Currencies](/guides/organization-and-access-management/viewing-and-editing-organization/creating-and-managing-currencies).
* When you create the new Currency, you are taken directly back to the Custom Plan Group **Create** page and the Currency is selected.
5. Enter **Standing charge** settings for the custom Plan Group, which are optional:
* **Standing charge**. Optional field to set standing charge to be applied for Plan Group.
* **Standing charge billing**. If you want to override the default **Use organization-wide configuration** setting for billing either in arrears or in advance for standing charges, and which is shown in brackets, select the setting you want for the Plan Group.
* **Standing charge accounting product**. If your accounting operations require it, you can use this to link the standing charge on the Account to a particular Product. *(Optional)*
* **Standing charge description**. You can enter a description for any Standing charge amounts, which will appear in the bill line item *(Optional)*:
![]() 6. Enter **Minimum spend** settings for the custom Plan Group, which are optional:
* **Minimum spend**. Optional field to define minimum spend across all Plans included in the Plan Group.
* **Minimum spend billing**. If you want to override the default **Use organization-wide configuration** setting for billing either in arrears or in advance for minimum spend amount, and which is shown in brackets, select the setting you want for the Plan Group.
* **Minimum spend accounting product**. If your accounting operations require it, you can use this to link the minimum spend on the Account to a particular Product. *(Optional)*
* **Minimum spend description**. You can enter a description for any Minimum spend amounts, which will appear in the bill line item *(Optional)*:
6. Enter **Minimum spend** settings for the custom Plan Group, which are optional:
* **Minimum spend**. Optional field to define minimum spend across all Plans included in the Plan Group.
* **Minimum spend billing**. If you want to override the default **Use organization-wide configuration** setting for billing either in arrears or in advance for minimum spend amount, and which is shown in brackets, select the setting you want for the Plan Group.
* **Minimum spend accounting product**. If your accounting operations require it, you can use this to link the minimum spend on the Account to a particular Product. *(Optional)*
* **Minimum spend description**. You can enter a description for any Minimum spend amounts, which will appear in the bill line item *(Optional)*:
![]() 7. Select **Next** to complete **Stage 1: Create plan group**. The page adjusts to allow you to complete **Stage 2: Attach plan group**- see [next section](/guides/end-customer-accounts/creating-custom-plan-groups-for-accounts#attaching-custom-plan-group-to-create-account-plan-group).
## Attaching Custom Plan Group to Create Account Plan Group
When you've created a custom Plan Group for the Account, you can complete **Stage 2: Attach plan group** to create an *Account Plan Group*.
**To attach custom Plan Group and create Account Plan Group:**
1. Under **Plan group attachment settings**, enter **Start date** and **End date** to define the period you want the Account Plan Group to be active for the Account for charging for Product usage:
* If you omit an **End date**, the Account Plan Group will be applied to the Account perpetually or until such time as you delete the Account Plan Group.
* End dates are *exclusive*. For example, if you set the **End date** of June 1st 2022, then the Account Plan Group ceases to be active for the Account at midnight on May 31st 2022, and any billing is calculated up to that point in time, NOT up to midnight on June 1st. If you want to include end customer Account usage occurring on June 1st for billing, you must set the **End date** to June 2nd:
7. Select **Next** to complete **Stage 1: Create plan group**. The page adjusts to allow you to complete **Stage 2: Attach plan group**- see [next section](/guides/end-customer-accounts/creating-custom-plan-groups-for-accounts#attaching-custom-plan-group-to-create-account-plan-group).
## Attaching Custom Plan Group to Create Account Plan Group
When you've created a custom Plan Group for the Account, you can complete **Stage 2: Attach plan group** to create an *Account Plan Group*.
**To attach custom Plan Group and create Account Plan Group:**
1. Under **Plan group attachment settings**, enter **Start date** and **End date** to define the period you want the Account Plan Group to be active for the Account for charging for Product usage:
* If you omit an **End date**, the Account Plan Group will be applied to the Account perpetually or until such time as you delete the Account Plan Group.
* End dates are *exclusive*. For example, if you set the **End date** of June 1st 2022, then the Account Plan Group ceases to be active for the Account at midnight on May 31st 2022, and any billing is calculated up to that point in time, NOT up to midnight on June 1st. If you want to include end customer Account usage occurring on June 1st for billing, you must set the **End date** to June 2nd:
![]() 2. If you want to set the date the first Bill is due for the selected Account using the Plan Group, you can use the **Billing cycle date** option. This allows you to set the date of first billing against the end-customer Account using the Plan Group. Subsequent billing will be determined from this first date. For example, if the Plan Group is configured for monthly billing frequency and you set **Billing cycle date** as February 14th 2022, then m3ter will create a first bill for the Account on that date and every month from that date. If left blank, then start of billing defaults to the billing cycle date configured for the Account. *(Optional)*
3. If you want to add the Account Plan Group to a Contract you've created for the Account, use the **Contract** drop down to select it.
**Notes:**
* Once you've attached a Plan Group to an Account, you can quickly add it to a Contract from **Plan group attachment details**.
* For more details on Contracts, see [Creating Contracts for Accounts](/guides/end-customer-accounts/creating-and-managing-external-mappings-for-accounts).
For more details on Contracts, see [Creating Contracts for Accounts](/guides/end-customer-accounts/creating-contracts-for-accounts). *(Optional)*
4. If the Account is either a Parent or a Child Account, you can select for **Account hierarchy billing mode**, which determines how billing will be handled and shown on bills for charges due for the Parent Account and charges due for Child Accounts:
* **Bill parent account - bill line item per account**. Default setting.
* **Bill parent account - single bill line item for all accounts**.
* **Bill child account**.
**Notes:**
* The billing mode options are only operative if the Account is a Parent or Child Account. For a full explanation of what each means when attaching Plans to create Account Plans for Parent or Child Accounts, see [Billing Hierarchy Modes for Parent/Child Accounts](/guides/end-customer-accounts/creating-and-working-with-child-accounts/billing-for-parent-child-accounts).
* If you price a Plan using a Counter for unit-based pricing, then Parent/Account billing is not available for the charges or credits due under the pricing.
5. Add any required **Custom fields** to the Account Plan Group. For more on Custom Fields, see [Working with Custom Fields](/guides/creating-and-managing-products/working-with-custom-fields).
6. Select **Create plan group and attach** to complete **Stage 2: Attach plan group**:
* The custom Plan Group is created for the Account - it's created as an *Account specific Plan Group*, which means you can only attach it to this Account.
* The custom Plan Group is attached to the Account and an Account Plan Group is created.
* You are taken directly to the **Plan group attachment** page of the newly created and attached Plan Group:
2. If you want to set the date the first Bill is due for the selected Account using the Plan Group, you can use the **Billing cycle date** option. This allows you to set the date of first billing against the end-customer Account using the Plan Group. Subsequent billing will be determined from this first date. For example, if the Plan Group is configured for monthly billing frequency and you set **Billing cycle date** as February 14th 2022, then m3ter will create a first bill for the Account on that date and every month from that date. If left blank, then start of billing defaults to the billing cycle date configured for the Account. *(Optional)*
3. If you want to add the Account Plan Group to a Contract you've created for the Account, use the **Contract** drop down to select it.
**Notes:**
* Once you've attached a Plan Group to an Account, you can quickly add it to a Contract from **Plan group attachment details**.
* For more details on Contracts, see [Creating Contracts for Accounts](/guides/end-customer-accounts/creating-and-managing-external-mappings-for-accounts).
For more details on Contracts, see [Creating Contracts for Accounts](/guides/end-customer-accounts/creating-contracts-for-accounts). *(Optional)*
4. If the Account is either a Parent or a Child Account, you can select for **Account hierarchy billing mode**, which determines how billing will be handled and shown on bills for charges due for the Parent Account and charges due for Child Accounts:
* **Bill parent account - bill line item per account**. Default setting.
* **Bill parent account - single bill line item for all accounts**.
* **Bill child account**.
**Notes:**
* The billing mode options are only operative if the Account is a Parent or Child Account. For a full explanation of what each means when attaching Plans to create Account Plans for Parent or Child Accounts, see [Billing Hierarchy Modes for Parent/Child Accounts](/guides/end-customer-accounts/creating-and-working-with-child-accounts/billing-for-parent-child-accounts).
* If you price a Plan using a Counter for unit-based pricing, then Parent/Account billing is not available for the charges or credits due under the pricing.
5. Add any required **Custom fields** to the Account Plan Group. For more on Custom Fields, see [Working with Custom Fields](/guides/creating-and-managing-products/working-with-custom-fields).
6. Select **Create plan group and attach** to complete **Stage 2: Attach plan group**:
* The custom Plan Group is created for the Account - it's created as an *Account specific Plan Group*, which means you can only attach it to this Account.
* The custom Plan Group is attached to the Account and an Account Plan Group is created.
* You are taken directly to the **Plan group attachment** page of the newly created and attached Plan Group:
![Createcustomplangroup63]() 7. For the Account Plan Group created when you attached the Plan Group to the Account, under **Plan group attachment details** you can:
* Check the dates for the period the Account Plan Group will be active for the Account.
* Read-off the Account Plan Group **ID** with the option to **Copy** this directly to your clipboard.
* Manage linking of the Account Plan Group to a Contract:
* If not previously added to a Contract, select **Add to contract**.
* If previously added to a Contract, select **Remove from contract**.
* Select **Edit** if you need to make any changes to the Account Plan Group, such as update the start and end dates.
8. If you scroll down the page, you can review the **Plan group attachment metadata**:
**Custom Fields**. Any fields created for the Account Plan Group entity are listed:
7. For the Account Plan Group created when you attached the Plan Group to the Account, under **Plan group attachment details** you can:
* Check the dates for the period the Account Plan Group will be active for the Account.
* Read-off the Account Plan Group **ID** with the option to **Copy** this directly to your clipboard.
* Manage linking of the Account Plan Group to a Contract:
* If not previously added to a Contract, select **Add to contract**.
* If previously added to a Contract, select **Remove from contract**.
* Select **Edit** if you need to make any changes to the Account Plan Group, such as update the start and end dates.
8. If you scroll down the page, you can review the **Plan group attachment metadata**:
**Custom Fields**. Any fields created for the Account Plan Group entity are listed:
![Attach Plan Group48]() * Note that because an Account Plan Group is a type of Account Plan, any Custom Fields created at Organizational level for Account Plans will be listed and you can **Copy** the number or string value of a field directly to your clipboard.
**External mappings**. Any mappings created for the Account Plan Group are listed:
* Note that because an Account Plan Group is a type of Account Plan, any Custom Fields created at Organizational level for Account Plans will be listed and you can **Copy** the number or string value of a field directly to your clipboard.
**External mappings**. Any mappings created for the Account Plan Group are listed:
![Attach Plan Group49]() * The **External system** and **External table** mapped to are shown - such as **Stripe - Pricing** in the above example. The **External entity ID** mapped to is also shown.
* If a listed External mapping is linked to an Integration, under **Linked integration** a hotlink text will be shown which you can use to open the Integration.
* Under **Actions**, you can edit or delete the External mapping.
* If the Account Plan Group has multiple External mappings created for it, you can use *Search external mappings* to search by **External table** and **External entity ID** and filter the list.
* You can commence a workflow to **Create external mapping** for the Account Plan Group directly - see [Creating and Managing External Mappings for Accounts](/guides/end-customer-accounts/creating-and-managing-external-mappings-for-accounts) for an example.
**Integration runs**. If you go on to set up an integration that synchronizes the Account Plan Group data with an external system, the date/time and status of the **Latest** integration run will be shown. You can use a text hotlink to open details of this latest run or **View all runs**. See [Reviewing Integration Run Details](/guides/integrations/setting-up-integrations/reviewing-integration-run-details).
9. Scroll down the page to the **Plan group details** panel:
* The **External system** and **External table** mapped to are shown - such as **Stripe - Pricing** in the above example. The **External entity ID** mapped to is also shown.
* If a listed External mapping is linked to an Integration, under **Linked integration** a hotlink text will be shown which you can use to open the Integration.
* Under **Actions**, you can edit or delete the External mapping.
* If the Account Plan Group has multiple External mappings created for it, you can use *Search external mappings* to search by **External table** and **External entity ID** and filter the list.
* You can commence a workflow to **Create external mapping** for the Account Plan Group directly - see [Creating and Managing External Mappings for Accounts](/guides/end-customer-accounts/creating-and-managing-external-mappings-for-accounts) for an example.
**Integration runs**. If you go on to set up an integration that synchronizes the Account Plan Group data with an external system, the date/time and status of the **Latest** integration run will be shown. You can use a text hotlink to open details of this latest run or **View all runs**. See [Reviewing Integration Run Details](/guides/integrations/setting-up-integrations/reviewing-integration-run-details).
9. Scroll down the page to the **Plan group details** panel:
![]() For the new custom Plan Group you've just created, you can:
* Check the details of the Plan Group and select **Edit** if you want to make any changes, such as update the minimum spend amount.
* Read-off the Account Plan Group **ID** with an option to **Copy** this directly to your clipboard.
* Use hotlink texts to open the **Plan group details** page directly or the **Account details** page directly.
## Adding Plans to Plan Group and Reviewing and Pricing Plans
There are two ways you can add Plans to a custom Plan Group:
* Go to **Pricing>Plan groups** and open the custom Plan Group you want to add a Plan to. On the **Included plans** panel, select **Add plan**. For more details, see the [Adding Plans to Plan Groups](/guides/plans-and-pricing/working-with-plan-templates-and-plans/working-with-plan-groups#adding-plans-to-plan-groups) section in the [Working with Plan Groups](/guides/plans-and-pricing/working-with-plan-templates-and-plans/working-with-plan-groups) topic.
* When you've attached a custom Plan Group to an Account, open the **Plan group attachment details** page from the **Account>Attached plans** tab and add Plans to the custom Plan Group directly from there.
This section explains how to add Plans to a custom Plan Group from the **Plan group attachment details** page.
**To add Plans to Plan Group and review and price Plans:**
1. Go to **Accounts** and search for and open the Account.
2. Select the **Attached plans** tab.
3. On the **Active and pending attached plans panel**, select the **NAME** hotlink text of the attached custom Plan Group you want to add Plans to. The **Plan group attachment** page opens.
4. Scroll down the **Plan group attachment** page.
* **Note**: If you have just created a new custom Plan Group and attached it to an Account, the new Plan Group will not yet have any Plans added and a blue help text will show to advise you.
5. On the **Plan group details** panel, select **Add plan**. A **Select plans** dialog appears and lists all the Plans created for Products in your Organization and any custom Plans created for the Account you've created the custom Plan Group for.
6. Select the Plans you want to add to the custom Plan Group and select **Confirm**. The **Select plans** dialog closes and:
* The Plans are added to the **Select a plan** drop-down list on the **Plan details** panel.
* The blue help text advising you the Plan Group doesn't currently contain any Plans is no longer shown.
* The **Edit linked plans** button on the **Plan group details** panel is enabled.
**Warning: Constraints on Adding Plans to Custom Plan Groups:**
* **Only one Plan per Product!** If you try to add more than one Plan for the same Product to the Plan Group, you'll receive an error message.
* **Custom Plans for other Accounts can't be added to a Custom Plan Group**. The **Select plans** dialog lists only Custom Plans belonging to the same Account as the Custom Plan Group and any non-Custom Plans.
7. To review a Plan and its pricing that you've added to the Plan Group, select it from the **Select a plan** drop-down list:
For the new custom Plan Group you've just created, you can:
* Check the details of the Plan Group and select **Edit** if you want to make any changes, such as update the minimum spend amount.
* Read-off the Account Plan Group **ID** with an option to **Copy** this directly to your clipboard.
* Use hotlink texts to open the **Plan group details** page directly or the **Account details** page directly.
## Adding Plans to Plan Group and Reviewing and Pricing Plans
There are two ways you can add Plans to a custom Plan Group:
* Go to **Pricing>Plan groups** and open the custom Plan Group you want to add a Plan to. On the **Included plans** panel, select **Add plan**. For more details, see the [Adding Plans to Plan Groups](/guides/plans-and-pricing/working-with-plan-templates-and-plans/working-with-plan-groups#adding-plans-to-plan-groups) section in the [Working with Plan Groups](/guides/plans-and-pricing/working-with-plan-templates-and-plans/working-with-plan-groups) topic.
* When you've attached a custom Plan Group to an Account, open the **Plan group attachment details** page from the **Account>Attached plans** tab and add Plans to the custom Plan Group directly from there.
This section explains how to add Plans to a custom Plan Group from the **Plan group attachment details** page.
**To add Plans to Plan Group and review and price Plans:**
1. Go to **Accounts** and search for and open the Account.
2. Select the **Attached plans** tab.
3. On the **Active and pending attached plans panel**, select the **NAME** hotlink text of the attached custom Plan Group you want to add Plans to. The **Plan group attachment** page opens.
4. Scroll down the **Plan group attachment** page.
* **Note**: If you have just created a new custom Plan Group and attached it to an Account, the new Plan Group will not yet have any Plans added and a blue help text will show to advise you.
5. On the **Plan group details** panel, select **Add plan**. A **Select plans** dialog appears and lists all the Plans created for Products in your Organization and any custom Plans created for the Account you've created the custom Plan Group for.
6. Select the Plans you want to add to the custom Plan Group and select **Confirm**. The **Select plans** dialog closes and:
* The Plans are added to the **Select a plan** drop-down list on the **Plan details** panel.
* The blue help text advising you the Plan Group doesn't currently contain any Plans is no longer shown.
* The **Edit linked plans** button on the **Plan group details** panel is enabled.
**Warning: Constraints on Adding Plans to Custom Plan Groups:**
* **Only one Plan per Product!** If you try to add more than one Plan for the same Product to the Plan Group, you'll receive an error message.
* **Custom Plans for other Accounts can't be added to a Custom Plan Group**. The **Select plans** dialog lists only Custom Plans belonging to the same Account as the Custom Plan Group and any non-Custom Plans.
7. To review a Plan and its pricing that you've added to the Plan Group, select it from the **Select a plan** drop-down list:
![]() On the **Plan details** panel, you can:
* Check the details of the Plan.
* Use hotlink texts to open the **Plan details** page directly and the associated details page for the **Plan template** or **Product**.
* Under **Associated pricing**:
* If the Plan is a *custom Plan* for the Account, then:
* If you've already priced the Plan, the pricing is shown and you can **Edit**, **Delete**, or review the **Details** of the existing pricing - as in the above example.
* If you've not already priced the Plan, you can **Create Plan pricing**. See [Pricing Plans and Plan Templates](/guides/plans-and-pricing/pricing-plans/pricing-plans) and [Creating Counters and Pricing Plans](/guides/recurring-charges-counters/creating-counters).
* If the Plan is *not a custom Plan* for the Account, then:
* If you've already priced the Plan, the pricing is shown but you cannot edit the pricing but can select to review the **Details** of the pricing.
* If you've not already priced the Plan, then you cannot price it but must open the non-custom Plan in the **Pricing Editor** and price it there.
At the bottom of **Plan details**, you can:
* Read-off the Plan **ID** and **Copy** it to your clipboard.
* Check the audit data for the Plan for who **Created** and **Last modified** the Plan and when.
8. When you have added the required Plans to the Plan Group and priced them, return to the **Attached plans** tab to complete **Stage 3: Adding plans to group and Reviewing and Pricing Plans.** The **Active and pending attached plans** panel shows the new custom Account Plan Group:
On the **Plan details** panel, you can:
* Check the details of the Plan.
* Use hotlink texts to open the **Plan details** page directly and the associated details page for the **Plan template** or **Product**.
* Under **Associated pricing**:
* If the Plan is a *custom Plan* for the Account, then:
* If you've already priced the Plan, the pricing is shown and you can **Edit**, **Delete**, or review the **Details** of the existing pricing - as in the above example.
* If you've not already priced the Plan, you can **Create Plan pricing**. See [Pricing Plans and Plan Templates](/guides/plans-and-pricing/pricing-plans/pricing-plans) and [Creating Counters and Pricing Plans](/guides/recurring-charges-counters/creating-counters).
* If the Plan is *not a custom Plan* for the Account, then:
* If you've already priced the Plan, the pricing is shown but you cannot edit the pricing but can select to review the **Details** of the pricing.
* If you've not already priced the Plan, then you cannot price it but must open the non-custom Plan in the **Pricing Editor** and price it there.
At the bottom of **Plan details**, you can:
* Read-off the Plan **ID** and **Copy** it to your clipboard.
* Check the audit data for the Plan for who **Created** and **Last modified** the Plan and when.
8. When you have added the required Plans to the Plan Group and priced them, return to the **Attached plans** tab to complete **Stage 3: Adding plans to group and Reviewing and Pricing Plans.** The **Active and pending attached plans** panel shows the new custom Account Plan Group:
![]() **Tip: Removing Plans from Plan Group?** To remove Plans from a Plan Group from the **Plan group attachment** page, on the **Plan group details** panel select **Edit linked plans**. The **Plan group details** page opens and the **Included plans** panel lists the Plans added to the Plan Group. From there you can remove Plans from the Plan Group - see [Removing Plans from Plan Group](/guides/plans-and-pricing/working-with-plan-templates-and-plans/working-with-plan-groups#removing-plans-from-plan-groups).
## Editing Account Plan Group Details
**To edit Account Plan Group details:**
1. On the **Active and pending attached plans** panel, select **Edit**:
**Tip: Removing Plans from Plan Group?** To remove Plans from a Plan Group from the **Plan group attachment** page, on the **Plan group details** panel select **Edit linked plans**. The **Plan group details** page opens and the **Included plans** panel lists the Plans added to the Plan Group. From there you can remove Plans from the Plan Group - see [Removing Plans from Plan Group](/guides/plans-and-pricing/working-with-plan-templates-and-plans/working-with-plan-groups#removing-plans-from-plan-groups).
## Editing Account Plan Group Details
**To edit Account Plan Group details:**
1. On the **Active and pending attached plans** panel, select **Edit**:
![]() The **Edit** page opens.
2. On the **Plan group attachment details** card, edit **Start date** and **End date**, as required:
The **Edit** page opens.
2. On the **Plan group attachment details** card, edit **Start date** and **End date**, as required:
![]() 3. On the **Plan group attachment settings** card:
3. On the **Plan group attachment settings** card:
![]() * If you want to set the date the first Bill is due for the selected Account using the Plan Group, you can use the **Billing cycle date** option. Allows you to set the date of first billing against the end customer Account using the Plan Group. Subsequent billing will be determined from this first date. For example, if the Plan Group is configured for monthly billing frequency and you set **Billing cycle date** as February 14th 2022, then m3ter will create a first bill for the Account on that date and every month from that date. If left blank, then start of billing defaults to the billing cycle date configured for the Account. *(Optional)*
* If you want to add the Account Plan Group to a Contract you've created for the Account, use the **Contract** drop down to select it. For more details on Contracts, see [Creating Contracts for Accounts](/guides/end-customer-accounts/creating-contracts-for-accounts). *(Optional)*
* If the Account is either a Parent or a Child Account, you can select for **Account hierarchy billing mode**, which determines how billing will be handled and shown on bills for charges due for the Parent Account and charges due for Child Accounts:
* **Bill parent account - bill line item per account**. Default setting.
* **Bill parent account - single bill line item for all accounts**.
* **Bill child account**.
**Notes:**
* The billing mode options are only operative if the Account is a Parent or Child Account. For a full explanation of what each means when attaching Plans to create Account Plans for Parent or Child Accounts, see [Billing Hierarchy Modes for Parent/Child Accounts](/guides/end-customer-accounts/creating-and-working-with-child-accounts/billing-for-parent-child-accounts).
* If you price a Plan using a Counter for unit-based pricing, then Parent/Account billing is not available for the charges or credits due under the pricing.
4. Add or edit any **Custom fields** required for the Account Plan Group.
5. Select **Update Plan group attachment** to complete **Stage 4: Edit Account Plan Group Details**. You now have a fully configured custom Account Plan Group on the Account and Bills will be calculated for the Account in accordance with the priced Plans that belong to the Plan Group.
## Deleting an Account Plan Group
**To delete an Account Plan Group:**
1. On the **Active and pending attached plans** panel, select **Delete**:
* If you want to set the date the first Bill is due for the selected Account using the Plan Group, you can use the **Billing cycle date** option. Allows you to set the date of first billing against the end customer Account using the Plan Group. Subsequent billing will be determined from this first date. For example, if the Plan Group is configured for monthly billing frequency and you set **Billing cycle date** as February 14th 2022, then m3ter will create a first bill for the Account on that date and every month from that date. If left blank, then start of billing defaults to the billing cycle date configured for the Account. *(Optional)*
* If you want to add the Account Plan Group to a Contract you've created for the Account, use the **Contract** drop down to select it. For more details on Contracts, see [Creating Contracts for Accounts](/guides/end-customer-accounts/creating-contracts-for-accounts). *(Optional)*
* If the Account is either a Parent or a Child Account, you can select for **Account hierarchy billing mode**, which determines how billing will be handled and shown on bills for charges due for the Parent Account and charges due for Child Accounts:
* **Bill parent account - bill line item per account**. Default setting.
* **Bill parent account - single bill line item for all accounts**.
* **Bill child account**.
**Notes:**
* The billing mode options are only operative if the Account is a Parent or Child Account. For a full explanation of what each means when attaching Plans to create Account Plans for Parent or Child Accounts, see [Billing Hierarchy Modes for Parent/Child Accounts](/guides/end-customer-accounts/creating-and-working-with-child-accounts/billing-for-parent-child-accounts).
* If you price a Plan using a Counter for unit-based pricing, then Parent/Account billing is not available for the charges or credits due under the pricing.
4. Add or edit any **Custom fields** required for the Account Plan Group.
5. Select **Update Plan group attachment** to complete **Stage 4: Edit Account Plan Group Details**. You now have a fully configured custom Account Plan Group on the Account and Bills will be calculated for the Account in accordance with the priced Plans that belong to the Plan Group.
## Deleting an Account Plan Group
**To delete an Account Plan Group:**
1. On the **Active and pending attached plans** panel, select **Delete**:
![]() A confirmation popup appears.
2. Select **Yes** to confirm the Account Plan Group deletion.
3. Alternatively, on the **Active and pending attached plans** panel, select the **Name** hotlink text of the Account Plan Group you want to delete. The **Plan group attachment** page opens.
4. Select **Delete**:
A confirmation popup appears.
2. Select **Yes** to confirm the Account Plan Group deletion.
3. Alternatively, on the **Active and pending attached plans** panel, select the **Name** hotlink text of the Account Plan Group you want to delete. The **Plan group attachment** page opens.
4. Select **Delete**:
 A confirmation popup appears.
5. Select **Yes** to confirm the Account Plan Group deletion. You are taken back to the **Attached plans** tab.
**Important: Deleting or Editing the Custom Plan Group!** Deleting or editing the *Account Plan Group* that is created automatically when you create a custom Plan Group for an Account does not mean the custom *Plan Group* is deleted or edited. If you want to delete or edit a custom Plan Group you've created for an Account, you must go to **Pricing>Plan groups**, and then delete or edit the Plan Group there. Similarly, if you have added several Plans to the custom Plan Group, you must go to **Pricing>Plan groups**, select the custom Plan Group, and delete the linked Plans under **Included plans**.
# Creating Prepayments for Accounts
Source: https://docs.m3ter.com/guides/end-customer-accounts/creating-prepayments-for-accounts
You can apply a *Prepayment/Commitment* to an end customer Account for cases where the end customer has agreed to pay a fixed amount over the duration of their contract with you to consume one or more of your products or services. The amount is understood as payable regardless of the actual usage they become liable to pay for during the contract period. However, a Prepayment contrasts with a simple agreed minimum spend amount defined for an Account, since an agreed minimum spend will typically be assessed on a bill-by-bill basis whereas the Prepayment spans across multiple bills for the entire contract period.
Depending on the payment use case you want to implement, you can exploit various configuration options when setting up Prepayments for your end-customer Accounts:
* If not all of an agreed Prepayment amount is paid at the start of a customer service period, you can choose one of two options for billing the outstanding fees due:
* Select a Product *Plan to bill with*.
* Define a *schedule of billing dates*.
* When setting up a Prepayment on an Account, you can include a surcharge rate to be applied for any overage on the Prepayment amount that occurs during the service period.
**Tip: Balances and Prepayments/Commitments?** You can use both Balances and Prepayments to help manage credit amounts for your end-customer Accounts, but they serve different purposes.
Prepayments are used for amounts end-customers have agreed to pay for consuming your product or services across a full contract term. In contrast, a Balance - often referred to as a *Top-Up* or *Prepaid draw-down* - is used when a customer wants to add a credit amount to their Account or you as service provider want to add a credit to a customer Account. This Balance credit can then be drawn-down against for billing the Account for usage. Balances therefore serve payment use cases in a more flexible way, for example to be used as a "Free Credit" sign-up scheme to encourage sales or to enhance customer satisfaction by adding credit to an Account when there have been issues delivering your service.
You can use Prepayments and Balances together, with the option to draw-down against the Balance credit amount before or after any Prepayment amounts on an Account. See below [Prepayments Draw-Down Order Against Balances](/guides/end-customer-accounts/creating-prepayments-for-accounts#prepayments-draw-down-order-against-balances).
This topic provides an example to illustrate how any Prepayments/Commitments you apply to a customer Account will be handled in m3ter for Billing against the Account, and explains how you can create Prepayments for your customer Accounts:
* [Example Prepayment](/guides/end-customer-accounts/creating-prepayments-for-accounts#example-prepayment)
* [Creating Prepayments](/guides/end-customer-accounts/creating-prepayments-for-accounts#creating-prepayments)
* [Prepayment Billing with a Plan](/guides/end-customer-accounts/creating-prepayments-for-accounts#prepayment-billing-with-a-plan)
* [Prepayment Billing on a Schedule](/guides/end-customer-accounts/creating-prepayments-for-accounts#prepayment-billing-on-a-schedule)
When you have created Prepayments for Accounts, you can open a details page to check fees and usage, fee dates, review a chart that tracks Prepayment consumption over the active period for the Account, and review the Prepayment's metadata:
* [Viewing Prepayment Details](/guides/end-customer-accounts/creating-prepayments-for-accounts#viewing-prepayment-details)
If you want to renew a contract with an existing end customer Account and want to include a Prepayment in the customer's contract renewal, you can quickly duplicate either an active or pending Prepayment you've already created for the Account:
* [Duplicating Prepayments](/guides/end-customer-accounts/creating-prepayments-for-accounts#duplicating-prepayments)
If you want to add a Prepayment to or remove it from a Contract on the Account, you can quickly do this from the *Prepayment details* page:
* [Adding Prepayments to or Removing from Contracts](#adding-prepayments-to-or-removing-from-contracts)
If you have linked an Account Plan attached to the Account to a Contract and you want to ensure the Prepayment is available for draw-down against billed charges on the Account, you must link the Prepayment to the same Contract:
* [Linking Prepayments to Contracts - Availability for Draw-Down](/guides/end-customer-accounts/creating-prepayments-for-accounts#linking-prepayments-to-contracts-availability-for-draw-down)
If you have added both Prepayment and Balance credit amounts to an Account, you can define the order in which these credits amount are drawn-down against for billing the Account:
* [Prepayments Draw-Down Order Against Balances](/guides/end-customer-accounts/creating-prepayments-for-accounts#prepayments-draw-down-order-against-balances)
## Example Prepayment
Suppose you have a customer who has agreed to pay a fixed amount over a year's contract for one of your products, say \$15,000, and to pay this total incrementally over the 12-month term in equal monthly billed amounts of \$1,250. You charge for your product on the basis of transactions at a rate of \$0.46 per transaction. The customer also agrees to pay a surcharge of 1% for any transactions payable over the agreed Prepayment amount:
* **Month 1**. The Account logs 20,000 transactions. At \$0.46 per transaction this comes to \$9,200 chargeable. This usage remains below the agreed Prepayment for the Account, so the transactions charge for usage is \$0. However, the regular monthly amount of \$1,250 is still due and the Bill for this first month is issued in this amount.
* **Month 2**. The Account makes another 20,000 transactions. At \$0.46 per transaction this comes to a further \$9,200 chargeable. The total chargeable is therefore \$18,400, which exceeds the Prepayment amount by \$3,400. Since a surcharge on any overage of 1% was agreed, this becomes \$3,434. So the Bill for this second month is issued in the amount of: \$1,250 + \$3,434 = \$4,684.
* **Month 3**. The Account makes another 20,000 transactions. At \$0.46 per transaction this comes to a further \$9,200 chargeable. The cumulative chargeable over the three-month period is now \$27,600, which exceeds the Prepayment amount by \$12,600. The monthly overage for this month is \$12,600 - \$3,400 = \$9,200, since month two's overage of \$3,400 was charged under that month's Bill. With the overage surcharge applied, this month's usage charge is \$9,292. So the Bill for this month is issued in the amount of: \$1,250 + \$9,292 = \$10,542.
## Creating Prepayments
You can create Prepayments for an end customer Account from the **Account** page.
**To create a Prepayment for an Account:**
1. Select **Accounts**. The **Accounts** page opens.
2. Select the **Name** text of the Account for which you want to create a Prepayment. The **Account** page opens.
3. On the **Account actions** menu, select **Prepayments>Create prepayment**:
A confirmation popup appears.
5. Select **Yes** to confirm the Account Plan Group deletion. You are taken back to the **Attached plans** tab.
**Important: Deleting or Editing the Custom Plan Group!** Deleting or editing the *Account Plan Group* that is created automatically when you create a custom Plan Group for an Account does not mean the custom *Plan Group* is deleted or edited. If you want to delete or edit a custom Plan Group you've created for an Account, you must go to **Pricing>Plan groups**, and then delete or edit the Plan Group there. Similarly, if you have added several Plans to the custom Plan Group, you must go to **Pricing>Plan groups**, select the custom Plan Group, and delete the linked Plans under **Included plans**.
# Creating Prepayments for Accounts
Source: https://docs.m3ter.com/guides/end-customer-accounts/creating-prepayments-for-accounts
You can apply a *Prepayment/Commitment* to an end customer Account for cases where the end customer has agreed to pay a fixed amount over the duration of their contract with you to consume one or more of your products or services. The amount is understood as payable regardless of the actual usage they become liable to pay for during the contract period. However, a Prepayment contrasts with a simple agreed minimum spend amount defined for an Account, since an agreed minimum spend will typically be assessed on a bill-by-bill basis whereas the Prepayment spans across multiple bills for the entire contract period.
Depending on the payment use case you want to implement, you can exploit various configuration options when setting up Prepayments for your end-customer Accounts:
* If not all of an agreed Prepayment amount is paid at the start of a customer service period, you can choose one of two options for billing the outstanding fees due:
* Select a Product *Plan to bill with*.
* Define a *schedule of billing dates*.
* When setting up a Prepayment on an Account, you can include a surcharge rate to be applied for any overage on the Prepayment amount that occurs during the service period.
**Tip: Balances and Prepayments/Commitments?** You can use both Balances and Prepayments to help manage credit amounts for your end-customer Accounts, but they serve different purposes.
Prepayments are used for amounts end-customers have agreed to pay for consuming your product or services across a full contract term. In contrast, a Balance - often referred to as a *Top-Up* or *Prepaid draw-down* - is used when a customer wants to add a credit amount to their Account or you as service provider want to add a credit to a customer Account. This Balance credit can then be drawn-down against for billing the Account for usage. Balances therefore serve payment use cases in a more flexible way, for example to be used as a "Free Credit" sign-up scheme to encourage sales or to enhance customer satisfaction by adding credit to an Account when there have been issues delivering your service.
You can use Prepayments and Balances together, with the option to draw-down against the Balance credit amount before or after any Prepayment amounts on an Account. See below [Prepayments Draw-Down Order Against Balances](/guides/end-customer-accounts/creating-prepayments-for-accounts#prepayments-draw-down-order-against-balances).
This topic provides an example to illustrate how any Prepayments/Commitments you apply to a customer Account will be handled in m3ter for Billing against the Account, and explains how you can create Prepayments for your customer Accounts:
* [Example Prepayment](/guides/end-customer-accounts/creating-prepayments-for-accounts#example-prepayment)
* [Creating Prepayments](/guides/end-customer-accounts/creating-prepayments-for-accounts#creating-prepayments)
* [Prepayment Billing with a Plan](/guides/end-customer-accounts/creating-prepayments-for-accounts#prepayment-billing-with-a-plan)
* [Prepayment Billing on a Schedule](/guides/end-customer-accounts/creating-prepayments-for-accounts#prepayment-billing-on-a-schedule)
When you have created Prepayments for Accounts, you can open a details page to check fees and usage, fee dates, review a chart that tracks Prepayment consumption over the active period for the Account, and review the Prepayment's metadata:
* [Viewing Prepayment Details](/guides/end-customer-accounts/creating-prepayments-for-accounts#viewing-prepayment-details)
If you want to renew a contract with an existing end customer Account and want to include a Prepayment in the customer's contract renewal, you can quickly duplicate either an active or pending Prepayment you've already created for the Account:
* [Duplicating Prepayments](/guides/end-customer-accounts/creating-prepayments-for-accounts#duplicating-prepayments)
If you want to add a Prepayment to or remove it from a Contract on the Account, you can quickly do this from the *Prepayment details* page:
* [Adding Prepayments to or Removing from Contracts](#adding-prepayments-to-or-removing-from-contracts)
If you have linked an Account Plan attached to the Account to a Contract and you want to ensure the Prepayment is available for draw-down against billed charges on the Account, you must link the Prepayment to the same Contract:
* [Linking Prepayments to Contracts - Availability for Draw-Down](/guides/end-customer-accounts/creating-prepayments-for-accounts#linking-prepayments-to-contracts-availability-for-draw-down)
If you have added both Prepayment and Balance credit amounts to an Account, you can define the order in which these credits amount are drawn-down against for billing the Account:
* [Prepayments Draw-Down Order Against Balances](/guides/end-customer-accounts/creating-prepayments-for-accounts#prepayments-draw-down-order-against-balances)
## Example Prepayment
Suppose you have a customer who has agreed to pay a fixed amount over a year's contract for one of your products, say \$15,000, and to pay this total incrementally over the 12-month term in equal monthly billed amounts of \$1,250. You charge for your product on the basis of transactions at a rate of \$0.46 per transaction. The customer also agrees to pay a surcharge of 1% for any transactions payable over the agreed Prepayment amount:
* **Month 1**. The Account logs 20,000 transactions. At \$0.46 per transaction this comes to \$9,200 chargeable. This usage remains below the agreed Prepayment for the Account, so the transactions charge for usage is \$0. However, the regular monthly amount of \$1,250 is still due and the Bill for this first month is issued in this amount.
* **Month 2**. The Account makes another 20,000 transactions. At \$0.46 per transaction this comes to a further \$9,200 chargeable. The total chargeable is therefore \$18,400, which exceeds the Prepayment amount by \$3,400. Since a surcharge on any overage of 1% was agreed, this becomes \$3,434. So the Bill for this second month is issued in the amount of: \$1,250 + \$3,434 = \$4,684.
* **Month 3**. The Account makes another 20,000 transactions. At \$0.46 per transaction this comes to a further \$9,200 chargeable. The cumulative chargeable over the three-month period is now \$27,600, which exceeds the Prepayment amount by \$12,600. The monthly overage for this month is \$12,600 - \$3,400 = \$9,200, since month two's overage of \$3,400 was charged under that month's Bill. With the overage surcharge applied, this month's usage charge is \$9,292. So the Bill for this month is issued in the amount of: \$1,250 + \$9,292 = \$10,542.
## Creating Prepayments
You can create Prepayments for an end customer Account from the **Account** page.
**To create a Prepayment for an Account:**
1. Select **Accounts**. The **Accounts** page opens.
2. Select the **Name** text of the Account for which you want to create a Prepayment. The **Account** page opens.
3. On the **Account actions** menu, select **Prepayments>Create prepayment**:
![]() Alternatively:
* Select the **Prepayments** tab.
* On the **Active and pending prepayments** panel, select **Create prepayment**.
The **Create** page opens.
**Warning: You must create at least one Currency for your Organization before you can create a Prepayment!** If you haven't, the **Create** page will not open and you'll see a warning:
* Select the **Manage currencies** hotlink text provided. This takes you directly to the **Create** page to create the Currency you want to use for the Prepayment. See [Creating and Managing Currencies](/guides/organization-and-access-management/viewing-and-editing-organization/creating-and-managing-currencies).
* When you create the new Currency, you are taken directly back to the Prepayment **Create** page and the Currency is selected.
4. Enter the required **Prepayment details**:
* **Start date (inclusive)** and **End date (exclusive)**. Use the popup calendars to select. *(Required)*
* Note that the end date is treated *exclusively* and will be applied as midnight of the selected date, where midnight is understood as the *start of that date*. This means that if you set the **End date** of June 1st 2022, then the Prepayment ceases to be active for the Account at the end of May 31st 2022, and any prepayment fees due are calculated up to that point in time.
* **Accounting product.** Use the drop-down to select a Product. *(Required)*
* You can use this to link the Prepayment on the Account to a particular Product for accounting purposes:
* If you omit a **Draw-downs accounting product** for **Prepayment drawdown**, then the **Accounting product** will be used for *Prepayment consumed* line items on Bills.
* If you omit a **Fees accounting product** when setting up billing for the Prepayment - either for billing with a Plan or on a Schedule - then the **Accounting product** will be used for *Prepayment fee* line items on Bills.
**Important!** If you're planning to set up an integration for sending Bills to an external accounts receivable system, please check requirements for your chosen system. Some systems, such as NetSuite, require a Product to be linked with any Bill line items associated with Account Prepayments, and the integration will fail if this is not present.
* **Currency**. Use the drop-down list to select the currency you want to use for the Prepayment. *(Required)*
* **Contract**. *(Optional)* If you want to add the Prepayment to a Contract you've created for the Account, use the drop-down to select it. For more details on Contracts, see [Creating Contracts for Accounts](/guides/end-customer-accounts/creating-contracts-for-accounts).
**Important: Linking Prepayment to Contract - ensuring Prepayment is available for draw-down at billing!** Whether you need to link a Prepayment on an Account to a Contract is dependent on whether or not an Account Plan on the same Account has been linked to a Contract. For details, see the following section on [Linking Prepayments to Contracts](/guides/end-customer-accounts/creating-prepayments-for-accounts#linking-prepayments-to-contracts-availability-for-draw-down).
5. Enter the **Billing configuration** settings.
* **Amount**. Enter the Prepayment amount. *(Required)*
* **Fully prepaid**:
* Enable this switch if the Prepayment is to be fully prepaid. The **Billing Configuration** panel will close since you don't need to set up billing for any remainder amount that has not been prepaid. Move to **Step 6** below for Prepayment Restrictions.
* Leave this switch disabled if only some or none of the Prepayment amount is to be prepaid. The **Billing Configuration** panel remains open ready for you to set up billing for the remainder amount of the Prepayment amount minus any prepaid amount. Default setting.
Alternatively:
* Select the **Prepayments** tab.
* On the **Active and pending prepayments** panel, select **Create prepayment**.
The **Create** page opens.
**Warning: You must create at least one Currency for your Organization before you can create a Prepayment!** If you haven't, the **Create** page will not open and you'll see a warning:
* Select the **Manage currencies** hotlink text provided. This takes you directly to the **Create** page to create the Currency you want to use for the Prepayment. See [Creating and Managing Currencies](/guides/organization-and-access-management/viewing-and-editing-organization/creating-and-managing-currencies).
* When you create the new Currency, you are taken directly back to the Prepayment **Create** page and the Currency is selected.
4. Enter the required **Prepayment details**:
* **Start date (inclusive)** and **End date (exclusive)**. Use the popup calendars to select. *(Required)*
* Note that the end date is treated *exclusively* and will be applied as midnight of the selected date, where midnight is understood as the *start of that date*. This means that if you set the **End date** of June 1st 2022, then the Prepayment ceases to be active for the Account at the end of May 31st 2022, and any prepayment fees due are calculated up to that point in time.
* **Accounting product.** Use the drop-down to select a Product. *(Required)*
* You can use this to link the Prepayment on the Account to a particular Product for accounting purposes:
* If you omit a **Draw-downs accounting product** for **Prepayment drawdown**, then the **Accounting product** will be used for *Prepayment consumed* line items on Bills.
* If you omit a **Fees accounting product** when setting up billing for the Prepayment - either for billing with a Plan or on a Schedule - then the **Accounting product** will be used for *Prepayment fee* line items on Bills.
**Important!** If you're planning to set up an integration for sending Bills to an external accounts receivable system, please check requirements for your chosen system. Some systems, such as NetSuite, require a Product to be linked with any Bill line items associated with Account Prepayments, and the integration will fail if this is not present.
* **Currency**. Use the drop-down list to select the currency you want to use for the Prepayment. *(Required)*
* **Contract**. *(Optional)* If you want to add the Prepayment to a Contract you've created for the Account, use the drop-down to select it. For more details on Contracts, see [Creating Contracts for Accounts](/guides/end-customer-accounts/creating-contracts-for-accounts).
**Important: Linking Prepayment to Contract - ensuring Prepayment is available for draw-down at billing!** Whether you need to link a Prepayment on an Account to a Contract is dependent on whether or not an Account Plan on the same Account has been linked to a Contract. For details, see the following section on [Linking Prepayments to Contracts](/guides/end-customer-accounts/creating-prepayments-for-accounts#linking-prepayments-to-contracts-availability-for-draw-down).
5. Enter the **Billing configuration** settings.
* **Amount**. Enter the Prepayment amount. *(Required)*
* **Fully prepaid**:
* Enable this switch if the Prepayment is to be fully prepaid. The **Billing Configuration** panel will close since you don't need to set up billing for any remainder amount that has not been prepaid. Move to **Step 6** below for Prepayment Restrictions.
* Leave this switch disabled if only some or none of the Prepayment amount is to be prepaid. The **Billing Configuration** panel remains open ready for you to set up billing for the remainder amount of the Prepayment amount minus any prepaid amount. Default setting.
![]() * Since in this example, nothing is prepaid against the Prepayment amount, you'll have to configure how you want to bill against the Prepayment for this Account. Two options:
* **Bill with plan**. See following section for [Prepayment Billing with Plan](/guides/end-customer-accounts/creating-prepayments-for-accounts#prepayment-billing-with-a-plan).
* **Bill on a schedule**. See following section for [Prepayment Billing on a Schedule](/guides/end-customer-accounts/creating-prepayments-for-accounts#prepayment-billing-on-a-schedule).
* **Amount pre-paid**. Enter the amount prepaid against the Prepayment.
6. Enter **Prepayment drawdown** settings, which are optional:
* **Draw-down Products**. Use the drop-down to select any **Products** to which you want to apply the Prepayment.
**Note:** If you don't select any Products for draw-down, by default the charges for *any Product* consumed by the Account will be drawn-down against the Prepayment amount.
* **Draw-down charge types**. Use the drop-down to select the types of charge that can draw-down against the Prepayment amount when the Account is billed. Six options:
* **Ad-hoc**
* **Counter adjustment debit**
* **Counter running total charge**
* **Minimum spend**
* **Standing charge**
* **Usage**
**Note:** If you leave the **Draw-down charge types** field empty, then charges due at billing for any of the charge types can be drawn-down against.
* **Draw-downs accounting product**. For accounting purposes, select a Product that will be linked to any *Prepayment consumed* line items on Bills. *(Optional)*
* Note that if you leave this blank, then the **Accounting product** selected for the Prepayment will be used instead.
7. Enter the remaining **Usage settings**, which are optional:
* **Usage description**. Enter a *custom description* used for Bill line items for Prepayment consumption for usage.
* Note that if you leave this blank, then a *default description* will be used. See [Bill Line Items - Default Descriptions](/guides/billing-and-usage-data/running-viewing-and-managing-bills/bill-line-items-default-descriptions) for details.
* **Overage surcharge (%)**. Enter a value for the additional surcharge (in percent) added to bills for overages on the Prepayment:
**Note:** You can enter a *negative percentage* if you want to give a discount rate for usage to end customers who exceed their Prepayment amount.
* **Overage description**. Optionally, enter a *custom description* to be used for Bill line items for Prepayment overage surcharge:
* Note that if you leave this blank, then a *default description* will be used. See [Bill Line Items - Default Descriptions](/guides/billing-and-usage-data/running-viewing-and-managing-bills/bill-line-items-default-descriptions) for details.
* **Overage usage**. If you have not entered a value for **Overage surcharge (%)** or you have entered a value of **0**, you can use a switch to enable **Separate bill line item for overage usage** on Bills. This means that if a Prepayment amount has been consumed by an Account, any subsequent line items on Bills against the Account for usage will show as separate "overage usage" charges, not simply as "usage" charges. Note:
* If you have entered a value other than **0** in the **Overage surcharge (%)** field, then this option will be grayed out and unavailable.
* If you have set up overage pricing on a tiered pricing structure when pricing a Plan that will apply to billing for the Prepayment and you enable **Separate bill line item for overage usage**, then overage usage charges for separate line items will be rated according to this overage pricing.
* **Account hierarchy drawdown mode**. If the Account is either a Parent or a Child Account, you can control on which Bill Prepayment fee and draw-down line items will appear:
* **Drawdown parent account - bill line item per account**. A separate bill line item per Account and appear as separate line items on the Parent Bill - one per Child. *(Default)*
* **Drawdown parent account - single bill line item for all accounts**. A single bill line item for all Accounts and appears as a single separate line item on the Parent Bill.
* **Drawdown child account**. Child Accounts are billed and appear as line items on each Child Account Bill.
**Important!**
* **Only Operative for Parent/Child Accounts**. The **Account hierarchy drawdown mode** options are only operative if the Account is a Parent or Child Account.
* **Parent/Child billing for Recurring Charges not supported**. If you price a Plan using a Counter to apply unit-based pricing for recurring subscription charges and attach the Plan to Parent or Child Accounts, Parent/Child billing is not supported for the recurring charges.
**Important! Prepayment Overage surcharge percentage overrides Prepayment Overage pricing.** If you have set up overage pricing on a tiered pricing structure when pricing a Plan that will apply to billing for the Prepayment and you have *also set up* overage surcharge percentage when creating the Prepayment for an Account, any overage usage charges on the Account will be billed at the *overage surcharge percentage rate* and the Prepayment *overage pricing will be ignored*. See [Creating Pricing for a Plan](/guides/plans-and-pricing/pricing-plans/pricing-plans#creating-a-pricing-for-a-plan).
**Tip: Prepayment/Commitment fee - billing in arrears or in advance?** You can configure this at the Organizational level - see [Viewing and Editing Organization Configuration](/guides/organization-and-access-management/viewing-and-editing-organization/viewing-and-editing-organization-configuration).
8. Select **Create prepayment**. You are returned to the **Prepayments** tab, where the Prepayment is listed on the **Active and pending prepayments** panel:
* Since in this example, nothing is prepaid against the Prepayment amount, you'll have to configure how you want to bill against the Prepayment for this Account. Two options:
* **Bill with plan**. See following section for [Prepayment Billing with Plan](/guides/end-customer-accounts/creating-prepayments-for-accounts#prepayment-billing-with-a-plan).
* **Bill on a schedule**. See following section for [Prepayment Billing on a Schedule](/guides/end-customer-accounts/creating-prepayments-for-accounts#prepayment-billing-on-a-schedule).
* **Amount pre-paid**. Enter the amount prepaid against the Prepayment.
6. Enter **Prepayment drawdown** settings, which are optional:
* **Draw-down Products**. Use the drop-down to select any **Products** to which you want to apply the Prepayment.
**Note:** If you don't select any Products for draw-down, by default the charges for *any Product* consumed by the Account will be drawn-down against the Prepayment amount.
* **Draw-down charge types**. Use the drop-down to select the types of charge that can draw-down against the Prepayment amount when the Account is billed. Six options:
* **Ad-hoc**
* **Counter adjustment debit**
* **Counter running total charge**
* **Minimum spend**
* **Standing charge**
* **Usage**
**Note:** If you leave the **Draw-down charge types** field empty, then charges due at billing for any of the charge types can be drawn-down against.
* **Draw-downs accounting product**. For accounting purposes, select a Product that will be linked to any *Prepayment consumed* line items on Bills. *(Optional)*
* Note that if you leave this blank, then the **Accounting product** selected for the Prepayment will be used instead.
7. Enter the remaining **Usage settings**, which are optional:
* **Usage description**. Enter a *custom description* used for Bill line items for Prepayment consumption for usage.
* Note that if you leave this blank, then a *default description* will be used. See [Bill Line Items - Default Descriptions](/guides/billing-and-usage-data/running-viewing-and-managing-bills/bill-line-items-default-descriptions) for details.
* **Overage surcharge (%)**. Enter a value for the additional surcharge (in percent) added to bills for overages on the Prepayment:
**Note:** You can enter a *negative percentage* if you want to give a discount rate for usage to end customers who exceed their Prepayment amount.
* **Overage description**. Optionally, enter a *custom description* to be used for Bill line items for Prepayment overage surcharge:
* Note that if you leave this blank, then a *default description* will be used. See [Bill Line Items - Default Descriptions](/guides/billing-and-usage-data/running-viewing-and-managing-bills/bill-line-items-default-descriptions) for details.
* **Overage usage**. If you have not entered a value for **Overage surcharge (%)** or you have entered a value of **0**, you can use a switch to enable **Separate bill line item for overage usage** on Bills. This means that if a Prepayment amount has been consumed by an Account, any subsequent line items on Bills against the Account for usage will show as separate "overage usage" charges, not simply as "usage" charges. Note:
* If you have entered a value other than **0** in the **Overage surcharge (%)** field, then this option will be grayed out and unavailable.
* If you have set up overage pricing on a tiered pricing structure when pricing a Plan that will apply to billing for the Prepayment and you enable **Separate bill line item for overage usage**, then overage usage charges for separate line items will be rated according to this overage pricing.
* **Account hierarchy drawdown mode**. If the Account is either a Parent or a Child Account, you can control on which Bill Prepayment fee and draw-down line items will appear:
* **Drawdown parent account - bill line item per account**. A separate bill line item per Account and appear as separate line items on the Parent Bill - one per Child. *(Default)*
* **Drawdown parent account - single bill line item for all accounts**. A single bill line item for all Accounts and appears as a single separate line item on the Parent Bill.
* **Drawdown child account**. Child Accounts are billed and appear as line items on each Child Account Bill.
**Important!**
* **Only Operative for Parent/Child Accounts**. The **Account hierarchy drawdown mode** options are only operative if the Account is a Parent or Child Account.
* **Parent/Child billing for Recurring Charges not supported**. If you price a Plan using a Counter to apply unit-based pricing for recurring subscription charges and attach the Plan to Parent or Child Accounts, Parent/Child billing is not supported for the recurring charges.
**Important! Prepayment Overage surcharge percentage overrides Prepayment Overage pricing.** If you have set up overage pricing on a tiered pricing structure when pricing a Plan that will apply to billing for the Prepayment and you have *also set up* overage surcharge percentage when creating the Prepayment for an Account, any overage usage charges on the Account will be billed at the *overage surcharge percentage rate* and the Prepayment *overage pricing will be ignored*. See [Creating Pricing for a Plan](/guides/plans-and-pricing/pricing-plans/pricing-plans#creating-a-pricing-for-a-plan).
**Tip: Prepayment/Commitment fee - billing in arrears or in advance?** You can configure this at the Organizational level - see [Viewing and Editing Organization Configuration](/guides/organization-and-access-management/viewing-and-editing-organization/viewing-and-editing-organization-configuration).
8. Select **Create prepayment**. You are returned to the **Prepayments** tab, where the Prepayment is listed on the **Active and pending prepayments** panel:
![]() **Tip: Reviewing Prepayments?** At any time, you can open the **Prepayment Details** page for a Prepayment/Commitment on an Account - see below, [Viewing Prepayment Details](/guides/end-customer-accounts/creating-prepayments-for-accounts#viewing-prepayment-details). Also, you can query for Prepayments and review the returned data using the Data Explorer. See [Performing Prepayments Queries and Reviewing Results](/guides/data-explorer/performing-commitments-queries-and-reviewing-results).
## Prepayment Billing with a Plan
If the customer Account has opted not to pay the agreed Prepayment in total upfront and the **Amount pre-paid** is less than the Prepayment **Amount**, then under **Billing for remaining** you can select to **Bill with plan** for the outstanding Prepayment amount. The **Billing Configuration** panel adjusts and you can enter billing details for adding line items for Prepayment fees to Bills in each billing period over the duration of the Prepayment:
* **Plan**. Use the drop-down to select which pricing Plan you want the Prepayment fees to be added for billing purposes. Note that this is to allow for cases where a customer Account has been placed on more than one pricing Plan, some of which are billed weekly and some of which are billed monthly.
* **First bill fee**. Enter a Prepayment fee amount to be paid in the first Bill. The remainder due under the Prepayment will be evenly split across subsequent Bills up to the end of the Prepayment contract period.
* **Billing cycle date**. Optional setting, which sets the date when the first Bill is created and acts as a reference for when in the applied billing frequency period subsequent bills for the Account are created:
* For example, suppose a Plan is configured for monthly billing frequency. You then set a **Billing cycle date** of February 15th, 2022. The first Bill will be created for the Account on February 15th, and subsequent Bills created on the 15th of the months following for the remainder of the billing period - March 15th, April 15th, and so on.
* If you leave this blank, then Epoch dates from your Organization's configuration will be used as the **Billing cycle date** for the Account instead - see [Viewing and Editing Organization Configuration](/guides/organization-and-access-management/viewing-and-editing-organization/viewing-and-editing-organization-configuration).
* **Fee billing interval**. How often the Prepayment fees are applied to bills. For example, if the plan you've selected using the **Bill with plan** setting means that bills are issued every three months and the **Fee billing interval** is set to **2**, then the Prepayment fees are applied every six months.
* **Fee billing offset**. Defines an offset for when the Prepayment fees are first applied to bills on the Account. For example, if the bill is issued every three months and the **Fee billing offset** is set to **0**, then the charge is applied to the first bill (at three months); if set to **1**, it would be applied to the next bill (at six months), and so on.
* **Fee billing**. Allows you to control whether any Prepayment fees due are billed in arrears or in advance:
* **Use organization-wide configuration**. Default selection. If enabled, the setting selected at Organization level for Fee billing will be used - it will be shown in brackets. If you select either of the other two options, the Organization level setting will be overridden. See [Viewing and Editing Organization Configuration](/guides/organization-and-access-management/viewing-and-editing-organization/viewing-and-editing-organization-configuration).
* **Bill in arrears (end of each billing period)**
* **Bill in advance (start of each billing period)**
* **Fees accounting product**. For accounting purposes, select a Product that will be linked to any *Prepayment fee* line items on Bills. (*Optional*)
* Note that if you leave this blank, then the **Accounting product** selected for the Prepayment will be used instead.
* **Fee description**. Optionally, enter a *custom description* used for Bill line items for Prepayment fees.
* Note that if you leave this blank, then a *default description* will be used. See [Bill Line Items - Default Descriptions](/guides/billing-and-usage-data/running-viewing-and-managing-bills/bill-line-items-default-descriptions) for details.
**Warning: Ensure Prepayment service period extends for required Billing Period!** If you choose to **Bill with plan** for any outstanding Prepayment fees, please ensure the Prepayment service period you define extends over the full billing period required for your Prepayment billing use case. See the [Billing Dates Issues](/guides/billing-and-usage-data/running-viewing-and-managing-bills/troubleshooting-bills#billing-dates-issues) section of the [Troubleshooting Bills](/guides/billing-and-usage-data/running-viewing-and-managing-bills/troubleshooting-bills) topic for an example where this can go wrong and give unexpected Bill amounts.
## Prepayment Billing on a Schedule
If the customer Account has opted not to pay the agreed Prepayment in total upfront and the **Amount prepaid** is less than the Prepayment **Amount**, then you can select to **Bill on a schedule** for the outstanding Prepayment amount. The **Billing Configuration** panel adjusts and you can set up a schedule for Bill dates where each Bill covers a portion of the outstanding Prepayment amount which will be used to cover usage for a defined service period.
**Important!** The total of the scheduled Bill amounts should equal the outstanding Prepayment amount. If they don't, you won't be able to save the Prepayment and you'll receive an error message.
1. Select **Add**. The **Billing panel** adjusts to allow you to enter the details of the first Bill:
* **Date**. Use the calendar pop-up to select the date of the first Bill.
* **Amount**. Enter the portion of the outstanding Prepayment amount that will be allocated for usage recorded during the defined service period of the first Bill.
* **Service period start date (inclusive)** and **Service period end date (exclusive)**. Use the calendar pop-up to set the service period for the first Bill.
2. If you want to set up subsequent Bills for the schedule, select **Add** again and repeat step 1.
**Tip: Reviewing Prepayments?** At any time, you can open the **Prepayment Details** page for a Prepayment/Commitment on an Account - see below, [Viewing Prepayment Details](/guides/end-customer-accounts/creating-prepayments-for-accounts#viewing-prepayment-details). Also, you can query for Prepayments and review the returned data using the Data Explorer. See [Performing Prepayments Queries and Reviewing Results](/guides/data-explorer/performing-commitments-queries-and-reviewing-results).
## Prepayment Billing with a Plan
If the customer Account has opted not to pay the agreed Prepayment in total upfront and the **Amount pre-paid** is less than the Prepayment **Amount**, then under **Billing for remaining** you can select to **Bill with plan** for the outstanding Prepayment amount. The **Billing Configuration** panel adjusts and you can enter billing details for adding line items for Prepayment fees to Bills in each billing period over the duration of the Prepayment:
* **Plan**. Use the drop-down to select which pricing Plan you want the Prepayment fees to be added for billing purposes. Note that this is to allow for cases where a customer Account has been placed on more than one pricing Plan, some of which are billed weekly and some of which are billed monthly.
* **First bill fee**. Enter a Prepayment fee amount to be paid in the first Bill. The remainder due under the Prepayment will be evenly split across subsequent Bills up to the end of the Prepayment contract period.
* **Billing cycle date**. Optional setting, which sets the date when the first Bill is created and acts as a reference for when in the applied billing frequency period subsequent bills for the Account are created:
* For example, suppose a Plan is configured for monthly billing frequency. You then set a **Billing cycle date** of February 15th, 2022. The first Bill will be created for the Account on February 15th, and subsequent Bills created on the 15th of the months following for the remainder of the billing period - March 15th, April 15th, and so on.
* If you leave this blank, then Epoch dates from your Organization's configuration will be used as the **Billing cycle date** for the Account instead - see [Viewing and Editing Organization Configuration](/guides/organization-and-access-management/viewing-and-editing-organization/viewing-and-editing-organization-configuration).
* **Fee billing interval**. How often the Prepayment fees are applied to bills. For example, if the plan you've selected using the **Bill with plan** setting means that bills are issued every three months and the **Fee billing interval** is set to **2**, then the Prepayment fees are applied every six months.
* **Fee billing offset**. Defines an offset for when the Prepayment fees are first applied to bills on the Account. For example, if the bill is issued every three months and the **Fee billing offset** is set to **0**, then the charge is applied to the first bill (at three months); if set to **1**, it would be applied to the next bill (at six months), and so on.
* **Fee billing**. Allows you to control whether any Prepayment fees due are billed in arrears or in advance:
* **Use organization-wide configuration**. Default selection. If enabled, the setting selected at Organization level for Fee billing will be used - it will be shown in brackets. If you select either of the other two options, the Organization level setting will be overridden. See [Viewing and Editing Organization Configuration](/guides/organization-and-access-management/viewing-and-editing-organization/viewing-and-editing-organization-configuration).
* **Bill in arrears (end of each billing period)**
* **Bill in advance (start of each billing period)**
* **Fees accounting product**. For accounting purposes, select a Product that will be linked to any *Prepayment fee* line items on Bills. (*Optional*)
* Note that if you leave this blank, then the **Accounting product** selected for the Prepayment will be used instead.
* **Fee description**. Optionally, enter a *custom description* used for Bill line items for Prepayment fees.
* Note that if you leave this blank, then a *default description* will be used. See [Bill Line Items - Default Descriptions](/guides/billing-and-usage-data/running-viewing-and-managing-bills/bill-line-items-default-descriptions) for details.
**Warning: Ensure Prepayment service period extends for required Billing Period!** If you choose to **Bill with plan** for any outstanding Prepayment fees, please ensure the Prepayment service period you define extends over the full billing period required for your Prepayment billing use case. See the [Billing Dates Issues](/guides/billing-and-usage-data/running-viewing-and-managing-bills/troubleshooting-bills#billing-dates-issues) section of the [Troubleshooting Bills](/guides/billing-and-usage-data/running-viewing-and-managing-bills/troubleshooting-bills) topic for an example where this can go wrong and give unexpected Bill amounts.
## Prepayment Billing on a Schedule
If the customer Account has opted not to pay the agreed Prepayment in total upfront and the **Amount prepaid** is less than the Prepayment **Amount**, then you can select to **Bill on a schedule** for the outstanding Prepayment amount. The **Billing Configuration** panel adjusts and you can set up a schedule for Bill dates where each Bill covers a portion of the outstanding Prepayment amount which will be used to cover usage for a defined service period.
**Important!** The total of the scheduled Bill amounts should equal the outstanding Prepayment amount. If they don't, you won't be able to save the Prepayment and you'll receive an error message.
1. Select **Add**. The **Billing panel** adjusts to allow you to enter the details of the first Bill:
* **Date**. Use the calendar pop-up to select the date of the first Bill.
* **Amount**. Enter the portion of the outstanding Prepayment amount that will be allocated for usage recorded during the defined service period of the first Bill.
* **Service period start date (inclusive)** and **Service period end date (exclusive)**. Use the calendar pop-up to set the service period for the first Bill.
2. If you want to set up subsequent Bills for the schedule, select **Add** again and repeat step 1.
![]() > In this example, where the Prepayment spans two calendar years, we've set up a Bill schedule for two billing dates, each covering half of the outstanding Prepayment amount - one at the outset for the first year; the second on December 1st, which is a month before the second service period for billing commences on January 1st of the second calendar year.
3. Optional settings:
* **Fees accounting product**. For accounting purposes, select a Product that will be linked to any *Prepayment fee* line items on Bills.
* Note that if you leave this blank, then the **Accounting product** selected for the Prepayment will be used instead.
* **Fee description**. Enter a *custom description*, which will appear against Bill line items for Prepayment fees.
* Note that if you leave this blank, then a *default description* will be used. See [Bill Line Items - Default Descriptions](/guides/billing-and-usage-data/running-viewing-and-managing-bills/bill-line-items-default-descriptions) for details.
**Important! Billing for Prepayments on a Schedule - please note:**
* **Adjusting Prepayment Schedule after generating Bills?** Suppose you've set up a schedule for Prepayment billing for an Account and a Bill has already been generated for one of the Prepayment fee dates on that schedule, a Bill that might also includes usage charges for priced Plans attached to the Account. If you then change the dates for the Prepayment schedule, when you recalculate the existing Bill the Prepayment fee due under the original schedule will still be included. You must first delete the old Bill generated for the original Prepayment fee schedule and then run billing again - the new Bill will then be generated in accordance with the updated Prepayment schedule. If you are using [Scheduled Billing](/guides/billing-and-usage-data/running-viewing-and-managing-bills/scheduling-billing), please ensure you check for this after updating a Prepayment schedule.
* **Usage charges exceed Prepayment amount?** If the Account you've created the Prepayment for has a priced Account Plan attached and the usage chargeable under the Account Plan exceeds the Prepayment amount charged for a service period on a scheduled Bill, then subsequent Bills will include the required Prepayment overage charges. To extend the example, if the Account uses a monthly frequency Account Plan and, by the first few days into July 2024, usage recorded on the Account begins to exceed the \$7, 500 Prepayment billed in advance on the 1st December 2023 for the 2024 service period, then the remaining Bills for that year - July through December - will show Prepayment overage line items for any usage throughout those months.
* **Service period start and end dates for scheduled Prepayment fee billing dates**:
* If you try to set the **Service period start date (inclusive)** *after* the **Service period end date (excusive)**, then you'll receive an error.
* You can set the **Service period start date (inclusive)** and the **Service period end date (exclusive)** to the same date without receiving an error, but *please be sure* your Prepayment billing use case requires this.
## Viewing Prepayment Details
If you want to review a Prepayment on an Account, you can do this from the Prepayments tab by opening a **Prepayment details** page where you can also view:
* **Fees and Usage**
* **Fee Dates**
* **Prepayment Consumption**
* **Prepayment metadata**
**To view Prepayment details:**
1. Select **Accounts**. The **Accounts** page opens.
2. Select the Account for which you want to view the details of a Prepayment. The **Account** page opens with the **Overview** tab selected.
3. Select the **Prepayments** tab. The page adjusts and shows any active, pending, or previous Prepayments created for the Account.
4. Select the **Amount** text of the Prepayment whose details you want to review:
> In this example, where the Prepayment spans two calendar years, we've set up a Bill schedule for two billing dates, each covering half of the outstanding Prepayment amount - one at the outset for the first year; the second on December 1st, which is a month before the second service period for billing commences on January 1st of the second calendar year.
3. Optional settings:
* **Fees accounting product**. For accounting purposes, select a Product that will be linked to any *Prepayment fee* line items on Bills.
* Note that if you leave this blank, then the **Accounting product** selected for the Prepayment will be used instead.
* **Fee description**. Enter a *custom description*, which will appear against Bill line items for Prepayment fees.
* Note that if you leave this blank, then a *default description* will be used. See [Bill Line Items - Default Descriptions](/guides/billing-and-usage-data/running-viewing-and-managing-bills/bill-line-items-default-descriptions) for details.
**Important! Billing for Prepayments on a Schedule - please note:**
* **Adjusting Prepayment Schedule after generating Bills?** Suppose you've set up a schedule for Prepayment billing for an Account and a Bill has already been generated for one of the Prepayment fee dates on that schedule, a Bill that might also includes usage charges for priced Plans attached to the Account. If you then change the dates for the Prepayment schedule, when you recalculate the existing Bill the Prepayment fee due under the original schedule will still be included. You must first delete the old Bill generated for the original Prepayment fee schedule and then run billing again - the new Bill will then be generated in accordance with the updated Prepayment schedule. If you are using [Scheduled Billing](/guides/billing-and-usage-data/running-viewing-and-managing-bills/scheduling-billing), please ensure you check for this after updating a Prepayment schedule.
* **Usage charges exceed Prepayment amount?** If the Account you've created the Prepayment for has a priced Account Plan attached and the usage chargeable under the Account Plan exceeds the Prepayment amount charged for a service period on a scheduled Bill, then subsequent Bills will include the required Prepayment overage charges. To extend the example, if the Account uses a monthly frequency Account Plan and, by the first few days into July 2024, usage recorded on the Account begins to exceed the \$7, 500 Prepayment billed in advance on the 1st December 2023 for the 2024 service period, then the remaining Bills for that year - July through December - will show Prepayment overage line items for any usage throughout those months.
* **Service period start and end dates for scheduled Prepayment fee billing dates**:
* If you try to set the **Service period start date (inclusive)** *after* the **Service period end date (excusive)**, then you'll receive an error.
* You can set the **Service period start date (inclusive)** and the **Service period end date (exclusive)** to the same date without receiving an error, but *please be sure* your Prepayment billing use case requires this.
## Viewing Prepayment Details
If you want to review a Prepayment on an Account, you can do this from the Prepayments tab by opening a **Prepayment details** page where you can also view:
* **Fees and Usage**
* **Fee Dates**
* **Prepayment Consumption**
* **Prepayment metadata**
**To view Prepayment details:**
1. Select **Accounts**. The **Accounts** page opens.
2. Select the Account for which you want to view the details of a Prepayment. The **Account** page opens with the **Overview** tab selected.
3. Select the **Prepayments** tab. The page adjusts and shows any active, pending, or previous Prepayments created for the Account.
4. Select the **Amount** text of the Prepayment whose details you want to review:
![]() In this example, we've selected to open the details for an **ACTIVE** Prepayment on an Account. The **Prepayment details** page opens, where you can review the Prepayment:
* Details, including which user **Created** and which **Last modified** the Prepayment:
In this example, we've selected to open the details for an **ACTIVE** Prepayment on an Account. The **Prepayment details** page opens, where you can review the Prepayment:
* Details, including which user **Created** and which **Last modified** the Prepayment:
![Prepayments40]() * **Fees and usage** details and **Fee dates**. For example:
* **Fees and usage** details and **Fee dates**. For example:
![]() 5. If consumption data is available for the Prepayment, you can scroll down the details page and review a **Prepayment consumption** chart that shows:
* Actual consumption to date with consumption trend.
* Minimum expected consumption over the entire active period.
* The percentage active period passed with number of days remaining
* The percentage consumption with amount remaining.
Here's an example:
5. If consumption data is available for the Prepayment, you can scroll down the details page and review a **Prepayment consumption** chart that shows:
* Actual consumption to date with consumption trend.
* Minimum expected consumption over the entire active period.
* The percentage active period passed with number of days remaining
* The percentage consumption with amount remaining.
Here's an example:
![Prepayments36]() If a Prepayment is fully consumed and overages are incurred, then this is clearly shown, for example:
If a Prepayment is fully consumed and overages are incurred, then this is clearly shown, for example:
![Prepayments37]() 6. If you scroll further down the page, you can review **Prepayment metadata**:
Select **External mappings** - any existing mappings created for the Prepayment are listed:
6. If you scroll further down the page, you can review **Prepayment metadata**:
Select **External mappings** - any existing mappings created for the Prepayment are listed:
![Prepayments39]() * The **External system** and **External table** mapped to are shown - such as **Netsuite - Item** in the above example. The **External entity ID** mapped to is also shown.
* If a listed External mapping is linked to an Integration, under **Linked integration** a hotlink text will be shown which you can use to open the Integration.
* Under **Actions**, you can edit or delete the External mapping.
* If the Prepayment has multiple External mappings created for it, you can use *Search external mappings* to search by **External table** and **External entity ID** and filter the list.
* You can commence a workflow to **Create external mapping** for the Prepayment directly - see [Creating and Managing External Mappings for Accounts](/guides/end-customer-accounts/creating-and-managing-external-mappings-for-accounts) for an example.
Select **Integration runs** - if you've set up an integration that synchronizes the Prepayment data with an external system, the date/time and status of the **Latest** integration run are shown. You can use a text hotlink to open details of this latest run or **View all runs**. See [Reviewing Integration Run Details](/guides/integrations/setting-up-integrations/reviewing-integration-run-details).
7. When you are finished viewing details, you can select to return to the main **Prepayments** tab.
## Duplicating Prepayments
You can duplicate a Prepayment/Commitment you've created for an Account. This is useful if you want to renew a contract with an end-customer Account and again include a Prepayment amount in the contract but adjust some of the details, such as renew with reduced Prepayment. You can do this for either an **Active** or a **Pending** Prepayment.
**To duplicate a Prepayment for an Account:**
1. Select **Accounts**. The **Accounts** page opens.
2. Select the **Name** text of the Account for which you want to create a Prepayment. The **Account** page opens with the **Overview** tab selected.
3. Select the **Prepayments** tab. On the **Active and pending prepayments** panel any active or pending Prepayments created for the Account are shown.
4. Select **Duplicate** for the Prepayment you want to duplicate for the Account:
* The **External system** and **External table** mapped to are shown - such as **Netsuite - Item** in the above example. The **External entity ID** mapped to is also shown.
* If a listed External mapping is linked to an Integration, under **Linked integration** a hotlink text will be shown which you can use to open the Integration.
* Under **Actions**, you can edit or delete the External mapping.
* If the Prepayment has multiple External mappings created for it, you can use *Search external mappings* to search by **External table** and **External entity ID** and filter the list.
* You can commence a workflow to **Create external mapping** for the Prepayment directly - see [Creating and Managing External Mappings for Accounts](/guides/end-customer-accounts/creating-and-managing-external-mappings-for-accounts) for an example.
Select **Integration runs** - if you've set up an integration that synchronizes the Prepayment data with an external system, the date/time and status of the **Latest** integration run are shown. You can use a text hotlink to open details of this latest run or **View all runs**. See [Reviewing Integration Run Details](/guides/integrations/setting-up-integrations/reviewing-integration-run-details).
7. When you are finished viewing details, you can select to return to the main **Prepayments** tab.
## Duplicating Prepayments
You can duplicate a Prepayment/Commitment you've created for an Account. This is useful if you want to renew a contract with an end-customer Account and again include a Prepayment amount in the contract but adjust some of the details, such as renew with reduced Prepayment. You can do this for either an **Active** or a **Pending** Prepayment.
**To duplicate a Prepayment for an Account:**
1. Select **Accounts**. The **Accounts** page opens.
2. Select the **Name** text of the Account for which you want to create a Prepayment. The **Account** page opens with the **Overview** tab selected.
3. Select the **Prepayments** tab. On the **Active and pending prepayments** panel any active or pending Prepayments created for the Account are shown.
4. Select **Duplicate** for the Prepayment you want to duplicate for the Account:
![]() The **Create** page opens and the details of the existing Prepayment are shown.
5. Edit the details as required for the duplicate.
6. Select **Create prepayment**. You are returned to the **Prepayments** tab and the duplicate Prepayment is listed.
**Tip: Overview tab?** You can also duplicate a Prepayment from the **Overview** tab in the same way using the **Active and pending prepayments** panel.
## Adding Prepayments to or Removing from Contracts
From a *Prepayment details* page, you can quickly add the Prepayment to or remove it from a Contract on the Account. This saves you having to open and edit the Prepayment.
**Notes:**
* **Adding or Removing Prepayments from Contract**. Alternatively, you can open the details page of the Contract you want to add a Prepayment to or remove a Prepayment from. See [Adding Prepayments to a Contract](https://docs.m3ter.com/guides/end-customer-accounts/creating-contracts-for-accounts/creating-and-managing-contracts#adding-prepayments-to-a-contract). If you do this, then the **Prepayment details** page will update accordingly.
* **Important: Linking Prepayment to Contract - ensuring Prepayment is available for draw-down at billing!** Whether you need to link a Prepayment on an Account to a Contract is dependent on whether or not an Account Plan on the same Account has been linked to a Contract. For details, see the following section on [Linking Prepayments to Contracts](/guides/end-customer-accounts/creating-prepayments-for-accounts#linking-prepayments-to-contracts-availability-for-draw-down).
**To add a Prepayment to or remove it from a Contract:**
1. Select **Accounts**. The **Accounts** page opens.
2. Select the **Name** text of the Account for which you want to add a Prepayment to or remove from a Contract. The **Account** details page opens with the **Overview** tab selected.
3. Select the **Prepayments** tab.
4. Select the hotlink text of the Prepayment. The **Prepayment details** page opens:
* If the Prepayment has not been added to a Contract, an **Add to contract** button is available.
* If the Prepayment has been added to a Contract, a **Remove from contract** button is available.
5. To add the Prepayment to a Contract, select **Add to contract**. A **Select contract** modal opens and lists the Contracts created for the Account.
6. Select the Contract you want to add the Prepayment to and select **Confirm**. The modal closes and the Contract is shown under **Prepayment details**:
The **Create** page opens and the details of the existing Prepayment are shown.
5. Edit the details as required for the duplicate.
6. Select **Create prepayment**. You are returned to the **Prepayments** tab and the duplicate Prepayment is listed.
**Tip: Overview tab?** You can also duplicate a Prepayment from the **Overview** tab in the same way using the **Active and pending prepayments** panel.
## Adding Prepayments to or Removing from Contracts
From a *Prepayment details* page, you can quickly add the Prepayment to or remove it from a Contract on the Account. This saves you having to open and edit the Prepayment.
**Notes:**
* **Adding or Removing Prepayments from Contract**. Alternatively, you can open the details page of the Contract you want to add a Prepayment to or remove a Prepayment from. See [Adding Prepayments to a Contract](https://docs.m3ter.com/guides/end-customer-accounts/creating-contracts-for-accounts/creating-and-managing-contracts#adding-prepayments-to-a-contract). If you do this, then the **Prepayment details** page will update accordingly.
* **Important: Linking Prepayment to Contract - ensuring Prepayment is available for draw-down at billing!** Whether you need to link a Prepayment on an Account to a Contract is dependent on whether or not an Account Plan on the same Account has been linked to a Contract. For details, see the following section on [Linking Prepayments to Contracts](/guides/end-customer-accounts/creating-prepayments-for-accounts#linking-prepayments-to-contracts-availability-for-draw-down).
**To add a Prepayment to or remove it from a Contract:**
1. Select **Accounts**. The **Accounts** page opens.
2. Select the **Name** text of the Account for which you want to add a Prepayment to or remove from a Contract. The **Account** details page opens with the **Overview** tab selected.
3. Select the **Prepayments** tab.
4. Select the hotlink text of the Prepayment. The **Prepayment details** page opens:
* If the Prepayment has not been added to a Contract, an **Add to contract** button is available.
* If the Prepayment has been added to a Contract, a **Remove from contract** button is available.
5. To add the Prepayment to a Contract, select **Add to contract**. A **Select contract** modal opens and lists the Contracts created for the Account.
6. Select the Contract you want to add the Prepayment to and select **Confirm**. The modal closes and the Contract is shown under **Prepayment details**:
![Prepayments41]() 7. To remove a Prepayment from a Contract, select **Remove from contract**. A confirmation popup appears:
7. To remove a Prepayment from a Contract, select **Remove from contract**. A confirmation popup appears:
 8. Select **Remove** to confirm. The popup closes and the Contract no longer shows under **Prepayment details**.
## Linking Prepayments to Contracts - Availability for Draw-Down
Linking a Prepayment to a Contract on an Account is optional. However, if you have linked an Account Plan attached to the Account to a Contract and you want to ensure the Prepayment is available for draw-down against billed charges on the Account, you must link the Prepayment to the same Contract. The following table list the consequences for draw-down availability when linking Account Plans and Prepayments to Contracts:
| Account Plan linked to Contract | Prepayment linked to Contract | Prepayment available for draw-down? |
| - | - | - |
| NO | NO | YES |
| Contract A | NO | NO |
| NO | Contract A | NO |
| Contract A | Contract A | YES |
| Contract A | Contract B | NO |
## Prepayments Draw-Down Order Against Balances
If you have added Prepayments and Balances as credits on an Account, you can define the order in which these credit amounts are drawn-down for billing the Account. Four options are available for this *credit application order* for Prepayments against Balances:
* **Prepayment then balance**. Draw-down against Prepayment credit before Balance credit. Default.
* **Balance then prepayment**. Draw-down against Balance credit before Prepayment credit.
* **Prepayment only**. Only draw-down against Prepayment credit.
* **Balance only**. Only draw-down against Balance credit.
You can configure this in two places:
* At Organization level as part of your Organization configuration. See [Viewing and Editing Organization Configuration](/guides/organization-and-access-management/viewing-and-editing-organization/viewing-and-editing-organization-configuration).
* At individual Account level when creating or editing the Account to which the Prepayments and Balances have been added under **Bill settings**. See [Creating an Account](/guides/end-customer-accounts/creating-an-account).
* If you configure this at Account level, the Account level setting takes precedence over any setting at Organizational level.
**Important!** If the Account belongs to a Parent/Child Account hierarchy, then the **Credit application order** settings are *not available*, and the draw-down order defaults always to Prepayment then Balance order.
# End Dating Account Billing Entities
Source: https://docs.m3ter.com/guides/end-customer-accounts/end-dating-account-billing-entities
You can apply an end date to billing entities associated with an end-customer Account:
* Account Plans
* Contracts
* Counter Pricings
* Prepayments
* Pricings
This capability to collectively end date billing entities associated with an Account is very useful in cases where you need to create new agreements with end-customers - such as for renewals or mid-service term amendments - and for service cancellations.
You can apply an end date to billing entities on an Account directly from the Account or via a Contract you've created for the Account:
* [Applying End Date to Account Billing Entities](/guides/end-customer-accounts/end-dating-account-billing-entities#applying-end-date-to-account-billing-entities)
* [Applying End Date to Account Billing Entities via Contract](/guides/end-customer-accounts/end-dating-account-billing-entities#applying-end-date-to-account-billing-entities-via-contract)
## Applying End Date to Account Billing Entities
You can use the *Account actions* menu to apply an end date to billing entities.
**To apply an end date to Account billing entities:**
1. Select **Accounts**. The **Accounts** page opens.
2. Select the Account you want to end date billing entities for. The **Account** page opens with the **Overview** tab selected.
3. On the **Account actions** menu, select **Account>End Account billing entities**:
8. Select **Remove** to confirm. The popup closes and the Contract no longer shows under **Prepayment details**.
## Linking Prepayments to Contracts - Availability for Draw-Down
Linking a Prepayment to a Contract on an Account is optional. However, if you have linked an Account Plan attached to the Account to a Contract and you want to ensure the Prepayment is available for draw-down against billed charges on the Account, you must link the Prepayment to the same Contract. The following table list the consequences for draw-down availability when linking Account Plans and Prepayments to Contracts:
| Account Plan linked to Contract | Prepayment linked to Contract | Prepayment available for draw-down? |
| - | - | - |
| NO | NO | YES |
| Contract A | NO | NO |
| NO | Contract A | NO |
| Contract A | Contract A | YES |
| Contract A | Contract B | NO |
## Prepayments Draw-Down Order Against Balances
If you have added Prepayments and Balances as credits on an Account, you can define the order in which these credit amounts are drawn-down for billing the Account. Four options are available for this *credit application order* for Prepayments against Balances:
* **Prepayment then balance**. Draw-down against Prepayment credit before Balance credit. Default.
* **Balance then prepayment**. Draw-down against Balance credit before Prepayment credit.
* **Prepayment only**. Only draw-down against Prepayment credit.
* **Balance only**. Only draw-down against Balance credit.
You can configure this in two places:
* At Organization level as part of your Organization configuration. See [Viewing and Editing Organization Configuration](/guides/organization-and-access-management/viewing-and-editing-organization/viewing-and-editing-organization-configuration).
* At individual Account level when creating or editing the Account to which the Prepayments and Balances have been added under **Bill settings**. See [Creating an Account](/guides/end-customer-accounts/creating-an-account).
* If you configure this at Account level, the Account level setting takes precedence over any setting at Organizational level.
**Important!** If the Account belongs to a Parent/Child Account hierarchy, then the **Credit application order** settings are *not available*, and the draw-down order defaults always to Prepayment then Balance order.
# End Dating Account Billing Entities
Source: https://docs.m3ter.com/guides/end-customer-accounts/end-dating-account-billing-entities
You can apply an end date to billing entities associated with an end-customer Account:
* Account Plans
* Contracts
* Counter Pricings
* Prepayments
* Pricings
This capability to collectively end date billing entities associated with an Account is very useful in cases where you need to create new agreements with end-customers - such as for renewals or mid-service term amendments - and for service cancellations.
You can apply an end date to billing entities on an Account directly from the Account or via a Contract you've created for the Account:
* [Applying End Date to Account Billing Entities](/guides/end-customer-accounts/end-dating-account-billing-entities#applying-end-date-to-account-billing-entities)
* [Applying End Date to Account Billing Entities via Contract](/guides/end-customer-accounts/end-dating-account-billing-entities#applying-end-date-to-account-billing-entities-via-contract)
## Applying End Date to Account Billing Entities
You can use the *Account actions* menu to apply an end date to billing entities.
**To apply an end date to Account billing entities:**
1. Select **Accounts**. The **Accounts** page opens.
2. Select the Account you want to end date billing entities for. The **Account** page opens with the **Overview** tab selected.
3. On the **Account actions** menu, select **Account>End Account billing entities**:
![]() The **End Account billing entities** modal appears.
4. On the modal, select the **Billing entities** associated with the Account that you want to end date:
* **Account plan**
* **Contract**
* **Counter pricings**
* **Prepayment**
* **Pricings**
5. If you also want to apply the end date to the same billing entities associated with any Child Accounts, enable the **Apply to children** switch.
* **Note**: This switch will only show for Accounts with at least one Child Account set up.
6. Use the **End date** field pop-up calendar to select the end date you want to apply.
* Note that the end date will be applied as midnight of the selected date, where midnight is understood as the *start of that date*. This means that if you select August 31st 2023, then billing entities for the Account will be active until the end of August 30th.
7. Select **End account billing entities**. The modal closes and the end dates for each of the selected billing entities associated with the Account are updated.
**Warning: Billing Entities must be Active on specified End date!** Only those billing entities of the selected type which are active for the Account on the end date specified will be updated. If all of the currently active entities have end dates that fall before the end date specified and therefore none are found to be active on that date, then you'll receive a message to inform you none have been updated.
## Applying End Date to Account Billing Entities via Contract
If you have created a Contract for an end-customer Account, you can apply an end date to billing entities associated with the Account via the Contract
**To apply an end date to Account billing entities via a Contract:**
1. Select **Accounts**. The **Accounts** page opens.
2. Select the Account you want to end date billing entities for. The **Account** page opens with the **Overview** tab selected.
3. Select the **Contracts** tab.
4. On the **Active and pending contracts** panel, select the name hotlink text of the Contract you want to use to apply an end date to billing entities. The **Contract Details** page opens.
5. On the **Contract details** panel, select **End contract billing entities**. An **End contract billing entities** modal appears.
6. On the modal, select the **Billing entities** associated with the Account that you want to end date:
* **Account plan**
* **Contract**
* **Counter pricings**
* **Prepayment**
* **Pricings**
7. If you also want to apply the end date to the same billing entities associated with any Child Accounts, enable the **Apply to children** switch.
* **Note**: This switch will only show for Accounts with at least one Child Account set up.
8. Use the **End date** field pop-up calendar to select the end date you want to apply.
* Note that the end date will be applied as midnight of the selected date, where midnight is understood as the *start of that date*. This means that if you select August 31st 2023, then billing entities for the Account will be active until the end of August 30th.
9. Select **End contract billing entities**. The modal closes and the end dates for each of the selected billing entities associated with the Account are updated.
**Tip: Which billing entities are end dated?**
* **Contract**. If you select to update the Contract, then *ONLY* the Contract itself will be end dated. If the Account has other Contracts associated with it, these will not be end dated.
* **Account Plans, Prepayments, Counter Pricings, and Pricings**. When you create a Contract for an Account, you can link Account Plans and Prepayments associated with the Account to the Contract. When you select to end date any of these types of billing entities, *ALL* Account Plans, Prepayments, Counter Pricings, and Pricings associated with the Account are end dated, and not *ONLY* those that have been linked to the Contract itself.
# Managing Accounts - Best Practices
Source: https://docs.m3ter.com/guides/end-customer-accounts/managing-accounts-best-practices
This topic offers some notes on best practices for managing the Accounts in your Organization. These notes are intended to help you avoid any unintended and unwanted issues with your end-customer Accounts:
* [Personally Identifiable Information (PII)](/guides/end-customer-accounts/managing-accounts-best-practices#personally-identifiable-information-pii)
* [Editing and Deleting Accounts - Implications for Usage Data](/guides/end-customer-accounts/managing-accounts-best-practices#editing-and-deleting-accounts-implications-for-usage-data)
## Personally Identifiable Information (PII)
Under the [Data Processing Agreement](https://www.m3ter.com/docs/legal/dpa), the only fields you are allowed to use for any of your end customer PII data in m3ter are the `name`, `address`, and `emailAddress` fields on the **Account** entity.
For more details see:
* The request schema for the [Create Account](/api/account/create-account) API call as documented in our API Reference.
* The following [Creating and Editing Accounts](/guides/end-customer-accounts/creating-an-account) topic.
* Section 4.2 of the [Terms of Service](https://www.m3ter.com/docs/legal/terms-of-service).
**Best Practice:**
* Please comply with these constraints on the use of *Personally Identifiable Information (PII)* when creating end-customer Accounts for your m3ter Organization.
## Editing and Deleting Accounts - Implications for Usage Data
The Usage Data measurements ingested for Accounts are key to the usage-based pricing applied to Product Plans used to charge and Bill Accounts that consume your Products. It's important to understand clearly how that usage data is associated with Accounts and what the implications are when it comes to editing or deleting Accounts.
### How are the usage data ingested for an Account linked to the Account?
When usage data measurements are ingested into the platform, you submit them using the relevant Meter and Account *Codes*. However, once ingested, and for subsequent configuration and data management purposes, the usage data is linked strictly to the Account and Meter *ids*.
**Note: Auto-created Accounts?** For usage data submission you make when the Account does not yet exist for your Organization, the system will [auto-create an Account](/guides/billing-and-usage-data/submitting-usage-data/submitting-usage-data-for-non-existent-accounts) for you. But the result is the same as when the Account does already exist - the usage data is linked strictly to the new Account's id.
### When is the Account id created and how do I find out what it is?
To create an Account, you supply the *Code* you want to use for the Account. On successful creation, the system generates a unique `id` and assigns it to the new Account:
* If you open an Account's Details page in the Console, the Account `id` is listed and you can copy it directly to your clipboard.
* Alternatively, you can submit a [List Accounts](/api/account/list-accounts) API call and use a `codes` query parameter for a specific Account. The response schema will contain the Account `id`.
### What are the consequences if I delete an Account after submitting usage data for the Account?
If you delete the Account, any submitted usage data linked to the Account's `id` are *permanently dissociated* from it.
### If I have no option but to delete and recreate an Account, what are the consequences?
In this sort of case, the key issue to consider is whether or not you have already submitted usage data for the Account:
* If you *have not*, then you can delete the Account and recreate it and begin submitting usage data, which will then be linked to the Account `id` in the normal way.
* If you *have*, you cannot use that previously ingested usage data for billing against the recreated Account. You will have to re-submit the usage data to the recreated Account for the data to become available for billing against the Account.
**Note: Recreated Account uses same Code?** This is the case even if you use the *same Code* for the recreated Account as the Code that was used for the original and now deleted Account.
### What happens to any Bills that have been generated for an Account if I then delete the Account?
Any Bills generated for an Account will still be available to view in Bill Management after the Account is deleted - see [Running Bills and Viewing Bill Details](/guides/billing-and-usage-data/running-viewing-and-managing-bills/running-bills-and-viewing-bill-details). However, even if you recreate the Account with the same code, this new Account will be assigned a *different Account* `id`. This means that existing Bills generated for the old deleted Account *will not be re-associated* with the new Account.
**Best Practice:**
* In view of these considerations, we *strongly recommend* that wherever possible you avoid *deleting Accounts* and instead *update Accounts*. You can edit and update an Account, including the Code, and continue to submit and ingest usage data seamlessly for the Account with the data continuously linked to the Account's unique `id`.
# Reviewing and Recalculating Bills for an Account
Source: https://docs.m3ter.com/guides/end-customer-accounts/reviewing-bills-for-an-account
If Bills have been produced for an Account, you can:
* Review them in the **Account** page and open full Bill details for a particular Bill.
* Recalculate selected Bills.
**To review and recalculate Bills for an Account:**
1. Select **Accounts**. The **Accounts** page opens.
2. Select the **Name** text of the Account. The **Account** page opens with the **Overview** tab selected. The **Latest bills** panel lists the most recent Bills created for the Account. You can:
* Select the **Reference** text of a bill to open the **Bill Management** page and review full Bill details.
* Select **View all** to go directly to open the **Bills** tab and view a full list of Account Bills.
3. Alternatively, select the **Bills** tab. All Bills created for the Account are listed in the **Bills** panel:
* Bills are listed by date order with the most recent Bill at the top.
* The following details are shown for each Bill:
* **Reference**
* **External reference**
* **External invoice date**
* **Total**
* **Status**
* **Locked**
4. If you want to check more details of a particular Bill, select its **Reference** text. The **Bill Management** page for the selected Bill opens and you can review full Bill details.
**Tip: Bill Management?** For more on Bill details and working in Bill Management, see [Running, Viewing, and Managing Bills](/guides/billing-and-usage-data/running-viewing-and-managing-bills).
5. On the **Bills** tab, if you want to recalculate a single Bill or collection of Bills from the list, use the checkboxes to select them and then select **Recalculate selected**.
**Warning: Child Account Bills can't be recalculated separately!** If you've opened the **Bills** tab for a Child Account, you can't recalculate Bills separately from the Parent Account. A Child Account Bill is only recalculated when its Parent Account Bill is recalculated.
6. If you want to run billing manually for the Account, select **Run billing**. The **Run billing** modal opens and you can create a Bill job by:
* **Invoice Date**
* **Bill Frequency**
* **Currency**
**Warning! Bill Frequency option not showing?** If you have enabled **Consolidate Bills** for your Organization, then the **Bill Frequency** option when running Bills will be unavailable.
7. Select **Run billing**. The Bill job is sent and you can open the **Running Tasks** panel to review its progress:
The **End Account billing entities** modal appears.
4. On the modal, select the **Billing entities** associated with the Account that you want to end date:
* **Account plan**
* **Contract**
* **Counter pricings**
* **Prepayment**
* **Pricings**
5. If you also want to apply the end date to the same billing entities associated with any Child Accounts, enable the **Apply to children** switch.
* **Note**: This switch will only show for Accounts with at least one Child Account set up.
6. Use the **End date** field pop-up calendar to select the end date you want to apply.
* Note that the end date will be applied as midnight of the selected date, where midnight is understood as the *start of that date*. This means that if you select August 31st 2023, then billing entities for the Account will be active until the end of August 30th.
7. Select **End account billing entities**. The modal closes and the end dates for each of the selected billing entities associated with the Account are updated.
**Warning: Billing Entities must be Active on specified End date!** Only those billing entities of the selected type which are active for the Account on the end date specified will be updated. If all of the currently active entities have end dates that fall before the end date specified and therefore none are found to be active on that date, then you'll receive a message to inform you none have been updated.
## Applying End Date to Account Billing Entities via Contract
If you have created a Contract for an end-customer Account, you can apply an end date to billing entities associated with the Account via the Contract
**To apply an end date to Account billing entities via a Contract:**
1. Select **Accounts**. The **Accounts** page opens.
2. Select the Account you want to end date billing entities for. The **Account** page opens with the **Overview** tab selected.
3. Select the **Contracts** tab.
4. On the **Active and pending contracts** panel, select the name hotlink text of the Contract you want to use to apply an end date to billing entities. The **Contract Details** page opens.
5. On the **Contract details** panel, select **End contract billing entities**. An **End contract billing entities** modal appears.
6. On the modal, select the **Billing entities** associated with the Account that you want to end date:
* **Account plan**
* **Contract**
* **Counter pricings**
* **Prepayment**
* **Pricings**
7. If you also want to apply the end date to the same billing entities associated with any Child Accounts, enable the **Apply to children** switch.
* **Note**: This switch will only show for Accounts with at least one Child Account set up.
8. Use the **End date** field pop-up calendar to select the end date you want to apply.
* Note that the end date will be applied as midnight of the selected date, where midnight is understood as the *start of that date*. This means that if you select August 31st 2023, then billing entities for the Account will be active until the end of August 30th.
9. Select **End contract billing entities**. The modal closes and the end dates for each of the selected billing entities associated with the Account are updated.
**Tip: Which billing entities are end dated?**
* **Contract**. If you select to update the Contract, then *ONLY* the Contract itself will be end dated. If the Account has other Contracts associated with it, these will not be end dated.
* **Account Plans, Prepayments, Counter Pricings, and Pricings**. When you create a Contract for an Account, you can link Account Plans and Prepayments associated with the Account to the Contract. When you select to end date any of these types of billing entities, *ALL* Account Plans, Prepayments, Counter Pricings, and Pricings associated with the Account are end dated, and not *ONLY* those that have been linked to the Contract itself.
# Managing Accounts - Best Practices
Source: https://docs.m3ter.com/guides/end-customer-accounts/managing-accounts-best-practices
This topic offers some notes on best practices for managing the Accounts in your Organization. These notes are intended to help you avoid any unintended and unwanted issues with your end-customer Accounts:
* [Personally Identifiable Information (PII)](/guides/end-customer-accounts/managing-accounts-best-practices#personally-identifiable-information-pii)
* [Editing and Deleting Accounts - Implications for Usage Data](/guides/end-customer-accounts/managing-accounts-best-practices#editing-and-deleting-accounts-implications-for-usage-data)
## Personally Identifiable Information (PII)
Under the [Data Processing Agreement](https://www.m3ter.com/docs/legal/dpa), the only fields you are allowed to use for any of your end customer PII data in m3ter are the `name`, `address`, and `emailAddress` fields on the **Account** entity.
For more details see:
* The request schema for the [Create Account](/api/account/create-account) API call as documented in our API Reference.
* The following [Creating and Editing Accounts](/guides/end-customer-accounts/creating-an-account) topic.
* Section 4.2 of the [Terms of Service](https://www.m3ter.com/docs/legal/terms-of-service).
**Best Practice:**
* Please comply with these constraints on the use of *Personally Identifiable Information (PII)* when creating end-customer Accounts for your m3ter Organization.
## Editing and Deleting Accounts - Implications for Usage Data
The Usage Data measurements ingested for Accounts are key to the usage-based pricing applied to Product Plans used to charge and Bill Accounts that consume your Products. It's important to understand clearly how that usage data is associated with Accounts and what the implications are when it comes to editing or deleting Accounts.
### How are the usage data ingested for an Account linked to the Account?
When usage data measurements are ingested into the platform, you submit them using the relevant Meter and Account *Codes*. However, once ingested, and for subsequent configuration and data management purposes, the usage data is linked strictly to the Account and Meter *ids*.
**Note: Auto-created Accounts?** For usage data submission you make when the Account does not yet exist for your Organization, the system will [auto-create an Account](/guides/billing-and-usage-data/submitting-usage-data/submitting-usage-data-for-non-existent-accounts) for you. But the result is the same as when the Account does already exist - the usage data is linked strictly to the new Account's id.
### When is the Account id created and how do I find out what it is?
To create an Account, you supply the *Code* you want to use for the Account. On successful creation, the system generates a unique `id` and assigns it to the new Account:
* If you open an Account's Details page in the Console, the Account `id` is listed and you can copy it directly to your clipboard.
* Alternatively, you can submit a [List Accounts](/api/account/list-accounts) API call and use a `codes` query parameter for a specific Account. The response schema will contain the Account `id`.
### What are the consequences if I delete an Account after submitting usage data for the Account?
If you delete the Account, any submitted usage data linked to the Account's `id` are *permanently dissociated* from it.
### If I have no option but to delete and recreate an Account, what are the consequences?
In this sort of case, the key issue to consider is whether or not you have already submitted usage data for the Account:
* If you *have not*, then you can delete the Account and recreate it and begin submitting usage data, which will then be linked to the Account `id` in the normal way.
* If you *have*, you cannot use that previously ingested usage data for billing against the recreated Account. You will have to re-submit the usage data to the recreated Account for the data to become available for billing against the Account.
**Note: Recreated Account uses same Code?** This is the case even if you use the *same Code* for the recreated Account as the Code that was used for the original and now deleted Account.
### What happens to any Bills that have been generated for an Account if I then delete the Account?
Any Bills generated for an Account will still be available to view in Bill Management after the Account is deleted - see [Running Bills and Viewing Bill Details](/guides/billing-and-usage-data/running-viewing-and-managing-bills/running-bills-and-viewing-bill-details). However, even if you recreate the Account with the same code, this new Account will be assigned a *different Account* `id`. This means that existing Bills generated for the old deleted Account *will not be re-associated* with the new Account.
**Best Practice:**
* In view of these considerations, we *strongly recommend* that wherever possible you avoid *deleting Accounts* and instead *update Accounts*. You can edit and update an Account, including the Code, and continue to submit and ingest usage data seamlessly for the Account with the data continuously linked to the Account's unique `id`.
# Reviewing and Recalculating Bills for an Account
Source: https://docs.m3ter.com/guides/end-customer-accounts/reviewing-bills-for-an-account
If Bills have been produced for an Account, you can:
* Review them in the **Account** page and open full Bill details for a particular Bill.
* Recalculate selected Bills.
**To review and recalculate Bills for an Account:**
1. Select **Accounts**. The **Accounts** page opens.
2. Select the **Name** text of the Account. The **Account** page opens with the **Overview** tab selected. The **Latest bills** panel lists the most recent Bills created for the Account. You can:
* Select the **Reference** text of a bill to open the **Bill Management** page and review full Bill details.
* Select **View all** to go directly to open the **Bills** tab and view a full list of Account Bills.
3. Alternatively, select the **Bills** tab. All Bills created for the Account are listed in the **Bills** panel:
* Bills are listed by date order with the most recent Bill at the top.
* The following details are shown for each Bill:
* **Reference**
* **External reference**
* **External invoice date**
* **Total**
* **Status**
* **Locked**
4. If you want to check more details of a particular Bill, select its **Reference** text. The **Bill Management** page for the selected Bill opens and you can review full Bill details.
**Tip: Bill Management?** For more on Bill details and working in Bill Management, see [Running, Viewing, and Managing Bills](/guides/billing-and-usage-data/running-viewing-and-managing-bills).
5. On the **Bills** tab, if you want to recalculate a single Bill or collection of Bills from the list, use the checkboxes to select them and then select **Recalculate selected**.
**Warning: Child Account Bills can't be recalculated separately!** If you've opened the **Bills** tab for a Child Account, you can't recalculate Bills separately from the Parent Account. A Child Account Bill is only recalculated when its Parent Account Bill is recalculated.
6. If you want to run billing manually for the Account, select **Run billing**. The **Run billing** modal opens and you can create a Bill job by:
* **Invoice Date**
* **Bill Frequency**
* **Currency**
**Warning! Bill Frequency option not showing?** If you have enabled **Consolidate Bills** for your Organization, then the **Bill Frequency** option when running Bills will be unavailable.
7. Select **Run billing**. The Bill job is sent and you can open the **Running Tasks** panel to review its progress:
![]() **Warning: Billing does not run for Child Accounts separately!** Only when you run billing for a Parent Account will billing run for its Child Accounts.
8. If you want to delete a single Bill or collection of Bills from the list, use the checkboxes to select them and then select **Delete selected**.
# Submitting Usage Data for an Account
Source: https://docs.m3ter.com/guides/end-customer-accounts/submitting-usage-data-for-an-account
When you've set up pricing for your Product Plans and attached these to an Account, you might want to generate some test Bills for the Account before you move to production. To do this, you'll need to feed some sample usage data for the Account into m3ter in readiness for generating test Bills against the Account. You can do this directly in the Console from the Account page.
**Tip: Checking for Submitted Usage Data?** Usage Data you've submitted for ingest into the m3ter platform can be queried for and viewed using the Data Explorer. See [Performing Usage Queries and Reviewing Results](/guides/data-explorer/performing-usage-queries-and-reviewing-results) for details.
**Tip: Submit Test Usage Data for a Meter?** Alternatively, you can follow similar steps to those explained here to submit usage data for a specific Account directly from **Meter Details** pages. See [Submitting and Checking Test Usage Data](/guides/billing-and-usage-data/submitting-usage-data/submitting-test-usage-data).
**To submit usage data for an Account:**
1. Select **Accounts**. The **Accounts** page opens.
2. Select the **NAME** text of the Account for which you want to submit usage data. The **Account** page opens with the **Overview** tab selected.
3. You can start the submit usage workflow in two ways:
* Select the **Submit usage** button above the **Account details** panel.
* Alternatively, on the **Account actions** menu, select **Account>Submit usage**:
**Warning: Billing does not run for Child Accounts separately!** Only when you run billing for a Parent Account will billing run for its Child Accounts.
8. If you want to delete a single Bill or collection of Bills from the list, use the checkboxes to select them and then select **Delete selected**.
# Submitting Usage Data for an Account
Source: https://docs.m3ter.com/guides/end-customer-accounts/submitting-usage-data-for-an-account
When you've set up pricing for your Product Plans and attached these to an Account, you might want to generate some test Bills for the Account before you move to production. To do this, you'll need to feed some sample usage data for the Account into m3ter in readiness for generating test Bills against the Account. You can do this directly in the Console from the Account page.
**Tip: Checking for Submitted Usage Data?** Usage Data you've submitted for ingest into the m3ter platform can be queried for and viewed using the Data Explorer. See [Performing Usage Queries and Reviewing Results](/guides/data-explorer/performing-usage-queries-and-reviewing-results) for details.
**Tip: Submit Test Usage Data for a Meter?** Alternatively, you can follow similar steps to those explained here to submit usage data for a specific Account directly from **Meter Details** pages. See [Submitting and Checking Test Usage Data](/guides/billing-and-usage-data/submitting-usage-data/submitting-test-usage-data).
**To submit usage data for an Account:**
1. Select **Accounts**. The **Accounts** page opens.
2. Select the **NAME** text of the Account for which you want to submit usage data. The **Account** page opens with the **Overview** tab selected.
3. You can start the submit usage workflow in two ways:
* Select the **Submit usage** button above the **Account details** panel.
* Alternatively, on the **Account actions** menu, select **Account>Submit usage**:
![]() A **Submit usage data** dialog appears.
4. For **Step 1 - Select a meter** on the dialog, use the **Meter** drop-down list to select the Meter whose Data Fields were Target Fields for an Aggregation used for pricing a Plan you've attached to the Account.
5. Select **Next**. The dialog adjusts to show **Step 1** completed and moves you to **Step 2 - Define measurements and send**:
* The default method to complete **Step 2** is **Simple**:
* A measurement **UID** is entered automatically. **Note:** If you edit this string, it must be *unique* and *immutable*.
* A **Timestamp** date/time is entered for the current date and time. You can adjust this and enter a date/time value that is in the past for your submission. This is useful if you need to adjust billing on an Account retrospectively. For more details, see [Using Timestamp to Submit Usage Data Adjustments](/guides/billing-and-usage-data/submitting-usage-data/submitting-test-usage-data#using-timestamp-to-submit-usage-data-adjustments). (*Required*)
* **End timestamp**. Can be used in those cases where a usage event needs to have an explicit start and end rather than being instantaneous. (*Optional*)
* The *Code* strings for the **Meter** and **Account** are entered automatically - these are required parameters for a [Submit Measurements API call](/api/measurements/submit-measurements) to the m3ter Ingest API.
* Enter a **Value** for each of the Meter Data fields as required for the usage data submission. In this example, the selected Meter has a single **MEASURE** numeric Data Field.
* Note that a **Log** of your submissions will be built at the right-hand side as you submit measurements:
A **Submit usage data** dialog appears.
4. For **Step 1 - Select a meter** on the dialog, use the **Meter** drop-down list to select the Meter whose Data Fields were Target Fields for an Aggregation used for pricing a Plan you've attached to the Account.
5. Select **Next**. The dialog adjusts to show **Step 1** completed and moves you to **Step 2 - Define measurements and send**:
* The default method to complete **Step 2** is **Simple**:
* A measurement **UID** is entered automatically. **Note:** If you edit this string, it must be *unique* and *immutable*.
* A **Timestamp** date/time is entered for the current date and time. You can adjust this and enter a date/time value that is in the past for your submission. This is useful if you need to adjust billing on an Account retrospectively. For more details, see [Using Timestamp to Submit Usage Data Adjustments](/guides/billing-and-usage-data/submitting-usage-data/submitting-test-usage-data#using-timestamp-to-submit-usage-data-adjustments). (*Required*)
* **End timestamp**. Can be used in those cases where a usage event needs to have an explicit start and end rather than being instantaneous. (*Optional*)
* The *Code* strings for the **Meter** and **Account** are entered automatically - these are required parameters for a [Submit Measurements API call](/api/measurements/submit-measurements) to the m3ter Ingest API.
* Enter a **Value** for each of the Meter Data fields as required for the usage data submission. In this example, the selected Meter has a single **MEASURE** numeric Data Field.
* Note that a **Log** of your submissions will be built at the right-hand side as you submit measurements:
![]() * Alternatively, you can switch to **Advanced**, where you can edit the raw JSON for the usage data submission:
* Alternatively, you can switch to **Advanced**, where you can edit the raw JSON for the usage data submission:
![]() **Important!**
* The [Submit Measurements](/api/measurements/submit-measurements) call to the Ingest API requires the Account *Code* string for the `"account"` request parameter. On the **Simple** format, the Account *Name* is used, but when you switch to the **Advanced** format, you'll see that it's the Account *Code* that is being used.
* Any change you make to the **Ingest request body** JSON in **Advanced** format before submitting - such as changing the `“account”` parameter value - will persist and be reflected in the **Simple** format.
* For JSON well-formedness, do not have a trailing comma after the last Data Field parameter entry. If you do, then your **Submit usage** call will be rejected as invalid.
6. Select **Submit usage**. If the submission succeeds, under **Log** you'll see:
* A confirmation message that the measurement was accepted:`{"result" : "accepted"}`
* The measurement **UID** has been regenerated allowing you to quickly enter new Values for Meter Data Fields as required and submit a further measurement:
**Important!**
* The [Submit Measurements](/api/measurements/submit-measurements) call to the Ingest API requires the Account *Code* string for the `"account"` request parameter. On the **Simple** format, the Account *Name* is used, but when you switch to the **Advanced** format, you'll see that it's the Account *Code* that is being used.
* Any change you make to the **Ingest request body** JSON in **Advanced** format before submitting - such as changing the `“account”` parameter value - will persist and be reflected in the **Simple** format.
* For JSON well-formedness, do not have a trailing comma after the last Data Field parameter entry. If you do, then your **Submit usage** call will be rejected as invalid.
6. Select **Submit usage**. If the submission succeeds, under **Log** you'll see:
* A confirmation message that the measurement was accepted:`{"result" : "accepted"}`
* The measurement **UID** has been regenerated allowing you to quickly enter new Values for Meter Data Fields as required and submit a further measurement:
![]() 7. Re-enter second set of measure values for the Meter Data Fields.
8. Select **Submit usage** again to submit a second set of usage data.
**Tip: Account consumes several Products?** If the Account for which you want to test Billing consumes more that one of your Products, you can select **Back** to select a Meter that is set up to collect usage data for a different Product, and repeat these steps for each of the Meters used as the basis for pricing each of the Product Plans attached to the Account.
**Tip: Using Data Explorer to check usage data ingest:**
* Submitted usage data can be queried for and then viewed using the Data Explorer. See [Performing Usage Queries and Reviewing Results](/guides/data-explorer/performing-usage-queries-and-reviewing-results) for details.
* However, please note that in the *special case* where, after submitting some usage data for an Account, you have:
* Deleted the Account and recreated it using the same Code.
* Submitted further usage data for the recreated Account.
* Then, usage data queries using the Data Explorer will not be synchronized fully with the usage data linked to the Account for Billing purposes.
* This is because the usage data linked to the now deleted Account is no longer available for Billing against the new recreated Account, but remains available for Data Explorer queries using the same Account Code.
* As a matter of best practice when managing your customer Accounts, we *strongly recommend* against deleting and recreating Accounts using the *same Code*. Please see [Managing Accounts - Best Practices](/guides/end-customer-accounts/managing-accounts-best-practices) for more on the implications of doing this.
# Working in Account Overview
Source: https://docs.m3ter.com/guides/end-customer-accounts/working-in-account-overview
When you first open an Account page, the *Overview* tab is selected. From here, you can quickly review key aspects of the current setup and state of the Account:
* The latest Bills for the Account are listed and you can view charts that track revenue, billed usage data, and billed recurring charges data for the service period covered by the latest Bills.
* Linked entities on the Account are listed and you can review and manage these directly from the tab:
* Prepayments
* Attached Plans
* Contracts
* Charges
* Account usage by selected Aggregation.
* Metadata for any Custom Fields, External Mappings, or Integrations runs linked to the Account are shown.
This topic explains how to work in the Account Overview tab to review latest Bills on an Account and review and manage linked entities on an Account:
* [Reviewing Latest Bills on Accounts](/guides/end-customer-accounts/working-in-account-overview#reviewing-latest-bills-on-account)
* [Reviewing Linked Account Entities](/guides/end-customer-accounts/working-in-account-overview#reviewing-linked-account-entities)
* [Checking Account Usage](#checking-account-usage)
* [Reviewing Account Metadata](/guides/end-customer-accounts/working-in-account-overview#reviewing-account-metadata)
## Reviewing Latest Bills on Account
When you open an Account's **Overview** tab, on the **Latest bills** card the latest ten Bills for the Account are listed ordered by Bill date with the most recent Bill at the top:
* A chart tracking revenue for the **Latest bills** is also loaded:
7. Re-enter second set of measure values for the Meter Data Fields.
8. Select **Submit usage** again to submit a second set of usage data.
**Tip: Account consumes several Products?** If the Account for which you want to test Billing consumes more that one of your Products, you can select **Back** to select a Meter that is set up to collect usage data for a different Product, and repeat these steps for each of the Meters used as the basis for pricing each of the Product Plans attached to the Account.
**Tip: Using Data Explorer to check usage data ingest:**
* Submitted usage data can be queried for and then viewed using the Data Explorer. See [Performing Usage Queries and Reviewing Results](/guides/data-explorer/performing-usage-queries-and-reviewing-results) for details.
* However, please note that in the *special case* where, after submitting some usage data for an Account, you have:
* Deleted the Account and recreated it using the same Code.
* Submitted further usage data for the recreated Account.
* Then, usage data queries using the Data Explorer will not be synchronized fully with the usage data linked to the Account for Billing purposes.
* This is because the usage data linked to the now deleted Account is no longer available for Billing against the new recreated Account, but remains available for Data Explorer queries using the same Account Code.
* As a matter of best practice when managing your customer Accounts, we *strongly recommend* against deleting and recreating Accounts using the *same Code*. Please see [Managing Accounts - Best Practices](/guides/end-customer-accounts/managing-accounts-best-practices) for more on the implications of doing this.
# Working in Account Overview
Source: https://docs.m3ter.com/guides/end-customer-accounts/working-in-account-overview
When you first open an Account page, the *Overview* tab is selected. From here, you can quickly review key aspects of the current setup and state of the Account:
* The latest Bills for the Account are listed and you can view charts that track revenue, billed usage data, and billed recurring charges data for the service period covered by the latest Bills.
* Linked entities on the Account are listed and you can review and manage these directly from the tab:
* Prepayments
* Attached Plans
* Contracts
* Charges
* Account usage by selected Aggregation.
* Metadata for any Custom Fields, External Mappings, or Integrations runs linked to the Account are shown.
This topic explains how to work in the Account Overview tab to review latest Bills on an Account and review and manage linked entities on an Account:
* [Reviewing Latest Bills on Accounts](/guides/end-customer-accounts/working-in-account-overview#reviewing-latest-bills-on-account)
* [Reviewing Linked Account Entities](/guides/end-customer-accounts/working-in-account-overview#reviewing-linked-account-entities)
* [Checking Account Usage](#checking-account-usage)
* [Reviewing Account Metadata](/guides/end-customer-accounts/working-in-account-overview#reviewing-account-metadata)
## Reviewing Latest Bills on Account
When you open an Account's **Overview** tab, on the **Latest bills** card the latest ten Bills for the Account are listed ordered by Bill date with the most recent Bill at the top:
* A chart tracking revenue for the **Latest bills** is also loaded:
![Latest Bills15]() * Hover over a Bill date to check the **Total billed** amount.
* If you want to review all Bills for the Account, select **View all**. The Account **Bills** tab opens.
You can also bring up billed quantities charts for **Latest bills**. These show the quantities used for billed amounts - either for usage charges by an Aggregation used to price Account Plans or for recurring charges by a Counter used to price Account Plans.
* For the **Billed usage** chart, select an **Aggregation**:
* Hover over a Bill date to check the **Total billed** amount.
* If you want to review all Bills for the Account, select **View all**. The Account **Bills** tab opens.
You can also bring up billed quantities charts for **Latest bills**. These show the quantities used for billed amounts - either for usage charges by an Aggregation used to price Account Plans or for recurring charges by a Counter used to price Account Plans.
* For the **Billed usage** chart, select an **Aggregation**:
 * The usage data measures used for billed usage are loaded into the chart, and you can hover over a data point to read-off a specific measure:
![Latest Bills17]() * For the **Billed recurring charges** chart, select a **Counter**:
* For the **Billed recurring charges** chart, select a **Counter**:
![]() * The Counter values used for billed recurring charges are loaded into the chart, and you can hover over a data point to read-off a specific value:
* The Counter values used for billed recurring charges are loaded into the chart, and you can hover over a data point to read-off a specific value:
![Latest Bills18]() * Note that the same zoom controls and download functions available on the revenue tracker chart are available on these billed quantities charts also.
**Tip: Charts not Showing?** There are cases where charts will not show on the Account Overview tab:
* The revenue tracking chart for an Account's **Latest bills** will not show if the Bills listed are in mixed currencies.
* The **Billed usage** and **Billed recurring charges** charts will not show if all of the Account's **Latest bills** are made up of standing charge, minimum spend, Prepayment fees, or Balance draw-down charge line items, since non of these charges are based on aggregated usage measures or Counter values.
## Reviewing Linked Account Entities
When you scroll down the **Overview** tab, you can review and manage entities linked to the Account:
* [Reviewing Prepayments](#reviewing-prepayments)
* [Reviewing Attached Plans](#reviewing-attached-plans)
* [Reviewing Contracts](#reviewing-contracts)
* [Reviewing Charges](#reviewing-charges)
### Reviewing Prepayments
The **Active and pending prepayments** card lists any Prepayments created for the Account:
* You can manage any of the Prepayments listed directly from here:
* Select the hotlink text of a Prepayment to open the **Prepayment details** page. See [Viewing Prepayment Details](/guides/end-customer-accounts/creating-prepayments-for-accounts#viewing-prepayment-details).
* Duplicate a Prepayment for the Account. See [Duplicating Prepayments](/guides/end-customer-accounts/creating-prepayments-for-accounts#duplicating-prepayments).
* **Edit** or **Delete** a Prepayment.
* If you want to add a new Prepayment to the Account, select **Create prepayment**. The **Prepayments>Create** page opens for the Account. See [Creating Prepayments for Accounts](/guides/end-customer-accounts/creating-prepayments-for-accounts).
* If you want to go to the **Account>Prepayments tab**, select **View all**.
### Reviewing Attached Plans
The **Active and pending attached plans** card lists any Plans attached to the Account:
* You can manage any of the attached Account Plans listed directly from here:
* Select the hotlink text of an attached Plan to open the **Plan attachment** page and review the Account Plan details.
* **Edit** or **Delete** an attached Account Plan.
* If you want attach another Plan to the Account, select **Create plan attachment**. The **Attached plans>Create** page opens. See [Attaching Plans to an Account](/guides/end-customer-accounts/attaching-plans-to-an-account).
* If you want to create a custom Account Plan or custom Account Plan Group for the Account, use the three-dot menu at top-right. The **Attached plans>Create** page opens. See [Creating Custom Plans for Accounts](/guides/end-customer-accounts/creating-custom-account-plans) or [Creating Custom Plan Groups for Accounts](/guides/end-customer-accounts/creating-custom-plan-groups-for-accounts):
* Note that the same zoom controls and download functions available on the revenue tracker chart are available on these billed quantities charts also.
**Tip: Charts not Showing?** There are cases where charts will not show on the Account Overview tab:
* The revenue tracking chart for an Account's **Latest bills** will not show if the Bills listed are in mixed currencies.
* The **Billed usage** and **Billed recurring charges** charts will not show if all of the Account's **Latest bills** are made up of standing charge, minimum spend, Prepayment fees, or Balance draw-down charge line items, since non of these charges are based on aggregated usage measures or Counter values.
## Reviewing Linked Account Entities
When you scroll down the **Overview** tab, you can review and manage entities linked to the Account:
* [Reviewing Prepayments](#reviewing-prepayments)
* [Reviewing Attached Plans](#reviewing-attached-plans)
* [Reviewing Contracts](#reviewing-contracts)
* [Reviewing Charges](#reviewing-charges)
### Reviewing Prepayments
The **Active and pending prepayments** card lists any Prepayments created for the Account:
* You can manage any of the Prepayments listed directly from here:
* Select the hotlink text of a Prepayment to open the **Prepayment details** page. See [Viewing Prepayment Details](/guides/end-customer-accounts/creating-prepayments-for-accounts#viewing-prepayment-details).
* Duplicate a Prepayment for the Account. See [Duplicating Prepayments](/guides/end-customer-accounts/creating-prepayments-for-accounts#duplicating-prepayments).
* **Edit** or **Delete** a Prepayment.
* If you want to add a new Prepayment to the Account, select **Create prepayment**. The **Prepayments>Create** page opens for the Account. See [Creating Prepayments for Accounts](/guides/end-customer-accounts/creating-prepayments-for-accounts).
* If you want to go to the **Account>Prepayments tab**, select **View all**.
### Reviewing Attached Plans
The **Active and pending attached plans** card lists any Plans attached to the Account:
* You can manage any of the attached Account Plans listed directly from here:
* Select the hotlink text of an attached Plan to open the **Plan attachment** page and review the Account Plan details.
* **Edit** or **Delete** an attached Account Plan.
* If you want attach another Plan to the Account, select **Create plan attachment**. The **Attached plans>Create** page opens. See [Attaching Plans to an Account](/guides/end-customer-accounts/attaching-plans-to-an-account).
* If you want to create a custom Account Plan or custom Account Plan Group for the Account, use the three-dot menu at top-right. The **Attached plans>Create** page opens. See [Creating Custom Plans for Accounts](/guides/end-customer-accounts/creating-custom-account-plans) or [Creating Custom Plan Groups for Accounts](/guides/end-customer-accounts/creating-custom-plan-groups-for-accounts):
![]() * If you want to go to the **Account>Attached plans tab**, select **View all**.
### Reviewing Contracts
The **Active and pending contracts** card lists any Contracts added to the Account:
* You can manage any of the Contracts listed:
* Select the hotlink text of a Contract to open the **Contract Details** page.
* **Edit** a Contract or **Delete** a Contract from the Account.
* If you want to add a new Contract to the Account, select **Create contract**. The **Contracts>Create** page opens for the Account. See [Creating Contracts for Accounts](/guides/end-customer-accounts/creating-contracts-for-accounts).
* If you want to go to the **Account>Contracts** tab, select **View all**.
### Reviewing Charges
The **Charges** card lists any Charges created for the Account:
* You can manage any of the Charges listed:
* Select the hotlink text of a Charge to open the **Charge details** page.
* **Edit** a Charge or **Delete** a Charge from the Account.
* If you want to add a Charge to the Account, select **Create charge**. The **Charges>Create** page opens. See [Creating Charges for Accounts](/guides/end-customer-accounts/creating-charges-for-accounts).
* If you want to go to the **Account>Charges** tab, select **View all**.
## Checking Account Usage
On the **Usage** panel, you can select a simple, non-segmented Aggregation to open a chart tracking Account usage:
* If you want to go to the **Account>Attached plans tab**, select **View all**.
### Reviewing Contracts
The **Active and pending contracts** card lists any Contracts added to the Account:
* You can manage any of the Contracts listed:
* Select the hotlink text of a Contract to open the **Contract Details** page.
* **Edit** a Contract or **Delete** a Contract from the Account.
* If you want to add a new Contract to the Account, select **Create contract**. The **Contracts>Create** page opens for the Account. See [Creating Contracts for Accounts](/guides/end-customer-accounts/creating-contracts-for-accounts).
* If you want to go to the **Account>Contracts** tab, select **View all**.
### Reviewing Charges
The **Charges** card lists any Charges created for the Account:
* You can manage any of the Charges listed:
* Select the hotlink text of a Charge to open the **Charge details** page.
* **Edit** a Charge or **Delete** a Charge from the Account.
* If you want to add a Charge to the Account, select **Create charge**. The **Charges>Create** page opens. See [Creating Charges for Accounts](/guides/end-customer-accounts/creating-charges-for-accounts).
* If you want to go to the **Account>Charges** tab, select **View all**.
## Checking Account Usage
On the **Usage** panel, you can select a simple, non-segmented Aggregation to open a chart tracking Account usage:
![Account Overview14]() * You can hover a data point to read-off the value.
* If additional usage is ingested into the system during the selected time period for the Meter the selected Aggregation targets and while you are viewing the chart, the chart will automatically update.
* You can manually refresh the chart at any time using the button against the **Last updated** date/time stamp:
* You can hover a data point to read-off the value.
* If additional usage is ingested into the system during the selected time period for the Meter the selected Aggregation targets and while you are viewing the chart, the chart will automatically update.
* You can manually refresh the chart at any time using the button against the **Last updated** date/time stamp:
![Account Overview15]() The default time period for usage to be shown is **Last 30 days** but you can select a different time period either before you select an Aggregation or after the chart has loaded:
The default time period for usage to be shown is **Last 30 days** but you can select a different time period either before you select an Aggregation or after the chart has loaded:
![Account Overview10]() Options are:
* **Today** or **Yesterday**
* **Week**, **Month**, or **Year to date**
* **Previous week**, **month**, **quarter**, or **year**
* **Last 12 hours**
* **Last 7**, **30**, **35**, **90**, or **120 days**
* **Last year**
If you want to review the ingested usage data directly, you can select **View in Data Explorer**. The **Usage Data Explorer** opens and runs a query for the Account against the Meter the selected Aggregation targets and for the selected time period - for the current example:
Options are:
* **Today** or **Yesterday**
* **Week**, **Month**, or **Year to date**
* **Previous week**, **month**, **quarter**, or **year**
* **Last 12 hours**
* **Last 7**, **30**, **35**, **90**, or **120 days**
* **Last year**
If you want to review the ingested usage data directly, you can select **View in Data Explorer**. The **Usage Data Explorer** opens and runs a query for the Account against the Meter the selected Aggregation targets and for the selected time period - for the current example:
![Account Overview13]() ## Reviewing Account Metadata
When you scroll down the **Overview** tab, you can review **Account metadata**:
**Custom fields**. Any Custom Fields created for the Account are listed:
## Reviewing Account Metadata
When you scroll down the **Overview** tab, you can review **Account metadata**:
**Custom fields**. Any Custom Fields created for the Account are listed:
![Account Overview2]() * You can **Copy** the *String* or *Number* value of a Custom Field to your clipboard. See [Working with Custom Fields](/guides/creating-and-managing-products/working-with-custom-fields) for more details.
**External mappings**. Any existing mappings created for the Account are listed:
* You can **Copy** the *String* or *Number* value of a Custom Field to your clipboard. See [Working with Custom Fields](/guides/creating-and-managing-products/working-with-custom-fields) for more details.
**External mappings**. Any existing mappings created for the Account are listed:
![Account Overview4]() * For each mapping, the **External system** and **External table** mapped to are shown. The **External entity ID** mapped to is also shown.
* If a listed External mapping is linked to an Integration, under **Linked integration** a hotlink text will be shown which you can use to open the Integration.
* Under **Actions**, you can edit or delete the External mapping.
* If the Account has multiple External mappings created for it, you can use *Search external mappings* to search by **External table** and **External entity ID** and filter the list.
* You can commence a workflow to **Create external mapping** for the Account directly - see [Creating and Managing External Mappings for Accounts](/guides/end-customer-accounts/creating-and-managing-external-mappings-for-accounts) for an example.
**Integration runs**. If you've set up an integration that synchronizes the Account with an external system, the date/time and status of the **Latest** integration run are shown. You can use a text hotlink to open details of this latest run or **View all runs**. See [Reviewing Integration Run Details](/guides/integrations/setting-up-integrations/reviewing-integration-run-details).
# Getting Started
Source: https://docs.m3ter.com/guides/getting-started
Use this section to get started working in the m3ter platform:
* [Quick Start](/guides/getting-started/quick-start-worked-example). Follow a first pass Console quick start workflow to see how easy it is to set up metered billing for customer usage on your products and services.
* [m3ter Console](/guides/getting-started/working-in-the-m3ter-console). Take a comprehensive tour of the Console, including a video orientation.
* [Configuration Workflow](/guides/getting-started/previewing-main-configuration-steps). Review the core configuration workflow needed to achieve the production of Account Bills rated in accordance with the usage-based pricing you've set up for your Products.
* [Worked Examples](/guides/getting-started/metering-for-production-worked-examples). Review examples for implementing usage-based pricing solutions, presented as easy-to-follow video tutorials to ramp up your m3ter expertise level.
* [Dates in m3ter - Quick Reference Starter](/guides/getting-started/working-with-dates-in-m3ter-easy-reference). Check how dates are handled in m3ter for key configuration and operational contexts, such as when defining dates for billing operations
* [Feature Release Stages](/guides/getting-started/feature-release-stages). m3ter releases some features as Beta or Preview prior to General Availability. Please review this topic to ensure you are aware of what each of these release stages mean.
* [Knowledge Index](/guides/getting-started/knowledge-index). Bookmark this page as a handy index listing to quickly find information about specific m3ter entities or areas of functionality.
* [Contacting m3ter Support](/guides/getting-started/contacting-m3ter-support). You can contact m3ter Support to report an incident, request technical support, ask billing or account questions, submit general feature requests, and log defects
**Working with m3ter APIs!** Please review the [m3ter APIs](/guides/m3ter-apis) section before you start to work with our APIs. The [Getting Started with API Calls](/guides/m3ter-apis/getting-started-with-api-calls) topic offers quick start guidance and provides some examples. Instructions are also given for [Importing m3ter Collections into your Postman Workspace](/guides/m3ter-apis/getting-started-with-api-calls#importing-m3ter-collections-into-your-postman-workspace).
# Contacting m3ter Support
Source: https://docs.m3ter.com/guides/getting-started/contacting-m3ter-support
Contact [m3ter Support](https://m3ter.myfreshworks.com/login/auth/1662629775049?client_id=451980218021503405\&redirect_uri=https%3A%2F%2Fm3ter.freshdesk.com%2Ffreshid%2Fcustomer_authorize_callback%3Fhd%3Dm3ter.freshdesk.com) by submitting a support request using the channels available to you as set out in the [Support Terms](https://www.m3ter.com/docs/legal/support-terms) and as advised during your onboarding process (depending on your m3ter Support entitlement).
## Submitting a Support Request
You can report an incident, request technical support, ask billing or account questions, submit general feature requests, and log defects.
Please provide as much information as possible when you raise a support request:
| What to Include | Details |
| - | - |
| Organization ID | The relevant Organization ID, which you can get from the URL when you access the m3ter Console. In the Console, you can also read-off the ID at: Settings>Organization>Configuration>Organization details and copy it from there. |
| Organization Type | Whether the relevant Organization is a Production, Non-Production, or Sandbox m3ter Organization. |
| Issue Impact | For service issues, a measure of the impact the issue is having on your normal operations. |
| Account ID | The relevant end-customer Account ID (if the issue relates to a specific end-customer). |
| User ID | If this is a service issue, the User ID of the logged in user at time of issue. Otherwise, the most relevant User ID in relation to the request. |
| Start Time | If an issue has occurred, when did you notice it start? |
| Area of Interaction | What were you trying to do when the issue occurred? Were you using the Console, if so which area? Were you attempting to make and API call and, if so, which endpoint were you trying to call? |
| Service Function | If the issue is with the m3ter service, which part of the service were you using? (Ingest, Billing & Rating, Analytics, and so on) |
| Description | What were you trying to accomplish? As much detail as you can provide regarding what the support request is about. |
| Steps to Reproduce | If this is a service issue - please describe the exact steps required to reproduce the issue. |
| Expected and Actual Behavior | If this is a service issue - what did you expect to happen and what actually did happen? |
| Additional Information | Include any screenshots or other files such as logs if these will help us to better understand the issue. |
**Important:** **Exclusions!** m3ter Support does not cover directly any third-party software connected via our integrations. Any m3ter created integration is supported, should the problem be related to the integration itself.
# Feature Release Stages
Source: https://docs.m3ter.com/guides/getting-started/feature-release-stages
m3ter releases some features as Beta or Preview prior to General Availability. There are some important differences between these release stages that you should be aware of before using them:
* [Beta Release](/guides/getting-started/feature-release-stages#beta-release)
* [Preview Release](/guides/getting-started/feature-release-stages#preview-release)
**Note: Documentation - release stage reminders.** Topics in this user documentation that cover Beta or Preview release features will carry a reminder and link you back to these definitions.
## Beta Release
### Definition
We use the Beta release stage as a mechanism to give customers early sight of a feature and collect feedback. Beta features are typically made available to customers with relevant use cases who are often actively working with us on the feature’s development, but they are sometimes made available to all customers.
### Constraints
Beta features may change in backwards-incompatible ways, and configuration may not persist from the Beta to future stages. We therefore recommend against using features at the Beta release stage for critical functionality.
## Preview Release
### Definition
Preview features are in the final stages of testing.
### Constraints
Preview features are typically stable and only minor changes are made prior to becoming Generally Available. However, we recommend customers discuss with us prior to relying on them for critical functionality because backwards-incompatible changes do occasionally need to be made.
## Service and Support
Service and Support Level Agreements (SLAs) are not applicable to Beta and Preview features.
# Knowledge Index
Source: https://docs.m3ter.com/guides/getting-started/knowledge-index
Use this index listing to quickly find information about specific m3ter entities or areas of functionality.
**AI Assistant!** Have you tried our AI Assistant to obtain the information you need? In the Console, you can quickly open the **Help** panel, select **Ask AI**, and then type in a search term or a specific question you have to obtain the information you need - see [Help Links](https://docs.m3ter.com/guides/getting-started/working-in-the-m3ter-console#help-links) for more details.
## Accounts
Represents one of your end-customer accounts:
* [attaching Plans to](/guides/end-customer-accounts/attaching-plans-to-an-account)
* [attaching Plan Groups to](/guides/end-customer-accounts/attaching-plan-groups-to-an-account)
* [best practices for managing](/guides/end-customer-accounts/managing-accounts-best-practices)
* [billing for Parent/Child accounts](/guides/end-customer-accounts/creating-and-working-with-child-accounts/billing-for-parent-child-accounts)
* [creating and managing](/guides/end-customer-accounts)
* [creating Balances for](/guides/end-customer-accounts/creating-balances-for-accounts)
* [creating Child Accounts for](/guides/end-customer-accounts/creating-and-working-with-child-accounts)
* [creating Contracts for](/guides/end-customer-accounts/creating-contracts-for-accounts)
* [creating Custom Plans for](/guides/end-customer-accounts/creating-custom-account-plans)
* [creating Custom Plan Groups for](/guides/end-customer-accounts/creating-custom-plan-groups-for-accounts)
* [creating Prepayments for](/guides/end-customer-accounts/creating-prepayments-for-accounts)
* [creating External Mappings for](/guides/end-customer-accounts/creating-and-managing-external-mappings-for-accounts)
* [defining day before bills due for](/guides/end-customer-accounts/creating-an-account)
* [end dating Account billing entities](/guides/end-customer-accounts/end-dating-account-billing-entities)
* [reviewing Bills for](/guides/end-customer-accounts/reviewing-bills-for-an-account)
* [submitting usage data for](/guides/end-customer-accounts/submitting-usage-data-for-an-account)
## Account Plans
Plans are attached to Accounts to create Account Plans, which then determine the charges incurred by your end customer.
* [creating by attaching Plan to Account](/guides/end-customer-accounts/attaching-plans-to-an-account)
* [defining active period for Account](/guides/end-customer-accounts/attaching-plans-to-an-account)
## Account Plan Groups
Plan Groups are attached to Accounts to create Account Plan Groups, which then determine the charges incurred by your end customer.
* [creating by attaching Plan Group to Account](/guides/end-customer-accounts/attaching-plan-groups-to-an-account)
* [defining active period for Account](/guides/end-customer-accounts/attaching-plan-groups-to-an-account)
## Aggregations
Aggregations define how to convert into a single number individual usage data measurements collected by Meter fields. They are used to configure pricing for Product Plans.
* [creating Compound Aggregations](/guides/usage-data-aggregations/compound-aggregations)
* [creating Custom SQL Aggregations](/guides/usage-data-aggregations/custom-sql-aggregations)
* [creating Global Aggregations](/guides/usage-data-aggregations/creating-global-aggregations)
* [creating Product Aggregations](/guides/usage-data-aggregations/creating-aggregations)
* [creating Segmented Aggregations](/guides/usage-data-aggregations/segmented-aggregations)
* [defining aggregation method for:](/guides/usage-data-aggregations/reviewing-aggregation-options#configuring-aggregations)
* [use Sum of values](/guides/usage-data-aggregations/reviewing-aggregation-options#configuring-aggregations)
* [use Min or Max values](/guides/usage-data-aggregations/reviewing-aggregation-options#configuring-aggregations)
* [use Count of number of values](/guides/usage-data-aggregations/reviewing-aggregation-options#configuring-aggregations)
* [use Mean of values](/guides/usage-data-aggregations/reviewing-aggregation-options#configuring-aggregations)
* [use Latest value](/guides/usage-data-aggregations/reviewing-aggregation-options#configuring-aggregations)
* [use Count of Unique values](/guides/usage-data-aggregations/reviewing-aggregation-options#configuring-aggregations)
* [use Custom SQL query result value](/guides/usage-data-aggregations/reviewing-aggregation-options#configuring-aggregations)
* [pricing Plans with](/guides/plans-and-pricing/pricing-plans/pricing-plans#setting-up-to-price-plansplan-templates-in-the-pricing-editor)
* [reviewing options for](/guides/usage-data-aggregations/reviewing-aggregation-options)
## APIs
The m3ter platform supports two HTTP-based REST APIs returning JSON encoded responses:
* The **Config API**, which you can use for configuration requests and management.
* The **Ingest API**, which you can use for submitting raw data measurements.
We impose limits on the calls you make to both of our APIs to maintain optimum performance and high availability for all customers.
* [call for submitting usage data](/guides/billing-and-usage-data/submitting-usage-data/api-calls-for-data-ingest)
* [getting started with](/guides/m3ter-apis/getting-started-with-api-calls)
* [http error codes returned](/guides/m3ter-apis/http-error-codes)
* [limits for Config API](/guides/m3ter-apis/config-api-limits)
* [limits for Data Explorer](/guides/m3ter-apis/config-api-limits#date-explorer-request-rate-limits)
* [limits for Ingest API](/guides/m3ter-apis/ingest-api-limits)
* [optimizing Ingest submissions](/guides/m3ter-apis/ingest-api-limits)
* [API reference docs](https://m3ter.com/docs/api)
* [supported APIs](/guides/m3ter-apis)
## Authentication
The m3ter platform supports several authentication methods:
* [service authentication for API calls](/guides/authenticating-with-the-platform/service-authentication)
* [single sign-on for federated identities](/guides/authenticating-with-the-platform/m3ter-single-sign-on)
* [user/password for login to console](/guides/authenticating-with-the-platform/user-password-authentication)
## Balances
*Balances* are created for end customer Accounts. You use Transactions to add and flexibly manage Balance amounts on Accounts. End-customers can then draw-down against their Balance amounts for any charges due throughout the period the Balance is active for the Account and a Transactions ledger is maintained for the Balance:
* [adding transactions to](/guides/end-customer-accounts/creating-balances-for-accounts/creating-and-managing-transactions-for-balances)
* [creating for accounts](/guides/end-customer-accounts/creating-balances-for-accounts/creating-and-managing-account-balances)
* [draw-down order against prepayments/commitments](/guides/end-customer-accounts/creating-balances-for-accounts/understanding-billing-for-balances#understanding-charges-draw-down-against-balances-for-billing)
* [overage pricing for](/guides/plans-and-pricing/pricing-plans/reviewing-pricing-options-and-pricing-plans)
* [overage surcharge percentage for](/guides/end-customer-accounts/creating-balances-for-accounts/understanding-billing-for-balances)
* [selecting charge types for](/guides/end-customer-accounts/creating-balances-for-accounts/understanding-billing-for-balances#draw-down-charge-types)
* [selecting products for](/guides/end-customer-accounts/creating-balances-for-accounts/creating-and-managing-account-balances)
* [understanding charges draw-down against for billing](/guides/end-customer-accounts/creating-balances-for-accounts/understanding-billing-for-balances#understanding-charges-draw-down-against-balances-for-billing)
* [working with balance transactions ledger](/guides/end-customer-accounts/creating-balances-for-accounts/creating-and-managing-transactions-for-balances#working-with-the-balance-transactions-ledger)
### Balance Transaction Schedules
You can set up a *Transaction Schedule* for a Balance. This allows you to generate Transactions of a specific type for a Balance at regular daily, weekly, monthly, or yearly intervals over a specified time period:
* [setting up transaction schedules](/guides/end-customer-accounts/creating-balances-for-accounts/setting-transaction-schedules-for-balances)
* [reviewing transaction schedules](/guides/end-customer-accounts/creating-balances-for-accounts/setting-transaction-schedules-for-balances#reviewing-transaction-schedules-for-a-balance)
### Balance Charges
You can create *Charges* for Balances to create single, one-off line items for Balance billing:
* [creating charges](/guides/end-customer-accounts/creating-balances-for-accounts/creating-charges-for-balances)
* [viewing charge details](/guides/end-customer-accounts/creating-balances-for-accounts/creating-charges-for-balances#viewing-balance-charge-details)
* [editing and deleting charges](/guides/end-customer-accounts/creating-balances-for-accounts/creating-charges-for-balances#editing-and-deleting-balance-charges)
### Balance Charge Schedules
You can set up a *Charge Schedule* for a Balance on an Account. This allows you to generate Charges for billing a Balance at regular daily, weekly, monthly, or yearly intervals over a specified time period:
* [setting up charge schedules](/guides/end-customer-accounts/creating-balances-for-accounts/setting-charge-schedules-for-balances)
* [reviewing charge schedules](/guides/end-customer-accounts/creating-balances-for-accounts/setting-charge-schedules-for-balances#reviewing-balance-charge-schedules)
* [viewing and managing scheduled charges](/guides/end-customer-accounts/creating-balances-for-accounts/setting-charge-schedules-for-balances#viewing-and-managing-scheduled-charges-for-balances)
## Bills & Billing
Bills are generated for an Account based on the usage-based pricing Plan that has been attached to the Account for charging the Account for consuming a Product. Plan Templates/Plans offer settings to control billing on Accounts that Product Plans are attached to for charging the Accounts.
* [adding debit line items to bills](/guides/billing-and-usage-data/running-viewing-and-managing-bills/adding-debit-line-items-to-bills)
* [adding credit line items to bills](/guides/billing-and-usage-data/running-viewing-and-managing-bills/adding-credit-line-items-to-bills)
* [approving](/guides/billing-and-usage-data/running-viewing-and-managing-bills/approving-and-locking-bills-managing-bill-lifecycle)
* [auto-approval for](/guides/billing-and-usage-data/running-viewing-and-managing-bills/approving-and-locking-bills-managing-bill-lifecycle#auto-approving-bills)
* [bill line item types explained](/guides/billing-and-usage-data/running-viewing-and-managing-bills/bill-line-item-types)
* [bills for accounts:](/guides/end-customer-accounts/reviewing-bills-for-an-account)
* [reviewing](/guides/end-customer-accounts/reviewing-bills-for-an-account)
* [recalculating](/guides/end-customer-accounts/reviewing-bills-for-an-account)
* [billing for parent/child accounts](/guides/end-customer-accounts/creating-and-working-with-child-accounts#billing-for-parentchild-accounts)
* [currency conversion rates for](/guides/organization-and-access-management/viewing-and-editing-organization/viewing-and-editing-organization-configuration)
* [dates for billing](/guides/getting-started/working-with-dates-in-m3ter-easy-reference#dates-for-billing-and-pricing)
* [downloading](/guides/billing-and-usage-data/running-viewing-and-managing-bills/managing-bills)
* [filtering](/guides/billing-and-usage-data/running-viewing-and-managing-bills/running-bills-and-viewing-bill-details#filtering-bills-by-status)
* [global lock date for](/guides/billing-and-usage-data/running-viewing-and-managing-bills/approving-and-locking-bills-managing-bill-lifecycle#setting-global-lock-date)
* [lifecycle for](/guides/billing-and-usage-data/running-viewing-and-managing-bills/approving-and-locking-bills-managing-bill-lifecycle)
* [locking](/guides/billing-and-usage-data/running-viewing-and-managing-bills/approving-and-locking-bills-managing-bill-lifecycle)
* [managing](/guides/billing-and-usage-data/running-viewing-and-managing-bills/managing-bills)
* [pro-rated charges](/guides/billing-and-usage-data/running-viewing-and-managing-bills/troubleshooting-bills#pro-rated-charges)
* [reviewing bills for an account](/guides/end-customer-accounts/reviewing-bills-for-an-account)
* [running](/guides/billing-and-usage-data/running-viewing-and-managing-bills/running-bills-and-viewing-bill-details)
* [running billing manually using modal](/guides/billing-and-usage-data/running-viewing-and-managing-bills/running-bills-and-viewing-bill-details#running-bills-manually)
* [scheduling](/guides/billing-and-usage-data/running-viewing-and-managing-bills/scheduling-billing)
* [settings for billing at organization level:](/guides/organization-and-access-management/viewing-and-editing-organization#viewing-details-and-editing-configuration)
* [billing reference settings](/guides/organization-and-access-management/viewing-and-editing-organization/viewing-and-editing-organization-configuration)
* [bill prefix](/guides/organization-and-access-management/viewing-and-editing-organization/viewing-and-editing-organization-configuration)
* [bill sequence start](/guides/organization-and-access-management/viewing-and-editing-organization/viewing-and-editing-organization-configuration)
* [consolidate bills across billing frequencies](/guides/organization-and-access-management/viewing-and-editing-organization/viewing-and-editing-organization-configuration)
* [external invoice date for](/guides/organization-and-access-management/viewing-and-editing-organization/viewing-and-editing-organization-configuration)
* [days before due](/guides/organization-and-access-management/viewing-and-editing-organization/viewing-and-editing-organization-configuration)
* [scheduled bill interval](/guides/organization-and-access-management/viewing-and-editing-organization#viewing-details-and-editing-configuration)
* [suppress generation of empty bills](/guides/organization-and-access-management/viewing-and-editing-organization#viewing-details-and-editing-configuration)
* [settings for billing using Plan Templates/Plans](/guides/plans-and-pricing/working-with-plan-templates-and-plans/reviewing-configuration-options-for-plans-and-plan-templates):
* [bill currency](/guides/plans-and-pricing/working-with-plan-templates-and-plans/reviewing-configuration-options-for-plans-and-plan-templates#plan-template-options)
* [bill frequency](/guides/plans-and-pricing/working-with-plan-templates-and-plans/reviewing-configuration-options-for-plans-and-plan-templates#plan-template-options)
* [bill interval](/guides/plans-and-pricing/working-with-plan-templates-and-plans/reviewing-configuration-options-for-plans-and-plan-templates#plan-template-options)
* [standing charge](/guides/plans-and-pricing/working-with-plan-templates-and-plans/understanding-billing-options-for-plan-templates-plans#standing-charge)
* [standing charge interval](/guides/plans-and-pricing/working-with-plan-templates-and-plans/understanding-billing-options-for-plan-templates-plans#standing-charge)
* [standing charge offset](/guides/plans-and-pricing/working-with-plan-templates-and-plans/understanding-billing-options-for-plan-templates-plans#standing-charge)
* [product minimum spend](/guides/plans-and-pricing/working-with-plan-templates-and-plans/understanding-billing-options-for-plan-templates-plans#minimum-spend)
* [statements for](/guides/billing-and-usage-data/running-viewing-and-managing-bills/working-with-bill-statements)
* [troubleshooting](/guides/billing-and-usage-data/running-viewing-and-managing-bills/troubleshooting-bills)
* [viewing details](/guides/billing-and-usage-data/running-viewing-and-managing-bills/running-bills-and-viewing-bill-details)
* [viewing history](/guides/m3ter-calculation-engine)
## Calculation Engine
You can exploit the m3ter platform's powerful *Calculation Engine* as you create calculations for *Meter Derived Fields*,\* Compound Aggregations\*, or *Notification Rules*.
* [m3ter calculation engine](/guides/m3ter-calculation-engine)
## Charges
You can create *Charges* for your end-customer Accounts to create ad-hoc or one-off line items for Account billing.
* [common use cases for](/guides/end-customer-accounts/creating-charges-for-accounts#charges-common-use-cases)
* [creating](/guides/end-customer-accounts/creating-charges-for-accounts)
* [viewing bills for](/guides/end-customer-accounts/creating-charges-for-accounts#viewing-bills-for-charges)
## Child Accounts
A Child Account is an Account that has a Parent Account defined. End customers with multiple Accounts can be issued with a single Bill for a Parent Account.
* [creating](/guides/end-customer-accounts/creating-and-working-with-child-accounts)
* [reviewing Parent/Child](/guides/end-customer-accounts/creating-and-working-with-child-accounts#reviewing-parentchild-accounts)
* [billing for Parent/Child](/guides/end-customer-accounts/creating-and-working-with-child-accounts#billing-for-parentchild-accounts)
## Compound Aggregations
A Compound Aggregation allows you to derive numerical measures from usage data by applying a calculation to one or more simple Aggregations. The calculation can also reference Custom Fields. You can then use these calculated measures as pricing metrics to set up usage-based pricing Plans for your Products.
* [creating](/guides/usage-data-aggregations/compound-aggregations)
* [bill period variables for calculations](/guides/m3ter-calculation-engine#referencing-bill-period-variables)
* [referencing segmented aggregations in calculations](/guides/usage-data-aggregations/compound-aggregations#compound-aggregations-referencing-values-and-fields-and-supported-syntax)
* [referencing values and fields in calculations](/guides/usage-data-aggregations/compound-aggregations#compound-aggregations-referencing-values-and-fields-and-supported-syntax)
* [syntax for calculations](/guides/usage-data-aggregations/compound-aggregation-calculations)
* [worked example for](/guides/getting-started/metering-for-production-worked-examples/example-2-compound-aggregation-for-sign-up-bonus)
## Contracts
Contracts are created for Accounts. For end customers who consume several different service or product packages, the total Contract value can be reported for accounting purposes. You can bill end-customer Accounts on a Contract basis, giving wide flexibility to fulfill invoicing requirements for cases where you offer customers a specific product package agreement to consume several of your core products.
* [adding attached Plans/Plan Groups to](/guides/end-customer-accounts/creating-contracts-for-accounts#adding-prepayments-to-a-contract)
* [adding Prepayments to](/guides/end-customer-accounts/creating-contracts-for-accounts/creating-and-managing-contracts#adding-prepayments-to-a-contract)
* [creating and managing](/guides/end-customer-accounts/creating-contracts-for-accounts/creating-and-managing-contracts)
* [end dating Contract and Account billing entities](/guides/end-customer-accounts/end-dating-account-billing-entities)
* [setting up contract billing](/guides/end-customer-accounts/creating-contracts-for-accounts/setting-up-contract-billing)
## Counters
Counters are used to create unit-based pricing for Plans and apply [recurring subscription charge](/guides/getting-started/knowledge-index#recurring-charges) rates for your Products.
* [creating](/guides/recurring-charges-counters/creating-counters)
* [creating counter adjustments on accounts](/guides/recurring-charges-counters/creating-counter-adjustments-for-accounts)
* [pricing plans with](/guides/recurring-charges-counters/creating-counters)
* [using for hybrid pricing](/guides/recurring-charges-counters/recurring-charges-example-2-hybrid-pricing)
* [using for seat-based pricing](/guides/recurring-charges-counters/reviewing-bills-for-recurring-charges)
## Credits
You can create and define *Credit Reasons* for your Organization. For Bill adjustments, Credit Reasons can then be used to add a Credit for an existing bill line item or apply a product Credit manually to a Bill.
* [adding credit line items to bills](/guides/organization-and-access-management/viewing-and-editing-organization/creating-debit-reasons)
* [creating credit reasons](/guides/organization-and-access-management/viewing-and-editing-organization/creating-credit-reasons)
## Currency
Currency for *billing* can be set at Organization level or individual Account level. You can also define a different *pricing* currency for your Plans at the Plan Template level. If you do this, the Organization or Account setting is used for billing and you must configure currency conversion rates to determine how charge amounts in the Plan pricing currency are converted into billing currency amounts. If any required currency conversion rates from pricing into billing currency are omitted, billing will fail.
* [adding conversion rates for](/guides/organization-and-access-management/viewing-and-editing-organization/creating-and-managing-currencies#adding-currency-conversion-rates)
* [archiving](/guides/organization-and-access-management/viewing-and-editing-organization/creating-and-managing-currencies)
* [creating and managing](/guides/organization-and-access-management/viewing-and-editing-organization/creating-and-managing-currencies)
* [setting for Organization](/guides/organization-and-access-management/viewing-and-editing-organization/viewing-and-editing-organization-configuration)
* [setting for Plan Templates](/guides/plans-and-pricing/working-with-plan-templates-and-plans/reviewing-configuration-options-for-plans-and-plan-templates)
## Custom Fields
Custom Fields allow you to attach custom data to your Organization and some other individual m3ter entities.
* [adding](/guides/organization-and-access-management/viewing-and-editing-organization/adding-and-editing-custom-fields)
* [referencing in meter derived field calculations](/guides/m3ter-calculation-engine#derived-fields-referencing-fields)
* [referencing in compound aggregation calculations](/guides/m3ter-calculation-engine#compound-aggregations-referencing-values-and-fields)
* [understanding and working with](/guides/creating-and-managing-products/working-with-custom-fields)
## Data Explorers
The m3ter Data Explorers allows you to query data collected for your Organization in the m3ter platform for Usage, Billing, and Prepayments/Commitments.
* [billing data explorer: querying & reviewing billing data](/guides/data-explorer/performing-billing-queries-and-reviewing-results)
* [exporting query results](/guides/data-explorer/exporting-usage-query-results)
* [prepayment data explorer: querying & reviewing prepayments data](/guides/data-explorer/performing-commitments-queries-and-reviewing-results)
* [saving, updating, reusing queries](/guides/data-explorer/saving-queries)
* [usage data explorer: querying & reviewing usage data](/guides/data-explorer/performing-usage-queries-and-reviewing-results)
## Data Exports
The Data Export service allows you to export usage data and operational data from your m3ter Organization directly into your AWS S3 buckets. Currently available in preview release.
* [data export entity schema relationship diagram](/guides/data-exports/data-export-object-relationship-diagram)
* [creating destinations for](/guides/data-exports/creating-data-export-destinations)
* [creating operational data export schedules](/guides/data-exports/creating-operational-data-export-schedules)
* [creating usage data export schedules](/guides/data-exports/creating-export-schedules)
* [reviewing export jobs](/guides/data-exports/reviewing-export-jobs)
* [running ad-hoc operational data exports](/guides/data-exports/running-ad-hoc-operational-data-exports)
* [running ad-hoc usage data exports](/guides/data-exports/running-ad-hoc-data-exports)
## Data Fields
Data Fields are added to Meters and define a raw usage data collection fields.
* [adding to meter](/guides/usage-data-meters/creating-meters)
* [types of data collected](/guides/usage-data-meters/reviewing-meter-options#data-field-options)
## Dates
* [for billing](/guides/getting-started/working-with-dates-in-m3ter-easy-reference#dates-for-billing-and-pricing)
* [for pricing](/guides/getting-started/working-with-dates-in-m3ter-easy-reference#dates-for-billing-and-pricing)
* [for usage data submission](/guides/getting-started/working-with-dates-in-m3ter-easy-reference#dates-for-usage-data)
* [quick reference on](/guides/getting-started/working-with-dates-in-m3ter-easy-reference)
* [setting organization epoch dates](/guides/organization-and-access-management/viewing-and-editing-organization/viewing-and-editing-organization-configuration)
* [setting organization timezone](/guides/organization-and-access-management/viewing-and-editing-organization/viewing-and-editing-organization-configuration)
## Debits
You can create and define *Debit Reasons* for your Organization. For Bill adjustments, Debit Reasons can then be used to add a Debit for an existing bill line item or apply a product Debit manually to a Bill.
* [adding debit line items to bills](/guides/billing-and-usage-data/running-viewing-and-managing-bills/adding-debit-line-items-to-bills)
* [creating debit reasons](/guides/organization-and-access-management/viewing-and-editing-organization/creating-debit-reasons)
## Derived Fields
Derived Fields are configured for Meters and use calculations on other fields to define usage data collection fields. Calculations can reference Meter Data Fields, Custom Fields, and system timestamp fields.
* [adding to meter](/guides/usage-data-meters/creating-meters)
* [examples of](/guides/usage-data-meters/derived-fields-for-meters-examples-and-supported-syntax)
* [calculations for](/guides/usage-data-meters/derived-fields-for-meters-examples-and-supported-syntax#derived-field-calculations-supported-syntax-and-referencing-fields)
* [referencing values and fields for](/guides/usage-data-meters/derived-fields-for-meters-examples-and-supported-syntax#derived-field-calculations-supported-syntax-and-referencing-fields)
* [syntax for](/guides/alerts-events-and-notifications/utilizing-events-and-notifications/creating-managing-and-reviewing-notifications#linking-notification-rules-to-destinations-to-create-notification-integration-configurations)
## Developer Tools
Developer tools are available to help you work with the m3ter platform:
* [developer tools](/guides/developer-tools)
* [SDKs](/guides/developer-tools#sdks)
* [terraform provider](/guides/developer-tools#terraform-provider)
## Entity Metadata
On the Details page for an entity, you can review the entity's metadata:
* [reviewing](/guides/getting-started/working-in-the-m3ter-console#reviewing-entity-metadata)
## Error Codes
* [HTTP error codes](/guides/m3ter-apis/http-error-codes)
## Events and Notifications
You can use *Events* generated in m3ter as the basis for setting up and sending Notifications into your external systems when those Events occur and the specific conditions you've defined for triggering a Notification are satisfied.
* [understanding events and notifications framework](/guides/alerts-events-and-notifications/utilizing-events-and-notifications/key-concepts-and-relationships)
* [utilizing events for notifications](/guides/alerts-events-and-notifications/utilizing-events-and-notifications)
### Events
* [creating scheduled events](/guides/alerts-events-and-notifications/utilizing-events-and-notifications/working-with-scheduled-events)
* [event types](https://docs.m3ter.com/guides/alerts-events-and-notifications/utilizing-events-and-notifications/key-concepts-and-relationships#types-of-events)
* [ingest validation failure events](/guides/billing-and-usage-data/submitting-usage-data/reviewing-and-resolving-ingest-events)
* [integration error events](/guides/integrations/setting-up-integrations/reviewing-and-resolving-integration-events)
### Notifications
* [creating calculations for](https://docs.m3ter.com/guides/alerts-events-and-notifications/utilizing-events-and-notifications/creating-managing-and-reviewing-notifications#creating-notification-rules)
* [creating and managing](/guides/alerts-events-and-notifications/utilizing-events-and-notifications/creating-managing-and-reviewing-notifications)
* [creating notification rules](https://docs.m3ter.com/guides/alerts-events-and-notifications/utilizing-events-and-notifications/creating-managing-and-reviewing-notifications#creating-notification-rules)
* [linking notification rules to destinations](https://docs.m3ter.com/guides/alerts-events-and-notifications/utilizing-events-and-notifications/creating-managing-and-reviewing-notifications#linking-notification-rules-to-outgoing-webhooks)
* reviewing events for notifications
## External Mappings
External Mappings are mapping reference lookups, which store unique ids for matched objects across two or more systems.
* [creating and managing for accounts](/guides/end-customer-accounts/creating-and-managing-external-mappings-for-accounts)
* [creating and managing for integrations](/guides/integrations/setting-up-integrations/creating-and-managing-external-mappings)
* [creating bulk mappings](/guides/integrations/setting-up-integrations/creating-and-managing-external-mappings#creating-bulk-external-mappings)
* [creating linked external mappings](/guides/integrations/setting-up-integrations/creating-and-managing-external-mappings#creating-linked-external-mappings)
## Global Meters
Global Meters do not belong to a specific Product, and are used to set up usage-based pricing across different Products.
* [creating](/guides/usage-data-meters/creating-global-meters)
## Grants
You can enable a Balance on an Account as a *Grant*. This allows you to credit the Account with an allowance of *pre-rated usage*, which can be drawn-down to reduce the amount of usage that is rated and would result in charges against the Account:
* [enabling balances as grants](https://m3ter.mintlify.app/guides/end-customer-accounts/creating-balances-for-accounts/balance-grants)
* [worked example](https://m3ter.mintlify.app/guides/end-customer-accounts/creating-balances-for-accounts/balance-grants)
## Integrations
Integrations exploit m3ter's open-API framework allowing you to quickly map and synchronize data held in any 3rd-party systems you use for core business operations.
* [creating configurations for](/guides/integrations/setting-up-integrations/creating-and-managing-integration-configurations)
* [creating credentials for](/guides/integrations/setting-up-integrations/managing-integration-credentials)
* [Chargebee integration credentials](/guides/integrations/setting-up-integrations/_managing-integration-credentials-legacy/creating-chargebee-integration-credentials)
* [NetSuite integration credentials](/guides/integrations/setting-up-integrations/_managing-integration-credentials-legacy/creating-netsuite-integration-credentials)
* [Paddle integration credentials](/guides/integrations/setting-up-integrations/_managing-integration-credentials-legacy/creating-paddle-integration-credentials)
* [QuickBooks integration credentials](/guides/integrations/setting-up-integrations/_managing-integration-credentials-legacy/creating-quickbooks-integration-credentials)
* [Stripe integration credentials](/guides/integrations/setting-up-integrations/_managing-integration-credentials-legacy/creating-stripe-integration-credentials)
* [Xero integration credentials](/guides/integrations/setting-up-integrations/_managing-integration-credentials-legacy/creating-xero-integration-credentials)
* [Salesforce integration credentials](/guides/integrations/setting-up-integrations/_managing-integration-credentials-legacy/creating-salesforce-integration-credentials)
* [creating outgoing webhooks for](/guides/integrations/setting-up-integrations/creating-and-managing-destinations)
* [creating linked external mappings for](/guides/integrations/setting-up-integrations/creating-and-managing-external-mappings#creating-linked-external-mappings)
* [m3ter integrations - overview](/guides/integrations/m3ter-integrations)
* [external mappings for](/guides/integrations/setting-up-integrations/creating-and-managing-external-mappings)
* [managing configurations for](/guides/integrations/setting-up-integrations/creating-and-managing-integration-configurations)
* [managing credentials for](/guides/integrations/setting-up-integrations/managing-integration-credentials)
* [managing multiple third party destinations for](/guides/integrations/setting-up-integrations/managing-multiple-destinations-for-integrations)
* [setting up integrations in console](/guides/integrations/setting-up-integrations)
* [Chargebee](/guides/integrations/setting-up-integrations/configuring-chargebee-integrations)
* [NetSuite](/guides/integrations/setting-up-integrations/configuring-netsuite-integrations)
* [Paddle](/guides/integrations/setting-up-integrations/configuring-paddle-integrations)
* [QuickBooks](/guides/integrations/setting-up-integrations/configuring-quickbooks-integrations)
* [Stripe](/guides/integrations/setting-up-integrations/configuring-stripe-integrations)
* [Xero](/guides/integrations/setting-up-integrations/configuring-xero-integrations)
* [Salesforce](/guides/integrations/setting-up-integrations/configuring-sf-entity-data-integrations)
* [AWS Marketplace](/guides/integrations/setting-up-integrations/configuring-aws-integrations)
* [Azure Marketplace](/guides/integrations/setting-up-integrations/configuring-azure-marketplace-integrations)
* [reviewing and resolving error Events for](/guides/integrations/setting-up-integrations/reviewing-and-resolving-integration-events)
* [reviewing integration runs](/guides/integrations/setting-up-integrations/reviewing-integration-run-details)
* [salesforce - m3ter Connector for](/guides/m3ter-connector-for-salesforce)
## Lookup Tables
Lookup Tables enable you to manage dynamic data mappings that your calculations reference. Use them for currency conversion, pricing tiers, discount rates, and similar scenarios where you require values to change operationally but for calculation logic to remain constant:
* [creating and managing](/guides/lookup-tables/creating-and-managing-lookup-tables)
* [lookup table revisions - adding data to and publishing](/guides/lookup-tables/adding-data-to-and-publishing-table-revisions)
* [lookup tables - worked example](/guides/lookup-tables/worked-example-variable-usage-discounting)
* [lookup functions](/guides/lookup-tables/lookup-functions)
## Meters
Meters define the Data Fields that your system will submit to the m3ter service as usage data. They can be created as Product-specific Meters or as Global Meters.
* [creating for product](/guides/usage-data-meters/creating-meters)
* [creating global](/guides/usage-data-meters/creating-global-meters)
* [custom fields for](/guides/usage-data-meters/reviewing-meter-options#custom-fields)
* [data fields for](/guides/usage-data-meters/reviewing-meter-options#data-field-options)
* [derived fields for](/guides/usage-data-meters/reviewing-meter-options#derived-fields)
* [options for](/guides/usage-data-meters/reviewing-meter-options)
## m3sh
The m3sh platform underpins and drives m3ter's interoperability and automation capabilities, encompassing Events and Notifications, Integrations, Workflows, and Apps:
* [exploring workflows](/guides/m3sh-automation/reviewing-m3sh-workflow-runs)
* [introduction and overview](/guides/m3sh-automation)
* [creating m3sh workflows](/guides/m3sh-workflows/m3sh-workflows)
* [reviewing workflow runs](/guides/m3sh-automation/reviewing-m3sh-workflow-runs)
## Notifications
You can set up Notifications to be triggered and sent into external systems on the basis of m3ter-generated Events. This includes the capability to create rule sets to define the precise conditions under which a Notification will be triggered and sent out when a specific Event occurs:
* [configuring](/guides/alerts-events-and-notifications/utilizing-events-and-notifications/key-concepts-and-relationships#notification-config)
* [destination and credentials for](/guides/alerts-events-and-notifications/utilizing-events-and-notifications/key-concepts-and-relationships#integration-destination-and-credentials)
* [example](/guides/alerts-events-and-notifications/utilizing-events-and-notifications/example-1-commitment-updated-event)
* [understanding](/guides/alerts-events-and-notifications/utilizing-events-and-notifications)
> **Note:** Also see index entries above for [Events and Notifications](/guides/getting-started/knowledge-index#events-and-notifications).
## Organizations
An Organization represents your company as a direct customer of the m3ter service.
* [editing config](/guides/organization-and-access-management/viewing-and-editing-organization/viewing-and-editing-organization-configuration)
* [creating credit reasons for](/guides/organization-and-access-management/viewing-and-editing-organization/creating-credit-reasons)
* [creating debit reasons for](/guides/organization-and-access-management/viewing-and-editing-organization/creating-debit-reasons)
* [creating Service Users for](/guides/organization-and-access-management/managing-users/creating-and-configuring-service-users)
* [currencies for](/guides/organization-and-access-management/viewing-and-editing-organization/creating-and-managing-currencies)
* [granting support access](/guides/organization-and-access-management/managing-users/granting-m3ter-support-access-to-organization)
* [managing](/guides/organization-and-access-management/viewing-and-editing-organization)
* [transaction types for](/guides/organization-and-access-management/viewing-and-editing-organization/creating-transaction-types)
* [viewing details](/guides/organization-and-access-management/viewing-and-editing-organization/viewing-and-editing-organization-configuration)
* [viewing Permission Policies](/guides/organization-and-access-management/managing-users/viewing-and-managing-permission-policies)
* [viewing and editing Users](/guides/organization-and-access-management/managing-users/managing-users-and-assigning-permission-policies)
## Permission Policies
Permission Policies allow you to control what users who have authenticated with the service are allowed to do in your Organization.
* [adding to Service Users](/guides/organization-and-access-management/managing-users/creating-and-configuring-service-users#adding-permission-policies-to-service-users)
* [creating and managing](/guides/organization-and-access-management/creating-and-managing-permissions)
* [viewing and managing](/guides/organization-and-access-management/managing-users/viewing-and-managing-permission-policies)
## Plans
Plans represent a pricing and billing plan for end customers who consume your products or services. They are derived from Plan Templates.
* [creating](/guides/plans-and-pricing/working-with-plan-templates-and-plans/creating-plans)
* [creating custom for Accounts](/guides/end-customer-accounts/creating-custom-account-plans)
* [editing](/guides/plans-and-pricing/working-with-plan-templates-and-plans/editing-plan-templates-and-plans)
* [pricing](/guides/plans-and-pricing/pricing-plans/pricing-plans)
* [reviewing options for](/guides/plans-and-pricing/working-with-plan-templates-and-plans/reviewing-configuration-options-for-plans-and-plan-templates):
* [billing currency](/guides/plans-and-pricing/working-with-plan-templates-and-plans/reviewing-configuration-options-for-plans-and-plan-templates#plan-template-options)
* [billing frequency](/guides/plans-and-pricing/working-with-plan-templates-and-plans/reviewing-configuration-options-for-plans-and-plan-templates#plan-template-options)
* [billing interval](/guides/plans-and-pricing/working-with-plan-templates-and-plans/reviewing-configuration-options-for-plans-and-plan-templates#plan-template-options)
* [standing charge](/guides/plans-and-pricing/working-with-plan-templates-and-plans/understanding-billing-options-for-plan-templates-plans#standing-charge)
* [standing charge interval](/guides/plans-and-pricing/working-with-plan-templates-and-plans/understanding-billing-options-for-plan-templates-plans#standing-charge)
* [standing charge offset](/guides/plans-and-pricing/working-with-plan-templates-and-plans/understanding-billing-options-for-plan-templates-plans#standing-charge)
* [product minimum spend](/guides/plans-and-pricing/working-with-plan-templates-and-plans/understanding-billing-options-for-plan-templates-plans#minimum-spend)
* [reviewing pricing options for](/guides/plans-and-pricing/pricing-plans/reviewing-pricing-options-and-pricing-plans)
* [understanding billing options for](/guides/plans-and-pricing/working-with-plan-templates-and-plans/understanding-billing-options-for-plan-templates-plans)
* [viewing details of](/guides/plans-and-pricing/working-with-plan-templates-and-plans/editing-plan-templates-and-plans)
## Plan Groups
Plan Groups allow you to group together Plans for different Products and define a minimum spend for the Group.
* [adding plans to](/guides/plans-and-pricing/working-with-plan-templates-and-plans/working-with-plan-groups#adding-plans-to-plan-groups)
* [example use case for](/guides/plans-and-pricing/working-with-plan-templates-and-plans/working-with-plan-groups#example-use-case-for-plan-groups)
* [creating](/guides/plans-and-pricing/working-with-plan-templates-and-plans/working-with-plan-groups#creating-plan-groups-and-adding-plans)
* [creating custom for Accounts](/guides/end-customer-accounts/creating-custom-plan-groups-for-accounts)
* [understanding billing options for](/guides/plans-and-pricing/working-with-plan-templates-and-plans/understanding-billing-options-for-plan-templates-plans)
* [understanding minimum spend for](/guides/plans-and-pricing/working-with-plan-templates-and-plans/working-with-plan-groups#plan-group-minimum-spend-vs-plans-minimum-spends)
## Plan Templates
Plan Templates allow you to configure default billing and pricing settings for your Plans, avoiding repetition in configuration work when setting up Plans.
* [creating](/guides/plans-and-pricing/working-with-plan-templates-and-plans/creating-plan-templates)
* [editing](/guides/plans-and-pricing/working-with-plan-templates-and-plans/editing-plan-templates-and-plans)
* [pricing](/guides/plans-and-pricing/pricing-plans/pricing-plans)
* [reviewing options for](/guides/plans-and-pricing/working-with-plan-templates-and-plans/reviewing-configuration-options-for-plans-and-plan-templates):
* [billing currency](/guides/plans-and-pricing/working-with-plan-templates-and-plans/reviewing-configuration-options-for-plans-and-plan-templates#plan-template-options)
* [billing frequency](/guides/plans-and-pricing/working-with-plan-templates-and-plans/reviewing-configuration-options-for-plans-and-plan-templates#plan-template-options)
* [billing interval](/guides/plans-and-pricing/working-with-plan-templates-and-plans/reviewing-configuration-options-for-plans-and-plan-templates#plan-template-options)
* [standing charge](/guides/plans-and-pricing/working-with-plan-templates-and-plans/understanding-billing-options-for-plan-templates-plans#standing-charge)
* [standing charge interval](/guides/plans-and-pricing/working-with-plan-templates-and-plans/understanding-billing-options-for-plan-templates-plans#standing-charge)
* [standing charge offset](/guides/plans-and-pricing/working-with-plan-templates-and-plans/understanding-billing-options-for-plan-templates-plans#standing-charge)
* [product minimum spend](/guides/plans-and-pricing/working-with-plan-templates-and-plans/understanding-billing-options-for-plan-templates-plans#minimum-spend)
* [reviewing pricing options for](/guides/plans-and-pricing/pricing-plans/reviewing-pricing-options-and-pricing-plans)
* [understanding billing options for](/guides/plans-and-pricing/working-with-plan-templates-and-plans/understanding-billing-options-for-plan-templates-plans)
* [viewing details of](/guides/plans-and-pricing/working-with-plan-templates-and-plans/editing-plan-templates-and-plans)
## Prepayments/Commitments
Prepayments/Commitments allow you to assign an amount to an Account that the end customer has agreed to pay over the duration of their contract with you.
* [billing with plan](/guides/end-customer-accounts/creating-prepayments-for-accounts#prepayment-billing-with-a-plan)
* [billing on schedule](/guides/end-customer-accounts/creating-prepayments-for-accounts#prepayment-billing-on-a-schedule)
* [creating for Account](/guides/end-customer-accounts/creating-prepayments-for-accounts)
* [draw-down order against Balances for](/guides/end-customer-accounts/creating-prepayments-for-accounts#prepayments-draw-down-order-against-balances)
* [duplicating](/guides/end-customer-accounts/creating-prepayments-for-accounts#duplicating-prepayments)
* [example of](/guides/end-customer-accounts/creating-prepayments-for-accounts#example-prepayment)
* [overage pricing for](/guides/plans-and-pricing/pricing-plans/reviewing-pricing-options-and-pricing-plans)
* [overage surcharge for](/guides/end-customer-accounts/creating-prepayments-for-accounts#creating-prepayments)
* [reviewing details of](/guides/end-customer-accounts/creating-prepayments-for-accounts#viewing-prepayment-details)
* [setting draw-down charge types for](/guides/end-customer-accounts/creating-prepayments-for-accounts)
## Pricing
A Pricing allows you to use Aggregations as pricing metrics to configure the cost of usage data consumed under Product Plans.
* [deleting](/guides/plans-and-pricing/pricing-plans/managing-and-editing-priced-plans-or-plan-templates#deleting-pricing)
* [editing priced Plans/Plan Templates](/guides/plans-and-pricing/pricing-plans/managing-and-editing-priced-plans-or-plan-templates)
* [pricing Plans/Plan Templates](/guides/plans-and-pricing/pricing-plans/pricing-plans):
* [using negative pricing for](/guides/plans-and-pricing/pricing-plans/pricing-plans#using-negative-pricing-for-plans)
* [pricing readiness - prerequisites for](/guides/plans-and-pricing/pricing-plans/pricing-plans#pricing-readiness-completing-prerequisites)
* [removing Aggregations from](/guides/plans-and-pricing/pricing-plans/managing-and-editing-priced-plans-or-plan-templates#removing-aggregations-from-the-pricing-editor)
* [reviewing options for](/guides/plans-and-pricing/pricing-plans/reviewing-pricing-options-and-pricing-plans)
* [seat-base pricing - derived field for](/guides/usage-data-meters/derived-fields-for-meters-examples-and-supported-syntax#example-7-derived-field-for-seat-based-pricing)
* [viewing historic and future pricing for Plans](/guides/plans-and-pricing/pricing-plans/pricing-plans#viewing-historic-and-future-pricing-on-a-plan)
* [viewing schedule for priced Plans/Plan Templates](/guides/plans-and-pricing/pricing-plans/managing-and-editing-priced-plans-or-plan-templates#viewing-pricing-schedule)
* [using segmented aggregations for](/guides/plans-and-pricing/pricing-plans/pricing-plans-using-segmented-aggregations)
## Products
Products represent in your m3ter Organization the products or service you offer to end customers.
* [creating and managing](/guides/creating-and-managing-products)
* [creating entities for](https://docs.m3ter.com/guides/creating-and-managing-products#creating-product-entities)
## Recurring Charges
The Recurring Charges feature in m3ter allows you to use [Counters](/guides/getting-started/knowledge-index#counters) to set up unit-based for your products and services.
* [creating counters for](/guides/recurring-charges-counters/creating-counters)
* [creating counter adjustments on accounts](/guides/recurring-charges-counters/creating-counter-adjustments-for-accounts)
* [creating unit-based pricing for plans](/guides/recurring-charges-counters/creating-counters)
* [using for hybrid pricing](/guides/recurring-charges-counters/recurring-charges-example-2-hybrid-pricing)
* [using for seat-based pricing](/guides/recurring-charges-counters/reviewing-bills-for-recurring-charges)
## Salesforce Managed Package
The [m3ter Connector for Salesforce](/guides/m3ter-connector-for-salesforce) managed package allows you to map and synchronize data in your Salesforce systems with the m3ter platform. You can quickly set up a connective framework between Salesforce CRM and CPQ to streamline and accelerate the process of connecting your Salesforce systems to your m3ter infrastructure with one simple, fully supported, and managed integration.
* [configuring](/guides/m3ter-connector-for-salesforce/configuring-m3ter-salesforce-connector)
* [metadata mappings for](/guides/m3ter-connector-for-salesforce/reviewing-and-managing-metadata-mappings)
* [custom metadata mappings](/guides/m3ter-connector-for-salesforce/creating-metadata-mappings)
* [sync to m3ter invocable action](/guides/m3ter-connector-for-salesforce/setting-up-invocable-action-for-event-driven-sync)
* [testing sync setup for](/guides/m3ter-connector-for-salesforce/testing-sync-setup-from-salesforce-to-m3ter)
* [troubleshooting syncs](/guides/m3ter-connector-for-salesforce/checking-sync-logs-and-troubleshooting)
## Segmented Aggregations
Segmented Aggregations allow you to segment the usage data collected by a single Meter and price your Plans by these segment values.
* [billing for](/guides/usage-data-aggregations/segmented-aggregations#billing-for-segmented-aggregations)
* [creating](/guides/usage-data-aggregations/segmented-aggregations#creating-segmented-aggregations)
* [example use case for](/guides/usage-data-aggregations/segmented-aggregations)
* [using to price Plans](/guides/plans-and-pricing/pricing-plans/pricing-plans-using-segmented-aggregations)
* [using wildcard values for](/guides/usage-data-aggregations/segmented-aggregations#using-wildcards-or-defaults-in-segmented-aggregations)
* [worked example for](/guides/getting-started/metering-for-production-worked-examples/example-3-segmented-aggregation-on-single-meter-usage)
## Service Users
Service Users represent automated processes that you want to grant direct API access to your Organization.
* [adding Permission Policy to](/guides/organization-and-access-management/managing-users/creating-and-configuring-service-users#adding-permission-policies-to-service-users)
* [creating and configuring](/guides/organization-and-access-management/managing-users/creating-and-configuring-service-users)
* [generating secret and access key for](/guides/organization-and-access-management/managing-users/creating-and-configuring-service-users#generating-access-keys-for-service-users)
* [obtaining bearer token for](/guides/authenticating-with-the-platform/service-authentication#obtaining-a-bearer-token-using-basic-auth)
## Statement Definitions
Statement Definitions allow you to define how the usage data collected by a Meter for a billing period is broken down. You can then use Statement Definitions to generate Bill Statements for specific Bills and append these to your end-customer invoices.
* [creating](/guides/billing-and-usage-data/running-viewing-and-managing-bills/working-with-bill-statements#creating-statement-definitions)
* [using](/guides/billing-and-usage-data/running-viewing-and-managing-bills/working-with-bill-statements#using-statement-definitions)
## Transactions
You can create and define *Transaction Types* for your Organization. Transaction Types can then be used to create specific *Transaction amounts* for Balances on end-customer Accounts. In this way, you can use Transactions to flexibly manage Balance amounts on end-customer Accounts, with a Transaction ledger being maintained for individual Balances.
* [creating transaction amounts for balances](/guides/end-customer-accounts/creating-balances-for-accounts#creating-transactions-for-a-balance)
* [creating transaction types for organization](/guides/organization-and-access-management/viewing-and-editing-organization/creating-transaction-types)
* [working with balance transaction ledger](/guides/end-customer-accounts/creating-balances-for-accounts#working-with-the-balance-transaction-ledger)
## Usage Data
You can create and configure *Meters* in m3ter to collect your end customer usage data. When you have set up Meters, you can define *Aggregations* of that data to give the pricing metrics to price Plans for your Products.
You can submit test usage data right in the Console and generate test Bills for that usage data. If usage data measurements you submit to the platform fail to ingest properly, an ingest failure Event is generated and a log file is made available to review and troubleshoot the ingest failure:
* [aggregating to price by](/guides/usage-data-aggregations/reviewing-aggregation-options)
* [file upload by meter](/guides/billing-and-usage-data/submitting-usage-data/file-uploads-for-usage-data-by-meter)
* [file upload service API for](/guides/billing-and-usage-data/submitting-usage-data/file-upload-service-api)
* [getting usage data into m3ter](/exploring-m3ter-getting-to-know-the-platform/getting-usage-data-into-m3ter-quick-reference-starter)
* [reviewing and resolving ingest failure events for](/guides/billing-and-usage-data/submitting-usage-data/reviewing-and-resolving-ingest-events)
* [setting up Meters to collect](/guides/usage-data-meters)
* [submitting](/guides/billing-and-usage-data/submitting-usage-data)
* [submitting for non-existent accounts](/guides/billing-and-usage-data/submitting-usage-data/submitting-usage-data-for-non-existent-accounts)
* [submitting and checking test usage data](/guides/billing-and-usage-data/submitting-usage-data/submitting-test-usage-data)
* [using timestamp to submit usage data adjustments](/guides/billing-and-usage-data/submitting-usage-data/submitting-usage-data-adjustments-using-timestamp)
## Users
Users represent a person you allow to authenticate with and have access to your Organization.
* [authentication for](/guides/authenticating-with-the-platform)
* [creating permission policies for](/guides/organization-and-access-management/creating-and-managing-permissions)
* [creating user groups for](/guides/organization-and-access-management/managing-users/creating-and-managing-user-groups)
* [deactivating and reactivating](/guides/organization-and-access-management/managing-users/managing-users-and-assigning-permission-policies#deactivating-and-reactivating-users)
* [editing profile](/guides/organization-and-access-management/managing-users/managing-users-and-assigning-permission-policies#editing-user-profile)
* [inviting to join your organization](/guides/organization-and-access-management/managing-users/inviting-users-to-organization)
* [managing and assigning permission policies to](/guides/organization-and-access-management/managing-users/managing-users-and-assigning-permission-policies)
* [single sign-on (SSO) for](/guides/authenticating-with-the-platform/m3ter-single-sign-on)
* [tracking user activity in organization](/guides/organization-and-access-management/managing-users/tracking-user-activity-in-organization)
* [viewing and editing](/guides/organization-and-access-management/managing-users/managing-users-and-assigning-permission-policies)
## Webhooks
In the Integrations section of the Console, you can create *Outgoing webhooks*. If you've defined a Notification Rule based on a system event, you can link this to an Outgoing webhook as the endpoint for the Notification and to create a Notification Webhook integration:
* [creating and managing outgoing webhooks](/guides/integrations/setting-up-integrations/creating-and-managing-destinations)
* [setting up authentication for connecting to](/guides/integrations/setting-up-integrations/creating-and-managing-destinations#webhook-authentication-for-m3ter-_-signed_request)
# Worked Examples
Source: https://docs.m3ter.com/guides/getting-started/metering-for-production-worked-examples
Discover m3ter's usage-based pricing examples: for simple cloud storage, allowing for sign-up bonuses, and usage segmentation.
In this section, you can review some worked examples with video walkthroughs. These are designed to illustrate the wide scope and flexibility the m3ter platform offers for gathering usage data and defining pricing metrics to meet the specific usage-based pricing requirements for your products and services:
* [Example 1: Cloud Storage and File Cleanup](/guides/getting-started/metering-for-production-worked-examples/worked-example-1-cloud-storage-and-file-cleanup)
* [Example 2: Compound Aggregation for Sign-Up Bonus](/guides/getting-started/metering-for-production-worked-examples/example-2-compound-aggregation-for-sign-up-bonus)
* [Example 3: Segmented Aggregation on Single Meter Usage](/guides/getting-started/metering-for-production-worked-examples/example-3-segmented-aggregation-on-single-meter-usage)
# Example 2: Compound Aggregation for Sign-Up Bonus
Source: https://docs.m3ter.com/guides/getting-started/metering-for-production-worked-examples/example-2-compound-aggregation-for-sign-up-bonus
Follow a worked example using a Compound Aggregation for pricing.
Suppose your SaaS company provides a "build-and-host" application service, one which allows customers to develop and run software applications and host these applications on your service:
* You'll charge customers by total number of requests made to all of their applications being hosted with your service in any given billing period.
* However, you want to offer customers a sign-up bonus for the first three months of using your service. The first 100 requests made to an application they host with you are free for each billing period - for example, if a customer has 3 applications hosted with you during the first billing period, they are due 300 free requests for the first Bill.
* The sign-up bonus will be generous in this sense - if a new customer reaches a maximum of 5 applications hosted in a billing period, but by the end of the billing period has taken down 2 of them, their bonus will be calculated for the maximum number of hosted applications reached in the billing period at 500 free requests.
This topic provides a worked example to illustrate how you can use a Compound Aggregation to provide a suitable metric for pricing Product Plans and easily satisfy this SaaS UBP use case - the pricing metric the Compound Aggregation provides will ensure the sign-up bonus is allowed for when billing is run for Accounts placed on the priced Product Plans.
The example goes on to show how to submit some test data against a test Account and then generate a Bill for the test Account and check billed amounts against submitted usage.
## Step 1: Create Product
*Products* represent a product or service that you offer to your end customers. A Meter, Aggregation, Plan Template, Plan, or Pricing typically all belong to a Product.
**To create a Product:**
1. In the Console, select **Products**. The **Products** page opens.
2. Select **Create product**. We'll create a single Product called **App Hosting Standard**:
* For each mapping, the **External system** and **External table** mapped to are shown. The **External entity ID** mapped to is also shown.
* If a listed External mapping is linked to an Integration, under **Linked integration** a hotlink text will be shown which you can use to open the Integration.
* Under **Actions**, you can edit or delete the External mapping.
* If the Account has multiple External mappings created for it, you can use *Search external mappings* to search by **External table** and **External entity ID** and filter the list.
* You can commence a workflow to **Create external mapping** for the Account directly - see [Creating and Managing External Mappings for Accounts](/guides/end-customer-accounts/creating-and-managing-external-mappings-for-accounts) for an example.
**Integration runs**. If you've set up an integration that synchronizes the Account with an external system, the date/time and status of the **Latest** integration run are shown. You can use a text hotlink to open details of this latest run or **View all runs**. See [Reviewing Integration Run Details](/guides/integrations/setting-up-integrations/reviewing-integration-run-details).
# Getting Started
Source: https://docs.m3ter.com/guides/getting-started
Use this section to get started working in the m3ter platform:
* [Quick Start](/guides/getting-started/quick-start-worked-example). Follow a first pass Console quick start workflow to see how easy it is to set up metered billing for customer usage on your products and services.
* [m3ter Console](/guides/getting-started/working-in-the-m3ter-console). Take a comprehensive tour of the Console, including a video orientation.
* [Configuration Workflow](/guides/getting-started/previewing-main-configuration-steps). Review the core configuration workflow needed to achieve the production of Account Bills rated in accordance with the usage-based pricing you've set up for your Products.
* [Worked Examples](/guides/getting-started/metering-for-production-worked-examples). Review examples for implementing usage-based pricing solutions, presented as easy-to-follow video tutorials to ramp up your m3ter expertise level.
* [Dates in m3ter - Quick Reference Starter](/guides/getting-started/working-with-dates-in-m3ter-easy-reference). Check how dates are handled in m3ter for key configuration and operational contexts, such as when defining dates for billing operations
* [Feature Release Stages](/guides/getting-started/feature-release-stages). m3ter releases some features as Beta or Preview prior to General Availability. Please review this topic to ensure you are aware of what each of these release stages mean.
* [Knowledge Index](/guides/getting-started/knowledge-index). Bookmark this page as a handy index listing to quickly find information about specific m3ter entities or areas of functionality.
* [Contacting m3ter Support](/guides/getting-started/contacting-m3ter-support). You can contact m3ter Support to report an incident, request technical support, ask billing or account questions, submit general feature requests, and log defects
**Working with m3ter APIs!** Please review the [m3ter APIs](/guides/m3ter-apis) section before you start to work with our APIs. The [Getting Started with API Calls](/guides/m3ter-apis/getting-started-with-api-calls) topic offers quick start guidance and provides some examples. Instructions are also given for [Importing m3ter Collections into your Postman Workspace](/guides/m3ter-apis/getting-started-with-api-calls#importing-m3ter-collections-into-your-postman-workspace).
# Contacting m3ter Support
Source: https://docs.m3ter.com/guides/getting-started/contacting-m3ter-support
Contact [m3ter Support](https://m3ter.myfreshworks.com/login/auth/1662629775049?client_id=451980218021503405\&redirect_uri=https%3A%2F%2Fm3ter.freshdesk.com%2Ffreshid%2Fcustomer_authorize_callback%3Fhd%3Dm3ter.freshdesk.com) by submitting a support request using the channels available to you as set out in the [Support Terms](https://www.m3ter.com/docs/legal/support-terms) and as advised during your onboarding process (depending on your m3ter Support entitlement).
## Submitting a Support Request
You can report an incident, request technical support, ask billing or account questions, submit general feature requests, and log defects.
Please provide as much information as possible when you raise a support request:
| What to Include | Details |
| - | - |
| Organization ID | The relevant Organization ID, which you can get from the URL when you access the m3ter Console. In the Console, you can also read-off the ID at: Settings>Organization>Configuration>Organization details and copy it from there. |
| Organization Type | Whether the relevant Organization is a Production, Non-Production, or Sandbox m3ter Organization. |
| Issue Impact | For service issues, a measure of the impact the issue is having on your normal operations. |
| Account ID | The relevant end-customer Account ID (if the issue relates to a specific end-customer). |
| User ID | If this is a service issue, the User ID of the logged in user at time of issue. Otherwise, the most relevant User ID in relation to the request. |
| Start Time | If an issue has occurred, when did you notice it start? |
| Area of Interaction | What were you trying to do when the issue occurred? Were you using the Console, if so which area? Were you attempting to make and API call and, if so, which endpoint were you trying to call? |
| Service Function | If the issue is with the m3ter service, which part of the service were you using? (Ingest, Billing & Rating, Analytics, and so on) |
| Description | What were you trying to accomplish? As much detail as you can provide regarding what the support request is about. |
| Steps to Reproduce | If this is a service issue - please describe the exact steps required to reproduce the issue. |
| Expected and Actual Behavior | If this is a service issue - what did you expect to happen and what actually did happen? |
| Additional Information | Include any screenshots or other files such as logs if these will help us to better understand the issue. |
**Important:** **Exclusions!** m3ter Support does not cover directly any third-party software connected via our integrations. Any m3ter created integration is supported, should the problem be related to the integration itself.
# Feature Release Stages
Source: https://docs.m3ter.com/guides/getting-started/feature-release-stages
m3ter releases some features as Beta or Preview prior to General Availability. There are some important differences between these release stages that you should be aware of before using them:
* [Beta Release](/guides/getting-started/feature-release-stages#beta-release)
* [Preview Release](/guides/getting-started/feature-release-stages#preview-release)
**Note: Documentation - release stage reminders.** Topics in this user documentation that cover Beta or Preview release features will carry a reminder and link you back to these definitions.
## Beta Release
### Definition
We use the Beta release stage as a mechanism to give customers early sight of a feature and collect feedback. Beta features are typically made available to customers with relevant use cases who are often actively working with us on the feature’s development, but they are sometimes made available to all customers.
### Constraints
Beta features may change in backwards-incompatible ways, and configuration may not persist from the Beta to future stages. We therefore recommend against using features at the Beta release stage for critical functionality.
## Preview Release
### Definition
Preview features are in the final stages of testing.
### Constraints
Preview features are typically stable and only minor changes are made prior to becoming Generally Available. However, we recommend customers discuss with us prior to relying on them for critical functionality because backwards-incompatible changes do occasionally need to be made.
## Service and Support
Service and Support Level Agreements (SLAs) are not applicable to Beta and Preview features.
# Knowledge Index
Source: https://docs.m3ter.com/guides/getting-started/knowledge-index
Use this index listing to quickly find information about specific m3ter entities or areas of functionality.
**AI Assistant!** Have you tried our AI Assistant to obtain the information you need? In the Console, you can quickly open the **Help** panel, select **Ask AI**, and then type in a search term or a specific question you have to obtain the information you need - see [Help Links](https://docs.m3ter.com/guides/getting-started/working-in-the-m3ter-console#help-links) for more details.
## Accounts
Represents one of your end-customer accounts:
* [attaching Plans to](/guides/end-customer-accounts/attaching-plans-to-an-account)
* [attaching Plan Groups to](/guides/end-customer-accounts/attaching-plan-groups-to-an-account)
* [best practices for managing](/guides/end-customer-accounts/managing-accounts-best-practices)
* [billing for Parent/Child accounts](/guides/end-customer-accounts/creating-and-working-with-child-accounts/billing-for-parent-child-accounts)
* [creating and managing](/guides/end-customer-accounts)
* [creating Balances for](/guides/end-customer-accounts/creating-balances-for-accounts)
* [creating Child Accounts for](/guides/end-customer-accounts/creating-and-working-with-child-accounts)
* [creating Contracts for](/guides/end-customer-accounts/creating-contracts-for-accounts)
* [creating Custom Plans for](/guides/end-customer-accounts/creating-custom-account-plans)
* [creating Custom Plan Groups for](/guides/end-customer-accounts/creating-custom-plan-groups-for-accounts)
* [creating Prepayments for](/guides/end-customer-accounts/creating-prepayments-for-accounts)
* [creating External Mappings for](/guides/end-customer-accounts/creating-and-managing-external-mappings-for-accounts)
* [defining day before bills due for](/guides/end-customer-accounts/creating-an-account)
* [end dating Account billing entities](/guides/end-customer-accounts/end-dating-account-billing-entities)
* [reviewing Bills for](/guides/end-customer-accounts/reviewing-bills-for-an-account)
* [submitting usage data for](/guides/end-customer-accounts/submitting-usage-data-for-an-account)
## Account Plans
Plans are attached to Accounts to create Account Plans, which then determine the charges incurred by your end customer.
* [creating by attaching Plan to Account](/guides/end-customer-accounts/attaching-plans-to-an-account)
* [defining active period for Account](/guides/end-customer-accounts/attaching-plans-to-an-account)
## Account Plan Groups
Plan Groups are attached to Accounts to create Account Plan Groups, which then determine the charges incurred by your end customer.
* [creating by attaching Plan Group to Account](/guides/end-customer-accounts/attaching-plan-groups-to-an-account)
* [defining active period for Account](/guides/end-customer-accounts/attaching-plan-groups-to-an-account)
## Aggregations
Aggregations define how to convert into a single number individual usage data measurements collected by Meter fields. They are used to configure pricing for Product Plans.
* [creating Compound Aggregations](/guides/usage-data-aggregations/compound-aggregations)
* [creating Custom SQL Aggregations](/guides/usage-data-aggregations/custom-sql-aggregations)
* [creating Global Aggregations](/guides/usage-data-aggregations/creating-global-aggregations)
* [creating Product Aggregations](/guides/usage-data-aggregations/creating-aggregations)
* [creating Segmented Aggregations](/guides/usage-data-aggregations/segmented-aggregations)
* [defining aggregation method for:](/guides/usage-data-aggregations/reviewing-aggregation-options#configuring-aggregations)
* [use Sum of values](/guides/usage-data-aggregations/reviewing-aggregation-options#configuring-aggregations)
* [use Min or Max values](/guides/usage-data-aggregations/reviewing-aggregation-options#configuring-aggregations)
* [use Count of number of values](/guides/usage-data-aggregations/reviewing-aggregation-options#configuring-aggregations)
* [use Mean of values](/guides/usage-data-aggregations/reviewing-aggregation-options#configuring-aggregations)
* [use Latest value](/guides/usage-data-aggregations/reviewing-aggregation-options#configuring-aggregations)
* [use Count of Unique values](/guides/usage-data-aggregations/reviewing-aggregation-options#configuring-aggregations)
* [use Custom SQL query result value](/guides/usage-data-aggregations/reviewing-aggregation-options#configuring-aggregations)
* [pricing Plans with](/guides/plans-and-pricing/pricing-plans/pricing-plans#setting-up-to-price-plansplan-templates-in-the-pricing-editor)
* [reviewing options for](/guides/usage-data-aggregations/reviewing-aggregation-options)
## APIs
The m3ter platform supports two HTTP-based REST APIs returning JSON encoded responses:
* The **Config API**, which you can use for configuration requests and management.
* The **Ingest API**, which you can use for submitting raw data measurements.
We impose limits on the calls you make to both of our APIs to maintain optimum performance and high availability for all customers.
* [call for submitting usage data](/guides/billing-and-usage-data/submitting-usage-data/api-calls-for-data-ingest)
* [getting started with](/guides/m3ter-apis/getting-started-with-api-calls)
* [http error codes returned](/guides/m3ter-apis/http-error-codes)
* [limits for Config API](/guides/m3ter-apis/config-api-limits)
* [limits for Data Explorer](/guides/m3ter-apis/config-api-limits#date-explorer-request-rate-limits)
* [limits for Ingest API](/guides/m3ter-apis/ingest-api-limits)
* [optimizing Ingest submissions](/guides/m3ter-apis/ingest-api-limits)
* [API reference docs](https://m3ter.com/docs/api)
* [supported APIs](/guides/m3ter-apis)
## Authentication
The m3ter platform supports several authentication methods:
* [service authentication for API calls](/guides/authenticating-with-the-platform/service-authentication)
* [single sign-on for federated identities](/guides/authenticating-with-the-platform/m3ter-single-sign-on)
* [user/password for login to console](/guides/authenticating-with-the-platform/user-password-authentication)
## Balances
*Balances* are created for end customer Accounts. You use Transactions to add and flexibly manage Balance amounts on Accounts. End-customers can then draw-down against their Balance amounts for any charges due throughout the period the Balance is active for the Account and a Transactions ledger is maintained for the Balance:
* [adding transactions to](/guides/end-customer-accounts/creating-balances-for-accounts/creating-and-managing-transactions-for-balances)
* [creating for accounts](/guides/end-customer-accounts/creating-balances-for-accounts/creating-and-managing-account-balances)
* [draw-down order against prepayments/commitments](/guides/end-customer-accounts/creating-balances-for-accounts/understanding-billing-for-balances#understanding-charges-draw-down-against-balances-for-billing)
* [overage pricing for](/guides/plans-and-pricing/pricing-plans/reviewing-pricing-options-and-pricing-plans)
* [overage surcharge percentage for](/guides/end-customer-accounts/creating-balances-for-accounts/understanding-billing-for-balances)
* [selecting charge types for](/guides/end-customer-accounts/creating-balances-for-accounts/understanding-billing-for-balances#draw-down-charge-types)
* [selecting products for](/guides/end-customer-accounts/creating-balances-for-accounts/creating-and-managing-account-balances)
* [understanding charges draw-down against for billing](/guides/end-customer-accounts/creating-balances-for-accounts/understanding-billing-for-balances#understanding-charges-draw-down-against-balances-for-billing)
* [working with balance transactions ledger](/guides/end-customer-accounts/creating-balances-for-accounts/creating-and-managing-transactions-for-balances#working-with-the-balance-transactions-ledger)
### Balance Transaction Schedules
You can set up a *Transaction Schedule* for a Balance. This allows you to generate Transactions of a specific type for a Balance at regular daily, weekly, monthly, or yearly intervals over a specified time period:
* [setting up transaction schedules](/guides/end-customer-accounts/creating-balances-for-accounts/setting-transaction-schedules-for-balances)
* [reviewing transaction schedules](/guides/end-customer-accounts/creating-balances-for-accounts/setting-transaction-schedules-for-balances#reviewing-transaction-schedules-for-a-balance)
### Balance Charges
You can create *Charges* for Balances to create single, one-off line items for Balance billing:
* [creating charges](/guides/end-customer-accounts/creating-balances-for-accounts/creating-charges-for-balances)
* [viewing charge details](/guides/end-customer-accounts/creating-balances-for-accounts/creating-charges-for-balances#viewing-balance-charge-details)
* [editing and deleting charges](/guides/end-customer-accounts/creating-balances-for-accounts/creating-charges-for-balances#editing-and-deleting-balance-charges)
### Balance Charge Schedules
You can set up a *Charge Schedule* for a Balance on an Account. This allows you to generate Charges for billing a Balance at regular daily, weekly, monthly, or yearly intervals over a specified time period:
* [setting up charge schedules](/guides/end-customer-accounts/creating-balances-for-accounts/setting-charge-schedules-for-balances)
* [reviewing charge schedules](/guides/end-customer-accounts/creating-balances-for-accounts/setting-charge-schedules-for-balances#reviewing-balance-charge-schedules)
* [viewing and managing scheduled charges](/guides/end-customer-accounts/creating-balances-for-accounts/setting-charge-schedules-for-balances#viewing-and-managing-scheduled-charges-for-balances)
## Bills & Billing
Bills are generated for an Account based on the usage-based pricing Plan that has been attached to the Account for charging the Account for consuming a Product. Plan Templates/Plans offer settings to control billing on Accounts that Product Plans are attached to for charging the Accounts.
* [adding debit line items to bills](/guides/billing-and-usage-data/running-viewing-and-managing-bills/adding-debit-line-items-to-bills)
* [adding credit line items to bills](/guides/billing-and-usage-data/running-viewing-and-managing-bills/adding-credit-line-items-to-bills)
* [approving](/guides/billing-and-usage-data/running-viewing-and-managing-bills/approving-and-locking-bills-managing-bill-lifecycle)
* [auto-approval for](/guides/billing-and-usage-data/running-viewing-and-managing-bills/approving-and-locking-bills-managing-bill-lifecycle#auto-approving-bills)
* [bill line item types explained](/guides/billing-and-usage-data/running-viewing-and-managing-bills/bill-line-item-types)
* [bills for accounts:](/guides/end-customer-accounts/reviewing-bills-for-an-account)
* [reviewing](/guides/end-customer-accounts/reviewing-bills-for-an-account)
* [recalculating](/guides/end-customer-accounts/reviewing-bills-for-an-account)
* [billing for parent/child accounts](/guides/end-customer-accounts/creating-and-working-with-child-accounts#billing-for-parentchild-accounts)
* [currency conversion rates for](/guides/organization-and-access-management/viewing-and-editing-organization/viewing-and-editing-organization-configuration)
* [dates for billing](/guides/getting-started/working-with-dates-in-m3ter-easy-reference#dates-for-billing-and-pricing)
* [downloading](/guides/billing-and-usage-data/running-viewing-and-managing-bills/managing-bills)
* [filtering](/guides/billing-and-usage-data/running-viewing-and-managing-bills/running-bills-and-viewing-bill-details#filtering-bills-by-status)
* [global lock date for](/guides/billing-and-usage-data/running-viewing-and-managing-bills/approving-and-locking-bills-managing-bill-lifecycle#setting-global-lock-date)
* [lifecycle for](/guides/billing-and-usage-data/running-viewing-and-managing-bills/approving-and-locking-bills-managing-bill-lifecycle)
* [locking](/guides/billing-and-usage-data/running-viewing-and-managing-bills/approving-and-locking-bills-managing-bill-lifecycle)
* [managing](/guides/billing-and-usage-data/running-viewing-and-managing-bills/managing-bills)
* [pro-rated charges](/guides/billing-and-usage-data/running-viewing-and-managing-bills/troubleshooting-bills#pro-rated-charges)
* [reviewing bills for an account](/guides/end-customer-accounts/reviewing-bills-for-an-account)
* [running](/guides/billing-and-usage-data/running-viewing-and-managing-bills/running-bills-and-viewing-bill-details)
* [running billing manually using modal](/guides/billing-and-usage-data/running-viewing-and-managing-bills/running-bills-and-viewing-bill-details#running-bills-manually)
* [scheduling](/guides/billing-and-usage-data/running-viewing-and-managing-bills/scheduling-billing)
* [settings for billing at organization level:](/guides/organization-and-access-management/viewing-and-editing-organization#viewing-details-and-editing-configuration)
* [billing reference settings](/guides/organization-and-access-management/viewing-and-editing-organization/viewing-and-editing-organization-configuration)
* [bill prefix](/guides/organization-and-access-management/viewing-and-editing-organization/viewing-and-editing-organization-configuration)
* [bill sequence start](/guides/organization-and-access-management/viewing-and-editing-organization/viewing-and-editing-organization-configuration)
* [consolidate bills across billing frequencies](/guides/organization-and-access-management/viewing-and-editing-organization/viewing-and-editing-organization-configuration)
* [external invoice date for](/guides/organization-and-access-management/viewing-and-editing-organization/viewing-and-editing-organization-configuration)
* [days before due](/guides/organization-and-access-management/viewing-and-editing-organization/viewing-and-editing-organization-configuration)
* [scheduled bill interval](/guides/organization-and-access-management/viewing-and-editing-organization#viewing-details-and-editing-configuration)
* [suppress generation of empty bills](/guides/organization-and-access-management/viewing-and-editing-organization#viewing-details-and-editing-configuration)
* [settings for billing using Plan Templates/Plans](/guides/plans-and-pricing/working-with-plan-templates-and-plans/reviewing-configuration-options-for-plans-and-plan-templates):
* [bill currency](/guides/plans-and-pricing/working-with-plan-templates-and-plans/reviewing-configuration-options-for-plans-and-plan-templates#plan-template-options)
* [bill frequency](/guides/plans-and-pricing/working-with-plan-templates-and-plans/reviewing-configuration-options-for-plans-and-plan-templates#plan-template-options)
* [bill interval](/guides/plans-and-pricing/working-with-plan-templates-and-plans/reviewing-configuration-options-for-plans-and-plan-templates#plan-template-options)
* [standing charge](/guides/plans-and-pricing/working-with-plan-templates-and-plans/understanding-billing-options-for-plan-templates-plans#standing-charge)
* [standing charge interval](/guides/plans-and-pricing/working-with-plan-templates-and-plans/understanding-billing-options-for-plan-templates-plans#standing-charge)
* [standing charge offset](/guides/plans-and-pricing/working-with-plan-templates-and-plans/understanding-billing-options-for-plan-templates-plans#standing-charge)
* [product minimum spend](/guides/plans-and-pricing/working-with-plan-templates-and-plans/understanding-billing-options-for-plan-templates-plans#minimum-spend)
* [statements for](/guides/billing-and-usage-data/running-viewing-and-managing-bills/working-with-bill-statements)
* [troubleshooting](/guides/billing-and-usage-data/running-viewing-and-managing-bills/troubleshooting-bills)
* [viewing details](/guides/billing-and-usage-data/running-viewing-and-managing-bills/running-bills-and-viewing-bill-details)
* [viewing history](/guides/m3ter-calculation-engine)
## Calculation Engine
You can exploit the m3ter platform's powerful *Calculation Engine* as you create calculations for *Meter Derived Fields*,\* Compound Aggregations\*, or *Notification Rules*.
* [m3ter calculation engine](/guides/m3ter-calculation-engine)
## Charges
You can create *Charges* for your end-customer Accounts to create ad-hoc or one-off line items for Account billing.
* [common use cases for](/guides/end-customer-accounts/creating-charges-for-accounts#charges-common-use-cases)
* [creating](/guides/end-customer-accounts/creating-charges-for-accounts)
* [viewing bills for](/guides/end-customer-accounts/creating-charges-for-accounts#viewing-bills-for-charges)
## Child Accounts
A Child Account is an Account that has a Parent Account defined. End customers with multiple Accounts can be issued with a single Bill for a Parent Account.
* [creating](/guides/end-customer-accounts/creating-and-working-with-child-accounts)
* [reviewing Parent/Child](/guides/end-customer-accounts/creating-and-working-with-child-accounts#reviewing-parentchild-accounts)
* [billing for Parent/Child](/guides/end-customer-accounts/creating-and-working-with-child-accounts#billing-for-parentchild-accounts)
## Compound Aggregations
A Compound Aggregation allows you to derive numerical measures from usage data by applying a calculation to one or more simple Aggregations. The calculation can also reference Custom Fields. You can then use these calculated measures as pricing metrics to set up usage-based pricing Plans for your Products.
* [creating](/guides/usage-data-aggregations/compound-aggregations)
* [bill period variables for calculations](/guides/m3ter-calculation-engine#referencing-bill-period-variables)
* [referencing segmented aggregations in calculations](/guides/usage-data-aggregations/compound-aggregations#compound-aggregations-referencing-values-and-fields-and-supported-syntax)
* [referencing values and fields in calculations](/guides/usage-data-aggregations/compound-aggregations#compound-aggregations-referencing-values-and-fields-and-supported-syntax)
* [syntax for calculations](/guides/usage-data-aggregations/compound-aggregation-calculations)
* [worked example for](/guides/getting-started/metering-for-production-worked-examples/example-2-compound-aggregation-for-sign-up-bonus)
## Contracts
Contracts are created for Accounts. For end customers who consume several different service or product packages, the total Contract value can be reported for accounting purposes. You can bill end-customer Accounts on a Contract basis, giving wide flexibility to fulfill invoicing requirements for cases where you offer customers a specific product package agreement to consume several of your core products.
* [adding attached Plans/Plan Groups to](/guides/end-customer-accounts/creating-contracts-for-accounts#adding-prepayments-to-a-contract)
* [adding Prepayments to](/guides/end-customer-accounts/creating-contracts-for-accounts/creating-and-managing-contracts#adding-prepayments-to-a-contract)
* [creating and managing](/guides/end-customer-accounts/creating-contracts-for-accounts/creating-and-managing-contracts)
* [end dating Contract and Account billing entities](/guides/end-customer-accounts/end-dating-account-billing-entities)
* [setting up contract billing](/guides/end-customer-accounts/creating-contracts-for-accounts/setting-up-contract-billing)
## Counters
Counters are used to create unit-based pricing for Plans and apply [recurring subscription charge](/guides/getting-started/knowledge-index#recurring-charges) rates for your Products.
* [creating](/guides/recurring-charges-counters/creating-counters)
* [creating counter adjustments on accounts](/guides/recurring-charges-counters/creating-counter-adjustments-for-accounts)
* [pricing plans with](/guides/recurring-charges-counters/creating-counters)
* [using for hybrid pricing](/guides/recurring-charges-counters/recurring-charges-example-2-hybrid-pricing)
* [using for seat-based pricing](/guides/recurring-charges-counters/reviewing-bills-for-recurring-charges)
## Credits
You can create and define *Credit Reasons* for your Organization. For Bill adjustments, Credit Reasons can then be used to add a Credit for an existing bill line item or apply a product Credit manually to a Bill.
* [adding credit line items to bills](/guides/organization-and-access-management/viewing-and-editing-organization/creating-debit-reasons)
* [creating credit reasons](/guides/organization-and-access-management/viewing-and-editing-organization/creating-credit-reasons)
## Currency
Currency for *billing* can be set at Organization level or individual Account level. You can also define a different *pricing* currency for your Plans at the Plan Template level. If you do this, the Organization or Account setting is used for billing and you must configure currency conversion rates to determine how charge amounts in the Plan pricing currency are converted into billing currency amounts. If any required currency conversion rates from pricing into billing currency are omitted, billing will fail.
* [adding conversion rates for](/guides/organization-and-access-management/viewing-and-editing-organization/creating-and-managing-currencies#adding-currency-conversion-rates)
* [archiving](/guides/organization-and-access-management/viewing-and-editing-organization/creating-and-managing-currencies)
* [creating and managing](/guides/organization-and-access-management/viewing-and-editing-organization/creating-and-managing-currencies)
* [setting for Organization](/guides/organization-and-access-management/viewing-and-editing-organization/viewing-and-editing-organization-configuration)
* [setting for Plan Templates](/guides/plans-and-pricing/working-with-plan-templates-and-plans/reviewing-configuration-options-for-plans-and-plan-templates)
## Custom Fields
Custom Fields allow you to attach custom data to your Organization and some other individual m3ter entities.
* [adding](/guides/organization-and-access-management/viewing-and-editing-organization/adding-and-editing-custom-fields)
* [referencing in meter derived field calculations](/guides/m3ter-calculation-engine#derived-fields-referencing-fields)
* [referencing in compound aggregation calculations](/guides/m3ter-calculation-engine#compound-aggregations-referencing-values-and-fields)
* [understanding and working with](/guides/creating-and-managing-products/working-with-custom-fields)
## Data Explorers
The m3ter Data Explorers allows you to query data collected for your Organization in the m3ter platform for Usage, Billing, and Prepayments/Commitments.
* [billing data explorer: querying & reviewing billing data](/guides/data-explorer/performing-billing-queries-and-reviewing-results)
* [exporting query results](/guides/data-explorer/exporting-usage-query-results)
* [prepayment data explorer: querying & reviewing prepayments data](/guides/data-explorer/performing-commitments-queries-and-reviewing-results)
* [saving, updating, reusing queries](/guides/data-explorer/saving-queries)
* [usage data explorer: querying & reviewing usage data](/guides/data-explorer/performing-usage-queries-and-reviewing-results)
## Data Exports
The Data Export service allows you to export usage data and operational data from your m3ter Organization directly into your AWS S3 buckets. Currently available in preview release.
* [data export entity schema relationship diagram](/guides/data-exports/data-export-object-relationship-diagram)
* [creating destinations for](/guides/data-exports/creating-data-export-destinations)
* [creating operational data export schedules](/guides/data-exports/creating-operational-data-export-schedules)
* [creating usage data export schedules](/guides/data-exports/creating-export-schedules)
* [reviewing export jobs](/guides/data-exports/reviewing-export-jobs)
* [running ad-hoc operational data exports](/guides/data-exports/running-ad-hoc-operational-data-exports)
* [running ad-hoc usage data exports](/guides/data-exports/running-ad-hoc-data-exports)
## Data Fields
Data Fields are added to Meters and define a raw usage data collection fields.
* [adding to meter](/guides/usage-data-meters/creating-meters)
* [types of data collected](/guides/usage-data-meters/reviewing-meter-options#data-field-options)
## Dates
* [for billing](/guides/getting-started/working-with-dates-in-m3ter-easy-reference#dates-for-billing-and-pricing)
* [for pricing](/guides/getting-started/working-with-dates-in-m3ter-easy-reference#dates-for-billing-and-pricing)
* [for usage data submission](/guides/getting-started/working-with-dates-in-m3ter-easy-reference#dates-for-usage-data)
* [quick reference on](/guides/getting-started/working-with-dates-in-m3ter-easy-reference)
* [setting organization epoch dates](/guides/organization-and-access-management/viewing-and-editing-organization/viewing-and-editing-organization-configuration)
* [setting organization timezone](/guides/organization-and-access-management/viewing-and-editing-organization/viewing-and-editing-organization-configuration)
## Debits
You can create and define *Debit Reasons* for your Organization. For Bill adjustments, Debit Reasons can then be used to add a Debit for an existing bill line item or apply a product Debit manually to a Bill.
* [adding debit line items to bills](/guides/billing-and-usage-data/running-viewing-and-managing-bills/adding-debit-line-items-to-bills)
* [creating debit reasons](/guides/organization-and-access-management/viewing-and-editing-organization/creating-debit-reasons)
## Derived Fields
Derived Fields are configured for Meters and use calculations on other fields to define usage data collection fields. Calculations can reference Meter Data Fields, Custom Fields, and system timestamp fields.
* [adding to meter](/guides/usage-data-meters/creating-meters)
* [examples of](/guides/usage-data-meters/derived-fields-for-meters-examples-and-supported-syntax)
* [calculations for](/guides/usage-data-meters/derived-fields-for-meters-examples-and-supported-syntax#derived-field-calculations-supported-syntax-and-referencing-fields)
* [referencing values and fields for](/guides/usage-data-meters/derived-fields-for-meters-examples-and-supported-syntax#derived-field-calculations-supported-syntax-and-referencing-fields)
* [syntax for](/guides/alerts-events-and-notifications/utilizing-events-and-notifications/creating-managing-and-reviewing-notifications#linking-notification-rules-to-destinations-to-create-notification-integration-configurations)
## Developer Tools
Developer tools are available to help you work with the m3ter platform:
* [developer tools](/guides/developer-tools)
* [SDKs](/guides/developer-tools#sdks)
* [terraform provider](/guides/developer-tools#terraform-provider)
## Entity Metadata
On the Details page for an entity, you can review the entity's metadata:
* [reviewing](/guides/getting-started/working-in-the-m3ter-console#reviewing-entity-metadata)
## Error Codes
* [HTTP error codes](/guides/m3ter-apis/http-error-codes)
## Events and Notifications
You can use *Events* generated in m3ter as the basis for setting up and sending Notifications into your external systems when those Events occur and the specific conditions you've defined for triggering a Notification are satisfied.
* [understanding events and notifications framework](/guides/alerts-events-and-notifications/utilizing-events-and-notifications/key-concepts-and-relationships)
* [utilizing events for notifications](/guides/alerts-events-and-notifications/utilizing-events-and-notifications)
### Events
* [creating scheduled events](/guides/alerts-events-and-notifications/utilizing-events-and-notifications/working-with-scheduled-events)
* [event types](https://docs.m3ter.com/guides/alerts-events-and-notifications/utilizing-events-and-notifications/key-concepts-and-relationships#types-of-events)
* [ingest validation failure events](/guides/billing-and-usage-data/submitting-usage-data/reviewing-and-resolving-ingest-events)
* [integration error events](/guides/integrations/setting-up-integrations/reviewing-and-resolving-integration-events)
### Notifications
* [creating calculations for](https://docs.m3ter.com/guides/alerts-events-and-notifications/utilizing-events-and-notifications/creating-managing-and-reviewing-notifications#creating-notification-rules)
* [creating and managing](/guides/alerts-events-and-notifications/utilizing-events-and-notifications/creating-managing-and-reviewing-notifications)
* [creating notification rules](https://docs.m3ter.com/guides/alerts-events-and-notifications/utilizing-events-and-notifications/creating-managing-and-reviewing-notifications#creating-notification-rules)
* [linking notification rules to destinations](https://docs.m3ter.com/guides/alerts-events-and-notifications/utilizing-events-and-notifications/creating-managing-and-reviewing-notifications#linking-notification-rules-to-outgoing-webhooks)
* reviewing events for notifications
## External Mappings
External Mappings are mapping reference lookups, which store unique ids for matched objects across two or more systems.
* [creating and managing for accounts](/guides/end-customer-accounts/creating-and-managing-external-mappings-for-accounts)
* [creating and managing for integrations](/guides/integrations/setting-up-integrations/creating-and-managing-external-mappings)
* [creating bulk mappings](/guides/integrations/setting-up-integrations/creating-and-managing-external-mappings#creating-bulk-external-mappings)
* [creating linked external mappings](/guides/integrations/setting-up-integrations/creating-and-managing-external-mappings#creating-linked-external-mappings)
## Global Meters
Global Meters do not belong to a specific Product, and are used to set up usage-based pricing across different Products.
* [creating](/guides/usage-data-meters/creating-global-meters)
## Grants
You can enable a Balance on an Account as a *Grant*. This allows you to credit the Account with an allowance of *pre-rated usage*, which can be drawn-down to reduce the amount of usage that is rated and would result in charges against the Account:
* [enabling balances as grants](https://m3ter.mintlify.app/guides/end-customer-accounts/creating-balances-for-accounts/balance-grants)
* [worked example](https://m3ter.mintlify.app/guides/end-customer-accounts/creating-balances-for-accounts/balance-grants)
## Integrations
Integrations exploit m3ter's open-API framework allowing you to quickly map and synchronize data held in any 3rd-party systems you use for core business operations.
* [creating configurations for](/guides/integrations/setting-up-integrations/creating-and-managing-integration-configurations)
* [creating credentials for](/guides/integrations/setting-up-integrations/managing-integration-credentials)
* [Chargebee integration credentials](/guides/integrations/setting-up-integrations/_managing-integration-credentials-legacy/creating-chargebee-integration-credentials)
* [NetSuite integration credentials](/guides/integrations/setting-up-integrations/_managing-integration-credentials-legacy/creating-netsuite-integration-credentials)
* [Paddle integration credentials](/guides/integrations/setting-up-integrations/_managing-integration-credentials-legacy/creating-paddle-integration-credentials)
* [QuickBooks integration credentials](/guides/integrations/setting-up-integrations/_managing-integration-credentials-legacy/creating-quickbooks-integration-credentials)
* [Stripe integration credentials](/guides/integrations/setting-up-integrations/_managing-integration-credentials-legacy/creating-stripe-integration-credentials)
* [Xero integration credentials](/guides/integrations/setting-up-integrations/_managing-integration-credentials-legacy/creating-xero-integration-credentials)
* [Salesforce integration credentials](/guides/integrations/setting-up-integrations/_managing-integration-credentials-legacy/creating-salesforce-integration-credentials)
* [creating outgoing webhooks for](/guides/integrations/setting-up-integrations/creating-and-managing-destinations)
* [creating linked external mappings for](/guides/integrations/setting-up-integrations/creating-and-managing-external-mappings#creating-linked-external-mappings)
* [m3ter integrations - overview](/guides/integrations/m3ter-integrations)
* [external mappings for](/guides/integrations/setting-up-integrations/creating-and-managing-external-mappings)
* [managing configurations for](/guides/integrations/setting-up-integrations/creating-and-managing-integration-configurations)
* [managing credentials for](/guides/integrations/setting-up-integrations/managing-integration-credentials)
* [managing multiple third party destinations for](/guides/integrations/setting-up-integrations/managing-multiple-destinations-for-integrations)
* [setting up integrations in console](/guides/integrations/setting-up-integrations)
* [Chargebee](/guides/integrations/setting-up-integrations/configuring-chargebee-integrations)
* [NetSuite](/guides/integrations/setting-up-integrations/configuring-netsuite-integrations)
* [Paddle](/guides/integrations/setting-up-integrations/configuring-paddle-integrations)
* [QuickBooks](/guides/integrations/setting-up-integrations/configuring-quickbooks-integrations)
* [Stripe](/guides/integrations/setting-up-integrations/configuring-stripe-integrations)
* [Xero](/guides/integrations/setting-up-integrations/configuring-xero-integrations)
* [Salesforce](/guides/integrations/setting-up-integrations/configuring-sf-entity-data-integrations)
* [AWS Marketplace](/guides/integrations/setting-up-integrations/configuring-aws-integrations)
* [Azure Marketplace](/guides/integrations/setting-up-integrations/configuring-azure-marketplace-integrations)
* [reviewing and resolving error Events for](/guides/integrations/setting-up-integrations/reviewing-and-resolving-integration-events)
* [reviewing integration runs](/guides/integrations/setting-up-integrations/reviewing-integration-run-details)
* [salesforce - m3ter Connector for](/guides/m3ter-connector-for-salesforce)
## Lookup Tables
Lookup Tables enable you to manage dynamic data mappings that your calculations reference. Use them for currency conversion, pricing tiers, discount rates, and similar scenarios where you require values to change operationally but for calculation logic to remain constant:
* [creating and managing](/guides/lookup-tables/creating-and-managing-lookup-tables)
* [lookup table revisions - adding data to and publishing](/guides/lookup-tables/adding-data-to-and-publishing-table-revisions)
* [lookup tables - worked example](/guides/lookup-tables/worked-example-variable-usage-discounting)
* [lookup functions](/guides/lookup-tables/lookup-functions)
## Meters
Meters define the Data Fields that your system will submit to the m3ter service as usage data. They can be created as Product-specific Meters or as Global Meters.
* [creating for product](/guides/usage-data-meters/creating-meters)
* [creating global](/guides/usage-data-meters/creating-global-meters)
* [custom fields for](/guides/usage-data-meters/reviewing-meter-options#custom-fields)
* [data fields for](/guides/usage-data-meters/reviewing-meter-options#data-field-options)
* [derived fields for](/guides/usage-data-meters/reviewing-meter-options#derived-fields)
* [options for](/guides/usage-data-meters/reviewing-meter-options)
## m3sh
The m3sh platform underpins and drives m3ter's interoperability and automation capabilities, encompassing Events and Notifications, Integrations, Workflows, and Apps:
* [exploring workflows](/guides/m3sh-automation/reviewing-m3sh-workflow-runs)
* [introduction and overview](/guides/m3sh-automation)
* [creating m3sh workflows](/guides/m3sh-workflows/m3sh-workflows)
* [reviewing workflow runs](/guides/m3sh-automation/reviewing-m3sh-workflow-runs)
## Notifications
You can set up Notifications to be triggered and sent into external systems on the basis of m3ter-generated Events. This includes the capability to create rule sets to define the precise conditions under which a Notification will be triggered and sent out when a specific Event occurs:
* [configuring](/guides/alerts-events-and-notifications/utilizing-events-and-notifications/key-concepts-and-relationships#notification-config)
* [destination and credentials for](/guides/alerts-events-and-notifications/utilizing-events-and-notifications/key-concepts-and-relationships#integration-destination-and-credentials)
* [example](/guides/alerts-events-and-notifications/utilizing-events-and-notifications/example-1-commitment-updated-event)
* [understanding](/guides/alerts-events-and-notifications/utilizing-events-and-notifications)
> **Note:** Also see index entries above for [Events and Notifications](/guides/getting-started/knowledge-index#events-and-notifications).
## Organizations
An Organization represents your company as a direct customer of the m3ter service.
* [editing config](/guides/organization-and-access-management/viewing-and-editing-organization/viewing-and-editing-organization-configuration)
* [creating credit reasons for](/guides/organization-and-access-management/viewing-and-editing-organization/creating-credit-reasons)
* [creating debit reasons for](/guides/organization-and-access-management/viewing-and-editing-organization/creating-debit-reasons)
* [creating Service Users for](/guides/organization-and-access-management/managing-users/creating-and-configuring-service-users)
* [currencies for](/guides/organization-and-access-management/viewing-and-editing-organization/creating-and-managing-currencies)
* [granting support access](/guides/organization-and-access-management/managing-users/granting-m3ter-support-access-to-organization)
* [managing](/guides/organization-and-access-management/viewing-and-editing-organization)
* [transaction types for](/guides/organization-and-access-management/viewing-and-editing-organization/creating-transaction-types)
* [viewing details](/guides/organization-and-access-management/viewing-and-editing-organization/viewing-and-editing-organization-configuration)
* [viewing Permission Policies](/guides/organization-and-access-management/managing-users/viewing-and-managing-permission-policies)
* [viewing and editing Users](/guides/organization-and-access-management/managing-users/managing-users-and-assigning-permission-policies)
## Permission Policies
Permission Policies allow you to control what users who have authenticated with the service are allowed to do in your Organization.
* [adding to Service Users](/guides/organization-and-access-management/managing-users/creating-and-configuring-service-users#adding-permission-policies-to-service-users)
* [creating and managing](/guides/organization-and-access-management/creating-and-managing-permissions)
* [viewing and managing](/guides/organization-and-access-management/managing-users/viewing-and-managing-permission-policies)
## Plans
Plans represent a pricing and billing plan for end customers who consume your products or services. They are derived from Plan Templates.
* [creating](/guides/plans-and-pricing/working-with-plan-templates-and-plans/creating-plans)
* [creating custom for Accounts](/guides/end-customer-accounts/creating-custom-account-plans)
* [editing](/guides/plans-and-pricing/working-with-plan-templates-and-plans/editing-plan-templates-and-plans)
* [pricing](/guides/plans-and-pricing/pricing-plans/pricing-plans)
* [reviewing options for](/guides/plans-and-pricing/working-with-plan-templates-and-plans/reviewing-configuration-options-for-plans-and-plan-templates):
* [billing currency](/guides/plans-and-pricing/working-with-plan-templates-and-plans/reviewing-configuration-options-for-plans-and-plan-templates#plan-template-options)
* [billing frequency](/guides/plans-and-pricing/working-with-plan-templates-and-plans/reviewing-configuration-options-for-plans-and-plan-templates#plan-template-options)
* [billing interval](/guides/plans-and-pricing/working-with-plan-templates-and-plans/reviewing-configuration-options-for-plans-and-plan-templates#plan-template-options)
* [standing charge](/guides/plans-and-pricing/working-with-plan-templates-and-plans/understanding-billing-options-for-plan-templates-plans#standing-charge)
* [standing charge interval](/guides/plans-and-pricing/working-with-plan-templates-and-plans/understanding-billing-options-for-plan-templates-plans#standing-charge)
* [standing charge offset](/guides/plans-and-pricing/working-with-plan-templates-and-plans/understanding-billing-options-for-plan-templates-plans#standing-charge)
* [product minimum spend](/guides/plans-and-pricing/working-with-plan-templates-and-plans/understanding-billing-options-for-plan-templates-plans#minimum-spend)
* [reviewing pricing options for](/guides/plans-and-pricing/pricing-plans/reviewing-pricing-options-and-pricing-plans)
* [understanding billing options for](/guides/plans-and-pricing/working-with-plan-templates-and-plans/understanding-billing-options-for-plan-templates-plans)
* [viewing details of](/guides/plans-and-pricing/working-with-plan-templates-and-plans/editing-plan-templates-and-plans)
## Plan Groups
Plan Groups allow you to group together Plans for different Products and define a minimum spend for the Group.
* [adding plans to](/guides/plans-and-pricing/working-with-plan-templates-and-plans/working-with-plan-groups#adding-plans-to-plan-groups)
* [example use case for](/guides/plans-and-pricing/working-with-plan-templates-and-plans/working-with-plan-groups#example-use-case-for-plan-groups)
* [creating](/guides/plans-and-pricing/working-with-plan-templates-and-plans/working-with-plan-groups#creating-plan-groups-and-adding-plans)
* [creating custom for Accounts](/guides/end-customer-accounts/creating-custom-plan-groups-for-accounts)
* [understanding billing options for](/guides/plans-and-pricing/working-with-plan-templates-and-plans/understanding-billing-options-for-plan-templates-plans)
* [understanding minimum spend for](/guides/plans-and-pricing/working-with-plan-templates-and-plans/working-with-plan-groups#plan-group-minimum-spend-vs-plans-minimum-spends)
## Plan Templates
Plan Templates allow you to configure default billing and pricing settings for your Plans, avoiding repetition in configuration work when setting up Plans.
* [creating](/guides/plans-and-pricing/working-with-plan-templates-and-plans/creating-plan-templates)
* [editing](/guides/plans-and-pricing/working-with-plan-templates-and-plans/editing-plan-templates-and-plans)
* [pricing](/guides/plans-and-pricing/pricing-plans/pricing-plans)
* [reviewing options for](/guides/plans-and-pricing/working-with-plan-templates-and-plans/reviewing-configuration-options-for-plans-and-plan-templates):
* [billing currency](/guides/plans-and-pricing/working-with-plan-templates-and-plans/reviewing-configuration-options-for-plans-and-plan-templates#plan-template-options)
* [billing frequency](/guides/plans-and-pricing/working-with-plan-templates-and-plans/reviewing-configuration-options-for-plans-and-plan-templates#plan-template-options)
* [billing interval](/guides/plans-and-pricing/working-with-plan-templates-and-plans/reviewing-configuration-options-for-plans-and-plan-templates#plan-template-options)
* [standing charge](/guides/plans-and-pricing/working-with-plan-templates-and-plans/understanding-billing-options-for-plan-templates-plans#standing-charge)
* [standing charge interval](/guides/plans-and-pricing/working-with-plan-templates-and-plans/understanding-billing-options-for-plan-templates-plans#standing-charge)
* [standing charge offset](/guides/plans-and-pricing/working-with-plan-templates-and-plans/understanding-billing-options-for-plan-templates-plans#standing-charge)
* [product minimum spend](/guides/plans-and-pricing/working-with-plan-templates-and-plans/understanding-billing-options-for-plan-templates-plans#minimum-spend)
* [reviewing pricing options for](/guides/plans-and-pricing/pricing-plans/reviewing-pricing-options-and-pricing-plans)
* [understanding billing options for](/guides/plans-and-pricing/working-with-plan-templates-and-plans/understanding-billing-options-for-plan-templates-plans)
* [viewing details of](/guides/plans-and-pricing/working-with-plan-templates-and-plans/editing-plan-templates-and-plans)
## Prepayments/Commitments
Prepayments/Commitments allow you to assign an amount to an Account that the end customer has agreed to pay over the duration of their contract with you.
* [billing with plan](/guides/end-customer-accounts/creating-prepayments-for-accounts#prepayment-billing-with-a-plan)
* [billing on schedule](/guides/end-customer-accounts/creating-prepayments-for-accounts#prepayment-billing-on-a-schedule)
* [creating for Account](/guides/end-customer-accounts/creating-prepayments-for-accounts)
* [draw-down order against Balances for](/guides/end-customer-accounts/creating-prepayments-for-accounts#prepayments-draw-down-order-against-balances)
* [duplicating](/guides/end-customer-accounts/creating-prepayments-for-accounts#duplicating-prepayments)
* [example of](/guides/end-customer-accounts/creating-prepayments-for-accounts#example-prepayment)
* [overage pricing for](/guides/plans-and-pricing/pricing-plans/reviewing-pricing-options-and-pricing-plans)
* [overage surcharge for](/guides/end-customer-accounts/creating-prepayments-for-accounts#creating-prepayments)
* [reviewing details of](/guides/end-customer-accounts/creating-prepayments-for-accounts#viewing-prepayment-details)
* [setting draw-down charge types for](/guides/end-customer-accounts/creating-prepayments-for-accounts)
## Pricing
A Pricing allows you to use Aggregations as pricing metrics to configure the cost of usage data consumed under Product Plans.
* [deleting](/guides/plans-and-pricing/pricing-plans/managing-and-editing-priced-plans-or-plan-templates#deleting-pricing)
* [editing priced Plans/Plan Templates](/guides/plans-and-pricing/pricing-plans/managing-and-editing-priced-plans-or-plan-templates)
* [pricing Plans/Plan Templates](/guides/plans-and-pricing/pricing-plans/pricing-plans):
* [using negative pricing for](/guides/plans-and-pricing/pricing-plans/pricing-plans#using-negative-pricing-for-plans)
* [pricing readiness - prerequisites for](/guides/plans-and-pricing/pricing-plans/pricing-plans#pricing-readiness-completing-prerequisites)
* [removing Aggregations from](/guides/plans-and-pricing/pricing-plans/managing-and-editing-priced-plans-or-plan-templates#removing-aggregations-from-the-pricing-editor)
* [reviewing options for](/guides/plans-and-pricing/pricing-plans/reviewing-pricing-options-and-pricing-plans)
* [seat-base pricing - derived field for](/guides/usage-data-meters/derived-fields-for-meters-examples-and-supported-syntax#example-7-derived-field-for-seat-based-pricing)
* [viewing historic and future pricing for Plans](/guides/plans-and-pricing/pricing-plans/pricing-plans#viewing-historic-and-future-pricing-on-a-plan)
* [viewing schedule for priced Plans/Plan Templates](/guides/plans-and-pricing/pricing-plans/managing-and-editing-priced-plans-or-plan-templates#viewing-pricing-schedule)
* [using segmented aggregations for](/guides/plans-and-pricing/pricing-plans/pricing-plans-using-segmented-aggregations)
## Products
Products represent in your m3ter Organization the products or service you offer to end customers.
* [creating and managing](/guides/creating-and-managing-products)
* [creating entities for](https://docs.m3ter.com/guides/creating-and-managing-products#creating-product-entities)
## Recurring Charges
The Recurring Charges feature in m3ter allows you to use [Counters](/guides/getting-started/knowledge-index#counters) to set up unit-based for your products and services.
* [creating counters for](/guides/recurring-charges-counters/creating-counters)
* [creating counter adjustments on accounts](/guides/recurring-charges-counters/creating-counter-adjustments-for-accounts)
* [creating unit-based pricing for plans](/guides/recurring-charges-counters/creating-counters)
* [using for hybrid pricing](/guides/recurring-charges-counters/recurring-charges-example-2-hybrid-pricing)
* [using for seat-based pricing](/guides/recurring-charges-counters/reviewing-bills-for-recurring-charges)
## Salesforce Managed Package
The [m3ter Connector for Salesforce](/guides/m3ter-connector-for-salesforce) managed package allows you to map and synchronize data in your Salesforce systems with the m3ter platform. You can quickly set up a connective framework between Salesforce CRM and CPQ to streamline and accelerate the process of connecting your Salesforce systems to your m3ter infrastructure with one simple, fully supported, and managed integration.
* [configuring](/guides/m3ter-connector-for-salesforce/configuring-m3ter-salesforce-connector)
* [metadata mappings for](/guides/m3ter-connector-for-salesforce/reviewing-and-managing-metadata-mappings)
* [custom metadata mappings](/guides/m3ter-connector-for-salesforce/creating-metadata-mappings)
* [sync to m3ter invocable action](/guides/m3ter-connector-for-salesforce/setting-up-invocable-action-for-event-driven-sync)
* [testing sync setup for](/guides/m3ter-connector-for-salesforce/testing-sync-setup-from-salesforce-to-m3ter)
* [troubleshooting syncs](/guides/m3ter-connector-for-salesforce/checking-sync-logs-and-troubleshooting)
## Segmented Aggregations
Segmented Aggregations allow you to segment the usage data collected by a single Meter and price your Plans by these segment values.
* [billing for](/guides/usage-data-aggregations/segmented-aggregations#billing-for-segmented-aggregations)
* [creating](/guides/usage-data-aggregations/segmented-aggregations#creating-segmented-aggregations)
* [example use case for](/guides/usage-data-aggregations/segmented-aggregations)
* [using to price Plans](/guides/plans-and-pricing/pricing-plans/pricing-plans-using-segmented-aggregations)
* [using wildcard values for](/guides/usage-data-aggregations/segmented-aggregations#using-wildcards-or-defaults-in-segmented-aggregations)
* [worked example for](/guides/getting-started/metering-for-production-worked-examples/example-3-segmented-aggregation-on-single-meter-usage)
## Service Users
Service Users represent automated processes that you want to grant direct API access to your Organization.
* [adding Permission Policy to](/guides/organization-and-access-management/managing-users/creating-and-configuring-service-users#adding-permission-policies-to-service-users)
* [creating and configuring](/guides/organization-and-access-management/managing-users/creating-and-configuring-service-users)
* [generating secret and access key for](/guides/organization-and-access-management/managing-users/creating-and-configuring-service-users#generating-access-keys-for-service-users)
* [obtaining bearer token for](/guides/authenticating-with-the-platform/service-authentication#obtaining-a-bearer-token-using-basic-auth)
## Statement Definitions
Statement Definitions allow you to define how the usage data collected by a Meter for a billing period is broken down. You can then use Statement Definitions to generate Bill Statements for specific Bills and append these to your end-customer invoices.
* [creating](/guides/billing-and-usage-data/running-viewing-and-managing-bills/working-with-bill-statements#creating-statement-definitions)
* [using](/guides/billing-and-usage-data/running-viewing-and-managing-bills/working-with-bill-statements#using-statement-definitions)
## Transactions
You can create and define *Transaction Types* for your Organization. Transaction Types can then be used to create specific *Transaction amounts* for Balances on end-customer Accounts. In this way, you can use Transactions to flexibly manage Balance amounts on end-customer Accounts, with a Transaction ledger being maintained for individual Balances.
* [creating transaction amounts for balances](/guides/end-customer-accounts/creating-balances-for-accounts#creating-transactions-for-a-balance)
* [creating transaction types for organization](/guides/organization-and-access-management/viewing-and-editing-organization/creating-transaction-types)
* [working with balance transaction ledger](/guides/end-customer-accounts/creating-balances-for-accounts#working-with-the-balance-transaction-ledger)
## Usage Data
You can create and configure *Meters* in m3ter to collect your end customer usage data. When you have set up Meters, you can define *Aggregations* of that data to give the pricing metrics to price Plans for your Products.
You can submit test usage data right in the Console and generate test Bills for that usage data. If usage data measurements you submit to the platform fail to ingest properly, an ingest failure Event is generated and a log file is made available to review and troubleshoot the ingest failure:
* [aggregating to price by](/guides/usage-data-aggregations/reviewing-aggregation-options)
* [file upload by meter](/guides/billing-and-usage-data/submitting-usage-data/file-uploads-for-usage-data-by-meter)
* [file upload service API for](/guides/billing-and-usage-data/submitting-usage-data/file-upload-service-api)
* [getting usage data into m3ter](/exploring-m3ter-getting-to-know-the-platform/getting-usage-data-into-m3ter-quick-reference-starter)
* [reviewing and resolving ingest failure events for](/guides/billing-and-usage-data/submitting-usage-data/reviewing-and-resolving-ingest-events)
* [setting up Meters to collect](/guides/usage-data-meters)
* [submitting](/guides/billing-and-usage-data/submitting-usage-data)
* [submitting for non-existent accounts](/guides/billing-and-usage-data/submitting-usage-data/submitting-usage-data-for-non-existent-accounts)
* [submitting and checking test usage data](/guides/billing-and-usage-data/submitting-usage-data/submitting-test-usage-data)
* [using timestamp to submit usage data adjustments](/guides/billing-and-usage-data/submitting-usage-data/submitting-usage-data-adjustments-using-timestamp)
## Users
Users represent a person you allow to authenticate with and have access to your Organization.
* [authentication for](/guides/authenticating-with-the-platform)
* [creating permission policies for](/guides/organization-and-access-management/creating-and-managing-permissions)
* [creating user groups for](/guides/organization-and-access-management/managing-users/creating-and-managing-user-groups)
* [deactivating and reactivating](/guides/organization-and-access-management/managing-users/managing-users-and-assigning-permission-policies#deactivating-and-reactivating-users)
* [editing profile](/guides/organization-and-access-management/managing-users/managing-users-and-assigning-permission-policies#editing-user-profile)
* [inviting to join your organization](/guides/organization-and-access-management/managing-users/inviting-users-to-organization)
* [managing and assigning permission policies to](/guides/organization-and-access-management/managing-users/managing-users-and-assigning-permission-policies)
* [single sign-on (SSO) for](/guides/authenticating-with-the-platform/m3ter-single-sign-on)
* [tracking user activity in organization](/guides/organization-and-access-management/managing-users/tracking-user-activity-in-organization)
* [viewing and editing](/guides/organization-and-access-management/managing-users/managing-users-and-assigning-permission-policies)
## Webhooks
In the Integrations section of the Console, you can create *Outgoing webhooks*. If you've defined a Notification Rule based on a system event, you can link this to an Outgoing webhook as the endpoint for the Notification and to create a Notification Webhook integration:
* [creating and managing outgoing webhooks](/guides/integrations/setting-up-integrations/creating-and-managing-destinations)
* [setting up authentication for connecting to](/guides/integrations/setting-up-integrations/creating-and-managing-destinations#webhook-authentication-for-m3ter-_-signed_request)
# Worked Examples
Source: https://docs.m3ter.com/guides/getting-started/metering-for-production-worked-examples
Discover m3ter's usage-based pricing examples: for simple cloud storage, allowing for sign-up bonuses, and usage segmentation.
In this section, you can review some worked examples with video walkthroughs. These are designed to illustrate the wide scope and flexibility the m3ter platform offers for gathering usage data and defining pricing metrics to meet the specific usage-based pricing requirements for your products and services:
* [Example 1: Cloud Storage and File Cleanup](/guides/getting-started/metering-for-production-worked-examples/worked-example-1-cloud-storage-and-file-cleanup)
* [Example 2: Compound Aggregation for Sign-Up Bonus](/guides/getting-started/metering-for-production-worked-examples/example-2-compound-aggregation-for-sign-up-bonus)
* [Example 3: Segmented Aggregation on Single Meter Usage](/guides/getting-started/metering-for-production-worked-examples/example-3-segmented-aggregation-on-single-meter-usage)
# Example 2: Compound Aggregation for Sign-Up Bonus
Source: https://docs.m3ter.com/guides/getting-started/metering-for-production-worked-examples/example-2-compound-aggregation-for-sign-up-bonus
Follow a worked example using a Compound Aggregation for pricing.
Suppose your SaaS company provides a "build-and-host" application service, one which allows customers to develop and run software applications and host these applications on your service:
* You'll charge customers by total number of requests made to all of their applications being hosted with your service in any given billing period.
* However, you want to offer customers a sign-up bonus for the first three months of using your service. The first 100 requests made to an application they host with you are free for each billing period - for example, if a customer has 3 applications hosted with you during the first billing period, they are due 300 free requests for the first Bill.
* The sign-up bonus will be generous in this sense - if a new customer reaches a maximum of 5 applications hosted in a billing period, but by the end of the billing period has taken down 2 of them, their bonus will be calculated for the maximum number of hosted applications reached in the billing period at 500 free requests.
This topic provides a worked example to illustrate how you can use a Compound Aggregation to provide a suitable metric for pricing Product Plans and easily satisfy this SaaS UBP use case - the pricing metric the Compound Aggregation provides will ensure the sign-up bonus is allowed for when billing is run for Accounts placed on the priced Product Plans.
The example goes on to show how to submit some test data against a test Account and then generate a Bill for the test Account and check billed amounts against submitted usage.
## Step 1: Create Product
*Products* represent a product or service that you offer to your end customers. A Meter, Aggregation, Plan Template, Plan, or Pricing typically all belong to a Product.
**To create a Product:**
1. In the Console, select **Products**. The **Products** page opens.
2. Select **Create product**. We'll create a single Product called **App Hosting Standard**:
![]() 3. Select **Create product**.
The **App Hosting Standard** Product can now serve as a container for any Meters, Aggregations, Plan Templates, Plans, or Pricings we'll need to create and configure for the example.
> **More Details:** [Creating and Managing Products](/guides/creating-and-managing-products)
## Step 2: Set up Meters
*Meters* define the Data Fields that your system will use to submit usage data to the m3ter platform:
* As well as *simple Data Fields*, which collect raw usage data, you can define *Derived Fields* that reference and apply calculations to simple fields. For this example, we'll create two Meters each with a single simple Data Field.
* You can create Product-specific Meters or Global Meters. For the example, we'll create two Meters for the **App Hosting Standard** Product.
**To create Meters:**
1. Select **Metering**. The **Meters** page opens.
2. In the **Product** drop-down, select **App Hosting Standard**.
3. Select **Create meter**.
Here's the set up for the first Meter to support the pricing model we want to use in the example:
3. Select **Create product**.
The **App Hosting Standard** Product can now serve as a container for any Meters, Aggregations, Plan Templates, Plans, or Pricings we'll need to create and configure for the example.
> **More Details:** [Creating and Managing Products](/guides/creating-and-managing-products)
## Step 2: Set up Meters
*Meters* define the Data Fields that your system will use to submit usage data to the m3ter platform:
* As well as *simple Data Fields*, which collect raw usage data, you can define *Derived Fields* that reference and apply calculations to simple fields. For this example, we'll create two Meters each with a single simple Data Field.
* You can create Product-specific Meters or Global Meters. For the example, we'll create two Meters for the **App Hosting Standard** Product.
**To create Meters:**
1. Select **Metering**. The **Meters** page opens.
2. In the **Product** drop-down, select **App Hosting Standard**.
3. Select **Create meter**.
Here's the set up for the first Meter to support the pricing model we want to use in the example:
![]() For the example, we've set up **App Hosting Meter 1** and added the single Data Field called **Number Apps** to capture usage data.
4. Select **Create meter**.
5. Return to the **Meters** pages and repeat steps **2** and **3** to set up a second Meter:
For the example, we've set up **App Hosting Meter 1** and added the single Data Field called **Number Apps** to capture usage data.
4. Select **Create meter**.
5. Return to the **Meters** pages and repeat steps **2** and **3** to set up a second Meter:
![]() We've set up a second **App Hosting Meter 2** and added a single Data Field called **Number Requests** to capture usage data.
6. Select **Create meter**.
We now have a two Meters for the example, which we can use to collect usage data on any Account that consumes the **App Hosting Standard** Product. This metered usage data will serve as the basis for the Compound Aggregation pricing metric we want to apply to rate Product consumption yet allow for a sign-up bonus.
> **More Details:** [Reviewing Meter Options](/guides/usage-data-meters/reviewing-meter-options) and [Creating Meters](/guides/usage-data-meters/creating-meters)
## Step 3: Define Aggregations
*Aggregations* define how to transform into a single number the individual measurements submitted to a Meter Data Field as usage data. For example, you may choose to simply SUM the submitted usage data values. In this way, Aggregations define the usage-based pricing metrics you'll use to set up pricing for your products and services.
For the usage-based pricing model we want to implement in our example, we'll need to create two simple Aggregations based on the usage data collected by our two Meters - **App Hosting Meter 1** and **App Hosting Meter 2**. Each simple Aggregation will target a different Meter and field to define a metric:
* For the maximum number of hosted applications, we'll target the **Number Apps** Data Field on **App Hosting Meter 1**.
* For the total number of requests made to hosted applications, we'll target the **Number Requests** Data Field on **App Hosting Meter 2**.
We'll then create a Compound Aggregation that references these two simple Aggregations and uses a calculation to ensure the sign-up bonus is factored into the pricing metric it provides.
**To create two simple Aggregations:**
1. Select **Metering>Aggregations**:
We've set up a second **App Hosting Meter 2** and added a single Data Field called **Number Requests** to capture usage data.
6. Select **Create meter**.
We now have a two Meters for the example, which we can use to collect usage data on any Account that consumes the **App Hosting Standard** Product. This metered usage data will serve as the basis for the Compound Aggregation pricing metric we want to apply to rate Product consumption yet allow for a sign-up bonus.
> **More Details:** [Reviewing Meter Options](/guides/usage-data-meters/reviewing-meter-options) and [Creating Meters](/guides/usage-data-meters/creating-meters)
## Step 3: Define Aggregations
*Aggregations* define how to transform into a single number the individual measurements submitted to a Meter Data Field as usage data. For example, you may choose to simply SUM the submitted usage data values. In this way, Aggregations define the usage-based pricing metrics you'll use to set up pricing for your products and services.
For the usage-based pricing model we want to implement in our example, we'll need to create two simple Aggregations based on the usage data collected by our two Meters - **App Hosting Meter 1** and **App Hosting Meter 2**. Each simple Aggregation will target a different Meter and field to define a metric:
* For the maximum number of hosted applications, we'll target the **Number Apps** Data Field on **App Hosting Meter 1**.
* For the total number of requests made to hosted applications, we'll target the **Number Requests** Data Field on **App Hosting Meter 2**.
We'll then create a Compound Aggregation that references these two simple Aggregations and uses a calculation to ensure the sign-up bonus is factored into the pricing metric it provides.
**To create two simple Aggregations:**
1. Select **Metering>Aggregations**:
![]() The **Aggregations** page opens.
2. In the **Product** drop-down, select **App Hosting Standard**.
3. Select **Create aggregation**.
Here's the setup for the first simple Aggregation:
* **Aggregation details**:
The **Aggregations** page opens.
2. In the **Product** drop-down, select **App Hosting Standard**.
3. Select **Create aggregation**.
Here's the setup for the first simple Aggregation:
* **Aggregation details**:
![]() * **Meter settings**:
* **Meter settings**:
![]() * **Aggregation settings**:
* **Aggregation settings**:
![]() The **Max Apps Hosted** Aggregation targets the **Number Apps** Data Field on **App Hosting Meter 1** and uses the **Maximum** value of the field.
4. Select **Create aggregation**.
5. Repeat steps **3.** and **4.** to create a second Aggregation.
Here's the setup for the second Aggregation:
* **Aggregation details**:
The **Max Apps Hosted** Aggregation targets the **Number Apps** Data Field on **App Hosting Meter 1** and uses the **Maximum** value of the field.
4. Select **Create aggregation**.
5. Repeat steps **3.** and **4.** to create a second Aggregation.
Here's the setup for the second Aggregation:
* **Aggregation details**:
![]() * **Meter settings**:
* **Meter settings**:
![]() * **Aggregation settings**:
* **Aggregation settings**:
![]() The **Number App Requests** Aggregation targets the **Number Requests** Data Field on **App Hosting Meter 2** and uses the **Sum** of values of the field.
6. Select **Create aggregation**.
We can now use these two simple Aggregations to set up a Compound Aggregation that provides the pricing metric we need to meet the sign-up bonus UBP use case.
**To create a Compound Aggregation:**
1. Select **Metering>Compound aggregations**:
The **Number App Requests** Aggregation targets the **Number Requests** Data Field on **App Hosting Meter 2** and uses the **Sum** of values of the field.
6. Select **Create aggregation**.
We can now use these two simple Aggregations to set up a Compound Aggregation that provides the pricing metric we need to meet the sign-up bonus UBP use case.
**To create a Compound Aggregation:**
1. Select **Metering>Compound aggregations**:
![]() The **Compound aggregations** page opens.
2. In the **Product** drop-down, select **App Hosting Standard**.
3. Select **Create compound aggregation**.
Here's the setup for the Compound Aggregation:
* **Compound aggregation details**:
The **Compound aggregations** page opens.
2. In the **Product** drop-down, select **App Hosting Standard**.
3. Select **Create compound aggregation**.
Here's the setup for the Compound Aggregation:
* **Compound aggregation details**:
![]() * **Compound aggregation settings**:
* **Compound aggregation settings**:
![]() Note that for the Calculation:
* We've switched to **Advanced**.
* Entered a valid expression that references our two simple Aggregations using the format: `aggregation.<>`. The Calculation will ensure that the pricing metric the Compound Aggregation provides subtracts the appropriate numbers of requests for the promised sign-up bonus.
**Tip: Working with Calculations?** For more details on working with calculations for Compound Aggregations, see [Compound Aggregations - Referencing Values and Fields and Supported Syntax](/guides/usage-data-aggregations/compound-aggregations#compound-aggregations-referencing-values-and-fields-and-supported-syntax).
4. Select **Create compound aggregation**.
We can now use the **App Requests Minus Free** Compound Aggregation to price a Plan for the **App Hosting Standard** Product.
> **More Details:** [Reviewing Aggregation Options](/guides/usage-data-aggregations/reviewing-aggregation-options), [Creating Aggregations](/guides/usage-data-aggregations/creating-aggregations), and [Compound Aggregations](/guides/usage-data-aggregations/compound-aggregations).
## Step 4: Create Product Plan
*Plans* represent a pricing plan for one of your products or services. A Plan is always derived from a Plan Template and inherits settings from the Plan Template which control billing operations, such as billing frequency and currency. You can override some of these settings when you create a Plan from a Plan Template. To meet the example requirements:
* First, we'll need a Plan Template for the **App Hosting Standard** Product. We'll configure the Plan Template:
* For monthly billing using a specific billing currency.
* Omit any **Standing charge** or **Minimum spend** amounts to be applied for each billing period.
* Second, we'll create a Product Plan based on the Plan Template.
**To create a Product Plan Template:**
1. Select **Pricing>Plan templates**:
Note that for the Calculation:
* We've switched to **Advanced**.
* Entered a valid expression that references our two simple Aggregations using the format: `aggregation.<>`. The Calculation will ensure that the pricing metric the Compound Aggregation provides subtracts the appropriate numbers of requests for the promised sign-up bonus.
**Tip: Working with Calculations?** For more details on working with calculations for Compound Aggregations, see [Compound Aggregations - Referencing Values and Fields and Supported Syntax](/guides/usage-data-aggregations/compound-aggregations#compound-aggregations-referencing-values-and-fields-and-supported-syntax).
4. Select **Create compound aggregation**.
We can now use the **App Requests Minus Free** Compound Aggregation to price a Plan for the **App Hosting Standard** Product.
> **More Details:** [Reviewing Aggregation Options](/guides/usage-data-aggregations/reviewing-aggregation-options), [Creating Aggregations](/guides/usage-data-aggregations/creating-aggregations), and [Compound Aggregations](/guides/usage-data-aggregations/compound-aggregations).
## Step 4: Create Product Plan
*Plans* represent a pricing plan for one of your products or services. A Plan is always derived from a Plan Template and inherits settings from the Plan Template which control billing operations, such as billing frequency and currency. You can override some of these settings when you create a Plan from a Plan Template. To meet the example requirements:
* First, we'll need a Plan Template for the **App Hosting Standard** Product. We'll configure the Plan Template:
* For monthly billing using a specific billing currency.
* Omit any **Standing charge** or **Minimum spend** amounts to be applied for each billing period.
* Second, we'll create a Product Plan based on the Plan Template.
**To create a Product Plan Template:**
1. Select **Pricing>Plan templates**:
![]() The **Plan templates** page opens.
2. In the **Product** drop-down, select **App Hosting Standard**.
3. Select **Create plan template**. The **Create** page opens.
Here's the setup for our Product Plan Template:
The **Plan templates** page opens.
2. In the **Product** drop-down, select **App Hosting Standard**.
3. Select **Create plan template**. The **Create** page opens.
Here's the setup for our Product Plan Template:
![]() For the **App Hosting Plan Template 1** we've:
* Chosen **US dollars** as the billing currency.
* Note that if **US Dollar** doesn't appear for selection in the **Currency** drop-down when you are creating your Plan Template, you'll need to create it for your Organization:
* Select **Settings>Organization** and open the **Currencies** tab.
* Click **Create currency** and on the **Create** page add **USD - US Dollar (\$)** as a **Standard currency**. You can define the **Maximum decimal places** for the currency also. Click **Create** - **US Dollar** will now be available for selection across your Organization.
* Selected a monthly **Bill frequency** with a **Bill interval** of **1**, which means Accounts put on the Plan will receive a Bill each month for a month's period of usage.
* Ignore the settings **Standing charge** and **Minimum spend**, which allow you to set up amounts for billing, neither of which are required for the example pricing model.
4. Select **Create plan template**. You are returned to the **Plan template details** page.
We can now create a Product Plan for the example based on this template.
**To create a Product Plan:**
1. Select **Pricing>Plans**. The **Plans** page opens.
2. In the **Product** drop-down, select **App Hosting Standard**.
3. Select **Create plan**. The **Create** page opens.
Here's the setup for our Product Plan:
For the **App Hosting Plan Template 1** we've:
* Chosen **US dollars** as the billing currency.
* Note that if **US Dollar** doesn't appear for selection in the **Currency** drop-down when you are creating your Plan Template, you'll need to create it for your Organization:
* Select **Settings>Organization** and open the **Currencies** tab.
* Click **Create currency** and on the **Create** page add **USD - US Dollar (\$)** as a **Standard currency**. You can define the **Maximum decimal places** for the currency also. Click **Create** - **US Dollar** will now be available for selection across your Organization.
* Selected a monthly **Bill frequency** with a **Bill interval** of **1**, which means Accounts put on the Plan will receive a Bill each month for a month's period of usage.
* Ignore the settings **Standing charge** and **Minimum spend**, which allow you to set up amounts for billing, neither of which are required for the example pricing model.
4. Select **Create plan template**. You are returned to the **Plan template details** page.
We can now create a Product Plan for the example based on this template.
**To create a Product Plan:**
1. Select **Pricing>Plans**. The **Plans** page opens.
2. In the **Product** drop-down, select **App Hosting Standard**.
3. Select **Create plan**. The **Create** page opens.
Here's the setup for our Product Plan:
![]() * Note that no **Standing charge** or **Minimum spend** amounts are required for the example.
4. Select **Create plan**. The **Plan details** page opens for our new Product Plan.
We can now price this Plan using our **App Requests Minus Free** Compound Aggregation.
> **More Details:** [Reviewing Options for Plan Templates and Plans](/guides/plans-and-pricing/working-with-plan-templates-and-plans/reviewing-configuration-options-for-plans-and-plan-templates) and [Creating Plans](/guides/plans-and-pricing/working-with-plan-templates-and-plans/creating-plans)
## Step 5: Price Product Plan
*Pricing* allows you to configure the cost of usage data under a specific Plan you apply to an Account, and is used to calculate bills.
We can use the **Pricing editor** in the m3ter Console to quickly price up our Product Plan to meet the pricing requirements for the example.
**To price Product Plan:**
1. Select **Pricing>Pricing editor**:
* Note that no **Standing charge** or **Minimum spend** amounts are required for the example.
4. Select **Create plan**. The **Plan details** page opens for our new Product Plan.
We can now price this Plan using our **App Requests Minus Free** Compound Aggregation.
> **More Details:** [Reviewing Options for Plan Templates and Plans](/guides/plans-and-pricing/working-with-plan-templates-and-plans/reviewing-configuration-options-for-plans-and-plan-templates) and [Creating Plans](/guides/plans-and-pricing/working-with-plan-templates-and-plans/creating-plans)
## Step 5: Price Product Plan
*Pricing* allows you to configure the cost of usage data under a specific Plan you apply to an Account, and is used to calculate bills.
We can use the **Pricing editor** in the m3ter Console to quickly price up our Product Plan to meet the pricing requirements for the example.
**To price Product Plan:**
1. Select **Pricing>Pricing editor**:
![]() The **Pricing editor** page opens.
2. In the **Product** drop-down, select **App Hosting Standard**.
3. Select **Add plans**. The **Select plans** dialog opens and lists all Plans created for the **App Hosting Standard** Product.
4. Check **App Hosting Plan 1** and select **Confirm**. The dialog closes and the Plan is added to the **Pricing** **editor** page.
We'll use the Compound Aggregation we created at **Step 3** for the usage-based metric to price the Plan in accordance with the requirements set out in the example.
5. Click **Add compound aggregations**. A **Select compound aggregations** dialog appears and lists all Compound Aggregations created for the **App Hosting Standard** Product.
* Note that you might also see *global* Compound Aggregations listed for selection. Global Compound Aggregations are not tied to any specific Product and can be used to price Plans across all Products.
6. On the **Select compound aggregations** dialog check **App Requests Minus Free**.
7. Click **Confirm**. The dialog closes and the selected Compound Aggregation is added to the **Pricing editor** page for the added Plan. You'll see that no **Active pricing** has been configured for the Plan using this Compound Aggregation.
8. In the pricing grid, select **Create Plan pricing** for **App Requests Minus Free**. The **Create** pricing page opens:
* You can read off details of the Compound Aggregation being used to create the pricing at the top of the page.
* You can **Switch to wizard** to follow an alternative streamlined pricing workflow by **Pricing type**. For the example workflow, we'll continue with the default *advanced pricing format*.
9. Under **Pricing settings** enter:
* **Start** and **End** dates for the period the pricing is active for the Plan.
* An **Accounting product** to link any Bill line items resulting from the pricing to a specific product line for your accounting purposes.
* A **Description** that will appear for any usage charge line items on Bills, such as **Requests Charges**.
10. Ignore the **Minimum spend settings**, which are not required for the current example.
11. Under **Pricing settings**:
* Leave the **Apply as** setting as the default - **Debit**.
* **Pricing type**:
* The pricing requirement was to charge at a flat rate by number of requests minus the free requests per billing period under the sign-up bonus offer. We have set things up carefully to ensure the Compound Aggregation factors in the appropriate number of free requests.
* We can therefore implement this pricing, using a **Tiered** pricing structure with a single pricing band configured:
The **Pricing editor** page opens.
2. In the **Product** drop-down, select **App Hosting Standard**.
3. Select **Add plans**. The **Select plans** dialog opens and lists all Plans created for the **App Hosting Standard** Product.
4. Check **App Hosting Plan 1** and select **Confirm**. The dialog closes and the Plan is added to the **Pricing** **editor** page.
We'll use the Compound Aggregation we created at **Step 3** for the usage-based metric to price the Plan in accordance with the requirements set out in the example.
5. Click **Add compound aggregations**. A **Select compound aggregations** dialog appears and lists all Compound Aggregations created for the **App Hosting Standard** Product.
* Note that you might also see *global* Compound Aggregations listed for selection. Global Compound Aggregations are not tied to any specific Product and can be used to price Plans across all Products.
6. On the **Select compound aggregations** dialog check **App Requests Minus Free**.
7. Click **Confirm**. The dialog closes and the selected Compound Aggregation is added to the **Pricing editor** page for the added Plan. You'll see that no **Active pricing** has been configured for the Plan using this Compound Aggregation.
8. In the pricing grid, select **Create Plan pricing** for **App Requests Minus Free**. The **Create** pricing page opens:
* You can read off details of the Compound Aggregation being used to create the pricing at the top of the page.
* You can **Switch to wizard** to follow an alternative streamlined pricing workflow by **Pricing type**. For the example workflow, we'll continue with the default *advanced pricing format*.
9. Under **Pricing settings** enter:
* **Start** and **End** dates for the period the pricing is active for the Plan.
* An **Accounting product** to link any Bill line items resulting from the pricing to a specific product line for your accounting purposes.
* A **Description** that will appear for any usage charge line items on Bills, such as **Requests Charges**.
10. Ignore the **Minimum spend settings**, which are not required for the current example.
11. Under **Pricing settings**:
* Leave the **Apply as** setting as the default - **Debit**.
* **Pricing type**:
* The pricing requirement was to charge at a flat rate by number of requests minus the free requests per billing period under the sign-up bonus offer. We have set things up carefully to ensure the Compound Aggregation factors in the appropriate number of free requests.
* We can therefore implement this pricing, using a **Tiered** pricing structure with a single pricing band configured:
![]() 12. Ignore the **Prepayment/Balance overage pricing settings**. We are not setting up any Prepayments or Balances on Accounts in the current example.
13. Select **Create pricing**. The **Create** pricing page closes and you are returned to the **Pricing editor** page:
12. Ignore the **Prepayment/Balance overage pricing settings**. We are not setting up any Prepayments or Balances on Accounts in the current example.
13. Select **Create pricing**. The **Create** pricing page closes and you are returned to the **Pricing editor** page:
![]() We now have a Product Plan priced according to the pricing requirements.
> **More Details:** [Reviewing Pricing Options for Plans and Plan Templates](/guides/plans-and-pricing/pricing-plans/reviewing-pricing-options-and-pricing-plans) and [Pricing Plans and Plan Templates](/guides/plans-and-pricing/pricing-plans/pricing-plans).
## Step 6: Create Test Account and Attach Priced Plan
An *Account* represents one of your end-customers, and contains the end-customer name and contact details:
* When you attach a priced Plan to an Account, this creates a link between them to create an *Account Plan*. Attaching priced Plans to an Account determines the charges incurred by customers who are put on the Plan when they consume one of your Products.
For this step, we'll create a test Account for the example and attach our priced Plan to it.
**To create a test Account and attach Plan:**
1. In the main Console navigation, select **Accounts**. The **Accounts** page opens.
2. Select **Create account**. The **Create** page opens.
3. Enter the details of the new Account:
* **Name** and **Code**. Required fields.
* Note that when you enter a **Name** and click in the **Code** field, a default code is entered based on the name you've entered, which you can then edit as required.
* **Email Address**. In addition to **Name** and **Code**, this is also a required field.
* **Other settings**. These are optional fields, such as physical address settings, which you can add later by editing the Account.
4. Select **Create account.** The **Account details** page for the new Account opens with the **Overview** tab selected:
We now have a Product Plan priced according to the pricing requirements.
> **More Details:** [Reviewing Pricing Options for Plans and Plan Templates](/guides/plans-and-pricing/pricing-plans/reviewing-pricing-options-and-pricing-plans) and [Pricing Plans and Plan Templates](/guides/plans-and-pricing/pricing-plans/pricing-plans).
## Step 6: Create Test Account and Attach Priced Plan
An *Account* represents one of your end-customers, and contains the end-customer name and contact details:
* When you attach a priced Plan to an Account, this creates a link between them to create an *Account Plan*. Attaching priced Plans to an Account determines the charges incurred by customers who are put on the Plan when they consume one of your Products.
For this step, we'll create a test Account for the example and attach our priced Plan to it.
**To create a test Account and attach Plan:**
1. In the main Console navigation, select **Accounts**. The **Accounts** page opens.
2. Select **Create account**. The **Create** page opens.
3. Enter the details of the new Account:
* **Name** and **Code**. Required fields.
* Note that when you enter a **Name** and click in the **Code** field, a default code is entered based on the name you've entered, which you can then edit as required.
* **Email Address**. In addition to **Name** and **Code**, this is also a required field.
* **Other settings**. These are optional fields, such as physical address settings, which you can add later by editing the Account.
4. Select **Create account.** The **Account details** page for the new Account opens with the **Overview** tab selected:
![]() For the worked example, we've created the **App Hosting Customer 1** test Account.
5. Select the **Attached plans** tab.
6. On the **Active and pending attached plans** panel, select **Create plan attachment**. The **Create** page opens.
* When you attach a Plan to an Account, you create an *Account Plan*, which lets you define the specific way in which you want the Plan to be applied to the individual Account. Note that the Account Plan you create when you attach the Plan to an Account *is distinct from* the Plan itself - you may want to attach the Plan to another Account but to configure the way the Plan is applied to that other Account differently.
7. On the **Create** page, leave the radio button for **Plan** as the default setting and enter the **Plan attachment details** for the Account Plan:
* Use the **Product** drop-down to select the Product, which is **App Hosting Standard** for the example. The Plan drop-down selection field is enabled.
* Use the **Plan** drop-down to select the Plan, which is **App Hosting Plan 1** for the example.
* Use the pop-up calendars to enter **Start date** and **End date**, which will define the period the Account Plan is active for the Account.
8. Ignore the **Plan attachment settings** - these can be left as the defaults for the current example.
9. Select **Create plan attachment**. Back on the **Attached plans** tab, the Account Plan is shown on the **Active and pending attached plans** panel:
For the worked example, we've created the **App Hosting Customer 1** test Account.
5. Select the **Attached plans** tab.
6. On the **Active and pending attached plans** panel, select **Create plan attachment**. The **Create** page opens.
* When you attach a Plan to an Account, you create an *Account Plan*, which lets you define the specific way in which you want the Plan to be applied to the individual Account. Note that the Account Plan you create when you attach the Plan to an Account *is distinct from* the Plan itself - you may want to attach the Plan to another Account but to configure the way the Plan is applied to that other Account differently.
7. On the **Create** page, leave the radio button for **Plan** as the default setting and enter the **Plan attachment details** for the Account Plan:
* Use the **Product** drop-down to select the Product, which is **App Hosting Standard** for the example. The Plan drop-down selection field is enabled.
* Use the **Plan** drop-down to select the Plan, which is **App Hosting Plan 1** for the example.
* Use the pop-up calendars to enter **Start date** and **End date**, which will define the period the Account Plan is active for the Account.
8. Ignore the **Plan attachment settings** - these can be left as the defaults for the current example.
9. Select **Create plan attachment**. Back on the **Attached plans** tab, the Account Plan is shown on the **Active and pending attached plans** panel:
![]() We now have a test Account set up that will be billed according to the pricing schema we've configured for the Plan for any metered usage of the Product.
> **More Details:** [Creating an Account](/guides/end-customer-accounts/creating-an-account) and [Attaching Plans to an Account](/guides/end-customer-accounts/attaching-plans-to-an-account)
## Step 7: Submit Data to Test Account and Check Bill
We'll now submit some test data to our test account for **App Hosting Meter 1** and **App Hosting Meter 2**, which will allow us to generate a Bill for the test Account and check that the usage charges on the Bill for the submitted test data are correct.
1. Select **Accounts**. On the **Accounts** page, select the **Name** hotlink text of the **App Hosting Customer 1** test Account we created at **Step 6**. The **Account details** page opens with the **Overview** tab selected.
2. Select **Submit usage**:
We now have a test Account set up that will be billed according to the pricing schema we've configured for the Plan for any metered usage of the Product.
> **More Details:** [Creating an Account](/guides/end-customer-accounts/creating-an-account) and [Attaching Plans to an Account](/guides/end-customer-accounts/attaching-plans-to-an-account)
## Step 7: Submit Data to Test Account and Check Bill
We'll now submit some test data to our test account for **App Hosting Meter 1** and **App Hosting Meter 2**, which will allow us to generate a Bill for the test Account and check that the usage charges on the Bill for the submitted test data are correct.
1. Select **Accounts**. On the **Accounts** page, select the **Name** hotlink text of the **App Hosting Customer 1** test Account we created at **Step 6**. The **Account details** page opens with the **Overview** tab selected.
2. Select **Submit usage**:
![]() A **Submit usage data** dialog appears. To submit usage data measurements for the Account, you must complete two stages using the dialog.
3. Under stage **1: Select a meter**, use the **Meter** drop-down to select **App Hosting Meter 1** and then select **Next**. The dialog adjusts to show stage **2: Define measurements and send:**
* Note that you can complete stage 2 using either a **Simple** or **Advanced** format, where the default is **Simple**.
* For the example, we'll use the **Simple** format to submit our test usage data measurements:
* **UID**. This field is automatically populated with a unique id for the measurement. For the example, we'll use this as our measurement id.
* **Timestamp**. The timestamp field is also automatically populated using the date/time the dialog was opened, and again for the example we'll use this as the timestamp for the measurement.
* **Meter**. The Meter **Code** is automatically entered.
* **Account**. The **Code** of the Account we're submitting the data measurement for is automatically entered.
* **Data fields**. The single Data Field we set up for the Meter is shown with an empty **Value** field.
4. Enter a test data **Value** for the **Number Apps** Data Field:
A **Submit usage data** dialog appears. To submit usage data measurements for the Account, you must complete two stages using the dialog.
3. Under stage **1: Select a meter**, use the **Meter** drop-down to select **App Hosting Meter 1** and then select **Next**. The dialog adjusts to show stage **2: Define measurements and send:**
* Note that you can complete stage 2 using either a **Simple** or **Advanced** format, where the default is **Simple**.
* For the example, we'll use the **Simple** format to submit our test usage data measurements:
* **UID**. This field is automatically populated with a unique id for the measurement. For the example, we'll use this as our measurement id.
* **Timestamp**. The timestamp field is also automatically populated using the date/time the dialog was opened, and again for the example we'll use this as the timestamp for the measurement.
* **Meter**. The Meter **Code** is automatically entered.
* **Account**. The **Code** of the Account we're submitting the data measurement for is automatically entered.
* **Data fields**. The single Data Field we set up for the Meter is shown with an empty **Value** field.
4. Enter a test data **Value** for the **Number Apps** Data Field:
![]() 5. Select **Submit usage**. If the measurement is ingested successfully, under **Log** you'll see a `{"result" : "accepted"}` message under the **Log** section of the **Submit usage data** dialog.
* Note that the **Submit usage data** dialog refreshes with a new measurement **UID** and readied for another data submission.
5. Select **Submit usage**. If the measurement is ingested successfully, under **Log** you'll see a `{"result" : "accepted"}` message under the **Log** section of the **Submit usage data** dialog.
* Note that the **Submit usage data** dialog refreshes with a new measurement **UID** and readied for another data submission.
![W Ex2screen27]() 6. For the example, repeat steps **3**. to **5**. to submit two more measures for the **App Hosting Meter 1>Number Apps** Data Field:
* **7**
* **5**
**Tip: Record the Test Data Values!** Keep a record of the test **Values** you've submitted. You can then calculate manually what the respective charges should be when you generate a sample Bill for the Account.
7. Close the **Submit usage data** dialog.
8. Repeat Steps **2** to **7**, to re-open the **Submit usage data** dialog, but this time select **App Hosting Meter 2** and submit a series of measures for the **Number Requests** Data Field we set up on that Meter:
* **250**
* **270**
* **120**
* **750**
9. Go to the test Account details page and select the **Bills** tab.
10. On the **Bills** tab, select **Run billing**. The **Run billing** dialog appears.
11. In the example, we are using monthly billing and the test data was submitted in May 2025, so we select:
* **June 1st** **2025** for **Invoice date**.
* Note - before running bills, it can be worth double-checking that your Organization configuration has the **Month Epoch** set to run Bills from the 1st of a month.
* **Monthly** for **Bill Frequency**.
12. Select **Run billing**. The dialog closes and your Bill job is queued.
* You can select the **Running tasks** button at top-right in the Console, whic:
* This opens the **Running tasks** panel and you can follow the status of your Bill job.
13. When the Bill has generated, it will be listed on the **Bills** tab for the Account. Select the **Reference** hotlink text to open the Bill in **Bill management**.
Before checking a sample Bill we've generated for the Account, we can calculate manually what the cumulative usage charges should be for the usage-based pricing we've implemented:
* **Number Apps**. We submitted 3 values - **8**, **7**, and **5** - for this Data Field and configured the **Max Apps Hosted** simple Aggregation to target this field and give the **Maximum** = **8**.
* **Number Requests**. We submitted **4** values - **250**, **270**, **120**, and **750** - for this Data Field and configured the **Number App Requests** simple Aggregation to target this field and give the **Sum** = **1390**.
* Our **App Request Minus Free** Compound Aggregation references these two simple Aggregations and applies a calculation to yield a value that allows for the sign-up bonus discount. For the test data this should mean the Account is charged for **1390** - **(8 x 100)** = **590** requests at the rate of **\$0.50** per request = **\$295**.
For the example, we can see that the Bill based on test usage data we submitted has been calculated correctly in accordance with our usage-based pricing schema:
6. For the example, repeat steps **3**. to **5**. to submit two more measures for the **App Hosting Meter 1>Number Apps** Data Field:
* **7**
* **5**
**Tip: Record the Test Data Values!** Keep a record of the test **Values** you've submitted. You can then calculate manually what the respective charges should be when you generate a sample Bill for the Account.
7. Close the **Submit usage data** dialog.
8. Repeat Steps **2** to **7**, to re-open the **Submit usage data** dialog, but this time select **App Hosting Meter 2** and submit a series of measures for the **Number Requests** Data Field we set up on that Meter:
* **250**
* **270**
* **120**
* **750**
9. Go to the test Account details page and select the **Bills** tab.
10. On the **Bills** tab, select **Run billing**. The **Run billing** dialog appears.
11. In the example, we are using monthly billing and the test data was submitted in May 2025, so we select:
* **June 1st** **2025** for **Invoice date**.
* Note - before running bills, it can be worth double-checking that your Organization configuration has the **Month Epoch** set to run Bills from the 1st of a month.
* **Monthly** for **Bill Frequency**.
12. Select **Run billing**. The dialog closes and your Bill job is queued.
* You can select the **Running tasks** button at top-right in the Console, whic:
* This opens the **Running tasks** panel and you can follow the status of your Bill job.
13. When the Bill has generated, it will be listed on the **Bills** tab for the Account. Select the **Reference** hotlink text to open the Bill in **Bill management**.
Before checking a sample Bill we've generated for the Account, we can calculate manually what the cumulative usage charges should be for the usage-based pricing we've implemented:
* **Number Apps**. We submitted 3 values - **8**, **7**, and **5** - for this Data Field and configured the **Max Apps Hosted** simple Aggregation to target this field and give the **Maximum** = **8**.
* **Number Requests**. We submitted **4** values - **250**, **270**, **120**, and **750** - for this Data Field and configured the **Number App Requests** simple Aggregation to target this field and give the **Sum** = **1390**.
* Our **App Request Minus Free** Compound Aggregation references these two simple Aggregations and applies a calculation to yield a value that allows for the sign-up bonus discount. For the test data this should mean the Account is charged for **1390** - **(8 x 100)** = **590** requests at the rate of **\$0.50** per request = **\$295**.
For the example, we can see that the Bill based on test usage data we submitted has been calculated correctly in accordance with our usage-based pricing schema:
![]() **Deploying to Production**: Having submitted some metered test data against a test Account, generated a Bill for the Account, and confirmed that charges are in accordance with our pricing requirements for consumption of our Product, we can be comfortable deploying our usage-based pricing implementation to live production.
**Tip: Billing beyond the first three months after sign-up bonus period expires?** To ensure billing is adjusted from the fourth month of service forward, you can create a new Pricing for the same Plan that uses the **Number App Requests** simple Aggregation, and set a **Start date** for this Pricing at the 1st of the fourth month of service for the Account.
> **More Details:** [Submitting Test Usage Data](/guides/billing-and-usage-data/submitting-usage-data/submitting-test-usage-data) and [Running Bills Manually](/guides/billing-and-usage-data/running-viewing-and-managing-bills/running-bills-and-viewing-bill-details#running-bills-manually)
# Example 3: Segmented Aggregation on Single Meter Usage
Source: https://docs.m3ter.com/guides/getting-started/metering-for-production-worked-examples/example-3-segmented-aggregation-on-single-meter-usage
Detailed example using a segmented Aggregation for pricing.
Suppose you run a SaaS company that offers a service to companies to perform background checks on employee candidates to support their hiring process:
* Pricing for this service will vary by candidate location and the level of background check done.
* The service is offered for candidate locations across three countries: the USA, the UK, and China.
* Three levels of background check are offered for each location: Standard, Extended, or Complete.
If you want to price differently for each possible combination of location/level, this can mean having to set up multiple Meters/Aggregations to support usage-pricing for all possible combinations. However, for this kind of pricing use case that demands a wide spread of differentiated pricing metrics, you can use a *Segmented Aggregation* on the same Meter usage data - you can submit data for the same Meter and allow a different pricing to be created for each segment defined by the Aggregation.
This topic provides a worked example to show how to set up a Segmented Aggregation to serve this differentiated pricing use case. The example goes on to show how to submit some test data against a test Account and then generate a Bill for the test Account and check billed amounts against submitted usage.
## Step 1: Create Product
*Products* represent a product or service that you offer to your end customers. A Meter, Aggregation, Plan Template, Plan, or Pricing typically all belong to a Product.
**To create a Product:**
1. In the Console, select **Products**. The **Products** page opens.
2. Select **Create Product**. We'll create a single Product called **Premium Candidate Checks**:
**Deploying to Production**: Having submitted some metered test data against a test Account, generated a Bill for the Account, and confirmed that charges are in accordance with our pricing requirements for consumption of our Product, we can be comfortable deploying our usage-based pricing implementation to live production.
**Tip: Billing beyond the first three months after sign-up bonus period expires?** To ensure billing is adjusted from the fourth month of service forward, you can create a new Pricing for the same Plan that uses the **Number App Requests** simple Aggregation, and set a **Start date** for this Pricing at the 1st of the fourth month of service for the Account.
> **More Details:** [Submitting Test Usage Data](/guides/billing-and-usage-data/submitting-usage-data/submitting-test-usage-data) and [Running Bills Manually](/guides/billing-and-usage-data/running-viewing-and-managing-bills/running-bills-and-viewing-bill-details#running-bills-manually)
# Example 3: Segmented Aggregation on Single Meter Usage
Source: https://docs.m3ter.com/guides/getting-started/metering-for-production-worked-examples/example-3-segmented-aggregation-on-single-meter-usage
Detailed example using a segmented Aggregation for pricing.
Suppose you run a SaaS company that offers a service to companies to perform background checks on employee candidates to support their hiring process:
* Pricing for this service will vary by candidate location and the level of background check done.
* The service is offered for candidate locations across three countries: the USA, the UK, and China.
* Three levels of background check are offered for each location: Standard, Extended, or Complete.
If you want to price differently for each possible combination of location/level, this can mean having to set up multiple Meters/Aggregations to support usage-pricing for all possible combinations. However, for this kind of pricing use case that demands a wide spread of differentiated pricing metrics, you can use a *Segmented Aggregation* on the same Meter usage data - you can submit data for the same Meter and allow a different pricing to be created for each segment defined by the Aggregation.
This topic provides a worked example to show how to set up a Segmented Aggregation to serve this differentiated pricing use case. The example goes on to show how to submit some test data against a test Account and then generate a Bill for the test Account and check billed amounts against submitted usage.
## Step 1: Create Product
*Products* represent a product or service that you offer to your end customers. A Meter, Aggregation, Plan Template, Plan, or Pricing typically all belong to a Product.
**To create a Product:**
1. In the Console, select **Products**. The **Products** page opens.
2. Select **Create Product**. We'll create a single Product called **Premium Candidate Checks**:
![]() 3. Select **Create** Product.
The **Premium Candidate Checks** Product can now serve as a container for any Meters, Aggregations, Pricing, Plans, and Plan Templates we'll need for the example.
> **More Details:** [Creating and Managing Products](/guides/creating-and-managing-products)
## Step 2: Set up Meter
*Meters* define the Data Fields that your system will use to submit usage data to the m3ter platform:
* As well as *simple Data Fields*, which collect raw usage data, you can define *Derived Fields* that reference and apply calculations to simple fields.
* You can create Product-specific Meters or Global Meters.
For this worked example, we'll create a single Meter for our **Premium Candidate Checks** Product.
**To create a Meter:**
1. Select **Usage>Meters**. The **Meters** page opens.
2. In the **Product** drop-down, select **Premium Candidate Checks**.
3. Select **Create Meter**.
Here's the set up for the Meter to support the pricing model we want to use in the example:
3. Select **Create** Product.
The **Premium Candidate Checks** Product can now serve as a container for any Meters, Aggregations, Pricing, Plans, and Plan Templates we'll need for the example.
> **More Details:** [Creating and Managing Products](/guides/creating-and-managing-products)
## Step 2: Set up Meter
*Meters* define the Data Fields that your system will use to submit usage data to the m3ter platform:
* As well as *simple Data Fields*, which collect raw usage data, you can define *Derived Fields* that reference and apply calculations to simple fields.
* You can create Product-specific Meters or Global Meters.
For this worked example, we'll create a single Meter for our **Premium Candidate Checks** Product.
**To create a Meter:**
1. Select **Usage>Meters**. The **Meters** page opens.
2. In the **Product** drop-down, select **Premium Candidate Checks**.
3. Select **Create Meter**.
Here's the set up for the Meter to support the pricing model we want to use in the example:
![]() For the example, we've set up **Candidate Check Meter 1** and added the three Data Fields:
* A **Location** field: **Category** is **Where**, which is a String field.
* A **Type** field of: **Category** is **What**, which is a String field.
* A **Checks** field: **Category** is **Measure**, which is a Numeric field.
4. Select **Create Meter**.
We now have a single Meter for the example, which we can use to collect usage data on any Account that consumes the **Premium Candidate Checks** Product. This metered usage data will serve as the basis for the Segmented Aggregation we shall create to apply differentiated pricing for Product consumption.
> **More Details:** [Reviewing Meter Options](/guides/usage-data-meters/reviewing-meter-options) and [Creating Meters](/guides/usage-data-meters/creating-meters)
## Step 3: Define Aggregations
*Aggregations* define how to transform into a single number the individual measurements submitted to a Meter Data Field as usage data. For example, you may choose to simply SUM the submitted usage data values. In this way, Aggregations define the usage-based pricing metrics you'll use to set up pricing for your products and services.
For the usage-based pricing model we want to implement in our example, we'll need to create a *Segmented Aggregation* based on the usage data collected by our single Meter - **Candidate Check Meter 1**:
* We'll use the **Location** and **Type** string Data Fields the create the required segments on the usage data.
* We can target the **Checks** numeric Data Field to give a sum of the number of checks performed for each defined segment.
**To create a Segmented Aggregation:**
1. Select **Usage>Aggregations**. The **Aggregations** page opens.
2. In the **Product** drop-down, select **Premium Candidate Checks**.
3. Select **Create Aggregation**. The **Create** page opens.
4. Enter a **Name** and **Code** for the new Aggregation.
5. Select the **Meter** previously created for the example and with the required Data Fields: **Location**, **Type**, and **Quantity**.
Here's the basic setup for the Segmented Aggregation:
For the example, we've set up **Candidate Check Meter 1** and added the three Data Fields:
* A **Location** field: **Category** is **Where**, which is a String field.
* A **Type** field of: **Category** is **What**, which is a String field.
* A **Checks** field: **Category** is **Measure**, which is a Numeric field.
4. Select **Create Meter**.
We now have a single Meter for the example, which we can use to collect usage data on any Account that consumes the **Premium Candidate Checks** Product. This metered usage data will serve as the basis for the Segmented Aggregation we shall create to apply differentiated pricing for Product consumption.
> **More Details:** [Reviewing Meter Options](/guides/usage-data-meters/reviewing-meter-options) and [Creating Meters](/guides/usage-data-meters/creating-meters)
## Step 3: Define Aggregations
*Aggregations* define how to transform into a single number the individual measurements submitted to a Meter Data Field as usage data. For example, you may choose to simply SUM the submitted usage data values. In this way, Aggregations define the usage-based pricing metrics you'll use to set up pricing for your products and services.
For the usage-based pricing model we want to implement in our example, we'll need to create a *Segmented Aggregation* based on the usage data collected by our single Meter - **Candidate Check Meter 1**:
* We'll use the **Location** and **Type** string Data Fields the create the required segments on the usage data.
* We can target the **Checks** numeric Data Field to give a sum of the number of checks performed for each defined segment.
**To create a Segmented Aggregation:**
1. Select **Usage>Aggregations**. The **Aggregations** page opens.
2. In the **Product** drop-down, select **Premium Candidate Checks**.
3. Select **Create Aggregation**. The **Create** page opens.
4. Enter a **Name** and **Code** for the new Aggregation.
5. Select the **Meter** previously created for the example and with the required Data Fields: **Location**, **Type**, and **Quantity**.
Here's the basic setup for the Segmented Aggregation:
![]() We've targeted the **Checks** field on **Candidate Checks Meter 1**. Although we intend to define segments by location and type, we want to charge by the total number of checks for each segment in any given billing period.
6. Scroll down the **Create** form and click the arrow to open the **Segments** panel:
We've targeted the **Checks** field on **Candidate Checks Meter 1**. Although we intend to define segments by location and type, we want to charge by the total number of checks for each segment in any given billing period.
6. Scroll down the **Create** form and click the arrow to open the **Segments** panel:
![]() Because the selected Meter also has two String Data Fields configured - **Location** and **Type** - these fields are made available to define segments for the usage data and to set up differentiated pricing for Product consumption.
7. Select the two fields to define segment values by location/type. The **Segments** panel adjusts for the selections:
Because the selected Meter also has two String Data Fields configured - **Location** and **Type** - these fields are made available to define segments for the usage data and to set up differentiated pricing for Product consumption.
7. Select the two fields to define segment values by location/type. The **Segments** panel adjusts for the selections:
![]() For the example, we'll assume the end-customer Account that will consume the **Premium Candidate Checks** Product has asked for six possible location/type checks to be done.
8. We can add the appropriate location/type segment values using the **Segments** panel:
For the example, we'll assume the end-customer Account that will consume the **Premium Candidate Checks** Product has asked for six possible location/type checks to be done.
8. We can add the appropriate location/type segment values using the **Segments** panel:
![]() 9. Select **Create Aggregation**.
We now have the **Candidate Checks Aggregation 1** with appropriate segment values defined and which we can use to apply differentiated pricing to a Plan for the **Premium Candidate Checks** Product.
**Tip: Setting up Default Segments?** Suppose in this example you'd wanted to charge the same rate for a **Standard** checks regardless of country of origin: **Any Location/Standard**. You can quickly set up this kind of default - for more details see [Using Wildcards or Defaults in Segmented Aggregations](/guides/usage-data-aggregations/segmented-aggregations#using-wildcards-or-defaults-in-segmented-aggregations).
## Step 4: Create Product Plan
*Plans* represent a pricing plan for one of your products or services. A Plan is always derived from a Plan Template and inherits settings from the Plan Template which control billing operations, such as billing frequency and currency. You can override some of these settings when you create a Plan from a Plan Template. To meet the example requirements:
* First, we'll need a Plan Template for the **Premium Candidate Checks** Product. We'll configure the Plan Template:
* For monthly billing using a specific billing currency.
* Omit any **Standing charge** or **Minimum spend** amounts to be applied for each billing period.
* Second, we'll create a Product Plan based on the Plan Template.
**To create a Product Plan Template:**
1. Select **Pricing>Plan Templates**. The **Plan Templates** page opens.
2. In the **Product** drop-down, select **Premium Candidate Checks**.
3. Select **Create Plan Template**. The **Create** page opens.
Here's the setup for our Product Plan Template:
9. Select **Create Aggregation**.
We now have the **Candidate Checks Aggregation 1** with appropriate segment values defined and which we can use to apply differentiated pricing to a Plan for the **Premium Candidate Checks** Product.
**Tip: Setting up Default Segments?** Suppose in this example you'd wanted to charge the same rate for a **Standard** checks regardless of country of origin: **Any Location/Standard**. You can quickly set up this kind of default - for more details see [Using Wildcards or Defaults in Segmented Aggregations](/guides/usage-data-aggregations/segmented-aggregations#using-wildcards-or-defaults-in-segmented-aggregations).
## Step 4: Create Product Plan
*Plans* represent a pricing plan for one of your products or services. A Plan is always derived from a Plan Template and inherits settings from the Plan Template which control billing operations, such as billing frequency and currency. You can override some of these settings when you create a Plan from a Plan Template. To meet the example requirements:
* First, we'll need a Plan Template for the **Premium Candidate Checks** Product. We'll configure the Plan Template:
* For monthly billing using a specific billing currency.
* Omit any **Standing charge** or **Minimum spend** amounts to be applied for each billing period.
* Second, we'll create a Product Plan based on the Plan Template.
**To create a Product Plan Template:**
1. Select **Pricing>Plan Templates**. The **Plan Templates** page opens.
2. In the **Product** drop-down, select **Premium Candidate Checks**.
3. Select **Create Plan Template**. The **Create** page opens.
Here's the setup for our Product Plan Template:
![]() For the **Candidate Checks Plan Template 1** we've:
* Chosen **US dollars** as the billing currency.
* Note that if **US Dollar** doesn't appear for selection in the **Currency** drop-down when you are creating your Plan Template, you'll need to create it for your Organization:
* Select **Settings>Organization** and open the **Currencies** tab.
* Click **Create currency** and on the **Create** page add **USD - US Dollar (\$)** as a **Standard currency**. You can define the **Maximum decimal places** for the currency also. Click **Create** - **US Dollar** will now be available for selection across you Organization.
* Selected a monthly **Bill frequency** with a **Bill interval** of **1**, which means Accounts put on the Plan will receive a Bill each month for a month's period of usage.
* Ignore the settings under **Advanced Configuration**. This section of the form allows you to set up **Standing charge** and **Minimum spend** amounts for billing, neither of which are required for the example pricing model.
4. Select **Create Plan Template**. You are returned to the **Plan Template Details** page.
We can now create a Product Plan for the example based on this template.
**To create a Product Plan:**
1. Select **Pricing>Plans**. The **Plans** page opens.
2. In the **Product** drop-down, select **Premium Data Checks**.
3. Select **Create Plan**. The **Create** page opens.
Here's the setup for our Product Plan:
For the **Candidate Checks Plan Template 1** we've:
* Chosen **US dollars** as the billing currency.
* Note that if **US Dollar** doesn't appear for selection in the **Currency** drop-down when you are creating your Plan Template, you'll need to create it for your Organization:
* Select **Settings>Organization** and open the **Currencies** tab.
* Click **Create currency** and on the **Create** page add **USD - US Dollar (\$)** as a **Standard currency**. You can define the **Maximum decimal places** for the currency also. Click **Create** - **US Dollar** will now be available for selection across you Organization.
* Selected a monthly **Bill frequency** with a **Bill interval** of **1**, which means Accounts put on the Plan will receive a Bill each month for a month's period of usage.
* Ignore the settings under **Advanced Configuration**. This section of the form allows you to set up **Standing charge** and **Minimum spend** amounts for billing, neither of which are required for the example pricing model.
4. Select **Create Plan Template**. You are returned to the **Plan Template Details** page.
We can now create a Product Plan for the example based on this template.
**To create a Product Plan:**
1. Select **Pricing>Plans**. The **Plans** page opens.
2. In the **Product** drop-down, select **Premium Data Checks**.
3. Select **Create Plan**. The **Create** page opens.
Here's the setup for our Product Plan:
![]() * Note that no **Template Overrides** for **Standing charge** or **Minimum spend** amounts are required for the example.
4. Select **Create Plan**. The **Plan Details** page opens for our new Product Plan.
We can now price **Candidate Checks Plan 1** using our **Candidate Checks Aggregation 1** Segmented Aggregation.
> **More Details:** [Reviewing Options for Plan Templates and Plans](/guides/plans-and-pricing/working-with-plan-templates-and-plans/reviewing-configuration-options-for-plans-and-plan-templates) and [Creating Plans](/guides/plans-and-pricing/working-with-plan-templates-and-plans/creating-plans)
## Step 5: Price Product Plan
*Pricing* allows you to configure the cost of usage data under a specific Plan you apply to an Account, and is used to calculate bills.
We can use the **Pricing Editor** in the m3ter Console to quickly price up our Product Plan to meet the pricing requirements for the example.
**To price Product Plan:**
1. Select **Pricing>Pricing Editor**. The **Pricing** page opens.
2. In the **Product** drop-down, select **Premium Candidate Checks**.
3. Select **Add Plans**. The **Select Plans** dialog opens and lists all Plans created for the **Premium Candidate Checks** Product.
4. Check **Candidate Checks Plan 1** and select **Confirm**. The dialog closes and the Plan is added to the **Pricing** page.
We'll use the Segmented Aggregation we created at **Step 3** for the usage-based metrics to apply differentiated price to the Plan in accordance with the requirements set out in the example.
5. Click **Add Aggregations**. A **Select Aggregations** dialog appears and lists all Aggregations created for the **Premium Candidate Checks** Product.
* Note that you might also see *global* Aggregations listed for selection. Global Aggregations are not tied to any specific Product and can be used to price Plans across all Products.
6. On the **Select Aggregations** dialog check **Candidate Checks Aggregation 1**.
7. Click **Confirm**. The dialog closes and the selected Aggregation is added to the **Pricing** page for the added Plan.
* You'll see a warning that none of the six segments we defined for the **Candidate Checks Aggregation 1** have active pricings configured.
8. In the pricing grid, select **Edit segmented pricing**. The **Segments** pricing page opens:
* You can read off details of the Segmented Aggregation being used to create the pricing at the top of the page.
* You can read off details of the Plan to which you are applying differentiated pricings by segment.
9. Scroll down the page to reveal the **Segments** pricing grid, which contains a row for each segment defined for the Aggregation:
* Note that no **Template Overrides** for **Standing charge** or **Minimum spend** amounts are required for the example.
4. Select **Create Plan**. The **Plan Details** page opens for our new Product Plan.
We can now price **Candidate Checks Plan 1** using our **Candidate Checks Aggregation 1** Segmented Aggregation.
> **More Details:** [Reviewing Options for Plan Templates and Plans](/guides/plans-and-pricing/working-with-plan-templates-and-plans/reviewing-configuration-options-for-plans-and-plan-templates) and [Creating Plans](/guides/plans-and-pricing/working-with-plan-templates-and-plans/creating-plans)
## Step 5: Price Product Plan
*Pricing* allows you to configure the cost of usage data under a specific Plan you apply to an Account, and is used to calculate bills.
We can use the **Pricing Editor** in the m3ter Console to quickly price up our Product Plan to meet the pricing requirements for the example.
**To price Product Plan:**
1. Select **Pricing>Pricing Editor**. The **Pricing** page opens.
2. In the **Product** drop-down, select **Premium Candidate Checks**.
3. Select **Add Plans**. The **Select Plans** dialog opens and lists all Plans created for the **Premium Candidate Checks** Product.
4. Check **Candidate Checks Plan 1** and select **Confirm**. The dialog closes and the Plan is added to the **Pricing** page.
We'll use the Segmented Aggregation we created at **Step 3** for the usage-based metrics to apply differentiated price to the Plan in accordance with the requirements set out in the example.
5. Click **Add Aggregations**. A **Select Aggregations** dialog appears and lists all Aggregations created for the **Premium Candidate Checks** Product.
* Note that you might also see *global* Aggregations listed for selection. Global Aggregations are not tied to any specific Product and can be used to price Plans across all Products.
6. On the **Select Aggregations** dialog check **Candidate Checks Aggregation 1**.
7. Click **Confirm**. The dialog closes and the selected Aggregation is added to the **Pricing** page for the added Plan.
* You'll see a warning that none of the six segments we defined for the **Candidate Checks Aggregation 1** have active pricings configured.
8. In the pricing grid, select **Edit segmented pricing**. The **Segments** pricing page opens:
* You can read off details of the Segmented Aggregation being used to create the pricing at the top of the page.
* You can read off details of the Plan to which you are applying differentiated pricings by segment.
9. Scroll down the page to reveal the **Segments** pricing grid, which contains a row for each segment defined for the Aggregation:
![]() For the example, we'll suppose that for each segment we want to charge customers a different flat rate per candidate check performed:
| Location | Type | Charge Rate per Check |
| - | - | - |
| China | Standard | \$0.2 |
| China | Extended | \$0.4 |
| USA | Extended | \$0.5 |
| USA | Complete | \$0.7 |
| UK | Standard | \$0.5 |
| UK | Complete | \$0.8 |
10. For the first segment row - **China/Standard** - select **Create Plan Pricing**. The **Create** pricing page opens:
* You can read off details of the Segmented Aggregation being used to create the pricing at the top of the page.
* You can **Switch to wizard** to follow an alternative streamlined pricing workflow by **Pricing Type**. For the example workflow, we'll continue with the default *advanced pricing format*.
11. Work down the form to enter:
* **Start** and **End** dates for the period the pricing will be active for the Plan.
* A **Description** that will appear for any usage charge line items on Bills, such as **China/Standard Check Charges**.
* Leave the **Apply as** setting as the default - **Debit**.
* **Pricing type**:
* The pricing requirement was to charge each segment at a flat rate on a per check basis per billing period.
* We can therefore implement this pricing for each segment using a **Tiered** pricing structure with a single pricing band configured:
For the example, we'll suppose that for each segment we want to charge customers a different flat rate per candidate check performed:
| Location | Type | Charge Rate per Check |
| - | - | - |
| China | Standard | \$0.2 |
| China | Extended | \$0.4 |
| USA | Extended | \$0.5 |
| USA | Complete | \$0.7 |
| UK | Standard | \$0.5 |
| UK | Complete | \$0.8 |
10. For the first segment row - **China/Standard** - select **Create Plan Pricing**. The **Create** pricing page opens:
* You can read off details of the Segmented Aggregation being used to create the pricing at the top of the page.
* You can **Switch to wizard** to follow an alternative streamlined pricing workflow by **Pricing Type**. For the example workflow, we'll continue with the default *advanced pricing format*.
11. Work down the form to enter:
* **Start** and **End** dates for the period the pricing will be active for the Plan.
* A **Description** that will appear for any usage charge line items on Bills, such as **China/Standard Check Charges**.
* Leave the **Apply as** setting as the default - **Debit**.
* **Pricing type**:
* The pricing requirement was to charge each segment at a flat rate on a per check basis per billing period.
* We can therefore implement this pricing for each segment using a **Tiered** pricing structure with a single pricing band configured:
![]() 12. Select **Create Pricing**. The **Create** pricing page closes and you are returned to the **Segments** page where the pricing is shown as active for the **China/Standard** segment:
12. Select **Create Pricing**. The **Create** pricing page closes and you are returned to the **Segments** page where the pricing is shown as active for the **China/Standard** segment:
![]() 13. Repeat steps **10**. to **12**. to create pricings for the remaining five segments.
14. If we return to the Pricing editor, we see that each of our six segments have active pricings configured:
13. Repeat steps **10**. to **12**. to create pricings for the remaining five segments.
14. If we return to the Pricing editor, we see that each of our six segments have active pricings configured:
![]() We now have a Product Plan to which we've applied differentiated pricing according to the pricing requirements using our Segmented Aggregation.
> **More Details:** [Reviewing Pricing Options for Plans and Plan Templates](/guides/plans-and-pricing/pricing-plans/reviewing-pricing-options-and-pricing-plans) and [Pricing Plans Using Segmented Aggregations](/guides/plans-and-pricing/pricing-plans/pricing-plans-using-segmented-aggregations).
## Step 6: Create Test Account and Attach Priced Plan
*Accounts* represent one of your end-customers, and contains the end-customer name and contact details:
* When you attach a priced Plan to an Account, this creates a link between them to create an *Account Plan*. Attaching priced Plans to an Account determines the charges incurred by customers who are put on the Plan when they consume one of your Products.
For this step, we'll create a test Account for the example and attach our priced Plan to it.
**To create a test Account and attach Plan:**
1. In the main Console navigation, select **Accounts**. The **Accounts** page opens.
2. Select **Create Account**. The **Create** page opens.
3. Enter the details of the new Account:
* **Name** and **Code**. Required fields.
* Note that when you enter a **Name** and click in the **Code** field, a default code is entered based on the name you've entered, which you can then edit as required.
* **Email Address**. In addition to **Name** and **Code**, this is also a required field.
* **Other settings**. These are optional fields, such as physical address settings, which you can add later by editing the Account.
4. Select **Create Account.** The **Account Details** page for the new Account opens with the **Overview** tab selected:
We now have a Product Plan to which we've applied differentiated pricing according to the pricing requirements using our Segmented Aggregation.
> **More Details:** [Reviewing Pricing Options for Plans and Plan Templates](/guides/plans-and-pricing/pricing-plans/reviewing-pricing-options-and-pricing-plans) and [Pricing Plans Using Segmented Aggregations](/guides/plans-and-pricing/pricing-plans/pricing-plans-using-segmented-aggregations).
## Step 6: Create Test Account and Attach Priced Plan
*Accounts* represent one of your end-customers, and contains the end-customer name and contact details:
* When you attach a priced Plan to an Account, this creates a link between them to create an *Account Plan*. Attaching priced Plans to an Account determines the charges incurred by customers who are put on the Plan when they consume one of your Products.
For this step, we'll create a test Account for the example and attach our priced Plan to it.
**To create a test Account and attach Plan:**
1. In the main Console navigation, select **Accounts**. The **Accounts** page opens.
2. Select **Create Account**. The **Create** page opens.
3. Enter the details of the new Account:
* **Name** and **Code**. Required fields.
* Note that when you enter a **Name** and click in the **Code** field, a default code is entered based on the name you've entered, which you can then edit as required.
* **Email Address**. In addition to **Name** and **Code**, this is also a required field.
* **Other settings**. These are optional fields, such as physical address settings, which you can add later by editing the Account.
4. Select **Create Account.** The **Account Details** page for the new Account opens with the **Overview** tab selected:
![]() For the worked example, we've created the **Candidate Checks Customer 1** test Account.
5. Select the **Attached Plans** tab.
6. On the **Active and pending attached plans** panel, select **Attach plan**. The **Create** page opens.
* When you attach a Plan to an Account, you create an *Account Plan*, which lets you define the specific way in which you want the Plan to be applied to the individual Account. Note that the Account Plan you create when you attach the Plan to an Account *is distinct from* the Plan itself - you may want to attach the Plan to another Account but to configure the way the Plan is applied to that other Account differently.
8. On the **Create** page, leave the radio button for **Plan** as default setting and enter the details of the Account Plan:
* Use the **Product** drop-down to select the Product, which is **Premium Candidate Checks** for the example. The **Plan** drop-down selection field is enabled.
* Use the **Plan** drop-down to select the Plan, which is **Candidate Checks Plan 1** for the example.
* Use the pop-up calendars to enter **Start date** and **End date**, which will define the period the Account Plan is active for the Account.
9. Select **Create Plan**. Back on the **Attached Plans** tab, the Account Plan is shown on the **Active and pending attached plans** panel:
For the worked example, we've created the **Candidate Checks Customer 1** test Account.
5. Select the **Attached Plans** tab.
6. On the **Active and pending attached plans** panel, select **Attach plan**. The **Create** page opens.
* When you attach a Plan to an Account, you create an *Account Plan*, which lets you define the specific way in which you want the Plan to be applied to the individual Account. Note that the Account Plan you create when you attach the Plan to an Account *is distinct from* the Plan itself - you may want to attach the Plan to another Account but to configure the way the Plan is applied to that other Account differently.
8. On the **Create** page, leave the radio button for **Plan** as default setting and enter the details of the Account Plan:
* Use the **Product** drop-down to select the Product, which is **Premium Candidate Checks** for the example. The **Plan** drop-down selection field is enabled.
* Use the **Plan** drop-down to select the Plan, which is **Candidate Checks Plan 1** for the example.
* Use the pop-up calendars to enter **Start date** and **End date**, which will define the period the Account Plan is active for the Account.
9. Select **Create Plan**. Back on the **Attached Plans** tab, the Account Plan is shown on the **Active and pending attached plans** panel:
![]() We now have a test Account set up that will be billed according to the segmented pricing schema we've configured for the Plan for any metered usage of the Product.
> **More Details:** [Creating an Account](/guides/end-customer-accounts/creating-an-account) and [Attaching Plans to an Account](/guides/end-customer-accounts/attaching-plans-to-an-account)
## Step 7: Submit Data to Test Account and Check Bill
We'll now submit some test data to our **Candidate Checks Customer 1** test account and for the **Candidate Check Meter 1**. This will allow us to generate a Bill for the test Account and check that the usage charges on the Bill for the submitted test data are correct.
1. Select **Accounts**. On the **Accounts** page, select the **NAME** hotlink text of the **Candidate Customer Customer 1** test Account we created at **Step 6**. The **Account Details** page opens with the **Overview** tab selected.
2. Select **Submit usage**:
We now have a test Account set up that will be billed according to the segmented pricing schema we've configured for the Plan for any metered usage of the Product.
> **More Details:** [Creating an Account](/guides/end-customer-accounts/creating-an-account) and [Attaching Plans to an Account](/guides/end-customer-accounts/attaching-plans-to-an-account)
## Step 7: Submit Data to Test Account and Check Bill
We'll now submit some test data to our **Candidate Checks Customer 1** test account and for the **Candidate Check Meter 1**. This will allow us to generate a Bill for the test Account and check that the usage charges on the Bill for the submitted test data are correct.
1. Select **Accounts**. On the **Accounts** page, select the **NAME** hotlink text of the **Candidate Customer Customer 1** test Account we created at **Step 6**. The **Account Details** page opens with the **Overview** tab selected.
2. Select **Submit usage**:
![]() A **Submit usage** dialog appears. To submit usage data measurements for the Account, you must complete two stages using the dialog.
3. Under stage **1: Select a meter**, use the **Meter** drop-down to select **Candidate Check Meter 1** and then select **Continue**. The dialog adjusts to show stage **2: Define measurements and send:**
* Note that you can complete stage 2 using either a **Simple** or **Advanced** format, where the default is **Simple**.
* For the example, we'll use the **Simple** format to submit our test usage data measurements:
* **UID**. This field is automatically populated with a unique id for the measurement. For the example, we'll use this as our measurement id.
* **Timestamp**. The timestamp field is also automatically populated using the date/time the dialog was opened, and again for the example we'll use this as the timestamp for the measurement.
* **Meter**. The Meter **Code** is automatically entered.
* **Account**. The **Code** of the Account we're submitting the data measurement for is automatically entered.
* **Data fields**. The three Data Fields we set up for the Meter are shown with empty **Value** fields.
4. Enter test data **Values** for the **Location**, **Type**, and **Checks** Data Fields:
A **Submit usage** dialog appears. To submit usage data measurements for the Account, you must complete two stages using the dialog.
3. Under stage **1: Select a meter**, use the **Meter** drop-down to select **Candidate Check Meter 1** and then select **Continue**. The dialog adjusts to show stage **2: Define measurements and send:**
* Note that you can complete stage 2 using either a **Simple** or **Advanced** format, where the default is **Simple**.
* For the example, we'll use the **Simple** format to submit our test usage data measurements:
* **UID**. This field is automatically populated with a unique id for the measurement. For the example, we'll use this as our measurement id.
* **Timestamp**. The timestamp field is also automatically populated using the date/time the dialog was opened, and again for the example we'll use this as the timestamp for the measurement.
* **Meter**. The Meter **Code** is automatically entered.
* **Account**. The **Code** of the Account we're submitting the data measurement for is automatically entered.
* **Data fields**. The three Data Fields we set up for the Meter are shown with empty **Value** fields.
4. Enter test data **Values** for the **Location**, **Type**, and **Checks** Data Fields:
![]() For this first submission, we've defined a measurement for the first segment value of **Location** = **China** and **Type** = **Standard** with number of **Checks** = **754**.
5. Select **Submit usage**. If the measurement is ingested successfully, under **Log** you'll see a `{"result" : "accepted"}` message with the measurement JSON submission reproduced:
For this first submission, we've defined a measurement for the first segment value of **Location** = **China** and **Type** = **Standard** with number of **Checks** = **754**.
5. Select **Submit usage**. If the measurement is ingested successfully, under **Log** you'll see a `{"result" : "accepted"}` message with the measurement JSON submission reproduced:
![]() * Note that the **Submit usage** dialog refreshes with a new measurement **UID** and readied for another data submission.
6. For the example, repeat steps **3**. to **5**. to submit test measures for each of the remaining five segment values:
* **China/Extended**. Number of **Checks** = **687**.
* **USA/Extended**. Number of **Checks** = **954**.
* **USA/Complete**. Number of **Checks** = **432**.
* **UK/Standard**. Number of **Checks** = **765**.
* **UK/Complete**. Number of **Checks** = **1206**.
**Tip: Record the Test Data Values!** Keep a record of the test **Values** you've submitted. You can then calculate manually what the respective charges should be when you generate a sample Bill for the Account.
7. Close the **Submit usage** dialog.
8. Go to the test Account details page and select the **Bills** tab.
9. On the **Bills** tab, select **Run billing**. The **Run billing** dialog appears.
10. In the example, we are using monthly billing and the test data was submitted in September 2023, so we select:
* **October 1st** for **Invoice date**.
* Note: it might be worth double-checking that your Organization configuration setting has the **Month Epoch** setting to run Bills from the 1st of a month.
* **Monthly** for **Bill Frequency**.
11. Select **Run billing**. The dialog closes and your Bill job is queued.
* You can select the **Running Tasks** button at top-right in the Console:
* Note that the **Submit usage** dialog refreshes with a new measurement **UID** and readied for another data submission.
6. For the example, repeat steps **3**. to **5**. to submit test measures for each of the remaining five segment values:
* **China/Extended**. Number of **Checks** = **687**.
* **USA/Extended**. Number of **Checks** = **954**.
* **USA/Complete**. Number of **Checks** = **432**.
* **UK/Standard**. Number of **Checks** = **765**.
* **UK/Complete**. Number of **Checks** = **1206**.
**Tip: Record the Test Data Values!** Keep a record of the test **Values** you've submitted. You can then calculate manually what the respective charges should be when you generate a sample Bill for the Account.
7. Close the **Submit usage** dialog.
8. Go to the test Account details page and select the **Bills** tab.
9. On the **Bills** tab, select **Run billing**. The **Run billing** dialog appears.
10. In the example, we are using monthly billing and the test data was submitted in September 2023, so we select:
* **October 1st** for **Invoice date**.
* Note: it might be worth double-checking that your Organization configuration setting has the **Month Epoch** setting to run Bills from the 1st of a month.
* **Monthly** for **Bill Frequency**.
11. Select **Run billing**. The dialog closes and your Bill job is queued.
* You can select the **Running Tasks** button at top-right in the Console:
![]() * This opens the **Running Tasks** panel and you can follow the status of your Bill job.
12. When the Bill has generated, it will be listed on the **Bills** tab for the Account. Select the **REFERENCE** hotlink text to open the Bill in **Bill Management**.
Before checking a sample Bill we've generated for the Account, we can calculate manually what the cumulative usage charges should be for the usage-based segmented pricing we've implemented:
* **China/Standard**. Number of **Checks** = **754** at \$0.20 per check: \$150.80.
* **China/Extended**. Number of **Checks** = **687** at \$0.40 per check: \$274.80.
* **USA/Extended**. Number of **Checks** = **954** at \$0.50 per check: \$477.00.
* **USA/Complete**. Number of **Checks** = **432** at \$0.70 per check: \$302.40.
* **UK/Standard**. Number of **Checks** = **765** at \$0.50 per check: \$382.50.
* **UK/Complete**. Number of **Checks** = **1206** at \$0.80 per check: \$964.80.
* This gives total for the usage data measures we submitted across segments of: \$2552.30
For the example, we can see that the Bill based on test usage data we submitted has been calculated correctly in accordance with our usage-based differentiated pricing schema:
* This opens the **Running Tasks** panel and you can follow the status of your Bill job.
12. When the Bill has generated, it will be listed on the **Bills** tab for the Account. Select the **REFERENCE** hotlink text to open the Bill in **Bill Management**.
Before checking a sample Bill we've generated for the Account, we can calculate manually what the cumulative usage charges should be for the usage-based segmented pricing we've implemented:
* **China/Standard**. Number of **Checks** = **754** at \$0.20 per check: \$150.80.
* **China/Extended**. Number of **Checks** = **687** at \$0.40 per check: \$274.80.
* **USA/Extended**. Number of **Checks** = **954** at \$0.50 per check: \$477.00.
* **USA/Complete**. Number of **Checks** = **432** at \$0.70 per check: \$302.40.
* **UK/Standard**. Number of **Checks** = **765** at \$0.50 per check: \$382.50.
* **UK/Complete**. Number of **Checks** = **1206** at \$0.80 per check: \$964.80.
* This gives total for the usage data measures we submitted across segments of: \$2552.30
For the example, we can see that the Bill based on test usage data we submitted has been calculated correctly in accordance with our usage-based differentiated pricing schema:
![]() **Deploying to Production**: Having submitted some metered test data against a test Account, generated a Bill for the Account, and confirmed that charges are in accordance with our pricing requirements for consumption of our Product, we can be comfortable deploying our usage-based pricing implementation to live production.
> **More Details:** [Submitting Test Usage Data](/guides/billing-and-usage-data/submitting-usage-data/submitting-test-usage-data) and [Running Bills Manually](/guides/billing-and-usage-data/running-viewing-and-managing-bills/running-bills-and-viewing-bill-details#running-bills-manually)
# Example 1: Cloud Storage and File Cleanup
Source: https://docs.m3ter.com/guides/getting-started/metering-for-production-worked-examples/worked-example-1-cloud-storage-and-file-cleanup
Follow a detailed example with step-by-step instructions on how to set up the pricing metrics, submit test data, generate bills, and verify billing amounts against usage.
Suppose you run a SaaS company that provides cloud storage and file cleanup services for corrupted graphics files. You want to charge your customers in US dollars on a monthly basis using the following usage pricing metrics:
* By cumulative volume of corrupted files submitted for storage and cleanup in the month measured in gigabytes, irrespective of how long they remain stored in any given month and irrespective of whether they ever are retrieved. Charge rate is \$0.15 per GB for the first 500GB; \$0.10 per GB thereafter.
* By count of the number of corrupted files submitted for storage and cleanup in the month, charged at \$0.50 per file.
* By an add-on amount each month based on the maximum average clean up processing time required per submitted files in any given month: charged at \$12 for up to 4 seconds maximum average processing; \$25 for up to 6 seconds maximum average processing; \$50 for anything above 6 seconds maximum average processing.
In addition to any usage charges, you want to apply a monthly standing charge of \$20.
This topic provides a worked example and steps you through the setup required to implement this SaaS usage-based pricing (UBP) model. It goes on to show you how to submit some sample usage data against a test Account, generate a Bill for that Account, and check billing amounts against submitted usage.
**Tip: New to m3ter?** If you are new to m3ter, this worked example step-through topic assumes no prior knowledge of working with the m3ter. The example is intended to give you a quick start experience of m3ter, demonstrating how easily you can set things up to implement UBP for your products and services. You can also see how to ingest some test usage data into the m3ter system and generate sample Bills to check your UBP implementation before deploying it to your live production environment.
## Step 1: Create Product
*Products* represent a product or service that you offer to your end customers. A Meter, Aggregation, Plan Template, Plan, or Pricing typically all belong to a Product.
**To create a Product:**
1. In the Console, select **Products**. The **Products** page opens.
2. Select **Create product**. We'll create a single Product called **Revive Graph Standard**:
**Deploying to Production**: Having submitted some metered test data against a test Account, generated a Bill for the Account, and confirmed that charges are in accordance with our pricing requirements for consumption of our Product, we can be comfortable deploying our usage-based pricing implementation to live production.
> **More Details:** [Submitting Test Usage Data](/guides/billing-and-usage-data/submitting-usage-data/submitting-test-usage-data) and [Running Bills Manually](/guides/billing-and-usage-data/running-viewing-and-managing-bills/running-bills-and-viewing-bill-details#running-bills-manually)
# Example 1: Cloud Storage and File Cleanup
Source: https://docs.m3ter.com/guides/getting-started/metering-for-production-worked-examples/worked-example-1-cloud-storage-and-file-cleanup
Follow a detailed example with step-by-step instructions on how to set up the pricing metrics, submit test data, generate bills, and verify billing amounts against usage.
Suppose you run a SaaS company that provides cloud storage and file cleanup services for corrupted graphics files. You want to charge your customers in US dollars on a monthly basis using the following usage pricing metrics:
* By cumulative volume of corrupted files submitted for storage and cleanup in the month measured in gigabytes, irrespective of how long they remain stored in any given month and irrespective of whether they ever are retrieved. Charge rate is \$0.15 per GB for the first 500GB; \$0.10 per GB thereafter.
* By count of the number of corrupted files submitted for storage and cleanup in the month, charged at \$0.50 per file.
* By an add-on amount each month based on the maximum average clean up processing time required per submitted files in any given month: charged at \$12 for up to 4 seconds maximum average processing; \$25 for up to 6 seconds maximum average processing; \$50 for anything above 6 seconds maximum average processing.
In addition to any usage charges, you want to apply a monthly standing charge of \$20.
This topic provides a worked example and steps you through the setup required to implement this SaaS usage-based pricing (UBP) model. It goes on to show you how to submit some sample usage data against a test Account, generate a Bill for that Account, and check billing amounts against submitted usage.
**Tip: New to m3ter?** If you are new to m3ter, this worked example step-through topic assumes no prior knowledge of working with the m3ter. The example is intended to give you a quick start experience of m3ter, demonstrating how easily you can set things up to implement UBP for your products and services. You can also see how to ingest some test usage data into the m3ter system and generate sample Bills to check your UBP implementation before deploying it to your live production environment.
## Step 1: Create Product
*Products* represent a product or service that you offer to your end customers. A Meter, Aggregation, Plan Template, Plan, or Pricing typically all belong to a Product.
**To create a Product:**
1. In the Console, select **Products**. The **Products** page opens.
2. Select **Create product**. We'll create a single Product called **Revive Graph Standard**:
![]() 3. Select **Create product**.
The **Revive Graph Standard** Product can now serve as a container for any Meters, Aggregations, Pricing, Plans, and Plan Templates we'll need for the example.
> **More Details:** [Creating and Managing Products](/guides/creating-and-managing-products)
## Step 2: Set up Meter
*Meters* define the data fields that your system will use to submit usage date to the m3ter platform:
* As well as simple data fields, which collect raw usage data, you can define derived fields that reference and apply calculations to simple fields. For the example, we'll create three data fields and a single derived field to meet the pricing requirements.
* You can create Product-specific Meters or Global Meters. For the example, we'll create a single Meter for our example Product.
**To create a Meter:**
1. Select **Metering**. The **Meters** page opens.
2. In the **Product** drop-down, select **Revive Graph Standard**.
3. Select **Create meter**.
Here's the Meter set up to support the pricing model we want to use in the example:
* **Meter details**:
3. Select **Create product**.
The **Revive Graph Standard** Product can now serve as a container for any Meters, Aggregations, Pricing, Plans, and Plan Templates we'll need for the example.
> **More Details:** [Creating and Managing Products](/guides/creating-and-managing-products)
## Step 2: Set up Meter
*Meters* define the data fields that your system will use to submit usage date to the m3ter platform:
* As well as simple data fields, which collect raw usage data, you can define derived fields that reference and apply calculations to simple fields. For the example, we'll create three data fields and a single derived field to meet the pricing requirements.
* You can create Product-specific Meters or Global Meters. For the example, we'll create a single Meter for our example Product.
**To create a Meter:**
1. Select **Metering**. The **Meters** page opens.
2. In the **Product** drop-down, select **Revive Graph Standard**.
3. Select **Create meter**.
Here's the Meter set up to support the pricing model we want to use in the example:
* **Meter details**:
![]() * **Data fields**:
* **Data fields**:
![]() * **Derived fields**:
* **Derived fields**:
![]() For the example, we've created the **Store N Clean Meter** and added the following fields to capture usage data:
* Three Data Fields of type **Measure**:
* **GigaByte Store** to collect quantitative data on the file storage volume in Gigabytes.
* **Graphic File Submits** to collect quantitative data on the number of files submitted.
* **Process Time** collect quantitative data on the total processing time required to clean files in seconds.
* One Derived Field of type **Measure**:
* **Processing Average** to reference two of the Data Fields and apply a calculation to derive the average processing time required per set of submitted files.
4. Select **Create meter**.
We now have a single Meter for the example, which we can use to collect usage data on any Account that consumes the **Revive Graph Standard** Product. This metered usage data will serve as the basis for the pricing metrics we want to apply to rate Product consumption.
> **More Details:** [Reviewing Meter Options](/guides/usage-data-meters/reviewing-meter-options) and [Creating Meters](/guides/usage-data-meters/creating-meters)
## Step 3: Define Aggregations
*Aggregations* define how to transform into a single number the individual measurements submitted to a Meter Data Field as usage data. For example, you may choose to simply SUM the submitted usage data values. In this way, Aggregations define the usage-based pricing metrics you'll use to set up pricing for your products and services.
For the usage-based pricing model we want to implement in our example, we'll need to create three Aggregations based on the usage data collected by our **Store N Clean Meter**. Each Aggregation will target a different Meter field to define a pricing metric:
* For cumulative volume of graphic files submitted for storage and cleanup, we'll target the **GigaByte Store** Data Field.
* For number of files submitted for storage and cleanup, we'll target the **Graphic File Submits** Data Field.
* For maximum average clean up processing time, we'll target the **Processing Average** Derived Field.
**To create an Aggregation:**
1. Select **Metering**. The **Meters** page opens.
2. Select **Aggregations**:
For the example, we've created the **Store N Clean Meter** and added the following fields to capture usage data:
* Three Data Fields of type **Measure**:
* **GigaByte Store** to collect quantitative data on the file storage volume in Gigabytes.
* **Graphic File Submits** to collect quantitative data on the number of files submitted.
* **Process Time** collect quantitative data on the total processing time required to clean files in seconds.
* One Derived Field of type **Measure**:
* **Processing Average** to reference two of the Data Fields and apply a calculation to derive the average processing time required per set of submitted files.
4. Select **Create meter**.
We now have a single Meter for the example, which we can use to collect usage data on any Account that consumes the **Revive Graph Standard** Product. This metered usage data will serve as the basis for the pricing metrics we want to apply to rate Product consumption.
> **More Details:** [Reviewing Meter Options](/guides/usage-data-meters/reviewing-meter-options) and [Creating Meters](/guides/usage-data-meters/creating-meters)
## Step 3: Define Aggregations
*Aggregations* define how to transform into a single number the individual measurements submitted to a Meter Data Field as usage data. For example, you may choose to simply SUM the submitted usage data values. In this way, Aggregations define the usage-based pricing metrics you'll use to set up pricing for your products and services.
For the usage-based pricing model we want to implement in our example, we'll need to create three Aggregations based on the usage data collected by our **Store N Clean Meter**. Each Aggregation will target a different Meter field to define a pricing metric:
* For cumulative volume of graphic files submitted for storage and cleanup, we'll target the **GigaByte Store** Data Field.
* For number of files submitted for storage and cleanup, we'll target the **Graphic File Submits** Data Field.
* For maximum average clean up processing time, we'll target the **Processing Average** Derived Field.
**To create an Aggregation:**
1. Select **Metering**. The **Meters** page opens.
2. Select **Aggregations**:
![]() 3. In the **Product** drop-down, select **Revive Graph Standard**.
4. Select **Create aggregation**.
Here's the setup for the first Aggregation:
* **Aggregation details**:
3. In the **Product** drop-down, select **Revive Graph Standard**.
4. Select **Create aggregation**.
Here's the setup for the first Aggregation:
* **Aggregation details**:
![]() * **Meter settings**:
* **Meter settings**:
![]() * **Aggregation settings**:
* **Aggregation settings**:
![]() The **Gigabyte Store Aggregation** gives us our first pricing metric by:
* Targeting the **Gigabyte Store** field on the **Store N Clean Meter** and uses the **Sum** of the Gigabytes stored.
* We leave the **Quantity per unit** setting at **1**, since we'll configure a tiered pricing by the Gigabyte using this Aggregation.
5. Select **Create Aggregation**.
6. Repeat steps **4.** and **5.** to create another two Aggregations:
Here's the setup for the second Aggregation:
* **Aggregation details**:
The **Gigabyte Store Aggregation** gives us our first pricing metric by:
* Targeting the **Gigabyte Store** field on the **Store N Clean Meter** and uses the **Sum** of the Gigabytes stored.
* We leave the **Quantity per unit** setting at **1**, since we'll configure a tiered pricing by the Gigabyte using this Aggregation.
5. Select **Create Aggregation**.
6. Repeat steps **4.** and **5.** to create another two Aggregations:
Here's the setup for the second Aggregation:
* **Aggregation details**:
![]() * **Meter settings**:
* **Meter settings**:
![]() * **Aggregation settings**:
* **Aggregation settings**:
![]() The **Graphic File Submits Aggregation** gives us our second pricing metric by:
* Targeting the **Graphic File Submits** field on the **Store N Clean Meter** and uses a **Sum** of file submissions.
* We leave the **Quantity per unit** setting at **1**, since we'll configure a flat rate pricing by file submissions using this Aggregation.
Here's the setup for the third Aggregation:
* **Aggregation details**:
The **Graphic File Submits Aggregation** gives us our second pricing metric by:
* Targeting the **Graphic File Submits** field on the **Store N Clean Meter** and uses a **Sum** of file submissions.
* We leave the **Quantity per unit** setting at **1**, since we'll configure a flat rate pricing by file submissions using this Aggregation.
Here's the setup for the third Aggregation:
* **Aggregation details**:
![]() * **Meter settings**:
* **Meter settings**:
![]() * **Aggregation settings**:
* **Aggregation settings**:
![]() The **Processing Average Aggregation** gives us our third pricing metric by:
* Targeting the **Processing Average** derived field on the **Store N Clean Meter** and uses the **Maximum** value resulting from the calculation built into the field.
* We leave the **Quantity per unit** setting at **1**, since we'll configure a tiered pricing by number of seconds using this Aggregation.
> **More Details:** [Reviewing Aggregation Options](/guides/usage-data-aggregations/reviewing-aggregation-options) and [Creating Aggregations](/guides/usage-data-aggregations/creating-aggregations)
## Step 4: Create Product Plan
*Plans* represent a pricing plan for one of your products or services. A Plan is always derived from a Plan Template and inherits settings from the Plan Template which control billing operations, such as billing frequency and currency. You can override some of these settings when you create a Plan from a Plan Template. To meet the example requirements:
* First, we'll need a Plan Template for the **Revive Graph Standard** Product. We'll configure the Plan Template:
* For monthly billing using a specific billing currency.
* To include for a Standing charge to be applied for each billing period.
* Second, we can then create a Product Plan based on the Plan Template. The Plan will then inherit the monthly billing frequency and Standing charge billing amount from the Plan Template.
**To create a Product Plan Template:**
1. Select **Pricing**. The **Plans** page opens.
2. Select **Plan templates**:
The **Processing Average Aggregation** gives us our third pricing metric by:
* Targeting the **Processing Average** derived field on the **Store N Clean Meter** and uses the **Maximum** value resulting from the calculation built into the field.
* We leave the **Quantity per unit** setting at **1**, since we'll configure a tiered pricing by number of seconds using this Aggregation.
> **More Details:** [Reviewing Aggregation Options](/guides/usage-data-aggregations/reviewing-aggregation-options) and [Creating Aggregations](/guides/usage-data-aggregations/creating-aggregations)
## Step 4: Create Product Plan
*Plans* represent a pricing plan for one of your products or services. A Plan is always derived from a Plan Template and inherits settings from the Plan Template which control billing operations, such as billing frequency and currency. You can override some of these settings when you create a Plan from a Plan Template. To meet the example requirements:
* First, we'll need a Plan Template for the **Revive Graph Standard** Product. We'll configure the Plan Template:
* For monthly billing using a specific billing currency.
* To include for a Standing charge to be applied for each billing period.
* Second, we can then create a Product Plan based on the Plan Template. The Plan will then inherit the monthly billing frequency and Standing charge billing amount from the Plan Template.
**To create a Product Plan Template:**
1. Select **Pricing**. The **Plans** page opens.
2. Select **Plan templates**:
![]() The **Plan templates** page opens.
3. In the **Product** drop-down, select **Revive Graph Standard**.
4. Select **Create plan template**. The **Create** page opens.
Here's the setup for the **Plan template details**:
The **Plan templates** page opens.
3. In the **Product** drop-down, select **Revive Graph Standard**.
4. Select **Create plan template**. The **Create** page opens.
Here's the setup for the **Plan template details**:
![]() For the **Revive Graph Standard Plan Template** we've:
* Chosen **US dollars** as the billing currency.
* Selected a monthly **Bill frequency** with a **Bill interval** of **1**, which means Accounts put on the Plan will receive a Bill each month for a month's period of usage.
5. Configure the settings for **Standing charge** and **Minimum spend** amounts:
* **Standing charge** settings:
* Set a **Standing charge** of **\$20** per month as required for the example.
* For **Standing charge billing**, leave **Use organization-wide configuration** checked for **(In arrears)**.
* Set **Standing charge interval** at **1** to charge this amount on every monthly Bill.
* Set **Standing charge offset** at **0** to apply this charge from the first Bill.
* Enter a **Standing charge description** if you wish - this will show against the Standing charge line items on customer Bills.
For the **Revive Graph Standard Plan Template** we've:
* Chosen **US dollars** as the billing currency.
* Selected a monthly **Bill frequency** with a **Bill interval** of **1**, which means Accounts put on the Plan will receive a Bill each month for a month's period of usage.
5. Configure the settings for **Standing charge** and **Minimum spend** amounts:
* **Standing charge** settings:
* Set a **Standing charge** of **\$20** per month as required for the example.
* For **Standing charge billing**, leave **Use organization-wide configuration** checked for **(In arrears)**.
* Set **Standing charge interval** at **1** to charge this amount on every monthly Bill.
* Set **Standing charge offset** at **0** to apply this charge from the first Bill.
* Enter a **Standing charge description** if you wish - this will show against the Standing charge line items on customer Bills.
![]() * **Minimum spend** settings:
* Omit a **Product minimum spend** per billing period, since this is not required for the example.
6. Select **Create plan template**. You are returned to the **Plan template details** page for the new template.
We can now proceed to create a Product Plan for the example based on this template.
7. Select **Plans**:
* **Minimum spend** settings:
* Omit a **Product minimum spend** per billing period, since this is not required for the example.
6. Select **Create plan template**. You are returned to the **Plan template details** page for the new template.
We can now proceed to create a Product Plan for the example based on this template.
7. Select **Plans**:
![]() The **Plans** page opens.
8. In the **Product** drop-down, select **Revive Graph Standard**.
9. Select **Create plan**. The **Create** page opens.
Here's the **Plan details** setup:
The **Plans** page opens.
8. In the **Product** drop-down, select **Revive Graph Standard**.
9. Select **Create plan**. The **Create** page opens.
Here's the **Plan details** setup:
![]() Note that we don't need to do any Plan template overrides for **Standing charge** or **Minimum spend** amounts we want to apply for the example - we configured the **Revive Graph Standard Template** for the required **Standing charge** amount of \$20 per month, and our new **Revive Graph Standard** **Plan** will inherit this setting from the template.
10. Select **Create plan**. You are returned to the **Plan details** page.
In the next step, we can price this Plan using our Aggregations.
> **More Details:** [Reviewing Options for Plan Templates and Plans](/guides/plans-and-pricing/working-with-plan-templates-and-plans/reviewing-configuration-options-for-plans-and-plan-templates) and [Creating Plans](/guides/plans-and-pricing/working-with-plan-templates-and-plans/creating-plans)
## Step 5: Price Product Plan
*Pricing* allows you to configure the cost of usage data under a specific Plan you apply to an Account, and is used to calculate bills.
We can use the Pricing editor in the Console to quickly price up our Product Plan to meet the pricing requirements for the example.
**To price Product Plan:**
1. Select **Pricing**. The **Pricing** page opens.
2. Select **Pricing editor**:
Note that we don't need to do any Plan template overrides for **Standing charge** or **Minimum spend** amounts we want to apply for the example - we configured the **Revive Graph Standard Template** for the required **Standing charge** amount of \$20 per month, and our new **Revive Graph Standard** **Plan** will inherit this setting from the template.
10. Select **Create plan**. You are returned to the **Plan details** page.
In the next step, we can price this Plan using our Aggregations.
> **More Details:** [Reviewing Options for Plan Templates and Plans](/guides/plans-and-pricing/working-with-plan-templates-and-plans/reviewing-configuration-options-for-plans-and-plan-templates) and [Creating Plans](/guides/plans-and-pricing/working-with-plan-templates-and-plans/creating-plans)
## Step 5: Price Product Plan
*Pricing* allows you to configure the cost of usage data under a specific Plan you apply to an Account, and is used to calculate bills.
We can use the Pricing editor in the Console to quickly price up our Product Plan to meet the pricing requirements for the example.
**To price Product Plan:**
1. Select **Pricing**. The **Pricing** page opens.
2. Select **Pricing editor**:
![]() The **Pricing editor** opens.
3. In the **Product** drop-down, select **Revive Graph Standard**.
4. Select **Add plans**. The **Select plans** dialog opens and lists all Plans created for the **Revive Graph Standard** Product.
5. Check **Revive Graph Standard Plan** and select **Confirm**:
* The dialog closes and the Plan is added to the **Pricing editor** page.
* A warning shows telling you: **No active pricing configured**.
We'll use the Aggregations we created at **Step 3** as usage-based metrics to price the Plan in accordance with the requirements set out in the example.
6. Click **Add aggregations**. A **Select aggregations** dialog appears and lists all Aggregations created for the **Revive Graph Standard** Product.
* Note that you might also see *global* Aggregations listed for selection. Global Aggregations are not tied to any specific Product and can be used to price Plans across all Products.
7. On the dialog check our three Aggregations:
* **GigaByte Store Aggregation**
* **Graphic File Submits Aggregation**
* **Processing Average Aggregation**
8. Click **Confirm**. The dialog closes and the selected Aggregations are added to the **Pricing editor** for the added Plan. You'll see **No** **active pricing configured** warnings for the Plan for each of the selected Aggregations.
9. In the pricing grid, select **Create plan pricing** for the **GigaByte Stored Aggregation**. The **Create** pricing page opens:
* You can read off details of the Aggregation being used to create the pricing at the top of the page.
* You can **Switch to wizard** if you want and follow an alternative streamlined pricing workflow by **Pricing type** selection. For the example workflow, we'll continue with the default **Advanced** pricing workflow format.
10. Work down the form to enter:
* **Pricing details**:
* **Start** and **End** date/times for the period the pricing will be active for the Plan.
* A **Description** that will appear for any usage charge line items on Bills, such as **Storage Charges**.
* **Minimum spend settings**:
* Ignore these settings - there was no requirement for the example to impose minimum spend amounts for billing.
* **Pricing settings**:
* Leave the **Usage accumulates over the entire plan contract period** switch in the default position of disabled.
* Leave the **Apply as** setting as the default - **Debit**.
* **Pricing type**: The pricing requirement was to charge by cumulative volume of corrupted files submitted for storage and cleanup in the month measured in gigabytes - charge rate is \$0.15 per GB for the first 500GB; \$0.10 per GB thereafter. We can implement this pricing, using a **Tiered** pricing structure with two pricing bands configured:
The **Pricing editor** opens.
3. In the **Product** drop-down, select **Revive Graph Standard**.
4. Select **Add plans**. The **Select plans** dialog opens and lists all Plans created for the **Revive Graph Standard** Product.
5. Check **Revive Graph Standard Plan** and select **Confirm**:
* The dialog closes and the Plan is added to the **Pricing editor** page.
* A warning shows telling you: **No active pricing configured**.
We'll use the Aggregations we created at **Step 3** as usage-based metrics to price the Plan in accordance with the requirements set out in the example.
6. Click **Add aggregations**. A **Select aggregations** dialog appears and lists all Aggregations created for the **Revive Graph Standard** Product.
* Note that you might also see *global* Aggregations listed for selection. Global Aggregations are not tied to any specific Product and can be used to price Plans across all Products.
7. On the dialog check our three Aggregations:
* **GigaByte Store Aggregation**
* **Graphic File Submits Aggregation**
* **Processing Average Aggregation**
8. Click **Confirm**. The dialog closes and the selected Aggregations are added to the **Pricing editor** for the added Plan. You'll see **No** **active pricing configured** warnings for the Plan for each of the selected Aggregations.
9. In the pricing grid, select **Create plan pricing** for the **GigaByte Stored Aggregation**. The **Create** pricing page opens:
* You can read off details of the Aggregation being used to create the pricing at the top of the page.
* You can **Switch to wizard** if you want and follow an alternative streamlined pricing workflow by **Pricing type** selection. For the example workflow, we'll continue with the default **Advanced** pricing workflow format.
10. Work down the form to enter:
* **Pricing details**:
* **Start** and **End** date/times for the period the pricing will be active for the Plan.
* A **Description** that will appear for any usage charge line items on Bills, such as **Storage Charges**.
* **Minimum spend settings**:
* Ignore these settings - there was no requirement for the example to impose minimum spend amounts for billing.
* **Pricing settings**:
* Leave the **Usage accumulates over the entire plan contract period** switch in the default position of disabled.
* Leave the **Apply as** setting as the default - **Debit**.
* **Pricing type**: The pricing requirement was to charge by cumulative volume of corrupted files submitted for storage and cleanup in the month measured in gigabytes - charge rate is \$0.15 per GB for the first 500GB; \$0.10 per GB thereafter. We can implement this pricing, using a **Tiered** pricing structure with two pricing bands configured:
![]() 11. Select **Create pricing**. The **Create** pricing page closes and the pricing using the Aggregation is shown as active in the pricing grid:
11. Select **Create pricing**. The **Create** pricing page closes and the pricing using the Aggregation is shown as active in the pricing grid:
![]() 12. Repeat steps **9.** to **11.**, using the other two Aggregations we created for pricing the Plan, and use a suitable pricing type and structure for each pricing:
* **Graphic File Submits Aggregation**. The pricing requirement was to charge by count of the number of corrupted files submitted for storage and cleanup in the month, charged at \$0.50 per file. We can use a **Tiered** structure with a single pricing band without limit to impose this flat rate pricing:
12. Repeat steps **9.** to **11.**, using the other two Aggregations we created for pricing the Plan, and use a suitable pricing type and structure for each pricing:
* **Graphic File Submits Aggregation**. The pricing requirement was to charge by count of the number of corrupted files submitted for storage and cleanup in the month, charged at \$0.50 per file. We can use a **Tiered** structure with a single pricing band without limit to impose this flat rate pricing:
![]() * **Processing Average**. The pricing requirement was to charge by an add-on amount each month based on maximum average clean up processing time required per submitted files: charged at \$12 for up to 4 seconds average processing; \$25 for up to 6 seconds average processing; \$50 for anything above 6 seconds average processing. We can use a **Stairstep** pricing type to impose this pricing:
* **Processing Average**. The pricing requirement was to charge by an add-on amount each month based on maximum average clean up processing time required per submitted files: charged at \$12 for up to 4 seconds average processing; \$25 for up to 6 seconds average processing; \$50 for anything above 6 seconds average processing. We can use a **Stairstep** pricing type to impose this pricing:
![]() 13. When you have saved the further two pricings, each will also show as **Active Pricing** for the Plan in the grid:
13. When you have saved the further two pricings, each will also show as **Active Pricing** for the Plan in the grid:
![]() We now have a Product Plan priced according to the pricing requirements.
> **More Details:** [Reviewing Pricing Options for Plans and Plan Templates](/guides/plans-and-pricing/pricing-plans/reviewing-pricing-options-and-pricing-plans) and [Pricing Plans and Plan Templates](/guides/plans-and-pricing/pricing-plans/pricing-plans).
## Step 6: Create Test Account and Attach Priced Plan
*Accounts* represent one of your end-customers, and contain an end-customer's name and contact details:
* When you attach a priced Plan to an Account, this creates a link between them to create an *Account Plan*. An Account Plan determines the charges incurred by customers who consume the Product the Plan is priced for.
For this step, we'll create a test Account for the example and attach our priced Plan to it.
**To create a test Account and attach Plan:**
1. In the main Console navigation, select **Accounts**. The **Accounts** page opens.
2. Select **Create account**. The **Create** page opens.
3. Enter the **Account details**:
* **Name** and **Code**. Required fields.
* Note that when you enter a **Name** and click in the **Code** field, a default code is entered based on the name you've entered, which you can then edit as required.
* **Email Address**. In addition to **Name** and **Code**, this is also a required field:
We now have a Product Plan priced according to the pricing requirements.
> **More Details:** [Reviewing Pricing Options for Plans and Plan Templates](/guides/plans-and-pricing/pricing-plans/reviewing-pricing-options-and-pricing-plans) and [Pricing Plans and Plan Templates](/guides/plans-and-pricing/pricing-plans/pricing-plans).
## Step 6: Create Test Account and Attach Priced Plan
*Accounts* represent one of your end-customers, and contain an end-customer's name and contact details:
* When you attach a priced Plan to an Account, this creates a link between them to create an *Account Plan*. An Account Plan determines the charges incurred by customers who consume the Product the Plan is priced for.
For this step, we'll create a test Account for the example and attach our priced Plan to it.
**To create a test Account and attach Plan:**
1. In the main Console navigation, select **Accounts**. The **Accounts** page opens.
2. Select **Create account**. The **Create** page opens.
3. Enter the **Account details**:
* **Name** and **Code**. Required fields.
* Note that when you enter a **Name** and click in the **Code** field, a default code is entered based on the name you've entered, which you can then edit as required.
* **Email Address**. In addition to **Name** and **Code**, this is also a required field:
![]() * **Other settings?** For the current example, we can leave the other settings at their defaults:
* **Address**
* **Bill settings**
* **Bill statements**
4. Select **Create account.** You are returned to the **Account details** page with the **Overview** tab selected.
For the worked example, we've created the **Revive Graph Customer 1** test Account.
5. Select the **Attached plans** tab.
6. On the **Active and pending attached plans** panel, select **Create plan** **attachment**. The **Create** page opens.
When you attach a Plan to an Account, you create an *Account Plan*, which lets you define the specific way in which you want the Plan to be applied to the individual Account. Note that the Account Plan you create when you attach the Plan to an Account *is distinct from* the Plan itself - you may want to attach the Plan to another Account but to configure the way the Plan is applied to that other Account differently.
7. On the **Create** page, leave the radio button for **Plan** as default setting and enter the **Plan attachment details**:
* Use the **Product** drop-down to select the Product, which is **Revive Graph Standard** for the example. (*Required*) The **Plan** drop-down is enabled.
* Use the **Plan** drop-down to select the Plan, which is **Revive Graph Standard Plan** for the example. (*Required*)
* Use the pop-up calendars to enter **Start date** (*Required*) and **End date** (*Optional*), which will define the period the Account Plan is active for the Account.
* **Other settings?** For the current example, we can leave the other settings at their defaults:
* **Address**
* **Bill settings**
* **Bill statements**
4. Select **Create account.** You are returned to the **Account details** page with the **Overview** tab selected.
For the worked example, we've created the **Revive Graph Customer 1** test Account.
5. Select the **Attached plans** tab.
6. On the **Active and pending attached plans** panel, select **Create plan** **attachment**. The **Create** page opens.
When you attach a Plan to an Account, you create an *Account Plan*, which lets you define the specific way in which you want the Plan to be applied to the individual Account. Note that the Account Plan you create when you attach the Plan to an Account *is distinct from* the Plan itself - you may want to attach the Plan to another Account but to configure the way the Plan is applied to that other Account differently.
7. On the **Create** page, leave the radio button for **Plan** as default setting and enter the **Plan attachment details**:
* Use the **Product** drop-down to select the Product, which is **Revive Graph Standard** for the example. (*Required*) The **Plan** drop-down is enabled.
* Use the **Plan** drop-down to select the Plan, which is **Revive Graph Standard Plan** for the example. (*Required*)
* Use the pop-up calendars to enter **Start date** (*Required*) and **End date** (*Optional*), which will define the period the Account Plan is active for the Account.
![]() * **Plan attachment settings?** For the current example, we can leave the other settings at their defaults
8. Select **Create plan attachment**. On the **Attached plans** tab, the Account Plan is shown on the **Active and pending attached plans** panel:
* **Plan attachment settings?** For the current example, we can leave the other settings at their defaults
8. Select **Create plan attachment**. On the **Attached plans** tab, the Account Plan is shown on the **Active and pending attached plans** panel:
![]() We now have a **Revive Graph Customer 1** test Account set up that will be billed according to the pricing schema we've configured for the **Revive Graph Standard Plan** for any metered usage of the Product by the Account.
> **More Details:** [Creating an Account](/guides/end-customer-accounts/creating-an-account) and [Attaching Plans to an Account](/guides/end-customer-accounts/attaching-plans-to-an-account)
## Step 7: Submit Data to Test Account and Check Bill
We'll now submit some test usage data to our test Account for the **Store N Clean Meter**, which will allow us to generate a Bill and check that the usage charges on the Bill for the submitted usage data are correct.
1. Select **Accounts**. On the **Accounts** page, select the **NAME** hotlink text of the **Revive Graph Customer 1** test Account we created at **Step 6**. The **Account details** page opens with the **Overview** tab selected.
2. Select **Submit usage**:
We now have a **Revive Graph Customer 1** test Account set up that will be billed according to the pricing schema we've configured for the **Revive Graph Standard Plan** for any metered usage of the Product by the Account.
> **More Details:** [Creating an Account](/guides/end-customer-accounts/creating-an-account) and [Attaching Plans to an Account](/guides/end-customer-accounts/attaching-plans-to-an-account)
## Step 7: Submit Data to Test Account and Check Bill
We'll now submit some test usage data to our test Account for the **Store N Clean Meter**, which will allow us to generate a Bill and check that the usage charges on the Bill for the submitted usage data are correct.
1. Select **Accounts**. On the **Accounts** page, select the **NAME** hotlink text of the **Revive Graph Customer 1** test Account we created at **Step 6**. The **Account details** page opens with the **Overview** tab selected.
2. Select **Submit usage**:
![]() A **Submit usage data** dialog appears.
To submit usage data measurements for an Account, you must complete two stages using the dialog.
3. Under stage **1: Select a meter**, use the **Meter** drop-down to select the **Store N Clean** Meter and then select **Next**. The dialog adjusts to show stage **2: Define measurements and send:**
* Note that you can complete stage 2 using either a **Simple** or **Advanced** format, where the default is **Simple**.
* For the example, we'll use the **Simple** format to submit our test usage data measurements:
* **UID**. This field is automatically populated with a unique id for the measurement. For the example, we'll use this as our measurement id.
* **Timestamp**. The timestamp field is also automatically populated using the date/time the dialog was opened, and again for the example we'll use this as the timestamp for the measurement.
* **Meter**. The Meter **Code** is automatically entered.
* **Account**. The **Code** of the Account we're submitting the data measurement for is automatically entered.
* **Data fields**. The three Data Fields we set up for the Meter are shown with empty **Value** fields.
4. Enter some test data **Values** for each of the Data Fields:
* **GigaByte Store** = 350
* **Graphic File Submits** = 8
* **Process Time** = 29
A **Submit usage data** dialog appears.
To submit usage data measurements for an Account, you must complete two stages using the dialog.
3. Under stage **1: Select a meter**, use the **Meter** drop-down to select the **Store N Clean** Meter and then select **Next**. The dialog adjusts to show stage **2: Define measurements and send:**
* Note that you can complete stage 2 using either a **Simple** or **Advanced** format, where the default is **Simple**.
* For the example, we'll use the **Simple** format to submit our test usage data measurements:
* **UID**. This field is automatically populated with a unique id for the measurement. For the example, we'll use this as our measurement id.
* **Timestamp**. The timestamp field is also automatically populated using the date/time the dialog was opened, and again for the example we'll use this as the timestamp for the measurement.
* **Meter**. The Meter **Code** is automatically entered.
* **Account**. The **Code** of the Account we're submitting the data measurement for is automatically entered.
* **Data fields**. The three Data Fields we set up for the Meter are shown with empty **Value** fields.
4. Enter some test data **Values** for each of the Data Fields:
* **GigaByte Store** = 350
* **Graphic File Submits** = 8
* **Process Time** = 29
![]() **Tip: Record the Test Data Values!** Keep a record of the test **Values** you've submitted for each of the fields. You can then calculate manually what the respective charges should be when you generate a sample Bill for the Account.
5. Select **Submit usage**. If the measurement is ingested successfully, you'll see a `{"result" : "accepted"}` message under the **Log** section of the **Submit usage data** dialog.
6. For additional test data measurements, repeat steps **3.** to **5.** - for the example, we'll submit two more measurements:
* Second measurement **Values**:
* **GigaByte Store** = 650
* **Graphic File Submits** = 12
* **Process Time** = 53
* Third measurement **Values**:
* **GigaByte Store** = 550
* **Graphic File Submits** = 10
* **Process Time** = 42
7. On the **Account details** page, select the **Bills** tab.
8. On the **Bills** tab, select **Run billing**. The **Run billing** dialog appears.
9. In the example, we are using monthly billing and the test data was submitted in March 2025, so we select:
* April 1st 2025 for **Invoice date**.
* **Monthly** for **Bill Frequency**.
10. Select **Run billing**. The dialog closes and your Bill job is queued.
* You can select the **Running tasks** button at top-right in the Console. This opens the **Running tasks** panel and you can check the status of your Bill job:
**Tip: Record the Test Data Values!** Keep a record of the test **Values** you've submitted for each of the fields. You can then calculate manually what the respective charges should be when you generate a sample Bill for the Account.
5. Select **Submit usage**. If the measurement is ingested successfully, you'll see a `{"result" : "accepted"}` message under the **Log** section of the **Submit usage data** dialog.
6. For additional test data measurements, repeat steps **3.** to **5.** - for the example, we'll submit two more measurements:
* Second measurement **Values**:
* **GigaByte Store** = 650
* **Graphic File Submits** = 12
* **Process Time** = 53
* Third measurement **Values**:
* **GigaByte Store** = 550
* **Graphic File Submits** = 10
* **Process Time** = 42
7. On the **Account details** page, select the **Bills** tab.
8. On the **Bills** tab, select **Run billing**. The **Run billing** dialog appears.
9. In the example, we are using monthly billing and the test data was submitted in March 2025, so we select:
* April 1st 2025 for **Invoice date**.
* **Monthly** for **Bill Frequency**.
10. Select **Run billing**. The dialog closes and your Bill job is queued.
* You can select the **Running tasks** button at top-right in the Console. This opens the **Running tasks** panel and you can check the status of your Bill job:
![]() 11. When the Bill has generated, it will be listed on the **Bills** tab for the Account. Select the **Reference** hotlink text to open the Bill in **Bill management**.
Before checking a sample Bill we've generated for the Account, we can calculate manually what the cumulative usage charges should be for each part of the usage-based pricing we've implemented:
* **GigaBytes Stored**. The total amounts to 350 + 650 + 550 = 1,550 GiBy. The tiered pricing structure we've set up means the charge for the first 500 at \$0.15 per GiBy = \$75 plus the charge for the remaining 1,050 at \$0.10 per GiBy = \$105. Total = \$180.
* **File Submits**. The total number of files submitted is 30. At the flat rate of \$0.50 per file, the charge = \$15.
* **Processing Average**. The maximum average processing time for the three data submissions results from the second submission, where 12 files were submitted and which required a total of 53 seconds processing time. The average processing time in this case is 53/12 = 4.4167 seconds. Because this is more than 4, charge = \$25.
The Bill for the Account should be the total of these three usage charges = \$220 plus the standing charge of \$20 per billing period, which amounts to an overall total = \$240.
For the example, we can see that the Bill based on test usage data we submitted has been calculated correctly in accordance with our usage-based pricing schema:
11. When the Bill has generated, it will be listed on the **Bills** tab for the Account. Select the **Reference** hotlink text to open the Bill in **Bill management**.
Before checking a sample Bill we've generated for the Account, we can calculate manually what the cumulative usage charges should be for each part of the usage-based pricing we've implemented:
* **GigaBytes Stored**. The total amounts to 350 + 650 + 550 = 1,550 GiBy. The tiered pricing structure we've set up means the charge for the first 500 at \$0.15 per GiBy = \$75 plus the charge for the remaining 1,050 at \$0.10 per GiBy = \$105. Total = \$180.
* **File Submits**. The total number of files submitted is 30. At the flat rate of \$0.50 per file, the charge = \$15.
* **Processing Average**. The maximum average processing time for the three data submissions results from the second submission, where 12 files were submitted and which required a total of 53 seconds processing time. The average processing time in this case is 53/12 = 4.4167 seconds. Because this is more than 4, charge = \$25.
The Bill for the Account should be the total of these three usage charges = \$220 plus the standing charge of \$20 per billing period, which amounts to an overall total = \$240.
For the example, we can see that the Bill based on test usage data we submitted has been calculated correctly in accordance with our usage-based pricing schema:
![]() **Deploying to Production**: Having submitted some metered test data against a test Account, generated a Bill for the Account, and confirmed that charges are in accordance with our pricing requirements for consumption of our Product, we can be comfortable deploying our usage-based pricing implementation to live production.
> **More Details:** [Submitting Test Usage Data](/guides/billing-and-usage-data/submitting-usage-data/submitting-test-usage-data) and [Running Bills Manually](/guides/billing-and-usage-data/running-viewing-and-managing-bills/running-bills-and-viewing-bill-details#running-bills-manually)
# Configuration Workflow
Source: https://docs.m3ter.com/guides/getting-started/previewing-main-configuration-steps
The following steps summarize your configuration workflow in m3ter when setting up to apply usage-based or unit-based pricing to your product plans, attaching those priced plans to your customer accounts, and running bills for those accounts.
### Step 1: Configure your Organization
* Configure Users for the people you want to grant access.
* Create and configure Service Users for the automated processes you want to grant access. You'll need to do this in preparation for setting up any Integrations in m3ter with your 3rd-party systems.
* Define the Timezone, Currencies, and Epochs for billing cycle dates.
**More Details?** See [Managing Organization and Users](/guides/organization-and-access-management)
### Step 2: Create Products
* Products act as containers for Meters, Aggregations, Counters, Pricing, Plans, and Plan Templates.
* You typically create a Product before creating any of these child entities.
* Note that to meet your pricing requirements you might want to bundle or combine Products for consumption by your end customer - a single Account might consume several Products. For these cases, you can create *global* Meters, Aggregations, and Counters, which means they are not tied to a specific Product.
**More Details?** See [Create and Manage Products](/guides/creating-and-managing-products).
### Step 3: Create Meters and Aggregations for Usage
* Create Meters with Data Fields and Derived Fields to collect usage data.
* Create Aggregations based on Meter fields to define your pricing metrics - the units of measurements you'll use when applying usage-based pricing to your Product plans.
**More Details?** See [Setting Up Usage Data: Meters](/guides/usage-data-meters) and [Pricing Metrics: Aggregations](/guides/usage-data-aggregations).
### Step 4: Create Counters for Recurring Charges
* Create a Counter to apply unit-based pricing to Product Plans for recurring subscription charge rates on Accounts.
* Use the Counter to post Counter Adjustments to define specific unit quantities subscribed to be end-customer Accounts
**More Details?** See [Recurring Charges: Counters](/guides/recurring-charges-counters).
### Step 5: Create Plan Templates and Plans
* Use Plan Templates to define general billing attributes, such as currency, frequency and interval, and any minimum spend or standing charges to apply.
* Create Plans from Templates to inherit common billing attributes and pricing structures.
**More Details?** See [Creating and Working with Plan Templates and Plans](/guides/plans-and-pricing/working-with-plan-templates-and-plans)
### Step 6: Configure Pricing for Plans
* In the Pricing Editor:
* Add Aggregations to Plans or Plan Templates and create *usage-based* pricing for your Products.
* Add Counter to Plans or Plan Templates and create *unit-based* pricing for your Products.
* Price up Plan Templates for common pricing structures to save repeat configuration work when pricing Plans.
**More Details?** See [Pricing and Managing Plans and Plan Templates](/guides/plans-and-pricing/pricing-plans) and [Creating Counters and Pricing Plans](/guides/recurring-charges-counters/creating-counters).
### Step 7: Set up Accounts
* Create Accounts for your customers who purchase one or more of your Products.
* Define any Child Accounts if you want billing for these Accounts to be rolled-up to a single Parent Account Bill.
**More Details?** See [End-Customer Accounts](/guides/end-customer-accounts)
### Step 8: Attach Plans and Create Prepayments and Balances for Accounts
* Attach a pricing Plan to an Account for each of your Products consumed by the Account.
* Select start and end dates to define the active period of the pricing Plan for the Account.
* If required, create any Prepayments/Commitments and Balances agreed by customers for an Account.
**More Details?** See [Attaching Plans to an Account](/guides/end-customer-accounts/attaching-plans-to-an-account) , [Creating Prepayments for Accounts](/guides/end-customer-accounts/creating-prepayments-for-accounts) and [Creating Balances for Accounts](/guides/end-customer-accounts/creating-balances-for-accounts).
### Step 9: Submit Test Usage Data via Console
* Usage data:
* Open the Details page for the Meter used to collect usage data on which the pricing Plans attached to an Account are based.
* For a given Account code, manually enter some test values for the Meter's Data Fields.
* Send the test usage data into the m3ter Ingest API using the *Submit Measurements* call.
* Recurring Charges Data:
* Open the Counter Adjustments tab for an Account with a Plan attached that is priced using a Counter.
* Create Counter Adjustments for the Account to define the Counter quantity the Account has subscribed to.
### Step 10: Run Bills
* Select Bill Frequency and Billing Period End.
* Enter the Account for which you have submitted test usage data and run Bills for the Account.
* Open the generated Bill in Bill Management to check the charge amounts. Bills are based on:
* The aggregated test usage data you have submitted for a Meter.
* The Counter quantities subscribed to on an Account.
**More Details?** See [Running, Viewing, and Managing Bills](/guides/billing-and-usage-data/running-viewing-and-managing-bills)
# Quick Start
Source: https://docs.m3ter.com/guides/getting-started/quick-start-worked-example
If you are new to the m3ter Console and open a fresh Organization, you can follow this *Quick Start* workflow, which introduces key m3ter entities you'll need to create and configure in order to implement usage-based pricing or unit-based pricing.
**Quick Start Experience!**
* **Check Full Coverage.** At each step, you'll find links to *full coverage topics* for these key m3ter entities and their dependencies with other parts of the system. We *strongly recommend* that you review this full coverage before attempting to set up your production environment.
* **Worked Examples with Video Walkthroughs.** You can also follow some [worked examples with video walkthroughs](/guides/getting-started/metering-for-production-worked-examples) showing how to set up usage-based pricing for SaaS products in the m3ter platform, submit some test usage data, and go on to check Bills.
**Working in the m3ter Console?** For more details on working in the m3ter Console see the [m3ter Console](/guides/getting-started/working-in-the-m3ter-console) page. This includes a *Console Orientation video* which gives you a guided tour of the Console layout and its features .
## First: Create a Product
A *Product* in m3ter represents a product or service that you offer to your end customers. You can use a Product to group together Meters, Aggregations, Counters, Plan Templates, Plans, and Pricing:
Enter the new **Product details**:
* **Name**. Enter a descriptive name for your Product.
* **Code**. Unique identifier for the Product. You will need the Code as a unique id when submitting API calls, such as a call to retrieve a Product.
* Note that when you've entered a name and then click in the **Code** field, the field is auto-populated with a default code string based on the name you've entered. You can edit this as required.
**Deploying to Production**: Having submitted some metered test data against a test Account, generated a Bill for the Account, and confirmed that charges are in accordance with our pricing requirements for consumption of our Product, we can be comfortable deploying our usage-based pricing implementation to live production.
> **More Details:** [Submitting Test Usage Data](/guides/billing-and-usage-data/submitting-usage-data/submitting-test-usage-data) and [Running Bills Manually](/guides/billing-and-usage-data/running-viewing-and-managing-bills/running-bills-and-viewing-bill-details#running-bills-manually)
# Configuration Workflow
Source: https://docs.m3ter.com/guides/getting-started/previewing-main-configuration-steps
The following steps summarize your configuration workflow in m3ter when setting up to apply usage-based or unit-based pricing to your product plans, attaching those priced plans to your customer accounts, and running bills for those accounts.
### Step 1: Configure your Organization
* Configure Users for the people you want to grant access.
* Create and configure Service Users for the automated processes you want to grant access. You'll need to do this in preparation for setting up any Integrations in m3ter with your 3rd-party systems.
* Define the Timezone, Currencies, and Epochs for billing cycle dates.
**More Details?** See [Managing Organization and Users](/guides/organization-and-access-management)
### Step 2: Create Products
* Products act as containers for Meters, Aggregations, Counters, Pricing, Plans, and Plan Templates.
* You typically create a Product before creating any of these child entities.
* Note that to meet your pricing requirements you might want to bundle or combine Products for consumption by your end customer - a single Account might consume several Products. For these cases, you can create *global* Meters, Aggregations, and Counters, which means they are not tied to a specific Product.
**More Details?** See [Create and Manage Products](/guides/creating-and-managing-products).
### Step 3: Create Meters and Aggregations for Usage
* Create Meters with Data Fields and Derived Fields to collect usage data.
* Create Aggregations based on Meter fields to define your pricing metrics - the units of measurements you'll use when applying usage-based pricing to your Product plans.
**More Details?** See [Setting Up Usage Data: Meters](/guides/usage-data-meters) and [Pricing Metrics: Aggregations](/guides/usage-data-aggregations).
### Step 4: Create Counters for Recurring Charges
* Create a Counter to apply unit-based pricing to Product Plans for recurring subscription charge rates on Accounts.
* Use the Counter to post Counter Adjustments to define specific unit quantities subscribed to be end-customer Accounts
**More Details?** See [Recurring Charges: Counters](/guides/recurring-charges-counters).
### Step 5: Create Plan Templates and Plans
* Use Plan Templates to define general billing attributes, such as currency, frequency and interval, and any minimum spend or standing charges to apply.
* Create Plans from Templates to inherit common billing attributes and pricing structures.
**More Details?** See [Creating and Working with Plan Templates and Plans](/guides/plans-and-pricing/working-with-plan-templates-and-plans)
### Step 6: Configure Pricing for Plans
* In the Pricing Editor:
* Add Aggregations to Plans or Plan Templates and create *usage-based* pricing for your Products.
* Add Counter to Plans or Plan Templates and create *unit-based* pricing for your Products.
* Price up Plan Templates for common pricing structures to save repeat configuration work when pricing Plans.
**More Details?** See [Pricing and Managing Plans and Plan Templates](/guides/plans-and-pricing/pricing-plans) and [Creating Counters and Pricing Plans](/guides/recurring-charges-counters/creating-counters).
### Step 7: Set up Accounts
* Create Accounts for your customers who purchase one or more of your Products.
* Define any Child Accounts if you want billing for these Accounts to be rolled-up to a single Parent Account Bill.
**More Details?** See [End-Customer Accounts](/guides/end-customer-accounts)
### Step 8: Attach Plans and Create Prepayments and Balances for Accounts
* Attach a pricing Plan to an Account for each of your Products consumed by the Account.
* Select start and end dates to define the active period of the pricing Plan for the Account.
* If required, create any Prepayments/Commitments and Balances agreed by customers for an Account.
**More Details?** See [Attaching Plans to an Account](/guides/end-customer-accounts/attaching-plans-to-an-account) , [Creating Prepayments for Accounts](/guides/end-customer-accounts/creating-prepayments-for-accounts) and [Creating Balances for Accounts](/guides/end-customer-accounts/creating-balances-for-accounts).
### Step 9: Submit Test Usage Data via Console
* Usage data:
* Open the Details page for the Meter used to collect usage data on which the pricing Plans attached to an Account are based.
* For a given Account code, manually enter some test values for the Meter's Data Fields.
* Send the test usage data into the m3ter Ingest API using the *Submit Measurements* call.
* Recurring Charges Data:
* Open the Counter Adjustments tab for an Account with a Plan attached that is priced using a Counter.
* Create Counter Adjustments for the Account to define the Counter quantity the Account has subscribed to.
### Step 10: Run Bills
* Select Bill Frequency and Billing Period End.
* Enter the Account for which you have submitted test usage data and run Bills for the Account.
* Open the generated Bill in Bill Management to check the charge amounts. Bills are based on:
* The aggregated test usage data you have submitted for a Meter.
* The Counter quantities subscribed to on an Account.
**More Details?** See [Running, Viewing, and Managing Bills](/guides/billing-and-usage-data/running-viewing-and-managing-bills)
# Quick Start
Source: https://docs.m3ter.com/guides/getting-started/quick-start-worked-example
If you are new to the m3ter Console and open a fresh Organization, you can follow this *Quick Start* workflow, which introduces key m3ter entities you'll need to create and configure in order to implement usage-based pricing or unit-based pricing.
**Quick Start Experience!**
* **Check Full Coverage.** At each step, you'll find links to *full coverage topics* for these key m3ter entities and their dependencies with other parts of the system. We *strongly recommend* that you review this full coverage before attempting to set up your production environment.
* **Worked Examples with Video Walkthroughs.** You can also follow some [worked examples with video walkthroughs](/guides/getting-started/metering-for-production-worked-examples) showing how to set up usage-based pricing for SaaS products in the m3ter platform, submit some test usage data, and go on to check Bills.
**Working in the m3ter Console?** For more details on working in the m3ter Console see the [m3ter Console](/guides/getting-started/working-in-the-m3ter-console) page. This includes a *Console Orientation video* which gives you a guided tour of the Console layout and its features .
## First: Create a Product
A *Product* in m3ter represents a product or service that you offer to your end customers. You can use a Product to group together Meters, Aggregations, Counters, Plan Templates, Plans, and Pricing:
Enter the new **Product details**:
* **Name**. Enter a descriptive name for your Product.
* **Code**. Unique identifier for the Product. You will need the Code as a unique id when submitting API calls, such as a call to retrieve a Product.
* Note that when you've entered a name and then click in the **Code** field, the field is auto-populated with a default code string based on the name you've entered. You can edit this as required.
![]() **Custom Fields?** These are optional and you can ignore them for now.
Select **Create Product**. The new Product is added to your Organization and you are returned to the **Product details** page:
**Custom Fields?** These are optional and you can ignore them for now.
Select **Create Product**. The new Product is added to your Organization and you are returned to the **Product details** page:
![]() **Full Details on Creating Products?** See [Create and Manage Products](/guides/creating-and-managing-products).
## Second: Create a Meter
You can create *Meters* in m3ter to collect usage data for end-customers who consume your Product:
Enter the new **Meter Details**:
* **Name.** Descriptive name for the Meter.
* **Code.** Used as unique id when submitting API calls, such as a call to update a Meter.
Add the **Data fields** you need to collect usage data:
* For example, suppose you offer your customers a cloud based build-and-host application service for developers and you want to charge for this Product in two ways:
* By applying *unit-based pricing* for the number of developer licenses your end-customer subscribes to in any given billing period.
* By applying *usage-based pricing* for the cumulative volume of files stored by developers on your service per billing period.
* For the usage-based pricing in this example, you can create Meter with a single numeric quantity field of type **Measure** to collect usage data on the volume of files stored:
**Full Details on Creating Products?** See [Create and Manage Products](/guides/creating-and-managing-products).
## Second: Create a Meter
You can create *Meters* in m3ter to collect usage data for end-customers who consume your Product:
Enter the new **Meter Details**:
* **Name.** Descriptive name for the Meter.
* **Code.** Used as unique id when submitting API calls, such as a call to update a Meter.
Add the **Data fields** you need to collect usage data:
* For example, suppose you offer your customers a cloud based build-and-host application service for developers and you want to charge for this Product in two ways:
* By applying *unit-based pricing* for the number of developer licenses your end-customer subscribes to in any given billing period.
* By applying *usage-based pricing* for the cumulative volume of files stored by developers on your service per billing period.
* For the usage-based pricing in this example, you can create Meter with a single numeric quantity field of type **Measure** to collect usage data on the volume of files stored:
![]() **Tip: Global Meters?** You can create a *Global Meter*, which is not tied to a specific Product if you want to charge across several Products on the basis of the usage data the Meter collects. If you remove the selection, **(Global)** will show for **Product**.
Select **Create Meter**. The new Meter is added to your Product and you are taken to the **Meter details** page:
**Tip: Global Meters?** You can create a *Global Meter*, which is not tied to a specific Product if you want to charge across several Products on the basis of the usage data the Meter collects. If you remove the selection, **(Global)** will show for **Product**.
Select **Create Meter**. The new Meter is added to your Product and you are taken to the **Meter details** page:
![]() **What are Derived Fields?** Derived Fields are Meter data-collection fields you can add that perform a calculation on Meter Data Fields, Custom Fields, or Timestamp Fields.
**Full Details on Creating and Configuring Meters?** See [Reviewing Meter Options](/guides/usage-data-meters/reviewing-meter-options) and [Creating Meters](/guides/usage-data-meters/creating-meters).
## Third: Create an Aggregation
You can create *Aggregations* in m3ter to define specific units of measurement based on the usage data collected by your Meters. You can then use these Aggregations as metrics for applying usage-based pricing to your Product Plans:
Enter the new **Aggregation details**:
* **Name.** Descriptive name for the Aggregation.
* **Code.** Used as unique id when submitting API calls, such as a call to update an Aggregation.
**What are Derived Fields?** Derived Fields are Meter data-collection fields you can add that perform a calculation on Meter Data Fields, Custom Fields, or Timestamp Fields.
**Full Details on Creating and Configuring Meters?** See [Reviewing Meter Options](/guides/usage-data-meters/reviewing-meter-options) and [Creating Meters](/guides/usage-data-meters/creating-meters).
## Third: Create an Aggregation
You can create *Aggregations* in m3ter to define specific units of measurement based on the usage data collected by your Meters. You can then use these Aggregations as metrics for applying usage-based pricing to your Product Plans:
Enter the new **Aggregation details**:
* **Name.** Descriptive name for the Aggregation.
* **Code.** Used as unique id when submitting API calls, such as a call to update an Aggregation.
![]() Enter the **Meter settings** for the Aggregation. You can create an Aggregation that targets the numeric **GigaBytes Stored** Data Field on the **Dev Store Meter 1** you [created above](/guides/getting-started/quick-start-worked-example#second-create-a-meter):
Enter the **Meter settings** for the Aggregation. You can create an Aggregation that targets the numeric **GigaBytes Stored** Data Field on the **Dev Store Meter 1** you [created above](/guides/getting-started/quick-start-worked-example#second-create-a-meter):
![]() Enter the **Aggregation settings** and use a **Sum** aggregation method to give the total volume of gigabytes stored:
Enter the **Aggregation settings** and use a **Sum** aggregation method to give the total volume of gigabytes stored:
![]() * **Quantity per unit**. This setting defines how much of a quantity equates to 1 unit to be used when setting the price per unit for billing purposes. Note that in this example, we've entered **50** for this setting, which means that the unit pricing rates we configure for Product Plans will be applied per 50 units - if the summed amount of storage recorded on an Account for a billing period is 250 gigabytes, then the Account will be charged at 5 x the unit price.
**Other Aggregation Settings?** You can leave **Default Value**, **Segments**, and **Custom Fields** for now. See [Reviewing Aggregation Options](/guides/usage-data-aggregations/reviewing-aggregation-options) for more information on these settings.
Select **Create Aggregation**. The Aggregation is added to your Product and you are taken to the **Aggregation details** page:
* **Quantity per unit**. This setting defines how much of a quantity equates to 1 unit to be used when setting the price per unit for billing purposes. Note that in this example, we've entered **50** for this setting, which means that the unit pricing rates we configure for Product Plans will be applied per 50 units - if the summed amount of storage recorded on an Account for a billing period is 250 gigabytes, then the Account will be charged at 5 x the unit price.
**Other Aggregation Settings?** You can leave **Default Value**, **Segments**, and **Custom Fields** for now. See [Reviewing Aggregation Options](/guides/usage-data-aggregations/reviewing-aggregation-options) for more information on these settings.
Select **Create Aggregation**. The Aggregation is added to your Product and you are taken to the **Aggregation details** page:
![]() **Full Details on Creating and Configuring Aggregations?** See [Reviewing Aggregation Options](/guides/usage-data-aggregations/reviewing-aggregation-options) and [Creating Aggregations](/guides/usage-data-aggregations/creating-aggregations).
## Fourth: Create Counters
You can create *Counters* in m3ter, which you can then use as pricing metrics to apply unit-based pricing to Plan Templates and Plans. You can also use Counters to define unit quantities subscribed to by your end-customer Accounts. An Account is then billed according to the unit-based pricing rates you've configured for the Product Plans attached to the Account.
Enter the new **Counter Details**:
* **Name.** Descriptive name for the Counter.
* **Code.** Used as unique id when submitting API calls, such as a call to update an Counter.
* **Product**. Use the drop-down to select the Product you want to create the Counter for.
* **Unit**. This will appear on Bill line items charged against the Counter:
**Full Details on Creating and Configuring Aggregations?** See [Reviewing Aggregation Options](/guides/usage-data-aggregations/reviewing-aggregation-options) and [Creating Aggregations](/guides/usage-data-aggregations/creating-aggregations).
## Fourth: Create Counters
You can create *Counters* in m3ter, which you can then use as pricing metrics to apply unit-based pricing to Plan Templates and Plans. You can also use Counters to define unit quantities subscribed to by your end-customer Accounts. An Account is then billed according to the unit-based pricing rates you've configured for the Product Plans attached to the Account.
Enter the new **Counter Details**:
* **Name.** Descriptive name for the Counter.
* **Code.** Used as unique id when submitting API calls, such as a call to update an Counter.
* **Product**. Use the drop-down to select the Product you want to create the Counter for.
* **Unit**. This will appear on Bill line items charged against the Counter:
![]() Select **Create Counter**. The Counter is added to your Product and you are taken to the **Counter details** page:
Select **Create Counter**. The Counter is added to your Product and you are taken to the **Counter details** page:
![]() **Full Details on Creating and Configuring Counters?** See [Creating Counters and Pricing Plans](/guides/recurring-charges-counters/creating-counters).
## Fifth: Create Plan Template and Plan
You can create *Plan Templates* for your Products and base *Product Plans* on these templates. Plan Templates and their derivative Plans define general billing attributes, such as currency, frequency and interval, and any minimum spend or standing charges to apply. You can then apply usage-based pricing using Aggregations or unit-based pricing using Counters to Plan Templates and Plans:
Enter **Plan template details**:
**Full Details on Creating and Configuring Counters?** See [Creating Counters and Pricing Plans](/guides/recurring-charges-counters/creating-counters).
## Fifth: Create Plan Template and Plan
You can create *Plan Templates* for your Products and base *Product Plans* on these templates. Plan Templates and their derivative Plans define general billing attributes, such as currency, frequency and interval, and any minimum spend or standing charges to apply. You can then apply usage-based pricing using Aggregations or unit-based pricing using Counters to Plan Templates and Plans:
Enter **Plan template details**:
![]() **Plan Template Configuration?** You can leave the **Standing Charge**, **Minimum Spend**, and **Custom Fields** sections for now. See [Reviewing Options for Plans and Plan Templates](/guides/plans-and-pricing/working-with-plan-templates-and-plans/reviewing-configuration-options-for-plans-and-plan-templates) for more information on the settings for these sections.
Select **Create Plan template**. The Plan Template is created for your Product and you are taken to the **Plan template details** page:
**Plan Template Configuration?** You can leave the **Standing Charge**, **Minimum Spend**, and **Custom Fields** sections for now. See [Reviewing Options for Plans and Plan Templates](/guides/plans-and-pricing/working-with-plan-templates-and-plans/reviewing-configuration-options-for-plans-and-plan-templates) for more information on the settings for these sections.
Select **Create Plan template**. The Plan Template is created for your Product and you are taken to the **Plan template details** page:
![]() You can now create a Plan based on the new Plan Template.
On the **Plan details** panel:
* Select the **Product**.
* Select the **Plan template** you've just created for the Product, which means the Plan will be based on the Plan Template.
* Enter a **Name** and **Code** for the new Plan.
You can now create a Plan based on the new Plan Template.
On the **Plan details** panel:
* Select the **Product**.
* Select the **Plan template** you've just created for the Product, which means the Plan will be based on the Plan Template.
* Enter a **Name** and **Code** for the new Plan.
![]() **Plan Configuration?** You can leave the **Standing Charge**, **Minimum Spend**, and **Custom Fields** sections for now. See [Reviewing Options for Plans and Plan Templates](/guides/plans-and-pricing/working-with-plan-templates-and-plans/reviewing-configuration-options-for-plans-and-plan-templates) for more information on these sections.
Select **Create Plan**. The Plan is created for your Product and you are returned to the **Plan details** page:
**Plan Configuration?** You can leave the **Standing Charge**, **Minimum Spend**, and **Custom Fields** sections for now. See [Reviewing Options for Plans and Plan Templates](/guides/plans-and-pricing/working-with-plan-templates-and-plans/reviewing-configuration-options-for-plans-and-plan-templates) for more information on these sections.
Select **Create Plan**. The Plan is created for your Product and you are returned to the **Plan details** page:
![]() ## Sixth: Pricing a Plan
You can now apply a hybrid pricing to your new Product Plan using an Aggregation and a Counter:
Check the Plan and select **Confirm**. The dialog closes and the selected Plan is added to the **Pricing Editor** in readiness for pricing:
* Note that a warning will show: **No active pricing configured**.
You can now create both usage-based pricing and unit-based pricing for the Product Plan.
Enter **Pricing details**:
* **Start date** and **End date** to define the time period the pricing will be applied to the Plan.
* **Description**. Enter a description that will appear against any line items on Bills for charges due for Product consumption using the usage-based pricing rates you configure for the Plan - such as *Dev Storage Charges*.
## Sixth: Pricing a Plan
You can now apply a hybrid pricing to your new Product Plan using an Aggregation and a Counter:
Check the Plan and select **Confirm**. The dialog closes and the selected Plan is added to the **Pricing Editor** in readiness for pricing:
* Note that a warning will show: **No active pricing configured**.
You can now create both usage-based pricing and unit-based pricing for the Product Plan.
Enter **Pricing details**:
* **Start date** and **End date** to define the time period the pricing will be applied to the Plan.
* **Description**. Enter a description that will appear against any line items on Bills for charges due for Product consumption using the usage-based pricing rates you configure for the Plan - such as *Dev Storage Charges*.
![]() Use the **Pricing settings** panel to define pricing bands for tiered **Pricing type**. In this example, we'll set up two **Tiered pricing bands**:
Use the **Pricing settings** panel to define pricing bands for tiered **Pricing type**. In this example, we'll set up two **Tiered pricing bands**:
![]() Select **Create Pricing**. You are returned to the **Pricing Editor** and the pricing structure you’ve configured using the Aggregation is shown in the pricing grid:
Select **Create Pricing**. You are returned to the **Pricing Editor** and the pricing structure you’ve configured using the Aggregation is shown in the pricing grid:
![]() **More on Pricing Configuration?** See [Reviewing Pricing Options for Plans and Plan Templates](/guides/plans-and-pricing/pricing-plans/reviewing-pricing-options-and-pricing-plans).
Enter **Counter pricing details**:
* **Start date** and **End date** to define the time period the pricing will be applied to the Plan.
* **Description**. Enter a description that will appear against any line items on Bills for charges due for Product consumption using the unit-based pricing rates you configure for the Plan - such as *Dev License Charges:*
**More on Pricing Configuration?** See [Reviewing Pricing Options for Plans and Plan Templates](/guides/plans-and-pricing/pricing-plans/reviewing-pricing-options-and-pricing-plans).
Enter **Counter pricing details**:
* **Start date** and **End date** to define the time period the pricing will be applied to the Plan.
* **Description**. Enter a description that will appear against any line items on Bills for charges due for Product consumption using the unit-based pricing rates you configure for the Plan - such as *Dev License Charges:*
![]() Enter **Counter pricing settings**. In this example we've:
* Left **Running total billing** at the default selection to **Bill in arrears** **(end of each billing period)**.
* Disabled the prorating settings - the defaults are to have these enabled.
* Used the default **Pricing type** selection for a **Tiered** pricing structure.
* Set up two **Tiered pricing bands**:
Enter **Counter pricing settings**. In this example we've:
* Left **Running total billing** at the default selection to **Bill in arrears** **(end of each billing period)**.
* Disabled the prorating settings - the defaults are to have these enabled.
* Used the default **Pricing type** selection for a **Tiered** pricing structure.
* Set up two **Tiered pricing bands**:
![]() Select **Create Counter pricing**. You are returned to the **Pricing Editor** and the pricing structure you’ve configured using the Counter is shown in the pricing grid:
Select **Create Counter pricing**. You are returned to the **Pricing Editor** and the pricing structure you’ve configured using the Counter is shown in the pricing grid:
![]() **More on Counter Pricing Configuration?** See [Creating Counters and Pricing Plans](/guides/recurring-charges-counters/creating-counters).
You now have a Product Plan priced in a hybrid way for: (i) charge rates against metered usage data on storage volumes by Accounts; (ii) recurring charge rates against Dev Licenses quantities subscribed to on end-customer Accounts. You can attach this Plan to a customer Account that consumes your Product. Bills will be created accordingly by m3ter based on this hybrid pricing.
**Full Coverage on Setting Up Plans and their Pricing?** See [Creating and Working with Plan Templates and Plans](/guides/plans-and-pricing/working-with-plan-templates-and-plans) and [Pricing and Managing Plans and Plan Templates](/guides/plans-and-pricing/pricing-plans).
# m3ter Console
Source: https://docs.m3ter.com/guides/getting-started/working-in-the-m3ter-console
The m3ter Console is designed to facilitate setting up and configuring your Organization to implement usage-based and unit-based pricing for the products and services you offer to your customers. The following video offers a quick walk through orientation of the m3ter Console:
Review this topic for guidance and pointers on the layout and features you'll find in the Console and to help familiarize yourself with the m3ter Console before you move on to setting up and managing your m3ter Organization:
* [Working in the Dashboard](/guides/getting-started/working-in-the-m3ter-console#working-in-the-dashboard)
* [Usability Features](/guides/getting-started/working-in-the-m3ter-console#usability-features)
* [Navigating the Console](/guides/getting-started/working-in-the-m3ter-console#navigating-the-console)
* [Help Links](#help-links)
* [Info Links](#info-links)
* [Reviewing Entity Metadata](/guides/getting-started/working-in-the-m3ter-console#reviewing-entity-metadata)
* [Tracking User Activity in your Organization](/guides/getting-started/working-in-the-m3ter-console#tracking-user-activity-in-your-organization)
* [Switching Organization](/guides/getting-started/working-in-the-m3ter-console#switching-organization)
* [Checking Service Status](/guides/getting-started/working-in-the-m3ter-console#checking-service-status)
* [Editing User Profile and Logging Out](/guides/getting-started/working-in-the-m3ter-console#editing-user-profile-and-logging-out)
## Working in the Dashboard
When you first log in to the m3ter Console, the *Dashboard* opens:
**More on Counter Pricing Configuration?** See [Creating Counters and Pricing Plans](/guides/recurring-charges-counters/creating-counters).
You now have a Product Plan priced in a hybrid way for: (i) charge rates against metered usage data on storage volumes by Accounts; (ii) recurring charge rates against Dev Licenses quantities subscribed to on end-customer Accounts. You can attach this Plan to a customer Account that consumes your Product. Bills will be created accordingly by m3ter based on this hybrid pricing.
**Full Coverage on Setting Up Plans and their Pricing?** See [Creating and Working with Plan Templates and Plans](/guides/plans-and-pricing/working-with-plan-templates-and-plans) and [Pricing and Managing Plans and Plan Templates](/guides/plans-and-pricing/pricing-plans).
# m3ter Console
Source: https://docs.m3ter.com/guides/getting-started/working-in-the-m3ter-console
The m3ter Console is designed to facilitate setting up and configuring your Organization to implement usage-based and unit-based pricing for the products and services you offer to your customers. The following video offers a quick walk through orientation of the m3ter Console:
Review this topic for guidance and pointers on the layout and features you'll find in the Console and to help familiarize yourself with the m3ter Console before you move on to setting up and managing your m3ter Organization:
* [Working in the Dashboard](/guides/getting-started/working-in-the-m3ter-console#working-in-the-dashboard)
* [Usability Features](/guides/getting-started/working-in-the-m3ter-console#usability-features)
* [Navigating the Console](/guides/getting-started/working-in-the-m3ter-console#navigating-the-console)
* [Help Links](#help-links)
* [Info Links](#info-links)
* [Reviewing Entity Metadata](/guides/getting-started/working-in-the-m3ter-console#reviewing-entity-metadata)
* [Tracking User Activity in your Organization](/guides/getting-started/working-in-the-m3ter-console#tracking-user-activity-in-your-organization)
* [Switching Organization](/guides/getting-started/working-in-the-m3ter-console#switching-organization)
* [Checking Service Status](/guides/getting-started/working-in-the-m3ter-console#checking-service-status)
* [Editing User Profile and Logging Out](/guides/getting-started/working-in-the-m3ter-console#editing-user-profile-and-logging-out)
## Working in the Dashboard
When you first log in to the m3ter Console, the *Dashboard* opens:
![Dashboard79b]() From the **Dashboard**, you can:
* Use the **Recent Accounts** panel to track Accounts you've worked with in your recent sessions in the Console - as you start to create and configure Accounts for your Organization, these will be added. The most recently visited Account appears at the top of the list, and you can select the **NAME** hotlink text to re-open the details page of an Account.
* Review **Your Alerts** for your Organization. Select **View All** to open the main **Alerts** page. For more details, see [Viewing and Managing Alerts](/guides/alerts-events-and-notifications/viewing-and-managing-alerts).
## Usability Features
Several usability features are available as you navigate the main pages of the Console:
* Select your **User** icon at top-right:
From the **Dashboard**, you can:
* Use the **Recent Accounts** panel to track Accounts you've worked with in your recent sessions in the Console - as you start to create and configure Accounts for your Organization, these will be added. The most recently visited Account appears at the top of the list, and you can select the **NAME** hotlink text to re-open the details page of an Account.
* Review **Your Alerts** for your Organization. Select **View All** to open the main **Alerts** page. For more details, see [Viewing and Managing Alerts](/guides/alerts-events-and-notifications/viewing-and-managing-alerts).
## Usability Features
Several usability features are available as you navigate the main pages of the Console:
* Select your **User** icon at top-right:
![]() * This opens a **User Profile** menu, where you can switch to use either **Light/Dark** mode:
* This opens a **User Profile** menu, where you can switch to use either **Light/Dark** mode:
![]() * Open a **Running Tasks** panel, which allows you to track the progress of any tasks, such a billing runs:
* Open a **Running Tasks** panel, which allows you to track the progress of any tasks, such a billing runs:
![]() * Check out **What's New** in the Product:
* Check out **What's New** in the Product:
![]() ## Navigating the Console
The m3ter Console is broken down into sections designed to support and optimize your configuration and operational workflows when setting up and managing your Organization for metered pricing and billing. You can open sections from the top navigation - for example the **Metering** section:
## Navigating the Console
The m3ter Console is broken down into sections designed to support and optimize your configuration and operational workflows when setting up and managing your Organization for metered pricing and billing. You can open sections from the top navigation - for example the **Metering** section:
![Dashboard80a]() Use the **Expand** icon at bottom-left:
Use the **Expand** icon at bottom-left:
![]() This opens a section's **Nav** panel for the pages available in the section:
This opens a section's **Nav** panel for the pages available in the section:
![Dashboard81a]() Use the **Collapse** icon if required to hide the section **Nav** panel:
Use the **Collapse** icon if required to hide the section **Nav** panel:
![]() ### Using Sections
Here's a summary of the main tasks and operations available in each of the main sections.
#### Settings
### Using Sections
Here's a summary of the main tasks and operations available in each of the main sections.
#### Settings
 * Manage your m3ter Organization, its Users and their access:
* Configure and manage your m3ter **Organization**.
* Create and manage **Users** and **User Groups** for the people and teams you want to grant access to your Organization.
* Create and manage **Service Users** for the automated processes that you want grant access to your Organization.
* Create and manage **Permission Policies** to closely control what Users can do when they are given access to your Organization.
* Invite Users and grant them time-bound access with appropriate permissions when they accept the invitation.
* Grant m3ter Support access if you require Help troubleshooting and resolving any issues that have arose.
#### Products
* Manage your m3ter Organization, its Users and their access:
* Configure and manage your m3ter **Organization**.
* Create and manage **Users** and **User Groups** for the people and teams you want to grant access to your Organization.
* Create and manage **Service Users** for the automated processes that you want grant access to your Organization.
* Create and manage **Permission Policies** to closely control what Users can do when they are given access to your Organization.
* Invite Users and grant them time-bound access with appropriate permissions when they accept the invitation.
* Grant m3ter Support access if you require Help troubleshooting and resolving any issues that have arose.
#### Products
![]() * Create and configure Products to represent the products and services you offer to your customers.
#### Metering
* Create and configure Products to represent the products and services you offer to your customers.
#### Metering
![]() * Create **Meters**, **Aggregations**, and **Compound Aggregations** to collect usage data and aggregate that usage data into specific usage measurements to use as pricing metrics to apply usage-based pricing to your **Product Plans**.
* Create **Counters** to use as pricing metrics to apply unit-based pricing to your **Product Plans**. Use Counters to define unit quantities on end-customer **Accounts**.
* Review **Ingest Events** to check for validation errors logged for usage data measurement submissions.
* Open a **Usage Data Explorer** to query for ingested usage data and review and check query results.
#### Pricing
* Create **Meters**, **Aggregations**, and **Compound Aggregations** to collect usage data and aggregate that usage data into specific usage measurements to use as pricing metrics to apply usage-based pricing to your **Product Plans**.
* Create **Counters** to use as pricing metrics to apply unit-based pricing to your **Product Plans**. Use Counters to define unit quantities on end-customer **Accounts**.
* Review **Ingest Events** to check for validation errors logged for usage data measurement submissions.
* Open a **Usage Data Explorer** to query for ingested usage data and review and check query results.
#### Pricing
![]() * Set up **Plan Templates** and **Plans** to control billing operations and to use for pricing your **Products**.
* In the **Pricing Editor**
* Add **Aggregations** to apply precise usage-based pricing to your **Plans**.
* Add **Counters** to apply unit-based pricing to your **Plans**.
#### Accounts
* Set up **Plan Templates** and **Plans** to control billing operations and to use for pricing your **Products**.
* In the **Pricing Editor**
* Add **Aggregations** to apply precise usage-based pricing to your **Plans**.
* Add **Counters** to apply unit-based pricing to your **Plans**.
#### Accounts
![]() * Create and manage **Accounts** for end-customers who purchase your Products.
* Attach one or more priced **Plans** to an **Account** for each of the **Products** an end customer consumes.
* Open a **Prepayments Data Explorer** to query against and review Prepayments/Commitments data for your Organization.
#### m3sh
* Create and manage **Accounts** for end-customers who purchase your Products.
* Attach one or more priced **Plans** to an **Account** for each of the **Products** an end customer consumes.
* Open a **Prepayments Data Explorer** to query against and review Prepayments/Commitments data for your Organization.
#### m3sh
 Create and Manage automation and interoperability features for your Organization:
* **Workflows**. Create automation routines to:
* Control the exchange of data between your m3ter Organization and your external systems.
* Fulfill key business operational use case for billing and accounts management within your m3ter production environment.
* **Notification rules**. Set up rules to define when Notifications are triggered with reference to an Event.
* **Credentials**. Create, view, and manage the *Credentials* for your Organization and required for:
* Authentication with external systems for your Integrations.
* Authentication with the designated webhook endpoint to support Notification webhook integrations.
* Authentication for various types of Workflow function: API functions that call an external system use Credentials set up for that system; API functions that call the m3ter system use m3ter Service User Credentials.
* Workflows using an Incoming Webhook as trigger require Incoming Webhook Credentials to authenticate with the Workflow as destination.
* **Integrations**. Create and manage integrations for your m3ter Organization with 3rd-party systems.
* **Outgoing webhooks**. If you’ve defined a Notification rule based on a system Event, you can link this to an Outgoing webhook as the endpoint for the Notification.
* **Integration events**. Review and follow up on integrations error Events to troubleshoot and resolve them.
* **External mappings**. Create and manage External mappings to act as mapping reference lookups for which entities and fields have been mapped across two or more systems.
* **Transformations**. Transformations define one-way data mappings from one specific data type to another. When building Workflows, you can use functions that reference Transformations.
#### Billing
Create and Manage automation and interoperability features for your Organization:
* **Workflows**. Create automation routines to:
* Control the exchange of data between your m3ter Organization and your external systems.
* Fulfill key business operational use case for billing and accounts management within your m3ter production environment.
* **Notification rules**. Set up rules to define when Notifications are triggered with reference to an Event.
* **Credentials**. Create, view, and manage the *Credentials* for your Organization and required for:
* Authentication with external systems for your Integrations.
* Authentication with the designated webhook endpoint to support Notification webhook integrations.
* Authentication for various types of Workflow function: API functions that call an external system use Credentials set up for that system; API functions that call the m3ter system use m3ter Service User Credentials.
* Workflows using an Incoming Webhook as trigger require Incoming Webhook Credentials to authenticate with the Workflow as destination.
* **Integrations**. Create and manage integrations for your m3ter Organization with 3rd-party systems.
* **Outgoing webhooks**. If you’ve defined a Notification rule based on a system Event, you can link this to an Outgoing webhook as the endpoint for the Notification.
* **Integration events**. Review and follow up on integrations error Events to troubleshoot and resolve them.
* **External mappings**. Create and manage External mappings to act as mapping reference lookups for which entities and fields have been mapped across two or more systems.
* **Transformations**. Transformations define one-way data mappings from one specific data type to another. When building Workflows, you can use functions that reference Transformations.
#### Billing
![]() * Run, view, and manage the **Bills** generated for your customer **Accounts**.
* Open a **Billing Data Explorer** to query against and review billing data for your Organization.
#### System Alerts
* Run, view, and manage the **Bills** generated for your customer **Accounts**.
* Open a **Billing Data Explorer** to query against and review billing data for your Organization.
#### System Alerts
 * Review and manage System Alerts, which are automatically generated for your m3ter Organization, informing you about key events and notifying you of any issues or errors.
#### Data Exports
* Review and manage System Alerts, which are automatically generated for your m3ter Organization, informing you about key events and notifying you of any issues or errors.
#### Data Exports
 * The m3ter *Data Export* service allows you to export usage data and operational data from your m3ter Organization directly into your AWS S3 or Google Cloud Storage buckets.
* Please note that the Data Export feature is currently available only in Preview release version. If not yet enabled for your Organization, this menu option will be grayed out. If you're interested in previewing the Data Export feature, please get in touch with m3ter Support or your m3ter contact.
## Help Links
Open a **Help** panel for links to help resources:
* The m3ter *Data Export* service allows you to export usage data and operational data from your m3ter Organization directly into your AWS S3 or Google Cloud Storage buckets.
* Please note that the Data Export feature is currently available only in Preview release version. If not yet enabled for your Organization, this menu option will be grayed out. If you're interested in previewing the Data Export feature, please get in touch with m3ter Support or your m3ter contact.
## Help Links
Open a **Help** panel for links to help resources:
 #### **Documentation - Search and AI Assistant**
* Select **Documentation** to search our comprehensive User and API Reference documentation. Enter a **Search** term and then select to open a specific page from the returned search results:
#### **Documentation - Search and AI Assistant**
* Select **Documentation** to search our comprehensive User and API Reference documentation. Enter a **Search** term and then select to open a specific page from the returned search results:
 * **Documentation AI**. Select **Ask AI**. An **AI Assistant** panel opens at the right-hand side and you can enter a question, for example:
 * When possible, the **AI Assistant** provides an answer together with links to any relevant available documentation topics for further details.
#### **Support**
Open the login page for our web ticketing Support portal.
#### **Service status**
Open a page to check the operational status of the m3ter platform's Config and Ingest API services. See below: [Checking Service Status](/guides/getting-started/working-in-the-m3ter-console#checking-service-status) for more details.
#### **Product roadmap**
Open a Product Portal page where you can review our roadmap of new features and capabilities planned for the m3ter Platform. You can also submit any ideas or suggestions for new features directly to us from here.
## Info Links
Also available as you work in the Console are **Info** links which open the Help panel giving immediate context relative guidance on pages and features.
For example, if you select **Info** on the **Meters** page:
* When possible, the **AI Assistant** provides an answer together with links to any relevant available documentation topics for further details.
#### **Support**
Open the login page for our web ticketing Support portal.
#### **Service status**
Open a page to check the operational status of the m3ter platform's Config and Ingest API services. See below: [Checking Service Status](/guides/getting-started/working-in-the-m3ter-console#checking-service-status) for more details.
#### **Product roadmap**
Open a Product Portal page where you can review our roadmap of new features and capabilities planned for the m3ter Platform. You can also submit any ideas or suggestions for new features directly to us from here.
## Info Links
Also available as you work in the Console are **Info** links which open the Help panel giving immediate context relative guidance on pages and features.
For example, if you select **Info** on the **Meters** page:
 The **Help** panel opens and gives a short explanation of what the page lets you do with links to relevant documentation for further guidance:
 **Info** links are also available for help on individual fields, for example when setting up a Notification rule:
 Again, the **Help** panel opens with brief guidance on how to use the setting with links out to the relevant further guidance in our documentation:
 ## Reviewing Entity Metadata
On the Details pages for the main entities in your m3ter Organization - such as the Account Details pages - you can quickly review an entity's metadata.
**Custom Fields**. Any Custom Fields created for the entity are listed, and you can **Copy** the *String* or *Number* value of a Custom Field to your clipboard.
* If the fields have been created only at Organizational-level, then these values will be shown:
## Reviewing Entity Metadata
On the Details pages for the main entities in your m3ter Organization - such as the Account Details pages - you can quickly review an entity's metadata.
**Custom Fields**. Any Custom Fields created for the entity are listed, and you can **Copy** the *String* or *Number* value of a Custom Field to your clipboard.
* If the fields have been created only at Organizational-level, then these values will be shown:
![Account Overview2]() * If the fields have also been created for an individual entity, then the values configured for those created at Organizational-level are struck out indicating clearly that the Account level values will be used:
* If the fields have also been created for an individual entity, then the values configured for those created at Organizational-level are struck out indicating clearly that the Account level values will be used:
![Account Overview5]() * See [Working with Custom Fields](/guides/creating-and-managing-products/working-with-custom-fields) for more details.
**External Mappings**. Any External Mappings for the entity are listed:
* See [Working with Custom Fields](/guides/creating-and-managing-products/working-with-custom-fields) for more details.
**External Mappings**. Any External Mappings for the entity are listed:
![Account Overview6]() * The **External system**, **External table**, and **External entity ID** mapped to are shown.
* If a listed External mapping is linked to an Integration, under **Linked integration** a hotlink text will be shown which you can use to open the Integration.
* Under **Actions**, you can edit or delete the External mapping.
* If the entity has multiple External mappings created for it, you can use *Search external mappings* to search by **External table** and **External entity ID** and filter the list.
* You can commence a workflow to **Create external mapping** for the entity directly - see [Creating and Managing External Mappings for Accounts](/guides/end-customer-accounts/creating-and-managing-external-mappings-for-accounts) for an example.
**Integration runs.** If you've set up an integration that synchronizes the entity with an external system, the date/time and status of the **Latest** integration run are shown. You can use a text hotlink to open details of this latest run or **View all runs**. See [Reviewing Integration Run Details](/guides/integrations/setting-up-integrations/reviewing-integration-run-details).
## Tracking User Activity in your Organization
As you and your colleagues start to work with your m3ter Organization, you'll find that many of the Details pages for the main configuration entities created for your Organization - such as the Meter Details pages - carry audit information on which User:
* Initially created the entity.
* Most recently modified the entity.
This audit data also allows you to click a hotlink text to open the details page for the logged User:
* The **External system**, **External table**, and **External entity ID** mapped to are shown.
* If a listed External mapping is linked to an Integration, under **Linked integration** a hotlink text will be shown which you can use to open the Integration.
* Under **Actions**, you can edit or delete the External mapping.
* If the entity has multiple External mappings created for it, you can use *Search external mappings* to search by **External table** and **External entity ID** and filter the list.
* You can commence a workflow to **Create external mapping** for the entity directly - see [Creating and Managing External Mappings for Accounts](/guides/end-customer-accounts/creating-and-managing-external-mappings-for-accounts) for an example.
**Integration runs.** If you've set up an integration that synchronizes the entity with an external system, the date/time and status of the **Latest** integration run are shown. You can use a text hotlink to open details of this latest run or **View all runs**. See [Reviewing Integration Run Details](/guides/integrations/setting-up-integrations/reviewing-integration-run-details).
## Tracking User Activity in your Organization
As you and your colleagues start to work with your m3ter Organization, you'll find that many of the Details pages for the main configuration entities created for your Organization - such as the Meter Details pages - carry audit information on which User:
* Initially created the entity.
* Most recently modified the entity.
This audit data also allows you to click a hotlink text to open the details page for the logged User:
![]() **Tip: User Activity is also shown on Account Specific Details Pages!** Which User created and which User last modified is also tracked in the Console on the details pages for some Account specific entities - Account Plans, Prepayments, Balances, and Contracts on an Account.
## Switching Organization
Many m3ter Users have access to more than one Organization. You can quickly switch to another Organization to which you have access using the **Organization** box at top-right. This shows the current Organization you are working in - select the arrow to show a list of all Organizations you have access to and then select the one you want to switch to:
**Tip: User Activity is also shown on Account Specific Details Pages!** Which User created and which User last modified is also tracked in the Console on the details pages for some Account specific entities - Account Plans, Prepayments, Balances, and Contracts on an Account.
## Switching Organization
Many m3ter Users have access to more than one Organization. You can quickly switch to another Organization to which you have access using the **Organization** box at top-right. This shows the current Organization you are working in - select the arrow to show a list of all Organizations you have access to and then select the one you want to switch to:
![]() * If you have access to multiple **Organizations**, you can use the **Search** field to filter the list.
* If you select **View all organizations**, you are taken back to the **Select Organization** page that opens when you first log into the Console. The **LAST ACCESSED** Organization is shown and you can search for and select to open any of the other Organizations you have access to.
## Checking Service Status
To check the operational status of the m3ter platform's Config, Ingest, and Search API services, select the **Help>** **Service Status** link:
* If you have access to multiple **Organizations**, you can use the **Search** field to filter the list.
* If you select **View all organizations**, you are taken back to the **Select Organization** page that opens when you first log into the Console. The **LAST ACCESSED** Organization is shown and you can search for and select to open any of the other Organizations you have access to.
## Checking Service Status
To check the operational status of the m3ter platform's Config, Ingest, and Search API services, select the **Help>** **Service Status** link:
 A **m3ter Service Status** page opens in a separate tab:
 On this page you can read-off the current operational status of the platform's **Config API**, **Ingest API**, and **Search API** services, together with a percentage measure of uptime over the last 90 days.
If you scroll down the page, you can check for any incidents reported over the past 15 days:
On this page you can read-off the current operational status of the platform's **Config API**, **Ingest API**, and **Search API** services, together with a percentage measure of uptime over the last 90 days.
If you scroll down the page, you can check for any incidents reported over the past 15 days:
 If you scroll to the bottom of the page, you can check **Incident History**:
 This opens an **Incidents** tab for the previous 3 months:
 You can page backwards and forwards to show specific 3-month periods:
 Select the **Uptime** tab to review the historical daily uptime for each API service for the selected 3-month period:
 If you want to receive notifications when an incident with the service is created, updated, or resolved, select **SUBSCRIBE TO UPDATES**. You can then select and set up your preferred method of receiving updates:
* **Email**. Enter your **Email address** and select **SUBSCRIBE VIA EMAIL**:
If you want to receive notifications when an incident with the service is created, updated, or resolved, select **SUBSCRIBE TO UPDATES**. You can then select and set up your preferred method of receiving updates:
* **Email**. Enter your **Email address** and select **SUBSCRIBE VIA EMAIL**:
 * **Text message**. Select your **Country code** and enter your **Phone number** and select **SUBSCRIBE VIA TEXT MESSAGE**:
 * **Slack**. Select **SUBSCRIBE VIA SLACK**:
 * **Microsoft Teams channel**. Enter **Channel's Webhook URL** and select **SUBSCRIBE VIA TEAMS**:
 * **Atom Feed or RSS Feed**. Etc:
 If you're still experiencing problems after a recovery has been posted on the status page, then please contact [m3ter Support](/guides/getting-started/contacting-m3ter-support).
## Editing User Profile and Logging Out
You can access your User profile at any time at the top-right of the Console:
If you're still experiencing problems after a recovery has been posted on the status page, then please contact [m3ter Support](/guides/getting-started/contacting-m3ter-support).
## Editing User Profile and Logging Out
You can access your User profile at any time at the top-right of the Console:
![]() You can then:
* Switch between Console Light and Dark mode.
* Select **Edit profile** to change your User name. See [Editing User Profile](/guides/organization-and-access-management/managing-users/managing-users-and-assigning-permission-policies#editing-user-profile) for details.
* Select **Log out** to end your Console session.
# Dates in m3ter - Quick Reference Starter
Source: https://docs.m3ter.com/guides/getting-started/working-with-dates-in-m3ter-easy-reference
Settings for dates are required in several functional contexts in m3ter. This topic provides a quick reference starter on how dates are handled in m3ter, such as when configuring dates for your billing operations:
* [Date/Time Fields - Format](/guides/getting-started/working-with-dates-in-m3ter-easy-reference#datetime-fields-format)
* [Setting your Organization Timezone](/guides/getting-started/working-with-dates-in-m3ter-easy-reference#organization-timezone)
* [Dates for Billing and Pricing](/guides/getting-started/working-with-dates-in-m3ter-easy-reference#dates-for-billing-and-pricing)
* [Dates for Usage Data](/guides/getting-started/working-with-dates-in-m3ter-easy-reference#dates-for-usage-data)
## Date/Time Fields - Format
Date/time fields are required to be in *ISO-8601* format:
* For example, the `ts` field used for the timestamp when you use the [Submit Measurements](/api/measurements/submit-measurements) API to make a usage data measurement ingest into the platform needs to be in ISO-8601 format.
**Tip: More on ISO-8601?** If you would like to learn more about the background and history of this standardized format, we suggest this resource as a starting point: [ISO 8601](https://en.wikipedia.org/wiki/ISO_8601) .
## Organization Timezone
Timezone is a baseline setting for dates in your Organization and it's important to understand how the timezone setting affects date/time settings you select.
### Setting your Timezone
The default timezone for a m3ter Organization is UTC. You can quickly change this setting in the Console:
* Select **Settings**:
You can then:
* Switch between Console Light and Dark mode.
* Select **Edit profile** to change your User name. See [Editing User Profile](/guides/organization-and-access-management/managing-users/managing-users-and-assigning-permission-policies#editing-user-profile) for details.
* Select **Log out** to end your Console session.
# Dates in m3ter - Quick Reference Starter
Source: https://docs.m3ter.com/guides/getting-started/working-with-dates-in-m3ter-easy-reference
Settings for dates are required in several functional contexts in m3ter. This topic provides a quick reference starter on how dates are handled in m3ter, such as when configuring dates for your billing operations:
* [Date/Time Fields - Format](/guides/getting-started/working-with-dates-in-m3ter-easy-reference#datetime-fields-format)
* [Setting your Organization Timezone](/guides/getting-started/working-with-dates-in-m3ter-easy-reference#organization-timezone)
* [Dates for Billing and Pricing](/guides/getting-started/working-with-dates-in-m3ter-easy-reference#dates-for-billing-and-pricing)
* [Dates for Usage Data](/guides/getting-started/working-with-dates-in-m3ter-easy-reference#dates-for-usage-data)
## Date/Time Fields - Format
Date/time fields are required to be in *ISO-8601* format:
* For example, the `ts` field used for the timestamp when you use the [Submit Measurements](/api/measurements/submit-measurements) API to make a usage data measurement ingest into the platform needs to be in ISO-8601 format.
**Tip: More on ISO-8601?** If you would like to learn more about the background and history of this standardized format, we suggest this resource as a starting point: [ISO 8601](https://en.wikipedia.org/wiki/ISO_8601) .
## Organization Timezone
Timezone is a baseline setting for dates in your Organization and it's important to understand how the timezone setting affects date/time settings you select.
### Setting your Timezone
The default timezone for a m3ter Organization is UTC. You can quickly change this setting in the Console:
* Select **Settings**:
![]() * Select **Edit** on the **Organization configuration details** panel. On the **Organization configuration** page scroll down to the **Timezone** setting:
* **Timezone**. Enter the timezone for your Organization. You can use any format that is valid under Release 2021c of the tz database (tzdata). For example:
* If you want to set your timezone by a UTC offset of plus one hour, you can enter **UTC+1:00**.
* If you want to set your timezone to GMT plus one hour, you can enter **GMT+1:00** or **GMT+1** or **+1:00** or simply **+1**.
* If you want to set your timezone to a regional timezone by tz database name, you can select from the drop-down list, for example, **Europe/Berlin**.
**Tip!** Alternatively, you can use the `timezone` request parameter for the [Update OrganizationConfig](/api/organizationconfig/update-organizationconfig) API call to set your Timezone.
> **See also:** [Managing your Organization](/guides/organization-and-access-management/viewing-and-editing-organization)
## Dates for Billing and Pricing
Your m3ter setup for controlling when and how bills for an end-customer account are created involves several key aspects:
* [Billing Frequency](/guides/getting-started/working-with-dates-in-m3ter-easy-reference#billing-frequency)
* [First and Subsequent Bill Creation Dates](/guides/getting-started/working-with-dates-in-m3ter-easy-reference#first-and-subsequent-bill-creation-dates)
* [First Bill Dates for Prepayments/Commitments](/guides/getting-started/working-with-dates-in-m3ter-easy-reference#first-bill-dates-for-prepaymentscommitments)
* [Dates for Pricing](/guides/getting-started/working-with-dates-in-m3ter-easy-reference#dates-for-pricing)
* [End Dates for Billing are Exclusive](/guides/getting-started/working-with-dates-in-m3ter-easy-reference#end-dates-for-billing-are-exclusive)
* [Billing In Arrears/In Advance](/guides/getting-started/working-with-dates-in-m3ter-easy-reference#billing-in-arrearsin-advance)
### Billing Frequency
Billing frequency means how often bills are generated - every day, week, month, and so on. You can set **Billing frequency** when you create Plan Templates for your Products. Each Plan will be based on a Plan Template, and will inherit the billing frequency setting. You'll then be able to attach a Plan to an end-customer Account, and go on to price the attached Plan to define the billing charge rates against the Account for consuming your Products.
In the Console, go to **Pricing>Plan Templates>Create Plan Template** and for **Bill frequency** there are four options:
* **Daily**. Starting at midnight each day, covering a twenty-four hour period following.
* **Weekly**. Starting at midnight on a Monday morning covering the seven-day period following.
* **Monthly**. Starting at midnight on the morning of the first day of each month covering the entire calendar month following.
* **Annually**. Starting at midnight on the morning of the first day of each year covering the entire calendar year following.
Note that when the repeat cycle of bill creation - weekly, monthly, and so on - *starts* depends on the date you have defined as the start date for each of these billing frequency options. See the next section on how to define billing start dates.
Alternatively, you can use `billFrequency` request parameter for the [Create PlanTemplate](/api/plantemplate/create-plantemplate) API call to set billing frequency.
> **See also:** [Reviewing Options for Plans and Plan Templates](/guides/plans-and-pricing/working-with-plan-templates-and-plans/reviewing-configuration-options-for-plans-and-plan-templates)
### First and Subsequent Bill Creation Dates
Linked to billing frequency are settings that define when bills are generated for the first time. When first billing dates are set, dates for subsequent bills depend on the billing frequency you've selected. For example, in a simple case where you are using a monthly billing frequency and set a first bill date of January 1st, subsequent bills will be created on the 1st of each month following throughout the billing period. Note that you can also use a **Billing interval** setting on your Plans to control when subsequent bills are generated. If Billing frequency is monthly and you've set Billing interval at 3, bills are generated every three months.
In m3ter, we use the concept of **Epoch** dates for billing periods: **Year**, **Month**, **Week**, and **Day**. These Epoch settings define the date when the first Bill is created for Accounts and then act as a reference for when in the applied billing frequency period subsequent bills for Accounts are created:
* For example, suppose you attach a Plan to an Account where the Plan is configured for monthly billing frequency and you've defined the period the Plan will apply to the Account to be from January 1st, 2022 until January 1st, 2023. You then set a **Month Epoch** date of February 15th, 2022. The first Bill will be created for the Account on February 15th, and subsequent Bills created on the 15th of the months following for the remainder of the billing period - March 15th, April 15th, and so on.
* The defaults are:
* **Year Epoch**. January 1st, 2022.
* **Month Epoch**. January 1st, 2022.
* **Week Epoch**. January 4th, 2022.
* **Day Epoch**. January 1st, 2022.
To define the Epoch dates for billing periods, go to **Settings>Organization** and on the **Configuration** tab, select **Edit** on the **Organization Configuration Details** panel and set the **Epoch** dates.
However, having set up your dates for Epochs at the Organization level, you can override these dates at two points when completing your configuration for billing against an end-customer Account:
* When you create an Account, you can use a **Billing cycle date** setting to override the Epoch settings:
* **Account Billing cycle date**. Optional attribute, which allows you to set the date of first and subsequent billing against the end customer Account. For example, if the Plan you attach to the Account for charging is configured for monthly billing frequency and you set a **Billing cycle date** at the Account level of January 14th 2022, then m3ter will create a first bill for the Account on that date and every month from that date. If you leave this blank then the start of billing defaults to the Epoch setting you've configured for your Organization.
* When you attach a Plan to an Account and create an Account Plan, you can use a **Billing cycle date** setting to override the Account-level setting:
* **Account Plan Billing cycle date**. Optional attribute, which allows you to set the date of first and subsequent billing against the end customer Account using the Account Plan. Subsequent billing will be determined from this first date. For example, if the Plan is configured for monthly billing frequency and you set a **Billing cycle date** of February 14th 2022, then m3ter will create a first bill for the Account on that date and every month from that date. If you leave this blank, then the start of billing defaults to the first bill date configured for the Account. Note that if you leave this setting at the Account Plan level blank and the **Billing cycle date** setting was left blank at the Account level, then start of billing defaults to the Epoch settings you've configured for your Organization.
**Important - Billing period spans successive months for defined first bill date!** If you set the first Bill date for an Account to fall somewhere mid-month, then the billing period for calculating any prorated charges will span that date on successive months. For example, if you set first Bill date at May 15th, then the first billing period is April 15th to May 15th, and the number of days in that period will vary depending on the successive months the period spans. For more details, see [First Bill Date Not Set to 1st of Month](/guides/billing-and-usage-data/running-viewing-and-managing-bills/troubleshooting-bills#first-and-subsequent-bill-date-not-set-to-1st-of-month).
API Calls:
* You can use the `yearEpoch`, `monthEpoch`, `weekEpoch`, and `dayEpoch` request parameters for the [Update OrganizationConfig](/api/organizationconfig/update-organizationconfig) API call to set your Organization Epoch dates.
* You can use the `billEpoch` request parameter for the [Create Account](/api/account/create-account) API call to set the first and subsequent bill dates at the Account level.
* You can use the `billEpoch` request parameter for the [Create AccountPlan](/api/accountplan/create-accountplan) API call to set the first and subsequent bill dates at the Account Plan level.
> **See also:** [Managing your Organization](/guides/organization-and-access-management/viewing-and-editing-organization), [Creating an Account](/guides/end-customer-accounts/creating-an-account), [Attaching Plans to an Account](/guides/end-customer-accounts/attaching-plans-to-an-account).
### First Bill Dates for Prepayments/Commitments
You can create Prepayments/Commitments amounts for your end-customer Accounts. If your end-customer hasn't paid the Prepayment amount in full upfront at the start of their contract, you can use billing options to control how the outstanding Prepayment fees are to be billed against the Account. You can do this in two ways:
* Bill with a Plan
* Bill on a Schedule
In both cases, you can define the first and subsequent bill dates.
In the Console, go to **Accounts** and open the Account. On the **Prepayments** tab, select **Create Prepayment**. If the **Amount pre-paid** is less than the **Amount**, then the **Billing** options are enabled.
#### Bill with Plan - Set First Bill Date
1. Select **Bill with plan**.
2. Use the optional **Billing cycle date** to set a date when line items for the Prepayment fees will first appear on a Bill. The dates of all future Bills for Prepayment fees will be calculated from this initial date. If you leave this blank, then the start of billing for Prepayments fees defaults to the Epoch setting you've configured for your Organization.
**Tip: Using API Call?** Alternatively, you can use the `billEpoch` request parameter for the [Create Commitment](/api/commitments/create-commitment) API call to set the first bill date for Prepayment fees.
#### Bill on a Schedule - Set First Bill Date
1. Select **Bill on a schedule**.
2. Use the **Add** button to define the details of the first Bill in the schedule for Prepayment fees due.
3. Enter a **Date** for the first Bill.
4. Select **Add** again to define the second and subsequent Bills with **Dates** for the Prepayment fees.
> **See also:** [Creating Prepayments for Accounts](/guides/end-customer-accounts/creating-prepayments-for-accounts).
### Dates for Pricing
In the Console Pricing Editor, you can add a Plan for a Product, add an Aggregation or a Counter, and then create a Pricing for the Plan:
* You *must* enter a **Start date** and can *optionally* enter an **End date**.
* Start/End dates define the period you want the Pricing you've configured to apply to the Plan.
* Note that you can also apply pricing to Plan Templates.
What if you have an end-customer Account that will consume one of your Products and you want to charge them at a reduced rate - as a sign-up bonus - for the first six months and then bump them up to the standard rate afterwards? You can attach a priced Product Plan to their Account and:
* Configure a Pricing for the Plan that applies for the first six months at the reduced rate.
* Configure a second Pricing that applies to the Plan after six months.
This allows you to set, for example, a year period for your customer to be on the Product Plan, which you set up when you set the Start and End dates for the Account Plan to be *active* for their Account, but ensures the standard rate will cut in for billing the Account at six months in - you won't have to attach a priced Plan to the Account twice to do this!
Alternatively, you can define the period a Pricing applies to a Plan using the `startDate` and `endDate` request parameters for the [Create Pricing](/api/pricing/create-pricing) API call.
**Tip: Pricing periods should not overlap!** If you try to overlap periods for a Pricing to apply to the same Plan, you'll see an error. You can introduce gaps in a Pricing applied to a Plan.
### End Dates for Billing are Exclusive
You must define start and end dates in contexts related to billing on your end-customer Accounts, such as:
* When you attach a Plan to an Account to create an Account Plan, you enter start and end dates to define the period you want the Plan to be *active* for the Account - that is, to define the period when the Account will be charged according to the pricing configured for the Plan for consuming one of your products.
* When you create a Prepayment amount for an Account, you enter start and end dates to define the period the Prepayment is active for the Account - that is, what is the period of contract for consuming one of your products and for which the Account customer is committed to paying the Prepayment amount.
Start dates are treated *inclusively* but end dates are treated *exclusively* in m3ter. What does this mean when setting up your billing periods? Note that with respect to end dates:
* If you set the end date for an Account Plan to be June 1st 2022, then this is applied at midnight of that selected date and where midnight is understood as the *start of that date*. This means the Account Plan ceases to be active for the Account at the end of May 31st. If you want to include for billing for customer Account usage occurring on June 1st, you have to set the end date as June 2nd.
* Similarly, if your set the end date for a Prepayment on an Account to be February 1st 2022, this means the contract period for the Prepayment, and the period for calculation of any fees due on that Prepayment, ceases at the end of January 31st 2022.
### Billing In Arrears/In Advance
Related to dates for billing, you can define when *standing charge*, *minimum spend*, and *Prepayment fee* amounts will be billed - either in arrears or in advance.
You can set this up in the first instance at the level of your Organization. In the Console, go to **Settings>Organization** and on the **Configuration** tab select Edit on the **Organization Configuration Details** panel:
* **Standing charge billing**. Default is to bill in arrears.
* **Minimum spend billing**. Default is to bill in arrears.
* **Prepayment fee billing**. Default is to bill in advance.
You can override this Organization-level setting for two of these - standard charge and minimum spend billing - when you *create* your Plan Templates and Plans:
* **Plan Templates**. When you create a Plan Template in the Console at **Pricing>Plan Templates>Create Plan Template**, by default the **Standing charge billing** setting is selected to **Use organization-wide configuration** and which is shown in brackets:
* You can select to override the Organization setting for **Standing charge billing** - **Bill in arrears** or **Bill in advance**.
* You can do the same for **Minimum spend billing**.
* **Plans**. When you create a Plan from a Plan Templates in the Console at **Pricing>Plans>Create Plan**, by default the **Standing charge billing** setting is selected to **Use configuration from plan template** and which is shown in brackets:
* You can select to override the Plan Template setting for **Standing charge billing** - **Bill in arrears** or **Bill in advance**.
* You can do the same for **Minimum spend billing**.
Alternatively, you can use API calls to set this at the level of Plan Template or Plan:
* **Plan Template**. You can use the `standingchargeBillInAdvance` or `minimumSpendBillInAdvance` request parameters for the [Create PlanTemplate](/api/plantemplate/create-plantemplate) API call.
* **Plan**. You can use the `standingchargeBillInAdvance` or `minimumSpendBillInAdvance` request parameters for the [Create Plan](/api/plan/create-plan) API call.
You can also override the Organizational-level setting for minimum spend billing when you *price* a Plan Template or Plan:
* In the Console, go to **Pricing>Pricing Editor**, add a **Plan** or **Plan Template** and an **Aggregation**. Select **Edit Pricing**. By default, the **Minimum spend billing** setting is checked to **Use organization-wide configuration** and which is shown in brackets:
* You can select to override the Organization setting for **Minimum spend billing** - **Bill in arrears** or **Bill in advance**.
Alternatively, you can use the `minimumSpendBillInAdvance` request parameter for the [Create Pricing](/api/pricing/create-pricing) API call to set this when you price a Plan Template or Plan.
Lastly, when you create or edit a Prepayment for an Account and you've set up outstanding amounts to **Bill with plan**, you can override the Organizational-level setting for Prepayment fee billing:
* In the Console, go to **Accounts** and open the Account details page and select the **Prepayments** tab.
* Select **Create Prepayment** or edit an existing Prepayment for the Account. By default, the **Fee billing** setting is checked to **Use organization-wide configuration** and which is shown in brackets:
* You can override this and select to have **Fee billing** for the Prepayment to **Bill in arrears** or **Bill in advance**.
Alternatively, you can use the `commitmentFeeBillInAdvance` request parameter for the [Create Commitment](/api/commitments/create-commitment) or [Update Commitment API](/api/commitments/update-commitment) call to set Fee billing for the Prepayment in arrears or in advance.
> **See also:** [Managing your Organization](/guides/organization-and-access-management/viewing-and-editing-organization), [Creating Plan Templates](/guides/plans-and-pricing/working-with-plan-templates-and-plans/creating-plan-templates), [Creating Plans](/guides/plans-and-pricing/working-with-plan-templates-and-plans/creating-plans), or [Creating Prepayments for Accounts](/guides/end-customer-accounts/creating-prepayments-for-accounts).
## Dates for Usage Data
When you have completed your usage-based pricing and billing setup in m3ter, you can submit some test usage data for an Account. This allows you to then calculate bills on the basis of the data you've submitted and check everything is working as you expect it to before switching to your production environment.
In the Console, you can perform data submission from the **Account** or from **Meter** details pages. When you do this, a **Timestamp** field is automatically populated with the current date/time. You can edit this field and enter your own past date/time value for the usage data submission:
* The data item is ingested immediately into m3ter.
* The date/time value you enter determines billing for the submitted usage.
* The date/time value you enter for the submission is used for the usage data item in the **Usage Data Explorer** - when you query for usage data, the date/time value you've entered for the submission is shown for Meter Data Fields and is the value that can be filtered on. If the Meter also has Derived Fields whose value is derivative on the Meter Data Fields, the custom date/time value you enter for the submission is applied to any such Derived Fields also.
Adjusting the **Timestamp** to use date/time values in the past for submitted usage data is useful if you need to make corrections for billing retrospectively against an Account - you can submit positive or negative usage data amounts to correct and reconcile earlier billing anomalies.
**Important!** If you edit the **Timestamp** value, you must enter a date/time that is in the past. If you try to submit usage date for a future date/time, the submission will be rejected and you'll receive an error message.
Alternatively, you can use the `ts` request parameter for the [Submit Measurements](/api/measurements/submit-measurements) Ingest API call to change the timestamp value for usage data items.
**Tip:** **See also:** [Submitting Usage Data for an Account](/guides/end-customer-accounts/submitting-usage-data-for-an-account) and [Submitting Test Usage Data](/guides/billing-and-usage-data/submitting-usage-data/submitting-test-usage-data).
# Integrations
Source: https://docs.m3ter.com/guides/integrations
Out-of-the-box integrations with leading Finance, CRM, and CPQ systems make it easy to automatically sync data bi-directionally. With configuration options in the API and Console, both engineering and non-technical users can connect your tools.
* [m3ter Integrations - Overview](/guides/integrations/m3ter-integrations)
In the **Integrations** section of the m3ter Console you can define *Integrations* to control how Bills generated in m3ter are sent out to external systems:
* [Setting Up and Managing Integrations](/guides/integrations/setting-up-integrations)
* [Creating and Managing Integrations](/guides/integrations/setting-up-integrations/creating-and-managing-integration-configurations)
* [Configuring Stripe Integrations](/guides/integrations/setting-up-integrations/configuring-stripe-integrations)
* [Configuring Netsuite Integrations](/guides/integrations/setting-up-integrations/configuring-netsuite-integrations)
* [Configuring Paddle Integrations](/guides/integrations/setting-up-integrations/configuring-paddle-integrations)
* [Configuring Chargebee Integrations](/guides/integrations/setting-up-integrations/configuring-chargebee-integrations)
* [Configuring QuickBooks Integrations](/guides/integrations/setting-up-integrations/configuring-quickbooks-integrations)
* [Configuring Xero Integrations](/guides/integrations/setting-up-integrations/configuring-xero-integrations)
* [Configuring Salesforce Entity Data Sync Integrations](/guides/integrations/setting-up-integrations/configuring-sf-entity-data-integrations)
* [Configuring AWS Marketplace Integrations](/guides/integrations/setting-up-integrations/configuring-aws-integrations)
* [Configuring Azure Marketplace Integrations](/guides/integrations/setting-up-integrations/configuring-azure-marketplace-integrations)
* [Managing Multiple Third Party Destinations for Integrations](/guides/integrations/setting-up-integrations/managing-multiple-destinations-for-integrations)
* [Creating and Managing Integration Credentials](/guides/integrations/setting-up-integrations/managing-integration-credentials)
* [Reviewing and Resolving Integration Events](/guides/integrations/setting-up-integrations/reviewing-and-resolving-integration-events)
* [Creating and Managing External Mappings](/guides/integrations/setting-up-integrations/creating-and-managing-external-mappings)
* [Reviewing Integration Run Details](/guides/integrations/setting-up-integrations/reviewing-integration-run-details)
**Tip: Salesforce Integration?** The m3ter Connector for Salesforce is available as an initial release version. Please see the [m3ter Connector for Salesforce](/guides/m3ter-connector-for-salesforce) section for more details.
# m3ter Integrations - Overview
Source: https://docs.m3ter.com/guides/integrations/m3ter-integrations
By exploiting the m3ter open-API framework, you can use m3ter Integrations to quickly map and synchronize data held in any 3rd-party systems you use for core business operations, such as sales, pricing, billing and invoicing, and general finance.
m3ter Integrations enable you to quickly set up and implement highly configurable usage-based pricing models for your new or existing external system or service. You can then charge your customers based on what they use, instead of charging by subscription under a one-price-fits-all pricing model. Integrations are seamless, which means you only need to ingest consumption usage data into m3ter in order to be able to bill via your regular account receivable invoicing system.
You can also then leverage this data synchronization between m3ter and your other systems to implement a wide range of use cases to serve wider business operational requirements.
A typical Integration combines three data flows into a seamless and unified data exchange and synchronization pipeline for end customer sales/subscriptions/usage through to usage-based billing and invoicing in your 3rd-party system:
1. **Subscription/Order/Sales flow into m3ter**. End customer account and subscription/order/sales details from 3rd-party system into m3ter.
2. **Usage Data Ingest for Metering**. End customer product usage data and events ingested into m3ter to drive usage-based pricing.
3. **Billing Flow**. From m3ter Bills out to 3rd-party invoicing and payments.
This topic describes at high-level some common m3ter integrations with 3rd-party systems and services:
* [Paddle](/guides/integrations/m3ter-integrations#paddle)
* [Chargebee](/guides/integrations/m3ter-integrations#chargebee)
* [Stripe](/guides/integrations/m3ter-integrations#stripe)
* [NetSuite](/guides/integrations/m3ter-integrations#netsuite)
* [Xero](/guides/integrations/m3ter-integrations#xero)
* [QuickBooks](/guides/integrations/m3ter-integrations#quickbooks)
**Notes & Tips:**
* **Other Integrations?** Integrations with 3rd-party systems are not limited to the above systems. If you want to implement an Integration in m3ter with a different 3rd-party system, please contact m3ter Support to discuss.
* **Setting Up Integrations?** In the m3ter Console, you can set up Integrations yourself on a self-serve basis. See following [Setting Up and Managing Integrations](/guides/integrations/setting-up-integrations) section for full details.
* **Salesforce Integration?** The m3ter Connector for Salesforce managed package is also available. Please see the [m3ter Connector for Salesforce](/guides/m3ter-connector-for-salesforce) section for more details.
* **Data Synchronization?** Data synchronization and flows between 3rd-party systems and m3ter are established and maintained using webhooks.
## Paddle
* Select **Edit** on the **Organization configuration details** panel. On the **Organization configuration** page scroll down to the **Timezone** setting:
* **Timezone**. Enter the timezone for your Organization. You can use any format that is valid under Release 2021c of the tz database (tzdata). For example:
* If you want to set your timezone by a UTC offset of plus one hour, you can enter **UTC+1:00**.
* If you want to set your timezone to GMT plus one hour, you can enter **GMT+1:00** or **GMT+1** or **+1:00** or simply **+1**.
* If you want to set your timezone to a regional timezone by tz database name, you can select from the drop-down list, for example, **Europe/Berlin**.
**Tip!** Alternatively, you can use the `timezone` request parameter for the [Update OrganizationConfig](/api/organizationconfig/update-organizationconfig) API call to set your Timezone.
> **See also:** [Managing your Organization](/guides/organization-and-access-management/viewing-and-editing-organization)
## Dates for Billing and Pricing
Your m3ter setup for controlling when and how bills for an end-customer account are created involves several key aspects:
* [Billing Frequency](/guides/getting-started/working-with-dates-in-m3ter-easy-reference#billing-frequency)
* [First and Subsequent Bill Creation Dates](/guides/getting-started/working-with-dates-in-m3ter-easy-reference#first-and-subsequent-bill-creation-dates)
* [First Bill Dates for Prepayments/Commitments](/guides/getting-started/working-with-dates-in-m3ter-easy-reference#first-bill-dates-for-prepaymentscommitments)
* [Dates for Pricing](/guides/getting-started/working-with-dates-in-m3ter-easy-reference#dates-for-pricing)
* [End Dates for Billing are Exclusive](/guides/getting-started/working-with-dates-in-m3ter-easy-reference#end-dates-for-billing-are-exclusive)
* [Billing In Arrears/In Advance](/guides/getting-started/working-with-dates-in-m3ter-easy-reference#billing-in-arrearsin-advance)
### Billing Frequency
Billing frequency means how often bills are generated - every day, week, month, and so on. You can set **Billing frequency** when you create Plan Templates for your Products. Each Plan will be based on a Plan Template, and will inherit the billing frequency setting. You'll then be able to attach a Plan to an end-customer Account, and go on to price the attached Plan to define the billing charge rates against the Account for consuming your Products.
In the Console, go to **Pricing>Plan Templates>Create Plan Template** and for **Bill frequency** there are four options:
* **Daily**. Starting at midnight each day, covering a twenty-four hour period following.
* **Weekly**. Starting at midnight on a Monday morning covering the seven-day period following.
* **Monthly**. Starting at midnight on the morning of the first day of each month covering the entire calendar month following.
* **Annually**. Starting at midnight on the morning of the first day of each year covering the entire calendar year following.
Note that when the repeat cycle of bill creation - weekly, monthly, and so on - *starts* depends on the date you have defined as the start date for each of these billing frequency options. See the next section on how to define billing start dates.
Alternatively, you can use `billFrequency` request parameter for the [Create PlanTemplate](/api/plantemplate/create-plantemplate) API call to set billing frequency.
> **See also:** [Reviewing Options for Plans and Plan Templates](/guides/plans-and-pricing/working-with-plan-templates-and-plans/reviewing-configuration-options-for-plans-and-plan-templates)
### First and Subsequent Bill Creation Dates
Linked to billing frequency are settings that define when bills are generated for the first time. When first billing dates are set, dates for subsequent bills depend on the billing frequency you've selected. For example, in a simple case where you are using a monthly billing frequency and set a first bill date of January 1st, subsequent bills will be created on the 1st of each month following throughout the billing period. Note that you can also use a **Billing interval** setting on your Plans to control when subsequent bills are generated. If Billing frequency is monthly and you've set Billing interval at 3, bills are generated every three months.
In m3ter, we use the concept of **Epoch** dates for billing periods: **Year**, **Month**, **Week**, and **Day**. These Epoch settings define the date when the first Bill is created for Accounts and then act as a reference for when in the applied billing frequency period subsequent bills for Accounts are created:
* For example, suppose you attach a Plan to an Account where the Plan is configured for monthly billing frequency and you've defined the period the Plan will apply to the Account to be from January 1st, 2022 until January 1st, 2023. You then set a **Month Epoch** date of February 15th, 2022. The first Bill will be created for the Account on February 15th, and subsequent Bills created on the 15th of the months following for the remainder of the billing period - March 15th, April 15th, and so on.
* The defaults are:
* **Year Epoch**. January 1st, 2022.
* **Month Epoch**. January 1st, 2022.
* **Week Epoch**. January 4th, 2022.
* **Day Epoch**. January 1st, 2022.
To define the Epoch dates for billing periods, go to **Settings>Organization** and on the **Configuration** tab, select **Edit** on the **Organization Configuration Details** panel and set the **Epoch** dates.
However, having set up your dates for Epochs at the Organization level, you can override these dates at two points when completing your configuration for billing against an end-customer Account:
* When you create an Account, you can use a **Billing cycle date** setting to override the Epoch settings:
* **Account Billing cycle date**. Optional attribute, which allows you to set the date of first and subsequent billing against the end customer Account. For example, if the Plan you attach to the Account for charging is configured for monthly billing frequency and you set a **Billing cycle date** at the Account level of January 14th 2022, then m3ter will create a first bill for the Account on that date and every month from that date. If you leave this blank then the start of billing defaults to the Epoch setting you've configured for your Organization.
* When you attach a Plan to an Account and create an Account Plan, you can use a **Billing cycle date** setting to override the Account-level setting:
* **Account Plan Billing cycle date**. Optional attribute, which allows you to set the date of first and subsequent billing against the end customer Account using the Account Plan. Subsequent billing will be determined from this first date. For example, if the Plan is configured for monthly billing frequency and you set a **Billing cycle date** of February 14th 2022, then m3ter will create a first bill for the Account on that date and every month from that date. If you leave this blank, then the start of billing defaults to the first bill date configured for the Account. Note that if you leave this setting at the Account Plan level blank and the **Billing cycle date** setting was left blank at the Account level, then start of billing defaults to the Epoch settings you've configured for your Organization.
**Important - Billing period spans successive months for defined first bill date!** If you set the first Bill date for an Account to fall somewhere mid-month, then the billing period for calculating any prorated charges will span that date on successive months. For example, if you set first Bill date at May 15th, then the first billing period is April 15th to May 15th, and the number of days in that period will vary depending on the successive months the period spans. For more details, see [First Bill Date Not Set to 1st of Month](/guides/billing-and-usage-data/running-viewing-and-managing-bills/troubleshooting-bills#first-and-subsequent-bill-date-not-set-to-1st-of-month).
API Calls:
* You can use the `yearEpoch`, `monthEpoch`, `weekEpoch`, and `dayEpoch` request parameters for the [Update OrganizationConfig](/api/organizationconfig/update-organizationconfig) API call to set your Organization Epoch dates.
* You can use the `billEpoch` request parameter for the [Create Account](/api/account/create-account) API call to set the first and subsequent bill dates at the Account level.
* You can use the `billEpoch` request parameter for the [Create AccountPlan](/api/accountplan/create-accountplan) API call to set the first and subsequent bill dates at the Account Plan level.
> **See also:** [Managing your Organization](/guides/organization-and-access-management/viewing-and-editing-organization), [Creating an Account](/guides/end-customer-accounts/creating-an-account), [Attaching Plans to an Account](/guides/end-customer-accounts/attaching-plans-to-an-account).
### First Bill Dates for Prepayments/Commitments
You can create Prepayments/Commitments amounts for your end-customer Accounts. If your end-customer hasn't paid the Prepayment amount in full upfront at the start of their contract, you can use billing options to control how the outstanding Prepayment fees are to be billed against the Account. You can do this in two ways:
* Bill with a Plan
* Bill on a Schedule
In both cases, you can define the first and subsequent bill dates.
In the Console, go to **Accounts** and open the Account. On the **Prepayments** tab, select **Create Prepayment**. If the **Amount pre-paid** is less than the **Amount**, then the **Billing** options are enabled.
#### Bill with Plan - Set First Bill Date
1. Select **Bill with plan**.
2. Use the optional **Billing cycle date** to set a date when line items for the Prepayment fees will first appear on a Bill. The dates of all future Bills for Prepayment fees will be calculated from this initial date. If you leave this blank, then the start of billing for Prepayments fees defaults to the Epoch setting you've configured for your Organization.
**Tip: Using API Call?** Alternatively, you can use the `billEpoch` request parameter for the [Create Commitment](/api/commitments/create-commitment) API call to set the first bill date for Prepayment fees.
#### Bill on a Schedule - Set First Bill Date
1. Select **Bill on a schedule**.
2. Use the **Add** button to define the details of the first Bill in the schedule for Prepayment fees due.
3. Enter a **Date** for the first Bill.
4. Select **Add** again to define the second and subsequent Bills with **Dates** for the Prepayment fees.
> **See also:** [Creating Prepayments for Accounts](/guides/end-customer-accounts/creating-prepayments-for-accounts).
### Dates for Pricing
In the Console Pricing Editor, you can add a Plan for a Product, add an Aggregation or a Counter, and then create a Pricing for the Plan:
* You *must* enter a **Start date** and can *optionally* enter an **End date**.
* Start/End dates define the period you want the Pricing you've configured to apply to the Plan.
* Note that you can also apply pricing to Plan Templates.
What if you have an end-customer Account that will consume one of your Products and you want to charge them at a reduced rate - as a sign-up bonus - for the first six months and then bump them up to the standard rate afterwards? You can attach a priced Product Plan to their Account and:
* Configure a Pricing for the Plan that applies for the first six months at the reduced rate.
* Configure a second Pricing that applies to the Plan after six months.
This allows you to set, for example, a year period for your customer to be on the Product Plan, which you set up when you set the Start and End dates for the Account Plan to be *active* for their Account, but ensures the standard rate will cut in for billing the Account at six months in - you won't have to attach a priced Plan to the Account twice to do this!
Alternatively, you can define the period a Pricing applies to a Plan using the `startDate` and `endDate` request parameters for the [Create Pricing](/api/pricing/create-pricing) API call.
**Tip: Pricing periods should not overlap!** If you try to overlap periods for a Pricing to apply to the same Plan, you'll see an error. You can introduce gaps in a Pricing applied to a Plan.
### End Dates for Billing are Exclusive
You must define start and end dates in contexts related to billing on your end-customer Accounts, such as:
* When you attach a Plan to an Account to create an Account Plan, you enter start and end dates to define the period you want the Plan to be *active* for the Account - that is, to define the period when the Account will be charged according to the pricing configured for the Plan for consuming one of your products.
* When you create a Prepayment amount for an Account, you enter start and end dates to define the period the Prepayment is active for the Account - that is, what is the period of contract for consuming one of your products and for which the Account customer is committed to paying the Prepayment amount.
Start dates are treated *inclusively* but end dates are treated *exclusively* in m3ter. What does this mean when setting up your billing periods? Note that with respect to end dates:
* If you set the end date for an Account Plan to be June 1st 2022, then this is applied at midnight of that selected date and where midnight is understood as the *start of that date*. This means the Account Plan ceases to be active for the Account at the end of May 31st. If you want to include for billing for customer Account usage occurring on June 1st, you have to set the end date as June 2nd.
* Similarly, if your set the end date for a Prepayment on an Account to be February 1st 2022, this means the contract period for the Prepayment, and the period for calculation of any fees due on that Prepayment, ceases at the end of January 31st 2022.
### Billing In Arrears/In Advance
Related to dates for billing, you can define when *standing charge*, *minimum spend*, and *Prepayment fee* amounts will be billed - either in arrears or in advance.
You can set this up in the first instance at the level of your Organization. In the Console, go to **Settings>Organization** and on the **Configuration** tab select Edit on the **Organization Configuration Details** panel:
* **Standing charge billing**. Default is to bill in arrears.
* **Minimum spend billing**. Default is to bill in arrears.
* **Prepayment fee billing**. Default is to bill in advance.
You can override this Organization-level setting for two of these - standard charge and minimum spend billing - when you *create* your Plan Templates and Plans:
* **Plan Templates**. When you create a Plan Template in the Console at **Pricing>Plan Templates>Create Plan Template**, by default the **Standing charge billing** setting is selected to **Use organization-wide configuration** and which is shown in brackets:
* You can select to override the Organization setting for **Standing charge billing** - **Bill in arrears** or **Bill in advance**.
* You can do the same for **Minimum spend billing**.
* **Plans**. When you create a Plan from a Plan Templates in the Console at **Pricing>Plans>Create Plan**, by default the **Standing charge billing** setting is selected to **Use configuration from plan template** and which is shown in brackets:
* You can select to override the Plan Template setting for **Standing charge billing** - **Bill in arrears** or **Bill in advance**.
* You can do the same for **Minimum spend billing**.
Alternatively, you can use API calls to set this at the level of Plan Template or Plan:
* **Plan Template**. You can use the `standingchargeBillInAdvance` or `minimumSpendBillInAdvance` request parameters for the [Create PlanTemplate](/api/plantemplate/create-plantemplate) API call.
* **Plan**. You can use the `standingchargeBillInAdvance` or `minimumSpendBillInAdvance` request parameters for the [Create Plan](/api/plan/create-plan) API call.
You can also override the Organizational-level setting for minimum spend billing when you *price* a Plan Template or Plan:
* In the Console, go to **Pricing>Pricing Editor**, add a **Plan** or **Plan Template** and an **Aggregation**. Select **Edit Pricing**. By default, the **Minimum spend billing** setting is checked to **Use organization-wide configuration** and which is shown in brackets:
* You can select to override the Organization setting for **Minimum spend billing** - **Bill in arrears** or **Bill in advance**.
Alternatively, you can use the `minimumSpendBillInAdvance` request parameter for the [Create Pricing](/api/pricing/create-pricing) API call to set this when you price a Plan Template or Plan.
Lastly, when you create or edit a Prepayment for an Account and you've set up outstanding amounts to **Bill with plan**, you can override the Organizational-level setting for Prepayment fee billing:
* In the Console, go to **Accounts** and open the Account details page and select the **Prepayments** tab.
* Select **Create Prepayment** or edit an existing Prepayment for the Account. By default, the **Fee billing** setting is checked to **Use organization-wide configuration** and which is shown in brackets:
* You can override this and select to have **Fee billing** for the Prepayment to **Bill in arrears** or **Bill in advance**.
Alternatively, you can use the `commitmentFeeBillInAdvance` request parameter for the [Create Commitment](/api/commitments/create-commitment) or [Update Commitment API](/api/commitments/update-commitment) call to set Fee billing for the Prepayment in arrears or in advance.
> **See also:** [Managing your Organization](/guides/organization-and-access-management/viewing-and-editing-organization), [Creating Plan Templates](/guides/plans-and-pricing/working-with-plan-templates-and-plans/creating-plan-templates), [Creating Plans](/guides/plans-and-pricing/working-with-plan-templates-and-plans/creating-plans), or [Creating Prepayments for Accounts](/guides/end-customer-accounts/creating-prepayments-for-accounts).
## Dates for Usage Data
When you have completed your usage-based pricing and billing setup in m3ter, you can submit some test usage data for an Account. This allows you to then calculate bills on the basis of the data you've submitted and check everything is working as you expect it to before switching to your production environment.
In the Console, you can perform data submission from the **Account** or from **Meter** details pages. When you do this, a **Timestamp** field is automatically populated with the current date/time. You can edit this field and enter your own past date/time value for the usage data submission:
* The data item is ingested immediately into m3ter.
* The date/time value you enter determines billing for the submitted usage.
* The date/time value you enter for the submission is used for the usage data item in the **Usage Data Explorer** - when you query for usage data, the date/time value you've entered for the submission is shown for Meter Data Fields and is the value that can be filtered on. If the Meter also has Derived Fields whose value is derivative on the Meter Data Fields, the custom date/time value you enter for the submission is applied to any such Derived Fields also.
Adjusting the **Timestamp** to use date/time values in the past for submitted usage data is useful if you need to make corrections for billing retrospectively against an Account - you can submit positive or negative usage data amounts to correct and reconcile earlier billing anomalies.
**Important!** If you edit the **Timestamp** value, you must enter a date/time that is in the past. If you try to submit usage date for a future date/time, the submission will be rejected and you'll receive an error message.
Alternatively, you can use the `ts` request parameter for the [Submit Measurements](/api/measurements/submit-measurements) Ingest API call to change the timestamp value for usage data items.
**Tip:** **See also:** [Submitting Usage Data for an Account](/guides/end-customer-accounts/submitting-usage-data-for-an-account) and [Submitting Test Usage Data](/guides/billing-and-usage-data/submitting-usage-data/submitting-test-usage-data).
# Integrations
Source: https://docs.m3ter.com/guides/integrations
Out-of-the-box integrations with leading Finance, CRM, and CPQ systems make it easy to automatically sync data bi-directionally. With configuration options in the API and Console, both engineering and non-technical users can connect your tools.
* [m3ter Integrations - Overview](/guides/integrations/m3ter-integrations)
In the **Integrations** section of the m3ter Console you can define *Integrations* to control how Bills generated in m3ter are sent out to external systems:
* [Setting Up and Managing Integrations](/guides/integrations/setting-up-integrations)
* [Creating and Managing Integrations](/guides/integrations/setting-up-integrations/creating-and-managing-integration-configurations)
* [Configuring Stripe Integrations](/guides/integrations/setting-up-integrations/configuring-stripe-integrations)
* [Configuring Netsuite Integrations](/guides/integrations/setting-up-integrations/configuring-netsuite-integrations)
* [Configuring Paddle Integrations](/guides/integrations/setting-up-integrations/configuring-paddle-integrations)
* [Configuring Chargebee Integrations](/guides/integrations/setting-up-integrations/configuring-chargebee-integrations)
* [Configuring QuickBooks Integrations](/guides/integrations/setting-up-integrations/configuring-quickbooks-integrations)
* [Configuring Xero Integrations](/guides/integrations/setting-up-integrations/configuring-xero-integrations)
* [Configuring Salesforce Entity Data Sync Integrations](/guides/integrations/setting-up-integrations/configuring-sf-entity-data-integrations)
* [Configuring AWS Marketplace Integrations](/guides/integrations/setting-up-integrations/configuring-aws-integrations)
* [Configuring Azure Marketplace Integrations](/guides/integrations/setting-up-integrations/configuring-azure-marketplace-integrations)
* [Managing Multiple Third Party Destinations for Integrations](/guides/integrations/setting-up-integrations/managing-multiple-destinations-for-integrations)
* [Creating and Managing Integration Credentials](/guides/integrations/setting-up-integrations/managing-integration-credentials)
* [Reviewing and Resolving Integration Events](/guides/integrations/setting-up-integrations/reviewing-and-resolving-integration-events)
* [Creating and Managing External Mappings](/guides/integrations/setting-up-integrations/creating-and-managing-external-mappings)
* [Reviewing Integration Run Details](/guides/integrations/setting-up-integrations/reviewing-integration-run-details)
**Tip: Salesforce Integration?** The m3ter Connector for Salesforce is available as an initial release version. Please see the [m3ter Connector for Salesforce](/guides/m3ter-connector-for-salesforce) section for more details.
# m3ter Integrations - Overview
Source: https://docs.m3ter.com/guides/integrations/m3ter-integrations
By exploiting the m3ter open-API framework, you can use m3ter Integrations to quickly map and synchronize data held in any 3rd-party systems you use for core business operations, such as sales, pricing, billing and invoicing, and general finance.
m3ter Integrations enable you to quickly set up and implement highly configurable usage-based pricing models for your new or existing external system or service. You can then charge your customers based on what they use, instead of charging by subscription under a one-price-fits-all pricing model. Integrations are seamless, which means you only need to ingest consumption usage data into m3ter in order to be able to bill via your regular account receivable invoicing system.
You can also then leverage this data synchronization between m3ter and your other systems to implement a wide range of use cases to serve wider business operational requirements.
A typical Integration combines three data flows into a seamless and unified data exchange and synchronization pipeline for end customer sales/subscriptions/usage through to usage-based billing and invoicing in your 3rd-party system:
1. **Subscription/Order/Sales flow into m3ter**. End customer account and subscription/order/sales details from 3rd-party system into m3ter.
2. **Usage Data Ingest for Metering**. End customer product usage data and events ingested into m3ter to drive usage-based pricing.
3. **Billing Flow**. From m3ter Bills out to 3rd-party invoicing and payments.
This topic describes at high-level some common m3ter integrations with 3rd-party systems and services:
* [Paddle](/guides/integrations/m3ter-integrations#paddle)
* [Chargebee](/guides/integrations/m3ter-integrations#chargebee)
* [Stripe](/guides/integrations/m3ter-integrations#stripe)
* [NetSuite](/guides/integrations/m3ter-integrations#netsuite)
* [Xero](/guides/integrations/m3ter-integrations#xero)
* [QuickBooks](/guides/integrations/m3ter-integrations#quickbooks)
**Notes & Tips:**
* **Other Integrations?** Integrations with 3rd-party systems are not limited to the above systems. If you want to implement an Integration in m3ter with a different 3rd-party system, please contact m3ter Support to discuss.
* **Setting Up Integrations?** In the m3ter Console, you can set up Integrations yourself on a self-serve basis. See following [Setting Up and Managing Integrations](/guides/integrations/setting-up-integrations) section for full details.
* **Salesforce Integration?** The m3ter Connector for Salesforce managed package is also available. Please see the [m3ter Connector for Salesforce](/guides/m3ter-connector-for-salesforce) section for more details.
* **Data Synchronization?** Data synchronization and flows between 3rd-party systems and m3ter are established and maintained using webhooks.
## Paddle
![Paddle Integration with m3ter | Sales to Payments: High-Level Integration Flow]() 1. **Checkout and Subscribe Flow: Paddle to m3ter**. Upon successful Checkout completion in Paddle by an end Customer, a Subscription Created webhook is triggered and captured by m3ter. An Account and Account Plan are created in m3ter, which contain the mapped Paddle Subscription Plan.
2. **Usage Data Ingest for Metering**. End customer usage data measures and events are submitted and ingested into m3ter via API calls or file uploads. See [Submitting Usage Data](/guides/billing-and-usage-data/submitting-usage-data) and our [Submit measurements](/api/measurements/introduction) API Reference documentation.
3. **Billing Flow: m3ter to Paddle**. m3ter Bills can be generated as often as required during the billing period. When a Bill is approved, the integration creates billing modifiers in Paddle.
**Notes:**
* **Paddle Integration?** If you are interested in setting up an integration in m3ter with your Paddle system, please contact m3ter Support to discuss.
* **Integration for Outbound Bills!** You can set up an Integration directly in the Console for outbound bills to be sent through to your Paddle system. See [Configuring Paddle Integrations](/guides/integrations/setting-up-integrations/configuring-paddle-integrations) for more details.
## Chargebee
1. **Checkout and Subscribe Flow: Paddle to m3ter**. Upon successful Checkout completion in Paddle by an end Customer, a Subscription Created webhook is triggered and captured by m3ter. An Account and Account Plan are created in m3ter, which contain the mapped Paddle Subscription Plan.
2. **Usage Data Ingest for Metering**. End customer usage data measures and events are submitted and ingested into m3ter via API calls or file uploads. See [Submitting Usage Data](/guides/billing-and-usage-data/submitting-usage-data) and our [Submit measurements](/api/measurements/introduction) API Reference documentation.
3. **Billing Flow: m3ter to Paddle**. m3ter Bills can be generated as often as required during the billing period. When a Bill is approved, the integration creates billing modifiers in Paddle.
**Notes:**
* **Paddle Integration?** If you are interested in setting up an integration in m3ter with your Paddle system, please contact m3ter Support to discuss.
* **Integration for Outbound Bills!** You can set up an Integration directly in the Console for outbound bills to be sent through to your Paddle system. See [Configuring Paddle Integrations](/guides/integrations/setting-up-integrations/configuring-paddle-integrations) for more details.
## Chargebee
![Chargebee integration | Flow from subscription to usage]() 1. **Subscription Flow: Chargebee into m3ter**. When a Subscriber and their Subscription are created in Chargebee, a webhook is triggered and captured by m3ter. This causes an Account and Account Plan to be created respectively in m3ter. If subsequently a Subscription is cancelled in Chargebee, a webhook is triggered and the end date supplied by Chargebee is set on the corresponding Account Plan in m3ter.
2. **Usage Data Ingest for Metering**. End customer usage data measures and events are submitted and ingested into m3ter via API calls or file uploads. See [Submitting Usage Data](/guides/billing-and-usage-data/submitting-usage-data) and our [Submit measurements](/api/measurements/introduction) API Reference documentation.
3. **Billing Flow: m3ter into Chargebee**. Bills in m3ter can be generated several times. When the Bill is ready to be sent to Chargebee for invoicing, the bill must be approved. On Bill approval in m3ter, Charge Items are created against the Chargebee Pending invoice.
**Integration for Outbound Bills!** You can set up an Integration directly in the Console for outbound bills to be sent through to your Chargebee system. See [Configuring Chargebee Integrations](/guides/integrations/setting-up-integrations/configuring-chargebee-integrations) for more details.
## Stripe
1. **Subscription Flow: Chargebee into m3ter**. When a Subscriber and their Subscription are created in Chargebee, a webhook is triggered and captured by m3ter. This causes an Account and Account Plan to be created respectively in m3ter. If subsequently a Subscription is cancelled in Chargebee, a webhook is triggered and the end date supplied by Chargebee is set on the corresponding Account Plan in m3ter.
2. **Usage Data Ingest for Metering**. End customer usage data measures and events are submitted and ingested into m3ter via API calls or file uploads. See [Submitting Usage Data](/guides/billing-and-usage-data/submitting-usage-data) and our [Submit measurements](/api/measurements/introduction) API Reference documentation.
3. **Billing Flow: m3ter into Chargebee**. Bills in m3ter can be generated several times. When the Bill is ready to be sent to Chargebee for invoicing, the bill must be approved. On Bill approval in m3ter, Charge Items are created against the Chargebee Pending invoice.
**Integration for Outbound Bills!** You can set up an Integration directly in the Console for outbound bills to be sent through to your Chargebee system. See [Configuring Chargebee Integrations](/guides/integrations/setting-up-integrations/configuring-chargebee-integrations) for more details.
## Stripe
![Stripe Integration with m3ter]() 1. **Checkout and Subscribe Flow: Stripe to m3ter**. Upon successful Checkout completion in Stripe by an end Customer, a Subscription Created webhook is triggered and captured by m3ter. An Account and Account Plan are created in m3ter, which are linked to Stripe Customer and Stripe Subscription Plan respectively.
2. **Usage Data Ingest for Metering**. End customer usage data measures and events are submitted and ingested into m3ter via API calls or file uploads. See [Submitting Usage Data](/guides/billing-and-usage-data/submitting-usage-data) and our [Submit measurements](/api/measurements/introduction) API Reference documentation.
3. **Billing Flow: m3ter to Stripe**. m3ter Bills can be generated as often as required during the billing period. There are two options for when billing data is sent through from m3ter to Stripe:
* Every time a Bill is generated.
* Only when a generated Bill is approved.
> This is configurable and, depending on the option you configure, invoice items are created as a result of the appropriate event in Stripe.
> There are also additional configurable options for your Stripe integration, depending on the *way you have configured your Stripe system*:
* **Stripe Invoicing**. A Stripe Invoice is created with Debit Items loaded if this is the first Billing run. On subsequent Billing, the Stripe Invoice Debit Items are updated.
* **Stripe Subscription Invoicing**. A Stripe Invoice is *not created*. Invoice Debit Items are created and these are associated with the Stripe Customer - Stripe will then automatically add these Debit Items to an Invoice when raised.
**Integration for Outbound Bills!** You can set up an Integration directly in the Console for outbound bills to be sent through to your Stripe system. See [Configuring Stripe Integrations](/guides/integrations/setting-up-integrations/configuring-stripe-integrations) for more details.
## NetSuite
1. **Checkout and Subscribe Flow: Stripe to m3ter**. Upon successful Checkout completion in Stripe by an end Customer, a Subscription Created webhook is triggered and captured by m3ter. An Account and Account Plan are created in m3ter, which are linked to Stripe Customer and Stripe Subscription Plan respectively.
2. **Usage Data Ingest for Metering**. End customer usage data measures and events are submitted and ingested into m3ter via API calls or file uploads. See [Submitting Usage Data](/guides/billing-and-usage-data/submitting-usage-data) and our [Submit measurements](/api/measurements/introduction) API Reference documentation.
3. **Billing Flow: m3ter to Stripe**. m3ter Bills can be generated as often as required during the billing period. There are two options for when billing data is sent through from m3ter to Stripe:
* Every time a Bill is generated.
* Only when a generated Bill is approved.
> This is configurable and, depending on the option you configure, invoice items are created as a result of the appropriate event in Stripe.
> There are also additional configurable options for your Stripe integration, depending on the *way you have configured your Stripe system*:
* **Stripe Invoicing**. A Stripe Invoice is created with Debit Items loaded if this is the first Billing run. On subsequent Billing, the Stripe Invoice Debit Items are updated.
* **Stripe Subscription Invoicing**. A Stripe Invoice is *not created*. Invoice Debit Items are created and these are associated with the Stripe Customer - Stripe will then automatically add these Debit Items to an Invoice when raised.
**Integration for Outbound Bills!** You can set up an Integration directly in the Console for outbound bills to be sent through to your Stripe system. See [Configuring Stripe Integrations](/guides/integrations/setting-up-integrations/configuring-stripe-integrations) for more details.
## NetSuite
![Netsuite integration with m3ter]() 1. **Sales Flow: 3rd-Party Systems into m3ter**. When a Customer and their Order/Quote are created in a 3rd-party sales channel, a webhook is triggered and captured by m3ter. This causes an Account and Account Plan to be created respectively in m3ter.
2. **Usage Data Ingest for Metering**. End customer usage data measures and events are submitted and ingested into m3ter via API calls or file uploads. See [Submitting Usage Data](/guides/billing-and-usage-data/submitting-usage-data) and our [Submit measurements](/api/measurements/introduction) API Reference documentation.
3. **Billing Flow: m3ter into NetSuite**. Bills in m3ter can be generated several times. A Bill can be sent to NetSuite without being approved. So, Bills can be updated throughout the month with the latest information then approved at the end.
**Integration for Outbound Bills!** You can set up an Integration directly in the Console for outbound bills to be sent through to your NetSuite system. See [Configuring NetSuite Integrations](/guides/integrations/setting-up-integrations/configuring-netsuite-integrations) for more details.
## Xero
1. **Sales Flow: 3rd-Party Systems into m3ter**. When a Customer and their Order/Quote are created in a 3rd-party sales channel, a webhook is triggered and captured by m3ter. This causes an Account and Account Plan to be created respectively in m3ter.
2. **Usage Data Ingest for Metering**. End customer usage data measures and events are submitted and ingested into m3ter via API calls or file uploads. See [Submitting Usage Data](/guides/billing-and-usage-data/submitting-usage-data) and our [Submit measurements](/api/measurements/introduction) API Reference documentation.
3. **Billing Flow: m3ter into NetSuite**. Bills in m3ter can be generated several times. A Bill can be sent to NetSuite without being approved. So, Bills can be updated throughout the month with the latest information then approved at the end.
**Integration for Outbound Bills!** You can set up an Integration directly in the Console for outbound bills to be sent through to your NetSuite system. See [Configuring NetSuite Integrations](/guides/integrations/setting-up-integrations/configuring-netsuite-integrations) for more details.
## Xero
![xero integration with m3ter]() 1. **Sales Flow: 3rd-Party Systems into m3ter**. When a Customer and their Order/Quote are created in a 3rd-party sales channel, a webhook is triggered and captured by m3ter. This causes an Account and Account Plan to be created respectively in m3ter.
2. **Usage Data Ingest for Metering**. End customer usage data measures and events are submitted and ingested into m3ter via API calls or file uploads. See [Submitting Usage Data](/guides/billing-and-usage-data/submitting-usage-data) and our [Submit measurements](/api/measurements/introduction) API Reference documentation.
3. **Billing Flow: m3ter into Xero**. Bills in m3ter can be generated several times. When the Bill is ready to be sent to Xero for invoicing, the Bill must be approved. On Bill approval in m3ter, the Bill line items are sent through as Xero Invoice and Invoice items.
**Integration for Outbound Bills!** You can set up an Integration directly in the Console for outbound bills to be sent through to your Xero system. See [Configuring Xero Integrations](/guides/integrations/setting-up-integrations/configuring-xero-integrations) for more details.
## QuickBooks
1. **Sales Flow: 3rd-Party Systems into m3ter**. When a Customer and their Order/Quote are created in a 3rd-party sales channel, a webhook is triggered and captured by m3ter. This causes an Account and Account Plan to be created respectively in m3ter.
2. **Usage Data Ingest for Metering**. End customer usage data measures and events are submitted and ingested into m3ter via API calls or file uploads. See [Submitting Usage Data](/guides/billing-and-usage-data/submitting-usage-data) and our [Submit measurements](/api/measurements/introduction) API Reference documentation.
3. **Billing Flow: m3ter into Xero**. Bills in m3ter can be generated several times. When the Bill is ready to be sent to Xero for invoicing, the Bill must be approved. On Bill approval in m3ter, the Bill line items are sent through as Xero Invoice and Invoice items.
**Integration for Outbound Bills!** You can set up an Integration directly in the Console for outbound bills to be sent through to your Xero system. See [Configuring Xero Integrations](/guides/integrations/setting-up-integrations/configuring-xero-integrations) for more details.
## QuickBooks
![Quickbooks integration with m3ter]() 1. **Sales Flow: 3rd-Party Systems into m3ter**. When a Customer and their Order/Quote are created in a 3rd-party sales channel, a webhook is triggered and captured by m3ter. This causes an Account and Account Plan to be created respectively in m3ter.
2. **Usage Data Ingest for Metering**. End customer usage data measures and events are submitted and ingested into m3ter via API calls or file uploads. See [Submitting Usage Data](/guides/billing-and-usage-data/submitting-usage-data) and our [Submit measurements](/api/measurements/introduction) API Reference documentation.
3. **Billing Flow: m3ter into QuickBooks**. Bills in m3ter can be generated several times. When the Bill is ready to be sent to QuickBooks for invoicing, the Bill must be approved. On Bill approval in m3ter, Bill line items are sent through as QuickBooks Invoice and Invoice items.
**Integration for Outbound Bills!** You can set up an Integration directly in the Console for outbound bills to be sent through to your QuickBooks system. See [Configuring QuickBooks Integrations](/guides/integrations/setting-up-integrations/configuring-quickbooks-integrations) for more details.
# Setting Up and Managing Integrations
Source: https://docs.m3ter.com/guides/integrations/setting-up-integrations
In the *Integrations* section of the m3ter Console you can define Integrations to control how Bills generated in m3ter are sent out to external systems:
* Stripe
* NetSuite
* Paddle
* Chargebee
* QuickBooks
* Xero
* Salesforce
For some external systems, such as for a Salesforce integration, you can also choose to send operational data for entities in you m3ter Organization.
When you have performed an integration set up for how data will be sent to and synchronized with an external system, the integration will be immediately available for use and listed on the *Integrations* page for that system in the m3ter Console.
In the Integrations section, you can also create *Outgoing Webhooks*. These are used to create *Notification Webhook Integrations*:
* Create a Notification rule to control when a Notification will be triggered on the basis of a system Event occurring.
* Link the Notification rule to an Outgoing Webhook you've set up.
This section explains how to create and work with Integrations you can set up in the m3ter Console with your external systems and how to create and work with Notification Webhook Integrations.
The first topic offers some introductory and general guidance on working with and managing both types of integration:
* [Creating and Managing Integrations](/guides/integrations/setting-up-integrations/creating-and-managing-integration-configurations)
The following topics then cover how to set up and create Integration configurations for outbound Bills into specific external systems:
* [Configuring Stripe Integrations](/guides/integrations/setting-up-integrations/configuring-stripe-integrations)
* [Configuring NetSuite Integrations](/guides/integrations/setting-up-integrations/configuring-netsuite-integrations)
* [Configuring Paddle Integrations](/guides/integrations/setting-up-integrations/configuring-paddle-integrations)
* [Configuring Chargebee Integrations](/guides/integrations/setting-up-integrations/configuring-chargebee-integrations)
* [Configuring QuickBooks Integrations](/guides/integrations/setting-up-integrations/configuring-quickbooks-integrations)
* [Configuring Xero Integrations](/guides/integrations/setting-up-integrations/configuring-xero-integrations)
For Salesforce, you can also configure entity data sync integrations to send Accounts, Bills, Contracts, Prepayments/Commitments, or Balances data into your Salesforce system:
* [Configuring Salesforce Entity Data Sync Integrations](/guides/integrations/setting-up-integrations/configuring-sf-entity-data-integrations)
You can create Integrations for sending out Bills to AWS Marketplace or Azure Marketplace. Once operational, m3ter also offers some very useful reconciliation features to support your Marketplace integrations:
* [Configuring AWS Marketplace Integrations](/guides/integrations/setting-up-integrations/configuring-aws-integrations)
* [AWS Marketplace Integrations - Reconciliation Features](/guides/integrations/setting-up-integrations/aws-marketplace-integrations-reconciliation-features)
* [Configuring Azure Marketplace Integrations](/guides/integrations/setting-up-integrations/configuring-azure-marketplace-integrations)
* [Azure Marketplace Integrations - Reconciliation Features](/guides/integrations/setting-up-integrations/azure-marketplace-integrations-reconciliation-features)
You can set up multiple destinations for your Integrations:
* [Managing Multiple Third Party Destinations for Integrations](/guides/integrations/setting-up-integrations/managing-multiple-destinations-for-integrations)
You can create Outgoing Webhooks for your Notification rules to link to:
* [Creating and Managing Outgoing Webhooks](/guides/integrations/setting-up-integrations/creating-and-managing-destinations)
You can create Credentials to authenticate your Integrations with your external systems:
* [Creating and Managing Integration Credentials](/guides/integrations/setting-up-integrations/managing-integration-credentials)
Five system Events are generated for errors that might occur with your integrations and you can review, troubleshoot, and resolve these:
* [Reviewing and Resolving Integration Events](/guides/integrations/setting-up-integrations/reviewing-and-resolving-integration-events)
When you integrate external systems with the m3ter platform, external system entities and fields are mapped to m3ter entities and fields. *External Mappings* are created and act as mapping reference lookups for which objects and fields have been mapped across systems:
* [Creating and Managing External Mappings](/guides/integrations/setting-up-integrations/creating-and-managing-external-mappings)
If you've set up an integration with an external system, you can review details of the integration runs that have been performed for the integration:
* [Reviewing Integration Run Details](/guides/integrations/setting-up-integrations/reviewing-integration-run-details)
**Tip: Integrations API Calls?** When you have set up an integration, you can review and manage the integration using a full set of API Calls. See the [Integrations section](/api/integrations/introduction) of our API Reference Docs.
# Creating AWS Marketplace Integration Credentials
Source: https://docs.m3ter.com/guides/integrations/setting-up-integrations/_managing-integration-credentials-legacy/creating-aws-marketplace-integration-credentials
This topic explains how to create AWS Marketplace Integration Credentials, which you can then use to connect integrations with your AWS Marketplace instance. See [Configuring AWS Marketplace Integrations](/guides/integrations/setting-up-integrations/configuring-aws-integrations).
**To create AWS Marketplace integration Credentials:**
1. Select **m3sh**. The **Workflows** page opens.
2. Select **Integrations**. The **Integrations** page opens.
3. Select **Marketplace Integrations**. The **Integrations** page adjusts.
4. Select **AWS**. The **m3sh>Integrations>AWS** page opens.
5. On the **Credentials** panel, select **Configure new credentials**. The **Create** pages opens.
6. Under **Credential details** enter:
* **Name**. Descriptive name for the Credential.
* **Destination**. This will be pre-selected for **AWS**.
* **Account id**. The id of the AWS account that hosts the IAM role m3ter will assume when connecting with AWS Marketplace.
* **Role name**. The name of the IAM role that m3ter will assume:
* In AWS, the role requires the following permissions.
* **aws-marketplace:DescribeEntity**
* **aws-marketplace:BatchMeterUsage**
* **aws-marketplace:ListEntities**
* Since the role will be impersonated by m3ter, its trust policy should include an **AssumeRole** action with a filtering condition. See [Creating AWS S3 Bucket Export Destinations](/guides/data-exports/creating-data-export-destinations#creating-aws-s3-bucket-export-destinations) for details on how to set up the required type of IAM role in your AWS account. Valid examples below:
**Permission Policy**
```json theme={null}
{
"Version": "2012-10-17",
"Statement": [
{
"Action": [
"aws-marketplace:BatchMeterUsage",
"aws-marketplace:ListEntities",
"aws-marketplace:DescribeEntity"
],
"Effect": "Allow",
"Resource": "*"
}
]
}
```
**Trust policy**
```json theme={null}
{
"Effect": "Allow",
"Principal": {
"AWS": "arn:aws:iam::816069165829:role/m3terExternalRole"
},
"Action": "sts:AssumeRole",
"Condition": {
"StringEquals": {
"sts:ExternalId": ""
}
}
},
```
7. Select **Create credential**. You are returned to the **Integrations>AWS** page where the new Credential is listed on the **Credentials** panel:
1. **Sales Flow: 3rd-Party Systems into m3ter**. When a Customer and their Order/Quote are created in a 3rd-party sales channel, a webhook is triggered and captured by m3ter. This causes an Account and Account Plan to be created respectively in m3ter.
2. **Usage Data Ingest for Metering**. End customer usage data measures and events are submitted and ingested into m3ter via API calls or file uploads. See [Submitting Usage Data](/guides/billing-and-usage-data/submitting-usage-data) and our [Submit measurements](/api/measurements/introduction) API Reference documentation.
3. **Billing Flow: m3ter into QuickBooks**. Bills in m3ter can be generated several times. When the Bill is ready to be sent to QuickBooks for invoicing, the Bill must be approved. On Bill approval in m3ter, Bill line items are sent through as QuickBooks Invoice and Invoice items.
**Integration for Outbound Bills!** You can set up an Integration directly in the Console for outbound bills to be sent through to your QuickBooks system. See [Configuring QuickBooks Integrations](/guides/integrations/setting-up-integrations/configuring-quickbooks-integrations) for more details.
# Setting Up and Managing Integrations
Source: https://docs.m3ter.com/guides/integrations/setting-up-integrations
In the *Integrations* section of the m3ter Console you can define Integrations to control how Bills generated in m3ter are sent out to external systems:
* Stripe
* NetSuite
* Paddle
* Chargebee
* QuickBooks
* Xero
* Salesforce
For some external systems, such as for a Salesforce integration, you can also choose to send operational data for entities in you m3ter Organization.
When you have performed an integration set up for how data will be sent to and synchronized with an external system, the integration will be immediately available for use and listed on the *Integrations* page for that system in the m3ter Console.
In the Integrations section, you can also create *Outgoing Webhooks*. These are used to create *Notification Webhook Integrations*:
* Create a Notification rule to control when a Notification will be triggered on the basis of a system Event occurring.
* Link the Notification rule to an Outgoing Webhook you've set up.
This section explains how to create and work with Integrations you can set up in the m3ter Console with your external systems and how to create and work with Notification Webhook Integrations.
The first topic offers some introductory and general guidance on working with and managing both types of integration:
* [Creating and Managing Integrations](/guides/integrations/setting-up-integrations/creating-and-managing-integration-configurations)
The following topics then cover how to set up and create Integration configurations for outbound Bills into specific external systems:
* [Configuring Stripe Integrations](/guides/integrations/setting-up-integrations/configuring-stripe-integrations)
* [Configuring NetSuite Integrations](/guides/integrations/setting-up-integrations/configuring-netsuite-integrations)
* [Configuring Paddle Integrations](/guides/integrations/setting-up-integrations/configuring-paddle-integrations)
* [Configuring Chargebee Integrations](/guides/integrations/setting-up-integrations/configuring-chargebee-integrations)
* [Configuring QuickBooks Integrations](/guides/integrations/setting-up-integrations/configuring-quickbooks-integrations)
* [Configuring Xero Integrations](/guides/integrations/setting-up-integrations/configuring-xero-integrations)
For Salesforce, you can also configure entity data sync integrations to send Accounts, Bills, Contracts, Prepayments/Commitments, or Balances data into your Salesforce system:
* [Configuring Salesforce Entity Data Sync Integrations](/guides/integrations/setting-up-integrations/configuring-sf-entity-data-integrations)
You can create Integrations for sending out Bills to AWS Marketplace or Azure Marketplace. Once operational, m3ter also offers some very useful reconciliation features to support your Marketplace integrations:
* [Configuring AWS Marketplace Integrations](/guides/integrations/setting-up-integrations/configuring-aws-integrations)
* [AWS Marketplace Integrations - Reconciliation Features](/guides/integrations/setting-up-integrations/aws-marketplace-integrations-reconciliation-features)
* [Configuring Azure Marketplace Integrations](/guides/integrations/setting-up-integrations/configuring-azure-marketplace-integrations)
* [Azure Marketplace Integrations - Reconciliation Features](/guides/integrations/setting-up-integrations/azure-marketplace-integrations-reconciliation-features)
You can set up multiple destinations for your Integrations:
* [Managing Multiple Third Party Destinations for Integrations](/guides/integrations/setting-up-integrations/managing-multiple-destinations-for-integrations)
You can create Outgoing Webhooks for your Notification rules to link to:
* [Creating and Managing Outgoing Webhooks](/guides/integrations/setting-up-integrations/creating-and-managing-destinations)
You can create Credentials to authenticate your Integrations with your external systems:
* [Creating and Managing Integration Credentials](/guides/integrations/setting-up-integrations/managing-integration-credentials)
Five system Events are generated for errors that might occur with your integrations and you can review, troubleshoot, and resolve these:
* [Reviewing and Resolving Integration Events](/guides/integrations/setting-up-integrations/reviewing-and-resolving-integration-events)
When you integrate external systems with the m3ter platform, external system entities and fields are mapped to m3ter entities and fields. *External Mappings* are created and act as mapping reference lookups for which objects and fields have been mapped across systems:
* [Creating and Managing External Mappings](/guides/integrations/setting-up-integrations/creating-and-managing-external-mappings)
If you've set up an integration with an external system, you can review details of the integration runs that have been performed for the integration:
* [Reviewing Integration Run Details](/guides/integrations/setting-up-integrations/reviewing-integration-run-details)
**Tip: Integrations API Calls?** When you have set up an integration, you can review and manage the integration using a full set of API Calls. See the [Integrations section](/api/integrations/introduction) of our API Reference Docs.
# Creating AWS Marketplace Integration Credentials
Source: https://docs.m3ter.com/guides/integrations/setting-up-integrations/_managing-integration-credentials-legacy/creating-aws-marketplace-integration-credentials
This topic explains how to create AWS Marketplace Integration Credentials, which you can then use to connect integrations with your AWS Marketplace instance. See [Configuring AWS Marketplace Integrations](/guides/integrations/setting-up-integrations/configuring-aws-integrations).
**To create AWS Marketplace integration Credentials:**
1. Select **m3sh**. The **Workflows** page opens.
2. Select **Integrations**. The **Integrations** page opens.
3. Select **Marketplace Integrations**. The **Integrations** page adjusts.
4. Select **AWS**. The **m3sh>Integrations>AWS** page opens.
5. On the **Credentials** panel, select **Configure new credentials**. The **Create** pages opens.
6. Under **Credential details** enter:
* **Name**. Descriptive name for the Credential.
* **Destination**. This will be pre-selected for **AWS**.
* **Account id**. The id of the AWS account that hosts the IAM role m3ter will assume when connecting with AWS Marketplace.
* **Role name**. The name of the IAM role that m3ter will assume:
* In AWS, the role requires the following permissions.
* **aws-marketplace:DescribeEntity**
* **aws-marketplace:BatchMeterUsage**
* **aws-marketplace:ListEntities**
* Since the role will be impersonated by m3ter, its trust policy should include an **AssumeRole** action with a filtering condition. See [Creating AWS S3 Bucket Export Destinations](/guides/data-exports/creating-data-export-destinations#creating-aws-s3-bucket-export-destinations) for details on how to set up the required type of IAM role in your AWS account. Valid examples below:
**Permission Policy**
```json theme={null}
{
"Version": "2012-10-17",
"Statement": [
{
"Action": [
"aws-marketplace:BatchMeterUsage",
"aws-marketplace:ListEntities",
"aws-marketplace:DescribeEntity"
],
"Effect": "Allow",
"Resource": "*"
}
]
}
```
**Trust policy**
```json theme={null}
{
"Effect": "Allow",
"Principal": {
"AWS": "arn:aws:iam::816069165829:role/m3terExternalRole"
},
"Action": "sts:AssumeRole",
"Condition": {
"StringEquals": {
"sts:ExternalId": ""
}
}
},
```
7. Select **Create credential**. You are returned to the **Integrations>AWS** page where the new Credential is listed on the **Credentials** panel:
![AWSM Integs16a]() * The Credential is now available for connecting your AWS Marketplace Integration to your AWS Marketplace instance. See [Configuring AWS Marketplace Integrations>Setting Up Authentication for the Integration](/guides/integrations/setting-up-integrations/configuring-aws-integrations#setting-up-authentication-for-the-integration).
# Creating Azure Marketplace Integration Credentials
Source: https://docs.m3ter.com/guides/integrations/setting-up-integrations/_managing-integration-credentials-legacy/creating-azure-marketplace-integration-credentials
This topic explains how to create Azure Marketplace Integration Credentials, which you can then use to connect integrations with your Azure Marketplace instance. See [Configuring Azure Marketplace Integrations](/guides/integrations/setting-up-integrations/configuring-azure-marketplace-integrations).
**To create Azure Marketplace integration Credentials:**
1. Select **m3sh**. The **Workflows** page opens.
2. Select **Integrations**. The **Integrations** page opens.
3. Select **Marketplace Integrations**. The **Integrations** page adjusts.
4. Select **AZURE**. The **m3sh>Integrations>AZURE** page opens.
5. On the **Credentials** panel, select **Configure new credentials**. The **Create** pages opens at **Stage 1: Select a system and name**.
6. Under **Credential details** enter:
* **Name**. Descriptive name for the Credential.
* **Destination**. This will be pre-selected for **Azure**.
* **Tenant id**. The Azure tenant hosting the app. For how to find this, see [Tenant ID](/guides/integrations/setting-up-integrations/configuring-azure-marketplace-integrations#tenant-id).
* **Client id**. The App registration client id.
* **Client secret**. The Credential Secret Value.
You can find the **Client id** and **Client secret** in the **M3terMarketplaceApp** under **Certificates & secrets**:
* The Credential is now available for connecting your AWS Marketplace Integration to your AWS Marketplace instance. See [Configuring AWS Marketplace Integrations>Setting Up Authentication for the Integration](/guides/integrations/setting-up-integrations/configuring-aws-integrations#setting-up-authentication-for-the-integration).
# Creating Azure Marketplace Integration Credentials
Source: https://docs.m3ter.com/guides/integrations/setting-up-integrations/_managing-integration-credentials-legacy/creating-azure-marketplace-integration-credentials
This topic explains how to create Azure Marketplace Integration Credentials, which you can then use to connect integrations with your Azure Marketplace instance. See [Configuring Azure Marketplace Integrations](/guides/integrations/setting-up-integrations/configuring-azure-marketplace-integrations).
**To create Azure Marketplace integration Credentials:**
1. Select **m3sh**. The **Workflows** page opens.
2. Select **Integrations**. The **Integrations** page opens.
3. Select **Marketplace Integrations**. The **Integrations** page adjusts.
4. Select **AZURE**. The **m3sh>Integrations>AZURE** page opens.
5. On the **Credentials** panel, select **Configure new credentials**. The **Create** pages opens at **Stage 1: Select a system and name**.
6. Under **Credential details** enter:
* **Name**. Descriptive name for the Credential.
* **Destination**. This will be pre-selected for **Azure**.
* **Tenant id**. The Azure tenant hosting the app. For how to find this, see [Tenant ID](/guides/integrations/setting-up-integrations/configuring-azure-marketplace-integrations#tenant-id).
* **Client id**. The App registration client id.
* **Client secret**. The Credential Secret Value.
You can find the **Client id** and **Client secret** in the **M3terMarketplaceApp** under **Certificates & secrets**:
![]() 6. Select **Create credential**. You are returned to the **Integrations>AZURE** page where the new Credential is listed on the **Credentials** panel:
6. Select **Create credential**. You are returned to the **Integrations>AZURE** page where the new Credential is listed on the **Credentials** panel:
![Azure Mkt Place21a]() * The Credential is now available for connecting your Azure Marketplace Integration to your Azure Marketplace instance. See [Configuring Azure Marketplace Integrations>Setting Up Authentication for the Integration](/guides/integrations/setting-up-integrations/configuring-azure-marketplace-integrations#setting-up-authentication-for-the-integration).
# Creating Chargebee Integration Credentials
Source: https://docs.m3ter.com/guides/integrations/setting-up-integrations/_managing-integration-credentials-legacy/creating-chargebee-integration-credentials
This topic explains how to create Chargebee Integration Credentials which you can then use to connect Integrations with your Chargebee system. See [Configuring Chargebee Integrations](/guides/integrations/setting-up-integrations/configuring-chargebee-integrations).
**To create Chargebee integration Credentials:**
1. Select **m3sh**:
* The Credential is now available for connecting your Azure Marketplace Integration to your Azure Marketplace instance. See [Configuring Azure Marketplace Integrations>Setting Up Authentication for the Integration](/guides/integrations/setting-up-integrations/configuring-azure-marketplace-integrations#setting-up-authentication-for-the-integration).
# Creating Chargebee Integration Credentials
Source: https://docs.m3ter.com/guides/integrations/setting-up-integrations/_managing-integration-credentials-legacy/creating-chargebee-integration-credentials
This topic explains how to create Chargebee Integration Credentials which you can then use to connect Integrations with your Chargebee system. See [Configuring Chargebee Integrations](/guides/integrations/setting-up-integrations/configuring-chargebee-integrations).
**To create Chargebee integration Credentials:**
1. Select **m3sh**:
 The **Workflows** page opens.
2. Select **Integrations**. The **Integrations** page opens.
3. Select **Chargebee**. The **Chargebee Integrations** page opens.
4. On the **Credentials** panel, select **Configure new credentials**:
The **Workflows** page opens.
2. Select **Integrations**. The **Integrations** page opens.
3. Select **Chargebee**. The **Chargebee Integrations** page opens.
4. On the **Credentials** panel, select **Configure new credentials**:
![Integration Credentials15a]() The **Create** pages opens.
5. Under **Credential details** enter:
* **Name**. Descriptive name for the Credential.
* **Destination**. This will be pre-selected for **Chargebee**.
* **Api key**. The **Api key** generated in the Chargebee Console.
* **Site**. The details of the Chargebee **Site** to be used as the subdomain when making API Requests.
6. Select **Create credential**. You are returned to the **Chargebee Integrations** page where the new Credential is listed on the **Credentials** panel:
The **Create** pages opens.
5. Under **Credential details** enter:
* **Name**. Descriptive name for the Credential.
* **Destination**. This will be pre-selected for **Chargebee**.
* **Api key**. The **Api key** generated in the Chargebee Console.
* **Site**. The details of the Chargebee **Site** to be used as the subdomain when making API Requests.
6. Select **Create credential**. You are returned to the **Chargebee Integrations** page where the new Credential is listed on the **Credentials** panel:
![Integration Credentials16a]() * The Credential is now available for connecting your Integrations with Chargebee. See [Configuring Chargebee Integrations>Setting Up Authentication for the Integration](/guides/integrations/setting-up-integrations/configuring-chargebee-integrations#setting-up-authentication-for-the-integration).
# Creating NetSuite Integration Credentials
Source: https://docs.m3ter.com/guides/integrations/setting-up-integrations/_managing-integration-credentials-legacy/creating-netsuite-integration-credentials
This topic explains how to create Integration Credentials, which you can then use to connect your NetSuite Integrations with your NetSuite system. See [Configuring NetSuite Integrations](/guides/integrations/setting-up-integrations/configuring-netsuite-integrations).
**To create NetSuite integration Credentials:**
1. Select **m3sh**:
* The Credential is now available for connecting your Integrations with Chargebee. See [Configuring Chargebee Integrations>Setting Up Authentication for the Integration](/guides/integrations/setting-up-integrations/configuring-chargebee-integrations#setting-up-authentication-for-the-integration).
# Creating NetSuite Integration Credentials
Source: https://docs.m3ter.com/guides/integrations/setting-up-integrations/_managing-integration-credentials-legacy/creating-netsuite-integration-credentials
This topic explains how to create Integration Credentials, which you can then use to connect your NetSuite Integrations with your NetSuite system. See [Configuring NetSuite Integrations](/guides/integrations/setting-up-integrations/configuring-netsuite-integrations).
**To create NetSuite integration Credentials:**
1. Select **m3sh**:
 The **Workflows** page opens.
2. Select **Integrations**. The **Integrations** page opens.
3. Select **NetSuite**. The **NetSuite Integrations** page opens.
4. On the **Credentials** panel, select **Configure new credentials**:
The **Workflows** page opens.
2. Select **Integrations**. The **Integrations** page opens.
3. Select **NetSuite**. The **NetSuite Integrations** page opens.
4. On the **Credentials** panel, select **Configure new credentials**:
![Integration Credentials11a]() The **Create** pages opens.
5. Under **Credential details** enter:
* **Name**. Descriptive name for the Credential.
* **Destination**. This will be pre-selected for **NetSuite**.
* **Account id.** Enter the NetSuite Account Id. You can find this on the **Setup>Company>Company Information** page in the NetSuite console.
**Warning! Sandbox Account id - use hyphen:** If you are creating a Credential to authenticate with your NetSuite Sandbox, the **Account id** field will need to use a *hyphen* character not an underscore. For example, `12345-SB` instead of `12345_SB`.
* **Client id.** Enter the m3ter Integration Client ID, which was available when the integration was set up in the NetSuite console.
* **Certificate id.** The Certificate ID. You can obtain this from the **Setup>Integrations>OAuth 2.0 Client Credentials Setup** page in the NetSuite console.
* **Upload Netsuite Credentials**. Allows you to upload a private key. This should be generated via OpenSSL or other tool providing a comparable encryption level.
**Note:** **NetSuite OAuth user's client credentials?** See the [Configuring NetSuite](/guides/integrations/setting-up-integrations/configuring-netsuite-integrations/configuring-netsuite-integration-prerequisites#configuring-netsuite) section in the [Completing NetSuite Integration Prerequisites](/guides/integrations/setting-up-integrations/configuring-netsuite-integrations/configuring-netsuite-integration-prerequisites) topic for more details on how to generate these credentials.
6. Select **Create credential**. You are returned to the **NetSuite Integrations** page where the new Credential is listed on the **Credentials** panel:
* The Credential is now available for connecting your Integrations with NetSuite. See [Configuring Netsuite Integrations>Setting Up Authentication for the Integration](/guides/integrations/setting-up-integrations/configuring-netsuite-integrations#setting-up-authentication-for-the-integration).
# Creating Paddle Integration Credentials
Source: https://docs.m3ter.com/guides/integrations/setting-up-integrations/_managing-integration-credentials-legacy/creating-paddle-integration-credentials
This topic explains how to create Integration Credentials which you can then use to connect your Paddle Integrations with your Paddle system. See [Configuring Paddle Integrations](/guides/integrations/setting-up-integrations/configuring-paddle-integrations).
**Tip: Paddle or Paddle (Sandbox Mode)?** The steps to create a Credential for authenticating an Integration with your Paddle *Sandbox environment* are the same, except you'll need to select **Paddle (Sandbox Mode)** as the destination.
**To create Paddle integration Credentials:**
1. Select **m3sh**:
The **Create** pages opens.
5. Under **Credential details** enter:
* **Name**. Descriptive name for the Credential.
* **Destination**. This will be pre-selected for **NetSuite**.
* **Account id.** Enter the NetSuite Account Id. You can find this on the **Setup>Company>Company Information** page in the NetSuite console.
**Warning! Sandbox Account id - use hyphen:** If you are creating a Credential to authenticate with your NetSuite Sandbox, the **Account id** field will need to use a *hyphen* character not an underscore. For example, `12345-SB` instead of `12345_SB`.
* **Client id.** Enter the m3ter Integration Client ID, which was available when the integration was set up in the NetSuite console.
* **Certificate id.** The Certificate ID. You can obtain this from the **Setup>Integrations>OAuth 2.0 Client Credentials Setup** page in the NetSuite console.
* **Upload Netsuite Credentials**. Allows you to upload a private key. This should be generated via OpenSSL or other tool providing a comparable encryption level.
**Note:** **NetSuite OAuth user's client credentials?** See the [Configuring NetSuite](/guides/integrations/setting-up-integrations/configuring-netsuite-integrations/configuring-netsuite-integration-prerequisites#configuring-netsuite) section in the [Completing NetSuite Integration Prerequisites](/guides/integrations/setting-up-integrations/configuring-netsuite-integrations/configuring-netsuite-integration-prerequisites) topic for more details on how to generate these credentials.
6. Select **Create credential**. You are returned to the **NetSuite Integrations** page where the new Credential is listed on the **Credentials** panel:
* The Credential is now available for connecting your Integrations with NetSuite. See [Configuring Netsuite Integrations>Setting Up Authentication for the Integration](/guides/integrations/setting-up-integrations/configuring-netsuite-integrations#setting-up-authentication-for-the-integration).
# Creating Paddle Integration Credentials
Source: https://docs.m3ter.com/guides/integrations/setting-up-integrations/_managing-integration-credentials-legacy/creating-paddle-integration-credentials
This topic explains how to create Integration Credentials which you can then use to connect your Paddle Integrations with your Paddle system. See [Configuring Paddle Integrations](/guides/integrations/setting-up-integrations/configuring-paddle-integrations).
**Tip: Paddle or Paddle (Sandbox Mode)?** The steps to create a Credential for authenticating an Integration with your Paddle *Sandbox environment* are the same, except you'll need to select **Paddle (Sandbox Mode)** as the destination.
**To create Paddle integration Credentials:**
1. Select **m3sh**:
 The **Workflows** page opens.
2. Select **Integrations**. The **Integrations** page opens.
3. Select **Paddle**. The **Paddle Integrations** page opens.
4. On the **Credentials** panel, select **Configure new credentials**:
The **Workflows** page opens.
2. Select **Integrations**. The **Integrations** page opens.
3. Select **Paddle**. The **Paddle Integrations** page opens.
4. On the **Credentials** panel, select **Configure new credentials**:
![Integration Credentials13a]() The **Create** pages opens.
5. Under **Credential details** enter:
* **Name**. Descriptive name for the Credential.
* **Destination**. This will be pre-selected for **Paddle**.
* **Api key**. Enter an Api key generated in the Paddle Console.
**Tip: Paddle Sandbox Environment?** Alternatively, select **Paddle (Sandbox Mode)** for **Destination** if you want to use the Credential to authenticate with your Paddle *Sandbox environment*.
6. Select **Create credential**. You are returned to the **Paddle Integrations** page where the new Credential is listed on the **Credentials** panel:
The **Create** pages opens.
5. Under **Credential details** enter:
* **Name**. Descriptive name for the Credential.
* **Destination**. This will be pre-selected for **Paddle**.
* **Api key**. Enter an Api key generated in the Paddle Console.
**Tip: Paddle Sandbox Environment?** Alternatively, select **Paddle (Sandbox Mode)** for **Destination** if you want to use the Credential to authenticate with your Paddle *Sandbox environment*.
6. Select **Create credential**. You are returned to the **Paddle Integrations** page where the new Credential is listed on the **Credentials** panel:
![Integration Credentials14a]() * The Credential is now available for connecting your Integrations with Paddle. See [Configuring Paddle Integrations>Setting Up Authentication for the Integration](/guides/integrations/setting-up-integrations/configuring-paddle-integrations#setting-up-the-authentication-for-the-integration).
# Creating QuickBooks Integration Credentials
Source: https://docs.m3ter.com/guides/integrations/setting-up-integrations/_managing-integration-credentials-legacy/creating-quickbooks-integration-credentials
This topic explains how to create Integration Credentials which you can then use to connect your QuickBooks Integrations with your QuickBooks system. See [Configuring QuickBooks Integrations](/guides/integrations/setting-up-integrations/configuring-quickbooks-integrations).
**Tip: QuickBooks or QuickBooks (Sandbox Mode)?** The steps to create a Credential for authenticating an integration with your QuickBooks *Sandbox environment* are the same, except you'll need to select **QuickBooks (Sandbox Mode)** as the destination.
**To create QuickBooks integration Credentials:**
1. Select **m3sh**:
* The Credential is now available for connecting your Integrations with Paddle. See [Configuring Paddle Integrations>Setting Up Authentication for the Integration](/guides/integrations/setting-up-integrations/configuring-paddle-integrations#setting-up-the-authentication-for-the-integration).
# Creating QuickBooks Integration Credentials
Source: https://docs.m3ter.com/guides/integrations/setting-up-integrations/_managing-integration-credentials-legacy/creating-quickbooks-integration-credentials
This topic explains how to create Integration Credentials which you can then use to connect your QuickBooks Integrations with your QuickBooks system. See [Configuring QuickBooks Integrations](/guides/integrations/setting-up-integrations/configuring-quickbooks-integrations).
**Tip: QuickBooks or QuickBooks (Sandbox Mode)?** The steps to create a Credential for authenticating an integration with your QuickBooks *Sandbox environment* are the same, except you'll need to select **QuickBooks (Sandbox Mode)** as the destination.
**To create QuickBooks integration Credentials:**
1. Select **m3sh**:
 The **Workflows** page opens.
2. Select **Integrations**. The **Integrations** page opens.
3. Select **QuickBooks**. The **QuickBooks Integrations** page opens.
4. On the **Credentials** panel, select **Configure new credentials**:
The **Workflows** page opens.
2. Select **Integrations**. The **Integrations** page opens.
3. Select **QuickBooks**. The **QuickBooks Integrations** page opens.
4. On the **Credentials** panel, select **Configure new credentials**:
![Integration Credentials17a]() The **Create** pages opens.
5. Under **Credential details** enter:
* **Name**. Descriptive name for the Credential.
* **Destination**. This will be pre-selected for **QuickBooks**.
When you enter a name, the form adjusts to show an information panel under **Destination**, which advises you that you'll need to provide authentication details on the QuickBooks website.
**Tip: QuickBooks Sandbox Environment?** Alternatively, select **QuickBooks (Sandbox Mode)** for **Destination** if you want to use the Credential to authenticate with your QuickBooks *Sandbox environment*.
6. Select **Go to QuickBooks**. You are taken to a **Sign in** page where you can use your Intuit account credentials to sign in to QuickBooks and approve access for m3ter.
7. Use your browser back button to return to the **Create** page.
8. Select **Create credential**. You are returned to the **QuickBooks Integrations** page where the new Credential is listed on the **Credentials** panel.
* The Credential is now available for connecting your Integrations with your QuickBooks system. See [Configuring Chargebee Integrations>Setting Up Authentication for the Integration](/guides/integrations/setting-up-integrations/configuring-quickbooks-integrations#setting-up-authentication-for-the-integration).
**Warning: Authentication with QuickBooks not completed!** If you fail to complete authentication with your QuickBooks instance promptly, a time-to-live (TTL) of ten minutes is imposed after which the Credential is removed and you'll have to start again. If you return to the **Quickbooks Integrations** page within that TTL, any **Credentials** waiting for authentication completion will have a suffix of "Incomplete" attached, such as: **Quickbooks Credential 1 (Incomplete)**.
# Creating Salesforce Integration Credentials
Source: https://docs.m3ter.com/guides/integrations/setting-up-integrations/_managing-integration-credentials-legacy/creating-salesforce-integration-credentials
This topic explains how to create Integration Credentials which you can then use to connect Salesforce Integrations with your Salesforce system. See [Configuring Salesforce Entity Data Sync Integrations](/guides/integrations/setting-up-integrations/configuring-sf-entity-data-integrations).
**Warning: Create External Client App in Salesforce First!** To create a Salesforce Integration Credential, you'll first need to create and configure an External Client App in Salesforce. For more details, please see the [Salesforce documentation](https://help.salesforce.com/s/articleView?id=xcloud.create_a_local_external_client_app.htm\&type=5) on how to do this. Also, note that the External Client App needs to be set up for the Client Credentials Flow - see the [Salesforce Documentation](https://help.salesforce.com/s/articleView?id=xcloud.configure_client_credentials_flow_for_external_client_apps.htm\&type=5) for more details. Please ensure that when configuring your External Client App, you select the required **OAuth Scopes**:
* Manage user data via APIS (api)
* Perform requests at any time (refresh\_token, offline\_access)
**To create Salesforce integration Credentials:**
1. Select **m3sh**:
The **Create** pages opens.
5. Under **Credential details** enter:
* **Name**. Descriptive name for the Credential.
* **Destination**. This will be pre-selected for **QuickBooks**.
When you enter a name, the form adjusts to show an information panel under **Destination**, which advises you that you'll need to provide authentication details on the QuickBooks website.
**Tip: QuickBooks Sandbox Environment?** Alternatively, select **QuickBooks (Sandbox Mode)** for **Destination** if you want to use the Credential to authenticate with your QuickBooks *Sandbox environment*.
6. Select **Go to QuickBooks**. You are taken to a **Sign in** page where you can use your Intuit account credentials to sign in to QuickBooks and approve access for m3ter.
7. Use your browser back button to return to the **Create** page.
8. Select **Create credential**. You are returned to the **QuickBooks Integrations** page where the new Credential is listed on the **Credentials** panel.
* The Credential is now available for connecting your Integrations with your QuickBooks system. See [Configuring Chargebee Integrations>Setting Up Authentication for the Integration](/guides/integrations/setting-up-integrations/configuring-quickbooks-integrations#setting-up-authentication-for-the-integration).
**Warning: Authentication with QuickBooks not completed!** If you fail to complete authentication with your QuickBooks instance promptly, a time-to-live (TTL) of ten minutes is imposed after which the Credential is removed and you'll have to start again. If you return to the **Quickbooks Integrations** page within that TTL, any **Credentials** waiting for authentication completion will have a suffix of "Incomplete" attached, such as: **Quickbooks Credential 1 (Incomplete)**.
# Creating Salesforce Integration Credentials
Source: https://docs.m3ter.com/guides/integrations/setting-up-integrations/_managing-integration-credentials-legacy/creating-salesforce-integration-credentials
This topic explains how to create Integration Credentials which you can then use to connect Salesforce Integrations with your Salesforce system. See [Configuring Salesforce Entity Data Sync Integrations](/guides/integrations/setting-up-integrations/configuring-sf-entity-data-integrations).
**Warning: Create External Client App in Salesforce First!** To create a Salesforce Integration Credential, you'll first need to create and configure an External Client App in Salesforce. For more details, please see the [Salesforce documentation](https://help.salesforce.com/s/articleView?id=xcloud.create_a_local_external_client_app.htm\&type=5) on how to do this. Also, note that the External Client App needs to be set up for the Client Credentials Flow - see the [Salesforce Documentation](https://help.salesforce.com/s/articleView?id=xcloud.configure_client_credentials_flow_for_external_client_apps.htm\&type=5) for more details. Please ensure that when configuring your External Client App, you select the required **OAuth Scopes**:
* Manage user data via APIS (api)
* Perform requests at any time (refresh\_token, offline\_access)
**To create Salesforce integration Credentials:**
1. Select **m3sh**:
 The **Workflows** page opens.
2. Select **Integrations**. The **Integrations** page opens.
3. Select **Salesforce**. The **Salesforce Integrations** page opens.
4. On the **Credentials** panel, select **Configure new credentials**:
The **Workflows** page opens.
2. Select **Integrations**. The **Integrations** page opens.
3. Select **Salesforce**. The **Salesforce Integrations** page opens.
4. On the **Credentials** panel, select **Configure new credentials**:
![Integration Credentials19a]() The **Create** pages opens.
5. Under **Credential details** enter:
* **Name**. Descriptive name for the Credential.
* **Destination**. This will be pre-selected for **Salesforce**.
* **Subdomain**. The subdomain of your Salesforce Org. For example, if you access Salesforce using *MyDomainName.my.salesforce.com*, then your subdomain would be *MyDomainName*.
* **Consumer key**. The consumer key obtained from the External Client App configured in Salesforce.
* **Consumer secret**. The consumer secret obtained from the External Client App configured in Salesforce.
6. Select **Create credential**. You are returned to the **Salesforce Integrations** page where the new Credential is listed on the **Credentials** panel:
The **Create** pages opens.
5. Under **Credential details** enter:
* **Name**. Descriptive name for the Credential.
* **Destination**. This will be pre-selected for **Salesforce**.
* **Subdomain**. The subdomain of your Salesforce Org. For example, if you access Salesforce using *MyDomainName.my.salesforce.com*, then your subdomain would be *MyDomainName*.
* **Consumer key**. The consumer key obtained from the External Client App configured in Salesforce.
* **Consumer secret**. The consumer secret obtained from the External Client App configured in Salesforce.
6. Select **Create credential**. You are returned to the **Salesforce Integrations** page where the new Credential is listed on the **Credentials** panel:
![Integration Credentials20a]() * The Credential is now available for connecting your Integrations with Salesforce. See [Configuring Salesforce Entity Data Sync Integrations>Setting Up Authentication for the Integration](/guides/integrations/setting-up-integrations/configuring-sf-entity-data-integrations#setting-up-authentication-for-the-integration).
# Creating Stripe Integration Credentials
Source: https://docs.m3ter.com/guides/integrations/setting-up-integrations/_managing-integration-credentials-legacy/creating-stripe-integration-credentials
This topic explains how to create Integration Credentials which you can use to connect your Stripe Integrations in m3ter with your Stripe system. See [Configuring Stripe Integrations](/guides/integrations/setting-up-integrations/configuring-stripe-integrations#setting-up-authentication-for-the-integration).
**Tip: Stripe or Stripe (Test Mode)?** The steps to create a Credential for authenticating an integration with your Stripe *test environment* are the same, except you'll need to select **Stripe (Test Mode)** as the destination.
**To create Stripe integration Credentials:**
1. Select **m3sh**:
* The Credential is now available for connecting your Integrations with Salesforce. See [Configuring Salesforce Entity Data Sync Integrations>Setting Up Authentication for the Integration](/guides/integrations/setting-up-integrations/configuring-sf-entity-data-integrations#setting-up-authentication-for-the-integration).
# Creating Stripe Integration Credentials
Source: https://docs.m3ter.com/guides/integrations/setting-up-integrations/_managing-integration-credentials-legacy/creating-stripe-integration-credentials
This topic explains how to create Integration Credentials which you can use to connect your Stripe Integrations in m3ter with your Stripe system. See [Configuring Stripe Integrations](/guides/integrations/setting-up-integrations/configuring-stripe-integrations#setting-up-authentication-for-the-integration).
**Tip: Stripe or Stripe (Test Mode)?** The steps to create a Credential for authenticating an integration with your Stripe *test environment* are the same, except you'll need to select **Stripe (Test Mode)** as the destination.
**To create Stripe integration Credentials:**
1. Select **m3sh**:
 The **Workflows** page opens.
2. Select **Integrations**. The **Integrations** page opens.
3. Select **Stripe**. The **Stripe Integrations** page opens.
4. On the **Credentials** panel, select **Configure new credentials**:
The **Workflows** page opens.
2. Select **Integrations**. The **Integrations** page opens.
3. Select **Stripe**. The **Stripe Integrations** page opens.
4. On the **Credentials** panel, select **Configure new credentials**:
![Integration Credentials8a]() The **Create** pages opens.
5. Under **Credential details** enter:
* **Name**. Descriptive name for the Credential.
* **Destination**. This will be pre-selected for **Stripe**.
When you enter a name, the form adjusts to show an information panel under **Destination**, which advises you that you'll need to provide authentication details on the Stripe website.
6. Select **Go to Stripe**. Under **Get started with Stripe**, log into your Stripe account and approve access for m3ter.
7. Select the **Return to m3ter** link at the left-hand side to be taken back to **Create** page.
8. Select **Create credential**. You are returned to the **Stripe Integrations** page where the new Credential is listed on the **Credentials** panel:
* The Credential is now available for connecting your Stripe Integrations with Stripe. See [Configuring Stripe Integrations>Setting Up Authentication for the Integration](/guides/integrations/setting-up-integrations/configuring-stripe-integrations#setting-up-authentication-for-the-integration).
**Warning: Authentication with Stripe not completed!** If you fail to complete authentication with your Stripe instance promptly, a time-to-live (TTL) of ten minutes is imposed after which the Credential is removed and you'll have to start again. If you return to the **Stripe Integrations** page within that TTL, any **Credentials** waiting for authentication completion will have a suffix of "Incomplete" attached, such as: **Stripe Credential 1 (Incomplete)**.
# Creating Xero Integration Credentials
Source: https://docs.m3ter.com/guides/integrations/setting-up-integrations/_managing-integration-credentials-legacy/creating-xero-integration-credentials
This topic explains how to create Integration Credentials which you can then use to connect your Xero Integrations with your Xero system. See [Configuring Xero Integrations](/guides/integrations/setting-up-integrations/configuring-xero-integrations).
**To create Xero integration Credentials:**
1. Select **m3sh**:
The **Create** pages opens.
5. Under **Credential details** enter:
* **Name**. Descriptive name for the Credential.
* **Destination**. This will be pre-selected for **Stripe**.
When you enter a name, the form adjusts to show an information panel under **Destination**, which advises you that you'll need to provide authentication details on the Stripe website.
6. Select **Go to Stripe**. Under **Get started with Stripe**, log into your Stripe account and approve access for m3ter.
7. Select the **Return to m3ter** link at the left-hand side to be taken back to **Create** page.
8. Select **Create credential**. You are returned to the **Stripe Integrations** page where the new Credential is listed on the **Credentials** panel:
* The Credential is now available for connecting your Stripe Integrations with Stripe. See [Configuring Stripe Integrations>Setting Up Authentication for the Integration](/guides/integrations/setting-up-integrations/configuring-stripe-integrations#setting-up-authentication-for-the-integration).
**Warning: Authentication with Stripe not completed!** If you fail to complete authentication with your Stripe instance promptly, a time-to-live (TTL) of ten minutes is imposed after which the Credential is removed and you'll have to start again. If you return to the **Stripe Integrations** page within that TTL, any **Credentials** waiting for authentication completion will have a suffix of "Incomplete" attached, such as: **Stripe Credential 1 (Incomplete)**.
# Creating Xero Integration Credentials
Source: https://docs.m3ter.com/guides/integrations/setting-up-integrations/_managing-integration-credentials-legacy/creating-xero-integration-credentials
This topic explains how to create Integration Credentials which you can then use to connect your Xero Integrations with your Xero system. See [Configuring Xero Integrations](/guides/integrations/setting-up-integrations/configuring-xero-integrations).
**To create Xero integration Credentials:**
1. Select **m3sh**:
 The **Workflows** page opens.
2. Select **Integrations**. The **Integrations** page opens.
3. Select **Xero**. The **Xero Integrations** page opens.
4. On the **Credentials** panel, select **Configure new credentials**:
The **Workflows** page opens.
2. Select **Integrations**. The **Integrations** page opens.
3. Select **Xero**. The **Xero Integrations** page opens.
4. On the **Credentials** panel, select **Configure new credentials**:
![Integration Credentials18a]() The **Create** pages opens.
5. Under **Credential details** enter:
* **Name**. Descriptive name for the Credential.
* **Destination**. This will be pre-selected for **Xero**.
When you enter a name, the form adjusts to show an information panel under **Destination**, which advises you that you'll need to provide authentication details on the Xero website.
6. Select **Go to Xero**. You are redirected to the **Log in to Xero** page:
The **Create** pages opens.
5. Under **Credential details** enter:
* **Name**. Descriptive name for the Credential.
* **Destination**. This will be pre-selected for **Xero**.
When you enter a name, the form adjusts to show an information panel under **Destination**, which advises you that you'll need to provide authentication details on the Xero website.
6. Select **Go to Xero**. You are redirected to the **Log in to Xero** page:
![]() 7. Log into your Xero Account.
**Important!** Ensure that the Xero org you are logged into to is the one you need to create the Credential for and which you'll use to connect your Integration to Xero.
8. Grant access to your Xero organisation for the m3ter integration Credential:
* If you have multiple Xero organisations set up, select the one you want the m3ter integration Credential to access and then select **Continue**:
* If you have a single Xero organisation set up, select **Allow access** for the m3ter integration Credential.
* You are redirected back to m3ter.
9. Select **Create credential**. You are returned to the **Xero Integrations** page where the new Credential is listed on the **Credentials** panel.
* The Credential is now available for connecting your Integrations with Xero. See [Configuring Xero Integrations>Setting Up Authentication for the Integration](/guides/integrations/setting-up-integrations/configuring-xero-integrations#setting-up-authentication-for-the-integration).
**Warning: Authentication with Xero not completed!** If you fail to complete authentication with your Xero instance promptly, a time-to-live (TTL) of ten minutes is imposed after which the Credential is removed and you'll have to start again. If you return to the **Xero Integrations** page within that TTL, any **Credentials** waiting for authentication completion will have a suffix of "Incomplete" attached, such as: **Xero Credential 1 (Incomplete)**.
# AWS Marketplace Integrations - Reconciliation Features
Source: https://docs.m3ter.com/guides/integrations/setting-up-integrations/aws-marketplace-integrations-reconciliation-features
m3ter offers two useful reconciliation features specifically designed to support AWS Marketplace integrations:
* [Reviewing Usage Reports for Bill integrations](/guides/integrations/setting-up-integrations/aws-marketplace-integrations-reconciliation-features#reviewing-usage-reports-for-bill-integrations)
* [Running AWS CloudTrail Reconciliation](/guides/integrations/setting-up-integrations/aws-marketplace-integrations-reconciliation-features#running-aws-cloudtrail-reconciliation)
You can also exploit a general troubleshooting and reconciliation feature in m3ter, which allows you to review integrations runs performed for your AWS Marketplace Bill integrations:
* [Reviewing AWS Marketplace Bill Integration Runs](/guides/integrations/setting-up-integrations/aws-marketplace-integrations-reconciliation-features#reviewing-aws-marketplace-bill-integration-runs)
## Reviewing Usage Reports for Bill Integrations
When Bill-based integration runs are performed, all interactions between m3ter and AWS Marketplace are persisted as logs. These logs are retrievable via a specific API endpoint, and you can use them to track, for each Bill, all amounts sent over to AWS Marketplace, together with the date and time the Bill data was sent. This provides a report on usage data sent to AWS Marketplace for each Bill integration run, and is particularly useful for Bill recalculation scenarios where several updates might have taken place during the billing period.
* **API Endpoint**: [Retrieve Reported Usage](/api/marketplace-integrations/retrieve-reported-usage)
* **Example Response**:
```json theme={null}
{
"data": [
{
"accountId": "07fc9a71-74ab-492a-b6e1-f48fd8500916",
"billId": "92d3154f-4c82-40c2-9af0-5d8c14326977",
"externalSystem": "AWS",
"reportedUsage": {
"3mgmp9q6okn47u0rgmzzjdi9k-m3BillAgg1": {
"2025-06-10T10:00:00Z": 1190000,
"2025-06-10T11:00:00Z": 790000,
"2025-06-10T12:00:00Z": 540000
},
"3mgmp9q6okn47u0rgmzzjdi9k-m3BillAgg2": {
"2025-06-10T10:00:00Z": 180000,
"2025-06-10T11:00:00Z": 200000,
"2025-06-10T12:00:00Z": 200000,
"2025-06-10T13:00:00Z": 180000
}
}
}
]
}
```
* Note that the format of the response can vary and depends on the selected configuration option for **Split usage line items** - **Item per bill**, **Item per product**, or **Item per aggregation**.
## Running AWS CloudTrail Reconciliation
AWS CloudTrail reconciliation is an optional feature designed to offer visibility between the data *received by* AWS Marketplace and the log data *sent by* m3ter when integrations run. The AWS Marketplace integration can then use this data comparison to help ensure billing accuracy and reliability is maintained. There are two cases where the data sent might diverge from the data received:
* If the usage data sent *is greater than* the data received, then the integration assumes something has failed in the data sync and will automatically send the difference.
* If the usage data sent *is less than* the data received, then the integration does not attempt to make any automatic adjustment because negative bill line items for credits are not supported in AWS Marketplace. However a safeguard is built in for this case. An alert is automatically sent to m3ter users at the end of the billing period giving details of the negative billing disparity, and enabling them to perform their own billing reconciliation, as they see fit.
By performing this process that compares data sent against data received on a daily basis, the AWS CloudTrail reconciliation feature minimizes the need for manual troubleshooting and reconciliation.
### Setting Up AWS CloudTrail Reconciliation
AWS CloudTrail reconciliation requires a custom event store to be provisioned on your infrastructure. An additional IAM Role also needs to be configured to allow access to that event store, with the following permissions:
* **cloudtrail:StartQuery**
* **cloudtrail:GetEventDataStore**
* **cloudtrail:GetQueryResults**
### AWS CloudTrail Reconciliation Process
The high-level process is as follows:
* Daily run at 11am UTC.
* Each run loads AWS CloudTrail events from the previous calendar day (00:00-24:00).
* If totals match, no further action is taken.
* If totals don’t match, corrective action is taken:
* If the sent total is greater, corrective usage is sent over to the AWS metering API.
* If the sent total is less, then an alert is issued to users.
## Reviewing AWS Marketplace Bill Integration Runs
If you've set up an integration with an external system, m3ter allows you to review details of the integration runs that have been performed for the integration. For any Bills that have been included in an AWS Marketplace integration run, you can access and review details of the run directly from the **Bill details** in **Bill management**. For example:
7. Log into your Xero Account.
**Important!** Ensure that the Xero org you are logged into to is the one you need to create the Credential for and which you'll use to connect your Integration to Xero.
8. Grant access to your Xero organisation for the m3ter integration Credential:
* If you have multiple Xero organisations set up, select the one you want the m3ter integration Credential to access and then select **Continue**:
* If you have a single Xero organisation set up, select **Allow access** for the m3ter integration Credential.
* You are redirected back to m3ter.
9. Select **Create credential**. You are returned to the **Xero Integrations** page where the new Credential is listed on the **Credentials** panel.
* The Credential is now available for connecting your Integrations with Xero. See [Configuring Xero Integrations>Setting Up Authentication for the Integration](/guides/integrations/setting-up-integrations/configuring-xero-integrations#setting-up-authentication-for-the-integration).
**Warning: Authentication with Xero not completed!** If you fail to complete authentication with your Xero instance promptly, a time-to-live (TTL) of ten minutes is imposed after which the Credential is removed and you'll have to start again. If you return to the **Xero Integrations** page within that TTL, any **Credentials** waiting for authentication completion will have a suffix of "Incomplete" attached, such as: **Xero Credential 1 (Incomplete)**.
# AWS Marketplace Integrations - Reconciliation Features
Source: https://docs.m3ter.com/guides/integrations/setting-up-integrations/aws-marketplace-integrations-reconciliation-features
m3ter offers two useful reconciliation features specifically designed to support AWS Marketplace integrations:
* [Reviewing Usage Reports for Bill integrations](/guides/integrations/setting-up-integrations/aws-marketplace-integrations-reconciliation-features#reviewing-usage-reports-for-bill-integrations)
* [Running AWS CloudTrail Reconciliation](/guides/integrations/setting-up-integrations/aws-marketplace-integrations-reconciliation-features#running-aws-cloudtrail-reconciliation)
You can also exploit a general troubleshooting and reconciliation feature in m3ter, which allows you to review integrations runs performed for your AWS Marketplace Bill integrations:
* [Reviewing AWS Marketplace Bill Integration Runs](/guides/integrations/setting-up-integrations/aws-marketplace-integrations-reconciliation-features#reviewing-aws-marketplace-bill-integration-runs)
## Reviewing Usage Reports for Bill Integrations
When Bill-based integration runs are performed, all interactions between m3ter and AWS Marketplace are persisted as logs. These logs are retrievable via a specific API endpoint, and you can use them to track, for each Bill, all amounts sent over to AWS Marketplace, together with the date and time the Bill data was sent. This provides a report on usage data sent to AWS Marketplace for each Bill integration run, and is particularly useful for Bill recalculation scenarios where several updates might have taken place during the billing period.
* **API Endpoint**: [Retrieve Reported Usage](/api/marketplace-integrations/retrieve-reported-usage)
* **Example Response**:
```json theme={null}
{
"data": [
{
"accountId": "07fc9a71-74ab-492a-b6e1-f48fd8500916",
"billId": "92d3154f-4c82-40c2-9af0-5d8c14326977",
"externalSystem": "AWS",
"reportedUsage": {
"3mgmp9q6okn47u0rgmzzjdi9k-m3BillAgg1": {
"2025-06-10T10:00:00Z": 1190000,
"2025-06-10T11:00:00Z": 790000,
"2025-06-10T12:00:00Z": 540000
},
"3mgmp9q6okn47u0rgmzzjdi9k-m3BillAgg2": {
"2025-06-10T10:00:00Z": 180000,
"2025-06-10T11:00:00Z": 200000,
"2025-06-10T12:00:00Z": 200000,
"2025-06-10T13:00:00Z": 180000
}
}
}
]
}
```
* Note that the format of the response can vary and depends on the selected configuration option for **Split usage line items** - **Item per bill**, **Item per product**, or **Item per aggregation**.
## Running AWS CloudTrail Reconciliation
AWS CloudTrail reconciliation is an optional feature designed to offer visibility between the data *received by* AWS Marketplace and the log data *sent by* m3ter when integrations run. The AWS Marketplace integration can then use this data comparison to help ensure billing accuracy and reliability is maintained. There are two cases where the data sent might diverge from the data received:
* If the usage data sent *is greater than* the data received, then the integration assumes something has failed in the data sync and will automatically send the difference.
* If the usage data sent *is less than* the data received, then the integration does not attempt to make any automatic adjustment because negative bill line items for credits are not supported in AWS Marketplace. However a safeguard is built in for this case. An alert is automatically sent to m3ter users at the end of the billing period giving details of the negative billing disparity, and enabling them to perform their own billing reconciliation, as they see fit.
By performing this process that compares data sent against data received on a daily basis, the AWS CloudTrail reconciliation feature minimizes the need for manual troubleshooting and reconciliation.
### Setting Up AWS CloudTrail Reconciliation
AWS CloudTrail reconciliation requires a custom event store to be provisioned on your infrastructure. An additional IAM Role also needs to be configured to allow access to that event store, with the following permissions:
* **cloudtrail:StartQuery**
* **cloudtrail:GetEventDataStore**
* **cloudtrail:GetQueryResults**
### AWS CloudTrail Reconciliation Process
The high-level process is as follows:
* Daily run at 11am UTC.
* Each run loads AWS CloudTrail events from the previous calendar day (00:00-24:00).
* If totals match, no further action is taken.
* If totals don’t match, corrective action is taken:
* If the sent total is greater, corrective usage is sent over to the AWS metering API.
* If the sent total is less, then an alert is issued to users.
## Reviewing AWS Marketplace Bill Integration Runs
If you've set up an integration with an external system, m3ter allows you to review details of the integration runs that have been performed for the integration. For any Bills that have been included in an AWS Marketplace integration run, you can access and review details of the run directly from the **Bill details** in **Bill management**. For example:
![]() * Select the date/timestamp hotlink text for the **Last integration run** to open the **Integration run details** page for the Bill. You can then review a **Run log** for the run and drill into details:
* Select the date/timestamp hotlink text for the **Last integration run** to open the **Integration run details** page for the Bill. You can then review a **Run log** for the run and drill into details:
![]() * In addition to generic information on date and time of execution, and the configuration in place at that time, the Integration Run also includes full details of the payloads exchanged with AWS Marketplace.
**Tip: More on Reviewing Integration Runs?** See [Reviewing Integration Run Details](/guides/integrations/setting-up-integrations/reviewing-integration-run-details).
# Azure Marketplace Integrations - Reconciliation Features
Source: https://docs.m3ter.com/guides/integrations/setting-up-integrations/azure-marketplace-integrations-reconciliation-features
m3ter offers some useful reconciliation features designed to support your Azure Marketplace integrations:
* [Reviewing Usage Reports for Bill integrations](/guides/integrations/setting-up-integrations/azure-marketplace-integrations-reconciliation-features#reviewing-usage-reports-for-bill-integrations)
* [Reviewing Azure Marketplace Bill Integration Runs](/guides/integrations/setting-up-integrations/azure-marketplace-integrations-reconciliation-features#reviewing-azure-marketplace-bill-integration-runs)
## Reviewing Usage Reports for Bill Integrations
When Bill-based integration runs are performed, all interactions between m3ter and Azure Marketplace are persisted as logs. These logs are retrievable via a specific API endpoint, and you can use them to track, for each Bill, all amounts sent over to Azure Marketplace, together with the date and time the Bill data was sent. This provides a report on usage data sent to Azure Marketplace for each Bill integration run, and is particularly useful for Bill recalculation scenarios where several updates might have taken place during the billing period.
* **API Endpoint**: [Retrieve Reported Usage](/api/marketplace-integrations/retrieve-reported-usage)
* **Example Response**:
```json theme={null}
{
"data": [
{
"accountId": "a2ae2c31-e89e-4c12-b636-e59414901cff",
"billId": "f2d3e527-66bb-4251-8d81-90bffe45e5b5",
"externalSystem": "Azure",
"reportedUsage": {
"storage": {
"2025-08-20T00:00:00Z": 400.0
}
}
}
]
}
```
* Note that the format of the response can vary and depends on the selected configuration option for **Split usage line items** - **Item per bill**, **Item per product**, or **Item per aggregation**.
## Reviewing Azure Marketplace Bill Integration Runs
If you've set up an integration with an external system, m3ter allows you to review details of the integration runs that have been performed for the integration. For any Bills that have been included in an Azure Marketplace integration run, you can access and review details of the run directly from the **Bill details** in **Bill management**. For example:
* In addition to generic information on date and time of execution, and the configuration in place at that time, the Integration Run also includes full details of the payloads exchanged with AWS Marketplace.
**Tip: More on Reviewing Integration Runs?** See [Reviewing Integration Run Details](/guides/integrations/setting-up-integrations/reviewing-integration-run-details).
# Azure Marketplace Integrations - Reconciliation Features
Source: https://docs.m3ter.com/guides/integrations/setting-up-integrations/azure-marketplace-integrations-reconciliation-features
m3ter offers some useful reconciliation features designed to support your Azure Marketplace integrations:
* [Reviewing Usage Reports for Bill integrations](/guides/integrations/setting-up-integrations/azure-marketplace-integrations-reconciliation-features#reviewing-usage-reports-for-bill-integrations)
* [Reviewing Azure Marketplace Bill Integration Runs](/guides/integrations/setting-up-integrations/azure-marketplace-integrations-reconciliation-features#reviewing-azure-marketplace-bill-integration-runs)
## Reviewing Usage Reports for Bill Integrations
When Bill-based integration runs are performed, all interactions between m3ter and Azure Marketplace are persisted as logs. These logs are retrievable via a specific API endpoint, and you can use them to track, for each Bill, all amounts sent over to Azure Marketplace, together with the date and time the Bill data was sent. This provides a report on usage data sent to Azure Marketplace for each Bill integration run, and is particularly useful for Bill recalculation scenarios where several updates might have taken place during the billing period.
* **API Endpoint**: [Retrieve Reported Usage](/api/marketplace-integrations/retrieve-reported-usage)
* **Example Response**:
```json theme={null}
{
"data": [
{
"accountId": "a2ae2c31-e89e-4c12-b636-e59414901cff",
"billId": "f2d3e527-66bb-4251-8d81-90bffe45e5b5",
"externalSystem": "Azure",
"reportedUsage": {
"storage": {
"2025-08-20T00:00:00Z": 400.0
}
}
}
]
}
```
* Note that the format of the response can vary and depends on the selected configuration option for **Split usage line items** - **Item per bill**, **Item per product**, or **Item per aggregation**.
## Reviewing Azure Marketplace Bill Integration Runs
If you've set up an integration with an external system, m3ter allows you to review details of the integration runs that have been performed for the integration. For any Bills that have been included in an Azure Marketplace integration run, you can access and review details of the run directly from the **Bill details** in **Bill management**. For example:
![]() * Select the date/timestamp hotlink text for the **Last integration run** to open the **Integration run details** page for the Bill. You can then review a **Run log** for the run and drill into details:
* Select the date/timestamp hotlink text for the **Last integration run** to open the **Integration run details** page for the Bill. You can then review a **Run log** for the run and drill into details:
![]() * In addition to generic information on date and time of execution, and the configuration in place at that time, the Integration Run also includes full details of the payloads exchanged with Azure Marketplace.
**Tip: More on Reviewing Integration Runs?** See [Reviewing Integration Run Details](/guides/integrations/setting-up-integrations/reviewing-integration-run-details).
# Configuring AWS Marketplace Integrations
Source: https://docs.m3ter.com/guides/integrations/setting-up-integrations/configuring-aws-integrations
The m3ter integration for AWS Marketplace allows you to combine m3ter’s advanced metering and rating capabilities with Marketplace’s unparalleled customer engagement.
You can define and manage integrations for sending your end customer Account Bills generated in m3ter outbound into AWS Marketplace:
* First, [complete prerequisites](/guides/integrations/setting-up-integrations/configuring-aws-integrations#completing-prerequisites).
* Second, [create the integration](/guides/integrations/setting-up-integrations/configuring-aws-integrations#creating-the-integration).
* Third, [set up authentication](/guides/integrations/setting-up-integrations/configuring-aws-integrations#setting-up-authentication-for-the-integration) for the integration to connect with AWS Marketplace using an integration credential.
**Notes:**
* **AWS Marketplace Integration in Beta Release!** Please note that the AWS Marketplace integration is currently in Beta release:
* See [Feature Release Stages](/guides/getting-started/feature-release-stages) for Beta release definition.
* If you intend to implement this integration for your m3ter Organization, please contact m3ter Support or your m3ter contact person to discuss. See section 7. of our [Terms of Service](https://www.m3ter.com/docs/legal/terms-of-service) for Beta Usage.
* **Accounting Products?** Many line item types can be mapped to specific Accounting Products to serve your revenue recognition and accounting purposes. Where this is the case, the integration will use the assigned Accounting Products.
* **Reconciliation Features!** m3ter offers two useful reconciliation features specifically designed to support AWS Marketplace integrations. See [AWS Marketplace Integrations - Reconciliation Features](/guides/integrations/setting-up-integrations/aws-marketplace-integrations-reconciliation-features) for more details.
* **Reviewing Integration Runs!** When you've set up an integration with AWS Marketplace for your Organization in your production environment, you can review details of the integration runs performed for the integration. See [Reviewing AWS Marketplace Bill Integration Runs](/guides/integrations/setting-up-integrations/aws-marketplace-integrations-reconciliation-features#reviewing-aws-marketplace-bill-integration-runs).
## Completing Prerequisites
This section provides guidance on completing some necessary prerequisites for your m3ter integration to successfully send out Bills to AWS Marketplace:
* [AWS Marketplace Dimension Pricing](/guides/integrations/setting-up-integrations/configuring-aws-integrations#aws-marketplace-dimension-pricing)
* [Completing AWS Prerequisites](/guides/integrations/setting-up-integrations/configuring-aws-integrations#completing-aws-prerequisites)
* [Completing External Mappings](/guides/integrations/setting-up-integrations/configuring-aws-integrations#completing-external-mappings)
### AWS Marketplace Dimension Pricing
As a prerequisite, you must ensure that any target pricing dimensions in your AWS Marketplace listing are configured with a price of \$0.01 per unit. Usage data for these dimensions is then submitted via the m3ter platform. This allows m3ter to fully control pricing logic and to ensure usage metering accuracy. m3ter then proceeds to calculate the quantity to report to AWS Marketplace based on the line items in the bill, and after pricing model logic has already been applied to metered usage. For example, for a line item total of \$0.50 dollars m3ter will report a quantity of 50 to AWS Marketplace.
### Completing AWS Prerequisites
The m3ter AWS Marketplace integration makes use of a combination of the product code and pricing dimension key to identify the correct dimensions in your AWS Marketplace account that billing data will be sent to. You'll need this product code/dimension key to hand when creating your AWS integration.
**To check the product code/dimension key in AWS Marketplace:**
1. In your AWS Marketplace account, go to **Home>SaaS Products**:
* In addition to generic information on date and time of execution, and the configuration in place at that time, the Integration Run also includes full details of the payloads exchanged with Azure Marketplace.
**Tip: More on Reviewing Integration Runs?** See [Reviewing Integration Run Details](/guides/integrations/setting-up-integrations/reviewing-integration-run-details).
# Configuring AWS Marketplace Integrations
Source: https://docs.m3ter.com/guides/integrations/setting-up-integrations/configuring-aws-integrations
The m3ter integration for AWS Marketplace allows you to combine m3ter’s advanced metering and rating capabilities with Marketplace’s unparalleled customer engagement.
You can define and manage integrations for sending your end customer Account Bills generated in m3ter outbound into AWS Marketplace:
* First, [complete prerequisites](/guides/integrations/setting-up-integrations/configuring-aws-integrations#completing-prerequisites).
* Second, [create the integration](/guides/integrations/setting-up-integrations/configuring-aws-integrations#creating-the-integration).
* Third, [set up authentication](/guides/integrations/setting-up-integrations/configuring-aws-integrations#setting-up-authentication-for-the-integration) for the integration to connect with AWS Marketplace using an integration credential.
**Notes:**
* **AWS Marketplace Integration in Beta Release!** Please note that the AWS Marketplace integration is currently in Beta release:
* See [Feature Release Stages](/guides/getting-started/feature-release-stages) for Beta release definition.
* If you intend to implement this integration for your m3ter Organization, please contact m3ter Support or your m3ter contact person to discuss. See section 7. of our [Terms of Service](https://www.m3ter.com/docs/legal/terms-of-service) for Beta Usage.
* **Accounting Products?** Many line item types can be mapped to specific Accounting Products to serve your revenue recognition and accounting purposes. Where this is the case, the integration will use the assigned Accounting Products.
* **Reconciliation Features!** m3ter offers two useful reconciliation features specifically designed to support AWS Marketplace integrations. See [AWS Marketplace Integrations - Reconciliation Features](/guides/integrations/setting-up-integrations/aws-marketplace-integrations-reconciliation-features) for more details.
* **Reviewing Integration Runs!** When you've set up an integration with AWS Marketplace for your Organization in your production environment, you can review details of the integration runs performed for the integration. See [Reviewing AWS Marketplace Bill Integration Runs](/guides/integrations/setting-up-integrations/aws-marketplace-integrations-reconciliation-features#reviewing-aws-marketplace-bill-integration-runs).
## Completing Prerequisites
This section provides guidance on completing some necessary prerequisites for your m3ter integration to successfully send out Bills to AWS Marketplace:
* [AWS Marketplace Dimension Pricing](/guides/integrations/setting-up-integrations/configuring-aws-integrations#aws-marketplace-dimension-pricing)
* [Completing AWS Prerequisites](/guides/integrations/setting-up-integrations/configuring-aws-integrations#completing-aws-prerequisites)
* [Completing External Mappings](/guides/integrations/setting-up-integrations/configuring-aws-integrations#completing-external-mappings)
### AWS Marketplace Dimension Pricing
As a prerequisite, you must ensure that any target pricing dimensions in your AWS Marketplace listing are configured with a price of \$0.01 per unit. Usage data for these dimensions is then submitted via the m3ter platform. This allows m3ter to fully control pricing logic and to ensure usage metering accuracy. m3ter then proceeds to calculate the quantity to report to AWS Marketplace based on the line items in the bill, and after pricing model logic has already been applied to metered usage. For example, for a line item total of \$0.50 dollars m3ter will report a quantity of 50 to AWS Marketplace.
### Completing AWS Prerequisites
The m3ter AWS Marketplace integration makes use of a combination of the product code and pricing dimension key to identify the correct dimensions in your AWS Marketplace account that billing data will be sent to. You'll need this product code/dimension key to hand when creating your AWS integration.
**To check the product code/dimension key in AWS Marketplace:**
1. In your AWS Marketplace account, go to **Home>SaaS Products**:
![]() 2. Open the Marketplace product you'll use for your m3ter integration - in this example **M3ter SaaS Alpha Test**:
2. Open the Marketplace product you'll use for your m3ter integration - in this example **M3ter SaaS Alpha Test**:
![]() 3. Under **Product summary** read-off the **Product code** and under **Pricing configuration** the **Pricing dimension** you want to use for your m3ter AWS Marketplace integration:
* In this example, the required format for the product code/dimension key will be:
* **78qogxeqwt7zyevfefsw6q48i-measurements**
### Completing External Mappings
There are External Mapping you must configure in m3ter to support your AWS Marketplace integration.
**Tip: More on External Mappings?** See [Creating and Managing External Mappings](/guides/integrations/setting-up-integrations/creating-and-managing-external-mappings) for more details.
#### Account Mappings
Whenever an end customer subscribes to a Marketplace product, AWS provides a customer identifier which m3ter needs to know in order to meter against it. So, an External Mapping needs to be set for an m3ter Account to the AWS Customer:
* First, **Select mapping type**:
3. Under **Product summary** read-off the **Product code** and under **Pricing configuration** the **Pricing dimension** you want to use for your m3ter AWS Marketplace integration:
* In this example, the required format for the product code/dimension key will be:
* **78qogxeqwt7zyevfefsw6q48i-measurements**
### Completing External Mappings
There are External Mapping you must configure in m3ter to support your AWS Marketplace integration.
**Tip: More on External Mappings?** See [Creating and Managing External Mappings](/guides/integrations/setting-up-integrations/creating-and-managing-external-mappings) for more details.
#### Account Mappings
Whenever an end customer subscribes to a Marketplace product, AWS provides a customer identifier which m3ter needs to know in order to meter against it. So, an External Mapping needs to be set for an m3ter Account to the AWS Customer:
* First, **Select mapping type**:
![]() * Second, **Add mapping IDs**:
* Second, **Add mapping IDs**:
![]() #### Usage Line Item Mappings
Depending on how you want to split Bill usage line items for your integration, you might also need to set up some additional External Mappings.
##### **Item Per Product**
With this option selected, you'll need to set up external mappings for each product. m3ter will then send the total of all line items for a given product over to its mapped AWS Marketplace dimension:
#### Usage Line Item Mappings
Depending on how you want to split Bill usage line items for your integration, you might also need to set up some additional External Mappings.
##### **Item Per Product**
With this option selected, you'll need to set up external mappings for each product. m3ter will then send the total of all line items for a given product over to its mapped AWS Marketplace dimension:
![]() ##### **Item Per Aggregation**
With this option selected, it’s necessary to set up external mappings for each aggregation. m3ter will then send the total of all line items for a given aggregation over to its mapped AWS Marketplace dimension:
##### **Item Per Aggregation**
With this option selected, it’s necessary to set up external mappings for each aggregation. m3ter will then send the total of all line items for a given aggregation over to its mapped AWS Marketplace dimension:
![]() ## Creating the Integration
You can quickly set up an AWS Marketplace integration in the Console.
**To define a m3ter - AWS Marketplace integration:**
1. Select **m3sh**:
## Creating the Integration
You can quickly set up an AWS Marketplace integration in the Console.
**To define a m3ter - AWS Marketplace integration:**
1. Select **m3sh**:
 The **Workflows** page opens.
2. Select **Integrations**. The **Integrations** page opens.
3. Select **Marketplace Integrations**:
4. Select **AWS**:
The **Workflows** page opens.
2. Select **Integrations**. The **Integrations** page opens.
3. Select **Marketplace Integrations**:
4. Select **AWS**:
 The **m3sh / Integrations>AWS** page opens.
5. On the **Configurations** panel, select **Configure new integration>Configure bill integration**:
The **m3sh / Integrations>AWS** page opens.
5. On the **Configurations** panel, select **Configure new integration>Configure bill integration**:
![AWSM Integs4b]() 6. Use the **Global configuration** panel to:
* Enter a **Name** for the Integration. This is required and is useful if you intend to create multiple Integrations for the same External system/Entity Type and need to clearly differentiate them.
* Select the Accounts you want the integration to apply to:
* **Account ids.** Select the Accounts you want to include - all selected Accounts are treated as *allowed* for the integration.
* **Restricted account ids.** Select the Accounts you want to exclude - all selected Accounts are treated as *disallowed* for the integration.
**Notes:**
* If you want to include *all Accounts* in the integration, leave both **Accounts ids** and **Restricted account ids** empty.
* Any filtering by **Account ids** you define using these settings to control which Accounts the integration runs for will be *in addition* to any filtering you define using the **Account filter** option - see the following step for **Entity configuration** options.
* Select Users for Email notifications if disabled:
* **Integration disabled notification users**. Select Organization Users you want to receive an Email notification if the integration is automatically disabled.
**Notes:**
* An integration is automatically disabled if there have been 20 successive previous error Event responses to earlier attempts to run the integration. See [Reviewing and Resolving Integration Events](/guides/integrations/setting-up-integrations/reviewing-and-resolving-integration-events) for more details.
* If you select Organization Users to receive an Email notification when the integration is automatically disabled, their User id will be listed under **Configuration data** on the **Integration details** page.
7. Use the **Entity configuration** panel to configure the m3ter entity you will be synchronizing with for the integration. In the case of a Bill integration, this entity will be the Bill generated for a customer Account in m3ter:
* **Only send bill on approval.** Enable this if you only want Bills to be sent when they have been approved. If disabled, the Bill will be sent every time it is regenerated. Default is disabled. Note that:
* The frequency of Bills sent will depend on the billing frequency defined for the Account Plan attached to the Account - such as daily/weekly/monthly/annually.
* If an Account has a Prepayment on it and the billing for Prepayment fees is configured to run on a customized schedule, Bills will be sent when scheduled Bills are generated.
* If a Bill is manually recalculated the updated Bill will be sent.
* If you enable this, then the integration will not run for *all Bill Jobs*.
* **Use external mapping account code.** Enable this if you want the integration to look in the External Mappings for the Account identifier code, which means you can use an external Id. If this is disabled, the m3ter Account Id is used. Default is disabled.
* **Excluded line item types.** Optionally filter the Bill line item types you send to the destination system. For example, only send charges or credits and exclude all other line item types.
* For details of line item types, see [Bill Line Item Types](/guides/billing-and-usage-data/running-viewing-and-managing-bills/bill-line-item-types).
* **Account filter**. Optionally, enter an expression that is run on the Account to determine whether or not the integration includes the Account. You can use this setting if you have multiple destinations for sending Bills outbound to AWS Marketplace. For example:
* `"customFields != null AND customFields.country == "UK""`
* In this example, the integration will include an Account *only if* you have created a Custom Field for the Account called *country* and given the field a value of *UK*.
**Notes:**
* **Other Account fields for Account filter expression?** You can reference other fields on the Account object in the **Account filter** expression. For details and another example, see [Managing Multiple Third Party Destinations for Integrations](/guides/integrations/setting-up-integrations/managing-multiple-destinations-for-integrations).
* **Additional filtering?** Any global filtering you define using the settings to include/exclude Accounts for integration runs by **Account ids** will be *in addition* to any filtering you define using the **Account filter** option - see the previous step for **Global Configuration**.
* **Enforce external mappings for config**. Optionally enable this if you want the integration to use only those external mappings specified as being for this configuration.
* Use this setting if you want to set up multiple integrations for the same external system. You can then create separate external mappings for each integration from the details page of each integration, and these external mappings become **Linked external mappings** for the specific integration. See [Creating Linked External Mappings](/guides/integrations/setting-up-integrations/creating-and-managing-external-mappings#creating-linked-external-mappings).
* **Excluded products**. Optionally filter the Bill line items you send to the external system. Any line items associated with the selected Products will be be excluded when the integration runs.
* **Excluded aggregations**. Optionally filter the Bill line items you send to the external system. Any line items associated with the selected Aggregations will be be excluded when the integration runs.
8. Use the **External system configuration** panel to enter the settings specific to the external system. These settings include field mappings as well as other system-specific configurations:
* **Split usage line items**. Select how you want m3ter to create usage invoice items in AWS Marketplace. Three options:
* **Item per bill**.
* **Item per product**.
* **Item per aggregation**.
* **Marketplace bill dimension**. Determines what AWS Marketplace dimension the bill will be mapped to:
6. Use the **Global configuration** panel to:
* Enter a **Name** for the Integration. This is required and is useful if you intend to create multiple Integrations for the same External system/Entity Type and need to clearly differentiate them.
* Select the Accounts you want the integration to apply to:
* **Account ids.** Select the Accounts you want to include - all selected Accounts are treated as *allowed* for the integration.
* **Restricted account ids.** Select the Accounts you want to exclude - all selected Accounts are treated as *disallowed* for the integration.
**Notes:**
* If you want to include *all Accounts* in the integration, leave both **Accounts ids** and **Restricted account ids** empty.
* Any filtering by **Account ids** you define using these settings to control which Accounts the integration runs for will be *in addition* to any filtering you define using the **Account filter** option - see the following step for **Entity configuration** options.
* Select Users for Email notifications if disabled:
* **Integration disabled notification users**. Select Organization Users you want to receive an Email notification if the integration is automatically disabled.
**Notes:**
* An integration is automatically disabled if there have been 20 successive previous error Event responses to earlier attempts to run the integration. See [Reviewing and Resolving Integration Events](/guides/integrations/setting-up-integrations/reviewing-and-resolving-integration-events) for more details.
* If you select Organization Users to receive an Email notification when the integration is automatically disabled, their User id will be listed under **Configuration data** on the **Integration details** page.
7. Use the **Entity configuration** panel to configure the m3ter entity you will be synchronizing with for the integration. In the case of a Bill integration, this entity will be the Bill generated for a customer Account in m3ter:
* **Only send bill on approval.** Enable this if you only want Bills to be sent when they have been approved. If disabled, the Bill will be sent every time it is regenerated. Default is disabled. Note that:
* The frequency of Bills sent will depend on the billing frequency defined for the Account Plan attached to the Account - such as daily/weekly/monthly/annually.
* If an Account has a Prepayment on it and the billing for Prepayment fees is configured to run on a customized schedule, Bills will be sent when scheduled Bills are generated.
* If a Bill is manually recalculated the updated Bill will be sent.
* If you enable this, then the integration will not run for *all Bill Jobs*.
* **Use external mapping account code.** Enable this if you want the integration to look in the External Mappings for the Account identifier code, which means you can use an external Id. If this is disabled, the m3ter Account Id is used. Default is disabled.
* **Excluded line item types.** Optionally filter the Bill line item types you send to the destination system. For example, only send charges or credits and exclude all other line item types.
* For details of line item types, see [Bill Line Item Types](/guides/billing-and-usage-data/running-viewing-and-managing-bills/bill-line-item-types).
* **Account filter**. Optionally, enter an expression that is run on the Account to determine whether or not the integration includes the Account. You can use this setting if you have multiple destinations for sending Bills outbound to AWS Marketplace. For example:
* `"customFields != null AND customFields.country == "UK""`
* In this example, the integration will include an Account *only if* you have created a Custom Field for the Account called *country* and given the field a value of *UK*.
**Notes:**
* **Other Account fields for Account filter expression?** You can reference other fields on the Account object in the **Account filter** expression. For details and another example, see [Managing Multiple Third Party Destinations for Integrations](/guides/integrations/setting-up-integrations/managing-multiple-destinations-for-integrations).
* **Additional filtering?** Any global filtering you define using the settings to include/exclude Accounts for integration runs by **Account ids** will be *in addition* to any filtering you define using the **Account filter** option - see the previous step for **Global Configuration**.
* **Enforce external mappings for config**. Optionally enable this if you want the integration to use only those external mappings specified as being for this configuration.
* Use this setting if you want to set up multiple integrations for the same external system. You can then create separate external mappings for each integration from the details page of each integration, and these external mappings become **Linked external mappings** for the specific integration. See [Creating Linked External Mappings](/guides/integrations/setting-up-integrations/creating-and-managing-external-mappings#creating-linked-external-mappings).
* **Excluded products**. Optionally filter the Bill line items you send to the external system. Any line items associated with the selected Products will be be excluded when the integration runs.
* **Excluded aggregations**. Optionally filter the Bill line items you send to the external system. Any line items associated with the selected Aggregations will be be excluded when the integration runs.
8. Use the **External system configuration** panel to enter the settings specific to the external system. These settings include field mappings as well as other system-specific configurations:
* **Split usage line items**. Select how you want m3ter to create usage invoice items in AWS Marketplace. Three options:
* **Item per bill**.
* **Item per product**.
* **Item per aggregation**.
* **Marketplace bill dimension**. Determines what AWS Marketplace dimension the bill will be mapped to:
![]() **Important: Split usage line item requirements!**
* **Item Per Bill** selected. In **Marketplace bill dimension** you *must enter* the product code/dimension key for the dimension you want to use in your AWS Marketplace instance for sending Bill data. See above [Completing AWS Prerequisites](/guides/integrations/setting-up-integrations/configuring-aws-integrations#completing-aws-prerequisites).
* **Item per product** or **Item per aggregation** selected. You *must set up* required External Mappings - see above [Usage Line Item Mappings](/guides/integrations/setting-up-integrations/configuring-aws-integrations#usage-line-item-mappings).
* Note that if you've selected **Item per product** or **Item per aggregation**, then **Marketplace bill dimension** is *not required*.
* **AWS Marketplace CloudTrail checks**. Enable this switch if you want to run additional checks using the AWS CloudTrail event store:
* **AWS Marketplace CloudTrail store ID**. AWS CloudTrail event store ID - used to run additional checks on usage submitted to AWS Marketplace.
* **AWS Marketplace CloudTrail region**. AWS CloudTrail event store region - used to run additional checks on usage submitted to AWS Marketplace.
9. Select **Create integration**. You are returned to the **Integrations>AWS** page, where the integration is listed on the **Configurations** panel:
**Important: Split usage line item requirements!**
* **Item Per Bill** selected. In **Marketplace bill dimension** you *must enter* the product code/dimension key for the dimension you want to use in your AWS Marketplace instance for sending Bill data. See above [Completing AWS Prerequisites](/guides/integrations/setting-up-integrations/configuring-aws-integrations#completing-aws-prerequisites).
* **Item per product** or **Item per aggregation** selected. You *must set up* required External Mappings - see above [Usage Line Item Mappings](/guides/integrations/setting-up-integrations/configuring-aws-integrations#usage-line-item-mappings).
* Note that if you've selected **Item per product** or **Item per aggregation**, then **Marketplace bill dimension** is *not required*.
* **AWS Marketplace CloudTrail checks**. Enable this switch if you want to run additional checks using the AWS CloudTrail event store:
* **AWS Marketplace CloudTrail store ID**. AWS CloudTrail event store ID - used to run additional checks on usage submitted to AWS Marketplace.
* **AWS Marketplace CloudTrail region**. AWS CloudTrail event store region - used to run additional checks on usage submitted to AWS Marketplace.
9. Select **Create integration**. You are returned to the **Integrations>AWS** page, where the integration is listed on the **Configurations** panel:
![]() ## Setting Up Authentication for the Integration
When you have created an AWS Marketplace integration, you can select an integration Credential you've created for authentication allowing the integration to connect with AWS Marketplace. See [Creating AWS Marketplace Integration Credentials](/guides/integrations/setting-up-integrations/_managing-integration-credentials-legacy/creating-aws-marketplace-integration-credentials).
**To set up authentication for your m3ter - AWS Marketplace integration:**
1. Select **m3sh**. The **Workflows** page opens
2. Select **Integrations**. The **Integrations** page opens.
3. Select **Marketplace**.
4. Select **AWS**. The **m3sh / Integrations>AWS** page opens.
5. On the **Configurations** panel, select the **Name** hotlink text of the **AWS Marketplace** integration you want to set up authentication for. The **Integration details** page opens:
## Setting Up Authentication for the Integration
When you have created an AWS Marketplace integration, you can select an integration Credential you've created for authentication allowing the integration to connect with AWS Marketplace. See [Creating AWS Marketplace Integration Credentials](/guides/integrations/setting-up-integrations/_managing-integration-credentials-legacy/creating-aws-marketplace-integration-credentials).
**To set up authentication for your m3ter - AWS Marketplace integration:**
1. Select **m3sh**. The **Workflows** page opens
2. Select **Integrations**. The **Integrations** page opens.
3. Select **Marketplace**.
4. Select **AWS**. The **m3sh / Integrations>AWS** page opens.
5. On the **Configurations** panel, select the **Name** hotlink text of the **AWS Marketplace** integration you want to set up authentication for. The **Integration details** page opens:
![AWSM Integs20a]() * **Notes:**
* A warning is shown that the integration is not yet connected to AWS Marketplace.
* The **ID** of the integration configuration is shown at the bottom of the **Integration details** card, and you can copy the **ID** directly to your clipboard.
6. Select **Connect credential**. A **Select credential** modal appears.
7. Select a Credential you created earlier and want to use to authenticate the integration with AWS Marketplace. See [Creating AWS Marketplace Integration Credentials](/guides/integrations/setting-up-integrations/_managing-integration-credentials-legacy/creating-aws-marketplace-integration-credentials).
8. Select **Confirm**. The modal closes and on **Integrations details**, the integration now shows as **CONNECTED**:
* The Credential used to connect the integration is shown.
* If at any time you want to disconnect the integration, select **Disconnect credential**.
* If you want to use a different Credential for connecting the integration, select **Change credential**. The **Select credential** modal appears and you can select a different Credential.
**Tip: Integrations API Calls?** When you have set up your integration, you can review and manage the integration using a full set of API Calls. See the [Integrations section](/api/integrations/introduction) of our API Reference Docs.
# Configuring Azure Marketplace Integrations
Source: https://docs.m3ter.com/guides/integrations/setting-up-integrations/configuring-azure-marketplace-integrations
The m3ter integration for Azure Marketplace allows you to combine m3ter’s advanced metering and rating capabilities with Marketplace’s unparalleled customer engagement.
You can define and manage integrations for sending your end customer Account Bills generated in m3ter outbound into Azure Marketplace:
* First, [complete prerequisites](/guides/integrations/setting-up-integrations/configuring-azure-marketplace-integrations#completing-azure-prerequisites).
* Second, [create the integration](/guides/integrations/setting-up-integrations/configuring-azure-marketplace-integrations#creating-the-integration).
* Third, [set up authentication](/guides/integrations/setting-up-integrations/configuring-azure-marketplace-integrations#setting-up-authentication-for-the-integration) for the integration to connect with Azure Marketplace using an integration credential.
**Notes:**
* **Azure Marketplace Integration in Beta Release!** Please note that the Azure Marketplace integration is currently in Beta release:
* See [Feature Release Stages](/guides/getting-started/feature-release-stages) for Beta release definition.
* If you intend to implement this integration for your m3ter Organization, please contact m3ter Support or your m3ter contact person to discuss. See section 7. of our [Terms of Service](https://www.m3ter.com/docs/legal/terms-of-service) for Beta Usage.
* **Accounting Products?** Many line item types can be mapped to specific Accounting Products to serve your revenue recognition and accounting purposes. Where this is the case, the integration will use the assigned Accounting Products.
* **Reconciliation Features!** m3ter offers useful reconciliation features to support Azure Marketplace integrations. See [Azure Marketplace Integrations - Reconciliation Features ](/guides/integrations/setting-up-integrations/azure-marketplace-integrations-reconciliation-features)for more details.
* **Reviewing Integration Runs!** When you've set up an integration with Azure Marketplace for your Organization in your production environment, you can review details of the integration runs performed for the integration. See [Reviewing Azure Marketplace Bill Integration Runs](/guides/integrations/setting-up-integrations/azure-marketplace-integrations-reconciliation-features#reviewing-azure-marketplace-bill-integration-runs).
## Completing Azure Prerequisites
This section provides guidance on completing some necessary prerequisites for your m3ter integration to successfully send out Bills to Azure Marketplace:
* [Azure Marketplace Dimension Pricing](/guides/integrations/setting-up-integrations/configuring-azure-marketplace-integrations#azure-marketplace-dimension-pricing)
* [Completing Offer Prerequisites](/guides/integrations/setting-up-integrations/configuring-azure-marketplace-integrations#completing-offer-prerequisites)
* [Completing External Mappings](/guides/integrations/setting-up-integrations/configuring-azure-marketplace-integrations#completing-external-mappings)
### Azure Marketplace Dimension Pricing
As a prerequisite, you must ensure that any target pricing dimensions in your Azure Marketplace listing are configured with a price of \$0.01 per unit. Usage data for these dimensions is then submitted via the m3ter platform. This allows m3ter to fully control pricing logic and to ensure usage metering accuracy. m3ter then proceeds to calculate the quantity to report to Azure Marketplace based on the line items in the bill, and after pricing model logic has already been applied to metered usage. For example, for a line item total of \$0.50 dollars m3ter will report a quantity of 50 to Azure Marketplace.
### Completing Offer Prerequisites
During offer setup, m3ter needs two prerequisites to be in place:
* Tenant ID
* Application (client) ID
You can then complete the technical configuration of the m3ter offer setup:
* Offer Setup
#### Tenant ID
You can create/find details of the **Tenant ID** under **Microsoft Entra ID** in the Azure portal.
* Under **Azure services**, select **Microsoft Entra ID**:
* **Notes:**
* A warning is shown that the integration is not yet connected to AWS Marketplace.
* The **ID** of the integration configuration is shown at the bottom of the **Integration details** card, and you can copy the **ID** directly to your clipboard.
6. Select **Connect credential**. A **Select credential** modal appears.
7. Select a Credential you created earlier and want to use to authenticate the integration with AWS Marketplace. See [Creating AWS Marketplace Integration Credentials](/guides/integrations/setting-up-integrations/_managing-integration-credentials-legacy/creating-aws-marketplace-integration-credentials).
8. Select **Confirm**. The modal closes and on **Integrations details**, the integration now shows as **CONNECTED**:
* The Credential used to connect the integration is shown.
* If at any time you want to disconnect the integration, select **Disconnect credential**.
* If you want to use a different Credential for connecting the integration, select **Change credential**. The **Select credential** modal appears and you can select a different Credential.
**Tip: Integrations API Calls?** When you have set up your integration, you can review and manage the integration using a full set of API Calls. See the [Integrations section](/api/integrations/introduction) of our API Reference Docs.
# Configuring Azure Marketplace Integrations
Source: https://docs.m3ter.com/guides/integrations/setting-up-integrations/configuring-azure-marketplace-integrations
The m3ter integration for Azure Marketplace allows you to combine m3ter’s advanced metering and rating capabilities with Marketplace’s unparalleled customer engagement.
You can define and manage integrations for sending your end customer Account Bills generated in m3ter outbound into Azure Marketplace:
* First, [complete prerequisites](/guides/integrations/setting-up-integrations/configuring-azure-marketplace-integrations#completing-azure-prerequisites).
* Second, [create the integration](/guides/integrations/setting-up-integrations/configuring-azure-marketplace-integrations#creating-the-integration).
* Third, [set up authentication](/guides/integrations/setting-up-integrations/configuring-azure-marketplace-integrations#setting-up-authentication-for-the-integration) for the integration to connect with Azure Marketplace using an integration credential.
**Notes:**
* **Azure Marketplace Integration in Beta Release!** Please note that the Azure Marketplace integration is currently in Beta release:
* See [Feature Release Stages](/guides/getting-started/feature-release-stages) for Beta release definition.
* If you intend to implement this integration for your m3ter Organization, please contact m3ter Support or your m3ter contact person to discuss. See section 7. of our [Terms of Service](https://www.m3ter.com/docs/legal/terms-of-service) for Beta Usage.
* **Accounting Products?** Many line item types can be mapped to specific Accounting Products to serve your revenue recognition and accounting purposes. Where this is the case, the integration will use the assigned Accounting Products.
* **Reconciliation Features!** m3ter offers useful reconciliation features to support Azure Marketplace integrations. See [Azure Marketplace Integrations - Reconciliation Features ](/guides/integrations/setting-up-integrations/azure-marketplace-integrations-reconciliation-features)for more details.
* **Reviewing Integration Runs!** When you've set up an integration with Azure Marketplace for your Organization in your production environment, you can review details of the integration runs performed for the integration. See [Reviewing Azure Marketplace Bill Integration Runs](/guides/integrations/setting-up-integrations/azure-marketplace-integrations-reconciliation-features#reviewing-azure-marketplace-bill-integration-runs).
## Completing Azure Prerequisites
This section provides guidance on completing some necessary prerequisites for your m3ter integration to successfully send out Bills to Azure Marketplace:
* [Azure Marketplace Dimension Pricing](/guides/integrations/setting-up-integrations/configuring-azure-marketplace-integrations#azure-marketplace-dimension-pricing)
* [Completing Offer Prerequisites](/guides/integrations/setting-up-integrations/configuring-azure-marketplace-integrations#completing-offer-prerequisites)
* [Completing External Mappings](/guides/integrations/setting-up-integrations/configuring-azure-marketplace-integrations#completing-external-mappings)
### Azure Marketplace Dimension Pricing
As a prerequisite, you must ensure that any target pricing dimensions in your Azure Marketplace listing are configured with a price of \$0.01 per unit. Usage data for these dimensions is then submitted via the m3ter platform. This allows m3ter to fully control pricing logic and to ensure usage metering accuracy. m3ter then proceeds to calculate the quantity to report to Azure Marketplace based on the line items in the bill, and after pricing model logic has already been applied to metered usage. For example, for a line item total of \$0.50 dollars m3ter will report a quantity of 50 to Azure Marketplace.
### Completing Offer Prerequisites
During offer setup, m3ter needs two prerequisites to be in place:
* Tenant ID
* Application (client) ID
You can then complete the technical configuration of the m3ter offer setup:
* Offer Setup
#### Tenant ID
You can create/find details of the **Tenant ID** under **Microsoft Entra ID** in the Azure portal.
* Under **Azure services**, select **Microsoft Entra ID**:
![]() * Select **M3ter Ltd | Overview**. The **Tenant ID** is listed under **Basic information**:
* Select **M3ter Ltd | Overview**. The **Tenant ID** is listed under **Basic information**:
![]() #### Application (client) ID
You can create/find the **Application (client) ID** to associate with the offer under Microsoft Entra **App registrations**:
#### Application (client) ID
You can create/find the **Application (client) ID** to associate with the offer under Microsoft Entra **App registrations**:
![]() * Alternatively:
* Alternatively:
![]() #### Offer Setup
To complete the offer setup:
* Enter the **Tenant ID** for **Microsoft Entra tenant ID**.
* Enter the **Application (client) ID** for **Microsoft Entra Identity application ID**:
#### Offer Setup
To complete the offer setup:
* Enter the **Tenant ID** for **Microsoft Entra tenant ID**.
* Enter the **Application (client) ID** for **Microsoft Entra Identity application ID**:
![]() ### Completing External Mappings
You must configure some External Mappings in m3ter to support your Azure Marketplace integration:
* [Account Mapping](/guides/integrations/setting-up-integrations/configuring-azure-marketplace-integrations#account-mapping)
* [Usage Line Item Mappings](/guides/integrations/setting-up-integrations/configuring-azure-marketplace-integrations#usage-line-item-mappings)
**Tip: More on External Mappings?** See [Creating and Managing External Mappings](/guides/integrations/setting-up-integrations/creating-and-managing-external-mappings) for more details.
#### Account Mapping
Whenever an end customer subscribes to a Marketplace product, Azure provides a unique **subscriptionId** which m3ter needs to know to submit usage data. An External Mapping therefore needs to be set up for a m3ter Account to the Azure Subscription:
* In your m3ter Organization, select **m3sh>External mappings**:
### Completing External Mappings
You must configure some External Mappings in m3ter to support your Azure Marketplace integration:
* [Account Mapping](/guides/integrations/setting-up-integrations/configuring-azure-marketplace-integrations#account-mapping)
* [Usage Line Item Mappings](/guides/integrations/setting-up-integrations/configuring-azure-marketplace-integrations#usage-line-item-mappings)
**Tip: More on External Mappings?** See [Creating and Managing External Mappings](/guides/integrations/setting-up-integrations/creating-and-managing-external-mappings) for more details.
#### Account Mapping
Whenever an end customer subscribes to a Marketplace product, Azure provides a unique **subscriptionId** which m3ter needs to know to submit usage data. An External Mapping therefore needs to be set up for a m3ter Account to the Azure Subscription:
* In your m3ter Organization, select **m3sh>External mappings**:
![]() * Select **Create external mapping**, and then for **Select mapping type** enter the following:
* Select **Create external mapping**, and then for **Select mapping type** enter the following:
![]() * Select **Next**. Under **Add mapping IDs**, enter the end customer Account for **m3ter entity** and the Azure Marketplace **subcriptionid** for **External entity ID**:
* Select **Next**. Under **Add mapping IDs**, enter the end customer Account for **m3ter entity** and the Azure Marketplace **subcriptionid** for **External entity ID**:
![]() #### Usage Line Item Mappings
Depending on how you want to split Bill usage line items for your integration, you might also need to set up some additional External Mappings.
##### **Item per Product**
With this option selected, you'll need to set up External Mappings for each product that's intended to meter to Azure. m3ter will then send the total of all line items for a given product over to its mapped Azure Marketplace dimension:
#### Usage Line Item Mappings
Depending on how you want to split Bill usage line items for your integration, you might also need to set up some additional External Mappings.
##### **Item per Product**
With this option selected, you'll need to set up External Mappings for each product that's intended to meter to Azure. m3ter will then send the total of all line items for a given product over to its mapped Azure Marketplace dimension:
![]() ##### **Item per Aggregation**
With this option selected, it’s necessary to set up External Mappings for each Aggregation that's intended to meter to Azure. m3ter will then send the total of all line items for a given Aggregation over to its mapped Azure Marketplace dimension:
##### **Item per Aggregation**
With this option selected, it’s necessary to set up External Mappings for each Aggregation that's intended to meter to Azure. m3ter will then send the total of all line items for a given Aggregation over to its mapped Azure Marketplace dimension:
![]() ## Creating the Integration
You can quickly set up an Azure Marketplace integration in the Console.
**To define a m3ter - Azure Marketplace integration:**
1. Select **m3sh**:
## Creating the Integration
You can quickly set up an Azure Marketplace integration in the Console.
**To define a m3ter - Azure Marketplace integration:**
1. Select **m3sh**:
 The **Workflows** page opens.
2. Select **Integrations**. The **Integrations** page opens.
3. Select **Marketplace Integrations**.
4. Select **AZURE**. The **m3sh / Integrations>AZURE** page opens.
5. On the **Configurations** panel, select **Configure new integration>Configure bill integration**:
The **Workflows** page opens.
2. Select **Integrations**. The **Integrations** page opens.
3. Select **Marketplace Integrations**.
4. Select **AZURE**. The **m3sh / Integrations>AZURE** page opens.
5. On the **Configurations** panel, select **Configure new integration>Configure bill integration**:
![Azure Mkt Place13a]() The **Create** page opens and the **Entity type** and **External system** you are creating the integration for are shown at the top of the page.
6. Use the **Global configuration** panel to:
* Enter a **Name** for the integration. This is required and is useful if you intend to create multiple integrations for the same External system/Entity Type and need to clearly differentiate them.
* Select the Accounts you want the integration to apply to:
* **Account ids.** Select the Accounts you want to include - all selected Accounts are treated as *allowed* for the integration.
* **Restricted account ids.** Select the Accounts you want to exclude - all selected Accounts are treated as *disallowed* for the integration.
**Notes:**
* If you want to include *all Accounts* in the integration, leave both **Accounts ids** and **Restricted account ids** empty.
* Any filtering by **Account ids** you define using these settings to control which Accounts the integration runs for will be *in addition* to any filtering you define using the **Account filter** option - see the following step for **Entity configuration** options.
* Select Users for Email notifications if disabled:
* **Integration disabled notification users**. Select Organization Users you want to receive an Email notification if the integration is automatically disabled.
**Notes:**
* An integration is automatically disabled if there have been 20 successive previous error Event responses to earlier attempts to run the integration. See [Reviewing and Resolving Integration Events](/guides/integrations/setting-up-integrations/reviewing-and-resolving-integration-events) for more details.
* If you select Organization Users to receive an Email notification when the integration is automatically disabled, their User id will be listed under **Configuration data** on the **Integration details** page.
7. Use the **Entity configuration** panel to configure the m3ter entity you will be synchronizing with for the integration. In the case of a Bill integration, this entity will be the Bill generated for a customer Account in m3ter:
* **Only send bill on approval.** Enable this if you only want Bills to be sent when they have been approved. If disabled, the Bill will be sent every time it is regenerated. Default is disabled. Note that:
* The frequency of Bills sent will depend on the billing frequency defined for the Account Plan attached to the Account - such as daily/weekly/monthly/annually.
* If an Account has a Prepayment on it and the billing for Prepayment fees is configured to run on a customized schedule, Bills will be sent when scheduled Bills are generated.
* If a Bill is manually recalculated the updated Bill will be sent.
* If you enable this, then the integration will not run for *all Bill Jobs*.
* **Use external mapping account code.** Enable this if you want the integration to look in the External Mappings for the Account identifier code, which means you can use an external Id. If this is disabled, the m3ter Account Id is used. Default is disabled.
* **Excluded line item types.** Optionally filter the Bill line item types you send to the destination system. For example, only send charges or credits and exclude all other line item types.
* For details of line item types, see [Bill Line Item Types](/guides/billing-and-usage-data/running-viewing-and-managing-bills/bill-line-item-types).
* **Account filter**. Optionally, enter an expression that is run on the Account to determine whether or not the integration includes the Account. You can use this setting if you have multiple destinations for sending Bills outbound to Azure Marketplace. For example:
* `"customFields != null AND customFields.country == "UK""`
* In this example, the integration will include an Account *only if* you have created a Custom Field for the Account called *country* and given the field a value of *UK*.
**Notes:**
* **Other Account fields for Account filter expression?** You can reference other fields on the Account object in the **Account filter** expression. For details and another example, see [Managing Multiple Third Party Destinations for Integrations](/guides/integrations/setting-up-integrations/managing-multiple-destinations-for-integrations).
* **Additional filtering?** Any global filtering you define using the settings to include/exclude Accounts for integration runs by **Account ids** will be *in addition* to any filtering you define using the **Account filter** option - see the previous step for **Global Configuration**.
* **Enforce external mappings for config**. Optionally enable this if you want the integration to use only those external mappings specified as being for this configuration.
* Use this setting if you want to set up multiple integrations for the same external system. You can then create separate external mappings for each integration from the details page of each integration, and these external mappings become **Linked external mappings** for the specific integration. See [Creating Linked External Mappings](/guides/integrations/setting-up-integrations/creating-and-managing-external-mappings#creating-linked-external-mappings).
* **Excluded products**. Optionally filter the Bill line items you send to the external system. Any line items associated with the selected Products will be be excluded when the integration runs.
* **Excluded aggregations**. Optionally filter the Bill line items you send to the external system. Any line items associated with the selected Aggregations will be be excluded when the integration runs.
8. Use the **External system configuration** panel to enter the settings specific to the external system. These settings include field mappings as well as other system-specific configurations:
* **Split usage line items**. Select how you want m3ter to create usage invoice items in Azure Marketplace. Three options:
* **Item per bill**.
* **Item per product**.
* **Item per aggregation**.
* If you select **Item per bill**, you must enter the Azure dimension you want to use for **Marketplace bill dimension**. m3ter will then send the bill total as one item to the configured dimension. For example, the following **Test Plan** has several dimensions set up under **Pricing and availability**:
The **Create** page opens and the **Entity type** and **External system** you are creating the integration for are shown at the top of the page.
6. Use the **Global configuration** panel to:
* Enter a **Name** for the integration. This is required and is useful if you intend to create multiple integrations for the same External system/Entity Type and need to clearly differentiate them.
* Select the Accounts you want the integration to apply to:
* **Account ids.** Select the Accounts you want to include - all selected Accounts are treated as *allowed* for the integration.
* **Restricted account ids.** Select the Accounts you want to exclude - all selected Accounts are treated as *disallowed* for the integration.
**Notes:**
* If you want to include *all Accounts* in the integration, leave both **Accounts ids** and **Restricted account ids** empty.
* Any filtering by **Account ids** you define using these settings to control which Accounts the integration runs for will be *in addition* to any filtering you define using the **Account filter** option - see the following step for **Entity configuration** options.
* Select Users for Email notifications if disabled:
* **Integration disabled notification users**. Select Organization Users you want to receive an Email notification if the integration is automatically disabled.
**Notes:**
* An integration is automatically disabled if there have been 20 successive previous error Event responses to earlier attempts to run the integration. See [Reviewing and Resolving Integration Events](/guides/integrations/setting-up-integrations/reviewing-and-resolving-integration-events) for more details.
* If you select Organization Users to receive an Email notification when the integration is automatically disabled, their User id will be listed under **Configuration data** on the **Integration details** page.
7. Use the **Entity configuration** panel to configure the m3ter entity you will be synchronizing with for the integration. In the case of a Bill integration, this entity will be the Bill generated for a customer Account in m3ter:
* **Only send bill on approval.** Enable this if you only want Bills to be sent when they have been approved. If disabled, the Bill will be sent every time it is regenerated. Default is disabled. Note that:
* The frequency of Bills sent will depend on the billing frequency defined for the Account Plan attached to the Account - such as daily/weekly/monthly/annually.
* If an Account has a Prepayment on it and the billing for Prepayment fees is configured to run on a customized schedule, Bills will be sent when scheduled Bills are generated.
* If a Bill is manually recalculated the updated Bill will be sent.
* If you enable this, then the integration will not run for *all Bill Jobs*.
* **Use external mapping account code.** Enable this if you want the integration to look in the External Mappings for the Account identifier code, which means you can use an external Id. If this is disabled, the m3ter Account Id is used. Default is disabled.
* **Excluded line item types.** Optionally filter the Bill line item types you send to the destination system. For example, only send charges or credits and exclude all other line item types.
* For details of line item types, see [Bill Line Item Types](/guides/billing-and-usage-data/running-viewing-and-managing-bills/bill-line-item-types).
* **Account filter**. Optionally, enter an expression that is run on the Account to determine whether or not the integration includes the Account. You can use this setting if you have multiple destinations for sending Bills outbound to Azure Marketplace. For example:
* `"customFields != null AND customFields.country == "UK""`
* In this example, the integration will include an Account *only if* you have created a Custom Field for the Account called *country* and given the field a value of *UK*.
**Notes:**
* **Other Account fields for Account filter expression?** You can reference other fields on the Account object in the **Account filter** expression. For details and another example, see [Managing Multiple Third Party Destinations for Integrations](/guides/integrations/setting-up-integrations/managing-multiple-destinations-for-integrations).
* **Additional filtering?** Any global filtering you define using the settings to include/exclude Accounts for integration runs by **Account ids** will be *in addition* to any filtering you define using the **Account filter** option - see the previous step for **Global Configuration**.
* **Enforce external mappings for config**. Optionally enable this if you want the integration to use only those external mappings specified as being for this configuration.
* Use this setting if you want to set up multiple integrations for the same external system. You can then create separate external mappings for each integration from the details page of each integration, and these external mappings become **Linked external mappings** for the specific integration. See [Creating Linked External Mappings](/guides/integrations/setting-up-integrations/creating-and-managing-external-mappings#creating-linked-external-mappings).
* **Excluded products**. Optionally filter the Bill line items you send to the external system. Any line items associated with the selected Products will be be excluded when the integration runs.
* **Excluded aggregations**. Optionally filter the Bill line items you send to the external system. Any line items associated with the selected Aggregations will be be excluded when the integration runs.
8. Use the **External system configuration** panel to enter the settings specific to the external system. These settings include field mappings as well as other system-specific configurations:
* **Split usage line items**. Select how you want m3ter to create usage invoice items in Azure Marketplace. Three options:
* **Item per bill**.
* **Item per product**.
* **Item per aggregation**.
* If you select **Item per bill**, you must enter the Azure dimension you want to use for **Marketplace bill dimension**. m3ter will then send the bill total as one item to the configured dimension. For example, the following **Test Plan** has several dimensions set up under **Pricing and availability**:
![]() * We can then use the ID of one of these dimensions - for example **compute**:
* We can then use the ID of one of these dimensions - for example **compute**:
![]() **Important: Split usage line item requirements!**
* **Item Per Bill** selected. In **Marketplace bill dimension** you *must enter* the ID of the Azure Marketplace dimension you want to use for sending Bill data.
* **Item per product** or **Item per aggregation** selected. You *must set up* required External Mappings - see above Usage Line Item Mappings.
* Note that if you've selected **Item per product** or **Item per aggregation**, then **Marketplace bill dimension** is *not required*.
9. Select **Create integration**. You are returned to the **Integrations>AZURE** page, where the integration is listed on the **Configurations** panel:
**Important: Split usage line item requirements!**
* **Item Per Bill** selected. In **Marketplace bill dimension** you *must enter* the ID of the Azure Marketplace dimension you want to use for sending Bill data.
* **Item per product** or **Item per aggregation** selected. You *must set up* required External Mappings - see above Usage Line Item Mappings.
* Note that if you've selected **Item per product** or **Item per aggregation**, then **Marketplace bill dimension** is *not required*.
9. Select **Create integration**. You are returned to the **Integrations>AZURE** page, where the integration is listed on the **Configurations** panel:
![Azure Mkt Place15a]() ## Setting Up Authentication for the Integration
When you have created an Azure Marketplace integration, you can select an integration Credential you've created for authentication allowing the integration to connect with Azure Marketplace. See [Creating Azure Marketplace Integration Credentials](/guides/integrations/setting-up-integrations/_managing-integration-credentials-legacy/creating-azure-marketplace-integration-credentials).
**To set up authentication for your m3ter - Azure Marketplace integration:**
1. Select **m3sh**. The **Workflows** page opens.
2. Select **Integrations**. The **Integrations** page opens.
3. Select **Marketplace**.
4. Select **Azure**. The **m3sh / Integrations>AZURE** page opens.
5. On the **Configurations** panel, select the **Name** hotlink text of the **Azure Marketplace** integration you want to set up authentication for. The **Integration details** page opens:
## Setting Up Authentication for the Integration
When you have created an Azure Marketplace integration, you can select an integration Credential you've created for authentication allowing the integration to connect with Azure Marketplace. See [Creating Azure Marketplace Integration Credentials](/guides/integrations/setting-up-integrations/_managing-integration-credentials-legacy/creating-azure-marketplace-integration-credentials).
**To set up authentication for your m3ter - Azure Marketplace integration:**
1. Select **m3sh**. The **Workflows** page opens.
2. Select **Integrations**. The **Integrations** page opens.
3. Select **Marketplace**.
4. Select **Azure**. The **m3sh / Integrations>AZURE** page opens.
5. On the **Configurations** panel, select the **Name** hotlink text of the **Azure Marketplace** integration you want to set up authentication for. The **Integration details** page opens:
![Azure Mkt Place22a]() * **Notes:**
* A warning is shown that the integration is not yet connected to Azure Marketplace.
* The **ID** of the integration configuration is shown at the bottom of the **Integration details** card, and you can copy the **ID** directly to your clipboard.
6. Select **Connect credential**. A **Select credential** modal appears.
7. Select a Credential you created earlier and want to use to authenticate the integration with Azure Marketplace. See [Creating Azure Marketplace Integration Credentials](/guides/integrations/setting-up-native-integrations/managing-integration-credentials/creating-azure-marketplace-integration-credentials).
8. Select **Confirm**. The modal closes and on **Integrations details**, the integration now shows as **CONNECTED**:
* The Credential used to connect the integration is shown.
* If at any time you want to disconnect the integration, select **Disconnect credential**.
* If you want to use a different Credential for connecting the integration, select **Change credential**. The **Select credential** modal appears and you can select a different Credential.
**Tip: Integrations API Calls?** When you have set up your integration, you can review and manage the integration using a full set of API Calls. See the [Integrations section](/api/integrations/introduction) of our API Reference Docs.
# Configuring Chargebee Integrations
Source: https://docs.m3ter.com/guides/integrations/setting-up-integrations/configuring-chargebee-integrations
You can define a integration for sending your end customer Account Bills generated in m3ter outbound into your Chargebee system:
* First, [create the integration](/guides/integrations/setting-up-integrations/configuring-chargebee-integrations#creating-the-integration).
* Second, [set up authentication](/guides/integrations/setting-up-integrations/configuring-chargebee-integrations#setting-up-authentication-for-the-integration) for the integration to connect with Chargebee.
## Creating the Integration
You can quickly set up a Chargebee integration in the Console.
**Important! Notes and Warnings:**
* **Note: Reviewing Integration Runs!** When you've set up an integration with Chargebee for your Organization in your production environment, you can review details of the integration runs performed for the integration. See [Reviewing Integration Run Details](/guides/integrations/setting-up-integrations/reviewing-integration-run-details).
* **Note: Accounting Products?** Many line item types can be mapped to specific Accounting Products to serve your revenue recognition and accounting purposes. Where this is the case, the integration will use the assigned Accounting Products.
* **Warning: Credit or Debit Line Items on Bills!** If you have added Credit or Debit line items to Bills, then *please ensure you enter Service Period start and end dates* for these line items. This is a Chargebee requirement and a Bills integration *will not run correctly* if you omit these dates.
* **Warning: Managing Empty Bills!** Please ensure you enable the **Suppress empty bills** setting for your Organization before deploying to your production environment. This means that any Account Bills without line items are not created in m3ter and are therefore not sent through as empty Bills to your Chargebee system when the integration runs resulting in an error. See [Viewing and Editing Organization Configuration](/guides/organization-and-access-management/viewing-and-editing-organization/viewing-and-editing-organization-configuration).
**To define a m3ter - Chargebee integration:**
1. Select **m3sh**:
* **Notes:**
* A warning is shown that the integration is not yet connected to Azure Marketplace.
* The **ID** of the integration configuration is shown at the bottom of the **Integration details** card, and you can copy the **ID** directly to your clipboard.
6. Select **Connect credential**. A **Select credential** modal appears.
7. Select a Credential you created earlier and want to use to authenticate the integration with Azure Marketplace. See [Creating Azure Marketplace Integration Credentials](/guides/integrations/setting-up-native-integrations/managing-integration-credentials/creating-azure-marketplace-integration-credentials).
8. Select **Confirm**. The modal closes and on **Integrations details**, the integration now shows as **CONNECTED**:
* The Credential used to connect the integration is shown.
* If at any time you want to disconnect the integration, select **Disconnect credential**.
* If you want to use a different Credential for connecting the integration, select **Change credential**. The **Select credential** modal appears and you can select a different Credential.
**Tip: Integrations API Calls?** When you have set up your integration, you can review and manage the integration using a full set of API Calls. See the [Integrations section](/api/integrations/introduction) of our API Reference Docs.
# Configuring Chargebee Integrations
Source: https://docs.m3ter.com/guides/integrations/setting-up-integrations/configuring-chargebee-integrations
You can define a integration for sending your end customer Account Bills generated in m3ter outbound into your Chargebee system:
* First, [create the integration](/guides/integrations/setting-up-integrations/configuring-chargebee-integrations#creating-the-integration).
* Second, [set up authentication](/guides/integrations/setting-up-integrations/configuring-chargebee-integrations#setting-up-authentication-for-the-integration) for the integration to connect with Chargebee.
## Creating the Integration
You can quickly set up a Chargebee integration in the Console.
**Important! Notes and Warnings:**
* **Note: Reviewing Integration Runs!** When you've set up an integration with Chargebee for your Organization in your production environment, you can review details of the integration runs performed for the integration. See [Reviewing Integration Run Details](/guides/integrations/setting-up-integrations/reviewing-integration-run-details).
* **Note: Accounting Products?** Many line item types can be mapped to specific Accounting Products to serve your revenue recognition and accounting purposes. Where this is the case, the integration will use the assigned Accounting Products.
* **Warning: Credit or Debit Line Items on Bills!** If you have added Credit or Debit line items to Bills, then *please ensure you enter Service Period start and end dates* for these line items. This is a Chargebee requirement and a Bills integration *will not run correctly* if you omit these dates.
* **Warning: Managing Empty Bills!** Please ensure you enable the **Suppress empty bills** setting for your Organization before deploying to your production environment. This means that any Account Bills without line items are not created in m3ter and are therefore not sent through as empty Bills to your Chargebee system when the integration runs resulting in an error. See [Viewing and Editing Organization Configuration](/guides/organization-and-access-management/viewing-and-editing-organization/viewing-and-editing-organization-configuration).
**To define a m3ter - Chargebee integration:**
1. Select **m3sh**:
 The **m3sh** page opens.
2. Select **Integrations**. The **Integrations** page opens with **All** selected by default.
3. Select **Chargebee**:
The **m3sh** page opens.
2. Select **Integrations**. The **Integrations** page opens with **All** selected by default.
3. Select **Chargebee**:
 The **m3sh / Integrations>Chargebee** page opens.
4. On the **Configurations** panel, select **Configure new integration>Configure bill integration**:
The **m3sh / Integrations>Chargebee** page opens.
4. On the **Configurations** panel, select **Configure new integration>Configure bill integration**:
![Integ Configs28b]() The **Create** page opens and the **Entity type** - **Bill** and **External system** - **Chargebee** are shown at the top of the page.
5. Use the **Global configuration** panel to:
* Enter a **Name** for the Integration. This is required and is useful if you intend to create multiple Integrations for the same External system/Entity Type and need to clearly differentiate them.
* Select the Accounts you want the integration to apply to:
* **Account ids.** Select the Accounts you want to include - all selected Accounts are treated as *allowed* for the integration.
* **Restricted account ids.** Select the Accounts you want to exclude - all selected Accounts are treated as *disallowed* for the integration.
**Notes:**
* If you want to include *all Accounts* in the integration, leave both **Accounts ids** and **Restricted account ids** empty.
* Any filtering by **Account ids** you define using these settings to control which Accounts the integration runs for will be *in addition* to any filtering you define using the **Account filter** option - see the following step for **Entity Configuration** options.
* Select Users for Email notifications if disabled:
* **Integration disabled notification users**. Select Organization Users you want to receive an Email notification if the integration is automatically disabled.
**Notes:**
* An integration is automatically disabled if there have been 20 successive previous error Event responses to earlier attempts to run the integration. See [Reviewing and Resolving Integration Events](/guides/integrations/setting-up-integrations/reviewing-and-resolving-integration-events) for more details.
* If you select Organization Users to receive an Email notification when the integration is automatically disabled, their User id will be listed under **Configuration Data** on the **Integration Details** page.
6. Use the **Entity configuration** panel to configure the m3ter entity you'll be synchronizing with for the integration. In the case of an outbound Bill integration, this entity will be the Bill generated for a customer Account in m3ter:
* **Only send bill on approval.** Enable this if you only want Bills to be sent when they have been approved. If disabled, the Bill will be sent every time it is regenerated. Default is disabled. Note that:
* The frequency of Bills sent will depend on the billing frequency defined for the Account Plan attached to the Account - such as daily/weekly/monthly/annually.
* If an Account has a Prepayment on it and the billing for Prepayment fees is configured to run on a customized schedule, Bills will be sent when scheduled Bills are generated.
* If a Bill is manually recalculated the updated Bill will be sent.
* If you enable this, then the integration will not run for *all Bill Jobs*.
* **Use external mapping account code.** Enable this if you want the integration to look in the External Mappings for the Account identifier code, which means you can use an external Id. If this is disabled, the m3ter Account Id is used. Default is disabled.
* **Excluded line item types.** Optionally filter the Bill line item types you send to the destination system. For example, only send charges or credits and exclude all other line item types.
* For details of line item types, see [Bill Line Item Types](/guides/billing-and-usage-data/running-viewing-and-managing-bills/bill-line-item-types).
**Warning: Credit and Debit line items on Bills!** If you set up the integration to include **CREDIT\_MEMO** and **DEBIT\_MEMO** line items and you have added Credit or Debit line items to Bills, please ensure you enter service period start and end dates for these line items. This is a Chargebee requirement and if you omit these dates, the integration will not run correctly. See [Adding Credit Line Items to Bills](/guides/billing-and-usage-data/running-viewing-and-managing-bills/adding-credit-line-items-to-bills) and [Adding Debit Line Items to Bills](/guides/billing-and-usage-data/running-viewing-and-managing-bills/adding-debit-line-items-to-bills).
* **Account filter**. Optionally, enter an expression that is run on the Account to determine whether or not the integration includes the Account. You can use this setting if you have multiple destinations for sending Bills outbound to your Chargebee system. For example:
* `"customFields != null AND customFields.country == "UK""`
* In this example, the integration will include an Account *only if* you have created a Custom Field for the Account called *country* and given the field a value of *UK*.
**Notes:**
* **Other Account fields for Account filter expression?** You can reference other fields on the Account object in the **Account filter** expression. For details and another example, see [Managing Multiple Third Party Destinations for Integrations](/guides/integrations/setting-up-integrations/managing-multiple-destinations-for-integrations).
* **Additional filtering?** Any global filtering you define using the settings to include/exclude Accounts for integration runs by **Account ids** will be *in addition* to any filtering you define using the **Account filter** option - see the previous step for **Global Configuration**.
* **Enforce external mappings for config**. Optionally enable this if you want the integration to use only those external mappings specified as being for this configuration.
* Use this setting if you want to set up multiple integrations for the same external system. You can then create separate external mappings for each integration from the details page of each integration, and these external mappings become **Linked external mappings** for the specific integration. See [Creating Linked External Mappings](/guides/integrations/setting-up-integrations/creating-and-managing-external-mappings#creating-linked-external-mappings).
* **Excluded products**. Optionally filter the Bill line items you send to the external system. Any line items associated with the selected Products will be be excluded when the integration runs.
* Note that if line items are mapped to a specific *Accounting Products*, these will be used for filtering to exclude line items.
* **Excluded aggregations**. Optionally filter the Bill line items you send to the external system. Any line items associated with the selected Aggregations will be be excluded when the integration runs.
7. Use the **External system configuration** panel to enter the settings specific to the external system. These settings include field mappings as well as other system-specific configurations:
* **Chargebee minimum spend item price.** Optional - enter the Charge Item Price ID to use when minimum spend line items are added to the invoice. Note that the value of the Charge Item will be used as the default value if there is no value available for a given pricing.
* **Chargebee standing charge item price.** Optional - enter the Charge Item Price ID to use when standing charge line items are added to the invoice. Note that the value of the Charge Item will be used as the default value if there is no value available for a given pricing.
* **Chargebee create invoice.** Whether or not m3ter should create an invoice in Chargebee. If disabled, m3ter will wait for Chargebee to generate a subscription invoice before trying to add line items. Default is disabled.
* **Chargebee use multidecimal.** Whether or not multi-decimal support is enabled in your Chargebee site. If it is, m3ter can send certain line item values with higher precision. Default is disabled.
* **Chargebee multi decimal price decimal places.** Enter the number of decimal places to be used when sending multi-decimal price values to Chargebee. This should be less than or equal to the number of decimal places configured in your Chargebee site:
* **Note:** Only relevant if **Chargebee use multidecimal** is enabled.
* **Chargebee multi decimal units decimal places.** Enter the number of decimal places to be used when sending multi-decimal units values to Chargebee. This should be less than or equal to the number of decimal places configured in your Chargebee site:
* **Note:** Only relevant if **Chargebee use multidecimal** is enabled.
**Tip: Rounding for decimal values?** Values are rounded up to nearest half. For example, if price or unit values in m3ter are set to 5 decimal places and you set price or unit values for the integration to use 3 decimal places to match the setting in Chargebee:
* 0.13333 is rounded to 0.133
* 0.16666 is rounded to 0.167
* **Split usage line items.** This setting determines how m3ter will create usage invoice items in Chargebee. Chargebee charge items can be mapped to an individual usage pricing band or to a product:
* **Item per usage band**
* **Item per product**
* **Chargebee default price id**. This setting defines the Chargebee Price ID that will be used if there is no External Mapping entity configured in m3ter between m3ter and Chargebee - for example "Other".
* **Chargebee price id mapping**:
* If configured, this setting means line items of the specified type will be mapped to the specified Chargebee Price ID.
* If not configured, the CHARGEBEE\_DEFAULT\_PRICE\_ID will be used.
* **Sort line items by**. Optionally, select a property to sort line items by before they are sent out to the external system. Three options:
* **None**
* **Subtotal**
* **Aggregation ID**
8. Select **Create integration**. You are returned to the **Integrations>Chargebee** page, where the integration is listed on the **Configurations** panel:
The **Create** page opens and the **Entity type** - **Bill** and **External system** - **Chargebee** are shown at the top of the page.
5. Use the **Global configuration** panel to:
* Enter a **Name** for the Integration. This is required and is useful if you intend to create multiple Integrations for the same External system/Entity Type and need to clearly differentiate them.
* Select the Accounts you want the integration to apply to:
* **Account ids.** Select the Accounts you want to include - all selected Accounts are treated as *allowed* for the integration.
* **Restricted account ids.** Select the Accounts you want to exclude - all selected Accounts are treated as *disallowed* for the integration.
**Notes:**
* If you want to include *all Accounts* in the integration, leave both **Accounts ids** and **Restricted account ids** empty.
* Any filtering by **Account ids** you define using these settings to control which Accounts the integration runs for will be *in addition* to any filtering you define using the **Account filter** option - see the following step for **Entity Configuration** options.
* Select Users for Email notifications if disabled:
* **Integration disabled notification users**. Select Organization Users you want to receive an Email notification if the integration is automatically disabled.
**Notes:**
* An integration is automatically disabled if there have been 20 successive previous error Event responses to earlier attempts to run the integration. See [Reviewing and Resolving Integration Events](/guides/integrations/setting-up-integrations/reviewing-and-resolving-integration-events) for more details.
* If you select Organization Users to receive an Email notification when the integration is automatically disabled, their User id will be listed under **Configuration Data** on the **Integration Details** page.
6. Use the **Entity configuration** panel to configure the m3ter entity you'll be synchronizing with for the integration. In the case of an outbound Bill integration, this entity will be the Bill generated for a customer Account in m3ter:
* **Only send bill on approval.** Enable this if you only want Bills to be sent when they have been approved. If disabled, the Bill will be sent every time it is regenerated. Default is disabled. Note that:
* The frequency of Bills sent will depend on the billing frequency defined for the Account Plan attached to the Account - such as daily/weekly/monthly/annually.
* If an Account has a Prepayment on it and the billing for Prepayment fees is configured to run on a customized schedule, Bills will be sent when scheduled Bills are generated.
* If a Bill is manually recalculated the updated Bill will be sent.
* If you enable this, then the integration will not run for *all Bill Jobs*.
* **Use external mapping account code.** Enable this if you want the integration to look in the External Mappings for the Account identifier code, which means you can use an external Id. If this is disabled, the m3ter Account Id is used. Default is disabled.
* **Excluded line item types.** Optionally filter the Bill line item types you send to the destination system. For example, only send charges or credits and exclude all other line item types.
* For details of line item types, see [Bill Line Item Types](/guides/billing-and-usage-data/running-viewing-and-managing-bills/bill-line-item-types).
**Warning: Credit and Debit line items on Bills!** If you set up the integration to include **CREDIT\_MEMO** and **DEBIT\_MEMO** line items and you have added Credit or Debit line items to Bills, please ensure you enter service period start and end dates for these line items. This is a Chargebee requirement and if you omit these dates, the integration will not run correctly. See [Adding Credit Line Items to Bills](/guides/billing-and-usage-data/running-viewing-and-managing-bills/adding-credit-line-items-to-bills) and [Adding Debit Line Items to Bills](/guides/billing-and-usage-data/running-viewing-and-managing-bills/adding-debit-line-items-to-bills).
* **Account filter**. Optionally, enter an expression that is run on the Account to determine whether or not the integration includes the Account. You can use this setting if you have multiple destinations for sending Bills outbound to your Chargebee system. For example:
* `"customFields != null AND customFields.country == "UK""`
* In this example, the integration will include an Account *only if* you have created a Custom Field for the Account called *country* and given the field a value of *UK*.
**Notes:**
* **Other Account fields for Account filter expression?** You can reference other fields on the Account object in the **Account filter** expression. For details and another example, see [Managing Multiple Third Party Destinations for Integrations](/guides/integrations/setting-up-integrations/managing-multiple-destinations-for-integrations).
* **Additional filtering?** Any global filtering you define using the settings to include/exclude Accounts for integration runs by **Account ids** will be *in addition* to any filtering you define using the **Account filter** option - see the previous step for **Global Configuration**.
* **Enforce external mappings for config**. Optionally enable this if you want the integration to use only those external mappings specified as being for this configuration.
* Use this setting if you want to set up multiple integrations for the same external system. You can then create separate external mappings for each integration from the details page of each integration, and these external mappings become **Linked external mappings** for the specific integration. See [Creating Linked External Mappings](/guides/integrations/setting-up-integrations/creating-and-managing-external-mappings#creating-linked-external-mappings).
* **Excluded products**. Optionally filter the Bill line items you send to the external system. Any line items associated with the selected Products will be be excluded when the integration runs.
* Note that if line items are mapped to a specific *Accounting Products*, these will be used for filtering to exclude line items.
* **Excluded aggregations**. Optionally filter the Bill line items you send to the external system. Any line items associated with the selected Aggregations will be be excluded when the integration runs.
7. Use the **External system configuration** panel to enter the settings specific to the external system. These settings include field mappings as well as other system-specific configurations:
* **Chargebee minimum spend item price.** Optional - enter the Charge Item Price ID to use when minimum spend line items are added to the invoice. Note that the value of the Charge Item will be used as the default value if there is no value available for a given pricing.
* **Chargebee standing charge item price.** Optional - enter the Charge Item Price ID to use when standing charge line items are added to the invoice. Note that the value of the Charge Item will be used as the default value if there is no value available for a given pricing.
* **Chargebee create invoice.** Whether or not m3ter should create an invoice in Chargebee. If disabled, m3ter will wait for Chargebee to generate a subscription invoice before trying to add line items. Default is disabled.
* **Chargebee use multidecimal.** Whether or not multi-decimal support is enabled in your Chargebee site. If it is, m3ter can send certain line item values with higher precision. Default is disabled.
* **Chargebee multi decimal price decimal places.** Enter the number of decimal places to be used when sending multi-decimal price values to Chargebee. This should be less than or equal to the number of decimal places configured in your Chargebee site:
* **Note:** Only relevant if **Chargebee use multidecimal** is enabled.
* **Chargebee multi decimal units decimal places.** Enter the number of decimal places to be used when sending multi-decimal units values to Chargebee. This should be less than or equal to the number of decimal places configured in your Chargebee site:
* **Note:** Only relevant if **Chargebee use multidecimal** is enabled.
**Tip: Rounding for decimal values?** Values are rounded up to nearest half. For example, if price or unit values in m3ter are set to 5 decimal places and you set price or unit values for the integration to use 3 decimal places to match the setting in Chargebee:
* 0.13333 is rounded to 0.133
* 0.16666 is rounded to 0.167
* **Split usage line items.** This setting determines how m3ter will create usage invoice items in Chargebee. Chargebee charge items can be mapped to an individual usage pricing band or to a product:
* **Item per usage band**
* **Item per product**
* **Chargebee default price id**. This setting defines the Chargebee Price ID that will be used if there is no External Mapping entity configured in m3ter between m3ter and Chargebee - for example "Other".
* **Chargebee price id mapping**:
* If configured, this setting means line items of the specified type will be mapped to the specified Chargebee Price ID.
* If not configured, the CHARGEBEE\_DEFAULT\_PRICE\_ID will be used.
* **Sort line items by**. Optionally, select a property to sort line items by before they are sent out to the external system. Three options:
* **None**
* **Subtotal**
* **Aggregation ID**
8. Select **Create integration**. You are returned to the **Integrations>Chargebee** page, where the integration is listed on the **Configurations** panel:
![]() ## Setting up Authentication for the Integration
When you've created a Chargebee integration, you can select an Integration Credential you've created for authentication allowing the integration to connect with your Chargebee system.
**To set up authentication for your m3ter - Chargebee integration:**
1. Select **m3sh**. The **Workflows** page opens.
2. Select **Integrations**. The **Integrations** page opens.
3. Select **Chargebee**. The **Integrations>Chargebee** page opens.
4. On the **Configurations** panel, select the **Name** hotlink text of the Chargebee integration you want to set up authentication for. The **Integration details** page opens:
## Setting up Authentication for the Integration
When you've created a Chargebee integration, you can select an Integration Credential you've created for authentication allowing the integration to connect with your Chargebee system.
**To set up authentication for your m3ter - Chargebee integration:**
1. Select **m3sh**. The **Workflows** page opens.
2. Select **Integrations**. The **Integrations** page opens.
3. Select **Chargebee**. The **Integrations>Chargebee** page opens.
4. On the **Configurations** panel, select the **Name** hotlink text of the Chargebee integration you want to set up authentication for. The **Integration details** page opens:
![Integ Configs44a]() * Notes:
* A warning is shown that the integration is not yet connected to your Chargebee system.
* The **ID** of the integration configuration is shown at the bottom of the **Details** card, and you can copy the **ID** directly to your clipboard.
5. Select **Connect credential**. A **Select credential** modal appears.
6. Select a Credential you created earlier and want to use to authenticate the integration with Chargebee. See [Creating Chargebee Integration Credentials](/guides/integrations/setting-up-integrations/_managing-integration-credentials-legacy/creating-chargebee-integration-credentials).
7. Select **Confirm**. The modal closes and on **Integrations details** the integration now shows as **CONNECTED**:
* Notes:
* A warning is shown that the integration is not yet connected to your Chargebee system.
* The **ID** of the integration configuration is shown at the bottom of the **Details** card, and you can copy the **ID** directly to your clipboard.
5. Select **Connect credential**. A **Select credential** modal appears.
6. Select a Credential you created earlier and want to use to authenticate the integration with Chargebee. See [Creating Chargebee Integration Credentials](/guides/integrations/setting-up-integrations/_managing-integration-credentials-legacy/creating-chargebee-integration-credentials).
7. Select **Confirm**. The modal closes and on **Integrations details** the integration now shows as **CONNECTED**:
![Chargebee Cred Added2a]() * The Credential used to connect the integration is shown.
* If at any time you want to disconnect the integration, select **Disconnect credential**.
* If you want to use a different Credential for connecting the integration, select **Change credential**. The **Select credential** modal appears and you can select a different Credential.
**Tip: Testing your Integration Setup?** Your Chargebee integration is now available for use. However, it remains in Beta release and we strongly recommend you test the implementation in your m3ter Sandbox or QA environment before releasing it to your Production environment. See section 7. of our [Terms of Service](https://www.m3ter.com/docs/legal/terms-of-service) for Beta Usage.
**Tip: Integrations API Calls?** When you have set up your Chargebee integration, you can review and manage the integration using a full set of API Calls. See the [Integrations section](/api/integrations/introduction) of our API Reference Docs.
# Configuring NetSuite Integrations
Source: https://docs.m3ter.com/guides/integrations/setting-up-integrations/configuring-netsuite-integrations
You can define and manage integrations for sending your end customer Bills generated in m3ter, into your NetSuite system:
* First, [create the integration](/guides/integrations/setting-up-integrations/configuring-netsuite-integrations#creating-the-integration).
* Second, [set up authentication](/guides/integrations/setting-up-integrations/configuring-netsuite-integrations#setting-up-authentication-for-the-integration) for the integration to connect with NetSuite.
This topic also includes a reference section sets out the mappings for a m3ter - NetSuite integration:
* [Mappings](/guides/integrations/setting-up-integrations/configuring-netsuite-integrations#mappings)
## Creating the Integration
You can quickly set up a NetSuite integration in the Console.
**Important! Notes and Warnings:**
* **Warning: Completing Prerequisites!** We *strongly recommend* that you first review [Completing NetSuite Integration Prerequisites](/guides/integrations/setting-up-integrations/configuring-netsuite-integrations/configuring-netsuite-integration-prerequisites) when setting up an integration with your NetSuite instance.
* **Note: Reviewing Integration Runs!** When you've set up an integration with NetSuite for your Organization in your production environment, you can review details of the integration runs performed for the integration. See [Reviewing Integration Run Details](/guides/integrations/setting-up-integrations/reviewing-integration-run-details).
* **Note: Accounting Products?** Many line item types can be mapped to specific Accounting Products to serve your revenue recognition and accounting purposes. Where this is the case, the integration will use the assigned Accounting Products.
* **Warning: Credit or Debit Line Items on Bills!** If you are using NetSuite's Advanced Revenue Module (ARM) and have added Credit or Debit line items to Bills, then *please ensure you enter Service Period start and end dates* for these line items. This is a NetSuite requirement when using ARM and a Bills integration *will not run correctly* if you omit these dates.
**To define a m3ter - NetSuite integration:**
1. Select **Integrations**:
* The Credential used to connect the integration is shown.
* If at any time you want to disconnect the integration, select **Disconnect credential**.
* If you want to use a different Credential for connecting the integration, select **Change credential**. The **Select credential** modal appears and you can select a different Credential.
**Tip: Testing your Integration Setup?** Your Chargebee integration is now available for use. However, it remains in Beta release and we strongly recommend you test the implementation in your m3ter Sandbox or QA environment before releasing it to your Production environment. See section 7. of our [Terms of Service](https://www.m3ter.com/docs/legal/terms-of-service) for Beta Usage.
**Tip: Integrations API Calls?** When you have set up your Chargebee integration, you can review and manage the integration using a full set of API Calls. See the [Integrations section](/api/integrations/introduction) of our API Reference Docs.
# Configuring NetSuite Integrations
Source: https://docs.m3ter.com/guides/integrations/setting-up-integrations/configuring-netsuite-integrations
You can define and manage integrations for sending your end customer Bills generated in m3ter, into your NetSuite system:
* First, [create the integration](/guides/integrations/setting-up-integrations/configuring-netsuite-integrations#creating-the-integration).
* Second, [set up authentication](/guides/integrations/setting-up-integrations/configuring-netsuite-integrations#setting-up-authentication-for-the-integration) for the integration to connect with NetSuite.
This topic also includes a reference section sets out the mappings for a m3ter - NetSuite integration:
* [Mappings](/guides/integrations/setting-up-integrations/configuring-netsuite-integrations#mappings)
## Creating the Integration
You can quickly set up a NetSuite integration in the Console.
**Important! Notes and Warnings:**
* **Warning: Completing Prerequisites!** We *strongly recommend* that you first review [Completing NetSuite Integration Prerequisites](/guides/integrations/setting-up-integrations/configuring-netsuite-integrations/configuring-netsuite-integration-prerequisites) when setting up an integration with your NetSuite instance.
* **Note: Reviewing Integration Runs!** When you've set up an integration with NetSuite for your Organization in your production environment, you can review details of the integration runs performed for the integration. See [Reviewing Integration Run Details](/guides/integrations/setting-up-integrations/reviewing-integration-run-details).
* **Note: Accounting Products?** Many line item types can be mapped to specific Accounting Products to serve your revenue recognition and accounting purposes. Where this is the case, the integration will use the assigned Accounting Products.
* **Warning: Credit or Debit Line Items on Bills!** If you are using NetSuite's Advanced Revenue Module (ARM) and have added Credit or Debit line items to Bills, then *please ensure you enter Service Period start and end dates* for these line items. This is a NetSuite requirement when using ARM and a Bills integration *will not run correctly* if you omit these dates.
**To define a m3ter - NetSuite integration:**
1. Select **Integrations**:
 The **Workflows** page opens.
2. Select **Integrations**. The **Integrations** page opens with **All** selected by default.
3. Select **Netsuite**:
The **Workflows** page opens.
2. Select **Integrations**. The **Integrations** page opens with **All** selected by default.
3. Select **Netsuite**:
 The **m3sh / Integrations>NetSuite** page opens.
4. On the **Configurations** panel, select **Configure new integration>Configure bill integration**:
The **m3sh / Integrations>NetSuite** page opens.
4. On the **Configurations** panel, select **Configure new integration>Configure bill integration**:
![Integ Configs25c]() The **Create** page opens and the **Entity type** - **Bill** and **External system** - **NetSuite** are shown at the top of the page.
5. Use the **Global configuration** panel to:
* Enter a **Name** for the Integration. This is required and is useful if you intend to create multiple Integrations for the same External system/Entity Type and need to clearly differentiate them.
* Select the Accounts you want the integration to apply to:
* **Account ids.** Select the Accounts you want to include - all selected Accounts are treated as *allowed* for the integration.
* **Restricted account ids.** Select the Accounts you want to exclude - all selected Accounts are treated as *not allowed* for the integration.
**Notes:**
* If you want to include *all Accounts* in the integration, leave both **Accounts ids** and **Restricted account ids** empty.
* Any filtering by **Account ids** you define using these settings to control which Accounts the integration runs for will be *in addition* to any filtering you define using the **Account filter** option - see the following step for **Entity Configuration** options.
* Select Users for Email notifications if disabled:
* **Integration disabled notification users**. Select Organization Users you want to receive an Email notification if the integration is automatically disabled.
**Notes:**
* An integration is automatically disabled if there have been 20 successive previous error Event responses to earlier attempts to run the integration. See [Reviewing and Resolving Integration Events](/guides/integrations/setting-up-integrations/reviewing-and-resolving-integration-events) for more details.
* If you select Organization Users to receive an Email notification when the integration is automatically disabled, their User id will be listed under **Configuration Data** on the **Integration Details** page.
6. Use the **Entity configuration** panel to configure the m3ter entity you will be synchronizing with for the integration. In the case of an outbound Bill integration, this entity will be the Bill generated for a customer Account in m3ter:
* **Only send bill on approval.** Enable this if you only want Bills to be sent when they have been approved. If disabled, the Bill will be sent every time it is regenerated. Default is disabled. Note that:
* The frequency of Bills sent will depend on the billing frequency defined for the Account Plan attached to the Account - such as daily/weekly/monthly/annually.
* If an Account has a Prepayment on it and the billing for Prepayment fees is configured to run on a customized schedule, Bills will be sent when scheduled Bills are generated.
* If a Bill is manually recalculated the updated Bill will be sent.
* If you enable this, then the integration will not run for *all Bill Jobs*.
* **Use external mapping account code.** Enable this if you want the integration to look in the External Mappings for the Account identifier, which means you can use an external Id. If this is disabled, the m3ter Account Id is used. Default is disabled.
* **Excluded line item types.** Filter the Bill line item types you send to the external system. For example, only send charges or credits and exclude all other line items.
* For details of line item types, see [Bill Line Item Types](/guides/billing-and-usage-data/running-viewing-and-managing-bills/bill-line-item-types).
**Warning: Credit and Debit line items on Bills!** If you are using the NetSuite Advanced Revenue Module (ARM) and you've set up the integration to include **CREDIT\_MEMO** and **DEBIT\_MEMO** line items and you have added Credit or Debit line items to Bills, please ensure you enter service period start and end dates for these line items. This is a NetSuite requirement when using the ARM and if you omit these dates, the integration will not run correctly. See [Adding Credit Line Items to Bills](/guides/billing-and-usage-data/running-viewing-and-managing-bills/adding-credit-line-items-to-bills) and [Adding Debit Line Items to Bills](/guides/billing-and-usage-data/running-viewing-and-managing-bills/adding-debit-line-items-to-bills).
* **Account filter**. Optionally, enter an expression that is run on the Account to determine whether or not the integration includes an Account. You can use this setting if you have multiple destinations for sending Bills outbound to your NetSuite system. For example:
* `"customFields != null AND customFields.country == "UK""`
* In this example, the integration will include an Account *only if* you have created a Custom Field for the Account called *country* and given the field a value of *UK*.
**Notes:**
* **Other Account fields for Account filter expression?** You can reference other fields on the Account object in the **Account filter** expression. For details and another example, see [Managing Multiple Third Party Destinations for Integrations](/guides/integrations/setting-up-integrations/managing-multiple-destinations-for-integrations).
* **Additional filtering?** Any global filtering you define using the settings to include/exclude Accounts for integration runs by **Account ids** will be *in addition* to any filtering you define using the **Account filter** option - see the previous step for **Global Configuration**.
* **Enforce external mappings for config**. Optionally enable this if you want the integration to use only those external mappings specified as being for this configuration.
* Use this setting if you want to set up multiple integrations for the same external system. You can then create separate external mappings for each integration from the details page of each integration, and these external mappings become **Linked external mappings** for the specific integration. See [Creating Linked External Mappings](/guides/integrations/setting-up-integrations/creating-and-managing-external-mappings#creating-linked-external-mappings).
* **Excluded products**. Optionally filter the Bill line items you send to the external system. Any line items associated with the selected Products will be be excluded when the integration runs.
* Note that if line items are mapped to a specific *Accounting Products*, these will be used for filtering to exclude line items.
* **Excluded aggregations**. Optionally filter the Bill line items you send to the external system. Any line items associated with the selected Aggregations will be be excluded when the integration runs.
7. Use the **External system configuration** panel to enter the settings specific to the external system. These settings include field mappings as well as other system-specific configurations:
* **Split usage line items.** Select how you want to split line items in the outgoing Bill. Two options:
* **Item per usage band**. Create a line item on your NetSuite invoice for each pricing band.
* **Item per product**. Create one NetSuite Item per m3ter Bill Item.
* **Netsuite send due date**. Whether the calculated due date is sent from m3ter to NetSuite. If this option is disabled, NetSuite will default the due date based on the customer configuration.
* **Netsuite commitment item id.** Enter the Id of the Commitment item in NetSuite. This field is only required if you are representing Commitments with a specific NetSuite Item. If not configured, the NETSUITE\_DEFAULT\_ITEM\_ID will be used.
* **Netsuite minimum spend id.** Enter the Id of the Minimum Spend in NetSuite. This field is only required if you are representing Minimum Spends with a specific NetSuite Item. If not configured, the NETSUITE\_DEFAULT\_ITEM\_ID will be used.
* **Netsuite default item id.** Enter the Id of the Default item in NetSuite. This will be used if there is no External Mapping entity configured in m3ter between m3ter and NetSuite - for example "Other".
* **Netsuite item mapping.** Enter the details for mapping each Bill line item type to their corresponding items in NetSuite. Optionally map each line item type in m3ter with a specific Item in NetSuite. These values will be used if there is no external mapping for a NetSuite Item. For any of these fields which are not populated, the value in NETSUITE\_DEFAULT\_ITEM\_ID will be used as the default for that line item type.
* For details of line item types, see [Bill Line Item Types](/guides/billing-and-usage-data/running-viewing-and-managing-bills/bill-line-item-types).
* **Netsuite item custom field mapping.** Optionally choose a specific mapping to NetSuite Custom fields. Currently, three line item fields are available for mapping to NetSuite Custom fields:
* **servicePeriodStart**
* **servicePeriodEnd**
* **contractCode**
* **Sort line items by**. Optionally, select a property to sort line items by before they are sent out to the external system. Three options:
* **None**
* **Subtotal**
* **Aggregation ID**
8. Select **Create integration**. You are returned to the **Integrations>NetSuite** page, where the integration is listed on the **Configurations** panel:
The **Create** page opens and the **Entity type** - **Bill** and **External system** - **NetSuite** are shown at the top of the page.
5. Use the **Global configuration** panel to:
* Enter a **Name** for the Integration. This is required and is useful if you intend to create multiple Integrations for the same External system/Entity Type and need to clearly differentiate them.
* Select the Accounts you want the integration to apply to:
* **Account ids.** Select the Accounts you want to include - all selected Accounts are treated as *allowed* for the integration.
* **Restricted account ids.** Select the Accounts you want to exclude - all selected Accounts are treated as *not allowed* for the integration.
**Notes:**
* If you want to include *all Accounts* in the integration, leave both **Accounts ids** and **Restricted account ids** empty.
* Any filtering by **Account ids** you define using these settings to control which Accounts the integration runs for will be *in addition* to any filtering you define using the **Account filter** option - see the following step for **Entity Configuration** options.
* Select Users for Email notifications if disabled:
* **Integration disabled notification users**. Select Organization Users you want to receive an Email notification if the integration is automatically disabled.
**Notes:**
* An integration is automatically disabled if there have been 20 successive previous error Event responses to earlier attempts to run the integration. See [Reviewing and Resolving Integration Events](/guides/integrations/setting-up-integrations/reviewing-and-resolving-integration-events) for more details.
* If you select Organization Users to receive an Email notification when the integration is automatically disabled, their User id will be listed under **Configuration Data** on the **Integration Details** page.
6. Use the **Entity configuration** panel to configure the m3ter entity you will be synchronizing with for the integration. In the case of an outbound Bill integration, this entity will be the Bill generated for a customer Account in m3ter:
* **Only send bill on approval.** Enable this if you only want Bills to be sent when they have been approved. If disabled, the Bill will be sent every time it is regenerated. Default is disabled. Note that:
* The frequency of Bills sent will depend on the billing frequency defined for the Account Plan attached to the Account - such as daily/weekly/monthly/annually.
* If an Account has a Prepayment on it and the billing for Prepayment fees is configured to run on a customized schedule, Bills will be sent when scheduled Bills are generated.
* If a Bill is manually recalculated the updated Bill will be sent.
* If you enable this, then the integration will not run for *all Bill Jobs*.
* **Use external mapping account code.** Enable this if you want the integration to look in the External Mappings for the Account identifier, which means you can use an external Id. If this is disabled, the m3ter Account Id is used. Default is disabled.
* **Excluded line item types.** Filter the Bill line item types you send to the external system. For example, only send charges or credits and exclude all other line items.
* For details of line item types, see [Bill Line Item Types](/guides/billing-and-usage-data/running-viewing-and-managing-bills/bill-line-item-types).
**Warning: Credit and Debit line items on Bills!** If you are using the NetSuite Advanced Revenue Module (ARM) and you've set up the integration to include **CREDIT\_MEMO** and **DEBIT\_MEMO** line items and you have added Credit or Debit line items to Bills, please ensure you enter service period start and end dates for these line items. This is a NetSuite requirement when using the ARM and if you omit these dates, the integration will not run correctly. See [Adding Credit Line Items to Bills](/guides/billing-and-usage-data/running-viewing-and-managing-bills/adding-credit-line-items-to-bills) and [Adding Debit Line Items to Bills](/guides/billing-and-usage-data/running-viewing-and-managing-bills/adding-debit-line-items-to-bills).
* **Account filter**. Optionally, enter an expression that is run on the Account to determine whether or not the integration includes an Account. You can use this setting if you have multiple destinations for sending Bills outbound to your NetSuite system. For example:
* `"customFields != null AND customFields.country == "UK""`
* In this example, the integration will include an Account *only if* you have created a Custom Field for the Account called *country* and given the field a value of *UK*.
**Notes:**
* **Other Account fields for Account filter expression?** You can reference other fields on the Account object in the **Account filter** expression. For details and another example, see [Managing Multiple Third Party Destinations for Integrations](/guides/integrations/setting-up-integrations/managing-multiple-destinations-for-integrations).
* **Additional filtering?** Any global filtering you define using the settings to include/exclude Accounts for integration runs by **Account ids** will be *in addition* to any filtering you define using the **Account filter** option - see the previous step for **Global Configuration**.
* **Enforce external mappings for config**. Optionally enable this if you want the integration to use only those external mappings specified as being for this configuration.
* Use this setting if you want to set up multiple integrations for the same external system. You can then create separate external mappings for each integration from the details page of each integration, and these external mappings become **Linked external mappings** for the specific integration. See [Creating Linked External Mappings](/guides/integrations/setting-up-integrations/creating-and-managing-external-mappings#creating-linked-external-mappings).
* **Excluded products**. Optionally filter the Bill line items you send to the external system. Any line items associated with the selected Products will be be excluded when the integration runs.
* Note that if line items are mapped to a specific *Accounting Products*, these will be used for filtering to exclude line items.
* **Excluded aggregations**. Optionally filter the Bill line items you send to the external system. Any line items associated with the selected Aggregations will be be excluded when the integration runs.
7. Use the **External system configuration** panel to enter the settings specific to the external system. These settings include field mappings as well as other system-specific configurations:
* **Split usage line items.** Select how you want to split line items in the outgoing Bill. Two options:
* **Item per usage band**. Create a line item on your NetSuite invoice for each pricing band.
* **Item per product**. Create one NetSuite Item per m3ter Bill Item.
* **Netsuite send due date**. Whether the calculated due date is sent from m3ter to NetSuite. If this option is disabled, NetSuite will default the due date based on the customer configuration.
* **Netsuite commitment item id.** Enter the Id of the Commitment item in NetSuite. This field is only required if you are representing Commitments with a specific NetSuite Item. If not configured, the NETSUITE\_DEFAULT\_ITEM\_ID will be used.
* **Netsuite minimum spend id.** Enter the Id of the Minimum Spend in NetSuite. This field is only required if you are representing Minimum Spends with a specific NetSuite Item. If not configured, the NETSUITE\_DEFAULT\_ITEM\_ID will be used.
* **Netsuite default item id.** Enter the Id of the Default item in NetSuite. This will be used if there is no External Mapping entity configured in m3ter between m3ter and NetSuite - for example "Other".
* **Netsuite item mapping.** Enter the details for mapping each Bill line item type to their corresponding items in NetSuite. Optionally map each line item type in m3ter with a specific Item in NetSuite. These values will be used if there is no external mapping for a NetSuite Item. For any of these fields which are not populated, the value in NETSUITE\_DEFAULT\_ITEM\_ID will be used as the default for that line item type.
* For details of line item types, see [Bill Line Item Types](/guides/billing-and-usage-data/running-viewing-and-managing-bills/bill-line-item-types).
* **Netsuite item custom field mapping.** Optionally choose a specific mapping to NetSuite Custom fields. Currently, three line item fields are available for mapping to NetSuite Custom fields:
* **servicePeriodStart**
* **servicePeriodEnd**
* **contractCode**
* **Sort line items by**. Optionally, select a property to sort line items by before they are sent out to the external system. Three options:
* **None**
* **Subtotal**
* **Aggregation ID**
8. Select **Create integration**. You are returned to the **Integrations>NetSuite** page, where the integration is listed on the **Configurations** panel:
![]() ## Setting Up Authentication for the Integration
When you have created a NetSuite integration, you can select an Integration Credential you've created for authentication allowing the integration to connect with your NetSuite system.
**To set up authentication for your m3ter - NetSuite integration:**
1. Select **m3sh**. The **Workflows** page opens.
2. Select **Integrations**. The **Integrations** page opens
3. Select **NetSuite**. The **Integrations>NetSuite** page opens.
4. On the **Configurations** panel, select the **Name** hotlink text of the NetSuite integration you want to set up authentication for. The **Integration details** page opens:
## Setting Up Authentication for the Integration
When you have created a NetSuite integration, you can select an Integration Credential you've created for authentication allowing the integration to connect with your NetSuite system.
**To set up authentication for your m3ter - NetSuite integration:**
1. Select **m3sh**. The **Workflows** page opens.
2. Select **Integrations**. The **Integrations** page opens
3. Select **NetSuite**. The **Integrations>NetSuite** page opens.
4. On the **Configurations** panel, select the **Name** hotlink text of the NetSuite integration you want to set up authentication for. The **Integration details** page opens:
![Integ Configs42a]() * **Notes:**
* A warning is shown that the integration is not yet connected to your NetSuite system.
* The **ID** of the integration configuration is shown at the bottom of the **Integration details** card, and you can copy the **ID** directly to your clipboard.
5. Select **Connect credential**. A **Select credential** modal appears.
6. Select a Credential you created earlier and want to use to authenticate the integration with NetSuite. See [Creating NetSuite Integration Credentials](/guides/integrations/setting-up-integrations/_managing-integration-credentials-legacy/creating-netsuite-integration-credentials).
7. Select **Confirm**. The modal closes and on **Integrations details**, the integration now shows as **CONNECTED**:
* The Credential used to connect the integration is shown.
* If at any time you want to disconnect the integration, select **Disconnect credential**.
* If you want to use a different Credential for connecting the integration, select **Change credential**. The **Select credential** modal appears and you can select a different Credential.
**Tip: Integrations API Calls?** When you have set up your NetSuite integration, you can review and manage the integration using a full set of API Calls. See the [Integrations section](/api/integrations/introduction) of our API Reference Docs.
## Mappings
This reference section sets out the mappings for a m3ter - NetSuite integration:
* [Bill](/guides/integrations/setting-up-integrations/configuring-netsuite-integrations#bill)
* [Bill Line Item](/guides/integrations/setting-up-integrations/configuring-netsuite-integrations#bill-line-item)
### Bill
| m3ter | NetSuite Invoice | Notes |
| - | - | - |
| accountId | Customer Id | External Mapping |
| billId | invoice id | External Mapping |
| dueDate | dueDate | Start of day |
| endDateTimeUTC | endDate | |
| purchaseOrderNumber | PoNumber | |
| sequentialInvoiceNumber | tranid | |
| startDateTimeUTC | startDate | |
### Bill Line Item
| m3ter Line Item | NetSuite Invoice Item | Notes |
| - | - | - |
| convertedSubTotal | amount | (1) Rounded to two decimal places or whatever is set for the billing currency. (2) Depends on Split usage line item setting for the integration: (i) converted SubTotal is mapped if Item per product is selected or if the setting is not configured; (ii) If Item per usage band is selected, then bandSubTotal is mapped instead. |
| description | description | |
| id | externalId | |
| quantity | quantity | |
| pricingBandId | ItemId | External mapping: mapped to ItemId only if Item per usage band is selected for Split usage line items setting. |
| productId | ItemId | External mapping: mapped to ItemId only if Item per product is selected for Split usage line items setting. |
| rate | rate | |
# Configuring Paddle Integrations
Source: https://docs.m3ter.com/guides/integrations/setting-up-integrations/configuring-paddle-integrations
You can define and manage integrations for sending your end customer Account Bills generated in m3ter into your Paddle system:
* First, [create the integration](/guides/integrations/setting-up-integrations/configuring-paddle-integrations#creating-the-integration).
* Second, [set up authentication](/guides/integrations/setting-up-integrations/configuring-paddle-integrations#setting-up-the-authentication-for-the-integration) for the integration to connect with Paddle.
**Important! Notes and Warnings:**
* **Note: Paddle Integration in Beta Release!** Please note that the Paddle integration is currently in beta release:
* See [Feature Release Stages](/guides/getting-started/feature-release-stages) for Beta release definition.
* If you intend to implement this integration for your m3ter Organization, please contact m3ter Support or your m3ter contact person to discuss.
* **Paddle or Paddle (Sandbox Mode)?** The difference between these two integrations is selecting **Paddle** means an integration destination into your Paddle *production environment*, selecting **Paddle (Sandbox Mode)** means an integration destination into your **Paddle**\* Sandbox environment\*. The configuration settings are the same for both destinations.
* **Note: Accounting Products?** Many line item types can be mapped to specific Accounting Products to serve your revenue recognition and accounting purposes. Where this is the case, the integration will use the assigned Accounting Products.
* **Tip: Reviewing Integration Runs!** When you've set up an integration with Paddle for your Organization in your production environment, you can review details of the integration runs performed for the integration. See [Reviewing Integration Run Details](/guides/integrations/setting-up-integrations/reviewing-integration-run-details).
* **Warning: Constraints on Paddle Integrations!**
* **Negative Line Items on Bills**. The Paddle system *does not* currently support negative line items on Bills.
* **Invoices Created in Draft**. The integration creates invoices in *draft form* in the Paddle system.
* **High-Precision Values**. The Paddle system *does not* currently support high-precision values. Values with more than 2 decimal places of precision are rounded leading to inaccurate values. Please bear this in mind when pricing Product Plans and entering a price per unit and when defining maximum decimal places for Currencies.
## Creating the Integration
You can quickly set up a Paddle integration in the Console.
**To define a m3ter - Paddle integration:**
1. Select **m3sh**:
* **Notes:**
* A warning is shown that the integration is not yet connected to your NetSuite system.
* The **ID** of the integration configuration is shown at the bottom of the **Integration details** card, and you can copy the **ID** directly to your clipboard.
5. Select **Connect credential**. A **Select credential** modal appears.
6. Select a Credential you created earlier and want to use to authenticate the integration with NetSuite. See [Creating NetSuite Integration Credentials](/guides/integrations/setting-up-integrations/_managing-integration-credentials-legacy/creating-netsuite-integration-credentials).
7. Select **Confirm**. The modal closes and on **Integrations details**, the integration now shows as **CONNECTED**:
* The Credential used to connect the integration is shown.
* If at any time you want to disconnect the integration, select **Disconnect credential**.
* If you want to use a different Credential for connecting the integration, select **Change credential**. The **Select credential** modal appears and you can select a different Credential.
**Tip: Integrations API Calls?** When you have set up your NetSuite integration, you can review and manage the integration using a full set of API Calls. See the [Integrations section](/api/integrations/introduction) of our API Reference Docs.
## Mappings
This reference section sets out the mappings for a m3ter - NetSuite integration:
* [Bill](/guides/integrations/setting-up-integrations/configuring-netsuite-integrations#bill)
* [Bill Line Item](/guides/integrations/setting-up-integrations/configuring-netsuite-integrations#bill-line-item)
### Bill
| m3ter | NetSuite Invoice | Notes |
| - | - | - |
| accountId | Customer Id | External Mapping |
| billId | invoice id | External Mapping |
| dueDate | dueDate | Start of day |
| endDateTimeUTC | endDate | |
| purchaseOrderNumber | PoNumber | |
| sequentialInvoiceNumber | tranid | |
| startDateTimeUTC | startDate | |
### Bill Line Item
| m3ter Line Item | NetSuite Invoice Item | Notes |
| - | - | - |
| convertedSubTotal | amount | (1) Rounded to two decimal places or whatever is set for the billing currency. (2) Depends on Split usage line item setting for the integration: (i) converted SubTotal is mapped if Item per product is selected or if the setting is not configured; (ii) If Item per usage band is selected, then bandSubTotal is mapped instead. |
| description | description | |
| id | externalId | |
| quantity | quantity | |
| pricingBandId | ItemId | External mapping: mapped to ItemId only if Item per usage band is selected for Split usage line items setting. |
| productId | ItemId | External mapping: mapped to ItemId only if Item per product is selected for Split usage line items setting. |
| rate | rate | |
# Configuring Paddle Integrations
Source: https://docs.m3ter.com/guides/integrations/setting-up-integrations/configuring-paddle-integrations
You can define and manage integrations for sending your end customer Account Bills generated in m3ter into your Paddle system:
* First, [create the integration](/guides/integrations/setting-up-integrations/configuring-paddle-integrations#creating-the-integration).
* Second, [set up authentication](/guides/integrations/setting-up-integrations/configuring-paddle-integrations#setting-up-the-authentication-for-the-integration) for the integration to connect with Paddle.
**Important! Notes and Warnings:**
* **Note: Paddle Integration in Beta Release!** Please note that the Paddle integration is currently in beta release:
* See [Feature Release Stages](/guides/getting-started/feature-release-stages) for Beta release definition.
* If you intend to implement this integration for your m3ter Organization, please contact m3ter Support or your m3ter contact person to discuss.
* **Paddle or Paddle (Sandbox Mode)?** The difference between these two integrations is selecting **Paddle** means an integration destination into your Paddle *production environment*, selecting **Paddle (Sandbox Mode)** means an integration destination into your **Paddle**\* Sandbox environment\*. The configuration settings are the same for both destinations.
* **Note: Accounting Products?** Many line item types can be mapped to specific Accounting Products to serve your revenue recognition and accounting purposes. Where this is the case, the integration will use the assigned Accounting Products.
* **Tip: Reviewing Integration Runs!** When you've set up an integration with Paddle for your Organization in your production environment, you can review details of the integration runs performed for the integration. See [Reviewing Integration Run Details](/guides/integrations/setting-up-integrations/reviewing-integration-run-details).
* **Warning: Constraints on Paddle Integrations!**
* **Negative Line Items on Bills**. The Paddle system *does not* currently support negative line items on Bills.
* **Invoices Created in Draft**. The integration creates invoices in *draft form* in the Paddle system.
* **High-Precision Values**. The Paddle system *does not* currently support high-precision values. Values with more than 2 decimal places of precision are rounded leading to inaccurate values. Please bear this in mind when pricing Product Plans and entering a price per unit and when defining maximum decimal places for Currencies.
## Creating the Integration
You can quickly set up a Paddle integration in the Console.
**To define a m3ter - Paddle integration:**
1. Select **m3sh**:
 The **Workflows** page opens.
2. Select **Integrations**. The **Integrations** page opens with **All** selected by default.
3. Select **Paddle**:
The **Workflows** page opens.
2. Select **Integrations**. The **Integrations** page opens with **All** selected by default.
3. Select **Paddle**:
 The **m3sh / Integrations>Paddle** page opens.
4. On the **Configurations** panel, select **Configure new integration>Configure bill integration**:
The **m3sh / Integrations>Paddle** page opens.
4. On the **Configurations** panel, select **Configure new integration>Configure bill integration**:
![Integ Configs26a]() The **Create** page opens and the **Entity type** - **Bill** and **External system** - **Paddle** are shown at the top of the page.
5. Use the **Global configuration** panel to:
* Enter a **Name** for the Integration. This is required and is useful if you intend to create multiple Integrations for the same External system/Entity Type and need to clearly differentiate them.
* Select the Accounts you want the integration to apply to:
* **Account ids.** Select the Accounts you want to include - all selected Accounts are treated as *allowed* for the integration.
* **Restricted account ids.** Select the Accounts you want to exclude - all selected Accounts are treated as *disallowed* for the integration.
**Notes:**
* If you want to include *all Accounts* in the integration, leave both **Accounts ids** and **Restricted account ids** empty.
* Any filtering by **Account ids** you define using these settings to control which Accounts the integration runs for will be *in addition* to any filtering you define using the **Account filter** option - see the following step for **Entity Configuration** options.
* Select Users for Email notifications if disabled:
* **Integration disabled notification users**. Select Organization Users you want to receive an Email notification if the integration is automatically disabled.
**Notes:**
* An integration is automatically disabled if there have been 20 successive previous error Event responses to earlier attempts to run the integration. See [Reviewing and Resolving Integration Events](/guides/integrations/setting-up-integrations/reviewing-and-resolving-integration-events) for more details.
* If you select Organization Users to receive an Email notification when the integration is automatically disabled, their User id will be listed under **Configuration Data** on the **Integration Details** page.
6. Use the **Entity configuration** panel to configure the m3ter entity you will be synchronizing with for the integration. In the case of a Bill integration, this entity will be the Bill generated for a customer Account in m3ter:
* **Only send bill on approval.** Enable this if you only want Bills to be sent when they have been approved. If disabled, the Bill will be sent every time it is regenerated. Default is disabled. Note that:
* The frequency of Bills sent will depend on the billing frequency defined for the Account Plan attached to the Account - such as daily/weekly/monthly/annually.
* If an Account has a Prepayment on it and the billing for Prepayment fees is configured to run on a customized schedule, Bills will be sent when scheduled Bills are generated.
* If a Bill is manually recalculated the updated Bill will be sent.
* If you enable this, then the integration will not run for *all Bill Jobs*.
* **Use external mapping account code.** Enable this if you want the integration to look in the External Mappings for the Account identifier code, which means you can use an external Id. If this is disabled, the m3ter Account Id is used. Default is disabled.
* **Excluded line item types.** Optionally, filter the Bill line item types you send to the external system. For example, only send charges or credits and exclude all other line item types.
* For details of line item types, see [Bill Line Item Types](/guides/billing-and-usage-data/running-viewing-and-managing-bills/bill-line-item-types).
* **Account filter**. Optionally, enter an expression that is run on the Account to determine whether or not the integration includes the Account. You can use this setting if you have multiple destinations for sending Bills outbound to your Paddle system. For example:
* `"customFields != null AND customFields.country == "UK""`
* In this example, the integration will include an Account *only if* you have created a Custom Field for the Account called *country* and given the field a value of *UK*.
**Notes:**
* **Other Account fields for Account filter expression?** You can reference other fields on the Account object in the **Account filter** expression. For details and another example, see [Managing Multiple Third Party Destinations for Integrations](/guides/integrations/setting-up-integrations/managing-multiple-destinations-for-integrations).
* **Additional filtering?** Any global filtering you define using the settings to include/exclude Accounts for integration runs by **Account ids** will be *in addition* to any filtering you define using the **Account filter** option - see the previous step for **Global Configuration**.
* **Enforce external mappings for config**. Optionally enable this if you want the integration to use only those external mappings specified as being for this configuration.
* Use this setting if you want to set up multiple integrations for the same external system. You can then create separate external mappings for each integration from the details page of each integration, and these external mappings become **Linked external mappings** for the specific integration. See [Creating Linked External Mappings](/guides/integrations/setting-up-integrations/creating-and-managing-external-mappings#creating-linked-external-mappings).
* **Excluded products**. Optionally filter the Bill line items you send to the external system. Any line items associated with the selected Products will be be excluded when the integration runs.
* Note that if line items are mapped to a specific \_Accounting Product\_s, these will be used for filtering to exclude line items.
* **Excluded aggregations**. Optionally filter the Bill line items you send to the external system. Any line items associated with the selected Aggregations will be be excluded when the integration runs.
7. Use the **External system configuration** panel to enter the settings specific to the external system. These settings include field mappings as well as other system-specific configurations:
* **Sort line items by**. Optionally, select a property to sort line items by before they are sent out to the external system. Three options:
* **None**
* **Subtotal**
* **Aggregation ID**
8. Select **Create integration**. You are returned to the **Integrations>Paddle** page, where the integration is listed on the **Configurations** panel:
The **Create** page opens and the **Entity type** - **Bill** and **External system** - **Paddle** are shown at the top of the page.
5. Use the **Global configuration** panel to:
* Enter a **Name** for the Integration. This is required and is useful if you intend to create multiple Integrations for the same External system/Entity Type and need to clearly differentiate them.
* Select the Accounts you want the integration to apply to:
* **Account ids.** Select the Accounts you want to include - all selected Accounts are treated as *allowed* for the integration.
* **Restricted account ids.** Select the Accounts you want to exclude - all selected Accounts are treated as *disallowed* for the integration.
**Notes:**
* If you want to include *all Accounts* in the integration, leave both **Accounts ids** and **Restricted account ids** empty.
* Any filtering by **Account ids** you define using these settings to control which Accounts the integration runs for will be *in addition* to any filtering you define using the **Account filter** option - see the following step for **Entity Configuration** options.
* Select Users for Email notifications if disabled:
* **Integration disabled notification users**. Select Organization Users you want to receive an Email notification if the integration is automatically disabled.
**Notes:**
* An integration is automatically disabled if there have been 20 successive previous error Event responses to earlier attempts to run the integration. See [Reviewing and Resolving Integration Events](/guides/integrations/setting-up-integrations/reviewing-and-resolving-integration-events) for more details.
* If you select Organization Users to receive an Email notification when the integration is automatically disabled, their User id will be listed under **Configuration Data** on the **Integration Details** page.
6. Use the **Entity configuration** panel to configure the m3ter entity you will be synchronizing with for the integration. In the case of a Bill integration, this entity will be the Bill generated for a customer Account in m3ter:
* **Only send bill on approval.** Enable this if you only want Bills to be sent when they have been approved. If disabled, the Bill will be sent every time it is regenerated. Default is disabled. Note that:
* The frequency of Bills sent will depend on the billing frequency defined for the Account Plan attached to the Account - such as daily/weekly/monthly/annually.
* If an Account has a Prepayment on it and the billing for Prepayment fees is configured to run on a customized schedule, Bills will be sent when scheduled Bills are generated.
* If a Bill is manually recalculated the updated Bill will be sent.
* If you enable this, then the integration will not run for *all Bill Jobs*.
* **Use external mapping account code.** Enable this if you want the integration to look in the External Mappings for the Account identifier code, which means you can use an external Id. If this is disabled, the m3ter Account Id is used. Default is disabled.
* **Excluded line item types.** Optionally, filter the Bill line item types you send to the external system. For example, only send charges or credits and exclude all other line item types.
* For details of line item types, see [Bill Line Item Types](/guides/billing-and-usage-data/running-viewing-and-managing-bills/bill-line-item-types).
* **Account filter**. Optionally, enter an expression that is run on the Account to determine whether or not the integration includes the Account. You can use this setting if you have multiple destinations for sending Bills outbound to your Paddle system. For example:
* `"customFields != null AND customFields.country == "UK""`
* In this example, the integration will include an Account *only if* you have created a Custom Field for the Account called *country* and given the field a value of *UK*.
**Notes:**
* **Other Account fields for Account filter expression?** You can reference other fields on the Account object in the **Account filter** expression. For details and another example, see [Managing Multiple Third Party Destinations for Integrations](/guides/integrations/setting-up-integrations/managing-multiple-destinations-for-integrations).
* **Additional filtering?** Any global filtering you define using the settings to include/exclude Accounts for integration runs by **Account ids** will be *in addition* to any filtering you define using the **Account filter** option - see the previous step for **Global Configuration**.
* **Enforce external mappings for config**. Optionally enable this if you want the integration to use only those external mappings specified as being for this configuration.
* Use this setting if you want to set up multiple integrations for the same external system. You can then create separate external mappings for each integration from the details page of each integration, and these external mappings become **Linked external mappings** for the specific integration. See [Creating Linked External Mappings](/guides/integrations/setting-up-integrations/creating-and-managing-external-mappings#creating-linked-external-mappings).
* **Excluded products**. Optionally filter the Bill line items you send to the external system. Any line items associated with the selected Products will be be excluded when the integration runs.
* Note that if line items are mapped to a specific \_Accounting Product\_s, these will be used for filtering to exclude line items.
* **Excluded aggregations**. Optionally filter the Bill line items you send to the external system. Any line items associated with the selected Aggregations will be be excluded when the integration runs.
7. Use the **External system configuration** panel to enter the settings specific to the external system. These settings include field mappings as well as other system-specific configurations:
* **Sort line items by**. Optionally, select a property to sort line items by before they are sent out to the external system. Three options:
* **None**
* **Subtotal**
* **Aggregation ID**
8. Select **Create integration**. You are returned to the **Integrations>Paddle** page, where the integration is listed on the **Configurations** panel:
![]() ## Setting Up the Authentication for the Integration
When you have created a Paddle integration, you can select an Integration Credential you've created for authentication allowing the integration to connect with your Paddle system.
**To set up authentication for your m3ter - Paddle integration:**
1. Select **m3sh**. The **Workflows** page opens.
2. Select **Integrations**. The **Integrations** page opens
3. Select **Paddle**. The **Integrations>Paddle** page opens.
4. On the **Configurations** panel, select the **Name** hotlink text of the Paddle integration you want to set up authentication for. The **Integration details** page opens:
## Setting Up the Authentication for the Integration
When you have created a Paddle integration, you can select an Integration Credential you've created for authentication allowing the integration to connect with your Paddle system.
**To set up authentication for your m3ter - Paddle integration:**
1. Select **m3sh**. The **Workflows** page opens.
2. Select **Integrations**. The **Integrations** page opens
3. Select **Paddle**. The **Integrations>Paddle** page opens.
4. On the **Configurations** panel, select the **Name** hotlink text of the Paddle integration you want to set up authentication for. The **Integration details** page opens:
![Integ Configs43a]() * Notes:
* A warning is shown that the integration is not yet connected to your Paddle system.
* The **ID** of the integration configuration is shown at the bottom of the **Details** card, and you can copy the **ID** directly to your clipboard.
5. Select **Connect credential**. A **Select credential** modal appears.
6. Select a Credential you created earlier and want to use to authenticate the integration with Paddle. See [Creating Paddle Integration Credentials](/guides/integrations/setting-up-integrations/_managing-integration-credentials-legacy/creating-paddle-integration-credentials).
7. Select **Confirm**. The modal closes and on **Integrations details** the integration now shows as **CONNECTED**:
* Notes:
* A warning is shown that the integration is not yet connected to your Paddle system.
* The **ID** of the integration configuration is shown at the bottom of the **Details** card, and you can copy the **ID** directly to your clipboard.
5. Select **Connect credential**. A **Select credential** modal appears.
6. Select a Credential you created earlier and want to use to authenticate the integration with Paddle. See [Creating Paddle Integration Credentials](/guides/integrations/setting-up-integrations/_managing-integration-credentials-legacy/creating-paddle-integration-credentials).
7. Select **Confirm**. The modal closes and on **Integrations details** the integration now shows as **CONNECTED**:
![Paddle Cred Added2a]() * The Credential used to connect the integration is shown.
* If at any time you want to disconnect the integration, select **Disconnect credential**.
* If you want to use a different Credential for connecting the integration, select **Change credential**. The **Select credential** modal appears and you can select a different Credential.
**Tip: Testing your Integration Setup?** Your Paddle integration is now available for use. However, it remains in Beta release and we strongly recommend you test the implementation in your m3ter Sandbox or QA environment before releasing it to your Production environment. See section 7. of our [Terms of Service](https://www.m3ter.com/docs/legal/terms-of-service) for Beta Usage.
**Tip: Integrations API Calls?** When you have set up your Paddle integration, you can review and manage the integration using a full set of API Calls. See the [Integrations section](/api/integrations/introduction) of our API Reference Docs.
# Configuring QuickBooks Integrations
Source: https://docs.m3ter.com/guides/integrations/setting-up-integrations/configuring-quickbooks-integrations
You can define integrations for sending your end customer Account Bills generated in m3ter outbound into your QuickBooks system:
* First, [create the integration](/guides/integrations/setting-up-integrations/configuring-quickbooks-integrations#creating-the-integration).
* Second, [set up authentication](/guides/integrations/setting-up-integrations/configuring-quickbooks-integrations#setting-up-authentication-for-the-integration) for the integration to connect with QuickBooks.
This topic also includes a section designed to help you set up your QuickBooks system and configure the required External Mappings in preparation for sending Bills from m3ter through to your QuickBooks instance:
* [Setting up QuickBooks and Required External Mappings in m3ter](/guides/integrations/setting-up-integrations/configuring-quickbooks-integrations#setting-up-quickbooks-and-required-external-mappings)
## Creating the Integration
You can quickly set up a QuickBooks integration in the Console.
**Notes:**
* **QuickBooks or QuickBooks (Sandbox Mode)?** The difference between these two integrations is selecting **QuickBooks** means an integration destination into your QuickBooks *production environment*, selecting **QuickBooks (Sandbox Mode)** means an integration destination into your **QuickBooks** *Sandbox environment*. The configuration settings are the same for both destinations.
* **Accounting Products?** Many line item types can be mapped to specific Accounting Products to serve your revenue recognition and accounting purposes. Where this is the case, the integration will use the assigned Accounting Products.
* **Reviewing Integration Runs!** When you've set up an integration with QuickBooks for your Organization in your production environment, you can review details of the integration runs performed for the integration. See [Reviewing Integration Run Details](/guides/integrations/setting-up-integrations/reviewing-integration-run-details).
**To create a m3ter - QuickBooks integration:**
1. Select **m3sh**:
* The Credential used to connect the integration is shown.
* If at any time you want to disconnect the integration, select **Disconnect credential**.
* If you want to use a different Credential for connecting the integration, select **Change credential**. The **Select credential** modal appears and you can select a different Credential.
**Tip: Testing your Integration Setup?** Your Paddle integration is now available for use. However, it remains in Beta release and we strongly recommend you test the implementation in your m3ter Sandbox or QA environment before releasing it to your Production environment. See section 7. of our [Terms of Service](https://www.m3ter.com/docs/legal/terms-of-service) for Beta Usage.
**Tip: Integrations API Calls?** When you have set up your Paddle integration, you can review and manage the integration using a full set of API Calls. See the [Integrations section](/api/integrations/introduction) of our API Reference Docs.
# Configuring QuickBooks Integrations
Source: https://docs.m3ter.com/guides/integrations/setting-up-integrations/configuring-quickbooks-integrations
You can define integrations for sending your end customer Account Bills generated in m3ter outbound into your QuickBooks system:
* First, [create the integration](/guides/integrations/setting-up-integrations/configuring-quickbooks-integrations#creating-the-integration).
* Second, [set up authentication](/guides/integrations/setting-up-integrations/configuring-quickbooks-integrations#setting-up-authentication-for-the-integration) for the integration to connect with QuickBooks.
This topic also includes a section designed to help you set up your QuickBooks system and configure the required External Mappings in preparation for sending Bills from m3ter through to your QuickBooks instance:
* [Setting up QuickBooks and Required External Mappings in m3ter](/guides/integrations/setting-up-integrations/configuring-quickbooks-integrations#setting-up-quickbooks-and-required-external-mappings)
## Creating the Integration
You can quickly set up a QuickBooks integration in the Console.
**Notes:**
* **QuickBooks or QuickBooks (Sandbox Mode)?** The difference between these two integrations is selecting **QuickBooks** means an integration destination into your QuickBooks *production environment*, selecting **QuickBooks (Sandbox Mode)** means an integration destination into your **QuickBooks** *Sandbox environment*. The configuration settings are the same for both destinations.
* **Accounting Products?** Many line item types can be mapped to specific Accounting Products to serve your revenue recognition and accounting purposes. Where this is the case, the integration will use the assigned Accounting Products.
* **Reviewing Integration Runs!** When you've set up an integration with QuickBooks for your Organization in your production environment, you can review details of the integration runs performed for the integration. See [Reviewing Integration Run Details](/guides/integrations/setting-up-integrations/reviewing-integration-run-details).
**To create a m3ter - QuickBooks integration:**
1. Select **m3sh**:
 The **Workflows** page opens.
2. Select **Integrations**. The **Integrations** page opens with **All** selected by default
3. Select **QuickBooks**:
The **Workflows** page opens.
2. Select **Integrations**. The **Integrations** page opens with **All** selected by default
3. Select **QuickBooks**:
 The **m3sh / Integrations>QuickBooks** page opens.
4. On the **Configurations** panel, select **Configure new integration>Configure bill integration**:
The **m3sh / Integrations>QuickBooks** page opens.
4. On the **Configurations** panel, select **Configure new integration>Configure bill integration**:
![Integ Configs30a]() The **Create** page opens and the **Entity type** - **Bill** and **External system** - **QuickBooks** are shown at the top of the page.
5. Use the **Global configuration** panel to:
* Enter a **Name** for the Integration. This is required and is useful if you intend to create multiple Integrations for the same External system/Entity Type and need to clearly differentiate them.
* Select the Accounts you want the integration to apply to:
* **Account ids.** Select the Accounts you want to include - all selected Accounts are treated as *allowed* for the integration.
* **Restricted account ids.** Select the Accounts you want to exclude - all selected Accounts are treated as *disallowed* for the integration.
**Notes:**
* If you want to include *all Accounts* in the integration, leave both **Accounts ids** and **Restricted account ids** empty.
* Any filtering by **Account ids** you define using these settings to control which Accounts the integration runs for will be *in addition* to any filtering you define using the **Account filter** option - see the following step for **Entity Configuration** options.
* Select Users for Email notifications if disabled:
* **Integration disabled notification users**. Select Organization Users you want to receive an Email notification if the integration is automatically disabled.
**Notes:**
* An integration is automatically disabled if there have been 20 successive previous error Event responses to earlier attempts to run the integration. See [Reviewing and Resolving Integration Events](/guides/integrations/setting-up-integrations/reviewing-and-resolving-integration-events) for more details.
* If you select Organization Users to receive an Email notification when the integration is automatically disabled, their User id will be listed under **Configuration Data** on the **Integration Details** page.
6. Use the **Entity configuration** panel to configure the m3ter entity you'll be synchronizing with for the integration. In the case of a Bill integration, this entity will be the Bill generated for a customer Account in m3ter:
* **Only send bill on approval.** Enable this if you only want Bills to be sent when they have been approved. If disabled, the Bill will be sent every time it is regenerated. Default is disabled. Note that:
* The frequency of Bills sent will depend on the billing frequency defined for the Account Plan attached to the Account - such as daily/weekly/monthly/annually.
* If an Account has a Prepayment on it and the billing for Prepayment fees is configured to run on a customized schedule, Bills will be sent when scheduled Bills are generated.
* If a Bill is manually recalculated the updated Bill will be sent.
* If you enable this, then the integration will not run for *all Bill Jobs*.
* **Use external mapping account code.** Enable this if you want the integration to look in the External Mappings for the Account identifier code, which means you can use an external Id. If this is disabled, the m3ter Account Id is used. Default is disabled.
* **Excluded line item types.** Optionally filter the Bill line item types you send to the destination system. For example, only send charges or credits and exclude all other line item types.
* For details of line item types, see [Bill Line Item Types](/guides/billing-and-usage-data/running-viewing-and-managing-bills/bill-line-item-types).
* **Account filter**. Optionally, enter an expression that is run on the Account to determine whether or not the integration includes the Account. You can use this setting if you have multiple destinations for sending Bills outbound to your QuickBooks system. For example:
* `"customFields != null AND customFields.country == "UK""`
* In this example, the integration will include an Account *only if* you have created a Custom Field for the Account called *country* and given the field a value of *UK*.
**Notes:**
* **Other Account fields for Account filter expression?** You can reference other fields on the Account object in the **Account filter** expression. For details and another example, see [Managing Multiple Third Party Destinations for Integrations](/guides/integrations/setting-up-integrations/managing-multiple-destinations-for-integrations).
* **Additional filtering?** Any global filtering you define using the settings to include/exclude Accounts for integration runs by **Account ids** will be *in addition* to any filtering you define using the **Account filter** option - see the previous step for **Global Configuration**.
* **Enforce external mappings for config**. Optionally enable this if you want the integration to use only those external mappings specified as being for this configuration.
* Use this setting if you want to set up multiple integrations for the same external system. You can then create separate external mappings for each integration from the details page of each integration, and these external mappings become **Linked external mappings** for the specific integration. See [Creating Linked External Mappings](/guides/integrations/setting-up-integrations/creating-and-managing-external-mappings#creating-linked-external-mappings).
* **Excluded products**. Optionally filter the Bill line items you send to the external system. Any line items associated with the selected Products will be be excluded when the integration runs.
* Note that if line items are mapped to a specific \_Accounting Product\_s, these will be used for filtering to exclude line items.
* **Excluded aggregations**. Optionally filter the Bill line items you send to the external system. Any line items associated with the selected Aggregations will be be excluded when the integration runs.
7. Use the **External system configuration** panel to enter the settings specific to the external system. These settings include field mappings as well as other system-specific configurations:
* **Split usage line items.** This setting determines how m3ter will create usage invoice items in QuickBooks. QuickBooks items can be mapped to a product, an aggregation/compound aggregation, or to an individual pricing band:
* **Item per usage band**
* **Item per product**
* **Item per aggregation**
* **Quick books item mapping**. This setting allows you to specify the QuickBooks item ID for mapping these line item types. If left blank, then the item will be sent to QuickBooks without being mapped to a product or service:
* **CREDIT\_MEMO**
* **DEBIT\_MEMO**
* **Send zero quantity line items**. Enable this switch if you want zero quantity line items to be sent through to QuickBooks. Default is disabled.
* **Allow bank transfer payment**. Enable this switch if you want to allow invoices to be paid with online bank transfers - corresponds to *bank transfer online payment* checkbox in QuickBooks. Default is disabled.
* **Allow credit card payment**. Enable this switch if you want to allow invoices to be paid with credit cards - corresponds to *Cards* checkbox in QuickBooks. Default is disabled.
* **Bcc invoice email address**. Enter the email address to be set as the *BCC email address* in QuickBooks invoices. (*Optional*)
* **Account manager email custom field**. Enter the Account custom field name that contains the email address of the Account Manager. Used to populate the email CC field when an invoice is sent to QuickBooks. (*Optional*). See [Working with Custom Fields.](/guides/creating-and-managing-products/working-with-custom-fields)
**Warning! Do not enter an email address directly into this field:** You'll receive an error message when you try to save or update the integration configuration.
* **Sort line items by**. Optionally, select a property to sort line items by before they are sent out to the external system. Three options:
* **None**
* **Subtotal**
* **Aggregation ID**
* **Strict line item mapping**. Optionally, enable this switch if you want the integration to map **Description**, **Quantity**, and **Unit price** line item values directly to QuickBooks invoice items.
**Possible rounding errors!** If you enable **Strict line item mapping**, this might result in rounding errors for the originating **Quantity** or **Unit price** values being mapped directly.
8. Select **Create integration**. You are returned to the **Integrations>QuickBooks** page, where the integration is listed on the **Configurations** panel:
The **Create** page opens and the **Entity type** - **Bill** and **External system** - **QuickBooks** are shown at the top of the page.
5. Use the **Global configuration** panel to:
* Enter a **Name** for the Integration. This is required and is useful if you intend to create multiple Integrations for the same External system/Entity Type and need to clearly differentiate them.
* Select the Accounts you want the integration to apply to:
* **Account ids.** Select the Accounts you want to include - all selected Accounts are treated as *allowed* for the integration.
* **Restricted account ids.** Select the Accounts you want to exclude - all selected Accounts are treated as *disallowed* for the integration.
**Notes:**
* If you want to include *all Accounts* in the integration, leave both **Accounts ids** and **Restricted account ids** empty.
* Any filtering by **Account ids** you define using these settings to control which Accounts the integration runs for will be *in addition* to any filtering you define using the **Account filter** option - see the following step for **Entity Configuration** options.
* Select Users for Email notifications if disabled:
* **Integration disabled notification users**. Select Organization Users you want to receive an Email notification if the integration is automatically disabled.
**Notes:**
* An integration is automatically disabled if there have been 20 successive previous error Event responses to earlier attempts to run the integration. See [Reviewing and Resolving Integration Events](/guides/integrations/setting-up-integrations/reviewing-and-resolving-integration-events) for more details.
* If you select Organization Users to receive an Email notification when the integration is automatically disabled, their User id will be listed under **Configuration Data** on the **Integration Details** page.
6. Use the **Entity configuration** panel to configure the m3ter entity you'll be synchronizing with for the integration. In the case of a Bill integration, this entity will be the Bill generated for a customer Account in m3ter:
* **Only send bill on approval.** Enable this if you only want Bills to be sent when they have been approved. If disabled, the Bill will be sent every time it is regenerated. Default is disabled. Note that:
* The frequency of Bills sent will depend on the billing frequency defined for the Account Plan attached to the Account - such as daily/weekly/monthly/annually.
* If an Account has a Prepayment on it and the billing for Prepayment fees is configured to run on a customized schedule, Bills will be sent when scheduled Bills are generated.
* If a Bill is manually recalculated the updated Bill will be sent.
* If you enable this, then the integration will not run for *all Bill Jobs*.
* **Use external mapping account code.** Enable this if you want the integration to look in the External Mappings for the Account identifier code, which means you can use an external Id. If this is disabled, the m3ter Account Id is used. Default is disabled.
* **Excluded line item types.** Optionally filter the Bill line item types you send to the destination system. For example, only send charges or credits and exclude all other line item types.
* For details of line item types, see [Bill Line Item Types](/guides/billing-and-usage-data/running-viewing-and-managing-bills/bill-line-item-types).
* **Account filter**. Optionally, enter an expression that is run on the Account to determine whether or not the integration includes the Account. You can use this setting if you have multiple destinations for sending Bills outbound to your QuickBooks system. For example:
* `"customFields != null AND customFields.country == "UK""`
* In this example, the integration will include an Account *only if* you have created a Custom Field for the Account called *country* and given the field a value of *UK*.
**Notes:**
* **Other Account fields for Account filter expression?** You can reference other fields on the Account object in the **Account filter** expression. For details and another example, see [Managing Multiple Third Party Destinations for Integrations](/guides/integrations/setting-up-integrations/managing-multiple-destinations-for-integrations).
* **Additional filtering?** Any global filtering you define using the settings to include/exclude Accounts for integration runs by **Account ids** will be *in addition* to any filtering you define using the **Account filter** option - see the previous step for **Global Configuration**.
* **Enforce external mappings for config**. Optionally enable this if you want the integration to use only those external mappings specified as being for this configuration.
* Use this setting if you want to set up multiple integrations for the same external system. You can then create separate external mappings for each integration from the details page of each integration, and these external mappings become **Linked external mappings** for the specific integration. See [Creating Linked External Mappings](/guides/integrations/setting-up-integrations/creating-and-managing-external-mappings#creating-linked-external-mappings).
* **Excluded products**. Optionally filter the Bill line items you send to the external system. Any line items associated with the selected Products will be be excluded when the integration runs.
* Note that if line items are mapped to a specific \_Accounting Product\_s, these will be used for filtering to exclude line items.
* **Excluded aggregations**. Optionally filter the Bill line items you send to the external system. Any line items associated with the selected Aggregations will be be excluded when the integration runs.
7. Use the **External system configuration** panel to enter the settings specific to the external system. These settings include field mappings as well as other system-specific configurations:
* **Split usage line items.** This setting determines how m3ter will create usage invoice items in QuickBooks. QuickBooks items can be mapped to a product, an aggregation/compound aggregation, or to an individual pricing band:
* **Item per usage band**
* **Item per product**
* **Item per aggregation**
* **Quick books item mapping**. This setting allows you to specify the QuickBooks item ID for mapping these line item types. If left blank, then the item will be sent to QuickBooks without being mapped to a product or service:
* **CREDIT\_MEMO**
* **DEBIT\_MEMO**
* **Send zero quantity line items**. Enable this switch if you want zero quantity line items to be sent through to QuickBooks. Default is disabled.
* **Allow bank transfer payment**. Enable this switch if you want to allow invoices to be paid with online bank transfers - corresponds to *bank transfer online payment* checkbox in QuickBooks. Default is disabled.
* **Allow credit card payment**. Enable this switch if you want to allow invoices to be paid with credit cards - corresponds to *Cards* checkbox in QuickBooks. Default is disabled.
* **Bcc invoice email address**. Enter the email address to be set as the *BCC email address* in QuickBooks invoices. (*Optional*)
* **Account manager email custom field**. Enter the Account custom field name that contains the email address of the Account Manager. Used to populate the email CC field when an invoice is sent to QuickBooks. (*Optional*). See [Working with Custom Fields.](/guides/creating-and-managing-products/working-with-custom-fields)
**Warning! Do not enter an email address directly into this field:** You'll receive an error message when you try to save or update the integration configuration.
* **Sort line items by**. Optionally, select a property to sort line items by before they are sent out to the external system. Three options:
* **None**
* **Subtotal**
* **Aggregation ID**
* **Strict line item mapping**. Optionally, enable this switch if you want the integration to map **Description**, **Quantity**, and **Unit price** line item values directly to QuickBooks invoice items.
**Possible rounding errors!** If you enable **Strict line item mapping**, this might result in rounding errors for the originating **Quantity** or **Unit price** values being mapped directly.
8. Select **Create integration**. You are returned to the **Integrations>QuickBooks** page, where the integration is listed on the **Configurations** panel:
![]() ## Setting Up Authentication for the Integration
When you've created a QuickBooks integration, you can select an Integration Credential you've created for authentication allowing the integration to connect with your QuickBooks system.
**To set up authentication for your m3ter - QuickBooks integration:**
1. Select **m3sh**. The **Workflows** page opens.
2. Select **Integrations**. The **Integrations** page opens.
3. Select **QuickBooks**. The **Integrations>QuickBooks** page opens.
4. On the **Configurations** panel, select the **Name** hotlink text of the QuickBooks integration you want to set up authentication for. The **Integration details** page opens:
## Setting Up Authentication for the Integration
When you've created a QuickBooks integration, you can select an Integration Credential you've created for authentication allowing the integration to connect with your QuickBooks system.
**To set up authentication for your m3ter - QuickBooks integration:**
1. Select **m3sh**. The **Workflows** page opens.
2. Select **Integrations**. The **Integrations** page opens.
3. Select **QuickBooks**. The **Integrations>QuickBooks** page opens.
4. On the **Configurations** panel, select the **Name** hotlink text of the QuickBooks integration you want to set up authentication for. The **Integration details** page opens:
![Integ Configs45a]() * Notes:
* A warning is shown that the integration is not yet connected to your QuickBooks system.
* The **ID** of the integration configuration is shown at the bottom of the **Details** card, and you can copy the **ID** directly to your clipboard.
5. Select **Connect credential**. A **Select credential** modal appears.
6. Select a Credential you created earlier and want to use to authenticate the integration with QuickBooks. See [Creating QuickBooks Integration Credentials](/guides/integrations/setting-up-integrations/_managing-integration-credentials-legacy/creating-quickbooks-integration-credentials).
7. Select **Confirm**. The modal closes and on **Integrations details** the integration now shows as **CONNECTED**:
* The Credential used to connect the integration is shown.
* If at any time you want to disconnect the integration, select **Disconnect credential**.
* If you want to use a different Credential for connecting the integration, select **Change credential**. The **Select credential** modal appears and you can select a different Credential.
**Tip: Testing your Integration Setup?** Your QuickBooks integration is now available for use. However, it remains in Beta release and we strongly recommend you test the implementation in your m3ter Sandbox or QA environment before releasing it to your Production environment. See section 7. of our [Terms of Service](https://www.m3ter.com/docs/legal/terms-of-service) for Beta Usage.
**Tip: Integrations API Calls?** When you have set up your Quickbooks integration, you can review and manage the integration using a full set of API Calls. See the [Integrations section](/api/integrations/introduction) of our API Reference Docs.
## Setting up QuickBooks and Required External Mappings in m3ter
This section provides guidance on setting up QuickBooks and any required External Mappings in preparation for sending out Bills to QuickBooks.
**Warning: Important - Please consult your QuickBooks Documentation!** The instructions given in this section for setting-up your QuickBooks system to prepare for an outbound Bill integration with m3ter are intended for *guidance only*. We do not hold ourselves responsible for any changes made by QuickBooks, and *strongly recommend* that you consult the QuickBooks end user documentation as you perform this configuration and that you treat the QuickBooks documentation as authoritative.
**To set up QuickBooks and configure External Mappings:**
Firstly, in you QuickBooks Sandbox:
1. In your QuickBooks Sandbox, create the Customer
* Select **Sales>Customers>New Customer**.
* Enter new **Customer Name**.
2. Go to **Settings>Account** and **settings>Advanced**:
* Set **Home Currency** to match the default currency configured for your m3ter Organization.
* Turn on **Multicurrency** if you intend to invoice in currencies other than your default currency, and then add these additional currencies.
Secondly, in your m3ter Organization
1. Select **m3sh>External mappings**. The **External mappings** page opens.
2. Select **Create External mapping**. The **Create** pages opens at **Stage 1: Select mapping type**.
3. Enter **External mapping settings**:
* **m3ter entity type**. Select **Account**.
* **External system**. Select **QuickBooksSandbox**.
* Note that the **External table** drop-down will only be activated when you've selected an **External system**.
* **External Table**. Select **Customer**.
* Notes:
* A warning is shown that the integration is not yet connected to your QuickBooks system.
* The **ID** of the integration configuration is shown at the bottom of the **Details** card, and you can copy the **ID** directly to your clipboard.
5. Select **Connect credential**. A **Select credential** modal appears.
6. Select a Credential you created earlier and want to use to authenticate the integration with QuickBooks. See [Creating QuickBooks Integration Credentials](/guides/integrations/setting-up-integrations/_managing-integration-credentials-legacy/creating-quickbooks-integration-credentials).
7. Select **Confirm**. The modal closes and on **Integrations details** the integration now shows as **CONNECTED**:
* The Credential used to connect the integration is shown.
* If at any time you want to disconnect the integration, select **Disconnect credential**.
* If you want to use a different Credential for connecting the integration, select **Change credential**. The **Select credential** modal appears and you can select a different Credential.
**Tip: Testing your Integration Setup?** Your QuickBooks integration is now available for use. However, it remains in Beta release and we strongly recommend you test the implementation in your m3ter Sandbox or QA environment before releasing it to your Production environment. See section 7. of our [Terms of Service](https://www.m3ter.com/docs/legal/terms-of-service) for Beta Usage.
**Tip: Integrations API Calls?** When you have set up your Quickbooks integration, you can review and manage the integration using a full set of API Calls. See the [Integrations section](/api/integrations/introduction) of our API Reference Docs.
## Setting up QuickBooks and Required External Mappings in m3ter
This section provides guidance on setting up QuickBooks and any required External Mappings in preparation for sending out Bills to QuickBooks.
**Warning: Important - Please consult your QuickBooks Documentation!** The instructions given in this section for setting-up your QuickBooks system to prepare for an outbound Bill integration with m3ter are intended for *guidance only*. We do not hold ourselves responsible for any changes made by QuickBooks, and *strongly recommend* that you consult the QuickBooks end user documentation as you perform this configuration and that you treat the QuickBooks documentation as authoritative.
**To set up QuickBooks and configure External Mappings:**
Firstly, in you QuickBooks Sandbox:
1. In your QuickBooks Sandbox, create the Customer
* Select **Sales>Customers>New Customer**.
* Enter new **Customer Name**.
2. Go to **Settings>Account** and **settings>Advanced**:
* Set **Home Currency** to match the default currency configured for your m3ter Organization.
* Turn on **Multicurrency** if you intend to invoice in currencies other than your default currency, and then add these additional currencies.
Secondly, in your m3ter Organization
1. Select **m3sh>External mappings**. The **External mappings** page opens.
2. Select **Create External mapping**. The **Create** pages opens at **Stage 1: Select mapping type**.
3. Enter **External mapping settings**:
* **m3ter entity type**. Select **Account**.
* **External system**. Select **QuickBooksSandbox**.
* Note that the **External table** drop-down will only be activated when you've selected an **External system**.
* **External Table**. Select **Customer**.
![]() 4. Select **Next**. The **Create** page adjusts to show **Stage 1: Select mapping type** as completed and allowing you to perform **Stage 2: Add mapping IDs**.
5. Enter **External mapping details**:
* **m3ter entity**. Select the m3ter Account you want to map to the QuickBooks Customer.
* **External entity ID**. Enter the ID of the **Customer** object you've created in your QuickBooks Sandbox.
**Tip: Possibles values might show!** Note that if the possible values for the **External entity ID** field can be fetched for the **External QuickBooks system**, then you can use a drop-down list to select the value for this field from the list of possible values returned.
6. To check that your QuickBooks setup and External Mappings configuration is correct, you can now:
* In your m3ter Organization, generate a Bill for the **Account** and then Approve the Bill. This will activate your QuickBooks integration and the Bill will be sent outbound to your QuickBooks system.
* In your QuickBooks system, go to **Sales>Invoices** and confirm that an invoice has been created for the respective **Customer** and that line item amounts are correct.
# Configuring Salesforce Entity Data Sync Integrations
Source: https://docs.m3ter.com/guides/integrations/setting-up-integrations/configuring-sf-entity-data-integrations
You can create integrations for sending **Accounts**, **Bills**, **Contracts**, **Prepayments/Commitments**, or **Balances** data into your Salesforce system. An *entity data sync* integration allows you to send the operational data held in your m3ter Organization for these entities. You can then use this data for setting up Reports or for supporting other business management tools in your external system.
This topic explains how to set up entity data sync integrations using the example of an *Accounts* entity data sync integration for Salesforce:
* First, [create the integration](/guides/integrations/setting-up-integrations/configuring-sf-entity-data-integrations#creating-the-integration).
* Second, [set up authentication](/guides/integrations/setting-up-integrations/configuring-sf-entity-data-integrations#setting-up-authentication-for-the-integration) for the integration to connect with your external system.
**Important! Notes and Warnings:**
* **Warning: Balance Entity Data Sync!** If you set up an entity data sync for Balances, then any Balance Transactions linked to Balances in your m3ter Organization are also sent through to your Salesforce system.
* **Note: Accounting Products for Bill integrations?** Many line item types can be mapped to specific Accounting Products to serve your revenue recognition and accounting purposes. Where this is the case, the integration will use the assigned Accounting Products.
* **Note: Reviewing Integration Runs!** When you've set up an integration with Salesforce for your Organization in your production environment, you can review details of the integration runs performed for the integration. See [Reviewing Integration Run Details](/guides/integrations/setting-up-integrations/reviewing-integration-run-details).
**Tip: m3ter Connector for Salesforce as also available!** The m3ter Connector for Salesforce allows you to map and synchronize data in your Salesforce systems with the m3ter platform. See [m3ter Connector for Salesforce](/guides/m3ter-connector-for-salesforce) for more details.
## Creating the Integration
You can quickly set up an entity data sync integration in the Console. You must complete two stages of configuration when setting up an entity data sync integration:
* [Global Configuration](/guides/integrations/setting-up-integrations/configuring-sf-entity-data-integrations#global-configuration)
* [External System Configuration](/guides/integrations/setting-up-integrations/configuring-sf-entity-data-integrations#external-system-configuration)
### Global Configuration
You can use Global configuration settings to define which Accounts you want the operational data for the selected entity to be included when the integration runs.
**To complete Global configuration for a Salesforce entity data sync integration:**
1. Select **m3sh**:
4. Select **Next**. The **Create** page adjusts to show **Stage 1: Select mapping type** as completed and allowing you to perform **Stage 2: Add mapping IDs**.
5. Enter **External mapping details**:
* **m3ter entity**. Select the m3ter Account you want to map to the QuickBooks Customer.
* **External entity ID**. Enter the ID of the **Customer** object you've created in your QuickBooks Sandbox.
**Tip: Possibles values might show!** Note that if the possible values for the **External entity ID** field can be fetched for the **External QuickBooks system**, then you can use a drop-down list to select the value for this field from the list of possible values returned.
6. To check that your QuickBooks setup and External Mappings configuration is correct, you can now:
* In your m3ter Organization, generate a Bill for the **Account** and then Approve the Bill. This will activate your QuickBooks integration and the Bill will be sent outbound to your QuickBooks system.
* In your QuickBooks system, go to **Sales>Invoices** and confirm that an invoice has been created for the respective **Customer** and that line item amounts are correct.
# Configuring Salesforce Entity Data Sync Integrations
Source: https://docs.m3ter.com/guides/integrations/setting-up-integrations/configuring-sf-entity-data-integrations
You can create integrations for sending **Accounts**, **Bills**, **Contracts**, **Prepayments/Commitments**, or **Balances** data into your Salesforce system. An *entity data sync* integration allows you to send the operational data held in your m3ter Organization for these entities. You can then use this data for setting up Reports or for supporting other business management tools in your external system.
This topic explains how to set up entity data sync integrations using the example of an *Accounts* entity data sync integration for Salesforce:
* First, [create the integration](/guides/integrations/setting-up-integrations/configuring-sf-entity-data-integrations#creating-the-integration).
* Second, [set up authentication](/guides/integrations/setting-up-integrations/configuring-sf-entity-data-integrations#setting-up-authentication-for-the-integration) for the integration to connect with your external system.
**Important! Notes and Warnings:**
* **Warning: Balance Entity Data Sync!** If you set up an entity data sync for Balances, then any Balance Transactions linked to Balances in your m3ter Organization are also sent through to your Salesforce system.
* **Note: Accounting Products for Bill integrations?** Many line item types can be mapped to specific Accounting Products to serve your revenue recognition and accounting purposes. Where this is the case, the integration will use the assigned Accounting Products.
* **Note: Reviewing Integration Runs!** When you've set up an integration with Salesforce for your Organization in your production environment, you can review details of the integration runs performed for the integration. See [Reviewing Integration Run Details](/guides/integrations/setting-up-integrations/reviewing-integration-run-details).
**Tip: m3ter Connector for Salesforce as also available!** The m3ter Connector for Salesforce allows you to map and synchronize data in your Salesforce systems with the m3ter platform. See [m3ter Connector for Salesforce](/guides/m3ter-connector-for-salesforce) for more details.
## Creating the Integration
You can quickly set up an entity data sync integration in the Console. You must complete two stages of configuration when setting up an entity data sync integration:
* [Global Configuration](/guides/integrations/setting-up-integrations/configuring-sf-entity-data-integrations#global-configuration)
* [External System Configuration](/guides/integrations/setting-up-integrations/configuring-sf-entity-data-integrations#external-system-configuration)
### Global Configuration
You can use Global configuration settings to define which Accounts you want the operational data for the selected entity to be included when the integration runs.
**To complete Global configuration for a Salesforce entity data sync integration:**
1. Select **m3sh**:
 The **Workflows** page opens.
2. Select **Integrations**. The **m3sh / Integrations** page opens with **All** selected by default.
3. Select **Data Sync Integrations**. The page adjusts.
4. Select **Salesforce**:
The **Workflows** page opens.
2. Select **Integrations**. The **m3sh / Integrations** page opens with **All** selected by default.
3. Select **Data Sync Integrations**. The page adjusts.
4. Select **Salesforce**:
 The **m3sh / Integrations>Salesforce** page opens.
5. On the **Configurations** panel, select **Configure new integration>Configure account integration**:
The **m3sh / Integrations>Salesforce** page opens.
5. On the **Configurations** panel, select **Configure new integration>Configure account integration**:
 The **Create** page opens and the **Entity type** - **Account** and **External system** - **Salesforce** are shown at the top of the page.
6. Use the **Global configuration** panel to:
* Enter a **Name** for the Integration. This is required and is useful if you intend to create multiple Integrations for the same External system/Entity Type and need to clearly differentiate them.
* Select the Accounts you want the integration to apply to:
* **Account ids.** Select the Accounts you want to include - all selected Accounts are treated as *allowed* for the integration.
* **Restricted account ids.** Select the Accounts you want to exclude - all selected Accounts are treated as *disallowed* for the integration.
**Tip: Include all Accounts Data?** If you want to include *all Accounts* in the integration, leave both **Accounts ids** and **Restricted account ids** empty.
* Select Users for Email notifications if disabled:
* **Integration disabled notification users**. Select Organization Users you want to receive an Email notification if the integration is automatically disabled.
**Notes:**
* An integration is automatically disabled if there have been 20 successive previous error Event responses to earlier attempts to run the integration. See [Reviewing and Resolving Integration Events](/guides/integrations/setting-up-integrations/reviewing-and-resolving-integration-events) for more details.
* If you select Organization Users to receive an Email notification when the integration is automatically disabled, their User id will be listed under **Configuration data** on the **Integration details** page.
The **Create** page opens and the **Entity type** - **Account** and **External system** - **Salesforce** are shown at the top of the page.
6. Use the **Global configuration** panel to:
* Enter a **Name** for the Integration. This is required and is useful if you intend to create multiple Integrations for the same External system/Entity Type and need to clearly differentiate them.
* Select the Accounts you want the integration to apply to:
* **Account ids.** Select the Accounts you want to include - all selected Accounts are treated as *allowed* for the integration.
* **Restricted account ids.** Select the Accounts you want to exclude - all selected Accounts are treated as *disallowed* for the integration.
**Tip: Include all Accounts Data?** If you want to include *all Accounts* in the integration, leave both **Accounts ids** and **Restricted account ids** empty.
* Select Users for Email notifications if disabled:
* **Integration disabled notification users**. Select Organization Users you want to receive an Email notification if the integration is automatically disabled.
**Notes:**
* An integration is automatically disabled if there have been 20 successive previous error Event responses to earlier attempts to run the integration. See [Reviewing and Resolving Integration Events](/guides/integrations/setting-up-integrations/reviewing-and-resolving-integration-events) for more details.
* If you select Organization Users to receive an Email notification when the integration is automatically disabled, their User id will be listed under **Configuration data** on the **Integration details** page.
 * In this example, the Accounts entity data sync integration will include data for *all Accounts* in the Organization because both **Accounts ids** and **Restricted account ids** settings are empty.
* You can now move on to complete [External system configuration](/guides/integrations/setting-up-integrations/configuring-sf-entity-data-integrations#external-system-configuration).
### External System Configuration
You can use the external system settings to define the location in your Salesforce Org where the selected entity's data will be synced to and to specify any entity Custom Fields you want to be included in the integration.
**To complete External system configuration for a Salesforce entity data sync integration:**
1. When you have completed the [Global configuration](/guides/integrations/setting-up-integrations/configuring-sf-entity-data-integrations#global-configuration), on the **External system configuration** panel enter:
* **Namespace**. This is a *required setting* for a Salesforce entity data sync integration. Use it to specify the correct location in your Salesforce Org where the entity data will be synced to. Three options:
* **Custom Objects**. If you don't have the m3ter Connector managed package installed.
* **m3ter Connector**. If you have the m3ter Connector managed package installed. *Default*.
* **m3ter Connector (Testing)**. If you have the m3ter Connector managed package installed as a test install.
* **Custom field mappings**. If you want custom fields data to be included when the entity data sync integration runs, add mappings for those custom fields set up for the entity in your Organization to Salesforce fields.
* In this example, the Accounts entity data sync integration will include data for *all Accounts* in the Organization because both **Accounts ids** and **Restricted account ids** settings are empty.
* You can now move on to complete [External system configuration](/guides/integrations/setting-up-integrations/configuring-sf-entity-data-integrations#external-system-configuration).
### External System Configuration
You can use the external system settings to define the location in your Salesforce Org where the selected entity's data will be synced to and to specify any entity Custom Fields you want to be included in the integration.
**To complete External system configuration for a Salesforce entity data sync integration:**
1. When you have completed the [Global configuration](/guides/integrations/setting-up-integrations/configuring-sf-entity-data-integrations#global-configuration), on the **External system configuration** panel enter:
* **Namespace**. This is a *required setting* for a Salesforce entity data sync integration. Use it to specify the correct location in your Salesforce Org where the entity data will be synced to. Three options:
* **Custom Objects**. If you don't have the m3ter Connector managed package installed.
* **m3ter Connector**. If you have the m3ter Connector managed package installed. *Default*.
* **m3ter Connector (Testing)**. If you have the m3ter Connector managed package installed as a test install.
* **Custom field mappings**. If you want custom fields data to be included when the entity data sync integration runs, add mappings for those custom fields set up for the entity in your Organization to Salesforce fields.
![]() * In this example, a single Account custom field mapping has been set up for the integration.
2. Select **Create integration**. You are returned to the **Integrations>Salesforce** page, where the integration is listed on the **Configurations** panel:
* In this example, a single Account custom field mapping has been set up for the integration.
2. Select **Create integration**. You are returned to the **Integrations>Salesforce** page, where the integration is listed on the **Configurations** panel:
![]() ## Setting up Authentication for the Integration
When you've created an entity data sync integration, you can select an Integration Credential you've created for authentication allowing the integration to connect with your external system.
**To set up authentication for your m3ter - entity data sync integration:**
1. Select **m3sh**. The **Workflows** page opens.
2. Select **Integrations**. The **Integrations** page opens.
3. Select **Salesforce**. The **m3sh / Integrations>Salesforce** page opens.
4. On the **Configurations** panel, select the **Name** hotlink text of the Salesforce integration you want to set up authentication for. The **Integration details** page opens:
## Setting up Authentication for the Integration
When you've created an entity data sync integration, you can select an Integration Credential you've created for authentication allowing the integration to connect with your external system.
**To set up authentication for your m3ter - entity data sync integration:**
1. Select **m3sh**. The **Workflows** page opens.
2. Select **Integrations**. The **Integrations** page opens.
3. Select **Salesforce**. The **m3sh / Integrations>Salesforce** page opens.
4. On the **Configurations** panel, select the **Name** hotlink text of the Salesforce integration you want to set up authentication for. The **Integration details** page opens:
![Integ Configs47a]() * Notes:
* A warning is shown that the integration is not yet connected to your external system - in this example Salesforce.
* The **ID** of the integration configuration is shown at the bottom of the **Details** card, and you can copy the **ID** directly to your clipboard.
5. Select **Connect credential**. A **Select credential** modal appears.
6. Select a Credential you created earlier and want to use to authenticate the integration with your external system.
7. Select **Confirm**. The modal closes and on **Integrations details** the integration now shows as **CONNECTED**:
* Notes:
* A warning is shown that the integration is not yet connected to your external system - in this example Salesforce.
* The **ID** of the integration configuration is shown at the bottom of the **Details** card, and you can copy the **ID** directly to your clipboard.
5. Select **Connect credential**. A **Select credential** modal appears.
6. Select a Credential you created earlier and want to use to authenticate the integration with your external system.
7. Select **Confirm**. The modal closes and on **Integrations details** the integration now shows as **CONNECTED**:
![Salesforce Cred Added2a]() * The Credential used to connect the integration is shown.
* If at any time you want to disconnect the integration, select **Disconnect credential**.
* If you want to use a different Credential for connecting the integration, select **Change credential**. The **Select credential** modal appears and you can select a different Credential.
**Notes:**
* **Testing your Integration Setup?** Your Salesforce integration is now available for use. However, it remains in Beta release and we strongly recommend you test the implementation in your m3ter Sandbox or QA environment before releasing it to your Production environment. See section 7. of our [Terms of Service](https://www.m3ter.com/docs/legal/terms-of-service) for Beta Usage.
* **When will the Integration run?** The integration will run on hourly basis close to the start of each hour. The schedule for integration runs is not currently configurable.
* **Integrations API Calls?** When you have set up your Salesforce integration, you can review and manage the integration using a full set of API Calls. See the [Integrations section](/api/integrations/introduction) of our API Reference Docs.
## Reviewing Entity Data in Salesforce
When the entity data sync integration has run, you can go into your Salesforce Org to review the entity data. For the current example when an Accounts entity data sync has run, you can review the Accounts entity and check that all m3ter Accounts have been synced:
* The Credential used to connect the integration is shown.
* If at any time you want to disconnect the integration, select **Disconnect credential**.
* If you want to use a different Credential for connecting the integration, select **Change credential**. The **Select credential** modal appears and you can select a different Credential.
**Notes:**
* **Testing your Integration Setup?** Your Salesforce integration is now available for use. However, it remains in Beta release and we strongly recommend you test the implementation in your m3ter Sandbox or QA environment before releasing it to your Production environment. See section 7. of our [Terms of Service](https://www.m3ter.com/docs/legal/terms-of-service) for Beta Usage.
* **When will the Integration run?** The integration will run on hourly basis close to the start of each hour. The schedule for integration runs is not currently configurable.
* **Integrations API Calls?** When you have set up your Salesforce integration, you can review and manage the integration using a full set of API Calls. See the [Integrations section](/api/integrations/introduction) of our API Reference Docs.
## Reviewing Entity Data in Salesforce
When the entity data sync integration has run, you can go into your Salesforce Org to review the entity data. For the current example when an Accounts entity data sync has run, you can review the Accounts entity and check that all m3ter Accounts have been synced:
![]() You can then drill into a specific Account and check details:
You can then drill into a specific Account and check details:
![]() # Configuring Stripe Integrations
Source: https://docs.m3ter.com/guides/integrations/setting-up-integrations/configuring-stripe-integrations
You can define and manage integrations for sending your end-customer Account Bills generated in m3ter outbound into your Stripe system:
* First, [create the integration](/guides/integrations/setting-up-integrations/configuring-stripe-integrations#creating-the-integration).
* Second, [set up authentication](/guides/integrations/setting-up-integrations/configuring-stripe-integrations#setting-up-authentication-for-integration) for the integration to connect with Stripe.
## Creating the Integration
You can quickly set up a Stripe integration in the Console.
**Important! Notes and Warnings:**
* **Note: Stripe or Stripe (Test mode)?** The difference between these two integrations is: selecting **Stripe** means an integration destination into your Stripe *production environment*; selecting **Stripe (Test mode)** means an integration destination into your Stripe *test environment*. The configuration settings are the same for both destinations.
* **Note: Accounting Products?** Many line item types can be mapped to specific Accounting Products to serve your revenue recognition and accounting purposes. Where this is the case, the integration will use the assigned Accounting Products.
* **Note: Reviewing Integration Runs?** When you've set up an integration with Stripe for your Organization in your production environment, you can review details of the integration runs performed for the integration. See [Reviewing Integration Run Details](/guides/integrations/setting-up-integrations/reviewing-integration-run-details).
* **Warning: Credit or Debit Line Items on Bills!** If you have added Credit or Debit line items to Bills, then *please ensure you enter Service Period start and end dates* for these line items. This is a Stripe requirement and a Bills integration *will not run correctly* if you omit these dates.
* **Warning: Managing Empty Bills!** Please ensure you enable the **Suppress empty bills** setting for your Organization before deploying to your production environment. This means that any Account Bills without line items are not created in m3ter and are therefore not sent through as empty Bills to your Stripe system when the integration runs resulting in an error. See [Viewing and Editing Organization Configuration](/guides/organization-and-access-management/viewing-and-editing-organization/viewing-and-editing-organization-configuration).
**To define a m3ter - Stripe integration:**
1. Select **m3sh**:
# Configuring Stripe Integrations
Source: https://docs.m3ter.com/guides/integrations/setting-up-integrations/configuring-stripe-integrations
You can define and manage integrations for sending your end-customer Account Bills generated in m3ter outbound into your Stripe system:
* First, [create the integration](/guides/integrations/setting-up-integrations/configuring-stripe-integrations#creating-the-integration).
* Second, [set up authentication](/guides/integrations/setting-up-integrations/configuring-stripe-integrations#setting-up-authentication-for-integration) for the integration to connect with Stripe.
## Creating the Integration
You can quickly set up a Stripe integration in the Console.
**Important! Notes and Warnings:**
* **Note: Stripe or Stripe (Test mode)?** The difference between these two integrations is: selecting **Stripe** means an integration destination into your Stripe *production environment*; selecting **Stripe (Test mode)** means an integration destination into your Stripe *test environment*. The configuration settings are the same for both destinations.
* **Note: Accounting Products?** Many line item types can be mapped to specific Accounting Products to serve your revenue recognition and accounting purposes. Where this is the case, the integration will use the assigned Accounting Products.
* **Note: Reviewing Integration Runs?** When you've set up an integration with Stripe for your Organization in your production environment, you can review details of the integration runs performed for the integration. See [Reviewing Integration Run Details](/guides/integrations/setting-up-integrations/reviewing-integration-run-details).
* **Warning: Credit or Debit Line Items on Bills!** If you have added Credit or Debit line items to Bills, then *please ensure you enter Service Period start and end dates* for these line items. This is a Stripe requirement and a Bills integration *will not run correctly* if you omit these dates.
* **Warning: Managing Empty Bills!** Please ensure you enable the **Suppress empty bills** setting for your Organization before deploying to your production environment. This means that any Account Bills without line items are not created in m3ter and are therefore not sent through as empty Bills to your Stripe system when the integration runs resulting in an error. See [Viewing and Editing Organization Configuration](/guides/organization-and-access-management/viewing-and-editing-organization/viewing-and-editing-organization-configuration).
**To define a m3ter - Stripe integration:**
1. Select **m3sh**:
 The **Workflows** page opens.
2. Select **Integrations**. The **Integrations** page opens with **All** selected by default
3. Select **Stripe**:
The **Workflows** page opens.
2. Select **Integrations**. The **Integrations** page opens with **All** selected by default
3. Select **Stripe**:
 The **m3sh / Integrations>Stripe** page opens.
4. On the **Configurations** panel, select **Configure new integration>Configure bill integration**:
The **m3sh / Integrations>Stripe** page opens.
4. On the **Configurations** panel, select **Configure new integration>Configure bill integration**:
![Integ Configs24a]() The **Create** page opens and the **Entity type** - **Bill** and **External system** - **Stripe** are shown at the top of the page.
5. Use the **Global Configuration** panel to:
* Enter a **Name** for the Integration. This is required and is useful if you intend to create multiple Integrations for the same External system/Entity Type and need to clearly differentiate them.
* Select the Accounts you want the integration to apply to:
* **Account ids.** Select the Accounts you want to include - all selected Accounts are treated as *allowed* for the integration.
* **Restricted account ids.** Select the Accounts you want to exclude - all selected Accounts are treated as *disallowed* for the integration.
**Notes:**
* If you want to include *all Accounts* in the integration, leave both **Accounts ids** and **Restricted account ids** empty.
* Any filtering by **Account ids** you define using these settings to control which Accounts the integration runs for will be *in addition* to any filtering you define using the **Account filter** option - see the following step for **Entity Configuration** options.
* Select Users for Email notifications if disabled:
* **Integration disabled notification users**. Select Organization Users you want to receive an Email notification if the integration is automatically disabled.
**Notes:**
* An integration is automatically disabled if there have been 20 successive previous error Event responses to earlier attempts to run the integration. See [Reviewing and Resolving Integration Events](/guides/integrations/setting-up-integrations/reviewing-and-resolving-integration-events) for more details.
* If you select Organization Users to receive an Email notification when the integration is automatically disabled, their User id will be listed under **Configuration Data** on the **Integration Details** page.
6. Use the **Entity configuration** panel to configure the m3ter entity you will be synchronizing with for the integration. In the case of a Bill integration, this entity will be the Bill generated for a customer Account in m3ter:
* **Only send bill on approval.** Enable this if you only want Bills to be sent when they have been approved. If disabled, the Bill will be sent every time it is regenerated. Default is disabled. Note that:
* The frequency of Bills sent will depend on the billing frequency defined for the Account Plan attached to the Account - such as daily/weekly/monthly/annually.
* If an Account has a Prepayment on it and the billing for Prepayment fees is configured to run on a customized schedule, Bills will be sent when scheduled Bills are generated.
* If a Bill is manually recalculated the updated Bill will be sent.
* If you enable this, then the integration will not run for *all Bill Jobs*.
* **Use external mapping account code.** Enable this if you want the integration to look in the External Mappings for the Account identifier code, which means you can use an external Id. If this is disabled, the m3ter Account Id is used. Default is disabled.
* **Excluded line item types.** Optionally filter the Bill line item types you send to the external system. For example, only send charges or credits and exclude all other line item types.
* For details of line item types, see [Bill Line Item Types](/guides/billing-and-usage-data/running-viewing-and-managing-bills/bill-line-item-types).
**Warning: Credit and Debit line items on Bills!** If you set up the integration to include **CREDIT\_MEMO** and **DEBIT\_MEMO** line items and you have added Credit or Debit line items to Bills, please ensure you enter service period start and end dates for these line items. This is a Stripe requirement and if you omit these dates, the integration will not run correctly. See [Adding Credit Line Items to Bills](/guides/billing-and-usage-data/running-viewing-and-managing-bills/adding-credit-line-items-to-bills) and [Adding Debit Line Items to Bills](/guides/billing-and-usage-data/running-viewing-and-managing-bills/adding-debit-line-items-to-bills).
* **Account filter**. Optionally, enter an expression that is run on the Account to determine whether or not the integration includes the Account. You can use this setting if you have multiple destinations for sending Bills outbound to your Stripe system. For example:
* `"customFields != null AND customFields.country == "UK""`
* In this example, the integration will include an Account *only if* you have created a Custom Field for the Account called *country* and given the field a value of *UK*.
**Notes:**
* **Other Account fields for Account filter expression?** You can reference other fields on the Account object in the **Account filter** expression. For details and another example, see [Managing Multiple Third Party Destinations for Integrations](/guides/integrations/setting-up-integrations/managing-multiple-destinations-for-integrations).
* **Additional filtering?** Any global filtering you define using the settings to include/exclude Accounts for integration runs by **Account ids** will be *in addition* to any filtering you define using the **Account filter** option - see the previous step for **Global Configuration**.
* **Enforce external mappings for config**. Optionally enable this if you want the integration to use only those external mappings specified as being for this configuration.
* Use this setting if you want to set up multiple integrations for the same external system. You can then create separate external mappings for each integration from the details page of each integration, and these external mappings become **Linked external mappings** for the specific integration. See [Creating Linked External Mappings](/guides/integrations/setting-up-integrations/creating-and-managing-external-mappings#creating-linked-external-mappings).
* **Excluded products**. Optionally filter the Bill line items you send to the external system. Any line items associated with the selected Products will be be excluded when the integration runs.
* Note that if line items are mapped to a specific *Accounting Products*, these will be used for filtering to exclude line items.
* **Excluded aggregations**. Optionally filter the Bill line items you send to the external system. Any line items associated with the selected Aggregations will be be excluded when the integration runs.
7. Use the **External system configuration** panel to enter the settings specific to the external system. These settings include field mappings as well as other system-specific configurations:
* **Create stripe invoice.** Enable this if you want the integration to create a Stripe invoice:
* Set this switch to true if you are using *Stripe Subscription Invoicing*. Note that if you switch this to true, you can specify an invoice rendering template you want the integration to use when creating invoices in Stripe - see settings below.
* Set this switch to false if you are using *Stripe Subscriptions*.
* **Price data product id.** Enter the Product Id in your Stripe Product List in order to enable the integration to set tax-related fields on line items that should be sent from m3ter. Only one Product Id is required.
* **Po number custom field**. Enter the name of the custom field in the Stripe system that will used for the Purchase Order number that appears in the m3ter Bill.
* **Sort line items by**. Optionally, select a property to sort line items by before they are sent out to the external system. Three options:
* **None**
* **Subtotal**
* **Aggregation ID**
* **Send due date**. If you want the m3ter Bill due date to be sent through when creating Stripe invoices, enable this switch. Note that this should be disabled if Stripe is configured to automatically charge invoices. Default is disabled.
* **Split usage line items**. Select how you want invoice items to be created in Stripe. Stripe charge items can be mapped to an individual usage pricing band or to a product:
* **Item per usage band**
* **Item per product**
* If you want the integration to create an invoice in Stripe and have enabled **Create stripe invoice**, you can specify an invoice rendering template to be used:
* **Invoice rendering template id**. Enter the ID of the template you want the integration to use.
* **Invoice rendering template version**. Enter the version of the specified template you want the integration to use.
**Tip: Stripe Invoice Rendering Templates?** See the [Invoice Rendering Templates](https://docs.stripe.com/invoicing/invoice-rendering-template) topic in your Stripe documentation for more details.
8. Select **Create integration**. You are returned to the **Integrations>Stripe** page, where the integration is listed on the **Configurations** panel:
The **Create** page opens and the **Entity type** - **Bill** and **External system** - **Stripe** are shown at the top of the page.
5. Use the **Global Configuration** panel to:
* Enter a **Name** for the Integration. This is required and is useful if you intend to create multiple Integrations for the same External system/Entity Type and need to clearly differentiate them.
* Select the Accounts you want the integration to apply to:
* **Account ids.** Select the Accounts you want to include - all selected Accounts are treated as *allowed* for the integration.
* **Restricted account ids.** Select the Accounts you want to exclude - all selected Accounts are treated as *disallowed* for the integration.
**Notes:**
* If you want to include *all Accounts* in the integration, leave both **Accounts ids** and **Restricted account ids** empty.
* Any filtering by **Account ids** you define using these settings to control which Accounts the integration runs for will be *in addition* to any filtering you define using the **Account filter** option - see the following step for **Entity Configuration** options.
* Select Users for Email notifications if disabled:
* **Integration disabled notification users**. Select Organization Users you want to receive an Email notification if the integration is automatically disabled.
**Notes:**
* An integration is automatically disabled if there have been 20 successive previous error Event responses to earlier attempts to run the integration. See [Reviewing and Resolving Integration Events](/guides/integrations/setting-up-integrations/reviewing-and-resolving-integration-events) for more details.
* If you select Organization Users to receive an Email notification when the integration is automatically disabled, their User id will be listed under **Configuration Data** on the **Integration Details** page.
6. Use the **Entity configuration** panel to configure the m3ter entity you will be synchronizing with for the integration. In the case of a Bill integration, this entity will be the Bill generated for a customer Account in m3ter:
* **Only send bill on approval.** Enable this if you only want Bills to be sent when they have been approved. If disabled, the Bill will be sent every time it is regenerated. Default is disabled. Note that:
* The frequency of Bills sent will depend on the billing frequency defined for the Account Plan attached to the Account - such as daily/weekly/monthly/annually.
* If an Account has a Prepayment on it and the billing for Prepayment fees is configured to run on a customized schedule, Bills will be sent when scheduled Bills are generated.
* If a Bill is manually recalculated the updated Bill will be sent.
* If you enable this, then the integration will not run for *all Bill Jobs*.
* **Use external mapping account code.** Enable this if you want the integration to look in the External Mappings for the Account identifier code, which means you can use an external Id. If this is disabled, the m3ter Account Id is used. Default is disabled.
* **Excluded line item types.** Optionally filter the Bill line item types you send to the external system. For example, only send charges or credits and exclude all other line item types.
* For details of line item types, see [Bill Line Item Types](/guides/billing-and-usage-data/running-viewing-and-managing-bills/bill-line-item-types).
**Warning: Credit and Debit line items on Bills!** If you set up the integration to include **CREDIT\_MEMO** and **DEBIT\_MEMO** line items and you have added Credit or Debit line items to Bills, please ensure you enter service period start and end dates for these line items. This is a Stripe requirement and if you omit these dates, the integration will not run correctly. See [Adding Credit Line Items to Bills](/guides/billing-and-usage-data/running-viewing-and-managing-bills/adding-credit-line-items-to-bills) and [Adding Debit Line Items to Bills](/guides/billing-and-usage-data/running-viewing-and-managing-bills/adding-debit-line-items-to-bills).
* **Account filter**. Optionally, enter an expression that is run on the Account to determine whether or not the integration includes the Account. You can use this setting if you have multiple destinations for sending Bills outbound to your Stripe system. For example:
* `"customFields != null AND customFields.country == "UK""`
* In this example, the integration will include an Account *only if* you have created a Custom Field for the Account called *country* and given the field a value of *UK*.
**Notes:**
* **Other Account fields for Account filter expression?** You can reference other fields on the Account object in the **Account filter** expression. For details and another example, see [Managing Multiple Third Party Destinations for Integrations](/guides/integrations/setting-up-integrations/managing-multiple-destinations-for-integrations).
* **Additional filtering?** Any global filtering you define using the settings to include/exclude Accounts for integration runs by **Account ids** will be *in addition* to any filtering you define using the **Account filter** option - see the previous step for **Global Configuration**.
* **Enforce external mappings for config**. Optionally enable this if you want the integration to use only those external mappings specified as being for this configuration.
* Use this setting if you want to set up multiple integrations for the same external system. You can then create separate external mappings for each integration from the details page of each integration, and these external mappings become **Linked external mappings** for the specific integration. See [Creating Linked External Mappings](/guides/integrations/setting-up-integrations/creating-and-managing-external-mappings#creating-linked-external-mappings).
* **Excluded products**. Optionally filter the Bill line items you send to the external system. Any line items associated with the selected Products will be be excluded when the integration runs.
* Note that if line items are mapped to a specific *Accounting Products*, these will be used for filtering to exclude line items.
* **Excluded aggregations**. Optionally filter the Bill line items you send to the external system. Any line items associated with the selected Aggregations will be be excluded when the integration runs.
7. Use the **External system configuration** panel to enter the settings specific to the external system. These settings include field mappings as well as other system-specific configurations:
* **Create stripe invoice.** Enable this if you want the integration to create a Stripe invoice:
* Set this switch to true if you are using *Stripe Subscription Invoicing*. Note that if you switch this to true, you can specify an invoice rendering template you want the integration to use when creating invoices in Stripe - see settings below.
* Set this switch to false if you are using *Stripe Subscriptions*.
* **Price data product id.** Enter the Product Id in your Stripe Product List in order to enable the integration to set tax-related fields on line items that should be sent from m3ter. Only one Product Id is required.
* **Po number custom field**. Enter the name of the custom field in the Stripe system that will used for the Purchase Order number that appears in the m3ter Bill.
* **Sort line items by**. Optionally, select a property to sort line items by before they are sent out to the external system. Three options:
* **None**
* **Subtotal**
* **Aggregation ID**
* **Send due date**. If you want the m3ter Bill due date to be sent through when creating Stripe invoices, enable this switch. Note that this should be disabled if Stripe is configured to automatically charge invoices. Default is disabled.
* **Split usage line items**. Select how you want invoice items to be created in Stripe. Stripe charge items can be mapped to an individual usage pricing band or to a product:
* **Item per usage band**
* **Item per product**
* If you want the integration to create an invoice in Stripe and have enabled **Create stripe invoice**, you can specify an invoice rendering template to be used:
* **Invoice rendering template id**. Enter the ID of the template you want the integration to use.
* **Invoice rendering template version**. Enter the version of the specified template you want the integration to use.
**Tip: Stripe Invoice Rendering Templates?** See the [Invoice Rendering Templates](https://docs.stripe.com/invoicing/invoice-rendering-template) topic in your Stripe documentation for more details.
8. Select **Create integration**. You are returned to the **Integrations>Stripe** page, where the integration is listed on the **Configurations** panel:
![]() ## Setting Up Authentication for the Integration
When you have created a Stripe integration, you can select a Credential you've created for authentication allowing the integration to connect with your Stripe system.
**To set up authentication for your m3ter - Stripe integration:**
1. Select **m3sh**. The **Workflows** page opens.
2. Select **Integrations**. The **Integrations** page opens with **All** selected by default.
3. Select **Stripe**. The **Integrations>Stripe** page opens.
4. On the **Configurations** panel, select the **Name** hotlink text of the Stripe integration you want to set up authentication for. The **Integration details** page opens:
## Setting Up Authentication for the Integration
When you have created a Stripe integration, you can select a Credential you've created for authentication allowing the integration to connect with your Stripe system.
**To set up authentication for your m3ter - Stripe integration:**
1. Select **m3sh**. The **Workflows** page opens.
2. Select **Integrations**. The **Integrations** page opens with **All** selected by default.
3. Select **Stripe**. The **Integrations>Stripe** page opens.
4. On the **Configurations** panel, select the **Name** hotlink text of the Stripe integration you want to set up authentication for. The **Integration details** page opens:
![Integ Auth43a]() * Notes:
* A warning is shown that the integration is **DISCONNECTED** from to your Stripe system.
* The **ID** of the integration configuration is shown at the bottom of the **Integration details** card, and you can copy the **ID** directly to your clipboard.
5. Select **Connect Credential**. A **Select credential** modal appears.
6. Select a Credential you created earlier and want to use to authenticate the integration with Stripe. See [Creating Stripe Integration Credentials](/guides/integrations/setting-up-integrations/_managing-integration-credentials-legacy/creating-stripe-integration-credentials).
7. Select **Confirm**. The modal closes and on **Integrations details**, the integration now shows as **CONNECTED**:
* Notes:
* A warning is shown that the integration is **DISCONNECTED** from to your Stripe system.
* The **ID** of the integration configuration is shown at the bottom of the **Integration details** card, and you can copy the **ID** directly to your clipboard.
5. Select **Connect Credential**. A **Select credential** modal appears.
6. Select a Credential you created earlier and want to use to authenticate the integration with Stripe. See [Creating Stripe Integration Credentials](/guides/integrations/setting-up-integrations/_managing-integration-credentials-legacy/creating-stripe-integration-credentials).
7. Select **Confirm**. The modal closes and on **Integrations details**, the integration now shows as **CONNECTED**:
![Stripe Cred Added2a]() * The Credential used to connect the integration is shown.
* If at any time you want to disconnect the integration, select **Disconnect credential**.
* If you want to use a different Credential for connecting the integration, select **Change credential**. The **Select credential** modal appears and you can select a different Credential.
**Tip: Testing your Integration Setup?** Your Stripe integration is now available for use. However, it remains in Beta release and we strongly recommend you test the implementation in your m3ter Sandbox or QA environment before releasing it to your Production environment. See section 7. of our [Terms of Service](https://www.m3ter.com/docs/legal/terms-of-service) for Beta Usage.
**Tip: Integrations API Calls?** When you have set up your Stripe integration, you can review and manage the integration using a full set of API Calls. See the [Integrations section](/api/integrations/introduction) of our API Reference Docs.
# Configuring Xero Integrations
Source: https://docs.m3ter.com/guides/integrations/setting-up-integrations/configuring-xero-integrations
You can define and manage integrations for sending your end customer Account Bills generated in m3ter outbound into your Xero system:
* First, [create the integration](/guides/integrations/setting-up-integrations/configuring-stripe-integrations#creating-the-integration).
* Second, [set up authentication](/guides/integrations/setting-up-integrations/configuring-stripe-integrations#setting-up-authentication-for-integration) for the integration to connect with Xero.
**Important! Notes and Warnings:**
* **Note: Xero Integration in Beta Release!** Please note that the Xero integration is currently in beta release:
* See [Feature Release Stages](/guides/getting-started/feature-release-stages) for Beta release definition.
* If you intend to implement this integration for your m3ter Organization, please contact m3ter Support or your m3ter contact person to discuss.
* **Note: Accounting Products?** Many line item types can be mapped to specific Accounting Products to serve your revenue recognition and accounting purposes. Where this is the case, the integration will use the assigned Accounting Products.
* **Note: Reviewing Integration Runs!** When you've set up an integration with Xero for your Organization in your production environment, you can review details of the integration runs performed for the integration. See [Reviewing Integration Run Details](/guides/integrations/setting-up-integrations/reviewing-integration-run-details).
* **Warning: High-Precision Values!** The Xero system *does not* currently support high-precision values. Values with more than 2 decimal places of precision are rounded leading to inaccurate values. Please bear this in mind when pricing Product Plans and entering a price per unit, and when defining maximum decimal places for Currencies.
## Creating the Integration
You can quickly set up a Xero integration in the Console.
**Tip: Reviewing Integration Runs!** When you've set up an integration with Xero for your Organization in your production environment, you can review details of the integration runs performed for the integration. See [Reviewing Integration Run Details](/guides/integrations/setting-up-integrations/reviewing-integration-run-details).
**To define a m3ter - Xero integration:**
1. Select **m3sh**:
* The Credential used to connect the integration is shown.
* If at any time you want to disconnect the integration, select **Disconnect credential**.
* If you want to use a different Credential for connecting the integration, select **Change credential**. The **Select credential** modal appears and you can select a different Credential.
**Tip: Testing your Integration Setup?** Your Stripe integration is now available for use. However, it remains in Beta release and we strongly recommend you test the implementation in your m3ter Sandbox or QA environment before releasing it to your Production environment. See section 7. of our [Terms of Service](https://www.m3ter.com/docs/legal/terms-of-service) for Beta Usage.
**Tip: Integrations API Calls?** When you have set up your Stripe integration, you can review and manage the integration using a full set of API Calls. See the [Integrations section](/api/integrations/introduction) of our API Reference Docs.
# Configuring Xero Integrations
Source: https://docs.m3ter.com/guides/integrations/setting-up-integrations/configuring-xero-integrations
You can define and manage integrations for sending your end customer Account Bills generated in m3ter outbound into your Xero system:
* First, [create the integration](/guides/integrations/setting-up-integrations/configuring-stripe-integrations#creating-the-integration).
* Second, [set up authentication](/guides/integrations/setting-up-integrations/configuring-stripe-integrations#setting-up-authentication-for-integration) for the integration to connect with Xero.
**Important! Notes and Warnings:**
* **Note: Xero Integration in Beta Release!** Please note that the Xero integration is currently in beta release:
* See [Feature Release Stages](/guides/getting-started/feature-release-stages) for Beta release definition.
* If you intend to implement this integration for your m3ter Organization, please contact m3ter Support or your m3ter contact person to discuss.
* **Note: Accounting Products?** Many line item types can be mapped to specific Accounting Products to serve your revenue recognition and accounting purposes. Where this is the case, the integration will use the assigned Accounting Products.
* **Note: Reviewing Integration Runs!** When you've set up an integration with Xero for your Organization in your production environment, you can review details of the integration runs performed for the integration. See [Reviewing Integration Run Details](/guides/integrations/setting-up-integrations/reviewing-integration-run-details).
* **Warning: High-Precision Values!** The Xero system *does not* currently support high-precision values. Values with more than 2 decimal places of precision are rounded leading to inaccurate values. Please bear this in mind when pricing Product Plans and entering a price per unit, and when defining maximum decimal places for Currencies.
## Creating the Integration
You can quickly set up a Xero integration in the Console.
**Tip: Reviewing Integration Runs!** When you've set up an integration with Xero for your Organization in your production environment, you can review details of the integration runs performed for the integration. See [Reviewing Integration Run Details](/guides/integrations/setting-up-integrations/reviewing-integration-run-details).
**To define a m3ter - Xero integration:**
1. Select **m3sh**:
 The **Workflows** page opens.
2. Select **Integrations**. The **Integrations** page opens with **All** selected by default.
3. Select **Xero**:
The **Workflows** page opens.
2. Select **Integrations**. The **Integrations** page opens with **All** selected by default.
3. Select **Xero**:
 The **m3sh / Integrations>Xero** page opens.
4. On the **Configurations** panel, select **Configure new integration>Configure bill integration**:
The **m3sh / Integrations>Xero** page opens.
4. On the **Configurations** panel, select **Configure new integration>Configure bill integration**:
![Integ Configs32a]() The **Create** page opens and the **Entity type** - **Bill** and **External system** - **Xero** are shown at the top of the page.
5. Use the **Global configuration** panel to:
* Enter a **Name** for the Integration. This is required and is useful if you intend to create multiple Integrations for the same External system/Entity type and need to clearly differentiate them.
* Select the Accounts you want the integration to apply to:
* **Account ids.** Select the Accounts you want to include - all selected Accounts are treated as *allowed* for the integration.
* **Restricted account ids.** Select the Accounts you want to exclude - all selected Accounts are treated as *disallowed* for the integration.
**Notes:**
* If you want to include *all Accounts* in the integration, leave both **Accounts ids** and **Restricted account ids** empty.
* Any filtering by **Account ids** you define using these settings to control which Accounts the integration runs for will be *in addition* to any filtering you define using the **Account filter** option - see the following step for **Entity Configuration** options.
* Select Users for Email notifications if disabled:
* **Integration disabled notification users**. Select Organization Users you want to receive an Email notification if the integration is automatically disabled.
**Notes:**
* An integration is automatically disabled if there have been 20 successive previous error Event responses to earlier attempts to run the integration. See [Reviewing and Resolving Integration Events](/guides/integrations/setting-up-integrations/reviewing-and-resolving-integration-events) for more details.
* If you select Organization Users to receive an Email notification when the integration is automatically disabled, their User id will be listed under **Configuration Data** on the **Integration Details** page.
6. Use the **Entity configuration** panel to configure the m3ter entity you will be synchronizing with for the integration. In the case of an outbound Bill integration, this entity will be the Bill generated for a customer Account in m3ter:
* **Only send bill on approval.** Enable this if you only want Bills to be sent when they have been approved. If disabled, the Bill will be sent every time it is regenerated. Default is disabled. Note that:
* The frequency of Bills sent will depend on the billing frequency defined for the Account Plan attached to the Account - such as daily/weekly/monthly/annually.
* If an Account has a Prepayment on it and the billing for Prepayment fees is configured to run on a customized schedule, Bills will be sent when scheduled Bills are generated.
* If a Bill is manually recalculated the updated Bill will be sent.
* If you enable this, then the integration will not run for *all Bill Jobs*.
* **Use external mapping account code.** Enable this if you want the integration to look in the External Mappings for the Account identifier code, which means you can use an external Id. If this is disabled, the m3ter Account Id is used. Default is disabled.
* **Excluded line item types.** Optionally, filter the Bill line item types you send to the destination system. For example, only send charges or credits and exclude all other line item types.
* For details of line item types, see [Bill Line Item Types](/guides/billing-and-usage-data/running-viewing-and-managing-bills/bill-line-item-types).
* **Account filter**. Optionally, enter an expression that is run on the Account to determine whether or not the integration includes the Account. You can use this setting if you have multiple destinations for sending Bills outbound to your Xero system. For example:
* `"customFields != null AND customFields.country == "UK""`
* In this example, the integration will include an Account *only if* you have created a Custom Field for the Account called *country* and given the field a value of *UK*.
**Notes:**
* **Other Account fields for Account filter expression?** You can reference other fields on the Account object in the **Account filter** expression. For details and another example, see [Managing Multiple Third Party Destinations for Integrations](/guides/integrations/setting-up-integrations/managing-multiple-destinations-for-integrations).
* **Additional filtering?** Any global filtering you define using the settings to include/exclude Accounts for integration runs by **Account ids** will be *in addition* to any filtering you define using the **Account filter** option - see the previous step for **Global Configuration**.
* **Enforce external mappings for config**. Optionally enable this if you want the integration to use only those external mappings specified as being for this configuration.
* Use this setting if you want to set up multiple integrations for the same external system. You can then create separate external mappings for each integration from the details page of each integration, and these external mappings become **Linked external mappings** for the specific integration. See [Creating Linked External Mappings](/guides/integrations/setting-up-integrations/creating-and-managing-external-mappings#creating-linked-external-mappings).
* **Excluded products**. Optionally filter the Bill line items you send to the external system. Any line items associated with the selected Products will be be excluded when the integration runs.
* Note that if line items are mapped to a specific *Accounting Products*, these will be used for filtering to exclude line items.
* **Excluded aggregations**. Optionally filter the Bill line items you send to the external system. Any line items associated with the selected Aggregations will be be excluded when the integration runs.
7. Use the **External system configuration** panel to enter the settings specific to the external system:
* **Split usage line items**. This setting determines how m3ter will create usage invoice items in Xero. Xero items can be mapped to an individual usage pricing band or to a product:
* **Item per usage band**.
* **Item per product**.
* **Sort line items by**. Optionally, select a property to sort line items by before they are sent out to the external system. Three options:
* **None**
* **Subtotal**
* **Aggregation ID**
* **Xero describe pricing bands**. If you have selected the **Item per product** option for **Split usage line items**, then optionally you can enable this switch. If enabled, the integration will add pricing band information to line item descriptions.
* **Strict line item mapping**. Optionally, enable this switch if you want the integration to map **Description**, **Quantity**, and **Unit price** line item values directly to Xero invoice items.
**Possible rounding errors!** If you enable **Strict line item mapping**, this might result in rounding errors for the originating **Quantity** or **Unit price** values being mapped directly.
8. Select **Create integration**. You are returned to the **Integrations>Xero** page, where the integration is listed on the **Configurations** panel:
The **Create** page opens and the **Entity type** - **Bill** and **External system** - **Xero** are shown at the top of the page.
5. Use the **Global configuration** panel to:
* Enter a **Name** for the Integration. This is required and is useful if you intend to create multiple Integrations for the same External system/Entity type and need to clearly differentiate them.
* Select the Accounts you want the integration to apply to:
* **Account ids.** Select the Accounts you want to include - all selected Accounts are treated as *allowed* for the integration.
* **Restricted account ids.** Select the Accounts you want to exclude - all selected Accounts are treated as *disallowed* for the integration.
**Notes:**
* If you want to include *all Accounts* in the integration, leave both **Accounts ids** and **Restricted account ids** empty.
* Any filtering by **Account ids** you define using these settings to control which Accounts the integration runs for will be *in addition* to any filtering you define using the **Account filter** option - see the following step for **Entity Configuration** options.
* Select Users for Email notifications if disabled:
* **Integration disabled notification users**. Select Organization Users you want to receive an Email notification if the integration is automatically disabled.
**Notes:**
* An integration is automatically disabled if there have been 20 successive previous error Event responses to earlier attempts to run the integration. See [Reviewing and Resolving Integration Events](/guides/integrations/setting-up-integrations/reviewing-and-resolving-integration-events) for more details.
* If you select Organization Users to receive an Email notification when the integration is automatically disabled, their User id will be listed under **Configuration Data** on the **Integration Details** page.
6. Use the **Entity configuration** panel to configure the m3ter entity you will be synchronizing with for the integration. In the case of an outbound Bill integration, this entity will be the Bill generated for a customer Account in m3ter:
* **Only send bill on approval.** Enable this if you only want Bills to be sent when they have been approved. If disabled, the Bill will be sent every time it is regenerated. Default is disabled. Note that:
* The frequency of Bills sent will depend on the billing frequency defined for the Account Plan attached to the Account - such as daily/weekly/monthly/annually.
* If an Account has a Prepayment on it and the billing for Prepayment fees is configured to run on a customized schedule, Bills will be sent when scheduled Bills are generated.
* If a Bill is manually recalculated the updated Bill will be sent.
* If you enable this, then the integration will not run for *all Bill Jobs*.
* **Use external mapping account code.** Enable this if you want the integration to look in the External Mappings for the Account identifier code, which means you can use an external Id. If this is disabled, the m3ter Account Id is used. Default is disabled.
* **Excluded line item types.** Optionally, filter the Bill line item types you send to the destination system. For example, only send charges or credits and exclude all other line item types.
* For details of line item types, see [Bill Line Item Types](/guides/billing-and-usage-data/running-viewing-and-managing-bills/bill-line-item-types).
* **Account filter**. Optionally, enter an expression that is run on the Account to determine whether or not the integration includes the Account. You can use this setting if you have multiple destinations for sending Bills outbound to your Xero system. For example:
* `"customFields != null AND customFields.country == "UK""`
* In this example, the integration will include an Account *only if* you have created a Custom Field for the Account called *country* and given the field a value of *UK*.
**Notes:**
* **Other Account fields for Account filter expression?** You can reference other fields on the Account object in the **Account filter** expression. For details and another example, see [Managing Multiple Third Party Destinations for Integrations](/guides/integrations/setting-up-integrations/managing-multiple-destinations-for-integrations).
* **Additional filtering?** Any global filtering you define using the settings to include/exclude Accounts for integration runs by **Account ids** will be *in addition* to any filtering you define using the **Account filter** option - see the previous step for **Global Configuration**.
* **Enforce external mappings for config**. Optionally enable this if you want the integration to use only those external mappings specified as being for this configuration.
* Use this setting if you want to set up multiple integrations for the same external system. You can then create separate external mappings for each integration from the details page of each integration, and these external mappings become **Linked external mappings** for the specific integration. See [Creating Linked External Mappings](/guides/integrations/setting-up-integrations/creating-and-managing-external-mappings#creating-linked-external-mappings).
* **Excluded products**. Optionally filter the Bill line items you send to the external system. Any line items associated with the selected Products will be be excluded when the integration runs.
* Note that if line items are mapped to a specific *Accounting Products*, these will be used for filtering to exclude line items.
* **Excluded aggregations**. Optionally filter the Bill line items you send to the external system. Any line items associated with the selected Aggregations will be be excluded when the integration runs.
7. Use the **External system configuration** panel to enter the settings specific to the external system:
* **Split usage line items**. This setting determines how m3ter will create usage invoice items in Xero. Xero items can be mapped to an individual usage pricing band or to a product:
* **Item per usage band**.
* **Item per product**.
* **Sort line items by**. Optionally, select a property to sort line items by before they are sent out to the external system. Three options:
* **None**
* **Subtotal**
* **Aggregation ID**
* **Xero describe pricing bands**. If you have selected the **Item per product** option for **Split usage line items**, then optionally you can enable this switch. If enabled, the integration will add pricing band information to line item descriptions.
* **Strict line item mapping**. Optionally, enable this switch if you want the integration to map **Description**, **Quantity**, and **Unit price** line item values directly to Xero invoice items.
**Possible rounding errors!** If you enable **Strict line item mapping**, this might result in rounding errors for the originating **Quantity** or **Unit price** values being mapped directly.
8. Select **Create integration**. You are returned to the **Integrations>Xero** page, where the integration is listed on the **Configurations** panel:
![]() ## Setting Up Authentication for the Integration
When you've created a Xero integration, you can select an Integration Credential you've created for authentication allowing the integration to connect with your Xero system.
**To set up authentication for your m3ter - Xero integration:**
1. Select **m3sh**. The **Workflows** page opens.
2. Select **Integrations**. The **Integrations** page opens.
3. Select **Xero**. The **Integrations>Xero** page opens.
4. On the **Configurations** panel, select the **Name** hotlink text of the Xero integration you want to set up authentication for. The **Integration details** page opens:
## Setting Up Authentication for the Integration
When you've created a Xero integration, you can select an Integration Credential you've created for authentication allowing the integration to connect with your Xero system.
**To set up authentication for your m3ter - Xero integration:**
1. Select **m3sh**. The **Workflows** page opens.
2. Select **Integrations**. The **Integrations** page opens.
3. Select **Xero**. The **Integrations>Xero** page opens.
4. On the **Configurations** panel, select the **Name** hotlink text of the Xero integration you want to set up authentication for. The **Integration details** page opens:
![Integ Configs46a]() * Notes:
* A warning is shown that the integration is not yet connected to your Xero system.
* The **ID** of the integration configuration is shown at the bottom of the **Details** card, and you can copy the **ID** directly to your clipboard.
5. Select **Connect credential**. A **Select credential** modal appears.
6. Select a Credential you created earlier and want to use to authenticate the integration with Xero. See [Creating Xero Integration Credentials](/guides/integrations/setting-up-integrations/_managing-integration-credentials-legacy/creating-xero-integration-credentials).
7. Select **Confirm**. The modal closes and on **Integrations details** the integration now shows as **CONNECTED**:
* Notes:
* A warning is shown that the integration is not yet connected to your Xero system.
* The **ID** of the integration configuration is shown at the bottom of the **Details** card, and you can copy the **ID** directly to your clipboard.
5. Select **Connect credential**. A **Select credential** modal appears.
6. Select a Credential you created earlier and want to use to authenticate the integration with Xero. See [Creating Xero Integration Credentials](/guides/integrations/setting-up-integrations/_managing-integration-credentials-legacy/creating-xero-integration-credentials).
7. Select **Confirm**. The modal closes and on **Integrations details** the integration now shows as **CONNECTED**:
![Xero Cred Added2a]() * The Credential used to connect the integration is shown.
* If at any time you want to disconnect the integration, select **Disconnect credential**.
* If you want to use a different Credential for connecting the integration, select **Change credential**. The **Select credential** modal appears and you can select a different Credential.
**Tip: Testing your Integration Setup?** Your Xero integration is now available for use. However, it remains in Beta release and we strongly recommend you test the implementation in your m3ter Sandbox or QA environment before releasing it to your Production environment. See section 7. of our [Terms of Service](https://www.m3ter.com/docs/legal/terms-of-service) for Beta Usage.
**Tip: Integrations API Calls?** When you have set up your Xero integration, you can review and manage the integration using a full set of API Calls. See the [Integrations section](/api/integrations/introduction) of our API Reference Docs.
# Creating and Managing Outgoing Webhooks
Source: https://docs.m3ter.com/guides/integrations/setting-up-integrations/creating-and-managing-destinations
In the Integrations section of the Console, you can create *Outgoing webhooks*:
* If you've defined a Notification Rule based on a system event, you can link this to an Outgoing webhook as the endpoint for the Notification, which creates a Notification Webhook integration. For more details on creating and configuring Notification Rules, see [Utilizing Events and Notifications](/guides/alerts-events-and-notifications/utilizing-events-and-notifications).
* Currently, only the `M3TER_SIGNED_REQUEST` credentials format can be used as the authentication method used for connecting to a webhook. See the [Webhook Authentication](/guides/integrations/setting-up-integrations/creating-and-managing-destinations#webhook-authentication-for-m3ter-_-signed_request) section below for more details on how to work with this format.
* If credentials are not required, then dummy values can be used.
**Tip: Integrations Webhook API Example?** See [Integrations Webhook API Example](/api) in our API Reference for a worked example of creating a webhook destination using the API.
This topic explains how to create and manage your integration Outgoing Webhooks. Detailed guidance is also given on how to construct and verify a secure signature for the `M3TER_SIGNED_REQUEST`:
* [Creating Outgoing Webhooks](/guides/integrations/setting-up-integrations/creating-and-managing-destinations#creating-outgoing-webhooks)
* [Linking Notifications to Outgoing Webhooks](/guides/integrations/setting-up-integrations/creating-and-managing-destinations#linking-notifications-to-outgoing-webhooks)
* [Managing Outgoing Webhooks](/guides/integrations/setting-up-integrations/creating-and-managing-destinations#managing-outgoing-webhooks)
* [Reviewing Outgoing Webhook Metadata](#reviewing-outgoing-webhook-metadata)
* [Webhook Authentication for M3TER\_SIGNED\_REQUEST](/guides/integrations/setting-up-integrations/creating-and-managing-destinations#webhook-authentication-for-m3ter_signed_request)
## Creating Outgoing Webhooks
**To create an Outgoing webhook:**
1. Select **m3sh**:
* The Credential used to connect the integration is shown.
* If at any time you want to disconnect the integration, select **Disconnect credential**.
* If you want to use a different Credential for connecting the integration, select **Change credential**. The **Select credential** modal appears and you can select a different Credential.
**Tip: Testing your Integration Setup?** Your Xero integration is now available for use. However, it remains in Beta release and we strongly recommend you test the implementation in your m3ter Sandbox or QA environment before releasing it to your Production environment. See section 7. of our [Terms of Service](https://www.m3ter.com/docs/legal/terms-of-service) for Beta Usage.
**Tip: Integrations API Calls?** When you have set up your Xero integration, you can review and manage the integration using a full set of API Calls. See the [Integrations section](/api/integrations/introduction) of our API Reference Docs.
# Creating and Managing Outgoing Webhooks
Source: https://docs.m3ter.com/guides/integrations/setting-up-integrations/creating-and-managing-destinations
In the Integrations section of the Console, you can create *Outgoing webhooks*:
* If you've defined a Notification Rule based on a system event, you can link this to an Outgoing webhook as the endpoint for the Notification, which creates a Notification Webhook integration. For more details on creating and configuring Notification Rules, see [Utilizing Events and Notifications](/guides/alerts-events-and-notifications/utilizing-events-and-notifications).
* Currently, only the `M3TER_SIGNED_REQUEST` credentials format can be used as the authentication method used for connecting to a webhook. See the [Webhook Authentication](/guides/integrations/setting-up-integrations/creating-and-managing-destinations#webhook-authentication-for-m3ter-_-signed_request) section below for more details on how to work with this format.
* If credentials are not required, then dummy values can be used.
**Tip: Integrations Webhook API Example?** See [Integrations Webhook API Example](/api) in our API Reference for a worked example of creating a webhook destination using the API.
This topic explains how to create and manage your integration Outgoing Webhooks. Detailed guidance is also given on how to construct and verify a secure signature for the `M3TER_SIGNED_REQUEST`:
* [Creating Outgoing Webhooks](/guides/integrations/setting-up-integrations/creating-and-managing-destinations#creating-outgoing-webhooks)
* [Linking Notifications to Outgoing Webhooks](/guides/integrations/setting-up-integrations/creating-and-managing-destinations#linking-notifications-to-outgoing-webhooks)
* [Managing Outgoing Webhooks](/guides/integrations/setting-up-integrations/creating-and-managing-destinations#managing-outgoing-webhooks)
* [Reviewing Outgoing Webhook Metadata](#reviewing-outgoing-webhook-metadata)
* [Webhook Authentication for M3TER\_SIGNED\_REQUEST](/guides/integrations/setting-up-integrations/creating-and-managing-destinations#webhook-authentication-for-m3ter_signed_request)
## Creating Outgoing Webhooks
**To create an Outgoing webhook:**
1. Select **m3sh**:
 The **Workflows** page opens.
2. Select **Outgoing webhooks**:
The **Workflows** page opens.
2. Select **Outgoing webhooks**:
![]() The **Outgoing webhooks** page opens.
3. Select **Create outgoing webhook**. The **Create** page opens.
4. Enter **Outgoing webhook details**:
* **Name** and **Code**:
* Note that when you enter a name and click in the **Code** field, a default code is entered based on the name you've entered, which you can then edit as required.
* **Description** for the Outgoing webhook.
* **URL** for the Outgoing webhook.
**Important - only valid Domain Name System (DNS) entries permitted!** If you enter an invalid DNS entry for **URL**, then an error message will show when you try to save the Outgoing webhook.
5. In the **Credentials** panel:
* **Credential type**. Method of authentication with the Outgoing webhook.
* Note that only the `M3TER_SIGNED_REQUEST` authentication method is currently available and the **Credential type** field is pre-populated with this value.
* Enter the **API key** and **API secret** you want use for the `M3TER_SIGNED_REQUEST` authentication when connecting to the Outgoing webhook.
6. Select **Create outgoing webhook**. You are returned to the **Outgoing webhook details** page. The Outgoing webhook is now available for linking your Notifications to it. See [Linking Notifications Rules to Outgoing Webhooks](/guides/alerts-events-and-notifications/utilizing-events-and-notifications/creating-managing-and-reviewing-notifications#linking-notification-rules-to-outgoing-webhooks) for more details.
## Linking Notifications to Outgoing Webhooks
To complete your setup for a Notification, you can link a Notification rule to an Outgoing webhook - see [Creating, Managing and Reviewing Notifications](/guides/alerts-events-and-notifications/utilizing-events-and-notifications/creating-managing-and-reviewing-notifications) for more details:
* When you link a Notification rule to an Outgoing webhook, this creates a *Notification Webhook* integration configuration.
* If an Event of the type on which the Notification rule is based occurs and any conditions you've defined using a calculation in the rule are satisfied, then the Notification is triggered and sent to the Outgoing webhook you've linked it to.
This section explains how to link Notifications to Outgoing webhooks and how to review and manage those links:
* [Linking Notification Rules to Webhooks](/guides/integrations/setting-up-integrations/creating-and-managing-destinations#linking-notification-rules-to-webhooks)
* [Reviewing and Managing Notifications/Outgoing Webhooks Links](/guides/integrations/setting-up-integrations/creating-and-managing-destinations#reviewing-and-managing-notificationsoutgoing-webhooks-links)
### Linking Notification Rules to Webhooks
**To link a Notification Rule to an Outgoing webhook:**
1. In the Console, select **m3sh**. The **Workflows** page opens.
2. Select **Outgoing webhooks**. The **Outgoing webhooks** page opens.
3. Select the **Name** hotlink text of the Outgoing webhook you want to link to a Notification rule to. The **Outgoing webhook details** page opens.
4. Scroll down the page and on the **Linked notification rules** panel, select **Link notification rules**. A **Select notification rules** dialog appears, and lists the Notification rules created for your Organization.
5. Select the Notification rules you want to link to the Outgoing webhook, and then select **Confirm**. The dialog closes and the selected Notification rules are listed:
The **Outgoing webhooks** page opens.
3. Select **Create outgoing webhook**. The **Create** page opens.
4. Enter **Outgoing webhook details**:
* **Name** and **Code**:
* Note that when you enter a name and click in the **Code** field, a default code is entered based on the name you've entered, which you can then edit as required.
* **Description** for the Outgoing webhook.
* **URL** for the Outgoing webhook.
**Important - only valid Domain Name System (DNS) entries permitted!** If you enter an invalid DNS entry for **URL**, then an error message will show when you try to save the Outgoing webhook.
5. In the **Credentials** panel:
* **Credential type**. Method of authentication with the Outgoing webhook.
* Note that only the `M3TER_SIGNED_REQUEST` authentication method is currently available and the **Credential type** field is pre-populated with this value.
* Enter the **API key** and **API secret** you want use for the `M3TER_SIGNED_REQUEST` authentication when connecting to the Outgoing webhook.
6. Select **Create outgoing webhook**. You are returned to the **Outgoing webhook details** page. The Outgoing webhook is now available for linking your Notifications to it. See [Linking Notifications Rules to Outgoing Webhooks](/guides/alerts-events-and-notifications/utilizing-events-and-notifications/creating-managing-and-reviewing-notifications#linking-notification-rules-to-outgoing-webhooks) for more details.
## Linking Notifications to Outgoing Webhooks
To complete your setup for a Notification, you can link a Notification rule to an Outgoing webhook - see [Creating, Managing and Reviewing Notifications](/guides/alerts-events-and-notifications/utilizing-events-and-notifications/creating-managing-and-reviewing-notifications) for more details:
* When you link a Notification rule to an Outgoing webhook, this creates a *Notification Webhook* integration configuration.
* If an Event of the type on which the Notification rule is based occurs and any conditions you've defined using a calculation in the rule are satisfied, then the Notification is triggered and sent to the Outgoing webhook you've linked it to.
This section explains how to link Notifications to Outgoing webhooks and how to review and manage those links:
* [Linking Notification Rules to Webhooks](/guides/integrations/setting-up-integrations/creating-and-managing-destinations#linking-notification-rules-to-webhooks)
* [Reviewing and Managing Notifications/Outgoing Webhooks Links](/guides/integrations/setting-up-integrations/creating-and-managing-destinations#reviewing-and-managing-notificationsoutgoing-webhooks-links)
### Linking Notification Rules to Webhooks
**To link a Notification Rule to an Outgoing webhook:**
1. In the Console, select **m3sh**. The **Workflows** page opens.
2. Select **Outgoing webhooks**. The **Outgoing webhooks** page opens.
3. Select the **Name** hotlink text of the Outgoing webhook you want to link to a Notification rule to. The **Outgoing webhook details** page opens.
4. Scroll down the page and on the **Linked notification rules** panel, select **Link notification rules**. A **Select notification rules** dialog appears, and lists the Notification rules created for your Organization.
5. Select the Notification rules you want to link to the Outgoing webhook, and then select **Confirm**. The dialog closes and the selected Notification rules are listed:
![]() In this example:
* A single Notification rule has been linked to an Outgoing webhook.
* You can read off the Event for the the Notification.
* If you haven't yet created the Notification rule you want to link to the Outgoing webhook, you can select **Create notification rule**. This takes you directly to the **Create** page - see [Creating, Managing, and Reviewing Notifications](/guides/alerts-events-and-notifications/utilizing-events-and-notifications/creating-managing-and-reviewing-notifications).
6. If you want to review the Notification rule details, select the **Name** hotlink text. The **Notification rule details** page opens:
In this example:
* A single Notification rule has been linked to an Outgoing webhook.
* You can read off the Event for the the Notification.
* If you haven't yet created the Notification rule you want to link to the Outgoing webhook, you can select **Create notification rule**. This takes you directly to the **Create** page - see [Creating, Managing, and Reviewing Notifications](/guides/alerts-events-and-notifications/utilizing-events-and-notifications/creating-managing-and-reviewing-notifications).
6. If you want to review the Notification rule details, select the **Name** hotlink text. The **Notification rule details** page opens:
![Outgoing Webhooks8a]() ### Reviewing and Managing Notifications/Outgoing Webhooks Links
When you've linked a Notification rule to an Outgoing webhook, you can review and manage the link:
* If the link is flagged as inactive, check the status.
* Set up Organization users to receive email notifications if the Notification Webhook integration created by the link has been auto-disabled.
**To review and manage Notification/Webhook Links:**
1. Open the **Outgoing webhooks** page and select the **Name** hotlink text of the Outgoing webhook you want to review and manage a Notification/Webhook link for. The **Outgoing webhook details** page opens.
2. Scroll down the page to the **Linked notification rules** panel.
3. Select the **Details** icon for the link you want to review and manage:
### Reviewing and Managing Notifications/Outgoing Webhooks Links
When you've linked a Notification rule to an Outgoing webhook, you can review and manage the link:
* If the link is flagged as inactive, check the status.
* Set up Organization users to receive email notifications if the Notification Webhook integration created by the link has been auto-disabled.
**To review and manage Notification/Webhook Links:**
1. Open the **Outgoing webhooks** page and select the **Name** hotlink text of the Outgoing webhook you want to review and manage a Notification/Webhook link for. The **Outgoing webhook details** page opens.
2. Scroll down the page to the **Linked notification rules** panel.
3. Select the **Details** icon for the link you want to review and manage:
![]() The **Notification rule / outgoing webhook link** modal appears:
The **Notification rule / outgoing webhook link** modal appears:
 * In this example, the modal for an **INACTIVE** Notification/Webhook link has been opened and an information banner gives the reason why - because the Notification rule configuration is set as globally inactive.
* If you want to change the status, select **Update**. The **Edit** page of the Notification opens.
* Under **Notification rule settings**, enable the **Active** switch and select **Update notification rule**. You are returned to the **Notification rules** page where the Notification now shows as **ACTIVE**.
4. If you want to set up an Organization user to receive an email notification when the Notification Webhook integration created by the link is auto-disabled, use the **Disabled notification users** drop-down to select the user:
* In this example, the modal for an **INACTIVE** Notification/Webhook link has been opened and an information banner gives the reason why - because the Notification rule configuration is set as globally inactive.
* If you want to change the status, select **Update**. The **Edit** page of the Notification opens.
* Under **Notification rule settings**, enable the **Active** switch and select **Update notification rule**. You are returned to the **Notification rules** page where the Notification now shows as **ACTIVE**.
4. If you want to set up an Organization user to receive an email notification when the Notification Webhook integration created by the link is auto-disabled, use the **Disabled notification users** drop-down to select the user:
 **Tip: When is a Notification Webhook Integration Auto-Disabled?** See [Integration Run Error Handling and Alerts](/guides/integrations/setting-up-integrations/creating-and-managing-integration-configurations#integration-run-error-handling-and-alerts) for details.
## Managing Outgoing Webhooks
You can edit, view details, or delete an Outgoing webhook.
**To manage Outgoing webhooks:**
1. Select **m3sh**. The **Workflows** page opens.
2. Select **Outgoing webhooks**:
**Tip: When is a Notification Webhook Integration Auto-Disabled?** See [Integration Run Error Handling and Alerts](/guides/integrations/setting-up-integrations/creating-and-managing-integration-configurations#integration-run-error-handling-and-alerts) for details.
## Managing Outgoing Webhooks
You can edit, view details, or delete an Outgoing webhook.
**To manage Outgoing webhooks:**
1. Select **m3sh**. The **Workflows** page opens.
2. Select **Outgoing webhooks**:
![]() The **Outgoing webhooks** page opens.
3. If you want to edit an Outgoing webhook select **Edit**:
The **Outgoing webhooks** page opens.
3. If you want to edit an Outgoing webhook select **Edit**:
![]() 4. On the **Edit** page, make your changes and select **Update outgoing webhook**.
5. If you want to view the details of an Outgoing webhook, select its **Name** hotlink. The **Outgoing webhook details** page opens:
4. On the **Edit** page, make your changes and select **Update outgoing webhook**.
5. If you want to view the details of an Outgoing webhook, select its **Name** hotlink. The **Outgoing webhook details** page opens:
![Outgoing Webhooks9a]() In this example, **Outgoing Webhook 1** details are shown. Note that you can **Copy** directly to your Clipboard the:
* **URL**
* **API key**
* **ID**
6. If you want to delete an Outgoing webhook, select **Delete**:
In this example, **Outgoing Webhook 1** details are shown. Note that you can **Copy** directly to your Clipboard the:
* **URL**
* **API key**
* **ID**
6. If you want to delete an Outgoing webhook, select **Delete**:
![]() A confirmation dialog appears. Select **Yes** to confirm the delete action.
**Warning!** If you try to delete an Outgoing webhook to which you've linked a Notification, then you won't be able to and an error message will show.
## Reviewing Outgoing Webhook Metadata
On the **Outgoing webhook details** page, you can also review **Outgoing webhook metadata**:
**External mappings**. Any External mappings set up for the Outgoing webhook are listed:
A confirmation dialog appears. Select **Yes** to confirm the delete action.
**Warning!** If you try to delete an Outgoing webhook to which you've linked a Notification, then you won't be able to and an error message will show.
## Reviewing Outgoing Webhook Metadata
On the **Outgoing webhook details** page, you can also review **Outgoing webhook metadata**:
**External mappings**. Any External mappings set up for the Outgoing webhook are listed:
![Outgoing Webhooks10]() * The **External system** and **External table** mapped to are shown - such as **NetSuite - Item** in the above example. The **External entity ID** mapped to is also shown.
* If a listed External mapping is linked to an Integration, under **Linked integration** a hotlink text will be shown which you can use to open the Integration.
* Under **Actions**, you can edit or delete the External mapping.
* If the Outgoing webhook has multiple External mappings created for it, you can use *Search external mappings* to search by **External table** and **External entity ID** and filter the list.
* You can commence a workflow to **Create external mapping** for the Outgoing webhook directly - see [Creating and Managing External Mappings for Accounts](https://docs.m3ter.com/guides/end-customer-accounts/creating-and-managing-external-mappings-for-accounts) for an example.
**Integration runs**. If you’ve set up an integration that synchronizes the Outgoing webhook with an external system, the date/time and status of the **Latest** integration run are shown. You can use a text hotlink to open details of this latest run or **View all runs**. See [Reviewing Integration Run Details](https://docs.m3ter.com/guides/integrations/setting-up-integrations/reviewing-integration-run-details).
## Webhook Authentication for M3TER\_SIGNED\_REQUEST
Currently, the only authentication support for connecting to a webhook is signing a request using an **ApiKey** and **ApiSecret**. In m3ter, this is the `M3TER_SIGNED_REQUEST` credentials format. This format implements a signed request for webhook access and is designed to enable you to build secure webhook endpoints and safeguard them from malicious attacks.
m3ter will sign all the requests it makes to your webhook. When you receive a request on your configured endpoint, you should:
* Validate that the timestamp of the request is within an acceptable grace period.
* Compute the signature based on the information you receive and compare that with the signature m3ter passes. This allows you to verify that the request was made by m3ter and not a third party as bad actor.
You'll receive the following m3ter headers:
* `X-m3ter-timestamp` - the timestamp when m3ter made the request.
* `X-m3ter-apikey` - the `apiKey` corresponding to the `apiSecret` used to sign the request.
* `X-m3ter-signature` - the signature m3ter computed for this request. You need to validate this header.
* `X-m3ter-signaturemethod` - the algorithm used for computing the signature. Currently, the algorithm used is always `HmacSHA256`.
* `X-m3ter-version` - the m3ter signature algorithm. Currently, this is always `1`.
### Validating the `X-m3ter-signature` Header
To validate the `X-m3ter-signature` header, you must prepare a `payload` String that you sign with your API Secret.
To compute the payload, you must concatenate the following data using a pipe `|` separator:
* **url**
* **query string** - Currently, there's no support for passing in query parameters. For now, you can hard code to this String: `{}`
* **API Key** - provided in the `X-m3ter-apikey` header.
* **timestamp** -provided in the `X-m3ter-timestamp` header.
* **body** - the request body.
### Example
```text theme={null}
POST https://test.com
X-m3ter-timestamp: 1688460685310
X-m3ter-apikey: testApiKey
X-m3ter-signature: a9f9936e662512f943a904f3a71d0141c9bdfbf9fd5496902172864e9333ba15
X-m3ter-signaturemethod: HmacSHA256
X-m3ter-version: 1
body: {"orgId":"f49e8e22-ddd2-4367-b1ed-761e7e1fbdfd","entityId":"136f7b01-6bbd-4779-88a1-4a22d47b4f97","requestType":"NOTIFICATION","name":"Bill Approved for Locking","description":"Bill approved for locking","accountId":"16c14570-5790-43b5-9ed8-109541b780bb","originalEventId":"8ab97599-02a4-4604-b9fb-e0110ef3dbb9","eventName":"billing.bill.updated","notificationEventId":"679c70ef-f843-4dac-add2-75420666f598","notificationCode":"bill_approved_for_locking"}
```
The payload will be:
```text theme={null}
payload = "https://test.com|{}|testApiKey|1688460685310|{\"orgId\":\"f49e8e22-ddd2-4367-b1ed-761e7e1fbdfd\",\"entityId\":\"136f7b01-6bbd-4779-88a1-4a22d47b4f97\",\"requestType\":\"NOTIFICATION\",\"name\":\"Bill Approved for Locking\",\"description\":\"Bill approved for locking\",\"accountId\":\"16c14570-5790-43b5-9ed8-109541b780bb\",\"originalEventId\":\"8ab97599-02a4-4604-b9fb-e0110ef3dbb9\",\"eventName\":\"billing.bill.updated\",\"notificationEventId\":\"679c70ef-f843-4dac-add2-75420666f598\",\"notificationCode\":\"bill_approved_for_locking\"}"
```
### Nodejs Example
```javascript theme={null}
const crypto = require('crypto');
// Main function to validate request authenticity
exports.validateSecret = function({ url, queryString, apiKey, apiSecret, timestamp, body, signature }) {
var currentTimestamp = Date.now();
var result = false;
// Check if the provided timestamp is in the past by comparing it with the current timestamp
if (currentTimestamp - 30 * 1000 > timestamp) {
var details = "timestamp in the past: " + currentTimestamp;
return {"result": result, "log": details};
}
// Prepare the payload string by concatenating the request data
var sharedSecret = apiSecret; // Secret associated with the apiKey
var safeQueryString = !queryString ? '{}' : queryString;
var payload = url + "|" + safeQueryString + "|" + apiKey + "|" + timestamp + "|" + body;
// Generate a cryptographic signature of the payload using HMAC-SHA256
var sig = crypto.createHmac('sha256', sharedSecret)
.update(payload)
.digest('hex');
// Compare the generated signature with the provided signature using a timing-safe comparison
result = crypto.timingSafeEqual(Buffer.from(sig), Buffer.from(signature));
// Return the result and additional information for debugging
return {"result": result, "log": {"payload": payload, "sig": sig, "signature": signature}};
};
```
**Integration runs**. If you’ve set up an integration that synchronizes the Outgoing webhook with an external system, the date/time and status of the **Latest** integration run are shown. You can use a text hotlink to open details of this latest run or **View all runs**. See [Reviewing Integration Run Details](https://docs.m3ter.com/guides/integrations/setting-up-integrations/reviewing-integration-run-details).
# Creating and Managing External Mappings
Source: https://docs.m3ter.com/guides/integrations/setting-up-integrations/creating-and-managing-external-mappings
When you integrate your 3rd-party external systems with the m3ter platform, entities and fields in external systems are mapped to m3ter entities and fields. *External Mappings* are created and act as mapping reference lookups for which entities and fields have been mapped across two or more systems. You can review these mapping references on the **External Mappings** page under **Integrations** where they are listed.
When you are working to set up your Integrations and want to test or troubleshoot your implementation before going live, you might need to create External Mappings manually and, at a later date, edit or delete them. You can also create *bulk mappings* for specific mapping types.
If you want to create multiple separate integrations for an external system, you can create external mappings for each separate integration, and these external mappings are then *linked to* the specific integration they were created for.
This topic explains how to create and manage the External Mapping needed for the integrations with external systems you've set up for your Organization:
* [Creating Single External Mappings](/guides/integrations/setting-up-integrations/creating-and-managing-external-mappings#creating-single-external-mappings)
* [Creating Bulk External Mappings](/guides/integrations/setting-up-integrations/creating-and-managing-external-mappings#creating-bulk-external-mappings)
* [Viewing and Managing External Mappings](/guides/integrations/setting-up-integrations/creating-and-managing-external-mappings#viewing-and-managing-external-mappings)
* [Creating Linked External Mappings](/guides/integrations/setting-up-integrations/creating-and-managing-external-mappings#creating-linked-external-mappings)
**Tip: Reviewing External Mappings for Entities?** On the Details pages for m3ter entities, any External mappings created for an entity are listed on the **Entity metadata** panel. You can then create External Mappings for the entity directly from there. For an example of how to do this, see [Creating and Managing External Mappings for Accounts](/guides/end-customer-accounts/creating-and-managing-external-mappings-for-accounts).
## Creating Single External Mappings
From the **External mappings** page, you can create a single mapping of a specific mapping type.
**To create a single External Mapping:**
1. Select **m3sh**:
* The **External system** and **External table** mapped to are shown - such as **NetSuite - Item** in the above example. The **External entity ID** mapped to is also shown.
* If a listed External mapping is linked to an Integration, under **Linked integration** a hotlink text will be shown which you can use to open the Integration.
* Under **Actions**, you can edit or delete the External mapping.
* If the Outgoing webhook has multiple External mappings created for it, you can use *Search external mappings* to search by **External table** and **External entity ID** and filter the list.
* You can commence a workflow to **Create external mapping** for the Outgoing webhook directly - see [Creating and Managing External Mappings for Accounts](https://docs.m3ter.com/guides/end-customer-accounts/creating-and-managing-external-mappings-for-accounts) for an example.
**Integration runs**. If you’ve set up an integration that synchronizes the Outgoing webhook with an external system, the date/time and status of the **Latest** integration run are shown. You can use a text hotlink to open details of this latest run or **View all runs**. See [Reviewing Integration Run Details](https://docs.m3ter.com/guides/integrations/setting-up-integrations/reviewing-integration-run-details).
## Webhook Authentication for M3TER\_SIGNED\_REQUEST
Currently, the only authentication support for connecting to a webhook is signing a request using an **ApiKey** and **ApiSecret**. In m3ter, this is the `M3TER_SIGNED_REQUEST` credentials format. This format implements a signed request for webhook access and is designed to enable you to build secure webhook endpoints and safeguard them from malicious attacks.
m3ter will sign all the requests it makes to your webhook. When you receive a request on your configured endpoint, you should:
* Validate that the timestamp of the request is within an acceptable grace period.
* Compute the signature based on the information you receive and compare that with the signature m3ter passes. This allows you to verify that the request was made by m3ter and not a third party as bad actor.
You'll receive the following m3ter headers:
* `X-m3ter-timestamp` - the timestamp when m3ter made the request.
* `X-m3ter-apikey` - the `apiKey` corresponding to the `apiSecret` used to sign the request.
* `X-m3ter-signature` - the signature m3ter computed for this request. You need to validate this header.
* `X-m3ter-signaturemethod` - the algorithm used for computing the signature. Currently, the algorithm used is always `HmacSHA256`.
* `X-m3ter-version` - the m3ter signature algorithm. Currently, this is always `1`.
### Validating the `X-m3ter-signature` Header
To validate the `X-m3ter-signature` header, you must prepare a `payload` String that you sign with your API Secret.
To compute the payload, you must concatenate the following data using a pipe `|` separator:
* **url**
* **query string** - Currently, there's no support for passing in query parameters. For now, you can hard code to this String: `{}`
* **API Key** - provided in the `X-m3ter-apikey` header.
* **timestamp** -provided in the `X-m3ter-timestamp` header.
* **body** - the request body.
### Example
```text theme={null}
POST https://test.com
X-m3ter-timestamp: 1688460685310
X-m3ter-apikey: testApiKey
X-m3ter-signature: a9f9936e662512f943a904f3a71d0141c9bdfbf9fd5496902172864e9333ba15
X-m3ter-signaturemethod: HmacSHA256
X-m3ter-version: 1
body: {"orgId":"f49e8e22-ddd2-4367-b1ed-761e7e1fbdfd","entityId":"136f7b01-6bbd-4779-88a1-4a22d47b4f97","requestType":"NOTIFICATION","name":"Bill Approved for Locking","description":"Bill approved for locking","accountId":"16c14570-5790-43b5-9ed8-109541b780bb","originalEventId":"8ab97599-02a4-4604-b9fb-e0110ef3dbb9","eventName":"billing.bill.updated","notificationEventId":"679c70ef-f843-4dac-add2-75420666f598","notificationCode":"bill_approved_for_locking"}
```
The payload will be:
```text theme={null}
payload = "https://test.com|{}|testApiKey|1688460685310|{\"orgId\":\"f49e8e22-ddd2-4367-b1ed-761e7e1fbdfd\",\"entityId\":\"136f7b01-6bbd-4779-88a1-4a22d47b4f97\",\"requestType\":\"NOTIFICATION\",\"name\":\"Bill Approved for Locking\",\"description\":\"Bill approved for locking\",\"accountId\":\"16c14570-5790-43b5-9ed8-109541b780bb\",\"originalEventId\":\"8ab97599-02a4-4604-b9fb-e0110ef3dbb9\",\"eventName\":\"billing.bill.updated\",\"notificationEventId\":\"679c70ef-f843-4dac-add2-75420666f598\",\"notificationCode\":\"bill_approved_for_locking\"}"
```
### Nodejs Example
```javascript theme={null}
const crypto = require('crypto');
// Main function to validate request authenticity
exports.validateSecret = function({ url, queryString, apiKey, apiSecret, timestamp, body, signature }) {
var currentTimestamp = Date.now();
var result = false;
// Check if the provided timestamp is in the past by comparing it with the current timestamp
if (currentTimestamp - 30 * 1000 > timestamp) {
var details = "timestamp in the past: " + currentTimestamp;
return {"result": result, "log": details};
}
// Prepare the payload string by concatenating the request data
var sharedSecret = apiSecret; // Secret associated with the apiKey
var safeQueryString = !queryString ? '{}' : queryString;
var payload = url + "|" + safeQueryString + "|" + apiKey + "|" + timestamp + "|" + body;
// Generate a cryptographic signature of the payload using HMAC-SHA256
var sig = crypto.createHmac('sha256', sharedSecret)
.update(payload)
.digest('hex');
// Compare the generated signature with the provided signature using a timing-safe comparison
result = crypto.timingSafeEqual(Buffer.from(sig), Buffer.from(signature));
// Return the result and additional information for debugging
return {"result": result, "log": {"payload": payload, "sig": sig, "signature": signature}};
};
```
**Integration runs**. If you’ve set up an integration that synchronizes the Outgoing webhook with an external system, the date/time and status of the **Latest** integration run are shown. You can use a text hotlink to open details of this latest run or **View all runs**. See [Reviewing Integration Run Details](https://docs.m3ter.com/guides/integrations/setting-up-integrations/reviewing-integration-run-details).
# Creating and Managing External Mappings
Source: https://docs.m3ter.com/guides/integrations/setting-up-integrations/creating-and-managing-external-mappings
When you integrate your 3rd-party external systems with the m3ter platform, entities and fields in external systems are mapped to m3ter entities and fields. *External Mappings* are created and act as mapping reference lookups for which entities and fields have been mapped across two or more systems. You can review these mapping references on the **External Mappings** page under **Integrations** where they are listed.
When you are working to set up your Integrations and want to test or troubleshoot your implementation before going live, you might need to create External Mappings manually and, at a later date, edit or delete them. You can also create *bulk mappings* for specific mapping types.
If you want to create multiple separate integrations for an external system, you can create external mappings for each separate integration, and these external mappings are then *linked to* the specific integration they were created for.
This topic explains how to create and manage the External Mapping needed for the integrations with external systems you've set up for your Organization:
* [Creating Single External Mappings](/guides/integrations/setting-up-integrations/creating-and-managing-external-mappings#creating-single-external-mappings)
* [Creating Bulk External Mappings](/guides/integrations/setting-up-integrations/creating-and-managing-external-mappings#creating-bulk-external-mappings)
* [Viewing and Managing External Mappings](/guides/integrations/setting-up-integrations/creating-and-managing-external-mappings#viewing-and-managing-external-mappings)
* [Creating Linked External Mappings](/guides/integrations/setting-up-integrations/creating-and-managing-external-mappings#creating-linked-external-mappings)
**Tip: Reviewing External Mappings for Entities?** On the Details pages for m3ter entities, any External mappings created for an entity are listed on the **Entity metadata** panel. You can then create External Mappings for the entity directly from there. For an example of how to do this, see [Creating and Managing External Mappings for Accounts](/guides/end-customer-accounts/creating-and-managing-external-mappings-for-accounts).
## Creating Single External Mappings
From the **External mappings** page, you can create a single mapping of a specific mapping type.
**To create a single External Mapping:**
1. Select **m3sh**:
 The **Workflows** page opens.
2. Select **External mappings**:
The **Workflows** page opens.
2. Select **External mappings**:
 The **External mappings** page opens and lists the mappings in your Organization by external system. The page will open for the external system mappings you last viewed.
3. Select the external system you want to view the external mappings for:
The **External mappings** page opens and lists the mappings in your Organization by external system. The page will open for the external system mappings you last viewed.
3. Select the external system you want to view the external mappings for:
![Ext Mapping46c]() In this example, we've selected to view the external mappings created for Xero integrations. Note that:
* The external systems available for creating external mappings for their integrations with m3ter are shown across the top of the page.
* If you want to view external mappings for another system, select it's icon. The icon will be highlighted as the selected system.
* For each external mapping, you can read off:
* **Entity type**. The m3ter entity the mapping is for.
* **External table**. The external table in the external system for the entity that is mapped to.
* **Linked integration**. If you've created the mapping as a *linked external mapping*, which means it can only be used for a specific integration for the external system, then the name of the specific integration is shown and you can select the hotlink text to open the integration's details page directly. See [Creating Linked External Mappings](/guides/integrations/setting-up-integrations/creating-and-managing-external-mappings#creating-linked-external-mappings) below for more details.
* **m3ter ID**. The id of the m3ter entity the mapping is for.
* **External entity ID**. The id of the external system entity that is mapped to.
4. Select **Create external mapping**. To create a mapping, you must complete a two-stage workflow and the **Create** page opens ready for you to complete **Stage 1**.
**Stage 1 - Select mapping type:**
5. Enter **External mapping settings**:
* Use the **Entity type** drop-down to select the m3ter entity type you want to use to create the mapping type.
* Use the **External system** drop-down to select the 3rd-party system referenced.
* Use the **External table** drop-down to select the table in the selected 3rd-party system that you want to use for the mapping type:
In this example, we've selected to view the external mappings created for Xero integrations. Note that:
* The external systems available for creating external mappings for their integrations with m3ter are shown across the top of the page.
* If you want to view external mappings for another system, select it's icon. The icon will be highlighted as the selected system.
* For each external mapping, you can read off:
* **Entity type**. The m3ter entity the mapping is for.
* **External table**. The external table in the external system for the entity that is mapped to.
* **Linked integration**. If you've created the mapping as a *linked external mapping*, which means it can only be used for a specific integration for the external system, then the name of the specific integration is shown and you can select the hotlink text to open the integration's details page directly. See [Creating Linked External Mappings](/guides/integrations/setting-up-integrations/creating-and-managing-external-mappings#creating-linked-external-mappings) below for more details.
* **m3ter ID**. The id of the m3ter entity the mapping is for.
* **External entity ID**. The id of the external system entity that is mapped to.
4. Select **Create external mapping**. To create a mapping, you must complete a two-stage workflow and the **Create** page opens ready for you to complete **Stage 1**.
**Stage 1 - Select mapping type:**
5. Enter **External mapping settings**:
* Use the **Entity type** drop-down to select the m3ter entity type you want to use to create the mapping type.
* Use the **External system** drop-down to select the 3rd-party system referenced.
* Use the **External table** drop-down to select the table in the selected 3rd-party system that you want to use for the mapping type:
 * In this example, we've chosen to create an **Account \<> Contact** mapping for **m3ter \<> Xero**.
**Tip: Settings are searchable.** The three drop-down selection fields for **External mapping settings** are searchable - if you start to enter the value you require, the list will be filtered according to your text input.
6. When you've completed the mapping type set up, select **Next**. The page adjusts to allow you to complete **Stage 2**.
**Stage 2 - Add mapping IDs:**
* The **Entity type**, **External System**, and **External table** you configured for **Stage 1** are shown.
* **Linked integration**. Note that because you started the create external mapping workflow from the general **External mappings** page, this mapping will *not be linked* to a specific integration for the external system.
7. On **External mappings details**:
* Use the **m3ter entity** drop-down to enter the specific m3ter entity of the type you've selected in **Stage 1** - in this example a m3ter Account - you want to create the mapping for.
**Tip: m3ter entity field is a drop-down selection field?**
* Depending on the m3ter entity type you are creating the mapping for, the m3ter entity field might show as a drop-down selection field - for example if you are mapping Account entities. In this kind of case, you can select the m3ter entity by Name/Code. Note that the list of m3ter entities available for selection will be filtered to show only those entities of that type for which a mapping of the selected type has not yet been created.
* If the m3ter entity field does not show as a drop-down selection, such as when you are creating a mapping for m3ter Bill Line Items, then you can enter the entity's ID.
* In the **External entity ID** field, enter the ID of the external system entity you want to map to.
**Tip: Possibles values might show!** Note that if the possible values for the **External entity ID** field can be fetched for the external system, then you can use a drop-down list to select the value for this field from the list of possible values returned.
* In this example, we've chosen to create an **Account \<> Contact** mapping for **m3ter \<> Xero**.
**Tip: Settings are searchable.** The three drop-down selection fields for **External mapping settings** are searchable - if you start to enter the value you require, the list will be filtered according to your text input.
6. When you've completed the mapping type set up, select **Next**. The page adjusts to allow you to complete **Stage 2**.
**Stage 2 - Add mapping IDs:**
* The **Entity type**, **External System**, and **External table** you configured for **Stage 1** are shown.
* **Linked integration**. Note that because you started the create external mapping workflow from the general **External mappings** page, this mapping will *not be linked* to a specific integration for the external system.
7. On **External mappings details**:
* Use the **m3ter entity** drop-down to enter the specific m3ter entity of the type you've selected in **Stage 1** - in this example a m3ter Account - you want to create the mapping for.
**Tip: m3ter entity field is a drop-down selection field?**
* Depending on the m3ter entity type you are creating the mapping for, the m3ter entity field might show as a drop-down selection field - for example if you are mapping Account entities. In this kind of case, you can select the m3ter entity by Name/Code. Note that the list of m3ter entities available for selection will be filtered to show only those entities of that type for which a mapping of the selected type has not yet been created.
* If the m3ter entity field does not show as a drop-down selection, such as when you are creating a mapping for m3ter Bill Line Items, then you can enter the entity's ID.
* In the **External entity ID** field, enter the ID of the external system entity you want to map to.
**Tip: Possibles values might show!** Note that if the possible values for the **External entity ID** field can be fetched for the external system, then you can use a drop-down list to select the value for this field from the list of possible values returned.
 8. Select **Create external mapping**. The **Create** page closes and the new external mapping is shown on the **External mappings** page for the external system:
![Ext Mapping75a]() * Note that if you select the hotlink text for the **m3ter ID**, this will open the **Details** page for the m3ter entity - in this example the **Clean Graph Customer 1** Account - where the new external mapping will be listed under **Account metadata**. You can start a **Create external mapping** workflow for the Account from there - see [Creating and Managing External Mappings for Accounts](/guides/end-customer-accounts/creating-and-managing-external-mappings-for-accounts) for more details:
* Note that if you select the hotlink text for the **m3ter ID**, this will open the **Details** page for the m3ter entity - in this example the **Clean Graph Customer 1** Account - where the new external mapping will be listed under **Account metadata**. You can start a **Create external mapping** workflow for the Account from there - see [Creating and Managing External Mappings for Accounts](/guides/end-customer-accounts/creating-and-managing-external-mappings-for-accounts) for more details:
![Ext Mapping77]() ## Creating Bulk External Mappings
From the **External mappings** page, you can create mappings in bulk for a specific mapping type for an external system:
**To create External mappings in bulk:**
1. Select **mesh**. The **Workflows** page opens.
2. Select **External mappings**:
## Creating Bulk External Mappings
From the **External mappings** page, you can create mappings in bulk for a specific mapping type for an external system:
**To create External mappings in bulk:**
1. Select **mesh**. The **Workflows** page opens.
2. Select **External mappings**:
 The **External mappings** page opens.
3. Select the three-dot menu button at top-right of the page and then select **Create in bulk**:
The **External mappings** page opens.
3. Select the three-dot menu button at top-right of the page and then select **Create in bulk**:
![]() To create mappings in bulk, you must complete a two-stage workflow and the **Create in bulk** page opens ready for you to complete **Stage 1**.
**Stage 1 - Select mapping type:**
4. Enter **External mapping settings**:
* Use the **Entity type** drop-down to select the m3ter entity type you want to use to create the mapping type.
* The **External system** drop-down field will be preselected for the external system - in this example Chargebee.
* Use the **External table** drop-down to select the table in the selected 3rd-party system that you want to use for the mapping type:
To create mappings in bulk, you must complete a two-stage workflow and the **Create in bulk** page opens ready for you to complete **Stage 1**.
**Stage 1 - Select mapping type:**
4. Enter **External mapping settings**:
* Use the **Entity type** drop-down to select the m3ter entity type you want to use to create the mapping type.
* The **External system** drop-down field will be preselected for the external system - in this example Chargebee.
* Use the **External table** drop-down to select the table in the selected 3rd-party system that you want to use for the mapping type:
 * In this example, we've chosen to create **Account \<> Subscription** mappings in bulk for **m3ter \<> Chargebee**.
5. When you've completed the mapping type set up, select **Next**. The page adjusts to allow you to complete **Stage 2**:
**Stage 2 - Add mapping IDs:**
* The **Entity type**, **External system**, and **External table** you configured for **Stage 1** are shown.
* **Linked integration**. Note that because you started the create bulk external mapping workflow from the general mappings page, none of the mappings will *not be linked* to a specific integration for the external system
6. On the **External mappings** panel, select **Add**. The page adjusts to add a row for the first mapping:
* Use the **m3ter entity** drop-down to select the specific entity in your Organization you want to create the mapping for.
**Tip: Selection is filtered!** Note that the list of m3ter entities available for selection will be filtered to show only those entities of that type - here Accounts - for which a mapping of the selected type has not yet been created.
* In the **External entity ID** field, enter the id of the external system entity you want to map to.
**Tip: Possibles values might show!** Note that if the possible values for the **External entity ID** field can be fetched for the external system, then you can use a drop-down list to select the value for this field from the list of possible values returned.
7. Select **Add** again and repeat up to a maximum of 20 mappings of the selected type:
* In this example, we've chosen to create **Account \<> Subscription** mappings in bulk for **m3ter \<> Chargebee**.
5. When you've completed the mapping type set up, select **Next**. The page adjusts to allow you to complete **Stage 2**:
**Stage 2 - Add mapping IDs:**
* The **Entity type**, **External system**, and **External table** you configured for **Stage 1** are shown.
* **Linked integration**. Note that because you started the create bulk external mapping workflow from the general mappings page, none of the mappings will *not be linked* to a specific integration for the external system
6. On the **External mappings** panel, select **Add**. The page adjusts to add a row for the first mapping:
* Use the **m3ter entity** drop-down to select the specific entity in your Organization you want to create the mapping for.
**Tip: Selection is filtered!** Note that the list of m3ter entities available for selection will be filtered to show only those entities of that type - here Accounts - for which a mapping of the selected type has not yet been created.
* In the **External entity ID** field, enter the id of the external system entity you want to map to.
**Tip: Possibles values might show!** Note that if the possible values for the **External entity ID** field can be fetched for the external system, then you can use a drop-down list to select the value for this field from the list of possible values returned.
7. Select **Add** again and repeat up to a maximum of 20 mappings of the selected type:
 * In this example, we've added four mappings of the selected **Account \<> Subscription** mapping type for **m3ter \<> Chargebee**.
8. Select **Create external mappings**. You are returned to the **External mappings** page for the external system where the bulk mappings of the selected type are now listed:
* In this example, we've added four mappings of the selected **Account \<> Subscription** mapping type for **m3ter \<> Chargebee**.
8. Select **Create external mappings**. You are returned to the **External mappings** page for the external system where the bulk mappings of the selected type are now listed:
![Ext Mapping80a]() ## Viewing and Managing External Mappings
From the **External mappings** page you can view and manage the external mappings created for your integrations with external systems and edit or delete them:
**To view and manage External Mappings:**
1. Select **m3sh**. The **Workflows** page opens.
2. In the sidebar, select **External mappings**:
## Viewing and Managing External Mappings
From the **External mappings** page you can view and manage the external mappings created for your integrations with external systems and edit or delete them:
**To view and manage External Mappings:**
1. Select **m3sh**. The **Workflows** page opens.
2. In the sidebar, select **External mappings**:
![Ext Mapping72]() The **External mappings** page opens.
3. Select the external system you want to view and manage the external mappings for:
The **External mappings** page opens.
3. Select the external system you want to view and manage the external mappings for:
![Ext Mapping81a]() 4. If you want to edit a mapping, select **Edit**:
4. If you want to edit a mapping, select **Edit**:
![]() 5. On the **Edit** page, make your changes and select **Update external mapping**.
6. If you want to delete a single mapping, select **Delete**:
5. On the **Edit** page, make your changes and select **Update external mapping**.
6. If you want to delete a single mapping, select **Delete**:
![]() A confirmation pop-up appears. Select **Yes** to complete the delete action.
7. If you want to delete multiple mappings, check those you want to delete and click **Delete selected**:
A confirmation pop-up appears. Select **Yes** to complete the delete action.
7. If you want to delete multiple mappings, check those you want to delete and click **Delete selected**:
![Ext Mapping82a]() ## Creating Linked External Mappings
If you intend to set up multiple integrations in m3ter with an external system, it's a good idea to create separate external mappings for use with each separate integration. You can do this by creating *linked external mappings* from the details page of each of the integrations you've set up for an external system.
For example, you might have your Xero system set up for two invoicing locations for your end-customers - UK and Europe. To serve this kind of use case:
* You can set **Xero Integration 1** for Bills outbound to your **Xero UK** invoicing instance and then create any required external mappings for the integration as linked to **Xero Integration 1**.
* You can set **Xero Integration 2** for Bills outbound to your **Xero Europe** invoicing instance and then create any required external mappings for the integration as linked to **Xero Integration 2**.
**To create linked External mappings:**
1. Select **m3sh**. The **Workflows** page opens.
2. Select the external system you want to create a linked external mappings for:
## Creating Linked External Mappings
If you intend to set up multiple integrations in m3ter with an external system, it's a good idea to create separate external mappings for use with each separate integration. You can do this by creating *linked external mappings* from the details page of each of the integrations you've set up for an external system.
For example, you might have your Xero system set up for two invoicing locations for your end-customers - UK and Europe. To serve this kind of use case:
* You can set **Xero Integration 1** for Bills outbound to your **Xero UK** invoicing instance and then create any required external mappings for the integration as linked to **Xero Integration 1**.
* You can set **Xero Integration 2** for Bills outbound to your **Xero Europe** invoicing instance and then create any required external mappings for the integration as linked to **Xero Integration 2**.
**To create linked External mappings:**
1. Select **m3sh**. The **Workflows** page opens.
2. Select the external system you want to create a linked external mappings for:
 The **Integrations** page for the external system opens.
3. On the **Configurations** panel, select the name hotlink text of the integration you want to create a linked external mapping for:
The **Integrations** page for the external system opens.
3. On the **Configurations** panel, select the name hotlink text of the integration you want to create a linked external mapping for:
![]() The **Integration details** page opens.
4. Scroll down the page and on the **Linked external mappings** panel select **Create external mapping**:
The **Integration details** page opens.
4. Scroll down the page and on the **Linked external mappings** panel select **Create external mapping**:
![]() To create a mapping, you must complete a two-stage workflow and the **Create** page opens allowing you to complete **Stage 1**.
**Stage 1 - Select mapping type:**
5. Enter **External mapping settings**:
* Use the **Entity type** drop-down to select the m3ter entity type you want to use to create the mapping type.
* The **External system** drop-down is preselected for the external system.
* Use the **External table** drop-down to select the table in the external system that you want to use for the mapping type:
To create a mapping, you must complete a two-stage workflow and the **Create** page opens allowing you to complete **Stage 1**.
**Stage 1 - Select mapping type:**
5. Enter **External mapping settings**:
* Use the **Entity type** drop-down to select the m3ter entity type you want to use to create the mapping type.
* The **External system** drop-down is preselected for the external system.
* Use the **External table** drop-down to select the table in the external system that you want to use for the mapping type:
 6. When you've completed the mapping type set up, select **Next**. The page adjusts to allow you to complete **Stage 2**:
**Stage 2 - Add mapping IDs:**
* The **Entity type**, **External System**, and **External table** you configured for **Stage 1** are shown.
* **Linked integration**. Note that because you started the create external mapping workflow from the Integration details page, this mapping will *be linked* *to the specific integration* for the external system and cannot be used for any other integration you've set up with that external system.
7. On **External mappings details**:
* Use the **m3ter entity** drop-down to enter the specific m3ter entity of the type you've selected in **Stage 1** - in this example the m3ter Account - you want to create the mapping for.
**Tip: m3ter entity field is a drop-down selection field?**
* Depending on the m3ter entity type you are creating the mapping for, the m3ter entity field might show as a drop-down selection field - for example if you are mapping Account entities. In this kind of case, you can select the m3ter entity by Name/Code. Note that the list of m3ter entities available for selection will be filtered to show only those entities of that type for which a mapping of the selected type has not yet been created.
* If the m3ter entity field does not show as a drop-down selection, such as when you are creating a mapping for m3ter Bill Line Items, then you can enter the entity's ID.
* In the **External entity ID** field, enter the ID of the 3rd-party system entity you want to map to.
**Tip: Possibles values might show!** Note that if the possible values for the **External entity ID** field can be fetched for the **External system**, then you can use a drop-down list to select the value for this field from the list of possible values returned.
6. When you've completed the mapping type set up, select **Next**. The page adjusts to allow you to complete **Stage 2**:
**Stage 2 - Add mapping IDs:**
* The **Entity type**, **External System**, and **External table** you configured for **Stage 1** are shown.
* **Linked integration**. Note that because you started the create external mapping workflow from the Integration details page, this mapping will *be linked* *to the specific integration* for the external system and cannot be used for any other integration you've set up with that external system.
7. On **External mappings details**:
* Use the **m3ter entity** drop-down to enter the specific m3ter entity of the type you've selected in **Stage 1** - in this example the m3ter Account - you want to create the mapping for.
**Tip: m3ter entity field is a drop-down selection field?**
* Depending on the m3ter entity type you are creating the mapping for, the m3ter entity field might show as a drop-down selection field - for example if you are mapping Account entities. In this kind of case, you can select the m3ter entity by Name/Code. Note that the list of m3ter entities available for selection will be filtered to show only those entities of that type for which a mapping of the selected type has not yet been created.
* If the m3ter entity field does not show as a drop-down selection, such as when you are creating a mapping for m3ter Bill Line Items, then you can enter the entity's ID.
* In the **External entity ID** field, enter the ID of the 3rd-party system entity you want to map to.
**Tip: Possibles values might show!** Note that if the possible values for the **External entity ID** field can be fetched for the **External system**, then you can use a drop-down list to select the value for this field from the list of possible values returned.
 8. Select **Create External mapping**. The **Create** page closes and the new external mapping is shown on the **Linked external mappings** panel for the integration:
![]() # Creating and Managing Integrations
Source: https://docs.m3ter.com/guides/integrations/setting-up-integrations/creating-and-managing-integration-configurations
Setting up an Integration in m3ter consists of two stages:
* Configuration to control how m3ter data will be synchronized with your external system.
* Configuration of a Credential, which will allow the Integration to authenticate and connect with an external system.
You can perform both stages of this overall set up in the Console for either *Integrations* or *Notification* *Webhook Integrations*:
* An *Integration* typically allows you to send billing data for end-customer Accounts in m3ter into your Accounts Receivables systems. For some external systems, you can also send operational data for entities in your m3ter Organization.
* A *Notification Webhook Integration* allows you to send out notifications triggered by m3ter system Events to webhooks.
This topic provides general guidance on how to create, review, and manage your Integrations:
* [Creating and Managing Integrations](/guides/integrations/setting-up-integrations/creating-and-managing-integration-configurations#creating-and-managing-native-integrations)
* [Creating and Managing Notification Webhook Integrations](/guides/integrations/setting-up-integrations/creating-and-managing-integration-configurations#creating-and-managing-notification-webhook-integrations)
* [Reviewing Integration Runs](/guides/integrations/setting-up-integrations/creating-and-managing-integration-configurations#reviewing-integration-runs)
* [Integration Run Error Handling and Alerts](/guides/integrations/setting-up-integrations/creating-and-managing-integration-configurations#integration-run-error-handling-and-alerts)
**Important! Auto-Disabling and Auto-Failure of Integrations:** When Integrations or Notification Webhook Integrations are deployed to production, checks are applied from the m3ter side to both ensure some resilience for integrations runs and to prevent runaway errors. *Please review* the [Integration Run Error Handling and Alerts](/guides/integrations/setting-up-integrations/creating-and-managing-integration-configurations#integration-run-error-handling-and-alerts) section below before you deploy your Integrations to your production environment.
## Creating and Managing Integrations
* [Creating Integrations](/guides/integrations/setting-up-integrations/creating-and-managing-integration-configurations#creating-integrations)
* [Reviewing and Managing Integrations](/guides/integrations/setting-up-integrations/creating-and-managing-integration-configurations#reviewing-and-managing-integrations)
### Creating Integrations
You can create Integrations for a billing data flow into external systems. For some external systems, you can also choose to set up Integrations to sync operational entity data in m3ter with the external system. For detailed guidance on creating Integrations, please see the relevant topic in this section:
* [Configuring Stripe Integrations](/guides/integrations/setting-up-integrations/creating-and-managing-integration-configurations#creating-and-managing-integrations)
* [Configuring Netsuite Integrations](/guides/integrations/setting-up-integrations/configuring-netsuite-integrations)
* [Configuring Paddle Integrations](/guides/integrations/setting-up-integrations/configuring-paddle-integrations)
* [Configuring Chargebee Integrations](/guides/integrations/setting-up-integrations/configuring-chargebee-integrations)
* [Configuring QuickBooks Integrations](/guides/integrations/setting-up-integrations/configuring-quickbooks-integrations)
* [Configuring Xero Integrations](/guides/integrations/setting-up-integrations/configuring-xero-integrations)
* [Configuring Salesforce Entity Data Sync Integrations](/guides/integrations/setting-up-integrations/configuring-sf-entity-data-integrations)
* [Configuring AWS Marketplace Integrations](/guides/integrations/setting-up-integrations/configuring-aws-integrations)
### Reviewing and Managing Integrations
When you have set up some Integrations, you can use the Integrations section in the Console to review and manage them.
**To review and manage Integrations:**
1. Select **m3sh**:
# Creating and Managing Integrations
Source: https://docs.m3ter.com/guides/integrations/setting-up-integrations/creating-and-managing-integration-configurations
Setting up an Integration in m3ter consists of two stages:
* Configuration to control how m3ter data will be synchronized with your external system.
* Configuration of a Credential, which will allow the Integration to authenticate and connect with an external system.
You can perform both stages of this overall set up in the Console for either *Integrations* or *Notification* *Webhook Integrations*:
* An *Integration* typically allows you to send billing data for end-customer Accounts in m3ter into your Accounts Receivables systems. For some external systems, you can also send operational data for entities in your m3ter Organization.
* A *Notification Webhook Integration* allows you to send out notifications triggered by m3ter system Events to webhooks.
This topic provides general guidance on how to create, review, and manage your Integrations:
* [Creating and Managing Integrations](/guides/integrations/setting-up-integrations/creating-and-managing-integration-configurations#creating-and-managing-native-integrations)
* [Creating and Managing Notification Webhook Integrations](/guides/integrations/setting-up-integrations/creating-and-managing-integration-configurations#creating-and-managing-notification-webhook-integrations)
* [Reviewing Integration Runs](/guides/integrations/setting-up-integrations/creating-and-managing-integration-configurations#reviewing-integration-runs)
* [Integration Run Error Handling and Alerts](/guides/integrations/setting-up-integrations/creating-and-managing-integration-configurations#integration-run-error-handling-and-alerts)
**Important! Auto-Disabling and Auto-Failure of Integrations:** When Integrations or Notification Webhook Integrations are deployed to production, checks are applied from the m3ter side to both ensure some resilience for integrations runs and to prevent runaway errors. *Please review* the [Integration Run Error Handling and Alerts](/guides/integrations/setting-up-integrations/creating-and-managing-integration-configurations#integration-run-error-handling-and-alerts) section below before you deploy your Integrations to your production environment.
## Creating and Managing Integrations
* [Creating Integrations](/guides/integrations/setting-up-integrations/creating-and-managing-integration-configurations#creating-integrations)
* [Reviewing and Managing Integrations](/guides/integrations/setting-up-integrations/creating-and-managing-integration-configurations#reviewing-and-managing-integrations)
### Creating Integrations
You can create Integrations for a billing data flow into external systems. For some external systems, you can also choose to set up Integrations to sync operational entity data in m3ter with the external system. For detailed guidance on creating Integrations, please see the relevant topic in this section:
* [Configuring Stripe Integrations](/guides/integrations/setting-up-integrations/creating-and-managing-integration-configurations#creating-and-managing-integrations)
* [Configuring Netsuite Integrations](/guides/integrations/setting-up-integrations/configuring-netsuite-integrations)
* [Configuring Paddle Integrations](/guides/integrations/setting-up-integrations/configuring-paddle-integrations)
* [Configuring Chargebee Integrations](/guides/integrations/setting-up-integrations/configuring-chargebee-integrations)
* [Configuring QuickBooks Integrations](/guides/integrations/setting-up-integrations/configuring-quickbooks-integrations)
* [Configuring Xero Integrations](/guides/integrations/setting-up-integrations/configuring-xero-integrations)
* [Configuring Salesforce Entity Data Sync Integrations](/guides/integrations/setting-up-integrations/configuring-sf-entity-data-integrations)
* [Configuring AWS Marketplace Integrations](/guides/integrations/setting-up-integrations/configuring-aws-integrations)
### Reviewing and Managing Integrations
When you have set up some Integrations, you can use the Integrations section in the Console to review and manage them.
**To review and manage Integrations:**
1. Select **m3sh**:
 The **Workflows** page opens.
2. Select **Integrations**:
The **Workflows** page opens.
2. Select **Integrations**:
 The **Integrations** page opens with **All** selected by default:
![Integ Configs14e]() * You can filter the page by selecting to show only **Data Sync Integrations**, **Invoicing Integrations**, or **Marketplace Integrations**.
On the **Integrations** page you can quickly identify for an external system:
* The number of **Credentials** and **Configurations** set up in your Organization for the system.
* If either a Credential is disconnected or a Configuration is disabled, then a warning will show and you'll need to open the Integrations page for the system and investigate:
* You can filter the page by selecting to show only **Data Sync Integrations**, **Invoicing Integrations**, or **Marketplace Integrations**.
On the **Integrations** page you can quickly identify for an external system:
* The number of **Credentials** and **Configurations** set up in your Organization for the system.
* If either a Credential is disconnected or a Configuration is disabled, then a warning will show and you'll need to open the Integrations page for the system and investigate:
 If you're planning to set up an Integration for a specific external system:
* Use a **Read docs** hotlink to open the topic explaining how to configure an integration for that system.
3. If you want to create a new Integration or review and edit the details of an existing Integration, select the tile for the system:
If you're planning to set up an Integration for a specific external system:
* Use a **Read docs** hotlink to open the topic explaining how to configure an integration for that system.
3. If you want to create a new Integration or review and edit the details of an existing Integration, select the tile for the system:
 The **m3sh / Integrations** page for the external system opens:
![Integ Configs38i]() 4. If you want to create a new Integration for the external system, select **Configure new integration** to commence your workflow - see the relevant specific topic in this section of the documentation.
5. If you want to review or edit an existing Integration for the system, on the **Configurations** panel select the **Name** hotlink text. The **Integration details** page opens:
4. If you want to create a new Integration for the external system, select **Configure new integration** to commence your workflow - see the relevant specific topic in this section of the documentation.
5. If you want to review or edit an existing Integration for the system, on the **Configurations** panel select the **Name** hotlink text. The **Integration details** page opens:
![Integ Configs40a]() This example shows the details for a **Bill - Stripe** Integration. Note that:
* We can see that the Integration is currently **DISCONNECTED** from the **Stripe** system:
* If you want to connect the Integration, select **Connect credential**. A **Select Credential** dialog appears, which you can use to select the Credential you want to use to connect the integration. See Creating Stripe Integration Credentials.
* The **Configuration data** is given in JSON format. You can copy this directly to your clipboard.
6. Scroll down the **Integration details** page to the **Linked external mappings** panel. If you intend to set up multiple Integrations in m3ter with a single external system, you can create separate external mappings for use with each separate integration. See [Creating Linked External Mappings](/guides/integrations/setting-up-integrations/creating-and-managing-external-mappings#creating-linked-external-mappings) for more details.
7. If you want to edit an existing Integration, select the **Edit** button. The **Edit** page opens and shows the **Entity type** and **External system** at the top of the page.
8. Make the required editing changes and select **Update integration**. You are returned to the **Integration details** page.
9. If you want to remove an existing Integration, go back to the **Integrations** page for the external system and on the **Configurations** panel select **delete**:
This example shows the details for a **Bill - Stripe** Integration. Note that:
* We can see that the Integration is currently **DISCONNECTED** from the **Stripe** system:
* If you want to connect the Integration, select **Connect credential**. A **Select Credential** dialog appears, which you can use to select the Credential you want to use to connect the integration. See Creating Stripe Integration Credentials.
* The **Configuration data** is given in JSON format. You can copy this directly to your clipboard.
6. Scroll down the **Integration details** page to the **Linked external mappings** panel. If you intend to set up multiple Integrations in m3ter with a single external system, you can create separate external mappings for use with each separate integration. See [Creating Linked External Mappings](/guides/integrations/setting-up-integrations/creating-and-managing-external-mappings#creating-linked-external-mappings) for more details.
7. If you want to edit an existing Integration, select the **Edit** button. The **Edit** page opens and shows the **Entity type** and **External system** at the top of the page.
8. Make the required editing changes and select **Update integration**. You are returned to the **Integration details** page.
9. If you want to remove an existing Integration, go back to the **Integrations** page for the external system and on the **Configurations** panel select **delete**:
![]() A confirmation popup appears.
10. Select **Yes** to confirm the delete action.
**Tip: Reviewing Integration runs once operational?** When you have deployed an Integration to production, you can review the details of integration runs - for details, see [Reviewing Integration Run Details](/guides/integrations/setting-up-integrations/reviewing-integration-run-details).
## Creating and Managing Notification Webhook Integrations
### Creating Notification Webhook Integrations
To create a Notification Webhook Integration, you must first create a Notification rule based on a system Event. You can then link this Notification Rule to an Outgoing Webhook. When you make this link, it creates a Notification Webhook Integration:
* For details on how to create Notification Rules based on system Events and link them to Outgoing Webhooks, see [Creating, Managing, and Reviewing Notifications](/guides/alerts-events-and-notifications/utilizing-events-and-notifications/creating-managing-and-reviewing-notifications).
* For details on how to create Outgoing Webhooks, see [Creating and Managing Outgoing Webhooks](/guides/integrations/setting-up-integrations/creating-and-managing-destinations).
## Reviewing Integration Runs
When you have set up Integrations or Notification Webhook Integrations and deployed them to your production environment, you can use links to open integrations runs to review them.
### Accessing Runs for Integrations
For Integrations set up for sending Bills out to your invoicing systems, links are provided on the **Bill details** pages of end-customer Accounts configured for the integration:
A confirmation popup appears.
10. Select **Yes** to confirm the delete action.
**Tip: Reviewing Integration runs once operational?** When you have deployed an Integration to production, you can review the details of integration runs - for details, see [Reviewing Integration Run Details](/guides/integrations/setting-up-integrations/reviewing-integration-run-details).
## Creating and Managing Notification Webhook Integrations
### Creating Notification Webhook Integrations
To create a Notification Webhook Integration, you must first create a Notification rule based on a system Event. You can then link this Notification Rule to an Outgoing Webhook. When you make this link, it creates a Notification Webhook Integration:
* For details on how to create Notification Rules based on system Events and link them to Outgoing Webhooks, see [Creating, Managing, and Reviewing Notifications](/guides/alerts-events-and-notifications/utilizing-events-and-notifications/creating-managing-and-reviewing-notifications).
* For details on how to create Outgoing Webhooks, see [Creating and Managing Outgoing Webhooks](/guides/integrations/setting-up-integrations/creating-and-managing-destinations).
## Reviewing Integration Runs
When you have set up Integrations or Notification Webhook Integrations and deployed them to your production environment, you can use links to open integrations runs to review them.
### Accessing Runs for Integrations
For Integrations set up for sending Bills out to your invoicing systems, links are provided on the **Bill details** pages of end-customer Accounts configured for the integration:
![View Bills32]() You can choose to **View all runs** or the **Last integration run** for the Account Bill. When you open an Integration run, you can then drill into a **Run log** to review the tasks performed for the run. If runs errors occurs this can be very helpful for troubleshooting. See [Reviewing Bill Integration Runs](/guides/integrations/setting-up-integrations/reviewing-integration-run-details#reviewing-bill-integration-runs) for more details.
### Accessing Runs for Notification Webhook Integrations
For Notification Webhook Integrations sending a payload out to a webhook when an Event occurs and triggers the Notification, links are provided on the **Notification rule details** page:
You can choose to **View all runs** or the **Last integration run** for the Account Bill. When you open an Integration run, you can then drill into a **Run log** to review the tasks performed for the run. If runs errors occurs this can be very helpful for troubleshooting. See [Reviewing Bill Integration Runs](/guides/integrations/setting-up-integrations/reviewing-integration-run-details#reviewing-bill-integration-runs) for more details.
### Accessing Runs for Notification Webhook Integrations
For Notification Webhook Integrations sending a payload out to a webhook when an Event occurs and triggers the Notification, links are provided on the **Notification rule details** page:
![Integs Run26a]() You can **View all runs** or the **Last run** for the Notification. When you open an Integration run, you can then drill into a **Run log** to review the tasks performed for the run. If runs errors occurs this can be very helpful for troubleshooting. See [Reviewing Notification Integration Runs](/guides/integrations/setting-up-integrations/reviewing-integration-run-details#reviewing-notification-integration-runs) for more details.
## Integration Run Error Handling and Alerts
Once an Integration or Notification Webhook Integration is operational, checks are in place from the m3ter side to ensure some resilience for integration runs and to prevent runaway errors.
### Integrations - Auto-Disabling
* **Auto-Disabling**. If there have been 20 successive previous error Event responses to earlier attempts to run an integration, then the Integration is automatically disabled and a **Re-enable** button will show for the **Integration details**. Please check the earlier error Events to resolve any issues preventing the Integration from running before you re-enable the integration.
### Notification Webhook Integrations - Auto-Failure and Auto-Disabling
* **Auto-Failure**. When a system Event occurs on which a Notification rule is based and triggers the Notification, four successive attempts are made to send the Notification payload out to the configured webhook. Note that there's an exponential back-off built into this process - a wait of 2 seconds after the first failure before retry, then a wait of 4 seconds before retry, and so on. If all four attempts fail, then the Integration is put into a failed state.
* **Auto-Disabling**. As with other Integrations, if there are 20 successive failures, the Notification Webhook Integration is then auto-disabled.
### Troubleshooting Disabled and Failed Integrations
Alerts and error Events are generated when an Integration run fails and you can quickly check these to help with troubleshooting. Please check:
* The **Integration Events** page. See [Reviewing and Resolving Integration Events](/guides/integrations/setting-up-integrations/reviewing-and-resolving-integration-events) for more details.
* The **Alerts** page. See [Viewing and Managing System Alerts](/guides/alerts-events-and-notifications/viewing-and-managing-alerts).
* The **Run log** for disabled or failed integrations runs. See [Reviewing Integration Run Details](/guides/integrations/setting-up-integrations/reviewing-integration-run-details).
# Creating and Managing Credentials
Source: https://docs.m3ter.com/guides/integrations/setting-up-integrations/managing-integration-credentials
In the Integrations section of the Console, you can create, view, and manage the *Credentials* for your Organization:
* **Integration Configurations**. Create the Credentials you'll need when setting up authentication with external systems for your Integration Configurations.
* **Multiple Third Party Destinations**. You can create multiple separate Credentials for authentication of your Integrations Configurations with multiple destinations in your 3rd-party system. See Managing Multiple Third Party Destinations for Integrations.
* **Notification Webhook Integrations**. When you create an Outgoing webhook and define the M3TER\_SIGNED\_REQUEST Credentials for authentication with the designated webhook endpoint, you can review the Credential on the **Outgoing webhook details** page. You can then link a Notification rule to the Outgoing webhook to complete the configuration of the Notification Webhook Integration. See Creating and Managing Outgoing Webhooks.
* **m3sh Workflows**. If you are using m3sh Workflows, depending on the Workflow type and the functions used in the Workflow, different types of Credentials might be required:
* **Incoming Webhook Credentials**. m3sh Workflows that use an Incoming Webhook trigger require Incoming Webhook Credentials to be set up that allow the webhook to authenticate with the Workflow as destination and act as the Workflow trigger.
* **External System Integration Credentials**. API functions in a m3sh Workflow that call an external system can use the integration Credentials you've set up for that system.
* **m3ter Service User Credentials**. API functions in a m3sh Workflow that call the m3ter system can use the Credentials set up for m3ter Service Users. See [Service Authentication](https://docs.m3ter.com/guides/authenticating-with-the-platform/service-authentication).
This topic explains how to create integration Credentials, Incoming Webhook Credentials, and how to view and manage your Organization's Credentials:
* [Creating Credentials for Integration Configurations](#creating-credentials-for-integration-configurations)
* [Creating Incoming Webhook Credentials](#creating-incoming-webhook-credentials)
* [Viewing and Managing Credentials](#viewing-and-managing-credentials)
## Creating Credentials for Integration Configurations
For each type of m3ter integrations available, you can create the Credentials you need to authenticate your integrations with specific external 3rd-party systems. In the Console, there are two ways you can create integration Credentials for external systems:
* Open the *Integrations* page for the specific external system and create Credentials from there - see the following topics for details:
* [Creating Stripe Integration Credentials](/guides/integrations/setting-up-integrations/_managing-integration-credentials-legacy/creating-stripe-integration-credentials)
* [Creating NetSuite Integration Credentials](/guides/integrations/setting-up-integrations/_managing-integration-credentials-legacy/creating-netsuite-integration-credentials)
* [Creating Paddle Integration Credentials](/guides/integrations/setting-up-integrations/_managing-integration-credentials-legacy/creating-paddle-integration-credentials)
* [Creating Chargebee Integration Credentials](/guides/integrations/setting-up-integrations/_managing-integration-credentials-legacy/creating-chargebee-integration-credentials)
* [Creating QuickBooks Integration Credentials](/guides/integrations/setting-up-integrations/_managing-integration-credentials-legacy/creating-quickbooks-integration-credentials)
* [Creating Xero Integration Credentials](/guides/integrations/setting-up-integrations/_managing-integration-credentials-legacy/creating-xero-integration-credentials)
* [Creating Salesforce Integration Credentials](/guides/integrations/setting-up-integrations/_managing-integration-credentials-legacy/creating-salesforce-integration-credentials)
* [Creating AWS Marketplace Integration Credentials](/guides/integrations/setting-up-integrations/_managing-integration-credentials-legacy/creating-aws-marketplace-integration-credentials)
* [Creating Azure Marketplace Integration Credentials](/guides/integrations/setting-up-integrations/_managing-integration-credentials-legacy/creating-azure-marketplace-integration-credentials)
* Open the *Credentials* page and create integration Credentials for specific externals systems from there, as follows:
**To create integration Credentials:**
1. Select **m3sh**:
You can **View all runs** or the **Last run** for the Notification. When you open an Integration run, you can then drill into a **Run log** to review the tasks performed for the run. If runs errors occurs this can be very helpful for troubleshooting. See [Reviewing Notification Integration Runs](/guides/integrations/setting-up-integrations/reviewing-integration-run-details#reviewing-notification-integration-runs) for more details.
## Integration Run Error Handling and Alerts
Once an Integration or Notification Webhook Integration is operational, checks are in place from the m3ter side to ensure some resilience for integration runs and to prevent runaway errors.
### Integrations - Auto-Disabling
* **Auto-Disabling**. If there have been 20 successive previous error Event responses to earlier attempts to run an integration, then the Integration is automatically disabled and a **Re-enable** button will show for the **Integration details**. Please check the earlier error Events to resolve any issues preventing the Integration from running before you re-enable the integration.
### Notification Webhook Integrations - Auto-Failure and Auto-Disabling
* **Auto-Failure**. When a system Event occurs on which a Notification rule is based and triggers the Notification, four successive attempts are made to send the Notification payload out to the configured webhook. Note that there's an exponential back-off built into this process - a wait of 2 seconds after the first failure before retry, then a wait of 4 seconds before retry, and so on. If all four attempts fail, then the Integration is put into a failed state.
* **Auto-Disabling**. As with other Integrations, if there are 20 successive failures, the Notification Webhook Integration is then auto-disabled.
### Troubleshooting Disabled and Failed Integrations
Alerts and error Events are generated when an Integration run fails and you can quickly check these to help with troubleshooting. Please check:
* The **Integration Events** page. See [Reviewing and Resolving Integration Events](/guides/integrations/setting-up-integrations/reviewing-and-resolving-integration-events) for more details.
* The **Alerts** page. See [Viewing and Managing System Alerts](/guides/alerts-events-and-notifications/viewing-and-managing-alerts).
* The **Run log** for disabled or failed integrations runs. See [Reviewing Integration Run Details](/guides/integrations/setting-up-integrations/reviewing-integration-run-details).
# Creating and Managing Credentials
Source: https://docs.m3ter.com/guides/integrations/setting-up-integrations/managing-integration-credentials
In the Integrations section of the Console, you can create, view, and manage the *Credentials* for your Organization:
* **Integration Configurations**. Create the Credentials you'll need when setting up authentication with external systems for your Integration Configurations.
* **Multiple Third Party Destinations**. You can create multiple separate Credentials for authentication of your Integrations Configurations with multiple destinations in your 3rd-party system. See Managing Multiple Third Party Destinations for Integrations.
* **Notification Webhook Integrations**. When you create an Outgoing webhook and define the M3TER\_SIGNED\_REQUEST Credentials for authentication with the designated webhook endpoint, you can review the Credential on the **Outgoing webhook details** page. You can then link a Notification rule to the Outgoing webhook to complete the configuration of the Notification Webhook Integration. See Creating and Managing Outgoing Webhooks.
* **m3sh Workflows**. If you are using m3sh Workflows, depending on the Workflow type and the functions used in the Workflow, different types of Credentials might be required:
* **Incoming Webhook Credentials**. m3sh Workflows that use an Incoming Webhook trigger require Incoming Webhook Credentials to be set up that allow the webhook to authenticate with the Workflow as destination and act as the Workflow trigger.
* **External System Integration Credentials**. API functions in a m3sh Workflow that call an external system can use the integration Credentials you've set up for that system.
* **m3ter Service User Credentials**. API functions in a m3sh Workflow that call the m3ter system can use the Credentials set up for m3ter Service Users. See [Service Authentication](https://docs.m3ter.com/guides/authenticating-with-the-platform/service-authentication).
This topic explains how to create integration Credentials, Incoming Webhook Credentials, and how to view and manage your Organization's Credentials:
* [Creating Credentials for Integration Configurations](#creating-credentials-for-integration-configurations)
* [Creating Incoming Webhook Credentials](#creating-incoming-webhook-credentials)
* [Viewing and Managing Credentials](#viewing-and-managing-credentials)
## Creating Credentials for Integration Configurations
For each type of m3ter integrations available, you can create the Credentials you need to authenticate your integrations with specific external 3rd-party systems. In the Console, there are two ways you can create integration Credentials for external systems:
* Open the *Integrations* page for the specific external system and create Credentials from there - see the following topics for details:
* [Creating Stripe Integration Credentials](/guides/integrations/setting-up-integrations/_managing-integration-credentials-legacy/creating-stripe-integration-credentials)
* [Creating NetSuite Integration Credentials](/guides/integrations/setting-up-integrations/_managing-integration-credentials-legacy/creating-netsuite-integration-credentials)
* [Creating Paddle Integration Credentials](/guides/integrations/setting-up-integrations/_managing-integration-credentials-legacy/creating-paddle-integration-credentials)
* [Creating Chargebee Integration Credentials](/guides/integrations/setting-up-integrations/_managing-integration-credentials-legacy/creating-chargebee-integration-credentials)
* [Creating QuickBooks Integration Credentials](/guides/integrations/setting-up-integrations/_managing-integration-credentials-legacy/creating-quickbooks-integration-credentials)
* [Creating Xero Integration Credentials](/guides/integrations/setting-up-integrations/_managing-integration-credentials-legacy/creating-xero-integration-credentials)
* [Creating Salesforce Integration Credentials](/guides/integrations/setting-up-integrations/_managing-integration-credentials-legacy/creating-salesforce-integration-credentials)
* [Creating AWS Marketplace Integration Credentials](/guides/integrations/setting-up-integrations/_managing-integration-credentials-legacy/creating-aws-marketplace-integration-credentials)
* [Creating Azure Marketplace Integration Credentials](/guides/integrations/setting-up-integrations/_managing-integration-credentials-legacy/creating-azure-marketplace-integration-credentials)
* Open the *Credentials* page and create integration Credentials for specific externals systems from there, as follows:
**To create integration Credentials:**
1. Select **m3sh**:
 The **Workflows** page opens
2. Select **Credentials**:
The **Workflows** page opens
2. Select **Credentials**:
 The **Credentials** page opens.
3. Select **Create credential**. The **Create** page opens.
4. Under **Credentials details**:
* Enter a **Name**.
* Use the **Destination** drop-down to select the external system. The card adjusts for the selected system to allow you to enter the settings required for authenticating with the system:
The **Credentials** page opens.
3. Select **Create credential**. The **Create** page opens.
4. Under **Credentials details**:
* Enter a **Name**.
* Use the **Destination** drop-down to select the external system. The card adjusts for the selected system to allow you to enter the settings required for authenticating with the system:
 * In this example of creating a Credential for authenticating with **Chargebee**, two settings are required:
* **Api key**. The **Api key** generated in the Chargebee Console.
* **Site**. The details of the Chargebee **Site** to be used as the subdomain when making API Requests
5. Select **Create credential**. You are returned to the **Credentials** page where the new Credential is listed:
* In this example of creating a Credential for authenticating with **Chargebee**, two settings are required:
* **Api key**. The **Api key** generated in the Chargebee Console.
* **Site**. The details of the Chargebee **Site** to be used as the subdomain when making API Requests
5. Select **Create credential**. You are returned to the **Credentials** page where the new Credential is listed:
![Credentials8]() * The Credential is now available for connecting your integrations with the external system - in this example **Chargebee**.
## Creating Incoming Webhook Credentials
m3sh Workflows that use an Incoming Webhook trigger require Incoming Webhook Credentials.
**To create Incoming Webhook Credentials:**
1. Select **m3sh**. The **Workflows** page opens.
2. Select Credentials. The **Credentials** page opens.
3. Select **Create credential**. The **Create** page opens.
4. Under **Credentials details**:
* Enter a **Name**.
* Use the **Destination** drop-down to select **m3sh workflow**. The **Credential details** card adjusts:
* The Credential is now available for connecting your integrations with the external system - in this example **Chargebee**.
## Creating Incoming Webhook Credentials
m3sh Workflows that use an Incoming Webhook trigger require Incoming Webhook Credentials.
**To create Incoming Webhook Credentials:**
1. Select **m3sh**. The **Workflows** page opens.
2. Select Credentials. The **Credentials** page opens.
3. Select **Create credential**. The **Create** page opens.
4. Under **Credentials details**:
* Enter a **Name**.
* Use the **Destination** drop-down to select **m3sh workflow**. The **Credential details** card adjusts:
 Six options are available for the **Type** of Incoming Webhook Credential, and the required settings for each option varies:
* **HTTP basic**. Enter a **Username** and **Password** that matches those configured for the Webhook in the source system. *(Default)*
* **AWS SNS request**. For **Topic arn**, enter the relevant Amazon Resource Name in the standard format including `region` and `account-id`. For example:
* `arn:aws:sns:eu-west-2:441235399388:m3sh-measurements`
* **m3ter app signature**. Enter the **Access key id** and **API secret** if the Incoming Webhook requires [M3TER\_SIGNED\_REQUEST](https://docs.m3ter.com/guides/integrations/setting-up-integrations/creating-and-managing-destinations#webhook-authentication-for-m3ter_signed_request) authentication.
* **Stripe signed request**. Enter a valid **Signing key** for the Stripe source.
* **HubSpot client server**. Enter a valid **Client secret** for the HubSpot source.
* **Sage Intacct client secret**. Enter a valid **Client secret** for the Sage Intacct source.
5. Select **Create credential**. You are returned to the **Credentials** page where the new Credential is listed:
Six options are available for the **Type** of Incoming Webhook Credential, and the required settings for each option varies:
* **HTTP basic**. Enter a **Username** and **Password** that matches those configured for the Webhook in the source system. *(Default)*
* **AWS SNS request**. For **Topic arn**, enter the relevant Amazon Resource Name in the standard format including `region` and `account-id`. For example:
* `arn:aws:sns:eu-west-2:441235399388:m3sh-measurements`
* **m3ter app signature**. Enter the **Access key id** and **API secret** if the Incoming Webhook requires [M3TER\_SIGNED\_REQUEST](https://docs.m3ter.com/guides/integrations/setting-up-integrations/creating-and-managing-destinations#webhook-authentication-for-m3ter_signed_request) authentication.
* **Stripe signed request**. Enter a valid **Signing key** for the Stripe source.
* **HubSpot client server**. Enter a valid **Client secret** for the HubSpot source.
* **Sage Intacct client secret**. Enter a valid **Client secret** for the Sage Intacct source.
5. Select **Create credential**. You are returned to the **Credentials** page where the new Credential is listed:
![Credentials5b]() ## Viewing and Managing Credentials
On the *Credentials* page in the m3sh section of the Console, you can view and manage all of your Organization's Credentials. If you only want to view the Credentials created for a specific external system, you can do that from the Integrations page for that system:
* [Viewing and Managing all Credentials](#viewing-and-managing-all-credentials)
* [Viewing and Managing Integration Credentials](#viewing-and-managing-integration-credentials)
### Viewing and Managing All Credentials
**To view all Credentials:**
1. Select **m3sh**. The **Workflows** page opens.
2. Select **Credentials**. The **Credentials** page opens and lists all Credentials created for your Organization:
## Viewing and Managing Credentials
On the *Credentials* page in the m3sh section of the Console, you can view and manage all of your Organization's Credentials. If you only want to view the Credentials created for a specific external system, you can do that from the Integrations page for that system:
* [Viewing and Managing all Credentials](#viewing-and-managing-all-credentials)
* [Viewing and Managing Integration Credentials](#viewing-and-managing-integration-credentials)
### Viewing and Managing All Credentials
**To view all Credentials:**
1. Select **m3sh**. The **Workflows** page opens.
2. Select **Credentials**. The **Credentials** page opens and lists all Credentials created for your Organization:
![Credentials6a]() * You can read-off the **Name**, **Destination**, **Type**, and **Created date** for each Credential.
* The **ID** of each Credential is shown and you can **Copy** this to your clipboard.
3. If you want to delete a Credential, select **Delete**:
* You can read-off the **Name**, **Destination**, **Type**, and **Created date** for each Credential.
* The **ID** of each Credential is shown and you can **Copy** this to your clipboard.
3. If you want to delete a Credential, select **Delete**:
 A confirmation dialog appears. Select **Yes** to confirm the delete action.
**NOTE: Editing Credentials?** You cannot edit a Credential you’ve created. This is to avoid the need to pass Credential secrets you entered when creating a Credential back up to the Console
### Viewing and Managing Integration Credentials
You can open an external system's Integration page and view Credentials from there.
**To view and manage integration Credentials:**
1. Select **m3sh**. The **Workflows** page opens.
2. Select **Integrations**. The **Integrations** page opens.
3. Select the external system you want to view Credentials for:
A confirmation dialog appears. Select **Yes** to confirm the delete action.
**NOTE: Editing Credentials?** You cannot edit a Credential you’ve created. This is to avoid the need to pass Credential secrets you entered when creating a Credential back up to the Console
### Viewing and Managing Integration Credentials
You can open an external system's Integration page and view Credentials from there.
**To view and manage integration Credentials:**
1. Select **m3sh**. The **Workflows** page opens.
2. Select **Integrations**. The **Integrations** page opens.
3. Select the external system you want to view Credentials for:
 The **Integrations** page for the selected system opens:
![Integration Credentials6c]() * Any existing Credentials you've set up for the external system are listed on the **Credentials** panel. For each Credential you can.
* Read-off the **Name** and **Created date**.
* Check the **ID** and **Copy** it to your clipboard.
* Note that if you want to create a new Credential, on the **Credentials** panel select **Configure new credentials**. See the relevant topic in this section for creating Credentials for specific external systems - for this example [Creating Chargebee Integration Credentials](/guides/integrations/setting-up-integrations/_managing-integration-credentials-legacy/creating-chargebee-integration-credentials).
3. If you want to delete a Credential, select **Delete**:
* Any existing Credentials you've set up for the external system are listed on the **Credentials** panel. For each Credential you can.
* Read-off the **Name** and **Created date**.
* Check the **ID** and **Copy** it to your clipboard.
* Note that if you want to create a new Credential, on the **Credentials** panel select **Configure new credentials**. See the relevant topic in this section for creating Credentials for specific external systems - for this example [Creating Chargebee Integration Credentials](/guides/integrations/setting-up-integrations/_managing-integration-credentials-legacy/creating-chargebee-integration-credentials).
3. If you want to delete a Credential, select **Delete**:
![Delete Icon3]() A confirmation dialog appears. Select **Yes** to confirm the delete action.
**Note: Editing Credentials?** You cannot edit a Credential you've set up for an integration. This is to avoid the need to pass Credential secrets you entered when creating a Credential back up to the Console.
# Managing Multiple Third Party Destinations for Integrations
Source: https://docs.m3ter.com/guides/integrations/setting-up-integrations/managing-multiple-destinations-for-integrations
If you want to set up multiple destinations for integrations to send outbound bills for Accounts to your 3rd-party system, then you can use the *Account Filter* setting on an integration to do this:
* When you configure the integration, enter an expression for Account Filter that references any of the available Account fields or references custom fields you have added to Accounts.
* The integration will then run for an Account *only if* the expression is satisfied.
**Warning: Accounts for integration runs also filtered by Global settings!** Note that any filtering you set up to control which Accounts an integration runs for using the **Account Ids** settings under **Global Configuration** is *in addition* to any filtering you define using the *Account Filter* setting and explained here. See the relevant *Configuring Integrations* topics in this section for more details.
## Account Fields for Integration Account Filter Expressions
The following fields on an Account can be referenced by the expression you enter for the Account Filter settings:
* `id`
* `accountName`
* `accountCode`
* `address`
* `addressLine1`
* `addressLine2`
* `addressLine3`
* `addressLine4`
* `locality`
* `region`
* `postCode`
* `country`
* `currency`
* `customFields`
## Example Setup for Multiple Destinations
Suppose you use Xero as your Accounts Receivable system. When you set up an integration in m3ter for your end customer Account Bills to be sent outbound into your Xero system, you want some Account Bills to go to a Xero US destination and other Account Bills to go to a Xero UK destination.
To satisfy this use case, you can set up two separate integrations - call them **Xero US** and **Xero UK** - and use an expression on the Account Filter to ensure each integration is run only for the relevant Accounts:
* **Xero US Integration**. Enter the following expression for the Account Filter setting, which references the `address.country` field on the Account object:
* `"address.country == "US""`
* **Xero UK Integration**. Enter the following expression for the Account Filter setting, which references the `address.country` field on the Account object:
* `"address.country == "UK""`
# Reviewing and Resolving Integration Events
Source: https://docs.m3ter.com/guides/integrations/setting-up-integrations/reviewing-and-resolving-integration-events
Five system Events are generated for errors that might occur with your integrations:
* **integration.validation.error**
* **integration.missingaccountmapping.error**
* **integration.authentication.error**
* **integration.perform.error**
* **integration.disabled.error**
In the **m3sh** section of the Console on the **Integration events** page, you can review and follow up on integrations error Events generated for your Organization and troubleshoot and resolve them. When you have followed-up on an error Event and resolved it, you can mark the event as actioned and remove it from the Events list:
* [Reviewing and Resolving Events](/guides/integrations/setting-up-integrations/reviewing-and-resolving-integration-events#reviewing-and-resolving-events)
* [Marking Events as Actioned](/guides/integrations/setting-up-integrations/reviewing-and-resolving-integration-events#marking-events-as-actioned)
## Reviewing and Resolving Events
**To review and resolve integration error Events:**
1. Select **m3sh**:
The **Workflows** page opens.
2. Select **Integration events**:
A confirmation dialog appears. Select **Yes** to confirm the delete action.
**Note: Editing Credentials?** You cannot edit a Credential you've set up for an integration. This is to avoid the need to pass Credential secrets you entered when creating a Credential back up to the Console.
# Managing Multiple Third Party Destinations for Integrations
Source: https://docs.m3ter.com/guides/integrations/setting-up-integrations/managing-multiple-destinations-for-integrations
If you want to set up multiple destinations for integrations to send outbound bills for Accounts to your 3rd-party system, then you can use the *Account Filter* setting on an integration to do this:
* When you configure the integration, enter an expression for Account Filter that references any of the available Account fields or references custom fields you have added to Accounts.
* The integration will then run for an Account *only if* the expression is satisfied.
**Warning: Accounts for integration runs also filtered by Global settings!** Note that any filtering you set up to control which Accounts an integration runs for using the **Account Ids** settings under **Global Configuration** is *in addition* to any filtering you define using the *Account Filter* setting and explained here. See the relevant *Configuring Integrations* topics in this section for more details.
## Account Fields for Integration Account Filter Expressions
The following fields on an Account can be referenced by the expression you enter for the Account Filter settings:
* `id`
* `accountName`
* `accountCode`
* `address`
* `addressLine1`
* `addressLine2`
* `addressLine3`
* `addressLine4`
* `locality`
* `region`
* `postCode`
* `country`
* `currency`
* `customFields`
## Example Setup for Multiple Destinations
Suppose you use Xero as your Accounts Receivable system. When you set up an integration in m3ter for your end customer Account Bills to be sent outbound into your Xero system, you want some Account Bills to go to a Xero US destination and other Account Bills to go to a Xero UK destination.
To satisfy this use case, you can set up two separate integrations - call them **Xero US** and **Xero UK** - and use an expression on the Account Filter to ensure each integration is run only for the relevant Accounts:
* **Xero US Integration**. Enter the following expression for the Account Filter setting, which references the `address.country` field on the Account object:
* `"address.country == "US""`
* **Xero UK Integration**. Enter the following expression for the Account Filter setting, which references the `address.country` field on the Account object:
* `"address.country == "UK""`
# Reviewing and Resolving Integration Events
Source: https://docs.m3ter.com/guides/integrations/setting-up-integrations/reviewing-and-resolving-integration-events
Five system Events are generated for errors that might occur with your integrations:
* **integration.validation.error**
* **integration.missingaccountmapping.error**
* **integration.authentication.error**
* **integration.perform.error**
* **integration.disabled.error**
In the **m3sh** section of the Console on the **Integration events** page, you can review and follow up on integrations error Events generated for your Organization and troubleshoot and resolve them. When you have followed-up on an error Event and resolved it, you can mark the event as actioned and remove it from the Events list:
* [Reviewing and Resolving Events](/guides/integrations/setting-up-integrations/reviewing-and-resolving-integration-events#reviewing-and-resolving-events)
* [Marking Events as Actioned](/guides/integrations/setting-up-integrations/reviewing-and-resolving-integration-events#marking-events-as-actioned)
## Reviewing and Resolving Events
**To review and resolve integration error Events:**
1. Select **m3sh**:
The **Workflows** page opens.
2. Select **Integration events**:
 The **Integration events** page opens and lists any existing error Events generated for your Organization:
![Integ Events13]() In this example:
* Three`integration.perform.error` Event are listed for a **Chargebee** integration.
* An`integration.perform.error` Event is listed for an **incoming webhook** integration with a **m3sh Workflow**.
You can read off the details of the Event:
* **NAME**. The Event type.
* **DATE**. A timestamp of when the Event occurred.
* **MESSAGE**. Details of the cause of the Event and suggested remedial action you can take.
* **ACTIONED/NOT ACTIONED**. All of the Events are shown as **NOT ACTIONED**.
Depending on the type of error Event, an appropriate button is also provided and which allows you to follow-up and resolve the error.
3. If you want to follow-up and resolve the error, click the follow-up and resolve button:
* **integration.validation.error**. Select **Go to integration run**:
* The relevant **Integrations run details** page opens and you can troubleshoot the perform error Event. For more details, see [Reviewing Integration Run Details](/guides/integrations/setting-up-integrations/reviewing-integration-run-details).
* **integration.missingaccountmapping.error**. Select **Create external mapping**:
* The **External mappings>Create** page opens. The **m3ter entity** and **m3ter entity type** fields are automatically populated and you can proceed to create the required mapping. For more details, see [Creating and Managing External Mappings](/guides/integrations/setting-up-integrations/creating-and-managing-external-mappings).
* **integration.authentication.error**. Select **Go to integration**:
* The relevant **Integration configuration details** page opens and you can proceed to configure the correct authentication for the integration's connection to the 3rd-party system. For more details, see the relevant *Integrations* topic in this [section](/guides/integrations/setting-up-integrations).
* **integration.perform.error**. Select **Go to integration run**:
* The relevant **Integrations run details** page opens and you can troubleshoot the perform error Event. For more details, see [Reviewing Integration Run Details](/guides/integrations/setting-up-integrations/reviewing-integration-run-details).
* **integration.disabled.error**. Select **Go to integration**:
* The relevant **Integration configuration details** page opens where you can select to re-enable the Integration or fix any Credential issues.
* **Note**. An integration is automatically disabled if there have been 20 successive previous error Event responses to earlier attempts to run the integration. Please check the earlier error Events to resolve any issues preventing the integration from running before you re-enable the integration.
4. For example, if we select **Go to integration run** for the `integration.perform.error` Event listed for a Chargebee integration, the **Integration run details** page opens:
In this example:
* Three`integration.perform.error` Event are listed for a **Chargebee** integration.
* An`integration.perform.error` Event is listed for an **incoming webhook** integration with a **m3sh Workflow**.
You can read off the details of the Event:
* **NAME**. The Event type.
* **DATE**. A timestamp of when the Event occurred.
* **MESSAGE**. Details of the cause of the Event and suggested remedial action you can take.
* **ACTIONED/NOT ACTIONED**. All of the Events are shown as **NOT ACTIONED**.
Depending on the type of error Event, an appropriate button is also provided and which allows you to follow-up and resolve the error.
3. If you want to follow-up and resolve the error, click the follow-up and resolve button:
* **integration.validation.error**. Select **Go to integration run**:
* The relevant **Integrations run details** page opens and you can troubleshoot the perform error Event. For more details, see [Reviewing Integration Run Details](/guides/integrations/setting-up-integrations/reviewing-integration-run-details).
* **integration.missingaccountmapping.error**. Select **Create external mapping**:
* The **External mappings>Create** page opens. The **m3ter entity** and **m3ter entity type** fields are automatically populated and you can proceed to create the required mapping. For more details, see [Creating and Managing External Mappings](/guides/integrations/setting-up-integrations/creating-and-managing-external-mappings).
* **integration.authentication.error**. Select **Go to integration**:
* The relevant **Integration configuration details** page opens and you can proceed to configure the correct authentication for the integration's connection to the 3rd-party system. For more details, see the relevant *Integrations* topic in this [section](/guides/integrations/setting-up-integrations).
* **integration.perform.error**. Select **Go to integration run**:
* The relevant **Integrations run details** page opens and you can troubleshoot the perform error Event. For more details, see [Reviewing Integration Run Details](/guides/integrations/setting-up-integrations/reviewing-integration-run-details).
* **integration.disabled.error**. Select **Go to integration**:
* The relevant **Integration configuration details** page opens where you can select to re-enable the Integration or fix any Credential issues.
* **Note**. An integration is automatically disabled if there have been 20 successive previous error Event responses to earlier attempts to run the integration. Please check the earlier error Events to resolve any issues preventing the integration from running before you re-enable the integration.
4. For example, if we select **Go to integration run** for the `integration.perform.error` Event listed for a Chargebee integration, the **Integration run details** page opens:
![Integ Events14a]() 5. On the **Run log** panel, drill into the **PERFORM** error and read-off the reason:
5. On the **Run log** panel, drill into the **PERFORM** error and read-off the reason:
![Integ Events15]() 6. You can expand the **HTTP REQUEST** and inspect the details of the request and response:
6. You can expand the **HTTP REQUEST** and inspect the details of the request and response:
![Integ Events16]() ## Marking Events as Actioned
When you have followed-up and resolved an error Event, you can mark it as actioned to remove it from the Integration events list
**To mark an Event as actioned and remove it from the Events list:**
1. Select the checkbox of the Event you want to mark as actioned.
2. Select the **Mark as actioned** button. A confirmation popup appears:
## Marking Events as Actioned
When you have followed-up and resolved an error Event, you can mark it as actioned to remove it from the Integration events list
**To mark an Event as actioned and remove it from the Events list:**
1. Select the checkbox of the Event you want to mark as actioned.
2. Select the **Mark as actioned** button. A confirmation popup appears:
![Integ Events17]() 3. Select **Yes** to confirm. The page refreshes and the checked Event is removed from the **Integration events** list.
**Tip: Mark multiple Events as actioned?** You can check-off multiple Events to mark them all as actioned at the same time.
4. If you want to check again on Events that you've already actioned, enable the **Include actioned events?** switch. The page refreshes and any actioned Events are added back into the **Integration events** list, and are clearly marked as **ACTIONED**:
3. Select **Yes** to confirm. The page refreshes and the checked Event is removed from the **Integration events** list.
**Tip: Mark multiple Events as actioned?** You can check-off multiple Events to mark them all as actioned at the same time.
4. If you want to check again on Events that you've already actioned, enable the **Include actioned events?** switch. The page refreshes and any actioned Events are added back into the **Integration events** list, and are clearly marked as **ACTIONED**:
![Integ Events18]() # Reviewing Integration Run Details
Source: https://docs.m3ter.com/guides/integrations/setting-up-integrations/reviewing-integration-run-details
If you've set up an integration with a 3rd-party system for your Organization, you can review details of the integration runs that have been performed for the integration, such as:
* A Bill integration set up to send approved Bills outbound to a 3rd-party invoicing system.
* A Notification set up to send a notification call to a webhook:
* For more details on how to link Notification rules to outgoing webhooks, see [Creating, Managing, and Reviewing Notifications.](/guides/alerts-events-and-notifications/utilizing-events-and-notifications/creating-managing-and-reviewing-notifications#linking-notification-rules-to-destinations-to-create-notification-integration-configurations)
When you review an integration run, you can:
* Review the integration configuration as it stood at the time the integration ran.
* Read off the tasks performed in the integration run.
* Drill into the details of each task.
Having access to the details of an integration run can be very helpful when troubleshooting integration runs that fail:
* For example, suppose you've set up an integration for Bill approval in m3ter outbound into your 3rd-party invoicing system, and you're using a monthly billing frequency. For the first three months the integration runs work correctly but on the fourth month some charge line items are missing from the invoice generated in your 3rd-party system by the integration run. To help with troubleshooting, you can review the details of the logs for the successful first three integration runs and compare and contrast them with the logs for the failed integration run at month four. This can help you to identify any changes to the integration configuration or the tasks performed in the run and therefore help to resolve the problem.
This topic gives explains how to review integration runs:
* [Reviewing Bill Integration Runs](/guides/integrations/setting-up-integrations/reviewing-integration-run-details#reviewing-bill-integration-runs)
* [Reviewing Notification Integration Runs](/guides/integrations/setting-up-integrations/reviewing-integration-run-details#reviewing-notification-integration-runs)
## Reviewing Bill Integration Runs
**To review latest integrations runs for a Bill integration:**
1. Open the Bill you want to review integration runs for. See [Running Bills and Viewing Bill Details](https://docs.m3ter.com/guides/billing-and-usage-data/running-viewing-and-managing-bills/running-bills-and-viewing-bill-details).
2. On the **Bill details** panel under **Last integration run**, select the **View all Runs** hotlink text. The **Integration runs** page opens listing all integration runs for the Bill:
# Reviewing Integration Run Details
Source: https://docs.m3ter.com/guides/integrations/setting-up-integrations/reviewing-integration-run-details
If you've set up an integration with a 3rd-party system for your Organization, you can review details of the integration runs that have been performed for the integration, such as:
* A Bill integration set up to send approved Bills outbound to a 3rd-party invoicing system.
* A Notification set up to send a notification call to a webhook:
* For more details on how to link Notification rules to outgoing webhooks, see [Creating, Managing, and Reviewing Notifications.](/guides/alerts-events-and-notifications/utilizing-events-and-notifications/creating-managing-and-reviewing-notifications#linking-notification-rules-to-destinations-to-create-notification-integration-configurations)
When you review an integration run, you can:
* Review the integration configuration as it stood at the time the integration ran.
* Read off the tasks performed in the integration run.
* Drill into the details of each task.
Having access to the details of an integration run can be very helpful when troubleshooting integration runs that fail:
* For example, suppose you've set up an integration for Bill approval in m3ter outbound into your 3rd-party invoicing system, and you're using a monthly billing frequency. For the first three months the integration runs work correctly but on the fourth month some charge line items are missing from the invoice generated in your 3rd-party system by the integration run. To help with troubleshooting, you can review the details of the logs for the successful first three integration runs and compare and contrast them with the logs for the failed integration run at month four. This can help you to identify any changes to the integration configuration or the tasks performed in the run and therefore help to resolve the problem.
This topic gives explains how to review integration runs:
* [Reviewing Bill Integration Runs](/guides/integrations/setting-up-integrations/reviewing-integration-run-details#reviewing-bill-integration-runs)
* [Reviewing Notification Integration Runs](/guides/integrations/setting-up-integrations/reviewing-integration-run-details#reviewing-notification-integration-runs)
## Reviewing Bill Integration Runs
**To review latest integrations runs for a Bill integration:**
1. Open the Bill you want to review integration runs for. See [Running Bills and Viewing Bill Details](https://docs.m3ter.com/guides/billing-and-usage-data/running-viewing-and-managing-bills/running-bills-and-viewing-bill-details).
2. On the **Bill details** panel under **Last integration run**, select the **View all Runs** hotlink text. The **Integration runs** page opens listing all integration runs for the Bill:
![Integs Run29]() * In this example, a single run has taken place for the integration.
* Note that if the **Integration runs** page lists a large number of runs, you can filter by run **Status**:
* In this example, a single run has taken place for the integration.
* Note that if the **Integration runs** page lists a large number of runs, you can filter by run **Status**:
![]() 3. Select the **Start time** hotlink text for the run you want to review. The **Integration run details** page opens:
3. Select the **Start time** hotlink text for the run you want to review. The **Integration run details** page opens:
![Integs Run27]() 4. Select to expand **Configuration data** and show the JSON. Note that this is the configuration as it stood at the time the integration run took place:
4. Select to expand **Configuration data** and show the JSON. Note that this is the configuration as it stood at the time the integration run took place:
![Integs Run28]() 5. You can expand to view the details of tasks listed under **Run log**:
5. You can expand to view the details of tasks listed under **Run log**:
![Integs Run30]() * Note that if you are reviewing a failed integration run and troubleshooting, you can **Copy** the JSON for the requests/reponses performed for tasks performed by the run directly to your clipboard.
## Reviewing Notification Integration Runs
**To review latest integrations runs for a Notification:**
1. Select **Alerts and notifications**:
* Note that if you are reviewing a failed integration run and troubleshooting, you can **Copy** the JSON for the requests/reponses performed for tasks performed by the run directly to your clipboard.
## Reviewing Notification Integration Runs
**To review latest integrations runs for a Notification:**
1. Select **Alerts and notifications**:
![]() The **Alerts** page opens.
2. Select **Notification rules**:
The **Alerts** page opens.
2. Select **Notification rules**:
![]() The **Notification rules** page opens.
3. Select the **Name** hotlink text of the Notification you want to review the integration runs for. The **Notification rule details** page opens:
The **Notification rules** page opens.
3. Select the **Name** hotlink text of the Notification you want to review the integration runs for. The **Notification rule details** page opens:
![Integs Run31]() * Note that if you want to review details of the most recent run performed for the Notification, under **Last run** select the **Start time** hotlink text for the run to open it directly.
4. Select the **View all runs** hotlink text. The **Integration runs** page opens and lists all runs for the Notification.
* Note that if the **Integration runs** page lists a large number of runs, you can filter by run **Status**:
* Note that if you want to review details of the most recent run performed for the Notification, under **Last run** select the **Start time** hotlink text for the run to open it directly.
4. Select the **View all runs** hotlink text. The **Integration runs** page opens and lists all runs for the Notification.
* Note that if the **Integration runs** page lists a large number of runs, you can filter by run **Status**:
![]() 5. Select the **Start time** hotlink text for the run you want to review:
5. Select the **Start time** hotlink text for the run you want to review:
![Integs Run32]() The **Integration run details** page for the Notification opens:
The **Integration run details** page for the Notification opens:
![Integs Run35]() 6. You can expand the **Run log** and drill into the details of the integration run:
6. You can expand the **Run log** and drill into the details of the integration run:
![Integs Run34]() * Note that if you are reviewing a failed integration run and troubleshooting, you can **Copy** the JSON for the requests/reponses performed for the run directly to your clipboard.
# Lookup Tables (Beta)
Source: https://docs.m3ter.com/guides/lookup-tables
Lookup Tables enable you to manage dynamic data mappings that your calculations reference. Use them for currency conversion, pricing tiers, discount rates, and similar scenarios where you require values to change operationally but for calculation logic to remain constant.
Lookup Tables are designed for very high throughput and millisecond latency, and can be used at any rate supported by the services that query them - for example, multiple lookups can be made for each measurement being ingested and enriched, thousands of times a second.
### How to Use Lookup Tables
Lookup Tables employ a table and revision model, which lets you update data cleanly and extend the schema without modifying existing calculations. Here are the steps for working with this model:
1. Create one or more **Lookup Tables** in your Organization.
2. Create **Revisions** for a Lookup Table, which you can use to define data schema and lookup keys.
3. Populate **Draft Revisions** with data values. You can create and edit multiple **Draft** **Revisions**, but only one can be **Published** at any given time.
4. **Publish** a Revision to activate it. Once published, you can use [Lookup Functions](/guides/lookup-tables/lookup-functions) within your [Derived Field calculations](/guides/usage-data-meters/derived-fields-for-meters-examples-and-supported-syntax) to query the data values of the Revision.
5. When you want different, updated data values to be used, publish the draft Revision containing the required new values. The currently published Revision is archived automatically, so you can always access the historical data.
This section uses a variable usage discounting rate example to explain how to create and manage Lookup Tables and their Revisions, add data to Revisions, publish Revisions, and use Lookup Tables in Derived Field calculations to fulfill this kind of dynamic data mapping use case:
* [Creating and Managing Lookup Tables](/guides/lookup-tables/creating-and-managing-lookup-tables)
* [Adding Data to, Publishing, and Managing Lookup Table Revisions](/guides/lookup-tables/adding-data-to-and-publishing-table-revisions)
* [Worked Example - Variable Usage Discounting](/guides/lookup-tables/worked-example-variable-usage-discounting)
* [Worked Example - Variable Usage Discounting by Account](/guides/lookup-tables/worked-example-variable-usage-discouting-by-account)
* [Lookup Functions](/guides/lookup-tables/lookup-functions) - Querying data from Lookup Tables
**Note: Lookup Tables are in Beta**
Please note that Lookup Tables are currently a Beta feature. See [Feature Release Stages](/guides/getting-started/feature-release-stages) for further information and things to be aware of.
# Adding Data to, Publishing, and Managing Lookup Table Revisions
Source: https://docs.m3ter.com/guides/lookup-tables/adding-data-to-and-publishing-table-revisions
This topic explains how to add string or number values for a Lookup Table Revision data schema and publish and manage Table Revisions. A Revision's data values only become available for calculations that reference the Lookup Table when the Revision is *published*:
* Data can only be added to a *draft* Revision.
* *Only one* Revision can be the published Revision for a Lookup Table at any given time.
* You *cannot change* the data values of a published Revision.
* If you want to use updated data values for the Lookup Table, you must:
* Create a new draft Revision with the same data schema, add updated values you want to use for the Table, and publish the new Revision.
* Alternatively, you can *duplicate* the published Revision as a new draft Revision, add updated values you want to use for the Table, and publish the new Revision.
* When you publish a new Revision:
* The current published Revision is *automatically archived*
* Any Lookup functions in your calculations will now use the data values defined for the new published Revision.
In this way, you can manage and deploy Lookup Table Revisions for use cases where you need to quickly and dynamically update the data values used for your calculations.
This topic continues the variable discount rate example introduced in the [previous topic](/guides/lookup-tables/creating-and-managing-lookup-tables) and goes on to explain how to add data to, publish, and manage Lookup Table Revisions:
* [Adding and Managing Data for Table Revisions](/guides/lookup-tables/adding-data-to-and-publishing-table-revisions#adding-and-managing-data-for-table-revisions)
* [Publishing Table Revisions](/guides/lookup-tables/adding-data-to-and-publishing-table-revisions#publishing-table-revisions)
* [Duplicating Table Revisions](/guides/lookup-tables/adding-data-to-and-publishing-table-revisions#duplicating-table-revisions)
* [Archiving Published Revisions](#archiving-published-revisions)
* [Copying Table Revision Data](/guides/lookup-tables/adding-data-to-and-publishing-table-revisions#copying-table-revision-data)
* [Viewing and Comparing Table Revision JSON](/guides/lookup-tables/adding-data-to-and-publishing-table-revisions#viewing-and-comparing-table-revision-json)
* [Downloading Table Revision Data](/guides/lookup-tables/adding-data-to-and-publishing-table-revisions#downloading-table-revision-data)
* [Uploading Table Revision Data](/guides/lookup-tables/adding-data-to-and-publishing-table-revisions#uploading-table-revision-data)
* [Managing Table Revisions](/guides/lookup-tables/adding-data-to-and-publishing-table-revisions#managing-table-revisions)
* [Reviewing and Managing Revision Data Jobs](/guides/lookup-tables/adding-data-to-and-publishing-table-revisions#reviewing-and-managing-revision-data-jobs)
* [Using Multiple Key Fields - Checking Revision Schema Field Order](/guides/lookup-tables/adding-data-to-and-publishing-table-revisions#using-multiple-key-fields-checking-revision-schema-field-order)
## Adding and Managing Data for Table Revisions
You can quickly add string and number values to draft Table Revisions.
**To add data to a Table Revision:**
1. Select **Settings>Lookup tables**. The **Lookup tables** page opens.
2. Select the **Name** hotlink text of the Lookup Table. The **Lookup table details** page opens.
3. Under **Revisions**, select the **Name** hotlink text of the draft Revision you want to add data to. The **Revision details** page opens.
4. Under **Revision data**, select **Create**. The **Create** page opens.
5. On **Revision data details**, enter the required string and number data values for the Revision field schema:
* Note that if you are reviewing a failed integration run and troubleshooting, you can **Copy** the JSON for the requests/reponses performed for the run directly to your clipboard.
# Lookup Tables (Beta)
Source: https://docs.m3ter.com/guides/lookup-tables
Lookup Tables enable you to manage dynamic data mappings that your calculations reference. Use them for currency conversion, pricing tiers, discount rates, and similar scenarios where you require values to change operationally but for calculation logic to remain constant.
Lookup Tables are designed for very high throughput and millisecond latency, and can be used at any rate supported by the services that query them - for example, multiple lookups can be made for each measurement being ingested and enriched, thousands of times a second.
### How to Use Lookup Tables
Lookup Tables employ a table and revision model, which lets you update data cleanly and extend the schema without modifying existing calculations. Here are the steps for working with this model:
1. Create one or more **Lookup Tables** in your Organization.
2. Create **Revisions** for a Lookup Table, which you can use to define data schema and lookup keys.
3. Populate **Draft Revisions** with data values. You can create and edit multiple **Draft** **Revisions**, but only one can be **Published** at any given time.
4. **Publish** a Revision to activate it. Once published, you can use [Lookup Functions](/guides/lookup-tables/lookup-functions) within your [Derived Field calculations](/guides/usage-data-meters/derived-fields-for-meters-examples-and-supported-syntax) to query the data values of the Revision.
5. When you want different, updated data values to be used, publish the draft Revision containing the required new values. The currently published Revision is archived automatically, so you can always access the historical data.
This section uses a variable usage discounting rate example to explain how to create and manage Lookup Tables and their Revisions, add data to Revisions, publish Revisions, and use Lookup Tables in Derived Field calculations to fulfill this kind of dynamic data mapping use case:
* [Creating and Managing Lookup Tables](/guides/lookup-tables/creating-and-managing-lookup-tables)
* [Adding Data to, Publishing, and Managing Lookup Table Revisions](/guides/lookup-tables/adding-data-to-and-publishing-table-revisions)
* [Worked Example - Variable Usage Discounting](/guides/lookup-tables/worked-example-variable-usage-discounting)
* [Worked Example - Variable Usage Discounting by Account](/guides/lookup-tables/worked-example-variable-usage-discouting-by-account)
* [Lookup Functions](/guides/lookup-tables/lookup-functions) - Querying data from Lookup Tables
**Note: Lookup Tables are in Beta**
Please note that Lookup Tables are currently a Beta feature. See [Feature Release Stages](/guides/getting-started/feature-release-stages) for further information and things to be aware of.
# Adding Data to, Publishing, and Managing Lookup Table Revisions
Source: https://docs.m3ter.com/guides/lookup-tables/adding-data-to-and-publishing-table-revisions
This topic explains how to add string or number values for a Lookup Table Revision data schema and publish and manage Table Revisions. A Revision's data values only become available for calculations that reference the Lookup Table when the Revision is *published*:
* Data can only be added to a *draft* Revision.
* *Only one* Revision can be the published Revision for a Lookup Table at any given time.
* You *cannot change* the data values of a published Revision.
* If you want to use updated data values for the Lookup Table, you must:
* Create a new draft Revision with the same data schema, add updated values you want to use for the Table, and publish the new Revision.
* Alternatively, you can *duplicate* the published Revision as a new draft Revision, add updated values you want to use for the Table, and publish the new Revision.
* When you publish a new Revision:
* The current published Revision is *automatically archived*
* Any Lookup functions in your calculations will now use the data values defined for the new published Revision.
In this way, you can manage and deploy Lookup Table Revisions for use cases where you need to quickly and dynamically update the data values used for your calculations.
This topic continues the variable discount rate example introduced in the [previous topic](/guides/lookup-tables/creating-and-managing-lookup-tables) and goes on to explain how to add data to, publish, and manage Lookup Table Revisions:
* [Adding and Managing Data for Table Revisions](/guides/lookup-tables/adding-data-to-and-publishing-table-revisions#adding-and-managing-data-for-table-revisions)
* [Publishing Table Revisions](/guides/lookup-tables/adding-data-to-and-publishing-table-revisions#publishing-table-revisions)
* [Duplicating Table Revisions](/guides/lookup-tables/adding-data-to-and-publishing-table-revisions#duplicating-table-revisions)
* [Archiving Published Revisions](#archiving-published-revisions)
* [Copying Table Revision Data](/guides/lookup-tables/adding-data-to-and-publishing-table-revisions#copying-table-revision-data)
* [Viewing and Comparing Table Revision JSON](/guides/lookup-tables/adding-data-to-and-publishing-table-revisions#viewing-and-comparing-table-revision-json)
* [Downloading Table Revision Data](/guides/lookup-tables/adding-data-to-and-publishing-table-revisions#downloading-table-revision-data)
* [Uploading Table Revision Data](/guides/lookup-tables/adding-data-to-and-publishing-table-revisions#uploading-table-revision-data)
* [Managing Table Revisions](/guides/lookup-tables/adding-data-to-and-publishing-table-revisions#managing-table-revisions)
* [Reviewing and Managing Revision Data Jobs](/guides/lookup-tables/adding-data-to-and-publishing-table-revisions#reviewing-and-managing-revision-data-jobs)
* [Using Multiple Key Fields - Checking Revision Schema Field Order](/guides/lookup-tables/adding-data-to-and-publishing-table-revisions#using-multiple-key-fields-checking-revision-schema-field-order)
## Adding and Managing Data for Table Revisions
You can quickly add string and number values to draft Table Revisions.
**To add data to a Table Revision:**
1. Select **Settings>Lookup tables**. The **Lookup tables** page opens.
2. Select the **Name** hotlink text of the Lookup Table. The **Lookup table details** page opens.
3. Under **Revisions**, select the **Name** hotlink text of the draft Revision you want to add data to. The **Revision details** page opens.
4. Under **Revision data**, select **Create**. The **Create** page opens.
5. On **Revision data details**, enter the required string and number data values for the Revision field schema:
![]() * For the current variable discount rate example, we've entered two sets of **rate** and **country** data field values for the Revision schema we set up in the [previous topic](/guides/lookup-tables/creating-and-managing-lookup-tables).
6. Select **Create revision data**. You are returned to the **Revision details** page and under **Revision data** the added data values are shown for the Revision fields:
* For the current variable discount rate example, we've entered two sets of **rate** and **country** data field values for the Revision schema we set up in the [previous topic](/guides/lookup-tables/creating-and-managing-lookup-tables).
6. Select **Create revision data**. You are returned to the **Revision details** page and under **Revision data** the added data values are shown for the Revision fields:
![Lookup Tables48]() * We now have a Table Revision with the data values we want to use for our current discounted rate example added. To make these values available for any Lookup functions used in calculations, we must first *publish* the Revision - see the [following section](/guides/lookup-tables/adding-data-to-and-publishing-table-revisions#publishing-table-revisions).
7. If you want to update the data you've added to the Revision before you publish it, under **Revision data** you can:
* Select **Edit** to edit the **Revision data details** for all data fields.
* Select the **Edit** button for a single data item to update it:
* We now have a Table Revision with the data values we want to use for our current discounted rate example added. To make these values available for any Lookup functions used in calculations, we must first *publish* the Revision - see the [following section](/guides/lookup-tables/adding-data-to-and-publishing-table-revisions#publishing-table-revisions).
7. If you want to update the data you've added to the Revision before you publish it, under **Revision data** you can:
* Select **Edit** to edit the **Revision data details** for all data fields.
* Select the **Edit** button for a single data item to update it:
![]() 8. If you want to delete *all the data* you've added to the Revision:
* Under **Revision data** select **Delete**. A confirmation dialog appears.
* Select to **Delete** all the Revision's data.
9. If you want to delete a single data item:
* Select the delete icon for the data item:
8. If you want to delete *all the data* you've added to the Revision:
* Under **Revision data** select **Delete**. A confirmation dialog appears.
* Select to **Delete** all the Revision's data.
9. If you want to delete a single data item:
* Select the delete icon for the data item:
![]() * A confirmation dialog appears.
10. Select to **Delete** the single data item.
**Important: Adding data prevents updates to the Revision data field schema!** If you add data values to a Revision, you will no longer be able to edit the Revision's data field schema to add additional fields, delete fields, change field order, or change keyed fields. See the following [Managing Table Revisions](/guides/lookup-tables/adding-data-to-and-publishing-table-revisions#managing-table-revisions) section.
## Publishing Table Revisions
When you've added any required data values to a draft Table Revision, you can publish it and make the values available to any Lookup functions used in calculations that reference the Lookup Table.
**To publish a Table Revision:**
1. Select **Settings>Lookup tables**. The **Lookup tables** page opens.
2. Select the **Name** hotlink text of the Lookup Table. The **Lookup table details** page opens.
3. On the **Revisions** panel under **Actions**, select the **Publish** icon for the **DRAFT** Revision you want to publish:
* A confirmation dialog appears.
10. Select to **Delete** the single data item.
**Important: Adding data prevents updates to the Revision data field schema!** If you add data values to a Revision, you will no longer be able to edit the Revision's data field schema to add additional fields, delete fields, change field order, or change keyed fields. See the following [Managing Table Revisions](/guides/lookup-tables/adding-data-to-and-publishing-table-revisions#managing-table-revisions) section.
## Publishing Table Revisions
When you've added any required data values to a draft Table Revision, you can publish it and make the values available to any Lookup functions used in calculations that reference the Lookup Table.
**To publish a Table Revision:**
1. Select **Settings>Lookup tables**. The **Lookup tables** page opens.
2. Select the **Name** hotlink text of the Lookup Table. The **Lookup table details** page opens.
3. On the **Revisions** panel under **Actions**, select the **Publish** icon for the **DRAFT** Revision you want to publish:
![]() * The **Revisions** panel adjusts and shows the Revision's **Status** as **PUBLISHED**:
* The **Revisions** panel adjusts and shows the Revision's **Status** as **PUBLISHED**:
![Lookup Tables35]() 4. Alternatively, select the **Name** hotlink text of the Revision you intend to publish. The **Revision details** page opens:
* On the **Revision data** panel you can review and check the values of the data fields for the draft Revision before you go ahead and publish it.
5. On the **Revision details** panel, select **Publish**:
* A confirmation dialog appears and reminds you that this action will archive the currently published version.
6. Select **Publish** to confirm. The **Revision details** panel adjusts and shows the Revision as **PUBLISHED**:
4. Alternatively, select the **Name** hotlink text of the Revision you intend to publish. The **Revision details** page opens:
* On the **Revision data** panel you can review and check the values of the data fields for the draft Revision before you go ahead and publish it.
5. On the **Revision details** panel, select **Publish**:
* A confirmation dialog appears and reminds you that this action will archive the currently published version.
6. Select **Publish** to confirm. The **Revision details** panel adjusts and shows the Revision as **PUBLISHED**:
![Lookup Tables43]() Note that:
* You cannot update or delete a **PUBLISHED** Table Revision.
* Any Lookup functions used in calculations that reference the Lookup Table will now use the data values on the newly published Revision.
* If you subsequently want to update a Revision to ensure different data values are used by Lookup functions, you must create a new draft Table Revision, populate it with the required data values, and *publish* the new Revision.
* If you want to use the same data schema for the new Revision, you can simply duplicate the **PUBLISHED** Revision in draft status, update the data values, and then publish the duplicate to supersede the currently published Revision - see the [following section](/guides/lookup-tables/adding-data-to-and-publishing-table-revisions#duplicating-table-revisions).
We now have a published Revision of the **Discount Vol Rates** Lookup Table. This will make available to Lookup functions the data values we want to use for our current discounted usage rate example:
* The following [Worked Example](https://m3ter.mintlify.app/guides/lookup-tables/worked-example-variable-usage-discounting) topic explains how to set up a derived field on a Meter with a calculation that uses a Lookup function referencing the **Discount Vol Rates** Lookup Table. This function will apply the discount rates by country to measured usage. The example goes on the show how to check that Accounts in different countries are billed according to the appropriate discounted usage measures.
## Duplicating Table Revisions
In many cases of using Lookup Tables to fulfill dynamic data mapping use cases, you'll want to use the same data schema as the currently published Table Revision. You can quickly duplicate the currently published Table Revision as a draft, add new data values as required, and then publish the updated draft Revision.
**To duplicate a Table Revision:**
1. Select **Settings>Lookup tables**. The **Lookup tables** page opens.
2. Select the **Name** hotlink text of the Lookup Table. The **Lookup table details** page opens.
3. Select the **Name** hotlink text of the Revision you want to duplicate. The **Revision details** page opens.
4. On the **Revision details** panel, select **Duplicate**:
Note that:
* You cannot update or delete a **PUBLISHED** Table Revision.
* Any Lookup functions used in calculations that reference the Lookup Table will now use the data values on the newly published Revision.
* If you subsequently want to update a Revision to ensure different data values are used by Lookup functions, you must create a new draft Table Revision, populate it with the required data values, and *publish* the new Revision.
* If you want to use the same data schema for the new Revision, you can simply duplicate the **PUBLISHED** Revision in draft status, update the data values, and then publish the duplicate to supersede the currently published Revision - see the [following section](/guides/lookup-tables/adding-data-to-and-publishing-table-revisions#duplicating-table-revisions).
We now have a published Revision of the **Discount Vol Rates** Lookup Table. This will make available to Lookup functions the data values we want to use for our current discounted usage rate example:
* The following [Worked Example](https://m3ter.mintlify.app/guides/lookup-tables/worked-example-variable-usage-discounting) topic explains how to set up a derived field on a Meter with a calculation that uses a Lookup function referencing the **Discount Vol Rates** Lookup Table. This function will apply the discount rates by country to measured usage. The example goes on the show how to check that Accounts in different countries are billed according to the appropriate discounted usage measures.
## Duplicating Table Revisions
In many cases of using Lookup Tables to fulfill dynamic data mapping use cases, you'll want to use the same data schema as the currently published Table Revision. You can quickly duplicate the currently published Table Revision as a draft, add new data values as required, and then publish the updated draft Revision.
**To duplicate a Table Revision:**
1. Select **Settings>Lookup tables**. The **Lookup tables** page opens.
2. Select the **Name** hotlink text of the Lookup Table. The **Lookup table details** page opens.
3. Select the **Name** hotlink text of the Revision you want to duplicate. The **Revision details** page opens.
4. On the **Revision details** panel, select **Duplicate**:
![Lookup Tables37]() A confirmation dialog opens:
A confirmation dialog opens:
 5. Select **Duplicate** to confirm. The Table Revision is duplicated and if you open the **Lookup Table details** page, the duplicate is now listed on the **Revisions** panel:
![Lookup Tables38]() The new duplicate Revision:
* Uses the original Revision's name with "Copy" appended.
* Inherits the original Revision's data schema and any data values.
* Is created as a **DRAFT** Revision.
6. You can now edit the duplicate Revision, as required.
## Archiving Published Revisions
If you have published a Table Revision, created a new draft Revision, and then publish the draft, the existing published Revision is *archived automatically*. You can also *manually archive* the Published Revision.
**Warning!** If you've referenced the Lookup Table in a calculation and you archive the published Table Revision, values *will not be available* for the calculation until you publish another Revision.
**To archive the published Table Revision:**
1. Select **Settings>Lookup tables**. The **Lookup tables** page opens.
2. Select the **Name** hotlink text of the Lookup Table. The **Lookup table details** page opens.
3. On the **Revisions** panel under **Actions**, select the **Archive** button for the **PUBLISHED** Revision:
The new duplicate Revision:
* Uses the original Revision's name with "Copy" appended.
* Inherits the original Revision's data schema and any data values.
* Is created as a **DRAFT** Revision.
6. You can now edit the duplicate Revision, as required.
## Archiving Published Revisions
If you have published a Table Revision, created a new draft Revision, and then publish the draft, the existing published Revision is *archived automatically*. You can also *manually archive* the Published Revision.
**Warning!** If you've referenced the Lookup Table in a calculation and you archive the published Table Revision, values *will not be available* for the calculation until you publish another Revision.
**To archive the published Table Revision:**
1. Select **Settings>Lookup tables**. The **Lookup tables** page opens.
2. Select the **Name** hotlink text of the Lookup Table. The **Lookup table details** page opens.
3. On the **Revisions** panel under **Actions**, select the **Archive** button for the **PUBLISHED** Revision:
![Lookup Tables40]() A confirmation dialog appears:
A confirmation dialog appears:
 4. Select **Archive**. The **Status** of the Table Revision now shows as **ARCHIVED** on the **Revisions** panel:
![Lookup Tables42 1]() ## Copying Table Revision Data
You can copy a Table Revision's data to another Revision:
* Copy the data from the current Revision to a destination Revision.
* Copy the data from a source Revision to the current Revision.
**Notes and Warnings:**
* **Check source and destination Revision data schema match!** If you attempt to copy data from one Revision to another and their data schema do not match, the copy will fail and you'll receive an error.
* **Restrictions when copying Revision data**. Some restrictions are imposed when copying Revision data - you cannot:
* Copy data to a **PUBLISHED** Revision.
* Copy data to or from an **ARCHIVED** Revision.
* Copy data from a Revision that is empty and has no data values added.
**To copy Table Revision data:**
1. Select **Settings>Lookup tables**. The **Lookup tables** page opens.
2. Select the **Name** hotlink text of the Lookup Table. The **Lookup table details** page opens.
3. Select the **Name** hotlink text of the Table Revision you want to copy data from or copy data to. The **Revision details** page opens.
4. On the **Revision data** panel, select **Copy**. A drop-down menu appears with two options
## Copying Table Revision Data
You can copy a Table Revision's data to another Revision:
* Copy the data from the current Revision to a destination Revision.
* Copy the data from a source Revision to the current Revision.
**Notes and Warnings:**
* **Check source and destination Revision data schema match!** If you attempt to copy data from one Revision to another and their data schema do not match, the copy will fail and you'll receive an error.
* **Restrictions when copying Revision data**. Some restrictions are imposed when copying Revision data - you cannot:
* Copy data to a **PUBLISHED** Revision.
* Copy data to or from an **ARCHIVED** Revision.
* Copy data from a Revision that is empty and has no data values added.
**To copy Table Revision data:**
1. Select **Settings>Lookup tables**. The **Lookup tables** page opens.
2. Select the **Name** hotlink text of the Lookup Table. The **Lookup table details** page opens.
3. Select the **Name** hotlink text of the Table Revision you want to copy data from or copy data to. The **Revision details** page opens.
4. On the **Revision data** panel, select **Copy**. A drop-down menu appears with two options
![]() 5. If you want to copy data from the current Revision to another Revision, select **Copy data to destination revision**. A **Select revision** dialog appears:
5. If you want to copy data from the current Revision to another Revision, select **Copy data to destination revision**. A **Select revision** dialog appears:
![]() Note that in this example:
* The current Revision is **Discount Vol Rates Rev 4** and cannot be selected as the destination Revision.
* Any **ARCHIVED** or the **PUBLISHED** Revision cannot be selected as a destination Revision destination Revision.
6. Select the Table Revision you want to *copy data to* and select **Confirm**. A copy job is run:
* If the copy job completes successfully, a message shows to confirm.
* If the copy job fails, you'll receive an error.
* A common cause of copy data error is when the source and destination Revision data schema do not match.
* You can select **Revision data jobs** to review and check copy data jobs. See below [Reviewing and Managing Revision Data Jobs](/guides/lookup-tables/adding-data-to-and-publishing-table-revisions#reviewing-and-managing-revision-data-jobs).
7. If you want to copy the data from another Revision to the current Revision, then select **Copy data from source revision**. A **Select revision** dialog appears:
Note that in this example:
* The current Revision is **Discount Vol Rates Rev 4** and cannot be selected as the destination Revision.
* Any **ARCHIVED** or the **PUBLISHED** Revision cannot be selected as a destination Revision destination Revision.
6. Select the Table Revision you want to *copy data to* and select **Confirm**. A copy job is run:
* If the copy job completes successfully, a message shows to confirm.
* If the copy job fails, you'll receive an error.
* A common cause of copy data error is when the source and destination Revision data schema do not match.
* You can select **Revision data jobs** to review and check copy data jobs. See below [Reviewing and Managing Revision Data Jobs](/guides/lookup-tables/adding-data-to-and-publishing-table-revisions#reviewing-and-managing-revision-data-jobs).
7. If you want to copy the data from another Revision to the current Revision, then select **Copy data from source revision**. A **Select revision** dialog appears:
![]() Note that in this example:
* The current Revision is **Discount Vol Rates Rev 4** and cannot be selected as the source Revision.
* Any **ARCHIVED** Revisions or empty Revisions - such as **Discount Vol Rates Rev 5** in this example - cannot be selected as the source Revision.
8. Select the Table Revision you want to *copy data from* and select **Confirm**. A copy job is run:
* If the copy job completes successfully, a message shows to confirm.
* If the copy job fails, you'll receive an error.
* A common cause of copy data error is when the source and destination Revision data schema do not match.
* You can select **Revision data jobs** to review and check copy data jobs. See below [Reviewing and Managing Revision Data Jobs](/guides/lookup-tables/adding-data-to-and-publishing-table-revisions#reviewing-and-managing-revision-data-jobs).
## Viewing and Comparing Table Revision JSON
As an aid to managing Table Revisions, you can view the JSON for a Revision and open and compare it with another Table Revision's JSON.
**To view Table Revision JSON:**
1. Select **Settings>Lookup tables**. The **Lookup tables** page opens.
2. Select the **Name** hotlink text of the Lookup Table. The **Lookup table details** page opens.
3. Select the **Name** hotlink text of the Table Revision you want to view JSON for. The **Revision details** page opens.
4. On the **Revision details** panel, select **View JSON**. A modal opens allowing you to review the Revision's JSON:
Note that in this example:
* The current Revision is **Discount Vol Rates Rev 4** and cannot be selected as the source Revision.
* Any **ARCHIVED** Revisions or empty Revisions - such as **Discount Vol Rates Rev 5** in this example - cannot be selected as the source Revision.
8. Select the Table Revision you want to *copy data from* and select **Confirm**. A copy job is run:
* If the copy job completes successfully, a message shows to confirm.
* If the copy job fails, you'll receive an error.
* A common cause of copy data error is when the source and destination Revision data schema do not match.
* You can select **Revision data jobs** to review and check copy data jobs. See below [Reviewing and Managing Revision Data Jobs](/guides/lookup-tables/adding-data-to-and-publishing-table-revisions#reviewing-and-managing-revision-data-jobs).
## Viewing and Comparing Table Revision JSON
As an aid to managing Table Revisions, you can view the JSON for a Revision and open and compare it with another Table Revision's JSON.
**To view Table Revision JSON:**
1. Select **Settings>Lookup tables**. The **Lookup tables** page opens.
2. Select the **Name** hotlink text of the Lookup Table. The **Lookup table details** page opens.
3. Select the **Name** hotlink text of the Table Revision you want to view JSON for. The **Revision details** page opens.
4. On the **Revision details** panel, select **View JSON**. A modal opens allowing you to review the Revision's JSON:
![]() * You can **Copy** the JSON to your clipboard.
5. If you want to compare the Table Revision's JSON with that of another Revision, use the **Select revision to compare** drop-down to select the other Revision. The modal adjusts to add in the selected Revision as **Comparator** to the **Original**:
* You can **Copy** the JSON to your clipboard.
5. If you want to compare the Table Revision's JSON with that of another Revision, use the **Select revision to compare** drop-down to select the other Revision. The modal adjusts to add in the selected Revision as **Comparator** to the **Original**:
![]() * Differences in the JSON are highlighted.
6. Select **Close** to end your view Revision JSON session.
## Downloading Table Revision Data
You can download a Lookup Table Revision's data in either JSONL or CSV format.
**To download a Table Revision's data:**
1. Select **Settings>Lookup tables**. The **Lookup tables** page opens.
2. Select the **Name** hotlink text of the Lookup Table. The **Lookup table details** page opens.
3. Select the **Name** hotlink text of the Revision whose data you want to download. The **Revision details** page opens.
4. On the **Revision data** panel, select **Download data**. A popup menu appears.
5. Select the format which you want to use for the download - **Download JSONL** or **Download CSV**:
* Differences in the JSON are highlighted.
6. Select **Close** to end your view Revision JSON session.
## Downloading Table Revision Data
You can download a Lookup Table Revision's data in either JSONL or CSV format.
**To download a Table Revision's data:**
1. Select **Settings>Lookup tables**. The **Lookup tables** page opens.
2. Select the **Name** hotlink text of the Lookup Table. The **Lookup table details** page opens.
3. Select the **Name** hotlink text of the Revision whose data you want to download. The **Revision details** page opens.
4. On the **Revision data** panel, select **Download data**. A popup menu appears.
5. Select the format which you want to use for the download - **Download JSONL** or **Download CSV**:
![]() * The revision data is compiled in the selected format and a file downloaded locally.
* You can then open the downloaded file using your preferred application and review the Revision's data.
**Tip: Downloading ARCHIVED Revision data?** If you open Revision details for an **ARCHIVED** Revision, then the **Revision data** panel will show **no revision data**. This is because when a Revision is archived, its data is stored remotely. However, when you download an **ARCHIVED** Revision, its data values are retrieved from remote storage and included in the downloaded file.
## Uploading Table Revision Data
Instead of manually adding Revision data, as explained in the [previous section](/guides/lookup-tables/adding-data-to-and-publishing-table-revisions#adding-and-managing-data-for-table-revisions), you can upload either a JSONL or CSV formatted file to either create the initial Revision schema data values or to update the existing data values.
**Note:** You can only upload data to a **DRAFT** Revision.
**To upload Table Revision data:**
1. Select **Settings>Lookup tables**. The **Lookup tables** page opens.
2. Select the **Name** hotlink text of the Lookup Table. The **Lookup table details** page opens.
3. Select the **Name** hotlink text of the Revision you want to upload data values for. The **Revision details** page opens and the **Revision data** panel shows the existing data values for the Revision schema fields:
* The revision data is compiled in the selected format and a file downloaded locally.
* You can then open the downloaded file using your preferred application and review the Revision's data.
**Tip: Downloading ARCHIVED Revision data?** If you open Revision details for an **ARCHIVED** Revision, then the **Revision data** panel will show **no revision data**. This is because when a Revision is archived, its data is stored remotely. However, when you download an **ARCHIVED** Revision, its data values are retrieved from remote storage and included in the downloaded file.
## Uploading Table Revision Data
Instead of manually adding Revision data, as explained in the [previous section](/guides/lookup-tables/adding-data-to-and-publishing-table-revisions#adding-and-managing-data-for-table-revisions), you can upload either a JSONL or CSV formatted file to either create the initial Revision schema data values or to update the existing data values.
**Note:** You can only upload data to a **DRAFT** Revision.
**To upload Table Revision data:**
1. Select **Settings>Lookup tables**. The **Lookup tables** page opens.
2. Select the **Name** hotlink text of the Lookup Table. The **Lookup table details** page opens.
3. Select the **Name** hotlink text of the Revision you want to upload data values for. The **Revision details** page opens and the **Revision data** panel shows the existing data values for the Revision schema fields:
![]() 4. On the **Revision data** panel, select **Upload revision** **data**:
4. On the **Revision data** panel, select **Upload revision** **data**:
![]() The panel adjusts to allow you to either drag and drop a file or use **Select files** to open a **File upload** dialog to select a file for upload:
* When you drag & drop or select a JSONL or CSV formatted file, the data values contained in the file are uploaded and used to either create new data values for the Revision schema fields or to overwrite existing values.
* At upload, a validation check is performed against selected files. If a file is not correctly JSONL or CSV formatted or contains data fields that don't match the Revision's schema, then the upload is blocked and you'll receive an error.
You'll receive a confirmation when the upload job has succeeded:
The panel adjusts to allow you to either drag and drop a file or use **Select files** to open a **File upload** dialog to select a file for upload:
* When you drag & drop or select a JSONL or CSV formatted file, the data values contained in the file are uploaded and used to either create new data values for the Revision schema fields or to overwrite existing values.
* At upload, a validation check is performed against selected files. If a file is not correctly JSONL or CSV formatted or contains data fields that don't match the Revision's schema, then the upload is blocked and you'll receive an error.
You'll receive a confirmation when the upload job has succeeded:
![]() 5. Select **Revision data**. You can then check that the values contained in the uploaded file have either created new data values or updated the existing values:
5. Select **Revision data**. You can then check that the values contained in the uploaded file have either created new data values or updated the existing values:
![]() ## Managing Table Revisions
You can edit or delete a draft Table Revision at any time. However:
* You *cannot edit* a published or archived Table Revision.
* You *cannot delete* a published Table Revision.
**To manage Lookup Table Revisions:**
1. Select **Settings>Lookup tables**. The **Lookup tables** page opens.
2. Select the **Name** hotlink text of the Lookup Table. The **Lookup table details** page opens.
3. If you want to edit a Table Revision, on the **Revisions** panel select the **Edit** icon:
## Managing Table Revisions
You can edit or delete a draft Table Revision at any time. However:
* You *cannot edit* a published or archived Table Revision.
* You *cannot delete* a published Table Revision.
**To manage Lookup Table Revisions:**
1. Select **Settings>Lookup tables**. The **Lookup tables** page opens.
2. Select the **Name** hotlink text of the Lookup Table. The **Lookup table details** page opens.
3. If you want to edit a Table Revision, on the **Revisions** panel select the **Edit** icon:
![]() * Alternatively, select the **Name** hotlink text for the Revision to open the **Revision details** page and then select **Edit**.
The **Edit** page opens.
4. Make your editing changes and select **Update** revision.
**Important: Data already added to a Revision!** If you've already added data values to a Revision, when you open the **Edit** page, you *will not be able to make any changes* to the Revision's data field schema. You must first delete any data values, re-open the **Edit** page to make any required changes to the Revision's data field schema, and then add in new data values.
5. If you want to delete a Table Revision, on the **Revisions** panel select the **Delete** icon:
* Alternatively, select the **Name** hotlink text for the Revision to open the **Revision details** page and then select **Edit**.
The **Edit** page opens.
4. Make your editing changes and select **Update** revision.
**Important: Data already added to a Revision!** If you've already added data values to a Revision, when you open the **Edit** page, you *will not be able to make any changes* to the Revision's data field schema. You must first delete any data values, re-open the **Edit** page to make any required changes to the Revision's data field schema, and then add in new data values.
5. If you want to delete a Table Revision, on the **Revisions** panel select the **Delete** icon:
![]() A confirmation dialog appears.
6. Select **Delete** to confirm the delete action.
## Reviewing and Managing Revision Data Jobs
On the **Revision details** page, you can review and manage data jobs that have run for a Revision's data. There are four types of Lookup Table Revision data jobs:
* **ARCHIVE**. Job runs for the existing **PUBLISHED** Revision and you publish a **DRAFT** Revision, which means the existing Revision is automatically archived. See above [Publishing Table Revisions](/guides/lookup-tables/adding-data-to-and-publishing-table-revisions#publishing-table-revisions).
* **DOWNLOAD**. Job runs when you download a Revision's data. See above [Downloading Table Revision Data](/guides/lookup-tables/adding-data-to-and-publishing-table-revisions#downloading-table-revision-data).
* **UPLOAD**. Job runs when you upload a data file to create or update a Revision's data values. See above [Uploading Table Revision Data](/guides/lookup-tables/adding-data-to-and-publishing-table-revisions#uploading-table-revision-data).
* **COPY**. Job runs when you:
* Duplicate a Revision. See above [Duplicating Table Revisions](/guides/lookup-tables/adding-data-to-and-publishing-table-revisions#duplicating-table-revisions).
* Copy a Revision's data to another Revision. See above [Copying Table Revision Data](/guides/lookup-tables/adding-data-to-and-publishing-table-revisions#copying-table-revision-data).
You can quickly check the status of a Revision's data jobs and manage them. If a data job has failed, then a failure reason is given allowing you to follow-up and troubleshoot.
**To review and manage Table Revision data jobs:**
1. Select **Settings>Lookup tables**. The **Lookup tables** page opens.
2. Select the **Name** hotlink text of the Lookup Table. The **Lookup table details** page opens.
3. Select the **Name** hotlink text of the Revision you want to review and manage the data jobs for. The **Revision details** page opens.
4. On the **Revision data** panel, select **Review data jobs**:
A confirmation dialog appears.
6. Select **Delete** to confirm the delete action.
## Reviewing and Managing Revision Data Jobs
On the **Revision details** page, you can review and manage data jobs that have run for a Revision's data. There are four types of Lookup Table Revision data jobs:
* **ARCHIVE**. Job runs for the existing **PUBLISHED** Revision and you publish a **DRAFT** Revision, which means the existing Revision is automatically archived. See above [Publishing Table Revisions](/guides/lookup-tables/adding-data-to-and-publishing-table-revisions#publishing-table-revisions).
* **DOWNLOAD**. Job runs when you download a Revision's data. See above [Downloading Table Revision Data](/guides/lookup-tables/adding-data-to-and-publishing-table-revisions#downloading-table-revision-data).
* **UPLOAD**. Job runs when you upload a data file to create or update a Revision's data values. See above [Uploading Table Revision Data](/guides/lookup-tables/adding-data-to-and-publishing-table-revisions#uploading-table-revision-data).
* **COPY**. Job runs when you:
* Duplicate a Revision. See above [Duplicating Table Revisions](/guides/lookup-tables/adding-data-to-and-publishing-table-revisions#duplicating-table-revisions).
* Copy a Revision's data to another Revision. See above [Copying Table Revision Data](/guides/lookup-tables/adding-data-to-and-publishing-table-revisions#copying-table-revision-data).
You can quickly check the status of a Revision's data jobs and manage them. If a data job has failed, then a failure reason is given allowing you to follow-up and troubleshoot.
**To review and manage Table Revision data jobs:**
1. Select **Settings>Lookup tables**. The **Lookup tables** page opens.
2. Select the **Name** hotlink text of the Lookup Table. The **Lookup table details** page opens.
3. Select the **Name** hotlink text of the Revision you want to review and manage the data jobs for. The **Revision details** page opens.
4. On the **Revision data** panel, select **Review data jobs**:
![]() The **Status** of a Revision data job can be one of three states:
* **PENDING**. The job is queued and has not yet run.
* **SUCCEEDED**. The job ran successfully.
* **FAILED**. The job ran unsuccessfully and you can read-off the **Failure reason**.
5. If you want to delete a Revision data job, under **Actions** select the delete icon:
The **Status** of a Revision data job can be one of three states:
* **PENDING**. The job is queued and has not yet run.
* **SUCCEEDED**. The job ran successfully.
* **FAILED**. The job ran unsuccessfully and you can read-off the **Failure reason**.
5. If you want to delete a Revision data job, under **Actions** select the delete icon:
![]() A confirmation dialog appears.
6. Select **Delete**.
## Using Multiple Key Fields - Checking Revision Schema Field Order
Your use case when utilizing a Lookup Table might require multiple key fields to be defined for the Lookup Table Revision schema. For example, suppose you want a variable cost amount to be applied which is determined on the basis of three key field values for country, region, and charge type. To meet the case you plan to use a `Lookup.findNumber()` function, such as:
> `Lookup.findNumber("cost_lookup", "cost", 1, "country", "region", "type")`
For this type of case, you must ensure the order in which you've set up the three key fields for the published Lookup Table Revision schema *corresponds to* the order you have used the key fields in the Lookup function. For the above function, the Revision schema key field order would need to be:
A confirmation dialog appears.
6. Select **Delete**.
## Using Multiple Key Fields - Checking Revision Schema Field Order
Your use case when utilizing a Lookup Table might require multiple key fields to be defined for the Lookup Table Revision schema. For example, suppose you want a variable cost amount to be applied which is determined on the basis of three key field values for country, region, and charge type. To meet the case you plan to use a `Lookup.findNumber()` function, such as:
> `Lookup.findNumber("cost_lookup", "cost", 1, "country", "region", "type")`
For this type of case, you must ensure the order in which you've set up the three key fields for the published Lookup Table Revision schema *corresponds to* the order you have used the key fields in the Lookup function. For the above function, the Revision schema key field order would need to be:
![]() Notes:
* The top-to-bottom order of the key fields must match the left-to-right order of the key field parameter used in your Lookup function, since this is the order they will be passed into the function.
* The names used for the fields in the Revision schema doesn't have to match the names used in the Lookup function.
* Non-key field order doesn't need to match.
### Reordering Revision Schema Key Fields
After setting up a Table Revision schema, you might need to edit it and reorder the key fields to ensure the order matches the order you've used in a Lookup function.
**To reorder Revision schema key fields:**
1. Select **Settings>Lookup tables**. The **Lookup tables** page opens.
2. Select the **Name** hotlink text of the Lookup Table. The **Lookup table details** page opens.
3. On the Revisions panel, select the **Name** hotlink text of the Revision. The **Revision details** page opens.
4. Select **Edit**.
5. On the **Revision fields** card, select **Revision fields order**. A drop-down **Order** menu appears.
* Note that if you've already added data values for the Revision schema fields, you won't be able to edit the field order. You'll first have to delete any Revision data.
6. On the **Order** menu select the field you want to move and drag and drop to where you want to place it in the field order:
Notes:
* The top-to-bottom order of the key fields must match the left-to-right order of the key field parameter used in your Lookup function, since this is the order they will be passed into the function.
* The names used for the fields in the Revision schema doesn't have to match the names used in the Lookup function.
* Non-key field order doesn't need to match.
### Reordering Revision Schema Key Fields
After setting up a Table Revision schema, you might need to edit it and reorder the key fields to ensure the order matches the order you've used in a Lookup function.
**To reorder Revision schema key fields:**
1. Select **Settings>Lookup tables**. The **Lookup tables** page opens.
2. Select the **Name** hotlink text of the Lookup Table. The **Lookup table details** page opens.
3. On the Revisions panel, select the **Name** hotlink text of the Revision. The **Revision details** page opens.
4. Select **Edit**.
5. On the **Revision fields** card, select **Revision fields order**. A drop-down **Order** menu appears.
* Note that if you've already added data values for the Revision schema fields, you won't be able to edit the field order. You'll first have to delete any Revision data.
6. On the **Order** menu select the field you want to move and drag and drop to where you want to place it in the field order:
![]() 7. When you have achieved the required key field order, select **Update revision**.
# Creating and Managing Lookup Tables
Source: https://docs.m3ter.com/guides/lookup-tables/creating-and-managing-lookup-tables
This topic introduces a variable discounting use case example to explain how to create a Lookup Table, add a Table Revision, and set up a data field schema for a Revision:
* [Example Use Case](/guides/lookup-tables/creating-and-managing-lookup-tables#example-use-case)
* [Creating a Lookup Table](/guides/lookup-tables/creating-and-managing-lookup-tables#creating-a-lookup-table)
* [Creating Lookup Table Revisions](/guides/lookup-tables/creating-and-managing-lookup-tables#creating-lookup-table-revisions)
## Example Use Case
Suppose you run an online data storage service and bill end customers monthly in arrears by volume of data uploaded to your platform. You have customers in two countries - the US and UK. You want to offer your customers a running discount on their usage of your service and vary the discount rate on a month-by-month basis. At the end of each month, your Sales team will review customer Accounts and determine a discount rate for uploaded volume for the following month by country. To fulfill this kind of variable discounting use case, we can:
* Create a Lookup Table and publish a new Table Revision for the required discounted usage volume rates by country each month.
* Apply a calculation to a Meter Derived Field which uses a Lookup function to reference the Lookup Table and pull the relevant discount rates by country to be applied to uploaded data volume measures.
* For pricing Account Plans, use an Aggregation that targets the Meter Derived Field and therefore at billing only charges your customers for appropriately discounted upload volume measures.
## Creating a Lookup Table
You can quickly create a new Lookup Table from the **Settings** section of the Console.
**To create a Lookup Table:**
1. Select **Settings>Lookup tables**:
7. When you have achieved the required key field order, select **Update revision**.
# Creating and Managing Lookup Tables
Source: https://docs.m3ter.com/guides/lookup-tables/creating-and-managing-lookup-tables
This topic introduces a variable discounting use case example to explain how to create a Lookup Table, add a Table Revision, and set up a data field schema for a Revision:
* [Example Use Case](/guides/lookup-tables/creating-and-managing-lookup-tables#example-use-case)
* [Creating a Lookup Table](/guides/lookup-tables/creating-and-managing-lookup-tables#creating-a-lookup-table)
* [Creating Lookup Table Revisions](/guides/lookup-tables/creating-and-managing-lookup-tables#creating-lookup-table-revisions)
## Example Use Case
Suppose you run an online data storage service and bill end customers monthly in arrears by volume of data uploaded to your platform. You have customers in two countries - the US and UK. You want to offer your customers a running discount on their usage of your service and vary the discount rate on a month-by-month basis. At the end of each month, your Sales team will review customer Accounts and determine a discount rate for uploaded volume for the following month by country. To fulfill this kind of variable discounting use case, we can:
* Create a Lookup Table and publish a new Table Revision for the required discounted usage volume rates by country each month.
* Apply a calculation to a Meter Derived Field which uses a Lookup function to reference the Lookup Table and pull the relevant discount rates by country to be applied to uploaded data volume measures.
* For pricing Account Plans, use an Aggregation that targets the Meter Derived Field and therefore at billing only charges your customers for appropriately discounted upload volume measures.
## Creating a Lookup Table
You can quickly create a new Lookup Table from the **Settings** section of the Console.
**To create a Lookup Table:**
1. Select **Settings>Lookup tables**:
![]() The **Lookup tables** page opens.
2. Select **Create lookup table**. The **Create** page opens.
3. Under **Lookup table details**, enter a **Name** and **Code**.
4. Select **Create lookup table**. The **Lookup table details** page opens:
The **Lookup tables** page opens.
2. Select **Create lookup table**. The **Create** page opens.
3. Under **Lookup table details**, enter a **Name** and **Code**.
4. Select **Create lookup table**. The **Lookup table details** page opens:
![Lookup Tables33]() * Note that you can **Copy** the Lookup Table **ID** directly to your clipboard.
## Creating Lookup Table Revisions
When you create a Lookup Table Revision, you can define a schema for the data fields and types the Revision contains:
* String and number data field types are supported.
* A maximum of ten fields is allowed for a Revision data schema.
**To create a Lookup Table Revision:**
1. Select **Settings>Lookup tables**. The **Lookup tables** page opens.
2. Select the **Name** hotlink text of the Lookup Table you want to create a Revision for. The **Lookup table details** page opens.
3. On the **Revisions** panel, select **Create revision**. The **Create** page opens.
4. Under **Revision details** enter a **Name** for the Revision. (*Required*)
5. Under **Revision fields**, add the fields for the Revision:
* Note that you can **Copy** the Lookup Table **ID** directly to your clipboard.
## Creating Lookup Table Revisions
When you create a Lookup Table Revision, you can define a schema for the data fields and types the Revision contains:
* String and number data field types are supported.
* A maximum of ten fields is allowed for a Revision data schema.
**To create a Lookup Table Revision:**
1. Select **Settings>Lookup tables**. The **Lookup tables** page opens.
2. Select the **Name** hotlink text of the Lookup Table you want to create a Revision for. The **Lookup table details** page opens.
3. On the **Revisions** panel, select **Create revision**. The **Create** page opens.
4. Under **Revision details** enter a **Name** for the Revision. (*Required*)
5. Under **Revision fields**, add the fields for the Revision:
 * Enter a **Name** and **Type** for each field and use *unique names* for each field.
* For the current example, we've created a Revision that contains a **rate** number field and a **country** string field and used the checkbox to define **country** as a **Key** field.
* There must be at least one key field and one non-key field in a Revision.
* A maximum of **10** fields can be added for a Revision.
**Important: Using Multiple key fields!** When using multiple key fields, the order is important because lookups will be performed sequentially. You can change the **Revision fields order** after adding them. See [Using Multiple Key Fields - Checking Revision Schema Field Order](/guides/lookup-tables/adding-data-to-and-publishing-table-revisions#using-multiple-key-fields-checking-revision-schema-field-order).
* Enter a **Name** and **Type** for each field and use *unique names* for each field.
* For the current example, we've created a Revision that contains a **rate** number field and a **country** string field and used the checkbox to define **country** as a **Key** field.
* There must be at least one key field and one non-key field in a Revision.
* A maximum of **10** fields can be added for a Revision.
**Important: Using Multiple key fields!** When using multiple key fields, the order is important because lookups will be performed sequentially. You can change the **Revision fields order** after adding them. See [Using Multiple Key Fields - Checking Revision Schema Field Order](/guides/lookup-tables/adding-data-to-and-publishing-table-revisions#using-multiple-key-fields-checking-revision-schema-field-order).
 * You can open the **Revision field order list** and drag-and-drop fields to achieve the required order. The **Revision fields** card will adjust as you do this.
6. Select **Create revision**. You are returned to the **Lookup table details** page and the new Revision is listed:
* You can open the **Revision field order list** and drag-and-drop fields to achieve the required order. The **Revision fields** card will adjust as you do this.
6. Select **Create revision**. You are returned to the **Lookup table details** page and the new Revision is listed:
![Lookup Tables34]() Note that:
* The **Status** of a Revision when first created is **DRAFT**.
* You can expand a Revision and read-off its **Fields**.
We've now defined the data field schema for a Lookup Table Revision to serve our variable discount rate example. Next, we'll need to add some data values for that schema and publish the Revision. Publishing a Lookup Table Revision makes the data values configured for the Revision available for any Lookup functions used in calculations that reference the Lookup Table - see the [following topic](/guides/lookup-tables/adding-data-to-and-publishing-table-revisions).
# Lookup Functions
Source: https://docs.m3ter.com/guides/lookup-tables/lookup-functions
Three Lookup functions are available for use in your Derived Field calculations:
* `Lookup.findNumber`
* `Lookup.findString`
* `Lookup.exists`
## `Lookup.findNumber`
`Lookup.findNumber()` is a multi-argument function which returns a number value and is of the generalized form:
> `Lookup.findNumber(, , , , , ...)`
For example:
> `Lookup.findNumber("discount_vol_rates", "rate", 1, "country")`
* This will lookup the number value for the `rate` field in the published Table Revision of the `discount_vol_rates` Lookup Table for the `country` keyed field.
* The `country` keyed field *must be present* in the measurement.
* If no match is found, then a default value of **1** will be used for the `rate`.
## `Lookup.findString`
`Lookup.findString()` is a multi-argument function which returns a string value and is of the generalized form:
> `Lookup.findString(, , , , , ...)`
For example:
> `Lookup.findString("account_ops_status", "standing", "Pending", "ops_status")`
* This will lookup the string value for the `standing` field in the published Table Revision of the `account_ops_status` Lookup Table for the `ops_status` keyed field.
* The `ops_status` keyed field *must be present* in the measurement.
* If no match is found, then a default value of **Pending** will be used for the `standing`.
## `Lookup.exists`
`Lookup.exists()` is a multi-argument function which returns true if found, false if not. It has the generalized form:
> `Lookup.exists(, [, , ...])`
This Lookup function is typically used in conditional blocks and ternary expressions. For example:
> `Lookup.exists(, [, , ...])`
# Worked Example - Variable Usage Discounting
Source: https://docs.m3ter.com/guides/lookup-tables/worked-example-variable-usage-discounting
The previous topics in this section introduced a variable usage discounting example use case and went on to explain how to create a **Discount Vol Rates** Lookup Table and a Table Revision to implement this kind of use case. How to add the required Table Revision data values for the example and publish the Table Revision was also explained.
This topic goes on to explain how to complete the set up in your Organization for the example use case. We then submit some sample data against test Accounts to check the implementation is working as expected:
* [Setting Up a Meter](/guides/lookup-tables/worked-example-variable-usage-discounting#setting-up-a-meter). Create and configure a Meter with a Derived Field calculation that uses a Lookup function referencing the **Discount Vol Rates** Lookup Table to apply discount rates by country to ingested usage data volumes.
* [Creating an Aggregation](/guides/lookup-tables/worked-example-variable-usage-discounting#creating-an-aggregation). Target the Meter's Derived Field and use the Aggregation to price Plans attached to Accounts.
* [Submitting Sample Data and Checking Account Bills](/guides/lookup-tables/worked-example-variable-usage-discounting#submitting-sample-data-and-checking-account-bills). Submit some sample usage data measures for test Accounts and generate sample Bills to check that Accounts in different countries are billed according to the appropriate discounted usage volume measures.
**Important!** Before you attempt to follow this worked example, please review the earlier topics in this section: [Creating and Managing Lookup Tables](/guides/lookup-tables/creating-and-managing-lookup-tables) and [Adding Data to, Publishing, and Managing Lookup Table Revisions](/guides/lookup-tables/adding-data-to-and-publishing-table-revisions).
## Setting Up a Meter
Here's the setup for **Vol Data Meter 1** to serve the example discounting usage rate use case:
Note that:
* The **Status** of a Revision when first created is **DRAFT**.
* You can expand a Revision and read-off its **Fields**.
We've now defined the data field schema for a Lookup Table Revision to serve our variable discount rate example. Next, we'll need to add some data values for that schema and publish the Revision. Publishing a Lookup Table Revision makes the data values configured for the Revision available for any Lookup functions used in calculations that reference the Lookup Table - see the [following topic](/guides/lookup-tables/adding-data-to-and-publishing-table-revisions).
# Lookup Functions
Source: https://docs.m3ter.com/guides/lookup-tables/lookup-functions
Three Lookup functions are available for use in your Derived Field calculations:
* `Lookup.findNumber`
* `Lookup.findString`
* `Lookup.exists`
## `Lookup.findNumber`
`Lookup.findNumber()` is a multi-argument function which returns a number value and is of the generalized form:
> `Lookup.findNumber(, , , , , ...)`
For example:
> `Lookup.findNumber("discount_vol_rates", "rate", 1, "country")`
* This will lookup the number value for the `rate` field in the published Table Revision of the `discount_vol_rates` Lookup Table for the `country` keyed field.
* The `country` keyed field *must be present* in the measurement.
* If no match is found, then a default value of **1** will be used for the `rate`.
## `Lookup.findString`
`Lookup.findString()` is a multi-argument function which returns a string value and is of the generalized form:
> `Lookup.findString(, , , , , ...)`
For example:
> `Lookup.findString("account_ops_status", "standing", "Pending", "ops_status")`
* This will lookup the string value for the `standing` field in the published Table Revision of the `account_ops_status` Lookup Table for the `ops_status` keyed field.
* The `ops_status` keyed field *must be present* in the measurement.
* If no match is found, then a default value of **Pending** will be used for the `standing`.
## `Lookup.exists`
`Lookup.exists()` is a multi-argument function which returns true if found, false if not. It has the generalized form:
> `Lookup.exists(, [, , ...])`
This Lookup function is typically used in conditional blocks and ternary expressions. For example:
> `Lookup.exists(, [, , ...])`
# Worked Example - Variable Usage Discounting
Source: https://docs.m3ter.com/guides/lookup-tables/worked-example-variable-usage-discounting
The previous topics in this section introduced a variable usage discounting example use case and went on to explain how to create a **Discount Vol Rates** Lookup Table and a Table Revision to implement this kind of use case. How to add the required Table Revision data values for the example and publish the Table Revision was also explained.
This topic goes on to explain how to complete the set up in your Organization for the example use case. We then submit some sample data against test Accounts to check the implementation is working as expected:
* [Setting Up a Meter](/guides/lookup-tables/worked-example-variable-usage-discounting#setting-up-a-meter). Create and configure a Meter with a Derived Field calculation that uses a Lookup function referencing the **Discount Vol Rates** Lookup Table to apply discount rates by country to ingested usage data volumes.
* [Creating an Aggregation](/guides/lookup-tables/worked-example-variable-usage-discounting#creating-an-aggregation). Target the Meter's Derived Field and use the Aggregation to price Plans attached to Accounts.
* [Submitting Sample Data and Checking Account Bills](/guides/lookup-tables/worked-example-variable-usage-discounting#submitting-sample-data-and-checking-account-bills). Submit some sample usage data measures for test Accounts and generate sample Bills to check that Accounts in different countries are billed according to the appropriate discounted usage volume measures.
**Important!** Before you attempt to follow this worked example, please review the earlier topics in this section: [Creating and Managing Lookup Tables](/guides/lookup-tables/creating-and-managing-lookup-tables) and [Adding Data to, Publishing, and Managing Lookup Table Revisions](/guides/lookup-tables/adding-data-to-and-publishing-table-revisions).
## Setting Up a Meter
Here's the setup for **Vol Data Meter 1** to serve the example discounting usage rate use case:
![Lookup Tables44]() * A **Measure** Data Field called **Gibytes Upload** to collect usage volumes.
* A **Dimension** Data Field called **Country** to collect Account country.
* A **Discount Volume** Derived Field with a calculation that uses a Lookup function referencing the **Discount Vol Rates** Lookup Table to apply discount rates by country to the **Gibytes Upload** Data Field usage volumes.
When a usage data measurement is ingested for an Account using the Meter, the example Derived Field calculation takes the value of the **Gibytes Upload** Data Field and multiplies it by the number value yielded by the `Lookup.findNumber()` function.
`Lookup.findNumber()` is a multi-argument function which returns a number value and is of the generalized form:
> `Lookup.findNumber(, , , , , ...)`
For the `Lookup.findNumber()` function used in our Derived Field calculation we have:
> `Lookup.findNumber("discount_vol_rates", "rate", 1, "country")`
This will lookup the number value for the `rate` field in the published **Discount Vol Rates Rev1** Revision of the **Discount Vol Rates** Lookup Table given the `country` keyed field, which must be present in the measurement. If no match is found, then a default value of **1** will be used for the `rate`.
Given the data values we set up for the published **Discount Vol Rates Rev1** Revision of the **Discount Vol Rates** Lookup Table:
* If the Meter ingests a usage data measurement where the `country` is **UK**, then the `rate` value returned by the **Lookup.findNumber()** function will be **0.8**.
* If the Meter ingests a usage data measurement where the `country` is **US**, then the `rate` value returned by the **Lookup.findNumber()** function will be **0.9**.
**Tip: Available Lookup Functions?** See [Lookup Functions](/guides/lookup-tables/lookup-functions) for a summary of available functions.
## Creating an Aggregation
Here's the detail for a **Vol Data Agg1** Aggregation targeting the **Discount Volume** Derived Field on **Vol Data Meter 1**:
* A **Measure** Data Field called **Gibytes Upload** to collect usage volumes.
* A **Dimension** Data Field called **Country** to collect Account country.
* A **Discount Volume** Derived Field with a calculation that uses a Lookup function referencing the **Discount Vol Rates** Lookup Table to apply discount rates by country to the **Gibytes Upload** Data Field usage volumes.
When a usage data measurement is ingested for an Account using the Meter, the example Derived Field calculation takes the value of the **Gibytes Upload** Data Field and multiplies it by the number value yielded by the `Lookup.findNumber()` function.
`Lookup.findNumber()` is a multi-argument function which returns a number value and is of the generalized form:
> `Lookup.findNumber(, , , , , ...)`
For the `Lookup.findNumber()` function used in our Derived Field calculation we have:
> `Lookup.findNumber("discount_vol_rates", "rate", 1, "country")`
This will lookup the number value for the `rate` field in the published **Discount Vol Rates Rev1** Revision of the **Discount Vol Rates** Lookup Table given the `country` keyed field, which must be present in the measurement. If no match is found, then a default value of **1** will be used for the `rate`.
Given the data values we set up for the published **Discount Vol Rates Rev1** Revision of the **Discount Vol Rates** Lookup Table:
* If the Meter ingests a usage data measurement where the `country` is **UK**, then the `rate` value returned by the **Lookup.findNumber()** function will be **0.8**.
* If the Meter ingests a usage data measurement where the `country` is **US**, then the `rate` value returned by the **Lookup.findNumber()** function will be **0.9**.
**Tip: Available Lookup Functions?** See [Lookup Functions](/guides/lookup-tables/lookup-functions) for a summary of available functions.
## Creating an Aggregation
Here's the detail for a **Vol Data Agg1** Aggregation targeting the **Discount Volume** Derived Field on **Vol Data Meter 1**:
![Lookup Tables45]() We can use this Aggregation as a pricing metric to price Plans attached to Accounts. Since it uses a **SUM** method on the Meter's **Discount Volume** Derived Field values, we expect that the volume charged for against an Account will be for *discounted usage volumes* according to the rates by country we have set up for the published Revision of the **Discount Vol Rates** Lookup Table.
## Submitting Sample Data and Checking Account Bills
To check our worked example of a variable discounted usage rate implemented using a Lookup Table, we'll now submit some sample Data to two test Accounts - one based in the UK and one in the US. We can then:
* Open Usage Data Explorer (v2) and perform a query to return the usage data submissions that were ingested, and to check the **Discount Volume** Derived Field values have been calculated correctly.
* Run billing for each Account and check they are correctly charged at the appropriate discounted rates by country.
**To test Lookup Table example:**
1. First create two test Accounts - one based in the UK and one based in the US. For example:
* **Vol Stored UK Account**
* **Vol Stored US Account**
See [Creating and Managing Accounts](/guides/end-customer-accounts/creating-an-account).
2. Create a test Product, create a Product Plan Template and a Plan based on the Plan Template that uses monthly billing in arrears with US Dollars billing currency.
3. Then use the **Vol Data Agg1** Aggregation to price the Plan using a single price tier for a flat charge rate of 1 USD per GigaByte of storage used.
4. Attach the priced Plan to each test Account.
5. Open each Account, and submit a single sample usage data measurement of 1000 GB using **Vol Data Meter 1** for a given month's billing period. For example:
We can use this Aggregation as a pricing metric to price Plans attached to Accounts. Since it uses a **SUM** method on the Meter's **Discount Volume** Derived Field values, we expect that the volume charged for against an Account will be for *discounted usage volumes* according to the rates by country we have set up for the published Revision of the **Discount Vol Rates** Lookup Table.
## Submitting Sample Data and Checking Account Bills
To check our worked example of a variable discounted usage rate implemented using a Lookup Table, we'll now submit some sample Data to two test Accounts - one based in the UK and one in the US. We can then:
* Open Usage Data Explorer (v2) and perform a query to return the usage data submissions that were ingested, and to check the **Discount Volume** Derived Field values have been calculated correctly.
* Run billing for each Account and check they are correctly charged at the appropriate discounted rates by country.
**To test Lookup Table example:**
1. First create two test Accounts - one based in the UK and one based in the US. For example:
* **Vol Stored UK Account**
* **Vol Stored US Account**
See [Creating and Managing Accounts](/guides/end-customer-accounts/creating-an-account).
2. Create a test Product, create a Product Plan Template and a Plan based on the Plan Template that uses monthly billing in arrears with US Dollars billing currency.
3. Then use the **Vol Data Agg1** Aggregation to price the Plan using a single price tier for a flat charge rate of 1 USD per GigaByte of storage used.
4. Attach the priced Plan to each test Account.
5. Open each Account, and submit a single sample usage data measurement of 1000 GB using **Vol Data Meter 1** for a given month's billing period. For example:
![1755534258 Lookuptables12]() 6. To check how the usage data measurements were ingested, you can now open [Usage Data Explorer (v2)](/guides/data-explorer/usage-data-explorer-v2) and submit a **Query** for the **Vol Data Meter 1** and a **Custom** time period for the date you made the usage submissions:
6. To check how the usage data measurements were ingested, you can now open [Usage Data Explorer (v2)](/guides/data-explorer/usage-data-explorer-v2) and submit a **Query** for the **Vol Data Meter 1** and a **Custom** time period for the date you made the usage submissions:
![1755676412 Lookuptables21]() * In the **Results row** table returned for the Query, we see that for each usage measurement submitted to the two Accounts, the **Discount Volume** Derived Field value has been correctly calculated for the **Gibytes Upload** raw volume and the rate values by **Country** we added to the published **Discount Vol Rates Rev1** Revision of the **Discount Vol Rates** Lookup Table.
7. Lastly, run billing for each Account for the relevant month's billing period. For the current example and having made the single **1000 GB** submissions to each Account in July, we'll run billing to check the usage charge for the August 1st bills:
* For **Vol Stored UK Account**:
* In the **Results row** table returned for the Query, we see that for each usage measurement submitted to the two Accounts, the **Discount Volume** Derived Field value has been correctly calculated for the **Gibytes Upload** raw volume and the rate values by **Country** we added to the published **Discount Vol Rates Rev1** Revision of the **Discount Vol Rates** Lookup Table.
7. Lastly, run billing for each Account for the relevant month's billing period. For the current example and having made the single **1000 GB** submissions to each Account in July, we'll run billing to check the usage charge for the August 1st bills:
* For **Vol Stored UK Account**:
![Lookup Tables60]() * For the **Vol Stored US Account**:
* For the **Vol Stored US Account**:
![Lookup Tables61]() As expected, each Account Bill shows that the number of units charged has been correctly adjusted for the rate by country set using the published **Discount Vol Rates Rev1** Revision of the **Discount Vol Rates** Lookup Table.
We can see that by using a Lookup function referencing the **Discount Vol Rates** in our Meter Derived Field calculation, to change these discounted usage volume rates for the next month's billing period we need only:
* Duplicate the published **Discount Vol Rates Rev1** Revision to create a new draft Revision called **Discount Vol Rates Rev2**.
* Add updated data values to the new draft Revision - for example:
* country = UK, rate = 0.85
* country = US, rate = 0.95
* Publish the new Revision.
In addition, if an end customer Account located in a third country was added, we could also ensure that the next published Revision for the Lookup Table our Derived Field calculation references has data field values added for rate and country to cover the discounted usage rate we want to apply to that third country.
# Worked Example - Variable Usage Discounting by Account
Source: https://docs.m3ter.com/guides/lookup-tables/worked-example-variable-usage-discouting-by-account
When using a Lookup function in a Meter Derived Field calculation, the *Account code* string can be referenced as the key field on the published Lookup Table Revision.
The [previous topic](/guides/lookup-tables/worked-example-variable-usage-discounting) set out a worked example using a Lookup table to impose variable usage discounting by country in which a customer Account is located. This topic adapts the example to illustrate how referencing the Account code string in a Derived Field calculation allows variable usage discounting to be imposed by Account:
* [Creating Lookup Table and Revision](#creating-lookup-table-and-revision). Create and configure a Lookup Table and Revision for imposing different usage rates for billing on an account-by-account basis.
* [Setting Up Meter](#setting-up-meter). Create and configure a Meter with a Derived Field calculation that uses a Lookup function referencing the Lookup Table to apply discount rates by Account to ingested usage data volumes.
* [Creating Aggregation](#creating-aggregation). Target the Meter's Derived Field and use the Aggregation to price Plans attached to Accounts.
* [Submitting Test Data and Checking Bills](#submitting-test-data-and-checking-bills). Submit some sample usage data measures for test Accounts and generate sample Bills to check that different Accounts are billed according to the defined discounted usage volume measures.
**Important!** Before you attempt to follow this worked example, please review the earlier topics in this section: [Creating and Managing Lookup Tables](https://docs.m3ter.com/guides/lookup-tables/creating-and-managing-lookup-tables), [Adding Data to, Publishing, and Managing Lookup Table Revisions](https://docs.m3ter.com/guides/lookup-tables/adding-data-to-and-publishing-table-revisions), and [Worked Example - Variable Usage Discounting](/guides/lookup-tables/worked-example-variable-usage-discounting).
## Creating Lookup Table and Revision
We'll first create the **Disc Vol Rates** Lookup Table and add **Disc Vol Rates Revision 1** to it:
As expected, each Account Bill shows that the number of units charged has been correctly adjusted for the rate by country set using the published **Discount Vol Rates Rev1** Revision of the **Discount Vol Rates** Lookup Table.
We can see that by using a Lookup function referencing the **Discount Vol Rates** in our Meter Derived Field calculation, to change these discounted usage volume rates for the next month's billing period we need only:
* Duplicate the published **Discount Vol Rates Rev1** Revision to create a new draft Revision called **Discount Vol Rates Rev2**.
* Add updated data values to the new draft Revision - for example:
* country = UK, rate = 0.85
* country = US, rate = 0.95
* Publish the new Revision.
In addition, if an end customer Account located in a third country was added, we could also ensure that the next published Revision for the Lookup Table our Derived Field calculation references has data field values added for rate and country to cover the discounted usage rate we want to apply to that third country.
# Worked Example - Variable Usage Discounting by Account
Source: https://docs.m3ter.com/guides/lookup-tables/worked-example-variable-usage-discouting-by-account
When using a Lookup function in a Meter Derived Field calculation, the *Account code* string can be referenced as the key field on the published Lookup Table Revision.
The [previous topic](/guides/lookup-tables/worked-example-variable-usage-discounting) set out a worked example using a Lookup table to impose variable usage discounting by country in which a customer Account is located. This topic adapts the example to illustrate how referencing the Account code string in a Derived Field calculation allows variable usage discounting to be imposed by Account:
* [Creating Lookup Table and Revision](#creating-lookup-table-and-revision). Create and configure a Lookup Table and Revision for imposing different usage rates for billing on an account-by-account basis.
* [Setting Up Meter](#setting-up-meter). Create and configure a Meter with a Derived Field calculation that uses a Lookup function referencing the Lookup Table to apply discount rates by Account to ingested usage data volumes.
* [Creating Aggregation](#creating-aggregation). Target the Meter's Derived Field and use the Aggregation to price Plans attached to Accounts.
* [Submitting Test Data and Checking Bills](#submitting-test-data-and-checking-bills). Submit some sample usage data measures for test Accounts and generate sample Bills to check that different Accounts are billed according to the defined discounted usage volume measures.
**Important!** Before you attempt to follow this worked example, please review the earlier topics in this section: [Creating and Managing Lookup Tables](https://docs.m3ter.com/guides/lookup-tables/creating-and-managing-lookup-tables), [Adding Data to, Publishing, and Managing Lookup Table Revisions](https://docs.m3ter.com/guides/lookup-tables/adding-data-to-and-publishing-table-revisions), and [Worked Example - Variable Usage Discounting](/guides/lookup-tables/worked-example-variable-usage-discounting).
## Creating Lookup Table and Revision
We'll first create the **Disc Vol Rates** Lookup Table and add **Disc Vol Rates Revision 1** to it:
![Lookup Tables49]() * We've added two fields for the Table Revision schema:
* We've added two fields for the Table Revision schema:
 * The Revision schema uses an **account** String field as the key field for Lookup and we can now add some data items for the fields:
 * Importantly note here that we've entered the actual *code string* values for the Accounts we want to impose usage discounting on.
* We can now publish the Table Revision:
* Importantly note here that we've entered the actual *code string* values for the Accounts we want to impose usage discounting on.
* We can now publish the Table Revision:
![Lookup Tables53]() ## Setting Up Meter
Here's the setup for **VolDisc Meter 1** to serve the example discounting usage rate by Account use case:
## Setting Up Meter
Here's the setup for **VolDisc Meter 1** to serve the example discounting usage rate by Account use case:
![Lookup Tables52]() * A **Measure** Data Field called **Gibs Load** to collect usage volumes.
* A **DiscVol** Derived Field with a calculation that uses a Lookup function referencing the **Disc Vol Rates** Lookup Table to apply discount rates by Account to the **Gibs Load** Data Field usage volumes.
When a usage data measurement is ingested for an Account using the Meter, the example Derived Field calculation takes the value of the **Gibs Load** Data Field and multiplies it by the number value yielded by the `Lookup.findNumber()` function.
For the `Lookup.findNumber()` function used in our Derived Field calculation we have:
> `Lookup.findNumber("disc_vol_rates", "rate", 1, m3ter.account.code)`
This will lookup the number value for the `rate` field in the published **Disc Vol Rates Revision 1** of the **Disc Vol Rates** Lookup Table given the Account *code string* of the `account` keyed field, which must be present in the measurement. If no match is found for a *code string*, then a default value of **1** will be used for the `rate`.
Given the data values we set up for the published **Disc Vol Rates Revision 1** of the **Disc Vol Rates** Lookup Table:
* If the Meter ingests a usage data measurement where the Account *code string* is **vol\_store\_acct\_uk**, then the `rate` value returned by the **Lookup.findNumber()** function will be **0.85**.
* If the Meter ingests a usage data measurement where the Account *code string* is **vol\_store\_acct\_us**, then the `rate` value returned by the **Lookup.findNumber()** function will be **0.95.**
## Creating Aggregation
Here's the detail for a **VolDisc Agg 1** Aggregation targeting the **DiscVol** Derived Field on **VolDisc Meter 1**:
* A **Measure** Data Field called **Gibs Load** to collect usage volumes.
* A **DiscVol** Derived Field with a calculation that uses a Lookup function referencing the **Disc Vol Rates** Lookup Table to apply discount rates by Account to the **Gibs Load** Data Field usage volumes.
When a usage data measurement is ingested for an Account using the Meter, the example Derived Field calculation takes the value of the **Gibs Load** Data Field and multiplies it by the number value yielded by the `Lookup.findNumber()` function.
For the `Lookup.findNumber()` function used in our Derived Field calculation we have:
> `Lookup.findNumber("disc_vol_rates", "rate", 1, m3ter.account.code)`
This will lookup the number value for the `rate` field in the published **Disc Vol Rates Revision 1** of the **Disc Vol Rates** Lookup Table given the Account *code string* of the `account` keyed field, which must be present in the measurement. If no match is found for a *code string*, then a default value of **1** will be used for the `rate`.
Given the data values we set up for the published **Disc Vol Rates Revision 1** of the **Disc Vol Rates** Lookup Table:
* If the Meter ingests a usage data measurement where the Account *code string* is **vol\_store\_acct\_uk**, then the `rate` value returned by the **Lookup.findNumber()** function will be **0.85**.
* If the Meter ingests a usage data measurement where the Account *code string* is **vol\_store\_acct\_us**, then the `rate` value returned by the **Lookup.findNumber()** function will be **0.95.**
## Creating Aggregation
Here's the detail for a **VolDisc Agg 1** Aggregation targeting the **DiscVol** Derived Field on **VolDisc Meter 1**:
![Lookup Table54]() We can use this Aggregation as a pricing metric to price Plans attached to Accounts. Since it uses a **SUM** method on the Meter's **DiscVol** Derived Field values, we expect that the volume charged against an Account will be for *discounted usage volumes* according to the rates by Account we have set up for the published Revision of the **Disc Vol Rates** Lookup Table.
## Submitting Test Data and Checking Bills
To check our worked example of a variable discounted usage rate implemented using a Lookup Table, we'll now submit some sample Data to two test Accounts. We can then:
* Open Usage Data Explorer (v2) and perform a query to return the usage data submissions that were ingested, and to check the **DiscVol** Derived Field values have been calculated correctly
* Run billing for each Account and check they are correctly charged at the appropriate discounted rates by Account.
**To test Lookup Table example:**
1. First create two test Accounts. For the current example:
* **Vol Store Acct UK** with code: **vol\_store\_acct\_uk**
* **Vol Store Acct US** with code: **vol\_store\_acct\_us**
See [Creating and Managing Accounts](https://docs.m3ter.com/guides/end-customer-accounts/creating-an-account).
2. Create a test Product, create a Product Plan Template and a Plan based on the Plan Template that uses monthly billing in arrears with US Dollars billing currency.
3. Then use the **VolDisc Agg1** Aggregation to price the Plan using a single price tier for a flat charge rate of 1 USD per GiGBites of storage used.
4. Attach the priced Plan to each test Account.
5. Open each Account, and submit a single sample usage data measurement of 1000 GB using **VolDisc Meter 1** for a given month's billing period. For example:
We can use this Aggregation as a pricing metric to price Plans attached to Accounts. Since it uses a **SUM** method on the Meter's **DiscVol** Derived Field values, we expect that the volume charged against an Account will be for *discounted usage volumes* according to the rates by Account we have set up for the published Revision of the **Disc Vol Rates** Lookup Table.
## Submitting Test Data and Checking Bills
To check our worked example of a variable discounted usage rate implemented using a Lookup Table, we'll now submit some sample Data to two test Accounts. We can then:
* Open Usage Data Explorer (v2) and perform a query to return the usage data submissions that were ingested, and to check the **DiscVol** Derived Field values have been calculated correctly
* Run billing for each Account and check they are correctly charged at the appropriate discounted rates by Account.
**To test Lookup Table example:**
1. First create two test Accounts. For the current example:
* **Vol Store Acct UK** with code: **vol\_store\_acct\_uk**
* **Vol Store Acct US** with code: **vol\_store\_acct\_us**
See [Creating and Managing Accounts](https://docs.m3ter.com/guides/end-customer-accounts/creating-an-account).
2. Create a test Product, create a Product Plan Template and a Plan based on the Plan Template that uses monthly billing in arrears with US Dollars billing currency.
3. Then use the **VolDisc Agg1** Aggregation to price the Plan using a single price tier for a flat charge rate of 1 USD per GiGBites of storage used.
4. Attach the priced Plan to each test Account.
5. Open each Account, and submit a single sample usage data measurement of 1000 GB using **VolDisc Meter 1** for a given month's billing period. For example:
![Lookup Tables56]() 6. To check how the usage data measurements were ingested, you can now open [Usage Data Explorer (v2)](https://docs.m3ter.com/guides/data-explorer/usage-data-explorer-v2) and submit a **Query** for the **VolDisc Meter 1** and a **Previous month** time period for the date you made the usage submissions:
6. To check how the usage data measurements were ingested, you can now open [Usage Data Explorer (v2)](https://docs.m3ter.com/guides/data-explorer/usage-data-explorer-v2) and submit a **Query** for the **VolDisc Meter 1** and a **Previous month** time period for the date you made the usage submissions:
![Lookup Tables57]() * In the **Results row** table returned for the Query, we see that for each usage measurement submitted to the two Accounts, the **DiscVol** Derived Field value has been correctly calculated for the **Gibs Load** raw volume and the rate values by Account we added to the published **Disc Vol Rates Revision 1** of the **Disc Vol Rates** Lookup Table.
7. Lastly, run billing for each Account for the relevant month's billing period. For the current example and, having made the single **1000 GB** submissions to each Account in April, we'll run billing to check the usage charge for the May 1st bills:
* For **Vol Store Acct UK**:
* In the **Results row** table returned for the Query, we see that for each usage measurement submitted to the two Accounts, the **DiscVol** Derived Field value has been correctly calculated for the **Gibs Load** raw volume and the rate values by Account we added to the published **Disc Vol Rates Revision 1** of the **Disc Vol Rates** Lookup Table.
7. Lastly, run billing for each Account for the relevant month's billing period. For the current example and, having made the single **1000 GB** submissions to each Account in April, we'll run billing to check the usage charge for the May 1st bills:
* For **Vol Store Acct UK**:
![Lookup Tables62]() * For **Vol Store Acct US**:
* For **Vol Store Acct US**:
![Lookup Tables63]() As expected, each Account Bill shows that the number of units charged has been correctly adjusted for the rate by Account set using the published **Disc Vol Rates Revision 1** of the **Disc Vol Rates** Lookup Table.
By using `m3ter.account.code` in the Lookup function configured for the Meter Derived Field Calculation, we can quickly set up additional usage discounting for customer Accounts by simply adding their respective Account codes to the published Lookup Table Revision data.
# m3sh
Source: https://docs.m3ter.com/guides/m3sh-automation
The m3sh platform underpins and drives m3ter's interoperability and automation capabilities, encompassing Events and Notifications, Integrations, Workflows, and Apps, such as the Salesforce Managed Package and soon the NetSuite SuiteApp. All m3ter customers have access to m3sh, offering you a generalized plug-and-play capability with the systems making up your quote-to-cash stack. In this way, m3sh facilitates and unlocks the full power of m3ter for fastest time-to-market implementation of usage-based and hybrid pricing and billing.
As expected, each Account Bill shows that the number of units charged has been correctly adjusted for the rate by Account set using the published **Disc Vol Rates Revision 1** of the **Disc Vol Rates** Lookup Table.
By using `m3ter.account.code` in the Lookup function configured for the Meter Derived Field Calculation, we can quickly set up additional usage discounting for customer Accounts by simply adding their respective Account codes to the published Lookup Table Revision data.
# m3sh
Source: https://docs.m3ter.com/guides/m3sh-automation
The m3sh platform underpins and drives m3ter's interoperability and automation capabilities, encompassing Events and Notifications, Integrations, Workflows, and Apps, such as the Salesforce Managed Package and soon the NetSuite SuiteApp. All m3ter customers have access to m3sh, offering you a generalized plug-and-play capability with the systems making up your quote-to-cash stack. In this way, m3sh facilitates and unlocks the full power of m3ter for fastest time-to-market implementation of usage-based and hybrid pricing and billing.
![]() This page introduces m3sh, gives an overview of its key design principles, and reviews some common use cases:
* [Key Design Principles](/guides/m3sh-automation#key-design-principles)
* [Common Use Cases](/guides/m3sh-automation#common-use-cases)
For further detailed guidance on accessing, reviewing, building, and managing m3sh Workflows in your m3ter Organization see:
* [m3sh Workflows](/guides/m3sh-workflows/m3sh-workflows)
In the m3sh section of the Console, you can access other automation and interoperability features available in the m3ter platform:
* [Utilizing Events and Notifications](/guides/alerts-events-and-notifications/utilizing-events-and-notifications)
* [Creating and Managing Credentials](/guides/integrations/setting-up-integrations/managing-integration-credentials)
* [Integrations](/guides/integrations)
* [Outgoing Webhooks](/guides/integrations/setting-up-integrations/creating-and-managing-destinations)
* [Integration Events](/guides/integrations/setting-up-integrations/reviewing-and-resolving-integration-events)
* [External Mappings](/guides/end-customer-accounts/creating-and-managing-external-mappings-for-accounts)
* [Transformations](/guides/m3sh-workflows/creating-and-managing-transformations)
**Note: m3sh in Preview Release!** Please note that m3sh is currently available in Preview release version. See [Feature Release Stages](/guides/getting-started/feature-release-stages) for Preview release definition.
## Key Design Principles
The m3sh platform is built around three key design principles to ensure a smooth end-to-end rating and billing flow through your quote-to-cash stack:
* [Interoperability and Connectivity](/guides/m3sh-automation#interoperability-and-connectivity)
* [Customer Stack: Accommodate and Enhance](/guides/m3sh-automation#customer-stack-accommodate-and-enhance)
* [Exploit and Enhance m3ter](/guides/m3sh-automation#exploit-and-enhance-m3ter)
### Interoperability and Connectivity
A baseline requirement was to ensure the capability to plug easily and seamlessly into existing systems:
* Input of data:
* From CRM systems for initial and ongoing set up and configuration.
* From SaaS platforms for end-customer product usage data.
* Output into ERP systems to support invoicing and analytics reporting across multiple systems.
### Customer Stack: Accommodate and Enhance
It was considered vital that implementing m3sh made no change demands on existing customer tech stacks:
* Can be deployed either as the source of truth, or as a headless platform.
* No system migrations should be needed to incorporate m3sh in the stack.
* Stack can evolve around m3sh - graduate ERPs, consolidate CRMs, add and remove other components - m3sh will adapt.
* No 3rd-party IPaaS necessary, leading to more robust IT governance.
### Exploit and Enhance m3ter
From the outset, a core objective was for the m3sh platform to extend and strengthen the value proposition of m3ter:
* Can be directly hooked into m3ter configuration and functions to complement and strengthen the platform's capacity to address and fulfill evolving operational billing and analytical needs.
* m3sh triggers for automated update and management of key billing entities in response to defined end-customer account events, such as balance depletion or contract expiry.
## Common Use Cases
m3sh can be used to fulfill several common use cases:
* [Multiple ERP: Invoicing to Multiple Endpoints](/guides/m3sh-automation#multiple-erp-invoicing-to-multiple-endpoints)
* [Unified Billing for Diverse Products and CRMs](/guides/m3sh-automation#unified-billing-for-diverse-products-and-crms)
* [Automated Plan and Contract Management with m3sh Triggers](/guides/m3sh-automation#automated-plan-and-contract-management-with-m3sh-triggers)
### Multiple ERP: Invoicing to Multiple Endpoints
For this use case, m3sh mediates and orchestrates data flows between the customer platform, Salesforce, m3ter, AWS, and NetSuite to implement multi-endpoint invoicing with enrichment and alerting:
This page introduces m3sh, gives an overview of its key design principles, and reviews some common use cases:
* [Key Design Principles](/guides/m3sh-automation#key-design-principles)
* [Common Use Cases](/guides/m3sh-automation#common-use-cases)
For further detailed guidance on accessing, reviewing, building, and managing m3sh Workflows in your m3ter Organization see:
* [m3sh Workflows](/guides/m3sh-workflows/m3sh-workflows)
In the m3sh section of the Console, you can access other automation and interoperability features available in the m3ter platform:
* [Utilizing Events and Notifications](/guides/alerts-events-and-notifications/utilizing-events-and-notifications)
* [Creating and Managing Credentials](/guides/integrations/setting-up-integrations/managing-integration-credentials)
* [Integrations](/guides/integrations)
* [Outgoing Webhooks](/guides/integrations/setting-up-integrations/creating-and-managing-destinations)
* [Integration Events](/guides/integrations/setting-up-integrations/reviewing-and-resolving-integration-events)
* [External Mappings](/guides/end-customer-accounts/creating-and-managing-external-mappings-for-accounts)
* [Transformations](/guides/m3sh-workflows/creating-and-managing-transformations)
**Note: m3sh in Preview Release!** Please note that m3sh is currently available in Preview release version. See [Feature Release Stages](/guides/getting-started/feature-release-stages) for Preview release definition.
## Key Design Principles
The m3sh platform is built around three key design principles to ensure a smooth end-to-end rating and billing flow through your quote-to-cash stack:
* [Interoperability and Connectivity](/guides/m3sh-automation#interoperability-and-connectivity)
* [Customer Stack: Accommodate and Enhance](/guides/m3sh-automation#customer-stack-accommodate-and-enhance)
* [Exploit and Enhance m3ter](/guides/m3sh-automation#exploit-and-enhance-m3ter)
### Interoperability and Connectivity
A baseline requirement was to ensure the capability to plug easily and seamlessly into existing systems:
* Input of data:
* From CRM systems for initial and ongoing set up and configuration.
* From SaaS platforms for end-customer product usage data.
* Output into ERP systems to support invoicing and analytics reporting across multiple systems.
### Customer Stack: Accommodate and Enhance
It was considered vital that implementing m3sh made no change demands on existing customer tech stacks:
* Can be deployed either as the source of truth, or as a headless platform.
* No system migrations should be needed to incorporate m3sh in the stack.
* Stack can evolve around m3sh - graduate ERPs, consolidate CRMs, add and remove other components - m3sh will adapt.
* No 3rd-party IPaaS necessary, leading to more robust IT governance.
### Exploit and Enhance m3ter
From the outset, a core objective was for the m3sh platform to extend and strengthen the value proposition of m3ter:
* Can be directly hooked into m3ter configuration and functions to complement and strengthen the platform's capacity to address and fulfill evolving operational billing and analytical needs.
* m3sh triggers for automated update and management of key billing entities in response to defined end-customer account events, such as balance depletion or contract expiry.
## Common Use Cases
m3sh can be used to fulfill several common use cases:
* [Multiple ERP: Invoicing to Multiple Endpoints](/guides/m3sh-automation#multiple-erp-invoicing-to-multiple-endpoints)
* [Unified Billing for Diverse Products and CRMs](/guides/m3sh-automation#unified-billing-for-diverse-products-and-crms)
* [Automated Plan and Contract Management with m3sh Triggers](/guides/m3sh-automation#automated-plan-and-contract-management-with-m3sh-triggers)
### Multiple ERP: Invoicing to Multiple Endpoints
For this use case, m3sh mediates and orchestrates data flows between the customer platform, Salesforce, m3ter, AWS, and NetSuite to implement multi-endpoint invoicing with enrichment and alerting:
![]() ### Unified Billing for Diverse Products and CRMs
For this use case, m3sh allows you to consolidate usage data and/or contract data from different CRMs - Salesforce and HubSpot - and from your customer platforms to enable centralized metering and rating for multiple products:
### Unified Billing for Diverse Products and CRMs
For this use case, m3sh allows you to consolidate usage data and/or contract data from different CRMs - Salesforce and HubSpot - and from your customer platforms to enable centralized metering and rating for multiple products:
![]() ### Automated Plan and Contract Management with m3sh Triggers
For this type of use case, m3sh triggers are set up to automate actions like plan switching, balance resets, and custom field updates in response to events such as balance depletion, contract expiry, or imposed usage limits:
### Automated Plan and Contract Management with m3sh Triggers
For this type of use case, m3sh triggers are set up to automate actions like plan switching, balance resets, and custom field updates in response to events such as balance depletion, contract expiry, or imposed usage limits:
![]() # Exploring m3sh Workflows
Source: https://docs.m3ter.com/guides/m3sh-automation/exploring-m3sh-workflows
If your m3ter Organization has m3sh Workflows implemented, this topic explains how to open and review them using an example Workflow designed to fulfill a common billing entity management use case.
* [m3sh Workflow Triggers](/guides/m3sh-automation/exploring-m3sh-workflows#m3sh-workflow-triggers)
* [Workflow Example for m3ter Billing Entity Management](/guides/m3sh-automation/exploring-m3sh-workflows#workflow-example-for-m3ter-billing-entity-management)
* [Opening and Reviewing a m3sh Workflow](/guides/m3sh-automation/exploring-m3sh-workflows#opening-and-reviewing-a-m3sh-workflow)
**Important: Read-only Access!** The default access for m3sh is read-only, meaning you will not be able to create and configure m3sh Workflows.
* If you're interested in full access, please get in touch with m3ter Support or your m3ter Sales contact.
## m3sh Workflow Triggers
Two types of trigger can be used for m3sh Workflows:
* **Event Notification Triggers**. Notification rules based on system Events can be added to Workflows as triggers. When the configured Notification rule fires, a Workflow run is started.
* **Incoming Webhook Triggers**. Incoming Webhooks can be configured as Workflow triggers. These Webhooks can then be called from an external source, such as other service providers or your own infrastructure. When an HTTP request is made to the Webhook, a Workflow run is started.
## Workflow Example for m3ter Billing Entity Management
In this example, a m3sh Workflow is used to automate a common Account management use case where new end-customer Accounts at sign-up are initially put on an introductory Product Plan at a discounted Product usage cost rate. They stay on the introductory Plan until billed charges deplete their sign-up Balance credit. At the point when the initial Balance amount is depleted, their Account is automatically switched to a standard and non-discounted rate Product Plan.
The Workflow designed to fulfill this example use case is triggered by a Notification Rule based on the `billing.balanceamount.updated` Event. This Notification rule has a calculation built in that checks for two conditions when an Event of this type occurs: (i) that the Balance is an introductory Balance; (ii) that the Balance has been depleted to zero. If these two conditions are evaluated as true, then the Notification fires and triggers a run of the Workflow.
## Opening and Reviewing a m3sh Workflow
With this use case and the m3sh Workflow design in mind, we can now open the example Workflow in the m3ter Console and learn how to review it.
**To open and review m3sh Workflows:**
1. Select **m3sh**:
# Exploring m3sh Workflows
Source: https://docs.m3ter.com/guides/m3sh-automation/exploring-m3sh-workflows
If your m3ter Organization has m3sh Workflows implemented, this topic explains how to open and review them using an example Workflow designed to fulfill a common billing entity management use case.
* [m3sh Workflow Triggers](/guides/m3sh-automation/exploring-m3sh-workflows#m3sh-workflow-triggers)
* [Workflow Example for m3ter Billing Entity Management](/guides/m3sh-automation/exploring-m3sh-workflows#workflow-example-for-m3ter-billing-entity-management)
* [Opening and Reviewing a m3sh Workflow](/guides/m3sh-automation/exploring-m3sh-workflows#opening-and-reviewing-a-m3sh-workflow)
**Important: Read-only Access!** The default access for m3sh is read-only, meaning you will not be able to create and configure m3sh Workflows.
* If you're interested in full access, please get in touch with m3ter Support or your m3ter Sales contact.
## m3sh Workflow Triggers
Two types of trigger can be used for m3sh Workflows:
* **Event Notification Triggers**. Notification rules based on system Events can be added to Workflows as triggers. When the configured Notification rule fires, a Workflow run is started.
* **Incoming Webhook Triggers**. Incoming Webhooks can be configured as Workflow triggers. These Webhooks can then be called from an external source, such as other service providers or your own infrastructure. When an HTTP request is made to the Webhook, a Workflow run is started.
## Workflow Example for m3ter Billing Entity Management
In this example, a m3sh Workflow is used to automate a common Account management use case where new end-customer Accounts at sign-up are initially put on an introductory Product Plan at a discounted Product usage cost rate. They stay on the introductory Plan until billed charges deplete their sign-up Balance credit. At the point when the initial Balance amount is depleted, their Account is automatically switched to a standard and non-discounted rate Product Plan.
The Workflow designed to fulfill this example use case is triggered by a Notification Rule based on the `billing.balanceamount.updated` Event. This Notification rule has a calculation built in that checks for two conditions when an Event of this type occurs: (i) that the Balance is an introductory Balance; (ii) that the Balance has been depleted to zero. If these two conditions are evaluated as true, then the Notification fires and triggers a run of the Workflow.
## Opening and Reviewing a m3sh Workflow
With this use case and the m3sh Workflow design in mind, we can now open the example Workflow in the m3ter Console and learn how to review it.
**To open and review m3sh Workflows:**
1. Select **m3sh**:
 The **Workflows** page opens.
2. Select the **Name** hotlink text of the Workflow you want to review:
The **Workflows** page opens.
2. Select the **Name** hotlink text of the Workflow you want to review:
![M3sh Automation6b]() The published **Workflow** opens:
The published **Workflow** opens:
![M3sh Automation6e]() On this page you can quickly check:
* Workflow **Name**, **Code**, and **Description**.
* Workflow **ID**, which you can **Copy** to your clipboard.
* The user who **Created** and who **Last modified** the Workflow.
3. The Workflow is set out in the main canvas area and you can use **Zoom In/Out** **and Fit View** controls at top-right or mouse/pad button pan and scroll zoom to negotiate the canvas and inspect the full Workflow:
On this page you can quickly check:
* Workflow **Name**, **Code**, and **Description**.
* Workflow **ID**, which you can **Copy** to your clipboard.
* The user who **Created** and who **Last modified** the Workflow.
3. The Workflow is set out in the main canvas area and you can use **Zoom In/Out** **and Fit View** controls at top-right or mouse/pad button pan and scroll zoom to negotiate the canvas and inspect the full Workflow:
![M3sh Automation151]() 4. You can zoom in to individual steps in the Workflow and quickly inspect details for a step:
4. You can zoom in to individual steps in the Workflow and quickly inspect details for a step:
![]() * Here we've opened details of the **START** and can read-off that the Workflow has a single trigger configured - it's triggered by the **Introductory credits Balance exhausted** Notification rule which is based on the `billing.balanceamount.updated` **EVENT**.
* Similarly, with a functional step in the Workflow, you can bring up **Function details**:
* Here we've opened details of the **START** and can read-off that the Workflow has a single trigger configured - it's triggered by the **Introductory credits Balance exhausted** Notification rule which is based on the `billing.balanceamount.updated` **EVENT**.
* Similarly, with a functional step in the Workflow, you can bring up **Function details**:
 5. If a Workflow contains a **Loop** stage, you can call up and inspect **Function details**:
 6. Scroll down the **Workflow details** page to check the **Workflow triggers** set up for the Workflow:
![M3sh Automation141]() * The **NOTIFICATION RULE** configured as a Workflow **Trigger** and the Event the rule is based on are shown.
* The status of the rule is shown: **ACTIVE** or **INACTIVE**.
* You can select the Notification rule hotlink text to open the **Notification rule** details page.
7. If you scroll further down the **Workflow details** page, you can check the **Latest workflow runs**:
* The **NOTIFICATION RULE** configured as a Workflow **Trigger** and the Event the rule is based on are shown.
* The status of the rule is shown: **ACTIVE** or **INACTIVE**.
* You can select the Notification rule hotlink text to open the **Notification rule** details page.
7. If you scroll further down the **Workflow details** page, you can check the **Latest workflow runs**:
![M3sh Automation142]() * The **Start time**, **Trigger**, and **Status** of listed Workflow runs are given.
* Use the **Status** drop-down list to filter the runs list.
* You can select the **Start time** hotlink text to open and review a Workflow run. See [Reviewing m3sh Workflow Runs](/guides/m3sh-automation/reviewing-m3sh-workflow-runs).
* The ten most recent Workflow runs are listed and you can select **View all** to open the **Runs** page for the Workflow.
# Reviewing m3sh Workflow Runs
Source: https://docs.m3ter.com/guides/m3sh-automation/reviewing-m3sh-workflow-runs
m3sh Workflow runs are logged by date and time and listed in the m3ter Console. This topic explains how to view all runs performed for a m3sh Workflow and how to open individual Workflows and review run log details:
* [Viewing Workflow Runs](/guides/m3sh-automation/reviewing-m3sh-workflow-runs#viewing-workflow-runs)
* [Reviewing Workflow Run Logs](/guides/m3sh-automation/reviewing-m3sh-workflow-runs#reviewing-workflow-run-logs)
## Viewing Workflow Runs
From the *Workflow details* page, you can view the ten most recent runs for a Workflow or open the *Runs* page and view all runs.
**To view m3sh Workflow runs:**
1. Select **m3sh**:
* The **Start time**, **Trigger**, and **Status** of listed Workflow runs are given.
* Use the **Status** drop-down list to filter the runs list.
* You can select the **Start time** hotlink text to open and review a Workflow run. See [Reviewing m3sh Workflow Runs](/guides/m3sh-automation/reviewing-m3sh-workflow-runs).
* The ten most recent Workflow runs are listed and you can select **View all** to open the **Runs** page for the Workflow.
# Reviewing m3sh Workflow Runs
Source: https://docs.m3ter.com/guides/m3sh-automation/reviewing-m3sh-workflow-runs
m3sh Workflow runs are logged by date and time and listed in the m3ter Console. This topic explains how to view all runs performed for a m3sh Workflow and how to open individual Workflows and review run log details:
* [Viewing Workflow Runs](/guides/m3sh-automation/reviewing-m3sh-workflow-runs#viewing-workflow-runs)
* [Reviewing Workflow Run Logs](/guides/m3sh-automation/reviewing-m3sh-workflow-runs#reviewing-workflow-run-logs)
## Viewing Workflow Runs
From the *Workflow details* page, you can view the ten most recent runs for a Workflow or open the *Runs* page and view all runs.
**To view m3sh Workflow runs:**
1. Select **m3sh**:
 The **Workflows** page opens.
2. Select the **Name** hotlink text of the Workflow whose runs you want to view. The **Workflow details** page opens.
3. Scroll down the page to the **Latest workflow runs** panel:
The **Workflows** page opens.
2. Select the **Name** hotlink text of the Workflow whose runs you want to view. The **Workflow details** page opens.
3. Scroll down the page to the **Latest workflow runs** panel:
![M3sh Automation143]() Workflow runs are designated and tracked using the UTC date/time the run was started. The **Latest workflow runs** panel lists the ten most recent runs in descending order of start time, and for each run listed you can:
* Read-off the **Start time**, **Trigger**, and **Status**.
* You can select the **Start time** hotlink text to open the details page for an individual run - see the [following section](#reviewing-workflow-run-logs).
4. Select **View all**. The **Runs** page for the Workflow opens:
Workflow runs are designated and tracked using the UTC date/time the run was started. The **Latest workflow runs** panel lists the ten most recent runs in descending order of start time, and for each run listed you can:
* Read-off the **Start time**, **Trigger**, and **Status**.
* You can select the **Start time** hotlink text to open the details page for an individual run - see the [following section](#reviewing-workflow-run-logs).
4. Select **View all**. The **Runs** page for the Workflow opens:
![M3sh Automation144a]() * Note that you can filter the **Runs** list by **Status**, and by default **All statuses** are shown.
**Tip: Accessing Workflow runs?** Depending on the Workflow set up, there can be other ways to access and review Workflow runs:
* If a Workflow uses a Notification rule as its trigger, you'll be able to open runs from the **Notification rule details** page.
* If a Workflow is associated with another m3ter entity - such as a Bill or an Account - then you'll be able to access runs from the entity details page - such as **Bill details**. The metadata card for an entity will also show hotlink texts you can use to open runs.
## Reviewing Workflow Run Logs
From the *Workflow details* page, you can quickly open an individual m3sh Workflow run and review detailed run logs on a step-by-step basis.
**To review individual m3sh Workflow run logs:**
1. Select **m3sh**. The **Workflows** page opens.
2. Select the **Name** hotlink text of the Workflow whose run you want open and review logs for. The **Workflow details** page opens.
3. Scroll down the page to the **Latest workflow runs** panel. The ten most recent Workflow runs are listed:
* If the Workflow run you want to review run logs for is listed, select the **Start time** hotlink text of the run. The Workflow **Run details** page opens.
* If the Workflow run you want to review run logs for is not listed, select **View all**. The **Runs** page opens listing all Workflow runs. Select the **Start time** hotlink text of the run you want to open and review. The Workflow **Runs** page opens:
* Note that you can filter the **Runs** list by **Status**, and by default **All statuses** are shown.
**Tip: Accessing Workflow runs?** Depending on the Workflow set up, there can be other ways to access and review Workflow runs:
* If a Workflow uses a Notification rule as its trigger, you'll be able to open runs from the **Notification rule details** page.
* If a Workflow is associated with another m3ter entity - such as a Bill or an Account - then you'll be able to access runs from the entity details page - such as **Bill details**. The metadata card for an entity will also show hotlink texts you can use to open runs.
## Reviewing Workflow Run Logs
From the *Workflow details* page, you can quickly open an individual m3sh Workflow run and review detailed run logs on a step-by-step basis.
**To review individual m3sh Workflow run logs:**
1. Select **m3sh**. The **Workflows** page opens.
2. Select the **Name** hotlink text of the Workflow whose run you want open and review logs for. The **Workflow details** page opens.
3. Scroll down the page to the **Latest workflow runs** panel. The ten most recent Workflow runs are listed:
* If the Workflow run you want to review run logs for is listed, select the **Start time** hotlink text of the run. The Workflow **Run details** page opens.
* If the Workflow run you want to review run logs for is not listed, select **View all**. The **Runs** page opens listing all Workflow runs. Select the **Start time** hotlink text of the run you want to open and review. The Workflow **Runs** page opens:
![M3sh Automation154a]() * The **Start time** and **Status** of the run are shown.
* You can use the controls to zoom in/out or fit to view.
4. If you want to inspect the log details for a specific step, select the details icon for the step. For example, for the Workflow **Start**:
* The **Start time** and **Status** of the run are shown.
* You can use the controls to zoom in/out or fit to view.
4. If you want to inspect the log details for a specific step, select the details icon for the step. For example, for the Workflow **Start**:
![M3sh Automation155a]() The log details for the selected step that was performed in the Workflow run are loaded into the right-hand side of the **Run log** panel:
* In this case, the JSON returned for the `billing.balanceamount.updated` Event that triggered the Workflow run is loaded.
* Similarly, you can review the log details for a functional step performed in the Workflow run:
The log details for the selected step that was performed in the Workflow run are loaded into the right-hand side of the **Run log** panel:
* In this case, the JSON returned for the `billing.balanceamount.updated` Event that triggered the Workflow run is loaded.
* Similarly, you can review the log details for a functional step performed in the Workflow run:
![M3sh Automation156a]() * In this case, the **HTTP REQUEST** performed by a **m3ter API** function is shown and you can expand the call to inspect the **Request** and **Response** JSON.
# Creating and Managing Transformations
Source: https://docs.m3ter.com/guides/m3sh-workflows/creating-and-managing-transformations
You can create *Transformations* to support your m3ter Workflows. Transformations allow you to customize the conversion of data as it flows into or out of the m3ter system via Workflows. A Transformation defines a one-way data mapping from one specific data type to another:
* When you are building your Workflows, you can use functions that reference Transformations.
* If you've created a Transformation and you want to create a second Transformation that is the same or very similar to the first, you can export the output fields of the first and import them into the second.
This topic explains how to create, review, and manage Transformations:
* [Creating Transformations](#creating-transformations)
* [Reviewing and Managing Transformations](#reviewing-and-managing-transformations)
* [Exporting and Importing Transformation Output Fields](#exporting-and-importing-transformation-output-fields)
**Note: Transformations in Preview Release!** Please note that the Transformations feature is currently available only in Preview release version.
* See [Feature Release Stages](/guides/getting-started/feature-release-stages) for Preview release definition.
* If you're interested in previewing Transformations, please get in touch with [m3ter Support](https://docs.m3ter.com/guides/getting-started/contacting-m3ter-support) or your m3ter contact.
## Creating Transformations
In the Console, you can quickly create any Transformations you need to support your m3ter Workflows.
**To create a Transformation:**
1. Select **mesh**:
* In this case, the **HTTP REQUEST** performed by a **m3ter API** function is shown and you can expand the call to inspect the **Request** and **Response** JSON.
# Creating and Managing Transformations
Source: https://docs.m3ter.com/guides/m3sh-workflows/creating-and-managing-transformations
You can create *Transformations* to support your m3ter Workflows. Transformations allow you to customize the conversion of data as it flows into or out of the m3ter system via Workflows. A Transformation defines a one-way data mapping from one specific data type to another:
* When you are building your Workflows, you can use functions that reference Transformations.
* If you've created a Transformation and you want to create a second Transformation that is the same or very similar to the first, you can export the output fields of the first and import them into the second.
This topic explains how to create, review, and manage Transformations:
* [Creating Transformations](#creating-transformations)
* [Reviewing and Managing Transformations](#reviewing-and-managing-transformations)
* [Exporting and Importing Transformation Output Fields](#exporting-and-importing-transformation-output-fields)
**Note: Transformations in Preview Release!** Please note that the Transformations feature is currently available only in Preview release version.
* See [Feature Release Stages](/guides/getting-started/feature-release-stages) for Preview release definition.
* If you're interested in previewing Transformations, please get in touch with [m3ter Support](https://docs.m3ter.com/guides/getting-started/contacting-m3ter-support) or your m3ter contact.
## Creating Transformations
In the Console, you can quickly create any Transformations you need to support your m3ter Workflows.
**To create a Transformation:**
1. Select **mesh**:
 The **Workflows** page opens.
2. On the sidebar, select **Transformations**:
The **Workflows** page opens.
2. On the sidebar, select **Transformations**:
![]() The **Transformations** page opens and lists any existing Transformations.
3. Select **Create transformation**. The **Create** page opens.
4. Enter the **Transformation details**:
* **Name**. (*Required*)
* **Description**. (*Required*)
5. Enter the **Transformation settings**:
* **Input system**. Select the input system. (*Required*)
* **Input table**. Select the table in the selected input system. (*Required*)
* **Output system**. Select the output system. (*Required*)
* **Output table**. Select the table in the selected output system. (*Required*)
The **Transformations** page opens and lists any existing Transformations.
3. Select **Create transformation**. The **Create** page opens.
4. Enter the **Transformation details**:
* **Name**. (*Required*)
* **Description**. (*Required*)
5. Enter the **Transformation settings**:
* **Input system**. Select the input system. (*Required*)
* **Input table**. Select the table in the selected input system. (*Required*)
* **Output system**. Select the output system. (*Required*)
* **Output table**. Select the table in the selected output system. (*Required*)
 In this example, a **Transformation** defines that m3ter *Account* entities will be mapped to NetSuite *Customer* objects.
6. To define output fields for the Transformation, on the **Output fields** panel select **Add output field**. The panel adjusts and you can enter the details of an output field.
Three types of **Transformation method** are available for defining output fields:
* **Field lookup**. A direct mapping from the source object into the destination field. (*Default*)
* **Calculation**. For more advanced scenarios, you can leverage m3ter’s [Calculation Engine](/guides/m3ter-calculation-engine) to set values at runtime.
* **Static value**. The defined field is set on the destination object with the same value.
For the current example, we'll use the **Field lookup** method to define how two values will be determined for the output fields:
* Enter a **Field key** value, and then use the **Input field** drop-down list to select the field on the entity, which in the current example is the m3ter **Account** entity:
In this example, a **Transformation** defines that m3ter *Account* entities will be mapped to NetSuite *Customer* objects.
6. To define output fields for the Transformation, on the **Output fields** panel select **Add output field**. The panel adjusts and you can enter the details of an output field.
Three types of **Transformation method** are available for defining output fields:
* **Field lookup**. A direct mapping from the source object into the destination field. (*Default*)
* **Calculation**. For more advanced scenarios, you can leverage m3ter’s [Calculation Engine](/guides/m3ter-calculation-engine) to set values at runtime.
* **Static value**. The defined field is set on the destination object with the same value.
For the current example, we'll use the **Field lookup** method to define how two values will be determined for the output fields:
* Enter a **Field key** value, and then use the **Input field** drop-down list to select the field on the entity, which in the current example is the m3ter **Account** entity:
![Transformations3a]() * Repeat for any other **Field value** transformations:
* For the current example, we'll also add a **Static value** transformation:
* Repeat for any other **Field value** transformations:
* For the current example, we'll also add a **Static value** transformation:
![]() **Tip: Import Output Fields!** Alternatively, you can import output fields that you've previously exported from another Transformation - see the [following section](#exporting-and-importing-transformation-output-fields) for details.
7. On the **Output fields** panel, select **Preview output**. A **Transformation output preview** modal opens:
**Tip: Import Output Fields!** Alternatively, you can import output fields that you've previously exported from another Transformation - see the [following section](#exporting-and-importing-transformation-output-fields) for details.
7. On the **Output fields** panel, select **Preview output**. A **Transformation output preview** modal opens:
![Transformations22]() You can use this to:
* Review and edit the **Input data** JSON for the **Output fields** you've defined.
* Select **Generate output** and review the **Output** that will result from the Transformation:
You can use this to:
* Review and edit the **Input data** JSON for the **Output fields** you've defined.
* Select **Generate output** and review the **Output** that will result from the Transformation:
![Transformations23]() 8. When you are happy with the generated **Output**, close the **Transformation output preview** modal.
9. Select **Create transformation**. The **Transformation details** page opens:
8. When you are happy with the generated **Output**, close the **Transformation output preview** modal.
9. Select **Create transformation**. The **Transformation details** page opens:
![M3sh Automation295a]() Note that you can:
* Review the **Output fields** you've set up for the Transformation.
* Use the **Export** button to open and copy the Transformation's output fields for importing into other Transformations.
10. If you return to the **Transformations** page, your new Transformation will be listed there.
## Reviewing and Managing Transformations
From the Transformations page, you can quickly review the details of a Transformation and edit or delete it.
**To review and manage Transformations:**
1. Open the **m3sh** section and select **Transformations**. The **Transformations** page opens.
2. If you want to view the details of a Transformation, select the **Name** hotlink text:
Note that you can:
* Review the **Output fields** you've set up for the Transformation.
* Use the **Export** button to open and copy the Transformation's output fields for importing into other Transformations.
10. If you return to the **Transformations** page, your new Transformation will be listed there.
## Reviewing and Managing Transformations
From the Transformations page, you can quickly review the details of a Transformation and edit or delete it.
**To review and manage Transformations:**
1. Open the **m3sh** section and select **Transformations**. The **Transformations** page opens.
2. If you want to view the details of a Transformation, select the **Name** hotlink text:
![Transformations14a]() The **Transformation details** page opens.
3. If you want to update the Transformation, select **Edit**. Make any required changes on the **Edit** page and select **Update transformation**.
4. If you want to delete a Transformation, return the **Transformations** page and select the **Delete** icon:
The **Transformation details** page opens.
3. If you want to update the Transformation, select **Edit**. Make any required changes on the **Edit** page and select **Update transformation**.
4. If you want to delete a Transformation, return the **Transformations** page and select the **Delete** icon:
![]() A confirmation dialog appears:
A confirmation dialog appears:
 5. Select **Delete** to confirm the delete action.
## Exporting and Importing Transformation Output Fields
When you have set up a Transformation, you might want to re-use the output fields of the Transformation for other Transformations in your Organization.
**Tip!** You can also do this in cases where the Transformations belong to different Organizations.
**To export and import Transformation output fields:**
1. Open the **Transformation details** page of the existing Transformation whose output fields you want to re-use.
2. Select **Export**. An **Export transformation** modal opens:
5. Select **Delete** to confirm the delete action.
## Exporting and Importing Transformation Output Fields
When you have set up a Transformation, you might want to re-use the output fields of the Transformation for other Transformations in your Organization.
**Tip!** You can also do this in cases where the Transformations belong to different Organizations.
**To export and import Transformation output fields:**
1. Open the **Transformation details** page of the existing Transformation whose output fields you want to re-use.
2. Select **Export**. An **Export transformation** modal opens:
![Transformations18c]() 3. Select **Copy**. The output fields are copied to your clipboard.
4. Open the **Transformation details** page of the Transformation you want to re-use the output fields for:
3. Select **Copy**. The output fields are copied to your clipboard.
4. Open the **Transformation details** page of the Transformation you want to re-use the output fields for:
![M3sh Automation296a]() * Note that the Transformation already has a **Static value** field set up.
5. Select **Edit**.
6. On the **Output fields** panel of the **Edit** page, select **Import**. An **Import transformation** modal opens.
7. Paste the copied output fields into the modal:
* Note that the Transformation already has a **Static value** field set up.
5. Select **Edit**.
6. On the **Output fields** panel of the **Edit** page, select **Import**. An **Import transformation** modal opens.
7. Paste the copied output fields into the modal:
![Transformations20]() 8. Select **Submit**. The imported fields are added to the **Output fields** panel.
* Note that if you've already added output fields to the Transformation, these will be overwritten by the imported fields and you'll have to add them again after importing.
9. Select **Update transformation**. The **Transformation details** page opens:
8. Select **Submit**. The imported fields are added to the **Output fields** panel.
* Note that if you've already added output fields to the Transformation, these will be overwritten by the imported fields and you'll have to add them again after importing.
9. Select **Update transformation**. The **Transformation details** page opens:
![M3sh Automation297a]() * We can see that the copied **Output fields** have been successfully imported and the existing **Output field** overridden.
# Creating Event Notification Workflows
Source: https://docs.m3ter.com/guides/m3sh-workflows/creating-event-notification-workflows
A main area of operational support that m3sh Workflows are designed to fulfill is enhancing and extending the m3ter platform's capabilities for addressing your operational billing and analytical needs. A common instance is to use m3sh Workflows to automate and streamline the management and updating of key billing entities in response to defined end-customer Account Events, such as when an Account Balance amount changes or an Account Contract expires. For this kind of use case, a Notification rule based on a system Event in m3ter can be configured and used as a Workflow trigger.
This topic introduces an example use case that calls for automated Account billing entity management. How to design, create, and configure a m3sh Workflow that uses a Notification rule as its trigger to implement a solution for this use case is then set out as a worked example:
* [Worked Example](#worked-example)
* [m3sh Workflow Solution - Design and Prerequisites](#m3sh-workflow-solution-design-and-prerequisites)
* [Building a m3sh Workflow](#building-a-m3sh-workflow)
* [Adding and Configuring a Workflow Notification Trigger](#adding-and-configuring-a-workflow-notification-trigger)
* [Testing the Workflow](#testing-the-workflow)
**Review First!** Before attempting to follow this worked example and create and build a m3sh Workflow, please review the earlier topics in this section introducing [Workflow Key Concepts and Options](/guides/m3sh-workflows/m3sh-workflows-key-concepts-and-options) and the [Workflow Builder](/guides/m3sh-workflows/getting-to-know-the-workflow-builder).
## Worked Example
Suppose you offer a sign-up discounted rate for one of your Products to customers. If a customer signs-up for the Product and adds a Balance credit amount to their Account at sign-up, you agree to charge them at a discounted Product pricing rate until the initial credit amount has been depleted by billed usage charges as they consume the Product. When the initial Account credit is depleted, the discounted Product rate will end and the Account will be switched to the standard Product pricing.
A m3sh Workflow that automatically switches a customer Account from an introductory Product pricing rate to the standard Product pricing rate when their sign-up credit has been depleted will clearly save much manual effort for your billing operations team.
## m3sh Workflow Solution - Design and Prerequisites
An Event Notification Workflow design solution can fulfill this type of billing entity management use case. Some preparatory work is required to set up an Account, create a Notification rule to act as the Workflow trigger, and to map out a Workflow design solution covering the functions we'll use for the Workflow steps:
* [Setting Up an Account](#setting-up-an-account)
* [Creating a Workflow Trigger](#creating-a-workflow-trigger)
* [Designing the Workflow](#designing-the-workflow)
* [Workflow Design - Setting Up Function Prerequisites](#workflow-design-setting-up-function-prerequisites)
### Setting Up an Account
For a new customer who signs up for the discounted rate offer, we can create an Account and set up the following configuration details:
* First, create a Balance on the Account to hold the initial credit amount loaded at sign-up:
* **Balance draw-down**. When creating the Balance, for **Draw-down products**, select the relevant Product in your Organization and for **Draw-down charge types** select **Usage**.
* **Sign-up credit amount**. When you've created the Balance, open the **Balance details** page and under **Balance transactions** add a sign-up credit amount.
* **Custom Field**. Edit the Balance to add a **Custom field**: **Name** = **type**, **Type** = **String**, **Value** = **intro**. When setting up the Notification rule to use as the Workflow trigger, we'll reference this Balance Custom field - see the [following section](#creating-a-workflow-trigger).
* Here's the relevant set up on the **Balance details** page:
* We can see that the copied **Output fields** have been successfully imported and the existing **Output field** overridden.
# Creating Event Notification Workflows
Source: https://docs.m3ter.com/guides/m3sh-workflows/creating-event-notification-workflows
A main area of operational support that m3sh Workflows are designed to fulfill is enhancing and extending the m3ter platform's capabilities for addressing your operational billing and analytical needs. A common instance is to use m3sh Workflows to automate and streamline the management and updating of key billing entities in response to defined end-customer Account Events, such as when an Account Balance amount changes or an Account Contract expires. For this kind of use case, a Notification rule based on a system Event in m3ter can be configured and used as a Workflow trigger.
This topic introduces an example use case that calls for automated Account billing entity management. How to design, create, and configure a m3sh Workflow that uses a Notification rule as its trigger to implement a solution for this use case is then set out as a worked example:
* [Worked Example](#worked-example)
* [m3sh Workflow Solution - Design and Prerequisites](#m3sh-workflow-solution-design-and-prerequisites)
* [Building a m3sh Workflow](#building-a-m3sh-workflow)
* [Adding and Configuring a Workflow Notification Trigger](#adding-and-configuring-a-workflow-notification-trigger)
* [Testing the Workflow](#testing-the-workflow)
**Review First!** Before attempting to follow this worked example and create and build a m3sh Workflow, please review the earlier topics in this section introducing [Workflow Key Concepts and Options](/guides/m3sh-workflows/m3sh-workflows-key-concepts-and-options) and the [Workflow Builder](/guides/m3sh-workflows/getting-to-know-the-workflow-builder).
## Worked Example
Suppose you offer a sign-up discounted rate for one of your Products to customers. If a customer signs-up for the Product and adds a Balance credit amount to their Account at sign-up, you agree to charge them at a discounted Product pricing rate until the initial credit amount has been depleted by billed usage charges as they consume the Product. When the initial Account credit is depleted, the discounted Product rate will end and the Account will be switched to the standard Product pricing.
A m3sh Workflow that automatically switches a customer Account from an introductory Product pricing rate to the standard Product pricing rate when their sign-up credit has been depleted will clearly save much manual effort for your billing operations team.
## m3sh Workflow Solution - Design and Prerequisites
An Event Notification Workflow design solution can fulfill this type of billing entity management use case. Some preparatory work is required to set up an Account, create a Notification rule to act as the Workflow trigger, and to map out a Workflow design solution covering the functions we'll use for the Workflow steps:
* [Setting Up an Account](#setting-up-an-account)
* [Creating a Workflow Trigger](#creating-a-workflow-trigger)
* [Designing the Workflow](#designing-the-workflow)
* [Workflow Design - Setting Up Function Prerequisites](#workflow-design-setting-up-function-prerequisites)
### Setting Up an Account
For a new customer who signs up for the discounted rate offer, we can create an Account and set up the following configuration details:
* First, create a Balance on the Account to hold the initial credit amount loaded at sign-up:
* **Balance draw-down**. When creating the Balance, for **Draw-down products**, select the relevant Product in your Organization and for **Draw-down charge types** select **Usage**.
* **Sign-up credit amount**. When you've created the Balance, open the **Balance details** page and under **Balance transactions** add a sign-up credit amount.
* **Custom Field**. Edit the Balance to add a **Custom field**: **Name** = **type**, **Type** = **String**, **Value** = **intro**. When setting up the Notification rule to use as the Workflow trigger, we'll reference this Balance Custom field - see the [following section](#creating-a-workflow-trigger).
* Here's the relevant set up on the **Balance details** page:
![M3sh Automation225]()
![M3sh Automation192]()
![M3sh Automation193]() * Second, create two Plans for the Product, one priced at the introductory discounted rate and one priced at the standard rate. Attach the introductory rate plan to the new Account - for the example, we've created and attached the **Introductory Plan** to our example Account:
* Second, create two Plans for the Product, one priced at the introductory discounted rate and one priced at the standard rate. Attach the introductory rate plan to the new Account - for the example, we've created and attached the **Introductory Plan** to our example Account:
![M3sh Automation226]() **Tip: More Details?** For more details on creating and managing end-customer Accounts, see the relevant topics in the [End-Customer Accounts](/guides/end-customer-accounts) section.
### Creating a Workflow Trigger
We'll use a Notification Rule as the m3sh Workflow trigger:
* In the **m3sh** section select **Notification rules**. Create a Notification rule based on the `billing.balanceamount.updated` Event. Here's the details of the **Intro Credit Balance Depleted** rule we've created for the example:
**Tip: More Details?** For more details on creating and managing end-customer Accounts, see the relevant topics in the [End-Customer Accounts](/guides/end-customer-accounts) section.
### Creating a Workflow Trigger
We'll use a Notification Rule as the m3sh Workflow trigger:
* In the **m3sh** section select **Notification rules**. Create a Notification rule based on the `billing.balanceamount.updated` Event. Here's the details of the **Intro Credit Balance Depleted** rule we've created for the example:
![M3sh Automation195a]() * Note that the rule calculation imposes two conditions and a Notification will only fire when a `balance.billingamount.updated` Event occurs and:
* The Balance is identified as an **intro** type since a **type** Custom field of that value is found in the Balance metadata.
* The `new.amount` field in the Event equals zero.
**Tip: More Details?** For more details on creating and managing Notification rules, see [Creating, Managing, and Reviewing Notifications](/guides/alerts-events-and-notifications/utilizing-events-and-notifications/creating-managing-and-reviewing-notifications) for more details.
### Designing the Workflow
Our Workflow design solution must ensure that when the introductory Balance credit amount on a customer Account is depleted, then the introductory pricing Plan attached to the Account is ended and replaced by a standard pricing Plan which starts at the same time as the introductory Plan ends.
#### Start
By adding the Notification rule we've set up as the Workflow trigger, we know that a Workflow run will only start when an introductory credit Balance has been depleted.
#### Step 1
When the configured Notification fires and the Workflow starts, we'll add a **List AccountPlans** API function as the first step and call it **List Active Account Plans**. We'll then configure this function:
* To lookup the `accountId` for the Account from the `billing.balanceamount.updated` Event payload associated with the Notification that will fire to trigger the Workflow.
* Use this `accountId` as a query parameter together with the `includeall` as query parameter to retrieve the IDs of the active Account Plans attached to the Account.
* The response will include the Account Plan created when we attached the **Introductory Plan** to the Account.
* The function will then load the response into a variable called `accountPlans` as the output state for the Workflow carried into the next step.
#### Step 2
We'll use a **Loop** Logic function as a second step for the Workflow. Loop functions allow you to embed sub-functions to create sub-Workflows. For our example Workflow solution, the Loop will perform the following sub-steps:
**Sub-Step 1**
Use an **If** Logic function to run through the Workflow state in the `accountPlans` variable passed in from from **Step 1**, and:
* If a match for the value for the **Introductory Plan** `planId` associated with an Account Plan *is found* for the **Introductory Plan**, allow the Workflow run to move to the next step.
* If a match for the value for the **Introductory Plan** `planId` associated with an Account Plan *is not found* for the **Introductory Plan**, stop the Workflow run.
**Sub-Step 2**
If the Workflow exits the **If** function and continues, we'll use a **Set Field** Data Management function to update the end date of the Account Plan in the Workflow state using the last modified date from the `billing.balanceamount.updated` Event.
**Sub-Step 3**
Third, use an **Update AccountPlan** API function to end the existing Account Plan using the end date set in the Workflow state by the previous step.
**Sub-Step 4**
Use a **Set Multiple Fields** Data Management function to create a new Standard Plan Account Plan payload. This Workflow state payload will:
* Use the `accountId` that currently exists in the Workflow state.
* Use the ID of the Standard Plan we created for the Product.
* Apply the same start date to the Standard Plan as we used to end the existing Introductory Plan - by again using the last modified date from the `billing.balanceamount.updated` Event.
**Sub-Step 5**
Use a **Create AccountPlan** API function to take the Account Plan data entered as payload into the Workflow state in the previous step and use this to attach the Standard Plan as the Account Plan on the Account starting at the same time as the Introductory Plan was ended at **Sub-Step 3**.
### Workflow Design - Setting Up Function Prerequisites
The Workflow design requires us to use all three types of Workflow function, and for some of these we'll need prerequisites in place to complete a valid functions configuration:
* **Logic functions**. No prerequisites required.
* **Data management functions**. None will require Transformations.
* **API functions**. API functions in a m3sh Workflow that call the m3ter system can use Credentials set up for m3ter Service Users. We'll need to create a m3ter Service User and a Credential for that user in our Organization. See [Service Authentication](https://docs.m3ter.com/guides/authenticating-with-the-platform/service-authentication).
## Building a m3sh Workflow
We'll now open the Workflow Builder and create a Workflow to fulfill the design solution set out in the [previous section](/guides/m3sh-workflows/creating-event-notification-workflows#designing-the-workflow).
**To create and build a m3sh Workflow:**
1. Select **m3sh**:
* Note that the rule calculation imposes two conditions and a Notification will only fire when a `balance.billingamount.updated` Event occurs and:
* The Balance is identified as an **intro** type since a **type** Custom field of that value is found in the Balance metadata.
* The `new.amount` field in the Event equals zero.
**Tip: More Details?** For more details on creating and managing Notification rules, see [Creating, Managing, and Reviewing Notifications](/guides/alerts-events-and-notifications/utilizing-events-and-notifications/creating-managing-and-reviewing-notifications) for more details.
### Designing the Workflow
Our Workflow design solution must ensure that when the introductory Balance credit amount on a customer Account is depleted, then the introductory pricing Plan attached to the Account is ended and replaced by a standard pricing Plan which starts at the same time as the introductory Plan ends.
#### Start
By adding the Notification rule we've set up as the Workflow trigger, we know that a Workflow run will only start when an introductory credit Balance has been depleted.
#### Step 1
When the configured Notification fires and the Workflow starts, we'll add a **List AccountPlans** API function as the first step and call it **List Active Account Plans**. We'll then configure this function:
* To lookup the `accountId` for the Account from the `billing.balanceamount.updated` Event payload associated with the Notification that will fire to trigger the Workflow.
* Use this `accountId` as a query parameter together with the `includeall` as query parameter to retrieve the IDs of the active Account Plans attached to the Account.
* The response will include the Account Plan created when we attached the **Introductory Plan** to the Account.
* The function will then load the response into a variable called `accountPlans` as the output state for the Workflow carried into the next step.
#### Step 2
We'll use a **Loop** Logic function as a second step for the Workflow. Loop functions allow you to embed sub-functions to create sub-Workflows. For our example Workflow solution, the Loop will perform the following sub-steps:
**Sub-Step 1**
Use an **If** Logic function to run through the Workflow state in the `accountPlans` variable passed in from from **Step 1**, and:
* If a match for the value for the **Introductory Plan** `planId` associated with an Account Plan *is found* for the **Introductory Plan**, allow the Workflow run to move to the next step.
* If a match for the value for the **Introductory Plan** `planId` associated with an Account Plan *is not found* for the **Introductory Plan**, stop the Workflow run.
**Sub-Step 2**
If the Workflow exits the **If** function and continues, we'll use a **Set Field** Data Management function to update the end date of the Account Plan in the Workflow state using the last modified date from the `billing.balanceamount.updated` Event.
**Sub-Step 3**
Third, use an **Update AccountPlan** API function to end the existing Account Plan using the end date set in the Workflow state by the previous step.
**Sub-Step 4**
Use a **Set Multiple Fields** Data Management function to create a new Standard Plan Account Plan payload. This Workflow state payload will:
* Use the `accountId` that currently exists in the Workflow state.
* Use the ID of the Standard Plan we created for the Product.
* Apply the same start date to the Standard Plan as we used to end the existing Introductory Plan - by again using the last modified date from the `billing.balanceamount.updated` Event.
**Sub-Step 5**
Use a **Create AccountPlan** API function to take the Account Plan data entered as payload into the Workflow state in the previous step and use this to attach the Standard Plan as the Account Plan on the Account starting at the same time as the Introductory Plan was ended at **Sub-Step 3**.
### Workflow Design - Setting Up Function Prerequisites
The Workflow design requires us to use all three types of Workflow function, and for some of these we'll need prerequisites in place to complete a valid functions configuration:
* **Logic functions**. No prerequisites required.
* **Data management functions**. None will require Transformations.
* **API functions**. API functions in a m3sh Workflow that call the m3ter system can use Credentials set up for m3ter Service Users. We'll need to create a m3ter Service User and a Credential for that user in our Organization. See [Service Authentication](https://docs.m3ter.com/guides/authenticating-with-the-platform/service-authentication).
## Building a m3sh Workflow
We'll now open the Workflow Builder and create a Workflow to fulfill the design solution set out in the [previous section](/guides/m3sh-workflows/creating-event-notification-workflows#designing-the-workflow).
**To create and build a m3sh Workflow:**
1. Select **m3sh**:
 * The **Workflows** page opens.
2. Select **Create workflow**:
* The **Workflows** page opens.
2. Select **Create workflow**:
 * The **Workflows>Create** page open allowing you to enter required details for the new Workflow:
* **Name**.
* **Code**.
* **Description**.
* The **Workflows>Create** page open allowing you to enter required details for the new Workflow:
* **Name**.
* **Code**.
* **Description**.
![M3sh Automation196a]() Notes:
* The builder canvas shows a starter Workflow. You can use pan and zoom controls or fit-to-view for the canvas area as you add and configure functions.
* The **Add function** menu panel is shown and you can collapse the panel at any time to open up more canvas area.
* If you try to create the Workflow without having added at least one function, then you'll receive an error.
* You can add a trigger in the Workflow builder later - see the [following section](/guides/m3sh-workflows/creating-event-notification-workflows#adding-workflow-trigger).
3. On the **Add function** menu, select **m3ter** under **APIs**.
4. Scroll down the **APIs** list and in the **READ** functions locate the **List AccountPlans** function. Note that before adding a function, you can hover your cursor on the function name to open a tool tip explaining what the function is used for:
Notes:
* The builder canvas shows a starter Workflow. You can use pan and zoom controls or fit-to-view for the canvas area as you add and configure functions.
* The **Add function** menu panel is shown and you can collapse the panel at any time to open up more canvas area.
* If you try to create the Workflow without having added at least one function, then you'll receive an error.
* You can add a trigger in the Workflow builder later - see the [following section](/guides/m3sh-workflows/creating-event-notification-workflows#adding-workflow-trigger).
3. On the **Add function** menu, select **m3ter** under **APIs**.
4. Scroll down the **APIs** list and in the **READ** functions locate the **List AccountPlans** function. Note that before adding a function, you can hover your cursor on the function name to open a tool tip explaining what the function is used for:
 5. Drag-and-drop the **List AccountPlans** function onto the Workflow to create the first step:
![M3sh Automation198a]() * When first added, the function shows an alert and has a red border since not yet configured.
6. On the **List AccountPlans** function, select the **Edit** icon:
* When first added, the function shows an alert and has a red border since not yet configured.
6. On the **List AccountPlans** function, select the **Edit** icon:
 * The function's **Edit** panel appears:
 * An information text explains what the function is used for, which you can collapse.
* Since we've just added the function, any validation errors are listed under **Function is invalid**.
7. We can now configure the **List AccountPlans** function in accordance with our design solution for **Step 1** of the Workflow:
* **Title**. We'll change this from the generic default to be specific for the Step: **List Active AccountPlans**.
* **Description**. Optional setting - add a description text.
* **Credentials**. Use the drop-down list to select the m3ter Service User Credential we set up as a prerequisite: **Workflows Service User Credentials**.
* **State path**. Enter `accountPlans` as the state variable which will store the function's output in the Workflow state.
* An information text explains what the function is used for, which you can collapse.
* Since we've just added the function, any validation errors are listed under **Function is invalid**.
7. We can now configure the **List AccountPlans** function in accordance with our design solution for **Step 1** of the Workflow:
* **Title**. We'll change this from the generic default to be specific for the Step: **List Active AccountPlans**.
* **Description**. Optional setting - add a description text.
* **Credentials**. Use the drop-down list to select the m3ter Service User Credential we set up as a prerequisite: **Workflows Service User Credentials**.
* **State path**. Enter `accountPlans` as the state variable which will store the function's output in the Workflow state.
 8. We only want to return *active* AccountPlans for the specified Account, so we'll also need to add two **Optional parameters** as **Query parameters**:
* Select **Add**. The panel adjusts allowing you to enter the first parameter:
* **Key**. Select`account`
* **Lookup type**. Select **State path**
* **Value**. Enter `event.new.accountId`
* Select **Add** again. The panel adjusts allowing you to add a second parameter:
* **Key**. Select`includeall`
* **Lookup type**. Select **Calculation**
* **Value**. Enter `false`
**Query parameters?** The `includeAll` boolean query parameter can be used in conjunction with the `account` query parameter to exclude inactive AccountPlans from the response. See [List AccountPlans](https://docs.m3ter.com/api/accountplan/list-accountplans) in the API Reference documentation.
9. Select **Update**. The **Edit** panel closes and you are returned to the Workflow. We now have the **Step 1** function added to our Workflow and configured to meet the design solution.
Notes:
* The function no longer shows an invalid alert flag and if we reopen the **Edit** panel, there are no validation errors.
* We can open a **Function details** card to check and review a Workflow function's configuration:
8. We only want to return *active* AccountPlans for the specified Account, so we'll also need to add two **Optional parameters** as **Query parameters**:
* Select **Add**. The panel adjusts allowing you to enter the first parameter:
* **Key**. Select`account`
* **Lookup type**. Select **State path**
* **Value**. Enter `event.new.accountId`
* Select **Add** again. The panel adjusts allowing you to add a second parameter:
* **Key**. Select`includeall`
* **Lookup type**. Select **Calculation**
* **Value**. Enter `false`
**Query parameters?** The `includeAll` boolean query parameter can be used in conjunction with the `account` query parameter to exclude inactive AccountPlans from the response. See [List AccountPlans](https://docs.m3ter.com/api/accountplan/list-accountplans) in the API Reference documentation.
9. Select **Update**. The **Edit** panel closes and you are returned to the Workflow. We now have the **Step 1** function added to our Workflow and configured to meet the design solution.
Notes:
* The function no longer shows an invalid alert flag and if we reopen the **Edit** panel, there are no validation errors.
* We can open a **Function details** card to check and review a Workflow function's configuration:
 **Important:** **Create Workflow!** If you expect a Workflow to require many steps, when you've added at least one function it's good practice to **Create** the Workflow to avoid any possible loss of your work.
10. Select **Create**. A published version of the Workflow is created and the Workflow remains open in **Draft** mode:
* You can continue to build the Workflow and **Save draft** changes as you proceed.
* Select to open the **Published** version at any time.
* When you've added further Workflow steps in **Draft**, you can **Publish draft** to update the **Published** version.
11. After creating the Workflow, remain in **Draft** mode and on the **Add function** menu open the **Logic** functions.
12. Drag-and-drop the **Loop** function onto the Workflow canvas to create the next step:
**Important:** **Create Workflow!** If you expect a Workflow to require many steps, when you've added at least one function it's good practice to **Create** the Workflow to avoid any possible loss of your work.
10. Select **Create**. A published version of the Workflow is created and the Workflow remains open in **Draft** mode:
* You can continue to build the Workflow and **Save draft** changes as you proceed.
* Select to open the **Published** version at any time.
* When you've added further Workflow steps in **Draft**, you can **Publish draft** to update the **Published** version.
11. After creating the Workflow, remain in **Draft** mode and on the **Add function** menu open the **Logic** functions.
12. Drag-and-drop the **Loop** function onto the Workflow canvas to create the next step:
![M3sh Automation207]() * Note that the function has a alert flag and displays a red border when first added to the Workflow since not yet configured.
13. Open the **Edit** panel for the **Loop** function and enter the required configuration details for our design solution:
* **Title**. We'll change this for a more specific title: **Loop over active AccountPlans**.
* **Source**. Enter `accountPlans`.
* **Counter variable name**. Enter `accountPlanIndex`.
* **Optional Parameters > Element variable**. Enter `accountPlan`.
14. Select **Update**. The **Edit** panel closes and you are returned to the Workflow. We now have the **Step 2** function added to our Workflow and configured to meet the design solution.
* You can open a **Function details** card to check the configuration we've set up for the Loop function.
* The **Loop** function embeds a starter sub-Workflow, which we can now build out in the same way as the main Workflow by dragging-and-dropping functions into the sub-Workflow needed to complete the design solution.
15. First, we'll add an **If** Logic function:
* Note that the function has a alert flag and displays a red border when first added to the Workflow since not yet configured.
13. Open the **Edit** panel for the **Loop** function and enter the required configuration details for our design solution:
* **Title**. We'll change this for a more specific title: **Loop over active AccountPlans**.
* **Source**. Enter `accountPlans`.
* **Counter variable name**. Enter `accountPlanIndex`.
* **Optional Parameters > Element variable**. Enter `accountPlan`.
14. Select **Update**. The **Edit** panel closes and you are returned to the Workflow. We now have the **Step 2** function added to our Workflow and configured to meet the design solution.
* You can open a **Function details** card to check the configuration we've set up for the Loop function.
* The **Loop** function embeds a starter sub-Workflow, which we can now build out in the same way as the main Workflow by dragging-and-dropping functions into the sub-Workflow needed to complete the design solution.
15. First, we'll add an **If** Logic function:
![M3sh Automation208]() 16. Open the **Edit** panel for the **If** function and enter the required configuration details for our design solution:
* **Title**. We'll change this for a title specific to our worked example: **Is "Introductory Plan"?**
* **Calculation**. Enter: `accountPlan.planId == "971da491-afa1-44d5-b977-4d80546ce921"`
**Important!** For the function's **Calculation**, make sure you use the *ID of the* *Introductory Plan* you attached to the Account *NOT the ID of the* *Account Plan* created for the Account when you attached the Introductory Plan to the Account.
17. Select **Update**. We now have **Sub-Step 1** created and configured for the sub-Workflow and in accordance with the design solution:
16. Open the **Edit** panel for the **If** function and enter the required configuration details for our design solution:
* **Title**. We'll change this for a title specific to our worked example: **Is "Introductory Plan"?**
* **Calculation**. Enter: `accountPlan.planId == "971da491-afa1-44d5-b977-4d80546ce921"`
**Important!** For the function's **Calculation**, make sure you use the *ID of the* *Introductory Plan* you attached to the Account *NOT the ID of the* *Account Plan* created for the Account when you attached the Introductory Plan to the Account.
17. Select **Update**. We now have **Sub-Step 1** created and configured for the sub-Workflow and in accordance with the design solution:
 * As required, the function will only evaluate to **TRUE** and the Workflow continue to the next step if a match is found in the Account's active AccountPlans for the attached **Introductory Plan** `planId`.
18. We'll now add the required functions for the remaining four sub-Workflow steps:
* **Sub-Step 2**. Add and configure a **Set Field** Data management function:
* **Title**. We'll change this for a title specific to our worked example: **Update AccountPlan endDate**
* **State Path**. Enter `accountPlan.endDate`
* **Lookup > Lookup type**. Select **State path** and enter **Value**: `event.new.dtLastModified`
* Select **Update** and check the **Function details**:
* As required, the function will only evaluate to **TRUE** and the Workflow continue to the next step if a match is found in the Account's active AccountPlans for the attached **Introductory Plan** `planId`.
18. We'll now add the required functions for the remaining four sub-Workflow steps:
* **Sub-Step 2**. Add and configure a **Set Field** Data management function:
* **Title**. We'll change this for a title specific to our worked example: **Update AccountPlan endDate**
* **State Path**. Enter `accountPlan.endDate`
* **Lookup > Lookup type**. Select **State path** and enter **Value**: `event.new.dtLastModified`
* Select **Update** and check the **Function details**:
 * **Sub-Step 3**. Add and configure an **Update AccountPlan** API **WRITE** function:
* **Title**. We'll change this for a title specific to our worked example: **End AccountPlan**
* **Description**. Optional setting - add a description text.
* **Credentials**. Select the **Workflows Service User Credentials**.
* **id**. Select **Lookup type** **=** **Static path** and enter **accountPlan.id** for **Value**
* **Request Path**. Enter `accountPlan`
* **Optional parameters**. Not required.
* Select **Update** and check the **Function details**:
* **Sub-Step 3**. Add and configure an **Update AccountPlan** API **WRITE** function:
* **Title**. We'll change this for a title specific to our worked example: **End AccountPlan**
* **Description**. Optional setting - add a description text.
* **Credentials**. Select the **Workflows Service User Credentials**.
* **id**. Select **Lookup type** **=** **Static path** and enter **accountPlan.id** for **Value**
* **Request Path**. Enter `accountPlan`
* **Optional parameters**. Not required.
* Select **Update** and check the **Function details**:
 * **Sub-Step 4**. Add and configure a **Set Multiple Fields** Data management function:
* **Title**. We'll change this for a title specific to our worked example: **Create new "Standard Plan" AccountPlan payload**
* **State Path**. Enter `newAccountPlan`
* **Lookups**. Three required:
* **#1**.
* **Key.** Enter `accountId`
* **Lookup type**. Select **State path**
* **Value**. Enter `event.new.accountId`
* **#2**.
* **Key.** Enter `startDate`
* **Lookup type**. Select **State path**
* **Value**. Enter `event.new.dtLastModified`
* **#3**.
* **Key.** Enter `planId`
* **Lookup type**. Select **Static string**
* **Value**. Enter `4b8716f4-03c5-4ae6-9bfa-00c8f49fee58`
* Select **Update** and check the **Function details**:
* **Sub-Step 4**. Add and configure a **Set Multiple Fields** Data management function:
* **Title**. We'll change this for a title specific to our worked example: **Create new "Standard Plan" AccountPlan payload**
* **State Path**. Enter `newAccountPlan`
* **Lookups**. Three required:
* **#1**.
* **Key.** Enter `accountId`
* **Lookup type**. Select **State path**
* **Value**. Enter `event.new.accountId`
* **#2**.
* **Key.** Enter `startDate`
* **Lookup type**. Select **State path**
* **Value**. Enter `event.new.dtLastModified`
* **#3**.
* **Key.** Enter `planId`
* **Lookup type**. Select **Static string**
* **Value**. Enter `4b8716f4-03c5-4ae6-9bfa-00c8f49fee58`
* Select **Update** and check the **Function details**:
 * **Sub-Step 5**. Add and configure a **Create AccountPlan** API **WRITE** function:
* **Title**. We'll change this for a title specific to our worked example: **Start new AccountPlan**
* **Description**. Optional setting - add a description text.
* **Credentials**. Select the **Workflows Service User Credentials**.
* **m3ter Entity**. Select **AccountPlan**.
* **Request Path**. Enter `newAccountPlan`
* **Optional parameters**. Not required.
* Select **Update** and check the **Function details**:
* **Sub-Step 5**. Add and configure a **Create AccountPlan** API **WRITE** function:
* **Title**. We'll change this for a title specific to our worked example: **Start new AccountPlan**
* **Description**. Optional setting - add a description text.
* **Credentials**. Select the **Workflows Service User Credentials**.
* **m3ter Entity**. Select **AccountPlan**.
* **Request Path**. Enter `newAccountPlan`
* **Optional parameters**. Not required.
* Select **Update** and check the **Function details**:
 * Our sub-workflow for the **Loop** function is now complete with five sub-steps:
 19. Select **Save draft**.
* We now have a Workflow with all required steps required under the design solution for the worked example. To complete the Workflow, we must now add the Notification rule we set up as the Workflow trigger - see the [following section](#adding-and-configuring-a-workflow-notification-trigger).
## Adding and Configuring a Workflow Notification Trigger
To complete the Workflow set up, we can now add the **Intro Credit Balance Depleted** Notification rule we created in the [earlier section](/guides/m3sh-workflows/creating-event-notification-workflows#creating-a-workflow-trigger) as the Workflow trigger.
When you add a Notification trigger to a Workflow, you have the option to select users in your Organization that you want to receive an email notification if the trigger is disabled.
**To add Notification trigger to Workflow:**
1. Select **m3sh**. The **Workflows** page opens.
2. Select the **Name** hotlink text of the Workflow you want to add a trigger to. The **Workflow** opens in **Draft** mode.
3. Select **Workflow triggers**. In the current worked example, no triggers have yet been added for the Workflow:
19. Select **Save draft**.
* We now have a Workflow with all required steps required under the design solution for the worked example. To complete the Workflow, we must now add the Notification rule we set up as the Workflow trigger - see the [following section](#adding-and-configuring-a-workflow-notification-trigger).
## Adding and Configuring a Workflow Notification Trigger
To complete the Workflow set up, we can now add the **Intro Credit Balance Depleted** Notification rule we created in the [earlier section](/guides/m3sh-workflows/creating-event-notification-workflows#creating-a-workflow-trigger) as the Workflow trigger.
When you add a Notification trigger to a Workflow, you have the option to select users in your Organization that you want to receive an email notification if the trigger is disabled.
**To add Notification trigger to Workflow:**
1. Select **m3sh**. The **Workflows** page opens.
2. Select the **Name** hotlink text of the Workflow you want to add a trigger to. The **Workflow** opens in **Draft** mode.
3. Select **Workflow triggers**. In the current worked example, no triggers have yet been added for the Workflow:
 4. Select **Add trigger>Add notification trigger**:
 * An **Add notification trigger** dialog appears:
![M3sh Automation216]() 5. Select the Notification rule you want to use as the Workflow trigger and then select **Submit**. The selected notification trigger is listed under **Workflow triggers**:
5. Select the Notification rule you want to use as the Workflow trigger and then select **Submit**. The selected notification trigger is listed under **Workflow triggers**:
 * For the selected **NOTIFICATION RULE**, you can read-off
* The Event the rule is based on.
* Whether the rule is **ACTIVE** or **INACTIVE**.
6. If you want to set up users in your Organization to receive an email notification if the trigger is disabled, select the **Details** icon:
* For the selected **NOTIFICATION RULE**, you can read-off
* The Event the rule is based on.
* Whether the rule is **ACTIVE** or **INACTIVE**.
6. If you want to set up users in your Organization to receive an email notification if the trigger is disabled, select the **Details** icon:
 * A **Workflow trigger** modal appears:
![M3sh Automation218]() 7. Under **Trigger options**, use the **Disabled notification users** drop-down to add the Organization users you want to receive an email notification if the Workflow trigger is disabled.
**Disabled Notification Triggers**: If a Notification rule used as a Workflow trigger is switched to inactive, then the Workflow trigger is disabled. Also, Notification triggers are automatically disabled if the Workflow encounters errors in 20 consecutive runs via a trigger.
8. Select **Update**. A message shows to confirm that the **Trigger options** for notifying Organization users were updated successfully.
9. Select **Publish draft**. The Workflow is now ready to be tested - see the [following section](#testing-the-workflow).
## Testing the Workflow
To test that the Event Notification Workflow we've built will meet the example use case and automate the switching out of AccountPlans on our test Account, we'll cause the Notification rule to fire and trigger the Workflow by adding a debit transaction to the Balance on the Account that reduces the Balance to zero.
**Publish Workflow!** Before testing your Workflow, check that you've published the most recent Draft.
**To test the Workflow:**
1. First, go back to the test Account we set up and open the **Attached plans** tab:
7. Under **Trigger options**, use the **Disabled notification users** drop-down to add the Organization users you want to receive an email notification if the Workflow trigger is disabled.
**Disabled Notification Triggers**: If a Notification rule used as a Workflow trigger is switched to inactive, then the Workflow trigger is disabled. Also, Notification triggers are automatically disabled if the Workflow encounters errors in 20 consecutive runs via a trigger.
8. Select **Update**. A message shows to confirm that the **Trigger options** for notifying Organization users were updated successfully.
9. Select **Publish draft**. The Workflow is now ready to be tested - see the [following section](#testing-the-workflow).
## Testing the Workflow
To test that the Event Notification Workflow we've built will meet the example use case and automate the switching out of AccountPlans on our test Account, we'll cause the Notification rule to fire and trigger the Workflow by adding a debit transaction to the Balance on the Account that reduces the Balance to zero.
**Publish Workflow!** Before testing your Workflow, check that you've published the most recent Draft.
**To test the Workflow:**
1. First, go back to the test Account we set up and open the **Attached plans** tab:
![M3sh Automation226]() * We can see that the **Introductory Plan** is still attached as the AccountPlan on the Account because the **Introductory Credits** Balance added to the Account remains in credit.
2. Select the **Balances** tab and open the **Balance details** page for the **Introductory Credits** Balance on the Account.
3. On the **Balance transactions** panel, select **Create balance transaction** and add a negative Transaction that reduces the Balance amount to zero:
* We can see that the **Introductory Plan** is still attached as the AccountPlan on the Account because the **Introductory Credits** Balance added to the Account remains in credit.
2. Select the **Balances** tab and open the **Balance details** page for the **Introductory Credits** Balance on the Account.
3. On the **Balance transactions** panel, select **Create balance transaction** and add a negative Transaction that reduces the Balance amount to zero:
![M3sh Automation227]() * This should fire the Notification rule and trigger the Workflow to run.
4. Go back to the **Attached plans** tab on the Account:
* This should fire the Notification rule and trigger the Workflow to run.
4. Go back to the **Attached plans** tab on the Account:
![M3sh Automation228]() * We can see that under **Active and pending attached plans** the **Standard Plan** is now the **ACTIVE** AccountPlan and the **Introductory Plan** now shows under **Previously attached plans**. As required, the **Introductory Plan** has been end dated at the same time as the **Standard Plan** start date.
5. Lastly, if we return to the **Sign-up Credits Depleted** Workflow, we can confirm under **Latest workflow runs** that a Workflow run started very soon after the Transaction that reduced the Balance to zero was created:
* We can see that under **Active and pending attached plans** the **Standard Plan** is now the **ACTIVE** AccountPlan and the **Introductory Plan** now shows under **Previously attached plans**. As required, the **Introductory Plan** has been end dated at the same time as the **Standard Plan** start date.
5. Lastly, if we return to the **Sign-up Credits Depleted** Workflow, we can confirm under **Latest workflow runs** that a Workflow run started very soon after the Transaction that reduced the Balance to zero was created:
![M3sh Automation229]() # Creating Incoming Webhook Workflows
Source: https://docs.m3ter.com/guides/m3sh-workflows/creating-incoming-webhook-workflows
A main area of operational support that m3sh Workflows are designed to fulfill is supporting data integration routines to control the exchange of data between your m3ter Organization and your external systems:
* Outbound from m3ter Organization into external systems.
* Inbound from external systems into your m3ter Organization.
This topic introduces an example use case that calls for automatic creation and syncing of data entities from an external system with m3ter data. How to design, create, and configure a m3sh Workflow triggered by an Incoming Webhook to implement a solution for this kind of use case is set out as a worked example:
* [Worked Example](#worked-example)
* [m3sh Workflow Solution - Design and Prerequisites](#m3sh-workflow-solution-design-and-prerequisites)
* [Building a Workflow](#building-a-workflow)
* [Adding and Configuring a Workflow Webhook Trigger](#adding-and-configuring-a-workflow-webhook-trigger)
* [Testing the Workflow](#testing-the-workflow)
**Review First!** Before attempting to follow this worked example and create and build a m3sh Workflow, please review the earlier topics in this section introducing [Workflow Key Concepts and Options](/guides/m3sh-workflows/m3sh-workflows-key-concepts-and-options) and the [Workflow Builder](/guides/m3sh-workflows/getting-to-know-the-workflow-builder).
## Worked Example
Suppose you use an external CRM system to create and maintain your customer account records. You want to automate the syncing of this data with the customer Accounts data held in your m3ter Organization and to ensure that any customer account creation, update, or delete event in the external CRM causes a corresponding change in the m3ter data.
## m3sh Workflow Solution - Design and Prerequisites
A m3sh Incoming Webhook Workflow can provide a solution to meet this example use case. Some preparatory work is required:
* [Setting Up External System Webhook](#setting-up-external-system-webhook)
* [Creating Incoming Webhook Credential](#creating-incoming-webhook-credential)
* [Designing the Workflow](#designing-the-workflow)
* [Workflow Design - Setting Up Function Prerequisites](#workflow-design-setting-up-function-prerequisites)
### Setting Up External System Webhook
In your external system, you must first set up a Webhook destination that you'll use to send any data payloads to for syncing with your m3ter data. See [Incoming Webhook Workflows](/guides/m3sh-workflows/m3sh-workflows-key-concepts-and-options#incoming-webhook-workflows) for more details.
For the current worked example where Chargebee is the external system, the Chargebee setup will have the system send `event_type` payloads when `customer` records are updated.
### Creating Incoming Webhook Credential
In the m3ter Console, open the **Integrations>Credentials** page and create an Incoming Webhook Credential:
* Enter a **Name** for the Credential and for **Destination**, select **m3sh Workflow**.
* For the current example, we'll leave the **Type** as default **HTTP basic** and since the Webhook was set up from Chargebee as the source system, enter the matching **Username** and **Password**. See [Creating Incoming Webhook Credentials](https://docs.m3ter.com/guides/integrations/setting-up-integrations/managing-integration-credentials#creating-incoming-webhook-credentials) for more details.
* The new Incoming Webhook Credential is listed on the **Credentials** page:
# Creating Incoming Webhook Workflows
Source: https://docs.m3ter.com/guides/m3sh-workflows/creating-incoming-webhook-workflows
A main area of operational support that m3sh Workflows are designed to fulfill is supporting data integration routines to control the exchange of data between your m3ter Organization and your external systems:
* Outbound from m3ter Organization into external systems.
* Inbound from external systems into your m3ter Organization.
This topic introduces an example use case that calls for automatic creation and syncing of data entities from an external system with m3ter data. How to design, create, and configure a m3sh Workflow triggered by an Incoming Webhook to implement a solution for this kind of use case is set out as a worked example:
* [Worked Example](#worked-example)
* [m3sh Workflow Solution - Design and Prerequisites](#m3sh-workflow-solution-design-and-prerequisites)
* [Building a Workflow](#building-a-workflow)
* [Adding and Configuring a Workflow Webhook Trigger](#adding-and-configuring-a-workflow-webhook-trigger)
* [Testing the Workflow](#testing-the-workflow)
**Review First!** Before attempting to follow this worked example and create and build a m3sh Workflow, please review the earlier topics in this section introducing [Workflow Key Concepts and Options](/guides/m3sh-workflows/m3sh-workflows-key-concepts-and-options) and the [Workflow Builder](/guides/m3sh-workflows/getting-to-know-the-workflow-builder).
## Worked Example
Suppose you use an external CRM system to create and maintain your customer account records. You want to automate the syncing of this data with the customer Accounts data held in your m3ter Organization and to ensure that any customer account creation, update, or delete event in the external CRM causes a corresponding change in the m3ter data.
## m3sh Workflow Solution - Design and Prerequisites
A m3sh Incoming Webhook Workflow can provide a solution to meet this example use case. Some preparatory work is required:
* [Setting Up External System Webhook](#setting-up-external-system-webhook)
* [Creating Incoming Webhook Credential](#creating-incoming-webhook-credential)
* [Designing the Workflow](#designing-the-workflow)
* [Workflow Design - Setting Up Function Prerequisites](#workflow-design-setting-up-function-prerequisites)
### Setting Up External System Webhook
In your external system, you must first set up a Webhook destination that you'll use to send any data payloads to for syncing with your m3ter data. See [Incoming Webhook Workflows](/guides/m3sh-workflows/m3sh-workflows-key-concepts-and-options#incoming-webhook-workflows) for more details.
For the current worked example where Chargebee is the external system, the Chargebee setup will have the system send `event_type` payloads when `customer` records are updated.
### Creating Incoming Webhook Credential
In the m3ter Console, open the **Integrations>Credentials** page and create an Incoming Webhook Credential:
* Enter a **Name** for the Credential and for **Destination**, select **m3sh Workflow**.
* For the current example, we'll leave the **Type** as default **HTTP basic** and since the Webhook was set up from Chargebee as the source system, enter the matching **Username** and **Password**. See [Creating Incoming Webhook Credentials](https://docs.m3ter.com/guides/integrations/setting-up-integrations/managing-integration-credentials#creating-incoming-webhook-credentials) for more details.
* The new Incoming Webhook Credential is listed on the **Credentials** page:
![M3sh Automation103a]() * When we add a trigger to the Incoming Webhook Workflow, this Incoming Webhook Credential will be available for selection, allowing the Chargebee system to access our Workflow as destination and act as its trigger.
### Designing the Workflow
Our Workflow design solution must ensure that when a change is made to a customer record in the external CRM system, a corresponding change is made automatically to the customer Account entity in our m3ter Organization.
The design solution has to accommodate different cases of a change in a customer record:
* **CASE 1 Customer Created**
* **CASE 2 Customer Changed**
* **CASE 2a** **Customer Updated**
* **CASE 2b** **Customer Deleted**
**Start**
By adding a Webhook trigger using the Incoming Webhook Credential for the Webhook set up from the external CRM system - for the current example Chargebee - we know that when the external system sends a payload to the Webhook, the Workflow will run.
**Step 1**
We'll add an **If Logic** function as the first step to check if the change to the external system customer record is a customer created event type:
* Give it a descriptive title: **Is customer created event?**
* Add the following **Calculation** as the condition to evaluate as **TRUE** or **FALSE**:
* `body.event_type == "customer_created"`
* The **If** function will then branch the Workflow.
#### **CASE 1: Customer Created**
If **Step 1** evaluates to **TRUE** and a new customer record has been created in the external system, create the following branch for the Workflow.
**Sub-Step 1**
For this first **Sub-Step 1**, we'll add an **Apply Transformation Data Management** function:
* Give it a descriptive title: **Build new Account data**.
* Configure it to apply a Transformation we've created to control how fields in the external system customer record are mapped to fields in the m3ter Account entity.
* Store the new object created by the Transformation into the Workflow state in the **newAccount** variable.
**Sub-Step 2**
This step will use a **Create Account m3ter API** function to:
* Use the **newAccount** state variable to make the create request.
* Store the response in the **newAccountResponse** state variable.
**Sub-Step 3**
Lastly on the main **TRUE** branch, we'll add a step that uses a **Create External Mapping m3ter API** function:
* The reason for this last step is to allow for cases where the customer record change is either a customer updated or customer deleted event type. Since the payload from the Chargebee system will not contain a m3ter Account ID, we create an External Mapping, which we can then use to obtain the corresponding m3ter Account ID using the external Chargebee system payload.
#### **CASE 2: Customer Changed**
If **Step 1** evaluates to **FALSE** and a customer record has been changed in the external system, we'll first add a **Lookup m3ter entity UUID m3ter API** function:
* Give it a descriptive title: **Does account exist?**
* Use this to lookup confirm that an External Mapping exists for the external system, table, and ID and as created by **Sub-Step 3** in the main **TRUE** branch.
* Store the m3ter Account entity UUID from that External Mapping in the **existingAccountId** Workflow state variable.
We'll then use an **IF Logic** function to check if the event is a customer record change:
* Give it a descriptive title: **Is customer changed event?**
* Add the following **Calculation** as the condition to evaluate as **TRUE** or **FALSE**:
* `body.event_type == "customer_changed"`
* The **If** function will then branch the Workflow.
**CASE 2a: Customer Updated**
**Sub-Step 1**
If the **Is customer changed event?** function evaluates to **TRUE**, add a **Retrieve Account m3ter API** function:
* Give it a descriptive title: **Load existing account**
* Enter a m3ter Service User Credentials to authenticate this call.
* Use this to load the existing Account using the value of the **existingAccountId** in the state.
* Store the response in the **existingAccount** state variable.
**Sub-Step 2**
Add an **Apply Transformation Data Management** function:
* Give it a descriptive title: **Create Account updates data**
* Reference a transformation created to map Chargebee field custom record values to m3ter customer Account entity fields. This will ensure any fields updated in the Chargebee payload for the change event are now mapped to the m3ter entity data fields.
* Store the transformed object in the Workflow state using the **accountUpdates** variable.
**Sub-Step 3**
Add a **Set Multiple Fields Data Management** function:
* Give it a descriptive title: **Apply Account updates to existing Account data**
* Use this function to set multiple fields in the **existingAccount** state variable using those held in the **accountUpdates** variable.
**Sub-Step 4**
Lastly, add an **Update Account m3ter API** function:
* Give it a descriptive title: **Update Account**
* Use this function to use the **existingAccount** state variable for the request and update the m3ter customer Account entity. This will ensure that the Account entity fields values now match the updated Chargebee customer record values.
**CASE 2b: Customer Deleted**
**Sub-Step 1**
If the **Is customer changed event?** function evaluates to **FALSE**, add an **If Logic** function to check if a customer record deleted event:
* Give it a descriptive title: **Is customer deleted event?**
* Add the following **Calculation** as the condition to evaluate as **TRUE** or **FALSE**:
* `body.event_type == "customer_deleted"`
* The **If** function will then branch the Workflow.
**Sub-Step 2**
If the **Is customer deleted event?** function evaluates to **TRUE**, add a **Delete Account m3ter API** function:
* Give it a descriptive title: **Delete Account**
* Use the **existingAccountId** state variable for the request.
* Store the response in the **deletedAccountResponse** variable.
### Workflow Design - Setting Up Function Prerequisites
The Workflow design requires us to use all three types of Workflow function, and for some of these we'll need prerequisites in place to complete a valid functions configuration:
* **Logic functions**. No prerequisites required.
* **Data management functions**. The Workflow design requires an **Apply Transformation Data Management** function and we can set up the **Chargebee Customer → m3ter Account** Transformation as a prerequisite:
* When we add a trigger to the Incoming Webhook Workflow, this Incoming Webhook Credential will be available for selection, allowing the Chargebee system to access our Workflow as destination and act as its trigger.
### Designing the Workflow
Our Workflow design solution must ensure that when a change is made to a customer record in the external CRM system, a corresponding change is made automatically to the customer Account entity in our m3ter Organization.
The design solution has to accommodate different cases of a change in a customer record:
* **CASE 1 Customer Created**
* **CASE 2 Customer Changed**
* **CASE 2a** **Customer Updated**
* **CASE 2b** **Customer Deleted**
**Start**
By adding a Webhook trigger using the Incoming Webhook Credential for the Webhook set up from the external CRM system - for the current example Chargebee - we know that when the external system sends a payload to the Webhook, the Workflow will run.
**Step 1**
We'll add an **If Logic** function as the first step to check if the change to the external system customer record is a customer created event type:
* Give it a descriptive title: **Is customer created event?**
* Add the following **Calculation** as the condition to evaluate as **TRUE** or **FALSE**:
* `body.event_type == "customer_created"`
* The **If** function will then branch the Workflow.
#### **CASE 1: Customer Created**
If **Step 1** evaluates to **TRUE** and a new customer record has been created in the external system, create the following branch for the Workflow.
**Sub-Step 1**
For this first **Sub-Step 1**, we'll add an **Apply Transformation Data Management** function:
* Give it a descriptive title: **Build new Account data**.
* Configure it to apply a Transformation we've created to control how fields in the external system customer record are mapped to fields in the m3ter Account entity.
* Store the new object created by the Transformation into the Workflow state in the **newAccount** variable.
**Sub-Step 2**
This step will use a **Create Account m3ter API** function to:
* Use the **newAccount** state variable to make the create request.
* Store the response in the **newAccountResponse** state variable.
**Sub-Step 3**
Lastly on the main **TRUE** branch, we'll add a step that uses a **Create External Mapping m3ter API** function:
* The reason for this last step is to allow for cases where the customer record change is either a customer updated or customer deleted event type. Since the payload from the Chargebee system will not contain a m3ter Account ID, we create an External Mapping, which we can then use to obtain the corresponding m3ter Account ID using the external Chargebee system payload.
#### **CASE 2: Customer Changed**
If **Step 1** evaluates to **FALSE** and a customer record has been changed in the external system, we'll first add a **Lookup m3ter entity UUID m3ter API** function:
* Give it a descriptive title: **Does account exist?**
* Use this to lookup confirm that an External Mapping exists for the external system, table, and ID and as created by **Sub-Step 3** in the main **TRUE** branch.
* Store the m3ter Account entity UUID from that External Mapping in the **existingAccountId** Workflow state variable.
We'll then use an **IF Logic** function to check if the event is a customer record change:
* Give it a descriptive title: **Is customer changed event?**
* Add the following **Calculation** as the condition to evaluate as **TRUE** or **FALSE**:
* `body.event_type == "customer_changed"`
* The **If** function will then branch the Workflow.
**CASE 2a: Customer Updated**
**Sub-Step 1**
If the **Is customer changed event?** function evaluates to **TRUE**, add a **Retrieve Account m3ter API** function:
* Give it a descriptive title: **Load existing account**
* Enter a m3ter Service User Credentials to authenticate this call.
* Use this to load the existing Account using the value of the **existingAccountId** in the state.
* Store the response in the **existingAccount** state variable.
**Sub-Step 2**
Add an **Apply Transformation Data Management** function:
* Give it a descriptive title: **Create Account updates data**
* Reference a transformation created to map Chargebee field custom record values to m3ter customer Account entity fields. This will ensure any fields updated in the Chargebee payload for the change event are now mapped to the m3ter entity data fields.
* Store the transformed object in the Workflow state using the **accountUpdates** variable.
**Sub-Step 3**
Add a **Set Multiple Fields Data Management** function:
* Give it a descriptive title: **Apply Account updates to existing Account data**
* Use this function to set multiple fields in the **existingAccount** state variable using those held in the **accountUpdates** variable.
**Sub-Step 4**
Lastly, add an **Update Account m3ter API** function:
* Give it a descriptive title: **Update Account**
* Use this function to use the **existingAccount** state variable for the request and update the m3ter customer Account entity. This will ensure that the Account entity fields values now match the updated Chargebee customer record values.
**CASE 2b: Customer Deleted**
**Sub-Step 1**
If the **Is customer changed event?** function evaluates to **FALSE**, add an **If Logic** function to check if a customer record deleted event:
* Give it a descriptive title: **Is customer deleted event?**
* Add the following **Calculation** as the condition to evaluate as **TRUE** or **FALSE**:
* `body.event_type == "customer_deleted"`
* The **If** function will then branch the Workflow.
**Sub-Step 2**
If the **Is customer deleted event?** function evaluates to **TRUE**, add a **Delete Account m3ter API** function:
* Give it a descriptive title: **Delete Account**
* Use the **existingAccountId** state variable for the request.
* Store the response in the **deletedAccountResponse** variable.
### Workflow Design - Setting Up Function Prerequisites
The Workflow design requires us to use all three types of Workflow function, and for some of these we'll need prerequisites in place to complete a valid functions configuration:
* **Logic functions**. No prerequisites required.
* **Data management functions**. The Workflow design requires an **Apply Transformation Data Management** function and we can set up the **Chargebee Customer → m3ter Account** Transformation as a prerequisite:
![M3sh Automation104a]() This will control the mapping of Chargebee customer record fields to m3ter customer Account entity fields:
This will control the mapping of Chargebee customer record fields to m3ter customer Account entity fields:
![M3sh Automation105]() * **API functions**. API functions in a m3sh Workflow that call the m3ter system can use Credentials set up for m3ter Service Users. We'll need to create a m3ter Service User and a Credential for that user in our Organization. See [Service Authentication](https://docs.m3ter.com/guides/authenticating-with-the-platform/service-authentication).
## Building a Workflow
We'll now open the Workflow Builder and create a Workflow to comply with the design solution set out in the [Designing the Workflow](#designing-the-workflow) section above.
**To create and build a m3sh Workflow:**
1. Select **m3sh**:
* **API functions**. API functions in a m3sh Workflow that call the m3ter system can use Credentials set up for m3ter Service Users. We'll need to create a m3ter Service User and a Credential for that user in our Organization. See [Service Authentication](https://docs.m3ter.com/guides/authenticating-with-the-platform/service-authentication).
## Building a Workflow
We'll now open the Workflow Builder and create a Workflow to comply with the design solution set out in the [Designing the Workflow](#designing-the-workflow) section above.
**To create and build a m3sh Workflow:**
1. Select **m3sh**:
 * The **Workflows** page opens.
2. Select **Create workflow**:
* The **Workflows** page opens.
2. Select **Create workflow**:
 * The **Workflows>Create** page open allowing you to enter required details for the new Workflow:
* **Name**.
* **Code**.
* **Description**.
* The **Workflows>Create** page open allowing you to enter required details for the new Workflow:
* **Name**.
* **Code**.
* **Description**.
![M3sh Automation230a]() Notes:
* The builder canvas shows a starter Workflow. You can use pan and zoom controls or fit-to-view for the canvas area as you add and configure functions.
* The **Add function** menu panel is shown and you can collapse the panel at any time to open up more canvas area.
* If you try to save the Workflow without having added at least one function, then you'll receive an error.
* You can add a trigger in the Workflow builder later - see the following [Adding and Configuring a Workflow Webhook Trigger](#adding-and-configuring-a-workflow-webhook-trigger) section.
3. On the **Add function** menu, select **Logic**.
4. Drag-and-drop the **If** function onto the Workflow to create the first step:
Notes:
* The builder canvas shows a starter Workflow. You can use pan and zoom controls or fit-to-view for the canvas area as you add and configure functions.
* The **Add function** menu panel is shown and you can collapse the panel at any time to open up more canvas area.
* If you try to save the Workflow without having added at least one function, then you'll receive an error.
* You can add a trigger in the Workflow builder later - see the following [Adding and Configuring a Workflow Webhook Trigger](#adding-and-configuring-a-workflow-webhook-trigger) section.
3. On the **Add function** menu, select **Logic**.
4. Drag-and-drop the **If** function onto the Workflow to create the first step:
![M3sh Automation231]() * Note that the function shows an alert and has a red border when first added to the Workflow since not yet configured.
5. On the **If** function, select the **Edit** icon:
* Note that the function shows an alert and has a red border when first added to the Workflow since not yet configured.
5. On the **If** function, select the **Edit** icon:
 * The function's **Edit** panel appears:
 * An information text explains what the function is used for, which you can collapse.
* Since we've just added the function, any validation errors are listed at the top of the **Edit** panel.
6. We can now configure the **If** function in accordance with our Workflow design for **Step 1**:
* **Title**. We'll change this from the generic default to be specific for the Step: **Is customer created event?**
* **Description**. Optional setting and we'll omit for the current worked example.
* **Calculation**. Add `body.event_type = "customer_created"` as the condition to evaluate as **TRUE** or **FALSE**.
* An information text explains what the function is used for, which you can collapse.
* Since we've just added the function, any validation errors are listed at the top of the **Edit** panel.
6. We can now configure the **If** function in accordance with our Workflow design for **Step 1**:
* **Title**. We'll change this from the generic default to be specific for the Step: **Is customer created event?**
* **Description**. Optional setting and we'll omit for the current worked example.
* **Calculation**. Add `body.event_type = "customer_created"` as the condition to evaluate as **TRUE** or **FALSE**.
 7. Select **Update**. The **Edit** panel closes and you are returned to the Workflow. We now have the **Step 1** function added to our Workflow and configured to meet the design solution.
Notes:
* The function no longer shows an invalid alert flag and if we reopen the **Edit** panel, there are no validation errors.
* We can open a **Function details** card to check and review the function's configuration:
7. Select **Update**. The **Edit** panel closes and you are returned to the Workflow. We now have the **Step 1** function added to our Workflow and configured to meet the design solution.
Notes:
* The function no longer shows an invalid alert flag and if we reopen the **Edit** panel, there are no validation errors.
* We can open a **Function details** card to check and review the function's configuration:
 **Important:** **Create Workflow!** If you expect a Workflow to require many steps, when you've added at least one function it's good practice to **Create** the Workflow to avoid any possible loss of your work.
8. Select **Create**. A published version of the Workflow is created and the Workflow remains open in **Draft** mode:
* You can continue to build the Workflow and **Save draft** changes as you proceed.
* Select to open the **Published** version at any time.
* When you've added further Workflow steps in **Draft**, you can **Publish draft** to update the **Published** version.
* After creating your Workflow, remain in **Draft** mode.
**CASE 1: Customer Created**
In accordance with the design solution, we'll now develop the main **TRUE** branch of the Workflow to cover **CASE 1: Customer Created**.
1. Select **Data Management** on the **Add function** menu.
2. Drag-and-drop an **Apply Transformation** function to create the next step in the Workflow:
**Important:** **Create Workflow!** If you expect a Workflow to require many steps, when you've added at least one function it's good practice to **Create** the Workflow to avoid any possible loss of your work.
8. Select **Create**. A published version of the Workflow is created and the Workflow remains open in **Draft** mode:
* You can continue to build the Workflow and **Save draft** changes as you proceed.
* Select to open the **Published** version at any time.
* When you've added further Workflow steps in **Draft**, you can **Publish draft** to update the **Published** version.
* After creating your Workflow, remain in **Draft** mode.
**CASE 1: Customer Created**
In accordance with the design solution, we'll now develop the main **TRUE** branch of the Workflow to cover **CASE 1: Customer Created**.
1. Select **Data Management** on the **Add function** menu.
2. Drag-and-drop an **Apply Transformation** function to create the next step in the Workflow:
![M3sh Automation329]() * Note that the function shows an alert flag and displays a red border when first added to the Workflow since not yet configured.
3. Open the **Edit** panel for the **Apply Transformation** function and enter the required configuration details for our design solution:
* **Title**. We'll change this for a more specific title: **Build new Account data**
* **Description**. Optional setting and we'll omit for the current worked example.
* **Source**. Name of variable by which name of the object to transform should be retrieved from state: `body.content.customer`
* **Transformation**. Select the **Chargebee Customer → m3ter Account** Transformation set up as a Workflow prerequisite.
* **Destination**. Name of the variable by which the transformed object will be stored in state: `newAccount`
4. Select **Update**. The **Edit** panel closes and you are returned to the Workflow. We now have the required **Apply Transformation** function added to our Workflow and configured to meet **Step 1** of the **Customer Created** solution.
* We can open the **Function details** card to check the configuration:
* Note that the function shows an alert flag and displays a red border when first added to the Workflow since not yet configured.
3. Open the **Edit** panel for the **Apply Transformation** function and enter the required configuration details for our design solution:
* **Title**. We'll change this for a more specific title: **Build new Account data**
* **Description**. Optional setting and we'll omit for the current worked example.
* **Source**. Name of variable by which name of the object to transform should be retrieved from state: `body.content.customer`
* **Transformation**. Select the **Chargebee Customer → m3ter Account** Transformation set up as a Workflow prerequisite.
* **Destination**. Name of the variable by which the transformed object will be stored in state: `newAccount`
4. Select **Update**. The **Edit** panel closes and you are returned to the Workflow. We now have the required **Apply Transformation** function added to our Workflow and configured to meet **Step 1** of the **Customer Created** solution.
* We can open the **Function details** card to check the configuration:
 5. On the **Add function** menu, select **m3ter API** functions.
6. Drag-and-drop a **Create Account** function to create the next step of the **Customer Created** branch of the Workflow.
7. Open the **Edit** panel for the **Create Account** function and enter the required configuration details for our design solution:
* **Title**. We'll leave this as the default **Create Account** title since applicable for the current example.
* **Credentials**. Select the Service User Credential we set up as a prerequisite.
* **Request Path**. This is the state variable containing the request: `newAccount`
* **Optional parameters**:
* **State Path**. This is the state variable in which to store the response: `newAccountResponse`
8. Select **Update**. The **Edit** panel closes and you are returned to the Workflow. We now have the required **Create Account** function added to our Workflow and configured to meet **Step 2** of the **Customer Created** case:
5. On the **Add function** menu, select **m3ter API** functions.
6. Drag-and-drop a **Create Account** function to create the next step of the **Customer Created** branch of the Workflow.
7. Open the **Edit** panel for the **Create Account** function and enter the required configuration details for our design solution:
* **Title**. We'll leave this as the default **Create Account** title since applicable for the current example.
* **Credentials**. Select the Service User Credential we set up as a prerequisite.
* **Request Path**. This is the state variable containing the request: `newAccount`
* **Optional parameters**:
* **State Path**. This is the state variable in which to store the response: `newAccountResponse`
8. Select **Update**. The **Edit** panel closes and you are returned to the Workflow. We now have the required **Create Account** function added to our Workflow and configured to meet **Step 2** of the **Customer Created** case:
 9. Lastly for this Workflow branch and as determined in our overall design solution to facilitate the **Customer Updated** or **Customer Deleted** cases, drag-and-drop a **Create m3ter external mapping API** function to create the final step of the **Customer Created** branch.
10. Open the **Edit** panel for the **Create m3ter external mapping** function and enter the required configuration details for our design solution:
* **Title**. Edit this to **Create External Mapping**.
* **Description**. Optional setting and we'll omit for the current worked example.
* **m3ter Entity Type**. Use the drop-down to select **Account**.
* **m3ter ID Path**. This is the path of the m3ter UUID to look up in the state: `newAccountResponse.id`
**Tip:** If you click in the empty field, a list of available state variables will show for selection.
* **External System**. Use the drop-down to select **Chargebee**.
* **External Table**. Enter **Customer**.
* **External ID Path**. This is the path of the external ID to lookup in the state: `body.content.customer.id`.
* **Optional parameters**. This function gives you a **Duplicate run log for entity** option. For the current example, we'll leave this option disabled.
11. Select **Update**. The **Edit** panel closes and you are returned to the Workflow. We now have the required **Create External Mapping** function added to our Workflow and configured to meet **Step 3** of the **Customer Created** case.
* We can open the **Function details** card to check the configuration:
9. Lastly for this Workflow branch and as determined in our overall design solution to facilitate the **Customer Updated** or **Customer Deleted** cases, drag-and-drop a **Create m3ter external mapping API** function to create the final step of the **Customer Created** branch.
10. Open the **Edit** panel for the **Create m3ter external mapping** function and enter the required configuration details for our design solution:
* **Title**. Edit this to **Create External Mapping**.
* **Description**. Optional setting and we'll omit for the current worked example.
* **m3ter Entity Type**. Use the drop-down to select **Account**.
* **m3ter ID Path**. This is the path of the m3ter UUID to look up in the state: `newAccountResponse.id`
**Tip:** If you click in the empty field, a list of available state variables will show for selection.
* **External System**. Use the drop-down to select **Chargebee**.
* **External Table**. Enter **Customer**.
* **External ID Path**. This is the path of the external ID to lookup in the state: `body.content.customer.id`.
* **Optional parameters**. This function gives you a **Duplicate run log for entity** option. For the current example, we'll leave this option disabled.
11. Select **Update**. The **Edit** panel closes and you are returned to the Workflow. We now have the required **Create External Mapping** function added to our Workflow and configured to meet **Step 3** of the **Customer Created** case.
* We can open the **Function details** card to check the configuration:
 **CASE 2: Customer Changed**
In accordance with the design solution, we'll now build out the main **FALSE** branch of the Workflow to cover **CASE 2: Customer Changed**
1. In the **Add function** menu, select **m3ter APIs**.
2. Scroll down the **READ** functions and drag-and-drop a **Lookup m3ter entity UUID** function to create the first step in the **FALSE** branch of the Workflow:
**CASE 2: Customer Changed**
In accordance with the design solution, we'll now build out the main **FALSE** branch of the Workflow to cover **CASE 2: Customer Changed**
1. In the **Add function** menu, select **m3ter APIs**.
2. Scroll down the **READ** functions and drag-and-drop a **Lookup m3ter entity UUID** function to create the first step in the **FALSE** branch of the Workflow:
![M3sh Automation237]() 3. Open the **Edit** panel for the **Lookup m3ter entity UUID** function and enter the required configuration details for our design solution:
* **Title**. Enter a descriptive title for the role of this function: **Does Account exist?**
* **Description**. Optional setting and we'll omit for the current worked example.
* **External System**. Use the drop-down to select **Chargebee**.
* **External Table**. Enter **Customer**.
* **External ID Path**. This is the path of the external ID to lookup in the state: `body.content.customer.id`
* **Optional parameters**. Use the **m3ter ID State Variable Name** option to save the m3ter UUID to the state: `existingAccountId`
4. Select **Update**. The **Edit** panel closes and you are returned to the Workflow. We now have the required **Does Account exist?** function added to our Workflow and configured to meet **Step 1** of the **Customer Changed** case.
* We can open the **Function details** card to check the configuration:
3. Open the **Edit** panel for the **Lookup m3ter entity UUID** function and enter the required configuration details for our design solution:
* **Title**. Enter a descriptive title for the role of this function: **Does Account exist?**
* **Description**. Optional setting and we'll omit for the current worked example.
* **External System**. Use the drop-down to select **Chargebee**.
* **External Table**. Enter **Customer**.
* **External ID Path**. This is the path of the external ID to lookup in the state: `body.content.customer.id`
* **Optional parameters**. Use the **m3ter ID State Variable Name** option to save the m3ter UUID to the state: `existingAccountId`
4. Select **Update**. The **Edit** panel closes and you are returned to the Workflow. We now have the required **Does Account exist?** function added to our Workflow and configured to meet **Step 1** of the **Customer Changed** case.
* We can open the **Function details** card to check the configuration:
 5. On the **Add function** menu select the **Logic** functions and drag-and-drop an **If** function onto the **TRUE** branch outcome of the previous **Does Account exist?** step:
![M3sh Automation239]() 6. Open the **Edit** panel for the **If** function and enter the required configuration details for our design solution:
* **Title**. Enter a descriptive title for the role of this function: **Is customer changed event?**
* **Description**. Optional setting and we'll omit for the current worked example.
* **Calculation**. Add `body.event_type == "customer_changed"` as the condition to evaluate as **TRUE** or **FALSE**.
7. Select **Update**. The **Edit** panel closes and you are returned to the Workflow. We now have the required **Is customer changed event?** function added to our Workflow and configured to meet **Step 2** of the **Customer Changed** case.
* We can open the **Function details** card to check the configuration:
6. Open the **Edit** panel for the **If** function and enter the required configuration details for our design solution:
* **Title**. Enter a descriptive title for the role of this function: **Is customer changed event?**
* **Description**. Optional setting and we'll omit for the current worked example.
* **Calculation**. Add `body.event_type == "customer_changed"` as the condition to evaluate as **TRUE** or **FALSE**.
7. Select **Update**. The **Edit** panel closes and you are returned to the Workflow. We now have the required **Is customer changed event?** function added to our Workflow and configured to meet **Step 2** of the **Customer Changed** case.
* We can open the **Function details** card to check the configuration:
 **CASE 2a: Customer Updated**
In accordance with the design solution, we'll now build out the main **TRUE** branch of the Customer Changed Workflow branch to cover **CASE 2a: Customer Updated**
1. In the **Add function** menu, select **m3ter APIs**.
2. Drag-and-drop a **Retrieve Account** function onto the first node of the **TRUE** branch for the previous **Is customer changed event?** step:
**CASE 2a: Customer Updated**
In accordance with the design solution, we'll now build out the main **TRUE** branch of the Customer Changed Workflow branch to cover **CASE 2a: Customer Updated**
1. In the **Add function** menu, select **m3ter APIs**.
2. Drag-and-drop a **Retrieve Account** function onto the first node of the **TRUE** branch for the previous **Is customer changed event?** step:
![M3sh Automation240]() 3. Open the **Edit** panel for the **Retrieve Account** function and enter the required configuration details for our design solution:
* **Title**. Enter a descriptive title for the role of this function: **Load existing Account**
* **Description**. Optional setting and we'll omit for the current worked example.
* **Credentials**. Select the Service User Credential we set up as a prerequisite.
* **id**. Select **State path** as the **Lookup type** and then enter `existingAccountId` as the **Value**.
* **Optional parameters**. For the state variable in which to store the response, enter `existingAccount` for **State Path**.
4. Select **Update**. The **Edit** panel closes and you are returned to the Workflow. We now have the required **Load existing Account** function added to our Workflow and configured to meet **Step 1** of the **Customer Updated** case.
* We can open the **Function details** card to check the configuration:
3. Open the **Edit** panel for the **Retrieve Account** function and enter the required configuration details for our design solution:
* **Title**. Enter a descriptive title for the role of this function: **Load existing Account**
* **Description**. Optional setting and we'll omit for the current worked example.
* **Credentials**. Select the Service User Credential we set up as a prerequisite.
* **id**. Select **State path** as the **Lookup type** and then enter `existingAccountId` as the **Value**.
* **Optional parameters**. For the state variable in which to store the response, enter `existingAccount` for **State Path**.
4. Select **Update**. The **Edit** panel closes and you are returned to the Workflow. We now have the required **Load existing Account** function added to our Workflow and configured to meet **Step 1** of the **Customer Updated** case.
* We can open the **Function details** card to check the configuration:
 5. On the **Add function** menu, select **Data management** and drag-and-drop an **Apply Transformation** function to create the next step on this branch of the Workflow:
![M3sh Automation242]() 6. Open the **Edit** panel for the **Apply Transformation** function and enter the required configuration details for our design solution:
* **Title**. Enter a descriptive title for the role of this function: **Create account updates data**
* **Description**. Optional setting and we'll omit for the current worked example.
* **Source**. This is the variable by which name of the object to transform should be retrieved from state: `body.content.customer`
* **Transformation**. Select the **Chargebee Customer → m3ter Account** Transformation set up as a Workflow prerequisite.
* **Destination**. Name of the variable by which the transformed object will be stored in state: `accountUpdates`
7. Select **Update**. The **Edit** panel closes and you are returned to the Workflow. We now have the required **Create account updates data** function added to our Workflow and configured to meet **Step 2** of the **Customer Updated** case.
* We can open the **Function details** card to check the configuration:
6. Open the **Edit** panel for the **Apply Transformation** function and enter the required configuration details for our design solution:
* **Title**. Enter a descriptive title for the role of this function: **Create account updates data**
* **Description**. Optional setting and we'll omit for the current worked example.
* **Source**. This is the variable by which name of the object to transform should be retrieved from state: `body.content.customer`
* **Transformation**. Select the **Chargebee Customer → m3ter Account** Transformation set up as a Workflow prerequisite.
* **Destination**. Name of the variable by which the transformed object will be stored in state: `accountUpdates`
7. Select **Update**. The **Edit** panel closes and you are returned to the Workflow. We now have the required **Create account updates data** function added to our Workflow and configured to meet **Step 2** of the **Customer Updated** case.
* We can open the **Function details** card to check the configuration:
 8. From **Data Management** functions, drag-and-drop a **Set Multiple Fields** function to create the next step in this branch of the Workflow.
9. Open the **Edit** panel for the **Set Multiple Fields** function and enter the required configuration details for our design solution:
* **Title**. Enter a descriptive title for the role of this function: **Apply Account updates to existing Account data**
* **Description**. Optional setting and we'll omit for the current worked example.
* **State Path**. This is the path to the object within the state to update: `existingAccount`
* **Lookup**. **Add** five Lookups:
* \#1
* **Key**. **name**
* **Lookup type**. **State path**
* **Value**. `accountUpdates.name`
* \#2
* **Key**. **code**
* **Lookup type**. **State path**
* **Value**. `accountUpdates.code`
* \#3
* **Key**. **emailAddress**
* **Lookup type**. **State path**
* **Value**. `accountUpdates.emailAddress`
* \#4
* **Key**. **address**
* **Lookup type**. **State path**
* **Value**. `accountUpdates.address`
* \#5
* **Key**. **currency**
* **Lookup type**. **State path**
* **Value**. `accountUpdates.currency`
10. Select **Update**. The **Edit** panel closes and you are returned to the Workflow. We now have the required **Apply account updates to existing Account data** function added to our Workflow and configured to meet **Step 3** of the **Customer Updated** case.
* We can open the **Function details** card to check the configuration:
8. From **Data Management** functions, drag-and-drop a **Set Multiple Fields** function to create the next step in this branch of the Workflow.
9. Open the **Edit** panel for the **Set Multiple Fields** function and enter the required configuration details for our design solution:
* **Title**. Enter a descriptive title for the role of this function: **Apply Account updates to existing Account data**
* **Description**. Optional setting and we'll omit for the current worked example.
* **State Path**. This is the path to the object within the state to update: `existingAccount`
* **Lookup**. **Add** five Lookups:
* \#1
* **Key**. **name**
* **Lookup type**. **State path**
* **Value**. `accountUpdates.name`
* \#2
* **Key**. **code**
* **Lookup type**. **State path**
* **Value**. `accountUpdates.code`
* \#3
* **Key**. **emailAddress**
* **Lookup type**. **State path**
* **Value**. `accountUpdates.emailAddress`
* \#4
* **Key**. **address**
* **Lookup type**. **State path**
* **Value**. `accountUpdates.address`
* \#5
* **Key**. **currency**
* **Lookup type**. **State path**
* **Value**. `accountUpdates.currency`
10. Select **Update**. The **Edit** panel closes and you are returned to the Workflow. We now have the required **Apply account updates to existing Account data** function added to our Workflow and configured to meet **Step 3** of the **Customer Updated** case.
* We can open the **Function details** card to check the configuration:
 11. Select **m3ter APIs** on the **Add function** menu and drag-and-drop an **Update Account** function to create the final step in this branch of the Workflow.
12. Open the **Edit** panel for the **Update Account** function and enter the required configuration details for our design solution:
* **Title**. We can retain the default title for the role of this function: **Update Account**
* **Description**. Optional setting and we'll omit for the current worked example.
* **Credentials**. Select the Service User Credential we set up as a prerequisite.
* **id**. Select **State path** as the **Lookup type** and then enter `existingAccountId` as the **Value**.
* **Request Path**. This is the state variable containing the request: `existingAccount`
* **Optional parameters**. For **State Path**, enter `updateAccountResponse` as the state variable in which to store the response.
13. Select **Update**. The **Edit** panel closes and you are returned to the Workflow. We now have the required **Update Account** function added to our Workflow and configured to meet **Step 4** of the **Customer Updated** case.
* We can open the **Function details** card to check the configuration:
11. Select **m3ter APIs** on the **Add function** menu and drag-and-drop an **Update Account** function to create the final step in this branch of the Workflow.
12. Open the **Edit** panel for the **Update Account** function and enter the required configuration details for our design solution:
* **Title**. We can retain the default title for the role of this function: **Update Account**
* **Description**. Optional setting and we'll omit for the current worked example.
* **Credentials**. Select the Service User Credential we set up as a prerequisite.
* **id**. Select **State path** as the **Lookup type** and then enter `existingAccountId` as the **Value**.
* **Request Path**. This is the state variable containing the request: `existingAccount`
* **Optional parameters**. For **State Path**, enter `updateAccountResponse` as the state variable in which to store the response.
13. Select **Update**. The **Edit** panel closes and you are returned to the Workflow. We now have the required **Update Account** function added to our Workflow and configured to meet **Step 4** of the **Customer Updated** case.
* We can open the **Function details** card to check the configuration:
 **CASE 2b: Customer Deleted**
In accordance with the design solution, we'll now build out the main **FALSE** branch of the Customer Changed Workflow branch to cover **CASE 2b: Customer Deleted**
1. In the **Add function** menu, select **Logic**.
2. Drag-and-drop an **If** function onto the first node of the **FALSE** branch for the previous **Is customer changed event?** step:
**CASE 2b: Customer Deleted**
In accordance with the design solution, we'll now build out the main **FALSE** branch of the Customer Changed Workflow branch to cover **CASE 2b: Customer Deleted**
1. In the **Add function** menu, select **Logic**.
2. Drag-and-drop an **If** function onto the first node of the **FALSE** branch for the previous **Is customer changed event?** step:
![M3sh Automation244]() 3. Open the **Edit** panel for the **If** function and enter the required configuration details for our design solution:
* **Title**. Enter a descriptive title for the role of this function: **Is customer deleted?**
* **Description**. Optional setting and we'll omit for the current worked example.
* **Calculation**. Add `body.event_type == "customer_deleted"` as the condition to evaluate as **TRUE** or **FALSE**.
4. Select **Update**. The **Edit** panel closes and you are returned to the Workflow. We now have the required **Is customer deleted?** function added to our Workflow and configured to meet **Step 1** of the **Customer Deleted** case.
* We can open the **Function details** card to check the configuration:
3. Open the **Edit** panel for the **If** function and enter the required configuration details for our design solution:
* **Title**. Enter a descriptive title for the role of this function: **Is customer deleted?**
* **Description**. Optional setting and we'll omit for the current worked example.
* **Calculation**. Add `body.event_type == "customer_deleted"` as the condition to evaluate as **TRUE** or **FALSE**.
4. Select **Update**. The **Edit** panel closes and you are returned to the Workflow. We now have the required **Is customer deleted?** function added to our Workflow and configured to meet **Step 1** of the **Customer Deleted** case.
* We can open the **Function details** card to check the configuration:
 5. On the **Add function** menu, select **m3ter APIs**.
6. Drag-and-drop a **Delete Account** function onto the first node of the **TRUE** branch of the previous **Is customer deleted?** function.
7. Open the **Edit** panel for the **Delete Account** function and enter the required configuration details for our design solution:
* **Title**. We can retain the default title for the role of this function: **Delete Account**
* **Description**. Optional setting and we'll omit for the current worked example.
* **Credentials**. Select the Service User Credential we set up as a prerequisite.
* **id**. Select **State path** as the **Lookup type** and then enter `existingAccountId` as the **Value**.
* **Optional parameters**. For **State Path**, enter `deletedAccountResponse` as the state variable in which to store the response.
8. Select **Update**. The **Edit** panel closes and you are returned to the Workflow. We now have the required **Delete Account** function added to our Workflow and configured to meet **Step 2** of the **Customer Deleted** case.
* We can open the **Function details** card to check the configuration:
5. On the **Add function** menu, select **m3ter APIs**.
6. Drag-and-drop a **Delete Account** function onto the first node of the **TRUE** branch of the previous **Is customer deleted?** function.
7. Open the **Edit** panel for the **Delete Account** function and enter the required configuration details for our design solution:
* **Title**. We can retain the default title for the role of this function: **Delete Account**
* **Description**. Optional setting and we'll omit for the current worked example.
* **Credentials**. Select the Service User Credential we set up as a prerequisite.
* **id**. Select **State path** as the **Lookup type** and then enter `existingAccountId` as the **Value**.
* **Optional parameters**. For **State Path**, enter `deletedAccountResponse` as the state variable in which to store the response.
8. Select **Update**. The **Edit** panel closes and you are returned to the Workflow. We now have the required **Delete Account** function added to our Workflow and configured to meet **Step 2** of the **Customer Deleted** case.
* We can open the **Function details** card to check the configuration:
 * We now have a Workflow with all required steps required under the design solution for the worked example. To complete the Workflow, we must now add a Webhook trigger to the Workflow - see the [following section](#adding-and-configuring-a-workflow-webhook-trigger).
## Adding and Configuring a Workflow Webhook Trigger
To complete the Workflow set up, we can now add a Webhook trigger to the Workflow.
When you add a webhook trigger to a Workflow, you have the option to select users in your Organization that you want to receive an email notification if the trigger is disabled.
**To add and configure a Workflow Webhook trigger:**
1. Select **m3sh**. The **Workflows** page opens.
2. Select the **Name** hotlink text of the Workflow you want to add a trigger to. The **Workflow** opens in **Draft** mode.
3. Select **Workflow triggers**. In the current worked example, no triggers have yet been added for the Workflow:
* We now have a Workflow with all required steps required under the design solution for the worked example. To complete the Workflow, we must now add a Webhook trigger to the Workflow - see the [following section](#adding-and-configuring-a-workflow-webhook-trigger).
## Adding and Configuring a Workflow Webhook Trigger
To complete the Workflow set up, we can now add a Webhook trigger to the Workflow.
When you add a webhook trigger to a Workflow, you have the option to select users in your Organization that you want to receive an email notification if the trigger is disabled.
**To add and configure a Workflow Webhook trigger:**
1. Select **m3sh**. The **Workflows** page opens.
2. Select the **Name** hotlink text of the Workflow you want to add a trigger to. The **Workflow** opens in **Draft** mode.
3. Select **Workflow triggers**. In the current worked example, no triggers have yet been added for the Workflow:
 4. Select **Add trigger>Add webhook trigger**:
 * An **Add webhook trigger** dialog appears:
![M3sh Automation248]() 5. Enter a **Name** for the webhook trigger.
6. Use the **Credentials** drop-down to select the Credential you want to use to authenticate with the Workflow. For the current worked example, we've selected the Incoming Webhook Credential we set up above - see [Creating Incoming Webhook Credential](#creating-incoming-webhook-credential).
7. Select **Submit**. The selected webhook trigger is listed under **Workflow triggers**:
5. Enter a **Name** for the webhook trigger.
6. Use the **Credentials** drop-down to select the Credential you want to use to authenticate with the Workflow. For the current worked example, we've selected the Incoming Webhook Credential we set up above - see [Creating Incoming Webhook Credential](#creating-incoming-webhook-credential).
7. Select **Submit**. The selected webhook trigger is listed under **Workflow triggers**:
![M3sh Automation250]() * For the selected **INCOMING WEBHOOK**, you can check:
* The URL and copy it to your clipboard.
* Whether the webhook is **ACTIVE** or **INACTIVE**.
8. If you want to set up users in you Organization to receive an email notification when the trigger is disabled, select the **Details** icon:
* For the selected **INCOMING WEBHOOK**, you can check:
* The URL and copy it to your clipboard.
* Whether the webhook is **ACTIVE** or **INACTIVE**.
8. If you want to set up users in you Organization to receive an email notification when the trigger is disabled, select the **Details** icon:
 * A **Workflow trigger** modal appears:
![M3sh Automation251]() 9. Under **Trigger options**, use the **Disabled notification users** drop-down to add the Organization users you want to receive an email notification if the Workflow trigger is disabled.
**Disabled Webhook Triggers:** Webhook triggers are automatically disabled if the Workflow encounters errors in 20 consecutive runs via a trigger.
10. Select **Update**. A message shows to confirm that the **Trigger options** for notifying Organization users were updated successfully.
11. Select **Publish draft**. The Workflow is now ready to be tested - see the [following section](#testing-the-workflow).
## Testing the Workflow
To test the Workflow, we can perform test updates to customer account records in our external CRM system to cover the three cases we've designed the Workflow to sync data for in our m3ter Organization:
* **CASE 1 Customer Created**
* **CASE 2 Customer Changed**
* **CASE 2a** **Customer Updated**
* **CASE 2b** **Customer Deleted**
For each case, we can then open and review the completed Workflow runs and follow-up to check the changes made to Account data in our m3ter Organization is correct.
**Publish Workflow!** Before testing your Workflow, check that you've published the most recent Draft.
**To test the Workflow:**
1. In your external CRM system, perform updates the following to customer account records: create a new customer account record, update a record, and delete a record.
* For the current example, we'll perform the following sequence of updates in our Chargebee CRM to test our Workflow:
* First, create new customer account.
* Second, update this new customer account to change the **Name** and **Code**.
* Third, delete the updated customer account.
2. Go back to the m3ter console and select **m3sh**. The **Workflows** page opens.
3. Select the **Name** hotlink text of the Workflow you want to test. The Workflow opens in Draft mode.
4. On the **Latest workflow runs** panel open the **COMPLETED** runs to review Workflow runs and check data syncing:
**CASE 1: Customer Created run**
* We can see that the first step in the Workflow run using the **Is customer created event?** logic function evaluated to **TRUE** and the Workflow run has completed as designed. If we select the **Create Account** m3ter **API** function, we can check the **Response** to the call:
9. Under **Trigger options**, use the **Disabled notification users** drop-down to add the Organization users you want to receive an email notification if the Workflow trigger is disabled.
**Disabled Webhook Triggers:** Webhook triggers are automatically disabled if the Workflow encounters errors in 20 consecutive runs via a trigger.
10. Select **Update**. A message shows to confirm that the **Trigger options** for notifying Organization users were updated successfully.
11. Select **Publish draft**. The Workflow is now ready to be tested - see the [following section](#testing-the-workflow).
## Testing the Workflow
To test the Workflow, we can perform test updates to customer account records in our external CRM system to cover the three cases we've designed the Workflow to sync data for in our m3ter Organization:
* **CASE 1 Customer Created**
* **CASE 2 Customer Changed**
* **CASE 2a** **Customer Updated**
* **CASE 2b** **Customer Deleted**
For each case, we can then open and review the completed Workflow runs and follow-up to check the changes made to Account data in our m3ter Organization is correct.
**Publish Workflow!** Before testing your Workflow, check that you've published the most recent Draft.
**To test the Workflow:**
1. In your external CRM system, perform updates the following to customer account records: create a new customer account record, update a record, and delete a record.
* For the current example, we'll perform the following sequence of updates in our Chargebee CRM to test our Workflow:
* First, create new customer account.
* Second, update this new customer account to change the **Name** and **Code**.
* Third, delete the updated customer account.
2. Go back to the m3ter console and select **m3sh**. The **Workflows** page opens.
3. Select the **Name** hotlink text of the Workflow you want to test. The Workflow opens in Draft mode.
4. On the **Latest workflow runs** panel open the **COMPLETED** runs to review Workflow runs and check data syncing:
**CASE 1: Customer Created run**
* We can see that the first step in the Workflow run using the **Is customer created event?** logic function evaluated to **TRUE** and the Workflow run has completed as designed. If we select the **Create Account** m3ter **API** function, we can check the **Response** to the call:
![M3sh Automation299a]() * If we now open the **Accounts** page in our m3ter Organization, we can confirm that a new Account with the correct **Name** and **Code** has been created:
* If we now open the **Accounts** page in our m3ter Organization, we can confirm that a new Account with the correct **Name** and **Code** has been created:
![M3sh Automation300]() **CASE 2a: Customer Updated run**
* We can see that the **Is customer changed?** step in the Workflow run evaluated to **TRUE**, and the run has completed as designed. If we then select the final step that uses an **Update Account** m3ter **API** function, the **Response** to he call shows the Account **Name** and **Code** have been updated:
**CASE 2a: Customer Updated run**
* We can see that the **Is customer changed?** step in the Workflow run evaluated to **TRUE**, and the run has completed as designed. If we then select the final step that uses an **Update Account** m3ter **API** function, the **Response** to he call shows the Account **Name** and **Code** have been updated:
![M3sh Automation301a]() **CASE 2b: Customer Deleted run**
* We can see that the **Is customer deleted?** step in the Workflow run evaluated to **TRUE**. If we then select the final step that uses a **Delete Account** m3ter **API** function, the **Response** shows that the correct Account was deleted:
**CASE 2b: Customer Deleted run**
* We can see that the **Is customer deleted?** step in the Workflow run evaluated to **TRUE**. If we then select the final step that uses a **Delete Account** m3ter **API** function, the **Response** shows that the correct Account was deleted:
![M3sh Automation302a]() # Exporting and Importing Workflows
Source: https://docs.m3ter.com/guides/m3sh-workflows/exporting-and-importing-workflows
If you've built and published a Workflow and want to use the Workflow as the basis for another Workflow by adapting the current Workflow to serve a different operational use case, you can export the Workflow and import it as a new one.
**Note:** you can export a Workflow from one Organization and import it into a different Organization if required.
**To export and import a m3sh Workflow:**
1. Select **m3sh**:
# Exporting and Importing Workflows
Source: https://docs.m3ter.com/guides/m3sh-workflows/exporting-and-importing-workflows
If you've built and published a Workflow and want to use the Workflow as the basis for another Workflow by adapting the current Workflow to serve a different operational use case, you can export the Workflow and import it as a new one.
**Note:** you can export a Workflow from one Organization and import it into a different Organization if required.
**To export and import a m3sh Workflow:**
1. Select **m3sh**:
 * The **Workflows** page opens.
2. Select the **Name** text of the Workflow you want to export. The Workflow opens in **Draft** mode.
**Check Published version!** The **Published** version of the Workflow will be exported. If you have made any changes to the Workflow **Draft** version since you last published it and you want to include those recent changes when you export, you must re-publish the current **Draft** first.
3. On the drop-down menu, select **Export workflow**:
* The **Workflows** page opens.
2. Select the **Name** text of the Workflow you want to export. The Workflow opens in **Draft** mode.
**Check Published version!** The **Published** version of the Workflow will be exported. If you have made any changes to the Workflow **Draft** version since you last published it and you want to include those recent changes when you export, you must re-publish the current **Draft** first.
3. On the drop-down menu, select **Export workflow**:
 An **Export workflow** panel opens:
![M3sh Automation257]() Note that you can:
* Review a help text.
* Scroll down the Workflow JSON to review it before proceeding with the export.
4. Select **Copy** and close the **Export workflow** panel.
5. Go back to the **Workflows** page and select **Create workflow>Import workflow**:
Note that you can:
* Review a help text.
* Scroll down the Workflow JSON to review it before proceeding with the export.
4. Select **Copy** and close the **Export workflow** panel.
5. Go back to the **Workflows** page and select **Create workflow>Import workflow**:
 An **Import workflow** panel opens.
6. Paste the Workflow JSON you copied from the **Export workflow** panel into the **Import workflow** panel:
An **Import workflow** panel opens.
6. Paste the Workflow JSON you copied from the **Export workflow** panel into the **Import workflow** panel:
![M3sh Automation259]() 7. Select **Submit**. The **Import workflow** panel closes and a message shows to confirm that the Workflow was imported successfully:
7. Select **Submit**. The **Import workflow** panel closes and a message shows to confirm that the Workflow was imported successfully:
![M3sh Automation260a]() * The imported Workflow is now listed on the **Workflows** page with "imported" appended to the **Name** and **Code** of the original Workflow.
* You can now open the new imported Workflow, edit the **Name** and **Code**, and modify it as required.
# Getting to Know the Workflow Builder
Source: https://docs.m3ter.com/guides/m3sh-workflows/getting-to-know-the-workflow-builder
The m3sh Workflow Builder lets you quickly add and configure the functions you'll use to create Workflows. This topic introduces the Workflow Builder environment and explains how work with the usability features and options it incorporates, which are designed to facilitate and streamline Workflow creation and management:
* [Accessing and Exploring Workflow Builder](#accessing-and-exploring-workflow-builder)
* [Adding and Configuring Workflow Functions](#adding-and-configuring-workflow-functions)
* [Arranging Workflow Steps](#arranging-workflow-steps)
* [Using Calculations for Workflow Functions](#using-calculations-for-workflow-functions)
* [Publishing Workflows](#publishing-workflows)
* [Managing and Testing Workflows - Builder Options](#managing-and-testing-workflows-builder-options)
## Accessing and Exploring Workflow Builder
You can open the Workflow Builder to begin creating a new m3sh Workflow from the *m3sh* section of the m3ter Console:
1. Select **m3sh**:
* The imported Workflow is now listed on the **Workflows** page with "imported" appended to the **Name** and **Code** of the original Workflow.
* You can now open the new imported Workflow, edit the **Name** and **Code**, and modify it as required.
# Getting to Know the Workflow Builder
Source: https://docs.m3ter.com/guides/m3sh-workflows/getting-to-know-the-workflow-builder
The m3sh Workflow Builder lets you quickly add and configure the functions you'll use to create Workflows. This topic introduces the Workflow Builder environment and explains how work with the usability features and options it incorporates, which are designed to facilitate and streamline Workflow creation and management:
* [Accessing and Exploring Workflow Builder](#accessing-and-exploring-workflow-builder)
* [Adding and Configuring Workflow Functions](#adding-and-configuring-workflow-functions)
* [Arranging Workflow Steps](#arranging-workflow-steps)
* [Using Calculations for Workflow Functions](#using-calculations-for-workflow-functions)
* [Publishing Workflows](#publishing-workflows)
* [Managing and Testing Workflows - Builder Options](#managing-and-testing-workflows-builder-options)
## Accessing and Exploring Workflow Builder
You can open the Workflow Builder to begin creating a new m3sh Workflow from the *m3sh* section of the m3ter Console:
1. Select **m3sh**:
 The **Workflows** page opens.
2. Select **Create workflow**:
The **Workflows** page opens.
2. Select **Create workflow**:
 Four options:
* **Create workflow**.
* **Create managed workflow**.
* **Branch from template**.
* **Import workflow**.
**More details:**
* On working with Workflow managed templates, see [Utilizing Workflow Managed Templates](/guides/m3sh-workflows/utilizing-workflow-managed-templates).
* On importing Workflows, see [Exporting and Importing Workflows](/guides/m3sh-workflows/exporting-and-importing-workflows).
3. Select the **Create workflow** option. The **Workflow Builder** opens:
Four options:
* **Create workflow**.
* **Create managed workflow**.
* **Branch from template**.
* **Import workflow**.
**More details:**
* On working with Workflow managed templates, see [Utilizing Workflow Managed Templates](/guides/m3sh-workflows/utilizing-workflow-managed-templates).
* On importing Workflows, see [Exporting and Importing Workflows](/guides/m3sh-workflows/exporting-and-importing-workflows).
3. Select the **Create workflow** option. The **Workflow Builder** opens:
![M3sh Automation166a]() * You can add required details for the new Workflow: **Name**, **Code**, and **Description**.
* The main canvas area:
* Contains a starter Workflow, ready for you to add a function to create the first step.
* Has controls at top-right allowing you to **Zoom In/Out**, **Fit View**, or **Undo/Redo** changes:
* You can add required details for the new Workflow: **Name**, **Code**, and **Description**.
* The main canvas area:
* Contains a starter Workflow, ready for you to add a function to create the first step.
* Has controls at top-right allowing you to **Zoom In/Out**, **Fit View**, or **Undo/Redo** changes:
 * An **Add function** panel is open at the left side. You can:
* Search available functions:
* An **Add function** panel is open at the left side. You can:
* Search available functions:
 * Drill into the **Add function** panel to open a sub-menu for one of the function types: **Data management**, **Logic**, or **APIs** (by external system or m3ter). For example **m3ter from Salesforce** **API** functions:
 * If you open an **Add function** sub-menu, the scope of **Search available functions** is limited to the subset of functions. For example a search of the **m3ter from Salesforce API WRITE** functions:
 * Use **Back** to return to the main **Add function** menu.
* You can hide the **Add function** menu to create more space in the Builder main canvas area:
* Use **Back** to return to the main **Add function** menu.
* You can hide the **Add function** menu to create more space in the Builder main canvas area:

![M3sh Automation167a]() * If you want to set up *Global parameters* to use when adding and configuring functions for your Workflows, you can open a **Global parameters** panel:
* If you want to set up *Global parameters* to use when adding and configuring functions for your Workflows, you can open a **Global parameters** panel:

![M3sh Automation262]() **Tip**: For more details, see [Working with Global Parameters](/guides/m3sh-workflows/working-with-global-parameters).
## Adding and Configuring Workflow Functions
Before you can create a new Workflow you must add a **Name**, **Code**, and **Description**, and add *at least one* function.
1. To add a function, search for the function or open the appropriate function sub-menu. You can then drag-and-drop the function onto the Workflow to create the first step:
**Tip**: For more details, see [Working with Global Parameters](/guides/m3sh-workflows/working-with-global-parameters).
## Adding and Configuring Workflow Functions
Before you can create a new Workflow you must add a **Name**, **Code**, and **Description**, and add *at least one* function.
1. To add a function, search for the function or open the appropriate function sub-menu. You can then drag-and-drop the function onto the Workflow to create the first step:
![M3sh Automation168a]() The newly added function shows an alert and red border to indicate that it needs configuring to be viable as a Workflow step. Functions have three icons you can use:
* To show **Function details**:
The newly added function shows an alert and red border to indicate that it needs configuring to be viable as a Workflow step. Functions have three icons you can use:
* To show **Function details**:
 * To **Edit**:
![]() * To **Delete**:
* To **Delete**:
![]() 2. To configure a function, select the **Edit** icon. An **Edit** panel appears:
2. To configure a function, select the **Edit** icon. An **Edit** panel appears:
 * When you open the **Edit** panel for a function, any required configuration is flagged up at the top of the panel.
* The configuration options for functions vary.
* When you've edited a function for the required configuration, select **Update**. The function then shows as valid in the Workflow canvas and the alert and red border no longer show:
* When you open the **Edit** panel for a function, any required configuration is flagged up at the top of the panel.
* The configuration options for functions vary.
* When you've edited a function for the required configuration, select **Update**. The function then shows as valid in the Workflow canvas and the alert and red border no longer show:
![M3sh Automation171a]() 3. As you configure steps, you can quickly check the **Function details** without having to re-open the **Edit** Panel:
3. As you configure steps, you can quickly check the **Function details** without having to re-open the **Edit** Panel:
 4. Some functions allow you to include flows, such as the **Loop** Logic function:
![M3sh Automation173a]() * You can then start to add functions to the **Loop** to create the required flow:
* You can then start to add functions to the **Loop** to create the required flow:
![M3sh Automation174a]() 5. Some functions allow you to create an alternative path if the function returns an error. For other functions this is not appropriate:
5. Some functions allow you to create an alternative path if the function returns an error. For other functions this is not appropriate:
![M3sh Automation175a]() * In this example, the **Get m3ter Entity API** function allows an alternative path to be built for the Workflow if the function returns an error. In contrast, the **Set Field Data management** does not.
**Create Workflow Promptly!** When you've added some functions to a new Draft Workflow, it's good practice to create the Workflow promptly and avoid the risk of losing your work. The Workflow is saved as a **Published** version but the Builder reopens in **Draft** mode allowing you to continue building. See below: [Publishing Workflows](#publishing-workflows).
## Arranging Workflow Steps
As you build a Workflow and add functions, you might need to re-arrange the sequence of steps. Builder features are available for quickly adding to or rearranging the Workflow sequence, avoiding the need to delete and re-add functions to achieve the required Workflow sequence.
1. **Adding intervening steps**. If you've added several steps to a Workflow and then realize you've missed a step, you can drag-and-drop the required missing function directly onto a **THEN**, **NEXT**, **TRUE**, **FALSE**, or **ERROR** node:
* In this example, the **Get m3ter Entity API** function allows an alternative path to be built for the Workflow if the function returns an error. In contrast, the **Set Field Data management** does not.
**Create Workflow Promptly!** When you've added some functions to a new Draft Workflow, it's good practice to create the Workflow promptly and avoid the risk of losing your work. The Workflow is saved as a **Published** version but the Builder reopens in **Draft** mode allowing you to continue building. See below: [Publishing Workflows](#publishing-workflows).
## Arranging Workflow Steps
As you build a Workflow and add functions, you might need to re-arrange the sequence of steps. Builder features are available for quickly adding to or rearranging the Workflow sequence, avoiding the need to delete and re-add functions to achieve the required Workflow sequence.
1. **Adding intervening steps**. If you've added several steps to a Workflow and then realize you've missed a step, you can drag-and-drop the required missing function directly onto a **THEN**, **NEXT**, **TRUE**, **FALSE**, or **ERROR** node:
![M3sh Automation178]() * In this example, a **List m3ter Entities API** function was omitted as the first step required in the Workflow.
* Note that as you drag a function over a node, it will show light blue to indicate the function can be inserted in the Workflow at that point.
2. **Detaching and re-attaching steps**. If you've reached a point when building your Workflow with several functions added but then realize you need to re-order the sequence, you can select the **X** on the **NEXT**, **TRUE**, **FALSE**, or **ERROR** node that precedes the function to detach it.
* In this example, we want to switch the order of the **Add to List** and **Sort List** functions. First, we'll detach the 2-step branch that starts with the **Add to List** function:
* In this example, a **List m3ter Entities API** function was omitted as the first step required in the Workflow.
* Note that as you drag a function over a node, it will show light blue to indicate the function can be inserted in the Workflow at that point.
2. **Detaching and re-attaching steps**. If you've reached a point when building your Workflow with several functions added but then realize you need to re-order the sequence, you can select the **X** on the **NEXT**, **TRUE**, **FALSE**, or **ERROR** node that precedes the function to detach it.
* In this example, we want to switch the order of the **Add to List** and **Sort List** functions. First, we'll detach the 2-step branch that starts with the **Add to List** function:
![M3sh Automation179]() * Second, we'll detach the **Sort List** function:
* Second, we'll detach the **Sort List** function:
![M3sh Automation186]()
![M3sh Automation187]() * Now, we can re-attach the **Sort List** function: if we hover our cursor over the blue box on the **NEXT** node, it changes to a cross:
* Now, we can re-attach the **Sort List** function: if we hover our cursor over the blue box on the **NEXT** node, it changes to a cross:
![]() * We can then click on the blue box and bring up a catch line which we can drag across the canvas to the **Sort List** function and release the catch line on it to re-attach it as that step in the main flow:
* We can then click on the blue box and bring up a catch line which we can drag across the canvas to the **Sort List** function and release the catch line on it to re-attach it as that step in the main flow:
![M3sh Automation188]() * Lastly, we use the same method to re-attach the **Add to List** function to the Workflow as the next step:
* Lastly, we use the same method to re-attach the **Add to List** function to the Workflow as the next step:
![M3sh Automation189]()
![M3sh Automation190]() * Note that you cannot detach a function if it is used as the *first step* in a Workflow.
## Using Calculations for Workflow Functions
You can exploit the m3ter platform's powerful [Calculation Engine](/guides/m3ter-calculation-engine) when setting up and configuring Workflow functions:
* [Calculation Examples](#calculation-examples)
* [Hash Calculation for Unique UUIDs](#hash-calculation-for-unique-uuids)
### Calculation Examples
Here are some examples:
* **Logic functions**. In this example, to define a condition that must evaluate to **TRUE** for the Workflow to continue to the next step:
* Note that you cannot detach a function if it is used as the *first step* in a Workflow.
## Using Calculations for Workflow Functions
You can exploit the m3ter platform's powerful [Calculation Engine](/guides/m3ter-calculation-engine) when setting up and configuring Workflow functions:
* [Calculation Examples](#calculation-examples)
* [Hash Calculation for Unique UUIDs](#hash-calculation-for-unique-uuids)
### Calculation Examples
Here are some examples:
* **Logic functions**. In this example, to define a condition that must evaluate to **TRUE** for the Workflow to continue to the next step:
 * **API Functions**. In this m3ter API function example, to set a boolean query parameter at **FALSE** to ensure only active Account Plans are returned:
 ### Hash Calculation for Unique UUIDs
If you are creating a m3sh Workflow to fulfill a scenario that includes data syncs to/from external systems, a `UUID()` hash calculation is also available in m3sh Workflow contexts. This allows you to generate random unique ids in cases where the external system requires unique Ids, but doesn’t auto-generate them itself.
For example, for a **Set UUID Field** Data Management function:
### Hash Calculation for Unique UUIDs
If you are creating a m3sh Workflow to fulfill a scenario that includes data syncs to/from external systems, a `UUID()` hash calculation is also available in m3sh Workflow contexts. This allows you to generate random unique ids in cases where the external system requires unique Ids, but doesn’t auto-generate them itself.
For example, for a **Set UUID Field** Data Management function:
 * **Function details**:
 * If we open a completed Workflow run to check the run logs and select this function, we can see that the hash calculation has generated a unique id:
![M3sh Automation336]() You can also use a seed parameter if you require the same id to be deterministically generated for the given seed value in multiple places:
You can also use a seed parameter if you require the same id to be deterministically generated for the given seed value in multiple places:
 * **Function details**:
 ## Publishing Workflows
When you've added some functions to a new draft Workflow, it's good practice to create the Workflow promptly without attempting to build the Workflow out to completion in a single work session and risk losing your work. A *Published* version of the Workflow is then created:
* A saved Draft version cannot be deployed into your production environment - the Published version must be used.
* If you export a Workflow, the Published version is exported. See below [Managing and Testing Workflows - Builder Options](#managing-and-testing-workflows-builder-options).
**To create and publish a Workflow:**
1. With a new Workflow open in **Draft** mode and with at least one function added, select **Create**. The Workflow is saved as a **Published** version and the Workflow Builder reopens in **Draft** mode:
## Publishing Workflows
When you've added some functions to a new draft Workflow, it's good practice to create the Workflow promptly without attempting to build the Workflow out to completion in a single work session and risk losing your work. A *Published* version of the Workflow is then created:
* A saved Draft version cannot be deployed into your production environment - the Published version must be used.
* If you export a Workflow, the Published version is exported. See below [Managing and Testing Workflows - Builder Options](#managing-and-testing-workflows-builder-options).
**To create and publish a Workflow:**
1. With a new Workflow open in **Draft** mode and with at least one function added, select **Create**. The Workflow is saved as a **Published** version and the Workflow Builder reopens in **Draft** mode:
![M3sh Automation176a]() * Note that you can read off the Workflow's details:
* Workflow **ID** which you can **Copy** to your clipboard.
* Audit data for when and who **Created** and **Last modified** the Workflow.
2. You can then continue to add and configure functions to the **Draft** Workflow and **Save draft** updates as you proceed.
3. When you've saved Draft updates and you want replace the **Published** version, select **Publish draft**. A confirmation modal appears:
* Note that you can read off the Workflow's details:
* Workflow **ID** which you can **Copy** to your clipboard.
* Audit data for when and who **Created** and **Last modified** the Workflow.
2. You can then continue to add and configure functions to the **Draft** Workflow and **Save draft** updates as you proceed.
3. When you've saved Draft updates and you want replace the **Published** version, select **Publish draft**. A confirmation modal appears:
 **Note:** When you publish a Workflow Draft version, the Draft is permanently deleted. If you've been using the traffic-forwarding feature to perform test runs of a Workflow using the Draft version before publishing, this means any Draft runs will no longer be available. See [Testing and Troubleshooting Workflows](/guides/m3sh-workflows/testing-and-troubleshooting-workflows) for more details.
4. Select **Publish draft**.
5. At any time, you can select to view the **Published** Workflow:
**Note:** When you publish a Workflow Draft version, the Draft is permanently deleted. If you've been using the traffic-forwarding feature to perform test runs of a Workflow using the Draft version before publishing, this means any Draft runs will no longer be available. See [Testing and Troubleshooting Workflows](/guides/m3sh-workflows/testing-and-troubleshooting-workflows) for more details.
4. Select **Publish draft**.
5. At any time, you can select to view the **Published** Workflow:
![M3sh Automation177b]() ## Managing and Testing Workflows - Builder Options
When, you've created a Workflow, options for managing and testing your Workflows are available in the Builder environment. Open the drop-down menu at top-right:
## Managing and Testing Workflows - Builder Options
When, you've created a Workflow, options for managing and testing your Workflows are available in the Builder environment. Open the drop-down menu at top-right:
 * **Enable/Disable traffic-forwarding**. If you've completed a Workflow and published it to your production environment, you might want to update and improve the Workflow. To facilitate testing your changes on a Draft version and before publishing, you can **Enable traffic-forwarding** to temporarily switch traffic to the Draft version. This means the Draft version will be triggered instead of the Published version. When you are finished testing, you can **Disable traffic-forwarding** to switch traffic back and ensure the Published version is triggered. See [Testing and Troubleshooting Workflows](/guides/m3sh-workflows/testing-and-troubleshooting-workflows) for more details.
* **Export Workflow**. If you've built and published a Workflow and want to use it as the basis for another Workflow - by adapting the current Workflow to serve a similar but different operational use case - you can export the *published Workflow* and import it as a new one. See [Exporting and Importing Workflows](/guides/m3sh-workflows/exporting-and-importing-workflows).
* **Discard draft version**. Only available if you've made changes to a Draft version and saved those changes to draft after you last published a Workflow. Any changes made are discarded and the Draft is reverted to match the Published version.
* **Delete Workflow**. Deletes the current Workflow - the Workflow builder closes and you are taken back to the **Workflows** page.
# m3sh Workflows
Source: https://docs.m3ter.com/guides/m3sh-workflows/m3sh-workflows
The *m3sh Workflows* feature in m3ter allows you to create automated routines to meet a wide variety of operational use cases:
* **Interoperability across systems**. Data integration routines to control the exchange of data between your m3ter Organization and your external systems:
* Outbound from m3ter Organization into external systems.
* Inbound from external systems into your m3ter Organization.
* **Enhance and extend m3ter**. Within your m3ter production environment, automated routines to fulfill key business operational areas for billing and accounts management.
The following topics in this section offer guidance and support for two different types of Workflow user:
* **m3sh Workflow Reviewer**. If m3sh Workflows have been set up for your Organization but you do not intend to build your own Workflows, the following topics offer guidance on understanding m3sh Workflows and explain how to access and review them:
* [m3sh Workflows - Key Concepts and Options](/guides/m3sh-workflows/m3sh-workflows-key-concepts-and-options)
* [Exploring m3sh Workflows](/guides/m3sh-automation/exploring-m3sh-workflows)
* [Reviewing m3sh Workflow Runs](/guides/m3sh-automation/reviewing-m3sh-workflow-runs)
* **m3sh Workflow Builder**. If you've been enabled for write-access to m3sh and intend to build your own Workflows, please review the following topics for comprehensive guidance on how to build and manage Workflows with some worked examples given:
* [m3sh Workflows - Key Concepts and Options](/guides/m3sh-workflows/m3sh-workflows-key-concepts-and-options)
* [Getting to Know the Workflows Builder](/guides/m3sh-workflows/getting-to-know-the-workflow-builder)
* [Creating Event Notification Workflows](/guides/m3sh-workflows/creating-event-notification-workflows)
* [Creating Incoming Webhook Workflows](/guides/m3sh-workflows/creating-incoming-webhook-workflows)
* [Working with Global Parameters](/guides/m3sh-workflows/working-with-global-parameters)
* [Utilizing Workflow Managed Templates](/guides/m3sh-workflows/utilizing-workflow-managed-templates)
* [Testing and Troubleshooting Workflows](/guides/m3sh-workflows/testing-and-troubleshooting-workflows)
* [Exporting and Importing Workflows](/guides/m3sh-workflows/exporting-and-importing-workflows)
**Note: Workflows in Preview Release!** Please note the m3ter Workflows feature is currently available only in Preview release version. See [Feature Release Stages](https://docs.m3ter.com/guides/getting-started/feature-release-stages) for Preview release definition.
# m3sh Workflows - Key Concepts and Options
Source: https://docs.m3ter.com/guides/m3sh-workflows/m3sh-workflows-key-concepts-and-options
In the *Workflows* section of the m3ter Console you can quickly create, build, and configure m3sh Workflows to fulfill your operational requirements. This topic introduces the key concepts and options you'll make use of when creating, managing, running, and reviewing your Workflows:
* [Understanding m3sh Workflows](#understanding-m3sh-workflows)
* [Common Workflow Applications](#common-workflow-applications)
* [Workflows - Types and Triggers](#workflows-types-and-triggers)
* [Workflow Functions](#workflow-functions)
* [Setting Up Workflow Prerequisites](#setting-up-workflow-prerequisites)
* [Exporting and Importing Workflows](#exporting-and-importing-workflows)
* [Workflow Managed Templates](#workflow-managed-templates)
* [Workflow Testing and Troubleshooting](#workflow-testing-and-troubleshooting)
* [Accessing m3sh Workflows](#accessing-m3sh-workflows)
* [Constraints and Limitations](#constraints-and-limitations)
* [FAQs](#faqs)
## Understanding m3sh Workflows
A m3sh Workflow implements an automated routine started by a trigger. Once triggered, the Workflow runs through an ordered sequence of steps, where each step performs a function. In more complex Workflows, a step might perform a sub-workflow which itself consists of one or more functions.
A toolkit of various function types are available for building your Workflows. These functions allow you to introduce variables into the Workflow "state" to hold data values. In subsequent steps, you can use functions to manipulate those state variables, create new variables, or by using logic functions build in decision gates to determine which of alternate paths specific Workflow runs will take. In brief:
* All Workflows have access to the *payload* of the Workflow trigger. The trigger will be either an Event on which a Notification rule is based or an Incoming Webhook.
* *API functions* allow you to load data via an API call to various external systems or to m3ter, and you can choose the variable name that the API response is stored under in the Workflow state.
* *Data management functions* allow you to manipulate the variables you've introduced or even create new ones from what is already held in the Workflow state set using Transformations.
* *Logic functions* allow you to alter how Workflow runs based on variables within the Workflow state branch based on some IF check, start looping over a list/array, and so on.
When preparing to design and build a Workflow to automate your operational requirements, it's important therefore to think in terms of how the "state" set of variables will be created and initialized, modified, added to, or used to determine alternate paths through each of the ordered sequence of steps performed when the Workflow runs.
## Common Workflow Applications
There are two main areas where m3sh Workflows are designed to fulfill your operational requirements for implementing automated processes:
* [Interoperability - Data Exchange across Systems](#interoperability-data-exchange-across-systems)
* [m3ter - Enhance and Extend](#m3ter-enhance-and-extend)
### Interoperability - Data Exchange across Systems
A core operational requirement Workflows fulfill is for designing and implementing data integration routines to control the exchange of data between your m3ter Organization and your external systems:
* Outbound from m3ter Organization into an external system.
* Inbound from an external system into your m3ter Organization.
m3sh Workflows are not restricted to simply pulling data from one system - say m3ter - and transferring it to another system - say your external Accounts Receivable system - but give you wide scope to control data transfer and exchange to meet your specific use cases. For example:
* When a new data item is created in one system, create a corresponding predefined data item in another system.
* Pull a data item from the source system and incorporate intermediate steps:
* To apply a calculation to the data value before loading it into the target system data item.
* To apply conditional logic and only load the source data item into the target system if the condition is met.
### m3ter - Enhance and Extend
From the outset, a core objective was for m3sh Workflow automation to extend and strengthen the value proposition of the m3ter platform:
* Can be directly hooked into m3ter configuration and used to complement and strengthen the platform's capacity to address and fulfill evolving operational billing and analytical needs.
* Deploy m3sh triggers for automated update and management of key billing entities in response to defined end-customer Account Events, such as Balance depletion or Contract expiry.
For example, you might offer a pricing model to your end customers that gives them a free sign-up credit balance and bills their Account using an introductory credit Plan. When this credit is exhausted, you want to automatically switch their Account in m3ter to use a different full contract Plan for billing. You could build a Workflow triggered each time the credit balance on an Account is updated, checks the balance amount, and when the balance credit has reached zero switches the Plan used for the Account.
## Workflows - Types and Triggers
m3sh Workflows fall into two types based on the type of trigger used:
* [Event Notification Workflows](#event-notification-workflows)
* [Incoming Webhook Workflows](#incoming-webhook-workflows)
**Workflow Managed Templates**. You can create Workflows from templates,which are designed and managed by the platform to meet specific common operational use cases. See the following [Workflow Managed Templates](#workflow-managed-templates) section for more details.
### Event Notification Workflows
This type of Workflow uses m3ter Event-based *Notification rules* as a trigger:
* In m3ter you can create and configure Notification rules that you want to use as Workflow triggers. You must then *link* the Notification rule to the Workflow by adding it to the Workflow as a trigger.
* When an Event occurs on which the Notification rule is based and any conditions built into the rule are satisfied, it causes the Notification to fire and the Workflow is triggered.
* The Notification's payload is the data returned by the system Event on which it is based and this data is then injected into the Workflow state and made available using an `event` prefix to reference it in your Workflow functions:
* For example, suppose you want to trigger a Workflow using a Notification rule based on the `billing.balanceamount.updated` system Event, and this Notification will fire and trigger the Workflow only when this Event occurs and the `new.amount` field for the Balance updated Event equals zero.
* You can then add functions to create Workflow steps that reference other fields in the Notification's payload. Continuing the example - you might want to update the end date of a m3ter AccountPlan to match the date on which the `billing.balanceamount.updated` Event occurred for a zero Balance reached. You can then lookup in the Workflow state the value of `event.new.dtLastModified` and use it to update an Account Plan's end date.
See [Creating, Managing, and Reviewing Notifications](https://docs.m3ter.com/guides/alerts-events-and-notifications/utilizing-events-and-notifications/creating-managing-and-reviewing-notifications).
### Incoming Webhook Workflows
This type of Workflow uses an *Incoming Webhook* as a trigger. You can set up these triggers for Workflows you want to use to enable interoperability between m3ter and your external systems:
* In your external system, you must first set up a Webhook destination that you'll use to send any data payloads to for syncing with your m3ter data.
* You can then set up Incoming Webhook Credentials in m3ter for authenticating Incoming Webhooks with Workflows as destinations and allowing them to act as Workflow triggers. When you add a webhook trigger to a Workflow, you can then select the relevant Incoming Webhook Credential.
* When your external system sends a data payload to the Webhook, the Workflow is triggered.
**How this works**
Every m3ter Organization has a provisioned inbound Webhook endpoint. External systems can `POST` to this URL to trigger a Workflow. Only `POST` requests are supported.
The request body is injected into the Workflow state under the `body` prefix. For example, if the Webhook is called with:
```json theme={null}
{
"accountId" : "abc123",
"amount" : 500
}
```
Then `body.accountId` and `body.amount` are available in the Workflow state.
See [Creating Incoming Webhook Credentials](https://docs.m3ter.com/guides/integrations/setting-up-integrations/managing-integration-credentials#creating-incoming-webhook-credentials).
**Scheduled Workflow Triggers?** Scheduled Triggers are on the roadmap. The current workaround is to use an external scheduler, such as AWS EventBridge or a cronjob, to call the Inbound Webhook URL on the required schedule.
## Workflow Functions
A wide toolkit of functions is available for use when building your Workflows. As you add functions, the Workflow Builder environment offers you many usability features to facilitate and streamline common Workflow tasks:
* Drag-and-drop functions to quickly create Workflow steps.
* Validation of functions is performed as you add them, and incomplete functions are clearly flagged as invalid.
* Edit function forms list any required fields and prerequisites, such as Credentials or Transformations that a function must reference.
* Easily insert, detach, and re-attach functions to quickly rearrange a Workflow step sequence, and avoid having to delete and re-add functions.
* Create global parameters to use when configuring multiple functions requiring a common parameter, such as Credentials or Transformation parameter. When these require an update, you can make a single update for the global parameter.
* Exploit the m3ter platform's powerful Calculation Engine when setting up and configuring Workflow functions.
**Workflow Builder!** Before you attempt to create a Workflow and add functions to it, we strongly recommend that you review [Getting to Know the Workflow Builder](/guides/m3sh-workflows/getting-to-know-the-workflow-builder) and familiarize yourself with the Workflows build and management environment.
* [Function Types](#function-types)
* [Global Parameters](#global-parameters)
* [Calculations in Functions](#calculations-in-functions)
### Function Types
The following table gives a summary of the three different types of functions available when building m3sh Workflows:
| **Function Type** | **Purpose** | Prerequisites |
| - | - | - |
| DATA MANAGEMENT | Convert or manipulate data in some way, such as merging data objects or removing a field from an object. Manipulate or create data objects lists. | Some require a Transformation. |
| LOGIC | Apply some logic, such as evaluate a calculation. | |
| APIs | Make read/write API calls to m3ter or a selected external system:
* **Enable/Disable traffic-forwarding**. If you've completed a Workflow and published it to your production environment, you might want to update and improve the Workflow. To facilitate testing your changes on a Draft version and before publishing, you can **Enable traffic-forwarding** to temporarily switch traffic to the Draft version. This means the Draft version will be triggered instead of the Published version. When you are finished testing, you can **Disable traffic-forwarding** to switch traffic back and ensure the Published version is triggered. See [Testing and Troubleshooting Workflows](/guides/m3sh-workflows/testing-and-troubleshooting-workflows) for more details.
* **Export Workflow**. If you've built and published a Workflow and want to use it as the basis for another Workflow - by adapting the current Workflow to serve a similar but different operational use case - you can export the *published Workflow* and import it as a new one. See [Exporting and Importing Workflows](/guides/m3sh-workflows/exporting-and-importing-workflows).
* **Discard draft version**. Only available if you've made changes to a Draft version and saved those changes to draft after you last published a Workflow. Any changes made are discarded and the Draft is reverted to match the Published version.
* **Delete Workflow**. Deletes the current Workflow - the Workflow builder closes and you are taken back to the **Workflows** page.
# m3sh Workflows
Source: https://docs.m3ter.com/guides/m3sh-workflows/m3sh-workflows
The *m3sh Workflows* feature in m3ter allows you to create automated routines to meet a wide variety of operational use cases:
* **Interoperability across systems**. Data integration routines to control the exchange of data between your m3ter Organization and your external systems:
* Outbound from m3ter Organization into external systems.
* Inbound from external systems into your m3ter Organization.
* **Enhance and extend m3ter**. Within your m3ter production environment, automated routines to fulfill key business operational areas for billing and accounts management.
The following topics in this section offer guidance and support for two different types of Workflow user:
* **m3sh Workflow Reviewer**. If m3sh Workflows have been set up for your Organization but you do not intend to build your own Workflows, the following topics offer guidance on understanding m3sh Workflows and explain how to access and review them:
* [m3sh Workflows - Key Concepts and Options](/guides/m3sh-workflows/m3sh-workflows-key-concepts-and-options)
* [Exploring m3sh Workflows](/guides/m3sh-automation/exploring-m3sh-workflows)
* [Reviewing m3sh Workflow Runs](/guides/m3sh-automation/reviewing-m3sh-workflow-runs)
* **m3sh Workflow Builder**. If you've been enabled for write-access to m3sh and intend to build your own Workflows, please review the following topics for comprehensive guidance on how to build and manage Workflows with some worked examples given:
* [m3sh Workflows - Key Concepts and Options](/guides/m3sh-workflows/m3sh-workflows-key-concepts-and-options)
* [Getting to Know the Workflows Builder](/guides/m3sh-workflows/getting-to-know-the-workflow-builder)
* [Creating Event Notification Workflows](/guides/m3sh-workflows/creating-event-notification-workflows)
* [Creating Incoming Webhook Workflows](/guides/m3sh-workflows/creating-incoming-webhook-workflows)
* [Working with Global Parameters](/guides/m3sh-workflows/working-with-global-parameters)
* [Utilizing Workflow Managed Templates](/guides/m3sh-workflows/utilizing-workflow-managed-templates)
* [Testing and Troubleshooting Workflows](/guides/m3sh-workflows/testing-and-troubleshooting-workflows)
* [Exporting and Importing Workflows](/guides/m3sh-workflows/exporting-and-importing-workflows)
**Note: Workflows in Preview Release!** Please note the m3ter Workflows feature is currently available only in Preview release version. See [Feature Release Stages](https://docs.m3ter.com/guides/getting-started/feature-release-stages) for Preview release definition.
# m3sh Workflows - Key Concepts and Options
Source: https://docs.m3ter.com/guides/m3sh-workflows/m3sh-workflows-key-concepts-and-options
In the *Workflows* section of the m3ter Console you can quickly create, build, and configure m3sh Workflows to fulfill your operational requirements. This topic introduces the key concepts and options you'll make use of when creating, managing, running, and reviewing your Workflows:
* [Understanding m3sh Workflows](#understanding-m3sh-workflows)
* [Common Workflow Applications](#common-workflow-applications)
* [Workflows - Types and Triggers](#workflows-types-and-triggers)
* [Workflow Functions](#workflow-functions)
* [Setting Up Workflow Prerequisites](#setting-up-workflow-prerequisites)
* [Exporting and Importing Workflows](#exporting-and-importing-workflows)
* [Workflow Managed Templates](#workflow-managed-templates)
* [Workflow Testing and Troubleshooting](#workflow-testing-and-troubleshooting)
* [Accessing m3sh Workflows](#accessing-m3sh-workflows)
* [Constraints and Limitations](#constraints-and-limitations)
* [FAQs](#faqs)
## Understanding m3sh Workflows
A m3sh Workflow implements an automated routine started by a trigger. Once triggered, the Workflow runs through an ordered sequence of steps, where each step performs a function. In more complex Workflows, a step might perform a sub-workflow which itself consists of one or more functions.
A toolkit of various function types are available for building your Workflows. These functions allow you to introduce variables into the Workflow "state" to hold data values. In subsequent steps, you can use functions to manipulate those state variables, create new variables, or by using logic functions build in decision gates to determine which of alternate paths specific Workflow runs will take. In brief:
* All Workflows have access to the *payload* of the Workflow trigger. The trigger will be either an Event on which a Notification rule is based or an Incoming Webhook.
* *API functions* allow you to load data via an API call to various external systems or to m3ter, and you can choose the variable name that the API response is stored under in the Workflow state.
* *Data management functions* allow you to manipulate the variables you've introduced or even create new ones from what is already held in the Workflow state set using Transformations.
* *Logic functions* allow you to alter how Workflow runs based on variables within the Workflow state branch based on some IF check, start looping over a list/array, and so on.
When preparing to design and build a Workflow to automate your operational requirements, it's important therefore to think in terms of how the "state" set of variables will be created and initialized, modified, added to, or used to determine alternate paths through each of the ordered sequence of steps performed when the Workflow runs.
## Common Workflow Applications
There are two main areas where m3sh Workflows are designed to fulfill your operational requirements for implementing automated processes:
* [Interoperability - Data Exchange across Systems](#interoperability-data-exchange-across-systems)
* [m3ter - Enhance and Extend](#m3ter-enhance-and-extend)
### Interoperability - Data Exchange across Systems
A core operational requirement Workflows fulfill is for designing and implementing data integration routines to control the exchange of data between your m3ter Organization and your external systems:
* Outbound from m3ter Organization into an external system.
* Inbound from an external system into your m3ter Organization.
m3sh Workflows are not restricted to simply pulling data from one system - say m3ter - and transferring it to another system - say your external Accounts Receivable system - but give you wide scope to control data transfer and exchange to meet your specific use cases. For example:
* When a new data item is created in one system, create a corresponding predefined data item in another system.
* Pull a data item from the source system and incorporate intermediate steps:
* To apply a calculation to the data value before loading it into the target system data item.
* To apply conditional logic and only load the source data item into the target system if the condition is met.
### m3ter - Enhance and Extend
From the outset, a core objective was for m3sh Workflow automation to extend and strengthen the value proposition of the m3ter platform:
* Can be directly hooked into m3ter configuration and used to complement and strengthen the platform's capacity to address and fulfill evolving operational billing and analytical needs.
* Deploy m3sh triggers for automated update and management of key billing entities in response to defined end-customer Account Events, such as Balance depletion or Contract expiry.
For example, you might offer a pricing model to your end customers that gives them a free sign-up credit balance and bills their Account using an introductory credit Plan. When this credit is exhausted, you want to automatically switch their Account in m3ter to use a different full contract Plan for billing. You could build a Workflow triggered each time the credit balance on an Account is updated, checks the balance amount, and when the balance credit has reached zero switches the Plan used for the Account.
## Workflows - Types and Triggers
m3sh Workflows fall into two types based on the type of trigger used:
* [Event Notification Workflows](#event-notification-workflows)
* [Incoming Webhook Workflows](#incoming-webhook-workflows)
**Workflow Managed Templates**. You can create Workflows from templates,which are designed and managed by the platform to meet specific common operational use cases. See the following [Workflow Managed Templates](#workflow-managed-templates) section for more details.
### Event Notification Workflows
This type of Workflow uses m3ter Event-based *Notification rules* as a trigger:
* In m3ter you can create and configure Notification rules that you want to use as Workflow triggers. You must then *link* the Notification rule to the Workflow by adding it to the Workflow as a trigger.
* When an Event occurs on which the Notification rule is based and any conditions built into the rule are satisfied, it causes the Notification to fire and the Workflow is triggered.
* The Notification's payload is the data returned by the system Event on which it is based and this data is then injected into the Workflow state and made available using an `event` prefix to reference it in your Workflow functions:
* For example, suppose you want to trigger a Workflow using a Notification rule based on the `billing.balanceamount.updated` system Event, and this Notification will fire and trigger the Workflow only when this Event occurs and the `new.amount` field for the Balance updated Event equals zero.
* You can then add functions to create Workflow steps that reference other fields in the Notification's payload. Continuing the example - you might want to update the end date of a m3ter AccountPlan to match the date on which the `billing.balanceamount.updated` Event occurred for a zero Balance reached. You can then lookup in the Workflow state the value of `event.new.dtLastModified` and use it to update an Account Plan's end date.
See [Creating, Managing, and Reviewing Notifications](https://docs.m3ter.com/guides/alerts-events-and-notifications/utilizing-events-and-notifications/creating-managing-and-reviewing-notifications).
### Incoming Webhook Workflows
This type of Workflow uses an *Incoming Webhook* as a trigger. You can set up these triggers for Workflows you want to use to enable interoperability between m3ter and your external systems:
* In your external system, you must first set up a Webhook destination that you'll use to send any data payloads to for syncing with your m3ter data.
* You can then set up Incoming Webhook Credentials in m3ter for authenticating Incoming Webhooks with Workflows as destinations and allowing them to act as Workflow triggers. When you add a webhook trigger to a Workflow, you can then select the relevant Incoming Webhook Credential.
* When your external system sends a data payload to the Webhook, the Workflow is triggered.
**How this works**
Every m3ter Organization has a provisioned inbound Webhook endpoint. External systems can `POST` to this URL to trigger a Workflow. Only `POST` requests are supported.
The request body is injected into the Workflow state under the `body` prefix. For example, if the Webhook is called with:
```json theme={null}
{
"accountId" : "abc123",
"amount" : 500
}
```
Then `body.accountId` and `body.amount` are available in the Workflow state.
See [Creating Incoming Webhook Credentials](https://docs.m3ter.com/guides/integrations/setting-up-integrations/managing-integration-credentials#creating-incoming-webhook-credentials).
**Scheduled Workflow Triggers?** Scheduled Triggers are on the roadmap. The current workaround is to use an external scheduler, such as AWS EventBridge or a cronjob, to call the Inbound Webhook URL on the required schedule.
## Workflow Functions
A wide toolkit of functions is available for use when building your Workflows. As you add functions, the Workflow Builder environment offers you many usability features to facilitate and streamline common Workflow tasks:
* Drag-and-drop functions to quickly create Workflow steps.
* Validation of functions is performed as you add them, and incomplete functions are clearly flagged as invalid.
* Edit function forms list any required fields and prerequisites, such as Credentials or Transformations that a function must reference.
* Easily insert, detach, and re-attach functions to quickly rearrange a Workflow step sequence, and avoid having to delete and re-add functions.
* Create global parameters to use when configuring multiple functions requiring a common parameter, such as Credentials or Transformation parameter. When these require an update, you can make a single update for the global parameter.
* Exploit the m3ter platform's powerful Calculation Engine when setting up and configuring Workflow functions.
**Workflow Builder!** Before you attempt to create a Workflow and add functions to it, we strongly recommend that you review [Getting to Know the Workflow Builder](/guides/m3sh-workflows/getting-to-know-the-workflow-builder) and familiarize yourself with the Workflows build and management environment.
* [Function Types](#function-types)
* [Global Parameters](#global-parameters)
* [Calculations in Functions](#calculations-in-functions)
### Function Types
The following table gives a summary of the three different types of functions available when building m3sh Workflows:
| **Function Type** | **Purpose** | Prerequisites |
| - | - | - |
| DATA MANAGEMENT | Convert or manipulate data in some way, such as merging data objects or removing a field from an object. Manipulate or create data objects lists. | Some require a Transformation. |
| LOGIC | Apply some logic, such as evaluate a calculation. | |
| APIs | Make read/write API calls to m3ter or a selected external system:
READ: Obtain data values from a system, such as a list if types of records.
WRITE: Create a data item or update a data value in another system. | Credentials |
### Global Parameters
You can set up four types of *Global parameters* to use in your Workflows when adding and configuring functions:
* **Credentials**
* **Transformation**
* **Workflow**
* **Outgoing webhook**
See [Working with Global Parameters](/guides/m3sh-workflows/working-with-global-parameters) for more details.
### Calculations in Functions
You can exploit the m3ter platform's powerful [Calculation Engine](/guides/m3ter-calculation-engine) when setting up and configuring Workflow functions, such as for Logic and Data Management functions. See [Using Calculations for Workflow Functions](https://docs.m3ter.com/guides/m3sh-workflows/getting-to-know-the-workflow-builder#using-calculations-for-workflow-functions) for more details and examples.
## Setting Up Workflow Prerequisites
As you begin to add functions to create Workflow steps, you'll need to set up prerequisites for some functions:
* **Transformations**. m3ter Transformations allow you to customize the conversion of data as it flows into or out of the m3ter system. A Transformation defines a one-way data mapping from one specific data type to another. See the following [Creating and Managing Transformations](/guides/m3sh-workflows/creating-and-managing-transformations) topic.
* **Credentials**. For data integration with external systems, you'll need to set up Credentials for authentication with specific systems. See [Creating and Managing Integration Credentials](/guides/integrations/setting-up-integrations/managing-integration-credentials) for more details.
* **m3ter Credentials**. For functions that will call m3ter API endpoints, you'll need to set up m3ter Service User Credentials. See [Service Authentication](https://docs.m3ter.com/guides/authenticating-with-the-platform/service-authentication).
* **Incoming Webhook Credentials**. If you create an Incoming Webhook Workflow, you'll need to set up credentials for the incoming webhook to be able to authenticate with the Workflow as destination and gain access to the Workflow to act as its trigger.
## Exporting and Importing Workflows
If you've built and published a Workflow and want to use the Workflow as the basis for another Workflow - by adapting the current Workflow to serve a different operational use case - you can export the Workflow and import it as a new one. See [Exporting and Importing Workflows](/guides/m3sh-workflows/exporting-and-importing-workflows) for more details.
## Workflow Managed Templates
You can create Workflows using pre-built templates, which are designed to fulfill specific automation use cases. Workflow templates are managed by the platform to ensure reliability and consistency. When you create a Workflow from a template, editing is restricted and you won't be able to alter the main design flow by adding or removing functions. You will be able to edit functions to provide required parameters to suit the particular Workflow instance such as adding any required credentials.
If you want to use a managed Workflow template in a customized and unmanaged way that avoids editing restrictions, there are two options:
* **Branch from template**. When you create a Workflow, select a managed template as the starting point and maintain full control over it's functions. No editing restrictions are imposed and you'll be able to add new functions, remove functions, or modify functions. However, your Workflow will no longer benefit from updates made for future versions of the original platform managed template. See [Branching from a Managed Template](https://docs.m3ter.com/guides/m3sh-workflows/utilizing-workflow-managed-templates#branching-from-a-managed-template).
* **Export and import**. You can create a Workflow instance from a managed template, export the instance, and then import it as a regular Workflow. See [Exporting and Importing Workflows](/guides/m3sh-workflows/exporting-and-importing-workflows).
**Workflow Managed Templates - Notes**:
* **Available Templates**. Currently one Workflow managed template is available: **Submit measurements from S3 source with SNS trigger**. More are expected soon.
* **Worked Example**. To follow a worked example of how to create and configure a Workflow based on a managed template, see [Utilizing Workflow Managed Templates](/guides/m3sh-workflows/utilizing-workflow-managed-templates).
## Workflow Testing and Troubleshooting
The Workflow Builder offers options to support and facilitate both troubleshooting published Workflows and testing Draft versions before publishing them:
* [Reviewing Workflow Runs](#reviewing-workflow-runs)
* [Enabling Traffic Forwarding](#enabling-traffic-forwarding)
* [Replaying Workflows Runs](#replaying-workflow-runs)
**More Details!** Please review the [Testing and Troubleshooting Workflows](/guides/m3sh-workflows/testing-and-troubleshooting-workflows) topic for more details on how to work with these options.
### Reviewing Workflow Runs
Workflows runs are logged by date and time and listed in the m3ter Console. When troubleshooting Workflows runs, you can quickly open a run and review detailed run logs on a step-by-step basis.
### Enabling Traffic Forwarding
If you've deployed a Published Workflow to production and you're now in the process of updating a Draft version of the Workflow for additional functionality, you can enable *traffic-forwarding* to the Draft version. This will temporarily switch traffic so that the Draft version of the Workflow will be triggered instead of the Published version allowing you to test your Draft updates.
### Replaying Workflow Runs
You can replay a Workflow run using the same Event Notification or Incoming Webhook trigger responsible for the original run. Replayed runs are clearly identified and this capability is especially useful when testing new Workflow designs or troubleshooting failures in existing Workflows without having to re-trigger runs from external systems.
## Accessing m3sh Workflows
* [Access Levels](#access-levels)
* [Console Access](#console-access)
* [API Endpoints](#api-endpoints)
### Access Levels
* By default all Organizations have read-only access to m3sh Workflows, both in the Console and through API endpoints. This means all users can view existing workflows and their execution history.
* To create, edit, or delete m3sh Workflows, your Organization must have the m3sh feature flag enabled.
| Access Level | Scope of Capabilities |
| - | - |
| All users in all Organizations | Review Workflows and their execution logs (read-only). |
| Users in m3sh enabled Organizations | Create, edit, delete, and trigger Workflows. |
| Admin users | Manage Integration Credentials shared across Workflows. |
**Important: Enabling Write Access**. If you are interested in have m3sh Workflows feature flag enabled for your Organization, please reach out to your m3ter contact to discuss and agree commercial terms.
### Console Access
To access Workflows in the m3ter Console, select **m3sh** in the main navigation menu:
 The **Workflows** page opens:
* Any existing Workflows created for your Organization are listed and you can open these in the Workflow Builder.
* You can create new Workflows, create managed Workflows, or import a Workflow.
In the **m3sh** section of the Console, you can also access and manage other related automation and interoperability features:
* **Notifications**
* **Credentials**
* **Integrations**
* **Outgoing Webhooks**
* **Integration Events**
* **Transformations**
* **Notification rules**
### API Endpoints
A full list of endpoints for m3sh Workflows is available in the [Integrations](https://docs.m3ter.com/api/integrations/introduction) section of our API Reference documentation.
## Constraints and Limitations
Constraints and limitations are imposed on the deployment and running of Workflows, as detailed in the following table:
| **Constraint or Limitation** | **Details** |
| - | - |
| Simultaneous Workflow execution | Each Organization is limited to a maximum of five Workflows executing simultaneously. Any subsequent Workflow runs are throttled |
| Workflow run duration |
The **Workflows** page opens:
* Any existing Workflows created for your Organization are listed and you can open these in the Workflow Builder.
* You can create new Workflows, create managed Workflows, or import a Workflow.
In the **m3sh** section of the Console, you can also access and manage other related automation and interoperability features:
* **Notifications**
* **Credentials**
* **Integrations**
* **Outgoing Webhooks**
* **Integration Events**
* **Transformations**
* **Notification rules**
### API Endpoints
A full list of endpoints for m3sh Workflows is available in the [Integrations](https://docs.m3ter.com/api/integrations/introduction) section of our API Reference documentation.
## Constraints and Limitations
Constraints and limitations are imposed on the deployment and running of Workflows, as detailed in the following table:
| **Constraint or Limitation** | **Details** |
| - | - |
| Simultaneous Workflow execution | Each Organization is limited to a maximum of five Workflows executing simultaneously. Any subsequent Workflow runs are throttled |
| Workflow run duration | - Each Workflow run can last for up to a maximum duration of **2 minutes**.
- This limit doesn’t consider IO wait - if a Workflow function is waiting for an HTTP response, or for a IO handle to be available, that time is not accounted for.
- In addition to this, an overall limit of **1 hour** is also enforced.
- Workflows that exceed these thresholds are immediately failed.
|
| Workflow Triggers | - Each Workflow trigger can only have **one active execution**.
- For Workflows with Event Notification triggers - that’s Notification + entity - the same m3ter Account can only trigger one Workflow at a time.
- For Workflows with incoming Webhook triggers, the constraint is one Webhook call.
- Subsequent runs get throttled.
- Manual Triggers are not supported - Workflows must be triggered by a Notification or Incoming Webhook.
- Scheduled Triggers are not currently supported. Use an external scheduler calling the Incoming Webhook URL as a workaround.
|
| Sub-Workflow calls | - Maximum depth of 1. A parent can call a child, but the child cannot call further workflows. Deeper nesting causes immediate failure.
- For parent-child Workflow pairs, concurrency limits are tracked at the parent level.
|
| External system limits | Each connected external system (Salesforce and NetSuite for example) will have their own concurrency limits and throttling logic. |
## FAQs
### Can m3sh Workflows be triggered on a schedule?
Scheduled triggers are on the m3sh roadmap. The current workaround is to use an external scheduler, such as AWS Eventbridge or a Cronjob, to call the Inbound Webhook URL and to trigger a Workflow's on the required schedued.
### Can m3sh Workflows be triggered manually?
No.
### Do m3sh Workflows require credentials?
Workflows themselves don’t require credentials. But some functions, particularly those that imply HTTP requests to either external systems or the m3ter system, require credentials to be provided. These can be created as Integration Credentials - where the credential format will depend on the system - and then shared across several functions in the Workflow or across several workflows.
### Can m3sh Workflows call other m3sh Workflows?
Yes, however the max depth is 1. You can have a Workflow invoking another Workflow, but the invoked Workflow itself cannot then invoke a Workflow. If this is attempted, the execution will immediately fail. This guardrail prevents infinite loop execution cycles, and explosive Workflow run log growth.
### Is m3sh Workflow execution limited in any way?
Yes - see the above [Constraints and Limitations](#constraints-and-limitations) section.
# Testing and Troubleshooting Workflows
Source: https://docs.m3ter.com/guides/m3sh-workflows/testing-and-troubleshooting-workflows
The Workflow Builder offers several useful options designed to support and facilitate both troubleshooting published Workflows and testing Draft versions before publishing.
This topic explains how to work with these options:
* [Reviewing Workflow Runs](#reviewing-workflow-runs)
* [Enabling Traffic-Forwarding](#enabling-traffic-forwarding)
* [Replaying Workflow Runs](#replaying-workflow-runs)
## Reviewing Workflow Runs
Workflow runs are logged by date and time and listed in the m3ter Console. You can view the runs performed for a m3sh Workflow or open individual Workflow runs and drill in to review run log details:
* [Viewing Workflow Runs](#viewing-workflow-runs)
* [Reviewing Workflow Run Logs](#reviewing-workflow-run-logs)
### Viewing Workflow Runs
**To view m3sh Workflow runs:**
1. Select **m3sh**:
 * The **Workflows** page opens.
2. Select the **Name** hotlink text of the Workflow you want to view runs for. The Workflow opens in **Draft** mode.
3. Scroll down to the to the **Latest workflow runs** panel:
* The **Workflows** page opens.
2. Select the **Name** hotlink text of the Workflow you want to view runs for. The Workflow opens in **Draft** mode.
3. Scroll down to the to the **Latest workflow runs** panel:
![M3sh Automation270]() * Workflow runs are designated and tracked using the UTC date/time when the run started. The **Latest workflow runs** panel lists the ten most recent runs in descending order of start date/time, and for each run listed you can:
* Read off the **Start time**, **Trigger**, and **Status**.
* You can select the **Start time** hotlink text to open the details page for an individual run - see the following [Reviewing Workflow Run Logs](#reviewing-workflow-run-logs) section.
* Filter the list by **Status**, for example to show only **ERROR** runs:
* Workflow runs are designated and tracked using the UTC date/time when the run started. The **Latest workflow runs** panel lists the ten most recent runs in descending order of start date/time, and for each run listed you can:
* Read off the **Start time**, **Trigger**, and **Status**.
* You can select the **Start time** hotlink text to open the details page for an individual run - see the following [Reviewing Workflow Run Logs](#reviewing-workflow-run-logs) section.
* Filter the list by **Status**, for example to show only **ERROR** runs:
![M3sh Automation271]() 4. Select **View all**. The **Runs** page for the Workflow opens:
4. Select **View all**. The **Runs** page for the Workflow opens:
![M3sh Automation272a]() **Tip: Accessing Workflow runs?** Depending on the Workflow set up, there can be other ways to access and review Workflow runs:
* If a Workflow uses a Notification rule as its trigger, you'll be able to open runs from the **Notification rule details** page.
* If a Workflow is associated with another m3ter entity - such as a Bill or an Account - then you'll be able to access runs from the entity details page - such as **Bill details**. The metadata card for an entity will also show hotlink texts you can use to open runs.
### Reviewing Workflow Run Logs
You can quickly open an individual Workflow run and review detailed run logs on a step-by-step basis. This is useful when troubleshooting Workflow runs that have failed to complete and show an error.
**To review individual m3sh Workflow run logs:**
1. Select **m3sh**:
**Tip: Accessing Workflow runs?** Depending on the Workflow set up, there can be other ways to access and review Workflow runs:
* If a Workflow uses a Notification rule as its trigger, you'll be able to open runs from the **Notification rule details** page.
* If a Workflow is associated with another m3ter entity - such as a Bill or an Account - then you'll be able to access runs from the entity details page - such as **Bill details**. The metadata card for an entity will also show hotlink texts you can use to open runs.
### Reviewing Workflow Run Logs
You can quickly open an individual Workflow run and review detailed run logs on a step-by-step basis. This is useful when troubleshooting Workflow runs that have failed to complete and show an error.
**To review individual m3sh Workflow run logs:**
1. Select **m3sh**:
 * The **Workflows** page opens.
2. Select the **Name** hotlink text of the Workflow you want to review run logs for. The Workflow opens in **Draft** mode.
3. Scroll down to the to the **Latest workflow runs** panel:
* If the Workflow run you want to review run logs for is listed, select the **Start time** hotlink text of the run. The **Workflow** **Runs** page opens.
* If the Workflow run you want to review run logs for is not listed, select **View all**. The **Runs** page opens listing all Workflow runs. Select the **Start time** hotlink text of the run you want to open and review. The **Workflow** **Runs** page opens:
* The **Workflows** page opens.
2. Select the **Name** hotlink text of the Workflow you want to review run logs for. The Workflow opens in **Draft** mode.
3. Scroll down to the to the **Latest workflow runs** panel:
* If the Workflow run you want to review run logs for is listed, select the **Start time** hotlink text of the run. The **Workflow** **Runs** page opens.
* If the Workflow run you want to review run logs for is not listed, select **View all**. The **Runs** page opens listing all Workflow runs. Select the **Start time** hotlink text of the run you want to open and review. The **Workflow** **Runs** page opens:
![M3sh Automation273a]() * The **Start time** and **Status** of the run are shown.
* You can use the controls to zoom in/out or fit to view.
* In this example, we've opened a Workflow run that is showing as in **ERROR** and a **Message** is provided to help debugging.
4. If you want to inspect the log details for a specific step, select the details icon for the step. For example, for the Workflow **Start**:
* The **Start time** and **Status** of the run are shown.
* You can use the controls to zoom in/out or fit to view.
* In this example, we've opened a Workflow run that is showing as in **ERROR** and a **Message** is provided to help debugging.
4. If you want to inspect the log details for a specific step, select the details icon for the step. For example, for the Workflow **Start**:
![M3sh Automation274a]() * The log details for the selected step that was performed in the Workflow run are loaded into the right-hand side of the **Run log**.
* In this example, the JSON returned for the `billing.balanceamount.updated` Event that triggered the Workflow run is loaded.
5. Similarly, you can review the log details for a functional step performed in the Workflow run:
* The log details for the selected step that was performed in the Workflow run are loaded into the right-hand side of the **Run log**.
* In this example, the JSON returned for the `billing.balanceamount.updated` Event that triggered the Workflow run is loaded.
5. Similarly, you can review the log details for a functional step performed in the Workflow run:
![M3sh Automation275a]() * In this case, the **HTTP REQUEST** performed by a **m3ter API** function is shown and you can expand the call to inspect the **Request** and **Response** JSON.
6. To identify and resolve the error with this example run, if we check through the remaining Workflow steps, we find that the final **Create AccountPlan** m3ter API function is showing an error flag and are told that no logs are available:
* In this case, the **HTTP REQUEST** performed by a **m3ter API** function is shown and you can expand the call to inspect the **Request** and **Response** JSON.
6. To identify and resolve the error with this example run, if we check through the remaining Workflow steps, we find that the final **Create AccountPlan** m3ter API function is showing an error flag and are told that no logs are available:
![M3sh Automation276a]() 7. If we now open the **Function details** for this step, we see that it is configured to use `oldAccountPlan` for **Request Path**:
7. If we now open the **Function details** for this step, we see that it is configured to use `oldAccountPlan` for **Request Path**:
 8. When we open the previous function the error is confirmed as a configuration mismatch, since this previous function has stored the Account to be created under `newAccountPlan` in the Workflow state:
![M3sh Automation278a]() * In an attempt to resolve the error, in the Draft version we can edit the **Create AccountPlan** function and update it to use `newAccountPlan` for **Request Path**.
* To test this fix and before publishing it to the Workflow, we can *enable traffic-forwarding* to the Draft version and check the next run - see the [following section](#enabling-traffic-forwarding) for details.
## Enabling Traffic-Forwarding
You can enable *traffic-forwarding* to the Draft version of a Workflow. This will temporarily switch traffic so that the Draft version of the Workflow will be triggered and run instead of the Published version allowing you to test any Draft updates. The traffic-forwarding option is very useful when you've deployed a Published Workflow to production and:
* You're in the process of updating a Draft version of the Workflow to add more functionality for a planned new version of the Workflow. As you do this, you can test your updates incrementally and before publishing.
* An error has occurred when the Workflow runs. After investigation, you've identified a possible cause for the run error and performed a fix in the Draft version. Before you publish the Draft, you can test the fix.
**To enable traffic-forwarding for m3sh Workflow runs:**
1. Select **m3sh**:
* In an attempt to resolve the error, in the Draft version we can edit the **Create AccountPlan** function and update it to use `newAccountPlan` for **Request Path**.
* To test this fix and before publishing it to the Workflow, we can *enable traffic-forwarding* to the Draft version and check the next run - see the [following section](#enabling-traffic-forwarding) for details.
## Enabling Traffic-Forwarding
You can enable *traffic-forwarding* to the Draft version of a Workflow. This will temporarily switch traffic so that the Draft version of the Workflow will be triggered and run instead of the Published version allowing you to test any Draft updates. The traffic-forwarding option is very useful when you've deployed a Published Workflow to production and:
* You're in the process of updating a Draft version of the Workflow to add more functionality for a planned new version of the Workflow. As you do this, you can test your updates incrementally and before publishing.
* An error has occurred when the Workflow runs. After investigation, you've identified a possible cause for the run error and performed a fix in the Draft version. Before you publish the Draft, you can test the fix.
**To enable traffic-forwarding for m3sh Workflow runs:**
1. Select **m3sh**:
 * The **Workflows** page opens.
2. Select the **Name** hotlink text of the Workflow you want to enable traffic-forwarding for. The Workflow opens in **Draft** mode and the default setting of **Traffic: Published version** is shown:
* The **Workflows** page opens.
2. Select the **Name** hotlink text of the Workflow you want to enable traffic-forwarding for. The Workflow opens in **Draft** mode and the default setting of **Traffic: Published version** is shown:
![M3sh Automation280a]() * In this example, we've opened a Workflow that showed a run error for the currently Published version. In the previous [Reviewing Workflow Run Logs](#reviewing-workflow-run-logs) section, this error was investigated and identified as a mistaken **Request Path** setting in the final m3ter API **Create AccountPlan** function. An attempted fix has been made to the final function in the Draft version:
* In this example, we've opened a Workflow that showed a run error for the currently Published version. In the previous [Reviewing Workflow Run Logs](#reviewing-workflow-run-logs) section, this error was investigated and identified as a mistaken **Request Path** setting in the final m3ter API **Create AccountPlan** function. An attempted fix has been made to the final function in the Draft version:
 * The **Request Path** update in the Draft has been saved but not yet pushed through to the Published version:
 * We can now enable traffic-forwarding and test the attempted fix in the Draft version
3. On the drop-down menu select **Enable traffic-forwarding**:
* We can now enable traffic-forwarding and test the attempted fix in the Draft version
3. On the drop-down menu select **Enable traffic-forwarding**:
 * A confirmation dialog shows:
 4. Select **Enable traffic-forwarding** to confirm the traffic switch. The Workflow's traffic flag updates:
 * When the Workflow is next triggered, it will run for the Draft version.
5. You can wait until the relevant Event Notification or Incoming Webhook next triggers the Workflow and then check the **Latest workflows runs** to see if the Draft Workflow has completed successfully:
* When the Workflow is next triggered, it will run for the Draft version.
5. You can wait until the relevant Event Notification or Incoming Webhook next triggers the Workflow and then check the **Latest workflows runs** to see if the Draft Workflow has completed successfully:
![M3sh Automation287]() * For the current example, we can see that an Event Notification has triggered the latest run for the Draft version and the run has completed without error. When we open the run to check logs the error showing for the final function is now fixed:
* For the current example, we can see that an Event Notification has triggered the latest run for the Draft version and the run has completed without error. When we open the run to check logs the error showing for the final function is now fixed:
![M3sh Automation288a]() 6. Return to the Workflow Draft and **Publish draft**. When you do this, traffic will be automatically switched back to **Traffic: Published version** default.
**Important!** When you publish a Workflow Draft version, the Draft is permanently deleted. If you've been using the traffic-forwarding feature to perform test runs of a Workflow using the Draft version before publishing, this means any Draft runs will no longer be available.
## Replaying Workflow Runs
You can replay a Workflow run using the same Event Notification or Incoming Webhook trigger responsible for the original run. Replay runs are clearly identified and this capability is especially useful when testing new Workflow designs or troubleshooting failures in existing Workflows without having to re-trigger runs from external systems.
**To replay m3sh Workflow runs:**
1. Select **m3sh**:
6. Return to the Workflow Draft and **Publish draft**. When you do this, traffic will be automatically switched back to **Traffic: Published version** default.
**Important!** When you publish a Workflow Draft version, the Draft is permanently deleted. If you've been using the traffic-forwarding feature to perform test runs of a Workflow using the Draft version before publishing, this means any Draft runs will no longer be available.
## Replaying Workflow Runs
You can replay a Workflow run using the same Event Notification or Incoming Webhook trigger responsible for the original run. Replay runs are clearly identified and this capability is especially useful when testing new Workflow designs or troubleshooting failures in existing Workflows without having to re-trigger runs from external systems.
**To replay m3sh Workflow runs:**
1. Select **m3sh**:
 * The **Workflows** page opens.
2. Select the **Name** hotlink text of the Workflow you want to view replay runs for. The Workflow opens in **Draft** mode.
3. To open the Workflow run you want to replay, on the **Latest workflow runs** panel either:
* Locate the run and open it.
* Select **View all** to open the **Runs** page for the Workflow, locate the run, and open it:
* The **Workflows** page opens.
2. Select the **Name** hotlink text of the Workflow you want to view replay runs for. The Workflow opens in **Draft** mode.
3. To open the Workflow run you want to replay, on the **Latest workflow runs** panel either:
* Locate the run and open it.
* Select **View all** to open the **Runs** page for the Workflow, locate the run, and open it:
![M3sh Automation289a]() * In this example of an Event Notification Workflow, we've opened a run that is in error. By reviewing the run logs and the error message provided, we've identified an error with the **Request Path** defined for an **Create AccountPlan** function used for the final step of the Workflow.
4. In an attempt to fix this error, we can open the **Draft** and update the **Create AccountPlan** function to change the **Request path** setting and then **Publish draft**. The Published version of the Workflow now has what we believe to be the required fix:
* In this example of an Event Notification Workflow, we've opened a run that is in error. By reviewing the run logs and the error message provided, we've identified an error with the **Request Path** defined for an **Create AccountPlan** function used for the final step of the Workflow.
4. In an attempt to fix this error, we can open the **Draft** and update the **Create AccountPlan** function to change the **Request path** setting and then **Publish draft**. The Published version of the Workflow now has what we believe to be the required fix:
 5. We can now go back to the original Workflow run page and select **Replay run**. A confirmation dialog opens:
 6. Select **Replay run** to confirm. The run is replayed using the original run's trigger payload and a message shows to confirm success.
7. If we return to the Workflow's **Latest workflows runs** panel, we can see the run which is clearly marked as a **REPLAYED** run:
6. Select **Replay run** to confirm. The run is replayed using the original run's trigger payload and a message shows to confirm success.
7. If we return to the Workflow's **Latest workflows runs** panel, we can see the run which is clearly marked as a **REPLAYED** run:
![M3sh Automation292]() 8. If we now open the replayed run, we can see that our fix worked and the Workflow run completed without error:
8. If we now open the replayed run, we can see that our fix worked and the Workflow run completed without error:
![M3sh Automation293a]() * Note that a link is provided to **View original run** if you need to perform further comparison for checking and debugging.
# Utilizing Workflow Managed Templates
Source: https://docs.m3ter.com/guides/m3sh-workflows/utilizing-workflow-managed-templates
You can create Workflows using pre-built templates, which are designed to fulfill specific automation use cases:
* Workflow templates are designed and managed by the platform to ensure reliability and consistency.
* When you create a Workflow from a template, editing is restricted and you won't be able to alter the main design flow by adding or removing functions. However, you will be able to edit functions to provide required parameters to suit the particular Workflow instance such as adding any required credentials.
This topic explains how to utilize Workflow managed templates by providing a worked example of creating a Workflow to automate usage data ingest into the m3ter platform:
* [Worked Example](#worked-example)
* [Prerequisites](#prerequisites)
* [Creating a Workflow from a Managed Template](#creating-a-workflow-from-a-managed-template)
* [Adding and Configuring a Webhook Trigger](#adding-and-configuring-a-webhook-trigger)
If you want to utilize a Workflow managed template but avoid the editing restrictions imposed on your Workflow instance, you can instead branch from a managed template:
* [Branching from a Managed Template](#branching-from-a-managed-template)
**Review First!** Before attempting to follow this worked example and create a m3sh Workflow based on a managed template, please review the earlier topics in this section introducing [Workflow Key Concepts and Options](/guides/m3sh-workflows/m3sh-workflows-key-concepts-and-options) and the [Workflow Builder](/guides/m3sh-workflows/getting-to-know-the-workflow-builder).
## Worked Example
If your operational use case for ingesting customer usage data into the m3ter platform calls for a file upload from data files stored in an AWS S3 bucket, you can utilize the **Submit measurements from S3 source with SNS Trigger** Workflow managed template designed to meet this requirement:
* Uses an Incoming Webhook trigger that exploits the AWS Simple Notification Service (SNS) - a Workflow run is triggered when a file is uploaded to the designated AWS S3 bucket.
* When triggered, the Workflow reads the file's content, applies transformations on the usage data, and ingests the data into the m3ter platform via the m3ter File Upload service.
**Warnings and Notes!**
* **Slow throughput**. m3sh Workflows are slow to process so using this managed template to implement a usage data ingest solution doesn’t in any way align with the current ingest Service Level Agreements (SLAs) and is NOT recommended as a valid solution for high throughput ingest scenarios.
* **Troubleshooting**. Using a Workflow for usage data ingest introduces an additional point of failure. If something fails *before* the file is processed by the Workflow, you will need to look for the causes of failure as an integration error event, not as an ingest error event.
## Prerequisites
To complete the configuration and setup for a usage data ingest Workflow based on the **Submit measurements from S3 source with SNS Trigger** Workflow managed template, you'll need to perform some prerequisite work:
* [Setting Up Credentials](#setting-up-credentials)
* [Checking Usage Data Files](#checking-usage-data-files)
### Setting Up Credentials
You must first create required Credentials in your m3ter Organization:
* [Creating Incoming Webhook Credential for AWS SNS Request](#creating-incoming-webhook-credential-for-aws-sns-request)
* [Creating AWS Service Credential](#creating-aws-service-credential)
#### Creating Incoming Webhook Credential for AWS SNS Request
In the m3ter Console, open the **m3sh** section and select **Credentials**. From there you can create an AWS SNS Request Incoming Webhook Credential:
* Enter a **Name** for the Credential and for **Destination**, select **m3sh Workflow**.
* For **Type** select **AWS SNS request**.
* For **Topic arn**, enter the relevant Amazon Resource Name in the standard format including `region` and `account-id`. For example:
`arn:aws:sns:eu-west-2:441235399388:m3sh-measurements`
* Select **Create credential**. The new Incoming Webhook Credential is listed on the **Credentials** page:
* Note that a link is provided to **View original run** if you need to perform further comparison for checking and debugging.
# Utilizing Workflow Managed Templates
Source: https://docs.m3ter.com/guides/m3sh-workflows/utilizing-workflow-managed-templates
You can create Workflows using pre-built templates, which are designed to fulfill specific automation use cases:
* Workflow templates are designed and managed by the platform to ensure reliability and consistency.
* When you create a Workflow from a template, editing is restricted and you won't be able to alter the main design flow by adding or removing functions. However, you will be able to edit functions to provide required parameters to suit the particular Workflow instance such as adding any required credentials.
This topic explains how to utilize Workflow managed templates by providing a worked example of creating a Workflow to automate usage data ingest into the m3ter platform:
* [Worked Example](#worked-example)
* [Prerequisites](#prerequisites)
* [Creating a Workflow from a Managed Template](#creating-a-workflow-from-a-managed-template)
* [Adding and Configuring a Webhook Trigger](#adding-and-configuring-a-webhook-trigger)
If you want to utilize a Workflow managed template but avoid the editing restrictions imposed on your Workflow instance, you can instead branch from a managed template:
* [Branching from a Managed Template](#branching-from-a-managed-template)
**Review First!** Before attempting to follow this worked example and create a m3sh Workflow based on a managed template, please review the earlier topics in this section introducing [Workflow Key Concepts and Options](/guides/m3sh-workflows/m3sh-workflows-key-concepts-and-options) and the [Workflow Builder](/guides/m3sh-workflows/getting-to-know-the-workflow-builder).
## Worked Example
If your operational use case for ingesting customer usage data into the m3ter platform calls for a file upload from data files stored in an AWS S3 bucket, you can utilize the **Submit measurements from S3 source with SNS Trigger** Workflow managed template designed to meet this requirement:
* Uses an Incoming Webhook trigger that exploits the AWS Simple Notification Service (SNS) - a Workflow run is triggered when a file is uploaded to the designated AWS S3 bucket.
* When triggered, the Workflow reads the file's content, applies transformations on the usage data, and ingests the data into the m3ter platform via the m3ter File Upload service.
**Warnings and Notes!**
* **Slow throughput**. m3sh Workflows are slow to process so using this managed template to implement a usage data ingest solution doesn’t in any way align with the current ingest Service Level Agreements (SLAs) and is NOT recommended as a valid solution for high throughput ingest scenarios.
* **Troubleshooting**. Using a Workflow for usage data ingest introduces an additional point of failure. If something fails *before* the file is processed by the Workflow, you will need to look for the causes of failure as an integration error event, not as an ingest error event.
## Prerequisites
To complete the configuration and setup for a usage data ingest Workflow based on the **Submit measurements from S3 source with SNS Trigger** Workflow managed template, you'll need to perform some prerequisite work:
* [Setting Up Credentials](#setting-up-credentials)
* [Checking Usage Data Files](#checking-usage-data-files)
### Setting Up Credentials
You must first create required Credentials in your m3ter Organization:
* [Creating Incoming Webhook Credential for AWS SNS Request](#creating-incoming-webhook-credential-for-aws-sns-request)
* [Creating AWS Service Credential](#creating-aws-service-credential)
#### Creating Incoming Webhook Credential for AWS SNS Request
In the m3ter Console, open the **m3sh** section and select **Credentials**. From there you can create an AWS SNS Request Incoming Webhook Credential:
* Enter a **Name** for the Credential and for **Destination**, select **m3sh Workflow**.
* For **Type** select **AWS SNS request**.
* For **Topic arn**, enter the relevant Amazon Resource Name in the standard format including `region` and `account-id`. For example:
`arn:aws:sns:eu-west-2:441235399388:m3sh-measurements`
* Select **Create credential**. The new Incoming Webhook Credential is listed on the **Credentials** page:
![M3sh Automation311b]() * When we add a trigger to the example Workflow for usage data ingest, this Incoming Webhook Credential will be available for selection, allowing the AWS SNS service to access our Workflow as destination and act as its trigger.
**More details?** See [Creating Incoming Webhook Credentials](https://docs.m3ter.com/guides/integrations/setting-up-integrations/managing-integration-credentials#creating-incoming-webhook-credentials).
#### Creating AWS Service Credential
In the m3ter Console, open the **m3sh** section and select **Credentials**. From there you can create an AWS Service Credential:
* Enter a **Name** for the Credential and for **Destination**, select **AWS**.
* For **Account id**, enter your AWS account number that hosts the IAM role m3ter will assume when connecting with AWS.
* For **Role name**, enter the IAM role m3ter will assume.
* Select **Create credential**. The new AWS Service Credential is listed on the **Credentials** page:
* When we add a trigger to the example Workflow for usage data ingest, this Incoming Webhook Credential will be available for selection, allowing the AWS SNS service to access our Workflow as destination and act as its trigger.
**More details?** See [Creating Incoming Webhook Credentials](https://docs.m3ter.com/guides/integrations/setting-up-integrations/managing-integration-credentials#creating-incoming-webhook-credentials).
#### Creating AWS Service Credential
In the m3ter Console, open the **m3sh** section and select **Credentials**. From there you can create an AWS Service Credential:
* Enter a **Name** for the Credential and for **Destination**, select **AWS**.
* For **Account id**, enter your AWS account number that hosts the IAM role m3ter will assume when connecting with AWS.
* For **Role name**, enter the IAM role m3ter will assume.
* Select **Create credential**. The new AWS Service Credential is listed on the **Credentials** page:
![M3sh Automation316c]() * When we create the example Workflow for usage data ingest, this AWS Service Credential will be available for selection to configure the AWS Read from S3 function used as the second step in the Workflow and allowing it to access the S3 bucket.
**More Details?** See [Creating and Managing Integration Credentials](/guides/integrations/setting-up-integrations/managing-integration-credentials).
### Checking Usage Data Files
The m3ter platform's File Upload service API for usage data measurements accepts JSON formatted files as the default. However, constraints are imposed on file structure and ingest will fail if these constraints are not met. For details, please review the [File Upload Service API](https://docs.m3ter.com/guides/billing-and-usage-data/submitting-usage-data/file-upload-service-api) topic and ensure the usage data measurements files in your AWS S3 buckets for file upload by the Workflow comply with these requirements.
**CSV Usage Data Files**. CSV formatted usage data files are also supported.
## Creating a Workflow from a Managed Template
For the current worked example, from the *Workflows* page we can quickly create a Workflow from a managed template to implement usage data ingest using file upload from an S3 bucket.
**To create a m3sh Workflow from a managed template:**
1. Select **m3sh**:
* When we create the example Workflow for usage data ingest, this AWS Service Credential will be available for selection to configure the AWS Read from S3 function used as the second step in the Workflow and allowing it to access the S3 bucket.
**More Details?** See [Creating and Managing Integration Credentials](/guides/integrations/setting-up-integrations/managing-integration-credentials).
### Checking Usage Data Files
The m3ter platform's File Upload service API for usage data measurements accepts JSON formatted files as the default. However, constraints are imposed on file structure and ingest will fail if these constraints are not met. For details, please review the [File Upload Service API](https://docs.m3ter.com/guides/billing-and-usage-data/submitting-usage-data/file-upload-service-api) topic and ensure the usage data measurements files in your AWS S3 buckets for file upload by the Workflow comply with these requirements.
**CSV Usage Data Files**. CSV formatted usage data files are also supported.
## Creating a Workflow from a Managed Template
For the current worked example, from the *Workflows* page we can quickly create a Workflow from a managed template to implement usage data ingest using file upload from an S3 bucket.
**To create a m3sh Workflow from a managed template:**
1. Select **m3sh**:
 * The **Workflows** page opens.
2. Select **Create workflow>Create managed workflow**:
* The **Workflows** page opens.
2. Select **Create workflow>Create managed workflow**:
 * The **Workflows>Create** from template page opens:
![M3sh Automation305]() 3. Enter the details of the new Workflow:
* **Name**. (*Required*)
* **Code**. (*Required*)
* **Description**. (*Required*)
* **Workflow template**. (Required) Use the drop-down to select the **PLATFORM TEMPLATE** you want to base the new Workflow on: **Submit measurements fro S3 source with SNS trigger**.
4. Select **Create**. The new Workflow opens in the builder in **Draft** mode and is clearly flagged as **MANAGED**:
3. Enter the details of the new Workflow:
* **Name**. (*Required*)
* **Code**. (*Required*)
* **Description**. (*Required*)
* **Workflow template**. (Required) Use the drop-down to select the **PLATFORM TEMPLATE** you want to base the new Workflow on: **Submit measurements fro S3 source with SNS trigger**.
4. Select **Create**. The new Workflow opens in the builder in **Draft** mode and is clearly flagged as **MANAGED**:
![M3sh Automation306]() 5. If you zoom in, you will see that the second step uses an **AWS Read from S3** function:
5. If you zoom in, you will see that the second step uses an **AWS Read from S3** function:
 * Note that this function is flagged as invalid because configuration is incomplete.
6. Select to open the function's **Edit** panel:
* Note that this function is flagged as invalid because configuration is incomplete.
6. Select to open the function's **Edit** panel:
 7. Enter the missing required details to complete the **AWS Read from S3** function's configuration:
* **Credentials**. Select the AWS Service Credential created above under [Prerequisites](#prerequisites).
* **Region**.
* **Bucket**.
For example:
7. Enter the missing required details to complete the **AWS Read from S3** function's configuration:
* **Credentials**. Select the AWS Service Credential created above under [Prerequisites](#prerequisites).
* **Region**.
* **Bucket**.
For example:
 * To complete setting up the Workflow, we must now add a webhook trigger to the usage data ingest Workflow - see the [following section](#adding-and-configuring-a-webhook-trigger).
**CSV Usage Data Files**. CSV formatted usage data files are also supported for upload and is an option available when you edit the **Read from S3** function for the Workflow.
## Adding and Configuring a Webhook Trigger
When you add a webhook trigger to a Workflow, you have the option to select users in your Organization that you want to receive an email notification when the trigger is disabled.
**To add and configure a Workflow Webhook trigger:**
1. Select **m3sh**. The **Workflows** page opens.
2. Select the **Name** hotlink text of the Workflow you want to add a trigger to. The **Workflow** opens in **Draft** mode.
3. Select **Workflow triggers**. In the current worked example, no triggers have yet been added for the Workflow:
* To complete setting up the Workflow, we must now add a webhook trigger to the usage data ingest Workflow - see the [following section](#adding-and-configuring-a-webhook-trigger).
**CSV Usage Data Files**. CSV formatted usage data files are also supported for upload and is an option available when you edit the **Read from S3** function for the Workflow.
## Adding and Configuring a Webhook Trigger
When you add a webhook trigger to a Workflow, you have the option to select users in your Organization that you want to receive an email notification when the trigger is disabled.
**To add and configure a Workflow Webhook trigger:**
1. Select **m3sh**. The **Workflows** page opens.
2. Select the **Name** hotlink text of the Workflow you want to add a trigger to. The **Workflow** opens in **Draft** mode.
3. Select **Workflow triggers**. In the current worked example, no triggers have yet been added for the Workflow:
 4. Select **Add trigger>Add webhook trigger**:
 * An **Add webhook trigger** dialog appears:
![M3sh Automation318]() 5. Enter a **Name** for the webhook trigger.
6. Use the **Credentials** drop-down to select the Incoming Webhook Credential you want to use to authenticate with the Workflow. For the current worked example, we've selected the Incoming Webhook Credential we set up above - see [Creating Incoming Webhook Credential for AWS SNS Request](#creating-incoming-webhook-credential-for-aws-sns-request).
7. Select **Submit**. The selected webhook trigger is listed under **Workflow triggers**:
5. Enter a **Name** for the webhook trigger.
6. Use the **Credentials** drop-down to select the Incoming Webhook Credential you want to use to authenticate with the Workflow. For the current worked example, we've selected the Incoming Webhook Credential we set up above - see [Creating Incoming Webhook Credential for AWS SNS Request](#creating-incoming-webhook-credential-for-aws-sns-request).
7. Select **Submit**. The selected webhook trigger is listed under **Workflow triggers**:
![M3sh Automation341]() * For the selected **INCOMING WEBHOOK**, you can check:
* The URL and copy it to your clipboard.
* Whether the webhook is **ACTIVE** or **INACTIVE**.
8. If you want to set up users in you Organization to receive an email notification if the trigger is disabled, select the **Details** icon:
* For the selected **INCOMING WEBHOOK**, you can check:
* The URL and copy it to your clipboard.
* Whether the webhook is **ACTIVE** or **INACTIVE**.
8. If you want to set up users in you Organization to receive an email notification if the trigger is disabled, select the **Details** icon:
 * A **Workflow trigger** modal appears:
9. Under **Trigger options**, use the **Disabled notification users** drop-down to add the Organization users you want to receive an email notification if the Workflow trigger is disabled.
**Disabled Webhook Triggers:** Webhook triggers are automatically disabled if the Workflow encounters errors in 20 consecutive runs via a trigger.
10. Select **Update**. A message shows to confirm that the **Trigger options** for notifying Organization users were updated successfully.
11. Select **Publish draft**. The Workflow is now ready to be triggered and run when you upload usage data files into the designated S3 bucket.
**Important: Testing Usage Data Ingest Workflow!** Before you deploy the Workflow to your production environment, we *strongly recommend* that you run it in your test environment/m3ter sandbox Organization and check all run logs for any errors. You can use Usage [Data Explorer (v2)](/guides/data-explorer/usage-data-explorer-v2) after running the Workflow to check that all usage data measurement from your S3 file have been ingested as expected.
## Branching from a Managed Template
When you create a Workflow, you can select a managed template as the starting point to branch your Workflow from. No editing restrictions are imposed and you'll be able to add new functions, remove functions, or modify functions. However, your Workflow will no longer benefit from updates made for future versions of the original platform managed template.
**To create a m3sh Workflow from a managed template:**
1. Select **m3sh**:
* A **Workflow trigger** modal appears:
9. Under **Trigger options**, use the **Disabled notification users** drop-down to add the Organization users you want to receive an email notification if the Workflow trigger is disabled.
**Disabled Webhook Triggers:** Webhook triggers are automatically disabled if the Workflow encounters errors in 20 consecutive runs via a trigger.
10. Select **Update**. A message shows to confirm that the **Trigger options** for notifying Organization users were updated successfully.
11. Select **Publish draft**. The Workflow is now ready to be triggered and run when you upload usage data files into the designated S3 bucket.
**Important: Testing Usage Data Ingest Workflow!** Before you deploy the Workflow to your production environment, we *strongly recommend* that you run it in your test environment/m3ter sandbox Organization and check all run logs for any errors. You can use Usage [Data Explorer (v2)](/guides/data-explorer/usage-data-explorer-v2) after running the Workflow to check that all usage data measurement from your S3 file have been ingested as expected.
## Branching from a Managed Template
When you create a Workflow, you can select a managed template as the starting point to branch your Workflow from. No editing restrictions are imposed and you'll be able to add new functions, remove functions, or modify functions. However, your Workflow will no longer benefit from updates made for future versions of the original platform managed template.
**To create a m3sh Workflow from a managed template:**
1. Select **m3sh**:
 * The **Workflows** page opens.
2. Select **Create workflow>Branch from template**:
* The **Workflows** page opens.
2. Select **Create workflow>Branch from template**:
 * A **Branch from template** modal opens:
![M3sh Automation323]() 3. Under **PLATFORM TEMPLATES**, select the **Workflow template** you want to branch your new Workflow from. The selected template is loaded into the modal to preview it:
3. Under **PLATFORM TEMPLATES**, select the **Workflow template** you want to branch your new Workflow from. The selected template is loaded into the modal to preview it:
![M3sh Automation324]() * You can zoom in and inspect function details to assess the suitability of the template as a starting point for your new Workflow:
* You can zoom in and inspect function details to assess the suitability of the template as a starting point for your new Workflow:
![M3sh Automation325]() 4. Select the **Branch from this template** hotlink. The **Workflows>Create** page open allowing you to enter required details for the new Workflow:
* **Name**.
* **Code**.
* **Description**.
5. Select **Create**. The Workflow opens in the Builder in **Draft** mode:
4. Select the **Branch from this template** hotlink. The **Workflows>Create** page open allowing you to enter required details for the new Workflow:
* **Name**.
* **Code**.
* **Description**.
5. Select **Create**. The Workflow opens in the Builder in **Draft** mode:
![M3sh Automation328]() Note that:
* You can select to open the **Functions** menu or add **Global parameters**.
* The Workflow is *not flagged* as **MANAGED**.
# Working with Global Parameters
Source: https://docs.m3ter.com/guides/m3sh-workflows/working-with-global-parameters
You can set up four types of *Global parameters* to use in your Workflows when adding and configuring functions:
* **Credentials**
* **Transformation**
* **Workflow**
* **Outgoing webhook**
Using Global parameters can save you much effort when managing and maintaining your Workflows over time. For example:
* **Credentials**. If you have a Workflow that uses several m3ter API functions each of which requires a m3ter Service User Credentials parameter, you can set up a Credentials Global parameter and use this for each function. When the time comes to rotate Service User Credentials and move to using new ones, you can simply update the Credentials Global parameter and assign the new Service User Credentials to it saving you the effort of opening every function and updating each one separately.
**Global parameter scope:** When you create Global parameters, their scope is restricted to the Workflow you've created them for - you cannot use a Global parameter across multiple different Workflows
This topic explains how to add, use, and manage Global parameters for your Workflow using the example of a Credentials Global parameter.
**Other Global parameter types?** You can follow a similar procedure to create, use, and manage other Global parameter types - **Transformation**, **Workflow**, or **Outgoing webhook**.
**To create and use Global parameters for m3sh Workflows:**
1. Select **m3sh**:
Note that:
* You can select to open the **Functions** menu or add **Global parameters**.
* The Workflow is *not flagged* as **MANAGED**.
# Working with Global Parameters
Source: https://docs.m3ter.com/guides/m3sh-workflows/working-with-global-parameters
You can set up four types of *Global parameters* to use in your Workflows when adding and configuring functions:
* **Credentials**
* **Transformation**
* **Workflow**
* **Outgoing webhook**
Using Global parameters can save you much effort when managing and maintaining your Workflows over time. For example:
* **Credentials**. If you have a Workflow that uses several m3ter API functions each of which requires a m3ter Service User Credentials parameter, you can set up a Credentials Global parameter and use this for each function. When the time comes to rotate Service User Credentials and move to using new ones, you can simply update the Credentials Global parameter and assign the new Service User Credentials to it saving you the effort of opening every function and updating each one separately.
**Global parameter scope:** When you create Global parameters, their scope is restricted to the Workflow you've created them for - you cannot use a Global parameter across multiple different Workflows
This topic explains how to add, use, and manage Global parameters for your Workflow using the example of a Credentials Global parameter.
**Other Global parameter types?** You can follow a similar procedure to create, use, and manage other Global parameter types - **Transformation**, **Workflow**, or **Outgoing webhook**.
**To create and use Global parameters for m3sh Workflows:**
1. Select **m3sh**:
 * The **Workflows** page opens.
2. Open a Workflow and select **Global parameters**:
* The **Workflows** page opens.
2. Open a Workflow and select **Global parameters**:
 * The **Global parameters** panel opens:
 3. Select **Add global parameter>Credentials**. The panel adjusts.
4. Enter a **Name** for the Credentials Global parameter and use the **Credentials** drop-down to select the existing Service User Credentials you want assign to the Global parameter:
3. Select **Add global parameter>Credentials**. The panel adjusts.
4. Enter a **Name** for the Credentials Global parameter and use the **Credentials** drop-down to select the existing Service User Credentials you want assign to the Global parameter:
 5. Select **Add**. The new Global parameter is listed on the panel:
 * The **Service User Credentials Global** parameter is now available when configuring m3ter API functions that require Service User Credentials.
* You can open the panel at any time and edit or delete a Global parameter.
* As you add Global parameters, a count is shown in the main Workflow Builder:
* The **Service User Credentials Global** parameter is now available when configuring m3ter API functions that require Service User Credentials.
* You can open the panel at any time and edit or delete a Global parameter.
* As you add Global parameters, a count is shown in the main Workflow Builder:
 **Important!** When your create a Global parameter, its scope is restricted to the Workflow you created it in and the parameter is not available for use in other Workflows.
6. Suppose you've added a **Get m3ter Entity** API function to your Workflow. When you open the **Edit** panel to configure the function, the **Service User Credentials Global** will be available for selection for **Credentials** under **GLOBAL PARAMETERS**:
**Important!** When your create a Global parameter, its scope is restricted to the Workflow you created it in and the parameter is not available for use in other Workflows.
6. Suppose you've added a **Get m3ter Entity** API function to your Workflow. When you open the **Edit** panel to configure the function, the **Service User Credentials Global** will be available for selection for **Credentials** under **GLOBAL PARAMETERS**:
 7. When the date arrives for rotating credentials under your security safeguarding policy, you can open the **Global parameters** panel and edit the **Service User Credentials Global** parameter to update it by assigning a new Service User Credentials to it:
 * All functions you've configured in your Workflows to use the **Service User Credentials Global** will now use the updated Credentials assigned to the Global parameter for authentication.
# m3ter APIs
Source: https://docs.m3ter.com/guides/m3ter-apis
The m3ter platform supports two HTTP-based REST APIs returning JSON encoded responses:
* The **Config API**, which you can use for configuration requests and management.
* The **Ingest API**, which you can use for submitting raw data measurements.
We impose separate limits on the calls you make to both of our APIs to maintain optimum performance and high availability for all customers. This section explains those limits and offers guidance on how to manage and optimize your measurement data submissions to the Ingest API within those limits:
* [Config API Limits](/guides/m3ter-apis/config-api-limits)
* [Ingest API Limits and Optimizing Measurement Submissions](/guides/m3ter-apis/ingest-api-limits)
* [WAF Rules for HTTP Requests](/guides/m3ter-apis/waf-rules-for-http-requests)
A starter topic is also provided to help you to quickly get set up for making API calls into the platform with example requests:
* [Getting Started with API Calls](/guides/m3ter-apis/getting-started-with-api-calls)
We return error messages under HTTP error codes for API calls that are invalid or incomplete. These messages are designed to help you troubleshoot and quickly remedy the rejected call. The following topic lists the HTTP error codes and some common examples of why calls fail are given:
* [HTTP Error Codes](/guides/m3ter-apis/http-error-codes)
**Note:** The request rate and payload limits are imposed independently on our two APIs.
## API Documentation
Before you attempt to submit any API calls to the m3ter system, *we strongly recommend* that you review our [API Reference Documentation](https://m3ter.com/docs/api).
## Bearer Token for API Calls
You'll need a Bearer Token when making API calls. For details on how to obtain a Bearer Token, see [Service Authentication](/guides/authenticating-with-the-platform/service-authentication).
## SDKs
SDKs are available in different languages to support convenient access to our REST APIs and maintain feature parity with our APIs - please see [Developer Tools](/guides/developer-tools) for more details.
# Config API Limits
Source: https://docs.m3ter.com/guides/m3ter-apis/config-api-limits
This topic explains the limits imposed on the API calls you make to our *Config API*:
* [Request Rate Limits](#request-rate-limits)
* [Data Explorer Request Rate Limits](#data-explorer-request-rate-limits)
**Tip: Separate from Ingest API Limits?** Yes, the Config API limits are separate to the limits imposed for the Ingest API.
## Request Rate Limits
On the Config API, we impose the following request rate limits:
* **Source IP Address.** Individual host machines can send up to 20,000 requests over a rolling 5-minute period. (An average of 66 requests per second)
* **m3ter Organization.** Each m3ter Organization can send a maximum of 50 requests per second from any number of source IP addresses.
If you exceed either of these rate limits, requests are throttled and an HTTP 429 (Too Many Requests) error response is returned:
* **Source IP address rate limit** - 429 is returned until the total number of requests in the rolling 5-minute period drops below 20,000.
* **m3ter Organization rate limit** - 429 is returned for the remainder of the second in which throttling has occurred.
You'll need to retry requests when throttling has finished.
## Data Explorer Request Rate Limits
Requests made to the Data Explorer are subject to tighter request rate limits:
* **Generally** - 1 request per second.
* **Burst** - 10 requests per second.
If you exceed either of these rate limits, requests are throttled and an HTTP 429 (Too Many Requests) error response is returned.
**Tip: Burst limit for Data Explorer requests?** We allow short bursts of higher TPS to allow us to accommodate occasional spikes from customers. For example, if the sustained rate is 50 TPS, we might set a bucket capacity (N) of 150. This means that you can do up to 150 TPS for 1s (and empty the bucket), but in the next second you'll only be able to do 50 TPS because that is all that has been refilled. If they drop below 50 TPS for a period of time, the bucket will refill back up to full capacity allowing another spike. This is usually referred to as "burst capacity".
# Getting Started with API Calls
Source: https://docs.m3ter.com/guides/m3ter-apis/getting-started-with-api-calls
This topic helps you get started making API calls as a *Service User* to the m3ter platform. It explains how to quickly get set up to make API calls and provides example calls to help you reach a point where you can begin to submit usage data measurements as a Service User:
* [Setting Up for Service User API Calls](/guides/m3ter-apis/getting-started-with-api-calls#setting-up-for-service-user-api-calls)
* [Example 1: Submit Measurements](/guides/m3ter-apis/getting-started-with-api-calls#example-1-submit-measurements)
* [Example 2: Get Organization Config](/guides/m3ter-apis/getting-started-with-api-calls#example-2-get-organization-config)
* [Example 3: Create Meter](/guides/m3ter-apis/getting-started-with-api-calls#example-3-create-meter)
If you are using Postman, you can import some sample m3ter collections into your Workspace. If you have downloaded the m3ter Open API spec, you can also import this as a collection into your Workspace in Postman:
* [Importing m3ter Collections into your Postman Workspace](/guides/m3ter-apis/getting-started-with-api-calls#importing-m3ter-collections-into-your-postman-workspace)
**Tip: Example Code Snippets.** The API call examples include code snippets that you can copy to your clipboard in **JSON**, **cURL**, or **Python Requests** versions.
## Setting Up for Service User API Calls
Follow these steps to get set up as a Service User able to make API calls to m3ter:
#### Step 1: Create a Service User and add Permissions
* Log in to the m3ter Console and under **Settings>Users**, create a Service User.
* Add required Permissions to the new Service User. You must assign **Administrator** Permissions to a Service User to allow that user to make API calls. See [Adding Permissions to Service Users](/guides/organization-and-access-management/managing-users#adding-permissions-to-service-users).
**More Details?** For details of how to complete this step, see [Creating and Configuring Service Users](/guides/organization-and-access-management/managing-users#creating-and-configuring-service-users).
#### Step 2: Generate Access Keys for the Service User.
* In the Console, open the Overview page for a Service User and generate an **Access Key id** and **Api Secret**.
* Make sure you make a copy of the **Api Secret**.
**More Details?** For details on how to complete this step, see [Generating an API Key and Secret for a Service User](/guides/authenticating-with-the-platform/service-authentication#generating-an-api-key-and-secret-for-a-service-user).
#### Step 3: Use Basic Authentication to obtain a Bearer Token.
* We maintain an OAuth 2.0 Client Credentials grant type authentication flow for Service User Authentication.
* From your preferred OAuth 2.0 client, submit a request to the m3ter OAuth Client Credentials authentication flow using the **Access Key id** and **Api Secret** to obtain a Bearer Token for your Service User.
* You will need the Bearer Token to make any subsequent API calls.
**More Details?** For more details on how to complete this step, see [Obtaining a Bearer Token Using Basic Auth](/guides/authenticating-with-the-platform/service-authentication#obtaining-a-bearer-token-using-basic-auth) and see the [Auth section](/api/auth/get-token) of our API Reference Docs.
#### Step 4: Copy your Organization Id.
* When you've obtained your Service User Bearer Token at Step 3, you'll also need a copy of your Organization Id to make any subsequent API calls.
* You can copy this directly to your clipboard from the **Settings>Organization details** page in the Console - see [Managing your Organization](/guides/organization-and-access-management/viewing-and-editing-organization).
* You can obtain your Organization Id from the URL in your browser after logging in to the m3ter Console:
> `https://console.m3ter.com/org/396d788d-XXXX-4e8b-YYYY-a41f46ZZZZZ3/settings/users`
In this example, the portion of the URL after `/org/` is the Organization Id.
## Example 1: Submit Measurements
In this example, we submit Meter measurements for an Account to the Ingest API. In addition to the JSON shown for the example request made through Postman, code versions using other common languages are given and can be copied directly to your clipboard:
* [cURL Version](/guides/m3ter-apis/getting-started-with-api-calls#curl-version)
* [JavaScript Version](/guides/m3ter-apis/getting-started-with-api-calls#javascript-version)
* [Python Requests Version](/guides/m3ter-apis/getting-started-with-api-calls#python-requests-version)
* [Java Version](/guides/m3ter-apis/getting-started-with-api-calls#java-version)
**API Reference Docs:** see [Submit measurements](/api/measurements/introduction)
**To Submit measurement using Postman:**
1. In your Postman Workspace, select to make a **POST** call and enter this URL as the endpoint:
> [https://ingest.m3ter.com/organizations/396d788d-XXXX-4e8b-XXXX-aYYYYY3/measurements](https://ingest.m3ter.com/organizations/396d788d-XXXX-4e8b-XXXX-aYYYYY3/measurements)
Where the portion of the URL endpoint after `/organizations/` is your Organization id and which you can copy from the **Settings>Organization details** page or from the URL in your browser after logging into the m3ter Console - see [Step 4](/guides/m3ter-apis/getting-started-with-api-calls#step-4-copy-your-organization-id) in the previous section.
2. On the **Authorization** tab, for **Type** select **Bearer Token** and copy and paste it into the **Token** field:
* All functions you've configured in your Workflows to use the **Service User Credentials Global** will now use the updated Credentials assigned to the Global parameter for authentication.
# m3ter APIs
Source: https://docs.m3ter.com/guides/m3ter-apis
The m3ter platform supports two HTTP-based REST APIs returning JSON encoded responses:
* The **Config API**, which you can use for configuration requests and management.
* The **Ingest API**, which you can use for submitting raw data measurements.
We impose separate limits on the calls you make to both of our APIs to maintain optimum performance and high availability for all customers. This section explains those limits and offers guidance on how to manage and optimize your measurement data submissions to the Ingest API within those limits:
* [Config API Limits](/guides/m3ter-apis/config-api-limits)
* [Ingest API Limits and Optimizing Measurement Submissions](/guides/m3ter-apis/ingest-api-limits)
* [WAF Rules for HTTP Requests](/guides/m3ter-apis/waf-rules-for-http-requests)
A starter topic is also provided to help you to quickly get set up for making API calls into the platform with example requests:
* [Getting Started with API Calls](/guides/m3ter-apis/getting-started-with-api-calls)
We return error messages under HTTP error codes for API calls that are invalid or incomplete. These messages are designed to help you troubleshoot and quickly remedy the rejected call. The following topic lists the HTTP error codes and some common examples of why calls fail are given:
* [HTTP Error Codes](/guides/m3ter-apis/http-error-codes)
**Note:** The request rate and payload limits are imposed independently on our two APIs.
## API Documentation
Before you attempt to submit any API calls to the m3ter system, *we strongly recommend* that you review our [API Reference Documentation](https://m3ter.com/docs/api).
## Bearer Token for API Calls
You'll need a Bearer Token when making API calls. For details on how to obtain a Bearer Token, see [Service Authentication](/guides/authenticating-with-the-platform/service-authentication).
## SDKs
SDKs are available in different languages to support convenient access to our REST APIs and maintain feature parity with our APIs - please see [Developer Tools](/guides/developer-tools) for more details.
# Config API Limits
Source: https://docs.m3ter.com/guides/m3ter-apis/config-api-limits
This topic explains the limits imposed on the API calls you make to our *Config API*:
* [Request Rate Limits](#request-rate-limits)
* [Data Explorer Request Rate Limits](#data-explorer-request-rate-limits)
**Tip: Separate from Ingest API Limits?** Yes, the Config API limits are separate to the limits imposed for the Ingest API.
## Request Rate Limits
On the Config API, we impose the following request rate limits:
* **Source IP Address.** Individual host machines can send up to 20,000 requests over a rolling 5-minute period. (An average of 66 requests per second)
* **m3ter Organization.** Each m3ter Organization can send a maximum of 50 requests per second from any number of source IP addresses.
If you exceed either of these rate limits, requests are throttled and an HTTP 429 (Too Many Requests) error response is returned:
* **Source IP address rate limit** - 429 is returned until the total number of requests in the rolling 5-minute period drops below 20,000.
* **m3ter Organization rate limit** - 429 is returned for the remainder of the second in which throttling has occurred.
You'll need to retry requests when throttling has finished.
## Data Explorer Request Rate Limits
Requests made to the Data Explorer are subject to tighter request rate limits:
* **Generally** - 1 request per second.
* **Burst** - 10 requests per second.
If you exceed either of these rate limits, requests are throttled and an HTTP 429 (Too Many Requests) error response is returned.
**Tip: Burst limit for Data Explorer requests?** We allow short bursts of higher TPS to allow us to accommodate occasional spikes from customers. For example, if the sustained rate is 50 TPS, we might set a bucket capacity (N) of 150. This means that you can do up to 150 TPS for 1s (and empty the bucket), but in the next second you'll only be able to do 50 TPS because that is all that has been refilled. If they drop below 50 TPS for a period of time, the bucket will refill back up to full capacity allowing another spike. This is usually referred to as "burst capacity".
# Getting Started with API Calls
Source: https://docs.m3ter.com/guides/m3ter-apis/getting-started-with-api-calls
This topic helps you get started making API calls as a *Service User* to the m3ter platform. It explains how to quickly get set up to make API calls and provides example calls to help you reach a point where you can begin to submit usage data measurements as a Service User:
* [Setting Up for Service User API Calls](/guides/m3ter-apis/getting-started-with-api-calls#setting-up-for-service-user-api-calls)
* [Example 1: Submit Measurements](/guides/m3ter-apis/getting-started-with-api-calls#example-1-submit-measurements)
* [Example 2: Get Organization Config](/guides/m3ter-apis/getting-started-with-api-calls#example-2-get-organization-config)
* [Example 3: Create Meter](/guides/m3ter-apis/getting-started-with-api-calls#example-3-create-meter)
If you are using Postman, you can import some sample m3ter collections into your Workspace. If you have downloaded the m3ter Open API spec, you can also import this as a collection into your Workspace in Postman:
* [Importing m3ter Collections into your Postman Workspace](/guides/m3ter-apis/getting-started-with-api-calls#importing-m3ter-collections-into-your-postman-workspace)
**Tip: Example Code Snippets.** The API call examples include code snippets that you can copy to your clipboard in **JSON**, **cURL**, or **Python Requests** versions.
## Setting Up for Service User API Calls
Follow these steps to get set up as a Service User able to make API calls to m3ter:
#### Step 1: Create a Service User and add Permissions
* Log in to the m3ter Console and under **Settings>Users**, create a Service User.
* Add required Permissions to the new Service User. You must assign **Administrator** Permissions to a Service User to allow that user to make API calls. See [Adding Permissions to Service Users](/guides/organization-and-access-management/managing-users#adding-permissions-to-service-users).
**More Details?** For details of how to complete this step, see [Creating and Configuring Service Users](/guides/organization-and-access-management/managing-users#creating-and-configuring-service-users).
#### Step 2: Generate Access Keys for the Service User.
* In the Console, open the Overview page for a Service User and generate an **Access Key id** and **Api Secret**.
* Make sure you make a copy of the **Api Secret**.
**More Details?** For details on how to complete this step, see [Generating an API Key and Secret for a Service User](/guides/authenticating-with-the-platform/service-authentication#generating-an-api-key-and-secret-for-a-service-user).
#### Step 3: Use Basic Authentication to obtain a Bearer Token.
* We maintain an OAuth 2.0 Client Credentials grant type authentication flow for Service User Authentication.
* From your preferred OAuth 2.0 client, submit a request to the m3ter OAuth Client Credentials authentication flow using the **Access Key id** and **Api Secret** to obtain a Bearer Token for your Service User.
* You will need the Bearer Token to make any subsequent API calls.
**More Details?** For more details on how to complete this step, see [Obtaining a Bearer Token Using Basic Auth](/guides/authenticating-with-the-platform/service-authentication#obtaining-a-bearer-token-using-basic-auth) and see the [Auth section](/api/auth/get-token) of our API Reference Docs.
#### Step 4: Copy your Organization Id.
* When you've obtained your Service User Bearer Token at Step 3, you'll also need a copy of your Organization Id to make any subsequent API calls.
* You can copy this directly to your clipboard from the **Settings>Organization details** page in the Console - see [Managing your Organization](/guides/organization-and-access-management/viewing-and-editing-organization).
* You can obtain your Organization Id from the URL in your browser after logging in to the m3ter Console:
> `https://console.m3ter.com/org/396d788d-XXXX-4e8b-YYYY-a41f46ZZZZZ3/settings/users`
In this example, the portion of the URL after `/org/` is the Organization Id.
## Example 1: Submit Measurements
In this example, we submit Meter measurements for an Account to the Ingest API. In addition to the JSON shown for the example request made through Postman, code versions using other common languages are given and can be copied directly to your clipboard:
* [cURL Version](/guides/m3ter-apis/getting-started-with-api-calls#curl-version)
* [JavaScript Version](/guides/m3ter-apis/getting-started-with-api-calls#javascript-version)
* [Python Requests Version](/guides/m3ter-apis/getting-started-with-api-calls#python-requests-version)
* [Java Version](/guides/m3ter-apis/getting-started-with-api-calls#java-version)
**API Reference Docs:** see [Submit measurements](/api/measurements/introduction)
**To Submit measurement using Postman:**
1. In your Postman Workspace, select to make a **POST** call and enter this URL as the endpoint:
> [https://ingest.m3ter.com/organizations/396d788d-XXXX-4e8b-XXXX-aYYYYY3/measurements](https://ingest.m3ter.com/organizations/396d788d-XXXX-4e8b-XXXX-aYYYYY3/measurements)
Where the portion of the URL endpoint after `/organizations/` is your Organization id and which you can copy from the **Settings>Organization details** page or from the URL in your browser after logging into the m3ter Console - see [Step 4](/guides/m3ter-apis/getting-started-with-api-calls#step-4-copy-your-organization-id) in the previous section.
2. On the **Authorization** tab, for **Type** select **Bearer Token** and copy and paste it into the **Token** field:
![]() 3. Select the **Body** tab and enter **JSON** for the request:
3. Select the **Body** tab and enter **JSON** for the request:
![]() In this example:
* We're submitting a single measurement for a measure type Data Field on a Meter.
* The `"uid"` provided for the measurement must be a *unique* and *immutable* string.
* For the `"meter"` parameter, enter the Meter's `code` string.
* For the `"account"` parameter, enter the Account's `code` string.
**Important!** If you submit another measurement using the same `"uid"` but with a different `"measure"` quantity, an `"accepted"` response will be returned but the system interprets this as the same data and ignores the new measure.
Here is the **JSON** for the **Submit measurements** request example:
```json theme={null}
{
"measurements": [
{
"uid": "258c80a3-0744-4318-866a-681a7b232378",
"meter": "test_meter1",
"account": "doetech_premium",
"ts": "2022-05-11T12:14:41.836Z",
"measure": {
"gb_stored": 34000
}
}
]
}
```
4. Click **Send**. You will see that your submitted Meter measurement has been accepted in the **Response** panel:
In this example:
* We're submitting a single measurement for a measure type Data Field on a Meter.
* The `"uid"` provided for the measurement must be a *unique* and *immutable* string.
* For the `"meter"` parameter, enter the Meter's `code` string.
* For the `"account"` parameter, enter the Account's `code` string.
**Important!** If you submit another measurement using the same `"uid"` but with a different `"measure"` quantity, an `"accepted"` response will be returned but the system interprets this as the same data and ignores the new measure.
Here is the **JSON** for the **Submit measurements** request example:
```json theme={null}
{
"measurements": [
{
"uid": "258c80a3-0744-4318-866a-681a7b232378",
"meter": "test_meter1",
"account": "doetech_premium",
"ts": "2022-05-11T12:14:41.836Z",
"measure": {
"gb_stored": 34000
}
}
]
}
```
4. Click **Send**. You will see that your submitted Meter measurement has been accepted in the **Response** panel:
![]() ### cURL Version
If you are working in the cmd line, here's the **cURL** version for this example **Submit Measurements** call:
```bash theme={null}
curl --location --request POST 'https://ingest.m3ter.com/organizations/{orgid}/measurements' \
--header 'Authorization: Bearer {bearerToken}} ' \
--header 'Content-Type: application/json' \
--data-raw '{
"measurements": [
{
"uid": "258c80a3-0744-4318-866a-681a7b232378",
"meter": "test_meter1",
"account": "doetech_premium",
"ts": "2022-05-11T12:14:41.836Z",
"measure": {
"gb_stored": 34000
}
}
]
}'
```
### JavaScript Version
Here's the **JavaScript** version of the **Submit Measurements** call:
```javascript theme={null}
const data = {
measurements: [
{
uid: '258c80a3-0744-4318-866a-681a7b232378',
meter: 'test_meter1',
account: 'doetech_premium',
ts: '2022-05-11T12:14:41.836Z',
measure: {
gb_stored: 34000
}
}
]
};
fetch('https://ingest.m3ter.com/organizations/{orgid}/measurements', {
method: 'POST',
headers: {
'Authorization': 'Bearer {bearer token}',
'Content-Type': 'application/json'
},
body: JSON.stringify(data)
}).then((response) => {
console.log(response.json());
});
```
### Python Requests Version
Here's the **Python Requests** version of the **Submit Measurements** call:
```python theme={null}
import requests
import json
url = "https://ingest.m3ter.com/organizations/{orgid}/measurements"
payload = json.dumps({
"measurements": [
{
"uid": "258c80a3-0744-4318-866a-681a7b232378",
"meter": "test_meter1",
"account": "doetech_premium",
"ts": "2022-05-11T12:14:41.836Z",
"measure": {
"gb_stored": 34000
}
}
]
})
headers = {
'Authorization': 'Bearer {bearerToken}',
'Content-Type': 'application/json'
}
response = requests.request("POST", url, headers=headers, data=payload)
print(response.text)
```
### Java Version
Here's the **Java** version of the **Submit Measurements** call:
```java theme={null}
package org.example;
import org.apache.http.HttpResponse;
import org.apache.http.HttpStatus;
import org.apache.http.client.fluent.Request;
import org.apache.http.entity.ContentType;
import org.apache.http.util.EntityUtils;
import java.io.IOException;
public class Main {
public static void main(String[] args) throws Exception {
new Main().start();
}
private void start() throws Exception {
System.out.println("Making POST request");
String response = post("https://ingest.m3ter.com/organizations/{orgid}/measurements", "{
\"measurements\": [
{
\"uid\": \"258c80a3-0744-4318-866a-681a7b232378\",
\"meter\": \"test_meter1\",
\"account\": \"doetech_premium\",
\"ts\": \"2022-05-11T12:14:41.836Z\",
\"measure\": {
\"gb_stored\": 34000
}
}
]
}");
System.out.println("Response = " + response);
}
private String post(String endpoint,
String body) throws IOException {
Request request = Request.Post(endpoint)
.bodyString(body, ContentType.APPLICATION_JSON)
.addHeader("Authorization", "Bearer {bearer token}");
HttpResponse response = request.execute().returnResponse();
int httpCode = response.getStatusLine().getStatusCode();
if (httpCode != HttpStatus.SC_OK) {
// Implement error handling here
return null;
}
return EntityUtils.toString(response.getEntity());
}
}
```
## Example 2: Get Organization Config
In this example, we retrieve the Organization config.
**API Reference Docs:** see [Retrieve OrganizationConfig](/api/organizationconfig/retrieve-organizationconfig).
**To obtain your Organization Config using Postman:**
1. In your Postman Workspace, select to make a **GET** call and enter this URL as the endpoint:
> [https://api.m3ter.com/organizations/396d788d-XXXX-4e8b-XXXX-a41fZZZZZ3/organizationconfig](https://api.m3ter.com/organizations/396d788d-XXXX-4e8b-XXXX-a41fZZZZZ3/organizationconfig)
2. On the **Authorization** tab, for **Type** select **Bearer Token** and copy and paste it into the **Token** field:
### cURL Version
If you are working in the cmd line, here's the **cURL** version for this example **Submit Measurements** call:
```bash theme={null}
curl --location --request POST 'https://ingest.m3ter.com/organizations/{orgid}/measurements' \
--header 'Authorization: Bearer {bearerToken}} ' \
--header 'Content-Type: application/json' \
--data-raw '{
"measurements": [
{
"uid": "258c80a3-0744-4318-866a-681a7b232378",
"meter": "test_meter1",
"account": "doetech_premium",
"ts": "2022-05-11T12:14:41.836Z",
"measure": {
"gb_stored": 34000
}
}
]
}'
```
### JavaScript Version
Here's the **JavaScript** version of the **Submit Measurements** call:
```javascript theme={null}
const data = {
measurements: [
{
uid: '258c80a3-0744-4318-866a-681a7b232378',
meter: 'test_meter1',
account: 'doetech_premium',
ts: '2022-05-11T12:14:41.836Z',
measure: {
gb_stored: 34000
}
}
]
};
fetch('https://ingest.m3ter.com/organizations/{orgid}/measurements', {
method: 'POST',
headers: {
'Authorization': 'Bearer {bearer token}',
'Content-Type': 'application/json'
},
body: JSON.stringify(data)
}).then((response) => {
console.log(response.json());
});
```
### Python Requests Version
Here's the **Python Requests** version of the **Submit Measurements** call:
```python theme={null}
import requests
import json
url = "https://ingest.m3ter.com/organizations/{orgid}/measurements"
payload = json.dumps({
"measurements": [
{
"uid": "258c80a3-0744-4318-866a-681a7b232378",
"meter": "test_meter1",
"account": "doetech_premium",
"ts": "2022-05-11T12:14:41.836Z",
"measure": {
"gb_stored": 34000
}
}
]
})
headers = {
'Authorization': 'Bearer {bearerToken}',
'Content-Type': 'application/json'
}
response = requests.request("POST", url, headers=headers, data=payload)
print(response.text)
```
### Java Version
Here's the **Java** version of the **Submit Measurements** call:
```java theme={null}
package org.example;
import org.apache.http.HttpResponse;
import org.apache.http.HttpStatus;
import org.apache.http.client.fluent.Request;
import org.apache.http.entity.ContentType;
import org.apache.http.util.EntityUtils;
import java.io.IOException;
public class Main {
public static void main(String[] args) throws Exception {
new Main().start();
}
private void start() throws Exception {
System.out.println("Making POST request");
String response = post("https://ingest.m3ter.com/organizations/{orgid}/measurements", "{
\"measurements\": [
{
\"uid\": \"258c80a3-0744-4318-866a-681a7b232378\",
\"meter\": \"test_meter1\",
\"account\": \"doetech_premium\",
\"ts\": \"2022-05-11T12:14:41.836Z\",
\"measure\": {
\"gb_stored\": 34000
}
}
]
}");
System.out.println("Response = " + response);
}
private String post(String endpoint,
String body) throws IOException {
Request request = Request.Post(endpoint)
.bodyString(body, ContentType.APPLICATION_JSON)
.addHeader("Authorization", "Bearer {bearer token}");
HttpResponse response = request.execute().returnResponse();
int httpCode = response.getStatusLine().getStatusCode();
if (httpCode != HttpStatus.SC_OK) {
// Implement error handling here
return null;
}
return EntityUtils.toString(response.getEntity());
}
}
```
## Example 2: Get Organization Config
In this example, we retrieve the Organization config.
**API Reference Docs:** see [Retrieve OrganizationConfig](/api/organizationconfig/retrieve-organizationconfig).
**To obtain your Organization Config using Postman:**
1. In your Postman Workspace, select to make a **GET** call and enter this URL as the endpoint:
> [https://api.m3ter.com/organizations/396d788d-XXXX-4e8b-XXXX-a41fZZZZZ3/organizationconfig](https://api.m3ter.com/organizations/396d788d-XXXX-4e8b-XXXX-a41fZZZZZ3/organizationconfig)
2. On the **Authorization** tab, for **Type** select **Bearer Token** and copy and paste it into the **Token** field:
![]() 4. Click **Send**. Your Organization Config is returned into the **Response** panel:
4. Click **Send**. Your Organization Config is returned into the **Response** panel:
![]() ## Example 3: Create Meter
In this example, we create a Meter.
**API Reference:** see [Create Meter](/api/meter/create-meter)
**To Create a Meter using Postman:**
1. In your Postman Workspace, select to make a **POST** call and enter this URL as the endpoint:
> [https://api.m3ter.com/organizations/396d788d-XXXX-4e8b-XXXX-a41fZZZZZ3/meters](https://api.m3ter.com/organizations/396d788d-XXXX-4e8b-XXXX-a41fZZZZZ3/meters)
2. On the **Authorization** tab, for **Type** select **Bearer Token** and copy and paste it into the **Token** field.
3. Select the **Body** tab and enter **JSON** for the request:
## Example 3: Create Meter
In this example, we create a Meter.
**API Reference:** see [Create Meter](/api/meter/create-meter)
**To Create a Meter using Postman:**
1. In your Postman Workspace, select to make a **POST** call and enter this URL as the endpoint:
> [https://api.m3ter.com/organizations/396d788d-XXXX-4e8b-XXXX-a41fZZZZZ3/meters](https://api.m3ter.com/organizations/396d788d-XXXX-4e8b-XXXX-a41fZZZZZ3/meters)
2. On the **Authorization** tab, for **Type** select **Bearer Token** and copy and paste it into the **Token** field.
3. Select the **Body** tab and enter **JSON** for the request:
![]() Here is the **JSON** for the **Create Meter** request example:
```json theme={null}
{
"name": "Test Meter 2",
"code": "test_meter2",
"dataFields": [
{
"category": "MEASURE",
"code": "gbs_stored",
"name": "GBStorage",
"unit": "GiBy"
}
],
"derivedFields": [ ]
}
```
In this example, we create a Meter with a single **Data Field** of type **Measure**, and which has no **Derived Fields** defined.
**Tip: Global or Product Meter?** In this example, we have omitted a `"product"` parameter from the request body, which means this request will create a *Global Meter*. If you want to create a Meter belonging exclusively to a specific Product, you must provide the Product id in your request.
4. Click **Send**. You'll see the newly created Meter details returned in the **Response** panel:
Here is the **JSON** for the **Create Meter** request example:
```json theme={null}
{
"name": "Test Meter 2",
"code": "test_meter2",
"dataFields": [
{
"category": "MEASURE",
"code": "gbs_stored",
"name": "GBStorage",
"unit": "GiBy"
}
],
"derivedFields": [ ]
}
```
In this example, we create a Meter with a single **Data Field** of type **Measure**, and which has no **Derived Fields** defined.
**Tip: Global or Product Meter?** In this example, we have omitted a `"product"` parameter from the request body, which means this request will create a *Global Meter*. If you want to create a Meter belonging exclusively to a specific Product, you must provide the Product id in your request.
4. Click **Send**. You'll see the newly created Meter details returned in the **Response** panel:
![]() ### cURL Version
If you are working in the cmd line, here's the **cURL** version for this example **Create Meter** call:
```bash theme={null}
curl --location --request POST 'https://api.m3ter.com/organizations/{orgid}/meters' \
--header 'Authorization: Bearer {bearerToken}' \
--header 'Content-Type: application/json' \
--data-raw '{
"name": "Test Meter 2",
"code": "test_meter2",
"dataFields": [
{
"category": "MEASURE",
"code": "gbs_stored",
"name": "GBStorage",
"unit": "GiBy"
}
],
"derivedFields": [ ]
}'
```
### Python Requests Version
Here's the **Python Requests** version for this example **Create Meter** call:
```python theme={null}
import requests
import json
url = "https://api.m3ter.com/organizations/{orgid}/meters"
payload = json.dumps({
"name": "Test Meter 2",
"code": "test_meter2",
"dataFields": [
{
"category": "MEASURE",
"code": "gbs_stored",
"name": "GBStorage",
"unit": "GiBy"
}
],
"derivedFields": []
})
headers = {
'Authorization': 'Bearer {bearerToken}',
'Content-Type': 'application/json'
}
response = requests.request("POST", url, headers=headers, data=payload)
print(response.text)
```
## Importing m3ter Collections into your Postman Workspace
If you are working in Postman for making API calls to m3ter, some m3ter Collections are available for you to import into your Postman Workspace. These Collections provide examples of calls you'll typically need to make to the m3ter APIs:
* [Importing the m3ter Open API](/guides/m3ter-apis/getting-started-with-api-calls#importing-the-m3ter-open-api)
* **m3ter Open API**. The entire set of available API calls for the m3ter platform.
* [Importing the m3ter-Template API Collection](/guides/m3ter-apis/getting-started-with-api-calls#importing-the-m3ter-template-api-collection)
* **m3ter-Template Collection**. A set of templated calls arranged by key functional area and covering calls for common operations in these areas.
### Importing the m3ter Open API
**To import the m3ter Open API as a Collection into your Postman Workspace:**
1. Go to the m3ter [API Reference documentation](/api).
2. In the **Getting Started** section, select **Postman**.
3. On the **Postman** page, select the **m3ter Open API spec JSON file** link:
### cURL Version
If you are working in the cmd line, here's the **cURL** version for this example **Create Meter** call:
```bash theme={null}
curl --location --request POST 'https://api.m3ter.com/organizations/{orgid}/meters' \
--header 'Authorization: Bearer {bearerToken}' \
--header 'Content-Type: application/json' \
--data-raw '{
"name": "Test Meter 2",
"code": "test_meter2",
"dataFields": [
{
"category": "MEASURE",
"code": "gbs_stored",
"name": "GBStorage",
"unit": "GiBy"
}
],
"derivedFields": [ ]
}'
```
### Python Requests Version
Here's the **Python Requests** version for this example **Create Meter** call:
```python theme={null}
import requests
import json
url = "https://api.m3ter.com/organizations/{orgid}/meters"
payload = json.dumps({
"name": "Test Meter 2",
"code": "test_meter2",
"dataFields": [
{
"category": "MEASURE",
"code": "gbs_stored",
"name": "GBStorage",
"unit": "GiBy"
}
],
"derivedFields": []
})
headers = {
'Authorization': 'Bearer {bearerToken}',
'Content-Type': 'application/json'
}
response = requests.request("POST", url, headers=headers, data=payload)
print(response.text)
```
## Importing m3ter Collections into your Postman Workspace
If you are working in Postman for making API calls to m3ter, some m3ter Collections are available for you to import into your Postman Workspace. These Collections provide examples of calls you'll typically need to make to the m3ter APIs:
* [Importing the m3ter Open API](/guides/m3ter-apis/getting-started-with-api-calls#importing-the-m3ter-open-api)
* **m3ter Open API**. The entire set of available API calls for the m3ter platform.
* [Importing the m3ter-Template API Collection](/guides/m3ter-apis/getting-started-with-api-calls#importing-the-m3ter-template-api-collection)
* **m3ter-Template Collection**. A set of templated calls arranged by key functional area and covering calls for common operations in these areas.
### Importing the m3ter Open API
**To import the m3ter Open API as a Collection into your Postman Workspace:**
1. Go to the m3ter [API Reference documentation](/api).
2. In the **Getting Started** section, select **Postman**.
3. On the **Postman** page, select the **m3ter Open API spec JSON file** link:
![Collections Import17]() * A `spec.json` file opens in a separate browser tab.
4. **Save** the file locally.
5. In your Postman Workspace, select **Import**:
* A `spec.json` file opens in a separate browser tab.
4. **Save** the file locally.
5. In your Postman Workspace, select **Import**:
 * An **Import** dialog appears:
![]() 6. Select to import **files**. A **File Upload** window appears.
7. Navigate to where you've saved the `spec.json` file locally and select **Open**:
* The **Import** dialog adjusts to show progress for the import process.
* When the import process has completed, you can select how you want to complete the import:
6. Select to import **files**. A **File Upload** window appears.
7. Navigate to where you've saved the `spec.json` file locally and select **Open**:
* The **Import** dialog adjusts to show progress for the import process.
* When the import process has completed, you can select how you want to complete the import:
![]() * In this example, we've selected to import the file as a **Postman Collection**.
8. Select **Import**.
* The m3ter API is loaded into the **Collections** panel in your Postman Workspace:
* In this example, we've selected to import the file as a **Postman Collection**.
8. Select **Import**.
* The m3ter API is loaded into the **Collections** panel in your Postman Workspace:
 ### Importing the m3ter-Template API Collection
**To import the m3ter-Template Collection into your Postman Workspace:**
1. Go to the m3ter [API Reference documentation](/api).
2. In the **Getting Started** section, select **Postman**.
3. On the **Postman** page, copy the link provided for the **m3ter-Template API Collection**:
### Importing the m3ter-Template API Collection
**To import the m3ter-Template Collection into your Postman Workspace:**
1. Go to the m3ter [API Reference documentation](/api).
2. In the **Getting Started** section, select **Postman**.
3. On the **Postman** page, copy the link provided for the **m3ter-Template API Collection**:
![Collections Import20]() 4. In your Postman Workspace, select **Collections**.
5. Select **Import**:
4. In your Postman Workspace, select **Collections**.
5. Select **Import**:
 * An **Import** dialog appears.
6. Paste the URL link into the import target field on the dialog.
* The **m3ter-Template API Collection** is imported into your Workspace:
* An **Import** dialog appears.
6. Paste the URL link into the import target field on the dialog.
* The **m3ter-Template API Collection** is imported into your Workspace:
 # HTTP Error Codes
Source: https://docs.m3ter.com/guides/m3ter-apis/http-error-codes
The m3ter platform supports two APIs:
* The **Config API**, which you can use for configuration requests and management.
* The **Ingest API**, which you can use for submitting raw data measurements.
Error messages are returned for any invalid or incomplete calls made to these two APIs.
This topic lists the HTTP error codes our APIs return, gives some examples of error messages to help you troubleshoot your calls, and offers recommendations on when to retry requests:
* [HTTP Error Codes](#http-error-codes)
* [400 - Bad Request Examples](#400-bad-request-examples)
* [403 - Forbidden Example](#403-forbidden-example)
* [403 - Unauthorized Example](#403-unauthorized-example)
* [404 - Not Found Example](#404-not-found-example)
* [Retry Recommendations](#retry-recommendations)
**Tip: Request Rate and Payload Errors?** For details of the errors returned when the API call request rate and payload limits are exceeded on our APIs, see the earlier topic in this section: [Config API Limits](/guides/m3ter-apis/config-api-limits) and [Ingest API Limits](/guides/m3ter-apis/ingest-api-limits).
## HTTP Error Codes
| HTTP Error Code | Reason Returned |
| - | - |
| 400 | Bad Request |
| 403 | Forbidden or Unauthorized |
| 404 | Not Found |
| 413 | Response too large |
| 429 | Too Many Requests |
| 500 | Internal Error (might be mapped to something else) |
| 502 | Bad Gateway |
| 504 | Gateway Timeout |
When you submit an invalid API call and one of these HTTP error codes is returned, an informative message is also returned, which is designed to help you correct the API call you initially made. The following sections provide some examples to illustrate.
**NOTE:** A Postman workspace was used for the error message examples.
## 400 - Bad Request Examples
### Example 1 - Update Meter > Invalid JSON Request Body Used
A `PUT` Update Meter call was made:
`https://api.m3ter.com/organizations/ZZ6d788d-5174-4e8b-9d69-a41f4671fcYY/meters/06f6b50c-a868-4ca6-b287-448e507d5248`
But the JSON request schema was not well-formed:
# HTTP Error Codes
Source: https://docs.m3ter.com/guides/m3ter-apis/http-error-codes
The m3ter platform supports two APIs:
* The **Config API**, which you can use for configuration requests and management.
* The **Ingest API**, which you can use for submitting raw data measurements.
Error messages are returned for any invalid or incomplete calls made to these two APIs.
This topic lists the HTTP error codes our APIs return, gives some examples of error messages to help you troubleshoot your calls, and offers recommendations on when to retry requests:
* [HTTP Error Codes](#http-error-codes)
* [400 - Bad Request Examples](#400-bad-request-examples)
* [403 - Forbidden Example](#403-forbidden-example)
* [403 - Unauthorized Example](#403-unauthorized-example)
* [404 - Not Found Example](#404-not-found-example)
* [Retry Recommendations](#retry-recommendations)
**Tip: Request Rate and Payload Errors?** For details of the errors returned when the API call request rate and payload limits are exceeded on our APIs, see the earlier topic in this section: [Config API Limits](/guides/m3ter-apis/config-api-limits) and [Ingest API Limits](/guides/m3ter-apis/ingest-api-limits).
## HTTP Error Codes
| HTTP Error Code | Reason Returned |
| - | - |
| 400 | Bad Request |
| 403 | Forbidden or Unauthorized |
| 404 | Not Found |
| 413 | Response too large |
| 429 | Too Many Requests |
| 500 | Internal Error (might be mapped to something else) |
| 502 | Bad Gateway |
| 504 | Gateway Timeout |
When you submit an invalid API call and one of these HTTP error codes is returned, an informative message is also returned, which is designed to help you correct the API call you initially made. The following sections provide some examples to illustrate.
**NOTE:** A Postman workspace was used for the error message examples.
## 400 - Bad Request Examples
### Example 1 - Update Meter > Invalid JSON Request Body Used
A `PUT` Update Meter call was made:
`https://api.m3ter.com/organizations/ZZ6d788d-5174-4e8b-9d69-a41f4671fcYY/meters/06f6b50c-a868-4ca6-b287-448e507d5248`
But the JSON request schema was not well-formed:
![]() A **400 Bad Request** is returned with a message in the return JSON body that identifies the JSON error:
A **400 Bad Request** is returned with a message in the return JSON body that identifies the JSON error:
![]() ### Example 2 - Update Meter > Request Breaks Configuration
A `PUT` Update Meter call was made:
`https://api.m3ter.com/organizations/ZZ6d788d-5174-4e8b-9d69-a41f4671fcYY/meters/06f6b50c-a868-4ca6-b287-448e507d5248`
But an existing Data Field or Derived Field on the Meter has already been configured as the target usage data field for an Aggregation. Updating the Meter using the call to remove the existing Data Fields/Derived Fields and replace them with a single new Data Field would break that existing configuration:
### Example 2 - Update Meter > Request Breaks Configuration
A `PUT` Update Meter call was made:
`https://api.m3ter.com/organizations/ZZ6d788d-5174-4e8b-9d69-a41f4671fcYY/meters/06f6b50c-a868-4ca6-b287-448e507d5248`
But an existing Data Field or Derived Field on the Meter has already been configured as the target usage data field for an Aggregation. Updating the Meter using the call to remove the existing Data Fields/Derived Fields and replace them with a single new Data Field would break that existing configuration:
![]() A **400 Bad Request** is returned with a message in the return JSON body that blocks the update to prevent the configuration disruption and explain why the request has been identified as a bad request:
A **400 Bad Request** is returned with a message in the return JSON body that blocks the update to prevent the configuration disruption and explain why the request has been identified as a bad request:
![]() ## 403 - Forbidden Example
### Example - List Meters > Unknown Org Id Used
A `GET` List Meters call was made:
`https://api.m3ter.com/organizations/ZZ6d788d-5174-4e8b-9d69-a41f4671fcYY/meters`
But the OrgId used in the path did not exist. A **403 Forbidden** is returned with a message in the JSON body of the response:
## 403 - Forbidden Example
### Example - List Meters > Unknown Org Id Used
A `GET` List Meters call was made:
`https://api.m3ter.com/organizations/ZZ6d788d-5174-4e8b-9d69-a41f4671fcYY/meters`
But the OrgId used in the path did not exist. A **403 Forbidden** is returned with a message in the JSON body of the response:
![]() ## 403 - Unauthorized Example
### Example - List OrgUsers > expired Bearer Token used
A GET List OrgUsers call was made:
[https://api.m3ter.com/organizations/396d788d-XXRRS-4e8b-9d69-a41f4671fc33/users](https://api.m3ter.com/organizations/396d788d-XXRRS-4e8b-9d69-a41f4671fc33/users)
But the Bearer Token for the user making the call had expired. A **403 Forbidden** is returned with a message that the call is **Unauthorized** in the JSON body of the response:
## 403 - Unauthorized Example
### Example - List OrgUsers > expired Bearer Token used
A GET List OrgUsers call was made:
[https://api.m3ter.com/organizations/396d788d-XXRRS-4e8b-9d69-a41f4671fc33/users](https://api.m3ter.com/organizations/396d788d-XXRRS-4e8b-9d69-a41f4671fc33/users)
But the Bearer Token for the user making the call had expired. A **403 Forbidden** is returned with a message that the call is **Unauthorized** in the JSON body of the response:
![]() **Tip: User Can't Authenticate?** Note that although a **Forbidden** response is returned in this case, this does not mean the user is not allowed to retrieve a list of the Organization's Users - does not have the requisite permissions to do this - merely that the authentication credentials used have failed to give the user access. The user must obtain a fresh Bearer Token and retry the call whilst the new Token remains valid.
## 404 - Not Found Example
### Example - Retrieve Account > Account Not Found
A `GET` Retrieve Account call was made:
`https://api.m3ter.com/organizations/396d788d-XXRRS-4e8b-YUYU-a41f4671fc33/accounts/game_dev_indie`
But the Account code was used in error instead of the id. A **404 Not Found** is returned with a message in the return JSON body:
**Tip: User Can't Authenticate?** Note that although a **Forbidden** response is returned in this case, this does not mean the user is not allowed to retrieve a list of the Organization's Users - does not have the requisite permissions to do this - merely that the authentication credentials used have failed to give the user access. The user must obtain a fresh Bearer Token and retry the call whilst the new Token remains valid.
## 404 - Not Found Example
### Example - Retrieve Account > Account Not Found
A `GET` Retrieve Account call was made:
`https://api.m3ter.com/organizations/396d788d-XXRRS-4e8b-YUYU-a41f4671fc33/accounts/game_dev_indie`
But the Account code was used in error instead of the id. A **404 Not Found** is returned with a message in the return JSON body:
![]() ## Retry Recommendations
In general, HTTP error codes returned for failed calls indicate two types of error:
* **4XX** codes. An error occurred on the client side.
* **5XX** codes. An error occurred on the server side.
This means that for the HTTP error codes listed in the [above section](/guides/m3ter-apis/http-error-codes#http-error-codes):
* If a **500**, **502**, or **504** error is returned, we recommend you attempt a retry to see if the error has resolved.
* If a **400**, **403**, or **404** error is returned, you should not attempt a retry of the call - you must look into the call you made and fix the call before attempting a retry.
* If a **413** error is returned, the response to the call exceeds the payload limit imposed. You can review the call you've made and attempt to reduce the response payload - such as by applying filters in the request - and retry the call.
* If a **429** error is returned (Too Many Requests), retries are valid. However, we recommend you wait at least 1 second before attempting a retry. If the second attempt fails, wait 3 seconds before attempting the call again, and so on, with an increased time gap before each successive retry. This method allows the request rate to fall back under the limit threshold and the **429** is no longer returned. For full details on request rate limits imposed on our APIs, see the earlier topic in this section: [Config API Limits](/guides/m3ter-apis/config-api-limits) and [Ingest API Limits](/guides/m3ter-apis/ingest-api-limits)
# Ingest API Limits and Optimizing Measurement Submissions
Source: https://docs.m3ter.com/guides/m3ter-apis/ingest-api-limits
This topic explains the limits imposed on the API calls you make to our *Ingest API*.
* [Request Rate Limits](#request-rate-limits)
* [Request Payload Limit](#request-payload-limit)
Guidance is also given on:
* How to manage your API calls to optimize submission of data measurements within these limits:
* [Batching for Higher Measurement Ingest Rate](#batching-for-higher-measurement-ingest-rate)
* How to accommodate periods of service failure due, for example, to throttling or platform unavailability:
* [Measurement Ingest - Fallback and Recovery](#measurement-ingest-falback-and-recovery)
**Tip: Separate from Config API Limits?** Yes, the Ingest API limits are separate to the limits imposed for the Config API.
## Request Rate Limits
On the Ingest API, we impose the following request rate limits:
* **Source IP Address.** Individual host machines can send up to 5,000 requests over a rolling 5-minute period. (An average of 16 requests per second)
* **m3ter Organization.** Each m3ter Organization can send a maximum of 50 requests per second from any number of source IP addresses.
If you exceed either of these rate limits, requests are throttled and an HTTP 429 (Too Many Requests) error response is returned:
* **Source IP address rate limit** - 429 is returned until the total number of requests in the rolling 5-minute period drops below 5,000.
* **m3ter Organization rate limit** - 429 is returned for the remainder of the second in which throttling has occurred.
You'll need to retry requests when throttling has finished. We recommend using an exponential back-off algorithm to manage retries - see the following [Fallback and Recovery section](/guides/m3ter-apis/ingest-api-limits#measurement-ingest-fallback-and-recovery) for guidance.
**Note:** If you need a temporary increase in API rate limit or if you're finding that you're breaching the limit frequently, please contact m3ter Support to discuss how we can best accommodate your requirements.
## Request Payload Limit
For the Ingest API, the maximum request payload size allowed is 512KB. If you exceed this request payload limit, then you'll receive a 403 (Forbidden) error response.
For more details see the [Submit measurements](/api/measurements/submit-measurements) API Reference documentation.
## Batching for Higher Measurement Ingest Rate
The main technique you can use to achieve higher ingest throughput is to batch measurements. This is not aggregation of measurements - the raw data is still included in the request. The measurement Ingest API is designed to accept a batch of up to 1,000 measurements up to an overall payload size of 512KB, and we strongly recommend including as many measurements as possible in each request.
For more details see the [Submit measurements](/api/measurements/submit-measurements) API Reference documentation.
## Measurement Ingest - Fallback and Recovery
The m3ter platform is designed to provide a highly available service, but it is impossible to build services that never fail. Whether a request fails through throttling or any other reason, we strongly recommend that your implementation for sending data measurements into our Ingest API is designed to be tolerant of failure.
You should back-off the raw measurement data to appropriate storage in your data architecture - for example, to disk, queue, stream service, and so on - before regularly uploading it to m3ter in batches of up to 1,000 measurements.
This approach enables easy fallback and recovery in the event you are unable to send data to m3ter due to throttling, platform unavailability, or other connection issues. Performing retries for sending the batches is easy and the data isn't lost, because it's still in your own storage. And by batching in this way, you are extremely unlikely to hit the rate limit even when recovering.
If you are already recording the data that you send to m3ter in your own metrics or logs, it should be straightforward to design this fallback approach into your process.
# WAF Rules for HTTP Requests
Source: https://docs.m3ter.com/guides/m3ter-apis/waf-rules-for-http-requests
We apply two types of Rules/Rule Groups to our Web Application Firewall (WAF). These impose constraints on HTTP requests you make to the m3ter platform.
## Managed by AWS
* [Core rule set (CRS) managed rule group](https://docs.aws.amazon.com/waf/latest/developerguide/aws-managed-rule-groups-baseline.html#aws-managed-rule-groups-baseline-crs)
* [Known bad inputs managed rule group](https://docs.aws.amazon.com/waf/latest/developerguide/aws-managed-rule-groups-baseline.html#aws-managed-rule-groups-baseline-known-bad-inputs)
* [SQL database managed rule group](https://docs.aws.amazon.com/waf/latest/developerguide/aws-managed-rule-groups-use-case.html#aws-managed-rule-groups-use-case-sql-db)
## Managed by m3ter
* Request Body Size Rule:
* Blocks all HTTP requests having a body larger than 512,000 bytes.
## Error Response
If your requests are blocked by any of these rules, a 403 (Forbidden) response is returned.
# m3ter Calculation Engine
Source: https://docs.m3ter.com/guides/m3ter-calculation-engine
You can exploit the m3ter platform's powerful *Calculation Engine* as you create calculations for *Meter Derived Fields*, *Compound Aggregations*, *Notification Rules*, or *m3sh Workflow Functions*.
This topic gives details of the supported operators, variables, functions, and type casts available in the m3ter Calculation Engine. Links out to other topics giving specific details and examples of the various calculation contexts are also given:
* [Supported Operators, Variables, Functions, and Type Casts](/guides/m3ter-calculation-engine#supported-operators-variables-functions-and-type-casts)
* [Calculation Contexts](/guides/m3ter-calculation-engine#calculation-contexts)
## Supported Operators, Variables, Functions, and Type Casts
Standard mathematical syntax and operators are supported:
* [Operators](/guides/m3ter-calculation-engine#operators)
* [Variables](/guides/m3ter-calculation-engine#variables)
* [Functions](/guides/m3ter-calculation-engine#functions)
* [Date Time Functions](/guides/m3ter-calculation-engine#date-time-functions)
* [Type Casts](/guides/m3ter-calculation-engine#type-casts)
* [String Functions](/guides/m3ter-calculation-engine#string-functions)
### Operators
* Arithmetic Operators: `+ - * / ^`
* Unary Operators: `+ -`
* Precedence: `( )`
* Equality: `== != < > <= >=`
* Modulo: `%`
* Ternary: `? :`
* Logical AND: `AND`
* Logical OR: `OR`
### Variables
* `null`
* `true`
* `false`
* `Math.PI`
* `DateTime.TS_FMT` - Has the value of `"yyyy-MM-dd'T'HH:mm:ss.SSSX"`.
### Functions
* `Math.max()` Supports 2 to many arguments.
* `Math.min()` Supports 2 to many arguments.
* `Math.floor()` Supports 2 arguments - returns the greatest integer less than or equal to the argument.
* Second parameter is optional to control scale - see [below](/guides/m3ter-calculation-engine#scale-parameter-for-math-functions) for explanation and examples.
* `Math.ceil()` Supports 2 arguments - returns the least integer greater than or equal to the argument.
* Second parameter is optional to control scale - see [below](/guides/m3ter-calculation-engine#scale-parameter-for-math-functions) for explanation and examples.
* `Math.round()` Supports 2 arguments - returns the nearest integer to the argument. Note that half-number values are rounded up.
* For example, `Math.round(2.5)` returns `3`.
* Second parameter is optional to control scale - see [below](/guides/m3ter-calculation-engine#scale-parameter-for-math-functions) for explanation and examples.
* `Math.pow()` Exactly two arguments - returns the value of the first raised to the power of the second.
* `Math.abs()` Supports 1 argument - returns the absolute value of a number.
* For example, `Math.abs(-2)` returns `2`.
* `isnull()` Exactly two arguments - returns 1st argument if it's not null; 2nd argument if it is null - same as in SQL.
* `IN()` Takes multiple arguments. Can be used with the ternary operator to return `TRUE` if any of the arguments are satisfied, otherwise return `FALSE`:
* For example, `IN("completed", "succeeded") ? "true" : "false"`
#### Scale Parameter for Math Functions
For the `Math.ceil()`, `Math.floor()`, and `Math.round()` functions, you can use a second optional parameter to control scale:
* Positive scales define the number of decimal points, while negative scales define the magnitude of the result in powers of ten:
* A scale of 2 would round to 2 decimal places.
* A scale of -2 would round to the nearest 100.
* A scale of 0 means round to the nearest whole number or, in other words, 0 decimal places, which is the existing behavior when scale is not specified.
* Examples:
* `Math.round(123.456, 2)` would result in `123.45`
* `Math.round(123.456, 0)` would result in `123`
* `Math.round(123.456, -2)` would result in `100`
### Date Time Functions
* [Core Date Time Functions](/guides/m3ter-calculation-engine#core-date-time-functions)
* [Date Time Format Functions](/guides/m3ter-calculation-engine#date-time-format-functions)
#### Core Date Time Functions
* `DateTime.dateAdd(datetime, interval, unit)` Adds a period of time to a date time.
* `datetime`: ISO date time.
* `interval`: amount of `unit` to add.
* `unit`: time unit, such as `YEARS`, `MONTHS`, `WEEKS`, `DAYS`, `HOURS`, `MINUTES`, `SECONDS`, or `MILLIS`.
* Returns a date time in ISO. For example: `DateTime.dateAdd("2025-04-01T14:00:00.000Z", 2, "HOURS")` will return `"2025-04-01T16:00:00.000Z"`.
* `DateTime.dateSub(datetime, interval, unit)` Subtracts a period of time from a date time.
* `datetime`: ISO date time.
* `interval`: amount of `unit` to subtract
* `unit`: time unit, such as `YEARS`, `MONTHS`, `WEEKS`, `DAYS`, `HOURS`, `MINUTES`, `SECONDS`, or `MILLIS`.
* Returns a date time in ISO. For example: `DateTime.dateSub("2025-04-01T16:00:00.000Z", 2, "HOURS")` will return `"2025-04-01T14:00:00.000Z"`.
* `DateTime.dateDiff(start, end, unit)` Calculates the differences in time between start and end in the defined time unit.
* `start`: ISO start date time.
* `end`: ISO end date time.
* `unit`: time unit, such as `YEARS`, `MONTHS`, `WEEKS`, `DAYS`, `HOURS`, `MINUTES`, `SECONDS`, or `MILLIS`.
* Returns a date time in ISO. For example: `DateTime.dateDiff("2025-04-01T14:00:00.000Z", "2025-04-01T16:00:00.000Z", "HOURS")` will return `2`.
* `DateTime.convertTz(datetime, fromZone, toZone)`
* `datetime`: ISO date time.
* `fromZone` and `toZone`: Timezone ids.
* Use this function to convert a date time from one time zone to another. For example: `DateTime.convertTz("2025-04-01T14:00:00.000Z", "UTC", "America/New_York")` will return `2025-04-01T10:00:00.000-04:00`.
* `DateTime.eoMonth(datetime, offset)`
* `datetime`: ISO date time.
* `offset`: Specifies the number of months to offset the calculation by. (*Optional*)
* Use this function to get the date time at the start of the day of the end of the month the `datetime` is in. For example: `DateTime.eoMonth("2025-04-01T14:00:00.000Z", 2)` will return `"2025-06-30T00:00:00.000Z"`.
* `DateTime.dayOfWeek(datetime)`
* `datetime`: ISO date time.
* Use this function to get the indexed day of the week for the `datetime`. By default, weeks run Monday to Monday. For example: `DateTime.dayOfWeek("2025-05-28T14:00:00.000Z")` will return `3`, because May 28th, 2025 is a Wednesday.
* `DateTime.isoWeekOfYear(datetime)`
* `datetime`: ISO date time.
* Use this function to return the ISO week date the `datetime` is in. Uses the *ISO 8601 week date* definition for ordinal weeks of a year. See [ISO week date](https://en.wikipedia.org/wiki/ISO_week_date) for more details. For example: `DateTime.isoWeekOfYear("2025-05-28T14:00:00.000Z")` will return `22`, because May 28th, 2025 falls in the 22nd week of 2025 according to the ISO week date standard.
* `DateTime.isoStartOfWeek(datetime, startOfWeek)`
* `datetime`: ISO date time.
* `startOfWeek`: Index of the day you want the week to start on. By default, weeks run Monday to Monday. Using 7 for `startOfWeek` would define Sunday as the start of the week. (*Optional*)
* Use this function to return the date time at the start of the week the `datetime` parameter falls in. For example: `DateTime.isoStartOfWeek("2025-05-28T14:00:00.000Z", 7)` will return `"2025-05-25T00:00:00.000Z"`, because `startOfWeek `= 7 means weeks start on a Sunday.
* `DateTime.daysInMonth(datetime)`
* `datetime`: ISO date time.
* Use this function to return the number of days in the month the `datetime` falls in. For example: `DateTime.daysInMonths("2025-06-28T14:00:00.000Z")` will return `30` because the month of June has 30 days.
* `DateTime.secondsOverlap`
* `startDateTime`: ISO date time.
* `endDateTime`: ISO date time.
* `startTime`: ISO date time.
* `endTime`: ISO date time.
* Use this function to calculate the total number of seconds of overlap between a given date time range - `startDateTime` to `endDateTime` - and a time period - `startTime` to `endTime`. For example, suppose you offer a discount rate for service consumption during "off-peak" hours, that is any consumption on any given day that is outside the peak hours of 06:00:00 until 22:00:00:
* If the overall period of consumption is from a `startDateTime` of 2025-03-23 23:00:00 until an `endDateTime` of 2025-03-25 09:12:34, then with a `startTime `of 06:00:00 and an `endTime` of 22:00:00 the function will return the calculated overlap as:
* March 23rd: Overlap from 23:00:00 to 00:00:00 = 1 hour
* March 24th: Overlap from 00:00:00 to 06:00:00 = 6 hours and from 22:00:00 to 00:00:00 = 2 hours, giving a total of 8 hours.
* March 25th: Overlap from 00:00:00 to 06:00:00 = 6 hours.
* The total overlap is therefore 1 + 8 + 6 = 15 hours, which = 54000 seconds.
#### Date Time Format Functions
Two date time format functions are available:
* `DateTime.dateStringFormat(datetime, oldFormat, newFormat)`
* `datetime`: Parsed as a string so doesn't have to be ISO but has to match the format of `oldFormat`.
* `oldFormat`: date time format string.
* `newFormat`: date time format string.
* You can use this function to obtain a single field from a date time, such as getting the day or month. For example: `DateTime.dateFormat("2025-04-01", "YYYY-MM-DD", "MM")` will return `"04"`.
* You can also use this function to change a date time format, such as changing the month format. For example: `DateTime.dateFormat("2025-04-01", "YYYY/MM/DD", "YYYY-MM-DD")`
* **IMPORTANT!** However, you cannot change a date time format to one where a string not present in `oldFormat` is added into `newFormat`. For example: `DateTime.dateFormat("2025-04-01", "YYYY/MM/DD", "YYYY-MM-DDTHH:mm:ss")` will not work since `HH`, `mm`, or `ss` are not present in the `oldFormat`.
* `DateTime.dateFormat(datetime, newFormat)`
* `datetime`: ISO date time.
* `newFormat`: date time format string.
* Use this function to obtain a single field from a date time, such as getting the day or month. For example: `DateTime.dateFormat(ts, "MM")` for a usage measurement ingested into m3ter during April would return `"04"`.
* Formatting for the `DateTime.dateFormat` function:
* In m3ter, the format of date times used - for example for the Timestamp `ts` field in usage data measurements - is `"yyyy-MM-dd'T'HH:mm:ss.SSSX"`. The following table gives some examples of these format strings:
| Symbol | Meaning | Examples |
| - | - | - |
| y | week-based-year | 1966; 96 |
| M | month-of-year | 7; 07; Jul; July; J |
| d | day-of-month | 10 |
| H | hour-of-day | 05 |
| m | minute-of-hour | 31 |
| s | second-of-minute | 55 |
| S | fraction-of-second | 978 |
### Type Casts
* `String()` Supports 1 argument.
* `Number()` Supports 1 argument.
* `Boolean()` Supports 1 argument.
### String Functions
* `String.left()` Supports 2 arguments - 1 string and 1 numeric. Returns a string containing a specified number of characters from the left side of a string.
* For example: `String.left("Test", 2)` will return `"Te"`
* `String.right()` Supports 2 arguments - 1 string and 1 numeric. Returns a string containing a specified number of characters from the right side of a string.
* For example: `String.right("Test", 2)` will return `"st"`
* `String.upper()` Supports 1 string argument. Returns a string of all uppercase characters.
* For example: `String.upper("Test")` will return `"TEST"`
* `String.lower()` Supports 1 string argument. Returns a string of all lowercase characters.
* For example: `String.lower("Test")` will return `"test"`
* `String.replace()` Supports 3 string arguments. Returns a new string in which all occurrences of a specified character or string in the current string are replaced with another specified character or string.
* For example: `String.replace("Test replace", "replace", "worked")` will return `"Test worked"`
* `String.length()` Supports 1 string argument. Returns a numeric count of all characters in a string.
* For example: `String.length("Test")` will return `4`
* `String.substring()` Supports 2 or 3 arguments.
* If 2 arguments, the substring starts at a specified character position and continues to the end of the string.
* For example: `String.substring("Test", 1)` will return `”est"`
* If 3 arguments, the substring starts at a specified start index and continues to the specified end index.
* For example: `String.substring("Test", 1, 3)` will return `”es"`
* `String.contains()` Supports 2 string arguments. Returns a boolean result if the first string contains the second string.
* For example: `String.contains("Test", "es")` will return `true`
* `String.indexOf()` Supports 2 or 3 arguments.
* If 2 arguments, returns the zero-based index of the first occurrence of a specified character or string within the first string. The method returns -1 if the character or string is not found in this instance.
* For Example: `String.indexOf("Test", "e")` will return `1`
* If 3 arguments, returns the zero-based index of the first occurrence of a specified character or string within the first string, starting from the specified index. The method returns -1 if the character or string is not found in this instance.
* For example: `String.indexOf("test", "t", 1)` will return `3`
* `String.trim()` Supports 1 string argument. Returns a new string in which all leading and trailing spaces from the current string are removed.
* For example: `String.trim(" Test ")` will return `"Test"`
## Calculation Contexts
You can use the platform's *Calculation Engine* when you create calculations in various calculation contexts:
* **Meter Derived Fields**. See [Working with Meter Derived Fields and Examples](/guides/usage-data-meters/derived-fields-for-meters-examples-and-supported-syntax).
* **Compound Aggregations**. See [Working with Compound Aggregation Calculations](/guides/usage-data-aggregations/compound-aggregation-calculations) and [Compound Aggregations - Examples](/guides/usage-data-aggregations/compound-aggregations-examples).
* **Notification Rules**. See [Creating Calculations](/guides/alerts-events-and-notifications/utilizing-events-and-notifications/key-concepts-and-relationships#creating-calculations) in the [Utilizing Events and Notifications](/guides/alerts-events-and-notifications/utilizing-events-and-notifications) section.
* **m3sh Workflow functions**. See [Workflow Functions](https://docs.m3ter.com/guides/m3sh-workflows/m3sh-workflows-key-concepts-and-options#workflow-functions).
# m3ter Connector for Salesforce
Source: https://docs.m3ter.com/guides/m3ter-connector-for-salesforce
The m3ter Connector for Salesforce allows you to map and synchronize data in your Salesforce systems with the m3ter platform. You can quickly set up a connective framework between Salesforce CRM and CPQ to streamline and accelerate the process of connecting your Salesforce systems to your m3ter infrastructure with one simple, fully supported, and managed integration:
* **Sales Cloud**. Connect your core customer data with your m3ter Organization ensuring accurate account data in both systems. Support multiple account IDs and billing hierarchy for usage pooling and pricing - you'll never have to re-enter account information into your bills.
* **Revenue Cloud - CPQ**. Ensure the source of truth for your custom deals is driving your billing operations. Your customers will love that no matter how complex, their bills are always right.
The first topic in this section provides an overview of the functional scope and limitations of the m3ter Connector for Salesforce, and we *strongly urge you to review this topic* and check that the Connector can meet your current use cases:
* [Overview - Functional Scope and Limitations](/guides/m3ter-connector-for-salesforce/overview-functional-scope-and-limitations)
The remainder of this section explains how to install and work with the m3ter Connector for Salesforce managed package in your Salesforce org to set up and test syncing of Salesforce data objects and fields with objects and fields in your m3ter Organization:
* [Configuring the m3ter Connector for Salesforce](/guides/m3ter-connector-for-salesforce/configuring-m3ter-salesforce-connector)
* [Reviewing and Managing Metadata Mappings](/guides/m3ter-connector-for-salesforce/reviewing-and-managing-metadata-mappings)
* [Creating Custom Metadata Mappings](/guides/m3ter-connector-for-salesforce/creating-metadata-mappings)
* [Testing Sync Setup from Salesforce to m3ter](/guides/m3ter-connector-for-salesforce/testing-sync-setup-from-salesforce-to-m3ter)
* [Setting Up and Using Sync to m3ter Invocable Action](/guides/m3ter-connector-for-salesforce/setting-up-invocable-action-for-event-driven-sync)
* [Setting Up Sync for End Dating m3ter Account Billing Entities](/guides/m3ter-connector-for-salesforce/setting-up-sync-for-end-dating-m3ter-account-billing-entities)
* [Enabling Two-Way Automated Sync for m3ter Objects](/guides/m3ter-connector-for-salesforce/enabling-two-way-automated-sync-for-m3ter-objects)
* [Mapping Custom Fields on m3ter Entities](/guides/m3ter-connector-for-salesforce/mapping-custom-fields-on-m3ter-entities)
* [Mapping Segment Attributes for Pricing](/guides/m3ter-connector-for-salesforce/mapping-segment-attributes-for-pricing)
* [Setting Up m3sh Webhook Triggers](/guides/m3ter-connector-for-salesforce/setting-up-m3sh-webhook-triggers)
* [CRUD for Metering Entities](/guides/m3ter-connector-for-salesforce/crud-for-metering-entities)
* [Usage Design Targets](/guides/m3ter-connector-for-salesforce/usage-design-targets)
* [Generic m3ter API Invocable Action](/guides/m3ter-connector-for-salesforce/generic-m3ter-api-invocable-action)
* [Product Mapping Resolution](/guides/m3ter-connector-for-salesforce/product-mapping-resolution)
* [Checking Sync Logs and Troubleshooting](/guides/m3ter-connector-for-salesforce/checking-sync-logs-and-troubleshooting)
Sample mappings are provided:
* [m3ter Connector - Sample Mappings](/guides/m3ter-connector-for-salesforce/m3ter-connector-sample-mappings)
Use the m3ter Connector Changelog to check your Connector version:
* [m3ter Connector for Salesforce - Changelog](/guides/m3ter-connector-for-salesforce/m3ter-connector-for-salesforce-changelog)
**Important! Please consult your Salesforce Documentation and Salesforce Admin User:**
* Any instructions for working with the m3ter Connector in your Salesforce org given in this section are intended for guidance and should be read in conjunction with your Salesforce end user documentation. We *strongly recommend* that you consult your Salesforce documentation as you follow guidance given in the topics in this section.
* We also *strongly recommend* that configuration work in your Salesforce org be carried out by a Salesforce Admin user or that someone with that level of expertise is available for guidance as you perform set up tasks.
# Checking Sync Logs and Troubleshooting
Source: https://docs.m3ter.com/guides/m3ter-connector-for-salesforce/checking-sync-logs-and-troubleshooting
The m3ter Connector builds Sync Logs as you perform sync actions from your Salesforce org. You can open and view the details of your SyncLogs, which includes the details of the API calls made to the m3ter platform as part of the sync action process. If any issues have occurred with a sync action, having access to this information can be very helpful for troubleshooting purposes.
**To check Sync Logs:**
1. In the **Apps** menu, search for and select **Syn Logs**:
## Retry Recommendations
In general, HTTP error codes returned for failed calls indicate two types of error:
* **4XX** codes. An error occurred on the client side.
* **5XX** codes. An error occurred on the server side.
This means that for the HTTP error codes listed in the [above section](/guides/m3ter-apis/http-error-codes#http-error-codes):
* If a **500**, **502**, or **504** error is returned, we recommend you attempt a retry to see if the error has resolved.
* If a **400**, **403**, or **404** error is returned, you should not attempt a retry of the call - you must look into the call you made and fix the call before attempting a retry.
* If a **413** error is returned, the response to the call exceeds the payload limit imposed. You can review the call you've made and attempt to reduce the response payload - such as by applying filters in the request - and retry the call.
* If a **429** error is returned (Too Many Requests), retries are valid. However, we recommend you wait at least 1 second before attempting a retry. If the second attempt fails, wait 3 seconds before attempting the call again, and so on, with an increased time gap before each successive retry. This method allows the request rate to fall back under the limit threshold and the **429** is no longer returned. For full details on request rate limits imposed on our APIs, see the earlier topic in this section: [Config API Limits](/guides/m3ter-apis/config-api-limits) and [Ingest API Limits](/guides/m3ter-apis/ingest-api-limits)
# Ingest API Limits and Optimizing Measurement Submissions
Source: https://docs.m3ter.com/guides/m3ter-apis/ingest-api-limits
This topic explains the limits imposed on the API calls you make to our *Ingest API*.
* [Request Rate Limits](#request-rate-limits)
* [Request Payload Limit](#request-payload-limit)
Guidance is also given on:
* How to manage your API calls to optimize submission of data measurements within these limits:
* [Batching for Higher Measurement Ingest Rate](#batching-for-higher-measurement-ingest-rate)
* How to accommodate periods of service failure due, for example, to throttling or platform unavailability:
* [Measurement Ingest - Fallback and Recovery](#measurement-ingest-falback-and-recovery)
**Tip: Separate from Config API Limits?** Yes, the Ingest API limits are separate to the limits imposed for the Config API.
## Request Rate Limits
On the Ingest API, we impose the following request rate limits:
* **Source IP Address.** Individual host machines can send up to 5,000 requests over a rolling 5-minute period. (An average of 16 requests per second)
* **m3ter Organization.** Each m3ter Organization can send a maximum of 50 requests per second from any number of source IP addresses.
If you exceed either of these rate limits, requests are throttled and an HTTP 429 (Too Many Requests) error response is returned:
* **Source IP address rate limit** - 429 is returned until the total number of requests in the rolling 5-minute period drops below 5,000.
* **m3ter Organization rate limit** - 429 is returned for the remainder of the second in which throttling has occurred.
You'll need to retry requests when throttling has finished. We recommend using an exponential back-off algorithm to manage retries - see the following [Fallback and Recovery section](/guides/m3ter-apis/ingest-api-limits#measurement-ingest-fallback-and-recovery) for guidance.
**Note:** If you need a temporary increase in API rate limit or if you're finding that you're breaching the limit frequently, please contact m3ter Support to discuss how we can best accommodate your requirements.
## Request Payload Limit
For the Ingest API, the maximum request payload size allowed is 512KB. If you exceed this request payload limit, then you'll receive a 403 (Forbidden) error response.
For more details see the [Submit measurements](/api/measurements/submit-measurements) API Reference documentation.
## Batching for Higher Measurement Ingest Rate
The main technique you can use to achieve higher ingest throughput is to batch measurements. This is not aggregation of measurements - the raw data is still included in the request. The measurement Ingest API is designed to accept a batch of up to 1,000 measurements up to an overall payload size of 512KB, and we strongly recommend including as many measurements as possible in each request.
For more details see the [Submit measurements](/api/measurements/submit-measurements) API Reference documentation.
## Measurement Ingest - Fallback and Recovery
The m3ter platform is designed to provide a highly available service, but it is impossible to build services that never fail. Whether a request fails through throttling or any other reason, we strongly recommend that your implementation for sending data measurements into our Ingest API is designed to be tolerant of failure.
You should back-off the raw measurement data to appropriate storage in your data architecture - for example, to disk, queue, stream service, and so on - before regularly uploading it to m3ter in batches of up to 1,000 measurements.
This approach enables easy fallback and recovery in the event you are unable to send data to m3ter due to throttling, platform unavailability, or other connection issues. Performing retries for sending the batches is easy and the data isn't lost, because it's still in your own storage. And by batching in this way, you are extremely unlikely to hit the rate limit even when recovering.
If you are already recording the data that you send to m3ter in your own metrics or logs, it should be straightforward to design this fallback approach into your process.
# WAF Rules for HTTP Requests
Source: https://docs.m3ter.com/guides/m3ter-apis/waf-rules-for-http-requests
We apply two types of Rules/Rule Groups to our Web Application Firewall (WAF). These impose constraints on HTTP requests you make to the m3ter platform.
## Managed by AWS
* [Core rule set (CRS) managed rule group](https://docs.aws.amazon.com/waf/latest/developerguide/aws-managed-rule-groups-baseline.html#aws-managed-rule-groups-baseline-crs)
* [Known bad inputs managed rule group](https://docs.aws.amazon.com/waf/latest/developerguide/aws-managed-rule-groups-baseline.html#aws-managed-rule-groups-baseline-known-bad-inputs)
* [SQL database managed rule group](https://docs.aws.amazon.com/waf/latest/developerguide/aws-managed-rule-groups-use-case.html#aws-managed-rule-groups-use-case-sql-db)
## Managed by m3ter
* Request Body Size Rule:
* Blocks all HTTP requests having a body larger than 512,000 bytes.
## Error Response
If your requests are blocked by any of these rules, a 403 (Forbidden) response is returned.
# m3ter Calculation Engine
Source: https://docs.m3ter.com/guides/m3ter-calculation-engine
You can exploit the m3ter platform's powerful *Calculation Engine* as you create calculations for *Meter Derived Fields*, *Compound Aggregations*, *Notification Rules*, or *m3sh Workflow Functions*.
This topic gives details of the supported operators, variables, functions, and type casts available in the m3ter Calculation Engine. Links out to other topics giving specific details and examples of the various calculation contexts are also given:
* [Supported Operators, Variables, Functions, and Type Casts](/guides/m3ter-calculation-engine#supported-operators-variables-functions-and-type-casts)
* [Calculation Contexts](/guides/m3ter-calculation-engine#calculation-contexts)
## Supported Operators, Variables, Functions, and Type Casts
Standard mathematical syntax and operators are supported:
* [Operators](/guides/m3ter-calculation-engine#operators)
* [Variables](/guides/m3ter-calculation-engine#variables)
* [Functions](/guides/m3ter-calculation-engine#functions)
* [Date Time Functions](/guides/m3ter-calculation-engine#date-time-functions)
* [Type Casts](/guides/m3ter-calculation-engine#type-casts)
* [String Functions](/guides/m3ter-calculation-engine#string-functions)
### Operators
* Arithmetic Operators: `+ - * / ^`
* Unary Operators: `+ -`
* Precedence: `( )`
* Equality: `== != < > <= >=`
* Modulo: `%`
* Ternary: `? :`
* Logical AND: `AND`
* Logical OR: `OR`
### Variables
* `null`
* `true`
* `false`
* `Math.PI`
* `DateTime.TS_FMT` - Has the value of `"yyyy-MM-dd'T'HH:mm:ss.SSSX"`.
### Functions
* `Math.max()` Supports 2 to many arguments.
* `Math.min()` Supports 2 to many arguments.
* `Math.floor()` Supports 2 arguments - returns the greatest integer less than or equal to the argument.
* Second parameter is optional to control scale - see [below](/guides/m3ter-calculation-engine#scale-parameter-for-math-functions) for explanation and examples.
* `Math.ceil()` Supports 2 arguments - returns the least integer greater than or equal to the argument.
* Second parameter is optional to control scale - see [below](/guides/m3ter-calculation-engine#scale-parameter-for-math-functions) for explanation and examples.
* `Math.round()` Supports 2 arguments - returns the nearest integer to the argument. Note that half-number values are rounded up.
* For example, `Math.round(2.5)` returns `3`.
* Second parameter is optional to control scale - see [below](/guides/m3ter-calculation-engine#scale-parameter-for-math-functions) for explanation and examples.
* `Math.pow()` Exactly two arguments - returns the value of the first raised to the power of the second.
* `Math.abs()` Supports 1 argument - returns the absolute value of a number.
* For example, `Math.abs(-2)` returns `2`.
* `isnull()` Exactly two arguments - returns 1st argument if it's not null; 2nd argument if it is null - same as in SQL.
* `IN()` Takes multiple arguments. Can be used with the ternary operator to return `TRUE` if any of the arguments are satisfied, otherwise return `FALSE`:
* For example, `IN("completed", "succeeded") ? "true" : "false"`
#### Scale Parameter for Math Functions
For the `Math.ceil()`, `Math.floor()`, and `Math.round()` functions, you can use a second optional parameter to control scale:
* Positive scales define the number of decimal points, while negative scales define the magnitude of the result in powers of ten:
* A scale of 2 would round to 2 decimal places.
* A scale of -2 would round to the nearest 100.
* A scale of 0 means round to the nearest whole number or, in other words, 0 decimal places, which is the existing behavior when scale is not specified.
* Examples:
* `Math.round(123.456, 2)` would result in `123.45`
* `Math.round(123.456, 0)` would result in `123`
* `Math.round(123.456, -2)` would result in `100`
### Date Time Functions
* [Core Date Time Functions](/guides/m3ter-calculation-engine#core-date-time-functions)
* [Date Time Format Functions](/guides/m3ter-calculation-engine#date-time-format-functions)
#### Core Date Time Functions
* `DateTime.dateAdd(datetime, interval, unit)` Adds a period of time to a date time.
* `datetime`: ISO date time.
* `interval`: amount of `unit` to add.
* `unit`: time unit, such as `YEARS`, `MONTHS`, `WEEKS`, `DAYS`, `HOURS`, `MINUTES`, `SECONDS`, or `MILLIS`.
* Returns a date time in ISO. For example: `DateTime.dateAdd("2025-04-01T14:00:00.000Z", 2, "HOURS")` will return `"2025-04-01T16:00:00.000Z"`.
* `DateTime.dateSub(datetime, interval, unit)` Subtracts a period of time from a date time.
* `datetime`: ISO date time.
* `interval`: amount of `unit` to subtract
* `unit`: time unit, such as `YEARS`, `MONTHS`, `WEEKS`, `DAYS`, `HOURS`, `MINUTES`, `SECONDS`, or `MILLIS`.
* Returns a date time in ISO. For example: `DateTime.dateSub("2025-04-01T16:00:00.000Z", 2, "HOURS")` will return `"2025-04-01T14:00:00.000Z"`.
* `DateTime.dateDiff(start, end, unit)` Calculates the differences in time between start and end in the defined time unit.
* `start`: ISO start date time.
* `end`: ISO end date time.
* `unit`: time unit, such as `YEARS`, `MONTHS`, `WEEKS`, `DAYS`, `HOURS`, `MINUTES`, `SECONDS`, or `MILLIS`.
* Returns a date time in ISO. For example: `DateTime.dateDiff("2025-04-01T14:00:00.000Z", "2025-04-01T16:00:00.000Z", "HOURS")` will return `2`.
* `DateTime.convertTz(datetime, fromZone, toZone)`
* `datetime`: ISO date time.
* `fromZone` and `toZone`: Timezone ids.
* Use this function to convert a date time from one time zone to another. For example: `DateTime.convertTz("2025-04-01T14:00:00.000Z", "UTC", "America/New_York")` will return `2025-04-01T10:00:00.000-04:00`.
* `DateTime.eoMonth(datetime, offset)`
* `datetime`: ISO date time.
* `offset`: Specifies the number of months to offset the calculation by. (*Optional*)
* Use this function to get the date time at the start of the day of the end of the month the `datetime` is in. For example: `DateTime.eoMonth("2025-04-01T14:00:00.000Z", 2)` will return `"2025-06-30T00:00:00.000Z"`.
* `DateTime.dayOfWeek(datetime)`
* `datetime`: ISO date time.
* Use this function to get the indexed day of the week for the `datetime`. By default, weeks run Monday to Monday. For example: `DateTime.dayOfWeek("2025-05-28T14:00:00.000Z")` will return `3`, because May 28th, 2025 is a Wednesday.
* `DateTime.isoWeekOfYear(datetime)`
* `datetime`: ISO date time.
* Use this function to return the ISO week date the `datetime` is in. Uses the *ISO 8601 week date* definition for ordinal weeks of a year. See [ISO week date](https://en.wikipedia.org/wiki/ISO_week_date) for more details. For example: `DateTime.isoWeekOfYear("2025-05-28T14:00:00.000Z")` will return `22`, because May 28th, 2025 falls in the 22nd week of 2025 according to the ISO week date standard.
* `DateTime.isoStartOfWeek(datetime, startOfWeek)`
* `datetime`: ISO date time.
* `startOfWeek`: Index of the day you want the week to start on. By default, weeks run Monday to Monday. Using 7 for `startOfWeek` would define Sunday as the start of the week. (*Optional*)
* Use this function to return the date time at the start of the week the `datetime` parameter falls in. For example: `DateTime.isoStartOfWeek("2025-05-28T14:00:00.000Z", 7)` will return `"2025-05-25T00:00:00.000Z"`, because `startOfWeek `= 7 means weeks start on a Sunday.
* `DateTime.daysInMonth(datetime)`
* `datetime`: ISO date time.
* Use this function to return the number of days in the month the `datetime` falls in. For example: `DateTime.daysInMonths("2025-06-28T14:00:00.000Z")` will return `30` because the month of June has 30 days.
* `DateTime.secondsOverlap`
* `startDateTime`: ISO date time.
* `endDateTime`: ISO date time.
* `startTime`: ISO date time.
* `endTime`: ISO date time.
* Use this function to calculate the total number of seconds of overlap between a given date time range - `startDateTime` to `endDateTime` - and a time period - `startTime` to `endTime`. For example, suppose you offer a discount rate for service consumption during "off-peak" hours, that is any consumption on any given day that is outside the peak hours of 06:00:00 until 22:00:00:
* If the overall period of consumption is from a `startDateTime` of 2025-03-23 23:00:00 until an `endDateTime` of 2025-03-25 09:12:34, then with a `startTime `of 06:00:00 and an `endTime` of 22:00:00 the function will return the calculated overlap as:
* March 23rd: Overlap from 23:00:00 to 00:00:00 = 1 hour
* March 24th: Overlap from 00:00:00 to 06:00:00 = 6 hours and from 22:00:00 to 00:00:00 = 2 hours, giving a total of 8 hours.
* March 25th: Overlap from 00:00:00 to 06:00:00 = 6 hours.
* The total overlap is therefore 1 + 8 + 6 = 15 hours, which = 54000 seconds.
#### Date Time Format Functions
Two date time format functions are available:
* `DateTime.dateStringFormat(datetime, oldFormat, newFormat)`
* `datetime`: Parsed as a string so doesn't have to be ISO but has to match the format of `oldFormat`.
* `oldFormat`: date time format string.
* `newFormat`: date time format string.
* You can use this function to obtain a single field from a date time, such as getting the day or month. For example: `DateTime.dateFormat("2025-04-01", "YYYY-MM-DD", "MM")` will return `"04"`.
* You can also use this function to change a date time format, such as changing the month format. For example: `DateTime.dateFormat("2025-04-01", "YYYY/MM/DD", "YYYY-MM-DD")`
* **IMPORTANT!** However, you cannot change a date time format to one where a string not present in `oldFormat` is added into `newFormat`. For example: `DateTime.dateFormat("2025-04-01", "YYYY/MM/DD", "YYYY-MM-DDTHH:mm:ss")` will not work since `HH`, `mm`, or `ss` are not present in the `oldFormat`.
* `DateTime.dateFormat(datetime, newFormat)`
* `datetime`: ISO date time.
* `newFormat`: date time format string.
* Use this function to obtain a single field from a date time, such as getting the day or month. For example: `DateTime.dateFormat(ts, "MM")` for a usage measurement ingested into m3ter during April would return `"04"`.
* Formatting for the `DateTime.dateFormat` function:
* In m3ter, the format of date times used - for example for the Timestamp `ts` field in usage data measurements - is `"yyyy-MM-dd'T'HH:mm:ss.SSSX"`. The following table gives some examples of these format strings:
| Symbol | Meaning | Examples |
| - | - | - |
| y | week-based-year | 1966; 96 |
| M | month-of-year | 7; 07; Jul; July; J |
| d | day-of-month | 10 |
| H | hour-of-day | 05 |
| m | minute-of-hour | 31 |
| s | second-of-minute | 55 |
| S | fraction-of-second | 978 |
### Type Casts
* `String()` Supports 1 argument.
* `Number()` Supports 1 argument.
* `Boolean()` Supports 1 argument.
### String Functions
* `String.left()` Supports 2 arguments - 1 string and 1 numeric. Returns a string containing a specified number of characters from the left side of a string.
* For example: `String.left("Test", 2)` will return `"Te"`
* `String.right()` Supports 2 arguments - 1 string and 1 numeric. Returns a string containing a specified number of characters from the right side of a string.
* For example: `String.right("Test", 2)` will return `"st"`
* `String.upper()` Supports 1 string argument. Returns a string of all uppercase characters.
* For example: `String.upper("Test")` will return `"TEST"`
* `String.lower()` Supports 1 string argument. Returns a string of all lowercase characters.
* For example: `String.lower("Test")` will return `"test"`
* `String.replace()` Supports 3 string arguments. Returns a new string in which all occurrences of a specified character or string in the current string are replaced with another specified character or string.
* For example: `String.replace("Test replace", "replace", "worked")` will return `"Test worked"`
* `String.length()` Supports 1 string argument. Returns a numeric count of all characters in a string.
* For example: `String.length("Test")` will return `4`
* `String.substring()` Supports 2 or 3 arguments.
* If 2 arguments, the substring starts at a specified character position and continues to the end of the string.
* For example: `String.substring("Test", 1)` will return `”est"`
* If 3 arguments, the substring starts at a specified start index and continues to the specified end index.
* For example: `String.substring("Test", 1, 3)` will return `”es"`
* `String.contains()` Supports 2 string arguments. Returns a boolean result if the first string contains the second string.
* For example: `String.contains("Test", "es")` will return `true`
* `String.indexOf()` Supports 2 or 3 arguments.
* If 2 arguments, returns the zero-based index of the first occurrence of a specified character or string within the first string. The method returns -1 if the character or string is not found in this instance.
* For Example: `String.indexOf("Test", "e")` will return `1`
* If 3 arguments, returns the zero-based index of the first occurrence of a specified character or string within the first string, starting from the specified index. The method returns -1 if the character or string is not found in this instance.
* For example: `String.indexOf("test", "t", 1)` will return `3`
* `String.trim()` Supports 1 string argument. Returns a new string in which all leading and trailing spaces from the current string are removed.
* For example: `String.trim(" Test ")` will return `"Test"`
## Calculation Contexts
You can use the platform's *Calculation Engine* when you create calculations in various calculation contexts:
* **Meter Derived Fields**. See [Working with Meter Derived Fields and Examples](/guides/usage-data-meters/derived-fields-for-meters-examples-and-supported-syntax).
* **Compound Aggregations**. See [Working with Compound Aggregation Calculations](/guides/usage-data-aggregations/compound-aggregation-calculations) and [Compound Aggregations - Examples](/guides/usage-data-aggregations/compound-aggregations-examples).
* **Notification Rules**. See [Creating Calculations](/guides/alerts-events-and-notifications/utilizing-events-and-notifications/key-concepts-and-relationships#creating-calculations) in the [Utilizing Events and Notifications](/guides/alerts-events-and-notifications/utilizing-events-and-notifications) section.
* **m3sh Workflow functions**. See [Workflow Functions](https://docs.m3ter.com/guides/m3sh-workflows/m3sh-workflows-key-concepts-and-options#workflow-functions).
# m3ter Connector for Salesforce
Source: https://docs.m3ter.com/guides/m3ter-connector-for-salesforce
The m3ter Connector for Salesforce allows you to map and synchronize data in your Salesforce systems with the m3ter platform. You can quickly set up a connective framework between Salesforce CRM and CPQ to streamline and accelerate the process of connecting your Salesforce systems to your m3ter infrastructure with one simple, fully supported, and managed integration:
* **Sales Cloud**. Connect your core customer data with your m3ter Organization ensuring accurate account data in both systems. Support multiple account IDs and billing hierarchy for usage pooling and pricing - you'll never have to re-enter account information into your bills.
* **Revenue Cloud - CPQ**. Ensure the source of truth for your custom deals is driving your billing operations. Your customers will love that no matter how complex, their bills are always right.
The first topic in this section provides an overview of the functional scope and limitations of the m3ter Connector for Salesforce, and we *strongly urge you to review this topic* and check that the Connector can meet your current use cases:
* [Overview - Functional Scope and Limitations](/guides/m3ter-connector-for-salesforce/overview-functional-scope-and-limitations)
The remainder of this section explains how to install and work with the m3ter Connector for Salesforce managed package in your Salesforce org to set up and test syncing of Salesforce data objects and fields with objects and fields in your m3ter Organization:
* [Configuring the m3ter Connector for Salesforce](/guides/m3ter-connector-for-salesforce/configuring-m3ter-salesforce-connector)
* [Reviewing and Managing Metadata Mappings](/guides/m3ter-connector-for-salesforce/reviewing-and-managing-metadata-mappings)
* [Creating Custom Metadata Mappings](/guides/m3ter-connector-for-salesforce/creating-metadata-mappings)
* [Testing Sync Setup from Salesforce to m3ter](/guides/m3ter-connector-for-salesforce/testing-sync-setup-from-salesforce-to-m3ter)
* [Setting Up and Using Sync to m3ter Invocable Action](/guides/m3ter-connector-for-salesforce/setting-up-invocable-action-for-event-driven-sync)
* [Setting Up Sync for End Dating m3ter Account Billing Entities](/guides/m3ter-connector-for-salesforce/setting-up-sync-for-end-dating-m3ter-account-billing-entities)
* [Enabling Two-Way Automated Sync for m3ter Objects](/guides/m3ter-connector-for-salesforce/enabling-two-way-automated-sync-for-m3ter-objects)
* [Mapping Custom Fields on m3ter Entities](/guides/m3ter-connector-for-salesforce/mapping-custom-fields-on-m3ter-entities)
* [Mapping Segment Attributes for Pricing](/guides/m3ter-connector-for-salesforce/mapping-segment-attributes-for-pricing)
* [Setting Up m3sh Webhook Triggers](/guides/m3ter-connector-for-salesforce/setting-up-m3sh-webhook-triggers)
* [CRUD for Metering Entities](/guides/m3ter-connector-for-salesforce/crud-for-metering-entities)
* [Usage Design Targets](/guides/m3ter-connector-for-salesforce/usage-design-targets)
* [Generic m3ter API Invocable Action](/guides/m3ter-connector-for-salesforce/generic-m3ter-api-invocable-action)
* [Product Mapping Resolution](/guides/m3ter-connector-for-salesforce/product-mapping-resolution)
* [Checking Sync Logs and Troubleshooting](/guides/m3ter-connector-for-salesforce/checking-sync-logs-and-troubleshooting)
Sample mappings are provided:
* [m3ter Connector - Sample Mappings](/guides/m3ter-connector-for-salesforce/m3ter-connector-sample-mappings)
Use the m3ter Connector Changelog to check your Connector version:
* [m3ter Connector for Salesforce - Changelog](/guides/m3ter-connector-for-salesforce/m3ter-connector-for-salesforce-changelog)
**Important! Please consult your Salesforce Documentation and Salesforce Admin User:**
* Any instructions for working with the m3ter Connector in your Salesforce org given in this section are intended for guidance and should be read in conjunction with your Salesforce end user documentation. We *strongly recommend* that you consult your Salesforce documentation as you follow guidance given in the topics in this section.
* We also *strongly recommend* that configuration work in your Salesforce org be carried out by a Salesforce Admin user or that someone with that level of expertise is available for guidance as you perform set up tasks.
# Checking Sync Logs and Troubleshooting
Source: https://docs.m3ter.com/guides/m3ter-connector-for-salesforce/checking-sync-logs-and-troubleshooting
The m3ter Connector builds Sync Logs as you perform sync actions from your Salesforce org. You can open and view the details of your SyncLogs, which includes the details of the API calls made to the m3ter platform as part of the sync action process. If any issues have occurred with a sync action, having access to this information can be very helpful for troubleshooting purposes.
**To check Sync Logs:**
1. In the **Apps** menu, search for and select **Syn Logs**:
![]() * The **SyncLogs** page opens for **Recently Viewed**.
2. Use the drop-down to switch to **All**:
* The **SyncLogs** page opens for **Recently Viewed**.
2. Use the drop-down to switch to **All**:
![]() 3. Select the **SyncLog** link. The Synclog opens with the **Details** tab showing.
4. Select the **Related** tab:
3. Select the **SyncLog** link. The Synclog opens with the **Details** tab showing.
4. Select the **Related** tab:
![]() * **SubmitSnapshots** for sync actions are listed.
5. Select a **SubmitSnapshot** to view details:
* **SubmitSnapshots** for sync actions are listed.
5. Select a **SubmitSnapshot** to view details:
![]() * You can read-off details of the **SubmitSnapshot**, including the JSON for the API call.
# Configuring the m3ter Connector for Salesforce
Source: https://docs.m3ter.com/guides/m3ter-connector-for-salesforce/configuring-m3ter-salesforce-connector
When you've installed the m3ter Connector for Salesforce managed package, you can configure your Salesforce org for syncing Salesforce data objects and fields to m3ter objects and fields to support your sales process.
This topic explains how to install the m3ter Connector for Salesforce into your Salesforce org, how to utilize the Connector for Salesforce CPQ syncing, and provides a worked example of how to set up and test for syncing Salesforce data objects and fields with your m3ter Organization.
* [Installing the m3ter Connector for Salesforce](/guides/m3ter-connector-for-salesforce/configuring-m3ter-salesforce-connector#installing-the-m3ter-connector-for-salesforce)
* [Utilizing the Connector for Salesforce CPQ Syncing](/guides/m3ter-connector-for-salesforce/configuring-m3ter-salesforce-connector#utilizing-the-connector-for-salesforce-cpq-syncing)
* [Syncing Example - Prerequisites in Salesforce Org](/guides/m3ter-connector-for-salesforce/configuring-m3ter-salesforce-connector#syncing-example-prerequisites-in-salesforce-org)
* [Adding m3ter Admin Permissions for Org Users](/guides/m3ter-connector-for-salesforce/configuring-m3ter-salesforce-connector#adding-m3ter-admin-permissions-for-org-users)
* [Adding m3ter Sync Action for Sales Object](/guides/m3ter-connector-for-salesforce/configuring-m3ter-salesforce-connector#adding-m3ter-sync-action-for-sales-object)
* [Adding Credentials to the m3ter App](/guides/m3ter-connector-for-salesforce/configuring-m3ter-salesforce-connector#adding-credentials-to-the-m3ter-app)
* [Creating m3ter Mappings](/guides/m3ter-connector-for-salesforce/configuring-m3ter-salesforce-connector#creating-m3ter-mappings)
**Important! Please consult your Salesforce Documentation and Salesforce Admin User:**
* The instructions in this topic explaining how to set up a Salesforce org for a Sales integration inbound flow into m3ter are intended for guidance only. We do not hold ourselves responsible for any changes made by Salesforce, and *strongly recommend* that you consult your Salesforce end user documentation as you perform this configuration, and treating the Salesforce documentation as authoritative.
* We also *strongly recommend* that this configuration work in a Salesforce org be carried out by a Salesforce Admin user or that someone with that level of expertise is available for guidance as you perform these set up tasks.
## Installing the m3ter Connector for Salesforce
When you are ready to install the m3ter Connector for Salesforce for your Salesforce org, please get in touch with m3ter Support or your m3ter contact for assistance with the install process.
**Tip: Download from Salesforce AppExchange?** You *cannot download* the m3ter Connector managed package directly from the AppExchange. You can purchase it as an add-on with your m3ter licence.
## Utilizing the Connector for Salesforce CPQ Syncing
The following sections provide a worked example of how work with the m3ter Connector to set up for a sync action with m3ter using a Sales Opportunity. If however your main business use case requires you to use the m3ter Connector for Salesforce CPQ data syncing, please get in touch with m3ter Support or your m3ter contact for assistance with the set up work to meet your specific requirements.
## Syncing Example - Prerequisites in Salesforce Org
The remaining sections in this topic take you through a worked example for the steps required in your Salesforce org to set up for syncing Salesforce data objects and fields with m3ter objects and fields using the m3ter Connector. The example uses a Salesforce Opportunity and some additional setting up is also required:
* Create a Product and add a Price Book to it.
* Create an Opportunity and add the Product to it.
It's assumed in the following sections that these prerequisites are in place in your Salesforce org.
**Warning!** If you're syncing a Sales object - in the example below an Opportunity - then the Contract mapping is required.
## Adding m3ter Admin Permissions for Org Users
When you've installed the m3ter Connector, you can add m3ter Admin permissions for your Salesforce org Users. This will enable Users to set up and test for syncing Salesforce data with m3ter objects and fields.
**To add m3ter Admin permissions for org Users:**
1. At top-right, select the gear icon and on the drop-down menu, select **Setup**:
* You can read-off details of the **SubmitSnapshot**, including the JSON for the API call.
# Configuring the m3ter Connector for Salesforce
Source: https://docs.m3ter.com/guides/m3ter-connector-for-salesforce/configuring-m3ter-salesforce-connector
When you've installed the m3ter Connector for Salesforce managed package, you can configure your Salesforce org for syncing Salesforce data objects and fields to m3ter objects and fields to support your sales process.
This topic explains how to install the m3ter Connector for Salesforce into your Salesforce org, how to utilize the Connector for Salesforce CPQ syncing, and provides a worked example of how to set up and test for syncing Salesforce data objects and fields with your m3ter Organization.
* [Installing the m3ter Connector for Salesforce](/guides/m3ter-connector-for-salesforce/configuring-m3ter-salesforce-connector#installing-the-m3ter-connector-for-salesforce)
* [Utilizing the Connector for Salesforce CPQ Syncing](/guides/m3ter-connector-for-salesforce/configuring-m3ter-salesforce-connector#utilizing-the-connector-for-salesforce-cpq-syncing)
* [Syncing Example - Prerequisites in Salesforce Org](/guides/m3ter-connector-for-salesforce/configuring-m3ter-salesforce-connector#syncing-example-prerequisites-in-salesforce-org)
* [Adding m3ter Admin Permissions for Org Users](/guides/m3ter-connector-for-salesforce/configuring-m3ter-salesforce-connector#adding-m3ter-admin-permissions-for-org-users)
* [Adding m3ter Sync Action for Sales Object](/guides/m3ter-connector-for-salesforce/configuring-m3ter-salesforce-connector#adding-m3ter-sync-action-for-sales-object)
* [Adding Credentials to the m3ter App](/guides/m3ter-connector-for-salesforce/configuring-m3ter-salesforce-connector#adding-credentials-to-the-m3ter-app)
* [Creating m3ter Mappings](/guides/m3ter-connector-for-salesforce/configuring-m3ter-salesforce-connector#creating-m3ter-mappings)
**Important! Please consult your Salesforce Documentation and Salesforce Admin User:**
* The instructions in this topic explaining how to set up a Salesforce org for a Sales integration inbound flow into m3ter are intended for guidance only. We do not hold ourselves responsible for any changes made by Salesforce, and *strongly recommend* that you consult your Salesforce end user documentation as you perform this configuration, and treating the Salesforce documentation as authoritative.
* We also *strongly recommend* that this configuration work in a Salesforce org be carried out by a Salesforce Admin user or that someone with that level of expertise is available for guidance as you perform these set up tasks.
## Installing the m3ter Connector for Salesforce
When you are ready to install the m3ter Connector for Salesforce for your Salesforce org, please get in touch with m3ter Support or your m3ter contact for assistance with the install process.
**Tip: Download from Salesforce AppExchange?** You *cannot download* the m3ter Connector managed package directly from the AppExchange. You can purchase it as an add-on with your m3ter licence.
## Utilizing the Connector for Salesforce CPQ Syncing
The following sections provide a worked example of how work with the m3ter Connector to set up for a sync action with m3ter using a Sales Opportunity. If however your main business use case requires you to use the m3ter Connector for Salesforce CPQ data syncing, please get in touch with m3ter Support or your m3ter contact for assistance with the set up work to meet your specific requirements.
## Syncing Example - Prerequisites in Salesforce Org
The remaining sections in this topic take you through a worked example for the steps required in your Salesforce org to set up for syncing Salesforce data objects and fields with m3ter objects and fields using the m3ter Connector. The example uses a Salesforce Opportunity and some additional setting up is also required:
* Create a Product and add a Price Book to it.
* Create an Opportunity and add the Product to it.
It's assumed in the following sections that these prerequisites are in place in your Salesforce org.
**Warning!** If you're syncing a Sales object - in the example below an Opportunity - then the Contract mapping is required.
## Adding m3ter Admin Permissions for Org Users
When you've installed the m3ter Connector, you can add m3ter Admin permissions for your Salesforce org Users. This will enable Users to set up and test for syncing Salesforce data with m3ter objects and fields.
**To add m3ter Admin permissions for org Users:**
1. At top-right, select the gear icon and on the drop-down menu, select **Setup**:
![]() * The **Setup** page opens.
2. In the **Quick Find** field at top-left, enter *users* and then select **Users**:
* The **Setup** page opens.
2. In the **Quick Find** field at top-left, enter *users* and then select **Users**:
![]() * The **Setup>Users** panel opens.
3. Select the **Full Name** link of the org user you want to add Permission Sets for:
* The **Users** panel adjusts to show the details of the selected User.
4. Scroll down to the **Permission Set Assignments** section and select **Edit Assignments**:
* The **Permission Set Assignments** panel opens for the selected User
5. If **m3ter Admin** does not appear in the **Enabled Permission Sets** list, select it from the **Available Permission Sets** list and select **Add**:
* The **Setup>Users** panel opens.
3. Select the **Full Name** link of the org user you want to add Permission Sets for:
* The **Users** panel adjusts to show the details of the selected User.
4. Scroll down to the **Permission Set Assignments** section and select **Edit Assignments**:
* The **Permission Set Assignments** panel opens for the selected User
5. If **m3ter Admin** does not appear in the **Enabled Permission Sets** list, select it from the **Available Permission Sets** list and select **Add**:
![]() 6. Select **Save**. You are returned to the **Setup>Users** panel for details of the selected User where the **Permission Set Assignments** section will show the newly added **m3ter Admin** Permission Set:
* The User will now be able to configure and test the set up for syncing Salesforce data with m3ter objects and fields.
## Adding m3ter Sync Action for Sales Object
Salesforce org Users with the m3ter Admin Permissions Set assigned can add m3ter Sync Actions for Salesforce objects. This section explains how and uses the Opportunity object as an example.
**To add m3ter Sync Action for Sales Object:**
1. At top-right in **Setup**, select the **Object Manager** tab.
2. In the **Quick Find** field at top-right, enter **Opportunity**:
* This filters the **Object Manager** list and saves you having to scroll to find the Object.
3. In the **LABEL** column, select the **Opportunity** link:
* The **Opportunity Details** panel opens:
**Tip: Refresh page?** You might have to refresh after selecting if the page does not appear right away.
4. Select **Page Layouts**.
5. Under **PAGE LAYOUT NAME** select the default **Opportunity Layout** link:
* Note that if using a scratch org, there should only be one layout listed.
* The **Opportunity Layout** opens.
6. In the expanded **Opportunity Layout** panel at the top, select **Mobile and Lightning Actions**:
6. Select **Save**. You are returned to the **Setup>Users** panel for details of the selected User where the **Permission Set Assignments** section will show the newly added **m3ter Admin** Permission Set:
* The User will now be able to configure and test the set up for syncing Salesforce data with m3ter objects and fields.
## Adding m3ter Sync Action for Sales Object
Salesforce org Users with the m3ter Admin Permissions Set assigned can add m3ter Sync Actions for Salesforce objects. This section explains how and uses the Opportunity object as an example.
**To add m3ter Sync Action for Sales Object:**
1. At top-right in **Setup**, select the **Object Manager** tab.
2. In the **Quick Find** field at top-right, enter **Opportunity**:
* This filters the **Object Manager** list and saves you having to scroll to find the Object.
3. In the **LABEL** column, select the **Opportunity** link:
* The **Opportunity Details** panel opens:
**Tip: Refresh page?** You might have to refresh after selecting if the page does not appear right away.
4. Select **Page Layouts**.
5. Under **PAGE LAYOUT NAME** select the default **Opportunity Layout** link:
* Note that if using a scratch org, there should only be one layout listed.
* The **Opportunity Layout** opens.
6. In the expanded **Opportunity Layout** panel at the top, select **Mobile and Lightning Actions**:
![]() 7. Scroll down the page to the corresponding **Salesforce Mobile and Lightning Experience Actions** section and select **override the predefined actions**:
7. Scroll down the page to the corresponding **Salesforce Mobile and Lightning Experience Actions** section and select **override the predefined actions**:
![]() * The section opens to show the predefined actions for the **Opportunity Layout**.
8. Drag-and-drop the **Send to M3ter** action from the top panel into the **Salesforce Mobile and Lightning Experience Actions** section:
* The section opens to show the predefined actions for the **Opportunity Layout**.
8. Drag-and-drop the **Send to M3ter** action from the top panel into the **Salesforce Mobile and Lightning Experience Actions** section:
![]() **Tip: Position as one of the first three actions!** In order that **Send to M3ter** is viewable when the Opportunity page is opened, position it as one one of the first three actions.
9. In the **Mobile and Lightning Actions** panel, select **Save**. Your updates to the Page Layout for the Opportunity object are saved and you're taken back to **Object Manager>Page Layouts**:
* When you open an Opportunity in your Salesforce org, the **Send to M3ter** button will now be shown at top-right of the page.
## Adding Sync Actions for Other Objects
The m3ter Connector for Salesforce package ships with Send to m3ter Quick Actions on Account and Opportunity out of the box. You can add the same Sync Action to any other Salesforce object — standard or custom — by creating a new Quick Action that uses the package's syncRecord Lightning Web Component.
**To add Sync Action for other Salesforce Objects:**
1. First and as a necessary prerequisite, make sure a **SyncConfig\_\_mdt** record exists for the object you're adding the action to. The Quick Action *will fail at runtime* if the orchestration service can't find a matching SyncConfig for the controlling object type.
2. In **Setup**, go to **Object Manager** and select the object you want to add the Sync Action to. For example: **Order**, **Contract**, **Quote**, or a custom object.
3. Open **Buttons**, **Links**, and **Actions** and then select **New Action**.
4. Enter the configuration details for the new Sync Action:
* **Action Type**: **Lightning Web Component**
* **Lightning Web Component**: **m3:syncRecord**
* **Standard Label Type**: None
* **Label**: **Sync to m3ter** (or another label conforming to your Organization's naming conventions)
* **Name**: **Sync\_to\_m3ter** (auto-populates from **Label** entry)
* **Icon**: Optional setting - select **Change Icon** to select an icon that matches your page layout.
**Tip: Position as one of the first three actions!** In order that **Send to M3ter** is viewable when the Opportunity page is opened, position it as one one of the first three actions.
9. In the **Mobile and Lightning Actions** panel, select **Save**. Your updates to the Page Layout for the Opportunity object are saved and you're taken back to **Object Manager>Page Layouts**:
* When you open an Opportunity in your Salesforce org, the **Send to M3ter** button will now be shown at top-right of the page.
## Adding Sync Actions for Other Objects
The m3ter Connector for Salesforce package ships with Send to m3ter Quick Actions on Account and Opportunity out of the box. You can add the same Sync Action to any other Salesforce object — standard or custom — by creating a new Quick Action that uses the package's syncRecord Lightning Web Component.
**To add Sync Action for other Salesforce Objects:**
1. First and as a necessary prerequisite, make sure a **SyncConfig\_\_mdt** record exists for the object you're adding the action to. The Quick Action *will fail at runtime* if the orchestration service can't find a matching SyncConfig for the controlling object type.
2. In **Setup**, go to **Object Manager** and select the object you want to add the Sync Action to. For example: **Order**, **Contract**, **Quote**, or a custom object.
3. Open **Buttons**, **Links**, and **Actions** and then select **New Action**.
4. Enter the configuration details for the new Sync Action:
* **Action Type**: **Lightning Web Component**
* **Lightning Web Component**: **m3:syncRecord**
* **Standard Label Type**: None
* **Label**: **Sync to m3ter** (or another label conforming to your Organization's naming conventions)
* **Name**: **Sync\_to\_m3ter** (auto-populates from **Label** entry)
* **Icon**: Optional setting - select **Change Icon** to select an icon that matches your page layout.
![Sales Force60]() * In this example, a **New Action** is configured for the **Order** object.
5. Select **Save**.
6. Add the new **Sync Action** to the object's page layout - **Lighting Record Page** or **Classic** page layout - so that users can see and select it.
## Adding Credentials to the m3ter App
You can add the required credentials to the m3ter App in your Salesforce org. This will allow the App to connect to and access your m3ter Organization.
**To add Credentials to the m3ter App:**
1. In the **Apps** menu, search for and select the **m3ter** App:
* In this example, a **New Action** is configured for the **Order** object.
5. Select **Save**.
6. Add the new **Sync Action** to the object's page layout - **Lighting Record Page** or **Classic** page layout - so that users can see and select it.
## Adding Credentials to the m3ter App
You can add the required credentials to the m3ter App in your Salesforce org. This will allow the App to connect to and access your m3ter Organization.
**To add Credentials to the m3ter App:**
1. In the **Apps** menu, search for and select the **m3ter** App:
![]() * If this is the first time you've added credentials for the m3ter App, you'll be prompted to configure a **Connection Setup** for the integration of your Salesforce instance with m3ter:
* If this is the first time you've added credentials for the m3ter App, you'll be prompted to configure a **Connection Setup** for the integration of your Salesforce instance with m3ter:
![]() **Warning: m3ter App not found!** If you do not see the m3ter App as an option on the Apps menu, then you must go back and complete the [Adding m3ter Admin Permissions for Org Users](/guides/m3ter-connector-for-salesforce/configuring-m3ter-salesforce-connector#adding-m3ter-admin-permissions-for-org-users) section above.
2. Select **Create**. The **Connection Setup** tab opens, where you can enter the required details to complete m3ter integration setup:
**Warning: m3ter App not found!** If you do not see the m3ter App as an option on the Apps menu, then you must go back and complete the [Adding m3ter Admin Permissions for Org Users](/guides/m3ter-connector-for-salesforce/configuring-m3ter-salesforce-connector#adding-m3ter-admin-permissions-for-org-users) section above.
2. Select **Create**. The **Connection Setup** tab opens, where you can enter the required details to complete m3ter integration setup:
![]() * **Access Key**. The m3ter Service User's *Access Key ID*.
* **Api Secret**. The m3ter Service User's *API Secret*.
* For details on how to generate the *Access Key ID* and *API Secret* for a m3ter Service User, see [Service Authentication](/guides/authenticating-with-the-platform/service-authentication).
* **m3ter Base Url**. For example: [*https://api.m3ter.com*](https://api.m3ter.com)
* **NOTES**:
* In a typical case where your are connecting to the m3ter Production environment, this will be: [*https://api.m3ter.com*](https://api.m3ter.com)
* If you include a forward slash at the end of the URL, you'll get a connection error.
* If you use *http* and **not** *https*, you'll get a connection error.
* **m3ter Org Id**. The ID of the m3ter Organization you are connecting to:
* You can copy this ID directly to your clipboard from your m3ter Organization - go to **Settings>Organization>Organization Details**.
3. Select **Save Integration Settings**:
* A progress bar runs and a message shows when the connection settings have been successfully saved.
* Note that the **Access Key** and **Api Secret** will be wiped immediately.
4. Refresh the page.
5. Select the **Setup** tab again. You'll see that a connection for m3ter integration has been added:
* **Access Key**. The m3ter Service User's *Access Key ID*.
* **Api Secret**. The m3ter Service User's *API Secret*.
* For details on how to generate the *Access Key ID* and *API Secret* for a m3ter Service User, see [Service Authentication](/guides/authenticating-with-the-platform/service-authentication).
* **m3ter Base Url**. For example: [*https://api.m3ter.com*](https://api.m3ter.com)
* **NOTES**:
* In a typical case where your are connecting to the m3ter Production environment, this will be: [*https://api.m3ter.com*](https://api.m3ter.com)
* If you include a forward slash at the end of the URL, you'll get a connection error.
* If you use *http* and **not** *https*, you'll get a connection error.
* **m3ter Org Id**. The ID of the m3ter Organization you are connecting to:
* You can copy this ID directly to your clipboard from your m3ter Organization - go to **Settings>Organization>Organization Details**.
3. Select **Save Integration Settings**:
* A progress bar runs and a message shows when the connection settings have been successfully saved.
* Note that the **Access Key** and **Api Secret** will be wiped immediately.
4. Refresh the page.
5. Select the **Setup** tab again. You'll see that a connection for m3ter integration has been added:
![]() ## Creating m3ter Mappings
When you install the m3ter Connector managed package, a set of Custom Metadata Types are installed. These metadata types contain preconfigured mapping definitions that specify *in general* how Salesforce data objects and fields are mapped to counterpart m3ter objects and fields:
* For example, which fields on the Salesforce Account object are mapped to which fields on the m3ter Account object.
However, you'll also have to define m3ter Mappings to relate *specific* Salesforce data items to *specific* m3ter data items:
* For example, that you want the the Salesforce Product called **Mega Storage** to be mapped to the m3ter Plan called **Mega Storage Plan**.
* Note that m3ter Mappings can be 1 to 1 or 1 to many.
**Tip: Custom Metadata Types?** See the following [Reviewing and Managing Metadata Mappings](/guides/m3ter-connector-for-salesforce/reviewing-and-managing-metadata-mappings) topic for more details.
**To create m3ter Mappings:**
1. Open the **m3ter App** and select the **m3ter Mappings** tab:
* The **Recently Viewed** list opens, and you can use the **List Views** drop-down to select **All**.
* For a fresh scratch org, there will be no mappings yet created.
2. Select **New**. A **New m3ter Mapping** modal opens.
3. Enter any required Mappings:
## Creating m3ter Mappings
When you install the m3ter Connector managed package, a set of Custom Metadata Types are installed. These metadata types contain preconfigured mapping definitions that specify *in general* how Salesforce data objects and fields are mapped to counterpart m3ter objects and fields:
* For example, which fields on the Salesforce Account object are mapped to which fields on the m3ter Account object.
However, you'll also have to define m3ter Mappings to relate *specific* Salesforce data items to *specific* m3ter data items:
* For example, that you want the the Salesforce Product called **Mega Storage** to be mapped to the m3ter Plan called **Mega Storage Plan**.
* Note that m3ter Mappings can be 1 to 1 or 1 to many.
**Tip: Custom Metadata Types?** See the following [Reviewing and Managing Metadata Mappings](/guides/m3ter-connector-for-salesforce/reviewing-and-managing-metadata-mappings) topic for more details.
**To create m3ter Mappings:**
1. Open the **m3ter App** and select the **m3ter Mappings** tab:
* The **Recently Viewed** list opens, and you can use the **List Views** drop-down to select **All**.
* For a fresh scratch org, there will be no mappings yet created.
2. Select **New**. A **New m3ter Mapping** modal opens.
3. Enter any required Mappings:
![]() In this example, we've entered the minimal mappings:
* **ProductName**. Name of the Product in your m3ter Organization.
* **MappingKey**. The Product Code of a Product added to the Salesforce Opportunity object.
* **PlanId**. The ID of the Product Plan in your m3ter Organization:
* Note that you can copy this ID directly to your clipboard from your m3ter Organization - go to **Pricing>Plans** and select the **NAME** text link to open **Plan Details**.
**NOTE: Standard Pricing vs. Pricing Override:**
* This minimal mapping configuration using the m3ter **PlanId** ensures standard pricing is preserved - the pricing defined for the Product in m3ter *will not be overridden*.
* If you want any change in the Salesforce pricing for the Product added to the Opportunity *to override* the pricing defined in m3ter for the Product, then you must also enter the IDs for the **Aggregation** and **PlanTemplateId**.
4. Select **Save**. The modal closes and you're taken back to the **Details** tab for the **m3ter Mapping.**
# Creating Custom Metadata Mappings
Source: https://docs.m3ter.com/guides/m3ter-connector-for-salesforce/creating-metadata-mappings
The Custom Metadata Types installed with the m3ter Connector for Salesforce package are used for syncing your Salesforce records to your m3ter Organization. Mappings are pre-installed which use the Opportunity and other Salesforce standard objects/fields. If you want to sync other Salesforce objects and fields to m3ter, then you can create a new *SyncConfig* Custom Metadata record and new Mapping records to suit your specific Sales process.
This topic explains how to set up new SyncConfigs with custom metadata mappings for syncing objects from your Sales flow in Salesforce into m3ter, such as Quotes or Contracts.
## Custom Metadata Mappings - Prerequisite
In order for any new custom metadata mappings used in a SyncConfig to work, a *m3ter Account* and a *m3ter Contract* need to be mapped as minimal prerequisites. The mappings for these objects are already included in the m3ter Connector managed package at install:
* Salesforce *Account* to m3ter *Account* is an AccountMapping named "New Account Mapping"
* Salesforce *Opportunity* to m3ter *Contract* is a ContractMapping named "New Contract Mapping".
**Important!** The installed mappings should not have their objects changed; these reference Salesforce standard objects. Please create a new mapping instead.
## Creating Custom Metadata Mappings - Contract Example
This section explains how to create Custom Metadata Mappings in your Salesforce Org for syncing objects with m3ter by taking you through the steps to create and set up a *SyncConfig* for a Contract.
**To create and configure a Contract SyncConfig:**
1. At top-right, select the gear icon and on the drop-down menu, select **Setup**. The **SETUP>Home** pages opens.
2. In the **Quick Find** field at top-left, start to type "metadata" - the **SETUP** navigation list is filtered and you'll see **Custom Code>Custom Metadata Types** returned.
3. Select **Custom Metadata Types** in the **SETUP** list. The **Custom Metadata Types** page opens:
In this example, we've entered the minimal mappings:
* **ProductName**. Name of the Product in your m3ter Organization.
* **MappingKey**. The Product Code of a Product added to the Salesforce Opportunity object.
* **PlanId**. The ID of the Product Plan in your m3ter Organization:
* Note that you can copy this ID directly to your clipboard from your m3ter Organization - go to **Pricing>Plans** and select the **NAME** text link to open **Plan Details**.
**NOTE: Standard Pricing vs. Pricing Override:**
* This minimal mapping configuration using the m3ter **PlanId** ensures standard pricing is preserved - the pricing defined for the Product in m3ter *will not be overridden*.
* If you want any change in the Salesforce pricing for the Product added to the Opportunity *to override* the pricing defined in m3ter for the Product, then you must also enter the IDs for the **Aggregation** and **PlanTemplateId**.
4. Select **Save**. The modal closes and you're taken back to the **Details** tab for the **m3ter Mapping.**
# Creating Custom Metadata Mappings
Source: https://docs.m3ter.com/guides/m3ter-connector-for-salesforce/creating-metadata-mappings
The Custom Metadata Types installed with the m3ter Connector for Salesforce package are used for syncing your Salesforce records to your m3ter Organization. Mappings are pre-installed which use the Opportunity and other Salesforce standard objects/fields. If you want to sync other Salesforce objects and fields to m3ter, then you can create a new *SyncConfig* Custom Metadata record and new Mapping records to suit your specific Sales process.
This topic explains how to set up new SyncConfigs with custom metadata mappings for syncing objects from your Sales flow in Salesforce into m3ter, such as Quotes or Contracts.
## Custom Metadata Mappings - Prerequisite
In order for any new custom metadata mappings used in a SyncConfig to work, a *m3ter Account* and a *m3ter Contract* need to be mapped as minimal prerequisites. The mappings for these objects are already included in the m3ter Connector managed package at install:
* Salesforce *Account* to m3ter *Account* is an AccountMapping named "New Account Mapping"
* Salesforce *Opportunity* to m3ter *Contract* is a ContractMapping named "New Contract Mapping".
**Important!** The installed mappings should not have their objects changed; these reference Salesforce standard objects. Please create a new mapping instead.
## Creating Custom Metadata Mappings - Contract Example
This section explains how to create Custom Metadata Mappings in your Salesforce Org for syncing objects with m3ter by taking you through the steps to create and set up a *SyncConfig* for a Contract.
**To create and configure a Contract SyncConfig:**
1. At top-right, select the gear icon and on the drop-down menu, select **Setup**. The **SETUP>Home** pages opens.
2. In the **Quick Find** field at top-left, start to type "metadata" - the **SETUP** navigation list is filtered and you'll see **Custom Code>Custom Metadata Types** returned.
3. Select **Custom Metadata Types** in the **SETUP** list. The **Custom Metadata Types** page opens:
![]() 4. Select **SyncConfig**. The **Custom Metadata Type>SyncConfig** details page opens.
5. Select **Manage SyncConfigs**. The **SyncConfigs** page opens.
6. Select **New**. A **SyncConfig Edit** page opens and you can enter the details of the new SyncConfig. There are three sections to configure:
* **Information**
* **Setup**
* **Mappings**
7. Use the **Information** section to enter:
* **Label**. A descriptive label for the new SyncConfig.
* **SyncConfig Name**. This will be used by the API and managed package. Click the info icon for formatting constraints.
* **Protected Component**. Check the box if you want the SyncConfig data to be treated as protected. Click the info icon for details.
8. Use the **Setup** section to enter:
* **Controlling Object**. Use the drop-down to select which Salesforce object will be the Controlling Object. The Controlling Object is the object you are planning to use to launch the sync. This might be an object that represents your Accounts, or an object that represents the Agreements you make with your customers.
* **Parent Id**. Enter the Id of the object you want use as the parent object. This is the field which points to the identifier of the parent object to this base sync object. In an account hierarchy, this might be the Parent account id field; in an Agreement, this might be the field which points to the account or organization you are selling to.
* **Product Mapping Key**. This is the field used on your line items to say which line item relates to which m3terMapping product. In most cases this will likely be a Product Name or Product Code.
* **Product Mapping Object**. This is the object used in your agreements which includes product information. In most cases, this will be a line item object.
* **Line Item Lookup**. This is how your product can be retrieved via your agreement. In the event your products are on line items as is the usual case, this will be the lookup field which ties them to your main agreement object.
* **Upserts**. For the new SynConifg, you can enable/disable upsert for the **Account** and **Contract** objects in m3ter. The default is for upserts to be enabled.
9. In the **Mappings** section, set up the metadata mappings you want to use for the new SyncConfig:
* You can use the lookup icon to open a **Lookup** modal to search for mappings to select:
4. Select **SyncConfig**. The **Custom Metadata Type>SyncConfig** details page opens.
5. Select **Manage SyncConfigs**. The **SyncConfigs** page opens.
6. Select **New**. A **SyncConfig Edit** page opens and you can enter the details of the new SyncConfig. There are three sections to configure:
* **Information**
* **Setup**
* **Mappings**
7. Use the **Information** section to enter:
* **Label**. A descriptive label for the new SyncConfig.
* **SyncConfig Name**. This will be used by the API and managed package. Click the info icon for formatting constraints.
* **Protected Component**. Check the box if you want the SyncConfig data to be treated as protected. Click the info icon for details.
8. Use the **Setup** section to enter:
* **Controlling Object**. Use the drop-down to select which Salesforce object will be the Controlling Object. The Controlling Object is the object you are planning to use to launch the sync. This might be an object that represents your Accounts, or an object that represents the Agreements you make with your customers.
* **Parent Id**. Enter the Id of the object you want use as the parent object. This is the field which points to the identifier of the parent object to this base sync object. In an account hierarchy, this might be the Parent account id field; in an Agreement, this might be the field which points to the account or organization you are selling to.
* **Product Mapping Key**. This is the field used on your line items to say which line item relates to which m3terMapping product. In most cases this will likely be a Product Name or Product Code.
* **Product Mapping Object**. This is the object used in your agreements which includes product information. In most cases, this will be a line item object.
* **Line Item Lookup**. This is how your product can be retrieved via your agreement. In the event your products are on line items as is the usual case, this will be the lookup field which ties them to your main agreement object.
* **Upserts**. For the new SynConifg, you can enable/disable upsert for the **Account** and **Contract** objects in m3ter. The default is for upserts to be enabled.
9. In the **Mappings** section, set up the metadata mappings you want to use for the new SyncConfig:
* You can use the lookup icon to open a **Lookup** modal to search for mappings to select:
![]() * For each mapping you set up, you can set the **SyncLevel**.
* For each mapping you set up, you can set the **SyncLevel**.
![]() 10. Select **Save**. You are returned to the **SyncConifgs** page where the new **ContractSync** is listed:
10. Select **Save**. You are returned to the **SyncConifgs** page where the new **ContractSync** is listed:
![]() # CRUD for Metering Entities
Source: https://docs.m3ter.com/guides/m3ter-connector-for-salesforce/crud-for-metering-entities
The m3ter Connector for Salesforce managed package offers automatic CRUD syncing from Salesforce for key metering entities - Products, Meters, Aggregations, and Compound Aggregations.
In addition, the m3ter Admin Setup tab has been improved for enhanced usability and a new Balance Consumption Widget is available, which allows you to quickly check and track Balance draw-down progress.
This topic explains how to work with these new features:
* [CRUD Sync for Metering Entities](#crud-sync-for-metering-entities)
* [Admin Setup](#admin-setup)
* [Balance Consumption Widget](#balance-consumption-widget)
**Important!**
* **Check Version**. CRUD for metering entities and the other features described in this topic are only available in **v0.15** and above. See [m3ter Connector for Salesforce - Changelog](https://docs.m3ter.com/guides/m3ter-connector-for-salesforce/m3ter-connector-for-salesforce-changelog) for details on how to check your current installed version.
## CRUD Sync for Metering Entities
The CRUD sync for metering entities feature delivers some common behavior across all entities it applies to, with the range of fields synced and certain constraints applied to specific entities:
* [Common CRUD Behavior](#common-crud-behavior)
* [Products](#products)
* [Meters](#meters)
* [Aggregations](#aggregations)
* [Compound Aggregations](#compound-aggregations)
### Common CRUD Behavior
The common CRUD behavior for all affected entities is as follows:
* **Automatic Sync**. Creating, updating, or deleting records in Salesforce automatically syncs the change to the corresponding m3ter entities.
* **Sync Status**. The `syncStatus_c` field tracks sync status:
* **Not Synced**
* **Success**
* **Failed**
* **Pending Deletion**
* **Delete Failed**
* **Troubleshooting**. A last synced timestamp and result message is stored on each record.
* **Retries**. Failed syncs can be retried manually.
* **Custom Field Syncing**. All four entity types support custom field syncing using `customFields_c` to store key/value pairs which are synced to m3ter.
* **Deleting Records**. Deleting a record moves it to the Recycle Bin and queues a deletion call to m3ter:
* If deletion succeeds, the record is permanently removed.
* If deletion fails, then record is restored from the Recycle Bin with a status of **Delete Failed**.
* **Restoring Records**. Restoring a record from the Recycle Bin resets sync status to **Not Synced** but *does not undo* the m3ter deletion. The m3ter entity must be re-synced or recreated in m3ter.
### Products
# CRUD for Metering Entities
Source: https://docs.m3ter.com/guides/m3ter-connector-for-salesforce/crud-for-metering-entities
The m3ter Connector for Salesforce managed package offers automatic CRUD syncing from Salesforce for key metering entities - Products, Meters, Aggregations, and Compound Aggregations.
In addition, the m3ter Admin Setup tab has been improved for enhanced usability and a new Balance Consumption Widget is available, which allows you to quickly check and track Balance draw-down progress.
This topic explains how to work with these new features:
* [CRUD Sync for Metering Entities](#crud-sync-for-metering-entities)
* [Admin Setup](#admin-setup)
* [Balance Consumption Widget](#balance-consumption-widget)
**Important!**
* **Check Version**. CRUD for metering entities and the other features described in this topic are only available in **v0.15** and above. See [m3ter Connector for Salesforce - Changelog](https://docs.m3ter.com/guides/m3ter-connector-for-salesforce/m3ter-connector-for-salesforce-changelog) for details on how to check your current installed version.
## CRUD Sync for Metering Entities
The CRUD sync for metering entities feature delivers some common behavior across all entities it applies to, with the range of fields synced and certain constraints applied to specific entities:
* [Common CRUD Behavior](#common-crud-behavior)
* [Products](#products)
* [Meters](#meters)
* [Aggregations](#aggregations)
* [Compound Aggregations](#compound-aggregations)
### Common CRUD Behavior
The common CRUD behavior for all affected entities is as follows:
* **Automatic Sync**. Creating, updating, or deleting records in Salesforce automatically syncs the change to the corresponding m3ter entities.
* **Sync Status**. The `syncStatus_c` field tracks sync status:
* **Not Synced**
* **Success**
* **Failed**
* **Pending Deletion**
* **Delete Failed**
* **Troubleshooting**. A last synced timestamp and result message is stored on each record.
* **Retries**. Failed syncs can be retried manually.
* **Custom Field Syncing**. All four entity types support custom field syncing using `customFields_c` to store key/value pairs which are synced to m3ter.
* **Deleting Records**. Deleting a record moves it to the Recycle Bin and queues a deletion call to m3ter:
* If deletion succeeds, the record is permanently removed.
* If deletion fails, then record is restored from the Recycle Bin with a status of **Delete Failed**.
* **Restoring Records**. Restoring a record from the Recycle Bin resets sync status to **Not Synced** but *does not undo* the m3ter deletion. The m3ter entity must be re-synced or recreated in m3ter.
### Products
![Crud Smp1]() * **Fields synced**: Name, Product Code, Custom Fields.
* **Deletion restrictions**: no deletion restrictions.
### Meters
* **Fields synced**: Name, Product Code, Custom Fields.
* **Deletion restrictions**: no deletion restrictions.
### Meters
![Crud Smp2]() * **Fields synced**: Name, Code, Product (optional and if left blank = *global Meter*), Custom Fields, Data Fields, Derived Fields.
* **Constraints**: Product association cannot be changed once set.
* **Deletion restrictions**: A Meter that has Aggregations that target it cannot be deleted - you must delete any dependent Aggregations first.
Custom components of the record page:
* **Data Fields**
* Inline editor for defining the Data Fields the Meter uses to collect raw data.
* Each Data Field has Name, Code, Category, and Description.
* Add or remove Data Fields directly from the record page; saved with a Save/Cancel flow.
* **Derived Fields**
* Same inline editor as for Data Fields with additional Calculation Formula column.
* Used to define fields that are computed from raw data at time of ingest.
* **Custom Fields**
* Key/Value editor for the `customFields_c` field.
* Keys must start with a letter or underscore and contain only alphanumeric characters and underscores.
* Validates in real time - any invalid keys are flagged before saving.
### Aggregations
* **Fields synced**: Name, Code, Product (optional and if left blank = *global Meter*), Custom Fields, Data Fields, Derived Fields.
* **Constraints**: Product association cannot be changed once set.
* **Deletion restrictions**: A Meter that has Aggregations that target it cannot be deleted - you must delete any dependent Aggregations first.
Custom components of the record page:
* **Data Fields**
* Inline editor for defining the Data Fields the Meter uses to collect raw data.
* Each Data Field has Name, Code, Category, and Description.
* Add or remove Data Fields directly from the record page; saved with a Save/Cancel flow.
* **Derived Fields**
* Same inline editor as for Data Fields with additional Calculation Formula column.
* Used to define fields that are computed from raw data at time of ingest.
* **Custom Fields**
* Key/Value editor for the `customFields_c` field.
* Keys must start with a letter or underscore and contain only alphanumeric characters and underscores.
* Validates in real time - any invalid keys are flagged before saving.
### Aggregations
![Crud Smp3]() * **Fields synced**: Name, Code, Meter (required), Target Field, Aggregation Type (SUM/MIN/MAX/COUNT/LATEST/MEAN/UNIQUE), Unit, Quantity Per Unit, Rounding, Default Value, Segmented Fields, Segments, Custom Fields.
* **Constraints**: On creation, Product is automatically inherited from targeted or parent Meter and cannot be changed.
* **Deletion restrictions**: no deletion restrictions.
* However, please note that if an Aggregation has been used to price a Plan in m3ter, then the deletion will be blocked on the Salesforce side.
Custom components of the record page:
* **Target Field Picker**
* A drop-down shows all Data and Derived Fields on the linked Meter.
* Options are labeled **\[Data]** or **\[Derived]** with field name and code.
* Save/Cancel only activates when the selection has changed.
* **Segmented Fields**
* Checkbox list of string type fields on the linked Meter - numeric fields cannot be segmented and are excluded.
* Up to 5 fields can be selected, and further selections are blocked once this limit is reached.
* A running count of selected fields is shown.
* **Segment Values**
* Table editor for defining specific segment value combinations.
* Table columns are derivative on the Segments Fields selections, which should be made first.
* Each row defines a segment. You can leave a cell blank to wildcard that field for the segment - matches any value.
* Duplicate rows are flagged and up to 1,000 segments are supported.
### Compound Aggregations
* **Fields synced**: Name, Code, Meter (required), Target Field, Aggregation Type (SUM/MIN/MAX/COUNT/LATEST/MEAN/UNIQUE), Unit, Quantity Per Unit, Rounding, Default Value, Segmented Fields, Segments, Custom Fields.
* **Constraints**: On creation, Product is automatically inherited from targeted or parent Meter and cannot be changed.
* **Deletion restrictions**: no deletion restrictions.
* However, please note that if an Aggregation has been used to price a Plan in m3ter, then the deletion will be blocked on the Salesforce side.
Custom components of the record page:
* **Target Field Picker**
* A drop-down shows all Data and Derived Fields on the linked Meter.
* Options are labeled **\[Data]** or **\[Derived]** with field name and code.
* Save/Cancel only activates when the selection has changed.
* **Segmented Fields**
* Checkbox list of string type fields on the linked Meter - numeric fields cannot be segmented and are excluded.
* Up to 5 fields can be selected, and further selections are blocked once this limit is reached.
* A running count of selected fields is shown.
* **Segment Values**
* Table editor for defining specific segment value combinations.
* Table columns are derivative on the Segments Fields selections, which should be made first.
* Each row defines a segment. You can leave a cell blank to wildcard that field for the segment - matches any value.
* Duplicate rows are flagged and up to 1,000 segments are supported.
### Compound Aggregations
![Crud Smp4]() * **Fields synced**: Name, Code, Calculation Expression, Product (Optional), Unit, Quantity Per Unit, Rounding, Evaluate Null Aggregations, Custom Fields.
* **Constraints**: Calculation Expression references Aggregation codes not Salesforce field names.
* **Evaluate Null Aggregations** (*Default is OFF*):
* When *OFF*, any simple Aggregations that have null values and are referenced by the Calculation Expression will not be passed in for evaluation. (Note: that simple Aggregations targeting Meter Data Fields with no usage data will have null values.)
* When *ON*, referenced simple Aggregations with null values will be passed in and evaluated. (Tip: set the default values on any referenced simple Aggregations to 0 for predictable results.)
* **Product scope**:
* Optional and global Compound Aggregations can be used to price Plans belonging to any Product.
* Product cannot be changed once set.
* **Deletion restrictions**: no deletion restrictions.
* However, please note that if a Compound Aggregation has been used to price a Plan in m3ter, then the deletion will be blocked on the Salesforce side.
## Admin Setup
The m3ter Admin **Setup** now opens with an **Overview** tab where the connection status is visible at a glance:
* **Fields synced**: Name, Code, Calculation Expression, Product (Optional), Unit, Quantity Per Unit, Rounding, Evaluate Null Aggregations, Custom Fields.
* **Constraints**: Calculation Expression references Aggregation codes not Salesforce field names.
* **Evaluate Null Aggregations** (*Default is OFF*):
* When *OFF*, any simple Aggregations that have null values and are referenced by the Calculation Expression will not be passed in for evaluation. (Note: that simple Aggregations targeting Meter Data Fields with no usage data will have null values.)
* When *ON*, referenced simple Aggregations with null values will be passed in and evaluated. (Tip: set the default values on any referenced simple Aggregations to 0 for predictable results.)
* **Product scope**:
* Optional and global Compound Aggregations can be used to price Plans belonging to any Product.
* Product cannot be changed once set.
* **Deletion restrictions**: no deletion restrictions.
* However, please note that if a Compound Aggregation has been used to price a Plan in m3ter, then the deletion will be blocked on the Salesforce side.
## Admin Setup
The m3ter Admin **Setup** now opens with an **Overview** tab where the connection status is visible at a glance:
![Crud Smp5]() The **CONNECTED STATUS** banner shows:
* Connected/Disconnected state.
* The m3ter connection URL.
* Quick links provided for editing the connection and for opening docs.
* When connected, the **TIMEZONE** of the m3ter Organization synced to.
* Pattern cards enabling quick navigation to:
* **Auto-Sync** settings.
* **m3sh Triggers** if enabled.
* Docs for **Sync to m3ter**.
## Balance Consumption Widget
A new Lightning component has been added to the Balance record page, which shows **Wallets** Balance cards that carry a visual Balance consumption progress bar:
The **CONNECTED STATUS** banner shows:
* Connected/Disconnected state.
* The m3ter connection URL.
* Quick links provided for editing the connection and for opening docs.
* When connected, the **TIMEZONE** of the m3ter Organization synced to.
* Pattern cards enabling quick navigation to:
* **Auto-Sync** settings.
* **m3sh Triggers** if enabled.
* Docs for **Sync to m3ter**.
## Balance Consumption Widget
A new Lightning component has been added to the Balance record page, which shows **Wallets** Balance cards that carry a visual Balance consumption progress bar:
 * **Balance Details**:
* Name
* Consumed amount
* Available amount
* Total Balance
* Currency
* **Balance Consumption**:
* Progress bar color coded for tracking consumption level:
* Green = \< 75%
* Orange = 75% to 89%
* Red = ≥ 90%
* **Refresh**:
* Auto-refresh every 2 minutes.
* Manual refresh button.
# Enabling Two-Way Automated Sync for m3ter Objects
Source: https://docs.m3ter.com/guides/m3ter-connector-for-salesforce/enabling-two-way-automated-sync-for-m3ter-objects
If you have set up entity data sync native integrations from m3ter into your Salesforce system for either *Accounts* or *Balances*, you can enable two-way auto-syncing of these objects between m3ter and your Salesforce Org.
This topic explains how to switch on the auto-sync feature and enable it for Account or Balance objects:
* [Switching on Two-Way Auto-Sync and Enabling for Objects](/guides/m3ter-connector-for-salesforce/enabling-two-way-automated-sync-for-m3ter-objects#switching-on-two-way-auto-sync-and-enabling-for-objects)
* [How Two-Way Auto-Sync Works](/guides/m3ter-connector-for-salesforce/enabling-two-way-automated-sync-for-m3ter-objects#how-two-way-auto-sync-works)
* [Monitoring and Troubleshooting](/guides/m3ter-connector-for-salesforce/enabling-two-way-automated-sync-for-m3ter-objects#monitoring-and-troubleshooting)
* [Technical Details](/guides/m3ter-connector-for-salesforce/enabling-two-way-automated-sync-for-m3ter-objects#technical-details)
* [Additional Notes](/guides/m3ter-connector-for-salesforce/enabling-two-way-automated-sync-for-m3ter-objects#additional-notes)
* [Recommended Next Steps](/guides/m3ter-connector-for-salesforce/enabling-two-way-automated-sync-for-m3ter-objects#recommended-next-steps)
**Important!**
**Check Version**. The two-way auto sync for m3ter objects feature is only available in version **0.6** and above of the m3ter Connector for Salesforce managed package. See [m3ter Connector for Salesforce - Changelog](/guides/m3ter-connector-for-salesforce/m3ter-connector-for-salesforce-changelog) for details on how to check your current installed version.
## Switching on Two-Way Auto-Sync and Enabling for Objects
Before you can use this feature, *you must ensure* that you've set up an Entity Data Sync native integration with your Salesforce system for the m3ter objects you want to enable two-way auto-sync for. See [Configuring Salesforce Entity Data Sync Integrations](/guides/integrations/setting-up-integrations/configuring-sf-entity-data-integrations) for more details.
**To switch on auto-sync and enable for objects:**
1. In your Salesforce Org, navigate to the **m3ter Admin** app.
2. Under **Setup**, select the **Auto-Sync Settings** tab:
* **Balance Details**:
* Name
* Consumed amount
* Available amount
* Total Balance
* Currency
* **Balance Consumption**:
* Progress bar color coded for tracking consumption level:
* Green = \< 75%
* Orange = 75% to 89%
* Red = ≥ 90%
* **Refresh**:
* Auto-refresh every 2 minutes.
* Manual refresh button.
# Enabling Two-Way Automated Sync for m3ter Objects
Source: https://docs.m3ter.com/guides/m3ter-connector-for-salesforce/enabling-two-way-automated-sync-for-m3ter-objects
If you have set up entity data sync native integrations from m3ter into your Salesforce system for either *Accounts* or *Balances*, you can enable two-way auto-syncing of these objects between m3ter and your Salesforce Org.
This topic explains how to switch on the auto-sync feature and enable it for Account or Balance objects:
* [Switching on Two-Way Auto-Sync and Enabling for Objects](/guides/m3ter-connector-for-salesforce/enabling-two-way-automated-sync-for-m3ter-objects#switching-on-two-way-auto-sync-and-enabling-for-objects)
* [How Two-Way Auto-Sync Works](/guides/m3ter-connector-for-salesforce/enabling-two-way-automated-sync-for-m3ter-objects#how-two-way-auto-sync-works)
* [Monitoring and Troubleshooting](/guides/m3ter-connector-for-salesforce/enabling-two-way-automated-sync-for-m3ter-objects#monitoring-and-troubleshooting)
* [Technical Details](/guides/m3ter-connector-for-salesforce/enabling-two-way-automated-sync-for-m3ter-objects#technical-details)
* [Additional Notes](/guides/m3ter-connector-for-salesforce/enabling-two-way-automated-sync-for-m3ter-objects#additional-notes)
* [Recommended Next Steps](/guides/m3ter-connector-for-salesforce/enabling-two-way-automated-sync-for-m3ter-objects#recommended-next-steps)
**Important!**
**Check Version**. The two-way auto sync for m3ter objects feature is only available in version **0.6** and above of the m3ter Connector for Salesforce managed package. See [m3ter Connector for Salesforce - Changelog](/guides/m3ter-connector-for-salesforce/m3ter-connector-for-salesforce-changelog) for details on how to check your current installed version.
## Switching on Two-Way Auto-Sync and Enabling for Objects
Before you can use this feature, *you must ensure* that you've set up an Entity Data Sync native integration with your Salesforce system for the m3ter objects you want to enable two-way auto-sync for. See [Configuring Salesforce Entity Data Sync Integrations](/guides/integrations/setting-up-integrations/configuring-sf-entity-data-integrations) for more details.
**To switch on auto-sync and enable for objects:**
1. In your Salesforce Org, navigate to the **m3ter Admin** app.
2. Under **Setup**, select the **Auto-Sync Settings** tab:
![]() 3. Use **m3 Auto-Sync Enabled?** switch to turn the feature on. This is the master switch and controls all two-way auto-sync settings for objects.
4. If you want to enable the feature for *m3 Account* objects, switch on **Is m3 Account Auto-Sync Enabled?**
5. If you want to enable the feature for *m3 Balance* and *m3 Balance Transaction* objects, switch on **Is m3 Balance Auto-Sync Enabled?**
## How Two-Way Auto-Sync Works
When enabled, the two-way auto-sync functionality:
1. Tracks any changes made to records in both systems.
2. Uses the `lastSystemToUpdate__c` field to identify which system made the most recent change.
3. Propagates changes:
* From SFDC to m3ter using Platform Events.
* From m3ter to SFDC via the m3ter Native Integration - see [Configuring Salesforce Entity Data Sync Integrations](/guides/integrations/setting-up-integrations/configuring-sf-entity-data-integrations).
## Monitoring and Troubleshooting
If you encounter any issues with the two-way auto-sync feature, you can view *Sync Logs* to troubleshoot issues.
### Viewing Sync Logs
To monitor the synchronization activity:
1. In the **m3ter Admin** app, navigate to the **Sync Logs** tab.
2. Review the logs to check sync operations, timestamps, and status.
### Common Issues and How to Resolve
Here are some common issues, their possible cause, and how to resolve them:
| Issue | Possible Cause | Resolution |
| - | - | - |
| Objects not syncing. | Master switch is turned OFF. | Ensure "m3 Auto-Sync Enabled?" is switched ON. |
| Specific objects not syncing. | Object-specific setting is OFF. | Verify the Object-specific setting is switched ON. |
| Sync errors. | API Connection issues. | Check integration settings and network connectivity. |
| Data conflicts. | Simultaneous updates in both systems. | Review sync logs to identify and resolve conflicts. |
## Technical Details
### Architecture Components
The two-way auto-sync feature leverages several components:
* **Custom Settings**: `m3AutoSyncSettings__c` controls feature enablement.
* **Custom Fields**: `lastSystemToUpdate__c` tracks which system last modified a record.
* **Apex Triggers**: Monitor record changes and initiate sync processes.
* **Platform Events**: `m3 Object Change Event` communicates changes between systems.
* **Flow**: `Handle m3ter Object Change Event` processes the platform events.
### Data Flow
1. When a record is created or updated in Salesforce:
* The `lastSystemToUpdate__c` field is set to 'sfdc'.
* A Platform Event is fired with the record ID.
* The flow processes the event and invokes the "Sync To M3ter" action.
2. When a record is created or updated in m3ter:
* The native integration updates the record in Salesforce.
* The `lastSystemToUpdate__c` field is set to 'm3'.
* No platform event is fired (to prevent circular updates).
## Additional Notes
Please note:
* Currently, only **INSERT** and **UPDATE** operations are supported for two-way auto-sync.
* **DELETE** and **UNDELETE** operations are not yet supported in the current implementation.
## Recommended Next Steps
After enabling two-way auto-sync, we recommend:
* Testing the sync by making sample changes in both systems.
* Review sync logs to ensure proper functionality.
# Generic m3ter API Invocable Action
Source: https://docs.m3ter.com/guides/m3ter-connector-for-salesforce/generic-m3ter-api-invocable-action
The m3ter Connector for Salesforce managed package offers the *Generic m3ter API Invocable Action* feature that lets admins and developers call any Organization-scoped m3ter API endpoint from Salesforce — Apex or Flow — reusing the package's existing authentication, retry, and telemetry:
* **Admins**. Automate m3ter from Flow without waiting on a developer.
* **System Integrators**. Offers a supported, reusable primitive to build customer solutions on, instead of hand-rolling callouts every time.
If there isn't a dedicated action for what you need yet, you can now do it yourself:
* Call any m3ter endpoint from Flow/Apex.
* Pull values out of responses without writing Apex.
* Ready-to-clone example flows so teams start from something that works, not a blank canvas
This topic introduces and explains how to work with the Generic m3ter API Invocable Action feature:
* [Key Components](#key-components)
* [Prerequisites](#prerequisites)
* [Organization-Scoped Endpoint Paths](#organization-scoped-endpoint-paths)
* [Apex and Flow Examples](#apex-and-flow-examples)
* [Limits](#limits)
* [Sync Logs and External Mappings](#sync-logs-and-external-mappings)
**Important!**
* **Check Version**. The *Generic m3ter API Invocable Action* feature described in this topic is only available in **v1.2** and above of the m3ter Connector for Salesforce. See [m3ter Connector for Salesforce - Changelog](https://docs.m3ter.com/guides/m3ter-connector-for-salesforce/m3ter-connector-for-salesforce-changelog) for details on how to check your current installed version.
## Key Components
| Component | Type | Purpose |
| - | - | - |
| M3terGenericAPIService | Apex + Invocable | Transport — call any endpoint (GET/POST/PUT/DELETE) |
| M3terJsonExtractInvocable | Invocable | No-code helper — pull values out of a JSON response by path |
| M3terAccountParserExample | Apex example | **Read** (GET): `GET accounts/{id}` → typed Flow fields |
| M3terCreateProductExample | Apex example | **Create** (POST): `POST products` → new m3ter id |
| M3terListAccountsExample | Apex example | **List + pagination**: pages `GET accounts` via `nextToken` |
| M3terListOptionsExample | Apex example | **Choice-list builder**: pages a list endpoint into `{label, value}` options for a Flow drop-down |
| m3ter Example: Create Balance and Transaction | Flow example | **Dependent-entity chain**: create a Balance, then a Transaction against it |
| m3ter Example: Create Segment Pricing | Flow example | **Read-then-write on segmented entities**: read an Aggregation's segments, then create a Pricing |
Notes:
* The example classes and Flows are **copy-and-adapt templates** — one per operation/pattern.
* To adapt: change the endpoint/operation, and map the fields you need from the response.
## Prerequisites
Please ensure the following prerequisites are in place before using the Generic m3ter API Invocable Action feature:
* The **m3 Sync** package is installed and configured (Access Key, API Secret, Base URL, Organization Id) in **Integration Settings**.
* Users are assigned the **m3ter\_Admin** or **m3ter\_User** permission set.
## Organization-Scoped Endpoint Paths
Main points to note:
* Supply the path **relative to your m3ter Organization**:
* The service prefixes `https:///organizations//`
* So for example for accounts: `.../organizations//accounts`
* Root-level endpoints - for example: `/organizationconfig`, `/oauth` - are **not** supported.
* Supported operations: **GET, POST, PUT, DELETE**.
* The canonical list of endpoints and payloads can be found in the m3ter API Reference documentation at: [https://docs.m3ter.com/](https://docs.m3ter.com/)
## Apex and Flow Examples
This section sets out some Apex and Flow examples using the Generic m3ter API Invocable Action feature:
* [Apex Usage Example](#apex-usage-example)
* [Apex Usage Complex Example](#apex-usage-complex-example)
* [Flow Usage](#flow-usage)
### Apex Usage Example
Apex:
```java theme={null}
m3.M3terGenericAPIService.GenericAPIRequest request = new m3.M3terGenericAPIService.GenericAPIRequest();
request.operation = 'GET';
request.endpoint = 'accounts';
request.queryParams = '{"pageSize":"50"}'; // optional, JSON object of string values
List results =
m3.M3terGenericAPIService.callM3terAPI(
new List{ request }
);
m3.M3terGenericAPIService.APITransportResult result = results[0];
if (result.success) {
Map body = (Map) JSON.deserializeUntyped(result.responseBody);
if (result.hasMoreResults) { /* result.nextToken */ }
} else {
// result.httpStatusCode, result.errorMessage
}
```
**GenericAPIRequest:**
* operation (required),
* endpoint (required),
* queryParams (optional JSON object of string values),
* requestBody (optional JSON body for POST/PUT).
**APITransportResult:**
* success,
* httpStatusCode,
* responseBody,
* errorMessage,
* nextToken,
* hasMoreResults.
### Apex Usage Complex Example
Apex:
```java theme={null}
//Create an m3ter Balance for an Account, then post a Transaction against it
String accountId = 'bfc500d9-0427-4d80-9ddb-03e6140970dc';
String currencyCode = 'USD';
String startDate = '2026-01-01T00:00:00.000Z';
String endDate = '2026-12-31T00:00:00.000Z';
Decimal initialAmount = 1000;
// ── Step 1: create the Balance
m3.M3terGenericAPIService.GenericAPIRequest balanceReq =
new m3.M3terGenericAPIService.GenericAPIRequest();
balanceReq.operation = 'POST';
balanceReq.endpoint = 'balances';
String balanceCode = System.UUID.randomUUID().toString();
balanceReq.requestBody = JSON.serialize(new Map{
'accountId' => accountId,
'currency' => currencyCode,
'startDate' => startDate,
'endDate' => endDate,
'code' => balanceCode,
'name' => 'Prepaid balance created via generic API service'
});
m3.M3terGenericAPIService.APITransportResult balanceRes =
m3.M3terGenericAPIService.callM3terAPI(
new List{ balanceReq }
)[0];
if (!balanceRes.success) {
System.debug(LoggingLevel.ERROR,
'Balance create failed (' + balanceRes.httpStatusCode + '): ' + balanceRes.errorMessage);
return;
}
Map balanceBody =
(Map) JSON.deserializeUntyped(balanceRes.responseBody);
String balanceId = (String) balanceBody.get('id');
System.debug('Created Balance: ' + balanceId);
// Step 2: post a Transaction against the new Balance
// The endpoint is built from the id returned by Step 1
m3.M3terGenericAPIService.GenericAPIRequest txReq =
new m3.M3terGenericAPIService.GenericAPIRequest();
txReq.operation = 'POST';
txReq.endpoint = 'balances/' + balanceId + '/transactions';
txReq.requestBody = JSON.serialize(new Map{
'amount' => initialAmount,
'appliedDate' => startDate,
'currencyPaid'=> currencyCode,
'transactionTypeId' => 'ca6af083-c94b-47a8-832f-22f17dba7267',
'description' => 'Initial funding'
});
m3.M3terGenericAPIService.APITransportResult txRes =
m3.M3terGenericAPIService.callM3terAPI(
new List{ txReq }
)[0];
if (!txRes.success) {
// Balance exists but the transaction failed — retry the transaction against
// balanceId rather than re-creating the balance (that would orphan one in m3ter).
System.debug(LoggingLevel.ERROR,
'Balance ' + balanceId + ' created, but transaction failed (' +
txRes.httpStatusCode + '): ' + txRes.errorMessage);
return;
}
Map txBody =
(Map) JSON.deserializeUntyped(txRes.responseBody);
System.debug('Created Transaction: ' + txBody.get('id') + ' against Balance ' + balanceId);
```
### Flow Usage
Two-action pattern:
1. **Call m3ter API** (M3terGenericAPIService) — set *Operation* and *Endpoint*; outputs Response Body, Success, HTTP Status Code, Next Token, Has More Results.
2. **Extract m3ter JSON Fields** (M3terJsonExtractInvocable) — optional; pull values out of the response by *Paths* (e.g. \["data\[0].name", "data\[0].address.locality"]). Object keys and array indexes are supported; an unmatched path returns null.
* **Values** — one entry per input path, in order.
* **Element Values** — when a path resolves to a JSON *array*, its elements are returned here so you can **loop over the array in Flow**.
Branch on `{!Call_m3ter_API.success}` and surface `{!Call_m3ter_API.errorMessage}` on failure.
See the two shipped example Flows for working patterns: dependent-entity chaining, dynamic-choice-set drop-downs bound to M3terListOptionsExample, product-filtered lists, looping over segmented fields, and assembling a JSON request body from a Formula.
## Limits
Note the following limitations:
* **Synchronous callout** in the current transaction. Because of Salesforce's "no callout after DML" rule, do **not** perform DML *before* this action in the same transaction/Flow run — do all callouts first and DML last, or split across transactions.
* Up to **100 callouts per transaction**; request/response bodies bounded by the **6 MB** heap limit; 120s callout timeout.
* Errors never throw out of the invocables — you must check **success / errorMessage**.
## Sync Logs and External Mappings
The Generic m3ter API Invocable Action feature is a **raw pass-through** service — it deliberately does **less** than the standard sync actions (Sync to m3ter, etc.), and you own the difference:
* **No Sync Logs.** Calls do not create **SyncLog\_\_c** or **SubmitSnapshot\_\_c** records. If you need an audit trail, you must log it yourself after the call.
* **Not external-mapping aware.** Performing a create through this service makes a brand-new m3ter entity with **no Salesforce ↔ m3ter link**, so the package's sync features won't reconcile it and repeat calls create duplicates. If linkage matters, prefer the standard **Sync to m3ter** action; otherwise keep your own calls idempotent (look up before create) and maintain the link via the externalmappings endpoint yourself. See [https://docs.m3ter.com/](https://docs.m3ter.com/).
# m3ter Connector for Salesforce - Changelog
Source: https://docs.m3ter.com/guides/m3ter-connector-for-salesforce/m3ter-connector-for-salesforce-changelog
This m3ter Connector for Salesforce changelog explains how to check for the Connector version you have installed and lists the new features, functionality, and updates added in each version release. The latest version is listed first.
## Checking Connector Version
In your Salesforce organization, navigate to **Setup** > **Packaging** > **Installed Packages**. You can read-off the **Version Number** of the m3ter Connector:
3. Use **m3 Auto-Sync Enabled?** switch to turn the feature on. This is the master switch and controls all two-way auto-sync settings for objects.
4. If you want to enable the feature for *m3 Account* objects, switch on **Is m3 Account Auto-Sync Enabled?**
5. If you want to enable the feature for *m3 Balance* and *m3 Balance Transaction* objects, switch on **Is m3 Balance Auto-Sync Enabled?**
## How Two-Way Auto-Sync Works
When enabled, the two-way auto-sync functionality:
1. Tracks any changes made to records in both systems.
2. Uses the `lastSystemToUpdate__c` field to identify which system made the most recent change.
3. Propagates changes:
* From SFDC to m3ter using Platform Events.
* From m3ter to SFDC via the m3ter Native Integration - see [Configuring Salesforce Entity Data Sync Integrations](/guides/integrations/setting-up-integrations/configuring-sf-entity-data-integrations).
## Monitoring and Troubleshooting
If you encounter any issues with the two-way auto-sync feature, you can view *Sync Logs* to troubleshoot issues.
### Viewing Sync Logs
To monitor the synchronization activity:
1. In the **m3ter Admin** app, navigate to the **Sync Logs** tab.
2. Review the logs to check sync operations, timestamps, and status.
### Common Issues and How to Resolve
Here are some common issues, their possible cause, and how to resolve them:
| Issue | Possible Cause | Resolution |
| - | - | - |
| Objects not syncing. | Master switch is turned OFF. | Ensure "m3 Auto-Sync Enabled?" is switched ON. |
| Specific objects not syncing. | Object-specific setting is OFF. | Verify the Object-specific setting is switched ON. |
| Sync errors. | API Connection issues. | Check integration settings and network connectivity. |
| Data conflicts. | Simultaneous updates in both systems. | Review sync logs to identify and resolve conflicts. |
## Technical Details
### Architecture Components
The two-way auto-sync feature leverages several components:
* **Custom Settings**: `m3AutoSyncSettings__c` controls feature enablement.
* **Custom Fields**: `lastSystemToUpdate__c` tracks which system last modified a record.
* **Apex Triggers**: Monitor record changes and initiate sync processes.
* **Platform Events**: `m3 Object Change Event` communicates changes between systems.
* **Flow**: `Handle m3ter Object Change Event` processes the platform events.
### Data Flow
1. When a record is created or updated in Salesforce:
* The `lastSystemToUpdate__c` field is set to 'sfdc'.
* A Platform Event is fired with the record ID.
* The flow processes the event and invokes the "Sync To M3ter" action.
2. When a record is created or updated in m3ter:
* The native integration updates the record in Salesforce.
* The `lastSystemToUpdate__c` field is set to 'm3'.
* No platform event is fired (to prevent circular updates).
## Additional Notes
Please note:
* Currently, only **INSERT** and **UPDATE** operations are supported for two-way auto-sync.
* **DELETE** and **UNDELETE** operations are not yet supported in the current implementation.
## Recommended Next Steps
After enabling two-way auto-sync, we recommend:
* Testing the sync by making sample changes in both systems.
* Review sync logs to ensure proper functionality.
# Generic m3ter API Invocable Action
Source: https://docs.m3ter.com/guides/m3ter-connector-for-salesforce/generic-m3ter-api-invocable-action
The m3ter Connector for Salesforce managed package offers the *Generic m3ter API Invocable Action* feature that lets admins and developers call any Organization-scoped m3ter API endpoint from Salesforce — Apex or Flow — reusing the package's existing authentication, retry, and telemetry:
* **Admins**. Automate m3ter from Flow without waiting on a developer.
* **System Integrators**. Offers a supported, reusable primitive to build customer solutions on, instead of hand-rolling callouts every time.
If there isn't a dedicated action for what you need yet, you can now do it yourself:
* Call any m3ter endpoint from Flow/Apex.
* Pull values out of responses without writing Apex.
* Ready-to-clone example flows so teams start from something that works, not a blank canvas
This topic introduces and explains how to work with the Generic m3ter API Invocable Action feature:
* [Key Components](#key-components)
* [Prerequisites](#prerequisites)
* [Organization-Scoped Endpoint Paths](#organization-scoped-endpoint-paths)
* [Apex and Flow Examples](#apex-and-flow-examples)
* [Limits](#limits)
* [Sync Logs and External Mappings](#sync-logs-and-external-mappings)
**Important!**
* **Check Version**. The *Generic m3ter API Invocable Action* feature described in this topic is only available in **v1.2** and above of the m3ter Connector for Salesforce. See [m3ter Connector for Salesforce - Changelog](https://docs.m3ter.com/guides/m3ter-connector-for-salesforce/m3ter-connector-for-salesforce-changelog) for details on how to check your current installed version.
## Key Components
| Component | Type | Purpose |
| - | - | - |
| M3terGenericAPIService | Apex + Invocable | Transport — call any endpoint (GET/POST/PUT/DELETE) |
| M3terJsonExtractInvocable | Invocable | No-code helper — pull values out of a JSON response by path |
| M3terAccountParserExample | Apex example | **Read** (GET): `GET accounts/{id}` → typed Flow fields |
| M3terCreateProductExample | Apex example | **Create** (POST): `POST products` → new m3ter id |
| M3terListAccountsExample | Apex example | **List + pagination**: pages `GET accounts` via `nextToken` |
| M3terListOptionsExample | Apex example | **Choice-list builder**: pages a list endpoint into `{label, value}` options for a Flow drop-down |
| m3ter Example: Create Balance and Transaction | Flow example | **Dependent-entity chain**: create a Balance, then a Transaction against it |
| m3ter Example: Create Segment Pricing | Flow example | **Read-then-write on segmented entities**: read an Aggregation's segments, then create a Pricing |
Notes:
* The example classes and Flows are **copy-and-adapt templates** — one per operation/pattern.
* To adapt: change the endpoint/operation, and map the fields you need from the response.
## Prerequisites
Please ensure the following prerequisites are in place before using the Generic m3ter API Invocable Action feature:
* The **m3 Sync** package is installed and configured (Access Key, API Secret, Base URL, Organization Id) in **Integration Settings**.
* Users are assigned the **m3ter\_Admin** or **m3ter\_User** permission set.
## Organization-Scoped Endpoint Paths
Main points to note:
* Supply the path **relative to your m3ter Organization**:
* The service prefixes `https:///organizations//`
* So for example for accounts: `.../organizations//accounts`
* Root-level endpoints - for example: `/organizationconfig`, `/oauth` - are **not** supported.
* Supported operations: **GET, POST, PUT, DELETE**.
* The canonical list of endpoints and payloads can be found in the m3ter API Reference documentation at: [https://docs.m3ter.com/](https://docs.m3ter.com/)
## Apex and Flow Examples
This section sets out some Apex and Flow examples using the Generic m3ter API Invocable Action feature:
* [Apex Usage Example](#apex-usage-example)
* [Apex Usage Complex Example](#apex-usage-complex-example)
* [Flow Usage](#flow-usage)
### Apex Usage Example
Apex:
```java theme={null}
m3.M3terGenericAPIService.GenericAPIRequest request = new m3.M3terGenericAPIService.GenericAPIRequest();
request.operation = 'GET';
request.endpoint = 'accounts';
request.queryParams = '{"pageSize":"50"}'; // optional, JSON object of string values
List results =
m3.M3terGenericAPIService.callM3terAPI(
new List{ request }
);
m3.M3terGenericAPIService.APITransportResult result = results[0];
if (result.success) {
Map body = (Map) JSON.deserializeUntyped(result.responseBody);
if (result.hasMoreResults) { /* result.nextToken */ }
} else {
// result.httpStatusCode, result.errorMessage
}
```
**GenericAPIRequest:**
* operation (required),
* endpoint (required),
* queryParams (optional JSON object of string values),
* requestBody (optional JSON body for POST/PUT).
**APITransportResult:**
* success,
* httpStatusCode,
* responseBody,
* errorMessage,
* nextToken,
* hasMoreResults.
### Apex Usage Complex Example
Apex:
```java theme={null}
//Create an m3ter Balance for an Account, then post a Transaction against it
String accountId = 'bfc500d9-0427-4d80-9ddb-03e6140970dc';
String currencyCode = 'USD';
String startDate = '2026-01-01T00:00:00.000Z';
String endDate = '2026-12-31T00:00:00.000Z';
Decimal initialAmount = 1000;
// ── Step 1: create the Balance
m3.M3terGenericAPIService.GenericAPIRequest balanceReq =
new m3.M3terGenericAPIService.GenericAPIRequest();
balanceReq.operation = 'POST';
balanceReq.endpoint = 'balances';
String balanceCode = System.UUID.randomUUID().toString();
balanceReq.requestBody = JSON.serialize(new Map{
'accountId' => accountId,
'currency' => currencyCode,
'startDate' => startDate,
'endDate' => endDate,
'code' => balanceCode,
'name' => 'Prepaid balance created via generic API service'
});
m3.M3terGenericAPIService.APITransportResult balanceRes =
m3.M3terGenericAPIService.callM3terAPI(
new List{ balanceReq }
)[0];
if (!balanceRes.success) {
System.debug(LoggingLevel.ERROR,
'Balance create failed (' + balanceRes.httpStatusCode + '): ' + balanceRes.errorMessage);
return;
}
Map balanceBody =
(Map) JSON.deserializeUntyped(balanceRes.responseBody);
String balanceId = (String) balanceBody.get('id');
System.debug('Created Balance: ' + balanceId);
// Step 2: post a Transaction against the new Balance
// The endpoint is built from the id returned by Step 1
m3.M3terGenericAPIService.GenericAPIRequest txReq =
new m3.M3terGenericAPIService.GenericAPIRequest();
txReq.operation = 'POST';
txReq.endpoint = 'balances/' + balanceId + '/transactions';
txReq.requestBody = JSON.serialize(new Map{
'amount' => initialAmount,
'appliedDate' => startDate,
'currencyPaid'=> currencyCode,
'transactionTypeId' => 'ca6af083-c94b-47a8-832f-22f17dba7267',
'description' => 'Initial funding'
});
m3.M3terGenericAPIService.APITransportResult txRes =
m3.M3terGenericAPIService.callM3terAPI(
new List{ txReq }
)[0];
if (!txRes.success) {
// Balance exists but the transaction failed — retry the transaction against
// balanceId rather than re-creating the balance (that would orphan one in m3ter).
System.debug(LoggingLevel.ERROR,
'Balance ' + balanceId + ' created, but transaction failed (' +
txRes.httpStatusCode + '): ' + txRes.errorMessage);
return;
}
Map txBody =
(Map) JSON.deserializeUntyped(txRes.responseBody);
System.debug('Created Transaction: ' + txBody.get('id') + ' against Balance ' + balanceId);
```
### Flow Usage
Two-action pattern:
1. **Call m3ter API** (M3terGenericAPIService) — set *Operation* and *Endpoint*; outputs Response Body, Success, HTTP Status Code, Next Token, Has More Results.
2. **Extract m3ter JSON Fields** (M3terJsonExtractInvocable) — optional; pull values out of the response by *Paths* (e.g. \["data\[0].name", "data\[0].address.locality"]). Object keys and array indexes are supported; an unmatched path returns null.
* **Values** — one entry per input path, in order.
* **Element Values** — when a path resolves to a JSON *array*, its elements are returned here so you can **loop over the array in Flow**.
Branch on `{!Call_m3ter_API.success}` and surface `{!Call_m3ter_API.errorMessage}` on failure.
See the two shipped example Flows for working patterns: dependent-entity chaining, dynamic-choice-set drop-downs bound to M3terListOptionsExample, product-filtered lists, looping over segmented fields, and assembling a JSON request body from a Formula.
## Limits
Note the following limitations:
* **Synchronous callout** in the current transaction. Because of Salesforce's "no callout after DML" rule, do **not** perform DML *before* this action in the same transaction/Flow run — do all callouts first and DML last, or split across transactions.
* Up to **100 callouts per transaction**; request/response bodies bounded by the **6 MB** heap limit; 120s callout timeout.
* Errors never throw out of the invocables — you must check **success / errorMessage**.
## Sync Logs and External Mappings
The Generic m3ter API Invocable Action feature is a **raw pass-through** service — it deliberately does **less** than the standard sync actions (Sync to m3ter, etc.), and you own the difference:
* **No Sync Logs.** Calls do not create **SyncLog\_\_c** or **SubmitSnapshot\_\_c** records. If you need an audit trail, you must log it yourself after the call.
* **Not external-mapping aware.** Performing a create through this service makes a brand-new m3ter entity with **no Salesforce ↔ m3ter link**, so the package's sync features won't reconcile it and repeat calls create duplicates. If linkage matters, prefer the standard **Sync to m3ter** action; otherwise keep your own calls idempotent (look up before create) and maintain the link via the externalmappings endpoint yourself. See [https://docs.m3ter.com/](https://docs.m3ter.com/).
# m3ter Connector for Salesforce - Changelog
Source: https://docs.m3ter.com/guides/m3ter-connector-for-salesforce/m3ter-connector-for-salesforce-changelog
This m3ter Connector for Salesforce changelog explains how to check for the Connector version you have installed and lists the new features, functionality, and updates added in each version release. The latest version is listed first.
## Checking Connector Version
In your Salesforce organization, navigate to **Setup** > **Packaging** > **Installed Packages**. You can read-off the **Version Number** of the m3ter Connector:
![]() ## Version 1.3
* Introduced support for [Custom SQL Aggregations](https://docs.m3ter.com/guides/usage-data-aggregations/custom-sql-aggregations#custom-sql-aggregations), as a selectable Aggregation Type.
* Security fixes.
## Version 1.2
* Introduced a Generic m3ter API Service, so Salesforce Admins and Developers can design and implement more advanced integrations between their Salesforce and m3ter organizations. See [Generic m3ter API Invocable Action](/guides/m3ter-connector-for-salesforce/generic-m3ter-api-invocable-action) for more details.
## Version 1.1
* Added a new Product Mapping resolution capability: now supporting mapping the same Salesforce Product to different m3ter Plan or Plan Template, depending on Billing Frequency and/or Currency Code. See [Product Mapping Resolution](/guides/m3ter-connector-for-salesforce/product-mapping-resolution) for more details.
* Introducing Usage Design Targets to support Revenue Cloud integration. See [Usage Design Targets](/guides/m3ter-connector-for-salesforce/usage-design-targets) for more details.
* Quality of life improvements.
## Version 1.00 🎉
* User experience improvements.
* Proactive fault monitoring and error reporting.
* Security fixes.
## Version 0.15
* Added support for managing Metering entities (Products, Meters, Aggregations and Compound Aggregations).
* New, improved Setup user experience.
* Bug fixes and quality-of-life improvements.
* See [CRUD for Metering Entities](/guides/m3ter-connector-for-salesforce/crud-for-metering-entities) for more details.
## Version 0.14
* Added support for synchronizing Balances.
* Bug fixes and UX improvements.
## Version 0.13
* Added support for m3sh Webhook Triggers giving Salesforce administrators a solution for sending Salesforce record data to m3sh Workflows via webhook endpoints. See [Setting Up m3sh Webhook Triggers](/guides/m3ter-connector-for-salesforce/setting-up-m3sh-webhook-triggers).
## Version 0.12
* Custom fields enhancement: added support for multiple edition scenarios. Namely, custom fields that are not managed by the m3ter Connector do not get deleted.
* Bug fixes and UX improvements.
## Version 0.11
* Added support for mapping Pricing Segments, in the Pricing custom metadata type. See [Mapping Segment Attributes for Pricing](/guides/m3ter-connector-for-salesforce/mapping-segment-attributes-for-pricing) for more details.
* Added support for mapping m3 Charges.
* Added the ability in m3ter Admin to load reference data from the configured m3ter Organization. Data can be referenced from existing m3 Objects, whenever applicable. Current supported data types:
* **m3 Balance transaction types**
* **m3 Currency codes**
* **m3 Product codes**
* Bug fixes and UX improvements.
**Note:** If you want to upgrade to **v0.11** from previous versions of the m3ter Connector for Salesforce, please get in touch with [m3ter Support](https://m3ter.myfreshworks.com/login/auth/1662629775049?client_id=451980218021503405\&redirect_uri=https%3A%2F%2Fm3ter.freshdesk.com%2Ffreshid%2Fcustomer_authorize_callback%3Fhd%3Dm3ter.freshdesk.com) or your m3ter contact for assistance in performing this upgrade.
## Version 0.9
* Added support for mapping custom fields in m3ter AccountPlans. See [Mapping Custom Fields on m3ter Entities](/guides/m3ter-connector-for-salesforce/mapping-custom-fields-on-m3ter-entities) for more details.
* Added support for m3 Contracts and m3 Commitments [automatic two-way data sync](/guides/m3ter-connector-for-salesforce/enabling-two-way-automated-sync-for-m3ter-objects)!
* For date fields in m3ter Objects, and End-dating operations, the time is now calculated using the timezone set in the Settings area of the m3ter Organisation. For additional clarity, the timezone is now also displayed in Salesforce, in the Setup area of the m3ter Admin app.
## Version 0.8
* Support for mapping custom fields in m3ter entities - Accounts and Contracts for now. See [Mapping Custom Fields on m3ter Entities](/guides/m3ter-connector-for-salesforce/mapping-custom-fields-on-m3ter-entities) for more details.
* m3 Objects are now incorporated into the managed package and are created as Custom Objects in installation. For 0.8:
* \*\* m3 Contract\*\*
* **m3 Commitment**
* **m3 Bill**
* **m3 Bill Item**
## Version 0.6
* Mapping multiple aggregations to the same product and/or plan is now supported.
* m3ter Balance mappings, and [automatic two-way data sync](/guides/m3ter-connector-for-salesforce/enabling-two-way-automated-sync-for-m3ter-objects)! Requires [setting up ](/guides/integrations/setting-up-integrations/configuring-sf-entity-data-integrations) Entity Data Sync integrations for Accounts and Balances.
* m3 Objects are now incorporated into the managed package and are created as Custom Objects in installation. For v0.6:
* **m3 Account**
* **m3 Balance**
* **m3 Balance Transaction**
**Important: Earlier Version Installed?** Customers with a previous version of the Connector for Salesforce managed package installed will need to perform a small manual setup so that the 'Admin' app is clearly distinguishable from the new 'm3ter App' that has been introduced as part of **v0.6**:
1. Go to **Setup** > **App Manager**.
2. Click **Edit** for the App with developer name 'm3terApp'.
3. Update the App name to 'm3ter Admin' and click **Save**.
## Version 0.5.3
* Bugfixes for the End Date m3ter Billing Data action - see [Setting Up Sync for End Dating m3ter Account Billing Entities](/guides/m3ter-connector-for-salesforce/setting-up-sync-for-end-dating-m3ter-account-billing-entities). This resolves issues for scenarios where Salesforce Org and m3ter Organization have a different timezone set.
## Version 0.5.2
* Label updates and minor bugfixes.
## Version 0.5.1
* Enabled the capability to map Compound Aggregations within a Plan or Plan Template.
## Version 0.5
* It's now possible to [end-date](/api/account/end-date-account-billing-entities) a m3ter Account's billing entities, using either a new button or as a Salesforce Invocable action. For more details, see [Setting Up Sync for End Dating m3ter Account Billing Entities](/guides/m3ter-connector-for-salesforce/setting-up-sync-for-end-dating-m3ter-account-billing-entities).
* Synchronizing of Plans and Plan Templates not linked to an Aggregation is now skipped and and informative alert that the Sync has been skipped is given.
## Version 0.4
* Parent / child billing relationships between existing Accounts.
* Ability to trigger data synchronization to m3ter from a Salesforce Trigger or a Flow. For more details, see [Setting Up and Using Sync to m3ter Invocable Action](/guides/m3ter-connector-for-salesforce/setting-up-invocable-action-for-event-driven-sync).
## Version 0.2
* Support for Account, Contract and Opportunity data synchronization to m3ter.
# m3ter Connector - Sample Mappings
Source: https://docs.m3ter.com/guides/m3ter-connector-for-salesforce/m3ter-connector-sample-mappings
This section provides sample mappings for the m3ter Connector for Salesforce:
* [Sample Mappings 1 - Account](/guides/m3ter-connector-for-salesforce/m3ter-connector-sample-mappings/sample-mapping-1-account)
* [Sample Mappings 2 - Commitment](/guides/m3ter-connector-for-salesforce/m3ter-connector-sample-mappings/sample-mappings-2-commitment)
* [Sample Mappings 3 - Contract](/guides/m3ter-connector-for-salesforce/m3ter-connector-sample-mappings/sample-mappings-3-contract)
* [Sample Mappings 4 - AccountPlan](/guides/m3ter-connector-for-salesforce/m3ter-connector-sample-mappings/sample-mappings-4-accountplan)
* [Sample Mappings 5 - Plan](/guides/m3ter-connector-for-salesforce/m3ter-connector-sample-mappings/sample-mappings-5-plan)
* [Sample Mappings 6 - Pricing](/guides/m3ter-connector-for-salesforce/m3ter-connector-sample-mappings/sample-mappings-6-pricing)
* [Sample Mappings 7 - Pricing Bands](/guides/m3ter-connector-for-salesforce/m3ter-connector-sample-mappings/sample-mappings-7-pricing-bands)
**Tip: Working with Mappings?** Before you start working with mapping for the Connector, we recommend that you go through the [Reviewing and Managing Metadata Mappings](/guides/m3ter-connector-for-salesforce/reviewing-and-managing-metadata-mappings) topic.
# Sample Mappings 1 - Account
Source: https://docs.m3ter.com/guides/m3ter-connector-for-salesforce/m3ter-connector-sample-mappings/sample-mapping-1-account
The following table sets out sample mappings for an Account:
| m3ter | Salesforce |
| - | - |
| AccountObject | Account |
| AddressLine1 | BillingStreet |
| AddressLine2 | |
| code | Id |
| Country | BillingCountry |
| emailAddress | [example@example.com](mailto:example@example.com) |
| hardcoded | emailAddress |
| Locality | BillingCity |
| m3Id | m3Id |
| name | Name |
| PostCode | BillingPostCode |
| Region | BillingState |
**Tip: Working with Mappings?** Please read the [Reviewing and Managing Metadata Mappings](/guides/m3ter-connector-for-salesforce/reviewing-and-managing-metadata-mappings) before working with mappings.
# Sample Mappings 2 - Commitment
Source: https://docs.m3ter.com/guides/m3ter-connector-for-salesforce/m3ter-connector-sample-mappings/sample-mappings-2-commitment
The following table sets out sample mappings for a Commitment:
| m3ter | Salesforce - Commitment | Salesforce - Order |
| - | - | - |
| accountMapping\_m3Id | Account | Order.Account |
| AccountMapping | | |
| amountFirstBill | | ListPrice |
| amountPrePaid | Amount | |
| amount | Amount | ListPrice |
| billingInterval | | 1 |
| billingOffset | | 0 |
| billingPlanId | | |
| commitmentFeeDescription | Description | |
| CommitmentObject | Opportunity | OrderItem |
| commitmentUsageDescription | NextStep | |
| currency | USD | USD |
| endDate | 2099-10-10 00:00:00 | EndDate |
| hardcoded | currency, endDate, billingInterval | billingPlanId, currency, billingInterval, billing Offset |
| overageDescription | Name | |
| overageSurchargePercent | Probability | |
| startDate | CloseDate | ServiceDate |
**Tip: Working with Mappings?** Please read the [Reviewing and Managing Metadata Mappings](/guides/m3ter-connector-for-salesforce/reviewing-and-managing-metadata-mappings) before working with mappings.
# Sample Mappings 3 - Contract
Source: https://docs.m3ter.com/guides/m3ter-connector-for-salesforce/m3ter-connector-sample-mappings/sample-mappings-3-contract
The following table sets out sample mappings for a Contract:
| m3ter | Salesforce - New Contract Mapping | Salesforce - Contract Mapping for Contract | Salesforce - Quote Contract Mapping | Salesforce - Order Contract Mapping |
| - | - | - | - | - |
| accountMapping\_m3Id | Account | Account | SBQQ\_\_Account\_\_r | Account |
| AccountMapping | | | | |
| code | Id | Id | Id | id |
| ContractObject | Opportunity | Contract | SBQQ\_\_Quote\_\_c | Order |
| description | Description | Description | Quote\_name\_\_c | Description |
| endDate | End\_Date\_\_c | endDate | SBQQ\_\_EndDate\_\_c | EndDate |
| hardcoded | | | | |
| name | id | ContractNumber | Quote\_Name\_\_c | Name |
| purchaseOrderNumber | | | | |
| startDate | CloseDate | startDate | SBQQ\_CloseDate\_\_c | EffectiveDate |
**Tip: Working with Mappings?** Please read the [Reviewing and Managing Metadata Mappings](/guides/m3ter-connector-for-salesforce/reviewing-and-managing-metadata-mappings) before working with mappings.
# Sample Mappings 4 - AccountPlan
Source: https://docs.m3ter.com/guides/m3ter-connector-for-salesforce/m3ter-connector-sample-mappings/sample-mappings-4-accountplan
The following table sets out sample mappings for a new AccountPlan from various Salesforce objects:
| m3ter | Salesforce Opportunity | Salesforce Contract | Salesforce Quote (CPQ) | Salesforce Order |
| - | - | - | - | - |
| accountMapping\_m3Id | Opportunity.Account | SBQQ\_\_Contract\_\_r.Account | SBQQ\_\_Quote\_\_r.SBQQ\_\_Account\_\_r | Order.Account |
| AccountMapping | | | | |
| AccountPlanObject | OpportunityLineItem | SBQQ\_\_Subscription\_\_c | SBQQ\_\_QuoteLine\_\_c | OrderItem |
| billEpoch | | | | |
| code | Id | Id | Id | Id |
| contractId | | | | |
| endDate | Opportunity.End\_Date\_\_c | SBQQ\_\_EndDate\_\_c | SBQQ\_\_EndDate\_\_c | EndDate |
| hardcoded | | | | |
| planGroupId | | | | |
| planId | ProductCode | SBQQ\_\_ProductName\_\_c | SBQQ\_\_ProductCode\_\_c | Product2Id |
| startDate | Opportunity.CloseDate | SBQQ\_\_StartDate\_\_C | SBQQ\_\_StartDate\_\_C | ServiceDate |
**Tip: Working with Mappings?** Please read the [Reviewing and Managing Metadata Mappings](/guides/m3ter-connector-for-salesforce/reviewing-and-managing-metadata-mappings) before working with mappings.
# Sample Mappings 5 - Plan
Source: https://docs.m3ter.com/guides/m3ter-connector-for-salesforce/m3ter-connector-sample-mappings/sample-mappings-5-plan
The following table sets out sample mappings for a new Plan from various Salesforce objects:
| m3ter | Salesforce Opportunity | Salesforce Contract | Salesforce Quote | Salesforce Order |
| - | - | - | - | - |
| accountId | | | | |
| accountMapping\_m3Id | Opportunity.Account | SBQQ\_\_Contract\_\_r.Account | SBQQ\_\_Quote\_\_r.SBQQ\_\_Account\_\_r | Order.Account |
| AccountMapping | | | | |
| bespoke | TRUE | TRUE | TRUE | TRUE |
| code | Id | Id | Id | id |
| hardcoded | ordinal,bespoke | ordinal,bespoke,minimumSpendDescription | ordinal,bespoke | ordinal,bespoke |
| minimumSpendBillInAdvance | | | | |
| minimumSpendDescription | Description | MinimumSpend | | |
| MinimumSpend | | | | |
| name | Name | SBQQ\_\_ProductName\_\_c | Name | OrderItemNumber |
| ordinal | 1 | 1 | 1 | 1 |
| PlanObject | OpportunityLineItem | SBQQ\_\_Subscription\_\_c | SBQQ\_\_QuoteLine\_\_c | OrderItem |
| planTemplateId | ProductCode | SBQQ\_\_ProductName\_\_c | SBQQ\_\_ProductCode\_\_c | Product2Id |
| standingChargeBillInAdvance | | | | |
| standingChargeDescription | | | | |
| standingCharge | | | | |
**Tip: Working with Mappings?** Please read the [Reviewing and Managing Metadata Mappings](/guides/m3ter-connector-for-salesforce/reviewing-and-managing-metadata-mappings) before working with mappings.
# Sample Mappings 6 - Pricing
Source: https://docs.m3ter.com/guides/m3ter-connector-for-salesforce/m3ter-connector-sample-mappings/sample-mappings-6-pricing
The following table sets out sample mappings for a new Pricing from various Salesforce objects:
**PricingObjects**
| m3ter | Salesforce - New Opportunity Pricing | Salesforce - New Contract Pricing | Salesforce - New Quote Pricing | Salesforce - New Order Pricing |
| - | - | - | - | - |
| aggregationId | ProductCode | SBQQ\_\_Product\_\_r.ProductCode | SBQQ\_\_Product\_\_r.ProductCode | |
| code | Id | Id | Id | Id |
| compoundAggregationId | | | | |
| cumulative | FALSE | FALSE | FALSE | FALSE |
| description | | | | |
| endDate | | SBQQ\_\_EndDate\_\_c | SBQQ\_\_EndDate\_\_c | |
| hardcoded | cumulative,type,tiersSpanPlan, | | | |
| minimumSpendBillInAdvance | cumulative,type,tiersSpanPlan, | | | |
| minimumSpendBillInAdvance | cumulative,type,tiersSpanPlan, | | | |
| minimumSpendBillInAdvance | cumulative,type,tiersSpanPlan, | | | |
| minimumSpendBillInAdvance | | | | |
| minimumSpendBillInAdvance | FALSE | FALSE | FALSE | FALSE |
| minimumSpendDescription | | | | |
| minimumSpend | | | | |
| NestedMapping\_pricingBands | | | | |
| planId | | | | Product2Id |
| planTemplateId | ProductCode | SBQQ\_\_Product\_\_r.ProductCode | SBQQ\_\_Product\_\_r.ProductCode | Product2Id |
| PricingObject | OpportunityLineItem | SBQQ\_\_Subscription\_\_c | SBQQ\_\_QuoteLine\_\_c | OrderItem |
| startDate | Opportunity.CloseDate | SBQQ\_\_StartDate\_\_c | SBQQ\_\_StartDate\_\_c | ServiceDate |
| tiersSpanPlan | FALSE | FALSE | FALSE | FALSE |
| type | DEBIT | DEBIT | DEBIT | DEBIT |
**Tip: Working with Mappings?** Please read the [Reviewing and Managing Metadata Mappings](/guides/m3ter-connector-for-salesforce/reviewing-and-managing-metadata-mappings) before working with mappings.
# Sample Mappings 7 - Pricing Bands
Source: https://docs.m3ter.com/guides/m3ter-connector-for-salesforce/m3ter-connector-sample-mappings/sample-mappings-7-pricing-bands
The following table sets out sample mappings for a new Pricing Bands from various Salesforce objects:
| m3ter | Salesforce - Opportunity New Pricing Bands | Salesforce - Subscription New Pricing Bands | Salesforce - Quote New Pricing Bands | Salesforce - Order New Pricing Bands |
| - | - | - | - | - |
| fixedPrice | UnitPrice | | QuoteNewPricingBands | ListPrice |
| hardcoded | lowerLimit | | lowerLimit | lowerLimit |
| lowerLimit | 0 | SBQQ\_\_LowerBound\_\_c | 0 | 0 |
| NestedObjectLookup | Id | SBQQ\_\_SubscriptionConsumptionSchedule\_\_r.SBQQ\_\_Subscription\_\_r.id | Id | id |
| PricingBandsObject | OpportunityLineItem | SBQQ\_\_SubscriptionConsumptionRate\_\_c | SBQQ\_\_QuoteLine\_\_c | OrderItem |
| unitPrice | UnitPrice | SBQQ\_\_Price\_\_c | SBQQ\_\_NetPrice\_\_c | ListPrice |
**Tip: Working with Mappings?** Please read the [Reviewing and Managing Metadata Mappings](/guides/m3ter-connector-for-salesforce/reviewing-and-managing-metadata-mappings) before working with mappings.
# Mapping Custom Fields on m3ter Entities
Source: https://docs.m3ter.com/guides/m3ter-connector-for-salesforce/mapping-custom-fields-on-m3ter-entities
The m3ter platform supports the creation of custom fields for the majority of its core configuration entities in the form of key/value pairs using string or number values. This capability to store data on entities in a free-hand way can prove very useful in fulfilling a wide range of operational business use cases.
The m3ter Connector for Salesforce managed package supports the mapping of custom fields from your Salesforce Org on m3ter entities.
This topic explains how to enable and work with the mapping custom fields on m3ter entities feature:
* [Overview](/guides/m3ter-connector-for-salesforce/mapping-custom-fields-on-m3ter-entities#overview)
* [Enabling Mapping for Custom Fields](/guides/m3ter-connector-for-salesforce/mapping-custom-fields-on-m3ter-entities#enabling-mapping-for-custom-fields)
* [Adding Custom Fields for Mapping](/guides/m3ter-connector-for-salesforce/mapping-custom-fields-on-m3ter-entities#adding-custom-fields-for-mapping)
* [Notes and Limitations](/guides/m3ter-connector-for-salesforce/mapping-custom-fields-on-m3ter-entities#notes-and-limitations)
**Important!**
* **Check Version**. The mapping custom fields on m3ter entities feature is only available in version **0.8** and above of the m3ter Connector for Salesforce managed package. See [m3ter Connector for Salesforce - Changelog](/guides/m3ter-connector-for-salesforce/m3ter-connector-for-salesforce-changelog) for details on how to check your current installed version.
* **Scope**. The mapping custom fields on m3ter entities feature is currently only supported for the *Account* and *Contract* m3ter entities.
* **Working with Custom Fields in m3ter**. If you enable and use the mapping custom fields on m3ter entities feature in your Salesforce Connector managed package, note that the values of the custom fields created on individual m3ter entities *will only be available for use* in Meter Derived Field or Compound Aggregation calculations *if you also create custom fields with the same name* for those entities with default values at Organization-level. See [Working with Custom Fields](/guides/creating-and-managing-products/working-with-custom-fields) for more details.
## Overview
The mapping of custom fields on m3ter entities feature is built on top of the existing custom metadata framework developed for the m3ter Connector.
A new attribute added to the Custom Metadata Types (CMDT) framework supports "Custom Fields". This attribute is a Long Text Area and is used to store a JSON representation of key/value pairs that the user defines. Once this data is on the CMDT, the Sync Orchestration logic can make use of these fields and include them in the payload sent to m3ter.
## Enabling Mapping for Custom Fields
**To enable mapping for objects:**
1. In your Salesforce Org, navigate to the **m3ter Admin** app.
2. Under **Setup**, select the **Custom fields** tab:
## Version 1.3
* Introduced support for [Custom SQL Aggregations](https://docs.m3ter.com/guides/usage-data-aggregations/custom-sql-aggregations#custom-sql-aggregations), as a selectable Aggregation Type.
* Security fixes.
## Version 1.2
* Introduced a Generic m3ter API Service, so Salesforce Admins and Developers can design and implement more advanced integrations between their Salesforce and m3ter organizations. See [Generic m3ter API Invocable Action](/guides/m3ter-connector-for-salesforce/generic-m3ter-api-invocable-action) for more details.
## Version 1.1
* Added a new Product Mapping resolution capability: now supporting mapping the same Salesforce Product to different m3ter Plan or Plan Template, depending on Billing Frequency and/or Currency Code. See [Product Mapping Resolution](/guides/m3ter-connector-for-salesforce/product-mapping-resolution) for more details.
* Introducing Usage Design Targets to support Revenue Cloud integration. See [Usage Design Targets](/guides/m3ter-connector-for-salesforce/usage-design-targets) for more details.
* Quality of life improvements.
## Version 1.00 🎉
* User experience improvements.
* Proactive fault monitoring and error reporting.
* Security fixes.
## Version 0.15
* Added support for managing Metering entities (Products, Meters, Aggregations and Compound Aggregations).
* New, improved Setup user experience.
* Bug fixes and quality-of-life improvements.
* See [CRUD for Metering Entities](/guides/m3ter-connector-for-salesforce/crud-for-metering-entities) for more details.
## Version 0.14
* Added support for synchronizing Balances.
* Bug fixes and UX improvements.
## Version 0.13
* Added support for m3sh Webhook Triggers giving Salesforce administrators a solution for sending Salesforce record data to m3sh Workflows via webhook endpoints. See [Setting Up m3sh Webhook Triggers](/guides/m3ter-connector-for-salesforce/setting-up-m3sh-webhook-triggers).
## Version 0.12
* Custom fields enhancement: added support for multiple edition scenarios. Namely, custom fields that are not managed by the m3ter Connector do not get deleted.
* Bug fixes and UX improvements.
## Version 0.11
* Added support for mapping Pricing Segments, in the Pricing custom metadata type. See [Mapping Segment Attributes for Pricing](/guides/m3ter-connector-for-salesforce/mapping-segment-attributes-for-pricing) for more details.
* Added support for mapping m3 Charges.
* Added the ability in m3ter Admin to load reference data from the configured m3ter Organization. Data can be referenced from existing m3 Objects, whenever applicable. Current supported data types:
* **m3 Balance transaction types**
* **m3 Currency codes**
* **m3 Product codes**
* Bug fixes and UX improvements.
**Note:** If you want to upgrade to **v0.11** from previous versions of the m3ter Connector for Salesforce, please get in touch with [m3ter Support](https://m3ter.myfreshworks.com/login/auth/1662629775049?client_id=451980218021503405\&redirect_uri=https%3A%2F%2Fm3ter.freshdesk.com%2Ffreshid%2Fcustomer_authorize_callback%3Fhd%3Dm3ter.freshdesk.com) or your m3ter contact for assistance in performing this upgrade.
## Version 0.9
* Added support for mapping custom fields in m3ter AccountPlans. See [Mapping Custom Fields on m3ter Entities](/guides/m3ter-connector-for-salesforce/mapping-custom-fields-on-m3ter-entities) for more details.
* Added support for m3 Contracts and m3 Commitments [automatic two-way data sync](/guides/m3ter-connector-for-salesforce/enabling-two-way-automated-sync-for-m3ter-objects)!
* For date fields in m3ter Objects, and End-dating operations, the time is now calculated using the timezone set in the Settings area of the m3ter Organisation. For additional clarity, the timezone is now also displayed in Salesforce, in the Setup area of the m3ter Admin app.
## Version 0.8
* Support for mapping custom fields in m3ter entities - Accounts and Contracts for now. See [Mapping Custom Fields on m3ter Entities](/guides/m3ter-connector-for-salesforce/mapping-custom-fields-on-m3ter-entities) for more details.
* m3 Objects are now incorporated into the managed package and are created as Custom Objects in installation. For 0.8:
* \*\* m3 Contract\*\*
* **m3 Commitment**
* **m3 Bill**
* **m3 Bill Item**
## Version 0.6
* Mapping multiple aggregations to the same product and/or plan is now supported.
* m3ter Balance mappings, and [automatic two-way data sync](/guides/m3ter-connector-for-salesforce/enabling-two-way-automated-sync-for-m3ter-objects)! Requires [setting up ](/guides/integrations/setting-up-integrations/configuring-sf-entity-data-integrations) Entity Data Sync integrations for Accounts and Balances.
* m3 Objects are now incorporated into the managed package and are created as Custom Objects in installation. For v0.6:
* **m3 Account**
* **m3 Balance**
* **m3 Balance Transaction**
**Important: Earlier Version Installed?** Customers with a previous version of the Connector for Salesforce managed package installed will need to perform a small manual setup so that the 'Admin' app is clearly distinguishable from the new 'm3ter App' that has been introduced as part of **v0.6**:
1. Go to **Setup** > **App Manager**.
2. Click **Edit** for the App with developer name 'm3terApp'.
3. Update the App name to 'm3ter Admin' and click **Save**.
## Version 0.5.3
* Bugfixes for the End Date m3ter Billing Data action - see [Setting Up Sync for End Dating m3ter Account Billing Entities](/guides/m3ter-connector-for-salesforce/setting-up-sync-for-end-dating-m3ter-account-billing-entities). This resolves issues for scenarios where Salesforce Org and m3ter Organization have a different timezone set.
## Version 0.5.2
* Label updates and minor bugfixes.
## Version 0.5.1
* Enabled the capability to map Compound Aggregations within a Plan or Plan Template.
## Version 0.5
* It's now possible to [end-date](/api/account/end-date-account-billing-entities) a m3ter Account's billing entities, using either a new button or as a Salesforce Invocable action. For more details, see [Setting Up Sync for End Dating m3ter Account Billing Entities](/guides/m3ter-connector-for-salesforce/setting-up-sync-for-end-dating-m3ter-account-billing-entities).
* Synchronizing of Plans and Plan Templates not linked to an Aggregation is now skipped and and informative alert that the Sync has been skipped is given.
## Version 0.4
* Parent / child billing relationships between existing Accounts.
* Ability to trigger data synchronization to m3ter from a Salesforce Trigger or a Flow. For more details, see [Setting Up and Using Sync to m3ter Invocable Action](/guides/m3ter-connector-for-salesforce/setting-up-invocable-action-for-event-driven-sync).
## Version 0.2
* Support for Account, Contract and Opportunity data synchronization to m3ter.
# m3ter Connector - Sample Mappings
Source: https://docs.m3ter.com/guides/m3ter-connector-for-salesforce/m3ter-connector-sample-mappings
This section provides sample mappings for the m3ter Connector for Salesforce:
* [Sample Mappings 1 - Account](/guides/m3ter-connector-for-salesforce/m3ter-connector-sample-mappings/sample-mapping-1-account)
* [Sample Mappings 2 - Commitment](/guides/m3ter-connector-for-salesforce/m3ter-connector-sample-mappings/sample-mappings-2-commitment)
* [Sample Mappings 3 - Contract](/guides/m3ter-connector-for-salesforce/m3ter-connector-sample-mappings/sample-mappings-3-contract)
* [Sample Mappings 4 - AccountPlan](/guides/m3ter-connector-for-salesforce/m3ter-connector-sample-mappings/sample-mappings-4-accountplan)
* [Sample Mappings 5 - Plan](/guides/m3ter-connector-for-salesforce/m3ter-connector-sample-mappings/sample-mappings-5-plan)
* [Sample Mappings 6 - Pricing](/guides/m3ter-connector-for-salesforce/m3ter-connector-sample-mappings/sample-mappings-6-pricing)
* [Sample Mappings 7 - Pricing Bands](/guides/m3ter-connector-for-salesforce/m3ter-connector-sample-mappings/sample-mappings-7-pricing-bands)
**Tip: Working with Mappings?** Before you start working with mapping for the Connector, we recommend that you go through the [Reviewing and Managing Metadata Mappings](/guides/m3ter-connector-for-salesforce/reviewing-and-managing-metadata-mappings) topic.
# Sample Mappings 1 - Account
Source: https://docs.m3ter.com/guides/m3ter-connector-for-salesforce/m3ter-connector-sample-mappings/sample-mapping-1-account
The following table sets out sample mappings for an Account:
| m3ter | Salesforce |
| - | - |
| AccountObject | Account |
| AddressLine1 | BillingStreet |
| AddressLine2 | |
| code | Id |
| Country | BillingCountry |
| emailAddress | [example@example.com](mailto:example@example.com) |
| hardcoded | emailAddress |
| Locality | BillingCity |
| m3Id | m3Id |
| name | Name |
| PostCode | BillingPostCode |
| Region | BillingState |
**Tip: Working with Mappings?** Please read the [Reviewing and Managing Metadata Mappings](/guides/m3ter-connector-for-salesforce/reviewing-and-managing-metadata-mappings) before working with mappings.
# Sample Mappings 2 - Commitment
Source: https://docs.m3ter.com/guides/m3ter-connector-for-salesforce/m3ter-connector-sample-mappings/sample-mappings-2-commitment
The following table sets out sample mappings for a Commitment:
| m3ter | Salesforce - Commitment | Salesforce - Order |
| - | - | - |
| accountMapping\_m3Id | Account | Order.Account |
| AccountMapping | | |
| amountFirstBill | | ListPrice |
| amountPrePaid | Amount | |
| amount | Amount | ListPrice |
| billingInterval | | 1 |
| billingOffset | | 0 |
| billingPlanId | | |
| commitmentFeeDescription | Description | |
| CommitmentObject | Opportunity | OrderItem |
| commitmentUsageDescription | NextStep | |
| currency | USD | USD |
| endDate | 2099-10-10 00:00:00 | EndDate |
| hardcoded | currency, endDate, billingInterval | billingPlanId, currency, billingInterval, billing Offset |
| overageDescription | Name | |
| overageSurchargePercent | Probability | |
| startDate | CloseDate | ServiceDate |
**Tip: Working with Mappings?** Please read the [Reviewing and Managing Metadata Mappings](/guides/m3ter-connector-for-salesforce/reviewing-and-managing-metadata-mappings) before working with mappings.
# Sample Mappings 3 - Contract
Source: https://docs.m3ter.com/guides/m3ter-connector-for-salesforce/m3ter-connector-sample-mappings/sample-mappings-3-contract
The following table sets out sample mappings for a Contract:
| m3ter | Salesforce - New Contract Mapping | Salesforce - Contract Mapping for Contract | Salesforce - Quote Contract Mapping | Salesforce - Order Contract Mapping |
| - | - | - | - | - |
| accountMapping\_m3Id | Account | Account | SBQQ\_\_Account\_\_r | Account |
| AccountMapping | | | | |
| code | Id | Id | Id | id |
| ContractObject | Opportunity | Contract | SBQQ\_\_Quote\_\_c | Order |
| description | Description | Description | Quote\_name\_\_c | Description |
| endDate | End\_Date\_\_c | endDate | SBQQ\_\_EndDate\_\_c | EndDate |
| hardcoded | | | | |
| name | id | ContractNumber | Quote\_Name\_\_c | Name |
| purchaseOrderNumber | | | | |
| startDate | CloseDate | startDate | SBQQ\_CloseDate\_\_c | EffectiveDate |
**Tip: Working with Mappings?** Please read the [Reviewing and Managing Metadata Mappings](/guides/m3ter-connector-for-salesforce/reviewing-and-managing-metadata-mappings) before working with mappings.
# Sample Mappings 4 - AccountPlan
Source: https://docs.m3ter.com/guides/m3ter-connector-for-salesforce/m3ter-connector-sample-mappings/sample-mappings-4-accountplan
The following table sets out sample mappings for a new AccountPlan from various Salesforce objects:
| m3ter | Salesforce Opportunity | Salesforce Contract | Salesforce Quote (CPQ) | Salesforce Order |
| - | - | - | - | - |
| accountMapping\_m3Id | Opportunity.Account | SBQQ\_\_Contract\_\_r.Account | SBQQ\_\_Quote\_\_r.SBQQ\_\_Account\_\_r | Order.Account |
| AccountMapping | | | | |
| AccountPlanObject | OpportunityLineItem | SBQQ\_\_Subscription\_\_c | SBQQ\_\_QuoteLine\_\_c | OrderItem |
| billEpoch | | | | |
| code | Id | Id | Id | Id |
| contractId | | | | |
| endDate | Opportunity.End\_Date\_\_c | SBQQ\_\_EndDate\_\_c | SBQQ\_\_EndDate\_\_c | EndDate |
| hardcoded | | | | |
| planGroupId | | | | |
| planId | ProductCode | SBQQ\_\_ProductName\_\_c | SBQQ\_\_ProductCode\_\_c | Product2Id |
| startDate | Opportunity.CloseDate | SBQQ\_\_StartDate\_\_C | SBQQ\_\_StartDate\_\_C | ServiceDate |
**Tip: Working with Mappings?** Please read the [Reviewing and Managing Metadata Mappings](/guides/m3ter-connector-for-salesforce/reviewing-and-managing-metadata-mappings) before working with mappings.
# Sample Mappings 5 - Plan
Source: https://docs.m3ter.com/guides/m3ter-connector-for-salesforce/m3ter-connector-sample-mappings/sample-mappings-5-plan
The following table sets out sample mappings for a new Plan from various Salesforce objects:
| m3ter | Salesforce Opportunity | Salesforce Contract | Salesforce Quote | Salesforce Order |
| - | - | - | - | - |
| accountId | | | | |
| accountMapping\_m3Id | Opportunity.Account | SBQQ\_\_Contract\_\_r.Account | SBQQ\_\_Quote\_\_r.SBQQ\_\_Account\_\_r | Order.Account |
| AccountMapping | | | | |
| bespoke | TRUE | TRUE | TRUE | TRUE |
| code | Id | Id | Id | id |
| hardcoded | ordinal,bespoke | ordinal,bespoke,minimumSpendDescription | ordinal,bespoke | ordinal,bespoke |
| minimumSpendBillInAdvance | | | | |
| minimumSpendDescription | Description | MinimumSpend | | |
| MinimumSpend | | | | |
| name | Name | SBQQ\_\_ProductName\_\_c | Name | OrderItemNumber |
| ordinal | 1 | 1 | 1 | 1 |
| PlanObject | OpportunityLineItem | SBQQ\_\_Subscription\_\_c | SBQQ\_\_QuoteLine\_\_c | OrderItem |
| planTemplateId | ProductCode | SBQQ\_\_ProductName\_\_c | SBQQ\_\_ProductCode\_\_c | Product2Id |
| standingChargeBillInAdvance | | | | |
| standingChargeDescription | | | | |
| standingCharge | | | | |
**Tip: Working with Mappings?** Please read the [Reviewing and Managing Metadata Mappings](/guides/m3ter-connector-for-salesforce/reviewing-and-managing-metadata-mappings) before working with mappings.
# Sample Mappings 6 - Pricing
Source: https://docs.m3ter.com/guides/m3ter-connector-for-salesforce/m3ter-connector-sample-mappings/sample-mappings-6-pricing
The following table sets out sample mappings for a new Pricing from various Salesforce objects:
**PricingObjects**
| m3ter | Salesforce - New Opportunity Pricing | Salesforce - New Contract Pricing | Salesforce - New Quote Pricing | Salesforce - New Order Pricing |
| - | - | - | - | - |
| aggregationId | ProductCode | SBQQ\_\_Product\_\_r.ProductCode | SBQQ\_\_Product\_\_r.ProductCode | |
| code | Id | Id | Id | Id |
| compoundAggregationId | | | | |
| cumulative | FALSE | FALSE | FALSE | FALSE |
| description | | | | |
| endDate | | SBQQ\_\_EndDate\_\_c | SBQQ\_\_EndDate\_\_c | |
| hardcoded | cumulative,type,tiersSpanPlan, | | | |
| minimumSpendBillInAdvance | cumulative,type,tiersSpanPlan, | | | |
| minimumSpendBillInAdvance | cumulative,type,tiersSpanPlan, | | | |
| minimumSpendBillInAdvance | cumulative,type,tiersSpanPlan, | | | |
| minimumSpendBillInAdvance | | | | |
| minimumSpendBillInAdvance | FALSE | FALSE | FALSE | FALSE |
| minimumSpendDescription | | | | |
| minimumSpend | | | | |
| NestedMapping\_pricingBands | | | | |
| planId | | | | Product2Id |
| planTemplateId | ProductCode | SBQQ\_\_Product\_\_r.ProductCode | SBQQ\_\_Product\_\_r.ProductCode | Product2Id |
| PricingObject | OpportunityLineItem | SBQQ\_\_Subscription\_\_c | SBQQ\_\_QuoteLine\_\_c | OrderItem |
| startDate | Opportunity.CloseDate | SBQQ\_\_StartDate\_\_c | SBQQ\_\_StartDate\_\_c | ServiceDate |
| tiersSpanPlan | FALSE | FALSE | FALSE | FALSE |
| type | DEBIT | DEBIT | DEBIT | DEBIT |
**Tip: Working with Mappings?** Please read the [Reviewing and Managing Metadata Mappings](/guides/m3ter-connector-for-salesforce/reviewing-and-managing-metadata-mappings) before working with mappings.
# Sample Mappings 7 - Pricing Bands
Source: https://docs.m3ter.com/guides/m3ter-connector-for-salesforce/m3ter-connector-sample-mappings/sample-mappings-7-pricing-bands
The following table sets out sample mappings for a new Pricing Bands from various Salesforce objects:
| m3ter | Salesforce - Opportunity New Pricing Bands | Salesforce - Subscription New Pricing Bands | Salesforce - Quote New Pricing Bands | Salesforce - Order New Pricing Bands |
| - | - | - | - | - |
| fixedPrice | UnitPrice | | QuoteNewPricingBands | ListPrice |
| hardcoded | lowerLimit | | lowerLimit | lowerLimit |
| lowerLimit | 0 | SBQQ\_\_LowerBound\_\_c | 0 | 0 |
| NestedObjectLookup | Id | SBQQ\_\_SubscriptionConsumptionSchedule\_\_r.SBQQ\_\_Subscription\_\_r.id | Id | id |
| PricingBandsObject | OpportunityLineItem | SBQQ\_\_SubscriptionConsumptionRate\_\_c | SBQQ\_\_QuoteLine\_\_c | OrderItem |
| unitPrice | UnitPrice | SBQQ\_\_Price\_\_c | SBQQ\_\_NetPrice\_\_c | ListPrice |
**Tip: Working with Mappings?** Please read the [Reviewing and Managing Metadata Mappings](/guides/m3ter-connector-for-salesforce/reviewing-and-managing-metadata-mappings) before working with mappings.
# Mapping Custom Fields on m3ter Entities
Source: https://docs.m3ter.com/guides/m3ter-connector-for-salesforce/mapping-custom-fields-on-m3ter-entities
The m3ter platform supports the creation of custom fields for the majority of its core configuration entities in the form of key/value pairs using string or number values. This capability to store data on entities in a free-hand way can prove very useful in fulfilling a wide range of operational business use cases.
The m3ter Connector for Salesforce managed package supports the mapping of custom fields from your Salesforce Org on m3ter entities.
This topic explains how to enable and work with the mapping custom fields on m3ter entities feature:
* [Overview](/guides/m3ter-connector-for-salesforce/mapping-custom-fields-on-m3ter-entities#overview)
* [Enabling Mapping for Custom Fields](/guides/m3ter-connector-for-salesforce/mapping-custom-fields-on-m3ter-entities#enabling-mapping-for-custom-fields)
* [Adding Custom Fields for Mapping](/guides/m3ter-connector-for-salesforce/mapping-custom-fields-on-m3ter-entities#adding-custom-fields-for-mapping)
* [Notes and Limitations](/guides/m3ter-connector-for-salesforce/mapping-custom-fields-on-m3ter-entities#notes-and-limitations)
**Important!**
* **Check Version**. The mapping custom fields on m3ter entities feature is only available in version **0.8** and above of the m3ter Connector for Salesforce managed package. See [m3ter Connector for Salesforce - Changelog](/guides/m3ter-connector-for-salesforce/m3ter-connector-for-salesforce-changelog) for details on how to check your current installed version.
* **Scope**. The mapping custom fields on m3ter entities feature is currently only supported for the *Account* and *Contract* m3ter entities.
* **Working with Custom Fields in m3ter**. If you enable and use the mapping custom fields on m3ter entities feature in your Salesforce Connector managed package, note that the values of the custom fields created on individual m3ter entities *will only be available for use* in Meter Derived Field or Compound Aggregation calculations *if you also create custom fields with the same name* for those entities with default values at Organization-level. See [Working with Custom Fields](/guides/creating-and-managing-products/working-with-custom-fields) for more details.
## Overview
The mapping of custom fields on m3ter entities feature is built on top of the existing custom metadata framework developed for the m3ter Connector.
A new attribute added to the Custom Metadata Types (CMDT) framework supports "Custom Fields". This attribute is a Long Text Area and is used to store a JSON representation of key/value pairs that the user defines. Once this data is on the CMDT, the Sync Orchestration logic can make use of these fields and include them in the payload sent to m3ter.
## Enabling Mapping for Custom Fields
**To enable mapping for objects:**
1. In your Salesforce Org, navigate to the **m3ter Admin** app.
2. Under **Setup**, select the **Custom fields** tab:
![]() 3. Use the **Enable Custom Fields?** switch to turn the feature on.
Once the feature is enabled, a set of accordions is displayed with each accordion representing a CMDT type that has the new ‘Custom Fields’ attribute:
3. Use the **Enable Custom Fields?** switch to turn the feature on.
Once the feature is enabled, a set of accordions is displayed with each accordion representing a CMDT type that has the new ‘Custom Fields’ attribute:
![]() Notes:
* By default, the mapping custom fields feature is *disabled*.
* For v0.8, the mapping custom fields feature is limited to **Account** and **Contract** Metadata Types.
**Important!** When you enable the mapping custom fields feature, a banner advises that how the application updates this metadata record is unlike almost any other mechanism we would use to update records in Salesforce, because we are dealing with Custom Metadata Types. For more information, please see the [Security Considerations](https://developer.salesforce.com/docs/atlas.en-us.apexcode.meta/apexcode/apex_metadata_security.htm) page in the Salesforce *Apex Developer Guide*.
## Adding Custom Fields for Mapping
When you have enabled the mapping custom fields feature, you can expand the accordion for the CMDT type you want to add a custom field to for mapping into the corresponding m3ter object:
* For a given Metadata Type that has the field ‘Custom Fields’ - the backend will pre-populate the possible options that could be selected in the **Field / Value** - a drop-down list of valid SFDC field options is shown. This is based on the Salesforce Object that the Metadata Type is referencing:
Notes:
* By default, the mapping custom fields feature is *disabled*.
* For v0.8, the mapping custom fields feature is limited to **Account** and **Contract** Metadata Types.
**Important!** When you enable the mapping custom fields feature, a banner advises that how the application updates this metadata record is unlike almost any other mechanism we would use to update records in Salesforce, because we are dealing with Custom Metadata Types. For more information, please see the [Security Considerations](https://developer.salesforce.com/docs/atlas.en-us.apexcode.meta/apexcode/apex_metadata_security.htm) page in the Salesforce *Apex Developer Guide*.
## Adding Custom Fields for Mapping
When you have enabled the mapping custom fields feature, you can expand the accordion for the CMDT type you want to add a custom field to for mapping into the corresponding m3ter object:
* For a given Metadata Type that has the field ‘Custom Fields’ - the backend will pre-populate the possible options that could be selected in the **Field / Value** - a drop-down list of valid SFDC field options is shown. This is based on the Salesforce Object that the Metadata Type is referencing:
![]() Here's an example of how the Custom Field mapping is saved on CMDT record:
Here's an example of how the Custom Field mapping is saved on CMDT record:
![]() The following then highlights the custom field being dynamically added to the mapped data:
The following then highlights the custom field being dynamically added to the mapped data:
![]() The custom field is then subsequently mapped into the corresponding m3ter entity under **Account metadata**:
The custom field is then subsequently mapped into the corresponding m3ter entity under **Account metadata**:
![]() ## Notes and Limitations
* **Support for hardcoded values**. The Field Value can accept a ‘hardcoded’ value, however these are currently not sent to m3ter by default.
* The workaround would be to create a custom field on the SFDC object with the hardcoded value (that is, Formula field or something similar) then map that field.
* **Custom field deletion**. Custom field definitions that are removed from the mapping after being synced will result in the data being deleted from m3ter if the record is synced again without the previous definitions of the custom field.
* **Null value fields**. Where a mapped custom field does not have a value - that is, the value in SFDC is null - the custom field will not be sent to m3ter and the the custom field will not be displayed on the sync pane.
# Mapping Segment Attributes for Pricing
Source: https://docs.m3ter.com/guides/m3ter-connector-for-salesforce/mapping-segment-attributes-for-pricing
The m3ter platform supports *Segmented Aggregations*, which allow you to segment the usage data collected by a single Meter. Segmented Aggregations are very useful for implementing certain pricing and billing use cases because you can then apply a different pricing to each of the defined segments.
The m3ter Connector for Salesforce managed package supports the mapping of Segment Attributes from your Salesforce Org onto m3ter pricing set up for Segmented Aggregations.
This topic explains how to enable and work with the mapping segment attributes on pricing feature:
* [Overview](/guides/m3ter-connector-for-salesforce/mapping-segment-attributes-for-pricing#overview)
* [Enabling Mapping Segment Attributes](/guides/m3ter-connector-for-salesforce/mapping-segment-attributes-for-pricing#enabling-mapping-segment-attributes)
* [Notes and Limitations](/guides/m3ter-connector-for-salesforce/mapping-segment-attributes-for-pricing#notes-and-limitations)
**Important!**
* **Check Version**. The mapping segment attributes for pricing feature is only available in version **0.8** and above of the m3ter Connector for Salesforce managed package. See [m3ter Connector for Salesforce - Changelog](/guides/m3ter-connector-for-salesforce/m3ter-connector-for-salesforce-changelog) for details on how to check your current installed version.
* **Working with Segmented Aggregation in m3ter**. If you enable and plan to use the mapping segment attributes on pricing feature in your m3ter Salesforce Connector managed package, we *strongly recommend* that you first review the [Segmented Aggregations](/guides/usage-data-aggregations/segmented-aggregations) topic in our user documentation.
## Overview
The mapping of segment attributes on m3ter pricing feature is built on top of the existing custom metadata framework developed for the m3ter Connector.
A new attribute added to the Custom Metadata Types (CMDT) framework supports a "Segments Field" in the `PricingMapping_mdt` and is designed to reference fields from the `PricingObject` specified in the metadata definition. This attribute is a Long Text Area and is used to store a JSON representation of key/value pairs that the user defines. Once this data is on the CMDT, the Sync Orchestration logic can make use of these fields and include them in the payload sent to m3ter.
## Enabling Mapping Segment Attributes
**To enable mapping of segment attributes:**
1. In your Salesforce Org, navigate to the **m3ter Admin** app.
2. Under **Setup**, select the **Segments** tab:
## Notes and Limitations
* **Support for hardcoded values**. The Field Value can accept a ‘hardcoded’ value, however these are currently not sent to m3ter by default.
* The workaround would be to create a custom field on the SFDC object with the hardcoded value (that is, Formula field or something similar) then map that field.
* **Custom field deletion**. Custom field definitions that are removed from the mapping after being synced will result in the data being deleted from m3ter if the record is synced again without the previous definitions of the custom field.
* **Null value fields**. Where a mapped custom field does not have a value - that is, the value in SFDC is null - the custom field will not be sent to m3ter and the the custom field will not be displayed on the sync pane.
# Mapping Segment Attributes for Pricing
Source: https://docs.m3ter.com/guides/m3ter-connector-for-salesforce/mapping-segment-attributes-for-pricing
The m3ter platform supports *Segmented Aggregations*, which allow you to segment the usage data collected by a single Meter. Segmented Aggregations are very useful for implementing certain pricing and billing use cases because you can then apply a different pricing to each of the defined segments.
The m3ter Connector for Salesforce managed package supports the mapping of Segment Attributes from your Salesforce Org onto m3ter pricing set up for Segmented Aggregations.
This topic explains how to enable and work with the mapping segment attributes on pricing feature:
* [Overview](/guides/m3ter-connector-for-salesforce/mapping-segment-attributes-for-pricing#overview)
* [Enabling Mapping Segment Attributes](/guides/m3ter-connector-for-salesforce/mapping-segment-attributes-for-pricing#enabling-mapping-segment-attributes)
* [Notes and Limitations](/guides/m3ter-connector-for-salesforce/mapping-segment-attributes-for-pricing#notes-and-limitations)
**Important!**
* **Check Version**. The mapping segment attributes for pricing feature is only available in version **0.8** and above of the m3ter Connector for Salesforce managed package. See [m3ter Connector for Salesforce - Changelog](/guides/m3ter-connector-for-salesforce/m3ter-connector-for-salesforce-changelog) for details on how to check your current installed version.
* **Working with Segmented Aggregation in m3ter**. If you enable and plan to use the mapping segment attributes on pricing feature in your m3ter Salesforce Connector managed package, we *strongly recommend* that you first review the [Segmented Aggregations](/guides/usage-data-aggregations/segmented-aggregations) topic in our user documentation.
## Overview
The mapping of segment attributes on m3ter pricing feature is built on top of the existing custom metadata framework developed for the m3ter Connector.
A new attribute added to the Custom Metadata Types (CMDT) framework supports a "Segments Field" in the `PricingMapping_mdt` and is designed to reference fields from the `PricingObject` specified in the metadata definition. This attribute is a Long Text Area and is used to store a JSON representation of key/value pairs that the user defines. Once this data is on the CMDT, the Sync Orchestration logic can make use of these fields and include them in the payload sent to m3ter.
## Enabling Mapping Segment Attributes
**To enable mapping of segment attributes:**
1. In your Salesforce Org, navigate to the **m3ter Admin** app.
2. Under **Setup**, select the **Segments** tab:
![]() * The page queries all CMDT types that have the field `Segments__c` defined for a given Custom Metadata Type. As of 2nd June 2025, this feature is only available for the Pricing sync:
* The page queries all CMDT types that have the field `Segments__c` defined for a given Custom Metadata Type. As of 2nd June 2025, this feature is only available for the Pricing sync:
![]() * Note that following the same pattern for how the m3ter Connector for SalesForce supports [Custom Fields](/guides/m3ter-connector-for-salesforce/mapping-custom-fields-on-m3ter-entities), there is a Long Text Area field added to `PricingMapping__mdt` for **Segments**.
3. Expand **NewPricing** on the **Segments** tab:
* Note that following the same pattern for how the m3ter Connector for SalesForce supports [Custom Fields](/guides/m3ter-connector-for-salesforce/mapping-custom-fields-on-m3ter-entities), there is a Long Text Area field added to `PricingMapping__mdt` for **Segments**.
3. Expand **NewPricing** on the **Segments** tab:
![]() 4. Use the **NewPricing** panel to define segment attributes that should be sent to m3ter. This configuration set up includes selecting a Salesforce **SFDC Field** to serve as the source for the attribute's value:
4. Use the **NewPricing** panel to define segment attributes that should be sent to m3ter. This configuration set up includes selecting a Salesforce **SFDC Field** to serve as the source for the attribute's value:
![]() * Note that for improved usability and to aid identification, the Sync Record component now highlights mapped attributes for Segments using a green icon:
* Note that for improved usability and to aid identification, the Sync Record component now highlights mapped attributes for Segments using a green icon:
![]() * For Custom Fields using a dark blue icon:
* For Custom Fields using a dark blue icon:
![]() ## Notes and Limitations
### Field Reference Constraints
The available fields for segment values are constrained by the `PricingObject` defined in the `PricingMapping__mdt` record.
#### PricingObject Context
The `PricingObject` field - for example `OpportunityLineItem` in the following screenshot - determines which of the object's fields can be referenced:
## Notes and Limitations
### Field Reference Constraints
The available fields for segment values are constrained by the `PricingObject` defined in the `PricingMapping__mdt` record.
#### PricingObject Context
The `PricingObject` field - for example `OpportunityLineItem` in the following screenshot - determines which of the object's fields can be referenced:
![]() * Only fields accessible from this object context can be used in segment values
* For example, if `PricingObject` is `OpportunityLineItem`, then fields like `OpportunityLineItem.Region__c` or fields from related objects like `Opportunity.Account.Region__c` would be valid.
#### Field Accessibility
* Standard and custom fields from the `PricingObject` are supported.
* Related object fields are supported through relationship notation - for example `Opportunity.Type`.
* Field-level security and object permissions are respected during resolution.
#### Reference Syntax
* For direct fields on the `PricingObject`, use just the field API name - for example `Region__c`.
* For related object fields, use relationship notation - for example `Opportunity.Account.Region__c`.
* Static values can be used directly without any special notation.
The format follows these additional rules:
* Each segment is a key-value pair separated by a colon.
* Multiple segments are separated by commas.
* Whitespace around keys and values is automatically trimmed.
* Invalid formats - such as missing colon or empty values - are ignored.
* Field references that don't exist on the `PricingObject` will cause validation errors.
* The field is optional and can be left empty.
### Support for Wildcards
In m3ter, when defining pricing for Segmented Aggregations, you can use wildcards to apply default pricing to unspecified segment combinations.
This is achieved by omitting certain fields in the segment object of your API request. In the m3ter Connector for SalesForce, no extra logic with respect to wildcards is needed. The Connector should be acting as a passthru and let the m3ter platform handle wildcards in segments - see [Segmented Aggregations - m3ter Documentation](/guides/usage-data-aggregations/segmented-aggregations#using-wildcards-order-of-evaluation) for details.
# Overview - Functional Scope and Limitations
Source: https://docs.m3ter.com/guides/m3ter-connector-for-salesforce/overview-functional-scope-and-limitations
The m3ter Connector for Salesforce supports two main sync flows from Salesforce to m3ter:
* **Account Sync**. Salesforce Customer Account to m3ter Account.
* **Sales Agreement Sync**. New sales agreements in Salesforce into m3ter.
The Connector ships with predefined mappings for the Opportunity (and Opportunity products) objects in Salesforce. However, it also supports other configurations and we can provide example mappings on request.
This topic provides a series of lookup references tables and listings to help you quickly check on the current scope and limitations of the sync flows you can implement using the m3ter Connector for Salesforce. Prerequisites for these flows in terms of your sales agreement set up in Salesforce and required mappings to m3ter Objects and Fields are also given:
* [Supported Operations for Connector Sync Flows](/guides/m3ter-connector-for-salesforce/overview-functional-scope-and-limitations#supported-operations-for-connector-syncs-flows)
* [Sync Limitations and Exclusions](/guides/m3ter-connector-for-salesforce/overview-functional-scope-and-limitations#sync-limitations-and-exclusions)
* [Expected Salesforce Sales Agreement Structure](/guides/m3ter-connector-for-salesforce/overview-functional-scope-and-limitations#expected-salesforce-sales-agreement-structure)
* [m3ter Objects and Fields - Mandatory Mappings](/guides/m3ter-connector-for-salesforce/overview-functional-scope-and-limitations#m3ter-object-and-fields---mandatory-mappings)
**Note: Use Case not Supported?** If you have use cases that are not currently supported, please contact your m3ter representative to discuss.
**Note: Sample Mappings!** The [m3ter Connector - Sample Mappings](/guides/m3ter-connector-for-salesforce/m3ter-connector-sample-mappings) sub-section provides sample mappings.
## Supported Operations for Connector Syncs Flows
The following table sets out the operations supported by the m3ter Connector for different sync flow types:
| Sync Type | m3ter Object | Supported Operations | Notes |
| - | - | - | - |
| Account Sync | Account | Create, Update | |
| Sales agreement Sync | Account | Create. Update | Where the sale agreement in Salesforce is based on related objects, such as an Opportunity and Opportunity Products, or Orders and Order Items, and so on. |
| | Contract | Create, Update | |
| | Commitment | Create Only | |
| | Account Plan | Create Only | Only prepaid Commitments supported currently or Commitments set up to be billed with Plan. |
| | Plan | Create Only | |
| | Pricing | Create Only | |
| Amendments Sync | End Date Contract | Available | End dates selected m3ter billing Objects linked to a Contract. |
| | End Date all Account Billing Objects | Available | End dates selected m3ter billing Objects linked to the m3ter Account. |
## Sync Limitations and Exclusions
Here is a summary of the current sync limitations and exclusions for the m3ter Connector for Salesforce managed package:
* **Balance and Balance Transactions**. We expect to support Balance and Balance Transaction creation starting from version 0.6 or above of the m3ter Connector.
* **Segmented Pricing**. Not yet available.
* **Plan Groups**. Existing and mapped Plan Groups can be synced.
* **Custom Billing Schedule for Commitments**. Not yet available - Commitment/Prepayment sync is currently only supported for Commitments where any unpaid amount is billed with a Plan.
* **Creation of Compound Aggregations**. Syncing of existing and mapped Compound Aggregations in m3ter is only supported in version 0.5.1 and above of the Connector managed package.
* **Price Overrides when using Plan Templates**. Supported for single Aggregation pricing.
## Expected Salesforce Sales Agreement Structure
The m3ter Connector for Salesforce can work with almost any sales flow within Salesforce. This is achieved by mapping the Salesforce objects used in your sales process to the m3ter billing configuration.
For the Connector to work properly, the data for mappings must be made to a related set of objects in your Salesforce Org set up - that is, objects in *Master/Detail* relationships. This will allow you to pull data from each related source for use within the mapping configuration. Mapped fields must be available on the Salesforce object (or via the related object) in order to be able to create mappings between m3ter and Salesforce. A typical sales object in Salesforce structure will have this general structure:
* Header (Master)
* Lines (Details)
* Pricing (pricing can be at the same level as the order line or in a related object)
Where the sales agreements objects can be:
* Opportunity (Master)
* Opportunity products (Details)
* Quote (Master)
* Quote Lines (Details)
* Order (Master)
* Order Items or Order Products (Details)
* Contract (Master)
* Subscriptions (Details)
* Subscription Consumption Schedule
* Custom Object (header)
* Custom Object (lines)
* Custom Object (pricing)
**Tip: Are Multiple Sales Flows Mapping possible?** Yes. You can also configure mappings for multiple sales flows in your CRM by creating new sets of metadata mappings for each set of objects on which the sync flow is based. For example, one flow for Opportunities and another flow for Contracts.
### Account Sync
The following illustrates the Account Sync flow:
* Only fields accessible from this object context can be used in segment values
* For example, if `PricingObject` is `OpportunityLineItem`, then fields like `OpportunityLineItem.Region__c` or fields from related objects like `Opportunity.Account.Region__c` would be valid.
#### Field Accessibility
* Standard and custom fields from the `PricingObject` are supported.
* Related object fields are supported through relationship notation - for example `Opportunity.Type`.
* Field-level security and object permissions are respected during resolution.
#### Reference Syntax
* For direct fields on the `PricingObject`, use just the field API name - for example `Region__c`.
* For related object fields, use relationship notation - for example `Opportunity.Account.Region__c`.
* Static values can be used directly without any special notation.
The format follows these additional rules:
* Each segment is a key-value pair separated by a colon.
* Multiple segments are separated by commas.
* Whitespace around keys and values is automatically trimmed.
* Invalid formats - such as missing colon or empty values - are ignored.
* Field references that don't exist on the `PricingObject` will cause validation errors.
* The field is optional and can be left empty.
### Support for Wildcards
In m3ter, when defining pricing for Segmented Aggregations, you can use wildcards to apply default pricing to unspecified segment combinations.
This is achieved by omitting certain fields in the segment object of your API request. In the m3ter Connector for SalesForce, no extra logic with respect to wildcards is needed. The Connector should be acting as a passthru and let the m3ter platform handle wildcards in segments - see [Segmented Aggregations - m3ter Documentation](/guides/usage-data-aggregations/segmented-aggregations#using-wildcards-order-of-evaluation) for details.
# Overview - Functional Scope and Limitations
Source: https://docs.m3ter.com/guides/m3ter-connector-for-salesforce/overview-functional-scope-and-limitations
The m3ter Connector for Salesforce supports two main sync flows from Salesforce to m3ter:
* **Account Sync**. Salesforce Customer Account to m3ter Account.
* **Sales Agreement Sync**. New sales agreements in Salesforce into m3ter.
The Connector ships with predefined mappings for the Opportunity (and Opportunity products) objects in Salesforce. However, it also supports other configurations and we can provide example mappings on request.
This topic provides a series of lookup references tables and listings to help you quickly check on the current scope and limitations of the sync flows you can implement using the m3ter Connector for Salesforce. Prerequisites for these flows in terms of your sales agreement set up in Salesforce and required mappings to m3ter Objects and Fields are also given:
* [Supported Operations for Connector Sync Flows](/guides/m3ter-connector-for-salesforce/overview-functional-scope-and-limitations#supported-operations-for-connector-syncs-flows)
* [Sync Limitations and Exclusions](/guides/m3ter-connector-for-salesforce/overview-functional-scope-and-limitations#sync-limitations-and-exclusions)
* [Expected Salesforce Sales Agreement Structure](/guides/m3ter-connector-for-salesforce/overview-functional-scope-and-limitations#expected-salesforce-sales-agreement-structure)
* [m3ter Objects and Fields - Mandatory Mappings](/guides/m3ter-connector-for-salesforce/overview-functional-scope-and-limitations#m3ter-object-and-fields---mandatory-mappings)
**Note: Use Case not Supported?** If you have use cases that are not currently supported, please contact your m3ter representative to discuss.
**Note: Sample Mappings!** The [m3ter Connector - Sample Mappings](/guides/m3ter-connector-for-salesforce/m3ter-connector-sample-mappings) sub-section provides sample mappings.
## Supported Operations for Connector Syncs Flows
The following table sets out the operations supported by the m3ter Connector for different sync flow types:
| Sync Type | m3ter Object | Supported Operations | Notes |
| - | - | - | - |
| Account Sync | Account | Create, Update | |
| Sales agreement Sync | Account | Create. Update | Where the sale agreement in Salesforce is based on related objects, such as an Opportunity and Opportunity Products, or Orders and Order Items, and so on. |
| | Contract | Create, Update | |
| | Commitment | Create Only | |
| | Account Plan | Create Only | Only prepaid Commitments supported currently or Commitments set up to be billed with Plan. |
| | Plan | Create Only | |
| | Pricing | Create Only | |
| Amendments Sync | End Date Contract | Available | End dates selected m3ter billing Objects linked to a Contract. |
| | End Date all Account Billing Objects | Available | End dates selected m3ter billing Objects linked to the m3ter Account. |
## Sync Limitations and Exclusions
Here is a summary of the current sync limitations and exclusions for the m3ter Connector for Salesforce managed package:
* **Balance and Balance Transactions**. We expect to support Balance and Balance Transaction creation starting from version 0.6 or above of the m3ter Connector.
* **Segmented Pricing**. Not yet available.
* **Plan Groups**. Existing and mapped Plan Groups can be synced.
* **Custom Billing Schedule for Commitments**. Not yet available - Commitment/Prepayment sync is currently only supported for Commitments where any unpaid amount is billed with a Plan.
* **Creation of Compound Aggregations**. Syncing of existing and mapped Compound Aggregations in m3ter is only supported in version 0.5.1 and above of the Connector managed package.
* **Price Overrides when using Plan Templates**. Supported for single Aggregation pricing.
## Expected Salesforce Sales Agreement Structure
The m3ter Connector for Salesforce can work with almost any sales flow within Salesforce. This is achieved by mapping the Salesforce objects used in your sales process to the m3ter billing configuration.
For the Connector to work properly, the data for mappings must be made to a related set of objects in your Salesforce Org set up - that is, objects in *Master/Detail* relationships. This will allow you to pull data from each related source for use within the mapping configuration. Mapped fields must be available on the Salesforce object (or via the related object) in order to be able to create mappings between m3ter and Salesforce. A typical sales object in Salesforce structure will have this general structure:
* Header (Master)
* Lines (Details)
* Pricing (pricing can be at the same level as the order line or in a related object)
Where the sales agreements objects can be:
* Opportunity (Master)
* Opportunity products (Details)
* Quote (Master)
* Quote Lines (Details)
* Order (Master)
* Order Items or Order Products (Details)
* Contract (Master)
* Subscriptions (Details)
* Subscription Consumption Schedule
* Custom Object (header)
* Custom Object (lines)
* Custom Object (pricing)
**Tip: Are Multiple Sales Flows Mapping possible?** Yes. You can also configure mappings for multiple sales flows in your CRM by creating new sets of metadata mappings for each set of objects on which the sync flow is based. For example, one flow for Opportunities and another flow for Contracts.
### Account Sync
The following illustrates the Account Sync flow:
![]() ### Sales Agreement Sync
Here are two examples illustrating the sales agreement Sync flow:
* **Contract**
### Sales Agreement Sync
Here are two examples illustrating the sales agreement Sync flow:
* **Contract**
![]() * **Opportunity**
* **Opportunity**
![]() ## m3ter Object and Fields - Mandatory Mappings
In order to successfully create agreements from a source sales agreement in Salesforce, m3ter requires certain Objects and Fields to be mapped. The following table sets out these mandatory mappings:
| m3ter Object | m3ter Field | Mandatory | Notes |
| - | - | - | - |
| Account | Name | Yes | |
| | Code | Yes | |
| | Email | Yes | |
| | Address Line 1 | | |
| | Address Line 2 | | |
| | Post Code | | |
| | Region | | |
| | Locality | | |
| | Country | | |
| Contract | Name | Yes | |
| | Code | Yes | |
| | Start Date | Yes | |
| | End Date | Yes | |
| | PO Number | | |
| | Description | | |
| Commitment | Billing Plan | Yes | |
| | Start Date | Yes | |
| | End Date | Yes | |
| | Currency | Yes | |
| | Amount | Yes | |
| | Amount Prepaid | | |
| | Amount First Bill | | |
| | Overage Surcharge Percent | | |
| | Billing Interval | | |
| | Billing Offset | | |
| | Commitment Fees Description | | |
| | Commitment Usage Description | | |
| | Overage Description | | |
| | Hardcoded | | |
| Account Plan | Plan ID | Conditional | Requires just one of either Plan ID or Plan Group ID but not both. |
| | Plan Group ID | Conditional | |
| | Contract ID | | |
| | Start Date | Yes | |
| | End Date | | |
| | Code | Yes | |
| | Bill Epoch | | |
| Plan | Plan Template ID | Yes | |
| | Code | Yes | |
| | Name | Yes | |
| | Minimum Spend | | |
| | Minimum Spend Bill in Advance | | |
| | Minimum Spend Description | | |
| | Standing Charge | | |
| | Standing Charge Bill in Advance | | |
| | Standing Charge Description | | |
| | Ordinal | Yes | |
| | Bespoke | Yes | |
| Pricing | Plan Template ID | | |
| | Plan ID | | |
| | Aggregation ID | | |
| | Compound Aggregation ID | | |
| | Code | Yes | |
| | Cumulative | | |
| | Description | | |
| | Type | Yes | |
| | Minimum Spend | | |
| | Minimum Spend Description | | |
| | Minimum Spend Bill in Advance | Yes | |
| | Start Date | Yes | |
| | End Date | | |
| Pricing Bands | Fixed Price | Conditional | |
| | Unit Price | Conditional | |
| | Lower Limit | Yes | |
# Product Mapping Resolution
Source: https://docs.m3ter.com/guides/m3ter-connector-for-salesforce/product-mapping-resolution
The m3ter Connector for Salesforce managed package offers the *Product Mapping Resolution* capability, which supports mapping the same Salesforce Product to different m3ter Plans or Plan Templates, depending on Billing Frequency and/or Currency Code.
This topic introduces Product Mapping Resolution and explains how to work with it:
* [Mapping Resolution Additional Dimensions](#mapping-resolution-additional-dimensions)
* [Billing Frequency](#billing-frequency)
* [Currency Code](#currency-code)
* [How Mapping Resolution Cascades](#how-mapping-resolution-cascades)
**Important!**
* **Check Version**. The Product Mapping Resolution feature described in this topic is only available in **v1.1** and above of the m3ter Connector for Salesforce. See [m3ter Connector for Salesforce - Changelog](https://docs.m3ter.com/guides/m3ter-connector-for-salesforce/m3ter-connector-for-salesforce-changelog) for details on how to check your current installed version.
## Mapping Resolution Additional Dimensions
The Product-to-Plan mapping engine can now resolve mappings using two additional dimensions — **billing frequency** and **currency code** — in addition to the existing Product match. Both additional dimensions are optional and only take effect when configured. For example:
## m3ter Object and Fields - Mandatory Mappings
In order to successfully create agreements from a source sales agreement in Salesforce, m3ter requires certain Objects and Fields to be mapped. The following table sets out these mandatory mappings:
| m3ter Object | m3ter Field | Mandatory | Notes |
| - | - | - | - |
| Account | Name | Yes | |
| | Code | Yes | |
| | Email | Yes | |
| | Address Line 1 | | |
| | Address Line 2 | | |
| | Post Code | | |
| | Region | | |
| | Locality | | |
| | Country | | |
| Contract | Name | Yes | |
| | Code | Yes | |
| | Start Date | Yes | |
| | End Date | Yes | |
| | PO Number | | |
| | Description | | |
| Commitment | Billing Plan | Yes | |
| | Start Date | Yes | |
| | End Date | Yes | |
| | Currency | Yes | |
| | Amount | Yes | |
| | Amount Prepaid | | |
| | Amount First Bill | | |
| | Overage Surcharge Percent | | |
| | Billing Interval | | |
| | Billing Offset | | |
| | Commitment Fees Description | | |
| | Commitment Usage Description | | |
| | Overage Description | | |
| | Hardcoded | | |
| Account Plan | Plan ID | Conditional | Requires just one of either Plan ID or Plan Group ID but not both. |
| | Plan Group ID | Conditional | |
| | Contract ID | | |
| | Start Date | Yes | |
| | End Date | | |
| | Code | Yes | |
| | Bill Epoch | | |
| Plan | Plan Template ID | Yes | |
| | Code | Yes | |
| | Name | Yes | |
| | Minimum Spend | | |
| | Minimum Spend Bill in Advance | | |
| | Minimum Spend Description | | |
| | Standing Charge | | |
| | Standing Charge Bill in Advance | | |
| | Standing Charge Description | | |
| | Ordinal | Yes | |
| | Bespoke | Yes | |
| Pricing | Plan Template ID | | |
| | Plan ID | | |
| | Aggregation ID | | |
| | Compound Aggregation ID | | |
| | Code | Yes | |
| | Cumulative | | |
| | Description | | |
| | Type | Yes | |
| | Minimum Spend | | |
| | Minimum Spend Description | | |
| | Minimum Spend Bill in Advance | Yes | |
| | Start Date | Yes | |
| | End Date | | |
| Pricing Bands | Fixed Price | Conditional | |
| | Unit Price | Conditional | |
| | Lower Limit | Yes | |
# Product Mapping Resolution
Source: https://docs.m3ter.com/guides/m3ter-connector-for-salesforce/product-mapping-resolution
The m3ter Connector for Salesforce managed package offers the *Product Mapping Resolution* capability, which supports mapping the same Salesforce Product to different m3ter Plans or Plan Templates, depending on Billing Frequency and/or Currency Code.
This topic introduces Product Mapping Resolution and explains how to work with it:
* [Mapping Resolution Additional Dimensions](#mapping-resolution-additional-dimensions)
* [Billing Frequency](#billing-frequency)
* [Currency Code](#currency-code)
* [How Mapping Resolution Cascades](#how-mapping-resolution-cascades)
**Important!**
* **Check Version**. The Product Mapping Resolution feature described in this topic is only available in **v1.1** and above of the m3ter Connector for Salesforce. See [m3ter Connector for Salesforce - Changelog](https://docs.m3ter.com/guides/m3ter-connector-for-salesforce/m3ter-connector-for-salesforce-changelog) for details on how to check your current installed version.
## Mapping Resolution Additional Dimensions
The Product-to-Plan mapping engine can now resolve mappings using two additional dimensions — **billing frequency** and **currency code** — in addition to the existing Product match. Both additional dimensions are optional and only take effect when configured. For example:
![SMPPRM1]() **Important!** If you are upgrading to **v1.1** of the m3ter Connector for Salesforce, you must first add the **Billing Frequency** and **Currency Code** fields to the **SyncConfig CMDT layouts** in your Org.
## Billing Frequency
This allows a single Product to resolve to different m3ter Plans depending on the source record's billing frequency - for example, Monthly vs. Annual.
**Setup (SyncConfig):**
* Set **Product Mapping Billing Frequency Key** to the field path where the billing frequency lives on the source object — a direct field (such as `Description`) or a parent path (such as `Opportunity.Description`)
**Mapping records:**
* Set the new **Billing Frequency** field on each m3ter Mapping to the value that mapping applies to.
* Leave it blank to act as the generic fallback for that Product.
**Notes:**
* Values are matched after trim and case normalization, so minor casing/white space differences still match.
* Leave the **SyncConfig** key blank to keep the existing Product-only behavior.
## Currency Code
This allows a single Product to resolve to different m3ter Plans depending on the record's currency — useful for multi-currency Orgs where each currency has its own Plan.
**Setup (SyncConfig):**
* Set **Product Mapping Currency Code Key** to the field path where the currency lives (such as `CurrencyIsoCode`), or a parent path (such as `Opportunity.CurrencyIsoCode`)
**Mapping records:**
* Set the new **Currency Code** field on each m3ter Mapping (such as USD, EUR, GBP).
* Leave it blank for a generic fallback mapping.
**Notes:**
* Values are matched after trim and uppercase normalization, in line with ISO currency codes.
## How Mapping Resolution Cascades
When both dimensions are configured, Product Mapping Resolution tries the most specific match first and falls back progressively:
* Product + Billing Frequency + Currency Code
* then Product + Billing Frequency
* then Product + Currency Code
* then Product only
# Reviewing and Managing Metadata Mappings
Source: https://docs.m3ter.com/guides/m3ter-connector-for-salesforce/reviewing-and-managing-metadata-mappings
When you install the m3ter Connector managed package into your Salesforce org, a set of *Custom Metadata Types* are included. Custom Metadata Types:
* Are a key part of the package and define mappings that control which fields on Salesforce data objects are synced with which fields on counterpart m3ter data objects.
* Act as starter or standard preconfigured mapping definitions for known Salesforce objects, such as Opportunities.
In your Salesforce org, you can review the Custom Metadata Types installed for the m3ter Connector. You might also want to edit these metadata types to ensure the sync actions you perform maps Salesforce objects and fields into m3ter objects and fields in a way that meets your specific business process requirements.
This topic explains how to review and manage the m3ter Connector standard Custom Metadata Types in your Salesforce org. A notes and tips section is also included, which we hope will help you when working with Custom Metadata Types:
* [Reviewing and Editing Custom Metadata Types](/guides/m3ter-connector-for-salesforce/reviewing-and-managing-metadata-mappings#reviewing-and-editing-custom-metadata-types)
* [Working with Custom Metadata Types - Notes and Tips](/guides/m3ter-connector-for-salesforce/reviewing-and-managing-metadata-mappings#working-with-custom-metadata-types-notes-and-tips)
**Important!**
* **Other Custom Metadata Types?** The Custom Metadata Types installed with the m3ter Connector for Salesforce package can be used for syncing Salesforce Opportunities with your m3ter Organization. However, if you want to sync other Salesforce objects and fields to m3ter, then ***you must create new*** Custom Metadata Types to suit your specific Sales process. See [Creating Custom Metadata Mappings](/guides/m3ter-connector-for-salesforce/creating-metadata-mappings).
* **Installed Seeded Mappings?** Secondly, ***you must not remove*** the mappings installed with the m3ter Connector.
**Tip: Sample Mappings?** You can review sample mappings for use with the Connector in the [m3ter Connector - Sample Mappings](/guides/m3ter-connector-for-salesforce/m3ter-connector-sample-mappings) section.
## Reviewing and Editing Custom Metadata Types
This section explains how to review and edit the Custom Metadata Types installed in your Salesforce org for the m3ter Connector.
**Note:** The [following section](/guides/m3ter-connector-for-salesforce/reviewing-and-managing-metadata-mappings#working-with-custom-metadata-types-notes-and-tips) offers some notes and tips designed to help you when working with Custom Metadata Types.
**To review and edit Custom Metadata Types:**
1. At top-right, select the gear icon and on the drop-down menu, select **Setup**. The **SETUP>Home** pages opens.
2. In the **Quick Find** field at top-left, start to type "metadata" - the **SETUP** navigation list is filtered and you'll see **Custom Code>Custom Metadata Types** returned.
3. Select **Custom Metadata Types** in the **SETUP** list. The **Custom Metadata Types** page opens:
**Important!** If you are upgrading to **v1.1** of the m3ter Connector for Salesforce, you must first add the **Billing Frequency** and **Currency Code** fields to the **SyncConfig CMDT layouts** in your Org.
## Billing Frequency
This allows a single Product to resolve to different m3ter Plans depending on the source record's billing frequency - for example, Monthly vs. Annual.
**Setup (SyncConfig):**
* Set **Product Mapping Billing Frequency Key** to the field path where the billing frequency lives on the source object — a direct field (such as `Description`) or a parent path (such as `Opportunity.Description`)
**Mapping records:**
* Set the new **Billing Frequency** field on each m3ter Mapping to the value that mapping applies to.
* Leave it blank to act as the generic fallback for that Product.
**Notes:**
* Values are matched after trim and case normalization, so minor casing/white space differences still match.
* Leave the **SyncConfig** key blank to keep the existing Product-only behavior.
## Currency Code
This allows a single Product to resolve to different m3ter Plans depending on the record's currency — useful for multi-currency Orgs where each currency has its own Plan.
**Setup (SyncConfig):**
* Set **Product Mapping Currency Code Key** to the field path where the currency lives (such as `CurrencyIsoCode`), or a parent path (such as `Opportunity.CurrencyIsoCode`)
**Mapping records:**
* Set the new **Currency Code** field on each m3ter Mapping (such as USD, EUR, GBP).
* Leave it blank for a generic fallback mapping.
**Notes:**
* Values are matched after trim and uppercase normalization, in line with ISO currency codes.
## How Mapping Resolution Cascades
When both dimensions are configured, Product Mapping Resolution tries the most specific match first and falls back progressively:
* Product + Billing Frequency + Currency Code
* then Product + Billing Frequency
* then Product + Currency Code
* then Product only
# Reviewing and Managing Metadata Mappings
Source: https://docs.m3ter.com/guides/m3ter-connector-for-salesforce/reviewing-and-managing-metadata-mappings
When you install the m3ter Connector managed package into your Salesforce org, a set of *Custom Metadata Types* are included. Custom Metadata Types:
* Are a key part of the package and define mappings that control which fields on Salesforce data objects are synced with which fields on counterpart m3ter data objects.
* Act as starter or standard preconfigured mapping definitions for known Salesforce objects, such as Opportunities.
In your Salesforce org, you can review the Custom Metadata Types installed for the m3ter Connector. You might also want to edit these metadata types to ensure the sync actions you perform maps Salesforce objects and fields into m3ter objects and fields in a way that meets your specific business process requirements.
This topic explains how to review and manage the m3ter Connector standard Custom Metadata Types in your Salesforce org. A notes and tips section is also included, which we hope will help you when working with Custom Metadata Types:
* [Reviewing and Editing Custom Metadata Types](/guides/m3ter-connector-for-salesforce/reviewing-and-managing-metadata-mappings#reviewing-and-editing-custom-metadata-types)
* [Working with Custom Metadata Types - Notes and Tips](/guides/m3ter-connector-for-salesforce/reviewing-and-managing-metadata-mappings#working-with-custom-metadata-types-notes-and-tips)
**Important!**
* **Other Custom Metadata Types?** The Custom Metadata Types installed with the m3ter Connector for Salesforce package can be used for syncing Salesforce Opportunities with your m3ter Organization. However, if you want to sync other Salesforce objects and fields to m3ter, then ***you must create new*** Custom Metadata Types to suit your specific Sales process. See [Creating Custom Metadata Mappings](/guides/m3ter-connector-for-salesforce/creating-metadata-mappings).
* **Installed Seeded Mappings?** Secondly, ***you must not remove*** the mappings installed with the m3ter Connector.
**Tip: Sample Mappings?** You can review sample mappings for use with the Connector in the [m3ter Connector - Sample Mappings](/guides/m3ter-connector-for-salesforce/m3ter-connector-sample-mappings) section.
## Reviewing and Editing Custom Metadata Types
This section explains how to review and edit the Custom Metadata Types installed in your Salesforce org for the m3ter Connector.
**Note:** The [following section](/guides/m3ter-connector-for-salesforce/reviewing-and-managing-metadata-mappings#working-with-custom-metadata-types-notes-and-tips) offers some notes and tips designed to help you when working with Custom Metadata Types.
**To review and edit Custom Metadata Types:**
1. At top-right, select the gear icon and on the drop-down menu, select **Setup**. The **SETUP>Home** pages opens.
2. In the **Quick Find** field at top-left, start to type "metadata" - the **SETUP** navigation list is filtered and you'll see **Custom Code>Custom Metadata Types** returned.
3. Select **Custom Metadata Types** in the **SETUP** list. The **Custom Metadata Types** page opens:
![]() * The m3ter Connector metadata types are listed with **Namespace Prefix** as **m3**.
4. To review the mappings defined by one of the Custom Metadata Types, select the **Manage Records** link for the type:
* The m3ter Connector metadata types are listed with **Namespace Prefix** as **m3**.
4. To review the mappings defined by one of the Custom Metadata Types, select the **Manage Records** link for the type:
![]() * The page for the selected type opens:
* The page for the selected type opens:
![]() * In this example, we've opened the **AccountMappings** Custom Metadata Type, and in the m3ter Connector package this type contains a single mappings definition called **New Account Mapping**
5. Select the **Label** link of the specific mappings definition you want to review. The **Detail** page opens:
* In this example, we've opened the **AccountMappings** Custom Metadata Type, and in the m3ter Connector package this type contains a single mappings definition called **New Account Mapping**
5. Select the **Label** link of the specific mappings definition you want to review. The **Detail** page opens:
![]() * The **Mappings** section shows which Salesforce Account fields are mapped into which m3ter Account fields for a sync action that creates a new Account, such as:
* m3ter Account **AddressLine1** *\< syncs to >* Salesforce **BillingStreet**
* m3ter Account **Region** *\< syncs to >* Salesforce **BillingState**
* m3ter Account **PostCode** *\< syncs to >* Salesforce **BillingPostalCode**
**Note: Using hardcoded for Mappings?**
* In this example of a managed set of mappings shipped with the Connector, there is an `emailAddress` field on the m3ter side, and for this an *actual value* has been entered (*[example@example.com](mailto:example@example.com)*). This means that the `hardcoded` entry must define the field (or fields) where instead of mapping by identifying a field on the Salesforce side, we want to be able to enter an *actual value* in this way, and therefore we enter `emailAddress` for `hardcoded`.
* If there are multiple fields used in this way for mapping, then enter a comma-separated list for `hardcoded` - for example: `emailAddress`,`locality`,`adddressLine2`.
6. If you want to edit the mappings definition, select **Edit**. The page adjusts:
**Warning!** If you want to change the object source - in this example the **AccountObject** - please create a new custom metadata mapping.
* The **Mappings** section shows which Salesforce Account fields are mapped into which m3ter Account fields for a sync action that creates a new Account, such as:
* m3ter Account **AddressLine1** *\< syncs to >* Salesforce **BillingStreet**
* m3ter Account **Region** *\< syncs to >* Salesforce **BillingState**
* m3ter Account **PostCode** *\< syncs to >* Salesforce **BillingPostalCode**
**Note: Using hardcoded for Mappings?**
* In this example of a managed set of mappings shipped with the Connector, there is an `emailAddress` field on the m3ter side, and for this an *actual value* has been entered (*[example@example.com](mailto:example@example.com)*). This means that the `hardcoded` entry must define the field (or fields) where instead of mapping by identifying a field on the Salesforce side, we want to be able to enter an *actual value* in this way, and therefore we enter `emailAddress` for `hardcoded`.
* If there are multiple fields used in this way for mapping, then enter a comma-separated list for `hardcoded` - for example: `emailAddress`,`locality`,`adddressLine2`.
6. If you want to edit the mappings definition, select **Edit**. The page adjusts:
**Warning!** If you want to change the object source - in this example the **AccountObject** - please create a new custom metadata mapping.
![]() * You can now edit the mappings definition and change which Salesforce Account object fields are mapped to the m3ter Account object fields.
* Note the warning that because this is a managed package not all mapping attributes are editable - to view more details, select **Display More Information**:
* You can now edit the mappings definition and change which Salesforce Account object fields are mapped to the m3ter Account object fields.
* Note the warning that because this is a managed package not all mapping attributes are editable - to view more details, select **Display More Information**:
![]() * Editable items are listed.
7. If you have made any changes, select **Save**.
## Working with Custom Metadata Types - Notes and Tips
This section offers guidance on working with Custom Metadata Types to set up the precise sync of Salesforce objects and fields with m3ter objects and fields.
### Typographical Note
Please note that Salesforce typographical conventions require the use of double-underscore characters:
* For example, single-underscore: **\_c** is not valid as a suffix and double-underscore: **\_\_c** must be used.
### Setting Up Relationship Mappings
Here are some pointers to note when creating relationships to mapped objects and fields.
* You can always optionally prefix with the current object (custom or standard) name.
* If the field you want is on the current object, you don't need a relationship (**\_\_r**).
* If the field you want is on a related object, you have to use the standard Salesforce Object Query Language (SOQL) relationship rules, such as:
* **someLookupField\_\_r.someOtherField**
The following examples illustrate how relationship mappings are set up.
#### Example 1
* Editable items are listed.
7. If you have made any changes, select **Save**.
## Working with Custom Metadata Types - Notes and Tips
This section offers guidance on working with Custom Metadata Types to set up the precise sync of Salesforce objects and fields with m3ter objects and fields.
### Typographical Note
Please note that Salesforce typographical conventions require the use of double-underscore characters:
* For example, single-underscore: **\_c** is not valid as a suffix and double-underscore: **\_\_c** must be used.
### Setting Up Relationship Mappings
Here are some pointers to note when creating relationships to mapped objects and fields.
* You can always optionally prefix with the current object (custom or standard) name.
* If the field you want is on the current object, you don't need a relationship (**\_\_r**).
* If the field you want is on a related object, you have to use the standard Salesforce Object Query Language (SOQL) relationship rules, such as:
* **someLookupField\_\_r.someOtherField**
The following examples illustrate how relationship mappings are set up.
#### Example 1
![]() When mapping the **accountMapping\_m3Id**:
* When the AccountPlanObject = **SBQQ\_\_Subscription\_\_c** the account field (**accountMapping\_m3Id** ) relationship is related to the Contract object which is the **SBQQ\_\_Contract\_\_r.Account** field.
#### Example 2
When mapping the accountPlan from Salesforce CPQ using the Quotes objects:
* The related **accountMapping\_m3Id** field is **SBQQ\_\_Account\_\_r**
* You don't need to reference the quote because that's the object you are on but the account field in this case is the relationship:
* **SBQQ\_\_Quote\_\_c.SBQQ\_\_Account\_\_r == correct**
**Note:** The **SBQQ\_\_Quote\_\_c** part is optional here. Omitting it won't break the relationship, however it may be easier to understand the relationship when left as **SBQQ\_\_Quote\_\_c.SBQQ\_\_Account\_\_r**
### Understanding Salesforce Suffixes
How are suffixes on custom objects and fields used in Salesforce? That is, those objects and fields suffixed with **\_\_c** or **\_\_r** in Salesforce:
* The **\_\_c** suffix is used for *Custom* objects and fields. For example: **Custom\_Object\_\_c**.
* Used for referencing custom objects in Apex or visualforce pages, formula fields and so on internally.
* This suffix is automatically added to the API name of the custom object/field by Salesforce upon creation.
* The **\_\_r** suffix is used is for Custom objects reference. For example: **Custom\_Field\_\_r**.
* Used for referencing a custom lookup or master-detail relationship name in Apex or visualforce page, formula field, and so on.
* When used as a suffix, **\_\_r** refers to the object being referenced via the lookup or master-detail in order to help you 'get' or 'navigate' to the parent from a child or vice versa. This allows you to reference a different field on the linked object.
* This is required Salesforce Object Query Language (SOQL) syntax when referencing fields in a lookup relationship.
* Standard lookups/master-details do not have this suffix, but can still be referenced in a similar fashion.
#### Examples
The standard object Opportunity has a standard lookup to the Account and Contract objects. Fields on these objects can be referenced by:
* **Account.Type**
* This is the apiname of the lookup field on the Opportunity, and the apiname of the desired field on the account.
* We now need to reference a custom field on this account:
* **Account.CustomField\_\_c**
Let’s say we add a second Account lookup to Opportunity. This second lookup field has the API name **CustomAccount\_\_c**
* We now need to reference the type of this second account:
* **CustomAccount\_\_r.Type**
* We now need to reference a custom field on this second account:
* **CustomAccount\_\_r.CustomField\_\_c**
Let’s say we’re querying from the Salesforce CPQ Quote object:
* This has an API name of **SBQQ\_\_Quote\_\_c**
* We want to get the account type for the account associated to this Quote. We are querying from the Quote object.
* **SBQQ\_\_Quote\_\_c.SBQQ\_\_Account\_\_r.Type**
# Setting Up and Using Sync to m3ter Invocable Action
Source: https://docs.m3ter.com/guides/m3ter-connector-for-salesforce/setting-up-invocable-action-for-event-driven-sync
As part of your m3ter Connector for Salesforce managed package and as a alternative to manually syncing your Salesforce data with your m3ter data, you can set up and configure an Invocable Action (IA) and enable event-driven automated syncing of data.
The *Sync to m3ter Invocable Action* provides a mechanism for initiating synchronization between Salesforce and m3ter:
* Allows for easy integration with Salesforce Flows and Apex, enabling automated sync processes based on a customer business process or automation needs.
* Extends the current manual sync functionality and leverages the same metadata / configuration driven approach by adding a layer of extensibility, namely via a new IA named ***Sync To m3ter***
This topic explains how to set up and work with the Sync to m3ter IA feature for your m3ter Connector managed package, and provides essential reference information on its details, design, and operational constraints:
* [Implementing Sync to m3ter IA](/guides/m3ter-connector-for-salesforce/setting-up-invocable-action-for-event-driven-sync#implementing-sync-to-m3ter-ia)
* [Reviewing Feature Details](/guides/m3ter-connector-for-salesforce/setting-up-invocable-action-for-event-driven-sync#reviewing-feature-details)
* [Reviewing Guardrails and Limits](/guides/m3ter-connector-for-salesforce/setting-up-invocable-action-for-event-driven-sync#reviewing-guardrails-and-limits)
* [Enforcing Asynchronous Processing](/guides/m3ter-connector-for-salesforce/setting-up-invocable-action-for-event-driven-sync#enforcing-asynchronous-processing)
**Important!**
* **Note on Usage:** The Sync to m3ter Invocable Action is designed for low-volume, event-driven synchronization. It is *not intended* for high-volume batch processing of hundreds of records daily. The primary goal is to automate individual sync processes, eliminating the need for manual user intervention while maintaining system performance and stability.
* **Check Version**. The Sync to m3ter Invocable Action feature is only available in version **0.4** and above of the m3ter Connector for Salesforce managed package. See [m3ter Connector for Salesforce - Changelog](/guides/m3ter-connector-for-salesforce/m3ter-connector-for-salesforce-changelog) for details on how to check your current installed version.
## Implementing Sync to m3ter IA
There are two ways you can implement Sync to m3ter IA feature for use with your managed package:
* **Flow**
* **APEX**
### Flow
The following diagram highlights the key settings when implementing with Flow using Recorded Trigger Flows:
When mapping the **accountMapping\_m3Id**:
* When the AccountPlanObject = **SBQQ\_\_Subscription\_\_c** the account field (**accountMapping\_m3Id** ) relationship is related to the Contract object which is the **SBQQ\_\_Contract\_\_r.Account** field.
#### Example 2
When mapping the accountPlan from Salesforce CPQ using the Quotes objects:
* The related **accountMapping\_m3Id** field is **SBQQ\_\_Account\_\_r**
* You don't need to reference the quote because that's the object you are on but the account field in this case is the relationship:
* **SBQQ\_\_Quote\_\_c.SBQQ\_\_Account\_\_r == correct**
**Note:** The **SBQQ\_\_Quote\_\_c** part is optional here. Omitting it won't break the relationship, however it may be easier to understand the relationship when left as **SBQQ\_\_Quote\_\_c.SBQQ\_\_Account\_\_r**
### Understanding Salesforce Suffixes
How are suffixes on custom objects and fields used in Salesforce? That is, those objects and fields suffixed with **\_\_c** or **\_\_r** in Salesforce:
* The **\_\_c** suffix is used for *Custom* objects and fields. For example: **Custom\_Object\_\_c**.
* Used for referencing custom objects in Apex or visualforce pages, formula fields and so on internally.
* This suffix is automatically added to the API name of the custom object/field by Salesforce upon creation.
* The **\_\_r** suffix is used is for Custom objects reference. For example: **Custom\_Field\_\_r**.
* Used for referencing a custom lookup or master-detail relationship name in Apex or visualforce page, formula field, and so on.
* When used as a suffix, **\_\_r** refers to the object being referenced via the lookup or master-detail in order to help you 'get' or 'navigate' to the parent from a child or vice versa. This allows you to reference a different field on the linked object.
* This is required Salesforce Object Query Language (SOQL) syntax when referencing fields in a lookup relationship.
* Standard lookups/master-details do not have this suffix, but can still be referenced in a similar fashion.
#### Examples
The standard object Opportunity has a standard lookup to the Account and Contract objects. Fields on these objects can be referenced by:
* **Account.Type**
* This is the apiname of the lookup field on the Opportunity, and the apiname of the desired field on the account.
* We now need to reference a custom field on this account:
* **Account.CustomField\_\_c**
Let’s say we add a second Account lookup to Opportunity. This second lookup field has the API name **CustomAccount\_\_c**
* We now need to reference the type of this second account:
* **CustomAccount\_\_r.Type**
* We now need to reference a custom field on this second account:
* **CustomAccount\_\_r.CustomField\_\_c**
Let’s say we’re querying from the Salesforce CPQ Quote object:
* This has an API name of **SBQQ\_\_Quote\_\_c**
* We want to get the account type for the account associated to this Quote. We are querying from the Quote object.
* **SBQQ\_\_Quote\_\_c.SBQQ\_\_Account\_\_r.Type**
# Setting Up and Using Sync to m3ter Invocable Action
Source: https://docs.m3ter.com/guides/m3ter-connector-for-salesforce/setting-up-invocable-action-for-event-driven-sync
As part of your m3ter Connector for Salesforce managed package and as a alternative to manually syncing your Salesforce data with your m3ter data, you can set up and configure an Invocable Action (IA) and enable event-driven automated syncing of data.
The *Sync to m3ter Invocable Action* provides a mechanism for initiating synchronization between Salesforce and m3ter:
* Allows for easy integration with Salesforce Flows and Apex, enabling automated sync processes based on a customer business process or automation needs.
* Extends the current manual sync functionality and leverages the same metadata / configuration driven approach by adding a layer of extensibility, namely via a new IA named ***Sync To m3ter***
This topic explains how to set up and work with the Sync to m3ter IA feature for your m3ter Connector managed package, and provides essential reference information on its details, design, and operational constraints:
* [Implementing Sync to m3ter IA](/guides/m3ter-connector-for-salesforce/setting-up-invocable-action-for-event-driven-sync#implementing-sync-to-m3ter-ia)
* [Reviewing Feature Details](/guides/m3ter-connector-for-salesforce/setting-up-invocable-action-for-event-driven-sync#reviewing-feature-details)
* [Reviewing Guardrails and Limits](/guides/m3ter-connector-for-salesforce/setting-up-invocable-action-for-event-driven-sync#reviewing-guardrails-and-limits)
* [Enforcing Asynchronous Processing](/guides/m3ter-connector-for-salesforce/setting-up-invocable-action-for-event-driven-sync#enforcing-asynchronous-processing)
**Important!**
* **Note on Usage:** The Sync to m3ter Invocable Action is designed for low-volume, event-driven synchronization. It is *not intended* for high-volume batch processing of hundreds of records daily. The primary goal is to automate individual sync processes, eliminating the need for manual user intervention while maintaining system performance and stability.
* **Check Version**. The Sync to m3ter Invocable Action feature is only available in version **0.4** and above of the m3ter Connector for Salesforce managed package. See [m3ter Connector for Salesforce - Changelog](/guides/m3ter-connector-for-salesforce/m3ter-connector-for-salesforce-changelog) for details on how to check your current installed version.
## Implementing Sync to m3ter IA
There are two ways you can implement Sync to m3ter IA feature for use with your managed package:
* **Flow**
* **APEX**
### Flow
The following diagram highlights the key settings when implementing with Flow using Recorded Trigger Flows:
![]() You must perform three configuration tasks to ensure that the Action performs as expected when using Record Triggered Flows:
1. To enable *Run Asynchronously*, you must select the checkbox for:
* **Include a Run Asynchronously path to access an external system after the original transaction for the triggering record is successfully committed.**
2. In the options for *When to Run the Flow for Updated Records*, you must select:
* **Only when a record is updated to meet the condition requirements.**
3. You must add the Action to the **Run Asynchronously** path.
### APEX
For implementing with APEX, the following is required and contains explanatory comments:
```javascript theme={null}
// Create a new sync request
m3.SyncToM3terService.M3terSyncRequest req = new m3.SyncToM3terService.M3terSyncRequest();
req.parentRecordId = '006S900000795MMIAY'; // Replace with an actual Salesforce ID
// Call the invocable action
List results = m3.SyncToM3terService.syncToM3ter(
new List{req}
);
// Process the results
if (!results.isEmpty()) {
m3.SyncToM3terService.M3terSyncResult result = results[0];
System.debug('Overall Sync Success: ' + result.success);
System.debug('Sync Status: ' + result.syncStatus);
System.debug('Sync Message: ' + result.message);
// Output concatenated results
System.debug('Concatenated Results:\n' + result.concatenatedResults);
// Process individual object results
for (m3.SyncToM3terService.M3terSyncObjectResult objResult : result.objectResults) {
System.debug('Object: ' + objResult.objectName +
', Success: ' + objResult.success +
', Message: ' + objResult.message +
', Salesforce ID: ' + objResult.salesforceId);
}
} else {
System.debug('No results returned from sync operation.');
}
```
#### Sample Outputs
1. Success = True, Sync Status = Completed:
`15:52:39.49 (2279271858)|USER_DEBUG|[12]|DEBUG|Overall Sync Success: ``**true**``
15:52:39.49 (2279288498)|USER_DEBUG|[13]|DEBUG|Sync Status: Complete
15:52:39.49 (2279300703)|USER_DEBUG|[14]|DEBUG|Sync Message: Sync process completed successfully
15:52:39.49 (2279312987)|USER_DEBUG|[17]|DEBUG|Concatenated Results:
Object: Account, Success: ``**true**``, Message: m3ter Identifier: d82738f3-d1d7-4a13-94a2-757658d64948, Salesforce ID: 001S900000RzsIUIAZ
Object: Contract, Success: ``**true**``, Message: m3ter Identifier: e383ee1c-01e7-4f56-a220-cbf4888bd9ec, Salesforce ID: 006S900000795MNIAY
Object: Commitment, Success: ``**true**``, Message: m3ter Identifier: acc4483e-f74c-4fb2-80ed-219480892a90, Salesforce ID: 006S900000795MNIAY
Object: Plan, Success: ``**true**``, Message:m3ter Identifier: b22233fe-5d97-4961-a3e8-24e97df0fd45, Salesforce ID: 00kS9000001Nxy5IAC
Object: AccountPlan, Success: ``**true**``, Message: m3ter Identifier: b22233fe-5d97-4961-a3e8-24e97df0fd45, Salesforce ID: 00kS9000001Nxy5IAC`
2. Success = False, Sync Status = Partial Success:
`15:29:01.57 (2557064317)|USER_DEBUG|[12]|DEBUG|Overall Sync Success: ``**false**``
15:29:01.57 (2557081586)|USER_DEBUG|[13]|DEBUG|Sync Status: Partial Success
15:29:01.57 (2557093491)|USER_DEBUG|[14]|DEBUG|Sync Message: Sync process completed successfully
15:29:01.57 (2557105264)|USER_DEBUG|[17]|DEBUG|Concatenated Results:
Object: Account, Success: ``**true**``, Message: m3ter Identifier: d82738f3-d1d7-4a13-94a2-757658d64948, Salesforce ID: 001S900000RzsIUIAZ
Object: Contract, Success: ``**true**``, Message: m3ter Identifier: 83df45e7-78ea-4211-8d12-6220b7c7ca86, Salesforce ID: 006S900000795MNIAY
Object: Commitment, Success: ``**false**``, Message: Commitment would overlap with existing Commitment 293b2bca-fa87-4036-9a0b-e0f1d3cd8c9e, Salesforce ID: 006S900000795MNIAY
Object: Plan, Success: ``**false**``, Message: The object plans ``**for**`` the record 00kS9000001Nxy5IAC was flagged to not sync., Salesforce ID: 00kS9000001Nxy5IAC
Object: Pricing, Success: ``**false**``, Message: The object pricings ``**for**`` the record 00kS9000001Nxy5IAC was flagged to not sync., Salesforce ID: 00kS9000001Nxy5IAC
Object: AccountPlan, Success: ``**false**``, Message: AccountPlan would overlap with AccountPlan 544ecdae-54a5-4654-b0fb-b503a7ed58b2 ``**for**`` the same product 21e063b6-2350-4add-a028-3e6ad5b233ed, Salesforce ID: 00kS9000001Nxy5IAC`
## Reviewing Feature Details
This section provides important reference information if you choose to implement the Sync to m3ter IA feature.
### Invocable Action - Sync to m3ter
| Field Name | Purpose |
| - | - |
| INPUT | |
| Parent Record ID | Salesforce ID of the parent record that initiates the sync process. (Required) |
| OUTPUT | |
| Success | Boolean indicating if the entire sync process was successful. True if all object results are success. False if any object result is false. |
| Sync Status | String describing the overall status. For example - "Completed", "Partial Success", "Failed". Completed if all object results are success. Partial Success if any object result is false. Failed if any system exceptions are thrown. |
| Message | Detailed message about the overall sync result. For example - "Sync process completed successfully" or "Sync process failed: \[exceptionMessage]". |
| Object Results | Map of object names to lists of individual sync results, providing granular details for each synced record. |
| Concatenated Results | A string representation of all object results. Note: This string is expected to be longer than 255 chars. |
### Individual Sync Results Details
| Field Name | Purpose |
| - | - |
| Object Name | Name of the Salesforce/m3ter object being synced. |
| Success | Boolean indicating if this particular object sync was successful. |
| Message | Detailed message about this object's sync result. |
| Salesforce ID | The Salesforce ID of the synced record. |
## Reviewing Guardrails and Limits
Some operational safeguards and design constraints are built into the Sync to m3ter IA. Please review this section before implementing and running the feature.
### Single Record Processing
To ensure predictable behavior and prevents resource exhaustion:
* The Action is explicitly designed to process *only one record at a time*.
* Multiple record requests *will result in a Failed status* with appropriate error message.
### Record Validation
Validation checks:
* Performs existence check on the parent record before initiating sync.
* Returns specific error statuses for:
* Invalid/null record IDs.
* Non-existent records.
* Record access issues.
### Status Codes and Messages
Three status codes are given:
* **Completed**: All objects synced successful.
* **Partial Success**: Some objects synced successfully, others failed.
* **Failed**: System-level failures (CPU limits, validation errors, and so on).
## Enforcing Asynchronous Processing
Given the action will perform a number of API callouts to m3ter, you must ensure that it is called from a separate transaction to avoid provoking the following error:
* ***"You have uncommitted work pending. Please commit or rollback before calling out"***
This is a common Salesforce error related to transaction management and external callouts.
This error is particularly relevant to the Sync to m3ter Invocable Action because:
1. **Flows**: If the action is not set to run asynchronously, and there are any DML operations before it in the flow, you will encounter this error.
2. **Apex**: If you try to call the action directly after performing DML operations in the same transaction, you will get this error.
To avoid this error:
1. **Flows**: Always use the "Run Asynchronously" option for the Sync to m3ter action.
2. **Apex**: Use the `@future(callout=true)` method. This ensures the callout happens in a separate transaction.
# Setting Up m3sh Webhook Triggers
Source: https://docs.m3ter.com/guides/m3ter-connector-for-salesforce/setting-up-m3sh-webhook-triggers
The m3sh Webhook Triggers capability in the m3ter Connector for Salesforce managed package offers Salesforce administrators a declarative, no-code solution to send Salesforce record data to m3sh Workflows via webhook endpoints.
This topic explains how to set up and work with the m3sh Webhook Triggers feature:
* [Overview](/guides/m3ter-connector-for-salesforce/setting-up-m3sh-webhook-triggers#overview)
* [Prerequisite Configuration](/guides/m3ter-connector-for-salesforce/setting-up-m3sh-webhook-triggers#prerequisite-configuration)
* [Creating m3sh Webhook Triggers](/guides/m3ter-connector-for-salesforce/setting-up-m3sh-webhook-triggers#creating-m3sh-webhook-triggers)
* [Testing Active m3sh Webhook Triggers](/guides/m3ter-connector-for-salesforce/setting-up-m3sh-webhook-triggers#testing-active-m3sh-webhook-triggers)
* [Implementation Notes](/guides/m3ter-connector-for-salesforce/setting-up-m3sh-webhook-triggers#implementation-notes)
* [Monitoring Execution Logs](/guides/m3ter-connector-for-salesforce/setting-up-m3sh-webhook-triggers#monitoring-execution-logs)
**Important!**
* **Check Version**. The m3sh Triggers feature is only available in version **0.13** and above of the m3ter Connector for Salesforce managed package. See [m3ter Connector for Salesforce - Changelog](/guides/m3ter-connector-for-salesforce/m3ter-connector-for-salesforce-changelog) for details on how to check your current installed version.
## Overview
The m3sh Triggers feature is built on top of the existing custom metadata framework developed for the m3ter Connector. Three distinct integration patterns are supported:
* **Scheduled Polling**. Automated batch jobs that run on a configurable schedule - at 15, 30, or 60 minute intervals.
* **Manual/On-Demand Execution**. Administrator-initiated webhook sent from the UI.
* **Flow/Apex Invocable Actions**. Developer-triggered webhook sent from Salesforce Flows or custom Apex code.
All three patterns leverage the same underlying webhook delivery infrastructure, ensuring consistent behavior, authentication, payload formatting, and execution logging across all integration methods.
## Prerequisite Configuration
There is some prerequisite configuration you'll need to perform in your Salesforce Org before creating and deploying m3sh Webhook Triggers:
* [Enabling m3sh Webhook Triggers](/guides/m3ter-connector-for-salesforce/setting-up-m3sh-webhook-triggers#enabling-m3sh-webhook-triggers)
* [Configuring Remote Site Settings](/guides/m3ter-connector-for-salesforce/setting-up-m3sh-webhook-triggers#configuring-remote-site-settings)
### Enabling m3sh Webhook Triggers
In order to create m3sh Webhook Triggers for your m3ter Connector for Salesforce, you must first enable them in the m3ter Admin App.
**To enable m3sh webhook triggers:**
1. In your Salesforce Org, navigate to **Setup > Custom Settings > m3 Org Settings > Manage > Edit**:
You must perform three configuration tasks to ensure that the Action performs as expected when using Record Triggered Flows:
1. To enable *Run Asynchronously*, you must select the checkbox for:
* **Include a Run Asynchronously path to access an external system after the original transaction for the triggering record is successfully committed.**
2. In the options for *When to Run the Flow for Updated Records*, you must select:
* **Only when a record is updated to meet the condition requirements.**
3. You must add the Action to the **Run Asynchronously** path.
### APEX
For implementing with APEX, the following is required and contains explanatory comments:
```javascript theme={null}
// Create a new sync request
m3.SyncToM3terService.M3terSyncRequest req = new m3.SyncToM3terService.M3terSyncRequest();
req.parentRecordId = '006S900000795MMIAY'; // Replace with an actual Salesforce ID
// Call the invocable action
List results = m3.SyncToM3terService.syncToM3ter(
new List{req}
);
// Process the results
if (!results.isEmpty()) {
m3.SyncToM3terService.M3terSyncResult result = results[0];
System.debug('Overall Sync Success: ' + result.success);
System.debug('Sync Status: ' + result.syncStatus);
System.debug('Sync Message: ' + result.message);
// Output concatenated results
System.debug('Concatenated Results:\n' + result.concatenatedResults);
// Process individual object results
for (m3.SyncToM3terService.M3terSyncObjectResult objResult : result.objectResults) {
System.debug('Object: ' + objResult.objectName +
', Success: ' + objResult.success +
', Message: ' + objResult.message +
', Salesforce ID: ' + objResult.salesforceId);
}
} else {
System.debug('No results returned from sync operation.');
}
```
#### Sample Outputs
1. Success = True, Sync Status = Completed:
`15:52:39.49 (2279271858)|USER_DEBUG|[12]|DEBUG|Overall Sync Success: ``**true**``
15:52:39.49 (2279288498)|USER_DEBUG|[13]|DEBUG|Sync Status: Complete
15:52:39.49 (2279300703)|USER_DEBUG|[14]|DEBUG|Sync Message: Sync process completed successfully
15:52:39.49 (2279312987)|USER_DEBUG|[17]|DEBUG|Concatenated Results:
Object: Account, Success: ``**true**``, Message: m3ter Identifier: d82738f3-d1d7-4a13-94a2-757658d64948, Salesforce ID: 001S900000RzsIUIAZ
Object: Contract, Success: ``**true**``, Message: m3ter Identifier: e383ee1c-01e7-4f56-a220-cbf4888bd9ec, Salesforce ID: 006S900000795MNIAY
Object: Commitment, Success: ``**true**``, Message: m3ter Identifier: acc4483e-f74c-4fb2-80ed-219480892a90, Salesforce ID: 006S900000795MNIAY
Object: Plan, Success: ``**true**``, Message:m3ter Identifier: b22233fe-5d97-4961-a3e8-24e97df0fd45, Salesforce ID: 00kS9000001Nxy5IAC
Object: AccountPlan, Success: ``**true**``, Message: m3ter Identifier: b22233fe-5d97-4961-a3e8-24e97df0fd45, Salesforce ID: 00kS9000001Nxy5IAC`
2. Success = False, Sync Status = Partial Success:
`15:29:01.57 (2557064317)|USER_DEBUG|[12]|DEBUG|Overall Sync Success: ``**false**``
15:29:01.57 (2557081586)|USER_DEBUG|[13]|DEBUG|Sync Status: Partial Success
15:29:01.57 (2557093491)|USER_DEBUG|[14]|DEBUG|Sync Message: Sync process completed successfully
15:29:01.57 (2557105264)|USER_DEBUG|[17]|DEBUG|Concatenated Results:
Object: Account, Success: ``**true**``, Message: m3ter Identifier: d82738f3-d1d7-4a13-94a2-757658d64948, Salesforce ID: 001S900000RzsIUIAZ
Object: Contract, Success: ``**true**``, Message: m3ter Identifier: 83df45e7-78ea-4211-8d12-6220b7c7ca86, Salesforce ID: 006S900000795MNIAY
Object: Commitment, Success: ``**false**``, Message: Commitment would overlap with existing Commitment 293b2bca-fa87-4036-9a0b-e0f1d3cd8c9e, Salesforce ID: 006S900000795MNIAY
Object: Plan, Success: ``**false**``, Message: The object plans ``**for**`` the record 00kS9000001Nxy5IAC was flagged to not sync., Salesforce ID: 00kS9000001Nxy5IAC
Object: Pricing, Success: ``**false**``, Message: The object pricings ``**for**`` the record 00kS9000001Nxy5IAC was flagged to not sync., Salesforce ID: 00kS9000001Nxy5IAC
Object: AccountPlan, Success: ``**false**``, Message: AccountPlan would overlap with AccountPlan 544ecdae-54a5-4654-b0fb-b503a7ed58b2 ``**for**`` the same product 21e063b6-2350-4add-a028-3e6ad5b233ed, Salesforce ID: 00kS9000001Nxy5IAC`
## Reviewing Feature Details
This section provides important reference information if you choose to implement the Sync to m3ter IA feature.
### Invocable Action - Sync to m3ter
| Field Name | Purpose |
| - | - |
| INPUT | |
| Parent Record ID | Salesforce ID of the parent record that initiates the sync process. (Required) |
| OUTPUT | |
| Success | Boolean indicating if the entire sync process was successful. True if all object results are success. False if any object result is false. |
| Sync Status | String describing the overall status. For example - "Completed", "Partial Success", "Failed". Completed if all object results are success. Partial Success if any object result is false. Failed if any system exceptions are thrown. |
| Message | Detailed message about the overall sync result. For example - "Sync process completed successfully" or "Sync process failed: \[exceptionMessage]". |
| Object Results | Map of object names to lists of individual sync results, providing granular details for each synced record. |
| Concatenated Results | A string representation of all object results. Note: This string is expected to be longer than 255 chars. |
### Individual Sync Results Details
| Field Name | Purpose |
| - | - |
| Object Name | Name of the Salesforce/m3ter object being synced. |
| Success | Boolean indicating if this particular object sync was successful. |
| Message | Detailed message about this object's sync result. |
| Salesforce ID | The Salesforce ID of the synced record. |
## Reviewing Guardrails and Limits
Some operational safeguards and design constraints are built into the Sync to m3ter IA. Please review this section before implementing and running the feature.
### Single Record Processing
To ensure predictable behavior and prevents resource exhaustion:
* The Action is explicitly designed to process *only one record at a time*.
* Multiple record requests *will result in a Failed status* with appropriate error message.
### Record Validation
Validation checks:
* Performs existence check on the parent record before initiating sync.
* Returns specific error statuses for:
* Invalid/null record IDs.
* Non-existent records.
* Record access issues.
### Status Codes and Messages
Three status codes are given:
* **Completed**: All objects synced successful.
* **Partial Success**: Some objects synced successfully, others failed.
* **Failed**: System-level failures (CPU limits, validation errors, and so on).
## Enforcing Asynchronous Processing
Given the action will perform a number of API callouts to m3ter, you must ensure that it is called from a separate transaction to avoid provoking the following error:
* ***"You have uncommitted work pending. Please commit or rollback before calling out"***
This is a common Salesforce error related to transaction management and external callouts.
This error is particularly relevant to the Sync to m3ter Invocable Action because:
1. **Flows**: If the action is not set to run asynchronously, and there are any DML operations before it in the flow, you will encounter this error.
2. **Apex**: If you try to call the action directly after performing DML operations in the same transaction, you will get this error.
To avoid this error:
1. **Flows**: Always use the "Run Asynchronously" option for the Sync to m3ter action.
2. **Apex**: Use the `@future(callout=true)` method. This ensures the callout happens in a separate transaction.
# Setting Up m3sh Webhook Triggers
Source: https://docs.m3ter.com/guides/m3ter-connector-for-salesforce/setting-up-m3sh-webhook-triggers
The m3sh Webhook Triggers capability in the m3ter Connector for Salesforce managed package offers Salesforce administrators a declarative, no-code solution to send Salesforce record data to m3sh Workflows via webhook endpoints.
This topic explains how to set up and work with the m3sh Webhook Triggers feature:
* [Overview](/guides/m3ter-connector-for-salesforce/setting-up-m3sh-webhook-triggers#overview)
* [Prerequisite Configuration](/guides/m3ter-connector-for-salesforce/setting-up-m3sh-webhook-triggers#prerequisite-configuration)
* [Creating m3sh Webhook Triggers](/guides/m3ter-connector-for-salesforce/setting-up-m3sh-webhook-triggers#creating-m3sh-webhook-triggers)
* [Testing Active m3sh Webhook Triggers](/guides/m3ter-connector-for-salesforce/setting-up-m3sh-webhook-triggers#testing-active-m3sh-webhook-triggers)
* [Implementation Notes](/guides/m3ter-connector-for-salesforce/setting-up-m3sh-webhook-triggers#implementation-notes)
* [Monitoring Execution Logs](/guides/m3ter-connector-for-salesforce/setting-up-m3sh-webhook-triggers#monitoring-execution-logs)
**Important!**
* **Check Version**. The m3sh Triggers feature is only available in version **0.13** and above of the m3ter Connector for Salesforce managed package. See [m3ter Connector for Salesforce - Changelog](/guides/m3ter-connector-for-salesforce/m3ter-connector-for-salesforce-changelog) for details on how to check your current installed version.
## Overview
The m3sh Triggers feature is built on top of the existing custom metadata framework developed for the m3ter Connector. Three distinct integration patterns are supported:
* **Scheduled Polling**. Automated batch jobs that run on a configurable schedule - at 15, 30, or 60 minute intervals.
* **Manual/On-Demand Execution**. Administrator-initiated webhook sent from the UI.
* **Flow/Apex Invocable Actions**. Developer-triggered webhook sent from Salesforce Flows or custom Apex code.
All three patterns leverage the same underlying webhook delivery infrastructure, ensuring consistent behavior, authentication, payload formatting, and execution logging across all integration methods.
## Prerequisite Configuration
There is some prerequisite configuration you'll need to perform in your Salesforce Org before creating and deploying m3sh Webhook Triggers:
* [Enabling m3sh Webhook Triggers](/guides/m3ter-connector-for-salesforce/setting-up-m3sh-webhook-triggers#enabling-m3sh-webhook-triggers)
* [Configuring Remote Site Settings](/guides/m3ter-connector-for-salesforce/setting-up-m3sh-webhook-triggers#configuring-remote-site-settings)
### Enabling m3sh Webhook Triggers
In order to create m3sh Webhook Triggers for your m3ter Connector for Salesforce, you must first enable them in the m3ter Admin App.
**To enable m3sh webhook triggers:**
1. In your Salesforce Org, navigate to **Setup > Custom Settings > m3 Org Settings > Manage > Edit**:
![]() 2. Check the **Enable m3sh Triggers** box and then select **Save**.
### Configuring Remote Site Settings
The m3sh Webhook Triggers feature will make callouts to your m3ter Organization, which means you must configure a remote site setting for m3sh Webhook endpoints.
**To create a** **remote site setting for m3sh Webhook endpoints:**
1. In your Salesforce Org, navigate to **Setup > Security > Remote Site Settings**:
2. Check the **Enable m3sh Triggers** box and then select **Save**.
### Configuring Remote Site Settings
The m3sh Webhook Triggers feature will make callouts to your m3ter Organization, which means you must configure a remote site setting for m3sh Webhook endpoints.
**To create a** **remote site setting for m3sh Webhook endpoints:**
1. In your Salesforce Org, navigate to **Setup > Security > Remote Site Settings**:
![]() 2. Under **Remote Site Settings >** **Remote Site Details** enter these settings for the m3ter Webhook endpoint:
* **Remote Site Name**: m3ter\_Webhook
* **Remote Site URL**: https//\<*m3ter\_Org\_ID*>>.webhook.m3ter.com
* **Active**: TRUE
## Creating m3sh Webhook Triggers
When you've enabled m3sh Webhook Triggers feature for the m3ter Admin App in your Connector for Salesforce, you can create m3sh Webhook Triggers.
**To create a m3sh webhook trigger:**
1. In your Salesforce Org, navigate to the **m3ter Admin** app.
2. Under **Setup**, select the **m3sh Triggers** tab:
2. Under **Remote Site Settings >** **Remote Site Details** enter these settings for the m3ter Webhook endpoint:
* **Remote Site Name**: m3ter\_Webhook
* **Remote Site URL**: https//\<*m3ter\_Org\_ID*>>.webhook.m3ter.com
* **Active**: TRUE
## Creating m3sh Webhook Triggers
When you've enabled m3sh Webhook Triggers feature for the m3ter Admin App in your Connector for Salesforce, you can create m3sh Webhook Triggers.
**To create a m3sh webhook trigger:**
1. In your Salesforce Org, navigate to the **m3ter Admin** app.
2. Under **Setup**, select the **m3sh Triggers** tab:
![]() 3. Select **Create New Trigger**. The tab adjusts and you can enter the details of the new Trigger:
3. Select **Create New Trigger**. The tab adjusts and you can enter the details of the new Trigger:
![]() * Use the **m3ter Workflow** drop-down to select the m3sh Workflow in your m3ter Organization that will be triggered. (*Required*)
* Enter the **Webhook URL**.
* Use the **Salesforce Object** drop-down to select which object's data will be sent to the selected m3sh Workflow. (*Required*)
* Select **Active** to enable the new Trigger.
**Tip: m3sh Webhook Trigger naming?** A composite name is given to a new m3sh Webhook Trigger using the Salesforce object selected followed by a dash followed by the name of the target m3sh Workflow selected - in the above example: **Account - Amazing m3sh Workflow**. You can update the name as required either by going directly to the CMDT record in the backend or after creating the trigger click **Edit**.
4. Select **Create**. The new m3sh Trigger is saved:
* Note that if you want to review or edit an active m3sh Webhook Trigger, you can return to the **m3sh Triggers** tab and use the **Active** drop-down to select the Trigger:
* Use the **m3ter Workflow** drop-down to select the m3sh Workflow in your m3ter Organization that will be triggered. (*Required*)
* Enter the **Webhook URL**.
* Use the **Salesforce Object** drop-down to select which object's data will be sent to the selected m3sh Workflow. (*Required*)
* Select **Active** to enable the new Trigger.
**Tip: m3sh Webhook Trigger naming?** A composite name is given to a new m3sh Webhook Trigger using the Salesforce object selected followed by a dash followed by the name of the target m3sh Workflow selected - in the above example: **Account - Amazing m3sh Workflow**. You can update the name as required either by going directly to the CMDT record in the backend or after creating the trigger click **Edit**.
4. Select **Create**. The new m3sh Trigger is saved:
* Note that if you want to review or edit an active m3sh Webhook Trigger, you can return to the **m3sh Triggers** tab and use the **Active** drop-down to select the Trigger:
![]() * Select **Edit** if you want to update the configuration of the Trigger.
* Use the **Active** switch if you want to deactivate the Trigger.
## Testing Active m3sh Webhook Triggers
You can run a test of an active m3sh Webhook Trigger.
**To test an active m3sh trigger:**
1. In your Salesforce Org, navigate to the **m3ter Admin** app.
2. Under **Setup**, select the **m3sh Triggers** tab.
3. In the **Active** drop-down list, select the m3sh Webhook Trigger. The Trigger configuration is shown and you can read-off:
* The Salesforce **Object** the Trigger is configured to transfer data for to the m3sh Workflow - in this example **Account**.
* The **Status** of the Trigger - in this example **Never Run**.
* The **Webhook URL** defined for the Trigger.
* Select **Edit** if you want to update the configuration of the Trigger.
* Use the **Active** switch if you want to deactivate the Trigger.
## Testing Active m3sh Webhook Triggers
You can run a test of an active m3sh Webhook Trigger.
**To test an active m3sh trigger:**
1. In your Salesforce Org, navigate to the **m3ter Admin** app.
2. Under **Setup**, select the **m3sh Triggers** tab.
3. In the **Active** drop-down list, select the m3sh Webhook Trigger. The Trigger configuration is shown and you can read-off:
* The Salesforce **Object** the Trigger is configured to transfer data for to the m3sh Workflow - in this example **Account**.
* The **Status** of the Trigger - in this example **Never Run**.
* The **Webhook URL** defined for the Trigger.
![]() 4. Select **Test**. A **Test Webhook** modal opens:
5. On the modal, select the **Account** you want to run the test for, and then select **Run Test**:
4. Select **Test**. A **Test Webhook** modal opens:
5. On the modal, select the **Account** you want to run the test for, and then select **Run Test**:
![]() * A successful test should return 200 http status code and a response such as the following example:
* A successful test should return 200 http status code and a response such as the following example:
![]() **Note!** Please be aware that Test runs will trigger the m3sh Workflow as normal.
## Implementation Notes
This section provides further guidance on successfully implementing the m3sh Webhook Triggers feature for your m3ter Connector for Salesforce managed package:
* [Adding Webhooks as Triggers for m3sh Workflows](/guides/m3ter-connector-for-salesforce/setting-up-m3sh-webhook-triggers#adding-webhooks-as-triggers-for-m3sh-workflows)
* [Implementation Patterns - Options](/guides/m3ter-connector-for-salesforce/setting-up-m3sh-webhook-triggers#implementation-patterns-options)
### Adding Webhooks as Triggers for m3sh Workflows
m3sh Workflows in m3ter can be configured to use different types of Trigger, including webhooks. In addition to the setup required in your Salesforce Org when implementing the m3sh Webhook Triggers feature, you must also ensure a corresponding webhook is configured in the m3ter Console as the Trigger for the target m3sh Workflow.
The correct credentials set up is necessary for the webhook you configure as a Trigger for the m3sh Workflow, and the m3sh Webhook Triggers feature uses the same Integration Credentials setup as used in the Connector for Salesforce managed package to sign requests made to m3ter. Therefore please ensure that when setting up the webhook Trigger for the m3sh Workflow, the integration credentials used match those of the service user used to set up the sync between the m3ter Connector for Salesforce managed package and m3ter, that is, the integration credentials in the managed package.
### Implementation Patterns - Options
Once a m3sh Webhook Trigger has been successfully configured and tested, you are ready to implement it in your process. Three different implementation patterns are available.
* [Use in Salesforce Flows](/guides/m3ter-connector-for-salesforce/setting-up-m3sh-webhook-triggers#salesforce-flows)
* [Use in Apex](/guides/m3ter-connector-for-salesforce/setting-up-m3sh-webhook-triggers#apex)
* [Scheduled Apex Jobs](/guides/m3ter-connector-for-salesforce/setting-up-m3sh-webhook-triggers#scheduled-apex-jobs)
#### Salesforce Flows
The invocable action has two required inputs:
* **Config Developer Name**:
* You can find this by navigating to the underlying CMDT record, that is from **Setup > Custom Metadata >** find\*\* m3sh Trigger Configs\*\* and select **Manage Records**.
* **Record IDs**:
* The Ids for the Salesforce Records to send to the Webhook. These must be of the same type as the configured Salesforce Object.
* The platform will send each record in a separate transaction.
**Note!** Please be aware that Test runs will trigger the m3sh Workflow as normal.
## Implementation Notes
This section provides further guidance on successfully implementing the m3sh Webhook Triggers feature for your m3ter Connector for Salesforce managed package:
* [Adding Webhooks as Triggers for m3sh Workflows](/guides/m3ter-connector-for-salesforce/setting-up-m3sh-webhook-triggers#adding-webhooks-as-triggers-for-m3sh-workflows)
* [Implementation Patterns - Options](/guides/m3ter-connector-for-salesforce/setting-up-m3sh-webhook-triggers#implementation-patterns-options)
### Adding Webhooks as Triggers for m3sh Workflows
m3sh Workflows in m3ter can be configured to use different types of Trigger, including webhooks. In addition to the setup required in your Salesforce Org when implementing the m3sh Webhook Triggers feature, you must also ensure a corresponding webhook is configured in the m3ter Console as the Trigger for the target m3sh Workflow.
The correct credentials set up is necessary for the webhook you configure as a Trigger for the m3sh Workflow, and the m3sh Webhook Triggers feature uses the same Integration Credentials setup as used in the Connector for Salesforce managed package to sign requests made to m3ter. Therefore please ensure that when setting up the webhook Trigger for the m3sh Workflow, the integration credentials used match those of the service user used to set up the sync between the m3ter Connector for Salesforce managed package and m3ter, that is, the integration credentials in the managed package.
### Implementation Patterns - Options
Once a m3sh Webhook Trigger has been successfully configured and tested, you are ready to implement it in your process. Three different implementation patterns are available.
* [Use in Salesforce Flows](/guides/m3ter-connector-for-salesforce/setting-up-m3sh-webhook-triggers#salesforce-flows)
* [Use in Apex](/guides/m3ter-connector-for-salesforce/setting-up-m3sh-webhook-triggers#apex)
* [Scheduled Apex Jobs](/guides/m3ter-connector-for-salesforce/setting-up-m3sh-webhook-triggers#scheduled-apex-jobs)
#### Salesforce Flows
The invocable action has two required inputs:
* **Config Developer Name**:
* You can find this by navigating to the underlying CMDT record, that is from **Setup > Custom Metadata >** find\*\* m3sh Trigger Configs\*\* and select **Manage Records**.
* **Record IDs**:
* The Ids for the Salesforce Records to send to the Webhook. These must be of the same type as the configured Salesforce Object.
* The platform will send each record in a separate transaction.
![]() **Note:** Because the Invocable Action makes callouts, it needs to be added to an ***Asynchronous Path***.
#### Apex
`Java:`
```java theme={null}
// Trigger delegation pattern
trigger AccountTrigger on Account (after insert, after update) {
AccountTriggerHandler.handleAfterInsertUpdate(Trigger.new, Trigger.oldMap);
}
// Trigger Handler class
public class AccountTriggerHandler {
public static void handleAfterInsertUpdate(List newRecords, Map oldMap) {
if (Trigger.isInsert || (Trigger.isUpdate && needsSync(newRecords, oldMap))) {
Set recordIds = new Map(newRecords).keySet();
sendToWebhookAsync(recordIds, 'Account_Realtime_Sync');
}
}
@future(Callout=true)
public static void sendToWebhookAsync(Set recordIds, String configDeveloperName) {
// Note: In subscriber orgs, use the namespace prefix 'm3' before class names
// Example: m3.M3shSendWebhookService for production installations
m3.M3shSendWebhookService.M3shWebhookRequest request = new m3.M3shSendWebhookService.M3shWebhookRequest();
request.configDeveloperName = configDeveloperName;
request.recordIds = new List(recordIds);
List results =
m3.M3shSendWebhookService.sendToWebhook(new List{ request });
if (!results.isEmpty() && !results[0].success) {
System.debug(LoggingLevel.ERROR, 'Webhook failed: ' + results[0].message);
}
}
private static Boolean needsSync(List newRecords, Map oldMap) {
// Implement your logic here
return true;
}
}
```
* Note that given the service makes callouts, it will need to be wrapped in a `@future(Callout=true) `method.
* See: [https://help.salesforce.com/s/articleView?id=000386018\&type=1](https://help.salesforce.com/s/articleView?id=000386018\&type=1)
#### Scheduled Apex Jobs
For a configured m3sh Webhook Trigger, you can to set up scheduled Apex jobs to periodically send records to the m3sh Webhook:
**Note:** Because the Invocable Action makes callouts, it needs to be added to an ***Asynchronous Path***.
#### Apex
`Java:`
```java theme={null}
// Trigger delegation pattern
trigger AccountTrigger on Account (after insert, after update) {
AccountTriggerHandler.handleAfterInsertUpdate(Trigger.new, Trigger.oldMap);
}
// Trigger Handler class
public class AccountTriggerHandler {
public static void handleAfterInsertUpdate(List newRecords, Map oldMap) {
if (Trigger.isInsert || (Trigger.isUpdate && needsSync(newRecords, oldMap))) {
Set recordIds = new Map(newRecords).keySet();
sendToWebhookAsync(recordIds, 'Account_Realtime_Sync');
}
}
@future(Callout=true)
public static void sendToWebhookAsync(Set recordIds, String configDeveloperName) {
// Note: In subscriber orgs, use the namespace prefix 'm3' before class names
// Example: m3.M3shSendWebhookService for production installations
m3.M3shSendWebhookService.M3shWebhookRequest request = new m3.M3shSendWebhookService.M3shWebhookRequest();
request.configDeveloperName = configDeveloperName;
request.recordIds = new List(recordIds);
List results =
m3.M3shSendWebhookService.sendToWebhook(new List{ request });
if (!results.isEmpty() && !results[0].success) {
System.debug(LoggingLevel.ERROR, 'Webhook failed: ' + results[0].message);
}
}
private static Boolean needsSync(List newRecords, Map oldMap) {
// Implement your logic here
return true;
}
}
```
* Note that given the service makes callouts, it will need to be wrapped in a `@future(Callout=true) `method.
* See: [https://help.salesforce.com/s/articleView?id=000386018\&type=1](https://help.salesforce.com/s/articleView?id=000386018\&type=1)
#### Scheduled Apex Jobs
For a configured m3sh Webhook Trigger, you can to set up scheduled Apex jobs to periodically send records to the m3sh Webhook:
![]() After selecting a **Run Interval** - available options are every 15 mins, every 30 mins, or every hour - select **Enable Scheduled Runs**:
After selecting a **Run Interval** - available options are every 15 mins, every 30 mins, or every hour - select **Enable Scheduled Runs**:
![]() With this feature enabled the m3ter Connector for Salesforce managed package will, for every configured m3sh Webhook Trigger:
* Query all the fields for the records from the associated Salesforce Object that have been updated/created since the last run.
* Prepare the request payload.
* Send the records to the Webhook endpoint.
**Tip: Switching off scheduled jobs?** You can easily turn off scheduled jobs using the **Disable Scheduled Runs** button from the Setup UI.
## Monitoring Execution Logs
To aid debugging and monitoring of the callouts made to m3sh Workflows, a new object and tab has been added to the m3ter Connector for Salesforce managed package. This new tab in the m3ter Admin App is called **m3sh Execution Logs**:
With this feature enabled the m3ter Connector for Salesforce managed package will, for every configured m3sh Webhook Trigger:
* Query all the fields for the records from the associated Salesforce Object that have been updated/created since the last run.
* Prepare the request payload.
* Send the records to the Webhook endpoint.
**Tip: Switching off scheduled jobs?** You can easily turn off scheduled jobs using the **Disable Scheduled Runs** button from the Setup UI.
## Monitoring Execution Logs
To aid debugging and monitoring of the callouts made to m3sh Workflows, a new object and tab has been added to the m3ter Connector for Salesforce managed package. This new tab in the m3ter Admin App is called **m3sh Execution Logs**:
![]() Each time a callout is made, the request payload, the response, and HTTP Status code is logged, along with other useful information like the Execution Type and name of the CMDT Config.
The possible values for the Execution Type are listed below:
* **Scheduled** - From scheduled batch jobs.
* **Manual** - From admin UI **Run Now** or **Test** buttons.
* **Invocable Action** - From Flow or Apex invocations.
Each time a callout is made, the request payload, the response, and HTTP Status code is logged, along with other useful information like the Execution Type and name of the CMDT Config.
The possible values for the Execution Type are listed below:
* **Scheduled** - From scheduled batch jobs.
* **Manual** - From admin UI **Run Now** or **Test** buttons.
* **Invocable Action** - From Flow or Apex invocations.
![]() # Setting Up Sync for End Dating m3ter Account Billing Entities
Source: https://docs.m3ter.com/guides/m3ter-connector-for-salesforce/setting-up-sync-for-end-dating-m3ter-account-billing-entities
You can configure your Connector for Salesforce Sync to end date billing entities associated with a m3ter Account:
* **Account Plan**
* **Prepayment/Commitment**
* **Contract**
* **Pricing**
* **Counter Pricing**
The capability to collectively end date billing entities associated with an end-customer Account is very useful in cases where you need to create new agreements with end-customers - such as for renewals or mid-service term amendments - and for service cancellations
Once you have the m3ter Connector for Salesforce managed package installed and configured for syncing with your m3ter Organization, you can end date Account billing entities directly and quickly through your Salesforce Org user interface using a simple set up form with submit button. Alternatively, you can trigger end dating for Account billing entities with an Invocable Action.
This topic explains how to set up and work with the end dating Account billing entities feature available in your m3ter Connector managed package, and provides essential reference information on its details, design, and operational constraints:
* [End Dating Using Set Up and Submit Form in UI](/guides/m3ter-connector-for-salesforce/setting-up-sync-for-end-dating-m3ter-account-billing-entities#end-dating-using-set-up-and-submit-form-in-ui)
* [End Dating Using Invocable Action](/guides/m3ter-connector-for-salesforce/setting-up-sync-for-end-dating-m3ter-account-billing-entities#end-dating-using-invocable-action)
**Note Alternative! End Dating Account Billing Entities via Contract**. You can also perform a sync to end date m3ter Account billing entities using a *Contract*. This topic explains how to do this with your installed Salesforce m3ter Connector using an Account, but the details apply similarly if instead you want to do this via a Contract data object or other data object in your Salesforce Org which is synced to a Contract linked to an Account in your m3ter Organization.
**Important!**
* **Check Version**. The end date Account billing entities feature is only available in version **0.5** and above of the m3ter Connector for Salesforce managed package. See [m3ter Connector for Salesforce - Changelog](/guides/m3ter-connector-for-salesforce/m3ter-connector-for-salesforce-changelog) for details on how to check your current installed version.
## End Dating Using Set Up and Submit Form in UI
In your Salesforce Org when you've set up the m3ter Connector for syncing Salesforce data objects with corresponding entities in your m3ter Organization, you can quickly set up and submit a sync for end dating the billing entities associated with an Account or Contract using the *End Date m3ter Billing Data* action.
**To end date Account billing entities:**
1. In your Salesforce Org under **Page Layouts**, use the **Mobile and Lightning Actions** list to add the **End Date m3ter Billing Data** button to the page where you want it to reside.
**Tip: More Details?** For more details, see the steps documented for [Adding m3ter Sync Action for Sales Object](/guides/m3ter-connector-for-salesforce/configuring-m3ter-salesforce-connector#adding-m3ter-sync-action-for-sales-object).
2. On the page, select the **End Date m3ter Billing Data** button. The set up form opens for the selected Account:
# Setting Up Sync for End Dating m3ter Account Billing Entities
Source: https://docs.m3ter.com/guides/m3ter-connector-for-salesforce/setting-up-sync-for-end-dating-m3ter-account-billing-entities
You can configure your Connector for Salesforce Sync to end date billing entities associated with a m3ter Account:
* **Account Plan**
* **Prepayment/Commitment**
* **Contract**
* **Pricing**
* **Counter Pricing**
The capability to collectively end date billing entities associated with an end-customer Account is very useful in cases where you need to create new agreements with end-customers - such as for renewals or mid-service term amendments - and for service cancellations
Once you have the m3ter Connector for Salesforce managed package installed and configured for syncing with your m3ter Organization, you can end date Account billing entities directly and quickly through your Salesforce Org user interface using a simple set up form with submit button. Alternatively, you can trigger end dating for Account billing entities with an Invocable Action.
This topic explains how to set up and work with the end dating Account billing entities feature available in your m3ter Connector managed package, and provides essential reference information on its details, design, and operational constraints:
* [End Dating Using Set Up and Submit Form in UI](/guides/m3ter-connector-for-salesforce/setting-up-sync-for-end-dating-m3ter-account-billing-entities#end-dating-using-set-up-and-submit-form-in-ui)
* [End Dating Using Invocable Action](/guides/m3ter-connector-for-salesforce/setting-up-sync-for-end-dating-m3ter-account-billing-entities#end-dating-using-invocable-action)
**Note Alternative! End Dating Account Billing Entities via Contract**. You can also perform a sync to end date m3ter Account billing entities using a *Contract*. This topic explains how to do this with your installed Salesforce m3ter Connector using an Account, but the details apply similarly if instead you want to do this via a Contract data object or other data object in your Salesforce Org which is synced to a Contract linked to an Account in your m3ter Organization.
**Important!**
* **Check Version**. The end date Account billing entities feature is only available in version **0.5** and above of the m3ter Connector for Salesforce managed package. See [m3ter Connector for Salesforce - Changelog](/guides/m3ter-connector-for-salesforce/m3ter-connector-for-salesforce-changelog) for details on how to check your current installed version.
## End Dating Using Set Up and Submit Form in UI
In your Salesforce Org when you've set up the m3ter Connector for syncing Salesforce data objects with corresponding entities in your m3ter Organization, you can quickly set up and submit a sync for end dating the billing entities associated with an Account or Contract using the *End Date m3ter Billing Data* action.
**To end date Account billing entities:**
1. In your Salesforce Org under **Page Layouts**, use the **Mobile and Lightning Actions** list to add the **End Date m3ter Billing Data** button to the page where you want it to reside.
**Tip: More Details?** For more details, see the steps documented for [Adding m3ter Sync Action for Sales Object](/guides/m3ter-connector-for-salesforce/configuring-m3ter-salesforce-connector#adding-m3ter-sync-action-for-sales-object).
2. On the page, select the **End Date m3ter Billing Data** button. The set up form opens for the selected Account:
![]() 3. Use the **End Date** calendar icon to open and select the end date you want to apply to the Account billing entities.
4. Under **Select Billing Entities**, select each of the entities linked to the Account you want to end date in the **Available** box and use the arrow to transfer them to the **Selected** box:
3. Use the **End Date** calendar icon to open and select the end date you want to apply to the Account billing entities.
4. Under **Select Billing Entities**, select each of the entities linked to the Account you want to end date in the **Available** box and use the arrow to transfer them to the **Selected** box:
![]() * Note that the **Submit to m3ter** button is now activated.
5. If the selected Account is a parent Account and you want to apply end dating to the selected billing entities linked to the Account's child Accounts in your m3ter Organization, select the **Apply to Child Accounts** checkbox.
6. Select **Submit to m3ter.** The end dating sync action is performed:
* If the action is successful, you'll receive a confirmation message with details of the Account billing entities that were updated accordingly in your m3ter Organization:
* Note that the **Submit to m3ter** button is now activated.
5. If the selected Account is a parent Account and you want to apply end dating to the selected billing entities linked to the Account's child Accounts in your m3ter Organization, select the **Apply to Child Accounts** checkbox.
6. Select **Submit to m3ter.** The end dating sync action is performed:
* If the action is successful, you'll receive a confirmation message with details of the Account billing entities that were updated accordingly in your m3ter Organization:
![]() * If the action fails, you'll see an error message:
* If the action fails, you'll see an error message:
![]() ## End Dating Using Invocable Action
Alternatively, you can perform a sync from your Salesforce Org using the m3ter Connector managed package to end date Account billing entities by triggering an Invocable Action (IA).
**Important: Review details of Sync to m3ter IA!** If you are planning to end date Account billing entities using the IA method, please review the earlier topic in this section for [Setting Up and Using Sync to m3ter Invocable Action](/guides/m3ter-connector-for-salesforce/setting-up-invocable-action-for-event-driven-sync). The end dating IA set up and operational constraints are similar and the following section assumes you have reviewed and understood the details for using the Sync to m3ter IA.
There are two ways you can implement the sync for end dating Account billing entities IA feature in your managed package:
* **Flow**
* **APEX**
### Flow
You must perform three configuration tasks to ensure that the Action performs as expected when using Record Triggered Flows:
1. To enable *Run Asynchronously*, you must select the checkbox for:
* ***Include a Run Asynchronously path to access an external system after the original transaction for the triggering record is successfully committed.***
2. In the options for *When to Run the Flow for Updated Records*, you must select:
* **Only when a record is updated to meet the condition requirements.**
3. You must add the Action to the **Run Asynchronously** path.
**Tip: More Details for Flow?** These settings are analogous to what is required when setting up the *Sync to m3ter Invocable Action*. See under **Flow** in the for [Implementing Sync to m3ter IA](/guides/m3ter-connector-for-salesforce/setting-up-invocable-action-for-event-driven-sync#implementing-sync-to-m3ter-ia) section for a helpful example and more details.
### Apex
Here is a sample Apex Code to invoke the end dating feature.
* Importantly, note that *you must check and alter* for the correct namespace and depending on the environment:
```javascript theme={null}
List requests;
List results;
System.debug('Testing Valid Record');
requests = new List{
new m3tertest.EndDateM3terEntitiesInvocable.M3terEndDateSyncRequest()
};
requests[0].recordId = '006Pu00000G88gkIAB';
requests[0].endDate = '2024-12-30T00:00:00Z';
requests[0].applyToChildRecords = false;
requests[0].billingEntities = new List{'CONTRACT'};
results = m3tertest.EndDateM3terEntitiesInvocable.endDateM3terEntities(requests);
if (!results.isEmpty()) {
m3tertest.EndDateM3terEntitiesInvocable.M3terEndDateSyncResult result = results[0];
System.debug('=== Result Details ===');
System.debug('Success: ' + result.success);
System.debug('Message: ' + result.message);
System.debug('Response: ' + result.response);
System.debug('====================\n');
}
```
### Sample Output
`USER_DEBUG|[16]|DEBUG|=== Result Details ===`
`USER_DEBUG|[17]|DEBUG|Success: true`
`USER_DEBUG|[18]|DEBUG|Message: Billing entities successfully updated.`
`Updated entity types: CONTRACT`
`USER_DEBUG|[19]|DEBUG|Response: {"statusMessage":"Billing entities successfully updated.","updatedEntities":{"CONTRACT":["3a270ffe-1ad3-47d8-bc29-dd4891b1e296"]}}`
`USER_DEBUG|[20]|DEBUG|====================`
### Reviewing Feature Details
This section provides important reference information if you choose to implement the end date Account billing entities feature.
| Field Name | Purpose |
| - | - |
| INPUT | |
| Record ID (string - required) | The Salesforce Id of the m3ter record to end date. Accounts or Contracts can be end dated. |
| End Date (string - required) | The date to end date the record. Format: ISO 8601, that is: YYYY-MM-DDTHH:MM:SSZ |
| Apply to Child Records (boolean- required) | If true, the end date will be applied to all child records. Default is false. |
| Billing entities (list \ - required) | The billing entities to end date. Valid values are: CONTRACT, ACCOUNTPLAN, PREPAYMENT, PRICINGS, COUNTER\_PRICINGS. |
| OUTPUT | |
| Success (boolean) | Boolean indicating whether or not the entire sync process was successful: |
| True if result is success; | |
| False if result is false. | |
| Message (string) | The overall status of the process. |
| Result (string) | Detailed message about the result. |
### Reviewing Guardrails and Limits
Some operational safeguards and design constraints are built into the end dating feature. Please review this section before implementing and running the feature.
#### Single Record Processing
To ensure predictable behavior and prevent resource exhaustion:
* The action is explicitly designed to process only one record at a time.
* Multiple record requests will result in a Failed status with appropriate error message.
#### Record Validation
Validation checks:
* Performs existence check on the parent record before initiating sync.
* Returns specific error statuses for:
* Invalid/null record IDs
* Non-existent records
* Record access issues
* Invalid End Date format
* Invalid Billing Entities
#### Status Codes and Messages
Two status codes are given:
* **Success**: All objects synced successful.
* **Failed**: System-level failures (CPU limits, validation errors, and so on).
### Enforcing Asynchronous Processing
Given the action will perform a number of API callouts to m3ter, you must ensure that it is called from a separate transaction to avoid provoking the following error:
* ***"You have uncommitted work pending. Please commit or rollback before calling out"***
This is a common Salesforce error related to transaction management and external callouts:
1. **Flows**: If the action is not set to run asynchronously, and there are any DML operations before it in the flow, you will encounter this error.
2. **Apex**: If you try to call the action directly after performing DML operations in the same transaction, you will get this error.
To avoid this error:
1. **Flows**: Always use the "Run Asynchronously" option for the Sync to m3ter action.
2. **Apex**: Use the `@future(callout=true)` method. This ensures the callout happens in a separate transaction.
# Testing Sync Setup from Salesforce to m3ter
Source: https://docs.m3ter.com/guides/m3ter-connector-for-salesforce/testing-sync-setup-from-salesforce-to-m3ter
When you have configured the m3ter Connector for Salesforce for syncing your Salesforce data with m3ter, you can test your m3ter Connector setup.
This topic explains how to test your Connector sync setup and assumes you have already worked through and completed all of the configuration set out in the [Configuring the m3ter Connector for Salesforce](/guides/m3ter-connector-for-salesforce/configuring-m3ter-salesforce-connector) topic. Testing a sync action setup for syncing a Salesforce Opportunity into your m3ter Organization is used as an example to explain the workflow.
**Tip: What in Salesforce gets mapped to what in m3ter when syncing?** When you have completed the required setting up work and initiate a sync action, a preview is shown for which Salesforce object fields will be mapped to which m3ter object fields. This data mapping for the sync is determined by the preconfigured metadata mapping types that are installed with the m3ter Connector managed package. For more details, see the [Reviewing and Managing Metadata Mappings](/guides/m3ter-connector-for-salesforce/reviewing-and-managing-metadata-mappings) topic in this section.
**To test sync setup:**
1. In **Sales** view, select the **Opportunities** tab.
2. Open the Opportunity you've added a Product to and configured a m3ter mappings for.
3. Select the **Send to M3ter** button at top-right:
## End Dating Using Invocable Action
Alternatively, you can perform a sync from your Salesforce Org using the m3ter Connector managed package to end date Account billing entities by triggering an Invocable Action (IA).
**Important: Review details of Sync to m3ter IA!** If you are planning to end date Account billing entities using the IA method, please review the earlier topic in this section for [Setting Up and Using Sync to m3ter Invocable Action](/guides/m3ter-connector-for-salesforce/setting-up-invocable-action-for-event-driven-sync). The end dating IA set up and operational constraints are similar and the following section assumes you have reviewed and understood the details for using the Sync to m3ter IA.
There are two ways you can implement the sync for end dating Account billing entities IA feature in your managed package:
* **Flow**
* **APEX**
### Flow
You must perform three configuration tasks to ensure that the Action performs as expected when using Record Triggered Flows:
1. To enable *Run Asynchronously*, you must select the checkbox for:
* ***Include a Run Asynchronously path to access an external system after the original transaction for the triggering record is successfully committed.***
2. In the options for *When to Run the Flow for Updated Records*, you must select:
* **Only when a record is updated to meet the condition requirements.**
3. You must add the Action to the **Run Asynchronously** path.
**Tip: More Details for Flow?** These settings are analogous to what is required when setting up the *Sync to m3ter Invocable Action*. See under **Flow** in the for [Implementing Sync to m3ter IA](/guides/m3ter-connector-for-salesforce/setting-up-invocable-action-for-event-driven-sync#implementing-sync-to-m3ter-ia) section for a helpful example and more details.
### Apex
Here is a sample Apex Code to invoke the end dating feature.
* Importantly, note that *you must check and alter* for the correct namespace and depending on the environment:
```javascript theme={null}
List requests;
List results;
System.debug('Testing Valid Record');
requests = new List{
new m3tertest.EndDateM3terEntitiesInvocable.M3terEndDateSyncRequest()
};
requests[0].recordId = '006Pu00000G88gkIAB';
requests[0].endDate = '2024-12-30T00:00:00Z';
requests[0].applyToChildRecords = false;
requests[0].billingEntities = new List{'CONTRACT'};
results = m3tertest.EndDateM3terEntitiesInvocable.endDateM3terEntities(requests);
if (!results.isEmpty()) {
m3tertest.EndDateM3terEntitiesInvocable.M3terEndDateSyncResult result = results[0];
System.debug('=== Result Details ===');
System.debug('Success: ' + result.success);
System.debug('Message: ' + result.message);
System.debug('Response: ' + result.response);
System.debug('====================\n');
}
```
### Sample Output
`USER_DEBUG|[16]|DEBUG|=== Result Details ===`
`USER_DEBUG|[17]|DEBUG|Success: true`
`USER_DEBUG|[18]|DEBUG|Message: Billing entities successfully updated.`
`Updated entity types: CONTRACT`
`USER_DEBUG|[19]|DEBUG|Response: {"statusMessage":"Billing entities successfully updated.","updatedEntities":{"CONTRACT":["3a270ffe-1ad3-47d8-bc29-dd4891b1e296"]}}`
`USER_DEBUG|[20]|DEBUG|====================`
### Reviewing Feature Details
This section provides important reference information if you choose to implement the end date Account billing entities feature.
| Field Name | Purpose |
| - | - |
| INPUT | |
| Record ID (string - required) | The Salesforce Id of the m3ter record to end date. Accounts or Contracts can be end dated. |
| End Date (string - required) | The date to end date the record. Format: ISO 8601, that is: YYYY-MM-DDTHH:MM:SSZ |
| Apply to Child Records (boolean- required) | If true, the end date will be applied to all child records. Default is false. |
| Billing entities (list \ - required) | The billing entities to end date. Valid values are: CONTRACT, ACCOUNTPLAN, PREPAYMENT, PRICINGS, COUNTER\_PRICINGS. |
| OUTPUT | |
| Success (boolean) | Boolean indicating whether or not the entire sync process was successful: |
| True if result is success; | |
| False if result is false. | |
| Message (string) | The overall status of the process. |
| Result (string) | Detailed message about the result. |
### Reviewing Guardrails and Limits
Some operational safeguards and design constraints are built into the end dating feature. Please review this section before implementing and running the feature.
#### Single Record Processing
To ensure predictable behavior and prevent resource exhaustion:
* The action is explicitly designed to process only one record at a time.
* Multiple record requests will result in a Failed status with appropriate error message.
#### Record Validation
Validation checks:
* Performs existence check on the parent record before initiating sync.
* Returns specific error statuses for:
* Invalid/null record IDs
* Non-existent records
* Record access issues
* Invalid End Date format
* Invalid Billing Entities
#### Status Codes and Messages
Two status codes are given:
* **Success**: All objects synced successful.
* **Failed**: System-level failures (CPU limits, validation errors, and so on).
### Enforcing Asynchronous Processing
Given the action will perform a number of API callouts to m3ter, you must ensure that it is called from a separate transaction to avoid provoking the following error:
* ***"You have uncommitted work pending. Please commit or rollback before calling out"***
This is a common Salesforce error related to transaction management and external callouts:
1. **Flows**: If the action is not set to run asynchronously, and there are any DML operations before it in the flow, you will encounter this error.
2. **Apex**: If you try to call the action directly after performing DML operations in the same transaction, you will get this error.
To avoid this error:
1. **Flows**: Always use the "Run Asynchronously" option for the Sync to m3ter action.
2. **Apex**: Use the `@future(callout=true)` method. This ensures the callout happens in a separate transaction.
# Testing Sync Setup from Salesforce to m3ter
Source: https://docs.m3ter.com/guides/m3ter-connector-for-salesforce/testing-sync-setup-from-salesforce-to-m3ter
When you have configured the m3ter Connector for Salesforce for syncing your Salesforce data with m3ter, you can test your m3ter Connector setup.
This topic explains how to test your Connector sync setup and assumes you have already worked through and completed all of the configuration set out in the [Configuring the m3ter Connector for Salesforce](/guides/m3ter-connector-for-salesforce/configuring-m3ter-salesforce-connector) topic. Testing a sync action setup for syncing a Salesforce Opportunity into your m3ter Organization is used as an example to explain the workflow.
**Tip: What in Salesforce gets mapped to what in m3ter when syncing?** When you have completed the required setting up work and initiate a sync action, a preview is shown for which Salesforce object fields will be mapped to which m3ter object fields. This data mapping for the sync is determined by the preconfigured metadata mapping types that are installed with the m3ter Connector managed package. For more details, see the [Reviewing and Managing Metadata Mappings](/guides/m3ter-connector-for-salesforce/reviewing-and-managing-metadata-mappings) topic in this section.
**To test sync setup:**
1. In **Sales** view, select the **Opportunities** tab.
2. Open the Opportunity you've added a Product to and configured a m3ter mappings for.
3. Select the **Send to M3ter** button at top-right:
![]() * A modal opens for the **Account Data Mapping** tab, which previews the mappings of the Salesforce Account object field values into corresponding m3ter Account object fields:
* A modal opens for the **Account Data Mapping** tab, which previews the mappings of the Salesforce Account object field values into corresponding m3ter Account object fields:
![]() * Note that if you want to change any to the field values that will be synced into m3ter, you can cancel out of the sync action at this point, make any required editing changes, and then restart and complete the **Send to M3ter** sync action.
4. Select **Submit to m3ter**. When the sync process completes, a **Sync to m3ter Results** screen shows:
* Note that if you want to change any to the field values that will be synced into m3ter, you can cancel out of the sync action at this point, make any required editing changes, and then restart and complete the **Send to M3ter** sync action.
4. Select **Submit to m3ter**. When the sync process completes, a **Sync to m3ter Results** screen shows:
![]() 5. You can now go to your m3ter Organization and check that the sync action has created or updated the respective data objects and mapped in the correct fields values for those objects:
5. You can now go to your m3ter Organization and check that the sync action has created or updated the respective data objects and mapped in the correct fields values for those objects:
![]() * In this example, the **Acme** Account has been successfully added to the m3ter Organization and the **Account Details** card shows that the fields values have been correctly synced in from Salesforce.
* Note also that the m3ter object creation is attributed to the m3ter Service User whose credentials you added for the Salesforce m3ter App.
# Usage Design Targets
Source: https://docs.m3ter.com/guides/m3ter-connector-for-salesforce/usage-design-targets
The m3ter Connector for Salesforce managed package offers the *Usage Design Targets (UDTs)* feature as a guided way to quickly link m3ter Aggregations to the Salesforce Revenue Cloud records they represent.
This topic introduces and explains how to work with User Design Targets:
* [Usage Design Targets - Overview](#usage-design-targets-overview)
* [Usage Design Targets - Definition and Details](#usage-design-targets-definition-and-details)
* [Launching the Wizard](#launching-the-wizard)
* [Wizard Workflow](#wizard-workflow)
**Important!**
* **Check Version**. The Usage Design Targets feature described in this topic is only available in **v1.1** and above of the m3ter Connector for Salesforce. See [m3ter Connector for Salesforce - Changelog](https://docs.m3ter.com/guides/m3ter-connector-for-salesforce/m3ter-connector-for-salesforce-changelog) for details on how to check your current installed version.
## Usage Design Targets - Overview
Usage Design Targets (UDTs) connect a m3ter Aggregation to the Salesforce Revenue Cloud records that describe how that usage is designed:
* The resource being metered.
* The unit it is measured in.
* The policy that governs it.
Instead of having to manually create and stitch together several records, as a Salesforce admin you can launch a wizard and then quickly work through a guided series of steps to define these links in a single workflow.
## Usage Design Targets - Definition and Details
### Definition
A Usage Design Target is:
* A configuration record that binds one m3ter **Aggregation** to a set of **target records** in your Salesforce Org. Key points:
* Each Usage Design Target is captured as a **binding** made up of a role, a target object, and a target record.
* One Aggregation can have more than one Usage Design Target, and a Usage Design Target can be re-pointed to a different Aggregation later.
### Three Core Targets
Every Usage Design Target requires all three core targets to be set before it can be saved:
* **Usage Resource** — the resource being metered.
* **Unit of Measure** — the unit the usage is measured in.
* **Usage Aggregation Policy** — the policy that governs how the usage is aggregated.
**Note:** When you start setting up a new Usage Design Target, the wizard pre-selects the default Revenue Cloud object for each of these (where it is available in your Org), so you only need to pick the specific record.
### Additional Targets
* Beyond the three core targets, you can add any number of **additional targets**.
* Each additional target is a role, an object, and a record — pointing to standard or custom objects as required.
* Additional targets must be **complete or removed**: a partially filled row (for example, a role with no record) is flagged and blocks saving until it is completed or deleted.
## Launching the Wizard
There are two entry points, both as record-page actions:
* **Link Usage Targets** — on a m3ter Aggregation record. The Aggregation is pre-filled, so the wizard opens at the **Targets** step.
* **Edit Usage Targets** — on an existing Usage Design Target record. The wizard opens in edit mode with the existing bindings loaded, ready for you to edit as required.
### One-time setup: adding the actions to the page layouts
The two quick actions are included in the package but are **not** added to any page layout automatically, so as a Salesforce admin you need to add them once before the buttons appear on the record pages. Each action lives on its own object's layout.
#### **Add "Link Usage Targets" to the Aggregation layout:**
1. From **Setup**, open **Object Manager** and select **m3 Aggregation**.
2. Click **Page Layouts**, then open the **m3 Aggregation Layout**.
3. In the palette at the top, select **Mobile & Lightning Actions**.
4. Drag the **Link Usage Targets** action into the **Salesforce Mobile and Lightning Experience Actions** section (click **override the predefined actions** first if the section is still inheriting defaults).
5. Click **Save**.
#### **Add "Edit Usage Targets" to the Usage Design Target layout:**
1. From **Setup**, open **Object Manager** and select **m3 Usage Design Target**.
2. Click **Page Layouts**, then open the **Usage Design Target Layout**.
3. In the palette, select **Mobile & Lightning Actions**.
4. Drag the **Edit Usage Targets** action into the **Salesforce Mobile and Lightning Experience Actions** section (override the predefined actions if needed).
5. Click **Save**.
## Wizard Workflow
You will need to work through four steps to complete the User Design Targets wizard workflow:
1. **Usage Design** — confirm or select the **Aggregation** this target applies to (pre-filled when launched from an Aggregation):
* In this example, the **Acme** Account has been successfully added to the m3ter Organization and the **Account Details** card shows that the fields values have been correctly synced in from Salesforce.
* Note also that the m3ter object creation is attributed to the m3ter Service User whose credentials you added for the Salesforce m3ter App.
# Usage Design Targets
Source: https://docs.m3ter.com/guides/m3ter-connector-for-salesforce/usage-design-targets
The m3ter Connector for Salesforce managed package offers the *Usage Design Targets (UDTs)* feature as a guided way to quickly link m3ter Aggregations to the Salesforce Revenue Cloud records they represent.
This topic introduces and explains how to work with User Design Targets:
* [Usage Design Targets - Overview](#usage-design-targets-overview)
* [Usage Design Targets - Definition and Details](#usage-design-targets-definition-and-details)
* [Launching the Wizard](#launching-the-wizard)
* [Wizard Workflow](#wizard-workflow)
**Important!**
* **Check Version**. The Usage Design Targets feature described in this topic is only available in **v1.1** and above of the m3ter Connector for Salesforce. See [m3ter Connector for Salesforce - Changelog](https://docs.m3ter.com/guides/m3ter-connector-for-salesforce/m3ter-connector-for-salesforce-changelog) for details on how to check your current installed version.
## Usage Design Targets - Overview
Usage Design Targets (UDTs) connect a m3ter Aggregation to the Salesforce Revenue Cloud records that describe how that usage is designed:
* The resource being metered.
* The unit it is measured in.
* The policy that governs it.
Instead of having to manually create and stitch together several records, as a Salesforce admin you can launch a wizard and then quickly work through a guided series of steps to define these links in a single workflow.
## Usage Design Targets - Definition and Details
### Definition
A Usage Design Target is:
* A configuration record that binds one m3ter **Aggregation** to a set of **target records** in your Salesforce Org. Key points:
* Each Usage Design Target is captured as a **binding** made up of a role, a target object, and a target record.
* One Aggregation can have more than one Usage Design Target, and a Usage Design Target can be re-pointed to a different Aggregation later.
### Three Core Targets
Every Usage Design Target requires all three core targets to be set before it can be saved:
* **Usage Resource** — the resource being metered.
* **Unit of Measure** — the unit the usage is measured in.
* **Usage Aggregation Policy** — the policy that governs how the usage is aggregated.
**Note:** When you start setting up a new Usage Design Target, the wizard pre-selects the default Revenue Cloud object for each of these (where it is available in your Org), so you only need to pick the specific record.
### Additional Targets
* Beyond the three core targets, you can add any number of **additional targets**.
* Each additional target is a role, an object, and a record — pointing to standard or custom objects as required.
* Additional targets must be **complete or removed**: a partially filled row (for example, a role with no record) is flagged and blocks saving until it is completed or deleted.
## Launching the Wizard
There are two entry points, both as record-page actions:
* **Link Usage Targets** — on a m3ter Aggregation record. The Aggregation is pre-filled, so the wizard opens at the **Targets** step.
* **Edit Usage Targets** — on an existing Usage Design Target record. The wizard opens in edit mode with the existing bindings loaded, ready for you to edit as required.
### One-time setup: adding the actions to the page layouts
The two quick actions are included in the package but are **not** added to any page layout automatically, so as a Salesforce admin you need to add them once before the buttons appear on the record pages. Each action lives on its own object's layout.
#### **Add "Link Usage Targets" to the Aggregation layout:**
1. From **Setup**, open **Object Manager** and select **m3 Aggregation**.
2. Click **Page Layouts**, then open the **m3 Aggregation Layout**.
3. In the palette at the top, select **Mobile & Lightning Actions**.
4. Drag the **Link Usage Targets** action into the **Salesforce Mobile and Lightning Experience Actions** section (click **override the predefined actions** first if the section is still inheriting defaults).
5. Click **Save**.
#### **Add "Edit Usage Targets" to the Usage Design Target layout:**
1. From **Setup**, open **Object Manager** and select **m3 Usage Design Target**.
2. Click **Page Layouts**, then open the **Usage Design Target Layout**.
3. In the palette, select **Mobile & Lightning Actions**.
4. Drag the **Edit Usage Targets** action into the **Salesforce Mobile and Lightning Experience Actions** section (override the predefined actions if needed).
5. Click **Save**.
## Wizard Workflow
You will need to work through four steps to complete the User Design Targets wizard workflow:
1. **Usage Design** — confirm or select the **Aggregation** this target applies to (pre-filled when launched from an Aggregation):
![SMPUDT1]() 2. **Targets** — set the three core targets - **Usage Resource**, **Unit of Measure**, and **Usage Aggregation Policy**. The **Next** button remains disabled until all three have a record selected:
2. **Targets** — set the three core targets - **Usage Resource**, **Unit of Measure**, and **Usage Aggregation Policy**. The **Next** button remains disabled until all three have a record selected:
![SMPUDT2]() 3. **Additional** — optionally add extra targets. This step can be left empty:
3. **Additional** — optionally add extra targets. This step can be left empty:
![SMPUDT3]() 4. **Review** — check every selected target laid out by role, object, and record name before saving:
4. **Review** — check every selected target laid out by role, object, and record name before saving:
![SMPUDT4]() * On **Save**, a success toast appears and you are taken to the Usage Design Target record. Editing a Usage Design Target replaces its bindings with the current selections.
# Organization and Access Management
Source: https://docs.m3ter.com/guides/organization-and-access-management
In the **Settings** section, you can manage your Organization and the Users who will have access.
To manage your Organization you can:
* View your Organization details.
* Edit your configuration to define Organization-wide settings for currency and currency conversions, timezone, and epoch dates for billing.
* Enable auto-approval and scheduling for billing.
* Create Credit Reasons to use when you add credit line items to Bills.
* Create Debit Reasons to use when you add debit line items to Bills.
* Add and edit Custom Fields.
To manage access to your Organization, you can:
* View and edit Users.
* Create and configure Service Users.
* Create and manage Permission Policies for controlling User access to your Organization.
* Create User Groups, apply Permission Policies to them. When you assign individual Users to a User Group, those Users have the Group permissions applied to them.
* Invite Users to join your Organization.
* Make a request to grant m3ter Support access to your Organization.
This section explains how to manage your Organization and how to control User access to your Organization:
* [Managing your Organization](/guides/organization-and-access-management/viewing-and-editing-organization)
* [Understanding, Creating, and Managing Permission Policies](/guides/organization-and-access-management/creating-and-managing-permissions)
* [Managing Access and Users](/guides/organization-and-access-management/managing-users)
# Understanding, Creating, and Managing Permission Policies
Source: https://docs.m3ter.com/guides/organization-and-access-management/creating-and-managing-permissions
You can create *Permission Policies* for your Users and assign these Permission Policies to them. There are two types of Permission Policies you can assign to Users:
* **Custom**. The policies you create yourself for controlling access to your Organization.
* **Managed**. System generated policies which you can assign to Users but which you cannot edit to change the access to resources they are configured to allow or deny.
When you create a Custom Permission Policy, you can add *statements* to the policy that *allow or deny actions* for specific *resources*. This allows you to control very precisely what a User who has been given access to your Organization can and cannot do. For example, you might want to create a Permissions Policy that denies Users the ability to retrieve Meters.
This section explains the m3ter permissions model, lists the actions and resources you can use when adding statements to create Permission Policies, and how to create and manage your Custom Permissions Policies:
* [Understanding the m3ter Permissions Model](/guides/organization-and-access-management/creating-and-managing-permissions#understanding-the-m3ter-permissions-model)
* [Permission Policy Statements - Actions and Resources](/guides/organization-and-access-management/creating-and-managing-permissions#permission-policy-statements-available-actions-and-resources)
* [Creating Custom Permission Policies](/guides/organization-and-access-management/creating-and-managing-permissions#creating-custom-permission-policies)
* [Permissions Exceptions](/guides/organization-and-access-management/creating-and-managing-permissions#permissions-exceptions)
**Warning - Check for Exceptions!** There are instances where exceptions to the general permissions framework might occur as a result of shared data. See the [Permissions Exceptions](/guides/organization-and-access-management/creating-and-managing-permissions#permissions-exceptions) section below for more details.
## Understanding the m3ter Permissions Model
The m3ter Permissions model is implemented using a three-fold framework of *Effect*, *Action*, and *Resource*:
* **Def**: A Permission is defined as imposing an *effect* of either allowing or denying access to a specific *resource* to perform a specific *action* on that resource.
In JSON format, the general schema for a Permission is:
```json theme={null}
{
"Effect": {effect},
"Action": [{action}],
"Resource": [{resource}]
}
```
### Resources
Resources are defined as *m3ter Resource Identifiers* (MRIs) in the format:
> `service:resource-type/item-type/id`
Where:
* *service* is a distinct part of the overall m3ter system, and which forms a natural functional grouping, such as "config" or "billing".
* *resource-type* is the resource type item accessed - for example: "Plan", "Meter", "Bill"
* *item-type* is one of:
* "item" - to specify an individual item.
* "group" - to specify a resource group.
* *id* is the resource group id or the resource item id
For example:
* To denote as resource a specific *Plan* with an *id = 12345* in the *config* service, the MRI would be:
> `config:plan/item/12345`
* To denote as resource a *Plan Resource Group* with *id= 987* (that is, applying to all Plans that are contained within the resource group) the MRI would be:
> `config:plan/group/987`
#### Use of Wildcards for Resources
The use of wildcards when denoting resources is allowed. For example, to denote all Plans as the resource in a permission statement, you can use:
> `config:plan/*`
**Tip: Available Resources?** Please see the [following section](/guides/organization-and-access-management/creating-and-managing-permissions#permission-policy-statements-available-actions-and-resources) for a full list of available resources by service you can use in statements when creating your Permission Policies.
#### Resource Groups
Resources can be assigned to one or more Resource Groups. For example, a Plan can be assigned to Plan Resource Groups, a Meter can be assigned to Meter Resource Groups, and so on. This is useful for cases where you want to create Permission Policies which allow or deny access to a specific subset of resources - you want to grant access to a User to only some of the Plans in your Organization.
This concept of grouping resources applies to every resource in m3ter, including Resource Groups themselves, which allows you to nest resource groups to support hierarchies of groups.
**Tip: Creating Resource Groups?** You can create Resource Groups, add resource items to them, and manage your Resource Groups using the [Resource Groups](/api/resourcegroup/introduction) API calls
### Actions
Actions define what a User is either allowed or not allowed to do with respect to a resource. For example, you can use a `config:create` and `config:retrieve` action to create a statement for a Permission Policy that allows Users to create or retrieve any Plan in your Organization. But if this is the only Permission Policy assigned to a User, they will not be able to update or delete any Plans:
```json theme={null}
{
"effect": "allow",
"action": [
"config:create",
"config:retrieve"
],
"resource": [
"config:plan/*"
]
}
```
Please see the [following section](/guides/organization-and-access-management/creating-and-managing-permissions#permission-policy-statements-available-actions-and-resources) for full details and explanation on using actions against resources when creating statements for your Permission Policies.
### Effects and Evaluation Logic
The effect for a Permission Policy is either *to allow* or *to deny*:
* **Allow** - indicates the policy is allowing access to the resource(s) for the given action(s).
* **Deny** - indicates the policy is denying access to the resource(s) for the given action(s).
If you create a Permission Policy with multiple statements this is how evaluation of access to a resource for a given action is applied:
* There is an implicit denial - the order of evaluation is:
* We check to see if there is a statement that denies access to a resource for a given action. If there is, the access is denied.
* We check to see if there is a statement that allows access to a resource for a given action. If there is, the access is allowed.
* If there is no statement that explicitly denies and no statement that explicitly allows, the access is denied.
* In the case of a conflict of deny/allow, denial takes precedence:
* If there is a statement that denies access to a resource for a given action and there is a statement that allows access to a resource for the same action, the access is denied.
**Warning - Check for Exceptions!** There are instances where exceptions to the general permissions framework might occur as a result of shared data. See the [Permissions Exceptions](/guides/organization-and-access-management/creating-and-managing-permissions#permissions-exceptions) section below for more details.
## Permission Policy Statements - Available Actions and Resources
This section lists the actions and resources available for compiling statements you add to your custom Permission Policies.
### Statements - Available Actions
When creating statements for Permission Policies, actions *always require* a resource-type to operate against.
**Warning!** If you attempt to use a statement when creating a Permission Policy without specifying a resource, then you'll receive an error message when you attempt to save the policy.
Some actions also require a resource path - either a specific item or group to be defined or a wildcard `‘*'` to indicate all items of the resource-type.
For a `config:create` action, no resource path is required and we use a wildcard to apply denial of meter creation to all meters:
```json theme={null}
{
"effect": "deny",
"action": [ "config:create" ],
"resource": [ "config:meter/*" ]
}
```
However, for a `config:retrieve` action, a resource path is required:
```json theme={null}
{
"effect": "deny",
"action": [ "config:retrieve" ],
"resource": [ "config:meter/item/456" ]
}
```
For actions that don’t require a path, paths in associated MRIs will be ignored, and only the resource-type will be used.
You can use the following actions when creating Permission Policy statements:
| Action | MRI Path Required? |
| - | - |
| config:create | No |
| config:retrieve | Yes |
| config:update | Yes |
| config:delete | Yes |
| measurements:upload | Yes |
| measurements:fileUpload | Yes |
| measurements:retrieve | Yes |
| exports:download | Yes |
| ALL | \* |
#### Which Actions can I use with which Resources?
For the resources listed in the [following section](/guides/organization-and-access-management/creating-and-managing-permissions#statements-available-resources), the Actions you can use when creating Permission Policy Statements are determined by Resource type:
* Measurements data:
* `measurements:retrieve`
* `measurements:upload`
* `measurements:fileUpload`
* Exports data:
* `exports:download`
* Other Resource types:
* `config:create`
* `config:retrieve`
* `config:update`
* `config:delete`
##### Examples
* **Billing Operations**. Suppose you want to set up a Permission Policy that you'll assign to Users of your Organization that belong to the Billing Operations Team. You want them to have full access to work with a specific collection of Bill, Account, AccountPlan, and Bill Statement resources. You can use the four `config` actions with the relevant resources to build the required Permission Policy statement:
```json theme={null}
{
"effect": "allow",
"action": [
"config:create",
"config:retrieve",
"config:update",
"config:delete"
],
"resource": [
"billing:bill/*",
"billing:balance/*",
"billing:billjob/*",
"billing:credit/*",
"billing:creditAdjustment/*",
"config:account/*",
"config:accountPlan/*",
"config:commitment/*",
"config:contract/*",
"config:plan/*",
"config:planGroup/*",
"config:planGroupLink/*",
"statement:statement/*",
"statementjob:statementjob/*"
]
}
```
This means that all members of the Billing Operations Team will have full CRUD access to all resources of the type specified.
**Tip: Assign Permissions using a User Group**. Note that for this sort of permissions control use case, you can create a Billing Operations User Group, add this Permission Policy to the User Group, and assign each team member to the Group. See [Creating and Managing User Groups](/guides/organization-and-access-management/managing-users#creating-and-managing-user-groups).
* **Measurements Data**. For a Permission Policy statement you want to use to define User permissions for the `measurements:data` resource, you *cannot use* any of the `config` actions. If you want to create a Permission Policy to allow a User full access to work with measurements data, you must use the `measurements` actions:
```json theme={null}
{
"effect": "allow",
"action": [
"measurements:upload",
"measurements:fileUpload",
"measurements:retrieve"
],
"resource": [
"measurements:data/*"
]
}
```
**Tip: Lower Case!** Always use lower case for `"action"` in your statements. For example, `"config:Create"` is not a valid expression.
* **Data Exports**. For a Permission Policy granting Users full working access to create, manage and run data exports, you can create a Permission Policy with two statements. To create and manage data exports:
```json theme={null}
{
"effect": "allow",
"action": [
"config:create",
"config:delete",
"config:retrieve",
"config:update"
],
"resource": [
"config:exportDestination/*",
"config:exportSchedules/*",
"config:exportStatus/*"
]
}
```
* To run data exports:
```json theme={null}
{
"effect": "allow",
"action": [
"exports:download"
],
"resource": [
"exports:data/*"
]
}
```
### Statements - Available Resources
You can use the following resources when creating Permission Policy statements:
| Resource | Policy Statement Format |
| - | - |
| ALL | \* |
| action | |
| ACTION\_PERFORMED | action:actionPerformed |
| analytics | |
| USAGE | analytics:usage |
| billing | |
| BALANCE | billing:balance |
| BILL | billing:bill |
| BILL\_JOB | billing:billjob |
| CHARGE | billing:charge |
| BILL\_CONFIG | billing:config |
| COUNTER\_ADJUSTMENT | billing:counterAdjustment |
| CREDIT | billing:credit |
| CREDIT\_ADJUSTMENT | billing:creditAdjustment |
| BILL\_LOCK | billing:lock |
| SCHEDULED\_VALIDATION | billing:validation |
| config | |
| ACCOUNT | config:account |
| ACCOUNT\_PLAN | config:accountPlan |
| ACTION | config:action |
| ACTION\_TRIGGER | config:actionTrigger |
| AGGREGATION | config:aggregation |
| ALERT | config:alert |
| ANALYTICS\_JOB | config:analyticsJob |
| COMMITMENT | config:commitment |
| CONTRACT | config:contract |
| COUNTER | config:counter |
| PICKLIST\_CREDIT\_REASON | config:creditReason |
| CREDIT\_TYPE | config:creditType |
| PICKLIST\_CURRENCY | config:currency |
| CUSTOM\_FIELD | config:customField |
| DATA\_EXPLORER\_SELECTION | config:dataExplorerSelection |
| PICKLIST\_DEBIT\_REASON | config:debitReason |
| EVENT | config:event |
| EXTERNAL\_MAPPING | config:externalMapping |
| INTEGRATION | config:integration |
| METER | config:meter |
| METER\_GROUP | config:metergroup |
| NOTIFICATION | config:notification |
| ORGANIZATION\_CONFIG | config:organizationConfig |
| OUTGOING\_INTEGRATION | config:outgoingIntegration |
| PERMISSION\_POLICY | config:permissionPolicy |
| PRINCIPAL\_PERMISSION | config:principalPermission |
| PLAN | config:plan |
| PLAN\_GROUP | config:planGroup |
| PLAN\_GROUP\_LINK | config:planGroupLink |
| PLAN\_TEMPLATE | config:planTemplate |
| PRODUCT | config:product |
| REPORT\_SELECTION | config:reportSelection |
| RESOURCE\_GROUP | config:resourceGroup |
| SERVICE\_USER | config:serviceUser |
| SUPPORT\_USERS | config:supportUsers |
| TEMPLATE | config:template |
| PICKLIST\_TRANSACTION\_TYPE | config:transactionType |
| ORG\_USER | config:user |
| ORG\_USER\_INVITATION | config:orgUserInvitation |
| EXPORT\_DESTINATION | config:exportDestination |
| EXPORT\_SCHEDULES | config:exportSchedules |
| EXPORT\_STATUS | config:exportStatus |
| SCHEDULED\_EVENT | config:scheduledEvent |
| USAGE\_SAVED\_QUERY | config:usageSavedQuery |
| integration | |
| INTEGRATION\_CONFIG | integration:integrationConfig |
| INTEGRATION\_CREDENTIALS | integration:integrationCredentials |
| INTEGRATION\_DESTINATION | integration:integrationDestination |
| INTEGRATION\_RUN | integration:integrationRun |
| INTEGRATION\_MARKETPLACE\_USAGE | integration:marketplaceUsage |
| measurements | |
| MEASUREMENTS | measurements:data |
| MEASUREMENTS\_VALIDATION\_ERRORS | measurements:validationErrors |
| statement | |
| STATEMENT | statement:statement |
| statement definition | |
| STATEMENT\_DEFINITION | statementdefinition:statementdefinition |
| statement job | |
| STATEMENT\_JOB | statementjob:statementjob |
| exports | |
| EXPORTS\_JOB | exports:data |
## Creating Custom Permission Policies
In the Settings area of the Console, you can quickly create and mange Custom Permission Policies.
**Important: Access to Console!** To enable any Users who are assigned **Custom** Permission Policies to access the m3ter Console, please ensure that one of their Permission Policies includes a Statement that allows them to **Retrieve** two Resources:
* `config:organizationConfig`
* `billing:config`
Without these permissions Users will be unable to access the Console - see step 9 in the following procedure.
**To create and manage Permission Policies:**
1. Select **Settings**:
* On **Save**, a success toast appears and you are taken to the Usage Design Target record. Editing a Usage Design Target replaces its bindings with the current selections.
# Organization and Access Management
Source: https://docs.m3ter.com/guides/organization-and-access-management
In the **Settings** section, you can manage your Organization and the Users who will have access.
To manage your Organization you can:
* View your Organization details.
* Edit your configuration to define Organization-wide settings for currency and currency conversions, timezone, and epoch dates for billing.
* Enable auto-approval and scheduling for billing.
* Create Credit Reasons to use when you add credit line items to Bills.
* Create Debit Reasons to use when you add debit line items to Bills.
* Add and edit Custom Fields.
To manage access to your Organization, you can:
* View and edit Users.
* Create and configure Service Users.
* Create and manage Permission Policies for controlling User access to your Organization.
* Create User Groups, apply Permission Policies to them. When you assign individual Users to a User Group, those Users have the Group permissions applied to them.
* Invite Users to join your Organization.
* Make a request to grant m3ter Support access to your Organization.
This section explains how to manage your Organization and how to control User access to your Organization:
* [Managing your Organization](/guides/organization-and-access-management/viewing-and-editing-organization)
* [Understanding, Creating, and Managing Permission Policies](/guides/organization-and-access-management/creating-and-managing-permissions)
* [Managing Access and Users](/guides/organization-and-access-management/managing-users)
# Understanding, Creating, and Managing Permission Policies
Source: https://docs.m3ter.com/guides/organization-and-access-management/creating-and-managing-permissions
You can create *Permission Policies* for your Users and assign these Permission Policies to them. There are two types of Permission Policies you can assign to Users:
* **Custom**. The policies you create yourself for controlling access to your Organization.
* **Managed**. System generated policies which you can assign to Users but which you cannot edit to change the access to resources they are configured to allow or deny.
When you create a Custom Permission Policy, you can add *statements* to the policy that *allow or deny actions* for specific *resources*. This allows you to control very precisely what a User who has been given access to your Organization can and cannot do. For example, you might want to create a Permissions Policy that denies Users the ability to retrieve Meters.
This section explains the m3ter permissions model, lists the actions and resources you can use when adding statements to create Permission Policies, and how to create and manage your Custom Permissions Policies:
* [Understanding the m3ter Permissions Model](/guides/organization-and-access-management/creating-and-managing-permissions#understanding-the-m3ter-permissions-model)
* [Permission Policy Statements - Actions and Resources](/guides/organization-and-access-management/creating-and-managing-permissions#permission-policy-statements-available-actions-and-resources)
* [Creating Custom Permission Policies](/guides/organization-and-access-management/creating-and-managing-permissions#creating-custom-permission-policies)
* [Permissions Exceptions](/guides/organization-and-access-management/creating-and-managing-permissions#permissions-exceptions)
**Warning - Check for Exceptions!** There are instances where exceptions to the general permissions framework might occur as a result of shared data. See the [Permissions Exceptions](/guides/organization-and-access-management/creating-and-managing-permissions#permissions-exceptions) section below for more details.
## Understanding the m3ter Permissions Model
The m3ter Permissions model is implemented using a three-fold framework of *Effect*, *Action*, and *Resource*:
* **Def**: A Permission is defined as imposing an *effect* of either allowing or denying access to a specific *resource* to perform a specific *action* on that resource.
In JSON format, the general schema for a Permission is:
```json theme={null}
{
"Effect": {effect},
"Action": [{action}],
"Resource": [{resource}]
}
```
### Resources
Resources are defined as *m3ter Resource Identifiers* (MRIs) in the format:
> `service:resource-type/item-type/id`
Where:
* *service* is a distinct part of the overall m3ter system, and which forms a natural functional grouping, such as "config" or "billing".
* *resource-type* is the resource type item accessed - for example: "Plan", "Meter", "Bill"
* *item-type* is one of:
* "item" - to specify an individual item.
* "group" - to specify a resource group.
* *id* is the resource group id or the resource item id
For example:
* To denote as resource a specific *Plan* with an *id = 12345* in the *config* service, the MRI would be:
> `config:plan/item/12345`
* To denote as resource a *Plan Resource Group* with *id= 987* (that is, applying to all Plans that are contained within the resource group) the MRI would be:
> `config:plan/group/987`
#### Use of Wildcards for Resources
The use of wildcards when denoting resources is allowed. For example, to denote all Plans as the resource in a permission statement, you can use:
> `config:plan/*`
**Tip: Available Resources?** Please see the [following section](/guides/organization-and-access-management/creating-and-managing-permissions#permission-policy-statements-available-actions-and-resources) for a full list of available resources by service you can use in statements when creating your Permission Policies.
#### Resource Groups
Resources can be assigned to one or more Resource Groups. For example, a Plan can be assigned to Plan Resource Groups, a Meter can be assigned to Meter Resource Groups, and so on. This is useful for cases where you want to create Permission Policies which allow or deny access to a specific subset of resources - you want to grant access to a User to only some of the Plans in your Organization.
This concept of grouping resources applies to every resource in m3ter, including Resource Groups themselves, which allows you to nest resource groups to support hierarchies of groups.
**Tip: Creating Resource Groups?** You can create Resource Groups, add resource items to them, and manage your Resource Groups using the [Resource Groups](/api/resourcegroup/introduction) API calls
### Actions
Actions define what a User is either allowed or not allowed to do with respect to a resource. For example, you can use a `config:create` and `config:retrieve` action to create a statement for a Permission Policy that allows Users to create or retrieve any Plan in your Organization. But if this is the only Permission Policy assigned to a User, they will not be able to update or delete any Plans:
```json theme={null}
{
"effect": "allow",
"action": [
"config:create",
"config:retrieve"
],
"resource": [
"config:plan/*"
]
}
```
Please see the [following section](/guides/organization-and-access-management/creating-and-managing-permissions#permission-policy-statements-available-actions-and-resources) for full details and explanation on using actions against resources when creating statements for your Permission Policies.
### Effects and Evaluation Logic
The effect for a Permission Policy is either *to allow* or *to deny*:
* **Allow** - indicates the policy is allowing access to the resource(s) for the given action(s).
* **Deny** - indicates the policy is denying access to the resource(s) for the given action(s).
If you create a Permission Policy with multiple statements this is how evaluation of access to a resource for a given action is applied:
* There is an implicit denial - the order of evaluation is:
* We check to see if there is a statement that denies access to a resource for a given action. If there is, the access is denied.
* We check to see if there is a statement that allows access to a resource for a given action. If there is, the access is allowed.
* If there is no statement that explicitly denies and no statement that explicitly allows, the access is denied.
* In the case of a conflict of deny/allow, denial takes precedence:
* If there is a statement that denies access to a resource for a given action and there is a statement that allows access to a resource for the same action, the access is denied.
**Warning - Check for Exceptions!** There are instances where exceptions to the general permissions framework might occur as a result of shared data. See the [Permissions Exceptions](/guides/organization-and-access-management/creating-and-managing-permissions#permissions-exceptions) section below for more details.
## Permission Policy Statements - Available Actions and Resources
This section lists the actions and resources available for compiling statements you add to your custom Permission Policies.
### Statements - Available Actions
When creating statements for Permission Policies, actions *always require* a resource-type to operate against.
**Warning!** If you attempt to use a statement when creating a Permission Policy without specifying a resource, then you'll receive an error message when you attempt to save the policy.
Some actions also require a resource path - either a specific item or group to be defined or a wildcard `‘*'` to indicate all items of the resource-type.
For a `config:create` action, no resource path is required and we use a wildcard to apply denial of meter creation to all meters:
```json theme={null}
{
"effect": "deny",
"action": [ "config:create" ],
"resource": [ "config:meter/*" ]
}
```
However, for a `config:retrieve` action, a resource path is required:
```json theme={null}
{
"effect": "deny",
"action": [ "config:retrieve" ],
"resource": [ "config:meter/item/456" ]
}
```
For actions that don’t require a path, paths in associated MRIs will be ignored, and only the resource-type will be used.
You can use the following actions when creating Permission Policy statements:
| Action | MRI Path Required? |
| - | - |
| config:create | No |
| config:retrieve | Yes |
| config:update | Yes |
| config:delete | Yes |
| measurements:upload | Yes |
| measurements:fileUpload | Yes |
| measurements:retrieve | Yes |
| exports:download | Yes |
| ALL | \* |
#### Which Actions can I use with which Resources?
For the resources listed in the [following section](/guides/organization-and-access-management/creating-and-managing-permissions#statements-available-resources), the Actions you can use when creating Permission Policy Statements are determined by Resource type:
* Measurements data:
* `measurements:retrieve`
* `measurements:upload`
* `measurements:fileUpload`
* Exports data:
* `exports:download`
* Other Resource types:
* `config:create`
* `config:retrieve`
* `config:update`
* `config:delete`
##### Examples
* **Billing Operations**. Suppose you want to set up a Permission Policy that you'll assign to Users of your Organization that belong to the Billing Operations Team. You want them to have full access to work with a specific collection of Bill, Account, AccountPlan, and Bill Statement resources. You can use the four `config` actions with the relevant resources to build the required Permission Policy statement:
```json theme={null}
{
"effect": "allow",
"action": [
"config:create",
"config:retrieve",
"config:update",
"config:delete"
],
"resource": [
"billing:bill/*",
"billing:balance/*",
"billing:billjob/*",
"billing:credit/*",
"billing:creditAdjustment/*",
"config:account/*",
"config:accountPlan/*",
"config:commitment/*",
"config:contract/*",
"config:plan/*",
"config:planGroup/*",
"config:planGroupLink/*",
"statement:statement/*",
"statementjob:statementjob/*"
]
}
```
This means that all members of the Billing Operations Team will have full CRUD access to all resources of the type specified.
**Tip: Assign Permissions using a User Group**. Note that for this sort of permissions control use case, you can create a Billing Operations User Group, add this Permission Policy to the User Group, and assign each team member to the Group. See [Creating and Managing User Groups](/guides/organization-and-access-management/managing-users#creating-and-managing-user-groups).
* **Measurements Data**. For a Permission Policy statement you want to use to define User permissions for the `measurements:data` resource, you *cannot use* any of the `config` actions. If you want to create a Permission Policy to allow a User full access to work with measurements data, you must use the `measurements` actions:
```json theme={null}
{
"effect": "allow",
"action": [
"measurements:upload",
"measurements:fileUpload",
"measurements:retrieve"
],
"resource": [
"measurements:data/*"
]
}
```
**Tip: Lower Case!** Always use lower case for `"action"` in your statements. For example, `"config:Create"` is not a valid expression.
* **Data Exports**. For a Permission Policy granting Users full working access to create, manage and run data exports, you can create a Permission Policy with two statements. To create and manage data exports:
```json theme={null}
{
"effect": "allow",
"action": [
"config:create",
"config:delete",
"config:retrieve",
"config:update"
],
"resource": [
"config:exportDestination/*",
"config:exportSchedules/*",
"config:exportStatus/*"
]
}
```
* To run data exports:
```json theme={null}
{
"effect": "allow",
"action": [
"exports:download"
],
"resource": [
"exports:data/*"
]
}
```
### Statements - Available Resources
You can use the following resources when creating Permission Policy statements:
| Resource | Policy Statement Format |
| - | - |
| ALL | \* |
| action | |
| ACTION\_PERFORMED | action:actionPerformed |
| analytics | |
| USAGE | analytics:usage |
| billing | |
| BALANCE | billing:balance |
| BILL | billing:bill |
| BILL\_JOB | billing:billjob |
| CHARGE | billing:charge |
| BILL\_CONFIG | billing:config |
| COUNTER\_ADJUSTMENT | billing:counterAdjustment |
| CREDIT | billing:credit |
| CREDIT\_ADJUSTMENT | billing:creditAdjustment |
| BILL\_LOCK | billing:lock |
| SCHEDULED\_VALIDATION | billing:validation |
| config | |
| ACCOUNT | config:account |
| ACCOUNT\_PLAN | config:accountPlan |
| ACTION | config:action |
| ACTION\_TRIGGER | config:actionTrigger |
| AGGREGATION | config:aggregation |
| ALERT | config:alert |
| ANALYTICS\_JOB | config:analyticsJob |
| COMMITMENT | config:commitment |
| CONTRACT | config:contract |
| COUNTER | config:counter |
| PICKLIST\_CREDIT\_REASON | config:creditReason |
| CREDIT\_TYPE | config:creditType |
| PICKLIST\_CURRENCY | config:currency |
| CUSTOM\_FIELD | config:customField |
| DATA\_EXPLORER\_SELECTION | config:dataExplorerSelection |
| PICKLIST\_DEBIT\_REASON | config:debitReason |
| EVENT | config:event |
| EXTERNAL\_MAPPING | config:externalMapping |
| INTEGRATION | config:integration |
| METER | config:meter |
| METER\_GROUP | config:metergroup |
| NOTIFICATION | config:notification |
| ORGANIZATION\_CONFIG | config:organizationConfig |
| OUTGOING\_INTEGRATION | config:outgoingIntegration |
| PERMISSION\_POLICY | config:permissionPolicy |
| PRINCIPAL\_PERMISSION | config:principalPermission |
| PLAN | config:plan |
| PLAN\_GROUP | config:planGroup |
| PLAN\_GROUP\_LINK | config:planGroupLink |
| PLAN\_TEMPLATE | config:planTemplate |
| PRODUCT | config:product |
| REPORT\_SELECTION | config:reportSelection |
| RESOURCE\_GROUP | config:resourceGroup |
| SERVICE\_USER | config:serviceUser |
| SUPPORT\_USERS | config:supportUsers |
| TEMPLATE | config:template |
| PICKLIST\_TRANSACTION\_TYPE | config:transactionType |
| ORG\_USER | config:user |
| ORG\_USER\_INVITATION | config:orgUserInvitation |
| EXPORT\_DESTINATION | config:exportDestination |
| EXPORT\_SCHEDULES | config:exportSchedules |
| EXPORT\_STATUS | config:exportStatus |
| SCHEDULED\_EVENT | config:scheduledEvent |
| USAGE\_SAVED\_QUERY | config:usageSavedQuery |
| integration | |
| INTEGRATION\_CONFIG | integration:integrationConfig |
| INTEGRATION\_CREDENTIALS | integration:integrationCredentials |
| INTEGRATION\_DESTINATION | integration:integrationDestination |
| INTEGRATION\_RUN | integration:integrationRun |
| INTEGRATION\_MARKETPLACE\_USAGE | integration:marketplaceUsage |
| measurements | |
| MEASUREMENTS | measurements:data |
| MEASUREMENTS\_VALIDATION\_ERRORS | measurements:validationErrors |
| statement | |
| STATEMENT | statement:statement |
| statement definition | |
| STATEMENT\_DEFINITION | statementdefinition:statementdefinition |
| statement job | |
| STATEMENT\_JOB | statementjob:statementjob |
| exports | |
| EXPORTS\_JOB | exports:data |
## Creating Custom Permission Policies
In the Settings area of the Console, you can quickly create and mange Custom Permission Policies.
**Important: Access to Console!** To enable any Users who are assigned **Custom** Permission Policies to access the m3ter Console, please ensure that one of their Permission Policies includes a Statement that allows them to **Retrieve** two Resources:
* `config:organizationConfig`
* `billing:config`
Without these permissions Users will be unable to access the Console - see step 9 in the following procedure.
**To create and manage Permission Policies:**
1. Select **Settings**:
![]() The **Organization** page opens.
2. Select **Access settings**:
The **Organization** page opens.
2. Select **Access settings**:
 The **Access settings** page opens with the **Users** tab selected.
3. Select the **Permission policies** tab:
* Any system-generated **Managed** Permission Policies will be listed. You can view this type of Permission Policy and assign them to your Users, but *you cannot edit them*.
* Any **Custom** Permission Policies already created for your Organization are also listed and you can view and edit these.
**Tip: You can't view, create, or edit Permission Policies?** As a User, you might have been assigned a Permission Policy that denies you view, creation, or edit rights for Permission Policies.
4. Select **Create permission policy**. The **Create** page opens.
5. Under **Permission policy details**, enter a descriptive **Name** for the new Permission Policy.
6. Under **Permission policy statements**, you have the option to use either a **Simple** or **Advanced** editor to add Statements to the Permission Policy. The **Simple** editor is selected by default.
7. Leave the **Simple** editor selected. Here's an example of how to compile Statements using the **Advanced editor** to allow all actions for all Meters:
* Under **Effects**, leave the default selection as **Allow**.
* Under **Actions**, select the **All Config** checkbox for **Create**, **Retrieve**, **Update**, and **Delete**.
* Under **Resources**, select **Selected resources** and use the drop-down to select `config.meter`:
The **Access settings** page opens with the **Users** tab selected.
3. Select the **Permission policies** tab:
* Any system-generated **Managed** Permission Policies will be listed. You can view this type of Permission Policy and assign them to your Users, but *you cannot edit them*.
* Any **Custom** Permission Policies already created for your Organization are also listed and you can view and edit these.
**Tip: You can't view, create, or edit Permission Policies?** As a User, you might have been assigned a Permission Policy that denies you view, creation, or edit rights for Permission Policies.
4. Select **Create permission policy**. The **Create** page opens.
5. Under **Permission policy details**, enter a descriptive **Name** for the new Permission Policy.
6. Under **Permission policy statements**, you have the option to use either a **Simple** or **Advanced** editor to add Statements to the Permission Policy. The **Simple** editor is selected by default.
7. Leave the **Simple** editor selected. Here's an example of how to compile Statements using the **Advanced editor** to allow all actions for all Meters:
* Under **Effects**, leave the default selection as **Allow**.
* Under **Actions**, select the **All Config** checkbox for **Create**, **Retrieve**, **Update**, and **Delete**.
* Under **Resources**, select **Selected resources** and use the drop-down to select `config.meter`:
![]() 8. Select **Advanced** if you want to add JSON formatted Statements. The page adjusts again to show a **Statements** text editor. Here's an example of how to compile Statements using the **Advanced** editor to allow all actions for all Meters:
8. Select **Advanced** if you want to add JSON formatted Statements. The page adjusts again to show a **Statements** text editor. Here's an example of how to compile Statements using the **Advanced** editor to allow all actions for all Meters:
![]() 9. If you want to add another JSON formatted Statement, select **Add**. A new Statement text editor window is shown:
9. If you want to add another JSON formatted Statement, select **Add**. A new Statement text editor window is shown:
![]() **Warning - Resource always required!** If you attempt to use a statement when creating a Permission Policy without specifying a resource, then you'll receive an error message when you attempt to save the policy.
**Tip: Permission Statement actions and resources?** For a full list of the actions and resources you can use when compiling your Permission Policy statements, see the [previous section](/guides/organization-and-access-management/creating-and-managing-permissions#permission-policy-statements-available-actions-and-resources).
10. In addition to adding the specific **Permission policy statements** for a **Custom** Permission Policy, to ensure any Users who are assigned this as a single Permission Policy *you must also add* a Statement that enables these Users to access the m3ter Console. This Statement should allow them to **Retrieve** two Resources:
* `config:organizationConfig`
* `billing:config`
11. When you have finished adding all of the required Statements for the Permission Policy, select **Create permission policy**. The **Permission policy details** page opens for the new Permission Policy:
**Warning - Resource always required!** If you attempt to use a statement when creating a Permission Policy without specifying a resource, then you'll receive an error message when you attempt to save the policy.
**Tip: Permission Statement actions and resources?** For a full list of the actions and resources you can use when compiling your Permission Policy statements, see the [previous section](/guides/organization-and-access-management/creating-and-managing-permissions#permission-policy-statements-available-actions-and-resources).
10. In addition to adding the specific **Permission policy statements** for a **Custom** Permission Policy, to ensure any Users who are assigned this as a single Permission Policy *you must also add* a Statement that enables these Users to access the m3ter Console. This Statement should allow them to **Retrieve** two Resources:
* `config:organizationConfig`
* `billing:config`
11. When you have finished adding all of the required Statements for the Permission Policy, select **Create permission policy**. The **Permission policy details** page opens for the new Permission Policy:
![Permissions24]() * The new Permission Policy is now available for assigning to Users, Service Users, and User Groups that have access to your Organization.
12. Select **Edit** to edit the new policy.
13. If you want to delete a Permission Policy, return to the **Permission policies** tab and select the delete icon for the Policy:
* The new Permission Policy is now available for assigning to Users, Service Users, and User Groups that have access to your Organization.
12. Select **Edit** to edit the new policy.
13. If you want to delete a Permission Policy, return to the **Permission policies** tab and select the delete icon for the Policy:
![]() A confirmation popup appears.
14. Select **Yes** to confirm the delete.
**Tip: Using API Call to Create Permission Policy?** You can use the [Create Permission Policy](/api/permissionpolicy/create-permission-policy) config API call.
## Permissions Exceptions
There are instances where exceptions to the general permissions framework can occur as a result of shared data:
* For example, if a user has been assigned a Permission Policy that denies them access to Products but grants them access to Bills, when they open a Bill, some Product data referenced by the Bill's line items will be shown for the user.
# Managing Access and Users
Source: https://docs.m3ter.com/guides/organization-and-access-management/managing-users
m3ter supports two types of user for your Organization:
* **Users**. Represent the *people* you’ll grant access to your Organization.
* **Service Users**. Intended to represent *automated processes* that you want to grant direct API access to your Organization. You'll want to set up Service Users for integrations of your 3rd-party systems with the m3ter platform.
Using Permission Policies, you can then control what Users and Service Users can do when they have gained access. See [Understanding, Creating, and Managing Permission Policies](/guides/organization-and-access-management/creating-and-managing-permissions).
From the Console *Access settings* page, you can:
* View the details of Users, deactivate and reactivate them, and manage their access permissions.
* Create *User Groups* and add Permission Policies to them. User Group are very useful for controlling access to your Organization when you want to set up a group of people and apply the same Permission Policies to them.
* Invite Users to join your Organization and assign Permission Policies to control their access once they have joined. Invites can be made to either existing m3ter Users or people who are not yet registered with the platform.
* Make a request to grant m3ter Support access to your Organization for a specified period.
This section explains how to manage the people and processes you grant access to your Organization in m3ter:
* [Managing Users and assigning Permission Policies](/guides/organization-and-access-management/managing-users/managing-users-and-assigning-permission-policies)
* [Create Service Users, configure them to add Permission Policies, and generate Access Keys](/guides/organization-and-access-management/managing-users/creating-and-configuring-service-users)
* [Create and Manage User Groups to add Permission Policies to them and assign Users to User Groups](/guides/organization-and-access-management/managing-users/creating-and-managing-user-groups)
* [Inviting Users to your Organization](/guides/organization-and-access-management/managing-users/inviting-users-to-organization)
* [Tracking User Activity in your Organization](/guides/organization-and-access-management/managing-users/tracking-user-activity-in-organization)
* [Granting m3ter Support Access to your Organization](/guides/organization-and-access-management/managing-users/granting-m3ter-support-access-to-organization)
* [View the Permission Policies in your Organization](/guides/organization-and-access-management/managing-users/viewing-and-managing-permission-policies)
**Important!**
**Mixed Permission Policies - deny permissions take precedence:** Care is needed if you set up a User's access with more than one Permission Policy applied to the User. For example, you might assign the Administrator Permission Policy directly to a User at the level of their individual permissions. But if you then add them to a User Group to which a more restrictive Permission Policy has been applied - say one that denies all members of the group access to any Meters - then the more restrictive permissions imposed by the User Group Meter Access Denied policy *takes precedence* over the more permissive Administrator policy.
**Mixed Statement in a Permission Policy - denial takes precedence:** If you create a Permissions Policy with multiple statements and two of more of the constituent statements conflict with respect to access to a resource for the given action, denial takes precedence - see [Effects and Evaluation Logic](/guides/organization-and-access-management/creating-and-managing-permissions#effects-and-evaluation-logic) for more details.
# Creating and Configuring Service Users
Source: https://docs.m3ter.com/guides/organization-and-access-management/managing-users/creating-and-configuring-service-users
*Service Users* represent the automated processes you want to grant access to your Organization. When you create a Service User you can:
* Add Permission Policies to the Service User to control what they can do when they gain access to your Organization.
* Generate Access Keys for the Service User, which you can use to perform service authentication with the m3ter platform. When you have authenticated the Service User, you can then can obtain a Bearer Token for use in API calls made to the platform by the Service User. For more details, see [Service Authentication](/guides/authenticating-with-the-platform/service-authentication).
This topic explains how to create Service Users for your Organization and generate access keys for them. How to assign Permission Policies to your Service Users and manage them is also explained:
* [Creating Service Users](/guides/organization-and-access-management/managing-users/creating-and-configuring-service-users#creating-service-users)
* [Assigning Permission Policies to Service Users](/guides/organization-and-access-management/managing-users/creating-and-configuring-service-users#adding-permission-policies-to-service-users)
* [Generating Access Keys for Service Users](/guides/organization-and-access-management/managing-users/creating-and-configuring-service-users#generating-access-keys-for-service-users)
* [Managing Service Users](/guides/organization-and-access-management/managing-users/creating-and-configuring-service-users#managing-service-users)
## Creating Service Users
**To create a Service User:**
1. Select **Settings>Access** **settings**. The **Access settings** page opens with the **Users** tab selected.
2. Select the **Service users** tab. Existing Service Users in your **Organization** are listed.
3. Select **Create service user**. The **Create** page opens.
4. Enter a **Name** for the new Service User.
5. If you want to generate an access key for the new Service User, leave the **Generate access key** switch enabled, which is the default setting.
* Note that you can create the new Service User without generating an access key - simply disable the switch - and you can edit and generate an access key later. See the [section below](/guides/organization-and-access-management/managing-users/creating-and-configuring-service-users#generating-access-keys-for-service-users).
6. If you want to assign Permission Policies to the new Service User, use the **Permission policies** drop-down list to select them - the list will contain both the *Managed* and any *Custom* Permission Policies that exist in your Organization.
* Note that you can create the new Service User without assigning any Permission Policies - simple leave the **Permission policies** drop-down empty - and you can edit and assign them later. See the [section below](/guides/organization-and-access-management/managing-users/creating-and-configuring-service-users#adding-permission-policies-to-service-users).
7. Select **Create service user**. The new Service User is created and a **Generate access key** modal appears, which shows:
* **Organization ID**
* **Access Key ID**
* **API secret**
as:
* **Environment variables**
* **JSON**
* **Individual values**
You can copy each of these to your clipboard, as required.
**Important!** When you generate an access key for a Service User, you need to keep a record of the **Api secret** before you close the popup, because this will only be shown once.
8. On the **Generate access key** popup, select **Close**. You are returned to the **Service user details** page for the new Service User:
A confirmation popup appears.
14. Select **Yes** to confirm the delete.
**Tip: Using API Call to Create Permission Policy?** You can use the [Create Permission Policy](/api/permissionpolicy/create-permission-policy) config API call.
## Permissions Exceptions
There are instances where exceptions to the general permissions framework can occur as a result of shared data:
* For example, if a user has been assigned a Permission Policy that denies them access to Products but grants them access to Bills, when they open a Bill, some Product data referenced by the Bill's line items will be shown for the user.
# Managing Access and Users
Source: https://docs.m3ter.com/guides/organization-and-access-management/managing-users
m3ter supports two types of user for your Organization:
* **Users**. Represent the *people* you’ll grant access to your Organization.
* **Service Users**. Intended to represent *automated processes* that you want to grant direct API access to your Organization. You'll want to set up Service Users for integrations of your 3rd-party systems with the m3ter platform.
Using Permission Policies, you can then control what Users and Service Users can do when they have gained access. See [Understanding, Creating, and Managing Permission Policies](/guides/organization-and-access-management/creating-and-managing-permissions).
From the Console *Access settings* page, you can:
* View the details of Users, deactivate and reactivate them, and manage their access permissions.
* Create *User Groups* and add Permission Policies to them. User Group are very useful for controlling access to your Organization when you want to set up a group of people and apply the same Permission Policies to them.
* Invite Users to join your Organization and assign Permission Policies to control their access once they have joined. Invites can be made to either existing m3ter Users or people who are not yet registered with the platform.
* Make a request to grant m3ter Support access to your Organization for a specified period.
This section explains how to manage the people and processes you grant access to your Organization in m3ter:
* [Managing Users and assigning Permission Policies](/guides/organization-and-access-management/managing-users/managing-users-and-assigning-permission-policies)
* [Create Service Users, configure them to add Permission Policies, and generate Access Keys](/guides/organization-and-access-management/managing-users/creating-and-configuring-service-users)
* [Create and Manage User Groups to add Permission Policies to them and assign Users to User Groups](/guides/organization-and-access-management/managing-users/creating-and-managing-user-groups)
* [Inviting Users to your Organization](/guides/organization-and-access-management/managing-users/inviting-users-to-organization)
* [Tracking User Activity in your Organization](/guides/organization-and-access-management/managing-users/tracking-user-activity-in-organization)
* [Granting m3ter Support Access to your Organization](/guides/organization-and-access-management/managing-users/granting-m3ter-support-access-to-organization)
* [View the Permission Policies in your Organization](/guides/organization-and-access-management/managing-users/viewing-and-managing-permission-policies)
**Important!**
**Mixed Permission Policies - deny permissions take precedence:** Care is needed if you set up a User's access with more than one Permission Policy applied to the User. For example, you might assign the Administrator Permission Policy directly to a User at the level of their individual permissions. But if you then add them to a User Group to which a more restrictive Permission Policy has been applied - say one that denies all members of the group access to any Meters - then the more restrictive permissions imposed by the User Group Meter Access Denied policy *takes precedence* over the more permissive Administrator policy.
**Mixed Statement in a Permission Policy - denial takes precedence:** If you create a Permissions Policy with multiple statements and two of more of the constituent statements conflict with respect to access to a resource for the given action, denial takes precedence - see [Effects and Evaluation Logic](/guides/organization-and-access-management/creating-and-managing-permissions#effects-and-evaluation-logic) for more details.
# Creating and Configuring Service Users
Source: https://docs.m3ter.com/guides/organization-and-access-management/managing-users/creating-and-configuring-service-users
*Service Users* represent the automated processes you want to grant access to your Organization. When you create a Service User you can:
* Add Permission Policies to the Service User to control what they can do when they gain access to your Organization.
* Generate Access Keys for the Service User, which you can use to perform service authentication with the m3ter platform. When you have authenticated the Service User, you can then can obtain a Bearer Token for use in API calls made to the platform by the Service User. For more details, see [Service Authentication](/guides/authenticating-with-the-platform/service-authentication).
This topic explains how to create Service Users for your Organization and generate access keys for them. How to assign Permission Policies to your Service Users and manage them is also explained:
* [Creating Service Users](/guides/organization-and-access-management/managing-users/creating-and-configuring-service-users#creating-service-users)
* [Assigning Permission Policies to Service Users](/guides/organization-and-access-management/managing-users/creating-and-configuring-service-users#adding-permission-policies-to-service-users)
* [Generating Access Keys for Service Users](/guides/organization-and-access-management/managing-users/creating-and-configuring-service-users#generating-access-keys-for-service-users)
* [Managing Service Users](/guides/organization-and-access-management/managing-users/creating-and-configuring-service-users#managing-service-users)
## Creating Service Users
**To create a Service User:**
1. Select **Settings>Access** **settings**. The **Access settings** page opens with the **Users** tab selected.
2. Select the **Service users** tab. Existing Service Users in your **Organization** are listed.
3. Select **Create service user**. The **Create** page opens.
4. Enter a **Name** for the new Service User.
5. If you want to generate an access key for the new Service User, leave the **Generate access key** switch enabled, which is the default setting.
* Note that you can create the new Service User without generating an access key - simply disable the switch - and you can edit and generate an access key later. See the [section below](/guides/organization-and-access-management/managing-users/creating-and-configuring-service-users#generating-access-keys-for-service-users).
6. If you want to assign Permission Policies to the new Service User, use the **Permission policies** drop-down list to select them - the list will contain both the *Managed* and any *Custom* Permission Policies that exist in your Organization.
* Note that you can create the new Service User without assigning any Permission Policies - simple leave the **Permission policies** drop-down empty - and you can edit and assign them later. See the [section below](/guides/organization-and-access-management/managing-users/creating-and-configuring-service-users#adding-permission-policies-to-service-users).
7. Select **Create service user**. The new Service User is created and a **Generate access key** modal appears, which shows:
* **Organization ID**
* **Access Key ID**
* **API secret**
as:
* **Environment variables**
* **JSON**
* **Individual values**
You can copy each of these to your clipboard, as required.
**Important!** When you generate an access key for a Service User, you need to keep a record of the **Api secret** before you close the popup, because this will only be shown once.
8. On the **Generate access key** popup, select **Close**. You are returned to the **Service user details** page for the new Service User:
![Service User7]() In this example, when we created the new Service User we've:
* Assigned the **ReadOnly** **Managed** Permission Policy.
* Generated an **Access key**.
## Adding Permission Policies to Service Users
Two *Managed* Permission Policies are currently available to assign to your Service Users:
* **Administrator**. Read and write permissions. Can submit API calls.
* **ReadOnly**. Read permissions only. Cannot submit API calls.
You *cannot edit* Managed Permission Policies.
You can also assign any *Custom* Permission Policies you've created to Service Users.
**Warning: Working with Permission Policies?** Before creating Custom Permission Policies to control Users access to your Organization, we strongly recommend that you review the following topic in this section on [Understanding, Creating, and Managing Permission Policies](/guides/organization-and-access-management/creating-and-managing-permissions).
**To add and manage Permission Policies for a Service User:**
1. On the **Settings>Access settings>Service users** tab, select the **Name** text of the Service User. The details page for the Service User opens. Any Permission Policies assigned to the Service User are listed in the **Permission policies** panel.
2. Select **Add permission policies**. A **Select permission policies** dialog appears.
3. Select the Permission Policies you want to assign to the Service User and click **Confirm**. You are returned to the details page where the selected Permission Policy is now listed in the **Permission policies** panel.
4. If you want add another Permission Policy to the Service User, repeat steps 2 and 3.
**Important!** You must add the **Administrator** Permission Policy to a Service User to allow the user to make API calls to the platform.
5. If you want to delete a Permission Policy from a Service User, select the **Delete** button. You are asked to confirm the delete action.
## Generating Access Keys for Service Users
You can generate access keys for Service Users at any time.
**To add and manage Access Keys for Service Users:**
1. On the **Settings>Access settings>Service users** tab, select the **Name** text of the Service User. The details page for the Service User opens. Any access keys generated for the Service User are listed in the **Access keys** panel.
2. Select **Generate access key**. A **Generate access key** popup appears, which shows:
* **Organization ID**
* **Access key ID**
* **API secret**
as:
* **Environment variables**
* **JSON**
* **Individual values**
You can copy each of these to your clipboard, as required.
**Important!** When you generate an access key for a Service User, you need to keep a record of the **Api secret** before you close the popup, because this will only be shown once.
3. On the **Generate access key** popup, select **Close**. You are returned to the details page where the access key is listed as **ACTIVE** on the **Access keys** panel.
You can now use the **Access key id** and **Api secret** to authenticate the Service User to m3ter using the Basic Authentication method and obtain a Bearer Token for making subsequent API calls. See [Service Authentication](/guides/authenticating-with-the-platform/service-authentication).
4. If you want to generate additional access keys, you can repeat steps 2 to 3. If you generate additional keys, you should take care to mark the old ones as **Inactive** - those for which you cannot remember or find the **Api secret** or those no longer required due to rotation.
**Tip: Rotating Access Keys?** Note that you can only create up to two Access Keys at a time - if you want to maintain continual rotation of your Service User Access Keys, after creating two you must first inactivate and remove one to create a new one.
## Managing Service Users
**To manage Service Users:**
1. Select **Settings>Access** **settings**. The **Access settings** page opens with the **Users** tab selected.
2. Select the **Service users** tab. The page adjusts and list the Service Users in your Organization.
3. If you want to edit a Service User, select the **Edit** icon:
In this example, when we created the new Service User we've:
* Assigned the **ReadOnly** **Managed** Permission Policy.
* Generated an **Access key**.
## Adding Permission Policies to Service Users
Two *Managed* Permission Policies are currently available to assign to your Service Users:
* **Administrator**. Read and write permissions. Can submit API calls.
* **ReadOnly**. Read permissions only. Cannot submit API calls.
You *cannot edit* Managed Permission Policies.
You can also assign any *Custom* Permission Policies you've created to Service Users.
**Warning: Working with Permission Policies?** Before creating Custom Permission Policies to control Users access to your Organization, we strongly recommend that you review the following topic in this section on [Understanding, Creating, and Managing Permission Policies](/guides/organization-and-access-management/creating-and-managing-permissions).
**To add and manage Permission Policies for a Service User:**
1. On the **Settings>Access settings>Service users** tab, select the **Name** text of the Service User. The details page for the Service User opens. Any Permission Policies assigned to the Service User are listed in the **Permission policies** panel.
2. Select **Add permission policies**. A **Select permission policies** dialog appears.
3. Select the Permission Policies you want to assign to the Service User and click **Confirm**. You are returned to the details page where the selected Permission Policy is now listed in the **Permission policies** panel.
4. If you want add another Permission Policy to the Service User, repeat steps 2 and 3.
**Important!** You must add the **Administrator** Permission Policy to a Service User to allow the user to make API calls to the platform.
5. If you want to delete a Permission Policy from a Service User, select the **Delete** button. You are asked to confirm the delete action.
## Generating Access Keys for Service Users
You can generate access keys for Service Users at any time.
**To add and manage Access Keys for Service Users:**
1. On the **Settings>Access settings>Service users** tab, select the **Name** text of the Service User. The details page for the Service User opens. Any access keys generated for the Service User are listed in the **Access keys** panel.
2. Select **Generate access key**. A **Generate access key** popup appears, which shows:
* **Organization ID**
* **Access key ID**
* **API secret**
as:
* **Environment variables**
* **JSON**
* **Individual values**
You can copy each of these to your clipboard, as required.
**Important!** When you generate an access key for a Service User, you need to keep a record of the **Api secret** before you close the popup, because this will only be shown once.
3. On the **Generate access key** popup, select **Close**. You are returned to the details page where the access key is listed as **ACTIVE** on the **Access keys** panel.
You can now use the **Access key id** and **Api secret** to authenticate the Service User to m3ter using the Basic Authentication method and obtain a Bearer Token for making subsequent API calls. See [Service Authentication](/guides/authenticating-with-the-platform/service-authentication).
4. If you want to generate additional access keys, you can repeat steps 2 to 3. If you generate additional keys, you should take care to mark the old ones as **Inactive** - those for which you cannot remember or find the **Api secret** or those no longer required due to rotation.
**Tip: Rotating Access Keys?** Note that you can only create up to two Access Keys at a time - if you want to maintain continual rotation of your Service User Access Keys, after creating two you must first inactivate and remove one to create a new one.
## Managing Service Users
**To manage Service Users:**
1. Select **Settings>Access** **settings**. The **Access settings** page opens with the **Users** tab selected.
2. Select the **Service users** tab. The page adjusts and list the Service Users in your Organization.
3. If you want to edit a Service User, select the **Edit** icon:
![]() The **Edit** page opens.
4. Make your editing changes and select **Update service user**.
5. If you want to delete a Service User, select the **Delete** icon:
The **Edit** page opens.
4. Make your editing changes and select **Update service user**.
5. If you want to delete a Service User, select the **Delete** icon:
![]() A confirmation dialog appears.
6. Select **Yes** to continue and delete the Service User.
# Creating and Managing User Groups
Source: https://docs.m3ter.com/guides/organization-and-access-management/managing-users/creating-and-managing-user-groups
You can create User Groups and add Permission Policies to them. User Groups are very useful for controlling access to your Organization when you want to set up a number of people with the same Permission Policies assigned to them. For example, you might have a Billing Operations team and you want to restrict the access of all members of this team to performing certain billing operations when working in your Organization. You can then:
* Create a Permission Policy which allows the required range of Billing resource access.
* Create a new **Billing User Group** and add this Permission Policy to it.
* Add each team member to the **Billing User Group**.
* Do not assign any Permission Policies to any Billing Operations team member.
This topic explains how to create User Groups and add Permission Policies to the them, how to add Users to Users Groups, and how to manage your User Groups:
* [Creating User Groups and Adding Permission Policies](/guides/organization-and-access-management/managing-users/creating-and-managing-user-groups#creating-user-groups-and-adding-permission-policies)
* [Adding Users to User Groups](/guides/organization-and-access-management/managing-users/creating-and-managing-user-groups#adding-users-to-user-groups)
* [Managing User Groups](/guides/organization-and-access-management/managing-users/creating-and-managing-user-groups#managing-user-groups)
## Creating User Groups and Adding Permission Policies
**To create a User Group and add Permission Policies to the Group:**
1. Select **Settings>Access settings**. The **Access settings** page opens with the **Users** tab selected.
2. Select the **User groups** tab.
3. Select **Create user group**. The **Create** page opens.
4. Enter a **Name** for the new User Group.
5. Use the **Permission policies** drop-down list to select the Policies you want to apply to the Group:
A confirmation dialog appears.
6. Select **Yes** to continue and delete the Service User.
# Creating and Managing User Groups
Source: https://docs.m3ter.com/guides/organization-and-access-management/managing-users/creating-and-managing-user-groups
You can create User Groups and add Permission Policies to them. User Groups are very useful for controlling access to your Organization when you want to set up a number of people with the same Permission Policies assigned to them. For example, you might have a Billing Operations team and you want to restrict the access of all members of this team to performing certain billing operations when working in your Organization. You can then:
* Create a Permission Policy which allows the required range of Billing resource access.
* Create a new **Billing User Group** and add this Permission Policy to it.
* Add each team member to the **Billing User Group**.
* Do not assign any Permission Policies to any Billing Operations team member.
This topic explains how to create User Groups and add Permission Policies to the them, how to add Users to Users Groups, and how to manage your User Groups:
* [Creating User Groups and Adding Permission Policies](/guides/organization-and-access-management/managing-users/creating-and-managing-user-groups#creating-user-groups-and-adding-permission-policies)
* [Adding Users to User Groups](/guides/organization-and-access-management/managing-users/creating-and-managing-user-groups#adding-users-to-user-groups)
* [Managing User Groups](/guides/organization-and-access-management/managing-users/creating-and-managing-user-groups#managing-user-groups)
## Creating User Groups and Adding Permission Policies
**To create a User Group and add Permission Policies to the Group:**
1. Select **Settings>Access settings**. The **Access settings** page opens with the **Users** tab selected.
2. Select the **User groups** tab.
3. Select **Create user group**. The **Create** page opens.
4. Enter a **Name** for the new User Group.
5. Use the **Permission policies** drop-down list to select the Policies you want to apply to the Group:
![]() 6. Select **Create user group**. The **User group details** page for the new User Group opens and the **Permissions policies** panel lists the Policies you've applied to the Group:
6. Select **Create user group**. The **User group details** page for the new User Group opens and the **Permissions policies** panel lists the Policies you've applied to the Group:
![User Group7]() You can manage the Permission Policies for the User Group from here:
* Select **Add permission policies** to add another Permission Policy to the User Group.
* To remove a Permission Policy from the User Group, select it on the **Permission policies** panel and then click **Remove selected**.
**Important!** To avoid any problems for users when attempting to access the Console, please ensure you include a Permission Policy assigned to their User Group that includes for a `config:retrieve` action for the `billing:config` and `config:organizationConfig` resources. See [Understanding, Creating, and Managing Permission Policies](/guides/organization-and-access-management/creating-and-managing-permissions).
## Adding Users to User Groups
**To add Users to a User Group:**
1. Select **Settings>Access settings**. The **Access settings** page opens with the **Users** tab selected.
2. Select the **Name** hotlink text of the User you want to add to a User Group. The **User details** page opens.
3. On the **User groups** panel, select **Add to user group**. A **Select user groups** dialog appears.
4. On the **Select user groups** dialog, select the User Group you want to add the user to and then select **Confirm**. The dialog closes and you are returned to the **User details** page and the User Group you've added the User to is listed on the **User groups** panel.
**Tip**: Alternatively, open the details page of the User group you want to add Users to, and on the **Users** panel you can use **Add user**.
## Managing User Groups
1. Select the **Access settings>User groups** tab. From there, you can manage your User Groups:
* Select the **Name** hotlink text to open the **User group details** page for a User Group and from there:
* Add and manage the **Permission policies** applied to the Group.
* Add and manage the **Users** belonging to the Group.
2. If you want to edit the User Group, from the **User groups** tab, select **Edit**:
You can manage the Permission Policies for the User Group from here:
* Select **Add permission policies** to add another Permission Policy to the User Group.
* To remove a Permission Policy from the User Group, select it on the **Permission policies** panel and then click **Remove selected**.
**Important!** To avoid any problems for users when attempting to access the Console, please ensure you include a Permission Policy assigned to their User Group that includes for a `config:retrieve` action for the `billing:config` and `config:organizationConfig` resources. See [Understanding, Creating, and Managing Permission Policies](/guides/organization-and-access-management/creating-and-managing-permissions).
## Adding Users to User Groups
**To add Users to a User Group:**
1. Select **Settings>Access settings**. The **Access settings** page opens with the **Users** tab selected.
2. Select the **Name** hotlink text of the User you want to add to a User Group. The **User details** page opens.
3. On the **User groups** panel, select **Add to user group**. A **Select user groups** dialog appears.
4. On the **Select user groups** dialog, select the User Group you want to add the user to and then select **Confirm**. The dialog closes and you are returned to the **User details** page and the User Group you've added the User to is listed on the **User groups** panel.
**Tip**: Alternatively, open the details page of the User group you want to add Users to, and on the **Users** panel you can use **Add user**.
## Managing User Groups
1. Select the **Access settings>User groups** tab. From there, you can manage your User Groups:
* Select the **Name** hotlink text to open the **User group details** page for a User Group and from there:
* Add and manage the **Permission policies** applied to the Group.
* Add and manage the **Users** belonging to the Group.
2. If you want to edit the User Group, from the **User groups** tab, select **Edit**:
![]() * Make your editing changes and select **Update User Group**.
3. If you want to delete a User Group, from the **User groups** tab, select the **Delete** icon:
* Make your editing changes and select **Update User Group**.
3. If you want to delete a User Group, from the **User groups** tab, select the **Delete** icon:
![]() A confirmation dialog appears.
4. Select **Yes** to continue and delete the User Group.
**Tip**: Alternatively, you can use the **Edit** and **Delete** buttons at top right on the **User group details** page.
# Granting m3ter Support Access to Organization
Source: https://docs.m3ter.com/guides/organization-and-access-management/managing-users/granting-m3ter-support-access-to-organization
You can grant m3ter Support time-bound access to your Organization. If you've made a Support request concerning an issue you've encountered in your Organization, you'll likely want to do this and allow Support to help you in resolving the issue.
**Note: Support Terms?** When you grant m3ter Support access to your Organization, their activity in your Organization will be conducted fully in accordance with our [Support Terms](https://www.m3ter.com/docs/legal/support-terms).
**To grant m3ter Support access to Organization:**
1. Select **Settings>Access settings**. The **Access settings** page opens with the **Users** tab selected.
2. Select the **Support access** tab.
3. On the **Support access details** panel, select **Edit**. The **Edit** page opens and you can enter the **Support access details**.
4. For **Support access end date** (*Required*) use the calendar pop-up to select the date on which you want m3ter Support access to end.
5. Use the **Permission policies** drop-down list to select the Permission Policies you want to apply for support users when they access your Organization.
6. Select **Update support access**. You are returned to the **Support access** tab and the **Support access details** panel and **Permission policies** panel now shows the updated Support access:
A confirmation dialog appears.
4. Select **Yes** to continue and delete the User Group.
**Tip**: Alternatively, you can use the **Edit** and **Delete** buttons at top right on the **User group details** page.
# Granting m3ter Support Access to Organization
Source: https://docs.m3ter.com/guides/organization-and-access-management/managing-users/granting-m3ter-support-access-to-organization
You can grant m3ter Support time-bound access to your Organization. If you've made a Support request concerning an issue you've encountered in your Organization, you'll likely want to do this and allow Support to help you in resolving the issue.
**Note: Support Terms?** When you grant m3ter Support access to your Organization, their activity in your Organization will be conducted fully in accordance with our [Support Terms](https://www.m3ter.com/docs/legal/support-terms).
**To grant m3ter Support access to Organization:**
1. Select **Settings>Access settings**. The **Access settings** page opens with the **Users** tab selected.
2. Select the **Support access** tab.
3. On the **Support access details** panel, select **Edit**. The **Edit** page opens and you can enter the **Support access details**.
4. For **Support access end date** (*Required*) use the calendar pop-up to select the date on which you want m3ter Support access to end.
5. Use the **Permission policies** drop-down list to select the Permission Policies you want to apply for support users when they access your Organization.
6. Select **Update support access**. You are returned to the **Support access** tab and the **Support access details** panel and **Permission policies** panel now shows the updated Support access:
![]() In this example:
* Support access will end at midnight on July 26th, 2025.
* Support has been granted **Administrator** access until that point in time.
7. If you want to update the Support access you've granted because the issue you made a request to Support about is now resolved and you want to close-off access, you can:
* Reset the **Support access end date** to tomorrow's date and select **Update support access** to end access as soon as possible. Note that when you grant Support access, it must be for at least the remainder of the current day.
* Under **Permission policies**, delete any Permission Policies you've added for the access.
# Inviting Users to Organization
Source: https://docs.m3ter.com/guides/organization-and-access-management/managing-users/inviting-users-to-organization
From the **Access settings** page, you can invite people to join your Organization as users. They will receive an e-mail invite and will then be able to access your Organization with the permission level you've assigned to them.
**Important - User Invite Permission Required!**
* You can issue an invite to a user to join your Organization only if you have the required permissions. The invite user permission can be conferred either with the **Administrator** *Managed Permission Policy* or a *Custom Permission Policy* that includes a `config:create` action for the `orgUserInvitation` resource.
* If you attempt to invite a User to your Organization but you don't have the required permissions, you'll receive an error.
**To invite a User to join your Organization:**
1. Select **Settings>Access settings**. The **Access settings** page opens with the **Users** tab selected.
2. Select the **Invitations** tab. Any invitations previously issued for your Organization are listed.
3. Select **Create invitation**. The **Create** page opens.
4. Enter the **Invitation details** for the User:
* **First name**. (*Required*)
* **Last name**. (*Required*)
* **Email address**. (*Required*)
* **Contact Number**. (*Optional*)
5. If you want to make the invited User's access to your Organization time-bound, use the pop-up calendar to enter the date and time you want their access to cease in the **Access end date** field. Optional - if you don't set this date, then the invited user will have continued access to your Organization.
6. Use the pop-up calendar for the **Invite expiry date** to enter the date you want the invitation to expire. Note that this is required and by default the invitation expiry date will be pre-set at 30 days in the future.
7. Use the **Permission policies** drop-down selection list to select the Permission you want to assign to the invited User:
* The drop-down selection list will include any Custom Permission Policies you've created and the two Managed Permission Policies - **Administrator** and **ReadOnly**.
* When the invited User has joined your Organization, you'll be able to edit the Permission Policies assigned to them.
In this example:
* Support access will end at midnight on July 26th, 2025.
* Support has been granted **Administrator** access until that point in time.
7. If you want to update the Support access you've granted because the issue you made a request to Support about is now resolved and you want to close-off access, you can:
* Reset the **Support access end date** to tomorrow's date and select **Update support access** to end access as soon as possible. Note that when you grant Support access, it must be for at least the remainder of the current day.
* Under **Permission policies**, delete any Permission Policies you've added for the access.
# Inviting Users to Organization
Source: https://docs.m3ter.com/guides/organization-and-access-management/managing-users/inviting-users-to-organization
From the **Access settings** page, you can invite people to join your Organization as users. They will receive an e-mail invite and will then be able to access your Organization with the permission level you've assigned to them.
**Important - User Invite Permission Required!**
* You can issue an invite to a user to join your Organization only if you have the required permissions. The invite user permission can be conferred either with the **Administrator** *Managed Permission Policy* or a *Custom Permission Policy* that includes a `config:create` action for the `orgUserInvitation` resource.
* If you attempt to invite a User to your Organization but you don't have the required permissions, you'll receive an error.
**To invite a User to join your Organization:**
1. Select **Settings>Access settings**. The **Access settings** page opens with the **Users** tab selected.
2. Select the **Invitations** tab. Any invitations previously issued for your Organization are listed.
3. Select **Create invitation**. The **Create** page opens.
4. Enter the **Invitation details** for the User:
* **First name**. (*Required*)
* **Last name**. (*Required*)
* **Email address**. (*Required*)
* **Contact Number**. (*Optional*)
5. If you want to make the invited User's access to your Organization time-bound, use the pop-up calendar to enter the date and time you want their access to cease in the **Access end date** field. Optional - if you don't set this date, then the invited user will have continued access to your Organization.
6. Use the pop-up calendar for the **Invite expiry date** to enter the date you want the invitation to expire. Note that this is required and by default the invitation expiry date will be pre-set at 30 days in the future.
7. Use the **Permission policies** drop-down selection list to select the Permission you want to assign to the invited User:
* The drop-down selection list will include any Custom Permission Policies you've created and the two Managed Permission Policies - **Administrator** and **ReadOnly**.
* When the invited User has joined your Organization, you'll be able to edit the Permission Policies assigned to them.
![]() 8. Select **Create invitation**. The **Invitations details** page opens for the invited User and the User will receive an e-mail inviting them to join your Organization:
* If the User is already a m3ter User and has a m3ter account, they can click a link and use their credentials to log into your Organization.
* If the User is not already a m3ter User and does not already have a m3ter account, they will be invited to create a m3ter account before logging into your Organization.
9. On the **Access settings>Invitations** tab, your Invitations are listed:
* **Name.**
* **Email address**. The invited User's email address.
* **Access end date**. The date you set for the invited User's access to your Organization to end.
* **Invite expiry date**. The date on which the invite expires - after that date the invited User will no longer be able to accept the invite. By default, any invite is valid for **30 days** from the date you sent the invite.
* **Accepted**. Whether or not the invitation has been accepted.
* **Permission policies**. The Permission Policies assigned to the invited User.
* **Invited by**.
10. When an invited User has joined your Organization, they appear in the **Users** tab on the **Access settings** page:
* If you entered an **Access end date** for the invited User's access, this will be shown.
* Their **Status** is shown as **ACTIVE**.
See: [Managing Users and Assigning Permission Policies](/guides/organization-and-access-management/managing-users/managing-users-and-assigning-permission-policies).
11. At any time, you can open the **Access settings>Invitations** tab and select the **Name** hotlink text of an invited User to open the **Invitation details** page for the User. This shows the details of the invitation including the **Permission policies** assigned to the invited user.
# Managing Users and Assigning Permission Policies
Source: https://docs.m3ter.com/guides/organization-and-access-management/managing-users/managing-users-and-assigning-permission-policies
At *Settings>Access* in the Console, you can view Users, deactivate and reactivate them, assign permission policies to modify User access to your Organization, edit User profiles, and resend temporary password to Users:
* [Viewing User Details](/guides/organization-and-access-management/managing-users/managing-users-and-assigning-permission-policies#viewing-user-details)
* [Deactivating and Reactivating Users](/guides/organization-and-access-management/managing-users/managing-users-and-assigning-permission-policies#deactivating-and-reactivating-users)
* [Assigning Permission Policies to Users](/guides/organization-and-access-management/managing-users/managing-users-and-assigning-permission-policies#assigning-permission-policies-to-users)
* [Editing User Profile](/guides/organization-and-access-management/managing-users/managing-users-and-assigning-permission-policies#editing-user-profile)
## Viewing User Details
**To view Users:**
1. Select **Settings**:
8. Select **Create invitation**. The **Invitations details** page opens for the invited User and the User will receive an e-mail inviting them to join your Organization:
* If the User is already a m3ter User and has a m3ter account, they can click a link and use their credentials to log into your Organization.
* If the User is not already a m3ter User and does not already have a m3ter account, they will be invited to create a m3ter account before logging into your Organization.
9. On the **Access settings>Invitations** tab, your Invitations are listed:
* **Name.**
* **Email address**. The invited User's email address.
* **Access end date**. The date you set for the invited User's access to your Organization to end.
* **Invite expiry date**. The date on which the invite expires - after that date the invited User will no longer be able to accept the invite. By default, any invite is valid for **30 days** from the date you sent the invite.
* **Accepted**. Whether or not the invitation has been accepted.
* **Permission policies**. The Permission Policies assigned to the invited User.
* **Invited by**.
10. When an invited User has joined your Organization, they appear in the **Users** tab on the **Access settings** page:
* If you entered an **Access end date** for the invited User's access, this will be shown.
* Their **Status** is shown as **ACTIVE**.
See: [Managing Users and Assigning Permission Policies](/guides/organization-and-access-management/managing-users/managing-users-and-assigning-permission-policies).
11. At any time, you can open the **Access settings>Invitations** tab and select the **Name** hotlink text of an invited User to open the **Invitation details** page for the User. This shows the details of the invitation including the **Permission policies** assigned to the invited user.
# Managing Users and Assigning Permission Policies
Source: https://docs.m3ter.com/guides/organization-and-access-management/managing-users/managing-users-and-assigning-permission-policies
At *Settings>Access* in the Console, you can view Users, deactivate and reactivate them, assign permission policies to modify User access to your Organization, edit User profiles, and resend temporary password to Users:
* [Viewing User Details](/guides/organization-and-access-management/managing-users/managing-users-and-assigning-permission-policies#viewing-user-details)
* [Deactivating and Reactivating Users](/guides/organization-and-access-management/managing-users/managing-users-and-assigning-permission-policies#deactivating-and-reactivating-users)
* [Assigning Permission Policies to Users](/guides/organization-and-access-management/managing-users/managing-users-and-assigning-permission-policies#assigning-permission-policies-to-users)
* [Editing User Profile](/guides/organization-and-access-management/managing-users/managing-users-and-assigning-permission-policies#editing-user-profile)
## Viewing User Details
**To view Users:**
1. Select **Settings**:
![]() The **Settings** section opens at the **Organization** page.
2. Select **Access settings**. The **Access settings** page opens with the **Users** tab selected. Any existing Users in your Organization are listed. For each User listed you can read-off:
* **Name**
* **Email address**.
* **Status** - whether the User is currently set as **ACTIVE** or **INACTIVE** for your Organization.
* **Access end date** - the date when the User's access to your Organization will end.
3. To review a User's **Permission policies** and **User groups**, select the **Summary** icon:
The **Settings** section opens at the **Organization** page.
2. Select **Access settings**. The **Access settings** page opens with the **Users** tab selected. Any existing Users in your Organization are listed. For each User listed you can read-off:
* **Name**
* **Email address**.
* **Status** - whether the User is currently set as **ACTIVE** or **INACTIVE** for your Organization.
* **Access end date** - the date when the User's access to your Organization will end.
3. To review a User's **Permission policies** and **User groups**, select the **Summary** icon:
![Invite Users23]() The **User** summary panel is populated for the selected User:
The **User** summary panel is populated for the selected User:
![]() **Tip: Users Missing?** When you open the **Users** page, you should see all the Users you asked m3ter to set up for your Organization and any who you've invited and have accepted your invitation. If any are missing, please contact m3ter Support.
4. To view a User's details, select their name hotlink text:
**Tip: Users Missing?** When you open the **Users** page, you should see all the Users you asked m3ter to set up for your Organization and any who you've invited and have accepted your invitation. If any are missing, please contact m3ter Support.
4. To view a User's details, select their name hotlink text:
![]() The **User details** page opens:
The **User details** page opens:
![]() From the **User details** panel, you can manage the User's details:
* **Status**:
* Read-off the User's Status - whether **ACTIVE** or **INACTIVE**.
* Deactivate or Reactivate the User. See below: [Deactivating and Reactivating Users](/guides/organization-and-access-management/managing-users#deactivating-and-reactivating-users).
* **Permission Policies**:
* Remove a Policy from the User.
* Add a Permission Policy to the User. See below: [Adding Permission Policies to Users](/guides/organization-and-access-management/managing-users#adding-permission-policies-to-users).
* **Other details**:
* Read-off the User's unique **ID** and **Copy** it directly to your clipboard.
* Check the User's email address.
* **Audit data**:
* Read-off when the User was **Created** and **Last modified**.
5. Scroll down the page. From the **User groups** panel, you can add the User to User Groups you've set up for your Organization. See: [Creating and Managing User Groups](/guides/organization-and-access-management/managing-users/creating-and-managing-user-groups).
## Deactivating and Reactivating Users
**To deactivate and reactivate Users:**
1. Select **Settings>Access settings**. The **Access settings** page opens with the **Users** tab selected. Any existing Users in your Organization are listed.
2. Select the **Name** text of the User you want to deactivate or reactivate. The **User details** page opens and you can read-off the current **Status** of the User - either **ACTIVE** or **INACTIVE**:
* If **ACTIVE**, a red **Deactivate user** button shows, which you can use to deactivate the User.
* If **INACTIVE**, a green **Activate user** button shows, which you can use to reactivate the User.
3. Use these **Deactivate user/Reactivate user** buttons appropriately to control the status of the User.
**Warning - Deactivating a User does not remove User!** If you deactivate a User, this does not remove them from your Organization - they remain dormant members and can be reactivated. If a deactivated User's details are updated, then other Users in the Organization will be able to view the updated details.
## Assigning Permission Policies to Users
Two types of Permission Policy are available for controlling User access to your Organization:
* **Managed**. System generated Permission Policies. Two *Managed* Permission Policies are currently available to assign to your Users, Service Users, or User Groups:
* **Administrator**. Read and write permissions. Can submit API calls.
* **ReadOnly**. Read permissions only. Cannot submit API calls.
**Note**: You *cannot edit* Managed Permission Policies.
* **Custom**. Permission Policies you create for your own Organization:
* You can use the m3ter Permissions framework to create and configure Custom Permission Policies to impose precise levels of access on individual Users and User Groups.
**Warning: Working with Permission Policies?** Before creating Custom Permission Policies to control Users access to your Organization, we recommend that you review the [Understanding, Creating, and Managing Permission Policies](/guides/organization-and-access-management/creating-and-managing-permissions) topic.
**To add and manage Permission Policies for a User:**
1. Select **Settings>Access settings**. The **Access settings** page opens with the **Users** tab selected. Any existing Users in your Organization are listed.
2. Select the **Name** text of the User whose Permission Policies you want to manage. The **User details** page opens.
3. If you want add a Permission Policy to the User, under **Permission policies**, select **Add permission policies**. A **Select permission policies** dialog opens.
4. Select the Permission Policies you want to add to the User and then select **Confirm**. The dialog closes and you are returned to the **User details** page and the selected Permission Policy shows in the **Permission policies** list for the User.
5. If you want to remove a Permission Policy for a User, select it in the list and select **Remove selected**. A confirmation dialog appears.
6. Select **Yes** to confirm the deletion.
## Editing User Profile
You can edit your User profile at any time to change first and last name.
**To edit User profile:**
1. Select your User profile at top-right of the Console:
From the **User details** panel, you can manage the User's details:
* **Status**:
* Read-off the User's Status - whether **ACTIVE** or **INACTIVE**.
* Deactivate or Reactivate the User. See below: [Deactivating and Reactivating Users](/guides/organization-and-access-management/managing-users#deactivating-and-reactivating-users).
* **Permission Policies**:
* Remove a Policy from the User.
* Add a Permission Policy to the User. See below: [Adding Permission Policies to Users](/guides/organization-and-access-management/managing-users#adding-permission-policies-to-users).
* **Other details**:
* Read-off the User's unique **ID** and **Copy** it directly to your clipboard.
* Check the User's email address.
* **Audit data**:
* Read-off when the User was **Created** and **Last modified**.
5. Scroll down the page. From the **User groups** panel, you can add the User to User Groups you've set up for your Organization. See: [Creating and Managing User Groups](/guides/organization-and-access-management/managing-users/creating-and-managing-user-groups).
## Deactivating and Reactivating Users
**To deactivate and reactivate Users:**
1. Select **Settings>Access settings**. The **Access settings** page opens with the **Users** tab selected. Any existing Users in your Organization are listed.
2. Select the **Name** text of the User you want to deactivate or reactivate. The **User details** page opens and you can read-off the current **Status** of the User - either **ACTIVE** or **INACTIVE**:
* If **ACTIVE**, a red **Deactivate user** button shows, which you can use to deactivate the User.
* If **INACTIVE**, a green **Activate user** button shows, which you can use to reactivate the User.
3. Use these **Deactivate user/Reactivate user** buttons appropriately to control the status of the User.
**Warning - Deactivating a User does not remove User!** If you deactivate a User, this does not remove them from your Organization - they remain dormant members and can be reactivated. If a deactivated User's details are updated, then other Users in the Organization will be able to view the updated details.
## Assigning Permission Policies to Users
Two types of Permission Policy are available for controlling User access to your Organization:
* **Managed**. System generated Permission Policies. Two *Managed* Permission Policies are currently available to assign to your Users, Service Users, or User Groups:
* **Administrator**. Read and write permissions. Can submit API calls.
* **ReadOnly**. Read permissions only. Cannot submit API calls.
**Note**: You *cannot edit* Managed Permission Policies.
* **Custom**. Permission Policies you create for your own Organization:
* You can use the m3ter Permissions framework to create and configure Custom Permission Policies to impose precise levels of access on individual Users and User Groups.
**Warning: Working with Permission Policies?** Before creating Custom Permission Policies to control Users access to your Organization, we recommend that you review the [Understanding, Creating, and Managing Permission Policies](/guides/organization-and-access-management/creating-and-managing-permissions) topic.
**To add and manage Permission Policies for a User:**
1. Select **Settings>Access settings**. The **Access settings** page opens with the **Users** tab selected. Any existing Users in your Organization are listed.
2. Select the **Name** text of the User whose Permission Policies you want to manage. The **User details** page opens.
3. If you want add a Permission Policy to the User, under **Permission policies**, select **Add permission policies**. A **Select permission policies** dialog opens.
4. Select the Permission Policies you want to add to the User and then select **Confirm**. The dialog closes and you are returned to the **User details** page and the selected Permission Policy shows in the **Permission policies** list for the User.
5. If you want to remove a Permission Policy for a User, select it in the list and select **Remove selected**. A confirmation dialog appears.
6. Select **Yes** to confirm the deletion.
## Editing User Profile
You can edit your User profile at any time to change first and last name.
**To edit User profile:**
1. Select your User profile at top-right of the Console:
![]() A User dialog opens:
A User dialog opens:
![]() 2. Select **Edit profile**. An dialog opens:
2. Select **Edit profile**. An dialog opens:
 3. Use the **First name** and **Last name** fields to make the required changes to your profile.
4. Select **Update**. The **Edit profile** dialog closes and the updates are saved.
**Notes:**
* When you update your User profile, its background color will change automatically - this is normal behavior.
* If the update fails, you'll receive an error message. For example, if you've selected to **Update** but the **Last name** field is blank.
# Tracking User Activity in Organization
Source: https://docs.m3ter.com/guides/organization-and-access-management/managing-users/tracking-user-activity-in-organization
You can track User activity for the main configuration entities created for your Organization - many of the details pages, such as the Product details pages, carry audit information on which User:
* Initially created the entity.
* Most recently modified the entity.
This audit data also allows you to click a hotlink text to open the details page for the logged User:
3. Use the **First name** and **Last name** fields to make the required changes to your profile.
4. Select **Update**. The **Edit profile** dialog closes and the updates are saved.
**Notes:**
* When you update your User profile, its background color will change automatically - this is normal behavior.
* If the update fails, you'll receive an error message. For example, if you've selected to **Update** but the **Last name** field is blank.
# Tracking User Activity in Organization
Source: https://docs.m3ter.com/guides/organization-and-access-management/managing-users/tracking-user-activity-in-organization
You can track User activity for the main configuration entities created for your Organization - many of the details pages, such as the Product details pages, carry audit information on which User:
* Initially created the entity.
* Most recently modified the entity.
This audit data also allows you to click a hotlink text to open the details page for the logged User:
![User Activity4]() **Tip: User Activity is also shown on Account Specific Details Pages!** Which User created and which User last modified is also tracked in the Console on the details pages for some Account specific entities - Account Plans, Prepayments, Balances, and Contracts on an Account.
# Viewing and Managing Permission Policies
Source: https://docs.m3ter.com/guides/organization-and-access-management/managing-users/viewing-and-managing-permission-policies
At **Settings>Access settings** in the Console, you can view and manage Permission Policies created for your Organization.
**Tip: Understanding Permission Policies?** For details on the m3ter Permission Policies framework and how to create the custom Permission Policies you need, please review the [Understanding, Creating, and Managing Permission Policies](/guides/organization-and-access-management/creating-and-managing-permissions) topic.
**To view and manage Permissions Policies in your Organization:**
1. Select **Settings>Access settings**. The **Users** page opens.
2. Select the **Permission policies** tab. Any existing **Managed** or **Custom** Permission Policies are listed:
**Tip: User Activity is also shown on Account Specific Details Pages!** Which User created and which User last modified is also tracked in the Console on the details pages for some Account specific entities - Account Plans, Prepayments, Balances, and Contracts on an Account.
# Viewing and Managing Permission Policies
Source: https://docs.m3ter.com/guides/organization-and-access-management/managing-users/viewing-and-managing-permission-policies
At **Settings>Access settings** in the Console, you can view and manage Permission Policies created for your Organization.
**Tip: Understanding Permission Policies?** For details on the m3ter Permission Policies framework and how to create the custom Permission Policies you need, please review the [Understanding, Creating, and Managing Permission Policies](/guides/organization-and-access-management/creating-and-managing-permissions) topic.
**To view and manage Permissions Policies in your Organization:**
1. Select **Settings>Access settings**. The **Users** page opens.
2. Select the **Permission policies** tab. Any existing **Managed** or **Custom** Permission Policies are listed:
![]() From the listing, you can read off:
* The **Type** of Permission Policy - either **Managed** or **Custom**.
* The number of **Statements** configured for a Permission Policy, which control what a User assigned the Policy can and cannot do in your Organization.
3. If you want to view the details of a Permission Policy, select the **Name** text hotlink. The **Permission policy details** page opens:
From the listing, you can read off:
* The **Type** of Permission Policy - either **Managed** or **Custom**.
* The number of **Statements** configured for a Permission Policy, which control what a User assigned the Policy can and cannot do in your Organization.
3. If you want to view the details of a Permission Policy, select the **Name** text hotlink. The **Permission policy details** page opens:
![Permissions25]() In this example, the details of a **CUSTOM** Permission Policy reveal that it has been set up using nine Statements and we can read-off what each of the Statements allows or denies a User assigned the Policy to do.
4. If you want to edit a Permission Policy, return to the **Permission policies** tab and select the **Edit** icon:
In this example, the details of a **CUSTOM** Permission Policy reveal that it has been set up using nine Statements and we can read-off what each of the Statements allows or denies a User assigned the Policy to do.
4. If you want to edit a Permission Policy, return to the **Permission policies** tab and select the **Edit** icon:
![]() 5. Make your editing changes and select **Update permission policy**.
**Tip: Working with Permission Policies?** See the [Understanding, Creating, and Managing Permission Policies](/guides/organization-and-access-management/creating-and-managing-permissions) for details on how to create and update Permission Policies.
6. If you want to delete a Permission Policy, on the **Permission policies** tab select the **Delete** icon:
5. Make your editing changes and select **Update permission policy**.
**Tip: Working with Permission Policies?** See the [Understanding, Creating, and Managing Permission Policies](/guides/organization-and-access-management/creating-and-managing-permissions) for details on how to create and update Permission Policies.
6. If you want to delete a Permission Policy, on the **Permission policies** tab select the **Delete** icon:
![]() A confirmation dialog appears.
7. Select **Yes** to continue and delete the Permission Policy.
**Note: Editing or deleting Managed Permission Policies?** Managed Permission Policies are system generated and *you cannot edit or delete them*.
# Managing your Organization
Source: https://docs.m3ter.com/guides/organization-and-access-management/viewing-and-editing-organization
At *Settings>Organization* in the Console, you can view and edit your Organization's configuration settings. This section explains how to manage and work with these Organization-wide settings to ensure key areas such as billing fulfill your specific requirements:
* [Viewing and Editing Organization Configuration](/guides/organization-and-access-management/viewing-and-editing-organization/viewing-and-editing-organization-configuration)
* [Timezone Settings - Notes and Recommendations](/guides/organization-and-access-management/viewing-and-editing-organization/timezone-settings-notes-and-recommendations)
* [Creating and Managing Currencies](/guides/organization-and-access-management/viewing-and-editing-organization/creating-and-managing-currencies)
* [Creating Credit Reasons to use for adding credit line items to bills](/guides/organization-and-access-management/viewing-and-editing-organization/creating-credit-reasons)
* [Creating Debit Reasons to use when adding debit line items to bills](/guides/organization-and-access-management/viewing-and-editing-organization/creating-debit-reasons)
* [Creating Transaction Types to use for adding Transactions for Balances on Accounts](/guides/organization-and-access-management/viewing-and-editing-organization/creating-transaction-types)
* [Adding and Editing Custom Fields](/guides/organization-and-access-management/viewing-and-editing-organization/adding-and-editing-custom-fields)
**Tip: Organization ID?** You can copy your Organization ID directly to your clipboard from the **Organization Details** panel in the Console.
# Adding and Editing Custom Fields
Source: https://docs.m3ter.com/guides/organization-and-access-management/viewing-and-editing-organization/adding-and-editing-custom-fields
*Custom Fields* allow you to attach custom data to entities in m3ter. You can use Custom Fields to define string or number values for these entities. When you set up your Organization, you can create them for your **Organization** and for the following entities:
* **Product**
* **Meter**
* **Plan**
* **Plan Template**
* **Account**
* **Account Plan**
* **Aggregation**
* **Compound Aggregation**
* **Contract**
The key points to note about creating and using Custom Fields are:
* You can define Custom Fields for these entities at two levels: at the Organization-wide level and at the level of individual entities:
* Note that **Organization** is the obvious exception.
* When you create Custom Fields at the Organization-wide level for any of the entities listed above, this allows you to set-up *default Custom Field values* for these entities.
* Custom Fields can be referenced in your Meter Derived Field calculations and in your Compound Aggregation calculations. Using number or string values stored in Custom Fields in this way offers you great flexibility when using those calculations to fulfill complex usage-based pricing use cases.
* For details on referencing Custom Fields in your calculations, see [Referencing Custom Fields in Derived Field Calculations](/guides/creating-and-managing-products/working-with-custom-fields#referencing-custom-fields-in-derived-field-calculations) and [Referencing Custom Fields in Compound Aggregation Calculations](/guides/creating-and-managing-products/working-with-custom-fields#referencing-custom-fields-in-compound-aggregation-calculations).
* If you want to use entity-level Custom Field values in your calculations - for example for a specific Account - *you must first create* a Custom Field for that entity type at Organization-level - in this example an **Account** Custom Field:
* This ensures a default Custom Field value exists for the entity type at the Organization-level.
* The entity-level Custom Field value will then be used for your calculation instead of the default value.
**Limits and Constraints:**
* **Maximum number.** The maximum number of Custom Fields you can create for each entity type at Organization-level is **25**.
* **Duplicate Naming**. More that one Custom Field with the same name is not allowed. If you try to add two or more Custom Fields with the same name for an entity type, when you save your changes *only the last one you added is saved*.
**Important!**
* **More on Custom Fields?** Before you attempt to use Custom Fields, we strongly recommend that you first review the [Working with Custom Fields](/guides/creating-and-managing-products/working-with-custom-fields) topic.
* **What about Custom Fields for Aggregations and Compound Aggregations?** You can define Custom Fields for **Aggregations** and **Compound Aggregations** at both the Organizational level and the individual entity level. However, these Custom Fields are NOT supported for referencing in Derived Field or Compound Aggregation calculations.
**Notes and Tips:**
* **Custom Fields created only at the individual entity-level?** For some entities, you can only create Custom Fields *at the individual entity-level*. This means you cannot set up default values for Custom Fields for Plan Groups or Balances at the Organizational-level, and you therefore cannot reference them in your calculations. Currently, these are:
* **Balances**
* **Balance Transaction Schedules**
* **Balance Charge Schedules**
* **Plan Groups**
* **See Also?** If you intend to add Custom Fields and reference them in your [Derived Field](/guides/usage-data-meters/derived-fields-for-meters-examples-and-supported-syntax) or [Compound Aggregation](/guides/usage-data-aggregations/compound-aggregations) calculations, we strongly recommend that you first review the [Calculations Syntax and Supported Functions/Operators](/guides/usage-data-aggregations/compound-aggregation-calculations) topic.
This topic explains how to create Custom Fields at Organization-level for your Organization and other entities when setting up your Organization.
**To add Custom Fields at Organizational level:**
1. Select **Settings**. The **Organization** page opens with the **Overview** tab selected.
2. Select the **Custom fields** tab.
3. On the **Custom fields details** panel, select **Edit**. The **Edit** page opens.
4. Select **Add** under the entity for which you want to add Custom Fields - **Organization**, **Product**, **Meter**, **Plan**, **Plan template**, **Account**, **Attached plan**, **Aggregation**, **Compound aggregation**, or **Contract**.
5. Enter a **Name**, select the **Type**, and enter the **Value**.
6. If you want to add multiple Custom Fields, select **Add** again - a new row is added and you can repeat steps 4 and 5. The maximum number for any entity type at Organization-level is **25**.
* Note that if you try to add two or more Custom Fields with the same name for an entity type, when you save your changes *only the last one you added is saved*.
7. At the bottom of the page, select **Update Custom fields**. You are returned to the **Organization>Custom field**s tab the new **Name/Value** pair is shown under the entity in the **Custom field details** panel.
8. If you now open the details page for an entity type you've created the Custom Fields for, the fields and their values will be shown on the metadata panel. For example, suppose you've created two **Account** Custom Fields at Organizational-level:
A confirmation dialog appears.
7. Select **Yes** to continue and delete the Permission Policy.
**Note: Editing or deleting Managed Permission Policies?** Managed Permission Policies are system generated and *you cannot edit or delete them*.
# Managing your Organization
Source: https://docs.m3ter.com/guides/organization-and-access-management/viewing-and-editing-organization
At *Settings>Organization* in the Console, you can view and edit your Organization's configuration settings. This section explains how to manage and work with these Organization-wide settings to ensure key areas such as billing fulfill your specific requirements:
* [Viewing and Editing Organization Configuration](/guides/organization-and-access-management/viewing-and-editing-organization/viewing-and-editing-organization-configuration)
* [Timezone Settings - Notes and Recommendations](/guides/organization-and-access-management/viewing-and-editing-organization/timezone-settings-notes-and-recommendations)
* [Creating and Managing Currencies](/guides/organization-and-access-management/viewing-and-editing-organization/creating-and-managing-currencies)
* [Creating Credit Reasons to use for adding credit line items to bills](/guides/organization-and-access-management/viewing-and-editing-organization/creating-credit-reasons)
* [Creating Debit Reasons to use when adding debit line items to bills](/guides/organization-and-access-management/viewing-and-editing-organization/creating-debit-reasons)
* [Creating Transaction Types to use for adding Transactions for Balances on Accounts](/guides/organization-and-access-management/viewing-and-editing-organization/creating-transaction-types)
* [Adding and Editing Custom Fields](/guides/organization-and-access-management/viewing-and-editing-organization/adding-and-editing-custom-fields)
**Tip: Organization ID?** You can copy your Organization ID directly to your clipboard from the **Organization Details** panel in the Console.
# Adding and Editing Custom Fields
Source: https://docs.m3ter.com/guides/organization-and-access-management/viewing-and-editing-organization/adding-and-editing-custom-fields
*Custom Fields* allow you to attach custom data to entities in m3ter. You can use Custom Fields to define string or number values for these entities. When you set up your Organization, you can create them for your **Organization** and for the following entities:
* **Product**
* **Meter**
* **Plan**
* **Plan Template**
* **Account**
* **Account Plan**
* **Aggregation**
* **Compound Aggregation**
* **Contract**
The key points to note about creating and using Custom Fields are:
* You can define Custom Fields for these entities at two levels: at the Organization-wide level and at the level of individual entities:
* Note that **Organization** is the obvious exception.
* When you create Custom Fields at the Organization-wide level for any of the entities listed above, this allows you to set-up *default Custom Field values* for these entities.
* Custom Fields can be referenced in your Meter Derived Field calculations and in your Compound Aggregation calculations. Using number or string values stored in Custom Fields in this way offers you great flexibility when using those calculations to fulfill complex usage-based pricing use cases.
* For details on referencing Custom Fields in your calculations, see [Referencing Custom Fields in Derived Field Calculations](/guides/creating-and-managing-products/working-with-custom-fields#referencing-custom-fields-in-derived-field-calculations) and [Referencing Custom Fields in Compound Aggregation Calculations](/guides/creating-and-managing-products/working-with-custom-fields#referencing-custom-fields-in-compound-aggregation-calculations).
* If you want to use entity-level Custom Field values in your calculations - for example for a specific Account - *you must first create* a Custom Field for that entity type at Organization-level - in this example an **Account** Custom Field:
* This ensures a default Custom Field value exists for the entity type at the Organization-level.
* The entity-level Custom Field value will then be used for your calculation instead of the default value.
**Limits and Constraints:**
* **Maximum number.** The maximum number of Custom Fields you can create for each entity type at Organization-level is **25**.
* **Duplicate Naming**. More that one Custom Field with the same name is not allowed. If you try to add two or more Custom Fields with the same name for an entity type, when you save your changes *only the last one you added is saved*.
**Important!**
* **More on Custom Fields?** Before you attempt to use Custom Fields, we strongly recommend that you first review the [Working with Custom Fields](/guides/creating-and-managing-products/working-with-custom-fields) topic.
* **What about Custom Fields for Aggregations and Compound Aggregations?** You can define Custom Fields for **Aggregations** and **Compound Aggregations** at both the Organizational level and the individual entity level. However, these Custom Fields are NOT supported for referencing in Derived Field or Compound Aggregation calculations.
**Notes and Tips:**
* **Custom Fields created only at the individual entity-level?** For some entities, you can only create Custom Fields *at the individual entity-level*. This means you cannot set up default values for Custom Fields for Plan Groups or Balances at the Organizational-level, and you therefore cannot reference them in your calculations. Currently, these are:
* **Balances**
* **Balance Transaction Schedules**
* **Balance Charge Schedules**
* **Plan Groups**
* **See Also?** If you intend to add Custom Fields and reference them in your [Derived Field](/guides/usage-data-meters/derived-fields-for-meters-examples-and-supported-syntax) or [Compound Aggregation](/guides/usage-data-aggregations/compound-aggregations) calculations, we strongly recommend that you first review the [Calculations Syntax and Supported Functions/Operators](/guides/usage-data-aggregations/compound-aggregation-calculations) topic.
This topic explains how to create Custom Fields at Organization-level for your Organization and other entities when setting up your Organization.
**To add Custom Fields at Organizational level:**
1. Select **Settings**. The **Organization** page opens with the **Overview** tab selected.
2. Select the **Custom fields** tab.
3. On the **Custom fields details** panel, select **Edit**. The **Edit** page opens.
4. Select **Add** under the entity for which you want to add Custom Fields - **Organization**, **Product**, **Meter**, **Plan**, **Plan template**, **Account**, **Attached plan**, **Aggregation**, **Compound aggregation**, or **Contract**.
5. Enter a **Name**, select the **Type**, and enter the **Value**.
6. If you want to add multiple Custom Fields, select **Add** again - a new row is added and you can repeat steps 4 and 5. The maximum number for any entity type at Organization-level is **25**.
* Note that if you try to add two or more Custom Fields with the same name for an entity type, when you save your changes *only the last one you added is saved*.
7. At the bottom of the page, select **Update Custom fields**. You are returned to the **Organization>Custom field**s tab the new **Name/Value** pair is shown under the entity in the **Custom field details** panel.
8. If you now open the details page for an entity type you've created the Custom Fields for, the fields and their values will be shown on the metadata panel. For example, suppose you've created two **Account** Custom Fields at Organizational-level:
![Account Overview7]() * In this example, Custom Fields *have not been created* at individual Account level and the default values that will be used are those configured at Organizational-level.
* In this example, Custom Fields *have not been created* at individual Account level and the default values that will be used are those configured at Organizational-level.
![Account Overview8]() * In this example, Custom Fields *have been created* at the individual Account level and the values configured for those created at Organizational-level are struck out indicating clearly that the Account level values will be used.
# Creating and Managing Currencies
Source: https://docs.m3ter.com/guides/organization-and-access-management/viewing-and-editing-organization/creating-and-managing-currencies
You can create currencies for your Organization, which will then be available for selection when you create and configure pricing and billing entities, such as Plan Templates or Accounts.
When your Organization is first set up, a US Dollar currency is created and set as the *default currency* - **USD**. You can create other standard or custom currencies and set one of these as the default currency.
The currency you select for your Organization determines the *billing currency*. This billing currency can be different from the *pricing currency* used when pricing Product Plans. If you intend to use different billing and pricing currencies, you must define currency conversion rates.
This topic explains how to create and manage the currencies you'll need in your m3ter Organization to meet your pricing and billing requirements:
* [Setting Default Currency](/guides/organization-and-access-management/viewing-and-editing-organization/creating-and-managing-currencies#setting-default-currency)
* [Creating Standard Currencies](/guides/organization-and-access-management/viewing-and-editing-organization/creating-and-managing-currencies#creating-standard-currencies)
* [Creating Custom Currencies](/guides/organization-and-access-management/viewing-and-editing-organization/creating-and-managing-currencies#creating-custom-currencies)
* [Adding Currency Conversion Rates](/guides/organization-and-access-management/viewing-and-editing-organization/creating-and-managing-currencies#adding-currency-conversion-rates)
* [Deleting and Archiving Currencies](/guides/organization-and-access-management/viewing-and-editing-organization/creating-and-managing-currencies#deleting-and-archiving-currencies)
## Setting Default Currency
When an Organization is first created in m3ter, US Dollar (**USD**) is added as the default currency and set at Organization level as the billing currency. This is to ensure from the outset that a billing currency is defined and Bills can be immediately generated for your Organization. You cannot delete the currency which is set as the default currency. If you want to make another currency the default for your Organization, you must first create the currency and then set it as the default.
**To set the default currency for your Organization:**
1. Select **Settings**. The **Organization** page opens.
2. Select **Currency settings**:
* In this example, Custom Fields *have been created* at the individual Account level and the values configured for those created at Organizational-level are struck out indicating clearly that the Account level values will be used.
# Creating and Managing Currencies
Source: https://docs.m3ter.com/guides/organization-and-access-management/viewing-and-editing-organization/creating-and-managing-currencies
You can create currencies for your Organization, which will then be available for selection when you create and configure pricing and billing entities, such as Plan Templates or Accounts.
When your Organization is first set up, a US Dollar currency is created and set as the *default currency* - **USD**. You can create other standard or custom currencies and set one of these as the default currency.
The currency you select for your Organization determines the *billing currency*. This billing currency can be different from the *pricing currency* used when pricing Product Plans. If you intend to use different billing and pricing currencies, you must define currency conversion rates.
This topic explains how to create and manage the currencies you'll need in your m3ter Organization to meet your pricing and billing requirements:
* [Setting Default Currency](/guides/organization-and-access-management/viewing-and-editing-organization/creating-and-managing-currencies#setting-default-currency)
* [Creating Standard Currencies](/guides/organization-and-access-management/viewing-and-editing-organization/creating-and-managing-currencies#creating-standard-currencies)
* [Creating Custom Currencies](/guides/organization-and-access-management/viewing-and-editing-organization/creating-and-managing-currencies#creating-custom-currencies)
* [Adding Currency Conversion Rates](/guides/organization-and-access-management/viewing-and-editing-organization/creating-and-managing-currencies#adding-currency-conversion-rates)
* [Deleting and Archiving Currencies](/guides/organization-and-access-management/viewing-and-editing-organization/creating-and-managing-currencies#deleting-and-archiving-currencies)
## Setting Default Currency
When an Organization is first created in m3ter, US Dollar (**USD**) is added as the default currency and set at Organization level as the billing currency. This is to ensure from the outset that a billing currency is defined and Bills can be immediately generated for your Organization. You cannot delete the currency which is set as the default currency. If you want to make another currency the default for your Organization, you must first create the currency and then set it as the default.
**To set the default currency for your Organization:**
1. Select **Settings**. The **Organization** page opens.
2. Select **Currency settings**:
![]() The **Currency settings** page opens:
The **Currency settings** page opens:
![Currencies6]() * In this example, **USD** is set as the **DEFAULT**.
* If the currency you want to use as your Organization's default is not listed, under **Configured currencies** select **Create currency**. See below [Creating Standard Currencies](/guides/organization-and-access-management/viewing-and-editing-organization/creating-and-managing-currencies#creating-standard-currencies) or [Creating Custom Currencies](/guides/organization-and-access-management/viewing-and-editing-organization/creating-and-managing-currencies#creating-custom-currencies) for details on how to create currencies.
3. Select the currency you want to use as the default, and then select **Set as default currency**. A confirmation dialog appears.
4. Select **Set as default currency** to confirm the selection. The **Configured currencies** list adjusts and the selected currency is now shown as the **DEFAULT**:
* In this example, **USD** is set as the **DEFAULT**.
* If the currency you want to use as your Organization's default is not listed, under **Configured currencies** select **Create currency**. See below [Creating Standard Currencies](/guides/organization-and-access-management/viewing-and-editing-organization/creating-and-managing-currencies#creating-standard-currencies) or [Creating Custom Currencies](/guides/organization-and-access-management/viewing-and-editing-organization/creating-and-managing-currencies#creating-custom-currencies) for details on how to create currencies.
3. Select the currency you want to use as the default, and then select **Set as default currency**. A confirmation dialog appears.
4. Select **Set as default currency** to confirm the selection. The **Configured currencies** list adjusts and the selected currency is now shown as the **DEFAULT**:
![Currencies7]() * In this example, British Pound (GBP) has been set as the **DEFAULT** currency.
* Note that you cannot delete a currency that is set as the Organization default.
## Creating Standard Currencies
**To create a Standard Currency for your Organization:**
1. Select **Settings>Organization**. The **Organization** page opens.
2. Select **Currency settings**. The **Currency settings** page opens.
3. Select **Create currency**. The **Create** page opens.
4. If you want to create a **Standard currency**, this is selected by default under **Currency details**. Use the drop-down list to select which standard world currency you want to create.
5. If you want to control the number of decimal places used when Bills are calculated using the standard currency, enter the **Maximum decimal places**.
* *(Optional)* Note that if you leave this blank, then the default number of decimal places will be used for the selected standard currency.
* The maximum number of decimal places is **5**. If you enter a number greater than **5**, you'll receive an error when you try to create the currency.
6. If you want currency amounts to be rounded, select the **Rounding mode** you want to apply:
* **Half-up** (Round half away from zero)
* Midpoint values (exactly 0.5) are rounded toward positive infinity: 2.5 is rounded to 3, −2.5 is rounded to −2.
* **Half-even** (Banker's Rounding / IEEE 754 Default)
* If the fractional part ≠ 0.5, round to the nearest integer. If the fractional part = 0.5, round to the nearest even integer: 2.5 is rounded to 2, 3.5 is rounded to 4, 4.5 is rounded to 4.
* **Down** (Round Toward Zero / Truncation)
* Discard the fractional part: 2.9 is rounded to 2, −2.9 is rounded to −2.
* **Up** (Round Away From Zero)
* Always rounds away from zero: 2.1 is rounded to 3, −2.1 is rounded to −3.
* **Half-down** (Round Half Toward Zero)
* Midpoint values (exactly 0.5) are rounded toward negative infinity: 2.5 is rounded to 2, 3.5 is rounded to 3.
* **Ceiling** (Round Toward Positive Infinity)
* Always round towards positive infinity: 2.1 is rounded to 3, −2.9 is rounded to −2.
* **Floor** (Round Toward Negative Infinity)
* Always round towards negative infinity: 2.9 is rounded to 2, −2.1 is rounded to −3.
7. If you want to archive a currency at any time, you can use the **Archived** switch to do so.
**Warning!** If you archive a currency, it will no longer be available in **Currency** drop-down lists across your Organization.
8. Select **Create currency**. You are returned to the **Currencies setting** page where the new standard currency is listed on the **Configured currencies** panel.
## Creating Custom Currencies
You’re not restricted to creating standard world currencies - such as US dollars (**USD**) or British pounds (**GBP**). You can also create non-standard or *custom currencies* for your Organization to:
* Allow your customers to be able to purchase custom currency amounts as credits to use for consuming your products and services.
* Use custom currency amounts to offer bonus or sign-up credits to your customers to spend when consuming your products and services.
**To create a Custom Currency for your Organization:**
1. Select **Settings>Organization**. The **Organization** page opens.
2. Select **Currency settings**. The **Currency settings** page opens.
3. Select **Create currency**. The **Create** page opens.
4. Select **Custom currency**. The **Currency details** panel adjusts.
5. Enter a **Name** for the currency. (*Required*)
6. Enter a **Code** for the currency:
* (*Required*) Note that the **Code** must be three characters.
7. Enter the **Maximum decimal places** used when Bills are calculated using the custom currency:
* *(Required)* Note that if you leave this blank, then you won't be able to save the custom currency and a warning will be shown.
8. If you want currency amounts to be rounded, select the **Rounding mode** you want to apply:
* **Half-up** (Round half away from zero)
* **Half-even** (Banker's Rounding / IEEE 754 Default)
* **Down** (Round Toward Zero / Truncation)
* **Up** (Round Away From Zero)
* **Half-down** (Round Half Toward Zero)
* **Ceiling** (Round Toward Positive Infinity)
* **Floor** (Round Toward Negative Infinity)
For more details and examples of these rounding options, see previous section: [Creating Standard Currencies](#creating-standard-currencies).
9. If you want to archive a currency at any time, you can use the **Archived** switch to do so.
**Warning!** If you archive a currency, it will no longer be available in Currency drop-down lists across your Organization.
10. Select **Create currency**. You are returned to the **Currencies setting** page where the new standard currency is listed on the **Configured currencies** panel.
## Adding Currency Conversion Rates
You can select a billing currency at either Organization or individual Account level:
* If you use a different pricing currency for an Account Plan attached to an Account, when a Bill is generated line items are calculated in the pricing currency and then converted to the billing currency.
* If you intend to use mixed currencies, you can add any required currency conversion rates.
**Important!** If you *haven't set up a conversion rate* to convert pricing currency amounts to billing currency amounts, ***Bills will fail for the Account*** and you'll receive an error alert.
**To add Currency Conversion Rates for your Organization:**
1. Select **Settings>Organization**. The **Organization** page opens.
2. Select **Currency settings**. The **Currency settings** page opens.
3. On the **Currency conversions** panel, select **Edit**. The Edit page opens.
4. On the **Currency conversions** card, select **Add**. The card adjusts to show a new conversion rate row for you to complete.
5. Use the **From** and **To** fields for the conversion rate direction - for example, from **British Pound** to **US Dollar**.
6. Enter the **Conversion rate**.
7. Select **Update currency conversions**. You are returned to the **Currency settings** page and the new conversion rate is listed under **Currency conversions**.
* Note that a warning text for **Missing currency conversions** is shown to remind of conversion rates you might also want to add.
**Tip: Deleting currency conversion rates?** To do this, open the **Currency conversions> Edit** page, delete the conversion rate that is no longer required and select **Update currency conversions**.
## Deleting and Archiving Currencies
You can delete or archive a currency at any time.
**Warning!** If you delete or archive a currency, it will no longer be available in **Currency** drop-down lists across your Organization.
**To delete or archive currencies:**
1. Select **Settings>Organization**. The **Organization** page opens.
2. Select **Currency settings**. The **Currency settings** page opens.
3. If you want to delete a currency, in the **Configured currencies** list select the **delete** icon:
* In this example, British Pound (GBP) has been set as the **DEFAULT** currency.
* Note that you cannot delete a currency that is set as the Organization default.
## Creating Standard Currencies
**To create a Standard Currency for your Organization:**
1. Select **Settings>Organization**. The **Organization** page opens.
2. Select **Currency settings**. The **Currency settings** page opens.
3. Select **Create currency**. The **Create** page opens.
4. If you want to create a **Standard currency**, this is selected by default under **Currency details**. Use the drop-down list to select which standard world currency you want to create.
5. If you want to control the number of decimal places used when Bills are calculated using the standard currency, enter the **Maximum decimal places**.
* *(Optional)* Note that if you leave this blank, then the default number of decimal places will be used for the selected standard currency.
* The maximum number of decimal places is **5**. If you enter a number greater than **5**, you'll receive an error when you try to create the currency.
6. If you want currency amounts to be rounded, select the **Rounding mode** you want to apply:
* **Half-up** (Round half away from zero)
* Midpoint values (exactly 0.5) are rounded toward positive infinity: 2.5 is rounded to 3, −2.5 is rounded to −2.
* **Half-even** (Banker's Rounding / IEEE 754 Default)
* If the fractional part ≠ 0.5, round to the nearest integer. If the fractional part = 0.5, round to the nearest even integer: 2.5 is rounded to 2, 3.5 is rounded to 4, 4.5 is rounded to 4.
* **Down** (Round Toward Zero / Truncation)
* Discard the fractional part: 2.9 is rounded to 2, −2.9 is rounded to −2.
* **Up** (Round Away From Zero)
* Always rounds away from zero: 2.1 is rounded to 3, −2.1 is rounded to −3.
* **Half-down** (Round Half Toward Zero)
* Midpoint values (exactly 0.5) are rounded toward negative infinity: 2.5 is rounded to 2, 3.5 is rounded to 3.
* **Ceiling** (Round Toward Positive Infinity)
* Always round towards positive infinity: 2.1 is rounded to 3, −2.9 is rounded to −2.
* **Floor** (Round Toward Negative Infinity)
* Always round towards negative infinity: 2.9 is rounded to 2, −2.1 is rounded to −3.
7. If you want to archive a currency at any time, you can use the **Archived** switch to do so.
**Warning!** If you archive a currency, it will no longer be available in **Currency** drop-down lists across your Organization.
8. Select **Create currency**. You are returned to the **Currencies setting** page where the new standard currency is listed on the **Configured currencies** panel.
## Creating Custom Currencies
You’re not restricted to creating standard world currencies - such as US dollars (**USD**) or British pounds (**GBP**). You can also create non-standard or *custom currencies* for your Organization to:
* Allow your customers to be able to purchase custom currency amounts as credits to use for consuming your products and services.
* Use custom currency amounts to offer bonus or sign-up credits to your customers to spend when consuming your products and services.
**To create a Custom Currency for your Organization:**
1. Select **Settings>Organization**. The **Organization** page opens.
2. Select **Currency settings**. The **Currency settings** page opens.
3. Select **Create currency**. The **Create** page opens.
4. Select **Custom currency**. The **Currency details** panel adjusts.
5. Enter a **Name** for the currency. (*Required*)
6. Enter a **Code** for the currency:
* (*Required*) Note that the **Code** must be three characters.
7. Enter the **Maximum decimal places** used when Bills are calculated using the custom currency:
* *(Required)* Note that if you leave this blank, then you won't be able to save the custom currency and a warning will be shown.
8. If you want currency amounts to be rounded, select the **Rounding mode** you want to apply:
* **Half-up** (Round half away from zero)
* **Half-even** (Banker's Rounding / IEEE 754 Default)
* **Down** (Round Toward Zero / Truncation)
* **Up** (Round Away From Zero)
* **Half-down** (Round Half Toward Zero)
* **Ceiling** (Round Toward Positive Infinity)
* **Floor** (Round Toward Negative Infinity)
For more details and examples of these rounding options, see previous section: [Creating Standard Currencies](#creating-standard-currencies).
9. If you want to archive a currency at any time, you can use the **Archived** switch to do so.
**Warning!** If you archive a currency, it will no longer be available in Currency drop-down lists across your Organization.
10. Select **Create currency**. You are returned to the **Currencies setting** page where the new standard currency is listed on the **Configured currencies** panel.
## Adding Currency Conversion Rates
You can select a billing currency at either Organization or individual Account level:
* If you use a different pricing currency for an Account Plan attached to an Account, when a Bill is generated line items are calculated in the pricing currency and then converted to the billing currency.
* If you intend to use mixed currencies, you can add any required currency conversion rates.
**Important!** If you *haven't set up a conversion rate* to convert pricing currency amounts to billing currency amounts, ***Bills will fail for the Account*** and you'll receive an error alert.
**To add Currency Conversion Rates for your Organization:**
1. Select **Settings>Organization**. The **Organization** page opens.
2. Select **Currency settings**. The **Currency settings** page opens.
3. On the **Currency conversions** panel, select **Edit**. The Edit page opens.
4. On the **Currency conversions** card, select **Add**. The card adjusts to show a new conversion rate row for you to complete.
5. Use the **From** and **To** fields for the conversion rate direction - for example, from **British Pound** to **US Dollar**.
6. Enter the **Conversion rate**.
7. Select **Update currency conversions**. You are returned to the **Currency settings** page and the new conversion rate is listed under **Currency conversions**.
* Note that a warning text for **Missing currency conversions** is shown to remind of conversion rates you might also want to add.
**Tip: Deleting currency conversion rates?** To do this, open the **Currency conversions> Edit** page, delete the conversion rate that is no longer required and select **Update currency conversions**.
## Deleting and Archiving Currencies
You can delete or archive a currency at any time.
**Warning!** If you delete or archive a currency, it will no longer be available in **Currency** drop-down lists across your Organization.
**To delete or archive currencies:**
1. Select **Settings>Organization**. The **Organization** page opens.
2. Select **Currency settings**. The **Currency settings** page opens.
3. If you want to delete a currency, in the **Configured currencies** list select the **delete** icon:
![]() A confirmation dialog appears.
4. Select **Delete** to confirm the delete action.
* Note that you cannot delete the **DEFAULT** currency. You must first set another currency as the **DEFAULT**.
5. If you want to archive a currency, select to **edit** the currency:
A confirmation dialog appears.
4. Select **Delete** to confirm the delete action.
* Note that you cannot delete the **DEFAULT** currency. You must first set another currency as the **DEFAULT**.
5. If you want to archive a currency, select to **edit** the currency:
![]() The **Edit** page opens.
6. On the **Currency details** card, enable the **Archived** switch.
* Note that you cannot archive the **DEFAULT** currency.
7. Select **Update currency**. You are returned to the **Currency settings** page where the archived currency is flagged as **ARCHIVED** in the **Configured currencies** list:
The **Edit** page opens.
6. On the **Currency details** card, enable the **Archived** switch.
* Note that you cannot archive the **DEFAULT** currency.
7. Select **Update currency**. You are returned to the **Currency settings** page where the archived currency is flagged as **ARCHIVED** in the **Configured currencies** list:
![Currencies8]() * Alternatively, you can select a currency in the **Configured currencies** list and select **Archive currency**:
* Alternatively, you can select a currency in the **Configured currencies** list and select **Archive currency**:
![Currencies9]() # Creating Credit Reasons
Source: https://docs.m3ter.com/guides/organization-and-access-management/viewing-and-editing-organization/creating-credit-reasons
You can create *Credit Reasons* for your Organization, which you can then use when adding a credit for an existing bill line item or applying a product credit.
**To create a Credit Reason for your Organization:**
1. Select **Settings>Organization**. The **Organization** page opens with the **Overview** tab selected.
2. Select the **Credit reasons** tab. Any existing Credit Reasons are listed:
# Creating Credit Reasons
Source: https://docs.m3ter.com/guides/organization-and-access-management/viewing-and-editing-organization/creating-credit-reasons
You can create *Credit Reasons* for your Organization, which you can then use when adding a credit for an existing bill line item or applying a product credit.
**To create a Credit Reason for your Organization:**
1. Select **Settings>Organization**. The **Organization** page opens with the **Overview** tab selected.
2. Select the **Credit reasons** tab. Any existing Credit Reasons are listed:
![Credit Reasons21]() 3. Select **Create credit reason**. The **Create** page opens.
4. Under **Credit reason details**, enter a **Name** and **Code**.
* **Archived** switch? See tip below on this option.
5. Select **Create**. You are returned to the **Credit reasons** tab where the new Credit Reason is listed:
3. Select **Create credit reason**. The **Create** page opens.
4. Under **Credit reason details**, enter a **Name** and **Code**.
* **Archived** switch? See tip below on this option.
5. Select **Create**. You are returned to the **Credit reasons** tab where the new Credit Reason is listed:
![Credit Reason22]() * The new Credit Reason will now be available for adding credit line items to bills or applying product credits. See [Adding Credit Line Items to Bills](/guides/billing-and-usage-data/running-viewing-and-managing-bills/adding-credit-line-items-to-bills).
**Tip: Credit Reason is now obsolete?** You can edit a Credit Reason and use the switch to **Archive** it. If you archive a Credit Reason, it will not be available for adding credit line items to bills.
# Creating Debit Reasons
Source: https://docs.m3ter.com/guides/organization-and-access-management/viewing-and-editing-organization/creating-debit-reasons
You can create *Debit Reasons* for your Organization, which you can then use when adding a debit for an existing bill line item or applying a product debit.
**To create a Debit Reason for your Organization:**
1. Select **Settings>Organization**. The **Organization** page opens with the **Overview** tab selected.
2. Select the **Debit reasons** tab. Any existing Debit Reasons are listed:
* The new Credit Reason will now be available for adding credit line items to bills or applying product credits. See [Adding Credit Line Items to Bills](/guides/billing-and-usage-data/running-viewing-and-managing-bills/adding-credit-line-items-to-bills).
**Tip: Credit Reason is now obsolete?** You can edit a Credit Reason and use the switch to **Archive** it. If you archive a Credit Reason, it will not be available for adding credit line items to bills.
# Creating Debit Reasons
Source: https://docs.m3ter.com/guides/organization-and-access-management/viewing-and-editing-organization/creating-debit-reasons
You can create *Debit Reasons* for your Organization, which you can then use when adding a debit for an existing bill line item or applying a product debit.
**To create a Debit Reason for your Organization:**
1. Select **Settings>Organization**. The **Organization** page opens with the **Overview** tab selected.
2. Select the **Debit reasons** tab. Any existing Debit Reasons are listed:
![Debit Reasons1]() 3. Select **Create debit reason**. The **Create** page opens.
4. Under **Debit reason details**, enter a **Name** and **Code**.
* **Archived** switch? See tip below on this option.
5. Select **Create**. You are returned to the **Debit reasons** tab where the new Debit Reason is listed:
3. Select **Create debit reason**. The **Create** page opens.
4. Under **Debit reason details**, enter a **Name** and **Code**.
* **Archived** switch? See tip below on this option.
5. Select **Create**. You are returned to the **Debit reasons** tab where the new Debit Reason is listed:
![Debit Reasons2]() * The new Debit Reason will now be available for adding debit line items to bills or applying product debits. See [Adding Debit Line Items to Bills](/guides/billing-and-usage-data/running-viewing-and-managing-bills/adding-debit-line-items-to-bills).
**Tip: Debit Reason is now obsolete?** You can edit a Debit Reason at any time and use the switch to **Archive** it. If you archive a Debit Reason, it will not be available for adding debit line items to bills.
# Creating Transaction Types
Source: https://docs.m3ter.com/guides/organization-and-access-management/viewing-and-editing-organization/creating-transaction-types
You can create *Transaction Types* for your Organization. These are then available across your Organization for adding individual Transactions, such as when you want to add Transactions to a Balance on an end customer Account.
**To create a Transaction Type for your Organization:**
1. Select **Settings>Organization**. The **Organization** page opens with the **Overview** tab selected.
2. Select the **Transaction types** tab. Any existing Transaction Types are listed.
3. Select **Create transaction type**. The **Create** page opens.
4. Under **Transaction type details**, enter a **Name** and **Code**.
* **Archived** switch? See tip below on this option.
5. Select **Create**. You are returned to the **Transaction types** tab where the new Transaction Type is listed:
* The new Debit Reason will now be available for adding debit line items to bills or applying product debits. See [Adding Debit Line Items to Bills](/guides/billing-and-usage-data/running-viewing-and-managing-bills/adding-debit-line-items-to-bills).
**Tip: Debit Reason is now obsolete?** You can edit a Debit Reason at any time and use the switch to **Archive** it. If you archive a Debit Reason, it will not be available for adding debit line items to bills.
# Creating Transaction Types
Source: https://docs.m3ter.com/guides/organization-and-access-management/viewing-and-editing-organization/creating-transaction-types
You can create *Transaction Types* for your Organization. These are then available across your Organization for adding individual Transactions, such as when you want to add Transactions to a Balance on an end customer Account.
**To create a Transaction Type for your Organization:**
1. Select **Settings>Organization**. The **Organization** page opens with the **Overview** tab selected.
2. Select the **Transaction types** tab. Any existing Transaction Types are listed.
3. Select **Create transaction type**. The **Create** page opens.
4. Under **Transaction type details**, enter a **Name** and **Code**.
* **Archived** switch? See tip below on this option.
5. Select **Create**. You are returned to the **Transaction types** tab where the new Transaction Type is listed:
![Balance Transactions5]() * In this example, we've created four Transaction Types to use when creating Transactions. These will now be available for creating Transactions across the Organization, for example, when creating Balances on end customer Accounts. See [Creating Balances for Accounts](/guides/end-customer-accounts/creating-balances-for-accounts).
**Tip: A Transaction Type is now obsolete?** You can edit a Transaction Type and use the switch to **Archive** it. If you archive a Transaction Type, it will no longer be available when creating Transactions for Balances.
# Timezone Settings - Notes and Recommendations
Source: https://docs.m3ter.com/guides/organization-and-access-management/viewing-and-editing-organization/timezone-settings-notes-and-recommendations
For your Organization *Timezone* setting, you can use the drop-down list to select a timezone using formats that are valid under Release 2021c of the tz database (tzdata). For example:
* **UTC**.
* **Calendars**. Depending on your browser and its settings, this timezone setting will typically resolve to show **UTC** for calendars used in the Console.
* **Regional**. By region using a regional timezone by tz database name. For example, **Europe/Berlin**. If you want to lookup tz regional timezones, they are listed in this [Wikipedia article](https://en.wikipedia.org/wiki/List_of_tz_database_time_zones).
* **Calendars**. Depending on your browser and its settings, regional timezone settings will typically resolve to show the equivalent **GMT** timezone for calendars used in the Console. For example, **Europe/Berlin** will show as **GMT+1** for calendars.
* **Special Area**. Using the "special area" **Etc** prefix format, such as **Etc - GMT-1**. Note that this format entails a **+/-** sign reversal with respect to GMT, so the **Etc - GMT-1** timezone setting is equivalent to **GMT+1**. Please see the [Area section](https://en.wikipedia.org/wiki/Tz_database#Area) entry of the Wikipedia tz database article for more details on this format.
* **Calendars**. Depending on your browser and its settings, special area timezone settings will typically resolve to show the equivalent **GMT** timezone for calendars used in the Console.
**Use Regional Timezone Settings!** We strongly recommend that you use the regional timezone settings when defining your Organization's Timezone.
# Viewing and Editing Organization Configuration
Source: https://docs.m3ter.com/guides/organization-and-access-management/viewing-and-editing-organization/viewing-and-editing-organization-configuration
At **Settings>Organization** in the Console, you can view and edit the details of your Organization's configuration:
* **Currency**. The default currency defined for your Organization is shown under **Organization configuration details**. You can use the **Currency settings** page to create and manage currencies and currency conversion rates. See [Creating and Managing Currencies](/guides/organization-and-access-management/viewing-and-editing-organization/creating-and-managing-currencies) for more details.
* [**Billing in arrears/advance**](/guides/organization-and-access-management/viewing-and-editing-organization/viewing-and-editing-organization-configuration#billing-in-arrearsadvance)
* [**Bill auto-approval**](/guides/organization-and-access-management/viewing-and-editing-organization/viewing-and-editing-organization-configuration#bill-auto-approval)
* [**Scheduled bill interval**](/guides/organization-and-access-management/viewing-and-editing-organization/viewing-and-editing-organization-configuration#scheduled-bill-interval)
* [**Timezone**](/guides/organization-and-access-management/viewing-and-editing-organization/viewing-and-editing-organization-configuration#timezone)
* [**Epochs for billing**](/guides/organization-and-access-management/viewing-and-editing-organization/viewing-and-editing-organization-configuration#epochs)
* [**Days before bill due**](/guides/organization-and-access-management/viewing-and-editing-organization/viewing-and-editing-organization-configuration#days-before-bill-due)
* [**External invoice date**](/guides/organization-and-access-management/viewing-and-editing-organization/viewing-and-editing-organization-configuration#external-invoice-date)
* [**Bill statements**](/guides/organization-and-access-management/viewing-and-editing-organization/viewing-and-editing-organization-configuration#bill-statements)
* [**Bill numbering**](/guides/organization-and-access-management/viewing-and-editing-organization/viewing-and-editing-organization-configuration#bill-numbering)
* [**Suppress empty bills**](/guides/organization-and-access-management/viewing-and-editing-organization/viewing-and-editing-organization-configuration#suppress-empty-bills)
* [**Consolidate bills**](/guides/organization-and-access-management/viewing-and-editing-organization/viewing-and-editing-organization-configuration#consolidate-bills)
* [**Credit application order**](/guides/organization-and-access-management/viewing-and-editing-organization/viewing-and-editing-organization-configuration#credit-application-order)
* [**Use unified drawdowns**](#use-unified-drawdowns)
* [**Allow overlapping attached plans**](/guides/organization-and-access-management/viewing-and-editing-organization/viewing-and-editing-organization-configuration#allow-overlapping-attached-plans)
This topic explains the various settings available for configuring your Organization and how to edit those settings to meet your requirements.
**To view and edit your Organization's configuration:**
1. Select **Settings>Organization**. The **Organization** page opens with the **Configuration** tab selected. You can view your **Organization details** at the top of the page.
* Select **Copy** against the **Organization ID** string to copy it to your clipboard.
2. To edit the configuration, on the **Organization configuration details** panel select **Edit**. The **Organization configuration** page opens.
3. Work down the page to edit the setting for your m3ter Organization - required settings have a red asterisk against them:
#### Billing in arrears/advance
You can select to bill in arrears or advance for:
* **Standing charge billing**. Default is to bill in arrears. You can override the Organization setting when you create Plan Templates and Plan Groups. See [Reviewing Options for Plans and Plan Templates](/guides/plans-and-pricing/working-with-plan-templates-and-plans/reviewing-configuration-options-for-plans-and-plan-templates).
* **Minimum spend billing**. Default is to bill in arrears. You can override the Organization setting:
* For *Product* minimum spend when you create Plan Templates and Plan Groups. See [Reviewing Options for Plans and Plan Templates](/guides/plans-and-pricing/working-with-plan-templates-and-plans/reviewing-configuration-options-for-plans-and-plan-templates).
* For *Pricing* minimum spend when you price a Plan or Plan Template. See [Reviewing Pricing Options for Plans and Plan Templates](/guides/plans-and-pricing/pricing-plans/reviewing-pricing-options-and-pricing-plans).
* **Prepayments/Commitment fee billing**. Default is to bill in advance. You can override the Organization setting when setting up Prepayment fee billing with a Plan. See [Prepayment Billing with a Plan](/guides/end-customer-accounts/creating-prepayments-for-accounts#prepayment-billing-with-a-plan).
#### Bill auto-approval
* **Auto-approve bills**. You can enable for bills to be automatically approved after a defined grace period.
* Once enabled, you can define the **Bill auto-approval grace period** *(in minutes, hours, or days)* following bill creation, after which the bills will be automatically approved.
* For example, suppose you are using a monthly billing frequency for an end customer Account and Bills are created at 12 midnight on the the last day of each month. You then enable **Auto-approve bills** and set the **Bill auto-approval grace period** to 2 hours. Each month's Bill is approved automatically at 2 a.m. on the first day of the month following.
**Warnings!**
* **Possible Conflict between Auto-Approval of Bills and Scheduled Bill Interval!** If a Bill is recalculated because of late-arriving data after being auto-approved, and the bill auto-approval interval is less than 24 hours, then the Bill will revert to a pending, unapproved state:
* We recommend setting the auto-approval interval to 24 hours or longer when using scheduled bill updates.
* Please see [Understanding the Scheduled Billing Process](/guides/billing-and-usage-data/running-viewing-and-managing-bills/scheduling-billing#understanding-the-scheduled-billing-process) for more details.
* **Auto-Approval tied to Bill date!** If you generate a Bill early and *before* the scheduled Bill date, it will *not be auto-approved* from the date/time you do this, but only at the specified time after the Bill date.
#### Scheduled bill interval
Define an interval in minutes or hours for when you want Bills to be updated:
* If you select for daily Bill updates (24 hours), you can also use the **Scheduled bill offset** option to specify which hour of the day the scheduled Bill update will run.
* For more details, see [Scheduling Billing](/guides/billing-and-usage-data/running-viewing-and-managing-bills/scheduling-billing).
#### Timezone
Use the drop-down list to select the timezone for your Organization. For more details and guidance on timezone settings, please see the [Timezone Settings - Notes and Recommendations](/guides/organization-and-access-management/viewing-and-editing-organization/timezone-settings-notes-and-recommendations) topic.
#### Epochs
Define the *Epoch dates* for your Organization. Epoch dates for billing periods: **Year**, **Month**, **Week**, and **Day** define the date when the first Bill is created for Accounts and then act as a reference for when in the applied billing frequency period subsequent bills for Accounts are created:
* For example, suppose you attach a Plan to an Account where the Plan is configured for monthly billing frequency and you've defined the period the Plan will apply to the Account to be from January 1st, 2022 until January 1st, 2023. You then set a **Month Epoch** date of February 15th, 2022. The first Bill will be created for the Account on February 15th, and subsequent Bills created on the 15th of the months following for the remainder of the billing period - March 15th, April 15th, and so on.
* The defaults are:
* **Year Epoch**. January 1st, 2021.
* **Month Epoch**. January 1st, 2021.
* **Week Epoch**. January 4th, 2021.
* **Day Epoch**. January 1st, 2021.
* Note that you can *override* the Epoch dates for billing configured for your Organization:
* At individual Account level using the **Billing cycle date** setting for an Account - see [Creating, Editing, and Deleting Accounts](/guides/end-customer-accounts/creating-an-account).
* When you attach a Plan or Plan Group to an Account to create an Account Plan or Account Plan Group, you then have the option to override the **Billing cycle date** setting for the Account. See [Attaching Plans to an Account](/guides/end-customer-accounts/attaching-plans-to-an-account) and [Attaching Plan Groups to an Account](/guides/end-customer-accounts/attaching-plan-groups-to-an-account).
#### Days before bill due
Enter the number of days after the Bill generation date that you want to show on Bills as the due date:
* You can also define this at the individual Account level - see [Creating an Account](/guides/end-customer-accounts/creating-an-account). This is useful for cases where you want Bills for your end-customer Accounts to show different due dates. The setting at individual Account level takes precedence over any setting at Organizational level.
#### External invoice date
For your accounting purposes, select which date you want to use for external invoicing with respect to billing periods - two options:
* **First day of next period**. Select this if you want to recognize usage revenue in the following period. This is the default.
* **Last day of arrears**. Select this if you want to recognize usage revenue in the same period that it's consumed, instead of in the following period.
#### Bill statements
Use this panel to set Organization defaults for Bill Statements:
* **Statement definition**. Select the default Statement definition for your Organization.
* **Auto-generate statements**. Select for auto-generation of Bill statements when Bills are either approved or locked:
* **None**. Disable auto-generation.
* **JSON**. Auto-generate Statements in JSON format only
* **JSON and CSV**. Auto-generate Statements in both JSON and CSV format.
#### Bill numbering
You can use two settings to control how you want to number your Bills:
* Select **Enable bill numbering**. The two settings are activated. (Default is disabled):
* **Bill prefix**. Enter a string as prefix for Bill numbering.
* **Bill sequence start**. Enter a start number from which Bills will be numbered in time sequence according to date/time the Bill was first created.
* For example, if you enter **INVOICE-** for **Bill prefix** and **100** for **Bill sequence start**, the first Bill generated after you update your Organization configuration will have a **REFERENCE** number of **INVOICE-101**.
* If you do not enable **Bill numbering** for your Organization, then a default numbering is used for the Bill **REFERENCE** number:
* The default number is composed using **INV-** as a prefix concatenated with the last four characters of the Bill **ID**. For example, if the last four characters of a Bill's ID are **7c19**, then the Bill **REFERENCE** number will be **INV-7c19**.
**Important!** We strongly recommend that you enable **Bill numbering** for your Organization to ensure reliable numbering of Bills sent through to your Accounts Receivable system.
#### Suppress empty bills
Enable this switch if you want to prevent generation of Bills that contain no line items. Default is disabled.
#### Consolidate bills
Enable this switch if you want to consolidate different billing frequencies into a single bill. Default is disabled.
* If disabled, Bills are created by bill date and billing frequency.
* If enabled, charges that are billed on a given bill date are automatically added to the bill regardless of charge billing frequency.
* For example, if you enable this option and charges are due on an Account for an invoice date of February 1st:
* For standing charges and usage charges under a monthly-billed Plan.
* For Prepayments fees billed annually.
* For ad-hoc charges on Accounts.
* For Balance charges.
* Then, the billing frequencies for the different charges are ignored and a single Bill is created for the Account for the invoice date and covering all of these charges. In contrast, if **Consolidate bills** is disabled, then in this example separate bills would have been created.
**Warnings! Consolidating bills:**
* If you've already run billing with **Consolidate bills** disabled for your Organization but you then enable it, subsequent Bills for specific bill dates will now start afresh and not update earlier non-consolidated Bills for the same bill date. In almost all cases, this will result in duplicate bills for the same Account.
* Similarly, if you've already run billing with **Consolidate bills** enabled, you'll be left with the old consolidated Bill for an Account - which is no longer updated - and start generating new Bills for the same Account at, for example, monthly frequencies.
* We therefore recommend caution if you need to switch to or from **Consolidate bills**, and, to avoid any of these unwanted billing conflicts, suggest you archive any earlier versions of Bills or delete them entirely.
* If you enable the **Consolidate bills** option, when you run Bills manually using the **Run Billing** modal, the **Bill frequency** option to run billing only for Bills of a certain frequency will not be available. See [Running Bills Manually](/guides/billing-and-usage-data/running-viewing-and-managing-bills/running-bills-and-viewing-bill-details#running-bills-manually).
#### Credit application order
Select the order in which any Prepayment/Commitment or Balance amounts on end customer Accounts are to be drawn-down against for billing. Four options:
* **Prepayment then Balance**. Draw-down against Prepayment credit before Balance credit. Default.
* **Balance then Prepayment**. Draw-down against Balance credit before Prepayment credit.
* **Prepayment only**. Only draw-down against Prepayment credit.
* **Balance only**. Only draw-down against Balance credit.
**Important!**
* You can override the setting for **Credit application order** you select for your Organization at the individual Account level under **Bill settings**. See [Creating an Account](/guides/end-customer-accounts/creating-an-account).
* If an Account belongs to a Parent/Child Account hierarchy, then the **Credit application order** settings are *not available*, and the draw-down order defaults always to Prepayment then Balance order.
#### Use unified drawdowns
Enable this switch if you want to implement the *Unified Balance Drawdown* model for your Organization.
* If enabled, the billing engine considers *all* eligible Balances on an Account grouped together rather than one at a time. A max-flow algorithm with iterative optimizations is then applied to achieve the best coverage for draw-down against the available Account credit. See [New Unified Balance Drawdown](https://docs.m3ter.com/guides/end-customer-accounts/creating-balances-for-accounts/understanding-billing-for-balances#new-unified-balance-drawdown).
* Default is disabled.
#### Allow overlapping attached plans
* Enable this switch if you want to allow multiple plans for the same Product to be active on an Account at the same time.
* For some billing use cases, you will need to enable this option. For example, if you intend to bill end-customer Accounts on a Contract basis and your billing use case requires some charges for a Product to be billed under one Contract and other charges for the same Product to be billed under a different Contract, you'll need different and overlapping Account Plans to be attached to an Account for the same Product but linked to different Contracts. See [Setting Up Contract Billing](/guides/end-customer-accounts/creating-contracts-for-accounts/setting-up-contract-billing).
* Default is disabled.
4. When you have completed your editing changes, select **Update organization configuration**. Your changes are saved and you are returned to the **Organization** page.
# Plans and Pricing
Source: https://docs.m3ter.com/guides/plans-and-pricing
Learn how to create customized pricing plans for your products or services with m3ter.
Plans represent a pricing and billing plan for end-customers who consume your products or services. They are derived from Plan Templates.
Pricing is the process of configuring the exact pricing structure you want to apply for charging end-customer Accounts that are placed on your Product Plans. You can create either usage-based or unit-based pricing for your Product Plans:
* Use Aggregations of metered usage data as the pricing metrics to apply usage-based pricing.
* Use Counters for unit quantities on Accounts as the pricing metrics to apply unit-based pricing.
* Combine usage-based and unit-based pricing for a single Plan to implement hybrid pricing for a product or service you offer to customers.
This section provides detailed guidance on how to create, configure, and price up the Plan Templates and Plans you need to meet the precise pricing and billing you want to apply to your end-customer Accounts:
* [Creating and Working with Plan Templates and Plans](/guides/plans-and-pricing/working-with-plan-templates-and-plans)
* [Reviewing Options for Plans and Plan Templates](/guides/plans-and-pricing/working-with-plan-templates-and-plans/reviewing-configuration-options-for-plans-and-plan-templates)
* [Understanding Billing Options for Plan Templates/Plans](/guides/plans-and-pricing/working-with-plan-templates-and-plans/understanding-billing-options-for-plan-templates-plans)
* [Creating Plan Templates](/guides/plans-and-pricing/working-with-plan-templates-and-plans/creating-plan-templates)
* [Creating Plans](/guides/plans-and-pricing/working-with-plan-templates-and-plans/creating-plans)
* [Editing Plan Templates and Plans](/guides/plans-and-pricing/working-with-plan-templates-and-plans/editing-plan-templates-and-plans)
* [Working with Plan Groups](/guides/plans-and-pricing/working-with-plan-templates-and-plans/working-with-plan-groups)
* [Pricing and Managing Plans and Plan Templates](/guides/plans-and-pricing/pricing-plans)
* [Reviewing Pricing Options for Plans and Plan Templates](/guides/plans-and-pricing/pricing-plans/reviewing-pricing-options-and-pricing-plans)
* [Pricing Plans and Plan Templates](/guides/plans-and-pricing/pricing-plans/pricing-plans)
* [Pricing Plans Using Segmented Aggregations](/guides/plans-and-pricing/pricing-plans/pricing-plans-using-segmented-aggregations)
* [Managing and Editing Priced Plans and Plan Templates](/guides/plans-and-pricing/pricing-plans/managing-and-editing-priced-plans-or-plan-templates)
* [Duplicating Priced Plans and Plan Templates](/guides/plans-and-pricing/pricing-plans/duplicating-priced-plans-or-plan-templates)
**Important! Unit-based pricing using Counters for recurring subscription charges**. The second part of this section for [Pricing and Managing Plans and Plan Templates](/guides/plans-and-pricing/pricing-plans) covers how to apply usage-based pricing to your Plan Templates and Plans using *Aggregations* as the pricing metrics. For full details on how to create *Counters* and use them as the pricing metrics to apply unit-based pricing to Plan Templates and Plans for recurring subscription charges on Accounts, please see the [Recurring Charges: Counters](/guides/recurring-charges-counters) section.
# Pricing and Managing Plans and Plan Templates
Source: https://docs.m3ter.com/guides/plans-and-pricing/pricing-plans
Discover how to work in the Pricing Editor to add Plans or Plan Templates, link Aggregations or Counters, and configure pricing.
In m3ter, you can use the *Pricing Editor* to quickly price up and review your Plans and Plan Templates:
* First, add a Plan or Plan Template.
* Second, add the pricing metrics you want to use to price the Plan or Plan Template:
* Add Aggregations for pricing based on metered usage data.
* Add Counters for pricing based on units subscribed to by Accounts.
* Configure the exact pricing structure you want to use for charging your end customers who are put on the priced Plan for consuming one of your Products.
* Easily review, compare, edit, or duplicate your priced Plans and Plan Templates, which are set out side-by-side in the Pricing Editor.
**Tip: Pricing Plan Templates?** If you have a Product where you want to charge the same pricing rates for usage for all Accounts that consume the Product but vary the standing charge across different Accounts, you can price up a Plan Template and then quickly create multiple Plans using the template and define specific standing charges for each Plan. For example, this approach is useful if you have a single Product where the end customer accounts that consume the same Product might be placed on different account levels - for example Standard or Premium - and the only difference is that the Premium customer pays a smaller standing charge.
This section lets you review pricing options, explains how to price your Plans or Plan Templates using the Pricing Editor, and how to go on to manage, edit, or duplicate them:
* [Reviewing Pricing Options for Plans and Plan Templates](/guides/plans-and-pricing/pricing-plans/reviewing-pricing-options-and-pricing-plans)
* [Pricing Plans and Plan Templates](/guides/plans-and-pricing/pricing-plans/pricing-plans)
* [Pricing Plans Using Segmented Aggregations](/guides/plans-and-pricing/pricing-plans/pricing-plans-using-segmented-aggregations)
* [Managing and Editing Priced Plans and Plan Templates](/guides/plans-and-pricing/pricing-plans/managing-and-editing-priced-plans-or-plan-templates)
* [Duplicating Priced Plans and Plan Templates](/guides/plans-and-pricing/pricing-plans/duplicating-priced-plans-or-plan-templates)
**Important! Unit-based pricing using Counters for recurring subscription charges**. This section explains how to apply usage-based pricing for Plan Templates and Plans using Aggregations as the pricing metrics. For full details on how to create Counters and use them as the pricing metrics to apply unit-based pricing to Plan Templates and Plans for recurring subscription charges on Accounts, please see the [Recurring Charges: Counters](/guides/recurring-charges-counters) section.
# Duplicating Priced Plans and Plan Templates
Source: https://docs.m3ter.com/guides/plans-and-pricing/pricing-plans/duplicating-priced-plans-or-plan-templates
There might be cases where you have set up a priced Plan for charging customers for one of your Products and you then require a priced Plan for a new and similar Product. If the billing set up and the pricing structure you need for charging for this new Product is similar to the existing Plan's set up, in the Pricing Editor you can quickly duplicate the existing Plan and then edit the duplicate Plan's pricing to achieve the exact billing set up needed for your new Product.
This topic explains how to duplicate priced Plans or Plan Templates.
Notes:
* **Duplicating Plan Templates?** In the **Pricing editor**, you can add and duplicate a Plan Template you've priced up in the same way as you can duplicate a priced Plan.
* **Duplicating from Plan and Plan Template Details!** You can also duplicate Plans and Plan Templates from their details pages. See [Working in Plan Template and Plan Details](https://docs.m3ter.com/guides/plans-and-pricing/working-with-plan-templates-and-plans/working-in-plan-details).
## Duplicating Priced Plans
**To duplicate a priced Plan:**
1. Select **Pricing>Pricing editor**. The **Pricing editor** opens.
2. Select **Add plans**. A **Select plans** dialog appears.
3. Select the Plan - or Plans - you want to duplicate and select **Confirm**. You are returned to the **Pricing Editor** where the selected **Plan** is shown.
4. Select **Duplicate**. A **Duplicate plan** popup appears.
5. Enter the **Name** and **Code** you want for the new duplicate Plan.
**Warning: Code must be unique!** You must use a different **Name** and **Code** when you duplicate a Plan - you'll receive an error if you try to duplicate a Plan using the same **Name** or **Code** as the original Plan. You can edit the new duplicate Plan at a later time and make the **Name** the same as the original Plan, if required. However, the **Code** must remain unique.
6. Select **Duplicate plan**. The popup closes and you are returned to the **Pricing editor** where the new duplicate Plan is shown alongside the original. The new duplicate Plan:
* Uses the same Plan Template as the original.
* Inherits the pricing structure of the original and you can now edit the pricing of the duplicate as required. See [Managing and Editing Priced Plans and Plan Templates](/guides/plans-and-pricing/pricing-plans/managing-and-editing-priced-plans-or-plan-templates).
# Managing and Editing Priced Plans and Plan Templates
Source: https://docs.m3ter.com/guides/plans-and-pricing/pricing-plans/managing-and-editing-priced-plans-or-plan-templates
You can open the Pricing Editor at any time and add Plans or Plan Templates you've previously priced. When reviewing your priced Plans and Plan Templates in this way, you can:
* Edit a priced Plan or Plan Template.
* View the details of Pricing on a priced Plan or Plan Template.
* Edit a Pricing for a priced Plan or Plan Template.
* View a Pricing Schedule for the Plan, which shows any historic, currently active, or future pricing configured for the Plan.
* Delete the pricing you've previously configured for a Plan.
* If you've previously added an Aggregation for pricing a plan, you can remove the Aggregation provided there is no historic, currently active, or future pricing configured for the Plan using the Aggregation.
This topic explains how to work in the Pricing Editor to edit and manage your priced Plans and Plan Templates:
* [Editing a Priced Plan or Plan Template](/guides/plans-and-pricing/pricing-plans/managing-and-editing-priced-plans-or-plan-templates#editing-a-priced-plan-or-plan-template)
* [Viewing Pricing Details](/guides/plans-and-pricing/pricing-plans/managing-and-editing-priced-plans-or-plan-templates#viewing-the-details-of-a-pricing-on-a-priced-plan-or-plan-template)
* [Editing a Pricing](/guides/plans-and-pricing/pricing-plans/managing-and-editing-priced-plans-or-plan-templates#editing-a-pricing-for-a-priced-plan-or-plan-template)
* [Viewing Pricing Schedule](/guides/plans-and-pricing/pricing-plans/managing-and-editing-priced-plans-or-plan-templates#viewing-pricing-schedule)
* [Deleting Pricing](/guides/plans-and-pricing/pricing-plans/managing-and-editing-priced-plans-or-plan-templates#deleting-pricing)
* [Removing Aggregations](/guides/plans-and-pricing/pricing-plans/managing-and-editing-priced-plans-or-plan-templates#removing-aggregations-from-the-pricing-editor)
**Important! Unit-based pricing using Counters**. This topic explains how to work in the Pricing Editor to manage and edit your Plan Templates and Plans to which you've applied usage-based pricing using *Aggregations* as the pricing metrics. The same functions and features are available for managing and editing your Plan Templates and Plans to which you've applied unit-based pricing using *Counters* as the pricing metrics. See the [Recurring Charges: Counters](/guides/recurring-charges-counters) section for more details.
**Tip: Reviewing Pricing?** You can quickly check and review the Pricing associated with a Plan or Plan Template at any time and without having to open the Pricing Editor by opening the Plan or Plan Template **Details** page. See [Working with Plan Templates and Plan Details](/guides/plans-and-pricing/working-with-plan-templates-and-plans/working-in-plan-details).
## Editing a Priced Plan or Plan Template
**To edit a priced Plan or Plan Template:**
1. Select **Pricing>Pricing editor**. The **Pricing editor** opens.
2. In the **Product** drop-down, select the Product for the Plan you want to edit.
3. Select **Add plans**. A **Select Plans** popup appears.
4. Select the Plans you want to edit and select **Confirm**. You are returned to the **Pricing** page where the selected **Plan** is shown.
5. If you want to edit the details of a Plan, select **Edit** under the Plan:
* In this example, we've created four Transaction Types to use when creating Transactions. These will now be available for creating Transactions across the Organization, for example, when creating Balances on end customer Accounts. See [Creating Balances for Accounts](/guides/end-customer-accounts/creating-balances-for-accounts).
**Tip: A Transaction Type is now obsolete?** You can edit a Transaction Type and use the switch to **Archive** it. If you archive a Transaction Type, it will no longer be available when creating Transactions for Balances.
# Timezone Settings - Notes and Recommendations
Source: https://docs.m3ter.com/guides/organization-and-access-management/viewing-and-editing-organization/timezone-settings-notes-and-recommendations
For your Organization *Timezone* setting, you can use the drop-down list to select a timezone using formats that are valid under Release 2021c of the tz database (tzdata). For example:
* **UTC**.
* **Calendars**. Depending on your browser and its settings, this timezone setting will typically resolve to show **UTC** for calendars used in the Console.
* **Regional**. By region using a regional timezone by tz database name. For example, **Europe/Berlin**. If you want to lookup tz regional timezones, they are listed in this [Wikipedia article](https://en.wikipedia.org/wiki/List_of_tz_database_time_zones).
* **Calendars**. Depending on your browser and its settings, regional timezone settings will typically resolve to show the equivalent **GMT** timezone for calendars used in the Console. For example, **Europe/Berlin** will show as **GMT+1** for calendars.
* **Special Area**. Using the "special area" **Etc** prefix format, such as **Etc - GMT-1**. Note that this format entails a **+/-** sign reversal with respect to GMT, so the **Etc - GMT-1** timezone setting is equivalent to **GMT+1**. Please see the [Area section](https://en.wikipedia.org/wiki/Tz_database#Area) entry of the Wikipedia tz database article for more details on this format.
* **Calendars**. Depending on your browser and its settings, special area timezone settings will typically resolve to show the equivalent **GMT** timezone for calendars used in the Console.
**Use Regional Timezone Settings!** We strongly recommend that you use the regional timezone settings when defining your Organization's Timezone.
# Viewing and Editing Organization Configuration
Source: https://docs.m3ter.com/guides/organization-and-access-management/viewing-and-editing-organization/viewing-and-editing-organization-configuration
At **Settings>Organization** in the Console, you can view and edit the details of your Organization's configuration:
* **Currency**. The default currency defined for your Organization is shown under **Organization configuration details**. You can use the **Currency settings** page to create and manage currencies and currency conversion rates. See [Creating and Managing Currencies](/guides/organization-and-access-management/viewing-and-editing-organization/creating-and-managing-currencies) for more details.
* [**Billing in arrears/advance**](/guides/organization-and-access-management/viewing-and-editing-organization/viewing-and-editing-organization-configuration#billing-in-arrearsadvance)
* [**Bill auto-approval**](/guides/organization-and-access-management/viewing-and-editing-organization/viewing-and-editing-organization-configuration#bill-auto-approval)
* [**Scheduled bill interval**](/guides/organization-and-access-management/viewing-and-editing-organization/viewing-and-editing-organization-configuration#scheduled-bill-interval)
* [**Timezone**](/guides/organization-and-access-management/viewing-and-editing-organization/viewing-and-editing-organization-configuration#timezone)
* [**Epochs for billing**](/guides/organization-and-access-management/viewing-and-editing-organization/viewing-and-editing-organization-configuration#epochs)
* [**Days before bill due**](/guides/organization-and-access-management/viewing-and-editing-organization/viewing-and-editing-organization-configuration#days-before-bill-due)
* [**External invoice date**](/guides/organization-and-access-management/viewing-and-editing-organization/viewing-and-editing-organization-configuration#external-invoice-date)
* [**Bill statements**](/guides/organization-and-access-management/viewing-and-editing-organization/viewing-and-editing-organization-configuration#bill-statements)
* [**Bill numbering**](/guides/organization-and-access-management/viewing-and-editing-organization/viewing-and-editing-organization-configuration#bill-numbering)
* [**Suppress empty bills**](/guides/organization-and-access-management/viewing-and-editing-organization/viewing-and-editing-organization-configuration#suppress-empty-bills)
* [**Consolidate bills**](/guides/organization-and-access-management/viewing-and-editing-organization/viewing-and-editing-organization-configuration#consolidate-bills)
* [**Credit application order**](/guides/organization-and-access-management/viewing-and-editing-organization/viewing-and-editing-organization-configuration#credit-application-order)
* [**Use unified drawdowns**](#use-unified-drawdowns)
* [**Allow overlapping attached plans**](/guides/organization-and-access-management/viewing-and-editing-organization/viewing-and-editing-organization-configuration#allow-overlapping-attached-plans)
This topic explains the various settings available for configuring your Organization and how to edit those settings to meet your requirements.
**To view and edit your Organization's configuration:**
1. Select **Settings>Organization**. The **Organization** page opens with the **Configuration** tab selected. You can view your **Organization details** at the top of the page.
* Select **Copy** against the **Organization ID** string to copy it to your clipboard.
2. To edit the configuration, on the **Organization configuration details** panel select **Edit**. The **Organization configuration** page opens.
3. Work down the page to edit the setting for your m3ter Organization - required settings have a red asterisk against them:
#### Billing in arrears/advance
You can select to bill in arrears or advance for:
* **Standing charge billing**. Default is to bill in arrears. You can override the Organization setting when you create Plan Templates and Plan Groups. See [Reviewing Options for Plans and Plan Templates](/guides/plans-and-pricing/working-with-plan-templates-and-plans/reviewing-configuration-options-for-plans-and-plan-templates).
* **Minimum spend billing**. Default is to bill in arrears. You can override the Organization setting:
* For *Product* minimum spend when you create Plan Templates and Plan Groups. See [Reviewing Options for Plans and Plan Templates](/guides/plans-and-pricing/working-with-plan-templates-and-plans/reviewing-configuration-options-for-plans-and-plan-templates).
* For *Pricing* minimum spend when you price a Plan or Plan Template. See [Reviewing Pricing Options for Plans and Plan Templates](/guides/plans-and-pricing/pricing-plans/reviewing-pricing-options-and-pricing-plans).
* **Prepayments/Commitment fee billing**. Default is to bill in advance. You can override the Organization setting when setting up Prepayment fee billing with a Plan. See [Prepayment Billing with a Plan](/guides/end-customer-accounts/creating-prepayments-for-accounts#prepayment-billing-with-a-plan).
#### Bill auto-approval
* **Auto-approve bills**. You can enable for bills to be automatically approved after a defined grace period.
* Once enabled, you can define the **Bill auto-approval grace period** *(in minutes, hours, or days)* following bill creation, after which the bills will be automatically approved.
* For example, suppose you are using a monthly billing frequency for an end customer Account and Bills are created at 12 midnight on the the last day of each month. You then enable **Auto-approve bills** and set the **Bill auto-approval grace period** to 2 hours. Each month's Bill is approved automatically at 2 a.m. on the first day of the month following.
**Warnings!**
* **Possible Conflict between Auto-Approval of Bills and Scheduled Bill Interval!** If a Bill is recalculated because of late-arriving data after being auto-approved, and the bill auto-approval interval is less than 24 hours, then the Bill will revert to a pending, unapproved state:
* We recommend setting the auto-approval interval to 24 hours or longer when using scheduled bill updates.
* Please see [Understanding the Scheduled Billing Process](/guides/billing-and-usage-data/running-viewing-and-managing-bills/scheduling-billing#understanding-the-scheduled-billing-process) for more details.
* **Auto-Approval tied to Bill date!** If you generate a Bill early and *before* the scheduled Bill date, it will *not be auto-approved* from the date/time you do this, but only at the specified time after the Bill date.
#### Scheduled bill interval
Define an interval in minutes or hours for when you want Bills to be updated:
* If you select for daily Bill updates (24 hours), you can also use the **Scheduled bill offset** option to specify which hour of the day the scheduled Bill update will run.
* For more details, see [Scheduling Billing](/guides/billing-and-usage-data/running-viewing-and-managing-bills/scheduling-billing).
#### Timezone
Use the drop-down list to select the timezone for your Organization. For more details and guidance on timezone settings, please see the [Timezone Settings - Notes and Recommendations](/guides/organization-and-access-management/viewing-and-editing-organization/timezone-settings-notes-and-recommendations) topic.
#### Epochs
Define the *Epoch dates* for your Organization. Epoch dates for billing periods: **Year**, **Month**, **Week**, and **Day** define the date when the first Bill is created for Accounts and then act as a reference for when in the applied billing frequency period subsequent bills for Accounts are created:
* For example, suppose you attach a Plan to an Account where the Plan is configured for monthly billing frequency and you've defined the period the Plan will apply to the Account to be from January 1st, 2022 until January 1st, 2023. You then set a **Month Epoch** date of February 15th, 2022. The first Bill will be created for the Account on February 15th, and subsequent Bills created on the 15th of the months following for the remainder of the billing period - March 15th, April 15th, and so on.
* The defaults are:
* **Year Epoch**. January 1st, 2021.
* **Month Epoch**. January 1st, 2021.
* **Week Epoch**. January 4th, 2021.
* **Day Epoch**. January 1st, 2021.
* Note that you can *override* the Epoch dates for billing configured for your Organization:
* At individual Account level using the **Billing cycle date** setting for an Account - see [Creating, Editing, and Deleting Accounts](/guides/end-customer-accounts/creating-an-account).
* When you attach a Plan or Plan Group to an Account to create an Account Plan or Account Plan Group, you then have the option to override the **Billing cycle date** setting for the Account. See [Attaching Plans to an Account](/guides/end-customer-accounts/attaching-plans-to-an-account) and [Attaching Plan Groups to an Account](/guides/end-customer-accounts/attaching-plan-groups-to-an-account).
#### Days before bill due
Enter the number of days after the Bill generation date that you want to show on Bills as the due date:
* You can also define this at the individual Account level - see [Creating an Account](/guides/end-customer-accounts/creating-an-account). This is useful for cases where you want Bills for your end-customer Accounts to show different due dates. The setting at individual Account level takes precedence over any setting at Organizational level.
#### External invoice date
For your accounting purposes, select which date you want to use for external invoicing with respect to billing periods - two options:
* **First day of next period**. Select this if you want to recognize usage revenue in the following period. This is the default.
* **Last day of arrears**. Select this if you want to recognize usage revenue in the same period that it's consumed, instead of in the following period.
#### Bill statements
Use this panel to set Organization defaults for Bill Statements:
* **Statement definition**. Select the default Statement definition for your Organization.
* **Auto-generate statements**. Select for auto-generation of Bill statements when Bills are either approved or locked:
* **None**. Disable auto-generation.
* **JSON**. Auto-generate Statements in JSON format only
* **JSON and CSV**. Auto-generate Statements in both JSON and CSV format.
#### Bill numbering
You can use two settings to control how you want to number your Bills:
* Select **Enable bill numbering**. The two settings are activated. (Default is disabled):
* **Bill prefix**. Enter a string as prefix for Bill numbering.
* **Bill sequence start**. Enter a start number from which Bills will be numbered in time sequence according to date/time the Bill was first created.
* For example, if you enter **INVOICE-** for **Bill prefix** and **100** for **Bill sequence start**, the first Bill generated after you update your Organization configuration will have a **REFERENCE** number of **INVOICE-101**.
* If you do not enable **Bill numbering** for your Organization, then a default numbering is used for the Bill **REFERENCE** number:
* The default number is composed using **INV-** as a prefix concatenated with the last four characters of the Bill **ID**. For example, if the last four characters of a Bill's ID are **7c19**, then the Bill **REFERENCE** number will be **INV-7c19**.
**Important!** We strongly recommend that you enable **Bill numbering** for your Organization to ensure reliable numbering of Bills sent through to your Accounts Receivable system.
#### Suppress empty bills
Enable this switch if you want to prevent generation of Bills that contain no line items. Default is disabled.
#### Consolidate bills
Enable this switch if you want to consolidate different billing frequencies into a single bill. Default is disabled.
* If disabled, Bills are created by bill date and billing frequency.
* If enabled, charges that are billed on a given bill date are automatically added to the bill regardless of charge billing frequency.
* For example, if you enable this option and charges are due on an Account for an invoice date of February 1st:
* For standing charges and usage charges under a monthly-billed Plan.
* For Prepayments fees billed annually.
* For ad-hoc charges on Accounts.
* For Balance charges.
* Then, the billing frequencies for the different charges are ignored and a single Bill is created for the Account for the invoice date and covering all of these charges. In contrast, if **Consolidate bills** is disabled, then in this example separate bills would have been created.
**Warnings! Consolidating bills:**
* If you've already run billing with **Consolidate bills** disabled for your Organization but you then enable it, subsequent Bills for specific bill dates will now start afresh and not update earlier non-consolidated Bills for the same bill date. In almost all cases, this will result in duplicate bills for the same Account.
* Similarly, if you've already run billing with **Consolidate bills** enabled, you'll be left with the old consolidated Bill for an Account - which is no longer updated - and start generating new Bills for the same Account at, for example, monthly frequencies.
* We therefore recommend caution if you need to switch to or from **Consolidate bills**, and, to avoid any of these unwanted billing conflicts, suggest you archive any earlier versions of Bills or delete them entirely.
* If you enable the **Consolidate bills** option, when you run Bills manually using the **Run Billing** modal, the **Bill frequency** option to run billing only for Bills of a certain frequency will not be available. See [Running Bills Manually](/guides/billing-and-usage-data/running-viewing-and-managing-bills/running-bills-and-viewing-bill-details#running-bills-manually).
#### Credit application order
Select the order in which any Prepayment/Commitment or Balance amounts on end customer Accounts are to be drawn-down against for billing. Four options:
* **Prepayment then Balance**. Draw-down against Prepayment credit before Balance credit. Default.
* **Balance then Prepayment**. Draw-down against Balance credit before Prepayment credit.
* **Prepayment only**. Only draw-down against Prepayment credit.
* **Balance only**. Only draw-down against Balance credit.
**Important!**
* You can override the setting for **Credit application order** you select for your Organization at the individual Account level under **Bill settings**. See [Creating an Account](/guides/end-customer-accounts/creating-an-account).
* If an Account belongs to a Parent/Child Account hierarchy, then the **Credit application order** settings are *not available*, and the draw-down order defaults always to Prepayment then Balance order.
#### Use unified drawdowns
Enable this switch if you want to implement the *Unified Balance Drawdown* model for your Organization.
* If enabled, the billing engine considers *all* eligible Balances on an Account grouped together rather than one at a time. A max-flow algorithm with iterative optimizations is then applied to achieve the best coverage for draw-down against the available Account credit. See [New Unified Balance Drawdown](https://docs.m3ter.com/guides/end-customer-accounts/creating-balances-for-accounts/understanding-billing-for-balances#new-unified-balance-drawdown).
* Default is disabled.
#### Allow overlapping attached plans
* Enable this switch if you want to allow multiple plans for the same Product to be active on an Account at the same time.
* For some billing use cases, you will need to enable this option. For example, if you intend to bill end-customer Accounts on a Contract basis and your billing use case requires some charges for a Product to be billed under one Contract and other charges for the same Product to be billed under a different Contract, you'll need different and overlapping Account Plans to be attached to an Account for the same Product but linked to different Contracts. See [Setting Up Contract Billing](/guides/end-customer-accounts/creating-contracts-for-accounts/setting-up-contract-billing).
* Default is disabled.
4. When you have completed your editing changes, select **Update organization configuration**. Your changes are saved and you are returned to the **Organization** page.
# Plans and Pricing
Source: https://docs.m3ter.com/guides/plans-and-pricing
Learn how to create customized pricing plans for your products or services with m3ter.
Plans represent a pricing and billing plan for end-customers who consume your products or services. They are derived from Plan Templates.
Pricing is the process of configuring the exact pricing structure you want to apply for charging end-customer Accounts that are placed on your Product Plans. You can create either usage-based or unit-based pricing for your Product Plans:
* Use Aggregations of metered usage data as the pricing metrics to apply usage-based pricing.
* Use Counters for unit quantities on Accounts as the pricing metrics to apply unit-based pricing.
* Combine usage-based and unit-based pricing for a single Plan to implement hybrid pricing for a product or service you offer to customers.
This section provides detailed guidance on how to create, configure, and price up the Plan Templates and Plans you need to meet the precise pricing and billing you want to apply to your end-customer Accounts:
* [Creating and Working with Plan Templates and Plans](/guides/plans-and-pricing/working-with-plan-templates-and-plans)
* [Reviewing Options for Plans and Plan Templates](/guides/plans-and-pricing/working-with-plan-templates-and-plans/reviewing-configuration-options-for-plans-and-plan-templates)
* [Understanding Billing Options for Plan Templates/Plans](/guides/plans-and-pricing/working-with-plan-templates-and-plans/understanding-billing-options-for-plan-templates-plans)
* [Creating Plan Templates](/guides/plans-and-pricing/working-with-plan-templates-and-plans/creating-plan-templates)
* [Creating Plans](/guides/plans-and-pricing/working-with-plan-templates-and-plans/creating-plans)
* [Editing Plan Templates and Plans](/guides/plans-and-pricing/working-with-plan-templates-and-plans/editing-plan-templates-and-plans)
* [Working with Plan Groups](/guides/plans-and-pricing/working-with-plan-templates-and-plans/working-with-plan-groups)
* [Pricing and Managing Plans and Plan Templates](/guides/plans-and-pricing/pricing-plans)
* [Reviewing Pricing Options for Plans and Plan Templates](/guides/plans-and-pricing/pricing-plans/reviewing-pricing-options-and-pricing-plans)
* [Pricing Plans and Plan Templates](/guides/plans-and-pricing/pricing-plans/pricing-plans)
* [Pricing Plans Using Segmented Aggregations](/guides/plans-and-pricing/pricing-plans/pricing-plans-using-segmented-aggregations)
* [Managing and Editing Priced Plans and Plan Templates](/guides/plans-and-pricing/pricing-plans/managing-and-editing-priced-plans-or-plan-templates)
* [Duplicating Priced Plans and Plan Templates](/guides/plans-and-pricing/pricing-plans/duplicating-priced-plans-or-plan-templates)
**Important! Unit-based pricing using Counters for recurring subscription charges**. The second part of this section for [Pricing and Managing Plans and Plan Templates](/guides/plans-and-pricing/pricing-plans) covers how to apply usage-based pricing to your Plan Templates and Plans using *Aggregations* as the pricing metrics. For full details on how to create *Counters* and use them as the pricing metrics to apply unit-based pricing to Plan Templates and Plans for recurring subscription charges on Accounts, please see the [Recurring Charges: Counters](/guides/recurring-charges-counters) section.
# Pricing and Managing Plans and Plan Templates
Source: https://docs.m3ter.com/guides/plans-and-pricing/pricing-plans
Discover how to work in the Pricing Editor to add Plans or Plan Templates, link Aggregations or Counters, and configure pricing.
In m3ter, you can use the *Pricing Editor* to quickly price up and review your Plans and Plan Templates:
* First, add a Plan or Plan Template.
* Second, add the pricing metrics you want to use to price the Plan or Plan Template:
* Add Aggregations for pricing based on metered usage data.
* Add Counters for pricing based on units subscribed to by Accounts.
* Configure the exact pricing structure you want to use for charging your end customers who are put on the priced Plan for consuming one of your Products.
* Easily review, compare, edit, or duplicate your priced Plans and Plan Templates, which are set out side-by-side in the Pricing Editor.
**Tip: Pricing Plan Templates?** If you have a Product where you want to charge the same pricing rates for usage for all Accounts that consume the Product but vary the standing charge across different Accounts, you can price up a Plan Template and then quickly create multiple Plans using the template and define specific standing charges for each Plan. For example, this approach is useful if you have a single Product where the end customer accounts that consume the same Product might be placed on different account levels - for example Standard or Premium - and the only difference is that the Premium customer pays a smaller standing charge.
This section lets you review pricing options, explains how to price your Plans or Plan Templates using the Pricing Editor, and how to go on to manage, edit, or duplicate them:
* [Reviewing Pricing Options for Plans and Plan Templates](/guides/plans-and-pricing/pricing-plans/reviewing-pricing-options-and-pricing-plans)
* [Pricing Plans and Plan Templates](/guides/plans-and-pricing/pricing-plans/pricing-plans)
* [Pricing Plans Using Segmented Aggregations](/guides/plans-and-pricing/pricing-plans/pricing-plans-using-segmented-aggregations)
* [Managing and Editing Priced Plans and Plan Templates](/guides/plans-and-pricing/pricing-plans/managing-and-editing-priced-plans-or-plan-templates)
* [Duplicating Priced Plans and Plan Templates](/guides/plans-and-pricing/pricing-plans/duplicating-priced-plans-or-plan-templates)
**Important! Unit-based pricing using Counters for recurring subscription charges**. This section explains how to apply usage-based pricing for Plan Templates and Plans using Aggregations as the pricing metrics. For full details on how to create Counters and use them as the pricing metrics to apply unit-based pricing to Plan Templates and Plans for recurring subscription charges on Accounts, please see the [Recurring Charges: Counters](/guides/recurring-charges-counters) section.
# Duplicating Priced Plans and Plan Templates
Source: https://docs.m3ter.com/guides/plans-and-pricing/pricing-plans/duplicating-priced-plans-or-plan-templates
There might be cases where you have set up a priced Plan for charging customers for one of your Products and you then require a priced Plan for a new and similar Product. If the billing set up and the pricing structure you need for charging for this new Product is similar to the existing Plan's set up, in the Pricing Editor you can quickly duplicate the existing Plan and then edit the duplicate Plan's pricing to achieve the exact billing set up needed for your new Product.
This topic explains how to duplicate priced Plans or Plan Templates.
Notes:
* **Duplicating Plan Templates?** In the **Pricing editor**, you can add and duplicate a Plan Template you've priced up in the same way as you can duplicate a priced Plan.
* **Duplicating from Plan and Plan Template Details!** You can also duplicate Plans and Plan Templates from their details pages. See [Working in Plan Template and Plan Details](https://docs.m3ter.com/guides/plans-and-pricing/working-with-plan-templates-and-plans/working-in-plan-details).
## Duplicating Priced Plans
**To duplicate a priced Plan:**
1. Select **Pricing>Pricing editor**. The **Pricing editor** opens.
2. Select **Add plans**. A **Select plans** dialog appears.
3. Select the Plan - or Plans - you want to duplicate and select **Confirm**. You are returned to the **Pricing Editor** where the selected **Plan** is shown.
4. Select **Duplicate**. A **Duplicate plan** popup appears.
5. Enter the **Name** and **Code** you want for the new duplicate Plan.
**Warning: Code must be unique!** You must use a different **Name** and **Code** when you duplicate a Plan - you'll receive an error if you try to duplicate a Plan using the same **Name** or **Code** as the original Plan. You can edit the new duplicate Plan at a later time and make the **Name** the same as the original Plan, if required. However, the **Code** must remain unique.
6. Select **Duplicate plan**. The popup closes and you are returned to the **Pricing editor** where the new duplicate Plan is shown alongside the original. The new duplicate Plan:
* Uses the same Plan Template as the original.
* Inherits the pricing structure of the original and you can now edit the pricing of the duplicate as required. See [Managing and Editing Priced Plans and Plan Templates](/guides/plans-and-pricing/pricing-plans/managing-and-editing-priced-plans-or-plan-templates).
# Managing and Editing Priced Plans and Plan Templates
Source: https://docs.m3ter.com/guides/plans-and-pricing/pricing-plans/managing-and-editing-priced-plans-or-plan-templates
You can open the Pricing Editor at any time and add Plans or Plan Templates you've previously priced. When reviewing your priced Plans and Plan Templates in this way, you can:
* Edit a priced Plan or Plan Template.
* View the details of Pricing on a priced Plan or Plan Template.
* Edit a Pricing for a priced Plan or Plan Template.
* View a Pricing Schedule for the Plan, which shows any historic, currently active, or future pricing configured for the Plan.
* Delete the pricing you've previously configured for a Plan.
* If you've previously added an Aggregation for pricing a plan, you can remove the Aggregation provided there is no historic, currently active, or future pricing configured for the Plan using the Aggregation.
This topic explains how to work in the Pricing Editor to edit and manage your priced Plans and Plan Templates:
* [Editing a Priced Plan or Plan Template](/guides/plans-and-pricing/pricing-plans/managing-and-editing-priced-plans-or-plan-templates#editing-a-priced-plan-or-plan-template)
* [Viewing Pricing Details](/guides/plans-and-pricing/pricing-plans/managing-and-editing-priced-plans-or-plan-templates#viewing-the-details-of-a-pricing-on-a-priced-plan-or-plan-template)
* [Editing a Pricing](/guides/plans-and-pricing/pricing-plans/managing-and-editing-priced-plans-or-plan-templates#editing-a-pricing-for-a-priced-plan-or-plan-template)
* [Viewing Pricing Schedule](/guides/plans-and-pricing/pricing-plans/managing-and-editing-priced-plans-or-plan-templates#viewing-pricing-schedule)
* [Deleting Pricing](/guides/plans-and-pricing/pricing-plans/managing-and-editing-priced-plans-or-plan-templates#deleting-pricing)
* [Removing Aggregations](/guides/plans-and-pricing/pricing-plans/managing-and-editing-priced-plans-or-plan-templates#removing-aggregations-from-the-pricing-editor)
**Important! Unit-based pricing using Counters**. This topic explains how to work in the Pricing Editor to manage and edit your Plan Templates and Plans to which you've applied usage-based pricing using *Aggregations* as the pricing metrics. The same functions and features are available for managing and editing your Plan Templates and Plans to which you've applied unit-based pricing using *Counters* as the pricing metrics. See the [Recurring Charges: Counters](/guides/recurring-charges-counters) section for more details.
**Tip: Reviewing Pricing?** You can quickly check and review the Pricing associated with a Plan or Plan Template at any time and without having to open the Pricing Editor by opening the Plan or Plan Template **Details** page. See [Working with Plan Templates and Plan Details](/guides/plans-and-pricing/working-with-plan-templates-and-plans/working-in-plan-details).
## Editing a Priced Plan or Plan Template
**To edit a priced Plan or Plan Template:**
1. Select **Pricing>Pricing editor**. The **Pricing editor** opens.
2. In the **Product** drop-down, select the Product for the Plan you want to edit.
3. Select **Add plans**. A **Select Plans** popup appears.
4. Select the Plans you want to edit and select **Confirm**. You are returned to the **Pricing** page where the selected **Plan** is shown.
5. If you want to edit the details of a Plan, select **Edit** under the Plan:
 The **Plans>Edit** page opens.
6. Make your editing changes. For example, you might want to change the **Standing Charge** amount.
7. Select **Update Plan**. You are returned to the **Pricing editor** and your changes are saved.
**Tip: Edit Plan Templates?** The steps required to edit a priced Plan Template are similar to those for editing a priced Plan.
## Viewing the Details of a Pricing on a Priced Plan or Plan Template
From the Pricing Editor, you can open the Details page for a Pricing you've configured for a priced Plan or Plan Template.
**To view the details of a Pricing for a priced Plan or Plan Template:**
1. Select **Pricing>Pricing Editor**. The **Pricing Editor** opens.
2. In the **Product** drop-down, select the Product for the Plan you want to edit.
3. Select **Add plans**. A **Select Plans** popup appears.
4. Select the Plan for which you want to view the details of a Pricing and select **Confirm**. You are returned to the **Pricing** page where the selected **Plan** is shown.
5. In the Pricing Grid, select **Details** for the Pricing on the Plan you want to view the details for:
The **Plans>Edit** page opens.
6. Make your editing changes. For example, you might want to change the **Standing Charge** amount.
7. Select **Update Plan**. You are returned to the **Pricing editor** and your changes are saved.
**Tip: Edit Plan Templates?** The steps required to edit a priced Plan Template are similar to those for editing a priced Plan.
## Viewing the Details of a Pricing on a Priced Plan or Plan Template
From the Pricing Editor, you can open the Details page for a Pricing you've configured for a priced Plan or Plan Template.
**To view the details of a Pricing for a priced Plan or Plan Template:**
1. Select **Pricing>Pricing Editor**. The **Pricing Editor** opens.
2. In the **Product** drop-down, select the Product for the Plan you want to edit.
3. Select **Add plans**. A **Select Plans** popup appears.
4. Select the Plan for which you want to view the details of a Pricing and select **Confirm**. You are returned to the **Pricing** page where the selected **Plan** is shown.
5. In the Pricing Grid, select **Details** for the Pricing on the Plan you want to view the details for:
 The **Pricing details** page opens:
![Edit Priced Plan5]() Note that you can:
* Use hotlinks to open the **Meter**, **Aggregation**, **Plan/Plan Template**, or **Accounting product** associated with the Pricing.
* Copy the **ID** of the **Pricing** and the **IDs** of any **Pricing bands** directly to your clipboard.
6. If you've configured any overage pricing bands to be applied when Prepayments or Balances on Accounts have been consumed, then these will be shown under **Overage pricing bands**:
Note that you can:
* Use hotlinks to open the **Meter**, **Aggregation**, **Plan/Plan Template**, or **Accounting product** associated with the Pricing.
* Copy the **ID** of the **Pricing** and the **IDs** of any **Pricing bands** directly to your clipboard.
6. If you've configured any overage pricing bands to be applied when Prepayments or Balances on Accounts have been consumed, then these will be shown under **Overage pricing bands**:
![Edit Priced Plan6]() 6. On the **Pricing details** page, you can also review **Pricing metadata**:
6. On the **Pricing details** page, you can also review **Pricing metadata**:
![Pricing Details5a]() **External mappings**. Any External mappings set up for the Pricing are listed:
* The **External system** and **External table** mapped to are shown - such as **NetSuite - Item** in the above example. The **External entity ID** mapped to is also shown.
* If a listed External mapping is linked to an Integration, under **Linked integration** a hotlink text will be shown which you can use to open the Integration.
* Under **Actions**, you can edit or delete the External mapping.
* If the Pricing has multiple External mappings created for it, you can use *Search external mappings* to search by **External table** and **External entity ID** and filter the list.
* You can commence a workflow to **Create external mapping** for the Pricing directly - see [Creating and Managing External Mappings for Accounts](https://m3ter.mintlify.app/guides/end-customer-accounts/creating-and-managing-external-mappings-for-accounts) for an example.
**Integration runs**. If you've set up an integration that synchronizes the Pricing with an external system, the date/time and status of the **Latest** integration run are shown. You can use a text hotlink to open details of this latest run or **View all runs**. See [Reviewing Integration Run Details](/guides/integrations/setting-up-integrations/reviewing-integration-run-details).
8. If you want to edit the Pricing, select the **Edit** button, The **Pricing>Edit** page opens where you can make changes and then select **Update pricing** - see the [following section](/guides/plans-and-pricing/pricing-plans/managing-and-editing-priced-plans-or-plan-templates#editing-the-pricing-for-a-priced-plan-or-plan-template).
9. If you want to return to the **Pricing editor**, use the back button on your browser.
## Editing a Pricing for a Priced Plan or Plan Template
**To edit the Pricing for a priced Plan or Plan Template:**
1. Select **Pricing>Pricing editor**. The **Pricing editor** opens.
2. In the **Product** drop-down, select the Product for the Plan you want to edit.
3. Select **Add plans**. A **Select plans** dialog appears.
4. Select the Plan for which you want to edit a Pricing and select **Confirm**. You are returned to the **Pricing** page where the selected **Plan** is shown.
5. Select **Edit** in the Pricing Grid under the Plan.
**External mappings**. Any External mappings set up for the Pricing are listed:
* The **External system** and **External table** mapped to are shown - such as **NetSuite - Item** in the above example. The **External entity ID** mapped to is also shown.
* If a listed External mapping is linked to an Integration, under **Linked integration** a hotlink text will be shown which you can use to open the Integration.
* Under **Actions**, you can edit or delete the External mapping.
* If the Pricing has multiple External mappings created for it, you can use *Search external mappings* to search by **External table** and **External entity ID** and filter the list.
* You can commence a workflow to **Create external mapping** for the Pricing directly - see [Creating and Managing External Mappings for Accounts](https://m3ter.mintlify.app/guides/end-customer-accounts/creating-and-managing-external-mappings-for-accounts) for an example.
**Integration runs**. If you've set up an integration that synchronizes the Pricing with an external system, the date/time and status of the **Latest** integration run are shown. You can use a text hotlink to open details of this latest run or **View all runs**. See [Reviewing Integration Run Details](/guides/integrations/setting-up-integrations/reviewing-integration-run-details).
8. If you want to edit the Pricing, select the **Edit** button, The **Pricing>Edit** page opens where you can make changes and then select **Update pricing** - see the [following section](/guides/plans-and-pricing/pricing-plans/managing-and-editing-priced-plans-or-plan-templates#editing-the-pricing-for-a-priced-plan-or-plan-template).
9. If you want to return to the **Pricing editor**, use the back button on your browser.
## Editing a Pricing for a Priced Plan or Plan Template
**To edit the Pricing for a priced Plan or Plan Template:**
1. Select **Pricing>Pricing editor**. The **Pricing editor** opens.
2. In the **Product** drop-down, select the Product for the Plan you want to edit.
3. Select **Add plans**. A **Select plans** dialog appears.
4. Select the Plan for which you want to edit a Pricing and select **Confirm**. You are returned to the **Pricing** page where the selected **Plan** is shown.
5. Select **Edit** in the Pricing Grid under the Plan.
![]() The **Pricing>Edit** page opens.
6. Make your editing changes to the Pricing. For example, you might have originally configured a **Tiered** pricing structure that uses two tiers and you now need to update this to use three tiers.
7. Select **Update pricing**. You are returned to the Pricing Editor and your changes are saved.
**Warning: Changing Pricing Type?** If you change the pricing type, a confirmation popup appears to warn you that the prices for pricing bands you set up earlier might be reset. This depends on the change you are making when editing the pricing structure. For example, changing from a **Tiered** pricing type to a **Volume** pricing type will preserve prices for pricing bands. However, if you change from **Tiered** to **Stairstep**, prices for bands will be reset to zero.
**Tip: When do changes take effect?** Make sure to select **Apply your editing changes to existing pricing** if you want the pricing changes to be effective immediately for the priced Plan. If not, enter a date to **Apply these changes from**. If you choose to apply your editing changes for the pricing to take effect at a future date, you'll be able to view this in the **Pricing schedule** - see the [following section](/guides/plans-and-pricing/pricing-plans/managing-and-editing-priced-plans-or-plan-templates#viewing-pricing-schedule) for details.
**Tip: Edit a Pricing for priced Plan Template?** The steps required to edit a Pricing for a priced Plan Template are similar to those for editing a Pricing for a priced Plan.
## Viewing Pricing Schedule
If you've set up more than one Pricing for a Plan or Plan Template, you can:
* View a **Pricing schedule** for the priced Plan/Plan Template.
* Check the currently active pricing.
* Review any historic or future pricing.
**Notes:**
* The following procedure explains how to view the **Pricing schedule** for a Priced Plan - the steps to follow are similar if you want to view the **Pricing schedule** for a priced Plan Template.
* If you've priced a Plan or Plan Template using a *Counter*, you can access and view a **Counter pricing schedule** in the same way.
**To view the pricing schedule for a priced Plan:**
1. Select **Pricing>Pricing editor**. The **Pricing editor** opens.
2. In the **Product** drop-down, select the Product for the priced Plan whose Pricing Schedule you want to view.
3. Select **Add plans**. A **Select plans** dialog appears.
4. Select the Plan you want to view the **Pricing schedule** for and select **Confirm**. You are returned to the **Pricing** page where the Pricing grid for the selected **Plans** is shown:
* An **Active pricing** will show in the grid only if a Pricing has been configured that is currently active.
* You can use the arrows on the **Pricing schedule** calendar icon to bring a past or future Pricing into the Pricing grid:
* If there is an **Historic pricing** for the Plan, the left-hand arrow on the calendar icon will be active and you can select it to bring that Pricing into the Grid:
The **Pricing>Edit** page opens.
6. Make your editing changes to the Pricing. For example, you might have originally configured a **Tiered** pricing structure that uses two tiers and you now need to update this to use three tiers.
7. Select **Update pricing**. You are returned to the Pricing Editor and your changes are saved.
**Warning: Changing Pricing Type?** If you change the pricing type, a confirmation popup appears to warn you that the prices for pricing bands you set up earlier might be reset. This depends on the change you are making when editing the pricing structure. For example, changing from a **Tiered** pricing type to a **Volume** pricing type will preserve prices for pricing bands. However, if you change from **Tiered** to **Stairstep**, prices for bands will be reset to zero.
**Tip: When do changes take effect?** Make sure to select **Apply your editing changes to existing pricing** if you want the pricing changes to be effective immediately for the priced Plan. If not, enter a date to **Apply these changes from**. If you choose to apply your editing changes for the pricing to take effect at a future date, you'll be able to view this in the **Pricing schedule** - see the [following section](/guides/plans-and-pricing/pricing-plans/managing-and-editing-priced-plans-or-plan-templates#viewing-pricing-schedule) for details.
**Tip: Edit a Pricing for priced Plan Template?** The steps required to edit a Pricing for a priced Plan Template are similar to those for editing a Pricing for a priced Plan.
## Viewing Pricing Schedule
If you've set up more than one Pricing for a Plan or Plan Template, you can:
* View a **Pricing schedule** for the priced Plan/Plan Template.
* Check the currently active pricing.
* Review any historic or future pricing.
**Notes:**
* The following procedure explains how to view the **Pricing schedule** for a Priced Plan - the steps to follow are similar if you want to view the **Pricing schedule** for a priced Plan Template.
* If you've priced a Plan or Plan Template using a *Counter*, you can access and view a **Counter pricing schedule** in the same way.
**To view the pricing schedule for a priced Plan:**
1. Select **Pricing>Pricing editor**. The **Pricing editor** opens.
2. In the **Product** drop-down, select the Product for the priced Plan whose Pricing Schedule you want to view.
3. Select **Add plans**. A **Select plans** dialog appears.
4. Select the Plan you want to view the **Pricing schedule** for and select **Confirm**. You are returned to the **Pricing** page where the Pricing grid for the selected **Plans** is shown:
* An **Active pricing** will show in the grid only if a Pricing has been configured that is currently active.
* You can use the arrows on the **Pricing schedule** calendar icon to bring a past or future Pricing into the Pricing grid:
* If there is an **Historic pricing** for the Plan, the left-hand arrow on the calendar icon will be active and you can select it to bring that Pricing into the Grid:
![]() * If there is a **Future pricing** for the Plan, the right-hand arrow on the calendar icon will be active and you can select it to bring that Pricing into the Grid:
* If there is a **Future pricing** for the Plan, the right-hand arrow on the calendar icon will be active and you can select it to bring that Pricing into the Grid:
![]() 5. To view the **Pricing schedule** for a priced Plan, select the calendar icon:
5. To view the **Pricing schedule** for a priced Plan, select the calendar icon:
![]() The **Pricing schedule** opens:
The **Pricing schedule** opens:
![]() On the **Pricing schedule**, you can:
* Review **Plan details** and **Aggregation details**. These will include audit data showing which User first created and which User last modified the Plan and Aggregation.
* Read-off the start and end dates of any historic or future pricing.
* Check which pricing is currently **ACTIVE**.
**REMINDER! End dates for Pricing are Exclusive.** Suppose you want to set up a Pricing schedule for one of your products that increases the charge for the highest pricing band in a tiered pricing structure on a month-by-month basis. When setting up this kind of pricing schedule for a Plan, please remember that the end date on a Pricing is *exclusive*. In the above example, it might look as though the second Pricing overlaps with the third Pricing, since the second is set to *end* on 02 Oct 2022 and the third is set to *start* on 02 Oct 2022. But this means the second Pricing ceases to be active for the Plan at midnight on 01 Oct 2022 and the third Pricing starts to be active at that point in time. If we had set the end date of the second Pricing to be 01 Oct 2022, this would have left a gap of one day where no Pricing was active for the Plan!
* If you have a Plan that originally inherited its pricing from the Plan Template but the inherited pricing was overridden at Plan level, this will also be shown. Here's an example on a **Counter pricing schedule**:
On the **Pricing schedule**, you can:
* Review **Plan details** and **Aggregation details**. These will include audit data showing which User first created and which User last modified the Plan and Aggregation.
* Read-off the start and end dates of any historic or future pricing.
* Check which pricing is currently **ACTIVE**.
**REMINDER! End dates for Pricing are Exclusive.** Suppose you want to set up a Pricing schedule for one of your products that increases the charge for the highest pricing band in a tiered pricing structure on a month-by-month basis. When setting up this kind of pricing schedule for a Plan, please remember that the end date on a Pricing is *exclusive*. In the above example, it might look as though the second Pricing overlaps with the third Pricing, since the second is set to *end* on 02 Oct 2022 and the third is set to *start* on 02 Oct 2022. But this means the second Pricing ceases to be active for the Plan at midnight on 01 Oct 2022 and the third Pricing starts to be active at that point in time. If we had set the end date of the second Pricing to be 01 Oct 2022, this would have left a gap of one day where no Pricing was active for the Plan!
* If you have a Plan that originally inherited its pricing from the Plan Template but the inherited pricing was overridden at Plan level, this will also be shown. Here's an example on a **Counter pricing schedule**:
![]() **Tip: Access Pricing Schedule from Plan details page**. Alternatively, you can access the Pricing Schedule for a priced Plan from the **Plan details** page under **Pricing** - simply select the **View pricing schedule** text link.
## Deleting Pricing
You can delete a pricing you've configured for a Plan in the Pricing Editor.
**Delete pricing for Plan Template?** This section explains how to delete the pricing for a Plan. You can delete the pricing for a Plan Template in a similar way.
**To delete the pricing for a Plan:**
1. Select **Pricing>Pricing editor**. The **Pricing editor** opens.
2. In the **Product** drop-down, select the Product for the Plan whose pricing you want to delete.
3. Select **Add plans**. A **Select plans** dialog appears.
4. Select the Plan whose pricing you want to delete and select **Confirm**. You are returned to the **Pricing** page where the selected **Plan** is shown with the pricing you configured earlier.
5. Select **Delete** under the Plan for an Aggregation used to create a pricing. A confirmation popup appears.
6. Select **Yes** to continue. The popup closes and the Plan now shows **No active pricing configured** using the Aggregation used previously.
7. If you want to reconfigure the pricing for the Plan using the Aggregation you used previously, you can select **Create pricing**.
**Warning: Deleting Pricing for Plans Attached to Accounts!** If you delete the pricing for a Plan that you've attached to one of your end-customer Accounts for charging against that Account, any future Bills will not be able to be calculated. You must re-price the Plan for any future Billing.
## Removing Aggregations from the Pricing Editor
You might want to remove an Aggregation you've previously added to the Pricing Editor for pricing up a Plan.
**Warning:** You can only remove an Aggregation if there's no *historic*, *currently active*, or *future pricing* configured for the Plan using the Aggregation.
**To remove Aggregations for a Plan in the Pricing Editor:**
1. Select **Pricing>Pricing editor**. The **Pricing editor** opens.
2. In the **Product** drop-down, select the Product for the Plan with an Aggregation you want to remove.
3. Select **Add plans**. A **Select plans** dialog appears.
4. Select the Plan with the Aggregation added earlier for pricing the Plan and select **Confirm**. You are returned to the **Pricing** page where the selected **Plan** is shown with the added Aggregation.
5. If in your earlier session in the Pricing Editor you added an Aggregation but *did not create a pricing* for the Plan using the Aggregation, a **No active pricing configured** message will show and a **Remove** button is available for the Aggregation, which you can then use to remove the Aggregation immediately.
6. If in your earlier session in the Pricing Editor you *did create a pricing* for the Plan using the Aggregation, you cannot remove the Aggregation:
* Select **Delete pricing** - see the [previous section](/guides/plans-and-pricing/pricing-plans/managing-and-editing-priced-plans-or-plan-templates#deleting-pricing) in this topic for details.
* After you delete the pricing and return to the Pricing Editor, a **Delete** button is now available for the Aggregation, which you can use to remove it:
**Tip: Access Pricing Schedule from Plan details page**. Alternatively, you can access the Pricing Schedule for a priced Plan from the **Plan details** page under **Pricing** - simply select the **View pricing schedule** text link.
## Deleting Pricing
You can delete a pricing you've configured for a Plan in the Pricing Editor.
**Delete pricing for Plan Template?** This section explains how to delete the pricing for a Plan. You can delete the pricing for a Plan Template in a similar way.
**To delete the pricing for a Plan:**
1. Select **Pricing>Pricing editor**. The **Pricing editor** opens.
2. In the **Product** drop-down, select the Product for the Plan whose pricing you want to delete.
3. Select **Add plans**. A **Select plans** dialog appears.
4. Select the Plan whose pricing you want to delete and select **Confirm**. You are returned to the **Pricing** page where the selected **Plan** is shown with the pricing you configured earlier.
5. Select **Delete** under the Plan for an Aggregation used to create a pricing. A confirmation popup appears.
6. Select **Yes** to continue. The popup closes and the Plan now shows **No active pricing configured** using the Aggregation used previously.
7. If you want to reconfigure the pricing for the Plan using the Aggregation you used previously, you can select **Create pricing**.
**Warning: Deleting Pricing for Plans Attached to Accounts!** If you delete the pricing for a Plan that you've attached to one of your end-customer Accounts for charging against that Account, any future Bills will not be able to be calculated. You must re-price the Plan for any future Billing.
## Removing Aggregations from the Pricing Editor
You might want to remove an Aggregation you've previously added to the Pricing Editor for pricing up a Plan.
**Warning:** You can only remove an Aggregation if there's no *historic*, *currently active*, or *future pricing* configured for the Plan using the Aggregation.
**To remove Aggregations for a Plan in the Pricing Editor:**
1. Select **Pricing>Pricing editor**. The **Pricing editor** opens.
2. In the **Product** drop-down, select the Product for the Plan with an Aggregation you want to remove.
3. Select **Add plans**. A **Select plans** dialog appears.
4. Select the Plan with the Aggregation added earlier for pricing the Plan and select **Confirm**. You are returned to the **Pricing** page where the selected **Plan** is shown with the added Aggregation.
5. If in your earlier session in the Pricing Editor you added an Aggregation but *did not create a pricing* for the Plan using the Aggregation, a **No active pricing configured** message will show and a **Remove** button is available for the Aggregation, which you can then use to remove the Aggregation immediately.
6. If in your earlier session in the Pricing Editor you *did create a pricing* for the Plan using the Aggregation, you cannot remove the Aggregation:
* Select **Delete pricing** - see the [previous section](/guides/plans-and-pricing/pricing-plans/managing-and-editing-priced-plans-or-plan-templates#deleting-pricing) in this topic for details.
* After you delete the pricing and return to the Pricing Editor, a **Delete** button is now available for the Aggregation, which you can use to remove it:
![]() # Pricing Plans and Plan Templates
Source: https://docs.m3ter.com/guides/plans-and-pricing/pricing-plans/pricing-plans
The *Pricing Editor* is designed to help you quickly add Plans or Plan Templates, link them to Aggregations, and configure the exact pricing structure you want to apply for charging end customer Accounts that are placed on your Product Plans - a Pricing is applied to a Plan for a defined period and any Accounts you put on that priced Plan are charged according to the Pricing for any usage they consume during that period. You can use a Pricing Wizard to quickly set up common types of usage-based pricing models.
The decision to price Plan Templates rather than individual Plans or, in contrast, always to price at the level of individual plans will depend on your overall usage-based charging policies:
* [Pricing Plan Templates or Pricing Plans](/guides/plans-and-pricing/pricing-plans/pricing-plans#pricing-plan-templates-or-pricing-plans)
Before you can start to price Plans for one of your Products, you must complete some prerequisite configuration:
* Usage-based pricing: Create a Meter for the Product and use the Meter to create an Aggregation.
* Unit-based pricing: Create a Counter for the Product.
* For both usage-based and unit-based pricing, create a Plan Template for the Product and create at least one Plan based on the Template.
If you open the Pricing Editor for a Product and these prerequisites are not completed, you will not be able to proceed:
* [Pricing Readiness - Completing Prerequisites](/guides/plans-and-pricing/pricing-plans/pricing-plans#pricing-readiness-completing-prerequisites)
When all prerequisites for pricing Product Plans are in place, creating a Pricing for a Plan using the Pricing Editor falls into two stages - setting up and then configuring the pricing:
* [Setting Up to Price Plans in the Pricing Editor](/guides/plans-and-pricing/pricing-plans/pricing-plans#setting-up-to-price-plansplan-templates-in-the-pricing-editor)
* [Setting Up in the Pricing Editor - Notes and Tips](/guides/plans-and-pricing/pricing-plans/pricing-plans#setting-up-in-the-pricing-editor-notes-and-tips)
* [Creating a Pricing for a Plan](/guides/plans-and-pricing/pricing-plans/pricing-plans#creating-a-pricing-for-a-plan)
When creating a Pricing that will be applied as either *Product credit* or *Global credit*, then you can use negative values for the unit or fixed price:
* [Using Negative Pricing for Plans](/guides/plans-and-pricing/pricing-plans/pricing-plans#using-negative-pricing-for-plans)
**Important!**
* **Unit-based pricing using Counters for recurring subscription charges**. This topic explains how to work in the Pricing Editor to prepare for and apply usage-based pricing to your Plan Templates and Plans using *Aggregations* as the pricing metrics. Although some of the set up work will be the same, for full details on how to create *Counters* and use them as the pricing metrics in the Pricing Editor to apply unit-based pricing to Plan Templates and Plans for recurring subscription charges on Accounts, please see the [Recurring Charges: Counters](/guides/recurring-charges-counters) section.
* **Preparing to price Plans and Plan Templates!** We *strongly recommend* that before you attempt to price up Product Plans or Plan Templates you review Pricing configuration options covered in the previous topic: [Reviewing Pricing Options for Plans and Plan Templates](/guides/plans-and-pricing/pricing-plans/reviewing-pricing-options-and-pricing-plans).
**FAQs:**
* **Can I price Plans using Segmented Aggregations?** Yes, you can use Segmented Aggregations to price a Plan and the Pricing Editor is designed to allow you to quickly price by each segment defined - see [Pricing Plans Using Segmented Aggregations](/guides/plans-and-pricing/pricing-plans/pricing-plans-using-segmented-aggregations) for more details.
* **Can I price Plans/Plan Templates from their details pages?** Yes, from Plan details or Plan Template details pages, you can review and manage a pricing or start the workflow to create a new pricing. See [Working in Plan Template and Plan Details](/guides/plans-and-pricing/working-with-plan-templates-and-plans/working-in-plan-details).
## Pricing Plan Templates or Pricing Plans
You can create a pricing for a Plan Template or for any Plans that are based on the template. How you decide to apply pricing for your Products - by creating a pricing at Plan Template level, or at individual Plan level, or both, will depend on your requirements for charging customers for product consumption. The ability to create pricing at the level of both Plan Templates and individual Plans is designed to give you maximum flexibility to best serve those charging needs across a range of products and services. Here are some key points and an example:
* **Key Points**:
* If you create a pricing for a Plan Template, any *unpriced Plans* based on the template will *inherit that pricing*.
* All Plans *must be based* on a Plan Template. If you create a pricing for an individual Plan, then the Plan pricing will *always override* any pricing created for the Plan Template on which the Plan is based.
* **Example**:
* Suppose you offer a product at three grades of license - Standard, Premium, and Enterprise - depending on the size of your customer's Organization. Across these three grades of license, you want to charge customers the same rates on usage but vary the standing charge per billed period. To meet this use case, you can price a Plan Template to define usage rates and then create three separate Plans - Standard Plan, Premium Plan, and Enterprise Plan based on the template. Each Plan will inherit the Plan Template pricing that sets charge rates for product usage but you can then apply appropriate standing charge amounts to each of the Plans, which will then override any standing charge applied at Plan Template Level.
## Pricing Readiness - Completing Prerequisites
Before you can start to price Plans for one of your Products, you must complete some prerequisite configuration:
* First, create a Product. If you open the **Pricing editor** with no Products created, then you'll see a warning with a *create a product* hotlink text which you can use to go directly to the **Products>Create** page. When you create the first Product for your Organization, you are returned to the **Pricing editor**. If you've not yet created any of the other entities needed to create a pricing for a Plan, then an advisory text will show:
# Pricing Plans and Plan Templates
Source: https://docs.m3ter.com/guides/plans-and-pricing/pricing-plans/pricing-plans
The *Pricing Editor* is designed to help you quickly add Plans or Plan Templates, link them to Aggregations, and configure the exact pricing structure you want to apply for charging end customer Accounts that are placed on your Product Plans - a Pricing is applied to a Plan for a defined period and any Accounts you put on that priced Plan are charged according to the Pricing for any usage they consume during that period. You can use a Pricing Wizard to quickly set up common types of usage-based pricing models.
The decision to price Plan Templates rather than individual Plans or, in contrast, always to price at the level of individual plans will depend on your overall usage-based charging policies:
* [Pricing Plan Templates or Pricing Plans](/guides/plans-and-pricing/pricing-plans/pricing-plans#pricing-plan-templates-or-pricing-plans)
Before you can start to price Plans for one of your Products, you must complete some prerequisite configuration:
* Usage-based pricing: Create a Meter for the Product and use the Meter to create an Aggregation.
* Unit-based pricing: Create a Counter for the Product.
* For both usage-based and unit-based pricing, create a Plan Template for the Product and create at least one Plan based on the Template.
If you open the Pricing Editor for a Product and these prerequisites are not completed, you will not be able to proceed:
* [Pricing Readiness - Completing Prerequisites](/guides/plans-and-pricing/pricing-plans/pricing-plans#pricing-readiness-completing-prerequisites)
When all prerequisites for pricing Product Plans are in place, creating a Pricing for a Plan using the Pricing Editor falls into two stages - setting up and then configuring the pricing:
* [Setting Up to Price Plans in the Pricing Editor](/guides/plans-and-pricing/pricing-plans/pricing-plans#setting-up-to-price-plansplan-templates-in-the-pricing-editor)
* [Setting Up in the Pricing Editor - Notes and Tips](/guides/plans-and-pricing/pricing-plans/pricing-plans#setting-up-in-the-pricing-editor-notes-and-tips)
* [Creating a Pricing for a Plan](/guides/plans-and-pricing/pricing-plans/pricing-plans#creating-a-pricing-for-a-plan)
When creating a Pricing that will be applied as either *Product credit* or *Global credit*, then you can use negative values for the unit or fixed price:
* [Using Negative Pricing for Plans](/guides/plans-and-pricing/pricing-plans/pricing-plans#using-negative-pricing-for-plans)
**Important!**
* **Unit-based pricing using Counters for recurring subscription charges**. This topic explains how to work in the Pricing Editor to prepare for and apply usage-based pricing to your Plan Templates and Plans using *Aggregations* as the pricing metrics. Although some of the set up work will be the same, for full details on how to create *Counters* and use them as the pricing metrics in the Pricing Editor to apply unit-based pricing to Plan Templates and Plans for recurring subscription charges on Accounts, please see the [Recurring Charges: Counters](/guides/recurring-charges-counters) section.
* **Preparing to price Plans and Plan Templates!** We *strongly recommend* that before you attempt to price up Product Plans or Plan Templates you review Pricing configuration options covered in the previous topic: [Reviewing Pricing Options for Plans and Plan Templates](/guides/plans-and-pricing/pricing-plans/reviewing-pricing-options-and-pricing-plans).
**FAQs:**
* **Can I price Plans using Segmented Aggregations?** Yes, you can use Segmented Aggregations to price a Plan and the Pricing Editor is designed to allow you to quickly price by each segment defined - see [Pricing Plans Using Segmented Aggregations](/guides/plans-and-pricing/pricing-plans/pricing-plans-using-segmented-aggregations) for more details.
* **Can I price Plans/Plan Templates from their details pages?** Yes, from Plan details or Plan Template details pages, you can review and manage a pricing or start the workflow to create a new pricing. See [Working in Plan Template and Plan Details](/guides/plans-and-pricing/working-with-plan-templates-and-plans/working-in-plan-details).
## Pricing Plan Templates or Pricing Plans
You can create a pricing for a Plan Template or for any Plans that are based on the template. How you decide to apply pricing for your Products - by creating a pricing at Plan Template level, or at individual Plan level, or both, will depend on your requirements for charging customers for product consumption. The ability to create pricing at the level of both Plan Templates and individual Plans is designed to give you maximum flexibility to best serve those charging needs across a range of products and services. Here are some key points and an example:
* **Key Points**:
* If you create a pricing for a Plan Template, any *unpriced Plans* based on the template will *inherit that pricing*.
* All Plans *must be based* on a Plan Template. If you create a pricing for an individual Plan, then the Plan pricing will *always override* any pricing created for the Plan Template on which the Plan is based.
* **Example**:
* Suppose you offer a product at three grades of license - Standard, Premium, and Enterprise - depending on the size of your customer's Organization. Across these three grades of license, you want to charge customers the same rates on usage but vary the standing charge per billed period. To meet this use case, you can price a Plan Template to define usage rates and then create three separate Plans - Standard Plan, Premium Plan, and Enterprise Plan based on the template. Each Plan will inherit the Plan Template pricing that sets charge rates for product usage but you can then apply appropriate standing charge amounts to each of the Plans, which will then override any standing charge applied at Plan Template Level.
## Pricing Readiness - Completing Prerequisites
Before you can start to price Plans for one of your Products, you must complete some prerequisite configuration:
* First, create a Product. If you open the **Pricing editor** with no Products created, then you'll see a warning with a *create a product* hotlink text which you can use to go directly to the **Products>Create** page. When you create the first Product for your Organization, you are returned to the **Pricing editor**. If you've not yet created any of the other entities needed to create a pricing for a Plan, then an advisory text will show:
![]() * If you want to create usage-based pricing for a Plan, you must first create a Meter and then an Aggregation:
* Create a Meter whose Data Fields collect usage data on consumption of a Product.
* Create an Aggregation that targets a Meter Data Field and transforms the usage data collected into a pricing metric suitable for pricing the Product.
**Tip: Global Meters and Aggregations?** You can create *Global* Meters and Aggregations. A Global Aggregation can be used to apply usage-based pricing to Plans or Plan Templates belonging to *any* Product.
* If you want to create unit-based pricing for a Plan, you must first create a Counter.
**Tip: Global Counters?** You can create *Global* Counters, which can be used to apply unit-based pricing to Plans or Plan Templates belonging to *any* Product.
* You must create at least one Plan Template for the Product and create at least one Plan based on a Plan Template.
* When you have completed the pricing prerequisites, the advisory text is removed from the **Pricing editor** and you can **Add plans** or **Add plan templates** and start to create a pricing. See next steps in the [Setting Up to Price Plans](/guides/plans-and-pricing/pricing-plans/pricing-plans#setting-up-to-price-plansplan-templates-in-the-pricing-editor) section below.
### Pricing Readiness - Notes and Tips
There are a few things worth noting as you perform the required configuration for starting to Price your Product Plans:
* **Configuration Order**:
* You must create a Meter before you can create an Aggregation.
* You must create a Plan Template before you can create a Plan.
* You can create the Meter/Aggregation or Counter first or you can create the Plan Template/Plan first - there's no precedence imposed.
* **Global Meters/Aggregations**. You can create *Global* Meters and Aggregations and use them to apply usage-based pricing to Plans belonging to any Product.
* **Global Counters**. You can create *Global* Counters and use them to apply unit-based pricing to Plans belonging to any Product.
* **Pricing of Plan Templates and Plans**. You can add a Plan Template and price it in the Pricing Editor - any Plans based on the Plan Template will inherit the pricing. However, if you add a Plan to the Pricing Editor that is based on a Plan Template that has already been priced, you can choose to override the inherited Plan Template pricing.
**Next**: See next steps in the [Setting Up to Price Plans](/guides/plans-and-pricing/pricing-plans/pricing-plans#setting-up-to-price-plansplan-templates-in-the-pricing-editor) section below.
## Setting Up to Price Plans/Plan Templates in the Pricing Editor
Before creating a Pricing for Plans/Plan Templates, you must link them with the Aggregations you'll use to apply usage-based pricing to them in the Pricing Editor.
**Note: Pricing Plans using Counters?** This section explains how to set up to price your Product Plans in the Pricing Editor using Aggregations as the pricing metrics. Alternatively, you can link your Plans/Plan Templates with Counters and use the Counters as the pricing metrics to apply unit-based pricing for recurring subscription charges. Setting up to use Counters for pricing Plans/Plan Templates is similar to setting up to use Aggregations. For more details on using Counters to price Plans/Plan Templates, see [Creating Counters and Pricing Plans](/guides/recurring-charges-counters/creating-counters).
**To set up the Pricing Editor for pricing Plans/Plan Templates:**
1. Select **Pricing**:
* If you want to create usage-based pricing for a Plan, you must first create a Meter and then an Aggregation:
* Create a Meter whose Data Fields collect usage data on consumption of a Product.
* Create an Aggregation that targets a Meter Data Field and transforms the usage data collected into a pricing metric suitable for pricing the Product.
**Tip: Global Meters and Aggregations?** You can create *Global* Meters and Aggregations. A Global Aggregation can be used to apply usage-based pricing to Plans or Plan Templates belonging to *any* Product.
* If you want to create unit-based pricing for a Plan, you must first create a Counter.
**Tip: Global Counters?** You can create *Global* Counters, which can be used to apply unit-based pricing to Plans or Plan Templates belonging to *any* Product.
* You must create at least one Plan Template for the Product and create at least one Plan based on a Plan Template.
* When you have completed the pricing prerequisites, the advisory text is removed from the **Pricing editor** and you can **Add plans** or **Add plan templates** and start to create a pricing. See next steps in the [Setting Up to Price Plans](/guides/plans-and-pricing/pricing-plans/pricing-plans#setting-up-to-price-plansplan-templates-in-the-pricing-editor) section below.
### Pricing Readiness - Notes and Tips
There are a few things worth noting as you perform the required configuration for starting to Price your Product Plans:
* **Configuration Order**:
* You must create a Meter before you can create an Aggregation.
* You must create a Plan Template before you can create a Plan.
* You can create the Meter/Aggregation or Counter first or you can create the Plan Template/Plan first - there's no precedence imposed.
* **Global Meters/Aggregations**. You can create *Global* Meters and Aggregations and use them to apply usage-based pricing to Plans belonging to any Product.
* **Global Counters**. You can create *Global* Counters and use them to apply unit-based pricing to Plans belonging to any Product.
* **Pricing of Plan Templates and Plans**. You can add a Plan Template and price it in the Pricing Editor - any Plans based on the Plan Template will inherit the pricing. However, if you add a Plan to the Pricing Editor that is based on a Plan Template that has already been priced, you can choose to override the inherited Plan Template pricing.
**Next**: See next steps in the [Setting Up to Price Plans](/guides/plans-and-pricing/pricing-plans/pricing-plans#setting-up-to-price-plansplan-templates-in-the-pricing-editor) section below.
## Setting Up to Price Plans/Plan Templates in the Pricing Editor
Before creating a Pricing for Plans/Plan Templates, you must link them with the Aggregations you'll use to apply usage-based pricing to them in the Pricing Editor.
**Note: Pricing Plans using Counters?** This section explains how to set up to price your Product Plans in the Pricing Editor using Aggregations as the pricing metrics. Alternatively, you can link your Plans/Plan Templates with Counters and use the Counters as the pricing metrics to apply unit-based pricing for recurring subscription charges. Setting up to use Counters for pricing Plans/Plan Templates is similar to setting up to use Aggregations. For more details on using Counters to price Plans/Plan Templates, see [Creating Counters and Pricing Plans](/guides/recurring-charges-counters/creating-counters).
**To set up the Pricing Editor for pricing Plans/Plan Templates:**
1. Select **Pricing**:
![]() The **Pricing editor** page opens.
2. In the **Product** drop-down, select the Product for the Plans you want to price up.
3. Select **Add plans**. A **Select plans** popup appears and lists the Plans created for the Product.
**Warnings!**
* **Duplicating Plans.** You cannot add a Plan more than once to the pricing Editor. If you've already added a Plan, you cannot select it again on the **Select Plans** popup.
* **Custom Plans are not shown for selection.** The **Select Plans** popup will only list non-custom Plans created for the selected Product. To price a custom Plan for the Product you must open the **Plan Attachment** page for the Account the custom Plan belongs to and price the custom Plan from there. See [Pricing Custom Plans](/guides/end-customer-accounts/creating-custom-account-plans#pricing-custom-plans) for more details.
4. Select the Plan or Plans you want to price and then select **Confirm**. You are returned to the **Pricing editor** page where the selected **Plan** is shown. A warning will show stating that no Pricing has yet been configured for the Plan.
5. Alternatively, if you want to price Plan templates, select **Add plan templates**. A **Select plan templates** popup appears, which you can use to select Plan templates you want to price - the remaining configuration steps are the same as for a selected Plan.
**Warnings: Duplicating Plan Templates.** You cannot add a Plan Template more than once to the pricing Editor. If you've already added a Plan Template, you cannot select it again on the **Select Plan Templates** popup.
6. If you want to create a new Plan to price, select **Create plan**:
* The **Plans>Create** page opens and you can enter the details of the new Plan. See [Creating Plans](/guides/plans-and-pricing/working-with-plan-templates-and-plans/creating-plans) for more details. When you've created the Plan, you are returned to the Pricing editor where the newly-created Plan has been added.
7. Select **Add aggregations**. A **Select aggregations** popup appears listing the Aggregations created for the Product.
**Notes: Selecting Aggregations for Pricing.**
* **Available Aggregations:** Only those Aggregations belonging to the same Product as the Plan and any Global Aggregations in your Organization are shown for selection in the popup.
* **Duplicating Aggregations:** You cannot add the same Aggregation more than once for pricing a Plan and any Aggregations you've already added will no longer be available for selection in the popup.
8. Select the Aggregations you want to use to price the selected Plans. You are returned to the **Pricing editor** page, where the selected Aggregations are shown linked to the Plan.
9. If you want to price the Plan using a Compound Aggregation, then select **Add compound aggregations** at Step 7. The remaining configuration steps are the same as when using a simple Aggregation to set up a Pricing for a Plan.
**Important!** Please review the [Compound Aggregations](/guides/usage-data-aggregations/compound-aggregations) topic before attempting to create a Compound Aggregation and price a Plan using it.
**Tip: Notes on Setting Up in the Pricing Editor!** Please review the [following section](/guides/plans-and-pricing/pricing-plans/pricing-plans#setting-up-in-the-pricing-editor-notes-and-tips) when you're setting up to price your product Plans/Plan Templates in the Pricing Editor.
## Setting Up in the Pricing Editor - Notes and Tips
When setting up in the Pricing editor and before you proceed to configure a pricing for your Plans/Plan templates, here are a few useful notes and tips to bear in mind:
* **Plans already show in Pricing editor?** If you have added Plans to the Pricing editor in an earlier work session, the page will automatically restore to show these Plans. This allows you to continue your work without having to re-add Plans. Restoration of a previous work session occurs across a Console logout/login and across closing/re-opening of your browser. Only if you *clear your browser cache* will the page *not be restored* to its earlier state.
* **Pricing shows for added Plan?** If an Aggregation has already been linked to the selected Plan, you can edit the Pricing that was previously configured. See [Managing and Editing Priced Plans and Plan Templates](/guides/plans-and-pricing/pricing-plans/managing-and-editing-priced-plans-or-plan-templates).
* **Pricing from Plan template inherited by added Plan?** If the Plan you've added to the Pricing Editor is based on a Plan template which you've already priced, when you add the Plan the pricing will be inherited and shows as a pricing derived from the template. You can then choose to **Override template pricing**. For example:
The **Pricing editor** page opens.
2. In the **Product** drop-down, select the Product for the Plans you want to price up.
3. Select **Add plans**. A **Select plans** popup appears and lists the Plans created for the Product.
**Warnings!**
* **Duplicating Plans.** You cannot add a Plan more than once to the pricing Editor. If you've already added a Plan, you cannot select it again on the **Select Plans** popup.
* **Custom Plans are not shown for selection.** The **Select Plans** popup will only list non-custom Plans created for the selected Product. To price a custom Plan for the Product you must open the **Plan Attachment** page for the Account the custom Plan belongs to and price the custom Plan from there. See [Pricing Custom Plans](/guides/end-customer-accounts/creating-custom-account-plans#pricing-custom-plans) for more details.
4. Select the Plan or Plans you want to price and then select **Confirm**. You are returned to the **Pricing editor** page where the selected **Plan** is shown. A warning will show stating that no Pricing has yet been configured for the Plan.
5. Alternatively, if you want to price Plan templates, select **Add plan templates**. A **Select plan templates** popup appears, which you can use to select Plan templates you want to price - the remaining configuration steps are the same as for a selected Plan.
**Warnings: Duplicating Plan Templates.** You cannot add a Plan Template more than once to the pricing Editor. If you've already added a Plan Template, you cannot select it again on the **Select Plan Templates** popup.
6. If you want to create a new Plan to price, select **Create plan**:
* The **Plans>Create** page opens and you can enter the details of the new Plan. See [Creating Plans](/guides/plans-and-pricing/working-with-plan-templates-and-plans/creating-plans) for more details. When you've created the Plan, you are returned to the Pricing editor where the newly-created Plan has been added.
7. Select **Add aggregations**. A **Select aggregations** popup appears listing the Aggregations created for the Product.
**Notes: Selecting Aggregations for Pricing.**
* **Available Aggregations:** Only those Aggregations belonging to the same Product as the Plan and any Global Aggregations in your Organization are shown for selection in the popup.
* **Duplicating Aggregations:** You cannot add the same Aggregation more than once for pricing a Plan and any Aggregations you've already added will no longer be available for selection in the popup.
8. Select the Aggregations you want to use to price the selected Plans. You are returned to the **Pricing editor** page, where the selected Aggregations are shown linked to the Plan.
9. If you want to price the Plan using a Compound Aggregation, then select **Add compound aggregations** at Step 7. The remaining configuration steps are the same as when using a simple Aggregation to set up a Pricing for a Plan.
**Important!** Please review the [Compound Aggregations](/guides/usage-data-aggregations/compound-aggregations) topic before attempting to create a Compound Aggregation and price a Plan using it.
**Tip: Notes on Setting Up in the Pricing Editor!** Please review the [following section](/guides/plans-and-pricing/pricing-plans/pricing-plans#setting-up-in-the-pricing-editor-notes-and-tips) when you're setting up to price your product Plans/Plan Templates in the Pricing Editor.
## Setting Up in the Pricing Editor - Notes and Tips
When setting up in the Pricing editor and before you proceed to configure a pricing for your Plans/Plan templates, here are a few useful notes and tips to bear in mind:
* **Plans already show in Pricing editor?** If you have added Plans to the Pricing editor in an earlier work session, the page will automatically restore to show these Plans. This allows you to continue your work without having to re-add Plans. Restoration of a previous work session occurs across a Console logout/login and across closing/re-opening of your browser. Only if you *clear your browser cache* will the page *not be restored* to its earlier state.
* **Pricing shows for added Plan?** If an Aggregation has already been linked to the selected Plan, you can edit the Pricing that was previously configured. See [Managing and Editing Priced Plans and Plan Templates](/guides/plans-and-pricing/pricing-plans/managing-and-editing-priced-plans-or-plan-templates).
* **Pricing from Plan template inherited by added Plan?** If the Plan you've added to the Pricing Editor is based on a Plan template which you've already priced, when you add the Plan the pricing will be inherited and shows as a pricing derived from the template. You can then choose to **Override template pricing**. For example:
![]() * In this example, we've added two Plans to the Pricing Editor and a single Aggregation to price them:
* **Clean Graph Plan 1**, which is based on a priced Plan Template and inherits it's Pricing from the Template.
* **Clean Graph Plan 2**, which is based a Plan Template that has not been priced and we'll have to create a Pricing from scratch for the Plan. Alternatively, you can select the plus icon next to the Plan Template to add it into the Pricing grid and you can then proceed to price the Plan Template the Plan uses:
* In this example, we've added two Plans to the Pricing Editor and a single Aggregation to price them:
* **Clean Graph Plan 1**, which is based on a priced Plan Template and inherits it's Pricing from the Template.
* **Clean Graph Plan 2**, which is based a Plan Template that has not been priced and we'll have to create a Pricing from scratch for the Plan. Alternatively, you can select the plus icon next to the Plan Template to add it into the Pricing grid and you can then proceed to price the Plan Template the Plan uses:
![]() * **Create new Plan Template?** You can also create a new Plan Template directly from the Pricing Editor in a similar way to creating a new Plan - see [Step 6 above](/guides/plans-and-pricing/pricing-plans/pricing-plans#setting-up-to-price-plansplan-templates-in-the-pricing-editor) - and you are returned to the Pricing Editor with the newly-created Plan Template added and ready for you to price up. See [Creating Plan Templates](/guides/plans-and-pricing/working-with-plan-templates-and-plans/creating-plan-templates).
* **Using Compound Aggregations for Pricing Plans?** If you've selected a Compound Aggregation to price a Plan, then this will be labeled as **COMPOUND** in the Pricing Editor. For more details on Compound Aggregations, see [Creating and Using Compound Aggregations](/guides/usage-data-aggregations/compound-aggregations).
* **Using Segmented Aggregation to Price a Plan?** If you want to use a Segmented Aggregation to price a Plan, see [Pricing Plans Using Segmented Aggregations](/guides/plans-and-pricing/pricing-plans/pricing-plans-using-segmented-aggregations) for details.
* **Removing Aggregations?** You can remove an Aggregation from the Pricing Editor only if no active Pricing has been configured for a Plan to which the Aggregation has been linked. See [Removing Aggregations from the Pricing Editor](/guides/plans-and-pricing/pricing-plans/managing-and-editing-priced-plans-or-plan-templates#removing-aggregations-from-the-pricing-editor).
## Creating a Pricing for a Plan
When you have added a Plan to the Pricing Editor and linked it to the Aggregations you'll use for pricing, you can create the exact pricing structure you need for the Plan.
**To create a pricing for a Plan:**
1. To configure the precise Pricing you want to apply to a Plan using an Aggregation, select **Create Pricing**. The **Pricing** page opens:
* **Review Aggregation for Pricing**: Shows the details of the Aggregation at the top of the page for your reference as you price up a Plan.
* **Advanced and Wizard Pricing formats**: The default format when you open the Pricing page is to use the *Advanced* Pricing format. From there, you have the option of using a Pricing *Wizard* format.
> **WIZARD: Create Pricing using Wizard** - Steps **2** to **7**:
2. Select **Wizard.** The page adjusts to show the Wizard options:
* **Create new Plan Template?** You can also create a new Plan Template directly from the Pricing Editor in a similar way to creating a new Plan - see [Step 6 above](/guides/plans-and-pricing/pricing-plans/pricing-plans#setting-up-to-price-plansplan-templates-in-the-pricing-editor) - and you are returned to the Pricing Editor with the newly-created Plan Template added and ready for you to price up. See [Creating Plan Templates](/guides/plans-and-pricing/working-with-plan-templates-and-plans/creating-plan-templates).
* **Using Compound Aggregations for Pricing Plans?** If you've selected a Compound Aggregation to price a Plan, then this will be labeled as **COMPOUND** in the Pricing Editor. For more details on Compound Aggregations, see [Creating and Using Compound Aggregations](/guides/usage-data-aggregations/compound-aggregations).
* **Using Segmented Aggregation to Price a Plan?** If you want to use a Segmented Aggregation to price a Plan, see [Pricing Plans Using Segmented Aggregations](/guides/plans-and-pricing/pricing-plans/pricing-plans-using-segmented-aggregations) for details.
* **Removing Aggregations?** You can remove an Aggregation from the Pricing Editor only if no active Pricing has been configured for a Plan to which the Aggregation has been linked. See [Removing Aggregations from the Pricing Editor](/guides/plans-and-pricing/pricing-plans/managing-and-editing-priced-plans-or-plan-templates#removing-aggregations-from-the-pricing-editor).
## Creating a Pricing for a Plan
When you have added a Plan to the Pricing Editor and linked it to the Aggregations you'll use for pricing, you can create the exact pricing structure you need for the Plan.
**To create a pricing for a Plan:**
1. To configure the precise Pricing you want to apply to a Plan using an Aggregation, select **Create Pricing**. The **Pricing** page opens:
* **Review Aggregation for Pricing**: Shows the details of the Aggregation at the top of the page for your reference as you price up a Plan.
* **Advanced and Wizard Pricing formats**: The default format when you open the Pricing page is to use the *Advanced* Pricing format. From there, you have the option of using a Pricing *Wizard* format.
> **WIZARD: Create Pricing using Wizard** - Steps **2** to **7**:
2. Select **Wizard.** The page adjusts to show the Wizard options:
![]() * The Wizard offers four common pricing models, designed to let you quickly set up the core pricing structure you want for a Plan. You can then edit the pricing for other settings as required and to complete the Pricing configuration.
* Note that you can switch back to the Advanced Pricing Editor format at any time using the **Advanced** button. See **Step 8.** below.
3. Select the **Pricing type** you want to use to price the Plan:
* **Single price per unit**. This is the default option.
* **Price per unit, with free tier**.
* **Tiered pricing**.
* **Volume pricing**.
For example, select **Tiered pricing**.
4. Select **Next**. The page adjusts to allow you to configure a tiered pricing structure.
5. On the **Pricing Details** panel, enter:
* **Start** **date (inclusive)** and **End date (exclusive)** for the Pricing using the calendar pop-ups.
* **Accounting product**. For accounting purposes, select a Product that will be linked to any Bill *Usage* line items for this Pricing. (*Optional*)
* If you leave this blank, then the **Accounting product** selected for the Aggregation will be used instead.
* If you haven't defined an **Accounting product** for the Aggregation, then the Product the Plan belongs to is used.
* **Description**. Enter a custom description for *Usage* line items on Bills. (*Optional*)
6. On the **Pricing Settings** panel:
* Use the **Start (>)**, **End (\<=)**, and **Price per unit** fields to configure pricing bands.
7. Select **Create Pricing**. You are returned to the **Pricing Editor** where your priced Plan using the selected Aggregation is shown. If you want to apply any other available settings to complete the Pricing configuration, such as **Minimum Spend** settings, select **Edit** - see **Step 8**.
> **ADVANCED: Creating Pricing using Advanced** - Steps **8** to **13**:
8. Select **Advanced**. You can now enter the details of the Pricing you want for the Plan using the selected Aggregation.
9. On the **Pricing Details** panel , enter:
* **Start** **date (inclusive)** and **End date (exclusive)** for the Pricing using the calendar pop-ups. This defines the period the Pricing will apply to the Plan.
* **Accounting product**. For accounting purposes, select a Product that will be linked to any Bill *Usage* line items for this Pricing. (*Optional*)
* If you leave this blank, then the **Accounting product** selected for the Aggregation will be used instead.
* If you haven't defined an **Accounting product** for the Aggregation, then the Product the Plan belongs to is used.
* **Description**. Enter a custom description for *Usage* line items on Bills. (*Optional*)
10. On the **Minimum spend settings** panel, enter:
* **Minimum spend**. Enter a value for a minimum spend for this pricing.
* At billing, this minimum amount then applies to charges due under that specific pricing on an Account to which you've attached the Plan. For example, if you've attached a Plan to an Account and set a Minimum Spend for the pricing on the Plan of **140**, but the charges due at billing amount only to **120**, then a Minimum Spend Adjustment line item will be added to the Bill in the amount of **20**.
* Note that this adjustment of minimum spend for the pricing on the Plan is independent of any *Product Minimum Spend* defined for the Plan itself - if that is set at **150**, then a line item for Product Minimum Spend will also appear in the amount of **10** to bring the spend for Product up to the minimum after the minimum for the pricing has been adjusted. See [Understanding Billing Options for Plan Templates/Plans](/guides/plans-and-pricing/working-with-plan-templates-and-plans/understanding-billing-options-for-plan-templates-plans) for more details.
* **Minimum spend billing**. Allows you to control whether minimum spends are applied to Bills in advance or in arrears for the Pricing:
* **Use organization-wide configuration**. Default selection. If enabled, the setting selected at Organization level for Minimum spend billing will be used - it will be shown in brackets. If you select either of the other two options, the Organization level setting will be overridden. See [Viewing and Editing Organization Configuration](/guides/organization-and-access-management/viewing-and-editing-organization/viewing-and-editing-organization-configuration).
* **Bill in arrears (end of each billing period)**
* **Bill in advance (start of each billing period)**
* **Minimum spend description**. Enter a custom description for *minimum spend line items* on Bills.
**Tip: Default Usage and Minimum Spend Descriptions?** If you omit custom descriptions, then default usage and minimum spend descriptions will be shown for Bill line items- see [Bill Line Items - Default Descriptions](/guides/billing-and-usage-data/running-viewing-and-managing-bills/bill-line-items-default-descriptions) for details.
11. On the **Pricing Settings** panel, enter:
* **Usage accumulates for the entire plan contract period**. Enable this if you want usage accumulation for the Pricing - see [Reviewing Pricing Options for Plans and Plan Templates>Pricing Options](/guides/plans-and-pricing/pricing-plans/reviewing-pricing-options-and-pricing-plans#pricing-options).
* **Apply as**. Select for how you want this Pricing to apply to customer Accounts that you place on this priced Plan. Three options:
* **Debit**. The amount calculated using the Pricing is added to the bill as a debit. This is the default setting.
* Note that you cannot enter *negative* *values* for **Price per unit** or **Fixed price** when a Pricing is applied as a **Debit**.
* **Product Credit**. The amount calculated using the Pricing is added to the bill as a credit (negative amount), which reduces the bill total. To prevent negative billing, the bill will be capped at the total of other line items for the *same Product*.
* **Global Credit**. The amount calculated using the Pricing is added to the bill as a credit (negative amount), which reduces the bill total. To prevent negative billing, the bill will be capped at the total of other line items for the *entire bill*, which might include charges on the Account for *other Products*.
* **Pricing type**. Select the type of pricing structure you want to apply for this Plan - five options:
* **Tiered**
* **Volume**
* **Stairstep**
* **Custom Tiered**
* **Custom Volume**
> When you select a **Pricing type**, a help text is shown that explains how the pricing will be applied. For more details, see [Reviewing Pricing Options for Plans and Plan Templates](/guides/plans-and-pricing/pricing-plans/reviewing-pricing-options-and-pricing-plans).
* **Pricing Bands**. Define the pricing bands for the Pricing:
* The settings required to complete a **Pricing type** configuration vary. For example for **Tiered Pricing Bands**, use the **Start (>)**, **End (\<=)**, and **Price per unit** fields to configure pricing bands for the Pricing.
* **Negative Values?** If you've selected **Product credit** or **Global credit** for **Apply as**, you can enter negative values for **Price per unit** or **Fixed price**, but please review the implications of doing so in the [Using Negative Pricing for Plans](/guides/plans-and-pricing/pricing-plans/pricing-plans#using-negative-pricing-for-plans) section below.
* **Decimal Places?** For **Price per unit**, you can enter a value with up to 16 decimal places and preserve precision.
* Note that the **Start (>)** value for a pricing band is treated *exclusively* and the **End (\<=)** value is treated *inclusively*. In the following example, the bottom tier band means any unit measures greater than 0 up to and including 100 are priced at \$2 per unit; the second tier band means any unit measures greater than 100 up to and including 200 are priced at \$3 per unit; the third tier band means that any unit measures greater than 200 are priced at \$4 per unit:
* The Wizard offers four common pricing models, designed to let you quickly set up the core pricing structure you want for a Plan. You can then edit the pricing for other settings as required and to complete the Pricing configuration.
* Note that you can switch back to the Advanced Pricing Editor format at any time using the **Advanced** button. See **Step 8.** below.
3. Select the **Pricing type** you want to use to price the Plan:
* **Single price per unit**. This is the default option.
* **Price per unit, with free tier**.
* **Tiered pricing**.
* **Volume pricing**.
For example, select **Tiered pricing**.
4. Select **Next**. The page adjusts to allow you to configure a tiered pricing structure.
5. On the **Pricing Details** panel, enter:
* **Start** **date (inclusive)** and **End date (exclusive)** for the Pricing using the calendar pop-ups.
* **Accounting product**. For accounting purposes, select a Product that will be linked to any Bill *Usage* line items for this Pricing. (*Optional*)
* If you leave this blank, then the **Accounting product** selected for the Aggregation will be used instead.
* If you haven't defined an **Accounting product** for the Aggregation, then the Product the Plan belongs to is used.
* **Description**. Enter a custom description for *Usage* line items on Bills. (*Optional*)
6. On the **Pricing Settings** panel:
* Use the **Start (>)**, **End (\<=)**, and **Price per unit** fields to configure pricing bands.
7. Select **Create Pricing**. You are returned to the **Pricing Editor** where your priced Plan using the selected Aggregation is shown. If you want to apply any other available settings to complete the Pricing configuration, such as **Minimum Spend** settings, select **Edit** - see **Step 8**.
> **ADVANCED: Creating Pricing using Advanced** - Steps **8** to **13**:
8. Select **Advanced**. You can now enter the details of the Pricing you want for the Plan using the selected Aggregation.
9. On the **Pricing Details** panel , enter:
* **Start** **date (inclusive)** and **End date (exclusive)** for the Pricing using the calendar pop-ups. This defines the period the Pricing will apply to the Plan.
* **Accounting product**. For accounting purposes, select a Product that will be linked to any Bill *Usage* line items for this Pricing. (*Optional*)
* If you leave this blank, then the **Accounting product** selected for the Aggregation will be used instead.
* If you haven't defined an **Accounting product** for the Aggregation, then the Product the Plan belongs to is used.
* **Description**. Enter a custom description for *Usage* line items on Bills. (*Optional*)
10. On the **Minimum spend settings** panel, enter:
* **Minimum spend**. Enter a value for a minimum spend for this pricing.
* At billing, this minimum amount then applies to charges due under that specific pricing on an Account to which you've attached the Plan. For example, if you've attached a Plan to an Account and set a Minimum Spend for the pricing on the Plan of **140**, but the charges due at billing amount only to **120**, then a Minimum Spend Adjustment line item will be added to the Bill in the amount of **20**.
* Note that this adjustment of minimum spend for the pricing on the Plan is independent of any *Product Minimum Spend* defined for the Plan itself - if that is set at **150**, then a line item for Product Minimum Spend will also appear in the amount of **10** to bring the spend for Product up to the minimum after the minimum for the pricing has been adjusted. See [Understanding Billing Options for Plan Templates/Plans](/guides/plans-and-pricing/working-with-plan-templates-and-plans/understanding-billing-options-for-plan-templates-plans) for more details.
* **Minimum spend billing**. Allows you to control whether minimum spends are applied to Bills in advance or in arrears for the Pricing:
* **Use organization-wide configuration**. Default selection. If enabled, the setting selected at Organization level for Minimum spend billing will be used - it will be shown in brackets. If you select either of the other two options, the Organization level setting will be overridden. See [Viewing and Editing Organization Configuration](/guides/organization-and-access-management/viewing-and-editing-organization/viewing-and-editing-organization-configuration).
* **Bill in arrears (end of each billing period)**
* **Bill in advance (start of each billing period)**
* **Minimum spend description**. Enter a custom description for *minimum spend line items* on Bills.
**Tip: Default Usage and Minimum Spend Descriptions?** If you omit custom descriptions, then default usage and minimum spend descriptions will be shown for Bill line items- see [Bill Line Items - Default Descriptions](/guides/billing-and-usage-data/running-viewing-and-managing-bills/bill-line-items-default-descriptions) for details.
11. On the **Pricing Settings** panel, enter:
* **Usage accumulates for the entire plan contract period**. Enable this if you want usage accumulation for the Pricing - see [Reviewing Pricing Options for Plans and Plan Templates>Pricing Options](/guides/plans-and-pricing/pricing-plans/reviewing-pricing-options-and-pricing-plans#pricing-options).
* **Apply as**. Select for how you want this Pricing to apply to customer Accounts that you place on this priced Plan. Three options:
* **Debit**. The amount calculated using the Pricing is added to the bill as a debit. This is the default setting.
* Note that you cannot enter *negative* *values* for **Price per unit** or **Fixed price** when a Pricing is applied as a **Debit**.
* **Product Credit**. The amount calculated using the Pricing is added to the bill as a credit (negative amount), which reduces the bill total. To prevent negative billing, the bill will be capped at the total of other line items for the *same Product*.
* **Global Credit**. The amount calculated using the Pricing is added to the bill as a credit (negative amount), which reduces the bill total. To prevent negative billing, the bill will be capped at the total of other line items for the *entire bill*, which might include charges on the Account for *other Products*.
* **Pricing type**. Select the type of pricing structure you want to apply for this Plan - five options:
* **Tiered**
* **Volume**
* **Stairstep**
* **Custom Tiered**
* **Custom Volume**
> When you select a **Pricing type**, a help text is shown that explains how the pricing will be applied. For more details, see [Reviewing Pricing Options for Plans and Plan Templates](/guides/plans-and-pricing/pricing-plans/reviewing-pricing-options-and-pricing-plans).
* **Pricing Bands**. Define the pricing bands for the Pricing:
* The settings required to complete a **Pricing type** configuration vary. For example for **Tiered Pricing Bands**, use the **Start (>)**, **End (\<=)**, and **Price per unit** fields to configure pricing bands for the Pricing.
* **Negative Values?** If you've selected **Product credit** or **Global credit** for **Apply as**, you can enter negative values for **Price per unit** or **Fixed price**, but please review the implications of doing so in the [Using Negative Pricing for Plans](/guides/plans-and-pricing/pricing-plans/pricing-plans#using-negative-pricing-for-plans) section below.
* **Decimal Places?** For **Price per unit**, you can enter a value with up to 16 decimal places and preserve precision.
* Note that the **Start (>)** value for a pricing band is treated *exclusively* and the **End (\<=)** value is treated *inclusively*. In the following example, the bottom tier band means any unit measures greater than 0 up to and including 100 are priced at \$2 per unit; the second tier band means any unit measures greater than 100 up to and including 200 are priced at \$3 per unit; the third tier band means that any unit measures greater than 200 are priced at \$4 per unit:
![]() **Notes and Warnings:**
* **Important: Check on Price per unit!** When you are configuring a pricing for a Plan, bear in mind that this depends the **Quantity per unit** you've configured for the Aggregation used for pricing. For example, if you're using an Aggregation that is derived from a gigabytes Meter measure field and **Quantity per unit** is set at 500, a **Price per unit** of \$0.25 means that end customer Accounts put on the pricing Plan will be charged \$0.25 per 500 gigabytes used.
* **Using negative values?** If you've selected **Product credit** or **Global credit** for **Apply as**, you can enter negative values for **Price per unit** or **Fixed price**, but please review the implications of doing so in the [Using Negative Pricing for Plans](https://docs.m3ter.com/guides/plans-and-pricing/pricing-plans/pricing-plans#using-negative-pricing-for-plans) section below.
12. If required, you can use the **Prepayment / Balance Overage Pricing Settings** panel:
* For example, if you are setting up a **Tiered** pricing structure, you can set up pricing for overages on pricing bands. This overage Pricing you configure will then be used to charge for usage if the priced Plan is attached to an Account, the Account has a Prepayment or Balance applied to it, and the entire Prepayment/Balance amount has been consumed:
* Use the down arrow to expand the panel and select **Add**. The panel adjusts, and you can use the **Start (>)**, **End (\<=)**, and **Price per unit** fields to configure overage pricing bands.
**Overage Pricing - Notes and Warnings:**
* **Prepayment Overage Pricing is Restricted!**
* You can set up Prepayment overage pricing bands *only if* you are setting up **Tiered** Pricing on a Plan.
* If you've enabled **Usage accumulates over the entire contract period**, you cannot set up overage pricing for any Pricing type.
* **Important:** **Prepayment / Balance Overage surcharge percentage overrides Prepayment / Balance Overage pricing!** If you set up overage pricing on a tiered pricing structure when pricing a Plan that will apply to billing for a Prepayment / Balance and you have *also set up* overage surcharge percentage when creating the Prepayment / Balance for an Account, any overage usage charges on the Account will be billed at the *overage surcharge percentage rate* and the Prepayment / Balance *overage pricing will be ignored*.
* **Using negative values?** As with the main pricing bands, if you're setting up a **Debit** pricing *you cannot use negative values* for **Price per unit** or **Fixed price** in overage pricing bands. Only if you've selected **Product credit** or **Global credit** for **Apply as** can you enter negative values, but please review the implications of doing so in the [Using Negative Pricing for Plans](https://docs.m3ter.com/guides/plans-and-pricing/pricing-plans/pricing-plans#using-negative-pricing-for-plans) section below.
13. Select **Create Pricing**. You are returned to the **Pricing editor** and the pricing structure you’ve configured using each of the Aggregations is shown under the Plan:
**Notes and Warnings:**
* **Important: Check on Price per unit!** When you are configuring a pricing for a Plan, bear in mind that this depends the **Quantity per unit** you've configured for the Aggregation used for pricing. For example, if you're using an Aggregation that is derived from a gigabytes Meter measure field and **Quantity per unit** is set at 500, a **Price per unit** of \$0.25 means that end customer Accounts put on the pricing Plan will be charged \$0.25 per 500 gigabytes used.
* **Using negative values?** If you've selected **Product credit** or **Global credit** for **Apply as**, you can enter negative values for **Price per unit** or **Fixed price**, but please review the implications of doing so in the [Using Negative Pricing for Plans](https://docs.m3ter.com/guides/plans-and-pricing/pricing-plans/pricing-plans#using-negative-pricing-for-plans) section below.
12. If required, you can use the **Prepayment / Balance Overage Pricing Settings** panel:
* For example, if you are setting up a **Tiered** pricing structure, you can set up pricing for overages on pricing bands. This overage Pricing you configure will then be used to charge for usage if the priced Plan is attached to an Account, the Account has a Prepayment or Balance applied to it, and the entire Prepayment/Balance amount has been consumed:
* Use the down arrow to expand the panel and select **Add**. The panel adjusts, and you can use the **Start (>)**, **End (\<=)**, and **Price per unit** fields to configure overage pricing bands.
**Overage Pricing - Notes and Warnings:**
* **Prepayment Overage Pricing is Restricted!**
* You can set up Prepayment overage pricing bands *only if* you are setting up **Tiered** Pricing on a Plan.
* If you've enabled **Usage accumulates over the entire contract period**, you cannot set up overage pricing for any Pricing type.
* **Important:** **Prepayment / Balance Overage surcharge percentage overrides Prepayment / Balance Overage pricing!** If you set up overage pricing on a tiered pricing structure when pricing a Plan that will apply to billing for a Prepayment / Balance and you have *also set up* overage surcharge percentage when creating the Prepayment / Balance for an Account, any overage usage charges on the Account will be billed at the *overage surcharge percentage rate* and the Prepayment / Balance *overage pricing will be ignored*.
* **Using negative values?** As with the main pricing bands, if you're setting up a **Debit** pricing *you cannot use negative values* for **Price per unit** or **Fixed price** in overage pricing bands. Only if you've selected **Product credit** or **Global credit** for **Apply as** can you enter negative values, but please review the implications of doing so in the [Using Negative Pricing for Plans](https://docs.m3ter.com/guides/plans-and-pricing/pricing-plans/pricing-plans#using-negative-pricing-for-plans) section below.
13. Select **Create Pricing**. You are returned to the **Pricing editor** and the pricing structure you’ve configured using each of the Aggregations is shown under the Plan:
![]() * Note that in this example, the period the Pricing is active for the Plan spans the current date and therefore is shown in the pricing grid as **Active Pricing**. For details on how to view historic and future pricing for a Plan, see the [following section](/guides/plans-and-pricing/pricing-plans/pricing-plans#viewing-historic-and-future-pricing).
**Important! Only one Pricing for a Plan using an Aggregation at any point in time**. If you try to create a new Pricing for a Plan using an Aggregation and the start and end dates you define means the new Pricing would overlap with an existing Pricing for the Plan that uses the same Aggregation, then you'll receive an error message and won't be able to save the new Pricing. If you receive this error, please check the [Pricing Schedule](/guides/plans-and-pricing/pricing-plans/managing-and-editing-priced-plans-or-plan-templates#viewing-pricing-schedule) for the Plan/Aggregation for possible conflicts with the Pricing you're trying to set up.
**Tip: Editing, Viewing Details, or Deleting a Pricing?**
You can do any of these directly from the Pricing Grid:
* **Editing**. See [Editing a Pricing for a Priced Plan or Plan Template](/guides/plans-and-pricing/pricing-plans/managing-and-editing-priced-plans-or-plan-templates#editing-a-pricing-for-a-priced-plan-or-plan-template).
* **Viewing Details**. See [Viewing the Details of a Pricing on a Priced Plan or Plan Template](/guides/plans-and-pricing/pricing-plans/managing-and-editing-priced-plans-or-plan-templates#viewing-the-details-of-a-pricing-on-a-priced-plan-or-plan-template).
* **Deleting**. You can delete the pricing you've configured for a Plan.
* **Important!** However, you must take care if you intend to delete a priced Plan that you've attached to an Account for charging against that Account - Bills will no longer be generated for the Account. See [Deleting Pricing](/guides/plans-and-pricing/pricing-plans/managing-and-editing-priced-plans-or-plan-templates#deleting-pricing).
**Tip: Updating Pricing mid-billing period?** If you update the Pricing for the change to take effect mid-billing period, then a Bill line item for each change made will be produced for that period's Bill, regardless of the Aggregation method used in the Pricing.
## Viewing Historic and Future Pricing on a Plan
If you are working in the Pricing Editor, you can quickly view any historic or future Pricing for a Plan.
**To view historic and future Pricing for a Plan:**
1. Open the Pricing Editor and add a Plan. If the **Start date** and **End date** you've configured for a Pricing does not include the current date and the period the Pricing would be active for the Plan is in the past, then nothing will show under **Active Pricing**.
2. If any **Historic Pricing** has been configured, the left-hand arrow next to the Pricing Schedule calendar icon will be active and you can select this:
* Note that in this example, the period the Pricing is active for the Plan spans the current date and therefore is shown in the pricing grid as **Active Pricing**. For details on how to view historic and future pricing for a Plan, see the [following section](/guides/plans-and-pricing/pricing-plans/pricing-plans#viewing-historic-and-future-pricing).
**Important! Only one Pricing for a Plan using an Aggregation at any point in time**. If you try to create a new Pricing for a Plan using an Aggregation and the start and end dates you define means the new Pricing would overlap with an existing Pricing for the Plan that uses the same Aggregation, then you'll receive an error message and won't be able to save the new Pricing. If you receive this error, please check the [Pricing Schedule](/guides/plans-and-pricing/pricing-plans/managing-and-editing-priced-plans-or-plan-templates#viewing-pricing-schedule) for the Plan/Aggregation for possible conflicts with the Pricing you're trying to set up.
**Tip: Editing, Viewing Details, or Deleting a Pricing?**
You can do any of these directly from the Pricing Grid:
* **Editing**. See [Editing a Pricing for a Priced Plan or Plan Template](/guides/plans-and-pricing/pricing-plans/managing-and-editing-priced-plans-or-plan-templates#editing-a-pricing-for-a-priced-plan-or-plan-template).
* **Viewing Details**. See [Viewing the Details of a Pricing on a Priced Plan or Plan Template](/guides/plans-and-pricing/pricing-plans/managing-and-editing-priced-plans-or-plan-templates#viewing-the-details-of-a-pricing-on-a-priced-plan-or-plan-template).
* **Deleting**. You can delete the pricing you've configured for a Plan.
* **Important!** However, you must take care if you intend to delete a priced Plan that you've attached to an Account for charging against that Account - Bills will no longer be generated for the Account. See [Deleting Pricing](/guides/plans-and-pricing/pricing-plans/managing-and-editing-priced-plans-or-plan-templates#deleting-pricing).
**Tip: Updating Pricing mid-billing period?** If you update the Pricing for the change to take effect mid-billing period, then a Bill line item for each change made will be produced for that period's Bill, regardless of the Aggregation method used in the Pricing.
## Viewing Historic and Future Pricing on a Plan
If you are working in the Pricing Editor, you can quickly view any historic or future Pricing for a Plan.
**To view historic and future Pricing for a Plan:**
1. Open the Pricing Editor and add a Plan. If the **Start date** and **End date** you've configured for a Pricing does not include the current date and the period the Pricing would be active for the Plan is in the past, then nothing will show under **Active Pricing**.
2. If any **Historic Pricing** has been configured, the left-hand arrow next to the Pricing Schedule calendar icon will be active and you can select this:
 The Pricing Grid adjusts to show the **Historic Pricing**:
 3. If any **Future Pricing** has been configured, the right-hand arrow next to the Pricing Schedule calendar icon will be active and you can select this:
 The Pricing Grid adjusts to show the future pricing:
 If you select the calendar icon, the **Pricing schedule** page opens:
 * For more details on working with the **Pricing schedule**, see [Viewing Pricing Schedule](/guides/plans-and-pricing/pricing-plans/managing-and-editing-priced-plans-or-plan-templates#viewing-pricing-schedule).
## Using Negative Pricing for Plans
You *cannot enter negative amounts* for **Price per unit** or **Fixed price** when pricing a Plan if you've selected **Debit** for **Apply as**.
You *can enter negative amounts* for **Price per unit** or **Fixed price** when pricing a Plan if you've selected **Product credit** or **Global credit** for **Apply as**:
* Note that if you use negative **Price per unit** values combined with an **Apply as** setting of either **Product credit** or **Global Credit** in this way, then a double-negative effect occurs when the Bill is calculated and results in a positive Bill - as if you had configured the same unit charge rates as positive price per unit values with the **Apply as Debit** setting.
# Pricing Plans Using Segmented Aggregations
Source: https://docs.m3ter.com/guides/plans-and-pricing/pricing-plans/pricing-plans-using-segmented-aggregations
If you want to use a Segmented Aggregation to price up one of your Product Plans, the Pricing Editor is designed to help you quickly price the segments you've defined for the Aggregation. This topic explains how to use the Segmented Aggregation described in the [Segmented Aggregations](/guides/usage-data-aggregations/segmented-aggregations) topic to price a Plan:
* [Creating Segmented Pricings for Plans in the Console](/guides/plans-and-pricing/pricing-plans/pricing-plans-using-segmented-aggregations#creating-segmented-pricings-for-plans-in-the-console)
* [Reviewing Segmented Priced Plan Details](#reviewing-segmented-priced-plan-details)
* [Using an API call to Create a Segmented Pricing](/guides/plans-and-pricing/pricing-plans/pricing-plans-using-segmented-aggregations#using-api-call-to-create-a-segmented-pricing)
If you've set up a Compound Aggregation that references Segmented Aggregations, you can also use this to Price Plans:
* [Pricing with Compound Aggregations Based on Segmented Aggregations](/guides/plans-and-pricing/pricing-plans/pricing-plans-using-segmented-aggregations#pricing-with-compound-aggregations-based-on-segmented-aggregations)
**Notes & Warnings:**
* **Preparing to price Plans and Plan Templates using Segmented Aggregations!** We *strongly recommend* that before you attempt to price up Product Plans or Plan Templates using a Segmented Aggregation, you first review the [Pricing Plans and Plan Templates](/guides/plans-and-pricing/pricing-plans/pricing-plans) topic.
* **Pricing Plans in conjunction with tiered pricing!** Caution is required when using Segmented Aggregations in conjunction with a tiered pricing structure:
* Suppose you offer a service to perform background checks for companies on job application candidates. You want to offer 50 free background checks to your customers per billing period and then charge \$50 per 100 checks made after the first 50 free per billing period. If you had priced using a non-segmented Aggregation and a customer consumes 150 checks in total during a billing period, then the bill would amount to \$50. If however you use a Segmented Aggregation and your customer again consumes a total of 150 checks but across 3 segmented values and at 50 checks for each value, then the 50 free tier is applied separately to each segment and the bill amount will be \$0.
## Creating Segmented Pricings for Plans in the Console
When you use a Segmented Aggregation to price one of your Product Plans, you must create a separate pricing for each segment value you've defined. You can do this using the Console's Pricing Editor.
**To price a Plan using a Segmented Aggregation:**
1. Select **Pricing>Pricing editor**. The **Pricing editor** opens.
2. In the **Product** drop-down, select the Product for which you want to add a Plan to price up.
3. Select **Add Plans**. A **Select Plans** popup appears and lists the Plans created for the Product.
4. Select the Plan or Plans you want to price and select **Confirm**. You are returned to the **Pricing** page where the selected **Plan** is shown. A warning states that no pricing has yet been configured for the Plan.
5. Select **Add aggregations**. A **Select Aggregations** popup appears listing the Aggregations created for the Product.
**Notes: Selecting Aggregations for Pricing.**
* **Available Aggregations:** Only those Aggregations belonging to the same Product as the Plan and any Global Aggregations in your Organization are shown for selection in the popup.
* **Duplicating Aggregations:** You cannot add the same Aggregation more than once for pricing a Plan and any Aggregations you've already added will no longer be available for selection in the popup.
6. Select the Segmented Aggregation you want to use to price the Plan and select **Confirm**. The popup closes, you are returned to the Pricing Editor where the Segmented Aggregation is shown ready for pricing. A warning states that no active pricing is yet configured.
7. Select **Edit segmented pricing**. The **Pricing>Segments** page opens:
* An **Aggregation details** and **Plan Details** panel are shown.
* A **Segmented pricing** grid allows you to create the pricing for each segment value you have configured for the Segmented Aggregation.
**Tip: Filter Grid?** You can use the filter fields at the head of each segment field column to filter the grid.
8. To configure a price for a segment value, select **Create plan pricing**. A **Pricing** page opens for the segment value, which mimics the Pricing page for a simple Aggregation that is not segmented - you can use either a **Pricing Wizard** workflow or choose to use the **Advanced Pricing** configuration options. See [Creating a Pricing for a Plan](/guides/plans-and-pricing/pricing-plans/pricing-plans#creating-a-pricing-for-a-plan) for more guidance.
9. Use the **Pricing** page to configure the precise pricing you want to apply to the segment value and select **Create Pricing**:
* For more details on working with the **Pricing schedule**, see [Viewing Pricing Schedule](/guides/plans-and-pricing/pricing-plans/managing-and-editing-priced-plans-or-plan-templates#viewing-pricing-schedule).
## Using Negative Pricing for Plans
You *cannot enter negative amounts* for **Price per unit** or **Fixed price** when pricing a Plan if you've selected **Debit** for **Apply as**.
You *can enter negative amounts* for **Price per unit** or **Fixed price** when pricing a Plan if you've selected **Product credit** or **Global credit** for **Apply as**:
* Note that if you use negative **Price per unit** values combined with an **Apply as** setting of either **Product credit** or **Global Credit** in this way, then a double-negative effect occurs when the Bill is calculated and results in a positive Bill - as if you had configured the same unit charge rates as positive price per unit values with the **Apply as Debit** setting.
# Pricing Plans Using Segmented Aggregations
Source: https://docs.m3ter.com/guides/plans-and-pricing/pricing-plans/pricing-plans-using-segmented-aggregations
If you want to use a Segmented Aggregation to price up one of your Product Plans, the Pricing Editor is designed to help you quickly price the segments you've defined for the Aggregation. This topic explains how to use the Segmented Aggregation described in the [Segmented Aggregations](/guides/usage-data-aggregations/segmented-aggregations) topic to price a Plan:
* [Creating Segmented Pricings for Plans in the Console](/guides/plans-and-pricing/pricing-plans/pricing-plans-using-segmented-aggregations#creating-segmented-pricings-for-plans-in-the-console)
* [Reviewing Segmented Priced Plan Details](#reviewing-segmented-priced-plan-details)
* [Using an API call to Create a Segmented Pricing](/guides/plans-and-pricing/pricing-plans/pricing-plans-using-segmented-aggregations#using-api-call-to-create-a-segmented-pricing)
If you've set up a Compound Aggregation that references Segmented Aggregations, you can also use this to Price Plans:
* [Pricing with Compound Aggregations Based on Segmented Aggregations](/guides/plans-and-pricing/pricing-plans/pricing-plans-using-segmented-aggregations#pricing-with-compound-aggregations-based-on-segmented-aggregations)
**Notes & Warnings:**
* **Preparing to price Plans and Plan Templates using Segmented Aggregations!** We *strongly recommend* that before you attempt to price up Product Plans or Plan Templates using a Segmented Aggregation, you first review the [Pricing Plans and Plan Templates](/guides/plans-and-pricing/pricing-plans/pricing-plans) topic.
* **Pricing Plans in conjunction with tiered pricing!** Caution is required when using Segmented Aggregations in conjunction with a tiered pricing structure:
* Suppose you offer a service to perform background checks for companies on job application candidates. You want to offer 50 free background checks to your customers per billing period and then charge \$50 per 100 checks made after the first 50 free per billing period. If you had priced using a non-segmented Aggregation and a customer consumes 150 checks in total during a billing period, then the bill would amount to \$50. If however you use a Segmented Aggregation and your customer again consumes a total of 150 checks but across 3 segmented values and at 50 checks for each value, then the 50 free tier is applied separately to each segment and the bill amount will be \$0.
## Creating Segmented Pricings for Plans in the Console
When you use a Segmented Aggregation to price one of your Product Plans, you must create a separate pricing for each segment value you've defined. You can do this using the Console's Pricing Editor.
**To price a Plan using a Segmented Aggregation:**
1. Select **Pricing>Pricing editor**. The **Pricing editor** opens.
2. In the **Product** drop-down, select the Product for which you want to add a Plan to price up.
3. Select **Add Plans**. A **Select Plans** popup appears and lists the Plans created for the Product.
4. Select the Plan or Plans you want to price and select **Confirm**. You are returned to the **Pricing** page where the selected **Plan** is shown. A warning states that no pricing has yet been configured for the Plan.
5. Select **Add aggregations**. A **Select Aggregations** popup appears listing the Aggregations created for the Product.
**Notes: Selecting Aggregations for Pricing.**
* **Available Aggregations:** Only those Aggregations belonging to the same Product as the Plan and any Global Aggregations in your Organization are shown for selection in the popup.
* **Duplicating Aggregations:** You cannot add the same Aggregation more than once for pricing a Plan and any Aggregations you've already added will no longer be available for selection in the popup.
6. Select the Segmented Aggregation you want to use to price the Plan and select **Confirm**. The popup closes, you are returned to the Pricing Editor where the Segmented Aggregation is shown ready for pricing. A warning states that no active pricing is yet configured.
7. Select **Edit segmented pricing**. The **Pricing>Segments** page opens:
* An **Aggregation details** and **Plan Details** panel are shown.
* A **Segmented pricing** grid allows you to create the pricing for each segment value you have configured for the Segmented Aggregation.
**Tip: Filter Grid?** You can use the filter fields at the head of each segment field column to filter the grid.
8. To configure a price for a segment value, select **Create plan pricing**. A **Pricing** page opens for the segment value, which mimics the Pricing page for a simple Aggregation that is not segmented - you can use either a **Pricing Wizard** workflow or choose to use the **Advanced Pricing** configuration options. See [Creating a Pricing for a Plan](/guides/plans-and-pricing/pricing-plans/pricing-plans#creating-a-pricing-for-a-plan) for more guidance.
9. Use the **Pricing** page to configure the precise pricing you want to apply to the segment value and select **Create Pricing**:
 * Above shows the first two for China location under **Segmented pricing**.
* Repeat Steps 8 and 9 to create the pricing for all segment values:
10. When you return to the **Pricing Editor**, you'll see the pricing you've configured using the Segmented Aggregation has been saved - in this example **6/6** (6 of 6) segments are now priced:
* Above shows the first two for China location under **Segmented pricing**.
* Repeat Steps 8 and 9 to create the pricing for all segment values:
10. When you return to the **Pricing Editor**, you'll see the pricing you've configured using the Segmented Aggregation has been saved - in this example **6/6** (6 of 6) segments are now priced:
![]() ## Reviewing Segmented Priced Plan Details
If you open the **Plan details** page of a Plan you've priced using a Segmented Aggregation, under **Pricing** you can review and manage the each segment's pricing. For the current example:
## Reviewing Segmented Priced Plan Details
If you open the **Plan details** page of a Plan you've priced using a Segmented Aggregation, under **Pricing** you can review and manage the each segment's pricing. For the current example:
![Create Plans46]() * For the current example, we'll select the **type** and **location** for the segment pricing to review:
* For the current example, we'll select the **type** and **location** for the segment pricing to review:
![Create Plans47]() * Note that you can **Edit segmented pricing** from this panel.
* When you've selected a specific segment pricing, you can then view any historic or future pricing for that segment applied to the Plan using the paging arrows at the bottom of the **Pricing** card:
* Note that you can **Edit segmented pricing** from this panel.
* When you've selected a specific segment pricing, you can then view any historic or future pricing for that segment applied to the Plan using the paging arrows at the bottom of the **Pricing** card:
![Create Plans53]() * Lastly, you can select the **View pricing schedule** hotlink to open the **Pricing schedule** for the selected segment pricing applied to the Plan:
* Lastly, you can select the **View pricing schedule** hotlink to open the **Pricing schedule** for the selected segment pricing applied to the Plan:
![Create Plans54]() * See [Viewing Pricing Schedule](https://docs.m3ter.com/guides/plans-and-pricing/pricing-plans/managing-and-editing-priced-plans-or-plan-templates#viewing-pricing-schedule) for more details.
## Using API Call to Create a Segmented Pricing
Instead of using the Console Pricing Editor, you can use the [Create Pricing](/api/pricing/create-pricing) API call to create a pricing on a Plan using a Segmented Aggregation. When you do this, you can create a separate pricing for each of the segment values defined for the Segmented Aggregation. You can also create a pricing using wildcards to satisfy cases where you only want a specific pricing to apply to some of the segment values and apply a common pricing to any of the other segment values.
This section uses the example of a Segmented Aggregation defined in the main [Segmented Aggregations](/guides/usage-data-aggregations/segmented-aggregations) topic to show how to:
* [Create a pricing for a specific segment value](/guides/plans-and-pricing/pricing-plans/pricing-plans-using-segmented-aggregations#api-call-creating-a-pricing-for-a-segment).
* [Create wildcard pricings](/guides/plans-and-pricing/pricing-plans/pricing-plans-using-segmented-aggregations#api-call-creating-wildcard-pricings-for-segments) to apply to segment values for which no specific pricing has been created
### API Call - Creating a Pricing for a Segment
We'll adapt the previous example to imagine we want to price a Plan using a Segmented Aggregation called **Hiring Check 4**:
* See [Viewing Pricing Schedule](https://docs.m3ter.com/guides/plans-and-pricing/pricing-plans/managing-and-editing-priced-plans-or-plan-templates#viewing-pricing-schedule) for more details.
## Using API Call to Create a Segmented Pricing
Instead of using the Console Pricing Editor, you can use the [Create Pricing](/api/pricing/create-pricing) API call to create a pricing on a Plan using a Segmented Aggregation. When you do this, you can create a separate pricing for each of the segment values defined for the Segmented Aggregation. You can also create a pricing using wildcards to satisfy cases where you only want a specific pricing to apply to some of the segment values and apply a common pricing to any of the other segment values.
This section uses the example of a Segmented Aggregation defined in the main [Segmented Aggregations](/guides/usage-data-aggregations/segmented-aggregations) topic to show how to:
* [Create a pricing for a specific segment value](/guides/plans-and-pricing/pricing-plans/pricing-plans-using-segmented-aggregations#api-call-creating-a-pricing-for-a-segment).
* [Create wildcard pricings](/guides/plans-and-pricing/pricing-plans/pricing-plans-using-segmented-aggregations#api-call-creating-wildcard-pricings-for-segments) to apply to segment values for which no specific pricing has been created
### API Call - Creating a Pricing for a Segment
We'll adapt the previous example to imagine we want to price a Plan using a Segmented Aggregation called **Hiring Check 4**:
![]() The **Hiring Check 4** Segmented Aggregation defines three segment values using **Location** and **Type** fields:
The **Hiring Check 4** Segmented Aggregation defines three segment values using **Location** and **Type** fields:
![]() If we select to **Edit segmented pricing**, **Pricing>Segments** page opens. Under **Segmented pricing**, the Pricing Grid shows that no active pricings have been configured for any of the three segment values:
If we select to **Edit segmented pricing**, **Pricing>Segments** page opens. Under **Segmented pricing**, the Pricing Grid shows that no active pricings have been configured for any of the three segment values:
![]() **To create a segment value pricing:**
1. Make a `POST` [Create Pricing](/api/pricing/create-pricing) call to create a pricing for the *Location = China/Type = Standard* segment value:
**To create a segment value pricing:**
1. Make a `POST` [Create Pricing](/api/pricing/create-pricing) call to create a pricing for the *Location = China/Type = Standard* segment value:
![]() Here's the request body JSON:
```json theme={null}
{
"planId": "12f2e595-d758-4d68-a492-d923bbxxxxxx",
"aggregationId": "2a6db6df-26de-481e-8974-e1a43fxxxxxx",
"segment": {
"location": "China",
"type": "Standard"
},
"cumulative": true,
"tiersSpanPlan": false,
"pricingBands": [
{
"lowerLimit": 0,
"fixedPrice": 0,
"unitPrice": 0.25
}
],
"startDate": "2023-11-01T14:15:22Z",
"endDate": "2024-11-01T14:15:22Z",
"minimumSpend": 0,
"minimumSpendDescription": ""
}
```
Note that:
* The `planId` parameter is required.
* The `aggregationId` of the Segmented Aggregation is a required request parameter for each segment pricing you create.
* Use the `segment` request parameter to specify which segment defined for the Segmented Aggregation you want the pricing to apply to.
* Use the `pricingBands` request parameter to define the pricing - in this example, a single tier pricing has been defined.
If the segment pricing has been created successfully, you'll receive a 200 response and a response body similar to this:
Here's the request body JSON:
```json theme={null}
{
"planId": "12f2e595-d758-4d68-a492-d923bbxxxxxx",
"aggregationId": "2a6db6df-26de-481e-8974-e1a43fxxxxxx",
"segment": {
"location": "China",
"type": "Standard"
},
"cumulative": true,
"tiersSpanPlan": false,
"pricingBands": [
{
"lowerLimit": 0,
"fixedPrice": 0,
"unitPrice": 0.25
}
],
"startDate": "2023-11-01T14:15:22Z",
"endDate": "2024-11-01T14:15:22Z",
"minimumSpend": 0,
"minimumSpendDescription": ""
}
```
Note that:
* The `planId` parameter is required.
* The `aggregationId` of the Segmented Aggregation is a required request parameter for each segment pricing you create.
* Use the `segment` request parameter to specify which segment defined for the Segmented Aggregation you want the pricing to apply to.
* Use the `pricingBands` request parameter to define the pricing - in this example, a single tier pricing has been defined.
If the segment pricing has been created successfully, you'll receive a 200 response and a response body similar to this:
![]() Note that:
* The pricing `id` is given.
* Each pricing band `id` is given.
2. If we return to **Pricing>Segments** and refresh the page, we can check that the **Segmented pricing** grid is now showing for the specified segment value:
Note that:
* The pricing `id` is given.
* Each pricing band `id` is given.
2. If we return to **Pricing>Segments** and refresh the page, we can check that the **Segmented pricing** grid is now showing for the specified segment value:
![]() ### API Call - Creating Wildcard Pricings for Segments
If you've created a Segmented Aggregation and defined multiple segment values, you might have a pricing use case that requires only some of those segment values to have their own specific pricing defined and for the remainder of the segments to be priced together using a common or default pricing. You can do this by using wildcard values for some or all of the fields used to define segments. This section illustrates with two example how to create such wildcard pricings for your Segmented Aggregations using the [Create Pricing](/api/pricing/create-pricing) API call.
#### Creating Double-Wildcard Default Segment Pricing
Suppose the pricing requirements for the current example of a three-value Segmented Aggregation is that for one segment value - *Location = China/Type = Standard* - a specific pricing will apply but for the remaining two segment values - *Location = USA/Type = Complete* and *Location = UK/Type = Extended* - a common pricing will apply.
To implement this, you'll first have to define a wildcard segment value for the Segmented Aggregation:
* In the Console, open the **Edit** page for the **Hiring Check 4** Aggregation and select **Add default segment**:
### API Call - Creating Wildcard Pricings for Segments
If you've created a Segmented Aggregation and defined multiple segment values, you might have a pricing use case that requires only some of those segment values to have their own specific pricing defined and for the remainder of the segments to be priced together using a common or default pricing. You can do this by using wildcard values for some or all of the fields used to define segments. This section illustrates with two example how to create such wildcard pricings for your Segmented Aggregations using the [Create Pricing](/api/pricing/create-pricing) API call.
#### Creating Double-Wildcard Default Segment Pricing
Suppose the pricing requirements for the current example of a three-value Segmented Aggregation is that for one segment value - *Location = China/Type = Standard* - a specific pricing will apply but for the remaining two segment values - *Location = USA/Type = Complete* and *Location = UK/Type = Extended* - a common pricing will apply.
To implement this, you'll first have to define a wildcard segment value for the Segmented Aggregation:
* In the Console, open the **Edit** page for the **Hiring Check 4** Aggregation and select **Add default segment**:
![]() * Select **Update Aggregation**.
* Return to the **Segmented pricing** grid for the Segmented Aggregation - we can see that this double-wildcard default segment value has no pricing yet created for it:
* Select **Update Aggregation**.
* Return to the **Segmented pricing** grid for the Segmented Aggregation - we can see that this double-wildcard default segment value has no pricing yet created for it:
![]() We can now create a pricing for this double-wildcard default segment. This pricing will then be applied to any usage data submitted for any undefined segment values.
**To create a double-wildcard segment value pricing:**
1. Make a `POST` [Create Pricing](/api/pricing/create-pricing) call:
We can now create a pricing for this double-wildcard default segment. This pricing will then be applied to any usage data submitted for any undefined segment values.
**To create a double-wildcard segment value pricing:**
1. Make a `POST` [Create Pricing](/api/pricing/create-pricing) call:
![]() Here's the request body JSON:
```json theme={null}
{
"planId": "12f2e595-d758-4d68-a492-d923bb1xxxxx",
"aggregationId": "2a6db6df-26de-481e-8974-e1a43f12xxxx",
"segment": {},
"cumulative": true,
"tiersSpanPlan": false,
"pricingBands": [
{
"lowerLimit": 0,
"fixedPrice": 0,
"unitPrice": 0.50
}
],
"startDate": "2023-11-01T14:15:22Z",
"endDate": "2024-11-01T14:15:22Z",
"minimumSpend": 0,
"minimumSpendDescription": ""
}
```
* Note that for the `segment` request parameter we leave this empty and omit any use of a `"location"` value or `"type"` value to create a double-wildcard pricing.
2. If we return to **Pricing>Segments** and refresh the page, we can check that the **Segmented pricing** grid is now showing for the wildcard segment value:
Here's the request body JSON:
```json theme={null}
{
"planId": "12f2e595-d758-4d68-a492-d923bb1xxxxx",
"aggregationId": "2a6db6df-26de-481e-8974-e1a43f12xxxx",
"segment": {},
"cumulative": true,
"tiersSpanPlan": false,
"pricingBands": [
{
"lowerLimit": 0,
"fixedPrice": 0,
"unitPrice": 0.50
}
],
"startDate": "2023-11-01T14:15:22Z",
"endDate": "2024-11-01T14:15:22Z",
"minimumSpend": 0,
"minimumSpendDescription": ""
}
```
* Note that for the `segment` request parameter we leave this empty and omit any use of a `"location"` value or `"type"` value to create a double-wildcard pricing.
2. If we return to **Pricing>Segments** and refresh the page, we can check that the **Segmented pricing** grid is now showing for the wildcard segment value:
![]() * With this double-wildcard default pricing created, any usage submitted for *Location/Type* Data Fields on our usage Meter and which do not have a corresponding segment defined for the **Hire Check 4** Segmented Aggregation will have this pricing applied for billing purposes.
**Important! Segments added to the Aggregation and which do not have Pricing created for them yet,** ***DO NOT*** **have the default segment pricing applied**. In the current example, if we now want the default segment pricing to be applied to usage data submitted for either *Location = USA/Type = Complete* or *Location = UK/Type = Extended*, we first have to update the **Hire Check 4** Segmented Aggregation and delete them from the Aggregation.
* With this double-wildcard default pricing created, any usage submitted for *Location/Type* Data Fields on our usage Meter and which do not have a corresponding segment defined for the **Hire Check 4** Segmented Aggregation will have this pricing applied for billing purposes.
**Important! Segments added to the Aggregation and which do not have Pricing created for them yet,** ***DO NOT*** **have the default segment pricing applied**. In the current example, if we now want the default segment pricing to be applied to usage data submitted for either *Location = USA/Type = Complete* or *Location = UK/Type = Extended*, we first have to update the **Hire Check 4** Segmented Aggregation and delete them from the Aggregation.
![]() #### Creating Single-Wildcard Segment Pricing
Lastly, you might want to create a pricing for a Segmented Aggregation that uses a single wildcard. In the current Example, suppose we define a segment value on **Hiring Check 4** for *Location = Germany/Type = Any*, since we want to apply the same pricing to any checks made for candidates located in Germany and regardless of the Type of check performed:
#### Creating Single-Wildcard Segment Pricing
Lastly, you might want to create a pricing for a Segmented Aggregation that uses a single wildcard. In the current Example, suppose we define a segment value on **Hiring Check 4** for *Location = Germany/Type = Any*, since we want to apply the same pricing to any checks made for candidates located in Germany and regardless of the Type of check performed:
![]() * Select **Update Aggregation**.
* Return to the **Segmented Pricing** grid for the Segmented Aggregation - we can see that this single-wildcard segment value has no pricing yet created for it:
* Select **Update Aggregation**.
* Return to the **Segmented Pricing** grid for the Segmented Aggregation - we can see that this single-wildcard segment value has no pricing yet created for it:
![]() We can now create a pricing for this single-wildcard pricing.
**To create a single-wildcard segment value pricing:**
1. Make a `POST` [Create Pricing](/api/pricing/create-pricing) call:
We can now create a pricing for this single-wildcard pricing.
**To create a single-wildcard segment value pricing:**
1. Make a `POST` [Create Pricing](/api/pricing/create-pricing) call:
![]() Here's the request body JSON:
```json theme={null}
{
"planId": "12f2e595-d758-4d68-a492-d923bb174981",
"aggregationId": "2a6db6df-26de-481e-8974-e1a43f121719",
"segment": {
"location": "Germany"
},
"cumulative": true,
"tiersSpanPlan": false,
"pricingBands": [
{
"lowerLimit": 0,
"fixedPrice": 0,
"unitPrice": 0.75
}
],
"startDate": "2023-11-01T14:15:22Z",
"endDate": "2024-11-01T14:15:22Z",
"minimumSpend": 0,
"minimumSpendDescription": ""
}
```
* Note that for the `segment` request parameter, we use a "location" value and omit any `"type"` to create a single-wildcard pricing.
2. If we return to **Pricing>Segments** and refresh the page, we can check that the **Segmented pricing** grid is now showing for the wildcard segment value:
Here's the request body JSON:
```json theme={null}
{
"planId": "12f2e595-d758-4d68-a492-d923bb174981",
"aggregationId": "2a6db6df-26de-481e-8974-e1a43f121719",
"segment": {
"location": "Germany"
},
"cumulative": true,
"tiersSpanPlan": false,
"pricingBands": [
{
"lowerLimit": 0,
"fixedPrice": 0,
"unitPrice": 0.75
}
],
"startDate": "2023-11-01T14:15:22Z",
"endDate": "2024-11-01T14:15:22Z",
"minimumSpend": 0,
"minimumSpendDescription": ""
}
```
* Note that for the `segment` request parameter, we use a "location" value and omit any `"type"` to create a single-wildcard pricing.
2. If we return to **Pricing>Segments** and refresh the page, we can check that the **Segmented pricing** grid is now showing for the wildcard segment value:
![]() * With this single-wildcard pricing created, any usage for *Location = Germany*, whether of *Type = Standard*, *Type = Complete*, or *Type = Extended*, will be charged according to this pricing.
**Tip: Using Wildcards for Segment Values - Evaluation Order?** If you use a mix of specific segment values and wildcard segment values, you might be wondering in what order evaluation occurs when usage data is ingested for different segment values. For details, see [Using Wildcards - Order of Evaluation](/guides/usage-data-aggregations/segmented-aggregations#using-wildcards-order-of-evaluation).
## Pricing with Compound Aggregations Based on Segmented Aggregations
You cannot define segments directly for a Compound Aggregation. However, if you've created a Compound Aggregation that references one or more Segmented Aggregations, you can also use the Compound Aggregation to price a Plan by segments defined for the Segmented Aggregations:
* The Compound Aggregation *does not inherit* any of the pricings for segments you might have configured when using the referenced Segmented Aggregations to price Plans.
* The segments set up on the referenced Segmented Aggregations are available to the Compound Aggregation to price a Plan by:
* If *only one* Segmented Aggregation is referenced, then all of the segments are available for pricing using the Compound Aggregation.
* If *two or more* Segmented Aggregations are referenced, then the segments available for pricing are restricted to those segments that are defined in common or intersect across any of the referenced Segmented Aggregations - see below [Compound Aggregations - Segments Available](/guides/plans-and-pricing/pricing-plans/pricing-plans-using-segmented-aggregations#compound-aggregations-segments-available).
**To price with Compound Aggregation based on Segmented Aggregations:**
1. Select **Pricing>Pricing Editor**. The **Pricing** page opens.
2. In the **Product** drop-down, select the Product for which you want to add a Plan to price up.
3. Select **Add Plans**. A **Select Plans** popup appears and lists the Plans created for the Product.
4. Select the Plan or Plans you want to price and select **Confirm**. You are returned to the **Pricing** page where the selected **Plan** is shown. A warning states that no pricing has yet been configured for the Plan.
5. Select **Add compound aggregations**. A **Select Compound Aggregations** popup appears listing the Aggregations created for the Product.
6. Select the Compound Aggregation based on Segmented Aggregations you want to use to price the Plan and select **Confirm**. The popup closes, you are returned to the Pricing Editor, and the Segmented Aggregation is shown ready for pricing. A warning states that no active pricing is yet configured for any of the available segments:
* With this single-wildcard pricing created, any usage for *Location = Germany*, whether of *Type = Standard*, *Type = Complete*, or *Type = Extended*, will be charged according to this pricing.
**Tip: Using Wildcards for Segment Values - Evaluation Order?** If you use a mix of specific segment values and wildcard segment values, you might be wondering in what order evaluation occurs when usage data is ingested for different segment values. For details, see [Using Wildcards - Order of Evaluation](/guides/usage-data-aggregations/segmented-aggregations#using-wildcards-order-of-evaluation).
## Pricing with Compound Aggregations Based on Segmented Aggregations
You cannot define segments directly for a Compound Aggregation. However, if you've created a Compound Aggregation that references one or more Segmented Aggregations, you can also use the Compound Aggregation to price a Plan by segments defined for the Segmented Aggregations:
* The Compound Aggregation *does not inherit* any of the pricings for segments you might have configured when using the referenced Segmented Aggregations to price Plans.
* The segments set up on the referenced Segmented Aggregations are available to the Compound Aggregation to price a Plan by:
* If *only one* Segmented Aggregation is referenced, then all of the segments are available for pricing using the Compound Aggregation.
* If *two or more* Segmented Aggregations are referenced, then the segments available for pricing are restricted to those segments that are defined in common or intersect across any of the referenced Segmented Aggregations - see below [Compound Aggregations - Segments Available](/guides/plans-and-pricing/pricing-plans/pricing-plans-using-segmented-aggregations#compound-aggregations-segments-available).
**To price with Compound Aggregation based on Segmented Aggregations:**
1. Select **Pricing>Pricing Editor**. The **Pricing** page opens.
2. In the **Product** drop-down, select the Product for which you want to add a Plan to price up.
3. Select **Add Plans**. A **Select Plans** popup appears and lists the Plans created for the Product.
4. Select the Plan or Plans you want to price and select **Confirm**. You are returned to the **Pricing** page where the selected **Plan** is shown. A warning states that no pricing has yet been configured for the Plan.
5. Select **Add compound aggregations**. A **Select Compound Aggregations** popup appears listing the Aggregations created for the Product.
6. Select the Compound Aggregation based on Segmented Aggregations you want to use to price the Plan and select **Confirm**. The popup closes, you are returned to the Pricing Editor, and the Segmented Aggregation is shown ready for pricing. A warning states that no active pricing is yet configured for any of the available segments:
![]() 7. Select **Edit segmented pricing**. The **Pricing>Segments** page opens:
* An **Aggregation details** and **Plan Details** panel are shown.
* Under **Segmented pricing**, a grid allows you to create the pricing for each available segment configured for the referenced Segmented Aggregations:
7. Select **Edit segmented pricing**. The **Pricing>Segments** page opens:
* An **Aggregation details** and **Plan Details** panel are shown.
* Under **Segmented pricing**, a grid allows you to create the pricing for each available segment configured for the referenced Segmented Aggregations:
![]() In this example, **Hiring Check Compound1** references a *single* Segmented Aggregation - **Hiring Check** - which has six segments defined and therefore there are 6 segments available to price, but we've chosen to price only **4/6** (4 of 6) segments:
In this example, **Hiring Check Compound1** references a *single* Segmented Aggregation - **Hiring Check** - which has six segments defined and therefore there are 6 segments available to price, but we've chosen to price only **4/6** (4 of 6) segments:
![]() ### Compound Aggregations - Segments Available
The Segments available for pricing using a Compound Aggregation depends on how many Segmented Aggregations are referenced:
* If a *single* Segmented Aggregation is referenced, then all segments defined are available.
* If *two or more* are referenced, then only those segments defined in common or which intersect across the referenced Segmented Aggregations are available.
For example, suppose we've set up **Hiring Check 1** Aggregation and defined the following segments on it for `"location"` and `"type"` fields:
```json theme={null}
{"location" : "China", "type" : "Extended"}
{"location" : "China", "type" : "Complete"}
{"location" : "USA", "type" : "Extended"}
{"location" : "USA", "type" : "Standard"}
{"location" : "UK", "type" : "Standard"}
{"location" : "UK", "type" : "Complete"}
```
We've then set up a second **Hiring Check 2** Aggregation and defined the following segments on it for `"location"` and `"type"` fields:
```json theme={null}
{"location" : "China", "type" : "Standard"}
{"location" : "China", "type" : "Complete"}
{"location" : "USA", "type" : "Complete"}
{"location" : "USA", "type" : "Standard"}
{"location" : "UK", "type" : "Extended"}
{"location" : "UK", "type" : "Complete"}
```
If we now create a Compound Aggregation - **Hiring Check Compound** - that references both **Hiring Check 1** and **Hiring Check 2**, then only the following three segments will be available to **Hiring Check Compound**:
```json theme={null}
{"location" : "China", "type" : "Complete"}
{"location" : "USA", "type" : "Standard"}
{"location" : "UK", "type" : "Complete"}
```
# Reviewing Pricing Options for Plans and Plan Templates
Source: https://docs.m3ter.com/guides/plans-and-pricing/pricing-plans/reviewing-pricing-options-and-pricing-plans
In the *Pricing Editor*, when you’ve added an Aggregation for a Plan or Plan Template, there are various options available to configure the exact pricing structure you want using that Aggregation. As preparation for performing this configuration work, this topic provides a review of the configuration options available for creating a Pricing for a Product Plan or Template:
* [Pricing Options](/guides/plans-and-pricing/pricing-plans/reviewing-pricing-options-and-pricing-plans#pricing-options)
A key part of pricing Plans and Plan Templates in m3ter is choosing the appropriate *Pricing Type*, one that will best fulfill the usage-based or unit-based pricing model you want to apply for charging your end-customers for consuming your product. The five Pricing Types options are designed to give you wide flexibility to set up your precise pricing use case, and these are explained in detail.
When you've set up pricing for Plans and Plan Templates and attached priced Plans to end-customer Accounts for billing, you might want to update a pricing on a Plan attached to an Account. It's important you are clear about the consequences of updating a pricing after the pricing has been used in production to determine charges on Account Bills:
* [Editing Pricing](/guides/plans-and-pricing/pricing-plans/reviewing-pricing-options-and-pricing-plans#editing-pricing)
**Important! Unit-based pricing using Counters for recurring subscription charges**. This topic reviews the pricing options available for applying usage-based pricing to your Plan Templates and Plans using *Aggregations* as the pricing metrics. For full details on how to create *Counters* and use them as the pricing metrics to apply unit-based pricing to Plan Templates and Plans for recurring subscription charges on Accounts, please see the [Recurring Charges: Counters](/guides/recurring-charges-counters) section.
## Pricing Options
In the Pricing Editor, a variety of configuration options for pricing Plans and Plan Templates are available:
* **Start date**. Enter the date from which you want the charges using this Pricing to apply for the Plan.
* **End date**. Enter a date on which you want the pricing to cease to apply to the Plan.
**Tip: Editing Pricing?** You might want to edit pricing you've applied to a Plan after the start date for the pricing to apply for the Plan. Please review the [Editing Pricing](/guides/plans-and-pricing/pricing-plans/reviewing-pricing-options-and-pricing-plans#editing-pricing) section below to understand the options you have when you do this and the implications for billing.
* **Description**. Enter a custom description for the Pricing, which will show against *usage* line items on Bills.
* **Minimum spend**. Enter a minimum spend for this Pricing. If the calculated *usage charge* using the Pricing falls below this value, then at billing an additional line item will be added to bring the charge up to the value you’ve entered. Default is **0**.
* **Minimum spend billing**. You can override the Organization-level setting for how minimum spends are billed - either *in arrears* or *in advance*.
* **Minimum spend description**. You can enter a custom description for any *minimum spend* line items on Bills.
**Tip: Default Usage and Minimum Spend Descriptions?** If you omit custom descriptions, then default usage and minimum spend descriptions will be shown for Bill line items- see [Bill Line Items - Default Descriptions](/guides/billing-and-usage-data/running-viewing-and-managing-bills/bill-line-items-default-descriptions) for details.
* **Usage accumulates over the entire plan contract period**. Enable a Pricing where the pricing tiers you set up are evaluated across the entire period the Plan is active for an Account, and not simply evaluated against each individual billing period. This option is designed a Pricing that uses an Aggregation method where the value is expected to accumulate over the period the Plan is active for an Account, such as **SUM** or **COUNT**, and can be used for **UNIQUE**:
* Suppose you have configured a [**Tiered** pricing](https://www.m3ter.com/guides/tiered-pricing-guide) structure for charging per number of requests made to your service using a **SUM** Aggregation: \$1 per request for the first 100 requests; \$0.80 per requests for the next 200 requests; \$0.60 per request for any above 300. If usage accumulation has been enabled for the Pricing and the billing is monthly:
* If the Account holder makes 70 requests in the first month, the charge will be 70 at \$1 = \$70.
* If a further 80 requests are made in the second month, the charge will be: 30 at \$1 = \$30 and 50 at \$0.80 = \$40 for a total of \$70.
* If the number of requests jumps to 220 in the third month, the charge will be 150 at \$0.80 = \$120 and 70 at \$0.60 = \$42 for a total of \$162.
**Tip:** The default setting for usage accumulation is **disabled**.
* **Apply as**. Select the way in which you want the Pricing to apply for a customer Account that you put on a Plan to which the Pricing is applied. Three options:
* **Debit**. This is the default setting for the typical case where you want the amount calculated to be added to the bill as a debit, which the end customer pays for.
* Note that you cannot enter *negative* *values* for **Price per unit** or **Fixed price** when a Pricing is applied as a **Debit**.
* **Product Credit**. Select this if you want the amount calculated to be added to the bill as a credit (negative amount) which reduces the bill total. To prevent negative billing, the bill will be capped at the total of other line items for the *same Product*.
* **Global Credit**. Select this if you want the amount calculated to be added to the bill as a credit (negative amount) which reduces the bill total. To prevent negative billing, the bill will be capped at the total of other line items for the *entire bill*, which might include other Products.
* **Pricing Type**. Allows you to select a type of pricing structure that is appropriate for how you want to charge using the selected **Aggregation**:
* **Pricing Bands**. For each pricing type, you can define pricing bands to charge different rates for different levels of aggregated usage measures recorded for an Account that consumes the Product.
* **Unit Price or Fixed Price**:
* **Unit Price**. For **Tiered** and **Volume** pricing types, you can set up pricing bands for charging on a per unit basis.
* **Fixed Price**. For the **Stairstep** pricing type, you can set up pricing bands for charging on a fixed price basis.
* **Combined Unit and Fixed Price**. For **Custom Tiered** and **Custom Volume** pricing types, you can set up pricing bands for charging using a combination of per unit and fixed price.
* There are five **Pricing Type** options:
* **Tiered**. Select to configure tiered pricing bands for charging on a per unit basis depending on which pricing band they fall in. For example, you might set up a first tier charging \$0.50 for the first 50 units used; a second tier charging \$0.25 for the next 100 units used; a third tier charging \$0.15 for any units used above 150 to an unlimited number.
* **Volume**. Select to configure charge rates on a per unit basis according to the highest pricing band reached. For example, you might set up three pricing bands where the first band charges \$0.50 for the first 50 units used; the second band charges \$0.25 for the next 100 used; the third band charges \$0.15 for any units used above 150 to an unlimited number. If a customer uses 120 units, they are charged at \$0.25 per unit for all units used. If a customer uses 170 units, they are charged at \$0.15 for all units used.
* **Stairstep**. Select to configure pricing bands for fixed prices charged based on the highest band reached. For example, you might set up three pricing bands where the first band charges \$2 for any usage between 1 and 50 units used - a customer who uses 1 unit is charged the same as a customer who uses 49 units; the second band charges \$1.60 for anything between 50 to 100 units used; the third band charges \$1.40 for 150 units used and above. The customer who uses 125 units will be charged \$1.60; the customer who uses 210 units will be charged \$1.40.
* **Custom Tiered**. Select to configure a custom pricing structure which combines a fixed charge and a per-unit charge. For example, you might want to charge on a per-unit basis across several tiers up to a maximum and then charge an additional fixed overage charge for any usage that exceeds the maximum.
* **Custom Volume**. Select to configure a custom pricing structure which combines a fixed charge and a per-unit charge. For example, you might want to set up three charging bands up to a maximum where customers are charged on the basis of the highest band they reach but any usage over the maximum incurs an additional fixed overage charge.
* **Price per unit**. Enter the price per unit charge rate for each pricing band configured for **Tiered** or **Volume** pricing types. Also available for **Custom Tiered** and **Custom Volume** pricing types.
**Important: Price per unit!** This depends the **Quantity per unit** configured for the Aggregation used for the Pricing. For example, if you're using an Aggregation that is derived from a gigabytes Meter measure field and **Quantity per unit** is set at 500 for the Aggregation, a **Price per unit** of \$0.25 means that end customer Accounts put on the pricing Plan will be charged \$.025 per 500 gigabytes used.
* **Fixed Price**. Enter a fixed price charge rate for pricing bands configured on the following pricing types:
* **Stairstep**
* **Custom Tiered**
* **Custom Volume**
**Tip: Using Negative Pricing?** Note that you can enter negative values for the **Price per unit** or **Fixed price** when the Pricing is applied as a **Product credit** or **Global credit**, but please review the implications of doing so in the [Using Negative Pricing for Plans](/guides/plans-and-pricing/pricing-plans/pricing-plans#using-negative-pricing-for-plans) section.
* **Prepayment / Balance Overage Pricing**. If an Account has a Prepayment or Balance amount added to it, you can set up overage pricing bands to charge for any usage on the Account after the Prepayment/Balance amount has been consumed. If you do not set up overage pricing, then any usage after the Prepayment/Balance has been consumed will be charged at the regular rate. Note this is only available if:
* You're using a **Tiered** pricing structure to price a Plan.
* You have not selected for **Usage accumulates over the entire contract period**.
**Important: Prepayment / Balance Overage surcharge percentage overrides Prepayment / Balance Overage pricing!** If you set up overage pricing on a tiered pricing structure when pricing a Plan that will apply to billing for a Prepayment / Balance and you have *also set up* overage surcharge percentage when creating the Prepayment / Balance for an Account, any overage usage charges on the Account will be billed at the *overage surcharge percentage rate* and the Prepayment / Balance *overage pricing will be ignored*.
## Editing Pricing
If you have set up a pricing using an **Aggregation** and you then edit the pricing structure, you can choose to either:
* **Apply these changes from**. Enter a date from which the new Pricing will come into effect. The original pricing structure will be applied for billing up to that date.
* **Apply your editing changes to existing pricing**. This means that the pricing structure will be updated immediately and will be applied to any re-calculated bills that were first calculated using the original pricing structure.
**Tip: Effect on Bills for mid-billing period price change?** Note that if you update a Pricing mid-billing period, then a bill line item will be produced for each pricing change in that period's next Bill. This occurs regardless of the Aggregation method used for a Pricing.
**Important: Editing the Pricing on a Plan Template!** If you configure a Pricing for a Plan Template, any Plan based on this Plan Template that does not override the Template Pricing will inherit the Pricing configured for the Template. If you update the Template Pricing, those Plans will also have their Pricing updated
# Creating and Working with Plan Templates, Plans, and Plan Groups
Source: https://docs.m3ter.com/guides/plans-and-pricing/working-with-plan-templates-and-plans
Learn how to define default settings for billing operations and set up consistent pricing structures for your products or services.
You can use *Plan Templates* in m3ter to configure default settings for your Plans. Using Plan Templates can save you repetition work when setting up your Plans to price your Products:
* Firstly, Plan Templates allow you to configure default settings for *general billing operations*, such as the billing currency, frequency, interval, and any standing charge to be applied. Many of your Product Plans might share the same settings for general billing operations and differ only in the details of their pricing structures to suit specific Products.
* Secondly, after you create a Plan Template, you can then define a *pricing structure* for the template in the Pricing Editor. If you do this first, then any Plans you create using the template will inherit this pricing structure. This approach will be useful in cases where you have a range of Products that share pricing structures, but across the range of Products the only difference in pricing is the amount of standing charge you want to apply.
A Plan is based on a Plan Template and represents a specific pricing plan for one of your products or services. Each Plan inherits general billing attributes or pricing structure from it's parent Plan Template. In a particular Plan:
* You can override some of these inherited attributes, such as standing charge, when you create a Plan.
* If the Plan is based on a Plan Template you've already priced, you can quickly edit the inherited pricing structure for the Plan in the Pricing Editor.
When you have created the Plan Templates and Plans you need for your Products, you can go on to configure the exact pricing structures for Plans you will need for charging customers that consume one or more of your Products. You can attach the appropriate priced Plans to customer Accounts to enable billing against those Accounts.
**Pricing Plans and Plan Templates?**
* **Usage-based pricing**. For details on how to price your Plan Templates and Plans using Aggregations for usage-based pricing, and how to edit a pricing, see [Pricing and Managing Plans and Plan Templates](/guides/plans-and-pricing/pricing-plans).
* **Unit-based pricing**. For details on how to price your Plan Templates and Plans using Counters for unit-based pricing, see [Recurring Charges: Counters](/guides/recurring-charges-counters).
In this section, you can review the configuration options for Plan Templates and Plans and learn how to create and manage them:
* [Reviewing Options for Plan Templates and Plans](/guides/plans-and-pricing/working-with-plan-templates-and-plans/reviewing-configuration-options-for-plans-and-plan-templates)
* [Understanding Billing Options for Plan Templates/Plans](/guides/plans-and-pricing/working-with-plan-templates-and-plans/understanding-billing-options-for-plan-templates-plans)
* [Creating Plan Templates](/guides/plans-and-pricing/working-with-plan-templates-and-plans/creating-plan-templates)
* [Creating Plans](/guides/plans-and-pricing/working-with-plan-templates-and-plans/creating-plans)
* [Working in Plan Template and Plan Details](/guides/plans-and-pricing/working-with-plan-templates-and-plans/working-in-plan-details)
* [Editing Plan Templates and Plans](/guides/plans-and-pricing/working-with-plan-templates-and-plans/editing-plan-templates-and-plans)
* [Working with Plan Groups](/guides/plans-and-pricing/working-with-plan-templates-and-plans/working-with-plan-groups)
# Creating Plan Templates
Source: https://docs.m3ter.com/guides/plans-and-pricing/working-with-plan-templates-and-plans/creating-plan-templates
This topic explains how to create and manage Plan templates.
**Important!** We *strongly recommend* that you review the options available for configuring Plan templates before you attempt to create them. See [Reviewing Options for Plans and Plan Templates](/guides/plans-and-pricing/working-with-plan-templates-and-plans/reviewing-configuration-options-for-plans-and-plan-templates).
## Creating and Managing Plan Templates
**To create a Plan template:**
1. Select **Pricing>Plan templates**. The **Plan templates** page opens.
2. In the **Product** drop-down, select the Product for which you want to create the new Plan template.
3. Select **Create plan template**. The **Plan templates>Create** page opens.
**Warning: You must create at least one Currency for your Organization before you can create a Plan template!** If you haven't, the **Create** page will not open and you'll see a warning:
* Select the **Manage currencies** hotlink text provided. This takes you directly to the **Create** page to create the Currency you want to use for the Plan Template. See [Creating and Managing Currencies](/guides/organization-and-access-management/viewing-and-editing-organization/creating-and-managing-currencies).
* When you create the new Currency, you are taken directly back to the Plan Template **Create** page and the Currency is selected.
4. Enter the **Plan template details**:
* **Name**. A descriptive name.
* **Code**. Unique identifier for the Plan template. *(Optional)*
* Note that when you've entered a Name for the Plan template, if you click in the **Code** field, a Code is automatically entered based on the Name you've used. You can then edit the auto-generated Code value or remove it as required.
* **Currency**. Use the drop-down list to select the Currency. For example, select **US Dollar**.
* **Bill frequency**. For example, select **Monthly**.
* **Bill Interval**. For example, select **1** for a bill each month:
### Compound Aggregations - Segments Available
The Segments available for pricing using a Compound Aggregation depends on how many Segmented Aggregations are referenced:
* If a *single* Segmented Aggregation is referenced, then all segments defined are available.
* If *two or more* are referenced, then only those segments defined in common or which intersect across the referenced Segmented Aggregations are available.
For example, suppose we've set up **Hiring Check 1** Aggregation and defined the following segments on it for `"location"` and `"type"` fields:
```json theme={null}
{"location" : "China", "type" : "Extended"}
{"location" : "China", "type" : "Complete"}
{"location" : "USA", "type" : "Extended"}
{"location" : "USA", "type" : "Standard"}
{"location" : "UK", "type" : "Standard"}
{"location" : "UK", "type" : "Complete"}
```
We've then set up a second **Hiring Check 2** Aggregation and defined the following segments on it for `"location"` and `"type"` fields:
```json theme={null}
{"location" : "China", "type" : "Standard"}
{"location" : "China", "type" : "Complete"}
{"location" : "USA", "type" : "Complete"}
{"location" : "USA", "type" : "Standard"}
{"location" : "UK", "type" : "Extended"}
{"location" : "UK", "type" : "Complete"}
```
If we now create a Compound Aggregation - **Hiring Check Compound** - that references both **Hiring Check 1** and **Hiring Check 2**, then only the following three segments will be available to **Hiring Check Compound**:
```json theme={null}
{"location" : "China", "type" : "Complete"}
{"location" : "USA", "type" : "Standard"}
{"location" : "UK", "type" : "Complete"}
```
# Reviewing Pricing Options for Plans and Plan Templates
Source: https://docs.m3ter.com/guides/plans-and-pricing/pricing-plans/reviewing-pricing-options-and-pricing-plans
In the *Pricing Editor*, when you’ve added an Aggregation for a Plan or Plan Template, there are various options available to configure the exact pricing structure you want using that Aggregation. As preparation for performing this configuration work, this topic provides a review of the configuration options available for creating a Pricing for a Product Plan or Template:
* [Pricing Options](/guides/plans-and-pricing/pricing-plans/reviewing-pricing-options-and-pricing-plans#pricing-options)
A key part of pricing Plans and Plan Templates in m3ter is choosing the appropriate *Pricing Type*, one that will best fulfill the usage-based or unit-based pricing model you want to apply for charging your end-customers for consuming your product. The five Pricing Types options are designed to give you wide flexibility to set up your precise pricing use case, and these are explained in detail.
When you've set up pricing for Plans and Plan Templates and attached priced Plans to end-customer Accounts for billing, you might want to update a pricing on a Plan attached to an Account. It's important you are clear about the consequences of updating a pricing after the pricing has been used in production to determine charges on Account Bills:
* [Editing Pricing](/guides/plans-and-pricing/pricing-plans/reviewing-pricing-options-and-pricing-plans#editing-pricing)
**Important! Unit-based pricing using Counters for recurring subscription charges**. This topic reviews the pricing options available for applying usage-based pricing to your Plan Templates and Plans using *Aggregations* as the pricing metrics. For full details on how to create *Counters* and use them as the pricing metrics to apply unit-based pricing to Plan Templates and Plans for recurring subscription charges on Accounts, please see the [Recurring Charges: Counters](/guides/recurring-charges-counters) section.
## Pricing Options
In the Pricing Editor, a variety of configuration options for pricing Plans and Plan Templates are available:
* **Start date**. Enter the date from which you want the charges using this Pricing to apply for the Plan.
* **End date**. Enter a date on which you want the pricing to cease to apply to the Plan.
**Tip: Editing Pricing?** You might want to edit pricing you've applied to a Plan after the start date for the pricing to apply for the Plan. Please review the [Editing Pricing](/guides/plans-and-pricing/pricing-plans/reviewing-pricing-options-and-pricing-plans#editing-pricing) section below to understand the options you have when you do this and the implications for billing.
* **Description**. Enter a custom description for the Pricing, which will show against *usage* line items on Bills.
* **Minimum spend**. Enter a minimum spend for this Pricing. If the calculated *usage charge* using the Pricing falls below this value, then at billing an additional line item will be added to bring the charge up to the value you’ve entered. Default is **0**.
* **Minimum spend billing**. You can override the Organization-level setting for how minimum spends are billed - either *in arrears* or *in advance*.
* **Minimum spend description**. You can enter a custom description for any *minimum spend* line items on Bills.
**Tip: Default Usage and Minimum Spend Descriptions?** If you omit custom descriptions, then default usage and minimum spend descriptions will be shown for Bill line items- see [Bill Line Items - Default Descriptions](/guides/billing-and-usage-data/running-viewing-and-managing-bills/bill-line-items-default-descriptions) for details.
* **Usage accumulates over the entire plan contract period**. Enable a Pricing where the pricing tiers you set up are evaluated across the entire period the Plan is active for an Account, and not simply evaluated against each individual billing period. This option is designed a Pricing that uses an Aggregation method where the value is expected to accumulate over the period the Plan is active for an Account, such as **SUM** or **COUNT**, and can be used for **UNIQUE**:
* Suppose you have configured a [**Tiered** pricing](https://www.m3ter.com/guides/tiered-pricing-guide) structure for charging per number of requests made to your service using a **SUM** Aggregation: \$1 per request for the first 100 requests; \$0.80 per requests for the next 200 requests; \$0.60 per request for any above 300. If usage accumulation has been enabled for the Pricing and the billing is monthly:
* If the Account holder makes 70 requests in the first month, the charge will be 70 at \$1 = \$70.
* If a further 80 requests are made in the second month, the charge will be: 30 at \$1 = \$30 and 50 at \$0.80 = \$40 for a total of \$70.
* If the number of requests jumps to 220 in the third month, the charge will be 150 at \$0.80 = \$120 and 70 at \$0.60 = \$42 for a total of \$162.
**Tip:** The default setting for usage accumulation is **disabled**.
* **Apply as**. Select the way in which you want the Pricing to apply for a customer Account that you put on a Plan to which the Pricing is applied. Three options:
* **Debit**. This is the default setting for the typical case where you want the amount calculated to be added to the bill as a debit, which the end customer pays for.
* Note that you cannot enter *negative* *values* for **Price per unit** or **Fixed price** when a Pricing is applied as a **Debit**.
* **Product Credit**. Select this if you want the amount calculated to be added to the bill as a credit (negative amount) which reduces the bill total. To prevent negative billing, the bill will be capped at the total of other line items for the *same Product*.
* **Global Credit**. Select this if you want the amount calculated to be added to the bill as a credit (negative amount) which reduces the bill total. To prevent negative billing, the bill will be capped at the total of other line items for the *entire bill*, which might include other Products.
* **Pricing Type**. Allows you to select a type of pricing structure that is appropriate for how you want to charge using the selected **Aggregation**:
* **Pricing Bands**. For each pricing type, you can define pricing bands to charge different rates for different levels of aggregated usage measures recorded for an Account that consumes the Product.
* **Unit Price or Fixed Price**:
* **Unit Price**. For **Tiered** and **Volume** pricing types, you can set up pricing bands for charging on a per unit basis.
* **Fixed Price**. For the **Stairstep** pricing type, you can set up pricing bands for charging on a fixed price basis.
* **Combined Unit and Fixed Price**. For **Custom Tiered** and **Custom Volume** pricing types, you can set up pricing bands for charging using a combination of per unit and fixed price.
* There are five **Pricing Type** options:
* **Tiered**. Select to configure tiered pricing bands for charging on a per unit basis depending on which pricing band they fall in. For example, you might set up a first tier charging \$0.50 for the first 50 units used; a second tier charging \$0.25 for the next 100 units used; a third tier charging \$0.15 for any units used above 150 to an unlimited number.
* **Volume**. Select to configure charge rates on a per unit basis according to the highest pricing band reached. For example, you might set up three pricing bands where the first band charges \$0.50 for the first 50 units used; the second band charges \$0.25 for the next 100 used; the third band charges \$0.15 for any units used above 150 to an unlimited number. If a customer uses 120 units, they are charged at \$0.25 per unit for all units used. If a customer uses 170 units, they are charged at \$0.15 for all units used.
* **Stairstep**. Select to configure pricing bands for fixed prices charged based on the highest band reached. For example, you might set up three pricing bands where the first band charges \$2 for any usage between 1 and 50 units used - a customer who uses 1 unit is charged the same as a customer who uses 49 units; the second band charges \$1.60 for anything between 50 to 100 units used; the third band charges \$1.40 for 150 units used and above. The customer who uses 125 units will be charged \$1.60; the customer who uses 210 units will be charged \$1.40.
* **Custom Tiered**. Select to configure a custom pricing structure which combines a fixed charge and a per-unit charge. For example, you might want to charge on a per-unit basis across several tiers up to a maximum and then charge an additional fixed overage charge for any usage that exceeds the maximum.
* **Custom Volume**. Select to configure a custom pricing structure which combines a fixed charge and a per-unit charge. For example, you might want to set up three charging bands up to a maximum where customers are charged on the basis of the highest band they reach but any usage over the maximum incurs an additional fixed overage charge.
* **Price per unit**. Enter the price per unit charge rate for each pricing band configured for **Tiered** or **Volume** pricing types. Also available for **Custom Tiered** and **Custom Volume** pricing types.
**Important: Price per unit!** This depends the **Quantity per unit** configured for the Aggregation used for the Pricing. For example, if you're using an Aggregation that is derived from a gigabytes Meter measure field and **Quantity per unit** is set at 500 for the Aggregation, a **Price per unit** of \$0.25 means that end customer Accounts put on the pricing Plan will be charged \$.025 per 500 gigabytes used.
* **Fixed Price**. Enter a fixed price charge rate for pricing bands configured on the following pricing types:
* **Stairstep**
* **Custom Tiered**
* **Custom Volume**
**Tip: Using Negative Pricing?** Note that you can enter negative values for the **Price per unit** or **Fixed price** when the Pricing is applied as a **Product credit** or **Global credit**, but please review the implications of doing so in the [Using Negative Pricing for Plans](/guides/plans-and-pricing/pricing-plans/pricing-plans#using-negative-pricing-for-plans) section.
* **Prepayment / Balance Overage Pricing**. If an Account has a Prepayment or Balance amount added to it, you can set up overage pricing bands to charge for any usage on the Account after the Prepayment/Balance amount has been consumed. If you do not set up overage pricing, then any usage after the Prepayment/Balance has been consumed will be charged at the regular rate. Note this is only available if:
* You're using a **Tiered** pricing structure to price a Plan.
* You have not selected for **Usage accumulates over the entire contract period**.
**Important: Prepayment / Balance Overage surcharge percentage overrides Prepayment / Balance Overage pricing!** If you set up overage pricing on a tiered pricing structure when pricing a Plan that will apply to billing for a Prepayment / Balance and you have *also set up* overage surcharge percentage when creating the Prepayment / Balance for an Account, any overage usage charges on the Account will be billed at the *overage surcharge percentage rate* and the Prepayment / Balance *overage pricing will be ignored*.
## Editing Pricing
If you have set up a pricing using an **Aggregation** and you then edit the pricing structure, you can choose to either:
* **Apply these changes from**. Enter a date from which the new Pricing will come into effect. The original pricing structure will be applied for billing up to that date.
* **Apply your editing changes to existing pricing**. This means that the pricing structure will be updated immediately and will be applied to any re-calculated bills that were first calculated using the original pricing structure.
**Tip: Effect on Bills for mid-billing period price change?** Note that if you update a Pricing mid-billing period, then a bill line item will be produced for each pricing change in that period's next Bill. This occurs regardless of the Aggregation method used for a Pricing.
**Important: Editing the Pricing on a Plan Template!** If you configure a Pricing for a Plan Template, any Plan based on this Plan Template that does not override the Template Pricing will inherit the Pricing configured for the Template. If you update the Template Pricing, those Plans will also have their Pricing updated
# Creating and Working with Plan Templates, Plans, and Plan Groups
Source: https://docs.m3ter.com/guides/plans-and-pricing/working-with-plan-templates-and-plans
Learn how to define default settings for billing operations and set up consistent pricing structures for your products or services.
You can use *Plan Templates* in m3ter to configure default settings for your Plans. Using Plan Templates can save you repetition work when setting up your Plans to price your Products:
* Firstly, Plan Templates allow you to configure default settings for *general billing operations*, such as the billing currency, frequency, interval, and any standing charge to be applied. Many of your Product Plans might share the same settings for general billing operations and differ only in the details of their pricing structures to suit specific Products.
* Secondly, after you create a Plan Template, you can then define a *pricing structure* for the template in the Pricing Editor. If you do this first, then any Plans you create using the template will inherit this pricing structure. This approach will be useful in cases where you have a range of Products that share pricing structures, but across the range of Products the only difference in pricing is the amount of standing charge you want to apply.
A Plan is based on a Plan Template and represents a specific pricing plan for one of your products or services. Each Plan inherits general billing attributes or pricing structure from it's parent Plan Template. In a particular Plan:
* You can override some of these inherited attributes, such as standing charge, when you create a Plan.
* If the Plan is based on a Plan Template you've already priced, you can quickly edit the inherited pricing structure for the Plan in the Pricing Editor.
When you have created the Plan Templates and Plans you need for your Products, you can go on to configure the exact pricing structures for Plans you will need for charging customers that consume one or more of your Products. You can attach the appropriate priced Plans to customer Accounts to enable billing against those Accounts.
**Pricing Plans and Plan Templates?**
* **Usage-based pricing**. For details on how to price your Plan Templates and Plans using Aggregations for usage-based pricing, and how to edit a pricing, see [Pricing and Managing Plans and Plan Templates](/guides/plans-and-pricing/pricing-plans).
* **Unit-based pricing**. For details on how to price your Plan Templates and Plans using Counters for unit-based pricing, see [Recurring Charges: Counters](/guides/recurring-charges-counters).
In this section, you can review the configuration options for Plan Templates and Plans and learn how to create and manage them:
* [Reviewing Options for Plan Templates and Plans](/guides/plans-and-pricing/working-with-plan-templates-and-plans/reviewing-configuration-options-for-plans-and-plan-templates)
* [Understanding Billing Options for Plan Templates/Plans](/guides/plans-and-pricing/working-with-plan-templates-and-plans/understanding-billing-options-for-plan-templates-plans)
* [Creating Plan Templates](/guides/plans-and-pricing/working-with-plan-templates-and-plans/creating-plan-templates)
* [Creating Plans](/guides/plans-and-pricing/working-with-plan-templates-and-plans/creating-plans)
* [Working in Plan Template and Plan Details](/guides/plans-and-pricing/working-with-plan-templates-and-plans/working-in-plan-details)
* [Editing Plan Templates and Plans](/guides/plans-and-pricing/working-with-plan-templates-and-plans/editing-plan-templates-and-plans)
* [Working with Plan Groups](/guides/plans-and-pricing/working-with-plan-templates-and-plans/working-with-plan-groups)
# Creating Plan Templates
Source: https://docs.m3ter.com/guides/plans-and-pricing/working-with-plan-templates-and-plans/creating-plan-templates
This topic explains how to create and manage Plan templates.
**Important!** We *strongly recommend* that you review the options available for configuring Plan templates before you attempt to create them. See [Reviewing Options for Plans and Plan Templates](/guides/plans-and-pricing/working-with-plan-templates-and-plans/reviewing-configuration-options-for-plans-and-plan-templates).
## Creating and Managing Plan Templates
**To create a Plan template:**
1. Select **Pricing>Plan templates**. The **Plan templates** page opens.
2. In the **Product** drop-down, select the Product for which you want to create the new Plan template.
3. Select **Create plan template**. The **Plan templates>Create** page opens.
**Warning: You must create at least one Currency for your Organization before you can create a Plan template!** If you haven't, the **Create** page will not open and you'll see a warning:
* Select the **Manage currencies** hotlink text provided. This takes you directly to the **Create** page to create the Currency you want to use for the Plan Template. See [Creating and Managing Currencies](/guides/organization-and-access-management/viewing-and-editing-organization/creating-and-managing-currencies).
* When you create the new Currency, you are taken directly back to the Plan Template **Create** page and the Currency is selected.
4. Enter the **Plan template details**:
* **Name**. A descriptive name.
* **Code**. Unique identifier for the Plan template. *(Optional)*
* Note that when you've entered a Name for the Plan template, if you click in the **Code** field, a Code is automatically entered based on the Name you've used. You can then edit the auto-generated Code value or remove it as required.
* **Currency**. Use the drop-down list to select the Currency. For example, select **US Dollar**.
* **Bill frequency**. For example, select **Monthly**.
* **Bill Interval**. For example, select **1** for a bill each month:
 5. Enter your **Standing charge** settings:
* **Standing charge**. For example, enter **25**.
* **Standing charge billing**. Allows you to control whether any standing charges due are billed in advance or in arrears:
* **Use organization-wide configuration**. Default selection. If enabled, the setting selected at Organization level for Standing charge billing will be used - it will be shown in brackets. If you select either of the other two options, the Organization level setting will be overridden. See [Viewing and Editing Organization Configuration](/guides/organization-and-access-management/viewing-and-editing-organization/viewing-and-editing-organization-configuration).
* **Bill in arrears (end of each billing period)**
* **Bill in advance (start of each billing period)**
* **Standing charge interval**. For example, enter **1** for the **Standing charge** to be applied to each Bill.
* **Standing charge offset**. For example, enter **0** to make the **Standing charge** be applied from the first Bill.
* **Standing charge description**. Enter a custom description, which will appear in the bill line item:
5. Enter your **Standing charge** settings:
* **Standing charge**. For example, enter **25**.
* **Standing charge billing**. Allows you to control whether any standing charges due are billed in advance or in arrears:
* **Use organization-wide configuration**. Default selection. If enabled, the setting selected at Organization level for Standing charge billing will be used - it will be shown in brackets. If you select either of the other two options, the Organization level setting will be overridden. See [Viewing and Editing Organization Configuration](/guides/organization-and-access-management/viewing-and-editing-organization/viewing-and-editing-organization-configuration).
* **Bill in arrears (end of each billing period)**
* **Bill in advance (start of each billing period)**
* **Standing charge interval**. For example, enter **1** for the **Standing charge** to be applied to each Bill.
* **Standing charge offset**. For example, enter **0** to make the **Standing charge** be applied from the first Bill.
* **Standing charge description**. Enter a custom description, which will appear in the bill line item:
 **Tip: Default Standing Charge Description?** If you omit a custom description, then a default Standing Charge description will be shown for Bill line items- see [Bill Line Items - Default Descriptions](/guides/billing-and-usage-data/running-viewing-and-managing-bills/bill-line-items-default-descriptions) for details.
6. Enter your **Minimum Spend** settings:
* **Product minimum spend**. For example, enter **150**:
* At billing, this value imposes a minimum for *Product charges* against any Account that has a priced Plan based on the Template attached to it. For example, if the total charges for Product usage is **140**, then an additional line item for a Product Minimum Spend charge of 10 will be added to the Bill to bring the spend up to the minimum.
* The check for Product minimum spend does not include any Standing Charge amounts due.
* When you create a Plan based on the Plan template, you can override the Product minimum spend.
* Note that when you price a Plan, you can also define a Minimum Spend *for that pricing*, which then applies to charges due on an Account at billing under that specific pricing. For example, if you've configured a pricing for a Plan attached to an Account and set a Minimum Spend for that pricing of **140**, but the charges due at billing amount only to **120**, then a Minimum Spend Adjustment line item will be added to the Bill in the amount of **20**. This is independent of any *Product Minimum Spend* defined for the Plan itself - if, as exampled above, that is set at **150**, then a line item for Product Minimum Spend will also appear in the amount of **10** to bring the spend for Product up to the minimum after the minimum for the pricing has been adjusted. See [Understanding Billing Options for Plan Templates/Plans](/guides/plans-and-pricing/working-with-plan-templates-and-plans/understanding-billing-options-for-plan-templates-plans) for more details.
* **Minimum spend billing**. Allows you to control whether minimum spends are applied to Bills in advance or in arrears:
* **Use organization-wide configuration**. Default selection. If enabled, the setting selected at Organization level for Minimum spend billing will be used - it will be shown in brackets. If you select either of the other two options, the Organization level setting will be overridden. See [Viewing and Editing Organization Configuration](/guides/organization-and-access-management/viewing-and-editing-organization/viewing-and-editing-organization-configuration).
* **Bill in arrears (end of each billing period)**
* **Bill in advance (start of each billing period)**
* **Minimum spend description**. Enter a description, which will appear in the bill line item:
**Tip: Default Standing Charge Description?** If you omit a custom description, then a default Standing Charge description will be shown for Bill line items- see [Bill Line Items - Default Descriptions](/guides/billing-and-usage-data/running-viewing-and-managing-bills/bill-line-items-default-descriptions) for details.
6. Enter your **Minimum Spend** settings:
* **Product minimum spend**. For example, enter **150**:
* At billing, this value imposes a minimum for *Product charges* against any Account that has a priced Plan based on the Template attached to it. For example, if the total charges for Product usage is **140**, then an additional line item for a Product Minimum Spend charge of 10 will be added to the Bill to bring the spend up to the minimum.
* The check for Product minimum spend does not include any Standing Charge amounts due.
* When you create a Plan based on the Plan template, you can override the Product minimum spend.
* Note that when you price a Plan, you can also define a Minimum Spend *for that pricing*, which then applies to charges due on an Account at billing under that specific pricing. For example, if you've configured a pricing for a Plan attached to an Account and set a Minimum Spend for that pricing of **140**, but the charges due at billing amount only to **120**, then a Minimum Spend Adjustment line item will be added to the Bill in the amount of **20**. This is independent of any *Product Minimum Spend* defined for the Plan itself - if, as exampled above, that is set at **150**, then a line item for Product Minimum Spend will also appear in the amount of **10** to bring the spend for Product up to the minimum after the minimum for the pricing has been adjusted. See [Understanding Billing Options for Plan Templates/Plans](/guides/plans-and-pricing/working-with-plan-templates-and-plans/understanding-billing-options-for-plan-templates-plans) for more details.
* **Minimum spend billing**. Allows you to control whether minimum spends are applied to Bills in advance or in arrears:
* **Use organization-wide configuration**. Default selection. If enabled, the setting selected at Organization level for Minimum spend billing will be used - it will be shown in brackets. If you select either of the other two options, the Organization level setting will be overridden. See [Viewing and Editing Organization Configuration](/guides/organization-and-access-management/viewing-and-editing-organization/viewing-and-editing-organization-configuration).
* **Bill in arrears (end of each billing period)**
* **Bill in advance (start of each billing period)**
* **Minimum spend description**. Enter a description, which will appear in the bill line item:
 **Tip: Default Minimum Spend Description?** If you omit a custom description, then a default Minimum Spend description will be shown for Bill line items- see [Bill Line Items - Default Descriptions](/guides/billing-and-usage-data/running-viewing-and-managing-bills/bill-line-items-default-descriptions) for details.
7. Add any required **Custom Fields** to the Plan template. For more on Custom Fields, see [Adding and Editing Custom Fields](/guides/organization-and-access-management/viewing-and-editing-organization#adding-and-editing-custom-fields).
8. Select **Create plan template**. The **Plan template details** page opens:
**Tip: Default Minimum Spend Description?** If you omit a custom description, then a default Minimum Spend description will be shown for Bill line items- see [Bill Line Items - Default Descriptions](/guides/billing-and-usage-data/running-viewing-and-managing-bills/bill-line-items-default-descriptions) for details.
7. Add any required **Custom Fields** to the Plan template. For more on Custom Fields, see [Adding and Editing Custom Fields](/guides/organization-and-access-management/viewing-and-editing-organization#adding-and-editing-custom-fields).
8. Select **Create plan template**. The **Plan template details** page opens:
![V2plan Template16]() * Note that the **Product** the Plan template belongs to is shown and you can select the text hotlink to open the **Product Details** page.
* For more details on working in **Plan template details** to review pricing and billing setup, manage your Plan templates, review Plan template metadata, or duplicate Plan Templates, see [Working in Plan Template and Plan Details](/guides/plans-and-pricing/working-with-plan-templates-and-plans/working-in-plan-details).
**New Plan template details?** The *new version* of the Plan template details page opens. If you prefer to work in the *old version* of the page, select **Use the old version**.
# Creating Plans
Source: https://docs.m3ter.com/guides/plans-and-pricing/working-with-plan-templates-and-plans/creating-plans
This topic explains how to create and manage Plans.
**Important!** We *strongly recommend* that you review the options available for configuring Plans before you attempt to create them. See [Reviewing Configuration Options for Plans and Plan Templates](/guides/plans-and-pricing/working-with-plan-templates-and-plans/reviewing-configuration-options-for-plans-and-plan-templates).
## Creating and Managing Plans
**To create a Plan:**
1. Select **Pricing>Plans**. The **Plans** page opens.
2. In the **Product** drop-down, select the Product for which you want to create the new Plan.
3. Select **Create plan**. The **Create** page opens and under **Plan details** the **Product** field shows the selected **Product**.
4. Use the **Plan template** drop-down to select a template. Note that:
* **No Plan templates**. If the selected Product doesn't have any Plan templates created for it, then you must first create a Template before you can create a Plan for the Product. The **Create** form settings will be grayed out and disabled and you'll see a warning with a **Create new plan template** hotlink text. Select this link to go directly to the **Plan templates>Create** page. When you've created a Plan template for the Product, you'll be brought straight back to the **Plans>Create** page to proceed.
* **Existing Plan templates**. If the selected Product does have Plan templates created for it, you can proceed and select the Plan template you want to base the Plan on.
5. Enter the **Plan details**:
* **Name**. Descriptive name for Plan.
* **Code**. Unique identifier for Plan.
* Note that when you've entered a name for the Plan and clicked in the **Code** field, a Code is automatically entered based on that name. You can then edit the auto-generated Code value as required.
* Note that the **Product** the Plan template belongs to is shown and you can select the text hotlink to open the **Product Details** page.
* For more details on working in **Plan template details** to review pricing and billing setup, manage your Plan templates, review Plan template metadata, or duplicate Plan Templates, see [Working in Plan Template and Plan Details](/guides/plans-and-pricing/working-with-plan-templates-and-plans/working-in-plan-details).
**New Plan template details?** The *new version* of the Plan template details page opens. If you prefer to work in the *old version* of the page, select **Use the old version**.
# Creating Plans
Source: https://docs.m3ter.com/guides/plans-and-pricing/working-with-plan-templates-and-plans/creating-plans
This topic explains how to create and manage Plans.
**Important!** We *strongly recommend* that you review the options available for configuring Plans before you attempt to create them. See [Reviewing Configuration Options for Plans and Plan Templates](/guides/plans-and-pricing/working-with-plan-templates-and-plans/reviewing-configuration-options-for-plans-and-plan-templates).
## Creating and Managing Plans
**To create a Plan:**
1. Select **Pricing>Plans**. The **Plans** page opens.
2. In the **Product** drop-down, select the Product for which you want to create the new Plan.
3. Select **Create plan**. The **Create** page opens and under **Plan details** the **Product** field shows the selected **Product**.
4. Use the **Plan template** drop-down to select a template. Note that:
* **No Plan templates**. If the selected Product doesn't have any Plan templates created for it, then you must first create a Template before you can create a Plan for the Product. The **Create** form settings will be grayed out and disabled and you'll see a warning with a **Create new plan template** hotlink text. Select this link to go directly to the **Plan templates>Create** page. When you've created a Plan template for the Product, you'll be brought straight back to the **Plans>Create** page to proceed.
* **Existing Plan templates**. If the selected Product does have Plan templates created for it, you can proceed and select the Plan template you want to base the Plan on.
5. Enter the **Plan details**:
* **Name**. Descriptive name for Plan.
* **Code**. Unique identifier for Plan.
* Note that when you've entered a name for the Plan and clicked in the **Code** field, a Code is automatically entered based on that name. You can then edit the auto-generated Code value as required.
 * If you want to change any of the settings the Plan inherits from the Plan Template, use the **Standing charge** and **Minimum spend** cards.
6. Enter the **Standing charge** settings for your Plan:
* **Standing charge**. You can override the value inherited from the **Plan template**. If you do override the Plan template, the **Value from template** is struck through.
* **Standing charge billing**. Allows you to control whether any standing charges due are billed in advance or in arrears:
* **Use configuration from plan template**. Default selection. If enabled, the setting selected for Standing charge billing on the Plan template will be used - it will be shown in brackets. If you select either of the other two options, the Plan template setting will be overridden.
* **Bill in arrears (end of each billing period)**
* **Bill in advance (start of each billing period)**
* **Standing charge accounting product.** For accounting purposes, select a Product that will be linked to any *Standing charge* line items on Bills. (*Optional*)
* Note that if you leave this blank, then the Product the Plan belongs will be used.
* **Standing charge description**. You can enter a custom description for any Standing charge amounts, which overrides any description entered for the Plan template and which will appear in the bill line item.
* If you want to change any of the settings the Plan inherits from the Plan Template, use the **Standing charge** and **Minimum spend** cards.
6. Enter the **Standing charge** settings for your Plan:
* **Standing charge**. You can override the value inherited from the **Plan template**. If you do override the Plan template, the **Value from template** is struck through.
* **Standing charge billing**. Allows you to control whether any standing charges due are billed in advance or in arrears:
* **Use configuration from plan template**. Default selection. If enabled, the setting selected for Standing charge billing on the Plan template will be used - it will be shown in brackets. If you select either of the other two options, the Plan template setting will be overridden.
* **Bill in arrears (end of each billing period)**
* **Bill in advance (start of each billing period)**
* **Standing charge accounting product.** For accounting purposes, select a Product that will be linked to any *Standing charge* line items on Bills. (*Optional*)
* Note that if you leave this blank, then the Product the Plan belongs will be used.
* **Standing charge description**. You can enter a custom description for any Standing charge amounts, which overrides any description entered for the Plan template and which will appear in the bill line item.
![]() **Tip: Default Standing Charge Description?** If you omit a custom description, then a default Standing charge description is shown for Bill line items- see [Bill Line Items - Default Descriptions](/guides/billing-and-usage-data/running-viewing-and-managing-bills/bill-line-items-default-descriptions) for details.
7. Enter the **Minimum spend** settings for your Plan:
* **Product minimum spend**. You can override the value inherited from the **Plan template**. If you do override the Plan Template, the **Value from template** is struck through. For example, enter **150**:
* At billing, this value imposes a minimum for *Product charges* against any Account that has the priced Plan attached to it. For example, if the total charges for Product usage is **140**, then an additional line item for a Product Minimum spend charge of **10** will be added to the Bill to bring the spend up to the minimum.
* The check for Product minimum spend does not include any Standing Charge amounts due.
* Note that when you price a Plan, you can also define a Minimum spend *for that pricing*, which then applies to charges due on an Account at billing under that specific pricing. For example, if you've configured a pricing for a Plan attached to an Account and set a Minimum spend for that pricing of **140**, but the charges due at billing amount only to **120**, then a Minimum spend adjustment line item will be added to the Bill in the amount of **20**. This is independent of any *Product Minimum spend* defined for the Plan itself - if, as exampled above, that is set at **150**, then a line item for Product Minimum spend will also appear in the amount of **10** to bring the spend for Product up to the minimum after the minimum for the pricing has been adjusted. See [Understanding Billing Options for Plan Templates/Plans](/guides/plans-and-pricing/working-with-plan-templates-and-plans/understanding-billing-options-for-plan-templates-plans) for more details.
* **Minimum spend billing**. Allows you to control whether Minimum spends are applied to Bills in advance or in arrears:
* **Use configuration from plan template**. Default selection. If enabled, the setting selected for Minimum spend billing on the Plan template will be used - it will be shown in brackets. If you select either of the other two options, the Plan template setting will be overridden.
* **Bill in arrears (end of each billing period)**
* **Bill in advance (start of each billing period)**
* **Minimum spend accounting product.** For accounting purposes, select a Product that will be linked to any *Minimum spend* or *Minimum spend adjustment* line items on Bills. (*Optional*)
* Note that if you leave this blank, then the Product the Plan belongs to will be used.
* **Minimum spend description**. You can enter a description for any Minimum spend amounts, which overrides any description entered for the Plan template and which will appear in the bill line item:
**Tip: Default Standing Charge Description?** If you omit a custom description, then a default Standing charge description is shown for Bill line items- see [Bill Line Items - Default Descriptions](/guides/billing-and-usage-data/running-viewing-and-managing-bills/bill-line-items-default-descriptions) for details.
7. Enter the **Minimum spend** settings for your Plan:
* **Product minimum spend**. You can override the value inherited from the **Plan template**. If you do override the Plan Template, the **Value from template** is struck through. For example, enter **150**:
* At billing, this value imposes a minimum for *Product charges* against any Account that has the priced Plan attached to it. For example, if the total charges for Product usage is **140**, then an additional line item for a Product Minimum spend charge of **10** will be added to the Bill to bring the spend up to the minimum.
* The check for Product minimum spend does not include any Standing Charge amounts due.
* Note that when you price a Plan, you can also define a Minimum spend *for that pricing*, which then applies to charges due on an Account at billing under that specific pricing. For example, if you've configured a pricing for a Plan attached to an Account and set a Minimum spend for that pricing of **140**, but the charges due at billing amount only to **120**, then a Minimum spend adjustment line item will be added to the Bill in the amount of **20**. This is independent of any *Product Minimum spend* defined for the Plan itself - if, as exampled above, that is set at **150**, then a line item for Product Minimum spend will also appear in the amount of **10** to bring the spend for Product up to the minimum after the minimum for the pricing has been adjusted. See [Understanding Billing Options for Plan Templates/Plans](/guides/plans-and-pricing/working-with-plan-templates-and-plans/understanding-billing-options-for-plan-templates-plans) for more details.
* **Minimum spend billing**. Allows you to control whether Minimum spends are applied to Bills in advance or in arrears:
* **Use configuration from plan template**. Default selection. If enabled, the setting selected for Minimum spend billing on the Plan template will be used - it will be shown in brackets. If you select either of the other two options, the Plan template setting will be overridden.
* **Bill in arrears (end of each billing period)**
* **Bill in advance (start of each billing period)**
* **Minimum spend accounting product.** For accounting purposes, select a Product that will be linked to any *Minimum spend* or *Minimum spend adjustment* line items on Bills. (*Optional*)
* Note that if you leave this blank, then the Product the Plan belongs to will be used.
* **Minimum spend description**. You can enter a description for any Minimum spend amounts, which overrides any description entered for the Plan template and which will appear in the bill line item:
![]() **Tip: Default Minimum Spend Description?** If you omit a custom description, then a default Minimum spend description will be shown for Bill line items- see [Bill Line Items - Default Descriptions](/guides/billing-and-usage-data/running-viewing-and-managing-bills/bill-line-items-default-descriptions) for details.
8. Add any required **Custom fields** to the Plan. For more on Custom fields, see [Adding and Editing Custom Fields](/guides/organization-and-access-management/viewing-and-editing-organization#adding-and-editing-custom-fields).
9. Select **Create plan**. The **Plan details** page opens:
**Tip: Default Minimum Spend Description?** If you omit a custom description, then a default Minimum spend description will be shown for Bill line items- see [Bill Line Items - Default Descriptions](/guides/billing-and-usage-data/running-viewing-and-managing-bills/bill-line-items-default-descriptions) for details.
8. Add any required **Custom fields** to the Plan. For more on Custom fields, see [Adding and Editing Custom Fields](/guides/organization-and-access-management/viewing-and-editing-organization#adding-and-editing-custom-fields).
9. Select **Create plan**. The **Plan details** page opens:
![Create Plans59]() * Note that the **Plan template** on which the Plan is based and the **Product** which the Plan belongs to are shown. You can open the **Plan template details** page or **Product details** page using the text hotlinks.
* For more details on working in **Plan details** to review pricing and billing setup, manage your Plans, review Plan metadata, or duplicate Plans, see [Working in Plan Template and Plan Details](/guides/plans-and-pricing/working-with-plan-templates-and-plans/working-in-plan-details).
**New Plan details?** The *new version* of the Plan details page opens. If you prefer to work in the *old version* of the page, select **Use the old version**.
# Editing and Deleting Plan Templates and Plans
Source: https://docs.m3ter.com/guides/plans-and-pricing/working-with-plan-templates-and-plans/editing-plan-templates-and-plans
When you have created and configured Plan Templates and Plans, you can:
* Edit them to change details.
* Open a Details page and review any pricing associated with them.
* Delete and remove them from your Organization.
This topic explains how to edit and review your Plan Templates and Plans:
* [Editing and Reviewing Plans](/guides/plans-and-pricing/working-with-plan-templates-and-plans/editing-plan-templates-and-plans#editing-and-reviewing-plans)
* [Deleting Plans](/guides/plans-and-pricing/working-with-plan-templates-and-plans/editing-plan-templates-and-plans#deleting-plans)
**Note**: Editing, reviewing, and deleting a Plan Template is the same as for a Plan. The procedures given here explains how to for a Plan.
## Editing and Reviewing Plans
**To edit and review a Plan:**
1. Select **Pricing>Plans**. The **Plans** page opens.
2. In the **Product** drop-down, select the Product for the Plan you want to edit or review. Existing Plans for the Product are listed.
3. If you want to edit the details of a Plan, select the **Edit** icon:
* Note that the **Plan template** on which the Plan is based and the **Product** which the Plan belongs to are shown. You can open the **Plan template details** page or **Product details** page using the text hotlinks.
* For more details on working in **Plan details** to review pricing and billing setup, manage your Plans, review Plan metadata, or duplicate Plans, see [Working in Plan Template and Plan Details](/guides/plans-and-pricing/working-with-plan-templates-and-plans/working-in-plan-details).
**New Plan details?** The *new version* of the Plan details page opens. If you prefer to work in the *old version* of the page, select **Use the old version**.
# Editing and Deleting Plan Templates and Plans
Source: https://docs.m3ter.com/guides/plans-and-pricing/working-with-plan-templates-and-plans/editing-plan-templates-and-plans
When you have created and configured Plan Templates and Plans, you can:
* Edit them to change details.
* Open a Details page and review any pricing associated with them.
* Delete and remove them from your Organization.
This topic explains how to edit and review your Plan Templates and Plans:
* [Editing and Reviewing Plans](/guides/plans-and-pricing/working-with-plan-templates-and-plans/editing-plan-templates-and-plans#editing-and-reviewing-plans)
* [Deleting Plans](/guides/plans-and-pricing/working-with-plan-templates-and-plans/editing-plan-templates-and-plans#deleting-plans)
**Note**: Editing, reviewing, and deleting a Plan Template is the same as for a Plan. The procedures given here explains how to for a Plan.
## Editing and Reviewing Plans
**To edit and review a Plan:**
1. Select **Pricing>Plans**. The **Plans** page opens.
2. In the **Product** drop-down, select the Product for the Plan you want to edit or review. Existing Plans for the Product are listed.
3. If you want to edit the details of a Plan, select the **Edit** icon:
![]() The **Edit** page opens.
4. Make the required editing changes to the Plan details.
5. Select **Update plan**.
**Tip: Check Plan Template Details?** When you open a Plan to edit its details, the **Edit** page shows the Plan template on which the Plan is based. You can select the name text of the Plan template to open it directly and check its details.
6. If you want to review a Plan, select its **Name** text in the listing. The **Plan details** page opens. Also shown is:
* Any **Pricings** configured for the Plan, which you can review and manage.
* **Plan metadata** giving details of any **Custom fields**, **Integration runs**, and **External mappings** configured for the Plan.
* See [Creating Plans](/guides/plans-and-pricing/working-with-plan-templates-and-plans/creating-plans) and [Creating Plan Templates](/guides/plans-and-pricing/working-with-plan-templates-and-plans/creating-plan-templates) for working in the **Plans details** and **Plan template details** pages.
## Deleting Plans
**To delete a Plan:**
1. Select **Pricing>Plans**. The **Plans** page opens.
2. In the **Product** drop-down, select the Product for the Plan you want to delete. Existing Plans for the Product are listed.
3. Select the **Delete** icon for the Plan:
The **Edit** page opens.
4. Make the required editing changes to the Plan details.
5. Select **Update plan**.
**Tip: Check Plan Template Details?** When you open a Plan to edit its details, the **Edit** page shows the Plan template on which the Plan is based. You can select the name text of the Plan template to open it directly and check its details.
6. If you want to review a Plan, select its **Name** text in the listing. The **Plan details** page opens. Also shown is:
* Any **Pricings** configured for the Plan, which you can review and manage.
* **Plan metadata** giving details of any **Custom fields**, **Integration runs**, and **External mappings** configured for the Plan.
* See [Creating Plans](/guides/plans-and-pricing/working-with-plan-templates-and-plans/creating-plans) and [Creating Plan Templates](/guides/plans-and-pricing/working-with-plan-templates-and-plans/creating-plan-templates) for working in the **Plans details** and **Plan template details** pages.
## Deleting Plans
**To delete a Plan:**
1. Select **Pricing>Plans**. The **Plans** page opens.
2. In the **Product** drop-down, select the Product for the Plan you want to delete. Existing Plans for the Product are listed.
3. Select the **Delete** icon for the Plan:
![]() A confirmation popup appears.
4. Select **Yes** to confirm the Plan deletion.
**Important: Plan is Attached to Account!** If the Plan has been attached to an Account to create an Account Plan, *you will not be able to delete the Plan* and an error is shown. You must first delete and Account Plans created using the Plan - see [Deleting an Account Plan](/guides/end-customer-accounts/attaching-plans-to-an-account#deleting-an-account-plan).
# Reviewing Options for Plans and Plan Templates
Source: https://docs.m3ter.com/guides/plans-and-pricing/working-with-plan-templates-and-plans/reviewing-configuration-options-for-plans-and-plan-templates
This topic explains the general and billing options available for configuring your Plan Templates and Plans:
* [General and Billing Options](/guides/plans-and-pricing/working-with-plan-templates-and-plans/reviewing-configuration-options-for-plans-and-plan-templates#general-and-billing-options)
* [Custom Fields](/guides/plans-and-pricing/working-with-plan-templates-and-plans/reviewing-configuration-options-for-plans-and-plan-templates#custom-fields)
## General and Billing Options
### Plan Template Options
Plan Templates offer the following configuration options:
* **Name**. Descriptive name for the Plan Template.
* **Code**. Unique reference for the Plan Template. (*Optional*)
* **Currency**. Use the drop-down list to select the currency you want to use for the Plan Template.
* Note that you must first create the currency you want use at the Organization level for it to show for selection in the list.
* This currency becomes the *pricing currency* and is used when you attach Product Plan Templates or Plans based on those templates to an Account to set up pricing for product usage against the Account.
* If you have entered a different currency for your Organization, then the Organization currency will be used as the *billing currency*. If you have selected a currency for the Account that is different to the Organization currency, then this Account level currency setting takes precedence and will be used as the billing currency.
**Tip: Why different pricing/billing currency?** If you have end customer Accounts located across many different countries, you may nevertheless want to always price for product usage in the same single currency. You can then select a different billing currency on an Account-by-Account basis to ensure you Bill each of your customers in the currency appropriate to their geographical location. For more details, see [Creating and Managing Currencies](/guides/organization-and-access-management/viewing-and-editing-organization/creating-and-managing-currencies).
* **Bill frequency**. Determines the period bills cover when you generate bills for the Accounts to which the Plan has been applied. Four options:
* **Daily**. Starting at midnight each day, covering a twenty-four hour period following.
* **Weekly**. Starting at midnight on a Monday morning covering the seven-day period following.
* **Monthly**. Starting at midnight on the morning of the first day of each month covering the entire calendar month following.
* **Annually**. Starting at midnight on the morning of the first day of each year covering the entire calendar year following.
**Note:** The options for Bill frequency depend on the **Epoch** settings you configure for your Organization. See [Managing your Organization](/guides/organization-and-access-management/viewing-and-editing-organization).
* **Bill interval**. How often bills are issued. For example, if **Bill frequency** is set to **Monthly** and **Bill interval** is set to **3**, bills are issued every three months.
* **Standing charge**. Enter a standing charge applied to bills for customer Accounts on a Plan derived from the template:
* **Standing charge billing**. You can override the organization-wide setting to bill either in arrears or in advance for the Standing charge.
* **Standing charge interval**. How often the standing charge is applied. For example, if the bill is issued every three months and the **Standing charge interval** is set to **2**, then the standing charge is applied every six months.
* **Standing charge offset**. Defines an offset for when the standing charge is first applied. For example, if the bill is issued every three months and the **Standing charge offset** is set to **0**, then the charge is applied to the first bill (at three months); if set to **1**, it would be applied to the next bill (at six months), and so on.
* **Standing charge description**. You can enter a custom description for any Standing charge amounts that appear in the bill as line items.
* Note that if you omit a custom description, then a default Standing Charge description will be shown for Bill line items- see [Bill Line Items - Default Descriptions](/guides/billing-and-usage-data/running-viewing-and-managing-bills/bill-line-items-default-descriptions) for details.
**Notes:**
* **Standing Charge Prorating.** Note that standing charges are prorated at billing. For example, if your billing frequency is monthly but when you run a Bill, the period for which the Plan has been active is only ten days, then the standing charge applied will be roughly one-third for the configured amount. For example, in a 31 day month, the standing charge applied = standing charge \* 10 / 31. See [Prorated Charges](/guides/billing-and-usage-data/running-viewing-and-managing-bills/troubleshooting-bills#pro-rated-charges) in the [Troubleshooting Bills](/guides/billing-and-usage-data/running-viewing-and-managing-bills/troubleshooting-bills) topic for more details.
* **Working with Standing charge interval and Standing charge offset?** For more information on how to use these settings to have a Standard charge applied to Bills on an Account, see the [Standing Charge](/guides/plans-and-pricing/working-with-plan-templates-and-plans/understanding-billing-options-for-plan-templates-plans#standing-charge) section in the following topic. An example is also given to explain these settings.
* **Product minimum spend**. Enter a minimum spend amount for *usage charges* per billing cycle for customer Accounts on a pricing Plan derived from the template. Note that this applies to a minimum spend amount for the Product *as a whole* for a customer Account that consumes the Product. If the customer Account has Child Accounts which have different pricing Plans attached, the minimum spend amount you enter for the Parent Account pricing Plan is reckoned at billing against the *total charges due* - for both Child and Parent. See [Billing for Parent/Child Accounts](/guides/end-customer-accounts/creating-and-working-with-child-accounts#billing-for-parentchild-accounts):
* **Minimum spend billing**. You can override the organization-wide setting to bill either in arrears or in advance for the Product minimum spend.
* **Minimum spend description**. You can enter a description for any Minimum spend amounts, which will appear in the bill line item.
**Notes:**
* **How are Minimum Spend amounts assessed at Billing?** For details, see the [Minimum Spend](/guides/plans-and-pricing/working-with-plan-templates-and-plans/understanding-billing-options-for-plan-templates-plans#minimum-spend) section in the [Understanding Billing Options for Plan Templates/Plans](/guides/plans-and-pricing/working-with-plan-templates-and-plans/understanding-billing-options-for-plan-templates-plans) topic.
* **Minimum Spend Prorating**. Note that Minimum Spends are prorated at billing. See [Prorated Charges](/guides/billing-and-usage-data/running-viewing-and-managing-bills/troubleshooting-bills#pro-rated-charges) in the [Troubleshooting Bills](/guides/billing-and-usage-data/running-viewing-and-managing-bills/troubleshooting-bills) topic for more details.
* **Default Minimum Spend Description?** If you omit a custom description, then a default Minimum Spend description will be shown for Bill line items- see [Bill Line Items - Default Descriptions](/guides/billing-and-usage-data/running-viewing-and-managing-bills/bill-line-items-default-descriptions) for details.
### Plan Options
A Plan is always based on a Plan Template - if you try to create a Plan for a Product for which no Plan Templates have yet been created, you'll be blocked and prompted to create a Plan Template first. Plans offer the following configuration options:
* **Name**. Descriptive name for the Plan.
* **Code**. Unique reference for the Plan. You will need this **Code** as a unique id when submitting API calls, such as a call to update a Plan.
* **Standing charge**. Enter a value to override the **Standing charge** value inherited from the Plan Template:
* **Standing charge billing**. You can override the template setting to bill either in arrears or in advance for the Standing charge.
* **Standing charge description**. You can enter a custom description for any Standing charge amounts that appear in the bill as line items, and which overrides any description entered for the Plan template:
* Note that if you omit a custom description, then a default Standing Charge description will be shown for Bill line items- see [Bill Line Items - Default Descriptions](/guides/billing-and-usage-data/running-viewing-and-managing-bills/bill-line-items-default-descriptions) for details.
* **Product minimum spend**. Enter a value to override the **Product minimum spend** value inherited from the Plan Template:
* **Minimum spend billing**. You can override the template setting to bill either in arrears or in advance for the Product minimum spend.
* **Minimum spend description**. You can enter a description for any Minimum spend amounts, which overrides any description entered for the template and which will appear in the bill line item.
**Important! Understanding Billing Options**. We recommend that you review [Understanding Billing Options for Plan Templates/Plans](/guides/plans-and-pricing/working-with-plan-templates-and-plans/understanding-billing-options-for-plan-templates-plans) before you proceed to create and price up your Product Plans.
**Tip: Default Minimum Spend Description?** If you omit a custom description, then a default Minimum Spend description will be shown for Bill line items- see [Bill Line Items - Default Descriptions](/guides/billing-and-usage-data/running-viewing-and-managing-bills/bill-line-items-default-descriptions) for details.
## Custom Fields
You can define **Custom Fields** when creating a Plan Template or Plan or edit them at a later date to do this. Any Custom Fields you create for an individual Plan Template or Plan override those you've created for them at the Organizational level. See [Working with Custom Fields](/guides/creating-and-managing-products/working-with-custom-fields).
# Understanding Billing Options for Plan Templates/Plans
Source: https://docs.m3ter.com/guides/plans-and-pricing/working-with-plan-templates-and-plans/understanding-billing-options-for-plan-templates-plans
When you create and configure Plan Templates and Plans for your Products to prepare for setting up usage-based pricing to charge Accounts that consume your Products, several key billing options are available. These billing options are designed to give you maximum flexibility in controlling the way you want to Bill your customer Accounts.
This topic explains in detail the key billing options available for Plan Templates/Plans:
* [Billing Currency, Pricing Currency, and Currency Conversions](/guides/plans-and-pricing/working-with-plan-templates-and-plans/understanding-billing-options-for-plan-templates-plans#billing-currency-pricing-currency-and-currency-conversions)
* [Standing Charge](/guides/plans-and-pricing/working-with-plan-templates-and-plans/understanding-billing-options-for-plan-templates-plans#standing-charge)
* [Minimum Spend](/guides/plans-and-pricing/working-with-plan-templates-and-plans/understanding-billing-options-for-plan-templates-plans#minimum-spend)
## Billing Currency, Pricing Currency, and Currency Conversions
You can select a *billing currency* at two levels:
* **Organization level**. This defines the currency used for Bills created against Accounts across your Organization.
* **Individual Account level**. You also can set the billing currency at level of an individual Account level and choose to override the Organization-level billing currency for the Account.
However, when you create a Plan Template you must select a currency. Product Plans are always based on a Plan Template and inherit the currency setting of their template. When you price the Plan, this currency is used as the *pricing currency*.
### Why might I want to use a billing currency that's different to the pricing currency?
Suppose you have end-customer Accounts across many different countries. You might want to always *price* for product usage by any Account using the *same pricing currency*. However, you want to *generate the Bills* for each Account using the appropriate\* billing currency\* - the one used in the country where the end-customer lives.
For an Account where the pricing currency does not match the required billing currency, at billing charges are calculated using the pricing currency and then currency conversion rates are used to convert those charges into the appropriate billing currency amounts. This means you must ensure any required currency conversion rates have been set up for your Organization.
### What does this mismatch between billing currency and pricing currency mean for Bills?
If you attach a Plan to an Account and the Plan uses a pricing currency that is different to the billing currency, when a Bill is generated for the Account the line items are first calculated using the Plan pricing currency and then the line item amounts are converted to the selected billing currency:
* **Billing Currency is Organization-level or Account-level**. This process occurs whether you are using the Organization-level billing currency or using an Account billing currency.
* **Currency Conversions**. For this to work, you must first set up currency conversion rates which the billing process can use to convert the Plan pricing currency amounts into the billing currency amounts. See [Adding Currency Conversion Rates](/guides/organization-and-access-management/viewing-and-editing-organization/creating-and-managing-currencies#adding-currency-conversion-rates).
**IMPORTANT!** If you're using different pricing and billing currencies and you haven't defined a conversion rate in your Organization configuration for converting a Plan pricing currency into the selected billing currency, then Bill creation will fail and you'll receive an error Alert.
* **Scheduled Billing**. Note that for scheduled billing runs, Billing always uses the billing currency that you've selected either at Organization level or individual Account level.
### Example Bill: Mixed Pricing Currencies vs. Billing Currency
Suppose you are a US based company offering a purified water supply, monitoring, and management service to dental practice groups worldwide. Your general pricing and billing policies are as follows:
* Your billing currency is always US Dollars (USD).
* Most customers consume two product lines:
* A core product charged by liters of water consumed per billing period and a standing charge per billing period that varies from country to country. These charges are priced in the customer's local currency.
* An online customer support service charged by number of help enquiries made per billing period. This is priced in US Dollars regardless of the country of origin of the customer.
#### Reviewing Example Bill in Console
For a monthly billing frequency, here's an example of Bill generated in the m3ter Console under **Bill management** for a UK customer where the end-customers are charged in British Pounds (GBP) for the core water consumption product with a £5 monthly standing charge applied:
A confirmation popup appears.
4. Select **Yes** to confirm the Plan deletion.
**Important: Plan is Attached to Account!** If the Plan has been attached to an Account to create an Account Plan, *you will not be able to delete the Plan* and an error is shown. You must first delete and Account Plans created using the Plan - see [Deleting an Account Plan](/guides/end-customer-accounts/attaching-plans-to-an-account#deleting-an-account-plan).
# Reviewing Options for Plans and Plan Templates
Source: https://docs.m3ter.com/guides/plans-and-pricing/working-with-plan-templates-and-plans/reviewing-configuration-options-for-plans-and-plan-templates
This topic explains the general and billing options available for configuring your Plan Templates and Plans:
* [General and Billing Options](/guides/plans-and-pricing/working-with-plan-templates-and-plans/reviewing-configuration-options-for-plans-and-plan-templates#general-and-billing-options)
* [Custom Fields](/guides/plans-and-pricing/working-with-plan-templates-and-plans/reviewing-configuration-options-for-plans-and-plan-templates#custom-fields)
## General and Billing Options
### Plan Template Options
Plan Templates offer the following configuration options:
* **Name**. Descriptive name for the Plan Template.
* **Code**. Unique reference for the Plan Template. (*Optional*)
* **Currency**. Use the drop-down list to select the currency you want to use for the Plan Template.
* Note that you must first create the currency you want use at the Organization level for it to show for selection in the list.
* This currency becomes the *pricing currency* and is used when you attach Product Plan Templates or Plans based on those templates to an Account to set up pricing for product usage against the Account.
* If you have entered a different currency for your Organization, then the Organization currency will be used as the *billing currency*. If you have selected a currency for the Account that is different to the Organization currency, then this Account level currency setting takes precedence and will be used as the billing currency.
**Tip: Why different pricing/billing currency?** If you have end customer Accounts located across many different countries, you may nevertheless want to always price for product usage in the same single currency. You can then select a different billing currency on an Account-by-Account basis to ensure you Bill each of your customers in the currency appropriate to their geographical location. For more details, see [Creating and Managing Currencies](/guides/organization-and-access-management/viewing-and-editing-organization/creating-and-managing-currencies).
* **Bill frequency**. Determines the period bills cover when you generate bills for the Accounts to which the Plan has been applied. Four options:
* **Daily**. Starting at midnight each day, covering a twenty-four hour period following.
* **Weekly**. Starting at midnight on a Monday morning covering the seven-day period following.
* **Monthly**. Starting at midnight on the morning of the first day of each month covering the entire calendar month following.
* **Annually**. Starting at midnight on the morning of the first day of each year covering the entire calendar year following.
**Note:** The options for Bill frequency depend on the **Epoch** settings you configure for your Organization. See [Managing your Organization](/guides/organization-and-access-management/viewing-and-editing-organization).
* **Bill interval**. How often bills are issued. For example, if **Bill frequency** is set to **Monthly** and **Bill interval** is set to **3**, bills are issued every three months.
* **Standing charge**. Enter a standing charge applied to bills for customer Accounts on a Plan derived from the template:
* **Standing charge billing**. You can override the organization-wide setting to bill either in arrears or in advance for the Standing charge.
* **Standing charge interval**. How often the standing charge is applied. For example, if the bill is issued every three months and the **Standing charge interval** is set to **2**, then the standing charge is applied every six months.
* **Standing charge offset**. Defines an offset for when the standing charge is first applied. For example, if the bill is issued every three months and the **Standing charge offset** is set to **0**, then the charge is applied to the first bill (at three months); if set to **1**, it would be applied to the next bill (at six months), and so on.
* **Standing charge description**. You can enter a custom description for any Standing charge amounts that appear in the bill as line items.
* Note that if you omit a custom description, then a default Standing Charge description will be shown for Bill line items- see [Bill Line Items - Default Descriptions](/guides/billing-and-usage-data/running-viewing-and-managing-bills/bill-line-items-default-descriptions) for details.
**Notes:**
* **Standing Charge Prorating.** Note that standing charges are prorated at billing. For example, if your billing frequency is monthly but when you run a Bill, the period for which the Plan has been active is only ten days, then the standing charge applied will be roughly one-third for the configured amount. For example, in a 31 day month, the standing charge applied = standing charge \* 10 / 31. See [Prorated Charges](/guides/billing-and-usage-data/running-viewing-and-managing-bills/troubleshooting-bills#pro-rated-charges) in the [Troubleshooting Bills](/guides/billing-and-usage-data/running-viewing-and-managing-bills/troubleshooting-bills) topic for more details.
* **Working with Standing charge interval and Standing charge offset?** For more information on how to use these settings to have a Standard charge applied to Bills on an Account, see the [Standing Charge](/guides/plans-and-pricing/working-with-plan-templates-and-plans/understanding-billing-options-for-plan-templates-plans#standing-charge) section in the following topic. An example is also given to explain these settings.
* **Product minimum spend**. Enter a minimum spend amount for *usage charges* per billing cycle for customer Accounts on a pricing Plan derived from the template. Note that this applies to a minimum spend amount for the Product *as a whole* for a customer Account that consumes the Product. If the customer Account has Child Accounts which have different pricing Plans attached, the minimum spend amount you enter for the Parent Account pricing Plan is reckoned at billing against the *total charges due* - for both Child and Parent. See [Billing for Parent/Child Accounts](/guides/end-customer-accounts/creating-and-working-with-child-accounts#billing-for-parentchild-accounts):
* **Minimum spend billing**. You can override the organization-wide setting to bill either in arrears or in advance for the Product minimum spend.
* **Minimum spend description**. You can enter a description for any Minimum spend amounts, which will appear in the bill line item.
**Notes:**
* **How are Minimum Spend amounts assessed at Billing?** For details, see the [Minimum Spend](/guides/plans-and-pricing/working-with-plan-templates-and-plans/understanding-billing-options-for-plan-templates-plans#minimum-spend) section in the [Understanding Billing Options for Plan Templates/Plans](/guides/plans-and-pricing/working-with-plan-templates-and-plans/understanding-billing-options-for-plan-templates-plans) topic.
* **Minimum Spend Prorating**. Note that Minimum Spends are prorated at billing. See [Prorated Charges](/guides/billing-and-usage-data/running-viewing-and-managing-bills/troubleshooting-bills#pro-rated-charges) in the [Troubleshooting Bills](/guides/billing-and-usage-data/running-viewing-and-managing-bills/troubleshooting-bills) topic for more details.
* **Default Minimum Spend Description?** If you omit a custom description, then a default Minimum Spend description will be shown for Bill line items- see [Bill Line Items - Default Descriptions](/guides/billing-and-usage-data/running-viewing-and-managing-bills/bill-line-items-default-descriptions) for details.
### Plan Options
A Plan is always based on a Plan Template - if you try to create a Plan for a Product for which no Plan Templates have yet been created, you'll be blocked and prompted to create a Plan Template first. Plans offer the following configuration options:
* **Name**. Descriptive name for the Plan.
* **Code**. Unique reference for the Plan. You will need this **Code** as a unique id when submitting API calls, such as a call to update a Plan.
* **Standing charge**. Enter a value to override the **Standing charge** value inherited from the Plan Template:
* **Standing charge billing**. You can override the template setting to bill either in arrears or in advance for the Standing charge.
* **Standing charge description**. You can enter a custom description for any Standing charge amounts that appear in the bill as line items, and which overrides any description entered for the Plan template:
* Note that if you omit a custom description, then a default Standing Charge description will be shown for Bill line items- see [Bill Line Items - Default Descriptions](/guides/billing-and-usage-data/running-viewing-and-managing-bills/bill-line-items-default-descriptions) for details.
* **Product minimum spend**. Enter a value to override the **Product minimum spend** value inherited from the Plan Template:
* **Minimum spend billing**. You can override the template setting to bill either in arrears or in advance for the Product minimum spend.
* **Minimum spend description**. You can enter a description for any Minimum spend amounts, which overrides any description entered for the template and which will appear in the bill line item.
**Important! Understanding Billing Options**. We recommend that you review [Understanding Billing Options for Plan Templates/Plans](/guides/plans-and-pricing/working-with-plan-templates-and-plans/understanding-billing-options-for-plan-templates-plans) before you proceed to create and price up your Product Plans.
**Tip: Default Minimum Spend Description?** If you omit a custom description, then a default Minimum Spend description will be shown for Bill line items- see [Bill Line Items - Default Descriptions](/guides/billing-and-usage-data/running-viewing-and-managing-bills/bill-line-items-default-descriptions) for details.
## Custom Fields
You can define **Custom Fields** when creating a Plan Template or Plan or edit them at a later date to do this. Any Custom Fields you create for an individual Plan Template or Plan override those you've created for them at the Organizational level. See [Working with Custom Fields](/guides/creating-and-managing-products/working-with-custom-fields).
# Understanding Billing Options for Plan Templates/Plans
Source: https://docs.m3ter.com/guides/plans-and-pricing/working-with-plan-templates-and-plans/understanding-billing-options-for-plan-templates-plans
When you create and configure Plan Templates and Plans for your Products to prepare for setting up usage-based pricing to charge Accounts that consume your Products, several key billing options are available. These billing options are designed to give you maximum flexibility in controlling the way you want to Bill your customer Accounts.
This topic explains in detail the key billing options available for Plan Templates/Plans:
* [Billing Currency, Pricing Currency, and Currency Conversions](/guides/plans-and-pricing/working-with-plan-templates-and-plans/understanding-billing-options-for-plan-templates-plans#billing-currency-pricing-currency-and-currency-conversions)
* [Standing Charge](/guides/plans-and-pricing/working-with-plan-templates-and-plans/understanding-billing-options-for-plan-templates-plans#standing-charge)
* [Minimum Spend](/guides/plans-and-pricing/working-with-plan-templates-and-plans/understanding-billing-options-for-plan-templates-plans#minimum-spend)
## Billing Currency, Pricing Currency, and Currency Conversions
You can select a *billing currency* at two levels:
* **Organization level**. This defines the currency used for Bills created against Accounts across your Organization.
* **Individual Account level**. You also can set the billing currency at level of an individual Account level and choose to override the Organization-level billing currency for the Account.
However, when you create a Plan Template you must select a currency. Product Plans are always based on a Plan Template and inherit the currency setting of their template. When you price the Plan, this currency is used as the *pricing currency*.
### Why might I want to use a billing currency that's different to the pricing currency?
Suppose you have end-customer Accounts across many different countries. You might want to always *price* for product usage by any Account using the *same pricing currency*. However, you want to *generate the Bills* for each Account using the appropriate\* billing currency\* - the one used in the country where the end-customer lives.
For an Account where the pricing currency does not match the required billing currency, at billing charges are calculated using the pricing currency and then currency conversion rates are used to convert those charges into the appropriate billing currency amounts. This means you must ensure any required currency conversion rates have been set up for your Organization.
### What does this mismatch between billing currency and pricing currency mean for Bills?
If you attach a Plan to an Account and the Plan uses a pricing currency that is different to the billing currency, when a Bill is generated for the Account the line items are first calculated using the Plan pricing currency and then the line item amounts are converted to the selected billing currency:
* **Billing Currency is Organization-level or Account-level**. This process occurs whether you are using the Organization-level billing currency or using an Account billing currency.
* **Currency Conversions**. For this to work, you must first set up currency conversion rates which the billing process can use to convert the Plan pricing currency amounts into the billing currency amounts. See [Adding Currency Conversion Rates](/guides/organization-and-access-management/viewing-and-editing-organization/creating-and-managing-currencies#adding-currency-conversion-rates).
**IMPORTANT!** If you're using different pricing and billing currencies and you haven't defined a conversion rate in your Organization configuration for converting a Plan pricing currency into the selected billing currency, then Bill creation will fail and you'll receive an error Alert.
* **Scheduled Billing**. Note that for scheduled billing runs, Billing always uses the billing currency that you've selected either at Organization level or individual Account level.
### Example Bill: Mixed Pricing Currencies vs. Billing Currency
Suppose you are a US based company offering a purified water supply, monitoring, and management service to dental practice groups worldwide. Your general pricing and billing policies are as follows:
* Your billing currency is always US Dollars (USD).
* Most customers consume two product lines:
* A core product charged by liters of water consumed per billing period and a standing charge per billing period that varies from country to country. These charges are priced in the customer's local currency.
* An online customer support service charged by number of help enquiries made per billing period. This is priced in US Dollars regardless of the country of origin of the customer.
#### Reviewing Example Bill in Console
For a monthly billing frequency, here's an example of Bill generated in the m3ter Console under **Bill management** for a UK customer where the end-customers are charged in British Pounds (GBP) for the core water consumption product with a £5 monthly standing charge applied:
![Bill Price Currency Example7]()
![Bill Price Currency Example5]() On review, we can see that the required mixed currency pricing has been accommodated:
* For the core **WaterGen Standard** product:
* The **Water Usage Charges** **Usage** line item is shown as priced at £1.00 per **Liter** **Unit price** according to the priced Plan attached to the Account for the Product. However, using the configured conversion rate for GBP to USD of 1.5 and shown at the bottom of the Bill under **Currency conversions**, the £1,000 due in this pricing currency has been converted into a billing currency **Subtotal** of \$1,500.
* The **Water Usage Charges Standing charge** line item is also priced under the same priced Plan attached to the Account. However, since this type of line item doesn't required any **Unit price**, the GBP total is not shown on the Bill and the UK rate of £5 shows as the converted \$7.50 **Subtotal**.
* For the **WaterGen Support** product:
* The **Support Charges** **Usage** line item is shown as priced at \$0.50 per **Call** **Unit price** according to the priced Plan attached to the Account for the Product because the pricing currency is USD, and the billing currency **Subtotal** is simply a multiplication of the recorded number of Calls by \$0.50 = \$550.
#### Using API to Review Example Bill JSON
If we now use the [`GET Retrieve Bill API`](/api/bill/retrieve-bill) endpoint for this Bill's id, we can review the response schema JSON to see how the mixed currencies pricing is handled:
* First, the Bill details section provides a number of parameters including:
* A `"currency"` parameter, which gives the *billing currency* - in this example the value is `"USD"`.
* A `"currencyConversions"` parameter giving an array listing the conversion rates configured for use in billing for your m3ter Organization:
```json theme={null}
{
"id": "5226324a-dcfe-4ff4-a1b0-98766f38ad7d",
"version": 3,
"accountId": "32728b36-5822-4568-8731-951762593b3c",
"accountCode": "water_gen_customer_uk",
"startDate": "2026-05-01",
"endDate": "2026-06-01",
"startDateTimeUTC": "2026-05-01T00:00:00.000Z",
"endDateTimeUTC": "2026-06-01T00:00:00.000Z",
"billDate": "2026-06-01",
"dueDate": "2026-06-08",
"billingFrequency": "MONTHLY",
"billFrequencyInterval": 1,
"timezone": "UTC",
"currency": "USD",
"locked": false,
"createdDate": "2026-06-11T15:31:24.663Z",
"status": "PENDING",
"billJobId": "ba5f053e-0f5d-4b08-bf9b-a3cdf5f46e4a",
"currencyConversions": [
{
"from": "GBP",
"to": "USD",
"multiplier": 1.5
},
{
"from": "APC",
"to": "USD",
"multiplier": 0.5
},
{
"from": "USD",
"to": "APC",
"multiplier": 2.0
},
{
"from": "CAD",
"to": "USD",
"multiplier": 0.75
}
],
```
In the response, the Bill's line items are returned in an array:
```json theme={null}
"lineItems": [...],
```
* The **Water Usage Charges** `USAGE `line item shows:
* A `"currency"` parameter, which gives a *pricing currency* of `"GBP"` for the line item, and which derives from the Plan template on which the priced Plan attached to the end-customer Account is based.
* A `"subtotal"` parameter, which gives the total due in the *pricing currency* of *1,000* `"GBP"`.
* A `"conversionRate"` parameter of `1.5`, which is determined by the conversion rate set under the `"currencyConversions"` parameter.
* A `"convertedSubtotal"` parameter, which gives the total due in the *billing currency* of *1,500* `"USD"`.
```json theme={null}
{
"id": "c36960e1-a52f-488b-9ec5-821da30e4949",
"productId": "773d030e-61c5-4e95-9cb7-a5414ae8bdda",
"productName": "WaterGen Standard",
"productCode": "water_gen_standard",
"accountingProductId": "",
"accountingProductName": "",
"accountingProductCode": "",
"aggregationId": "e0ff067a-6407-4ffd-bfb4-a1bf8250d221",
"compoundAggregationId": "",
"group": {},
"meterId": "6ee668bd-cc89-41d0-b313-8a7aaedadeee",
"planId": "607cf3ec-eee6-43fd-aa0f-d1da8679a5f6",
"planGroupId": "",
"description": "Water Usage Charges",
"quantity": 1000,
"units": 1000,
"unit": "Liters",
"subtotal": 1000,
"currency": "GBP",
"conversionRate": 1.5,
"convertedSubtotal": 1500,
"lineItemType": "USAGE",
"pricingId": "90aac9f0-f336-43f9-a755-dae429f84734",
"childAccountId": "",
"childAccountCode": "",
"usagePerPricingBand": [
{
"pricingBandId": "fb8a56c8-8b54-484d-ae00-61920185a323",
"lowerLimit": 0.0,
"fixedPrice": 0,
"unitSubtotal": 1000,
"unitPrice": 1,
"bandUnits": 1000,
"bandQuantity": 1000,
"bandSubtotal": 1000,
"convertedBandSubtotal": 1500
}
],
"servicePeriodStartDate": "2026-05-01T00:00:00.000Z",
"servicePeriodEndDate": "2026-06-01T00:00:00.000Z",
"averageUnitPrice": 1,
"sequenceNumber": 3
}
```
* Similarly, the **Water Usage Charges** `STANDING_CHARGE` line item shows:
* A `"currency"` parameter, which gives a *pricing currency* of `"GBP"` for the line item.
* A `"subtotal"` parameter, which gives the total due in the *pricing currency* of 5 `"GBP"`.
* A `"conversionRate"` parameter of `"1.5"`, which is determined by the conversion rate set under the `"currencyConversions"` parameter.
* A `"convertedSubtotal"` parameter, which gives the total due in the *billing currency* of *7.5* `"USD"`.
```json theme={null}
{
"id": "9346e0f1-4d8a-4ca5-b8fd-fe7660e3a896",
"productId": "773d030e-61c5-4e95-9cb7-a5414ae8bdda",
"productName": "WaterGen Standard",
"productCode": "water_gen_standard",
"accountingProductId": "",
"accountingProductName": "",
"accountingProductCode": "",
"aggregationId": "",
"compoundAggregationId": "",
"meterId": "",
"planId": "607cf3ec-eee6-43fd-aa0f-d1da8679a5f6",
"planGroupId": "",
"description": "Water Usage Charges",
"quantity": 1,
"units": 1,
"unit": "",
"subtotal": 5,
"currency": "GBP",
"conversionRate": 1.5,
"convertedSubtotal": 7.5,
"lineItemType": "STANDING_CHARGE",
"pricingId": "",
"childAccountId": "",
"childAccountCode": "",
"servicePeriodStartDate": "2026-05-01T00:00:00.000Z",
"servicePeriodEndDate": "2026-06-01T00:00:00.000Z",
"averageUnitPrice": 5,
"sequenceNumber": 1
},
```
* The **Support Charges** `USAGE` line item shows:
* A `"currency"` parameter, which gives a *pricing currency* of `"USD"` for the line item, and which derives from the Plan template on which the priced Plan attached to the end-customer Account is based.
* A `"subtotal"` parameter, which gives the total due in the *pricing currency* of *550* `"USD"`.
* A `"conversionRate"` parameter of `"1"`, since in this case the *pricing currency* for the line item is the same as the *billing currency*.
* A `"convertedSubtotal"` parameter, which gives the total due in the *billing currency* of *550* `"USD"`.
```json theme={null}
{
"id": "72543f02-9b3d-4eb2-8043-de827543e3de",
"productId": "88a719a7-f90d-4074-9e13-e3dfb2d36a11",
"productName": "WaterGen Support",
"productCode": "water_gen_support",
"accountingProductId": "",
"accountingProductName": "",
"accountingProductCode": "",
"aggregationId": "82fc80f2-a9bd-4dfc-ad0f-8a30e60627e5",
"compoundAggregationId": "",
"group": {},
"meterId": "96bd030b-0523-4ae7-b6bc-32bf514e9c36",
"planId": "dbd987c3-1333-4441-8fba-d2be86e8770d",
"planGroupId": "",
"description": "Support Charges",
"quantity": 1100,
"units": 1100,
"unit": "Calls",
"subtotal": 550,
"currency": "USD",
"conversionRate": 1,
"convertedSubtotal": 550,
"lineItemType": "USAGE",
"pricingId": "cd02b224-74b4-4a5f-b2bc-5973e242f5e7",
"childAccountId": "",
"childAccountCode": "",
"usagePerPricingBand": [
{
"pricingBandId": "f161c79c-6800-46c6-9dca-d866831d7e04",
"lowerLimit": 0.0,
"fixedPrice": 0,
"unitSubtotal": 550,
"unitPrice": 0.5,
"bandUnits": 1100,
"bandQuantity": 1100,
"bandSubtotal": 550,
"convertedBandSubtotal": 550
}
],
"servicePeriodStartDate": "2026-05-01T00:00:00.000Z",
"servicePeriodEndDate": "2026-06-01T00:00:00.000Z",
"averageUnitPrice": 0.5,
"sequenceNumber": 2
},
```
### What if I want to use a different billing currency for some of my Accounts and outside of the scheduled billing runs?
You can do this by creating a *Bill Job*, where you can specify:
* The Accounts for which you want their Bills created in a specific currency.
* The currency the Bills will use.
* Conversion rates for converting Plan currencies to Bill currency.
* Conversion rates you've defined at Organization level can also be used. If a conversion rate is defined both at Organization level and for the Bill Job, the Bill Job rate is used.
You can use the [Create a new Bill Job](/api/billjob/create-billjob) API call to do this. See the [Bill Job](/api/billjob/introduction) section in our API Reference Docs for other calls you can use to create and manage Bill Jobs.
## Standing Charge
### What is a Billing Standing Charge?
A *Standing Charge* allows you to set a *fixed amount* that is charged on Account Bills:
* You can define this fixed amount for Plan Templates, Plans, and Plan Groups.
### How is the Standing Charge applied for a Plan Group?
If you define a Standing Charge for a Plan Group, which doesn't have a well-defined billing cycle because the Plans it contains might have different billing dates or frequencies, then if *any of the Plans* in the Group should be included in the billing run, then the Plan Group Standing Charge amount is included.
### Can I control which Bills the Standing Charge is applied to?
**Yes**. If you don't want the Standing charge to be applied to every Bill in a series, you can use the settings for *Standing charge interval* and *Standing charge offset* to control which Bills in a series of Bills the Standing Charge is applied to:
* A Standing charge interval of **3** means the charge is applied to the first Bill and then only to every 3rd Bill following in the billing series:
* For example, suppose you have a *daily* Bill Frequency with Bills issued *every day*, a *First bill date* of January 1st, and the *Standing charge offset* at **0**, and with a *Standing charge interval* set at **3**. The Standing charge amount will be applied to the January 1st Bill, the January 4th Bill, the January 7th Bill, and so on. Here's how the billing series unfolds for an Account that incurs a regular \$10 per month usage charges and the Standing charge is set at \$47:
On review, we can see that the required mixed currency pricing has been accommodated:
* For the core **WaterGen Standard** product:
* The **Water Usage Charges** **Usage** line item is shown as priced at £1.00 per **Liter** **Unit price** according to the priced Plan attached to the Account for the Product. However, using the configured conversion rate for GBP to USD of 1.5 and shown at the bottom of the Bill under **Currency conversions**, the £1,000 due in this pricing currency has been converted into a billing currency **Subtotal** of \$1,500.
* The **Water Usage Charges Standing charge** line item is also priced under the same priced Plan attached to the Account. However, since this type of line item doesn't required any **Unit price**, the GBP total is not shown on the Bill and the UK rate of £5 shows as the converted \$7.50 **Subtotal**.
* For the **WaterGen Support** product:
* The **Support Charges** **Usage** line item is shown as priced at \$0.50 per **Call** **Unit price** according to the priced Plan attached to the Account for the Product because the pricing currency is USD, and the billing currency **Subtotal** is simply a multiplication of the recorded number of Calls by \$0.50 = \$550.
#### Using API to Review Example Bill JSON
If we now use the [`GET Retrieve Bill API`](/api/bill/retrieve-bill) endpoint for this Bill's id, we can review the response schema JSON to see how the mixed currencies pricing is handled:
* First, the Bill details section provides a number of parameters including:
* A `"currency"` parameter, which gives the *billing currency* - in this example the value is `"USD"`.
* A `"currencyConversions"` parameter giving an array listing the conversion rates configured for use in billing for your m3ter Organization:
```json theme={null}
{
"id": "5226324a-dcfe-4ff4-a1b0-98766f38ad7d",
"version": 3,
"accountId": "32728b36-5822-4568-8731-951762593b3c",
"accountCode": "water_gen_customer_uk",
"startDate": "2026-05-01",
"endDate": "2026-06-01",
"startDateTimeUTC": "2026-05-01T00:00:00.000Z",
"endDateTimeUTC": "2026-06-01T00:00:00.000Z",
"billDate": "2026-06-01",
"dueDate": "2026-06-08",
"billingFrequency": "MONTHLY",
"billFrequencyInterval": 1,
"timezone": "UTC",
"currency": "USD",
"locked": false,
"createdDate": "2026-06-11T15:31:24.663Z",
"status": "PENDING",
"billJobId": "ba5f053e-0f5d-4b08-bf9b-a3cdf5f46e4a",
"currencyConversions": [
{
"from": "GBP",
"to": "USD",
"multiplier": 1.5
},
{
"from": "APC",
"to": "USD",
"multiplier": 0.5
},
{
"from": "USD",
"to": "APC",
"multiplier": 2.0
},
{
"from": "CAD",
"to": "USD",
"multiplier": 0.75
}
],
```
In the response, the Bill's line items are returned in an array:
```json theme={null}
"lineItems": [...],
```
* The **Water Usage Charges** `USAGE `line item shows:
* A `"currency"` parameter, which gives a *pricing currency* of `"GBP"` for the line item, and which derives from the Plan template on which the priced Plan attached to the end-customer Account is based.
* A `"subtotal"` parameter, which gives the total due in the *pricing currency* of *1,000* `"GBP"`.
* A `"conversionRate"` parameter of `1.5`, which is determined by the conversion rate set under the `"currencyConversions"` parameter.
* A `"convertedSubtotal"` parameter, which gives the total due in the *billing currency* of *1,500* `"USD"`.
```json theme={null}
{
"id": "c36960e1-a52f-488b-9ec5-821da30e4949",
"productId": "773d030e-61c5-4e95-9cb7-a5414ae8bdda",
"productName": "WaterGen Standard",
"productCode": "water_gen_standard",
"accountingProductId": "",
"accountingProductName": "",
"accountingProductCode": "",
"aggregationId": "e0ff067a-6407-4ffd-bfb4-a1bf8250d221",
"compoundAggregationId": "",
"group": {},
"meterId": "6ee668bd-cc89-41d0-b313-8a7aaedadeee",
"planId": "607cf3ec-eee6-43fd-aa0f-d1da8679a5f6",
"planGroupId": "",
"description": "Water Usage Charges",
"quantity": 1000,
"units": 1000,
"unit": "Liters",
"subtotal": 1000,
"currency": "GBP",
"conversionRate": 1.5,
"convertedSubtotal": 1500,
"lineItemType": "USAGE",
"pricingId": "90aac9f0-f336-43f9-a755-dae429f84734",
"childAccountId": "",
"childAccountCode": "",
"usagePerPricingBand": [
{
"pricingBandId": "fb8a56c8-8b54-484d-ae00-61920185a323",
"lowerLimit": 0.0,
"fixedPrice": 0,
"unitSubtotal": 1000,
"unitPrice": 1,
"bandUnits": 1000,
"bandQuantity": 1000,
"bandSubtotal": 1000,
"convertedBandSubtotal": 1500
}
],
"servicePeriodStartDate": "2026-05-01T00:00:00.000Z",
"servicePeriodEndDate": "2026-06-01T00:00:00.000Z",
"averageUnitPrice": 1,
"sequenceNumber": 3
}
```
* Similarly, the **Water Usage Charges** `STANDING_CHARGE` line item shows:
* A `"currency"` parameter, which gives a *pricing currency* of `"GBP"` for the line item.
* A `"subtotal"` parameter, which gives the total due in the *pricing currency* of 5 `"GBP"`.
* A `"conversionRate"` parameter of `"1.5"`, which is determined by the conversion rate set under the `"currencyConversions"` parameter.
* A `"convertedSubtotal"` parameter, which gives the total due in the *billing currency* of *7.5* `"USD"`.
```json theme={null}
{
"id": "9346e0f1-4d8a-4ca5-b8fd-fe7660e3a896",
"productId": "773d030e-61c5-4e95-9cb7-a5414ae8bdda",
"productName": "WaterGen Standard",
"productCode": "water_gen_standard",
"accountingProductId": "",
"accountingProductName": "",
"accountingProductCode": "",
"aggregationId": "",
"compoundAggregationId": "",
"meterId": "",
"planId": "607cf3ec-eee6-43fd-aa0f-d1da8679a5f6",
"planGroupId": "",
"description": "Water Usage Charges",
"quantity": 1,
"units": 1,
"unit": "",
"subtotal": 5,
"currency": "GBP",
"conversionRate": 1.5,
"convertedSubtotal": 7.5,
"lineItemType": "STANDING_CHARGE",
"pricingId": "",
"childAccountId": "",
"childAccountCode": "",
"servicePeriodStartDate": "2026-05-01T00:00:00.000Z",
"servicePeriodEndDate": "2026-06-01T00:00:00.000Z",
"averageUnitPrice": 5,
"sequenceNumber": 1
},
```
* The **Support Charges** `USAGE` line item shows:
* A `"currency"` parameter, which gives a *pricing currency* of `"USD"` for the line item, and which derives from the Plan template on which the priced Plan attached to the end-customer Account is based.
* A `"subtotal"` parameter, which gives the total due in the *pricing currency* of *550* `"USD"`.
* A `"conversionRate"` parameter of `"1"`, since in this case the *pricing currency* for the line item is the same as the *billing currency*.
* A `"convertedSubtotal"` parameter, which gives the total due in the *billing currency* of *550* `"USD"`.
```json theme={null}
{
"id": "72543f02-9b3d-4eb2-8043-de827543e3de",
"productId": "88a719a7-f90d-4074-9e13-e3dfb2d36a11",
"productName": "WaterGen Support",
"productCode": "water_gen_support",
"accountingProductId": "",
"accountingProductName": "",
"accountingProductCode": "",
"aggregationId": "82fc80f2-a9bd-4dfc-ad0f-8a30e60627e5",
"compoundAggregationId": "",
"group": {},
"meterId": "96bd030b-0523-4ae7-b6bc-32bf514e9c36",
"planId": "dbd987c3-1333-4441-8fba-d2be86e8770d",
"planGroupId": "",
"description": "Support Charges",
"quantity": 1100,
"units": 1100,
"unit": "Calls",
"subtotal": 550,
"currency": "USD",
"conversionRate": 1,
"convertedSubtotal": 550,
"lineItemType": "USAGE",
"pricingId": "cd02b224-74b4-4a5f-b2bc-5973e242f5e7",
"childAccountId": "",
"childAccountCode": "",
"usagePerPricingBand": [
{
"pricingBandId": "f161c79c-6800-46c6-9dca-d866831d7e04",
"lowerLimit": 0.0,
"fixedPrice": 0,
"unitSubtotal": 550,
"unitPrice": 0.5,
"bandUnits": 1100,
"bandQuantity": 1100,
"bandSubtotal": 550,
"convertedBandSubtotal": 550
}
],
"servicePeriodStartDate": "2026-05-01T00:00:00.000Z",
"servicePeriodEndDate": "2026-06-01T00:00:00.000Z",
"averageUnitPrice": 0.5,
"sequenceNumber": 2
},
```
### What if I want to use a different billing currency for some of my Accounts and outside of the scheduled billing runs?
You can do this by creating a *Bill Job*, where you can specify:
* The Accounts for which you want their Bills created in a specific currency.
* The currency the Bills will use.
* Conversion rates for converting Plan currencies to Bill currency.
* Conversion rates you've defined at Organization level can also be used. If a conversion rate is defined both at Organization level and for the Bill Job, the Bill Job rate is used.
You can use the [Create a new Bill Job](/api/billjob/create-billjob) API call to do this. See the [Bill Job](/api/billjob/introduction) section in our API Reference Docs for other calls you can use to create and manage Bill Jobs.
## Standing Charge
### What is a Billing Standing Charge?
A *Standing Charge* allows you to set a *fixed amount* that is charged on Account Bills:
* You can define this fixed amount for Plan Templates, Plans, and Plan Groups.
### How is the Standing Charge applied for a Plan Group?
If you define a Standing Charge for a Plan Group, which doesn't have a well-defined billing cycle because the Plans it contains might have different billing dates or frequencies, then if *any of the Plans* in the Group should be included in the billing run, then the Plan Group Standing Charge amount is included.
### Can I control which Bills the Standing Charge is applied to?
**Yes**. If you don't want the Standing charge to be applied to every Bill in a series, you can use the settings for *Standing charge interval* and *Standing charge offset* to control which Bills in a series of Bills the Standing Charge is applied to:
* A Standing charge interval of **3** means the charge is applied to the first Bill and then only to every 3rd Bill following in the billing series:
* For example, suppose you have a *daily* Bill Frequency with Bills issued *every day*, a *First bill date* of January 1st, and the *Standing charge offset* at **0**, and with a *Standing charge interval* set at **3**. The Standing charge amount will be applied to the January 1st Bill, the January 4th Bill, the January 7th Bill, and so on. Here's how the billing series unfolds for an Account that incurs a regular \$10 per month usage charges and the Standing charge is set at \$47:
![]() * If you've set the *Standing charge interval* to **3**, you can then use the *Standing charge offset* to determine *which* of the Bills in a series the charge is applied to:
* Do you want to apply the Standing charge to the 1st bill, 4th bill, 7th bill and so on? Or, do you want to apply it to the 2nd Bill, 5th Bill, 8th Bill, and so on?
* A Standing charge offset of **0** would mean the charge is applied to the 1st Bill, 4th Bill, 7th Bill and so on; a Standing charge offset of **1** would mean the charge is first applied to the 2nd Bill in the series, so in this case to the 2nd Bill, 5th Bill, 8th Bill, and so on.
* To illustrate we can adapt the current example, and change the *Standing charge offset* setting to **1**. Here's how the billing series now unfolds with respect to which Bills have the \$47 Standing charge applied:
* If you've set the *Standing charge interval* to **3**, you can then use the *Standing charge offset* to determine *which* of the Bills in a series the charge is applied to:
* Do you want to apply the Standing charge to the 1st bill, 4th bill, 7th bill and so on? Or, do you want to apply it to the 2nd Bill, 5th Bill, 8th Bill, and so on?
* A Standing charge offset of **0** would mean the charge is applied to the 1st Bill, 4th Bill, 7th Bill and so on; a Standing charge offset of **1** would mean the charge is first applied to the 2nd Bill in the series, so in this case to the 2nd Bill, 5th Bill, 8th Bill, and so on.
* To illustrate we can adapt the current example, and change the *Standing charge offset* setting to **1**. Here's how the billing series now unfolds with respect to which Bills have the \$47 Standing charge applied:
![]() ## Minimum Spend
A Minimum Spend allows you to define a minimum amount that your customer has agreed to spend *for usage charges* on each Bill they receive.
**Important!** Minimum Spend excludes any charges due at billing for Standing Charges or Prepayment/Commitment fees.
You can define a Minimum Spend at three levels:
* **Plan Template or Plan**
* **Plan Group**
* **Pricing**
The way in which the Minimum Spend amount is assessed differs at the three levels:
* **Plan Template or Plan**. All line item charges for usage of the Product are added up. If there is any shortfall against the Minimum Spend amount, this is added as a new line item to the Bill.
* **Plan Group**. Line item charges for usage on all the Products for all the Plans in the Plan Group are considered.
* For further details of how Plan Group Minimum Spend amounts are evaluated as against the Minimum Spend amounts defined for the Group's included Plans, see [Plan Group Minimum Spends vs. Plans Minimum Spends](/guides/plans-and-pricing/working-with-plan-templates-and-plans/working-with-plan-groups#plan-group-minimum-spend-vs-plans-minimum-spends).
* **Pricing**. Only the line item for usage charges under that specific Pricing is considered and an extra line item is added to the Bill if needed to make up any shortfall against the Minimum Spend.
For example, you might have a single priced Plan on an Account:
* Standing Charge is \$20
* Minimum Spend defined for usage charges per billing period is \$50
* For first billing period:
* Calculated usage charges amount to \$34.
* Extra line item in the amount of \$16 is added to reach Minimum Spend.
* Total Bill 1 = \$70
* For second billing period:
* Calculated usage charges amount to \$54, which exceed Minimum Spend.
* Total Bill 2 = \$74
**Tip: Minimum Spend with Parent/Child Accounts?** Note that a Minimum Spend amount is for the Product *as a whole* for an end customer Account that consumes the Product. If the customer Account has Child Accounts which have different pricing Plans attached, the Minimum Spend amount you enter for the Parent Account pricing Plan is reckoned at billing against the *total usage charges due* - for both Child and Parent. For more on billing for Parent/Child Accounts, see [Billing Hierarchy Modes for Parent/Child Accounts](/guides/end-customer-accounts/creating-and-working-with-child-accounts/billing-for-parent-child-accounts).
### What if I've chosen to bill Minimum Spend in advance? How does Minimum Spend work in this case?
When billing in arrears, Minimum Spend constraints can be assessed against usage charges that are known at the time of Bill calculation. When billing in advance, the method for applying a Minimum Spend is as follows:
* Since the actual usage charges for a given billing period are not known before the Bill is drawn in advance, for each Bill in a series except for the last Bill, the Minimum Spend is applied. At the time of the next billing, the appropriate adjustment is made in light of the actual usage charges due for the previous billing period.
* For example, suppose the Minimum Spend for a priced Plan is set at \$50 and no Standing Charges are defined and the Account has no Prepayment/Commitment fees due.
* At the time of first Bill, and before the actual usage charges due are known for the billing period to come, Minimum Spend is applied and therefore the usage total for Bill 1 = \$50
* If at the time of second billing, the actual usage charges due amount to \$40, a refund item of \$40 would be included in Bill 2 to ensure the customer does not end up paying \$90 for usage in the first billing period.
* Note that any refund amount is obviously capped at the defined Minimum Spend.
#### Minimum Spend Billed in Advance - Example
Here's a worked example to show how billing works when minimum spend is billed in advance:
* Suppose you want to bill end-customers for API calls made to your service. You charge a flat rate of \$1 per call made. Billing is monthly and there is a minimum spend of \$3000 per month billed in advance.
* An end-customer signs-up for this deal with you and their service period commences October 1st 2024. Metered API call usage over the following three months is: 500 calls in October; 1000 calls in November; 3500 calls in December. No Standing Charges are defined and the Account has no Prepayment/Commitment fees due.
* For this example, the first Bill dated October 1st will show:
* The minimum spend in advance charge for the coming month of October, since this is the first Bill for the service period and no API calls usage has yet been metered for the Account.
## Minimum Spend
A Minimum Spend allows you to define a minimum amount that your customer has agreed to spend *for usage charges* on each Bill they receive.
**Important!** Minimum Spend excludes any charges due at billing for Standing Charges or Prepayment/Commitment fees.
You can define a Minimum Spend at three levels:
* **Plan Template or Plan**
* **Plan Group**
* **Pricing**
The way in which the Minimum Spend amount is assessed differs at the three levels:
* **Plan Template or Plan**. All line item charges for usage of the Product are added up. If there is any shortfall against the Minimum Spend amount, this is added as a new line item to the Bill.
* **Plan Group**. Line item charges for usage on all the Products for all the Plans in the Plan Group are considered.
* For further details of how Plan Group Minimum Spend amounts are evaluated as against the Minimum Spend amounts defined for the Group's included Plans, see [Plan Group Minimum Spends vs. Plans Minimum Spends](/guides/plans-and-pricing/working-with-plan-templates-and-plans/working-with-plan-groups#plan-group-minimum-spend-vs-plans-minimum-spends).
* **Pricing**. Only the line item for usage charges under that specific Pricing is considered and an extra line item is added to the Bill if needed to make up any shortfall against the Minimum Spend.
For example, you might have a single priced Plan on an Account:
* Standing Charge is \$20
* Minimum Spend defined for usage charges per billing period is \$50
* For first billing period:
* Calculated usage charges amount to \$34.
* Extra line item in the amount of \$16 is added to reach Minimum Spend.
* Total Bill 1 = \$70
* For second billing period:
* Calculated usage charges amount to \$54, which exceed Minimum Spend.
* Total Bill 2 = \$74
**Tip: Minimum Spend with Parent/Child Accounts?** Note that a Minimum Spend amount is for the Product *as a whole* for an end customer Account that consumes the Product. If the customer Account has Child Accounts which have different pricing Plans attached, the Minimum Spend amount you enter for the Parent Account pricing Plan is reckoned at billing against the *total usage charges due* - for both Child and Parent. For more on billing for Parent/Child Accounts, see [Billing Hierarchy Modes for Parent/Child Accounts](/guides/end-customer-accounts/creating-and-working-with-child-accounts/billing-for-parent-child-accounts).
### What if I've chosen to bill Minimum Spend in advance? How does Minimum Spend work in this case?
When billing in arrears, Minimum Spend constraints can be assessed against usage charges that are known at the time of Bill calculation. When billing in advance, the method for applying a Minimum Spend is as follows:
* Since the actual usage charges for a given billing period are not known before the Bill is drawn in advance, for each Bill in a series except for the last Bill, the Minimum Spend is applied. At the time of the next billing, the appropriate adjustment is made in light of the actual usage charges due for the previous billing period.
* For example, suppose the Minimum Spend for a priced Plan is set at \$50 and no Standing Charges are defined and the Account has no Prepayment/Commitment fees due.
* At the time of first Bill, and before the actual usage charges due are known for the billing period to come, Minimum Spend is applied and therefore the usage total for Bill 1 = \$50
* If at the time of second billing, the actual usage charges due amount to \$40, a refund item of \$40 would be included in Bill 2 to ensure the customer does not end up paying \$90 for usage in the first billing period.
* Note that any refund amount is obviously capped at the defined Minimum Spend.
#### Minimum Spend Billed in Advance - Example
Here's a worked example to show how billing works when minimum spend is billed in advance:
* Suppose you want to bill end-customers for API calls made to your service. You charge a flat rate of \$1 per call made. Billing is monthly and there is a minimum spend of \$3000 per month billed in advance.
* An end-customer signs-up for this deal with you and their service period commences October 1st 2024. Metered API call usage over the following three months is: 500 calls in October; 1000 calls in November; 3500 calls in December. No Standing Charges are defined and the Account has no Prepayment/Commitment fees due.
* For this example, the first Bill dated October 1st will show:
* The minimum spend in advance charge for the coming month of October, since this is the first Bill for the service period and no API calls usage has yet been metered for the Account.
![Min Spend Advance Oct2]() * The second Bill dated November 1st will show:
* The \$500 charge for API calls usage in October, but with a corresponding \$500 rebate since the usage in the month did not exceed the minimum billed in advance at the start of the month.
* A minimum spend in advance charge for the coming month of November.
* The second Bill dated November 1st will show:
* The \$500 charge for API calls usage in October, but with a corresponding \$500 rebate since the usage in the month did not exceed the minimum billed in advance at the start of the month.
* A minimum spend in advance charge for the coming month of November.
![Min Spend Advance Nov2]() * The third Bill dated December 1st will show:
* The \$1000 charge for API calls usage in November, but with a corresponding \$1000 rebate since the usage in the month did not exceed the minimum billed in advance at the start of the month.
* A minimum spend in advance charge for the coming month of December.
* The third Bill dated December 1st will show:
* The \$1000 charge for API calls usage in November, but with a corresponding \$1000 rebate since the usage in the month did not exceed the minimum billed in advance at the start of the month.
* A minimum spend in advance charge for the coming month of December.
![Min Spend Advance Dec2]() * The fourth Bill dated January 1st will show:
* The \$3,500 charge for API calls usage in December, but with a \$3000 rebate since the usage in the month exceeded the minimum billed in advance at the start of the month.
* A minimum spend in advance charge for the coming month of January.
* The fourth Bill dated January 1st will show:
* The \$3,500 charge for API calls usage in December, but with a \$3000 rebate since the usage in the month exceeded the minimum billed in advance at the start of the month.
* A minimum spend in advance charge for the coming month of January.
![Min Spend Advance Jan2]() # Working in Plan Template and Plan Details
Source: https://docs.m3ter.com/guides/plans-and-pricing/working-with-plan-templates-and-plans/working-in-plan-details
When you've created a Plan Template or Plan, you can open a details page which is designed to help you to quickly review them for billing setup and pricing and to perform common management and operational tasks:
* [Reviewing Plan Details](#reviewing-plan-details)
* [Reviewing Plan Metadata](#reviewin-plan-metadata)
* [Duplicating Plan and Plan Templates](#duplicating-plans-and-plan-templates)
**Note:** This topic explains how to work in *Plan details* but the guidance given also applies for working in *Plan Template details*.
## Reviewing Plan Details
You can use the Plan details page to review and manage a Plan's setup:
* Review specific and billing details configured for the Plan.
* Check and edit any standing charges, pricing, or minimum spends configured for a Plan.
* Add a usage-based or counter-based pricing to a Plan.
**To review Plan details:**
1. Select **Pricing>Plans**. The **Plans** page opens.
2. In the **Product** drop-down, select the Product the Plan you want to review belongs to. The **Plans** list adjusts.
3. Select the **Name** hotlink text of the the Plan you want to review and work with. The **Plan details** page opens:
# Working in Plan Template and Plan Details
Source: https://docs.m3ter.com/guides/plans-and-pricing/working-with-plan-templates-and-plans/working-in-plan-details
When you've created a Plan Template or Plan, you can open a details page which is designed to help you to quickly review them for billing setup and pricing and to perform common management and operational tasks:
* [Reviewing Plan Details](#reviewing-plan-details)
* [Reviewing Plan Metadata](#reviewin-plan-metadata)
* [Duplicating Plan and Plan Templates](#duplicating-plans-and-plan-templates)
**Note:** This topic explains how to work in *Plan details* but the guidance given also applies for working in *Plan Template details*.
## Reviewing Plan Details
You can use the Plan details page to review and manage a Plan's setup:
* Review specific and billing details configured for the Plan.
* Check and edit any standing charges, pricing, or minimum spends configured for a Plan.
* Add a usage-based or counter-based pricing to a Plan.
**To review Plan details:**
1. Select **Pricing>Plans**. The **Plans** page opens.
2. In the **Product** drop-down, select the Product the Plan you want to review belongs to. The **Plans** list adjusts.
3. Select the **Name** hotlink text of the the Plan you want to review and work with. The **Plan details** page opens:
![Create Plans63]() On the **Plan details** panel, you can
* Read-off the Plan's **Name** and **Code**.
* Check the **Currency** and **Bill frequency** configured for the Plan.
* Use hotlink texts to open the **Plan template** the Plan is based on or the **Product** the Plan belongs to.
* Read-off which user **Created** and which **Last modified** the Plan and when.
* Check the Plan's **ID** and **Copy** it to your clipboard.
**Note:** The new version of the Plan details page opens. If you prefer to work in the old version of the page, select **Use the old version**.
4. Scroll down the **Plan details** page to check the **Standing charge** configured for the Plan:
On the **Plan details** panel, you can
* Read-off the Plan's **Name** and **Code**.
* Check the **Currency** and **Bill frequency** configured for the Plan.
* Use hotlink texts to open the **Plan template** the Plan is based on or the **Product** the Plan belongs to.
* Read-off which user **Created** and which **Last modified** the Plan and when.
* Check the Plan's **ID** and **Copy** it to your clipboard.
**Note:** The new version of the Plan details page opens. If you prefer to work in the old version of the page, select **Use the old version**.
4. Scroll down the **Plan details** page to check the **Standing charge** configured for the Plan:
![Createplans38]() * In this example, the **Standing charge** billing settings for the Plan are clearly labeled as inherited **FROM PLAN TEMPLATE** and you can read-off:
* Amount.
* Billed in arrears
* Interval for billing is every two Bills.
* No Accounting product is defined.
* You can select **Override** to edit the **Standing charge** if you want to define a specific Standing charge for the Plan:
* In this example, the **Standing charge** billing settings for the Plan are clearly labeled as inherited **FROM PLAN TEMPLATE** and you can read-off:
* Amount.
* Billed in arrears
* Interval for billing is every two Bills.
* No Accounting product is defined.
* You can select **Override** to edit the **Standing charge** if you want to define a specific Standing charge for the Plan:
![Create Plans44]() * The panel adjusts to clearly label the Standing charge as **FROM PLAN** and the Plan template value is crossed out.
5. Under **Pricing**, you can **Add usage-based pricing** or **Add counter-based pricing**. For example, to add usage-based pricing:
* The panel adjusts to clearly label the Standing charge as **FROM PLAN** and the Plan template value is crossed out.
5. Under **Pricing**, you can **Add usage-based pricing** or **Add counter-based pricing**. For example, to add usage-based pricing:
![Createplans39]() * A **Select aggregations** modal appears - for **Aggregation type** select to use either a simple **Aggregation** or a **Compound aggregation** and then select **Next**.
* Select the **Aggregation** you want to use, and then **Confirm**. The selected Aggregation is loaded into the **Pricing** panel and you can expand it to show details:
* A **Select aggregations** modal appears - for **Aggregation type** select to use either a simple **Aggregation** or a **Compound aggregation** and then select **Next**.
* Select the **Aggregation** you want to use, and then **Confirm**. The selected Aggregation is loaded into the **Pricing** panel and you can expand it to show details:
![Create Plans64]() * You can then select to **create new pricing**:
* You can then select to **create new pricing**:
![Create Plans65]() * The **Pricing editor** opens where you can create a pricing for the Plan - see [Pricing Plans and Plan Templates](/guides/plans-and-pricing/pricing-plans/pricing-plans). When you've completed pricing the Plan, you are returned to the **Plan details** page and the **Pricing** is laid out for reviewing and managing:
* The **Pricing editor** opens where you can create a pricing for the Plan - see [Pricing Plans and Plan Templates](/guides/plans-and-pricing/pricing-plans/pricing-plans). When you've completed pricing the Plan, you are returned to the **Plan details** page and the **Pricing** is laid out for reviewing and managing:
![Create Plans66]() 6. If you've priced a Plan using a segmented Aggregation - see [Pricing Plans Using Segmented Aggregations](/guides/plans-and-pricing/pricing-plans/pricing-plans-using-segmented-aggregations) - you can review each individual segment's pricing - for example:
6. If you've priced a Plan using a segmented Aggregation - see [Pricing Plans Using Segmented Aggregations](/guides/plans-and-pricing/pricing-plans/pricing-plans-using-segmented-aggregations) - you can review each individual segment's pricing - for example:
![Create Plans67]() * In this example, where segments are defined by **type** and **location** fields, select the segment whose pricing you want to review:
* In this example, where segments are defined by **type** and **location** fields, select the segment whose pricing you want to review:
![Create Plans68]() 7. You can view any historic or future pricing applied to a Plan using the paging arrows at the bottom of the **Pricing** card, for example a **HISTORICAL** pricing:
7. You can view any historic or future pricing applied to a Plan using the paging arrows at the bottom of the **Pricing** card, for example a **HISTORICAL** pricing:
![Create Plans69]() * Lastly, you can select the **View pricing schedule** hotlink to open the **Pricing schedule** for the Plan - see [Viewing Pricing Schedule](https://docs.m3ter.com/guides/plans-and-pricing/pricing-plans/managing-and-editing-priced-plans-or-plan-templates#viewing-pricing-schedule) for more details.
8. Scroll further down a Plan details page and under **Adjustments**, you can check the **Product minimum spend** configured for the Plan:
* Lastly, you can select the **View pricing schedule** hotlink to open the **Pricing schedule** for the Plan - see [Viewing Pricing Schedule](https://docs.m3ter.com/guides/plans-and-pricing/pricing-plans/managing-and-editing-priced-plans-or-plan-templates#viewing-pricing-schedule) for more details.
8. Scroll further down a Plan details page and under **Adjustments**, you can check the **Product minimum spend** configured for the Plan:
![Createplans41]() * You can **Edit** the **Product minimum spend** directly from this panel.
9. If you want to edit the Plan's details, select **Edit** at the top of the page, make your changes, and click **Update plan**.
## Reviewing Plan Metadata
On the **Plan details** page, you can also review **Plan metadata**:
**Custom fields**. Any Custom fields created for the Plan entity are listed, and you can **Copy** the *String* or *Number* value of a Custom Field to your clipboard:
* If the fields have been created only at Organizational-level, these values will be shown:
* You can **Edit** the **Product minimum spend** directly from this panel.
9. If you want to edit the Plan's details, select **Edit** at the top of the page, make your changes, and click **Update plan**.
## Reviewing Plan Metadata
On the **Plan details** page, you can also review **Plan metadata**:
**Custom fields**. Any Custom fields created for the Plan entity are listed, and you can **Copy** the *String* or *Number* value of a Custom Field to your clipboard:
* If the fields have been created only at Organizational-level, these values will be shown:
![Create Plans50]() * If the fields have also been created for an individual Plan, then the values configured for those created at Organizational-level are struck out indicating clearly that the individual Plan's values will be used:
* If the fields have also been created for an individual Plan, then the values configured for those created at Organizational-level are struck out indicating clearly that the individual Plan's values will be used:
![Create Plans49]() **External mappings**. Any External mappings set up for the Plan are listed:
**External mappings**. Any External mappings set up for the Plan are listed:
![Create Plans51]() * The **External system** and **External table** mapped to are shown - such as **NetSuite - Item** in the above example. The **External entity ID** mapped to is also shown.
* If a listed External mapping is linked to an Integration, under **Linked integration** a hotlink text will be shown which you can use to open the Integration.
* Under **Actions**, you can edit or delete the External mapping.
* If the Plan has multiple External mappings created for it, you can use *Search external mappings* to search by **External table** and **External entity ID** and filter the list.
* You can commence a workflow to **Create external mapping** for the Plan directly - see [Creating and Managing External Mappings for Accounts](https://docs.m3ter.com/guides/end-customer-accounts/creating-and-managing-external-mappings-for-accounts) for an example.
**Integration runs**. If you’ve set up an integration that synchronizes the Plan with an external system, the date/time and status of the **Latest** integration run are shown. You can use a text hotlink to open details of this latest run or **View all runs**. See [Reviewing Integration Run Details](https://docs.m3ter.com/guides/integrations/setting-up-integrations/reviewing-integration-run-details).
## Duplicating Plans and Plan Templates
You might require a Plan or Plan Template similar to one you've already set up:
* You are planning to offer your customers a new Product line - for example a new premium service as an optional upgrade to your current standard Product service - and you expect the billing set up and pricing structure for this new Product line to be similar to the existing standard service Product offering.
* A customer is coming up for renewal of contract and their existing Product Plan is about to expire. You have agreed a slightly different Product pricing structure for their next service period.
The ability to duplicate an existing Plan and modify the duplicate as required instead of having to start from scratch and create and configure an entirely new Plan saves much time and effort. This topic explains how to duplicate Plans from Plan details pages.
**Notes:**
* **Duplicating Plan Templates?** This section explains how to duplicate an existing Plan from the **Plan details** page. You can duplicate an existing Plan Template from the **Plan Template details** page in the same way.
* **Duplicating from the Pricing Editor!** You can also duplicate Plans and Plan Templates you've priced from the Pricing Editor. See [Duplicating Priced Plans and Plan Templates](https://docs.m3ter.com/guides/plans-and-pricing/pricing-plans/duplicating-priced-plans-or-plan-templates).
**To duplicate a Plan:**
1. Select **Pricing>Plans**. The **Plans** page opens.
2. Search for and then select the **Name** hotlink text of the Plan you want to duplicate. The **Plan details** page opens:
* The **External system** and **External table** mapped to are shown - such as **NetSuite - Item** in the above example. The **External entity ID** mapped to is also shown.
* If a listed External mapping is linked to an Integration, under **Linked integration** a hotlink text will be shown which you can use to open the Integration.
* Under **Actions**, you can edit or delete the External mapping.
* If the Plan has multiple External mappings created for it, you can use *Search external mappings* to search by **External table** and **External entity ID** and filter the list.
* You can commence a workflow to **Create external mapping** for the Plan directly - see [Creating and Managing External Mappings for Accounts](https://docs.m3ter.com/guides/end-customer-accounts/creating-and-managing-external-mappings-for-accounts) for an example.
**Integration runs**. If you’ve set up an integration that synchronizes the Plan with an external system, the date/time and status of the **Latest** integration run are shown. You can use a text hotlink to open details of this latest run or **View all runs**. See [Reviewing Integration Run Details](https://docs.m3ter.com/guides/integrations/setting-up-integrations/reviewing-integration-run-details).
## Duplicating Plans and Plan Templates
You might require a Plan or Plan Template similar to one you've already set up:
* You are planning to offer your customers a new Product line - for example a new premium service as an optional upgrade to your current standard Product service - and you expect the billing set up and pricing structure for this new Product line to be similar to the existing standard service Product offering.
* A customer is coming up for renewal of contract and their existing Product Plan is about to expire. You have agreed a slightly different Product pricing structure for their next service period.
The ability to duplicate an existing Plan and modify the duplicate as required instead of having to start from scratch and create and configure an entirely new Plan saves much time and effort. This topic explains how to duplicate Plans from Plan details pages.
**Notes:**
* **Duplicating Plan Templates?** This section explains how to duplicate an existing Plan from the **Plan details** page. You can duplicate an existing Plan Template from the **Plan Template details** page in the same way.
* **Duplicating from the Pricing Editor!** You can also duplicate Plans and Plan Templates you've priced from the Pricing Editor. See [Duplicating Priced Plans and Plan Templates](https://docs.m3ter.com/guides/plans-and-pricing/pricing-plans/duplicating-priced-plans-or-plan-templates).
**To duplicate a Plan:**
1. Select **Pricing>Plans**. The **Plans** page opens.
2. Search for and then select the **Name** hotlink text of the Plan you want to duplicate. The **Plan details** page opens:
![Create Plans60]() 3. Select **Duplicate**. A **Duplicate plan** popup appears:
3. Select **Duplicate**. A **Duplicate plan** popup appears:
 4. Enter the **Name** and **Code** you want for the new duplicate Plan.
**Warning!** **Code must be unique!** You must use a different **Name** and **Code** when you duplicate a Plan - you’ll receive an error if you try to duplicate a Plan using the same **Name** or **Code** as the original Plan. You can edit the new duplicate Plan at a later time and make the **Name** the same as the original Plan, if required. However, the **Code** must remain unique.
5. Select **Duplicate plan**. The popup closes, a message shows to confirm Plan duplication, and the **Plan details** page for the new Plan opens:
4. Enter the **Name** and **Code** you want for the new duplicate Plan.
**Warning!** **Code must be unique!** You must use a different **Name** and **Code** when you duplicate a Plan - you’ll receive an error if you try to duplicate a Plan using the same **Name** or **Code** as the original Plan. You can edit the new duplicate Plan at a later time and make the **Name** the same as the original Plan, if required. However, the **Code** must remain unique.
5. Select **Duplicate plan**. The popup closes, a message shows to confirm Plan duplication, and the **Plan details** page for the new Plan opens:
![Create Plans62]() The new duplicate Plan:
* Uses the same Plan Template as the original.
* Inherits the pricing structure of the original and you can now edit the duplicate Plan and its pricing as required. See [Managing and Editing Priced Plans and Plan Templates](https://docs.m3ter.com/guides/plans-and-pricing/pricing-plans/managing-and-editing-priced-plans-or-plan-templates).
# Working with Plan Groups
Source: https://docs.m3ter.com/guides/plans-and-pricing/working-with-plan-templates-and-plans/working-with-plan-groups
You can create *Plan Groups* for cases where you want to apply a minimum spend amount at billing across several of your products or features that are each priced separately. When you create the Plan Group, you can define an overall minimum spend and then add the priced Plans you want to include in the Plan Group. You can then attach the Plan Group to an end customer Account that consumes the separate products or features which are priced using the included Plans. At billing, the minimum spend you've defined for the Plan Group is applied.
This topic provides an example use case where Plan Groups can be used, and explains how to create Plan Groups and how to add Plans to them:
* [Example Use Case for Plan Groups](/guides/plans-and-pricing/working-with-plan-templates-and-plans/working-with-plan-groups#example-use-case-for-plan-groups)
* [Creating Plan Groups](/guides/plans-and-pricing/working-with-plan-templates-and-plans/working-with-plan-groups#creating-plan-groups)
* [Adding Plans to Plan Groups](/guides/plans-and-pricing/working-with-plan-templates-and-plans/working-with-plan-groups#adding-plans-to-plan-groups)
* [Removing Plans from Plan Groups](/guides/plans-and-pricing/working-with-plan-templates-and-plans/working-with-plan-groups#removing-plans-from-plan-groups)
* [Plan Group Minimum Spend vs. Plans Minimum Spends](/guides/plans-and-pricing/working-with-plan-templates-and-plans/working-with-plan-groups#plan-group-minimum-spend-vs-plans-minimum-spends)
**Tip: Attaching a Plan Group to an Account?** For details on how to do this, see [Attaching Plan Groups to an Account](/guides/end-customer-accounts/attaching-plan-groups-to-an-account).
## Example Use Case for Plan Groups
Suppose you offer a cloud service for game developers, which they can use to build and host their games. You offer several features as key capabilities for game development, such as Team Login, Player Matchmaking, and Real Time Player Messaging. With respect to the inclusion of these different features, you want to offer three levels of contract to your end customers and impose different minimum spends amounts at the three levels:
| Minimum Spend and Features | Independent | Professional | Enterprise |
| - | - | - | - |
| Minimum Spend | \$0 | \$250 | \$1000 |
| Team Login | Included | Included | Included |
| Player Matchmaking | Not Included | Included | Included |
| Real Time Player Messaging | Not Included | Not Included | Included |
More features are included for higher-level contracts, as well as a higher minimum spend amount.
For this example, you can create a Product - such as Game Dev Product - and then create and set-up a pricing Plan for each of the three features - such as Team Login Plan, Player Matchmaking Plan, and Real Time Player Messaging Plan. Using these feature Plans, you can then create different Plan Groups to use for charging customer Accounts that are placed on different contract levels:
* **Independent Plan Group**, which contains a single Team Login Plan.
* **Professional Plan Group**, which contains the Team Login Plan and Player Matchmaking Plan.
* **Enterprise Plan Group**, which contains the Team Login Plan, Player Matchmaking Plan, and Real Time Player Messaging Plan.
For each Plan Group you can define a minimum spend for customer Accounts placed on the different contract levels.
**Note:** You can create the Plans you need for pricing different features under different Products. A Plan Group can include Plans from different Products.
## Creating Plan Groups
**To create a Plan group:**
1. Select **Pricing>Plan groups**:
The new duplicate Plan:
* Uses the same Plan Template as the original.
* Inherits the pricing structure of the original and you can now edit the duplicate Plan and its pricing as required. See [Managing and Editing Priced Plans and Plan Templates](https://docs.m3ter.com/guides/plans-and-pricing/pricing-plans/managing-and-editing-priced-plans-or-plan-templates).
# Working with Plan Groups
Source: https://docs.m3ter.com/guides/plans-and-pricing/working-with-plan-templates-and-plans/working-with-plan-groups
You can create *Plan Groups* for cases where you want to apply a minimum spend amount at billing across several of your products or features that are each priced separately. When you create the Plan Group, you can define an overall minimum spend and then add the priced Plans you want to include in the Plan Group. You can then attach the Plan Group to an end customer Account that consumes the separate products or features which are priced using the included Plans. At billing, the minimum spend you've defined for the Plan Group is applied.
This topic provides an example use case where Plan Groups can be used, and explains how to create Plan Groups and how to add Plans to them:
* [Example Use Case for Plan Groups](/guides/plans-and-pricing/working-with-plan-templates-and-plans/working-with-plan-groups#example-use-case-for-plan-groups)
* [Creating Plan Groups](/guides/plans-and-pricing/working-with-plan-templates-and-plans/working-with-plan-groups#creating-plan-groups)
* [Adding Plans to Plan Groups](/guides/plans-and-pricing/working-with-plan-templates-and-plans/working-with-plan-groups#adding-plans-to-plan-groups)
* [Removing Plans from Plan Groups](/guides/plans-and-pricing/working-with-plan-templates-and-plans/working-with-plan-groups#removing-plans-from-plan-groups)
* [Plan Group Minimum Spend vs. Plans Minimum Spends](/guides/plans-and-pricing/working-with-plan-templates-and-plans/working-with-plan-groups#plan-group-minimum-spend-vs-plans-minimum-spends)
**Tip: Attaching a Plan Group to an Account?** For details on how to do this, see [Attaching Plan Groups to an Account](/guides/end-customer-accounts/attaching-plan-groups-to-an-account).
## Example Use Case for Plan Groups
Suppose you offer a cloud service for game developers, which they can use to build and host their games. You offer several features as key capabilities for game development, such as Team Login, Player Matchmaking, and Real Time Player Messaging. With respect to the inclusion of these different features, you want to offer three levels of contract to your end customers and impose different minimum spends amounts at the three levels:
| Minimum Spend and Features | Independent | Professional | Enterprise |
| - | - | - | - |
| Minimum Spend | \$0 | \$250 | \$1000 |
| Team Login | Included | Included | Included |
| Player Matchmaking | Not Included | Included | Included |
| Real Time Player Messaging | Not Included | Not Included | Included |
More features are included for higher-level contracts, as well as a higher minimum spend amount.
For this example, you can create a Product - such as Game Dev Product - and then create and set-up a pricing Plan for each of the three features - such as Team Login Plan, Player Matchmaking Plan, and Real Time Player Messaging Plan. Using these feature Plans, you can then create different Plan Groups to use for charging customer Accounts that are placed on different contract levels:
* **Independent Plan Group**, which contains a single Team Login Plan.
* **Professional Plan Group**, which contains the Team Login Plan and Player Matchmaking Plan.
* **Enterprise Plan Group**, which contains the Team Login Plan, Player Matchmaking Plan, and Real Time Player Messaging Plan.
For each Plan Group you can define a minimum spend for customer Accounts placed on the different contract levels.
**Note:** You can create the Plans you need for pricing different features under different Products. A Plan Group can include Plans from different Products.
## Creating Plan Groups
**To create a Plan group:**
1. Select **Pricing>Plan groups**:
![]() 2. The **Plan groups** page opens and any existing Plan Groups are listed.
3. Select **Create plan group**. The **Create** page opens.
4. Enter the required **Plan group details**:
* **Name**. Descriptive name for Plan Group. (*Required*)
* **Code**. Unique identifier for Plan Group. (*Required*)
* **Currency**. Use the drop-down list to select the Currency. (*Required*) For example, select **US Dollar**:
2. The **Plan groups** page opens and any existing Plan Groups are listed.
3. Select **Create plan group**. The **Create** page opens.
4. Enter the required **Plan group details**:
* **Name**. Descriptive name for Plan Group. (*Required*)
* **Code**. Unique identifier for Plan Group. (*Required*)
* **Currency**. Use the drop-down list to select the Currency. (*Required*) For example, select **US Dollar**:
![]() **Warning: You must create at least one Currency for your Organization before you can create a Plan Group!** If you haven't, the **Currency** drop-down list will not be available and you'll see a warning:
* Select the **create a new currency** hotlink text provided. This takes you directly to the **Create** page to create the Currency you want to use for the Plan Group. See [Creating and Managing Currencies](/guides/organization-and-access-management/viewing-and-editing-organization/creating-and-managing-currencies).
* When you create the new Currency, you are taken directly back to the **Plan groups>Create** page and the Currency is selected.
5. Enter **Standing charge** settings for the Plan Group, which are optional:
* **Standing charge**. A standing charge to be applied for Plan Group.
* **Standing charge billing**. Allows you to control whether any standing charges due are billed in advance or in arrears for the Plan Group:
* **Use organization-wide configuration**. Default selection. If enabled, the setting selected at Organization level for Standing charge billing will be used - it will be shown in brackets. If you select either of the other two options, the Organization level setting will be overridden. See [Viewing and Editing Organization Configuration](/guides/organization-and-access-management/viewing-and-editing-organization/viewing-and-editing-organization-configuration).
* **Bill in arrears (end of each billing period)**
* **Bill in advance (start of each billing period)**
* **Standing charge accounting product**. For accounting purposes, select a Product that will be linked to any *Standing charge* line items on Bills. (*Optional*)
* **Standing charge description**. You can enter a custom description for any Standing charge amounts, which will appear in the bill line item.
**Warning: You must create at least one Currency for your Organization before you can create a Plan Group!** If you haven't, the **Currency** drop-down list will not be available and you'll see a warning:
* Select the **create a new currency** hotlink text provided. This takes you directly to the **Create** page to create the Currency you want to use for the Plan Group. See [Creating and Managing Currencies](/guides/organization-and-access-management/viewing-and-editing-organization/creating-and-managing-currencies).
* When you create the new Currency, you are taken directly back to the **Plan groups>Create** page and the Currency is selected.
5. Enter **Standing charge** settings for the Plan Group, which are optional:
* **Standing charge**. A standing charge to be applied for Plan Group.
* **Standing charge billing**. Allows you to control whether any standing charges due are billed in advance or in arrears for the Plan Group:
* **Use organization-wide configuration**. Default selection. If enabled, the setting selected at Organization level for Standing charge billing will be used - it will be shown in brackets. If you select either of the other two options, the Organization level setting will be overridden. See [Viewing and Editing Organization Configuration](/guides/organization-and-access-management/viewing-and-editing-organization/viewing-and-editing-organization-configuration).
* **Bill in arrears (end of each billing period)**
* **Bill in advance (start of each billing period)**
* **Standing charge accounting product**. For accounting purposes, select a Product that will be linked to any *Standing charge* line items on Bills. (*Optional*)
* **Standing charge description**. You can enter a custom description for any Standing charge amounts, which will appear in the bill line item.
![]() **Notes and Tips:**
* **How is a Plan Group Standing charge applied?** If you define a Standing Charge for a Plan Group, which doesn't have a well-defined billing cycle because the Plans it contains might have different billing dates or frequencies, then if *any of the Plans* in the Group should be included in the billing run, then the Plan Group Standing Charge amount is included.
* **Default Standing charge description?** If you omit a custom description, then a default Standing charge description will be shown for Bill line items- see [Bill Line Items - Default Descriptions](/guides/billing-and-usage-data/running-viewing-and-managing-bills/bill-line-items-default-descriptions) for details.
6. Enter the **Minimum spend** settings for the Plan Group, which are optional:
* **Minimum spend**. Define a minimum spend across all Plans included in the Plan Group.
* **Minimum spend billing** Allows you to control whether minimum spends are applied to Bills in advance or in arrears for the Plan Group:
* **Use organization-wide configuration**. Default selection. If enabled, the setting selected at Organization level for Minimum spend billing will be used - it will be shown in brackets. If you select either of the other two options, the Organization level setting will be overridden. See [Viewing and Editing Organization Configuration](/guides/organization-and-access-management/viewing-and-editing-organization/viewing-and-editing-organization-configuration).
* **Bill in arrears (end of each billing period)**
* **Bill in advance (start of each billing period)**
* **Minimum spend accounting product**. For accounting purposes, select a Product that will be linked to any *Minimum spend* or *Minimum spend adjustment* line items on Bills. (*Optional*)
* **Minimum spend description**. You can enter a custom description for any minimum spend amounts, which will appear in the bill line item:
**Notes and Tips:**
* **How is a Plan Group Standing charge applied?** If you define a Standing Charge for a Plan Group, which doesn't have a well-defined billing cycle because the Plans it contains might have different billing dates or frequencies, then if *any of the Plans* in the Group should be included in the billing run, then the Plan Group Standing Charge amount is included.
* **Default Standing charge description?** If you omit a custom description, then a default Standing charge description will be shown for Bill line items- see [Bill Line Items - Default Descriptions](/guides/billing-and-usage-data/running-viewing-and-managing-bills/bill-line-items-default-descriptions) for details.
6. Enter the **Minimum spend** settings for the Plan Group, which are optional:
* **Minimum spend**. Define a minimum spend across all Plans included in the Plan Group.
* **Minimum spend billing** Allows you to control whether minimum spends are applied to Bills in advance or in arrears for the Plan Group:
* **Use organization-wide configuration**. Default selection. If enabled, the setting selected at Organization level for Minimum spend billing will be used - it will be shown in brackets. If you select either of the other two options, the Organization level setting will be overridden. See [Viewing and Editing Organization Configuration](/guides/organization-and-access-management/viewing-and-editing-organization/viewing-and-editing-organization-configuration).
* **Bill in arrears (end of each billing period)**
* **Bill in advance (start of each billing period)**
* **Minimum spend accounting product**. For accounting purposes, select a Product that will be linked to any *Minimum spend* or *Minimum spend adjustment* line items on Bills. (*Optional*)
* **Minimum spend description**. You can enter a custom description for any minimum spend amounts, which will appear in the bill line item:
![]() **Tip: Plan Group Minimum spend and individual Plans Minimum spends?** For details on how to Minimum spend amounts defined for a Plan Group work with minimum spend amounts defined for individual Plans belonging to the Plan Group, see the following section: [Plan Group Minimum Spend vs. Plan Minimum Spends](/guides/plans-and-pricing/working-with-plan-templates-and-plans/working-with-plan-groups#plan-group-minimum-spend-vs-plans-minimum-spends).
**Tip: Default Minimum spend Description?** If you omit a custom description, then a default Minimum spend description will be shown for Bill line items- see [Bill Line Items - Default Descriptions](/guides/billing-and-usage-data/running-viewing-and-managing-bills/bill-line-items-default-descriptions) for details.
7. If required, add any **Custom Fields** to the Plan Group:
* Currently, you cannot create Custom fields for Plan Groups at the Organization-level, and therefore you cannot reference the Custom fields values you create for an individual Plan Group in your calculations
* For more on Custom fields, see [Adding and Editing Custom Fields](/guides/organization-and-access-management/viewing-and-editing-organization/adding-and-editing-custom-fields). We *strongly recommend* reviewing [Working with Custom Fields](/guides/creating-and-managing-products/working-with-custom-fields) before you attempt to create and use Custom fields.
8. Select **Create plan group**. The **Plan group details** page opens:
**Tip: Plan Group Minimum spend and individual Plans Minimum spends?** For details on how to Minimum spend amounts defined for a Plan Group work with minimum spend amounts defined for individual Plans belonging to the Plan Group, see the following section: [Plan Group Minimum Spend vs. Plan Minimum Spends](/guides/plans-and-pricing/working-with-plan-templates-and-plans/working-with-plan-groups#plan-group-minimum-spend-vs-plans-minimum-spends).
**Tip: Default Minimum spend Description?** If you omit a custom description, then a default Minimum spend description will be shown for Bill line items- see [Bill Line Items - Default Descriptions](/guides/billing-and-usage-data/running-viewing-and-managing-bills/bill-line-items-default-descriptions) for details.
7. If required, add any **Custom Fields** to the Plan Group:
* Currently, you cannot create Custom fields for Plan Groups at the Organization-level, and therefore you cannot reference the Custom fields values you create for an individual Plan Group in your calculations
* For more on Custom fields, see [Adding and Editing Custom Fields](/guides/organization-and-access-management/viewing-and-editing-organization/adding-and-editing-custom-fields). We *strongly recommend* reviewing [Working with Custom Fields](/guides/creating-and-managing-products/working-with-custom-fields) before you attempt to create and use Custom fields.
8. Select **Create plan group**. The **Plan group details** page opens:
![Create Plan Group42]() 9. On the **Plan group details** page, you can also review **Plan group metadata**:
**Custom fields**. Any Custom fields created for the Plan Group entity are listed, and you can **Copy** the *String* or *Number* value of a Custom Field to your clipboard:
9. On the **Plan group details** page, you can also review **Plan group metadata**:
**Custom fields**. Any Custom fields created for the Plan Group entity are listed, and you can **Copy** the *String* or *Number* value of a Custom Field to your clipboard:
![Create Plan Group41]() 10. If you want to edit the Plan Group, select the **Edit** button, make your changes, and click **Update plan group**.
11. If you want to remove a Plan Group, return to the **Plans** page and select the **Delete** button for the Plan Group:
10. If you want to edit the Plan Group, select the **Edit** button, make your changes, and click **Update plan group**.
11. If you want to remove a Plan Group, return to the **Plans** page and select the **Delete** button for the Plan Group:
![]() A confirmation popup opens.
12. Select **Yes** to confirm the delete action.
## Adding Plans to Plan Groups
**To add Plans to a Plan Group:**
1. Select **Pricing>Plan groups**. The **Plan groups** page opens and any existing Plan Groups are listed.
2. Select **Name** text of the Plan Group you want to add Plans to. The **Plan group details** page for the selected Plan Group opens.
3. Check the **Included plans** panel - any Plans already added to the Plan Group will be listed.
4. Select **Add plans**. A **Select plans** dialog appears.
5. Select the Plans you want to add to the Plan Group.
6. Select **Confirm**. The popup closes and the selected Plans are listed on the **Included plans** panel:
A confirmation popup opens.
12. Select **Yes** to confirm the delete action.
## Adding Plans to Plan Groups
**To add Plans to a Plan Group:**
1. Select **Pricing>Plan groups**. The **Plan groups** page opens and any existing Plan Groups are listed.
2. Select **Name** text of the Plan Group you want to add Plans to. The **Plan group details** page for the selected Plan Group opens.
3. Check the **Included plans** panel - any Plans already added to the Plan Group will be listed.
4. Select **Add plans**. A **Select plans** dialog appears.
5. Select the Plans you want to add to the Plan Group.
6. Select **Confirm**. The popup closes and the selected Plans are listed on the **Included plans** panel:
![]() In this example, we've added a single **Team Login** Plan to the **Independent Plan Group 2** Plan Group.
**Warning: Constraints on adding Plans to Plan Groups!**
* **Only one Plan per Product:** If you try to add more than one Plan for the same Product to the Plan Group, you'll receive an error message.
* **Custom Plans can't be added to a non-Custom Plan Group:** If you're adding Plans to a non-Custom Plan Group, the **Select plans** dialog will list only non-Custom Plans and any Custom Plans will *not be listed*. See also [Creating Custom Plan Groups for Accounts](/guides/end-customer-accounts/creating-custom-plan-groups-for-accounts).
**Tip: Attaching Plan Groups to Accounts?** You can attach a Plan Group to an Account to create an Account Plan Group. When you do this, you can open a Plan Group Attachment Details page and add Plans to the Plan Group directly from there - see the [Adding Plans to Plan Groups and Reviewing Pricing](/guides/end-customer-accounts/attaching-plan-groups-to-an-account#adding-plans-to-plan-group-and-reviewing-plan-pricing) section for more details.
## Removing Plans from Plan Groups
**To remove Plans from a Plan Group:**
1. Select **Pricing>Plan groups**. The **Plan groups** page opens and any existing Plan Groups are listed.
2. Select **Name** text of the Plan Group you want to remove Plans from. The **Plan group details** page opens.
3. Check the **Included plans** panel - any Plans already added to the Plan Group will be listed.
4. Select the **Delete** icon for the Plan you want to remove from the Plan Group:
In this example, we've added a single **Team Login** Plan to the **Independent Plan Group 2** Plan Group.
**Warning: Constraints on adding Plans to Plan Groups!**
* **Only one Plan per Product:** If you try to add more than one Plan for the same Product to the Plan Group, you'll receive an error message.
* **Custom Plans can't be added to a non-Custom Plan Group:** If you're adding Plans to a non-Custom Plan Group, the **Select plans** dialog will list only non-Custom Plans and any Custom Plans will *not be listed*. See also [Creating Custom Plan Groups for Accounts](/guides/end-customer-accounts/creating-custom-plan-groups-for-accounts).
**Tip: Attaching Plan Groups to Accounts?** You can attach a Plan Group to an Account to create an Account Plan Group. When you do this, you can open a Plan Group Attachment Details page and add Plans to the Plan Group directly from there - see the [Adding Plans to Plan Groups and Reviewing Pricing](/guides/end-customer-accounts/attaching-plan-groups-to-an-account#adding-plans-to-plan-group-and-reviewing-plan-pricing) section for more details.
## Removing Plans from Plan Groups
**To remove Plans from a Plan Group:**
1. Select **Pricing>Plan groups**. The **Plan groups** page opens and any existing Plan Groups are listed.
2. Select **Name** text of the Plan Group you want to remove Plans from. The **Plan group details** page opens.
3. Check the **Included plans** panel - any Plans already added to the Plan Group will be listed.
4. Select the **Delete** icon for the Plan you want to remove from the Plan Group:
![]() A confirmation dialog appears.
5. Select **Yes** to confirm removal of the Plan from the Plan Group.
## Plan Group Minimum Spend vs. Plans Minimum Spends
When you define a minimum spend amount for a Plan Group, it does not override any Product minimum spend amounts you've defined for the Plans included in the Plan Group. Both remain valid settings and any minimum spends defined for included Plans is evaluated first. The Plan Group minimum spend is then evaluated. So, for example:
* Plan Group X contains two Plans: Plan A and Plan B. The minimum spends defined for both Plan Group and Plans are:
* Plan Group X = \$500
* Plan A = \$100
* Plan B = \$200
* Suppose for the first billing period the end-customer Account being charged using Plan Group X spends \$50 on Plan A and \$100 on Plan B:
* Plan A minimum spend is applied and bumps up the charge to \$100.
* Plan B minimum spend is applied and bumps up the charge to \$200.
* This comes to a charge of \$300 due.
* Plan Group X minimum spend is now applied and bumps up the charge to \$500.
* The Bill total is therefore \$500.
### Minimum Spends when Attaching Multiple Plan Groups
This principle is applied also if you choose to bill end-customers for different Products by attaching multiple Plan Groups to an Account. However, in this case the Plan Group minimum spends *will be added for the billing total*.
To extend the above example, suppose you create two Plan Groups containing Plans for different Products:
* Plan Group X contains one Plan: Plan A for billing Product A consumption. The minimum spends defined for both Plan Group and Plan are:
* Plan Group X = \$500
* Plan A = \$100
* Plan Group Y contains one Plan: Plan B for billing Product B consumption. The minimum spends defined for both Plan Group and Plan are:
* Plan group Y = \$700
* Plan B = \$200
Plan Groups X and Y are now attached to the same Account and are active for the same billing service period. As assumed for the above example, the customer Account spends \$50 on Plan A and \$100 on Plan B:
At billing:
* **Product A**:
* Plan A minimum spend is applied and bumps up the charge to \$100.
* Plan Group X minimum spend is now applied and bumps up the charge to \$500.
* **Product B**:
* Plan B minimum spend is applied and bumps up the charge to \$200.
* Plan Group Y minimum spend is now applied and bumps up the charge to \$700.
* **Bill Total**: The Plan Group X and Plan Group Y minimum spend amounts are now added for a Bill total of \$1200.
# Recurring Charges: Counters
Source: https://docs.m3ter.com/guides/recurring-charges-counters
Learn how to set up Counters in m3ter for recurring charges and subscription-based product pricing. Using Counters, follow a seat-based pricing example and a hybrid pricing example.
Many providers of SaaS products and services want to charge their end-customers for product consumption using a subscription or recurring charge pricing model, one where end-customers are charged based on the numbers of product units, seats, or user licenses subscribed to within a given billing period. For example:
* **User-Based Licensing**: A Customer Relationship Management (CRM) provider might charge \$30 per user per month. Any of their end-customers with fluctuating staff numbers can adjust their subscriptions monthly, ensuring they pay for exactly the number of active users.
* **Resource-Based Billing**: A cloud storage service provider might charge based on the number of units of storage used, such as \$10 per TB per month. As any of their end-customer's data storage needs grow, their monthly charge can be scaled accordingly.
The Recurring Charges feature in m3ter allows you to implement this type of product pricing in using *Counters*:
* Create a suitable Counter for any Product that you want to charge for in this way.
* Use the Counter as a metric to set up a Pricing for a Product Plan.
* Attach the priced Plan to end-customer Accounts that have signed-up for the Product.
* Create Counter adjustments against the Account for the number of units the Account has subscribed to - such as seats or user licenses.
* At billing, the Account will be charged in accordance with the subscription charge rates you have set up using the Counter.
In this way, Counters in m3ter enable you to quickly implement a wide-range of unit-based pricing models for your products:
* Set up recurring subscription charges for your products with a quantity or number of units as the pricing metric.
* Offer your end-customers a flexible subscription model to help them optimize their subscription costs and easily manage their billing as their level of product consumption changes.
* Implement hybrid pricing models for products or services that you want to charge your end-customer for in a mixed way - partly on this kind of subscription basis and partly based on metered product usage.
Using a seat-based pricing example, this section explains how to create Counters for recurring charge pricing for products, price Product Plans using Counters, create Counter adjustments against Accounts for their subscription quantities on Products, and review Bills generated against Accounts for Counter-based charges due:
* [Creating Counters and Pricing Plans](/guides/recurring-charges-counters/creating-counters)
* [Understanding and Creating Counter Adjustments on Accounts](/guides/recurring-charges-counters/creating-counter-adjustments-for-accounts)
* [Recurring Charges Billing: Seat-Based Pricing](/guides/recurring-charges-counters/reviewing-bills-for-recurring-charges)
A final topic gives a worked example for setting up hybrid pricing, one where the overall pricing for a product or service combines recurring subscription charges with usage-based charges:
* [Recurring Charges Billing: Hybrid Pricing](/guides/recurring-charges-counters/recurring-charges-example-2-hybrid-pricing)
**Initial Release: Recurring Charges billing for Parent/Child Accounts is not supported**. If you price a Plan using a Counter to apply recurring subscription charges and attach the Plan to a Parent or Child Account, Parent/Child billing is not supported in this initial release.
# Understanding and Creating Counter Adjustments for Accounts
Source: https://docs.m3ter.com/guides/recurring-charges-counters/creating-counter-adjustments-for-accounts
When you've created a Counter to use for recurring subscription charges for your Product and used this Counter to price a Product Plan, you can attach the priced Plan to an end-customer Account that has signed up for your Product. You can then create Counter Adjustments against the Account for the number of Counter units the end-customer subscribes to.
This topic explains how the Recurring Charges feature in m3ter is designed to work using Counter Adjustments made against end-customer Accounts throughout their contract service period. How to attach a Plan priced using a Counter to an Account and make Counter Adjustments to the Account is then explained:
* [Understanding Counter Adjustments for Accounts](/guides/recurring-charges-counters/creating-counter-adjustments-for-accounts#understanding-counter-adjustments-for-accounts)
* [Attaching Plans to Accounts and Creating Counter Adjustments](/guides/recurring-charges-counters/creating-counter-adjustments-for-accounts#attaching-plans-to-accounts-and-creating-counter-adjustments)
## Understanding Counter Adjustments for Accounts
The Recurring Charges feature in m3ter allows you to apply in a flexible way unit-based pricing for products, where end-customers who consume a product are charged on the basis of the number of units - such as seats or licenses - they have subscribed to for each billing period in their contract service period. Importantly, the number of units chargeable can fluctuate from one billing period to the next. The need to keep a precise track of the changing number of chargeable units across separate billing periods is met using *Counter Adjustments*.
For example, suppose you offer a product which you want to charge for based on the number of seats subscribed to within any given billing period, and at a flat rate of \$2 per seat. Let's assume billing is on a monthly frequency and in a typical case you agree a yearly contract service period with end-customers. Here's an example of a series of Counter Adjustments across several billing periods to illustrate how fluctuations in subscribed seat numbers on an Account are tracked and billed for - note that prorating of any Counter charges is disabled for this example:
* If a customer signs up for your product to run from June 1st 2025 until June 30th 2025, and commits to 15 seats for the first month, you can post a Counter Adjustment of 15 using your Seats Counter against their Account on June 1st 2025. The first Bill - dated July 1st 2025 - will charge this initial number of Seats as a *Counter running total charge* at 15 x \$2 = \$30:
A confirmation dialog appears.
5. Select **Yes** to confirm removal of the Plan from the Plan Group.
## Plan Group Minimum Spend vs. Plans Minimum Spends
When you define a minimum spend amount for a Plan Group, it does not override any Product minimum spend amounts you've defined for the Plans included in the Plan Group. Both remain valid settings and any minimum spends defined for included Plans is evaluated first. The Plan Group minimum spend is then evaluated. So, for example:
* Plan Group X contains two Plans: Plan A and Plan B. The minimum spends defined for both Plan Group and Plans are:
* Plan Group X = \$500
* Plan A = \$100
* Plan B = \$200
* Suppose for the first billing period the end-customer Account being charged using Plan Group X spends \$50 on Plan A and \$100 on Plan B:
* Plan A minimum spend is applied and bumps up the charge to \$100.
* Plan B minimum spend is applied and bumps up the charge to \$200.
* This comes to a charge of \$300 due.
* Plan Group X minimum spend is now applied and bumps up the charge to \$500.
* The Bill total is therefore \$500.
### Minimum Spends when Attaching Multiple Plan Groups
This principle is applied also if you choose to bill end-customers for different Products by attaching multiple Plan Groups to an Account. However, in this case the Plan Group minimum spends *will be added for the billing total*.
To extend the above example, suppose you create two Plan Groups containing Plans for different Products:
* Plan Group X contains one Plan: Plan A for billing Product A consumption. The minimum spends defined for both Plan Group and Plan are:
* Plan Group X = \$500
* Plan A = \$100
* Plan Group Y contains one Plan: Plan B for billing Product B consumption. The minimum spends defined for both Plan Group and Plan are:
* Plan group Y = \$700
* Plan B = \$200
Plan Groups X and Y are now attached to the same Account and are active for the same billing service period. As assumed for the above example, the customer Account spends \$50 on Plan A and \$100 on Plan B:
At billing:
* **Product A**:
* Plan A minimum spend is applied and bumps up the charge to \$100.
* Plan Group X minimum spend is now applied and bumps up the charge to \$500.
* **Product B**:
* Plan B minimum spend is applied and bumps up the charge to \$200.
* Plan Group Y minimum spend is now applied and bumps up the charge to \$700.
* **Bill Total**: The Plan Group X and Plan Group Y minimum spend amounts are now added for a Bill total of \$1200.
# Recurring Charges: Counters
Source: https://docs.m3ter.com/guides/recurring-charges-counters
Learn how to set up Counters in m3ter for recurring charges and subscription-based product pricing. Using Counters, follow a seat-based pricing example and a hybrid pricing example.
Many providers of SaaS products and services want to charge their end-customers for product consumption using a subscription or recurring charge pricing model, one where end-customers are charged based on the numbers of product units, seats, or user licenses subscribed to within a given billing period. For example:
* **User-Based Licensing**: A Customer Relationship Management (CRM) provider might charge \$30 per user per month. Any of their end-customers with fluctuating staff numbers can adjust their subscriptions monthly, ensuring they pay for exactly the number of active users.
* **Resource-Based Billing**: A cloud storage service provider might charge based on the number of units of storage used, such as \$10 per TB per month. As any of their end-customer's data storage needs grow, their monthly charge can be scaled accordingly.
The Recurring Charges feature in m3ter allows you to implement this type of product pricing in using *Counters*:
* Create a suitable Counter for any Product that you want to charge for in this way.
* Use the Counter as a metric to set up a Pricing for a Product Plan.
* Attach the priced Plan to end-customer Accounts that have signed-up for the Product.
* Create Counter adjustments against the Account for the number of units the Account has subscribed to - such as seats or user licenses.
* At billing, the Account will be charged in accordance with the subscription charge rates you have set up using the Counter.
In this way, Counters in m3ter enable you to quickly implement a wide-range of unit-based pricing models for your products:
* Set up recurring subscription charges for your products with a quantity or number of units as the pricing metric.
* Offer your end-customers a flexible subscription model to help them optimize their subscription costs and easily manage their billing as their level of product consumption changes.
* Implement hybrid pricing models for products or services that you want to charge your end-customer for in a mixed way - partly on this kind of subscription basis and partly based on metered product usage.
Using a seat-based pricing example, this section explains how to create Counters for recurring charge pricing for products, price Product Plans using Counters, create Counter adjustments against Accounts for their subscription quantities on Products, and review Bills generated against Accounts for Counter-based charges due:
* [Creating Counters and Pricing Plans](/guides/recurring-charges-counters/creating-counters)
* [Understanding and Creating Counter Adjustments on Accounts](/guides/recurring-charges-counters/creating-counter-adjustments-for-accounts)
* [Recurring Charges Billing: Seat-Based Pricing](/guides/recurring-charges-counters/reviewing-bills-for-recurring-charges)
A final topic gives a worked example for setting up hybrid pricing, one where the overall pricing for a product or service combines recurring subscription charges with usage-based charges:
* [Recurring Charges Billing: Hybrid Pricing](/guides/recurring-charges-counters/recurring-charges-example-2-hybrid-pricing)
**Initial Release: Recurring Charges billing for Parent/Child Accounts is not supported**. If you price a Plan using a Counter to apply recurring subscription charges and attach the Plan to a Parent or Child Account, Parent/Child billing is not supported in this initial release.
# Understanding and Creating Counter Adjustments for Accounts
Source: https://docs.m3ter.com/guides/recurring-charges-counters/creating-counter-adjustments-for-accounts
When you've created a Counter to use for recurring subscription charges for your Product and used this Counter to price a Product Plan, you can attach the priced Plan to an end-customer Account that has signed up for your Product. You can then create Counter Adjustments against the Account for the number of Counter units the end-customer subscribes to.
This topic explains how the Recurring Charges feature in m3ter is designed to work using Counter Adjustments made against end-customer Accounts throughout their contract service period. How to attach a Plan priced using a Counter to an Account and make Counter Adjustments to the Account is then explained:
* [Understanding Counter Adjustments for Accounts](/guides/recurring-charges-counters/creating-counter-adjustments-for-accounts#understanding-counter-adjustments-for-accounts)
* [Attaching Plans to Accounts and Creating Counter Adjustments](/guides/recurring-charges-counters/creating-counter-adjustments-for-accounts#attaching-plans-to-accounts-and-creating-counter-adjustments)
## Understanding Counter Adjustments for Accounts
The Recurring Charges feature in m3ter allows you to apply in a flexible way unit-based pricing for products, where end-customers who consume a product are charged on the basis of the number of units - such as seats or licenses - they have subscribed to for each billing period in their contract service period. Importantly, the number of units chargeable can fluctuate from one billing period to the next. The need to keep a precise track of the changing number of chargeable units across separate billing periods is met using *Counter Adjustments*.
For example, suppose you offer a product which you want to charge for based on the number of seats subscribed to within any given billing period, and at a flat rate of \$2 per seat. Let's assume billing is on a monthly frequency and in a typical case you agree a yearly contract service period with end-customers. Here's an example of a series of Counter Adjustments across several billing periods to illustrate how fluctuations in subscribed seat numbers on an Account are tracked and billed for - note that prorating of any Counter charges is disabled for this example:
* If a customer signs up for your product to run from June 1st 2025 until June 30th 2025, and commits to 15 seats for the first month, you can post a Counter Adjustment of 15 using your Seats Counter against their Account on June 1st 2025. The first Bill - dated July 1st 2025 - will charge this initial number of Seats as a *Counter running total charge* at 15 x \$2 = \$30:
![Counters53]() * If no further Counter Adjustments are posted on the Account in July 2025, the second Bill - for the July billing period and dated August 1st 2025 - will again charge for the 15 seats as a *Counter running total charge* at 15 x \$2 = \$30.
* If however a Counter Adjustment of 18 seats is posted on the Account on July 20th 2025, the second Bill - for July billing period and dated August 1st 2025 - will charge for the 15 seats as a *Counter running total charge* at 15 x \$2 = \$30 and also will charge for the extra 3 seats as a *Counter Adjustment debit* at 3 x \$2 = \$6, bringing the total billed to \$36:
* If no further Counter Adjustments are posted on the Account in July 2025, the second Bill - for the July billing period and dated August 1st 2025 - will again charge for the 15 seats as a *Counter running total charge* at 15 x \$2 = \$30.
* If however a Counter Adjustment of 18 seats is posted on the Account on July 20th 2025, the second Bill - for July billing period and dated August 1st 2025 - will charge for the 15 seats as a *Counter running total charge* at 15 x \$2 = \$30 and also will charge for the extra 3 seats as a *Counter Adjustment debit* at 3 x \$2 = \$6, bringing the total billed to \$36:
![Counters54]() * With this single Counter Adjustment for the increase to 18 seats, for the start of the next billing period - August 1st 2025 - the *Counter running total* for the Account becomes 18.
* If a Counter Adjustment is now posted on the Account on August 10th 2025 for a decrease in the number of seats to 12, the third Bill - for the August billing period and dated September 1st 2025 - will charge for the 18 seats as a *Counter running total charge* at 18 x \$2 = \$36 and also will apply a credit to the Account as a *Counter Adjustment credit* at 6 x \$2 = -\$12, bringing the total billed to \$24:
* With this single Counter Adjustment for the increase to 18 seats, for the start of the next billing period - August 1st 2025 - the *Counter running total* for the Account becomes 18.
* If a Counter Adjustment is now posted on the Account on August 10th 2025 for a decrease in the number of seats to 12, the third Bill - for the August billing period and dated September 1st 2025 - will charge for the 18 seats as a *Counter running total charge* at 18 x \$2 = \$36 and also will apply a credit to the Account as a *Counter Adjustment credit* at 6 x \$2 = -\$12, bringing the total billed to \$24:
![Counters55]() * If no other Counter Adjustments are posted on the Account for August 2025, the *Counter running total* for the start of the next billing period - September 2025 - becomes 12.
In this way, three types of billing charge are used for the Counter Adjustments you post to Accounts - *Counter running total charge*, *Counter adjustment debit*, and *Counter adjustment credit*. This ensures any fluctuations in the number of units are accurately tracked and billed for across successive billing period throughout an end-customer's contract service period.
### Counter Adjustments - Notes and Tips
There are some key points to note when working with Counter Adjustments:
* Always use the *absolute value* for a Counter when posting Counter Adjustments on an Account. If the running total was 20, but you want to increase it to 25, enter ***25*** and do not attempt to enter the *amount of variation* - in this case plus 5. As seen above, the plus or minus for the new running total value will be tracked accurately.
* Note that you can enter a value of 0 for a Counter Adjustment on an Account, which is useful if an end-customer wants to terminate a contract with you mid-billing period.
* You can enable prorating to be applied for how the *Counter running total*, *Counter Adjustment debit*, and *Counter Adjustment credit* charges are calculated. See [Using Counters to Price Plans](/guides/recurring-charges-counters/creating-counters#using-counters-to-price-plans) in the [previous topic](/guides/recurring-charges-counters/creating-counters) for details with examples on how prorating is applied to charges.
* Counter Adjustments are supported down to a *specific day of granularity* - you cannot create more than one Counter Adjustment per day per Account for a Counter, and you will receive an error if you try to do this. If for a specific date you create a Counter Adjustment for an Account with the incorrect value, you must delete it and recreate it with the correct value.
## Attaching Plans to Accounts and Creating Counter Adjustments
In the [previous topic](/guides/recurring-charges-counters/creating-counters), we followed a seat-based pricing example and created a **Premium Seats Counter** for applying recurring charges for a **Premium Seating** Product. We then used the Counter to define a tiered Counter Pricing for **Premium Seats Plan 2**.
To continue the example, we'll now attach **Premium Seats Plan 2** to an Account and go on to create some Counter Adjustments on the Account using the **Premium Seats Counter**. This will leave us ready to generate some Bills for the Account for the period covering the Counter Adjustments, and then review those Bills to confirm the seat-based charges are being calculated correctly:
* In preparation for the current example, we've [created an Account](/guides/end-customer-accounts/creating-an-account) called **Seats Account 2**.
**To Attach a Plan to an Account and create Counter Adjustments:**
1. Select **Accounts**. The **Accounts** page opens.
2. Search for and then select the **Name** hotlink text of the Account you want to attach the priced Plan to. The **Account** page opens with the **Overview** tab selected.
3. Select the **Attached plans** tab.
4. Select **Create plan attachment** and attach the Plan you've priced using a Counter.
* For the current example, we'll attach **Premium Seats Plan 2**:
* If no other Counter Adjustments are posted on the Account for August 2025, the *Counter running total* for the start of the next billing period - September 2025 - becomes 12.
In this way, three types of billing charge are used for the Counter Adjustments you post to Accounts - *Counter running total charge*, *Counter adjustment debit*, and *Counter adjustment credit*. This ensures any fluctuations in the number of units are accurately tracked and billed for across successive billing period throughout an end-customer's contract service period.
### Counter Adjustments - Notes and Tips
There are some key points to note when working with Counter Adjustments:
* Always use the *absolute value* for a Counter when posting Counter Adjustments on an Account. If the running total was 20, but you want to increase it to 25, enter ***25*** and do not attempt to enter the *amount of variation* - in this case plus 5. As seen above, the plus or minus for the new running total value will be tracked accurately.
* Note that you can enter a value of 0 for a Counter Adjustment on an Account, which is useful if an end-customer wants to terminate a contract with you mid-billing period.
* You can enable prorating to be applied for how the *Counter running total*, *Counter Adjustment debit*, and *Counter Adjustment credit* charges are calculated. See [Using Counters to Price Plans](/guides/recurring-charges-counters/creating-counters#using-counters-to-price-plans) in the [previous topic](/guides/recurring-charges-counters/creating-counters) for details with examples on how prorating is applied to charges.
* Counter Adjustments are supported down to a *specific day of granularity* - you cannot create more than one Counter Adjustment per day per Account for a Counter, and you will receive an error if you try to do this. If for a specific date you create a Counter Adjustment for an Account with the incorrect value, you must delete it and recreate it with the correct value.
## Attaching Plans to Accounts and Creating Counter Adjustments
In the [previous topic](/guides/recurring-charges-counters/creating-counters), we followed a seat-based pricing example and created a **Premium Seats Counter** for applying recurring charges for a **Premium Seating** Product. We then used the Counter to define a tiered Counter Pricing for **Premium Seats Plan 2**.
To continue the example, we'll now attach **Premium Seats Plan 2** to an Account and go on to create some Counter Adjustments on the Account using the **Premium Seats Counter**. This will leave us ready to generate some Bills for the Account for the period covering the Counter Adjustments, and then review those Bills to confirm the seat-based charges are being calculated correctly:
* In preparation for the current example, we've [created an Account](/guides/end-customer-accounts/creating-an-account) called **Seats Account 2**.
**To Attach a Plan to an Account and create Counter Adjustments:**
1. Select **Accounts**. The **Accounts** page opens.
2. Search for and then select the **Name** hotlink text of the Account you want to attach the priced Plan to. The **Account** page opens with the **Overview** tab selected.
3. Select the **Attached plans** tab.
4. Select **Create plan attachment** and attach the Plan you've priced using a Counter.
* For the current example, we'll attach **Premium Seats Plan 2**:
![Counters61]() * Note we've selected dates for the Plan Attachment - for the period the Plan is active for the Account - that correspond with the period we defined for the Counter pricing to be applied to the Plan.
**Warning: Parent/Child Billing!**
* **Not supported for Counter charges on Bills.** When you attach a Plan to an Account that has been priced using a Counter and is either a Parent or Child Account, then Parent/Child billing is not supported.
* **Hybrid Pricing?** If you want to implement hybrid pricing you can attach a Plan to the Account that is priced using both an Aggregation for usage charges and Counter for recurring unit-based charges. However, for Parent/Child billing only the usage charges will be considered.
**Tip: More on Attaching Plans to Accounts?** See [Attaching Plans to an Account](/guides/end-customer-accounts/attaching-plans-to-an-account).
5. Select the **Counter adjustments** tab.
6. Select the **Counter** you want to use to make the Counter Adjustment on the Account.
* For the current example, we'll select **Premium Seats Counter**.
7. Select **Create counter adjustment**. The **Counter adjustments>Create** page opens.
8. Enter the **Counter adjustment details**:
* **Counter**. Required.
* **Account**. Required and pre-selected.
* **Date**. Required.
* Note that Counter Adjustments are supported down to a *specific day* of granularity - you cannot create more than one Counter Adjustment for any given day using the selected Counter and you'll receive an error if you try to do this.
* **Value**. Required. The number of the selected Counter.
* **Important!** Enter the new *absolute value* for the Counter for the selected date - if it was 15 and has increased to 20, enter 20; if it was 15 and has decreased to 10, enter 10. *Do not enter* the plus or minus value relative to the previous Counter value!
* **Purchase order number**. Optional.
* For the current example, we've assumed the customer Account we're creating the Counter Adjustment for has subscribed to 15 Premium Seats for the month of July 2025:
* Note we've selected dates for the Plan Attachment - for the period the Plan is active for the Account - that correspond with the period we defined for the Counter pricing to be applied to the Plan.
**Warning: Parent/Child Billing!**
* **Not supported for Counter charges on Bills.** When you attach a Plan to an Account that has been priced using a Counter and is either a Parent or Child Account, then Parent/Child billing is not supported.
* **Hybrid Pricing?** If you want to implement hybrid pricing you can attach a Plan to the Account that is priced using both an Aggregation for usage charges and Counter for recurring unit-based charges. However, for Parent/Child billing only the usage charges will be considered.
**Tip: More on Attaching Plans to Accounts?** See [Attaching Plans to an Account](/guides/end-customer-accounts/attaching-plans-to-an-account).
5. Select the **Counter adjustments** tab.
6. Select the **Counter** you want to use to make the Counter Adjustment on the Account.
* For the current example, we'll select **Premium Seats Counter**.
7. Select **Create counter adjustment**. The **Counter adjustments>Create** page opens.
8. Enter the **Counter adjustment details**:
* **Counter**. Required.
* **Account**. Required and pre-selected.
* **Date**. Required.
* Note that Counter Adjustments are supported down to a *specific day* of granularity - you cannot create more than one Counter Adjustment for any given day using the selected Counter and you'll receive an error if you try to do this.
* **Value**. Required. The number of the selected Counter.
* **Important!** Enter the new *absolute value* for the Counter for the selected date - if it was 15 and has increased to 20, enter 20; if it was 15 and has decreased to 10, enter 10. *Do not enter* the plus or minus value relative to the previous Counter value!
* **Purchase order number**. Optional.
* For the current example, we've assumed the customer Account we're creating the Counter Adjustment for has subscribed to 15 Premium Seats for the month of July 2025:
 9. Select **Create counter adjustment**. You are returned to the **Counter adjustments** tab where the new Adjustment is listed for the Account:
![Counters63]() * Note that an **Adjustments totals** chart shows on the tab allowing you to read-off the running total value for the Counter Adjustments made against the Account using the selected Counter.
10. If your end-customer changes the number of units they want to subscribe to for the billing period, you can create a second Counter Adjustment:
* Note that an **Adjustments totals** chart shows on the tab allowing you to read-off the running total value for the Counter Adjustments made against the Account using the selected Counter.
10. If your end-customer changes the number of units they want to subscribe to for the billing period, you can create a second Counter Adjustment:
![Counters64]() * For the current example, we'll suppose the end-customer has realized by mid-month they require 18 not 15 seats for July 2025, so we repeat Steps 8 and 9 to create a second Counter Adjustment dated July 15th for the Account:
* Note that an **Adjustments totals** chart has updated for the new running total value for the selected Counter.
We now have an Account set up with a Product Plan attached which we priced using our example recurring charge **Premium Seats Counter**. Secondly, we've created Counter Adjustments against the Account for the Counter value the end-customer has subscribed to for a billing period - here a month. In the [next topic](/guides/recurring-charges-counters/reviewing-bills-for-recurring-charges), we'll run billing for that month and review the Bill generated to check that the recurring charges due on the Account have been correctly calculated.
# Creating Counters and Pricing Plans
Source: https://docs.m3ter.com/guides/recurring-charges-counters/creating-counters
You can quickly create Counters in your m3ter Organization, which you can then use as pricing metrics to apply unit-based pricing to Product Plans or Plan Templates for recurring subscription charges.
This topic explains how to create Counters and how to use them to price your Product Plans or Plan Templates. A seat-based example is used to explain these tasks - how to set up a Counter to use as a pricing metric to price Plans and be able to charge on the basis of how many seats end-customer Accounts subscribe to in a given billing period:
* [Creating Counters](/guides/recurring-charges-counters/creating-counters#creating-counters)
* [Using Counters to Price Plans](/guides/recurring-charges-counters/creating-counters#using-counters-to-price-plans)
## Creating Counters
You can create Counters as:
* **Product Counters**. These can only be used to price Plans belonging to the *same Product*.
* **Global Counters**. These can be used to price Plans belonging to *any Product*.
**To create a Product Counter:**
1. Select **Metering>Counters**. The **Counters** page opens and lists Counters already created for your Organization.
2. Use the **Product** drop-down to select the Product you want to create a Counter for. The lists adjust to show any existing Counters belonging to the Product.
**Tip: Create Global Counter?** If you want to create a Global Counter, clear the **Product** drop-down.
3. Select **Create Counter**. The **Create** page opens.
4. Enter the details of the Counter:
* **Product**.
* If you selected a **Product** on the **Counters** page, this will be pre-selected.
* If you want to create the Counter for a different Product, select it.
* If you want to create a Global Counter, leave this blank.
* **Name** and **Code** of the new Counter. (*Required*)
* **Unit**. (*Required*) This will appear on Bill line items charged against the Counter:
* In this example, we'll create a **Premium Seats Counter** for the **Premium Seating Product**.
* For the current example, we'll suppose the end-customer has realized by mid-month they require 18 not 15 seats for July 2025, so we repeat Steps 8 and 9 to create a second Counter Adjustment dated July 15th for the Account:
* Note that an **Adjustments totals** chart has updated for the new running total value for the selected Counter.
We now have an Account set up with a Product Plan attached which we priced using our example recurring charge **Premium Seats Counter**. Secondly, we've created Counter Adjustments against the Account for the Counter value the end-customer has subscribed to for a billing period - here a month. In the [next topic](/guides/recurring-charges-counters/reviewing-bills-for-recurring-charges), we'll run billing for that month and review the Bill generated to check that the recurring charges due on the Account have been correctly calculated.
# Creating Counters and Pricing Plans
Source: https://docs.m3ter.com/guides/recurring-charges-counters/creating-counters
You can quickly create Counters in your m3ter Organization, which you can then use as pricing metrics to apply unit-based pricing to Product Plans or Plan Templates for recurring subscription charges.
This topic explains how to create Counters and how to use them to price your Product Plans or Plan Templates. A seat-based example is used to explain these tasks - how to set up a Counter to use as a pricing metric to price Plans and be able to charge on the basis of how many seats end-customer Accounts subscribe to in a given billing period:
* [Creating Counters](/guides/recurring-charges-counters/creating-counters#creating-counters)
* [Using Counters to Price Plans](/guides/recurring-charges-counters/creating-counters#using-counters-to-price-plans)
## Creating Counters
You can create Counters as:
* **Product Counters**. These can only be used to price Plans belonging to the *same Product*.
* **Global Counters**. These can be used to price Plans belonging to *any Product*.
**To create a Product Counter:**
1. Select **Metering>Counters**. The **Counters** page opens and lists Counters already created for your Organization.
2. Use the **Product** drop-down to select the Product you want to create a Counter for. The lists adjust to show any existing Counters belonging to the Product.
**Tip: Create Global Counter?** If you want to create a Global Counter, clear the **Product** drop-down.
3. Select **Create Counter**. The **Create** page opens.
4. Enter the details of the Counter:
* **Product**.
* If you selected a **Product** on the **Counters** page, this will be pre-selected.
* If you want to create the Counter for a different Product, select it.
* If you want to create a Global Counter, leave this blank.
* **Name** and **Code** of the new Counter. (*Required*)
* **Unit**. (*Required*) This will appear on Bill line items charged against the Counter:
* In this example, we'll create a **Premium Seats Counter** for the **Premium Seating Product**.
 5. Select **Create counter**. The **Counter details** page opens:
![Counters57]() * We now have a **Premium Seats Counter** we can use to price Plans belonging to the **Premium Seating** Product - see the [next section](/guides/recurring-charges-counters/creating-counters#using-counters-to-price-plans).
## Using Counters to Price Plans
You can quickly price Plans in using Counters. We created the **Premium Seats Counter** for the current seat-based pricing example in the [previous section](/guides/recurring-charges-counters/creating-counters#creating-counters). We've also set up in preparation for pricing using this Counter:
* **Premium Seats Plan Template** for the Premium Seating Product. This Plan Template is configured for monthly billing frequency in **USD** currency with no Standing Charge and no Minimum Spend amounts defined.
* **Premium Seats Plan 2** based on the **Premium Seats Plan Template**. This Plan will inherit billing attributes from the template. See [Creating and Working with Plan Templates and Plans](/guides/plans-and-pricing/working-with-plan-templates-and-plans).
We'll now use our **Premium Seats Counter** to set up seat-based pricing for **Premium Seats Plan 2**.
**Notes & Tips:**
* **Working in the Pricing Editor?** Alternatively, you can open the Pricing editor and create a counter-based pricing for a Plan from there. For further guidance on working in the Pricing Editor to price your Product Plans/Plan Templates, see [Pricing Plans and Plan Templates](https://docs.m3ter.com/guides/plans-and-pricing/pricing-plans/pricing-plans).
* **Price Plan Templates?** For the current example, we'll apply unit-based pricing using our Counter to the Product Plan. The steps to price a Plan Template using a Counter are similar. Any Plan based on the priced Plan Template will inherit the pricing but you can override this pricing at the individual Plan level.
**To use a Counter to price a Plan:**
1. Select **Pricing** the **Plans** page opens.
2. Use **Search plans** to find the Plan you want to create a pricing for or select the **Product** the Plan belongs to and filter the **Plans** list.
3. Select the **Name** hotlink text of the Plan you want to price using a Counter - for the current example **Premium Seats Plan 2**. The **Plan details** page opens.
4. Scroll down the page and under **Pricing** select **Add counter-based pricing**. A **Select counters** modal appears.
5. Select the Counter you want to use to price the Plan - for the current example **Premium Seats Counter** - and select **Confirm**. The modal closes and the selected Counter is added to the **Pricing** panel:
* We now have a **Premium Seats Counter** we can use to price Plans belonging to the **Premium Seating** Product - see the [next section](/guides/recurring-charges-counters/creating-counters#using-counters-to-price-plans).
## Using Counters to Price Plans
You can quickly price Plans in using Counters. We created the **Premium Seats Counter** for the current seat-based pricing example in the [previous section](/guides/recurring-charges-counters/creating-counters#creating-counters). We've also set up in preparation for pricing using this Counter:
* **Premium Seats Plan Template** for the Premium Seating Product. This Plan Template is configured for monthly billing frequency in **USD** currency with no Standing Charge and no Minimum Spend amounts defined.
* **Premium Seats Plan 2** based on the **Premium Seats Plan Template**. This Plan will inherit billing attributes from the template. See [Creating and Working with Plan Templates and Plans](/guides/plans-and-pricing/working-with-plan-templates-and-plans).
We'll now use our **Premium Seats Counter** to set up seat-based pricing for **Premium Seats Plan 2**.
**Notes & Tips:**
* **Working in the Pricing Editor?** Alternatively, you can open the Pricing editor and create a counter-based pricing for a Plan from there. For further guidance on working in the Pricing Editor to price your Product Plans/Plan Templates, see [Pricing Plans and Plan Templates](https://docs.m3ter.com/guides/plans-and-pricing/pricing-plans/pricing-plans).
* **Price Plan Templates?** For the current example, we'll apply unit-based pricing using our Counter to the Product Plan. The steps to price a Plan Template using a Counter are similar. Any Plan based on the priced Plan Template will inherit the pricing but you can override this pricing at the individual Plan level.
**To use a Counter to price a Plan:**
1. Select **Pricing** the **Plans** page opens.
2. Use **Search plans** to find the Plan you want to create a pricing for or select the **Product** the Plan belongs to and filter the **Plans** list.
3. Select the **Name** hotlink text of the Plan you want to price using a Counter - for the current example **Premium Seats Plan 2**. The **Plan details** page opens.
4. Scroll down the page and under **Pricing** select **Add counter-based pricing**. A **Select counters** modal appears.
5. Select the Counter you want to use to price the Plan - for the current example **Premium Seats Counter** - and select **Confirm**. The modal closes and the selected Counter is added to the **Pricing** panel:
![Counters58]() 6. Select the **creating new pricing** link. You are taken to the **Pricing editor>Counter pricing** page and at the top of the page details are listed for:
* The **Counter** you are using and the **Unit** it uses.
* The **Plan** you are pricing and the **Plan template** it is based on.
7. Enter the **Counter pricing details**:
* **Start date (inclusive)** and **End date (exclusive)**. (*Required*) Define the period you want the pricing to be active for the Plan. For the current example, we'll enter July 1st, 2025 until July 1st, 2027.
* **Accounting product**. For accounting purposes, select a Product that will be linked to any Bill recurring charges line items for this Pricing - *Counter adjustment credit*, *Counter adjustment debit*, or *Counter running total charge*. (*Optional*) Note that:
* If you leave this blank, then the **Product** the Counter belongs to will be used instead.
* When viewing Bills in the Console that contain line items for these charge types and an Accounting product is defined for the Counter pricing, you'll be able to group line items by Accounting product. See [Viewing Bills - Display Options](https://docs.m3ter.com/guides/billing-and-usage-data/running-viewing-and-managing-bills/running-bills-and-viewing-bill-details#viewing-bills-display-options) for more details.
* **Description**. Enter a *custom description* that will appear for Bill line item charges for the pricing. (*Optional*)
* For the current example, we'll use: **Seating charges**.
6. Select the **creating new pricing** link. You are taken to the **Pricing editor>Counter pricing** page and at the top of the page details are listed for:
* The **Counter** you are using and the **Unit** it uses.
* The **Plan** you are pricing and the **Plan template** it is based on.
7. Enter the **Counter pricing details**:
* **Start date (inclusive)** and **End date (exclusive)**. (*Required*) Define the period you want the pricing to be active for the Plan. For the current example, we'll enter July 1st, 2025 until July 1st, 2027.
* **Accounting product**. For accounting purposes, select a Product that will be linked to any Bill recurring charges line items for this Pricing - *Counter adjustment credit*, *Counter adjustment debit*, or *Counter running total charge*. (*Optional*) Note that:
* If you leave this blank, then the **Product** the Counter belongs to will be used instead.
* When viewing Bills in the Console that contain line items for these charge types and an Accounting product is defined for the Counter pricing, you'll be able to group line items by Accounting product. See [Viewing Bills - Display Options](https://docs.m3ter.com/guides/billing-and-usage-data/running-viewing-and-managing-bills/running-bills-and-viewing-bill-details#viewing-bills-display-options) for more details.
* **Description**. Enter a *custom description* that will appear for Bill line item charges for the pricing. (*Optional*)
* For the current example, we'll use: **Seating charges**.
![Counters59]() **Tip: Default Description?** If you omit a custom description, then a *default description* is used: see [Bill Line Items - Default Descriptions](/guides/billing-and-usage-data/running-viewing-and-managing-bills/bill-line-items-default-descriptions) for details
8. Define the **Counter pricing settings**:
* **Running total billing**. Select for either **Bill in arrears** - at the end of each billing period - or **Bill in advance** - at the beginning of each billing period.
* For the current example, we can leave this as default: **Bill in arrears**.
* **Pro-rate running total**. Use this setting to control how *Counter running total* charges are calculated at billing for cases where the pricing applied to an Account starts or finishes somewhere within the first or final billing period:
* For example, suppose you are pricing a Plan set up for monthly billing frequency. The service period agreed with an end-customer Account on the Plan runs from June 1st 2023 until June 15th 2024. The running total at the start of the June 2024 - the final billing period - is 10. The pricing applied to the Account ends June 15th 2024 - this could be because the pricing is set to end for the Account Plan on that date or because the Plan ceases to be active for the Account on that date:
* If you *enable* **Pro-rate running total** for the pricing and the pricing configured is \$2 per unit, then the final Bill of July 1st 2024 will calculate the Counter running total charge for 15 days of the 30 day month of June, that is: 10 x \$2 x 1/2 = \$10.
* If you *disable* **Pro-rate running total**, then the final Bill of July 1st 2024 will calculate a Counter running total charge for the full month, that is: 10 x \$2 = \$20.
* Default is enabled. For the current example, we'll switch this to **disabled**.
* **Pro-rate adjustment credit**. Use this setting to control how a *Counter Adjustment credit* for an Account on the Plan made during the arrears billing period is rated with respect to credit amounts due on the Account:
* As if the units were unsubscribed to (not used) for the entire billing period. (Prorating is disabled)
* As if the units were unsubscribed to (not used) for the number of days from the date the Counter Adjustment was made to the arrears billing period end. (Prorating is enabled)
* For example, suppose the Plan is set up for monthly billing frequency and the Counter pricing you've configured is for a flat charge rate of \$2 per seat. A Counter Adjustment is made on the Account on June 1st 2024 for 15 seats and a second Counter Adjustment is made on June 16th for 10 seats:
* If disabled, the July 1st 2024 Bill will be calculated as if the credit due for the reduction in Counter number of 5 seats covered the entire month: 5 x -\$2 = -\$10.
* If enabled, the July 1st 2024 Bill will be calculated as if the credit due for the reduction in Counter number of 5 seats covered only the remaining 15 days of the 30-day month of June: 5 x -\$2 x 1/2 = -\$5.
* Default is enabled. For the current example, we'll switch this to **disabled**.
* **Pro-rate adjustment debit**. Use this setting to control how a *Counter Adjustment debit* for an Account on the Plan made during the arrears billing period is rated with respect to debit amounts due on the Account:
* As if the units were subscribed to (used) for the entire billing period. (Prorating is disabled)
* As if the units were subscribed to (used) only for the number of days from the date the Counter Adjustment was made to the arrears billing period end. (Prorating is enabled)
* For example, suppose the Plan is set up for monthly billing frequency and the Counter pricing you've configured is for a flat charge rate of \$2 per seat. A single Counter Adjustment is made for the June billing period on June 16th 2024 for 15 seats:
* If disabled, the July 1st 2024 Bill will charge for the full amount: 15 x \$2 = \$30.
* If enabled, the July 1st 2024 Bill will only charge a pro-rated amount for the 15 days remaining in the 30-day month of June: 15 x \$2 x 1/2 = \$15.
* Default is enabled. For the current example, we'll switch this to **disabled**.
**Tip: More on Prorating of Charges using Counter Pricing for Plans?** Generating Bills for the current example for seat-based pricing with prorating enabled is illustrated in the following [Recurring Charges Billing: Seat-Based Pricing](/guides/recurring-charges-counters/reviewing-bills-for-recurring-charges) topic.
* **Pricing type**. Select the pricing type you want to use for the Counter pricing applied to the Plan:
* For the current example, we can leave this as the default of **Tiered**.
**Tip: More on Pricing Types?** See [Reviewing Pricing Options for Pricing Plans and Plan Templates](/guides/plans-and-pricing/pricing-plans/reviewing-pricing-options-and-pricing-plans).
* **Pricing bands**. Create the pricing bands for the pricing type:
* For the current example, we'll set up two **Tiered pricing bands** for the Counter pricing:
**Tip: Default Description?** If you omit a custom description, then a *default description* is used: see [Bill Line Items - Default Descriptions](/guides/billing-and-usage-data/running-viewing-and-managing-bills/bill-line-items-default-descriptions) for details
8. Define the **Counter pricing settings**:
* **Running total billing**. Select for either **Bill in arrears** - at the end of each billing period - or **Bill in advance** - at the beginning of each billing period.
* For the current example, we can leave this as default: **Bill in arrears**.
* **Pro-rate running total**. Use this setting to control how *Counter running total* charges are calculated at billing for cases where the pricing applied to an Account starts or finishes somewhere within the first or final billing period:
* For example, suppose you are pricing a Plan set up for monthly billing frequency. The service period agreed with an end-customer Account on the Plan runs from June 1st 2023 until June 15th 2024. The running total at the start of the June 2024 - the final billing period - is 10. The pricing applied to the Account ends June 15th 2024 - this could be because the pricing is set to end for the Account Plan on that date or because the Plan ceases to be active for the Account on that date:
* If you *enable* **Pro-rate running total** for the pricing and the pricing configured is \$2 per unit, then the final Bill of July 1st 2024 will calculate the Counter running total charge for 15 days of the 30 day month of June, that is: 10 x \$2 x 1/2 = \$10.
* If you *disable* **Pro-rate running total**, then the final Bill of July 1st 2024 will calculate a Counter running total charge for the full month, that is: 10 x \$2 = \$20.
* Default is enabled. For the current example, we'll switch this to **disabled**.
* **Pro-rate adjustment credit**. Use this setting to control how a *Counter Adjustment credit* for an Account on the Plan made during the arrears billing period is rated with respect to credit amounts due on the Account:
* As if the units were unsubscribed to (not used) for the entire billing period. (Prorating is disabled)
* As if the units were unsubscribed to (not used) for the number of days from the date the Counter Adjustment was made to the arrears billing period end. (Prorating is enabled)
* For example, suppose the Plan is set up for monthly billing frequency and the Counter pricing you've configured is for a flat charge rate of \$2 per seat. A Counter Adjustment is made on the Account on June 1st 2024 for 15 seats and a second Counter Adjustment is made on June 16th for 10 seats:
* If disabled, the July 1st 2024 Bill will be calculated as if the credit due for the reduction in Counter number of 5 seats covered the entire month: 5 x -\$2 = -\$10.
* If enabled, the July 1st 2024 Bill will be calculated as if the credit due for the reduction in Counter number of 5 seats covered only the remaining 15 days of the 30-day month of June: 5 x -\$2 x 1/2 = -\$5.
* Default is enabled. For the current example, we'll switch this to **disabled**.
* **Pro-rate adjustment debit**. Use this setting to control how a *Counter Adjustment debit* for an Account on the Plan made during the arrears billing period is rated with respect to debit amounts due on the Account:
* As if the units were subscribed to (used) for the entire billing period. (Prorating is disabled)
* As if the units were subscribed to (used) only for the number of days from the date the Counter Adjustment was made to the arrears billing period end. (Prorating is enabled)
* For example, suppose the Plan is set up for monthly billing frequency and the Counter pricing you've configured is for a flat charge rate of \$2 per seat. A single Counter Adjustment is made for the June billing period on June 16th 2024 for 15 seats:
* If disabled, the July 1st 2024 Bill will charge for the full amount: 15 x \$2 = \$30.
* If enabled, the July 1st 2024 Bill will only charge a pro-rated amount for the 15 days remaining in the 30-day month of June: 15 x \$2 x 1/2 = \$15.
* Default is enabled. For the current example, we'll switch this to **disabled**.
**Tip: More on Prorating of Charges using Counter Pricing for Plans?** Generating Bills for the current example for seat-based pricing with prorating enabled is illustrated in the following [Recurring Charges Billing: Seat-Based Pricing](/guides/recurring-charges-counters/reviewing-bills-for-recurring-charges) topic.
* **Pricing type**. Select the pricing type you want to use for the Counter pricing applied to the Plan:
* For the current example, we can leave this as the default of **Tiered**.
**Tip: More on Pricing Types?** See [Reviewing Pricing Options for Pricing Plans and Plan Templates](/guides/plans-and-pricing/pricing-plans/reviewing-pricing-options-and-pricing-plans).
* **Pricing bands**. Create the pricing bands for the pricing type:
* For the current example, we'll set up two **Tiered pricing bands** for the Counter pricing:
![]() * Note that the **Start (>)** value for a pricing band is treated *exclusively* and the **End (\<=)** value is treated *inclusively*. In this example, the bottom tier band means any unit measures greater than 0 up to and including 20 are priced at \$2 per unit; the second tier band means any unit measures greater than 20 are priced at \$3 per unit.
9. Select **Create counter pricing**. You are returned to the **Plan details** page where under Pricing the **ACTIVE Tiered pricing** is now shown:
* Note that the **Start (>)** value for a pricing band is treated *exclusively* and the **End (\<=)** value is treated *inclusively*. In this example, the bottom tier band means any unit measures greater than 0 up to and including 20 are priced at \$2 per unit; the second tier band means any unit measures greater than 20 are priced at \$3 per unit.
9. Select **Create counter pricing**. You are returned to the **Plan details** page where under Pricing the **ACTIVE Tiered pricing** is now shown:
![Counters60]() * We've now set up an example for seat-based recurring charges to be applied to the **Premium Seating** Product. In the [next topic](/guides/recurring-charges-counters/creating-counter-adjustments-for-accounts), we'll attach **Premium Seats Plan 2,** which is priced using the **Premium Seats Counter**, to an Account and then create some Counter Adjustments on the Account.
**Tip: Managing Priced Plans and Counter Pricing?** When you've priced a Plan using a Counter, from the Pricing editor grid you can manage the priced Plan and the Pricing:
* Edit, duplicate, or delete the priced Plan.
* Edit, view details, or delete the pricing configured for the Plan.
* If you've set up more than one pricing for a Plan, view a Pricing Schedule for historic, currently active, and any future pricing.
* For more details, see [Managing and Editing Priced Plans and Plan Templates](/guides/plans-and-pricing/pricing-plans/managing-and-editing-priced-plans-or-plan-templates) and [Duplicating Priced Plans and Plan Templates](/guides/plans-and-pricing/pricing-plans/duplicating-priced-plans-or-plan-templates).
# Recurring Charges Billing: Hybrid Pricing
Source: https://docs.m3ter.com/guides/recurring-charges-counters/recurring-charges-example-2-hybrid-pricing
Suppose you run a SaaS company that provides a build-and-host application service to developers. You want to charge customers in the first instance on a user license basis and allow for the number of developer licenses to increase and decrease throughout a customer's contract service period. Bills created for each billing period should correctly reflect any such changes in the number of developer licenses subscribed to. You also want to charge for any data storage developers make use of on a per gigabyte stored basis, which is an add-on service you offer. This amounts to a hybrid pricing model:
* The user license charges are a form of recurring subscription charges best served by a unit-based pricing model.
* The data storage charges are best served by a usage-based pricing model based on metered data storage volumes.
In m3ter, you can easily implement this kind of hybrid pricing model for your end-customer Accounts and set up pricing for an Account Plan that combines the rates you want to apply for both types of charge. At billing, all charge amounts due on the Account are combined in a single Bill.
This topic offers a worked example for this hybrid pricing use case, taking you through:
* [Creating Product and Account](/guides/recurring-charges-counters/recurring-charges-example-2-hybrid-pricing#creating-product-and-account)
* [Setting Up Pricing on Account](/guides/recurring-charges-counters/recurring-charges-example-2-hybrid-pricing#setting-up-pricing-for-account)
* [Submitting Sample Product Consumption to Account](/guides/recurring-charges-counters/recurring-charges-example-2-hybrid-pricing#submitting-sample-product-consumption-to-account)
* [Creating and Reviewing Bills on Account](/guides/recurring-charges-counters/recurring-charges-example-2-hybrid-pricing#creating-and-reviewing-bills-on-account)
## Creating Product and Account
We'll first set up a Product and Account for the hybrid pricing example.
**To set up a Product and an Account:**
First, create a Product:
1. In the Console, select **Product** and then select **Create product**.
2. Under **Product details** enter a **Name** and **Code** for the new Product and then select **Create product**:
* For the example, we've called the Product: **Dev License and Store**.
3. Select **Accounts** and then select **Create account**.
4. Under **Account details** enter **Name**, **Code**, and **Email address**, and then select **Create account**:
* For the example, we've called the Account: **Dev License n Store Account 1**.
## Setting Up Pricing for Account
For our hybrid pricing example to set up pricing for the Account, we'll need to
* Create two pricing metrics:
* First, an *Aggregation* that sums metered values for storage volumes on the Account.
* Second, a *Counter* to track the number of developer licenses the Account subscribes to.
* Third, create a Plan Template and Plan for the Product.
* Fourth, use our pricing metrics to price a Product Plan.
* Lastly, attach the priced Plan to the Account.
**To set up pricing for the Account:**
First, create an Aggregation targeting a Meter field:
1. Select **Metering**. The **Meters** page opens.
2. For **Product** select **Dev License and Store**.
3. Select **Create meter**. Here's the Meter configuration:
* We've now set up an example for seat-based recurring charges to be applied to the **Premium Seating** Product. In the [next topic](/guides/recurring-charges-counters/creating-counter-adjustments-for-accounts), we'll attach **Premium Seats Plan 2,** which is priced using the **Premium Seats Counter**, to an Account and then create some Counter Adjustments on the Account.
**Tip: Managing Priced Plans and Counter Pricing?** When you've priced a Plan using a Counter, from the Pricing editor grid you can manage the priced Plan and the Pricing:
* Edit, duplicate, or delete the priced Plan.
* Edit, view details, or delete the pricing configured for the Plan.
* If you've set up more than one pricing for a Plan, view a Pricing Schedule for historic, currently active, and any future pricing.
* For more details, see [Managing and Editing Priced Plans and Plan Templates](/guides/plans-and-pricing/pricing-plans/managing-and-editing-priced-plans-or-plan-templates) and [Duplicating Priced Plans and Plan Templates](/guides/plans-and-pricing/pricing-plans/duplicating-priced-plans-or-plan-templates).
# Recurring Charges Billing: Hybrid Pricing
Source: https://docs.m3ter.com/guides/recurring-charges-counters/recurring-charges-example-2-hybrid-pricing
Suppose you run a SaaS company that provides a build-and-host application service to developers. You want to charge customers in the first instance on a user license basis and allow for the number of developer licenses to increase and decrease throughout a customer's contract service period. Bills created for each billing period should correctly reflect any such changes in the number of developer licenses subscribed to. You also want to charge for any data storage developers make use of on a per gigabyte stored basis, which is an add-on service you offer. This amounts to a hybrid pricing model:
* The user license charges are a form of recurring subscription charges best served by a unit-based pricing model.
* The data storage charges are best served by a usage-based pricing model based on metered data storage volumes.
In m3ter, you can easily implement this kind of hybrid pricing model for your end-customer Accounts and set up pricing for an Account Plan that combines the rates you want to apply for both types of charge. At billing, all charge amounts due on the Account are combined in a single Bill.
This topic offers a worked example for this hybrid pricing use case, taking you through:
* [Creating Product and Account](/guides/recurring-charges-counters/recurring-charges-example-2-hybrid-pricing#creating-product-and-account)
* [Setting Up Pricing on Account](/guides/recurring-charges-counters/recurring-charges-example-2-hybrid-pricing#setting-up-pricing-for-account)
* [Submitting Sample Product Consumption to Account](/guides/recurring-charges-counters/recurring-charges-example-2-hybrid-pricing#submitting-sample-product-consumption-to-account)
* [Creating and Reviewing Bills on Account](/guides/recurring-charges-counters/recurring-charges-example-2-hybrid-pricing#creating-and-reviewing-bills-on-account)
## Creating Product and Account
We'll first set up a Product and Account for the hybrid pricing example.
**To set up a Product and an Account:**
First, create a Product:
1. In the Console, select **Product** and then select **Create product**.
2. Under **Product details** enter a **Name** and **Code** for the new Product and then select **Create product**:
* For the example, we've called the Product: **Dev License and Store**.
3. Select **Accounts** and then select **Create account**.
4. Under **Account details** enter **Name**, **Code**, and **Email address**, and then select **Create account**:
* For the example, we've called the Account: **Dev License n Store Account 1**.
## Setting Up Pricing for Account
For our hybrid pricing example to set up pricing for the Account, we'll need to
* Create two pricing metrics:
* First, an *Aggregation* that sums metered values for storage volumes on the Account.
* Second, a *Counter* to track the number of developer licenses the Account subscribes to.
* Third, create a Plan Template and Plan for the Product.
* Fourth, use our pricing metrics to price a Product Plan.
* Lastly, attach the priced Plan to the Account.
**To set up pricing for the Account:**
First, create an Aggregation targeting a Meter field:
1. Select **Metering**. The **Meters** page opens.
2. For **Product** select **Dev License and Store**.
3. Select **Create meter**. Here's the Meter configuration:
![]() * For the example, we've created a Meter with a single **Measure** Data Field - **GigBytes Storage** -to collect usage data amounts for gigabytes of storage used: **Dev Store Meter 1**.
4. Select **Create meter**.
5. Select **Metering>Aggregations**. The **Aggregations** page opens.
6. For **Product** select **Dev License and Store**, and select **Create aggregation**. Here's the Aggregation configuration:
**Aggregation details**:
* For the example, we've created a Meter with a single **Measure** Data Field - **GigBytes Storage** -to collect usage data amounts for gigabytes of storage used: **Dev Store Meter 1**.
4. Select **Create meter**.
5. Select **Metering>Aggregations**. The **Aggregations** page opens.
6. For **Product** select **Dev License and Store**, and select **Create aggregation**. Here's the Aggregation configuration:
**Aggregation details**:
 * We've called the Aggregation: **Dev Store Agg 1**.
**Meter settings**:
* We've called the Aggregation: **Dev Store Agg 1**.
**Meter settings**:
![]() * The Aggregation targets the **GigBytes Storage** field on **Dev Store Meter 1**.
**Aggregation settings**:
* The Aggregation targets the **GigBytes Storage** field on **Dev Store Meter 1**.
**Aggregation settings**:
![]() * The Aggregation applies a **Sum** function to give a usage-based pricing metric of the total of values submitted for the **GigBytes Storage** target field for a billing period.
7. Select **Create aggregation**.
Second, create a Counter:
1. Select **Metering>Counters**. The **Counters** page opens.
2. For **Product** select **Dev License and Store**, and select **Create counter**. Here's the **Counter details** configuration:
* The Aggregation applies a **Sum** function to give a usage-based pricing metric of the total of values submitted for the **GigBytes Storage** target field for a billing period.
7. Select **Create aggregation**.
Second, create a Counter:
1. Select **Metering>Counters**. The **Counters** page opens.
2. For **Product** select **Dev License and Store**, and select **Create counter**. Here's the **Counter details** configuration:
 * For the example, we've created the **Dev License Counter** to use **Licenses** as the **Unit**.
3. Select **Create counter**.
Third, create a **Plan Template** and **Plan** for the Product:
1. Open the **Pricing>Plan templates** page.
2. For **Product** select **Dev License and Store** and select **Create plan template**. Here's the **Plan template details** configuration:
* For the example, we've created the **Dev License Counter** to use **Licenses** as the **Unit**.
3. Select **Create counter**.
Third, create a **Plan Template** and **Plan** for the Product:
1. Open the **Pricing>Plan templates** page.
2. For **Product** select **Dev License and Store** and select **Create plan template**. Here's the **Plan template details** configuration:
![]() * We've created the **Dev License n Store Template 1** and set it up for **Monthly Bill frequency** using **US Dollar** as the billing **Currency**.
* For the current example, we can omit setting up any **Standing Charge** or **Minimum Spend** amounts for the Plan Template.
3. Open the **Pricing>Plans** page.
4. For **Product** select **Dev License and Store** and select **Create plan**. Here's the **Plan details** configuration:
* We've created the **Dev License n Store Template 1** and set it up for **Monthly Bill frequency** using **US Dollar** as the billing **Currency**.
* For the current example, we can omit setting up any **Standing Charge** or **Minimum Spend** amounts for the Plan Template.
3. Open the **Pricing>Plans** page.
4. For **Product** select **Dev License and Store** and select **Create plan**. Here's the **Plan details** configuration:
 * The **Dev License n Store Plan 1** is based on **Dev License n Store Template 1**. The Plan will inherit the Monthly Billing frequency and US Dollar billing Currency we set up for the template.
* For the current example, we can omit setting up any **Standing charge** or **Minimum spend** amounts for the Plan.
5. Select **Create plan**.
Fourth, price the Plan:
1. Open **Pricing details** for **Dev License n Store Plan 1**.
2. Scroll down the page and on **Pricing** panel select **Add usage-based pricing**. A **Select aggregations** modal appears.
3. Select **Dev Store Agg 1** and then select confirm. The modal closes and the selected Aggregation is now shown under **Pricing**:
* The **Dev License n Store Plan 1** is based on **Dev License n Store Template 1**. The Plan will inherit the Monthly Billing frequency and US Dollar billing Currency we set up for the template.
* For the current example, we can omit setting up any **Standing charge** or **Minimum spend** amounts for the Plan.
5. Select **Create plan**.
Fourth, price the Plan:
1. Open **Pricing details** for **Dev License n Store Plan 1**.
2. Scroll down the page and on **Pricing** panel select **Add usage-based pricing**. A **Select aggregations** modal appears.
3. Select **Dev Store Agg 1** and then select confirm. The modal closes and the selected Aggregation is now shown under **Pricing**:
![Counters75]() 4. Select the **create new pricing** text link. You are taken to the **Pricing editor** with the **Pricing>Create** page open.
5. Under **Pricing details**, create a pricing for the Plan using **Dev Store Agg 1**:
* Leave as default to **Bill in arrears**.
* Set the period the pricing will apply to the Plan as July 1st 2025 through to June 30th 2026.
* Define a two-tiered pricing:
* From 0 to 50 = \$0.60 per unit.
* Over 50 = \$0.80 per unit
6. Select **Create pricing**. You are taken back to the **Plan details** page where the new usage-based **Pricing** is shown:
4. Select the **create new pricing** text link. You are taken to the **Pricing editor** with the **Pricing>Create** page open.
5. Under **Pricing details**, create a pricing for the Plan using **Dev Store Agg 1**:
* Leave as default to **Bill in arrears**.
* Set the period the pricing will apply to the Plan as July 1st 2025 through to June 30th 2026.
* Define a two-tiered pricing:
* From 0 to 50 = \$0.60 per unit.
* Over 50 = \$0.80 per unit
6. Select **Create pricing**. You are taken back to the **Plan details** page where the new usage-based **Pricing** is shown:
![Counters76]() 7. Under **Pricing**, select **Add counter-based pricing**. A **Select counters** modal appears.
8. Select **Dev License Counter** and then select **Confirm**. The modal closes and the selected Counter is now shown under Pricing:
7. Under **Pricing**, select **Add counter-based pricing**. A **Select counters** modal appears.
8. Select **Dev License Counter** and then select **Confirm**. The modal closes and the selected Counter is now shown under Pricing:
![Counters77]() 9. Select the **create new pricing** text link. You are taken to the **Pricing editor** with the **Counter pricing>Create** page open.
10. Under **Pricing details**, create a pricing for the Plan using **Dev License Counter**:
* Set the period the pricing will apply to the Plan as July 1st 2025 through to June 30th 2026.
* Leave as default to **Bill in arrears**.
* Switch all of the pro-rating switches for Counter charges to disabled.
* Define a two-tiered pricing:
* From 0 to 20 = \$5 per unit.
* Over 20 = \$7 per unit
11. Select **Create counter pricing**. You are taken back to the **Plan details** page where the new counter-based **Pricing** is shown:
9. Select the **create new pricing** text link. You are taken to the **Pricing editor** with the **Counter pricing>Create** page open.
10. Under **Pricing details**, create a pricing for the Plan using **Dev License Counter**:
* Set the period the pricing will apply to the Plan as July 1st 2025 through to June 30th 2026.
* Leave as default to **Bill in arrears**.
* Switch all of the pro-rating switches for Counter charges to disabled.
* Define a two-tiered pricing:
* From 0 to 20 = \$5 per unit.
* Over 20 = \$7 per unit
11. Select **Create counter pricing**. You are taken back to the **Plan details** page where the new counter-based **Pricing** is shown:
![Counters78]() Lastly, attach the priced Plan to the Account
1. Open **Dev License n Store Account 1**, select the **Attached plans** tab, and select **Create plan attachment**. Here's the **Plan attachment details**:
Lastly, attach the priced Plan to the Account
1. Open **Dev License n Store Account 1**, select the **Attached plans** tab, and select **Create plan attachment**. Here's the **Plan attachment details**:
 * Note that for convenience, we've set up the period the Plan will be *active for the Account* to correspond with the period the *pricing applies to the Plan*.
* For the current example, we do not need to change any of the **Plan attachment settings**.
2. Select **Create plan attachment**.
We now have a Product Plan set up for hybrid pricing and attached to our example Account.
## Submitting Sample Product Consumption to Account
To be able to run billing against the Account, we'll need to submit some sample Product consumption for the Account for a specific billing period:
* Metered measures for stored data volumes used by the Account.
* Counter Adjustments for developer license numbers subscribed to on the Account.
**To submit sample Product consumption for the Account:**
First, submit some sample measures for stored data volumes:
1. Select **Metering**. The **Meters** page opens
2. For **Product** select **Dev License and Store**.
3. Select **Dev Store Meter 1** hotlink text to open the Meter's **Details** page.
4. Scroll down to the **Submit measurements** panel and select **Submit usage data**.
5. For **Account**, select **Dev License n Store Account 1** and submit two usage data measures using the Meter's **GigBytes Storage** field:
* A measure **Value** of **50**.
* A measure **Value** of **20**.
* Make the **Timestamp** for each usage measurement as a Date/Time in July 2024.
Second, post a sample Counter Adjustment to the Account:
1. Select **Accounts** and open the **Dev License n Store Account 1** page.
2. Select the **Counter adjustments** tab.
3. For **Counter**, select the **Dev License Counter** and then **Create counter adjustment**.
4. Create a single Counter Adjustment for July 1st 2024. Here's the **Counter adjustment details**:
* Note that for convenience, we've set up the period the Plan will be *active for the Account* to correspond with the period the *pricing applies to the Plan*.
* For the current example, we do not need to change any of the **Plan attachment settings**.
2. Select **Create plan attachment**.
We now have a Product Plan set up for hybrid pricing and attached to our example Account.
## Submitting Sample Product Consumption to Account
To be able to run billing against the Account, we'll need to submit some sample Product consumption for the Account for a specific billing period:
* Metered measures for stored data volumes used by the Account.
* Counter Adjustments for developer license numbers subscribed to on the Account.
**To submit sample Product consumption for the Account:**
First, submit some sample measures for stored data volumes:
1. Select **Metering**. The **Meters** page opens
2. For **Product** select **Dev License and Store**.
3. Select **Dev Store Meter 1** hotlink text to open the Meter's **Details** page.
4. Scroll down to the **Submit measurements** panel and select **Submit usage data**.
5. For **Account**, select **Dev License n Store Account 1** and submit two usage data measures using the Meter's **GigBytes Storage** field:
* A measure **Value** of **50**.
* A measure **Value** of **20**.
* Make the **Timestamp** for each usage measurement as a Date/Time in July 2024.
Second, post a sample Counter Adjustment to the Account:
1. Select **Accounts** and open the **Dev License n Store Account 1** page.
2. Select the **Counter adjustments** tab.
3. For **Counter**, select the **Dev License Counter** and then **Create counter adjustment**.
4. Create a single Counter Adjustment for July 1st 2024. Here's the **Counter adjustment details**:
 5. Select **Create counter adjustment**.
We now have some sample product consumption entered for the Account for July 2025 - both data volume stored and number of Dev Licenses subscribed to for the month's billing period.
## Creating and Reviewing Bills on Account
We'll run billing for the **Dev License n Store Account 1** for the July 2025 billing period and review and check the Bill.
**To run billing for the Account:**
1. Open the **Dev License n Store Account 1** page and select the **Bills** tab.
2. Select **Run billing** and on the modal that appears enter:
* **Invoice date**. Use the calendar pop-out to select **August 1st 2025**.
* **Bill frequency**. Select **Monthly**.
* **Target currency**. Select **US Dollar**.
3. Select **Run billing**. The modal closes and the Bill job executes. When the Bill job completes the newly generated Bill is listed on the **Bills** tab.
4. Select the **Reference** hotlink text for the Bill. The Bill opens in **Bill management**:
5. Select **Create counter adjustment**.
We now have some sample product consumption entered for the Account for July 2025 - both data volume stored and number of Dev Licenses subscribed to for the month's billing period.
## Creating and Reviewing Bills on Account
We'll run billing for the **Dev License n Store Account 1** for the July 2025 billing period and review and check the Bill.
**To run billing for the Account:**
1. Open the **Dev License n Store Account 1** page and select the **Bills** tab.
2. Select **Run billing** and on the modal that appears enter:
* **Invoice date**. Use the calendar pop-out to select **August 1st 2025**.
* **Bill frequency**. Select **Monthly**.
* **Target currency**. Select **US Dollar**.
3. Select **Run billing**. The modal closes and the Bill job executes. When the Bill job completes the newly generated Bill is listed on the **Bills** tab.
4. Select the **Reference** hotlink text for the Bill. The Bill opens in **Bill management**:
![Counters81]() On review, we see that line item charges for the hybrid pricing for the **Dev License ad Store** Product are combined in the single Bill:
* The 70 **GigBytes Stored** are shown as **Usage** and are calculated correctly according to the two-tiered pricing we set up using the **Dev Store Agg 1**.
* The 15 **Licenses** are shown as a **Counter running total charge** and are calculated correctly according to the two-tiered pricing we set up using **Dev License Counter**.
# Recurring Charges Billing: Seat-Based Pricing
Source: https://docs.m3ter.com/guides/recurring-charges-counters/reviewing-bills-for-recurring-charges
When you've used a Counter to set up recurring charges pricing for a Product Plan, attached the priced Plan to an Account that consumes the Product, and created Counter Adjustments on the Account for a billing period, you can generate Bills for the Account.
In this topic, we'll use the seat-based pricing example set up in the previous two topics to run Bills for Accounts to review and check how the recurring charges have been calculated.
To recap on this example, we:
* Created the **Premium Seats Counter** and used it to set up a Tiered pricing for **Premium Seats Plan 2**: up to 20 seats at \$2 per seat; 21 and above seats at \$3 per seat. All prorating of charges or credits - for *Counter running totals*, *Counter adjustments debits*, and *Counter adjustment credits* - was disabled.
* Attached the priced Plan to **Seats Account 2** for a service period July 1st 2025 until June 30th 2027 inclusive. The Plan was configured for monthly billing frequency, no Standing Charge or Minimum Spend amounts were defined, and USD billing currency was used.
* Created Counter Adjustments using **Premium Seats Counter** on **Seats Account 2**:
* For 15 seats on July 1st 2025.
* For 18 seats on July 15th 2025.
To illustrate how billing charges are calculated for this seat-based pricing example:
* [Running Billing - Prorating Disabled](/guides/recurring-charges-counters/reviewing-bills-for-recurring-charges#running-billing-prorating-disabled) First, we'll first leave all prorating disabled and run billing for the July 2025 and August 2025 billing periods.
* [Running Billing - Prorating Enabled](/guides/recurring-charges-counters/reviewing-bills-for-recurring-charges#running-billing-prorating-enabled) Second, we'll enable prorating for the different Counter charge and credit types and re-run billing to show how prorating is applied for these types at billing.
**Important!** Before you attempt to work through this topic, please first review the previous topics for [Creating Counters and Pricing Plans](/guides/recurring-charges-counters/creating-counters) and [Understanding and Creating Counter Adjustments for Accounts](/guides/recurring-charges-counters/creating-counter-adjustments-for-accounts).
## Running Billing - Prorating Disabled
With prorating disabled for all Counter charge and credit types:
* First, we'll generate the Bill for the July 2025 billing period for **Seats Account 2**.
* Second, we'll post some additional Counter Adjustments on **Seats Account 2** and run billing for the August 2025 billing period.
**To run billing for an Account:**
1. Select **Accounts**. The Accounts created for the Organization are listed.
2. Select the **Name** hotlink text for **Seats Account 2**. The Account page opens with the **Overview** tab selected.
3. Select the **Bills** tab.
4. Select **Run billing**. A **Run billing** dialog opens.
5. On the dialog:
* **Invoice date**. Use the calendar pop-out to select **August 1st 2025**.
* **Bill frequency**. Select **Monthly**.
* **Target currency**. Select **US Dollar**.
6. Select **Run billing**. The modal closes and the Bill job executes. When the Bill job completes the newly generated Bill is listed on the **Bills** tab.
7. Select the **Reference** hotlink text for the Bill. The Bill opens in **Bill management**:
On review, we see that line item charges for the hybrid pricing for the **Dev License ad Store** Product are combined in the single Bill:
* The 70 **GigBytes Stored** are shown as **Usage** and are calculated correctly according to the two-tiered pricing we set up using the **Dev Store Agg 1**.
* The 15 **Licenses** are shown as a **Counter running total charge** and are calculated correctly according to the two-tiered pricing we set up using **Dev License Counter**.
# Recurring Charges Billing: Seat-Based Pricing
Source: https://docs.m3ter.com/guides/recurring-charges-counters/reviewing-bills-for-recurring-charges
When you've used a Counter to set up recurring charges pricing for a Product Plan, attached the priced Plan to an Account that consumes the Product, and created Counter Adjustments on the Account for a billing period, you can generate Bills for the Account.
In this topic, we'll use the seat-based pricing example set up in the previous two topics to run Bills for Accounts to review and check how the recurring charges have been calculated.
To recap on this example, we:
* Created the **Premium Seats Counter** and used it to set up a Tiered pricing for **Premium Seats Plan 2**: up to 20 seats at \$2 per seat; 21 and above seats at \$3 per seat. All prorating of charges or credits - for *Counter running totals*, *Counter adjustments debits*, and *Counter adjustment credits* - was disabled.
* Attached the priced Plan to **Seats Account 2** for a service period July 1st 2025 until June 30th 2027 inclusive. The Plan was configured for monthly billing frequency, no Standing Charge or Minimum Spend amounts were defined, and USD billing currency was used.
* Created Counter Adjustments using **Premium Seats Counter** on **Seats Account 2**:
* For 15 seats on July 1st 2025.
* For 18 seats on July 15th 2025.
To illustrate how billing charges are calculated for this seat-based pricing example:
* [Running Billing - Prorating Disabled](/guides/recurring-charges-counters/reviewing-bills-for-recurring-charges#running-billing-prorating-disabled) First, we'll first leave all prorating disabled and run billing for the July 2025 and August 2025 billing periods.
* [Running Billing - Prorating Enabled](/guides/recurring-charges-counters/reviewing-bills-for-recurring-charges#running-billing-prorating-enabled) Second, we'll enable prorating for the different Counter charge and credit types and re-run billing to show how prorating is applied for these types at billing.
**Important!** Before you attempt to work through this topic, please first review the previous topics for [Creating Counters and Pricing Plans](/guides/recurring-charges-counters/creating-counters) and [Understanding and Creating Counter Adjustments for Accounts](/guides/recurring-charges-counters/creating-counter-adjustments-for-accounts).
## Running Billing - Prorating Disabled
With prorating disabled for all Counter charge and credit types:
* First, we'll generate the Bill for the July 2025 billing period for **Seats Account 2**.
* Second, we'll post some additional Counter Adjustments on **Seats Account 2** and run billing for the August 2025 billing period.
**To run billing for an Account:**
1. Select **Accounts**. The Accounts created for the Organization are listed.
2. Select the **Name** hotlink text for **Seats Account 2**. The Account page opens with the **Overview** tab selected.
3. Select the **Bills** tab.
4. Select **Run billing**. A **Run billing** dialog opens.
5. On the dialog:
* **Invoice date**. Use the calendar pop-out to select **August 1st 2025**.
* **Bill frequency**. Select **Monthly**.
* **Target currency**. Select **US Dollar**.
6. Select **Run billing**. The modal closes and the Bill job executes. When the Bill job completes the newly generated Bill is listed on the **Bills** tab.
7. Select the **Reference** hotlink text for the Bill. The Bill opens in **Bill management**:
![Counters65]() On review, we can see that:
* The two Counter Adjustments we made on the Account appear on this first bill as line item charges of **Type**:
* **Counter running total charge**. For the initial adjustment posted for 15 seats to start the running total on the Account.
* **Counter adjustment debit**. For the second adjustment, which increased the number of seats by 3, and the Bill shows this correctly as an additional charge to give the correct total.
* Because prorating is disabled for all Counter charge types, although the second Counter Adjustment was posted on the Account on July 15th and therefore the extra 3 seats were only subscribed to for the remaining days of the 31-day month, the full \$2 per seat charge is applied.
* Lastly, charges can be expanded to show a breakdown which gives relevant details: **Plan**, **Counter**, and **Counter Pricing** period.
We now extend the example to:
* Post two more Counter Adjustments on **Seats Account 2** using **Premium Seats Counter** for the month of July:
* On August 1st 2025 for an increase to 22 seats.
* On August 20th 2025 for a decrease back down to 20 seats.
8. Re-run billing as Step 5 above but this time set the **Invoice Date** to September 1st 2025 for the August billing period.
9. When the September 1st 2025 Bill appears on the **Bills** tab, open it in **Bill management**:
On review, we can see that:
* The two Counter Adjustments we made on the Account appear on this first bill as line item charges of **Type**:
* **Counter running total charge**. For the initial adjustment posted for 15 seats to start the running total on the Account.
* **Counter adjustment debit**. For the second adjustment, which increased the number of seats by 3, and the Bill shows this correctly as an additional charge to give the correct total.
* Because prorating is disabled for all Counter charge types, although the second Counter Adjustment was posted on the Account on July 15th and therefore the extra 3 seats were only subscribed to for the remaining days of the 31-day month, the full \$2 per seat charge is applied.
* Lastly, charges can be expanded to show a breakdown which gives relevant details: **Plan**, **Counter**, and **Counter Pricing** period.
We now extend the example to:
* Post two more Counter Adjustments on **Seats Account 2** using **Premium Seats Counter** for the month of July:
* On August 1st 2025 for an increase to 22 seats.
* On August 20th 2025 for a decrease back down to 20 seats.
8. Re-run billing as Step 5 above but this time set the **Invoice Date** to September 1st 2025 for the August billing period.
9. When the September 1st 2025 Bill appears on the **Bills** tab, open it in **Bill management**:
![Counters66]() On review, we can see that:
* The number of seats at the end of the previous billing period - July 2025 - was 18 and the Counter Adjustment posted of August 1st 2025 increased the seats Counter number to 22. This becomes the Counter running total for the start of the next billing period - August 2025. We therefore see the first line item charge is of **Type** - **Counter running total charge**, and which means on the Tiered pricing we applied to the Account Plan, 20 seats each incur a charge of \$2 and 2 seats each incur a charge of \$3.
* The second Counter Adjustment of August 20th 2025 decreased the seats Counter number from 22 to 20, which means a credit of 2 seats at a rate of \$3 is given. This line item is of **Type** - **Counter adjustment credit**.
## Running Billing - Prorating Enabled
You can enable prorating for the Counter adjustment debits or credits due at billing under a unit-based product pricing model. For example, if you are billing Accounts monthly and an end-customer increases their units subscription mid-month, you might want to only charge the customer for the extra units for the remaining days of the month billing period and not as if they had subscribed to them for the entire month:
* [Prorating for Counter Adjustment Credits and Debits](/guides/recurring-charges-counters/reviewing-bills-for-recurring-charges#prorating-for-counter-adjustment-credits-and-debits)
In a similar way, you can enable prorating for Counter running total charges under a unit-based product pricing model. This is useful in cases where, for example, you are billing monthly but the contract service period on an Account ends mid-month. You might then want the final bill to apply Counter running total charges for only those days of the final month before the contract service period ended and not for the entire month:
* [Prorating for Counter Running Total Charges](/guides/recurring-charges-counters/reviewing-bills-for-recurring-charges#prorating-for-counter-running-total-charges)
### Prorating for Counter Adjustment Credits and Debits
For the current seat-based pricing example, we'll:
* First, edit the Counter pricing applied to **Premium Seats Plan 2** to enable prorating for **Counter adjustment credits** and **Counter adjustment debits**.
* Second, re-calculate the sample Bills we created above to review and check that prorating for these Counter charge types has been correctly applied.
**To enable prorating for Counter adjustments debits and credits and re-calculate Bills:**
1. Open the **Plan details** page for **Premium Seats Plan 2**.
2. Scroll down the page and on the **Pricing** panel, select **Edit**. The **Counter pricing>Edit** page opens.
3. Under **Counter pricing settings**, select the **Pro-rate adjustment credit** and **Pro-rate adjustment debit** switches to enable them.
4. Select **Update counter pricing**. The **Edit** page closes and you are returned to **Plan details** where the prorating is now shown for the Counter-based **Pricing**:
On review, we can see that:
* The number of seats at the end of the previous billing period - July 2025 - was 18 and the Counter Adjustment posted of August 1st 2025 increased the seats Counter number to 22. This becomes the Counter running total for the start of the next billing period - August 2025. We therefore see the first line item charge is of **Type** - **Counter running total charge**, and which means on the Tiered pricing we applied to the Account Plan, 20 seats each incur a charge of \$2 and 2 seats each incur a charge of \$3.
* The second Counter Adjustment of August 20th 2025 decreased the seats Counter number from 22 to 20, which means a credit of 2 seats at a rate of \$3 is given. This line item is of **Type** - **Counter adjustment credit**.
## Running Billing - Prorating Enabled
You can enable prorating for the Counter adjustment debits or credits due at billing under a unit-based product pricing model. For example, if you are billing Accounts monthly and an end-customer increases their units subscription mid-month, you might want to only charge the customer for the extra units for the remaining days of the month billing period and not as if they had subscribed to them for the entire month:
* [Prorating for Counter Adjustment Credits and Debits](/guides/recurring-charges-counters/reviewing-bills-for-recurring-charges#prorating-for-counter-adjustment-credits-and-debits)
In a similar way, you can enable prorating for Counter running total charges under a unit-based product pricing model. This is useful in cases where, for example, you are billing monthly but the contract service period on an Account ends mid-month. You might then want the final bill to apply Counter running total charges for only those days of the final month before the contract service period ended and not for the entire month:
* [Prorating for Counter Running Total Charges](/guides/recurring-charges-counters/reviewing-bills-for-recurring-charges#prorating-for-counter-running-total-charges)
### Prorating for Counter Adjustment Credits and Debits
For the current seat-based pricing example, we'll:
* First, edit the Counter pricing applied to **Premium Seats Plan 2** to enable prorating for **Counter adjustment credits** and **Counter adjustment debits**.
* Second, re-calculate the sample Bills we created above to review and check that prorating for these Counter charge types has been correctly applied.
**To enable prorating for Counter adjustments debits and credits and re-calculate Bills:**
1. Open the **Plan details** page for **Premium Seats Plan 2**.
2. Scroll down the page and on the **Pricing** panel, select **Edit**. The **Counter pricing>Edit** page opens.
3. Under **Counter pricing settings**, select the **Pro-rate adjustment credit** and **Pro-rate adjustment debit** switches to enable them.
4. Select **Update counter pricing**. The **Edit** page closes and you are returned to **Plan details** where the prorating is now shown for the Counter-based **Pricing**:
![Counters67]() 5. Open **Seats Account 2** and select the **Bills** tab on the Account page.
6. Select the checkbox for the **August 1st 2025** Bill generated earlier and then click **Recalculate selected**. The Bill job executes and when complete, you'll see the **Total** amount adjusts.
7. Select the Bill's **Reference** text hotlink to open it in **Bill management**:
5. Open **Seats Account 2** and select the **Bills** tab on the Account page.
6. Select the checkbox for the **August 1st 2025** Bill generated earlier and then click **Recalculate selected**. The Bill job executes and when complete, you'll see the **Total** amount adjusts.
7. Select the Bill's **Reference** text hotlink to open it in **Bill management**:
![Counters68]() On review, we can see the total for the Bill has been reduced:
* The **Counter running total** charge of \$30 for the initial 15 seats on Account remains unchanged since the Counter Adjustment posted on the Account was made July 1st and so these seats were subscribed to for the entire month.
* However, the **Counter adjustment debit** charge for the extra 3 seats due the Counter Adjustment for 18 posted to the Account July 15th has been prorated for the 17 days remaining of the 31-day month of July. The prorating is calculated by adjusting the **Unit Price** charged per seat accordingly - that is, with a base rate of \$2 per seat per month: \$2/31 x 17 = \$1.096, which amounts to a **Counter adjustment debit** charge of \$3.29 (3 x \$1.096) for 3 extra seats.
8. Return to the **Seats Account 2** page and on the **Bills** tab, select the checkbox for the **September 1st 2025** Bill generated earlier and then click **Recalculate selected**. The Bill job executes and when complete, you'll see the **Total** adjusts.
9. Select the Bill's **Reference** text hotlink to open it in **Bill management**:
On review, we can see the total for the Bill has been reduced:
* The **Counter running total** charge of \$30 for the initial 15 seats on Account remains unchanged since the Counter Adjustment posted on the Account was made July 1st and so these seats were subscribed to for the entire month.
* However, the **Counter adjustment debit** charge for the extra 3 seats due the Counter Adjustment for 18 posted to the Account July 15th has been prorated for the 17 days remaining of the 31-day month of July. The prorating is calculated by adjusting the **Unit Price** charged per seat accordingly - that is, with a base rate of \$2 per seat per month: \$2/31 x 17 = \$1.096, which amounts to a **Counter adjustment debit** charge of \$3.29 (3 x \$1.096) for 3 extra seats.
8. Return to the **Seats Account 2** page and on the **Bills** tab, select the checkbox for the **September 1st 2025** Bill generated earlier and then click **Recalculate selected**. The Bill job executes and when complete, you'll see the **Total** adjusts.
9. Select the Bill's **Reference** text hotlink to open it in **Bill management**:
![Counters69]() On review, we can see that the total for the Bill has increased:
* The **Counter running total charge** remains the same as when we first generated the Bill.
* The **Counter adjustment credit** amount has now reduced, since the Counter Adjustment posted to the Account of 20 was made on August 20th 2025, and the credit due is prorated for the remaining 12 days of the 31-day month of August instead of for the full month. The prorating is calculated by adjusting the **Unit Price** credit due per seat accordingly - that is, with a base rate of \$3 per seat per month: \$3/31 x 12 = \$1.161, which amounts to a **Counter adjustment credit** of -\$2.32 (2 x \$1.161) for 2 fewer seats.
### Prorating for Counter Running Total Charges
In this section, we take our current seat-based pricing example and edit the Counter pricing for the Account Plan such that it ends September 15th 2025, that is, mid-way through the third monthly billing period:
* First, edit the pricing to end mid-billing period - September 15th.
* Second, with prorating disabled, we'll generate the Bill for the September billing period and dated October 1st 2025.
* Third, we'll then edit the pricing again to enable prorating for **Counter running total charges**.
* Fourth, recalculate the October 1st Bill to review and check how the prorating has been applied at billing.
**To enable pro-rating for Counter running total and re-calculate Bills:**
First, edit the Pricing to change the end date to mid-September 2025:
1. Open the **Plan details** page for **Premium Seats Plan 2**.
2. Scroll down the page and on the **Pricing** panel, select **Edit**. The **Counter pricing>Edit** page opens.
3. Under **Counter Pricing Details**, change the **End date** to **September 16th 2025** - End dates for pricing are *exclusive* so this means the Pricing will apply to the Plan up to the end of day on September 15th 2025.
4. Select **Update counter pricing**.
Second, run billing for the September 2025 billing period:
5. From the **Accounts** page, select to open **Seats Account 2**. The Account page opens with the **Overview** tab selected.
6. Select the **Bills** tab.
7. Select **Run billing**. A **Run billing** dialog opens.
8. On the dialog:
* **Invoice date**. Use the calendar pop-out to select **October 1st 2025**.
* **Bill frequency**. Select **Monthly**.
* **Target currency**. Select **US Dollar**.
9. Select **Run billing**. The modal closes and the Bill job executes. When the Bill job completes the newly generated Bill is listed on the **Bills** tab.
10. Select the **Reference** hotlink text for the Bill. The Bill opens in **Bill management**:
On review, we can see that the total for the Bill has increased:
* The **Counter running total charge** remains the same as when we first generated the Bill.
* The **Counter adjustment credit** amount has now reduced, since the Counter Adjustment posted to the Account of 20 was made on August 20th 2025, and the credit due is prorated for the remaining 12 days of the 31-day month of August instead of for the full month. The prorating is calculated by adjusting the **Unit Price** credit due per seat accordingly - that is, with a base rate of \$3 per seat per month: \$3/31 x 12 = \$1.161, which amounts to a **Counter adjustment credit** of -\$2.32 (2 x \$1.161) for 2 fewer seats.
### Prorating for Counter Running Total Charges
In this section, we take our current seat-based pricing example and edit the Counter pricing for the Account Plan such that it ends September 15th 2025, that is, mid-way through the third monthly billing period:
* First, edit the pricing to end mid-billing period - September 15th.
* Second, with prorating disabled, we'll generate the Bill for the September billing period and dated October 1st 2025.
* Third, we'll then edit the pricing again to enable prorating for **Counter running total charges**.
* Fourth, recalculate the October 1st Bill to review and check how the prorating has been applied at billing.
**To enable pro-rating for Counter running total and re-calculate Bills:**
First, edit the Pricing to change the end date to mid-September 2025:
1. Open the **Plan details** page for **Premium Seats Plan 2**.
2. Scroll down the page and on the **Pricing** panel, select **Edit**. The **Counter pricing>Edit** page opens.
3. Under **Counter Pricing Details**, change the **End date** to **September 16th 2025** - End dates for pricing are *exclusive* so this means the Pricing will apply to the Plan up to the end of day on September 15th 2025.
4. Select **Update counter pricing**.
Second, run billing for the September 2025 billing period:
5. From the **Accounts** page, select to open **Seats Account 2**. The Account page opens with the **Overview** tab selected.
6. Select the **Bills** tab.
7. Select **Run billing**. A **Run billing** dialog opens.
8. On the dialog:
* **Invoice date**. Use the calendar pop-out to select **October 1st 2025**.
* **Bill frequency**. Select **Monthly**.
* **Target currency**. Select **US Dollar**.
9. Select **Run billing**. The modal closes and the Bill job executes. When the Bill job completes the newly generated Bill is listed on the **Bills** tab.
10. Select the **Reference** hotlink text for the Bill. The Bill opens in **Bill management**:
![Counters70]() * On review, we can see that even though the pricing ceases to apply to the Account Plan at the end of day on September 15th 2025, the **Counter running total charge** is for the full amount of 20 seats at \$2 per seat.
Third, enable prorating for Counter running total charges:
11. Open the **Pricing details** page again for **Premium Seats Plan 2**.
12. Scroll down the page and on the **Pricing** panel, select **Edit**. The **Counter pricing>Edit** page opens.
13. Under **Counter pricing settings**, enable the **Pro-rate running total** switch.
14. Select **Update counter pricing**.
Fourth, re-calculate the October 1st 2025 Bill:
15. Return to the **Bills** tab on the **Seats Account 2** page.
16. Select the checkbox for the October 1st 2025 Bill and click **Recalculate selected**. The Bill job executes and when complete, you'll see the **Total** amount adjusts.
17. Select the **Reference** hotlink text for the Bill. The Bill opens in **Bill management**:
* On review, we can see that even though the pricing ceases to apply to the Account Plan at the end of day on September 15th 2025, the **Counter running total charge** is for the full amount of 20 seats at \$2 per seat.
Third, enable prorating for Counter running total charges:
11. Open the **Pricing details** page again for **Premium Seats Plan 2**.
12. Scroll down the page and on the **Pricing** panel, select **Edit**. The **Counter pricing>Edit** page opens.
13. Under **Counter pricing settings**, enable the **Pro-rate running total** switch.
14. Select **Update counter pricing**.
Fourth, re-calculate the October 1st 2025 Bill:
15. Return to the **Bills** tab on the **Seats Account 2** page.
16. Select the checkbox for the October 1st 2025 Bill and click **Recalculate selected**. The Bill job executes and when complete, you'll see the **Total** amount adjusts.
17. Select the **Reference** hotlink text for the Bill. The Bill opens in **Bill management**:
![Counters71]() * On review, with pro-rating enabled, we can see that the **Counter running total charge** has been reduced. The prorating is calculated by adjusting the **Unit price** per seat accordingly - for the 15 days the pricing was active for the Account Plan, with a base rate of \$2 per seat per month: \$2/30 x 15 = \$1, which amounts to a **Counter running total charge** of \$20 for 20 seats.
# Pricing Metrics: Aggregations
Source: https://docs.m3ter.com/guides/usage-data-aggregations
Discover how to implement usage-based pricing and billing for your products by defining Aggregations of usage data to use as pricing metrics.
Once Meters are set up, you can define *Aggregations* of that data to give the usage metrics you want to use to price Plans for your Products. This allows you to introduce usage-based pricing and billing for your Products.
This section reviews the configuration options available for Aggregations and explains how to create them:
* [Reviewing Aggregation Options](/guides/usage-data-aggregations/reviewing-aggregation-options)
* [Creating Product Aggregations](/guides/usage-data-aggregations/creating-aggregations)
* [Creating Global Aggregations](/guides/usage-data-aggregations/creating-global-aggregations)
* [Compound Aggregations](/guides/usage-data-aggregations/compound-aggregations)
* [Working with Compound Aggregation Calculations](/guides/usage-data-aggregations/compound-aggregation-calculations)
* [Compound Aggregations - Examples](/guides/usage-data-aggregations/compound-aggregations-examples)
* [Segmented Aggregations](/guides/usage-data-aggregations/segmented-aggregations)
* [Custom SQL Aggregations](/guides/usage-data-aggregations/custom-sql-aggregations)
* [Reviewing Aggregation Details](/guides/usage-data-aggregations/reviewing-aggregation-details)
# Working with Compound Aggregation Calculations
Source: https://docs.m3ter.com/guides/usage-data-aggregations/compound-aggregation-calculations
For many usage-based pricing use cases, you can use Compound Aggregation calculations to reference one or more simple Aggregations and resolve complex pricing requirements - they're the complexity crunchers! By exploiting the powerful m3ter Calculation Engine, there's virtually no limit to the flexibility they give you for defining the precise pricing metrics you need. And it's worth noting that you can create a Compound Aggregation that *does not reference a single simple Aggregation*, giving you a pricing metric not determined by metered usage, but is nevertheless essential for your complex, mixed-pricing use case.
This topic explains the different types of field you can reference in your Compound Aggregation calculations and the correct formats for those field references:
* [Referencing Simple Aggregation Values](/guides/usage-data-aggregations/compound-aggregation-calculations#referencing-simple-aggregation-values)
* [Referencing Custom Fields in Compound Aggregations](/guides/usage-data-aggregations/compound-aggregation-calculations#referencing-custom-fields-in-compound-aggregations)
* [Referencing Bill Period Values](/guides/usage-data-aggregations/compound-aggregation-calculations#referencing-bill-period-variables)
**Important!** If you're reviewing this topic for help in using Compound Aggregation calculations, please also see further details of the operators, variables, functions, and type casts at [m3ter Calculation Engine](/guides/m3ter-calculation-engine).
## Referencing Simple Aggregation Values
You can reference the resultant values of simple Aggregations in a Compound Aggregation calculation using a simple Aggregation's *Code*. The general format is:
> `aggregation.`
The simple Aggregations you can reference when you create a Product-specific Compound Aggregation or a Global Compound Aggregation are the same:
* The calculation can reference all simple Aggregations – any Product-specific and any Global simple Aggregations.
You can reference Segmented Aggregations in a Compound Aggregation. The segments defined for the referenced Aggregations that are made available the Compound Aggregation depends on whether it references one or many Segmented Aggregations - see [Compound Aggregations - Segments Available](/guides/plans-and-pricing/pricing-plans/pricing-plans-using-segmented-aggregations#compound-aggregations-segments-available).
**Important! Compound Aggregation Calculations Use Base Values of Simple Aggregations**. If a simple Aggregation referenced by a Compound Aggregation has a **Quantity per unit** defined for pricing and billing purposes or a **Rounding** defined, then these *will not be factored into the value used by the calculation*. For example, if a simple Aggregation referenced has a base value of 100 and has a **Quantity per unit** set at 10, any Compound Aggregation calculation that references it will use the base *value of 100 and not 10*.
## Referencing Custom Fields in Compound Aggregations
You can reference the values for Custom Fields defined at both Organization level or individual entity in your Compound Aggregation calculations using the following format for the following entities:
* `organization.`
* `product.`
* `account.`
* `accountPlan.`
* `plan.`
* `planTemplate.`
* `meter.`
When you reference a Custom Field in a calculation, the value defined for the Custom Field at the Organizational level will be used unless you've also defined a Custom Field at the individual entity level. If a Custom Field has also been defined at the individual entity level, this value will be used:
* But see important note on [Exception](/guides/usage-data-aggregations/compound-aggregation-calculations#exception-referencing-individual-meter-custom-fields) below regarding Meter Custom Fields.
**Important! Aggregation and Compound Aggregation Custom Fields**. You can also define Custom Fields for **Aggregations** and **Compound Aggregations**. However, these Custom Fields are NOT supported for referencing in Compound Aggregation calculations.
#### Exception - Referencing Individual Meter Custom Fields
The exception to the general rule is:
* `meter.`
Even if you've created a Custom Field at the individual Meter level, the default value defined for the Custom Field created for Meter at the Organizational-level will be used for the calculation. This is because a Compound Aggregation might reference multiple Aggregations and therefore multiple Meters, which leaves it ambiguous as to which individual Meter's Custom Field value should be used for the calculation.
**Tip: See Also?** For creating Custom Fields in the Console, see [Managing your Organization](/guides/organization-and-access-management/viewing-and-editing-organization). You can use the Create/Edit Console pages for individual entities to set up Custom Fields. For API calls, see the [CustomField](/api/customfield/introduction) section of our API Ref Docs. For more background on Custom Fields, see [Working with Custom Fields](/guides/creating-and-managing-products/working-with-custom-fields).
## Referencing Bill Period Variables
You can reference the following twelve bill period variables in your Compound Aggregation calculations:
* `ts.hoursInPlanArrearsPeriod`
* `ts.datesInPlanArrearsPeriod`
* `ts.daysInPlanArrearsPeriod`
* `ts.hoursInPlanAdvancePeriod`
* `ts.datesInPlanAdvancePeriod`
* `ts.daysInPlanAdvancePeriod`
* `ts.hoursInBillArrearsPeriod`
* `ts.datesInBillArrearsPeriod`
* `ts.daysInBillArrearsPeriod`
* `ts.hoursInBillAdvancePeriod`
* `ts.datesInBillAdvancePeriod`
* `ts.daysInBillAdvancePeriod`
How these variables work to determine bill periods can be understood against three distinctions:
* **In Arrears Period vs. In Advance Period**:
* **In Arrears**. The arrears period is the time when usage is accrued - the period between the previous bill and this one.
* **In Advance**. The advance period is the period during which advance charges would appear on the bill - the period between this bill and the next one.
* **Bill vs. Plan**:
* **Bill Period**. Bill period is determined by the billing frequency. For example, if you bill on the 15th of each month, then your bill period will be 28 days from 15th Feb - 15th March, or 30 days from 15th November - 15th December, and so on.
* **Plan Period**. A Plan period may be shorter than the bill period, because the Plan might start or end mid-way through the bill period.
* **Hours vs. Days vs. Dates**. More care is needed with this 3-way distinction, because users might be working from different timezones, and timezones can change due to deliberate seasonal clock adjustments, such as Daylight Saving Time changes. For example, on 27th March 2022 in the UK (Europe/London timezone) clocks were put forward one hour, so that day was only 23 hours long:
* **Hours**. The number of whole hours in the period. Note this isn't "clock" hours - it's just any arbitrary 60-minute period. For example: 12:00 - 14:00 would be 2 hours; 12:37 - 14:37 would be 2 hours; but 12:37 - 14:36 would only be 1 hour - it's almost 2 hours, but not quite, and therefore only contains one entire 60-minute period.
* Note that with the example above (using Europe/London timezone), the period 1st March 2022 00:00 to 1st April 2022 00:00 wouldn't have 31\*24=744 hours, it only has 743 due to the time change. If the timezone was UTC on the other hand, this same period would have 744 hours.
* **Days**. The number of whole days in the period. This automatically accounts for the configured Organization timezone, and automatically accommodates any clock adjustments such as daylight savings. Similarly to hours, it's not calendar days, but entire 24-hour periods (or in some cases, actually 23 or 25 hours if the period spans a Daylight Savings change)
* For example: 25th March 2022 14:00 - 30th March 2022 14:00 would be 5 days (even though there are only 23 hours on 27th March due to the daylight savings clock adjustment).
* Partial days are not counted, so 25th March 2022 14:00 - 30th March 2022 13:00 would only be 4 days (because it's an hour short of being a 5th full day).
* **Dates**. the number of distinct calendar dates in the period in the configured Organization timezone. This is different to days:
* For example: 25th March 2022 14:00 - 30th March 2022 13:00 would be 6 dates - 25th, 26th, 27th, 28th, 29th, and 30th. The time components don't matter here.
# Compound Aggregations
Source: https://docs.m3ter.com/guides/usage-data-aggregations/compound-aggregations
*Compound Aggregations* allow you to derive numerical measures from usage data by applying a calculation to one or more simple Aggregations. The calculation can also reference Custom Fields. You can then use these calculated measures as pricing metrics to set up usage-based pricing Plans for your Products. In this way, Compound Aggregations can help you to implement a wide range of pricing use cases for your Products.
This topic starts off by explaining the difference between Product-specific and Global Compound Aggregations:
* [Product vs. Global Compound Aggregations](/guides/usage-data-aggregations/compound-aggregations#product-vs-global-compound-aggregations)
The topic then illustrates the value of using Compound Aggregations with a usage-based pricing example, and explains how to create a Compound Aggregation to apply a calculation to simple Aggregations to satisfy the example pricing use case:
* [Example Use Case](/guides/usage-data-aggregations/compound-aggregations#example-use-case)
* [Creating a Compound Aggregation](/guides/usage-data-aggregations/compound-aggregations#creating-a-compound-aggregation)
**Important!**
* **Creating Simple Aggregations?** We *strongly recommend* that you create some simple Aggregations and are familiar with their purpose and their configuration as helpful preparation to creating and using Compound Aggregations. See [Reviewing Aggregation Options](/guides/usage-data-aggregations/reviewing-aggregation-options).
* **Referencing Fields in Compound Aggregation Calculations?** For details of the different types of fields you can reference in your calculations and supported syntax, see [Working with Compound Aggregation Calculations](/guides/usage-data-aggregations/compound-aggregation-calculations).
* **Compound Aggregations based on Segmented Aggregations?** You can use Compound Aggregations that reference Segmented Aggregations to price Plans. However, the segments available to the Compound Aggregation for pricing a Plan will depend on whether the Compound Aggregation references a single or multiple Segmented Aggregations. See [Pricing with Compound Aggregations Based on Segmented Aggregations](/guides/plans-and-pricing/pricing-plans/pricing-plans-using-segmented-aggregations#pricing-with-compound-aggregations-based-on-segmented-aggregations) for details.
**Tip: Compound Aggregations - the "Complexity Crunchers" - see more!** By exploiting the powerful [m3ter Calculation Engine](/guides/m3ter-calculation-engine), there's virtually no limit to the flexibility Compound Aggregations give you for defining your precise pricing metrics. To see some worked examples of Compound Aggregations that illustrate how Compound Aggregations can quickly help you resolve complex UBP use cases, please review the [Compound Aggregations - Examples](/guides/usage-data-aggregations/compound-aggregations-examples) topic.
## Product vs. Global Compound Aggregations
You can create Product Compound Aggregations, which belong to a specific Product, or Global Compound Aggregations, which are not tied to a specific Product:
* You can use a Product Compound Aggregation to price only those Plans that belong to the same Product.
* You can use a Global Compound Aggregation to price Plans belonging to any Product.
**Note: Referencing Simple Aggregations in Product/Global Compound Aggregation Calculations!** The simple Aggregations you can reference in the calculation for a Product-specific Compound Aggregation or a Global Compound Aggregation are the same - for details, see [Working with Compound Aggregation Calculations](/guides/usage-data-aggregations/compound-aggregation-calculations).
## Example Use Case
Suppose you provide a service which allows your customers to develop and run software applications and host these applications on your service. You intend to charge customers for this application build-and-host service by total number of requests made to all of their applications being hosted in any given billing period. However, you want to offer customers a sign-up bonus for their first year of using your service, where the first 100 requests made to an application they host with you are free for each billing period - for example, if a customer has 3 applications hosted with you during the first billing period, they are due 300 free requests for the first Bill.
To set things up in m3ter to implement usage-based pricing for this type of case, you can use a Compound Aggregation:
* First, create and configure a Meter which will record the number of applications hosted. You can send an event into m3ter each time one of your customers creates and loads an application into your service. Use this Meter field to create a simple Aggregation to give a **Maximum** value measure for hosted applications. Give this simple Aggregation a code of: **unique\_apps**. (Note that for the example, we suppose that under the terms of the sign-up bonus if a customer reaches 5 applications in any given billing period, they are granted 500 free requests even if 2 of those applications are disabled before the end of the billing period.)
* Second, create and configure a Meter to record the number of requests made by applications. You can then create a second simple Aggregation to **Sum** this data. Give this simple Aggregation a Code of: **num\_requests**.
* Third, create a Compound Aggregation that applies a calculation to the two simple Aggregations to give a number for chargeable requests:
> `Math.max(0, aggregation.num_requests - (aggregation.unique_apps * 100))`
When you come to price up your Product Plans, you can now use this Compound Aggregation.
**Important! Compound Aggregation Calculations Use Base Values of Simple Aggregations**. If a simple Aggregation referenced by a Compound Aggregation has a **Quantity per unit** defined for pricing and billing purposes or a **Rounding** defined, then these *will not be factored into the value used by the calculation*. For example in this case, if the `num_requests` simple Aggregation referenced has a base value of 100 and has **Quantity per unit** set at 10, the Compound Aggregation calculation will use the base *value of 100* *not 10*.
**Tip: Calculation Expression - Referencing simple Aggregations and Supported Syntax?** For details of how to reference the values of simple Aggregations in calculation expressions and the supported syntax, see [Working with Compound Aggregation Calculations](/guides/usage-data-aggregations/compound-aggregation-calculations).
## Creating a Compound Aggregation
This section explains how to create a new Product Compound Aggregation for the example use case [outlined above](/guides/usage-data-aggregations/compound-aggregations#example-use-case), and assumes the two simple Aggregations used have already been created for the same Product.
**To create a Compound Aggregation:**
1. Select **Metering>Compound aggregations**. The **Compound aggregations** page opens.
2. In the **Product** drop-down, select the Product for which you want to create the new Compound Aggregation. The **Compound aggregations** page adjusts and lists:
* Any existing Compound Aggregations created for the selected Product.
* Any Global Compound Aggregations, which are clearly labeled.
**Tip: Global Compound Aggregation?** If you want to create a *Global* Compound Aggregation, which is not tied to a specific Product and which you can then use to price any of your Products, remove the selection - **(Global)** will then show for **Product** and the **Compound Aggregations** page will adjust to show only existing Global Compound Aggregations. When you select to **Create Compound Aggregation**, on the **Create** page the **Product** field will also then show **(Global)**.
3. Select **Create compound aggregation**. The **Compound aggregations>Create** page opens.
4. Enter the **Compound aggregation details**:
* **Name**. (*Required*) For this example, enter a descriptive name, such as **Requests minus free**.
* **Code**. (*Required*) Unique identifier. For this example, we've used **requests**\*\*\*\_\*\*\***minus\_free**.
* **Accounting product**. Use the drop-down to select a Product. (*Optional*)
* For accounting purposes, you can use this to link to a specific Product any usage line items on Bills that result from pricing a Plan using this Aggregation:
* If you've also defined an Accounting product for a Pricing that uses this Aggregation, then the *Pricing Accounting product* takes precedence and is used.
* If no Accounting product is defined for a Pricing and you omit an Accounting product for the Aggregation, then the *Product the Plan belongs* to is used.
* On review, with pro-rating enabled, we can see that the **Counter running total charge** has been reduced. The prorating is calculated by adjusting the **Unit price** per seat accordingly - for the 15 days the pricing was active for the Account Plan, with a base rate of \$2 per seat per month: \$2/30 x 15 = \$1, which amounts to a **Counter running total charge** of \$20 for 20 seats.
# Pricing Metrics: Aggregations
Source: https://docs.m3ter.com/guides/usage-data-aggregations
Discover how to implement usage-based pricing and billing for your products by defining Aggregations of usage data to use as pricing metrics.
Once Meters are set up, you can define *Aggregations* of that data to give the usage metrics you want to use to price Plans for your Products. This allows you to introduce usage-based pricing and billing for your Products.
This section reviews the configuration options available for Aggregations and explains how to create them:
* [Reviewing Aggregation Options](/guides/usage-data-aggregations/reviewing-aggregation-options)
* [Creating Product Aggregations](/guides/usage-data-aggregations/creating-aggregations)
* [Creating Global Aggregations](/guides/usage-data-aggregations/creating-global-aggregations)
* [Compound Aggregations](/guides/usage-data-aggregations/compound-aggregations)
* [Working with Compound Aggregation Calculations](/guides/usage-data-aggregations/compound-aggregation-calculations)
* [Compound Aggregations - Examples](/guides/usage-data-aggregations/compound-aggregations-examples)
* [Segmented Aggregations](/guides/usage-data-aggregations/segmented-aggregations)
* [Custom SQL Aggregations](/guides/usage-data-aggregations/custom-sql-aggregations)
* [Reviewing Aggregation Details](/guides/usage-data-aggregations/reviewing-aggregation-details)
# Working with Compound Aggregation Calculations
Source: https://docs.m3ter.com/guides/usage-data-aggregations/compound-aggregation-calculations
For many usage-based pricing use cases, you can use Compound Aggregation calculations to reference one or more simple Aggregations and resolve complex pricing requirements - they're the complexity crunchers! By exploiting the powerful m3ter Calculation Engine, there's virtually no limit to the flexibility they give you for defining the precise pricing metrics you need. And it's worth noting that you can create a Compound Aggregation that *does not reference a single simple Aggregation*, giving you a pricing metric not determined by metered usage, but is nevertheless essential for your complex, mixed-pricing use case.
This topic explains the different types of field you can reference in your Compound Aggregation calculations and the correct formats for those field references:
* [Referencing Simple Aggregation Values](/guides/usage-data-aggregations/compound-aggregation-calculations#referencing-simple-aggregation-values)
* [Referencing Custom Fields in Compound Aggregations](/guides/usage-data-aggregations/compound-aggregation-calculations#referencing-custom-fields-in-compound-aggregations)
* [Referencing Bill Period Values](/guides/usage-data-aggregations/compound-aggregation-calculations#referencing-bill-period-variables)
**Important!** If you're reviewing this topic for help in using Compound Aggregation calculations, please also see further details of the operators, variables, functions, and type casts at [m3ter Calculation Engine](/guides/m3ter-calculation-engine).
## Referencing Simple Aggregation Values
You can reference the resultant values of simple Aggregations in a Compound Aggregation calculation using a simple Aggregation's *Code*. The general format is:
> `aggregation.`
The simple Aggregations you can reference when you create a Product-specific Compound Aggregation or a Global Compound Aggregation are the same:
* The calculation can reference all simple Aggregations – any Product-specific and any Global simple Aggregations.
You can reference Segmented Aggregations in a Compound Aggregation. The segments defined for the referenced Aggregations that are made available the Compound Aggregation depends on whether it references one or many Segmented Aggregations - see [Compound Aggregations - Segments Available](/guides/plans-and-pricing/pricing-plans/pricing-plans-using-segmented-aggregations#compound-aggregations-segments-available).
**Important! Compound Aggregation Calculations Use Base Values of Simple Aggregations**. If a simple Aggregation referenced by a Compound Aggregation has a **Quantity per unit** defined for pricing and billing purposes or a **Rounding** defined, then these *will not be factored into the value used by the calculation*. For example, if a simple Aggregation referenced has a base value of 100 and has a **Quantity per unit** set at 10, any Compound Aggregation calculation that references it will use the base *value of 100 and not 10*.
## Referencing Custom Fields in Compound Aggregations
You can reference the values for Custom Fields defined at both Organization level or individual entity in your Compound Aggregation calculations using the following format for the following entities:
* `organization.`
* `product.`
* `account.`
* `accountPlan.`
* `plan.`
* `planTemplate.`
* `meter.`
When you reference a Custom Field in a calculation, the value defined for the Custom Field at the Organizational level will be used unless you've also defined a Custom Field at the individual entity level. If a Custom Field has also been defined at the individual entity level, this value will be used:
* But see important note on [Exception](/guides/usage-data-aggregations/compound-aggregation-calculations#exception-referencing-individual-meter-custom-fields) below regarding Meter Custom Fields.
**Important! Aggregation and Compound Aggregation Custom Fields**. You can also define Custom Fields for **Aggregations** and **Compound Aggregations**. However, these Custom Fields are NOT supported for referencing in Compound Aggregation calculations.
#### Exception - Referencing Individual Meter Custom Fields
The exception to the general rule is:
* `meter.`
Even if you've created a Custom Field at the individual Meter level, the default value defined for the Custom Field created for Meter at the Organizational-level will be used for the calculation. This is because a Compound Aggregation might reference multiple Aggregations and therefore multiple Meters, which leaves it ambiguous as to which individual Meter's Custom Field value should be used for the calculation.
**Tip: See Also?** For creating Custom Fields in the Console, see [Managing your Organization](/guides/organization-and-access-management/viewing-and-editing-organization). You can use the Create/Edit Console pages for individual entities to set up Custom Fields. For API calls, see the [CustomField](/api/customfield/introduction) section of our API Ref Docs. For more background on Custom Fields, see [Working with Custom Fields](/guides/creating-and-managing-products/working-with-custom-fields).
## Referencing Bill Period Variables
You can reference the following twelve bill period variables in your Compound Aggregation calculations:
* `ts.hoursInPlanArrearsPeriod`
* `ts.datesInPlanArrearsPeriod`
* `ts.daysInPlanArrearsPeriod`
* `ts.hoursInPlanAdvancePeriod`
* `ts.datesInPlanAdvancePeriod`
* `ts.daysInPlanAdvancePeriod`
* `ts.hoursInBillArrearsPeriod`
* `ts.datesInBillArrearsPeriod`
* `ts.daysInBillArrearsPeriod`
* `ts.hoursInBillAdvancePeriod`
* `ts.datesInBillAdvancePeriod`
* `ts.daysInBillAdvancePeriod`
How these variables work to determine bill periods can be understood against three distinctions:
* **In Arrears Period vs. In Advance Period**:
* **In Arrears**. The arrears period is the time when usage is accrued - the period between the previous bill and this one.
* **In Advance**. The advance period is the period during which advance charges would appear on the bill - the period between this bill and the next one.
* **Bill vs. Plan**:
* **Bill Period**. Bill period is determined by the billing frequency. For example, if you bill on the 15th of each month, then your bill period will be 28 days from 15th Feb - 15th March, or 30 days from 15th November - 15th December, and so on.
* **Plan Period**. A Plan period may be shorter than the bill period, because the Plan might start or end mid-way through the bill period.
* **Hours vs. Days vs. Dates**. More care is needed with this 3-way distinction, because users might be working from different timezones, and timezones can change due to deliberate seasonal clock adjustments, such as Daylight Saving Time changes. For example, on 27th March 2022 in the UK (Europe/London timezone) clocks were put forward one hour, so that day was only 23 hours long:
* **Hours**. The number of whole hours in the period. Note this isn't "clock" hours - it's just any arbitrary 60-minute period. For example: 12:00 - 14:00 would be 2 hours; 12:37 - 14:37 would be 2 hours; but 12:37 - 14:36 would only be 1 hour - it's almost 2 hours, but not quite, and therefore only contains one entire 60-minute period.
* Note that with the example above (using Europe/London timezone), the period 1st March 2022 00:00 to 1st April 2022 00:00 wouldn't have 31\*24=744 hours, it only has 743 due to the time change. If the timezone was UTC on the other hand, this same period would have 744 hours.
* **Days**. The number of whole days in the period. This automatically accounts for the configured Organization timezone, and automatically accommodates any clock adjustments such as daylight savings. Similarly to hours, it's not calendar days, but entire 24-hour periods (or in some cases, actually 23 or 25 hours if the period spans a Daylight Savings change)
* For example: 25th March 2022 14:00 - 30th March 2022 14:00 would be 5 days (even though there are only 23 hours on 27th March due to the daylight savings clock adjustment).
* Partial days are not counted, so 25th March 2022 14:00 - 30th March 2022 13:00 would only be 4 days (because it's an hour short of being a 5th full day).
* **Dates**. the number of distinct calendar dates in the period in the configured Organization timezone. This is different to days:
* For example: 25th March 2022 14:00 - 30th March 2022 13:00 would be 6 dates - 25th, 26th, 27th, 28th, 29th, and 30th. The time components don't matter here.
# Compound Aggregations
Source: https://docs.m3ter.com/guides/usage-data-aggregations/compound-aggregations
*Compound Aggregations* allow you to derive numerical measures from usage data by applying a calculation to one or more simple Aggregations. The calculation can also reference Custom Fields. You can then use these calculated measures as pricing metrics to set up usage-based pricing Plans for your Products. In this way, Compound Aggregations can help you to implement a wide range of pricing use cases for your Products.
This topic starts off by explaining the difference between Product-specific and Global Compound Aggregations:
* [Product vs. Global Compound Aggregations](/guides/usage-data-aggregations/compound-aggregations#product-vs-global-compound-aggregations)
The topic then illustrates the value of using Compound Aggregations with a usage-based pricing example, and explains how to create a Compound Aggregation to apply a calculation to simple Aggregations to satisfy the example pricing use case:
* [Example Use Case](/guides/usage-data-aggregations/compound-aggregations#example-use-case)
* [Creating a Compound Aggregation](/guides/usage-data-aggregations/compound-aggregations#creating-a-compound-aggregation)
**Important!**
* **Creating Simple Aggregations?** We *strongly recommend* that you create some simple Aggregations and are familiar with their purpose and their configuration as helpful preparation to creating and using Compound Aggregations. See [Reviewing Aggregation Options](/guides/usage-data-aggregations/reviewing-aggregation-options).
* **Referencing Fields in Compound Aggregation Calculations?** For details of the different types of fields you can reference in your calculations and supported syntax, see [Working with Compound Aggregation Calculations](/guides/usage-data-aggregations/compound-aggregation-calculations).
* **Compound Aggregations based on Segmented Aggregations?** You can use Compound Aggregations that reference Segmented Aggregations to price Plans. However, the segments available to the Compound Aggregation for pricing a Plan will depend on whether the Compound Aggregation references a single or multiple Segmented Aggregations. See [Pricing with Compound Aggregations Based on Segmented Aggregations](/guides/plans-and-pricing/pricing-plans/pricing-plans-using-segmented-aggregations#pricing-with-compound-aggregations-based-on-segmented-aggregations) for details.
**Tip: Compound Aggregations - the "Complexity Crunchers" - see more!** By exploiting the powerful [m3ter Calculation Engine](/guides/m3ter-calculation-engine), there's virtually no limit to the flexibility Compound Aggregations give you for defining your precise pricing metrics. To see some worked examples of Compound Aggregations that illustrate how Compound Aggregations can quickly help you resolve complex UBP use cases, please review the [Compound Aggregations - Examples](/guides/usage-data-aggregations/compound-aggregations-examples) topic.
## Product vs. Global Compound Aggregations
You can create Product Compound Aggregations, which belong to a specific Product, or Global Compound Aggregations, which are not tied to a specific Product:
* You can use a Product Compound Aggregation to price only those Plans that belong to the same Product.
* You can use a Global Compound Aggregation to price Plans belonging to any Product.
**Note: Referencing Simple Aggregations in Product/Global Compound Aggregation Calculations!** The simple Aggregations you can reference in the calculation for a Product-specific Compound Aggregation or a Global Compound Aggregation are the same - for details, see [Working with Compound Aggregation Calculations](/guides/usage-data-aggregations/compound-aggregation-calculations).
## Example Use Case
Suppose you provide a service which allows your customers to develop and run software applications and host these applications on your service. You intend to charge customers for this application build-and-host service by total number of requests made to all of their applications being hosted in any given billing period. However, you want to offer customers a sign-up bonus for their first year of using your service, where the first 100 requests made to an application they host with you are free for each billing period - for example, if a customer has 3 applications hosted with you during the first billing period, they are due 300 free requests for the first Bill.
To set things up in m3ter to implement usage-based pricing for this type of case, you can use a Compound Aggregation:
* First, create and configure a Meter which will record the number of applications hosted. You can send an event into m3ter each time one of your customers creates and loads an application into your service. Use this Meter field to create a simple Aggregation to give a **Maximum** value measure for hosted applications. Give this simple Aggregation a code of: **unique\_apps**. (Note that for the example, we suppose that under the terms of the sign-up bonus if a customer reaches 5 applications in any given billing period, they are granted 500 free requests even if 2 of those applications are disabled before the end of the billing period.)
* Second, create and configure a Meter to record the number of requests made by applications. You can then create a second simple Aggregation to **Sum** this data. Give this simple Aggregation a Code of: **num\_requests**.
* Third, create a Compound Aggregation that applies a calculation to the two simple Aggregations to give a number for chargeable requests:
> `Math.max(0, aggregation.num_requests - (aggregation.unique_apps * 100))`
When you come to price up your Product Plans, you can now use this Compound Aggregation.
**Important! Compound Aggregation Calculations Use Base Values of Simple Aggregations**. If a simple Aggregation referenced by a Compound Aggregation has a **Quantity per unit** defined for pricing and billing purposes or a **Rounding** defined, then these *will not be factored into the value used by the calculation*. For example in this case, if the `num_requests` simple Aggregation referenced has a base value of 100 and has **Quantity per unit** set at 10, the Compound Aggregation calculation will use the base *value of 100* *not 10*.
**Tip: Calculation Expression - Referencing simple Aggregations and Supported Syntax?** For details of how to reference the values of simple Aggregations in calculation expressions and the supported syntax, see [Working with Compound Aggregation Calculations](/guides/usage-data-aggregations/compound-aggregation-calculations).
## Creating a Compound Aggregation
This section explains how to create a new Product Compound Aggregation for the example use case [outlined above](/guides/usage-data-aggregations/compound-aggregations#example-use-case), and assumes the two simple Aggregations used have already been created for the same Product.
**To create a Compound Aggregation:**
1. Select **Metering>Compound aggregations**. The **Compound aggregations** page opens.
2. In the **Product** drop-down, select the Product for which you want to create the new Compound Aggregation. The **Compound aggregations** page adjusts and lists:
* Any existing Compound Aggregations created for the selected Product.
* Any Global Compound Aggregations, which are clearly labeled.
**Tip: Global Compound Aggregation?** If you want to create a *Global* Compound Aggregation, which is not tied to a specific Product and which you can then use to price any of your Products, remove the selection - **(Global)** will then show for **Product** and the **Compound Aggregations** page will adjust to show only existing Global Compound Aggregations. When you select to **Create Compound Aggregation**, on the **Create** page the **Product** field will also then show **(Global)**.
3. Select **Create compound aggregation**. The **Compound aggregations>Create** page opens.
4. Enter the **Compound aggregation details**:
* **Name**. (*Required*) For this example, enter a descriptive name, such as **Requests minus free**.
* **Code**. (*Required*) Unique identifier. For this example, we've used **requests**\*\*\*\_\*\*\***minus\_free**.
* **Accounting product**. Use the drop-down to select a Product. (*Optional*)
* For accounting purposes, you can use this to link to a specific Product any usage line items on Bills that result from pricing a Plan using this Aggregation:
* If you've also defined an Accounting product for a Pricing that uses this Aggregation, then the *Pricing Accounting product* takes precedence and is used.
* If no Accounting product is defined for a Pricing and you omit an Accounting product for the Aggregation, then the *Product the Plan belongs* to is used.
![]() 5. Enter the **Compound aggregation settings**:
* **Calculation**. First select **Advanced** if you want to enter a specific calculation. The form adjusts to show a text entry box. Enter the expression for the required calculation referencing simple Aggregations:
> `Math.max(0, aggregation.num_requests - (aggregation.unique_apps * 100))`
**Important! Compound Aggregation Calculations:**
* **Calculations Use Base Values of Simple Aggregations**. If a simple Aggregation referenced by a Compound Aggregation has a **Quantity per unit** defined for pricing and billing purposes or a **Rounding** defined, then these *will not be factored into the value used by the calculation*. For example in this case, if the `num_requests` simple Aggregation referenced has a base value of 100 and has **Quantity per unit** set at 10, the Compound Aggregation calculation will use the base *value of 100* *not 10*.
* **Referencing Custom Fields with the same name in Calculations**. If you intend to reference a Custom Field on an Account Plan in a Calculation for a Compound Aggregation used to Price Plans attached to an Account for billing, please ensure to use *different names for any Custom Fields* if there is more than one Account Plan attached to the Account. For example, you have two Account Plans attached to an Account and the Calculation used by the Compound Aggregation is designed to use a value from a Custom Field on one of the Account Plans. However, you have created Custom Fields with the *same name but different values* on each of the two Account Plans. The Calculation is then be unable to distinguish which value to use and billing charges will be unpredictable.
**Notes and Tips:**
* **Info?** You can select the **Info** link to open the m3ter Calculation Engine page in a new tab, which gives details of supported operators, variables, and functions.
* **Add Aggregations?** If you want to create a Compound Aggregation by merely adding two or more simple Aggregations, you can leave the selection at the default **Add Aggregations**. You can then use a drop-down to select the simple Aggregations you want to add together. Note that **Add Aggregations** is searchable - if your start to type the name of a simple Aggregation, the list of available simple Aggregations is filtered.
* **Unit**. For this example, enter **Requests**. This will be used as a label for billing to indicate to your customers what they are being charged for.
* **Quantity per unit**. Enter the quantity by which you want to charge for the measured value. For example, if you want to charge your customers on a per-500 units used basis, enter **500**. For the current example, enter **1**.
* **Rounding**. Specifies how you want m3ter to deal with non-integer, that is fractional number, Aggregation values. See [Reviewing Aggregation Options](/guides/usage-data-aggregations/reviewing-aggregation-options) for example. Four options:
* **None**. Default
* **Down**
* **Up**
* **Nearest**. Rounds up to the nearest half: 5.1 is rounded to 5; 5.5 is rounded to 6.
* **Note**: Also used in conjunction with **Quantity per unit** setting. Rounds the number of units after the **Quantity per unit** has been applied. See [Reviewing Aggregation Options](/guides/usage-data-aggregations/reviewing-aggregation-options) for example.
* **Evaluate null aggregations**. Optional setting - enable this if you want to allow null values from the simple Aggregations referenced in the Compound Aggregation to be passed in. Simple Aggregations based on Meter Target Fields where no usage data is available will have null values. Default is to have this disabled:
5. Enter the **Compound aggregation settings**:
* **Calculation**. First select **Advanced** if you want to enter a specific calculation. The form adjusts to show a text entry box. Enter the expression for the required calculation referencing simple Aggregations:
> `Math.max(0, aggregation.num_requests - (aggregation.unique_apps * 100))`
**Important! Compound Aggregation Calculations:**
* **Calculations Use Base Values of Simple Aggregations**. If a simple Aggregation referenced by a Compound Aggregation has a **Quantity per unit** defined for pricing and billing purposes or a **Rounding** defined, then these *will not be factored into the value used by the calculation*. For example in this case, if the `num_requests` simple Aggregation referenced has a base value of 100 and has **Quantity per unit** set at 10, the Compound Aggregation calculation will use the base *value of 100* *not 10*.
* **Referencing Custom Fields with the same name in Calculations**. If you intend to reference a Custom Field on an Account Plan in a Calculation for a Compound Aggregation used to Price Plans attached to an Account for billing, please ensure to use *different names for any Custom Fields* if there is more than one Account Plan attached to the Account. For example, you have two Account Plans attached to an Account and the Calculation used by the Compound Aggregation is designed to use a value from a Custom Field on one of the Account Plans. However, you have created Custom Fields with the *same name but different values* on each of the two Account Plans. The Calculation is then be unable to distinguish which value to use and billing charges will be unpredictable.
**Notes and Tips:**
* **Info?** You can select the **Info** link to open the m3ter Calculation Engine page in a new tab, which gives details of supported operators, variables, and functions.
* **Add Aggregations?** If you want to create a Compound Aggregation by merely adding two or more simple Aggregations, you can leave the selection at the default **Add Aggregations**. You can then use a drop-down to select the simple Aggregations you want to add together. Note that **Add Aggregations** is searchable - if your start to type the name of a simple Aggregation, the list of available simple Aggregations is filtered.
* **Unit**. For this example, enter **Requests**. This will be used as a label for billing to indicate to your customers what they are being charged for.
* **Quantity per unit**. Enter the quantity by which you want to charge for the measured value. For example, if you want to charge your customers on a per-500 units used basis, enter **500**. For the current example, enter **1**.
* **Rounding**. Specifies how you want m3ter to deal with non-integer, that is fractional number, Aggregation values. See [Reviewing Aggregation Options](/guides/usage-data-aggregations/reviewing-aggregation-options) for example. Four options:
* **None**. Default
* **Down**
* **Up**
* **Nearest**. Rounds up to the nearest half: 5.1 is rounded to 5; 5.5 is rounded to 6.
* **Note**: Also used in conjunction with **Quantity per unit** setting. Rounds the number of units after the **Quantity per unit** has been applied. See [Reviewing Aggregation Options](/guides/usage-data-aggregations/reviewing-aggregation-options) for example.
* **Evaluate null aggregations**. Optional setting - enable this if you want to allow null values from the simple Aggregations referenced in the Compound Aggregation to be passed in. Simple Aggregations based on Meter Target Fields where no usage data is available will have null values. Default is to have this disabled:
![]() **Tip: Set Default Values of Simple Aggregations to 0**. If any of the simple Aggregations you reference in your Compound Aggregation calculation might have null values, you must set their **Default Value** to **0**. This ensures that any null values passed into the Compound Aggregation are passed in correctly with value = 0.
6. Add any required **Custom fields** to the Compound Aggregation. For more on Custom fields, see [Adding and Editing Custom Fields](/guides/organization-and-access-management/viewing-and-editing-organization/adding-and-editing-custom-fields). We strongly recommend reviewing [Working with Custom Fields](/guides/creating-and-managing-products/working-with-custom-fields) before you create and use Custom fields.
**Important! Compound Aggregation Custom Fields not supported for calculations**. Creating Custom Fields for Compound Aggregations is intended to support financial reporting use cases. Although you can define Custom Fields at both the Organizational level and individual Compound Aggregation level, they are not supported for use in Derived Field and Compound Aggregation calculations.
7. Select **Create compound aggregation**. The **Compound aggregation details** page opens:
**Tip: Set Default Values of Simple Aggregations to 0**. If any of the simple Aggregations you reference in your Compound Aggregation calculation might have null values, you must set their **Default Value** to **0**. This ensures that any null values passed into the Compound Aggregation are passed in correctly with value = 0.
6. Add any required **Custom fields** to the Compound Aggregation. For more on Custom fields, see [Adding and Editing Custom Fields](/guides/organization-and-access-management/viewing-and-editing-organization/adding-and-editing-custom-fields). We strongly recommend reviewing [Working with Custom Fields](/guides/creating-and-managing-products/working-with-custom-fields) before you create and use Custom fields.
**Important! Compound Aggregation Custom Fields not supported for calculations**. Creating Custom Fields for Compound Aggregations is intended to support financial reporting use cases. Although you can define Custom Fields at both the Organizational level and individual Compound Aggregation level, they are not supported for use in Derived Field and Compound Aggregation calculations.
7. Select **Create compound aggregation**. The **Compound aggregation details** page opens:
![Create Agg81]() Any new Compound Aggregations you've created become immediately available for pricing up your Product Plans. See [Pricing Plans and Plan Templates](/guides/plans-and-pricing/pricing-plans/pricing-plans).
**Important: Create Simple Aggregations First!** If you try to create a Compound Aggregation and you enter a Calculation that references a simple Aggregation that you have not yet created for your Product, you won't be able to save the Compound Aggregation and an error message will show.
8. If you want to edit a Compound Aggregation's details, select the **Edit** button, make your changes, and click **Update**.
9. If you want to remove a Compound Aggregation, return to the **Compound Aggregations** page and select the **Delete** button for the Compound Aggregation:
Any new Compound Aggregations you've created become immediately available for pricing up your Product Plans. See [Pricing Plans and Plan Templates](/guides/plans-and-pricing/pricing-plans/pricing-plans).
**Important: Create Simple Aggregations First!** If you try to create a Compound Aggregation and you enter a Calculation that references a simple Aggregation that you have not yet created for your Product, you won't be able to save the Compound Aggregation and an error message will show.
8. If you want to edit a Compound Aggregation's details, select the **Edit** button, make your changes, and click **Update**.
9. If you want to remove a Compound Aggregation, return to the **Compound Aggregations** page and select the **Delete** button for the Compound Aggregation:
![]() A confirmation popup opens.
10. Select **Yes** to confirm the delete action.
**Tip: Compound Aggregation Metadata?** If you scroll down the **Compound aggregation details** page, you can review **Compound Aggregation metadata** - see [Reviewing Aggregation Details](/guides/usage-data-aggregations/reviewing-aggregation-details).
# Compound Aggregations - Examples
Source: https://docs.m3ter.com/guides/usage-data-aggregations/compound-aggregations-examples
This topic gives some examples of Compound Aggregation calculations as guidance on how to work with them to achieve the precise pricing you need for products and services:
* [Example 1 - Combining Aggregations in Seconds to Minutes](/guides/usage-data-aggregations/compound-aggregations-examples#example-1-combining-aggregations-in-seconds-to-minutes)
* [Example 2 - Calculating Credits for Reduced Product Usage](/guides/usage-data-aggregations/compound-aggregations-examples#example-2-calculating-credits-for-reduced-product-usage)
* [Example 3 - Global Compound Aggregation for Product Bundling](/guides/usage-data-aggregations/compound-aggregations-examples#example-3-global-compound-aggregation-for-product-bundling)
**Important!**
* **Further details on creating Compound Aggregation Calculations**. For details on the types of fields you can reference in your calculations, see [Working with Compound Aggregations Calculations](/guides/usage-data-aggregations/compound-aggregation-calculations).
* **Compound Aggregation Calculations Use Base Values of Simple Aggregations**. If a simple Aggregation referenced by a Compound Aggregation has a **Quantity per unit** defined for pricing and billing purposes or a **Rounding** defined, then these *will not be factored into the value used by the calculation*. For example, if a simple Aggregation referenced has a base value of 100 and has a **Quantity per unit** set at 10, any Compound Aggregation calculation that references it will use the base *value of 100 and not 10*.
## Example 1 - Combining Aggregations in Seconds to Minutes
Suppose your production environment contains three Meters each collecting usage data for time duration measures in seconds. You have set up simple Aggregations to **SUM** each of these Meter Data Fields:
* Watch duration: `watch_seconds`
* Testing duration: `test_seconds`
* Live duration: `live_seconds`
However, you want to set up pricing on a Product that charges your end-customers on the basis of their combined usage duration per billing period across all three simple Aggregations, and to charge by the minute, not by the second.
To satisfy this pricing use-case, you can use a Compound Aggregation that adds together the simple Aggregation values and then divides the total by 60:
> **Calculation:** `aggregation.watch_seconds` + `aggregation.test_seconds` + `aggregation.live_seconds`/60
## Example 2 - Calculating Credits for Reduced Product Usage
Suppose you a run a cloud service company which offers end customers computing capabilities. You'll set up pricing for products to charge on a monthly basis with a usage measure of total Gigabytes-per second used per month together with a monthly standing charge. However, as a sign-up bonus you want to offer credits to new customers for the first six months whereby they receive a credit rebate each month if they log into their accounts fewer than 20 times that month per user - roughly, that is, at least once for every user they have for every working day in a month. For each time fewer than the expected number of user logins, they'll receive a \$10 credit rebate on their Bill. To implement this and incorporate it into your pricing schema, you therefore need a way to count the number of user logins fewer than 20 each month for each user registered under a customer Account. This might seem like a difficult use case to satisfy as part of your overall UBP model, but by using the following Compound Aggregation in m3ter you can quickly implement it.
First we set up two simple Aggregations:
* The total number of registered users under the end customer Account at the end of each monthly billing period: `number_regusers`
* The total actual number of logins recorded for all the registered users on the Account in a given month: `total_reguserlogins`
We can then create a Compound Aggregation that references these two simple Aggregations:
> **Calculation:** `Math.max(20*aggregation.number_regusers - aggregation.total_reguserlogins,0)`
This calculation yields the required count of the number of fewer than expected registered user logins in the month:
* We take the number of registered users for the Account and multiply this by 20 (using this as a rough average of the number of working days per month) to generate an expected number of user logins (one login per user per working day).
* We then subtract the actual number of user logins from the number of expected user logins to generate a number of credits to rebate the Account that month.
* We use a `Math.max()` function to give a zero (no credits) if the number of actual user logins exceeds the number of expected logins for that Account.
**Tip: Negative Pricing!** Note that since we suppose there will be positive charges applied under the pricing applied for usage and standing charge, you can set the pricing configured using this Compound Aggregation as a negative pricing (-\$10 per unit) to have it show as a credit on the monthly Bills.
## Example 3 - Global Compound Aggregation for Product Bundling
Suppose you a run a cloud service company which offers financial institutions products designed to prevent them becoming victims of online fraudulent behavior:
* A service to catch and block suspect attempts to gain access to their online services - either by login attempts that use bogus accounts or login attempts using registered accounts that show suspicious traits. In either case, the login attempt is blocked and the attempt logged. You market this under the product name: "Account Secure".
* A service that checks payments submitted by legitimate account holders using credit cards. If the payment details are not validated, the payment attempt is rejected and logged. You market this second service under the product name: "Payments Check".
Your pricing schema for both these services will be similar:
* For both services, you will charge on the basis of the number of events where your protection service has been activated during the agreed billing period:
* For customers who take the Account Secure product: a count of the number of events where your service activated, identified something suspicious, and blocked an attempt at login.
* For customers who take the Payment Check product, a count of the number of events where your service was activated, checked submitted payment details and, finding those details to be false, rejected the payment submission.
In addition for both products, you differentiate within the total count of these events by recording the country of origin of the online users, which is useful when reviewing and analyzing bogus login attempts and attempts to pay using false credit card details. For the sake of the example, we suppose your customers operate across these three countries - the United States, Canada, and the United Kingdom.
To price each product, we can now use a Compound Aggregation that simply adds the simple Aggregations that count events across the three countries of operation:
**Account Secure Product**: we create three simple Aggregations to count bogus login attempts for each country:
* `account_uslogins`
* `account_canlogins`
* `account_uklogins`
We can now create a Compound Aggregation for this product, which adds together the values of these three simple Aggregations:
> **Calculation:** `aggregation.account_uslogins + aggregation.account_canlogins + aggregation.account_uklogins`
This is now available to price Plans for your Account Secure product and for charging end customer Accounts that consume this product.
**Payment Check**: we create three simple Aggregations to count payments that tried to use false credit card details for each country:
* `payment_ussubmit`
* `payment_cansubmit`
* `payment_uksubmit`
We can now create a Compound Aggregation for this product, which adds together the values of these three simple Aggregations:
> **Calculation:** `aggregation.payment_ussubmits + aggregation.payment_cansubmits + aggregation.payment_uksubmits`
This is now available to price Plans for your Payment Check product and for charging end customer Accounts that consume this product.
However, a new customer approaches you and wants to take both products as a combined contract and you'll likely want to offer them discounted rates across both products. For this use case, we can now set up a *global* Compound Aggregation - one that is not tied to a specific product - and adds together both sets of simple Aggregations we used for pricing a specific product, and therefore creates a Compound Aggregation that forms a cross-product bundle:
> **Calculation:** `aggregation.account_uslogins + aggregation.account_canlogins + aggregation.account_uklogins + aggregation.payment_ussubmits + aggregation.payment_cansubmits + aggregation.payment_uksubmits`
This is now available to price Plans for your product bundle offering and for charging end customer Accounts that consume both products under the bundle.
# Creating Product Aggregations
Source: https://docs.m3ter.com/guides/usage-data-aggregations/creating-aggregations
This topic explains how to create *Product-specific Aggregations* to convert the usage data collected by your Product Meters into numerical measures:
* The Product the target Meter belongs to when you create an Aggregation determines the Product the Aggregation belongs to.
* You can then use a Product-specific Aggregation as a pricing metric to set up usage-based pricing for Plans that belong to that specific Product.
* You cannot use a Product-specific Aggregation to price Plans that belong to another Product.
**Tips:**
* **Create Product Aggregation from Meter Details**. You can create an Aggregation that will target a specific Meter Data Field or Derived Field directly from the **Meter Details** page. See [Creating Product Meters](/guides/usage-data-meters/creating-meters).
* **Aggregations that are not Product-specific?** You can also create *Global Aggregations*, which can be used to price Plans belonging to any Product. For more details, see [Creating Global Aggregations](/guides/usage-data-aggregations/creating-global-aggregations).
**Understanding Aggregation Options!** We *strongly recommend* that you review the options available for configuring Aggregations before you attempt to create them. See [Reviewing Aggregation Options](/guides/usage-data-aggregations/reviewing-aggregation-options).
## Creating and Managing Product Aggregations
**To create a Product Aggregation:**
1. Select **Metering>Aggregations**. The **Aggregations** page opens.
2. In the **Product** drop-down, select the Product for which you want to create the new Aggregation. The **Aggregations** page adjusts and lists:
* Any existing Aggregations created for the selected Product.
* Any Global Aggregations, which are clearly labeled.
**Tip: Global Aggregation?** You can create a *Global Aggregation*, which is not tied to a specific Product. You can then use Global Aggregations to charge across several Products. For more details, see [Creating Global Aggregations](/guides/usage-data-aggregations/creating-global-aggregations).
3. Select **Create Aggregation**. The **Aggregations>Create** page opens.
4. Configure **Aggregation** **Details** and enter a **Name** and **Code** for the **Aggregation**:
* **Name**. (*Required*)
* **Code**. (*Required*)
* **Accounting product**. Use the drop-down to select a Product. (*Optional*)
* For accounting purposes, you can use this to link to a specific Product any usage line items on Bills that result from pricing a Plan using this Aggregation:
* If you've also defined an Accounting product for a Pricing that uses this Aggregation, then the *Pricing Accounting product* takes precedence and is used.
* If no Accounting product is defined for a Pricing and you omit an Accounting product for the Aggregation, then the *Product the Plan belongs* to is used.
A confirmation popup opens.
10. Select **Yes** to confirm the delete action.
**Tip: Compound Aggregation Metadata?** If you scroll down the **Compound aggregation details** page, you can review **Compound Aggregation metadata** - see [Reviewing Aggregation Details](/guides/usage-data-aggregations/reviewing-aggregation-details).
# Compound Aggregations - Examples
Source: https://docs.m3ter.com/guides/usage-data-aggregations/compound-aggregations-examples
This topic gives some examples of Compound Aggregation calculations as guidance on how to work with them to achieve the precise pricing you need for products and services:
* [Example 1 - Combining Aggregations in Seconds to Minutes](/guides/usage-data-aggregations/compound-aggregations-examples#example-1-combining-aggregations-in-seconds-to-minutes)
* [Example 2 - Calculating Credits for Reduced Product Usage](/guides/usage-data-aggregations/compound-aggregations-examples#example-2-calculating-credits-for-reduced-product-usage)
* [Example 3 - Global Compound Aggregation for Product Bundling](/guides/usage-data-aggregations/compound-aggregations-examples#example-3-global-compound-aggregation-for-product-bundling)
**Important!**
* **Further details on creating Compound Aggregation Calculations**. For details on the types of fields you can reference in your calculations, see [Working with Compound Aggregations Calculations](/guides/usage-data-aggregations/compound-aggregation-calculations).
* **Compound Aggregation Calculations Use Base Values of Simple Aggregations**. If a simple Aggregation referenced by a Compound Aggregation has a **Quantity per unit** defined for pricing and billing purposes or a **Rounding** defined, then these *will not be factored into the value used by the calculation*. For example, if a simple Aggregation referenced has a base value of 100 and has a **Quantity per unit** set at 10, any Compound Aggregation calculation that references it will use the base *value of 100 and not 10*.
## Example 1 - Combining Aggregations in Seconds to Minutes
Suppose your production environment contains three Meters each collecting usage data for time duration measures in seconds. You have set up simple Aggregations to **SUM** each of these Meter Data Fields:
* Watch duration: `watch_seconds`
* Testing duration: `test_seconds`
* Live duration: `live_seconds`
However, you want to set up pricing on a Product that charges your end-customers on the basis of their combined usage duration per billing period across all three simple Aggregations, and to charge by the minute, not by the second.
To satisfy this pricing use-case, you can use a Compound Aggregation that adds together the simple Aggregation values and then divides the total by 60:
> **Calculation:** `aggregation.watch_seconds` + `aggregation.test_seconds` + `aggregation.live_seconds`/60
## Example 2 - Calculating Credits for Reduced Product Usage
Suppose you a run a cloud service company which offers end customers computing capabilities. You'll set up pricing for products to charge on a monthly basis with a usage measure of total Gigabytes-per second used per month together with a monthly standing charge. However, as a sign-up bonus you want to offer credits to new customers for the first six months whereby they receive a credit rebate each month if they log into their accounts fewer than 20 times that month per user - roughly, that is, at least once for every user they have for every working day in a month. For each time fewer than the expected number of user logins, they'll receive a \$10 credit rebate on their Bill. To implement this and incorporate it into your pricing schema, you therefore need a way to count the number of user logins fewer than 20 each month for each user registered under a customer Account. This might seem like a difficult use case to satisfy as part of your overall UBP model, but by using the following Compound Aggregation in m3ter you can quickly implement it.
First we set up two simple Aggregations:
* The total number of registered users under the end customer Account at the end of each monthly billing period: `number_regusers`
* The total actual number of logins recorded for all the registered users on the Account in a given month: `total_reguserlogins`
We can then create a Compound Aggregation that references these two simple Aggregations:
> **Calculation:** `Math.max(20*aggregation.number_regusers - aggregation.total_reguserlogins,0)`
This calculation yields the required count of the number of fewer than expected registered user logins in the month:
* We take the number of registered users for the Account and multiply this by 20 (using this as a rough average of the number of working days per month) to generate an expected number of user logins (one login per user per working day).
* We then subtract the actual number of user logins from the number of expected user logins to generate a number of credits to rebate the Account that month.
* We use a `Math.max()` function to give a zero (no credits) if the number of actual user logins exceeds the number of expected logins for that Account.
**Tip: Negative Pricing!** Note that since we suppose there will be positive charges applied under the pricing applied for usage and standing charge, you can set the pricing configured using this Compound Aggregation as a negative pricing (-\$10 per unit) to have it show as a credit on the monthly Bills.
## Example 3 - Global Compound Aggregation for Product Bundling
Suppose you a run a cloud service company which offers financial institutions products designed to prevent them becoming victims of online fraudulent behavior:
* A service to catch and block suspect attempts to gain access to their online services - either by login attempts that use bogus accounts or login attempts using registered accounts that show suspicious traits. In either case, the login attempt is blocked and the attempt logged. You market this under the product name: "Account Secure".
* A service that checks payments submitted by legitimate account holders using credit cards. If the payment details are not validated, the payment attempt is rejected and logged. You market this second service under the product name: "Payments Check".
Your pricing schema for both these services will be similar:
* For both services, you will charge on the basis of the number of events where your protection service has been activated during the agreed billing period:
* For customers who take the Account Secure product: a count of the number of events where your service activated, identified something suspicious, and blocked an attempt at login.
* For customers who take the Payment Check product, a count of the number of events where your service was activated, checked submitted payment details and, finding those details to be false, rejected the payment submission.
In addition for both products, you differentiate within the total count of these events by recording the country of origin of the online users, which is useful when reviewing and analyzing bogus login attempts and attempts to pay using false credit card details. For the sake of the example, we suppose your customers operate across these three countries - the United States, Canada, and the United Kingdom.
To price each product, we can now use a Compound Aggregation that simply adds the simple Aggregations that count events across the three countries of operation:
**Account Secure Product**: we create three simple Aggregations to count bogus login attempts for each country:
* `account_uslogins`
* `account_canlogins`
* `account_uklogins`
We can now create a Compound Aggregation for this product, which adds together the values of these three simple Aggregations:
> **Calculation:** `aggregation.account_uslogins + aggregation.account_canlogins + aggregation.account_uklogins`
This is now available to price Plans for your Account Secure product and for charging end customer Accounts that consume this product.
**Payment Check**: we create three simple Aggregations to count payments that tried to use false credit card details for each country:
* `payment_ussubmit`
* `payment_cansubmit`
* `payment_uksubmit`
We can now create a Compound Aggregation for this product, which adds together the values of these three simple Aggregations:
> **Calculation:** `aggregation.payment_ussubmits + aggregation.payment_cansubmits + aggregation.payment_uksubmits`
This is now available to price Plans for your Payment Check product and for charging end customer Accounts that consume this product.
However, a new customer approaches you and wants to take both products as a combined contract and you'll likely want to offer them discounted rates across both products. For this use case, we can now set up a *global* Compound Aggregation - one that is not tied to a specific product - and adds together both sets of simple Aggregations we used for pricing a specific product, and therefore creates a Compound Aggregation that forms a cross-product bundle:
> **Calculation:** `aggregation.account_uslogins + aggregation.account_canlogins + aggregation.account_uklogins + aggregation.payment_ussubmits + aggregation.payment_cansubmits + aggregation.payment_uksubmits`
This is now available to price Plans for your product bundle offering and for charging end customer Accounts that consume both products under the bundle.
# Creating Product Aggregations
Source: https://docs.m3ter.com/guides/usage-data-aggregations/creating-aggregations
This topic explains how to create *Product-specific Aggregations* to convert the usage data collected by your Product Meters into numerical measures:
* The Product the target Meter belongs to when you create an Aggregation determines the Product the Aggregation belongs to.
* You can then use a Product-specific Aggregation as a pricing metric to set up usage-based pricing for Plans that belong to that specific Product.
* You cannot use a Product-specific Aggregation to price Plans that belong to another Product.
**Tips:**
* **Create Product Aggregation from Meter Details**. You can create an Aggregation that will target a specific Meter Data Field or Derived Field directly from the **Meter Details** page. See [Creating Product Meters](/guides/usage-data-meters/creating-meters).
* **Aggregations that are not Product-specific?** You can also create *Global Aggregations*, which can be used to price Plans belonging to any Product. For more details, see [Creating Global Aggregations](/guides/usage-data-aggregations/creating-global-aggregations).
**Understanding Aggregation Options!** We *strongly recommend* that you review the options available for configuring Aggregations before you attempt to create them. See [Reviewing Aggregation Options](/guides/usage-data-aggregations/reviewing-aggregation-options).
## Creating and Managing Product Aggregations
**To create a Product Aggregation:**
1. Select **Metering>Aggregations**. The **Aggregations** page opens.
2. In the **Product** drop-down, select the Product for which you want to create the new Aggregation. The **Aggregations** page adjusts and lists:
* Any existing Aggregations created for the selected Product.
* Any Global Aggregations, which are clearly labeled.
**Tip: Global Aggregation?** You can create a *Global Aggregation*, which is not tied to a specific Product. You can then use Global Aggregations to charge across several Products. For more details, see [Creating Global Aggregations](/guides/usage-data-aggregations/creating-global-aggregations).
3. Select **Create Aggregation**. The **Aggregations>Create** page opens.
4. Configure **Aggregation** **Details** and enter a **Name** and **Code** for the **Aggregation**:
* **Name**. (*Required*)
* **Code**. (*Required*)
* **Accounting product**. Use the drop-down to select a Product. (*Optional*)
* For accounting purposes, you can use this to link to a specific Product any usage line items on Bills that result from pricing a Plan using this Aggregation:
* If you've also defined an Accounting product for a Pricing that uses this Aggregation, then the *Pricing Accounting product* takes precedence and is used.
* If no Accounting product is defined for a Pricing and you omit an Accounting product for the Aggregation, then the *Product the Plan belongs* to is used.
![]() 5. Configure **Meter Settings**:
* **Meter**. Select the **Meter** whose **Data Field** or **Derived Field** you want to use as the basis for the Aggregation. Note that only those Meters created for the selected Product will be available. If you're creating a Global Aggregation only Global Meters will be available.
* **Target Field**. When you select a **Meter**, the **Target Field** drop-down list automatically populates with the **Codes** of any fields set up on that **Meter**. For example, select **gb\_stored**:
5. Configure **Meter Settings**:
* **Meter**. Select the **Meter** whose **Data Field** or **Derived Field** you want to use as the basis for the Aggregation. Note that only those Meters created for the selected Product will be available. If you're creating a Global Aggregation only Global Meters will be available.
* **Target Field**. When you select a **Meter**, the **Target Field** drop-down list automatically populates with the **Codes** of any fields set up on that **Meter**. For example, select **gb\_stored**:
![]() 6. Configure **Aggregation Settings**:
* **Aggregation**. Select the method for aggregating the data collected by the selected **Target Field**. For example, if you want to use the summed value of gigabytes used, select **Sum**.
* **Unit**. For example, enter **gigabytes**. This will be used as a label for billing to indicate to your customers what they are being charged for.
* **Quantity per unit**. Enter the quantity by which you want to charge for the measured value. For example, if you want to charge your customers on a per-500 gigabytes used basis, enter **500**.
* **Rounding**. Specifies how you want m3ter to deal with non-integer, that is fractional number, Aggregation values. See [Reviewing Aggregation Options](/guides/usage-data-aggregations/reviewing-aggregation-options) for example. Four options:
* **None**. Default
* **Down**
* **Up**
* **Nearest**. Rounds up to the nearest half: 5.1 is rounded to 5; 5.5 is rounded to 6.
* **Note**: Also used in conjunction with **Quantity per unit** setting. Rounds the number of units after the **Quantity per unit** has been applied. See [Reviewing Aggregation Options](/guides/usage-data-aggregations/reviewing-aggregation-options) for example.
**Important!** When you create a Compound Aggregation that references a simple Aggregation, the Compound Aggregation calculation uses the *base value* of the simple Aggregation and before any **Quantity per unit** factor or **Rounding** defined for the simple Aggregation is applied.
* **Default Value**. If required, enter a default value to be used for the Aggregation if no usage-data is available from the selected Meter Target field:
6. Configure **Aggregation Settings**:
* **Aggregation**. Select the method for aggregating the data collected by the selected **Target Field**. For example, if you want to use the summed value of gigabytes used, select **Sum**.
* **Unit**. For example, enter **gigabytes**. This will be used as a label for billing to indicate to your customers what they are being charged for.
* **Quantity per unit**. Enter the quantity by which you want to charge for the measured value. For example, if you want to charge your customers on a per-500 gigabytes used basis, enter **500**.
* **Rounding**. Specifies how you want m3ter to deal with non-integer, that is fractional number, Aggregation values. See [Reviewing Aggregation Options](/guides/usage-data-aggregations/reviewing-aggregation-options) for example. Four options:
* **None**. Default
* **Down**
* **Up**
* **Nearest**. Rounds up to the nearest half: 5.1 is rounded to 5; 5.5 is rounded to 6.
* **Note**: Also used in conjunction with **Quantity per unit** setting. Rounds the number of units after the **Quantity per unit** has been applied. See [Reviewing Aggregation Options](/guides/usage-data-aggregations/reviewing-aggregation-options) for example.
**Important!** When you create a Compound Aggregation that references a simple Aggregation, the Compound Aggregation calculation uses the *base value* of the simple Aggregation and before any **Quantity per unit** factor or **Rounding** defined for the simple Aggregation is applied.
* **Default Value**. If required, enter a default value to be used for the Aggregation if no usage-data is available from the selected Meter Target field:
![]() **Important!** If you intend to reference the Aggregation in a Compound Aggregation and the Aggregation might have null values because the Meter Target field fails to collect any usage data, then set **Default Value** to **0**. This ensures any null values from the simple Aggregation are passed in correctly to the Compound Aggregation with value = 0.
7. Configure **Segments**, if required. If you've set up non-numeric fields on the selected Meter and want to configure a segmented Aggregation using these, open the **Segments** panel. See [Segmented Aggregations](/guides/usage-data-aggregations/segmented-aggregations).
8. Add any required **Custom Fields** to the Aggregation. For more on Custom Fields, see [Adding and Editing Custom Fields](/guides/organization-and-access-management/viewing-and-editing-organization/adding-and-editing-custom-fields). We strongly recommend reviewing [Working with Custom Fields](/guides/creating-and-managing-products/working-with-custom-fields) before you create and use Custom Fields.
**Important! Aggregation Custom Fields not supported for calculations**. Creating Custom Fields for Aggregations is intended to support financial reporting use cases. Although you can define Custom Fields at both the Organizational level and individual Aggregation level, they are not supported for use in Derived Field and Compound Aggregation calculations.
9. Select **Create Aggregation**. The **Aggregation Details** page opens - see [Reviewing Aggregation Details](/guides/usage-data-aggregations/reviewing-aggregation-details).
10. If you want to edit the Aggregation's details, select the **Edit** button, make your changes, and click **Update**.
11. If you want to remove an Aggregation, return to the **Aggregations** page and select the **Delete** button for the Aggregation:
**Important!** If you intend to reference the Aggregation in a Compound Aggregation and the Aggregation might have null values because the Meter Target field fails to collect any usage data, then set **Default Value** to **0**. This ensures any null values from the simple Aggregation are passed in correctly to the Compound Aggregation with value = 0.
7. Configure **Segments**, if required. If you've set up non-numeric fields on the selected Meter and want to configure a segmented Aggregation using these, open the **Segments** panel. See [Segmented Aggregations](/guides/usage-data-aggregations/segmented-aggregations).
8. Add any required **Custom Fields** to the Aggregation. For more on Custom Fields, see [Adding and Editing Custom Fields](/guides/organization-and-access-management/viewing-and-editing-organization/adding-and-editing-custom-fields). We strongly recommend reviewing [Working with Custom Fields](/guides/creating-and-managing-products/working-with-custom-fields) before you create and use Custom Fields.
**Important! Aggregation Custom Fields not supported for calculations**. Creating Custom Fields for Aggregations is intended to support financial reporting use cases. Although you can define Custom Fields at both the Organizational level and individual Aggregation level, they are not supported for use in Derived Field and Compound Aggregation calculations.
9. Select **Create Aggregation**. The **Aggregation Details** page opens - see [Reviewing Aggregation Details](/guides/usage-data-aggregations/reviewing-aggregation-details).
10. If you want to edit the Aggregation's details, select the **Edit** button, make your changes, and click **Update**.
11. If you want to remove an Aggregation, return to the **Aggregations** page and select the **Delete** button for the Aggregation:
![]() A confirmation popup opens.
12. Select **Yes** to confirm the delete action.
# Creating Global Aggregations
Source: https://docs.m3ter.com/guides/usage-data-aggregations/creating-global-aggregations
This topic explains how to create *Global Aggregations* to convert the usage data collected by your Global Meters into numerical measures:
* If you select a Global Meter as the target when you create an Aggregation, the Aggregation will be Global.
* You can then use the Global Aggregation as a pricing metric to set up usage-based pricing for Plans that belong to any Product.
**Tips:**
* **Create Global Aggregation from Meter Details**. You can create an Aggregation that will target a specific Meter Data Field or Derived Field directly from the **Meter Details** page. See [Creating Global Meters](/guides/usage-data-meters/creating-global-meters).
* **Product-specific Aggregations?** You can also create Aggregations that are specific to a Product. For more details, see [Creating Product Aggregations](/guides/usage-data-aggregations/creating-aggregations).
**Understanding Aggregation Options!** We *strongly recommend* that you review the options available for configuring Aggregations before you attempt to create them. See [Reviewing Aggregation Options](/guides/usage-data-aggregations/reviewing-aggregation-options).
## Creating and Managing Global Aggregations
**To create a Global Aggregation:**
1. Select **Metering>Aggregations**. The **Aggregations** page opens.
2. If there is a Product selected, clear the **Product** drop-down to show **(Global)**. The **Aggregations** page adjusts and lists any existing Global Aggregations, which are clearly labeled.
3. Select **Create Aggregation**. The **Aggregations>Create** page opens.
4. Configure **Aggregation** **Details**:
* Since the **Product** selection was cleared on the main **Aggregations** page, this shows **(Global)**.
* **Name**. (*Required*)
* **Code**. (*Required*)
* **Accounting product**. Use the drop-down to select a Product. (*Optional*)
* For accounting purposes, you can use this to link to a specific Product any usage line items on Bills that result from pricing a Plan using this Aggregation:
* If you've also defined an Accounting product for a Pricing that uses this Aggregation, then the *Pricing Accounting product* takes precedence and is used.
* If no Accounting product is defined for a Pricing and you omit an Accounting product for the Aggregation, then the *Product the Plan belongs* to is used.
A confirmation popup opens.
12. Select **Yes** to confirm the delete action.
# Creating Global Aggregations
Source: https://docs.m3ter.com/guides/usage-data-aggregations/creating-global-aggregations
This topic explains how to create *Global Aggregations* to convert the usage data collected by your Global Meters into numerical measures:
* If you select a Global Meter as the target when you create an Aggregation, the Aggregation will be Global.
* You can then use the Global Aggregation as a pricing metric to set up usage-based pricing for Plans that belong to any Product.
**Tips:**
* **Create Global Aggregation from Meter Details**. You can create an Aggregation that will target a specific Meter Data Field or Derived Field directly from the **Meter Details** page. See [Creating Global Meters](/guides/usage-data-meters/creating-global-meters).
* **Product-specific Aggregations?** You can also create Aggregations that are specific to a Product. For more details, see [Creating Product Aggregations](/guides/usage-data-aggregations/creating-aggregations).
**Understanding Aggregation Options!** We *strongly recommend* that you review the options available for configuring Aggregations before you attempt to create them. See [Reviewing Aggregation Options](/guides/usage-data-aggregations/reviewing-aggregation-options).
## Creating and Managing Global Aggregations
**To create a Global Aggregation:**
1. Select **Metering>Aggregations**. The **Aggregations** page opens.
2. If there is a Product selected, clear the **Product** drop-down to show **(Global)**. The **Aggregations** page adjusts and lists any existing Global Aggregations, which are clearly labeled.
3. Select **Create Aggregation**. The **Aggregations>Create** page opens.
4. Configure **Aggregation** **Details**:
* Since the **Product** selection was cleared on the main **Aggregations** page, this shows **(Global)**.
* **Name**. (*Required*)
* **Code**. (*Required*)
* **Accounting product**. Use the drop-down to select a Product. (*Optional*)
* For accounting purposes, you can use this to link to a specific Product any usage line items on Bills that result from pricing a Plan using this Aggregation:
* If you've also defined an Accounting product for a Pricing that uses this Aggregation, then the *Pricing Accounting product* takes precedence and is used.
* If no Accounting product is defined for a Pricing and you omit an Accounting product for the Aggregation, then the *Product the Plan belongs* to is used.
![]() **Tip: Check Product Drop-Down?** It's worth double-checking that the Product drop-down is cleared and shows **(Global)** before you continue.
5. Configure **Meter Settings**:
* **Meter**. Select the **Global Meter** whose **Data Field** or **Derived Field** you want to use as the basis for the Aggregation.
* Note that only Global Meters will be available.
* **Target Field**. When you select a **Meter**, the **Target field** drop-down list automatically populates with the **Codes** of any fields set up on that **Meter**. For example, select **gb\_stored**:
**Tip: Check Product Drop-Down?** It's worth double-checking that the Product drop-down is cleared and shows **(Global)** before you continue.
5. Configure **Meter Settings**:
* **Meter**. Select the **Global Meter** whose **Data Field** or **Derived Field** you want to use as the basis for the Aggregation.
* Note that only Global Meters will be available.
* **Target Field**. When you select a **Meter**, the **Target field** drop-down list automatically populates with the **Codes** of any fields set up on that **Meter**. For example, select **gb\_stored**:
![]() 6. Configure **Aggregation Settings**:
* **Aggregation**. Select the method for aggregating the data collected by the selected **Target field**. For example, if you want to use the summed value of gigabytes used, select **Sum**.
* **Unit**. For example, enter **gigabytes**. This will be used as a label for billing to indicate to your customers what they are being charged for.
* **Quantity per unit**. Enter the quantity by which you want to charge for the measured value. For example, if you want to charge your customers on a per-500 gigabytes used basis, enter **500**.
* **Rounding**. Specifies how you want m3ter to deal with non-integer, that is fractional number, Aggregation values. See [Reviewing Aggregation Options](/guides/usage-data-aggregations/reviewing-aggregation-options) for example. Four options:
* **None**. Default
* **Down**
* **Up**
* **Nearest**. Rounds up to the nearest half: 5.1 is rounded to 5; 5.5 is rounded to 6.
* **Note**: Also used in conjunction with **Quantity per unit** setting. Rounds the number of units after the **Quantity per unit** has been applied. See [Reviewing Aggregation Options](/guides/usage-data-aggregations/reviewing-aggregation-options) for example.
**Important!** When you create a Compound Aggregation that references a simple Aggregation, the Compound Aggregation calculation uses the *base value* of the simple Aggregation and before any **Quantity per unit** factor or **Rounding** defined for the simple Aggregation is applied.
* **Default Value**. If required, enter a default value to be used for the Aggregation if no usage-data is available from the selected Meter Target field:
6. Configure **Aggregation Settings**:
* **Aggregation**. Select the method for aggregating the data collected by the selected **Target field**. For example, if you want to use the summed value of gigabytes used, select **Sum**.
* **Unit**. For example, enter **gigabytes**. This will be used as a label for billing to indicate to your customers what they are being charged for.
* **Quantity per unit**. Enter the quantity by which you want to charge for the measured value. For example, if you want to charge your customers on a per-500 gigabytes used basis, enter **500**.
* **Rounding**. Specifies how you want m3ter to deal with non-integer, that is fractional number, Aggregation values. See [Reviewing Aggregation Options](/guides/usage-data-aggregations/reviewing-aggregation-options) for example. Four options:
* **None**. Default
* **Down**
* **Up**
* **Nearest**. Rounds up to the nearest half: 5.1 is rounded to 5; 5.5 is rounded to 6.
* **Note**: Also used in conjunction with **Quantity per unit** setting. Rounds the number of units after the **Quantity per unit** has been applied. See [Reviewing Aggregation Options](/guides/usage-data-aggregations/reviewing-aggregation-options) for example.
**Important!** When you create a Compound Aggregation that references a simple Aggregation, the Compound Aggregation calculation uses the *base value* of the simple Aggregation and before any **Quantity per unit** factor or **Rounding** defined for the simple Aggregation is applied.
* **Default Value**. If required, enter a default value to be used for the Aggregation if no usage-data is available from the selected Meter Target field:
![]() **Important!** If you intend to reference the Aggregation in a Compound Aggregation and the Aggregation might have null values because the Meter Target field fails to collect any usage data, then set **Default Value** to **0**. This ensures any null values from the simple Aggregation are passed in correctly to the Compound Aggregation with value = 0.
7. Configure **Segments**, if required. If you've set up non-numeric fields on the selected Meter and want to configure a segmented Aggregation using these, open the **Segments** panel. See [Segmented Aggregations](/guides/usage-data-aggregations/segmented-aggregations).
8. Add any required **Custom Fields** to the Aggregation. For more on Custom Fields, see [Adding and Editing Custom Fields](/guides/organization-and-access-management/viewing-and-editing-organization/adding-and-editing-custom-fields). We strongly recommend reviewing [Working with Custom Fields](/guides/creating-and-managing-products/working-with-custom-fields) before you create and use Custom Fields.
**Important! Aggregation Custom Fields not supported for calculations**. Creating Custom Fields for Aggregations is intended to support financial reporting use cases. Although you can define Custom Fields at both the Organizational level and individual Aggregation level, they are not supported for use in Derived Field and Compound Aggregation calculations.
9. Select **Create Aggregation**. The **Aggregation Details** page opens - see [Reviewing Aggregation Details](/guides/usage-data-aggregations/reviewing-aggregation-details).
10. If you want to edit the Aggregation's details, select the **Edit** button, make your changes, and click **Update**.
11. If you want to remove an Aggregation, return to the **Aggregations** page and select the **Delete** button for the Aggregation:
**Important!** If you intend to reference the Aggregation in a Compound Aggregation and the Aggregation might have null values because the Meter Target field fails to collect any usage data, then set **Default Value** to **0**. This ensures any null values from the simple Aggregation are passed in correctly to the Compound Aggregation with value = 0.
7. Configure **Segments**, if required. If you've set up non-numeric fields on the selected Meter and want to configure a segmented Aggregation using these, open the **Segments** panel. See [Segmented Aggregations](/guides/usage-data-aggregations/segmented-aggregations).
8. Add any required **Custom Fields** to the Aggregation. For more on Custom Fields, see [Adding and Editing Custom Fields](/guides/organization-and-access-management/viewing-and-editing-organization/adding-and-editing-custom-fields). We strongly recommend reviewing [Working with Custom Fields](/guides/creating-and-managing-products/working-with-custom-fields) before you create and use Custom Fields.
**Important! Aggregation Custom Fields not supported for calculations**. Creating Custom Fields for Aggregations is intended to support financial reporting use cases. Although you can define Custom Fields at both the Organizational level and individual Aggregation level, they are not supported for use in Derived Field and Compound Aggregation calculations.
9. Select **Create Aggregation**. The **Aggregation Details** page opens - see [Reviewing Aggregation Details](/guides/usage-data-aggregations/reviewing-aggregation-details).
10. If you want to edit the Aggregation's details, select the **Edit** button, make your changes, and click **Update**.
11. If you want to remove an Aggregation, return to the **Aggregations** page and select the **Delete** button for the Aggregation:
![]() A confirmation popup opens.
12. Select **Yes** to confirm the delete action.
# Custom SQL Aggregations
Source: https://docs.m3ter.com/guides/usage-data-aggregations/custom-sql-aggregations
*Custom SQL Aggregations* are a powerful new feature that offer you more flexibility than traditional simple Aggregations such as SUM, MAX, and COUNT when defining your billing metrics.
As an additional option in the existing Aggregation layer, Custom SQL Aggregations can be used in combination with Segmentation and any existing pricing model.
This topic explains how to create Custom SQL Aggregations and provides some examples:
* [Creating Custom SQL Aggregations](/guides/usage-data-aggregations/custom-sql-aggregations#creating-custom-sql-aggregations)
* [Creating Custom SQL Queries](/guides/usage-data-aggregations/custom-sql-aggregations#creating-custom-sql-queries)
* [Custom SQL Aggregations - Examples](#custom-sql-aggregations-examples)
* [Example 1 - Monthly Billing, Daily Rating](/guides/usage-data-aggregations/custom-sql-aggregations#example-1-monthly-billing-daily-rating)
* [Example 2 - Group by Dimension](/guides/usage-data-aggregations/custom-sql-aggregations#example-2-group-by-dimension)
* [Example 3 - Reserved Instances (RIs) with Overages](/guides/usage-data-aggregations/custom-sql-aggregations#example-3-reserved-instances-ris-with-overages)
* [Example 4 - Custom SQL Descriptions](#example-4-custom-sql-descriptions)
* [Supported SQL Functions](/guides/usage-data-aggregations/custom-sql-aggregations#supported-sql-functions)
**Custom SQL Aggregations - Notes and Warnings!**
* **Preview Release.** The Custom SQL Aggregations feature is currently available in Preview release version. See [Feature Release Stages](/guides/getting-started/feature-release-stages) for Preview release definition and guidance.
* **Parent/Child Accounts Billing**. If you use a Custom SQL Aggregation to price a Plan attached to an Account, Parent/Child Account billing is not currently supported.
## Creating Custom SQL Aggregations
To create Custom SQL Aggregations in the m3ter Console you can follow similar steps as when you create other types of Aggregation using the standard aggregation methods, such as SUM, COUNT, MAXIMUM, and so on.
**To create a Custom SQL Aggregation:**
1. Select **Metering>Aggregations**. The **Aggregations** page opens.
2. In the **Product** drop-down, select the Product for which you want to create the new Custom SQL Aggregation.
3. Select **Create aggregation**. The **Aggregations>Create** page opens.
4. Configure **Aggregation** **details** and enter:
* **Name**. (*Required*)
* **Code**. (*Required*)
* **Accounting product**. Use the drop-down to select a Product. (*Optional*)
* For accounting purposes, you can use this to link to a specific Product any usage line items on Bills that result from pricing a Plan using this Aggregation:
* If you've also defined an Accounting product for a Pricing that uses this Aggregation, then the *Pricing Accounting product* takes precedence and is used.
* If no Accounting product is defined for a Pricing and you omit an Accounting product for the Aggregation, then the *Product the Plan belongs* to is used.
5. Configure **Meter settings**:
* **Meter**. Select the **Meter** whose **Data Field** or **Derived Field** you want to use as the basis for the Aggregation. Note that only those Meters created for the selected Product will be available. If you're creating a Global Aggregation only Global Meters will be available.
* **Target Field**. When you select a **Meter**, the **Target Field** drop-down list automatically populates with the **Codes** of any fields set up on that **Meter**:
* Note that you must select a *measure* target field on the Meter - that is, of type **Measure**, **Income**, or **Cost**.
6. Configure **Aggregation settings**:
* **Aggregation**. Select **Custom SQL** for the aggregation method. The page adjusts to show an **SQL** text entry box where you can enter your SQL query expression. For example:
A confirmation popup opens.
12. Select **Yes** to confirm the delete action.
# Custom SQL Aggregations
Source: https://docs.m3ter.com/guides/usage-data-aggregations/custom-sql-aggregations
*Custom SQL Aggregations* are a powerful new feature that offer you more flexibility than traditional simple Aggregations such as SUM, MAX, and COUNT when defining your billing metrics.
As an additional option in the existing Aggregation layer, Custom SQL Aggregations can be used in combination with Segmentation and any existing pricing model.
This topic explains how to create Custom SQL Aggregations and provides some examples:
* [Creating Custom SQL Aggregations](/guides/usage-data-aggregations/custom-sql-aggregations#creating-custom-sql-aggregations)
* [Creating Custom SQL Queries](/guides/usage-data-aggregations/custom-sql-aggregations#creating-custom-sql-queries)
* [Custom SQL Aggregations - Examples](#custom-sql-aggregations-examples)
* [Example 1 - Monthly Billing, Daily Rating](/guides/usage-data-aggregations/custom-sql-aggregations#example-1-monthly-billing-daily-rating)
* [Example 2 - Group by Dimension](/guides/usage-data-aggregations/custom-sql-aggregations#example-2-group-by-dimension)
* [Example 3 - Reserved Instances (RIs) with Overages](/guides/usage-data-aggregations/custom-sql-aggregations#example-3-reserved-instances-ris-with-overages)
* [Example 4 - Custom SQL Descriptions](#example-4-custom-sql-descriptions)
* [Supported SQL Functions](/guides/usage-data-aggregations/custom-sql-aggregations#supported-sql-functions)
**Custom SQL Aggregations - Notes and Warnings!**
* **Preview Release.** The Custom SQL Aggregations feature is currently available in Preview release version. See [Feature Release Stages](/guides/getting-started/feature-release-stages) for Preview release definition and guidance.
* **Parent/Child Accounts Billing**. If you use a Custom SQL Aggregation to price a Plan attached to an Account, Parent/Child Account billing is not currently supported.
## Creating Custom SQL Aggregations
To create Custom SQL Aggregations in the m3ter Console you can follow similar steps as when you create other types of Aggregation using the standard aggregation methods, such as SUM, COUNT, MAXIMUM, and so on.
**To create a Custom SQL Aggregation:**
1. Select **Metering>Aggregations**. The **Aggregations** page opens.
2. In the **Product** drop-down, select the Product for which you want to create the new Custom SQL Aggregation.
3. Select **Create aggregation**. The **Aggregations>Create** page opens.
4. Configure **Aggregation** **details** and enter:
* **Name**. (*Required*)
* **Code**. (*Required*)
* **Accounting product**. Use the drop-down to select a Product. (*Optional*)
* For accounting purposes, you can use this to link to a specific Product any usage line items on Bills that result from pricing a Plan using this Aggregation:
* If you've also defined an Accounting product for a Pricing that uses this Aggregation, then the *Pricing Accounting product* takes precedence and is used.
* If no Accounting product is defined for a Pricing and you omit an Accounting product for the Aggregation, then the *Product the Plan belongs* to is used.
5. Configure **Meter settings**:
* **Meter**. Select the **Meter** whose **Data Field** or **Derived Field** you want to use as the basis for the Aggregation. Note that only those Meters created for the selected Product will be available. If you're creating a Global Aggregation only Global Meters will be available.
* **Target Field**. When you select a **Meter**, the **Target Field** drop-down list automatically populates with the **Codes** of any fields set up on that **Meter**:
* Note that you must select a *measure* target field on the Meter - that is, of type **Measure**, **Income**, or **Cost**.
6. Configure **Aggregation settings**:
* **Aggregation**. Select **Custom SQL** for the aggregation method. The page adjusts to show an **SQL** text entry box where you can enter your SQL query expression. For example:
![]() > For details on creating Custom SQL queries for use in your Aggregations, please see the following [Creating Custom SQL Queries](/guides/usage-data-aggregations/custom-sql-aggregations#creating-custom-sql-queries) section.
* **Unit**. This will be used as a label for billing to indicate to your customers what they are being charged for.
* **Quantity per unit**. Enter the quantity by which you want to charge for the measured value.
* **Rounding**. Specifies how you want m3ter to deal with non-integer, that is fractional number, Aggregation values.
7. Select **Create aggregation**. The **Aggregation details** page opens:
> For details on creating Custom SQL queries for use in your Aggregations, please see the following [Creating Custom SQL Queries](/guides/usage-data-aggregations/custom-sql-aggregations#creating-custom-sql-queries) section.
* **Unit**. This will be used as a label for billing to indicate to your customers what they are being charged for.
* **Quantity per unit**. Enter the quantity by which you want to charge for the measured value.
* **Rounding**. Specifies how you want m3ter to deal with non-integer, that is fractional number, Aggregation values.
7. Select **Create aggregation**. The **Aggregation details** page opens:
![Custom SQL5]() On the **Aggregation details** panel, you can:
* Read-off the Aggregation's **Name** and **Code**.
* Use a hotlink text to open the details page of the **Meter** whose Data Field the Aggregation targets.
* Review the **SQL** and **Copy** this to your clipboard.
* Note that for this example, because the selected Meter **Target field** for the Aggregation is `gbyte_store`, then it is *this field* that is accessible in SQL as a field called `measure`.
* Check the **Unit** configured for the Aggregation, which will be used on Bill line items to indicates what the charge is for.
* Copy the Aggregation's **ID** to your clipboard.
* Check the audit data to see who **Created** and who **Last modified** the Aggregation.
**Tip: More on Creating and Managing Aggregations?** For more details and guidance on how to create and manage Aggregations, please see [Reviewing Aggregation Options](/guides/usage-data-aggregations/reviewing-aggregation-options) and [Creating Product Aggregations](/guides/usage-data-aggregations/creating-aggregations).
## Creating Custom SQL Queries
This section provides details and guidance for creating queries for your Custom SQL Aggregations. Please review this section in preparation for creating Custom SQL queries:
* [Measurements Table](/guides/usage-data-aggregations/custom-sql-aggregations#measurements-table)
* [Key Points](/guides/usage-data-aggregations/custom-sql-aggregations#key-points)
* [Limit on GROUP BY Clause](/guides/usage-data-aggregations/custom-sql-aggregations#limit-on-group-by-clause)
### Measurements Table
Custom SQL queries should be run against the **measurements** table. This table is provided to your SQL query and is already limited to the appropriate Account, time period, and so on that the Aggregation needs to run over, so you don’t need to include anything in your own SQL for these factors.
Several columns of the `measurements` table are made available to your Custom SQL queries:
| Column | Type | Used for |
| - | - | - |
| measure | Float64 | The value of the target field you selected. |
| ts | DateTime64 | The ts value of the measurement in UTC timezone. |
| ets | DateTime64 | The ets value of the measurement in UTC timezone. |
| uid | String | The uid value of the measurement. |
| received\_at | DateTime64 | When the data was received in UTC timezone. |
| account\_id | UUID | |
| dimensions | Map of Strings | String dimension values for the measurement. |
### Key Points
When creating your SQL queries, please note the following key points:
* The **result(s)** of the query must be returned as a numeric column called **value**.
* Queries can return up to 1,000 rows.
* Any additional columns returned (apart from **value**) are treated as “group keys” and are used downstream – this can be useful if the query returns multiple rows to help identify each row.
* If there are multiple rows, each row will be rated independently and appear as separate line items on the Bill.
* Dimensions can be accessed using map notation. For example, to access the value of a dimension called “region”, you would write `dimensions['region']`.
* The group key values can be accessed in line item descriptions using the syntax `{group.columnName}` (where `columnName` is the name of the column you returned from your custom SQL query).
### Limit on GROUP BY Clause
The limit on the use of GROUP BY clauses for a Custom SQL Aggregation depends on whether or not the Aggregation is segmented. This is because the “unique keys” in the operation will implicitly include segments:
* An SQL query on an unsegmented Aggregation could process up to 50,000 unique keys from custom SQL.
* An SQL query on a segmented Aggregation will use some of those keys for the segment values (up to 1,000 depending on the data). In the worst case, if the data actually contained 1,000 different segment values, you’d only have 50 unique values for your own data that you are grouping by. This is because each of your own “keys” would be multiplied by (up to) 1,000 segment values,
* For example, if your data had keys of “a”, “b”, and “c”:
* An unsegmented Aggregation would see these 3 keys.
* However, if you segmented the Aggregation and each of your groups contained data for 3 segments: “1”, “2”, and “3”, then the total number of keys “seen” by the query will be:
* “a”, “1”
* “a”, “2”
* “a”, “3”
* “b”, “1”
* “b”, “2”
* “b”, “3”
* “c”, “1”
* “c”, “2”
* “c”, “3”
Which is 9 keys in total.
## Custom SQL Aggregations - Examples
This section offers some example billing use cases fulfilled using Custom SQL Aggregations:
* [Example 1 - Monthly Billing, Daily Rating](/guides/usage-data-aggregations/custom-sql-aggregations#example-1-monthly-billing-daily-rating)
* [Example 2 - Group by Dimension](/guides/usage-data-aggregations/custom-sql-aggregations#example-2-group-by-dimension)
* [Example 3 - Reserved Instances (RIs) with Overages](/guides/usage-data-aggregations/custom-sql-aggregations#example-3-reserved-instances-ris-with-overages)
* [Example 4 - Custom SQL Descriptions](https://docs.m3ter.com/#example-4-custom-sql-descriptions)
### Example 1 - Monthly Billing, Daily Rating
In this example you have tiered pricing with a usage allowance that resets daily - but you bill monthly. This use case is simple to fulfill with Custom SQL Aggregations - we can group by the day based on the measurement timestamp:
```sql theme={null}
SELECT SUM(measure) AS value, DATE_TRUNC('day', ts) AS date
FROM measurements
GROUP BY DATE_TRUNC('day', ts)
```
### Example 2 - Group by Dimension
Suppose you price based on a simple total of the distance driven by vehicles each month. Each measurement has a dimension of `vehicle_id` on it, indicating which vehicle drove a certain distance.
Currently, we support taking a SUM over the entire dataset, regardless of the value of the `vehicle_id` field. We also support segmentation, but to configure segments you’d need to know and configure the vehicle ids ahead of time, and there’s a per-Organization limit of 1000.
This means that before Custom SQL Aggregations, for non-trivial pricing (such as tiered or volume pricing) the final cost is determined by the total distance driven by *all vehicles combined*.
Instead, we want to rate each vehicle independently, so that the first 100 miles driven by each vehicle is more expensive than subsequent miles. This would be possible by writing custom SQL which groups the total distance traveled by `vehicle_id` as follows:
```sql theme={null}
SELECT SUM(measure) AS value, dimensions[‘vehicle_id’] as vehicle_id
FROM measurements
GROUP BY dimensions[‘vehicle_id’]
```
The Meter definition would (for example) have these fields on it:
* `distance` (a measure field)
* `vehicle_id` (a dimension field)
You would pick `distance` as the target field in the Custom SQL Aggregation configuration, which is then accessible in SQL as a field called `measure`.
### Example 3 - Reserved Instances (RIs) with Overages
You can reference Counter values from Custom SQL using the syntax:
```sql theme={null}
counters ['counterCode']
```
The system will automatically split Custom SQL Aggregations across the billing period when the Counter value changes, so the returned Counter will always represent the value as it was at the timestamp of the measurements being queried. This is particularly useful for billing use cases where you want to calculate things like Reserved Instances (RIs) with Overages.
For example, suppose an end-customer reserves 10 instances for the current month - say 10 CPUs for compute resource allocation. This is charged as a flat fee per CPU for the month. However, if the customer uses more compute resource than their reserved allocation, overages are charged at a higher on-demand (OD) rate for the duration they are being used.
To illustrate how referencing Counter values in Custom SQL Aggregations solve for this kind of billing use case for monthly billing frequency, we can take a concrete example - let's assume:
* The Reserved Instance (RI) rate is \$2.50 per CPU per month.
* The overage on-demand (OD) rate is \$0.005 per CPU-hour, which is more expensive per month than the RI rate, at roughly £3.60 for a 30-day month.
* Usage is monitored, and every hour one measurement is sent to m3ter indicating how many CPUs the end-customer actually using during that hour.
* By around mid-month, the end-customer realizes they are using more compute resource than expected, so they increase their number of Reserved Instances to 20 on the 15th of the month.
We can model this using a Counter with code `ri` for the number of Reserved Instances, which is initially set to 10 and increased to 20 on the 15th. The Counter pricing for the RIs is set to \$2.50, that is, the cost of 1 RI per month.
The Bill for the month is calculated and we get the usual Counter line items, giving us a line item of \$38.71 for the RIs:
* Assuming a 31-day month and because the end-customer increased their RIs from 10 to 20 on the 15th of the month, the costs due under the Counter pricing we've set up is pro-rated for the Bill calculation:
* (14/31)\*10(CPUs) + (17/31)\*20(CPUs) = 15.4838709677 CPUs, which at a rate of \$2.50 per CPU per month costs \$38.71.
We now need to include for any overage charges incurred at the on-demand per CPU-hour rate, and we can do this by creating a Custom SQL Aggregation like the following:
```sql theme={null}
SELECT SUM(
CASE((measure - counters['ri']) > 0) WHEN 1 THEN (measure - counters['ri']) ELSE 0 END
) AS value
FROM measurements
```
Because the usage data is being sent to m3ter every hour, this returns the number of “overages” for each measurement in units of CPU-hours.
For simplicity, let’s assume they used a steady 25 CPUs every hour of the month. That means that between 1st-14th, they used 15 on-demand CPUs each hour, and from 15th-31st, they used 5 on-demand CPUs each hour.
When we re-run the Bill to include overages charges, we get two more line items on the Bill representing the overages:
* 1st-14th : \$25.20 (14\*24\*15\*0.005\$)
* 15th-31st: \$10.20 (17\*24\*5\*0.005)
Note the Aggregation has been automatically “split” to cover the 2 periods separately, because the RI Counter value was increased on the 15th of the month:
* The total bill covering both Reserved Instances and on-demand overages is therefore: \$38.71 + \$25.20 + \$10.20 = \$74.11.
### Example 4 - Custom SQL Descriptions
If you are using Custom SQL Aggregations to price Plans, this feature offers you wide flexibility when setting up Bill line item descriptions.
Suppose you run a vehicle hire business and want to charge your customers for vehicle hire usage and invoice them monthly for vehicle distances recorded on a per-car basis. To do this, we can set up a Meter as follows:
On the **Aggregation details** panel, you can:
* Read-off the Aggregation's **Name** and **Code**.
* Use a hotlink text to open the details page of the **Meter** whose Data Field the Aggregation targets.
* Review the **SQL** and **Copy** this to your clipboard.
* Note that for this example, because the selected Meter **Target field** for the Aggregation is `gbyte_store`, then it is *this field* that is accessible in SQL as a field called `measure`.
* Check the **Unit** configured for the Aggregation, which will be used on Bill line items to indicates what the charge is for.
* Copy the Aggregation's **ID** to your clipboard.
* Check the audit data to see who **Created** and who **Last modified** the Aggregation.
**Tip: More on Creating and Managing Aggregations?** For more details and guidance on how to create and manage Aggregations, please see [Reviewing Aggregation Options](/guides/usage-data-aggregations/reviewing-aggregation-options) and [Creating Product Aggregations](/guides/usage-data-aggregations/creating-aggregations).
## Creating Custom SQL Queries
This section provides details and guidance for creating queries for your Custom SQL Aggregations. Please review this section in preparation for creating Custom SQL queries:
* [Measurements Table](/guides/usage-data-aggregations/custom-sql-aggregations#measurements-table)
* [Key Points](/guides/usage-data-aggregations/custom-sql-aggregations#key-points)
* [Limit on GROUP BY Clause](/guides/usage-data-aggregations/custom-sql-aggregations#limit-on-group-by-clause)
### Measurements Table
Custom SQL queries should be run against the **measurements** table. This table is provided to your SQL query and is already limited to the appropriate Account, time period, and so on that the Aggregation needs to run over, so you don’t need to include anything in your own SQL for these factors.
Several columns of the `measurements` table are made available to your Custom SQL queries:
| Column | Type | Used for |
| - | - | - |
| measure | Float64 | The value of the target field you selected. |
| ts | DateTime64 | The ts value of the measurement in UTC timezone. |
| ets | DateTime64 | The ets value of the measurement in UTC timezone. |
| uid | String | The uid value of the measurement. |
| received\_at | DateTime64 | When the data was received in UTC timezone. |
| account\_id | UUID | |
| dimensions | Map of Strings | String dimension values for the measurement. |
### Key Points
When creating your SQL queries, please note the following key points:
* The **result(s)** of the query must be returned as a numeric column called **value**.
* Queries can return up to 1,000 rows.
* Any additional columns returned (apart from **value**) are treated as “group keys” and are used downstream – this can be useful if the query returns multiple rows to help identify each row.
* If there are multiple rows, each row will be rated independently and appear as separate line items on the Bill.
* Dimensions can be accessed using map notation. For example, to access the value of a dimension called “region”, you would write `dimensions['region']`.
* The group key values can be accessed in line item descriptions using the syntax `{group.columnName}` (where `columnName` is the name of the column you returned from your custom SQL query).
### Limit on GROUP BY Clause
The limit on the use of GROUP BY clauses for a Custom SQL Aggregation depends on whether or not the Aggregation is segmented. This is because the “unique keys” in the operation will implicitly include segments:
* An SQL query on an unsegmented Aggregation could process up to 50,000 unique keys from custom SQL.
* An SQL query on a segmented Aggregation will use some of those keys for the segment values (up to 1,000 depending on the data). In the worst case, if the data actually contained 1,000 different segment values, you’d only have 50 unique values for your own data that you are grouping by. This is because each of your own “keys” would be multiplied by (up to) 1,000 segment values,
* For example, if your data had keys of “a”, “b”, and “c”:
* An unsegmented Aggregation would see these 3 keys.
* However, if you segmented the Aggregation and each of your groups contained data for 3 segments: “1”, “2”, and “3”, then the total number of keys “seen” by the query will be:
* “a”, “1”
* “a”, “2”
* “a”, “3”
* “b”, “1”
* “b”, “2”
* “b”, “3”
* “c”, “1”
* “c”, “2”
* “c”, “3”
Which is 9 keys in total.
## Custom SQL Aggregations - Examples
This section offers some example billing use cases fulfilled using Custom SQL Aggregations:
* [Example 1 - Monthly Billing, Daily Rating](/guides/usage-data-aggregations/custom-sql-aggregations#example-1-monthly-billing-daily-rating)
* [Example 2 - Group by Dimension](/guides/usage-data-aggregations/custom-sql-aggregations#example-2-group-by-dimension)
* [Example 3 - Reserved Instances (RIs) with Overages](/guides/usage-data-aggregations/custom-sql-aggregations#example-3-reserved-instances-ris-with-overages)
* [Example 4 - Custom SQL Descriptions](https://docs.m3ter.com/#example-4-custom-sql-descriptions)
### Example 1 - Monthly Billing, Daily Rating
In this example you have tiered pricing with a usage allowance that resets daily - but you bill monthly. This use case is simple to fulfill with Custom SQL Aggregations - we can group by the day based on the measurement timestamp:
```sql theme={null}
SELECT SUM(measure) AS value, DATE_TRUNC('day', ts) AS date
FROM measurements
GROUP BY DATE_TRUNC('day', ts)
```
### Example 2 - Group by Dimension
Suppose you price based on a simple total of the distance driven by vehicles each month. Each measurement has a dimension of `vehicle_id` on it, indicating which vehicle drove a certain distance.
Currently, we support taking a SUM over the entire dataset, regardless of the value of the `vehicle_id` field. We also support segmentation, but to configure segments you’d need to know and configure the vehicle ids ahead of time, and there’s a per-Organization limit of 1000.
This means that before Custom SQL Aggregations, for non-trivial pricing (such as tiered or volume pricing) the final cost is determined by the total distance driven by *all vehicles combined*.
Instead, we want to rate each vehicle independently, so that the first 100 miles driven by each vehicle is more expensive than subsequent miles. This would be possible by writing custom SQL which groups the total distance traveled by `vehicle_id` as follows:
```sql theme={null}
SELECT SUM(measure) AS value, dimensions[‘vehicle_id’] as vehicle_id
FROM measurements
GROUP BY dimensions[‘vehicle_id’]
```
The Meter definition would (for example) have these fields on it:
* `distance` (a measure field)
* `vehicle_id` (a dimension field)
You would pick `distance` as the target field in the Custom SQL Aggregation configuration, which is then accessible in SQL as a field called `measure`.
### Example 3 - Reserved Instances (RIs) with Overages
You can reference Counter values from Custom SQL using the syntax:
```sql theme={null}
counters ['counterCode']
```
The system will automatically split Custom SQL Aggregations across the billing period when the Counter value changes, so the returned Counter will always represent the value as it was at the timestamp of the measurements being queried. This is particularly useful for billing use cases where you want to calculate things like Reserved Instances (RIs) with Overages.
For example, suppose an end-customer reserves 10 instances for the current month - say 10 CPUs for compute resource allocation. This is charged as a flat fee per CPU for the month. However, if the customer uses more compute resource than their reserved allocation, overages are charged at a higher on-demand (OD) rate for the duration they are being used.
To illustrate how referencing Counter values in Custom SQL Aggregations solve for this kind of billing use case for monthly billing frequency, we can take a concrete example - let's assume:
* The Reserved Instance (RI) rate is \$2.50 per CPU per month.
* The overage on-demand (OD) rate is \$0.005 per CPU-hour, which is more expensive per month than the RI rate, at roughly £3.60 for a 30-day month.
* Usage is monitored, and every hour one measurement is sent to m3ter indicating how many CPUs the end-customer actually using during that hour.
* By around mid-month, the end-customer realizes they are using more compute resource than expected, so they increase their number of Reserved Instances to 20 on the 15th of the month.
We can model this using a Counter with code `ri` for the number of Reserved Instances, which is initially set to 10 and increased to 20 on the 15th. The Counter pricing for the RIs is set to \$2.50, that is, the cost of 1 RI per month.
The Bill for the month is calculated and we get the usual Counter line items, giving us a line item of \$38.71 for the RIs:
* Assuming a 31-day month and because the end-customer increased their RIs from 10 to 20 on the 15th of the month, the costs due under the Counter pricing we've set up is pro-rated for the Bill calculation:
* (14/31)\*10(CPUs) + (17/31)\*20(CPUs) = 15.4838709677 CPUs, which at a rate of \$2.50 per CPU per month costs \$38.71.
We now need to include for any overage charges incurred at the on-demand per CPU-hour rate, and we can do this by creating a Custom SQL Aggregation like the following:
```sql theme={null}
SELECT SUM(
CASE((measure - counters['ri']) > 0) WHEN 1 THEN (measure - counters['ri']) ELSE 0 END
) AS value
FROM measurements
```
Because the usage data is being sent to m3ter every hour, this returns the number of “overages” for each measurement in units of CPU-hours.
For simplicity, let’s assume they used a steady 25 CPUs every hour of the month. That means that between 1st-14th, they used 15 on-demand CPUs each hour, and from 15th-31st, they used 5 on-demand CPUs each hour.
When we re-run the Bill to include overages charges, we get two more line items on the Bill representing the overages:
* 1st-14th : \$25.20 (14\*24\*15\*0.005\$)
* 15th-31st: \$10.20 (17\*24\*5\*0.005)
Note the Aggregation has been automatically “split” to cover the 2 periods separately, because the RI Counter value was increased on the 15th of the month:
* The total bill covering both Reserved Instances and on-demand overages is therefore: \$38.71 + \$25.20 + \$10.20 = \$74.11.
### Example 4 - Custom SQL Descriptions
If you are using Custom SQL Aggregations to price Plans, this feature offers you wide flexibility when setting up Bill line item descriptions.
Suppose you run a vehicle hire business and want to charge your customers for vehicle hire usage and invoice them monthly for vehicle distances recorded on a per-car basis. To do this, we can set up a Meter as follows:
![Custom SQL8]() We can then use a Custom SQL Aggregation that targets the `distance` Meter's Measure Data Field and groups by the `vehicle_id` Dimension Data Field:
We can then use a Custom SQL Aggregation that targets the `distance` Meter's Measure Data Field and groups by the `vehicle_id` Dimension Data Field:
![Custom SQL9]() For this setup, we can:
* Use **Vehicle Hire Aggregation 1** to price a Plan we've attached to the customer Account:
* Define a two-tiered pricing.
* Define a generic description: **Vehicle hire mileage charge**.
For this setup, we can:
* Use **Vehicle Hire Aggregation 1** to price a Plan we've attached to the customer Account:
* Define a two-tiered pricing.
* Define a generic description: **Vehicle hire mileage charge**.
![Custom SQL12]() * If we make some test usage data submissions for a customer Account using **Vehicle Hire Meter 1** for the month of April 2026 and for two vehicles, we can check the submissions in Usage Data Explorer:
* If we make some test usage data submissions for a customer Account using **Vehicle Hire Meter 1** for the month of April 2026 and for two vehicles, we can check the submissions in Usage Data Explorer:
![Custom SQL10]() We then run billing for the Account for May 1st Bill:
We then run billing for the Account for May 1st Bill:
![Custom SQL11]() Although the billed charges are in accordance with the test usage data submission amounts and are grouped correctly by the two distinct vehicle IDs, the generic description defined for the pricing fails to show us which particular vehicle each line item applies to.
If you want Bill line item descriptions to distinguish clearly in this way when your Custom SQL Aggregations use GROUP BY, you can use handlebar notation to reference group key/values within the pricing description definition. For example:
Although the billed charges are in accordance with the test usage data submission amounts and are grouped correctly by the two distinct vehicle IDs, the generic description defined for the pricing fails to show us which particular vehicle each line item applies to.
If you want Bill line item descriptions to distinguish clearly in this way when your Custom SQL Aggregations use GROUP BY, you can use handlebar notation to reference group key/values within the pricing description definition. For example:
![Custom SQL15]()
![Custom SQL13]() If we now recalculate the Bill for the current example, we see that the line item descriptions includes the respective values of the `vehicle_id` dimension used in the Custom SQL to GROUP BY:
If we now recalculate the Bill for the current example, we see that the line item descriptions includes the respective values of the `vehicle_id` dimension used in the Custom SQL to GROUP BY:
![Custom SQL16]() Alternatively, if required, you can include the entire group for the pricing description:
Alternatively, if required, you can include the entire group for the pricing description:
![Custom SQL17]() For the current example, this would resolve to:
For the current example, this would resolve to:
![Custom SQL18]() Suppose you also wanted to show the *vehicle make* as well as vehicle ID for line item descriptions. You could update the current example to:
* Add a `vehicle_make` dimension Data Field to the Meter.
* Adjust the Aggregation's SQL to GROUP BY this second dimension:
Suppose you also wanted to show the *vehicle make* as well as vehicle ID for line item descriptions. You could update the current example to:
* Add a `vehicle_make` dimension Data Field to the Meter.
* Adjust the Aggregation's SQL to GROUP BY this second dimension:
![Custom SQL19]() If we then generate a Bill where the usage data measurements included values for the `vehicle_make` Meter Data Field and continue to use the same pricing description for group:
If we then generate a Bill where the usage data measurements included values for the `vehicle_make` Meter Data Field and continue to use the same pricing description for group:
 This will resolve on Bills to show:
![Custom SQL20]() Alternatively, for the pricing description we can use:
Alternatively, for the pricing description we can use:
 Which will resolve on Bills to show:
![Custom SQL23]() #### Default Custom SQL Descriptions
If you *do not* define a description on the pricing you configure for a Plan using a Custom SQL Aggregation, then a default description is used that includes any key/value pairs used in the GROUP BY clause:
*\ (\,\,* \*...)*
For the current example, the default description format resolves to:
#### Default Custom SQL Descriptions
If you *do not* define a description on the pricing you configure for a Plan using a Custom SQL Aggregation, then a default description is used that includes any key/value pairs used in the GROUP BY clause:
*\ (\,\,* \*...)*
For the current example, the default description format resolves to:
![Custom SQL25]() ## Supported SQL Functions
The following functions are supported in Custom SQL Aggregations:
* `AVG`
* `CAST`
* `CEIL`
* `COALESCE`
* `COUNT`
* `DATE_TRUNC`
* `FIRST_VALUE`
* `FLOOR`
* `GREATEST`
* `LAST_VALUE`
* `LEAST`
* `MAX`
* `MIN`
* `ORDER_BY`
* `ROUND`
* `ROW_NUMBER`
* `SUM`
# Reviewing Aggregation Details
Source: https://docs.m3ter.com/guides/usage-data-aggregations/reviewing-aggregation-details
When you've created an Aggregation, you can open the Aggregations details page which is designed to help you perform common Aggregation management tasks:
* [Reviewing Details](/guides/usage-data-aggregations/reviewing-aggregation-details#reviewing-details)
* [Reviewing Metadata](/guides/usage-data-aggregations/reviewing-aggregation-details#reviewing-metadata)
**Note: Reviewing details for other Aggregation types?** This topic explains how to review the details of a *Product Aggregation*. You can review the details of a *Global Aggregation* or *Compound Aggregation* in a similar way,
## Reviewing Details
You can use the *Aggregation details* page to review and manage the Aggregation set up.
**To review Aggregation details:**
1. In the **Metering** section, select **Aggregations**:
## Supported SQL Functions
The following functions are supported in Custom SQL Aggregations:
* `AVG`
* `CAST`
* `CEIL`
* `COALESCE`
* `COUNT`
* `DATE_TRUNC`
* `FIRST_VALUE`
* `FLOOR`
* `GREATEST`
* `LAST_VALUE`
* `LEAST`
* `MAX`
* `MIN`
* `ORDER_BY`
* `ROUND`
* `ROW_NUMBER`
* `SUM`
# Reviewing Aggregation Details
Source: https://docs.m3ter.com/guides/usage-data-aggregations/reviewing-aggregation-details
When you've created an Aggregation, you can open the Aggregations details page which is designed to help you perform common Aggregation management tasks:
* [Reviewing Details](/guides/usage-data-aggregations/reviewing-aggregation-details#reviewing-details)
* [Reviewing Metadata](/guides/usage-data-aggregations/reviewing-aggregation-details#reviewing-metadata)
**Note: Reviewing details for other Aggregation types?** This topic explains how to review the details of a *Product Aggregation*. You can review the details of a *Global Aggregation* or *Compound Aggregation* in a similar way,
## Reviewing Details
You can use the *Aggregation details* page to review and manage the Aggregation set up.
**To review Aggregation details:**
1. In the **Metering** section, select **Aggregations**:
![]() The **Aggregations** page opens and lists Aggregations by Product.
2. If you want to review the details of a Product Aggregation, search or filter the page by **Product**.
3. Select the hotlink text of the **Aggregation**. The **Aggregation details** page opens:
The **Aggregations** page opens and lists Aggregations by Product.
2. If you want to review the details of a Product Aggregation, search or filter the page by **Product**.
3. Select the hotlink text of the **Aggregation**. The **Aggregation details** page opens:
![Agg Review10]() 4. On this page, you can:
* Read-off the Aggregation's **Name** and **Code**.
* Use the hotlink text to open the details page of the **Meter** whose Data or Derived Field the Aggregation targets.
* Read-off:
* The method the **Aggregation** uses - such as **Sum**, **Minimum**, **Latest**, **Mean**, and so on.
* The **Unit** configured for the Aggregation, which will be used on Bill line items to indicates what the charge is for.
* The Aggregation's **ID** and **Copy** this to your clipboard.
* Check the audit data to see who **Created** and who **Last modified** the Aggregation.
**Note:** If the Aggregation is configured to use a **Custom SQL** method, then an additional **SQL** section is shown under **Aggregation details** showing the Custom SQL query used which you can **Copy** to your Clipboard.
## Reviewing Metadata
If you scroll down the **Aggregation details** page, you can review Aggregation metadata:
**Custom fields**. Any Custom fields created for the Aggregation entity are listed, and you can **Copy** the *String* or *Number* value of a Custom Field to your clipboard:
4. On this page, you can:
* Read-off the Aggregation's **Name** and **Code**.
* Use the hotlink text to open the details page of the **Meter** whose Data or Derived Field the Aggregation targets.
* Read-off:
* The method the **Aggregation** uses - such as **Sum**, **Minimum**, **Latest**, **Mean**, and so on.
* The **Unit** configured for the Aggregation, which will be used on Bill line items to indicates what the charge is for.
* The Aggregation's **ID** and **Copy** this to your clipboard.
* Check the audit data to see who **Created** and who **Last modified** the Aggregation.
**Note:** If the Aggregation is configured to use a **Custom SQL** method, then an additional **SQL** section is shown under **Aggregation details** showing the Custom SQL query used which you can **Copy** to your Clipboard.
## Reviewing Metadata
If you scroll down the **Aggregation details** page, you can review Aggregation metadata:
**Custom fields**. Any Custom fields created for the Aggregation entity are listed, and you can **Copy** the *String* or *Number* value of a Custom Field to your clipboard:
![Agg Review7]() * If the fields have been created only at Organizational-level, then these values will be shown:
* If the fields have also been created for an individual Aggregation, then the values configured for those created at Organizational-level are struck out indicating clearly that the individual Aggregation's values will be used:
* If the fields have been created only at Organizational-level, then these values will be shown:
* If the fields have also been created for an individual Aggregation, then the values configured for those created at Organizational-level are struck out indicating clearly that the individual Aggregation's values will be used:
![Agg Review8]() **External mappings**. Any External mappings set up for the Aggregation are listed:
**External mappings**. Any External mappings set up for the Aggregation are listed:
![Agg Review9]() * The **External system** and **External table** mapped to are shown - such as **NetSuite - Item** in the above example. The **External entity ID** mapped to is also shown.
* If a listed External mapping is linked to an Integration, under **Linked integration** a hotlink text will be shown which you can use to open the Integration.
* Under **Actions**, you can edit or delete the External mapping.
* If the Aggregation has multiple External mappings created for it, you can use *Search external mappings* to search by **External table** and **External entity ID** and filter the list.
* You can commence a workflow to **Create external mapping** for the Aggregation directly - see [Creating and Managing External Mappings for Accounts](/guides/end-customer-accounts/creating-and-managing-external-mappings-for-accounts) for an example.
**Integration runs**. If you've set up an integration that synchronizes the Aggregation with an external system, the date/time and status of the **Latest** integration run are shown. You can use a text hotlink to open details of this latest run or **View all runs**. See [Reviewing Integration Run Details](/guides/integrations/setting-up-integrations/reviewing-integration-run-details).
# Reviewing Aggregation Options
Source: https://docs.m3ter.com/guides/usage-data-aggregations/reviewing-aggregation-options
You can use *Aggregations* to convert the usage data collected by your Meters into numerical measures. You can then use these Aggregations to price your product Plans and apply usage-based pricing to your products and services. You might also want to aggregate raw data measures for other purposes, such as to feed into analytical or business performance tools.
This topic explains the difference between Product and Global Aggregations and the configuration options available for Aggregations.
## Product vs. Global Aggregations
You can create Product Aggregations, which belong to a specific Product, or Global Aggregations, which are not tied to a specific Product:
* If you create an Aggregation that targets a Product-specific Meter, the Aggregation is tied to the same Product and can only be used to price Plans created for that Product. See [Creating Product Aggregations](/guides/usage-data-aggregations/creating-aggregations).
* If you create an Aggregation that targets a Global Meter, the Aggregation also becomes Global and can be used to price Plans created for any Product. See [Creating Global Aggregations](/guides/usage-data-aggregations/creating-global-aggregations).
* If you create an Aggregation that targets a Product-specific Meter, the Aggregation is Product-specific also for the Product. If you then switch the target Meter to be a Global Meter, the Aggregation then becomes Global also. See [Product Meters vs. Global Meters](/guides/usage-data-meters/reviewing-meter-options#product-meters-vs-global-meters).
## Configuring Aggregations
When you create an Aggregation and have entered a **Name** and **Code** you must define several key attributes to ensure the resultant Aggregation value precisely suits your pricing or other requirements:
* **Meter**. Each Aggregation is a child of a Meter, so you must first select the Meter you want to use as the source of raw usage data for your Aggregation.
* **Target Field**. When you select a Meter, you can then select a Data Field or Derived Field on the Meter as the basis for your Aggregation.
* **Aggregation**. This defines the method by which a numerical measurement is determined on the basis of the usage data collected by the Target Field. The options for how the Aggregation gives a unit value based on the Target Field depends on the **Category** configured for the selected Target Field:
* **Sum**. Adds the values. Can be applied to a **Measure**, **Income**, or **Cost** Target Field.
* **Minimum**. Uses the minimum value. Can be applied to a **Measure**, **Income**, or **Cost** Target Field.
* **Maximum**. Uses the maximum value. Can be applied to a **Measure**, **Income**, or **Cost** Target Field.
* **Count**. Counts the number of values. Can be applied to a **Measure**, **Income**, or **Cost** Target Field.
* **Latest**. Uses the most recent value. Can be applied to a **Measure**, **Income**, or **Cost** Target Field.
* **Notes**:
* This is based on the timestamp - `ts` - value of usage data measurement submissions.
* If you are using the **Latest** aggregation method, please ensure distinct `ts` values are used for your usage data measurements.
* **Mean**. Uses the arithmetic mean of the values. Can be applied to a **Measure**, **Income**, or **Cost** Target Field.
* **Custom SQL**. Allows you to run an SQL query against the `measurements` table to define a pricing metric. Can be applied to a **Measure**, **Income**, or **Cost** Target Field.
* **Unique**. Uses unique values and returns a count of the number of unique values. Can be applied to a **Metadata** Target Field:
* For example, if the data set collected by a Metadata field is \[5,6,7,8,9,8,7,6,5,4,3,3,2], this function returns a count of **8** for the distinct unique values found in the data set - 5,6,7,8,9,4,3,2.
* **Unit**. The Unit you enter here is a label that will be used for billing to indicate to your customers what they are being charged for. For example, suppose you charge your end customers based on a measure of the volume of data streamed over time, such as kilobytes per second. You can enter **KiBy/s** as the unit for billing purposes.
* **Rounding**. Specifies how you want m3ter to deal with non-integer, that is fractional number, Aggregation values. For example, suppose your Product charges end customers on the basis of the number of megabytes (MB) of storage they've used in any given billing period. If the value of the Aggregation you've used to price the Product Plan amounts to 73.2 MB for a billing period, do you want to round up the fractional value to 74 MB and charge them for that amount, round it down to 73 MB, or apply no rounding for the Bill calculation and charge them for the exact 73.2 MB Aggregated usage value? Four options:
* **None**. Default.
* **Down**
* **Up**
* **Nearest**. Rounds up to the nearest half: 5.1 is rounded to 5; 5.5 is rounded to 6.
* Note that the **Rounding** setting is also used in conjunction with the **Quantity per unit** setting. Rounds the number of units after the **Quantity per unit** has been applied - see next bullet point.
* **Quantity per unit**. Defines how much of a quantity equates to 1 unit to be used when setting the price per unit for billing purposes. For example, suppose you are charging in kilobytes per second (KiBy/s) and want to charge \$0.25 per 500 KiBy/s. When you come to price a Plan using the Aggregation, you can configure the price per unit to be \$0.25 and enter **500** here for **Quantity per unit**.
* Note that if you set **Quantity per unit** to a value other than one, you would typically set **Rounding** to **Up**. In this example, suppose your customer on average used 48,900 KiBy/s during the billing period, the billing charge would then be 48,900 / 500 = 97.8 rounded up to 98 \* 0.25 = \$2.45.
**Important!** When you create a Compound Aggregation that references a simple Aggregation, the Compound Aggregation calculation uses the *base value* of the simple Aggregation and before any **Quantity per unit** factor or **Rounding** defined for the simple Aggregation is applied.
* **Default Value**. Optional field - enter a default value to be used for the Aggregation if no usage-data is available from the selected Meter Target field. Set to 0, if you expect to reference the Aggregation in a Compound Aggregation. This ensures that any null values are passed in correctly to the Compound Aggregation calculation with a value = 0.
## Segmented Aggregations
If you've set up non-numeric fields on the selected target Meter, you can configure a segmented Aggregation using the **Segments** panel. See [Segmented Aggregations](/guides/usage-data-aggregations/segmented-aggregations).
## Custom Fields
You can define **Custom Fields** when creating an Aggregation or edit the Aggregation at a later date to do this. Any Custom Fields you create for an Aggregation override those you've created for Aggregations at the Organizational level. We strongly recommend reviewing [Working with Custom Fields](/guides/creating-and-managing-products/working-with-custom-fields) before you create and use Custom Fields.
**Important! Aggregation Custom Fields not supported for calculations**. Creating Custom Fields for Aggregations is intended to support financial reporting use cases. Although you can define Custom Fields at both the Organizational level and individual Aggregation level, they are not supported for use in Derived Field and Compound Aggregation calculations.
# Segmented Aggregations
Source: https://docs.m3ter.com/guides/usage-data-aggregations/segmented-aggregations
*Segmented Aggregations* allow you to segment the usage data collected by a single Meter. This capability is very useful for implementing some pricing and billing use cases.
This topic introduces an example usage-based pricing use case and explains how to create and work with Segmented Aggregations:
* [Example Use Case](#example-use-case)
* [Configuration for Example Use Case](#configuration-for-example-use-case)
* [Creating Segmented Aggregations](#creating-segmented-aggregations)
* [Pricing Plans with Segmented Aggregations](#pricing-plans-with-segmented-aggregations)
* [Reviewing Bills for Segmented Aggregation Pricing](#reviewing-bills-for-segmented-aggregation-pricing)
* [Custom Descriptions for Segmented Aggregations](#custom-descriptions-for-segmented-aggregations)
* [Using Copy or Cut and Paste to Create and Manage Segment Values](#using-copy-or-cut-and-paste-to-create-and-manage-segment-values)
* [Using Wildcards or Defaults in Segmented Aggregations](#using-wildcards-or-defaults-in-segmented-aggregations)
## Example Use Case
Suppose you offer a service to companies to perform background checks on employee candidates to support their hiring process. Pricing for this service will vary by candidate location and the level of check done. The service is offered for candidate locations across three countries and you can perform three levels of background check for each location: Standard, Extended, or Complete. If you want to price differently for each possible combination of check for Country/Level, this would mean having to set up multiple Meters/Aggregations to support usage-pricing for all possible combinations. This then places the burden of deciding which Meter to use for pricing on you when sending customer usage data into the m3ter platform. For such cases, you can use Segmented Aggregations on the same Meter usage data, which means you can always send us data for the same Meter and allows a different pricing to be created for each segment.
## Configuration for Example Use Case
Here's the configuration for the example.
### Meter
Create and configure a single Meter with three Data Fields:
| Data | Field | Category | Example Values |
| - | - | - | - |
| Candidate location | location | Where | China \| USA \| UK |
| Background check level | type | What | Standard \| Extended \| Complete |
| Number of checks performed | quantity | Measure | 1 |
### Aggregations
First, you can define which Meter Data Fields are part of the segmented Aggregation - for the current example, these are **location** and **type**.
**Tip: Only String Data Fields can be Segmented!** That is: **Who**, **What**, and **Where** Data Fields. Numeric Data Fields, such as **Measure**, **Cost**, and **Income** cannot be segmented.
Second, you can then define different segmented values for the Aggregation, where for each value you want to assign a specific pricing. For the current example, let's suppose we want to set up six segment values:
| Segments | location | type |
| - | - | - |
| Segment value 1 | China | Standard |
| Segment value 2 | China | Extended |
| Segment value 3 | USA | Extended |
| Segment value 4 | USA | Complete |
| Segment value 5 | UK | Standard |
| Segment value 6 | UK | Complete |
## Creating Segmented Aggregations
This section explains how to create a Segmented Aggregation for the example use case described in the [earlier section](/guides/usage-data-aggregations/segmented-aggregations#example-use-case) of this topic. It's assumed that a Meter with the required three Data Fields has been set up.
**Important: Segmentation Limits!**
* The maximum number of fields that can be used for segmentation is **5**.
* The maximum number of unique segment combinations is **1000**.
**To create a Segmented Aggregation:**
1. Select **Metering>Aggregations**. The **Aggregations** page opens.
2. In the **Product** drop-down, select the Product for which you want to create the new Segmented Aggregation.
3. Select **Create aggregation**. The **Create** page opens.
4. Under **Aggregation details**, enter a **Name** and **Code** for the new Aggregation:
* The **External system** and **External table** mapped to are shown - such as **NetSuite - Item** in the above example. The **External entity ID** mapped to is also shown.
* If a listed External mapping is linked to an Integration, under **Linked integration** a hotlink text will be shown which you can use to open the Integration.
* Under **Actions**, you can edit or delete the External mapping.
* If the Aggregation has multiple External mappings created for it, you can use *Search external mappings* to search by **External table** and **External entity ID** and filter the list.
* You can commence a workflow to **Create external mapping** for the Aggregation directly - see [Creating and Managing External Mappings for Accounts](/guides/end-customer-accounts/creating-and-managing-external-mappings-for-accounts) for an example.
**Integration runs**. If you've set up an integration that synchronizes the Aggregation with an external system, the date/time and status of the **Latest** integration run are shown. You can use a text hotlink to open details of this latest run or **View all runs**. See [Reviewing Integration Run Details](/guides/integrations/setting-up-integrations/reviewing-integration-run-details).
# Reviewing Aggregation Options
Source: https://docs.m3ter.com/guides/usage-data-aggregations/reviewing-aggregation-options
You can use *Aggregations* to convert the usage data collected by your Meters into numerical measures. You can then use these Aggregations to price your product Plans and apply usage-based pricing to your products and services. You might also want to aggregate raw data measures for other purposes, such as to feed into analytical or business performance tools.
This topic explains the difference between Product and Global Aggregations and the configuration options available for Aggregations.
## Product vs. Global Aggregations
You can create Product Aggregations, which belong to a specific Product, or Global Aggregations, which are not tied to a specific Product:
* If you create an Aggregation that targets a Product-specific Meter, the Aggregation is tied to the same Product and can only be used to price Plans created for that Product. See [Creating Product Aggregations](/guides/usage-data-aggregations/creating-aggregations).
* If you create an Aggregation that targets a Global Meter, the Aggregation also becomes Global and can be used to price Plans created for any Product. See [Creating Global Aggregations](/guides/usage-data-aggregations/creating-global-aggregations).
* If you create an Aggregation that targets a Product-specific Meter, the Aggregation is Product-specific also for the Product. If you then switch the target Meter to be a Global Meter, the Aggregation then becomes Global also. See [Product Meters vs. Global Meters](/guides/usage-data-meters/reviewing-meter-options#product-meters-vs-global-meters).
## Configuring Aggregations
When you create an Aggregation and have entered a **Name** and **Code** you must define several key attributes to ensure the resultant Aggregation value precisely suits your pricing or other requirements:
* **Meter**. Each Aggregation is a child of a Meter, so you must first select the Meter you want to use as the source of raw usage data for your Aggregation.
* **Target Field**. When you select a Meter, you can then select a Data Field or Derived Field on the Meter as the basis for your Aggregation.
* **Aggregation**. This defines the method by which a numerical measurement is determined on the basis of the usage data collected by the Target Field. The options for how the Aggregation gives a unit value based on the Target Field depends on the **Category** configured for the selected Target Field:
* **Sum**. Adds the values. Can be applied to a **Measure**, **Income**, or **Cost** Target Field.
* **Minimum**. Uses the minimum value. Can be applied to a **Measure**, **Income**, or **Cost** Target Field.
* **Maximum**. Uses the maximum value. Can be applied to a **Measure**, **Income**, or **Cost** Target Field.
* **Count**. Counts the number of values. Can be applied to a **Measure**, **Income**, or **Cost** Target Field.
* **Latest**. Uses the most recent value. Can be applied to a **Measure**, **Income**, or **Cost** Target Field.
* **Notes**:
* This is based on the timestamp - `ts` - value of usage data measurement submissions.
* If you are using the **Latest** aggregation method, please ensure distinct `ts` values are used for your usage data measurements.
* **Mean**. Uses the arithmetic mean of the values. Can be applied to a **Measure**, **Income**, or **Cost** Target Field.
* **Custom SQL**. Allows you to run an SQL query against the `measurements` table to define a pricing metric. Can be applied to a **Measure**, **Income**, or **Cost** Target Field.
* **Unique**. Uses unique values and returns a count of the number of unique values. Can be applied to a **Metadata** Target Field:
* For example, if the data set collected by a Metadata field is \[5,6,7,8,9,8,7,6,5,4,3,3,2], this function returns a count of **8** for the distinct unique values found in the data set - 5,6,7,8,9,4,3,2.
* **Unit**. The Unit you enter here is a label that will be used for billing to indicate to your customers what they are being charged for. For example, suppose you charge your end customers based on a measure of the volume of data streamed over time, such as kilobytes per second. You can enter **KiBy/s** as the unit for billing purposes.
* **Rounding**. Specifies how you want m3ter to deal with non-integer, that is fractional number, Aggregation values. For example, suppose your Product charges end customers on the basis of the number of megabytes (MB) of storage they've used in any given billing period. If the value of the Aggregation you've used to price the Product Plan amounts to 73.2 MB for a billing period, do you want to round up the fractional value to 74 MB and charge them for that amount, round it down to 73 MB, or apply no rounding for the Bill calculation and charge them for the exact 73.2 MB Aggregated usage value? Four options:
* **None**. Default.
* **Down**
* **Up**
* **Nearest**. Rounds up to the nearest half: 5.1 is rounded to 5; 5.5 is rounded to 6.
* Note that the **Rounding** setting is also used in conjunction with the **Quantity per unit** setting. Rounds the number of units after the **Quantity per unit** has been applied - see next bullet point.
* **Quantity per unit**. Defines how much of a quantity equates to 1 unit to be used when setting the price per unit for billing purposes. For example, suppose you are charging in kilobytes per second (KiBy/s) and want to charge \$0.25 per 500 KiBy/s. When you come to price a Plan using the Aggregation, you can configure the price per unit to be \$0.25 and enter **500** here for **Quantity per unit**.
* Note that if you set **Quantity per unit** to a value other than one, you would typically set **Rounding** to **Up**. In this example, suppose your customer on average used 48,900 KiBy/s during the billing period, the billing charge would then be 48,900 / 500 = 97.8 rounded up to 98 \* 0.25 = \$2.45.
**Important!** When you create a Compound Aggregation that references a simple Aggregation, the Compound Aggregation calculation uses the *base value* of the simple Aggregation and before any **Quantity per unit** factor or **Rounding** defined for the simple Aggregation is applied.
* **Default Value**. Optional field - enter a default value to be used for the Aggregation if no usage-data is available from the selected Meter Target field. Set to 0, if you expect to reference the Aggregation in a Compound Aggregation. This ensures that any null values are passed in correctly to the Compound Aggregation calculation with a value = 0.
## Segmented Aggregations
If you've set up non-numeric fields on the selected target Meter, you can configure a segmented Aggregation using the **Segments** panel. See [Segmented Aggregations](/guides/usage-data-aggregations/segmented-aggregations).
## Custom Fields
You can define **Custom Fields** when creating an Aggregation or edit the Aggregation at a later date to do this. Any Custom Fields you create for an Aggregation override those you've created for Aggregations at the Organizational level. We strongly recommend reviewing [Working with Custom Fields](/guides/creating-and-managing-products/working-with-custom-fields) before you create and use Custom Fields.
**Important! Aggregation Custom Fields not supported for calculations**. Creating Custom Fields for Aggregations is intended to support financial reporting use cases. Although you can define Custom Fields at both the Organizational level and individual Aggregation level, they are not supported for use in Derived Field and Compound Aggregation calculations.
# Segmented Aggregations
Source: https://docs.m3ter.com/guides/usage-data-aggregations/segmented-aggregations
*Segmented Aggregations* allow you to segment the usage data collected by a single Meter. This capability is very useful for implementing some pricing and billing use cases.
This topic introduces an example usage-based pricing use case and explains how to create and work with Segmented Aggregations:
* [Example Use Case](#example-use-case)
* [Configuration for Example Use Case](#configuration-for-example-use-case)
* [Creating Segmented Aggregations](#creating-segmented-aggregations)
* [Pricing Plans with Segmented Aggregations](#pricing-plans-with-segmented-aggregations)
* [Reviewing Bills for Segmented Aggregation Pricing](#reviewing-bills-for-segmented-aggregation-pricing)
* [Custom Descriptions for Segmented Aggregations](#custom-descriptions-for-segmented-aggregations)
* [Using Copy or Cut and Paste to Create and Manage Segment Values](#using-copy-or-cut-and-paste-to-create-and-manage-segment-values)
* [Using Wildcards or Defaults in Segmented Aggregations](#using-wildcards-or-defaults-in-segmented-aggregations)
## Example Use Case
Suppose you offer a service to companies to perform background checks on employee candidates to support their hiring process. Pricing for this service will vary by candidate location and the level of check done. The service is offered for candidate locations across three countries and you can perform three levels of background check for each location: Standard, Extended, or Complete. If you want to price differently for each possible combination of check for Country/Level, this would mean having to set up multiple Meters/Aggregations to support usage-pricing for all possible combinations. This then places the burden of deciding which Meter to use for pricing on you when sending customer usage data into the m3ter platform. For such cases, you can use Segmented Aggregations on the same Meter usage data, which means you can always send us data for the same Meter and allows a different pricing to be created for each segment.
## Configuration for Example Use Case
Here's the configuration for the example.
### Meter
Create and configure a single Meter with three Data Fields:
| Data | Field | Category | Example Values |
| - | - | - | - |
| Candidate location | location | Where | China \| USA \| UK |
| Background check level | type | What | Standard \| Extended \| Complete |
| Number of checks performed | quantity | Measure | 1 |
### Aggregations
First, you can define which Meter Data Fields are part of the segmented Aggregation - for the current example, these are **location** and **type**.
**Tip: Only String Data Fields can be Segmented!** That is: **Who**, **What**, and **Where** Data Fields. Numeric Data Fields, such as **Measure**, **Cost**, and **Income** cannot be segmented.
Second, you can then define different segmented values for the Aggregation, where for each value you want to assign a specific pricing. For the current example, let's suppose we want to set up six segment values:
| Segments | location | type |
| - | - | - |
| Segment value 1 | China | Standard |
| Segment value 2 | China | Extended |
| Segment value 3 | USA | Extended |
| Segment value 4 | USA | Complete |
| Segment value 5 | UK | Standard |
| Segment value 6 | UK | Complete |
## Creating Segmented Aggregations
This section explains how to create a Segmented Aggregation for the example use case described in the [earlier section](/guides/usage-data-aggregations/segmented-aggregations#example-use-case) of this topic. It's assumed that a Meter with the required three Data Fields has been set up.
**Important: Segmentation Limits!**
* The maximum number of fields that can be used for segmentation is **5**.
* The maximum number of unique segment combinations is **1000**.
**To create a Segmented Aggregation:**
1. Select **Metering>Aggregations**. The **Aggregations** page opens.
2. In the **Product** drop-down, select the Product for which you want to create the new Segmented Aggregation.
3. Select **Create aggregation**. The **Create** page opens.
4. Under **Aggregation details**, enter a **Name** and **Code** for the new Aggregation:
![]() * **Accounting product**. Use the drop-down to select a Product. For accounting purposes, you can use this to link to a specific Product any usage line items on Bills that result from pricing a Plan using this Aggregation. (*Optional*)
* If you've also defined an Accounting product for a Pricing that uses this Aggregation, then the *Pricing Accounting product* takes precedence and is used.
* If no Accounting product is defined for a Pricing and you omit an Accounting product for the Aggregation, then the *Product the Plan belongs* to is used.
5. Under **Meter settings**, select the **Meter** previously created for the example and with the required Data Fields: **Location**, **Type**, and **Quantity**:
* **Accounting product**. Use the drop-down to select a Product. For accounting purposes, you can use this to link to a specific Product any usage line items on Bills that result from pricing a Plan using this Aggregation. (*Optional*)
* If you've also defined an Accounting product for a Pricing that uses this Aggregation, then the *Pricing Accounting product* takes precedence and is used.
* If no Accounting product is defined for a Pricing and you omit an Accounting product for the Aggregation, then the *Product the Plan belongs* to is used.
5. Under **Meter settings**, select the **Meter** previously created for the example and with the required Data Fields: **Location**, **Type**, and **Quantity**:
![]() In this example:
* Our Meter set up earlier is called **Candidate Check**.
* We've selected **quantity** as the Target Field.
6. Enter the **Aggregation settings**:
In this example:
* Our Meter set up earlier is called **Candidate Check**.
* We've selected **quantity** as the Target Field.
6. Enter the **Aggregation settings**:
 In this example:
* We've selected to **Sum** the number of **Candidate Hiring Checks**.
7. Open the **Segments** panel:
In this example:
* We've selected to **Sum** the number of **Candidate Hiring Checks**.
7. Open the **Segments** panel:
![Segment Aggs93]() * Because the **Candidate Check** Meter has two Data Fields of the category that can be segmented - a **Location>Where** and a **Type>What** field - the **Segments** panel is loaded with these:
**Tip: Creating Segmented Aggregations using Derived Fields?** If you have added a Derived Field on the target Meter which is a string type, then this Derived Field will show as available to set up segment values for when creating an Aggregation. For example, if you've set up a Derived Field which concatenates two string Data Fields, this Derived Field will show as available under **Segments** to set up segment values for the Aggregation.
8. In the **Segments** panel, select the Meter fields you want to use to create segments. The panel adjust to add a first blank row for the selected Meter fields:
* Because the **Candidate Check** Meter has two Data Fields of the category that can be segmented - a **Location>Where** and a **Type>What** field - the **Segments** panel is loaded with these:
**Tip: Creating Segmented Aggregations using Derived Fields?** If you have added a Derived Field on the target Meter which is a string type, then this Derived Field will show as available to set up segment values for when creating an Aggregation. For example, if you've set up a Derived Field which concatenates two string Data Fields, this Derived Field will show as available under **Segments** to set up segment values for the Aggregation.
8. In the **Segments** panel, select the Meter fields you want to use to create segments. The panel adjust to add a first blank row for the selected Meter fields:
![Segment Aggs92]() 9. Enter segment values for the first row and then use the **Add segment** button to successively add the required segments you want to price by. For the current example, we've added six segment values using the **Location/Type** Meter fields:
9. Enter segment values for the first row and then use the **Add segment** button to successively add the required segments you want to price by. For the current example, we've added six segment values using the **Location/Type** Meter fields:
![Segment Aggs94]() 10. Select **Create aggregation**. The **Aggregation details** page opens:
10. Select **Create aggregation**. The **Aggregation details** page opens:
![Segment Aggs90]() When you come to price up your Product Plans in the Pricing Editor, the new Segmented Aggregation will be available for selection.
**Notes and Tips:**
* **Pricing a Plan using this example Segmented Aggregation?** See [Pricing Plans Using Segmented Aggregations](/guides/plans-and-pricing/pricing-plans/pricing-plans-using-segmented-aggregations).
* **Aggregation metadata?** If you scroll down the **Aggregation details** page, you can review Aggregation metadata. See [Reviewing Aggregation Details](/guides/usage-data-aggregations/reviewing-aggregation-details).
11. If you want to edit an Aggregation's details, select the **Edit** button, make your changes, and click **Update**.
12. If you want to remove an Aggregation, return to the **Aggregations** page and select the **Delete** button for the Aggregation:
When you come to price up your Product Plans in the Pricing Editor, the new Segmented Aggregation will be available for selection.
**Notes and Tips:**
* **Pricing a Plan using this example Segmented Aggregation?** See [Pricing Plans Using Segmented Aggregations](/guides/plans-and-pricing/pricing-plans/pricing-plans-using-segmented-aggregations).
* **Aggregation metadata?** If you scroll down the **Aggregation details** page, you can review Aggregation metadata. See [Reviewing Aggregation Details](/guides/usage-data-aggregations/reviewing-aggregation-details).
11. If you want to edit an Aggregation's details, select the **Edit** button, make your changes, and click **Update**.
12. If you want to remove an Aggregation, return to the **Aggregations** page and select the **Delete** button for the Aggregation:
![]() A confirmation popup opens.
13. Select **Yes** to confirm the delete action.
**Tip: Create Segmented Aggregation using API call?** You can also use the *Create Aggregation* API call - see the [Aggregation section](/api/aggregation/introduction) of our API Reference documentation.
## Pricing Plans with Segmented Aggregations
When pricing Plans you can define a pricing for each segmented value set up for an Aggregation. For more details on how to do this, see [Pricing Plans Using Segmented Aggregations](https://docs.m3ter.com/guides/plans-and-pricing/pricing-plans/pricing-plans-using-segmented-aggregations).
**Pricing Plans in conjunction with tiered pricing!** Caution is required when using Segmented Aggregations in conjunction with a tiered pricing structure:
* Suppose in the current example use case you want to offer 50 free background checks to your customers per billing period and then charge \$50 per 100 checks made after the first 50 free per billing period. If you had priced using a non-segmented Aggregation and a customer consumes 150 checks in total during a billing period, then the bill would amount to \$50. If however you use a Segmented Aggregation and your customer again consumes a total of 150 checks but across 3 segmented values and at 50 checks for each value, then the 50 free tier is applied separately to each segment and the bill amount will be \$0.
## Reviewing Bills for Segmented Aggregation Pricing
If you use Segmented Aggregations to price your Product Plans, then at billing one line item will be created per Aggregation segment value you've used for pricing and any default pricing you've used:
* Each Bill line item shows a charge for a priced segment.
* If you do not use a segment value for pricing, then no line item for this appears on the Bill.
To illustrate how Bills are generated when a segmented Aggregation is used for pricing, we'll use the **Hire Check** segmented Aggregation for the **Premium Data Checks** Product created in the [earlier section](https://docs.m3ter.com/#creating-segmented-aggregations), submit some test usage data to an Account, and then generate a Bill.
**To generate and review Bills for Segmented Aggregation pricing:**
1. Select **Products>Premium Data Checks**. The **Product details** page opens.
We'll first create a Plan for the Product.
2. Create a Plan Template for the Product configured for monthly billing in US Dollars and then create the **Premium Data Check Plan** based on the template. See [Creating Product Entities](https://docs.m3ter.com/guides/creating-and-managing-products#creating-product-entities) for more details.
Next, we'll open the **Hire Check** Aggregation then use it to price the **Premium Data Check Plan**.
3. Open the **Plan details** page for the **Premium Data Check Plan** and then use the **Hire Check** Segmented Aggregation to configure pricing for each segment.
A confirmation popup opens.
13. Select **Yes** to confirm the delete action.
**Tip: Create Segmented Aggregation using API call?** You can also use the *Create Aggregation* API call - see the [Aggregation section](/api/aggregation/introduction) of our API Reference documentation.
## Pricing Plans with Segmented Aggregations
When pricing Plans you can define a pricing for each segmented value set up for an Aggregation. For more details on how to do this, see [Pricing Plans Using Segmented Aggregations](https://docs.m3ter.com/guides/plans-and-pricing/pricing-plans/pricing-plans-using-segmented-aggregations).
**Pricing Plans in conjunction with tiered pricing!** Caution is required when using Segmented Aggregations in conjunction with a tiered pricing structure:
* Suppose in the current example use case you want to offer 50 free background checks to your customers per billing period and then charge \$50 per 100 checks made after the first 50 free per billing period. If you had priced using a non-segmented Aggregation and a customer consumes 150 checks in total during a billing period, then the bill would amount to \$50. If however you use a Segmented Aggregation and your customer again consumes a total of 150 checks but across 3 segmented values and at 50 checks for each value, then the 50 free tier is applied separately to each segment and the bill amount will be \$0.
## Reviewing Bills for Segmented Aggregation Pricing
If you use Segmented Aggregations to price your Product Plans, then at billing one line item will be created per Aggregation segment value you've used for pricing and any default pricing you've used:
* Each Bill line item shows a charge for a priced segment.
* If you do not use a segment value for pricing, then no line item for this appears on the Bill.
To illustrate how Bills are generated when a segmented Aggregation is used for pricing, we'll use the **Hire Check** segmented Aggregation for the **Premium Data Checks** Product created in the [earlier section](https://docs.m3ter.com/#creating-segmented-aggregations), submit some test usage data to an Account, and then generate a Bill.
**To generate and review Bills for Segmented Aggregation pricing:**
1. Select **Products>Premium Data Checks**. The **Product details** page opens.
We'll first create a Plan for the Product.
2. Create a Plan Template for the Product configured for monthly billing in US Dollars and then create the **Premium Data Check Plan** based on the template. See [Creating Product Entities](https://docs.m3ter.com/guides/creating-and-managing-products#creating-product-entities) for more details.
Next, we'll open the **Hire Check** Aggregation then use it to price the **Premium Data Check Plan**.
3. Open the **Plan details** page for the **Premium Data Check Plan** and then use the **Hire Check** Segmented Aggregation to configure pricing for each segment.
![Segment Aggs77]() * See [Pricing Plans Using Segmented Aggregations](https://docs.m3ter.com/guides/plans-and-pricing/pricing-plans/pricing-plans-using-segmented-aggregations).
* For the current example, we've configured a flat-rate single tier pricing in US Dollars for each of the six segments defined for the **Hire Check** Aggregation as follows:
| Type | Location | Unit Price |
| - | - | - |
| Complete | UK | 30 |
| Complete | USA | 20 |
| Extended | China | 15 |
| Extended | USA | 12 |
| Standard | China | 10 |
| Standard | UK | 20 |
* For each segment Pricing, we've entered a *generic description* to appear on Bill line items:
* See [Pricing Plans Using Segmented Aggregations](https://docs.m3ter.com/guides/plans-and-pricing/pricing-plans/pricing-plans-using-segmented-aggregations).
* For the current example, we've configured a flat-rate single tier pricing in US Dollars for each of the six segments defined for the **Hire Check** Aggregation as follows:
| Type | Location | Unit Price |
| - | - | - |
| Complete | UK | 30 |
| Complete | USA | 20 |
| Extended | China | 15 |
| Extended | USA | 12 |
| Standard | China | 10 |
| Standard | UK | 20 |
* For each segment Pricing, we've entered a *generic description* to appear on Bill line items:
 4. Create a test Account and attach the **Premium Data Check Plan** to it. We've created the **Data Check Customer 1** Account and attached the Plan to it:
![Segment Aggs89]() Next, we can submit some test usage data to the Account
5. Select **Submit usage**
* On the **Submit usage data** modal, select **Candidate Check** for **Step 1: Select a meter**.
* For **Step 2: Define measurements and send**, submit a single test usage data measurement for each of the six segments we priced for the **Premium Data Check Plan**, and all within the same month. The correct Meter and Account fields will be preselected. For example:
| Type | Location | Quantity |
| - | - | - |
| Complete | UK | 27 |
| Complete | USA | 42 |
| Extended | China | 15 |
| Extended | USA | 61 |
| Standard | China | 18 |
| Standard | UK | 56 |
We now have a test usage data submission made against the **Data Check Customer 1** Account for each of the segment values we priced the attached Product Plan for and we can generate a Bill for the month in which the submissions were made.
6. Select the **Data Check Customer 1** Account **Bills** tab and **Run billing** for the month in which you made test usage data submissions. See [Running Bills Manually](https://docs.m3ter.com/guides/billing-and-usage-data/running-viewing-and-managing-bills/running-bills-and-viewing-bill-details#running-bills-manually).
* When the Bill job has completed the newly generated Bill will appear on the **Bills** tab. Select Bill **Reference** text hotlink to open the Bill:
Next, we can submit some test usage data to the Account
5. Select **Submit usage**
* On the **Submit usage data** modal, select **Candidate Check** for **Step 1: Select a meter**.
* For **Step 2: Define measurements and send**, submit a single test usage data measurement for each of the six segments we priced for the **Premium Data Check Plan**, and all within the same month. The correct Meter and Account fields will be preselected. For example:
| Type | Location | Quantity |
| - | - | - |
| Complete | UK | 27 |
| Complete | USA | 42 |
| Extended | China | 15 |
| Extended | USA | 61 |
| Standard | China | 18 |
| Standard | UK | 56 |
We now have a test usage data submission made against the **Data Check Customer 1** Account for each of the segment values we priced the attached Product Plan for and we can generate a Bill for the month in which the submissions were made.
6. Select the **Data Check Customer 1** Account **Bills** tab and **Run billing** for the month in which you made test usage data submissions. See [Running Bills Manually](https://docs.m3ter.com/guides/billing-and-usage-data/running-viewing-and-managing-bills/running-bills-and-viewing-bill-details#running-bills-manually).
* When the Bill job has completed the newly generated Bill will appear on the **Bills** tab. Select Bill **Reference** text hotlink to open the Bill:
![Segment Aggs78]() * As expected the Bill contains six line items - one for each of the priced segment values defined for the **Hire Check** Segmented Aggregation which we used to price the **Premium Data Check Plan** attached to the Account.
* However, the generic description we defined for each segment pricing fails to show us which particular segment value each line item applies to. You can reference the segment values in [custom descriptions](#defining-custom-descriptions) for segment pricing to ensure that when Bills are generated, the segment value the line item applies to can be distinguished.
## Custom Descriptions for Segmented Aggregations
If you want to use custom descriptions for the line items on Bills generated when a segmented Aggregations has been used for pricing, you can use handlebar notation to reference segment values within the pricing description definition.
For the example Bill we generated in the [previous section](#reviewing-bills-for-segmented-aggregation-pricing), we can update each segment pricing description as follows:
* As expected the Bill contains six line items - one for each of the priced segment values defined for the **Hire Check** Segmented Aggregation which we used to price the **Premium Data Check Plan** attached to the Account.
* However, the generic description we defined for each segment pricing fails to show us which particular segment value each line item applies to. You can reference the segment values in [custom descriptions](#defining-custom-descriptions) for segment pricing to ensure that when Bills are generated, the segment value the line item applies to can be distinguished.
## Custom Descriptions for Segmented Aggregations
If you want to use custom descriptions for the line items on Bills generated when a segmented Aggregations has been used for pricing, you can use handlebar notation to reference segment values within the pricing description definition.
For the example Bill we generated in the [previous section](#reviewing-bills-for-segmented-aggregation-pricing), we can update each segment pricing description as follows:
![Segment Aggs80]() If we recalculate the Bill this will resolve for line item **Descriptions** as:
If we recalculate the Bill this will resolve for line item **Descriptions** as:
 Alternatively, if we use the following for each segment pricing description:
![Segment Aggs82]() This will resolve on Bills as:
This will resolve on Bills as:
 If you *do not* define a description on the pricing you configure for a Plan using a Segmented Aggregation, then a default description is used that includes any segment values:
*\ (\,\,* \*...)*
For the current example, the default description format resolves to:
If you *do not* define a description on the pricing you configure for a Plan using a Segmented Aggregation, then a default description is used that includes any segment values:
*\ (\,\,* \*...)*
For the current example, the default description format resolves to:
 ## Using Copy or Cut and Paste to Create and Manage Segment Values
If you have a longer list of segment values to set up and manage for an Aggregation, you can copy/cut and paste values from a spreadsheet application into the **Segments** values grid. Suppose in the above example, you want to set up six additional segment values that you've already set out in a spreadsheet:
## Using Copy or Cut and Paste to Create and Manage Segment Values
If you have a longer list of segment values to set up and manage for an Aggregation, you can copy/cut and paste values from a spreadsheet application into the **Segments** values grid. Suppose in the above example, you want to set up six additional segment values that you've already set out in a spreadsheet:
 Instead of adding these row-by-row, highlight and copy the segment value rows in your spreadsheet then select to **Add segment** in the **Segments** panel:
![Segment Aggs96]() You can then paste the additional copied segment value rows directly into the **Segments** panel:
You can then paste the additional copied segment value rows directly into the **Segments** panel:
![Segment Aggs97]() ## Using Wildcards or Defaults in Segmented Aggregations
You can use wildcards or defaults when setting up a Segmented Aggregation:
* [Using Wildcards - An example](/guides/usage-data-aggregations/segmented-aggregations#using-wildcards-an-example)
* [Using Wildcards - API Calls](/guides/usage-data-aggregations/segmented-aggregations#using-wildcards-api-calls)
* [Using Wildcards - Order of Evaluation](/guides/usage-data-aggregations/segmented-aggregations#using-wildcards-order-of-evaluation)
**Tip: Create Pricings for Wildcard Segments?** For example of how to create pricings for segments that use wildcards using the [Create Pricing](/api/pricing/create-pricing) API call, see the [Creating Wildcard Pricings for Segments](/guides/plans-and-pricing/pricing-plans/pricing-plans-using-segmented-aggregations#api-call---creating-wildcard-pricings-for-segments) section of the [Pricing Plans Using Segmented Aggregations](/guides/plans-and-pricing/pricing-plans/pricing-plans-using-segmented-aggregations) topic.
### Using Wildcards - An example
To illustrate, we can adapt the current example use case. Suppose, instead of wanting to charge a different rate for a Standard checks by Country, you want to charge the *same amount* as a default for a Standard level of candidate background check regardless of country of location. The schema for the segment values will now look like this:
| Segments | location | type |
| - | - | - |
| Segment value 1 | China | Extended |
| Segment value 2 | USA | Extended |
| Segment value 3 | USA | Complete |
| Segment value 4 | UK | Complete |
| Segment value 5 | Any | Standard |
Using this schema, we can set up a second Aggregation - called **Hire Check 2** (and [see above](/guides/usage-data-aggregations/segmented-aggregations#creating-segmented-aggregations)) - that is segmented using the **location** and **type** fields in the following way for the required **Extended** or **Complete** level:
## Using Wildcards or Defaults in Segmented Aggregations
You can use wildcards or defaults when setting up a Segmented Aggregation:
* [Using Wildcards - An example](/guides/usage-data-aggregations/segmented-aggregations#using-wildcards-an-example)
* [Using Wildcards - API Calls](/guides/usage-data-aggregations/segmented-aggregations#using-wildcards-api-calls)
* [Using Wildcards - Order of Evaluation](/guides/usage-data-aggregations/segmented-aggregations#using-wildcards-order-of-evaluation)
**Tip: Create Pricings for Wildcard Segments?** For example of how to create pricings for segments that use wildcards using the [Create Pricing](/api/pricing/create-pricing) API call, see the [Creating Wildcard Pricings for Segments](/guides/plans-and-pricing/pricing-plans/pricing-plans-using-segmented-aggregations#api-call---creating-wildcard-pricings-for-segments) section of the [Pricing Plans Using Segmented Aggregations](/guides/plans-and-pricing/pricing-plans/pricing-plans-using-segmented-aggregations) topic.
### Using Wildcards - An example
To illustrate, we can adapt the current example use case. Suppose, instead of wanting to charge a different rate for a Standard checks by Country, you want to charge the *same amount* as a default for a Standard level of candidate background check regardless of country of location. The schema for the segment values will now look like this:
| Segments | location | type |
| - | - | - |
| Segment value 1 | China | Extended |
| Segment value 2 | USA | Extended |
| Segment value 3 | USA | Complete |
| Segment value 4 | UK | Complete |
| Segment value 5 | Any | Standard |
Using this schema, we can set up a second Aggregation - called **Hire Check 2** (and [see above](/guides/usage-data-aggregations/segmented-aggregations#creating-segmented-aggregations)) - that is segmented using the **location** and **type** fields in the following way for the required **Extended** or **Complete** level:
![Segment Aggs99]() To set up the default for any **Standard** check level, first select **Add segment**. A new row is added with **(Any)** shown for both the **Location** and **Type**. You can now edit the **Type** for **Standard** and leave **Location** as **(Any)**:
To set up the default for any **Standard** check level, first select **Add segment**. A new row is added with **(Any)** shown for both the **Location** and **Type**. You can now edit the **Type** for **Standard** and leave **Location** as **(Any)**:
![Segment Aggs100]() We can now use **Hiring Check 2** in the Pricing Editor to price up Plans and define a charge - see [Pricing Plans Using Segmented Aggregations](/guides/plans-and-pricing/pricing-plans/pricing-plans-using-segmented-aggregations) - for **Standard** checks for candidates in any location:
We can now use **Hiring Check 2** in the Pricing Editor to price up Plans and define a charge - see [Pricing Plans Using Segmented Aggregations](/guides/plans-and-pricing/pricing-plans/pricing-plans-using-segmented-aggregations) - for **Standard** checks for candidates in any location:
![]() ### Using Wildcards - API Calls
If you use a [Create Aggregation](/api/aggregation/create-aggregation) API call to set up a Segmented Aggregation, you can use wildcards when defining segments using the `"segments"` request schema parameter. For instance, if we take the [example from the previous section](/guides/usage-data-aggregations/segmented-aggregations#using-wildcards---an-example), we can use this line in the request body of the call to define the five segment values:
> `"segments": [{"location" : "China", "type" : "Extended"}, {"location" : "USA", "type" : "Extended"},{"location" : "USA", "type" : "Complete"},{"location" : "UK", "type" : "Complete"}, {"type" : "Standard"}]`
Note that for the last segment defined, where we want a wildcard for `"location"` value, we simply omit this field and only define a value for the `"type"`.
Similarly, if we had wanted to define a *double-wildcard* segment for the **Location/Type** segmented fields, we can omit a specific value for both:
> `"segments": [{"location" : "China", "type" : "Extended"}, {"location" : "USA", "type" : "Extended"},{"location" : "USA", "type" : "Complete"},{"location" : "UK", "type" : "Complete"}, {}]`
As another example, suppose you want to create a segmented aggregation that has only a single segmented field and you want to create a single wildcard segment. In this case, you can use the same syntax. Here's an example request payload to illustrate:
```json theme={null}
{
"meterId": "b91e4ac1-bf9f-4e33-a676-63554108dxyz",
"name": "Test Segmented Agg",
"aggregation": "SUM",
"rounding": "NONE",
"quantityPerUnit": 1,
"unit": "GB",
"targetField": "quantity",
"segmentedFields": ["service_id"],
"segments": [
{}
]
}
```
### Using Wildcards - Order of Evaluation
If you are using wildcards in your Segmented Aggregations, you should be clear about the order of evaluation. To understand this, we can develop the example use case for a third - **Hiring Check 3** - that uses the same **Candidate Check** Meter for source usage data and we use the following schema for segmented values on this Aggregation using the **location** and **type** Data Fields with wildcards:
| Segments | location | type |
| - | - | - |
| Segment 1 | Any | Standard |
| Segment 2 | UK | Any |
| Segment 3 | Any | Any |
Again, we can configure the segment values when we create **Hiring Check 3** to follow this schema using wildcards:
### Using Wildcards - API Calls
If you use a [Create Aggregation](/api/aggregation/create-aggregation) API call to set up a Segmented Aggregation, you can use wildcards when defining segments using the `"segments"` request schema parameter. For instance, if we take the [example from the previous section](/guides/usage-data-aggregations/segmented-aggregations#using-wildcards---an-example), we can use this line in the request body of the call to define the five segment values:
> `"segments": [{"location" : "China", "type" : "Extended"}, {"location" : "USA", "type" : "Extended"},{"location" : "USA", "type" : "Complete"},{"location" : "UK", "type" : "Complete"}, {"type" : "Standard"}]`
Note that for the last segment defined, where we want a wildcard for `"location"` value, we simply omit this field and only define a value for the `"type"`.
Similarly, if we had wanted to define a *double-wildcard* segment for the **Location/Type** segmented fields, we can omit a specific value for both:
> `"segments": [{"location" : "China", "type" : "Extended"}, {"location" : "USA", "type" : "Extended"},{"location" : "USA", "type" : "Complete"},{"location" : "UK", "type" : "Complete"}, {}]`
As another example, suppose you want to create a segmented aggregation that has only a single segmented field and you want to create a single wildcard segment. In this case, you can use the same syntax. Here's an example request payload to illustrate:
```json theme={null}
{
"meterId": "b91e4ac1-bf9f-4e33-a676-63554108dxyz",
"name": "Test Segmented Agg",
"aggregation": "SUM",
"rounding": "NONE",
"quantityPerUnit": 1,
"unit": "GB",
"targetField": "quantity",
"segmentedFields": ["service_id"],
"segments": [
{}
]
}
```
### Using Wildcards - Order of Evaluation
If you are using wildcards in your Segmented Aggregations, you should be clear about the order of evaluation. To understand this, we can develop the example use case for a third - **Hiring Check 3** - that uses the same **Candidate Check** Meter for source usage data and we use the following schema for segmented values on this Aggregation using the **location** and **type** Data Fields with wildcards:
| Segments | location | type |
| - | - | - |
| Segment 1 | Any | Standard |
| Segment 2 | UK | Any |
| Segment 3 | Any | Any |
Again, we can configure the segment values when we create **Hiring Check 3** to follow this schema using wildcards:
![Segment Aggs102]() Now, suppose we have an item of usage data collected by the **Candidate Check** Meter as follows:
* **location** = **UK**
* **type** = **Standard**
If we've used **Hiring Check 3** to price a Plan for a Product, how will the end customer Account with that Plan attached be charged for this usage data; under which segment value pricing will the Account be charged? This depends on the *order* in which you've defined the segmented fields:
* In this example, where the order of defined segmented fields is **location** then **type**, the data would be matched preferentially to the **location** value, and would be charged according to the pricing configured for the **UK/(Any)** segment value.
* If, however, we'd defined the segmented fields for the Aggregation in the order of **type** then **location**, the data would be matched preferentially to the **type** value, and would be charged according to the pricing configured for the **Standard/(Any)** segment value.
You can change the order of segmented fields in the configuration table for an Aggregation by deselecting the **Segmented fields** checkboxes and then reselecting them in order for the evaluation order you want. The columns in the table will be ordered accordingly:
Now, suppose we have an item of usage data collected by the **Candidate Check** Meter as follows:
* **location** = **UK**
* **type** = **Standard**
If we've used **Hiring Check 3** to price a Plan for a Product, how will the end customer Account with that Plan attached be charged for this usage data; under which segment value pricing will the Account be charged? This depends on the *order* in which you've defined the segmented fields:
* In this example, where the order of defined segmented fields is **location** then **type**, the data would be matched preferentially to the **location** value, and would be charged according to the pricing configured for the **UK/(Any)** segment value.
* If, however, we'd defined the segmented fields for the Aggregation in the order of **type** then **location**, the data would be matched preferentially to the **type** value, and would be charged according to the pricing configured for the **Standard/(Any)** segment value.
You can change the order of segmented fields in the configuration table for an Aggregation by deselecting the **Segmented fields** checkboxes and then reselecting them in order for the evaluation order you want. The columns in the table will be ordered accordingly:
![Segment Aggs103]() Lastly, there might be usage data items collected that do not have a match for either **location** or **type** fields with segment values configured, such as in this case:
* **location** = **USA**
* **type** = **Complete**
These would be evaluated for charging against the Account on the basis of our third, "double wildcard", segment value: **(Any)/(Any)**.
# Usage Data: Meters
Source: https://docs.m3ter.com/guides/usage-data-meters
Discover how to create, configure, and manage Meters for your Organization.
You can create and configure *Meters* in m3ter to collect your end customer usage data. When you have set up Meters, you can define *Aggregations* of that usage data to give the pricing metrics you want to use to price Plans for your Products. (See [Pricing Metrics: Aggregations](/guides/usage-data-aggregations) for more details.) This allows you to introduce usage-based pricing and billing for your Products.
For production environments, your data-collection requirements are unlikely to stop short with the data measures you'll use to support usage-based pricing of your products and services, but extend to collecting other data on costings and customer activity. These collected data can then be fed into analytical tools to yield valuable insights into business performance and management over time.
This section reviews the configuration options available for Meters and explains how to create them:
* [Reviewing Meter Options](/guides/usage-data-meters/reviewing-meter-options)
* [Creating Product Meters](/guides/usage-data-meters/creating-meters)
* [Creating Global Meters](/guides/usage-data-meters/creating-global-meters)
* [Working in Meter Details](/guides/usage-data-meters/working-in-meter-details)
* [Working with Meter Derived Fields and Examples](/guides/usage-data-meters/derived-fields-for-meters-examples-and-supported-syntax)
**Important! Feeding Usage Data into m3ter?** When you have set up your Meters and their data-collection fields, you'll need to submit your customer usage data to support your production environment. For more details, see the [Submitting Usage Data](/guides/billing-and-usage-data/submitting-usage-data) section.
**Tip: Reviewing Usage Data?** You can query for usage data and review the returned data using the Data Explorer. See [Performing Usage Queries and Reviewing Results](/guides/data-explorer/performing-usage-queries-and-reviewing-results).
# Creating Global Meters
Source: https://docs.m3ter.com/guides/usage-data-meters/creating-global-meters
This topic explains how to create Global Meters to collect usage data that you want to use to set up usage-based pricing across multiple Products:
* Any Aggregations that target a Global Meter also become Global and can be used to to price Plans for any Product.
* Global Meters can also be used to collect user data you require to serve other business purposes.
**Tip: Product-specific Meters?** You can also create *Product Meters*, which allow you to collect usage data for specific Products. Any Aggregations that target a Product-specific Meter also then belongs to the same specific Product and can only be used to price Plans belonging to that Product. See [Creating Product Meters](/guides/usage-data-meters/creating-meters).
**Understanding Meter Options!** We *strongly recommend* that you review the options available for configuring Meters before you attempt to create them. See [Reviewing Meter Options](/guides/usage-data-meters/reviewing-meter-options).
**To create a Global Meter:**
1. Select **Metering**. The **Meters** page opens and lists Meters by Product for **All products** together with any **Global** Meters.
2. Under **Global** select **Create meter**.
* Alternatively, you can select **Create meter** at top-right of the page.
The **Create** page opens:
* Note that for **Product**, **(Global)** is pre-selected.
3. Enter the **Meter** **details**:
* **Name.** Descriptive name for the Meter.
* **Code.** Unique identifier for the **Meter** in the m3ter system. You will need this **Code** as a unique id when submitting API calls, such as a call to update a Meter.
* **Notes**:
* When you've entered a **Name** and clicked in the **Code** field, a string is automatically entered based on the **Name** string. You can then edit the auto-generated **Code** as required.
* The **Code** string has a maximum length of 80 characters and must not contain non-printable or whitespace characters (except space), and cannot start/end with whitespace.
Lastly, there might be usage data items collected that do not have a match for either **location** or **type** fields with segment values configured, such as in this case:
* **location** = **USA**
* **type** = **Complete**
These would be evaluated for charging against the Account on the basis of our third, "double wildcard", segment value: **(Any)/(Any)**.
# Usage Data: Meters
Source: https://docs.m3ter.com/guides/usage-data-meters
Discover how to create, configure, and manage Meters for your Organization.
You can create and configure *Meters* in m3ter to collect your end customer usage data. When you have set up Meters, you can define *Aggregations* of that usage data to give the pricing metrics you want to use to price Plans for your Products. (See [Pricing Metrics: Aggregations](/guides/usage-data-aggregations) for more details.) This allows you to introduce usage-based pricing and billing for your Products.
For production environments, your data-collection requirements are unlikely to stop short with the data measures you'll use to support usage-based pricing of your products and services, but extend to collecting other data on costings and customer activity. These collected data can then be fed into analytical tools to yield valuable insights into business performance and management over time.
This section reviews the configuration options available for Meters and explains how to create them:
* [Reviewing Meter Options](/guides/usage-data-meters/reviewing-meter-options)
* [Creating Product Meters](/guides/usage-data-meters/creating-meters)
* [Creating Global Meters](/guides/usage-data-meters/creating-global-meters)
* [Working in Meter Details](/guides/usage-data-meters/working-in-meter-details)
* [Working with Meter Derived Fields and Examples](/guides/usage-data-meters/derived-fields-for-meters-examples-and-supported-syntax)
**Important! Feeding Usage Data into m3ter?** When you have set up your Meters and their data-collection fields, you'll need to submit your customer usage data to support your production environment. For more details, see the [Submitting Usage Data](/guides/billing-and-usage-data/submitting-usage-data) section.
**Tip: Reviewing Usage Data?** You can query for usage data and review the returned data using the Data Explorer. See [Performing Usage Queries and Reviewing Results](/guides/data-explorer/performing-usage-queries-and-reviewing-results).
# Creating Global Meters
Source: https://docs.m3ter.com/guides/usage-data-meters/creating-global-meters
This topic explains how to create Global Meters to collect usage data that you want to use to set up usage-based pricing across multiple Products:
* Any Aggregations that target a Global Meter also become Global and can be used to to price Plans for any Product.
* Global Meters can also be used to collect user data you require to serve other business purposes.
**Tip: Product-specific Meters?** You can also create *Product Meters*, which allow you to collect usage data for specific Products. Any Aggregations that target a Product-specific Meter also then belongs to the same specific Product and can only be used to price Plans belonging to that Product. See [Creating Product Meters](/guides/usage-data-meters/creating-meters).
**Understanding Meter Options!** We *strongly recommend* that you review the options available for configuring Meters before you attempt to create them. See [Reviewing Meter Options](/guides/usage-data-meters/reviewing-meter-options).
**To create a Global Meter:**
1. Select **Metering**. The **Meters** page opens and lists Meters by Product for **All products** together with any **Global** Meters.
2. Under **Global** select **Create meter**.
* Alternatively, you can select **Create meter** at top-right of the page.
The **Create** page opens:
* Note that for **Product**, **(Global)** is pre-selected.
3. Enter the **Meter** **details**:
* **Name.** Descriptive name for the Meter.
* **Code.** Unique identifier for the **Meter** in the m3ter system. You will need this **Code** as a unique id when submitting API calls, such as a call to update a Meter.
* **Notes**:
* When you've entered a **Name** and clicked in the **Code** field, a string is automatically entered based on the **Name** string. You can then edit the auto-generated **Code** as required.
* The **Code** string has a maximum length of 80 characters and must not contain non-printable or whitespace characters (except space), and cannot start/end with whitespace.
![]() 4. **Add** the **Data fields** you need to collect usage data. For example, a field to collect data on the volume of files stored on your service:
* **Name.** Descriptive name for the field.
* **Code.** Unique Identifier for field. You will need this **Code** as a unique id when submitting API calls, such as a call to submit measurements for this field.
* **Notes**:
* When you've entered a **Name** and clicked in the **Code** field, a string is automatically entered based on the **Name** string. You can then edit the auto-generated Code as required.
* The **Code** string has a maximum length of 80 characters and can only contain letters, numbers, underscore, and the dollar character, and must not start with a number. The same applies to the Code used for any Derived Fields you add to a Meter - see Step 6 below.
* **Category.** Defines what type of usage data you want to collect using this field. Select a **Measure** field type for this example.
* **Unit.** Defines the unit of measure.
4. **Add** the **Data fields** you need to collect usage data. For example, a field to collect data on the volume of files stored on your service:
* **Name.** Descriptive name for the field.
* **Code.** Unique Identifier for field. You will need this **Code** as a unique id when submitting API calls, such as a call to submit measurements for this field.
* **Notes**:
* When you've entered a **Name** and clicked in the **Code** field, a string is automatically entered based on the **Name** string. You can then edit the auto-generated Code as required.
* The **Code** string has a maximum length of 80 characters and can only contain letters, numbers, underscore, and the dollar character, and must not start with a number. The same applies to the Code used for any Derived Fields you add to a Meter - see Step 6 below.
* **Category.** Defines what type of usage data you want to collect using this field. Select a **Measure** field type for this example.
* **Unit.** Defines the unit of measure.
![]() **Important: Units of Measure?** We recommend that the units you use for your Data Fields conform to *The Unified Code for Units of Measure (UCUM)*, which is designed to facilitate the communication between electronic systems of quantities with their units. In the above example, we therefore use **GiBy** as the unit for the **GB Stored** Data Field. For more details, see [Units for Meter Fields - Examples](/guides/usage-data-meters/reviewing-meter-options#units-for-meter-fields-examples).
5. **Add** any required **Derived fields** or **Custom fields** to the Meter:
* For more on Derived Fields, see the [following topic](/guides/usage-data-meters/derived-fields-for-meters-examples-and-supported-syntax).
* For more on Custom Fields, see [Adding and Editing Custom Fields](/guides/organization-and-access-management/viewing-and-editing-organization#adding-and-editing-custom-fields). We strongly recommend reviewing [Working with Custom Fields](/guides/creating-and-managing-products/working-with-custom-fields) before you create and use Custom Fields.
6. Select **Create meter**. The **Meter details** page opens:
**Important: Units of Measure?** We recommend that the units you use for your Data Fields conform to *The Unified Code for Units of Measure (UCUM)*, which is designed to facilitate the communication between electronic systems of quantities with their units. In the above example, we therefore use **GiBy** as the unit for the **GB Stored** Data Field. For more details, see [Units for Meter Fields - Examples](/guides/usage-data-meters/reviewing-meter-options#units-for-meter-fields-examples).
5. **Add** any required **Derived fields** or **Custom fields** to the Meter:
* For more on Derived Fields, see the [following topic](/guides/usage-data-meters/derived-fields-for-meters-examples-and-supported-syntax).
* For more on Custom Fields, see [Adding and Editing Custom Fields](/guides/organization-and-access-management/viewing-and-editing-organization#adding-and-editing-custom-fields). We strongly recommend reviewing [Working with Custom Fields](/guides/creating-and-managing-products/working-with-custom-fields) before you create and use Custom Fields.
6. Select **Create meter**. The **Meter details** page opens:
![Create Meter67]() 7. If you want to create an Aggregation that targets one of the Meter's Data Fields or Derived Fields, then select **Create aggregation** for that field:
* You are taken directly to the **Aggregations>Create** page where the **Product** is pre-selected for **(Global)** and the **Meter** and **Target field** under **Meter settings** are also pre-selected.
* When you complete the **Aggregations>Create** workflow, you are returned to the **Meter details** page.
* For more details, see [Creating Global Aggregations](/guides/usage-data-meters/working-in-meter-details).
8. If you want to edit a Meter's details, select the **Edit** button, make your changes, and click **Update meter**.
9. If you want to remove a Meter, return to the **Meters** page and select the **Delete** button for the Meter:
7. If you want to create an Aggregation that targets one of the Meter's Data Fields or Derived Fields, then select **Create aggregation** for that field:
* You are taken directly to the **Aggregations>Create** page where the **Product** is pre-selected for **(Global)** and the **Meter** and **Target field** under **Meter settings** are also pre-selected.
* When you complete the **Aggregations>Create** workflow, you are returned to the **Meter details** page.
* For more details, see [Creating Global Aggregations](/guides/usage-data-meters/working-in-meter-details).
8. If you want to edit a Meter's details, select the **Edit** button, make your changes, and click **Update meter**.
9. If you want to remove a Meter, return to the **Meters** page and select the **Delete** button for the Meter:
![]() A confirmation popup opens.
10. Select **Yes** to confirm the delete action.
**Tip: Working in Meter Details?** The **Meter details** page is designed to help you perform common Meter management and operational tasks, including submitting usage data measurements for your Meters. See [Working in Meter Details](/guides/usage-data-meters/working-in-meter-details).
# Creating Product Meters
Source: https://docs.m3ter.com/guides/usage-data-meters/creating-meters
This topic explains how to create a Meter for collecting the data which you will use to set up usage-based pricing for specific Products your end customers will consume:
* Any Aggregations that target a Product Meter also become specific to the same Product and can only be used to price Plans for that Product.
* Product Meters can also be used to collect Product-specific user data you require to serve other business purposes.
**Tip: Meters that are not Product-specific?** You can also create *Global Meters*, which allow you to collect usage data which you can use to set up pricing across multiple Products. Any Aggregations that target a Global Meter also become Global and can then be used to price Plans belonging to any Product. See [Creating Global Meters](/guides/usage-data-meters/creating-global-meters).
**Understanding Meter Options!** We *strongly recommend* that you review the options available for configuring Meters before you attempt to create them. See [Reviewing Meter Options](/guides/usage-data-meters/reviewing-meter-options).
**To create a Product Meter:**
1. Select **Metering**. The **Meters** page opens and lists Meters by **Product** for **All products** together with any **Global** Meters.
2. Use the drop-down at top-right to select the **Product** you want to create the new Meter for. The **Meters** page adjusts and shows:
* Any existing Meters created for the selected **Product** at the top of the page.
* Any **Global** Meters.
**Tip: Global Meter?** You can create a *Global Meter*, which is not tied to a specific Product. For more details, see [Creating Global Meters](/guides/usage-data-meters/creating-global-meters).
3. Select **Create meter** for the **Product**. The **Create** page opens:
* The **Product** is pre-selected.
* Alternatively, you can skip **Step 2** above to filter for the Product and select **Create meter** immediately at top-right. If you do this you will then have to select the Product on the **Create** page when it opens.
4. Enter the **Meter details**:
* **Name.** Descriptive name for the Meter.
* **Code.** Unique identifier for the **Meter** in the m3ter system. You will need this **Code** as a unique id when submitting API calls, such as a call to update a Meter.
* **Notes**:
* When you've entered a **Name** and clicked in the **Code** field, a Code is automatically entered based on the Name. You can then edit the auto-generated Code as required.
* The **Code** string has a maximum length of 80 characters and must not contain non-printable or whitespace characters (except space), and cannot start/end with whitespace.
A confirmation popup opens.
10. Select **Yes** to confirm the delete action.
**Tip: Working in Meter Details?** The **Meter details** page is designed to help you perform common Meter management and operational tasks, including submitting usage data measurements for your Meters. See [Working in Meter Details](/guides/usage-data-meters/working-in-meter-details).
# Creating Product Meters
Source: https://docs.m3ter.com/guides/usage-data-meters/creating-meters
This topic explains how to create a Meter for collecting the data which you will use to set up usage-based pricing for specific Products your end customers will consume:
* Any Aggregations that target a Product Meter also become specific to the same Product and can only be used to price Plans for that Product.
* Product Meters can also be used to collect Product-specific user data you require to serve other business purposes.
**Tip: Meters that are not Product-specific?** You can also create *Global Meters*, which allow you to collect usage data which you can use to set up pricing across multiple Products. Any Aggregations that target a Global Meter also become Global and can then be used to price Plans belonging to any Product. See [Creating Global Meters](/guides/usage-data-meters/creating-global-meters).
**Understanding Meter Options!** We *strongly recommend* that you review the options available for configuring Meters before you attempt to create them. See [Reviewing Meter Options](/guides/usage-data-meters/reviewing-meter-options).
**To create a Product Meter:**
1. Select **Metering**. The **Meters** page opens and lists Meters by **Product** for **All products** together with any **Global** Meters.
2. Use the drop-down at top-right to select the **Product** you want to create the new Meter for. The **Meters** page adjusts and shows:
* Any existing Meters created for the selected **Product** at the top of the page.
* Any **Global** Meters.
**Tip: Global Meter?** You can create a *Global Meter*, which is not tied to a specific Product. For more details, see [Creating Global Meters](/guides/usage-data-meters/creating-global-meters).
3. Select **Create meter** for the **Product**. The **Create** page opens:
* The **Product** is pre-selected.
* Alternatively, you can skip **Step 2** above to filter for the Product and select **Create meter** immediately at top-right. If you do this you will then have to select the Product on the **Create** page when it opens.
4. Enter the **Meter details**:
* **Name.** Descriptive name for the Meter.
* **Code.** Unique identifier for the **Meter** in the m3ter system. You will need this **Code** as a unique id when submitting API calls, such as a call to update a Meter.
* **Notes**:
* When you've entered a **Name** and clicked in the **Code** field, a Code is automatically entered based on the Name. You can then edit the auto-generated Code as required.
* The **Code** string has a maximum length of 80 characters and must not contain non-printable or whitespace characters (except space), and cannot start/end with whitespace.
![]() 5. **Add** the **Data fields** you need to collect usage data. For example, a field to collect data on the volume of files stored on your service:
* **Name.** Descriptive name for the field.
* **Code.** Unique Identifier for field. You will need this **Code** as a unique id when submitting API calls, such as a call to submit measurements for this field.
* **Notes**:
* When you've entered a Name and clicked in the **Code** field, a Code is automatically entered based on the Name. You can then edit the auto-generated Code as required.
* The **Code** string has a maximum length of 80 characters and can only contain letters, numbers, underscore, and the dollar character, and must not start with a number. The same applies to the Code used for any Derived Fields you add to a Meter - see Step 6 below.
* **Category.** Defines what type of usage data you want to collect using this field.
* **Unit.** Defines the unit of measure.
5. **Add** the **Data fields** you need to collect usage data. For example, a field to collect data on the volume of files stored on your service:
* **Name.** Descriptive name for the field.
* **Code.** Unique Identifier for field. You will need this **Code** as a unique id when submitting API calls, such as a call to submit measurements for this field.
* **Notes**:
* When you've entered a Name and clicked in the **Code** field, a Code is automatically entered based on the Name. You can then edit the auto-generated Code as required.
* The **Code** string has a maximum length of 80 characters and can only contain letters, numbers, underscore, and the dollar character, and must not start with a number. The same applies to the Code used for any Derived Fields you add to a Meter - see Step 6 below.
* **Category.** Defines what type of usage data you want to collect using this field.
* **Unit.** Defines the unit of measure.
![]() **Important: Units of Measure?** We recommend that the units you use for your Data Fields conform to *The Unified Code for Units of Measure (UCUM)*, which is designed to facilitate the communication between electronic systems of quantities with their units. In the above example, we therefore use **GiBy** as the unit for the **Gigabyte Store** Data Field. For more details, see [Units for Meter Fields - Examples](/guides/usage-data-meters/reviewing-meter-options#units-for-meter-fields-examples).
6. **Add** any required **Derived fields** to the Meter:
**Important: Units of Measure?** We recommend that the units you use for your Data Fields conform to *The Unified Code for Units of Measure (UCUM)*, which is designed to facilitate the communication between electronic systems of quantities with their units. In the above example, we therefore use **GiBy** as the unit for the **Gigabyte Store** Data Field. For more details, see [Units for Meter Fields - Examples](/guides/usage-data-meters/reviewing-meter-options#units-for-meter-fields-examples).
6. **Add** any required **Derived fields** to the Meter:
![]() * For more on Derived Fields, see the [following topic](/guides/usage-data-meters/derived-fields-for-meters-examples-and-supported-syntax) in this section.
7. **Add** any required **Custom fields** to the Meter:
* For more on Custom Fields, see [Adding and Editing Custom Fields](/guides/organization-and-access-management/viewing-and-editing-organization#adding-and-editing-custom-fields). We strongly recommend reviewing [Working with Custom Fields](/guides/creating-and-managing-products/working-with-custom-fields) before you create and use Custom Fields.
8. Select **Create meter**. The **Meter details** page opens:
* For more on Derived Fields, see the [following topic](/guides/usage-data-meters/derived-fields-for-meters-examples-and-supported-syntax) in this section.
7. **Add** any required **Custom fields** to the Meter:
* For more on Custom Fields, see [Adding and Editing Custom Fields](/guides/organization-and-access-management/viewing-and-editing-organization#adding-and-editing-custom-fields). We strongly recommend reviewing [Working with Custom Fields](/guides/creating-and-managing-products/working-with-custom-fields) before you create and use Custom Fields.
8. Select **Create meter**. The **Meter details** page opens:
![Create Meter66]() 9. If you want to create an Aggregation that targets one of the Meter's Data Fields or Derived Fields, then select **Create aggregation** for that field:
* You are taken directly to the **Aggregations>Create** page where the **Product** is pre-selected and the **Meter** and **Target field** under **Meter settings** are also pre-selected.
* When you complete the **Aggregations>Create** workflow, you are returned to the **Meter details** page.
* For more details, see [Creating Product Aggregations](/guides/usage-data-aggregations/creating-aggregations).
10. If you want to edit a Meter's details, select the **Edit** button, make your changes, and click **Update meter**.
11. If you want to remove a Meter, return to the **Meters** page and select the **Delete** button for the Meter:
9. If you want to create an Aggregation that targets one of the Meter's Data Fields or Derived Fields, then select **Create aggregation** for that field:
* You are taken directly to the **Aggregations>Create** page where the **Product** is pre-selected and the **Meter** and **Target field** under **Meter settings** are also pre-selected.
* When you complete the **Aggregations>Create** workflow, you are returned to the **Meter details** page.
* For more details, see [Creating Product Aggregations](/guides/usage-data-aggregations/creating-aggregations).
10. If you want to edit a Meter's details, select the **Edit** button, make your changes, and click **Update meter**.
11. If you want to remove a Meter, return to the **Meters** page and select the **Delete** button for the Meter:
![]() A confirmation popup opens.
12. Select **Yes** to confirm the delete action.
**Tip: Working in Meter Details?** The **Meter details** page is designed to help you perform common Meter management and operational tasks, including submitting usage data measurements for your Meters. See [Working in Meter Details](/guides/usage-data-meters/working-in-meter-details).
# Working with Meter Derived Fields and Examples
Source: https://docs.m3ter.com/guides/usage-data-meters/derived-fields-for-meters-examples-and-supported-syntax
The values of Meter Derived Fields are not raw usage data values but always the result of a calculation, which can reference Meter Data Fields, Custom Fields, or Timestamp Fields as source fields. Derived Fields add a very powerful extra dimension of flexibility for setting up the data on which your usage-based pricing plans will be based.
This topic explains the different types of field you can reference in Derived Field calculations, how to format those references in calculations, and offers some Derived Field examples:
* [Referencing Fields in Derived Field Calculations](/guides/usage-data-meters/derived-fields-for-meters-examples-and-supported-syntax#referencing-fields-in-derived-field-calculations)
* [Derived Field Examples](/guides/usage-data-meters/derived-fields-for-meters-examples-and-supported-syntax#derived-field-examples)
**Important!**
* If you're reviewing this topic for help in using Derived Field calculations, please also see further details of the supported operators, variables, functions, and type casts at [m3ter Calculation Engine](/guides/m3ter-calculation-engine).
* You can use [Lookup functions](/guides/lookup-tables/lookup-functions) in your Derived Field calculations and reference Lookup Tables you've created for your Organization. See [Lookup Tables](/guides/lookup-tables) for more details and an example.
## Referencing Fields in Derived Field Calculations
Derived Field calculations will typically reference Meter Data Fields. But you're not restricted to referencing only Meter Data Fields in your calculations. You can also reference *Custom Fields* and *Timestamp Fields,* which greatly extends the scope of measures you can derive and subsequently use as the basis for the Aggregations you need to price your Product Plans.
* [Referencing Data Fields](/guides/usage-data-meters/derived-fields-for-meters-examples-and-supported-syntax#referencing-data-fields)
* [Referencing Custom Fields](/guides/usage-data-meters/derived-fields-for-meters-examples-and-supported-syntax#referencing-custom-fields)
* [Referencing Timestamp Fields](/guides/usage-data-meters/derived-fields-for-meters-examples-and-supported-syntax#referencing-timestamp-fields)
### Referencing Data Fields
The values of Data Fields in the measurement are available as variables, and can be referenced by the Data Field code, for example:
* `myDataField`
### Referencing Custom Fields
You can define Custom Fields for your **Organization** and for the following entity types:
* **Product**
* **Plan Template**
* **Plan**
* **Meter**
* **Account**
* **Account Plan**
* **Aggregation**
* **Compound Aggregation**
* **Contract**
Note that you can define a Custom Field for any of these entities at both the Organizational level and at the level of the individual entity:
* When you reference the Custom Field in a calculation, the value defined for the Custom Field at the Organizational level will be used unless you've also defined a Custom Field at the individual entity level.
* If a Custom Field has also been defined at the individual entity level, this value will be used. This allows you to set up default Custom Field values to use for each entity type in your Organization.
However, restrictions apply to the Custom Fields you can reference in a Derived Field calculation. See [Referencing Custom Fields in Derived Field Calculations](/guides/creating-and-managing-products/working-with-custom-fields#referencing-custom-fields-in-derived-field-calculations) for details.
**Important!** If you want to use the value of a Custom Field you've defined at an individual entity level, you *must first define* a Custom Field for the entity type at the Organizational level with a default value. For more details, see [Working with Custom Fields](/guides/creating-and-managing-products/working-with-custom-fields).
**Important!** You can also define Custom Fields for **Aggregations** and **Compound Aggregations**. However, these Custom Fields are NOT supported for referencing in Derived Field calculations.
#### Example - Custom Fields for Accounts
For example, suppose you have five Accounts in your Organization: **Acct1**, **Acct2**, **Acct3**, **Acct4**, and **Acct5**. You expect to use a Derived Field Calculation that will reference a Custom Field for Accounts to add a weighting to each Account for usage data:
* You create a Custom Field for Accounts at the Organization level called `cfAccount` and set its value = **25**.
* You create a Custom Field for **Acct2** called `cfAccount` and set its value = **20**.
* You create a Custom Field for **Acct4** called `cfAccount` and set its value = **30**.
* You do not create any Custom Fields for **Acct1**, **Acct3**, or **Acct5**.
You now reference the Custom Field in your calculation:
* `account.cfAccount`
The calculation will now be evaluated across the five Accounts using these values:
* **Acct1** = **25**
* **Acct2** = **20**
* **Acct3** = **25**
* **Acct4** = **30**
* **Acct5** = **25**
#### Format for Referencing Custom Fields
Here's the general format to use when referencing Custom Fields:
* `organization.`
* `meter.`
* `product.`
* `account.`
* `accountPlan.`
* `plan.`
* `planTemplate.`
**Tip: Global vs. Product Meters?** Note that Global Meters - those not associated with a Product - cannot resolve Product-scoped Custom Fields, therefore the default will be used. Meters that are associated to a Product can use the Product-specific Custom Field value if it is defined.
**Tip: See Also?** For creating Custom Fields in the Console, see [Managing your Organization](/guides/organization-and-access-management/viewing-and-editing-organization). You can use the Create/Edit Console pages for individual entities to set up Custom Fields. For API calls, see the [CustomField](/api/customfield/introduction) section of our API Ref Docs. For more background on Custom Fields, see [Working with Custom Fields](/guides/creating-and-managing-products/working-with-custom-fields).
### Referencing Timestamp Fields
You can reference system variable Timestamp Fields in your Derived Field calculations. All timestamps are numeric values representing the appropriate date/times in Epoch milliseconds:
* `ts`
* `ts.startOfMonth`
* `ts.endOfMonth`
* `ts.startOfMonthUTC`
* `ts.endOfMonthUTC`
If the “ets” field - End Timestamp - is specified in the measurement, the following are also available:
* `ets`
* `ets.startOfMonth`
* `ets.endOfMonth`
* `ets.startOfMonthUTC`
* `ets.endOfMonthUTC`
## Derived Field Examples
Please run through the first example as a starter, which shows both the Console setup for the field and the JSON body schema to create the field using a Create Meter API call. Other examples simply give the calculation for the Derived Field:
* [Example 1 - Gigabytes/second measure](https://m3ter.mintlify.app/guides/usage-data-meters/derived-fields-for-meters-examples-and-supported-syntax#example-1-gigabytes/second-measure)
* [Example 2 - Convert GB to MB measure](https://m3ter.mintlify.app/guides/usage-data-meters/derived-fields-for-meters-examples-and-supported-syntax#example-2-convert-gb-to-mb-measure)
* [Example 3 - Convert GB and KB to MB measure](https://m3ter.mintlify.app/guides/usage-data-meters/derived-fields-for-meters-examples-and-supported-syntax#example-3-convert-gb-and-kb-to-mb-measure)
* [Example 4 - MB-mins measure](https://m3ter.mintlify.app/guides/usage-data-meters/derived-fields-for-meters-examples-and-supported-syntax#example-4-mb-mins-measure)
* [Example 5 - String Derived Field operations](https://m3ter.mintlify.app/guides/usage-data-meters/derived-fields-for-meters-examples-and-supported-syntax#example-5-string-derived-field-operations)
* [Example 6 - Derived Fields for Product Add-Ons](https://m3ter.mintlify.app/guides/usage-data-meters/derived-fields-for-meters-examples-and-supported-syntax#example-6-derived-fields-for-product-add-ons)
* [Example 7 - Derived Field for Seat-Based Pricing](https://m3ter.mintlify.app/guides/usage-data-meters/derived-fields-for-meters-examples-and-supported-syntax#example-7-derived-field-for-seat-based-pricing)
In addition to concrete examples, the [final section](/guides/usage-data-meters/derived-fields-for-meters-examples-and-supported-syntax#derived-field-calculations-supported-syntax-and-referencing-fields) in this topic:
* Links you out to a topic on supported syntax and functions for your Derived Field calculations.
* Explains how to reference Custom Fields and system timestamp fields in your Derived Field calculations.
**Tip: String Derived Fields?** Yes, you can also create non-numeric, string Derived Fields which reference Data Fields. See [Example 5](/guides/usage-data-meters/derived-fields-for-meters-examples-and-supported-syntax#example-5-string-derived-field-operations) below for some examples of operations to create string Derived Fields.
**Important: Updating the Calculation?** When you use a Derived Field, the calculation is performed at the time the data is ingested and is persisted in the platform at the resultant values. This means that if you update the calculation at a later date:
* Any calculated values for data ingested *before the update* remain the same.
* Any calculated values for data ingested *after the update* will be the result of the new calculation.
## Example 1 - Gigabytes/second measure
#### Description and Console Setup
Suppose you run a cloud service which offers your end customers computing capabilities. To implement this service, you want to charge for Products that your end customers consume on the basis of a usage measure in Gigabyte-seconds of processing. To set this up, you can first create two Data Fields of type **Measure** on a Product Meter that ingest raw data measures:
* A **Memory MB** field, which represents the amount of memory in megabytes allocated to the compute function.
* A **Duration** field, which represents the length of time the compute function ran for in milliseconds.
You can then create a Derived Field of type **Measure** on your Product Meter that:
* Converts the input to **Memory MB**, which is in Megabytes (unit: MiBy), to Gigabytes simply by dividing by 1024.
* Converts the input to **Duration,** which is in milliseconds (unit: ms), to seconds simply by dividing by 1000.
* Multiplies the memory allocation in GiBy by the duration value in secs to give a measure in Gigabyte-seconds (unit: GiBy.s):
A confirmation popup opens.
12. Select **Yes** to confirm the delete action.
**Tip: Working in Meter Details?** The **Meter details** page is designed to help you perform common Meter management and operational tasks, including submitting usage data measurements for your Meters. See [Working in Meter Details](/guides/usage-data-meters/working-in-meter-details).
# Working with Meter Derived Fields and Examples
Source: https://docs.m3ter.com/guides/usage-data-meters/derived-fields-for-meters-examples-and-supported-syntax
The values of Meter Derived Fields are not raw usage data values but always the result of a calculation, which can reference Meter Data Fields, Custom Fields, or Timestamp Fields as source fields. Derived Fields add a very powerful extra dimension of flexibility for setting up the data on which your usage-based pricing plans will be based.
This topic explains the different types of field you can reference in Derived Field calculations, how to format those references in calculations, and offers some Derived Field examples:
* [Referencing Fields in Derived Field Calculations](/guides/usage-data-meters/derived-fields-for-meters-examples-and-supported-syntax#referencing-fields-in-derived-field-calculations)
* [Derived Field Examples](/guides/usage-data-meters/derived-fields-for-meters-examples-and-supported-syntax#derived-field-examples)
**Important!**
* If you're reviewing this topic for help in using Derived Field calculations, please also see further details of the supported operators, variables, functions, and type casts at [m3ter Calculation Engine](/guides/m3ter-calculation-engine).
* You can use [Lookup functions](/guides/lookup-tables/lookup-functions) in your Derived Field calculations and reference Lookup Tables you've created for your Organization. See [Lookup Tables](/guides/lookup-tables) for more details and an example.
## Referencing Fields in Derived Field Calculations
Derived Field calculations will typically reference Meter Data Fields. But you're not restricted to referencing only Meter Data Fields in your calculations. You can also reference *Custom Fields* and *Timestamp Fields,* which greatly extends the scope of measures you can derive and subsequently use as the basis for the Aggregations you need to price your Product Plans.
* [Referencing Data Fields](/guides/usage-data-meters/derived-fields-for-meters-examples-and-supported-syntax#referencing-data-fields)
* [Referencing Custom Fields](/guides/usage-data-meters/derived-fields-for-meters-examples-and-supported-syntax#referencing-custom-fields)
* [Referencing Timestamp Fields](/guides/usage-data-meters/derived-fields-for-meters-examples-and-supported-syntax#referencing-timestamp-fields)
### Referencing Data Fields
The values of Data Fields in the measurement are available as variables, and can be referenced by the Data Field code, for example:
* `myDataField`
### Referencing Custom Fields
You can define Custom Fields for your **Organization** and for the following entity types:
* **Product**
* **Plan Template**
* **Plan**
* **Meter**
* **Account**
* **Account Plan**
* **Aggregation**
* **Compound Aggregation**
* **Contract**
Note that you can define a Custom Field for any of these entities at both the Organizational level and at the level of the individual entity:
* When you reference the Custom Field in a calculation, the value defined for the Custom Field at the Organizational level will be used unless you've also defined a Custom Field at the individual entity level.
* If a Custom Field has also been defined at the individual entity level, this value will be used. This allows you to set up default Custom Field values to use for each entity type in your Organization.
However, restrictions apply to the Custom Fields you can reference in a Derived Field calculation. See [Referencing Custom Fields in Derived Field Calculations](/guides/creating-and-managing-products/working-with-custom-fields#referencing-custom-fields-in-derived-field-calculations) for details.
**Important!** If you want to use the value of a Custom Field you've defined at an individual entity level, you *must first define* a Custom Field for the entity type at the Organizational level with a default value. For more details, see [Working with Custom Fields](/guides/creating-and-managing-products/working-with-custom-fields).
**Important!** You can also define Custom Fields for **Aggregations** and **Compound Aggregations**. However, these Custom Fields are NOT supported for referencing in Derived Field calculations.
#### Example - Custom Fields for Accounts
For example, suppose you have five Accounts in your Organization: **Acct1**, **Acct2**, **Acct3**, **Acct4**, and **Acct5**. You expect to use a Derived Field Calculation that will reference a Custom Field for Accounts to add a weighting to each Account for usage data:
* You create a Custom Field for Accounts at the Organization level called `cfAccount` and set its value = **25**.
* You create a Custom Field for **Acct2** called `cfAccount` and set its value = **20**.
* You create a Custom Field for **Acct4** called `cfAccount` and set its value = **30**.
* You do not create any Custom Fields for **Acct1**, **Acct3**, or **Acct5**.
You now reference the Custom Field in your calculation:
* `account.cfAccount`
The calculation will now be evaluated across the five Accounts using these values:
* **Acct1** = **25**
* **Acct2** = **20**
* **Acct3** = **25**
* **Acct4** = **30**
* **Acct5** = **25**
#### Format for Referencing Custom Fields
Here's the general format to use when referencing Custom Fields:
* `organization.`
* `meter.`
* `product.`
* `account.`
* `accountPlan.`
* `plan.`
* `planTemplate.`
**Tip: Global vs. Product Meters?** Note that Global Meters - those not associated with a Product - cannot resolve Product-scoped Custom Fields, therefore the default will be used. Meters that are associated to a Product can use the Product-specific Custom Field value if it is defined.
**Tip: See Also?** For creating Custom Fields in the Console, see [Managing your Organization](/guides/organization-and-access-management/viewing-and-editing-organization). You can use the Create/Edit Console pages for individual entities to set up Custom Fields. For API calls, see the [CustomField](/api/customfield/introduction) section of our API Ref Docs. For more background on Custom Fields, see [Working with Custom Fields](/guides/creating-and-managing-products/working-with-custom-fields).
### Referencing Timestamp Fields
You can reference system variable Timestamp Fields in your Derived Field calculations. All timestamps are numeric values representing the appropriate date/times in Epoch milliseconds:
* `ts`
* `ts.startOfMonth`
* `ts.endOfMonth`
* `ts.startOfMonthUTC`
* `ts.endOfMonthUTC`
If the “ets” field - End Timestamp - is specified in the measurement, the following are also available:
* `ets`
* `ets.startOfMonth`
* `ets.endOfMonth`
* `ets.startOfMonthUTC`
* `ets.endOfMonthUTC`
## Derived Field Examples
Please run through the first example as a starter, which shows both the Console setup for the field and the JSON body schema to create the field using a Create Meter API call. Other examples simply give the calculation for the Derived Field:
* [Example 1 - Gigabytes/second measure](https://m3ter.mintlify.app/guides/usage-data-meters/derived-fields-for-meters-examples-and-supported-syntax#example-1-gigabytes/second-measure)
* [Example 2 - Convert GB to MB measure](https://m3ter.mintlify.app/guides/usage-data-meters/derived-fields-for-meters-examples-and-supported-syntax#example-2-convert-gb-to-mb-measure)
* [Example 3 - Convert GB and KB to MB measure](https://m3ter.mintlify.app/guides/usage-data-meters/derived-fields-for-meters-examples-and-supported-syntax#example-3-convert-gb-and-kb-to-mb-measure)
* [Example 4 - MB-mins measure](https://m3ter.mintlify.app/guides/usage-data-meters/derived-fields-for-meters-examples-and-supported-syntax#example-4-mb-mins-measure)
* [Example 5 - String Derived Field operations](https://m3ter.mintlify.app/guides/usage-data-meters/derived-fields-for-meters-examples-and-supported-syntax#example-5-string-derived-field-operations)
* [Example 6 - Derived Fields for Product Add-Ons](https://m3ter.mintlify.app/guides/usage-data-meters/derived-fields-for-meters-examples-and-supported-syntax#example-6-derived-fields-for-product-add-ons)
* [Example 7 - Derived Field for Seat-Based Pricing](https://m3ter.mintlify.app/guides/usage-data-meters/derived-fields-for-meters-examples-and-supported-syntax#example-7-derived-field-for-seat-based-pricing)
In addition to concrete examples, the [final section](/guides/usage-data-meters/derived-fields-for-meters-examples-and-supported-syntax#derived-field-calculations-supported-syntax-and-referencing-fields) in this topic:
* Links you out to a topic on supported syntax and functions for your Derived Field calculations.
* Explains how to reference Custom Fields and system timestamp fields in your Derived Field calculations.
**Tip: String Derived Fields?** Yes, you can also create non-numeric, string Derived Fields which reference Data Fields. See [Example 5](/guides/usage-data-meters/derived-fields-for-meters-examples-and-supported-syntax#example-5-string-derived-field-operations) below for some examples of operations to create string Derived Fields.
**Important: Updating the Calculation?** When you use a Derived Field, the calculation is performed at the time the data is ingested and is persisted in the platform at the resultant values. This means that if you update the calculation at a later date:
* Any calculated values for data ingested *before the update* remain the same.
* Any calculated values for data ingested *after the update* will be the result of the new calculation.
## Example 1 - Gigabytes/second measure
#### Description and Console Setup
Suppose you run a cloud service which offers your end customers computing capabilities. To implement this service, you want to charge for Products that your end customers consume on the basis of a usage measure in Gigabyte-seconds of processing. To set this up, you can first create two Data Fields of type **Measure** on a Product Meter that ingest raw data measures:
* A **Memory MB** field, which represents the amount of memory in megabytes allocated to the compute function.
* A **Duration** field, which represents the length of time the compute function ran for in milliseconds.
You can then create a Derived Field of type **Measure** on your Product Meter that:
* Converts the input to **Memory MB**, which is in Megabytes (unit: MiBy), to Gigabytes simply by dividing by 1024.
* Converts the input to **Duration,** which is in milliseconds (unit: ms), to seconds simply by dividing by 1000.
* Multiplies the memory allocation in GiBy by the duration value in secs to give a measure in Gigabyte-seconds (unit: GiBy.s):
![]() You can now use this Meter's **GB Second** Derived Field as the basis for setting up an Aggregation for pricing your Product Plans.
**Important!** Note that when you reference Data Fields in a Derived Field calculation, you must use the **Code** of the referenced fields.
#### Setup using API Call
If you want to create this Meter with the same Data and Derived Fields using an API call, please see our API Reference [Create Meter](/api/meter/create-meter) page. Here's the JSON using this call for the example:
```json theme={null}
{
"data": [
{
"id": "3ddfea4b-XXXX-467d-XXXX-b6YYYYYYYYYf",
"version": 1,
"productId": "1b364e59-e32b-4fbf-bc1e-91b5fc4872e5",
"name": "Compute Execution",
"code": "compute_execution",
"dataFields": [
{
"category": "MEASURE",
"code": "memory_mb",
"name": "Memory MB",
"unit": "MiBy"
},
{
"category": "MEASURE",
"code": "duration_ms",
"name": "Duration",
"unit": "ms"
}
],
"derivedFields": [
{
"category": "MEASURE",
"code": "gb_second",
"name": "GB second",
"unit": "GiBy.s",
"calculation": "(memory_mb/1024)*(duration_ms/1000)"
}
]
}
]
}
```
## Example 2 - Convert GB to MB measure
If you have a Data Field on your Meter that measures gigabytes stored - field code is `gigabytes_stored` - and you require a megabytes stored measure, then you can create a **Measure** Derived Field and use:
> **Calculation:** `gigabytes_stored*1024`
## Example 3 - Convert GB and KB to MB measure
Suppose you have a Meter with two **Measure** Data Fields for:
* Gigabytes stored: `gigabytes_stored`
* Kilobytes stored: `kilobytes_stored`
If you require a megabytes stored measure that combines these two, then you can create a **Measure** Derived Field and use:
> **Calculation:** `(gigabytes_stored*1024) + (kilobytes_stored/1024)`
## Example 4 - MB-mins measure
Suppose you have a Meter with two Measure Data Fields for:
* Stored volume of data in megabytes at point of last backup: `lastbackup_size`
* Duration since last backup was made in minutes: `lastbackup_duration`
If you require a MB-mins measure, you can create a **Measure** Derived Field and use:
> **Calculation:** `lastbackup_size * lastbackup_duration`
## Example 5 - String Derived Field Operations
You can create string Derived Fields which reference Data Fields. Here's some examples.
#### Concatenation
Suppose you have two string Data Fields on a Meter:
* **Location**, which is a **Where** field used to identify the country of residence of your customers.
* **Type**, which is a **What** field used to identify the type of data check you are performing on your customers.
However, you want a field that combines both these string data types - **Location Type**. To do this, you can use the `+` operator in a Derived Field calculation to concatenate the two string fields:
You can now use this Meter's **GB Second** Derived Field as the basis for setting up an Aggregation for pricing your Product Plans.
**Important!** Note that when you reference Data Fields in a Derived Field calculation, you must use the **Code** of the referenced fields.
#### Setup using API Call
If you want to create this Meter with the same Data and Derived Fields using an API call, please see our API Reference [Create Meter](/api/meter/create-meter) page. Here's the JSON using this call for the example:
```json theme={null}
{
"data": [
{
"id": "3ddfea4b-XXXX-467d-XXXX-b6YYYYYYYYYf",
"version": 1,
"productId": "1b364e59-e32b-4fbf-bc1e-91b5fc4872e5",
"name": "Compute Execution",
"code": "compute_execution",
"dataFields": [
{
"category": "MEASURE",
"code": "memory_mb",
"name": "Memory MB",
"unit": "MiBy"
},
{
"category": "MEASURE",
"code": "duration_ms",
"name": "Duration",
"unit": "ms"
}
],
"derivedFields": [
{
"category": "MEASURE",
"code": "gb_second",
"name": "GB second",
"unit": "GiBy.s",
"calculation": "(memory_mb/1024)*(duration_ms/1000)"
}
]
}
]
}
```
## Example 2 - Convert GB to MB measure
If you have a Data Field on your Meter that measures gigabytes stored - field code is `gigabytes_stored` - and you require a megabytes stored measure, then you can create a **Measure** Derived Field and use:
> **Calculation:** `gigabytes_stored*1024`
## Example 3 - Convert GB and KB to MB measure
Suppose you have a Meter with two **Measure** Data Fields for:
* Gigabytes stored: `gigabytes_stored`
* Kilobytes stored: `kilobytes_stored`
If you require a megabytes stored measure that combines these two, then you can create a **Measure** Derived Field and use:
> **Calculation:** `(gigabytes_stored*1024) + (kilobytes_stored/1024)`
## Example 4 - MB-mins measure
Suppose you have a Meter with two Measure Data Fields for:
* Stored volume of data in megabytes at point of last backup: `lastbackup_size`
* Duration since last backup was made in minutes: `lastbackup_duration`
If you require a MB-mins measure, you can create a **Measure** Derived Field and use:
> **Calculation:** `lastbackup_size * lastbackup_duration`
## Example 5 - String Derived Field Operations
You can create string Derived Fields which reference Data Fields. Here's some examples.
#### Concatenation
Suppose you have two string Data Fields on a Meter:
* **Location**, which is a **Where** field used to identify the country of residence of your customers.
* **Type**, which is a **What** field used to identify the type of data check you are performing on your customers.
However, you want a field that combines both these string data types - **Location Type**. To do this, you can use the `+` operator in a Derived Field calculation to concatenate the two string fields:
![]() #### Cast Numeric to String
If you need to cast a numeric Data Field as a string to give a string Derived field, you can do this:
#### Cast Numeric to String
If you need to cast a numeric Data Field as a string to give a string Derived field, you can do this:
![]() **Tip: String Manipulation Functions?** You can also use String functions in your Derived Field calculations - see [String Functions](/guides/m3ter-calculation-engine#string-functions) for a listing and explanations.
## Example 6 - Derived Fields for Product Add-Ons
Suppose you offer a service to manage and process orders and deliveries for online retailers. Your basic pricing model uses a tiered structure on number of orders/deliveries you handle per billing period. You also want to include some product add-ons, which customers can select for on an order-by-order basis. Pricing for an add-on will use a simple unit price model - each billing period customers are charged a fixed price per add-on consumed.
To meet this pricing use case, you can create a Derived Field that uses the 3-argument `? :` ternary operator. This operator evaluates a boolean statement as first argument and yields one value if the statement is `TRUE`, another value if the statement is `FALSE`.
In this example:
* We have a string Data Field on a Meter of type **What** called `packaging_design.`
* We then create a Derived Field called `package_addon` of type **Measure**, which uses a calculation that references this Data Field:
> **Calculation:** `packaging_design=="yes"?1:0`
* When an order is placed for processing that takes the add-on, `yes` is entered in the `packaging``*_*``design` field.
The calculation evaluates the first argument to return `TRUE` or `FALSE`:
* If the value of `packaging_design` is `yes`, then the statement is `TRUE` and the value of `package_addon` is `1`.
* If the value of `packaging_design` is not `yes`, then the statement is `FALSE` and the value of the `package_addon` is `0`.
For pricing, we can now set up an Aggregation that uses the `package_addon` Derived Field as its target field, and then select **SUM** for the Aggregation method.
We can extend this example to show how Derived Fields can be used for use cases where you want to price for a combination of product add-ons. Suppose you want to price when an order you process has opted for an express package delivery and gift packaging as a combined product add-on. You can set up two string Data Fields on a Meter of type **What**:
* `packaging_express`
* `packaging_gift`
You can then use a calculation for a Derived Field of type **Measure** called `package_addon2` that references these two Data Fields and employs a nested ternary operator:
> **Calculation:** `packaging_express=="yes"?(packaging_gift=="yes"?1:0):0`
How does this work?
* The nested expression in brackets is evaluated, which will result in `1` only if `packaging_gift` has a value of `yes`.
* The main expression is then evaluated and results in `1` only if `packaging_express` has a value of `yes` and the nested expression has returned a value of `1`. If the nested expression has returned `0`, then the main expression will return `0`, regardless of whether `packaging_express` has a value of `yes` or any other value - that is, is either `TRUE` or `FALSE`.
We can therefore see how this form of calculation is useful when we want to price for multiple product add-ons as a bundled add-on - only if all referenced Data Fields have a value of `yes` does the Derived Field have a value of `1` returned.
## Example 7 - Derived Field for Seat-Based Pricing
**Note: Using the m3ter Recurring Charges for Counters feature!** You can also implement seat-based pricing for your products and services out-of-the-box using m3ter's Recurring Charges for Counters feature. See [Recurring Charges: Counters](/guides/recurring-charges-counters) for more details.
Suppose you want to implement usage-based pricing against an end-customer Account which accommodates changes in the number of users on that Account during the billing period. This kind of billing use case is often referred to as "seat-based pricing" and can adjust billing charges in the following way:
* If members are added to the Account at any time within the billing cycle, the Account will be charged a prorated amount based on the percentage of the billing cycle left at the time each member was added.
* If members are removed from the Account at any time within the billing cycle, the Account will be credited in a similar, prorated way.
You can implement seat-based pricing using a Derived Field calculation that uses the 3-argument `? : `ternary operator. This operator evaluates a boolean statement as first argument and yields one value if the statement is `TRUE` , another value if the statement is `FALSE`.
Taking a worked example to illustrate how this calculation works, let's suppose you've put an end-customer Account on a Product Plan for monthly billing and you want to charge for seat-based pricing for September, a 30-day month:
* The Account starts the month at 30 seats.
* 1 seat is removed after 8 days.
* 1 seat was added back in after 20 days.
* This means the seat count is back at 30 at the end of the month.
* The charge rate is \$10 per month per seat on the Account.
For this example:
* The `seat-adjustments` Data Field is used to log either the removal or addition of a single seat and sends in an appropriate value for these events throughout the billing period:
* A value of -1 when a seat is removed.
* A value of +1 when a seat is added.
* We then create a Derived Field called `seat_proration` of type Measure that references the `seat_adjustments` field and exploits system `ts` (timestamp) fields:
> **Calculation**: `seat_adjustments * ((ts <= ts.startOfMonth) ? 1 : (ts <= ts.endOfMonth) ? 1 * (((ts.endOfMonth - ts))/(ts.endOfMonth - ts.startOfMonth)) : 0)`
For our worked example, we can first manually calculate what the charge amount should be:
* We have an unchanged seat count of 29 for the full month that results in a charge due of: 29 x \$10 = \$290
* We have a seat count of one that will be charged at the prorate of \$10/30 per day for:
* 8 days worth: 8 x \$10/30 = \$2.67
* 10 days worth: 10 x \$10/30 = \$3.33
* Total charge: \$290 + \$2.67 + \$3.33 = \$296.
We can now breakdown the `seat_proration` Derived Field calculation in the context of the worked example and see how the calculation is evaluated to give a correct prorated seat count value for the month:
* `(ts <= ts.startOfMonth) ? 1`
* If the `ts` (timestamp) for the `seat_adjustments` event is less than or equal to the start of the month `(ts.startOfMonth)`, the result is 1.
* `(ts <= ts.endOfMonth) ? 1 * (((ts.endOfMonth - ts))/(ts.endOfMonth - ts.startOfMonth)) : 0`
* In our example, the first `seat_adjustments` event was sent at the end of the 8th day of the Month and this expression checks whether `ts` is less than or equal to the end of the month `(ts.endOfMonth)` which it is. If true, it calculates a weighted value based on the position of `ts` within the month:
* For the first `seat_adjustment` event, -1 was sent at the end of the 8th day so the prorated value returned would be -0.73, which represents the reduction in charge due for the 22 days of the month remaining with one seat removed.
* For the second `seat_adjustment` event, +1 was sent at the start of the 21st day so the prorated value returned would be 0.33, which represents the additional charge due for the 10 days of the month remaining with one seat added back in.
* This results in a net adjustment of: -0.73 + 0.33 = -0.4
To implement pricing on the Account, we create another Data Field on another Meter: `start_seatcount`. This sends a measure of the number of seats registered for the Account at the start of each billing period - in our example, the start of each month. With these two Data Fields in place, we can now add Aggregations to arrive at a pricing metric that accommodates seat count adjustments:
* A simple SUM Aggregation targeting the `start_seatcount` Data Field.
* A simple SUM Aggregation targeting the `seat_proration` Derived Field.
* A Compound Aggregation: `adjusted_seatcount`, that references these two fields and adds them together them using the following calculation:
> **Calculation:** `(aggregation.start``*_*``seatcount`` ``+ aggregation.seat_proration)`
* We can now use the `adjusted_seatcount` Compound Aggregation to price up Product Plans for those Accounts to which we want to apply seat-based pricing.
* In our concrete example, the result of the calculation used for the `adjusted_seatcount` Compound Aggregation will be: 30 - 0.4 = 29.60. Therefore the charges for the Account will be: \$10 x 29.60 = \$296, which agrees with what we calculated manually.
In summary, the Derived Field for implementing seat-base pricing calculates a prorated value based on the position of a timestamp (ts) within a month provided by the remove/add usage event.
# Reviewing Meter Options
Source: https://docs.m3ter.com/guides/usage-data-meters/reviewing-meter-options
You can set up *Meters* to collect usage data on your end customer activity when they consume your products and services. For example:
* Number of logins.
* Duration of session.
* Amount of data downloaded.
Meters offer you wide-ranging flexibility when configuring the types of data you need to collect to support the usage-based pricing models you want to apply to your products and services. Metering for data need not stop there. The m3ter platform offers virtually unrestricted scope in the range and types of data you can collect - not just the immediate customer usage data measures you require to price your products and services very precisely - but also to gather any associated data you need to feed into your business performance and analytical tools; tools which can then support and inform your long-term business management and improvement decisions.
This topic explains the difference between Product and Global Meters and the configuration options available for Meters:
* [Product Meters vs. Global Meters](/guides/usage-data-meters/reviewing-meter-options#product-meters-vs-global-meters)
* [Configuring Meter Fields](/guides/usage-data-meters/reviewing-meter-options#configuring-meter-fields)
* [Data Field Options](/guides/usage-data-meters/reviewing-meter-options#data-field-options)
* [Derived Fields](/guides/usage-data-meters/reviewing-meter-options#derived-fields)
* [Units for Meter Fields - Examples](/guides/usage-data-meters/reviewing-meter-options#units-for-meter-fields-examples)
* [Custom Fields](/guides/usage-data-meters/reviewing-meter-options#custom-fields)
## Product Meters vs. Global Meters
You can create Meters that belong to a specific Product or create Global Meters.
**Usage data Meters collect**:
* You can use Product-specific Meters to charge for usage data the Meter collects *for the Product*.
* You can use Global Meters when you want to charge for the usage data the Meter collects *across multiple different Products*.
**Aggregations targeting Meters**:
* Any Aggregations that target a Product-specific Meter, then also becomes Product-specific and can only be used to Price Plans *for that Product*.
* Any Aggregations that target a Global Meter are also Global, meaning they are not tied to a specific Product and can be used to price Plans *belonging to different Products*.
**Switching Meters between Product-specific and Global**:
* *You can* *switch* a Product-specific Meter to Global, but you cannot switch it back to make it a Product-specific Meter again.
* If you have already created any Aggregations that target a Product-specific Meter and you then switch the Product-specific Meter to be Global, then the Aggregations then become Global.
* *You cannot* *switch* a Product-specific Meter to another Product.
* *You cannot* *switch* a Global Meter to Product-specific.
## Configuring Meter Fields
When you create and set up a Meter, the key configuration is adding fields to collect data:
* **Data Fields.** Baseline fields for collecting raw usage data.
* **Derived Fields.** Fields whose values are the result of a calculation/function performed on Meter Data Fields, Custom Fields, or Timestamp Fields.
* **Custom Fields.** Allow you to attach custom data to the Meter as name/value pairs.
## Data Field Options
You can add *Data Fields* to a Meter to collect;
* Usage data on which you want to base your measurements for pricing.
* Any associated data required for other business needs, such as for analytics purposes.
Each Meter can have up to a maximum of fifteen Data Fields. For each field, you can define the type of data you want the field to collect using the **Category** attribute. There are eight options:
* **Who**. String. Use to collect usage data about an individual or organization - data events that answer a "Who" question, such as, "Who or which organization logged-in?", "Who was contacted?", and so on.
* **What**. String. Use to collect usage data about some object or thing, whether it be a physical object in the real world or something in a virtual context.
* **Where**. String. Use to collect usage data about a location - where something happened, whether in physical geographical space or a virtual space.
* **Measure**. Numeric. Use in a general way to collect quantitative usage data.
* **Metadata**. String. *(Max. 256 characters).* Use for high-cardinality fields that you don't intend to segment when you aggregate the data.
* **Income**. Numeric. Use to collect usage data associated with income.
* **Cost**. Numeric. Use to collect usage data associated with costs.
* **Other.** String. Use to collect textual usage not applicable to **Who**, **What**, or **Where** events.
**Important: When setting up Measures on Meters, consider how you want to aggregate your usage data!** The options for Aggregating usage data collected by a Meter are constrained by the Categories you select for a Meter's Data Fields - not all data aggregation methods can be applied to all Data Field Categories. For details on which aggregation methods are available for which Categories, see [Configuring Aggregations](/guides/usage-data-aggregations/reviewing-aggregation-options#configuring-aggregations).
These options offer a very wide range in the type of data you can collect about your customer activity. Importantly, they allow you to gather data associated with your customer's behavior when using your service not only for the purpose of charging them but also for other crucial business purposes, such as performing advanced analytics on accumulated data about customer behavior over time. For example:
* **Who**. Suppose you want to charge for your service based on the number of times a customer logs in to your system. You can define a Data Field using this option to meet this requirement. This option would allow m3ter to identify a specific customer at login and then count the number of logins by that customer within a defined period. Additionally, you might want to gather this usage data on login frequency not simply for the purpose of charging customers but to feed into analytical tools that will afford useful insights into your customer behavior when using your service over time.
* **Where**. You might also want to charge customers not only on the number of logins but also by location, with charges varying across geographical regions. To enable this, you can define a second Data Field using this option. Alternatively, you might want to use this option to capture the source of the data your customer downloaded when they were logged in your service - say from which server instance it came - and this could provide very useful for analytical purposes over time.
In general when setting up Meters, your approach should be to use multiple Data Fields on a single Meter where the data types collected are related to the same event. So to continue the example, if in addition to charging customers by number of logins and by geographical location, you want to include charges for the amount of data customers upload to and download from your service during their login session, you would set up a second Meter and add Data Fields of type **Measure** to collect these upload and download volumes.
## Derived Fields
Each Meter can have up to a maximum of fifteen *Derived Fields*. The values of a Derived Field are not raw usage data values but always the result of a calculation or function performed on Meter Data Fields, Custom Fields, or Timestamp Fields as source fields. Derived Fields add a very powerful extra dimension of flexibility for setting up the data on which your usage-based pricing plans will be based.
**Tip: Examples?** The [Derived Fields for Meters - Examples and Supported Syntax](/guides/usage-data-meters/derived-fields-for-meters-examples-and-supported-syntax) topic offers numerous examples of how to set up Derived Fields on your Meters to serve your usage-based pricing needs.
## Units for Meter Fields - Examples
For numeric Meter Data and Derived Fields - Measure, Income, or Cost - we recommend that you conform to the [*The Unified Code for Units of Measure (UCUM)*](https://ucum.org/ucum), which is designed to facilitate the communication between electronic systems of quantities with their units.
With reference to [section 4.6](https://ucum.org/ucum#section-Prefixes-and-Units-Used-in-Information-Technology) of the UCUM Specification for **Prefixes and Unit Used in Information Technology**, this section offers some typical examples.
### Measures of Data Storage
For example, services that want to price on sum of storage used:
* Kilobyte: **KiBy**
* Gigabyte: **GiBy**
* Megabyte: **MiBy**
* Terabytes: **TiBy**
### Measures of Rates of Consumption
For example, services that want to price on maximum rates of consumption:
* Gigabytes per second: **GiBy/s**
* Megabytes per hour: **MiBy/h**
### Measures of Computing Resource
For example, services that want to price on sum of memory allocation over time, that is, for memory allocation multiplied by execution time for called computing functions:
* Gigabyte-seconds: **GiBy.s**
* Megabyte-hours: **MiBy.h**
### Non-Units of Measure - Counts
Counts aren't strictly units of measure, but within UCUM curly braces can be used to represent them as described in [Appendix A](https://ucum.org/ucum#section-Examples-for-some-Non-Units.) of the UCUM specification. For example, a service that wants to price on the basis of number of API calls:
* A count of number of API calls: `{API_calls}`
* A count of the number of API calls per second: `{API_calls/s}`
**Tip: Other Resources?** You might also like to consult the Wikipedia article on the [Unified Code for Units of Measure](https://en.wikipedia.org/wiki/Unified_Code_for_Units_of_Measure).
## Custom Fields
You can define **Custom Fields** when creating a Meter or edit the Meter at a later date to do this. Any Custom Fields you create for an individual Meter override those you've created for Meters at the Organizational level. We strongly recommend reviewing [Working with Custom Fields](/guides/creating-and-managing-products/working-with-custom-fields) before you create and use Custom Fields.
# Working in Meter Details
Source: https://docs.m3ter.com/guides/usage-data-meters/working-in-meter-details
When you've created a Meter, you can open the Meter details page which is designed to help you perform common Meter management and operational tasks:
* [Reviewing Meter Details](/guides/usage-data-meters/working-in-meter-details#reviewing-meter-details)
* [Submitting and Checking Usage Data Measurements](/guides/usage-data-meters/working-in-meter-details#submitting-and-checking-usage-data-measurements)
* [Reviewing Meter Metadata](/guides/usage-data-meters/working-in-meter-details#reviewing-meter-metadata)
## Reviewing Meter Details
You can use the Meter details page to review and manage the Meter set up.
**To review Meter details:**
1. Select **Metering**. The **Meters** page opens and lists Meters by Product for **All products** together with any **Global** Meters.
2. If you want to review the details of a Product Meter, search or filter the page by **Product**.
3. Select the hotlink text of the Meter:
**Tip: String Manipulation Functions?** You can also use String functions in your Derived Field calculations - see [String Functions](/guides/m3ter-calculation-engine#string-functions) for a listing and explanations.
## Example 6 - Derived Fields for Product Add-Ons
Suppose you offer a service to manage and process orders and deliveries for online retailers. Your basic pricing model uses a tiered structure on number of orders/deliveries you handle per billing period. You also want to include some product add-ons, which customers can select for on an order-by-order basis. Pricing for an add-on will use a simple unit price model - each billing period customers are charged a fixed price per add-on consumed.
To meet this pricing use case, you can create a Derived Field that uses the 3-argument `? :` ternary operator. This operator evaluates a boolean statement as first argument and yields one value if the statement is `TRUE`, another value if the statement is `FALSE`.
In this example:
* We have a string Data Field on a Meter of type **What** called `packaging_design.`
* We then create a Derived Field called `package_addon` of type **Measure**, which uses a calculation that references this Data Field:
> **Calculation:** `packaging_design=="yes"?1:0`
* When an order is placed for processing that takes the add-on, `yes` is entered in the `packaging``*_*``design` field.
The calculation evaluates the first argument to return `TRUE` or `FALSE`:
* If the value of `packaging_design` is `yes`, then the statement is `TRUE` and the value of `package_addon` is `1`.
* If the value of `packaging_design` is not `yes`, then the statement is `FALSE` and the value of the `package_addon` is `0`.
For pricing, we can now set up an Aggregation that uses the `package_addon` Derived Field as its target field, and then select **SUM** for the Aggregation method.
We can extend this example to show how Derived Fields can be used for use cases where you want to price for a combination of product add-ons. Suppose you want to price when an order you process has opted for an express package delivery and gift packaging as a combined product add-on. You can set up two string Data Fields on a Meter of type **What**:
* `packaging_express`
* `packaging_gift`
You can then use a calculation for a Derived Field of type **Measure** called `package_addon2` that references these two Data Fields and employs a nested ternary operator:
> **Calculation:** `packaging_express=="yes"?(packaging_gift=="yes"?1:0):0`
How does this work?
* The nested expression in brackets is evaluated, which will result in `1` only if `packaging_gift` has a value of `yes`.
* The main expression is then evaluated and results in `1` only if `packaging_express` has a value of `yes` and the nested expression has returned a value of `1`. If the nested expression has returned `0`, then the main expression will return `0`, regardless of whether `packaging_express` has a value of `yes` or any other value - that is, is either `TRUE` or `FALSE`.
We can therefore see how this form of calculation is useful when we want to price for multiple product add-ons as a bundled add-on - only if all referenced Data Fields have a value of `yes` does the Derived Field have a value of `1` returned.
## Example 7 - Derived Field for Seat-Based Pricing
**Note: Using the m3ter Recurring Charges for Counters feature!** You can also implement seat-based pricing for your products and services out-of-the-box using m3ter's Recurring Charges for Counters feature. See [Recurring Charges: Counters](/guides/recurring-charges-counters) for more details.
Suppose you want to implement usage-based pricing against an end-customer Account which accommodates changes in the number of users on that Account during the billing period. This kind of billing use case is often referred to as "seat-based pricing" and can adjust billing charges in the following way:
* If members are added to the Account at any time within the billing cycle, the Account will be charged a prorated amount based on the percentage of the billing cycle left at the time each member was added.
* If members are removed from the Account at any time within the billing cycle, the Account will be credited in a similar, prorated way.
You can implement seat-based pricing using a Derived Field calculation that uses the 3-argument `? : `ternary operator. This operator evaluates a boolean statement as first argument and yields one value if the statement is `TRUE` , another value if the statement is `FALSE`.
Taking a worked example to illustrate how this calculation works, let's suppose you've put an end-customer Account on a Product Plan for monthly billing and you want to charge for seat-based pricing for September, a 30-day month:
* The Account starts the month at 30 seats.
* 1 seat is removed after 8 days.
* 1 seat was added back in after 20 days.
* This means the seat count is back at 30 at the end of the month.
* The charge rate is \$10 per month per seat on the Account.
For this example:
* The `seat-adjustments` Data Field is used to log either the removal or addition of a single seat and sends in an appropriate value for these events throughout the billing period:
* A value of -1 when a seat is removed.
* A value of +1 when a seat is added.
* We then create a Derived Field called `seat_proration` of type Measure that references the `seat_adjustments` field and exploits system `ts` (timestamp) fields:
> **Calculation**: `seat_adjustments * ((ts <= ts.startOfMonth) ? 1 : (ts <= ts.endOfMonth) ? 1 * (((ts.endOfMonth - ts))/(ts.endOfMonth - ts.startOfMonth)) : 0)`
For our worked example, we can first manually calculate what the charge amount should be:
* We have an unchanged seat count of 29 for the full month that results in a charge due of: 29 x \$10 = \$290
* We have a seat count of one that will be charged at the prorate of \$10/30 per day for:
* 8 days worth: 8 x \$10/30 = \$2.67
* 10 days worth: 10 x \$10/30 = \$3.33
* Total charge: \$290 + \$2.67 + \$3.33 = \$296.
We can now breakdown the `seat_proration` Derived Field calculation in the context of the worked example and see how the calculation is evaluated to give a correct prorated seat count value for the month:
* `(ts <= ts.startOfMonth) ? 1`
* If the `ts` (timestamp) for the `seat_adjustments` event is less than or equal to the start of the month `(ts.startOfMonth)`, the result is 1.
* `(ts <= ts.endOfMonth) ? 1 * (((ts.endOfMonth - ts))/(ts.endOfMonth - ts.startOfMonth)) : 0`
* In our example, the first `seat_adjustments` event was sent at the end of the 8th day of the Month and this expression checks whether `ts` is less than or equal to the end of the month `(ts.endOfMonth)` which it is. If true, it calculates a weighted value based on the position of `ts` within the month:
* For the first `seat_adjustment` event, -1 was sent at the end of the 8th day so the prorated value returned would be -0.73, which represents the reduction in charge due for the 22 days of the month remaining with one seat removed.
* For the second `seat_adjustment` event, +1 was sent at the start of the 21st day so the prorated value returned would be 0.33, which represents the additional charge due for the 10 days of the month remaining with one seat added back in.
* This results in a net adjustment of: -0.73 + 0.33 = -0.4
To implement pricing on the Account, we create another Data Field on another Meter: `start_seatcount`. This sends a measure of the number of seats registered for the Account at the start of each billing period - in our example, the start of each month. With these two Data Fields in place, we can now add Aggregations to arrive at a pricing metric that accommodates seat count adjustments:
* A simple SUM Aggregation targeting the `start_seatcount` Data Field.
* A simple SUM Aggregation targeting the `seat_proration` Derived Field.
* A Compound Aggregation: `adjusted_seatcount`, that references these two fields and adds them together them using the following calculation:
> **Calculation:** `(aggregation.start``*_*``seatcount`` ``+ aggregation.seat_proration)`
* We can now use the `adjusted_seatcount` Compound Aggregation to price up Product Plans for those Accounts to which we want to apply seat-based pricing.
* In our concrete example, the result of the calculation used for the `adjusted_seatcount` Compound Aggregation will be: 30 - 0.4 = 29.60. Therefore the charges for the Account will be: \$10 x 29.60 = \$296, which agrees with what we calculated manually.
In summary, the Derived Field for implementing seat-base pricing calculates a prorated value based on the position of a timestamp (ts) within a month provided by the remove/add usage event.
# Reviewing Meter Options
Source: https://docs.m3ter.com/guides/usage-data-meters/reviewing-meter-options
You can set up *Meters* to collect usage data on your end customer activity when they consume your products and services. For example:
* Number of logins.
* Duration of session.
* Amount of data downloaded.
Meters offer you wide-ranging flexibility when configuring the types of data you need to collect to support the usage-based pricing models you want to apply to your products and services. Metering for data need not stop there. The m3ter platform offers virtually unrestricted scope in the range and types of data you can collect - not just the immediate customer usage data measures you require to price your products and services very precisely - but also to gather any associated data you need to feed into your business performance and analytical tools; tools which can then support and inform your long-term business management and improvement decisions.
This topic explains the difference between Product and Global Meters and the configuration options available for Meters:
* [Product Meters vs. Global Meters](/guides/usage-data-meters/reviewing-meter-options#product-meters-vs-global-meters)
* [Configuring Meter Fields](/guides/usage-data-meters/reviewing-meter-options#configuring-meter-fields)
* [Data Field Options](/guides/usage-data-meters/reviewing-meter-options#data-field-options)
* [Derived Fields](/guides/usage-data-meters/reviewing-meter-options#derived-fields)
* [Units for Meter Fields - Examples](/guides/usage-data-meters/reviewing-meter-options#units-for-meter-fields-examples)
* [Custom Fields](/guides/usage-data-meters/reviewing-meter-options#custom-fields)
## Product Meters vs. Global Meters
You can create Meters that belong to a specific Product or create Global Meters.
**Usage data Meters collect**:
* You can use Product-specific Meters to charge for usage data the Meter collects *for the Product*.
* You can use Global Meters when you want to charge for the usage data the Meter collects *across multiple different Products*.
**Aggregations targeting Meters**:
* Any Aggregations that target a Product-specific Meter, then also becomes Product-specific and can only be used to Price Plans *for that Product*.
* Any Aggregations that target a Global Meter are also Global, meaning they are not tied to a specific Product and can be used to price Plans *belonging to different Products*.
**Switching Meters between Product-specific and Global**:
* *You can* *switch* a Product-specific Meter to Global, but you cannot switch it back to make it a Product-specific Meter again.
* If you have already created any Aggregations that target a Product-specific Meter and you then switch the Product-specific Meter to be Global, then the Aggregations then become Global.
* *You cannot* *switch* a Product-specific Meter to another Product.
* *You cannot* *switch* a Global Meter to Product-specific.
## Configuring Meter Fields
When you create and set up a Meter, the key configuration is adding fields to collect data:
* **Data Fields.** Baseline fields for collecting raw usage data.
* **Derived Fields.** Fields whose values are the result of a calculation/function performed on Meter Data Fields, Custom Fields, or Timestamp Fields.
* **Custom Fields.** Allow you to attach custom data to the Meter as name/value pairs.
## Data Field Options
You can add *Data Fields* to a Meter to collect;
* Usage data on which you want to base your measurements for pricing.
* Any associated data required for other business needs, such as for analytics purposes.
Each Meter can have up to a maximum of fifteen Data Fields. For each field, you can define the type of data you want the field to collect using the **Category** attribute. There are eight options:
* **Who**. String. Use to collect usage data about an individual or organization - data events that answer a "Who" question, such as, "Who or which organization logged-in?", "Who was contacted?", and so on.
* **What**. String. Use to collect usage data about some object or thing, whether it be a physical object in the real world or something in a virtual context.
* **Where**. String. Use to collect usage data about a location - where something happened, whether in physical geographical space or a virtual space.
* **Measure**. Numeric. Use in a general way to collect quantitative usage data.
* **Metadata**. String. *(Max. 256 characters).* Use for high-cardinality fields that you don't intend to segment when you aggregate the data.
* **Income**. Numeric. Use to collect usage data associated with income.
* **Cost**. Numeric. Use to collect usage data associated with costs.
* **Other.** String. Use to collect textual usage not applicable to **Who**, **What**, or **Where** events.
**Important: When setting up Measures on Meters, consider how you want to aggregate your usage data!** The options for Aggregating usage data collected by a Meter are constrained by the Categories you select for a Meter's Data Fields - not all data aggregation methods can be applied to all Data Field Categories. For details on which aggregation methods are available for which Categories, see [Configuring Aggregations](/guides/usage-data-aggregations/reviewing-aggregation-options#configuring-aggregations).
These options offer a very wide range in the type of data you can collect about your customer activity. Importantly, they allow you to gather data associated with your customer's behavior when using your service not only for the purpose of charging them but also for other crucial business purposes, such as performing advanced analytics on accumulated data about customer behavior over time. For example:
* **Who**. Suppose you want to charge for your service based on the number of times a customer logs in to your system. You can define a Data Field using this option to meet this requirement. This option would allow m3ter to identify a specific customer at login and then count the number of logins by that customer within a defined period. Additionally, you might want to gather this usage data on login frequency not simply for the purpose of charging customers but to feed into analytical tools that will afford useful insights into your customer behavior when using your service over time.
* **Where**. You might also want to charge customers not only on the number of logins but also by location, with charges varying across geographical regions. To enable this, you can define a second Data Field using this option. Alternatively, you might want to use this option to capture the source of the data your customer downloaded when they were logged in your service - say from which server instance it came - and this could provide very useful for analytical purposes over time.
In general when setting up Meters, your approach should be to use multiple Data Fields on a single Meter where the data types collected are related to the same event. So to continue the example, if in addition to charging customers by number of logins and by geographical location, you want to include charges for the amount of data customers upload to and download from your service during their login session, you would set up a second Meter and add Data Fields of type **Measure** to collect these upload and download volumes.
## Derived Fields
Each Meter can have up to a maximum of fifteen *Derived Fields*. The values of a Derived Field are not raw usage data values but always the result of a calculation or function performed on Meter Data Fields, Custom Fields, or Timestamp Fields as source fields. Derived Fields add a very powerful extra dimension of flexibility for setting up the data on which your usage-based pricing plans will be based.
**Tip: Examples?** The [Derived Fields for Meters - Examples and Supported Syntax](/guides/usage-data-meters/derived-fields-for-meters-examples-and-supported-syntax) topic offers numerous examples of how to set up Derived Fields on your Meters to serve your usage-based pricing needs.
## Units for Meter Fields - Examples
For numeric Meter Data and Derived Fields - Measure, Income, or Cost - we recommend that you conform to the [*The Unified Code for Units of Measure (UCUM)*](https://ucum.org/ucum), which is designed to facilitate the communication between electronic systems of quantities with their units.
With reference to [section 4.6](https://ucum.org/ucum#section-Prefixes-and-Units-Used-in-Information-Technology) of the UCUM Specification for **Prefixes and Unit Used in Information Technology**, this section offers some typical examples.
### Measures of Data Storage
For example, services that want to price on sum of storage used:
* Kilobyte: **KiBy**
* Gigabyte: **GiBy**
* Megabyte: **MiBy**
* Terabytes: **TiBy**
### Measures of Rates of Consumption
For example, services that want to price on maximum rates of consumption:
* Gigabytes per second: **GiBy/s**
* Megabytes per hour: **MiBy/h**
### Measures of Computing Resource
For example, services that want to price on sum of memory allocation over time, that is, for memory allocation multiplied by execution time for called computing functions:
* Gigabyte-seconds: **GiBy.s**
* Megabyte-hours: **MiBy.h**
### Non-Units of Measure - Counts
Counts aren't strictly units of measure, but within UCUM curly braces can be used to represent them as described in [Appendix A](https://ucum.org/ucum#section-Examples-for-some-Non-Units.) of the UCUM specification. For example, a service that wants to price on the basis of number of API calls:
* A count of number of API calls: `{API_calls}`
* A count of the number of API calls per second: `{API_calls/s}`
**Tip: Other Resources?** You might also like to consult the Wikipedia article on the [Unified Code for Units of Measure](https://en.wikipedia.org/wiki/Unified_Code_for_Units_of_Measure).
## Custom Fields
You can define **Custom Fields** when creating a Meter or edit the Meter at a later date to do this. Any Custom Fields you create for an individual Meter override those you've created for Meters at the Organizational level. We strongly recommend reviewing [Working with Custom Fields](/guides/creating-and-managing-products/working-with-custom-fields) before you create and use Custom Fields.
# Working in Meter Details
Source: https://docs.m3ter.com/guides/usage-data-meters/working-in-meter-details
When you've created a Meter, you can open the Meter details page which is designed to help you perform common Meter management and operational tasks:
* [Reviewing Meter Details](/guides/usage-data-meters/working-in-meter-details#reviewing-meter-details)
* [Submitting and Checking Usage Data Measurements](/guides/usage-data-meters/working-in-meter-details#submitting-and-checking-usage-data-measurements)
* [Reviewing Meter Metadata](/guides/usage-data-meters/working-in-meter-details#reviewing-meter-metadata)
## Reviewing Meter Details
You can use the Meter details page to review and manage the Meter set up.
**To review Meter details:**
1. Select **Metering**. The **Meters** page opens and lists Meters by Product for **All products** together with any **Global** Meters.
2. If you want to review the details of a Product Meter, search or filter the page by **Product**.
3. Select the hotlink text of the Meter:
![]() The **Meter details** page opens:
The **Meter details** page opens:
![Create Meter68]() On this panel, you can:
* Read-off the Meter's **Name** and **Code**.
* Use the hotlink text to open directly the details of the **Product** the Meter belongs to. Note that if you've opened the details of a Global Meter, this will be shown under **Product**.
* Read-off the Meter's **ID** and **Copy** this to your clipboard.
* Check the audit data to see who **Created** and who **Last modified** the Meter.
* Review the **Data fields** that have been added to the Meter. These are listed as two types:
* **Measure data fields**.
* **Dimension data fields**.
* Review any **Derived fields** added to the Meter. Note that you can expand a **Derived field** to review it's calculation:
On this panel, you can:
* Read-off the Meter's **Name** and **Code**.
* Use the hotlink text to open directly the details of the **Product** the Meter belongs to. Note that if you've opened the details of a Global Meter, this will be shown under **Product**.
* Read-off the Meter's **ID** and **Copy** this to your clipboard.
* Check the audit data to see who **Created** and who **Last modified** the Meter.
* Review the **Data fields** that have been added to the Meter. These are listed as two types:
* **Measure data fields**.
* **Dimension data fields**.
* Review any **Derived fields** added to the Meter. Note that you can expand a **Derived field** to review it's calculation:
![]() * If you intend to upload a a `CSV` formatted file for usage data measurements ingest for the Meter, use the **Download CSV template** button to obtain a file you can use for this purpose. See the [following section](/guides/usage-data-meters/working-in-meter-details#upload-csv) for further details.
## Submitting and Checking Usage Data Measurements
A **Submit measurements** panel is made available on **Meter details** pages. This facilitates the various ways you can submit usage data measurements into the m3ter platform for the specific Meter:
* [Ingest API](/guides/usage-data-meters/working-in-meter-details#ingest-api)
* [File Upload API](/guides/usage-data-meters/working-in-meter-details#file-upload-api)
* [Upload CSV](/guides/usage-data-meters/working-in-meter-details#upload-csv)
* [Submit usage data](/guides/usage-data-meters/working-in-meter-details#submit-usage-data)
* [Checking Usage Data Submissions](/guides/usage-data-meters/working-in-meter-details#checking-usage-data-submissions)
### Ingest API
The default selection under **Submit measurements** is **Ingest API**:
* If you intend to upload a a `CSV` formatted file for usage data measurements ingest for the Meter, use the **Download CSV template** button to obtain a file you can use for this purpose. See the [following section](/guides/usage-data-meters/working-in-meter-details#upload-csv) for further details.
## Submitting and Checking Usage Data Measurements
A **Submit measurements** panel is made available on **Meter details** pages. This facilitates the various ways you can submit usage data measurements into the m3ter platform for the specific Meter:
* [Ingest API](/guides/usage-data-meters/working-in-meter-details#ingest-api)
* [File Upload API](/guides/usage-data-meters/working-in-meter-details#file-upload-api)
* [Upload CSV](/guides/usage-data-meters/working-in-meter-details#upload-csv)
* [Submit usage data](/guides/usage-data-meters/working-in-meter-details#submit-usage-data)
* [Checking Usage Data Submissions](/guides/usage-data-meters/working-in-meter-details#checking-usage-data-submissions)
### Ingest API
The default selection under **Submit measurements** is **Ingest API**:
![]() This option is designed to help you use the [Submit measurements](/api/measurements/submit-measurements) call for the m3ter Ingest API:
* The **Submission URL** is shown for the call with your Organization ID used, and you can **Copy** this to your clipboard.
* Five tabs are available for Meter-specific code samples to use for the call, and you can **Copy** the version you prefer to use:
* **JSON**
* **cURL**
* **JavaScript**
* **Python**
* **Java**
* If you are using this method to submit usage data measurements, please see [Getting Started with API Calls](/guides/billing-and-usage-data/submitting-usage-data/file-upload-service-api) for additional guidance.
### File Upload API
Under **Submit measurements**, select **File upload API**:
This option is designed to help you use the [Submit measurements](/api/measurements/submit-measurements) call for the m3ter Ingest API:
* The **Submission URL** is shown for the call with your Organization ID used, and you can **Copy** this to your clipboard.
* Five tabs are available for Meter-specific code samples to use for the call, and you can **Copy** the version you prefer to use:
* **JSON**
* **cURL**
* **JavaScript**
* **Python**
* **Java**
* If you are using this method to submit usage data measurements, please see [Getting Started with API Calls](/guides/billing-and-usage-data/submitting-usage-data/file-upload-service-api) for additional guidance.
### File Upload API
Under **Submit measurements**, select **File upload API**:
![]() This option is designed to help you use the m3ter *File Upload Service API* to upload a usage data measurements data file to the platform:
* You can drag and drop a JSON file here containing an array of usage data measurements for ingest.
* Please review the [File Upload Service API topic](/guides/billing-and-usage-data/submitting-usage-data/file-upload-service-api) if you want to use this method.
### Upload CSV
Under **Submit measurements**, select **Upload CSV**:
This option is designed to help you use the m3ter *File Upload Service API* to upload a usage data measurements data file to the platform:
* You can drag and drop a JSON file here containing an array of usage data measurements for ingest.
* Please review the [File Upload Service API topic](/guides/billing-and-usage-data/submitting-usage-data/file-upload-service-api) if you want to use this method.
### Upload CSV
Under **Submit measurements**, select **Upload CSV**:
![]() This option is designed to help you use upload a `CSV` formatted file for Meter usage data measurements ingest:
* Please see the [File Uploads for Usage Data by Meter](/guides/billing-and-usage-data/submitting-usage-data/file-uploads-for-usage-data-by-meter) topic if you want to use this method
### Submit usage data
Under **Submit measurements**, select **Submit usage data**:
This option is designed to help you use upload a `CSV` formatted file for Meter usage data measurements ingest:
* Please see the [File Uploads for Usage Data by Meter](/guides/billing-and-usage-data/submitting-usage-data/file-uploads-for-usage-data-by-meter) topic if you want to use this method
### Submit usage data
Under **Submit measurements**, select **Submit usage data**:
![]() This option is designed to help you submit individual usage data measurements for the Meter and a selected **Account**, **Timestamp**, and optional **End Timestamp**:
* You can use a default **Simple** view and enter values for Meter Data fields or switch to an **Advanced** format and edit the JSON payload of usage measurements.
* Please review [Submitting Test Usage Data](/guides/billing-and-usage-data/submitting-usage-data/submitting-test-usage-data#submitting-test-usage-data) if you want to use this method.
### Checking Usage Data Submissions
If you scroll further down the **Meter details** page, you can use the **Activity** panel to check usage data measurement submissions made for the Meter:
* A *Recent measurements* list for the Meter for submissions made in the last hour and which were successfully ingested into the platform:
* Up to a maximum of the ten most recent submissions made in the last hour are listed.
* A *Measurement counts* chart showing a running count of submissions made for the Meter over the previous 24 hours:
* You can hover your cursor over the chart's hourly data points to read off actual measurement counts.
This option is designed to help you submit individual usage data measurements for the Meter and a selected **Account**, **Timestamp**, and optional **End Timestamp**:
* You can use a default **Simple** view and enter values for Meter Data fields or switch to an **Advanced** format and edit the JSON payload of usage measurements.
* Please review [Submitting Test Usage Data](/guides/billing-and-usage-data/submitting-usage-data/submitting-test-usage-data#submitting-test-usage-data) if you want to use this method.
### Checking Usage Data Submissions
If you scroll further down the **Meter details** page, you can use the **Activity** panel to check usage data measurement submissions made for the Meter:
* A *Recent measurements* list for the Meter for submissions made in the last hour and which were successfully ingested into the platform:
* Up to a maximum of the ten most recent submissions made in the last hour are listed.
* A *Measurement counts* chart showing a running count of submissions made for the Meter over the previous 24 hours:
* You can hover your cursor over the chart's hourly data points to read off actual measurement counts.
![Submit Usage74]() * Please see [Checking Usage Data Submissions](/guides/billing-and-usage-data/submitting-usage-data/submitting-test-usage-data#checking-test-usage-data-submissions) for more details.
## Reviewing Meter Metadata
On the metadata panel on **Meter details** pages under **Meter metadata** you can review:
**Custom fields**. Any Custom fields created for the Meter are listed, and you can **Copy** the *String* or *Number* value of a Custom Field to your clipboard:
* If the fields have been created only at Organizational-level, then these values will be shown:
* Please see [Checking Usage Data Submissions](/guides/billing-and-usage-data/submitting-usage-data/submitting-test-usage-data#checking-test-usage-data-submissions) for more details.
## Reviewing Meter Metadata
On the metadata panel on **Meter details** pages under **Meter metadata** you can review:
**Custom fields**. Any Custom fields created for the Meter are listed, and you can **Copy** the *String* or *Number* value of a Custom Field to your clipboard:
* If the fields have been created only at Organizational-level, then these values will be shown:
![Create Meter63]() * If the fields have also been created for an individual Meter, then the values configured for those created at Organizational-level are struck out indicating clearly that the individual Meter values will be used:
* If the fields have also been created for an individual Meter, then the values configured for those created at Organizational-level are struck out indicating clearly that the individual Meter values will be used:
![Create Meter64]() **External mappings**. Any External mappings set up for the Meter are listed:
**External mappings**. Any External mappings set up for the Meter are listed:
![Create Meter65]() * The **External system** and **External table** mapped to are shown - such as **NetSuite - Item** in the above example. The **External entity ID** mapped to is also shown.
* If a listed External mapping is linked to an Integration, under **Linked integration** a hotlink text will be shown which you can use to open the Integration.
* Under **Actions**, you can edit or delete the External mapping.
* If the Meter has multiple External mappings created for it, you can use *Search external mappings* to search by **External table** and **External entity ID** and filter the list.
* You can commence a workflow to **Create external mapping** for the Meter directly - see [Creating and Managing External Mappings for Accounts](/guides/end-customer-accounts/creating-and-managing-external-mappings-for-accounts) for an example.
**Integration runs**. If you've set up an integration that synchronizes the Meter with an external system, the date/time and status of the **Latest** integration run are shown. You can use a text hotlink to open details of this latest run or **View all runs**. See [Reviewing Integration Run Details](/guides/integrations/setting-up-integrations/reviewing-integration-run-details).
# Documentation
Source: https://docs.m3ter.com/index
Check out our guides and learning resources.
Looking to Evaluate m3ter? Review [Exploring m3ter](/exploring-m3ter-getting-to-know-the-platform) for a survey of the platform’s wide range of features and capabilities.
Getting Started in m3ter? Go to [Working in m3ter](/guides/getting-started) for a comprehensive set of guides on how to build out and manage your usage-based pricing and billing solution in m3ter.
Developer working with m3ter APIs? Exploit a full [API Reference](/api) including request and response samples for REST endpoints.
# Accountplans
Source: https://docs.m3ter.com/m3sh-function-reference/m3ter/accountplans
## Retrieve AccountPlan
**Function name:** `m3ter_GetAccountPlan`
**Category:** READ
**HTTP method:** GET
**Destination:** m3ter
Retrieve the AccountPlan or AccountPlanGroup details corresponding to the given UUID.
### Parameters
| Name | Label | Type | Required | Description | Constraints |
| - | - | - | :-: | - | - |
| `integrationCredentialsId` | Credentials | M3terEntityParameter | Yes | The m3ter credentials to use. | authType: M3TER\_SIGNED\_REQUEST, m3terEntity: IntegrationCredentials |
| `id` | id | LookupParameter | Yes | The unique identifier (UUID) of the AccountPlan or AccountPlanGroup to retrieve. | - |
| `statePath` | State Path | StateVariableParameter | No | State variable to store the response. | - |
### Exits
| Exit | Description |
| - | - |
| `NEXT` | The API call succeeded. |
| `ERROR` | The API call failed. Error details are stored in the `m3shError` state variable. |
## Update AccountPlan
**Function name:** `m3ter_PutAccountPlan`
**Category:** WRITE
**HTTP method:** PUT
**Destination:** m3ter
Update the AccountPlan or AccountPlanGroup with the given UUID.
This endpoint updates a new AccountPlan or AccountPlanGroup for a specific Account in your Organization. The updated information should be provided in the request body.
**Notes:**
* You cannot use this call to update *both* an AccountPlan and AccountPlanGroup for an Account at the same time. If you want to update an AccounPlan and an AccountPlanGroup attached to an Account, you must submit two separate calls.
* If you have created Custom Fields for an AccountPlan, when you use this endpoint to update the AccountPlan use the `customFields` parameter to preserve those Custom Fields. If you omit them from the update request, they will be lost.
### Parameters
| Name | Label | Type | Required | Description | Constraints |
| - | - | - | :-: | - | - |
| `integrationCredentialsId` | Credentials | M3terEntityParameter | Yes | The m3ter credentials to use. | authType: M3TER\_SIGNED\_REQUEST, m3terEntity: IntegrationCredentials |
| `id` | id | LookupParameter | Yes | The unique identifier (UUID) of the AccountPlan or AccountPlanGroup to update. | - |
| `requestPath` | Request Path | StateVariableParameter | Yes | State variable containing the request. | - |
| `statePath` | State Path | StateVariableParameter | No | State variable to store the response. | - |
### Exits
| Exit | Description |
| - | - |
| `NEXT` | The API call succeeded. |
| `ERROR` | The API call failed. Error details are stored in the `m3shError` state variable. |
## Delete AccountPlan
**Function name:** `m3ter_DeleteAccountPlan`
**Category:** WRITE
**HTTP method:** DELETE
**Destination:** m3ter
Delete the AccountPlan or AccountPlanGroup with the given UUID.
This endpoint deletes an AccountPlan or AccountPlanGroup that has been attached to a specific Account in your Organization.
### Parameters
| Name | Label | Type | Required | Description | Constraints |
| - | - | - | :-: | - | - |
| `integrationCredentialsId` | Credentials | M3terEntityParameter | Yes | The m3ter credentials to use. | authType: M3TER\_SIGNED\_REQUEST, m3terEntity: IntegrationCredentials |
| `id` | id | LookupParameter | Yes | The unique identifer (UUID) of the AccountPlan or AccountPlanGroup to delete. | - |
| `statePath` | State Path | StateVariableParameter | No | State variable to store the response. | - |
### Exits
| Exit | Description |
| - | - |
| `NEXT` | The API call succeeded. |
| `ERROR` | The API call failed. Error details are stored in the `m3shError` state variable. |
## List AccountPlans
**Function name:** `m3ter_ListAccountPlans`
**Category:** READ
**HTTP method:** GET (paginated)
**Destination:** m3ter
Retrieves a list of AccountPlan and AccountPlanGroup entities for the specified Organization. The list can be paginated for easier management, and supports filtering with various query parameters.
### Parameters
| Name | Label | Type | Required | Description | Constraints |
| - | - | - | :-: | - | - |
| `integrationCredentialsId` | Credentials | M3terEntityParameter | Yes | The m3ter credentials to use. | authType: M3TER\_SIGNED\_REQUEST, m3terEntity: IntegrationCredentials |
| `statePath` | State Path | StateVariableParameter | No | State variable to store the response. | - |
| `queryParams` | Query Parameters | KeyValueLookupParameter | No | Query parameters to include in the request | allowedValues: date,account,plan,product,includeall,ids,contract |
### Exits
| Exit | Description |
| - | - |
| `NEXT` | The API call succeeded. |
| `ERROR` | The API call failed. Error details are stored in the `m3shError` state variable. |
## Create AccountPlan
**Function name:** `m3ter_PostAccountPlan`
**Category:** WRITE
**HTTP method:** POST
**Destination:** m3ter
Create a new AccountPlan or AccountPlanGroup.
This endpoint creates a new AccountPlan or AccountPlanGroup for a specific Account in your Organization. The details of the new AccountPlan or AccountPlanGroup should be supplied in the request body.
**Note:** You cannot use this call to create *both* an AccountPlan and AccountPlanGroup for an Account at the same time. If you want to create both for an Account, you must submit two separate calls.
### Parameters
| Name | Label | Type | Required | Description | Constraints |
| - | - | - | :-: | - | - |
| `integrationCredentialsId` | Credentials | M3terEntityParameter | Yes | The m3ter credentials to use. | authType: M3TER\_SIGNED\_REQUEST, m3terEntity: IntegrationCredentials |
| `requestPath` | Request Path | StateVariableParameter | Yes | State variable containing the request. | - |
| `statePath` | State Path | StateVariableParameter | No | State variable to store the response. | - |
### Exits
| Exit | Description |
| - | - |
| `NEXT` | The API call succeeded. |
| `ERROR` | The API call failed. Error details are stored in the `m3shError` state variable. |
## Replace AccountPlan
**Function name:** `m3ter_ReplaceAccountPlan`
**Category:** WRITE
**HTTP method:** POST
**Destination:** m3ter
End-dates the specified AccountPlan at the new startDate and creates the new AccountPlan.
### Parameters
| Name | Label | Type | Required | Description | Constraints |
| - | - | - | :-: | - | - |
| `integrationCredentialsId` | Credentials | M3terEntityParameter | Yes | The m3ter credentials to use. | authType: M3TER\_SIGNED\_REQUEST, m3terEntity: IntegrationCredentials |
| `id` | id | LookupParameter | Yes | The UUID of the AccountPlan to replace. | - |
| `requestPath` | Request Path | StateVariableParameter | Yes | State variable containing the request. | - |
| `statePath` | State Path | StateVariableParameter | No | State variable to store the response. | - |
### Exits
| Exit | Description |
| - | - |
| `NEXT` | The API call succeeded. |
| `ERROR` | The API call failed. Error details are stored in the `m3shError` state variable. |
# Accounts
Source: https://docs.m3ter.com/m3sh-function-reference/m3ter/accounts
## Search Accounts
**Function name:** `m3ter_SearchAccounts`
**Category:** READ
**HTTP method:** GET (paginated)
**Destination:** m3ter
Search for Account entities.
This endpoint executes a search query for Accounts based on the user specified search criteria. The search query is customizable, allowing for complex nested conditions and sorting. The returned list of Accounts can be paginated for easier management.
### Parameters
| Name | Label | Type | Required | Description | Constraints |
| - | - | - | :-: | - | - |
| `integrationCredentialsId` | Credentials | M3terEntityParameter | Yes | The m3ter credentials to use. | authType: M3TER\_SIGNED\_REQUEST, m3terEntity: IntegrationCredentials |
| `statePath` | State Path | StateVariableParameter | No | State variable to store the response. | - |
| `queryParams` | Query Parameters | KeyValueLookupParameter | No | Query parameters to include in the request | allowedValues: searchQuery,fromDocument,operator,sortBy,sortOrder |
### Exits
| Exit | Description |
| - | - |
| `NEXT` | The API call succeeded. |
| `ERROR` | The API call failed. Error details are stored in the `m3shError` state variable. |
## End-date Account billing entities
**Function name:** `m3ter_EndDateBillingEntitiesForAccount`
**Category:** WRITE
**HTTP method:** PUT
**Destination:** m3ter
Apply the specified end-date to billing entities associated with an Account.
**NOTE:**
* When you successfully end-date billing entities, the version number of each entity is incremented.
### Parameters
| Name | Label | Type | Required | Description | Constraints |
| - | - | - | :-: | - | - |
| `integrationCredentialsId` | Credentials | M3terEntityParameter | Yes | The m3ter credentials to use. | authType: M3TER\_SIGNED\_REQUEST, m3terEntity: IntegrationCredentials |
| `id` | id | LookupParameter | Yes | The UUID of the Account. | - |
| `requestPath` | Request Path | StateVariableParameter | Yes | State variable containing the request. | - |
| `statePath` | State Path | StateVariableParameter | No | State variable to store the response. | - |
### Exits
| Exit | Description |
| - | - |
| `NEXT` | The API call succeeded. |
| `ERROR` | The API call failed. Error details are stored in the `m3shError` state variable. |
## List Account Children
**Function name:** `m3ter_ListAccountChildren`
**Category:** READ
**HTTP method:** GET (paginated)
**Destination:** m3ter
Retrieve a list of Accounts that are children of the specified Account.
### Parameters
| Name | Label | Type | Required | Description | Constraints |
| - | - | - | :-: | - | - |
| `integrationCredentialsId` | Credentials | M3terEntityParameter | Yes | The m3ter credentials to use. | authType: M3TER\_SIGNED\_REQUEST, m3terEntity: IntegrationCredentials |
| `id` | id | LookupParameter | Yes | The UUID of the Account to list children for. | - |
| `statePath` | State Path | StateVariableParameter | No | State variable to store the response. | - |
### Exits
| Exit | Description |
| - | - |
| `NEXT` | The API call succeeded. |
| `ERROR` | The API call failed. Error details are stored in the `m3shError` state variable. |
## List Accounts
**Function name:** `m3ter_ListAccounts`
**Category:** READ
**HTTP method:** GET (paginated)
**Destination:** m3ter
Retrieve a list of Accounts that can be filtered by Account ID or Account Code.
### Parameters
| Name | Label | Type | Required | Description | Constraints |
| - | - | - | :-: | - | - |
| `integrationCredentialsId` | Credentials | M3terEntityParameter | Yes | The m3ter credentials to use. | authType: M3TER\_SIGNED\_REQUEST, m3terEntity: IntegrationCredentials |
| `statePath` | State Path | StateVariableParameter | No | State variable to store the response. | - |
| `queryParams` | Query Parameters | KeyValueLookupParameter | No | Query parameters to include in the request | allowedValues: ids,codes |
### Exits
| Exit | Description |
| - | - |
| `NEXT` | The API call succeeded. |
| `ERROR` | The API call failed. Error details are stored in the `m3shError` state variable. |
## Create Account
**Function name:** `m3ter_PostAccount`
**Category:** WRITE
**HTTP method:** POST
**Destination:** m3ter
Create a new Account within the Organization.
### Parameters
| Name | Label | Type | Required | Description | Constraints |
| - | - | - | :-: | - | - |
| `integrationCredentialsId` | Credentials | M3terEntityParameter | Yes | The m3ter credentials to use. | authType: M3TER\_SIGNED\_REQUEST, m3terEntity: IntegrationCredentials |
| `requestPath` | Request Path | StateVariableParameter | Yes | State variable containing the request. | - |
| `statePath` | State Path | StateVariableParameter | No | State variable to store the response. | - |
### Exits
| Exit | Description |
| - | - |
| `NEXT` | The API call succeeded. |
| `ERROR` | The API call failed. Error details are stored in the `m3shError` state variable. |
## Retrieve Account
**Function name:** `m3ter_GetAccount`
**Category:** READ
**HTTP method:** GET
**Destination:** m3ter
Retrieve the Account with the given Account UUID.
### Parameters
| Name | Label | Type | Required | Description | Constraints |
| - | - | - | :-: | - | - |
| `integrationCredentialsId` | Credentials | M3terEntityParameter | Yes | The m3ter credentials to use. | authType: M3TER\_SIGNED\_REQUEST, m3terEntity: IntegrationCredentials |
| `id` | id | LookupParameter | Yes | The UUID of the Account to retrieve. | - |
| `statePath` | State Path | StateVariableParameter | No | State variable to store the response. | - |
### Exits
| Exit | Description |
| - | - |
| `NEXT` | The API call succeeded. |
| `ERROR` | The API call failed. Error details are stored in the `m3shError` state variable. |
## Update Account
**Function name:** `m3ter_PutAccount`
**Category:** WRITE
**HTTP method:** PUT
**Destination:** m3ter
Update the Account with the given Account UUID.
**Note:** If you have created Custom Fields for an Account, when you use this endpoint to update the Account, use the `customFields` parameter to preserve those Custom Fields. If you omit them from the update request, they will be lost.
### Parameters
| Name | Label | Type | Required | Description | Constraints |
| - | - | - | :-: | - | - |
| `integrationCredentialsId` | Credentials | M3terEntityParameter | Yes | The m3ter credentials to use. | authType: M3TER\_SIGNED\_REQUEST, m3terEntity: IntegrationCredentials |
| `id` | id | LookupParameter | Yes | The UUID of the Account to update. | - |
| `requestPath` | Request Path | StateVariableParameter | Yes | State variable containing the request. | - |
| `statePath` | State Path | StateVariableParameter | No | State variable to store the response. | - |
### Exits
| Exit | Description |
| - | - |
| `NEXT` | The API call succeeded. |
| `ERROR` | The API call failed. Error details are stored in the `m3shError` state variable. |
## Delete Account
**Function name:** `m3ter_DeleteAccount`
**Category:** WRITE
**HTTP method:** DELETE
**Destination:** m3ter
Delete the Account with the given UUID. This may fail if there are any AccountPlans that reference the Account being deleted.
### Parameters
| Name | Label | Type | Required | Description | Constraints |
| - | - | - | :-: | - | - |
| `integrationCredentialsId` | Credentials | M3terEntityParameter | Yes | The m3ter credentials to use. | authType: M3TER\_SIGNED\_REQUEST, m3terEntity: IntegrationCredentials |
| `id` | id | LookupParameter | Yes | The UUID of the Account to delete. | - |
| `statePath` | State Path | StateVariableParameter | No | State variable to store the response. | - |
### Exits
| Exit | Description |
| - | - |
| `NEXT` | The API call succeeded. |
| `ERROR` | The API call failed. Error details are stored in the `m3shError` state variable. |
# Aggregations
Source: https://docs.m3ter.com/m3sh-function-reference/m3ter/aggregations
## List Aggregations
**Function name:** `m3ter_ListAggregations`
**Category:** READ
**HTTP method:** GET (paginated)
**Destination:** m3ter
Retrieve a list of Aggregations that can be filtered by Product, Aggregation ID, or Code.
### Parameters
| Name | Label | Type | Required | Description | Constraints |
| - | - | - | :-: | - | - |
| `integrationCredentialsId` | Credentials | M3terEntityParameter | Yes | The m3ter credentials to use. | authType: M3TER\_SIGNED\_REQUEST, m3terEntity: IntegrationCredentials |
| `statePath` | State Path | StateVariableParameter | No | State variable to store the response. | - |
| `queryParams` | Query Parameters | KeyValueLookupParameter | No | Query parameters to include in the request | allowedValues: productId,ids,codes |
### Exits
| Exit | Description |
| - | - |
| `NEXT` | The API call succeeded. |
| `ERROR` | The API call failed. Error details are stored in the `m3shError` state variable. |
## Create Aggregation
**Function name:** `m3ter_PostAggregation`
**Category:** WRITE
**HTTP method:** POST
**Destination:** m3ter
Create a new Aggregation.
### Parameters
| Name | Label | Type | Required | Description | Constraints |
| - | - | - | :-: | - | - |
| `integrationCredentialsId` | Credentials | M3terEntityParameter | Yes | The m3ter credentials to use. | authType: M3TER\_SIGNED\_REQUEST, m3terEntity: IntegrationCredentials |
| `requestPath` | Request Path | StateVariableParameter | Yes | State variable containing the request. | - |
| `statePath` | State Path | StateVariableParameter | No | State variable to store the response. | - |
### Exits
| Exit | Description |
| - | - |
| `NEXT` | The API call succeeded. |
| `ERROR` | The API call failed. Error details are stored in the `m3shError` state variable. |
## Retrieve Aggregation
**Function name:** `m3ter_GetAggregation`
**Category:** READ
**HTTP method:** GET
**Destination:** m3ter
Retrieve the Aggregation with the given UUID.
### Parameters
| Name | Label | Type | Required | Description | Constraints |
| - | - | - | :-: | - | - |
| `integrationCredentialsId` | Credentials | M3terEntityParameter | Yes | The m3ter credentials to use. | authType: M3TER\_SIGNED\_REQUEST, m3terEntity: IntegrationCredentials |
| `id` | id | LookupParameter | Yes | The UUID of the Aggregation to retrieve. | - |
| `statePath` | State Path | StateVariableParameter | No | State variable to store the response. | - |
### Exits
| Exit | Description |
| - | - |
| `NEXT` | The API call succeeded. |
| `ERROR` | The API call failed. Error details are stored in the `m3shError` state variable. |
## Update Aggregation
**Function name:** `m3ter_PutAggregation`
**Category:** WRITE
**HTTP method:** PUT
**Destination:** m3ter
Update the Aggregation with the given UUID.
**Note:** If you have created Custom Fields for an Aggregation, when you use this endpoint to update the Aggregation use the `customFields` parameter to preserve those Custom Fields. If you omit them from the update request, they will be lost.
### Parameters
| Name | Label | Type | Required | Description | Constraints |
| - | - | - | :-: | - | - |
| `integrationCredentialsId` | Credentials | M3terEntityParameter | Yes | The m3ter credentials to use. | authType: M3TER\_SIGNED\_REQUEST, m3terEntity: IntegrationCredentials |
| `id` | id | LookupParameter | Yes | The UUID of the Aggregation to update. | - |
| `requestPath` | Request Path | StateVariableParameter | Yes | State variable containing the request. | - |
| `statePath` | State Path | StateVariableParameter | No | State variable to store the response. | - |
### Exits
| Exit | Description |
| - | - |
| `NEXT` | The API call succeeded. |
| `ERROR` | The API call failed. Error details are stored in the `m3shError` state variable. |
## Delete Aggregation
**Function name:** `m3ter_DeleteAggregation`
**Category:** WRITE
**HTTP method:** DELETE
**Destination:** m3ter
Delete the Aggregation with the given UUID.
### Parameters
| Name | Label | Type | Required | Description | Constraints |
| - | - | - | :-: | - | - |
| `integrationCredentialsId` | Credentials | M3terEntityParameter | Yes | The m3ter credentials to use. | authType: M3TER\_SIGNED\_REQUEST, m3terEntity: IntegrationCredentials |
| `id` | id | LookupParameter | Yes | The UUID of the Aggregation to delete. | - |
| `statePath` | State Path | StateVariableParameter | No | State variable to store the response. | - |
### Exits
| Exit | Description |
| - | - |
| `NEXT` | The API call succeeded. |
| `ERROR` | The API call failed. Error details are stored in the `m3shError` state variable. |
# Balances
Source: https://docs.m3ter.com/m3sh-function-reference/m3ter/balances
## List BalanceTransactionSchedule
**Function name:** `m3ter_ListBalanceTransactionSchedule`
**Category:** READ
**HTTP method:** GET (paginated)
**Destination:** m3ter
Retrieve a list of BalanceTransactionSchedule entities.
### Parameters
| Name | Label | Type | Required | Description | Constraints |
| - | - | - | :-: | - | - |
| `integrationCredentialsId` | Credentials | M3terEntityParameter | Yes | The m3ter credentials to use. | authType: M3TER\_SIGNED\_REQUEST, m3terEntity: IntegrationCredentials |
| `balanceId` | balanceId | LookupParameter | Yes | UUID of the balance | - |
| `statePath` | State Path | StateVariableParameter | No | State variable to store the response. | - |
| `queryParams` | Query Parameters | KeyValueLookupParameter | No | Query parameters to include in the request | allowedValues: ids |
### Exits
| Exit | Description |
| - | - |
| `NEXT` | The API call succeeded. |
| `ERROR` | The API call failed. Error details are stored in the `m3shError` state variable. |
## Create BalanceTransactionSchedule
**Function name:** `m3ter_CreateBalanceTransactionSchedule`
**Category:** WRITE
**HTTP method:** POST
**Destination:** m3ter
Create a new BalanceTransactionSchedule.
### Parameters
| Name | Label | Type | Required | Description | Constraints |
| - | - | - | :-: | - | - |
| `integrationCredentialsId` | Credentials | M3terEntityParameter | Yes | The m3ter credentials to use. | authType: M3TER\_SIGNED\_REQUEST, m3terEntity: IntegrationCredentials |
| `balanceId` | balanceId | LookupParameter | Yes | UUID of the balance | - |
| `requestPath` | Request Path | StateVariableParameter | Yes | State variable containing the request. | - |
| `statePath` | State Path | StateVariableParameter | No | State variable to store the response. | - |
### Exits
| Exit | Description |
| - | - |
| `NEXT` | The API call succeeded. |
| `ERROR` | The API call failed. Error details are stored in the `m3shError` state variable. |
## Retrieve BalanceChargeSchedule
**Function name:** `m3ter_GetBalanceChargeSchedule`
**Category:** READ
**HTTP method:** GET
**Destination:** m3ter
Retrieve a BalanceChargeSchedule for the given UUID.
### Parameters
| Name | Label | Type | Required | Description | Constraints |
| - | - | - | :-: | - | - |
| `integrationCredentialsId` | Credentials | M3terEntityParameter | Yes | The m3ter credentials to use. | authType: M3TER\_SIGNED\_REQUEST, m3terEntity: IntegrationCredentials |
| `balanceId` | balanceId | LookupParameter | Yes | UUID of the balance | - |
| `id` | id | LookupParameter | Yes | The UUID of the BalanceChargeSchedule to retrieve. | - |
| `statePath` | State Path | StateVariableParameter | No | State variable to store the response. | - |
### Exits
| Exit | Description |
| - | - |
| `NEXT` | The API call succeeded. |
| `ERROR` | The API call failed. Error details are stored in the `m3shError` state variable. |
## Update BalanceChargeSchedule
**Function name:** `m3ter_UpdateBalanceChargeSchedule`
**Category:** WRITE
**HTTP method:** PUT
**Destination:** m3ter
Update a BalanceChargeSchedule for the given UUID.
### Parameters
| Name | Label | Type | Required | Description | Constraints |
| - | - | - | :-: | - | - |
| `integrationCredentialsId` | Credentials | M3terEntityParameter | Yes | The m3ter credentials to use. | authType: M3TER\_SIGNED\_REQUEST, m3terEntity: IntegrationCredentials |
| `balanceId` | balanceId | LookupParameter | Yes | UUID of the balance | - |
| `id` | id | LookupParameter | Yes | The UUID of the BalanceChargeSchedule to update. | - |
| `requestPath` | Request Path | StateVariableParameter | Yes | State variable containing the request. | - |
| `statePath` | State Path | StateVariableParameter | No | State variable to store the response. | - |
### Exits
| Exit | Description |
| - | - |
| `NEXT` | The API call succeeded. |
| `ERROR` | The API call failed. Error details are stored in the `m3shError` state variable. |
## Delete BalanceChargeSchedule
**Function name:** `m3ter_DeleteBalanceChargeSchedule`
**Category:** WRITE
**HTTP method:** DELETE
**Destination:** m3ter
Delete the BalanceChargeSchedule for the given UUID.
### Parameters
| Name | Label | Type | Required | Description | Constraints |
| - | - | - | :-: | - | - |
| `integrationCredentialsId` | Credentials | M3terEntityParameter | Yes | The m3ter credentials to use. | authType: M3TER\_SIGNED\_REQUEST, m3terEntity: IntegrationCredentials |
| `balanceId` | balanceId | LookupParameter | Yes | UUID of the balance | - |
| `id` | id | LookupParameter | Yes | The UUID of the BalanceChargeSchedule to update. | - |
| `statePath` | State Path | StateVariableParameter | No | State variable to store the response. | - |
### Exits
| Exit | Description |
| - | - |
| `NEXT` | The API call succeeded. |
| `ERROR` | The API call failed. Error details are stored in the `m3shError` state variable. |
## Preview ScheduledBalanceTransactions
**Function name:** `m3ter_PreviewBalanceTransactionSchedule`
**Category:** WRITE
**HTTP method:** POST
**Destination:** m3ter
Previews the BalanceTransactions this Schedule would create, without persisting them. You can use this call to obtain a preview of the Transactions a Schedule you plan to create for a Balance would generate.
### Parameters
| Name | Label | Type | Required | Description | Constraints |
| - | - | - | :-: | - | - |
| `integrationCredentialsId` | Credentials | M3terEntityParameter | Yes | The m3ter credentials to use. | authType: M3TER\_SIGNED\_REQUEST, m3terEntity: IntegrationCredentials |
| `balanceId` | balanceId | LookupParameter | Yes | UUID of the balance | - |
| `requestPath` | Request Path | StateVariableParameter | Yes | State variable containing the request. | - |
| `statePath` | State Path | StateVariableParameter | No | State variable to store the response. | - |
### Exits
| Exit | Description |
| - | - |
| `NEXT` | The API call succeeded. |
| `ERROR` | The API call failed. Error details are stored in the `m3shError` state variable. |
## List Balances
**Function name:** `m3ter_ListBalances`
**Category:** READ
**HTTP method:** GET (paginated)
**Destination:** m3ter
Retrieve a list of all Balances for your Organization.
This endpoint returns a list of all Balances associated with your organization. You can filter the Balances by the end customer's Account UUID and end dates, and paginate through them using the `pageSize` and `nextToken` parameters.
**NOTE:** If a Balance has a rollover amount configured and you want to use the `endDateStart` or `endDateEnd` query parameters, the `rolloverEndDate` is used as the end date/time for the Balance.
### Parameters
| Name | Label | Type | Required | Description | Constraints |
| - | - | - | :-: | - | - |
| `integrationCredentialsId` | Credentials | M3terEntityParameter | Yes | The m3ter credentials to use. | authType: M3TER\_SIGNED\_REQUEST, m3terEntity: IntegrationCredentials |
| `statePath` | State Path | StateVariableParameter | No | State variable to store the response. | - |
| `queryParams` | Query Parameters | KeyValueLookupParameter | No | Query parameters to include in the request | allowedValues: accountId,endDateStart,endDateEnd,contract,contractId,ids |
### Exits
| Exit | Description |
| - | - |
| `NEXT` | The API call succeeded. |
| `ERROR` | The API call failed. Error details are stored in the `m3shError` state variable. |
## Create Balance
**Function name:** `m3ter_PostBalance`
**Category:** WRITE
**HTTP method:** POST
**Destination:** m3ter
Create a new Balance for the given end customer Account.
This endpoint allows you to create a new Balance for a specific end customer Account. The Balance details should be provided in the request body.
### Parameters
| Name | Label | Type | Required | Description | Constraints |
| - | - | - | :-: | - | - |
| `integrationCredentialsId` | Credentials | M3terEntityParameter | Yes | The m3ter credentials to use. | authType: M3TER\_SIGNED\_REQUEST, m3terEntity: IntegrationCredentials |
| `requestPath` | Request Path | StateVariableParameter | Yes | State variable containing the request. | - |
| `statePath` | State Path | StateVariableParameter | No | State variable to store the response. | - |
### Exits
| Exit | Description |
| - | - |
| `NEXT` | The API call succeeded. |
| `ERROR` | The API call failed. Error details are stored in the `m3shError` state variable. |
## List Transactions
**Function name:** `m3ter_ListBalanceTransactions`
**Category:** READ
**HTTP method:** GET (paginated)
**Destination:** m3ter
Retrieve all Transactions for a specific Balance.
This endpoint returns a list of all Transactions associated with a specific Balance. You can paginate through the Transactions by using the `pageSize` and `nextToken` parameters.
### Parameters
| Name | Label | Type | Required | Description | Constraints |
| - | - | - | :-: | - | - |
| `integrationCredentialsId` | Credentials | M3terEntityParameter | Yes | The m3ter credentials to use. | authType: M3TER\_SIGNED\_REQUEST, m3terEntity: IntegrationCredentials |
| `balanceId` | balanceId | LookupParameter | Yes | The unique identifier (UUID) for the Balance whose Transactions you want to retrieve. | - |
| `statePath` | State Path | StateVariableParameter | No | State variable to store the response. | - |
| `queryParams` | Query Parameters | KeyValueLookupParameter | No | Query parameters to include in the request | allowedValues: transactionTypeId,entityType,entityId |
### Exits
| Exit | Description |
| - | - |
| `NEXT` | The API call succeeded. |
| `ERROR` | The API call failed. Error details are stored in the `m3shError` state variable. |
## Create Balance Transaction
**Function name:** `m3ter_PostBalanceTransaction`
**Category:** WRITE
**HTTP method:** POST
**Destination:** m3ter
Add a Transaction to a Balance. This endpoint allows you to create a new Transaction amount for a Balance. This amount then becomes available at billing for draw-down to cover charges due. The Transaction details should be provided in the request body.
Before you can add a Transaction amount, you must first set up Transaction Types at the Organization Level - see the [Transaction Type](https://docs.m3ter.com/api/transactiontype/introduction) section in this API Reference for more details. You can then use this call to add an instance of a Transaction Type to a Balance.
**Note:** If you have a customer whose payment is in a different currency to the Balance currency, you can use the `paid` and `paidCurrency` request parameters to record the amount paid and alternative currency respectively. For example, you might add a Transaction amount of 200 USD to a Balance on a customer Account where the customer actually paid you 50 units in virtual currency X.
### Parameters
| Name | Label | Type | Required | Description | Constraints |
| - | - | - | :-: | - | - |
| `integrationCredentialsId` | Credentials | M3terEntityParameter | Yes | The m3ter credentials to use. | authType: M3TER\_SIGNED\_REQUEST, m3terEntity: IntegrationCredentials |
| `balanceId` | balanceId | LookupParameter | Yes | The unique identifier (UUID) for the Balance to which you want to add a transaction. | - |
| `requestPath` | Request Path | StateVariableParameter | Yes | State variable containing the request. | - |
| `statePath` | State Path | StateVariableParameter | No | State variable to store the response. | - |
### Exits
| Exit | Description |
| - | - |
| `NEXT` | The API call succeeded. |
| `ERROR` | The API call failed. Error details are stored in the `m3shError` state variable. |
## List BalanceChargeSchedule
**Function name:** `m3ter_ListBalanceChargeSchedule`
**Category:** READ
**HTTP method:** GET (paginated)
**Destination:** m3ter
Retrieve a list of BalanceChargeSchedule entities
### Parameters
| Name | Label | Type | Required | Description | Constraints |
| - | - | - | :-: | - | - |
| `integrationCredentialsId` | Credentials | M3terEntityParameter | Yes | The m3ter credentials to use. | authType: M3TER\_SIGNED\_REQUEST, m3terEntity: IntegrationCredentials |
| `balanceId` | balanceId | LookupParameter | Yes | UUID of the balance | - |
| `statePath` | State Path | StateVariableParameter | No | State variable to store the response. | - |
| `queryParams` | Query Parameters | KeyValueLookupParameter | No | Query parameters to include in the request | allowedValues: ids |
### Exits
| Exit | Description |
| - | - |
| `NEXT` | The API call succeeded. |
| `ERROR` | The API call failed. Error details are stored in the `m3shError` state variable. |
## Create BalanceChargeSchedule
**Function name:** `m3ter_CreateBalanceChargeSchedule`
**Category:** WRITE
**HTTP method:** POST
**Destination:** m3ter
Create a new BalanceChargeSchedule.
### Parameters
| Name | Label | Type | Required | Description | Constraints |
| - | - | - | :-: | - | - |
| `integrationCredentialsId` | Credentials | M3terEntityParameter | Yes | The m3ter credentials to use. | authType: M3TER\_SIGNED\_REQUEST, m3terEntity: IntegrationCredentials |
| `balanceId` | balanceId | LookupParameter | Yes | UUID of the balance | - |
| `requestPath` | Request Path | StateVariableParameter | Yes | State variable containing the request. | - |
| `statePath` | State Path | StateVariableParameter | No | State variable to store the response. | - |
### Exits
| Exit | Description |
| - | - |
| `NEXT` | The API call succeeded. |
| `ERROR` | The API call failed. Error details are stored in the `m3shError` state variable. |
## Get Balance Transactions Summary
**Function name:** `m3ter_GetBalanceTransactionsSummary`
**Category:** READ
**HTTP method:** GET
**Destination:** m3ter
Retrieves the Balance Transactions Summary for a given Balance.
The response contains useful recorded and calculated Transaction amounts created for a Balance during the time it is active for the Account, including amounts relevant to any rollover amount configured for a Balance:
* `totalCreditAmount`. The sum of all credits amounts created for the Balance.
* `totalDebitAmount`. The sum of all debit amounts created for the Balance.
* `initialCreditAmount`. The initial credit amount created for the Balance.
* `expiredBalanceAmount`. The amount of the Balance remaining at the time the Balance expires and which is not included in any configured Rollover amount. For example,suppose a Balance reaches its end date and 1000 credit remains unused. If the Balance is configured to rollover 800, then the `expiredBalanceAmount` is calculated as 1000 - 800 = 200.
* `rolloverConsumed`. The sum of debits made against the configured rollover amount. Note that this amount is dynamic relative to when the API call is made until either the rollover end date is reached or the cap configured for the rollover amount is reached, after which it will be unchanged. If no rollover is configured for a Balance, then this is ignored.
* `balanceConsumed`. The sum of debits made against the Balance. Note that this amount is dynamic relative to when the API call is made until either the Balance end date is reached or the available Balance amount reaches zero, after which it will be unchanged.
### Parameters
| Name | Label | Type | Required | Description | Constraints |
| - | - | - | :-: | - | - |
| `integrationCredentialsId` | Credentials | M3terEntityParameter | Yes | The m3ter credentials to use. | authType: M3TER\_SIGNED\_REQUEST, m3terEntity: IntegrationCredentials |
| `balanceId` | balanceId | LookupParameter | Yes | The UUID of the Balance | - |
| `statePath` | State Path | StateVariableParameter | No | State variable to store the response. | - |
### Exits
| Exit | Description |
| - | - |
| `NEXT` | The API call succeeded. |
| `ERROR` | The API call failed. Error details are stored in the `m3shError` state variable. |
## Preview ScheduledBalanceCharges
**Function name:** `m3ter_PreviewScheduledCharge`
**Category:** WRITE
**HTTP method:** POST
**Destination:** m3ter
Previews the Charges this Schedule would create, without persisting them. You can use this call to obtain a preview of the Charges a Schedule you plan to create for a Balance would generate.
### Parameters
| Name | Label | Type | Required | Description | Constraints |
| - | - | - | :-: | - | - |
| `integrationCredentialsId` | Credentials | M3terEntityParameter | Yes | The m3ter credentials to use. | authType: M3TER\_SIGNED\_REQUEST, m3terEntity: IntegrationCredentials |
| `balanceId` | balanceId | LookupParameter | Yes | UUID of the balance | - |
| `requestPath` | Request Path | StateVariableParameter | Yes | State variable containing the request. | - |
| `statePath` | State Path | StateVariableParameter | No | State variable to store the response. | - |
### Exits
| Exit | Description |
| - | - |
| `NEXT` | The API call succeeded. |
| `ERROR` | The API call failed. Error details are stored in the `m3shError` state variable. |
## Retrieve Balance
**Function name:** `m3ter_GetBalance`
**Category:** READ
**HTTP method:** GET
**Destination:** m3ter
Retrieve a specific Balance.
This endpoint returns the details of the specified Balance.
### Parameters
| Name | Label | Type | Required | Description | Constraints |
| - | - | - | :-: | - | - |
| `integrationCredentialsId` | Credentials | M3terEntityParameter | Yes | The m3ter credentials to use. | authType: M3TER\_SIGNED\_REQUEST, m3terEntity: IntegrationCredentials |
| `id` | id | LookupParameter | Yes | The unique identifier (UUID) of the Balance to retrieve. | - |
| `statePath` | State Path | StateVariableParameter | No | State variable to store the response. | - |
### Exits
| Exit | Description |
| - | - |
| `NEXT` | The API call succeeded. |
| `ERROR` | The API call failed. Error details are stored in the `m3shError` state variable. |
## Update Balance
**Function name:** `m3ter_PutBalance`
**Category:** WRITE
**HTTP method:** PUT
**Destination:** m3ter
Update a specific Balance.
This endpoint allows you to update the details of a specific Balance. The updated Balance details should be provided in the request body.
### Parameters
| Name | Label | Type | Required | Description | Constraints |
| - | - | - | :-: | - | - |
| `integrationCredentialsId` | Credentials | M3terEntityParameter | Yes | The m3ter credentials to use. | authType: M3TER\_SIGNED\_REQUEST, m3terEntity: IntegrationCredentials |
| `id` | id | LookupParameter | Yes | The unique identifier (UUID) of the Balance to update. | - |
| `requestPath` | Request Path | StateVariableParameter | Yes | State variable containing the request. | - |
| `statePath` | State Path | StateVariableParameter | No | State variable to store the response. | - |
### Exits
| Exit | Description |
| - | - |
| `NEXT` | The API call succeeded. |
| `ERROR` | The API call failed. Error details are stored in the `m3shError` state variable. |
## Delete Balance
**Function name:** `m3ter_DeleteBalance`
**Category:** WRITE
**HTTP method:** DELETE
**Destination:** m3ter
Delete a specific Balance.
This endpoint allows you to delete a specific Balance with the given UUID.
### Parameters
| Name | Label | Type | Required | Description | Constraints |
| - | - | - | :-: | - | - |
| `integrationCredentialsId` | Credentials | M3terEntityParameter | Yes | The m3ter credentials to use. | authType: M3TER\_SIGNED\_REQUEST, m3terEntity: IntegrationCredentials |
| `id` | id | LookupParameter | Yes | The unique identifier (UUID) of the Balance to delete. | - |
| `statePath` | State Path | StateVariableParameter | No | State variable to store the response. | - |
### Exits
| Exit | Description |
| - | - |
| `NEXT` | The API call succeeded. |
| `ERROR` | The API call failed. Error details are stored in the `m3shError` state variable. |
## Retrieve BalanceTransactionSchedule
**Function name:** `m3ter_GetBalanceTransactionSchedule`
**Category:** READ
**HTTP method:** GET
**Destination:** m3ter
Retrieve a BalanceTransactionSchedule for the given UUID.
### Parameters
| Name | Label | Type | Required | Description | Constraints |
| - | - | - | :-: | - | - |
| `integrationCredentialsId` | Credentials | M3terEntityParameter | Yes | The m3ter credentials to use. | authType: M3TER\_SIGNED\_REQUEST, m3terEntity: IntegrationCredentials |
| `balanceId` | balanceId | LookupParameter | Yes | UUID of the balance | - |
| `id` | id | LookupParameter | Yes | The UUID of the BalanceTransactionSchedule to retrieve. | - |
| `statePath` | State Path | StateVariableParameter | No | State variable to store the response. | - |
### Exits
| Exit | Description |
| - | - |
| `NEXT` | The API call succeeded. |
| `ERROR` | The API call failed. Error details are stored in the `m3shError` state variable. |
## Update BalanceTransactionSchedule
**Function name:** `m3ter_UpdateBalanceTransactionSchedule`
**Category:** WRITE
**HTTP method:** PUT
**Destination:** m3ter
Update a BalanceTransactionSchedule for the given UUID.
### Parameters
| Name | Label | Type | Required | Description | Constraints |
| - | - | - | :-: | - | - |
| `integrationCredentialsId` | Credentials | M3terEntityParameter | Yes | The m3ter credentials to use. | authType: M3TER\_SIGNED\_REQUEST, m3terEntity: IntegrationCredentials |
| `balanceId` | balanceId | LookupParameter | Yes | UUID of the balance | - |
| `id` | id | LookupParameter | Yes | The UUID of the BalanceTransactionSchedule to update. | - |
| `requestPath` | Request Path | StateVariableParameter | Yes | State variable containing the request. | - |
| `statePath` | State Path | StateVariableParameter | No | State variable to store the response. | - |
### Exits
| Exit | Description |
| - | - |
| `NEXT` | The API call succeeded. |
| `ERROR` | The API call failed. Error details are stored in the `m3shError` state variable. |
## Delete BalanceTransactionSchedule
**Function name:** `m3ter_DeleteBalanceTransactionSchedule`
**Category:** WRITE
**HTTP method:** DELETE
**Destination:** m3ter
Delete the BalanceTransactionSchedule for the given UUID.
### Parameters
| Name | Label | Type | Required | Description | Constraints |
| - | - | - | :-: | - | - |
| `integrationCredentialsId` | Credentials | M3terEntityParameter | Yes | The m3ter credentials to use. | authType: M3TER\_SIGNED\_REQUEST, m3terEntity: IntegrationCredentials |
| `balanceId` | balanceId | LookupParameter | Yes | UUID of the balance | - |
| `id` | id | LookupParameter | Yes | The UUID of the BalanceTransactionSchedule to update. | - |
| `statePath` | State Path | StateVariableParameter | No | State variable to store the response. | - |
### Exits
| Exit | Description |
| - | - |
| `NEXT` | The API call succeeded. |
| `ERROR` | The API call failed. Error details are stored in the `m3shError` state variable. |
# Billconfig
Source: https://docs.m3ter.com/m3sh-function-reference/m3ter/billconfig
## Retrieve BillConfig
**Function name:** `m3ter_GetBillConfig`
**Category:** READ
**HTTP method:** GET
**Destination:** m3ter
Retrieve the Organization-wide BillConfig.
### Parameters
| Name | Label | Type | Required | Description | Constraints |
| - | - | - | :-: | - | - |
| `integrationCredentialsId` | Credentials | M3terEntityParameter | Yes | The m3ter credentials to use. | authType: M3TER\_SIGNED\_REQUEST, m3terEntity: IntegrationCredentials |
| `statePath` | State Path | StateVariableParameter | No | State variable to store the response. | - |
### Exits
| Exit | Description |
| - | - |
| `NEXT` | The API call succeeded. |
| `ERROR` | The API call failed. Error details are stored in the `m3shError` state variable. |
## Update BillConfig
**Function name:** `m3ter_UpdateBillConfig`
**Category:** WRITE
**HTTP method:** PUT
**Destination:** m3ter
Update the Organization-wide BillConfig.
You can use this endpoint to set a global lock date for **all** Bills - any Bill with a service period end date on or before the set date will be locked and cannot be updated or recalculated.
### Parameters
| Name | Label | Type | Required | Description | Constraints |
| - | - | - | :-: | - | - |
| `integrationCredentialsId` | Credentials | M3terEntityParameter | Yes | The m3ter credentials to use. | authType: M3TER\_SIGNED\_REQUEST, m3terEntity: IntegrationCredentials |
| `requestPath` | Request Path | StateVariableParameter | Yes | State variable containing the request. | - |
| `statePath` | State Path | StateVariableParameter | No | State variable to store the response. | - |
### Exits
| Exit | Description |
| - | - |
| `NEXT` | The API call succeeded. |
| `ERROR` | The API call failed. Error details are stored in the `m3shError` state variable. |
# Billjobs
Source: https://docs.m3ter.com/m3sh-function-reference/m3ter/billjobs
## List BillJobs
**Function name:** `m3ter_ListBillJobs`
**Category:** READ
**HTTP method:** GET (paginated)
**Destination:** m3ter
Retrieve a list of BillJobs.
This endpoint retrieves a list of BillJobs for the specified Organization. The list can be paginated for easier management, and allows you to query and filter based on various parameters, such as BillJob `status` and whether or not BillJob remains `active`.
### Parameters
| Name | Label | Type | Required | Description | Constraints |
| - | - | - | :-: | - | - |
| `integrationCredentialsId` | Credentials | M3terEntityParameter | Yes | The m3ter credentials to use. | authType: M3TER\_SIGNED\_REQUEST, m3terEntity: IntegrationCredentials |
| `statePath` | State Path | StateVariableParameter | No | State variable to store the response. | - |
| `queryParams` | Query Parameters | KeyValueLookupParameter | No | Query parameters to include in the request | allowedValues: active,status |
### Exits
| Exit | Description |
| - | - |
| `NEXT` | The API call succeeded. |
| `ERROR` | The API call failed. Error details are stored in the `m3shError` state variable. |
## Create BillJob
**Function name:** `m3ter_CreateBillJob`
**Category:** WRITE
**HTTP method:** POST
**Destination:** m3ter
Create a new BillJob to handle asynchronous bill calculations for a specific Organization.
This operation allows you to initiate the processing of bills according to specified parameters. For example, create a BillJob to run only those bills where `billingFrequency` is `MONTHLY`. Note that if you want to run a BillJob for all billing frequencies, simply omit the `billingFrequency` request parameter.
Once created, the BillJob's progress can be monitored:
* In the Running Tasks panel in the m3ter Console - for more details, see [Running Bills Manually](https://www.m3ter.com/docs/guides/billing-and-usage-data/running-viewing-and-managing-bills/running-bills-and-viewing-bill-details#running-bills-manually)
* Queried using the [List BillJobs](https://docs.m3ter.com/api/billjob/list-billjobs) endpoint.
**NOTES:**
* **Consolidated bills**. If you've already run billing with the Consolidate bills option disabled for your Organization but you then enable it, subsequent Bills for specific bill dates will now start afresh and not update earlier non-consolidated Bills for the same bill date. To avoid any billing conflicts, you might want to archive these earlier versions or delete them entirely.
* **Maximum concurrent BillJobs**. If you already have 10 BillJobs currently running, and try to create another one, you'll get an HTTP 429 response (Too many requests). When one of the existing BillJobs has completed, you'll be able to submit another job
### Parameters
| Name | Label | Type | Required | Description | Constraints |
| - | - | - | :-: | - | - |
| `integrationCredentialsId` | Credentials | M3terEntityParameter | Yes | The m3ter credentials to use. | authType: M3TER\_SIGNED\_REQUEST, m3terEntity: IntegrationCredentials |
| `requestPath` | Request Path | StateVariableParameter | Yes | State variable containing the request. | - |
| `statePath` | State Path | StateVariableParameter | No | State variable to store the response. | - |
### Exits
| Exit | Description |
| - | - |
| `NEXT` | The API call succeeded. |
| `ERROR` | The API call failed. Error details are stored in the `m3shError` state variable. |
## Cancel BillJob
**Function name:** `m3ter_CancelBillJob`
**Category:** WRITE
**HTTP method:** POST
**Destination:** m3ter
Cancel an ongoing BillJob for the given Organization and BillJob UUID.
This endpoint allows you to halt the processing of a specific BillJob, which might be necessary if there are changes in billing requirements or other operational considerations.
### Parameters
| Name | Label | Type | Required | Description | Constraints |
| - | - | - | :-: | - | - |
| `integrationCredentialsId` | Credentials | M3terEntityParameter | Yes | The m3ter credentials to use. | authType: M3TER\_SIGNED\_REQUEST, m3terEntity: IntegrationCredentials |
| `id` | id | LookupParameter | Yes | The unique identifier (UUID) of the BillJob to cancel. | - |
| `statePath` | State Path | StateVariableParameter | No | State variable to store the response. | - |
### Exits
| Exit | Description |
| - | - |
| `NEXT` | The API call succeeded. |
| `ERROR` | The API call failed. Error details are stored in the `m3shError` state variable. |
## Create Recalculation BillJob
**Function name:** `m3ter_RecalculateBillJob`
**Category:** WRITE
**HTTP method:** POST
**Destination:** m3ter
Create a new BillJob specifically to recalculate existing bills for a given Organization.
This operation is essential when adjustments or corrections are required in previously calculated bills. The recalculated bills when the BillJob is complete can be checked in the m3ter Console Bill Management page or queried by using the [List Bills](https://docs.m3ter.com/api/bill/list-bills) operation.
**NOTE:**
* **Response Schema**. The response schema for this call is dynamic. This means that the response might not contain all of the parameters listed. If set to null,the parameter is hidden to help simplify the output as well as to reduce its size and improve performance.
### Parameters
| Name | Label | Type | Required | Description | Constraints |
| - | - | - | :-: | - | - |
| `integrationCredentialsId` | Credentials | M3terEntityParameter | Yes | The m3ter credentials to use. | authType: M3TER\_SIGNED\_REQUEST, m3terEntity: IntegrationCredentials |
| `requestPath` | Request Path | StateVariableParameter | Yes | State variable containing the request. | - |
| `statePath` | State Path | StateVariableParameter | No | State variable to store the response. | - |
### Exits
| Exit | Description |
| - | - |
| `NEXT` | The API call succeeded. |
| `ERROR` | The API call failed. Error details are stored in the `m3shError` state variable. |
## Retrieve BillJob
**Function name:** `m3ter_GetBillJob`
**Category:** READ
**HTTP method:** GET
**Destination:** m3ter
Retrieve a Bill Job for the given UUID.
### Parameters
| Name | Label | Type | Required | Description | Constraints |
| - | - | - | :-: | - | - |
| `integrationCredentialsId` | Credentials | M3terEntityParameter | Yes | The m3ter credentials to use. | authType: M3TER\_SIGNED\_REQUEST, m3terEntity: IntegrationCredentials |
| `id` | id | LookupParameter | Yes | The UUID of the Bill Job to retrieve. | - |
| `statePath` | State Path | StateVariableParameter | No | State variable to store the response. | - |
### Exits
| Exit | Description |
| - | - |
| `NEXT` | The API call succeeded. |
| `ERROR` | The API call failed. Error details are stored in the `m3shError` state variable. |
# Bills
Source: https://docs.m3ter.com/m3sh-function-reference/m3ter/bills
## List Bills
**Function name:** `m3ter_ListBills`
**Category:** READ
**HTTP method:** GET (paginated)
**Destination:** m3ter
Retrieve a list of Bills.
This endpoint retrieves a list of all Bills for the given Account within the specified Organization. Optional filters can be applied such as by date range, lock status, or other attributes. The list can also be paginated for easier management.
### Parameters
| Name | Label | Type | Required | Description | Constraints |
| - | - | - | :-: | - | - |
| `integrationCredentialsId` | Credentials | M3terEntityParameter | Yes | The m3ter credentials to use. | authType: M3TER\_SIGNED\_REQUEST, m3terEntity: IntegrationCredentials |
| `statePath` | State Path | StateVariableParameter | No | State variable to store the response. | - |
| `queryParams` | Query Parameters | KeyValueLookupParameter | No | Query parameters to include in the request | allowedValues: accountId,locked,excludeLineItems,includeBillTotal,status,billDate,billDateStart,billDateEnd,externalInvoiceDateStart,externalInvoiceDateEnd,ids,billJobId,additional,billingFrequency |
### Exits
| Exit | Description |
| - | - |
| `NEXT` | The API call succeeded. |
| `ERROR` | The API call failed. Error details are stored in the `m3shError` state variable. |
## Retrieve Bill Statement in JSON Format
**Function name:** `m3ter_GetBillJsonStatement`
**Category:** READ
**HTTP method:** GET
**Destination:** m3ter
Retrieve a Bill Statement in JSON format for a given Bill ID.
Bill Statements are backing sheets to the invoices sent to your customers. Bill Statements provide a breakdown of the usage responsible for the usage charge line items shown on invoices.
The response to this call returns a pre-signed `downloadUrl`, which you use with a `GET` call to obtain the Bill Statement.
### Parameters
| Name | Label | Type | Required | Description | Constraints |
| - | - | - | :-: | - | - |
| `integrationCredentialsId` | Credentials | M3terEntityParameter | Yes | The m3ter credentials to use. | authType: M3TER\_SIGNED\_REQUEST, m3terEntity: IntegrationCredentials |
| `id` | id | LookupParameter | Yes | The unique identifier (UUID) of the Bill for which you want to retrieve the Statement. | - |
| `statePath` | State Path | StateVariableParameter | No | State variable to store the response. | - |
### Exits
| Exit | Description |
| - | - |
| `NEXT` | The API call succeeded. |
| `ERROR` | The API call failed. Error details are stored in the `m3shError` state variable. |
## Retrieve Debit Line Item
**Function name:** `m3ter_GetDebitLineItem`
**Category:** READ
**HTTP method:** GET
**Destination:** m3ter
Retrieve the Debit line item with the given UUID.
### Parameters
| Name | Label | Type | Required | Description | Constraints |
| - | - | - | :-: | - | - |
| `integrationCredentialsId` | Credentials | M3terEntityParameter | Yes | The m3ter credentials to use. | authType: M3TER\_SIGNED\_REQUEST, m3terEntity: IntegrationCredentials |
| `billId` | billId | LookupParameter | Yes | UUID of the bill. | - |
| `id` | id | LookupParameter | Yes | The UUID of the debit line item to retrieve. | - |
| `statePath` | State Path | StateVariableParameter | No | State variable to store the response. | - |
### Exits
| Exit | Description |
| - | - |
| `NEXT` | The API call succeeded. |
| `ERROR` | The API call failed. Error details are stored in the `m3shError` state variable. |
## Update Debit Line Item
**Function name:** `m3ter_PutDebitLineItem`
**Category:** WRITE
**HTTP method:** PUT
**Destination:** m3ter
Update the Debit line item with the given UUID.
### Parameters
| Name | Label | Type | Required | Description | Constraints |
| - | - | - | :-: | - | - |
| `integrationCredentialsId` | Credentials | M3terEntityParameter | Yes | The m3ter credentials to use. | authType: M3TER\_SIGNED\_REQUEST, m3terEntity: IntegrationCredentials |
| `billId` | billId | LookupParameter | Yes | UUID of the bill. | - |
| `id` | id | LookupParameter | Yes | The UUID of the debit line item to update. | - |
| `requestPath` | Request Path | StateVariableParameter | Yes | State variable containing the request. | - |
| `statePath` | State Path | StateVariableParameter | No | State variable to store the response. | - |
### Exits
| Exit | Description |
| - | - |
| `NEXT` | The API call succeeded. |
| `ERROR` | The API call failed. Error details are stored in the `m3shError` state variable. |
## Delete Debit Line Item
**Function name:** `m3ter_DeleteDebitLineItem`
**Category:** WRITE
**HTTP method:** DELETE
**Destination:** m3ter
Delete the Debit line item with the given UUID.
### Parameters
| Name | Label | Type | Required | Description | Constraints |
| - | - | - | :-: | - | - |
| `integrationCredentialsId` | Credentials | M3terEntityParameter | Yes | The m3ter credentials to use. | authType: M3TER\_SIGNED\_REQUEST, m3terEntity: IntegrationCredentials |
| `billId` | billId | LookupParameter | Yes | UUID of the bill. | - |
| `id` | id | LookupParameter | Yes | UUID of the debit line item. | - |
| `statePath` | State Path | StateVariableParameter | No | State variable to store the response. | - |
### Exits
| Exit | Description |
| - | - |
| `NEXT` | The API call succeeded. |
| `ERROR` | The API call failed. Error details are stored in the `m3shError` state variable. |
## Retrieve Credit Line Item
**Function name:** `m3ter_GetCreditLineItem`
**Category:** READ
**HTTP method:** GET
**Destination:** m3ter
Retrieve the Credit line item with the given UUID.
### Parameters
| Name | Label | Type | Required | Description | Constraints |
| - | - | - | :-: | - | - |
| `integrationCredentialsId` | Credentials | M3terEntityParameter | Yes | The m3ter credentials to use. | authType: M3TER\_SIGNED\_REQUEST, m3terEntity: IntegrationCredentials |
| `billId` | billId | LookupParameter | Yes | UUID of the Bill. | - |
| `id` | id | LookupParameter | Yes | The UUID of the Credit line item to retrieve. | - |
| `statePath` | State Path | StateVariableParameter | No | State variable to store the response. | - |
### Exits
| Exit | Description |
| - | - |
| `NEXT` | The API call succeeded. |
| `ERROR` | The API call failed. Error details are stored in the `m3shError` state variable. |
## Update Credit Line Item
**Function name:** `m3ter_PutCreditLineItem`
**Category:** WRITE
**HTTP method:** PUT
**Destination:** m3ter
Update the Credit line item with the given UUID.
### Parameters
| Name | Label | Type | Required | Description | Constraints |
| - | - | - | :-: | - | - |
| `integrationCredentialsId` | Credentials | M3terEntityParameter | Yes | The m3ter credentials to use. | authType: M3TER\_SIGNED\_REQUEST, m3terEntity: IntegrationCredentials |
| `billId` | billId | LookupParameter | Yes | UUID of the bill. | - |
| `id` | id | LookupParameter | Yes | The UUID of the credit line item to update. | - |
| `requestPath` | Request Path | StateVariableParameter | Yes | State variable containing the request. | - |
| `statePath` | State Path | StateVariableParameter | No | State variable to store the response. | - |
### Exits
| Exit | Description |
| - | - |
| `NEXT` | The API call succeeded. |
| `ERROR` | The API call failed. Error details are stored in the `m3shError` state variable. |
## Delete Credit Line Item
**Function name:** `m3ter_DeleteCreditLineItem`
**Category:** WRITE
**HTTP method:** DELETE
**Destination:** m3ter
Delete the Credit line item with the given UUID.
### Parameters
| Name | Label | Type | Required | Description | Constraints |
| - | - | - | :-: | - | - |
| `integrationCredentialsId` | Credentials | M3terEntityParameter | Yes | The m3ter credentials to use. | authType: M3TER\_SIGNED\_REQUEST, m3terEntity: IntegrationCredentials |
| `billId` | billId | LookupParameter | Yes | UUID of the bill. | - |
| `id` | id | LookupParameter | Yes | UUID of the credit line item to delete. | - |
| `statePath` | State Path | StateVariableParameter | No | State variable to store the response. | - |
### Exits
| Exit | Description |
| - | - |
| `NEXT` | The API call succeeded. |
| `ERROR` | The API call failed. Error details are stored in the `m3shError` state variable. |
## Retrieve Line Item
**Function name:** `m3ter_GetBillLineItem`
**Category:** READ
**HTTP method:** GET
**Destination:** m3ter
Retrieves a specific line item within a Bill.
This endpoint retrieves the line item given by its unique identifier (UUID) from a specific Bill.
### Parameters
| Name | Label | Type | Required | Description | Constraints |
| - | - | - | :-: | - | - |
| `integrationCredentialsId` | Credentials | M3terEntityParameter | Yes | The m3ter credentials to use. | authType: M3TER\_SIGNED\_REQUEST, m3terEntity: IntegrationCredentials |
| `billId` | billId | LookupParameter | Yes | The unique identifier (UUID) of the Bill containing the line item. | - |
| `id` | id | LookupParameter | Yes | The unique identifier (UUID) of the line item you want to retrieve. | - |
| `statePath` | State Path | StateVariableParameter | No | State variable to store the response. | - |
| `queryParams` | Query Parameters | KeyValueLookupParameter | No | Query parameters to include in the request | allowedValues: additional |
### Exits
| Exit | Description |
| - | - |
| `NEXT` | The API call succeeded. |
| `ERROR` | The API call failed. Error details are stored in the `m3shError` state variable. |
## Retrieve Line Item Usage in JSON Format
**Function name:** `m3ter_GetBillLineItemJsonUsage`
**Category:** READ
**HTTP method:** GET
**Destination:** m3ter
Retrieve the line item with the given UUID in JSON format.
This endpoint retrieves detailed usage information for a specific billing line item in JSON format. It is designed to provide granular insights into the consumption pattern for the given line item.
The response includes a pre-signed `downloadUrl`, which must be used with a separate `GET` call to download the Bill line item. This ensures secure access to the requested information.
### Parameters
| Name | Label | Type | Required | Description | Constraints |
| - | - | - | :-: | - | - |
| `integrationCredentialsId` | Credentials | M3terEntityParameter | Yes | The m3ter credentials to use. | authType: M3TER\_SIGNED\_REQUEST, m3terEntity: IntegrationCredentials |
| `billId` | billId | LookupParameter | Yes | UUID of the Bill | - |
| `id` | id | LookupParameter | Yes | The unique identifier (UUID) of the Bill line item for which to retrieve the usage. | - |
| `statePath` | State Path | StateVariableParameter | No | State variable to store the response. | - |
### Exits
| Exit | Description |
| - | - |
| `NEXT` | The API call succeeded. |
| `ERROR` | The API call failed. Error details are stored in the `m3shError` state variable. |
## Download Bills URL
**Function name:** `m3ter_DownloadBillsCsvUrl`
**Category:** WRITE
**HTTP method:** POST
**Destination:** m3ter
Generate a URL for downloading a CSV file containing a comprehensive list of Bills data for the specified organization for a specified period. This endpoint facilitates easy exporting of billing data for external analysis and reporting.
The response to this call returns a pre-signed `downloadUrl`, which you then enter into your browser to download the CSV file of the Bill entities.
You can use the `externalSystem` request parameter to control the format of the Bills data in the CSV file:
* **STANDARD** A wider range of Bills data columns is given.
* **XERO** A more limited range of data columns is given and compatible with loading into your 3rd-party Xero system.
**NOTES:**
* **Download Limits**. You can only download Bills for a period of up to 31 days or up to a maximum of 5000 Bills. If you attempt a download that exceeds either of these two limits, you'll receive an error message
* **Empty Bills**. The CSV formatted file is compiled for download by taking each of the line items found in Bills that exist in your Organization for the specified period. The Bill for each line item record is given, along with Bill Total and other billing attributes. However, this means that if you have an *empty Bill* that exists for the specified period - one for which *no line items currently exist* - then no line item records will be shown for this Bill in the CSV file you download.
### Parameters
| Name | Label | Type | Required | Description | Constraints |
| - | - | - | :-: | - | - |
| `integrationCredentialsId` | Credentials | M3terEntityParameter | Yes | The m3ter credentials to use. | authType: M3TER\_SIGNED\_REQUEST, m3terEntity: IntegrationCredentials |
| `requestPath` | Request Path | StateVariableParameter | Yes | State variable containing the request. | - |
| `statePath` | State Path | StateVariableParameter | No | State variable to store the response. | - |
### Exits
| Exit | Description |
| - | - |
| `NEXT` | The API call succeeded. |
| `ERROR` | The API call failed. Error details are stored in the `m3shError` state variable. |
## Approve Bills
**Function name:** `m3ter_ApproveBills`
**Category:** WRITE
**HTTP method:** POST
**Destination:** m3ter
Approve multiple Bills for the specified Organization based on the given criteria.
This endpoint allows you to change currently *Pending* Bills to *Approved* status for further processing.
Query Parameters:
* Use `accountIds` to approve Bills for specifed Accounts.
Request Body Schema Parameter:
* Use `billIds` to specify a collection of Bills for batch approval.
**Important!** If you use the `billIds` Request Body Schema parameter, any Query parameters you might have also used are ignored when the call is processed.
### Parameters
| Name | Label | Type | Required | Description | Constraints |
| - | - | - | :-: | - | - |
| `integrationCredentialsId` | Credentials | M3terEntityParameter | Yes | The m3ter credentials to use. | authType: M3TER\_SIGNED\_REQUEST, m3terEntity: IntegrationCredentials |
| `requestPath` | Request Path | StateVariableParameter | Yes | State variable containing the request. | - |
| `statePath` | State Path | StateVariableParameter | No | State variable to store the response. | - |
| `queryParams` | Query Parameters | KeyValueLookupParameter | No | Query parameters to include in the request | allowedValues: externalInvoiceDateStart,externalInvoiceDateEnd,accountIds |
### Exits
| Exit | Description |
| - | - |
| `NEXT` | The API call succeeded. |
| `ERROR` | The API call failed. Error details are stored in the `m3shError` state variable. |
## Search Bills
**Function name:** `m3ter_SearchBills`
**Category:** READ
**HTTP method:** GET (paginated)
**Destination:** m3ter
Search for Bill entities.
This endpoint executes a search query for Bills based on the user specified search criteria. The search query is customizable, allowing for complex nested conditions and sorting. The returned list of Bills can be paginated for easier management.
### Parameters
| Name | Label | Type | Required | Description | Constraints |
| - | - | - | :-: | - | - |
| `integrationCredentialsId` | Credentials | M3terEntityParameter | Yes | The m3ter credentials to use. | authType: M3TER\_SIGNED\_REQUEST, m3terEntity: IntegrationCredentials |
| `statePath` | State Path | StateVariableParameter | No | State variable to store the response. | - |
| `queryParams` | Query Parameters | KeyValueLookupParameter | No | Query parameters to include in the request | allowedValues: searchQuery,fromDocument,operator,sortBy,sortOrder |
### Exits
| Exit | Description |
| - | - |
| `NEXT` | The API call succeeded. |
| `ERROR` | The API call failed. Error details are stored in the `m3shError` state variable. |
## Retrieve latest Bill
**Function name:** `m3ter_GetLatestBill`
**Category:** READ
**HTTP method:** GET
**Destination:** m3ter
Retrieve the latest Bill for the given Account.
This endpoint retrieves the latest Bill for the given Account in the specified Organization. It facilitates tracking of the most recent charges and consumption details.
### Parameters
| Name | Label | Type | Required | Description | Constraints |
| - | - | - | :-: | - | - |
| `integrationCredentialsId` | Credentials | M3terEntityParameter | Yes | The m3ter credentials to use. | authType: M3TER\_SIGNED\_REQUEST, m3terEntity: IntegrationCredentials |
| `accountId` | accountId | LookupParameter | Yes | The unique identifier (UUID) of the Account for which the latest Bill should be retrieved. | - |
| `statePath` | State Path | StateVariableParameter | No | State variable to store the response. | - |
| `queryParams` | Query Parameters | KeyValueLookupParameter | No | Query parameters to include in the request | allowedValues: additional |
### Exits
| Exit | Description |
| - | - |
| `NEXT` | The API call succeeded. |
| `ERROR` | The API call failed. Error details are stored in the `m3shError` state variable. |
## Update Bill Status
**Function name:** `m3ter_UpdateBillStatus`
**Category:** WRITE
**HTTP method:** PUT
**Destination:** m3ter
Updates the status of a specified Bill with the given Bill ID.
This endpoint allows you to transition a Bill's status through various stages, such as from "Pending" to "Approved".
### Parameters
| Name | Label | Type | Required | Description | Constraints |
| - | - | - | :-: | - | - |
| `integrationCredentialsId` | Credentials | M3terEntityParameter | Yes | The m3ter credentials to use. | authType: M3TER\_SIGNED\_REQUEST, m3terEntity: IntegrationCredentials |
| `id` | id | LookupParameter | Yes | The unique identifier (UUID) of the Bill whose status you want to update. | - |
| `requestPath` | Request Path | StateVariableParameter | Yes | State variable containing the request. | - |
| `statePath` | State Path | StateVariableParameter | No | State variable to store the response. | - |
### Exits
| Exit | Description |
| - | - |
| `NEXT` | The API call succeeded. |
| `ERROR` | The API call failed. Error details are stored in the `m3shError` state variable. |
## Retrieve Bill Statement in CSV Format
**Function name:** `m3ter_GetBillCsvStatement`
**Category:** READ
**HTTP method:** GET
**Destination:** m3ter
Retrieve a specific Bill Statement for the given Bill UUID in CSV format.
Bill Statements are backing sheets to the invoices sent to your customers. Bill Statements provide a breakdown of the usage responsible for the usage charge line items shown on invoices.
The response includes a pre-signed `downloadUrl`, which must be used with a separate `GET` call to download the actual Bill Statement. This ensures secure access to the requested information.
### Parameters
| Name | Label | Type | Required | Description | Constraints |
| - | - | - | :-: | - | - |
| `integrationCredentialsId` | Credentials | M3terEntityParameter | Yes | The m3ter credentials to use. | authType: M3TER\_SIGNED\_REQUEST, m3terEntity: IntegrationCredentials |
| `id` | id | LookupParameter | Yes | The unique identifier (UUID) of the Bill for which to retrieve the Statement in CSV format. | - |
| `statePath` | State Path | StateVariableParameter | No | State variable to store the response. | - |
### Exits
| Exit | Description |
| - | - |
| `NEXT` | The API call succeeded. |
| `ERROR` | The API call failed. Error details are stored in the `m3shError` state variable. |
## Create Bill Statement in CSV Format
**Function name:** `m3ter_CreateBillCsvStatement`
**Category:** WRITE
**HTTP method:** POST
**Destination:** m3ter
Generate a specific Bill Statement for the provided Bill UUID in CSV format.
Bill Statements are backing sheets to the invoices sent to your customers. Bill Statements provide a breakdown of the usage responsible for the usage charge line items shown on invoices.
The response to this call returns a pre-signed `downloadUrl`, which you then use with a `GET` call to obtain the Bill statement in CSV format.
### Parameters
| Name | Label | Type | Required | Description | Constraints |
| - | - | - | :-: | - | - |
| `integrationCredentialsId` | Credentials | M3terEntityParameter | Yes | The m3ter credentials to use. | authType: M3TER\_SIGNED\_REQUEST, m3terEntity: IntegrationCredentials |
| `id` | id | LookupParameter | Yes | The unique identifier (UUID) of the Bill for which you want to generate the Statement in CSV format. | - |
| `statePath` | State Path | StateVariableParameter | No | State variable to store the response. | - |
### Exits
| Exit | Description |
| - | - |
| `NEXT` | The API call succeeded. |
| `ERROR` | The API call failed. Error details are stored in the `m3shError` state variable. |
## List Credit Line Items
**Function name:** `m3ter_ListCreditLineItems`
**Category:** READ
**HTTP method:** GET (paginated)
**Destination:** m3ter
List the Credit line items for the given Bill.
### Parameters
| Name | Label | Type | Required | Description | Constraints |
| - | - | - | :-: | - | - |
| `integrationCredentialsId` | Credentials | M3terEntityParameter | Yes | The m3ter credentials to use. | authType: M3TER\_SIGNED\_REQUEST, m3terEntity: IntegrationCredentials |
| `billId` | billId | LookupParameter | Yes | UUID of the bill. | - |
| `statePath` | State Path | StateVariableParameter | No | State variable to store the response. | - |
### Exits
| Exit | Description |
| - | - |
| `NEXT` | The API call succeeded. |
| `ERROR` | The API call failed. Error details are stored in the `m3shError` state variable. |
## Create Credit Line Item
**Function name:** `m3ter_PostCreditLineItem`
**Category:** WRITE
**HTTP method:** POST
**Destination:** m3ter
Create a new Credit line item for the given Bill.
When creating Credit line items for Bills, use the Credit Reasons created for your Organization. See [CreditReason](https://www.m3ter.com/docs/api#tag/CreditReason).
### Parameters
| Name | Label | Type | Required | Description | Constraints |
| - | - | - | :-: | - | - |
| `integrationCredentialsId` | Credentials | M3terEntityParameter | Yes | The m3ter credentials to use. | authType: M3TER\_SIGNED\_REQUEST, m3terEntity: IntegrationCredentials |
| `billId` | billId | LookupParameter | Yes | UUID of the bill. | - |
| `requestPath` | Request Path | StateVariableParameter | Yes | State variable containing the request. | - |
| `statePath` | State Path | StateVariableParameter | No | State variable to store the response. | - |
### Exits
| Exit | Description |
| - | - |
| `NEXT` | The API call succeeded. |
| `ERROR` | The API call failed. Error details are stored in the `m3shError` state variable. |
## Retrieve Bills in Billing Period
**Function name:** `m3ter_GetAllBillsInBillingPeriod`
**Category:** READ
**HTTP method:** GET (paginated)
**Destination:** m3ter
Retrieve all Bills within a specified billing period. This endpoint allows you to retrieve Bills on various frequencies, such as daily, weekly, monthly, or annually. Specify the last day of the period to define the range.
For example, to retrieve all Bills on monthly billing up to September with due date of 1st of month, use the last day of September, which is September 30th.
The list can also be paginated for easier management.
### Parameters
| Name | Label | Type | Required | Description | Constraints |
| - | - | - | :-: | - | - |
| `integrationCredentialsId` | Credentials | M3terEntityParameter | Yes | The m3ter credentials to use. | authType: M3TER\_SIGNED\_REQUEST, m3terEntity: IntegrationCredentials |
| `lastDateInBillingPeriod` | lastDateInBillingPeriod | LookupParameter | Yes | The last date of the billing period for which you want to retrieve Bills. This date defines the range of Bills to be retrieved. | - |
| `billingFrequency` | billingFrequency | LookupParameter | Yes | The billing frequency for the specified period. Valid options are daily, weekly, monthly, or annually. | - |
| `statePath` | State Path | StateVariableParameter | No | State variable to store the response. | - |
| `queryParams` | Query Parameters | KeyValueLookupParameter | No | Query parameters to include in the request | allowedValues: additional |
### Exits
| Exit | Description |
| - | - |
| `NEXT` | The API call succeeded. |
| `ERROR` | The API call failed. Error details are stored in the `m3shError` state variable. |
## List Line Items
**Function name:** `m3ter_ListBillLineItems`
**Category:** READ
**HTTP method:** GET (paginated)
**Destination:** m3ter
Lists all the line items for a specific Bill.
This endpoint retrieves a list of line items for the given Bill within the specified Organization. The list can also be paginated for easier management. The line items returned in the list include individual charges, discounts, or adjustments within a Bill.
### Parameters
| Name | Label | Type | Required | Description | Constraints |
| - | - | - | :-: | - | - |
| `integrationCredentialsId` | Credentials | M3terEntityParameter | Yes | The m3ter credentials to use. | authType: M3TER\_SIGNED\_REQUEST, m3terEntity: IntegrationCredentials |
| `billId` | billId | LookupParameter | Yes | The unique identifier (UUID) of the Bill for which you want to list the line items. | - |
| `statePath` | State Path | StateVariableParameter | No | State variable to store the response. | - |
| `queryParams` | Query Parameters | KeyValueLookupParameter | No | Query parameters to include in the request | allowedValues: additional |
### Exits
| Exit | Description |
| - | - |
| `NEXT` | The API call succeeded. |
| `ERROR` | The API call failed. Error details are stored in the `m3shError` state variable. |
## Lock Bill
**Function name:** `m3ter_LockBill`
**Category:** WRITE
**HTTP method:** PUT
**Destination:** m3ter
Lock the specific Bill identified by the given UUID. Once a Bill is locked, no further changes can be made to it.
**NOTE:** You cannot lock a Bill whose current status is `PENDING`. You will receive an error message if you try to do this. You must first use the [Approve Bills](https://docs.m3ter.com/api/bill/approve-bills) call to approve a Bill before you can lock it.
### Parameters
| Name | Label | Type | Required | Description | Constraints |
| - | - | - | :-: | - | - |
| `integrationCredentialsId` | Credentials | M3terEntityParameter | Yes | The m3ter credentials to use. | authType: M3TER\_SIGNED\_REQUEST, m3terEntity: IntegrationCredentials |
| `id` | id | LookupParameter | Yes | The unique identifier (UUID) of the Bill to lock. | - |
| `statePath` | State Path | StateVariableParameter | No | State variable to store the response. | - |
### Exits
| Exit | Description |
| - | - |
| `NEXT` | The API call succeeded. |
| `ERROR` | The API call failed. Error details are stored in the `m3shError` state variable. |
## Approve Bills in Billing Period
**Function name:** `m3ter_ApproveAllBillsInBillingPeriod`
**Category:** WRITE
**HTTP method:** POST
**Destination:** m3ter
Approve all Bills within a specified billing period. This endpoint allows you to approve Bills on various frequencies, such as daily, weekly, monthly, or annually. Specify the last day of the period to define the range.
For example, to approve all Bills on monthly billing up to September with due date of 1st of month, use the last day of September, which is September 30th.
### Parameters
| Name | Label | Type | Required | Description | Constraints |
| - | - | - | :-: | - | - |
| `integrationCredentialsId` | Credentials | M3terEntityParameter | Yes | The m3ter credentials to use. | authType: M3TER\_SIGNED\_REQUEST, m3terEntity: IntegrationCredentials |
| `lastDateInBillingPeriod` | lastDateInBillingPeriod | LookupParameter | Yes | The last date of the billing period for which you want to approve Bills. This date defines the range of Bills to be approved. | - |
| `billingFrequency` | billingFrequency | LookupParameter | Yes | The billing frequency for the specified period. Valid options are daily, weekly, monthly, or annually. | - |
| `statePath` | State Path | StateVariableParameter | No | State variable to store the response. | - |
### Exits
| Exit | Description |
| - | - |
| `NEXT` | The API call succeeded. |
| `ERROR` | The API call failed. Error details are stored in the `m3shError` state variable. |
## Preview Bill
**Function name:** `m3ter_PreviewBill`
**Category:** WRITE
**HTTP method:** POST
**Destination:** m3ter
Preview the current Bill for a specific account.
This endpoint is designed to provide a preview of the Bill for exactly one account, allowing you to review charges, frequencies, and other details before finalization. Required parameters include:
* `accountIds` - exactly 1 account must be specified for previewing a Bill.
* `billingFrequency`
* `billFrequencyInterval`
Other request parameters are optional. If `version` is not specified, the latest version of the Bill is previewed.
### Parameters
| Name | Label | Type | Required | Description | Constraints |
| - | - | - | :-: | - | - |
| `integrationCredentialsId` | Credentials | M3terEntityParameter | Yes | The m3ter credentials to use. | authType: M3TER\_SIGNED\_REQUEST, m3terEntity: IntegrationCredentials |
| `requestPath` | Request Path | StateVariableParameter | Yes | State variable containing the request. | - |
| `statePath` | State Path | StateVariableParameter | No | State variable to store the response. | - |
| `queryParams` | Query Parameters | KeyValueLookupParameter | No | Query parameters to include in the request | allowedValues: debug |
### Exits
| Exit | Description |
| - | - |
| `NEXT` | The API call succeeded. |
| `ERROR` | The API call failed. Error details are stored in the `m3shError` state variable. |
## Retrieve Bill
**Function name:** `m3ter_GetBill`
**Category:** READ
**HTTP method:** GET
**Destination:** m3ter
Retrieve the Bill with the given UUID.
This endpoint retrieves the Bill with the given unique identifier (UUID) and specific Organization.
### Parameters
| Name | Label | Type | Required | Description | Constraints |
| - | - | - | :-: | - | - |
| `integrationCredentialsId` | Credentials | M3terEntityParameter | Yes | The m3ter credentials to use. | authType: M3TER\_SIGNED\_REQUEST, m3terEntity: IntegrationCredentials |
| `id` | id | LookupParameter | Yes | The unique identifier (UUID) of the Bill to retrieve. | - |
| `statePath` | State Path | StateVariableParameter | No | State variable to store the response. | - |
| `queryParams` | Query Parameters | KeyValueLookupParameter | No | Query parameters to include in the request | allowedValues: additional |
### Exits
| Exit | Description |
| - | - |
| `NEXT` | The API call succeeded. |
| `ERROR` | The API call failed. Error details are stored in the `m3shError` state variable. |
## Delete Bill
**Function name:** `m3ter_DeleteBill`
**Category:** WRITE
**HTTP method:** DELETE
**Destination:** m3ter
Delete the Bill with the given UUID.
This endpoint deletes the specified Bill with the given unique identifier. Use with caution since deleted Bills cannot be recovered. Suitable for removing incorrect or obsolete Bills, and for Bills that have not been sent to customers. Where end-customer invoices for Bills have been sent to customers, Bills should not be deleted to ensure you have an audit trail of how the invoice was created.
### Parameters
| Name | Label | Type | Required | Description | Constraints |
| - | - | - | :-: | - | - |
| `integrationCredentialsId` | Credentials | M3terEntityParameter | Yes | The m3ter credentials to use. | authType: M3TER\_SIGNED\_REQUEST, m3terEntity: IntegrationCredentials |
| `id` | id | LookupParameter | Yes | The unique identifier (UUID) of the Bill to delete. | - |
| `statePath` | State Path | StateVariableParameter | No | State variable to store the response. | - |
### Exits
| Exit | Description |
| - | - |
| `NEXT` | The API call succeeded. |
| `ERROR` | The API call failed. Error details are stored in the `m3shError` state variable. |
## Retrieve Bills for an Account ID
**Function name:** `m3ter_GetAllBillsForAccount`
**Category:** READ
**HTTP method:** GET (paginated)
**Destination:** m3ter
Retrieve all Bills for the given Account.
This endpoint retrieves all Bills associated with a specific Account ID in a specified organization. The list can also be paginated for easier management.
This is useful for obtaining an overview of all billing activities for an Account.
### Parameters
| Name | Label | Type | Required | Description | Constraints |
| - | - | - | :-: | - | - |
| `integrationCredentialsId` | Credentials | M3terEntityParameter | Yes | The m3ter credentials to use. | authType: M3TER\_SIGNED\_REQUEST, m3terEntity: IntegrationCredentials |
| `accountId` | accountId | LookupParameter | Yes | The unique identifier (UUID) of the Account for which you want to retrieve Bills. | - |
| `statePath` | State Path | StateVariableParameter | No | State variable to store the response. | - |
| `queryParams` | Query Parameters | KeyValueLookupParameter | No | Query parameters to include in the request | allowedValues: additional |
### Exits
| Exit | Description |
| - | - |
| `NEXT` | The API call succeeded. |
| `ERROR` | The API call failed. Error details are stored in the `m3shError` state variable. |
## List Debit Line Items
**Function name:** `m3ter_ListDebitLineItems`
**Category:** READ
**HTTP method:** GET (paginated)
**Destination:** m3ter
List the Debit line items for the given bill.
### Parameters
| Name | Label | Type | Required | Description | Constraints |
| - | - | - | :-: | - | - |
| `integrationCredentialsId` | Credentials | M3terEntityParameter | Yes | The m3ter credentials to use. | authType: M3TER\_SIGNED\_REQUEST, m3terEntity: IntegrationCredentials |
| `billId` | billId | LookupParameter | Yes | UUID of the bill. | - |
| `statePath` | State Path | StateVariableParameter | No | State variable to store the response. | - |
### Exits
| Exit | Description |
| - | - |
| `NEXT` | The API call succeeded. |
| `ERROR` | The API call failed. Error details are stored in the `m3shError` state variable. |
## Create Debit Line Item
**Function name:** `m3ter_PostDebitLineItem`
**Category:** WRITE
**HTTP method:** POST
**Destination:** m3ter
Create a new Debit line item for the given bill.
When creating Debit line items for Bills, use the Debit Reasons created for your Organization. See [DebitReason](https://www.m3ter.com/docs/api#tag/DebitReason).
### Parameters
| Name | Label | Type | Required | Description | Constraints |
| - | - | - | :-: | - | - |
| `integrationCredentialsId` | Credentials | M3terEntityParameter | Yes | The m3ter credentials to use. | authType: M3TER\_SIGNED\_REQUEST, m3terEntity: IntegrationCredentials |
| `billId` | billId | LookupParameter | Yes | UUID of the bill. | - |
| `requestPath` | Request Path | StateVariableParameter | Yes | State variable containing the request. | - |
| `statePath` | State Path | StateVariableParameter | No | State variable to store the response. | - |
### Exits
| Exit | Description |
| - | - |
| `NEXT` | The API call succeeded. |
| `ERROR` | The API call failed. Error details are stored in the `m3shError` state variable. |
# Charges
Source: https://docs.m3ter.com/m3sh-function-reference/m3ter/charges
## Retrieve Charge
**Function name:** `m3ter_GetCharge`
**Category:** READ
**HTTP method:** GET
**Destination:** m3ter
Retrieve a Charge for the given UUID.
### Parameters
| Name | Label | Type | Required | Description | Constraints |
| - | - | - | :-: | - | - |
| `integrationCredentialsId` | Credentials | M3terEntityParameter | Yes | The m3ter credentials to use. | authType: M3TER\_SIGNED\_REQUEST, m3terEntity: IntegrationCredentials |
| `id` | id | LookupParameter | Yes | The UUID of the Charge to retrieve. | - |
| `statePath` | State Path | StateVariableParameter | No | State variable to store the response. | - |
### Exits
| Exit | Description |
| - | - |
| `NEXT` | The API call succeeded. |
| `ERROR` | The API call failed. Error details are stored in the `m3shError` state variable. |
## Update Charge
**Function name:** `m3ter_UpdateCharge`
**Category:** WRITE
**HTTP method:** PUT
**Destination:** m3ter
Update a Charge for the given UUID.
**NOTE:** When you update a Charge on an Account, you can provide either a Charge `amount` or Charge `units` together with a `unitPrice`, but *not both*.
### Parameters
| Name | Label | Type | Required | Description | Constraints |
| - | - | - | :-: | - | - |
| `integrationCredentialsId` | Credentials | M3terEntityParameter | Yes | The m3ter credentials to use. | authType: M3TER\_SIGNED\_REQUEST, m3terEntity: IntegrationCredentials |
| `id` | id | LookupParameter | Yes | The UUID of the Charge to update. | - |
| `requestPath` | Request Path | StateVariableParameter | Yes | State variable containing the request. | - |
| `statePath` | State Path | StateVariableParameter | No | State variable to store the response. | - |
### Exits
| Exit | Description |
| - | - |
| `NEXT` | The API call succeeded. |
| `ERROR` | The API call failed. Error details are stored in the `m3shError` state variable. |
## Delete Charge
**Function name:** `m3ter_DeleteCharge`
**Category:** WRITE
**HTTP method:** DELETE
**Destination:** m3ter
Delete the Charge for the given UUID.
### Parameters
| Name | Label | Type | Required | Description | Constraints |
| - | - | - | :-: | - | - |
| `integrationCredentialsId` | Credentials | M3terEntityParameter | Yes | The m3ter credentials to use. | authType: M3TER\_SIGNED\_REQUEST, m3terEntity: IntegrationCredentials |
| `id` | id | LookupParameter | Yes | The UUID of the Charge to update. | - |
| `statePath` | State Path | StateVariableParameter | No | State variable to store the response. | - |
### Exits
| Exit | Description |
| - | - |
| `NEXT` | The API call succeeded. |
| `ERROR` | The API call failed. Error details are stored in the `m3shError` state variable. |
## List Charges
**Function name:** `m3ter_ListCharges`
**Category:** READ
**HTTP method:** GET (paginated)
**Destination:** m3ter
Retrieve a list of Charge entities
### Parameters
| Name | Label | Type | Required | Description | Constraints |
| - | - | - | :-: | - | - |
| `integrationCredentialsId` | Credentials | M3terEntityParameter | Yes | The m3ter credentials to use. | authType: M3TER\_SIGNED\_REQUEST, m3terEntity: IntegrationCredentials |
| `statePath` | State Path | StateVariableParameter | No | State variable to store the response. | - |
| `queryParams` | Query Parameters | KeyValueLookupParameter | No | Query parameters to include in the request | allowedValues: accountId,entityType,entityId,billDate,ids,scheduleId |
### Exits
| Exit | Description |
| - | - |
| `NEXT` | The API call succeeded. |
| `ERROR` | The API call failed. Error details are stored in the `m3shError` state variable. |
## Create Charge
**Function name:** `m3ter_CreateCharge`
**Category:** WRITE
**HTTP method:** POST
**Destination:** m3ter
Create a new Charge.
**NOTES:**
* To create an ad-hoc Charge on an Account, use the `accountId` request parameter.
* To create a balance fee Charge for a Balance, use the `entityId` request parameter to specify which Balance on an Account the Charge is for.
* To define the value of the Charge amount that is billed, you can simply specify an `amount` or use a number of `units` together with a `unitPrice` for a calculated value = units x unit price. But you cannot specify *both an amount and units/unit price*.
### Parameters
| Name | Label | Type | Required | Description | Constraints |
| - | - | - | :-: | - | - |
| `integrationCredentialsId` | Credentials | M3terEntityParameter | Yes | The m3ter credentials to use. | authType: M3TER\_SIGNED\_REQUEST, m3terEntity: IntegrationCredentials |
| `requestPath` | Request Path | StateVariableParameter | Yes | State variable containing the request. | - |
| `statePath` | State Path | StateVariableParameter | No | State variable to store the response. | - |
### Exits
| Exit | Description |
| - | - |
| `NEXT` | The API call succeeded. |
| `ERROR` | The API call failed. Error details are stored in the `m3shError` state variable. |
# Commitments
Source: https://docs.m3ter.com/m3sh-function-reference/m3ter/commitments
## List Commitments
**Function name:** `m3ter_ListCommitments`
**Category:** READ
**HTTP method:** GET (paginated)
**Destination:** m3ter
Retrieve a list of Commitments.
Retrieves a list of all Commitments associated with an Organization. This endpoint supports pagination and includes various query parameters to filter the Commitments based on Account, Product, date, and end dates.
### Parameters
| Name | Label | Type | Required | Description | Constraints |
| - | - | - | :-: | - | - |
| `integrationCredentialsId` | Credentials | M3terEntityParameter | Yes | The m3ter credentials to use. | authType: M3TER\_SIGNED\_REQUEST, m3terEntity: IntegrationCredentials |
| `statePath` | State Path | StateVariableParameter | No | State variable to store the response. | - |
| `queryParams` | Query Parameters | KeyValueLookupParameter | No | Query parameters to include in the request | allowedValues: accountId,productId,date,endDateStart,endDateEnd,ids,contractId |
### Exits
| Exit | Description |
| - | - |
| `NEXT` | The API call succeeded. |
| `ERROR` | The API call failed. Error details are stored in the `m3shError` state variable. |
## Create Commitment
**Function name:** `m3ter_PostCommitment`
**Category:** WRITE
**HTTP method:** POST
**Destination:** m3ter
Create a new Commitment.
Creates a new Commitment for an Organization. The request body must include all the necessary details such as the agreed amount, overage surcharge percentage, and the associated account and product details.
**Note:** If some of the agreed Commitment amount remains unpaid at the start of an end-customer contract period, when you create a Commitment for an Account you can set up billing for the outstanding amount in one of two ways:
* Select a Product *Plan to bill with*. Use the `billingPlanId` request parameter to select the Plan used for billing.
* Define a *schedule of billing dates*. Omit a `billingPlanId` and use the `feeDates` request parameter to define a precise schedule of bill dates and amounts.
### Parameters
| Name | Label | Type | Required | Description | Constraints |
| - | - | - | :-: | - | - |
| `integrationCredentialsId` | Credentials | M3terEntityParameter | Yes | The m3ter credentials to use. | authType: M3TER\_SIGNED\_REQUEST, m3terEntity: IntegrationCredentials |
| `requestPath` | Request Path | StateVariableParameter | Yes | State variable containing the request. | - |
| `statePath` | State Path | StateVariableParameter | No | State variable to store the response. | - |
### Exits
| Exit | Description |
| - | - |
| `NEXT` | The API call succeeded. |
| `ERROR` | The API call failed. Error details are stored in the `m3shError` state variable. |
## Search Commitments
**Function name:** `m3ter_SearchCommitments`
**Category:** READ
**HTTP method:** GET (paginated)
**Destination:** m3ter
Search for commitment entities.
This endpoint executes a search query for Commitments based on the user specified search criteria. The search query is customizable, allowing for complex nested conditions and sorting. The returned list of Commitments can be paginated for easier management.
### Parameters
| Name | Label | Type | Required | Description | Constraints |
| - | - | - | :-: | - | - |
| `integrationCredentialsId` | Credentials | M3terEntityParameter | Yes | The m3ter credentials to use. | authType: M3TER\_SIGNED\_REQUEST, m3terEntity: IntegrationCredentials |
| `statePath` | State Path | StateVariableParameter | No | State variable to store the response. | - |
| `queryParams` | Query Parameters | KeyValueLookupParameter | No | Query parameters to include in the request | allowedValues: searchQuery,fromDocument,operator,sortBy,sortOrder |
### Exits
| Exit | Description |
| - | - |
| `NEXT` | The API call succeeded. |
| `ERROR` | The API call failed. Error details are stored in the `m3shError` state variable. |
## Retrieve Commitment
**Function name:** `m3ter_GetCommitment`
**Category:** READ
**HTTP method:** GET
**Destination:** m3ter
Retrieve a specific Commitment.
Retrieve the details of the Commitment with the given UUID. It provides comprehensive information about the Commitment, such as the agreed amount, overage surcharge percentage, and other related details.
### Parameters
| Name | Label | Type | Required | Description | Constraints |
| - | - | - | :-: | - | - |
| `integrationCredentialsId` | Credentials | M3terEntityParameter | Yes | The m3ter credentials to use. | authType: M3TER\_SIGNED\_REQUEST, m3terEntity: IntegrationCredentials |
| `id` | id | LookupParameter | Yes | The unique identifier (UUID) of the Commitment to retrieve. | - |
| `statePath` | State Path | StateVariableParameter | No | State variable to store the response. | - |
### Exits
| Exit | Description |
| - | - |
| `NEXT` | The API call succeeded. |
| `ERROR` | The API call failed. Error details are stored in the `m3shError` state variable. |
## Update Commitment
**Function name:** `m3ter_PutCommitment`
**Category:** WRITE
**HTTP method:** PUT
**Destination:** m3ter
Modify a specific Commitment.
Update the details of the Commitment with the given UUID. Use this endpoint to adjust Commitment parameters such as the fixed amount, overage surcharge percentage, or associated contract details.
### Parameters
| Name | Label | Type | Required | Description | Constraints |
| - | - | - | :-: | - | - |
| `integrationCredentialsId` | Credentials | M3terEntityParameter | Yes | The m3ter credentials to use. | authType: M3TER\_SIGNED\_REQUEST, m3terEntity: IntegrationCredentials |
| `id` | id | LookupParameter | Yes | The unique identifier (UUID) for the Commitment to update. | - |
| `requestPath` | Request Path | StateVariableParameter | Yes | State variable containing the request. | - |
| `statePath` | State Path | StateVariableParameter | No | State variable to store the response. | - |
### Exits
| Exit | Description |
| - | - |
| `NEXT` | The API call succeeded. |
| `ERROR` | The API call failed. Error details are stored in the `m3shError` state variable. |
## Delete Commitment
**Function name:** `m3ter_DeleteCommitment`
**Category:** WRITE
**HTTP method:** DELETE
**Destination:** m3ter
Remove a specific Commitment.
Deletes the Commitment with the given UUID. Use this endpoint when a Commitment is no longer valid or needs to be removed from the system.
### Parameters
| Name | Label | Type | Required | Description | Constraints |
| - | - | - | :-: | - | - |
| `integrationCredentialsId` | Credentials | M3terEntityParameter | Yes | The m3ter credentials to use. | authType: M3TER\_SIGNED\_REQUEST, m3terEntity: IntegrationCredentials |
| `id` | id | LookupParameter | Yes | The unique identifier (UUID) for the Commitment to delete. | - |
| `statePath` | State Path | StateVariableParameter | No | State variable to store the response. | - |
### Exits
| Exit | Description |
| - | - |
| `NEXT` | The API call succeeded. |
| `ERROR` | The API call failed. Error details are stored in the `m3shError` state variable. |
# Compoundaggregations
Source: https://docs.m3ter.com/m3sh-function-reference/m3ter/compoundaggregations
## List Compound Aggregations
**Function name:** `m3ter_ListCompoundAggregations`
**Category:** READ
**HTTP method:** GET (paginated)
**Destination:** m3ter
Retrieve a list of all Compound Aggregations.
This endpoint retrieves a list of Compound Aggregations associated with a specific organization. Compound Aggregations enable you to define numerical measures based on simple Aggregations of usage data. It supports pagination, and includes various query parameters to filter the Compound Aggregations based on Product, Compound Aggregation IDs or short codes.
### Parameters
| Name | Label | Type | Required | Description | Constraints |
| - | - | - | :-: | - | - |
| `integrationCredentialsId` | Credentials | M3terEntityParameter | Yes | The m3ter credentials to use. | authType: M3TER\_SIGNED\_REQUEST, m3terEntity: IntegrationCredentials |
| `statePath` | State Path | StateVariableParameter | No | State variable to store the response. | - |
| `queryParams` | Query Parameters | KeyValueLookupParameter | No | Query parameters to include in the request | allowedValues: productId,ids,codes |
### Exits
| Exit | Description |
| - | - |
| `NEXT` | The API call succeeded. |
| `ERROR` | The API call failed. Error details are stored in the `m3shError` state variable. |
## Create Compound Aggregation
**Function name:** `m3ter_PostCompoundAggregation`
**Category:** WRITE
**HTTP method:** POST
**Destination:** m3ter
Create a new Compound Aggregation.
This endpoint allows you to create a new Compound Aggregation for a specific Organization. The request body must include all the necessary details such as the Calculation formula.
### Parameters
| Name | Label | Type | Required | Description | Constraints |
| - | - | - | :-: | - | - |
| `integrationCredentialsId` | Credentials | M3terEntityParameter | Yes | The m3ter credentials to use. | authType: M3TER\_SIGNED\_REQUEST, m3terEntity: IntegrationCredentials |
| `requestPath` | Request Path | StateVariableParameter | Yes | State variable containing the request. | - |
| `statePath` | State Path | StateVariableParameter | No | State variable to store the response. | - |
### Exits
| Exit | Description |
| - | - |
| `NEXT` | The API call succeeded. |
| `ERROR` | The API call failed. Error details are stored in the `m3shError` state variable. |
## Retrieve Compound Aggregation
**Function name:** `m3ter_GetCompoundAggregation`
**Category:** READ
**HTTP method:** GET
**Destination:** m3ter
Retrieve a Compound Aggregation using the given UUID.
This endpoint returns a specific Compound Aggregation associated with an Organization. It provides detailed information about the Compound Aggregation.
### Parameters
| Name | Label | Type | Required | Description | Constraints |
| - | - | - | :-: | - | - |
| `integrationCredentialsId` | Credentials | M3terEntityParameter | Yes | The m3ter credentials to use. | authType: M3TER\_SIGNED\_REQUEST, m3terEntity: IntegrationCredentials |
| `id` | id | LookupParameter | Yes | The unique identifier (UUID) of the Compound Aggregation to retrieve. | - |
| `statePath` | State Path | StateVariableParameter | No | State variable to store the response. | - |
### Exits
| Exit | Description |
| - | - |
| `NEXT` | The API call succeeded. |
| `ERROR` | The API call failed. Error details are stored in the `m3shError` state variable. |
## Update Compound Aggregation
**Function name:** `m3ter_PutCompoundAggregation`
**Category:** WRITE
**HTTP method:** PUT
**Destination:** m3ter
Update the Compound Aggregation with the given UUID.
This endpoint allows you to update the details of a specific Compound Aggregation associated with an Organization. Use it to modify details of an existing Compound Aggregation such as the Calculation formula.
**Note:** If you have created Custom Fields for a Compound Aggregation, when you use this endpoint to update the Compound Aggregation use the `customFields` parameter to preserve those Custom Fields. If you omit them from the update request, they will be lost.
### Parameters
| Name | Label | Type | Required | Description | Constraints |
| - | - | - | :-: | - | - |
| `integrationCredentialsId` | Credentials | M3terEntityParameter | Yes | The m3ter credentials to use. | authType: M3TER\_SIGNED\_REQUEST, m3terEntity: IntegrationCredentials |
| `id` | id | LookupParameter | Yes | The unique identifier (UUID) of the Compound Aggregation to update. | - |
| `requestPath` | Request Path | StateVariableParameter | Yes | State variable containing the request. | - |
| `statePath` | State Path | StateVariableParameter | No | State variable to store the response. | - |
### Exits
| Exit | Description |
| - | - |
| `NEXT` | The API call succeeded. |
| `ERROR` | The API call failed. Error details are stored in the `m3shError` state variable. |
## Delete Compound Aggregation
**Function name:** `m3ter_DeleteCompoundAggregation`
**Category:** WRITE
**HTTP method:** DELETE
**Destination:** m3ter
Delete a Compound Aggregation with the given UUID.
This endpoint enables deletion of a specific Compound Aggregation associated with a specific Organization. Useful when you need to remove an existing Compound Aggregation that is no longer required, such as when changing pricing or planning models.
### Parameters
| Name | Label | Type | Required | Description | Constraints |
| - | - | - | :-: | - | - |
| `integrationCredentialsId` | Credentials | M3terEntityParameter | Yes | The m3ter credentials to use. | authType: M3TER\_SIGNED\_REQUEST, m3terEntity: IntegrationCredentials |
| `id` | id | LookupParameter | Yes | The unique identifier (UUID) of the Compound Aggregation to delete. | - |
| `statePath` | State Path | StateVariableParameter | No | State variable to store the response. | - |
### Exits
| Exit | Description |
| - | - |
| `NEXT` | The API call succeeded. |
| `ERROR` | The API call failed. Error details are stored in the `m3shError` state variable. |
# Contracts
Source: https://docs.m3ter.com/m3sh-function-reference/m3ter/contracts
## List Contracts
**Function name:** `m3ter_ListContracts`
**Category:** READ
**HTTP method:** GET (paginated)
**Destination:** m3ter
Retrieves a list of Contracts by Organization ID. Supports pagination and includes various query parameters to filter the Contracts returned based on Contract IDs or short codes.
### Parameters
| Name | Label | Type | Required | Description | Constraints |
| - | - | - | :-: | - | - |
| `integrationCredentialsId` | Credentials | M3terEntityParameter | Yes | The m3ter credentials to use. | authType: M3TER\_SIGNED\_REQUEST, m3terEntity: IntegrationCredentials |
| `statePath` | State Path | StateVariableParameter | No | State variable to store the response. | - |
| `queryParams` | Query Parameters | KeyValueLookupParameter | No | Query parameters to include in the request | allowedValues: ids,codes,accountId |
### Exits
| Exit | Description |
| - | - |
| `NEXT` | The API call succeeded. |
| `ERROR` | The API call failed. Error details are stored in the `m3shError` state variable. |
## Create Contract
**Function name:** `m3ter_PostContract`
**Category:** WRITE
**HTTP method:** POST
**Destination:** m3ter
Creates a new Contract for the specified Account. The Contract includes information such as the associated Account along with start and end dates.
If you intend to bill an Account on a Contract basis, you can use the `billGroupingKeyId`, `applyContractPeriodLimits`, and `usageFilters` request parameters to control Contract billing.
### Parameters
| Name | Label | Type | Required | Description | Constraints |
| - | - | - | :-: | - | - |
| `integrationCredentialsId` | Credentials | M3terEntityParameter | Yes | The m3ter credentials to use. | authType: M3TER\_SIGNED\_REQUEST, m3terEntity: IntegrationCredentials |
| `requestPath` | Request Path | StateVariableParameter | Yes | State variable containing the request. | - |
| `statePath` | State Path | StateVariableParameter | No | State variable to store the response. | - |
### Exits
| Exit | Description |
| - | - |
| `NEXT` | The API call succeeded. |
| `ERROR` | The API call failed. Error details are stored in the `m3shError` state variable. |
## Retrieve Contract
**Function name:** `m3ter_GetContract`
**Category:** READ
**HTTP method:** GET
**Destination:** m3ter
Retrieves the Contract with the given UUID. Used to obtain the details of a Contract.
### Parameters
| Name | Label | Type | Required | Description | Constraints |
| - | - | - | :-: | - | - |
| `integrationCredentialsId` | Credentials | M3terEntityParameter | Yes | The m3ter credentials to use. | authType: M3TER\_SIGNED\_REQUEST, m3terEntity: IntegrationCredentials |
| `id` | id | LookupParameter | Yes | The unique identifier (UUID) of the Contract to retrieve. | - |
| `statePath` | State Path | StateVariableParameter | No | State variable to store the response. | - |
### Exits
| Exit | Description |
| - | - |
| `NEXT` | The API call succeeded. |
| `ERROR` | The API call failed. Error details are stored in the `m3shError` state variable. |
## Update Contract
**Function name:** `m3ter_PutContract`
**Category:** WRITE
**HTTP method:** PUT
**Destination:** m3ter
Update the Contract with the given UUID.
This endpoint updates the details of the Contract with the specified ID. Used to modify details of an existing Contract such as the start or end dates.
**Note:** If you have created Custom Fields for a Contract, when you use this endpoint to update the Contract use the `customFields` parameter to preserve those Custom Fields. If you omit them from the update request, they will be lost.
### Parameters
| Name | Label | Type | Required | Description | Constraints |
| - | - | - | :-: | - | - |
| `integrationCredentialsId` | Credentials | M3terEntityParameter | Yes | The m3ter credentials to use. | authType: M3TER\_SIGNED\_REQUEST, m3terEntity: IntegrationCredentials |
| `id` | id | LookupParameter | Yes | The unique identifier (UUID) of the Contract to update. | - |
| `requestPath` | Request Path | StateVariableParameter | Yes | State variable containing the request. | - |
| `statePath` | State Path | StateVariableParameter | No | State variable to store the response. | - |
### Exits
| Exit | Description |
| - | - |
| `NEXT` | The API call succeeded. |
| `ERROR` | The API call failed. Error details are stored in the `m3shError` state variable. |
## Delete Contract
**Function name:** `m3ter_DeleteContract`
**Category:** WRITE
**HTTP method:** DELETE
**Destination:** m3ter
Deletes the Contract with the specified UUID. Used to remove an existing Contract from an Account.
**Note:** This call will fail if there are any other billing entities associated with the Account and that have been added to the Contract, such as AccountPlans, Balance, or Commitments.
### Parameters
| Name | Label | Type | Required | Description | Constraints |
| - | - | - | :-: | - | - |
| `integrationCredentialsId` | Credentials | M3terEntityParameter | Yes | The m3ter credentials to use. | authType: M3TER\_SIGNED\_REQUEST, m3terEntity: IntegrationCredentials |
| `id` | id | LookupParameter | Yes | The unique identifier (UUID) of the Contract to delete. | - |
| `statePath` | State Path | StateVariableParameter | No | State variable to store the response. | - |
### Exits
| Exit | Description |
| - | - |
| `NEXT` | The API call succeeded. |
| `ERROR` | The API call failed. Error details are stored in the `m3shError` state variable. |
## End-date Contract Account billing entities
**Function name:** `m3ter_EndDateBillingEntitiesForContract`
**Category:** WRITE
**HTTP method:** PUT
**Destination:** m3ter
Apply the specified end-date to billing entities associated with Accounts the Contract has been added to, and apply the end-date to the Contract itself.
**NOTES:**
* If you want to apply the end-date to the Contract *itself* - the Contract `id` you use as the required PATH PARAMETER - you must also specify `CONTRACT` as a `billingEntities` option in the request body schema.
* Only the Contract whose id you specify for the PATH PARAMETER will be end-dated. If there are other Contracts associated with the Account, these will not be end-dated.
* When you successfully end-date billing entities, the version number of each entity is incremented.
### Parameters
| Name | Label | Type | Required | Description | Constraints |
| - | - | - | :-: | - | - |
| `integrationCredentialsId` | Credentials | M3terEntityParameter | Yes | The m3ter credentials to use. | authType: M3TER\_SIGNED\_REQUEST, m3terEntity: IntegrationCredentials |
| `id` | id | LookupParameter | Yes | Unique identifier (UUID) of the Contract - the specified billing entities associated with the Account the Contract has been added to will be end-dated. | - |
| `requestPath` | Request Path | StateVariableParameter | Yes | State variable containing the request. | - |
| `statePath` | State Path | StateVariableParameter | No | State variable to store the response. | - |
### Exits
| Exit | Description |
| - | - |
| `NEXT` | The API call succeeded. |
| `ERROR` | The API call failed. Error details are stored in the `m3shError` state variable. |
# Counteradjustments
Source: https://docs.m3ter.com/m3sh-function-reference/m3ter/counteradjustments
## List CounterAdjustments
**Function name:** `m3ter_ListCounterAdjustments`
**Category:** READ
**HTTP method:** GET (paginated)
**Destination:** m3ter
Retrieve a list of CounterAdjustments created for Accounts in your Organization. You can filter the list returned by date, Account ID, or Counter ID.
**CONSTRAINTS:**
* The `counterId` query parameter is always required when calling this endpoint, used either as a single query parameter or in combination with any of the other query parameters.
* If you want to use the `date`, `dateStart`, or `dateEnd` query parameters, you must also use the `accountId` query parameter.
### Parameters
| Name | Label | Type | Required | Description | Constraints |
| - | - | - | :-: | - | - |
| `integrationCredentialsId` | Credentials | M3terEntityParameter | Yes | The m3ter credentials to use. | authType: M3TER\_SIGNED\_REQUEST, m3terEntity: IntegrationCredentials |
| `statePath` | State Path | StateVariableParameter | No | State variable to store the response. | - |
| `queryParams` | Query Parameters | KeyValueLookupParameter | No | Query parameters to include in the request | allowedValues: counterId,accountId,date,endDateStart,endDateEnd,sortOrder,dateStart,dateEnd |
### Exits
| Exit | Description |
| - | - |
| `NEXT` | The API call succeeded. |
| `ERROR` | The API call failed. Error details are stored in the `m3shError` state variable. |
## Create CounterAdjustment
**Function name:** `m3ter_PostCounterAdjustment`
**Category:** WRITE
**HTTP method:** POST
**Destination:** m3ter
Create a new CounterAdjustment for an Account using a Counter.
**Notes:**
* Use the new absolute value for the Counter for the selected date - if it was 15 and has increased to 20, enter 20; if it was 15 and has decreased to 10, enter 10. *Do not enter* the plus or minus value relative to the previous Counter value on the Account.
* CounterAdjustments on Accounts are supported down to a *specific day* of granularity - you cannot create more than one CounterAdjustment for any given day using the same Counter and you'll receive an error if you try to do this.
### Parameters
| Name | Label | Type | Required | Description | Constraints |
| - | - | - | :-: | - | - |
| `integrationCredentialsId` | Credentials | M3terEntityParameter | Yes | The m3ter credentials to use. | authType: M3TER\_SIGNED\_REQUEST, m3terEntity: IntegrationCredentials |
| `requestPath` | Request Path | StateVariableParameter | Yes | State variable containing the request. | - |
| `statePath` | State Path | StateVariableParameter | No | State variable to store the response. | - |
### Exits
| Exit | Description |
| - | - |
| `NEXT` | The API call succeeded. |
| `ERROR` | The API call failed. Error details are stored in the `m3shError` state variable. |
## Retrieve CounterAdjustment
**Function name:** `m3ter_GetCounterAdjustment`
**Category:** READ
**HTTP method:** GET
**Destination:** m3ter
Retrieve a CounterAdjustment for the given UUID.
### Parameters
| Name | Label | Type | Required | Description | Constraints |
| - | - | - | :-: | - | - |
| `integrationCredentialsId` | Credentials | M3terEntityParameter | Yes | The m3ter credentials to use. | authType: M3TER\_SIGNED\_REQUEST, m3terEntity: IntegrationCredentials |
| `id` | id | LookupParameter | Yes | The UUID of the CounterAdjustment to retrieve. | - |
| `statePath` | State Path | StateVariableParameter | No | State variable to store the response. | - |
### Exits
| Exit | Description |
| - | - |
| `NEXT` | The API call succeeded. |
| `ERROR` | The API call failed. Error details are stored in the `m3shError` state variable. |
## Update CounterAdjustment
**Function name:** `m3ter_PutCounterAdjustment`
**Category:** WRITE
**HTTP method:** PUT
**Destination:** m3ter
Update a CounterAdjustment for an Account.
### Parameters
| Name | Label | Type | Required | Description | Constraints |
| - | - | - | :-: | - | - |
| `integrationCredentialsId` | Credentials | M3terEntityParameter | Yes | The m3ter credentials to use. | authType: M3TER\_SIGNED\_REQUEST, m3terEntity: IntegrationCredentials |
| `id` | id | LookupParameter | Yes | The UUID of the CounterAdjustment to update. | - |
| `requestPath` | Request Path | StateVariableParameter | Yes | State variable containing the request. | - |
| `statePath` | State Path | StateVariableParameter | No | State variable to store the response. | - |
### Exits
| Exit | Description |
| - | - |
| `NEXT` | The API call succeeded. |
| `ERROR` | The API call failed. Error details are stored in the `m3shError` state variable. |
## Delete CounterAdjustment
**Function name:** `m3ter_DeleteCounterAdjustment`
**Category:** WRITE
**HTTP method:** DELETE
**Destination:** m3ter
Delete a CounterAdjustment for the given UUID.
### Parameters
| Name | Label | Type | Required | Description | Constraints |
| - | - | - | :-: | - | - |
| `integrationCredentialsId` | Credentials | M3terEntityParameter | Yes | The m3ter credentials to use. | authType: M3TER\_SIGNED\_REQUEST, m3terEntity: IntegrationCredentials |
| `id` | id | LookupParameter | Yes | The UUID of the CounterAdjustment to delete. | - |
| `statePath` | State Path | StateVariableParameter | No | State variable to store the response. | - |
### Exits
| Exit | Description |
| - | - |
| `NEXT` | The API call succeeded. |
| `ERROR` | The API call failed. Error details are stored in the `m3shError` state variable. |
# Counterpricings
Source: https://docs.m3ter.com/m3sh-function-reference/m3ter/counterpricings
## List CounterPricings
**Function name:** `m3ter_ListCounterPricings`
**Category:** READ
**HTTP method:** GET (paginated)
**Destination:** m3ter
Retrieve a list of CounterPricing entities filtered by date, Plan ID, Plan Template ID, or CounterPricing ID.
### Parameters
| Name | Label | Type | Required | Description | Constraints |
| - | - | - | :-: | - | - |
| `integrationCredentialsId` | Credentials | M3terEntityParameter | Yes | The m3ter credentials to use. | authType: M3TER\_SIGNED\_REQUEST, m3terEntity: IntegrationCredentials |
| `statePath` | State Path | StateVariableParameter | No | State variable to store the response. | - |
| `queryParams` | Query Parameters | KeyValueLookupParameter | No | Query parameters to include in the request | allowedValues: date,planId,planTemplateId,ids |
### Exits
| Exit | Description |
| - | - |
| `NEXT` | The API call succeeded. |
| `ERROR` | The API call failed. Error details are stored in the `m3shError` state variable. |
## Create CounterPricing
**Function name:** `m3ter_PostCounterPricing`
**Category:** WRITE
**HTTP method:** POST
**Destination:** m3ter
Create a new CounterPricing.
**Note:** Either `planId` or `planTemplateId` request parameters are required for this call to be valid. If you omit both, then you will receive a validation error.
### Parameters
| Name | Label | Type | Required | Description | Constraints |
| - | - | - | :-: | - | - |
| `integrationCredentialsId` | Credentials | M3terEntityParameter | Yes | The m3ter credentials to use. | authType: M3TER\_SIGNED\_REQUEST, m3terEntity: IntegrationCredentials |
| `requestPath` | Request Path | StateVariableParameter | Yes | State variable containing the request. | - |
| `statePath` | State Path | StateVariableParameter | No | State variable to store the response. | - |
### Exits
| Exit | Description |
| - | - |
| `NEXT` | The API call succeeded. |
| `ERROR` | The API call failed. Error details are stored in the `m3shError` state variable. |
## Retrieve CounterPricing
**Function name:** `m3ter_GetCounterPricing`
**Category:** READ
**HTTP method:** GET
**Destination:** m3ter
Retrieve a CounterPricing for the given UUID.
### Parameters
| Name | Label | Type | Required | Description | Constraints |
| - | - | - | :-: | - | - |
| `integrationCredentialsId` | Credentials | M3terEntityParameter | Yes | The m3ter credentials to use. | authType: M3TER\_SIGNED\_REQUEST, m3terEntity: IntegrationCredentials |
| `id` | id | LookupParameter | Yes | The UUID of the CounterPricing to retrieve. | - |
| `statePath` | State Path | StateVariableParameter | No | State variable to store the response. | - |
### Exits
| Exit | Description |
| - | - |
| `NEXT` | The API call succeeded. |
| `ERROR` | The API call failed. Error details are stored in the `m3shError` state variable. |
## Update CounterPricing
**Function name:** `m3ter_PutCounterPricing`
**Category:** WRITE
**HTTP method:** PUT
**Destination:** m3ter
Update CounterPricing for the given UUID.
**Note:** Either `planId` or `planTemplateId` request parameters are required for this call to be valid. If you omit both, then you will receive a validation error.
### Parameters
| Name | Label | Type | Required | Description | Constraints |
| - | - | - | :-: | - | - |
| `integrationCredentialsId` | Credentials | M3terEntityParameter | Yes | The m3ter credentials to use. | authType: M3TER\_SIGNED\_REQUEST, m3terEntity: IntegrationCredentials |
| `id` | id | LookupParameter | Yes | The UUID of the CounterPricing to update. | - |
| `requestPath` | Request Path | StateVariableParameter | Yes | State variable containing the request. | - |
| `statePath` | State Path | StateVariableParameter | No | State variable to store the response. | - |
### Exits
| Exit | Description |
| - | - |
| `NEXT` | The API call succeeded. |
| `ERROR` | The API call failed. Error details are stored in the `m3shError` state variable. |
## Delete CounterPricing
**Function name:** `m3ter_DeleteCounterPricing`
**Category:** WRITE
**HTTP method:** DELETE
**Destination:** m3ter
Delete a CounterPricing for the given UUID.
### Parameters
| Name | Label | Type | Required | Description | Constraints |
| - | - | - | :-: | - | - |
| `integrationCredentialsId` | Credentials | M3terEntityParameter | Yes | The m3ter credentials to use. | authType: M3TER\_SIGNED\_REQUEST, m3terEntity: IntegrationCredentials |
| `id` | id | LookupParameter | Yes | The UUID of the CounterPricing to delete. | - |
| `statePath` | State Path | StateVariableParameter | No | State variable to store the response. | - |
### Exits
| Exit | Description |
| - | - |
| `NEXT` | The API call succeeded. |
| `ERROR` | The API call failed. Error details are stored in the `m3shError` state variable. |
# Counters
Source: https://docs.m3ter.com/m3sh-function-reference/m3ter/counters
## List Counters
**Function name:** `m3ter_ListCounters`
**Category:** READ
**HTTP method:** GET (paginated)
**Destination:** m3ter
Retrieve a list of Counter entities that can be filtered by Product, Counter ID, or Codes.
### Parameters
| Name | Label | Type | Required | Description | Constraints |
| - | - | - | :-: | - | - |
| `integrationCredentialsId` | Credentials | M3terEntityParameter | Yes | The m3ter credentials to use. | authType: M3TER\_SIGNED\_REQUEST, m3terEntity: IntegrationCredentials |
| `statePath` | State Path | StateVariableParameter | No | State variable to store the response. | - |
| `queryParams` | Query Parameters | KeyValueLookupParameter | No | Query parameters to include in the request | allowedValues: ids,codes,productId |
### Exits
| Exit | Description |
| - | - |
| `NEXT` | The API call succeeded. |
| `ERROR` | The API call failed. Error details are stored in the `m3shError` state variable. |
## Create Counter
**Function name:** `m3ter_PostCounter`
**Category:** WRITE
**HTTP method:** POST
**Destination:** m3ter
Create a new Counter.
### Parameters
| Name | Label | Type | Required | Description | Constraints |
| - | - | - | :-: | - | - |
| `integrationCredentialsId` | Credentials | M3terEntityParameter | Yes | The m3ter credentials to use. | authType: M3TER\_SIGNED\_REQUEST, m3terEntity: IntegrationCredentials |
| `requestPath` | Request Path | StateVariableParameter | Yes | State variable containing the request. | - |
| `statePath` | State Path | StateVariableParameter | No | State variable to store the response. | - |
### Exits
| Exit | Description |
| - | - |
| `NEXT` | The API call succeeded. |
| `ERROR` | The API call failed. Error details are stored in the `m3shError` state variable. |
## Retrieve Counter
**Function name:** `m3ter_GetCounter`
**Category:** READ
**HTTP method:** GET
**Destination:** m3ter
Retrieve a Counter for the given UUID.
### Parameters
| Name | Label | Type | Required | Description | Constraints |
| - | - | - | :-: | - | - |
| `integrationCredentialsId` | Credentials | M3terEntityParameter | Yes | The m3ter credentials to use. | authType: M3TER\_SIGNED\_REQUEST, m3terEntity: IntegrationCredentials |
| `id` | id | LookupParameter | Yes | The UUID of the Counter to retrieve. | - |
| `statePath` | State Path | StateVariableParameter | No | State variable to store the response. | - |
### Exits
| Exit | Description |
| - | - |
| `NEXT` | The API call succeeded. |
| `ERROR` | The API call failed. Error details are stored in the `m3shError` state variable. |
## Update Counter
**Function name:** `m3ter_PutCounter`
**Category:** WRITE
**HTTP method:** PUT
**Destination:** m3ter
Update Counter for the given UUID.
### Parameters
| Name | Label | Type | Required | Description | Constraints |
| - | - | - | :-: | - | - |
| `integrationCredentialsId` | Credentials | M3terEntityParameter | Yes | The m3ter credentials to use. | authType: M3TER\_SIGNED\_REQUEST, m3terEntity: IntegrationCredentials |
| `id` | id | LookupParameter | Yes | The UUID of the Counter to update. | - |
| `requestPath` | Request Path | StateVariableParameter | Yes | State variable containing the request. | - |
| `statePath` | State Path | StateVariableParameter | No | State variable to store the response. | - |
### Exits
| Exit | Description |
| - | - |
| `NEXT` | The API call succeeded. |
| `ERROR` | The API call failed. Error details are stored in the `m3shError` state variable. |
## Delete Counter
**Function name:** `m3ter_DeleteCounter`
**Category:** WRITE
**HTTP method:** DELETE
**Destination:** m3ter
Delete a Counter for the given UUID.
### Parameters
| Name | Label | Type | Required | Description | Constraints |
| - | - | - | :-: | - | - |
| `integrationCredentialsId` | Credentials | M3terEntityParameter | Yes | The m3ter credentials to use. | authType: M3TER\_SIGNED\_REQUEST, m3terEntity: IntegrationCredentials |
| `id` | id | LookupParameter | Yes | The UUID of the Counter to delete. | - |
| `statePath` | State Path | StateVariableParameter | No | State variable to store the response. | - |
### Exits
| Exit | Description |
| - | - |
| `NEXT` | The API call succeeded. |
| `ERROR` | The API call failed. Error details are stored in the `m3shError` state variable. |
# Customfields
Source: https://docs.m3ter.com/m3sh-function-reference/m3ter/customfields
## Retrieve CustomField
**Function name:** `m3ter_GetCustomField`
**Category:** READ
**HTTP method:** GET
**Destination:** m3ter
Retrieve all Custom Fields added at Organizational level for the entities that support them.
### Parameters
| Name | Label | Type | Required | Description | Constraints |
| - | - | - | :-: | - | - |
| `integrationCredentialsId` | Credentials | M3terEntityParameter | Yes | The m3ter credentials to use. | authType: M3TER\_SIGNED\_REQUEST, m3terEntity: IntegrationCredentials |
| `statePath` | State Path | StateVariableParameter | No | State variable to store the response. | - |
### Exits
| Exit | Description |
| - | - |
| `NEXT` | The API call succeeded. |
| `ERROR` | The API call failed. Error details are stored in the `m3shError` state variable. |
## Update CustomFields
**Function name:** `m3ter_UpdateCustomFields`
**Category:** WRITE
**HTTP method:** PUT
**Destination:** m3ter
Update Custom Fields added at Organization level to entities that support them.
### Parameters
| Name | Label | Type | Required | Description | Constraints |
| - | - | - | :-: | - | - |
| `integrationCredentialsId` | Credentials | M3terEntityParameter | Yes | The m3ter credentials to use. | authType: M3TER\_SIGNED\_REQUEST, m3terEntity: IntegrationCredentials |
| `requestPath` | Request Path | StateVariableParameter | Yes | State variable containing the request. | - |
| `statePath` | State Path | StateVariableParameter | No | State variable to store the response. | - |
### Exits
| Exit | Description |
| - | - |
| `NEXT` | The API call succeeded. |
| `ERROR` | The API call failed. Error details are stored in the `m3shError` state variable. |
# Dataexplorer
Source: https://docs.m3ter.com/m3sh-function-reference/m3ter/dataexplorer
## Query and filter for commitments.
**Function name:** `m3ter_PostQueryCommitments`
**Category:** WRITE
**HTTP method:** POST
**Destination:** m3ter
Query and filter for commitments.
### Parameters
| Name | Label | Type | Required | Description | Constraints |
| - | - | - | :-: | - | - |
| `integrationCredentialsId` | Credentials | M3terEntityParameter | Yes | The m3ter credentials to use. | authType: M3TER\_SIGNED\_REQUEST, m3terEntity: IntegrationCredentials |
| `requestPath` | Request Path | StateVariableParameter | Yes | State variable containing the request. | - |
| `statePath` | State Path | StateVariableParameter | No | State variable to store the response. | - |
### Exits
| Exit | Description |
| - | - |
| `NEXT` | The API call succeeded. |
| `ERROR` | The API call failed. Error details are stored in the `m3shError` state variable. |
## Retrieve the values of a single Dimension for one or more Meters.
**Function name:** `m3ter_GetMergedMeterDimensions`
**Category:** WRITE
**HTTP method:** POST
**Destination:** m3ter
Retrieve the values of a single Dimension for one or more Meters stored in the Data Warehouse over a period of time.
### Parameters
| Name | Label | Type | Required | Description | Constraints |
| - | - | - | :-: | - | - |
| `integrationCredentialsId` | Credentials | M3terEntityParameter | Yes | The m3ter credentials to use. | authType: M3TER\_SIGNED\_REQUEST, m3terEntity: IntegrationCredentials |
| `requestPath` | Request Path | StateVariableParameter | Yes | State variable containing the request. | - |
| `statePath` | State Path | StateVariableParameter | No | State variable to store the response. | - |
### Exits
| Exit | Description |
| - | - |
| `NEXT` | The API call succeeded. |
| `ERROR` | The API call failed. Error details are stored in the `m3shError` state variable. |
## Get account values for querying commitments.
**Function name:** `m3ter_GetCommitmentsAccounts`
**Category:** READ
**HTTP method:** GET
**Destination:** m3ter
Get account values for querying commitments.
### Parameters
| Name | Label | Type | Required | Description | Constraints |
| - | - | - | :-: | - | - |
| `integrationCredentialsId` | Credentials | M3terEntityParameter | Yes | The m3ter credentials to use. | authType: M3TER\_SIGNED\_REQUEST, m3terEntity: IntegrationCredentials |
| `statePath` | State Path | StateVariableParameter | No | State variable to store the response. | - |
| `queryParams` | Query Parameters | KeyValueLookupParameter | No | Query parameters to include in the request | allowedValues: limit |
### Exits
| Exit | Description |
| - | - |
| `NEXT` | The API call succeeded. |
| `ERROR` | The API call failed. Error details are stored in the `m3shError` state variable. |
## Download Commitments data as JSON.
**Function name:** `m3ter_DownloadCommitmentsDataJson`
**Category:** WRITE
**HTTP method:** POST
**Destination:** m3ter
Download Commitments data as JSON.
### Parameters
| Name | Label | Type | Required | Description | Constraints |
| - | - | - | :-: | - | - |
| `integrationCredentialsId` | Credentials | M3terEntityParameter | Yes | The m3ter credentials to use. | authType: M3TER\_SIGNED\_REQUEST, m3terEntity: IntegrationCredentials |
| `requestPath` | Request Path | StateVariableParameter | Yes | State variable containing the request. | - |
| `statePath` | State Path | StateVariableParameter | No | State variable to store the response. | - |
### Exits
| Exit | Description |
| - | - |
| `NEXT` | The API call succeeded. |
| `ERROR` | The API call failed. Error details are stored in the `m3shError` state variable. |
## Query and filter for Remaining Commitments.
**Function name:** `m3ter_PostQueryRemainingCommitment`
**Category:** WRITE
**HTTP method:** POST
**Destination:** m3ter
Query and filter for remaining commitments.
### Parameters
| Name | Label | Type | Required | Description | Constraints |
| - | - | - | :-: | - | - |
| `integrationCredentialsId` | Credentials | M3terEntityParameter | Yes | The m3ter credentials to use. | authType: M3TER\_SIGNED\_REQUEST, m3terEntity: IntegrationCredentials |
| `requestPath` | Request Path | StateVariableParameter | Yes | State variable containing the request. | - |
| `statePath` | State Path | StateVariableParameter | No | State variable to store the response. | - |
### Exits
| Exit | Description |
| - | - |
| `NEXT` | The API call succeeded. |
| `ERROR` | The API call failed. Error details are stored in the `m3shError` state variable. |
## Download aggregated usage data as JSON.
**Function name:** `m3ter_DownloadAggregatedUsageDataJson`
**Category:** WRITE
**HTTP method:** POST
**Destination:** m3ter
Download aggregated usage data as JSON.
### Parameters
| Name | Label | Type | Required | Description | Constraints |
| - | - | - | :-: | - | - |
| `integrationCredentialsId` | Credentials | M3terEntityParameter | Yes | The m3ter credentials to use. | authType: M3TER\_SIGNED\_REQUEST, m3terEntity: IntegrationCredentials |
| `requestPath` | Request Path | StateVariableParameter | Yes | State variable containing the request. | - |
| `statePath` | State Path | StateVariableParameter | No | State variable to store the response. | - |
### Exits
| Exit | Description |
| - | - |
| `NEXT` | The API call succeeded. |
| `ERROR` | The API call failed. Error details are stored in the `m3shError` state variable. |
## Query and filter for bill line items.
**Function name:** `m3ter_PostQueryBillData`
**Category:** WRITE
**HTTP method:** POST
**Destination:** m3ter
Query and filter for bill line items.
### Parameters
| Name | Label | Type | Required | Description | Constraints |
| - | - | - | :-: | - | - |
| `integrationCredentialsId` | Credentials | M3terEntityParameter | Yes | The m3ter credentials to use. | authType: M3TER\_SIGNED\_REQUEST, m3terEntity: IntegrationCredentials |
| `requestPath` | Request Path | StateVariableParameter | Yes | State variable containing the request. | - |
| `statePath` | State Path | StateVariableParameter | No | State variable to store the response. | - |
### Exits
| Exit | Description |
| - | - |
| `NEXT` | The API call succeeded. |
| `ERROR` | The API call failed. Error details are stored in the `m3shError` state variable. |
## Download Commitments Obligations data as JSON.
**Function name:** `m3ter_DownloadCommitmentsObligationsDataJson`
**Category:** WRITE
**HTTP method:** POST
**Destination:** m3ter
Download Commitments Obligations data as JSON.
### Parameters
| Name | Label | Type | Required | Description | Constraints |
| - | - | - | :-: | - | - |
| `integrationCredentialsId` | Credentials | M3terEntityParameter | Yes | The m3ter credentials to use. | authType: M3TER\_SIGNED\_REQUEST, m3terEntity: IntegrationCredentials |
| `requestPath` | Request Path | StateVariableParameter | Yes | State variable containing the request. | - |
| `statePath` | State Path | StateVariableParameter | No | State variable to store the response. | - |
### Exits
| Exit | Description |
| - | - |
| `NEXT` | The API call succeeded. |
| `ERROR` | The API call failed. Error details are stored in the `m3shError` state variable. |
## Get account values for querying bill line items.
**Function name:** `m3ter_GetBillAccounts`
**Category:** READ
**HTTP method:** GET
**Destination:** m3ter
Get account values for querying bill line items.
### Parameters
| Name | Label | Type | Required | Description | Constraints |
| - | - | - | :-: | - | - |
| `integrationCredentialsId` | Credentials | M3terEntityParameter | Yes | The m3ter credentials to use. | authType: M3TER\_SIGNED\_REQUEST, m3terEntity: IntegrationCredentials |
| `statePath` | State Path | StateVariableParameter | No | State variable to store the response. | - |
| `queryParams` | Query Parameters | KeyValueLookupParameter | No | Query parameters to include in the request | allowedValues: limit |
### Exits
| Exit | Description |
| - | - |
| `NEXT` | The API call succeeded. |
| `ERROR` | The API call failed. Error details are stored in the `m3shError` state variable. |
## Query and filter for obligations.
**Function name:** `m3ter_PostQueryObligations`
**Category:** WRITE
**HTTP method:** POST
**Destination:** m3ter
Query and filter for obligations.
### Parameters
| Name | Label | Type | Required | Description | Constraints |
| - | - | - | :-: | - | - |
| `integrationCredentialsId` | Credentials | M3terEntityParameter | Yes | The m3ter credentials to use. | authType: M3TER\_SIGNED\_REQUEST, m3terEntity: IntegrationCredentials |
| `requestPath` | Request Path | StateVariableParameter | Yes | State variable containing the request. | - |
| `statePath` | State Path | StateVariableParameter | No | State variable to store the response. | - |
### Exits
| Exit | Description |
| - | - |
| `NEXT` | The API call succeeded. |
| `ERROR` | The API call failed. Error details are stored in the `m3shError` state variable. |
## Download Bill data as JSON.
**Function name:** `m3ter_DownloadBillDataJson`
**Category:** WRITE
**HTTP method:** POST
**Destination:** m3ter
Download Bill data as JSON.
### Parameters
| Name | Label | Type | Required | Description | Constraints |
| - | - | - | :-: | - | - |
| `integrationCredentialsId` | Credentials | M3terEntityParameter | Yes | The m3ter credentials to use. | authType: M3TER\_SIGNED\_REQUEST, m3terEntity: IntegrationCredentials |
| `requestPath` | Request Path | StateVariableParameter | Yes | State variable containing the request. | - |
| `statePath` | State Path | StateVariableParameter | No | State variable to store the response. | - |
### Exits
| Exit | Description |
| - | - |
| `NEXT` | The API call succeeded. |
| `ERROR` | The API call failed. Error details are stored in the `m3shError` state variable. |
## Query and filter for commitment line items.
**Function name:** `m3ter_PostQueryCommitmentLineItems`
**Category:** WRITE
**HTTP method:** POST
**Destination:** m3ter
Query and filter for commitment line items.
### Parameters
| Name | Label | Type | Required | Description | Constraints |
| - | - | - | :-: | - | - |
| `integrationCredentialsId` | Credentials | M3terEntityParameter | Yes | The m3ter credentials to use. | authType: M3TER\_SIGNED\_REQUEST, m3terEntity: IntegrationCredentials |
| `requestPath` | Request Path | StateVariableParameter | Yes | State variable containing the request. | - |
| `statePath` | State Path | StateVariableParameter | No | State variable to store the response. | - |
### Exits
| Exit | Description |
| - | - |
| `NEXT` | The API call succeeded. |
| `ERROR` | The API call failed. Error details are stored in the `m3shError` state variable. |
## Download aggregated usage data as a CSV.
**Function name:** `m3ter_DownloadAggregatedUsageDataCsv`
**Category:** WRITE
**HTTP method:** POST
**Destination:** m3ter
Download aggregated usage data as a CSV.
### Parameters
| Name | Label | Type | Required | Description | Constraints |
| - | - | - | :-: | - | - |
| `integrationCredentialsId` | Credentials | M3terEntityParameter | Yes | The m3ter credentials to use. | authType: M3TER\_SIGNED\_REQUEST, m3terEntity: IntegrationCredentials |
| `requestPath` | Request Path | StateVariableParameter | Yes | State variable containing the request. | - |
| `statePath` | State Path | StateVariableParameter | No | State variable to store the response. | - |
### Exits
| Exit | Description |
| - | - |
| `NEXT` | The API call succeeded. |
| `ERROR` | The API call failed. Error details are stored in the `m3shError` state variable. |
## Query and filter aggregated usage data.
**Function name:** `m3ter_PostQueryAggregatedUsageData`
**Category:** WRITE
**HTTP method:** POST
**Destination:** m3ter
Query and filter aggregated usage data.
### Parameters
| Name | Label | Type | Required | Description | Constraints |
| - | - | - | :-: | - | - |
| `integrationCredentialsId` | Credentials | M3terEntityParameter | Yes | The m3ter credentials to use. | authType: M3TER\_SIGNED\_REQUEST, m3terEntity: IntegrationCredentials |
| `requestPath` | Request Path | StateVariableParameter | Yes | State variable containing the request. | - |
| `statePath` | State Path | StateVariableParameter | No | State variable to store the response. | - |
### Exits
| Exit | Description |
| - | - |
| `NEXT` | The API call succeeded. |
| `ERROR` | The API call failed. Error details are stored in the `m3shError` state variable. |
## Download Bill data as a CSV.
**Function name:** `m3ter_DownloadBillDataCsv`
**Category:** WRITE
**HTTP method:** POST
**Destination:** m3ter
Download Bill data as a CSV.
### Parameters
| Name | Label | Type | Required | Description | Constraints |
| - | - | - | :-: | - | - |
| `integrationCredentialsId` | Credentials | M3terEntityParameter | Yes | The m3ter credentials to use. | authType: M3TER\_SIGNED\_REQUEST, m3terEntity: IntegrationCredentials |
| `requestPath` | Request Path | StateVariableParameter | Yes | State variable containing the request. | - |
| `statePath` | State Path | StateVariableParameter | No | State variable to store the response. | - |
### Exits
| Exit | Description |
| - | - |
| `NEXT` | The API call succeeded. |
| `ERROR` | The API call failed. Error details are stored in the `m3shError` state variable. |
## Download Commitments Obligations data in CSV format
**Function name:** `m3ter_DownloadCommitmentsObligationsDataCsv`
**Category:** WRITE
**HTTP method:** POST
**Destination:** m3ter
Download Commitments Obligations data in CSV format.
### Parameters
| Name | Label | Type | Required | Description | Constraints |
| - | - | - | :-: | - | - |
| `integrationCredentialsId` | Credentials | M3terEntityParameter | Yes | The m3ter credentials to use. | authType: M3TER\_SIGNED\_REQUEST, m3terEntity: IntegrationCredentials |
| `requestPath` | Request Path | StateVariableParameter | Yes | State variable containing the request. | - |
| `statePath` | State Path | StateVariableParameter | No | State variable to store the response. | - |
### Exits
| Exit | Description |
| - | - |
| `NEXT` | The API call succeeded. |
| `ERROR` | The API call failed. Error details are stored in the `m3shError` state variable. |
## Retrieve the values of a Meter Dimension.
**Function name:** `m3ter_GetMeterDimensions`
**Category:** WRITE
**HTTP method:** POST
**Destination:** m3ter
Retrieve the Dimensions of a Meter stored in the Data Warehouse over a period of time.
### Parameters
| Name | Label | Type | Required | Description | Constraints |
| - | - | - | :-: | - | - |
| `integrationCredentialsId` | Credentials | M3terEntityParameter | Yes | The m3ter credentials to use. | authType: M3TER\_SIGNED\_REQUEST, m3terEntity: IntegrationCredentials |
| `requestPath` | Request Path | StateVariableParameter | Yes | State variable containing the request. | - |
| `statePath` | State Path | StateVariableParameter | No | State variable to store the response. | - |
### Exits
| Exit | Description |
| - | - |
| `NEXT` | The API call succeeded. |
| `ERROR` | The API call failed. Error details are stored in the `m3shError` state variable. |
## Retrieve Meters stored in the Data Warehouse over a period of time.
**Function name:** `m3ter_GetMeters`
**Category:** READ
**HTTP method:** GET
**Destination:** m3ter
Retrieve the Meters and their dimension and measure names that are stored in the Data Warehouse over a period of time.
### Parameters
| Name | Label | Type | Required | Description | Constraints |
| - | - | - | :-: | - | - |
| `integrationCredentialsId` | Credentials | M3terEntityParameter | Yes | The m3ter credentials to use. | authType: M3TER\_SIGNED\_REQUEST, m3terEntity: IntegrationCredentials |
| `statePath` | State Path | StateVariableParameter | No | State variable to store the response. | - |
| `queryParams` | Query Parameters | KeyValueLookupParameter | No | Query parameters to include in the request | allowedValues: startDate,endDate,limit |
### Exits
| Exit | Description |
| - | - |
| `NEXT` | The API call succeeded. |
| `ERROR` | The API call failed. Error details are stored in the `m3shError` state variable. |
## Get product values for querying bill line items.
**Function name:** `m3ter_GetBillProducts`
**Category:** READ
**HTTP method:** GET
**Destination:** m3ter
Get product values for querying bill line items.
### Parameters
| Name | Label | Type | Required | Description | Constraints |
| - | - | - | :-: | - | - |
| `integrationCredentialsId` | Credentials | M3terEntityParameter | Yes | The m3ter credentials to use. | authType: M3TER\_SIGNED\_REQUEST, m3terEntity: IntegrationCredentials |
| `statePath` | State Path | StateVariableParameter | No | State variable to store the response. | - |
| `queryParams` | Query Parameters | KeyValueLookupParameter | No | Query parameters to include in the request | allowedValues: limit |
### Exits
| Exit | Description |
| - | - |
| `NEXT` | The API call succeeded. |
| `ERROR` | The API call failed. Error details are stored in the `m3shError` state variable. |
## Download Commitments data as a CSV.
**Function name:** `m3ter_DownloadCommitmentsDataCsv`
**Category:** WRITE
**HTTP method:** POST
**Destination:** m3ter
Download Commitments data as a CSV.
### Parameters
| Name | Label | Type | Required | Description | Constraints |
| - | - | - | :-: | - | - |
| `integrationCredentialsId` | Credentials | M3terEntityParameter | Yes | The m3ter credentials to use. | authType: M3TER\_SIGNED\_REQUEST, m3terEntity: IntegrationCredentials |
| `requestPath` | Request Path | StateVariableParameter | Yes | State variable containing the request. | - |
| `statePath` | State Path | StateVariableParameter | No | State variable to store the response. | - |
### Exits
| Exit | Description |
| - | - |
| `NEXT` | The API call succeeded. |
| `ERROR` | The API call failed. Error details are stored in the `m3shError` state variable. |
# Dataexports
Source: https://docs.m3ter.com/m3sh-function-reference/m3ter/dataexports
## List ExportDestinations
**Function name:** `m3ter_ListDestinations`
**Category:** READ
**HTTP method:** GET (paginated)
**Destination:** m3ter
Retrieve a list of Export Destination entities. You can filter the list of Destinations returned by UUID.
### Parameters
| Name | Label | Type | Required | Description | Constraints |
| - | - | - | :-: | - | - |
| `integrationCredentialsId` | Credentials | M3terEntityParameter | Yes | The m3ter credentials to use. | authType: M3TER\_SIGNED\_REQUEST, m3terEntity: IntegrationCredentials |
| `statePath` | State Path | StateVariableParameter | No | State variable to store the response. | - |
| `queryParams` | Query Parameters | KeyValueLookupParameter | No | Query parameters to include in the request | allowedValues: ids |
### Exits
| Exit | Description |
| - | - |
| `NEXT` | The API call succeeded. |
| `ERROR` | The API call failed. Error details are stored in the `m3shError` state variable. |
## Create ExportDestination
**Function name:** `m3ter_PostDestination`
**Category:** WRITE
**HTTP method:** POST
**Destination:** m3ter
Create a new Export Destination to use for your Data Export Schedules or Ad-Hoc Data Exports.
Currently, two options for setting up Data Export Destinations are available:
* S3 buckets on your AWS account.
* Buckets in your Google Cloud Storage account.
Request and Response schema:
* Use the selector under the `destinationType` parameter to expose the relevant request and response schema for the type of Destination.
Request and Response samples:
* Use the **Example** selector to show the relevant request and response samples for the type of Destination.
### Parameters
| Name | Label | Type | Required | Description | Constraints |
| - | - | - | :-: | - | - |
| `integrationCredentialsId` | Credentials | M3terEntityParameter | Yes | The m3ter credentials to use. | authType: M3TER\_SIGNED\_REQUEST, m3terEntity: IntegrationCredentials |
| `requestPath` | Request Path | StateVariableParameter | Yes | State variable containing the request. | - |
| `statePath` | State Path | StateVariableParameter | No | State variable to store the response. | - |
### Exits
| Exit | Description |
| - | - |
| `NEXT` | The API call succeeded. |
| `ERROR` | The API call failed. Error details are stored in the `m3shError` state variable. |
## List Jobs
**Function name:** `m3ter_listJobStatuses`
**Category:** READ
**HTTP method:** GET (paginated)
**Destination:** m3ter
Retrieve a list of Export Job entities.
### Parameters
| Name | Label | Type | Required | Description | Constraints |
| - | - | - | :-: | - | - |
| `integrationCredentialsId` | Credentials | M3terEntityParameter | Yes | The m3ter credentials to use. | authType: M3TER\_SIGNED\_REQUEST, m3terEntity: IntegrationCredentials |
| `statePath` | State Path | StateVariableParameter | No | State variable to store the response. | - |
| `queryParams` | Query Parameters | KeyValueLookupParameter | No | Query parameters to include in the request | allowedValues: ids,scheduleId,status,dateCreatedStart,dateCreatedEnd |
### Exits
| Exit | Description |
| - | - |
| `NEXT` | The API call succeeded. |
| `ERROR` | The API call failed. Error details are stored in the `m3shError` state variable. |
## List Schedules
**Function name:** `m3ter_listSchedules`
**Category:** READ
**HTTP method:** GET (paginated)
**Destination:** m3ter
Retrieve a list of Data Export Schedules created for your Organization. You can filter the response by Schedules `ids`.
The response will contain an array for both the operational and usage Data Export Schedules in your Organization.
### Parameters
| Name | Label | Type | Required | Description | Constraints |
| - | - | - | :-: | - | - |
| `integrationCredentialsId` | Credentials | M3terEntityParameter | Yes | The m3ter credentials to use. | authType: M3TER\_SIGNED\_REQUEST, m3terEntity: IntegrationCredentials |
| `statePath` | State Path | StateVariableParameter | No | State variable to store the response. | - |
| `queryParams` | Query Parameters | KeyValueLookupParameter | No | Query parameters to include in the request | allowedValues: ids |
### Exits
| Exit | Description |
| - | - |
| `NEXT` | The API call succeeded. |
| `ERROR` | The API call failed. Error details are stored in the `m3shError` state variable. |
## Create Schedule
**Function name:** `m3ter_CreateSchedule`
**Category:** WRITE
**HTTP method:** POST
**Destination:** m3ter
Create a new Data Export Schedule. Each Schedule can be configured for exporting *only one* of either Usage or Operational data:
**Operational Data Exports**.
* Use the `operationalDataTypes` parameter to specify the entities whose operational data you want to include in the export each time the Export Schedule runs.
* For each of the entity types you select, each time the Export Schedule runs a separate file is compiled containing the operational data for all entities of that type that exist in your Organization
**Usage Data Exports**.
* Select the Meters and Accounts whose usage data you want to include in the export each time the Export Schedule runs.
* You can use the `dimensionFilters` parameter to filter the usage data returned for export by adding specific values of non-numeric Dimension data fields on included Meters. Only the data collected for the values you've added for the selected Dimension fields will be included in the export.
* You can use the `aggregations` to apply aggregation methods the usage data returned for export. This restricts the range of usage data returned for export to only the data collected by aggregated fields on selected Meters. Nothing is returned for any non-aggregated fields on Meters. The usage data for Meter fields is returned as the values resulting from applying the selected aggregation method. See the [Aggregations for Queries - Options and Consequences](https://www.m3ter.com/docs/guides/data-explorer/usage-data-explorer-v2#aggregations-for-queries---understanding-options-and-consequences) for more details.
* If you've applied `aggregations` to the usage returned for export, you can then use the `groups` parameter to group the data by *Account*, *Dimension*, or *Time*.
Request and Response schema:
* Use the selector under the `sourceType` parameter to expose the relevant request and response schema for the source data type.
Request and Response samples:
* Use the **Example** selector to show the relevant request and response samples for source data type.
### Parameters
| Name | Label | Type | Required | Description | Constraints |
| - | - | - | :-: | - | - |
| `integrationCredentialsId` | Credentials | M3terEntityParameter | Yes | The m3ter credentials to use. | authType: M3TER\_SIGNED\_REQUEST, m3terEntity: IntegrationCredentials |
| `requestPath` | Request Path | StateVariableParameter | Yes | State variable containing the request. | - |
| `statePath` | State Path | StateVariableParameter | No | State variable to store the response. | - |
### Exits
| Exit | Description |
| - | - |
| `NEXT` | The API call succeeded. |
| `ERROR` | The API call failed. Error details are stored in the `m3shError` state variable. |
## Get Data Export File Download URL
**Function name:** `m3ter_GenerateDataExportFileDownloadUrl`
**Category:** READ
**HTTP method:** GET
**Destination:** m3ter
Returns a presigned download URL for data export file download based on the `jobId` provided.
If you omit `destinationIds` when setting up your [Ad-Hoc data exports](https://www.m3ter.com/docs/api#tag/ExportAdHoc) or [Scheduled data exports](https://www.m3ter.com/docs/api#tag/ExportSchedule), then the data is not copied to a destination but is available for you to download using the returned download URL.
**Constraints:**
* Only valid for Export jobs ran in the past 24 hours.
* The download URL is time-bound and is only valid for 15 minutes.
**NOTE!** This ExportDestination endpoint is available in Beta release version. See [Feature Release Stages](https://www.m3ter.com/docs/guides/getting-started/feature-release-stages) for Beta release definition.
### Parameters
| Name | Label | Type | Required | Description | Constraints |
| - | - | - | :-: | - | - |
| `integrationCredentialsId` | Credentials | M3terEntityParameter | Yes | The m3ter credentials to use. | authType: M3TER\_SIGNED\_REQUEST, m3terEntity: IntegrationCredentials |
| `jobId` | jobId | LookupParameter | Yes | The job ID | - |
| `statePath` | State Path | StateVariableParameter | No | State variable to store the response. | - |
### Exits
| Exit | Description |
| - | - |
| `NEXT` | The API call succeeded. |
| `ERROR` | The API call failed. Error details are stored in the `m3shError` state variable. |
## Retrieve Job
**Function name:** `m3ter_GetJob`
**Category:** READ
**HTTP method:** GET
**Destination:** m3ter
Retrieve an Export Job for the given UUID.
The response returns:
* The source type for the data exported by the Export Job: one of USAGE or OPERATIONAL.
* The status of the Export Job.
### Parameters
| Name | Label | Type | Required | Description | Constraints |
| - | - | - | :-: | - | - |
| `integrationCredentialsId` | Credentials | M3terEntityParameter | Yes | The m3ter credentials to use. | authType: M3TER\_SIGNED\_REQUEST, m3terEntity: IntegrationCredentials |
| `id` | id | LookupParameter | Yes | The UUID of the Job to retrieve. | - |
| `statePath` | State Path | StateVariableParameter | No | State variable to store the response. | - |
### Exits
| Exit | Description |
| - | - |
| `NEXT` | The API call succeeded. |
| `ERROR` | The API call failed. Error details are stored in the `m3shError` state variable. |
## Retrieve ExportDestination
**Function name:** `m3ter_GetExportDestination`
**Category:** READ
**HTTP method:** GET
**Destination:** m3ter
Retrieve an Export Destination for the given UUID.
### Parameters
| Name | Label | Type | Required | Description | Constraints |
| - | - | - | :-: | - | - |
| `integrationCredentialsId` | Credentials | M3terEntityParameter | Yes | The m3ter credentials to use. | authType: M3TER\_SIGNED\_REQUEST, m3terEntity: IntegrationCredentials |
| `id` | id | LookupParameter | Yes | The UUID of the ExportDestination to retrieve. | - |
| `statePath` | State Path | StateVariableParameter | No | State variable to store the response. | - |
### Exits
| Exit | Description |
| - | - |
| `NEXT` | The API call succeeded. |
| `ERROR` | The API call failed. Error details are stored in the `m3shError` state variable. |
## Update ExportDestination
**Function name:** `m3ter_PutDestination`
**Category:** WRITE
**HTTP method:** PUT
**Destination:** m3ter
Update an Export Destination for the given UUID.
Currently, two options for setting up Data Export Destinations are available:
* S3 buckets on your AWS account.
* Buckets in your Google Cloud Storage account.
Request and Response schema:
* Use the selector under the `destinationType` parameter to expose the relevant request and response schema for the type of Destination.
Request and Response samples:
* Use the **Example** selector to show the relevant request and response samples for the type of Destination.
### Parameters
| Name | Label | Type | Required | Description | Constraints |
| - | - | - | :-: | - | - |
| `integrationCredentialsId` | Credentials | M3terEntityParameter | Yes | The m3ter credentials to use. | authType: M3TER\_SIGNED\_REQUEST, m3terEntity: IntegrationCredentials |
| `id` | id | LookupParameter | Yes | The UUID of the Export Destination to update. | - |
| `requestPath` | Request Path | StateVariableParameter | Yes | State variable containing the request. | - |
| `statePath` | State Path | StateVariableParameter | No | State variable to store the response. | - |
### Exits
| Exit | Description |
| - | - |
| `NEXT` | The API call succeeded. |
| `ERROR` | The API call failed. Error details are stored in the `m3shError` state variable. |
## Delete ExportDestination
**Function name:** `m3ter_DeleteDestination`
**Category:** WRITE
**HTTP method:** DELETE
**Destination:** m3ter
Delete an Export Destination for the given UUID.
**NOTE:** If you attempt to delete an Export Destination that is currently linked to a Data Export Schedule, an error message is returned and you won't be able to delete the Destination.
### Parameters
| Name | Label | Type | Required | Description | Constraints |
| - | - | - | :-: | - | - |
| `integrationCredentialsId` | Credentials | M3terEntityParameter | Yes | The m3ter credentials to use. | authType: M3TER\_SIGNED\_REQUEST, m3terEntity: IntegrationCredentials |
| `id` | id | LookupParameter | Yes | The UUID of the Export Destination to delete. | - |
| `statePath` | State Path | StateVariableParameter | No | State variable to store the response. | - |
### Exits
| Exit | Description |
| - | - |
| `NEXT` | The API call succeeded. |
| `ERROR` | The API call failed. Error details are stored in the `m3shError` state variable. |
## Retrieve Schedule
**Function name:** `m3ter_GetSchedule`
**Category:** READ
**HTTP method:** GET
**Destination:** m3ter
Retrieve a Data Export Schedule for the given UUID. Each Schedule can be configured for exporting *only one* of either Usage or Operational data.
### Parameters
| Name | Label | Type | Required | Description | Constraints |
| - | - | - | :-: | - | - |
| `integrationCredentialsId` | Credentials | M3terEntityParameter | Yes | The m3ter credentials to use. | authType: M3TER\_SIGNED\_REQUEST, m3terEntity: IntegrationCredentials |
| `id` | id | LookupParameter | Yes | The UUID of the Schedule to retrieve. | - |
| `statePath` | State Path | StateVariableParameter | No | State variable to store the response. | - |
### Exits
| Exit | Description |
| - | - |
| `NEXT` | The API call succeeded. |
| `ERROR` | The API call failed. Error details are stored in the `m3shError` state variable. |
## Update Schedule
**Function name:** `m3ter_UpdateSchedule`
**Category:** WRITE
**HTTP method:** PUT
**Destination:** m3ter
Update a Data Export Schedule for the given UUID. Each Schedule can be configured for exporting *only one* of either Usage or Operational data:
**Operational Data Exports**.
* Use the `operationalDataTypes` parameter to specify the entities whose operational data you want to include in the export each time the Export Schedule runs.
* For each of the entity types you select, each time the Export Schedule runs a separate file is compiled containing the operational data for all entities of that type that exist in your Organization
**Usage Data Exports**.
* Select the Meters and Accounts whose usage data you want to include in the export each time the Export Schedule runs.
* You can use the `dimensionFilters` parameter to filter the usage data returned for export by adding specific values of non-numeric Dimension data fields on included Meters. Only the data collected for the values you've added for the selected Dimension fields will be included in the export.
* You can use the `aggregations` to apply aggregation methods the usage data returned for export. This restricts the range of usage data returned for export to only the data collected by aggregated fields on selected Meters. Nothing is returned for any non-aggregated fields on Meters. The usage data for Meter fields is returned as the values resulting from applying the selected aggregation method. See the [Aggregations for Queries - Options and Consequences](https://www.m3ter.com/docs/guides/data-explorer/usage-data-explorer-v2#aggregations-for-queries---understanding-options-and-consequences) for more details.
* If you've applied `aggregations` to the usage returned for export, you can then use the `groups` parameter to group the data by *Account*, *Dimension*, or *Time*.
### Parameters
| Name | Label | Type | Required | Description | Constraints |
| - | - | - | :-: | - | - |
| `integrationCredentialsId` | Credentials | M3terEntityParameter | Yes | The m3ter credentials to use. | authType: M3TER\_SIGNED\_REQUEST, m3terEntity: IntegrationCredentials |
| `id` | id | LookupParameter | Yes | The UUID of the Schedule to update. | - |
| `requestPath` | Request Path | StateVariableParameter | Yes | State variable containing the request. | - |
| `statePath` | State Path | StateVariableParameter | No | State variable to store the response. | - |
### Exits
| Exit | Description |
| - | - |
| `NEXT` | The API call succeeded. |
| `ERROR` | The API call failed. Error details are stored in the `m3shError` state variable. |
## Delete Schedule
**Function name:** `m3ter_DeleteSchedule`
**Category:** WRITE
**HTTP method:** DELETE
**Destination:** m3ter
Delete the Data Export Schedule for the given UUID. Each Schedule can be configured for exporting *only one* of either Usage or Operational data.
### Parameters
| Name | Label | Type | Required | Description | Constraints |
| - | - | - | :-: | - | - |
| `integrationCredentialsId` | Credentials | M3terEntityParameter | Yes | The m3ter credentials to use. | authType: M3TER\_SIGNED\_REQUEST, m3terEntity: IntegrationCredentials |
| `id` | id | LookupParameter | Yes | The UUID of the Schedule to delete. | - |
| `statePath` | State Path | StateVariableParameter | No | State variable to store the response. | - |
### Exits
| Exit | Description |
| - | - |
| `NEXT` | The API call succeeded. |
| `ERROR` | The API call failed. Error details are stored in the `m3shError` state variable. |
## Trigger data export.
**Function name:** `m3ter_TriggerDataExport`
**Category:** WRITE
**HTTP method:** POST
**Destination:** m3ter
Trigger an ad-hoc Data Export. Each ad-hoc Export can be configured for exporting *only one of* either Usage or Operational data:
**Operational Data Exports**.
* **Entity Types**. Use the `operationalDataTypes` parameter to specify the entities whose operational data you want to include in the ad-hoc export.
* **Export Files**. For each of the entity types you select, when the ad-hoc export runs a separate file is compiled containing the operational data for all entities of that type that exist in your Organization
**Usage Data Exports**.
* Select the Meters and Accounts whose usage data you want to include in the ad-hoc export.
* You can use the `dimensionFilters` parameter to filter the usage data returned for export by adding specific values of non-numeric Dimension data fields on included Meters. Only the data collected for the values you've added for the selected Dimension fields will be included in the export.
* You can use the `aggregations` to apply aggregation methods the usage data returned for export. This restricts the range of usage data returned for export to only the data collected by aggregated fields on selected Meters. Nothing is returned for any non-aggregated fields on Meters. The usage data for Meter fields is returned as the values resulting from applying the selected aggregation method. See the [Aggregations for Queries - Options and Consequences](https://www.m3ter.com/docs/guides/data-explorer/usage-data-explorer-v2#aggregations-for-queries---understanding-options-and-consequences) for more details.
* If you've applied `aggregations` to the usage returned for export, you can then use the `groups` parameter to group the data by *Account*, *Dimension*, or *Time*.
**Date Range for Operational Data Exports**. To restrict the operational data included in the ad-hoc export by a date/time range, use the `startDate` date/time request parameter to specify the start of the time period. The export will include all operational data from the specified `startDate` up until the date/time the export job runs.
**Date Range for Usage Data Exports**. To restrict the usage data included in the ad-hoc export by date/time range, use the `startDate` and `endDate` date/time parameters:
* Both `startDate` and `endDate` are required.
* `endDate` must be after `startDate`.
* `endDate` cannot be after tomorrow at midnight UTC. For example if today is May 20th 2025, you can only choose `endDate` to be equal or before 2025-05-21T00:00:00.000Z.
**NOTE:** You can use the ExportJob `id` returned to check the status of the triggered ad-hoc export. See the [ExportJob](https://www.m3ter.com/docs/api#tag/ExportJob) section of this API Reference.
### Parameters
| Name | Label | Type | Required | Description | Constraints |
| - | - | - | :-: | - | - |
| `integrationCredentialsId` | Credentials | M3terEntityParameter | Yes | The m3ter credentials to use. | authType: M3TER\_SIGNED\_REQUEST, m3terEntity: IntegrationCredentials |
| `requestPath` | Request Path | StateVariableParameter | Yes | State variable containing the request. | - |
| `statePath` | State Path | StateVariableParameter | No | State variable to store the response. | - |
### Exits
| Exit | Description |
| - | - |
| `NEXT` | The API call succeeded. |
| `ERROR` | The API call failed. Error details are stored in the `m3shError` state variable. |
# Events
Source: https://docs.m3ter.com/m3sh-function-reference/m3ter/events
## List Event Fields
**Function name:** `m3ter_ListEventFields`
**Category:** READ
**HTTP method:** GET
**Destination:** m3ter
List Event Fields.
Retrieves a list of Fields for a specific Event Type. These Fields are dynamic and forward compatibile, enabling calculation operations on the Event schema.
**Notes:**
* In many of the Response schema for this call, such as when you retrieve the Fields for a `configuration.commitment.created` Event Type, `new` represents the attributes the newly created object has. The Response to a call to retrieve the Fields for a `configuration.commitment.updated` Event Type will contain Field values for both the `old` and `new` objects. The Response to a call to retrieve the Fields for a `configuration.commitment.deleted` Event Type will only contain `old` Fields, for values at point of deletion. Having access to reference both `new` and `old` Field values for an object can be very useful if you want to base a Notification rule on an Event and include a calculation in the rule that, for example, compares `new` values with `old` - for example, trigger a Notification only when a Commitment has been updated and the `new` value for the `amount` is at least \$1,000 greater than the `old` value.
* Some Event types will show `customFields` even though the specific billing or configuration object the Event is for does not yet have the custom fields functionality implemented. For these Events, their `customFields` values will not be populated until such time as the custom fields functionality is implemented for them
### Parameters
| Name | Label | Type | Required | Description | Constraints |
| - | - | - | :-: | - | - |
| `integrationCredentialsId` | Credentials | M3terEntityParameter | Yes | The m3ter credentials to use. | authType: M3TER\_SIGNED\_REQUEST, m3terEntity: IntegrationCredentials |
| `statePath` | State Path | StateVariableParameter | No | State variable to store the response. | - |
| `queryParams` | Query Parameters | KeyValueLookupParameter | No | Query parameters to include in the request | allowedValues: eventName |
### Exits
| Exit | Description |
| - | - |
| `NEXT` | The API call succeeded. |
| `ERROR` | The API call failed. Error details are stored in the `m3shError` state variable. |
## Retrieve EventResponse
**Function name:** `m3ter_GetEvent`
**Category:** READ
**HTTP method:** GET
**Destination:** m3ter
Retrieve a specific Event.
Retrieves detailed information about the specific Event with the given UUID. An Event corresponds to a unique instance of a state change within the system, classified under a specific Event Type.
### Parameters
| Name | Label | Type | Required | Description | Constraints |
| - | - | - | :-: | - | - |
| `integrationCredentialsId` | Credentials | M3terEntityParameter | Yes | The m3ter credentials to use. | authType: M3TER\_SIGNED\_REQUEST, m3terEntity: IntegrationCredentials |
| `id` | id | LookupParameter | Yes | The unique identifier (UUID) of the Event to retrieve. | - |
| `statePath` | State Path | StateVariableParameter | No | State variable to store the response. | - |
### Exits
| Exit | Description |
| - | - |
| `NEXT` | The API call succeeded. |
| `ERROR` | The API call failed. Error details are stored in the `m3shError` state variable. |
## List EventResponse
**Function name:** `m3ter_ListEvents`
**Category:** READ
**HTTP method:** GET (paginated)
**Destination:** m3ter
List all Events.
Retrieve a list of all Events, with options to filter the returned list based on various criteria. Each Event represents a unique instance of a state change within the system, classified under a specific kind of Event.
**NOTES:** You can:
* Use `eventName` as a valid Query parameter to filter the list of Events returned. For example:
`.../organizations/{orgId}/events?eventName=configuration.commitment.created`
* Use the [List Notification Events](https://www.m3ter.com/docs/api#tag/Events/operation/ListEventTypes) endpoint in this section. The response lists the valid Query parameters.
### Parameters
| Name | Label | Type | Required | Description | Constraints |
| - | - | - | :-: | - | - |
| `integrationCredentialsId` | Credentials | M3terEntityParameter | Yes | The m3ter credentials to use. | authType: M3TER\_SIGNED\_REQUEST, m3terEntity: IntegrationCredentials |
| `statePath` | State Path | StateVariableParameter | No | State variable to store the response. | - |
| `queryParams` | Query Parameters | KeyValueLookupParameter | No | Query parameters to include in the request | allowedValues: ids,notificationId,accountId,eventType,notificationCode,includeActioned,eventName,resourceId |
### Exits
| Exit | Description |
| - | - |
| `NEXT` | The API call succeeded. |
| `ERROR` | The API call failed. Error details are stored in the `m3shError` state variable. |
## List Notification Events
**Function name:** `m3ter_ListEventTypes`
**Category:** READ
**HTTP method:** GET
**Destination:** m3ter
Retrieve a list of Notification Event Types.
This endpoint retrieves a list of Event Types that can have Notification rules configured.
### Parameters
| Name | Label | Type | Required | Description | Constraints |
| - | - | - | :-: | - | - |
| `integrationCredentialsId` | Credentials | M3terEntityParameter | Yes | The m3ter credentials to use. | authType: M3TER\_SIGNED\_REQUEST, m3terEntity: IntegrationCredentials |
| `statePath` | State Path | StateVariableParameter | No | State variable to store the response. | - |
### Exits
| Exit | Description |
| - | - |
| `NEXT` | The API call succeeded. |
| `ERROR` | The API call failed. Error details are stored in the `m3shError` state variable. |
# Externalmappingconfiguration
Source: https://docs.m3ter.com/m3sh-function-reference/m3ter/externalmappingconfiguration
## Retrieve External Entities from Destination
**Function name:** `m3ter_GetExternalMappingOptionsForDestination`
**Category:** READ
**HTTP method:** GET
**Destination:** m3ter
Retrieve a list of external entities from the specified destination system.
This endpoint enables you to retrieve a list of potential values for creating an External Mapping from a specified destination system. The list is only returned if the destination system has been authenticated successfully and it supports such functionality, otherwise, you will receive an empty response.
### Parameters
| Name | Label | Type | Required | Description | Constraints |
| - | - | - | :-: | - | - |
| `integrationCredentialsId` | Credentials | M3terEntityParameter | Yes | The m3ter credentials to use. | authType: M3TER\_SIGNED\_REQUEST, m3terEntity: IntegrationCredentials |
| `destination` | destination | LookupParameter | Yes | The name of the destination system from where the external entities are to be retrieved. | - |
| `entityType` | entityType | LookupParameter | Yes | The m3ter entity type. | - |
| `statePath` | State Path | StateVariableParameter | No | State variable to store the response. | - |
| `queryParams` | Query Parameters | KeyValueLookupParameter | No | Query parameters to include in the request | allowedValues: externalTable |
### Exits
| Exit | Description |
| - | - |
| `NEXT` | The API call succeeded. |
| `ERROR` | The API call failed. Error details are stored in the `m3shError` state variable. |
## Retrieve a list of external entities from the destination system for a particular credential
**Function name:** `m3ter_GetExternalMappingOptionsForDestinationForCredentialsId`
**Category:** READ
**HTTP method:** GET
**Destination:** m3ter
Retrieve a list of possible values to create an external mapping using a particular credential. These options are retrieved from the destination system if the system has been successfully authenticated and provides the mechanism to do so. Otherwise an empty response is returned.
### Parameters
| Name | Label | Type | Required | Description | Constraints |
| - | - | - | :-: | - | - |
| `integrationCredentialsId` | Credentials | M3terEntityParameter | Yes | The m3ter credentials to use. | authType: M3TER\_SIGNED\_REQUEST, m3terEntity: IntegrationCredentials |
| `destination` | destination | LookupParameter | Yes | Name of the destination system | - |
| `entityType` | entityType | LookupParameter | Yes | The m3ter entity type. | - |
| `integrationCredentialsId` | integrationCredentialsId | LookupParameter | Yes | The UUID of the credentials to use. | - |
| `statePath` | State Path | StateVariableParameter | No | State variable to store the response. | - |
| `queryParams` | Query Parameters | KeyValueLookupParameter | No | Query parameters to include in the request | allowedValues: externalTable |
### Exits
| Exit | Description |
| - | - |
| `NEXT` | The API call succeeded. |
| `ERROR` | The API call failed. Error details are stored in the `m3shError` state variable. |
## Retrieve External Mapping Configuration
**Function name:** `m3ter_GetExternalMappingConfiguration`
**Category:** READ
**HTTP method:** GET
**Destination:** m3ter
Retrieve the global External Mapping configuration.
This endpoint retrieves the global External Mapping configuration for the specified Organization.
### Parameters
| Name | Label | Type | Required | Description | Constraints |
| - | - | - | :-: | - | - |
| `integrationCredentialsId` | Credentials | M3terEntityParameter | Yes | The m3ter credentials to use. | authType: M3TER\_SIGNED\_REQUEST, m3terEntity: IntegrationCredentials |
| `statePath` | State Path | StateVariableParameter | No | State variable to store the response. | - |
### Exits
| Exit | Description |
| - | - |
| `NEXT` | The API call succeeded. |
| `ERROR` | The API call failed. Error details are stored in the `m3shError` state variable. |
# Externalmappings
Source: https://docs.m3ter.com/m3sh-function-reference/m3ter/externalmappings
## Retrieve External Mapping
**Function name:** `m3ter_GetExternalMapping`
**Category:** READ
**HTTP method:** GET
**Destination:** m3ter
Retrieve an External Mapping with the given UUID.
This endpoint enables you to retrieve the External Mapping with the specified UUID for a specific Organization.
### Parameters
| Name | Label | Type | Required | Description | Constraints |
| - | - | - | :-: | - | - |
| `integrationCredentialsId` | Credentials | M3terEntityParameter | Yes | The m3ter credentials to use. | authType: M3TER\_SIGNED\_REQUEST, m3terEntity: IntegrationCredentials |
| `id` | id | LookupParameter | Yes | The unique identifier (UUID) of the External Mapping to retrieve. | - |
| `statePath` | State Path | StateVariableParameter | No | State variable to store the response. | - |
### Exits
| Exit | Description |
| - | - |
| `NEXT` | The API call succeeded. |
| `ERROR` | The API call failed. Error details are stored in the `m3shError` state variable. |
## Update External Mapping
**Function name:** `m3ter_UpdateExternalMapping`
**Category:** WRITE
**HTTP method:** PUT
**Destination:** m3ter
Updates an External Mapping with the given UUID.
This endpoint enables you to update an existing External Mapping entity, identified by its UUID. You must supply a request body with the new details for the External Mapping.
### Parameters
| Name | Label | Type | Required | Description | Constraints |
| - | - | - | :-: | - | - |
| `integrationCredentialsId` | Credentials | M3terEntityParameter | Yes | The m3ter credentials to use. | authType: M3TER\_SIGNED\_REQUEST, m3terEntity: IntegrationCredentials |
| `id` | id | LookupParameter | Yes | The unique identifier (UUID) of the External Mapping to retrieve. | - |
| `requestPath` | Request Path | StateVariableParameter | Yes | State variable containing the request. | - |
| `statePath` | State Path | StateVariableParameter | No | State variable to store the response. | - |
### Exits
| Exit | Description |
| - | - |
| `NEXT` | The API call succeeded. |
| `ERROR` | The API call failed. Error details are stored in the `m3shError` state variable. |
## List External Mappings for a m3ter Entity
**Function name:** `m3ter_ListExternalMappingsForM3terEntity`
**Category:** READ
**HTTP method:** GET (paginated)
**Destination:** m3ter
Retrieve a list of External Mapping entities for a specified m3ter entity.
Use this endpoint to retrieve a list of External Mapping entities associated with a specific m3ter entity. The list can be paginated for easier management.
### Parameters
| Name | Label | Type | Required | Description | Constraints |
| - | - | - | :-: | - | - |
| `integrationCredentialsId` | Credentials | M3terEntityParameter | Yes | The m3ter credentials to use. | authType: M3TER\_SIGNED\_REQUEST, m3terEntity: IntegrationCredentials |
| `entity` | entity | LookupParameter | Yes | The entity type. | - |
| `m3terId` | m3terId | LookupParameter | Yes | The unique identifer (UUID) of the m3ter entity. | - |
| `statePath` | State Path | StateVariableParameter | No | State variable to store the response. | - |
### Exits
| Exit | Description |
| - | - |
| `NEXT` | The API call succeeded. |
| `ERROR` | The API call failed. Error details are stored in the `m3shError` state variable. |
## List External Mappings for External Entity
**Function name:** `m3ter_ListExternalMappingsForExternalSystemAndEntity`
**Category:** READ
**HTTP method:** GET (paginated)
**Destination:** m3ter
Retrieve a list of External Mapping entities for a specified external system entity.
Use this endpoint to retrieve a list of External Mapping entities associated with a specific external system entity. The list can be paginated for easier management.
### Parameters
| Name | Label | Type | Required | Description | Constraints |
| - | - | - | :-: | - | - |
| `integrationCredentialsId` | Credentials | M3terEntityParameter | Yes | The m3ter credentials to use. | authType: M3TER\_SIGNED\_REQUEST, m3terEntity: IntegrationCredentials |
| `system` | system | LookupParameter | Yes | The identifier for the external system. | - |
| `externalTable` | externalTable | LookupParameter | Yes | The identifier for the external table. | - |
| `externalId` | externalId | LookupParameter | Yes | The unique identifier (UUID) for the external entity. | - |
| `statePath` | State Path | StateVariableParameter | No | State variable to store the response. | - |
### Exits
| Exit | Description |
| - | - |
| `NEXT` | The API call succeeded. |
| `ERROR` | The API call failed. Error details are stored in the `m3shError` state variable. |
## List External Mappings
**Function name:** `m3ter_ListExternalMappings`
**Category:** READ
**HTTP method:** GET (paginated)
**Destination:** m3ter
Retrieve a list of all External Mapping entities.
This endpoint retrieves a list of all External Mapping entities for a specific Organization. The list can be paginated for better management, and supports filtering using the external system.
### Parameters
| Name | Label | Type | Required | Description | Constraints |
| - | - | - | :-: | - | - |
| `integrationCredentialsId` | Credentials | M3terEntityParameter | Yes | The m3ter credentials to use. | authType: M3TER\_SIGNED\_REQUEST, m3terEntity: IntegrationCredentials |
| `statePath` | State Path | StateVariableParameter | No | State variable to store the response. | - |
| `queryParams` | Query Parameters | KeyValueLookupParameter | No | Query parameters to include in the request | allowedValues: externalSystemId,m3terIds,integrationConfigId |
### Exits
| Exit | Description |
| - | - |
| `NEXT` | The API call succeeded. |
| `ERROR` | The API call failed. Error details are stored in the `m3shError` state variable. |
# Fileuploads
Source: https://docs.m3ter.com/m3sh-function-reference/m3ter/fileuploads
## Get File Upload Job Response
**Function name:** `m3ter_GetUploadJobResponse`
**Category:** READ
**HTTP method:** GET
**Destination:** m3ter
Get the file upload job response using the UUID of the file upload job.
Part of the file upload service for measurements ingest.
### Parameters
| Name | Label | Type | Required | Description | Constraints |
| - | - | - | :-: | - | - |
| `integrationCredentialsId` | Credentials | M3terEntityParameter | Yes | The m3ter credentials to use. | authType: M3TER\_SIGNED\_REQUEST, m3terEntity: IntegrationCredentials |
| `id` | id | LookupParameter | Yes | UUID of the file upload job. | - |
| `statePath` | State Path | StateVariableParameter | No | State variable to store the response. | - |
### Exits
| Exit | Description |
| - | - |
| `NEXT` | The API call succeeded. |
| `ERROR` | The API call failed. Error details are stored in the `m3shError` state variable. |
## List File Upload Jobs
**Function name:** `m3ter_ListJobs`
**Category:** READ
**HTTP method:** GET (paginated)
**Destination:** m3ter
Lists the File Upload jobs. Part of the File Upload service for measurements ingest:
* You can use the `dateCreatedStart` and `dateCreatedEnd` optional Query parameters to define a date range to filter the File Uploads jobs returned for this call.
* If `dateCreatedStart` and `dateCreatedEnd` Query parameters are not used, then all File Upload jobs are returned.
### Parameters
| Name | Label | Type | Required | Description | Constraints |
| - | - | - | :-: | - | - |
| `integrationCredentialsId` | Credentials | M3terEntityParameter | Yes | The m3ter credentials to use. | authType: M3TER\_SIGNED\_REQUEST, m3terEntity: IntegrationCredentials |
| `statePath` | State Path | StateVariableParameter | No | State variable to store the response. | - |
| `queryParams` | Query Parameters | KeyValueLookupParameter | No | Query parameters to include in the request | allowedValues: dateCreatedStart,dateCreatedEnd,fileKey |
### Exits
| Exit | Description |
| - | - |
| `NEXT` | The API call succeeded. |
| `ERROR` | The API call failed. Error details are stored in the `m3shError` state variable. |
## Get Original File Download URL
**Function name:** `m3ter_GetJobOriginalFileDownloadUrl`
**Category:** READ
**HTTP method:** GET
**Destination:** m3ter
Use the original file upload job id to obtain a download URL, which you can then use to retrieve the file you originally uploaded to the file upload service:
* A download URL is returned together with a download job id.
* You can then use a `GET` using the returned download URL as the endpoint to retrieve the file you originally uploaded.
Part of the file upload service for submitting measurements data files.
### Parameters
| Name | Label | Type | Required | Description | Constraints |
| - | - | - | :-: | - | - |
| `integrationCredentialsId` | Credentials | M3terEntityParameter | Yes | The m3ter credentials to use. | authType: M3TER\_SIGNED\_REQUEST, m3terEntity: IntegrationCredentials |
| `id` | id | LookupParameter | Yes | UUID of the file service job for the original measurements file upload. | - |
| `statePath` | State Path | StateVariableParameter | No | State variable to store the response. | - |
### Exits
| Exit | Description |
| - | - |
| `NEXT` | The API call succeeded. |
| `ERROR` | The API call failed. Error details are stored in the `m3shError` state variable. |
## Generate Upload URL
**Function name:** `m3ter_GenerateUploadUrl`
**Category:** WRITE
**HTTP method:** POST
**Destination:** m3ter
Generate a URL for uploading a file containing measurements to the platform in preparation for the measurements it contains to be ingested:
* An upload URL is returned together with an upload job id:
* You can then upload your data measurements file using a `PUT` request using the returned upload URL as the endpoint.
* You can use the returned upload job id with other calls to the File Upload Service for any follow-up or troubleshooting.
**Important:**
* The `contentLength` request parameter is required.
* The upload URL is time limited - it is valid for ***one*** minute.
Part of the file upload service for submitting measurements data files.
### Parameters
| Name | Label | Type | Required | Description | Constraints |
| - | - | - | :-: | - | - |
| `integrationCredentialsId` | Credentials | M3terEntityParameter | Yes | The m3ter credentials to use. | authType: M3TER\_SIGNED\_REQUEST, m3terEntity: IntegrationCredentials |
| `requestPath` | Request Path | StateVariableParameter | Yes | State variable containing the request. | - |
| `statePath` | State Path | StateVariableParameter | No | State variable to store the response. | - |
### Exits
| Exit | Description |
| - | - |
| `NEXT` | The API call succeeded. |
| `ERROR` | The API call failed. Error details are stored in the `m3shError` state variable. |
# Integrationdestinations
Source: https://docs.m3ter.com/m3sh-function-reference/m3ter/integrationdestinations
## Retrieve reported usage
**Function name:** `m3ter_GetUsageReport`
**Category:** READ
**HTTP method:** GET (paginated)
**Destination:** m3ter
Retrieve a list of reported usage records that match the provided filters.
When Bill integration runs are performed, all interactions between m3ter and a Marketplace system are persisted as logs. Use this endpoint to retrieve these logs, which you can use to track all amounts sent over to the Marketplace system together with the date and time the Bill data was sent. This provides a report on usage data sent to the Marketplace for each Bill integration run
### Parameters
| Name | Label | Type | Required | Description | Constraints |
| - | - | - | :-: | - | - |
| `integrationCredentialsId` | Credentials | M3terEntityParameter | Yes | The m3ter credentials to use. | authType: M3TER\_SIGNED\_REQUEST, m3terEntity: IntegrationCredentials |
| `statePath` | State Path | StateVariableParameter | No | State variable to store the response. | - |
| `queryParams` | Query Parameters | KeyValueLookupParameter | No | Query parameters to include in the request | allowedValues: billStartDate,accountId,externalSystem,billId |
### Exits
| Exit | Description |
| - | - |
| `NEXT` | The API call succeeded. |
| `ERROR` | The API call failed. Error details are stored in the `m3shError` state variable. |
# Integrationruns
Source: https://docs.m3ter.com/m3sh-function-reference/m3ter/integrationruns
## Retrieve Latest IntegrationRun
**Function name:** `m3ter_GetIntegrationRunLatest`
**Category:** READ
**HTTP method:** GET
**Destination:** m3ter
Retrieve the latest integration run for the entity.
### Parameters
| Name | Label | Type | Required | Description | Constraints |
| - | - | - | :-: | - | - |
| `integrationCredentialsId` | Credentials | M3terEntityParameter | Yes | The m3ter credentials to use. | authType: M3TER\_SIGNED\_REQUEST, m3terEntity: IntegrationCredentials |
| `entityType` | entityType | LookupParameter | Yes | The type of the entity you want to retrieve the last integration run for. Two options: \* Bill \* Notification | - |
| `id` | id | LookupParameter | Yes | The UUID of the entity to retrieve the latest integration run for. | - |
| `statePath` | State Path | StateVariableParameter | No | State variable to store the response. | - |
### Exits
| Exit | Description |
| - | - |
| `NEXT` | The API call succeeded. |
| `ERROR` | The API call failed. Error details are stored in the `m3shError` state variable. |
## Retrieve IntegrationRuns
**Function name:** `m3ter_GetIntegrationRunLatestForIds`
**Category:** READ
**HTTP method:** GET
**Destination:** m3ter
Retrieve the latest integration runs for entity and ids
### Parameters
| Name | Label | Type | Required | Description | Constraints |
| - | - | - | :-: | - | - |
| `integrationCredentialsId` | Credentials | M3terEntityParameter | Yes | The m3ter credentials to use. | authType: M3TER\_SIGNED\_REQUEST, m3terEntity: IntegrationCredentials |
| `entityType` | entityType | LookupParameter | Yes | The type of the entity (e.g. Bill). | - |
| `statePath` | State Path | StateVariableParameter | No | State variable to store the response. | - |
| `queryParams` | Query Parameters | KeyValueLookupParameter | No | Query parameters to include in the request | allowedValues: ids |
### Exits
| Exit | Description |
| - | - |
| `NEXT` | The API call succeeded. |
| `ERROR` | The API call failed. Error details are stored in the `m3shError` state variable. |
## Get IntegrationRun for the UUID
**Function name:** `m3ter_GetIntegrationRun`
**Category:** READ
**HTTP method:** GET
**Destination:** m3ter
Retrieve the integration run for the id
### Parameters
| Name | Label | Type | Required | Description | Constraints |
| - | - | - | :-: | - | - |
| `integrationCredentialsId` | Credentials | M3terEntityParameter | Yes | The m3ter credentials to use. | authType: M3TER\_SIGNED\_REQUEST, m3terEntity: IntegrationCredentials |
| `id` | id | LookupParameter | Yes | The UUID of the entity. | - |
| `statePath` | State Path | StateVariableParameter | No | State variable to store the response. | - |
### Exits
| Exit | Description |
| - | - |
| `NEXT` | The API call succeeded. |
| `ERROR` | The API call failed. Error details are stored in the `m3shError` state variable. |
## Get IntegrationRun Log
**Function name:** `m3ter_GetIntegrationRunLogs`
**Category:** READ
**HTTP method:** GET
**Destination:** m3ter
Retrieve the integrationrun log for the given UUID.
This endpoint is for retrieving logs of a specific integrationrun. It is useful for debugging and monitoring the performance of integrations within your organization.
### Parameters
| Name | Label | Type | Required | Description | Constraints |
| - | - | - | :-: | - | - |
| `integrationCredentialsId` | Credentials | M3terEntityParameter | Yes | The m3ter credentials to use. | authType: M3TER\_SIGNED\_REQUEST, m3terEntity: IntegrationCredentials |
| `id` | id | LookupParameter | Yes | The UUID associated with the integrationrun. This ID helps in pinpointing the exact integrationrun logs you are looking to retrieve. | - |
| `statePath` | State Path | StateVariableParameter | No | State variable to store the response. | - |
### Exits
| Exit | Description |
| - | - |
| `NEXT` | The API call succeeded. |
| `ERROR` | The API call failed. Error details are stored in the `m3shError` state variable. |
## List IntegrationRuns By DestinationId
**Function name:** `m3ter_ListIntegrationRunsByDestinationId`
**Category:** READ
**HTTP method:** GET (paginated)
**Destination:** m3ter
Retrieve a list of the integration runs for the destination
### Parameters
| Name | Label | Type | Required | Description | Constraints |
| - | - | - | :-: | - | - |
| `integrationCredentialsId` | Credentials | M3terEntityParameter | Yes | The m3ter credentials to use. | authType: M3TER\_SIGNED\_REQUEST, m3terEntity: IntegrationCredentials |
| `destinationId` | destinationId | LookupParameter | Yes | The UUID of the destination. | - |
| `statePath` | State Path | StateVariableParameter | No | State variable to store the response. | - |
| `queryParams` | Query Parameters | KeyValueLookupParameter | No | Query parameters to include in the request | allowedValues: destination,startDate,endDate,status,order |
### Exits
| Exit | Description |
| - | - |
| `NEXT` | The API call succeeded. |
| `ERROR` | The API call failed. Error details are stored in the `m3shError` state variable. |
## Get a download URL for a sanitised IntegrationRun log
**Function name:** `m3ter_GetIntegrationRunLogDownload`
**Category:** READ
**HTTP method:** GET
**Destination:** m3ter
Creates a sanitised copy of the integration run log (with internal fields removed) and returns a presigned download URL
### Parameters
| Name | Label | Type | Required | Description | Constraints |
| - | - | - | :-: | - | - |
| `integrationCredentialsId` | Credentials | M3terEntityParameter | Yes | The m3ter credentials to use. | authType: M3TER\_SIGNED\_REQUEST, m3terEntity: IntegrationCredentials |
| `id` | id | LookupParameter | Yes | The UUID of the integration run. | - |
| `statePath` | State Path | StateVariableParameter | No | State variable to store the response. | - |
### Exits
| Exit | Description |
| - | - |
| `NEXT` | The API call succeeded. |
| `ERROR` | The API call failed. Error details are stored in the `m3shError` state variable. |
## List IntegrationRuns
**Function name:** `m3ter_ListIntegrationRuns`
**Category:** READ
**HTTP method:** GET (paginated)
**Destination:** m3ter
Retrieve a list of the integration runs for the specified entity.
You can filter the list using the `startDate` and `endDate` query parameters to specify date/times to define the time period you want to return integration runs for.
### Parameters
| Name | Label | Type | Required | Description | Constraints |
| - | - | - | :-: | - | - |
| `integrationCredentialsId` | Credentials | M3terEntityParameter | Yes | The m3ter credentials to use. | authType: M3TER\_SIGNED\_REQUEST, m3terEntity: IntegrationCredentials |
| `entityId` | entityId | LookupParameter | Yes | The UUID of the entity to retrieve the integration runs for. | - |
| `entityType` | entityType | LookupParameter | Yes | The type of the entity you want to retrieve the integration runs for. Two options: \* Bill \* Notification | - |
| `statePath` | State Path | StateVariableParameter | No | State variable to store the response. | - |
| `queryParams` | Query Parameters | KeyValueLookupParameter | No | Query parameters to include in the request | allowedValues: startDate,endDate,status,order |
### Exits
| Exit | Description |
| - | - |
| `NEXT` | The API call succeeded. |
| `ERROR` | The API call failed. Error details are stored in the `m3shError` state variable. |
# Integrationtransformations
Source: https://docs.m3ter.com/m3sh-function-reference/m3ter/integrationtransformations
## Preview a transformation against an existing entity
**Function name:** `m3ter_PreviewIntegrationTransformation`
**Category:** WRITE
**HTTP method:** POST
**Destination:** m3ter
Create a new transformation
### Parameters
| Name | Label | Type | Required | Description | Constraints |
| - | - | - | :-: | - | - |
| `integrationCredentialsId` | Credentials | M3terEntityParameter | Yes | The m3ter credentials to use. | authType: M3TER\_SIGNED\_REQUEST, m3terEntity: IntegrationCredentials |
| `requestPath` | Request Path | StateVariableParameter | Yes | State variable containing the request. | - |
| `statePath` | State Path | StateVariableParameter | No | State variable to store the response. | - |
### Exits
| Exit | Description |
| - | - |
| `NEXT` | The API call succeeded. |
| `ERROR` | The API call failed. Error details are stored in the `m3shError` state variable. |
## Preview a transformation against an existing entity
**Function name:** `m3ter_ListSupportedSystems`
**Category:** READ
**HTTP method:** GET
**Destination:** m3ter
Create a new transformation
### Parameters
| Name | Label | Type | Required | Description | Constraints |
| - | - | - | :-: | - | - |
| `integrationCredentialsId` | Credentials | M3terEntityParameter | Yes | The m3ter credentials to use. | authType: M3TER\_SIGNED\_REQUEST, m3terEntity: IntegrationCredentials |
| `statePath` | State Path | StateVariableParameter | No | State variable to store the response. | - |
### Exits
| Exit | Description |
| - | - |
| `NEXT` | The API call succeeded. |
| `ERROR` | The API call failed. Error details are stored in the `m3shError` state variable. |
## Retrieve IntegrationTransformations
**Function name:** `m3ter_GetIntegrationTransformations`
**Category:** READ
**HTTP method:** GET (paginated)
**Destination:** m3ter
Retrieve the integration transformations
### Parameters
| Name | Label | Type | Required | Description | Constraints |
| - | - | - | :-: | - | - |
| `integrationCredentialsId` | Credentials | M3terEntityParameter | Yes | The m3ter credentials to use. | authType: M3TER\_SIGNED\_REQUEST, m3terEntity: IntegrationCredentials |
| `statePath` | State Path | StateVariableParameter | No | State variable to store the response. | - |
| `queryParams` | Query Parameters | KeyValueLookupParameter | No | Query parameters to include in the request | allowedValues: destinationSystem |
### Exits
| Exit | Description |
| - | - |
| `NEXT` | The API call succeeded. |
| `ERROR` | The API call failed. Error details are stored in the `m3shError` state variable. |
## Create a new transformation
**Function name:** `m3ter_CreateIntegrationTransformation`
**Category:** WRITE
**HTTP method:** POST
**Destination:** m3ter
Create a new transformation
### Parameters
| Name | Label | Type | Required | Description | Constraints |
| - | - | - | :-: | - | - |
| `integrationCredentialsId` | Credentials | M3terEntityParameter | Yes | The m3ter credentials to use. | authType: M3TER\_SIGNED\_REQUEST, m3terEntity: IntegrationCredentials |
| `requestPath` | Request Path | StateVariableParameter | Yes | State variable containing the request. | - |
| `statePath` | State Path | StateVariableParameter | No | State variable to store the response. | - |
### Exits
| Exit | Description |
| - | - |
| `NEXT` | The API call succeeded. |
| `ERROR` | The API call failed. Error details are stored in the `m3shError` state variable. |
## Get IntegrationTransformation for the UUID
**Function name:** `m3ter_GetIntegrationTransformationForId`
**Category:** READ
**HTTP method:** GET
**Destination:** m3ter
Retrieve the integration transformation for the id
### Parameters
| Name | Label | Type | Required | Description | Constraints |
| - | - | - | :-: | - | - |
| `integrationCredentialsId` | Credentials | M3terEntityParameter | Yes | The m3ter credentials to use. | authType: M3TER\_SIGNED\_REQUEST, m3terEntity: IntegrationCredentials |
| `id` | id | LookupParameter | Yes | The UUID of the entity. | - |
| `statePath` | State Path | StateVariableParameter | No | State variable to store the response. | - |
### Exits
| Exit | Description |
| - | - |
| `NEXT` | The API call succeeded. |
| `ERROR` | The API call failed. Error details are stored in the `m3shError` state variable. |
## Update the IntegrationTransformation for the UUID
**Function name:** `m3ter_PutIntegrationTransformationForId`
**Category:** WRITE
**HTTP method:** PUT
**Destination:** m3ter
Update the integration transformation for the id
### Parameters
| Name | Label | Type | Required | Description | Constraints |
| - | - | - | :-: | - | - |
| `integrationCredentialsId` | Credentials | M3terEntityParameter | Yes | The m3ter credentials to use. | authType: M3TER\_SIGNED\_REQUEST, m3terEntity: IntegrationCredentials |
| `id` | id | LookupParameter | Yes | The UUID of the entity. | - |
| `requestPath` | Request Path | StateVariableParameter | Yes | State variable containing the request. | - |
| `statePath` | State Path | StateVariableParameter | No | State variable to store the response. | - |
### Exits
| Exit | Description |
| - | - |
| `NEXT` | The API call succeeded. |
| `ERROR` | The API call failed. Error details are stored in the `m3shError` state variable. |
## Delete IntegrationTransformation for the UUID
**Function name:** `m3ter_DeleteIntegrationTransformationForId`
**Category:** WRITE
**HTTP method:** DELETE
**Destination:** m3ter
Deletes the integration transformation for the id
### Parameters
| Name | Label | Type | Required | Description | Constraints |
| - | - | - | :-: | - | - |
| `integrationCredentialsId` | Credentials | M3terEntityParameter | Yes | The m3ter credentials to use. | authType: M3TER\_SIGNED\_REQUEST, m3terEntity: IntegrationCredentials |
| `id` | id | LookupParameter | Yes | The UUID of the entity. | - |
| `statePath` | State Path | StateVariableParameter | No | State variable to store the response. | - |
### Exits
| Exit | Description |
| - | - |
| `NEXT` | The API call succeeded. |
| `ERROR` | The API call failed. Error details are stored in the `m3shError` state variable. |
# m3ter
Source: https://docs.m3ter.com/m3sh-function-reference/m3ter/introduction
Synthetic functions for the **m3ter** destination, generated from its OpenAPI spec and grouped by entity below.
# Invitations
Source: https://docs.m3ter.com/m3sh-function-reference/m3ter/invitations
## Retrieve Invitation
**Function name:** `m3ter_GetOrgUserInvitation`
**Category:** READ
**HTTP method:** GET
**Destination:** m3ter
Retrieve the specified invitation with the given UUID.
### Parameters
| Name | Label | Type | Required | Description | Constraints |
| - | - | - | :-: | - | - |
| `integrationCredentialsId` | Credentials | M3terEntityParameter | Yes | The m3ter credentials to use. | authType: M3TER\_SIGNED\_REQUEST, m3terEntity: IntegrationCredentials |
| `id` | id | LookupParameter | Yes | UUID of the specific invitation to retrieve. | - |
| `statePath` | State Path | StateVariableParameter | No | State variable to store the response. | - |
### Exits
| Exit | Description |
| - | - |
| `NEXT` | The API call succeeded. |
| `ERROR` | The API call failed. Error details are stored in the `m3shError` state variable. |
## Retrieve Invitations
**Function name:** `m3ter_ListOrgUserInvitations`
**Category:** READ
**HTTP method:** GET (paginated)
**Destination:** m3ter
Retrieve a list of all invitations in the Organization.
### Parameters
| Name | Label | Type | Required | Description | Constraints |
| - | - | - | :-: | - | - |
| `integrationCredentialsId` | Credentials | M3terEntityParameter | Yes | The m3ter credentials to use. | authType: M3TER\_SIGNED\_REQUEST, m3terEntity: IntegrationCredentials |
| `statePath` | State Path | StateVariableParameter | No | State variable to store the response. | - |
### Exits
| Exit | Description |
| - | - |
| `NEXT` | The API call succeeded. |
| `ERROR` | The API call failed. Error details are stored in the `m3shError` state variable. |
## Invite User to Organization
**Function name:** `m3ter_CreateOrgUserInvitation`
**Category:** WRITE
**HTTP method:** POST
**Destination:** m3ter
Invite a new user to your Organization.
This sends an email to someone inviting them to join your m3ter Organization.
### Parameters
| Name | Label | Type | Required | Description | Constraints |
| - | - | - | :-: | - | - |
| `integrationCredentialsId` | Credentials | M3terEntityParameter | Yes | The m3ter credentials to use. | authType: M3TER\_SIGNED\_REQUEST, m3terEntity: IntegrationCredentials |
| `requestPath` | Request Path | StateVariableParameter | Yes | State variable containing the request. | - |
| `statePath` | State Path | StateVariableParameter | No | State variable to store the response. | - |
### Exits
| Exit | Description |
| - | - |
| `NEXT` | The API call succeeded. |
| `ERROR` | The API call failed. Error details are stored in the `m3shError` state variable. |
# Lineitems
Source: https://docs.m3ter.com/m3sh-function-reference/m3ter/lineitems
## List Line Items
**Function name:** `m3ter_ListLineItems`
**Category:** READ
**HTTP method:** GET (paginated)
**Destination:** m3ter
List the billing line items for the given Organization, which can be filtered by the type of line item, Bill ID, or Commitment *(prepayment)* ID.
### Parameters
| Name | Label | Type | Required | Description | Constraints |
| - | - | - | :-: | - | - |
| `integrationCredentialsId` | Credentials | M3terEntityParameter | Yes | The m3ter credentials to use. | authType: M3TER\_SIGNED\_REQUEST, m3terEntity: IntegrationCredentials |
| `statePath` | State Path | StateVariableParameter | No | State variable to store the response. | - |
| `queryParams` | Query Parameters | KeyValueLookupParameter | No | Query parameters to include in the request | allowedValues: commitmentId,lineItemType,billId,additional |
### Exits
| Exit | Description |
| - | - |
| `NEXT` | The API call succeeded. |
| `ERROR` | The API call failed. Error details are stored in the `m3shError` state variable. |
# Lookuptables
Source: https://docs.m3ter.com/m3sh-function-reference/m3ter/lookuptables
## List LookupTableRevisionData Jobs
**Function name:** `m3ter_ListLookupTableRevisionDataJobs`
**Category:** READ
**HTTP method:** GET (paginated)
**Destination:** m3ter
List the Lookup Table Revision Data job Responses for the given Lookup Table Revision.
There are four types of Revision Data jobs:
* **COPY**. Job runs when you use the [Copy LookupTableRevisionData](https://www.m3ter.com/docs/api#tag/LookupTableRevisionData/operation/CopyLookupTableRevisionData) endpoint which returns the `jobId`.
* **UPLOAD**. Job runs when you use the [Generate LookupTableRevisionData Upload URL](https://www.m3ter.com/docs/api#tag/LookupTableRevisionData/operation/GenerateLookupTableDataUploadUrl) endpoint which returns the `jobId`.
* **DOWNLOAD**. Job runs when you use the [](https://www.m3ter.com/docs/api#tag/LookupTableRevisionData/operation/TriggerLookupTableRevisionDataDownloadJob) endpoint which returns the `jobId`.
* **ARCHIVE**. Job runs when you either manually change a DRAFT Revision to PUBLISHED using the [Update LookupTableRevision Status](https://www.m3ter.com/docs/api#tag/LookupTableRevision/operation/UpdateLookupTableRevisionStatus) endpoint or you publish a DRAFT Revision and the existing PUBLISHED Revision is archived.
**NOTE:** This endpoint returns the id of each Data job. You then use:
* The [Get LookupTableRevisionData Job Response](https://www.m3ter.com/docs/api#tag/LookupTableRevisionData/operation/GetLookupTableRevisionDataJobResponse) endpoint to retrieve a specific Data job Response.
* The [Delete LookupTableRevisionData Job Response](https://www.m3ter.com/docs/api#tag/LookupTableRevisionData/operation/DeleteLookupTableRevisionDataJobResponse) to delete a specific Data job Response.
### Parameters
| Name | Label | Type | Required | Description | Constraints |
| - | - | - | :-: | - | - |
| `integrationCredentialsId` | Credentials | M3terEntityParameter | Yes | The m3ter credentials to use. | authType: M3TER\_SIGNED\_REQUEST, m3terEntity: IntegrationCredentials |
| `lookupTableId` | lookupTableId | LookupParameter | Yes | UUID of the Lookup Table. | - |
| `lookupTableRevisionId` | lookupTableRevisionId | LookupParameter | Yes | UUID of the Lookup Table Revision. | - |
| `statePath` | State Path | StateVariableParameter | No | State variable to store the response. | - |
### Exits
| Exit | Description |
| - | - |
| `NEXT` | The API call succeeded. |
| `ERROR` | The API call failed. Error details are stored in the `m3shError` state variable. |
## Retrieve LookupTableRevision
**Function name:** `m3ter_GetLookupTableRevision`
**Category:** READ
**HTTP method:** GET
**Destination:** m3ter
Retrieve a Lookup Table Revision for the given UUID.
### Parameters
| Name | Label | Type | Required | Description | Constraints |
| - | - | - | :-: | - | - |
| `integrationCredentialsId` | Credentials | M3terEntityParameter | Yes | The m3ter credentials to use. | authType: M3TER\_SIGNED\_REQUEST, m3terEntity: IntegrationCredentials |
| `id` | id | LookupParameter | Yes | The UUID of the Lookup Table Revision to retrieve. | - |
| `lookupTableId` | lookupTableId | LookupParameter | Yes | The UUID of the Lookup Table the Revision belongs to. | - |
| `statePath` | State Path | StateVariableParameter | No | State variable to store the response. | - |
### Exits
| Exit | Description |
| - | - |
| `NEXT` | The API call succeeded. |
| `ERROR` | The API call failed. Error details are stored in the `m3shError` state variable. |
## Update LookupTableRevision
**Function name:** `m3ter_UpdateLookupTableRevision`
**Category:** WRITE
**HTTP method:** PUT
**Destination:** m3ter
Update a Lookup Table Revision for the given UUID.
**NOTE:** If you've already added data to a Lookup Table Revision - see the following [Lookup Table Revision Data](https://www.m3ter.com/docs/api#tag/LookupTableRevisionData) section - then you won't be able to change the Revision's field schema and you'll receive an error if you try do this. Create a new Revision instead, or delete the data items first.
### Parameters
| Name | Label | Type | Required | Description | Constraints |
| - | - | - | :-: | - | - |
| `integrationCredentialsId` | Credentials | M3terEntityParameter | Yes | The m3ter credentials to use. | authType: M3TER\_SIGNED\_REQUEST, m3terEntity: IntegrationCredentials |
| `id` | id | LookupParameter | Yes | The UUID of the Lookup Table Revision to update. | - |
| `lookupTableId` | lookupTableId | LookupParameter | Yes | The UUID of the Lookup Table the Revision belongs to. | - |
| `requestPath` | Request Path | StateVariableParameter | Yes | State variable containing the request. | - |
| `statePath` | State Path | StateVariableParameter | No | State variable to store the response. | - |
### Exits
| Exit | Description |
| - | - |
| `NEXT` | The API call succeeded. |
| `ERROR` | The API call failed. Error details are stored in the `m3shError` state variable. |
## Delete LookupTableRevision
**Function name:** `m3ter_DeleteLookupTableRevision`
**Category:** WRITE
**HTTP method:** DELETE
**Destination:** m3ter
Delete the Lookup Table Revision for the given UUID.
### Parameters
| Name | Label | Type | Required | Description | Constraints |
| - | - | - | :-: | - | - |
| `integrationCredentialsId` | Credentials | M3terEntityParameter | Yes | The m3ter credentials to use. | authType: M3TER\_SIGNED\_REQUEST, m3terEntity: IntegrationCredentials |
| `id` | id | LookupParameter | Yes | The UUID of the Lookup Table Revision to update. | - |
| `lookupTableId` | lookupTableId | LookupParameter | Yes | The UUID of the Lookup Table the Revision belongs to. | - |
| `statePath` | State Path | StateVariableParameter | No | State variable to store the response. | - |
### Exits
| Exit | Description |
| - | - |
| `NEXT` | The API call succeeded. |
| `ERROR` | The API call failed. Error details are stored in the `m3shError` state variable. |
## Trigger Download LookupTableRevisionData URL Job
**Function name:** `m3ter_TriggerLookupTableRevisionDataDownloadJob`
**Category:** WRITE
**HTTP method:** POST
**Destination:** m3ter
Trigger an URL job to download the Lookup Table Revision Data. The URL download Data `jobId` is returned and you can then use the [List LookupTableRevisionData Jobs](https://www.m3ter.com/docs/api#tag/LookupTableRevisionData/operation/ListLookupTableRevisionDataJobs) endpoint or the [Get LookupTableRevisionData Job Response](https://www.m3ter.com/docs/api#tag/LookupTableRevisionData/operation/GetLookupTableRevisionDataJobResponse) endpoint to retrieve the URL and perform the Revision data Download.
### Parameters
| Name | Label | Type | Required | Description | Constraints |
| - | - | - | :-: | - | - |
| `integrationCredentialsId` | Credentials | M3terEntityParameter | Yes | The m3ter credentials to use. | authType: M3TER\_SIGNED\_REQUEST, m3terEntity: IntegrationCredentials |
| `lookupTableId` | lookupTableId | LookupParameter | Yes | UUID of the Lookup Table. | - |
| `lookupTableRevisionId` | lookupTableRevisionId | LookupParameter | Yes | UUID of the Lookup Table Revision. | - |
| `requestPath` | Request Path | StateVariableParameter | Yes | State variable containing the request. | - |
| `statePath` | State Path | StateVariableParameter | No | State variable to store the response. | - |
### Exits
| Exit | Description |
| - | - |
| `NEXT` | The API call succeeded. |
| `ERROR` | The API call failed. Error details are stored in the `m3shError` state variable. |
## Get LookupTableRevisionData entry
**Function name:** `m3ter_GetLookupTableRevisionDataEntry`
**Category:** READ
**HTTP method:** GET
**Destination:** m3ter
Retrieve a Lookup Table Revision Data item for the given lookup key.
**NOTES:**
* To obtain the lookup key for a Revision's data items, use the [Get LookupTableRevisionData](https://www.m3ter.com/docs/api#tag/LookupTableRevisionData/operation/GetLookupTableRevisionData) endpoint in this section and use the `additional=lookupKey` query parameter.
* If the Revision's Data schema uses multiple key fields, enter these as a comma-separated list for the `lookupKey` path parameter: .../key1,key2,key3 and so on. Importantly, multiple keys must be *entered in the same order* as they are configured in the Revision's Data schema.
### Parameters
| Name | Label | Type | Required | Description | Constraints |
| - | - | - | :-: | - | - |
| `integrationCredentialsId` | Credentials | M3terEntityParameter | Yes | The m3ter credentials to use. | authType: M3TER\_SIGNED\_REQUEST, m3terEntity: IntegrationCredentials |
| `lookupTableId` | lookupTableId | LookupParameter | Yes | UUID of the Lookup Table. | - |
| `lookupTableRevisionId` | lookupTableRevisionId | LookupParameter | Yes | UUID of the Lookup Table Revision. | - |
| `lookupKey` | lookupKey | LookupParameter | Yes | The specific lookup key for the Data item to retrieve. | - |
| `statePath` | State Path | StateVariableParameter | No | State variable to store the response. | - |
### Exits
| Exit | Description |
| - | - |
| `NEXT` | The API call succeeded. |
| `ERROR` | The API call failed. Error details are stored in the `m3shError` state variable. |
## Upsert LookupTableRevisionData entry
**Function name:** `m3ter_PutLookupTableRevisionDataEntry`
**Category:** WRITE
**HTTP method:** PUT
**Destination:** m3ter
Create/update a Lookup Table Revision Data item by lookup key.
**NOTES:**
* To obtain the lookup key for a Revision's data items, use the [Get LookupTableRevisionData](https://www.m3ter.com/docs/api#tag/LookupTableRevisionData/operation/GetLookupTableRevisionData) endpoint in this section and use the `additional=lookupKey` query parameter.
* If the Revision's Data schema uses multiple key fields, enter these as a comma-separated list for the `lookupKey` path parameter: .../key1,key2,key3 and so on. Importantly, multiple keys must be *entered in the same order* as they are configured in the Revision's Data schema.
### Parameters
| Name | Label | Type | Required | Description | Constraints |
| - | - | - | :-: | - | - |
| `integrationCredentialsId` | Credentials | M3terEntityParameter | Yes | The m3ter credentials to use. | authType: M3TER\_SIGNED\_REQUEST, m3terEntity: IntegrationCredentials |
| `lookupTableId` | lookupTableId | LookupParameter | Yes | UUID of the Lookup Table. | - |
| `lookupTableRevisionId` | lookupTableRevisionId | LookupParameter | Yes | UUID of the Lookup Table Revision. | - |
| `lookupKey` | lookupKey | LookupParameter | Yes | The specific lookup key for the Data item to upsert. | - |
| `requestPath` | Request Path | StateVariableParameter | Yes | State variable containing the request. | - |
| `statePath` | State Path | StateVariableParameter | No | State variable to store the response. | - |
| `queryParams` | Query Parameters | KeyValueLookupParameter | No | Query parameters to include in the request | allowedValues: additional |
### Exits
| Exit | Description |
| - | - |
| `NEXT` | The API call succeeded. |
| `ERROR` | The API call failed. Error details are stored in the `m3shError` state variable. |
## Delete LookupTableRevisionData entry
**Function name:** `m3ter_DeleteLookupTableRevisionDataEntry`
**Category:** WRITE
**HTTP method:** DELETE
**Destination:** m3ter
Delete a Lookup Table Revision Data entry by lookup key.
**NOTES:**
* To obtain the lookup key for a Revision's data items, use the [Get LookupTableRevisionData](https://www.m3ter.com/docs/api#tag/LookupTableRevisionData/operation/GetLookupTableRevisionData) endpoint in this section and use the `additional=lookupKey` query parameter.
* If the Revision's Data schema uses multiple key fields, enter these as a comma-separated list for the `lookupKey` path parameter: .../key1,key2,key3 and so on. Importantly, multiple keys must be *entered in the same order* as they are configured in the Revision's Data schema.
### Parameters
| Name | Label | Type | Required | Description | Constraints |
| - | - | - | :-: | - | - |
| `integrationCredentialsId` | Credentials | M3terEntityParameter | Yes | The m3ter credentials to use. | authType: M3TER\_SIGNED\_REQUEST, m3terEntity: IntegrationCredentials |
| `lookupTableId` | lookupTableId | LookupParameter | Yes | UUID of the Lookup Table. | - |
| `lookupTableRevisionId` | lookupTableRevisionId | LookupParameter | Yes | UUID of the Lookup Table Revision. | - |
| `lookupKey` | lookupKey | LookupParameter | Yes | The specific lookup key for the Data item to delete. | - |
| `requestPath` | Request Path | StateVariableParameter | Yes | State variable containing the request. | - |
| `statePath` | State Path | StateVariableParameter | No | State variable to store the response. | - |
### Exits
| Exit | Description |
| - | - |
| `NEXT` | The API call succeeded. |
| `ERROR` | The API call failed. Error details are stored in the `m3shError` state variable. |
## Get LookupTable
**Function name:** `m3ter_GetLookupTable`
**Category:** READ
**HTTP method:** GET
**Destination:** m3ter
Retrieve a Lookup Table by UUID.
### Parameters
| Name | Label | Type | Required | Description | Constraints |
| - | - | - | :-: | - | - |
| `integrationCredentialsId` | Credentials | M3terEntityParameter | Yes | The m3ter credentials to use. | authType: M3TER\_SIGNED\_REQUEST, m3terEntity: IntegrationCredentials |
| `id` | id | LookupParameter | Yes | The UUID of the Lookup Table to retrieve. | - |
| `statePath` | State Path | StateVariableParameter | No | State variable to store the response. | - |
| `queryParams` | Query Parameters | KeyValueLookupParameter | No | Query parameters to include in the request | allowedValues: additional |
### Exits
| Exit | Description |
| - | - |
| `NEXT` | The API call succeeded. |
| `ERROR` | The API call failed. Error details are stored in the `m3shError` state variable. |
## Update LookupTable
**Function name:** `m3ter_PutLookupTable`
**Category:** WRITE
**HTTP method:** PUT
**Destination:** m3ter
Update the Lookup Table with the given UUID.
### Parameters
| Name | Label | Type | Required | Description | Constraints |
| - | - | - | :-: | - | - |
| `integrationCredentialsId` | Credentials | M3terEntityParameter | Yes | The m3ter credentials to use. | authType: M3TER\_SIGNED\_REQUEST, m3terEntity: IntegrationCredentials |
| `id` | id | LookupParameter | Yes | The UUID of the Lookup Table to update. | - |
| `requestPath` | Request Path | StateVariableParameter | Yes | State variable containing the request. | - |
| `statePath` | State Path | StateVariableParameter | No | State variable to store the response. | - |
### Exits
| Exit | Description |
| - | - |
| `NEXT` | The API call succeeded. |
| `ERROR` | The API call failed. Error details are stored in the `m3shError` state variable. |
## Delete LookupTable
**Function name:** `m3ter_DeleteLookupTable`
**Category:** WRITE
**HTTP method:** DELETE
**Destination:** m3ter
Delete the Lookup Table with the given UUID.
### Parameters
| Name | Label | Type | Required | Description | Constraints |
| - | - | - | :-: | - | - |
| `integrationCredentialsId` | Credentials | M3terEntityParameter | Yes | The m3ter credentials to use. | authType: M3TER\_SIGNED\_REQUEST, m3terEntity: IntegrationCredentials |
| `id` | id | LookupParameter | Yes | The UUID of the Lookup Table to delete. | - |
| `statePath` | State Path | StateVariableParameter | No | State variable to store the response. | - |
### Exits
| Exit | Description |
| - | - |
| `NEXT` | The API call succeeded. |
| `ERROR` | The API call failed. Error details are stored in the `m3shError` state variable. |
## Get LookupTableRevisionData Job Response.
**Function name:** `m3ter_GetLookupTableRevisionDataJobResponse`
**Category:** READ
**HTTP method:** GET
**Destination:** m3ter
Get the Lookup Table Revision Data job Response for given job id.
**NOTE:** Use the [List LookupTableRevisionData Jobs](https://www.m3ter.com/docs/api#tag/LookupTableRevisionData/operation/ListLookupTableRevisionDataJobs) endpoint to list the Data job Responses for a specific Revision.
### Parameters
| Name | Label | Type | Required | Description | Constraints |
| - | - | - | :-: | - | - |
| `integrationCredentialsId` | Credentials | M3terEntityParameter | Yes | The m3ter credentials to use. | authType: M3TER\_SIGNED\_REQUEST, m3terEntity: IntegrationCredentials |
| `lookupTableId` | lookupTableId | LookupParameter | Yes | UUID of the Lookup Table. | - |
| `lookupTableRevisionId` | lookupTableRevisionId | LookupParameter | Yes | UUID of the Lookup Table Revision. | - |
| `id` | id | LookupParameter | Yes | UUID of the Lookup Table Revision Data job. | - |
| `statePath` | State Path | StateVariableParameter | No | State variable to store the response. | - |
### Exits
| Exit | Description |
| - | - |
| `NEXT` | The API call succeeded. |
| `ERROR` | The API call failed. Error details are stored in the `m3shError` state variable. |
## Delete LookupTableRevisionData Job Response
**Function name:** `m3ter_DeleteLookupTableRevisionDataJobResponse`
**Category:** WRITE
**HTTP method:** DELETE
**Destination:** m3ter
Delete the LookupTableRevisionData Job Response for given job id.
**NOTE:** Use the [List LookupTableRevisionData Jobs](https://www.m3ter.com/docs/api#tag/LookupTableRevisionData/operation/ListLookupTableRevisionDataJobs) endpoint to list the Data job Responses for a specific Revision.
### Parameters
| Name | Label | Type | Required | Description | Constraints |
| - | - | - | :-: | - | - |
| `integrationCredentialsId` | Credentials | M3terEntityParameter | Yes | The m3ter credentials to use. | authType: M3TER\_SIGNED\_REQUEST, m3terEntity: IntegrationCredentials |
| `lookupTableId` | lookupTableId | LookupParameter | Yes | UUID of the Lookup Table. | - |
| `lookupTableRevisionId` | lookupTableRevisionId | LookupParameter | Yes | UUID of the Lookup Table Revision. | - |
| `id` | id | LookupParameter | Yes | UUID of the Lookup Table Revision Data job. | - |
| `statePath` | State Path | StateVariableParameter | No | State variable to store the response. | - |
### Exits
| Exit | Description |
| - | - |
| `NEXT` | The API call succeeded. |
| `ERROR` | The API call failed. Error details are stored in the `m3shError` state variable. |
## Get LookupTableRevisionArchivedData URL
**Function name:** `m3ter_GetLookupTableRevisionArchivedDataUrl`
**Category:** WRITE
**HTTP method:** POST
**Destination:** m3ter
Get a URL which you can use to download the data for the specified archived Lookup Table Revision:
* The `contentType` request parameter is required.
* The returned URL is presigned - you can copy it into a browser and the data file is downloaded locally.
* The upload URL is time limited - the `expiry` time is given in the response and the URL is valid for ***one hour***.
### Parameters
| Name | Label | Type | Required | Description | Constraints |
| - | - | - | :-: | - | - |
| `integrationCredentialsId` | Credentials | M3terEntityParameter | Yes | The m3ter credentials to use. | authType: M3TER\_SIGNED\_REQUEST, m3terEntity: IntegrationCredentials |
| `lookupTableId` | lookupTableId | LookupParameter | Yes | UUID of the LookupTable | - |
| `lookupTableRevisionId` | lookupTableRevisionId | LookupParameter | Yes | UUID of the LookupTableRevision | - |
| `requestPath` | Request Path | StateVariableParameter | Yes | State variable containing the request. | - |
| `statePath` | State Path | StateVariableParameter | No | State variable to store the response. | - |
### Exits
| Exit | Description |
| - | - |
| `NEXT` | The API call succeeded. |
| `ERROR` | The API call failed. Error details are stored in the `m3shError` state variable. |
## Copy LookupTableRevisionData
**Function name:** `m3ter_CopyLookupTableRevisionData`
**Category:** WRITE
**HTTP method:** POST
**Destination:** m3ter
Copy the Lookup Table Revision Data from a source Revision to an optional target Revision:
* If you omit a target `revisionId`, then the source Revision and its Data is duplicated. The new Revision is given the source Revision's name appended with "Copy" but is assigned a new unique id.
* If you specify a target `revisionId` to copy the source Revision and its Data to, you must ensure that the target Revision has a Data schema that matches the source Revision's Data schema otherwise you'll receive an error
### Parameters
| Name | Label | Type | Required | Description | Constraints |
| - | - | - | :-: | - | - |
| `integrationCredentialsId` | Credentials | M3terEntityParameter | Yes | The m3ter credentials to use. | authType: M3TER\_SIGNED\_REQUEST, m3terEntity: IntegrationCredentials |
| `lookupTableId` | lookupTableId | LookupParameter | Yes | UUID of the Lookup Table. | - |
| `lookupTableRevisionId` | lookupTableRevisionId | LookupParameter | Yes | UUID of the source Lookup Table Revision to copy from. | - |
| `requestPath` | Request Path | StateVariableParameter | Yes | State variable containing the request. | - |
| `statePath` | State Path | StateVariableParameter | No | State variable to store the response. | - |
### Exits
| Exit | Description |
| - | - |
| `NEXT` | The API call succeeded. |
| `ERROR` | The API call failed. Error details are stored in the `m3shError` state variable. |
## Generate LookupTableRevisionData Upload URL
**Function name:** `m3ter_GenerateLookupTableDataUploadUrl`
**Category:** WRITE
**HTTP method:** POST
**Destination:** m3ter
Generate a URL which can be used to upload a data file for creating or updating the Lookup Table Revision's data:
* An upload URL is returned together with an UPLOAD `jobId`.
* You can then upload your data file using a PUT request using the returned upload URL as the endpoint. For the PUT request, map the headers returned and their values and in the request body select the specified CSV or JSONL file containing the Revision Data to upload.
* You can use the returned UPLOAD `jobId` with the [List LookupTableRevisionData Jobs](https://www.m3ter.com/docs/api#tag/LookupTableRevisionData/operation/ListLookupTableRevisionDataJobs) or the [Get LookupTableRevisionData Job Response](https://www.m3ter.com/docs/api#tag/LookupTableRevisionData/operation/GetLookupTableRevisionDataJobResponse) endpoints for any follow-up or troubleshooting.
**Important:**
* The `contentLength` request parameter is required.
* The upload URL is time limited - it is valid for ***one minute***.
### Parameters
| Name | Label | Type | Required | Description | Constraints |
| - | - | - | :-: | - | - |
| `integrationCredentialsId` | Credentials | M3terEntityParameter | Yes | The m3ter credentials to use. | authType: M3TER\_SIGNED\_REQUEST, m3terEntity: IntegrationCredentials |
| `lookupTableId` | lookupTableId | LookupParameter | Yes | UUID of the Lookup Table. | - |
| `lookupTableRevisionId` | lookupTableRevisionId | LookupParameter | Yes | UUID of the Lookup Table Revision. | - |
| `requestPath` | Request Path | StateVariableParameter | Yes | State variable containing the request. | - |
| `statePath` | State Path | StateVariableParameter | No | State variable to store the response. | - |
### Exits
| Exit | Description |
| - | - |
| `NEXT` | The API call succeeded. |
| `ERROR` | The API call failed. Error details are stored in the `m3shError` state variable. |
## List LookupTable
**Function name:** `m3ter_ListLookupTable`
**Category:** READ
**HTTP method:** GET (paginated)
**Destination:** m3ter
Retrieve a list Lookup Tables created for the Organization:
* Returned list can be filtered by Lookup Table `code` query parameter.
* If you want to include any non-default fields for the returned Lookup Tables, use the additional query parameter to specify which you want to include in the response.
### Parameters
| Name | Label | Type | Required | Description | Constraints |
| - | - | - | :-: | - | - |
| `integrationCredentialsId` | Credentials | M3terEntityParameter | Yes | The m3ter credentials to use. | authType: M3TER\_SIGNED\_REQUEST, m3terEntity: IntegrationCredentials |
| `statePath` | State Path | StateVariableParameter | No | State variable to store the response. | - |
| `queryParams` | Query Parameters | KeyValueLookupParameter | No | Query parameters to include in the request | allowedValues: codes,additional |
### Exits
| Exit | Description |
| - | - |
| `NEXT` | The API call succeeded. |
| `ERROR` | The API call failed. Error details are stored in the `m3shError` state variable. |
## Create LookupTable
**Function name:** `m3ter_PostLookupTable`
**Category:** WRITE
**HTTP method:** POST
**Destination:** m3ter
Create a new Lookup Table.
### Parameters
| Name | Label | Type | Required | Description | Constraints |
| - | - | - | :-: | - | - |
| `integrationCredentialsId` | Credentials | M3terEntityParameter | Yes | The m3ter credentials to use. | authType: M3TER\_SIGNED\_REQUEST, m3terEntity: IntegrationCredentials |
| `requestPath` | Request Path | StateVariableParameter | Yes | State variable containing the request. | - |
| `statePath` | State Path | StateVariableParameter | No | State variable to store the response. | - |
### Exits
| Exit | Description |
| - | - |
| `NEXT` | The API call succeeded. |
| `ERROR` | The API call failed. Error details are stored in the `m3shError` state variable. |
## List LookupTableRevision
**Function name:** `m3ter_ListLookupTableRevision`
**Category:** READ
**HTTP method:** GET (paginated)
**Destination:** m3ter
List LookupTableRevision entities
### Parameters
| Name | Label | Type | Required | Description | Constraints |
| - | - | - | :-: | - | - |
| `integrationCredentialsId` | Credentials | M3terEntityParameter | Yes | The m3ter credentials to use. | authType: M3TER\_SIGNED\_REQUEST, m3terEntity: IntegrationCredentials |
| `lookupTableId` | lookupTableId | LookupParameter | Yes | The lookup table Id | - |
| `statePath` | State Path | StateVariableParameter | No | State variable to store the response. | - |
| `queryParams` | Query Parameters | KeyValueLookupParameter | No | Query parameters to include in the request | allowedValues: ids |
### Exits
| Exit | Description |
| - | - |
| `NEXT` | The API call succeeded. |
| `ERROR` | The API call failed. Error details are stored in the `m3shError` state variable. |
## Create LookupTableRevision
**Function name:** `m3ter_CreateLookupTableRevision`
**Category:** WRITE
**HTTP method:** POST
**Destination:** m3ter
Create a new Revision for a Lookup Table.
Fields and Keys for Revision schema: Use the `fields` parameter to define a Revision schema containing up to 10 number or string fields. Use the `keys` parameter to specify which are the key fields:
* At least one field must be a non-key field and at least one a key field.
* Up to 5 key fields can be defined.
* Using multiple key fields: ensure that the order in which they are defined matches the order in which you want to use them in any Lookup functions that reference the Revision's Lookup Table, because this is the order in which they will be passed into the function. The order of non-key fields is not constrained in this way.
Revision status: when you first create a Lookup Table Revision it has DRAFT status. Use the [Update LookupTableRevision Status](https://docs.m3ter.com/api/lookuptablerevision/update-lookuptablerevision-status) call to change a Revision's status.
### Parameters
| Name | Label | Type | Required | Description | Constraints |
| - | - | - | :-: | - | - |
| `integrationCredentialsId` | Credentials | M3terEntityParameter | Yes | The m3ter credentials to use. | authType: M3TER\_SIGNED\_REQUEST, m3terEntity: IntegrationCredentials |
| `lookupTableId` | lookupTableId | LookupParameter | Yes | UUID of the Lookup Table the Revision will be created for. | - |
| `requestPath` | Request Path | StateVariableParameter | Yes | State variable containing the request. | - |
| `statePath` | State Path | StateVariableParameter | No | State variable to store the response. | - |
### Exits
| Exit | Description |
| - | - |
| `NEXT` | The API call succeeded. |
| `ERROR` | The API call failed. Error details are stored in the `m3shError` state variable. |
## Get LookupTableRevisionData
**Function name:** `m3ter_GetLookupTableRevisionData`
**Category:** READ
**HTTP method:** GET
**Destination:** m3ter
List Lookup Table Revision Data items for the given UUID.
### Parameters
| Name | Label | Type | Required | Description | Constraints |
| - | - | - | :-: | - | - |
| `integrationCredentialsId` | Credentials | M3terEntityParameter | Yes | The m3ter credentials to use. | authType: M3TER\_SIGNED\_REQUEST, m3terEntity: IntegrationCredentials |
| `lookupTableId` | lookupTableId | LookupParameter | Yes | UUID of the Lookup Table. | - |
| `lookupTableRevisionId` | lookupTableRevisionId | LookupParameter | Yes | UUID of the Lookup Table Revision. | - |
| `statePath` | State Path | StateVariableParameter | No | State variable to store the response. | - |
| `queryParams` | Query Parameters | KeyValueLookupParameter | No | Query parameters to include in the request | allowedValues: limit,additional |
### Exits
| Exit | Description |
| - | - |
| `NEXT` | The API call succeeded. |
| `ERROR` | The API call failed. Error details are stored in the `m3shError` state variable. |
## Upsert LookupTableRevisionData
**Function name:** `m3ter_PutLookupTableRevisionData`
**Category:** WRITE
**HTTP method:** PUT
**Destination:** m3ter
Create/update the Lookup Table Revision Data for the given UUID.
### Parameters
| Name | Label | Type | Required | Description | Constraints |
| - | - | - | :-: | - | - |
| `integrationCredentialsId` | Credentials | M3terEntityParameter | Yes | The m3ter credentials to use. | authType: M3TER\_SIGNED\_REQUEST, m3terEntity: IntegrationCredentials |
| `lookupTableId` | lookupTableId | LookupParameter | Yes | UUID of the Lookup Table. | - |
| `lookupTableRevisionId` | lookupTableRevisionId | LookupParameter | Yes | UUID of the Lookup Table Revision. | - |
| `requestPath` | Request Path | StateVariableParameter | Yes | State variable containing the request. | - |
| `statePath` | State Path | StateVariableParameter | No | State variable to store the response. | - |
| `queryParams` | Query Parameters | KeyValueLookupParameter | No | Query parameters to include in the request | allowedValues: additional |
### Exits
| Exit | Description |
| - | - |
| `NEXT` | The API call succeeded. |
| `ERROR` | The API call failed. Error details are stored in the `m3shError` state variable. |
## Delete LookupTableRevisionData
**Function name:** `m3ter_DeleteLookupTableRevisionData`
**Category:** WRITE
**HTTP method:** DELETE
**Destination:** m3ter
Delete the Lookup Table Revision Data for the given UUID.
### Parameters
| Name | Label | Type | Required | Description | Constraints |
| - | - | - | :-: | - | - |
| `integrationCredentialsId` | Credentials | M3terEntityParameter | Yes | The m3ter credentials to use. | authType: M3TER\_SIGNED\_REQUEST, m3terEntity: IntegrationCredentials |
| `lookupTableId` | lookupTableId | LookupParameter | Yes | UUID of the Lookup Table. | - |
| `lookupTableRevisionId` | lookupTableRevisionId | LookupParameter | Yes | UUID of the Lookup Table Revision. | - |
| `statePath` | State Path | StateVariableParameter | No | State variable to store the response. | - |
### Exits
| Exit | Description |
| - | - |
| `NEXT` | The API call succeeded. |
| `ERROR` | The API call failed. Error details are stored in the `m3shError` state variable. |
## Update LookupTableRevision Status
**Function name:** `m3ter_UpdateLookupTableRevisionStatus`
**Category:** WRITE
**HTTP method:** PUT
**Destination:** m3ter
Update the status of a Lookup Table Revision for the given UUID.
### Parameters
| Name | Label | Type | Required | Description | Constraints |
| - | - | - | :-: | - | - |
| `integrationCredentialsId` | Credentials | M3terEntityParameter | Yes | The m3ter credentials to use. | authType: M3TER\_SIGNED\_REQUEST, m3terEntity: IntegrationCredentials |
| `id` | id | LookupParameter | Yes | The UUID of the Lookup Table Revision to update the status for. | - |
| `lookupTableId` | lookupTableId | LookupParameter | Yes | UUID of the Lookup Table the Revision belongs to. | - |
| `requestPath` | Request Path | StateVariableParameter | Yes | State variable containing the request. | - |
| `statePath` | State Path | StateVariableParameter | No | State variable to store the response. | - |
### Exits
| Exit | Description |
| - | - |
| `NEXT` | The API call succeeded. |
| `ERROR` | The API call failed. Error details are stored in the `m3shError` state variable. |
# Measurements
Source: https://docs.m3ter.com/m3sh-function-reference/m3ter/measurements
## Get Failed Ingest File Download URL
**Function name:** `m3ter_GetValidationErrorDownloadUrl`
**Category:** READ
**HTTP method:** GET
**Destination:** m3ter
Returns a presigned download URL for failed ingest file download based on the file path provided.
If a usage data ingest measurement you submit to the m3ter platform fails, an `ingest.validation.failure` Event is generated. Use this call to obtain a download URL which you can then use to download a file containing details of what went wrong with the attempted usage data measurement ingest, and allowing you to follow-up and resolve the issue.
To obtain the `file` query parameter:
* Use the [List Events](https://www.m3ter.com/docs/api#tag/Events/operation/ListEventFields) call with the `ingest.validation.failure` for the `eventName` query parameter.
* The response contains a `getDownloadUrl` response parameter and this contains the file path you can use to obtain the failed ingest file download URL.
**Notes:**
* The presigned Url returned to use for failed ingest file download is time-bound and expires after 5 minutes.
* If you make a List Events call for `ingest.validation.failure` Events in your Organization, then you can perform this **GET** call using the full URL returned for any ingest failure Event to obtain a failed ingest file download URL for the Event.
### Parameters
| Name | Label | Type | Required | Description | Constraints |
| - | - | - | :-: | - | - |
| `integrationCredentialsId` | Credentials | M3terEntityParameter | Yes | The m3ter credentials to use. | authType: M3TER\_SIGNED\_REQUEST, m3terEntity: IntegrationCredentials |
| `statePath` | State Path | StateVariableParameter | No | State variable to store the response. | - |
| `queryParams` | Query Parameters | KeyValueLookupParameter | No | Query parameters to include in the request | allowedValues: file |
### Exits
| Exit | Description |
| - | - |
| `NEXT` | The API call succeeded. |
| `ERROR` | The API call failed. Error details are stored in the `m3shError` state variable. |
# Metergroups
Source: https://docs.m3ter.com/m3sh-function-reference/m3ter/metergroups
## List MeterGroups
**Function name:** `m3ter_ListMeterGroups`
**Category:** READ
**HTTP method:** GET (paginated)
**Destination:** m3ter
Retrieve a list of MeterGroup entities
### Parameters
| Name | Label | Type | Required | Description | Constraints |
| - | - | - | :-: | - | - |
| `integrationCredentialsId` | Credentials | M3terEntityParameter | Yes | The m3ter credentials to use. | authType: M3TER\_SIGNED\_REQUEST, m3terEntity: IntegrationCredentials |
| `statePath` | State Path | StateVariableParameter | No | State variable to store the response. | - |
| `queryParams` | Query Parameters | KeyValueLookupParameter | No | Query parameters to include in the request | allowedValues: ids |
### Exits
| Exit | Description |
| - | - |
| `NEXT` | The API call succeeded. |
| `ERROR` | The API call failed. Error details are stored in the `m3shError` state variable. |
## Create MeterGroup
**Function name:** `m3ter_PostMeterGroup`
**Category:** WRITE
**HTTP method:** POST
**Destination:** m3ter
Create a new MeterGroup.
### Parameters
| Name | Label | Type | Required | Description | Constraints |
| - | - | - | :-: | - | - |
| `integrationCredentialsId` | Credentials | M3terEntityParameter | Yes | The m3ter credentials to use. | authType: M3TER\_SIGNED\_REQUEST, m3terEntity: IntegrationCredentials |
| `requestPath` | Request Path | StateVariableParameter | Yes | State variable containing the request. | - |
| `statePath` | State Path | StateVariableParameter | No | State variable to store the response. | - |
### Exits
| Exit | Description |
| - | - |
| `NEXT` | The API call succeeded. |
| `ERROR` | The API call failed. Error details are stored in the `m3shError` state variable. |
## Retrieve MeterGroup
**Function name:** `m3ter_GetMeterGroup`
**Category:** READ
**HTTP method:** GET
**Destination:** m3ter
Retrieve a MeterGroup for the given UUID.
### Parameters
| Name | Label | Type | Required | Description | Constraints |
| - | - | - | :-: | - | - |
| `integrationCredentialsId` | Credentials | M3terEntityParameter | Yes | The m3ter credentials to use. | authType: M3TER\_SIGNED\_REQUEST, m3terEntity: IntegrationCredentials |
| `id` | id | LookupParameter | Yes | The UUID of the MeterGroup to retrieve. | - |
| `statePath` | State Path | StateVariableParameter | No | State variable to store the response. | - |
### Exits
| Exit | Description |
| - | - |
| `NEXT` | The API call succeeded. |
| `ERROR` | The API call failed. Error details are stored in the `m3shError` state variable. |
## Update MeterGroup
**Function name:** `m3ter_PutMeterGroup`
**Category:** WRITE
**HTTP method:** PUT
**Destination:** m3ter
Update MeterGroup for the given UUID.
### Parameters
| Name | Label | Type | Required | Description | Constraints |
| - | - | - | :-: | - | - |
| `integrationCredentialsId` | Credentials | M3terEntityParameter | Yes | The m3ter credentials to use. | authType: M3TER\_SIGNED\_REQUEST, m3terEntity: IntegrationCredentials |
| `id` | id | LookupParameter | Yes | The UUID of the MeterGroup to update. | - |
| `requestPath` | Request Path | StateVariableParameter | Yes | State variable containing the request. | - |
| `statePath` | State Path | StateVariableParameter | No | State variable to store the response. | - |
### Exits
| Exit | Description |
| - | - |
| `NEXT` | The API call succeeded. |
| `ERROR` | The API call failed. Error details are stored in the `m3shError` state variable. |
## Delete MeterGroup
**Function name:** `m3ter_DeleteMeterGroup`
**Category:** WRITE
**HTTP method:** DELETE
**Destination:** m3ter
Delete a MeterGroup for the given UUID.
### Parameters
| Name | Label | Type | Required | Description | Constraints |
| - | - | - | :-: | - | - |
| `integrationCredentialsId` | Credentials | M3terEntityParameter | Yes | The m3ter credentials to use. | authType: M3TER\_SIGNED\_REQUEST, m3terEntity: IntegrationCredentials |
| `id` | id | LookupParameter | Yes | The UUID of the MeterGroup to delete. | - |
| `statePath` | State Path | StateVariableParameter | No | State variable to store the response. | - |
### Exits
| Exit | Description |
| - | - |
| `NEXT` | The API call succeeded. |
| `ERROR` | The API call failed. Error details are stored in the `m3shError` state variable. |
# Meters
Source: https://docs.m3ter.com/m3sh-function-reference/m3ter/meters
## Retrieve Meter
**Function name:** `m3ter_GetMeter`
**Category:** READ
**HTTP method:** GET
**Destination:** m3ter
Retrieve the Meter with the given UUID.
### Parameters
| Name | Label | Type | Required | Description | Constraints |
| - | - | - | :-: | - | - |
| `integrationCredentialsId` | Credentials | M3terEntityParameter | Yes | The m3ter credentials to use. | authType: M3TER\_SIGNED\_REQUEST, m3terEntity: IntegrationCredentials |
| `id` | id | LookupParameter | Yes | The UUID of the Meter to retrieve. | - |
| `statePath` | State Path | StateVariableParameter | No | State variable to store the response. | - |
### Exits
| Exit | Description |
| - | - |
| `NEXT` | The API call succeeded. |
| `ERROR` | The API call failed. Error details are stored in the `m3shError` state variable. |
## Update Meter
**Function name:** `m3ter_PutMeter`
**Category:** WRITE
**HTTP method:** PUT
**Destination:** m3ter
Update the Meter with the given UUID.
**Note:** If you have created Custom Fields for a Meter, when you use this endpoint to update the Meter use the `customFields` parameter to preserve those Custom Fields. If you omit them from the update request, they will be lost.
### Parameters
| Name | Label | Type | Required | Description | Constraints |
| - | - | - | :-: | - | - |
| `integrationCredentialsId` | Credentials | M3terEntityParameter | Yes | The m3ter credentials to use. | authType: M3TER\_SIGNED\_REQUEST, m3terEntity: IntegrationCredentials |
| `id` | id | LookupParameter | Yes | The UUID of the Meter to update. | - |
| `requestPath` | Request Path | StateVariableParameter | Yes | State variable containing the request. | - |
| `statePath` | State Path | StateVariableParameter | No | State variable to store the response. | - |
### Exits
| Exit | Description |
| - | - |
| `NEXT` | The API call succeeded. |
| `ERROR` | The API call failed. Error details are stored in the `m3shError` state variable. |
## Delete Meter
**Function name:** `m3ter_DeleteMeter`
**Category:** WRITE
**HTTP method:** DELETE
**Destination:** m3ter
Delete the Meter with the given UUID.
### Parameters
| Name | Label | Type | Required | Description | Constraints |
| - | - | - | :-: | - | - |
| `integrationCredentialsId` | Credentials | M3terEntityParameter | Yes | The m3ter credentials to use. | authType: M3TER\_SIGNED\_REQUEST, m3terEntity: IntegrationCredentials |
| `id` | id | LookupParameter | Yes | The UUID of the Meter to delete. | - |
| `statePath` | State Path | StateVariableParameter | No | State variable to store the response. | - |
### Exits
| Exit | Description |
| - | - |
| `NEXT` | The API call succeeded. |
| `ERROR` | The API call failed. Error details are stored in the `m3shError` state variable. |
## List Meters
**Function name:** `m3ter_ListMeters`
**Category:** READ
**HTTP method:** GET (paginated)
**Destination:** m3ter
Retrieve a list of Meters that can be filtered by Product, Meter ID, or Meter short code.
### Parameters
| Name | Label | Type | Required | Description | Constraints |
| - | - | - | :-: | - | - |
| `integrationCredentialsId` | Credentials | M3terEntityParameter | Yes | The m3ter credentials to use. | authType: M3TER\_SIGNED\_REQUEST, m3terEntity: IntegrationCredentials |
| `statePath` | State Path | StateVariableParameter | No | State variable to store the response. | - |
| `queryParams` | Query Parameters | KeyValueLookupParameter | No | Query parameters to include in the request | allowedValues: productId,ids,codes |
### Exits
| Exit | Description |
| - | - |
| `NEXT` | The API call succeeded. |
| `ERROR` | The API call failed. Error details are stored in the `m3shError` state variable. |
## Create Meter
**Function name:** `m3ter_PostMeter`
**Category:** WRITE
**HTTP method:** POST
**Destination:** m3ter
Create a new Meter.
When you create a Meter, you can define two types of field for usage data collection and ingest into the platform:
* `dataFields` to collect raw usage data measures - numeric quantitative data values or non-numeric point data values.
* `derivedFields` to derive usage data measures that are the result of applying a calculation to `dataFields`, `customFields`, or system `Timestamp` fields.
You can also:
* Create `customFields` for a Meter, which allows you to attach custom data to the Meter as name/value pairs.
* Create Global Meters, which are not tied to a specific Product and allow you collect to usage data that will form the basis of usage-based pricing across more than one of your Products.
**IMPORTANT! - use of PII:** The use of any of your end-customers' Personally Identifiable Information (PII) in m3ter is restricted to a few fields on the **Account** entity. Please ensure that any fields you configure for Meters, such as Data Fields or Derived Fields, do not contain any end-customer PII data. See the [Introduction section](https://www.m3ter.com/docs/api#section/Introduction) above for more details.
See also:
* [Reviewing Meter Options](https://www.m3ter.com/docs/guides/setting-up-usage-data-meters-and-aggregations/reviewing-meter-options).
### Parameters
| Name | Label | Type | Required | Description | Constraints |
| - | - | - | :-: | - | - |
| `integrationCredentialsId` | Credentials | M3terEntityParameter | Yes | The m3ter credentials to use. | authType: M3TER\_SIGNED\_REQUEST, m3terEntity: IntegrationCredentials |
| `requestPath` | Request Path | StateVariableParameter | Yes | State variable containing the request. | - |
| `statePath` | State Path | StateVariableParameter | No | State variable to store the response. | - |
### Exits
| Exit | Description |
| - | - |
| `NEXT` | The API call succeeded. |
| `ERROR` | The API call failed. Error details are stored in the `m3shError` state variable. |
# Notifications
Source: https://docs.m3ter.com/m3sh-function-reference/m3ter/notifications
## Evaluate Calculation
**Function name:** `m3ter_EvaluateCalculation`
**Category:** WRITE
**HTTP method:** POST
**Destination:** m3ter
Evaluates a calculation against a specific Event or an Event type without triggering a Notification. This is useful for validating your calculation logic before adding it to a Notification.
You can use either the `eventId` or `eventName` to test your calculation against:
* `eventId` Tests the calculation for validity against a *specific Event* that has been generated for your Organization.
* `eventName` Tests the calculation for validity against the *Event type*.
Possible outcomes:
* If in either case the calculation is valid, then `"success" : true` is returned.
* If in either case the calculation is invalid, then `"success" : false` is returned, together with an `"error message"` giving the reason why the calculation is invaild for use against the specific Event or Event type.
**Note:** If you use both the `eventId` and the `eventName` as request body parameters in a single call, then the `eventName` takes precedence and the calculation is evaluated for validity against the *Event type*.
### Parameters
| Name | Label | Type | Required | Description | Constraints |
| - | - | - | :-: | - | - |
| `integrationCredentialsId` | Credentials | M3terEntityParameter | Yes | The m3ter credentials to use. | authType: M3TER\_SIGNED\_REQUEST, m3terEntity: IntegrationCredentials |
| `requestPath` | Request Path | StateVariableParameter | Yes | State variable containing the request. | - |
| `statePath` | State Path | StateVariableParameter | No | State variable to store the response. | - |
### Exits
| Exit | Description |
| - | - |
| `NEXT` | The API call succeeded. |
| `ERROR` | The API call failed. Error details are stored in the `m3shError` state variable. |
## Retrieve Notification
**Function name:** `m3ter_GetNotification`
**Category:** READ
**HTTP method:** GET
**Destination:** m3ter
Retrieve the details of a specific Notification using its UUID. Includes the Event the Notification is based on, and any calculation referencing the Event's field and which defines further conditions that must be met to trigger the Notification when the Event occurs.
### Parameters
| Name | Label | Type | Required | Description | Constraints |
| - | - | - | :-: | - | - |
| `integrationCredentialsId` | Credentials | M3terEntityParameter | Yes | The m3ter credentials to use. | authType: M3TER\_SIGNED\_REQUEST, m3terEntity: IntegrationCredentials |
| `id` | id | LookupParameter | Yes | The unique identifier (UUID) of the Notification to retrieve. | - |
| `statePath` | State Path | StateVariableParameter | No | State variable to store the response. | - |
### Exits
| Exit | Description |
| - | - |
| `NEXT` | The API call succeeded. |
| `ERROR` | The API call failed. Error details are stored in the `m3shError` state variable. |
## Update Notification
**Function name:** `m3ter_UpdateNotification`
**Category:** WRITE
**HTTP method:** PUT
**Destination:** m3ter
Update a Notification with the given UUID.
This endpoint modifies the configuration details of an existing Notification. You can change the Event that triggers the Notification and/or update the conditions for sending the Notification.
### Parameters
| Name | Label | Type | Required | Description | Constraints |
| - | - | - | :-: | - | - |
| `integrationCredentialsId` | Credentials | M3terEntityParameter | Yes | The m3ter credentials to use. | authType: M3TER\_SIGNED\_REQUEST, m3terEntity: IntegrationCredentials |
| `id` | id | LookupParameter | Yes | The unique identifier (UUID) of the Notification to update. | - |
| `requestPath` | Request Path | StateVariableParameter | Yes | State variable containing the request. | - |
| `statePath` | State Path | StateVariableParameter | No | State variable to store the response. | - |
### Exits
| Exit | Description |
| - | - |
| `NEXT` | The API call succeeded. |
| `ERROR` | The API call failed. Error details are stored in the `m3shError` state variable. |
## Delete Notification
**Function name:** `m3ter_DeleteNotification`
**Category:** WRITE
**HTTP method:** DELETE
**Destination:** m3ter
Delete the Notification with the given UUID.
This endpoint permanently removes a specified Notification and its configuration. This action cannot be undone.
### Parameters
| Name | Label | Type | Required | Description | Constraints |
| - | - | - | :-: | - | - |
| `integrationCredentialsId` | Credentials | M3terEntityParameter | Yes | The m3ter credentials to use. | authType: M3TER\_SIGNED\_REQUEST, m3terEntity: IntegrationCredentials |
| `id` | id | LookupParameter | Yes | The unique identifier (UUID) of the Notification to delete. | - |
| `statePath` | State Path | StateVariableParameter | No | State variable to store the response. | - |
### Exits
| Exit | Description |
| - | - |
| `NEXT` | The API call succeeded. |
| `ERROR` | The API call failed. Error details are stored in the `m3shError` state variable. |
## List Notifications
**Function name:** `m3ter_ListNotifications`
**Category:** READ
**HTTP method:** GET (paginated)
**Destination:** m3ter
Retrieve a list of Event Notifications for the specified Organization.
This endpoint retrieves a list of all Event Notifications for the Organization identified by its UUID. The list can be paginated for easier management. The list also supports filtering by parameters such as Notification UUID.
### Parameters
| Name | Label | Type | Required | Description | Constraints |
| - | - | - | :-: | - | - |
| `integrationCredentialsId` | Credentials | M3terEntityParameter | Yes | The m3ter credentials to use. | authType: M3TER\_SIGNED\_REQUEST, m3terEntity: IntegrationCredentials |
| `statePath` | State Path | StateVariableParameter | No | State variable to store the response. | - |
| `queryParams` | Query Parameters | KeyValueLookupParameter | No | Query parameters to include in the request | allowedValues: active,eventName,ids |
### Exits
| Exit | Description |
| - | - |
| `NEXT` | The API call succeeded. |
| `ERROR` | The API call failed. Error details are stored in the `m3shError` state variable. |
## Create Notification
**Function name:** `m3ter_CreateNotification`
**Category:** WRITE
**HTTP method:** POST
**Destination:** m3ter
Create a new Notification for an Event.
This endpoint enables you to create a new Event Notification for the specified Organization. You need to supply a request body with the details of the new Notification.
### Parameters
| Name | Label | Type | Required | Description | Constraints |
| - | - | - | :-: | - | - |
| `integrationCredentialsId` | Credentials | M3terEntityParameter | Yes | The m3ter credentials to use. | authType: M3TER\_SIGNED\_REQUEST, m3terEntity: IntegrationCredentials |
| `requestPath` | Request Path | StateVariableParameter | Yes | State variable containing the request. | - |
| `statePath` | State Path | StateVariableParameter | No | State variable to store the response. | - |
### Exits
| Exit | Description |
| - | - |
| `NEXT` | The API call succeeded. |
| `ERROR` | The API call failed. Error details are stored in the `m3shError` state variable. |
# Oauth
Source: https://docs.m3ter.com/m3sh-function-reference/m3ter/oauth
## Get Token
**Function name:** `m3ter_GenerateToken`
**Category:** WRITE
**HTTP method:** POST
**Destination:** m3ter
Get authentication token
### Parameters
| Name | Label | Type | Required | Description | Constraints |
| - | - | - | :-: | - | - |
| `integrationCredentialsId` | Credentials | M3terEntityParameter | Yes | The m3ter credentials to use. | authType: M3TER\_SIGNED\_REQUEST, m3terEntity: IntegrationCredentials |
| `requestPath` | Request Path | StateVariableParameter | Yes | State variable containing the request. | - |
| `statePath` | State Path | StateVariableParameter | No | State variable to store the response. | - |
### Exits
| Exit | Description |
| - | - |
| `NEXT` | The API call succeeded. |
| `ERROR` | The API call failed. Error details are stored in the `m3shError` state variable. |
# Organizationconfig
Source: https://docs.m3ter.com/m3sh-function-reference/m3ter/organizationconfig
## Retrieve OrganizationConfig
**Function name:** `m3ter_GetOrganizationConfig`
**Category:** READ
**HTTP method:** GET
**Destination:** m3ter
Retrieve the Organization-wide configuration details.
### Parameters
| Name | Label | Type | Required | Description | Constraints |
| - | - | - | :-: | - | - |
| `integrationCredentialsId` | Credentials | M3terEntityParameter | Yes | The m3ter credentials to use. | authType: M3TER\_SIGNED\_REQUEST, m3terEntity: IntegrationCredentials |
| `statePath` | State Path | StateVariableParameter | No | State variable to store the response. | - |
### Exits
| Exit | Description |
| - | - |
| `NEXT` | The API call succeeded. |
| `ERROR` | The API call failed. Error details are stored in the `m3shError` state variable. |
## Update OrganizationConfig
**Function name:** `m3ter_UpdateOrganizationConfig`
**Category:** WRITE
**HTTP method:** PUT
**Destination:** m3ter
Update the Organization-wide configuration details.
### Parameters
| Name | Label | Type | Required | Description | Constraints |
| - | - | - | :-: | - | - |
| `integrationCredentialsId` | Credentials | M3terEntityParameter | Yes | The m3ter credentials to use. | authType: M3TER\_SIGNED\_REQUEST, m3terEntity: IntegrationCredentials |
| `requestPath` | Request Path | StateVariableParameter | Yes | State variable containing the request. | - |
| `statePath` | State Path | StateVariableParameter | No | State variable to store the response. | - |
### Exits
| Exit | Description |
| - | - |
| `NEXT` | The API call succeeded. |
| `ERROR` | The API call failed. Error details are stored in the `m3shError` state variable. |
# Permissionpolicies
Source: https://docs.m3ter.com/m3sh-function-reference/m3ter/permissionpolicies
## Remove a PermissionPolicy from support users for an organization
**Function name:** `m3ter_RemovePermissionPolicyFromSupportUsers`
**Category:** WRITE
**HTTP method:** POST
**Destination:** m3ter
Remove a permission policy from support users for an organization.
### Parameters
| Name | Label | Type | Required | Description | Constraints |
| - | - | - | :-: | - | - |
| `integrationCredentialsId` | Credentials | M3terEntityParameter | Yes | The m3ter credentials to use. | authType: M3TER\_SIGNED\_REQUEST, m3terEntity: IntegrationCredentials |
| `permissionPolicyId` | permissionPolicyId | LookupParameter | Yes | UUID of the permission policy | - |
| `statePath` | State Path | StateVariableParameter | No | State variable to store the response. | - |
### Exits
| Exit | Description |
| - | - |
| `NEXT` | The API call succeeded. |
| `ERROR` | The API call failed. Error details are stored in the `m3shError` state variable. |
## Add a PermissionPolicy to a user
**Function name:** `m3ter_AddPermissionPolicyToUser`
**Category:** WRITE
**HTTP method:** POST
**Destination:** m3ter
Add a permission policy to a user.
### Parameters
| Name | Label | Type | Required | Description | Constraints |
| - | - | - | :-: | - | - |
| `integrationCredentialsId` | Credentials | M3terEntityParameter | Yes | The m3ter credentials to use. | authType: M3TER\_SIGNED\_REQUEST, m3terEntity: IntegrationCredentials |
| `permissionPolicyId` | permissionPolicyId | LookupParameter | Yes | UUID of the permission policy | - |
| `requestPath` | Request Path | StateVariableParameter | Yes | State variable containing the request. | - |
| `statePath` | State Path | StateVariableParameter | No | State variable to store the response. | - |
### Exits
| Exit | Description |
| - | - |
| `NEXT` | The API call succeeded. |
| `ERROR` | The API call failed. Error details are stored in the `m3shError` state variable. |
## Add a PermissionPolicy to support users for an organization
**Function name:** `m3ter_AddPermissionPolicyToSupportUsers`
**Category:** WRITE
**HTTP method:** POST
**Destination:** m3ter
Add a permission policy to support users for an organization.
### Parameters
| Name | Label | Type | Required | Description | Constraints |
| - | - | - | :-: | - | - |
| `integrationCredentialsId` | Credentials | M3terEntityParameter | Yes | The m3ter credentials to use. | authType: M3TER\_SIGNED\_REQUEST, m3terEntity: IntegrationCredentials |
| `permissionPolicyId` | permissionPolicyId | LookupParameter | Yes | UUID of the permission policy | - |
| `requestPath` | Request Path | StateVariableParameter | Yes | State variable containing the request. | - |
| `statePath` | State Path | StateVariableParameter | No | State variable to store the response. | - |
### Exits
| Exit | Description |
| - | - |
| `NEXT` | The API call succeeded. |
| `ERROR` | The API call failed. Error details are stored in the `m3shError` state variable. |
## Add a PermissionPolicy to a service user
**Function name:** `m3ter_AddPermissionPolicyToServiceUser`
**Category:** WRITE
**HTTP method:** POST
**Destination:** m3ter
Add a permission policy to a service user.
### Parameters
| Name | Label | Type | Required | Description | Constraints |
| - | - | - | :-: | - | - |
| `integrationCredentialsId` | Credentials | M3terEntityParameter | Yes | The m3ter credentials to use. | authType: M3TER\_SIGNED\_REQUEST, m3terEntity: IntegrationCredentials |
| `permissionPolicyId` | permissionPolicyId | LookupParameter | Yes | UUID of the permission policy | - |
| `requestPath` | Request Path | StateVariableParameter | Yes | State variable containing the request. | - |
| `statePath` | State Path | StateVariableParameter | No | State variable to store the response. | - |
### Exits
| Exit | Description |
| - | - |
| `NEXT` | The API call succeeded. |
| `ERROR` | The API call failed. Error details are stored in the `m3shError` state variable. |
## Remove a PermissionPolicy from a service user
**Function name:** `m3ter_RemovePermissionPolicyFromServiceUser`
**Category:** WRITE
**HTTP method:** POST
**Destination:** m3ter
Remove a permission policy from a service user.
### Parameters
| Name | Label | Type | Required | Description | Constraints |
| - | - | - | :-: | - | - |
| `integrationCredentialsId` | Credentials | M3terEntityParameter | Yes | The m3ter credentials to use. | authType: M3TER\_SIGNED\_REQUEST, m3terEntity: IntegrationCredentials |
| `permissionPolicyId` | permissionPolicyId | LookupParameter | Yes | UUID of the permission policy | - |
| `requestPath` | Request Path | StateVariableParameter | Yes | State variable containing the request. | - |
| `statePath` | State Path | StateVariableParameter | No | State variable to store the response. | - |
### Exits
| Exit | Description |
| - | - |
| `NEXT` | The API call succeeded. |
| `ERROR` | The API call failed. Error details are stored in the `m3shError` state variable. |
## List PermissionPolicies
**Function name:** `m3ter_ListPermissionPolicies`
**Category:** READ
**HTTP method:** GET (paginated)
**Destination:** m3ter
Retrieve a list of PermissionPolicy entities
### Parameters
| Name | Label | Type | Required | Description | Constraints |
| - | - | - | :-: | - | - |
| `integrationCredentialsId` | Credentials | M3terEntityParameter | Yes | The m3ter credentials to use. | authType: M3TER\_SIGNED\_REQUEST, m3terEntity: IntegrationCredentials |
| `statePath` | State Path | StateVariableParameter | No | State variable to store the response. | - |
### Exits
| Exit | Description |
| - | - |
| `NEXT` | The API call succeeded. |
| `ERROR` | The API call failed. Error details are stored in the `m3shError` state variable. |
## Create Permission Policy
**Function name:** `m3ter_PostPermissionPolicy`
**Category:** WRITE
**HTTP method:** POST
**Destination:** m3ter
Create a new Permission Policy
**NOTE:** When you set up a policy statement for this call using the `permissionPolicy` request parameter to specify the `effect`, `action`, and `resource`, you must use all lower case and the format as shown in this example for a Permission Policy statement that grants full CRUD access to all meters:
```
"permissionPolicy" : [
{
"effect" : "allow",
"action" : [
"config:create",
"config:delete",
"config:retrieve",
"config:update"
]
"resource" : [
"config:meter/*"
]
}
]
```
For more details and further examples, see [Understanding, Creating, and Managing Permission Policies](https://www.m3ter.com/docs/guides/organization-and-access-management/creating-and-managing-permissions#permission-policy-statements---available-actions-and-resources) in our main Documentation.
### Parameters
| Name | Label | Type | Required | Description | Constraints |
| - | - | - | :-: | - | - |
| `integrationCredentialsId` | Credentials | M3terEntityParameter | Yes | The m3ter credentials to use. | authType: M3TER\_SIGNED\_REQUEST, m3terEntity: IntegrationCredentials |
| `requestPath` | Request Path | StateVariableParameter | Yes | State variable containing the request. | - |
| `statePath` | State Path | StateVariableParameter | No | State variable to store the response. | - |
### Exits
| Exit | Description |
| - | - |
| `NEXT` | The API call succeeded. |
| `ERROR` | The API call failed. Error details are stored in the `m3shError` state variable. |
## Remove a PermissionPolicy from a user group
**Function name:** `m3ter_RemovePermissionPolicyFromUserGroup`
**Category:** WRITE
**HTTP method:** POST
**Destination:** m3ter
Remove a permission policy from a user group.
### Parameters
| Name | Label | Type | Required | Description | Constraints |
| - | - | - | :-: | - | - |
| `integrationCredentialsId` | Credentials | M3terEntityParameter | Yes | The m3ter credentials to use. | authType: M3TER\_SIGNED\_REQUEST, m3terEntity: IntegrationCredentials |
| `permissionPolicyId` | permissionPolicyId | LookupParameter | Yes | UUID of the permission policy | - |
| `requestPath` | Request Path | StateVariableParameter | Yes | State variable containing the request. | - |
| `statePath` | State Path | StateVariableParameter | No | State variable to store the response. | - |
### Exits
| Exit | Description |
| - | - |
| `NEXT` | The API call succeeded. |
| `ERROR` | The API call failed. Error details are stored in the `m3shError` state variable. |
## Retrieve Permission Policy
**Function name:** `m3ter_GetPermissionPolicy`
**Category:** READ
**HTTP method:** GET
**Destination:** m3ter
Retrieve the permission policy for the UUID
### Parameters
| Name | Label | Type | Required | Description | Constraints |
| - | - | - | :-: | - | - |
| `integrationCredentialsId` | Credentials | M3terEntityParameter | Yes | The m3ter credentials to use. | authType: M3TER\_SIGNED\_REQUEST, m3terEntity: IntegrationCredentials |
| `id` | id | LookupParameter | Yes | The UUID of the PermissionPolicy to retrieve. | - |
| `statePath` | State Path | StateVariableParameter | No | State variable to store the response. | - |
### Exits
| Exit | Description |
| - | - |
| `NEXT` | The API call succeeded. |
| `ERROR` | The API call failed. Error details are stored in the `m3shError` state variable. |
## Update Permission Policy
**Function name:** `m3ter_PutPermissionPolicy`
**Category:** WRITE
**HTTP method:** PUT
**Destination:** m3ter
Update a Permission Policy for the UUID
**NOTE:** When you set up a policy statement for this call to specify the `effect`, `action`, and `resource`, you must use all lower case and the format as shown in this example - a Permission Policy statement that grants full CRUD access to all meters:
```
"permissionPolicy" : [
{
"effect" : "allow",
"action" : [
"config:create",
"config:delete",
"config:retrieve",
"config:update"
]
"resource" : [
"config:meter/*"
]
}
]
```
For more details and further examples, see [Understanding, Creating, and Managing Permission Policies](https://www.m3ter.com/docs/guides/organization-and-access-management/creating-and-managing-permissions#permission-policy-statements---available-actions-and-resources) in our main Documentation.
### Parameters
| Name | Label | Type | Required | Description | Constraints |
| - | - | - | :-: | - | - |
| `integrationCredentialsId` | Credentials | M3terEntityParameter | Yes | The m3ter credentials to use. | authType: M3TER\_SIGNED\_REQUEST, m3terEntity: IntegrationCredentials |
| `id` | id | LookupParameter | Yes | The UUID of the PermissionPolicy to update. | - |
| `requestPath` | Request Path | StateVariableParameter | Yes | State variable containing the request. | - |
| `statePath` | State Path | StateVariableParameter | No | State variable to store the response. | - |
### Exits
| Exit | Description |
| - | - |
| `NEXT` | The API call succeeded. |
| `ERROR` | The API call failed. Error details are stored in the `m3shError` state variable. |
## Delete Permission Policy
**Function name:** `m3ter_DeletePermissionPolicy`
**Category:** WRITE
**HTTP method:** DELETE
**Destination:** m3ter
Delete the PermissionPolicy for the UUID
### Parameters
| Name | Label | Type | Required | Description | Constraints |
| - | - | - | :-: | - | - |
| `integrationCredentialsId` | Credentials | M3terEntityParameter | Yes | The m3ter credentials to use. | authType: M3TER\_SIGNED\_REQUEST, m3terEntity: IntegrationCredentials |
| `id` | id | LookupParameter | Yes | The UUID of the PermissionPolicy to delete. | - |
| `statePath` | State Path | StateVariableParameter | No | State variable to store the response. | - |
### Exits
| Exit | Description |
| - | - |
| `NEXT` | The API call succeeded. |
| `ERROR` | The API call failed. Error details are stored in the `m3shError` state variable. |
## Add a PermissionPolicy to a user group
**Function name:** `m3ter_AddPermissionPolicyToUserGroup`
**Category:** WRITE
**HTTP method:** POST
**Destination:** m3ter
Add a permission Policy to a user group
### Parameters
| Name | Label | Type | Required | Description | Constraints |
| - | - | - | :-: | - | - |
| `integrationCredentialsId` | Credentials | M3terEntityParameter | Yes | The m3ter credentials to use. | authType: M3TER\_SIGNED\_REQUEST, m3terEntity: IntegrationCredentials |
| `permissionPolicyId` | permissionPolicyId | LookupParameter | Yes | UUID of the permission policy | - |
| `requestPath` | Request Path | StateVariableParameter | Yes | State variable containing the request. | - |
| `statePath` | State Path | StateVariableParameter | No | State variable to store the response. | - |
### Exits
| Exit | Description |
| - | - |
| `NEXT` | The API call succeeded. |
| `ERROR` | The API call failed. Error details are stored in the `m3shError` state variable. |
## Remove a PermissionPolicy from a user
**Function name:** `m3ter_RemovePermissionPolicyFromUser`
**Category:** WRITE
**HTTP method:** POST
**Destination:** m3ter
Remove a permission policy from a user.
### Parameters
| Name | Label | Type | Required | Description | Constraints |
| - | - | - | :-: | - | - |
| `integrationCredentialsId` | Credentials | M3terEntityParameter | Yes | The m3ter credentials to use. | authType: M3TER\_SIGNED\_REQUEST, m3terEntity: IntegrationCredentials |
| `permissionPolicyId` | permissionPolicyId | LookupParameter | Yes | UUID of the permission policy | - |
| `requestPath` | Request Path | StateVariableParameter | Yes | State variable containing the request. | - |
| `statePath` | State Path | StateVariableParameter | No | State variable to store the response. | - |
### Exits
| Exit | Description |
| - | - |
| `NEXT` | The API call succeeded. |
| `ERROR` | The API call failed. Error details are stored in the `m3shError` state variable. |
# Picklists
Source: https://docs.m3ter.com/m3sh-function-reference/m3ter/picklists
## Retrieve TransactionType
**Function name:** `m3ter_GetTransactionType`
**Category:** READ
**HTTP method:** GET
**Destination:** m3ter
Retrieves the TransactionType with the given UUID from the specified Organization.
### Parameters
| Name | Label | Type | Required | Description | Constraints |
| - | - | - | :-: | - | - |
| `integrationCredentialsId` | Credentials | M3terEntityParameter | Yes | The m3ter credentials to use. | authType: M3TER\_SIGNED\_REQUEST, m3terEntity: IntegrationCredentials |
| `id` | id | LookupParameter | Yes | The unique identifier (UUID) of the TransactionType to retrieve. | - |
| `statePath` | State Path | StateVariableParameter | No | State variable to store the response. | - |
### Exits
| Exit | Description |
| - | - |
| `NEXT` | The API call succeeded. |
| `ERROR` | The API call failed. Error details are stored in the `m3shError` state variable. |
## Update TransactionType
**Function name:** `m3ter_UpdateTransactionType`
**Category:** WRITE
**HTTP method:** PUT
**Destination:** m3ter
Updates the TransactionType with the specified UUID for the specified Organization. Update details for the TransactionType should be included in the request body.
### Parameters
| Name | Label | Type | Required | Description | Constraints |
| - | - | - | :-: | - | - |
| `integrationCredentialsId` | Credentials | M3terEntityParameter | Yes | The m3ter credentials to use. | authType: M3TER\_SIGNED\_REQUEST, m3terEntity: IntegrationCredentials |
| `id` | id | LookupParameter | Yes | The unique identifer (UUID) of the TransactionType to update. | - |
| `requestPath` | Request Path | StateVariableParameter | Yes | State variable containing the request. | - |
| `statePath` | State Path | StateVariableParameter | No | State variable to store the response. | - |
### Exits
| Exit | Description |
| - | - |
| `NEXT` | The API call succeeded. |
| `ERROR` | The API call failed. Error details are stored in the `m3shError` state variable. |
## Delete TransactionType
**Function name:** `m3ter_DeleteTransactionType`
**Category:** WRITE
**HTTP method:** DELETE
**Destination:** m3ter
Deletes the TransactionType with the given UUID from the specified Organization.
### Parameters
| Name | Label | Type | Required | Description | Constraints |
| - | - | - | :-: | - | - |
| `integrationCredentialsId` | Credentials | M3terEntityParameter | Yes | The m3ter credentials to use. | authType: M3TER\_SIGNED\_REQUEST, m3terEntity: IntegrationCredentials |
| `id` | id | LookupParameter | Yes | The unique identifier (UUID) of the TransactionType to delete. | - |
| `statePath` | State Path | StateVariableParameter | No | State variable to store the response. | - |
### Exits
| Exit | Description |
| - | - |
| `NEXT` | The API call succeeded. |
| `ERROR` | The API call failed. Error details are stored in the `m3shError` state variable. |
## List Credit Reasons
**Function name:** `m3ter_ListCreditReasons`
**Category:** READ
**HTTP method:** GET (paginated)
**Destination:** m3ter
Retrieve a list of the Credit Reason entities created for your Organization. You can filter the list returned for the call by Credit Reason ID, Credit Reason short code, or by Archive status.
### Parameters
| Name | Label | Type | Required | Description | Constraints |
| - | - | - | :-: | - | - |
| `integrationCredentialsId` | Credentials | M3terEntityParameter | Yes | The m3ter credentials to use. | authType: M3TER\_SIGNED\_REQUEST, m3terEntity: IntegrationCredentials |
| `statePath` | State Path | StateVariableParameter | No | State variable to store the response. | - |
| `queryParams` | Query Parameters | KeyValueLookupParameter | No | Query parameters to include in the request | allowedValues: ids,codes,archived |
### Exits
| Exit | Description |
| - | - |
| `NEXT` | The API call succeeded. |
| `ERROR` | The API call failed. Error details are stored in the `m3shError` state variable. |
## Create Credit Reason
**Function name:** `m3ter_CreateCreditReason`
**Category:** WRITE
**HTTP method:** POST
**Destination:** m3ter
Create a new Credit Reason for your Organization. When you've created a Credit Reason, it becomes available as a credit type for adding Credit line items to Bills. See [Credits](https://www.m3ter.com/docs/api#tag/Credits).
### Parameters
| Name | Label | Type | Required | Description | Constraints |
| - | - | - | :-: | - | - |
| `integrationCredentialsId` | Credentials | M3terEntityParameter | Yes | The m3ter credentials to use. | authType: M3TER\_SIGNED\_REQUEST, m3terEntity: IntegrationCredentials |
| `requestPath` | Request Path | StateVariableParameter | Yes | State variable containing the request. | - |
| `statePath` | State Path | StateVariableParameter | No | State variable to store the response. | - |
### Exits
| Exit | Description |
| - | - |
| `NEXT` | The API call succeeded. |
| `ERROR` | The API call failed. Error details are stored in the `m3shError` state variable. |
## List Bill Grouping Keys
**Function name:** `m3ter_ListBillGroupingKeys`
**Category:** READ
**HTTP method:** GET (paginated)
**Destination:** m3ter
Retrieve a list of Bill Grouping Keys created for your Organization.
### Parameters
| Name | Label | Type | Required | Description | Constraints |
| - | - | - | :-: | - | - |
| `integrationCredentialsId` | Credentials | M3terEntityParameter | Yes | The m3ter credentials to use. | authType: M3TER\_SIGNED\_REQUEST, m3terEntity: IntegrationCredentials |
| `statePath` | State Path | StateVariableParameter | No | State variable to store the response. | - |
| `queryParams` | Query Parameters | KeyValueLookupParameter | No | Query parameters to include in the request | allowedValues: ids,codes,archived |
### Exits
| Exit | Description |
| - | - |
| `NEXT` | The API call succeeded. |
| `ERROR` | The API call failed. Error details are stored in the `m3shError` state variable. |
## Create BillGroupingKey
**Function name:** `m3ter_CreateBillGroupingKey`
**Category:** WRITE
**HTTP method:** POST
**Destination:** m3ter
Create a new Bill Grouping Key.
### Parameters
| Name | Label | Type | Required | Description | Constraints |
| - | - | - | :-: | - | - |
| `integrationCredentialsId` | Credentials | M3terEntityParameter | Yes | The m3ter credentials to use. | authType: M3TER\_SIGNED\_REQUEST, m3terEntity: IntegrationCredentials |
| `requestPath` | Request Path | StateVariableParameter | Yes | State variable containing the request. | - |
| `statePath` | State Path | StateVariableParameter | No | State variable to store the response. | - |
### Exits
| Exit | Description |
| - | - |
| `NEXT` | The API call succeeded. |
| `ERROR` | The API call failed. Error details are stored in the `m3shError` state variable. |
## Retrieve Currency
**Function name:** `m3ter_GetCurrency`
**Category:** READ
**HTTP method:** GET
**Destination:** m3ter
Retrieve the specified Currency with the given UUID. Used to obtain the details of a specified existing Currency in your Organization.
### Parameters
| Name | Label | Type | Required | Description | Constraints |
| - | - | - | :-: | - | - |
| `integrationCredentialsId` | Credentials | M3terEntityParameter | Yes | The m3ter credentials to use. | authType: M3TER\_SIGNED\_REQUEST, m3terEntity: IntegrationCredentials |
| `id` | id | LookupParameter | Yes | The unique identifier (UUID) of the Currency to retrieve. | - |
| `statePath` | State Path | StateVariableParameter | No | State variable to store the response. | - |
### Exits
| Exit | Description |
| - | - |
| `NEXT` | The API call succeeded. |
| `ERROR` | The API call failed. Error details are stored in the `m3shError` state variable. |
## Update Currency
**Function name:** `m3ter_UpdateCurrency`
**Category:** WRITE
**HTTP method:** PUT
**Destination:** m3ter
Update a Currency with the given UUID.
Used to update the attributes of the specified Currency for the specified Organization.
### Parameters
| Name | Label | Type | Required | Description | Constraints |
| - | - | - | :-: | - | - |
| `integrationCredentialsId` | Credentials | M3terEntityParameter | Yes | The m3ter credentials to use. | authType: M3TER\_SIGNED\_REQUEST, m3terEntity: IntegrationCredentials |
| `id` | id | LookupParameter | Yes | The unique identifier (UUID) of the Currency to update. | - |
| `requestPath` | Request Path | StateVariableParameter | Yes | State variable containing the request. | - |
| `statePath` | State Path | StateVariableParameter | No | State variable to store the response. | - |
### Exits
| Exit | Description |
| - | - |
| `NEXT` | The API call succeeded. |
| `ERROR` | The API call failed. Error details are stored in the `m3shError` state variable. |
## Delete Currency
**Function name:** `m3ter_DeleteCurrency`
**Category:** WRITE
**HTTP method:** DELETE
**Destination:** m3ter
Delete the Currency with the given UUID.
Used to remove an existing Currency from your Organization that is no longer required.
### Parameters
| Name | Label | Type | Required | Description | Constraints |
| - | - | - | :-: | - | - |
| `integrationCredentialsId` | Credentials | M3terEntityParameter | Yes | The m3ter credentials to use. | authType: M3TER\_SIGNED\_REQUEST, m3terEntity: IntegrationCredentials |
| `id` | id | LookupParameter | Yes | The unique identifier (UUID) of the Currency to delete. | - |
| `statePath` | State Path | StateVariableParameter | No | State variable to store the response. | - |
### Exits
| Exit | Description |
| - | - |
| `NEXT` | The API call succeeded. |
| `ERROR` | The API call failed. Error details are stored in the `m3shError` state variable. |
## List Currencies
**Function name:** `m3ter_ListCurrencies`
**Category:** READ
**HTTP method:** GET (paginated)
**Destination:** m3ter
Retrieve a list of Currencies.
Retrieves a list of Currencies for the specified Organization. This endpoint supports pagination and includes various query parameters to filter the Currencies based on Currency ID, and short codes.
### Parameters
| Name | Label | Type | Required | Description | Constraints |
| - | - | - | :-: | - | - |
| `integrationCredentialsId` | Credentials | M3terEntityParameter | Yes | The m3ter credentials to use. | authType: M3TER\_SIGNED\_REQUEST, m3terEntity: IntegrationCredentials |
| `statePath` | State Path | StateVariableParameter | No | State variable to store the response. | - |
| `queryParams` | Query Parameters | KeyValueLookupParameter | No | Query parameters to include in the request | allowedValues: ids,codes,archived |
### Exits
| Exit | Description |
| - | - |
| `NEXT` | The API call succeeded. |
| `ERROR` | The API call failed. Error details are stored in the `m3shError` state variable. |
## Create Currency
**Function name:** `m3ter_CreateCurrency`
**Category:** WRITE
**HTTP method:** POST
**Destination:** m3ter
Creates a new Currency for the specified Organization.
Used to create a Currency that your Organization will start to use.
### Parameters
| Name | Label | Type | Required | Description | Constraints |
| - | - | - | :-: | - | - |
| `integrationCredentialsId` | Credentials | M3terEntityParameter | Yes | The m3ter credentials to use. | authType: M3TER\_SIGNED\_REQUEST, m3terEntity: IntegrationCredentials |
| `requestPath` | Request Path | StateVariableParameter | Yes | State variable containing the request. | - |
| `statePath` | State Path | StateVariableParameter | No | State variable to store the response. | - |
### Exits
| Exit | Description |
| - | - |
| `NEXT` | The API call succeeded. |
| `ERROR` | The API call failed. Error details are stored in the `m3shError` state variable. |
## List TransactionTypes
**Function name:** `m3ter_ListTransactionTypes`
**Category:** READ
**HTTP method:** GET (paginated)
**Destination:** m3ter
Retrieves a list of TransactionType entities for the specified Organization. The list can be paginated for easier management, and supports filtering by various parameters.
### Parameters
| Name | Label | Type | Required | Description | Constraints |
| - | - | - | :-: | - | - |
| `integrationCredentialsId` | Credentials | M3terEntityParameter | Yes | The m3ter credentials to use. | authType: M3TER\_SIGNED\_REQUEST, m3terEntity: IntegrationCredentials |
| `statePath` | State Path | StateVariableParameter | No | State variable to store the response. | - |
| `queryParams` | Query Parameters | KeyValueLookupParameter | No | Query parameters to include in the request | allowedValues: ids,codes,archived |
### Exits
| Exit | Description |
| - | - |
| `NEXT` | The API call succeeded. |
| `ERROR` | The API call failed. Error details are stored in the `m3shError` state variable. |
## Create TransactionType
**Function name:** `m3ter_CreateTransactionType`
**Category:** WRITE
**HTTP method:** POST
**Destination:** m3ter
Create a new TransactionType for the specified Organization. Details of the new TransactionType should be included in the request body.
### Parameters
| Name | Label | Type | Required | Description | Constraints |
| - | - | - | :-: | - | - |
| `integrationCredentialsId` | Credentials | M3terEntityParameter | Yes | The m3ter credentials to use. | authType: M3TER\_SIGNED\_REQUEST, m3terEntity: IntegrationCredentials |
| `requestPath` | Request Path | StateVariableParameter | Yes | State variable containing the request. | - |
| `statePath` | State Path | StateVariableParameter | No | State variable to store the response. | - |
### Exits
| Exit | Description |
| - | - |
| `NEXT` | The API call succeeded. |
| `ERROR` | The API call failed. Error details are stored in the `m3shError` state variable. |
## Retrieve BillGroupingKey
**Function name:** `m3ter_GetBillGroupingKey`
**Category:** READ
**HTTP method:** GET
**Destination:** m3ter
Retrieve a Bill Grouping Key for the given UUID.
### Parameters
| Name | Label | Type | Required | Description | Constraints |
| - | - | - | :-: | - | - |
| `integrationCredentialsId` | Credentials | M3terEntityParameter | Yes | The m3ter credentials to use. | authType: M3TER\_SIGNED\_REQUEST, m3terEntity: IntegrationCredentials |
| `id` | id | LookupParameter | Yes | The UUID of the Bill Grouping Key to retrieve. | - |
| `statePath` | State Path | StateVariableParameter | No | State variable to store the response. | - |
### Exits
| Exit | Description |
| - | - |
| `NEXT` | The API call succeeded. |
| `ERROR` | The API call failed. Error details are stored in the `m3shError` state variable. |
## Update BillGroupingKey
**Function name:** `m3ter_UpdateBillGroupingKey`
**Category:** WRITE
**HTTP method:** PUT
**Destination:** m3ter
Update a Bill Grouping Key for the given UUID.
### Parameters
| Name | Label | Type | Required | Description | Constraints |
| - | - | - | :-: | - | - |
| `integrationCredentialsId` | Credentials | M3terEntityParameter | Yes | The m3ter credentials to use. | authType: M3TER\_SIGNED\_REQUEST, m3terEntity: IntegrationCredentials |
| `id` | id | LookupParameter | Yes | The UUID of the Bill Grouping Key to update. | - |
| `requestPath` | Request Path | StateVariableParameter | Yes | State variable containing the request. | - |
| `statePath` | State Path | StateVariableParameter | No | State variable to store the response. | - |
### Exits
| Exit | Description |
| - | - |
| `NEXT` | The API call succeeded. |
| `ERROR` | The API call failed. Error details are stored in the `m3shError` state variable. |
## Delete BillGroupingKey
**Function name:** `m3ter_DeleteBillGroupingKey`
**Category:** WRITE
**HTTP method:** DELETE
**Destination:** m3ter
Delete a Bill Grouping Key for the given UUID.
### Parameters
| Name | Label | Type | Required | Description | Constraints |
| - | - | - | :-: | - | - |
| `integrationCredentialsId` | Credentials | M3terEntityParameter | Yes | The m3ter credentials to use. | authType: M3TER\_SIGNED\_REQUEST, m3terEntity: IntegrationCredentials |
| `id` | id | LookupParameter | Yes | The UUID of the Bill Grouping Key to delete. | - |
| `statePath` | State Path | StateVariableParameter | No | State variable to store the response. | - |
### Exits
| Exit | Description |
| - | - |
| `NEXT` | The API call succeeded. |
| `ERROR` | The API call failed. Error details are stored in the `m3shError` state variable. |
## List Debit Reasons
**Function name:** `m3ter_ListDebitReasons`
**Category:** READ
**HTTP method:** GET (paginated)
**Destination:** m3ter
Retrieve a list of the Debit Reason entities created for your Organization. You can filter the list returned for the call by Debit Reason ID, Debit Reason short code, or by Archive status.
### Parameters
| Name | Label | Type | Required | Description | Constraints |
| - | - | - | :-: | - | - |
| `integrationCredentialsId` | Credentials | M3terEntityParameter | Yes | The m3ter credentials to use. | authType: M3TER\_SIGNED\_REQUEST, m3terEntity: IntegrationCredentials |
| `statePath` | State Path | StateVariableParameter | No | State variable to store the response. | - |
| `queryParams` | Query Parameters | KeyValueLookupParameter | No | Query parameters to include in the request | allowedValues: ids,codes,archived |
### Exits
| Exit | Description |
| - | - |
| `NEXT` | The API call succeeded. |
| `ERROR` | The API call failed. Error details are stored in the `m3shError` state variable. |
## Create Debit Reason
**Function name:** `m3ter_CreateDebitReason`
**Category:** WRITE
**HTTP method:** POST
**Destination:** m3ter
Create a new Debit Reason for your Organization. When you've created a Debit Reason, it becomes available as a debit type for adding Debit line items to Bills. See [Debits](https://www.m3ter.com/docs/api#tag/Debits).
### Parameters
| Name | Label | Type | Required | Description | Constraints |
| - | - | - | :-: | - | - |
| `integrationCredentialsId` | Credentials | M3terEntityParameter | Yes | The m3ter credentials to use. | authType: M3TER\_SIGNED\_REQUEST, m3terEntity: IntegrationCredentials |
| `requestPath` | Request Path | StateVariableParameter | Yes | State variable containing the request. | - |
| `statePath` | State Path | StateVariableParameter | No | State variable to store the response. | - |
### Exits
| Exit | Description |
| - | - |
| `NEXT` | The API call succeeded. |
| `ERROR` | The API call failed. Error details are stored in the `m3shError` state variable. |
## Retrieve Credit Reason
**Function name:** `m3ter_GetCreditReason`
**Category:** READ
**HTTP method:** GET
**Destination:** m3ter
Retrieve the Credit Reason with the given UUID.
### Parameters
| Name | Label | Type | Required | Description | Constraints |
| - | - | - | :-: | - | - |
| `integrationCredentialsId` | Credentials | M3terEntityParameter | Yes | The m3ter credentials to use. | authType: M3TER\_SIGNED\_REQUEST, m3terEntity: IntegrationCredentials |
| `id` | id | LookupParameter | Yes | The UUID of the Credit Reason to retrieve. | - |
| `statePath` | State Path | StateVariableParameter | No | State variable to store the response. | - |
### Exits
| Exit | Description |
| - | - |
| `NEXT` | The API call succeeded. |
| `ERROR` | The API call failed. Error details are stored in the `m3shError` state variable. |
## Update Credit Reason
**Function name:** `m3ter_UpdateCreditReason`
**Category:** WRITE
**HTTP method:** PUT
**Destination:** m3ter
Update the Credit Reason with the given UUID.
### Parameters
| Name | Label | Type | Required | Description | Constraints |
| - | - | - | :-: | - | - |
| `integrationCredentialsId` | Credentials | M3terEntityParameter | Yes | The m3ter credentials to use. | authType: M3TER\_SIGNED\_REQUEST, m3terEntity: IntegrationCredentials |
| `id` | id | LookupParameter | Yes | The UUID of the Credit Reason to update. | - |
| `requestPath` | Request Path | StateVariableParameter | Yes | State variable containing the request. | - |
| `statePath` | State Path | StateVariableParameter | No | State variable to store the response. | - |
### Exits
| Exit | Description |
| - | - |
| `NEXT` | The API call succeeded. |
| `ERROR` | The API call failed. Error details are stored in the `m3shError` state variable. |
## Delete Credit Reason
**Function name:** `m3ter_DeleteCreditReason`
**Category:** WRITE
**HTTP method:** DELETE
**Destination:** m3ter
Delete the Credit Reason with the given UUID.
### Parameters
| Name | Label | Type | Required | Description | Constraints |
| - | - | - | :-: | - | - |
| `integrationCredentialsId` | Credentials | M3terEntityParameter | Yes | The m3ter credentials to use. | authType: M3TER\_SIGNED\_REQUEST, m3terEntity: IntegrationCredentials |
| `id` | id | LookupParameter | Yes | The UUID of the Credit Reason to delete. | - |
| `statePath` | State Path | StateVariableParameter | No | State variable to store the response. | - |
### Exits
| Exit | Description |
| - | - |
| `NEXT` | The API call succeeded. |
| `ERROR` | The API call failed. Error details are stored in the `m3shError` state variable. |
## Retrieve Debit Reason
**Function name:** `m3ter_GetDebitReason`
**Category:** READ
**HTTP method:** GET
**Destination:** m3ter
Retrieve the Debit Reason with the given UUID.
### Parameters
| Name | Label | Type | Required | Description | Constraints |
| - | - | - | :-: | - | - |
| `integrationCredentialsId` | Credentials | M3terEntityParameter | Yes | The m3ter credentials to use. | authType: M3TER\_SIGNED\_REQUEST, m3terEntity: IntegrationCredentials |
| `id` | id | LookupParameter | Yes | The UUID of the Debit Reason to retrieve. | - |
| `statePath` | State Path | StateVariableParameter | No | State variable to store the response. | - |
### Exits
| Exit | Description |
| - | - |
| `NEXT` | The API call succeeded. |
| `ERROR` | The API call failed. Error details are stored in the `m3shError` state variable. |
## Update Debit Reason
**Function name:** `m3ter_UpdateDebitReason`
**Category:** WRITE
**HTTP method:** PUT
**Destination:** m3ter
Update the Debit Reason with the given UUID.
### Parameters
| Name | Label | Type | Required | Description | Constraints |
| - | - | - | :-: | - | - |
| `integrationCredentialsId` | Credentials | M3terEntityParameter | Yes | The m3ter credentials to use. | authType: M3TER\_SIGNED\_REQUEST, m3terEntity: IntegrationCredentials |
| `id` | id | LookupParameter | Yes | The UUID of the Debit Reason to update. | - |
| `requestPath` | Request Path | StateVariableParameter | Yes | State variable containing the request. | - |
| `statePath` | State Path | StateVariableParameter | No | State variable to store the response. | - |
### Exits
| Exit | Description |
| - | - |
| `NEXT` | The API call succeeded. |
| `ERROR` | The API call failed. Error details are stored in the `m3shError` state variable. |
## Delete Debit Reason
**Function name:** `m3ter_DeleteDebitReason`
**Category:** WRITE
**HTTP method:** DELETE
**Destination:** m3ter
Delete the Debit Reason with the given UUID.
### Parameters
| Name | Label | Type | Required | Description | Constraints |
| - | - | - | :-: | - | - |
| `integrationCredentialsId` | Credentials | M3terEntityParameter | Yes | The m3ter credentials to use. | authType: M3TER\_SIGNED\_REQUEST, m3terEntity: IntegrationCredentials |
| `id` | id | LookupParameter | Yes | The UUID of the Debit Reason to delete. | - |
| `statePath` | State Path | StateVariableParameter | No | State variable to store the response. | - |
### Exits
| Exit | Description |
| - | - |
| `NEXT` | The API call succeeded. |
| `ERROR` | The API call failed. Error details are stored in the `m3shError` state variable. |
# Plangrouplinks
Source: https://docs.m3ter.com/m3sh-function-reference/m3ter/plangrouplinks
## Retrieve PlanGroupLink
**Function name:** `m3ter_GetPlanGroupLink`
**Category:** READ
**HTTP method:** GET
**Destination:** m3ter
Retrieve a PlanGroupLink for the given UUID.
### Parameters
| Name | Label | Type | Required | Description | Constraints |
| - | - | - | :-: | - | - |
| `integrationCredentialsId` | Credentials | M3terEntityParameter | Yes | The m3ter credentials to use. | authType: M3TER\_SIGNED\_REQUEST, m3terEntity: IntegrationCredentials |
| `id` | id | LookupParameter | Yes | The UUID of the PlanGroupLink to retrieve. | - |
| `statePath` | State Path | StateVariableParameter | No | State variable to store the response. | - |
### Exits
| Exit | Description |
| - | - |
| `NEXT` | The API call succeeded. |
| `ERROR` | The API call failed. Error details are stored in the `m3shError` state variable. |
## Update PlanGroupLink
**Function name:** `m3ter_PutPlanGroupLink`
**Category:** WRITE
**HTTP method:** PUT
**Destination:** m3ter
Update PlanGroupLink for the given UUID.
### Parameters
| Name | Label | Type | Required | Description | Constraints |
| - | - | - | :-: | - | - |
| `integrationCredentialsId` | Credentials | M3terEntityParameter | Yes | The m3ter credentials to use. | authType: M3TER\_SIGNED\_REQUEST, m3terEntity: IntegrationCredentials |
| `id` | id | LookupParameter | Yes | The UUID of the PlanGroupLink to update. | - |
| `requestPath` | Request Path | StateVariableParameter | Yes | State variable containing the request. | - |
| `statePath` | State Path | StateVariableParameter | No | State variable to store the response. | - |
### Exits
| Exit | Description |
| - | - |
| `NEXT` | The API call succeeded. |
| `ERROR` | The API call failed. Error details are stored in the `m3shError` state variable. |
## Delete PlanGroupLink
**Function name:** `m3ter_DeletePlanGroupLink`
**Category:** WRITE
**HTTP method:** DELETE
**Destination:** m3ter
Delete a PlanGroupLink for the given UUID.
### Parameters
| Name | Label | Type | Required | Description | Constraints |
| - | - | - | :-: | - | - |
| `integrationCredentialsId` | Credentials | M3terEntityParameter | Yes | The m3ter credentials to use. | authType: M3TER\_SIGNED\_REQUEST, m3terEntity: IntegrationCredentials |
| `id` | id | LookupParameter | Yes | The UUID of the PlanGroupLink to delete. | - |
| `statePath` | State Path | StateVariableParameter | No | State variable to store the response. | - |
### Exits
| Exit | Description |
| - | - |
| `NEXT` | The API call succeeded. |
| `ERROR` | The API call failed. Error details are stored in the `m3shError` state variable. |
## List PlanGroupLinks
**Function name:** `m3ter_ListPlanGroupLinks`
**Category:** READ
**HTTP method:** GET (paginated)
**Destination:** m3ter
Retrieve a list of PlanGroupLink entities
### Parameters
| Name | Label | Type | Required | Description | Constraints |
| - | - | - | :-: | - | - |
| `integrationCredentialsId` | Credentials | M3terEntityParameter | Yes | The m3ter credentials to use. | authType: M3TER\_SIGNED\_REQUEST, m3terEntity: IntegrationCredentials |
| `statePath` | State Path | StateVariableParameter | No | State variable to store the response. | - |
| `queryParams` | Query Parameters | KeyValueLookupParameter | No | Query parameters to include in the request | allowedValues: planGroup,plan,ids |
### Exits
| Exit | Description |
| - | - |
| `NEXT` | The API call succeeded. |
| `ERROR` | The API call failed. Error details are stored in the `m3shError` state variable. |
## Create PlanGroupLink
**Function name:** `m3ter_PostPlanGroupLink`
**Category:** WRITE
**HTTP method:** POST
**Destination:** m3ter
Create a new PlanGroupLink.
### Parameters
| Name | Label | Type | Required | Description | Constraints |
| - | - | - | :-: | - | - |
| `integrationCredentialsId` | Credentials | M3terEntityParameter | Yes | The m3ter credentials to use. | authType: M3TER\_SIGNED\_REQUEST, m3terEntity: IntegrationCredentials |
| `requestPath` | Request Path | StateVariableParameter | Yes | State variable containing the request. | - |
| `statePath` | State Path | StateVariableParameter | No | State variable to store the response. | - |
### Exits
| Exit | Description |
| - | - |
| `NEXT` | The API call succeeded. |
| `ERROR` | The API call failed. Error details are stored in the `m3shError` state variable. |
# Plangroups
Source: https://docs.m3ter.com/m3sh-function-reference/m3ter/plangroups
## List PlanGroups
**Function name:** `m3ter_ListPlanGroups`
**Category:** READ
**HTTP method:** GET (paginated)
**Destination:** m3ter
Retrieve a list of PlanGroups.
Retrieves a list of PlanGroups within the specified organization. You can optionally filter by Account IDs or PlanGroup IDs, and also paginate the results for easier management.
### Parameters
| Name | Label | Type | Required | Description | Constraints |
| - | - | - | :-: | - | - |
| `integrationCredentialsId` | Credentials | M3terEntityParameter | Yes | The m3ter credentials to use. | authType: M3TER\_SIGNED\_REQUEST, m3terEntity: IntegrationCredentials |
| `statePath` | State Path | StateVariableParameter | No | State variable to store the response. | - |
| `queryParams` | Query Parameters | KeyValueLookupParameter | No | Query parameters to include in the request | allowedValues: accountId,ids |
### Exits
| Exit | Description |
| - | - |
| `NEXT` | The API call succeeded. |
| `ERROR` | The API call failed. Error details are stored in the `m3shError` state variable. |
## Create PlanGroup
**Function name:** `m3ter_PostPlanGroup`
**Category:** WRITE
**HTTP method:** POST
**Destination:** m3ter
Create a new PlanGroup.
This endpoint creates a new PlanGroup within the specified organization.
### Parameters
| Name | Label | Type | Required | Description | Constraints |
| - | - | - | :-: | - | - |
| `integrationCredentialsId` | Credentials | M3terEntityParameter | Yes | The m3ter credentials to use. | authType: M3TER\_SIGNED\_REQUEST, m3terEntity: IntegrationCredentials |
| `requestPath` | Request Path | StateVariableParameter | Yes | State variable containing the request. | - |
| `statePath` | State Path | StateVariableParameter | No | State variable to store the response. | - |
### Exits
| Exit | Description |
| - | - |
| `NEXT` | The API call succeeded. |
| `ERROR` | The API call failed. Error details are stored in the `m3shError` state variable. |
## Retrieve PlanGroup
**Function name:** `m3ter_GetPlanGroup`
**Category:** READ
**HTTP method:** GET
**Destination:** m3ter
Retrieve a specific PlanGroup with the given UUID.
This endpoint retrieves detailed information about a specific PlanGroup identified by the given UUID within a specific organization.
### Parameters
| Name | Label | Type | Required | Description | Constraints |
| - | - | - | :-: | - | - |
| `integrationCredentialsId` | Credentials | M3terEntityParameter | Yes | The m3ter credentials to use. | authType: M3TER\_SIGNED\_REQUEST, m3terEntity: IntegrationCredentials |
| `id` | id | LookupParameter | Yes | The unique identifier (UUID) of the PlanGroup to retrieve. | - |
| `statePath` | State Path | StateVariableParameter | No | State variable to store the response. | - |
### Exits
| Exit | Description |
| - | - |
| `NEXT` | The API call succeeded. |
| `ERROR` | The API call failed. Error details are stored in the `m3shError` state variable. |
## Update PlanGroup
**Function name:** `m3ter_PutPlanGroup`
**Category:** WRITE
**HTTP method:** PUT
**Destination:** m3ter
Update the PlanGroup with the given UUID.
This endpoint updates the details of a specific PlanGroup identified by the given UUID within a specific organization. This allows modifications to existing PlanGroup attributes.
**Note:** If you have created Custom Fields for a PlanGroup, when you use this endpoint to update the PlanGroup use the `customFields` parameter to preserve those Custom Fields. If you omit them from the update request, they will be lost.
### Parameters
| Name | Label | Type | Required | Description | Constraints |
| - | - | - | :-: | - | - |
| `integrationCredentialsId` | Credentials | M3terEntityParameter | Yes | The m3ter credentials to use. | authType: M3TER\_SIGNED\_REQUEST, m3terEntity: IntegrationCredentials |
| `id` | id | LookupParameter | Yes | The unique identifier (UUID) of the PlanGroup to update. | - |
| `requestPath` | Request Path | StateVariableParameter | Yes | State variable containing the request. | - |
| `statePath` | State Path | StateVariableParameter | No | State variable to store the response. | - |
### Exits
| Exit | Description |
| - | - |
| `NEXT` | The API call succeeded. |
| `ERROR` | The API call failed. Error details are stored in the `m3shError` state variable. |
## Delete PlanGroup
**Function name:** `m3ter_DeletePlanGroup`
**Category:** WRITE
**HTTP method:** DELETE
**Destination:** m3ter
Delete a PlanGroup with the given UUID.
This endpoint deletes the PlanGroup identified by the given UUID within a specific organization. This operation is irreversible and removes the PlanGroup along with any associated settings.
### Parameters
| Name | Label | Type | Required | Description | Constraints |
| - | - | - | :-: | - | - |
| `integrationCredentialsId` | Credentials | M3terEntityParameter | Yes | The m3ter credentials to use. | authType: M3TER\_SIGNED\_REQUEST, m3terEntity: IntegrationCredentials |
| `id` | id | LookupParameter | Yes | The unique identifier (UUID) of the PlanGroup to delete. | - |
| `statePath` | State Path | StateVariableParameter | No | State variable to store the response. | - |
### Exits
| Exit | Description |
| - | - |
| `NEXT` | The API call succeeded. |
| `ERROR` | The API call failed. Error details are stored in the `m3shError` state variable. |
# Plans
Source: https://docs.m3ter.com/m3sh-function-reference/m3ter/plans
## List Plans
**Function name:** `m3ter_ListPlans`
**Category:** READ
**HTTP method:** GET (paginated)
**Destination:** m3ter
Retrieve a list of Plans that can be filtered by Product, Account, or Plan ID.
### Parameters
| Name | Label | Type | Required | Description | Constraints |
| - | - | - | :-: | - | - |
| `integrationCredentialsId` | Credentials | M3terEntityParameter | Yes | The m3ter credentials to use. | authType: M3TER\_SIGNED\_REQUEST, m3terEntity: IntegrationCredentials |
| `statePath` | State Path | StateVariableParameter | No | State variable to store the response. | - |
| `queryParams` | Query Parameters | KeyValueLookupParameter | No | Query parameters to include in the request | allowedValues: productId,accountId,ids |
### Exits
| Exit | Description |
| - | - |
| `NEXT` | The API call succeeded. |
| `ERROR` | The API call failed. Error details are stored in the `m3shError` state variable. |
## Create Plan
**Function name:** `m3ter_PostPlan`
**Category:** WRITE
**HTTP method:** POST
**Destination:** m3ter
Create a new Plan.
### Parameters
| Name | Label | Type | Required | Description | Constraints |
| - | - | - | :-: | - | - |
| `integrationCredentialsId` | Credentials | M3terEntityParameter | Yes | The m3ter credentials to use. | authType: M3TER\_SIGNED\_REQUEST, m3terEntity: IntegrationCredentials |
| `requestPath` | Request Path | StateVariableParameter | Yes | State variable containing the request. | - |
| `statePath` | State Path | StateVariableParameter | No | State variable to store the response. | - |
### Exits
| Exit | Description |
| - | - |
| `NEXT` | The API call succeeded. |
| `ERROR` | The API call failed. Error details are stored in the `m3shError` state variable. |
## Retrieve Plan
**Function name:** `m3ter_GetPlan`
**Category:** READ
**HTTP method:** GET
**Destination:** m3ter
Retrieve the Plan with the given UUID.
### Parameters
| Name | Label | Type | Required | Description | Constraints |
| - | - | - | :-: | - | - |
| `integrationCredentialsId` | Credentials | M3terEntityParameter | Yes | The m3ter credentials to use. | authType: M3TER\_SIGNED\_REQUEST, m3terEntity: IntegrationCredentials |
| `id` | id | LookupParameter | Yes | The UUID of the Plan to retrieve. | - |
| `statePath` | State Path | StateVariableParameter | No | State variable to store the response. | - |
### Exits
| Exit | Description |
| - | - |
| `NEXT` | The API call succeeded. |
| `ERROR` | The API call failed. Error details are stored in the `m3shError` state variable. |
## Update Plan
**Function name:** `m3ter_PutPlan`
**Category:** WRITE
**HTTP method:** PUT
**Destination:** m3ter
Update the Plan with the given UUID.
**Note:** If you have created Custom Fields for a Plan, when you use this endpoint to update the Plan use the `customFields` parameter to preserve those Custom Fields. If you omit them from the update request, they will be lost.
### Parameters
| Name | Label | Type | Required | Description | Constraints |
| - | - | - | :-: | - | - |
| `integrationCredentialsId` | Credentials | M3terEntityParameter | Yes | The m3ter credentials to use. | authType: M3TER\_SIGNED\_REQUEST, m3terEntity: IntegrationCredentials |
| `id` | id | LookupParameter | Yes | The UUID of the Plan to update. | - |
| `requestPath` | Request Path | StateVariableParameter | Yes | State variable containing the request. | - |
| `statePath` | State Path | StateVariableParameter | No | State variable to store the response. | - |
### Exits
| Exit | Description |
| - | - |
| `NEXT` | The API call succeeded. |
| `ERROR` | The API call failed. Error details are stored in the `m3shError` state variable. |
## Delete Plan
**Function name:** `m3ter_DeletePlan`
**Category:** WRITE
**HTTP method:** DELETE
**Destination:** m3ter
Delete the Plan with the given UUID.
### Parameters
| Name | Label | Type | Required | Description | Constraints |
| - | - | - | :-: | - | - |
| `integrationCredentialsId` | Credentials | M3terEntityParameter | Yes | The m3ter credentials to use. | authType: M3TER\_SIGNED\_REQUEST, m3terEntity: IntegrationCredentials |
| `id` | id | LookupParameter | Yes | The UUID of the Plan to delete. | - |
| `statePath` | State Path | StateVariableParameter | No | State variable to store the response. | - |
### Exits
| Exit | Description |
| - | - |
| `NEXT` | The API call succeeded. |
| `ERROR` | The API call failed. Error details are stored in the `m3shError` state variable. |
# Plantemplates
Source: https://docs.m3ter.com/m3sh-function-reference/m3ter/plantemplates
## List PlanTemplates
**Function name:** `m3ter_ListPlanTemplates`
**Category:** READ
**HTTP method:** GET (paginated)
**Destination:** m3ter
Retrieve a list of PlanTemplates.
This endpoint enables you to retrieve a paginated list of PlanTemplates belonging to a specific Organization, identified by its UUID. You can filter the list by PlanTemplate IDs or Product IDs for more focused retrieval.
### Parameters
| Name | Label | Type | Required | Description | Constraints |
| - | - | - | :-: | - | - |
| `integrationCredentialsId` | Credentials | M3terEntityParameter | Yes | The m3ter credentials to use. | authType: M3TER\_SIGNED\_REQUEST, m3terEntity: IntegrationCredentials |
| `statePath` | State Path | StateVariableParameter | No | State variable to store the response. | - |
| `queryParams` | Query Parameters | KeyValueLookupParameter | No | Query parameters to include in the request | allowedValues: productId,ids |
### Exits
| Exit | Description |
| - | - |
| `NEXT` | The API call succeeded. |
| `ERROR` | The API call failed. Error details are stored in the `m3shError` state variable. |
## Create PlanTemplate
**Function name:** `m3ter_PostPlanTemplate`
**Category:** WRITE
**HTTP method:** POST
**Destination:** m3ter
Create a new PlanTemplate.
This endpoint creates a new PlanTemplate within a specific Organization, identified by its unique UUID. The request body should contain the necessary information for the new PlanTemplate.
### Parameters
| Name | Label | Type | Required | Description | Constraints |
| - | - | - | :-: | - | - |
| `integrationCredentialsId` | Credentials | M3terEntityParameter | Yes | The m3ter credentials to use. | authType: M3TER\_SIGNED\_REQUEST, m3terEntity: IntegrationCredentials |
| `requestPath` | Request Path | StateVariableParameter | Yes | State variable containing the request. | - |
| `statePath` | State Path | StateVariableParameter | No | State variable to store the response. | - |
### Exits
| Exit | Description |
| - | - |
| `NEXT` | The API call succeeded. |
| `ERROR` | The API call failed. Error details are stored in the `m3shError` state variable. |
## Retrieve PlanTemplate
**Function name:** `m3ter_GetPlanTemplate`
**Category:** READ
**HTTP method:** GET
**Destination:** m3ter
Retrieve a specific PlanTemplate.
This endpoint allows you to retrieve a specific PlanTemplate within a specific Organization, both identified by their unique identifiers (UUIDs).
### Parameters
| Name | Label | Type | Required | Description | Constraints |
| - | - | - | :-: | - | - |
| `integrationCredentialsId` | Credentials | M3terEntityParameter | Yes | The m3ter credentials to use. | authType: M3TER\_SIGNED\_REQUEST, m3terEntity: IntegrationCredentials |
| `id` | id | LookupParameter | Yes | The unique identifier (UUID) of the PlanTemplate to retrieve. | - |
| `statePath` | State Path | StateVariableParameter | No | State variable to store the response. | - |
### Exits
| Exit | Description |
| - | - |
| `NEXT` | The API call succeeded. |
| `ERROR` | The API call failed. Error details are stored in the `m3shError` state variable. |
## Update PlanTemplate
**Function name:** `m3ter_PutPlanTemplate`
**Category:** WRITE
**HTTP method:** PUT
**Destination:** m3ter
Update a specific PlanTemplate.
This endpoint enables you to update a specific PlanTemplate within a specific Organization, both identified by their unique identifiers (UUIDs). The request body should contain the updated information for the PlanTemplate.
**Note:** If you have created Custom Fields for a Plan Template, when you use this endpoint to update the Plan Template use the `customFields` parameter to preserve those Custom Fields. If you omit them from the update request, they will be lost.
### Parameters
| Name | Label | Type | Required | Description | Constraints |
| - | - | - | :-: | - | - |
| `integrationCredentialsId` | Credentials | M3terEntityParameter | Yes | The m3ter credentials to use. | authType: M3TER\_SIGNED\_REQUEST, m3terEntity: IntegrationCredentials |
| `id` | id | LookupParameter | Yes | The unique identifier (UUID) of the PlanTemplate to update. | - |
| `requestPath` | Request Path | StateVariableParameter | Yes | State variable containing the request. | - |
| `statePath` | State Path | StateVariableParameter | No | State variable to store the response. | - |
### Exits
| Exit | Description |
| - | - |
| `NEXT` | The API call succeeded. |
| `ERROR` | The API call failed. Error details are stored in the `m3shError` state variable. |
## Delete PlanTemplate
**Function name:** `m3ter_DeletePlanTemplate`
**Category:** WRITE
**HTTP method:** DELETE
**Destination:** m3ter
Delete a specific PlanTemplate.
This endpoint enables you to delete a specific PlanTemplate within a specific Organization, both identified by their unique identifiers (UUIDs).
### Parameters
| Name | Label | Type | Required | Description | Constraints |
| - | - | - | :-: | - | - |
| `integrationCredentialsId` | Credentials | M3terEntityParameter | Yes | The m3ter credentials to use. | authType: M3TER\_SIGNED\_REQUEST, m3terEntity: IntegrationCredentials |
| `id` | id | LookupParameter | Yes | The unique identifier (UUID) of the PlanTemplate to update. | - |
| `statePath` | State Path | StateVariableParameter | No | State variable to store the response. | - |
### Exits
| Exit | Description |
| - | - |
| `NEXT` | The API call succeeded. |
| `ERROR` | The API call failed. Error details are stored in the `m3shError` state variable. |
# Pricings
Source: https://docs.m3ter.com/m3sh-function-reference/m3ter/pricings
## Retrieve Pricing
**Function name:** `m3ter_GetPricing`
**Category:** READ
**HTTP method:** GET
**Destination:** m3ter
Retrieve the Pricing with the given UUID.
### Parameters
| Name | Label | Type | Required | Description | Constraints |
| - | - | - | :-: | - | - |
| `integrationCredentialsId` | Credentials | M3terEntityParameter | Yes | The m3ter credentials to use. | authType: M3TER\_SIGNED\_REQUEST, m3terEntity: IntegrationCredentials |
| `id` | id | LookupParameter | Yes | The UUID of the Pricing to retrieve. | - |
| `statePath` | State Path | StateVariableParameter | No | State variable to store the response. | - |
### Exits
| Exit | Description |
| - | - |
| `NEXT` | The API call succeeded. |
| `ERROR` | The API call failed. Error details are stored in the `m3shError` state variable. |
## Update Pricing
**Function name:** `m3ter_PutPricing`
**Category:** WRITE
**HTTP method:** PUT
**Destination:** m3ter
Update Pricing for the given UUID.
**Notes:**
* **Pricing Plan or Plan Template?** Exactly one of `planId` or `planTemplateId` request parameters are required for this call to be valid. If you omit both, then you will receive a validation error.
* **Using Aggregation or Compound Aggregation for Pricing?** Exactly one of `aggregationId` or `compoundAggregationId` request parameters are required for this call to be valid. If you omit both, then you will receive a validation error.
* **Using Negative Values for Pricing?** If you use the `type` request parameter with the `DEBIT` option, *you cannot use negative values* for `fixedPrice` or `unitPrice` in `pricingBands` or `overagePricingBands`, and you'll receive a validation error. If you omit a `type` request parameter a `DEBIT` pricing is created by default and the same constraint on the use of negative values applies.
### Parameters
| Name | Label | Type | Required | Description | Constraints |
| - | - | - | :-: | - | - |
| `integrationCredentialsId` | Credentials | M3terEntityParameter | Yes | The m3ter credentials to use. | authType: M3TER\_SIGNED\_REQUEST, m3terEntity: IntegrationCredentials |
| `id` | id | LookupParameter | Yes | The UUID of the Pricing to update. | - |
| `requestPath` | Request Path | StateVariableParameter | Yes | State variable containing the request. | - |
| `statePath` | State Path | StateVariableParameter | No | State variable to store the response. | - |
### Exits
| Exit | Description |
| - | - |
| `NEXT` | The API call succeeded. |
| `ERROR` | The API call failed. Error details are stored in the `m3shError` state variable. |
## Delete Pricing
**Function name:** `m3ter_DeletePricing`
**Category:** WRITE
**HTTP method:** DELETE
**Destination:** m3ter
Delete the Pricing with the given UUID.
### Parameters
| Name | Label | Type | Required | Description | Constraints |
| - | - | - | :-: | - | - |
| `integrationCredentialsId` | Credentials | M3terEntityParameter | Yes | The m3ter credentials to use. | authType: M3TER\_SIGNED\_REQUEST, m3terEntity: IntegrationCredentials |
| `id` | id | LookupParameter | Yes | The UUID of the Pricing to delete. | - |
| `statePath` | State Path | StateVariableParameter | No | State variable to store the response. | - |
### Exits
| Exit | Description |
| - | - |
| `NEXT` | The API call succeeded. |
| `ERROR` | The API call failed. Error details are stored in the `m3shError` state variable. |
## List Pricings
**Function name:** `m3ter_ListPricings`
**Category:** READ
**HTTP method:** GET (paginated)
**Destination:** m3ter
Retrieve a list of Pricings filtered by date/time, Plan ID, PlanTemplate ID, or Pricing ID.
### Parameters
| Name | Label | Type | Required | Description | Constraints |
| - | - | - | :-: | - | - |
| `integrationCredentialsId` | Credentials | M3terEntityParameter | Yes | The m3ter credentials to use. | authType: M3TER\_SIGNED\_REQUEST, m3terEntity: IntegrationCredentials |
| `statePath` | State Path | StateVariableParameter | No | State variable to store the response. | - |
| `queryParams` | Query Parameters | KeyValueLookupParameter | No | Query parameters to include in the request | allowedValues: date,planId,planTemplateId,aggregationId,ids |
### Exits
| Exit | Description |
| - | - |
| `NEXT` | The API call succeeded. |
| `ERROR` | The API call failed. Error details are stored in the `m3shError` state variable. |
## Create Pricing
**Function name:** `m3ter_PostPricing`
**Category:** WRITE
**HTTP method:** POST
**Destination:** m3ter
Create a new Pricing.
**Notes:**
* **Pricing Plan or Plan Template?** Exactly one of `planId` or `planTemplateId` request parameters are required for this call to be valid. If you omit both, then you will receive a validation error.
* **Using Aggregation or Compound Aggregation for Pricing?** Exactly one of `aggregationId` or `compoundAggregationId` request parameters are required for this call to be valid. If you omit both, then you will receive a validation error.
* **Using Negative Values for Pricing?** If you use the `type` request parameter with the `DEBIT` option, *you cannot use negative values* for `fixedPrice` or `unitPrice` in `pricingBands` or `overagePricingBands`, and you'll receive a validation error. If you omit a `type` request parameter a `DEBIT` pricing is created by default and the same constraint on the use of negative values applies.
### Parameters
| Name | Label | Type | Required | Description | Constraints |
| - | - | - | :-: | - | - |
| `integrationCredentialsId` | Credentials | M3terEntityParameter | Yes | The m3ter credentials to use. | authType: M3TER\_SIGNED\_REQUEST, m3terEntity: IntegrationCredentials |
| `requestPath` | Request Path | StateVariableParameter | Yes | State variable containing the request. | - |
| `statePath` | State Path | StateVariableParameter | No | State variable to store the response. | - |
### Exits
| Exit | Description |
| - | - |
| `NEXT` | The API call succeeded. |
| `ERROR` | The API call failed. Error details are stored in the `m3shError` state variable. |
# Products
Source: https://docs.m3ter.com/m3sh-function-reference/m3ter/products
## Retrieve Product
**Function name:** `m3ter_GetProduct`
**Category:** READ
**HTTP method:** GET
**Destination:** m3ter
Retrieve a Product with the given UUID.
This endpoint retrieves the details of a specific Product within a specified Organization, using the Product UUID.
### Parameters
| Name | Label | Type | Required | Description | Constraints |
| - | - | - | :-: | - | - |
| `integrationCredentialsId` | Credentials | M3terEntityParameter | Yes | The m3ter credentials to use. | authType: M3TER\_SIGNED\_REQUEST, m3terEntity: IntegrationCredentials |
| `id` | id | LookupParameter | Yes | The unique identifier (UUID) of the Product to retrieve. | - |
| `statePath` | State Path | StateVariableParameter | No | State variable to store the response. | - |
### Exits
| Exit | Description |
| - | - |
| `NEXT` | The API call succeeded. |
| `ERROR` | The API call failed. Error details are stored in the `m3shError` state variable. |
## Update Product
**Function name:** `m3ter_PutProduct`
**Category:** WRITE
**HTTP method:** PUT
**Destination:** m3ter
Update a Product with the given UUID.
This endpoint updates the details of a specific Product within a specified Organization, using the Product UUID. The updated details are provided in the request body.
**Note:** If you have created Custom Fields for a Product, when you use this endpoint to update the Product use the `customFields` parameter to preserve those Custom Fields. If you omit them from the update request, they will be lost.
### Parameters
| Name | Label | Type | Required | Description | Constraints |
| - | - | - | :-: | - | - |
| `integrationCredentialsId` | Credentials | M3terEntityParameter | Yes | The m3ter credentials to use. | authType: M3TER\_SIGNED\_REQUEST, m3terEntity: IntegrationCredentials |
| `id` | id | LookupParameter | Yes | The unique identifer (UUID) of the Product to update. | - |
| `requestPath` | Request Path | StateVariableParameter | Yes | State variable containing the request. | - |
| `statePath` | State Path | StateVariableParameter | No | State variable to store the response. | - |
### Exits
| Exit | Description |
| - | - |
| `NEXT` | The API call succeeded. |
| `ERROR` | The API call failed. Error details are stored in the `m3shError` state variable. |
## Delete Product
**Function name:** `m3ter_DeleteProduct`
**Category:** WRITE
**HTTP method:** DELETE
**Destination:** m3ter
Delete a Product with the given UUID.
This endpoint deletes a specific Product within a specified Organization, using the Product UUID.
### Parameters
| Name | Label | Type | Required | Description | Constraints |
| - | - | - | :-: | - | - |
| `integrationCredentialsId` | Credentials | M3terEntityParameter | Yes | The m3ter credentials to use. | authType: M3TER\_SIGNED\_REQUEST, m3terEntity: IntegrationCredentials |
| `id` | id | LookupParameter | Yes | The unique identifer (UUID) of the Product to delete. | - |
| `statePath` | State Path | StateVariableParameter | No | State variable to store the response. | - |
### Exits
| Exit | Description |
| - | - |
| `NEXT` | The API call succeeded. |
| `ERROR` | The API call failed. Error details are stored in the `m3shError` state variable. |
## List Products
**Function name:** `m3ter_ListProducts`
**Category:** READ
**HTTP method:** GET (paginated)
**Destination:** m3ter
Retrieve a list of Products.
This endpoint retrieves a list of all the Products within a specified Organization. The list can be paginated, and supports filtering by specific Product IDs.
### Parameters
| Name | Label | Type | Required | Description | Constraints |
| - | - | - | :-: | - | - |
| `integrationCredentialsId` | Credentials | M3terEntityParameter | Yes | The m3ter credentials to use. | authType: M3TER\_SIGNED\_REQUEST, m3terEntity: IntegrationCredentials |
| `statePath` | State Path | StateVariableParameter | No | State variable to store the response. | - |
| `queryParams` | Query Parameters | KeyValueLookupParameter | No | Query parameters to include in the request | allowedValues: ids |
### Exits
| Exit | Description |
| - | - |
| `NEXT` | The API call succeeded. |
| `ERROR` | The API call failed. Error details are stored in the `m3shError` state variable. |
## Create Product
**Function name:** `m3ter_PostProduct`
**Category:** WRITE
**HTTP method:** POST
**Destination:** m3ter
Create a new Product.
This endpoint creates a new Product within the specified Organization. The details of the Product are provided in the request body.
### Parameters
| Name | Label | Type | Required | Description | Constraints |
| - | - | - | :-: | - | - |
| `integrationCredentialsId` | Credentials | M3terEntityParameter | Yes | The m3ter credentials to use. | authType: M3TER\_SIGNED\_REQUEST, m3terEntity: IntegrationCredentials |
| `requestPath` | Request Path | StateVariableParameter | Yes | State variable containing the request. | - |
| `statePath` | State Path | StateVariableParameter | No | State variable to store the response. | - |
### Exits
| Exit | Description |
| - | - |
| `NEXT` | The API call succeeded. |
| `ERROR` | The API call failed. Error details are stored in the `m3shError` state variable. |
# Resourcegroups
Source: https://docs.m3ter.com/m3sh-function-reference/m3ter/resourcegroups
## List ResourceGroup permission policies
**Function name:** `m3ter_GetResourceGroupPermissions`
**Category:** READ
**HTTP method:** GET (paginated)
**Destination:** m3ter
Retrieve a list of permission policies for a ResourceGroup
### Parameters
| Name | Label | Type | Required | Description | Constraints |
| - | - | - | :-: | - | - |
| `integrationCredentialsId` | Credentials | M3terEntityParameter | Yes | The m3ter credentials to use. | authType: M3TER\_SIGNED\_REQUEST, m3terEntity: IntegrationCredentials |
| `type` | type | LookupParameter | Yes | The type of resource | - |
| `resourceGroupId` | resourceGroupId | LookupParameter | Yes | UUID of the ResourceGroup | - |
| `statePath` | State Path | StateVariableParameter | No | State variable to store the response. | - |
### Exits
| Exit | Description |
| - | - |
| `NEXT` | The API call succeeded. |
| `ERROR` | The API call failed. Error details are stored in the `m3shError` state variable. |
## Remove item
**Function name:** `m3ter_RemoveResourceFromGroup`
**Category:** WRITE
**HTTP method:** POST
**Destination:** m3ter
Remove an item from a ResourceGroup.
### Parameters
| Name | Label | Type | Required | Description | Constraints |
| - | - | - | :-: | - | - |
| `integrationCredentialsId` | Credentials | M3terEntityParameter | Yes | The m3ter credentials to use. | authType: M3TER\_SIGNED\_REQUEST, m3terEntity: IntegrationCredentials |
| `resourceGroupId` | resourceGroupId | LookupParameter | Yes | The UUID of the ResourceGroup to remove the item from. | - |
| `type` | type | LookupParameter | Yes | The type of resource | - |
| `requestPath` | Request Path | StateVariableParameter | Yes | State variable containing the request. | - |
| `statePath` | State Path | StateVariableParameter | No | State variable to store the response. | - |
### Exits
| Exit | Description |
| - | - |
| `NEXT` | The API call succeeded. |
| `ERROR` | The API call failed. Error details are stored in the `m3shError` state variable. |
## Retrieve ResourceGroup
**Function name:** `m3ter_GetResourceGroup`
**Category:** READ
**HTTP method:** GET
**Destination:** m3ter
Retrieve the ResourceGroup for the UUID
### Parameters
| Name | Label | Type | Required | Description | Constraints |
| - | - | - | :-: | - | - |
| `integrationCredentialsId` | Credentials | M3terEntityParameter | Yes | The m3ter credentials to use. | authType: M3TER\_SIGNED\_REQUEST, m3terEntity: IntegrationCredentials |
| `id` | id | LookupParameter | Yes | The UUID of the ResourceGroup to retrieve. | - |
| `type` | type | LookupParameter | Yes | The type of resource | - |
| `statePath` | State Path | StateVariableParameter | No | State variable to store the response. | - |
### Exits
| Exit | Description |
| - | - |
| `NEXT` | The API call succeeded. |
| `ERROR` | The API call failed. Error details are stored in the `m3shError` state variable. |
## Update ResourceGroup
**Function name:** `m3ter_PutResourceGroup`
**Category:** WRITE
**HTTP method:** PUT
**Destination:** m3ter
Update the ResourceGroup for the UUID
### Parameters
| Name | Label | Type | Required | Description | Constraints |
| - | - | - | :-: | - | - |
| `integrationCredentialsId` | Credentials | M3terEntityParameter | Yes | The m3ter credentials to use. | authType: M3TER\_SIGNED\_REQUEST, m3terEntity: IntegrationCredentials |
| `id` | id | LookupParameter | Yes | The UUID of the ResourceGroup to update. | - |
| `type` | type | LookupParameter | Yes | The type of resource | - |
| `requestPath` | Request Path | StateVariableParameter | Yes | State variable containing the request. | - |
| `statePath` | State Path | StateVariableParameter | No | State variable to store the response. | - |
### Exits
| Exit | Description |
| - | - |
| `NEXT` | The API call succeeded. |
| `ERROR` | The API call failed. Error details are stored in the `m3shError` state variable. |
## Delete ResourceGroup
**Function name:** `m3ter_DeleteResourceGroup`
**Category:** WRITE
**HTTP method:** DELETE
**Destination:** m3ter
Delete a ResourceGroup for the UUID
### Parameters
| Name | Label | Type | Required | Description | Constraints |
| - | - | - | :-: | - | - |
| `integrationCredentialsId` | Credentials | M3terEntityParameter | Yes | The m3ter credentials to use. | authType: M3TER\_SIGNED\_REQUEST, m3terEntity: IntegrationCredentials |
| `id` | id | LookupParameter | Yes | The UUID of the ResourceGroup to delete. | - |
| `type` | type | LookupParameter | Yes | The type of resource | - |
| `statePath` | State Path | StateVariableParameter | No | State variable to store the response. | - |
### Exits
| Exit | Description |
| - | - |
| `NEXT` | The API call succeeded. |
| `ERROR` | The API call failed. Error details are stored in the `m3shError` state variable. |
## List ResourceGroups
**Function name:** `m3ter_ListResourceGroups`
**Category:** READ
**HTTP method:** GET (paginated)
**Destination:** m3ter
Retrieve a list of ResourceGroup entities
### Parameters
| Name | Label | Type | Required | Description | Constraints |
| - | - | - | :-: | - | - |
| `integrationCredentialsId` | Credentials | M3terEntityParameter | Yes | The m3ter credentials to use. | authType: M3TER\_SIGNED\_REQUEST, m3terEntity: IntegrationCredentials |
| `type` | type | LookupParameter | Yes | The type of resource | - |
| `statePath` | State Path | StateVariableParameter | No | State variable to store the response. | - |
### Exits
| Exit | Description |
| - | - |
| `NEXT` | The API call succeeded. |
| `ERROR` | The API call failed. Error details are stored in the `m3shError` state variable. |
## Create ResourceGroup
**Function name:** `m3ter_PostResourceGroup`
**Category:** WRITE
**HTTP method:** POST
**Destination:** m3ter
Create a ResourceGroup for the UUID
### Parameters
| Name | Label | Type | Required | Description | Constraints |
| - | - | - | :-: | - | - |
| `integrationCredentialsId` | Credentials | M3terEntityParameter | Yes | The m3ter credentials to use. | authType: M3TER\_SIGNED\_REQUEST, m3terEntity: IntegrationCredentials |
| `type` | type | LookupParameter | Yes | The type of resource | - |
| `requestPath` | Request Path | StateVariableParameter | Yes | State variable containing the request. | - |
| `statePath` | State Path | StateVariableParameter | No | State variable to store the response. | - |
### Exits
| Exit | Description |
| - | - |
| `NEXT` | The API call succeeded. |
| `ERROR` | The API call failed. Error details are stored in the `m3shError` state variable. |
## List ResourceGroup items
**Function name:** `m3ter_ListResourceGroupsForId`
**Category:** WRITE
**HTTP method:** POST
**Destination:** m3ter
Retrieve a list of items for a ResourceGroup
### Parameters
| Name | Label | Type | Required | Description | Constraints |
| - | - | - | :-: | - | - |
| `integrationCredentialsId` | Credentials | M3terEntityParameter | Yes | The m3ter credentials to use. | authType: M3TER\_SIGNED\_REQUEST, m3terEntity: IntegrationCredentials |
| `type` | type | LookupParameter | Yes | The type of resource | - |
| `resourceGroupId` | resourceGroupId | LookupParameter | Yes | UUID of the ResourceGroup | - |
| `statePath` | State Path | StateVariableParameter | No | State variable to store the response. | - |
### Exits
| Exit | Description |
| - | - |
| `NEXT` | The API call succeeded. |
| `ERROR` | The API call failed. Error details are stored in the `m3shError` state variable. |
## Add item
**Function name:** `m3ter_AddResourceToGroup`
**Category:** WRITE
**HTTP method:** POST
**Destination:** m3ter
Add an item to a ResourceGroup.
### Parameters
| Name | Label | Type | Required | Description | Constraints |
| - | - | - | :-: | - | - |
| `integrationCredentialsId` | Credentials | M3terEntityParameter | Yes | The m3ter credentials to use. | authType: M3TER\_SIGNED\_REQUEST, m3terEntity: IntegrationCredentials |
| `resourceGroupId` | resourceGroupId | LookupParameter | Yes | The UUID of the ResourceGroup to add the item to. | - |
| `type` | type | LookupParameter | Yes | The type of resource the Resource Group is for, such as a Meter Resource Group. | - |
| `requestPath` | Request Path | StateVariableParameter | Yes | State variable containing the request. | - |
| `statePath` | State Path | StateVariableParameter | No | State variable to store the response. | - |
### Exits
| Exit | Description |
| - | - |
| `NEXT` | The API call succeeded. |
| `ERROR` | The API call failed. Error details are stored in the `m3shError` state variable. |
# Scheduledevents
Source: https://docs.m3ter.com/m3sh-function-reference/m3ter/scheduledevents
## Retrieve ScheduledEventConfiguration
**Function name:** `m3ter_GetScheduledEventConfiguration`
**Category:** READ
**HTTP method:** GET
**Destination:** m3ter
Retrieve a ScheduledEventConfiguration for the given UUID.
### Parameters
| Name | Label | Type | Required | Description | Constraints |
| - | - | - | :-: | - | - |
| `integrationCredentialsId` | Credentials | M3terEntityParameter | Yes | The m3ter credentials to use. | authType: M3TER\_SIGNED\_REQUEST, m3terEntity: IntegrationCredentials |
| `id` | id | LookupParameter | Yes | The UUID of the ScheduledEventConfiguration to retrieve. | - |
| `statePath` | State Path | StateVariableParameter | No | State variable to store the response. | - |
### Exits
| Exit | Description |
| - | - |
| `NEXT` | The API call succeeded. |
| `ERROR` | The API call failed. Error details are stored in the `m3shError` state variable. |
## Update ScheduledEventConfiguration
**Function name:** `m3ter_UpdateScheduledEventConfiguration`
**Category:** WRITE
**HTTP method:** PUT
**Destination:** m3ter
Update a ScheduledEventConfiguration for the given UUID.
### Parameters
| Name | Label | Type | Required | Description | Constraints |
| - | - | - | :-: | - | - |
| `integrationCredentialsId` | Credentials | M3terEntityParameter | Yes | The m3ter credentials to use. | authType: M3TER\_SIGNED\_REQUEST, m3terEntity: IntegrationCredentials |
| `id` | id | LookupParameter | Yes | The UUID of the ScheduledEventConfiguration to update. | - |
| `requestPath` | Request Path | StateVariableParameter | Yes | State variable containing the request. | - |
| `statePath` | State Path | StateVariableParameter | No | State variable to store the response. | - |
### Exits
| Exit | Description |
| - | - |
| `NEXT` | The API call succeeded. |
| `ERROR` | The API call failed. Error details are stored in the `m3shError` state variable. |
## Delete ScheduledEventConfiguration
**Function name:** `m3ter_DeleteScheduledEventConfiguration`
**Category:** WRITE
**HTTP method:** DELETE
**Destination:** m3ter
Delete the ScheduledEventConfiguration for the given UUID.
### Parameters
| Name | Label | Type | Required | Description | Constraints |
| - | - | - | :-: | - | - |
| `integrationCredentialsId` | Credentials | M3terEntityParameter | Yes | The m3ter credentials to use. | authType: M3TER\_SIGNED\_REQUEST, m3terEntity: IntegrationCredentials |
| `id` | id | LookupParameter | Yes | The UUID of the ScheduledEventConfiguration to delete. | - |
| `statePath` | State Path | StateVariableParameter | No | State variable to store the response. | - |
### Exits
| Exit | Description |
| - | - |
| `NEXT` | The API call succeeded. |
| `ERROR` | The API call failed. Error details are stored in the `m3shError` state variable. |
## List ScheduledEventConfigurations
**Function name:** `m3ter_ListScheduledEventConfigurations`
**Category:** READ
**HTTP method:** GET (paginated)
**Destination:** m3ter
Retrieve a list of ScheduledEventConfiguration entities
### Parameters
| Name | Label | Type | Required | Description | Constraints |
| - | - | - | :-: | - | - |
| `integrationCredentialsId` | Credentials | M3terEntityParameter | Yes | The m3ter credentials to use. | authType: M3TER\_SIGNED\_REQUEST, m3terEntity: IntegrationCredentials |
| `statePath` | State Path | StateVariableParameter | No | State variable to store the response. | - |
| `queryParams` | Query Parameters | KeyValueLookupParameter | No | Query parameters to include in the request | allowedValues: ids |
### Exits
| Exit | Description |
| - | - |
| `NEXT` | The API call succeeded. |
| `ERROR` | The API call failed. Error details are stored in the `m3shError` state variable. |
## Create ScheduledEventConfiguration
**Function name:** `m3ter_CreateScheduledEventConfiguration`
**Category:** WRITE
**HTTP method:** POST
**Destination:** m3ter
Create a new ScheduledEventConfiguration.
### Parameters
| Name | Label | Type | Required | Description | Constraints |
| - | - | - | :-: | - | - |
| `integrationCredentialsId` | Credentials | M3terEntityParameter | Yes | The m3ter credentials to use. | authType: M3TER\_SIGNED\_REQUEST, m3terEntity: IntegrationCredentials |
| `requestPath` | Request Path | StateVariableParameter | Yes | State variable containing the request. | - |
| `statePath` | State Path | StateVariableParameter | No | State variable to store the response. | - |
### Exits
| Exit | Description |
| - | - |
| `NEXT` | The API call succeeded. |
| `ERROR` | The API call failed. Error details are stored in the `m3shError` state variable. |
# Serviceusers
Source: https://docs.m3ter.com/m3sh-function-reference/m3ter/serviceusers
## Activate ServiceUser Credentials
**Function name:** `m3ter_ActivateServiceUserCredentials`
**Category:** WRITE
**HTTP method:** PUT
**Destination:** m3ter
Activate a credentials key pair for a service user.
### Parameters
| Name | Label | Type | Required | Description | Constraints |
| - | - | - | :-: | - | - |
| `integrationCredentialsId` | Credentials | M3terEntityParameter | Yes | The m3ter credentials to use. | authType: M3TER\_SIGNED\_REQUEST, m3terEntity: IntegrationCredentials |
| `id` | id | LookupParameter | Yes | UUID of the service user. | - |
| `apiKey` | apiKey | LookupParameter | Yes | API key for the service user credentials. | - |
| `statePath` | State Path | StateVariableParameter | No | State variable to store the response. | - |
### Exits
| Exit | Description |
| - | - |
| `NEXT` | The API call succeeded. |
| `ERROR` | The API call failed. Error details are stored in the `m3shError` state variable. |
## Retrieve ServiceUser Permissions
**Function name:** `m3ter_GetServiceUserPermissions`
**Category:** READ
**HTTP method:** GET
**Destination:** m3ter
Retrieve permission policies attached to a service user.
### Parameters
| Name | Label | Type | Required | Description | Constraints |
| - | - | - | :-: | - | - |
| `integrationCredentialsId` | Credentials | M3terEntityParameter | Yes | The m3ter credentials to use. | authType: M3TER\_SIGNED\_REQUEST, m3terEntity: IntegrationCredentials |
| `id` | id | LookupParameter | Yes | UUID of the service user. | - |
| `statePath` | State Path | StateVariableParameter | No | State variable to store the response. | - |
### Exits
| Exit | Description |
| - | - |
| `NEXT` | The API call succeeded. |
| `ERROR` | The API call failed. Error details are stored in the `m3shError` state variable. |
## List ServiceUser Credentials
**Function name:** `m3ter_ListServiceUserCredentials`
**Category:** READ
**HTTP method:** GET (paginated)
**Destination:** m3ter
Retrieve the credentials key pairs for a service user.
### Parameters
| Name | Label | Type | Required | Description | Constraints |
| - | - | - | :-: | - | - |
| `integrationCredentialsId` | Credentials | M3terEntityParameter | Yes | The m3ter credentials to use. | authType: M3TER\_SIGNED\_REQUEST, m3terEntity: IntegrationCredentials |
| `id` | id | LookupParameter | Yes | UUID of the service user. | - |
| `statePath` | State Path | StateVariableParameter | No | State variable to store the response. | - |
### Exits
| Exit | Description |
| - | - |
| `NEXT` | The API call succeeded. |
| `ERROR` | The API call failed. Error details are stored in the `m3shError` state variable. |
## Create ServiceUser Credentials
**Function name:** `m3ter_PostServiceUserCredentials`
**Category:** WRITE
**HTTP method:** POST
**Destination:** m3ter
Create a new credentials key pair for a service user.
### Parameters
| Name | Label | Type | Required | Description | Constraints |
| - | - | - | :-: | - | - |
| `integrationCredentialsId` | Credentials | M3terEntityParameter | Yes | The m3ter credentials to use. | authType: M3TER\_SIGNED\_REQUEST, m3terEntity: IntegrationCredentials |
| `id` | id | LookupParameter | Yes | UUID of the service user. | - |
| `statePath` | State Path | StateVariableParameter | No | State variable to store the response. | - |
### Exits
| Exit | Description |
| - | - |
| `NEXT` | The API call succeeded. |
| `ERROR` | The API call failed. Error details are stored in the `m3shError` state variable. |
## Deactivate ServiceUser Credentials
**Function name:** `m3ter_InactivateServiceUserCredentials`
**Category:** WRITE
**HTTP method:** PUT
**Destination:** m3ter
Deactivate a credentials key pair for a service user.
### Parameters
| Name | Label | Type | Required | Description | Constraints |
| - | - | - | :-: | - | - |
| `integrationCredentialsId` | Credentials | M3terEntityParameter | Yes | The m3ter credentials to use. | authType: M3TER\_SIGNED\_REQUEST, m3terEntity: IntegrationCredentials |
| `id` | id | LookupParameter | Yes | UUID of the service user. | - |
| `apiKey` | apiKey | LookupParameter | Yes | API key for the service user credentials. | - |
| `statePath` | State Path | StateVariableParameter | No | State variable to store the response. | - |
### Exits
| Exit | Description |
| - | - |
| `NEXT` | The API call succeeded. |
| `ERROR` | The API call failed. Error details are stored in the `m3shError` state variable. |
## Retrieve ServiceUser Credentials
**Function name:** `m3ter_GetServiceUserCredentials`
**Category:** READ
**HTTP method:** GET
**Destination:** m3ter
Retrieve a credentials key pair for a service user.
### Parameters
| Name | Label | Type | Required | Description | Constraints |
| - | - | - | :-: | - | - |
| `integrationCredentialsId` | Credentials | M3terEntityParameter | Yes | The m3ter credentials to use. | authType: M3TER\_SIGNED\_REQUEST, m3terEntity: IntegrationCredentials |
| `id` | id | LookupParameter | Yes | UUID of the service user. | - |
| `apiKey` | apiKey | LookupParameter | Yes | API key for the service user credentials. | - |
| `statePath` | State Path | StateVariableParameter | No | State variable to store the response. | - |
### Exits
| Exit | Description |
| - | - |
| `NEXT` | The API call succeeded. |
| `ERROR` | The API call failed. Error details are stored in the `m3shError` state variable. |
## Delete ServiceUser Credentials
**Function name:** `m3ter_DeleteServiceUserCredentials`
**Category:** WRITE
**HTTP method:** DELETE
**Destination:** m3ter
Delete a deactivated credentials key pair for a service user.
### Parameters
| Name | Label | Type | Required | Description | Constraints |
| - | - | - | :-: | - | - |
| `integrationCredentialsId` | Credentials | M3terEntityParameter | Yes | The m3ter credentials to use. | authType: M3TER\_SIGNED\_REQUEST, m3terEntity: IntegrationCredentials |
| `id` | id | LookupParameter | Yes | UUID of the service user. | - |
| `apiKey` | apiKey | LookupParameter | Yes | API key for the service user credentials. | - |
| `statePath` | State Path | StateVariableParameter | No | State variable to store the response. | - |
### Exits
| Exit | Description |
| - | - |
| `NEXT` | The API call succeeded. |
| `ERROR` | The API call failed. Error details are stored in the `m3shError` state variable. |
## Retrieve ServiceUser
**Function name:** `m3ter_GetServiceUser`
**Category:** READ
**HTTP method:** GET
**Destination:** m3ter
Retrieve the service user for the UUID.
### Parameters
| Name | Label | Type | Required | Description | Constraints |
| - | - | - | :-: | - | - |
| `integrationCredentialsId` | Credentials | M3terEntityParameter | Yes | The m3ter credentials to use. | authType: M3TER\_SIGNED\_REQUEST, m3terEntity: IntegrationCredentials |
| `id` | id | LookupParameter | Yes | UUID of the service user to retrieve. | - |
| `statePath` | State Path | StateVariableParameter | No | State variable to store the response. | - |
### Exits
| Exit | Description |
| - | - |
| `NEXT` | The API call succeeded. |
| `ERROR` | The API call failed. Error details are stored in the `m3shError` state variable. |
## Update ServiceUser
**Function name:** `m3ter_PutServiceUser`
**Category:** WRITE
**HTTP method:** PUT
**Destination:** m3ter
Update the service user for the UUID.
### Parameters
| Name | Label | Type | Required | Description | Constraints |
| - | - | - | :-: | - | - |
| `integrationCredentialsId` | Credentials | M3terEntityParameter | Yes | The m3ter credentials to use. | authType: M3TER\_SIGNED\_REQUEST, m3terEntity: IntegrationCredentials |
| `id` | id | LookupParameter | Yes | UUID of the service user to update. | - |
| `requestPath` | Request Path | StateVariableParameter | Yes | State variable containing the request. | - |
| `statePath` | State Path | StateVariableParameter | No | State variable to store the response. | - |
### Exits
| Exit | Description |
| - | - |
| `NEXT` | The API call succeeded. |
| `ERROR` | The API call failed. Error details are stored in the `m3shError` state variable. |
## Delete ServiceUser
**Function name:** `m3ter_DeleteServiceUser`
**Category:** WRITE
**HTTP method:** DELETE
**Destination:** m3ter
Delete the service user for the UUID.
### Parameters
| Name | Label | Type | Required | Description | Constraints |
| - | - | - | :-: | - | - |
| `integrationCredentialsId` | Credentials | M3terEntityParameter | Yes | The m3ter credentials to use. | authType: M3TER\_SIGNED\_REQUEST, m3terEntity: IntegrationCredentials |
| `id` | id | LookupParameter | Yes | UUID of the service user to delete. | - |
| `statePath` | State Path | StateVariableParameter | No | State variable to store the response. | - |
### Exits
| Exit | Description |
| - | - |
| `NEXT` | The API call succeeded. |
| `ERROR` | The API call failed. Error details are stored in the `m3shError` state variable. |
## List ServiceUsers
**Function name:** `m3ter_ListServiceUsers`
**Category:** READ
**HTTP method:** GET (paginated)
**Destination:** m3ter
Retrieve a list of service users.
### Parameters
| Name | Label | Type | Required | Description | Constraints |
| - | - | - | :-: | - | - |
| `integrationCredentialsId` | Credentials | M3terEntityParameter | Yes | The m3ter credentials to use. | authType: M3TER\_SIGNED\_REQUEST, m3terEntity: IntegrationCredentials |
| `statePath` | State Path | StateVariableParameter | No | State variable to store the response. | - |
### Exits
| Exit | Description |
| - | - |
| `NEXT` | The API call succeeded. |
| `ERROR` | The API call failed. Error details are stored in the `m3shError` state variable. |
## Create ServiceUser
**Function name:** `m3ter_PostServiceUser`
**Category:** WRITE
**HTTP method:** POST
**Destination:** m3ter
Create a new service user.
### Parameters
| Name | Label | Type | Required | Description | Constraints |
| - | - | - | :-: | - | - |
| `integrationCredentialsId` | Credentials | M3terEntityParameter | Yes | The m3ter credentials to use. | authType: M3TER\_SIGNED\_REQUEST, m3terEntity: IntegrationCredentials |
| `requestPath` | Request Path | StateVariableParameter | Yes | State variable containing the request. | - |
| `statePath` | State Path | StateVariableParameter | No | State variable to store the response. | - |
### Exits
| Exit | Description |
| - | - |
| `NEXT` | The API call succeeded. |
| `ERROR` | The API call failed. Error details are stored in the `m3shError` state variable. |
# Statementdefinitions
Source: https://docs.m3ter.com/m3sh-function-reference/m3ter/statementdefinitions
## Retrieve StatementDefinition
**Function name:** `m3ter_GetStatementDefinition`
**Category:** READ
**HTTP method:** GET
**Destination:** m3ter
Retrieve a StatementDefinition with the given UUID.
Retrieves the details of a specific StatementDefinition for the specified Organization, using its unique identifier (UUID). This endpoint is useful when you want to retrieve the complete details of a single StatementDefinition.
### Parameters
| Name | Label | Type | Required | Description | Constraints |
| - | - | - | :-: | - | - |
| `integrationCredentialsId` | Credentials | M3terEntityParameter | Yes | The m3ter credentials to use. | authType: M3TER\_SIGNED\_REQUEST, m3terEntity: IntegrationCredentials |
| `id` | id | LookupParameter | Yes | The unique identifier (UUID) of the StatementDefinition to retrieve. | - |
| `statePath` | State Path | StateVariableParameter | No | State variable to store the response. | - |
### Exits
| Exit | Description |
| - | - |
| `NEXT` | The API call succeeded. |
| `ERROR` | The API call failed. Error details are stored in the `m3shError` state variable. |
## Update StatementDefinition
**Function name:** `m3ter_PutStatementDefinition`
**Category:** WRITE
**HTTP method:** PUT
**Destination:** m3ter
Update StatementDefinition for the given UUID.
Update the details of a specific StatementDefinition for the specified Organization, using its unique identifier (UUID). The updated details for the StatementDefinition should be sent in the request body.
### Parameters
| Name | Label | Type | Required | Description | Constraints |
| - | - | - | :-: | - | - |
| `integrationCredentialsId` | Credentials | M3terEntityParameter | Yes | The m3ter credentials to use. | authType: M3TER\_SIGNED\_REQUEST, m3terEntity: IntegrationCredentials |
| `id` | id | LookupParameter | Yes | | - |
| `requestPath` | Request Path | StateVariableParameter | Yes | State variable containing the request. | - |
| `statePath` | State Path | StateVariableParameter | No | State variable to store the response. | - |
### Exits
| Exit | Description |
| - | - |
| `NEXT` | The API call succeeded. |
| `ERROR` | The API call failed. Error details are stored in the `m3shError` state variable. |
## Delete StatementDefinition
**Function name:** `m3ter_DeleteStatementDefinition`
**Category:** WRITE
**HTTP method:** DELETE
**Destination:** m3ter
Delete a StatementDefinition with the given UUID.
This endpoint deletes a specific StatementDefinition within a specified Organization, using the StatementDefinition UUID.
### Parameters
| Name | Label | Type | Required | Description | Constraints |
| - | - | - | :-: | - | - |
| `integrationCredentialsId` | Credentials | M3terEntityParameter | Yes | The m3ter credentials to use. | authType: M3TER\_SIGNED\_REQUEST, m3terEntity: IntegrationCredentials |
| `id` | id | LookupParameter | Yes | The unique identifier (UUID) of the StatementDefinition to delete. | - |
| `statePath` | State Path | StateVariableParameter | No | State variable to store the response. | - |
### Exits
| Exit | Description |
| - | - |
| `NEXT` | The API call succeeded. |
| `ERROR` | The API call failed. Error details are stored in the `m3shError` state variable. |
## List StatementDefinitions
**Function name:** `m3ter_ListStatementDefinitions`
**Category:** READ
**HTTP method:** GET (paginated)
**Destination:** m3ter
Retrieve a list of StatementDefinitions.
This endpoint retrieves a list of all the StatementDefinitions within a specified Organization. The list can be paginated for easier management.
### Parameters
| Name | Label | Type | Required | Description | Constraints |
| - | - | - | :-: | - | - |
| `integrationCredentialsId` | Credentials | M3terEntityParameter | Yes | The m3ter credentials to use. | authType: M3TER\_SIGNED\_REQUEST, m3terEntity: IntegrationCredentials |
| `statePath` | State Path | StateVariableParameter | No | State variable to store the response. | - |
### Exits
| Exit | Description |
| - | - |
| `NEXT` | The API call succeeded. |
| `ERROR` | The API call failed. Error details are stored in the `m3shError` state variable. |
## Create StatementDefinition
**Function name:** `m3ter_PostStatementDefinition`
**Category:** WRITE
**HTTP method:** POST
**Destination:** m3ter
Create a new StatementDefinition.
This endpoint creates a new StatementDefinition within the specified Organization. The details of the StatementDefinition are provided in the request body.
### Parameters
| Name | Label | Type | Required | Description | Constraints |
| - | - | - | :-: | - | - |
| `integrationCredentialsId` | Credentials | M3terEntityParameter | Yes | The m3ter credentials to use. | authType: M3TER\_SIGNED\_REQUEST, m3terEntity: IntegrationCredentials |
| `requestPath` | Request Path | StateVariableParameter | Yes | State variable containing the request. | - |
| `statePath` | State Path | StateVariableParameter | No | State variable to store the response. | - |
### Exits
| Exit | Description |
| - | - |
| `NEXT` | The API call succeeded. |
| `ERROR` | The API call failed. Error details are stored in the `m3shError` state variable. |
# Statementjobs
Source: https://docs.m3ter.com/m3sh-function-reference/m3ter/statementjobs
## Get StatementJob
**Function name:** `m3ter_GetStatementJob`
**Category:** READ
**HTTP method:** GET
**Destination:** m3ter
Retrieves the details of a specific StatementJob using its UUID.
Use this call to obtain the time-bound pre-signed download URL for the generated Bill Statement if the initial [Create StatementJob](https://www.m3ter.com/docs/api#tag/StatementJob/operation/CreateStatementJob) returned a response showing the `statementJobStatus` not yet complete and as `PENDING` or `RUNNING`.
**Note:** When you have submitted a StatementJob and a Bill Statement has been generated, you can also download the Statement directly from a Bill Details page in the Console. See [Working with Bill Statements](https://www.m3ter.com/docs/guides/billing-and-usage-data/running-viewing-and-managing-bills/working-with-bill-statements) in our user Documentation.
### Parameters
| Name | Label | Type | Required | Description | Constraints |
| - | - | - | :-: | - | - |
| `integrationCredentialsId` | Credentials | M3terEntityParameter | Yes | The m3ter credentials to use. | authType: M3TER\_SIGNED\_REQUEST, m3terEntity: IntegrationCredentials |
| `id` | id | LookupParameter | Yes | | - |
| `statePath` | State Path | StateVariableParameter | No | State variable to store the response. | - |
### Exits
| Exit | Description |
| - | - |
| `NEXT` | The API call succeeded. |
| `ERROR` | The API call failed. Error details are stored in the `m3shError` state variable. |
## List Statement Jobs
**Function name:** `m3ter_ListStatementJobs`
**Category:** READ
**HTTP method:** GET (paginated)
**Destination:** m3ter
Retrieve a list of StatementJobs.
Retrieves a list of all StatementJobs for a specific Organization. You can filter the results based on:
* StatementJob status.
* Whether StatementJob is neither completed nor cancelled but remains active.
* The ID of the Bill the StatementJob is associated with.
You can also paginate the results for easier management.
**WARNING!**
* You can use only one of the valid Query parameters: `active`, `status`, or `billId` in any call. If you use more than one of these Query parameters in the same call, then a 400 Bad Request is returned with an error message.
### Parameters
| Name | Label | Type | Required | Description | Constraints |
| - | - | - | :-: | - | - |
| `integrationCredentialsId` | Credentials | M3terEntityParameter | Yes | The m3ter credentials to use. | authType: M3TER\_SIGNED\_REQUEST, m3terEntity: IntegrationCredentials |
| `statePath` | State Path | StateVariableParameter | No | State variable to store the response. | - |
| `queryParams` | Query Parameters | KeyValueLookupParameter | No | Query parameters to include in the request | allowedValues: active,status,billId |
### Exits
| Exit | Description |
| - | - |
| `NEXT` | The API call succeeded. |
| `ERROR` | The API call failed. Error details are stored in the `m3shError` state variable. |
## Create StatementJob
**Function name:** `m3ter_CreateStatementJob`
**Category:** WRITE
**HTTP method:** POST
**Destination:** m3ter
This endpoint creates a StatementJob for a single bill within an Organization using the Bill UUID.
The Bill Statement is generated asynchronously:
* The default format for generating the Statement is in JSON format and according to the Bill Statement Definition you've specified at either Organization level or Account level.
* If you also want to generate the Statement in CSV format, use the `includeCsvFormat` request body parameter.
* The response body provides a time-bound pre-signed URL, which you can use to download the JSON format Statement.
* When you have generated a Statement for a Bill, you can also obtain a time-bound pre-signed download URL using either the [Retrieve Bill Statement in JSON Format](https://www.m3ter.com/docs/api#tag/Bill/operation/GetBillJsonStatement) and [Retrieve Bill Statement in CSV Format](https://www.m3ter.com/docs/api#tag/Bill/operation/GetBillCsvStatement) calls found in the [Bill](https://www.m3ter.com/docs/api#tag/Bill) section of this API Reference.
**Notes:**
* If the response to the Create StatementJob call shows the `statementJobStatus` as `PENDING` or `RUNNING`, you will not receive the pre-signed URL in the response. Wait a few minutes to allow the StatementJob to complete and then use the [Get StatmentJob](https://www.m3ter.com/docs/api#tag/StatementJob/operation/GetStatementJob) call in this section to obtain the pre-signed download URL for the generated Bill Statement.
* When you have submitted a StatementJob and a Bill Statement has been generated, you can also download the Statement directly from a Bill Details page in the Console. See [Working with Bill Statements](https://www.m3ter.com/docs/guides/billing-and-usage-data/running-viewing-and-managing-bills/working-with-bill-statements) in our user Documentation.
### Parameters
| Name | Label | Type | Required | Description | Constraints |
| - | - | - | :-: | - | - |
| `integrationCredentialsId` | Credentials | M3terEntityParameter | Yes | The m3ter credentials to use. | authType: M3TER\_SIGNED\_REQUEST, m3terEntity: IntegrationCredentials |
| `requestPath` | Request Path | StateVariableParameter | Yes | State variable containing the request. | - |
| `statePath` | State Path | StateVariableParameter | No | State variable to store the response. | - |
### Exits
| Exit | Description |
| - | - |
| `NEXT` | The API call succeeded. |
| `ERROR` | The API call failed. Error details are stored in the `m3shError` state variable. |
## Create Batch StatementJobs
**Function name:** `m3ter_CreateStatementJobBatch`
**Category:** WRITE
**HTTP method:** POST
**Destination:** m3ter
Create a batch of StatementJobs for multiple bills.
Initiate the creation of multiple StatementJobs asynchronously for the list of bills with the given UUIDs:
* The default format for generating Bill Statements is in JSON format and according to the Bill Statement Definition you've specified at either Organization level or Account level.
* If you also want to generate the Statements in CSV format, use the `includeCsvFormat` request body parameter.
* The response body provides a time-bound pre-signed URL, which you can use to download the JSON format Statement.
* When you have generated a Statement for a Bill, you can also obtain a time-bound pre-signed download URL using either the [Retrieve Bill Statement in JSON Format](https://www.m3ter.com/docs/api#tag/Bill/operation/GetBillJsonStatement) and [Retrieve Bill Statement in CSV Format](https://www.m3ter.com/docs/api#tag/Bill/operation/GetBillCsvStatement) calls found in the [Bill](https://www.m3ter.com/docs/api#tag/Bill) section of this API Reference.
**Notes:**
* If the response to the Create StatementJob call shows the `statementJobStatus` as `PENDING` or `RUNNING`, you will not receive the pre-signed URL in the response. Wait a few minutes to allow the StatementJob to complete and then use the [Get StatmentJob](https://www.m3ter.com/docs/api#tag/StatementJob/operation/GetStatementJob) call in this section to obtain the pre-signed download URL for the generated Bill Statement.
* When you have submitted a StatementJob and a Bill Statement has been generated, you can also download the Statement directly from a Bill Details page in the Console. See [Working with Bill Statements](https://www.m3ter.com/docs/guides/billing-and-usage-data/running-viewing-and-managing-bills/working-with-bill-statements) in our user Documentation.
### Parameters
| Name | Label | Type | Required | Description | Constraints |
| - | - | - | :-: | - | - |
| `integrationCredentialsId` | Credentials | M3terEntityParameter | Yes | The m3ter credentials to use. | authType: M3TER\_SIGNED\_REQUEST, m3terEntity: IntegrationCredentials |
| `requestPath` | Request Path | StateVariableParameter | Yes | State variable containing the request. | - |
| `statePath` | State Path | StateVariableParameter | No | State variable to store the response. | - |
### Exits
| Exit | Description |
| - | - |
| `NEXT` | The API call succeeded. |
| `ERROR` | The API call failed. Error details are stored in the `m3shError` state variable. |
## Cancel StatementJob
**Function name:** `m3ter_CancelStatementJob`
**Category:** WRITE
**HTTP method:** POST
**Destination:** m3ter
Cancel the StatementJob with the given UUID.
Use this endpoint to halt the execution of a specific StatementJob identified by its UUID. This operation may be useful if you need to stop a StatementJob due to unforeseen issues or changes.
### Parameters
| Name | Label | Type | Required | Description | Constraints |
| - | - | - | :-: | - | - |
| `integrationCredentialsId` | Credentials | M3terEntityParameter | Yes | The m3ter credentials to use. | authType: M3TER\_SIGNED\_REQUEST, m3terEntity: IntegrationCredentials |
| `id` | id | LookupParameter | Yes | The unique identifier (UUID) of the StatementJob to cancel. | - |
| `statePath` | State Path | StateVariableParameter | No | State variable to store the response. | - |
### Exits
| Exit | Description |
| - | - |
| `NEXT` | The API call succeeded. |
| `ERROR` | The API call failed. Error details are stored in the `m3shError` state variable. |
# Support
Source: https://docs.m3ter.com/m3sh-function-reference/m3ter/support
## Retrieve Support Details
**Function name:** `m3ter_GetSupport`
**Category:** READ
**HTTP method:** GET
**Destination:** m3ter
Get support user details on the specific permissions applied and the date and time support access ends.
### Parameters
| Name | Label | Type | Required | Description | Constraints |
| - | - | - | :-: | - | - |
| `integrationCredentialsId` | Credentials | M3terEntityParameter | Yes | The m3ter credentials to use. | authType: M3TER\_SIGNED\_REQUEST, m3terEntity: IntegrationCredentials |
| `statePath` | State Path | StateVariableParameter | No | State variable to store the response. | - |
### Exits
| Exit | Description |
| - | - |
| `NEXT` | The API call succeeded. |
| `ERROR` | The API call failed. Error details are stored in the `m3shError` state variable. |
## Request Support
**Function name:** `m3ter_PutSupport`
**Category:** WRITE
**HTTP method:** PUT
**Destination:** m3ter
Use this call to make a request and grant m3ter Support access to your Organization for a specified timeframe and with specific permissions assigned to Support users. You might want to grant Support access when you've submitted a request for help in resolving an issue you've encountered in your Organization
### Parameters
| Name | Label | Type | Required | Description | Constraints |
| - | - | - | :-: | - | - |
| `integrationCredentialsId` | Credentials | M3terEntityParameter | Yes | The m3ter credentials to use. | authType: M3TER\_SIGNED\_REQUEST, m3terEntity: IntegrationCredentials |
| `requestPath` | Request Path | StateVariableParameter | Yes | State variable containing the request. | - |
| `statePath` | State Path | StateVariableParameter | No | State variable to store the response. | - |
### Exits
| Exit | Description |
| - | - |
| `NEXT` | The API call succeeded. |
| `ERROR` | The API call failed. Error details are stored in the `m3shError` state variable. |
# Support Permissions
Source: https://docs.m3ter.com/m3sh-function-reference/m3ter/support-permissions
## Retrieve Support Permissions
**Function name:** `m3ter_GetSupportUserPermissions`
**Category:** READ
**HTTP method:** GET (paginated)
**Destination:** m3ter
Get permission policies assigned to support users when they access your Organization.
### Parameters
| Name | Label | Type | Required | Description | Constraints |
| - | - | - | :-: | - | - |
| `integrationCredentialsId` | Credentials | M3terEntityParameter | Yes | The m3ter credentials to use. | authType: M3TER\_SIGNED\_REQUEST, m3terEntity: IntegrationCredentials |
| `statePath` | State Path | StateVariableParameter | No | State variable to store the response. | - |
### Exits
| Exit | Description |
| - | - |
| `NEXT` | The API call succeeded. |
| `ERROR` | The API call failed. Error details are stored in the `m3shError` state variable. |
# Usage
Source: https://docs.m3ter.com/m3sh-function-reference/m3ter/usage
## List UsageSavedQueries
**Function name:** `m3ter_ListUsageSavedQueries`
**Category:** READ
**HTTP method:** GET (paginated)
**Destination:** m3ter
Retrieve a list of UsageSavedQuery entities
### Parameters
| Name | Label | Type | Required | Description | Constraints |
| - | - | - | :-: | - | - |
| `integrationCredentialsId` | Credentials | M3terEntityParameter | Yes | The m3ter credentials to use. | authType: M3TER\_SIGNED\_REQUEST, m3terEntity: IntegrationCredentials |
| `statePath` | State Path | StateVariableParameter | No | State variable to store the response. | - |
| `queryParams` | Query Parameters | KeyValueLookupParameter | No | Query parameters to include in the request | allowedValues: ids,queryType |
### Exits
| Exit | Description |
| - | - |
| `NEXT` | The API call succeeded. |
| `ERROR` | The API call failed. Error details are stored in the `m3shError` state variable. |
## Create UsageSavedQuery
**Function name:** `m3ter_CreateUsageSavedQuery`
**Category:** WRITE
**HTTP method:** POST
**Destination:** m3ter
Create a new UsageSavedQuery.
### Parameters
| Name | Label | Type | Required | Description | Constraints |
| - | - | - | :-: | - | - |
| `integrationCredentialsId` | Credentials | M3terEntityParameter | Yes | The m3ter credentials to use. | authType: M3TER\_SIGNED\_REQUEST, m3terEntity: IntegrationCredentials |
| `requestPath` | Request Path | StateVariableParameter | Yes | State variable containing the request. | - |
| `statePath` | State Path | StateVariableParameter | No | State variable to store the response. | - |
### Exits
| Exit | Description |
| - | - |
| `NEXT` | The API call succeeded. |
| `ERROR` | The API call failed. Error details are stored in the `m3shError` state variable. |
## Query and filter usage data
**Function name:** `m3ter_PostUsageDataQuery`
**Category:** READ
**HTTP method:** POST
**Destination:** m3ter
Query and filter usage data collected for your Organization.
You can use several parameters to filter the range of usage data returned:
* **Time period.** Use `startDate` and `endDate` to define a period. The query references the `timestamp` values of usage data submissions for applying the defined time period, and not the time submissions were `receivedAt` by the platform. Only usage data with a `timestamp` that falls in the defined time period are returned.(Required)
* **Meters.** Specify the Meters you want the query to return data for.
* **Accounts.** Specify the Accounts you want the query to return data for.
* **Dimension Filters.** Specify values for Dimension data fields on included Meters. Only data that match the specified Dimension field values will be returned for the query.
You can apply Aggregations functions to the usage data returned for the query. If you apply Aggregations, you can select to group the data by:
* **Account**
* **Time**
* **Dimension**
### Parameters
| Name | Label | Type | Required | Description | Constraints |
| - | - | - | :-: | - | - |
| `integrationCredentialsId` | Credentials | M3terEntityParameter | Yes | The m3ter credentials to use. | authType: M3TER\_SIGNED\_REQUEST, m3terEntity: IntegrationCredentials |
| `requestPath` | Request Path | StateVariableParameter | Yes | State variable containing the request. | - |
| `statePath` | State Path | StateVariableParameter | No | State variable to store the response. | - |
### Exits
| Exit | Description |
| - | - |
| `NEXT` | The API call succeeded. |
| `ERROR` | The API call failed. Error details are stored in the `m3shError` state variable. |
## Retrieve UsageSavedQuery
**Function name:** `m3ter_GetUsageSavedQuery`
**Category:** READ
**HTTP method:** GET
**Destination:** m3ter
Retrieve a UsageSavedQuery for the given UUID.
### Parameters
| Name | Label | Type | Required | Description | Constraints |
| - | - | - | :-: | - | - |
| `integrationCredentialsId` | Credentials | M3terEntityParameter | Yes | The m3ter credentials to use. | authType: M3TER\_SIGNED\_REQUEST, m3terEntity: IntegrationCredentials |
| `id` | id | LookupParameter | Yes | The UUID of the UsageSavedQuery to retrieve. | - |
| `statePath` | State Path | StateVariableParameter | No | State variable to store the response. | - |
### Exits
| Exit | Description |
| - | - |
| `NEXT` | The API call succeeded. |
| `ERROR` | The API call failed. Error details are stored in the `m3shError` state variable. |
## Update UsageSavedQuery
**Function name:** `m3ter_UpdateUsageSavedQuery`
**Category:** WRITE
**HTTP method:** PUT
**Destination:** m3ter
Update a UsageSavedQuery for the given UUID.
### Parameters
| Name | Label | Type | Required | Description | Constraints |
| - | - | - | :-: | - | - |
| `integrationCredentialsId` | Credentials | M3terEntityParameter | Yes | The m3ter credentials to use. | authType: M3TER\_SIGNED\_REQUEST, m3terEntity: IntegrationCredentials |
| `id` | id | LookupParameter | Yes | The UUID of the UsageSavedQuery to update. | - |
| `requestPath` | Request Path | StateVariableParameter | Yes | State variable containing the request. | - |
| `statePath` | State Path | StateVariableParameter | No | State variable to store the response. | - |
### Exits
| Exit | Description |
| - | - |
| `NEXT` | The API call succeeded. |
| `ERROR` | The API call failed. Error details are stored in the `m3shError` state variable. |
## Delete UsageSavedQuery
**Function name:** `m3ter_DeleteUsageSavedQuery`
**Category:** WRITE
**HTTP method:** DELETE
**Destination:** m3ter
Delete the UsageSavedQuery for the given UUID.
### Parameters
| Name | Label | Type | Required | Description | Constraints |
| - | - | - | :-: | - | - |
| `integrationCredentialsId` | Credentials | M3terEntityParameter | Yes | The m3ter credentials to use. | authType: M3TER\_SIGNED\_REQUEST, m3terEntity: IntegrationCredentials |
| `id` | id | LookupParameter | Yes | The UUID of the UsageSavedQuery to update. | - |
| `statePath` | State Path | StateVariableParameter | No | State variable to store the response. | - |
### Exits
| Exit | Description |
| - | - |
| `NEXT` | The API call succeeded. |
| `ERROR` | The API call failed. Error details are stored in the `m3shError` state variable. |
# Users
Source: https://docs.m3ter.com/m3sh-function-reference/m3ter/users
## Retrieve OrgUser
**Function name:** `m3ter_GetOrgUser`
**Category:** READ
**HTTP method:** GET
**Destination:** m3ter
Retrieve the OrgUser with the given UUID.
Retrieves detailed information for a specific user within an Organization, using their unique identifier (UUID).
### Parameters
| Name | Label | Type | Required | Description | Constraints |
| - | - | - | :-: | - | - |
| `integrationCredentialsId` | Credentials | M3terEntityParameter | Yes | The m3ter credentials to use. | authType: M3TER\_SIGNED\_REQUEST, m3terEntity: IntegrationCredentials |
| `id` | id | LookupParameter | Yes | The unique identifier (UUID) of the Organization User to retrieve. **Note:** The `orgId` path parameter is also required. | - |
| `statePath` | State Path | StateVariableParameter | No | State variable to store the response. | - |
### Exits
| Exit | Description |
| - | - |
| `NEXT` | The API call succeeded. |
| `ERROR` | The API call failed. Error details are stored in the `m3shError` state variable. |
## Update OrgUser
**Function name:** `m3ter_PutOrgUser`
**Category:** WRITE
**HTTP method:** PUT
**Destination:** m3ter
Update the OrgUser with the given UUID.
Updates the details for a specific user within an Organization using their unique identifier (UUID). Use this endpoint when you need to modify user information such as their permission policy.
### Parameters
| Name | Label | Type | Required | Description | Constraints |
| - | - | - | :-: | - | - |
| `integrationCredentialsId` | Credentials | M3terEntityParameter | Yes | The m3ter credentials to use. | authType: M3TER\_SIGNED\_REQUEST, m3terEntity: IntegrationCredentials |
| `id` | id | LookupParameter | Yes | The unique identifier (UUID) of the OrgUser to update. **Note:** The `orgId` path parameter is also required. | - |
| `requestPath` | Request Path | StateVariableParameter | Yes | State variable containing the request. | - |
| `statePath` | State Path | StateVariableParameter | No | State variable to store the response. | - |
### Exits
| Exit | Description |
| - | - |
| `NEXT` | The API call succeeded. |
| `ERROR` | The API call failed. Error details are stored in the `m3shError` state variable. |
## Retrieve OrgUser Permissions
**Function name:** `m3ter_GetOrgUserPermissions`
**Category:** READ
**HTTP method:** GET
**Destination:** m3ter
Retrieve the permissions for the OrgUser with the given UUID.
Retrieves a list of all permissions associated with a specific user in an Organization using their UUID. The list can be paginated for easier management.
### Parameters
| Name | Label | Type | Required | Description | Constraints |
| - | - | - | :-: | - | - |
| `integrationCredentialsId` | Credentials | M3terEntityParameter | Yes | The m3ter credentials to use. | authType: M3TER\_SIGNED\_REQUEST, m3terEntity: IntegrationCredentials |
| `id` | id | LookupParameter | Yes | The unique identifier (UUID) of the user whose permissions you want to retrieve. | - |
| `statePath` | State Path | StateVariableParameter | No | State variable to store the response. | - |
### Exits
| Exit | Description |
| - | - |
| `NEXT` | The API call succeeded. |
| `ERROR` | The API call failed. Error details are stored in the `m3shError` state variable. |
## List OrgUsers
**Function name:** `m3ter_ListOrgUsers`
**Category:** READ
**HTTP method:** GET (paginated)
**Destination:** m3ter
Retrieve a list of OrgUsers.
Retrieves a list of all users within a specified Organization. Use this endpoint to get an overview of all users and their basic details. The list can be paginated for easier management.
### Parameters
| Name | Label | Type | Required | Description | Constraints |
| - | - | - | :-: | - | - |
| `integrationCredentialsId` | Credentials | M3terEntityParameter | Yes | The m3ter credentials to use. | authType: M3TER\_SIGNED\_REQUEST, m3terEntity: IntegrationCredentials |
| `statePath` | State Path | StateVariableParameter | No | State variable to store the response. | - |
| `queryParams` | Query Parameters | KeyValueLookupParameter | No | Query parameters to include in the request | allowedValues: ids |
### Exits
| Exit | Description |
| - | - |
| `NEXT` | The API call succeeded. |
| `ERROR` | The API call failed. Error details are stored in the `m3shError` state variable. |
## Retrieve OrgUser Groups
**Function name:** `m3ter_GetOrgUserGroups`
**Category:** READ
**HTTP method:** GET
**Destination:** m3ter
Retrieve a list of User Groups for an OrgUser.
Retrieves a list of all User Groups that a specific user belongs to within an Organization. The list can be paginated for easier management.
**Notes:**
* **User Groups as Resource Groups**. A User Group is a Resource Group - one used to group resources of type `user`. You can use the *Create ResourceGroup* call detailed in the [ResourceGroup](https://www.m3ter.com/docs/api#tag/ResourceGroup) section to create a User Resource Group, and then use the *Add Item* and *Remove Item* calls to manage which Users belong to the User Resource Group.
* **Using the `inherited` parameter for the Retrieve OrgUser Groups call**. Resource Groups can be nested, which means a User Resource Group can contain another User Resource Group as a member. You can use the `inherited` parameter with this *Retrieve OrgUser Groups* call as a *QUERY PARAMETER* to control which User Resource Groups are returned:
- If the user specified belongs to a User Resource Group that is nested as part of another User Resource Group:
* If `inherited = TRUE`, then any Groups the user belongs to AND any parent Groups those Groups belong to as nested Groups are returned.
* If `inherited = FALSE`, then only those User Resource Groups to which the user belongs are returned.
### Parameters
| Name | Label | Type | Required | Description | Constraints |
| - | - | - | :-: | - | - |
| `integrationCredentialsId` | Credentials | M3terEntityParameter | Yes | The m3ter credentials to use. | authType: M3TER\_SIGNED\_REQUEST, m3terEntity: IntegrationCredentials |
| `id` | id | LookupParameter | Yes | The unique identifier (UUID) of the user. | - |
| `statePath` | State Path | StateVariableParameter | No | State variable to store the response. | - |
| `queryParams` | Query Parameters | KeyValueLookupParameter | No | Query parameters to include in the request | allowedValues: inherited |
### Exits
| Exit | Description |
| - | - |
| `NEXT` | The API call succeeded. |
| `ERROR` | The API call failed. Error details are stored in the `m3shError` state variable. |
## Retrieve current user information
**Function name:** `m3ter_GetMe`
**Category:** READ
**HTTP method:** GET
**Destination:** m3ter
Retrieve information about the current user
### Parameters
| Name | Label | Type | Required | Description | Constraints |
| - | - | - | :-: | - | - |
| `integrationCredentialsId` | Credentials | M3terEntityParameter | Yes | The m3ter credentials to use. | authType: M3TER\_SIGNED\_REQUEST, m3terEntity: IntegrationCredentials |
| `statePath` | State Path | StateVariableParameter | No | State variable to store the response. | - |
### Exits
| Exit | Description |
| - | - |
| `NEXT` | The API call succeeded. |
| `ERROR` | The API call failed. Error details are stored in the `m3shError` state variable. |
## Resend temporary password for user
**Function name:** `m3ter_AdminResendTempPass`
**Category:** WRITE
**HTTP method:** PUT
**Destination:** m3ter
Resend temporary password for user
### Parameters
| Name | Label | Type | Required | Description | Constraints |
| - | - | - | :-: | - | - |
| `integrationCredentialsId` | Credentials | M3terEntityParameter | Yes | The m3ter credentials to use. | authType: M3TER\_SIGNED\_REQUEST, m3terEntity: IntegrationCredentials |
| `id` | id | LookupParameter | Yes | UUID of the user | - |
### Exits
| Exit | Description |
| - | - |
| `NEXT` | The API call succeeded. |
| `ERROR` | The API call failed. Error details are stored in the `m3shError` state variable. |
# Aws Functions
Source: https://docs.m3ter.com/m3sh-function-reference/native/aws
## Invoke Lambda
**Function name:** `InvokeLambdaFunction`
**Category:** Write
**Destination:** Aws
Invokes an AWS lambda function
### Parameters
| Name | Label | Required | Description |
| - | - | :-: | - |
| `integrationCredentialsId` | Credentials | Yes | The AWS credentials to use. |
| `functionName` | Function Name | Yes | The name of the function to invoke. |
| `region` | Region | Yes | The AWS region where the function has been deployed. |
| `payload` | Payload | No | The name of the object to pass as the payload when the function is invoked. |
| `resultPayload` | Result Payload | No | The name of the object to store the result payload in. |
| `resultStatus` | Result Status | No | The name of the object to store the result status in. |
| `resultError` | Result Error | No | The name of the object to store the result error in. |
### Exits
| Exit | Description |
| - | - |
| `NEXT` | - |
| `ERROR` | - |
## Read from S3
**Function name:** `ReadFromS3Function`
**Category:** Read
**Destination:** Aws
Reads AWS S3 object into state
### Parameters
| Name | Label | Required | Description |
| - | - | :-: | - |
| `integrationCredentialsId` | Credentials | Yes | The AWS credentials to use. |
| `region` | Region | Yes | The AWS region where the bucket is located |
| `bucket` | Bucket | Yes | The name of the S3 bucket |
| `source` | Source | Yes | The state path to the name of the S3 Object |
| `stateVariable` | State name | Yes | The variable name by which this can be referred to in the workflow |
| `csv` | CSV | Yes | If the file is a CSV file |
| `hasHeaders` | Has headers | No | If the csv file has headers |
### Exits
| Exit | Description |
| - | - |
| `NEXT` | - |
| `ERROR` | - |
## Send Email
**Function name:** `SendEmailFunction`
**Category:** Write
**Destination:** Aws
Sends email via AWS SES
### Parameters
| Name | Label | Required | Description |
| - | - | :-: | - |
| `integrationCredentialsId` | Credentials | Yes | The AWS credentials to use. |
| `region` | Region | Yes | The name of the AWS region where the domain is registered. |
| `from` | From | Yes | The email address to send the email from. |
| `to` | To | Yes | The name of the object to pass as the recipient email address. |
| `emailSubject` | Email Subject | No | The name of the object to pass as the Subject for the email. |
| `payload` | Payload | No | The name of the object to pass as the payload for the email/emailTemplate. |
| `emailTemplate` | Email Template | No | The name of the aws email template. |
| `attachmentData` | Attachment Data | No | State variable holding the data to attach as a file. |
| `attachmentType` | Attachment Type | No | The type of the attachment eg csv or json |
### Exits
| Exit | Description |
| - | - |
| `NEXT` | - |
| `ERROR` | - |
## Send to SNS
**Function name:** `SendToSNSFunction`
**Category:** Write
**Destination:** Aws
Write a state value to an AWS SNS Topic
### Parameters
| Name | Label | Required | Description |
| - | - | :-: | - |
| `integrationCredentialsId` | Credentials | Yes | The AWS credentials to use. |
| `region` | Region | Yes | The AWS region where the SQS queue is located |
| `source` | Source | Yes | The name of the state object to write to SNS |
| `topic` | Queue | Yes | The name of the SNS topic name |
### Exits
| Exit | Description |
| - | - |
| `NEXT` | - |
| `ERROR` | - |
## Send to SQS
**Function name:** `SendToSQSFunction`
**Category:** Write
**Destination:** Aws
Write a state value to an AWS SQS Queue
### Parameters
| Name | Label | Required | Description |
| - | - | :-: | - |
| `integrationCredentialsId` | Credentials | Yes | The AWS credentials to use. |
| `region` | Region | Yes | The AWS region where the SQS queue is located |
| `source` | Source | Yes | The name of the state object to write to SQS |
| `queue` | Queue | Yes | The name of the SQS queue name |
### Exits
| Exit | Description |
| - | - |
| `NEXT` | - |
| `ERROR` | - |
## Write to S3
**Function name:** `WriteToS3Function`
**Category:** Write
**Destination:** Aws
Write a state value to AWS S3
### Parameters
| Name | Label | Required | Description |
| - | - | :-: | - |
| `integrationCredentialsId` | Credentials | Yes | The AWS credentials to use. |
| `region` | Region | Yes | The AWS region where the bucket is located |
| `stateVariable` | State variable | Yes | The variable name by which this output can be referenced using |
| `bucket` | Bucket | Yes | The name of the S3 Bucket |
| `destinationS3Key` | Destination | Yes | The path to the S3 object |
### Exits
| Exit | Description |
| - | - |
| `NEXT` | - |
| `ERROR` | - |
# Chargebee Functions
Source: https://docs.m3ter.com/m3sh-function-reference/native/chargebee
## Create Chargebee Charge Item
**Function name:** `CreateChargebeeChargeItemFunction`
**Category:** Write
**Destination:** Chargebee
Creates a charge item in Chargebee
### Parameters
| Name | Label | Required | Description |
| - | - | :-: | - |
| `integrationCredentialsId` | Credentials | Yes | Chargebee credentials to use. |
| `chargebeeInvoiceId` | Chargebee invoice ID | Yes | Name of the variable by which the Chargebee invoice ID should be retrieved from state |
| `lineItemId` | Line item id | Yes | Name of the variable by which the line item ID should be retrieved from state |
| `itemPrice` | Item price | Yes | Name of the variable by which the item price should be retrieved from state |
| `itemTiersRef` | Item tiers | No | Name of the variable by which the item tiers should be retrieved from state |
| `addExternalMapping` | Add external mappings | No | Flag to decide if external mappings should be added. Defaults to true. |
| `chargebeeInvoiceStateVariable` | Chargebee invoice | Yes | Chargebee invoice passed to state |
### Exits
| Exit | Description |
| - | - |
| `NEXT` | - |
| `ERROR` | - |
## Create Chargebee Invoice
**Function name:** `CreateChargebeeInvoiceFunction`
**Category:** Write
**Destination:** Chargebee
Creates an invoice in Chargebee
### Parameters
| Name | Label | Required | Description |
| - | - | :-: | - |
| `integrationCredentialsId` | Credentials | Yes | Chargebee credentials to use. |
| `m3terBillIdRef` | m3ter bill id | Yes | Name of the variable by which the m3ter bill id should be retrieved from state |
| `accountId` | Account Id | Yes | Name of the variable by which the account id should be retrieved from state |
| `currencyCode` | Currency Code | Yes | Name of the variable by which the currency code should be retrieved from state |
| `itemPrices` | Initial item prices | Yes | Name of the variable by which the initial item prices should be retrieved from state |
| `chargebeeInvoiceStateVariable` | Chargebee invoice | Yes | Name of the variable by which the Chargebee invoice should be stored in state |
| `addExternalMapping` | Add external mappings | No | Flag to decide if external mappings should be added. Defaults to true. |
### Exits
| Exit | Description |
| - | - |
| `NEXT` | - |
| `ERROR` | - |
## Create Chargebee Promotional Credit
**Function name:** `CreateChargebeePromoCreditFunction`
**Category:** Write
**Destination:** Chargebee
Creates a promotional credit in Chargebee
### Parameters
| Name | Label | Required | Description |
| - | - | :-: | - |
| `integrationCredentialsId` | Credentials | Yes | Chargebee credentials to use. |
| `accountId` | Account Id | Yes | Name of the variable by which the account id should be retrieved from state |
| `lineItemId` | Line Item Id | Yes | Name of the variable by which the line item id should be retrieved from state |
| `amount` | Amount | Yes | Name of the variable by which the amount should be retrieved from state |
| `amountInDecimal` | Amount in Decimal | No | Name of the variable by which the amount in decimal should be retrieved from state |
| `currencyCode` | Currency Code | Yes | Currency code for the promotional credit |
| `promoCreditDescription` | Description | Yes | Description of the promotional credit |
| `addExternalMapping` | Add external mappings | No | Flag to decide if external mappings should be added. Defaults to true. |
| `promoCreditStateVariable` | Promotional credit reference | Yes | Name of the variable by which the promotional credit should be stored in state |
### Exits
| Exit | Description |
| - | - |
| `NEXT` | - |
| `ERROR` | - |
## Update Chargebee Promotional Credit
**Function name:** `UpdateChargebeePromoCreditFunction`
**Category:** Write
**Destination:** Chargebee
Update a Promotional Credit in Chargebee
### Parameters
| Name | Label | Required | Description |
| - | - | :-: | - |
| `integrationCredentialsId` | Credentials | Yes | Chargebee credentials to use. |
| `promotionalCreditId` | Promotional credit ID | Yes | Name of the variable by which the promotional credit ID should be retrieved from state |
| `amount` | Amount | Yes | Name of the variable by which the amount should be retrieved from state |
| `amountInDecimal` | Amount in Decimal | No | Name of the variable by which the amount in decimal should be retrieved from state |
| `promotionalCreditStateVariable` | Promotional credit | No | Name of the variable by which the updated promotional credit should be stored in state |
### Exits
| Exit | Description |
| - | - |
| `NEXT` | - |
| `ERROR` | - |
# General Functions
Source: https://docs.m3ter.com/m3sh-function-reference/native/general
## Abort Workflow
**Function name:** `AbortWorkflowFunction`
**Category:** Logic
**Destination:** General
Terminates the workflow with an error message
### Parameters
| Name | Label | Required | Description |
| - | - | :-: | - |
| `message` | Message | No | Error message |
### Exits
| Exit | Description |
| - | - |
| `TERMINATE` | - |
## Add to List
**Function name:** `AddToListFunction`
**Category:** Variables
**Destination:** General
Add a variable to a list
### Parameters
| Name | Label | Required | Description |
| - | - | :-: | - |
| `listName` | Name | Yes | The name by which this list can be referred to in the workflow |
| `path` | Path | Yes | The path to the state variable to add to the list |
### Exits
| Exit | Description |
| - | - |
| `NEXT` | - |
## Apply Transformation
**Function name:** `ApplyTransformationFunction`
**Category:** Convert
**Destination:** General
Perform a pre-defined transformation
### Parameters
| Name | Label | Required | Description |
| - | - | :-: | - |
| `sourceName` | Source | Yes | Name of variable by which name of the object to transform should be retrieved from state |
| `integrationTransformationId` | Transformation | Yes | The UUID of the transformation to apply |
| `stateVariable` | Destination | Yes | Name of the variable by which the transformed object will be stored in state |
### Exits
| Exit | Description |
| - | - |
| `NEXT` | - |
## If
**Function name:** `CalculationFunction`
**Category:** Logic
**Destination:** General
Evaluate a calculation and choose a path based one whether it's true or false
### Parameters
| Name | Label | Required | Description |
| - | - | :-: | - |
| `calculation` | Calculation | Yes | the calculation to evaluate |
### Exits
| Exit | Description |
| - | - |
| `TRUE` | - |
| `FALSE` | - |
## Chunk Iterator
**Function name:** `ChunkIteratorFunction`
**Category:** Logic
**Destination:** General
Wraps a list or iterator and yields it in chunks of up to N elements.
### Parameters
| Name | Label | Required | Description |
| - | - | :-: | - |
| `source` | Source | Yes | State path to a list, or the name of an iterator, to chunk. |
| `chunkSize` | Chunk size | No | Maximum number of elements per chunk. |
| `stateVariable` | State name | Yes | The name to expose the chunk iterator under (loop over this). |
### Exits
| Exit | Description |
| - | - |
| `NEXT` | - |
## Clear Error Status
**Function name:** `ClearErrorStatusFunction`
**Category:** Logic
**Destination:** General
Clears the last error from the state, allowing the workflow to complete successfully. Place this on an error branch once the error has been handled.
### Parameters
| Name | Label | Required | Description |
| - | - | :-: | - |
### Exits
| Exit | Description |
| - | - |
| `NEXT` | - |
## Convert line items
**Function name:** `ConvertLineItemsFunction`
**Category:** Convert
**Destination:** General
Convert line items
### Parameters
| Name | Label | Required | Description |
| - | - | :-: | - |
| `stateVariable` | Destination | Yes | The variable name to store the results of the conversion in the IntegrationState (e.g. `convertedLineItems`) |
### Exits
| Exit | Description |
| - | - |
| `NEXT` | - |
## Create Index
**Function name:** `CreateIndexFunction`
**Category:** Write
**Destination:** General
Create a index on a table in m3sh DB
### Parameters
| Name | Label | Required | Description |
| - | - | :-: | - |
| `tableName` | Table Name | Yes | Table name of the table |
| `indexName` | Index Name | Yes | The name of the index |
| `fieldsToIndex` | Fields to index | Yes | The fields to be indexed |
| `fieldsToInclude` | Fields to include | No | The fields to be included |
### Exits
| Exit | Description |
| - | - |
| `NEXT` | - |
## Create List
**Function name:** `CreateStateListFunction`
**Category:** Variables
**Destination:** General
Create a list which can then be added to
### Parameters
| Name | Label | Required | Description |
| - | - | :-: | - |
| `listName` | Name | Yes | The name by which this list can be referred to in the workflow |
| `listType` | Type | No | The type of object to be added to the list (defaults to objects) |
### Exits
| Exit | Description |
| - | - |
| `NEXT` | - |
## Create Map
**Function name:** `CreateStateMapFunction`
**Category:** Variables
**Destination:** General
Create a map which can then be added to
### Parameters
| Name | Label | Required | Description |
| - | - | :-: | - |
| `mapName` | Name | Yes | The name by which this map can be referred to in the workflow |
### Exits
| Exit | Description |
| - | - |
| `NEXT` | - |
## Create Table
**Function name:** `CreateTableFunction`
**Category:** Write
**Destination:** General
Create a table in m3sh DB and populates it with data from an iterator.
### Parameters
| Name | Label | Required | Description |
| - | - | :-: | - |
| `tableName` | Table Name | Yes | Table name of the table |
| `source` | Source | Yes | The source of the data |
### Exits
| Exit | Description |
| - | - |
| `NEXT` | - |
## For Loop
**Function name:** `ForLoopFunction`
**Category:** Logic
**Destination:** General
Increment or decrement a counter between two numbers.
### Parameters
| Name | Label | Required | Description |
| - | - | :-: | - |
| `startValue` | Start value (inclusive) | Yes | The value to start the for loop at. |
| `endValue` | End value (exclusive) | Yes | The value to end the for loop at. |
| `counterVariableName` | Counter variable | Yes | Counter variable name. |
| `decrement` | Decrement | No | Decrement the counter |
### Exits
| Exit | Description |
| - | - |
| `NEXT` | - |
| `ERROR` | - |
## Get First Result Or Null
**Function name:** `GetFirstResultOrNullFunction`
**Category:** Variables
**Destination:** General
Retrieves the first element from a list or iterator and stores it in a state variable.
### Parameters
| Name | Label | Required | Description |
| - | - | :-: | - |
| `sourceObjectPath` | Source | Yes | The list or iterator to retrieve the first element from. |
| `outputStateVariable` | Output variable | Yes | The name of the state variable in which to store the first element (null if none). |
### Exits
| Exit | Description |
| - | - |
| `NEXT` | - |
## Has Results
**Function name:** `HasResultsFunction`
**Category:** Logic
**Destination:** General
Inspect a list or iterator and branch based on whether it contains values or not
### Parameters
| Name | Label | Required | Description |
| - | - | :-: | - |
| `sourceObjectPath` | Source | Yes | Source of the objects to loop over. |
### Exits
| Exit | Description |
| - | - |
| `TRUE` | - |
| `FALSE` | - |
## Loop
**Function name:** `LoopFunction`
**Category:** Logic
**Destination:** General
Loop over a collection of objects and apply functions to them
### Parameters
| Name | Label | Required | Description |
| - | - | :-: | - |
| `sourceObjectPath` | Source | Yes | Source of the objects to loop over. |
| `counterVariableName` | Counter variable | Yes | Counter variable name. |
| `elementVariableName` | Element variable | No | Element variable name. |
### Exits
| Exit | Description |
| - | - |
| `NEXT` | - |
| `ERROR` | - |
## List Map Values
**Function name:** `MapValuesFunction`
**Category:** Variables
**Destination:** General
Creates a list of values stored in a map
### Parameters
| Name | Label | Required | Description |
| - | - | :-: | - |
| `mapPath` | Map Path | Yes | The state path of the map to retrieve values from |
| `listPath` | List Path | Yes | The state path of the list that will be created containing values copied from the map |
| `fieldName` | Field Name | No | The field within each map value that will be listed - if this is not set, the map value itself will be listed |
### Exits
| Exit | Description |
| - | - |
| `NEXT` | - |
## Merge Lists
**Function name:** `MergeListsFunction`
**Category:** Variables
**Destination:** General
Merges two list of object with a matching field value. The merged objects are added to the destination list
### Parameters
| Name | Label | Required | Description |
| - | - | :-: | - |
| `leftList` | Left List | Yes | The left hand source list. |
| `rightList` | Right List | Yes | The right hand source list. |
| `mergedListsStateVariable` | Merged lists name | Yes | The variable name in which the merged list will be stored in the state. |
| `field` | Field | Yes | The field name that the lists will be joined on. |
| `joinType` | Join Type | Yes | The way in which the lists are joined. |
### Exits
| Exit | Description |
| - | - |
| `NEXT` | - |
## Merge Objects
**Function name:** `MergeObjectsFunction`
**Category:** Convert
**Destination:** General
Merge the source object into the destination object.
### Parameters
| Name | Label | Required | Description |
| - | - | :-: | - |
| `sourceObjectName` | Source Name | Yes | The name of the object |
| `targetObjectName` | Object to merge into | Yes | The name of the object to merge with. Fields in this object that are not also in the source will remain unchanged |
| `fieldName` | Field name | No | Optional field name to use when merging |
### Exits
| Exit | Description |
| - | - |
| `NEXT` | - |
## Merge Transformation
**Function name:** `MergeTransformationFunction`
**Category:** Convert
**Destination:** General
Coalesces two objects using a transformation. Values in the mergeObject are overwritten by transformed fields from the sourceObject; otherwise they remain unchanged.
### Parameters
| Name | Label | Required | Description |
| - | - | :-: | - |
| `integrationTransformationId` | Transformation | Yes | The UUID of the transformation to apply |
| `sourceObjectName` | Source Name | Yes | The name of the object to transform |
| `mergeObjectName` | Object to Merge | Yes | The name of the object to merge with. Fields in this object that are not transformed from the source will remain unchanged |
| `stateVariable` | Destination Name | Yes | The name of the object to create in the state |
### Exits
| Exit | Description |
| - | - |
| `NEXT` | - |
## Remove Field
**Function name:** `RemoveFieldFunction`
**Category:** Convert
**Destination:** General
Removes a field on an object within the state.
### Parameters
| Name | Label | Required | Description |
| - | - | :-: | - |
| `statePath` | State Path | Yes | Path to the field within the state to remove. If the field is an object, the entire object is removed. |
### Exits
| Exit | Description |
| - | - |
| `NEXT` | - |
## Run error workflow
**Function name:** `RunErrorWorkflowFunction`
**Category:** Logic
**Destination:** General
Run workflow to handle an error. No further functions will be run in this workflow.
### Parameters
| Name | Label | Required | Description |
| - | - | :-: | - |
| `integrationDestinationId` | Integration destination ID | Yes | Workflow's Integration destination ID |
| `failWorkflow` | Fail workflow | No | If enabled, this (current) workflow will fail once the error workflow is completed. |
| `messageLookup` | Message | No | Error message to be used. |
### Exits
| Exit | Description |
| - | - |
## Run workflow
**Function name:** `RunWorkflowFunction`
**Category:** Logic
**Destination:** General
Run a workflow
### Parameters
| Name | Label | Required | Description |
| - | - | :-: | - |
| `integrationDestinationId` | Integration destination ID | Yes | Workflow's Integration destination ID |
### Exits
| Exit | Description |
| - | - |
| `NEXT` | - |
## Set Field
**Function name:** `SetFieldFunction`
**Category:** Convert
**Destination:** General
Update a field on an object within the state.
### Parameters
| Name | Label | Required | Description |
| - | - | :-: | - |
| `statePath` | State Path | Yes | Path to the field within the state to update. If the field does not exist it will be created |
| `lookup` | Lookup | Yes | The value to set the field to. |
### Exits
| Exit | Description |
| - | - |
| `NEXT` | - |
## Set Multiple Fields
**Function name:** `SetMultiFieldsFunction`
**Category:** Convert
**Destination:** General
Update one or more fields on an object within the state.
### Parameters
| Name | Label | Required | Description |
| - | - | :-: | - |
| `statePath` | State Path | Yes | Path to the object within the state to update. |
| `lookups` | Lookup | Yes | The value to set the field to. |
### Exits
| Exit | Description |
| - | - |
| `NEXT` | - |
## Create SFTP file
**Function name:** `SftpDataOutputFunction`
**Category:** Write
**Destination:** General
Create a file on a SFTP server which can be used for writing data to.
### Parameters
| Name | Label | Required | Description |
| - | - | :-: | - |
| `integrationCredentialsId` | Credentials | Yes | The basic credentials required to connect to the SFTP server. |
| `host` | Host | Yes | Host name of the server to connect to. |
| `port` | Port | No | The port on which to connect to the SFTP server on. If unspecified, the default value of 22 will be used |
| `remoteFileName` | Destination File | Yes | The remote file to write to. |
| `stateVariable` | State variable | Yes | The variable name by which this output can be referenced using |
### Exits
| Exit | Description |
| - | - |
| `NEXT` | - |
## Sort List
**Function name:** `SortListFunction`
**Category:** Variables
**Destination:** General
Sort an existing list in the state based on a field.
### Parameters
| Name | Label | Required | Description |
| - | - | :-: | - |
| `listName` | Name | Yes | The name of the list in the state to sort. |
| `sortField` | Sort Field | Yes | The name of the field to sort on. |
| `descending` | Descending | No | Sort the list in a descending order. e.g. (3, 2, 1) or (Z, Y, X) |
### Exits
| Exit | Description |
| - | - |
| `NEXT` | - |
## SQL Select Data
**Function name:** `SqlSelectFunction`
**Category:** Read
**Destination:** General
Run SQL against a table
### Parameters
| Name | Label | Required | Description |
| - | - | :-: | - |
| `sql` | SQL | Yes | Select statement. N.B. Datastore does not support all SQL keywords |
| `responsePath` | Response Path | Yes | The path in which to store the response in the state. |
### Exits
| Exit | Description |
| - | - |
| `NEXT` | - |
## Validate
**Function name:** `ValidateFunction`
**Category:** Logic
**Destination:** General
Validates an object from the state against a schema (if supported) and branches based on whether it is valid or not.
### Parameters
| Name | Label | Required | Description |
| - | - | :-: | - |
| `system` | System | Yes | The system to validate against. |
| `schemaName` | Schema name | Yes | The name of the schema to validate against. |
| `objectName` | Object | Yes | The name of the object in state to validate. |
### Exits
| Exit | Description |
| - | - |
| `VALID` | - |
| `INVALID` | - |
## Write CSV
**Function name:** `WriteObjectToCsvFunction`
**Category:** Write
**Destination:** General
Writes data to a declared output as a CSV row.
### Parameters
| Name | Label | Required | Description |
| - | - | :-: | - |
| `output` | Output | Yes | Name of a previously declared output. |
| `source` | Source | Yes | Source state object to write |
### Exits
| Exit | Description |
| - | - |
| `NEXT` | - |
## Write JSON
**Function name:** `WriteObjectToJsonFunction`
**Category:** Write
**Destination:** General
Writes data to a declared output as a JSON object. Multiple objects written to the same format are separated by a line break (JSONL)
### Parameters
| Name | Label | Required | Description |
| - | - | :-: | - |
| `output` | Output | Yes | Name of a previously declared output. |
| `source` | Source | Yes | Source state object to write |
### Exits
| Exit | Description |
| - | - |
| `NEXT` | - |
# Hubspot Functions
Source: https://docs.m3ter.com/m3sh-function-reference/native/hubspot
## Call HubSpot webhook
**Function name:** `CallHubspotWebhookFunction`
**Category:** Write
**Destination:** Hubspot
Calls a HubSpot webhook
### Parameters
| Name | Label | Required | Description |
| - | - | :-: | - |
| `webhookUrl` | Webhook URL | Yes | Webhook URL to call |
| `objectData` | Object Data | Yes | The name of the variable containing object data to be sent to the webhook |
### Exits
| Exit | Description |
| - | - |
| `NEXT` | - |
| `ERROR` | - |
## Create HubSpot object
**Function name:** `CreateHubspotObjectFunction`
**Category:** Write
**Destination:** Hubspot
Creates a HubSpot object
### Parameters
| Name | Label | Required | Description |
| - | - | :-: | - |
| `integrationCredentialsId` | Credentials | Yes | HubSpot credentials to use. |
| `objectName` | Object Name | Yes | Name of the HubSpot object |
| `objectData` | Object Data | Yes | The name of the variable containing object data to be created to in HubSpot |
| `outputObjectStateVariable` | Output resource name | No | Name of the variable by which the object will be stored in state |
### Exits
| Exit | Description |
| - | - |
| `NEXT` | - |
| `ERROR` | - |
## Delete HubSpot object
**Function name:** `DeleteHubspotObjectFunction`
**Category:** Write
**Destination:** Hubspot
Deletes a HubSpot object
### Parameters
| Name | Label | Required | Description |
| - | - | :-: | - |
| `integrationCredentialsId` | Credentials | Yes | HubSpot credentials to use. |
| `objectName` | Object Name | Yes | Name of the HubSpot object |
| `objectId` | Object ID | Yes | Name of the variable containing the ID of the object to be deleted from HubSpot |
### Exits
| Exit | Description |
| - | - |
| `NEXT` | - |
| `ERROR` | - |
## Read HubSpot object
**Function name:** `ReadHubspotObjectFunction`
**Category:** Read
**Destination:** Hubspot
Reads a HubSpot object
### Parameters
| Name | Label | Required | Description |
| - | - | :-: | - |
| `integrationCredentialsId` | Credentials | Yes | HubSpot credentials to use. |
| `objectName` | Object Name | Yes | Name of the HubSpot object |
| `objectId` | Object ID | Yes | Name of the variable containing the ID of the object to be retrieved from HubSpot |
| `properties` | Properties | No | Comma separated list of properties to retrieve. If not set, default properties will be retrieved. |
| `outputObjectStateVariable` | Output object | No | Name of the variable by which the object will be stored in state |
### Exits
| Exit | Description |
| - | - |
| `NEXT` | - |
| `ERROR` | - |
## Search HubSpot objects
**Function name:** `SearchHubspotObjectsFunction`
**Category:** Read
**Destination:** Hubspot
Function for searching for HubSpot objects. Can be used to find objects by specific criteria. Also can be used to list all objects of a specific type.
### Parameters
| Name | Label | Required | Description |
| - | - | :-: | - |
| `integrationCredentialsId` | Credentials | Yes | HubSpot credentials to use. |
| `objectName` | Object Name | Yes | Name of the HubSpot object |
| `query` | Query | No | The name of the variable containing the query to be executed |
| `properties` | Properties | No | Comma separated list of properties to retrieve. If not set, default properties will be retrieved. |
| `sorts` | Sorts | No | Sort objects to sort the search results. |
| `filterGroups` | Filter Groups | No | Filter group objects to filter the search results. |
| `outputResultsStateVariable` | Output results name | Yes | Name of the variable by which the objects iterator will be stored in state |
### Exits
| Exit | Description |
| - | - |
| `NEXT` | - |
| `ERROR` | - |
## Update HubSpot object
**Function name:** `UpdateHubspotObjectFunction`
**Category:** Write
**Destination:** Hubspot
Updates a HubSpot object
### Parameters
| Name | Label | Required | Description |
| - | - | :-: | - |
| `integrationCredentialsId` | Credentials | Yes | HubSpot credentials to use. |
| `objectName` | Object Name | Yes | Name of the HubSpot object |
| `objectId` | Object ID | Yes | Name of the variable containing the ID of the object to be retrieved from HubSpot |
| `updateData` | Update data | Yes | The name of the variable containing data to be sent to HubSpot for update |
| `outputObjectStateVariable` | Output object | No | Name of the variable by which the updated object will be stored in state |
### Exits
| Exit | Description |
| - | - |
| `NEXT` | - |
| `ERROR` | - |
# m3ter Functions
Source: https://docs.m3ter.com/m3sh-function-reference/native/m3ter
## Bulk retrieve m3ter entities
**Function name:** `BulkGetM3terEntityFunction`
**Category:** Read
**Destination:** m3ter
Read a list of m3ter entities from a list endpoint by consuming an iterator of entity IDs
### Parameters
| Name | Label | Required | Description |
| - | - | :-: | - |
| `integrationCredentialsId` | Credentials | Yes | The m3ter credentials to use. |
| `m3terEntity` | m3ter Entity | Yes | The name of the m3ter entity |
| `m3terEntityIdsIterator` | m3ter entity ID iterator name | Yes | The name of the iterator containing m3ter entity UUIDs |
| `stateVariable` | Output state name | Yes | Name of the variable by which the objects iterator will be stored in state |
| `parentM3terEntityIdPath` | Parent m3ter entity UUID path | No | The path to the UUID of the parent entity for the m3ter entity targeted by this operation (e.g event.new\.id) |
### Exits
| Exit | Description |
| - | - |
| `NEXT` | - |
| `ERROR` | - |
## Create m3ter external mapping
**Function name:** `CreateExternalMappingFunction`
**Category:** Write
**Destination:** m3ter
Creates an external mapping between a m3ter entity and an external system
### Parameters
| Name | Label | Required | Description |
| - | - | :-: | - |
| `m3terEntity` | m3ter Entity Type | Yes | The name of the m3ter entity type |
| `m3terIdPath` | m3ter ID Path | Yes | The path of the m3ter UUID to lookup in the state |
| `externalSystem` | External System | Yes | The name of the external system |
| `externalTable` | External Table | Yes | The name of the external table |
| `externalIdPath` | External ID Path | Yes | The path of the external ID to lookup in the state |
| `duplicateRunForEntity` | Duplicate run log for entity | No | If enabled, the run is also associated with the m3ter entity this external mapping was created for |
### Exits
| Exit | Description |
| - | - |
| `NEXT` | - |
## Create m3ter Entity
**Function name:** `CreateM3terEntityFunction`
**Category:** Write
**Destination:** m3ter
Create a m3ter entity with a payload
### Parameters
| Name | Label | Required | Description |
| - | - | :-: | - |
| `integrationCredentialsId` | Credentials | Yes | The m3ter credentials to use. |
| `m3terEntity` | m3ter Entity | Yes | The name of the m3ter entity |
| `payloadPath` | Path to m3ter entity payload | Yes | The path to the m3ter entity create payload |
| `responsePath` | Path to entity create response | No | The path to save the m3ter entity create response |
| `parentM3terEntityIdPath` | Parent m3ter entity UUID path | No | The path to the UUID of the parent entity for the m3ter entity targeted by this operation (e.g event.new\.id) |
### Exits
| Exit | Description |
| - | - |
| `NEXT` | - |
| `ERROR` | - |
## Delete External Mapping
**Function name:** `DeleteExternalMappingsForExternalEntityFunction`
**Category:** Write
**Destination:** m3ter
Delete External Mappings for a external system, table, and external ID
### Parameters
| Name | Label | Required | Description |
| - | - | :-: | - |
| `externalSystem` | External System | Yes | The external system |
| `externalTable` | External Table | Yes | The external table (e.g Customer) |
| `stateVariable` | External ID path | Yes | The path to the ID in the state |
### Exits
| Exit | Description |
| - | - |
| `NEXT` | - |
## Delete m3ter Entity
**Function name:** `DeleteM3terEntityFunction`
**Category:** Write
**Destination:** m3ter
Delete a m3ter entity
### Parameters
| Name | Label | Required | Description |
| - | - | :-: | - |
| `integrationCredentialsId` | Credentials | Yes | The m3ter credentials to use. |
| `m3terEntity` | m3ter Entity | Yes | The name of the m3ter entity |
| `m3terEntityIdPath` | m3ter entity UUID path | Yes | The path to the UUID of the m3ter entity to delete (e.g event.new\.id) |
| `responsePath` | Path to entity update response | No | The path to save the m3ter entity update response |
| `parentM3terEntityIdPath` | Parent m3ter entity UUID path | No | The path to the UUID of the parent entity for the m3ter entity targeted by this operation (e.g event.new\.id) |
### Exits
| Exit | Description |
| - | - |
| `NEXT` | - |
| `ERROR` | - |
## Lookup external ID for m3ter entity
**Function name:** `ExternalMappingExistsForM3terFunction`
**Category:** Logic
**Destination:** m3ter
Look for an external mapping for a m3ter entity and destination
### Parameters
| Name | Label | Required | Description |
| - | - | :-: | - |
| `m3terEntity` | m3ter Entity Type | Yes | The name of the m3ter entity type |
| `m3terIdPath` | m3ter ID Path | Yes | The path to the m3ter UUID to lookup |
| `externalSystem` | External System | Yes | The name of the external system |
| `externalTable` | External Table | No | The name of the external table |
| `stateVariable` | External ID State Variable Name | No | The name to use to save the external ID to the state |
| `duplicateRunForEntity` | Duplicate run log for entity | No | If enabled and an external mapping is found, the run will also associated with the m3ter entity |
### Exits
| Exit | Description |
| - | - |
| `TRUE` | - |
| `FALSE` | - |
## Lookup m3ter entity UUID
**Function name:** `ExternalMappingExistsForSystemFunction`
**Category:** Logic
**Destination:** m3ter
Look for an external mapping for an external service, table, and ID
### Parameters
| Name | Label | Required | Description |
| - | - | :-: | - |
| `externalSystem` | External System | Yes | The external system |
| `externalTable` | External Table | Yes | The external table name |
| `externalIdPath` | External ID Path | Yes | The path to the external ID to lookup |
| `stateVariable` | m3ter ID State Variable Name | No | The name to use to save the m3ter UUID to the state |
### Exits
| Exit | Description |
| - | - |
| `TRUE` | - |
| `FALSE` | - |
## Get m3ter Entity
**Function name:** `GetM3terEntityFunction`
**Category:** Read
**Destination:** m3ter
Get a m3ter entity
### Parameters
| Name | Label | Required | Description |
| - | - | :-: | - |
| `integrationCredentialsId` | Credentials | Yes | The m3ter credentials to use. |
| `m3terEntity` | m3ter Entity | Yes | The name of the m3ter entity |
| `m3terEntityIdPath` | m3ter entity UUID path | Yes | The path to the UUID of the m3ter entity to get (e.g event.new\.id) |
| `responsePath` | Path to entity get response | No | The path to save the m3ter entity get response |
| `parentM3terEntityIdPath` | Parent m3ter entity UUID path | No | The path to the UUID of the parent entity for the m3ter entity targeted by this operation (e.g event.new\.id) |
### Exits
| Exit | Description |
| - | - |
| `NEXT` | - |
| `ERROR` | - |
## List m3ter entities
**Function name:** `ListM3terEntityFunction`
**Category:** Read
**Destination:** m3ter
Read a list of m3ter entities from a list endpoint. The data is retrieved by pages
### Parameters
| Name | Label | Required | Description |
| - | - | :-: | - |
| `integrationCredentialsId` | Credentials | Yes | The m3ter credentials to use. |
| `m3terEntity` | m3ter Entity | Yes | The name of the m3ter entity |
| `stateVariable` | Output state name | Yes | Name of the variable by which the objects iterator will be stored in state |
| `queryParameters` | Query parameters | No | Optional query parameters to include in the request |
| `parentM3terEntityIdPath` | Parent m3ter entity UUID path | No | The path to the UUID of the parent entity for the m3ter entity targeted by this operation (e.g event.new\.id) |
### Exits
| Exit | Description |
| - | - |
| `NEXT` | - |
| `ERROR` | - |
## Update external bill
**Function name:** `UpdateExternalReferenceOnM3terBillFunction`
**Category:** Write
**Destination:** m3ter
Updates the external reference on a m3ter bill
### Parameters
| Name | Label | Required | Description |
| - | - | :-: | - |
| `m3terBillUuidStateVariable` | m3ter Bill UUID path | Yes | The path to the UUID of the m3ter bill to update (e.g event.new\.id) |
| `externalReferenceStateVariable` | External reference path | Yes | The path to the reference of the external Invoice. |
### Exits
| Exit | Description |
| - | - |
| `NEXT` | - |
| `ERROR` | - |
## Update m3ter Entity
**Function name:** `UpdateM3terEntityFunction`
**Category:** Write
**Destination:** m3ter
Update a m3ter entity with a payload
### Parameters
| Name | Label | Required | Description |
| - | - | :-: | - |
| `integrationCredentialsId` | Credentials | Yes | The m3ter credentials to use. |
| `m3terEntity` | m3ter Entity | Yes | The name of the m3ter entity |
| `m3terEntityIdPath` | m3ter entity UUID path | Yes | The path to the UUID of the m3ter entity to update (e.g event.new\.id) |
| `payloadPath` | Path to m3ter Entity Payload | Yes | The path to the m3ter entity update payload |
| `responsePath` | Path to entity update response | No | The path to save the m3ter entity update response |
| `parentM3terEntityIdPath` | Parent m3ter entity UUID path | No | The path to the UUID of the parent entity for the m3ter entity targeted by this operation (e.g event.new\.id) |
### Exits
| Exit | Description |
| - | - |
| `NEXT` | - |
| `ERROR` | - |
## Upload Measurements File
**Function name:** `UploadMeasurementsFunction`
**Category:** Write
**Destination:** m3ter
Upload measurements from a list or iterator and uploads them to m3ter via presigned URL(s)
### Parameters
| Name | Label | Required | Description |
| - | - | :-: | - |
| `integrationCredentialsId` | Credentials | Yes | The m3ter credentials to use. |
| `source` | Measurements | Yes | State path to a list of measurements, or the name of an iterator, to upload |
| `jobIdVariable` | Job ID location | No | Optional state location to store the jobId. |
### Exits
| Exit | Description |
| - | - |
| `NEXT` | - |
| `ERROR` | - |
# NetSuite Functions
Source: https://docs.m3ter.com/m3sh-function-reference/native/netsuite
## Create NetSuite Record
**Function name:** `CreateNetsuiteRecordFunction`
**Category:** Write
**Destination:** NetSuite
Creates a record in NetSuite
### Parameters
| Name | Label | Required | Description |
| - | - | :-: | - |
| `integrationCredentialsId` | Credentials | Yes | NetSuite credentials to use. |
| `recordType` | Record type | Yes | The type of NetSuite record to create |
| `inputData` | Input data | Yes | The name of the variable containing the record data to be sent to NetSuite |
| `stateVariable` | Output data | No | The name of the variable to store the response from NetSuite |
| `parentRecordPathCalculation` | Parent record path calculation | No | Calculation that evaluates to the path to a parent record |
### Exits
| Exit | Description |
| - | - |
| `NEXT` | - |
| `ERROR` | - |
## Delete NetSuite Record
**Function name:** `DeleteNetsuiteRecordFunction`
**Category:** Write
**Destination:** NetSuite
Deletes a record in NetSuite
### Parameters
| Name | Label | Required | Description |
| - | - | :-: | - |
| `integrationCredentialsId` | Credentials | Yes | NetSuite credentials to use. |
| `recordType` | Record type | Yes | The type of NetSuite record to delete |
| `recordId` | Record id | Yes | The name of the variable containing the ID of the record to delete |
| `parentRecordPathCalculation` | Parent record path calculation | No | Calculation that evaluates to the path to a parent record |
### Exits
| Exit | Description |
| - | - |
| `NEXT` | - |
| `ERROR` | - |
## List NetSuite Records
**Function name:** `ListNetsuiteRecordsFunction`
**Category:** Read
**Destination:** NetSuite
List records in NetSuite
### Parameters
| Name | Label | Required | Description |
| - | - | :-: | - |
| `integrationCredentialsId` | Credentials | Yes | NetSuite credentials to use. |
| `recordType` | Record type | Yes | The type of NetSuite record to read |
| `query` | Query | Yes | The name of the variable containing the query to be executed |
| `stateVariable` | Output results name | Yes | Name of the variable by which the objects iterator will be stored in state |
| `parentRecordPathCalculation` | Parent record path calculation | No | Calculation that evaluates to the path to a parent record |
### Exits
| Exit | Description |
| - | - |
| `NEXT` | - |
| `ERROR` | - |
## Query NetSuite Record
**Function name:** `QueryNetsuiteSingleRecordFunction`
**Category:** Read
**Destination:** NetSuite
Retrieve a single Netsuite record using SuiteQL. If more than one record is returned by the query, the workflow will fail.
### Parameters
| Name | Label | Required | Description |
| - | - | :-: | - |
| `integrationCredentialsId` | Credentials | Yes | NetSuite credentials to use. |
| `query` | Query | Yes | The SuiteQL query to be executed |
| `stateVariable` | Output results name | Yes | Name of the variable by which the record will be stored in state |
| `parentRecordPathCalculation` | Parent record path calculation | No | Calculation that evaluates to the path to a parent record |
### Exits
| Exit | Description |
| - | - |
| `NEXT` | - |
| `ERROR` | - |
## Read NetSuite Record
**Function name:** `ReadNetsuiteRecordFunction`
**Category:** Read
**Destination:** NetSuite
Read a record from NetSuite
### Parameters
| Name | Label | Required | Description |
| - | - | :-: | - |
| `integrationCredentialsId` | Credentials | Yes | NetSuite credentials to use. |
| `recordType` | Record type | Yes | The type of NetSuite record to read |
| `recordId` | Record id | Yes | The name of the variable containing the ID of the record to read |
| `stateVariable` | Output data | No | The name of the variable to store the response from NetSuite |
| `parentRecordPathCalculation` | Parent record path calculation | No | Calculation that evaluates to the path to a parent record |
### Exits
| Exit | Description |
| - | - |
| `NEXT` | - |
| `ERROR` | - |
## Update NetSuite Record
**Function name:** `UpdateNetsuiteRecordFunction`
**Category:** Write
**Destination:** NetSuite
Updates a record in NetSuite
### Parameters
| Name | Label | Required | Description |
| - | - | :-: | - |
| `integrationCredentialsId` | Credentials | Yes | NetSuite credentials to use. |
| `recordType` | Record type | Yes | The type of NetSuite record to create |
| `recordId` | Record id variable | Yes | The name of the variable containing the ID of the existing record in NetSuite that should be updated |
| `replace` | Replace | No | The names of sublists on this record. All sublist lines will be replaced with lines specified in the request. The names are delimited by comma. If this is not specified, the sublist lines will be appended to the existing lines. In order to update top level fields do not set this parameter. |
| `inputData` | Input data variable | Yes | The name of the variable containing the record data to be sent to NetSuite |
| `stateVariable` | Output data variable | No | The name of the variable to store the response from NetSuite |
| `parentRecordPathCalculation` | Parent record path calculation | No | Calculation that evaluates to the path to a parent record |
### Exits
| Exit | Description |
| - | - |
| `NEXT` | - |
| `ERROR` | - |
# Opsgenie Functions
Source: https://docs.m3ter.com/m3sh-function-reference/native/opsgenie
## Create OpsGenie Alert
**Function name:** `CreateOpsGenieAlertFunction`
**Category:** Write
**Destination:** Opsgenie
Creates an alert in OpsGenie
### Parameters
| Name | Label | Required | Description |
| - | - | :-: | - |
| `integrationCredentialsId` | Credentials | Yes | OpsGenie credentials to use. |
| `alertMessage` | Alert message | Yes | Name of the variable by which alert message should be retrieved from state |
| `alias` | Alias | No | Name of the variable by which alert alias should be retrieved from state. Identifier of the alert, that is also the key element of Alert De-Duplication |
| `alertDescription` | Description | No | Name of the variable by which alert description should be retrieved from state. Detailed information about the alert |
| `responders` | Responders | No | Teams, users, escalations and schedules that the alert will be routed to send notifications |
| `visibleTo` | Visible to | No | Teams and users that the alert will become visible to without sending any notification |
| `source` | Source | No | Name of the variable by which alert source should be retrieved from state. The name of the system that created the alert |
| `priority` | Priority | No | Name of the variable by which alert priority should be retrieved from state. Priority level of the alert. Possible values are P1, P2, P3, P4 and P5. Default value is P3 |
| `user` | User | No | Name of the variable by which alert user should be retrieved from state. The name of the user that created the alert |
| `note` | Note | No | Name of the variable by which alert note should be retrieved from state. Note that will be added to the alert |
### Exits
| Exit | Description |
| - | - |
| `NEXT` | - |
| `ERROR` | - |
# Sage Intacct Functions
Source: https://docs.m3ter.com/m3sh-function-reference/native/sage-intacct
## Create Sage Intacct object
**Function name:** `CreateSageIntacctObjectFunction`
**Category:** Write
**Destination:** Sage Intacct
Creates object in Sage Intacct
### Parameters
| Name | Label | Required | Description |
| - | - | :-: | - |
| `integrationCredentialsId` | Credentials | Yes | Sage Intacct credentials to use. |
| `objectName` | Object Name | Yes | Name of the Sage Intacct object. For example 'customer' |
| `groupName` | Group name | Yes | Name of the Sage Intacct group. For example 'Accounts Receivable' |
| `objectData` | Object Data | Yes | The name of the variable containing object data to be created to in Sage Intacct |
| `outputObjectStateVariable` | Output resource name | No | Name of the variable by which the object will be stored in state |
### Exits
| Exit | Description |
| - | - |
| `NEXT` | - |
| `ERROR` | - |
## Delete Sage Intacct object
**Function name:** `DeleteSageIntacctObjectFunction`
**Category:** Write
**Destination:** Sage Intacct
Deletes a Sage Intacct object
### Parameters
| Name | Label | Required | Description |
| - | - | :-: | - |
| `integrationCredentialsId` | Credentials | Yes | Sage Intacct credentials to use. |
| `objectName` | Object Name | Yes | Name of the Sage Intacct object. For example 'customer' |
| `groupName` | Group name | Yes | Name of the Sage Intacct group. For example 'Accounts Receivable' |
| `objectId` | Object ID | Yes | Name of the variable containing the ID of the object to be deleted from Sage Intacct |
### Exits
| Exit | Description |
| - | - |
| `NEXT` | - |
| `ERROR` | - |
## Query Sage Intacct objects
**Function name:** `QuerySageIntacctObjectFunction`
**Category:** Read
**Destination:** Sage Intacct
Function for querying Sage Intacct objects.
### Parameters
| Name | Label | Required | Description |
| - | - | :-: | - |
| `integrationCredentialsId` | Credentials | Yes | Sage Intacct credentials to use. |
| `objectName` | Object Name | Yes | Name of the Sage Intacct object. For example 'customer' |
| `groupName` | Group name | Yes | Name of the Sage Intacct group. For example 'Accounts Receivable' |
| `fields` | Fields | Yes | Comma separated list of fields to retrieve. For example: id,key,href |
| `filters` | Filters | No | Filters to apply to the query with multiple lookup types. |
| `filterExpression` | Filter Expression | No | Logical operators to apply when there are multiple filter conditions. The conditions in the filters array are implicitly numbered starting at 1. Supports and, or, and grouping with parentheses. |
| `orderBy` | Order By | No | Set the order of the results by specifying field names to sort by and whether they should be in ascending (asc) or descending (desc) order. |
| `outputResultsStateVariable` | Output results name | Yes | Name of the variable by which the objects iterator will be stored in state |
### Exits
| Exit | Description |
| - | - |
| `NEXT` | - |
| `ERROR` | - |
## Read Sage Intacct object
**Function name:** `ReadSageIntacctObjectFunction`
**Category:** Read
**Destination:** Sage Intacct
Reads a Sage Intacct object
### Parameters
| Name | Label | Required | Description |
| - | - | :-: | - |
| `integrationCredentialsId` | Credentials | Yes | Sage Intacct credentials to use. |
| `objectName` | Object Name | Yes | Name of the Sage Intacct object. For example 'customer' |
| `groupName` | Group name | Yes | Name of the Sage Intacct group. For example 'Accounts Receivable' |
| `objectId` | Object ID | Yes | Name of the variable containing the ID (key) of the object to be retrieved from Sage Intacct |
| `outputObjectStateVariable` | Output object | No | Name of the variable by which the object will be stored in state |
### Exits
| Exit | Description |
| - | - |
| `NEXT` | - |
| `ERROR` | - |
## Update Sage Intacct object
**Function name:** `UpdateSageIntacctObjectFunction`
**Category:** Write
**Destination:** Sage Intacct
Updates a Sage Intacct object
### Parameters
| Name | Label | Required | Description |
| - | - | :-: | - |
| `integrationCredentialsId` | Credentials | Yes | Sage Intacct credentials to use. |
| `objectName` | Object Name | Yes | Name of the Sage Intacct object. For example 'customer' |
| `groupName` | Group name | Yes | Name of the Sage Intacct group. For example 'Accounts Receivable' |
| `objectId` | Object ID | Yes | Name of the variable containing the ID of the object to be updated in Sage Intacct |
| `updateData` | Update data | Yes | The name of the variable containing data to be sent to Sage Intacct for update |
| `outputObjectStateVariable` | Output object | No | Name of the variable by which the updated object will be stored in state |
### Exits
| Exit | Description |
| - | - |
| `NEXT` | - |
| `ERROR` | - |
# Salesforce Functions
Source: https://docs.m3ter.com/m3sh-function-reference/native/salesforce
## Await bulk upload job completion
**Function name:** `AwaitSalesforceBulkJobCompletionFunction`
**Category:** Read
**Destination:** Salesforce
Polls until a bulk upload job enters a completion state.
### Parameters
| Name | Label | Required | Description |
| - | - | :-: | - |
| `jobIdPath` | Job ID path | Yes | The state path where the job ID is stored. |
| `integrationCredentialsId` | Credentials | Yes | Salesforce credentials to use. |
| `apiVersion` | API version | No | Salesforce API version. If not set defaults to 62.0 |
### Exits
| Exit | Description |
| - | - |
| `NEXT` | - |
| `ERROR` | - |
## Complete bulk upload job
**Function name:** `CompleteSalesforceBulkUploadFunction`
**Category:** Write
**Destination:** Salesforce
Marks a bulk upload job as completed, indicating that no more data will be sent and the job should be processed.
### Parameters
| Name | Label | Required | Description |
| - | - | :-: | - |
| `jobIdPath` | Job ID path | Yes | The state path where the job ID is stored. |
| `integrationCredentialsId` | Credentials | Yes | Salesforce credentials to use. |
| `apiVersion` | API version | No | Salesforce API version. If not set defaults to 62.0 |
### Exits
| Exit | Description |
| - | - |
| `NEXT` | - |
| `ERROR` | - |
## Create bulk upload job
**Function name:** `CreateSalesforceBulkJobFunction`
**Category:** Write
**Destination:** Salesforce
Creates a bulk upload job for the specified object.
### Parameters
| Name | Label | Required | Description |
| - | - | :-: | - |
| `object` | Object | Yes | Type of object to create a bulk upload job for. |
| `operation` | Operation | Yes | The operation to perform. |
| `integrationCredentialsId` | Credentials | Yes | Salesforce credentials to use. |
| `externalIdFieldName` | External ID field name | No | The external ID field in the object being updated. Only needed for upsert operations. |
| `apiVersion` | API version | No | Salesforce API version. If not set defaults to 62.0 |
| `jobIdPath` | Job ID path | Yes | The state path where the job ID should be stored. |
### Exits
| Exit | Description |
| - | - |
| `NEXT` | - |
| `ERROR` | - |
## Create Salesforce object
**Function name:** `CreateSalesforceObjectFunction`
**Category:** Write
**Destination:** Salesforce
Creates Salesforce object
### Parameters
| Name | Label | Required | Description |
| - | - | :-: | - |
| `integrationCredentialsId` | Credentials | Yes | Salesforce credentials to use. |
| `apiVersion` | API version | No | Salesforce API version. If not set defaults to 62.0 |
| `resourceName` | Resource Name | Yes | Name of the Salesforce object resource |
| `resource` | Resource | Yes | Resource to be created |
| `outputResourceIdStateVariable` | Output resource name | Yes | Name of the variable by which the resource ID will be stored in state |
### Exits
| Exit | Description |
| - | - |
| `NEXT` | - |
| `ERROR` | - |
## Delete Salesforce object
**Function name:** `DeleteSalesforceObjectFunction`
**Category:** Write
**Destination:** Salesforce
Deletes Salesforce object
### Parameters
| Name | Label | Required | Description |
| - | - | :-: | - |
| `integrationCredentialsId` | Credentials | Yes | Salesforce credentials to use. |
| `apiVersion` | API version | No | Salesforce API version. If not set defaults to 62.0 |
| `resourceName` | Resource Name | Yes | Name of the Salesforce object resource |
| `resourceIdStateVariable` | Resource ID | Yes | Name of variable by which resource ID should be retrieved from state |
### Exits
| Exit | Description |
| - | - |
| `NEXT` | - |
| `ERROR` | - |
## Ingest Salesforce invoice
**Function name:** `IngestSalesforceInvoiceFunction`
**Category:** Write
**Destination:** Salesforce
Ingests an invoice into Salesforce using the Invoice Ingestion API. Builds the invoice graph from the provided invoice and line item objects, automatically wiring the invoiceId relationship onto each line item.
### Parameters
| Name | Label | Required | Description |
| - | - | :-: | - |
| `integrationCredentialsId` | Credentials | Yes | Salesforce credentials to use. |
| `apiVersion` | API version | No | Salesforce API version. If not set defaults to 62.0 |
| `invoiceStateVariable` | Invoice state variable | Yes | State variable containing the invoice object with all header fields pre-populated. |
| `lineItemsStateVariable` | Line items state variable | Yes | State variable containing the list of invoice line item objects with all fields pre-populated. |
| `billingAddressStateVariable` | Billing address state variable | Yes | State variable containing the billing address object, used to create the billing InvoiceAddressGroup record. |
| `shippingAddressStateVariable` | Shipping address state variable | No | Optional. State variable containing the shipping address object. If not provided, the billing address is used for shipping as well. |
| `outputStateVariable` | Output state variable | Yes | State variable name to store the ingestion response. |
### Exits
| Exit | Description |
| - | - |
| `NEXT` | - |
| `ERROR` | - |
## Query Salesforce Object
**Function name:** `QuerySalesforceSingleObjectFunction`
**Category:** Read
**Destination:** Salesforce
Reads a single Salesforce object using a SOQL query. If the query doesn't return a single result the workflow will fail.
### Parameters
| Name | Label | Required | Description |
| - | - | :-: | - |
| `integrationCredentialsId` | Credentials | Yes | Salesforce credentials to use. |
| `apiVersion` | API version | No | Salesforce API version. If not set defaults to 62.0 |
| `soqlQuery` | Query | Yes | Query to run |
| `stateVariable` | Output data | Yes | Name of the variable by which the object will be stored in state |
### Exits
| Exit | Description |
| - | - |
| `NEXT` | - |
| `ERROR` | - |
## Read Salesforce bulk job successful results
**Function name:** `ReadSalesforceBulkJobResultsFunction`
**Category:** Read
**Destination:** Salesforce
Opens a streaming iterator over the successful results of a Salesforce bulk upload job. Rows are read incrementally without loading the full response into memory.
### Parameters
| Name | Label | Required | Description |
| - | - | :-: | - |
| `jobIdPath` | Job ID path | Yes | State path where the bulk upload job ID is stored. |
| `integrationCredentialsId` | Credentials | Yes | Salesforce credentials to use. |
| `apiVersion` | API version | No | Salesforce API version. If not set defaults to 62.0 |
| `outputResultsStateVariable` | Output iterator name | Yes | Name under which the results iterator will be stored in state. |
### Exits
| Exit | Description |
| - | - |
| `NEXT` | - |
| `ERROR` | - |
## Read Salesforce object
**Function name:** `ReadSalesforceObjectFunction`
**Category:** Read
**Destination:** Salesforce
Reads Salesforce object
### Parameters
| Name | Label | Required | Description |
| - | - | :-: | - |
| `integrationCredentialsId` | Credentials | Yes | Salesforce credentials to use. |
| `apiVersion` | API version | No | Salesforce API version. If not set defaults to 62.0 |
| `resourceName` | Resource Name | Yes | Name of the Salesforce object resource |
| `resourceIdStateVariable` | Resource ID | Yes | Name of variable by which resource ID should be retrieved from state |
| `resourceOutputStateVariable` | Output resource name | Yes | Name of the variable by which the resource will be stored in state |
### Exits
| Exit | Description |
| - | - |
| `NEXT` | - |
| `ERROR` | - |
## Read Salesforce objects using SOQL query
**Function name:** `SOQLSalesforceQueryFunction`
**Category:** Read
**Destination:** Salesforce
Reads Salesforce object using SOQL query
### Parameters
| Name | Label | Required | Description |
| - | - | :-: | - |
| `integrationCredentialsId` | Credentials | Yes | Salesforce credentials to use. |
| `apiVersion` | API version | No | Salesforce API version. If not set defaults to 62.0 |
| `soqlQuery` | Query | Yes | Query to run |
| `outputResultsStateVariable` | Output results name | Yes | Name of the variable by which the objects iterator will be stored in state |
### Exits
| Exit | Description |
| - | - |
| `NEXT` | - |
| `ERROR` | - |
## Set Salesforce External URL
**Function name:** `SalesforceSetExternalUrlFunction`
**Category:** Write
**Destination:** Salesforce
Sets the external URL in the integration state to the Lightning Experience URL of a Salesforce record.
### Parameters
| Name | Label | Required | Description |
| - | - | :-: | - |
| `integrationCredentialsId` | Credentials | Yes | Salesforce credentials to use. |
| `objectType` | Object Type | Yes | The Salesforce object type (e.g. Opportunity, Account). |
| `objectId` | Object ID | Yes | State variable containing the Salesforce record ID. |
### Exits
| Exit | Description |
| - | - |
| `NEXT` | - |
## Update Salesforce object
**Function name:** `UpdateSalesforceObjectFunction`
**Category:** Write
**Destination:** Salesforce
Updates Salesforce object
### Parameters
| Name | Label | Required | Description |
| - | - | :-: | - |
| `integrationCredentialsId` | Credentials | Yes | Salesforce credentials to use. |
| `apiVersion` | API version | No | Salesforce API version. If not set defaults to 62.0 |
| `resourceName` | Resource Name | Yes | Name of the Salesforce object resource |
| `resourceIdStateVariable` | Resource ID | Yes | Name of variable by which resource ID should be retrieved from state |
| `resource` | Resource | Yes | Resource to be updated |
### Exits
| Exit | Description |
| - | - |
| `NEXT` | - |
| `ERROR` | - |
## Upload bulk job data
**Function name:** `UploadSalesforceBulkJobDataFunction`
**Category:** Write
**Destination:** Salesforce
Uploads data from a list or iterator to Salesforce. Data is automatically split into batches when necessary.
### Parameters
| Name | Label | Required | Description |
| - | - | :-: | - |
| `jobIdPath` | Job ID path | Yes | The state path where the job ID is stored. |
| `dataPath` | Data path | Yes | The state variable containing the data that should be uploaded to Salesforce. |
| `integrationCredentialsId` | Credentials | Yes | Salesforce credentials to use. |
| `apiVersion` | API version | No | Salesforce API version. If not set defaults to 62.0 |
### Exits
| Exit | Description |
| - | - |
| `NEXT` | - |
| `ERROR` | - |
# Salesforce Prerelease Functions
Source: https://docs.m3ter.com/m3sh-function-reference/native/salesforce-prerelease
## Await bulk upload job completion
**Function name:** `AwaitSalesforceBulkJobCompletionFunction`
**Category:** Read
**Destination:** Salesforce Prerelease
Polls until a bulk upload job enters a completion state.
### Parameters
| Name | Label | Required | Description |
| - | - | :-: | - |
| `jobIdPath` | Job ID path | Yes | The state path where the job ID is stored. |
| `integrationCredentialsId` | Credentials | Yes | Salesforce credentials to use. |
| `apiVersion` | API version | No | Salesforce API version. If not set defaults to 62.0 |
### Exits
| Exit | Description |
| - | - |
| `NEXT` | - |
| `ERROR` | - |
## Complete bulk upload job
**Function name:** `CompleteSalesforceBulkUploadFunction`
**Category:** Write
**Destination:** Salesforce Prerelease
Marks a bulk upload job as completed, indicating that no more data will be sent and the job should be processed.
### Parameters
| Name | Label | Required | Description |
| - | - | :-: | - |
| `jobIdPath` | Job ID path | Yes | The state path where the job ID is stored. |
| `integrationCredentialsId` | Credentials | Yes | Salesforce credentials to use. |
| `apiVersion` | API version | No | Salesforce API version. If not set defaults to 62.0 |
### Exits
| Exit | Description |
| - | - |
| `NEXT` | - |
| `ERROR` | - |
## Create bulk upload job
**Function name:** `CreateSalesforceBulkJobFunction`
**Category:** Write
**Destination:** Salesforce Prerelease
Creates a bulk upload job for the specified object.
### Parameters
| Name | Label | Required | Description |
| - | - | :-: | - |
| `object` | Object | Yes | Type of object to create a bulk upload job for. |
| `operation` | Operation | Yes | The operation to perform. |
| `integrationCredentialsId` | Credentials | Yes | Salesforce credentials to use. |
| `externalIdFieldName` | External ID field name | No | The external ID field in the object being updated. Only needed for upsert operations. |
| `apiVersion` | API version | No | Salesforce API version. If not set defaults to 62.0 |
| `jobIdPath` | Job ID path | Yes | The state path where the job ID should be stored. |
### Exits
| Exit | Description |
| - | - |
| `NEXT` | - |
| `ERROR` | - |
## Create Salesforce object
**Function name:** `CreateSalesforceObjectFunction`
**Category:** Write
**Destination:** Salesforce Prerelease
Creates Salesforce object
### Parameters
| Name | Label | Required | Description |
| - | - | :-: | - |
| `integrationCredentialsId` | Credentials | Yes | Salesforce credentials to use. |
| `apiVersion` | API version | No | Salesforce API version. If not set defaults to 62.0 |
| `resourceName` | Resource Name | Yes | Name of the Salesforce object resource |
| `resource` | Resource | Yes | Resource to be created |
| `outputResourceIdStateVariable` | Output resource name | Yes | Name of the variable by which the resource ID will be stored in state |
### Exits
| Exit | Description |
| - | - |
| `NEXT` | - |
| `ERROR` | - |
## Delete Salesforce object
**Function name:** `DeleteSalesforceObjectFunction`
**Category:** Write
**Destination:** Salesforce Prerelease
Deletes Salesforce object
### Parameters
| Name | Label | Required | Description |
| - | - | :-: | - |
| `integrationCredentialsId` | Credentials | Yes | Salesforce credentials to use. |
| `apiVersion` | API version | No | Salesforce API version. If not set defaults to 62.0 |
| `resourceName` | Resource Name | Yes | Name of the Salesforce object resource |
| `resourceIdStateVariable` | Resource ID | Yes | Name of variable by which resource ID should be retrieved from state |
### Exits
| Exit | Description |
| - | - |
| `NEXT` | - |
| `ERROR` | - |
## Ingest Salesforce invoice
**Function name:** `IngestSalesforceInvoiceFunction`
**Category:** Write
**Destination:** Salesforce Prerelease
Ingests an invoice into Salesforce using the Invoice Ingestion API. Builds the invoice graph from the provided invoice and line item objects, automatically wiring the invoiceId relationship onto each line item.
### Parameters
| Name | Label | Required | Description |
| - | - | :-: | - |
| `integrationCredentialsId` | Credentials | Yes | Salesforce credentials to use. |
| `apiVersion` | API version | No | Salesforce API version. If not set defaults to 62.0 |
| `invoiceStateVariable` | Invoice state variable | Yes | State variable containing the invoice object with all header fields pre-populated. |
| `lineItemsStateVariable` | Line items state variable | Yes | State variable containing the list of invoice line item objects with all fields pre-populated. |
| `billingAddressStateVariable` | Billing address state variable | Yes | State variable containing the billing address object, used to create the billing InvoiceAddressGroup record. |
| `shippingAddressStateVariable` | Shipping address state variable | No | Optional. State variable containing the shipping address object. If not provided, the billing address is used for shipping as well. |
| `outputStateVariable` | Output state variable | Yes | State variable name to store the ingestion response. |
### Exits
| Exit | Description |
| - | - |
| `NEXT` | - |
| `ERROR` | - |
## Query Salesforce Object
**Function name:** `QuerySalesforceSingleObjectFunction`
**Category:** Read
**Destination:** Salesforce Prerelease
Reads a single Salesforce object using a SOQL query. If the query doesn't return a single result the workflow will fail.
### Parameters
| Name | Label | Required | Description |
| - | - | :-: | - |
| `integrationCredentialsId` | Credentials | Yes | Salesforce credentials to use. |
| `apiVersion` | API version | No | Salesforce API version. If not set defaults to 62.0 |
| `soqlQuery` | Query | Yes | Query to run |
| `stateVariable` | Output data | Yes | Name of the variable by which the object will be stored in state |
### Exits
| Exit | Description |
| - | - |
| `NEXT` | - |
| `ERROR` | - |
## Read Salesforce bulk job successful results
**Function name:** `ReadSalesforceBulkJobResultsFunction`
**Category:** Read
**Destination:** Salesforce Prerelease
Opens a streaming iterator over the successful results of a Salesforce bulk upload job. Rows are read incrementally without loading the full response into memory.
### Parameters
| Name | Label | Required | Description |
| - | - | :-: | - |
| `jobIdPath` | Job ID path | Yes | State path where the bulk upload job ID is stored. |
| `integrationCredentialsId` | Credentials | Yes | Salesforce credentials to use. |
| `apiVersion` | API version | No | Salesforce API version. If not set defaults to 62.0 |
| `outputResultsStateVariable` | Output iterator name | Yes | Name under which the results iterator will be stored in state. |
### Exits
| Exit | Description |
| - | - |
| `NEXT` | - |
| `ERROR` | - |
## Read Salesforce object
**Function name:** `ReadSalesforceObjectFunction`
**Category:** Read
**Destination:** Salesforce Prerelease
Reads Salesforce object
### Parameters
| Name | Label | Required | Description |
| - | - | :-: | - |
| `integrationCredentialsId` | Credentials | Yes | Salesforce credentials to use. |
| `apiVersion` | API version | No | Salesforce API version. If not set defaults to 62.0 |
| `resourceName` | Resource Name | Yes | Name of the Salesforce object resource |
| `resourceIdStateVariable` | Resource ID | Yes | Name of variable by which resource ID should be retrieved from state |
| `resourceOutputStateVariable` | Output resource name | Yes | Name of the variable by which the resource will be stored in state |
### Exits
| Exit | Description |
| - | - |
| `NEXT` | - |
| `ERROR` | - |
## Read Salesforce objects using SOQL query
**Function name:** `SOQLSalesforceQueryFunction`
**Category:** Read
**Destination:** Salesforce Prerelease
Reads Salesforce object using SOQL query
### Parameters
| Name | Label | Required | Description |
| - | - | :-: | - |
| `integrationCredentialsId` | Credentials | Yes | Salesforce credentials to use. |
| `apiVersion` | API version | No | Salesforce API version. If not set defaults to 62.0 |
| `soqlQuery` | Query | Yes | Query to run |
| `outputResultsStateVariable` | Output results name | Yes | Name of the variable by which the objects iterator will be stored in state |
### Exits
| Exit | Description |
| - | - |
| `NEXT` | - |
| `ERROR` | - |
## Set Salesforce External URL
**Function name:** `SalesforceSetExternalUrlFunction`
**Category:** Write
**Destination:** Salesforce Prerelease
Sets the external URL in the integration state to the Lightning Experience URL of a Salesforce record.
### Parameters
| Name | Label | Required | Description |
| - | - | :-: | - |
| `integrationCredentialsId` | Credentials | Yes | Salesforce credentials to use. |
| `objectType` | Object Type | Yes | The Salesforce object type (e.g. Opportunity, Account). |
| `objectId` | Object ID | Yes | State variable containing the Salesforce record ID. |
### Exits
| Exit | Description |
| - | - |
| `NEXT` | - |
## Update Salesforce object
**Function name:** `UpdateSalesforceObjectFunction`
**Category:** Write
**Destination:** Salesforce Prerelease
Updates Salesforce object
### Parameters
| Name | Label | Required | Description |
| - | - | :-: | - |
| `integrationCredentialsId` | Credentials | Yes | Salesforce credentials to use. |
| `apiVersion` | API version | No | Salesforce API version. If not set defaults to 62.0 |
| `resourceName` | Resource Name | Yes | Name of the Salesforce object resource |
| `resourceIdStateVariable` | Resource ID | Yes | Name of variable by which resource ID should be retrieved from state |
| `resource` | Resource | Yes | Resource to be updated |
### Exits
| Exit | Description |
| - | - |
| `NEXT` | - |
| `ERROR` | - |
## Upload bulk job data
**Function name:** `UploadSalesforceBulkJobDataFunction`
**Category:** Write
**Destination:** Salesforce Prerelease
Uploads data from a list or iterator to Salesforce. Data is automatically split into batches when necessary.
### Parameters
| Name | Label | Required | Description |
| - | - | :-: | - |
| `jobIdPath` | Job ID path | Yes | The state path where the job ID is stored. |
| `dataPath` | Data path | Yes | The state variable containing the data that should be uploaded to Salesforce. |
| `integrationCredentialsId` | Credentials | Yes | Salesforce credentials to use. |
| `apiVersion` | API version | No | Salesforce API version. If not set defaults to 62.0 |
### Exits
| Exit | Description |
| - | - |
| `NEXT` | - |
| `ERROR` | - |
# Sap Byd Functions
Source: https://docs.m3ter.com/m3sh-function-reference/native/sap-byd
## Create Business Object in SAP ByD
**Function name:** `CreateSapBydBusinessObjectFunction`
**Category:** Write
**Destination:** Sap Byd
Creates a business object in SAP ByD
### Parameters
| Name | Label | Required | Description |
| - | - | :-: | - |
| `integrationCredentialsId` | Credentials | Yes | SAP ByD credentials to use. |
| `serviceName` | Service name | Yes | Name of the SAP ByD service to call. In order to call specific collection use 'serviceName/collectionName' format, e.g. 'businesspartnerservice/BusinessPartnerCollection' |
| `inputData` | Input data | Yes | The name of the variable containing the record data to be sent to SAP ByD |
| `stateVariable` | Output data | No | The name of the variable to store the response from SAP ByD |
### Exits
| Exit | Description |
| - | - |
| `NEXT` | - |
| `ERROR` | - |
## Delete Business Object in SAP ByD
**Function name:** `DeleteSapBydBusinessObjectFunction`
**Category:** Write
**Destination:** Sap Byd
Deletes a business object from SAP ByD
### Parameters
| Name | Label | Required | Description |
| - | - | :-: | - |
| `integrationCredentialsId` | Credentials | Yes | SAP ByD credentials to use. |
| `serviceName` | Service name | Yes | Name of the SAP ByD service to call. In order to call specific collection use 'serviceName/collectionName' format, e.g. 'businesspartnerservice/BusinessPartnerCollection' |
| `businessObjectId` | Business Object ID | Yes | Name of the variable containing the ID of the business object to be deleted from SAP ByD |
### Exits
| Exit | Description |
| - | - |
| `NEXT` | - |
| `ERROR` | - |
## Read Business Object in SAP ByD
**Function name:** `ReadSapBydBusinessObjectFunction`
**Category:** Read
**Destination:** Sap Byd
Reads a business object from SAP ByD and stores it in a state variable
### Parameters
| Name | Label | Required | Description |
| - | - | :-: | - |
| `integrationCredentialsId` | Credentials | Yes | SAP ByD credentials to use. |
| `serviceName` | Service name | Yes | Name of the SAP ByD service to call. In order to call specific collection use 'serviceName/collectionName' format, e.g. 'businesspartnerservice/BusinessPartnerCollection' |
| `businessObjectId` | Business Object ID | Yes | Name of the variable containing the ID of the business object to be read from SAP ByD |
| `stateVariable` | Output data | No | The name of the variable to store the response from SAP ByD |
### Exits
| Exit | Description |
| - | - |
| `NEXT` | - |
| `ERROR` | - |
## Update Business Object in SAP ByD
**Function name:** `UpdateSapBydBusinessObjectFunction`
**Category:** Write
**Destination:** Sap Byd
Updates a business object in SAP ByD. This update is a partial update, meaning that only the fields provided in the input data will be updated.
### Parameters
| Name | Label | Required | Description |
| - | - | :-: | - |
| `integrationCredentialsId` | Credentials | Yes | SAP ByD credentials to use. |
| `serviceName` | Service name | Yes | Name of the SAP ByD service to call. In order to call specific collection use 'serviceName/collectionName' format, e.g. 'businesspartnerservice/BusinessPartnerCollection' |
| `businessObjectId` | Business Object ID | Yes | Name of the variable containing the ID of the business object to be read from SAP ByD |
| `inputData` | Input data | Yes | The name of the variable containing the record data to be sent to SAP ByD |
### Exits
| Exit | Description |
| - | - |
| `NEXT` | - |
| `ERROR` | - |
# Slack Functions
Source: https://docs.m3ter.com/m3sh-function-reference/native/slack
## Send Slack Error Message
**Function name:** `SendSlackErrorMessageFunction`
**Category:** Write
**Destination:** Slack
Sends a formatted workflow error message to Slack
### Parameters
| Name | Label | Required | Description |
| - | - | :-: | - |
| `integrationCredentialsId` | Credentials | Yes | The Slack credentials to use. |
| `channelId` | Channel ID | Yes | Slack Channel ID |
### Exits
| Exit | Description |
| - | - |
| `NEXT` | - |
| `ERROR` | - |
## Send Slack Message
**Function name:** `SendSlackMessageFunction`
**Category:** Write
**Destination:** Slack
Sends message to a given Slack channel
### Parameters
| Name | Label | Required | Description |
| - | - | :-: | - |
| `integrationCredentialsId` | Credentials | Yes | The Slack credentials to use. |
| `channelId` | Channel ID | Yes | Slack Channel ID |
| `message` | Message | No | The name of the object to pass as message text |
| `contentBlocks` | ContentBlocks | No | The name of the object to pass as message blocks list |
| `attachment` | Attachment | No | m3sh file to send as an attachment. N.B. Attachments cannot be sent using Slack webhook credentials. m3sh files that are sent as attachment can no longer be written to during the workflow |
| `compressAttachment` | Compress attachment | No | Compress the contents of the attachment before sending to Slack |
### Exits
| Exit | Description |
| - | - |
| `NEXT` | - |
| `ERROR` | - |
## Send Slack Webhook Error Message
**Function name:** `SendSlackWebhookErrorMessageFunction`
**Category:** Write
**Destination:** Slack
Sends a formatted workflow error message to Slack using a webhook
### Parameters
| Name | Label | Required | Description |
| - | - | :-: | - |
| `integrationCredentialsId` | Credentials | Yes | The Slack credentials to use. |
### Exits
| Exit | Description |
| - | - |
| `NEXT` | - |
| `ERROR` | - |
## Send Slack Webhook Message
**Function name:** `SendSlackWebhookMessageFunction`
**Category:** Write
**Destination:** Slack
Sends message to a given Slack channel using a webhook.
### Parameters
| Name | Label | Required | Description |
| - | - | :-: | - |
| `integrationCredentialsId` | Credentials | Yes | The Slack credentials to use. |
| `message` | Message | No | The name of the object to pass as message content |
| `contentBlocks` | ContentBlocks | No | The name of the object to pass as message blocks list |
### Exits
| Exit | Description |
| - | - |
| `NEXT` | - |
| `ERROR` | - |
# Stripe Functions
Source: https://docs.m3ter.com/m3sh-function-reference/native/stripe
## Create Stripe Object
**Function name:** `CreateStripeObjectFunction`
**Category:** Write
**Destination:** Stripe
Creates an object in Stripe
### Parameters
| Name | Label | Required | Description |
| - | - | :-: | - |
| `integrationCredentialsId` | Credentials | Yes | Stripe credentials to use. |
| `objectType` | Object type | Yes | The type of Stripe object to create |
| `inputData` | Input data | Yes | The name of the variable containing the object data to be sent to Stripe |
| `stateVariable` | Output data | No | The name of the variable to store the response from Stripe |
### Exits
| Exit | Description |
| - | - |
| `NEXT` | - |
| `ERROR` | - |
## Delete Stripe Object
**Function name:** `DeleteStripeObjectFunction`
**Category:** Write
**Destination:** Stripe
Deletes an object in Stripe
### Parameters
| Name | Label | Required | Description |
| - | - | :-: | - |
| `integrationCredentialsId` | Credentials | Yes | Stripe credentials to use. |
| `objectType` | Object type | Yes | The type of Stripe object to delete |
| `objectId` | Object id | Yes | The name of the variable containing the ID of the object to delete |
### Exits
| Exit | Description |
| - | - |
| `NEXT` | - |
| `ERROR` | - |
## List Stripe Objects
**Function name:** `ListStripeObjectsFunction`
**Category:** Read
**Destination:** Stripe
List objects in Stripe
### Parameters
| Name | Label | Required | Description |
| - | - | :-: | - |
| `integrationCredentialsId` | Credentials | Yes | Stripe credentials to use. |
| `objectType` | Object type | Yes | The type of Stripe object to read |
| `stateVariable` | Output results name | Yes | Name of the variable by which the objects iterator will be stored in state |
### Exits
| Exit | Description |
| - | - |
| `NEXT` | - |
| `ERROR` | - |
## Read Stripe Object
**Function name:** `ReadStripeObjectFunction`
**Category:** Read
**Destination:** Stripe
Reads an from Stripe and stores it in the state
### Parameters
| Name | Label | Required | Description |
| - | - | :-: | - |
| `integrationCredentialsId` | Credentials | Yes | Stripe credentials to use. |
| `objectType` | Object type | Yes | The type of Stripe object to read |
| `objectId` | Object id | Yes | The name of the variable containing the ID of the record to read |
| `stateVariable` | Output data | No | The name of the variable to store the response from Stripe |
### Exits
| Exit | Description |
| - | - |
| `NEXT` | - |
| `ERROR` | - |
## Update Stripe Object
**Function name:** `UpdateStripeObjectFunction`
**Category:** Write
**Destination:** Stripe
Updates an object in Stripe
### Parameters
| Name | Label | Required | Description |
| - | - | :-: | - |
| `integrationCredentialsId` | Credentials | Yes | Stripe credentials to use. |
| `objectType` | Object type | Yes | The type of Stripe object to create |
| `objectId` | Object id variable | Yes | The name of the variable containing the ID of the existing object in Stripe that should be updated |
| `inputData` | Input data variable | Yes | The name of the variable containing the record data to be sent to Stripe |
| `stateVariable` | Output data variable | No | The name of the variable to store the response from Stripe |
### Exits
| Exit | Description |
| - | - |
| `NEXT` | - |
| `ERROR` | - |
# Stripe Test Functions
Source: https://docs.m3ter.com/m3sh-function-reference/native/stripe-test
## Create Stripe Object
**Function name:** `CreateStripeObjectFunction`
**Category:** Write
**Destination:** Stripe Test
Creates an object in Stripe
### Parameters
| Name | Label | Required | Description |
| - | - | :-: | - |
| `integrationCredentialsId` | Credentials | Yes | Stripe credentials to use. |
| `objectType` | Object type | Yes | The type of Stripe object to create |
| `inputData` | Input data | Yes | The name of the variable containing the object data to be sent to Stripe |
| `stateVariable` | Output data | No | The name of the variable to store the response from Stripe |
### Exits
| Exit | Description |
| - | - |
| `NEXT` | - |
| `ERROR` | - |
## Delete Stripe Object
**Function name:** `DeleteStripeObjectFunction`
**Category:** Write
**Destination:** Stripe Test
Deletes an object in Stripe
### Parameters
| Name | Label | Required | Description |
| - | - | :-: | - |
| `integrationCredentialsId` | Credentials | Yes | Stripe credentials to use. |
| `objectType` | Object type | Yes | The type of Stripe object to delete |
| `objectId` | Object id | Yes | The name of the variable containing the ID of the object to delete |
### Exits
| Exit | Description |
| - | - |
| `NEXT` | - |
| `ERROR` | - |
## List Stripe Objects
**Function name:** `ListStripeObjectsFunction`
**Category:** Read
**Destination:** Stripe Test
List objects in Stripe
### Parameters
| Name | Label | Required | Description |
| - | - | :-: | - |
| `integrationCredentialsId` | Credentials | Yes | Stripe credentials to use. |
| `objectType` | Object type | Yes | The type of Stripe object to read |
| `stateVariable` | Output results name | Yes | Name of the variable by which the objects iterator will be stored in state |
### Exits
| Exit | Description |
| - | - |
| `NEXT` | - |
| `ERROR` | - |
## Read Stripe Object
**Function name:** `ReadStripeObjectFunction`
**Category:** Read
**Destination:** Stripe Test
Reads an from Stripe and stores it in the state
### Parameters
| Name | Label | Required | Description |
| - | - | :-: | - |
| `integrationCredentialsId` | Credentials | Yes | Stripe credentials to use. |
| `objectType` | Object type | Yes | The type of Stripe object to read |
| `objectId` | Object id | Yes | The name of the variable containing the ID of the record to read |
| `stateVariable` | Output data | No | The name of the variable to store the response from Stripe |
### Exits
| Exit | Description |
| - | - |
| `NEXT` | - |
| `ERROR` | - |
## Update Stripe Object
**Function name:** `UpdateStripeObjectFunction`
**Category:** Write
**Destination:** Stripe Test
Updates an object in Stripe
### Parameters
| Name | Label | Required | Description |
| - | - | :-: | - |
| `integrationCredentialsId` | Credentials | Yes | Stripe credentials to use. |
| `objectType` | Object type | Yes | The type of Stripe object to create |
| `objectId` | Object id variable | Yes | The name of the variable containing the ID of the existing object in Stripe that should be updated |
| `inputData` | Input data variable | Yes | The name of the variable containing the record data to be sent to Stripe |
| `stateVariable` | Output data variable | No | The name of the variable to store the response from Stripe |
### Exits
| Exit | Description |
| - | - |
| `NEXT` | - |
| `ERROR` | - |
# Webhook Functions
Source: https://docs.m3ter.com/m3sh-function-reference/native/webhook
## Call Outgoing Webhook
**Function name:** `CallOutgoingWebhookFunction`
**Category:** Write
**Destination:** Webhook
Calls an outgoing webhook using the specified payload. It will also use m3ter's webhook signature mechanism to sign the request (M3TER\_SIGNED\_REQUEST).
### Parameters
| Name | Label | Required | Description |
| - | - | :-: | - |
| `outgoingWebhookId` | OutgoingWebhook | Yes | The UUID of the webhook to call |
| `webhookPayload` | Webhook payload | Yes | Name of variable by which the webhook payload should be retrieved from state |
| `responseStateVariable` | Output data | No | State variable to store the response from the webhook call |
### Exits
| Exit | Description |
| - | - |
| `NEXT` | - |
| `ERROR` | - |
# Xero Functions
Source: https://docs.m3ter.com/m3sh-function-reference/native/xero
## Create Xero invoice
**Function name:** `CreateXeroInvoiceFunction`
**Category:** Write
**Destination:** Xero
Function to create Xero invoice
### Parameters
| Name | Label | Required | Description |
| - | - | :-: | - |
| `integrationCredentialsId` | Credentials | Yes | Xero credentials to use. |
| `xeroInvoiceStateVariable` | Xero invoice | Yes | Xero invoice to be created. |
| `outputResourceStateVariable` | Output resource name | Yes | Name of the variable by which the invoices will be stored in state |
### Exits
| Exit | Description |
| - | - |
| `NEXT` | - |
| `ERROR` | - |
## Delete Xero invoice
**Function name:** `DeleteXeroInvoiceFunction`
**Category:** Write
**Destination:** Xero
Function to delete Xero invoice
### Parameters
| Name | Label | Required | Description |
| - | - | :-: | - |
| `integrationCredentialsId` | Credentials | Yes | Xero credentials to use. |
| `xeroInvoiceIdStateVariable` | Xero invoice ID | Yes | Name of variable by which invoice ID should be retrieved from state |
### Exits
| Exit | Description |
| - | - |
| `NEXT` | - |
| `ERROR` | - |
## Read Xero invoice
**Function name:** `ReadXeroInvoiceFunction`
**Category:** Read
**Destination:** Xero
Function to read Xero invoice
### Parameters
| Name | Label | Required | Description |
| - | - | :-: | - |
| `integrationCredentialsId` | Credentials | Yes | Xero credentials to use. |
| `xeroInvoiceIdStateVariable` | Xero invoice ID | Yes | Name of variable by which invoice ID should be retrieved from state |
| `outputResourceStateVariable` | Output resource name | Yes | Name of the variable by which the invoice will be stored in state |
### Exits
| Exit | Description |
| - | - |
| `NEXT` | - |
| `ERROR` | - |
## Update Xero invoice
**Function name:** `UpdateXeroInvoiceFunction`
**Category:** Write
**Destination:** Xero
Function to update Xero invoice
### Parameters
| Name | Label | Required | Description |
| - | - | :-: | - |
| `integrationCredentialsId` | Credentials | Yes | Xero credentials to use. |
| `xeroInvoiceIdStateVariable` | Xero invoice ID | Yes | Name of variable by which invoice ID should be retrieved from state |
| `updateDataStateVariable` | Update data | Yes | Name of the variable by which data for update should be retrieved from state |
| `outputResourceStateVariable` | Output resource name | Yes | Name of the variable by which the invoice will be stored in state |
### Exits
| Exit | Description |
| - | - |
| `NEXT` | - |
| `ERROR` | - |
* The **External system** and **External table** mapped to are shown - such as **NetSuite - Item** in the above example. The **External entity ID** mapped to is also shown.
* If a listed External mapping is linked to an Integration, under **Linked integration** a hotlink text will be shown which you can use to open the Integration.
* Under **Actions**, you can edit or delete the External mapping.
* If the Meter has multiple External mappings created for it, you can use *Search external mappings* to search by **External table** and **External entity ID** and filter the list.
* You can commence a workflow to **Create external mapping** for the Meter directly - see [Creating and Managing External Mappings for Accounts](/guides/end-customer-accounts/creating-and-managing-external-mappings-for-accounts) for an example.
**Integration runs**. If you've set up an integration that synchronizes the Meter with an external system, the date/time and status of the **Latest** integration run are shown. You can use a text hotlink to open details of this latest run or **View all runs**. See [Reviewing Integration Run Details](/guides/integrations/setting-up-integrations/reviewing-integration-run-details).
# Documentation
Source: https://docs.m3ter.com/index
Check out our guides and learning resources.
Looking to Evaluate m3ter? Review [Exploring m3ter](/exploring-m3ter-getting-to-know-the-platform) for a survey of the platform’s wide range of features and capabilities.
Getting Started in m3ter? Go to [Working in m3ter](/guides/getting-started) for a comprehensive set of guides on how to build out and manage your usage-based pricing and billing solution in m3ter.
Developer working with m3ter APIs? Exploit a full [API Reference](/api) including request and response samples for REST endpoints.
# Accountplans
Source: https://docs.m3ter.com/m3sh-function-reference/m3ter/accountplans
## Retrieve AccountPlan
**Function name:** `m3ter_GetAccountPlan`
**Category:** READ
**HTTP method:** GET
**Destination:** m3ter
Retrieve the AccountPlan or AccountPlanGroup details corresponding to the given UUID.
### Parameters
| Name | Label | Type | Required | Description | Constraints |
| - | - | - | :-: | - | - |
| `integrationCredentialsId` | Credentials | M3terEntityParameter | Yes | The m3ter credentials to use. | authType: M3TER\_SIGNED\_REQUEST, m3terEntity: IntegrationCredentials |
| `id` | id | LookupParameter | Yes | The unique identifier (UUID) of the AccountPlan or AccountPlanGroup to retrieve. | - |
| `statePath` | State Path | StateVariableParameter | No | State variable to store the response. | - |
### Exits
| Exit | Description |
| - | - |
| `NEXT` | The API call succeeded. |
| `ERROR` | The API call failed. Error details are stored in the `m3shError` state variable. |
## Update AccountPlan
**Function name:** `m3ter_PutAccountPlan`
**Category:** WRITE
**HTTP method:** PUT
**Destination:** m3ter
Update the AccountPlan or AccountPlanGroup with the given UUID.
This endpoint updates a new AccountPlan or AccountPlanGroup for a specific Account in your Organization. The updated information should be provided in the request body.
**Notes:**
* You cannot use this call to update *both* an AccountPlan and AccountPlanGroup for an Account at the same time. If you want to update an AccounPlan and an AccountPlanGroup attached to an Account, you must submit two separate calls.
* If you have created Custom Fields for an AccountPlan, when you use this endpoint to update the AccountPlan use the `customFields` parameter to preserve those Custom Fields. If you omit them from the update request, they will be lost.
### Parameters
| Name | Label | Type | Required | Description | Constraints |
| - | - | - | :-: | - | - |
| `integrationCredentialsId` | Credentials | M3terEntityParameter | Yes | The m3ter credentials to use. | authType: M3TER\_SIGNED\_REQUEST, m3terEntity: IntegrationCredentials |
| `id` | id | LookupParameter | Yes | The unique identifier (UUID) of the AccountPlan or AccountPlanGroup to update. | - |
| `requestPath` | Request Path | StateVariableParameter | Yes | State variable containing the request. | - |
| `statePath` | State Path | StateVariableParameter | No | State variable to store the response. | - |
### Exits
| Exit | Description |
| - | - |
| `NEXT` | The API call succeeded. |
| `ERROR` | The API call failed. Error details are stored in the `m3shError` state variable. |
## Delete AccountPlan
**Function name:** `m3ter_DeleteAccountPlan`
**Category:** WRITE
**HTTP method:** DELETE
**Destination:** m3ter
Delete the AccountPlan or AccountPlanGroup with the given UUID.
This endpoint deletes an AccountPlan or AccountPlanGroup that has been attached to a specific Account in your Organization.
### Parameters
| Name | Label | Type | Required | Description | Constraints |
| - | - | - | :-: | - | - |
| `integrationCredentialsId` | Credentials | M3terEntityParameter | Yes | The m3ter credentials to use. | authType: M3TER\_SIGNED\_REQUEST, m3terEntity: IntegrationCredentials |
| `id` | id | LookupParameter | Yes | The unique identifer (UUID) of the AccountPlan or AccountPlanGroup to delete. | - |
| `statePath` | State Path | StateVariableParameter | No | State variable to store the response. | - |
### Exits
| Exit | Description |
| - | - |
| `NEXT` | The API call succeeded. |
| `ERROR` | The API call failed. Error details are stored in the `m3shError` state variable. |
## List AccountPlans
**Function name:** `m3ter_ListAccountPlans`
**Category:** READ
**HTTP method:** GET (paginated)
**Destination:** m3ter
Retrieves a list of AccountPlan and AccountPlanGroup entities for the specified Organization. The list can be paginated for easier management, and supports filtering with various query parameters.
### Parameters
| Name | Label | Type | Required | Description | Constraints |
| - | - | - | :-: | - | - |
| `integrationCredentialsId` | Credentials | M3terEntityParameter | Yes | The m3ter credentials to use. | authType: M3TER\_SIGNED\_REQUEST, m3terEntity: IntegrationCredentials |
| `statePath` | State Path | StateVariableParameter | No | State variable to store the response. | - |
| `queryParams` | Query Parameters | KeyValueLookupParameter | No | Query parameters to include in the request | allowedValues: date,account,plan,product,includeall,ids,contract |
### Exits
| Exit | Description |
| - | - |
| `NEXT` | The API call succeeded. |
| `ERROR` | The API call failed. Error details are stored in the `m3shError` state variable. |
## Create AccountPlan
**Function name:** `m3ter_PostAccountPlan`
**Category:** WRITE
**HTTP method:** POST
**Destination:** m3ter
Create a new AccountPlan or AccountPlanGroup.
This endpoint creates a new AccountPlan or AccountPlanGroup for a specific Account in your Organization. The details of the new AccountPlan or AccountPlanGroup should be supplied in the request body.
**Note:** You cannot use this call to create *both* an AccountPlan and AccountPlanGroup for an Account at the same time. If you want to create both for an Account, you must submit two separate calls.
### Parameters
| Name | Label | Type | Required | Description | Constraints |
| - | - | - | :-: | - | - |
| `integrationCredentialsId` | Credentials | M3terEntityParameter | Yes | The m3ter credentials to use. | authType: M3TER\_SIGNED\_REQUEST, m3terEntity: IntegrationCredentials |
| `requestPath` | Request Path | StateVariableParameter | Yes | State variable containing the request. | - |
| `statePath` | State Path | StateVariableParameter | No | State variable to store the response. | - |
### Exits
| Exit | Description |
| - | - |
| `NEXT` | The API call succeeded. |
| `ERROR` | The API call failed. Error details are stored in the `m3shError` state variable. |
## Replace AccountPlan
**Function name:** `m3ter_ReplaceAccountPlan`
**Category:** WRITE
**HTTP method:** POST
**Destination:** m3ter
End-dates the specified AccountPlan at the new startDate and creates the new AccountPlan.
### Parameters
| Name | Label | Type | Required | Description | Constraints |
| - | - | - | :-: | - | - |
| `integrationCredentialsId` | Credentials | M3terEntityParameter | Yes | The m3ter credentials to use. | authType: M3TER\_SIGNED\_REQUEST, m3terEntity: IntegrationCredentials |
| `id` | id | LookupParameter | Yes | The UUID of the AccountPlan to replace. | - |
| `requestPath` | Request Path | StateVariableParameter | Yes | State variable containing the request. | - |
| `statePath` | State Path | StateVariableParameter | No | State variable to store the response. | - |
### Exits
| Exit | Description |
| - | - |
| `NEXT` | The API call succeeded. |
| `ERROR` | The API call failed. Error details are stored in the `m3shError` state variable. |
# Accounts
Source: https://docs.m3ter.com/m3sh-function-reference/m3ter/accounts
## Search Accounts
**Function name:** `m3ter_SearchAccounts`
**Category:** READ
**HTTP method:** GET (paginated)
**Destination:** m3ter
Search for Account entities.
This endpoint executes a search query for Accounts based on the user specified search criteria. The search query is customizable, allowing for complex nested conditions and sorting. The returned list of Accounts can be paginated for easier management.
### Parameters
| Name | Label | Type | Required | Description | Constraints |
| - | - | - | :-: | - | - |
| `integrationCredentialsId` | Credentials | M3terEntityParameter | Yes | The m3ter credentials to use. | authType: M3TER\_SIGNED\_REQUEST, m3terEntity: IntegrationCredentials |
| `statePath` | State Path | StateVariableParameter | No | State variable to store the response. | - |
| `queryParams` | Query Parameters | KeyValueLookupParameter | No | Query parameters to include in the request | allowedValues: searchQuery,fromDocument,operator,sortBy,sortOrder |
### Exits
| Exit | Description |
| - | - |
| `NEXT` | The API call succeeded. |
| `ERROR` | The API call failed. Error details are stored in the `m3shError` state variable. |
## End-date Account billing entities
**Function name:** `m3ter_EndDateBillingEntitiesForAccount`
**Category:** WRITE
**HTTP method:** PUT
**Destination:** m3ter
Apply the specified end-date to billing entities associated with an Account.
**NOTE:**
* When you successfully end-date billing entities, the version number of each entity is incremented.
### Parameters
| Name | Label | Type | Required | Description | Constraints |
| - | - | - | :-: | - | - |
| `integrationCredentialsId` | Credentials | M3terEntityParameter | Yes | The m3ter credentials to use. | authType: M3TER\_SIGNED\_REQUEST, m3terEntity: IntegrationCredentials |
| `id` | id | LookupParameter | Yes | The UUID of the Account. | - |
| `requestPath` | Request Path | StateVariableParameter | Yes | State variable containing the request. | - |
| `statePath` | State Path | StateVariableParameter | No | State variable to store the response. | - |
### Exits
| Exit | Description |
| - | - |
| `NEXT` | The API call succeeded. |
| `ERROR` | The API call failed. Error details are stored in the `m3shError` state variable. |
## List Account Children
**Function name:** `m3ter_ListAccountChildren`
**Category:** READ
**HTTP method:** GET (paginated)
**Destination:** m3ter
Retrieve a list of Accounts that are children of the specified Account.
### Parameters
| Name | Label | Type | Required | Description | Constraints |
| - | - | - | :-: | - | - |
| `integrationCredentialsId` | Credentials | M3terEntityParameter | Yes | The m3ter credentials to use. | authType: M3TER\_SIGNED\_REQUEST, m3terEntity: IntegrationCredentials |
| `id` | id | LookupParameter | Yes | The UUID of the Account to list children for. | - |
| `statePath` | State Path | StateVariableParameter | No | State variable to store the response. | - |
### Exits
| Exit | Description |
| - | - |
| `NEXT` | The API call succeeded. |
| `ERROR` | The API call failed. Error details are stored in the `m3shError` state variable. |
## List Accounts
**Function name:** `m3ter_ListAccounts`
**Category:** READ
**HTTP method:** GET (paginated)
**Destination:** m3ter
Retrieve a list of Accounts that can be filtered by Account ID or Account Code.
### Parameters
| Name | Label | Type | Required | Description | Constraints |
| - | - | - | :-: | - | - |
| `integrationCredentialsId` | Credentials | M3terEntityParameter | Yes | The m3ter credentials to use. | authType: M3TER\_SIGNED\_REQUEST, m3terEntity: IntegrationCredentials |
| `statePath` | State Path | StateVariableParameter | No | State variable to store the response. | - |
| `queryParams` | Query Parameters | KeyValueLookupParameter | No | Query parameters to include in the request | allowedValues: ids,codes |
### Exits
| Exit | Description |
| - | - |
| `NEXT` | The API call succeeded. |
| `ERROR` | The API call failed. Error details are stored in the `m3shError` state variable. |
## Create Account
**Function name:** `m3ter_PostAccount`
**Category:** WRITE
**HTTP method:** POST
**Destination:** m3ter
Create a new Account within the Organization.
### Parameters
| Name | Label | Type | Required | Description | Constraints |
| - | - | - | :-: | - | - |
| `integrationCredentialsId` | Credentials | M3terEntityParameter | Yes | The m3ter credentials to use. | authType: M3TER\_SIGNED\_REQUEST, m3terEntity: IntegrationCredentials |
| `requestPath` | Request Path | StateVariableParameter | Yes | State variable containing the request. | - |
| `statePath` | State Path | StateVariableParameter | No | State variable to store the response. | - |
### Exits
| Exit | Description |
| - | - |
| `NEXT` | The API call succeeded. |
| `ERROR` | The API call failed. Error details are stored in the `m3shError` state variable. |
## Retrieve Account
**Function name:** `m3ter_GetAccount`
**Category:** READ
**HTTP method:** GET
**Destination:** m3ter
Retrieve the Account with the given Account UUID.
### Parameters
| Name | Label | Type | Required | Description | Constraints |
| - | - | - | :-: | - | - |
| `integrationCredentialsId` | Credentials | M3terEntityParameter | Yes | The m3ter credentials to use. | authType: M3TER\_SIGNED\_REQUEST, m3terEntity: IntegrationCredentials |
| `id` | id | LookupParameter | Yes | The UUID of the Account to retrieve. | - |
| `statePath` | State Path | StateVariableParameter | No | State variable to store the response. | - |
### Exits
| Exit | Description |
| - | - |
| `NEXT` | The API call succeeded. |
| `ERROR` | The API call failed. Error details are stored in the `m3shError` state variable. |
## Update Account
**Function name:** `m3ter_PutAccount`
**Category:** WRITE
**HTTP method:** PUT
**Destination:** m3ter
Update the Account with the given Account UUID.
**Note:** If you have created Custom Fields for an Account, when you use this endpoint to update the Account, use the `customFields` parameter to preserve those Custom Fields. If you omit them from the update request, they will be lost.
### Parameters
| Name | Label | Type | Required | Description | Constraints |
| - | - | - | :-: | - | - |
| `integrationCredentialsId` | Credentials | M3terEntityParameter | Yes | The m3ter credentials to use. | authType: M3TER\_SIGNED\_REQUEST, m3terEntity: IntegrationCredentials |
| `id` | id | LookupParameter | Yes | The UUID of the Account to update. | - |
| `requestPath` | Request Path | StateVariableParameter | Yes | State variable containing the request. | - |
| `statePath` | State Path | StateVariableParameter | No | State variable to store the response. | - |
### Exits
| Exit | Description |
| - | - |
| `NEXT` | The API call succeeded. |
| `ERROR` | The API call failed. Error details are stored in the `m3shError` state variable. |
## Delete Account
**Function name:** `m3ter_DeleteAccount`
**Category:** WRITE
**HTTP method:** DELETE
**Destination:** m3ter
Delete the Account with the given UUID. This may fail if there are any AccountPlans that reference the Account being deleted.
### Parameters
| Name | Label | Type | Required | Description | Constraints |
| - | - | - | :-: | - | - |
| `integrationCredentialsId` | Credentials | M3terEntityParameter | Yes | The m3ter credentials to use. | authType: M3TER\_SIGNED\_REQUEST, m3terEntity: IntegrationCredentials |
| `id` | id | LookupParameter | Yes | The UUID of the Account to delete. | - |
| `statePath` | State Path | StateVariableParameter | No | State variable to store the response. | - |
### Exits
| Exit | Description |
| - | - |
| `NEXT` | The API call succeeded. |
| `ERROR` | The API call failed. Error details are stored in the `m3shError` state variable. |
# Aggregations
Source: https://docs.m3ter.com/m3sh-function-reference/m3ter/aggregations
## List Aggregations
**Function name:** `m3ter_ListAggregations`
**Category:** READ
**HTTP method:** GET (paginated)
**Destination:** m3ter
Retrieve a list of Aggregations that can be filtered by Product, Aggregation ID, or Code.
### Parameters
| Name | Label | Type | Required | Description | Constraints |
| - | - | - | :-: | - | - |
| `integrationCredentialsId` | Credentials | M3terEntityParameter | Yes | The m3ter credentials to use. | authType: M3TER\_SIGNED\_REQUEST, m3terEntity: IntegrationCredentials |
| `statePath` | State Path | StateVariableParameter | No | State variable to store the response. | - |
| `queryParams` | Query Parameters | KeyValueLookupParameter | No | Query parameters to include in the request | allowedValues: productId,ids,codes |
### Exits
| Exit | Description |
| - | - |
| `NEXT` | The API call succeeded. |
| `ERROR` | The API call failed. Error details are stored in the `m3shError` state variable. |
## Create Aggregation
**Function name:** `m3ter_PostAggregation`
**Category:** WRITE
**HTTP method:** POST
**Destination:** m3ter
Create a new Aggregation.
### Parameters
| Name | Label | Type | Required | Description | Constraints |
| - | - | - | :-: | - | - |
| `integrationCredentialsId` | Credentials | M3terEntityParameter | Yes | The m3ter credentials to use. | authType: M3TER\_SIGNED\_REQUEST, m3terEntity: IntegrationCredentials |
| `requestPath` | Request Path | StateVariableParameter | Yes | State variable containing the request. | - |
| `statePath` | State Path | StateVariableParameter | No | State variable to store the response. | - |
### Exits
| Exit | Description |
| - | - |
| `NEXT` | The API call succeeded. |
| `ERROR` | The API call failed. Error details are stored in the `m3shError` state variable. |
## Retrieve Aggregation
**Function name:** `m3ter_GetAggregation`
**Category:** READ
**HTTP method:** GET
**Destination:** m3ter
Retrieve the Aggregation with the given UUID.
### Parameters
| Name | Label | Type | Required | Description | Constraints |
| - | - | - | :-: | - | - |
| `integrationCredentialsId` | Credentials | M3terEntityParameter | Yes | The m3ter credentials to use. | authType: M3TER\_SIGNED\_REQUEST, m3terEntity: IntegrationCredentials |
| `id` | id | LookupParameter | Yes | The UUID of the Aggregation to retrieve. | - |
| `statePath` | State Path | StateVariableParameter | No | State variable to store the response. | - |
### Exits
| Exit | Description |
| - | - |
| `NEXT` | The API call succeeded. |
| `ERROR` | The API call failed. Error details are stored in the `m3shError` state variable. |
## Update Aggregation
**Function name:** `m3ter_PutAggregation`
**Category:** WRITE
**HTTP method:** PUT
**Destination:** m3ter
Update the Aggregation with the given UUID.
**Note:** If you have created Custom Fields for an Aggregation, when you use this endpoint to update the Aggregation use the `customFields` parameter to preserve those Custom Fields. If you omit them from the update request, they will be lost.
### Parameters
| Name | Label | Type | Required | Description | Constraints |
| - | - | - | :-: | - | - |
| `integrationCredentialsId` | Credentials | M3terEntityParameter | Yes | The m3ter credentials to use. | authType: M3TER\_SIGNED\_REQUEST, m3terEntity: IntegrationCredentials |
| `id` | id | LookupParameter | Yes | The UUID of the Aggregation to update. | - |
| `requestPath` | Request Path | StateVariableParameter | Yes | State variable containing the request. | - |
| `statePath` | State Path | StateVariableParameter | No | State variable to store the response. | - |
### Exits
| Exit | Description |
| - | - |
| `NEXT` | The API call succeeded. |
| `ERROR` | The API call failed. Error details are stored in the `m3shError` state variable. |
## Delete Aggregation
**Function name:** `m3ter_DeleteAggregation`
**Category:** WRITE
**HTTP method:** DELETE
**Destination:** m3ter
Delete the Aggregation with the given UUID.
### Parameters
| Name | Label | Type | Required | Description | Constraints |
| - | - | - | :-: | - | - |
| `integrationCredentialsId` | Credentials | M3terEntityParameter | Yes | The m3ter credentials to use. | authType: M3TER\_SIGNED\_REQUEST, m3terEntity: IntegrationCredentials |
| `id` | id | LookupParameter | Yes | The UUID of the Aggregation to delete. | - |
| `statePath` | State Path | StateVariableParameter | No | State variable to store the response. | - |
### Exits
| Exit | Description |
| - | - |
| `NEXT` | The API call succeeded. |
| `ERROR` | The API call failed. Error details are stored in the `m3shError` state variable. |
# Balances
Source: https://docs.m3ter.com/m3sh-function-reference/m3ter/balances
## List BalanceTransactionSchedule
**Function name:** `m3ter_ListBalanceTransactionSchedule`
**Category:** READ
**HTTP method:** GET (paginated)
**Destination:** m3ter
Retrieve a list of BalanceTransactionSchedule entities.
### Parameters
| Name | Label | Type | Required | Description | Constraints |
| - | - | - | :-: | - | - |
| `integrationCredentialsId` | Credentials | M3terEntityParameter | Yes | The m3ter credentials to use. | authType: M3TER\_SIGNED\_REQUEST, m3terEntity: IntegrationCredentials |
| `balanceId` | balanceId | LookupParameter | Yes | UUID of the balance | - |
| `statePath` | State Path | StateVariableParameter | No | State variable to store the response. | - |
| `queryParams` | Query Parameters | KeyValueLookupParameter | No | Query parameters to include in the request | allowedValues: ids |
### Exits
| Exit | Description |
| - | - |
| `NEXT` | The API call succeeded. |
| `ERROR` | The API call failed. Error details are stored in the `m3shError` state variable. |
## Create BalanceTransactionSchedule
**Function name:** `m3ter_CreateBalanceTransactionSchedule`
**Category:** WRITE
**HTTP method:** POST
**Destination:** m3ter
Create a new BalanceTransactionSchedule.
### Parameters
| Name | Label | Type | Required | Description | Constraints |
| - | - | - | :-: | - | - |
| `integrationCredentialsId` | Credentials | M3terEntityParameter | Yes | The m3ter credentials to use. | authType: M3TER\_SIGNED\_REQUEST, m3terEntity: IntegrationCredentials |
| `balanceId` | balanceId | LookupParameter | Yes | UUID of the balance | - |
| `requestPath` | Request Path | StateVariableParameter | Yes | State variable containing the request. | - |
| `statePath` | State Path | StateVariableParameter | No | State variable to store the response. | - |
### Exits
| Exit | Description |
| - | - |
| `NEXT` | The API call succeeded. |
| `ERROR` | The API call failed. Error details are stored in the `m3shError` state variable. |
## Retrieve BalanceChargeSchedule
**Function name:** `m3ter_GetBalanceChargeSchedule`
**Category:** READ
**HTTP method:** GET
**Destination:** m3ter
Retrieve a BalanceChargeSchedule for the given UUID.
### Parameters
| Name | Label | Type | Required | Description | Constraints |
| - | - | - | :-: | - | - |
| `integrationCredentialsId` | Credentials | M3terEntityParameter | Yes | The m3ter credentials to use. | authType: M3TER\_SIGNED\_REQUEST, m3terEntity: IntegrationCredentials |
| `balanceId` | balanceId | LookupParameter | Yes | UUID of the balance | - |
| `id` | id | LookupParameter | Yes | The UUID of the BalanceChargeSchedule to retrieve. | - |
| `statePath` | State Path | StateVariableParameter | No | State variable to store the response. | - |
### Exits
| Exit | Description |
| - | - |
| `NEXT` | The API call succeeded. |
| `ERROR` | The API call failed. Error details are stored in the `m3shError` state variable. |
## Update BalanceChargeSchedule
**Function name:** `m3ter_UpdateBalanceChargeSchedule`
**Category:** WRITE
**HTTP method:** PUT
**Destination:** m3ter
Update a BalanceChargeSchedule for the given UUID.
### Parameters
| Name | Label | Type | Required | Description | Constraints |
| - | - | - | :-: | - | - |
| `integrationCredentialsId` | Credentials | M3terEntityParameter | Yes | The m3ter credentials to use. | authType: M3TER\_SIGNED\_REQUEST, m3terEntity: IntegrationCredentials |
| `balanceId` | balanceId | LookupParameter | Yes | UUID of the balance | - |
| `id` | id | LookupParameter | Yes | The UUID of the BalanceChargeSchedule to update. | - |
| `requestPath` | Request Path | StateVariableParameter | Yes | State variable containing the request. | - |
| `statePath` | State Path | StateVariableParameter | No | State variable to store the response. | - |
### Exits
| Exit | Description |
| - | - |
| `NEXT` | The API call succeeded. |
| `ERROR` | The API call failed. Error details are stored in the `m3shError` state variable. |
## Delete BalanceChargeSchedule
**Function name:** `m3ter_DeleteBalanceChargeSchedule`
**Category:** WRITE
**HTTP method:** DELETE
**Destination:** m3ter
Delete the BalanceChargeSchedule for the given UUID.
### Parameters
| Name | Label | Type | Required | Description | Constraints |
| - | - | - | :-: | - | - |
| `integrationCredentialsId` | Credentials | M3terEntityParameter | Yes | The m3ter credentials to use. | authType: M3TER\_SIGNED\_REQUEST, m3terEntity: IntegrationCredentials |
| `balanceId` | balanceId | LookupParameter | Yes | UUID of the balance | - |
| `id` | id | LookupParameter | Yes | The UUID of the BalanceChargeSchedule to update. | - |
| `statePath` | State Path | StateVariableParameter | No | State variable to store the response. | - |
### Exits
| Exit | Description |
| - | - |
| `NEXT` | The API call succeeded. |
| `ERROR` | The API call failed. Error details are stored in the `m3shError` state variable. |
## Preview ScheduledBalanceTransactions
**Function name:** `m3ter_PreviewBalanceTransactionSchedule`
**Category:** WRITE
**HTTP method:** POST
**Destination:** m3ter
Previews the BalanceTransactions this Schedule would create, without persisting them. You can use this call to obtain a preview of the Transactions a Schedule you plan to create for a Balance would generate.
### Parameters
| Name | Label | Type | Required | Description | Constraints |
| - | - | - | :-: | - | - |
| `integrationCredentialsId` | Credentials | M3terEntityParameter | Yes | The m3ter credentials to use. | authType: M3TER\_SIGNED\_REQUEST, m3terEntity: IntegrationCredentials |
| `balanceId` | balanceId | LookupParameter | Yes | UUID of the balance | - |
| `requestPath` | Request Path | StateVariableParameter | Yes | State variable containing the request. | - |
| `statePath` | State Path | StateVariableParameter | No | State variable to store the response. | - |
### Exits
| Exit | Description |
| - | - |
| `NEXT` | The API call succeeded. |
| `ERROR` | The API call failed. Error details are stored in the `m3shError` state variable. |
## List Balances
**Function name:** `m3ter_ListBalances`
**Category:** READ
**HTTP method:** GET (paginated)
**Destination:** m3ter
Retrieve a list of all Balances for your Organization.
This endpoint returns a list of all Balances associated with your organization. You can filter the Balances by the end customer's Account UUID and end dates, and paginate through them using the `pageSize` and `nextToken` parameters.
**NOTE:** If a Balance has a rollover amount configured and you want to use the `endDateStart` or `endDateEnd` query parameters, the `rolloverEndDate` is used as the end date/time for the Balance.
### Parameters
| Name | Label | Type | Required | Description | Constraints |
| - | - | - | :-: | - | - |
| `integrationCredentialsId` | Credentials | M3terEntityParameter | Yes | The m3ter credentials to use. | authType: M3TER\_SIGNED\_REQUEST, m3terEntity: IntegrationCredentials |
| `statePath` | State Path | StateVariableParameter | No | State variable to store the response. | - |
| `queryParams` | Query Parameters | KeyValueLookupParameter | No | Query parameters to include in the request | allowedValues: accountId,endDateStart,endDateEnd,contract,contractId,ids |
### Exits
| Exit | Description |
| - | - |
| `NEXT` | The API call succeeded. |
| `ERROR` | The API call failed. Error details are stored in the `m3shError` state variable. |
## Create Balance
**Function name:** `m3ter_PostBalance`
**Category:** WRITE
**HTTP method:** POST
**Destination:** m3ter
Create a new Balance for the given end customer Account.
This endpoint allows you to create a new Balance for a specific end customer Account. The Balance details should be provided in the request body.
### Parameters
| Name | Label | Type | Required | Description | Constraints |
| - | - | - | :-: | - | - |
| `integrationCredentialsId` | Credentials | M3terEntityParameter | Yes | The m3ter credentials to use. | authType: M3TER\_SIGNED\_REQUEST, m3terEntity: IntegrationCredentials |
| `requestPath` | Request Path | StateVariableParameter | Yes | State variable containing the request. | - |
| `statePath` | State Path | StateVariableParameter | No | State variable to store the response. | - |
### Exits
| Exit | Description |
| - | - |
| `NEXT` | The API call succeeded. |
| `ERROR` | The API call failed. Error details are stored in the `m3shError` state variable. |
## List Transactions
**Function name:** `m3ter_ListBalanceTransactions`
**Category:** READ
**HTTP method:** GET (paginated)
**Destination:** m3ter
Retrieve all Transactions for a specific Balance.
This endpoint returns a list of all Transactions associated with a specific Balance. You can paginate through the Transactions by using the `pageSize` and `nextToken` parameters.
### Parameters
| Name | Label | Type | Required | Description | Constraints |
| - | - | - | :-: | - | - |
| `integrationCredentialsId` | Credentials | M3terEntityParameter | Yes | The m3ter credentials to use. | authType: M3TER\_SIGNED\_REQUEST, m3terEntity: IntegrationCredentials |
| `balanceId` | balanceId | LookupParameter | Yes | The unique identifier (UUID) for the Balance whose Transactions you want to retrieve. | - |
| `statePath` | State Path | StateVariableParameter | No | State variable to store the response. | - |
| `queryParams` | Query Parameters | KeyValueLookupParameter | No | Query parameters to include in the request | allowedValues: transactionTypeId,entityType,entityId |
### Exits
| Exit | Description |
| - | - |
| `NEXT` | The API call succeeded. |
| `ERROR` | The API call failed. Error details are stored in the `m3shError` state variable. |
## Create Balance Transaction
**Function name:** `m3ter_PostBalanceTransaction`
**Category:** WRITE
**HTTP method:** POST
**Destination:** m3ter
Add a Transaction to a Balance. This endpoint allows you to create a new Transaction amount for a Balance. This amount then becomes available at billing for draw-down to cover charges due. The Transaction details should be provided in the request body.
Before you can add a Transaction amount, you must first set up Transaction Types at the Organization Level - see the [Transaction Type](https://docs.m3ter.com/api/transactiontype/introduction) section in this API Reference for more details. You can then use this call to add an instance of a Transaction Type to a Balance.
**Note:** If you have a customer whose payment is in a different currency to the Balance currency, you can use the `paid` and `paidCurrency` request parameters to record the amount paid and alternative currency respectively. For example, you might add a Transaction amount of 200 USD to a Balance on a customer Account where the customer actually paid you 50 units in virtual currency X.
### Parameters
| Name | Label | Type | Required | Description | Constraints |
| - | - | - | :-: | - | - |
| `integrationCredentialsId` | Credentials | M3terEntityParameter | Yes | The m3ter credentials to use. | authType: M3TER\_SIGNED\_REQUEST, m3terEntity: IntegrationCredentials |
| `balanceId` | balanceId | LookupParameter | Yes | The unique identifier (UUID) for the Balance to which you want to add a transaction. | - |
| `requestPath` | Request Path | StateVariableParameter | Yes | State variable containing the request. | - |
| `statePath` | State Path | StateVariableParameter | No | State variable to store the response. | - |
### Exits
| Exit | Description |
| - | - |
| `NEXT` | The API call succeeded. |
| `ERROR` | The API call failed. Error details are stored in the `m3shError` state variable. |
## List BalanceChargeSchedule
**Function name:** `m3ter_ListBalanceChargeSchedule`
**Category:** READ
**HTTP method:** GET (paginated)
**Destination:** m3ter
Retrieve a list of BalanceChargeSchedule entities
### Parameters
| Name | Label | Type | Required | Description | Constraints |
| - | - | - | :-: | - | - |
| `integrationCredentialsId` | Credentials | M3terEntityParameter | Yes | The m3ter credentials to use. | authType: M3TER\_SIGNED\_REQUEST, m3terEntity: IntegrationCredentials |
| `balanceId` | balanceId | LookupParameter | Yes | UUID of the balance | - |
| `statePath` | State Path | StateVariableParameter | No | State variable to store the response. | - |
| `queryParams` | Query Parameters | KeyValueLookupParameter | No | Query parameters to include in the request | allowedValues: ids |
### Exits
| Exit | Description |
| - | - |
| `NEXT` | The API call succeeded. |
| `ERROR` | The API call failed. Error details are stored in the `m3shError` state variable. |
## Create BalanceChargeSchedule
**Function name:** `m3ter_CreateBalanceChargeSchedule`
**Category:** WRITE
**HTTP method:** POST
**Destination:** m3ter
Create a new BalanceChargeSchedule.
### Parameters
| Name | Label | Type | Required | Description | Constraints |
| - | - | - | :-: | - | - |
| `integrationCredentialsId` | Credentials | M3terEntityParameter | Yes | The m3ter credentials to use. | authType: M3TER\_SIGNED\_REQUEST, m3terEntity: IntegrationCredentials |
| `balanceId` | balanceId | LookupParameter | Yes | UUID of the balance | - |
| `requestPath` | Request Path | StateVariableParameter | Yes | State variable containing the request. | - |
| `statePath` | State Path | StateVariableParameter | No | State variable to store the response. | - |
### Exits
| Exit | Description |
| - | - |
| `NEXT` | The API call succeeded. |
| `ERROR` | The API call failed. Error details are stored in the `m3shError` state variable. |
## Get Balance Transactions Summary
**Function name:** `m3ter_GetBalanceTransactionsSummary`
**Category:** READ
**HTTP method:** GET
**Destination:** m3ter
Retrieves the Balance Transactions Summary for a given Balance.
The response contains useful recorded and calculated Transaction amounts created for a Balance during the time it is active for the Account, including amounts relevant to any rollover amount configured for a Balance:
* `totalCreditAmount`. The sum of all credits amounts created for the Balance.
* `totalDebitAmount`. The sum of all debit amounts created for the Balance.
* `initialCreditAmount`. The initial credit amount created for the Balance.
* `expiredBalanceAmount`. The amount of the Balance remaining at the time the Balance expires and which is not included in any configured Rollover amount. For example,suppose a Balance reaches its end date and 1000 credit remains unused. If the Balance is configured to rollover 800, then the `expiredBalanceAmount` is calculated as 1000 - 800 = 200.
* `rolloverConsumed`. The sum of debits made against the configured rollover amount. Note that this amount is dynamic relative to when the API call is made until either the rollover end date is reached or the cap configured for the rollover amount is reached, after which it will be unchanged. If no rollover is configured for a Balance, then this is ignored.
* `balanceConsumed`. The sum of debits made against the Balance. Note that this amount is dynamic relative to when the API call is made until either the Balance end date is reached or the available Balance amount reaches zero, after which it will be unchanged.
### Parameters
| Name | Label | Type | Required | Description | Constraints |
| - | - | - | :-: | - | - |
| `integrationCredentialsId` | Credentials | M3terEntityParameter | Yes | The m3ter credentials to use. | authType: M3TER\_SIGNED\_REQUEST, m3terEntity: IntegrationCredentials |
| `balanceId` | balanceId | LookupParameter | Yes | The UUID of the Balance | - |
| `statePath` | State Path | StateVariableParameter | No | State variable to store the response. | - |
### Exits
| Exit | Description |
| - | - |
| `NEXT` | The API call succeeded. |
| `ERROR` | The API call failed. Error details are stored in the `m3shError` state variable. |
## Preview ScheduledBalanceCharges
**Function name:** `m3ter_PreviewScheduledCharge`
**Category:** WRITE
**HTTP method:** POST
**Destination:** m3ter
Previews the Charges this Schedule would create, without persisting them. You can use this call to obtain a preview of the Charges a Schedule you plan to create for a Balance would generate.
### Parameters
| Name | Label | Type | Required | Description | Constraints |
| - | - | - | :-: | - | - |
| `integrationCredentialsId` | Credentials | M3terEntityParameter | Yes | The m3ter credentials to use. | authType: M3TER\_SIGNED\_REQUEST, m3terEntity: IntegrationCredentials |
| `balanceId` | balanceId | LookupParameter | Yes | UUID of the balance | - |
| `requestPath` | Request Path | StateVariableParameter | Yes | State variable containing the request. | - |
| `statePath` | State Path | StateVariableParameter | No | State variable to store the response. | - |
### Exits
| Exit | Description |
| - | - |
| `NEXT` | The API call succeeded. |
| `ERROR` | The API call failed. Error details are stored in the `m3shError` state variable. |
## Retrieve Balance
**Function name:** `m3ter_GetBalance`
**Category:** READ
**HTTP method:** GET
**Destination:** m3ter
Retrieve a specific Balance.
This endpoint returns the details of the specified Balance.
### Parameters
| Name | Label | Type | Required | Description | Constraints |
| - | - | - | :-: | - | - |
| `integrationCredentialsId` | Credentials | M3terEntityParameter | Yes | The m3ter credentials to use. | authType: M3TER\_SIGNED\_REQUEST, m3terEntity: IntegrationCredentials |
| `id` | id | LookupParameter | Yes | The unique identifier (UUID) of the Balance to retrieve. | - |
| `statePath` | State Path | StateVariableParameter | No | State variable to store the response. | - |
### Exits
| Exit | Description |
| - | - |
| `NEXT` | The API call succeeded. |
| `ERROR` | The API call failed. Error details are stored in the `m3shError` state variable. |
## Update Balance
**Function name:** `m3ter_PutBalance`
**Category:** WRITE
**HTTP method:** PUT
**Destination:** m3ter
Update a specific Balance.
This endpoint allows you to update the details of a specific Balance. The updated Balance details should be provided in the request body.
### Parameters
| Name | Label | Type | Required | Description | Constraints |
| - | - | - | :-: | - | - |
| `integrationCredentialsId` | Credentials | M3terEntityParameter | Yes | The m3ter credentials to use. | authType: M3TER\_SIGNED\_REQUEST, m3terEntity: IntegrationCredentials |
| `id` | id | LookupParameter | Yes | The unique identifier (UUID) of the Balance to update. | - |
| `requestPath` | Request Path | StateVariableParameter | Yes | State variable containing the request. | - |
| `statePath` | State Path | StateVariableParameter | No | State variable to store the response. | - |
### Exits
| Exit | Description |
| - | - |
| `NEXT` | The API call succeeded. |
| `ERROR` | The API call failed. Error details are stored in the `m3shError` state variable. |
## Delete Balance
**Function name:** `m3ter_DeleteBalance`
**Category:** WRITE
**HTTP method:** DELETE
**Destination:** m3ter
Delete a specific Balance.
This endpoint allows you to delete a specific Balance with the given UUID.
### Parameters
| Name | Label | Type | Required | Description | Constraints |
| - | - | - | :-: | - | - |
| `integrationCredentialsId` | Credentials | M3terEntityParameter | Yes | The m3ter credentials to use. | authType: M3TER\_SIGNED\_REQUEST, m3terEntity: IntegrationCredentials |
| `id` | id | LookupParameter | Yes | The unique identifier (UUID) of the Balance to delete. | - |
| `statePath` | State Path | StateVariableParameter | No | State variable to store the response. | - |
### Exits
| Exit | Description |
| - | - |
| `NEXT` | The API call succeeded. |
| `ERROR` | The API call failed. Error details are stored in the `m3shError` state variable. |
## Retrieve BalanceTransactionSchedule
**Function name:** `m3ter_GetBalanceTransactionSchedule`
**Category:** READ
**HTTP method:** GET
**Destination:** m3ter
Retrieve a BalanceTransactionSchedule for the given UUID.
### Parameters
| Name | Label | Type | Required | Description | Constraints |
| - | - | - | :-: | - | - |
| `integrationCredentialsId` | Credentials | M3terEntityParameter | Yes | The m3ter credentials to use. | authType: M3TER\_SIGNED\_REQUEST, m3terEntity: IntegrationCredentials |
| `balanceId` | balanceId | LookupParameter | Yes | UUID of the balance | - |
| `id` | id | LookupParameter | Yes | The UUID of the BalanceTransactionSchedule to retrieve. | - |
| `statePath` | State Path | StateVariableParameter | No | State variable to store the response. | - |
### Exits
| Exit | Description |
| - | - |
| `NEXT` | The API call succeeded. |
| `ERROR` | The API call failed. Error details are stored in the `m3shError` state variable. |
## Update BalanceTransactionSchedule
**Function name:** `m3ter_UpdateBalanceTransactionSchedule`
**Category:** WRITE
**HTTP method:** PUT
**Destination:** m3ter
Update a BalanceTransactionSchedule for the given UUID.
### Parameters
| Name | Label | Type | Required | Description | Constraints |
| - | - | - | :-: | - | - |
| `integrationCredentialsId` | Credentials | M3terEntityParameter | Yes | The m3ter credentials to use. | authType: M3TER\_SIGNED\_REQUEST, m3terEntity: IntegrationCredentials |
| `balanceId` | balanceId | LookupParameter | Yes | UUID of the balance | - |
| `id` | id | LookupParameter | Yes | The UUID of the BalanceTransactionSchedule to update. | - |
| `requestPath` | Request Path | StateVariableParameter | Yes | State variable containing the request. | - |
| `statePath` | State Path | StateVariableParameter | No | State variable to store the response. | - |
### Exits
| Exit | Description |
| - | - |
| `NEXT` | The API call succeeded. |
| `ERROR` | The API call failed. Error details are stored in the `m3shError` state variable. |
## Delete BalanceTransactionSchedule
**Function name:** `m3ter_DeleteBalanceTransactionSchedule`
**Category:** WRITE
**HTTP method:** DELETE
**Destination:** m3ter
Delete the BalanceTransactionSchedule for the given UUID.
### Parameters
| Name | Label | Type | Required | Description | Constraints |
| - | - | - | :-: | - | - |
| `integrationCredentialsId` | Credentials | M3terEntityParameter | Yes | The m3ter credentials to use. | authType: M3TER\_SIGNED\_REQUEST, m3terEntity: IntegrationCredentials |
| `balanceId` | balanceId | LookupParameter | Yes | UUID of the balance | - |
| `id` | id | LookupParameter | Yes | The UUID of the BalanceTransactionSchedule to update. | - |
| `statePath` | State Path | StateVariableParameter | No | State variable to store the response. | - |
### Exits
| Exit | Description |
| - | - |
| `NEXT` | The API call succeeded. |
| `ERROR` | The API call failed. Error details are stored in the `m3shError` state variable. |
# Billconfig
Source: https://docs.m3ter.com/m3sh-function-reference/m3ter/billconfig
## Retrieve BillConfig
**Function name:** `m3ter_GetBillConfig`
**Category:** READ
**HTTP method:** GET
**Destination:** m3ter
Retrieve the Organization-wide BillConfig.
### Parameters
| Name | Label | Type | Required | Description | Constraints |
| - | - | - | :-: | - | - |
| `integrationCredentialsId` | Credentials | M3terEntityParameter | Yes | The m3ter credentials to use. | authType: M3TER\_SIGNED\_REQUEST, m3terEntity: IntegrationCredentials |
| `statePath` | State Path | StateVariableParameter | No | State variable to store the response. | - |
### Exits
| Exit | Description |
| - | - |
| `NEXT` | The API call succeeded. |
| `ERROR` | The API call failed. Error details are stored in the `m3shError` state variable. |
## Update BillConfig
**Function name:** `m3ter_UpdateBillConfig`
**Category:** WRITE
**HTTP method:** PUT
**Destination:** m3ter
Update the Organization-wide BillConfig.
You can use this endpoint to set a global lock date for **all** Bills - any Bill with a service period end date on or before the set date will be locked and cannot be updated or recalculated.
### Parameters
| Name | Label | Type | Required | Description | Constraints |
| - | - | - | :-: | - | - |
| `integrationCredentialsId` | Credentials | M3terEntityParameter | Yes | The m3ter credentials to use. | authType: M3TER\_SIGNED\_REQUEST, m3terEntity: IntegrationCredentials |
| `requestPath` | Request Path | StateVariableParameter | Yes | State variable containing the request. | - |
| `statePath` | State Path | StateVariableParameter | No | State variable to store the response. | - |
### Exits
| Exit | Description |
| - | - |
| `NEXT` | The API call succeeded. |
| `ERROR` | The API call failed. Error details are stored in the `m3shError` state variable. |
# Billjobs
Source: https://docs.m3ter.com/m3sh-function-reference/m3ter/billjobs
## List BillJobs
**Function name:** `m3ter_ListBillJobs`
**Category:** READ
**HTTP method:** GET (paginated)
**Destination:** m3ter
Retrieve a list of BillJobs.
This endpoint retrieves a list of BillJobs for the specified Organization. The list can be paginated for easier management, and allows you to query and filter based on various parameters, such as BillJob `status` and whether or not BillJob remains `active`.
### Parameters
| Name | Label | Type | Required | Description | Constraints |
| - | - | - | :-: | - | - |
| `integrationCredentialsId` | Credentials | M3terEntityParameter | Yes | The m3ter credentials to use. | authType: M3TER\_SIGNED\_REQUEST, m3terEntity: IntegrationCredentials |
| `statePath` | State Path | StateVariableParameter | No | State variable to store the response. | - |
| `queryParams` | Query Parameters | KeyValueLookupParameter | No | Query parameters to include in the request | allowedValues: active,status |
### Exits
| Exit | Description |
| - | - |
| `NEXT` | The API call succeeded. |
| `ERROR` | The API call failed. Error details are stored in the `m3shError` state variable. |
## Create BillJob
**Function name:** `m3ter_CreateBillJob`
**Category:** WRITE
**HTTP method:** POST
**Destination:** m3ter
Create a new BillJob to handle asynchronous bill calculations for a specific Organization.
This operation allows you to initiate the processing of bills according to specified parameters. For example, create a BillJob to run only those bills where `billingFrequency` is `MONTHLY`. Note that if you want to run a BillJob for all billing frequencies, simply omit the `billingFrequency` request parameter.
Once created, the BillJob's progress can be monitored:
* In the Running Tasks panel in the m3ter Console - for more details, see [Running Bills Manually](https://www.m3ter.com/docs/guides/billing-and-usage-data/running-viewing-and-managing-bills/running-bills-and-viewing-bill-details#running-bills-manually)
* Queried using the [List BillJobs](https://docs.m3ter.com/api/billjob/list-billjobs) endpoint.
**NOTES:**
* **Consolidated bills**. If you've already run billing with the Consolidate bills option disabled for your Organization but you then enable it, subsequent Bills for specific bill dates will now start afresh and not update earlier non-consolidated Bills for the same bill date. To avoid any billing conflicts, you might want to archive these earlier versions or delete them entirely.
* **Maximum concurrent BillJobs**. If you already have 10 BillJobs currently running, and try to create another one, you'll get an HTTP 429 response (Too many requests). When one of the existing BillJobs has completed, you'll be able to submit another job
### Parameters
| Name | Label | Type | Required | Description | Constraints |
| - | - | - | :-: | - | - |
| `integrationCredentialsId` | Credentials | M3terEntityParameter | Yes | The m3ter credentials to use. | authType: M3TER\_SIGNED\_REQUEST, m3terEntity: IntegrationCredentials |
| `requestPath` | Request Path | StateVariableParameter | Yes | State variable containing the request. | - |
| `statePath` | State Path | StateVariableParameter | No | State variable to store the response. | - |
### Exits
| Exit | Description |
| - | - |
| `NEXT` | The API call succeeded. |
| `ERROR` | The API call failed. Error details are stored in the `m3shError` state variable. |
## Cancel BillJob
**Function name:** `m3ter_CancelBillJob`
**Category:** WRITE
**HTTP method:** POST
**Destination:** m3ter
Cancel an ongoing BillJob for the given Organization and BillJob UUID.
This endpoint allows you to halt the processing of a specific BillJob, which might be necessary if there are changes in billing requirements or other operational considerations.
### Parameters
| Name | Label | Type | Required | Description | Constraints |
| - | - | - | :-: | - | - |
| `integrationCredentialsId` | Credentials | M3terEntityParameter | Yes | The m3ter credentials to use. | authType: M3TER\_SIGNED\_REQUEST, m3terEntity: IntegrationCredentials |
| `id` | id | LookupParameter | Yes | The unique identifier (UUID) of the BillJob to cancel. | - |
| `statePath` | State Path | StateVariableParameter | No | State variable to store the response. | - |
### Exits
| Exit | Description |
| - | - |
| `NEXT` | The API call succeeded. |
| `ERROR` | The API call failed. Error details are stored in the `m3shError` state variable. |
## Create Recalculation BillJob
**Function name:** `m3ter_RecalculateBillJob`
**Category:** WRITE
**HTTP method:** POST
**Destination:** m3ter
Create a new BillJob specifically to recalculate existing bills for a given Organization.
This operation is essential when adjustments or corrections are required in previously calculated bills. The recalculated bills when the BillJob is complete can be checked in the m3ter Console Bill Management page or queried by using the [List Bills](https://docs.m3ter.com/api/bill/list-bills) operation.
**NOTE:**
* **Response Schema**. The response schema for this call is dynamic. This means that the response might not contain all of the parameters listed. If set to null,the parameter is hidden to help simplify the output as well as to reduce its size and improve performance.
### Parameters
| Name | Label | Type | Required | Description | Constraints |
| - | - | - | :-: | - | - |
| `integrationCredentialsId` | Credentials | M3terEntityParameter | Yes | The m3ter credentials to use. | authType: M3TER\_SIGNED\_REQUEST, m3terEntity: IntegrationCredentials |
| `requestPath` | Request Path | StateVariableParameter | Yes | State variable containing the request. | - |
| `statePath` | State Path | StateVariableParameter | No | State variable to store the response. | - |
### Exits
| Exit | Description |
| - | - |
| `NEXT` | The API call succeeded. |
| `ERROR` | The API call failed. Error details are stored in the `m3shError` state variable. |
## Retrieve BillJob
**Function name:** `m3ter_GetBillJob`
**Category:** READ
**HTTP method:** GET
**Destination:** m3ter
Retrieve a Bill Job for the given UUID.
### Parameters
| Name | Label | Type | Required | Description | Constraints |
| - | - | - | :-: | - | - |
| `integrationCredentialsId` | Credentials | M3terEntityParameter | Yes | The m3ter credentials to use. | authType: M3TER\_SIGNED\_REQUEST, m3terEntity: IntegrationCredentials |
| `id` | id | LookupParameter | Yes | The UUID of the Bill Job to retrieve. | - |
| `statePath` | State Path | StateVariableParameter | No | State variable to store the response. | - |
### Exits
| Exit | Description |
| - | - |
| `NEXT` | The API call succeeded. |
| `ERROR` | The API call failed. Error details are stored in the `m3shError` state variable. |
# Bills
Source: https://docs.m3ter.com/m3sh-function-reference/m3ter/bills
## List Bills
**Function name:** `m3ter_ListBills`
**Category:** READ
**HTTP method:** GET (paginated)
**Destination:** m3ter
Retrieve a list of Bills.
This endpoint retrieves a list of all Bills for the given Account within the specified Organization. Optional filters can be applied such as by date range, lock status, or other attributes. The list can also be paginated for easier management.
### Parameters
| Name | Label | Type | Required | Description | Constraints |
| - | - | - | :-: | - | - |
| `integrationCredentialsId` | Credentials | M3terEntityParameter | Yes | The m3ter credentials to use. | authType: M3TER\_SIGNED\_REQUEST, m3terEntity: IntegrationCredentials |
| `statePath` | State Path | StateVariableParameter | No | State variable to store the response. | - |
| `queryParams` | Query Parameters | KeyValueLookupParameter | No | Query parameters to include in the request | allowedValues: accountId,locked,excludeLineItems,includeBillTotal,status,billDate,billDateStart,billDateEnd,externalInvoiceDateStart,externalInvoiceDateEnd,ids,billJobId,additional,billingFrequency |
### Exits
| Exit | Description |
| - | - |
| `NEXT` | The API call succeeded. |
| `ERROR` | The API call failed. Error details are stored in the `m3shError` state variable. |
## Retrieve Bill Statement in JSON Format
**Function name:** `m3ter_GetBillJsonStatement`
**Category:** READ
**HTTP method:** GET
**Destination:** m3ter
Retrieve a Bill Statement in JSON format for a given Bill ID.
Bill Statements are backing sheets to the invoices sent to your customers. Bill Statements provide a breakdown of the usage responsible for the usage charge line items shown on invoices.
The response to this call returns a pre-signed `downloadUrl`, which you use with a `GET` call to obtain the Bill Statement.
### Parameters
| Name | Label | Type | Required | Description | Constraints |
| - | - | - | :-: | - | - |
| `integrationCredentialsId` | Credentials | M3terEntityParameter | Yes | The m3ter credentials to use. | authType: M3TER\_SIGNED\_REQUEST, m3terEntity: IntegrationCredentials |
| `id` | id | LookupParameter | Yes | The unique identifier (UUID) of the Bill for which you want to retrieve the Statement. | - |
| `statePath` | State Path | StateVariableParameter | No | State variable to store the response. | - |
### Exits
| Exit | Description |
| - | - |
| `NEXT` | The API call succeeded. |
| `ERROR` | The API call failed. Error details are stored in the `m3shError` state variable. |
## Retrieve Debit Line Item
**Function name:** `m3ter_GetDebitLineItem`
**Category:** READ
**HTTP method:** GET
**Destination:** m3ter
Retrieve the Debit line item with the given UUID.
### Parameters
| Name | Label | Type | Required | Description | Constraints |
| - | - | - | :-: | - | - |
| `integrationCredentialsId` | Credentials | M3terEntityParameter | Yes | The m3ter credentials to use. | authType: M3TER\_SIGNED\_REQUEST, m3terEntity: IntegrationCredentials |
| `billId` | billId | LookupParameter | Yes | UUID of the bill. | - |
| `id` | id | LookupParameter | Yes | The UUID of the debit line item to retrieve. | - |
| `statePath` | State Path | StateVariableParameter | No | State variable to store the response. | - |
### Exits
| Exit | Description |
| - | - |
| `NEXT` | The API call succeeded. |
| `ERROR` | The API call failed. Error details are stored in the `m3shError` state variable. |
## Update Debit Line Item
**Function name:** `m3ter_PutDebitLineItem`
**Category:** WRITE
**HTTP method:** PUT
**Destination:** m3ter
Update the Debit line item with the given UUID.
### Parameters
| Name | Label | Type | Required | Description | Constraints |
| - | - | - | :-: | - | - |
| `integrationCredentialsId` | Credentials | M3terEntityParameter | Yes | The m3ter credentials to use. | authType: M3TER\_SIGNED\_REQUEST, m3terEntity: IntegrationCredentials |
| `billId` | billId | LookupParameter | Yes | UUID of the bill. | - |
| `id` | id | LookupParameter | Yes | The UUID of the debit line item to update. | - |
| `requestPath` | Request Path | StateVariableParameter | Yes | State variable containing the request. | - |
| `statePath` | State Path | StateVariableParameter | No | State variable to store the response. | - |
### Exits
| Exit | Description |
| - | - |
| `NEXT` | The API call succeeded. |
| `ERROR` | The API call failed. Error details are stored in the `m3shError` state variable. |
## Delete Debit Line Item
**Function name:** `m3ter_DeleteDebitLineItem`
**Category:** WRITE
**HTTP method:** DELETE
**Destination:** m3ter
Delete the Debit line item with the given UUID.
### Parameters
| Name | Label | Type | Required | Description | Constraints |
| - | - | - | :-: | - | - |
| `integrationCredentialsId` | Credentials | M3terEntityParameter | Yes | The m3ter credentials to use. | authType: M3TER\_SIGNED\_REQUEST, m3terEntity: IntegrationCredentials |
| `billId` | billId | LookupParameter | Yes | UUID of the bill. | - |
| `id` | id | LookupParameter | Yes | UUID of the debit line item. | - |
| `statePath` | State Path | StateVariableParameter | No | State variable to store the response. | - |
### Exits
| Exit | Description |
| - | - |
| `NEXT` | The API call succeeded. |
| `ERROR` | The API call failed. Error details are stored in the `m3shError` state variable. |
## Retrieve Credit Line Item
**Function name:** `m3ter_GetCreditLineItem`
**Category:** READ
**HTTP method:** GET
**Destination:** m3ter
Retrieve the Credit line item with the given UUID.
### Parameters
| Name | Label | Type | Required | Description | Constraints |
| - | - | - | :-: | - | - |
| `integrationCredentialsId` | Credentials | M3terEntityParameter | Yes | The m3ter credentials to use. | authType: M3TER\_SIGNED\_REQUEST, m3terEntity: IntegrationCredentials |
| `billId` | billId | LookupParameter | Yes | UUID of the Bill. | - |
| `id` | id | LookupParameter | Yes | The UUID of the Credit line item to retrieve. | - |
| `statePath` | State Path | StateVariableParameter | No | State variable to store the response. | - |
### Exits
| Exit | Description |
| - | - |
| `NEXT` | The API call succeeded. |
| `ERROR` | The API call failed. Error details are stored in the `m3shError` state variable. |
## Update Credit Line Item
**Function name:** `m3ter_PutCreditLineItem`
**Category:** WRITE
**HTTP method:** PUT
**Destination:** m3ter
Update the Credit line item with the given UUID.
### Parameters
| Name | Label | Type | Required | Description | Constraints |
| - | - | - | :-: | - | - |
| `integrationCredentialsId` | Credentials | M3terEntityParameter | Yes | The m3ter credentials to use. | authType: M3TER\_SIGNED\_REQUEST, m3terEntity: IntegrationCredentials |
| `billId` | billId | LookupParameter | Yes | UUID of the bill. | - |
| `id` | id | LookupParameter | Yes | The UUID of the credit line item to update. | - |
| `requestPath` | Request Path | StateVariableParameter | Yes | State variable containing the request. | - |
| `statePath` | State Path | StateVariableParameter | No | State variable to store the response. | - |
### Exits
| Exit | Description |
| - | - |
| `NEXT` | The API call succeeded. |
| `ERROR` | The API call failed. Error details are stored in the `m3shError` state variable. |
## Delete Credit Line Item
**Function name:** `m3ter_DeleteCreditLineItem`
**Category:** WRITE
**HTTP method:** DELETE
**Destination:** m3ter
Delete the Credit line item with the given UUID.
### Parameters
| Name | Label | Type | Required | Description | Constraints |
| - | - | - | :-: | - | - |
| `integrationCredentialsId` | Credentials | M3terEntityParameter | Yes | The m3ter credentials to use. | authType: M3TER\_SIGNED\_REQUEST, m3terEntity: IntegrationCredentials |
| `billId` | billId | LookupParameter | Yes | UUID of the bill. | - |
| `id` | id | LookupParameter | Yes | UUID of the credit line item to delete. | - |
| `statePath` | State Path | StateVariableParameter | No | State variable to store the response. | - |
### Exits
| Exit | Description |
| - | - |
| `NEXT` | The API call succeeded. |
| `ERROR` | The API call failed. Error details are stored in the `m3shError` state variable. |
## Retrieve Line Item
**Function name:** `m3ter_GetBillLineItem`
**Category:** READ
**HTTP method:** GET
**Destination:** m3ter
Retrieves a specific line item within a Bill.
This endpoint retrieves the line item given by its unique identifier (UUID) from a specific Bill.
### Parameters
| Name | Label | Type | Required | Description | Constraints |
| - | - | - | :-: | - | - |
| `integrationCredentialsId` | Credentials | M3terEntityParameter | Yes | The m3ter credentials to use. | authType: M3TER\_SIGNED\_REQUEST, m3terEntity: IntegrationCredentials |
| `billId` | billId | LookupParameter | Yes | The unique identifier (UUID) of the Bill containing the line item. | - |
| `id` | id | LookupParameter | Yes | The unique identifier (UUID) of the line item you want to retrieve. | - |
| `statePath` | State Path | StateVariableParameter | No | State variable to store the response. | - |
| `queryParams` | Query Parameters | KeyValueLookupParameter | No | Query parameters to include in the request | allowedValues: additional |
### Exits
| Exit | Description |
| - | - |
| `NEXT` | The API call succeeded. |
| `ERROR` | The API call failed. Error details are stored in the `m3shError` state variable. |
## Retrieve Line Item Usage in JSON Format
**Function name:** `m3ter_GetBillLineItemJsonUsage`
**Category:** READ
**HTTP method:** GET
**Destination:** m3ter
Retrieve the line item with the given UUID in JSON format.
This endpoint retrieves detailed usage information for a specific billing line item in JSON format. It is designed to provide granular insights into the consumption pattern for the given line item.
The response includes a pre-signed `downloadUrl`, which must be used with a separate `GET` call to download the Bill line item. This ensures secure access to the requested information.
### Parameters
| Name | Label | Type | Required | Description | Constraints |
| - | - | - | :-: | - | - |
| `integrationCredentialsId` | Credentials | M3terEntityParameter | Yes | The m3ter credentials to use. | authType: M3TER\_SIGNED\_REQUEST, m3terEntity: IntegrationCredentials |
| `billId` | billId | LookupParameter | Yes | UUID of the Bill | - |
| `id` | id | LookupParameter | Yes | The unique identifier (UUID) of the Bill line item for which to retrieve the usage. | - |
| `statePath` | State Path | StateVariableParameter | No | State variable to store the response. | - |
### Exits
| Exit | Description |
| - | - |
| `NEXT` | The API call succeeded. |
| `ERROR` | The API call failed. Error details are stored in the `m3shError` state variable. |
## Download Bills URL
**Function name:** `m3ter_DownloadBillsCsvUrl`
**Category:** WRITE
**HTTP method:** POST
**Destination:** m3ter
Generate a URL for downloading a CSV file containing a comprehensive list of Bills data for the specified organization for a specified period. This endpoint facilitates easy exporting of billing data for external analysis and reporting.
The response to this call returns a pre-signed `downloadUrl`, which you then enter into your browser to download the CSV file of the Bill entities.
You can use the `externalSystem` request parameter to control the format of the Bills data in the CSV file:
* **STANDARD** A wider range of Bills data columns is given.
* **XERO** A more limited range of data columns is given and compatible with loading into your 3rd-party Xero system.
**NOTES:**
* **Download Limits**. You can only download Bills for a period of up to 31 days or up to a maximum of 5000 Bills. If you attempt a download that exceeds either of these two limits, you'll receive an error message
* **Empty Bills**. The CSV formatted file is compiled for download by taking each of the line items found in Bills that exist in your Organization for the specified period. The Bill for each line item record is given, along with Bill Total and other billing attributes. However, this means that if you have an *empty Bill* that exists for the specified period - one for which *no line items currently exist* - then no line item records will be shown for this Bill in the CSV file you download.
### Parameters
| Name | Label | Type | Required | Description | Constraints |
| - | - | - | :-: | - | - |
| `integrationCredentialsId` | Credentials | M3terEntityParameter | Yes | The m3ter credentials to use. | authType: M3TER\_SIGNED\_REQUEST, m3terEntity: IntegrationCredentials |
| `requestPath` | Request Path | StateVariableParameter | Yes | State variable containing the request. | - |
| `statePath` | State Path | StateVariableParameter | No | State variable to store the response. | - |
### Exits
| Exit | Description |
| - | - |
| `NEXT` | The API call succeeded. |
| `ERROR` | The API call failed. Error details are stored in the `m3shError` state variable. |
## Approve Bills
**Function name:** `m3ter_ApproveBills`
**Category:** WRITE
**HTTP method:** POST
**Destination:** m3ter
Approve multiple Bills for the specified Organization based on the given criteria.
This endpoint allows you to change currently *Pending* Bills to *Approved* status for further processing.
Query Parameters:
* Use `accountIds` to approve Bills for specifed Accounts.
Request Body Schema Parameter:
* Use `billIds` to specify a collection of Bills for batch approval.
**Important!** If you use the `billIds` Request Body Schema parameter, any Query parameters you might have also used are ignored when the call is processed.
### Parameters
| Name | Label | Type | Required | Description | Constraints |
| - | - | - | :-: | - | - |
| `integrationCredentialsId` | Credentials | M3terEntityParameter | Yes | The m3ter credentials to use. | authType: M3TER\_SIGNED\_REQUEST, m3terEntity: IntegrationCredentials |
| `requestPath` | Request Path | StateVariableParameter | Yes | State variable containing the request. | - |
| `statePath` | State Path | StateVariableParameter | No | State variable to store the response. | - |
| `queryParams` | Query Parameters | KeyValueLookupParameter | No | Query parameters to include in the request | allowedValues: externalInvoiceDateStart,externalInvoiceDateEnd,accountIds |
### Exits
| Exit | Description |
| - | - |
| `NEXT` | The API call succeeded. |
| `ERROR` | The API call failed. Error details are stored in the `m3shError` state variable. |
## Search Bills
**Function name:** `m3ter_SearchBills`
**Category:** READ
**HTTP method:** GET (paginated)
**Destination:** m3ter
Search for Bill entities.
This endpoint executes a search query for Bills based on the user specified search criteria. The search query is customizable, allowing for complex nested conditions and sorting. The returned list of Bills can be paginated for easier management.
### Parameters
| Name | Label | Type | Required | Description | Constraints |
| - | - | - | :-: | - | - |
| `integrationCredentialsId` | Credentials | M3terEntityParameter | Yes | The m3ter credentials to use. | authType: M3TER\_SIGNED\_REQUEST, m3terEntity: IntegrationCredentials |
| `statePath` | State Path | StateVariableParameter | No | State variable to store the response. | - |
| `queryParams` | Query Parameters | KeyValueLookupParameter | No | Query parameters to include in the request | allowedValues: searchQuery,fromDocument,operator,sortBy,sortOrder |
### Exits
| Exit | Description |
| - | - |
| `NEXT` | The API call succeeded. |
| `ERROR` | The API call failed. Error details are stored in the `m3shError` state variable. |
## Retrieve latest Bill
**Function name:** `m3ter_GetLatestBill`
**Category:** READ
**HTTP method:** GET
**Destination:** m3ter
Retrieve the latest Bill for the given Account.
This endpoint retrieves the latest Bill for the given Account in the specified Organization. It facilitates tracking of the most recent charges and consumption details.
### Parameters
| Name | Label | Type | Required | Description | Constraints |
| - | - | - | :-: | - | - |
| `integrationCredentialsId` | Credentials | M3terEntityParameter | Yes | The m3ter credentials to use. | authType: M3TER\_SIGNED\_REQUEST, m3terEntity: IntegrationCredentials |
| `accountId` | accountId | LookupParameter | Yes | The unique identifier (UUID) of the Account for which the latest Bill should be retrieved. | - |
| `statePath` | State Path | StateVariableParameter | No | State variable to store the response. | - |
| `queryParams` | Query Parameters | KeyValueLookupParameter | No | Query parameters to include in the request | allowedValues: additional |
### Exits
| Exit | Description |
| - | - |
| `NEXT` | The API call succeeded. |
| `ERROR` | The API call failed. Error details are stored in the `m3shError` state variable. |
## Update Bill Status
**Function name:** `m3ter_UpdateBillStatus`
**Category:** WRITE
**HTTP method:** PUT
**Destination:** m3ter
Updates the status of a specified Bill with the given Bill ID.
This endpoint allows you to transition a Bill's status through various stages, such as from "Pending" to "Approved".
### Parameters
| Name | Label | Type | Required | Description | Constraints |
| - | - | - | :-: | - | - |
| `integrationCredentialsId` | Credentials | M3terEntityParameter | Yes | The m3ter credentials to use. | authType: M3TER\_SIGNED\_REQUEST, m3terEntity: IntegrationCredentials |
| `id` | id | LookupParameter | Yes | The unique identifier (UUID) of the Bill whose status you want to update. | - |
| `requestPath` | Request Path | StateVariableParameter | Yes | State variable containing the request. | - |
| `statePath` | State Path | StateVariableParameter | No | State variable to store the response. | - |
### Exits
| Exit | Description |
| - | - |
| `NEXT` | The API call succeeded. |
| `ERROR` | The API call failed. Error details are stored in the `m3shError` state variable. |
## Retrieve Bill Statement in CSV Format
**Function name:** `m3ter_GetBillCsvStatement`
**Category:** READ
**HTTP method:** GET
**Destination:** m3ter
Retrieve a specific Bill Statement for the given Bill UUID in CSV format.
Bill Statements are backing sheets to the invoices sent to your customers. Bill Statements provide a breakdown of the usage responsible for the usage charge line items shown on invoices.
The response includes a pre-signed `downloadUrl`, which must be used with a separate `GET` call to download the actual Bill Statement. This ensures secure access to the requested information.
### Parameters
| Name | Label | Type | Required | Description | Constraints |
| - | - | - | :-: | - | - |
| `integrationCredentialsId` | Credentials | M3terEntityParameter | Yes | The m3ter credentials to use. | authType: M3TER\_SIGNED\_REQUEST, m3terEntity: IntegrationCredentials |
| `id` | id | LookupParameter | Yes | The unique identifier (UUID) of the Bill for which to retrieve the Statement in CSV format. | - |
| `statePath` | State Path | StateVariableParameter | No | State variable to store the response. | - |
### Exits
| Exit | Description |
| - | - |
| `NEXT` | The API call succeeded. |
| `ERROR` | The API call failed. Error details are stored in the `m3shError` state variable. |
## Create Bill Statement in CSV Format
**Function name:** `m3ter_CreateBillCsvStatement`
**Category:** WRITE
**HTTP method:** POST
**Destination:** m3ter
Generate a specific Bill Statement for the provided Bill UUID in CSV format.
Bill Statements are backing sheets to the invoices sent to your customers. Bill Statements provide a breakdown of the usage responsible for the usage charge line items shown on invoices.
The response to this call returns a pre-signed `downloadUrl`, which you then use with a `GET` call to obtain the Bill statement in CSV format.
### Parameters
| Name | Label | Type | Required | Description | Constraints |
| - | - | - | :-: | - | - |
| `integrationCredentialsId` | Credentials | M3terEntityParameter | Yes | The m3ter credentials to use. | authType: M3TER\_SIGNED\_REQUEST, m3terEntity: IntegrationCredentials |
| `id` | id | LookupParameter | Yes | The unique identifier (UUID) of the Bill for which you want to generate the Statement in CSV format. | - |
| `statePath` | State Path | StateVariableParameter | No | State variable to store the response. | - |
### Exits
| Exit | Description |
| - | - |
| `NEXT` | The API call succeeded. |
| `ERROR` | The API call failed. Error details are stored in the `m3shError` state variable. |
## List Credit Line Items
**Function name:** `m3ter_ListCreditLineItems`
**Category:** READ
**HTTP method:** GET (paginated)
**Destination:** m3ter
List the Credit line items for the given Bill.
### Parameters
| Name | Label | Type | Required | Description | Constraints |
| - | - | - | :-: | - | - |
| `integrationCredentialsId` | Credentials | M3terEntityParameter | Yes | The m3ter credentials to use. | authType: M3TER\_SIGNED\_REQUEST, m3terEntity: IntegrationCredentials |
| `billId` | billId | LookupParameter | Yes | UUID of the bill. | - |
| `statePath` | State Path | StateVariableParameter | No | State variable to store the response. | - |
### Exits
| Exit | Description |
| - | - |
| `NEXT` | The API call succeeded. |
| `ERROR` | The API call failed. Error details are stored in the `m3shError` state variable. |
## Create Credit Line Item
**Function name:** `m3ter_PostCreditLineItem`
**Category:** WRITE
**HTTP method:** POST
**Destination:** m3ter
Create a new Credit line item for the given Bill.
When creating Credit line items for Bills, use the Credit Reasons created for your Organization. See [CreditReason](https://www.m3ter.com/docs/api#tag/CreditReason).
### Parameters
| Name | Label | Type | Required | Description | Constraints |
| - | - | - | :-: | - | - |
| `integrationCredentialsId` | Credentials | M3terEntityParameter | Yes | The m3ter credentials to use. | authType: M3TER\_SIGNED\_REQUEST, m3terEntity: IntegrationCredentials |
| `billId` | billId | LookupParameter | Yes | UUID of the bill. | - |
| `requestPath` | Request Path | StateVariableParameter | Yes | State variable containing the request. | - |
| `statePath` | State Path | StateVariableParameter | No | State variable to store the response. | - |
### Exits
| Exit | Description |
| - | - |
| `NEXT` | The API call succeeded. |
| `ERROR` | The API call failed. Error details are stored in the `m3shError` state variable. |
## Retrieve Bills in Billing Period
**Function name:** `m3ter_GetAllBillsInBillingPeriod`
**Category:** READ
**HTTP method:** GET (paginated)
**Destination:** m3ter
Retrieve all Bills within a specified billing period. This endpoint allows you to retrieve Bills on various frequencies, such as daily, weekly, monthly, or annually. Specify the last day of the period to define the range.
For example, to retrieve all Bills on monthly billing up to September with due date of 1st of month, use the last day of September, which is September 30th.
The list can also be paginated for easier management.
### Parameters
| Name | Label | Type | Required | Description | Constraints |
| - | - | - | :-: | - | - |
| `integrationCredentialsId` | Credentials | M3terEntityParameter | Yes | The m3ter credentials to use. | authType: M3TER\_SIGNED\_REQUEST, m3terEntity: IntegrationCredentials |
| `lastDateInBillingPeriod` | lastDateInBillingPeriod | LookupParameter | Yes | The last date of the billing period for which you want to retrieve Bills. This date defines the range of Bills to be retrieved. | - |
| `billingFrequency` | billingFrequency | LookupParameter | Yes | The billing frequency for the specified period. Valid options are daily, weekly, monthly, or annually. | - |
| `statePath` | State Path | StateVariableParameter | No | State variable to store the response. | - |
| `queryParams` | Query Parameters | KeyValueLookupParameter | No | Query parameters to include in the request | allowedValues: additional |
### Exits
| Exit | Description |
| - | - |
| `NEXT` | The API call succeeded. |
| `ERROR` | The API call failed. Error details are stored in the `m3shError` state variable. |
## List Line Items
**Function name:** `m3ter_ListBillLineItems`
**Category:** READ
**HTTP method:** GET (paginated)
**Destination:** m3ter
Lists all the line items for a specific Bill.
This endpoint retrieves a list of line items for the given Bill within the specified Organization. The list can also be paginated for easier management. The line items returned in the list include individual charges, discounts, or adjustments within a Bill.
### Parameters
| Name | Label | Type | Required | Description | Constraints |
| - | - | - | :-: | - | - |
| `integrationCredentialsId` | Credentials | M3terEntityParameter | Yes | The m3ter credentials to use. | authType: M3TER\_SIGNED\_REQUEST, m3terEntity: IntegrationCredentials |
| `billId` | billId | LookupParameter | Yes | The unique identifier (UUID) of the Bill for which you want to list the line items. | - |
| `statePath` | State Path | StateVariableParameter | No | State variable to store the response. | - |
| `queryParams` | Query Parameters | KeyValueLookupParameter | No | Query parameters to include in the request | allowedValues: additional |
### Exits
| Exit | Description |
| - | - |
| `NEXT` | The API call succeeded. |
| `ERROR` | The API call failed. Error details are stored in the `m3shError` state variable. |
## Lock Bill
**Function name:** `m3ter_LockBill`
**Category:** WRITE
**HTTP method:** PUT
**Destination:** m3ter
Lock the specific Bill identified by the given UUID. Once a Bill is locked, no further changes can be made to it.
**NOTE:** You cannot lock a Bill whose current status is `PENDING`. You will receive an error message if you try to do this. You must first use the [Approve Bills](https://docs.m3ter.com/api/bill/approve-bills) call to approve a Bill before you can lock it.
### Parameters
| Name | Label | Type | Required | Description | Constraints |
| - | - | - | :-: | - | - |
| `integrationCredentialsId` | Credentials | M3terEntityParameter | Yes | The m3ter credentials to use. | authType: M3TER\_SIGNED\_REQUEST, m3terEntity: IntegrationCredentials |
| `id` | id | LookupParameter | Yes | The unique identifier (UUID) of the Bill to lock. | - |
| `statePath` | State Path | StateVariableParameter | No | State variable to store the response. | - |
### Exits
| Exit | Description |
| - | - |
| `NEXT` | The API call succeeded. |
| `ERROR` | The API call failed. Error details are stored in the `m3shError` state variable. |
## Approve Bills in Billing Period
**Function name:** `m3ter_ApproveAllBillsInBillingPeriod`
**Category:** WRITE
**HTTP method:** POST
**Destination:** m3ter
Approve all Bills within a specified billing period. This endpoint allows you to approve Bills on various frequencies, such as daily, weekly, monthly, or annually. Specify the last day of the period to define the range.
For example, to approve all Bills on monthly billing up to September with due date of 1st of month, use the last day of September, which is September 30th.
### Parameters
| Name | Label | Type | Required | Description | Constraints |
| - | - | - | :-: | - | - |
| `integrationCredentialsId` | Credentials | M3terEntityParameter | Yes | The m3ter credentials to use. | authType: M3TER\_SIGNED\_REQUEST, m3terEntity: IntegrationCredentials |
| `lastDateInBillingPeriod` | lastDateInBillingPeriod | LookupParameter | Yes | The last date of the billing period for which you want to approve Bills. This date defines the range of Bills to be approved. | - |
| `billingFrequency` | billingFrequency | LookupParameter | Yes | The billing frequency for the specified period. Valid options are daily, weekly, monthly, or annually. | - |
| `statePath` | State Path | StateVariableParameter | No | State variable to store the response. | - |
### Exits
| Exit | Description |
| - | - |
| `NEXT` | The API call succeeded. |
| `ERROR` | The API call failed. Error details are stored in the `m3shError` state variable. |
## Preview Bill
**Function name:** `m3ter_PreviewBill`
**Category:** WRITE
**HTTP method:** POST
**Destination:** m3ter
Preview the current Bill for a specific account.
This endpoint is designed to provide a preview of the Bill for exactly one account, allowing you to review charges, frequencies, and other details before finalization. Required parameters include:
* `accountIds` - exactly 1 account must be specified for previewing a Bill.
* `billingFrequency`
* `billFrequencyInterval`
Other request parameters are optional. If `version` is not specified, the latest version of the Bill is previewed.
### Parameters
| Name | Label | Type | Required | Description | Constraints |
| - | - | - | :-: | - | - |
| `integrationCredentialsId` | Credentials | M3terEntityParameter | Yes | The m3ter credentials to use. | authType: M3TER\_SIGNED\_REQUEST, m3terEntity: IntegrationCredentials |
| `requestPath` | Request Path | StateVariableParameter | Yes | State variable containing the request. | - |
| `statePath` | State Path | StateVariableParameter | No | State variable to store the response. | - |
| `queryParams` | Query Parameters | KeyValueLookupParameter | No | Query parameters to include in the request | allowedValues: debug |
### Exits
| Exit | Description |
| - | - |
| `NEXT` | The API call succeeded. |
| `ERROR` | The API call failed. Error details are stored in the `m3shError` state variable. |
## Retrieve Bill
**Function name:** `m3ter_GetBill`
**Category:** READ
**HTTP method:** GET
**Destination:** m3ter
Retrieve the Bill with the given UUID.
This endpoint retrieves the Bill with the given unique identifier (UUID) and specific Organization.
### Parameters
| Name | Label | Type | Required | Description | Constraints |
| - | - | - | :-: | - | - |
| `integrationCredentialsId` | Credentials | M3terEntityParameter | Yes | The m3ter credentials to use. | authType: M3TER\_SIGNED\_REQUEST, m3terEntity: IntegrationCredentials |
| `id` | id | LookupParameter | Yes | The unique identifier (UUID) of the Bill to retrieve. | - |
| `statePath` | State Path | StateVariableParameter | No | State variable to store the response. | - |
| `queryParams` | Query Parameters | KeyValueLookupParameter | No | Query parameters to include in the request | allowedValues: additional |
### Exits
| Exit | Description |
| - | - |
| `NEXT` | The API call succeeded. |
| `ERROR` | The API call failed. Error details are stored in the `m3shError` state variable. |
## Delete Bill
**Function name:** `m3ter_DeleteBill`
**Category:** WRITE
**HTTP method:** DELETE
**Destination:** m3ter
Delete the Bill with the given UUID.
This endpoint deletes the specified Bill with the given unique identifier. Use with caution since deleted Bills cannot be recovered. Suitable for removing incorrect or obsolete Bills, and for Bills that have not been sent to customers. Where end-customer invoices for Bills have been sent to customers, Bills should not be deleted to ensure you have an audit trail of how the invoice was created.
### Parameters
| Name | Label | Type | Required | Description | Constraints |
| - | - | - | :-: | - | - |
| `integrationCredentialsId` | Credentials | M3terEntityParameter | Yes | The m3ter credentials to use. | authType: M3TER\_SIGNED\_REQUEST, m3terEntity: IntegrationCredentials |
| `id` | id | LookupParameter | Yes | The unique identifier (UUID) of the Bill to delete. | - |
| `statePath` | State Path | StateVariableParameter | No | State variable to store the response. | - |
### Exits
| Exit | Description |
| - | - |
| `NEXT` | The API call succeeded. |
| `ERROR` | The API call failed. Error details are stored in the `m3shError` state variable. |
## Retrieve Bills for an Account ID
**Function name:** `m3ter_GetAllBillsForAccount`
**Category:** READ
**HTTP method:** GET (paginated)
**Destination:** m3ter
Retrieve all Bills for the given Account.
This endpoint retrieves all Bills associated with a specific Account ID in a specified organization. The list can also be paginated for easier management.
This is useful for obtaining an overview of all billing activities for an Account.
### Parameters
| Name | Label | Type | Required | Description | Constraints |
| - | - | - | :-: | - | - |
| `integrationCredentialsId` | Credentials | M3terEntityParameter | Yes | The m3ter credentials to use. | authType: M3TER\_SIGNED\_REQUEST, m3terEntity: IntegrationCredentials |
| `accountId` | accountId | LookupParameter | Yes | The unique identifier (UUID) of the Account for which you want to retrieve Bills. | - |
| `statePath` | State Path | StateVariableParameter | No | State variable to store the response. | - |
| `queryParams` | Query Parameters | KeyValueLookupParameter | No | Query parameters to include in the request | allowedValues: additional |
### Exits
| Exit | Description |
| - | - |
| `NEXT` | The API call succeeded. |
| `ERROR` | The API call failed. Error details are stored in the `m3shError` state variable. |
## List Debit Line Items
**Function name:** `m3ter_ListDebitLineItems`
**Category:** READ
**HTTP method:** GET (paginated)
**Destination:** m3ter
List the Debit line items for the given bill.
### Parameters
| Name | Label | Type | Required | Description | Constraints |
| - | - | - | :-: | - | - |
| `integrationCredentialsId` | Credentials | M3terEntityParameter | Yes | The m3ter credentials to use. | authType: M3TER\_SIGNED\_REQUEST, m3terEntity: IntegrationCredentials |
| `billId` | billId | LookupParameter | Yes | UUID of the bill. | - |
| `statePath` | State Path | StateVariableParameter | No | State variable to store the response. | - |
### Exits
| Exit | Description |
| - | - |
| `NEXT` | The API call succeeded. |
| `ERROR` | The API call failed. Error details are stored in the `m3shError` state variable. |
## Create Debit Line Item
**Function name:** `m3ter_PostDebitLineItem`
**Category:** WRITE
**HTTP method:** POST
**Destination:** m3ter
Create a new Debit line item for the given bill.
When creating Debit line items for Bills, use the Debit Reasons created for your Organization. See [DebitReason](https://www.m3ter.com/docs/api#tag/DebitReason).
### Parameters
| Name | Label | Type | Required | Description | Constraints |
| - | - | - | :-: | - | - |
| `integrationCredentialsId` | Credentials | M3terEntityParameter | Yes | The m3ter credentials to use. | authType: M3TER\_SIGNED\_REQUEST, m3terEntity: IntegrationCredentials |
| `billId` | billId | LookupParameter | Yes | UUID of the bill. | - |
| `requestPath` | Request Path | StateVariableParameter | Yes | State variable containing the request. | - |
| `statePath` | State Path | StateVariableParameter | No | State variable to store the response. | - |
### Exits
| Exit | Description |
| - | - |
| `NEXT` | The API call succeeded. |
| `ERROR` | The API call failed. Error details are stored in the `m3shError` state variable. |
# Charges
Source: https://docs.m3ter.com/m3sh-function-reference/m3ter/charges
## Retrieve Charge
**Function name:** `m3ter_GetCharge`
**Category:** READ
**HTTP method:** GET
**Destination:** m3ter
Retrieve a Charge for the given UUID.
### Parameters
| Name | Label | Type | Required | Description | Constraints |
| - | - | - | :-: | - | - |
| `integrationCredentialsId` | Credentials | M3terEntityParameter | Yes | The m3ter credentials to use. | authType: M3TER\_SIGNED\_REQUEST, m3terEntity: IntegrationCredentials |
| `id` | id | LookupParameter | Yes | The UUID of the Charge to retrieve. | - |
| `statePath` | State Path | StateVariableParameter | No | State variable to store the response. | - |
### Exits
| Exit | Description |
| - | - |
| `NEXT` | The API call succeeded. |
| `ERROR` | The API call failed. Error details are stored in the `m3shError` state variable. |
## Update Charge
**Function name:** `m3ter_UpdateCharge`
**Category:** WRITE
**HTTP method:** PUT
**Destination:** m3ter
Update a Charge for the given UUID.
**NOTE:** When you update a Charge on an Account, you can provide either a Charge `amount` or Charge `units` together with a `unitPrice`, but *not both*.
### Parameters
| Name | Label | Type | Required | Description | Constraints |
| - | - | - | :-: | - | - |
| `integrationCredentialsId` | Credentials | M3terEntityParameter | Yes | The m3ter credentials to use. | authType: M3TER\_SIGNED\_REQUEST, m3terEntity: IntegrationCredentials |
| `id` | id | LookupParameter | Yes | The UUID of the Charge to update. | - |
| `requestPath` | Request Path | StateVariableParameter | Yes | State variable containing the request. | - |
| `statePath` | State Path | StateVariableParameter | No | State variable to store the response. | - |
### Exits
| Exit | Description |
| - | - |
| `NEXT` | The API call succeeded. |
| `ERROR` | The API call failed. Error details are stored in the `m3shError` state variable. |
## Delete Charge
**Function name:** `m3ter_DeleteCharge`
**Category:** WRITE
**HTTP method:** DELETE
**Destination:** m3ter
Delete the Charge for the given UUID.
### Parameters
| Name | Label | Type | Required | Description | Constraints |
| - | - | - | :-: | - | - |
| `integrationCredentialsId` | Credentials | M3terEntityParameter | Yes | The m3ter credentials to use. | authType: M3TER\_SIGNED\_REQUEST, m3terEntity: IntegrationCredentials |
| `id` | id | LookupParameter | Yes | The UUID of the Charge to update. | - |
| `statePath` | State Path | StateVariableParameter | No | State variable to store the response. | - |
### Exits
| Exit | Description |
| - | - |
| `NEXT` | The API call succeeded. |
| `ERROR` | The API call failed. Error details are stored in the `m3shError` state variable. |
## List Charges
**Function name:** `m3ter_ListCharges`
**Category:** READ
**HTTP method:** GET (paginated)
**Destination:** m3ter
Retrieve a list of Charge entities
### Parameters
| Name | Label | Type | Required | Description | Constraints |
| - | - | - | :-: | - | - |
| `integrationCredentialsId` | Credentials | M3terEntityParameter | Yes | The m3ter credentials to use. | authType: M3TER\_SIGNED\_REQUEST, m3terEntity: IntegrationCredentials |
| `statePath` | State Path | StateVariableParameter | No | State variable to store the response. | - |
| `queryParams` | Query Parameters | KeyValueLookupParameter | No | Query parameters to include in the request | allowedValues: accountId,entityType,entityId,billDate,ids,scheduleId |
### Exits
| Exit | Description |
| - | - |
| `NEXT` | The API call succeeded. |
| `ERROR` | The API call failed. Error details are stored in the `m3shError` state variable. |
## Create Charge
**Function name:** `m3ter_CreateCharge`
**Category:** WRITE
**HTTP method:** POST
**Destination:** m3ter
Create a new Charge.
**NOTES:**
* To create an ad-hoc Charge on an Account, use the `accountId` request parameter.
* To create a balance fee Charge for a Balance, use the `entityId` request parameter to specify which Balance on an Account the Charge is for.
* To define the value of the Charge amount that is billed, you can simply specify an `amount` or use a number of `units` together with a `unitPrice` for a calculated value = units x unit price. But you cannot specify *both an amount and units/unit price*.
### Parameters
| Name | Label | Type | Required | Description | Constraints |
| - | - | - | :-: | - | - |
| `integrationCredentialsId` | Credentials | M3terEntityParameter | Yes | The m3ter credentials to use. | authType: M3TER\_SIGNED\_REQUEST, m3terEntity: IntegrationCredentials |
| `requestPath` | Request Path | StateVariableParameter | Yes | State variable containing the request. | - |
| `statePath` | State Path | StateVariableParameter | No | State variable to store the response. | - |
### Exits
| Exit | Description |
| - | - |
| `NEXT` | The API call succeeded. |
| `ERROR` | The API call failed. Error details are stored in the `m3shError` state variable. |
# Commitments
Source: https://docs.m3ter.com/m3sh-function-reference/m3ter/commitments
## List Commitments
**Function name:** `m3ter_ListCommitments`
**Category:** READ
**HTTP method:** GET (paginated)
**Destination:** m3ter
Retrieve a list of Commitments.
Retrieves a list of all Commitments associated with an Organization. This endpoint supports pagination and includes various query parameters to filter the Commitments based on Account, Product, date, and end dates.
### Parameters
| Name | Label | Type | Required | Description | Constraints |
| - | - | - | :-: | - | - |
| `integrationCredentialsId` | Credentials | M3terEntityParameter | Yes | The m3ter credentials to use. | authType: M3TER\_SIGNED\_REQUEST, m3terEntity: IntegrationCredentials |
| `statePath` | State Path | StateVariableParameter | No | State variable to store the response. | - |
| `queryParams` | Query Parameters | KeyValueLookupParameter | No | Query parameters to include in the request | allowedValues: accountId,productId,date,endDateStart,endDateEnd,ids,contractId |
### Exits
| Exit | Description |
| - | - |
| `NEXT` | The API call succeeded. |
| `ERROR` | The API call failed. Error details are stored in the `m3shError` state variable. |
## Create Commitment
**Function name:** `m3ter_PostCommitment`
**Category:** WRITE
**HTTP method:** POST
**Destination:** m3ter
Create a new Commitment.
Creates a new Commitment for an Organization. The request body must include all the necessary details such as the agreed amount, overage surcharge percentage, and the associated account and product details.
**Note:** If some of the agreed Commitment amount remains unpaid at the start of an end-customer contract period, when you create a Commitment for an Account you can set up billing for the outstanding amount in one of two ways:
* Select a Product *Plan to bill with*. Use the `billingPlanId` request parameter to select the Plan used for billing.
* Define a *schedule of billing dates*. Omit a `billingPlanId` and use the `feeDates` request parameter to define a precise schedule of bill dates and amounts.
### Parameters
| Name | Label | Type | Required | Description | Constraints |
| - | - | - | :-: | - | - |
| `integrationCredentialsId` | Credentials | M3terEntityParameter | Yes | The m3ter credentials to use. | authType: M3TER\_SIGNED\_REQUEST, m3terEntity: IntegrationCredentials |
| `requestPath` | Request Path | StateVariableParameter | Yes | State variable containing the request. | - |
| `statePath` | State Path | StateVariableParameter | No | State variable to store the response. | - |
### Exits
| Exit | Description |
| - | - |
| `NEXT` | The API call succeeded. |
| `ERROR` | The API call failed. Error details are stored in the `m3shError` state variable. |
## Search Commitments
**Function name:** `m3ter_SearchCommitments`
**Category:** READ
**HTTP method:** GET (paginated)
**Destination:** m3ter
Search for commitment entities.
This endpoint executes a search query for Commitments based on the user specified search criteria. The search query is customizable, allowing for complex nested conditions and sorting. The returned list of Commitments can be paginated for easier management.
### Parameters
| Name | Label | Type | Required | Description | Constraints |
| - | - | - | :-: | - | - |
| `integrationCredentialsId` | Credentials | M3terEntityParameter | Yes | The m3ter credentials to use. | authType: M3TER\_SIGNED\_REQUEST, m3terEntity: IntegrationCredentials |
| `statePath` | State Path | StateVariableParameter | No | State variable to store the response. | - |
| `queryParams` | Query Parameters | KeyValueLookupParameter | No | Query parameters to include in the request | allowedValues: searchQuery,fromDocument,operator,sortBy,sortOrder |
### Exits
| Exit | Description |
| - | - |
| `NEXT` | The API call succeeded. |
| `ERROR` | The API call failed. Error details are stored in the `m3shError` state variable. |
## Retrieve Commitment
**Function name:** `m3ter_GetCommitment`
**Category:** READ
**HTTP method:** GET
**Destination:** m3ter
Retrieve a specific Commitment.
Retrieve the details of the Commitment with the given UUID. It provides comprehensive information about the Commitment, such as the agreed amount, overage surcharge percentage, and other related details.
### Parameters
| Name | Label | Type | Required | Description | Constraints |
| - | - | - | :-: | - | - |
| `integrationCredentialsId` | Credentials | M3terEntityParameter | Yes | The m3ter credentials to use. | authType: M3TER\_SIGNED\_REQUEST, m3terEntity: IntegrationCredentials |
| `id` | id | LookupParameter | Yes | The unique identifier (UUID) of the Commitment to retrieve. | - |
| `statePath` | State Path | StateVariableParameter | No | State variable to store the response. | - |
### Exits
| Exit | Description |
| - | - |
| `NEXT` | The API call succeeded. |
| `ERROR` | The API call failed. Error details are stored in the `m3shError` state variable. |
## Update Commitment
**Function name:** `m3ter_PutCommitment`
**Category:** WRITE
**HTTP method:** PUT
**Destination:** m3ter
Modify a specific Commitment.
Update the details of the Commitment with the given UUID. Use this endpoint to adjust Commitment parameters such as the fixed amount, overage surcharge percentage, or associated contract details.
### Parameters
| Name | Label | Type | Required | Description | Constraints |
| - | - | - | :-: | - | - |
| `integrationCredentialsId` | Credentials | M3terEntityParameter | Yes | The m3ter credentials to use. | authType: M3TER\_SIGNED\_REQUEST, m3terEntity: IntegrationCredentials |
| `id` | id | LookupParameter | Yes | The unique identifier (UUID) for the Commitment to update. | - |
| `requestPath` | Request Path | StateVariableParameter | Yes | State variable containing the request. | - |
| `statePath` | State Path | StateVariableParameter | No | State variable to store the response. | - |
### Exits
| Exit | Description |
| - | - |
| `NEXT` | The API call succeeded. |
| `ERROR` | The API call failed. Error details are stored in the `m3shError` state variable. |
## Delete Commitment
**Function name:** `m3ter_DeleteCommitment`
**Category:** WRITE
**HTTP method:** DELETE
**Destination:** m3ter
Remove a specific Commitment.
Deletes the Commitment with the given UUID. Use this endpoint when a Commitment is no longer valid or needs to be removed from the system.
### Parameters
| Name | Label | Type | Required | Description | Constraints |
| - | - | - | :-: | - | - |
| `integrationCredentialsId` | Credentials | M3terEntityParameter | Yes | The m3ter credentials to use. | authType: M3TER\_SIGNED\_REQUEST, m3terEntity: IntegrationCredentials |
| `id` | id | LookupParameter | Yes | The unique identifier (UUID) for the Commitment to delete. | - |
| `statePath` | State Path | StateVariableParameter | No | State variable to store the response. | - |
### Exits
| Exit | Description |
| - | - |
| `NEXT` | The API call succeeded. |
| `ERROR` | The API call failed. Error details are stored in the `m3shError` state variable. |
# Compoundaggregations
Source: https://docs.m3ter.com/m3sh-function-reference/m3ter/compoundaggregations
## List Compound Aggregations
**Function name:** `m3ter_ListCompoundAggregations`
**Category:** READ
**HTTP method:** GET (paginated)
**Destination:** m3ter
Retrieve a list of all Compound Aggregations.
This endpoint retrieves a list of Compound Aggregations associated with a specific organization. Compound Aggregations enable you to define numerical measures based on simple Aggregations of usage data. It supports pagination, and includes various query parameters to filter the Compound Aggregations based on Product, Compound Aggregation IDs or short codes.
### Parameters
| Name | Label | Type | Required | Description | Constraints |
| - | - | - | :-: | - | - |
| `integrationCredentialsId` | Credentials | M3terEntityParameter | Yes | The m3ter credentials to use. | authType: M3TER\_SIGNED\_REQUEST, m3terEntity: IntegrationCredentials |
| `statePath` | State Path | StateVariableParameter | No | State variable to store the response. | - |
| `queryParams` | Query Parameters | KeyValueLookupParameter | No | Query parameters to include in the request | allowedValues: productId,ids,codes |
### Exits
| Exit | Description |
| - | - |
| `NEXT` | The API call succeeded. |
| `ERROR` | The API call failed. Error details are stored in the `m3shError` state variable. |
## Create Compound Aggregation
**Function name:** `m3ter_PostCompoundAggregation`
**Category:** WRITE
**HTTP method:** POST
**Destination:** m3ter
Create a new Compound Aggregation.
This endpoint allows you to create a new Compound Aggregation for a specific Organization. The request body must include all the necessary details such as the Calculation formula.
### Parameters
| Name | Label | Type | Required | Description | Constraints |
| - | - | - | :-: | - | - |
| `integrationCredentialsId` | Credentials | M3terEntityParameter | Yes | The m3ter credentials to use. | authType: M3TER\_SIGNED\_REQUEST, m3terEntity: IntegrationCredentials |
| `requestPath` | Request Path | StateVariableParameter | Yes | State variable containing the request. | - |
| `statePath` | State Path | StateVariableParameter | No | State variable to store the response. | - |
### Exits
| Exit | Description |
| - | - |
| `NEXT` | The API call succeeded. |
| `ERROR` | The API call failed. Error details are stored in the `m3shError` state variable. |
## Retrieve Compound Aggregation
**Function name:** `m3ter_GetCompoundAggregation`
**Category:** READ
**HTTP method:** GET
**Destination:** m3ter
Retrieve a Compound Aggregation using the given UUID.
This endpoint returns a specific Compound Aggregation associated with an Organization. It provides detailed information about the Compound Aggregation.
### Parameters
| Name | Label | Type | Required | Description | Constraints |
| - | - | - | :-: | - | - |
| `integrationCredentialsId` | Credentials | M3terEntityParameter | Yes | The m3ter credentials to use. | authType: M3TER\_SIGNED\_REQUEST, m3terEntity: IntegrationCredentials |
| `id` | id | LookupParameter | Yes | The unique identifier (UUID) of the Compound Aggregation to retrieve. | - |
| `statePath` | State Path | StateVariableParameter | No | State variable to store the response. | - |
### Exits
| Exit | Description |
| - | - |
| `NEXT` | The API call succeeded. |
| `ERROR` | The API call failed. Error details are stored in the `m3shError` state variable. |
## Update Compound Aggregation
**Function name:** `m3ter_PutCompoundAggregation`
**Category:** WRITE
**HTTP method:** PUT
**Destination:** m3ter
Update the Compound Aggregation with the given UUID.
This endpoint allows you to update the details of a specific Compound Aggregation associated with an Organization. Use it to modify details of an existing Compound Aggregation such as the Calculation formula.
**Note:** If you have created Custom Fields for a Compound Aggregation, when you use this endpoint to update the Compound Aggregation use the `customFields` parameter to preserve those Custom Fields. If you omit them from the update request, they will be lost.
### Parameters
| Name | Label | Type | Required | Description | Constraints |
| - | - | - | :-: | - | - |
| `integrationCredentialsId` | Credentials | M3terEntityParameter | Yes | The m3ter credentials to use. | authType: M3TER\_SIGNED\_REQUEST, m3terEntity: IntegrationCredentials |
| `id` | id | LookupParameter | Yes | The unique identifier (UUID) of the Compound Aggregation to update. | - |
| `requestPath` | Request Path | StateVariableParameter | Yes | State variable containing the request. | - |
| `statePath` | State Path | StateVariableParameter | No | State variable to store the response. | - |
### Exits
| Exit | Description |
| - | - |
| `NEXT` | The API call succeeded. |
| `ERROR` | The API call failed. Error details are stored in the `m3shError` state variable. |
## Delete Compound Aggregation
**Function name:** `m3ter_DeleteCompoundAggregation`
**Category:** WRITE
**HTTP method:** DELETE
**Destination:** m3ter
Delete a Compound Aggregation with the given UUID.
This endpoint enables deletion of a specific Compound Aggregation associated with a specific Organization. Useful when you need to remove an existing Compound Aggregation that is no longer required, such as when changing pricing or planning models.
### Parameters
| Name | Label | Type | Required | Description | Constraints |
| - | - | - | :-: | - | - |
| `integrationCredentialsId` | Credentials | M3terEntityParameter | Yes | The m3ter credentials to use. | authType: M3TER\_SIGNED\_REQUEST, m3terEntity: IntegrationCredentials |
| `id` | id | LookupParameter | Yes | The unique identifier (UUID) of the Compound Aggregation to delete. | - |
| `statePath` | State Path | StateVariableParameter | No | State variable to store the response. | - |
### Exits
| Exit | Description |
| - | - |
| `NEXT` | The API call succeeded. |
| `ERROR` | The API call failed. Error details are stored in the `m3shError` state variable. |
# Contracts
Source: https://docs.m3ter.com/m3sh-function-reference/m3ter/contracts
## List Contracts
**Function name:** `m3ter_ListContracts`
**Category:** READ
**HTTP method:** GET (paginated)
**Destination:** m3ter
Retrieves a list of Contracts by Organization ID. Supports pagination and includes various query parameters to filter the Contracts returned based on Contract IDs or short codes.
### Parameters
| Name | Label | Type | Required | Description | Constraints |
| - | - | - | :-: | - | - |
| `integrationCredentialsId` | Credentials | M3terEntityParameter | Yes | The m3ter credentials to use. | authType: M3TER\_SIGNED\_REQUEST, m3terEntity: IntegrationCredentials |
| `statePath` | State Path | StateVariableParameter | No | State variable to store the response. | - |
| `queryParams` | Query Parameters | KeyValueLookupParameter | No | Query parameters to include in the request | allowedValues: ids,codes,accountId |
### Exits
| Exit | Description |
| - | - |
| `NEXT` | The API call succeeded. |
| `ERROR` | The API call failed. Error details are stored in the `m3shError` state variable. |
## Create Contract
**Function name:** `m3ter_PostContract`
**Category:** WRITE
**HTTP method:** POST
**Destination:** m3ter
Creates a new Contract for the specified Account. The Contract includes information such as the associated Account along with start and end dates.
If you intend to bill an Account on a Contract basis, you can use the `billGroupingKeyId`, `applyContractPeriodLimits`, and `usageFilters` request parameters to control Contract billing.
### Parameters
| Name | Label | Type | Required | Description | Constraints |
| - | - | - | :-: | - | - |
| `integrationCredentialsId` | Credentials | M3terEntityParameter | Yes | The m3ter credentials to use. | authType: M3TER\_SIGNED\_REQUEST, m3terEntity: IntegrationCredentials |
| `requestPath` | Request Path | StateVariableParameter | Yes | State variable containing the request. | - |
| `statePath` | State Path | StateVariableParameter | No | State variable to store the response. | - |
### Exits
| Exit | Description |
| - | - |
| `NEXT` | The API call succeeded. |
| `ERROR` | The API call failed. Error details are stored in the `m3shError` state variable. |
## Retrieve Contract
**Function name:** `m3ter_GetContract`
**Category:** READ
**HTTP method:** GET
**Destination:** m3ter
Retrieves the Contract with the given UUID. Used to obtain the details of a Contract.
### Parameters
| Name | Label | Type | Required | Description | Constraints |
| - | - | - | :-: | - | - |
| `integrationCredentialsId` | Credentials | M3terEntityParameter | Yes | The m3ter credentials to use. | authType: M3TER\_SIGNED\_REQUEST, m3terEntity: IntegrationCredentials |
| `id` | id | LookupParameter | Yes | The unique identifier (UUID) of the Contract to retrieve. | - |
| `statePath` | State Path | StateVariableParameter | No | State variable to store the response. | - |
### Exits
| Exit | Description |
| - | - |
| `NEXT` | The API call succeeded. |
| `ERROR` | The API call failed. Error details are stored in the `m3shError` state variable. |
## Update Contract
**Function name:** `m3ter_PutContract`
**Category:** WRITE
**HTTP method:** PUT
**Destination:** m3ter
Update the Contract with the given UUID.
This endpoint updates the details of the Contract with the specified ID. Used to modify details of an existing Contract such as the start or end dates.
**Note:** If you have created Custom Fields for a Contract, when you use this endpoint to update the Contract use the `customFields` parameter to preserve those Custom Fields. If you omit them from the update request, they will be lost.
### Parameters
| Name | Label | Type | Required | Description | Constraints |
| - | - | - | :-: | - | - |
| `integrationCredentialsId` | Credentials | M3terEntityParameter | Yes | The m3ter credentials to use. | authType: M3TER\_SIGNED\_REQUEST, m3terEntity: IntegrationCredentials |
| `id` | id | LookupParameter | Yes | The unique identifier (UUID) of the Contract to update. | - |
| `requestPath` | Request Path | StateVariableParameter | Yes | State variable containing the request. | - |
| `statePath` | State Path | StateVariableParameter | No | State variable to store the response. | - |
### Exits
| Exit | Description |
| - | - |
| `NEXT` | The API call succeeded. |
| `ERROR` | The API call failed. Error details are stored in the `m3shError` state variable. |
## Delete Contract
**Function name:** `m3ter_DeleteContract`
**Category:** WRITE
**HTTP method:** DELETE
**Destination:** m3ter
Deletes the Contract with the specified UUID. Used to remove an existing Contract from an Account.
**Note:** This call will fail if there are any other billing entities associated with the Account and that have been added to the Contract, such as AccountPlans, Balance, or Commitments.
### Parameters
| Name | Label | Type | Required | Description | Constraints |
| - | - | - | :-: | - | - |
| `integrationCredentialsId` | Credentials | M3terEntityParameter | Yes | The m3ter credentials to use. | authType: M3TER\_SIGNED\_REQUEST, m3terEntity: IntegrationCredentials |
| `id` | id | LookupParameter | Yes | The unique identifier (UUID) of the Contract to delete. | - |
| `statePath` | State Path | StateVariableParameter | No | State variable to store the response. | - |
### Exits
| Exit | Description |
| - | - |
| `NEXT` | The API call succeeded. |
| `ERROR` | The API call failed. Error details are stored in the `m3shError` state variable. |
## End-date Contract Account billing entities
**Function name:** `m3ter_EndDateBillingEntitiesForContract`
**Category:** WRITE
**HTTP method:** PUT
**Destination:** m3ter
Apply the specified end-date to billing entities associated with Accounts the Contract has been added to, and apply the end-date to the Contract itself.
**NOTES:**
* If you want to apply the end-date to the Contract *itself* - the Contract `id` you use as the required PATH PARAMETER - you must also specify `CONTRACT` as a `billingEntities` option in the request body schema.
* Only the Contract whose id you specify for the PATH PARAMETER will be end-dated. If there are other Contracts associated with the Account, these will not be end-dated.
* When you successfully end-date billing entities, the version number of each entity is incremented.
### Parameters
| Name | Label | Type | Required | Description | Constraints |
| - | - | - | :-: | - | - |
| `integrationCredentialsId` | Credentials | M3terEntityParameter | Yes | The m3ter credentials to use. | authType: M3TER\_SIGNED\_REQUEST, m3terEntity: IntegrationCredentials |
| `id` | id | LookupParameter | Yes | Unique identifier (UUID) of the Contract - the specified billing entities associated with the Account the Contract has been added to will be end-dated. | - |
| `requestPath` | Request Path | StateVariableParameter | Yes | State variable containing the request. | - |
| `statePath` | State Path | StateVariableParameter | No | State variable to store the response. | - |
### Exits
| Exit | Description |
| - | - |
| `NEXT` | The API call succeeded. |
| `ERROR` | The API call failed. Error details are stored in the `m3shError` state variable. |
# Counteradjustments
Source: https://docs.m3ter.com/m3sh-function-reference/m3ter/counteradjustments
## List CounterAdjustments
**Function name:** `m3ter_ListCounterAdjustments`
**Category:** READ
**HTTP method:** GET (paginated)
**Destination:** m3ter
Retrieve a list of CounterAdjustments created for Accounts in your Organization. You can filter the list returned by date, Account ID, or Counter ID.
**CONSTRAINTS:**
* The `counterId` query parameter is always required when calling this endpoint, used either as a single query parameter or in combination with any of the other query parameters.
* If you want to use the `date`, `dateStart`, or `dateEnd` query parameters, you must also use the `accountId` query parameter.
### Parameters
| Name | Label | Type | Required | Description | Constraints |
| - | - | - | :-: | - | - |
| `integrationCredentialsId` | Credentials | M3terEntityParameter | Yes | The m3ter credentials to use. | authType: M3TER\_SIGNED\_REQUEST, m3terEntity: IntegrationCredentials |
| `statePath` | State Path | StateVariableParameter | No | State variable to store the response. | - |
| `queryParams` | Query Parameters | KeyValueLookupParameter | No | Query parameters to include in the request | allowedValues: counterId,accountId,date,endDateStart,endDateEnd,sortOrder,dateStart,dateEnd |
### Exits
| Exit | Description |
| - | - |
| `NEXT` | The API call succeeded. |
| `ERROR` | The API call failed. Error details are stored in the `m3shError` state variable. |
## Create CounterAdjustment
**Function name:** `m3ter_PostCounterAdjustment`
**Category:** WRITE
**HTTP method:** POST
**Destination:** m3ter
Create a new CounterAdjustment for an Account using a Counter.
**Notes:**
* Use the new absolute value for the Counter for the selected date - if it was 15 and has increased to 20, enter 20; if it was 15 and has decreased to 10, enter 10. *Do not enter* the plus or minus value relative to the previous Counter value on the Account.
* CounterAdjustments on Accounts are supported down to a *specific day* of granularity - you cannot create more than one CounterAdjustment for any given day using the same Counter and you'll receive an error if you try to do this.
### Parameters
| Name | Label | Type | Required | Description | Constraints |
| - | - | - | :-: | - | - |
| `integrationCredentialsId` | Credentials | M3terEntityParameter | Yes | The m3ter credentials to use. | authType: M3TER\_SIGNED\_REQUEST, m3terEntity: IntegrationCredentials |
| `requestPath` | Request Path | StateVariableParameter | Yes | State variable containing the request. | - |
| `statePath` | State Path | StateVariableParameter | No | State variable to store the response. | - |
### Exits
| Exit | Description |
| - | - |
| `NEXT` | The API call succeeded. |
| `ERROR` | The API call failed. Error details are stored in the `m3shError` state variable. |
## Retrieve CounterAdjustment
**Function name:** `m3ter_GetCounterAdjustment`
**Category:** READ
**HTTP method:** GET
**Destination:** m3ter
Retrieve a CounterAdjustment for the given UUID.
### Parameters
| Name | Label | Type | Required | Description | Constraints |
| - | - | - | :-: | - | - |
| `integrationCredentialsId` | Credentials | M3terEntityParameter | Yes | The m3ter credentials to use. | authType: M3TER\_SIGNED\_REQUEST, m3terEntity: IntegrationCredentials |
| `id` | id | LookupParameter | Yes | The UUID of the CounterAdjustment to retrieve. | - |
| `statePath` | State Path | StateVariableParameter | No | State variable to store the response. | - |
### Exits
| Exit | Description |
| - | - |
| `NEXT` | The API call succeeded. |
| `ERROR` | The API call failed. Error details are stored in the `m3shError` state variable. |
## Update CounterAdjustment
**Function name:** `m3ter_PutCounterAdjustment`
**Category:** WRITE
**HTTP method:** PUT
**Destination:** m3ter
Update a CounterAdjustment for an Account.
### Parameters
| Name | Label | Type | Required | Description | Constraints |
| - | - | - | :-: | - | - |
| `integrationCredentialsId` | Credentials | M3terEntityParameter | Yes | The m3ter credentials to use. | authType: M3TER\_SIGNED\_REQUEST, m3terEntity: IntegrationCredentials |
| `id` | id | LookupParameter | Yes | The UUID of the CounterAdjustment to update. | - |
| `requestPath` | Request Path | StateVariableParameter | Yes | State variable containing the request. | - |
| `statePath` | State Path | StateVariableParameter | No | State variable to store the response. | - |
### Exits
| Exit | Description |
| - | - |
| `NEXT` | The API call succeeded. |
| `ERROR` | The API call failed. Error details are stored in the `m3shError` state variable. |
## Delete CounterAdjustment
**Function name:** `m3ter_DeleteCounterAdjustment`
**Category:** WRITE
**HTTP method:** DELETE
**Destination:** m3ter
Delete a CounterAdjustment for the given UUID.
### Parameters
| Name | Label | Type | Required | Description | Constraints |
| - | - | - | :-: | - | - |
| `integrationCredentialsId` | Credentials | M3terEntityParameter | Yes | The m3ter credentials to use. | authType: M3TER\_SIGNED\_REQUEST, m3terEntity: IntegrationCredentials |
| `id` | id | LookupParameter | Yes | The UUID of the CounterAdjustment to delete. | - |
| `statePath` | State Path | StateVariableParameter | No | State variable to store the response. | - |
### Exits
| Exit | Description |
| - | - |
| `NEXT` | The API call succeeded. |
| `ERROR` | The API call failed. Error details are stored in the `m3shError` state variable. |
# Counterpricings
Source: https://docs.m3ter.com/m3sh-function-reference/m3ter/counterpricings
## List CounterPricings
**Function name:** `m3ter_ListCounterPricings`
**Category:** READ
**HTTP method:** GET (paginated)
**Destination:** m3ter
Retrieve a list of CounterPricing entities filtered by date, Plan ID, Plan Template ID, or CounterPricing ID.
### Parameters
| Name | Label | Type | Required | Description | Constraints |
| - | - | - | :-: | - | - |
| `integrationCredentialsId` | Credentials | M3terEntityParameter | Yes | The m3ter credentials to use. | authType: M3TER\_SIGNED\_REQUEST, m3terEntity: IntegrationCredentials |
| `statePath` | State Path | StateVariableParameter | No | State variable to store the response. | - |
| `queryParams` | Query Parameters | KeyValueLookupParameter | No | Query parameters to include in the request | allowedValues: date,planId,planTemplateId,ids |
### Exits
| Exit | Description |
| - | - |
| `NEXT` | The API call succeeded. |
| `ERROR` | The API call failed. Error details are stored in the `m3shError` state variable. |
## Create CounterPricing
**Function name:** `m3ter_PostCounterPricing`
**Category:** WRITE
**HTTP method:** POST
**Destination:** m3ter
Create a new CounterPricing.
**Note:** Either `planId` or `planTemplateId` request parameters are required for this call to be valid. If you omit both, then you will receive a validation error.
### Parameters
| Name | Label | Type | Required | Description | Constraints |
| - | - | - | :-: | - | - |
| `integrationCredentialsId` | Credentials | M3terEntityParameter | Yes | The m3ter credentials to use. | authType: M3TER\_SIGNED\_REQUEST, m3terEntity: IntegrationCredentials |
| `requestPath` | Request Path | StateVariableParameter | Yes | State variable containing the request. | - |
| `statePath` | State Path | StateVariableParameter | No | State variable to store the response. | - |
### Exits
| Exit | Description |
| - | - |
| `NEXT` | The API call succeeded. |
| `ERROR` | The API call failed. Error details are stored in the `m3shError` state variable. |
## Retrieve CounterPricing
**Function name:** `m3ter_GetCounterPricing`
**Category:** READ
**HTTP method:** GET
**Destination:** m3ter
Retrieve a CounterPricing for the given UUID.
### Parameters
| Name | Label | Type | Required | Description | Constraints |
| - | - | - | :-: | - | - |
| `integrationCredentialsId` | Credentials | M3terEntityParameter | Yes | The m3ter credentials to use. | authType: M3TER\_SIGNED\_REQUEST, m3terEntity: IntegrationCredentials |
| `id` | id | LookupParameter | Yes | The UUID of the CounterPricing to retrieve. | - |
| `statePath` | State Path | StateVariableParameter | No | State variable to store the response. | - |
### Exits
| Exit | Description |
| - | - |
| `NEXT` | The API call succeeded. |
| `ERROR` | The API call failed. Error details are stored in the `m3shError` state variable. |
## Update CounterPricing
**Function name:** `m3ter_PutCounterPricing`
**Category:** WRITE
**HTTP method:** PUT
**Destination:** m3ter
Update CounterPricing for the given UUID.
**Note:** Either `planId` or `planTemplateId` request parameters are required for this call to be valid. If you omit both, then you will receive a validation error.
### Parameters
| Name | Label | Type | Required | Description | Constraints |
| - | - | - | :-: | - | - |
| `integrationCredentialsId` | Credentials | M3terEntityParameter | Yes | The m3ter credentials to use. | authType: M3TER\_SIGNED\_REQUEST, m3terEntity: IntegrationCredentials |
| `id` | id | LookupParameter | Yes | The UUID of the CounterPricing to update. | - |
| `requestPath` | Request Path | StateVariableParameter | Yes | State variable containing the request. | - |
| `statePath` | State Path | StateVariableParameter | No | State variable to store the response. | - |
### Exits
| Exit | Description |
| - | - |
| `NEXT` | The API call succeeded. |
| `ERROR` | The API call failed. Error details are stored in the `m3shError` state variable. |
## Delete CounterPricing
**Function name:** `m3ter_DeleteCounterPricing`
**Category:** WRITE
**HTTP method:** DELETE
**Destination:** m3ter
Delete a CounterPricing for the given UUID.
### Parameters
| Name | Label | Type | Required | Description | Constraints |
| - | - | - | :-: | - | - |
| `integrationCredentialsId` | Credentials | M3terEntityParameter | Yes | The m3ter credentials to use. | authType: M3TER\_SIGNED\_REQUEST, m3terEntity: IntegrationCredentials |
| `id` | id | LookupParameter | Yes | The UUID of the CounterPricing to delete. | - |
| `statePath` | State Path | StateVariableParameter | No | State variable to store the response. | - |
### Exits
| Exit | Description |
| - | - |
| `NEXT` | The API call succeeded. |
| `ERROR` | The API call failed. Error details are stored in the `m3shError` state variable. |
# Counters
Source: https://docs.m3ter.com/m3sh-function-reference/m3ter/counters
## List Counters
**Function name:** `m3ter_ListCounters`
**Category:** READ
**HTTP method:** GET (paginated)
**Destination:** m3ter
Retrieve a list of Counter entities that can be filtered by Product, Counter ID, or Codes.
### Parameters
| Name | Label | Type | Required | Description | Constraints |
| - | - | - | :-: | - | - |
| `integrationCredentialsId` | Credentials | M3terEntityParameter | Yes | The m3ter credentials to use. | authType: M3TER\_SIGNED\_REQUEST, m3terEntity: IntegrationCredentials |
| `statePath` | State Path | StateVariableParameter | No | State variable to store the response. | - |
| `queryParams` | Query Parameters | KeyValueLookupParameter | No | Query parameters to include in the request | allowedValues: ids,codes,productId |
### Exits
| Exit | Description |
| - | - |
| `NEXT` | The API call succeeded. |
| `ERROR` | The API call failed. Error details are stored in the `m3shError` state variable. |
## Create Counter
**Function name:** `m3ter_PostCounter`
**Category:** WRITE
**HTTP method:** POST
**Destination:** m3ter
Create a new Counter.
### Parameters
| Name | Label | Type | Required | Description | Constraints |
| - | - | - | :-: | - | - |
| `integrationCredentialsId` | Credentials | M3terEntityParameter | Yes | The m3ter credentials to use. | authType: M3TER\_SIGNED\_REQUEST, m3terEntity: IntegrationCredentials |
| `requestPath` | Request Path | StateVariableParameter | Yes | State variable containing the request. | - |
| `statePath` | State Path | StateVariableParameter | No | State variable to store the response. | - |
### Exits
| Exit | Description |
| - | - |
| `NEXT` | The API call succeeded. |
| `ERROR` | The API call failed. Error details are stored in the `m3shError` state variable. |
## Retrieve Counter
**Function name:** `m3ter_GetCounter`
**Category:** READ
**HTTP method:** GET
**Destination:** m3ter
Retrieve a Counter for the given UUID.
### Parameters
| Name | Label | Type | Required | Description | Constraints |
| - | - | - | :-: | - | - |
| `integrationCredentialsId` | Credentials | M3terEntityParameter | Yes | The m3ter credentials to use. | authType: M3TER\_SIGNED\_REQUEST, m3terEntity: IntegrationCredentials |
| `id` | id | LookupParameter | Yes | The UUID of the Counter to retrieve. | - |
| `statePath` | State Path | StateVariableParameter | No | State variable to store the response. | - |
### Exits
| Exit | Description |
| - | - |
| `NEXT` | The API call succeeded. |
| `ERROR` | The API call failed. Error details are stored in the `m3shError` state variable. |
## Update Counter
**Function name:** `m3ter_PutCounter`
**Category:** WRITE
**HTTP method:** PUT
**Destination:** m3ter
Update Counter for the given UUID.
### Parameters
| Name | Label | Type | Required | Description | Constraints |
| - | - | - | :-: | - | - |
| `integrationCredentialsId` | Credentials | M3terEntityParameter | Yes | The m3ter credentials to use. | authType: M3TER\_SIGNED\_REQUEST, m3terEntity: IntegrationCredentials |
| `id` | id | LookupParameter | Yes | The UUID of the Counter to update. | - |
| `requestPath` | Request Path | StateVariableParameter | Yes | State variable containing the request. | - |
| `statePath` | State Path | StateVariableParameter | No | State variable to store the response. | - |
### Exits
| Exit | Description |
| - | - |
| `NEXT` | The API call succeeded. |
| `ERROR` | The API call failed. Error details are stored in the `m3shError` state variable. |
## Delete Counter
**Function name:** `m3ter_DeleteCounter`
**Category:** WRITE
**HTTP method:** DELETE
**Destination:** m3ter
Delete a Counter for the given UUID.
### Parameters
| Name | Label | Type | Required | Description | Constraints |
| - | - | - | :-: | - | - |
| `integrationCredentialsId` | Credentials | M3terEntityParameter | Yes | The m3ter credentials to use. | authType: M3TER\_SIGNED\_REQUEST, m3terEntity: IntegrationCredentials |
| `id` | id | LookupParameter | Yes | The UUID of the Counter to delete. | - |
| `statePath` | State Path | StateVariableParameter | No | State variable to store the response. | - |
### Exits
| Exit | Description |
| - | - |
| `NEXT` | The API call succeeded. |
| `ERROR` | The API call failed. Error details are stored in the `m3shError` state variable. |
# Customfields
Source: https://docs.m3ter.com/m3sh-function-reference/m3ter/customfields
## Retrieve CustomField
**Function name:** `m3ter_GetCustomField`
**Category:** READ
**HTTP method:** GET
**Destination:** m3ter
Retrieve all Custom Fields added at Organizational level for the entities that support them.
### Parameters
| Name | Label | Type | Required | Description | Constraints |
| - | - | - | :-: | - | - |
| `integrationCredentialsId` | Credentials | M3terEntityParameter | Yes | The m3ter credentials to use. | authType: M3TER\_SIGNED\_REQUEST, m3terEntity: IntegrationCredentials |
| `statePath` | State Path | StateVariableParameter | No | State variable to store the response. | - |
### Exits
| Exit | Description |
| - | - |
| `NEXT` | The API call succeeded. |
| `ERROR` | The API call failed. Error details are stored in the `m3shError` state variable. |
## Update CustomFields
**Function name:** `m3ter_UpdateCustomFields`
**Category:** WRITE
**HTTP method:** PUT
**Destination:** m3ter
Update Custom Fields added at Organization level to entities that support them.
### Parameters
| Name | Label | Type | Required | Description | Constraints |
| - | - | - | :-: | - | - |
| `integrationCredentialsId` | Credentials | M3terEntityParameter | Yes | The m3ter credentials to use. | authType: M3TER\_SIGNED\_REQUEST, m3terEntity: IntegrationCredentials |
| `requestPath` | Request Path | StateVariableParameter | Yes | State variable containing the request. | - |
| `statePath` | State Path | StateVariableParameter | No | State variable to store the response. | - |
### Exits
| Exit | Description |
| - | - |
| `NEXT` | The API call succeeded. |
| `ERROR` | The API call failed. Error details are stored in the `m3shError` state variable. |
# Dataexplorer
Source: https://docs.m3ter.com/m3sh-function-reference/m3ter/dataexplorer
## Query and filter for commitments.
**Function name:** `m3ter_PostQueryCommitments`
**Category:** WRITE
**HTTP method:** POST
**Destination:** m3ter
Query and filter for commitments.
### Parameters
| Name | Label | Type | Required | Description | Constraints |
| - | - | - | :-: | - | - |
| `integrationCredentialsId` | Credentials | M3terEntityParameter | Yes | The m3ter credentials to use. | authType: M3TER\_SIGNED\_REQUEST, m3terEntity: IntegrationCredentials |
| `requestPath` | Request Path | StateVariableParameter | Yes | State variable containing the request. | - |
| `statePath` | State Path | StateVariableParameter | No | State variable to store the response. | - |
### Exits
| Exit | Description |
| - | - |
| `NEXT` | The API call succeeded. |
| `ERROR` | The API call failed. Error details are stored in the `m3shError` state variable. |
## Retrieve the values of a single Dimension for one or more Meters.
**Function name:** `m3ter_GetMergedMeterDimensions`
**Category:** WRITE
**HTTP method:** POST
**Destination:** m3ter
Retrieve the values of a single Dimension for one or more Meters stored in the Data Warehouse over a period of time.
### Parameters
| Name | Label | Type | Required | Description | Constraints |
| - | - | - | :-: | - | - |
| `integrationCredentialsId` | Credentials | M3terEntityParameter | Yes | The m3ter credentials to use. | authType: M3TER\_SIGNED\_REQUEST, m3terEntity: IntegrationCredentials |
| `requestPath` | Request Path | StateVariableParameter | Yes | State variable containing the request. | - |
| `statePath` | State Path | StateVariableParameter | No | State variable to store the response. | - |
### Exits
| Exit | Description |
| - | - |
| `NEXT` | The API call succeeded. |
| `ERROR` | The API call failed. Error details are stored in the `m3shError` state variable. |
## Get account values for querying commitments.
**Function name:** `m3ter_GetCommitmentsAccounts`
**Category:** READ
**HTTP method:** GET
**Destination:** m3ter
Get account values for querying commitments.
### Parameters
| Name | Label | Type | Required | Description | Constraints |
| - | - | - | :-: | - | - |
| `integrationCredentialsId` | Credentials | M3terEntityParameter | Yes | The m3ter credentials to use. | authType: M3TER\_SIGNED\_REQUEST, m3terEntity: IntegrationCredentials |
| `statePath` | State Path | StateVariableParameter | No | State variable to store the response. | - |
| `queryParams` | Query Parameters | KeyValueLookupParameter | No | Query parameters to include in the request | allowedValues: limit |
### Exits
| Exit | Description |
| - | - |
| `NEXT` | The API call succeeded. |
| `ERROR` | The API call failed. Error details are stored in the `m3shError` state variable. |
## Download Commitments data as JSON.
**Function name:** `m3ter_DownloadCommitmentsDataJson`
**Category:** WRITE
**HTTP method:** POST
**Destination:** m3ter
Download Commitments data as JSON.
### Parameters
| Name | Label | Type | Required | Description | Constraints |
| - | - | - | :-: | - | - |
| `integrationCredentialsId` | Credentials | M3terEntityParameter | Yes | The m3ter credentials to use. | authType: M3TER\_SIGNED\_REQUEST, m3terEntity: IntegrationCredentials |
| `requestPath` | Request Path | StateVariableParameter | Yes | State variable containing the request. | - |
| `statePath` | State Path | StateVariableParameter | No | State variable to store the response. | - |
### Exits
| Exit | Description |
| - | - |
| `NEXT` | The API call succeeded. |
| `ERROR` | The API call failed. Error details are stored in the `m3shError` state variable. |
## Query and filter for Remaining Commitments.
**Function name:** `m3ter_PostQueryRemainingCommitment`
**Category:** WRITE
**HTTP method:** POST
**Destination:** m3ter
Query and filter for remaining commitments.
### Parameters
| Name | Label | Type | Required | Description | Constraints |
| - | - | - | :-: | - | - |
| `integrationCredentialsId` | Credentials | M3terEntityParameter | Yes | The m3ter credentials to use. | authType: M3TER\_SIGNED\_REQUEST, m3terEntity: IntegrationCredentials |
| `requestPath` | Request Path | StateVariableParameter | Yes | State variable containing the request. | - |
| `statePath` | State Path | StateVariableParameter | No | State variable to store the response. | - |
### Exits
| Exit | Description |
| - | - |
| `NEXT` | The API call succeeded. |
| `ERROR` | The API call failed. Error details are stored in the `m3shError` state variable. |
## Download aggregated usage data as JSON.
**Function name:** `m3ter_DownloadAggregatedUsageDataJson`
**Category:** WRITE
**HTTP method:** POST
**Destination:** m3ter
Download aggregated usage data as JSON.
### Parameters
| Name | Label | Type | Required | Description | Constraints |
| - | - | - | :-: | - | - |
| `integrationCredentialsId` | Credentials | M3terEntityParameter | Yes | The m3ter credentials to use. | authType: M3TER\_SIGNED\_REQUEST, m3terEntity: IntegrationCredentials |
| `requestPath` | Request Path | StateVariableParameter | Yes | State variable containing the request. | - |
| `statePath` | State Path | StateVariableParameter | No | State variable to store the response. | - |
### Exits
| Exit | Description |
| - | - |
| `NEXT` | The API call succeeded. |
| `ERROR` | The API call failed. Error details are stored in the `m3shError` state variable. |
## Query and filter for bill line items.
**Function name:** `m3ter_PostQueryBillData`
**Category:** WRITE
**HTTP method:** POST
**Destination:** m3ter
Query and filter for bill line items.
### Parameters
| Name | Label | Type | Required | Description | Constraints |
| - | - | - | :-: | - | - |
| `integrationCredentialsId` | Credentials | M3terEntityParameter | Yes | The m3ter credentials to use. | authType: M3TER\_SIGNED\_REQUEST, m3terEntity: IntegrationCredentials |
| `requestPath` | Request Path | StateVariableParameter | Yes | State variable containing the request. | - |
| `statePath` | State Path | StateVariableParameter | No | State variable to store the response. | - |
### Exits
| Exit | Description |
| - | - |
| `NEXT` | The API call succeeded. |
| `ERROR` | The API call failed. Error details are stored in the `m3shError` state variable. |
## Download Commitments Obligations data as JSON.
**Function name:** `m3ter_DownloadCommitmentsObligationsDataJson`
**Category:** WRITE
**HTTP method:** POST
**Destination:** m3ter
Download Commitments Obligations data as JSON.
### Parameters
| Name | Label | Type | Required | Description | Constraints |
| - | - | - | :-: | - | - |
| `integrationCredentialsId` | Credentials | M3terEntityParameter | Yes | The m3ter credentials to use. | authType: M3TER\_SIGNED\_REQUEST, m3terEntity: IntegrationCredentials |
| `requestPath` | Request Path | StateVariableParameter | Yes | State variable containing the request. | - |
| `statePath` | State Path | StateVariableParameter | No | State variable to store the response. | - |
### Exits
| Exit | Description |
| - | - |
| `NEXT` | The API call succeeded. |
| `ERROR` | The API call failed. Error details are stored in the `m3shError` state variable. |
## Get account values for querying bill line items.
**Function name:** `m3ter_GetBillAccounts`
**Category:** READ
**HTTP method:** GET
**Destination:** m3ter
Get account values for querying bill line items.
### Parameters
| Name | Label | Type | Required | Description | Constraints |
| - | - | - | :-: | - | - |
| `integrationCredentialsId` | Credentials | M3terEntityParameter | Yes | The m3ter credentials to use. | authType: M3TER\_SIGNED\_REQUEST, m3terEntity: IntegrationCredentials |
| `statePath` | State Path | StateVariableParameter | No | State variable to store the response. | - |
| `queryParams` | Query Parameters | KeyValueLookupParameter | No | Query parameters to include in the request | allowedValues: limit |
### Exits
| Exit | Description |
| - | - |
| `NEXT` | The API call succeeded. |
| `ERROR` | The API call failed. Error details are stored in the `m3shError` state variable. |
## Query and filter for obligations.
**Function name:** `m3ter_PostQueryObligations`
**Category:** WRITE
**HTTP method:** POST
**Destination:** m3ter
Query and filter for obligations.
### Parameters
| Name | Label | Type | Required | Description | Constraints |
| - | - | - | :-: | - | - |
| `integrationCredentialsId` | Credentials | M3terEntityParameter | Yes | The m3ter credentials to use. | authType: M3TER\_SIGNED\_REQUEST, m3terEntity: IntegrationCredentials |
| `requestPath` | Request Path | StateVariableParameter | Yes | State variable containing the request. | - |
| `statePath` | State Path | StateVariableParameter | No | State variable to store the response. | - |
### Exits
| Exit | Description |
| - | - |
| `NEXT` | The API call succeeded. |
| `ERROR` | The API call failed. Error details are stored in the `m3shError` state variable. |
## Download Bill data as JSON.
**Function name:** `m3ter_DownloadBillDataJson`
**Category:** WRITE
**HTTP method:** POST
**Destination:** m3ter
Download Bill data as JSON.
### Parameters
| Name | Label | Type | Required | Description | Constraints |
| - | - | - | :-: | - | - |
| `integrationCredentialsId` | Credentials | M3terEntityParameter | Yes | The m3ter credentials to use. | authType: M3TER\_SIGNED\_REQUEST, m3terEntity: IntegrationCredentials |
| `requestPath` | Request Path | StateVariableParameter | Yes | State variable containing the request. | - |
| `statePath` | State Path | StateVariableParameter | No | State variable to store the response. | - |
### Exits
| Exit | Description |
| - | - |
| `NEXT` | The API call succeeded. |
| `ERROR` | The API call failed. Error details are stored in the `m3shError` state variable. |
## Query and filter for commitment line items.
**Function name:** `m3ter_PostQueryCommitmentLineItems`
**Category:** WRITE
**HTTP method:** POST
**Destination:** m3ter
Query and filter for commitment line items.
### Parameters
| Name | Label | Type | Required | Description | Constraints |
| - | - | - | :-: | - | - |
| `integrationCredentialsId` | Credentials | M3terEntityParameter | Yes | The m3ter credentials to use. | authType: M3TER\_SIGNED\_REQUEST, m3terEntity: IntegrationCredentials |
| `requestPath` | Request Path | StateVariableParameter | Yes | State variable containing the request. | - |
| `statePath` | State Path | StateVariableParameter | No | State variable to store the response. | - |
### Exits
| Exit | Description |
| - | - |
| `NEXT` | The API call succeeded. |
| `ERROR` | The API call failed. Error details are stored in the `m3shError` state variable. |
## Download aggregated usage data as a CSV.
**Function name:** `m3ter_DownloadAggregatedUsageDataCsv`
**Category:** WRITE
**HTTP method:** POST
**Destination:** m3ter
Download aggregated usage data as a CSV.
### Parameters
| Name | Label | Type | Required | Description | Constraints |
| - | - | - | :-: | - | - |
| `integrationCredentialsId` | Credentials | M3terEntityParameter | Yes | The m3ter credentials to use. | authType: M3TER\_SIGNED\_REQUEST, m3terEntity: IntegrationCredentials |
| `requestPath` | Request Path | StateVariableParameter | Yes | State variable containing the request. | - |
| `statePath` | State Path | StateVariableParameter | No | State variable to store the response. | - |
### Exits
| Exit | Description |
| - | - |
| `NEXT` | The API call succeeded. |
| `ERROR` | The API call failed. Error details are stored in the `m3shError` state variable. |
## Query and filter aggregated usage data.
**Function name:** `m3ter_PostQueryAggregatedUsageData`
**Category:** WRITE
**HTTP method:** POST
**Destination:** m3ter
Query and filter aggregated usage data.
### Parameters
| Name | Label | Type | Required | Description | Constraints |
| - | - | - | :-: | - | - |
| `integrationCredentialsId` | Credentials | M3terEntityParameter | Yes | The m3ter credentials to use. | authType: M3TER\_SIGNED\_REQUEST, m3terEntity: IntegrationCredentials |
| `requestPath` | Request Path | StateVariableParameter | Yes | State variable containing the request. | - |
| `statePath` | State Path | StateVariableParameter | No | State variable to store the response. | - |
### Exits
| Exit | Description |
| - | - |
| `NEXT` | The API call succeeded. |
| `ERROR` | The API call failed. Error details are stored in the `m3shError` state variable. |
## Download Bill data as a CSV.
**Function name:** `m3ter_DownloadBillDataCsv`
**Category:** WRITE
**HTTP method:** POST
**Destination:** m3ter
Download Bill data as a CSV.
### Parameters
| Name | Label | Type | Required | Description | Constraints |
| - | - | - | :-: | - | - |
| `integrationCredentialsId` | Credentials | M3terEntityParameter | Yes | The m3ter credentials to use. | authType: M3TER\_SIGNED\_REQUEST, m3terEntity: IntegrationCredentials |
| `requestPath` | Request Path | StateVariableParameter | Yes | State variable containing the request. | - |
| `statePath` | State Path | StateVariableParameter | No | State variable to store the response. | - |
### Exits
| Exit | Description |
| - | - |
| `NEXT` | The API call succeeded. |
| `ERROR` | The API call failed. Error details are stored in the `m3shError` state variable. |
## Download Commitments Obligations data in CSV format
**Function name:** `m3ter_DownloadCommitmentsObligationsDataCsv`
**Category:** WRITE
**HTTP method:** POST
**Destination:** m3ter
Download Commitments Obligations data in CSV format.
### Parameters
| Name | Label | Type | Required | Description | Constraints |
| - | - | - | :-: | - | - |
| `integrationCredentialsId` | Credentials | M3terEntityParameter | Yes | The m3ter credentials to use. | authType: M3TER\_SIGNED\_REQUEST, m3terEntity: IntegrationCredentials |
| `requestPath` | Request Path | StateVariableParameter | Yes | State variable containing the request. | - |
| `statePath` | State Path | StateVariableParameter | No | State variable to store the response. | - |
### Exits
| Exit | Description |
| - | - |
| `NEXT` | The API call succeeded. |
| `ERROR` | The API call failed. Error details are stored in the `m3shError` state variable. |
## Retrieve the values of a Meter Dimension.
**Function name:** `m3ter_GetMeterDimensions`
**Category:** WRITE
**HTTP method:** POST
**Destination:** m3ter
Retrieve the Dimensions of a Meter stored in the Data Warehouse over a period of time.
### Parameters
| Name | Label | Type | Required | Description | Constraints |
| - | - | - | :-: | - | - |
| `integrationCredentialsId` | Credentials | M3terEntityParameter | Yes | The m3ter credentials to use. | authType: M3TER\_SIGNED\_REQUEST, m3terEntity: IntegrationCredentials |
| `requestPath` | Request Path | StateVariableParameter | Yes | State variable containing the request. | - |
| `statePath` | State Path | StateVariableParameter | No | State variable to store the response. | - |
### Exits
| Exit | Description |
| - | - |
| `NEXT` | The API call succeeded. |
| `ERROR` | The API call failed. Error details are stored in the `m3shError` state variable. |
## Retrieve Meters stored in the Data Warehouse over a period of time.
**Function name:** `m3ter_GetMeters`
**Category:** READ
**HTTP method:** GET
**Destination:** m3ter
Retrieve the Meters and their dimension and measure names that are stored in the Data Warehouse over a period of time.
### Parameters
| Name | Label | Type | Required | Description | Constraints |
| - | - | - | :-: | - | - |
| `integrationCredentialsId` | Credentials | M3terEntityParameter | Yes | The m3ter credentials to use. | authType: M3TER\_SIGNED\_REQUEST, m3terEntity: IntegrationCredentials |
| `statePath` | State Path | StateVariableParameter | No | State variable to store the response. | - |
| `queryParams` | Query Parameters | KeyValueLookupParameter | No | Query parameters to include in the request | allowedValues: startDate,endDate,limit |
### Exits
| Exit | Description |
| - | - |
| `NEXT` | The API call succeeded. |
| `ERROR` | The API call failed. Error details are stored in the `m3shError` state variable. |
## Get product values for querying bill line items.
**Function name:** `m3ter_GetBillProducts`
**Category:** READ
**HTTP method:** GET
**Destination:** m3ter
Get product values for querying bill line items.
### Parameters
| Name | Label | Type | Required | Description | Constraints |
| - | - | - | :-: | - | - |
| `integrationCredentialsId` | Credentials | M3terEntityParameter | Yes | The m3ter credentials to use. | authType: M3TER\_SIGNED\_REQUEST, m3terEntity: IntegrationCredentials |
| `statePath` | State Path | StateVariableParameter | No | State variable to store the response. | - |
| `queryParams` | Query Parameters | KeyValueLookupParameter | No | Query parameters to include in the request | allowedValues: limit |
### Exits
| Exit | Description |
| - | - |
| `NEXT` | The API call succeeded. |
| `ERROR` | The API call failed. Error details are stored in the `m3shError` state variable. |
## Download Commitments data as a CSV.
**Function name:** `m3ter_DownloadCommitmentsDataCsv`
**Category:** WRITE
**HTTP method:** POST
**Destination:** m3ter
Download Commitments data as a CSV.
### Parameters
| Name | Label | Type | Required | Description | Constraints |
| - | - | - | :-: | - | - |
| `integrationCredentialsId` | Credentials | M3terEntityParameter | Yes | The m3ter credentials to use. | authType: M3TER\_SIGNED\_REQUEST, m3terEntity: IntegrationCredentials |
| `requestPath` | Request Path | StateVariableParameter | Yes | State variable containing the request. | - |
| `statePath` | State Path | StateVariableParameter | No | State variable to store the response. | - |
### Exits
| Exit | Description |
| - | - |
| `NEXT` | The API call succeeded. |
| `ERROR` | The API call failed. Error details are stored in the `m3shError` state variable. |
# Dataexports
Source: https://docs.m3ter.com/m3sh-function-reference/m3ter/dataexports
## List ExportDestinations
**Function name:** `m3ter_ListDestinations`
**Category:** READ
**HTTP method:** GET (paginated)
**Destination:** m3ter
Retrieve a list of Export Destination entities. You can filter the list of Destinations returned by UUID.
### Parameters
| Name | Label | Type | Required | Description | Constraints |
| - | - | - | :-: | - | - |
| `integrationCredentialsId` | Credentials | M3terEntityParameter | Yes | The m3ter credentials to use. | authType: M3TER\_SIGNED\_REQUEST, m3terEntity: IntegrationCredentials |
| `statePath` | State Path | StateVariableParameter | No | State variable to store the response. | - |
| `queryParams` | Query Parameters | KeyValueLookupParameter | No | Query parameters to include in the request | allowedValues: ids |
### Exits
| Exit | Description |
| - | - |
| `NEXT` | The API call succeeded. |
| `ERROR` | The API call failed. Error details are stored in the `m3shError` state variable. |
## Create ExportDestination
**Function name:** `m3ter_PostDestination`
**Category:** WRITE
**HTTP method:** POST
**Destination:** m3ter
Create a new Export Destination to use for your Data Export Schedules or Ad-Hoc Data Exports.
Currently, two options for setting up Data Export Destinations are available:
* S3 buckets on your AWS account.
* Buckets in your Google Cloud Storage account.
Request and Response schema:
* Use the selector under the `destinationType` parameter to expose the relevant request and response schema for the type of Destination.
Request and Response samples:
* Use the **Example** selector to show the relevant request and response samples for the type of Destination.
### Parameters
| Name | Label | Type | Required | Description | Constraints |
| - | - | - | :-: | - | - |
| `integrationCredentialsId` | Credentials | M3terEntityParameter | Yes | The m3ter credentials to use. | authType: M3TER\_SIGNED\_REQUEST, m3terEntity: IntegrationCredentials |
| `requestPath` | Request Path | StateVariableParameter | Yes | State variable containing the request. | - |
| `statePath` | State Path | StateVariableParameter | No | State variable to store the response. | - |
### Exits
| Exit | Description |
| - | - |
| `NEXT` | The API call succeeded. |
| `ERROR` | The API call failed. Error details are stored in the `m3shError` state variable. |
## List Jobs
**Function name:** `m3ter_listJobStatuses`
**Category:** READ
**HTTP method:** GET (paginated)
**Destination:** m3ter
Retrieve a list of Export Job entities.
### Parameters
| Name | Label | Type | Required | Description | Constraints |
| - | - | - | :-: | - | - |
| `integrationCredentialsId` | Credentials | M3terEntityParameter | Yes | The m3ter credentials to use. | authType: M3TER\_SIGNED\_REQUEST, m3terEntity: IntegrationCredentials |
| `statePath` | State Path | StateVariableParameter | No | State variable to store the response. | - |
| `queryParams` | Query Parameters | KeyValueLookupParameter | No | Query parameters to include in the request | allowedValues: ids,scheduleId,status,dateCreatedStart,dateCreatedEnd |
### Exits
| Exit | Description |
| - | - |
| `NEXT` | The API call succeeded. |
| `ERROR` | The API call failed. Error details are stored in the `m3shError` state variable. |
## List Schedules
**Function name:** `m3ter_listSchedules`
**Category:** READ
**HTTP method:** GET (paginated)
**Destination:** m3ter
Retrieve a list of Data Export Schedules created for your Organization. You can filter the response by Schedules `ids`.
The response will contain an array for both the operational and usage Data Export Schedules in your Organization.
### Parameters
| Name | Label | Type | Required | Description | Constraints |
| - | - | - | :-: | - | - |
| `integrationCredentialsId` | Credentials | M3terEntityParameter | Yes | The m3ter credentials to use. | authType: M3TER\_SIGNED\_REQUEST, m3terEntity: IntegrationCredentials |
| `statePath` | State Path | StateVariableParameter | No | State variable to store the response. | - |
| `queryParams` | Query Parameters | KeyValueLookupParameter | No | Query parameters to include in the request | allowedValues: ids |
### Exits
| Exit | Description |
| - | - |
| `NEXT` | The API call succeeded. |
| `ERROR` | The API call failed. Error details are stored in the `m3shError` state variable. |
## Create Schedule
**Function name:** `m3ter_CreateSchedule`
**Category:** WRITE
**HTTP method:** POST
**Destination:** m3ter
Create a new Data Export Schedule. Each Schedule can be configured for exporting *only one* of either Usage or Operational data:
**Operational Data Exports**.
* Use the `operationalDataTypes` parameter to specify the entities whose operational data you want to include in the export each time the Export Schedule runs.
* For each of the entity types you select, each time the Export Schedule runs a separate file is compiled containing the operational data for all entities of that type that exist in your Organization
**Usage Data Exports**.
* Select the Meters and Accounts whose usage data you want to include in the export each time the Export Schedule runs.
* You can use the `dimensionFilters` parameter to filter the usage data returned for export by adding specific values of non-numeric Dimension data fields on included Meters. Only the data collected for the values you've added for the selected Dimension fields will be included in the export.
* You can use the `aggregations` to apply aggregation methods the usage data returned for export. This restricts the range of usage data returned for export to only the data collected by aggregated fields on selected Meters. Nothing is returned for any non-aggregated fields on Meters. The usage data for Meter fields is returned as the values resulting from applying the selected aggregation method. See the [Aggregations for Queries - Options and Consequences](https://www.m3ter.com/docs/guides/data-explorer/usage-data-explorer-v2#aggregations-for-queries---understanding-options-and-consequences) for more details.
* If you've applied `aggregations` to the usage returned for export, you can then use the `groups` parameter to group the data by *Account*, *Dimension*, or *Time*.
Request and Response schema:
* Use the selector under the `sourceType` parameter to expose the relevant request and response schema for the source data type.
Request and Response samples:
* Use the **Example** selector to show the relevant request and response samples for source data type.
### Parameters
| Name | Label | Type | Required | Description | Constraints |
| - | - | - | :-: | - | - |
| `integrationCredentialsId` | Credentials | M3terEntityParameter | Yes | The m3ter credentials to use. | authType: M3TER\_SIGNED\_REQUEST, m3terEntity: IntegrationCredentials |
| `requestPath` | Request Path | StateVariableParameter | Yes | State variable containing the request. | - |
| `statePath` | State Path | StateVariableParameter | No | State variable to store the response. | - |
### Exits
| Exit | Description |
| - | - |
| `NEXT` | The API call succeeded. |
| `ERROR` | The API call failed. Error details are stored in the `m3shError` state variable. |
## Get Data Export File Download URL
**Function name:** `m3ter_GenerateDataExportFileDownloadUrl`
**Category:** READ
**HTTP method:** GET
**Destination:** m3ter
Returns a presigned download URL for data export file download based on the `jobId` provided.
If you omit `destinationIds` when setting up your [Ad-Hoc data exports](https://www.m3ter.com/docs/api#tag/ExportAdHoc) or [Scheduled data exports](https://www.m3ter.com/docs/api#tag/ExportSchedule), then the data is not copied to a destination but is available for you to download using the returned download URL.
**Constraints:**
* Only valid for Export jobs ran in the past 24 hours.
* The download URL is time-bound and is only valid for 15 minutes.
**NOTE!** This ExportDestination endpoint is available in Beta release version. See [Feature Release Stages](https://www.m3ter.com/docs/guides/getting-started/feature-release-stages) for Beta release definition.
### Parameters
| Name | Label | Type | Required | Description | Constraints |
| - | - | - | :-: | - | - |
| `integrationCredentialsId` | Credentials | M3terEntityParameter | Yes | The m3ter credentials to use. | authType: M3TER\_SIGNED\_REQUEST, m3terEntity: IntegrationCredentials |
| `jobId` | jobId | LookupParameter | Yes | The job ID | - |
| `statePath` | State Path | StateVariableParameter | No | State variable to store the response. | - |
### Exits
| Exit | Description |
| - | - |
| `NEXT` | The API call succeeded. |
| `ERROR` | The API call failed. Error details are stored in the `m3shError` state variable. |
## Retrieve Job
**Function name:** `m3ter_GetJob`
**Category:** READ
**HTTP method:** GET
**Destination:** m3ter
Retrieve an Export Job for the given UUID.
The response returns:
* The source type for the data exported by the Export Job: one of USAGE or OPERATIONAL.
* The status of the Export Job.
### Parameters
| Name | Label | Type | Required | Description | Constraints |
| - | - | - | :-: | - | - |
| `integrationCredentialsId` | Credentials | M3terEntityParameter | Yes | The m3ter credentials to use. | authType: M3TER\_SIGNED\_REQUEST, m3terEntity: IntegrationCredentials |
| `id` | id | LookupParameter | Yes | The UUID of the Job to retrieve. | - |
| `statePath` | State Path | StateVariableParameter | No | State variable to store the response. | - |
### Exits
| Exit | Description |
| - | - |
| `NEXT` | The API call succeeded. |
| `ERROR` | The API call failed. Error details are stored in the `m3shError` state variable. |
## Retrieve ExportDestination
**Function name:** `m3ter_GetExportDestination`
**Category:** READ
**HTTP method:** GET
**Destination:** m3ter
Retrieve an Export Destination for the given UUID.
### Parameters
| Name | Label | Type | Required | Description | Constraints |
| - | - | - | :-: | - | - |
| `integrationCredentialsId` | Credentials | M3terEntityParameter | Yes | The m3ter credentials to use. | authType: M3TER\_SIGNED\_REQUEST, m3terEntity: IntegrationCredentials |
| `id` | id | LookupParameter | Yes | The UUID of the ExportDestination to retrieve. | - |
| `statePath` | State Path | StateVariableParameter | No | State variable to store the response. | - |
### Exits
| Exit | Description |
| - | - |
| `NEXT` | The API call succeeded. |
| `ERROR` | The API call failed. Error details are stored in the `m3shError` state variable. |
## Update ExportDestination
**Function name:** `m3ter_PutDestination`
**Category:** WRITE
**HTTP method:** PUT
**Destination:** m3ter
Update an Export Destination for the given UUID.
Currently, two options for setting up Data Export Destinations are available:
* S3 buckets on your AWS account.
* Buckets in your Google Cloud Storage account.
Request and Response schema:
* Use the selector under the `destinationType` parameter to expose the relevant request and response schema for the type of Destination.
Request and Response samples:
* Use the **Example** selector to show the relevant request and response samples for the type of Destination.
### Parameters
| Name | Label | Type | Required | Description | Constraints |
| - | - | - | :-: | - | - |
| `integrationCredentialsId` | Credentials | M3terEntityParameter | Yes | The m3ter credentials to use. | authType: M3TER\_SIGNED\_REQUEST, m3terEntity: IntegrationCredentials |
| `id` | id | LookupParameter | Yes | The UUID of the Export Destination to update. | - |
| `requestPath` | Request Path | StateVariableParameter | Yes | State variable containing the request. | - |
| `statePath` | State Path | StateVariableParameter | No | State variable to store the response. | - |
### Exits
| Exit | Description |
| - | - |
| `NEXT` | The API call succeeded. |
| `ERROR` | The API call failed. Error details are stored in the `m3shError` state variable. |
## Delete ExportDestination
**Function name:** `m3ter_DeleteDestination`
**Category:** WRITE
**HTTP method:** DELETE
**Destination:** m3ter
Delete an Export Destination for the given UUID.
**NOTE:** If you attempt to delete an Export Destination that is currently linked to a Data Export Schedule, an error message is returned and you won't be able to delete the Destination.
### Parameters
| Name | Label | Type | Required | Description | Constraints |
| - | - | - | :-: | - | - |
| `integrationCredentialsId` | Credentials | M3terEntityParameter | Yes | The m3ter credentials to use. | authType: M3TER\_SIGNED\_REQUEST, m3terEntity: IntegrationCredentials |
| `id` | id | LookupParameter | Yes | The UUID of the Export Destination to delete. | - |
| `statePath` | State Path | StateVariableParameter | No | State variable to store the response. | - |
### Exits
| Exit | Description |
| - | - |
| `NEXT` | The API call succeeded. |
| `ERROR` | The API call failed. Error details are stored in the `m3shError` state variable. |
## Retrieve Schedule
**Function name:** `m3ter_GetSchedule`
**Category:** READ
**HTTP method:** GET
**Destination:** m3ter
Retrieve a Data Export Schedule for the given UUID. Each Schedule can be configured for exporting *only one* of either Usage or Operational data.
### Parameters
| Name | Label | Type | Required | Description | Constraints |
| - | - | - | :-: | - | - |
| `integrationCredentialsId` | Credentials | M3terEntityParameter | Yes | The m3ter credentials to use. | authType: M3TER\_SIGNED\_REQUEST, m3terEntity: IntegrationCredentials |
| `id` | id | LookupParameter | Yes | The UUID of the Schedule to retrieve. | - |
| `statePath` | State Path | StateVariableParameter | No | State variable to store the response. | - |
### Exits
| Exit | Description |
| - | - |
| `NEXT` | The API call succeeded. |
| `ERROR` | The API call failed. Error details are stored in the `m3shError` state variable. |
## Update Schedule
**Function name:** `m3ter_UpdateSchedule`
**Category:** WRITE
**HTTP method:** PUT
**Destination:** m3ter
Update a Data Export Schedule for the given UUID. Each Schedule can be configured for exporting *only one* of either Usage or Operational data:
**Operational Data Exports**.
* Use the `operationalDataTypes` parameter to specify the entities whose operational data you want to include in the export each time the Export Schedule runs.
* For each of the entity types you select, each time the Export Schedule runs a separate file is compiled containing the operational data for all entities of that type that exist in your Organization
**Usage Data Exports**.
* Select the Meters and Accounts whose usage data you want to include in the export each time the Export Schedule runs.
* You can use the `dimensionFilters` parameter to filter the usage data returned for export by adding specific values of non-numeric Dimension data fields on included Meters. Only the data collected for the values you've added for the selected Dimension fields will be included in the export.
* You can use the `aggregations` to apply aggregation methods the usage data returned for export. This restricts the range of usage data returned for export to only the data collected by aggregated fields on selected Meters. Nothing is returned for any non-aggregated fields on Meters. The usage data for Meter fields is returned as the values resulting from applying the selected aggregation method. See the [Aggregations for Queries - Options and Consequences](https://www.m3ter.com/docs/guides/data-explorer/usage-data-explorer-v2#aggregations-for-queries---understanding-options-and-consequences) for more details.
* If you've applied `aggregations` to the usage returned for export, you can then use the `groups` parameter to group the data by *Account*, *Dimension*, or *Time*.
### Parameters
| Name | Label | Type | Required | Description | Constraints |
| - | - | - | :-: | - | - |
| `integrationCredentialsId` | Credentials | M3terEntityParameter | Yes | The m3ter credentials to use. | authType: M3TER\_SIGNED\_REQUEST, m3terEntity: IntegrationCredentials |
| `id` | id | LookupParameter | Yes | The UUID of the Schedule to update. | - |
| `requestPath` | Request Path | StateVariableParameter | Yes | State variable containing the request. | - |
| `statePath` | State Path | StateVariableParameter | No | State variable to store the response. | - |
### Exits
| Exit | Description |
| - | - |
| `NEXT` | The API call succeeded. |
| `ERROR` | The API call failed. Error details are stored in the `m3shError` state variable. |
## Delete Schedule
**Function name:** `m3ter_DeleteSchedule`
**Category:** WRITE
**HTTP method:** DELETE
**Destination:** m3ter
Delete the Data Export Schedule for the given UUID. Each Schedule can be configured for exporting *only one* of either Usage or Operational data.
### Parameters
| Name | Label | Type | Required | Description | Constraints |
| - | - | - | :-: | - | - |
| `integrationCredentialsId` | Credentials | M3terEntityParameter | Yes | The m3ter credentials to use. | authType: M3TER\_SIGNED\_REQUEST, m3terEntity: IntegrationCredentials |
| `id` | id | LookupParameter | Yes | The UUID of the Schedule to delete. | - |
| `statePath` | State Path | StateVariableParameter | No | State variable to store the response. | - |
### Exits
| Exit | Description |
| - | - |
| `NEXT` | The API call succeeded. |
| `ERROR` | The API call failed. Error details are stored in the `m3shError` state variable. |
## Trigger data export.
**Function name:** `m3ter_TriggerDataExport`
**Category:** WRITE
**HTTP method:** POST
**Destination:** m3ter
Trigger an ad-hoc Data Export. Each ad-hoc Export can be configured for exporting *only one of* either Usage or Operational data:
**Operational Data Exports**.
* **Entity Types**. Use the `operationalDataTypes` parameter to specify the entities whose operational data you want to include in the ad-hoc export.
* **Export Files**. For each of the entity types you select, when the ad-hoc export runs a separate file is compiled containing the operational data for all entities of that type that exist in your Organization
**Usage Data Exports**.
* Select the Meters and Accounts whose usage data you want to include in the ad-hoc export.
* You can use the `dimensionFilters` parameter to filter the usage data returned for export by adding specific values of non-numeric Dimension data fields on included Meters. Only the data collected for the values you've added for the selected Dimension fields will be included in the export.
* You can use the `aggregations` to apply aggregation methods the usage data returned for export. This restricts the range of usage data returned for export to only the data collected by aggregated fields on selected Meters. Nothing is returned for any non-aggregated fields on Meters. The usage data for Meter fields is returned as the values resulting from applying the selected aggregation method. See the [Aggregations for Queries - Options and Consequences](https://www.m3ter.com/docs/guides/data-explorer/usage-data-explorer-v2#aggregations-for-queries---understanding-options-and-consequences) for more details.
* If you've applied `aggregations` to the usage returned for export, you can then use the `groups` parameter to group the data by *Account*, *Dimension*, or *Time*.
**Date Range for Operational Data Exports**. To restrict the operational data included in the ad-hoc export by a date/time range, use the `startDate` date/time request parameter to specify the start of the time period. The export will include all operational data from the specified `startDate` up until the date/time the export job runs.
**Date Range for Usage Data Exports**. To restrict the usage data included in the ad-hoc export by date/time range, use the `startDate` and `endDate` date/time parameters:
* Both `startDate` and `endDate` are required.
* `endDate` must be after `startDate`.
* `endDate` cannot be after tomorrow at midnight UTC. For example if today is May 20th 2025, you can only choose `endDate` to be equal or before 2025-05-21T00:00:00.000Z.
**NOTE:** You can use the ExportJob `id` returned to check the status of the triggered ad-hoc export. See the [ExportJob](https://www.m3ter.com/docs/api#tag/ExportJob) section of this API Reference.
### Parameters
| Name | Label | Type | Required | Description | Constraints |
| - | - | - | :-: | - | - |
| `integrationCredentialsId` | Credentials | M3terEntityParameter | Yes | The m3ter credentials to use. | authType: M3TER\_SIGNED\_REQUEST, m3terEntity: IntegrationCredentials |
| `requestPath` | Request Path | StateVariableParameter | Yes | State variable containing the request. | - |
| `statePath` | State Path | StateVariableParameter | No | State variable to store the response. | - |
### Exits
| Exit | Description |
| - | - |
| `NEXT` | The API call succeeded. |
| `ERROR` | The API call failed. Error details are stored in the `m3shError` state variable. |
# Events
Source: https://docs.m3ter.com/m3sh-function-reference/m3ter/events
## List Event Fields
**Function name:** `m3ter_ListEventFields`
**Category:** READ
**HTTP method:** GET
**Destination:** m3ter
List Event Fields.
Retrieves a list of Fields for a specific Event Type. These Fields are dynamic and forward compatibile, enabling calculation operations on the Event schema.
**Notes:**
* In many of the Response schema for this call, such as when you retrieve the Fields for a `configuration.commitment.created` Event Type, `new` represents the attributes the newly created object has. The Response to a call to retrieve the Fields for a `configuration.commitment.updated` Event Type will contain Field values for both the `old` and `new` objects. The Response to a call to retrieve the Fields for a `configuration.commitment.deleted` Event Type will only contain `old` Fields, for values at point of deletion. Having access to reference both `new` and `old` Field values for an object can be very useful if you want to base a Notification rule on an Event and include a calculation in the rule that, for example, compares `new` values with `old` - for example, trigger a Notification only when a Commitment has been updated and the `new` value for the `amount` is at least \$1,000 greater than the `old` value.
* Some Event types will show `customFields` even though the specific billing or configuration object the Event is for does not yet have the custom fields functionality implemented. For these Events, their `customFields` values will not be populated until such time as the custom fields functionality is implemented for them
### Parameters
| Name | Label | Type | Required | Description | Constraints |
| - | - | - | :-: | - | - |
| `integrationCredentialsId` | Credentials | M3terEntityParameter | Yes | The m3ter credentials to use. | authType: M3TER\_SIGNED\_REQUEST, m3terEntity: IntegrationCredentials |
| `statePath` | State Path | StateVariableParameter | No | State variable to store the response. | - |
| `queryParams` | Query Parameters | KeyValueLookupParameter | No | Query parameters to include in the request | allowedValues: eventName |
### Exits
| Exit | Description |
| - | - |
| `NEXT` | The API call succeeded. |
| `ERROR` | The API call failed. Error details are stored in the `m3shError` state variable. |
## Retrieve EventResponse
**Function name:** `m3ter_GetEvent`
**Category:** READ
**HTTP method:** GET
**Destination:** m3ter
Retrieve a specific Event.
Retrieves detailed information about the specific Event with the given UUID. An Event corresponds to a unique instance of a state change within the system, classified under a specific Event Type.
### Parameters
| Name | Label | Type | Required | Description | Constraints |
| - | - | - | :-: | - | - |
| `integrationCredentialsId` | Credentials | M3terEntityParameter | Yes | The m3ter credentials to use. | authType: M3TER\_SIGNED\_REQUEST, m3terEntity: IntegrationCredentials |
| `id` | id | LookupParameter | Yes | The unique identifier (UUID) of the Event to retrieve. | - |
| `statePath` | State Path | StateVariableParameter | No | State variable to store the response. | - |
### Exits
| Exit | Description |
| - | - |
| `NEXT` | The API call succeeded. |
| `ERROR` | The API call failed. Error details are stored in the `m3shError` state variable. |
## List EventResponse
**Function name:** `m3ter_ListEvents`
**Category:** READ
**HTTP method:** GET (paginated)
**Destination:** m3ter
List all Events.
Retrieve a list of all Events, with options to filter the returned list based on various criteria. Each Event represents a unique instance of a state change within the system, classified under a specific kind of Event.
**NOTES:** You can:
* Use `eventName` as a valid Query parameter to filter the list of Events returned. For example:
`.../organizations/{orgId}/events?eventName=configuration.commitment.created`
* Use the [List Notification Events](https://www.m3ter.com/docs/api#tag/Events/operation/ListEventTypes) endpoint in this section. The response lists the valid Query parameters.
### Parameters
| Name | Label | Type | Required | Description | Constraints |
| - | - | - | :-: | - | - |
| `integrationCredentialsId` | Credentials | M3terEntityParameter | Yes | The m3ter credentials to use. | authType: M3TER\_SIGNED\_REQUEST, m3terEntity: IntegrationCredentials |
| `statePath` | State Path | StateVariableParameter | No | State variable to store the response. | - |
| `queryParams` | Query Parameters | KeyValueLookupParameter | No | Query parameters to include in the request | allowedValues: ids,notificationId,accountId,eventType,notificationCode,includeActioned,eventName,resourceId |
### Exits
| Exit | Description |
| - | - |
| `NEXT` | The API call succeeded. |
| `ERROR` | The API call failed. Error details are stored in the `m3shError` state variable. |
## List Notification Events
**Function name:** `m3ter_ListEventTypes`
**Category:** READ
**HTTP method:** GET
**Destination:** m3ter
Retrieve a list of Notification Event Types.
This endpoint retrieves a list of Event Types that can have Notification rules configured.
### Parameters
| Name | Label | Type | Required | Description | Constraints |
| - | - | - | :-: | - | - |
| `integrationCredentialsId` | Credentials | M3terEntityParameter | Yes | The m3ter credentials to use. | authType: M3TER\_SIGNED\_REQUEST, m3terEntity: IntegrationCredentials |
| `statePath` | State Path | StateVariableParameter | No | State variable to store the response. | - |
### Exits
| Exit | Description |
| - | - |
| `NEXT` | The API call succeeded. |
| `ERROR` | The API call failed. Error details are stored in the `m3shError` state variable. |
# Externalmappingconfiguration
Source: https://docs.m3ter.com/m3sh-function-reference/m3ter/externalmappingconfiguration
## Retrieve External Entities from Destination
**Function name:** `m3ter_GetExternalMappingOptionsForDestination`
**Category:** READ
**HTTP method:** GET
**Destination:** m3ter
Retrieve a list of external entities from the specified destination system.
This endpoint enables you to retrieve a list of potential values for creating an External Mapping from a specified destination system. The list is only returned if the destination system has been authenticated successfully and it supports such functionality, otherwise, you will receive an empty response.
### Parameters
| Name | Label | Type | Required | Description | Constraints |
| - | - | - | :-: | - | - |
| `integrationCredentialsId` | Credentials | M3terEntityParameter | Yes | The m3ter credentials to use. | authType: M3TER\_SIGNED\_REQUEST, m3terEntity: IntegrationCredentials |
| `destination` | destination | LookupParameter | Yes | The name of the destination system from where the external entities are to be retrieved. | - |
| `entityType` | entityType | LookupParameter | Yes | The m3ter entity type. | - |
| `statePath` | State Path | StateVariableParameter | No | State variable to store the response. | - |
| `queryParams` | Query Parameters | KeyValueLookupParameter | No | Query parameters to include in the request | allowedValues: externalTable |
### Exits
| Exit | Description |
| - | - |
| `NEXT` | The API call succeeded. |
| `ERROR` | The API call failed. Error details are stored in the `m3shError` state variable. |
## Retrieve a list of external entities from the destination system for a particular credential
**Function name:** `m3ter_GetExternalMappingOptionsForDestinationForCredentialsId`
**Category:** READ
**HTTP method:** GET
**Destination:** m3ter
Retrieve a list of possible values to create an external mapping using a particular credential. These options are retrieved from the destination system if the system has been successfully authenticated and provides the mechanism to do so. Otherwise an empty response is returned.
### Parameters
| Name | Label | Type | Required | Description | Constraints |
| - | - | - | :-: | - | - |
| `integrationCredentialsId` | Credentials | M3terEntityParameter | Yes | The m3ter credentials to use. | authType: M3TER\_SIGNED\_REQUEST, m3terEntity: IntegrationCredentials |
| `destination` | destination | LookupParameter | Yes | Name of the destination system | - |
| `entityType` | entityType | LookupParameter | Yes | The m3ter entity type. | - |
| `integrationCredentialsId` | integrationCredentialsId | LookupParameter | Yes | The UUID of the credentials to use. | - |
| `statePath` | State Path | StateVariableParameter | No | State variable to store the response. | - |
| `queryParams` | Query Parameters | KeyValueLookupParameter | No | Query parameters to include in the request | allowedValues: externalTable |
### Exits
| Exit | Description |
| - | - |
| `NEXT` | The API call succeeded. |
| `ERROR` | The API call failed. Error details are stored in the `m3shError` state variable. |
## Retrieve External Mapping Configuration
**Function name:** `m3ter_GetExternalMappingConfiguration`
**Category:** READ
**HTTP method:** GET
**Destination:** m3ter
Retrieve the global External Mapping configuration.
This endpoint retrieves the global External Mapping configuration for the specified Organization.
### Parameters
| Name | Label | Type | Required | Description | Constraints |
| - | - | - | :-: | - | - |
| `integrationCredentialsId` | Credentials | M3terEntityParameter | Yes | The m3ter credentials to use. | authType: M3TER\_SIGNED\_REQUEST, m3terEntity: IntegrationCredentials |
| `statePath` | State Path | StateVariableParameter | No | State variable to store the response. | - |
### Exits
| Exit | Description |
| - | - |
| `NEXT` | The API call succeeded. |
| `ERROR` | The API call failed. Error details are stored in the `m3shError` state variable. |
# Externalmappings
Source: https://docs.m3ter.com/m3sh-function-reference/m3ter/externalmappings
## Retrieve External Mapping
**Function name:** `m3ter_GetExternalMapping`
**Category:** READ
**HTTP method:** GET
**Destination:** m3ter
Retrieve an External Mapping with the given UUID.
This endpoint enables you to retrieve the External Mapping with the specified UUID for a specific Organization.
### Parameters
| Name | Label | Type | Required | Description | Constraints |
| - | - | - | :-: | - | - |
| `integrationCredentialsId` | Credentials | M3terEntityParameter | Yes | The m3ter credentials to use. | authType: M3TER\_SIGNED\_REQUEST, m3terEntity: IntegrationCredentials |
| `id` | id | LookupParameter | Yes | The unique identifier (UUID) of the External Mapping to retrieve. | - |
| `statePath` | State Path | StateVariableParameter | No | State variable to store the response. | - |
### Exits
| Exit | Description |
| - | - |
| `NEXT` | The API call succeeded. |
| `ERROR` | The API call failed. Error details are stored in the `m3shError` state variable. |
## Update External Mapping
**Function name:** `m3ter_UpdateExternalMapping`
**Category:** WRITE
**HTTP method:** PUT
**Destination:** m3ter
Updates an External Mapping with the given UUID.
This endpoint enables you to update an existing External Mapping entity, identified by its UUID. You must supply a request body with the new details for the External Mapping.
### Parameters
| Name | Label | Type | Required | Description | Constraints |
| - | - | - | :-: | - | - |
| `integrationCredentialsId` | Credentials | M3terEntityParameter | Yes | The m3ter credentials to use. | authType: M3TER\_SIGNED\_REQUEST, m3terEntity: IntegrationCredentials |
| `id` | id | LookupParameter | Yes | The unique identifier (UUID) of the External Mapping to retrieve. | - |
| `requestPath` | Request Path | StateVariableParameter | Yes | State variable containing the request. | - |
| `statePath` | State Path | StateVariableParameter | No | State variable to store the response. | - |
### Exits
| Exit | Description |
| - | - |
| `NEXT` | The API call succeeded. |
| `ERROR` | The API call failed. Error details are stored in the `m3shError` state variable. |
## List External Mappings for a m3ter Entity
**Function name:** `m3ter_ListExternalMappingsForM3terEntity`
**Category:** READ
**HTTP method:** GET (paginated)
**Destination:** m3ter
Retrieve a list of External Mapping entities for a specified m3ter entity.
Use this endpoint to retrieve a list of External Mapping entities associated with a specific m3ter entity. The list can be paginated for easier management.
### Parameters
| Name | Label | Type | Required | Description | Constraints |
| - | - | - | :-: | - | - |
| `integrationCredentialsId` | Credentials | M3terEntityParameter | Yes | The m3ter credentials to use. | authType: M3TER\_SIGNED\_REQUEST, m3terEntity: IntegrationCredentials |
| `entity` | entity | LookupParameter | Yes | The entity type. | - |
| `m3terId` | m3terId | LookupParameter | Yes | The unique identifer (UUID) of the m3ter entity. | - |
| `statePath` | State Path | StateVariableParameter | No | State variable to store the response. | - |
### Exits
| Exit | Description |
| - | - |
| `NEXT` | The API call succeeded. |
| `ERROR` | The API call failed. Error details are stored in the `m3shError` state variable. |
## List External Mappings for External Entity
**Function name:** `m3ter_ListExternalMappingsForExternalSystemAndEntity`
**Category:** READ
**HTTP method:** GET (paginated)
**Destination:** m3ter
Retrieve a list of External Mapping entities for a specified external system entity.
Use this endpoint to retrieve a list of External Mapping entities associated with a specific external system entity. The list can be paginated for easier management.
### Parameters
| Name | Label | Type | Required | Description | Constraints |
| - | - | - | :-: | - | - |
| `integrationCredentialsId` | Credentials | M3terEntityParameter | Yes | The m3ter credentials to use. | authType: M3TER\_SIGNED\_REQUEST, m3terEntity: IntegrationCredentials |
| `system` | system | LookupParameter | Yes | The identifier for the external system. | - |
| `externalTable` | externalTable | LookupParameter | Yes | The identifier for the external table. | - |
| `externalId` | externalId | LookupParameter | Yes | The unique identifier (UUID) for the external entity. | - |
| `statePath` | State Path | StateVariableParameter | No | State variable to store the response. | - |
### Exits
| Exit | Description |
| - | - |
| `NEXT` | The API call succeeded. |
| `ERROR` | The API call failed. Error details are stored in the `m3shError` state variable. |
## List External Mappings
**Function name:** `m3ter_ListExternalMappings`
**Category:** READ
**HTTP method:** GET (paginated)
**Destination:** m3ter
Retrieve a list of all External Mapping entities.
This endpoint retrieves a list of all External Mapping entities for a specific Organization. The list can be paginated for better management, and supports filtering using the external system.
### Parameters
| Name | Label | Type | Required | Description | Constraints |
| - | - | - | :-: | - | - |
| `integrationCredentialsId` | Credentials | M3terEntityParameter | Yes | The m3ter credentials to use. | authType: M3TER\_SIGNED\_REQUEST, m3terEntity: IntegrationCredentials |
| `statePath` | State Path | StateVariableParameter | No | State variable to store the response. | - |
| `queryParams` | Query Parameters | KeyValueLookupParameter | No | Query parameters to include in the request | allowedValues: externalSystemId,m3terIds,integrationConfigId |
### Exits
| Exit | Description |
| - | - |
| `NEXT` | The API call succeeded. |
| `ERROR` | The API call failed. Error details are stored in the `m3shError` state variable. |
# Fileuploads
Source: https://docs.m3ter.com/m3sh-function-reference/m3ter/fileuploads
## Get File Upload Job Response
**Function name:** `m3ter_GetUploadJobResponse`
**Category:** READ
**HTTP method:** GET
**Destination:** m3ter
Get the file upload job response using the UUID of the file upload job.
Part of the file upload service for measurements ingest.
### Parameters
| Name | Label | Type | Required | Description | Constraints |
| - | - | - | :-: | - | - |
| `integrationCredentialsId` | Credentials | M3terEntityParameter | Yes | The m3ter credentials to use. | authType: M3TER\_SIGNED\_REQUEST, m3terEntity: IntegrationCredentials |
| `id` | id | LookupParameter | Yes | UUID of the file upload job. | - |
| `statePath` | State Path | StateVariableParameter | No | State variable to store the response. | - |
### Exits
| Exit | Description |
| - | - |
| `NEXT` | The API call succeeded. |
| `ERROR` | The API call failed. Error details are stored in the `m3shError` state variable. |
## List File Upload Jobs
**Function name:** `m3ter_ListJobs`
**Category:** READ
**HTTP method:** GET (paginated)
**Destination:** m3ter
Lists the File Upload jobs. Part of the File Upload service for measurements ingest:
* You can use the `dateCreatedStart` and `dateCreatedEnd` optional Query parameters to define a date range to filter the File Uploads jobs returned for this call.
* If `dateCreatedStart` and `dateCreatedEnd` Query parameters are not used, then all File Upload jobs are returned.
### Parameters
| Name | Label | Type | Required | Description | Constraints |
| - | - | - | :-: | - | - |
| `integrationCredentialsId` | Credentials | M3terEntityParameter | Yes | The m3ter credentials to use. | authType: M3TER\_SIGNED\_REQUEST, m3terEntity: IntegrationCredentials |
| `statePath` | State Path | StateVariableParameter | No | State variable to store the response. | - |
| `queryParams` | Query Parameters | KeyValueLookupParameter | No | Query parameters to include in the request | allowedValues: dateCreatedStart,dateCreatedEnd,fileKey |
### Exits
| Exit | Description |
| - | - |
| `NEXT` | The API call succeeded. |
| `ERROR` | The API call failed. Error details are stored in the `m3shError` state variable. |
## Get Original File Download URL
**Function name:** `m3ter_GetJobOriginalFileDownloadUrl`
**Category:** READ
**HTTP method:** GET
**Destination:** m3ter
Use the original file upload job id to obtain a download URL, which you can then use to retrieve the file you originally uploaded to the file upload service:
* A download URL is returned together with a download job id.
* You can then use a `GET` using the returned download URL as the endpoint to retrieve the file you originally uploaded.
Part of the file upload service for submitting measurements data files.
### Parameters
| Name | Label | Type | Required | Description | Constraints |
| - | - | - | :-: | - | - |
| `integrationCredentialsId` | Credentials | M3terEntityParameter | Yes | The m3ter credentials to use. | authType: M3TER\_SIGNED\_REQUEST, m3terEntity: IntegrationCredentials |
| `id` | id | LookupParameter | Yes | UUID of the file service job for the original measurements file upload. | - |
| `statePath` | State Path | StateVariableParameter | No | State variable to store the response. | - |
### Exits
| Exit | Description |
| - | - |
| `NEXT` | The API call succeeded. |
| `ERROR` | The API call failed. Error details are stored in the `m3shError` state variable. |
## Generate Upload URL
**Function name:** `m3ter_GenerateUploadUrl`
**Category:** WRITE
**HTTP method:** POST
**Destination:** m3ter
Generate a URL for uploading a file containing measurements to the platform in preparation for the measurements it contains to be ingested:
* An upload URL is returned together with an upload job id:
* You can then upload your data measurements file using a `PUT` request using the returned upload URL as the endpoint.
* You can use the returned upload job id with other calls to the File Upload Service for any follow-up or troubleshooting.
**Important:**
* The `contentLength` request parameter is required.
* The upload URL is time limited - it is valid for ***one*** minute.
Part of the file upload service for submitting measurements data files.
### Parameters
| Name | Label | Type | Required | Description | Constraints |
| - | - | - | :-: | - | - |
| `integrationCredentialsId` | Credentials | M3terEntityParameter | Yes | The m3ter credentials to use. | authType: M3TER\_SIGNED\_REQUEST, m3terEntity: IntegrationCredentials |
| `requestPath` | Request Path | StateVariableParameter | Yes | State variable containing the request. | - |
| `statePath` | State Path | StateVariableParameter | No | State variable to store the response. | - |
### Exits
| Exit | Description |
| - | - |
| `NEXT` | The API call succeeded. |
| `ERROR` | The API call failed. Error details are stored in the `m3shError` state variable. |
# Integrationdestinations
Source: https://docs.m3ter.com/m3sh-function-reference/m3ter/integrationdestinations
## Retrieve reported usage
**Function name:** `m3ter_GetUsageReport`
**Category:** READ
**HTTP method:** GET (paginated)
**Destination:** m3ter
Retrieve a list of reported usage records that match the provided filters.
When Bill integration runs are performed, all interactions between m3ter and a Marketplace system are persisted as logs. Use this endpoint to retrieve these logs, which you can use to track all amounts sent over to the Marketplace system together with the date and time the Bill data was sent. This provides a report on usage data sent to the Marketplace for each Bill integration run
### Parameters
| Name | Label | Type | Required | Description | Constraints |
| - | - | - | :-: | - | - |
| `integrationCredentialsId` | Credentials | M3terEntityParameter | Yes | The m3ter credentials to use. | authType: M3TER\_SIGNED\_REQUEST, m3terEntity: IntegrationCredentials |
| `statePath` | State Path | StateVariableParameter | No | State variable to store the response. | - |
| `queryParams` | Query Parameters | KeyValueLookupParameter | No | Query parameters to include in the request | allowedValues: billStartDate,accountId,externalSystem,billId |
### Exits
| Exit | Description |
| - | - |
| `NEXT` | The API call succeeded. |
| `ERROR` | The API call failed. Error details are stored in the `m3shError` state variable. |
# Integrationruns
Source: https://docs.m3ter.com/m3sh-function-reference/m3ter/integrationruns
## Retrieve Latest IntegrationRun
**Function name:** `m3ter_GetIntegrationRunLatest`
**Category:** READ
**HTTP method:** GET
**Destination:** m3ter
Retrieve the latest integration run for the entity.
### Parameters
| Name | Label | Type | Required | Description | Constraints |
| - | - | - | :-: | - | - |
| `integrationCredentialsId` | Credentials | M3terEntityParameter | Yes | The m3ter credentials to use. | authType: M3TER\_SIGNED\_REQUEST, m3terEntity: IntegrationCredentials |
| `entityType` | entityType | LookupParameter | Yes | The type of the entity you want to retrieve the last integration run for. Two options: \* Bill \* Notification | - |
| `id` | id | LookupParameter | Yes | The UUID of the entity to retrieve the latest integration run for. | - |
| `statePath` | State Path | StateVariableParameter | No | State variable to store the response. | - |
### Exits
| Exit | Description |
| - | - |
| `NEXT` | The API call succeeded. |
| `ERROR` | The API call failed. Error details are stored in the `m3shError` state variable. |
## Retrieve IntegrationRuns
**Function name:** `m3ter_GetIntegrationRunLatestForIds`
**Category:** READ
**HTTP method:** GET
**Destination:** m3ter
Retrieve the latest integration runs for entity and ids
### Parameters
| Name | Label | Type | Required | Description | Constraints |
| - | - | - | :-: | - | - |
| `integrationCredentialsId` | Credentials | M3terEntityParameter | Yes | The m3ter credentials to use. | authType: M3TER\_SIGNED\_REQUEST, m3terEntity: IntegrationCredentials |
| `entityType` | entityType | LookupParameter | Yes | The type of the entity (e.g. Bill). | - |
| `statePath` | State Path | StateVariableParameter | No | State variable to store the response. | - |
| `queryParams` | Query Parameters | KeyValueLookupParameter | No | Query parameters to include in the request | allowedValues: ids |
### Exits
| Exit | Description |
| - | - |
| `NEXT` | The API call succeeded. |
| `ERROR` | The API call failed. Error details are stored in the `m3shError` state variable. |
## Get IntegrationRun for the UUID
**Function name:** `m3ter_GetIntegrationRun`
**Category:** READ
**HTTP method:** GET
**Destination:** m3ter
Retrieve the integration run for the id
### Parameters
| Name | Label | Type | Required | Description | Constraints |
| - | - | - | :-: | - | - |
| `integrationCredentialsId` | Credentials | M3terEntityParameter | Yes | The m3ter credentials to use. | authType: M3TER\_SIGNED\_REQUEST, m3terEntity: IntegrationCredentials |
| `id` | id | LookupParameter | Yes | The UUID of the entity. | - |
| `statePath` | State Path | StateVariableParameter | No | State variable to store the response. | - |
### Exits
| Exit | Description |
| - | - |
| `NEXT` | The API call succeeded. |
| `ERROR` | The API call failed. Error details are stored in the `m3shError` state variable. |
## Get IntegrationRun Log
**Function name:** `m3ter_GetIntegrationRunLogs`
**Category:** READ
**HTTP method:** GET
**Destination:** m3ter
Retrieve the integrationrun log for the given UUID.
This endpoint is for retrieving logs of a specific integrationrun. It is useful for debugging and monitoring the performance of integrations within your organization.
### Parameters
| Name | Label | Type | Required | Description | Constraints |
| - | - | - | :-: | - | - |
| `integrationCredentialsId` | Credentials | M3terEntityParameter | Yes | The m3ter credentials to use. | authType: M3TER\_SIGNED\_REQUEST, m3terEntity: IntegrationCredentials |
| `id` | id | LookupParameter | Yes | The UUID associated with the integrationrun. This ID helps in pinpointing the exact integrationrun logs you are looking to retrieve. | - |
| `statePath` | State Path | StateVariableParameter | No | State variable to store the response. | - |
### Exits
| Exit | Description |
| - | - |
| `NEXT` | The API call succeeded. |
| `ERROR` | The API call failed. Error details are stored in the `m3shError` state variable. |
## List IntegrationRuns By DestinationId
**Function name:** `m3ter_ListIntegrationRunsByDestinationId`
**Category:** READ
**HTTP method:** GET (paginated)
**Destination:** m3ter
Retrieve a list of the integration runs for the destination
### Parameters
| Name | Label | Type | Required | Description | Constraints |
| - | - | - | :-: | - | - |
| `integrationCredentialsId` | Credentials | M3terEntityParameter | Yes | The m3ter credentials to use. | authType: M3TER\_SIGNED\_REQUEST, m3terEntity: IntegrationCredentials |
| `destinationId` | destinationId | LookupParameter | Yes | The UUID of the destination. | - |
| `statePath` | State Path | StateVariableParameter | No | State variable to store the response. | - |
| `queryParams` | Query Parameters | KeyValueLookupParameter | No | Query parameters to include in the request | allowedValues: destination,startDate,endDate,status,order |
### Exits
| Exit | Description |
| - | - |
| `NEXT` | The API call succeeded. |
| `ERROR` | The API call failed. Error details are stored in the `m3shError` state variable. |
## Get a download URL for a sanitised IntegrationRun log
**Function name:** `m3ter_GetIntegrationRunLogDownload`
**Category:** READ
**HTTP method:** GET
**Destination:** m3ter
Creates a sanitised copy of the integration run log (with internal fields removed) and returns a presigned download URL
### Parameters
| Name | Label | Type | Required | Description | Constraints |
| - | - | - | :-: | - | - |
| `integrationCredentialsId` | Credentials | M3terEntityParameter | Yes | The m3ter credentials to use. | authType: M3TER\_SIGNED\_REQUEST, m3terEntity: IntegrationCredentials |
| `id` | id | LookupParameter | Yes | The UUID of the integration run. | - |
| `statePath` | State Path | StateVariableParameter | No | State variable to store the response. | - |
### Exits
| Exit | Description |
| - | - |
| `NEXT` | The API call succeeded. |
| `ERROR` | The API call failed. Error details are stored in the `m3shError` state variable. |
## List IntegrationRuns
**Function name:** `m3ter_ListIntegrationRuns`
**Category:** READ
**HTTP method:** GET (paginated)
**Destination:** m3ter
Retrieve a list of the integration runs for the specified entity.
You can filter the list using the `startDate` and `endDate` query parameters to specify date/times to define the time period you want to return integration runs for.
### Parameters
| Name | Label | Type | Required | Description | Constraints |
| - | - | - | :-: | - | - |
| `integrationCredentialsId` | Credentials | M3terEntityParameter | Yes | The m3ter credentials to use. | authType: M3TER\_SIGNED\_REQUEST, m3terEntity: IntegrationCredentials |
| `entityId` | entityId | LookupParameter | Yes | The UUID of the entity to retrieve the integration runs for. | - |
| `entityType` | entityType | LookupParameter | Yes | The type of the entity you want to retrieve the integration runs for. Two options: \* Bill \* Notification | - |
| `statePath` | State Path | StateVariableParameter | No | State variable to store the response. | - |
| `queryParams` | Query Parameters | KeyValueLookupParameter | No | Query parameters to include in the request | allowedValues: startDate,endDate,status,order |
### Exits
| Exit | Description |
| - | - |
| `NEXT` | The API call succeeded. |
| `ERROR` | The API call failed. Error details are stored in the `m3shError` state variable. |
# Integrationtransformations
Source: https://docs.m3ter.com/m3sh-function-reference/m3ter/integrationtransformations
## Preview a transformation against an existing entity
**Function name:** `m3ter_PreviewIntegrationTransformation`
**Category:** WRITE
**HTTP method:** POST
**Destination:** m3ter
Create a new transformation
### Parameters
| Name | Label | Type | Required | Description | Constraints |
| - | - | - | :-: | - | - |
| `integrationCredentialsId` | Credentials | M3terEntityParameter | Yes | The m3ter credentials to use. | authType: M3TER\_SIGNED\_REQUEST, m3terEntity: IntegrationCredentials |
| `requestPath` | Request Path | StateVariableParameter | Yes | State variable containing the request. | - |
| `statePath` | State Path | StateVariableParameter | No | State variable to store the response. | - |
### Exits
| Exit | Description |
| - | - |
| `NEXT` | The API call succeeded. |
| `ERROR` | The API call failed. Error details are stored in the `m3shError` state variable. |
## Preview a transformation against an existing entity
**Function name:** `m3ter_ListSupportedSystems`
**Category:** READ
**HTTP method:** GET
**Destination:** m3ter
Create a new transformation
### Parameters
| Name | Label | Type | Required | Description | Constraints |
| - | - | - | :-: | - | - |
| `integrationCredentialsId` | Credentials | M3terEntityParameter | Yes | The m3ter credentials to use. | authType: M3TER\_SIGNED\_REQUEST, m3terEntity: IntegrationCredentials |
| `statePath` | State Path | StateVariableParameter | No | State variable to store the response. | - |
### Exits
| Exit | Description |
| - | - |
| `NEXT` | The API call succeeded. |
| `ERROR` | The API call failed. Error details are stored in the `m3shError` state variable. |
## Retrieve IntegrationTransformations
**Function name:** `m3ter_GetIntegrationTransformations`
**Category:** READ
**HTTP method:** GET (paginated)
**Destination:** m3ter
Retrieve the integration transformations
### Parameters
| Name | Label | Type | Required | Description | Constraints |
| - | - | - | :-: | - | - |
| `integrationCredentialsId` | Credentials | M3terEntityParameter | Yes | The m3ter credentials to use. | authType: M3TER\_SIGNED\_REQUEST, m3terEntity: IntegrationCredentials |
| `statePath` | State Path | StateVariableParameter | No | State variable to store the response. | - |
| `queryParams` | Query Parameters | KeyValueLookupParameter | No | Query parameters to include in the request | allowedValues: destinationSystem |
### Exits
| Exit | Description |
| - | - |
| `NEXT` | The API call succeeded. |
| `ERROR` | The API call failed. Error details are stored in the `m3shError` state variable. |
## Create a new transformation
**Function name:** `m3ter_CreateIntegrationTransformation`
**Category:** WRITE
**HTTP method:** POST
**Destination:** m3ter
Create a new transformation
### Parameters
| Name | Label | Type | Required | Description | Constraints |
| - | - | - | :-: | - | - |
| `integrationCredentialsId` | Credentials | M3terEntityParameter | Yes | The m3ter credentials to use. | authType: M3TER\_SIGNED\_REQUEST, m3terEntity: IntegrationCredentials |
| `requestPath` | Request Path | StateVariableParameter | Yes | State variable containing the request. | - |
| `statePath` | State Path | StateVariableParameter | No | State variable to store the response. | - |
### Exits
| Exit | Description |
| - | - |
| `NEXT` | The API call succeeded. |
| `ERROR` | The API call failed. Error details are stored in the `m3shError` state variable. |
## Get IntegrationTransformation for the UUID
**Function name:** `m3ter_GetIntegrationTransformationForId`
**Category:** READ
**HTTP method:** GET
**Destination:** m3ter
Retrieve the integration transformation for the id
### Parameters
| Name | Label | Type | Required | Description | Constraints |
| - | - | - | :-: | - | - |
| `integrationCredentialsId` | Credentials | M3terEntityParameter | Yes | The m3ter credentials to use. | authType: M3TER\_SIGNED\_REQUEST, m3terEntity: IntegrationCredentials |
| `id` | id | LookupParameter | Yes | The UUID of the entity. | - |
| `statePath` | State Path | StateVariableParameter | No | State variable to store the response. | - |
### Exits
| Exit | Description |
| - | - |
| `NEXT` | The API call succeeded. |
| `ERROR` | The API call failed. Error details are stored in the `m3shError` state variable. |
## Update the IntegrationTransformation for the UUID
**Function name:** `m3ter_PutIntegrationTransformationForId`
**Category:** WRITE
**HTTP method:** PUT
**Destination:** m3ter
Update the integration transformation for the id
### Parameters
| Name | Label | Type | Required | Description | Constraints |
| - | - | - | :-: | - | - |
| `integrationCredentialsId` | Credentials | M3terEntityParameter | Yes | The m3ter credentials to use. | authType: M3TER\_SIGNED\_REQUEST, m3terEntity: IntegrationCredentials |
| `id` | id | LookupParameter | Yes | The UUID of the entity. | - |
| `requestPath` | Request Path | StateVariableParameter | Yes | State variable containing the request. | - |
| `statePath` | State Path | StateVariableParameter | No | State variable to store the response. | - |
### Exits
| Exit | Description |
| - | - |
| `NEXT` | The API call succeeded. |
| `ERROR` | The API call failed. Error details are stored in the `m3shError` state variable. |
## Delete IntegrationTransformation for the UUID
**Function name:** `m3ter_DeleteIntegrationTransformationForId`
**Category:** WRITE
**HTTP method:** DELETE
**Destination:** m3ter
Deletes the integration transformation for the id
### Parameters
| Name | Label | Type | Required | Description | Constraints |
| - | - | - | :-: | - | - |
| `integrationCredentialsId` | Credentials | M3terEntityParameter | Yes | The m3ter credentials to use. | authType: M3TER\_SIGNED\_REQUEST, m3terEntity: IntegrationCredentials |
| `id` | id | LookupParameter | Yes | The UUID of the entity. | - |
| `statePath` | State Path | StateVariableParameter | No | State variable to store the response. | - |
### Exits
| Exit | Description |
| - | - |
| `NEXT` | The API call succeeded. |
| `ERROR` | The API call failed. Error details are stored in the `m3shError` state variable. |
# m3ter
Source: https://docs.m3ter.com/m3sh-function-reference/m3ter/introduction
Synthetic functions for the **m3ter** destination, generated from its OpenAPI spec and grouped by entity below.
# Invitations
Source: https://docs.m3ter.com/m3sh-function-reference/m3ter/invitations
## Retrieve Invitation
**Function name:** `m3ter_GetOrgUserInvitation`
**Category:** READ
**HTTP method:** GET
**Destination:** m3ter
Retrieve the specified invitation with the given UUID.
### Parameters
| Name | Label | Type | Required | Description | Constraints |
| - | - | - | :-: | - | - |
| `integrationCredentialsId` | Credentials | M3terEntityParameter | Yes | The m3ter credentials to use. | authType: M3TER\_SIGNED\_REQUEST, m3terEntity: IntegrationCredentials |
| `id` | id | LookupParameter | Yes | UUID of the specific invitation to retrieve. | - |
| `statePath` | State Path | StateVariableParameter | No | State variable to store the response. | - |
### Exits
| Exit | Description |
| - | - |
| `NEXT` | The API call succeeded. |
| `ERROR` | The API call failed. Error details are stored in the `m3shError` state variable. |
## Retrieve Invitations
**Function name:** `m3ter_ListOrgUserInvitations`
**Category:** READ
**HTTP method:** GET (paginated)
**Destination:** m3ter
Retrieve a list of all invitations in the Organization.
### Parameters
| Name | Label | Type | Required | Description | Constraints |
| - | - | - | :-: | - | - |
| `integrationCredentialsId` | Credentials | M3terEntityParameter | Yes | The m3ter credentials to use. | authType: M3TER\_SIGNED\_REQUEST, m3terEntity: IntegrationCredentials |
| `statePath` | State Path | StateVariableParameter | No | State variable to store the response. | - |
### Exits
| Exit | Description |
| - | - |
| `NEXT` | The API call succeeded. |
| `ERROR` | The API call failed. Error details are stored in the `m3shError` state variable. |
## Invite User to Organization
**Function name:** `m3ter_CreateOrgUserInvitation`
**Category:** WRITE
**HTTP method:** POST
**Destination:** m3ter
Invite a new user to your Organization.
This sends an email to someone inviting them to join your m3ter Organization.
### Parameters
| Name | Label | Type | Required | Description | Constraints |
| - | - | - | :-: | - | - |
| `integrationCredentialsId` | Credentials | M3terEntityParameter | Yes | The m3ter credentials to use. | authType: M3TER\_SIGNED\_REQUEST, m3terEntity: IntegrationCredentials |
| `requestPath` | Request Path | StateVariableParameter | Yes | State variable containing the request. | - |
| `statePath` | State Path | StateVariableParameter | No | State variable to store the response. | - |
### Exits
| Exit | Description |
| - | - |
| `NEXT` | The API call succeeded. |
| `ERROR` | The API call failed. Error details are stored in the `m3shError` state variable. |
# Lineitems
Source: https://docs.m3ter.com/m3sh-function-reference/m3ter/lineitems
## List Line Items
**Function name:** `m3ter_ListLineItems`
**Category:** READ
**HTTP method:** GET (paginated)
**Destination:** m3ter
List the billing line items for the given Organization, which can be filtered by the type of line item, Bill ID, or Commitment *(prepayment)* ID.
### Parameters
| Name | Label | Type | Required | Description | Constraints |
| - | - | - | :-: | - | - |
| `integrationCredentialsId` | Credentials | M3terEntityParameter | Yes | The m3ter credentials to use. | authType: M3TER\_SIGNED\_REQUEST, m3terEntity: IntegrationCredentials |
| `statePath` | State Path | StateVariableParameter | No | State variable to store the response. | - |
| `queryParams` | Query Parameters | KeyValueLookupParameter | No | Query parameters to include in the request | allowedValues: commitmentId,lineItemType,billId,additional |
### Exits
| Exit | Description |
| - | - |
| `NEXT` | The API call succeeded. |
| `ERROR` | The API call failed. Error details are stored in the `m3shError` state variable. |
# Lookuptables
Source: https://docs.m3ter.com/m3sh-function-reference/m3ter/lookuptables
## List LookupTableRevisionData Jobs
**Function name:** `m3ter_ListLookupTableRevisionDataJobs`
**Category:** READ
**HTTP method:** GET (paginated)
**Destination:** m3ter
List the Lookup Table Revision Data job Responses for the given Lookup Table Revision.
There are four types of Revision Data jobs:
* **COPY**. Job runs when you use the [Copy LookupTableRevisionData](https://www.m3ter.com/docs/api#tag/LookupTableRevisionData/operation/CopyLookupTableRevisionData) endpoint which returns the `jobId`.
* **UPLOAD**. Job runs when you use the [Generate LookupTableRevisionData Upload URL](https://www.m3ter.com/docs/api#tag/LookupTableRevisionData/operation/GenerateLookupTableDataUploadUrl) endpoint which returns the `jobId`.
* **DOWNLOAD**. Job runs when you use the [](https://www.m3ter.com/docs/api#tag/LookupTableRevisionData/operation/TriggerLookupTableRevisionDataDownloadJob) endpoint which returns the `jobId`.
* **ARCHIVE**. Job runs when you either manually change a DRAFT Revision to PUBLISHED using the [Update LookupTableRevision Status](https://www.m3ter.com/docs/api#tag/LookupTableRevision/operation/UpdateLookupTableRevisionStatus) endpoint or you publish a DRAFT Revision and the existing PUBLISHED Revision is archived.
**NOTE:** This endpoint returns the id of each Data job. You then use:
* The [Get LookupTableRevisionData Job Response](https://www.m3ter.com/docs/api#tag/LookupTableRevisionData/operation/GetLookupTableRevisionDataJobResponse) endpoint to retrieve a specific Data job Response.
* The [Delete LookupTableRevisionData Job Response](https://www.m3ter.com/docs/api#tag/LookupTableRevisionData/operation/DeleteLookupTableRevisionDataJobResponse) to delete a specific Data job Response.
### Parameters
| Name | Label | Type | Required | Description | Constraints |
| - | - | - | :-: | - | - |
| `integrationCredentialsId` | Credentials | M3terEntityParameter | Yes | The m3ter credentials to use. | authType: M3TER\_SIGNED\_REQUEST, m3terEntity: IntegrationCredentials |
| `lookupTableId` | lookupTableId | LookupParameter | Yes | UUID of the Lookup Table. | - |
| `lookupTableRevisionId` | lookupTableRevisionId | LookupParameter | Yes | UUID of the Lookup Table Revision. | - |
| `statePath` | State Path | StateVariableParameter | No | State variable to store the response. | - |
### Exits
| Exit | Description |
| - | - |
| `NEXT` | The API call succeeded. |
| `ERROR` | The API call failed. Error details are stored in the `m3shError` state variable. |
## Retrieve LookupTableRevision
**Function name:** `m3ter_GetLookupTableRevision`
**Category:** READ
**HTTP method:** GET
**Destination:** m3ter
Retrieve a Lookup Table Revision for the given UUID.
### Parameters
| Name | Label | Type | Required | Description | Constraints |
| - | - | - | :-: | - | - |
| `integrationCredentialsId` | Credentials | M3terEntityParameter | Yes | The m3ter credentials to use. | authType: M3TER\_SIGNED\_REQUEST, m3terEntity: IntegrationCredentials |
| `id` | id | LookupParameter | Yes | The UUID of the Lookup Table Revision to retrieve. | - |
| `lookupTableId` | lookupTableId | LookupParameter | Yes | The UUID of the Lookup Table the Revision belongs to. | - |
| `statePath` | State Path | StateVariableParameter | No | State variable to store the response. | - |
### Exits
| Exit | Description |
| - | - |
| `NEXT` | The API call succeeded. |
| `ERROR` | The API call failed. Error details are stored in the `m3shError` state variable. |
## Update LookupTableRevision
**Function name:** `m3ter_UpdateLookupTableRevision`
**Category:** WRITE
**HTTP method:** PUT
**Destination:** m3ter
Update a Lookup Table Revision for the given UUID.
**NOTE:** If you've already added data to a Lookup Table Revision - see the following [Lookup Table Revision Data](https://www.m3ter.com/docs/api#tag/LookupTableRevisionData) section - then you won't be able to change the Revision's field schema and you'll receive an error if you try do this. Create a new Revision instead, or delete the data items first.
### Parameters
| Name | Label | Type | Required | Description | Constraints |
| - | - | - | :-: | - | - |
| `integrationCredentialsId` | Credentials | M3terEntityParameter | Yes | The m3ter credentials to use. | authType: M3TER\_SIGNED\_REQUEST, m3terEntity: IntegrationCredentials |
| `id` | id | LookupParameter | Yes | The UUID of the Lookup Table Revision to update. | - |
| `lookupTableId` | lookupTableId | LookupParameter | Yes | The UUID of the Lookup Table the Revision belongs to. | - |
| `requestPath` | Request Path | StateVariableParameter | Yes | State variable containing the request. | - |
| `statePath` | State Path | StateVariableParameter | No | State variable to store the response. | - |
### Exits
| Exit | Description |
| - | - |
| `NEXT` | The API call succeeded. |
| `ERROR` | The API call failed. Error details are stored in the `m3shError` state variable. |
## Delete LookupTableRevision
**Function name:** `m3ter_DeleteLookupTableRevision`
**Category:** WRITE
**HTTP method:** DELETE
**Destination:** m3ter
Delete the Lookup Table Revision for the given UUID.
### Parameters
| Name | Label | Type | Required | Description | Constraints |
| - | - | - | :-: | - | - |
| `integrationCredentialsId` | Credentials | M3terEntityParameter | Yes | The m3ter credentials to use. | authType: M3TER\_SIGNED\_REQUEST, m3terEntity: IntegrationCredentials |
| `id` | id | LookupParameter | Yes | The UUID of the Lookup Table Revision to update. | - |
| `lookupTableId` | lookupTableId | LookupParameter | Yes | The UUID of the Lookup Table the Revision belongs to. | - |
| `statePath` | State Path | StateVariableParameter | No | State variable to store the response. | - |
### Exits
| Exit | Description |
| - | - |
| `NEXT` | The API call succeeded. |
| `ERROR` | The API call failed. Error details are stored in the `m3shError` state variable. |
## Trigger Download LookupTableRevisionData URL Job
**Function name:** `m3ter_TriggerLookupTableRevisionDataDownloadJob`
**Category:** WRITE
**HTTP method:** POST
**Destination:** m3ter
Trigger an URL job to download the Lookup Table Revision Data. The URL download Data `jobId` is returned and you can then use the [List LookupTableRevisionData Jobs](https://www.m3ter.com/docs/api#tag/LookupTableRevisionData/operation/ListLookupTableRevisionDataJobs) endpoint or the [Get LookupTableRevisionData Job Response](https://www.m3ter.com/docs/api#tag/LookupTableRevisionData/operation/GetLookupTableRevisionDataJobResponse) endpoint to retrieve the URL and perform the Revision data Download.
### Parameters
| Name | Label | Type | Required | Description | Constraints |
| - | - | - | :-: | - | - |
| `integrationCredentialsId` | Credentials | M3terEntityParameter | Yes | The m3ter credentials to use. | authType: M3TER\_SIGNED\_REQUEST, m3terEntity: IntegrationCredentials |
| `lookupTableId` | lookupTableId | LookupParameter | Yes | UUID of the Lookup Table. | - |
| `lookupTableRevisionId` | lookupTableRevisionId | LookupParameter | Yes | UUID of the Lookup Table Revision. | - |
| `requestPath` | Request Path | StateVariableParameter | Yes | State variable containing the request. | - |
| `statePath` | State Path | StateVariableParameter | No | State variable to store the response. | - |
### Exits
| Exit | Description |
| - | - |
| `NEXT` | The API call succeeded. |
| `ERROR` | The API call failed. Error details are stored in the `m3shError` state variable. |
## Get LookupTableRevisionData entry
**Function name:** `m3ter_GetLookupTableRevisionDataEntry`
**Category:** READ
**HTTP method:** GET
**Destination:** m3ter
Retrieve a Lookup Table Revision Data item for the given lookup key.
**NOTES:**
* To obtain the lookup key for a Revision's data items, use the [Get LookupTableRevisionData](https://www.m3ter.com/docs/api#tag/LookupTableRevisionData/operation/GetLookupTableRevisionData) endpoint in this section and use the `additional=lookupKey` query parameter.
* If the Revision's Data schema uses multiple key fields, enter these as a comma-separated list for the `lookupKey` path parameter: .../key1,key2,key3 and so on. Importantly, multiple keys must be *entered in the same order* as they are configured in the Revision's Data schema.
### Parameters
| Name | Label | Type | Required | Description | Constraints |
| - | - | - | :-: | - | - |
| `integrationCredentialsId` | Credentials | M3terEntityParameter | Yes | The m3ter credentials to use. | authType: M3TER\_SIGNED\_REQUEST, m3terEntity: IntegrationCredentials |
| `lookupTableId` | lookupTableId | LookupParameter | Yes | UUID of the Lookup Table. | - |
| `lookupTableRevisionId` | lookupTableRevisionId | LookupParameter | Yes | UUID of the Lookup Table Revision. | - |
| `lookupKey` | lookupKey | LookupParameter | Yes | The specific lookup key for the Data item to retrieve. | - |
| `statePath` | State Path | StateVariableParameter | No | State variable to store the response. | - |
### Exits
| Exit | Description |
| - | - |
| `NEXT` | The API call succeeded. |
| `ERROR` | The API call failed. Error details are stored in the `m3shError` state variable. |
## Upsert LookupTableRevisionData entry
**Function name:** `m3ter_PutLookupTableRevisionDataEntry`
**Category:** WRITE
**HTTP method:** PUT
**Destination:** m3ter
Create/update a Lookup Table Revision Data item by lookup key.
**NOTES:**
* To obtain the lookup key for a Revision's data items, use the [Get LookupTableRevisionData](https://www.m3ter.com/docs/api#tag/LookupTableRevisionData/operation/GetLookupTableRevisionData) endpoint in this section and use the `additional=lookupKey` query parameter.
* If the Revision's Data schema uses multiple key fields, enter these as a comma-separated list for the `lookupKey` path parameter: .../key1,key2,key3 and so on. Importantly, multiple keys must be *entered in the same order* as they are configured in the Revision's Data schema.
### Parameters
| Name | Label | Type | Required | Description | Constraints |
| - | - | - | :-: | - | - |
| `integrationCredentialsId` | Credentials | M3terEntityParameter | Yes | The m3ter credentials to use. | authType: M3TER\_SIGNED\_REQUEST, m3terEntity: IntegrationCredentials |
| `lookupTableId` | lookupTableId | LookupParameter | Yes | UUID of the Lookup Table. | - |
| `lookupTableRevisionId` | lookupTableRevisionId | LookupParameter | Yes | UUID of the Lookup Table Revision. | - |
| `lookupKey` | lookupKey | LookupParameter | Yes | The specific lookup key for the Data item to upsert. | - |
| `requestPath` | Request Path | StateVariableParameter | Yes | State variable containing the request. | - |
| `statePath` | State Path | StateVariableParameter | No | State variable to store the response. | - |
| `queryParams` | Query Parameters | KeyValueLookupParameter | No | Query parameters to include in the request | allowedValues: additional |
### Exits
| Exit | Description |
| - | - |
| `NEXT` | The API call succeeded. |
| `ERROR` | The API call failed. Error details are stored in the `m3shError` state variable. |
## Delete LookupTableRevisionData entry
**Function name:** `m3ter_DeleteLookupTableRevisionDataEntry`
**Category:** WRITE
**HTTP method:** DELETE
**Destination:** m3ter
Delete a Lookup Table Revision Data entry by lookup key.
**NOTES:**
* To obtain the lookup key for a Revision's data items, use the [Get LookupTableRevisionData](https://www.m3ter.com/docs/api#tag/LookupTableRevisionData/operation/GetLookupTableRevisionData) endpoint in this section and use the `additional=lookupKey` query parameter.
* If the Revision's Data schema uses multiple key fields, enter these as a comma-separated list for the `lookupKey` path parameter: .../key1,key2,key3 and so on. Importantly, multiple keys must be *entered in the same order* as they are configured in the Revision's Data schema.
### Parameters
| Name | Label | Type | Required | Description | Constraints |
| - | - | - | :-: | - | - |
| `integrationCredentialsId` | Credentials | M3terEntityParameter | Yes | The m3ter credentials to use. | authType: M3TER\_SIGNED\_REQUEST, m3terEntity: IntegrationCredentials |
| `lookupTableId` | lookupTableId | LookupParameter | Yes | UUID of the Lookup Table. | - |
| `lookupTableRevisionId` | lookupTableRevisionId | LookupParameter | Yes | UUID of the Lookup Table Revision. | - |
| `lookupKey` | lookupKey | LookupParameter | Yes | The specific lookup key for the Data item to delete. | - |
| `requestPath` | Request Path | StateVariableParameter | Yes | State variable containing the request. | - |
| `statePath` | State Path | StateVariableParameter | No | State variable to store the response. | - |
### Exits
| Exit | Description |
| - | - |
| `NEXT` | The API call succeeded. |
| `ERROR` | The API call failed. Error details are stored in the `m3shError` state variable. |
## Get LookupTable
**Function name:** `m3ter_GetLookupTable`
**Category:** READ
**HTTP method:** GET
**Destination:** m3ter
Retrieve a Lookup Table by UUID.
### Parameters
| Name | Label | Type | Required | Description | Constraints |
| - | - | - | :-: | - | - |
| `integrationCredentialsId` | Credentials | M3terEntityParameter | Yes | The m3ter credentials to use. | authType: M3TER\_SIGNED\_REQUEST, m3terEntity: IntegrationCredentials |
| `id` | id | LookupParameter | Yes | The UUID of the Lookup Table to retrieve. | - |
| `statePath` | State Path | StateVariableParameter | No | State variable to store the response. | - |
| `queryParams` | Query Parameters | KeyValueLookupParameter | No | Query parameters to include in the request | allowedValues: additional |
### Exits
| Exit | Description |
| - | - |
| `NEXT` | The API call succeeded. |
| `ERROR` | The API call failed. Error details are stored in the `m3shError` state variable. |
## Update LookupTable
**Function name:** `m3ter_PutLookupTable`
**Category:** WRITE
**HTTP method:** PUT
**Destination:** m3ter
Update the Lookup Table with the given UUID.
### Parameters
| Name | Label | Type | Required | Description | Constraints |
| - | - | - | :-: | - | - |
| `integrationCredentialsId` | Credentials | M3terEntityParameter | Yes | The m3ter credentials to use. | authType: M3TER\_SIGNED\_REQUEST, m3terEntity: IntegrationCredentials |
| `id` | id | LookupParameter | Yes | The UUID of the Lookup Table to update. | - |
| `requestPath` | Request Path | StateVariableParameter | Yes | State variable containing the request. | - |
| `statePath` | State Path | StateVariableParameter | No | State variable to store the response. | - |
### Exits
| Exit | Description |
| - | - |
| `NEXT` | The API call succeeded. |
| `ERROR` | The API call failed. Error details are stored in the `m3shError` state variable. |
## Delete LookupTable
**Function name:** `m3ter_DeleteLookupTable`
**Category:** WRITE
**HTTP method:** DELETE
**Destination:** m3ter
Delete the Lookup Table with the given UUID.
### Parameters
| Name | Label | Type | Required | Description | Constraints |
| - | - | - | :-: | - | - |
| `integrationCredentialsId` | Credentials | M3terEntityParameter | Yes | The m3ter credentials to use. | authType: M3TER\_SIGNED\_REQUEST, m3terEntity: IntegrationCredentials |
| `id` | id | LookupParameter | Yes | The UUID of the Lookup Table to delete. | - |
| `statePath` | State Path | StateVariableParameter | No | State variable to store the response. | - |
### Exits
| Exit | Description |
| - | - |
| `NEXT` | The API call succeeded. |
| `ERROR` | The API call failed. Error details are stored in the `m3shError` state variable. |
## Get LookupTableRevisionData Job Response.
**Function name:** `m3ter_GetLookupTableRevisionDataJobResponse`
**Category:** READ
**HTTP method:** GET
**Destination:** m3ter
Get the Lookup Table Revision Data job Response for given job id.
**NOTE:** Use the [List LookupTableRevisionData Jobs](https://www.m3ter.com/docs/api#tag/LookupTableRevisionData/operation/ListLookupTableRevisionDataJobs) endpoint to list the Data job Responses for a specific Revision.
### Parameters
| Name | Label | Type | Required | Description | Constraints |
| - | - | - | :-: | - | - |
| `integrationCredentialsId` | Credentials | M3terEntityParameter | Yes | The m3ter credentials to use. | authType: M3TER\_SIGNED\_REQUEST, m3terEntity: IntegrationCredentials |
| `lookupTableId` | lookupTableId | LookupParameter | Yes | UUID of the Lookup Table. | - |
| `lookupTableRevisionId` | lookupTableRevisionId | LookupParameter | Yes | UUID of the Lookup Table Revision. | - |
| `id` | id | LookupParameter | Yes | UUID of the Lookup Table Revision Data job. | - |
| `statePath` | State Path | StateVariableParameter | No | State variable to store the response. | - |
### Exits
| Exit | Description |
| - | - |
| `NEXT` | The API call succeeded. |
| `ERROR` | The API call failed. Error details are stored in the `m3shError` state variable. |
## Delete LookupTableRevisionData Job Response
**Function name:** `m3ter_DeleteLookupTableRevisionDataJobResponse`
**Category:** WRITE
**HTTP method:** DELETE
**Destination:** m3ter
Delete the LookupTableRevisionData Job Response for given job id.
**NOTE:** Use the [List LookupTableRevisionData Jobs](https://www.m3ter.com/docs/api#tag/LookupTableRevisionData/operation/ListLookupTableRevisionDataJobs) endpoint to list the Data job Responses for a specific Revision.
### Parameters
| Name | Label | Type | Required | Description | Constraints |
| - | - | - | :-: | - | - |
| `integrationCredentialsId` | Credentials | M3terEntityParameter | Yes | The m3ter credentials to use. | authType: M3TER\_SIGNED\_REQUEST, m3terEntity: IntegrationCredentials |
| `lookupTableId` | lookupTableId | LookupParameter | Yes | UUID of the Lookup Table. | - |
| `lookupTableRevisionId` | lookupTableRevisionId | LookupParameter | Yes | UUID of the Lookup Table Revision. | - |
| `id` | id | LookupParameter | Yes | UUID of the Lookup Table Revision Data job. | - |
| `statePath` | State Path | StateVariableParameter | No | State variable to store the response. | - |
### Exits
| Exit | Description |
| - | - |
| `NEXT` | The API call succeeded. |
| `ERROR` | The API call failed. Error details are stored in the `m3shError` state variable. |
## Get LookupTableRevisionArchivedData URL
**Function name:** `m3ter_GetLookupTableRevisionArchivedDataUrl`
**Category:** WRITE
**HTTP method:** POST
**Destination:** m3ter
Get a URL which you can use to download the data for the specified archived Lookup Table Revision:
* The `contentType` request parameter is required.
* The returned URL is presigned - you can copy it into a browser and the data file is downloaded locally.
* The upload URL is time limited - the `expiry` time is given in the response and the URL is valid for ***one hour***.
### Parameters
| Name | Label | Type | Required | Description | Constraints |
| - | - | - | :-: | - | - |
| `integrationCredentialsId` | Credentials | M3terEntityParameter | Yes | The m3ter credentials to use. | authType: M3TER\_SIGNED\_REQUEST, m3terEntity: IntegrationCredentials |
| `lookupTableId` | lookupTableId | LookupParameter | Yes | UUID of the LookupTable | - |
| `lookupTableRevisionId` | lookupTableRevisionId | LookupParameter | Yes | UUID of the LookupTableRevision | - |
| `requestPath` | Request Path | StateVariableParameter | Yes | State variable containing the request. | - |
| `statePath` | State Path | StateVariableParameter | No | State variable to store the response. | - |
### Exits
| Exit | Description |
| - | - |
| `NEXT` | The API call succeeded. |
| `ERROR` | The API call failed. Error details are stored in the `m3shError` state variable. |
## Copy LookupTableRevisionData
**Function name:** `m3ter_CopyLookupTableRevisionData`
**Category:** WRITE
**HTTP method:** POST
**Destination:** m3ter
Copy the Lookup Table Revision Data from a source Revision to an optional target Revision:
* If you omit a target `revisionId`, then the source Revision and its Data is duplicated. The new Revision is given the source Revision's name appended with "Copy" but is assigned a new unique id.
* If you specify a target `revisionId` to copy the source Revision and its Data to, you must ensure that the target Revision has a Data schema that matches the source Revision's Data schema otherwise you'll receive an error
### Parameters
| Name | Label | Type | Required | Description | Constraints |
| - | - | - | :-: | - | - |
| `integrationCredentialsId` | Credentials | M3terEntityParameter | Yes | The m3ter credentials to use. | authType: M3TER\_SIGNED\_REQUEST, m3terEntity: IntegrationCredentials |
| `lookupTableId` | lookupTableId | LookupParameter | Yes | UUID of the Lookup Table. | - |
| `lookupTableRevisionId` | lookupTableRevisionId | LookupParameter | Yes | UUID of the source Lookup Table Revision to copy from. | - |
| `requestPath` | Request Path | StateVariableParameter | Yes | State variable containing the request. | - |
| `statePath` | State Path | StateVariableParameter | No | State variable to store the response. | - |
### Exits
| Exit | Description |
| - | - |
| `NEXT` | The API call succeeded. |
| `ERROR` | The API call failed. Error details are stored in the `m3shError` state variable. |
## Generate LookupTableRevisionData Upload URL
**Function name:** `m3ter_GenerateLookupTableDataUploadUrl`
**Category:** WRITE
**HTTP method:** POST
**Destination:** m3ter
Generate a URL which can be used to upload a data file for creating or updating the Lookup Table Revision's data:
* An upload URL is returned together with an UPLOAD `jobId`.
* You can then upload your data file using a PUT request using the returned upload URL as the endpoint. For the PUT request, map the headers returned and their values and in the request body select the specified CSV or JSONL file containing the Revision Data to upload.
* You can use the returned UPLOAD `jobId` with the [List LookupTableRevisionData Jobs](https://www.m3ter.com/docs/api#tag/LookupTableRevisionData/operation/ListLookupTableRevisionDataJobs) or the [Get LookupTableRevisionData Job Response](https://www.m3ter.com/docs/api#tag/LookupTableRevisionData/operation/GetLookupTableRevisionDataJobResponse) endpoints for any follow-up or troubleshooting.
**Important:**
* The `contentLength` request parameter is required.
* The upload URL is time limited - it is valid for ***one minute***.
### Parameters
| Name | Label | Type | Required | Description | Constraints |
| - | - | - | :-: | - | - |
| `integrationCredentialsId` | Credentials | M3terEntityParameter | Yes | The m3ter credentials to use. | authType: M3TER\_SIGNED\_REQUEST, m3terEntity: IntegrationCredentials |
| `lookupTableId` | lookupTableId | LookupParameter | Yes | UUID of the Lookup Table. | - |
| `lookupTableRevisionId` | lookupTableRevisionId | LookupParameter | Yes | UUID of the Lookup Table Revision. | - |
| `requestPath` | Request Path | StateVariableParameter | Yes | State variable containing the request. | - |
| `statePath` | State Path | StateVariableParameter | No | State variable to store the response. | - |
### Exits
| Exit | Description |
| - | - |
| `NEXT` | The API call succeeded. |
| `ERROR` | The API call failed. Error details are stored in the `m3shError` state variable. |
## List LookupTable
**Function name:** `m3ter_ListLookupTable`
**Category:** READ
**HTTP method:** GET (paginated)
**Destination:** m3ter
Retrieve a list Lookup Tables created for the Organization:
* Returned list can be filtered by Lookup Table `code` query parameter.
* If you want to include any non-default fields for the returned Lookup Tables, use the additional query parameter to specify which you want to include in the response.
### Parameters
| Name | Label | Type | Required | Description | Constraints |
| - | - | - | :-: | - | - |
| `integrationCredentialsId` | Credentials | M3terEntityParameter | Yes | The m3ter credentials to use. | authType: M3TER\_SIGNED\_REQUEST, m3terEntity: IntegrationCredentials |
| `statePath` | State Path | StateVariableParameter | No | State variable to store the response. | - |
| `queryParams` | Query Parameters | KeyValueLookupParameter | No | Query parameters to include in the request | allowedValues: codes,additional |
### Exits
| Exit | Description |
| - | - |
| `NEXT` | The API call succeeded. |
| `ERROR` | The API call failed. Error details are stored in the `m3shError` state variable. |
## Create LookupTable
**Function name:** `m3ter_PostLookupTable`
**Category:** WRITE
**HTTP method:** POST
**Destination:** m3ter
Create a new Lookup Table.
### Parameters
| Name | Label | Type | Required | Description | Constraints |
| - | - | - | :-: | - | - |
| `integrationCredentialsId` | Credentials | M3terEntityParameter | Yes | The m3ter credentials to use. | authType: M3TER\_SIGNED\_REQUEST, m3terEntity: IntegrationCredentials |
| `requestPath` | Request Path | StateVariableParameter | Yes | State variable containing the request. | - |
| `statePath` | State Path | StateVariableParameter | No | State variable to store the response. | - |
### Exits
| Exit | Description |
| - | - |
| `NEXT` | The API call succeeded. |
| `ERROR` | The API call failed. Error details are stored in the `m3shError` state variable. |
## List LookupTableRevision
**Function name:** `m3ter_ListLookupTableRevision`
**Category:** READ
**HTTP method:** GET (paginated)
**Destination:** m3ter
List LookupTableRevision entities
### Parameters
| Name | Label | Type | Required | Description | Constraints |
| - | - | - | :-: | - | - |
| `integrationCredentialsId` | Credentials | M3terEntityParameter | Yes | The m3ter credentials to use. | authType: M3TER\_SIGNED\_REQUEST, m3terEntity: IntegrationCredentials |
| `lookupTableId` | lookupTableId | LookupParameter | Yes | The lookup table Id | - |
| `statePath` | State Path | StateVariableParameter | No | State variable to store the response. | - |
| `queryParams` | Query Parameters | KeyValueLookupParameter | No | Query parameters to include in the request | allowedValues: ids |
### Exits
| Exit | Description |
| - | - |
| `NEXT` | The API call succeeded. |
| `ERROR` | The API call failed. Error details are stored in the `m3shError` state variable. |
## Create LookupTableRevision
**Function name:** `m3ter_CreateLookupTableRevision`
**Category:** WRITE
**HTTP method:** POST
**Destination:** m3ter
Create a new Revision for a Lookup Table.
Fields and Keys for Revision schema: Use the `fields` parameter to define a Revision schema containing up to 10 number or string fields. Use the `keys` parameter to specify which are the key fields:
* At least one field must be a non-key field and at least one a key field.
* Up to 5 key fields can be defined.
* Using multiple key fields: ensure that the order in which they are defined matches the order in which you want to use them in any Lookup functions that reference the Revision's Lookup Table, because this is the order in which they will be passed into the function. The order of non-key fields is not constrained in this way.
Revision status: when you first create a Lookup Table Revision it has DRAFT status. Use the [Update LookupTableRevision Status](https://docs.m3ter.com/api/lookuptablerevision/update-lookuptablerevision-status) call to change a Revision's status.
### Parameters
| Name | Label | Type | Required | Description | Constraints |
| - | - | - | :-: | - | - |
| `integrationCredentialsId` | Credentials | M3terEntityParameter | Yes | The m3ter credentials to use. | authType: M3TER\_SIGNED\_REQUEST, m3terEntity: IntegrationCredentials |
| `lookupTableId` | lookupTableId | LookupParameter | Yes | UUID of the Lookup Table the Revision will be created for. | - |
| `requestPath` | Request Path | StateVariableParameter | Yes | State variable containing the request. | - |
| `statePath` | State Path | StateVariableParameter | No | State variable to store the response. | - |
### Exits
| Exit | Description |
| - | - |
| `NEXT` | The API call succeeded. |
| `ERROR` | The API call failed. Error details are stored in the `m3shError` state variable. |
## Get LookupTableRevisionData
**Function name:** `m3ter_GetLookupTableRevisionData`
**Category:** READ
**HTTP method:** GET
**Destination:** m3ter
List Lookup Table Revision Data items for the given UUID.
### Parameters
| Name | Label | Type | Required | Description | Constraints |
| - | - | - | :-: | - | - |
| `integrationCredentialsId` | Credentials | M3terEntityParameter | Yes | The m3ter credentials to use. | authType: M3TER\_SIGNED\_REQUEST, m3terEntity: IntegrationCredentials |
| `lookupTableId` | lookupTableId | LookupParameter | Yes | UUID of the Lookup Table. | - |
| `lookupTableRevisionId` | lookupTableRevisionId | LookupParameter | Yes | UUID of the Lookup Table Revision. | - |
| `statePath` | State Path | StateVariableParameter | No | State variable to store the response. | - |
| `queryParams` | Query Parameters | KeyValueLookupParameter | No | Query parameters to include in the request | allowedValues: limit,additional |
### Exits
| Exit | Description |
| - | - |
| `NEXT` | The API call succeeded. |
| `ERROR` | The API call failed. Error details are stored in the `m3shError` state variable. |
## Upsert LookupTableRevisionData
**Function name:** `m3ter_PutLookupTableRevisionData`
**Category:** WRITE
**HTTP method:** PUT
**Destination:** m3ter
Create/update the Lookup Table Revision Data for the given UUID.
### Parameters
| Name | Label | Type | Required | Description | Constraints |
| - | - | - | :-: | - | - |
| `integrationCredentialsId` | Credentials | M3terEntityParameter | Yes | The m3ter credentials to use. | authType: M3TER\_SIGNED\_REQUEST, m3terEntity: IntegrationCredentials |
| `lookupTableId` | lookupTableId | LookupParameter | Yes | UUID of the Lookup Table. | - |
| `lookupTableRevisionId` | lookupTableRevisionId | LookupParameter | Yes | UUID of the Lookup Table Revision. | - |
| `requestPath` | Request Path | StateVariableParameter | Yes | State variable containing the request. | - |
| `statePath` | State Path | StateVariableParameter | No | State variable to store the response. | - |
| `queryParams` | Query Parameters | KeyValueLookupParameter | No | Query parameters to include in the request | allowedValues: additional |
### Exits
| Exit | Description |
| - | - |
| `NEXT` | The API call succeeded. |
| `ERROR` | The API call failed. Error details are stored in the `m3shError` state variable. |
## Delete LookupTableRevisionData
**Function name:** `m3ter_DeleteLookupTableRevisionData`
**Category:** WRITE
**HTTP method:** DELETE
**Destination:** m3ter
Delete the Lookup Table Revision Data for the given UUID.
### Parameters
| Name | Label | Type | Required | Description | Constraints |
| - | - | - | :-: | - | - |
| `integrationCredentialsId` | Credentials | M3terEntityParameter | Yes | The m3ter credentials to use. | authType: M3TER\_SIGNED\_REQUEST, m3terEntity: IntegrationCredentials |
| `lookupTableId` | lookupTableId | LookupParameter | Yes | UUID of the Lookup Table. | - |
| `lookupTableRevisionId` | lookupTableRevisionId | LookupParameter | Yes | UUID of the Lookup Table Revision. | - |
| `statePath` | State Path | StateVariableParameter | No | State variable to store the response. | - |
### Exits
| Exit | Description |
| - | - |
| `NEXT` | The API call succeeded. |
| `ERROR` | The API call failed. Error details are stored in the `m3shError` state variable. |
## Update LookupTableRevision Status
**Function name:** `m3ter_UpdateLookupTableRevisionStatus`
**Category:** WRITE
**HTTP method:** PUT
**Destination:** m3ter
Update the status of a Lookup Table Revision for the given UUID.
### Parameters
| Name | Label | Type | Required | Description | Constraints |
| - | - | - | :-: | - | - |
| `integrationCredentialsId` | Credentials | M3terEntityParameter | Yes | The m3ter credentials to use. | authType: M3TER\_SIGNED\_REQUEST, m3terEntity: IntegrationCredentials |
| `id` | id | LookupParameter | Yes | The UUID of the Lookup Table Revision to update the status for. | - |
| `lookupTableId` | lookupTableId | LookupParameter | Yes | UUID of the Lookup Table the Revision belongs to. | - |
| `requestPath` | Request Path | StateVariableParameter | Yes | State variable containing the request. | - |
| `statePath` | State Path | StateVariableParameter | No | State variable to store the response. | - |
### Exits
| Exit | Description |
| - | - |
| `NEXT` | The API call succeeded. |
| `ERROR` | The API call failed. Error details are stored in the `m3shError` state variable. |
# Measurements
Source: https://docs.m3ter.com/m3sh-function-reference/m3ter/measurements
## Get Failed Ingest File Download URL
**Function name:** `m3ter_GetValidationErrorDownloadUrl`
**Category:** READ
**HTTP method:** GET
**Destination:** m3ter
Returns a presigned download URL for failed ingest file download based on the file path provided.
If a usage data ingest measurement you submit to the m3ter platform fails, an `ingest.validation.failure` Event is generated. Use this call to obtain a download URL which you can then use to download a file containing details of what went wrong with the attempted usage data measurement ingest, and allowing you to follow-up and resolve the issue.
To obtain the `file` query parameter:
* Use the [List Events](https://www.m3ter.com/docs/api#tag/Events/operation/ListEventFields) call with the `ingest.validation.failure` for the `eventName` query parameter.
* The response contains a `getDownloadUrl` response parameter and this contains the file path you can use to obtain the failed ingest file download URL.
**Notes:**
* The presigned Url returned to use for failed ingest file download is time-bound and expires after 5 minutes.
* If you make a List Events call for `ingest.validation.failure` Events in your Organization, then you can perform this **GET** call using the full URL returned for any ingest failure Event to obtain a failed ingest file download URL for the Event.
### Parameters
| Name | Label | Type | Required | Description | Constraints |
| - | - | - | :-: | - | - |
| `integrationCredentialsId` | Credentials | M3terEntityParameter | Yes | The m3ter credentials to use. | authType: M3TER\_SIGNED\_REQUEST, m3terEntity: IntegrationCredentials |
| `statePath` | State Path | StateVariableParameter | No | State variable to store the response. | - |
| `queryParams` | Query Parameters | KeyValueLookupParameter | No | Query parameters to include in the request | allowedValues: file |
### Exits
| Exit | Description |
| - | - |
| `NEXT` | The API call succeeded. |
| `ERROR` | The API call failed. Error details are stored in the `m3shError` state variable. |
# Metergroups
Source: https://docs.m3ter.com/m3sh-function-reference/m3ter/metergroups
## List MeterGroups
**Function name:** `m3ter_ListMeterGroups`
**Category:** READ
**HTTP method:** GET (paginated)
**Destination:** m3ter
Retrieve a list of MeterGroup entities
### Parameters
| Name | Label | Type | Required | Description | Constraints |
| - | - | - | :-: | - | - |
| `integrationCredentialsId` | Credentials | M3terEntityParameter | Yes | The m3ter credentials to use. | authType: M3TER\_SIGNED\_REQUEST, m3terEntity: IntegrationCredentials |
| `statePath` | State Path | StateVariableParameter | No | State variable to store the response. | - |
| `queryParams` | Query Parameters | KeyValueLookupParameter | No | Query parameters to include in the request | allowedValues: ids |
### Exits
| Exit | Description |
| - | - |
| `NEXT` | The API call succeeded. |
| `ERROR` | The API call failed. Error details are stored in the `m3shError` state variable. |
## Create MeterGroup
**Function name:** `m3ter_PostMeterGroup`
**Category:** WRITE
**HTTP method:** POST
**Destination:** m3ter
Create a new MeterGroup.
### Parameters
| Name | Label | Type | Required | Description | Constraints |
| - | - | - | :-: | - | - |
| `integrationCredentialsId` | Credentials | M3terEntityParameter | Yes | The m3ter credentials to use. | authType: M3TER\_SIGNED\_REQUEST, m3terEntity: IntegrationCredentials |
| `requestPath` | Request Path | StateVariableParameter | Yes | State variable containing the request. | - |
| `statePath` | State Path | StateVariableParameter | No | State variable to store the response. | - |
### Exits
| Exit | Description |
| - | - |
| `NEXT` | The API call succeeded. |
| `ERROR` | The API call failed. Error details are stored in the `m3shError` state variable. |
## Retrieve MeterGroup
**Function name:** `m3ter_GetMeterGroup`
**Category:** READ
**HTTP method:** GET
**Destination:** m3ter
Retrieve a MeterGroup for the given UUID.
### Parameters
| Name | Label | Type | Required | Description | Constraints |
| - | - | - | :-: | - | - |
| `integrationCredentialsId` | Credentials | M3terEntityParameter | Yes | The m3ter credentials to use. | authType: M3TER\_SIGNED\_REQUEST, m3terEntity: IntegrationCredentials |
| `id` | id | LookupParameter | Yes | The UUID of the MeterGroup to retrieve. | - |
| `statePath` | State Path | StateVariableParameter | No | State variable to store the response. | - |
### Exits
| Exit | Description |
| - | - |
| `NEXT` | The API call succeeded. |
| `ERROR` | The API call failed. Error details are stored in the `m3shError` state variable. |
## Update MeterGroup
**Function name:** `m3ter_PutMeterGroup`
**Category:** WRITE
**HTTP method:** PUT
**Destination:** m3ter
Update MeterGroup for the given UUID.
### Parameters
| Name | Label | Type | Required | Description | Constraints |
| - | - | - | :-: | - | - |
| `integrationCredentialsId` | Credentials | M3terEntityParameter | Yes | The m3ter credentials to use. | authType: M3TER\_SIGNED\_REQUEST, m3terEntity: IntegrationCredentials |
| `id` | id | LookupParameter | Yes | The UUID of the MeterGroup to update. | - |
| `requestPath` | Request Path | StateVariableParameter | Yes | State variable containing the request. | - |
| `statePath` | State Path | StateVariableParameter | No | State variable to store the response. | - |
### Exits
| Exit | Description |
| - | - |
| `NEXT` | The API call succeeded. |
| `ERROR` | The API call failed. Error details are stored in the `m3shError` state variable. |
## Delete MeterGroup
**Function name:** `m3ter_DeleteMeterGroup`
**Category:** WRITE
**HTTP method:** DELETE
**Destination:** m3ter
Delete a MeterGroup for the given UUID.
### Parameters
| Name | Label | Type | Required | Description | Constraints |
| - | - | - | :-: | - | - |
| `integrationCredentialsId` | Credentials | M3terEntityParameter | Yes | The m3ter credentials to use. | authType: M3TER\_SIGNED\_REQUEST, m3terEntity: IntegrationCredentials |
| `id` | id | LookupParameter | Yes | The UUID of the MeterGroup to delete. | - |
| `statePath` | State Path | StateVariableParameter | No | State variable to store the response. | - |
### Exits
| Exit | Description |
| - | - |
| `NEXT` | The API call succeeded. |
| `ERROR` | The API call failed. Error details are stored in the `m3shError` state variable. |
# Meters
Source: https://docs.m3ter.com/m3sh-function-reference/m3ter/meters
## Retrieve Meter
**Function name:** `m3ter_GetMeter`
**Category:** READ
**HTTP method:** GET
**Destination:** m3ter
Retrieve the Meter with the given UUID.
### Parameters
| Name | Label | Type | Required | Description | Constraints |
| - | - | - | :-: | - | - |
| `integrationCredentialsId` | Credentials | M3terEntityParameter | Yes | The m3ter credentials to use. | authType: M3TER\_SIGNED\_REQUEST, m3terEntity: IntegrationCredentials |
| `id` | id | LookupParameter | Yes | The UUID of the Meter to retrieve. | - |
| `statePath` | State Path | StateVariableParameter | No | State variable to store the response. | - |
### Exits
| Exit | Description |
| - | - |
| `NEXT` | The API call succeeded. |
| `ERROR` | The API call failed. Error details are stored in the `m3shError` state variable. |
## Update Meter
**Function name:** `m3ter_PutMeter`
**Category:** WRITE
**HTTP method:** PUT
**Destination:** m3ter
Update the Meter with the given UUID.
**Note:** If you have created Custom Fields for a Meter, when you use this endpoint to update the Meter use the `customFields` parameter to preserve those Custom Fields. If you omit them from the update request, they will be lost.
### Parameters
| Name | Label | Type | Required | Description | Constraints |
| - | - | - | :-: | - | - |
| `integrationCredentialsId` | Credentials | M3terEntityParameter | Yes | The m3ter credentials to use. | authType: M3TER\_SIGNED\_REQUEST, m3terEntity: IntegrationCredentials |
| `id` | id | LookupParameter | Yes | The UUID of the Meter to update. | - |
| `requestPath` | Request Path | StateVariableParameter | Yes | State variable containing the request. | - |
| `statePath` | State Path | StateVariableParameter | No | State variable to store the response. | - |
### Exits
| Exit | Description |
| - | - |
| `NEXT` | The API call succeeded. |
| `ERROR` | The API call failed. Error details are stored in the `m3shError` state variable. |
## Delete Meter
**Function name:** `m3ter_DeleteMeter`
**Category:** WRITE
**HTTP method:** DELETE
**Destination:** m3ter
Delete the Meter with the given UUID.
### Parameters
| Name | Label | Type | Required | Description | Constraints |
| - | - | - | :-: | - | - |
| `integrationCredentialsId` | Credentials | M3terEntityParameter | Yes | The m3ter credentials to use. | authType: M3TER\_SIGNED\_REQUEST, m3terEntity: IntegrationCredentials |
| `id` | id | LookupParameter | Yes | The UUID of the Meter to delete. | - |
| `statePath` | State Path | StateVariableParameter | No | State variable to store the response. | - |
### Exits
| Exit | Description |
| - | - |
| `NEXT` | The API call succeeded. |
| `ERROR` | The API call failed. Error details are stored in the `m3shError` state variable. |
## List Meters
**Function name:** `m3ter_ListMeters`
**Category:** READ
**HTTP method:** GET (paginated)
**Destination:** m3ter
Retrieve a list of Meters that can be filtered by Product, Meter ID, or Meter short code.
### Parameters
| Name | Label | Type | Required | Description | Constraints |
| - | - | - | :-: | - | - |
| `integrationCredentialsId` | Credentials | M3terEntityParameter | Yes | The m3ter credentials to use. | authType: M3TER\_SIGNED\_REQUEST, m3terEntity: IntegrationCredentials |
| `statePath` | State Path | StateVariableParameter | No | State variable to store the response. | - |
| `queryParams` | Query Parameters | KeyValueLookupParameter | No | Query parameters to include in the request | allowedValues: productId,ids,codes |
### Exits
| Exit | Description |
| - | - |
| `NEXT` | The API call succeeded. |
| `ERROR` | The API call failed. Error details are stored in the `m3shError` state variable. |
## Create Meter
**Function name:** `m3ter_PostMeter`
**Category:** WRITE
**HTTP method:** POST
**Destination:** m3ter
Create a new Meter.
When you create a Meter, you can define two types of field for usage data collection and ingest into the platform:
* `dataFields` to collect raw usage data measures - numeric quantitative data values or non-numeric point data values.
* `derivedFields` to derive usage data measures that are the result of applying a calculation to `dataFields`, `customFields`, or system `Timestamp` fields.
You can also:
* Create `customFields` for a Meter, which allows you to attach custom data to the Meter as name/value pairs.
* Create Global Meters, which are not tied to a specific Product and allow you collect to usage data that will form the basis of usage-based pricing across more than one of your Products.
**IMPORTANT! - use of PII:** The use of any of your end-customers' Personally Identifiable Information (PII) in m3ter is restricted to a few fields on the **Account** entity. Please ensure that any fields you configure for Meters, such as Data Fields or Derived Fields, do not contain any end-customer PII data. See the [Introduction section](https://www.m3ter.com/docs/api#section/Introduction) above for more details.
See also:
* [Reviewing Meter Options](https://www.m3ter.com/docs/guides/setting-up-usage-data-meters-and-aggregations/reviewing-meter-options).
### Parameters
| Name | Label | Type | Required | Description | Constraints |
| - | - | - | :-: | - | - |
| `integrationCredentialsId` | Credentials | M3terEntityParameter | Yes | The m3ter credentials to use. | authType: M3TER\_SIGNED\_REQUEST, m3terEntity: IntegrationCredentials |
| `requestPath` | Request Path | StateVariableParameter | Yes | State variable containing the request. | - |
| `statePath` | State Path | StateVariableParameter | No | State variable to store the response. | - |
### Exits
| Exit | Description |
| - | - |
| `NEXT` | The API call succeeded. |
| `ERROR` | The API call failed. Error details are stored in the `m3shError` state variable. |
# Notifications
Source: https://docs.m3ter.com/m3sh-function-reference/m3ter/notifications
## Evaluate Calculation
**Function name:** `m3ter_EvaluateCalculation`
**Category:** WRITE
**HTTP method:** POST
**Destination:** m3ter
Evaluates a calculation against a specific Event or an Event type without triggering a Notification. This is useful for validating your calculation logic before adding it to a Notification.
You can use either the `eventId` or `eventName` to test your calculation against:
* `eventId` Tests the calculation for validity against a *specific Event* that has been generated for your Organization.
* `eventName` Tests the calculation for validity against the *Event type*.
Possible outcomes:
* If in either case the calculation is valid, then `"success" : true` is returned.
* If in either case the calculation is invalid, then `"success" : false` is returned, together with an `"error message"` giving the reason why the calculation is invaild for use against the specific Event or Event type.
**Note:** If you use both the `eventId` and the `eventName` as request body parameters in a single call, then the `eventName` takes precedence and the calculation is evaluated for validity against the *Event type*.
### Parameters
| Name | Label | Type | Required | Description | Constraints |
| - | - | - | :-: | - | - |
| `integrationCredentialsId` | Credentials | M3terEntityParameter | Yes | The m3ter credentials to use. | authType: M3TER\_SIGNED\_REQUEST, m3terEntity: IntegrationCredentials |
| `requestPath` | Request Path | StateVariableParameter | Yes | State variable containing the request. | - |
| `statePath` | State Path | StateVariableParameter | No | State variable to store the response. | - |
### Exits
| Exit | Description |
| - | - |
| `NEXT` | The API call succeeded. |
| `ERROR` | The API call failed. Error details are stored in the `m3shError` state variable. |
## Retrieve Notification
**Function name:** `m3ter_GetNotification`
**Category:** READ
**HTTP method:** GET
**Destination:** m3ter
Retrieve the details of a specific Notification using its UUID. Includes the Event the Notification is based on, and any calculation referencing the Event's field and which defines further conditions that must be met to trigger the Notification when the Event occurs.
### Parameters
| Name | Label | Type | Required | Description | Constraints |
| - | - | - | :-: | - | - |
| `integrationCredentialsId` | Credentials | M3terEntityParameter | Yes | The m3ter credentials to use. | authType: M3TER\_SIGNED\_REQUEST, m3terEntity: IntegrationCredentials |
| `id` | id | LookupParameter | Yes | The unique identifier (UUID) of the Notification to retrieve. | - |
| `statePath` | State Path | StateVariableParameter | No | State variable to store the response. | - |
### Exits
| Exit | Description |
| - | - |
| `NEXT` | The API call succeeded. |
| `ERROR` | The API call failed. Error details are stored in the `m3shError` state variable. |
## Update Notification
**Function name:** `m3ter_UpdateNotification`
**Category:** WRITE
**HTTP method:** PUT
**Destination:** m3ter
Update a Notification with the given UUID.
This endpoint modifies the configuration details of an existing Notification. You can change the Event that triggers the Notification and/or update the conditions for sending the Notification.
### Parameters
| Name | Label | Type | Required | Description | Constraints |
| - | - | - | :-: | - | - |
| `integrationCredentialsId` | Credentials | M3terEntityParameter | Yes | The m3ter credentials to use. | authType: M3TER\_SIGNED\_REQUEST, m3terEntity: IntegrationCredentials |
| `id` | id | LookupParameter | Yes | The unique identifier (UUID) of the Notification to update. | - |
| `requestPath` | Request Path | StateVariableParameter | Yes | State variable containing the request. | - |
| `statePath` | State Path | StateVariableParameter | No | State variable to store the response. | - |
### Exits
| Exit | Description |
| - | - |
| `NEXT` | The API call succeeded. |
| `ERROR` | The API call failed. Error details are stored in the `m3shError` state variable. |
## Delete Notification
**Function name:** `m3ter_DeleteNotification`
**Category:** WRITE
**HTTP method:** DELETE
**Destination:** m3ter
Delete the Notification with the given UUID.
This endpoint permanently removes a specified Notification and its configuration. This action cannot be undone.
### Parameters
| Name | Label | Type | Required | Description | Constraints |
| - | - | - | :-: | - | - |
| `integrationCredentialsId` | Credentials | M3terEntityParameter | Yes | The m3ter credentials to use. | authType: M3TER\_SIGNED\_REQUEST, m3terEntity: IntegrationCredentials |
| `id` | id | LookupParameter | Yes | The unique identifier (UUID) of the Notification to delete. | - |
| `statePath` | State Path | StateVariableParameter | No | State variable to store the response. | - |
### Exits
| Exit | Description |
| - | - |
| `NEXT` | The API call succeeded. |
| `ERROR` | The API call failed. Error details are stored in the `m3shError` state variable. |
## List Notifications
**Function name:** `m3ter_ListNotifications`
**Category:** READ
**HTTP method:** GET (paginated)
**Destination:** m3ter
Retrieve a list of Event Notifications for the specified Organization.
This endpoint retrieves a list of all Event Notifications for the Organization identified by its UUID. The list can be paginated for easier management. The list also supports filtering by parameters such as Notification UUID.
### Parameters
| Name | Label | Type | Required | Description | Constraints |
| - | - | - | :-: | - | - |
| `integrationCredentialsId` | Credentials | M3terEntityParameter | Yes | The m3ter credentials to use. | authType: M3TER\_SIGNED\_REQUEST, m3terEntity: IntegrationCredentials |
| `statePath` | State Path | StateVariableParameter | No | State variable to store the response. | - |
| `queryParams` | Query Parameters | KeyValueLookupParameter | No | Query parameters to include in the request | allowedValues: active,eventName,ids |
### Exits
| Exit | Description |
| - | - |
| `NEXT` | The API call succeeded. |
| `ERROR` | The API call failed. Error details are stored in the `m3shError` state variable. |
## Create Notification
**Function name:** `m3ter_CreateNotification`
**Category:** WRITE
**HTTP method:** POST
**Destination:** m3ter
Create a new Notification for an Event.
This endpoint enables you to create a new Event Notification for the specified Organization. You need to supply a request body with the details of the new Notification.
### Parameters
| Name | Label | Type | Required | Description | Constraints |
| - | - | - | :-: | - | - |
| `integrationCredentialsId` | Credentials | M3terEntityParameter | Yes | The m3ter credentials to use. | authType: M3TER\_SIGNED\_REQUEST, m3terEntity: IntegrationCredentials |
| `requestPath` | Request Path | StateVariableParameter | Yes | State variable containing the request. | - |
| `statePath` | State Path | StateVariableParameter | No | State variable to store the response. | - |
### Exits
| Exit | Description |
| - | - |
| `NEXT` | The API call succeeded. |
| `ERROR` | The API call failed. Error details are stored in the `m3shError` state variable. |
# Oauth
Source: https://docs.m3ter.com/m3sh-function-reference/m3ter/oauth
## Get Token
**Function name:** `m3ter_GenerateToken`
**Category:** WRITE
**HTTP method:** POST
**Destination:** m3ter
Get authentication token
### Parameters
| Name | Label | Type | Required | Description | Constraints |
| - | - | - | :-: | - | - |
| `integrationCredentialsId` | Credentials | M3terEntityParameter | Yes | The m3ter credentials to use. | authType: M3TER\_SIGNED\_REQUEST, m3terEntity: IntegrationCredentials |
| `requestPath` | Request Path | StateVariableParameter | Yes | State variable containing the request. | - |
| `statePath` | State Path | StateVariableParameter | No | State variable to store the response. | - |
### Exits
| Exit | Description |
| - | - |
| `NEXT` | The API call succeeded. |
| `ERROR` | The API call failed. Error details are stored in the `m3shError` state variable. |
# Organizationconfig
Source: https://docs.m3ter.com/m3sh-function-reference/m3ter/organizationconfig
## Retrieve OrganizationConfig
**Function name:** `m3ter_GetOrganizationConfig`
**Category:** READ
**HTTP method:** GET
**Destination:** m3ter
Retrieve the Organization-wide configuration details.
### Parameters
| Name | Label | Type | Required | Description | Constraints |
| - | - | - | :-: | - | - |
| `integrationCredentialsId` | Credentials | M3terEntityParameter | Yes | The m3ter credentials to use. | authType: M3TER\_SIGNED\_REQUEST, m3terEntity: IntegrationCredentials |
| `statePath` | State Path | StateVariableParameter | No | State variable to store the response. | - |
### Exits
| Exit | Description |
| - | - |
| `NEXT` | The API call succeeded. |
| `ERROR` | The API call failed. Error details are stored in the `m3shError` state variable. |
## Update OrganizationConfig
**Function name:** `m3ter_UpdateOrganizationConfig`
**Category:** WRITE
**HTTP method:** PUT
**Destination:** m3ter
Update the Organization-wide configuration details.
### Parameters
| Name | Label | Type | Required | Description | Constraints |
| - | - | - | :-: | - | - |
| `integrationCredentialsId` | Credentials | M3terEntityParameter | Yes | The m3ter credentials to use. | authType: M3TER\_SIGNED\_REQUEST, m3terEntity: IntegrationCredentials |
| `requestPath` | Request Path | StateVariableParameter | Yes | State variable containing the request. | - |
| `statePath` | State Path | StateVariableParameter | No | State variable to store the response. | - |
### Exits
| Exit | Description |
| - | - |
| `NEXT` | The API call succeeded. |
| `ERROR` | The API call failed. Error details are stored in the `m3shError` state variable. |
# Permissionpolicies
Source: https://docs.m3ter.com/m3sh-function-reference/m3ter/permissionpolicies
## Remove a PermissionPolicy from support users for an organization
**Function name:** `m3ter_RemovePermissionPolicyFromSupportUsers`
**Category:** WRITE
**HTTP method:** POST
**Destination:** m3ter
Remove a permission policy from support users for an organization.
### Parameters
| Name | Label | Type | Required | Description | Constraints |
| - | - | - | :-: | - | - |
| `integrationCredentialsId` | Credentials | M3terEntityParameter | Yes | The m3ter credentials to use. | authType: M3TER\_SIGNED\_REQUEST, m3terEntity: IntegrationCredentials |
| `permissionPolicyId` | permissionPolicyId | LookupParameter | Yes | UUID of the permission policy | - |
| `statePath` | State Path | StateVariableParameter | No | State variable to store the response. | - |
### Exits
| Exit | Description |
| - | - |
| `NEXT` | The API call succeeded. |
| `ERROR` | The API call failed. Error details are stored in the `m3shError` state variable. |
## Add a PermissionPolicy to a user
**Function name:** `m3ter_AddPermissionPolicyToUser`
**Category:** WRITE
**HTTP method:** POST
**Destination:** m3ter
Add a permission policy to a user.
### Parameters
| Name | Label | Type | Required | Description | Constraints |
| - | - | - | :-: | - | - |
| `integrationCredentialsId` | Credentials | M3terEntityParameter | Yes | The m3ter credentials to use. | authType: M3TER\_SIGNED\_REQUEST, m3terEntity: IntegrationCredentials |
| `permissionPolicyId` | permissionPolicyId | LookupParameter | Yes | UUID of the permission policy | - |
| `requestPath` | Request Path | StateVariableParameter | Yes | State variable containing the request. | - |
| `statePath` | State Path | StateVariableParameter | No | State variable to store the response. | - |
### Exits
| Exit | Description |
| - | - |
| `NEXT` | The API call succeeded. |
| `ERROR` | The API call failed. Error details are stored in the `m3shError` state variable. |
## Add a PermissionPolicy to support users for an organization
**Function name:** `m3ter_AddPermissionPolicyToSupportUsers`
**Category:** WRITE
**HTTP method:** POST
**Destination:** m3ter
Add a permission policy to support users for an organization.
### Parameters
| Name | Label | Type | Required | Description | Constraints |
| - | - | - | :-: | - | - |
| `integrationCredentialsId` | Credentials | M3terEntityParameter | Yes | The m3ter credentials to use. | authType: M3TER\_SIGNED\_REQUEST, m3terEntity: IntegrationCredentials |
| `permissionPolicyId` | permissionPolicyId | LookupParameter | Yes | UUID of the permission policy | - |
| `requestPath` | Request Path | StateVariableParameter | Yes | State variable containing the request. | - |
| `statePath` | State Path | StateVariableParameter | No | State variable to store the response. | - |
### Exits
| Exit | Description |
| - | - |
| `NEXT` | The API call succeeded. |
| `ERROR` | The API call failed. Error details are stored in the `m3shError` state variable. |
## Add a PermissionPolicy to a service user
**Function name:** `m3ter_AddPermissionPolicyToServiceUser`
**Category:** WRITE
**HTTP method:** POST
**Destination:** m3ter
Add a permission policy to a service user.
### Parameters
| Name | Label | Type | Required | Description | Constraints |
| - | - | - | :-: | - | - |
| `integrationCredentialsId` | Credentials | M3terEntityParameter | Yes | The m3ter credentials to use. | authType: M3TER\_SIGNED\_REQUEST, m3terEntity: IntegrationCredentials |
| `permissionPolicyId` | permissionPolicyId | LookupParameter | Yes | UUID of the permission policy | - |
| `requestPath` | Request Path | StateVariableParameter | Yes | State variable containing the request. | - |
| `statePath` | State Path | StateVariableParameter | No | State variable to store the response. | - |
### Exits
| Exit | Description |
| - | - |
| `NEXT` | The API call succeeded. |
| `ERROR` | The API call failed. Error details are stored in the `m3shError` state variable. |
## Remove a PermissionPolicy from a service user
**Function name:** `m3ter_RemovePermissionPolicyFromServiceUser`
**Category:** WRITE
**HTTP method:** POST
**Destination:** m3ter
Remove a permission policy from a service user.
### Parameters
| Name | Label | Type | Required | Description | Constraints |
| - | - | - | :-: | - | - |
| `integrationCredentialsId` | Credentials | M3terEntityParameter | Yes | The m3ter credentials to use. | authType: M3TER\_SIGNED\_REQUEST, m3terEntity: IntegrationCredentials |
| `permissionPolicyId` | permissionPolicyId | LookupParameter | Yes | UUID of the permission policy | - |
| `requestPath` | Request Path | StateVariableParameter | Yes | State variable containing the request. | - |
| `statePath` | State Path | StateVariableParameter | No | State variable to store the response. | - |
### Exits
| Exit | Description |
| - | - |
| `NEXT` | The API call succeeded. |
| `ERROR` | The API call failed. Error details are stored in the `m3shError` state variable. |
## List PermissionPolicies
**Function name:** `m3ter_ListPermissionPolicies`
**Category:** READ
**HTTP method:** GET (paginated)
**Destination:** m3ter
Retrieve a list of PermissionPolicy entities
### Parameters
| Name | Label | Type | Required | Description | Constraints |
| - | - | - | :-: | - | - |
| `integrationCredentialsId` | Credentials | M3terEntityParameter | Yes | The m3ter credentials to use. | authType: M3TER\_SIGNED\_REQUEST, m3terEntity: IntegrationCredentials |
| `statePath` | State Path | StateVariableParameter | No | State variable to store the response. | - |
### Exits
| Exit | Description |
| - | - |
| `NEXT` | The API call succeeded. |
| `ERROR` | The API call failed. Error details are stored in the `m3shError` state variable. |
## Create Permission Policy
**Function name:** `m3ter_PostPermissionPolicy`
**Category:** WRITE
**HTTP method:** POST
**Destination:** m3ter
Create a new Permission Policy
**NOTE:** When you set up a policy statement for this call using the `permissionPolicy` request parameter to specify the `effect`, `action`, and `resource`, you must use all lower case and the format as shown in this example for a Permission Policy statement that grants full CRUD access to all meters:
```
"permissionPolicy" : [
{
"effect" : "allow",
"action" : [
"config:create",
"config:delete",
"config:retrieve",
"config:update"
]
"resource" : [
"config:meter/*"
]
}
]
```
For more details and further examples, see [Understanding, Creating, and Managing Permission Policies](https://www.m3ter.com/docs/guides/organization-and-access-management/creating-and-managing-permissions#permission-policy-statements---available-actions-and-resources) in our main Documentation.
### Parameters
| Name | Label | Type | Required | Description | Constraints |
| - | - | - | :-: | - | - |
| `integrationCredentialsId` | Credentials | M3terEntityParameter | Yes | The m3ter credentials to use. | authType: M3TER\_SIGNED\_REQUEST, m3terEntity: IntegrationCredentials |
| `requestPath` | Request Path | StateVariableParameter | Yes | State variable containing the request. | - |
| `statePath` | State Path | StateVariableParameter | No | State variable to store the response. | - |
### Exits
| Exit | Description |
| - | - |
| `NEXT` | The API call succeeded. |
| `ERROR` | The API call failed. Error details are stored in the `m3shError` state variable. |
## Remove a PermissionPolicy from a user group
**Function name:** `m3ter_RemovePermissionPolicyFromUserGroup`
**Category:** WRITE
**HTTP method:** POST
**Destination:** m3ter
Remove a permission policy from a user group.
### Parameters
| Name | Label | Type | Required | Description | Constraints |
| - | - | - | :-: | - | - |
| `integrationCredentialsId` | Credentials | M3terEntityParameter | Yes | The m3ter credentials to use. | authType: M3TER\_SIGNED\_REQUEST, m3terEntity: IntegrationCredentials |
| `permissionPolicyId` | permissionPolicyId | LookupParameter | Yes | UUID of the permission policy | - |
| `requestPath` | Request Path | StateVariableParameter | Yes | State variable containing the request. | - |
| `statePath` | State Path | StateVariableParameter | No | State variable to store the response. | - |
### Exits
| Exit | Description |
| - | - |
| `NEXT` | The API call succeeded. |
| `ERROR` | The API call failed. Error details are stored in the `m3shError` state variable. |
## Retrieve Permission Policy
**Function name:** `m3ter_GetPermissionPolicy`
**Category:** READ
**HTTP method:** GET
**Destination:** m3ter
Retrieve the permission policy for the UUID
### Parameters
| Name | Label | Type | Required | Description | Constraints |
| - | - | - | :-: | - | - |
| `integrationCredentialsId` | Credentials | M3terEntityParameter | Yes | The m3ter credentials to use. | authType: M3TER\_SIGNED\_REQUEST, m3terEntity: IntegrationCredentials |
| `id` | id | LookupParameter | Yes | The UUID of the PermissionPolicy to retrieve. | - |
| `statePath` | State Path | StateVariableParameter | No | State variable to store the response. | - |
### Exits
| Exit | Description |
| - | - |
| `NEXT` | The API call succeeded. |
| `ERROR` | The API call failed. Error details are stored in the `m3shError` state variable. |
## Update Permission Policy
**Function name:** `m3ter_PutPermissionPolicy`
**Category:** WRITE
**HTTP method:** PUT
**Destination:** m3ter
Update a Permission Policy for the UUID
**NOTE:** When you set up a policy statement for this call to specify the `effect`, `action`, and `resource`, you must use all lower case and the format as shown in this example - a Permission Policy statement that grants full CRUD access to all meters:
```
"permissionPolicy" : [
{
"effect" : "allow",
"action" : [
"config:create",
"config:delete",
"config:retrieve",
"config:update"
]
"resource" : [
"config:meter/*"
]
}
]
```
For more details and further examples, see [Understanding, Creating, and Managing Permission Policies](https://www.m3ter.com/docs/guides/organization-and-access-management/creating-and-managing-permissions#permission-policy-statements---available-actions-and-resources) in our main Documentation.
### Parameters
| Name | Label | Type | Required | Description | Constraints |
| - | - | - | :-: | - | - |
| `integrationCredentialsId` | Credentials | M3terEntityParameter | Yes | The m3ter credentials to use. | authType: M3TER\_SIGNED\_REQUEST, m3terEntity: IntegrationCredentials |
| `id` | id | LookupParameter | Yes | The UUID of the PermissionPolicy to update. | - |
| `requestPath` | Request Path | StateVariableParameter | Yes | State variable containing the request. | - |
| `statePath` | State Path | StateVariableParameter | No | State variable to store the response. | - |
### Exits
| Exit | Description |
| - | - |
| `NEXT` | The API call succeeded. |
| `ERROR` | The API call failed. Error details are stored in the `m3shError` state variable. |
## Delete Permission Policy
**Function name:** `m3ter_DeletePermissionPolicy`
**Category:** WRITE
**HTTP method:** DELETE
**Destination:** m3ter
Delete the PermissionPolicy for the UUID
### Parameters
| Name | Label | Type | Required | Description | Constraints |
| - | - | - | :-: | - | - |
| `integrationCredentialsId` | Credentials | M3terEntityParameter | Yes | The m3ter credentials to use. | authType: M3TER\_SIGNED\_REQUEST, m3terEntity: IntegrationCredentials |
| `id` | id | LookupParameter | Yes | The UUID of the PermissionPolicy to delete. | - |
| `statePath` | State Path | StateVariableParameter | No | State variable to store the response. | - |
### Exits
| Exit | Description |
| - | - |
| `NEXT` | The API call succeeded. |
| `ERROR` | The API call failed. Error details are stored in the `m3shError` state variable. |
## Add a PermissionPolicy to a user group
**Function name:** `m3ter_AddPermissionPolicyToUserGroup`
**Category:** WRITE
**HTTP method:** POST
**Destination:** m3ter
Add a permission Policy to a user group
### Parameters
| Name | Label | Type | Required | Description | Constraints |
| - | - | - | :-: | - | - |
| `integrationCredentialsId` | Credentials | M3terEntityParameter | Yes | The m3ter credentials to use. | authType: M3TER\_SIGNED\_REQUEST, m3terEntity: IntegrationCredentials |
| `permissionPolicyId` | permissionPolicyId | LookupParameter | Yes | UUID of the permission policy | - |
| `requestPath` | Request Path | StateVariableParameter | Yes | State variable containing the request. | - |
| `statePath` | State Path | StateVariableParameter | No | State variable to store the response. | - |
### Exits
| Exit | Description |
| - | - |
| `NEXT` | The API call succeeded. |
| `ERROR` | The API call failed. Error details are stored in the `m3shError` state variable. |
## Remove a PermissionPolicy from a user
**Function name:** `m3ter_RemovePermissionPolicyFromUser`
**Category:** WRITE
**HTTP method:** POST
**Destination:** m3ter
Remove a permission policy from a user.
### Parameters
| Name | Label | Type | Required | Description | Constraints |
| - | - | - | :-: | - | - |
| `integrationCredentialsId` | Credentials | M3terEntityParameter | Yes | The m3ter credentials to use. | authType: M3TER\_SIGNED\_REQUEST, m3terEntity: IntegrationCredentials |
| `permissionPolicyId` | permissionPolicyId | LookupParameter | Yes | UUID of the permission policy | - |
| `requestPath` | Request Path | StateVariableParameter | Yes | State variable containing the request. | - |
| `statePath` | State Path | StateVariableParameter | No | State variable to store the response. | - |
### Exits
| Exit | Description |
| - | - |
| `NEXT` | The API call succeeded. |
| `ERROR` | The API call failed. Error details are stored in the `m3shError` state variable. |
# Picklists
Source: https://docs.m3ter.com/m3sh-function-reference/m3ter/picklists
## Retrieve TransactionType
**Function name:** `m3ter_GetTransactionType`
**Category:** READ
**HTTP method:** GET
**Destination:** m3ter
Retrieves the TransactionType with the given UUID from the specified Organization.
### Parameters
| Name | Label | Type | Required | Description | Constraints |
| - | - | - | :-: | - | - |
| `integrationCredentialsId` | Credentials | M3terEntityParameter | Yes | The m3ter credentials to use. | authType: M3TER\_SIGNED\_REQUEST, m3terEntity: IntegrationCredentials |
| `id` | id | LookupParameter | Yes | The unique identifier (UUID) of the TransactionType to retrieve. | - |
| `statePath` | State Path | StateVariableParameter | No | State variable to store the response. | - |
### Exits
| Exit | Description |
| - | - |
| `NEXT` | The API call succeeded. |
| `ERROR` | The API call failed. Error details are stored in the `m3shError` state variable. |
## Update TransactionType
**Function name:** `m3ter_UpdateTransactionType`
**Category:** WRITE
**HTTP method:** PUT
**Destination:** m3ter
Updates the TransactionType with the specified UUID for the specified Organization. Update details for the TransactionType should be included in the request body.
### Parameters
| Name | Label | Type | Required | Description | Constraints |
| - | - | - | :-: | - | - |
| `integrationCredentialsId` | Credentials | M3terEntityParameter | Yes | The m3ter credentials to use. | authType: M3TER\_SIGNED\_REQUEST, m3terEntity: IntegrationCredentials |
| `id` | id | LookupParameter | Yes | The unique identifer (UUID) of the TransactionType to update. | - |
| `requestPath` | Request Path | StateVariableParameter | Yes | State variable containing the request. | - |
| `statePath` | State Path | StateVariableParameter | No | State variable to store the response. | - |
### Exits
| Exit | Description |
| - | - |
| `NEXT` | The API call succeeded. |
| `ERROR` | The API call failed. Error details are stored in the `m3shError` state variable. |
## Delete TransactionType
**Function name:** `m3ter_DeleteTransactionType`
**Category:** WRITE
**HTTP method:** DELETE
**Destination:** m3ter
Deletes the TransactionType with the given UUID from the specified Organization.
### Parameters
| Name | Label | Type | Required | Description | Constraints |
| - | - | - | :-: | - | - |
| `integrationCredentialsId` | Credentials | M3terEntityParameter | Yes | The m3ter credentials to use. | authType: M3TER\_SIGNED\_REQUEST, m3terEntity: IntegrationCredentials |
| `id` | id | LookupParameter | Yes | The unique identifier (UUID) of the TransactionType to delete. | - |
| `statePath` | State Path | StateVariableParameter | No | State variable to store the response. | - |
### Exits
| Exit | Description |
| - | - |
| `NEXT` | The API call succeeded. |
| `ERROR` | The API call failed. Error details are stored in the `m3shError` state variable. |
## List Credit Reasons
**Function name:** `m3ter_ListCreditReasons`
**Category:** READ
**HTTP method:** GET (paginated)
**Destination:** m3ter
Retrieve a list of the Credit Reason entities created for your Organization. You can filter the list returned for the call by Credit Reason ID, Credit Reason short code, or by Archive status.
### Parameters
| Name | Label | Type | Required | Description | Constraints |
| - | - | - | :-: | - | - |
| `integrationCredentialsId` | Credentials | M3terEntityParameter | Yes | The m3ter credentials to use. | authType: M3TER\_SIGNED\_REQUEST, m3terEntity: IntegrationCredentials |
| `statePath` | State Path | StateVariableParameter | No | State variable to store the response. | - |
| `queryParams` | Query Parameters | KeyValueLookupParameter | No | Query parameters to include in the request | allowedValues: ids,codes,archived |
### Exits
| Exit | Description |
| - | - |
| `NEXT` | The API call succeeded. |
| `ERROR` | The API call failed. Error details are stored in the `m3shError` state variable. |
## Create Credit Reason
**Function name:** `m3ter_CreateCreditReason`
**Category:** WRITE
**HTTP method:** POST
**Destination:** m3ter
Create a new Credit Reason for your Organization. When you've created a Credit Reason, it becomes available as a credit type for adding Credit line items to Bills. See [Credits](https://www.m3ter.com/docs/api#tag/Credits).
### Parameters
| Name | Label | Type | Required | Description | Constraints |
| - | - | - | :-: | - | - |
| `integrationCredentialsId` | Credentials | M3terEntityParameter | Yes | The m3ter credentials to use. | authType: M3TER\_SIGNED\_REQUEST, m3terEntity: IntegrationCredentials |
| `requestPath` | Request Path | StateVariableParameter | Yes | State variable containing the request. | - |
| `statePath` | State Path | StateVariableParameter | No | State variable to store the response. | - |
### Exits
| Exit | Description |
| - | - |
| `NEXT` | The API call succeeded. |
| `ERROR` | The API call failed. Error details are stored in the `m3shError` state variable. |
## List Bill Grouping Keys
**Function name:** `m3ter_ListBillGroupingKeys`
**Category:** READ
**HTTP method:** GET (paginated)
**Destination:** m3ter
Retrieve a list of Bill Grouping Keys created for your Organization.
### Parameters
| Name | Label | Type | Required | Description | Constraints |
| - | - | - | :-: | - | - |
| `integrationCredentialsId` | Credentials | M3terEntityParameter | Yes | The m3ter credentials to use. | authType: M3TER\_SIGNED\_REQUEST, m3terEntity: IntegrationCredentials |
| `statePath` | State Path | StateVariableParameter | No | State variable to store the response. | - |
| `queryParams` | Query Parameters | KeyValueLookupParameter | No | Query parameters to include in the request | allowedValues: ids,codes,archived |
### Exits
| Exit | Description |
| - | - |
| `NEXT` | The API call succeeded. |
| `ERROR` | The API call failed. Error details are stored in the `m3shError` state variable. |
## Create BillGroupingKey
**Function name:** `m3ter_CreateBillGroupingKey`
**Category:** WRITE
**HTTP method:** POST
**Destination:** m3ter
Create a new Bill Grouping Key.
### Parameters
| Name | Label | Type | Required | Description | Constraints |
| - | - | - | :-: | - | - |
| `integrationCredentialsId` | Credentials | M3terEntityParameter | Yes | The m3ter credentials to use. | authType: M3TER\_SIGNED\_REQUEST, m3terEntity: IntegrationCredentials |
| `requestPath` | Request Path | StateVariableParameter | Yes | State variable containing the request. | - |
| `statePath` | State Path | StateVariableParameter | No | State variable to store the response. | - |
### Exits
| Exit | Description |
| - | - |
| `NEXT` | The API call succeeded. |
| `ERROR` | The API call failed. Error details are stored in the `m3shError` state variable. |
## Retrieve Currency
**Function name:** `m3ter_GetCurrency`
**Category:** READ
**HTTP method:** GET
**Destination:** m3ter
Retrieve the specified Currency with the given UUID. Used to obtain the details of a specified existing Currency in your Organization.
### Parameters
| Name | Label | Type | Required | Description | Constraints |
| - | - | - | :-: | - | - |
| `integrationCredentialsId` | Credentials | M3terEntityParameter | Yes | The m3ter credentials to use. | authType: M3TER\_SIGNED\_REQUEST, m3terEntity: IntegrationCredentials |
| `id` | id | LookupParameter | Yes | The unique identifier (UUID) of the Currency to retrieve. | - |
| `statePath` | State Path | StateVariableParameter | No | State variable to store the response. | - |
### Exits
| Exit | Description |
| - | - |
| `NEXT` | The API call succeeded. |
| `ERROR` | The API call failed. Error details are stored in the `m3shError` state variable. |
## Update Currency
**Function name:** `m3ter_UpdateCurrency`
**Category:** WRITE
**HTTP method:** PUT
**Destination:** m3ter
Update a Currency with the given UUID.
Used to update the attributes of the specified Currency for the specified Organization.
### Parameters
| Name | Label | Type | Required | Description | Constraints |
| - | - | - | :-: | - | - |
| `integrationCredentialsId` | Credentials | M3terEntityParameter | Yes | The m3ter credentials to use. | authType: M3TER\_SIGNED\_REQUEST, m3terEntity: IntegrationCredentials |
| `id` | id | LookupParameter | Yes | The unique identifier (UUID) of the Currency to update. | - |
| `requestPath` | Request Path | StateVariableParameter | Yes | State variable containing the request. | - |
| `statePath` | State Path | StateVariableParameter | No | State variable to store the response. | - |
### Exits
| Exit | Description |
| - | - |
| `NEXT` | The API call succeeded. |
| `ERROR` | The API call failed. Error details are stored in the `m3shError` state variable. |
## Delete Currency
**Function name:** `m3ter_DeleteCurrency`
**Category:** WRITE
**HTTP method:** DELETE
**Destination:** m3ter
Delete the Currency with the given UUID.
Used to remove an existing Currency from your Organization that is no longer required.
### Parameters
| Name | Label | Type | Required | Description | Constraints |
| - | - | - | :-: | - | - |
| `integrationCredentialsId` | Credentials | M3terEntityParameter | Yes | The m3ter credentials to use. | authType: M3TER\_SIGNED\_REQUEST, m3terEntity: IntegrationCredentials |
| `id` | id | LookupParameter | Yes | The unique identifier (UUID) of the Currency to delete. | - |
| `statePath` | State Path | StateVariableParameter | No | State variable to store the response. | - |
### Exits
| Exit | Description |
| - | - |
| `NEXT` | The API call succeeded. |
| `ERROR` | The API call failed. Error details are stored in the `m3shError` state variable. |
## List Currencies
**Function name:** `m3ter_ListCurrencies`
**Category:** READ
**HTTP method:** GET (paginated)
**Destination:** m3ter
Retrieve a list of Currencies.
Retrieves a list of Currencies for the specified Organization. This endpoint supports pagination and includes various query parameters to filter the Currencies based on Currency ID, and short codes.
### Parameters
| Name | Label | Type | Required | Description | Constraints |
| - | - | - | :-: | - | - |
| `integrationCredentialsId` | Credentials | M3terEntityParameter | Yes | The m3ter credentials to use. | authType: M3TER\_SIGNED\_REQUEST, m3terEntity: IntegrationCredentials |
| `statePath` | State Path | StateVariableParameter | No | State variable to store the response. | - |
| `queryParams` | Query Parameters | KeyValueLookupParameter | No | Query parameters to include in the request | allowedValues: ids,codes,archived |
### Exits
| Exit | Description |
| - | - |
| `NEXT` | The API call succeeded. |
| `ERROR` | The API call failed. Error details are stored in the `m3shError` state variable. |
## Create Currency
**Function name:** `m3ter_CreateCurrency`
**Category:** WRITE
**HTTP method:** POST
**Destination:** m3ter
Creates a new Currency for the specified Organization.
Used to create a Currency that your Organization will start to use.
### Parameters
| Name | Label | Type | Required | Description | Constraints |
| - | - | - | :-: | - | - |
| `integrationCredentialsId` | Credentials | M3terEntityParameter | Yes | The m3ter credentials to use. | authType: M3TER\_SIGNED\_REQUEST, m3terEntity: IntegrationCredentials |
| `requestPath` | Request Path | StateVariableParameter | Yes | State variable containing the request. | - |
| `statePath` | State Path | StateVariableParameter | No | State variable to store the response. | - |
### Exits
| Exit | Description |
| - | - |
| `NEXT` | The API call succeeded. |
| `ERROR` | The API call failed. Error details are stored in the `m3shError` state variable. |
## List TransactionTypes
**Function name:** `m3ter_ListTransactionTypes`
**Category:** READ
**HTTP method:** GET (paginated)
**Destination:** m3ter
Retrieves a list of TransactionType entities for the specified Organization. The list can be paginated for easier management, and supports filtering by various parameters.
### Parameters
| Name | Label | Type | Required | Description | Constraints |
| - | - | - | :-: | - | - |
| `integrationCredentialsId` | Credentials | M3terEntityParameter | Yes | The m3ter credentials to use. | authType: M3TER\_SIGNED\_REQUEST, m3terEntity: IntegrationCredentials |
| `statePath` | State Path | StateVariableParameter | No | State variable to store the response. | - |
| `queryParams` | Query Parameters | KeyValueLookupParameter | No | Query parameters to include in the request | allowedValues: ids,codes,archived |
### Exits
| Exit | Description |
| - | - |
| `NEXT` | The API call succeeded. |
| `ERROR` | The API call failed. Error details are stored in the `m3shError` state variable. |
## Create TransactionType
**Function name:** `m3ter_CreateTransactionType`
**Category:** WRITE
**HTTP method:** POST
**Destination:** m3ter
Create a new TransactionType for the specified Organization. Details of the new TransactionType should be included in the request body.
### Parameters
| Name | Label | Type | Required | Description | Constraints |
| - | - | - | :-: | - | - |
| `integrationCredentialsId` | Credentials | M3terEntityParameter | Yes | The m3ter credentials to use. | authType: M3TER\_SIGNED\_REQUEST, m3terEntity: IntegrationCredentials |
| `requestPath` | Request Path | StateVariableParameter | Yes | State variable containing the request. | - |
| `statePath` | State Path | StateVariableParameter | No | State variable to store the response. | - |
### Exits
| Exit | Description |
| - | - |
| `NEXT` | The API call succeeded. |
| `ERROR` | The API call failed. Error details are stored in the `m3shError` state variable. |
## Retrieve BillGroupingKey
**Function name:** `m3ter_GetBillGroupingKey`
**Category:** READ
**HTTP method:** GET
**Destination:** m3ter
Retrieve a Bill Grouping Key for the given UUID.
### Parameters
| Name | Label | Type | Required | Description | Constraints |
| - | - | - | :-: | - | - |
| `integrationCredentialsId` | Credentials | M3terEntityParameter | Yes | The m3ter credentials to use. | authType: M3TER\_SIGNED\_REQUEST, m3terEntity: IntegrationCredentials |
| `id` | id | LookupParameter | Yes | The UUID of the Bill Grouping Key to retrieve. | - |
| `statePath` | State Path | StateVariableParameter | No | State variable to store the response. | - |
### Exits
| Exit | Description |
| - | - |
| `NEXT` | The API call succeeded. |
| `ERROR` | The API call failed. Error details are stored in the `m3shError` state variable. |
## Update BillGroupingKey
**Function name:** `m3ter_UpdateBillGroupingKey`
**Category:** WRITE
**HTTP method:** PUT
**Destination:** m3ter
Update a Bill Grouping Key for the given UUID.
### Parameters
| Name | Label | Type | Required | Description | Constraints |
| - | - | - | :-: | - | - |
| `integrationCredentialsId` | Credentials | M3terEntityParameter | Yes | The m3ter credentials to use. | authType: M3TER\_SIGNED\_REQUEST, m3terEntity: IntegrationCredentials |
| `id` | id | LookupParameter | Yes | The UUID of the Bill Grouping Key to update. | - |
| `requestPath` | Request Path | StateVariableParameter | Yes | State variable containing the request. | - |
| `statePath` | State Path | StateVariableParameter | No | State variable to store the response. | - |
### Exits
| Exit | Description |
| - | - |
| `NEXT` | The API call succeeded. |
| `ERROR` | The API call failed. Error details are stored in the `m3shError` state variable. |
## Delete BillGroupingKey
**Function name:** `m3ter_DeleteBillGroupingKey`
**Category:** WRITE
**HTTP method:** DELETE
**Destination:** m3ter
Delete a Bill Grouping Key for the given UUID.
### Parameters
| Name | Label | Type | Required | Description | Constraints |
| - | - | - | :-: | - | - |
| `integrationCredentialsId` | Credentials | M3terEntityParameter | Yes | The m3ter credentials to use. | authType: M3TER\_SIGNED\_REQUEST, m3terEntity: IntegrationCredentials |
| `id` | id | LookupParameter | Yes | The UUID of the Bill Grouping Key to delete. | - |
| `statePath` | State Path | StateVariableParameter | No | State variable to store the response. | - |
### Exits
| Exit | Description |
| - | - |
| `NEXT` | The API call succeeded. |
| `ERROR` | The API call failed. Error details are stored in the `m3shError` state variable. |
## List Debit Reasons
**Function name:** `m3ter_ListDebitReasons`
**Category:** READ
**HTTP method:** GET (paginated)
**Destination:** m3ter
Retrieve a list of the Debit Reason entities created for your Organization. You can filter the list returned for the call by Debit Reason ID, Debit Reason short code, or by Archive status.
### Parameters
| Name | Label | Type | Required | Description | Constraints |
| - | - | - | :-: | - | - |
| `integrationCredentialsId` | Credentials | M3terEntityParameter | Yes | The m3ter credentials to use. | authType: M3TER\_SIGNED\_REQUEST, m3terEntity: IntegrationCredentials |
| `statePath` | State Path | StateVariableParameter | No | State variable to store the response. | - |
| `queryParams` | Query Parameters | KeyValueLookupParameter | No | Query parameters to include in the request | allowedValues: ids,codes,archived |
### Exits
| Exit | Description |
| - | - |
| `NEXT` | The API call succeeded. |
| `ERROR` | The API call failed. Error details are stored in the `m3shError` state variable. |
## Create Debit Reason
**Function name:** `m3ter_CreateDebitReason`
**Category:** WRITE
**HTTP method:** POST
**Destination:** m3ter
Create a new Debit Reason for your Organization. When you've created a Debit Reason, it becomes available as a debit type for adding Debit line items to Bills. See [Debits](https://www.m3ter.com/docs/api#tag/Debits).
### Parameters
| Name | Label | Type | Required | Description | Constraints |
| - | - | - | :-: | - | - |
| `integrationCredentialsId` | Credentials | M3terEntityParameter | Yes | The m3ter credentials to use. | authType: M3TER\_SIGNED\_REQUEST, m3terEntity: IntegrationCredentials |
| `requestPath` | Request Path | StateVariableParameter | Yes | State variable containing the request. | - |
| `statePath` | State Path | StateVariableParameter | No | State variable to store the response. | - |
### Exits
| Exit | Description |
| - | - |
| `NEXT` | The API call succeeded. |
| `ERROR` | The API call failed. Error details are stored in the `m3shError` state variable. |
## Retrieve Credit Reason
**Function name:** `m3ter_GetCreditReason`
**Category:** READ
**HTTP method:** GET
**Destination:** m3ter
Retrieve the Credit Reason with the given UUID.
### Parameters
| Name | Label | Type | Required | Description | Constraints |
| - | - | - | :-: | - | - |
| `integrationCredentialsId` | Credentials | M3terEntityParameter | Yes | The m3ter credentials to use. | authType: M3TER\_SIGNED\_REQUEST, m3terEntity: IntegrationCredentials |
| `id` | id | LookupParameter | Yes | The UUID of the Credit Reason to retrieve. | - |
| `statePath` | State Path | StateVariableParameter | No | State variable to store the response. | - |
### Exits
| Exit | Description |
| - | - |
| `NEXT` | The API call succeeded. |
| `ERROR` | The API call failed. Error details are stored in the `m3shError` state variable. |
## Update Credit Reason
**Function name:** `m3ter_UpdateCreditReason`
**Category:** WRITE
**HTTP method:** PUT
**Destination:** m3ter
Update the Credit Reason with the given UUID.
### Parameters
| Name | Label | Type | Required | Description | Constraints |
| - | - | - | :-: | - | - |
| `integrationCredentialsId` | Credentials | M3terEntityParameter | Yes | The m3ter credentials to use. | authType: M3TER\_SIGNED\_REQUEST, m3terEntity: IntegrationCredentials |
| `id` | id | LookupParameter | Yes | The UUID of the Credit Reason to update. | - |
| `requestPath` | Request Path | StateVariableParameter | Yes | State variable containing the request. | - |
| `statePath` | State Path | StateVariableParameter | No | State variable to store the response. | - |
### Exits
| Exit | Description |
| - | - |
| `NEXT` | The API call succeeded. |
| `ERROR` | The API call failed. Error details are stored in the `m3shError` state variable. |
## Delete Credit Reason
**Function name:** `m3ter_DeleteCreditReason`
**Category:** WRITE
**HTTP method:** DELETE
**Destination:** m3ter
Delete the Credit Reason with the given UUID.
### Parameters
| Name | Label | Type | Required | Description | Constraints |
| - | - | - | :-: | - | - |
| `integrationCredentialsId` | Credentials | M3terEntityParameter | Yes | The m3ter credentials to use. | authType: M3TER\_SIGNED\_REQUEST, m3terEntity: IntegrationCredentials |
| `id` | id | LookupParameter | Yes | The UUID of the Credit Reason to delete. | - |
| `statePath` | State Path | StateVariableParameter | No | State variable to store the response. | - |
### Exits
| Exit | Description |
| - | - |
| `NEXT` | The API call succeeded. |
| `ERROR` | The API call failed. Error details are stored in the `m3shError` state variable. |
## Retrieve Debit Reason
**Function name:** `m3ter_GetDebitReason`
**Category:** READ
**HTTP method:** GET
**Destination:** m3ter
Retrieve the Debit Reason with the given UUID.
### Parameters
| Name | Label | Type | Required | Description | Constraints |
| - | - | - | :-: | - | - |
| `integrationCredentialsId` | Credentials | M3terEntityParameter | Yes | The m3ter credentials to use. | authType: M3TER\_SIGNED\_REQUEST, m3terEntity: IntegrationCredentials |
| `id` | id | LookupParameter | Yes | The UUID of the Debit Reason to retrieve. | - |
| `statePath` | State Path | StateVariableParameter | No | State variable to store the response. | - |
### Exits
| Exit | Description |
| - | - |
| `NEXT` | The API call succeeded. |
| `ERROR` | The API call failed. Error details are stored in the `m3shError` state variable. |
## Update Debit Reason
**Function name:** `m3ter_UpdateDebitReason`
**Category:** WRITE
**HTTP method:** PUT
**Destination:** m3ter
Update the Debit Reason with the given UUID.
### Parameters
| Name | Label | Type | Required | Description | Constraints |
| - | - | - | :-: | - | - |
| `integrationCredentialsId` | Credentials | M3terEntityParameter | Yes | The m3ter credentials to use. | authType: M3TER\_SIGNED\_REQUEST, m3terEntity: IntegrationCredentials |
| `id` | id | LookupParameter | Yes | The UUID of the Debit Reason to update. | - |
| `requestPath` | Request Path | StateVariableParameter | Yes | State variable containing the request. | - |
| `statePath` | State Path | StateVariableParameter | No | State variable to store the response. | - |
### Exits
| Exit | Description |
| - | - |
| `NEXT` | The API call succeeded. |
| `ERROR` | The API call failed. Error details are stored in the `m3shError` state variable. |
## Delete Debit Reason
**Function name:** `m3ter_DeleteDebitReason`
**Category:** WRITE
**HTTP method:** DELETE
**Destination:** m3ter
Delete the Debit Reason with the given UUID.
### Parameters
| Name | Label | Type | Required | Description | Constraints |
| - | - | - | :-: | - | - |
| `integrationCredentialsId` | Credentials | M3terEntityParameter | Yes | The m3ter credentials to use. | authType: M3TER\_SIGNED\_REQUEST, m3terEntity: IntegrationCredentials |
| `id` | id | LookupParameter | Yes | The UUID of the Debit Reason to delete. | - |
| `statePath` | State Path | StateVariableParameter | No | State variable to store the response. | - |
### Exits
| Exit | Description |
| - | - |
| `NEXT` | The API call succeeded. |
| `ERROR` | The API call failed. Error details are stored in the `m3shError` state variable. |
# Plangrouplinks
Source: https://docs.m3ter.com/m3sh-function-reference/m3ter/plangrouplinks
## Retrieve PlanGroupLink
**Function name:** `m3ter_GetPlanGroupLink`
**Category:** READ
**HTTP method:** GET
**Destination:** m3ter
Retrieve a PlanGroupLink for the given UUID.
### Parameters
| Name | Label | Type | Required | Description | Constraints |
| - | - | - | :-: | - | - |
| `integrationCredentialsId` | Credentials | M3terEntityParameter | Yes | The m3ter credentials to use. | authType: M3TER\_SIGNED\_REQUEST, m3terEntity: IntegrationCredentials |
| `id` | id | LookupParameter | Yes | The UUID of the PlanGroupLink to retrieve. | - |
| `statePath` | State Path | StateVariableParameter | No | State variable to store the response. | - |
### Exits
| Exit | Description |
| - | - |
| `NEXT` | The API call succeeded. |
| `ERROR` | The API call failed. Error details are stored in the `m3shError` state variable. |
## Update PlanGroupLink
**Function name:** `m3ter_PutPlanGroupLink`
**Category:** WRITE
**HTTP method:** PUT
**Destination:** m3ter
Update PlanGroupLink for the given UUID.
### Parameters
| Name | Label | Type | Required | Description | Constraints |
| - | - | - | :-: | - | - |
| `integrationCredentialsId` | Credentials | M3terEntityParameter | Yes | The m3ter credentials to use. | authType: M3TER\_SIGNED\_REQUEST, m3terEntity: IntegrationCredentials |
| `id` | id | LookupParameter | Yes | The UUID of the PlanGroupLink to update. | - |
| `requestPath` | Request Path | StateVariableParameter | Yes | State variable containing the request. | - |
| `statePath` | State Path | StateVariableParameter | No | State variable to store the response. | - |
### Exits
| Exit | Description |
| - | - |
| `NEXT` | The API call succeeded. |
| `ERROR` | The API call failed. Error details are stored in the `m3shError` state variable. |
## Delete PlanGroupLink
**Function name:** `m3ter_DeletePlanGroupLink`
**Category:** WRITE
**HTTP method:** DELETE
**Destination:** m3ter
Delete a PlanGroupLink for the given UUID.
### Parameters
| Name | Label | Type | Required | Description | Constraints |
| - | - | - | :-: | - | - |
| `integrationCredentialsId` | Credentials | M3terEntityParameter | Yes | The m3ter credentials to use. | authType: M3TER\_SIGNED\_REQUEST, m3terEntity: IntegrationCredentials |
| `id` | id | LookupParameter | Yes | The UUID of the PlanGroupLink to delete. | - |
| `statePath` | State Path | StateVariableParameter | No | State variable to store the response. | - |
### Exits
| Exit | Description |
| - | - |
| `NEXT` | The API call succeeded. |
| `ERROR` | The API call failed. Error details are stored in the `m3shError` state variable. |
## List PlanGroupLinks
**Function name:** `m3ter_ListPlanGroupLinks`
**Category:** READ
**HTTP method:** GET (paginated)
**Destination:** m3ter
Retrieve a list of PlanGroupLink entities
### Parameters
| Name | Label | Type | Required | Description | Constraints |
| - | - | - | :-: | - | - |
| `integrationCredentialsId` | Credentials | M3terEntityParameter | Yes | The m3ter credentials to use. | authType: M3TER\_SIGNED\_REQUEST, m3terEntity: IntegrationCredentials |
| `statePath` | State Path | StateVariableParameter | No | State variable to store the response. | - |
| `queryParams` | Query Parameters | KeyValueLookupParameter | No | Query parameters to include in the request | allowedValues: planGroup,plan,ids |
### Exits
| Exit | Description |
| - | - |
| `NEXT` | The API call succeeded. |
| `ERROR` | The API call failed. Error details are stored in the `m3shError` state variable. |
## Create PlanGroupLink
**Function name:** `m3ter_PostPlanGroupLink`
**Category:** WRITE
**HTTP method:** POST
**Destination:** m3ter
Create a new PlanGroupLink.
### Parameters
| Name | Label | Type | Required | Description | Constraints |
| - | - | - | :-: | - | - |
| `integrationCredentialsId` | Credentials | M3terEntityParameter | Yes | The m3ter credentials to use. | authType: M3TER\_SIGNED\_REQUEST, m3terEntity: IntegrationCredentials |
| `requestPath` | Request Path | StateVariableParameter | Yes | State variable containing the request. | - |
| `statePath` | State Path | StateVariableParameter | No | State variable to store the response. | - |
### Exits
| Exit | Description |
| - | - |
| `NEXT` | The API call succeeded. |
| `ERROR` | The API call failed. Error details are stored in the `m3shError` state variable. |
# Plangroups
Source: https://docs.m3ter.com/m3sh-function-reference/m3ter/plangroups
## List PlanGroups
**Function name:** `m3ter_ListPlanGroups`
**Category:** READ
**HTTP method:** GET (paginated)
**Destination:** m3ter
Retrieve a list of PlanGroups.
Retrieves a list of PlanGroups within the specified organization. You can optionally filter by Account IDs or PlanGroup IDs, and also paginate the results for easier management.
### Parameters
| Name | Label | Type | Required | Description | Constraints |
| - | - | - | :-: | - | - |
| `integrationCredentialsId` | Credentials | M3terEntityParameter | Yes | The m3ter credentials to use. | authType: M3TER\_SIGNED\_REQUEST, m3terEntity: IntegrationCredentials |
| `statePath` | State Path | StateVariableParameter | No | State variable to store the response. | - |
| `queryParams` | Query Parameters | KeyValueLookupParameter | No | Query parameters to include in the request | allowedValues: accountId,ids |
### Exits
| Exit | Description |
| - | - |
| `NEXT` | The API call succeeded. |
| `ERROR` | The API call failed. Error details are stored in the `m3shError` state variable. |
## Create PlanGroup
**Function name:** `m3ter_PostPlanGroup`
**Category:** WRITE
**HTTP method:** POST
**Destination:** m3ter
Create a new PlanGroup.
This endpoint creates a new PlanGroup within the specified organization.
### Parameters
| Name | Label | Type | Required | Description | Constraints |
| - | - | - | :-: | - | - |
| `integrationCredentialsId` | Credentials | M3terEntityParameter | Yes | The m3ter credentials to use. | authType: M3TER\_SIGNED\_REQUEST, m3terEntity: IntegrationCredentials |
| `requestPath` | Request Path | StateVariableParameter | Yes | State variable containing the request. | - |
| `statePath` | State Path | StateVariableParameter | No | State variable to store the response. | - |
### Exits
| Exit | Description |
| - | - |
| `NEXT` | The API call succeeded. |
| `ERROR` | The API call failed. Error details are stored in the `m3shError` state variable. |
## Retrieve PlanGroup
**Function name:** `m3ter_GetPlanGroup`
**Category:** READ
**HTTP method:** GET
**Destination:** m3ter
Retrieve a specific PlanGroup with the given UUID.
This endpoint retrieves detailed information about a specific PlanGroup identified by the given UUID within a specific organization.
### Parameters
| Name | Label | Type | Required | Description | Constraints |
| - | - | - | :-: | - | - |
| `integrationCredentialsId` | Credentials | M3terEntityParameter | Yes | The m3ter credentials to use. | authType: M3TER\_SIGNED\_REQUEST, m3terEntity: IntegrationCredentials |
| `id` | id | LookupParameter | Yes | The unique identifier (UUID) of the PlanGroup to retrieve. | - |
| `statePath` | State Path | StateVariableParameter | No | State variable to store the response. | - |
### Exits
| Exit | Description |
| - | - |
| `NEXT` | The API call succeeded. |
| `ERROR` | The API call failed. Error details are stored in the `m3shError` state variable. |
## Update PlanGroup
**Function name:** `m3ter_PutPlanGroup`
**Category:** WRITE
**HTTP method:** PUT
**Destination:** m3ter
Update the PlanGroup with the given UUID.
This endpoint updates the details of a specific PlanGroup identified by the given UUID within a specific organization. This allows modifications to existing PlanGroup attributes.
**Note:** If you have created Custom Fields for a PlanGroup, when you use this endpoint to update the PlanGroup use the `customFields` parameter to preserve those Custom Fields. If you omit them from the update request, they will be lost.
### Parameters
| Name | Label | Type | Required | Description | Constraints |
| - | - | - | :-: | - | - |
| `integrationCredentialsId` | Credentials | M3terEntityParameter | Yes | The m3ter credentials to use. | authType: M3TER\_SIGNED\_REQUEST, m3terEntity: IntegrationCredentials |
| `id` | id | LookupParameter | Yes | The unique identifier (UUID) of the PlanGroup to update. | - |
| `requestPath` | Request Path | StateVariableParameter | Yes | State variable containing the request. | - |
| `statePath` | State Path | StateVariableParameter | No | State variable to store the response. | - |
### Exits
| Exit | Description |
| - | - |
| `NEXT` | The API call succeeded. |
| `ERROR` | The API call failed. Error details are stored in the `m3shError` state variable. |
## Delete PlanGroup
**Function name:** `m3ter_DeletePlanGroup`
**Category:** WRITE
**HTTP method:** DELETE
**Destination:** m3ter
Delete a PlanGroup with the given UUID.
This endpoint deletes the PlanGroup identified by the given UUID within a specific organization. This operation is irreversible and removes the PlanGroup along with any associated settings.
### Parameters
| Name | Label | Type | Required | Description | Constraints |
| - | - | - | :-: | - | - |
| `integrationCredentialsId` | Credentials | M3terEntityParameter | Yes | The m3ter credentials to use. | authType: M3TER\_SIGNED\_REQUEST, m3terEntity: IntegrationCredentials |
| `id` | id | LookupParameter | Yes | The unique identifier (UUID) of the PlanGroup to delete. | - |
| `statePath` | State Path | StateVariableParameter | No | State variable to store the response. | - |
### Exits
| Exit | Description |
| - | - |
| `NEXT` | The API call succeeded. |
| `ERROR` | The API call failed. Error details are stored in the `m3shError` state variable. |
# Plans
Source: https://docs.m3ter.com/m3sh-function-reference/m3ter/plans
## List Plans
**Function name:** `m3ter_ListPlans`
**Category:** READ
**HTTP method:** GET (paginated)
**Destination:** m3ter
Retrieve a list of Plans that can be filtered by Product, Account, or Plan ID.
### Parameters
| Name | Label | Type | Required | Description | Constraints |
| - | - | - | :-: | - | - |
| `integrationCredentialsId` | Credentials | M3terEntityParameter | Yes | The m3ter credentials to use. | authType: M3TER\_SIGNED\_REQUEST, m3terEntity: IntegrationCredentials |
| `statePath` | State Path | StateVariableParameter | No | State variable to store the response. | - |
| `queryParams` | Query Parameters | KeyValueLookupParameter | No | Query parameters to include in the request | allowedValues: productId,accountId,ids |
### Exits
| Exit | Description |
| - | - |
| `NEXT` | The API call succeeded. |
| `ERROR` | The API call failed. Error details are stored in the `m3shError` state variable. |
## Create Plan
**Function name:** `m3ter_PostPlan`
**Category:** WRITE
**HTTP method:** POST
**Destination:** m3ter
Create a new Plan.
### Parameters
| Name | Label | Type | Required | Description | Constraints |
| - | - | - | :-: | - | - |
| `integrationCredentialsId` | Credentials | M3terEntityParameter | Yes | The m3ter credentials to use. | authType: M3TER\_SIGNED\_REQUEST, m3terEntity: IntegrationCredentials |
| `requestPath` | Request Path | StateVariableParameter | Yes | State variable containing the request. | - |
| `statePath` | State Path | StateVariableParameter | No | State variable to store the response. | - |
### Exits
| Exit | Description |
| - | - |
| `NEXT` | The API call succeeded. |
| `ERROR` | The API call failed. Error details are stored in the `m3shError` state variable. |
## Retrieve Plan
**Function name:** `m3ter_GetPlan`
**Category:** READ
**HTTP method:** GET
**Destination:** m3ter
Retrieve the Plan with the given UUID.
### Parameters
| Name | Label | Type | Required | Description | Constraints |
| - | - | - | :-: | - | - |
| `integrationCredentialsId` | Credentials | M3terEntityParameter | Yes | The m3ter credentials to use. | authType: M3TER\_SIGNED\_REQUEST, m3terEntity: IntegrationCredentials |
| `id` | id | LookupParameter | Yes | The UUID of the Plan to retrieve. | - |
| `statePath` | State Path | StateVariableParameter | No | State variable to store the response. | - |
### Exits
| Exit | Description |
| - | - |
| `NEXT` | The API call succeeded. |
| `ERROR` | The API call failed. Error details are stored in the `m3shError` state variable. |
## Update Plan
**Function name:** `m3ter_PutPlan`
**Category:** WRITE
**HTTP method:** PUT
**Destination:** m3ter
Update the Plan with the given UUID.
**Note:** If you have created Custom Fields for a Plan, when you use this endpoint to update the Plan use the `customFields` parameter to preserve those Custom Fields. If you omit them from the update request, they will be lost.
### Parameters
| Name | Label | Type | Required | Description | Constraints |
| - | - | - | :-: | - | - |
| `integrationCredentialsId` | Credentials | M3terEntityParameter | Yes | The m3ter credentials to use. | authType: M3TER\_SIGNED\_REQUEST, m3terEntity: IntegrationCredentials |
| `id` | id | LookupParameter | Yes | The UUID of the Plan to update. | - |
| `requestPath` | Request Path | StateVariableParameter | Yes | State variable containing the request. | - |
| `statePath` | State Path | StateVariableParameter | No | State variable to store the response. | - |
### Exits
| Exit | Description |
| - | - |
| `NEXT` | The API call succeeded. |
| `ERROR` | The API call failed. Error details are stored in the `m3shError` state variable. |
## Delete Plan
**Function name:** `m3ter_DeletePlan`
**Category:** WRITE
**HTTP method:** DELETE
**Destination:** m3ter
Delete the Plan with the given UUID.
### Parameters
| Name | Label | Type | Required | Description | Constraints |
| - | - | - | :-: | - | - |
| `integrationCredentialsId` | Credentials | M3terEntityParameter | Yes | The m3ter credentials to use. | authType: M3TER\_SIGNED\_REQUEST, m3terEntity: IntegrationCredentials |
| `id` | id | LookupParameter | Yes | The UUID of the Plan to delete. | - |
| `statePath` | State Path | StateVariableParameter | No | State variable to store the response. | - |
### Exits
| Exit | Description |
| - | - |
| `NEXT` | The API call succeeded. |
| `ERROR` | The API call failed. Error details are stored in the `m3shError` state variable. |
# Plantemplates
Source: https://docs.m3ter.com/m3sh-function-reference/m3ter/plantemplates
## List PlanTemplates
**Function name:** `m3ter_ListPlanTemplates`
**Category:** READ
**HTTP method:** GET (paginated)
**Destination:** m3ter
Retrieve a list of PlanTemplates.
This endpoint enables you to retrieve a paginated list of PlanTemplates belonging to a specific Organization, identified by its UUID. You can filter the list by PlanTemplate IDs or Product IDs for more focused retrieval.
### Parameters
| Name | Label | Type | Required | Description | Constraints |
| - | - | - | :-: | - | - |
| `integrationCredentialsId` | Credentials | M3terEntityParameter | Yes | The m3ter credentials to use. | authType: M3TER\_SIGNED\_REQUEST, m3terEntity: IntegrationCredentials |
| `statePath` | State Path | StateVariableParameter | No | State variable to store the response. | - |
| `queryParams` | Query Parameters | KeyValueLookupParameter | No | Query parameters to include in the request | allowedValues: productId,ids |
### Exits
| Exit | Description |
| - | - |
| `NEXT` | The API call succeeded. |
| `ERROR` | The API call failed. Error details are stored in the `m3shError` state variable. |
## Create PlanTemplate
**Function name:** `m3ter_PostPlanTemplate`
**Category:** WRITE
**HTTP method:** POST
**Destination:** m3ter
Create a new PlanTemplate.
This endpoint creates a new PlanTemplate within a specific Organization, identified by its unique UUID. The request body should contain the necessary information for the new PlanTemplate.
### Parameters
| Name | Label | Type | Required | Description | Constraints |
| - | - | - | :-: | - | - |
| `integrationCredentialsId` | Credentials | M3terEntityParameter | Yes | The m3ter credentials to use. | authType: M3TER\_SIGNED\_REQUEST, m3terEntity: IntegrationCredentials |
| `requestPath` | Request Path | StateVariableParameter | Yes | State variable containing the request. | - |
| `statePath` | State Path | StateVariableParameter | No | State variable to store the response. | - |
### Exits
| Exit | Description |
| - | - |
| `NEXT` | The API call succeeded. |
| `ERROR` | The API call failed. Error details are stored in the `m3shError` state variable. |
## Retrieve PlanTemplate
**Function name:** `m3ter_GetPlanTemplate`
**Category:** READ
**HTTP method:** GET
**Destination:** m3ter
Retrieve a specific PlanTemplate.
This endpoint allows you to retrieve a specific PlanTemplate within a specific Organization, both identified by their unique identifiers (UUIDs).
### Parameters
| Name | Label | Type | Required | Description | Constraints |
| - | - | - | :-: | - | - |
| `integrationCredentialsId` | Credentials | M3terEntityParameter | Yes | The m3ter credentials to use. | authType: M3TER\_SIGNED\_REQUEST, m3terEntity: IntegrationCredentials |
| `id` | id | LookupParameter | Yes | The unique identifier (UUID) of the PlanTemplate to retrieve. | - |
| `statePath` | State Path | StateVariableParameter | No | State variable to store the response. | - |
### Exits
| Exit | Description |
| - | - |
| `NEXT` | The API call succeeded. |
| `ERROR` | The API call failed. Error details are stored in the `m3shError` state variable. |
## Update PlanTemplate
**Function name:** `m3ter_PutPlanTemplate`
**Category:** WRITE
**HTTP method:** PUT
**Destination:** m3ter
Update a specific PlanTemplate.
This endpoint enables you to update a specific PlanTemplate within a specific Organization, both identified by their unique identifiers (UUIDs). The request body should contain the updated information for the PlanTemplate.
**Note:** If you have created Custom Fields for a Plan Template, when you use this endpoint to update the Plan Template use the `customFields` parameter to preserve those Custom Fields. If you omit them from the update request, they will be lost.
### Parameters
| Name | Label | Type | Required | Description | Constraints |
| - | - | - | :-: | - | - |
| `integrationCredentialsId` | Credentials | M3terEntityParameter | Yes | The m3ter credentials to use. | authType: M3TER\_SIGNED\_REQUEST, m3terEntity: IntegrationCredentials |
| `id` | id | LookupParameter | Yes | The unique identifier (UUID) of the PlanTemplate to update. | - |
| `requestPath` | Request Path | StateVariableParameter | Yes | State variable containing the request. | - |
| `statePath` | State Path | StateVariableParameter | No | State variable to store the response. | - |
### Exits
| Exit | Description |
| - | - |
| `NEXT` | The API call succeeded. |
| `ERROR` | The API call failed. Error details are stored in the `m3shError` state variable. |
## Delete PlanTemplate
**Function name:** `m3ter_DeletePlanTemplate`
**Category:** WRITE
**HTTP method:** DELETE
**Destination:** m3ter
Delete a specific PlanTemplate.
This endpoint enables you to delete a specific PlanTemplate within a specific Organization, both identified by their unique identifiers (UUIDs).
### Parameters
| Name | Label | Type | Required | Description | Constraints |
| - | - | - | :-: | - | - |
| `integrationCredentialsId` | Credentials | M3terEntityParameter | Yes | The m3ter credentials to use. | authType: M3TER\_SIGNED\_REQUEST, m3terEntity: IntegrationCredentials |
| `id` | id | LookupParameter | Yes | The unique identifier (UUID) of the PlanTemplate to update. | - |
| `statePath` | State Path | StateVariableParameter | No | State variable to store the response. | - |
### Exits
| Exit | Description |
| - | - |
| `NEXT` | The API call succeeded. |
| `ERROR` | The API call failed. Error details are stored in the `m3shError` state variable. |
# Pricings
Source: https://docs.m3ter.com/m3sh-function-reference/m3ter/pricings
## Retrieve Pricing
**Function name:** `m3ter_GetPricing`
**Category:** READ
**HTTP method:** GET
**Destination:** m3ter
Retrieve the Pricing with the given UUID.
### Parameters
| Name | Label | Type | Required | Description | Constraints |
| - | - | - | :-: | - | - |
| `integrationCredentialsId` | Credentials | M3terEntityParameter | Yes | The m3ter credentials to use. | authType: M3TER\_SIGNED\_REQUEST, m3terEntity: IntegrationCredentials |
| `id` | id | LookupParameter | Yes | The UUID of the Pricing to retrieve. | - |
| `statePath` | State Path | StateVariableParameter | No | State variable to store the response. | - |
### Exits
| Exit | Description |
| - | - |
| `NEXT` | The API call succeeded. |
| `ERROR` | The API call failed. Error details are stored in the `m3shError` state variable. |
## Update Pricing
**Function name:** `m3ter_PutPricing`
**Category:** WRITE
**HTTP method:** PUT
**Destination:** m3ter
Update Pricing for the given UUID.
**Notes:**
* **Pricing Plan or Plan Template?** Exactly one of `planId` or `planTemplateId` request parameters are required for this call to be valid. If you omit both, then you will receive a validation error.
* **Using Aggregation or Compound Aggregation for Pricing?** Exactly one of `aggregationId` or `compoundAggregationId` request parameters are required for this call to be valid. If you omit both, then you will receive a validation error.
* **Using Negative Values for Pricing?** If you use the `type` request parameter with the `DEBIT` option, *you cannot use negative values* for `fixedPrice` or `unitPrice` in `pricingBands` or `overagePricingBands`, and you'll receive a validation error. If you omit a `type` request parameter a `DEBIT` pricing is created by default and the same constraint on the use of negative values applies.
### Parameters
| Name | Label | Type | Required | Description | Constraints |
| - | - | - | :-: | - | - |
| `integrationCredentialsId` | Credentials | M3terEntityParameter | Yes | The m3ter credentials to use. | authType: M3TER\_SIGNED\_REQUEST, m3terEntity: IntegrationCredentials |
| `id` | id | LookupParameter | Yes | The UUID of the Pricing to update. | - |
| `requestPath` | Request Path | StateVariableParameter | Yes | State variable containing the request. | - |
| `statePath` | State Path | StateVariableParameter | No | State variable to store the response. | - |
### Exits
| Exit | Description |
| - | - |
| `NEXT` | The API call succeeded. |
| `ERROR` | The API call failed. Error details are stored in the `m3shError` state variable. |
## Delete Pricing
**Function name:** `m3ter_DeletePricing`
**Category:** WRITE
**HTTP method:** DELETE
**Destination:** m3ter
Delete the Pricing with the given UUID.
### Parameters
| Name | Label | Type | Required | Description | Constraints |
| - | - | - | :-: | - | - |
| `integrationCredentialsId` | Credentials | M3terEntityParameter | Yes | The m3ter credentials to use. | authType: M3TER\_SIGNED\_REQUEST, m3terEntity: IntegrationCredentials |
| `id` | id | LookupParameter | Yes | The UUID of the Pricing to delete. | - |
| `statePath` | State Path | StateVariableParameter | No | State variable to store the response. | - |
### Exits
| Exit | Description |
| - | - |
| `NEXT` | The API call succeeded. |
| `ERROR` | The API call failed. Error details are stored in the `m3shError` state variable. |
## List Pricings
**Function name:** `m3ter_ListPricings`
**Category:** READ
**HTTP method:** GET (paginated)
**Destination:** m3ter
Retrieve a list of Pricings filtered by date/time, Plan ID, PlanTemplate ID, or Pricing ID.
### Parameters
| Name | Label | Type | Required | Description | Constraints |
| - | - | - | :-: | - | - |
| `integrationCredentialsId` | Credentials | M3terEntityParameter | Yes | The m3ter credentials to use. | authType: M3TER\_SIGNED\_REQUEST, m3terEntity: IntegrationCredentials |
| `statePath` | State Path | StateVariableParameter | No | State variable to store the response. | - |
| `queryParams` | Query Parameters | KeyValueLookupParameter | No | Query parameters to include in the request | allowedValues: date,planId,planTemplateId,aggregationId,ids |
### Exits
| Exit | Description |
| - | - |
| `NEXT` | The API call succeeded. |
| `ERROR` | The API call failed. Error details are stored in the `m3shError` state variable. |
## Create Pricing
**Function name:** `m3ter_PostPricing`
**Category:** WRITE
**HTTP method:** POST
**Destination:** m3ter
Create a new Pricing.
**Notes:**
* **Pricing Plan or Plan Template?** Exactly one of `planId` or `planTemplateId` request parameters are required for this call to be valid. If you omit both, then you will receive a validation error.
* **Using Aggregation or Compound Aggregation for Pricing?** Exactly one of `aggregationId` or `compoundAggregationId` request parameters are required for this call to be valid. If you omit both, then you will receive a validation error.
* **Using Negative Values for Pricing?** If you use the `type` request parameter with the `DEBIT` option, *you cannot use negative values* for `fixedPrice` or `unitPrice` in `pricingBands` or `overagePricingBands`, and you'll receive a validation error. If you omit a `type` request parameter a `DEBIT` pricing is created by default and the same constraint on the use of negative values applies.
### Parameters
| Name | Label | Type | Required | Description | Constraints |
| - | - | - | :-: | - | - |
| `integrationCredentialsId` | Credentials | M3terEntityParameter | Yes | The m3ter credentials to use. | authType: M3TER\_SIGNED\_REQUEST, m3terEntity: IntegrationCredentials |
| `requestPath` | Request Path | StateVariableParameter | Yes | State variable containing the request. | - |
| `statePath` | State Path | StateVariableParameter | No | State variable to store the response. | - |
### Exits
| Exit | Description |
| - | - |
| `NEXT` | The API call succeeded. |
| `ERROR` | The API call failed. Error details are stored in the `m3shError` state variable. |
# Products
Source: https://docs.m3ter.com/m3sh-function-reference/m3ter/products
## Retrieve Product
**Function name:** `m3ter_GetProduct`
**Category:** READ
**HTTP method:** GET
**Destination:** m3ter
Retrieve a Product with the given UUID.
This endpoint retrieves the details of a specific Product within a specified Organization, using the Product UUID.
### Parameters
| Name | Label | Type | Required | Description | Constraints |
| - | - | - | :-: | - | - |
| `integrationCredentialsId` | Credentials | M3terEntityParameter | Yes | The m3ter credentials to use. | authType: M3TER\_SIGNED\_REQUEST, m3terEntity: IntegrationCredentials |
| `id` | id | LookupParameter | Yes | The unique identifier (UUID) of the Product to retrieve. | - |
| `statePath` | State Path | StateVariableParameter | No | State variable to store the response. | - |
### Exits
| Exit | Description |
| - | - |
| `NEXT` | The API call succeeded. |
| `ERROR` | The API call failed. Error details are stored in the `m3shError` state variable. |
## Update Product
**Function name:** `m3ter_PutProduct`
**Category:** WRITE
**HTTP method:** PUT
**Destination:** m3ter
Update a Product with the given UUID.
This endpoint updates the details of a specific Product within a specified Organization, using the Product UUID. The updated details are provided in the request body.
**Note:** If you have created Custom Fields for a Product, when you use this endpoint to update the Product use the `customFields` parameter to preserve those Custom Fields. If you omit them from the update request, they will be lost.
### Parameters
| Name | Label | Type | Required | Description | Constraints |
| - | - | - | :-: | - | - |
| `integrationCredentialsId` | Credentials | M3terEntityParameter | Yes | The m3ter credentials to use. | authType: M3TER\_SIGNED\_REQUEST, m3terEntity: IntegrationCredentials |
| `id` | id | LookupParameter | Yes | The unique identifer (UUID) of the Product to update. | - |
| `requestPath` | Request Path | StateVariableParameter | Yes | State variable containing the request. | - |
| `statePath` | State Path | StateVariableParameter | No | State variable to store the response. | - |
### Exits
| Exit | Description |
| - | - |
| `NEXT` | The API call succeeded. |
| `ERROR` | The API call failed. Error details are stored in the `m3shError` state variable. |
## Delete Product
**Function name:** `m3ter_DeleteProduct`
**Category:** WRITE
**HTTP method:** DELETE
**Destination:** m3ter
Delete a Product with the given UUID.
This endpoint deletes a specific Product within a specified Organization, using the Product UUID.
### Parameters
| Name | Label | Type | Required | Description | Constraints |
| - | - | - | :-: | - | - |
| `integrationCredentialsId` | Credentials | M3terEntityParameter | Yes | The m3ter credentials to use. | authType: M3TER\_SIGNED\_REQUEST, m3terEntity: IntegrationCredentials |
| `id` | id | LookupParameter | Yes | The unique identifer (UUID) of the Product to delete. | - |
| `statePath` | State Path | StateVariableParameter | No | State variable to store the response. | - |
### Exits
| Exit | Description |
| - | - |
| `NEXT` | The API call succeeded. |
| `ERROR` | The API call failed. Error details are stored in the `m3shError` state variable. |
## List Products
**Function name:** `m3ter_ListProducts`
**Category:** READ
**HTTP method:** GET (paginated)
**Destination:** m3ter
Retrieve a list of Products.
This endpoint retrieves a list of all the Products within a specified Organization. The list can be paginated, and supports filtering by specific Product IDs.
### Parameters
| Name | Label | Type | Required | Description | Constraints |
| - | - | - | :-: | - | - |
| `integrationCredentialsId` | Credentials | M3terEntityParameter | Yes | The m3ter credentials to use. | authType: M3TER\_SIGNED\_REQUEST, m3terEntity: IntegrationCredentials |
| `statePath` | State Path | StateVariableParameter | No | State variable to store the response. | - |
| `queryParams` | Query Parameters | KeyValueLookupParameter | No | Query parameters to include in the request | allowedValues: ids |
### Exits
| Exit | Description |
| - | - |
| `NEXT` | The API call succeeded. |
| `ERROR` | The API call failed. Error details are stored in the `m3shError` state variable. |
## Create Product
**Function name:** `m3ter_PostProduct`
**Category:** WRITE
**HTTP method:** POST
**Destination:** m3ter
Create a new Product.
This endpoint creates a new Product within the specified Organization. The details of the Product are provided in the request body.
### Parameters
| Name | Label | Type | Required | Description | Constraints |
| - | - | - | :-: | - | - |
| `integrationCredentialsId` | Credentials | M3terEntityParameter | Yes | The m3ter credentials to use. | authType: M3TER\_SIGNED\_REQUEST, m3terEntity: IntegrationCredentials |
| `requestPath` | Request Path | StateVariableParameter | Yes | State variable containing the request. | - |
| `statePath` | State Path | StateVariableParameter | No | State variable to store the response. | - |
### Exits
| Exit | Description |
| - | - |
| `NEXT` | The API call succeeded. |
| `ERROR` | The API call failed. Error details are stored in the `m3shError` state variable. |
# Resourcegroups
Source: https://docs.m3ter.com/m3sh-function-reference/m3ter/resourcegroups
## List ResourceGroup permission policies
**Function name:** `m3ter_GetResourceGroupPermissions`
**Category:** READ
**HTTP method:** GET (paginated)
**Destination:** m3ter
Retrieve a list of permission policies for a ResourceGroup
### Parameters
| Name | Label | Type | Required | Description | Constraints |
| - | - | - | :-: | - | - |
| `integrationCredentialsId` | Credentials | M3terEntityParameter | Yes | The m3ter credentials to use. | authType: M3TER\_SIGNED\_REQUEST, m3terEntity: IntegrationCredentials |
| `type` | type | LookupParameter | Yes | The type of resource | - |
| `resourceGroupId` | resourceGroupId | LookupParameter | Yes | UUID of the ResourceGroup | - |
| `statePath` | State Path | StateVariableParameter | No | State variable to store the response. | - |
### Exits
| Exit | Description |
| - | - |
| `NEXT` | The API call succeeded. |
| `ERROR` | The API call failed. Error details are stored in the `m3shError` state variable. |
## Remove item
**Function name:** `m3ter_RemoveResourceFromGroup`
**Category:** WRITE
**HTTP method:** POST
**Destination:** m3ter
Remove an item from a ResourceGroup.
### Parameters
| Name | Label | Type | Required | Description | Constraints |
| - | - | - | :-: | - | - |
| `integrationCredentialsId` | Credentials | M3terEntityParameter | Yes | The m3ter credentials to use. | authType: M3TER\_SIGNED\_REQUEST, m3terEntity: IntegrationCredentials |
| `resourceGroupId` | resourceGroupId | LookupParameter | Yes | The UUID of the ResourceGroup to remove the item from. | - |
| `type` | type | LookupParameter | Yes | The type of resource | - |
| `requestPath` | Request Path | StateVariableParameter | Yes | State variable containing the request. | - |
| `statePath` | State Path | StateVariableParameter | No | State variable to store the response. | - |
### Exits
| Exit | Description |
| - | - |
| `NEXT` | The API call succeeded. |
| `ERROR` | The API call failed. Error details are stored in the `m3shError` state variable. |
## Retrieve ResourceGroup
**Function name:** `m3ter_GetResourceGroup`
**Category:** READ
**HTTP method:** GET
**Destination:** m3ter
Retrieve the ResourceGroup for the UUID
### Parameters
| Name | Label | Type | Required | Description | Constraints |
| - | - | - | :-: | - | - |
| `integrationCredentialsId` | Credentials | M3terEntityParameter | Yes | The m3ter credentials to use. | authType: M3TER\_SIGNED\_REQUEST, m3terEntity: IntegrationCredentials |
| `id` | id | LookupParameter | Yes | The UUID of the ResourceGroup to retrieve. | - |
| `type` | type | LookupParameter | Yes | The type of resource | - |
| `statePath` | State Path | StateVariableParameter | No | State variable to store the response. | - |
### Exits
| Exit | Description |
| - | - |
| `NEXT` | The API call succeeded. |
| `ERROR` | The API call failed. Error details are stored in the `m3shError` state variable. |
## Update ResourceGroup
**Function name:** `m3ter_PutResourceGroup`
**Category:** WRITE
**HTTP method:** PUT
**Destination:** m3ter
Update the ResourceGroup for the UUID
### Parameters
| Name | Label | Type | Required | Description | Constraints |
| - | - | - | :-: | - | - |
| `integrationCredentialsId` | Credentials | M3terEntityParameter | Yes | The m3ter credentials to use. | authType: M3TER\_SIGNED\_REQUEST, m3terEntity: IntegrationCredentials |
| `id` | id | LookupParameter | Yes | The UUID of the ResourceGroup to update. | - |
| `type` | type | LookupParameter | Yes | The type of resource | - |
| `requestPath` | Request Path | StateVariableParameter | Yes | State variable containing the request. | - |
| `statePath` | State Path | StateVariableParameter | No | State variable to store the response. | - |
### Exits
| Exit | Description |
| - | - |
| `NEXT` | The API call succeeded. |
| `ERROR` | The API call failed. Error details are stored in the `m3shError` state variable. |
## Delete ResourceGroup
**Function name:** `m3ter_DeleteResourceGroup`
**Category:** WRITE
**HTTP method:** DELETE
**Destination:** m3ter
Delete a ResourceGroup for the UUID
### Parameters
| Name | Label | Type | Required | Description | Constraints |
| - | - | - | :-: | - | - |
| `integrationCredentialsId` | Credentials | M3terEntityParameter | Yes | The m3ter credentials to use. | authType: M3TER\_SIGNED\_REQUEST, m3terEntity: IntegrationCredentials |
| `id` | id | LookupParameter | Yes | The UUID of the ResourceGroup to delete. | - |
| `type` | type | LookupParameter | Yes | The type of resource | - |
| `statePath` | State Path | StateVariableParameter | No | State variable to store the response. | - |
### Exits
| Exit | Description |
| - | - |
| `NEXT` | The API call succeeded. |
| `ERROR` | The API call failed. Error details are stored in the `m3shError` state variable. |
## List ResourceGroups
**Function name:** `m3ter_ListResourceGroups`
**Category:** READ
**HTTP method:** GET (paginated)
**Destination:** m3ter
Retrieve a list of ResourceGroup entities
### Parameters
| Name | Label | Type | Required | Description | Constraints |
| - | - | - | :-: | - | - |
| `integrationCredentialsId` | Credentials | M3terEntityParameter | Yes | The m3ter credentials to use. | authType: M3TER\_SIGNED\_REQUEST, m3terEntity: IntegrationCredentials |
| `type` | type | LookupParameter | Yes | The type of resource | - |
| `statePath` | State Path | StateVariableParameter | No | State variable to store the response. | - |
### Exits
| Exit | Description |
| - | - |
| `NEXT` | The API call succeeded. |
| `ERROR` | The API call failed. Error details are stored in the `m3shError` state variable. |
## Create ResourceGroup
**Function name:** `m3ter_PostResourceGroup`
**Category:** WRITE
**HTTP method:** POST
**Destination:** m3ter
Create a ResourceGroup for the UUID
### Parameters
| Name | Label | Type | Required | Description | Constraints |
| - | - | - | :-: | - | - |
| `integrationCredentialsId` | Credentials | M3terEntityParameter | Yes | The m3ter credentials to use. | authType: M3TER\_SIGNED\_REQUEST, m3terEntity: IntegrationCredentials |
| `type` | type | LookupParameter | Yes | The type of resource | - |
| `requestPath` | Request Path | StateVariableParameter | Yes | State variable containing the request. | - |
| `statePath` | State Path | StateVariableParameter | No | State variable to store the response. | - |
### Exits
| Exit | Description |
| - | - |
| `NEXT` | The API call succeeded. |
| `ERROR` | The API call failed. Error details are stored in the `m3shError` state variable. |
## List ResourceGroup items
**Function name:** `m3ter_ListResourceGroupsForId`
**Category:** WRITE
**HTTP method:** POST
**Destination:** m3ter
Retrieve a list of items for a ResourceGroup
### Parameters
| Name | Label | Type | Required | Description | Constraints |
| - | - | - | :-: | - | - |
| `integrationCredentialsId` | Credentials | M3terEntityParameter | Yes | The m3ter credentials to use. | authType: M3TER\_SIGNED\_REQUEST, m3terEntity: IntegrationCredentials |
| `type` | type | LookupParameter | Yes | The type of resource | - |
| `resourceGroupId` | resourceGroupId | LookupParameter | Yes | UUID of the ResourceGroup | - |
| `statePath` | State Path | StateVariableParameter | No | State variable to store the response. | - |
### Exits
| Exit | Description |
| - | - |
| `NEXT` | The API call succeeded. |
| `ERROR` | The API call failed. Error details are stored in the `m3shError` state variable. |
## Add item
**Function name:** `m3ter_AddResourceToGroup`
**Category:** WRITE
**HTTP method:** POST
**Destination:** m3ter
Add an item to a ResourceGroup.
### Parameters
| Name | Label | Type | Required | Description | Constraints |
| - | - | - | :-: | - | - |
| `integrationCredentialsId` | Credentials | M3terEntityParameter | Yes | The m3ter credentials to use. | authType: M3TER\_SIGNED\_REQUEST, m3terEntity: IntegrationCredentials |
| `resourceGroupId` | resourceGroupId | LookupParameter | Yes | The UUID of the ResourceGroup to add the item to. | - |
| `type` | type | LookupParameter | Yes | The type of resource the Resource Group is for, such as a Meter Resource Group. | - |
| `requestPath` | Request Path | StateVariableParameter | Yes | State variable containing the request. | - |
| `statePath` | State Path | StateVariableParameter | No | State variable to store the response. | - |
### Exits
| Exit | Description |
| - | - |
| `NEXT` | The API call succeeded. |
| `ERROR` | The API call failed. Error details are stored in the `m3shError` state variable. |
# Scheduledevents
Source: https://docs.m3ter.com/m3sh-function-reference/m3ter/scheduledevents
## Retrieve ScheduledEventConfiguration
**Function name:** `m3ter_GetScheduledEventConfiguration`
**Category:** READ
**HTTP method:** GET
**Destination:** m3ter
Retrieve a ScheduledEventConfiguration for the given UUID.
### Parameters
| Name | Label | Type | Required | Description | Constraints |
| - | - | - | :-: | - | - |
| `integrationCredentialsId` | Credentials | M3terEntityParameter | Yes | The m3ter credentials to use. | authType: M3TER\_SIGNED\_REQUEST, m3terEntity: IntegrationCredentials |
| `id` | id | LookupParameter | Yes | The UUID of the ScheduledEventConfiguration to retrieve. | - |
| `statePath` | State Path | StateVariableParameter | No | State variable to store the response. | - |
### Exits
| Exit | Description |
| - | - |
| `NEXT` | The API call succeeded. |
| `ERROR` | The API call failed. Error details are stored in the `m3shError` state variable. |
## Update ScheduledEventConfiguration
**Function name:** `m3ter_UpdateScheduledEventConfiguration`
**Category:** WRITE
**HTTP method:** PUT
**Destination:** m3ter
Update a ScheduledEventConfiguration for the given UUID.
### Parameters
| Name | Label | Type | Required | Description | Constraints |
| - | - | - | :-: | - | - |
| `integrationCredentialsId` | Credentials | M3terEntityParameter | Yes | The m3ter credentials to use. | authType: M3TER\_SIGNED\_REQUEST, m3terEntity: IntegrationCredentials |
| `id` | id | LookupParameter | Yes | The UUID of the ScheduledEventConfiguration to update. | - |
| `requestPath` | Request Path | StateVariableParameter | Yes | State variable containing the request. | - |
| `statePath` | State Path | StateVariableParameter | No | State variable to store the response. | - |
### Exits
| Exit | Description |
| - | - |
| `NEXT` | The API call succeeded. |
| `ERROR` | The API call failed. Error details are stored in the `m3shError` state variable. |
## Delete ScheduledEventConfiguration
**Function name:** `m3ter_DeleteScheduledEventConfiguration`
**Category:** WRITE
**HTTP method:** DELETE
**Destination:** m3ter
Delete the ScheduledEventConfiguration for the given UUID.
### Parameters
| Name | Label | Type | Required | Description | Constraints |
| - | - | - | :-: | - | - |
| `integrationCredentialsId` | Credentials | M3terEntityParameter | Yes | The m3ter credentials to use. | authType: M3TER\_SIGNED\_REQUEST, m3terEntity: IntegrationCredentials |
| `id` | id | LookupParameter | Yes | The UUID of the ScheduledEventConfiguration to delete. | - |
| `statePath` | State Path | StateVariableParameter | No | State variable to store the response. | - |
### Exits
| Exit | Description |
| - | - |
| `NEXT` | The API call succeeded. |
| `ERROR` | The API call failed. Error details are stored in the `m3shError` state variable. |
## List ScheduledEventConfigurations
**Function name:** `m3ter_ListScheduledEventConfigurations`
**Category:** READ
**HTTP method:** GET (paginated)
**Destination:** m3ter
Retrieve a list of ScheduledEventConfiguration entities
### Parameters
| Name | Label | Type | Required | Description | Constraints |
| - | - | - | :-: | - | - |
| `integrationCredentialsId` | Credentials | M3terEntityParameter | Yes | The m3ter credentials to use. | authType: M3TER\_SIGNED\_REQUEST, m3terEntity: IntegrationCredentials |
| `statePath` | State Path | StateVariableParameter | No | State variable to store the response. | - |
| `queryParams` | Query Parameters | KeyValueLookupParameter | No | Query parameters to include in the request | allowedValues: ids |
### Exits
| Exit | Description |
| - | - |
| `NEXT` | The API call succeeded. |
| `ERROR` | The API call failed. Error details are stored in the `m3shError` state variable. |
## Create ScheduledEventConfiguration
**Function name:** `m3ter_CreateScheduledEventConfiguration`
**Category:** WRITE
**HTTP method:** POST
**Destination:** m3ter
Create a new ScheduledEventConfiguration.
### Parameters
| Name | Label | Type | Required | Description | Constraints |
| - | - | - | :-: | - | - |
| `integrationCredentialsId` | Credentials | M3terEntityParameter | Yes | The m3ter credentials to use. | authType: M3TER\_SIGNED\_REQUEST, m3terEntity: IntegrationCredentials |
| `requestPath` | Request Path | StateVariableParameter | Yes | State variable containing the request. | - |
| `statePath` | State Path | StateVariableParameter | No | State variable to store the response. | - |
### Exits
| Exit | Description |
| - | - |
| `NEXT` | The API call succeeded. |
| `ERROR` | The API call failed. Error details are stored in the `m3shError` state variable. |
# Serviceusers
Source: https://docs.m3ter.com/m3sh-function-reference/m3ter/serviceusers
## Activate ServiceUser Credentials
**Function name:** `m3ter_ActivateServiceUserCredentials`
**Category:** WRITE
**HTTP method:** PUT
**Destination:** m3ter
Activate a credentials key pair for a service user.
### Parameters
| Name | Label | Type | Required | Description | Constraints |
| - | - | - | :-: | - | - |
| `integrationCredentialsId` | Credentials | M3terEntityParameter | Yes | The m3ter credentials to use. | authType: M3TER\_SIGNED\_REQUEST, m3terEntity: IntegrationCredentials |
| `id` | id | LookupParameter | Yes | UUID of the service user. | - |
| `apiKey` | apiKey | LookupParameter | Yes | API key for the service user credentials. | - |
| `statePath` | State Path | StateVariableParameter | No | State variable to store the response. | - |
### Exits
| Exit | Description |
| - | - |
| `NEXT` | The API call succeeded. |
| `ERROR` | The API call failed. Error details are stored in the `m3shError` state variable. |
## Retrieve ServiceUser Permissions
**Function name:** `m3ter_GetServiceUserPermissions`
**Category:** READ
**HTTP method:** GET
**Destination:** m3ter
Retrieve permission policies attached to a service user.
### Parameters
| Name | Label | Type | Required | Description | Constraints |
| - | - | - | :-: | - | - |
| `integrationCredentialsId` | Credentials | M3terEntityParameter | Yes | The m3ter credentials to use. | authType: M3TER\_SIGNED\_REQUEST, m3terEntity: IntegrationCredentials |
| `id` | id | LookupParameter | Yes | UUID of the service user. | - |
| `statePath` | State Path | StateVariableParameter | No | State variable to store the response. | - |
### Exits
| Exit | Description |
| - | - |
| `NEXT` | The API call succeeded. |
| `ERROR` | The API call failed. Error details are stored in the `m3shError` state variable. |
## List ServiceUser Credentials
**Function name:** `m3ter_ListServiceUserCredentials`
**Category:** READ
**HTTP method:** GET (paginated)
**Destination:** m3ter
Retrieve the credentials key pairs for a service user.
### Parameters
| Name | Label | Type | Required | Description | Constraints |
| - | - | - | :-: | - | - |
| `integrationCredentialsId` | Credentials | M3terEntityParameter | Yes | The m3ter credentials to use. | authType: M3TER\_SIGNED\_REQUEST, m3terEntity: IntegrationCredentials |
| `id` | id | LookupParameter | Yes | UUID of the service user. | - |
| `statePath` | State Path | StateVariableParameter | No | State variable to store the response. | - |
### Exits
| Exit | Description |
| - | - |
| `NEXT` | The API call succeeded. |
| `ERROR` | The API call failed. Error details are stored in the `m3shError` state variable. |
## Create ServiceUser Credentials
**Function name:** `m3ter_PostServiceUserCredentials`
**Category:** WRITE
**HTTP method:** POST
**Destination:** m3ter
Create a new credentials key pair for a service user.
### Parameters
| Name | Label | Type | Required | Description | Constraints |
| - | - | - | :-: | - | - |
| `integrationCredentialsId` | Credentials | M3terEntityParameter | Yes | The m3ter credentials to use. | authType: M3TER\_SIGNED\_REQUEST, m3terEntity: IntegrationCredentials |
| `id` | id | LookupParameter | Yes | UUID of the service user. | - |
| `statePath` | State Path | StateVariableParameter | No | State variable to store the response. | - |
### Exits
| Exit | Description |
| - | - |
| `NEXT` | The API call succeeded. |
| `ERROR` | The API call failed. Error details are stored in the `m3shError` state variable. |
## Deactivate ServiceUser Credentials
**Function name:** `m3ter_InactivateServiceUserCredentials`
**Category:** WRITE
**HTTP method:** PUT
**Destination:** m3ter
Deactivate a credentials key pair for a service user.
### Parameters
| Name | Label | Type | Required | Description | Constraints |
| - | - | - | :-: | - | - |
| `integrationCredentialsId` | Credentials | M3terEntityParameter | Yes | The m3ter credentials to use. | authType: M3TER\_SIGNED\_REQUEST, m3terEntity: IntegrationCredentials |
| `id` | id | LookupParameter | Yes | UUID of the service user. | - |
| `apiKey` | apiKey | LookupParameter | Yes | API key for the service user credentials. | - |
| `statePath` | State Path | StateVariableParameter | No | State variable to store the response. | - |
### Exits
| Exit | Description |
| - | - |
| `NEXT` | The API call succeeded. |
| `ERROR` | The API call failed. Error details are stored in the `m3shError` state variable. |
## Retrieve ServiceUser Credentials
**Function name:** `m3ter_GetServiceUserCredentials`
**Category:** READ
**HTTP method:** GET
**Destination:** m3ter
Retrieve a credentials key pair for a service user.
### Parameters
| Name | Label | Type | Required | Description | Constraints |
| - | - | - | :-: | - | - |
| `integrationCredentialsId` | Credentials | M3terEntityParameter | Yes | The m3ter credentials to use. | authType: M3TER\_SIGNED\_REQUEST, m3terEntity: IntegrationCredentials |
| `id` | id | LookupParameter | Yes | UUID of the service user. | - |
| `apiKey` | apiKey | LookupParameter | Yes | API key for the service user credentials. | - |
| `statePath` | State Path | StateVariableParameter | No | State variable to store the response. | - |
### Exits
| Exit | Description |
| - | - |
| `NEXT` | The API call succeeded. |
| `ERROR` | The API call failed. Error details are stored in the `m3shError` state variable. |
## Delete ServiceUser Credentials
**Function name:** `m3ter_DeleteServiceUserCredentials`
**Category:** WRITE
**HTTP method:** DELETE
**Destination:** m3ter
Delete a deactivated credentials key pair for a service user.
### Parameters
| Name | Label | Type | Required | Description | Constraints |
| - | - | - | :-: | - | - |
| `integrationCredentialsId` | Credentials | M3terEntityParameter | Yes | The m3ter credentials to use. | authType: M3TER\_SIGNED\_REQUEST, m3terEntity: IntegrationCredentials |
| `id` | id | LookupParameter | Yes | UUID of the service user. | - |
| `apiKey` | apiKey | LookupParameter | Yes | API key for the service user credentials. | - |
| `statePath` | State Path | StateVariableParameter | No | State variable to store the response. | - |
### Exits
| Exit | Description |
| - | - |
| `NEXT` | The API call succeeded. |
| `ERROR` | The API call failed. Error details are stored in the `m3shError` state variable. |
## Retrieve ServiceUser
**Function name:** `m3ter_GetServiceUser`
**Category:** READ
**HTTP method:** GET
**Destination:** m3ter
Retrieve the service user for the UUID.
### Parameters
| Name | Label | Type | Required | Description | Constraints |
| - | - | - | :-: | - | - |
| `integrationCredentialsId` | Credentials | M3terEntityParameter | Yes | The m3ter credentials to use. | authType: M3TER\_SIGNED\_REQUEST, m3terEntity: IntegrationCredentials |
| `id` | id | LookupParameter | Yes | UUID of the service user to retrieve. | - |
| `statePath` | State Path | StateVariableParameter | No | State variable to store the response. | - |
### Exits
| Exit | Description |
| - | - |
| `NEXT` | The API call succeeded. |
| `ERROR` | The API call failed. Error details are stored in the `m3shError` state variable. |
## Update ServiceUser
**Function name:** `m3ter_PutServiceUser`
**Category:** WRITE
**HTTP method:** PUT
**Destination:** m3ter
Update the service user for the UUID.
### Parameters
| Name | Label | Type | Required | Description | Constraints |
| - | - | - | :-: | - | - |
| `integrationCredentialsId` | Credentials | M3terEntityParameter | Yes | The m3ter credentials to use. | authType: M3TER\_SIGNED\_REQUEST, m3terEntity: IntegrationCredentials |
| `id` | id | LookupParameter | Yes | UUID of the service user to update. | - |
| `requestPath` | Request Path | StateVariableParameter | Yes | State variable containing the request. | - |
| `statePath` | State Path | StateVariableParameter | No | State variable to store the response. | - |
### Exits
| Exit | Description |
| - | - |
| `NEXT` | The API call succeeded. |
| `ERROR` | The API call failed. Error details are stored in the `m3shError` state variable. |
## Delete ServiceUser
**Function name:** `m3ter_DeleteServiceUser`
**Category:** WRITE
**HTTP method:** DELETE
**Destination:** m3ter
Delete the service user for the UUID.
### Parameters
| Name | Label | Type | Required | Description | Constraints |
| - | - | - | :-: | - | - |
| `integrationCredentialsId` | Credentials | M3terEntityParameter | Yes | The m3ter credentials to use. | authType: M3TER\_SIGNED\_REQUEST, m3terEntity: IntegrationCredentials |
| `id` | id | LookupParameter | Yes | UUID of the service user to delete. | - |
| `statePath` | State Path | StateVariableParameter | No | State variable to store the response. | - |
### Exits
| Exit | Description |
| - | - |
| `NEXT` | The API call succeeded. |
| `ERROR` | The API call failed. Error details are stored in the `m3shError` state variable. |
## List ServiceUsers
**Function name:** `m3ter_ListServiceUsers`
**Category:** READ
**HTTP method:** GET (paginated)
**Destination:** m3ter
Retrieve a list of service users.
### Parameters
| Name | Label | Type | Required | Description | Constraints |
| - | - | - | :-: | - | - |
| `integrationCredentialsId` | Credentials | M3terEntityParameter | Yes | The m3ter credentials to use. | authType: M3TER\_SIGNED\_REQUEST, m3terEntity: IntegrationCredentials |
| `statePath` | State Path | StateVariableParameter | No | State variable to store the response. | - |
### Exits
| Exit | Description |
| - | - |
| `NEXT` | The API call succeeded. |
| `ERROR` | The API call failed. Error details are stored in the `m3shError` state variable. |
## Create ServiceUser
**Function name:** `m3ter_PostServiceUser`
**Category:** WRITE
**HTTP method:** POST
**Destination:** m3ter
Create a new service user.
### Parameters
| Name | Label | Type | Required | Description | Constraints |
| - | - | - | :-: | - | - |
| `integrationCredentialsId` | Credentials | M3terEntityParameter | Yes | The m3ter credentials to use. | authType: M3TER\_SIGNED\_REQUEST, m3terEntity: IntegrationCredentials |
| `requestPath` | Request Path | StateVariableParameter | Yes | State variable containing the request. | - |
| `statePath` | State Path | StateVariableParameter | No | State variable to store the response. | - |
### Exits
| Exit | Description |
| - | - |
| `NEXT` | The API call succeeded. |
| `ERROR` | The API call failed. Error details are stored in the `m3shError` state variable. |
# Statementdefinitions
Source: https://docs.m3ter.com/m3sh-function-reference/m3ter/statementdefinitions
## Retrieve StatementDefinition
**Function name:** `m3ter_GetStatementDefinition`
**Category:** READ
**HTTP method:** GET
**Destination:** m3ter
Retrieve a StatementDefinition with the given UUID.
Retrieves the details of a specific StatementDefinition for the specified Organization, using its unique identifier (UUID). This endpoint is useful when you want to retrieve the complete details of a single StatementDefinition.
### Parameters
| Name | Label | Type | Required | Description | Constraints |
| - | - | - | :-: | - | - |
| `integrationCredentialsId` | Credentials | M3terEntityParameter | Yes | The m3ter credentials to use. | authType: M3TER\_SIGNED\_REQUEST, m3terEntity: IntegrationCredentials |
| `id` | id | LookupParameter | Yes | The unique identifier (UUID) of the StatementDefinition to retrieve. | - |
| `statePath` | State Path | StateVariableParameter | No | State variable to store the response. | - |
### Exits
| Exit | Description |
| - | - |
| `NEXT` | The API call succeeded. |
| `ERROR` | The API call failed. Error details are stored in the `m3shError` state variable. |
## Update StatementDefinition
**Function name:** `m3ter_PutStatementDefinition`
**Category:** WRITE
**HTTP method:** PUT
**Destination:** m3ter
Update StatementDefinition for the given UUID.
Update the details of a specific StatementDefinition for the specified Organization, using its unique identifier (UUID). The updated details for the StatementDefinition should be sent in the request body.
### Parameters
| Name | Label | Type | Required | Description | Constraints |
| - | - | - | :-: | - | - |
| `integrationCredentialsId` | Credentials | M3terEntityParameter | Yes | The m3ter credentials to use. | authType: M3TER\_SIGNED\_REQUEST, m3terEntity: IntegrationCredentials |
| `id` | id | LookupParameter | Yes | | - |
| `requestPath` | Request Path | StateVariableParameter | Yes | State variable containing the request. | - |
| `statePath` | State Path | StateVariableParameter | No | State variable to store the response. | - |
### Exits
| Exit | Description |
| - | - |
| `NEXT` | The API call succeeded. |
| `ERROR` | The API call failed. Error details are stored in the `m3shError` state variable. |
## Delete StatementDefinition
**Function name:** `m3ter_DeleteStatementDefinition`
**Category:** WRITE
**HTTP method:** DELETE
**Destination:** m3ter
Delete a StatementDefinition with the given UUID.
This endpoint deletes a specific StatementDefinition within a specified Organization, using the StatementDefinition UUID.
### Parameters
| Name | Label | Type | Required | Description | Constraints |
| - | - | - | :-: | - | - |
| `integrationCredentialsId` | Credentials | M3terEntityParameter | Yes | The m3ter credentials to use. | authType: M3TER\_SIGNED\_REQUEST, m3terEntity: IntegrationCredentials |
| `id` | id | LookupParameter | Yes | The unique identifier (UUID) of the StatementDefinition to delete. | - |
| `statePath` | State Path | StateVariableParameter | No | State variable to store the response. | - |
### Exits
| Exit | Description |
| - | - |
| `NEXT` | The API call succeeded. |
| `ERROR` | The API call failed. Error details are stored in the `m3shError` state variable. |
## List StatementDefinitions
**Function name:** `m3ter_ListStatementDefinitions`
**Category:** READ
**HTTP method:** GET (paginated)
**Destination:** m3ter
Retrieve a list of StatementDefinitions.
This endpoint retrieves a list of all the StatementDefinitions within a specified Organization. The list can be paginated for easier management.
### Parameters
| Name | Label | Type | Required | Description | Constraints |
| - | - | - | :-: | - | - |
| `integrationCredentialsId` | Credentials | M3terEntityParameter | Yes | The m3ter credentials to use. | authType: M3TER\_SIGNED\_REQUEST, m3terEntity: IntegrationCredentials |
| `statePath` | State Path | StateVariableParameter | No | State variable to store the response. | - |
### Exits
| Exit | Description |
| - | - |
| `NEXT` | The API call succeeded. |
| `ERROR` | The API call failed. Error details are stored in the `m3shError` state variable. |
## Create StatementDefinition
**Function name:** `m3ter_PostStatementDefinition`
**Category:** WRITE
**HTTP method:** POST
**Destination:** m3ter
Create a new StatementDefinition.
This endpoint creates a new StatementDefinition within the specified Organization. The details of the StatementDefinition are provided in the request body.
### Parameters
| Name | Label | Type | Required | Description | Constraints |
| - | - | - | :-: | - | - |
| `integrationCredentialsId` | Credentials | M3terEntityParameter | Yes | The m3ter credentials to use. | authType: M3TER\_SIGNED\_REQUEST, m3terEntity: IntegrationCredentials |
| `requestPath` | Request Path | StateVariableParameter | Yes | State variable containing the request. | - |
| `statePath` | State Path | StateVariableParameter | No | State variable to store the response. | - |
### Exits
| Exit | Description |
| - | - |
| `NEXT` | The API call succeeded. |
| `ERROR` | The API call failed. Error details are stored in the `m3shError` state variable. |
# Statementjobs
Source: https://docs.m3ter.com/m3sh-function-reference/m3ter/statementjobs
## Get StatementJob
**Function name:** `m3ter_GetStatementJob`
**Category:** READ
**HTTP method:** GET
**Destination:** m3ter
Retrieves the details of a specific StatementJob using its UUID.
Use this call to obtain the time-bound pre-signed download URL for the generated Bill Statement if the initial [Create StatementJob](https://www.m3ter.com/docs/api#tag/StatementJob/operation/CreateStatementJob) returned a response showing the `statementJobStatus` not yet complete and as `PENDING` or `RUNNING`.
**Note:** When you have submitted a StatementJob and a Bill Statement has been generated, you can also download the Statement directly from a Bill Details page in the Console. See [Working with Bill Statements](https://www.m3ter.com/docs/guides/billing-and-usage-data/running-viewing-and-managing-bills/working-with-bill-statements) in our user Documentation.
### Parameters
| Name | Label | Type | Required | Description | Constraints |
| - | - | - | :-: | - | - |
| `integrationCredentialsId` | Credentials | M3terEntityParameter | Yes | The m3ter credentials to use. | authType: M3TER\_SIGNED\_REQUEST, m3terEntity: IntegrationCredentials |
| `id` | id | LookupParameter | Yes | | - |
| `statePath` | State Path | StateVariableParameter | No | State variable to store the response. | - |
### Exits
| Exit | Description |
| - | - |
| `NEXT` | The API call succeeded. |
| `ERROR` | The API call failed. Error details are stored in the `m3shError` state variable. |
## List Statement Jobs
**Function name:** `m3ter_ListStatementJobs`
**Category:** READ
**HTTP method:** GET (paginated)
**Destination:** m3ter
Retrieve a list of StatementJobs.
Retrieves a list of all StatementJobs for a specific Organization. You can filter the results based on:
* StatementJob status.
* Whether StatementJob is neither completed nor cancelled but remains active.
* The ID of the Bill the StatementJob is associated with.
You can also paginate the results for easier management.
**WARNING!**
* You can use only one of the valid Query parameters: `active`, `status`, or `billId` in any call. If you use more than one of these Query parameters in the same call, then a 400 Bad Request is returned with an error message.
### Parameters
| Name | Label | Type | Required | Description | Constraints |
| - | - | - | :-: | - | - |
| `integrationCredentialsId` | Credentials | M3terEntityParameter | Yes | The m3ter credentials to use. | authType: M3TER\_SIGNED\_REQUEST, m3terEntity: IntegrationCredentials |
| `statePath` | State Path | StateVariableParameter | No | State variable to store the response. | - |
| `queryParams` | Query Parameters | KeyValueLookupParameter | No | Query parameters to include in the request | allowedValues: active,status,billId |
### Exits
| Exit | Description |
| - | - |
| `NEXT` | The API call succeeded. |
| `ERROR` | The API call failed. Error details are stored in the `m3shError` state variable. |
## Create StatementJob
**Function name:** `m3ter_CreateStatementJob`
**Category:** WRITE
**HTTP method:** POST
**Destination:** m3ter
This endpoint creates a StatementJob for a single bill within an Organization using the Bill UUID.
The Bill Statement is generated asynchronously:
* The default format for generating the Statement is in JSON format and according to the Bill Statement Definition you've specified at either Organization level or Account level.
* If you also want to generate the Statement in CSV format, use the `includeCsvFormat` request body parameter.
* The response body provides a time-bound pre-signed URL, which you can use to download the JSON format Statement.
* When you have generated a Statement for a Bill, you can also obtain a time-bound pre-signed download URL using either the [Retrieve Bill Statement in JSON Format](https://www.m3ter.com/docs/api#tag/Bill/operation/GetBillJsonStatement) and [Retrieve Bill Statement in CSV Format](https://www.m3ter.com/docs/api#tag/Bill/operation/GetBillCsvStatement) calls found in the [Bill](https://www.m3ter.com/docs/api#tag/Bill) section of this API Reference.
**Notes:**
* If the response to the Create StatementJob call shows the `statementJobStatus` as `PENDING` or `RUNNING`, you will not receive the pre-signed URL in the response. Wait a few minutes to allow the StatementJob to complete and then use the [Get StatmentJob](https://www.m3ter.com/docs/api#tag/StatementJob/operation/GetStatementJob) call in this section to obtain the pre-signed download URL for the generated Bill Statement.
* When you have submitted a StatementJob and a Bill Statement has been generated, you can also download the Statement directly from a Bill Details page in the Console. See [Working with Bill Statements](https://www.m3ter.com/docs/guides/billing-and-usage-data/running-viewing-and-managing-bills/working-with-bill-statements) in our user Documentation.
### Parameters
| Name | Label | Type | Required | Description | Constraints |
| - | - | - | :-: | - | - |
| `integrationCredentialsId` | Credentials | M3terEntityParameter | Yes | The m3ter credentials to use. | authType: M3TER\_SIGNED\_REQUEST, m3terEntity: IntegrationCredentials |
| `requestPath` | Request Path | StateVariableParameter | Yes | State variable containing the request. | - |
| `statePath` | State Path | StateVariableParameter | No | State variable to store the response. | - |
### Exits
| Exit | Description |
| - | - |
| `NEXT` | The API call succeeded. |
| `ERROR` | The API call failed. Error details are stored in the `m3shError` state variable. |
## Create Batch StatementJobs
**Function name:** `m3ter_CreateStatementJobBatch`
**Category:** WRITE
**HTTP method:** POST
**Destination:** m3ter
Create a batch of StatementJobs for multiple bills.
Initiate the creation of multiple StatementJobs asynchronously for the list of bills with the given UUIDs:
* The default format for generating Bill Statements is in JSON format and according to the Bill Statement Definition you've specified at either Organization level or Account level.
* If you also want to generate the Statements in CSV format, use the `includeCsvFormat` request body parameter.
* The response body provides a time-bound pre-signed URL, which you can use to download the JSON format Statement.
* When you have generated a Statement for a Bill, you can also obtain a time-bound pre-signed download URL using either the [Retrieve Bill Statement in JSON Format](https://www.m3ter.com/docs/api#tag/Bill/operation/GetBillJsonStatement) and [Retrieve Bill Statement in CSV Format](https://www.m3ter.com/docs/api#tag/Bill/operation/GetBillCsvStatement) calls found in the [Bill](https://www.m3ter.com/docs/api#tag/Bill) section of this API Reference.
**Notes:**
* If the response to the Create StatementJob call shows the `statementJobStatus` as `PENDING` or `RUNNING`, you will not receive the pre-signed URL in the response. Wait a few minutes to allow the StatementJob to complete and then use the [Get StatmentJob](https://www.m3ter.com/docs/api#tag/StatementJob/operation/GetStatementJob) call in this section to obtain the pre-signed download URL for the generated Bill Statement.
* When you have submitted a StatementJob and a Bill Statement has been generated, you can also download the Statement directly from a Bill Details page in the Console. See [Working with Bill Statements](https://www.m3ter.com/docs/guides/billing-and-usage-data/running-viewing-and-managing-bills/working-with-bill-statements) in our user Documentation.
### Parameters
| Name | Label | Type | Required | Description | Constraints |
| - | - | - | :-: | - | - |
| `integrationCredentialsId` | Credentials | M3terEntityParameter | Yes | The m3ter credentials to use. | authType: M3TER\_SIGNED\_REQUEST, m3terEntity: IntegrationCredentials |
| `requestPath` | Request Path | StateVariableParameter | Yes | State variable containing the request. | - |
| `statePath` | State Path | StateVariableParameter | No | State variable to store the response. | - |
### Exits
| Exit | Description |
| - | - |
| `NEXT` | The API call succeeded. |
| `ERROR` | The API call failed. Error details are stored in the `m3shError` state variable. |
## Cancel StatementJob
**Function name:** `m3ter_CancelStatementJob`
**Category:** WRITE
**HTTP method:** POST
**Destination:** m3ter
Cancel the StatementJob with the given UUID.
Use this endpoint to halt the execution of a specific StatementJob identified by its UUID. This operation may be useful if you need to stop a StatementJob due to unforeseen issues or changes.
### Parameters
| Name | Label | Type | Required | Description | Constraints |
| - | - | - | :-: | - | - |
| `integrationCredentialsId` | Credentials | M3terEntityParameter | Yes | The m3ter credentials to use. | authType: M3TER\_SIGNED\_REQUEST, m3terEntity: IntegrationCredentials |
| `id` | id | LookupParameter | Yes | The unique identifier (UUID) of the StatementJob to cancel. | - |
| `statePath` | State Path | StateVariableParameter | No | State variable to store the response. | - |
### Exits
| Exit | Description |
| - | - |
| `NEXT` | The API call succeeded. |
| `ERROR` | The API call failed. Error details are stored in the `m3shError` state variable. |
# Support
Source: https://docs.m3ter.com/m3sh-function-reference/m3ter/support
## Retrieve Support Details
**Function name:** `m3ter_GetSupport`
**Category:** READ
**HTTP method:** GET
**Destination:** m3ter
Get support user details on the specific permissions applied and the date and time support access ends.
### Parameters
| Name | Label | Type | Required | Description | Constraints |
| - | - | - | :-: | - | - |
| `integrationCredentialsId` | Credentials | M3terEntityParameter | Yes | The m3ter credentials to use. | authType: M3TER\_SIGNED\_REQUEST, m3terEntity: IntegrationCredentials |
| `statePath` | State Path | StateVariableParameter | No | State variable to store the response. | - |
### Exits
| Exit | Description |
| - | - |
| `NEXT` | The API call succeeded. |
| `ERROR` | The API call failed. Error details are stored in the `m3shError` state variable. |
## Request Support
**Function name:** `m3ter_PutSupport`
**Category:** WRITE
**HTTP method:** PUT
**Destination:** m3ter
Use this call to make a request and grant m3ter Support access to your Organization for a specified timeframe and with specific permissions assigned to Support users. You might want to grant Support access when you've submitted a request for help in resolving an issue you've encountered in your Organization
### Parameters
| Name | Label | Type | Required | Description | Constraints |
| - | - | - | :-: | - | - |
| `integrationCredentialsId` | Credentials | M3terEntityParameter | Yes | The m3ter credentials to use. | authType: M3TER\_SIGNED\_REQUEST, m3terEntity: IntegrationCredentials |
| `requestPath` | Request Path | StateVariableParameter | Yes | State variable containing the request. | - |
| `statePath` | State Path | StateVariableParameter | No | State variable to store the response. | - |
### Exits
| Exit | Description |
| - | - |
| `NEXT` | The API call succeeded. |
| `ERROR` | The API call failed. Error details are stored in the `m3shError` state variable. |
# Support Permissions
Source: https://docs.m3ter.com/m3sh-function-reference/m3ter/support-permissions
## Retrieve Support Permissions
**Function name:** `m3ter_GetSupportUserPermissions`
**Category:** READ
**HTTP method:** GET (paginated)
**Destination:** m3ter
Get permission policies assigned to support users when they access your Organization.
### Parameters
| Name | Label | Type | Required | Description | Constraints |
| - | - | - | :-: | - | - |
| `integrationCredentialsId` | Credentials | M3terEntityParameter | Yes | The m3ter credentials to use. | authType: M3TER\_SIGNED\_REQUEST, m3terEntity: IntegrationCredentials |
| `statePath` | State Path | StateVariableParameter | No | State variable to store the response. | - |
### Exits
| Exit | Description |
| - | - |
| `NEXT` | The API call succeeded. |
| `ERROR` | The API call failed. Error details are stored in the `m3shError` state variable. |
# Usage
Source: https://docs.m3ter.com/m3sh-function-reference/m3ter/usage
## List UsageSavedQueries
**Function name:** `m3ter_ListUsageSavedQueries`
**Category:** READ
**HTTP method:** GET (paginated)
**Destination:** m3ter
Retrieve a list of UsageSavedQuery entities
### Parameters
| Name | Label | Type | Required | Description | Constraints |
| - | - | - | :-: | - | - |
| `integrationCredentialsId` | Credentials | M3terEntityParameter | Yes | The m3ter credentials to use. | authType: M3TER\_SIGNED\_REQUEST, m3terEntity: IntegrationCredentials |
| `statePath` | State Path | StateVariableParameter | No | State variable to store the response. | - |
| `queryParams` | Query Parameters | KeyValueLookupParameter | No | Query parameters to include in the request | allowedValues: ids,queryType |
### Exits
| Exit | Description |
| - | - |
| `NEXT` | The API call succeeded. |
| `ERROR` | The API call failed. Error details are stored in the `m3shError` state variable. |
## Create UsageSavedQuery
**Function name:** `m3ter_CreateUsageSavedQuery`
**Category:** WRITE
**HTTP method:** POST
**Destination:** m3ter
Create a new UsageSavedQuery.
### Parameters
| Name | Label | Type | Required | Description | Constraints |
| - | - | - | :-: | - | - |
| `integrationCredentialsId` | Credentials | M3terEntityParameter | Yes | The m3ter credentials to use. | authType: M3TER\_SIGNED\_REQUEST, m3terEntity: IntegrationCredentials |
| `requestPath` | Request Path | StateVariableParameter | Yes | State variable containing the request. | - |
| `statePath` | State Path | StateVariableParameter | No | State variable to store the response. | - |
### Exits
| Exit | Description |
| - | - |
| `NEXT` | The API call succeeded. |
| `ERROR` | The API call failed. Error details are stored in the `m3shError` state variable. |
## Query and filter usage data
**Function name:** `m3ter_PostUsageDataQuery`
**Category:** READ
**HTTP method:** POST
**Destination:** m3ter
Query and filter usage data collected for your Organization.
You can use several parameters to filter the range of usage data returned:
* **Time period.** Use `startDate` and `endDate` to define a period. The query references the `timestamp` values of usage data submissions for applying the defined time period, and not the time submissions were `receivedAt` by the platform. Only usage data with a `timestamp` that falls in the defined time period are returned.(Required)
* **Meters.** Specify the Meters you want the query to return data for.
* **Accounts.** Specify the Accounts you want the query to return data for.
* **Dimension Filters.** Specify values for Dimension data fields on included Meters. Only data that match the specified Dimension field values will be returned for the query.
You can apply Aggregations functions to the usage data returned for the query. If you apply Aggregations, you can select to group the data by:
* **Account**
* **Time**
* **Dimension**
### Parameters
| Name | Label | Type | Required | Description | Constraints |
| - | - | - | :-: | - | - |
| `integrationCredentialsId` | Credentials | M3terEntityParameter | Yes | The m3ter credentials to use. | authType: M3TER\_SIGNED\_REQUEST, m3terEntity: IntegrationCredentials |
| `requestPath` | Request Path | StateVariableParameter | Yes | State variable containing the request. | - |
| `statePath` | State Path | StateVariableParameter | No | State variable to store the response. | - |
### Exits
| Exit | Description |
| - | - |
| `NEXT` | The API call succeeded. |
| `ERROR` | The API call failed. Error details are stored in the `m3shError` state variable. |
## Retrieve UsageSavedQuery
**Function name:** `m3ter_GetUsageSavedQuery`
**Category:** READ
**HTTP method:** GET
**Destination:** m3ter
Retrieve a UsageSavedQuery for the given UUID.
### Parameters
| Name | Label | Type | Required | Description | Constraints |
| - | - | - | :-: | - | - |
| `integrationCredentialsId` | Credentials | M3terEntityParameter | Yes | The m3ter credentials to use. | authType: M3TER\_SIGNED\_REQUEST, m3terEntity: IntegrationCredentials |
| `id` | id | LookupParameter | Yes | The UUID of the UsageSavedQuery to retrieve. | - |
| `statePath` | State Path | StateVariableParameter | No | State variable to store the response. | - |
### Exits
| Exit | Description |
| - | - |
| `NEXT` | The API call succeeded. |
| `ERROR` | The API call failed. Error details are stored in the `m3shError` state variable. |
## Update UsageSavedQuery
**Function name:** `m3ter_UpdateUsageSavedQuery`
**Category:** WRITE
**HTTP method:** PUT
**Destination:** m3ter
Update a UsageSavedQuery for the given UUID.
### Parameters
| Name | Label | Type | Required | Description | Constraints |
| - | - | - | :-: | - | - |
| `integrationCredentialsId` | Credentials | M3terEntityParameter | Yes | The m3ter credentials to use. | authType: M3TER\_SIGNED\_REQUEST, m3terEntity: IntegrationCredentials |
| `id` | id | LookupParameter | Yes | The UUID of the UsageSavedQuery to update. | - |
| `requestPath` | Request Path | StateVariableParameter | Yes | State variable containing the request. | - |
| `statePath` | State Path | StateVariableParameter | No | State variable to store the response. | - |
### Exits
| Exit | Description |
| - | - |
| `NEXT` | The API call succeeded. |
| `ERROR` | The API call failed. Error details are stored in the `m3shError` state variable. |
## Delete UsageSavedQuery
**Function name:** `m3ter_DeleteUsageSavedQuery`
**Category:** WRITE
**HTTP method:** DELETE
**Destination:** m3ter
Delete the UsageSavedQuery for the given UUID.
### Parameters
| Name | Label | Type | Required | Description | Constraints |
| - | - | - | :-: | - | - |
| `integrationCredentialsId` | Credentials | M3terEntityParameter | Yes | The m3ter credentials to use. | authType: M3TER\_SIGNED\_REQUEST, m3terEntity: IntegrationCredentials |
| `id` | id | LookupParameter | Yes | The UUID of the UsageSavedQuery to update. | - |
| `statePath` | State Path | StateVariableParameter | No | State variable to store the response. | - |
### Exits
| Exit | Description |
| - | - |
| `NEXT` | The API call succeeded. |
| `ERROR` | The API call failed. Error details are stored in the `m3shError` state variable. |
# Users
Source: https://docs.m3ter.com/m3sh-function-reference/m3ter/users
## Retrieve OrgUser
**Function name:** `m3ter_GetOrgUser`
**Category:** READ
**HTTP method:** GET
**Destination:** m3ter
Retrieve the OrgUser with the given UUID.
Retrieves detailed information for a specific user within an Organization, using their unique identifier (UUID).
### Parameters
| Name | Label | Type | Required | Description | Constraints |
| - | - | - | :-: | - | - |
| `integrationCredentialsId` | Credentials | M3terEntityParameter | Yes | The m3ter credentials to use. | authType: M3TER\_SIGNED\_REQUEST, m3terEntity: IntegrationCredentials |
| `id` | id | LookupParameter | Yes | The unique identifier (UUID) of the Organization User to retrieve. **Note:** The `orgId` path parameter is also required. | - |
| `statePath` | State Path | StateVariableParameter | No | State variable to store the response. | - |
### Exits
| Exit | Description |
| - | - |
| `NEXT` | The API call succeeded. |
| `ERROR` | The API call failed. Error details are stored in the `m3shError` state variable. |
## Update OrgUser
**Function name:** `m3ter_PutOrgUser`
**Category:** WRITE
**HTTP method:** PUT
**Destination:** m3ter
Update the OrgUser with the given UUID.
Updates the details for a specific user within an Organization using their unique identifier (UUID). Use this endpoint when you need to modify user information such as their permission policy.
### Parameters
| Name | Label | Type | Required | Description | Constraints |
| - | - | - | :-: | - | - |
| `integrationCredentialsId` | Credentials | M3terEntityParameter | Yes | The m3ter credentials to use. | authType: M3TER\_SIGNED\_REQUEST, m3terEntity: IntegrationCredentials |
| `id` | id | LookupParameter | Yes | The unique identifier (UUID) of the OrgUser to update. **Note:** The `orgId` path parameter is also required. | - |
| `requestPath` | Request Path | StateVariableParameter | Yes | State variable containing the request. | - |
| `statePath` | State Path | StateVariableParameter | No | State variable to store the response. | - |
### Exits
| Exit | Description |
| - | - |
| `NEXT` | The API call succeeded. |
| `ERROR` | The API call failed. Error details are stored in the `m3shError` state variable. |
## Retrieve OrgUser Permissions
**Function name:** `m3ter_GetOrgUserPermissions`
**Category:** READ
**HTTP method:** GET
**Destination:** m3ter
Retrieve the permissions for the OrgUser with the given UUID.
Retrieves a list of all permissions associated with a specific user in an Organization using their UUID. The list can be paginated for easier management.
### Parameters
| Name | Label | Type | Required | Description | Constraints |
| - | - | - | :-: | - | - |
| `integrationCredentialsId` | Credentials | M3terEntityParameter | Yes | The m3ter credentials to use. | authType: M3TER\_SIGNED\_REQUEST, m3terEntity: IntegrationCredentials |
| `id` | id | LookupParameter | Yes | The unique identifier (UUID) of the user whose permissions you want to retrieve. | - |
| `statePath` | State Path | StateVariableParameter | No | State variable to store the response. | - |
### Exits
| Exit | Description |
| - | - |
| `NEXT` | The API call succeeded. |
| `ERROR` | The API call failed. Error details are stored in the `m3shError` state variable. |
## List OrgUsers
**Function name:** `m3ter_ListOrgUsers`
**Category:** READ
**HTTP method:** GET (paginated)
**Destination:** m3ter
Retrieve a list of OrgUsers.
Retrieves a list of all users within a specified Organization. Use this endpoint to get an overview of all users and their basic details. The list can be paginated for easier management.
### Parameters
| Name | Label | Type | Required | Description | Constraints |
| - | - | - | :-: | - | - |
| `integrationCredentialsId` | Credentials | M3terEntityParameter | Yes | The m3ter credentials to use. | authType: M3TER\_SIGNED\_REQUEST, m3terEntity: IntegrationCredentials |
| `statePath` | State Path | StateVariableParameter | No | State variable to store the response. | - |
| `queryParams` | Query Parameters | KeyValueLookupParameter | No | Query parameters to include in the request | allowedValues: ids |
### Exits
| Exit | Description |
| - | - |
| `NEXT` | The API call succeeded. |
| `ERROR` | The API call failed. Error details are stored in the `m3shError` state variable. |
## Retrieve OrgUser Groups
**Function name:** `m3ter_GetOrgUserGroups`
**Category:** READ
**HTTP method:** GET
**Destination:** m3ter
Retrieve a list of User Groups for an OrgUser.
Retrieves a list of all User Groups that a specific user belongs to within an Organization. The list can be paginated for easier management.
**Notes:**
* **User Groups as Resource Groups**. A User Group is a Resource Group - one used to group resources of type `user`. You can use the *Create ResourceGroup* call detailed in the [ResourceGroup](https://www.m3ter.com/docs/api#tag/ResourceGroup) section to create a User Resource Group, and then use the *Add Item* and *Remove Item* calls to manage which Users belong to the User Resource Group.
* **Using the `inherited` parameter for the Retrieve OrgUser Groups call**. Resource Groups can be nested, which means a User Resource Group can contain another User Resource Group as a member. You can use the `inherited` parameter with this *Retrieve OrgUser Groups* call as a *QUERY PARAMETER* to control which User Resource Groups are returned:
- If the user specified belongs to a User Resource Group that is nested as part of another User Resource Group:
* If `inherited = TRUE`, then any Groups the user belongs to AND any parent Groups those Groups belong to as nested Groups are returned.
* If `inherited = FALSE`, then only those User Resource Groups to which the user belongs are returned.
### Parameters
| Name | Label | Type | Required | Description | Constraints |
| - | - | - | :-: | - | - |
| `integrationCredentialsId` | Credentials | M3terEntityParameter | Yes | The m3ter credentials to use. | authType: M3TER\_SIGNED\_REQUEST, m3terEntity: IntegrationCredentials |
| `id` | id | LookupParameter | Yes | The unique identifier (UUID) of the user. | - |
| `statePath` | State Path | StateVariableParameter | No | State variable to store the response. | - |
| `queryParams` | Query Parameters | KeyValueLookupParameter | No | Query parameters to include in the request | allowedValues: inherited |
### Exits
| Exit | Description |
| - | - |
| `NEXT` | The API call succeeded. |
| `ERROR` | The API call failed. Error details are stored in the `m3shError` state variable. |
## Retrieve current user information
**Function name:** `m3ter_GetMe`
**Category:** READ
**HTTP method:** GET
**Destination:** m3ter
Retrieve information about the current user
### Parameters
| Name | Label | Type | Required | Description | Constraints |
| - | - | - | :-: | - | - |
| `integrationCredentialsId` | Credentials | M3terEntityParameter | Yes | The m3ter credentials to use. | authType: M3TER\_SIGNED\_REQUEST, m3terEntity: IntegrationCredentials |
| `statePath` | State Path | StateVariableParameter | No | State variable to store the response. | - |
### Exits
| Exit | Description |
| - | - |
| `NEXT` | The API call succeeded. |
| `ERROR` | The API call failed. Error details are stored in the `m3shError` state variable. |
## Resend temporary password for user
**Function name:** `m3ter_AdminResendTempPass`
**Category:** WRITE
**HTTP method:** PUT
**Destination:** m3ter
Resend temporary password for user
### Parameters
| Name | Label | Type | Required | Description | Constraints |
| - | - | - | :-: | - | - |
| `integrationCredentialsId` | Credentials | M3terEntityParameter | Yes | The m3ter credentials to use. | authType: M3TER\_SIGNED\_REQUEST, m3terEntity: IntegrationCredentials |
| `id` | id | LookupParameter | Yes | UUID of the user | - |
### Exits
| Exit | Description |
| - | - |
| `NEXT` | The API call succeeded. |
| `ERROR` | The API call failed. Error details are stored in the `m3shError` state variable. |
# Aws Functions
Source: https://docs.m3ter.com/m3sh-function-reference/native/aws
## Invoke Lambda
**Function name:** `InvokeLambdaFunction`
**Category:** Write
**Destination:** Aws
Invokes an AWS lambda function
### Parameters
| Name | Label | Required | Description |
| - | - | :-: | - |
| `integrationCredentialsId` | Credentials | Yes | The AWS credentials to use. |
| `functionName` | Function Name | Yes | The name of the function to invoke. |
| `region` | Region | Yes | The AWS region where the function has been deployed. |
| `payload` | Payload | No | The name of the object to pass as the payload when the function is invoked. |
| `resultPayload` | Result Payload | No | The name of the object to store the result payload in. |
| `resultStatus` | Result Status | No | The name of the object to store the result status in. |
| `resultError` | Result Error | No | The name of the object to store the result error in. |
### Exits
| Exit | Description |
| - | - |
| `NEXT` | - |
| `ERROR` | - |
## Read from S3
**Function name:** `ReadFromS3Function`
**Category:** Read
**Destination:** Aws
Reads AWS S3 object into state
### Parameters
| Name | Label | Required | Description |
| - | - | :-: | - |
| `integrationCredentialsId` | Credentials | Yes | The AWS credentials to use. |
| `region` | Region | Yes | The AWS region where the bucket is located |
| `bucket` | Bucket | Yes | The name of the S3 bucket |
| `source` | Source | Yes | The state path to the name of the S3 Object |
| `stateVariable` | State name | Yes | The variable name by which this can be referred to in the workflow |
| `csv` | CSV | Yes | If the file is a CSV file |
| `hasHeaders` | Has headers | No | If the csv file has headers |
### Exits
| Exit | Description |
| - | - |
| `NEXT` | - |
| `ERROR` | - |
## Send Email
**Function name:** `SendEmailFunction`
**Category:** Write
**Destination:** Aws
Sends email via AWS SES
### Parameters
| Name | Label | Required | Description |
| - | - | :-: | - |
| `integrationCredentialsId` | Credentials | Yes | The AWS credentials to use. |
| `region` | Region | Yes | The name of the AWS region where the domain is registered. |
| `from` | From | Yes | The email address to send the email from. |
| `to` | To | Yes | The name of the object to pass as the recipient email address. |
| `emailSubject` | Email Subject | No | The name of the object to pass as the Subject for the email. |
| `payload` | Payload | No | The name of the object to pass as the payload for the email/emailTemplate. |
| `emailTemplate` | Email Template | No | The name of the aws email template. |
| `attachmentData` | Attachment Data | No | State variable holding the data to attach as a file. |
| `attachmentType` | Attachment Type | No | The type of the attachment eg csv or json |
### Exits
| Exit | Description |
| - | - |
| `NEXT` | - |
| `ERROR` | - |
## Send to SNS
**Function name:** `SendToSNSFunction`
**Category:** Write
**Destination:** Aws
Write a state value to an AWS SNS Topic
### Parameters
| Name | Label | Required | Description |
| - | - | :-: | - |
| `integrationCredentialsId` | Credentials | Yes | The AWS credentials to use. |
| `region` | Region | Yes | The AWS region where the SQS queue is located |
| `source` | Source | Yes | The name of the state object to write to SNS |
| `topic` | Queue | Yes | The name of the SNS topic name |
### Exits
| Exit | Description |
| - | - |
| `NEXT` | - |
| `ERROR` | - |
## Send to SQS
**Function name:** `SendToSQSFunction`
**Category:** Write
**Destination:** Aws
Write a state value to an AWS SQS Queue
### Parameters
| Name | Label | Required | Description |
| - | - | :-: | - |
| `integrationCredentialsId` | Credentials | Yes | The AWS credentials to use. |
| `region` | Region | Yes | The AWS region where the SQS queue is located |
| `source` | Source | Yes | The name of the state object to write to SQS |
| `queue` | Queue | Yes | The name of the SQS queue name |
### Exits
| Exit | Description |
| - | - |
| `NEXT` | - |
| `ERROR` | - |
## Write to S3
**Function name:** `WriteToS3Function`
**Category:** Write
**Destination:** Aws
Write a state value to AWS S3
### Parameters
| Name | Label | Required | Description |
| - | - | :-: | - |
| `integrationCredentialsId` | Credentials | Yes | The AWS credentials to use. |
| `region` | Region | Yes | The AWS region where the bucket is located |
| `stateVariable` | State variable | Yes | The variable name by which this output can be referenced using |
| `bucket` | Bucket | Yes | The name of the S3 Bucket |
| `destinationS3Key` | Destination | Yes | The path to the S3 object |
### Exits
| Exit | Description |
| - | - |
| `NEXT` | - |
| `ERROR` | - |
# Chargebee Functions
Source: https://docs.m3ter.com/m3sh-function-reference/native/chargebee
## Create Chargebee Charge Item
**Function name:** `CreateChargebeeChargeItemFunction`
**Category:** Write
**Destination:** Chargebee
Creates a charge item in Chargebee
### Parameters
| Name | Label | Required | Description |
| - | - | :-: | - |
| `integrationCredentialsId` | Credentials | Yes | Chargebee credentials to use. |
| `chargebeeInvoiceId` | Chargebee invoice ID | Yes | Name of the variable by which the Chargebee invoice ID should be retrieved from state |
| `lineItemId` | Line item id | Yes | Name of the variable by which the line item ID should be retrieved from state |
| `itemPrice` | Item price | Yes | Name of the variable by which the item price should be retrieved from state |
| `itemTiersRef` | Item tiers | No | Name of the variable by which the item tiers should be retrieved from state |
| `addExternalMapping` | Add external mappings | No | Flag to decide if external mappings should be added. Defaults to true. |
| `chargebeeInvoiceStateVariable` | Chargebee invoice | Yes | Chargebee invoice passed to state |
### Exits
| Exit | Description |
| - | - |
| `NEXT` | - |
| `ERROR` | - |
## Create Chargebee Invoice
**Function name:** `CreateChargebeeInvoiceFunction`
**Category:** Write
**Destination:** Chargebee
Creates an invoice in Chargebee
### Parameters
| Name | Label | Required | Description |
| - | - | :-: | - |
| `integrationCredentialsId` | Credentials | Yes | Chargebee credentials to use. |
| `m3terBillIdRef` | m3ter bill id | Yes | Name of the variable by which the m3ter bill id should be retrieved from state |
| `accountId` | Account Id | Yes | Name of the variable by which the account id should be retrieved from state |
| `currencyCode` | Currency Code | Yes | Name of the variable by which the currency code should be retrieved from state |
| `itemPrices` | Initial item prices | Yes | Name of the variable by which the initial item prices should be retrieved from state |
| `chargebeeInvoiceStateVariable` | Chargebee invoice | Yes | Name of the variable by which the Chargebee invoice should be stored in state |
| `addExternalMapping` | Add external mappings | No | Flag to decide if external mappings should be added. Defaults to true. |
### Exits
| Exit | Description |
| - | - |
| `NEXT` | - |
| `ERROR` | - |
## Create Chargebee Promotional Credit
**Function name:** `CreateChargebeePromoCreditFunction`
**Category:** Write
**Destination:** Chargebee
Creates a promotional credit in Chargebee
### Parameters
| Name | Label | Required | Description |
| - | - | :-: | - |
| `integrationCredentialsId` | Credentials | Yes | Chargebee credentials to use. |
| `accountId` | Account Id | Yes | Name of the variable by which the account id should be retrieved from state |
| `lineItemId` | Line Item Id | Yes | Name of the variable by which the line item id should be retrieved from state |
| `amount` | Amount | Yes | Name of the variable by which the amount should be retrieved from state |
| `amountInDecimal` | Amount in Decimal | No | Name of the variable by which the amount in decimal should be retrieved from state |
| `currencyCode` | Currency Code | Yes | Currency code for the promotional credit |
| `promoCreditDescription` | Description | Yes | Description of the promotional credit |
| `addExternalMapping` | Add external mappings | No | Flag to decide if external mappings should be added. Defaults to true. |
| `promoCreditStateVariable` | Promotional credit reference | Yes | Name of the variable by which the promotional credit should be stored in state |
### Exits
| Exit | Description |
| - | - |
| `NEXT` | - |
| `ERROR` | - |
## Update Chargebee Promotional Credit
**Function name:** `UpdateChargebeePromoCreditFunction`
**Category:** Write
**Destination:** Chargebee
Update a Promotional Credit in Chargebee
### Parameters
| Name | Label | Required | Description |
| - | - | :-: | - |
| `integrationCredentialsId` | Credentials | Yes | Chargebee credentials to use. |
| `promotionalCreditId` | Promotional credit ID | Yes | Name of the variable by which the promotional credit ID should be retrieved from state |
| `amount` | Amount | Yes | Name of the variable by which the amount should be retrieved from state |
| `amountInDecimal` | Amount in Decimal | No | Name of the variable by which the amount in decimal should be retrieved from state |
| `promotionalCreditStateVariable` | Promotional credit | No | Name of the variable by which the updated promotional credit should be stored in state |
### Exits
| Exit | Description |
| - | - |
| `NEXT` | - |
| `ERROR` | - |
# General Functions
Source: https://docs.m3ter.com/m3sh-function-reference/native/general
## Abort Workflow
**Function name:** `AbortWorkflowFunction`
**Category:** Logic
**Destination:** General
Terminates the workflow with an error message
### Parameters
| Name | Label | Required | Description |
| - | - | :-: | - |
| `message` | Message | No | Error message |
### Exits
| Exit | Description |
| - | - |
| `TERMINATE` | - |
## Add to List
**Function name:** `AddToListFunction`
**Category:** Variables
**Destination:** General
Add a variable to a list
### Parameters
| Name | Label | Required | Description |
| - | - | :-: | - |
| `listName` | Name | Yes | The name by which this list can be referred to in the workflow |
| `path` | Path | Yes | The path to the state variable to add to the list |
### Exits
| Exit | Description |
| - | - |
| `NEXT` | - |
## Apply Transformation
**Function name:** `ApplyTransformationFunction`
**Category:** Convert
**Destination:** General
Perform a pre-defined transformation
### Parameters
| Name | Label | Required | Description |
| - | - | :-: | - |
| `sourceName` | Source | Yes | Name of variable by which name of the object to transform should be retrieved from state |
| `integrationTransformationId` | Transformation | Yes | The UUID of the transformation to apply |
| `stateVariable` | Destination | Yes | Name of the variable by which the transformed object will be stored in state |
### Exits
| Exit | Description |
| - | - |
| `NEXT` | - |
## If
**Function name:** `CalculationFunction`
**Category:** Logic
**Destination:** General
Evaluate a calculation and choose a path based one whether it's true or false
### Parameters
| Name | Label | Required | Description |
| - | - | :-: | - |
| `calculation` | Calculation | Yes | the calculation to evaluate |
### Exits
| Exit | Description |
| - | - |
| `TRUE` | - |
| `FALSE` | - |
## Chunk Iterator
**Function name:** `ChunkIteratorFunction`
**Category:** Logic
**Destination:** General
Wraps a list or iterator and yields it in chunks of up to N elements.
### Parameters
| Name | Label | Required | Description |
| - | - | :-: | - |
| `source` | Source | Yes | State path to a list, or the name of an iterator, to chunk. |
| `chunkSize` | Chunk size | No | Maximum number of elements per chunk. |
| `stateVariable` | State name | Yes | The name to expose the chunk iterator under (loop over this). |
### Exits
| Exit | Description |
| - | - |
| `NEXT` | - |
## Clear Error Status
**Function name:** `ClearErrorStatusFunction`
**Category:** Logic
**Destination:** General
Clears the last error from the state, allowing the workflow to complete successfully. Place this on an error branch once the error has been handled.
### Parameters
| Name | Label | Required | Description |
| - | - | :-: | - |
### Exits
| Exit | Description |
| - | - |
| `NEXT` | - |
## Convert line items
**Function name:** `ConvertLineItemsFunction`
**Category:** Convert
**Destination:** General
Convert line items
### Parameters
| Name | Label | Required | Description |
| - | - | :-: | - |
| `stateVariable` | Destination | Yes | The variable name to store the results of the conversion in the IntegrationState (e.g. `convertedLineItems`) |
### Exits
| Exit | Description |
| - | - |
| `NEXT` | - |
## Create Index
**Function name:** `CreateIndexFunction`
**Category:** Write
**Destination:** General
Create a index on a table in m3sh DB
### Parameters
| Name | Label | Required | Description |
| - | - | :-: | - |
| `tableName` | Table Name | Yes | Table name of the table |
| `indexName` | Index Name | Yes | The name of the index |
| `fieldsToIndex` | Fields to index | Yes | The fields to be indexed |
| `fieldsToInclude` | Fields to include | No | The fields to be included |
### Exits
| Exit | Description |
| - | - |
| `NEXT` | - |
## Create List
**Function name:** `CreateStateListFunction`
**Category:** Variables
**Destination:** General
Create a list which can then be added to
### Parameters
| Name | Label | Required | Description |
| - | - | :-: | - |
| `listName` | Name | Yes | The name by which this list can be referred to in the workflow |
| `listType` | Type | No | The type of object to be added to the list (defaults to objects) |
### Exits
| Exit | Description |
| - | - |
| `NEXT` | - |
## Create Map
**Function name:** `CreateStateMapFunction`
**Category:** Variables
**Destination:** General
Create a map which can then be added to
### Parameters
| Name | Label | Required | Description |
| - | - | :-: | - |
| `mapName` | Name | Yes | The name by which this map can be referred to in the workflow |
### Exits
| Exit | Description |
| - | - |
| `NEXT` | - |
## Create Table
**Function name:** `CreateTableFunction`
**Category:** Write
**Destination:** General
Create a table in m3sh DB and populates it with data from an iterator.
### Parameters
| Name | Label | Required | Description |
| - | - | :-: | - |
| `tableName` | Table Name | Yes | Table name of the table |
| `source` | Source | Yes | The source of the data |
### Exits
| Exit | Description |
| - | - |
| `NEXT` | - |
## For Loop
**Function name:** `ForLoopFunction`
**Category:** Logic
**Destination:** General
Increment or decrement a counter between two numbers.
### Parameters
| Name | Label | Required | Description |
| - | - | :-: | - |
| `startValue` | Start value (inclusive) | Yes | The value to start the for loop at. |
| `endValue` | End value (exclusive) | Yes | The value to end the for loop at. |
| `counterVariableName` | Counter variable | Yes | Counter variable name. |
| `decrement` | Decrement | No | Decrement the counter |
### Exits
| Exit | Description |
| - | - |
| `NEXT` | - |
| `ERROR` | - |
## Get First Result Or Null
**Function name:** `GetFirstResultOrNullFunction`
**Category:** Variables
**Destination:** General
Retrieves the first element from a list or iterator and stores it in a state variable.
### Parameters
| Name | Label | Required | Description |
| - | - | :-: | - |
| `sourceObjectPath` | Source | Yes | The list or iterator to retrieve the first element from. |
| `outputStateVariable` | Output variable | Yes | The name of the state variable in which to store the first element (null if none). |
### Exits
| Exit | Description |
| - | - |
| `NEXT` | - |
## Has Results
**Function name:** `HasResultsFunction`
**Category:** Logic
**Destination:** General
Inspect a list or iterator and branch based on whether it contains values or not
### Parameters
| Name | Label | Required | Description |
| - | - | :-: | - |
| `sourceObjectPath` | Source | Yes | Source of the objects to loop over. |
### Exits
| Exit | Description |
| - | - |
| `TRUE` | - |
| `FALSE` | - |
## Loop
**Function name:** `LoopFunction`
**Category:** Logic
**Destination:** General
Loop over a collection of objects and apply functions to them
### Parameters
| Name | Label | Required | Description |
| - | - | :-: | - |
| `sourceObjectPath` | Source | Yes | Source of the objects to loop over. |
| `counterVariableName` | Counter variable | Yes | Counter variable name. |
| `elementVariableName` | Element variable | No | Element variable name. |
### Exits
| Exit | Description |
| - | - |
| `NEXT` | - |
| `ERROR` | - |
## List Map Values
**Function name:** `MapValuesFunction`
**Category:** Variables
**Destination:** General
Creates a list of values stored in a map
### Parameters
| Name | Label | Required | Description |
| - | - | :-: | - |
| `mapPath` | Map Path | Yes | The state path of the map to retrieve values from |
| `listPath` | List Path | Yes | The state path of the list that will be created containing values copied from the map |
| `fieldName` | Field Name | No | The field within each map value that will be listed - if this is not set, the map value itself will be listed |
### Exits
| Exit | Description |
| - | - |
| `NEXT` | - |
## Merge Lists
**Function name:** `MergeListsFunction`
**Category:** Variables
**Destination:** General
Merges two list of object with a matching field value. The merged objects are added to the destination list
### Parameters
| Name | Label | Required | Description |
| - | - | :-: | - |
| `leftList` | Left List | Yes | The left hand source list. |
| `rightList` | Right List | Yes | The right hand source list. |
| `mergedListsStateVariable` | Merged lists name | Yes | The variable name in which the merged list will be stored in the state. |
| `field` | Field | Yes | The field name that the lists will be joined on. |
| `joinType` | Join Type | Yes | The way in which the lists are joined. |
### Exits
| Exit | Description |
| - | - |
| `NEXT` | - |
## Merge Objects
**Function name:** `MergeObjectsFunction`
**Category:** Convert
**Destination:** General
Merge the source object into the destination object.
### Parameters
| Name | Label | Required | Description |
| - | - | :-: | - |
| `sourceObjectName` | Source Name | Yes | The name of the object |
| `targetObjectName` | Object to merge into | Yes | The name of the object to merge with. Fields in this object that are not also in the source will remain unchanged |
| `fieldName` | Field name | No | Optional field name to use when merging |
### Exits
| Exit | Description |
| - | - |
| `NEXT` | - |
## Merge Transformation
**Function name:** `MergeTransformationFunction`
**Category:** Convert
**Destination:** General
Coalesces two objects using a transformation. Values in the mergeObject are overwritten by transformed fields from the sourceObject; otherwise they remain unchanged.
### Parameters
| Name | Label | Required | Description |
| - | - | :-: | - |
| `integrationTransformationId` | Transformation | Yes | The UUID of the transformation to apply |
| `sourceObjectName` | Source Name | Yes | The name of the object to transform |
| `mergeObjectName` | Object to Merge | Yes | The name of the object to merge with. Fields in this object that are not transformed from the source will remain unchanged |
| `stateVariable` | Destination Name | Yes | The name of the object to create in the state |
### Exits
| Exit | Description |
| - | - |
| `NEXT` | - |
## Remove Field
**Function name:** `RemoveFieldFunction`
**Category:** Convert
**Destination:** General
Removes a field on an object within the state.
### Parameters
| Name | Label | Required | Description |
| - | - | :-: | - |
| `statePath` | State Path | Yes | Path to the field within the state to remove. If the field is an object, the entire object is removed. |
### Exits
| Exit | Description |
| - | - |
| `NEXT` | - |
## Run error workflow
**Function name:** `RunErrorWorkflowFunction`
**Category:** Logic
**Destination:** General
Run workflow to handle an error. No further functions will be run in this workflow.
### Parameters
| Name | Label | Required | Description |
| - | - | :-: | - |
| `integrationDestinationId` | Integration destination ID | Yes | Workflow's Integration destination ID |
| `failWorkflow` | Fail workflow | No | If enabled, this (current) workflow will fail once the error workflow is completed. |
| `messageLookup` | Message | No | Error message to be used. |
### Exits
| Exit | Description |
| - | - |
## Run workflow
**Function name:** `RunWorkflowFunction`
**Category:** Logic
**Destination:** General
Run a workflow
### Parameters
| Name | Label | Required | Description |
| - | - | :-: | - |
| `integrationDestinationId` | Integration destination ID | Yes | Workflow's Integration destination ID |
### Exits
| Exit | Description |
| - | - |
| `NEXT` | - |
## Set Field
**Function name:** `SetFieldFunction`
**Category:** Convert
**Destination:** General
Update a field on an object within the state.
### Parameters
| Name | Label | Required | Description |
| - | - | :-: | - |
| `statePath` | State Path | Yes | Path to the field within the state to update. If the field does not exist it will be created |
| `lookup` | Lookup | Yes | The value to set the field to. |
### Exits
| Exit | Description |
| - | - |
| `NEXT` | - |
## Set Multiple Fields
**Function name:** `SetMultiFieldsFunction`
**Category:** Convert
**Destination:** General
Update one or more fields on an object within the state.
### Parameters
| Name | Label | Required | Description |
| - | - | :-: | - |
| `statePath` | State Path | Yes | Path to the object within the state to update. |
| `lookups` | Lookup | Yes | The value to set the field to. |
### Exits
| Exit | Description |
| - | - |
| `NEXT` | - |
## Create SFTP file
**Function name:** `SftpDataOutputFunction`
**Category:** Write
**Destination:** General
Create a file on a SFTP server which can be used for writing data to.
### Parameters
| Name | Label | Required | Description |
| - | - | :-: | - |
| `integrationCredentialsId` | Credentials | Yes | The basic credentials required to connect to the SFTP server. |
| `host` | Host | Yes | Host name of the server to connect to. |
| `port` | Port | No | The port on which to connect to the SFTP server on. If unspecified, the default value of 22 will be used |
| `remoteFileName` | Destination File | Yes | The remote file to write to. |
| `stateVariable` | State variable | Yes | The variable name by which this output can be referenced using |
### Exits
| Exit | Description |
| - | - |
| `NEXT` | - |
## Sort List
**Function name:** `SortListFunction`
**Category:** Variables
**Destination:** General
Sort an existing list in the state based on a field.
### Parameters
| Name | Label | Required | Description |
| - | - | :-: | - |
| `listName` | Name | Yes | The name of the list in the state to sort. |
| `sortField` | Sort Field | Yes | The name of the field to sort on. |
| `descending` | Descending | No | Sort the list in a descending order. e.g. (3, 2, 1) or (Z, Y, X) |
### Exits
| Exit | Description |
| - | - |
| `NEXT` | - |
## SQL Select Data
**Function name:** `SqlSelectFunction`
**Category:** Read
**Destination:** General
Run SQL against a table
### Parameters
| Name | Label | Required | Description |
| - | - | :-: | - |
| `sql` | SQL | Yes | Select statement. N.B. Datastore does not support all SQL keywords |
| `responsePath` | Response Path | Yes | The path in which to store the response in the state. |
### Exits
| Exit | Description |
| - | - |
| `NEXT` | - |
## Validate
**Function name:** `ValidateFunction`
**Category:** Logic
**Destination:** General
Validates an object from the state against a schema (if supported) and branches based on whether it is valid or not.
### Parameters
| Name | Label | Required | Description |
| - | - | :-: | - |
| `system` | System | Yes | The system to validate against. |
| `schemaName` | Schema name | Yes | The name of the schema to validate against. |
| `objectName` | Object | Yes | The name of the object in state to validate. |
### Exits
| Exit | Description |
| - | - |
| `VALID` | - |
| `INVALID` | - |
## Write CSV
**Function name:** `WriteObjectToCsvFunction`
**Category:** Write
**Destination:** General
Writes data to a declared output as a CSV row.
### Parameters
| Name | Label | Required | Description |
| - | - | :-: | - |
| `output` | Output | Yes | Name of a previously declared output. |
| `source` | Source | Yes | Source state object to write |
### Exits
| Exit | Description |
| - | - |
| `NEXT` | - |
## Write JSON
**Function name:** `WriteObjectToJsonFunction`
**Category:** Write
**Destination:** General
Writes data to a declared output as a JSON object. Multiple objects written to the same format are separated by a line break (JSONL)
### Parameters
| Name | Label | Required | Description |
| - | - | :-: | - |
| `output` | Output | Yes | Name of a previously declared output. |
| `source` | Source | Yes | Source state object to write |
### Exits
| Exit | Description |
| - | - |
| `NEXT` | - |
# Hubspot Functions
Source: https://docs.m3ter.com/m3sh-function-reference/native/hubspot
## Call HubSpot webhook
**Function name:** `CallHubspotWebhookFunction`
**Category:** Write
**Destination:** Hubspot
Calls a HubSpot webhook
### Parameters
| Name | Label | Required | Description |
| - | - | :-: | - |
| `webhookUrl` | Webhook URL | Yes | Webhook URL to call |
| `objectData` | Object Data | Yes | The name of the variable containing object data to be sent to the webhook |
### Exits
| Exit | Description |
| - | - |
| `NEXT` | - |
| `ERROR` | - |
## Create HubSpot object
**Function name:** `CreateHubspotObjectFunction`
**Category:** Write
**Destination:** Hubspot
Creates a HubSpot object
### Parameters
| Name | Label | Required | Description |
| - | - | :-: | - |
| `integrationCredentialsId` | Credentials | Yes | HubSpot credentials to use. |
| `objectName` | Object Name | Yes | Name of the HubSpot object |
| `objectData` | Object Data | Yes | The name of the variable containing object data to be created to in HubSpot |
| `outputObjectStateVariable` | Output resource name | No | Name of the variable by which the object will be stored in state |
### Exits
| Exit | Description |
| - | - |
| `NEXT` | - |
| `ERROR` | - |
## Delete HubSpot object
**Function name:** `DeleteHubspotObjectFunction`
**Category:** Write
**Destination:** Hubspot
Deletes a HubSpot object
### Parameters
| Name | Label | Required | Description |
| - | - | :-: | - |
| `integrationCredentialsId` | Credentials | Yes | HubSpot credentials to use. |
| `objectName` | Object Name | Yes | Name of the HubSpot object |
| `objectId` | Object ID | Yes | Name of the variable containing the ID of the object to be deleted from HubSpot |
### Exits
| Exit | Description |
| - | - |
| `NEXT` | - |
| `ERROR` | - |
## Read HubSpot object
**Function name:** `ReadHubspotObjectFunction`
**Category:** Read
**Destination:** Hubspot
Reads a HubSpot object
### Parameters
| Name | Label | Required | Description |
| - | - | :-: | - |
| `integrationCredentialsId` | Credentials | Yes | HubSpot credentials to use. |
| `objectName` | Object Name | Yes | Name of the HubSpot object |
| `objectId` | Object ID | Yes | Name of the variable containing the ID of the object to be retrieved from HubSpot |
| `properties` | Properties | No | Comma separated list of properties to retrieve. If not set, default properties will be retrieved. |
| `outputObjectStateVariable` | Output object | No | Name of the variable by which the object will be stored in state |
### Exits
| Exit | Description |
| - | - |
| `NEXT` | - |
| `ERROR` | - |
## Search HubSpot objects
**Function name:** `SearchHubspotObjectsFunction`
**Category:** Read
**Destination:** Hubspot
Function for searching for HubSpot objects. Can be used to find objects by specific criteria. Also can be used to list all objects of a specific type.
### Parameters
| Name | Label | Required | Description |
| - | - | :-: | - |
| `integrationCredentialsId` | Credentials | Yes | HubSpot credentials to use. |
| `objectName` | Object Name | Yes | Name of the HubSpot object |
| `query` | Query | No | The name of the variable containing the query to be executed |
| `properties` | Properties | No | Comma separated list of properties to retrieve. If not set, default properties will be retrieved. |
| `sorts` | Sorts | No | Sort objects to sort the search results. |
| `filterGroups` | Filter Groups | No | Filter group objects to filter the search results. |
| `outputResultsStateVariable` | Output results name | Yes | Name of the variable by which the objects iterator will be stored in state |
### Exits
| Exit | Description |
| - | - |
| `NEXT` | - |
| `ERROR` | - |
## Update HubSpot object
**Function name:** `UpdateHubspotObjectFunction`
**Category:** Write
**Destination:** Hubspot
Updates a HubSpot object
### Parameters
| Name | Label | Required | Description |
| - | - | :-: | - |
| `integrationCredentialsId` | Credentials | Yes | HubSpot credentials to use. |
| `objectName` | Object Name | Yes | Name of the HubSpot object |
| `objectId` | Object ID | Yes | Name of the variable containing the ID of the object to be retrieved from HubSpot |
| `updateData` | Update data | Yes | The name of the variable containing data to be sent to HubSpot for update |
| `outputObjectStateVariable` | Output object | No | Name of the variable by which the updated object will be stored in state |
### Exits
| Exit | Description |
| - | - |
| `NEXT` | - |
| `ERROR` | - |
# m3ter Functions
Source: https://docs.m3ter.com/m3sh-function-reference/native/m3ter
## Bulk retrieve m3ter entities
**Function name:** `BulkGetM3terEntityFunction`
**Category:** Read
**Destination:** m3ter
Read a list of m3ter entities from a list endpoint by consuming an iterator of entity IDs
### Parameters
| Name | Label | Required | Description |
| - | - | :-: | - |
| `integrationCredentialsId` | Credentials | Yes | The m3ter credentials to use. |
| `m3terEntity` | m3ter Entity | Yes | The name of the m3ter entity |
| `m3terEntityIdsIterator` | m3ter entity ID iterator name | Yes | The name of the iterator containing m3ter entity UUIDs |
| `stateVariable` | Output state name | Yes | Name of the variable by which the objects iterator will be stored in state |
| `parentM3terEntityIdPath` | Parent m3ter entity UUID path | No | The path to the UUID of the parent entity for the m3ter entity targeted by this operation (e.g event.new\.id) |
### Exits
| Exit | Description |
| - | - |
| `NEXT` | - |
| `ERROR` | - |
## Create m3ter external mapping
**Function name:** `CreateExternalMappingFunction`
**Category:** Write
**Destination:** m3ter
Creates an external mapping between a m3ter entity and an external system
### Parameters
| Name | Label | Required | Description |
| - | - | :-: | - |
| `m3terEntity` | m3ter Entity Type | Yes | The name of the m3ter entity type |
| `m3terIdPath` | m3ter ID Path | Yes | The path of the m3ter UUID to lookup in the state |
| `externalSystem` | External System | Yes | The name of the external system |
| `externalTable` | External Table | Yes | The name of the external table |
| `externalIdPath` | External ID Path | Yes | The path of the external ID to lookup in the state |
| `duplicateRunForEntity` | Duplicate run log for entity | No | If enabled, the run is also associated with the m3ter entity this external mapping was created for |
### Exits
| Exit | Description |
| - | - |
| `NEXT` | - |
## Create m3ter Entity
**Function name:** `CreateM3terEntityFunction`
**Category:** Write
**Destination:** m3ter
Create a m3ter entity with a payload
### Parameters
| Name | Label | Required | Description |
| - | - | :-: | - |
| `integrationCredentialsId` | Credentials | Yes | The m3ter credentials to use. |
| `m3terEntity` | m3ter Entity | Yes | The name of the m3ter entity |
| `payloadPath` | Path to m3ter entity payload | Yes | The path to the m3ter entity create payload |
| `responsePath` | Path to entity create response | No | The path to save the m3ter entity create response |
| `parentM3terEntityIdPath` | Parent m3ter entity UUID path | No | The path to the UUID of the parent entity for the m3ter entity targeted by this operation (e.g event.new\.id) |
### Exits
| Exit | Description |
| - | - |
| `NEXT` | - |
| `ERROR` | - |
## Delete External Mapping
**Function name:** `DeleteExternalMappingsForExternalEntityFunction`
**Category:** Write
**Destination:** m3ter
Delete External Mappings for a external system, table, and external ID
### Parameters
| Name | Label | Required | Description |
| - | - | :-: | - |
| `externalSystem` | External System | Yes | The external system |
| `externalTable` | External Table | Yes | The external table (e.g Customer) |
| `stateVariable` | External ID path | Yes | The path to the ID in the state |
### Exits
| Exit | Description |
| - | - |
| `NEXT` | - |
## Delete m3ter Entity
**Function name:** `DeleteM3terEntityFunction`
**Category:** Write
**Destination:** m3ter
Delete a m3ter entity
### Parameters
| Name | Label | Required | Description |
| - | - | :-: | - |
| `integrationCredentialsId` | Credentials | Yes | The m3ter credentials to use. |
| `m3terEntity` | m3ter Entity | Yes | The name of the m3ter entity |
| `m3terEntityIdPath` | m3ter entity UUID path | Yes | The path to the UUID of the m3ter entity to delete (e.g event.new\.id) |
| `responsePath` | Path to entity update response | No | The path to save the m3ter entity update response |
| `parentM3terEntityIdPath` | Parent m3ter entity UUID path | No | The path to the UUID of the parent entity for the m3ter entity targeted by this operation (e.g event.new\.id) |
### Exits
| Exit | Description |
| - | - |
| `NEXT` | - |
| `ERROR` | - |
## Lookup external ID for m3ter entity
**Function name:** `ExternalMappingExistsForM3terFunction`
**Category:** Logic
**Destination:** m3ter
Look for an external mapping for a m3ter entity and destination
### Parameters
| Name | Label | Required | Description |
| - | - | :-: | - |
| `m3terEntity` | m3ter Entity Type | Yes | The name of the m3ter entity type |
| `m3terIdPath` | m3ter ID Path | Yes | The path to the m3ter UUID to lookup |
| `externalSystem` | External System | Yes | The name of the external system |
| `externalTable` | External Table | No | The name of the external table |
| `stateVariable` | External ID State Variable Name | No | The name to use to save the external ID to the state |
| `duplicateRunForEntity` | Duplicate run log for entity | No | If enabled and an external mapping is found, the run will also associated with the m3ter entity |
### Exits
| Exit | Description |
| - | - |
| `TRUE` | - |
| `FALSE` | - |
## Lookup m3ter entity UUID
**Function name:** `ExternalMappingExistsForSystemFunction`
**Category:** Logic
**Destination:** m3ter
Look for an external mapping for an external service, table, and ID
### Parameters
| Name | Label | Required | Description |
| - | - | :-: | - |
| `externalSystem` | External System | Yes | The external system |
| `externalTable` | External Table | Yes | The external table name |
| `externalIdPath` | External ID Path | Yes | The path to the external ID to lookup |
| `stateVariable` | m3ter ID State Variable Name | No | The name to use to save the m3ter UUID to the state |
### Exits
| Exit | Description |
| - | - |
| `TRUE` | - |
| `FALSE` | - |
## Get m3ter Entity
**Function name:** `GetM3terEntityFunction`
**Category:** Read
**Destination:** m3ter
Get a m3ter entity
### Parameters
| Name | Label | Required | Description |
| - | - | :-: | - |
| `integrationCredentialsId` | Credentials | Yes | The m3ter credentials to use. |
| `m3terEntity` | m3ter Entity | Yes | The name of the m3ter entity |
| `m3terEntityIdPath` | m3ter entity UUID path | Yes | The path to the UUID of the m3ter entity to get (e.g event.new\.id) |
| `responsePath` | Path to entity get response | No | The path to save the m3ter entity get response |
| `parentM3terEntityIdPath` | Parent m3ter entity UUID path | No | The path to the UUID of the parent entity for the m3ter entity targeted by this operation (e.g event.new\.id) |
### Exits
| Exit | Description |
| - | - |
| `NEXT` | - |
| `ERROR` | - |
## List m3ter entities
**Function name:** `ListM3terEntityFunction`
**Category:** Read
**Destination:** m3ter
Read a list of m3ter entities from a list endpoint. The data is retrieved by pages
### Parameters
| Name | Label | Required | Description |
| - | - | :-: | - |
| `integrationCredentialsId` | Credentials | Yes | The m3ter credentials to use. |
| `m3terEntity` | m3ter Entity | Yes | The name of the m3ter entity |
| `stateVariable` | Output state name | Yes | Name of the variable by which the objects iterator will be stored in state |
| `queryParameters` | Query parameters | No | Optional query parameters to include in the request |
| `parentM3terEntityIdPath` | Parent m3ter entity UUID path | No | The path to the UUID of the parent entity for the m3ter entity targeted by this operation (e.g event.new\.id) |
### Exits
| Exit | Description |
| - | - |
| `NEXT` | - |
| `ERROR` | - |
## Update external bill
**Function name:** `UpdateExternalReferenceOnM3terBillFunction`
**Category:** Write
**Destination:** m3ter
Updates the external reference on a m3ter bill
### Parameters
| Name | Label | Required | Description |
| - | - | :-: | - |
| `m3terBillUuidStateVariable` | m3ter Bill UUID path | Yes | The path to the UUID of the m3ter bill to update (e.g event.new\.id) |
| `externalReferenceStateVariable` | External reference path | Yes | The path to the reference of the external Invoice. |
### Exits
| Exit | Description |
| - | - |
| `NEXT` | - |
| `ERROR` | - |
## Update m3ter Entity
**Function name:** `UpdateM3terEntityFunction`
**Category:** Write
**Destination:** m3ter
Update a m3ter entity with a payload
### Parameters
| Name | Label | Required | Description |
| - | - | :-: | - |
| `integrationCredentialsId` | Credentials | Yes | The m3ter credentials to use. |
| `m3terEntity` | m3ter Entity | Yes | The name of the m3ter entity |
| `m3terEntityIdPath` | m3ter entity UUID path | Yes | The path to the UUID of the m3ter entity to update (e.g event.new\.id) |
| `payloadPath` | Path to m3ter Entity Payload | Yes | The path to the m3ter entity update payload |
| `responsePath` | Path to entity update response | No | The path to save the m3ter entity update response |
| `parentM3terEntityIdPath` | Parent m3ter entity UUID path | No | The path to the UUID of the parent entity for the m3ter entity targeted by this operation (e.g event.new\.id) |
### Exits
| Exit | Description |
| - | - |
| `NEXT` | - |
| `ERROR` | - |
## Upload Measurements File
**Function name:** `UploadMeasurementsFunction`
**Category:** Write
**Destination:** m3ter
Upload measurements from a list or iterator and uploads them to m3ter via presigned URL(s)
### Parameters
| Name | Label | Required | Description |
| - | - | :-: | - |
| `integrationCredentialsId` | Credentials | Yes | The m3ter credentials to use. |
| `source` | Measurements | Yes | State path to a list of measurements, or the name of an iterator, to upload |
| `jobIdVariable` | Job ID location | No | Optional state location to store the jobId. |
### Exits
| Exit | Description |
| - | - |
| `NEXT` | - |
| `ERROR` | - |
# NetSuite Functions
Source: https://docs.m3ter.com/m3sh-function-reference/native/netsuite
## Create NetSuite Record
**Function name:** `CreateNetsuiteRecordFunction`
**Category:** Write
**Destination:** NetSuite
Creates a record in NetSuite
### Parameters
| Name | Label | Required | Description |
| - | - | :-: | - |
| `integrationCredentialsId` | Credentials | Yes | NetSuite credentials to use. |
| `recordType` | Record type | Yes | The type of NetSuite record to create |
| `inputData` | Input data | Yes | The name of the variable containing the record data to be sent to NetSuite |
| `stateVariable` | Output data | No | The name of the variable to store the response from NetSuite |
| `parentRecordPathCalculation` | Parent record path calculation | No | Calculation that evaluates to the path to a parent record |
### Exits
| Exit | Description |
| - | - |
| `NEXT` | - |
| `ERROR` | - |
## Delete NetSuite Record
**Function name:** `DeleteNetsuiteRecordFunction`
**Category:** Write
**Destination:** NetSuite
Deletes a record in NetSuite
### Parameters
| Name | Label | Required | Description |
| - | - | :-: | - |
| `integrationCredentialsId` | Credentials | Yes | NetSuite credentials to use. |
| `recordType` | Record type | Yes | The type of NetSuite record to delete |
| `recordId` | Record id | Yes | The name of the variable containing the ID of the record to delete |
| `parentRecordPathCalculation` | Parent record path calculation | No | Calculation that evaluates to the path to a parent record |
### Exits
| Exit | Description |
| - | - |
| `NEXT` | - |
| `ERROR` | - |
## List NetSuite Records
**Function name:** `ListNetsuiteRecordsFunction`
**Category:** Read
**Destination:** NetSuite
List records in NetSuite
### Parameters
| Name | Label | Required | Description |
| - | - | :-: | - |
| `integrationCredentialsId` | Credentials | Yes | NetSuite credentials to use. |
| `recordType` | Record type | Yes | The type of NetSuite record to read |
| `query` | Query | Yes | The name of the variable containing the query to be executed |
| `stateVariable` | Output results name | Yes | Name of the variable by which the objects iterator will be stored in state |
| `parentRecordPathCalculation` | Parent record path calculation | No | Calculation that evaluates to the path to a parent record |
### Exits
| Exit | Description |
| - | - |
| `NEXT` | - |
| `ERROR` | - |
## Query NetSuite Record
**Function name:** `QueryNetsuiteSingleRecordFunction`
**Category:** Read
**Destination:** NetSuite
Retrieve a single Netsuite record using SuiteQL. If more than one record is returned by the query, the workflow will fail.
### Parameters
| Name | Label | Required | Description |
| - | - | :-: | - |
| `integrationCredentialsId` | Credentials | Yes | NetSuite credentials to use. |
| `query` | Query | Yes | The SuiteQL query to be executed |
| `stateVariable` | Output results name | Yes | Name of the variable by which the record will be stored in state |
| `parentRecordPathCalculation` | Parent record path calculation | No | Calculation that evaluates to the path to a parent record |
### Exits
| Exit | Description |
| - | - |
| `NEXT` | - |
| `ERROR` | - |
## Read NetSuite Record
**Function name:** `ReadNetsuiteRecordFunction`
**Category:** Read
**Destination:** NetSuite
Read a record from NetSuite
### Parameters
| Name | Label | Required | Description |
| - | - | :-: | - |
| `integrationCredentialsId` | Credentials | Yes | NetSuite credentials to use. |
| `recordType` | Record type | Yes | The type of NetSuite record to read |
| `recordId` | Record id | Yes | The name of the variable containing the ID of the record to read |
| `stateVariable` | Output data | No | The name of the variable to store the response from NetSuite |
| `parentRecordPathCalculation` | Parent record path calculation | No | Calculation that evaluates to the path to a parent record |
### Exits
| Exit | Description |
| - | - |
| `NEXT` | - |
| `ERROR` | - |
## Update NetSuite Record
**Function name:** `UpdateNetsuiteRecordFunction`
**Category:** Write
**Destination:** NetSuite
Updates a record in NetSuite
### Parameters
| Name | Label | Required | Description |
| - | - | :-: | - |
| `integrationCredentialsId` | Credentials | Yes | NetSuite credentials to use. |
| `recordType` | Record type | Yes | The type of NetSuite record to create |
| `recordId` | Record id variable | Yes | The name of the variable containing the ID of the existing record in NetSuite that should be updated |
| `replace` | Replace | No | The names of sublists on this record. All sublist lines will be replaced with lines specified in the request. The names are delimited by comma. If this is not specified, the sublist lines will be appended to the existing lines. In order to update top level fields do not set this parameter. |
| `inputData` | Input data variable | Yes | The name of the variable containing the record data to be sent to NetSuite |
| `stateVariable` | Output data variable | No | The name of the variable to store the response from NetSuite |
| `parentRecordPathCalculation` | Parent record path calculation | No | Calculation that evaluates to the path to a parent record |
### Exits
| Exit | Description |
| - | - |
| `NEXT` | - |
| `ERROR` | - |
# Opsgenie Functions
Source: https://docs.m3ter.com/m3sh-function-reference/native/opsgenie
## Create OpsGenie Alert
**Function name:** `CreateOpsGenieAlertFunction`
**Category:** Write
**Destination:** Opsgenie
Creates an alert in OpsGenie
### Parameters
| Name | Label | Required | Description |
| - | - | :-: | - |
| `integrationCredentialsId` | Credentials | Yes | OpsGenie credentials to use. |
| `alertMessage` | Alert message | Yes | Name of the variable by which alert message should be retrieved from state |
| `alias` | Alias | No | Name of the variable by which alert alias should be retrieved from state. Identifier of the alert, that is also the key element of Alert De-Duplication |
| `alertDescription` | Description | No | Name of the variable by which alert description should be retrieved from state. Detailed information about the alert |
| `responders` | Responders | No | Teams, users, escalations and schedules that the alert will be routed to send notifications |
| `visibleTo` | Visible to | No | Teams and users that the alert will become visible to without sending any notification |
| `source` | Source | No | Name of the variable by which alert source should be retrieved from state. The name of the system that created the alert |
| `priority` | Priority | No | Name of the variable by which alert priority should be retrieved from state. Priority level of the alert. Possible values are P1, P2, P3, P4 and P5. Default value is P3 |
| `user` | User | No | Name of the variable by which alert user should be retrieved from state. The name of the user that created the alert |
| `note` | Note | No | Name of the variable by which alert note should be retrieved from state. Note that will be added to the alert |
### Exits
| Exit | Description |
| - | - |
| `NEXT` | - |
| `ERROR` | - |
# Sage Intacct Functions
Source: https://docs.m3ter.com/m3sh-function-reference/native/sage-intacct
## Create Sage Intacct object
**Function name:** `CreateSageIntacctObjectFunction`
**Category:** Write
**Destination:** Sage Intacct
Creates object in Sage Intacct
### Parameters
| Name | Label | Required | Description |
| - | - | :-: | - |
| `integrationCredentialsId` | Credentials | Yes | Sage Intacct credentials to use. |
| `objectName` | Object Name | Yes | Name of the Sage Intacct object. For example 'customer' |
| `groupName` | Group name | Yes | Name of the Sage Intacct group. For example 'Accounts Receivable' |
| `objectData` | Object Data | Yes | The name of the variable containing object data to be created to in Sage Intacct |
| `outputObjectStateVariable` | Output resource name | No | Name of the variable by which the object will be stored in state |
### Exits
| Exit | Description |
| - | - |
| `NEXT` | - |
| `ERROR` | - |
## Delete Sage Intacct object
**Function name:** `DeleteSageIntacctObjectFunction`
**Category:** Write
**Destination:** Sage Intacct
Deletes a Sage Intacct object
### Parameters
| Name | Label | Required | Description |
| - | - | :-: | - |
| `integrationCredentialsId` | Credentials | Yes | Sage Intacct credentials to use. |
| `objectName` | Object Name | Yes | Name of the Sage Intacct object. For example 'customer' |
| `groupName` | Group name | Yes | Name of the Sage Intacct group. For example 'Accounts Receivable' |
| `objectId` | Object ID | Yes | Name of the variable containing the ID of the object to be deleted from Sage Intacct |
### Exits
| Exit | Description |
| - | - |
| `NEXT` | - |
| `ERROR` | - |
## Query Sage Intacct objects
**Function name:** `QuerySageIntacctObjectFunction`
**Category:** Read
**Destination:** Sage Intacct
Function for querying Sage Intacct objects.
### Parameters
| Name | Label | Required | Description |
| - | - | :-: | - |
| `integrationCredentialsId` | Credentials | Yes | Sage Intacct credentials to use. |
| `objectName` | Object Name | Yes | Name of the Sage Intacct object. For example 'customer' |
| `groupName` | Group name | Yes | Name of the Sage Intacct group. For example 'Accounts Receivable' |
| `fields` | Fields | Yes | Comma separated list of fields to retrieve. For example: id,key,href |
| `filters` | Filters | No | Filters to apply to the query with multiple lookup types. |
| `filterExpression` | Filter Expression | No | Logical operators to apply when there are multiple filter conditions. The conditions in the filters array are implicitly numbered starting at 1. Supports and, or, and grouping with parentheses. |
| `orderBy` | Order By | No | Set the order of the results by specifying field names to sort by and whether they should be in ascending (asc) or descending (desc) order. |
| `outputResultsStateVariable` | Output results name | Yes | Name of the variable by which the objects iterator will be stored in state |
### Exits
| Exit | Description |
| - | - |
| `NEXT` | - |
| `ERROR` | - |
## Read Sage Intacct object
**Function name:** `ReadSageIntacctObjectFunction`
**Category:** Read
**Destination:** Sage Intacct
Reads a Sage Intacct object
### Parameters
| Name | Label | Required | Description |
| - | - | :-: | - |
| `integrationCredentialsId` | Credentials | Yes | Sage Intacct credentials to use. |
| `objectName` | Object Name | Yes | Name of the Sage Intacct object. For example 'customer' |
| `groupName` | Group name | Yes | Name of the Sage Intacct group. For example 'Accounts Receivable' |
| `objectId` | Object ID | Yes | Name of the variable containing the ID (key) of the object to be retrieved from Sage Intacct |
| `outputObjectStateVariable` | Output object | No | Name of the variable by which the object will be stored in state |
### Exits
| Exit | Description |
| - | - |
| `NEXT` | - |
| `ERROR` | - |
## Update Sage Intacct object
**Function name:** `UpdateSageIntacctObjectFunction`
**Category:** Write
**Destination:** Sage Intacct
Updates a Sage Intacct object
### Parameters
| Name | Label | Required | Description |
| - | - | :-: | - |
| `integrationCredentialsId` | Credentials | Yes | Sage Intacct credentials to use. |
| `objectName` | Object Name | Yes | Name of the Sage Intacct object. For example 'customer' |
| `groupName` | Group name | Yes | Name of the Sage Intacct group. For example 'Accounts Receivable' |
| `objectId` | Object ID | Yes | Name of the variable containing the ID of the object to be updated in Sage Intacct |
| `updateData` | Update data | Yes | The name of the variable containing data to be sent to Sage Intacct for update |
| `outputObjectStateVariable` | Output object | No | Name of the variable by which the updated object will be stored in state |
### Exits
| Exit | Description |
| - | - |
| `NEXT` | - |
| `ERROR` | - |
# Salesforce Functions
Source: https://docs.m3ter.com/m3sh-function-reference/native/salesforce
## Await bulk upload job completion
**Function name:** `AwaitSalesforceBulkJobCompletionFunction`
**Category:** Read
**Destination:** Salesforce
Polls until a bulk upload job enters a completion state.
### Parameters
| Name | Label | Required | Description |
| - | - | :-: | - |
| `jobIdPath` | Job ID path | Yes | The state path where the job ID is stored. |
| `integrationCredentialsId` | Credentials | Yes | Salesforce credentials to use. |
| `apiVersion` | API version | No | Salesforce API version. If not set defaults to 62.0 |
### Exits
| Exit | Description |
| - | - |
| `NEXT` | - |
| `ERROR` | - |
## Complete bulk upload job
**Function name:** `CompleteSalesforceBulkUploadFunction`
**Category:** Write
**Destination:** Salesforce
Marks a bulk upload job as completed, indicating that no more data will be sent and the job should be processed.
### Parameters
| Name | Label | Required | Description |
| - | - | :-: | - |
| `jobIdPath` | Job ID path | Yes | The state path where the job ID is stored. |
| `integrationCredentialsId` | Credentials | Yes | Salesforce credentials to use. |
| `apiVersion` | API version | No | Salesforce API version. If not set defaults to 62.0 |
### Exits
| Exit | Description |
| - | - |
| `NEXT` | - |
| `ERROR` | - |
## Create bulk upload job
**Function name:** `CreateSalesforceBulkJobFunction`
**Category:** Write
**Destination:** Salesforce
Creates a bulk upload job for the specified object.
### Parameters
| Name | Label | Required | Description |
| - | - | :-: | - |
| `object` | Object | Yes | Type of object to create a bulk upload job for. |
| `operation` | Operation | Yes | The operation to perform. |
| `integrationCredentialsId` | Credentials | Yes | Salesforce credentials to use. |
| `externalIdFieldName` | External ID field name | No | The external ID field in the object being updated. Only needed for upsert operations. |
| `apiVersion` | API version | No | Salesforce API version. If not set defaults to 62.0 |
| `jobIdPath` | Job ID path | Yes | The state path where the job ID should be stored. |
### Exits
| Exit | Description |
| - | - |
| `NEXT` | - |
| `ERROR` | - |
## Create Salesforce object
**Function name:** `CreateSalesforceObjectFunction`
**Category:** Write
**Destination:** Salesforce
Creates Salesforce object
### Parameters
| Name | Label | Required | Description |
| - | - | :-: | - |
| `integrationCredentialsId` | Credentials | Yes | Salesforce credentials to use. |
| `apiVersion` | API version | No | Salesforce API version. If not set defaults to 62.0 |
| `resourceName` | Resource Name | Yes | Name of the Salesforce object resource |
| `resource` | Resource | Yes | Resource to be created |
| `outputResourceIdStateVariable` | Output resource name | Yes | Name of the variable by which the resource ID will be stored in state |
### Exits
| Exit | Description |
| - | - |
| `NEXT` | - |
| `ERROR` | - |
## Delete Salesforce object
**Function name:** `DeleteSalesforceObjectFunction`
**Category:** Write
**Destination:** Salesforce
Deletes Salesforce object
### Parameters
| Name | Label | Required | Description |
| - | - | :-: | - |
| `integrationCredentialsId` | Credentials | Yes | Salesforce credentials to use. |
| `apiVersion` | API version | No | Salesforce API version. If not set defaults to 62.0 |
| `resourceName` | Resource Name | Yes | Name of the Salesforce object resource |
| `resourceIdStateVariable` | Resource ID | Yes | Name of variable by which resource ID should be retrieved from state |
### Exits
| Exit | Description |
| - | - |
| `NEXT` | - |
| `ERROR` | - |
## Ingest Salesforce invoice
**Function name:** `IngestSalesforceInvoiceFunction`
**Category:** Write
**Destination:** Salesforce
Ingests an invoice into Salesforce using the Invoice Ingestion API. Builds the invoice graph from the provided invoice and line item objects, automatically wiring the invoiceId relationship onto each line item.
### Parameters
| Name | Label | Required | Description |
| - | - | :-: | - |
| `integrationCredentialsId` | Credentials | Yes | Salesforce credentials to use. |
| `apiVersion` | API version | No | Salesforce API version. If not set defaults to 62.0 |
| `invoiceStateVariable` | Invoice state variable | Yes | State variable containing the invoice object with all header fields pre-populated. |
| `lineItemsStateVariable` | Line items state variable | Yes | State variable containing the list of invoice line item objects with all fields pre-populated. |
| `billingAddressStateVariable` | Billing address state variable | Yes | State variable containing the billing address object, used to create the billing InvoiceAddressGroup record. |
| `shippingAddressStateVariable` | Shipping address state variable | No | Optional. State variable containing the shipping address object. If not provided, the billing address is used for shipping as well. |
| `outputStateVariable` | Output state variable | Yes | State variable name to store the ingestion response. |
### Exits
| Exit | Description |
| - | - |
| `NEXT` | - |
| `ERROR` | - |
## Query Salesforce Object
**Function name:** `QuerySalesforceSingleObjectFunction`
**Category:** Read
**Destination:** Salesforce
Reads a single Salesforce object using a SOQL query. If the query doesn't return a single result the workflow will fail.
### Parameters
| Name | Label | Required | Description |
| - | - | :-: | - |
| `integrationCredentialsId` | Credentials | Yes | Salesforce credentials to use. |
| `apiVersion` | API version | No | Salesforce API version. If not set defaults to 62.0 |
| `soqlQuery` | Query | Yes | Query to run |
| `stateVariable` | Output data | Yes | Name of the variable by which the object will be stored in state |
### Exits
| Exit | Description |
| - | - |
| `NEXT` | - |
| `ERROR` | - |
## Read Salesforce bulk job successful results
**Function name:** `ReadSalesforceBulkJobResultsFunction`
**Category:** Read
**Destination:** Salesforce
Opens a streaming iterator over the successful results of a Salesforce bulk upload job. Rows are read incrementally without loading the full response into memory.
### Parameters
| Name | Label | Required | Description |
| - | - | :-: | - |
| `jobIdPath` | Job ID path | Yes | State path where the bulk upload job ID is stored. |
| `integrationCredentialsId` | Credentials | Yes | Salesforce credentials to use. |
| `apiVersion` | API version | No | Salesforce API version. If not set defaults to 62.0 |
| `outputResultsStateVariable` | Output iterator name | Yes | Name under which the results iterator will be stored in state. |
### Exits
| Exit | Description |
| - | - |
| `NEXT` | - |
| `ERROR` | - |
## Read Salesforce object
**Function name:** `ReadSalesforceObjectFunction`
**Category:** Read
**Destination:** Salesforce
Reads Salesforce object
### Parameters
| Name | Label | Required | Description |
| - | - | :-: | - |
| `integrationCredentialsId` | Credentials | Yes | Salesforce credentials to use. |
| `apiVersion` | API version | No | Salesforce API version. If not set defaults to 62.0 |
| `resourceName` | Resource Name | Yes | Name of the Salesforce object resource |
| `resourceIdStateVariable` | Resource ID | Yes | Name of variable by which resource ID should be retrieved from state |
| `resourceOutputStateVariable` | Output resource name | Yes | Name of the variable by which the resource will be stored in state |
### Exits
| Exit | Description |
| - | - |
| `NEXT` | - |
| `ERROR` | - |
## Read Salesforce objects using SOQL query
**Function name:** `SOQLSalesforceQueryFunction`
**Category:** Read
**Destination:** Salesforce
Reads Salesforce object using SOQL query
### Parameters
| Name | Label | Required | Description |
| - | - | :-: | - |
| `integrationCredentialsId` | Credentials | Yes | Salesforce credentials to use. |
| `apiVersion` | API version | No | Salesforce API version. If not set defaults to 62.0 |
| `soqlQuery` | Query | Yes | Query to run |
| `outputResultsStateVariable` | Output results name | Yes | Name of the variable by which the objects iterator will be stored in state |
### Exits
| Exit | Description |
| - | - |
| `NEXT` | - |
| `ERROR` | - |
## Set Salesforce External URL
**Function name:** `SalesforceSetExternalUrlFunction`
**Category:** Write
**Destination:** Salesforce
Sets the external URL in the integration state to the Lightning Experience URL of a Salesforce record.
### Parameters
| Name | Label | Required | Description |
| - | - | :-: | - |
| `integrationCredentialsId` | Credentials | Yes | Salesforce credentials to use. |
| `objectType` | Object Type | Yes | The Salesforce object type (e.g. Opportunity, Account). |
| `objectId` | Object ID | Yes | State variable containing the Salesforce record ID. |
### Exits
| Exit | Description |
| - | - |
| `NEXT` | - |
## Update Salesforce object
**Function name:** `UpdateSalesforceObjectFunction`
**Category:** Write
**Destination:** Salesforce
Updates Salesforce object
### Parameters
| Name | Label | Required | Description |
| - | - | :-: | - |
| `integrationCredentialsId` | Credentials | Yes | Salesforce credentials to use. |
| `apiVersion` | API version | No | Salesforce API version. If not set defaults to 62.0 |
| `resourceName` | Resource Name | Yes | Name of the Salesforce object resource |
| `resourceIdStateVariable` | Resource ID | Yes | Name of variable by which resource ID should be retrieved from state |
| `resource` | Resource | Yes | Resource to be updated |
### Exits
| Exit | Description |
| - | - |
| `NEXT` | - |
| `ERROR` | - |
## Upload bulk job data
**Function name:** `UploadSalesforceBulkJobDataFunction`
**Category:** Write
**Destination:** Salesforce
Uploads data from a list or iterator to Salesforce. Data is automatically split into batches when necessary.
### Parameters
| Name | Label | Required | Description |
| - | - | :-: | - |
| `jobIdPath` | Job ID path | Yes | The state path where the job ID is stored. |
| `dataPath` | Data path | Yes | The state variable containing the data that should be uploaded to Salesforce. |
| `integrationCredentialsId` | Credentials | Yes | Salesforce credentials to use. |
| `apiVersion` | API version | No | Salesforce API version. If not set defaults to 62.0 |
### Exits
| Exit | Description |
| - | - |
| `NEXT` | - |
| `ERROR` | - |
# Salesforce Prerelease Functions
Source: https://docs.m3ter.com/m3sh-function-reference/native/salesforce-prerelease
## Await bulk upload job completion
**Function name:** `AwaitSalesforceBulkJobCompletionFunction`
**Category:** Read
**Destination:** Salesforce Prerelease
Polls until a bulk upload job enters a completion state.
### Parameters
| Name | Label | Required | Description |
| - | - | :-: | - |
| `jobIdPath` | Job ID path | Yes | The state path where the job ID is stored. |
| `integrationCredentialsId` | Credentials | Yes | Salesforce credentials to use. |
| `apiVersion` | API version | No | Salesforce API version. If not set defaults to 62.0 |
### Exits
| Exit | Description |
| - | - |
| `NEXT` | - |
| `ERROR` | - |
## Complete bulk upload job
**Function name:** `CompleteSalesforceBulkUploadFunction`
**Category:** Write
**Destination:** Salesforce Prerelease
Marks a bulk upload job as completed, indicating that no more data will be sent and the job should be processed.
### Parameters
| Name | Label | Required | Description |
| - | - | :-: | - |
| `jobIdPath` | Job ID path | Yes | The state path where the job ID is stored. |
| `integrationCredentialsId` | Credentials | Yes | Salesforce credentials to use. |
| `apiVersion` | API version | No | Salesforce API version. If not set defaults to 62.0 |
### Exits
| Exit | Description |
| - | - |
| `NEXT` | - |
| `ERROR` | - |
## Create bulk upload job
**Function name:** `CreateSalesforceBulkJobFunction`
**Category:** Write
**Destination:** Salesforce Prerelease
Creates a bulk upload job for the specified object.
### Parameters
| Name | Label | Required | Description |
| - | - | :-: | - |
| `object` | Object | Yes | Type of object to create a bulk upload job for. |
| `operation` | Operation | Yes | The operation to perform. |
| `integrationCredentialsId` | Credentials | Yes | Salesforce credentials to use. |
| `externalIdFieldName` | External ID field name | No | The external ID field in the object being updated. Only needed for upsert operations. |
| `apiVersion` | API version | No | Salesforce API version. If not set defaults to 62.0 |
| `jobIdPath` | Job ID path | Yes | The state path where the job ID should be stored. |
### Exits
| Exit | Description |
| - | - |
| `NEXT` | - |
| `ERROR` | - |
## Create Salesforce object
**Function name:** `CreateSalesforceObjectFunction`
**Category:** Write
**Destination:** Salesforce Prerelease
Creates Salesforce object
### Parameters
| Name | Label | Required | Description |
| - | - | :-: | - |
| `integrationCredentialsId` | Credentials | Yes | Salesforce credentials to use. |
| `apiVersion` | API version | No | Salesforce API version. If not set defaults to 62.0 |
| `resourceName` | Resource Name | Yes | Name of the Salesforce object resource |
| `resource` | Resource | Yes | Resource to be created |
| `outputResourceIdStateVariable` | Output resource name | Yes | Name of the variable by which the resource ID will be stored in state |
### Exits
| Exit | Description |
| - | - |
| `NEXT` | - |
| `ERROR` | - |
## Delete Salesforce object
**Function name:** `DeleteSalesforceObjectFunction`
**Category:** Write
**Destination:** Salesforce Prerelease
Deletes Salesforce object
### Parameters
| Name | Label | Required | Description |
| - | - | :-: | - |
| `integrationCredentialsId` | Credentials | Yes | Salesforce credentials to use. |
| `apiVersion` | API version | No | Salesforce API version. If not set defaults to 62.0 |
| `resourceName` | Resource Name | Yes | Name of the Salesforce object resource |
| `resourceIdStateVariable` | Resource ID | Yes | Name of variable by which resource ID should be retrieved from state |
### Exits
| Exit | Description |
| - | - |
| `NEXT` | - |
| `ERROR` | - |
## Ingest Salesforce invoice
**Function name:** `IngestSalesforceInvoiceFunction`
**Category:** Write
**Destination:** Salesforce Prerelease
Ingests an invoice into Salesforce using the Invoice Ingestion API. Builds the invoice graph from the provided invoice and line item objects, automatically wiring the invoiceId relationship onto each line item.
### Parameters
| Name | Label | Required | Description |
| - | - | :-: | - |
| `integrationCredentialsId` | Credentials | Yes | Salesforce credentials to use. |
| `apiVersion` | API version | No | Salesforce API version. If not set defaults to 62.0 |
| `invoiceStateVariable` | Invoice state variable | Yes | State variable containing the invoice object with all header fields pre-populated. |
| `lineItemsStateVariable` | Line items state variable | Yes | State variable containing the list of invoice line item objects with all fields pre-populated. |
| `billingAddressStateVariable` | Billing address state variable | Yes | State variable containing the billing address object, used to create the billing InvoiceAddressGroup record. |
| `shippingAddressStateVariable` | Shipping address state variable | No | Optional. State variable containing the shipping address object. If not provided, the billing address is used for shipping as well. |
| `outputStateVariable` | Output state variable | Yes | State variable name to store the ingestion response. |
### Exits
| Exit | Description |
| - | - |
| `NEXT` | - |
| `ERROR` | - |
## Query Salesforce Object
**Function name:** `QuerySalesforceSingleObjectFunction`
**Category:** Read
**Destination:** Salesforce Prerelease
Reads a single Salesforce object using a SOQL query. If the query doesn't return a single result the workflow will fail.
### Parameters
| Name | Label | Required | Description |
| - | - | :-: | - |
| `integrationCredentialsId` | Credentials | Yes | Salesforce credentials to use. |
| `apiVersion` | API version | No | Salesforce API version. If not set defaults to 62.0 |
| `soqlQuery` | Query | Yes | Query to run |
| `stateVariable` | Output data | Yes | Name of the variable by which the object will be stored in state |
### Exits
| Exit | Description |
| - | - |
| `NEXT` | - |
| `ERROR` | - |
## Read Salesforce bulk job successful results
**Function name:** `ReadSalesforceBulkJobResultsFunction`
**Category:** Read
**Destination:** Salesforce Prerelease
Opens a streaming iterator over the successful results of a Salesforce bulk upload job. Rows are read incrementally without loading the full response into memory.
### Parameters
| Name | Label | Required | Description |
| - | - | :-: | - |
| `jobIdPath` | Job ID path | Yes | State path where the bulk upload job ID is stored. |
| `integrationCredentialsId` | Credentials | Yes | Salesforce credentials to use. |
| `apiVersion` | API version | No | Salesforce API version. If not set defaults to 62.0 |
| `outputResultsStateVariable` | Output iterator name | Yes | Name under which the results iterator will be stored in state. |
### Exits
| Exit | Description |
| - | - |
| `NEXT` | - |
| `ERROR` | - |
## Read Salesforce object
**Function name:** `ReadSalesforceObjectFunction`
**Category:** Read
**Destination:** Salesforce Prerelease
Reads Salesforce object
### Parameters
| Name | Label | Required | Description |
| - | - | :-: | - |
| `integrationCredentialsId` | Credentials | Yes | Salesforce credentials to use. |
| `apiVersion` | API version | No | Salesforce API version. If not set defaults to 62.0 |
| `resourceName` | Resource Name | Yes | Name of the Salesforce object resource |
| `resourceIdStateVariable` | Resource ID | Yes | Name of variable by which resource ID should be retrieved from state |
| `resourceOutputStateVariable` | Output resource name | Yes | Name of the variable by which the resource will be stored in state |
### Exits
| Exit | Description |
| - | - |
| `NEXT` | - |
| `ERROR` | - |
## Read Salesforce objects using SOQL query
**Function name:** `SOQLSalesforceQueryFunction`
**Category:** Read
**Destination:** Salesforce Prerelease
Reads Salesforce object using SOQL query
### Parameters
| Name | Label | Required | Description |
| - | - | :-: | - |
| `integrationCredentialsId` | Credentials | Yes | Salesforce credentials to use. |
| `apiVersion` | API version | No | Salesforce API version. If not set defaults to 62.0 |
| `soqlQuery` | Query | Yes | Query to run |
| `outputResultsStateVariable` | Output results name | Yes | Name of the variable by which the objects iterator will be stored in state |
### Exits
| Exit | Description |
| - | - |
| `NEXT` | - |
| `ERROR` | - |
## Set Salesforce External URL
**Function name:** `SalesforceSetExternalUrlFunction`
**Category:** Write
**Destination:** Salesforce Prerelease
Sets the external URL in the integration state to the Lightning Experience URL of a Salesforce record.
### Parameters
| Name | Label | Required | Description |
| - | - | :-: | - |
| `integrationCredentialsId` | Credentials | Yes | Salesforce credentials to use. |
| `objectType` | Object Type | Yes | The Salesforce object type (e.g. Opportunity, Account). |
| `objectId` | Object ID | Yes | State variable containing the Salesforce record ID. |
### Exits
| Exit | Description |
| - | - |
| `NEXT` | - |
## Update Salesforce object
**Function name:** `UpdateSalesforceObjectFunction`
**Category:** Write
**Destination:** Salesforce Prerelease
Updates Salesforce object
### Parameters
| Name | Label | Required | Description |
| - | - | :-: | - |
| `integrationCredentialsId` | Credentials | Yes | Salesforce credentials to use. |
| `apiVersion` | API version | No | Salesforce API version. If not set defaults to 62.0 |
| `resourceName` | Resource Name | Yes | Name of the Salesforce object resource |
| `resourceIdStateVariable` | Resource ID | Yes | Name of variable by which resource ID should be retrieved from state |
| `resource` | Resource | Yes | Resource to be updated |
### Exits
| Exit | Description |
| - | - |
| `NEXT` | - |
| `ERROR` | - |
## Upload bulk job data
**Function name:** `UploadSalesforceBulkJobDataFunction`
**Category:** Write
**Destination:** Salesforce Prerelease
Uploads data from a list or iterator to Salesforce. Data is automatically split into batches when necessary.
### Parameters
| Name | Label | Required | Description |
| - | - | :-: | - |
| `jobIdPath` | Job ID path | Yes | The state path where the job ID is stored. |
| `dataPath` | Data path | Yes | The state variable containing the data that should be uploaded to Salesforce. |
| `integrationCredentialsId` | Credentials | Yes | Salesforce credentials to use. |
| `apiVersion` | API version | No | Salesforce API version. If not set defaults to 62.0 |
### Exits
| Exit | Description |
| - | - |
| `NEXT` | - |
| `ERROR` | - |
# Sap Byd Functions
Source: https://docs.m3ter.com/m3sh-function-reference/native/sap-byd
## Create Business Object in SAP ByD
**Function name:** `CreateSapBydBusinessObjectFunction`
**Category:** Write
**Destination:** Sap Byd
Creates a business object in SAP ByD
### Parameters
| Name | Label | Required | Description |
| - | - | :-: | - |
| `integrationCredentialsId` | Credentials | Yes | SAP ByD credentials to use. |
| `serviceName` | Service name | Yes | Name of the SAP ByD service to call. In order to call specific collection use 'serviceName/collectionName' format, e.g. 'businesspartnerservice/BusinessPartnerCollection' |
| `inputData` | Input data | Yes | The name of the variable containing the record data to be sent to SAP ByD |
| `stateVariable` | Output data | No | The name of the variable to store the response from SAP ByD |
### Exits
| Exit | Description |
| - | - |
| `NEXT` | - |
| `ERROR` | - |
## Delete Business Object in SAP ByD
**Function name:** `DeleteSapBydBusinessObjectFunction`
**Category:** Write
**Destination:** Sap Byd
Deletes a business object from SAP ByD
### Parameters
| Name | Label | Required | Description |
| - | - | :-: | - |
| `integrationCredentialsId` | Credentials | Yes | SAP ByD credentials to use. |
| `serviceName` | Service name | Yes | Name of the SAP ByD service to call. In order to call specific collection use 'serviceName/collectionName' format, e.g. 'businesspartnerservice/BusinessPartnerCollection' |
| `businessObjectId` | Business Object ID | Yes | Name of the variable containing the ID of the business object to be deleted from SAP ByD |
### Exits
| Exit | Description |
| - | - |
| `NEXT` | - |
| `ERROR` | - |
## Read Business Object in SAP ByD
**Function name:** `ReadSapBydBusinessObjectFunction`
**Category:** Read
**Destination:** Sap Byd
Reads a business object from SAP ByD and stores it in a state variable
### Parameters
| Name | Label | Required | Description |
| - | - | :-: | - |
| `integrationCredentialsId` | Credentials | Yes | SAP ByD credentials to use. |
| `serviceName` | Service name | Yes | Name of the SAP ByD service to call. In order to call specific collection use 'serviceName/collectionName' format, e.g. 'businesspartnerservice/BusinessPartnerCollection' |
| `businessObjectId` | Business Object ID | Yes | Name of the variable containing the ID of the business object to be read from SAP ByD |
| `stateVariable` | Output data | No | The name of the variable to store the response from SAP ByD |
### Exits
| Exit | Description |
| - | - |
| `NEXT` | - |
| `ERROR` | - |
## Update Business Object in SAP ByD
**Function name:** `UpdateSapBydBusinessObjectFunction`
**Category:** Write
**Destination:** Sap Byd
Updates a business object in SAP ByD. This update is a partial update, meaning that only the fields provided in the input data will be updated.
### Parameters
| Name | Label | Required | Description |
| - | - | :-: | - |
| `integrationCredentialsId` | Credentials | Yes | SAP ByD credentials to use. |
| `serviceName` | Service name | Yes | Name of the SAP ByD service to call. In order to call specific collection use 'serviceName/collectionName' format, e.g. 'businesspartnerservice/BusinessPartnerCollection' |
| `businessObjectId` | Business Object ID | Yes | Name of the variable containing the ID of the business object to be read from SAP ByD |
| `inputData` | Input data | Yes | The name of the variable containing the record data to be sent to SAP ByD |
### Exits
| Exit | Description |
| - | - |
| `NEXT` | - |
| `ERROR` | - |
# Slack Functions
Source: https://docs.m3ter.com/m3sh-function-reference/native/slack
## Send Slack Error Message
**Function name:** `SendSlackErrorMessageFunction`
**Category:** Write
**Destination:** Slack
Sends a formatted workflow error message to Slack
### Parameters
| Name | Label | Required | Description |
| - | - | :-: | - |
| `integrationCredentialsId` | Credentials | Yes | The Slack credentials to use. |
| `channelId` | Channel ID | Yes | Slack Channel ID |
### Exits
| Exit | Description |
| - | - |
| `NEXT` | - |
| `ERROR` | - |
## Send Slack Message
**Function name:** `SendSlackMessageFunction`
**Category:** Write
**Destination:** Slack
Sends message to a given Slack channel
### Parameters
| Name | Label | Required | Description |
| - | - | :-: | - |
| `integrationCredentialsId` | Credentials | Yes | The Slack credentials to use. |
| `channelId` | Channel ID | Yes | Slack Channel ID |
| `message` | Message | No | The name of the object to pass as message text |
| `contentBlocks` | ContentBlocks | No | The name of the object to pass as message blocks list |
| `attachment` | Attachment | No | m3sh file to send as an attachment. N.B. Attachments cannot be sent using Slack webhook credentials. m3sh files that are sent as attachment can no longer be written to during the workflow |
| `compressAttachment` | Compress attachment | No | Compress the contents of the attachment before sending to Slack |
### Exits
| Exit | Description |
| - | - |
| `NEXT` | - |
| `ERROR` | - |
## Send Slack Webhook Error Message
**Function name:** `SendSlackWebhookErrorMessageFunction`
**Category:** Write
**Destination:** Slack
Sends a formatted workflow error message to Slack using a webhook
### Parameters
| Name | Label | Required | Description |
| - | - | :-: | - |
| `integrationCredentialsId` | Credentials | Yes | The Slack credentials to use. |
### Exits
| Exit | Description |
| - | - |
| `NEXT` | - |
| `ERROR` | - |
## Send Slack Webhook Message
**Function name:** `SendSlackWebhookMessageFunction`
**Category:** Write
**Destination:** Slack
Sends message to a given Slack channel using a webhook.
### Parameters
| Name | Label | Required | Description |
| - | - | :-: | - |
| `integrationCredentialsId` | Credentials | Yes | The Slack credentials to use. |
| `message` | Message | No | The name of the object to pass as message content |
| `contentBlocks` | ContentBlocks | No | The name of the object to pass as message blocks list |
### Exits
| Exit | Description |
| - | - |
| `NEXT` | - |
| `ERROR` | - |
# Stripe Functions
Source: https://docs.m3ter.com/m3sh-function-reference/native/stripe
## Create Stripe Object
**Function name:** `CreateStripeObjectFunction`
**Category:** Write
**Destination:** Stripe
Creates an object in Stripe
### Parameters
| Name | Label | Required | Description |
| - | - | :-: | - |
| `integrationCredentialsId` | Credentials | Yes | Stripe credentials to use. |
| `objectType` | Object type | Yes | The type of Stripe object to create |
| `inputData` | Input data | Yes | The name of the variable containing the object data to be sent to Stripe |
| `stateVariable` | Output data | No | The name of the variable to store the response from Stripe |
### Exits
| Exit | Description |
| - | - |
| `NEXT` | - |
| `ERROR` | - |
## Delete Stripe Object
**Function name:** `DeleteStripeObjectFunction`
**Category:** Write
**Destination:** Stripe
Deletes an object in Stripe
### Parameters
| Name | Label | Required | Description |
| - | - | :-: | - |
| `integrationCredentialsId` | Credentials | Yes | Stripe credentials to use. |
| `objectType` | Object type | Yes | The type of Stripe object to delete |
| `objectId` | Object id | Yes | The name of the variable containing the ID of the object to delete |
### Exits
| Exit | Description |
| - | - |
| `NEXT` | - |
| `ERROR` | - |
## List Stripe Objects
**Function name:** `ListStripeObjectsFunction`
**Category:** Read
**Destination:** Stripe
List objects in Stripe
### Parameters
| Name | Label | Required | Description |
| - | - | :-: | - |
| `integrationCredentialsId` | Credentials | Yes | Stripe credentials to use. |
| `objectType` | Object type | Yes | The type of Stripe object to read |
| `stateVariable` | Output results name | Yes | Name of the variable by which the objects iterator will be stored in state |
### Exits
| Exit | Description |
| - | - |
| `NEXT` | - |
| `ERROR` | - |
## Read Stripe Object
**Function name:** `ReadStripeObjectFunction`
**Category:** Read
**Destination:** Stripe
Reads an from Stripe and stores it in the state
### Parameters
| Name | Label | Required | Description |
| - | - | :-: | - |
| `integrationCredentialsId` | Credentials | Yes | Stripe credentials to use. |
| `objectType` | Object type | Yes | The type of Stripe object to read |
| `objectId` | Object id | Yes | The name of the variable containing the ID of the record to read |
| `stateVariable` | Output data | No | The name of the variable to store the response from Stripe |
### Exits
| Exit | Description |
| - | - |
| `NEXT` | - |
| `ERROR` | - |
## Update Stripe Object
**Function name:** `UpdateStripeObjectFunction`
**Category:** Write
**Destination:** Stripe
Updates an object in Stripe
### Parameters
| Name | Label | Required | Description |
| - | - | :-: | - |
| `integrationCredentialsId` | Credentials | Yes | Stripe credentials to use. |
| `objectType` | Object type | Yes | The type of Stripe object to create |
| `objectId` | Object id variable | Yes | The name of the variable containing the ID of the existing object in Stripe that should be updated |
| `inputData` | Input data variable | Yes | The name of the variable containing the record data to be sent to Stripe |
| `stateVariable` | Output data variable | No | The name of the variable to store the response from Stripe |
### Exits
| Exit | Description |
| - | - |
| `NEXT` | - |
| `ERROR` | - |
# Stripe Test Functions
Source: https://docs.m3ter.com/m3sh-function-reference/native/stripe-test
## Create Stripe Object
**Function name:** `CreateStripeObjectFunction`
**Category:** Write
**Destination:** Stripe Test
Creates an object in Stripe
### Parameters
| Name | Label | Required | Description |
| - | - | :-: | - |
| `integrationCredentialsId` | Credentials | Yes | Stripe credentials to use. |
| `objectType` | Object type | Yes | The type of Stripe object to create |
| `inputData` | Input data | Yes | The name of the variable containing the object data to be sent to Stripe |
| `stateVariable` | Output data | No | The name of the variable to store the response from Stripe |
### Exits
| Exit | Description |
| - | - |
| `NEXT` | - |
| `ERROR` | - |
## Delete Stripe Object
**Function name:** `DeleteStripeObjectFunction`
**Category:** Write
**Destination:** Stripe Test
Deletes an object in Stripe
### Parameters
| Name | Label | Required | Description |
| - | - | :-: | - |
| `integrationCredentialsId` | Credentials | Yes | Stripe credentials to use. |
| `objectType` | Object type | Yes | The type of Stripe object to delete |
| `objectId` | Object id | Yes | The name of the variable containing the ID of the object to delete |
### Exits
| Exit | Description |
| - | - |
| `NEXT` | - |
| `ERROR` | - |
## List Stripe Objects
**Function name:** `ListStripeObjectsFunction`
**Category:** Read
**Destination:** Stripe Test
List objects in Stripe
### Parameters
| Name | Label | Required | Description |
| - | - | :-: | - |
| `integrationCredentialsId` | Credentials | Yes | Stripe credentials to use. |
| `objectType` | Object type | Yes | The type of Stripe object to read |
| `stateVariable` | Output results name | Yes | Name of the variable by which the objects iterator will be stored in state |
### Exits
| Exit | Description |
| - | - |
| `NEXT` | - |
| `ERROR` | - |
## Read Stripe Object
**Function name:** `ReadStripeObjectFunction`
**Category:** Read
**Destination:** Stripe Test
Reads an from Stripe and stores it in the state
### Parameters
| Name | Label | Required | Description |
| - | - | :-: | - |
| `integrationCredentialsId` | Credentials | Yes | Stripe credentials to use. |
| `objectType` | Object type | Yes | The type of Stripe object to read |
| `objectId` | Object id | Yes | The name of the variable containing the ID of the record to read |
| `stateVariable` | Output data | No | The name of the variable to store the response from Stripe |
### Exits
| Exit | Description |
| - | - |
| `NEXT` | - |
| `ERROR` | - |
## Update Stripe Object
**Function name:** `UpdateStripeObjectFunction`
**Category:** Write
**Destination:** Stripe Test
Updates an object in Stripe
### Parameters
| Name | Label | Required | Description |
| - | - | :-: | - |
| `integrationCredentialsId` | Credentials | Yes | Stripe credentials to use. |
| `objectType` | Object type | Yes | The type of Stripe object to create |
| `objectId` | Object id variable | Yes | The name of the variable containing the ID of the existing object in Stripe that should be updated |
| `inputData` | Input data variable | Yes | The name of the variable containing the record data to be sent to Stripe |
| `stateVariable` | Output data variable | No | The name of the variable to store the response from Stripe |
### Exits
| Exit | Description |
| - | - |
| `NEXT` | - |
| `ERROR` | - |
# Webhook Functions
Source: https://docs.m3ter.com/m3sh-function-reference/native/webhook
## Call Outgoing Webhook
**Function name:** `CallOutgoingWebhookFunction`
**Category:** Write
**Destination:** Webhook
Calls an outgoing webhook using the specified payload. It will also use m3ter's webhook signature mechanism to sign the request (M3TER\_SIGNED\_REQUEST).
### Parameters
| Name | Label | Required | Description |
| - | - | :-: | - |
| `outgoingWebhookId` | OutgoingWebhook | Yes | The UUID of the webhook to call |
| `webhookPayload` | Webhook payload | Yes | Name of variable by which the webhook payload should be retrieved from state |
| `responseStateVariable` | Output data | No | State variable to store the response from the webhook call |
### Exits
| Exit | Description |
| - | - |
| `NEXT` | - |
| `ERROR` | - |
# Xero Functions
Source: https://docs.m3ter.com/m3sh-function-reference/native/xero
## Create Xero invoice
**Function name:** `CreateXeroInvoiceFunction`
**Category:** Write
**Destination:** Xero
Function to create Xero invoice
### Parameters
| Name | Label | Required | Description |
| - | - | :-: | - |
| `integrationCredentialsId` | Credentials | Yes | Xero credentials to use. |
| `xeroInvoiceStateVariable` | Xero invoice | Yes | Xero invoice to be created. |
| `outputResourceStateVariable` | Output resource name | Yes | Name of the variable by which the invoices will be stored in state |
### Exits
| Exit | Description |
| - | - |
| `NEXT` | - |
| `ERROR` | - |
## Delete Xero invoice
**Function name:** `DeleteXeroInvoiceFunction`
**Category:** Write
**Destination:** Xero
Function to delete Xero invoice
### Parameters
| Name | Label | Required | Description |
| - | - | :-: | - |
| `integrationCredentialsId` | Credentials | Yes | Xero credentials to use. |
| `xeroInvoiceIdStateVariable` | Xero invoice ID | Yes | Name of variable by which invoice ID should be retrieved from state |
### Exits
| Exit | Description |
| - | - |
| `NEXT` | - |
| `ERROR` | - |
## Read Xero invoice
**Function name:** `ReadXeroInvoiceFunction`
**Category:** Read
**Destination:** Xero
Function to read Xero invoice
### Parameters
| Name | Label | Required | Description |
| - | - | :-: | - |
| `integrationCredentialsId` | Credentials | Yes | Xero credentials to use. |
| `xeroInvoiceIdStateVariable` | Xero invoice ID | Yes | Name of variable by which invoice ID should be retrieved from state |
| `outputResourceStateVariable` | Output resource name | Yes | Name of the variable by which the invoice will be stored in state |
### Exits
| Exit | Description |
| - | - |
| `NEXT` | - |
| `ERROR` | - |
## Update Xero invoice
**Function name:** `UpdateXeroInvoiceFunction`
**Category:** Write
**Destination:** Xero
Function to update Xero invoice
### Parameters
| Name | Label | Required | Description |
| - | - | :-: | - |
| `integrationCredentialsId` | Credentials | Yes | Xero credentials to use. |
| `xeroInvoiceIdStateVariable` | Xero invoice ID | Yes | Name of variable by which invoice ID should be retrieved from state |
| `updateDataStateVariable` | Update data | Yes | Name of the variable by which data for update should be retrieved from state |
| `outputResourceStateVariable` | Output resource name | Yes | Name of the variable by which the invoice will be stored in state |
### Exits
| Exit | Description |
| - | - |
| `NEXT` | - |
| `ERROR` | - |