Your end customer Accounts will typically be created in m3ter as a result of an integration with one of your 3rd-party systems. However, you might need to create an Account manually during the set up phase of your Organization and for testing before you switch to a production environment. This topic explains how to create, manage, and delete Accounts in the Console:
Tip: Accounts Created for Integrations? In typical production settings, your end customer Accounts will be created in m3ter as a result of an Integration with one of your 3rd-party systems. For more details, see m3ter Integrations. Creating Accounts
You can quickly create an Account manually in the Console. Accounts do not belong to Products to allow for cases where an end-customer consumes more that one of your products or services.
To create an Account:
- Select Accounts. The Accounts page opens.
- Select Create account. The Accounts>Create page opens.
- Enter the Account details:
- Name. The customer’s name. Required field.
- Code. Unique identifier for the Account. You will need this Code as a unique id for API calls, such as a call to make usage data submissions for the Account. It will also be used to identify the Account in any 3rd-party systems you integrate with m3ter. Required field.
- Email Address. Required field.
- Parent account. Optional - if you want the Account to be the Child of another Account, then select the Parent Account. For more details see Working with Parent/Child Accounts.
Warnings:
- Only single tier Parent/Child Accounts are allowed! An Account cannot be made a Child of another Child Account or made a Child of itself. If you select an Account that means the Account would become a grandchild Account, then you will receive an error when you try to save.
- Accounts selection list restricted to twenty! If you have a large number (more than twenty) Accounts in your Organization, then the Account you want to select as the Parent might not show in the drop-down list. To find the Account you want, start to type the Account name and the list will be filtered to match the entered text string.
- Enter the optional Address details for the Account:
- Address line 1.
- Address line 2.
- City / town.
- Region / province.
- Postcode / ZIP.
- Country.
Warning: Personally Identifiable Information (PII)! Under the Data Processing Agreement, the only fields you are allowed to use for any of your end-customer’s PII are Name, Address, and Email Address. See the Personally Identifiable Information (PII) section for more details.
- Enter any Bill settings for the Account:
- Currency. Use the drop-down list to select the currency you want to use as the billing currency for the Account. Note that:
- If you select a currency for the Account, this will override the billing currency you’ve defined at Organizational level.
- If you leave this blank, the billing currency defined at Organizational level will be used for billing on the Account. See Creating and Managing Currencies.
- Note that if you attach a Plan to the Account that uses a different pricing currency to the selected billing currency, then you must add the relevant currency conversion rate at Organization level to ensure the billing process can convert line items calculated using the pricing currency into the selected billing currency. If you don’t add these currency conversion rates, then bills will fail for the Account. See Adding Currency Conversion Rates.
- Billing cycle date. Optional setting, which sets the date when the first Bill is created and acts as a reference for when in the applied billing frequency period subsequent bills for the Account are created:
- For example, suppose you attach a Plan to the Account that is configured for monthly billing frequency and you’ve defined the period the Plan will apply to the Account to be from January 1st, 2022 until January 1st, 2023. You then set a Billing cycle date of February 15th, 2022. The first Bill will be created for the Account on February 15th, and subsequent Bills created on the 15th of the months following for the remainder of the billing period - March 15th, April 15th, and so on.
- If you leave this blank, then Epoch dates from your Organization’s configuration will be used as the Billing cycle date for the Account instead - see Viewing and Editing Organization Configuration.
- Note that you can override the Billing cycle date set for the Account when you attach a Plan to the Account to create an Account Plan - see Attaching Plans to an Account.
- Credit application order. Optional setting. Select to define the order in which any Prepayment or Balance credit amounts on the Account are to be drawn-down for billing:
- Use organization-wide configuration. Default selection. If enabled, the setting selected at Organization level for credit draw-down order will be used - it will be shown in brackets. If you select any of the other four options, the Organization level setting will be overridden. See Viewing and Editing Organization Configuration.
- Prepayment then balance. Draw-down against Prepayment credit before Balance credit.
- Balance then prepayment. Draw-down against Balance credit before Prepayment credit.
- Prepayment only. Only draw-down against Prepayment credit.
- Balance only. Only draw-down against Balance credit.
Important! If the Account belongs to a Parent/Child Account hierarchy, then the Credit application order settings are not available, and the draw-down order defaults always to Prepayment then Balance order.
- Days before bill due. Optional setting. Enter the number of days after the Bill generation date that you want to show on Bills as the due date. This is useful for cases where you want Bills for different end-customer Accounts to show different due dates:
- Purchase order number. Optional attribute. Allows you to assign an order number to an end-customer Account. The purchase order number will then come through into invoicing. For example, your financial systems might require this as a reference for clearing payments.
Warning: Changing Account Purchase Order Number! If you have generated Bills for an Account that has a Purchase Order number assigned to it and then changed the number, when you recalculate Bills the old number will persist on Bill Details and not be updated. This is expected behavior. If you need a Bill to show the new Purchase Order number, you must delete the Bill and regenerate it.
- Enter any Bill statements settings for the Account. These are optional allowing you to define how you want Bill Statements to be generated for the Account. Any settings at Account level will override Organization level settings for Bill Statements:
- Statement definition. Optional setting. Select a Statement definition on which Statements generated for the Account will be based.
- Auto-generate statements. Optional setting. Select for the formats in which Statements for the Account will be generated when Bills for the Account are approved or locked - four options:
- Use organization-wide configuration. Default selection. If enabled, the setting selected at Organizational-level for auto-generation of statements will be used - it will be shown in brackets. If you select any of the other three options, the Organization level setting will be overridden. See Viewing and Editing Organization Configuration.
- None. Statements are not auto-generated.
- JSON. Statements are generated only in JSON format.
- JSON and CSV. Statements are generated in both JSON and CSV formats.
- Create any Custom fields for the Account:
- You can define Custom Fields when creating an Account or edit it at a later date to do this. Any Custom Fields you create for an Account override Custom Fields you’ve created for Accounts at Organizational level. We strongly recommend reviewing Working with Custom Fields before you create Custom Fields.
- Select Create account. The Account Details page opens with the Overview tab selected.
 Note that:
- The unique
id generated for the new Account is listed under Account Details and you can copy this directly to your clipboard.
- Any usage data ingested for the Account will be linked strictly to the Account
id.
- You can scroll down the page to review the Account metadata. See Reviewing Account Metadata for more details.
Editing and Deleting Accounts
You can edit or delete Accounts in the Console.
Warning: Deleting Accounts for which you’ve already submitted usage data! If you delete an Account for which you’ve already submitted usage data, that usage data is permanently dissociated from the Account. Even if you recreate a new Account with the same Code as the Account you deleted earlier, the usage data ingested for the deleted Account is no longer available for billing against the newly created Account using the same Code. This means you’ll have to re-submit the usage data for the recreated Account if you want to use the data for billing the Account. See Editing and Deleting Accounts - Implications for Usage Data for more details.
- Select Accounts. The Accounts listing page opens.
- Search for the Account you want to edit or delete.
- If you want to edit the Account, select the NAME hotlink text. The Account page opens with the Overview tab selected.
- On the Account details panel select Edit. The Edit page opens.
- Make your editing changes, and click Update account. You are returned to the Account page.
- If you want to delete the Account, stay on the Accounts listing page and select the Delete button for the Account:
 A confirmation popup opens:

- Select Yes to confirm the delete action.
Managing the Accounts Page
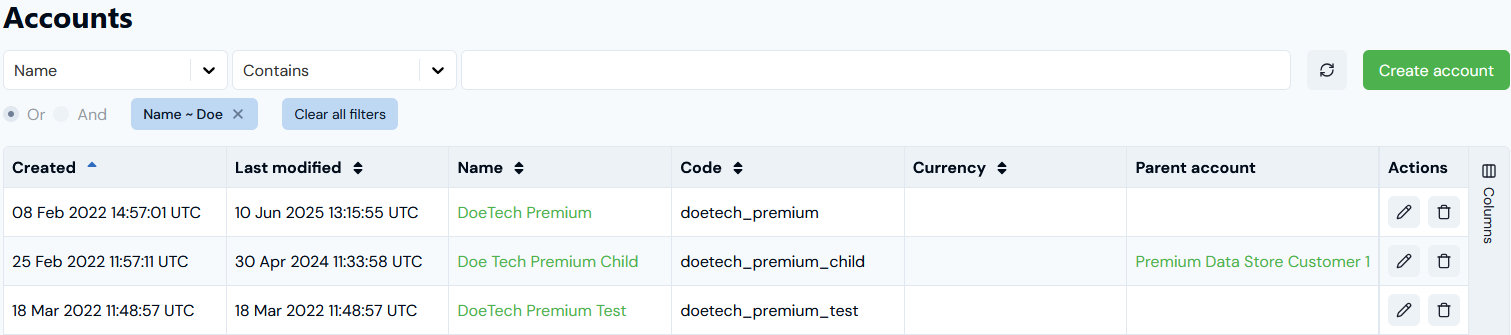
When working with Accounts, you can quickly reorder columns or switch columns on or off to suit your current operational purposes. For example, you might want to show the Created by and Last modified dates as the first two columns or show additional columns for Currency and Parent account:
Reordering Accounts Page Columns
To reorder columns for the Accounts page:
- Select Accounts. The Accounts page opens with columns in the default order.
- Select the vertical Columns button on the right-hand side of the list:

- On the reorder columns panel that appears, drag-and-drop columns to give the order you want to show on the page:

- Repeat until you have a top-bottom order of columns that you want to appear in left-right order on the page.
- Select Columns again. The reorder columns panel closes and the Accounts page shows the reordered columns:

Switching Accounts Page Columns On and Off
To reorder columns for the Accounts page:
- Select Accounts. The Accounts page opens with columns in the default order.
- Select the vertical Columns button on the right-hand side of the list:
- Use the Columns panel that appears to switch on or off any columns you want to show or hide from the list:

- In this example, we’ve switched on two additional columns for Currency and Parent account that are hidden in the default arrangement of the page.
- Note that the Name and Actions columns are fixed and you cannot switch them off to hide them.
- Select Columns again. The Columns panel closes and the Accounts page shows the columns you have switched on: