Suppose you run a SaaS company that offers a service to companies to perform background checks on employee candidates to support their hiring process:
- Pricing for this service will vary by candidate location and the level of background check done.
- The service is offered for candidate locations across three countries: the USA, the UK, and China.
- Three levels of background check are offered for each location: Standard, Extended, or Complete.
Step 1: Create Product
Products represent a product or service that you offer to your end customers. A Meter, Aggregation, Plan Template, Plan, or Pricing typically all belong to a Product. To create a Product:- In the Console, select Products. The Products page opens.
- Select Create Product. We’ll create a single Product called Premium Candidate Checks:
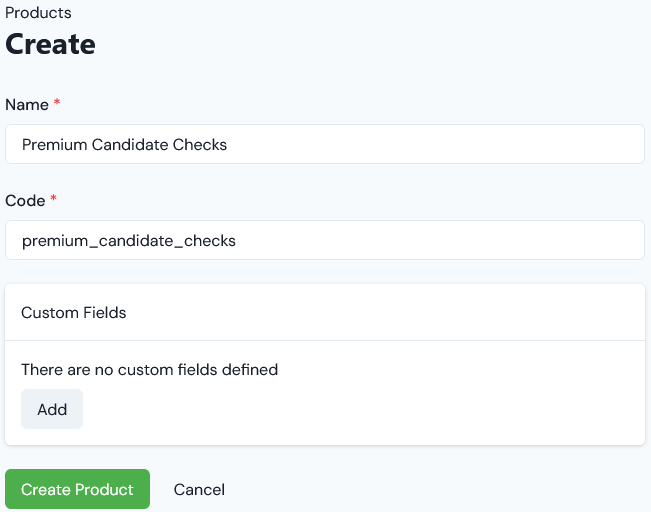
- Select Create Product.
More Details: Creating and Managing Products
Step 2: Set up Meter
Meters define the Data Fields that your system will use to submit usage data to the m3ter platform:- As well as simple Data Fields, which collect raw usage data, you can define Derived Fields that reference and apply calculations to simple fields.
- You can create Product-specific Meters or Global Meters.
- Select Usage>Meters. The Meters page opens.
- In the Product drop-down, select Premium Candidate Checks.
- Select Create Meter.
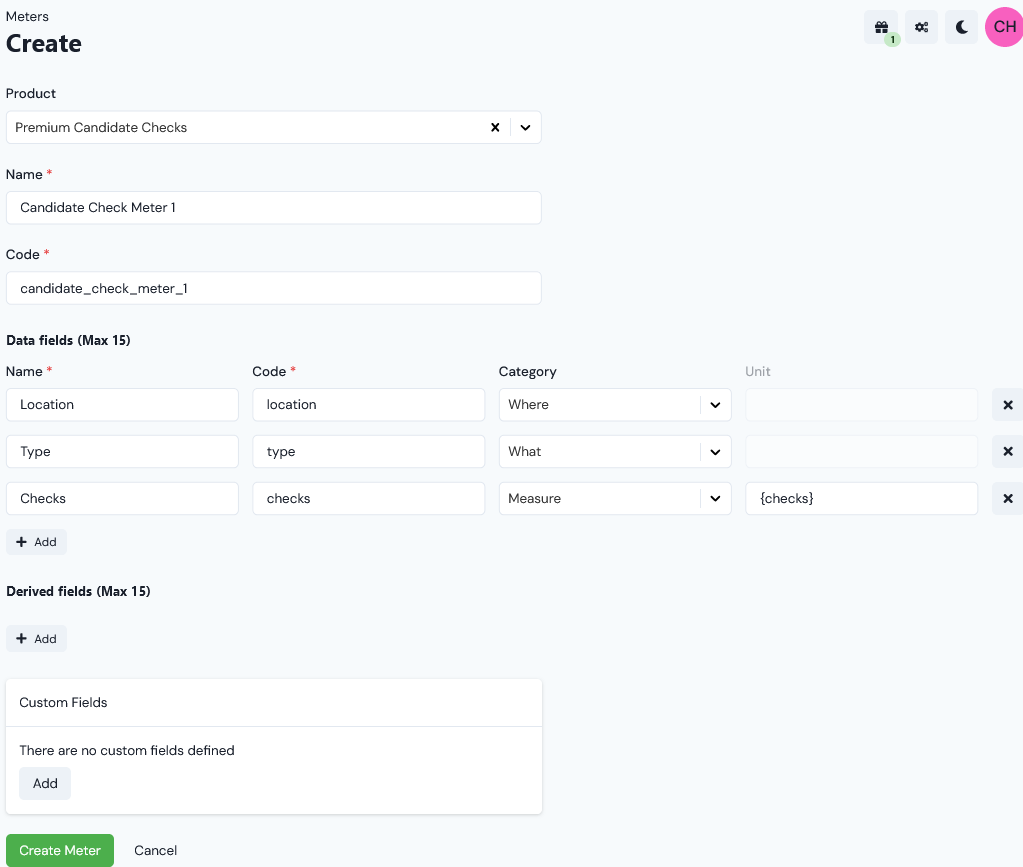
- A Location field: Category is Where, which is a String field.
- A Type field of: Category is What, which is a String field.
- A Checks field: Category is Measure, which is a Numeric field.
- Select Create Meter.
More Details: Reviewing Meter Options and Creating Meters
Step 3: Define Aggregations
Aggregations define how to transform into a single number the individual measurements submitted to a Meter Data Field as usage data. For example, you may choose to simply SUM the submitted usage data values. In this way, Aggregations define the usage-based pricing metrics you’ll use to set up pricing for your products and services. For the usage-based pricing model we want to implement in our example, we’ll need to create a Segmented Aggregation based on the usage data collected by our single Meter - Candidate Check Meter 1:- We’ll use the Location and Type string Data Fields the create the required segments on the usage data.
- We can target the Checks numeric Data Field to give a sum of the number of checks performed for each defined segment.
- Select Usage>Aggregations. The Aggregations page opens.
- In the Product drop-down, select Premium Candidate Checks.
- Select Create Aggregation. The Create page opens.
- Enter a Name and Code for the new Aggregation.
- Select the Meter previously created for the example and with the required Data Fields: Location, Type, and Quantity.

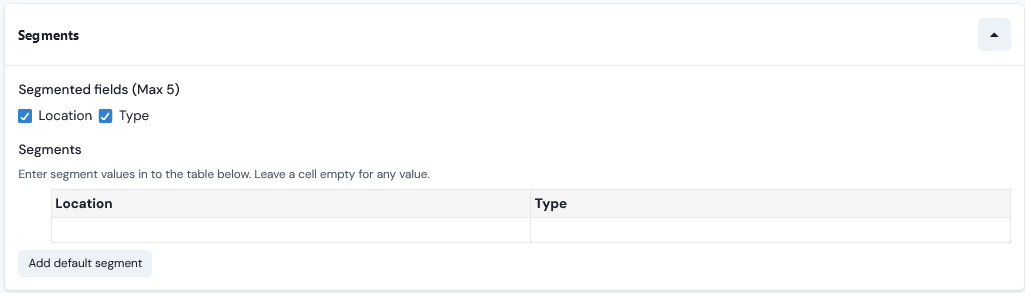
- Scroll down the Create form and click the arrow to open the Segments panel:

- Select the two fields to define segment values by location/type. The Segments panel adjusts for the selections:
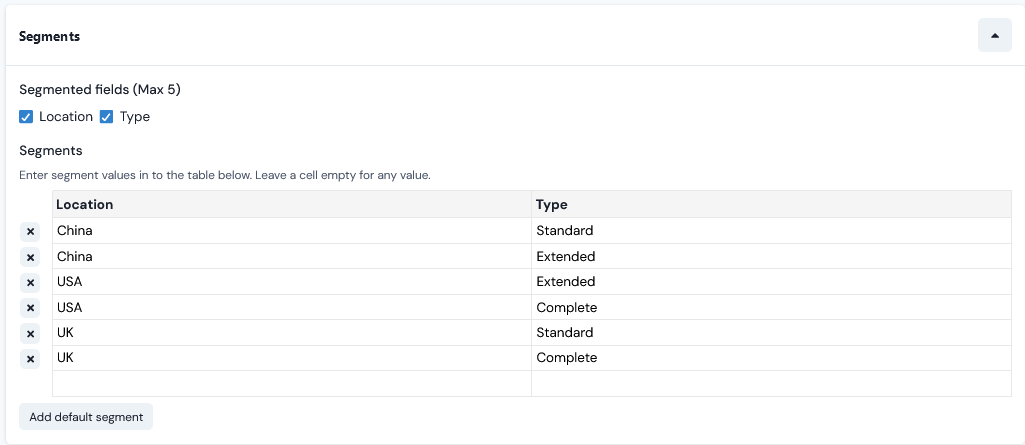
- We can add the appropriate location/type segment values using the Segments panel:
- Select Create Aggregation.
Step 4: Create Product Plan
Plans represent a pricing plan for one of your products or services. A Plan is always derived from a Plan Template and inherits settings from the Plan Template which control billing operations, such as billing frequency and currency. You can override some of these settings when you create a Plan from a Plan Template. To meet the example requirements:- First, we’ll need a Plan Template for the Premium Candidate Checks Product. We’ll configure the Plan Template:
- For monthly billing using a specific billing currency.
- Omit any Standing charge or Minimum spend amounts to be applied for each billing period.
- Second, we’ll create a Product Plan based on the Plan Template.
- Select Pricing>Plan Templates. The Plan Templates page opens.
- In the Product drop-down, select Premium Candidate Checks.
- Select Create Plan Template. The Create page opens.
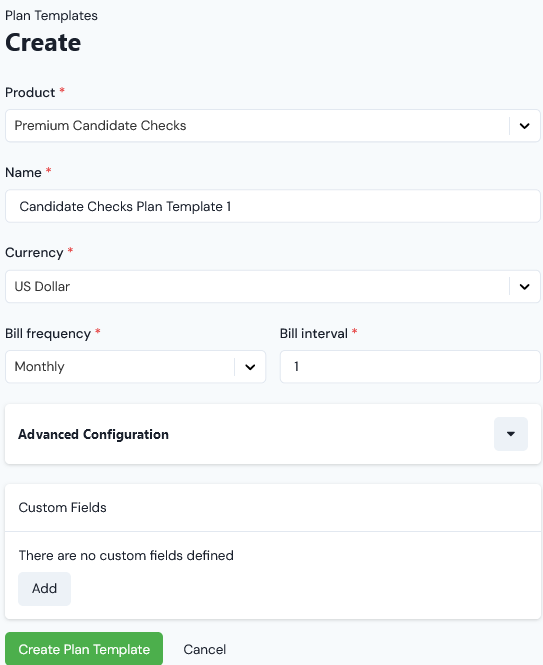
- Chosen US dollars as the billing currency.
- Note that if US Dollar doesn’t appear for selection in the Currency drop-down when you are creating your Plan Template, you’ll need to create it for your Organization:
- Select Settings>Organization and open the Currencies tab.
- Click Create currency and on the Create page add USD - US Dollar ($) as a Standard currency. You can define the Maximum decimal places for the currency also. Click Create - US Dollar will now be available for selection across you Organization.
- Note that if US Dollar doesn’t appear for selection in the Currency drop-down when you are creating your Plan Template, you’ll need to create it for your Organization:
- Selected a monthly Bill frequency with a Bill interval of 1, which means Accounts put on the Plan will receive a Bill each month for a month’s period of usage.
- Ignore the settings under Advanced Configuration. This section of the form allows you to set up Standing charge and Minimum spend amounts for billing, neither of which are required for the example pricing model.
- Select Create Plan Template. You are returned to the Plan Template Details page.
- Select Pricing>Plans. The Plans page opens.
- In the Product drop-down, select Premium Data Checks.
- Select Create Plan. The Create page opens.
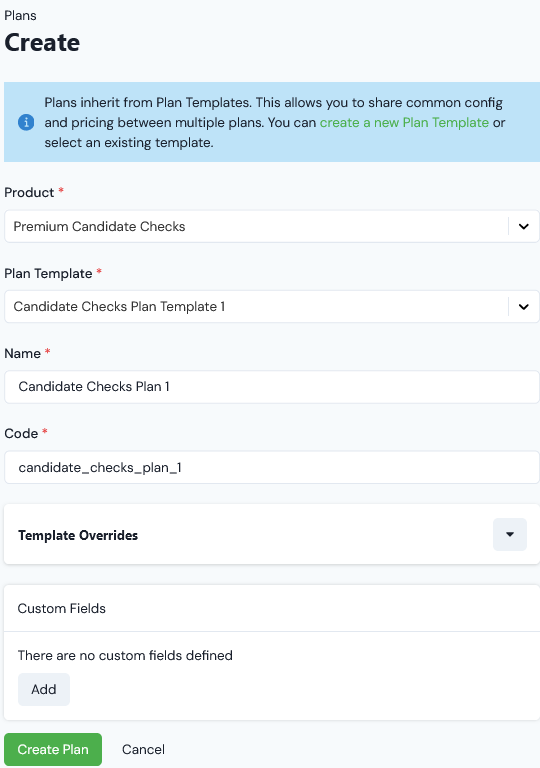
- Note that no Template Overrides for Standing charge or Minimum spend amounts are required for the example.
- Select Create Plan. The Plan Details page opens for our new Product Plan.
More Details: Reviewing Options for Plan Templates and Plans and Creating Plans
Step 5: Price Product Plan
Pricing allows you to configure the cost of usage data under a specific Plan you apply to an Account, and is used to calculate bills. We can use the Pricing Editor in the m3ter Console to quickly price up our Product Plan to meet the pricing requirements for the example. To price Product Plan:- Select Pricing>Pricing Editor. The Pricing page opens.
- In the Product drop-down, select Premium Candidate Checks.
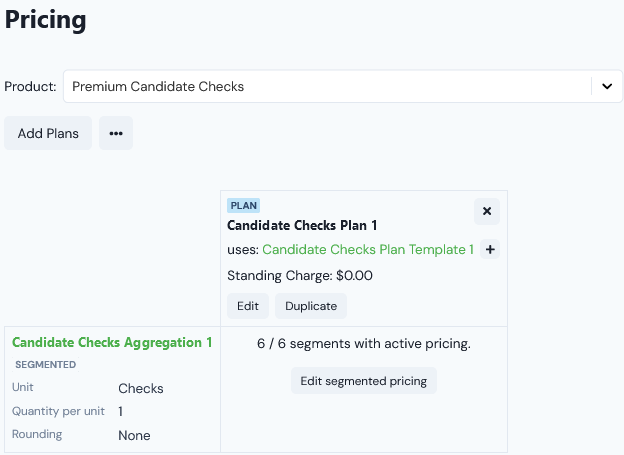
- Select Add Plans. The Select Plans dialog opens and lists all Plans created for the Premium Candidate Checks Product.
- Check Candidate Checks Plan 1 and select Confirm. The dialog closes and the Plan is added to the Pricing page.
- Click Add Aggregations. A Select Aggregations dialog appears and lists all Aggregations created for the Premium Candidate Checks Product.
- Note that you might also see global Aggregations listed for selection. Global Aggregations are not tied to any specific Product and can be used to price Plans across all Products.
- On the Select Aggregations dialog check Candidate Checks Aggregation 1.
- Click Confirm. The dialog closes and the selected Aggregation is added to the Pricing page for the added Plan.
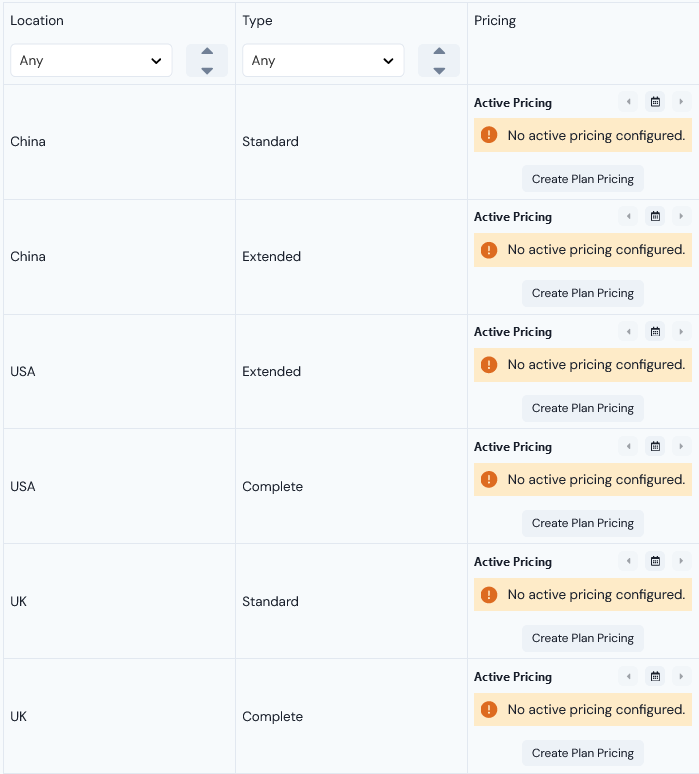
- You’ll see a warning that none of the six segments we defined for the Candidate Checks Aggregation 1 have active pricings configured.
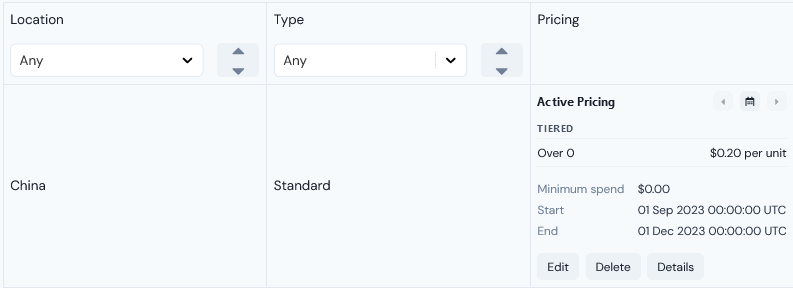
- In the pricing grid, select Edit segmented pricing. The Segments pricing page opens:
- You can read off details of the Segmented Aggregation being used to create the pricing at the top of the page.
- You can read off details of the Plan to which you are applying differentiated pricings by segment.
- Scroll down the page to reveal the Segments pricing grid, which contains a row for each segment defined for the Aggregation:
| Location | Type | Charge Rate per Check |
|---|---|---|
| China | Standard | $0.2 |
| China | Extended | $0.4 |
| USA | Extended | $0.5 |
| USA | Complete | $0.7 |
| UK | Standard | $0.5 |
| UK | Complete | $0.8 |
- For the first segment row - China/Standard - select Create Plan Pricing. The Create pricing page opens:
- You can read off details of the Segmented Aggregation being used to create the pricing at the top of the page.
- You can Switch to wizard to follow an alternative streamlined pricing workflow by Pricing Type. For the example workflow, we’ll continue with the default advanced pricing format.
- Work down the form to enter:
- Start and End dates for the period the pricing will be active for the Plan.
- A Description that will appear for any usage charge line items on Bills, such as China/Standard Check Charges.
- Leave the Apply as setting as the default - Debit.
- Pricing type:
- The pricing requirement was to charge each segment at a flat rate on a per check basis per billing period.
- We can therefore implement this pricing for each segment using a Tiered pricing structure with a single pricing band configured:
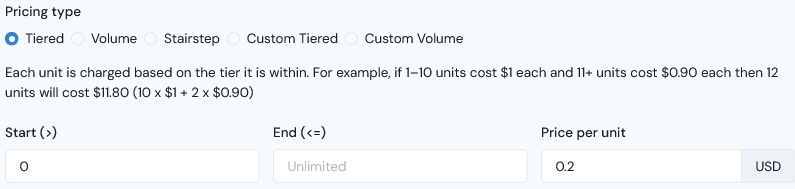
- Select Create Pricing. The Create pricing page closes and you are returned to the Segments page where the pricing is shown as active for the China/Standard segment:
- Repeat steps 10. to 12. to create pricings for the remaining five segments.
- If we return to the Pricing editor, we see that each of our six segments have active pricings configured:
More Details: Reviewing Pricing Options for Plans and Plan Templates and Pricing Plans Using Segmented Aggregations.
Step 6: Create Test Account and Attach Priced Plan
Accounts represent one of your end-customers, and contains the end-customer name and contact details:- When you attach a priced Plan to an Account, this creates a link between them to create an Account Plan. Attaching priced Plans to an Account determines the charges incurred by customers who are put on the Plan when they consume one of your Products.
- In the main Console navigation, select Accounts. The Accounts page opens.
- Select Create Account. The Create page opens.
- Enter the details of the new Account:
- Name and Code. Required fields.
- Note that when you enter a Name and click in the Code field, a default code is entered based on the name you’ve entered, which you can then edit as required.
- Email Address. In addition to Name and Code, this is also a required field.
- Other settings. These are optional fields, such as physical address settings, which you can add later by editing the Account.
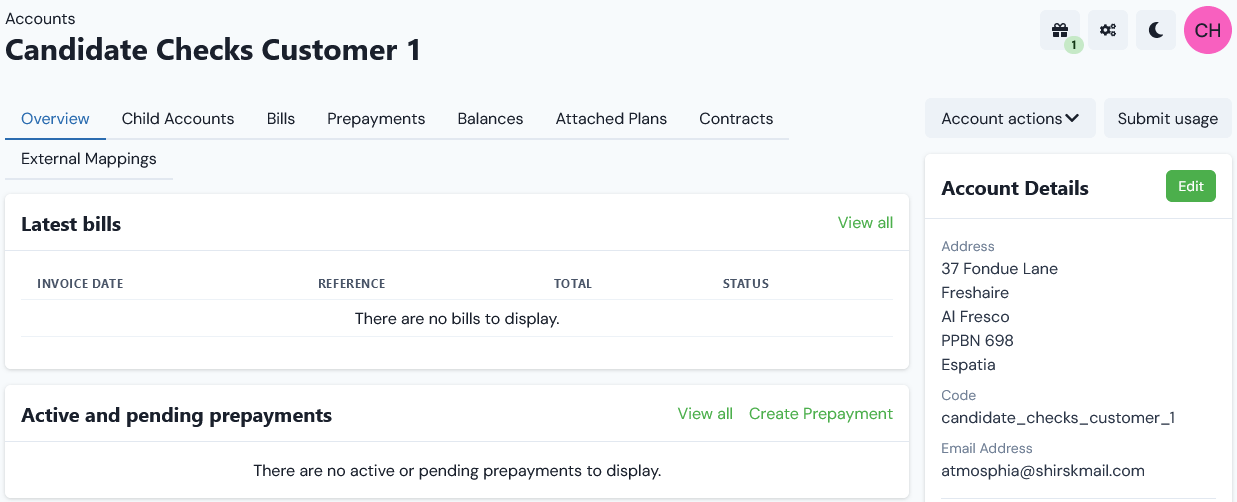
- Select Create Account. The Account Details page for the new Account opens with the Overview tab selected:
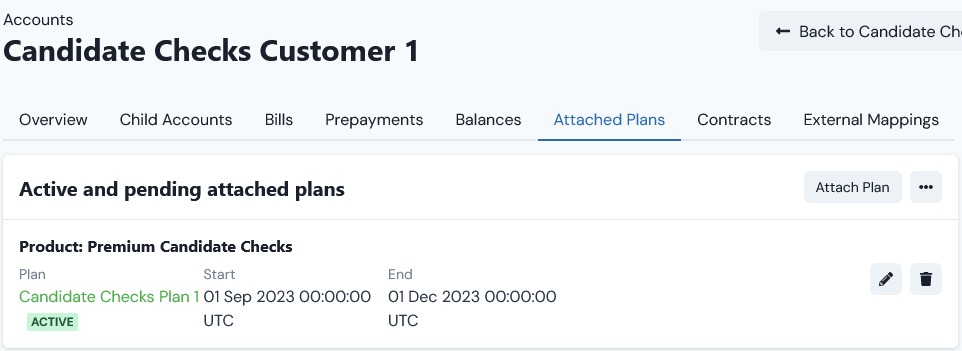
- Select the Attached Plans tab.
- On the Active and pending attached plans panel, select Attach plan. The Create page opens.
- When you attach a Plan to an Account, you create an Account Plan, which lets you define the specific way in which you want the Plan to be applied to the individual Account. Note that the Account Plan you create when you attach the Plan to an Account is distinct from the Plan itself - you may want to attach the Plan to another Account but to configure the way the Plan is applied to that other Account differently.
- On the Create page, leave the radio button for Plan as default setting and enter the details of the Account Plan:
- Use the Product drop-down to select the Product, which is Premium Candidate Checks for the example. The Plan drop-down selection field is enabled.
- Use the Plan drop-down to select the Plan, which is Candidate Checks Plan 1 for the example.
- Use the pop-up calendars to enter Start date and End date, which will define the period the Account Plan is active for the Account.
- Select Create Plan. Back on the Attached Plans tab, the Account Plan is shown on the Active and pending attached plans panel:
More Details: Creating an Account and Attaching Plans to an Account
Step 7: Submit Data to Test Account and Check Bill
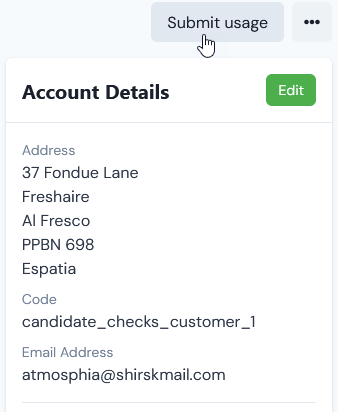
We’ll now submit some test data to our Candidate Checks Customer 1 test account and for the Candidate Check Meter 1. This will allow us to generate a Bill for the test Account and check that the usage charges on the Bill for the submitted test data are correct.- Select Accounts. On the Accounts page, select the NAME hotlink text of the Candidate Customer Customer 1 test Account we created at Step 6. The Account Details page opens with the Overview tab selected.
- Select Submit usage:
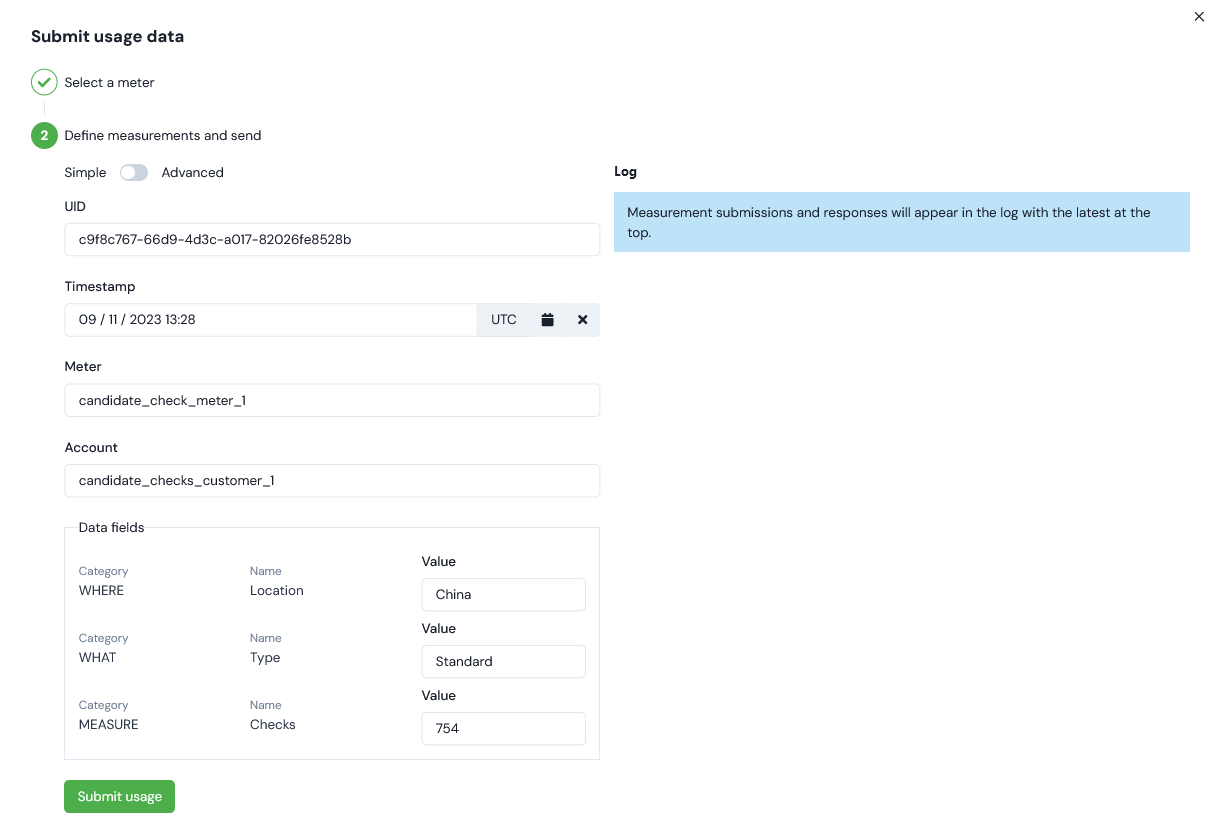
- Under stage 1: Select a meter, use the Meter drop-down to select Candidate Check Meter 1 and then select Continue. The dialog adjusts to show stage 2: Define measurements and send:
- Note that you can complete stage 2 using either a Simple or Advanced format, where the default is Simple.
- For the example, we’ll use the Simple format to submit our test usage data measurements:
- UID. This field is automatically populated with a unique id for the measurement. For the example, we’ll use this as our measurement id.
- Timestamp. The timestamp field is also automatically populated using the date/time the dialog was opened, and again for the example we’ll use this as the timestamp for the measurement.
- Meter. The Meter Code is automatically entered.
- Account. The Code of the Account we’re submitting the data measurement for is automatically entered.
- Data fields. The three Data Fields we set up for the Meter are shown with empty Value fields.
- Enter test data Values for the Location, Type, and Checks Data Fields:
- Select Submit usage. If the measurement is ingested successfully, under Log you’ll see a
{"result" : "accepted"}message with the measurement JSON submission reproduced:
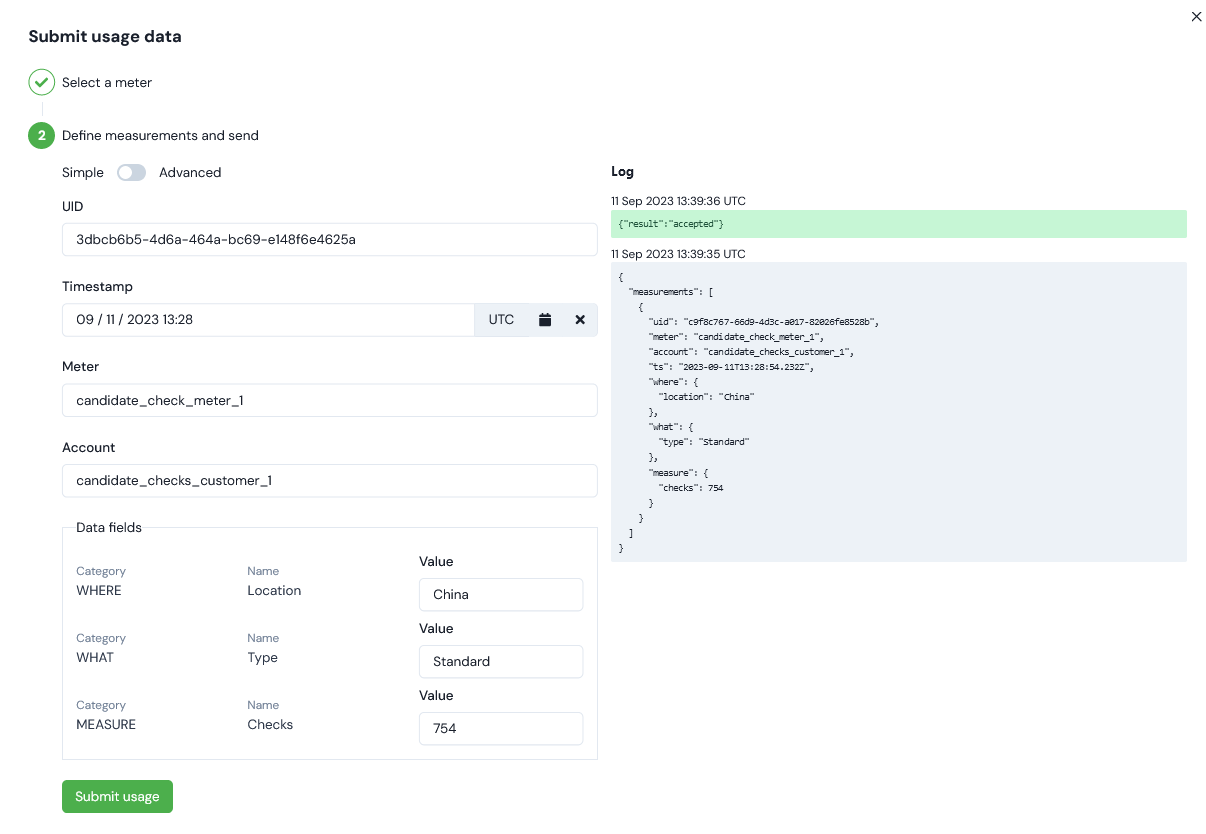
- Note that the Submit usage dialog refreshes with a new measurement UID and readied for another data submission.
- For the example, repeat steps 3. to 5. to submit test measures for each of the remaining five segment values:
- China/Extended. Number of Checks = 687.
- USA/Extended. Number of Checks = 954.
- USA/Complete. Number of Checks = 432.
- UK/Standard. Number of Checks = 765.
- UK/Complete. Number of Checks = 1206.
- Close the Submit usage dialog.
- Go to the test Account details page and select the Bills tab.
- On the Bills tab, select Run billing. The Run billing dialog appears.
- In the example, we are using monthly billing and the test data was submitted in September 2023, so we select:
- October 1st for Invoice date.
- Note: it might be worth double-checking that your Organization configuration setting has the Month Epoch setting to run Bills from the 1st of a month.
- Monthly for Bill Frequency.
- Select Run billing. The dialog closes and your Bill job is queued.
- You can select the Running Tasks button at top-right in the Console:

- This opens the Running Tasks panel and you can follow the status of your Bill job.
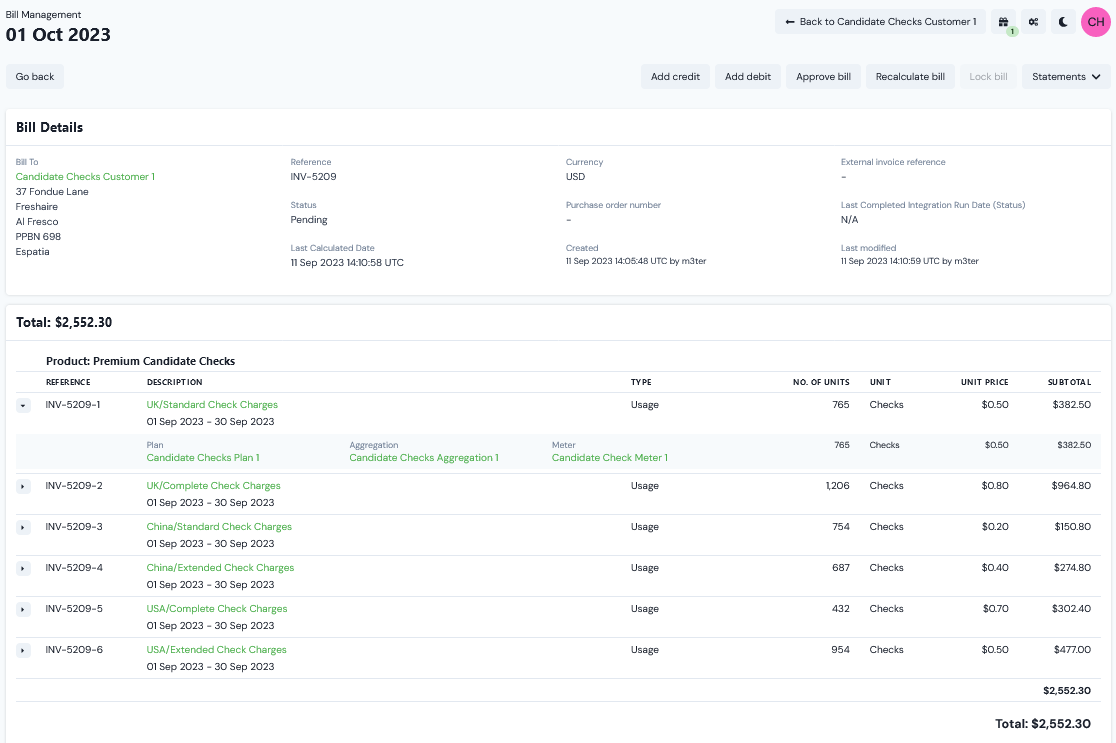
- When the Bill has generated, it will be listed on the Bills tab for the Account. Select the REFERENCE hotlink text to open the Bill in Bill Management.
- China/Standard. Number of Checks = 754 at $0.20 per check: $150.80.
- China/Extended. Number of Checks = 687 at $0.40 per check: $274.80.
- USA/Extended. Number of Checks = 954 at $0.50 per check: $477.00.
- USA/Complete. Number of Checks = 432 at $0.70 per check: $302.40.
- UK/Standard. Number of Checks = 765 at $0.50 per check: $382.50.
- UK/Complete. Number of Checks = 1206 at $0.80 per check: $964.80.
- This gives total for the usage data measures we submitted across segments of: $2552.30
More Details: Submitting Test Usage Data and Running Bills Manually